
The illustrations in this manual are for reference only. Please refer to the actual product.
Robot Vacuum and Mop with
Auto-Empty and Mop Self-Cleaning
Dreame L10s Ultra Gen 3 Series
User Manual
A
A-1
A-2
A-4
A-3
1
2
5
6
8
7
3
4
14
23
24
25
26
27
17
9
18
19
20
21
22
10
11
12
13
15
16
1
2
3
4
6
5
1
2 3
2
9
10
3
4
5
6
1
11
7
8
12
13
15
17
16
18
14
19
20
21
22
23
24
B
C
C-1
C-2
C-3
C-7C-6
C-4
C-5
1 2
3
4
>1 m (40")
>5 cm (2")
>5 cm (2")
①
②
②
①
①
②
①
②
③
21
D E
E-2
E-1
E-3
E-5
E-4
E-6 E-7
①
①
②
②
③
③
④
① ② ① ②
E-8 E-9
E-10
E-11 E-12
①
② ③
④
24h
1
2
3
4
5
6
3 4

1
EN
Usage Restrictions
Safety Information
•Thisproductshouldnotbeusedbychildrenyoungerthan8yearsoldnorpersonswithphysical,
sensory,intellectualdeficiencies,orlimitedexperienceorknowledgewithoutthesupervisionofa
parentorguardiantoensuresafeoperationandtoavoidanyrisks.Cleaningandmaintenanceshallnot
beperformedbychildrenwithoutsupervision.
•Theapplianceisonlytobeusedwiththepowersupplyunitprovidedwiththeappliance.
•Thisappliancecontainsbatteriesthatareonlyreplaceablebyskilledpersons.
•Cleartheareatobecleaned.Childrenshallnotplaywiththeappliance.Ensurechildrenandpetsare
keptatasafedistancefromtherobotwhileitisoperating.
•Donotinstall,chargeorusetheapplianceinthebathroomsoraroundthepools.
•Thisproductisforfloorcleaninginahomeenvironmentonly.Donotuseitoutdoors,onnon-floor
surfaces,orinacommercialorindustrialsetting.
•Ensurethattheapplianceoperatescorrectlyinaproperenvironment.Otherwise,donotusethe
appliance.
•Ifthepowercordisdamaged,itmustbereplacedbyaspecialcordorassemblyavailablefromthe
manufactureroritsserviceagent.
•Donotusetherobotinanareasuspendedabovegroundlevelwithoutaprotectivebarrier.
Toavoidelectricshock,fireorinjurycausedbyimproperuseoftheappliance,pleasereadtheuser
manualcarefullybeforeusingtheapplianceandkeepitforfuturereference.

2
EN
Safety Information
•Donotplacetherobotupsidedown.DonotusetheLDScover,robotcover,orbumperasahandlefor
therobot.
•Usetherobotinenvironmentswithanambienttemperatureabove0°Candbelow40°C.Makesure
thereisnoliquidorstickysubstanceonthefloor.
•Topreventdamageorharmfromdragging,clearanylooseobjectsfromthefloor,andremovecablesor
powercordsonthecleaningpathbeforeoperatingtheappliance.
•Removefragileorsmallitemsfromthefloortopreventtherobotfrombumpingintoanddamaging
them.
•Keephair,fingers,andotherbodypartsawayfromthesuctionopeningoftherobot.
•Keepthecleaningtooloutofreachofchildren.
•Donotoperatetheapplianceinaroomwhereaninfantorchildissleeping.
•Donotplacechildren,pets,oranyitemontopoftherobotregardlessofwhetheritisstationaryormoving.
•Onlycleanwaterandtheofficially-approvedcleaningsolutioncanbeaddedtothecleanwatertank.
Donotaddanyotherliquidsuchasalcoholordisinfectant.Theratioofthecleaningsolutiontoclean
watercanbecheckedonthecleaningsolutionbottle.Keepthecleaningsolutionoutofreachof
children.
•Donotusetherobottocleananyburningobjects.Donotusetherobottopickupflammableor
combustibleliquids,corrosivegases,orundilutedacidsorsolvents.
•Donotvacuumhardorsharpobjects.Donotusetheappliancetopickupobjectssuchasstones,large
piecesofpaperoranyitemthatmayclogtheappliance.
•Plugmustberemovedfromthesocket-outletbeforecleaningormaintainingtheappliance.

3
EN
Safety Information
•WARNING:Againstrechargingnon-rechargeablebatteries.
•Donotuseanythird-partybatteryorbasestation.Therobotcanonlybeusedwiththemodel
RCLE0510basestation.
•Donotattempttodisassemble,repair,ormodifythebatteryorthebasestationonyourown.
•Donotplacethebasestationnearaheatsource.
•Donotuseawetclothorwethandstowipeorcleanthebasestation'schargingcontacts.
•Donotimproperlydisposeofoldbatteries.Unneededbatteriesshouldbediscardedatanappropriate
recyclingfacility.
•Ifthepowercordbecomesdamagedorbroken,stopusingitimmediatelyandcontactafter-sales
service.
•Makesuretherobotisturnedoffwhenbeingtransportedandkeptinitsoriginalpackagingifpossible.
•Iftherobotwillnotbeusedforanextendedperiodoftime,fullychargeit,thenturnitoffandstore
itinacool,dryplace.Rechargetherobotatleastonceevery3monthstoavoidover-dischargingthe
battery.
•Donotwipetherobotorthebasestationwithawetclothorrinsethemwithanyliquid.Aftercleaning
washableparts,fullydrythepartsbeforereinstallingandusingthem.
•PleaseusethisproductinaccordancewiththeinstructionsintheUserManual.Usersareresponsible
foranylossordamagethatarisefromimproperuseofthisproduct.
Batteries and Charging

4
EN
•ThelasersensorinthisproductmeetstheIEC60825-1:2014/EN60825-1:2014/A11:2021Standardfor
Class1laserproducts.Pleaseavoiddirecteyecontactwithitduringuse.
CLASS1LASERPRODUCT
CONSUMERLASERPRODUCT
EN50689:2021
Laser Safety Information
Safety Information
Hereby,DreameTrading(Tianjin)Co.,Ltd.declaresthattheradioequipmenttypeRLL53SEisincompliancewithDirective2014/53/EU.ThefulltextoftheEU
declarationofconformityisavailableatthefollowinginternetaddress:https://global.dreametech.com
Fordetailede-manual,pleasegotohttps://global.dreametech.com/pages/user-manuals-and-faqs
Forindooruseonly
Readoperator'smanual

5
EN
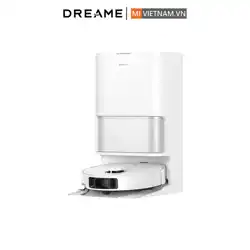
Product Overview
A
Robot
1. SpotCleaningButton
•Presstostartspotcleaning
2.Power/CleanButton
•Pressandholdfor3secondstoturnonoroff
•Presstostartcleaningaftertherobotisturnedon
3.DockButton
•Presstosendtherobotbacktothebasestation
•Pressandholdfor3secondstodisableChildLock
ButtonStatusIndicator
•SolidWhite:Cleaningorcleanupcompleted
•BreathingWhite:Charging(notlowbattery)
•SolidOrange:Awaitingatlowbatteryorpaused
atlowbattery
•BreathingOrange:Charging(lowbattery)
•BlinkingOrange:Error
Note:
•Pressanybuttonontherobottopausewhiletherobotis
cleaningorreturningtocharge.
•ChildLockcanbeenabled/disabledthroughthe
DreamehomeApp.
4.3DLineLaserSensor
5.LDSCover
6.LaserDistanceSensor(LDS)
7. Bumper
8.BumperWindow
9. Cover
10.Auto-emptyVent
11.ChargingContacts
2.MopPadHolder
3.MopPad
Fig. A-3
Base Station
1. StatusIndicator
•SolidWhite:Thebasestationisconnectedtopower
•SolidOrange:Thebasestationhasanerror
2.AutoSolutionDispenserModule-Single
Compartment
3.Filter
4.SignalingArea
5.Auto-emptyVents
6.DustBagSlot
7. ChargingContacts
8.AutomaticWaterAddingOutlet
9. ReservedSlotforConnectingtheWaterHookup
KitforAutoRefillingandDraining
Note:
Thewaterhookupkitforautorefillinganddrainingneeds
tobepurchasedseparately.(Onlyavailableinspecificregions).
10.PowerCordStorageSlot
11.PowerPort
12.Cover
13.UsedWaterTank
14.CleanWaterTank
15.DustTankCover
16.Washboard
17.WashboardFilter
18.RampExtensionPlate
19.WaterTankClip
20.FloatBall
21.WaterTankClip
22.WaterPipe
23.Filter
24.Floater
Fig. A-4
12.Connectors
13.AutomaticWaterRefillingInlet
14.ResetButton
•Pressandholdfor3secondstorestoretofactory
settings
15.Wi-FiIndicator
16.EdgeSensor
17.CliffSensors
18.CarpetSensor
19.SideBrushExtensionAssembly
20.MainBrush
21.MainWheel
22.MopExtendAssembly
23.OmnidirectionalWheel
24.BrushGuard
25.MainWheel
26.BrushGuardClips
27.MopPadHolderMountingHoles
Fig. A-1
Dust Box
1. Filter
2.FilterHandle
3.Auto-emptyVent
4.DustBoxCoverClip
5.DustBoxClip
6.DustBoxCover
Fig. A-2
Mop Assembly
1. MopPadAttachmentArea

6
EN
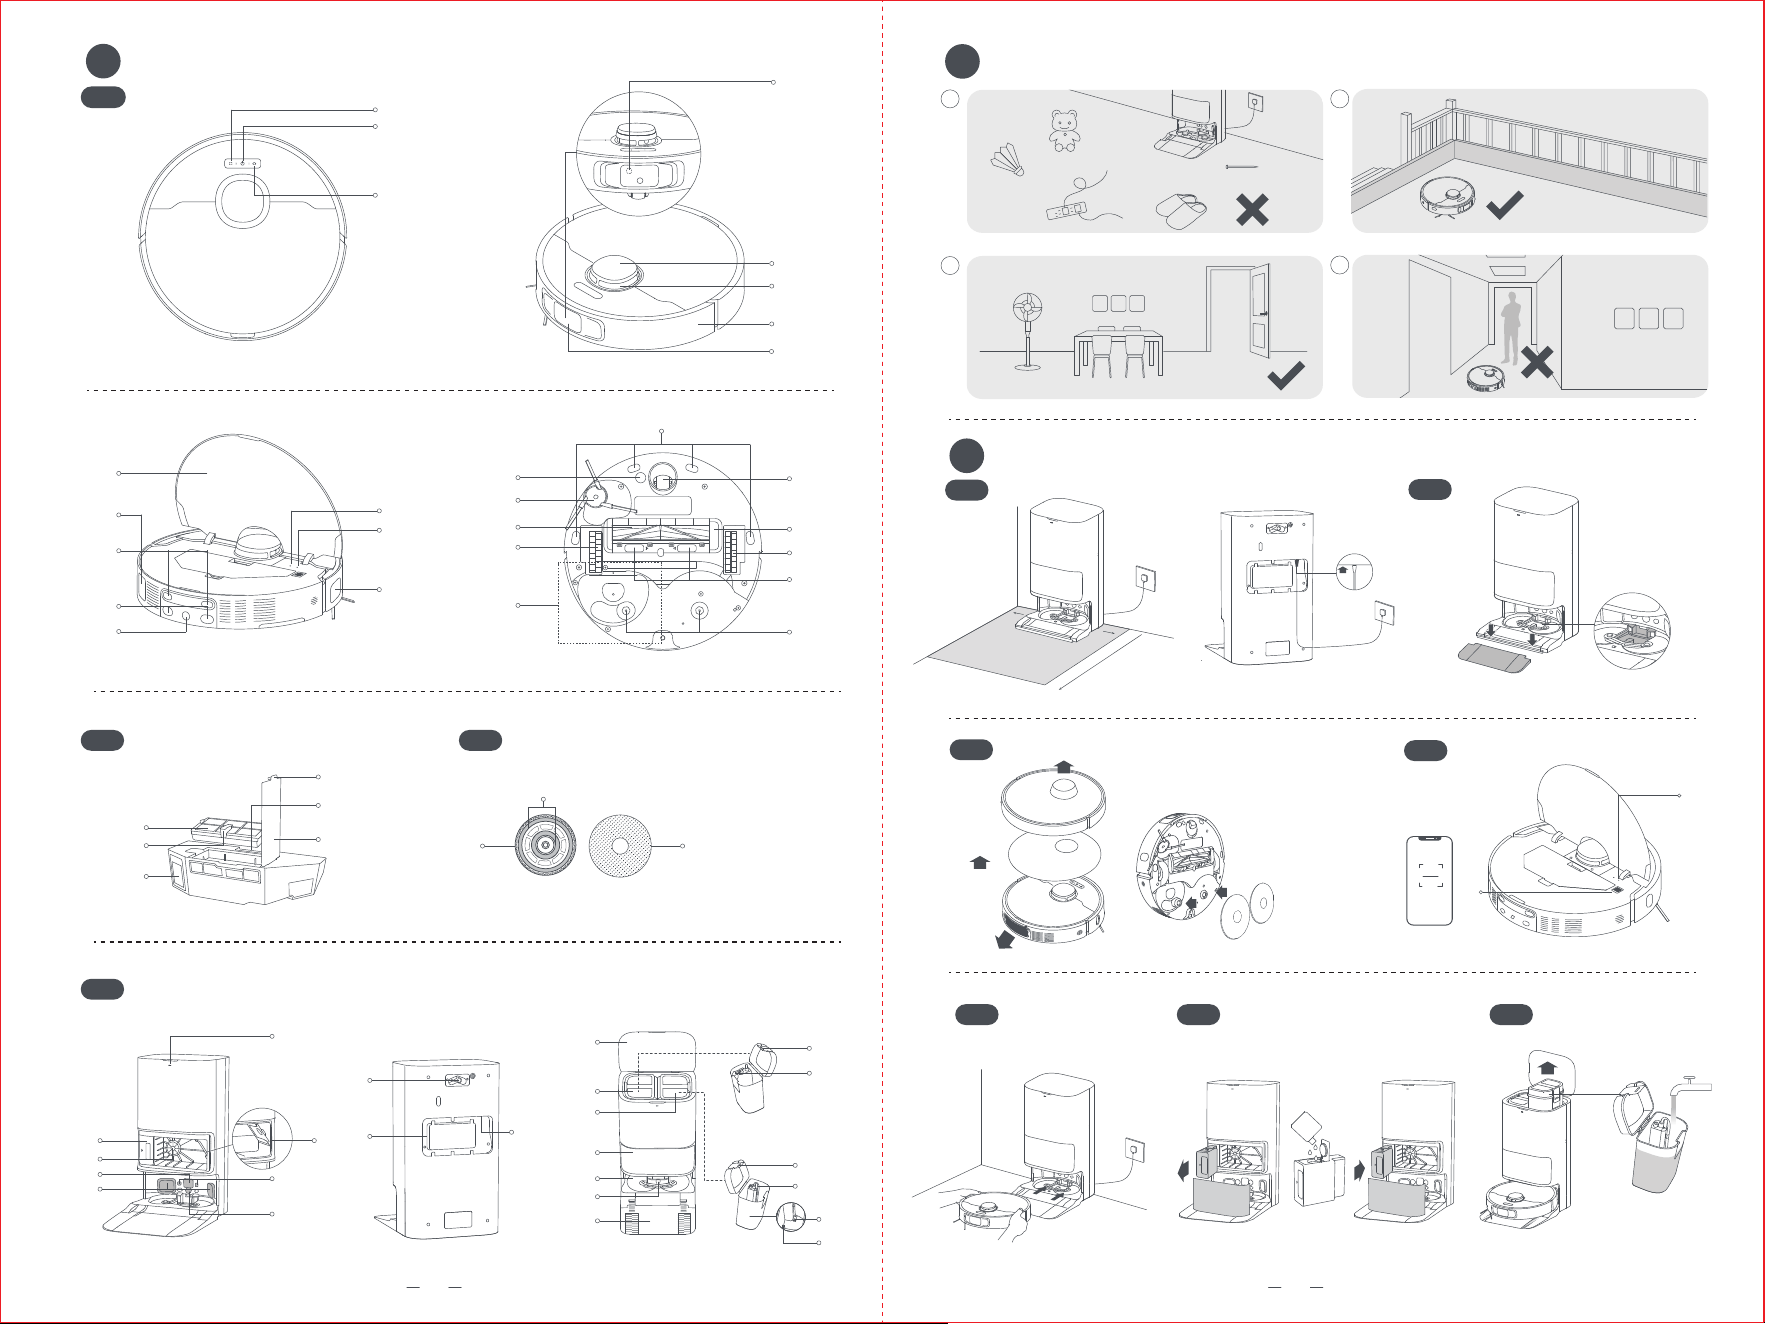
Preparing Your Home
B
1. Beforecleaning,pleasemoveawayunstable,
fragile,valuableordangerousitems,andclean
upcables,cloths,toys,hardobjectsandsharp
objectsonthegroundtoavoidbeingentangled,
scratchedorknockedoverbytherobotand
causinglosses.
2.Beforecleaning,placeaphysicalbarrieratthe
edgeofthestairstoensurethesecureand
smoothoperationsoftherobot.
3.Openthedooroftheroomtobecleaned,and
putthefurnitureinitsproperplacetoleavemore
space.
4.Topreventtherobotfrommissingareasthatneed
tobecleaned,donotstandinfrontoftherobot,
threshold,hallway,ornarrowplaces.
Note:
•Whenoperatingtherobotforthefirsttime,followit
aroundwhilecleaningtoremoveanypotentialobstacles
intime.
•Donotvacuumhardobjectslikestones,steelballsand
toyparts,orsharpobjectslikeconstructionwaste,broken
glassandnails,otherwisethegroundmaybescratched.
Fig. B
1. PlacetheBaseStationandConnecttoan
ElectricalOutlet
Placethebasestationinalocationthatisasopen
aspossiblewithagoodWi-Fisignal.Leaveenough
spaceasshowninthefigureandremoveanyobjects
intheshadedarea.Insertthepowercordintothe
basestationandplugitintothesocket.
Note:
•Firmlyinsertthepowercordupwardsuntiltheindicator
turnson.
•Makesurethatnoobjectsmightblockthesignalingarea.
•Topreventwaterstainsfromwettingwoodfloorsor
carpets,placingthebasestationontilefloorsormarble
floorsisrecommended.
2.InstalltheRampExtensionPlate
Note:
•Ensurethatthewashboardfilterisinstalledintoplace
beforeuse.
•Thewashboardfiltercanberemovedforcleaningduring
routinemaintenance.
3.RemoveRobotProtectionsandInstalltheMop
Assembly
4.ConnectwiththeDreamehomeApp
(1)Pressandholdthepowerbuttonontherobot
for3secondstoturniton.Opentherobotcover
andscantheQRcodeontherobot,orsearch
"Dreamehome"intheappstoretodownloadand
installtheapp.
(2)OpentheDreamehomeapp,tap"ScanQRcode
toconnect",andscanthesameQRcodeonthe
robotagaintoaddthedevice.Pleasefollowthe
promptstofinishtheWi-Ficonnection.
①Wi-FiIndicator
•Blinkingslowly:Tobeconnected
•Blinkingquickly:Connecting
•On:Connected
②QRCode
Note:
•Only2.4GHzWi-Fiissupported.
•ToresetWi-Fi,repeatstep(2)andthenfollowtheprompts
tofinishtheWi-Ficonnection.
•Afterthedeviceissuccessfullyconnectedtothehome
Wi-Finetwork,itwillcontinuouslyattempttoreconnect
incaseofnetworkdisruptionscausedbyissuessuchas
unpaidbillsorpoweroutages,inordertoensureasmooth
userexperienceuponnetworkrestoration.
•TodisconnectthedevicefromWi-Finetwork,pressand
holdtheResetbuttonontherobotfor3seconds.
•Duetoupgradesintheappsoftware,theactual
operationsmaydifferfromthedirectionsinthismanual.
Pleasefollowtheinstructionsbasedonthecurrentapp
version.
5.ConnecttheRobottotheBaseStation
Placetherobotontothebasestationwiththe
mopassemblyfacingtowardthewashboard.Then
youwillhearavoicenotificationwhentherobot
successfullyconnectstothebasestation.After
therobotisfullycharged,thestatusindicatorson
therobotandthebasestationwillremainlitfor10
minutesandwillthendim.
Note:Itisrecommendedtofullychargetherobotbefore
itsfirstuse.Whentherobotcannotbeturnedonafterthe
batteryisdepleted,manuallyconnecttherobotwiththe
stationtochargeit.
Before Use
C

7
EN
6.AddtheCleaningSolution
(1)Removethedusttankcoverandpullouttheauto
solutiondispensermodule.
(2)Opentheupperlidofthemoduleandaddthe
cleaningsolution.
(3)Closethelidofthemodule,putitbackintothe
basestation,andthenreinstallthedusttankcover.
Thecleaningsolutionwillbeaddedautomatically
whileworking.
Note:
•Theautosolutiondispensermodulecanbefilledupwith
cleaningsolutionforuse.Donotaddanyliquidotherthan
theofficially-approvedcleaningsolutiontohelpprevent
malfunction.
•Installtheautosolutiondispensermoduleuntilitclicks
intoplace.
7.AddWatertotheCleanWaterTank
Takeoutthecleanwatertankfromthebasestation
andfillupthetankwithcleanwater.Theninstallit
backintothebasestation.
Note: Donotaddhotwaterintothewatertank,asthismay
causethetanktobecomedeformed.
Fig. C-1-Fig. C-7
How to Use
D
Auto Resume Cleaning
Ifthebatteryistoolow,therobotwillautomatically
returntothebasestationtocharge.Aftercharging
totheappropriatebatterylevel,itwillresume
unfinishedcleaningtasks.
Note:
Tousethisfunction,pleaseenableitintheapp.
Do Not Disturb (DND) Mode
WhentherobotissettotheDoNotDisturb(DND)
mode,therobotwillbepreventedfromresuming
cleaning.TheDNDmodeisdisabledbydefaultat
thefactory.YoucanusetheapptoenabletheDND
modeormodifytheDNDperiod.TheDNDperiodis
22:00-8:00bydefault.
Note:
•Thescheduledcleaningtaskswillbeperformedduring
theDNDperiod.
•Therobotwillresumecleanupwhereitleftoffafterthe
DNDperiodexpires.
Spot Cleaning
Whentherobotisawaiting,pressbrieflythebutton
toenablethespotcleaningmode.Inthismode,
therobotcleansasquare-shapedareaof1.5x1.5
metersarounditandreturnstoitsstartingpoint
oncethespotcleaningiscompleted.
Robot Restarting
Iftherobotstopsrespondingorcannotbeturned
off,pressandholdthepowerbuttonfor10seconds
toforcefullyturnitoff.Then,pressandholdthe
powerbuttonfor3secondstoturntheroboton.
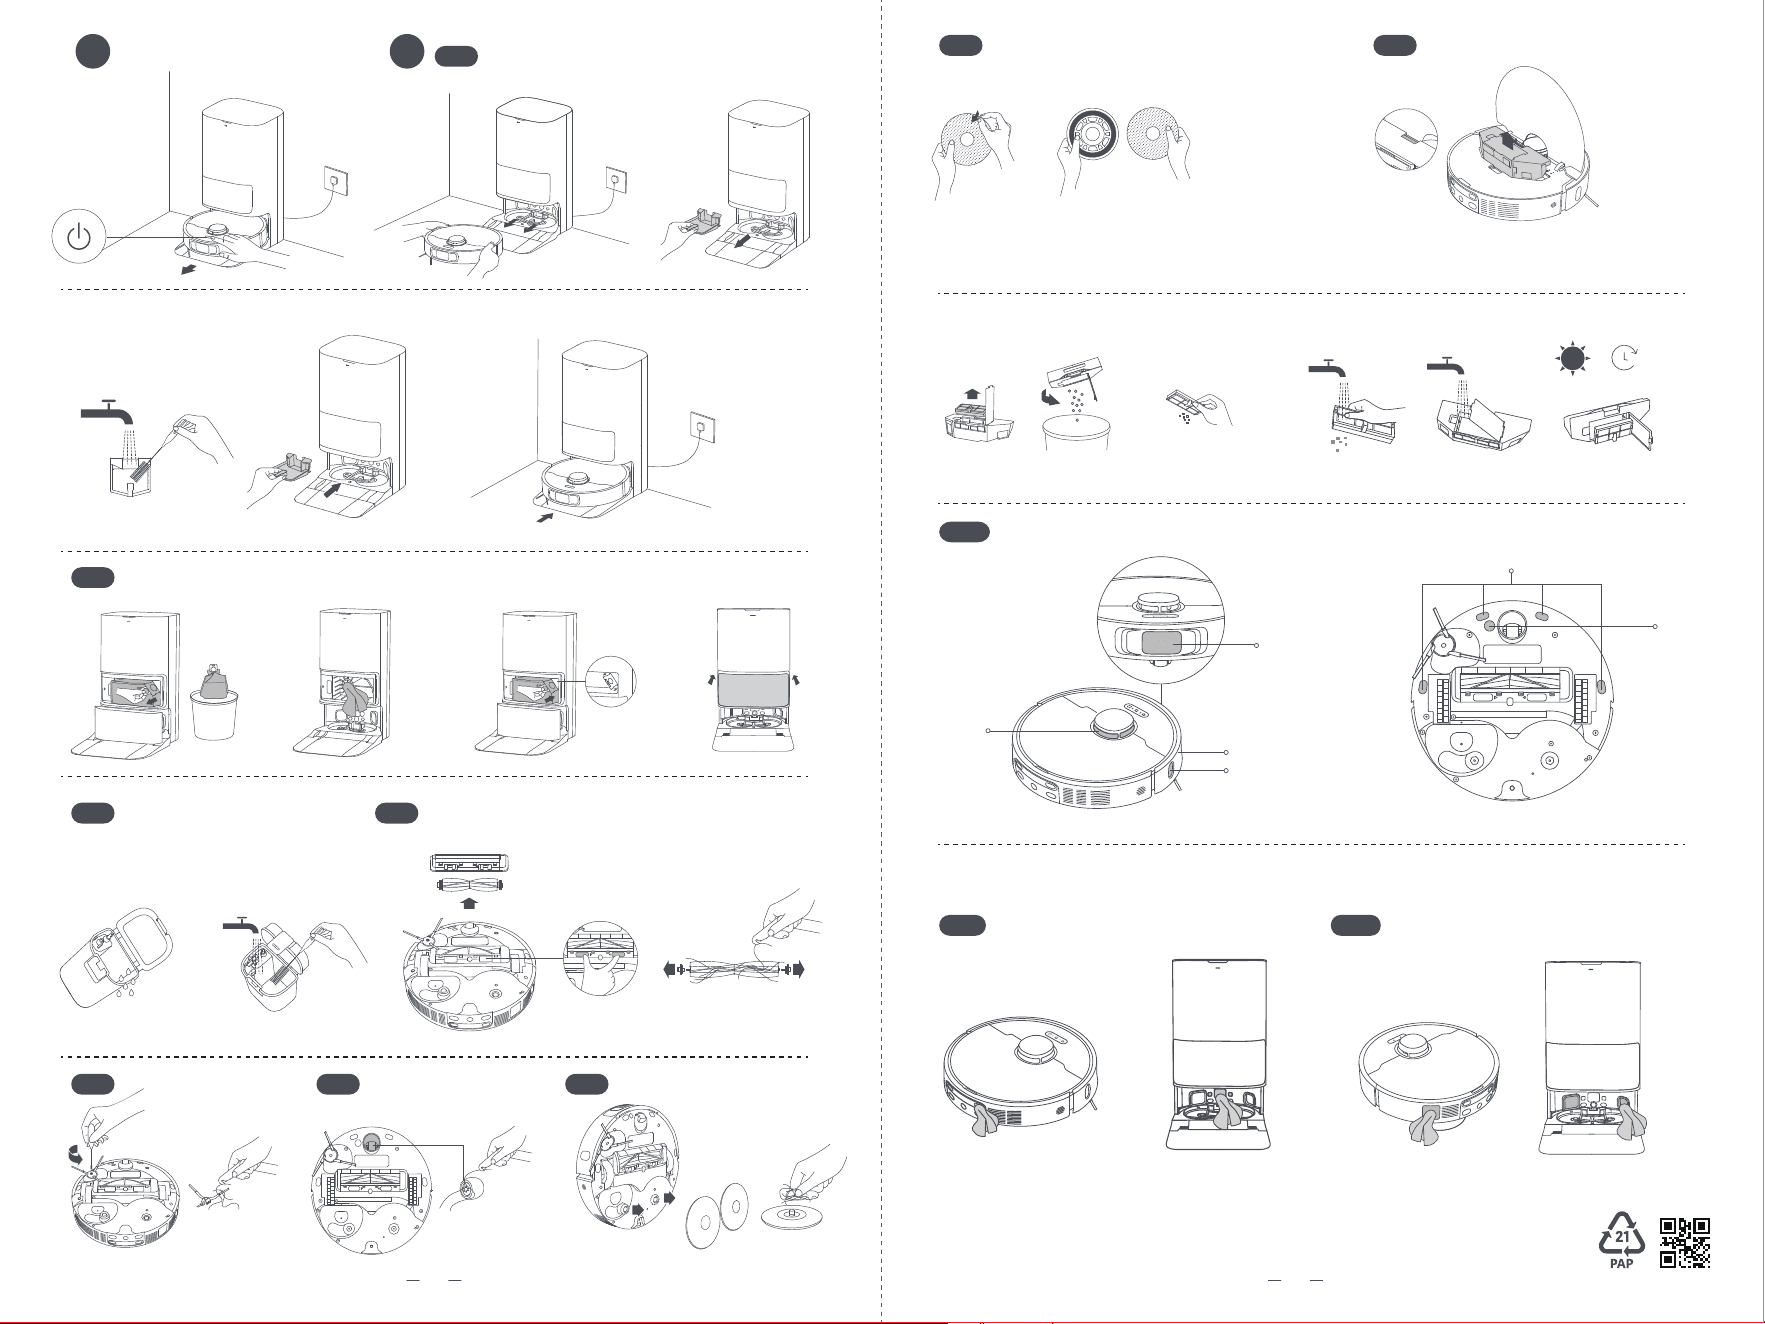
Turn On/Off
Pressandholdthepowerbuttonfor3secondsto
turnontherobot.Thepowerindicatorwillremain
lit.Or,placetherobotontothebasestationby
aligningthechargingcontactsoftherobotwith
thoseofthebasestation,andthentherobotwill
turnonautomaticallyandbegincharging.Toturn
offtherobot,movetherobotawayfromthebase
stationandpressandholdthepowerbuttonfor3
seconds.
Fast Mapping
Afterconfiguringthenetworkforthefirsttime,
followtheinstructionsintheapptoquicklycreatea
map.Therobotwillstartmappingwithoutcleaning.
Whentherobotreturnstothebasestation,the
mappingprocesshasbeencompletedandthemap
willbesavedautomatically.
Pause/Sleep
Whentherobotisrunning,pressanybuttonto
pauseit.
Iftherobotispausedformorethan10minutes,it
automaticallyenterssleepmode.Allindicatorson
therobotwillturnoff.Pressanybuttonontherobot,
orusetheapptowakeuptherobot.
Note: Iftherobotispausedandplacedontothebasestation,
thecurrentcleaningprocesswillend.

8
EN
Vacuum and Mop
Note: Afterinstallingthemopassembly,therobotwilldefault
to"VacuumandMop"modeduringitsfirstuse.Toadjustthe
cleaningmode,gototheCleaningModesettingsintheapp
andselectfromthefollowingthreeadditionaloptions:
①MopafterVacuuming
②Vacuum
③Mop
1. Startcleaning
Pressthepowerbuttonontherobot,orusethe
apptomaketherobotstartfromthebasestation.
Thentherobotwillplantheoptimalcleaningroute
andperformthecleaningtaskbasedonthecreated
map.
Note:
•Toensuretheroboteasilyreturnstothebasestationafter
cleaning,itisrecommendedtomaketherobotstartfrom
thebasestation.
•Themoppadswillbecleanedbeforetherobotstarts
mopping,pleasewaitpatiently.
•Donotmovethebasestation,thecleanwatertank,the
usedwatertank,orthewashboardfilterduringoperation.
•Topreventscalding,donottouchthewateroutletwhile
thebasestationisoperating.
2.Automopwashing
Whencleaning,therobotwillautomaticallyreturn
tothebasestationtowashmoppadsbasedonthe
moppadcleaningfrequencyspecifiedintheapp.
Thebasestationwillautomaticallyrefilltherobot's
watertankandtherobotwillresumecleanup.
3.Automaticallyemptythedustboxandwashand
drythemoppads
Aftertherobotfinishesacleaningtaskandreturns
tothebasestationtocharge,thebasestationwill
automaticallyemptythedustboxandthenwash
anddrythemoppads.
Note:
•Iftheauto-emptyfunctionisturnedoffintheapp,the
basestationwillnotautomaticallyemptythedustbox.
•Thebasestationwillemptythedustboxaccordingtothe
settingintheapp.
4.Cleantheusedwatertank
Aftertherobothascompleteditstask,pleaseclean
theusedwatertanktopreventanyodor.

9
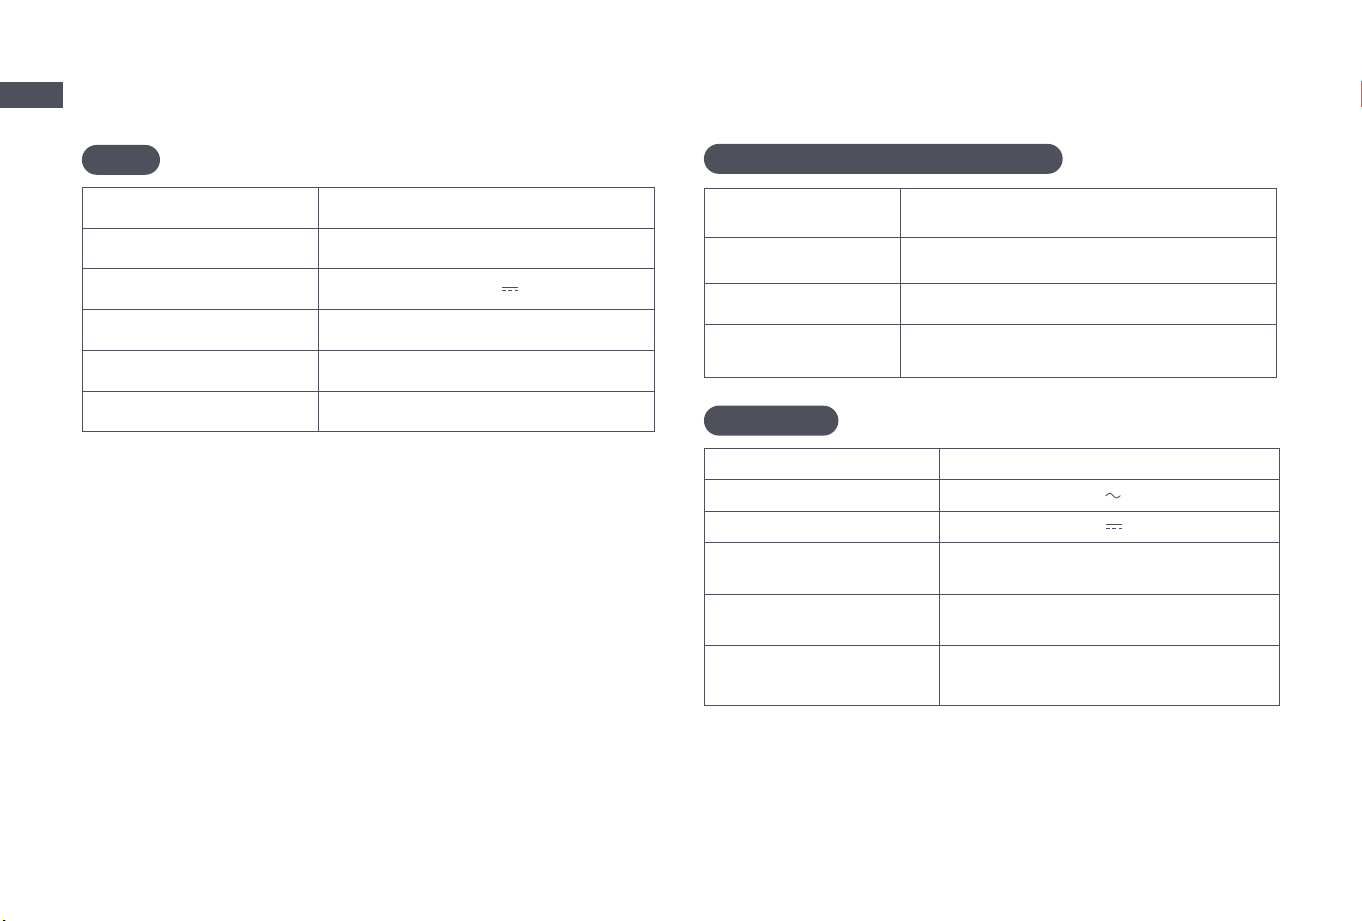
EN
Part
Maintenance
Frequency
Replacement
Period
Usedwatertank Aftereachuse
/
Cleanwatertank
Onceevery2weeks
Mainbrush Every6to12months
Dustbox'sfilter
Every3to6months
Sidebrush
Moppadholders /
Washboardfilter
Onceevery1to2months
/
Basestation'ssignaling
area
Onceeverymonth /
Chargingcontacts
Auto-emptyvents
Omnidirectionalwheel
Edgesensor
LaserDistanceSensor
(LDS)
E
Part
Maintenance
Frequency
Replacement
Period
Carpetsensor
Onceeverymonth
/
Cliffsensors
Bumperwindow
Bumper
Robot'sautomatic
waterrefillinginlet
Bottomoftherobot
Dustbox
Cleanitasneeded
Mainwheels
Dustbag
/
Every2to4months
Moppads Every1to3months
Parts
Routine Maintenance
Tokeeptherobotingoodcondition,itisrecommendedtorefertotheaccessoryusageintheapporthefollowingtableforroutinemaintenance.
Note:Thefrequencyofmaintenanceandreplacementdependsonactualusage.
Ifanexceptionoccursduetospecialcircumstances,promptmaintenanceor
replacementisrecommended.

10
EN
Washboard Filter
1. Takeouttherobotandremovethewashboard
filterafterthemoppadcleaningiscomplete.
2.Rinsethewashboardfilterwithcleanwater,wipe
itclean,andthenreinstallitinthewashboard.
3.Usetheapporpressthebutton toreturnthe
robottothebasestation,ormanuallyputthe
robotback.
Note:
Duringcleaning,donotmaketherobotreturntothe
basestation.
Fig. E-1
Dust Bag
1. Removethedusttankcoveranddiscardthedust
bag.
Note:
Pullingupwardsonthehandlewillsealthebagto
preventthedustanddebrisfromaccidentallyfallingout.
2.Removethedustanddebrisfromthefilterwitha
drycloth.
3.Installanewdustbag.
4.Reinstallthedusttankcover.
Fig. E-2
Used Water Tank
1. Removetheusedwatertank,openitscoverand
pourouttheusedwater.
2.Rinsetheusedwatertankwithcleanwater,and
useapropertooltocleantheinnerwallofthe
usedwatertank.
Note:
Thefloatballintheusedwatertankisamovable
part.Donotapplytoomuchforcewhencleaningittoavoid
damagingit.
Fig. E-3
Main Brush
1. Pressthebrushguardclipsinwardstoremovethe
brushguard,andliftthebrushoutoftherobot.
2.Pulloutthebrushcoversatbothendsofthe
brushasshowninthefigure.Useaproper
cleaningtooltoremoveanyhairtangledinthe
brush.Reinstallthebrushcoversonbothendsof
thebrush,andthenreinstallthebrush.Presson
thebrushguardtolockitinplace.
Fig. E-4
Side Brush
Unscrewthesidebrushwithascrewdriver,cleanthe
hairfromthebrush,andthenscrewitbackon.
Fig. E-5
Omnidirectional Wheel
Note:
•Useatoolsuchasasmallscrewdrivertoseparatethe
axleandtireoftheomnidirectionalwheel.Donotuse
excessiveforce.
•Rinsetheomnidirectionalwheelundertherunningwater
andputitbackafterdryingitcompletely.
Fig. E-6
Mop Pad Holders
Removeandcleanthemoppadholders.
Fig. E-7
Mop Pads
Removethemoppadsfromthemoppadholdersto
replacethem.
Fig. E-8
Dust Box and Filter
1. Opentherobotcoverandpressthedustboxclip
toremovethedustbox.
2.Openthedustboxcover,removethefilter,and
thenemptythedustboxasshowninthefigure.
3.Gentlytapthebasketofthefiltertoremovethe
dirt.
Note:
Donotattempttocleanthefilterwithabrush,afinger
orsharpobjectstopreventdamage.
4.Rinsethedustboxandfilterwithwateranddry
themcompletelybeforereinstalling.
Note:
•Rinsethedustboxandfilterwithcleanwateronly.Donot
useanydetergent.
•Usethedustboxandfilteronlywhentheyarecompletely
dry.
Fig. E-9
Robot Sensors
Wipetherobotsensorsbyusingasoftanddrycloth,
asshowninthefigure:

11
EN
1. LaserDistanceSensor(LDS)
2.BumperWindow
3.Bumper
4.EdgeSensor
5.CliffSensors
6.CarpetSensor
Note:
Awetclothcandamagesensitiveelementswithin
therobotandthebasestation.Pleaseuseadryclothfor
cleaning.
Fig. E-10
Charging Contacts and Signaling Area
Cleanthechargingcontactsandthesignalingarea
withasoftanddrycloth.
Fig. E-11
Auto-empty Vents
Cleantheauto-emptyventsoftherobotandthe
basestationwithasoftanddrycloth.
Fig. E-12
Battery
Therobotcontainsahigh-performancelithium-ion
batterypack.Makesurethatthebatteryremains
well-chargedfordailyusetomaintainoptimal
batteryperformance.Iftherobotisnotusedforan
extendedperiodoftime,turnitoffandputitaway.
Topreventdamagefromover-discharging,charge
therobotatleastonceeverythreemonths.

12
EN
Troubleshooting
Problem Solution
Therobotwill
notturnon.
•Thebatteryislow.Rechargetherobotonthebasestation
andtryagain.
•Thetemperatureofthebatteryistoolowortoohigh.
Itisrecommendedtousetherobotinenvironments
withanambienttemperatureabove0°C(32℉)and
below40°C(104℉).
Therobotwill
notcharge.
•Thebasestationisnotconnectedtopower,please
makesurebothendsofitspowercordarecorrectly
pluggedin.
•Thecontactbetweenthechargingcontactsonthe
basestationandtherobotispoor,pleasecleanthe
chargingcontacts.
•Checkwhetherthereisanyforeignobjectatthe
connectorsoftherobotandremovetheforeignobject
ifany.
Therobot
failsto
connectto
Wi-Fi.
•TheWi-Finetworkpasswordisincorrect.Makesure
thepasswordusedtoconnecttoyourWi-Finetworkis
correct.
•Therobotdoesnotsupporta5GHzWi-Ficonnection.
Makesuretherobotisconnectedtoa2.4GHzWi-Fi
connection.
•TheWi-Fisignalisweak.Makesuretherobotisinan
areawithgoodWi-Ficoverage.
•Therobotmaynotbereadytobeconfigured.Please
exitandre-entertheapp,andthentryagainas
instructed.
Problem Solution
Therobot
cannotfind
andreturn
tothebase
station.
•Therouteforreturningtochargeisblocked,e.g.the
doorisclosed.
•Thebasestationisdisconnectedfrompowerormoved
whentherobotisnotonit.Pleaseconnectthebase
stationtothepowersupplyorplacetherobotontothe
basestationtocharge.
•Therearetoomanyobstructionsaroundthebase
station.Placethebasestationinamoreopenarea.
•Movingtherobotmaycauseittore-positionitself,and
itwillrecreateamapifre-positioningfails.Iftherobot
istoofarfromthebasestation,itmightnotbeable
toautomaticallyreturnonitsown,inwhichcaseyou
willneedtomanuallyplacetherobotontothebase
station.
•Wipethesignalingareaonthebasestationtoremove
dustordebris.
Therobot
getsstuckin
frontofthe
basestation
andcannot
returntoit.
•Checkwhetherthereisenoughspaceonbothsidesor
infrontofthebasestationtopreventtherobotfrom
beingblocked.
•Therobotmayslipifthefloorinfrontofthebase
stationisoverlywet.Ifso,cleantheexcesswater
beforetryingagain.
•Itisrecommendedtomovethebasestationtoa
differentplaceandtryagain.
•Makesuretherampextensionplateisinstalled
properly.

13
EN
Troubleshooting
Problem Solution
Therobotwill
notturnoff.
•Therobotcannotbeturnedoffwhenitischarging.
Itisrecommendedtomovetherobotfromthebase
station,andthenpressandholdthepowerbuttonfor
3secondstoturnitoff.
•Iftherobotcannotbeturnedoffbyperformingstep
1,pressandholdthepowerbuttonfor10seconds
toforciblyturnofftherobot.Iftheproblempersists,
pleasecontactafter-salesservice.
Thecharging
speedisslow.
•Ittakesabout3.5hourstofullychargetherobotwhen
itsbatteryislow.
•Ifyouoperatetherobotattemperaturesoutsideofthe
specifiedrange,thechargingspeedwillautomatically
slowdowntoextendthebatterylife.
•Thechargingcontactsonboththerobotandthebase
stationmaybedirty,pleasewipethemwithadry
cloth.
Thenoise
increases
whiletherobot
isoperating.
•Checkwhetherthedustbox'sfilterisclogged.Ifso,
cleanitorreplaceit.
•Ahardobjectmaybecaughtinthemainbrushorthe
dustbox.Checkandremoveanyhardobject.
•Themainbrushorthesidebrushmaybecometangled.
Checkandremoveanyforeignobjects.
•SwitchthesuctionmodetoStandardorQuiet.
Problem Solution
Therobot
moveswithout
followingthe
setroute.
•Objectssuchaspowercordsandslippersshouldbe
organizedbeforeusingtherobot.
•Workingonwetslipperysurfacescausesthemain
wheeltoslip.Itisrecommendedtodrythewetplaces
beforeusingtherobot.
•Wipethebumperwindowontherobotwithaclean,
softclothtokeepthemcleanandunobstructed.
Therobot
missesthe
roomstobe
cleaned.
•Makesurethatthedoorsoftheroomstobecleaned
areopen.
•Theplaceinfrontoftheroomtobecleanedmaybe
wetandslippery,causingtherobottoslipandwork
abnormally.Pleasetrydryingthefloorbeforeusing
therobot.
Therobotwill
notresume
cleaningafter
charging.
•MakesurethattherobotisnotsettotheDoNot
Disturb(DND)mode,whichwillpreventitfrom
resumingcleaning.
•Therobotwillnotresumecleaningafteryoumanually
placetherobotonthebasestationorsendtherobot
tochargeviatheapporthebutton .

14
EN
Troubleshooting
Problem Solution
Thestationcannot
automaticallyemptythedust
box.
•Checkwhetherthedustbaginthedust
tankisfull.
•Ifthedustbagisnotfull,checkwhether
thereisanyobstructionattheauto-
emptyventsoftherobot,thebase
station,orthedustbox.Ifany,cleanthe
blockedpartintime.
Thewaterlevelinthe
washboardisabnormal.
•Checkwhetherthesealontheused
watertankislooseornotcorrectly
installed,andmanuallyresetitifso.If
theproblempersists,pleasecontactthe
after-salesserviceteam.
•Gentlypressdownontheusedwater
tanktomakesureitisinstalledcorrectly.
•Removethewashboardfilterandcheck
whetherthesewagedrainoutletis
blockedandcleanit.
•Checkthecleaningsolution.Donot
addanyliquidotherthantheofficially-
approvedcleaningsolution.
Problem Solution
Themoppadholderis
raisedabnormally.
•Pleaseremovethemoppadholderto
checkifthereisanyforeignobjectstuck
init,andtrytorestarttherobot.Ifthe
problempersists,pleasecontactthe
after-salesserviceteam.
Thereiswaterunderthe
cleanwatertankoraround
theseal.
•Whentakingoutthecleanwatertank,
somewaterinthepipemaybeleft
underthetankoraroundtheseal.Thisis
normal.Pleasewipewithadrycloth.
Formoresupport,contactusviahttps://global.dreametech.com
15
EN
Specifications
Model RLL53SE
ChargingTime Approx.3.5hours
RatedVoltage 14.4V
RatedPower 75W
OperationFrequency 2400-2483.5MHz
MaximumOutputPower <20dBm
Model RCLE0510
RatedInput 220-240V 50-60Hz
RatedOutput 20V 2A
RatedPower
(duringdustemptying)
700W
RatedPower
(duringcleaning)
40W
RatedPower
(duringcharginganddrying)
87W
Robot
Base Station
Undernormaluseofcondition,thisequipmentshouldbekeptaseparation
distanceofatleast20cmbetweentheantennaandthebodyoftheuser.
Note: RatedPower(duringcharginganddrying)isdeterminedbythepower
valueduringfullloadperiod(ambienttemperature23℃±2℃).
Model R2412-4S2P-MMBK/R2412-4S2P-FMTEV
Type Li-ion
Number 1
RatedCapacity 4.8Ah
Rechargeable Lithium-ion Battery Pack
Powerconsumptioninstandbymode:≤ 0.5W(within15minutesaftertherobot
leavesthebasestation/chargingdock)
Powerconsumptioninnetworkedstandbymode:≤ 2W(Within20minutesafter
thebatterypackofroboticvacuumcleanerisfullycharged.)
Powerconsumptioninstandbymode:≤ 0.5W(Within20minutesafterthe
batterypackofroboticvacuumcleanerisfullycharged.)
Base Station/Charging Dock
Robot&Base Station/Charging Dock

16
EN
Battery Disposal and
Removal
Removal Guide:
1.Turnovertherobot,useapropertooltoremove
thescrewsonthebackoftherobot,andthen
removethecover.
2.Unplugtheterminalsbetweenthebatteryand
PCBboardtoremovethebattery.
Thebuilt-inlithium-ionbatterycontainssubstances
thatarehazardoustotheenvironment.Before
disposingofthebattery,makesurethebatteryis
removedbyqualifiedtechniciansanddiscardedat
anappropriaterecyclingfacility.
–thebatterymustberemovedfromtheappliance
beforeitisscrapped;
–theappliancemustbedisconnectedfromthe
supplymainswhenremovingthebattery;
–thebatteryistobedisposedofsafely.
CAUTION:
Beforeremovingthebattery,disconnectthepower
andrunoutthebatteryasmuchaspossible.
Unneededbatteriesshouldbediscardedatan
appropriaterecyclingfacility.
Donotexposetohightemperatureenvironmentto
avoidrisksofexplosion.
Underabusiveconditions,liquidmaybeejected
fromthebattery.Ifcontactoccurs,flushwithwater
andseekmedicalhelp.
Allproductsbearingthissymbolarewaste
electricalandelectronicequipment(WEEE
asindirective2012/19/EU)whichshould
notbemixedwithunsortedhousehold
waste.Instead,youshouldprotecthuman
healthandtheenvironmentbyhanding
overyourwasteequipmenttoadesignated
collectionpointfortherecyclingofwaste
electricalandelectronicequipment,
appointedbythegovernmentorlocal
authorities.Correctdisposalandrecycling
willhelppreventpotentialnegative
consequencestotheenvironmentand
humanhealth.Pleasecontacttheinstaller
orlocalauthoritiesformoreinformation
aboutthelocationaswellastermsand
conditionsofsuchcollectionpoints.
WEEE Information
