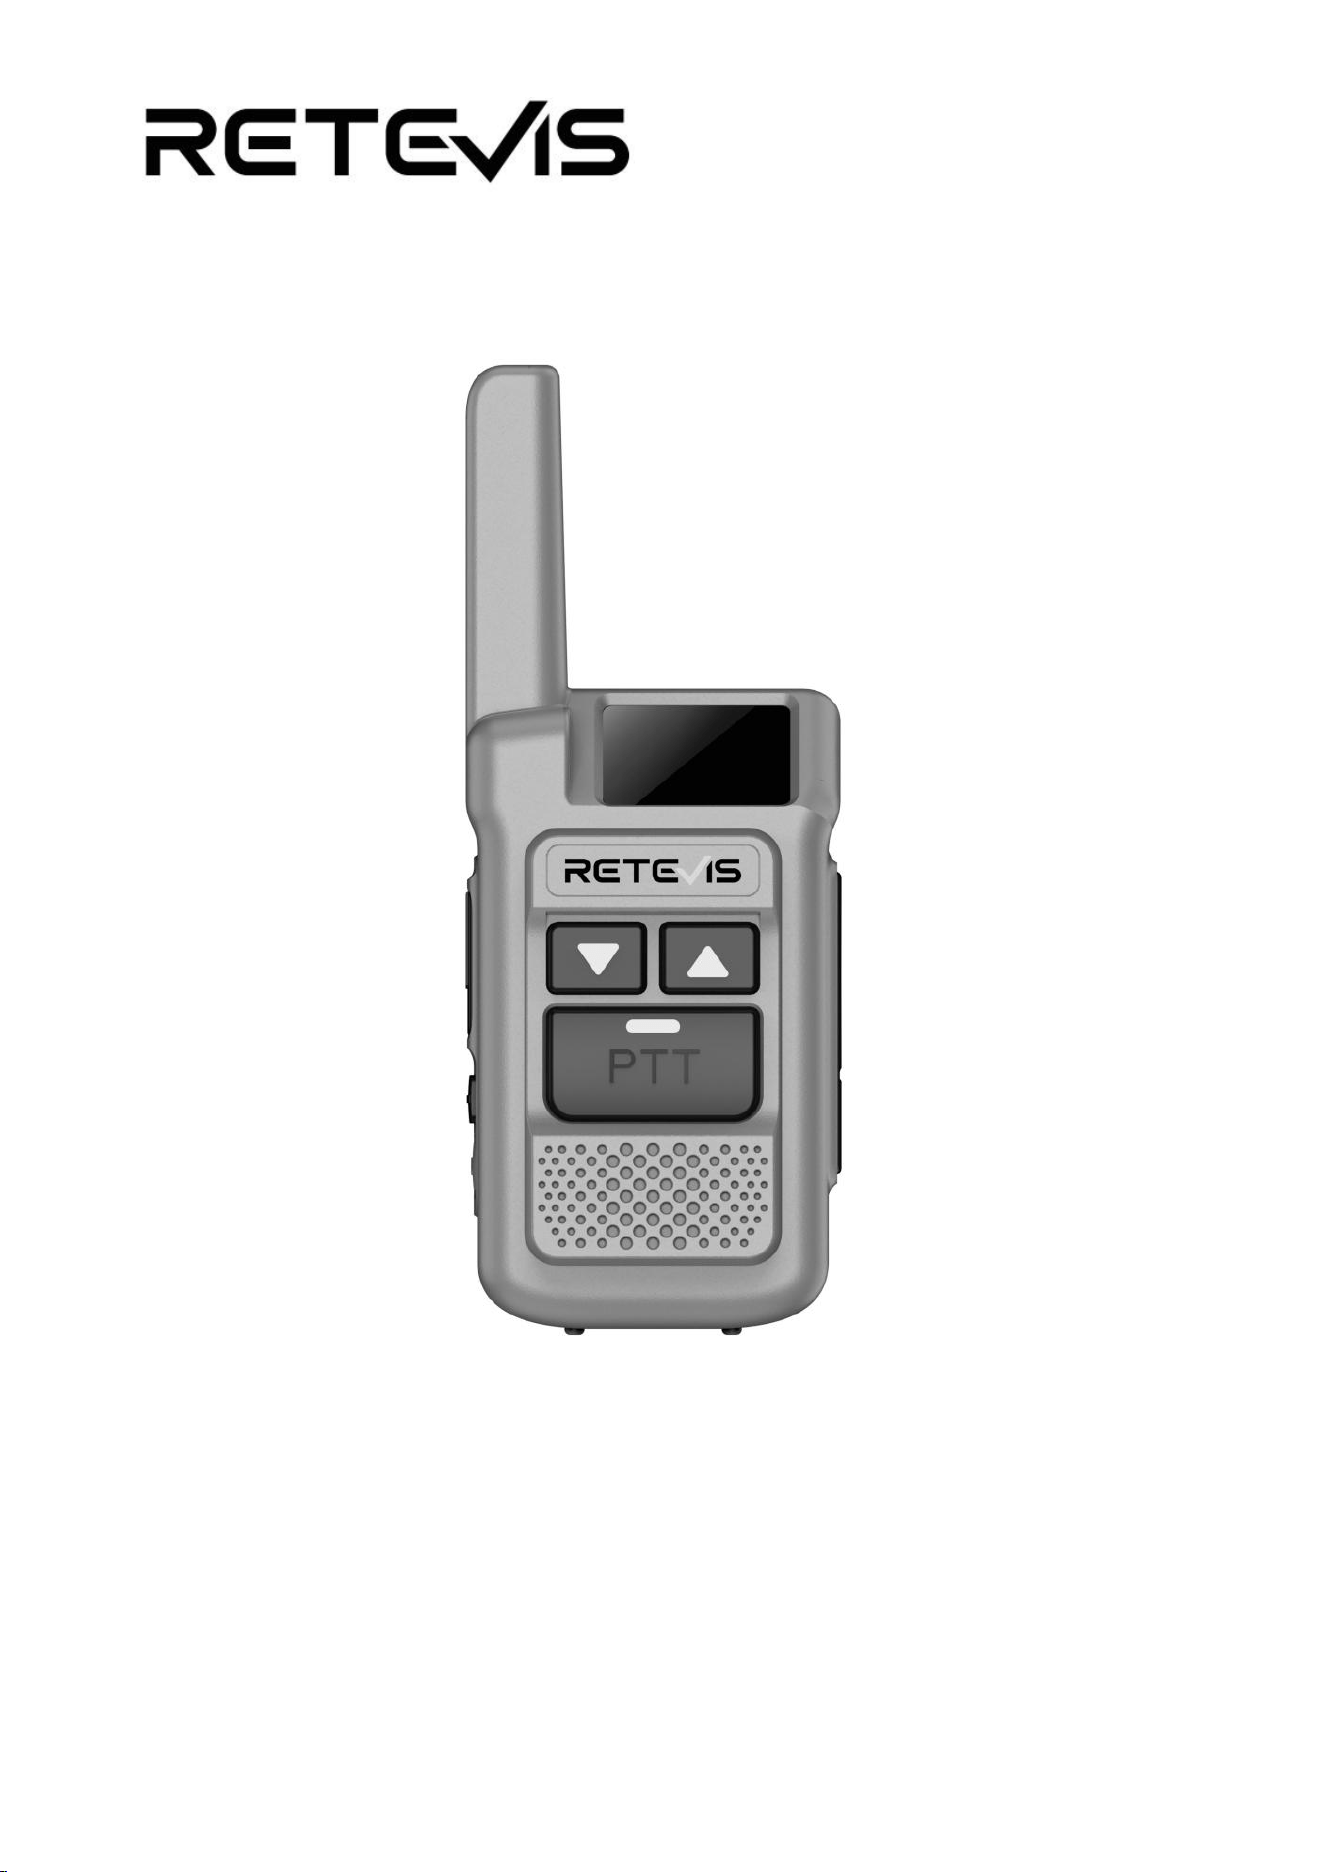
EZTalk 1R Two Way Radio
USER MANUAL

1
Important Attention
Before using the Retevis EZTalk 1R, please read the manual which contains important operating
instructions for safe usage, RF Energy Awareness, control information, and operational instructions
for compliance with RF Energy Exposure limits in applicable national and international standards.
Content
USER MANUAL ................................................................................... 1
Introduction .................................................................................. 5
Out-of-box Check ....................................................................... 5
1. Getting Started ............................................................................ 8
2. Radio Features ............................................................................ 10
2.1. Selecting a Channel A Setting ( Channel, Sub-code and Transmit Power) ............... 10
2.2. Selecting a Channel B Setting ( Channel, Sub-code and Transmit Power) ............... 10
2.3. Squelch Level Setting ............................................................... 11
2.4. Voice Operated Exchange (VOX) ....................................................... 11
2.5. Time Out Timer (TOT) ................................................................ 11
2.6. NOAA Weather Channel Mode Setting ................................................... 11
2.7. Weather Alert ....................................................................... 11
2.8. Noise Cancellation .................................................................. 11
2.9. Call Tone ........................................................................... 12
2.10. Keypad Tone ........................................................................ 12
2.11. Roger Tone/Beep .................................................................... 12
2.12. Busy Channel Lockout (BCL) ......................................................... 12
2.13. Display Brightness ................................................................. 12
2.14. Low Battery Alert .................................................................. 12
2.15. Voice Annunciation ................................................................. 13
2.16. Screen Sleep ....................................................................... 13
2.17. Display Orientation ................................................................ 13
2.18. Battery Saver ...................................................................... 13

2
2.19.
SOS/Emergency
Alert
................................................................13
2.20.
SOS/Emergency
Alert
................................................................
13
2.21.
Factory
Reset
......................................................................
14
3.
Troubleshooting
...........................................................................
14
4.
Weather
Channel
Frequencies
...............................................................
15
5.
Channels
&
Frequencies
....................................................................
15
6.
CTCSS
Chart
&
DCS
Code
List
...............................................................
16
7.
Specification
.............................................................................
17

3
To Customer
Before using Retevis EZTalk 1R, please thoroughly read this operation manual. Pay special attention
to the following aspects to ensure smooth and safe communication.
1. Equipment inspection
• Battery status: Ensure that the battery of the radio is fully charged to prevent communication
interruption due to battery depletion.
• Antenna connection: Check that the antenna is securely connected and free from damage or
bending to maintain optimal signal transmission.
2. Frequency settings
• Channel selection: Choose an appropriate channel to ensure all partici- pants are communicating
on the same channel.
• Frequency legality: Ensure that the frequencies used comply with local laws and regulations
to avoid legal issues stemming from illegal frequency use.
3. Environmental Factors
• Topographical influence: In complex terrains such as mountains or forests, signals may be
obstructed, affecting communication quality. Opt for open areas for communication.
• Weather conditions: Severe weather (e.g., heavy rain, and strong winds) can impact signal
transmission. Ensure safe conditions for radio use.
4. Communication Protocols
• Clear communication: Use concise and clear language to avoid lengthy conversations and ensure
accurate information transfer.
• Await response: After sending an instruction or message, wait for a response to avoid confusion
caused by simultaneous speaking by multiple individuals.
• Emergency situations: Pre-agree on emergency communication methods and signals to ensure rapid
and effective information dissemination in emergencies.
5. Equipment protection
• Water and dust resistance IP67: Retevis EZTalk 1R boasts good water and dust resistance. In
cases of water or dust ingress during activities like hiking, climbing, promptly wipe of moisture
and clean the device to extend its lifespan.
• Drop Resistance 1m: Ensure the product is securely fastened to prevent damage to the radio
from violent collisions or drops during skiing.
• Data were tested under controlled laboratory conditions.Data depend on many other factors;
Use these laboratory-derived data for reference purposes only and actual results will vary.
6. Backup plans
• Spare radio: Carry a spare radio for unexpected needs.
• Mobile phone backup: Carry a smartphone with sufficient battery life and signal as an
alternative means of communication.
7. Maintenance and Servicing
• Regular checks: Periodically inspect the performance of the radio and micro- phone to ensure
they are in good condition.

4
• Cleaning and servicing: Regularly clean the radio to ensure long-term use of the equipment.
Thank you once again for choosing our product. If you encounter any issues during use, please feel
free to contact us through the following channels. Thank you.
Email: i[email protected]
Website: www.retevis.com
Facebook: @retevis.fans

5
Introduction
This user manual provides detailed instructions on how to operate your device. Please read this manual
carefully before using the device.
Out-of-box Check
Open the package box and check the radio and accessories in the box before use. Contact the deliverer
or dealer immediately if any item is lost or damaged during deliver.
Charging Notice
Charge the new or long-term unused Li-ion battery before use. Charge or discharge twice or three times
circle, and the battery will reach the best performance. Charge the battery when the battery is at
a low battery level.
Eliminating the Risk, keep away from the flammable materials, heat sources and ignition sources while
a battery is charged. Charging should only take place in a well ventilated area and when someone is
about to be aware and react to a potential issue. To reduce risk of fire, a battery should not be
charged for more than 6 hours and disconnect charger from line voltage (AC outlet) by removing main
plug even if the battery is not completely charged. Don't leave a device unattended while charging.
Disconnect the charger when the device is fully charged: do not overcharge the device.
Attention:
Charging temperature should be between 0˚ C to 40˚ C. Beyond the temperature, it will affect
the correct charging.
Before charging, it is strictly prohibited to use the device during charging, which will affect
the normal charging of the Li-ion battery and cause accidental danger.
After the walkie-talkie is fully charged, unplug the USB charging plug. Do not charge it for
more than 6 hours.
Don’t unplug the power or cable to avoid interference during charging.
If the use time decreases even when the charging is full, the battery life reaches the end. Replace
with the new battery.
Don’t charge when the radio is wet. To reduce the danger, use the cloth to wipe it dry before
charging.
Don’t throw the short-circuit battery terminal or the battery away into the fire. Don’t
disassemble the battery cover by yourself.
Please do not disassemble the device and replace the battery at will. Misuse of Li-ion batteries
may result in the following hazards: smoke, fire, or the battery may rupture. Misuse can also
cause damage to the battery or degradation of the battery’s performance.
The plug of the adapter is considered a disconnect device. The socket-outlet shall be installed
near the equipment and shall be easily accessible.
Warning:
Device is charged directly with the adapter. When charging, first insert the plug of the “adapter”
into 110~220V power supply, plug the Type-C charging cable to adapter and then plug the Type-C connector
directly inserted into the connector port on the bottom side of the radio. The battery charging icon
on the screen indicating the battery is start charging. When fully charged, the battery icon displays
full battery bar. Charging time is about 3-4 hours.
6
Keep and Clean
Don’t hold the antenna directly.
Use a smooth cloth to wipe the dust and stains, avoiding poor performance.
Cover the USB charging port when the radio is not in use.
Use the neutral detergent (do not use strong corrosive chemicals) and a warm cloth to clean.
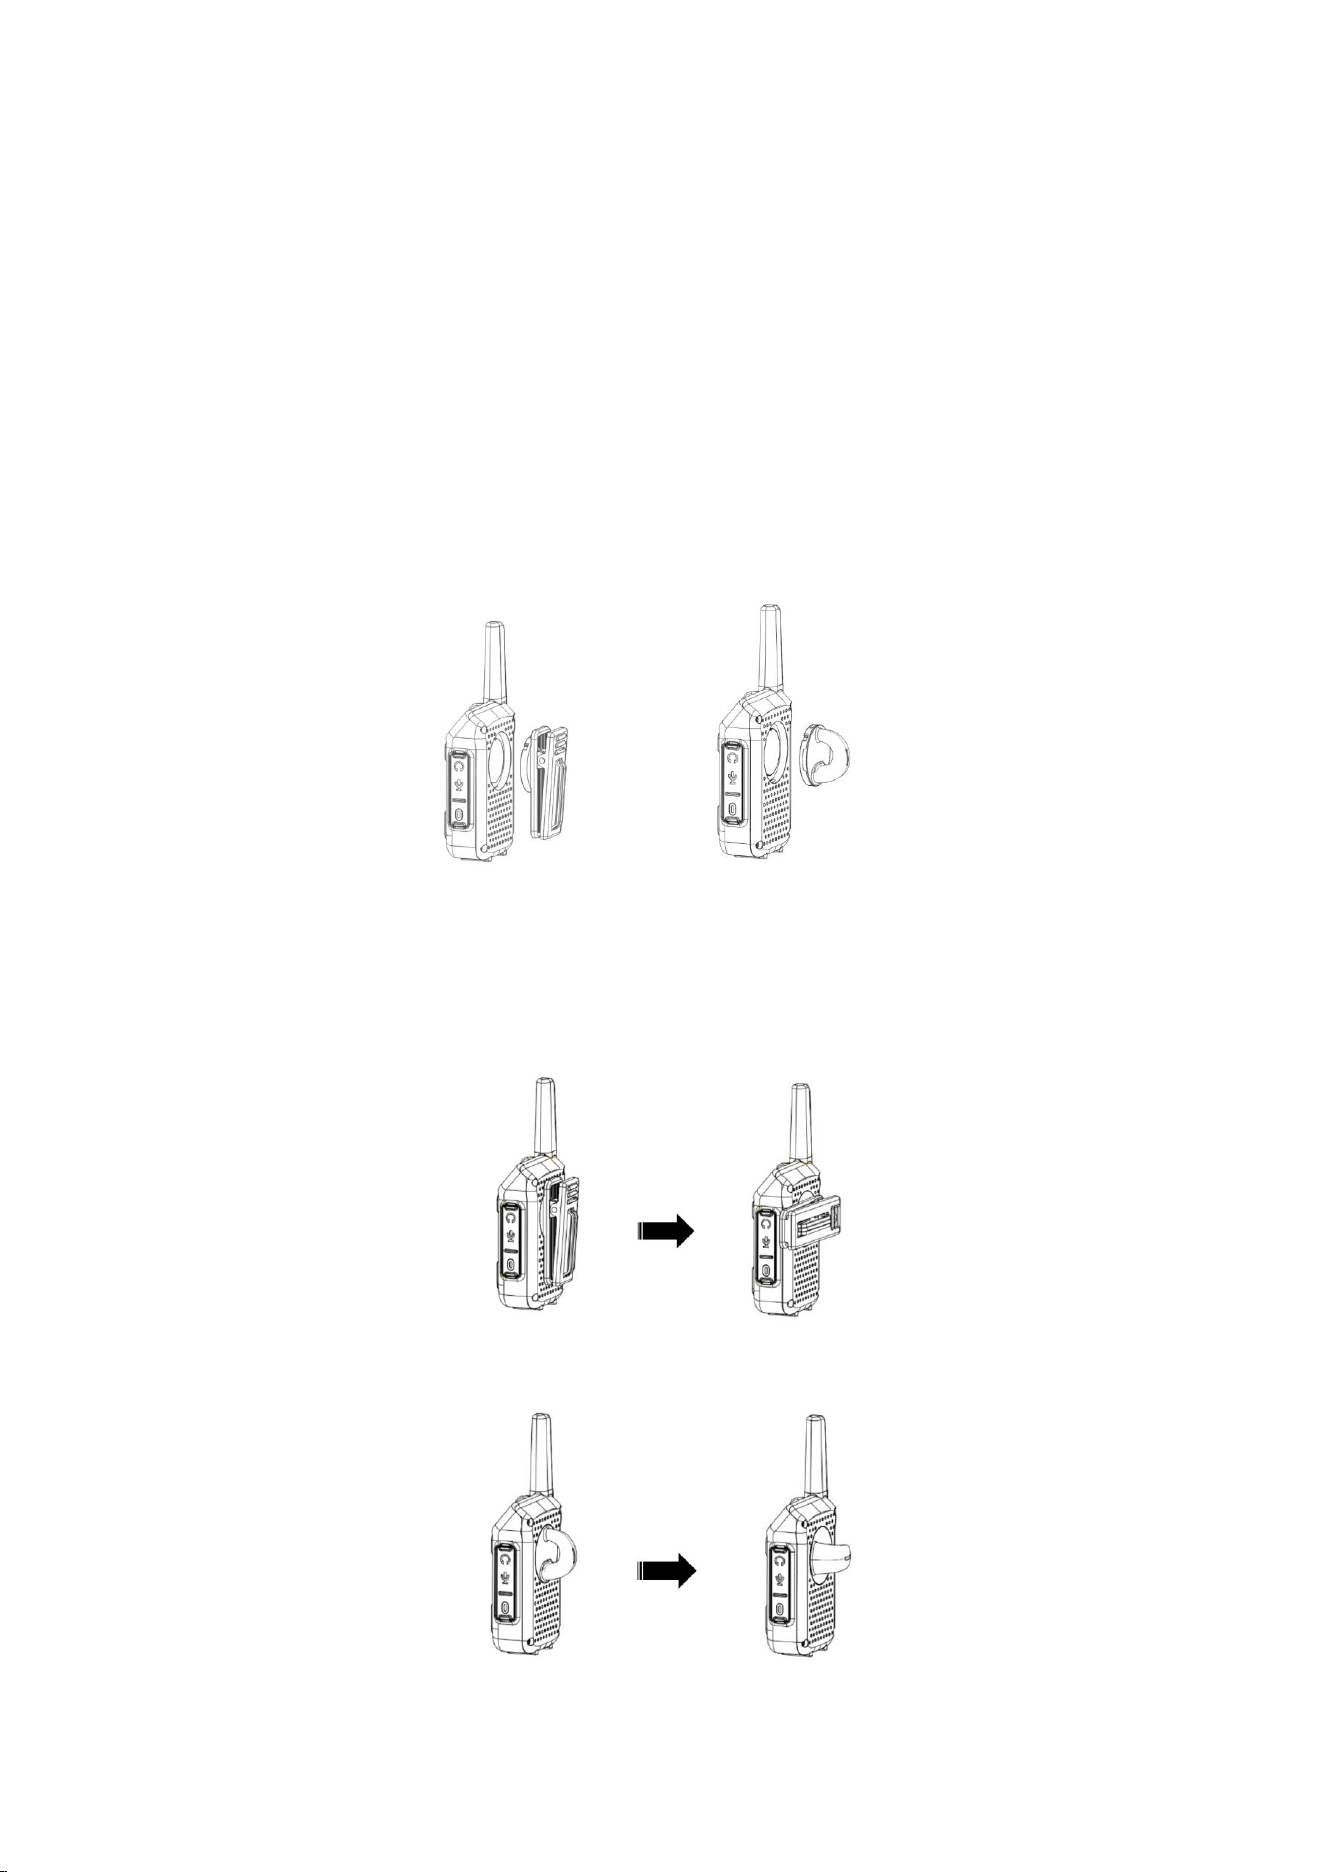
Accessories Installation
This radio features a changeable wearable accessory slot, compatible with belt clip and carabiner
hanger.
Install/Remove Belt Clip/ Carabiner Hanger
1. Bring the magnetic belt clip/ carabiner hanger close to the back of the device in the
direction shown in the diagram 1. The accessory will attach and slightly press the
accessory to lock into place.
Diagram 1
2. To release, rotate the magnetic belt clip/ carabiner hanger accessory 90° in any
direction as shown in the diagram 2 & 3. The main unit will automatically release and
separate from the accessory.
Diagram 2
Diagram 3
7
Checking Battery Charging Status
1. To check the battery charging status while the radio is charging and turned OFF, press
the Power ON/OFF button. The indicator will show the current charging status.
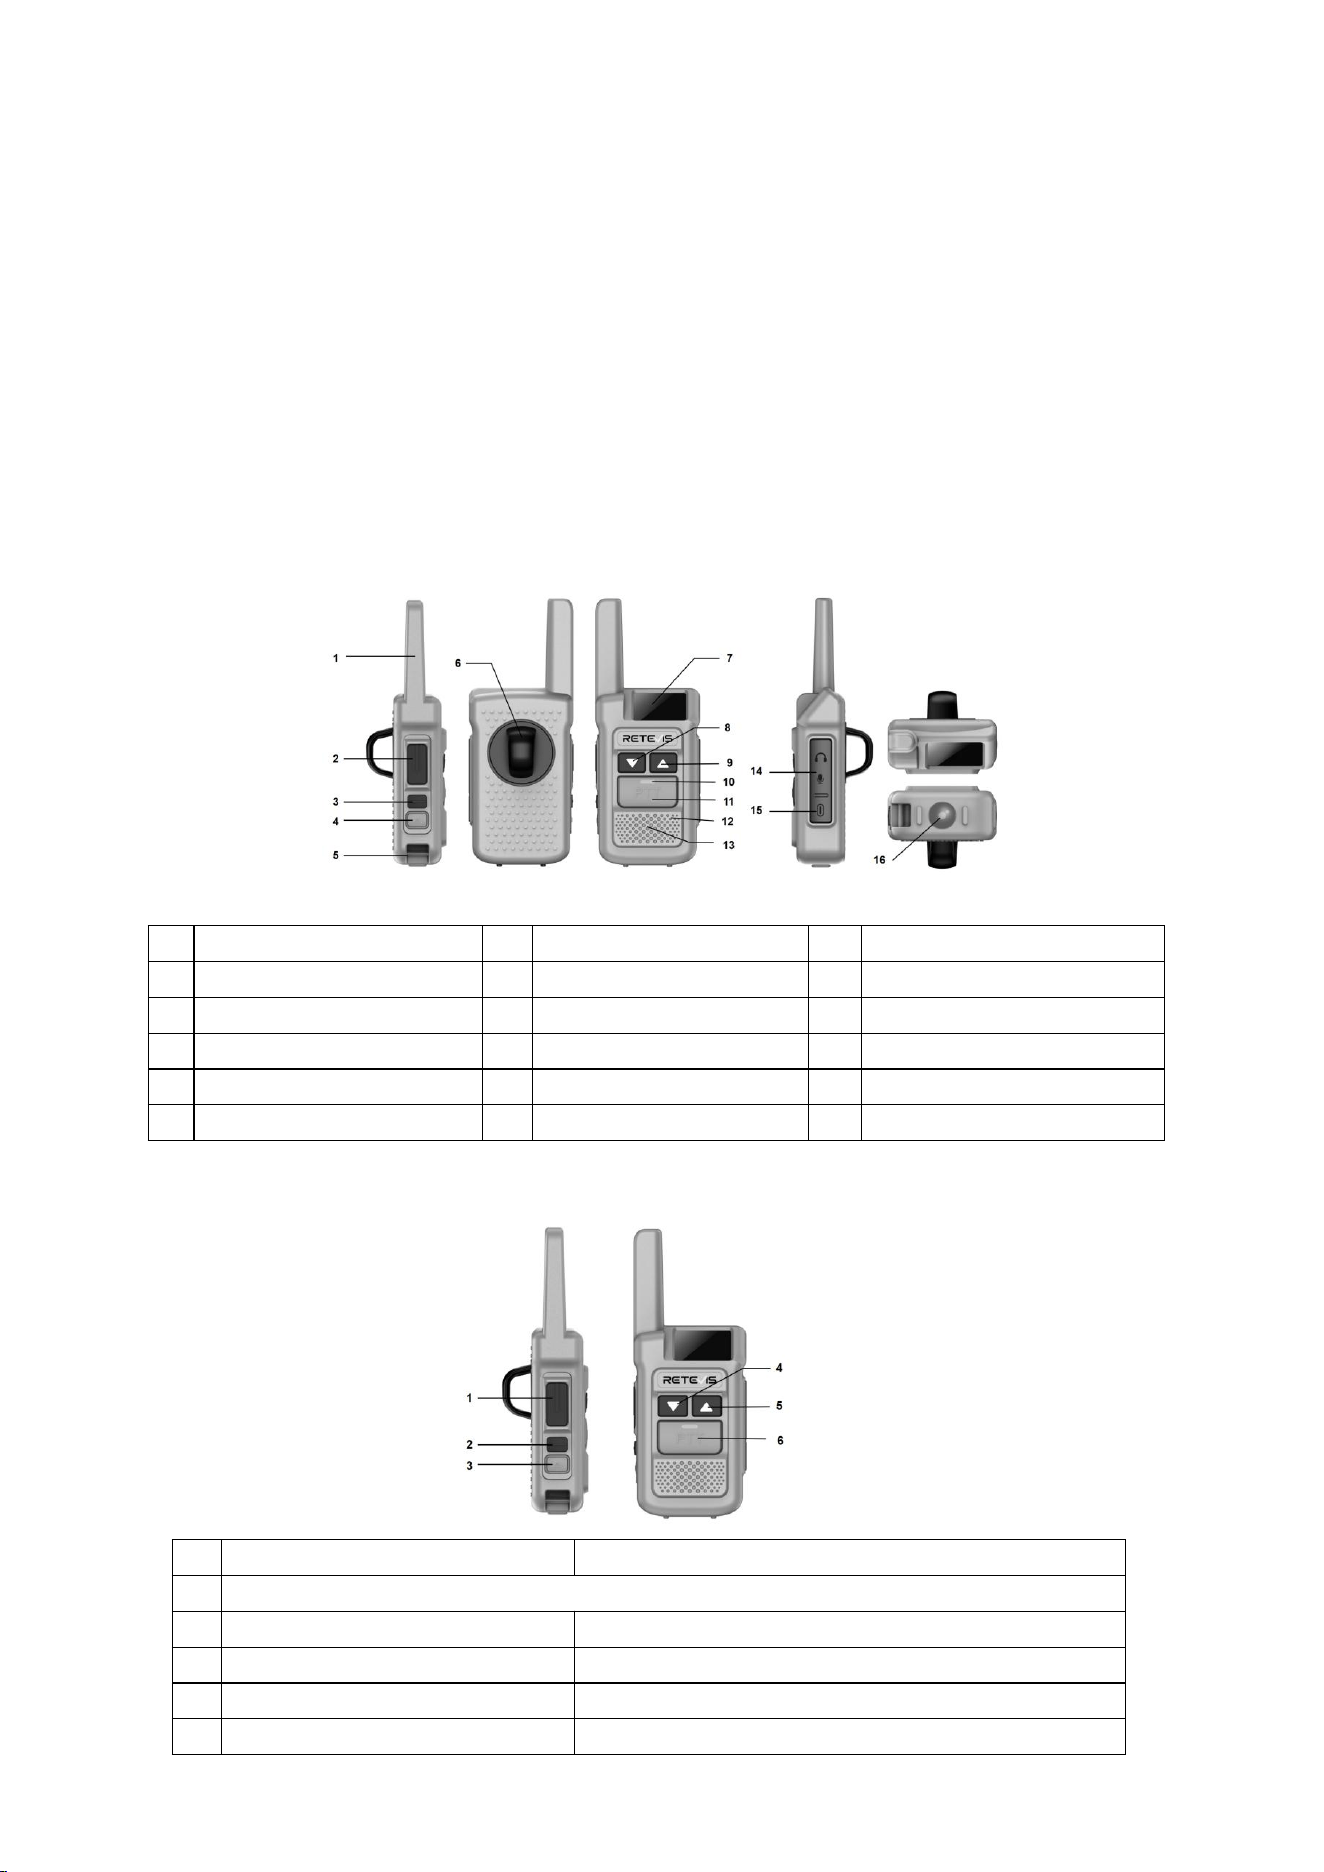
FAMILIAR WITH RADIO
1
Antenna
7
LCD display
13
Speaker
2
PTT button (A)
8
Down button
14
Audio Connector
3
Power / Menu button
9
Up button
15
USB-C charging port
4
Torch / SOS button
10
TX/RX indicator
16
Torch Light
5
Lanyard bar
11
PTT Button (B)
6
Wearable slot
12
Microphone
KEY FUNCTIONS
No
Short Press
Long Press
1
[ PTT (A) ]
2
[Menu]
[Power On/Off]
3
[Torch]
[SOS/ Emergency]
4
[▼] (Down)
[Scan]
5
[ ▲ ] (Up)
[NOAA Weather Channel]
8
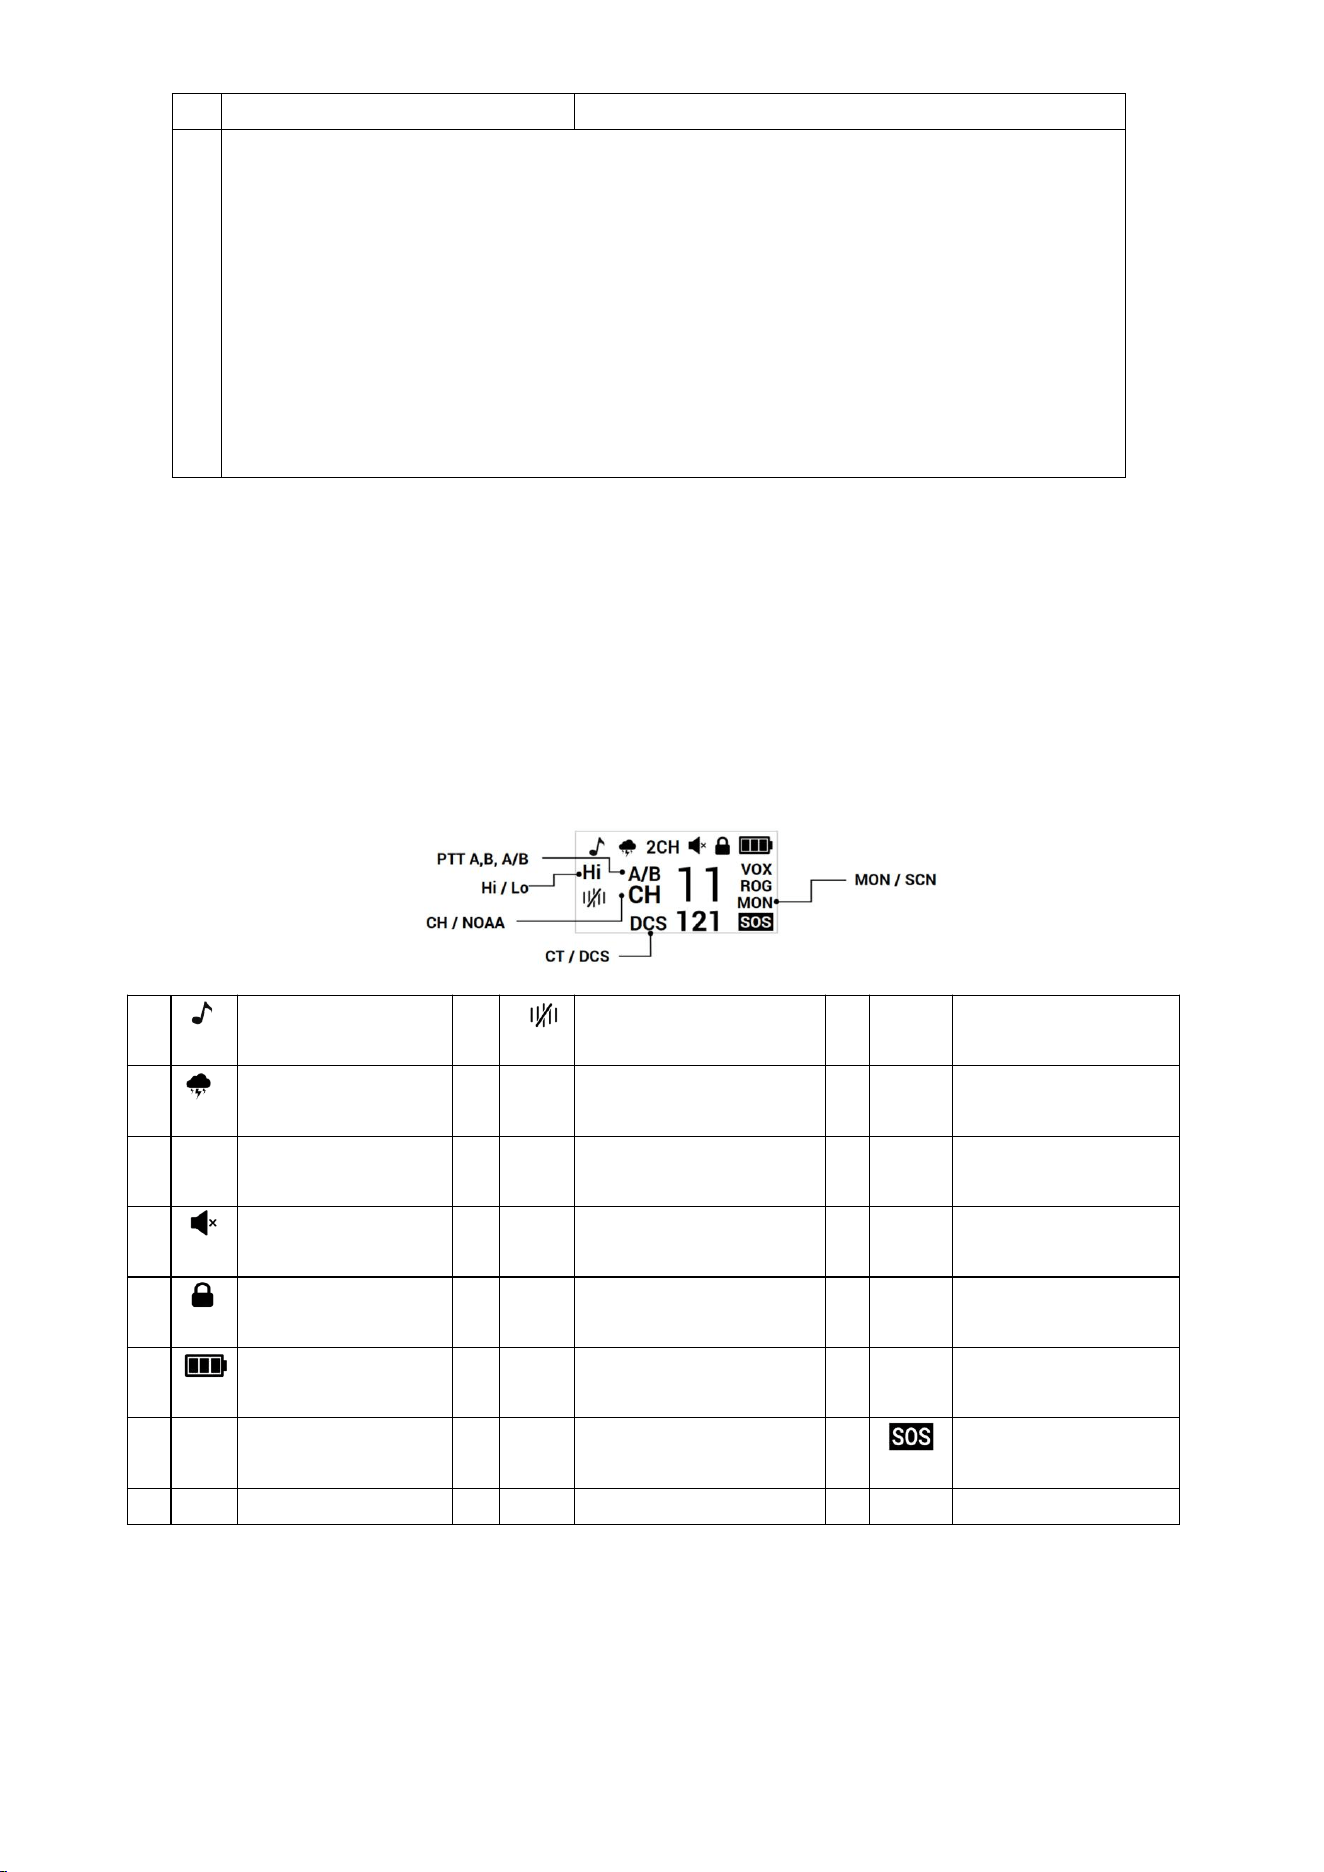
DISPLAY SCREEN GUIDE
1
Call tone
9
Noise Cancellation
1
7
11
Operating Channel
2
Weather Alert
10
A
PTT (A) channel set
1
8
121
CTCSS/DCS Sub-code
3
2CH
Dual Channel
11
B
PTT (B) channel set
1
9
VOX
VOX
4
Mute
12
A/B
PTT (A) & (B) same
channel
2
0
ROG
Roger Tone
5
Button Lock
13
CH
Channel
2
1
MON
Monitor
6
Battery Indicator
14
NOAA
NOAA Weather Channel
2
2
SCN
Scan
7
Hi
High Power
15
CT
CTCSS Sub-code
2
3
SOS Emergency Call
8
Lo
Low Power
16
DCS
DCS Sub-code
1. Getting Started
1.1. Powering On/Off
To Power On: Press and hold the [ Power / Menu ] button for 4 seconds.
To Power Off: Press and hold the Power button for 4 seconds。
1.2. Up/Down Button
6
[ PTT (B) ]
7
Combination Button Functions
(1) One-Key Sub-Code Switch - Firstly press and hold [ ▲ ] and continue press [PTT (B) ]
for 2 seconds to temporary quick clear all sub- code (disappear) and press again to resume
back the preset sub-codes.
(2) Call - Press [ ▼ ] & [ ▲ ] simultaneously to send call .
(3) Monitor - Long press [ ▼ ] & [ ▲ ] simultaneously,press [MENU] or [PTT (A)/(B)] to
disable to disable.
(4) Keypad Lock - Long press [ Power / Menu ] & [ Torch / SOS ] simultaneously to lock
and unlock button. When lock, only [ ▼] , [ ▲ ] and [Menu] buttons are disabled.
(5) Screen Orientation - Short press [ PTT (B) ] & [ ▼ ] simultaneously to flip the screen.

9
On the home screen, press [▼] and [ ▲ ] to adjust volume level 0~10.
Press and hold the [ ▲ ] button for 2 seconds to ON or OFF the NOAA Weather Channel.
Press and hold [▼] button for 2 seconds to activate scan; press any button to deactivate.
1.3. Scan
The scan feature automatically searches for active signals on all channels. To enable scanning:
Long press [▼] button to start scanning.
Press [MENU] button to exit.
1.4. NOAA Weather Channel
In this mode, you can listen to weather broadcast from NOAA or Environment Canada.
Long press [ ▲ ] button to ON or OFF the NOAA Weather Channel.
Adjust the volume setting by pressing the [ ▲ ] or [▼] button.
Long press the [ ▲ ] button to turn it off and the radio switches to Two-Way Mode.
1.5. One-Key Sub-Code Switch
To clear or restore the preset sub- codes
Press and hold the [▲] button, then press and hold the [PTT (B)] button for 2 seconds.
The sub- codes will disappear when cleared.
Repeat the same action to restore the preset sub- codes.
1.6. Call Button
To send a short call tone to the other radios on the same channel.
When selecting 1–10, press [ ▼ ] & [ ▲ ] simultaneously to send call tone.
1.7. Monitor
The Monitor function temporarily open the squelch to listen for weak signals or background noise
on the current channel.
Long press [ ▼ ] & [ ▲ ] simultaneously,press [MENU] or [PTT (A)/(B)] to disable.
1.8. Keypad Lock
Turn keypad on/off to prevents accidental key presses.
Long press [ Power / Menu ] & [ Torch / SOS ] simultaneously to lock and unlock button. When lock, only
[ ▼] , [ ▲ ] and [Menu] buttons are disabled.
1.9. Screen Orientation -
To adjust the display orientation.
Short press [ PTT (B) ] & [ ▼ ] simultaneously to flip the screen.
1.10. Dual Channel Monitor
Dual Scan allows you to monitor your primary channel and a second designated channel simultaneously.
To set the A & B channel, please refer to section 2.1 & section 2.2.
Note: When you receive a message on either the PTT (A) Channel or PTT (B) Channel, that channel will
automatically hold for few seconds. This hold time gives you a window to transmit your response back
using the same channel using either PTT (A) for channel A and PTT (B) for channel B.

10
Note: To turn off the dual channel monitor, navigate to Channel for PTT (B) , select the channel
selection as [ OFF ].
2. Radio Features
2.1. Selecting a Channel A Setting ( Channel, Sub-code and Transmit Power)
2.1.1. Channel for PTT (A)
Press [MENU] until Channel A’s number and “A” start to flash.
Press [ ▼ ] or [ ▲ ] to change the channel.
Press [PTT] button to exit menu or [MENU] button to continue setup.
2.1.2. Sub-code for PTT (A)
Press [MENU] until the CTCSS/DCS code start to flash.
Press [ ▼ ] or [ ▲ ] to select the code. You can hold down the button to scroll through the codes
rapidly.
Press [PTT] button to exit menu or [MENU] button to continue setup.
Note: CT/DCS is change according to CT/DCS number setting.
2.1.3. Setting Transmit Power for PTT (A)
(1) Press [MENU] until Channel A’s Hi/Lo start to flash.
(2) Press [ ▼ ] or [ ▲ ] to select transmit power. Select either 0.5W (Low) or 2W (High). Channel
8 to Channel 14 are fixed with 0.5W.
(3) Press [PTT] button to exit menu or [MENU] button to continue setup.
2.2. Selecting a Channel B Setting ( Channel, Sub-code and Transmit Power)
2.2.1. Channel for PTT (B)
Press [MENU] until Channel B’s number and “B” start to flash.
Press [ ▼ ] or [ ▲ ] to change the channel.
Press [PTT] button to exit menu or [MENU] button to continue setup.
2.2.2. Sub-code for PTT (B)
Press [MENU] until the CTCSS/DCS code start to flash.
Press [ ▼ ] or [ ▲ ] to select the code. You can hold down the button to scroll through the codes
rapidly.
Press [PTT] button to exit menu or [MENU] button to continue setup.
Note: CT/DCS is change according to CT/DCS number setting.
2.2.3. Setting Transmit Power for PTT (B)
(1) Press [MENU] until Channel B’s Hi/Lo start to flash.
(2) Press [ ▼ ] or [ ▲ ] to select transmit power. Select either 0.5W (Low) or 2W (High). Channel
8 to Channel 14 are fixed with 0.5W.
(3) Press [PTT] button to exit menu or [MENU] button to continue setup.
Note:

11
If PTT (A) and PTT (B) are assigned to the same channel, the display will show "A/B".
If they are assigned to different channels, the radio defaults to Channel A. During transmission,
the display indicates "A" when using PTT (A) and "B" when using PTT (B).
2.3. Squelch Level Setting
The squelch function mutes background noise when no signal is present. A higher level requires a
stronger signal to unmute. To adjust the squelch level:
Press [MENU] until SQL setting appears. The current setting Off/ 1~9 will flash.
Press [ ▼ ] or [ ▲ ] to turn Off/ 1~9.
Press the [PTT] button to confirm and exit or [MENU] to continue set up.
2.4. Voice Operated Exchange (VOX)
The VOX feature allows for hands-free operation by transmitting when it detects your voice. To set
the VOX sensitivity:
Press [MENU] until VOX setting appears. The current setting Off/ L1~L3 will flash.
Press the [ ▲ ] or [ ▼] button to select sensitivity (L1, L2, L3). Select OFF to disable
VOX. L1 is most sensitive, L2 is medium and L3 is less sensitive.
Press [ Menu/OK ] to confirm your selection.
2.5. Time Out Timer (TOT)
The Time Out Timer (TOT) limits your transmission time to conserve battery and comply with radio
regulations. To set the timer:
Press [MENU] until Time Out Timer setting appears. The current setting 30, 60, 90, 180, 300 seconds
will flash.
Press the [ ▲ ] or [ ▼] to select.
Press the [PTT] button to confirm and exit or [MENU] to continue set up.
2.6. NOAA Weather Channel Mode Setting
To set to desired NOAA weather channel and broadcasts when Weather Mode and Weather Alert is on:
Press [MENU] until Weather Mode setting appears. The current setting 1~11 will flash
Press the [ ▲ ] or [▼] button to select a weather channel.
Press the [PTT] button to confirm and exit or [MENU] to continue set up.
To active NOAA Weather Channel refer to Section 1.4.
2.7. Weather Alert
Note: To activate the Weather Alert mode, NOAA Weather must set with weather channel.
To enable/ disable Weather Alert mode:
1. Press [MENU] until Weather Alert setting appears. The current setting On/Off will flash.
2. Press [ ▲ ] or [ ▼] to ON or OFF to disable Weather Alert.
3. Press any button to confirm and weather mode is activated and back to home screen.
2.8. Noise Cancellation

12
Reduces unwanted background sounds, allowing clearer voice communication in noisy environments. Turn
noise cancellation to "Off" can be useful in specific scenarios where full voice fidelity. To select
noise cancellation:
Press [MENU] until Voice CNCL appears. The current setting on/off will flash.
Press [ ▲ ] or [ ▼] to turn on/off.
Press the [PTT] button to confirm and exit or [MENU] to continue set up.
2.9. Call Tone
This setting allows you to choose an audible tone that signals an incoming call. To select a call
tone:
Press [MENU] until Call Tone appears. The current setting Off, 1~10 will flash.
Press [ ▲ ] or [ ▼] to select call tone.
Press the [PTT] button to confirm and exit or [MENU] to continue set up.
2.10. Keypad Tone
Enable or disable keypad audible sound. To enable or disable this feature:
Press [MENU] until Keypad Tone appears. The current setting On/Off will flash.
Press [ ▲ ] or [ ▼] to turn on/off.
Press the [PTT] button to confirm and exit or [MENU] to continue set up.
2.11. Roger Tone/Beep
The Roger Tone/Beep is an audible tone that sounds at the end of a transmission. To enable or disable
this feature:
Press [MENU] until Roger Tone appears. The current setting On/Off will flash.
Press [ ▲ ] or [ ▼] to turn on/off.
Press the [PTT] button to confirm and exit or [MENU] to continue set up.
2.12. Busy Channel Lockout (BCL)
This feature prevents transmitting on a channel that is currently in use by others. To enable or disable
this feature:
Press [MENU] until Busy CH. Lockout appears. The current setting On/Off will flash.
Press [ ▲ ] or [ ▼] to turn on/off.
Press the [PTT] button to confirm and exit or [MENU] to continue set up.
Note: When the busy channel lockout is enabled, pressing the PTT button while receiving signals should
display both a prompt tone and a message, as shown in the image below, indicating "Busy CH. Lockout".
2.13. Display Brightness
To adjust the screen brightness level. Brightness level can be set 1-3, default:2.
Press [MENU] until Display BRT appears. The current setting 1~3 will flash.
Press [ ▲ ] or [ ▼] to select setting.
Press the [PTT] button to confirm and exit or [MENU] to continue set up.
2.14. Low Battery Alert
Adjust the low battery alert.
Press [MENU] until Low Batt. Alert appears. The current setting On/Off will flash.
Press [ ▲ ] or [ ▼] to turn on/off.

13
Press the [PTT] button to confirm and exit or [MENU] to continue set up.
2.15. Voice Annunciation
EZTalk 1R supports 1 language (English) for voice annunciation prompts.
2.16. Screen Sleep
Screen Sleep automatically turns off the LCD backlight or display after a period of inactivity. The
radio remains fully operational; pressing any key or using PTT will wake the screen immediately.
Press [MENU] until Screen Sleep appears. The current setting will flash.
Press [ ▲ ] or [ ▼] to select setting. Screen Sleep duration 0s,15s, 20s, 30s, 1 min, 2 min,
5 min.
Press the [PTT] button to confirm and exit or [MENU] to continue set up.
2.17. Display Orientation
To adjust the display orientation.
Press [MENU] until Screen ORI appears. The current setting standard/ flipped will flash.
Press [ ▲ ] or [ ▼] to select setting.
Press the [PTT] button to confirm and exit or [MENU] to continue set up.
2.18. Battery Saver
The Battery Saver feature reduces power consumption when the radio is in standby mode. When enabled,
the radio cycles between active monitoring and low power sleep to extend battery life. It can be set:
OFF, 1:1, 1:2, and 1:4. 1:4 extends longer battery life during standby.
1:1: Full power always - faster response, highest power use and shorten battery life (for
critical communication).
1:2: Balance of response and battery life (Periodic yet consistent communication)
1:4: Maximum battery saving, slightly slower response (long outdoor trips with moderate or
occasional communication).
Press [MENU] until Battery Saver appears. The current setting will flash.
Press [ ▲ ] or [ ▼] to select setting.
Press the [PTT] button to confirm and exit or [MENU] to continue set up.
2.19. SOS/Emergency Alert
You can use the Emergency alert feature to signal members in your group if you require urgent help.
After pressing the SOS button, an alert tone is transmitted from your radio to the radios in your
group or contact channel. The 1R/ 61R radios in your group automatically advance the speaker volume
to the maximum setting and sound an alert tone for 8 seconds. After 8 seconds, the alert tone stops.
Then, the radio is in hands free mode for 22 seconds, allowing you to talk without pressing the PTT
button. For the 30 seconds duration of the Emergency alert mode,radio controls and buttons are locked
to maximize reception of the emergency message.
Press [MENU] until SOS appears. The current setting will flash.
Press [ ▲ ] or [ ▼] to select channel.
Press MENU to move to CTCSS/ DCS Sub-code setting.
Press [ ▲ ] or [ ▼] to select CTCSS/ DCS Sub-code.
Press the [PTT] button to confirm and exit or [MENU] to continue set up.
14
WARNING: Use the Emergency alert feature in case of emergency only. Retevis is not responsible if
there is no response to the emergency alert from the receiving group.
2.20. Factory Reset
Restore all settings to their original defaults.
Press [MENU] until Factory Reset appears. The current setting will flash.
Press [ ▲ ] or [ ▼] to select preferred language.
If Factory Reset is “NO”
Press the [PTT] button to confirm and exit or [MENU] to continue set up.
If Factory Reset is “YES”
Press the [PTT] button to confirm “Yes” or Press [ ▲ ] or [ ▼] to select “No”.
Press the [PTT] to confirm and return to home screen.
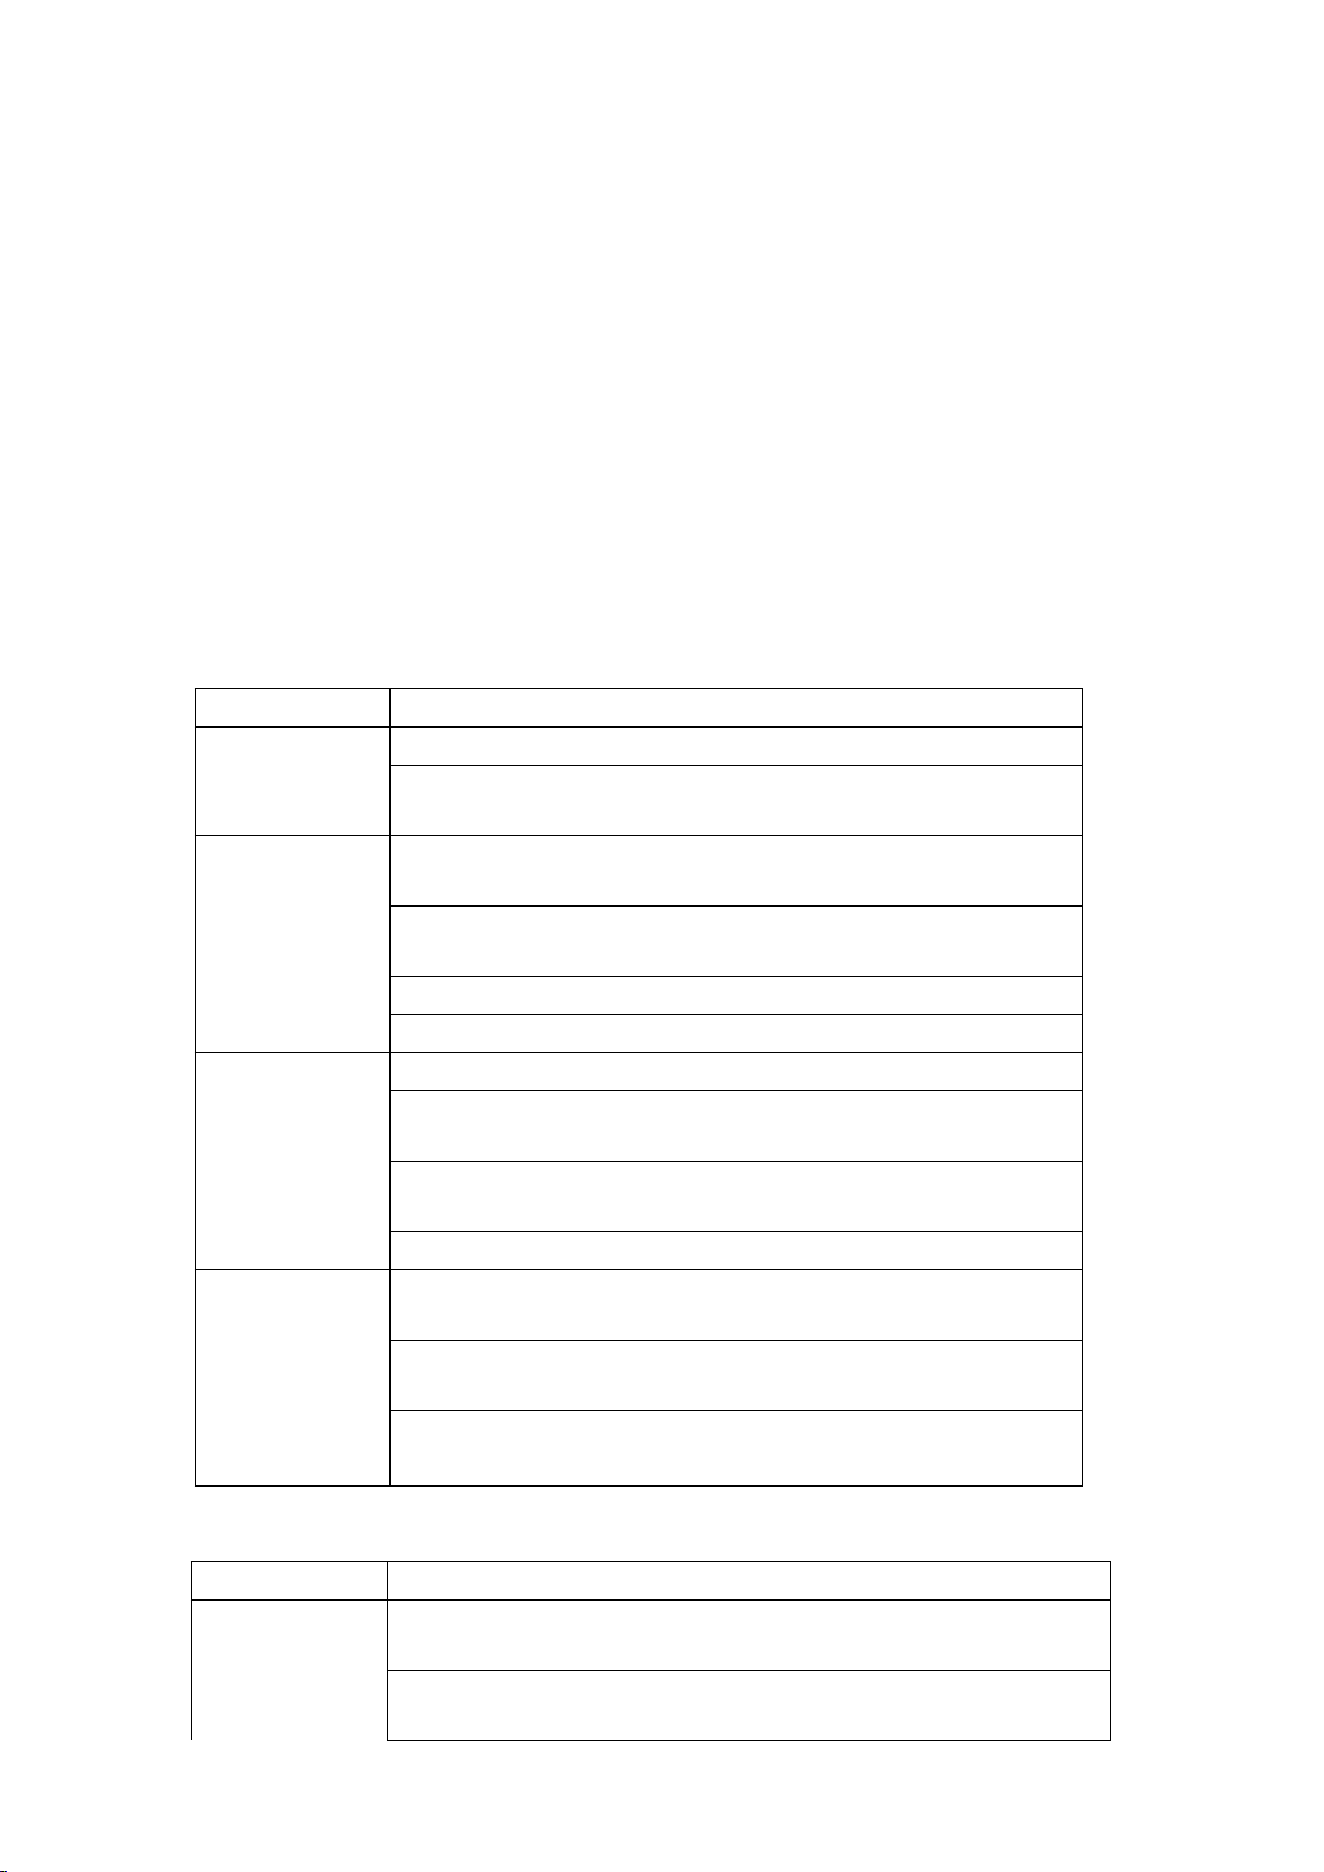
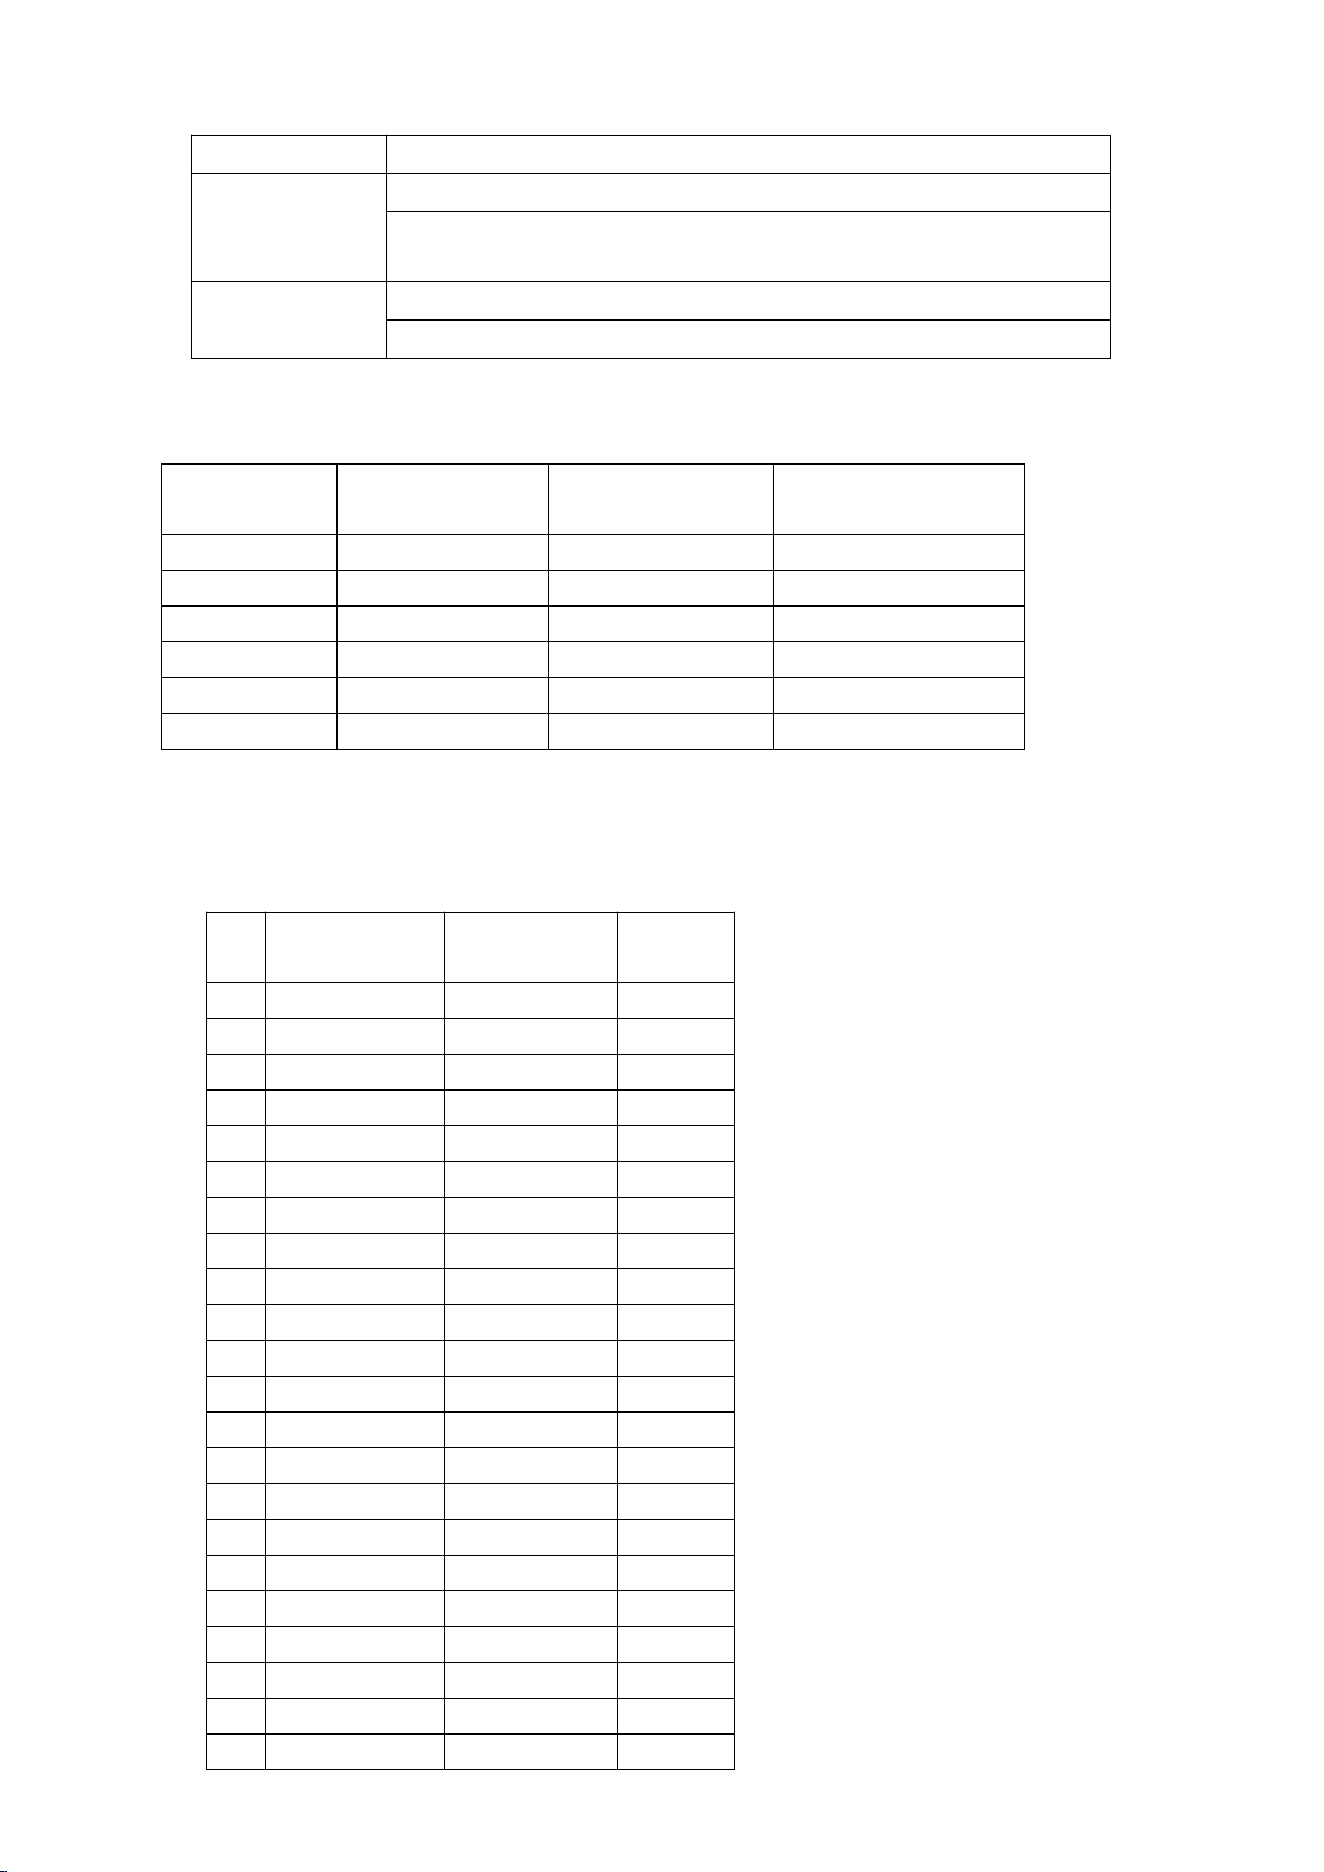
3. Troubleshooting
If you experience issues with your radio, please check the following solutions before requesting
service.
3.1 General Issue
Problem
Possible Cause & Solution
Radio will not
turn on
Battery depleted: Charge the battery fully.
Faulty charger or power source: Try a different USB cable or
power adapter.
Battery drains
too quickly
Transmit power set to High (2W): Use Low (0.5W) power when
possible.
Backlight duration too long: Shorten the screen sleep time
in Settings.
Battery Saver mode is off: Enable Battery Saver in Settings.
Old or damaged battery: Battery may need replacement.
Cannot hear any
audio
Volume is too low: Press the Volume [ ▲ ] button.
Squelch level is too high: Lower the squelch level in Radio
Settings.
Headset/earpiece connected: Disconnect the accessory or check
its connection.
Channel is inactive: Ensure you are on a channel with activity.
Other users
cannot hear me
Microphone is blocked: Ensure the microphone hole is clean and
unobstructed.
You are not transmitting: Press and hold the PTT
(Push-To-Talk) button fully while speaking.
Privacy Codes mismatch: Ensure all radios in your group use the
same channel and privacy code.
3.2. Scanning Issue
Problem
Possible Cause & Solution
Scanning does
not stop on
active channels
Squelch level is too low: Raise the squelch level so it doesn't
stop on weak interference.
Privacy Codes are enabled: Scanning may only stop for signals with
matching privacy codes.
15
3.3. Display & Button Issues
4.Weather Channel Frequencies
This section shows the weather channels and its frequencies available for the radio.
Weather
Channel
Frequency (MHz)
Weather Channel
Frequency (MHz)
WX1
162.550
WX7
162.525
WX2
162.400
WX8
161.650
WX3
162.475
WX9
161.775
WX4
162.425
WX10
161.750
WX5
162.450
WX11
162.000
WX6
162.500
-
-
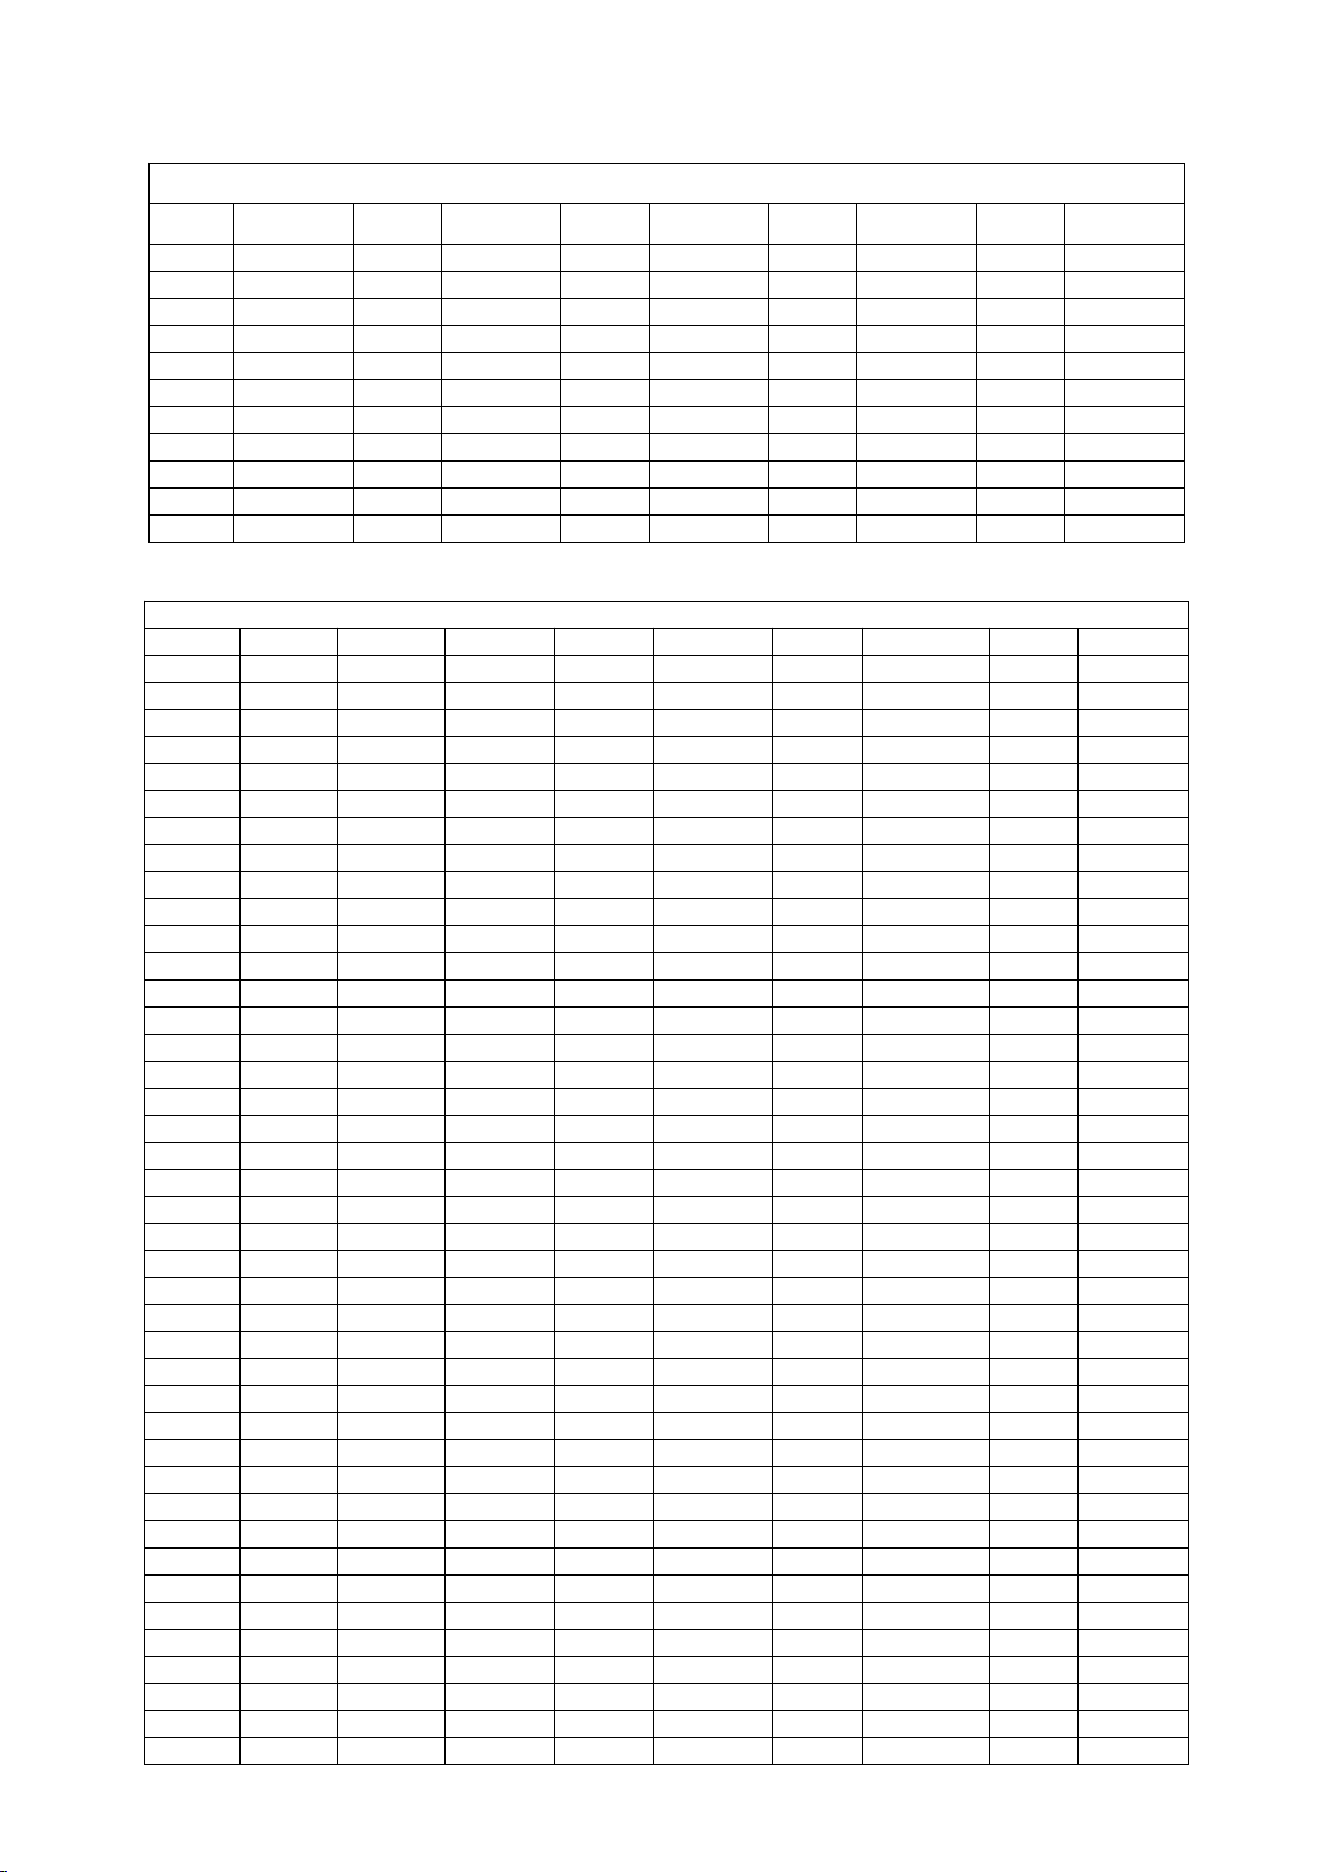
5. Channels & Frequencies
This section shows the channels and its frequencies available for the device.
No
Frequency
(MHz)
CTCSS/DCS
Power
1
462.5625
67.0
High
2
462.5875
118.8
High
3
462.6125
127.3
High
4
462.6375
131.8
High
5
462.6625
136.5
High
6
462.6875
141.3
High
7
462.7125
146.2
High
8
467.5625
D243N
Low
9
467.5875
D032N
Low
10
467.6125
D047N
Low
11
467.6375
D051N
Low
12
467.6625
D053N
Low
13
467.6875
D065N
Low
14
467.7125
D116N
Low
15
462.5500
123.0
High
16
462.5750
D743I
High
17
462.6000
D332I
High
18
462.6250
127.3
High
19
462.6500
D243I
High
20
462.6750
D606N
High
21
462.7000
D731I
High
22
462.7250
136.5
High
Problem
Possible Cause & Solution
Screen is dim or
blank
Screen sleep timer activated: Press any button to wake the screen.
Brightness is set too low: Adjust brightness in Settings >
Display Brightness.
Buttons do not
respond
Keypad is locked: Check manual for keypad lock/unlock procedure.
The radio is busy: Wait for a transmission to finish.
16
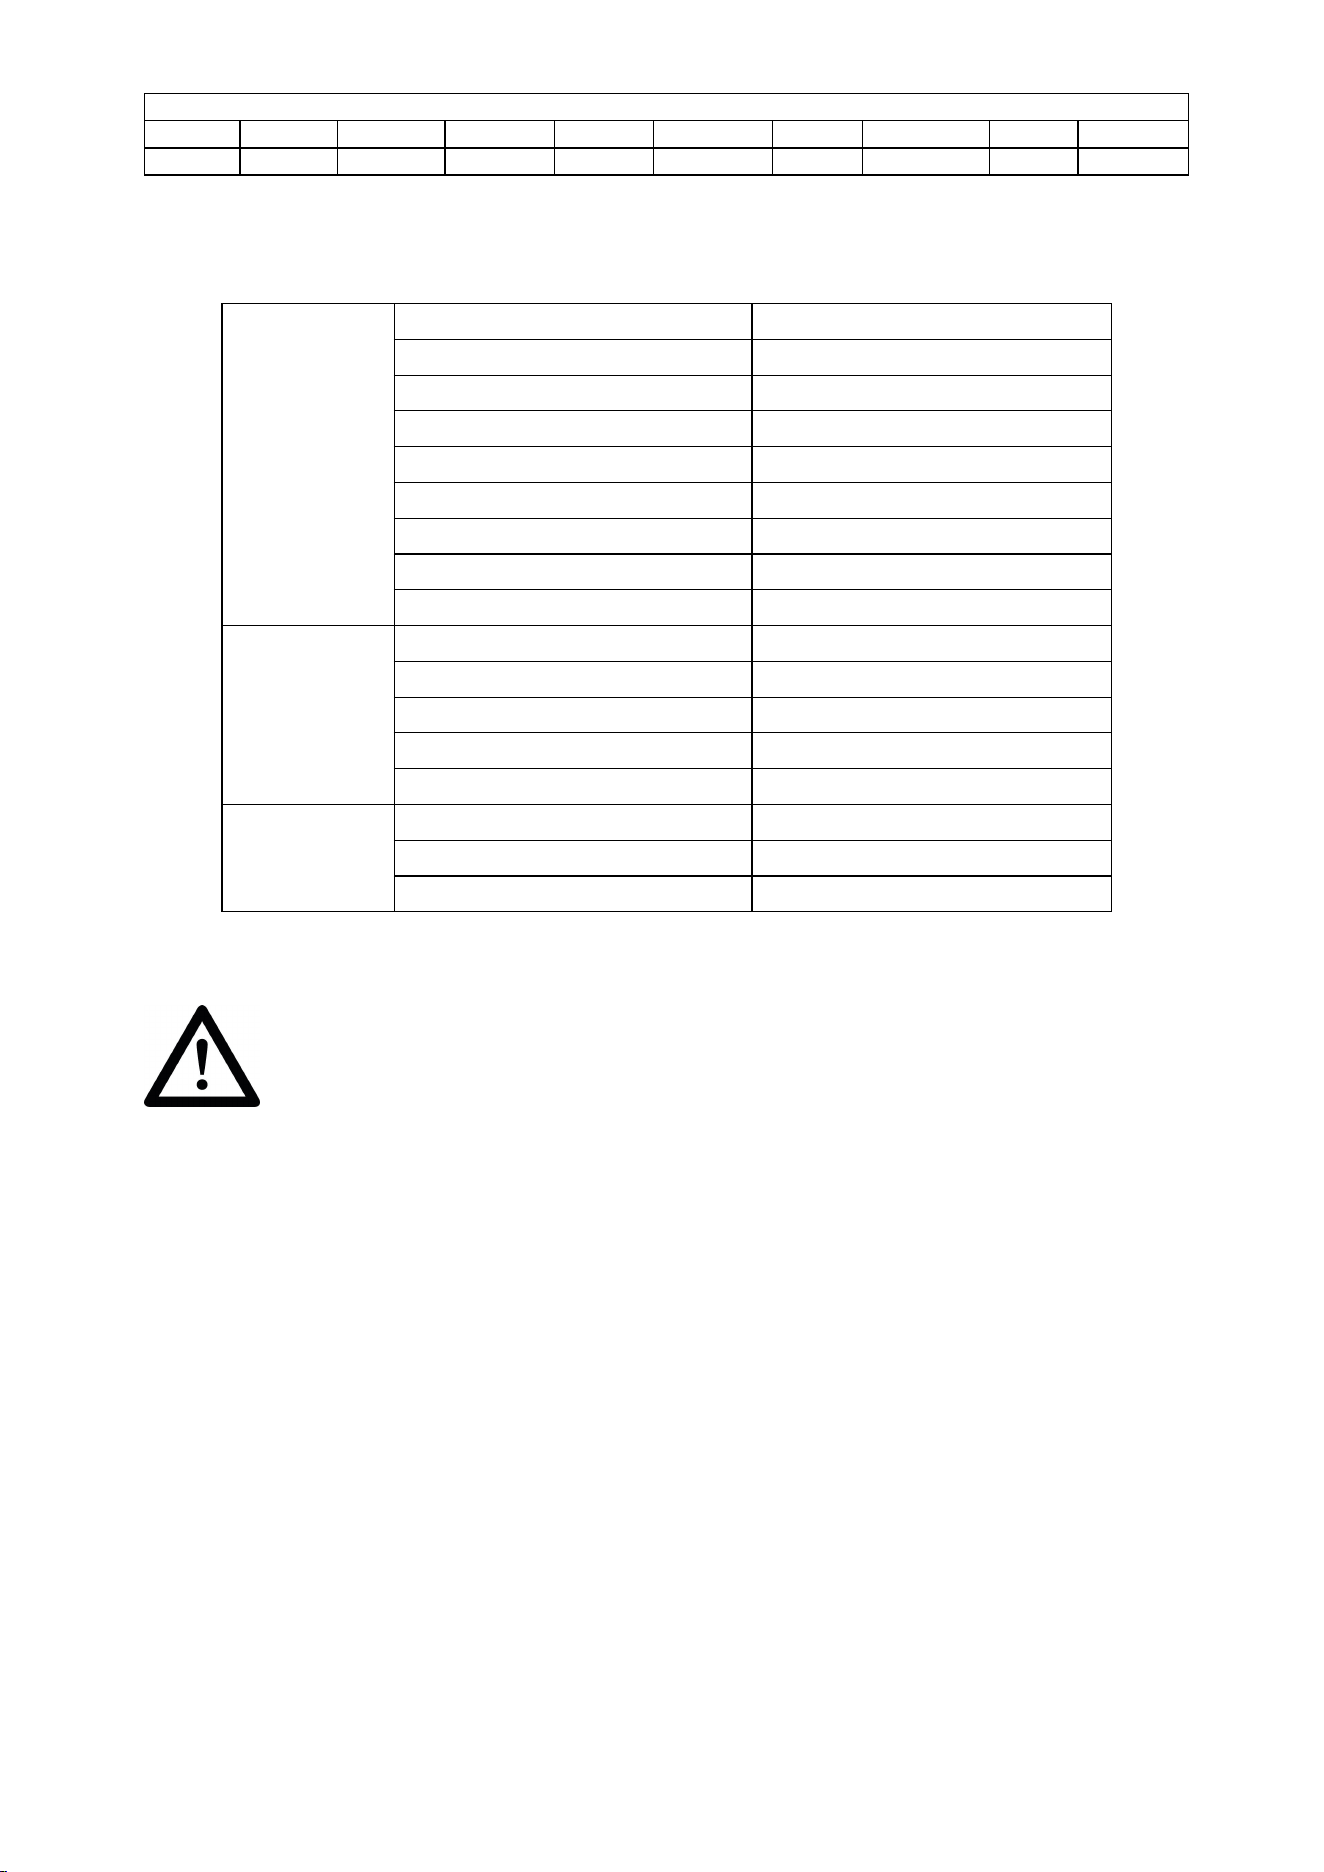
6. CTCSS Chart & DCS Code List
CTCSS CHART
Number
Frequency
Number
Frequency
Number
Frequency
Number
Frequency
Number
Frequency
OFF
/
1
67
2
69.3
3
71.9
4
74.4
5
77
6
79.7
7
82.5
8
85.4
9
88.5
10
91.5
11
94.8
12
97.4
13
100
14
103.5
15
107.2
16
110.9
17
114.8
18
118.8
19
123
20
127.3
21
131.8
22
136.5
23
141.3
24
146.2
25
151.4
26
156.7
27
159.8
28
162.2
29
165.5
30
167.9
31
171.3
32
173.8
33
177.3
34
179.9
35
183.5
36
186.2
37
189.9
38
192.8
39
196.6
40
199.5
41
203.5
42
206.5
43
210.7
44
218.1
45
225.7
46
229.1
47
233.6
48
241.8
49
250.3
50
254.1
DCS CODE LIST
Number
Code
Number
Code
Number
Code
Number
Code
Number
Code
1
D023N
2
D025N
3
D026N
4
D031N
5
D032N
6
D036N
7
D043N
8
D047N
9
D051N
10
D053N
11
D054N
12
D065N
13
D071N
14
D072N
15
D073N
16
D074N
17
D114N
18
D115N
19
D116N
20
D122N
21
D125N
22
D131N
23
D132N
24
D134N
25
D143N
26
D145N
27
D152N
28
D155N
29
D156N
30
D162N
31
D165N
32
D172N
33
D174N
34
D205N
35
D212N
36
D223N
37
D225N
38
D226N
39
D243N
40
D244N
41
D245N
42
D246N
43
D251N
44
D252N
45
D255N
46
D261N
47
D263N
48
D265N
49
D266N
50
D271N
51
D274N
52
D306N
53
D311N
54
D315N
55
D325N
56
D331N
57
D332N
58
D343N
59
D346N
60
D351N
61
D356N
62
D364N
63
D365N
64
D371N
65
D411N
66
D412N
67
D413N
68
D423N
69
D431N
70
D432N
71
D445N
72
D446N
73
D452N
74
D454N
75
D455N
76
D462N
77
D464N
78
D465N
79
D466N
80
D503N
81
D506N
82
D516N
83
D523N
84
D526N
85
D532N
86
D546N
87
D565N
88
D606N
89
D612N
90
D624N
91
D627N
92
D631N
93
D632N
94
D645N
95
D654N
96
D662N
97
D664N
98
D703N
99
D712N
100
D723N
101
D731N
102
D732N
103
D734N
104
D743N
105
D754N
106
D023I
107
D025I
108
D026I
109
D031I
110
D032I
111
D036I
112
D043I
113
D047I
114
D051I
115
D053I
116
D054I
117
D065I
118
D071I
119
D072I
120
D073I
121
D074I
122
D114I
123
D115I
124
D116I
125
D122I
126
D125I
127
D131I
128
D132I
129
D134I
130
D143I
131
D145I
132
D152I
133
D155I
134
D156I
135
D162I
136
D165I
137
D172I
138
D174I
139
D205I
140
D212I
141
D223I
142
D225I
143
D226I
144
D243I
145
D244I
146
D245I
147
D246I
148
D251I
149
D252I
150
D255I
151
D261I
152
D263I
153
D265I
154
D266I
155
D271I
156
D274I
157
D306I
158
D311I
159
D315I
160
D325I
161
D331I
162
D332I
163
D343I
164
D346I
165
D351I
166
D356I
167
D364I
168
D365I
169
D371I
170
D411I
171
D412I
172
D413I
173
D423I
174
D431I
175
D432I
176
D445I
177
D446I
178
D452I
179
D454I
180
D455I
181
D462I
182
D464I
183
D465I
184
D466I
185
D503I
186
D506I
187
D516I
188
D523I
189
D526I
190
D532I
191
D546I
192
D565I
193
D606I
194
D612I
195
D624I
196
D627I
197
D631I
198
D632I
199
D645I
200
D654I
201
D662I
202
D664I
203
D703I
204
D712I
205
D723I
17
DCS CODE LIST
Number
Code
Number
Code
Number
Code
Number
Code
Number
Code
206
D731I
207
D732I
208
D734I
209
D743I
210
D754I
7. Specification
7.1 Radio
General
Frequency Range
FRS 462.55-467.7125MHz
Channel Capacity
FRS: 22
Channel Spacing
12.5kHz
Operating Voltage
3.7V
Battery Capacity
1500mAh
Operating Temperature
-20°C~60°C
Charging Temperature
0°C~40°C
Antenna Impedance
50Ω
Dimensions(H*W*D)
96.7*56*29.6mm
Transmitter
Output Power
High: 2.0W, Low: 0.5W
Frequency Stability
±2.5ppm
Adjacent Channel Power
60dBm@12.5kHz
FM Modulation
12.5kHz@11K0F3E
Transmission Current
≤1500mA
Receiver
Analog Receive Sensitivity
0.25uV/-119dBm(20dB SINAD)
Rated Audio Distortion
≤3%
Receive Current
≤500mA
PRODUCT SAFETY GUIDE FOR TWO-WAY RADIOS
Attention: Before using this radio, read this guide which contains important operating
instructions for safe usage and RF energy awareness and control for compliance with
applicable standards and regulations.
User instructions should accompany the device when transferred to other users.
Do not use this device if the operational requirements described herein are not met.
These instructions are important because they inform users of RF energy exposure and provide
simple procedures on how to control it.
Please refer to the following websites for more information on what RF energy exposure is and
how to control your exposure to assure compliance with established RF exposure limits:
http://www.who.int/en/
Unauthorized modification and adjustment
Changes or modifications not expressly approved by the party responsible for compliance may void the
user’s authority granted by the local government radio management departments to operate this radio
and should not be made. To comply with the corresponding requirements, transmitter adjustments should
be made only by or under the supervision of a person certified as technically qualified to perform
transmitter maintenance and repairs in the private land mobile and fixed services as certified by
an organization representative of the user of those services.
Replacement of any transmitter component (crystal, semiconductor, etc.) not authorized by the
local government
radio management departments equipment authorization for this radio could violate the rules.

18
FCC
Requirements:
This
device
complies
with
part
15
of
the
FCC
Rules.
Operation
is
subject
to
the
following
two
conditions:
(1)
This
device
may
not
cause
harmful
interference,
and
(2)
this
device
must
accept
any
interference
received,
including
interference
that
may
cause
undesired
operation.
Note:
This
equipment
has
been
tested
and
found
to
comply
with
the
limits
for
a
Class
B
digital
device,
pursuant
to
part
15
of
the
FCC
Rules.
These
limits
are
designed
to
provide
reasonable
protection
against
harmful
interference
in
a
residential
installation.
This
equipment
generates,
uses
and
can
radiate
radio
frequency
energy
and,
if
not
installed
and
used
in
accordance
with
the
instructions,
may
cause
harmful
interference
to
radio
communications.
However,
there
is
no
guarantee
that
interference
will
not
occur
in
a
particular
installation.
If
this
equipment
does
cause
harmful
interference
to
radio
or
television
reception,
which
can
be
determined
by
turning
the
equipment
off
and
on,
the
user
is
encouraged
to
try
to
correct
the
interference
by
one
or
more
of
the
following
measures:
—Reorient
or
relocate
the
receiving
antenna.
—Increase
the
separation
between
the
equipment
and
receiver.
—Connect
the
equipment
into
an
outlet
on
a
circuit
different
from
that
to
which
the
receiver
is
connected.
—Consult
the
dealer
or
an
experienced
radio/TV
technician
for
help.
IC
Requirements:
Licence-exempt
radio
apparatus
This
device
contains
licence-exempt
transmitter(s)/receiver(s)
that
comply
with
Innovation,
Science
and
Economic
Development
Canada’s
licence-exempt
RSS(s).
Operation
is
subject
to
the
following
two
conditions:
(1) This
device
may
not
cause
interference.
(2
)
This
device
must
accept
any
interference,
including
interference
that
may
cause
undesired
operation
of
the
device.
Le
présent
appareil
est
conforme
aux
CNR
d’Industrie
Canada
applicables
aux
appareils
radio
exempts
de
licence.
L’exploitation
est
autorisée
aux
deux
conditions
suivantes
:
(1) l’appareil
ne
doit
pas
produire
de
brouillage;
(2
)
l’utilisateur
de
l’appareil
doit
accepter
tout
brouillage
radioélectrique
subi,
même
si
le
brouillage
est
susceptible
d’en
compromettre
le
fonctionnement.
RF
Exposure
Compliance
and
Control
Guidelines
and
Operating
Instructions
DO
NOT
transmit
for
more
than
75%
of
total
radio
use
time,
more
than
75%
of
the
time
can
cause
RF
exposure
compliance
requirements
to
be
exceeded.
During
transmissions,
your
radio
generates
RF
energy
that
can
possibly
cause
interference
with
other
devices
or
systems.
To
avoid
such
interference,
turn
off
the
radio
in
areas
where
signs
are
posted
to
do
so.
Portable
Device,
this
transmitter
may
operate
with
the
antenna(s)
documented
in
this
filing
in
Push-to-Talk
and
body-worn
configurations.
RF
exposure
compliance
is
limited
to
the
specific
belt-clip
and
accessory
configurations
as
documented
in
this
filing
and
the
separation
distance
between
head
and
its
antenna
shall
be
at
least
2.5
cm.
19
When worn on the body, always place the radio in approved clip, holder, holster, case, or body harness
for this product. Use of non-approved accessories may result in exposure levels, which exceed the
RF exposure limits.
Hand-held Mode (if applicable)
Hold the radio in a vertical position with the microphone (and other parts of the radio
including the antenna) at least 2.5 cm (one inch) away from the nose or lips. The antenna
should be kept away from the eyes. Keeping the radio at a proper distance is important
as RF exposure decreases with increasing distance from the antenna.
Avoid Choking Hazard
Small Parts. Not for children under 3 years.
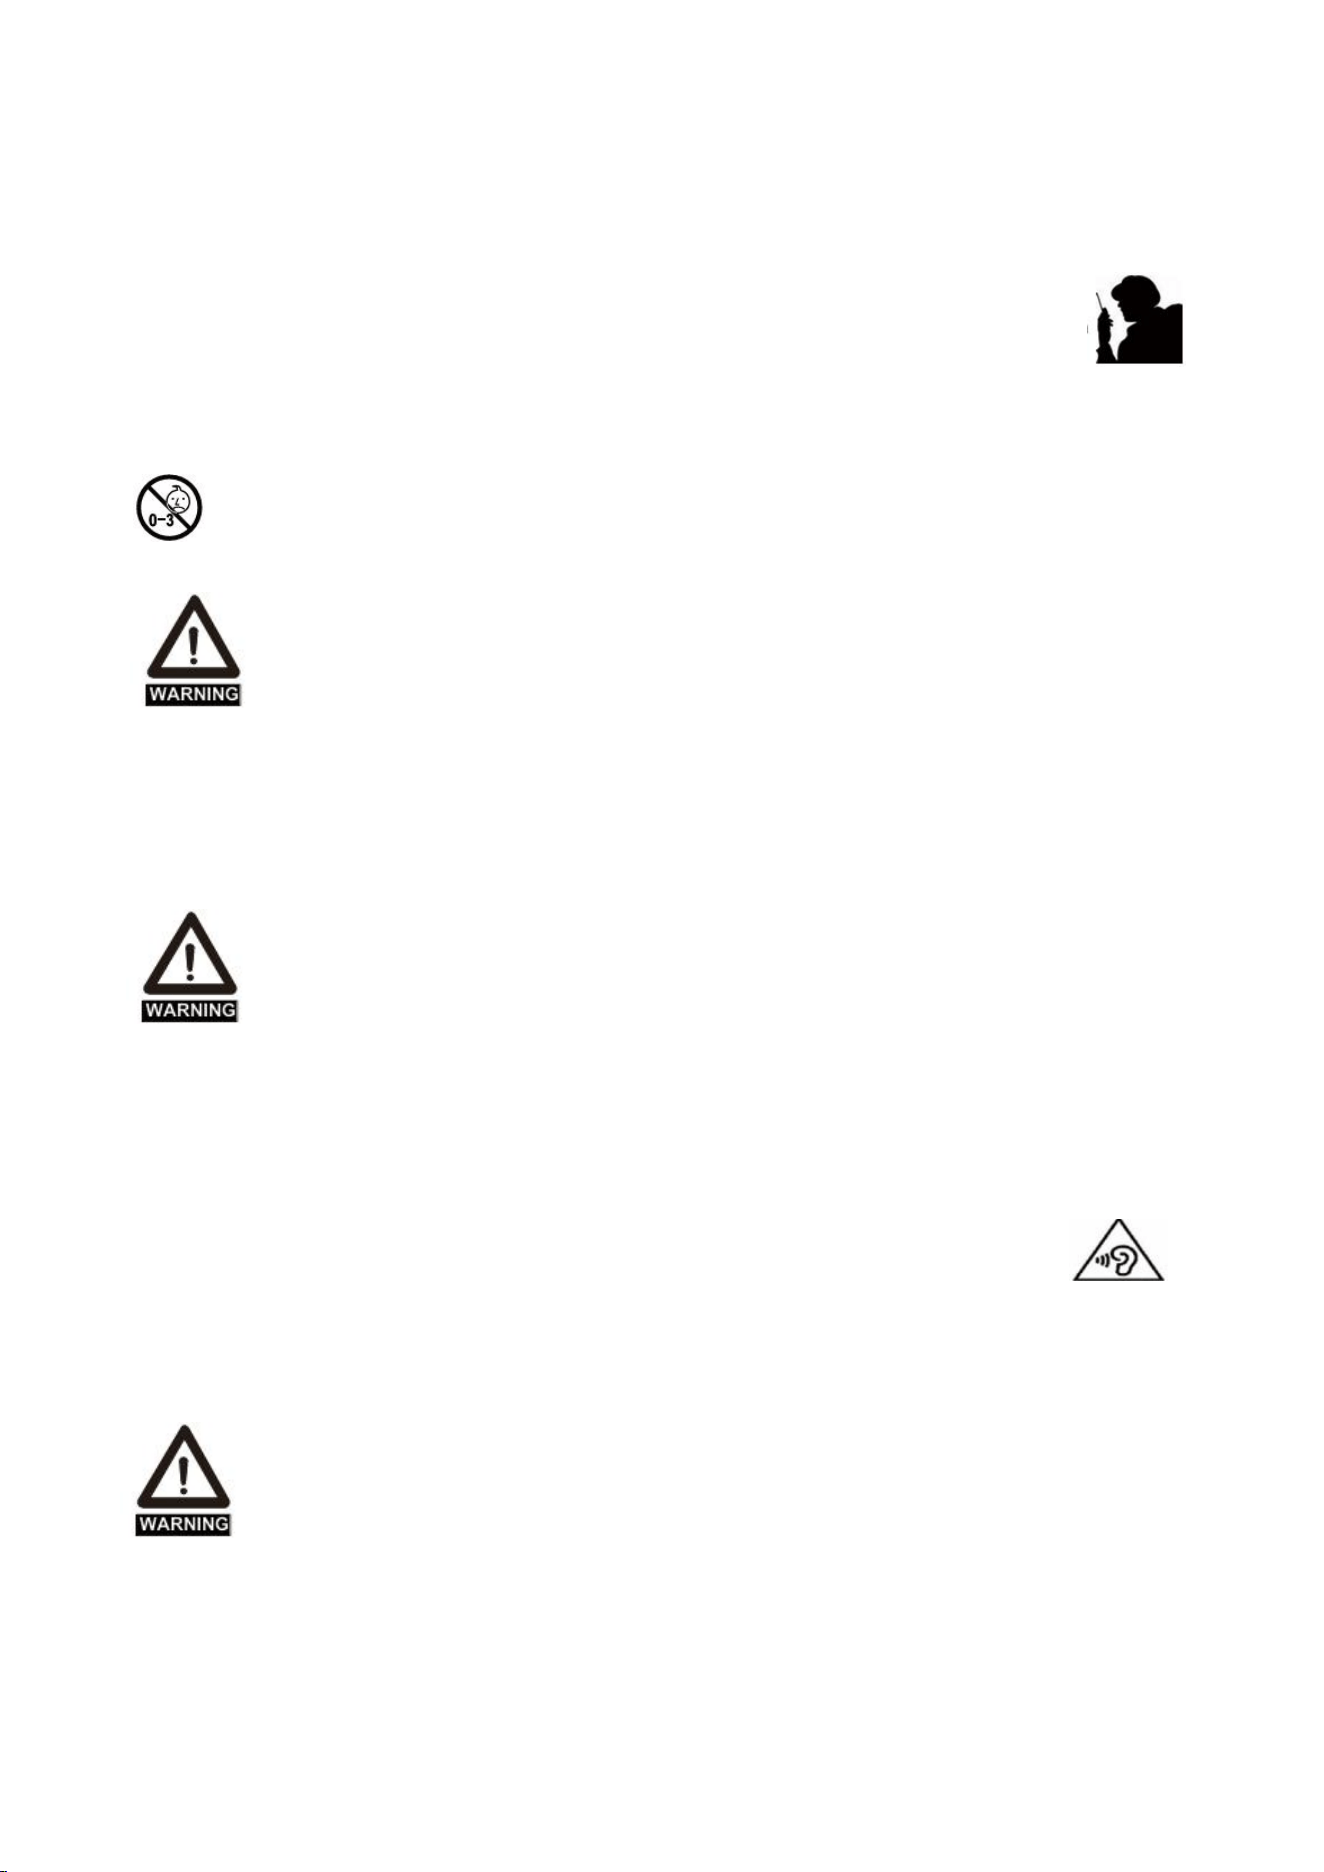
Turn off your radio power in the following conditions:
Turn off your radio before removing (installing) a battery or accessory or when charging
battery.
Turn off your radio when you are in a potentially hazardous environments: Near
electrical blasting caps, in a blasting area, in explosive atmospheres (inflammable
gas, dust particles, metallic powders, grain powders, etc.).
Turn off your radio in any facility where posted notices instruct you to do so, hospitals
or health care facilities (Pacemakers, Hearing Aids and Other Medical Devices) may be
using equipment that is sensitive to external RF energy.
Protect your hearing:
Use the lowest volume necessary to do your job.
Turn up the volume only if you are in noisy surroundings.
Turn down the volume before adding headset or earpiece.
Limit the amount of time you use headsets or earpieces at high volume.
When using the radio without a headset or earpiece, do not place the radio's speaker
directly against your ear.
Use careful with the earphone maybe possible excessive sound pressure from earphones
and headphones can cause hearing loss.
Note: Exposure to loud noises from any source for extended periods of time may temporarily
or permanently affect your hearing. The louder the radio's volume, the
less time is required before your hearing could be affected. Hearing
damage from loud noise is sometimes undetectable at first and can have
a cumulative effect.
Avoid Burns:
Do not use any portable radio that has a damaged antenna. If a damaged antenna comes
into contact with the skin when the radio is in use, a minor burn can result.
When the conductive material such as jewelry, keys or chains touch exposed terminals
of the batteries, may complete an electrical circuit (short circuit the battery) and
become hot to cause bodily injury such as burns. Exercise care in handling any battery,
particularly when placing it inside a pocket, purse or other container with metal
objects.
•• BATTERY WARNING: KEEP OUT OF REACH OF CHILDREN
Store spare batteries securely.
Dispose of used batteries immediately and safely
20
When the transceiver is used for long transmissions, the radiator and chassis will
become hot.
Safety Operation
Do not use charger outdoors or in moist environments, use only in dry
locations/conditions.
Do not disassemble the charger, that may result in risk of electrical shock or fire.
Do not operate the charger if it has been broken or damaged in any way.
Do not place a portable radio in the area over an air bag or in the air bag deployment
area. The radio may be propelled with great force and cause serious injury to occupants
of the vehicle when the air bag inflates.
To reduce risk
Pull by the plug rather than the cord when disconnecting the charger.
Unplug the charger from the AC outlet before attempting any maintenance or cleaning.
Contact Retevis for assistance regarding repairs and service.
The adapter shall be installed near the equipment and shall be easily accessible
The crossed-out wheeled-bin symbol on your product, literature, or packaging reminds
you that all electrical and electronic products, batteries, or accumulators must be
taken to designated collection locations at the end of their working life. Do not dispose
of these products as unsorted municipal waste. Dispose of them according to the laws
and rules in your area.
Approved Accessories
This radio meets the RF exposure guidelines when used with the Retevis accessories
supplied or designated for the product. Use of other accessories may not ensure
compliance with the RF exposure guidelines and may violate regulations.
For a list of Retevis-approved accessories for your radio model, visit the following
website: http://www.Retevis.com

21
22
23