by
1123R1-SKU 791FP
Scan the QR code to
register your product
Scannez le code QR pour
enregistrer votre produit
Escanee el código QR para
registrar su producto
Read all instructions before
assembling and using product.
IMPORTANT - Keep instructions
for future use.
Lisez toutes les instructions avant avant
d'assembler et d'utiliser le produit.
IMPORTANT - Conservez les instructions
pour pour une utilisation ultérieure.
Lea todas las instrucciones antes
de montar y utilizar el producto.
IMPORTANTE - Guarde las
instrucciones para uso futuro.
©2023 Mattel.
By
OWNER’S MANUAL
MANUEL DU PROPRIÉTAIRE MANUAL DEL USUARIO
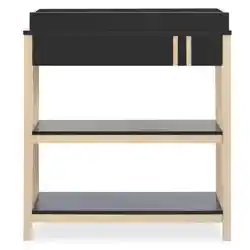
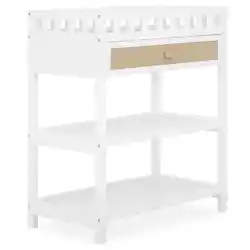
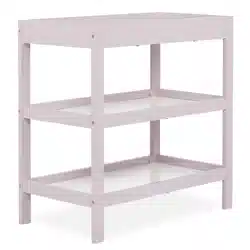
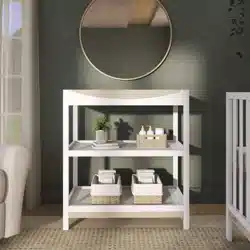
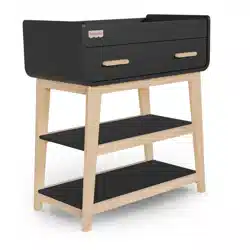
Iris/Siesta
Changer

From mealtime to downtime, step to crawl, the Fisher-Price by Dream On Me collection
enables the modern parent to create experiences with multipurpose pieces.
Offering an entire range of nursery must-haves for infants to toddlers, each piece is playful, fun and aims to
ensure that every child’s imagination is always at play… wherever, whenever.
Say HELLO to the
Collection!
by
From mealtime to downtime, step to crawl, the Fisher-Price by Dream On Me collec
tion
enables the modern parent to create experiences with multipurpose pieces.
Offering an entire range of nursery must-haves for infants to toddlers, each piece is playful, fun and aims to
ensure that every child’s imagination is always at play… wherever, whenever.
2
By

De l'heure du repas à celle du repos, de la marche à la marche à quatre pattes, la collection
Fisher-Price by Dream On Me permet aux parents modernes de créer des expériences avec des
pièces polyvalentes.
La collection !
par
By
Dites bonjour à la
Où
L'imagination
Jeux
3
Proposant une gamme complète d'articles de puériculture pour les nourrissons et les jeunes enfants,
chaque pièce est ludique et amusante et vise à garantir que l'imagination de chaque enfant est toujours à
l'œuvre. l'imagination de chaque enfant... où qu'il soit, quand il le souhaite.

De la hora de comer al tiempo de descanso, del paso al gateo, la colección Fisher-Price by
Dream On Me permite a los padres modernos crear experiencias con piezas multiusos.
Con una gama completa de artículos indispensables para la guardería, desde bebés hasta niños pequeños,
cada pieza es lúdica, divertida y tiene como objetivo garantizar que la imaginación de cada niño esté siem-
pre en juego... donde sea y cuando sea.
¡Colección!
por
4
By
Saluda al
Dónde
Imaginación
Reproduce
SAFE SLEEP TIPS
5
By
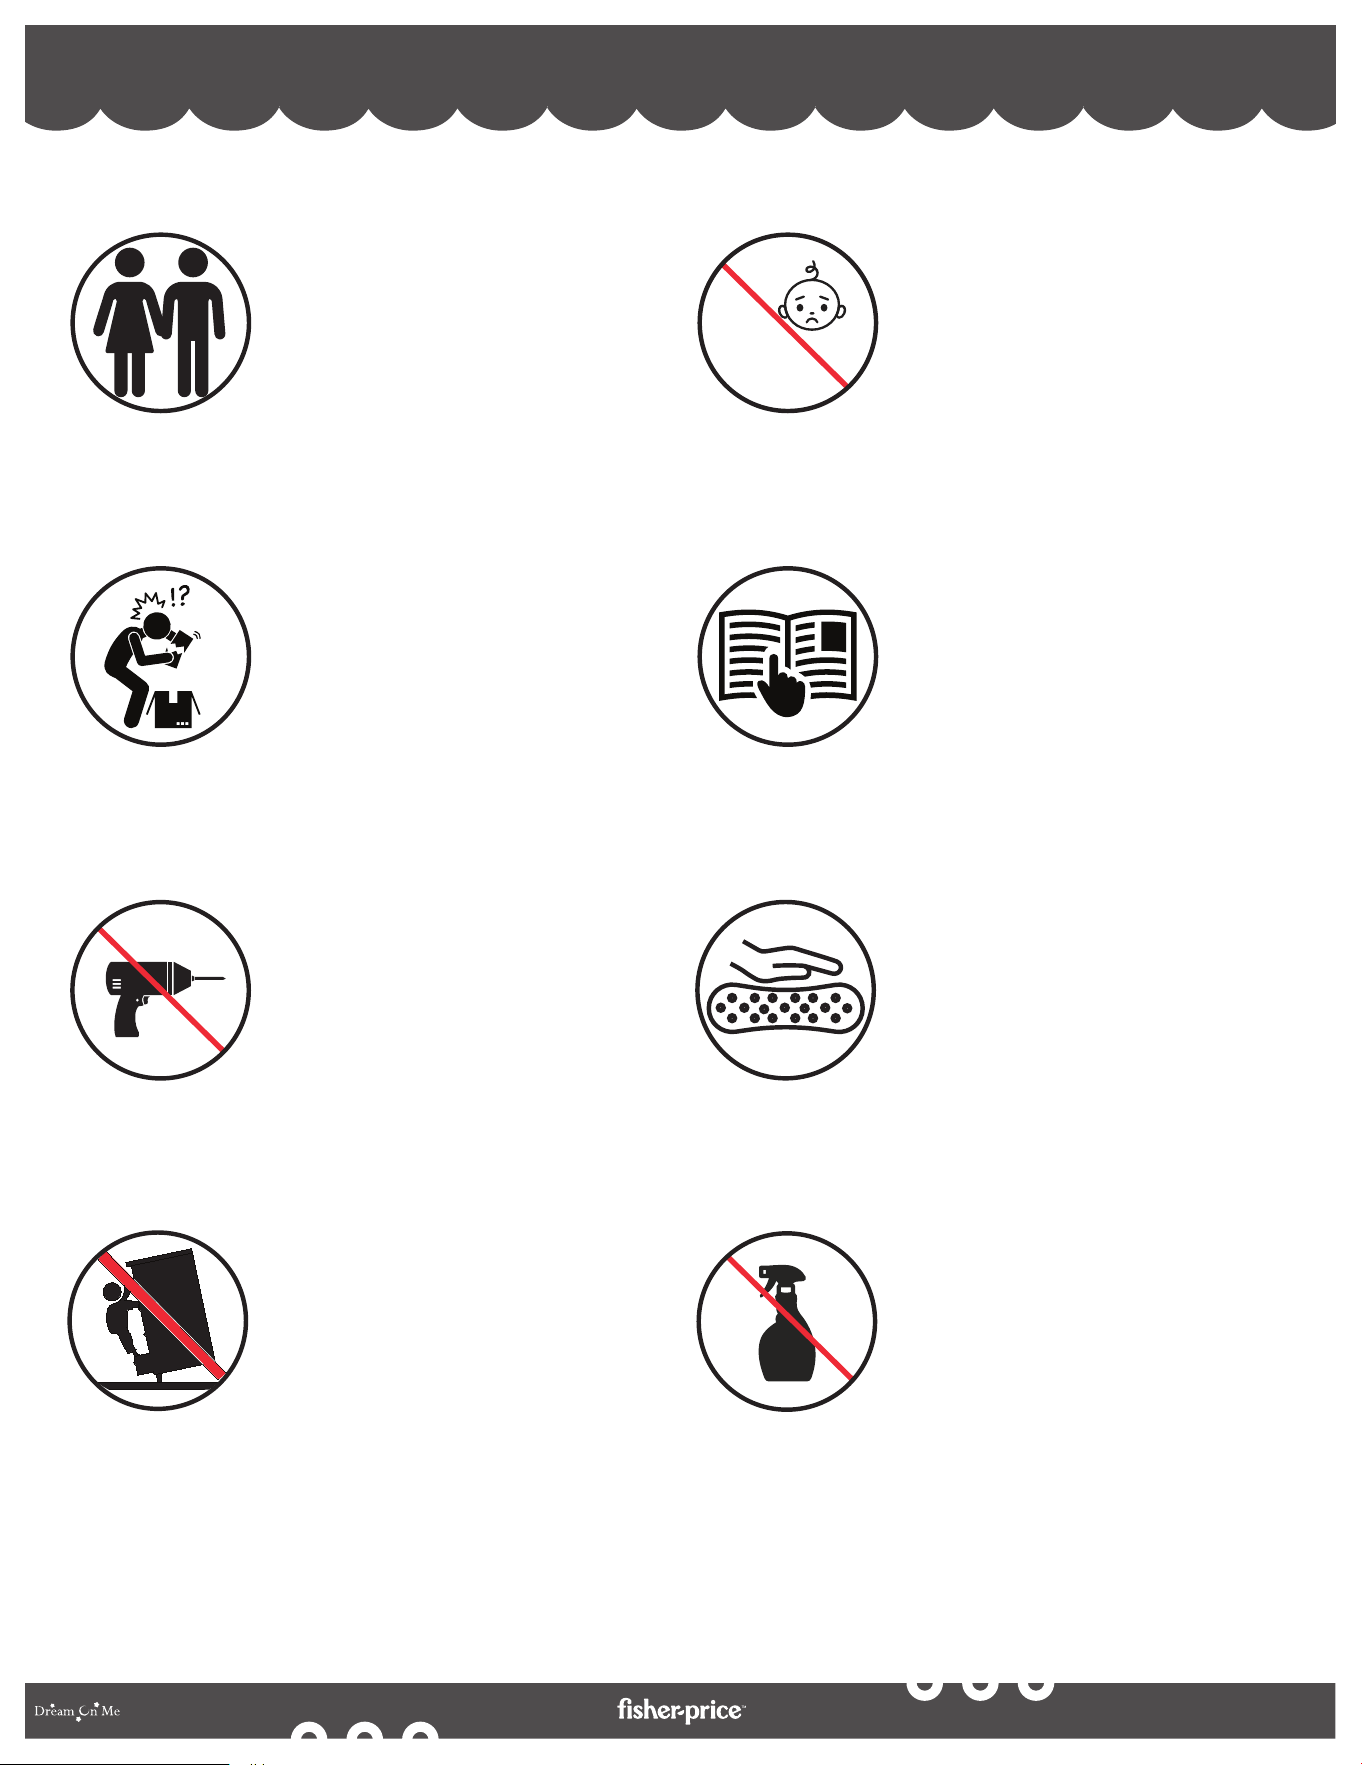
Adult Assembly Required.
DO NOT use the product if
it is damaged, broken,
and/or components are
missing or broken.
To protect your parts during
assembly, please place
them on a soft surface.
Small parts may present
choking hazard prior to
assembly.
Please read the instructions
thoroughly. Identify all parts
& hardware.
Do Not Use Power
Drills or Drivers.
To clean surface, use only
water on a damp cloth. Do
not use window cleaner or
cleaning abrasive as it will
scratch the surface and
could damage the
protective coating.
0-6
Always monitor your
child’s activity in the
nursery or near
furniture.

CONSEILS POUR UN SOMMEIL SÛR
6
By
Un assemblage par un
adulte est requis.
NE PAS utiliser le produit
s'il est endommagé, cassé,
et/ou si des composants
sont manquants ou cassés.
Pour protéger vos pièces
pendant l'assemblage,
veuillez les placer sur une
surface souple.
Les petites pièces
peuvent présenter un
risque d'étouffement
avant l'assemblage.
Veuillez lire attentivement
les instructions. Identifiez
toutes les pièces et le
matériel.
N'utilisez pas de
perceuse ou de
visseuse électrique.
Pour nettoyer la surface,
utilisez uniquement de l'eau
sur un chiffon humide.
N'utilisez pas de nettoyant
pour vitres ou d'abrasif de
nettoyage, car cela rayerait
la surface et pourrait
endommager le revêtement
protecteur.
0-6
Surveillez toujours
l'activité de votre enfant
dans la chambre
d'enfant ou à proximité
des meubles.

7
CONSEJOS PARA DORMIR CON SEGURIDAD
By
Se requiere el montaje
por parte de un adulto.
NO utilice el producto si
está dañado, roto y/o faltan
componentes o están rotos.
Para proteger las piezas
durante el montaje,
colóquelas sobre una
superficie blanda.
Las piezas pequeñas
pueden presentar peligro
de asfixia antes del
montaje.
Lea detenidamente las
instrucciones. Identifique
todas las piezas y herrajes.
No utilice taladros o
atornilladores
eléctricos.
Para limpiar la superficie,
utilice sólo agua en un paño
húmedo. No utilice
limpiacristales o productos
de limpieza abrasivos, ya
que rayarán la superficie y
podrían dañar el
revestimiento protector.
0-6
Vigile siempre la
actividad de su hijo en
la guardería o cerca de
los muebles.

8
By
WARNINGS
• FAILURE TO FOLLOW THESE WARNINGS AND ASSEMBLY INSTRUCTIONS COULD RESULT
IN SERIOUS INJURY OR DEATH.
• READ ALL INSTRUCTIONS BEFORE ASSEMBLING CHANGING TABLE. KEEP INSTRUCTIONS
FOR FUTURE USE. DO NOT USE THIS CHANGING TABLE IF THE INSTRUCTIONS CANNOT
BE STRICTLY FOLLOWED.
• BEFORE EACH USE OR ASSEMBLY, INSPECT THE UNIT FOR DAMAGED HARDWARE,
LOOSE JOINT, MISSING PARTS, OR SHARP EDGES. DO NOT USE THE UNIT IF ANY PARTS
ARE MISSING OR DAMAGED. ASK YOUR DEALER OR CALL DREAM ON ME - 45 VERONICA
AVENUE SOMERSET NEW JERSEY 08873, 5375 BOULEVARD DES GRANDES PRAIRIES ST
LEONARD, QUÉBEC H1R 1B1 FOR REPLACEMENT PARTS AND INSTRUCTIONAL
LITERATURE IF NEEDED. DO NOT SUBSTITUTE PARTS.
• DURING THE ASSEMBLY PROCESS WHENEVER USING SCREWS OR BOLTS, CHECK EACH
BY PLACING THE SCREW/BOLT ON THE DIAGRAM OF THE ITEM THAT IS DRAWN TO THE
ACTUAL SIZE AND DESIGN.
• BE SURE TO USE THE PROPER SIZE AND SHAPE SPECIFIED IN THE INSTRUCTIONS.
• IT IS STRONGLY RECOMMENDED THAT ASSEMBLY BE DONE ON A SOFT, NON-ABRASIVE
SURFACE
• TO AVOID DAMAGING THE FINISH.
• KEEP CHILDREN AND OTHERS SAFE BY FOLLOWING THESE SIMPLE RULES:
- DO NOT ALLOW ANY CHILD TO PLAY ON FURNITURE.
- DO NOT ALLOW CLIMBING ON ANY PIECE OF FURNITURE.
- DO NOT ALLOW HANGING FROM ANY PIECE OF FURNITURE.
- ALWAYS MONITOR YOUR CHILD'S ACTIVITY WHEN IN THE NURSERY.
• CHOKING HAZARD: KEEP UNASSEMBLED PARTS OUT OF THE REACH OF SMALL
CHILDREN.
• USE ONLY THE PARTS, HARDWARE, AND CHANGING PAD PROVIDED BY DREAM ON ME.
FALL HAZARD:
• CHILDREN HAVE SUFFERED SERIOUS INJURIES AFTER FALLING FROM CHANGING TABLES.
FALLS CAN HAPPEN QUICKLY.
• STAY WITHIN ARM'S REACH OF YOUR CHILD.
• TO PREVENT DEATH OR SERIOUS INJURY, ALWAYS KEEP THE CHILD WITHIN ARM'S
REACH.
• NEVER LEAVE THE CHILD UNATTENDED.
• USE ONLY THE PAD PROVIDED BY THE MANUFACTURER.
• DO NOT USE CHANGING TABLE, ADD-ON CHANGING UNIT, OR CONTOURED CHANGING
PAD IF IT IS DAMAGED OR BROKEN.
• MAXIMUM WEIGHT OF CHILD: 30 POUNDS (13.6 KG).
• ALWAYS USE THE SAFETY BELT PROVIDED, AND AS AN EXTRA PRECAUTION KEEP AT
LEAST ONE HAND ON YOUR BABY AT ALL TIMES. DO NOT ALLOW ANY CHILDREN TO
CLIMB OR PLAY ON THE TABLE. PERIODICALLY CHECK TO MAKE SURE ALL THE BOLTS
AND SCREWS REMAIN TIGHT.

SUFFOCATION HAZARD:
• BABIES HAVE SUFFOCATED WHILE SLEEPING IN CHANGING TABLES: CHANGING TABLE IS
NOT DESIGNED FOR SAFE SLEEP.
• NEVER ALLOW THE BABY TO SLEEP ON THE CHANGING TABLE.
STRANGULATION HAZARD:
• STRINGS CAUSE STRANGULATION! DO NOT PLACE ITEMS WITH A STRING AROUND A
CHILD'S NECK, SUCH AS HOOD STRINGS OR PACIFIER CORDS. DO NOT SUSPEND
STRINGS OVER A CHANGING TABLE OR ATTACH STRINGS TO TOYS.
• TO HELP PREVENT STRANGULATION TIGHTEN ALL FASTENERS. A CHILD CAN TRAP
PARTS OF THE BODY OR CLOTHING ON LOOSE FASTENERS.
• DO NOT PLACE CHANGING TABLE NEAR THE WINDOW WHERE CORDS FROM BLINDS OR
DRAPES MAY STRANGLE A CHILD.
• INFANTS CAN SUFFOCATE ON SOFT BEDDING.
• NEVER ADD A PILLOW, COMFORTER, OR PADDING.
• NEVER PLACE ADDITIONAL PADDING UNDER THE INFANT.
• NEVER USE PLASTIC SHIPPING BAGS OR ANY PLASTIC FILM AS MATTRESS COVERS,
BECAUSE THEY CAN CAUSE SUFFOCATION.
9
By
WARNINGS (cont.)

• LE NON-RESPECT DE CES AVERTISSEMENTS ET DES INSTRUCTIONS D'ASSEMBLAGE PEUT
ENTRAÎNER DES BLESSURES GRAVES, VOIRE MORTELLES.
• LIRE TOUTES LES INSTRUCTIONS AVANT D'ASSEMBLER LA TABLE A LANGER. CONSERVER LES
INSTRUCTIONS POUR UNE UTILISATION ULTÉRIEURE. NE PAS UTILISER CETTE TABLE À LANGER SI
LES INSTRUCTIONS NE PEUVENT PAS ÊTRE SUIVIES À LA • LETTRE.
• AVANT CHAQUE UTILISATION OU ASSEMBLAGE, VÉRIFIEZ QUE L'APPAREIL N'EST PAS ENDOMMAGÉ,
QU'IL N'Y A PAS DE JOINTS L CHES, DE PIÈCES MANQUANTES OU D'ARÊTES VIVES. N'UTILISEZ PAS
L'APPAREIL SI DES PIÈCES SONT MANQUANTES OU ENDOMMAGÉES. DEMANDEZ À VOTRE
REVENDEUR OU APPELEZ DREAM ON ME - 45 VERONICA AVENUE SOMERSET NEW JERSEY 08873,
5375 BOULEVARD DES GRANDES PRAIRIES ST LEONARD, QUÉBEC H1R 1B1 POUR OBTENIR DES
PIÈCES DE RECHANGE ET DE LA DOCUMENTATION SI NÉCESSAIRE. NE PAS REMPLACER LES
PIÈCES.
• PENDANT LE PROCESSUS D'ASSEMBLAGE, LORSQUE VOUS UTILISEZ DES VIS OU DES BOULONS,
VÉRIFIEZ-LES EN LES PLAÇANT SUR LE DIAGRAMME DE L'ARTICLE QUI EST DESSINÉ SELON LA
TAILLE ET LA CONCEPTION RÉELLES.
• ASSUREZ-VOUS D'UTILISER LA TAILLE ET LA FORME APPROPRIÉES SPÉCIFIÉES DANS LES
INSTRUCTIONS.
• IL EST FORTEMENT RECOMMANDÉ D'EFFECTUER L'ASSEMBLAGE SUR UNE SURFACE DOUCE ET
NON ABRASIVE AFIN D'ÉVITER D'ENDOMMAGER LA FINITION.
• POUR ÉVITER D'ENDOMMAGER LA FINITION.
• ASSUREZ LA SÉCURITÉ DES ENFANTS ET DES AUTRES PERSONNES EN SUIVANT CES RÈGLES
SIMPLES :
- NE PAS LAISSER LES ENFANTS JOUER SUR LES MEUBLES.
- NE PAS PERMETTRE AUX ENFANTS DE JOUER SUR LES MEUBLES. NE PAS PERMETTRE
AUX ENFANTS DE GRIMPER SUR LES MEUBLES.
- NE PAS PERMETTRE AUX ENFANTS DE SE SUSPENDRE À UN MEUBLE.
- SURVEILLEZ TOUJOURS L'ACTIVITÉ DE VOTRE ENFANT LORSQU'IL SE TROUVE DANS LA
CRÈCHE.
• RISQUE D'ETOUFFEMENT : GARDEZ LES PIECES NON ASSEMBLEES HORS DE LA PORTEE DES
JEUNES ENFANTS.
• N'UTILISEZ QUE LES PIÈCES, LE MATÉRIEL ET LE MATELAS À LANGER FOURNIS PAR DREAM ON ME.
RISQUE DE CHUTE :
• DES ENFANTS SE SONT GRAVEMENT BLESSÉS EN TOMBANT D'UNE TABLE À LANGER. LES CHUTES
PEUVENT SURVENIR RAPIDEMENT.
• RESTEZ À PORTÉE DE MAIN DE VOTRE ENFANT.
• POUR ÉVITER LA MORT OU DES BLESSURES GRAVES, GARDEZ TOUJOURS L'ENFANT À PORTÉE DE
MAIN.
• NE JAMAIS LAISSER L'ENFANT SANS SURVEILLANCE.
• N'UTILISER QUE LE COUSSIN FOURNI PAR LE FABRICANT.
• N'UTILISEZ PAS LA TABLE À LANGER, LE MEUBLE À LANGER COMPLÉMENTAIRE OU LE MATELAS À
LANGER PROFILÉ S'ILS SONT ENDOMMAGÉS OU CASSÉS.
• POIDS MAXIMUM DE L'ENFANT : 30 LIVRES (13,6 KG).
• UTILISEZ TOUJOURS LA CEINTURE DE SÉCURITÉ FOURNIE ET, PAR MESURE DE PRÉCAUTION
SUPPLÉMENTAIRE, GARDEZ AU MOINS UNE MAIN SUR VOTRE BÉBÉ À TOUT MOMENT. NE LAISSEZ
PAS LES ENFANTS GRIMPER OU JOUER SUR LA TABLE. VÉRIFIEZ RÉGULIÈREMENT QUE TOUS LES
BOULONS ET VIS SONT BIEN SERRÉS.
10
By
AVERTISSEMENTS

RISQUE DE SUFFOCATION :
• DES BÉBÉS SE SONT ÉTOUFFÉS EN DORMANT SUR DES TABLES À LANGER : LA TABLE À LANGER
N'EST PAS CONÇUE POUR UN SOMMEIL SÛR.
• NE LAISSEZ JAMAIS VOTRE ENFANT DORMIR SUR UNE TABLE À LANGER.
RISQUE DE STRANGULATION :
• LES FICELLES PROVOQUENT LA STRANGULATION ! NE PLACEZ PAS D'OBJETS MUNIS D'UNE FICELLE
AUTOUR DU COU DE L'ENFANT, TELS QUE DES CORDONS DE CAPUCHE OU DE SUCETTE. NE
SUSPENDEZ PAS DE FICELLES AU-DESSUS DE LA TABLE À LANGER ET N'ATTACHEZ PAS DE
FICELLES AUX JOUETS.
• POUR ÉVITER LA STRANGULATION, SERREZ TOUTES LES ATTACHES. UN ENFANT PEUT COINCER
DES PARTIES DE SON CORPS OU DE SES VÊTEMENTS DANS DES ATTACHES MAL SERRÉES.
• NE PLACEZ PAS LA TABLE À LANGER PRÈS D'UNE FENÊTRE OÙ LES CORDONS DES STORES OU DES
RIDEAUX PEUVENT ÉTRANGLER L'ENFANT.
• LES NOURRISSONS PEUVENT SUFFOQUER SUR UNE LITERIE MOLLE.
• N'AJOUTEZ JAMAIS D'OREILLER, DE COUETTE OU DE REMBOURRAGE.
• NE PLACEZ JAMAIS DE REMBOURRAGE SUPPLÉMENTAIRE SOUS LE NOURRISSON.
• NE JAMAIS UTILISER DE SACS D'EXPÉDITION EN PLASTIQUE OU DE FILMS PLASTIQUES COMME
HOUSSES DE MATELAS, CAR ILS PEUVENT PROVOQUER UN ÉTOUFFEMENT.
11
By
AVERTISSEMENTS (suite)

• EL INCUMPLIMIENTO DE ESTAS ADVERTENCIAS E INSTRUCCIONES DE MONTAJE PUEDE PROVOCAR
LESIONES GRAVES O LA MUERTE.
• LEA TODAS LAS INSTRUCCIONES ANTES DE MONTAR EL CAMBIADOR. CONSERVE LAS
INSTRUCCIONES PARA USO FUTURO. NO UTILICE ESTE CAMBIADOR SI NO PUEDE SEGUIR
ESTRICTAMENTE LAS INSTRUCCIONES.
• ANTES DE CADA USO O MONTAJE, INSPECCIONE LA UNIDAD EN BUSCA DE HERRAJES DAÑADOS,
JUNTAS SUELTAS, PIEZAS FALTANTES O BORDES AFILADOS. NO UTILICE LA UNIDAD SI FALTA
ALGUNA PIEZA O ESTÁ DAÑADA. PREGUNTE A SU DISTRIBUIDOR O LLAME A DREAM ON ME - 45
VERONICA AVENUE SOMERSET NEW JERSEY 08873, 5375 BOULEVARD DES GRANDES PRAIRIES ST
LEONARD, QUÉBEC H1R 1B1 PARA OBTENER PIEZAS DE REPUESTO Y LITERATURA INSTRUCTIVA SI
ES NECESARIO. NO SUSTITUYA LAS PIEZAS.
• DURANTE EL PROCESO DE MONTAJE, SIEMPRE QUE UTILICE TORNILLOS O PERNOS, COMPRUEBE
CADA UNO DE ELLOS COLOCANDO EL TORNILLO/PERNO EN EL DIAGRAMA DEL ARTÍCULO QUE
ESTÁ DIBUJADO CON EL TAMAÑO Y DISEÑO REALES.
• ASEGÚRESE DE UTILIZAR EL TAMAÑO Y LA FORMA ADECUADOS ESPECIFICADOS EN LAS
INSTRUCCIONES.
• SE RECOMIENDA ENCARECIDAMENTE QUE EL MONTAJE SE REALICE SOBRE UNA SUPERFICIE SUAVE
Y NO ABRASIVA
• PARA EVITAR DAÑAR EL ACABADO.
• MANTENGA A SALVO A LOS NIÑOS Y A OTRAS PERSONAS SIGUIENDO ESTAS SENCILLAS REGLAS:
- NO PERMITA QUE NINGÚN NIÑO JUEGUE SOBRE LOS MUEBLES.
- NO PERMITA QUE SE SUBAN A NINGÚN MUEBLE.
- NO PERMITA QUE SE CUELGUEN DE NINGÚN MUEBLE.
- VIGILE SIEMPRE LA ACTIVIDAD DE SU HIJO CUANDO ESTÉ EN LA GUARDERÍA.
• PELIGRO DE ASFIXIA: MANTENGA LAS PIEZAS SIN MONTAR FUERA DEL ALCANCE DE LOS NIÑOS
PEQUEÑOS.
• UTILICE ÚNICAMENTE LAS PIEZAS, LOS HERRAJES Y EL CAMBIADOR SUMINISTRADOS POR DREAM
ON ME.
PELIGRO DE CAÍDA:
• LOS NIÑOS HAN SUFRIDO LESIONES GRAVES TRAS CAERSE DE LOS CAMBIADORES. LAS CAÍDAS
PUEDEN OCURRIR RÁPIDAMENTE.
• MANTÉNGASE AL ALCANCE DE LA MANO DE SU HIJO.
• PARA EVITAR LA MUERTE O LESIONES GRAVES, MANTENGA SIEMPRE AL NIÑO AL ALCANCE DE LA
MANO.
• NO DEJE NUNCA AL NIÑO SIN VIGILANCIA.
• UTILICE SÓLO EL COJÍN SUMINISTRADO POR EL FABRICANTE.
• NO UTILICE EL CAMBIADOR, EL CAMBIADOR COMPLEMENTARIO NI EL CAMBIADOR CONTORNEADO
SI ESTÁN DAÑADOS O ROTOS.
• PESO MÁXIMO DEL NIÑO: 13,6 KG (30 LIBRAS).
• UTILICE SIEMPRE EL CINTURÓN DE SEGURIDAD SUMINISTRADO Y, COMO PRECAUCIÓN ADICIONAL,
MANTENGA AL MENOS UNA MANO SOBRE EL BEBÉ EN TODO MOMENTO. NO PERMITA QUE NINGÚN
NIÑO SE SUBA O JUEGUE SOBRE LA MESA. COMPRUEBE PERIÓDICAMENTE QUE TODOS LOS
PERNOS Y TORNILLOS PERMANECEN APRETADOS.
12
By
ADVERTENCIAS

PELIGRO DE ASFIXIA:
• LOS BEBÉS SE HAN ASFIXIADO MIENTRAS DORMÍAN EN CAMBIADORES: EL CAMBIADOR NO ESTÁ
DISEÑADO PARA UN SUEÑO SEGURO.
• NUNCA PERMITA QUE EL BEBÉ DUERMA EN EL CAMBIADOR.
PELIGRO DE ESTRANGULACIÓN:
• ¡LAS CUERDAS PROVOCAN ESTRANGULAMIENTO! NO COLOQUE OBJETOS CON CORDONES
ALREDEDOR DEL CUELLO DEL NIÑO, COMO CORDONES DE CAPUCHAS O CHUPETES. NO CUELGUE
CUERDAS SOBRE UN CAMBIADOR NI FIJE CUERDAS A LOS JUGUETES.
• PARA EVITAR EL ESTRANGULAMIENTO, APRIETE TODOS LOS CIERRES. UN NIÑO PUEDE ATRAPAR
PARTES DEL CUERPO O DE LA ROPA EN CIERRES SUELTOS.
• NO COLOQUE EL CAMBIADOR CERCA DE LA VENTANA, DONDE LAS CUERDAS DE LAS PERSIANAS O
CORTINAS PUEDEN ESTRANGULAR AL NIÑO.
• LOS NIÑOS PUEDEN ASFIXIARSE CON ROPA DE CAMA BLANDA.
• NO AÑADA NUNCA UNA ALMOHADA, UN EDREDÓN O UN RELLENO.
• NO COLOQUE NUNCA RELLENO ADICIONAL DEBAJO DEL BEBÉ.
• NO UTILICES NUNCA BOLSAS DE PLÁSTICO DE TRANSPORTE O CUALQUIER FILM DE PLÁSTICO
COMO FUNDAS DE COLCHÓN, PORQUE PUEDEN PROVOCAR ASFIXIA.
13
By
ADVERTENCIAS (suite)
14
By
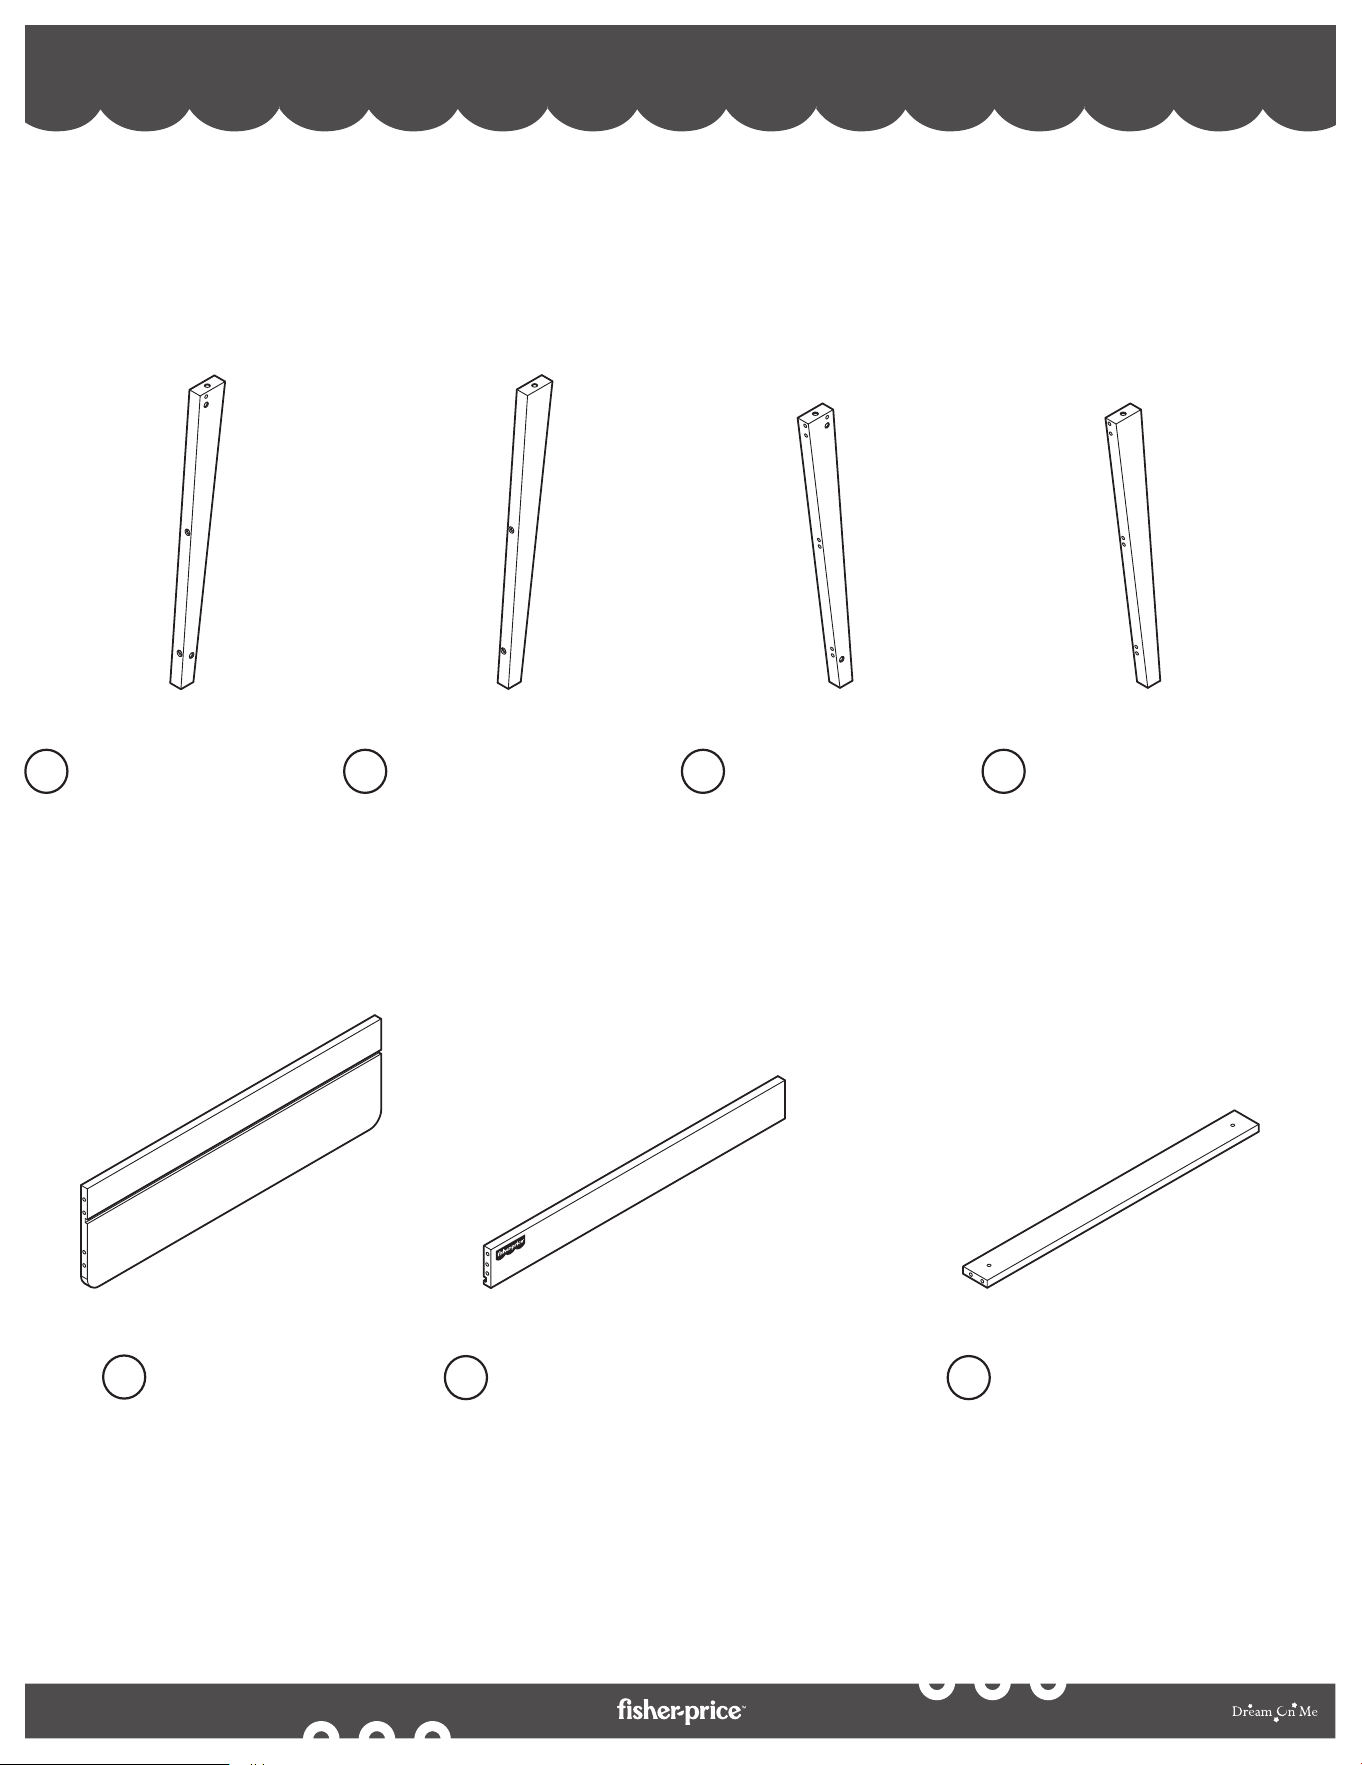
PARTS PIÈCES PARTES
If there are any missing parts, please contact Dream On Me before using the product.
S'il y a des pièces manquantes, veuillez contacter Dream On Me avant d'utiliser le produit.
Si falta alguna pieza, póngase en contacto con Dream On Me antes de utilizar el producto.
1
Left Front Post
Poteau avant gauche
Poste delantero izquierdo
2
Rear Rail
Rail arrière
Raíl trasero
5
Changing Top Front
Changer le devant supérieur
Cambiando el frente superior
6
Right Rear Post
Poteau arrière droit
Poste trasero derecho
3
Right Front Post
Poteau avant droit
Poste delantero derecho
4
Left Rear Post
Poteau arrière gauche
Poste trasero izquierdo
Drawer Front Rail
Rail avant du tiroir
Carril frontal del cajón
7
15
By
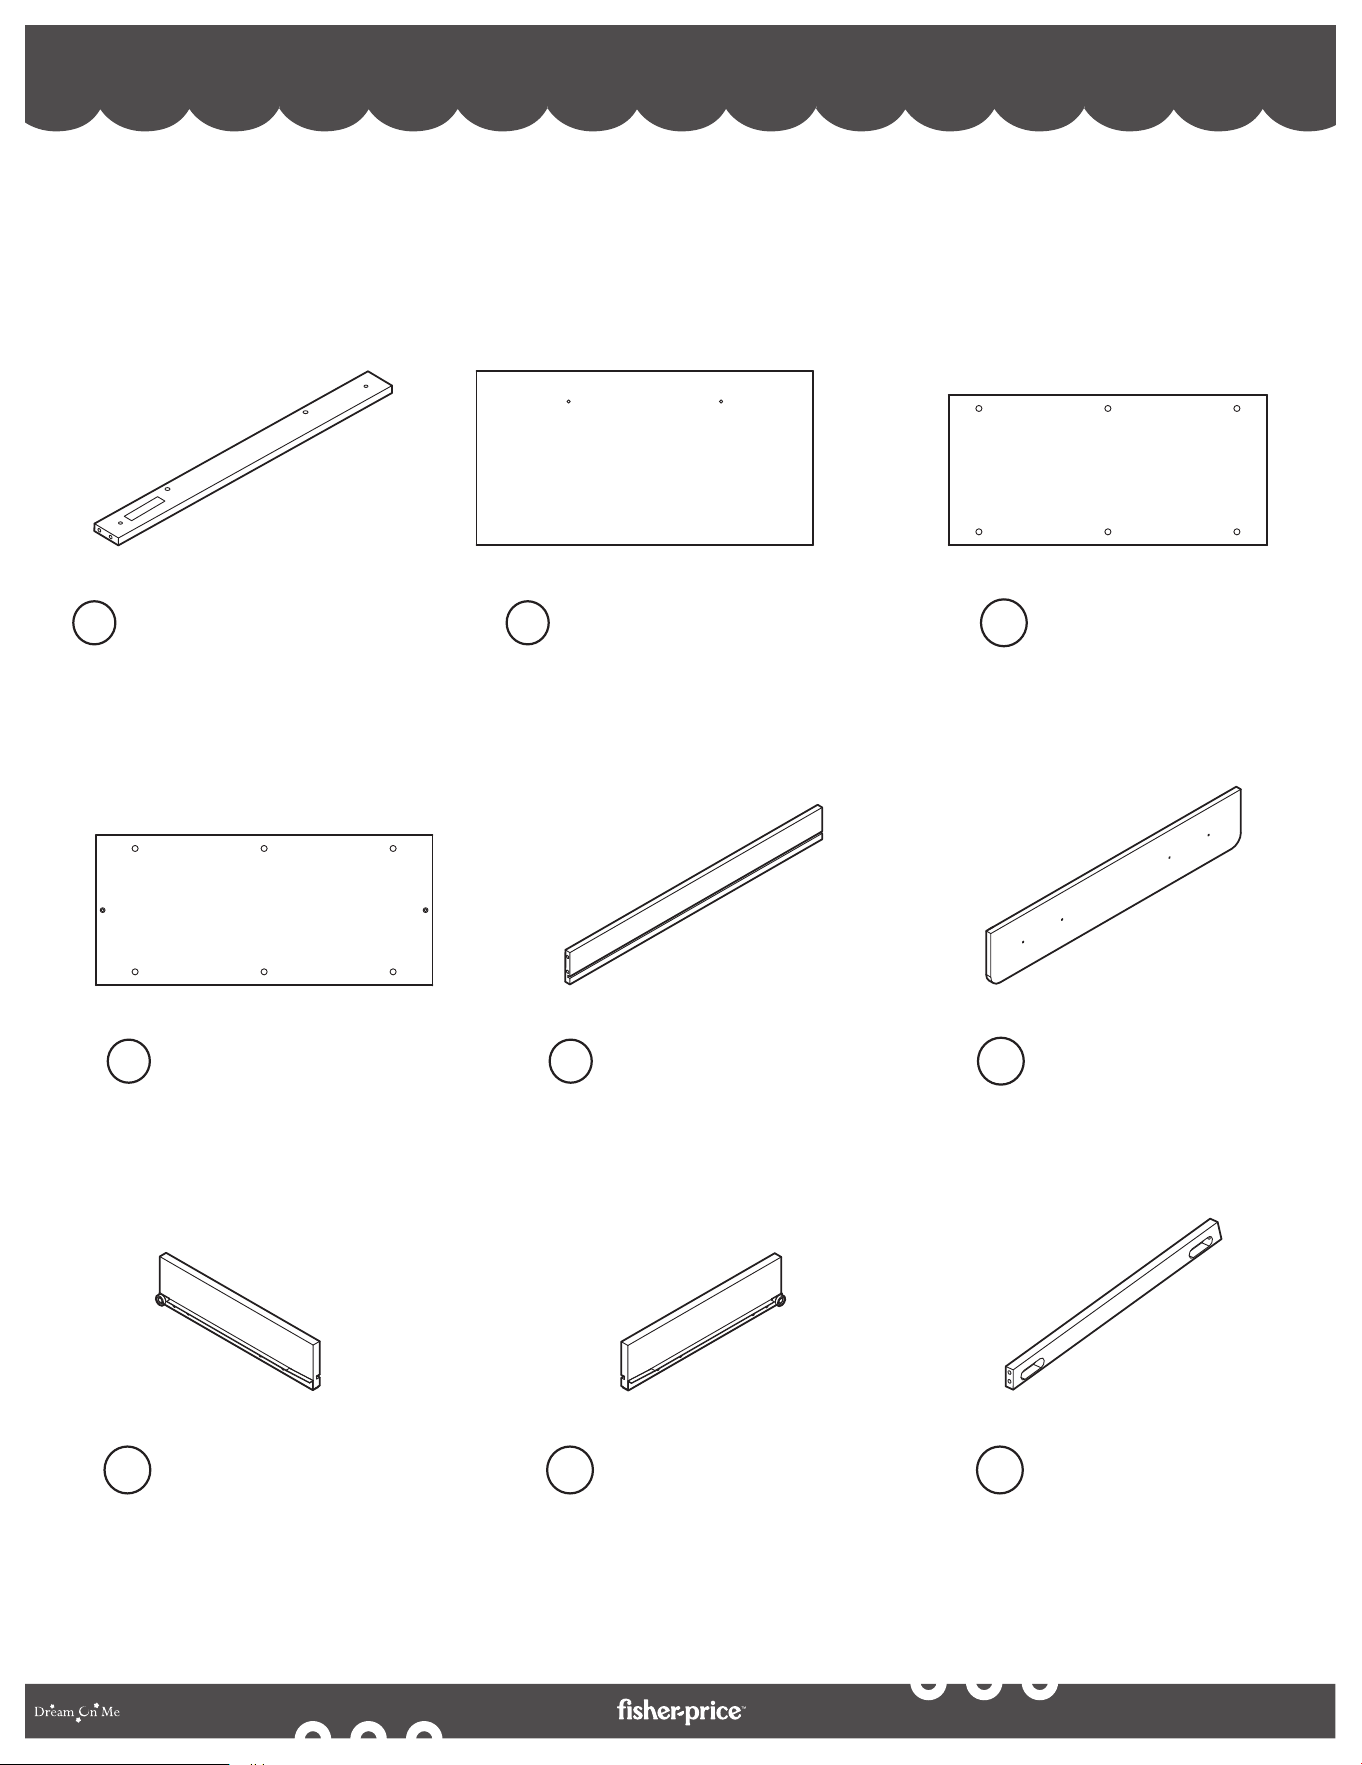
If there are any missing parts, please contact Dream On Me before using the product.
S'il y a des pièces manquantes, veuillez contacter Dream On Me avant d'utiliser le produit.
Si falta alguna pieza, póngase en contacto con Dream On Me antes de utilizar el producto.
PARTS PIÈCES PARTES
Drawer Rear Rail
Rail arrière du tiroir
Guía trasera del cajón
8
Top Panel
Panneau supérieur
Panel superior
9
Middle Shelf
Plateau central
Estante intermedio
10
Drawer Left panel
Tiroir Panneau gauche
Cajón Panel izquierdo
14
Drawer Right Panel
Panneau droit du tiroir
Panel derecho del cajón
15
Top Rail (x2)
Rail supérieur (x2)
Raíl superior (x2)
16
Drawer Back
Dos du tiroir
Parte trasera del cajón
12
Drawer Front
Façade du tiroir
Frente de cajón
13
Bottom Shelf
Étagère inférieure
Estante inferior
11
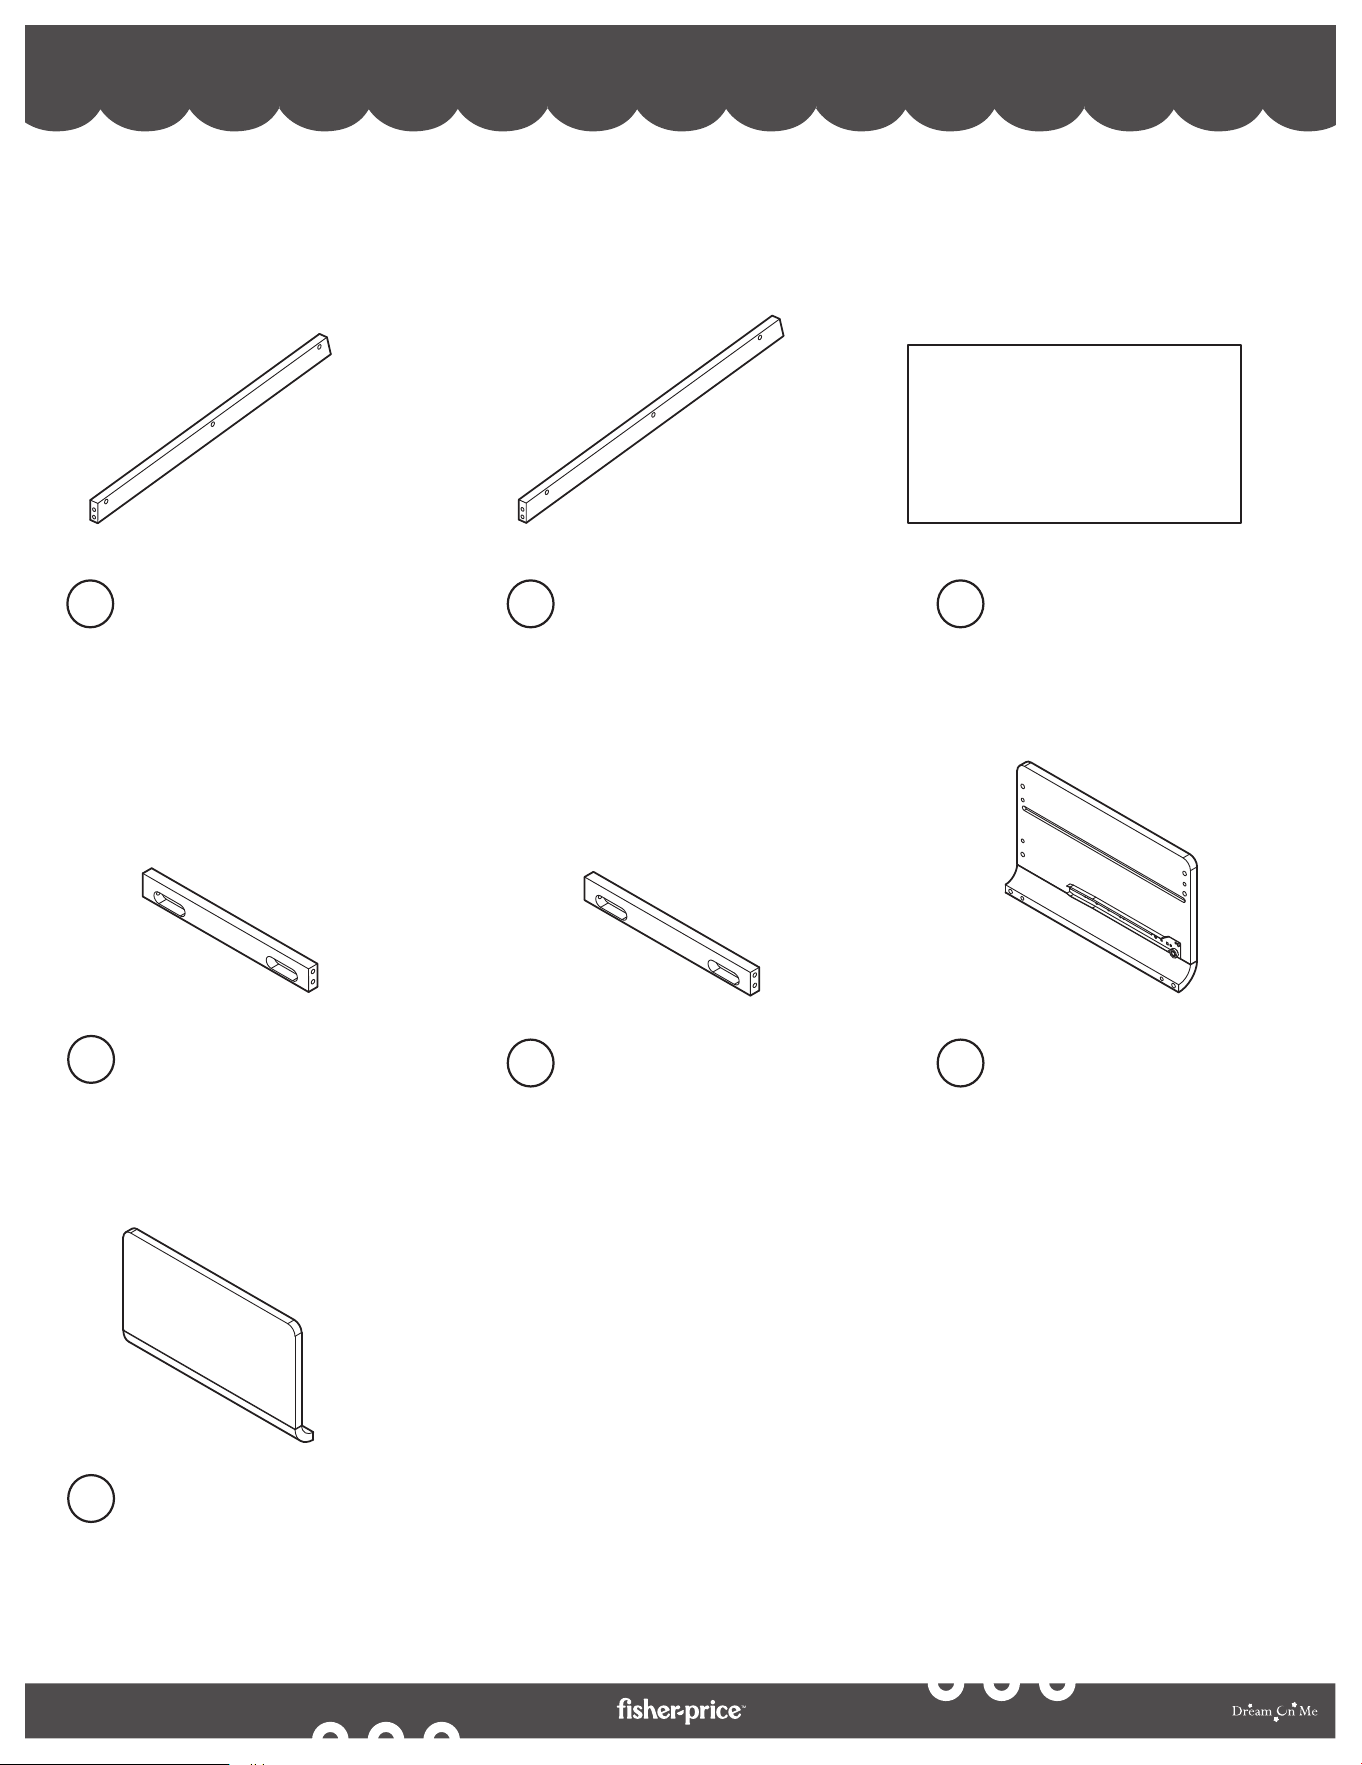
If there are any missing parts, please contact Dream On Me before using the product.
S'il y a des pièces manquantes, veuillez contacter Dream On Me avant d'utiliser le produit.
Si falta alguna pieza, póngase en contacto con Dream On Me antes de utilizar el producto.
PARTS PIÈCES PARTES
Middle Rail (x2)
Rail central (x2)
Raíl central (x2)
17
Bottom Rail (x2)
Rail inférieur (x2)
Raíl inferior (x2)
18
Drawer Bottom
Fond de tiroir
Fondo del cajón
19
16
By
Top side Rail (x2)
Rail supérieur (x2)
Carril lateral superior (x2)
20
Changer Left Side
Changeur côté gauche
Cambiador Lado Izquierdo
23
Bottom side Rail (x2)
Rail latéral inférieur (x2)
Carril lateral inferior (x2)
21
Changer Right Side
Changeur côté droit
Cambiador Lado Derecho
22
If there are any missing parts, please contact Dream On Me before using the product.
S'il y a des pièces manquantes, veuillez contacter Dream On Me avant d'utiliser le produit.
Si falta alguna pieza, póngase en contacto con Dream On Me antes de utilizar el producto.
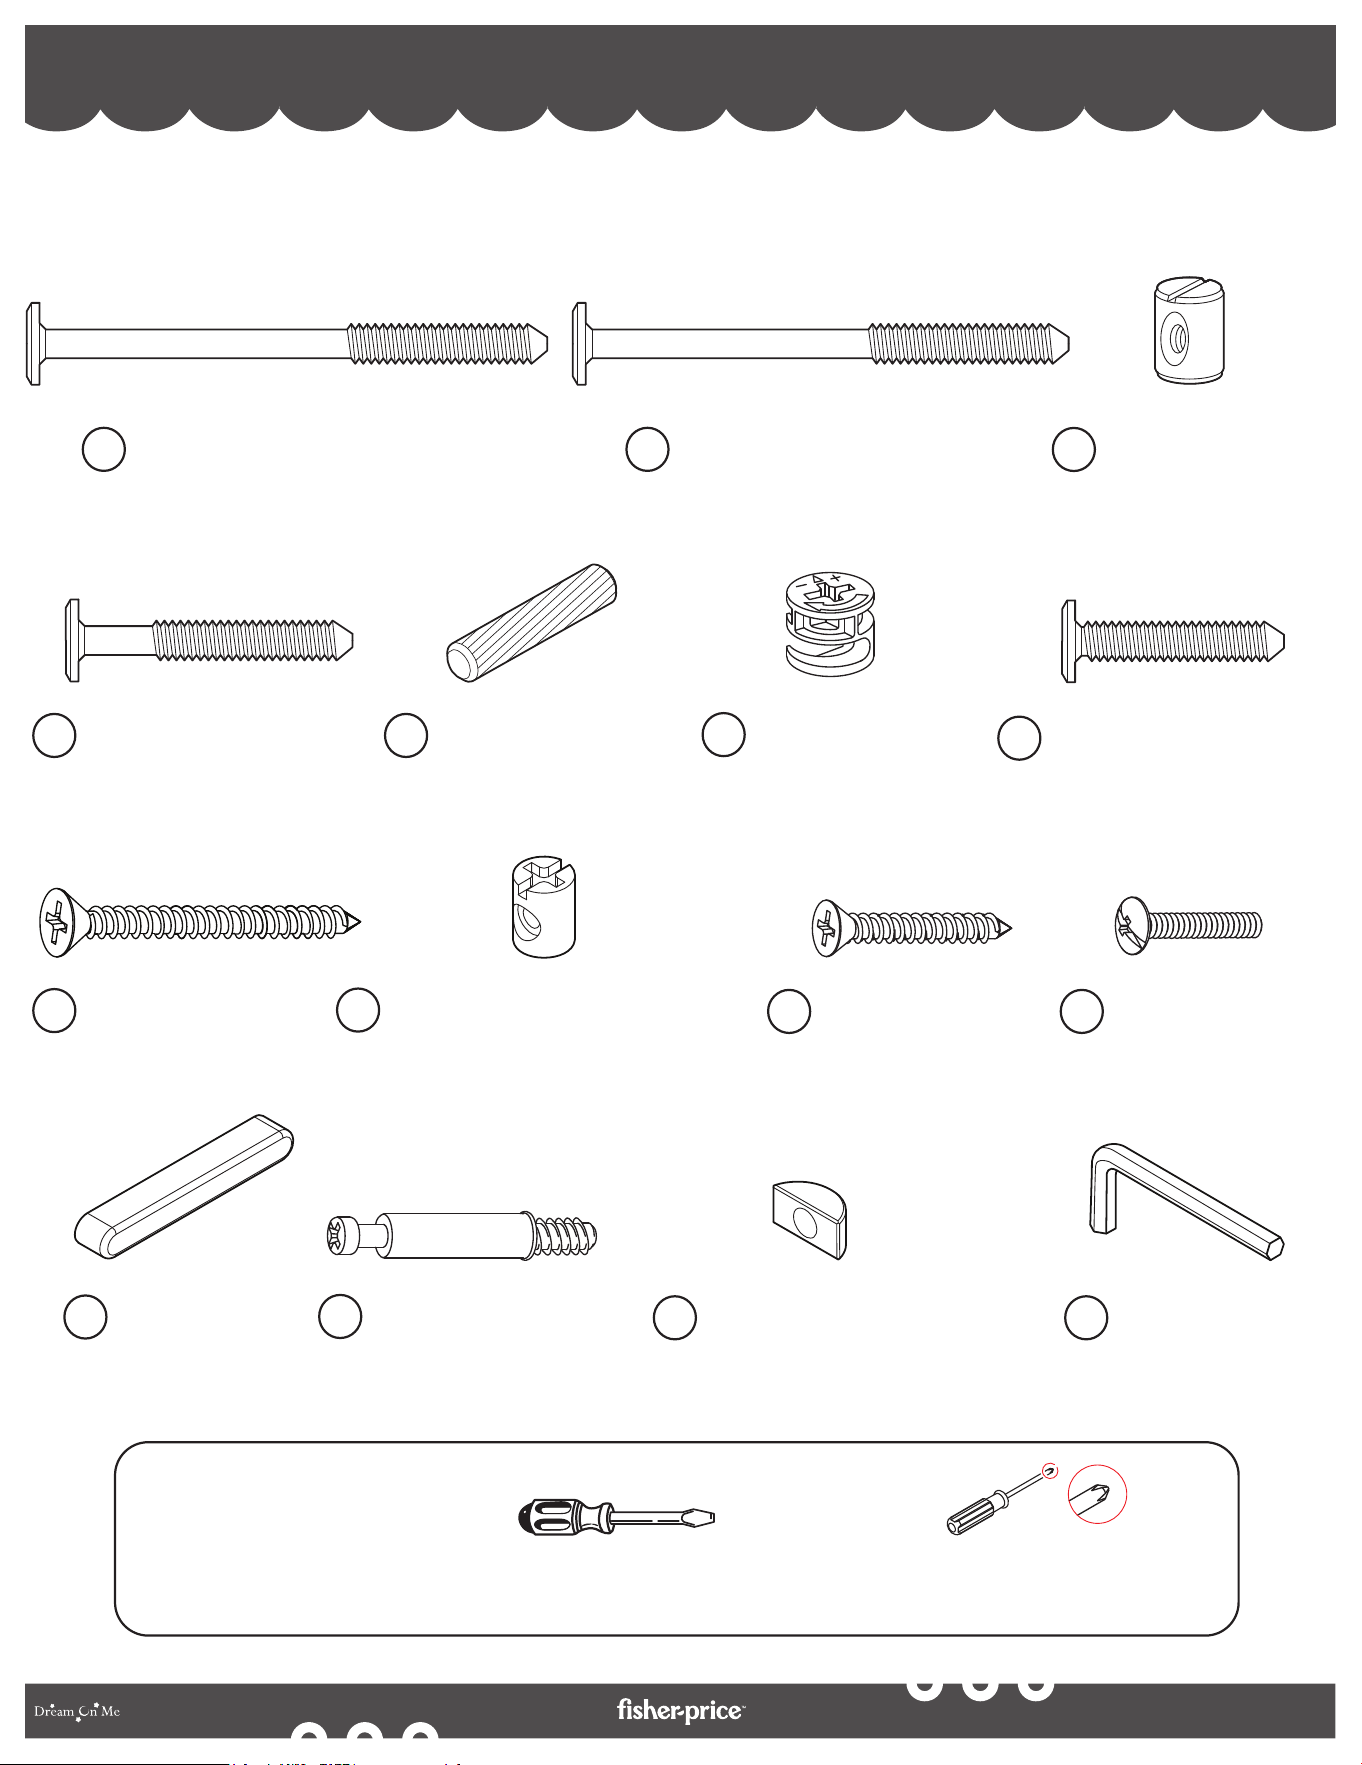
HARDWARE MATÉRIEL
17
By
Barrel Nut (x8)
Écrou de baril (x8)
Tuerca de barril (x8)
C
Allen Key (x1)
Clé Allen (x1)
Llave Allen (x1)
P
Crescent Washer (x12)
Rondelle à croissant (x12)
Arandela Crescent (x12)
O
K
Screw 25 MM (x4)
Vis 25 MM (x4)
Tornillo 25 MM (x4)
L
Knob Screw (x4)
Vis du bouton (x4)
Perilla Tornillo (x4)
Wooden Dowel (x24)
Cheville en bois (x24)
Clavija de madera (x24)
E
F
Cam Lock (x26)
Verrou à came (x26)
Cierre de leva (x26)
Plastic Barrel Nut (x4)
Écrou de baril en plastique (x4)
Tuerca de barril de plástico (x4)
J
Flat Head Screw Driver (NOT INCLUDED)
Tournevis à tête plate (NON INCLUS)
Destornillador de cabeza plana (NO INCLUIDO)
Tools Needed:
Outils nécessaires:
Herramientas necesarias:
Philips Screw Driver (NOT INCLUDED)
Tournevis Philips (NON INCLUS)
Destornillador Philips (NO INCLUIDO)
Bolt M6 X 85 MM (x4)
Boulon M6 X 85 MM (x4)
Perno M6 X 85 MM (x4)
A
Bolt M6 X 75 MM (x4)
Boulon M6 X 75 MM (x4)
Perno M6 X 75 MM (x4)
B
Bolt M6 X 30mm (x4)
Boulon M6 X 30mm (x4)
Perno M6 X 30mm (x4)
G
Bolt M6 X 45 MM (x14)
Boulon M6 X 45 MM (x14)
Perno M6 X 45 MM (x14)
D
Screw 45 MM (x4)
Vis de 45 mm (x4)
Tornillo 45mm (x4)
H
Cam Bolt (x26)
Boulon à came (x26)
Perno de leva (x26)
N
Knob (x2)
Bouton (x2)
Pomo (x2)
M
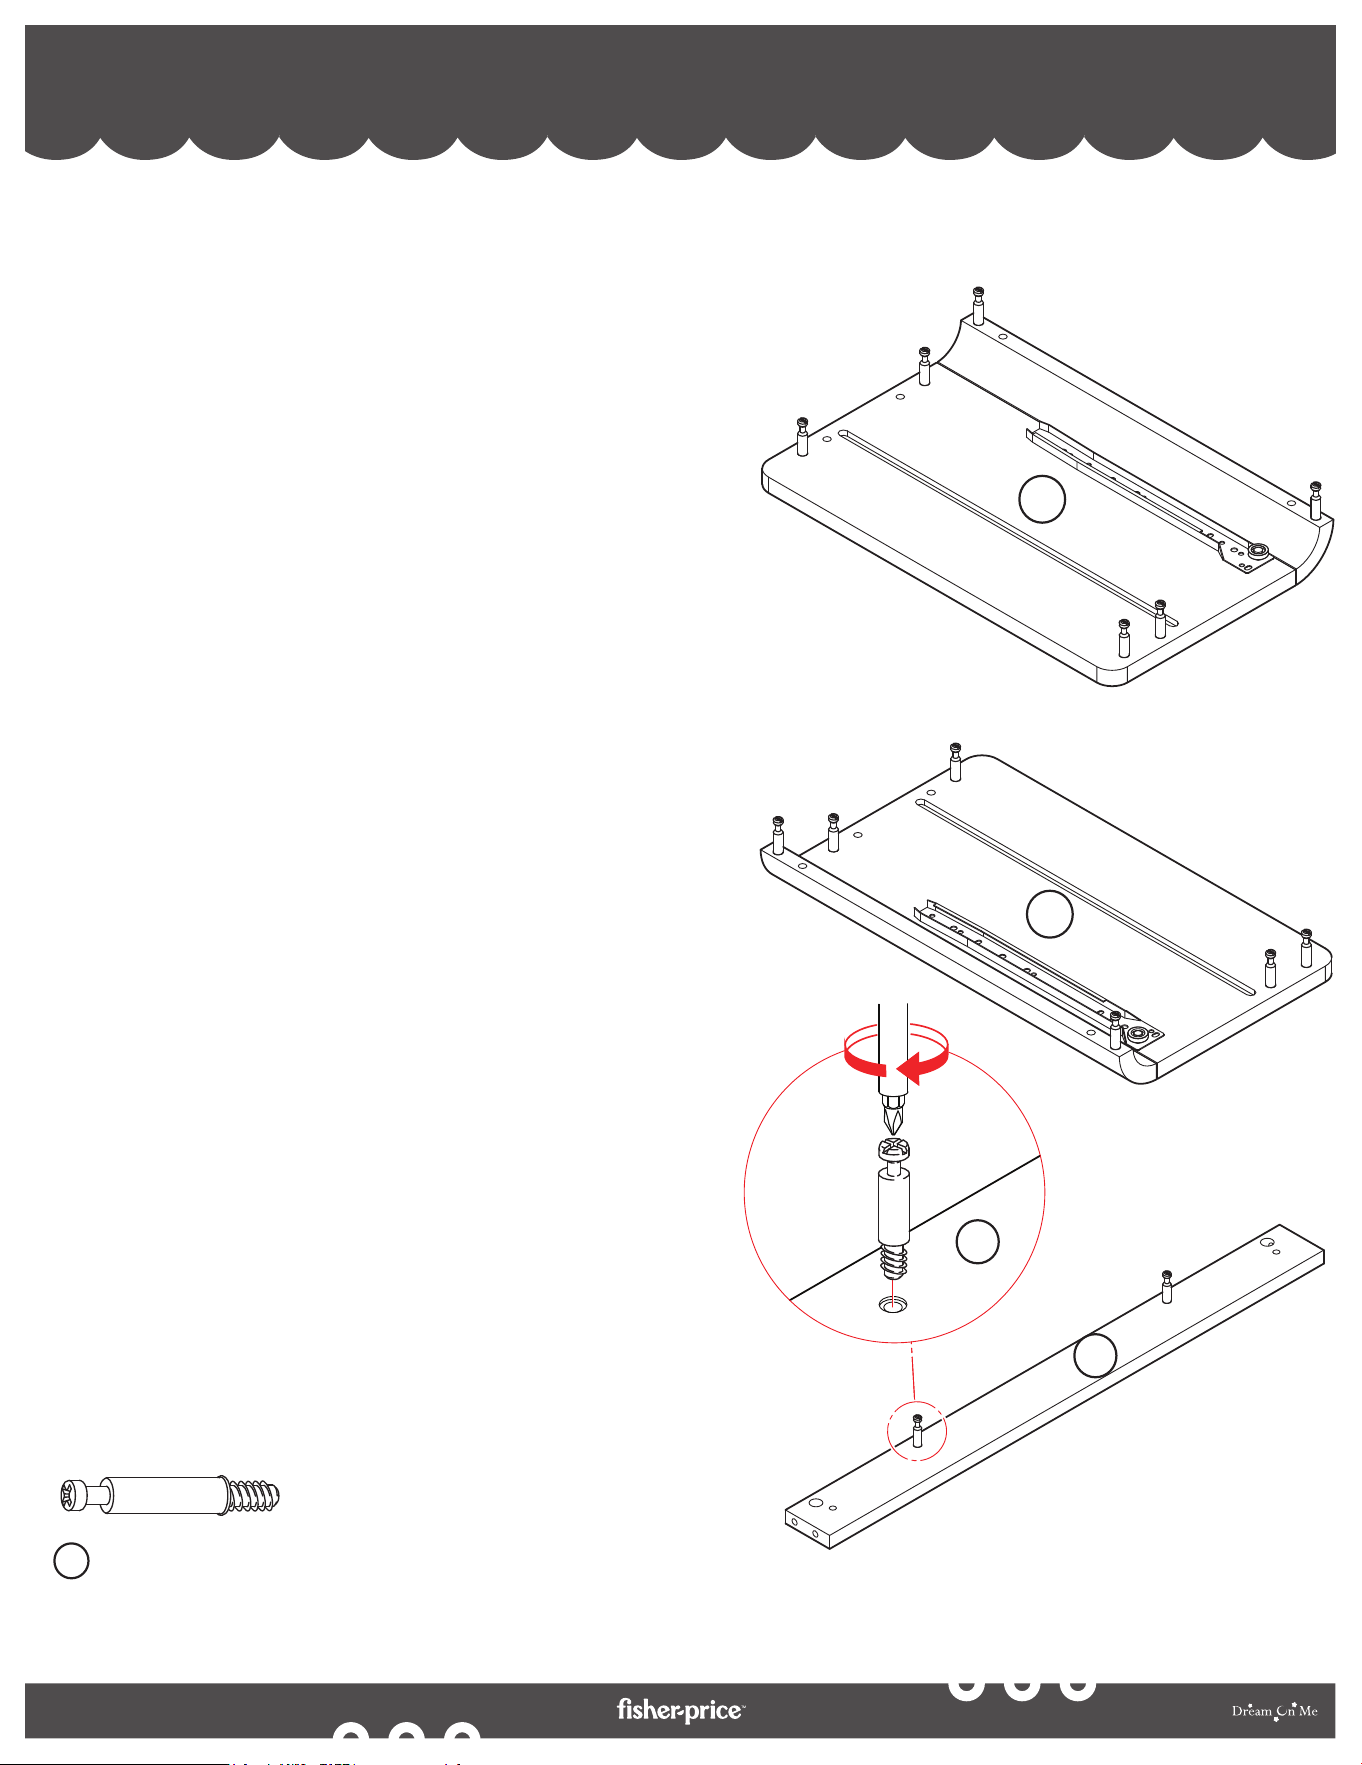
CHANGING TABLE ASSEMBLY - CAM BOLT ASSEMBLY
ASSEMBLAGE DE LA TABLE À LANGER - ASSEMBLAGE DU BOULON DE CAME
MONTAJE DEL CAMBIADOR - MONTAJE DEL PERNO DE LEVA
1
18
By
(N)
(N)
(N)
(N)
(N)
(N)
(N)
(N)
(N)
(N)
(N)
(N)
(N)
(N)
Cam Bolt (x14)
Boulon à came (x14)
Perno de leva (x14)
N
22
23
8
8
1a. Place the parts of the changing table to be
assembled on a soft, horizontal surface.
1b. Lay the Drawer Rear Rail (8), Changer Right Side
(22), and Changer Left Side (23) flat on a soft,
level surface.
1c. Align and insert the Cam Bolts (N) in their
respective insertions on the panels as shown in
the illustration. Tighten the bolts using the
Philips Screw Driver (NOT INCLUDED).
1a. Placer les pièces de la table à langer à assembler
sur une surface souple et horizontale.
1b. Poser le rail arrière du tiroir (8), le côté droit du
changeur (22) et le côté gauche du changeur (23) à
plat sur une surface souple et horizontale.
1c. Aligner et insérer les boulons à came (N) dans leurs
insertions respectives sur les panneaux, comme
indiqué sur l'illustration. Serrer les boulons à l'aide
d'un tournevis Philips (NON INCLU).
1a. Coloque las piezas del cambiador a montar
sobre una superficie blanda y horizontal.
1b. Coloque el riel trasero del cajón (8), el lado
derecho del cambiador (22) y el lado izquierdo
del cambiador (23) sobre una superficie suave
y nivelada.
1c. Alinee e inserte los pernos de leva (N) en sus
respectivas inserciones en los paneles como se
muestra en la ilustración. Apriete los pernos
con el destornillador Philips (NO INCLUIDO).
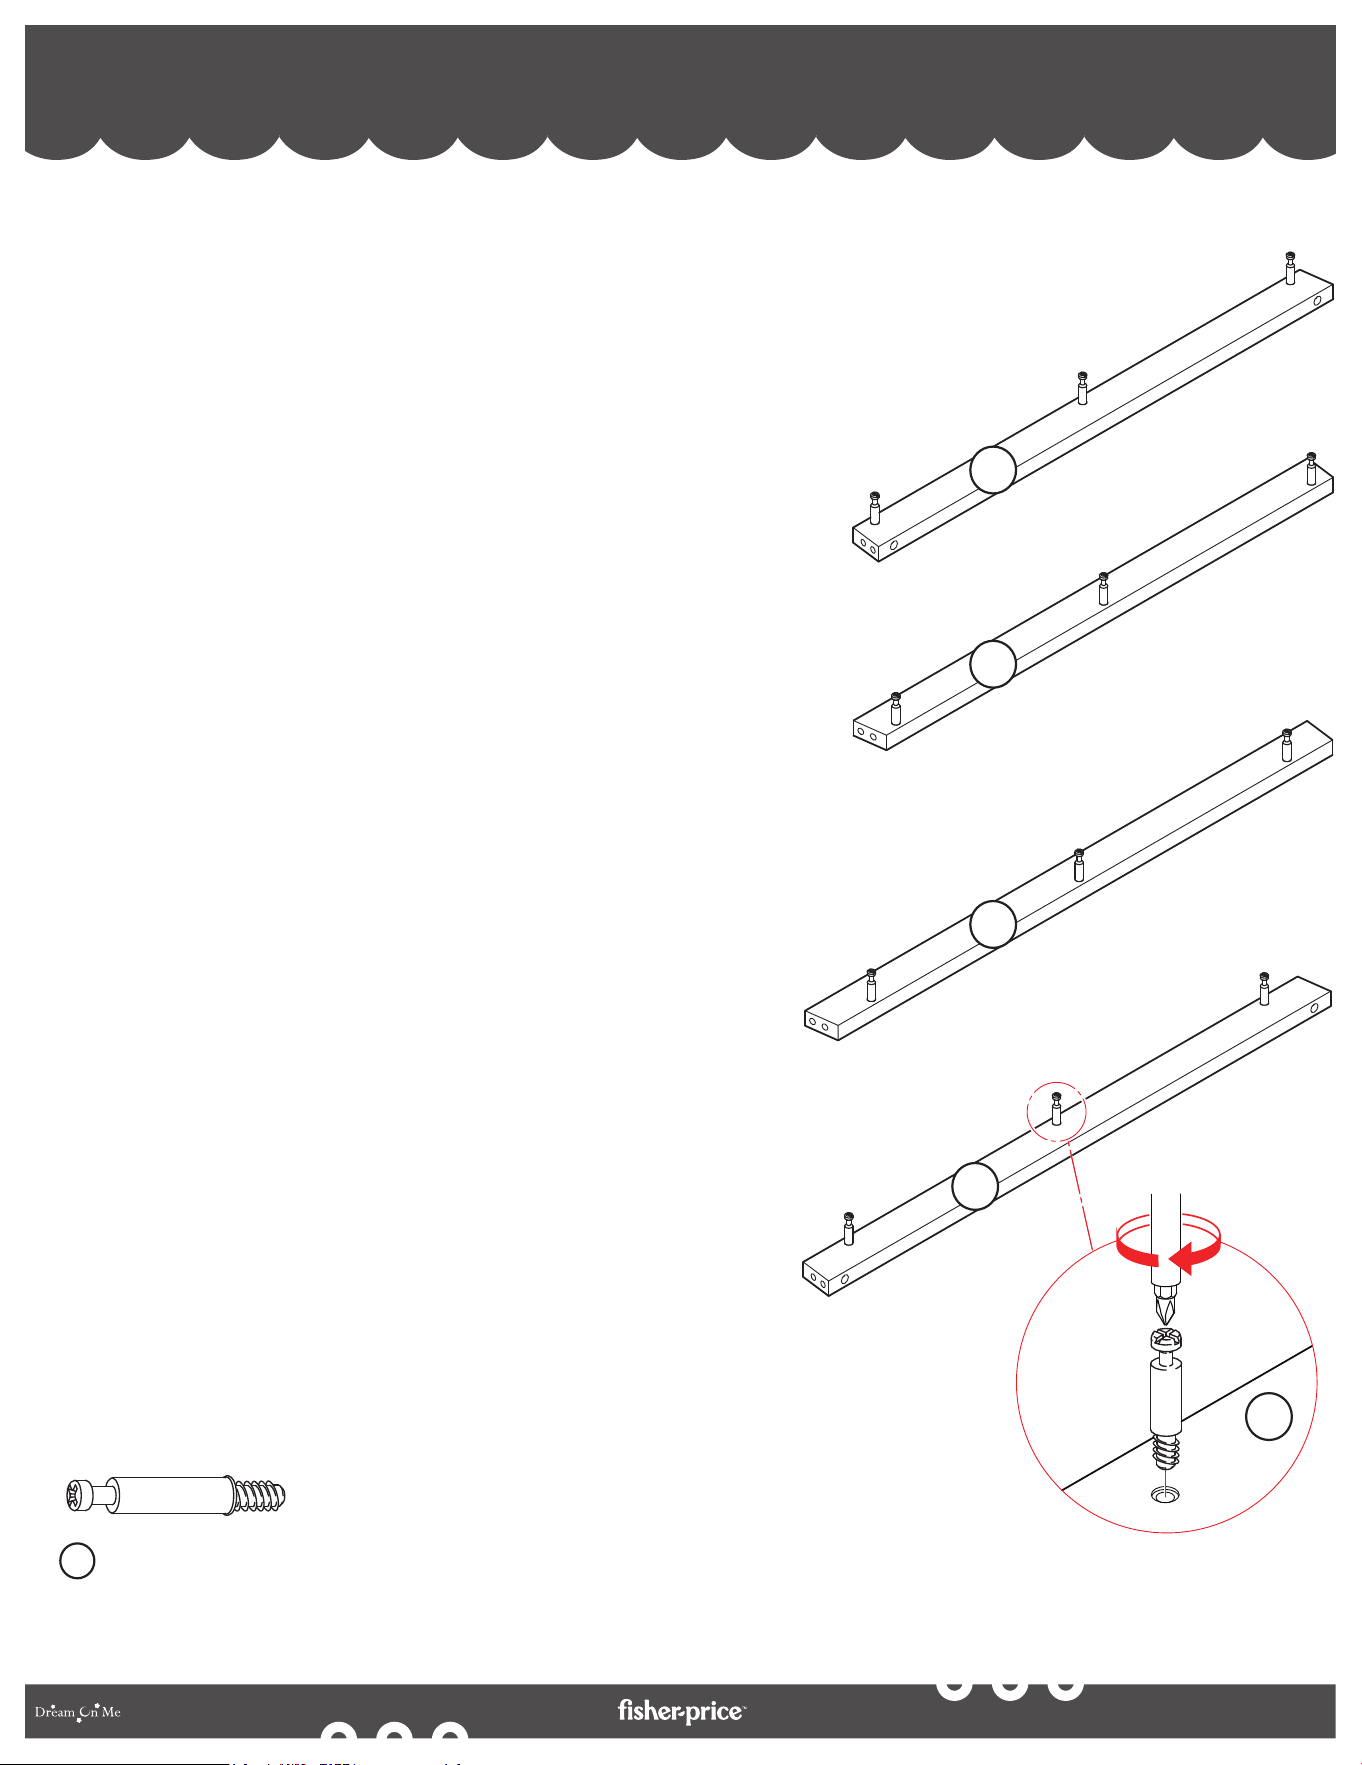
CHANGING TABLE ASSEMBLY - CAM BOLT ASSEMBLY (cont.)
ASSEMBLAGE DE LA TABLE À LANGER - ASSEMBLAGE DU BOULON DE CAME (suite)
MONTAJE DEL CAMBIADOR - MONTAJE DEL PERNO DE LEVA (cont.)
1
19
By
(N)
(N)
(N)
(N)
(N)
(N)
(N)
(N)
(N)
(N)
(N)
Cam Bolt (x12)
Boulon à came (x12)
Perno de leva (x12)
N
(N)
17
17
18
18
18
1d. Lay the Middle Rail (17), and Bottom Rail (18) flat
on a soft, level surface.
1e. Align and insert the Cam Bolts (N) in their
respective insertions on the panels as shown in the
illustration. Tighten the bolts using the Philips
Screw Driver (NOT INCLUDED).
1d. Poser le rail central (17) et le rail inférieur (18) à
plat sur une surface souple et plane.
1e. Alignez et insérez les boulons à came (N) dans leurs
insertions respectives sur les panneaux, comme
indiqué sur l'illustration. Serrez les boulons à l'aide
d'un tournevis Philips (NON INCLU).
1d. Coloque el travesaño central (17) y el travesaño
inferior (18) planos sobre una superficie blanda y
nivelada.
1e. Alinee e inserte los pernos de leva (N) en sus
respectivas inserciones en los paneles como se
muestra en la ilustración. Apriete los pernos con el
destornillador Philips (NO INCLUIDO).
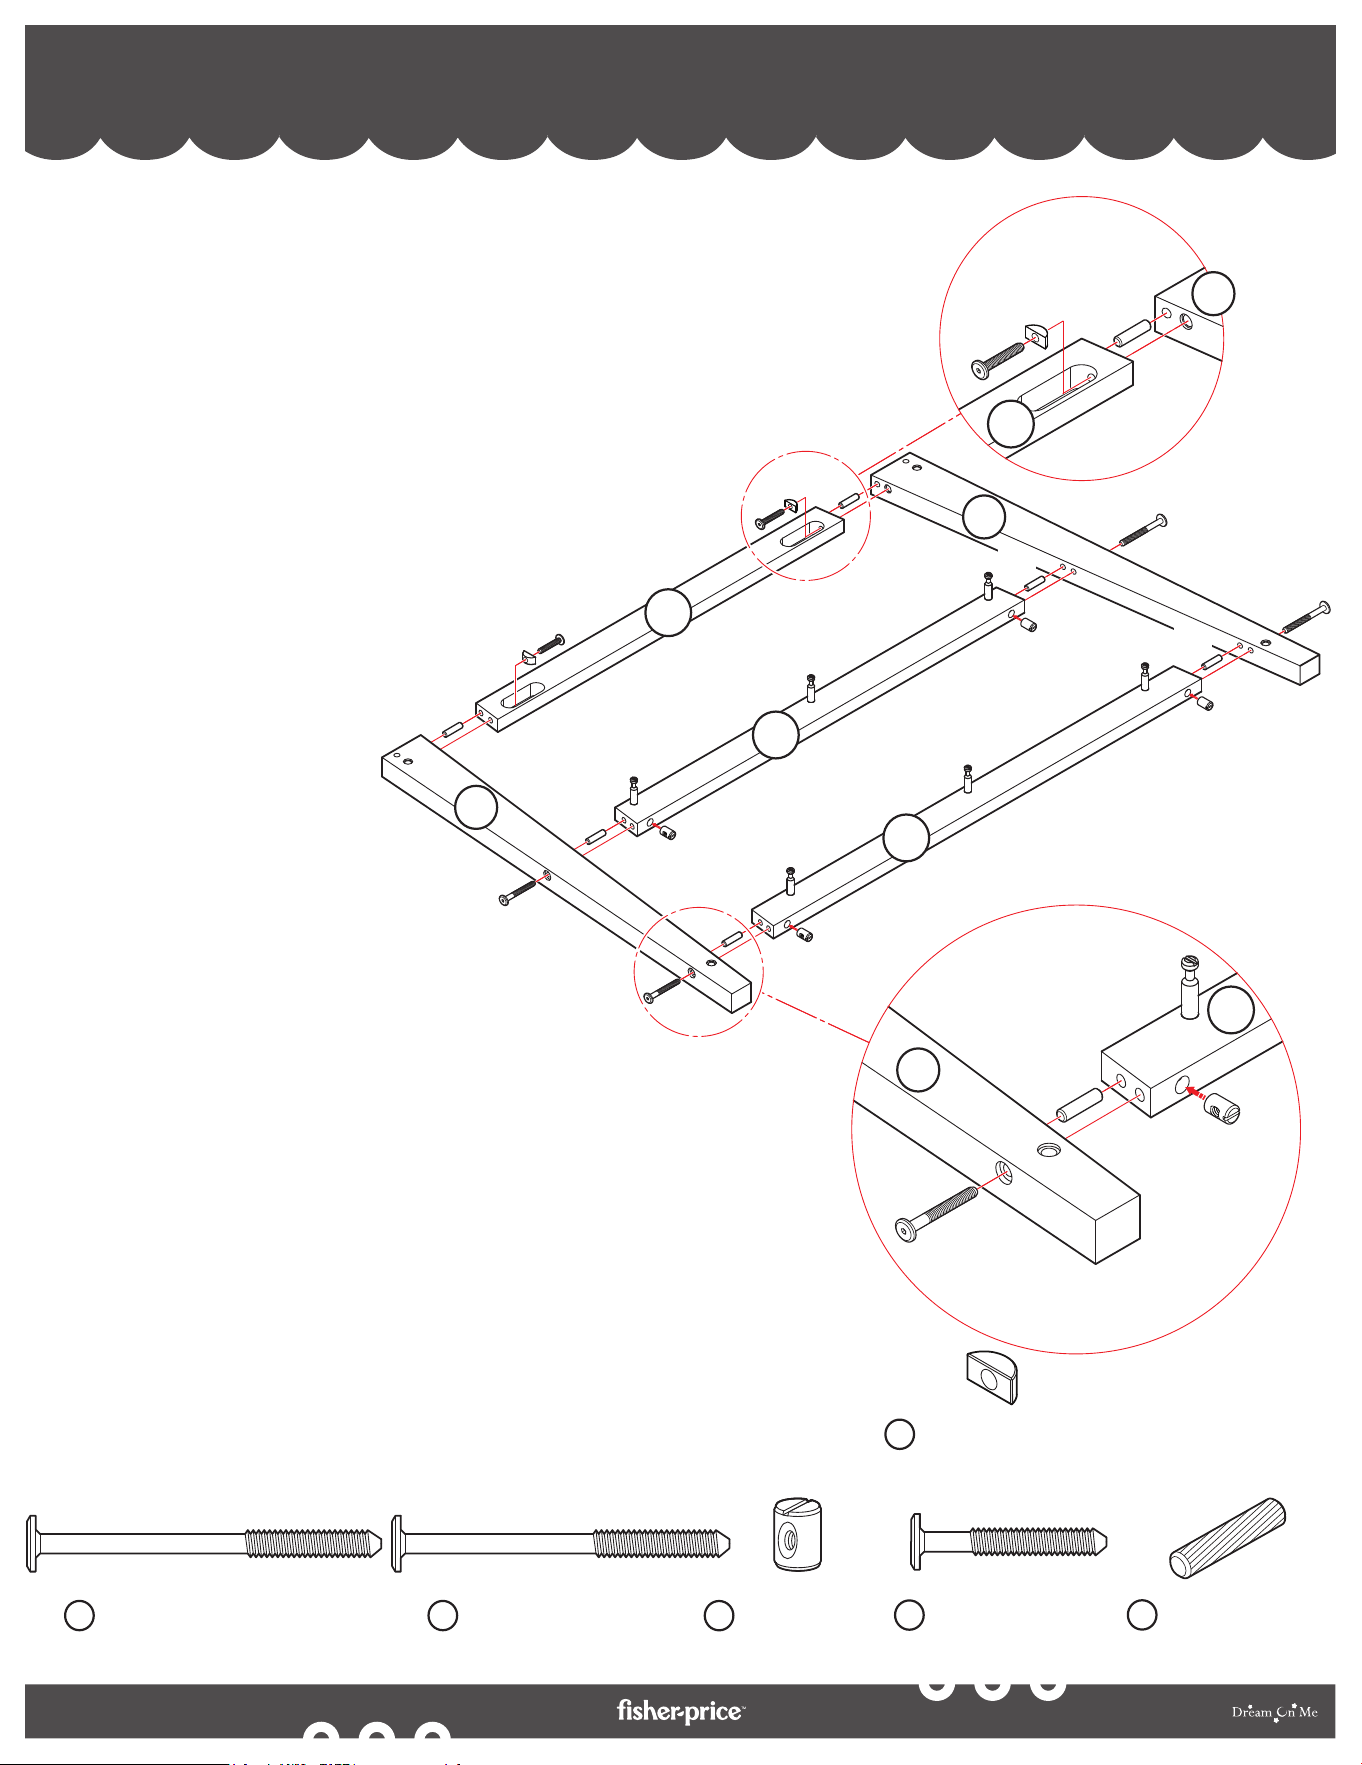
CHANGING TABLE ASSEMBLY - REAR PANEL ASSEMBLY
ASSEMBLAGE DE LA TABLE À LANGER - ASSEMBLAGE DU PANNEAU ARRIERE
MONTAJE DEL CAMBIADOR - MONTAJE DEL PANEL TRASERO
2
20
By
(A)
(A)
(B)
(B)
(E)
(E)
(E)
(C)
(C)
(C)
(C)
Barrel Nut (x4)
Écrou de baril (x4)
Tuerca de barril (x4)
C
Crescent Washer (x2)
Rondelle à croissant (x2)
Arandela Crescent (x2)
O
Wooden Dowel (x6)
Cheville en bois (x6)
Clavija de madera (x6)
E
Bolt M6 X 85 MM (x2)
Boulon M6 X 85 MM (x2)
Perno M6 X 85 MM (x2)
A
Bolt M6 X 75 MM (x2)
Boulon M6 X 75 MM (x2)
Perno M6 X 75 MM (x2)
B
Bolt M6 X 45 MM (x2)
Boulon M6 X 45 MM (x2)
Perno M6 X 45 MM (x2)
D
16
16
17
18
18
1
1
3
3
(E)
(D)
(D)
(O)
(O)
(E)
(E)
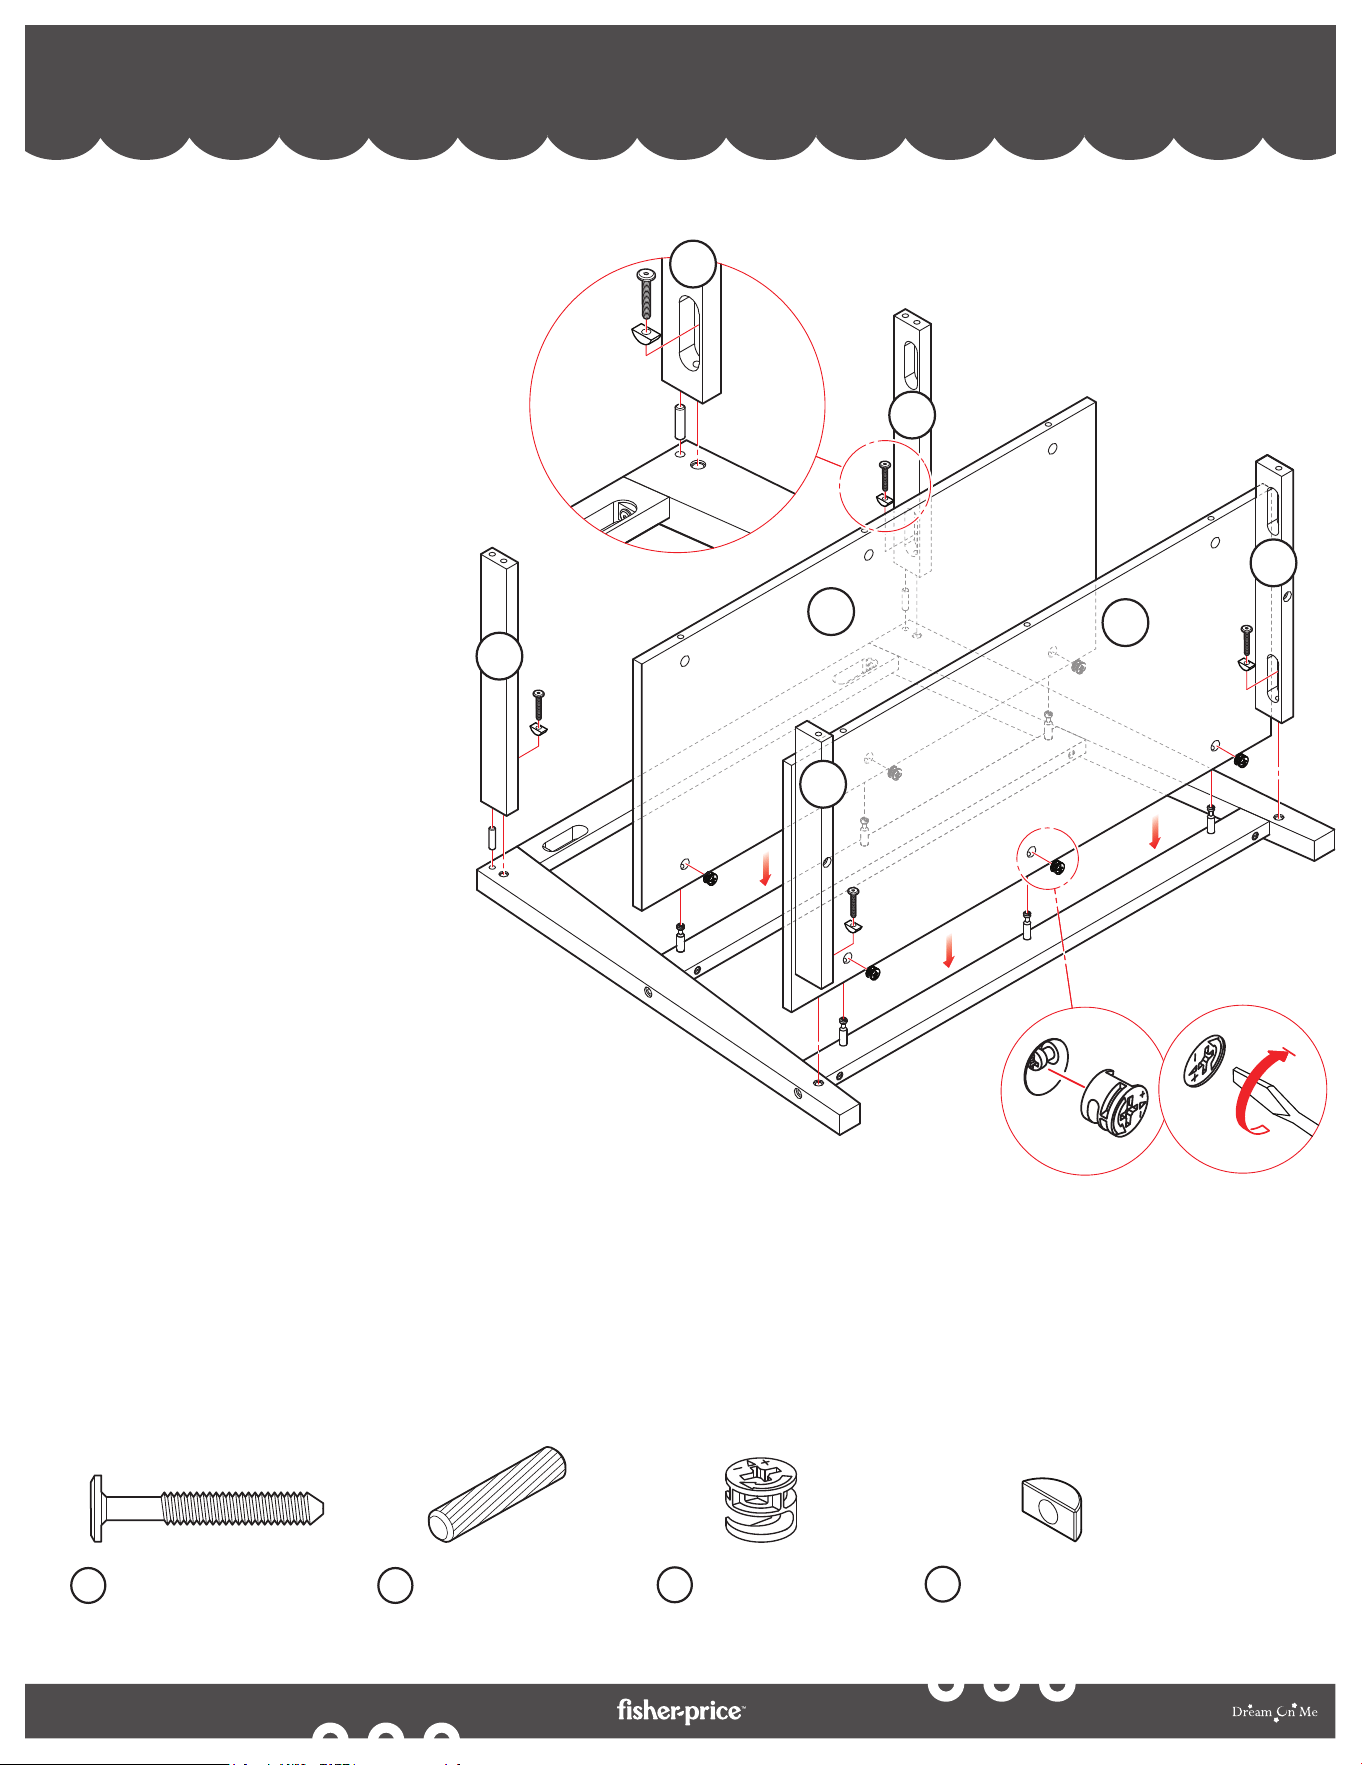
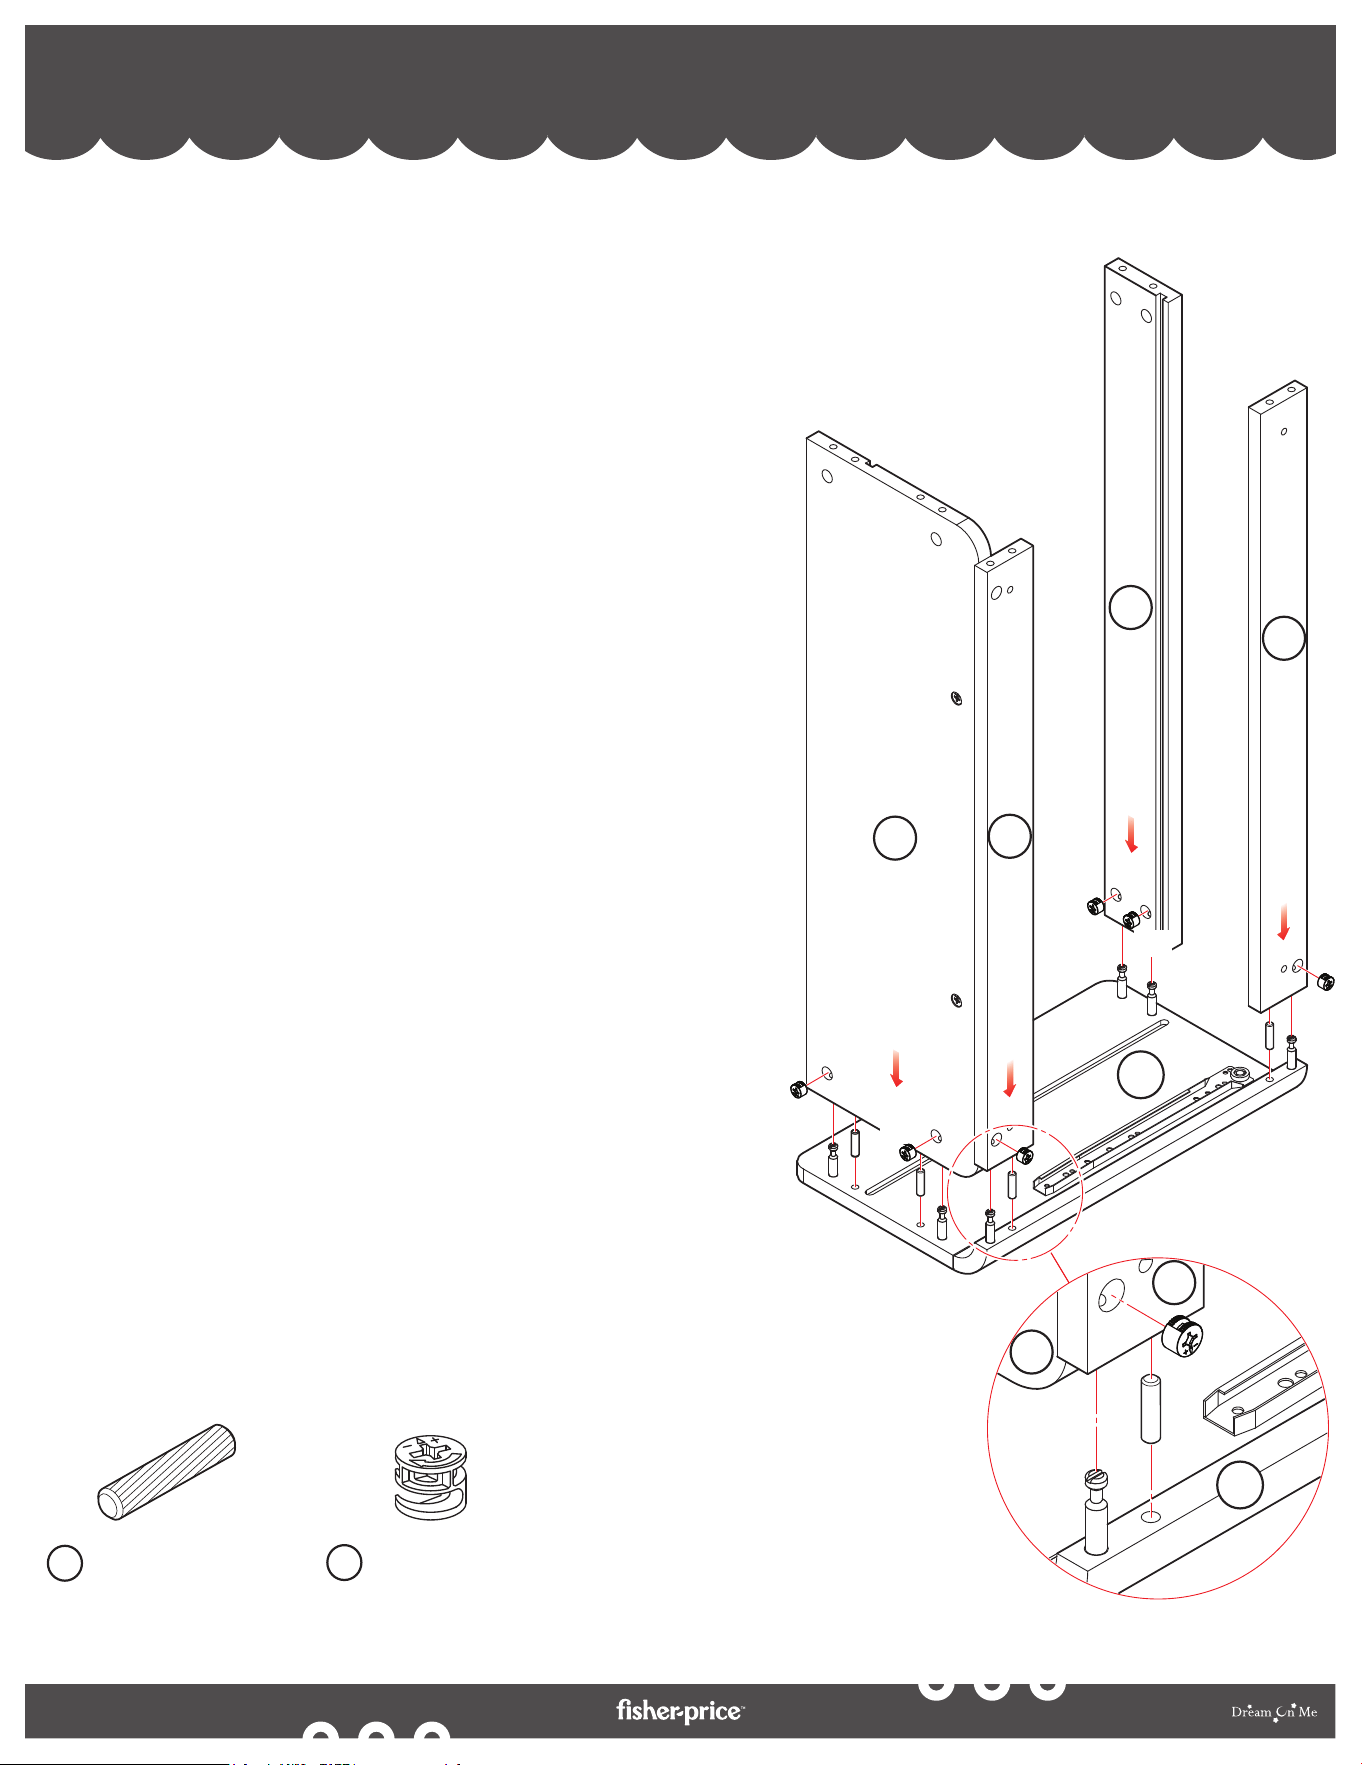
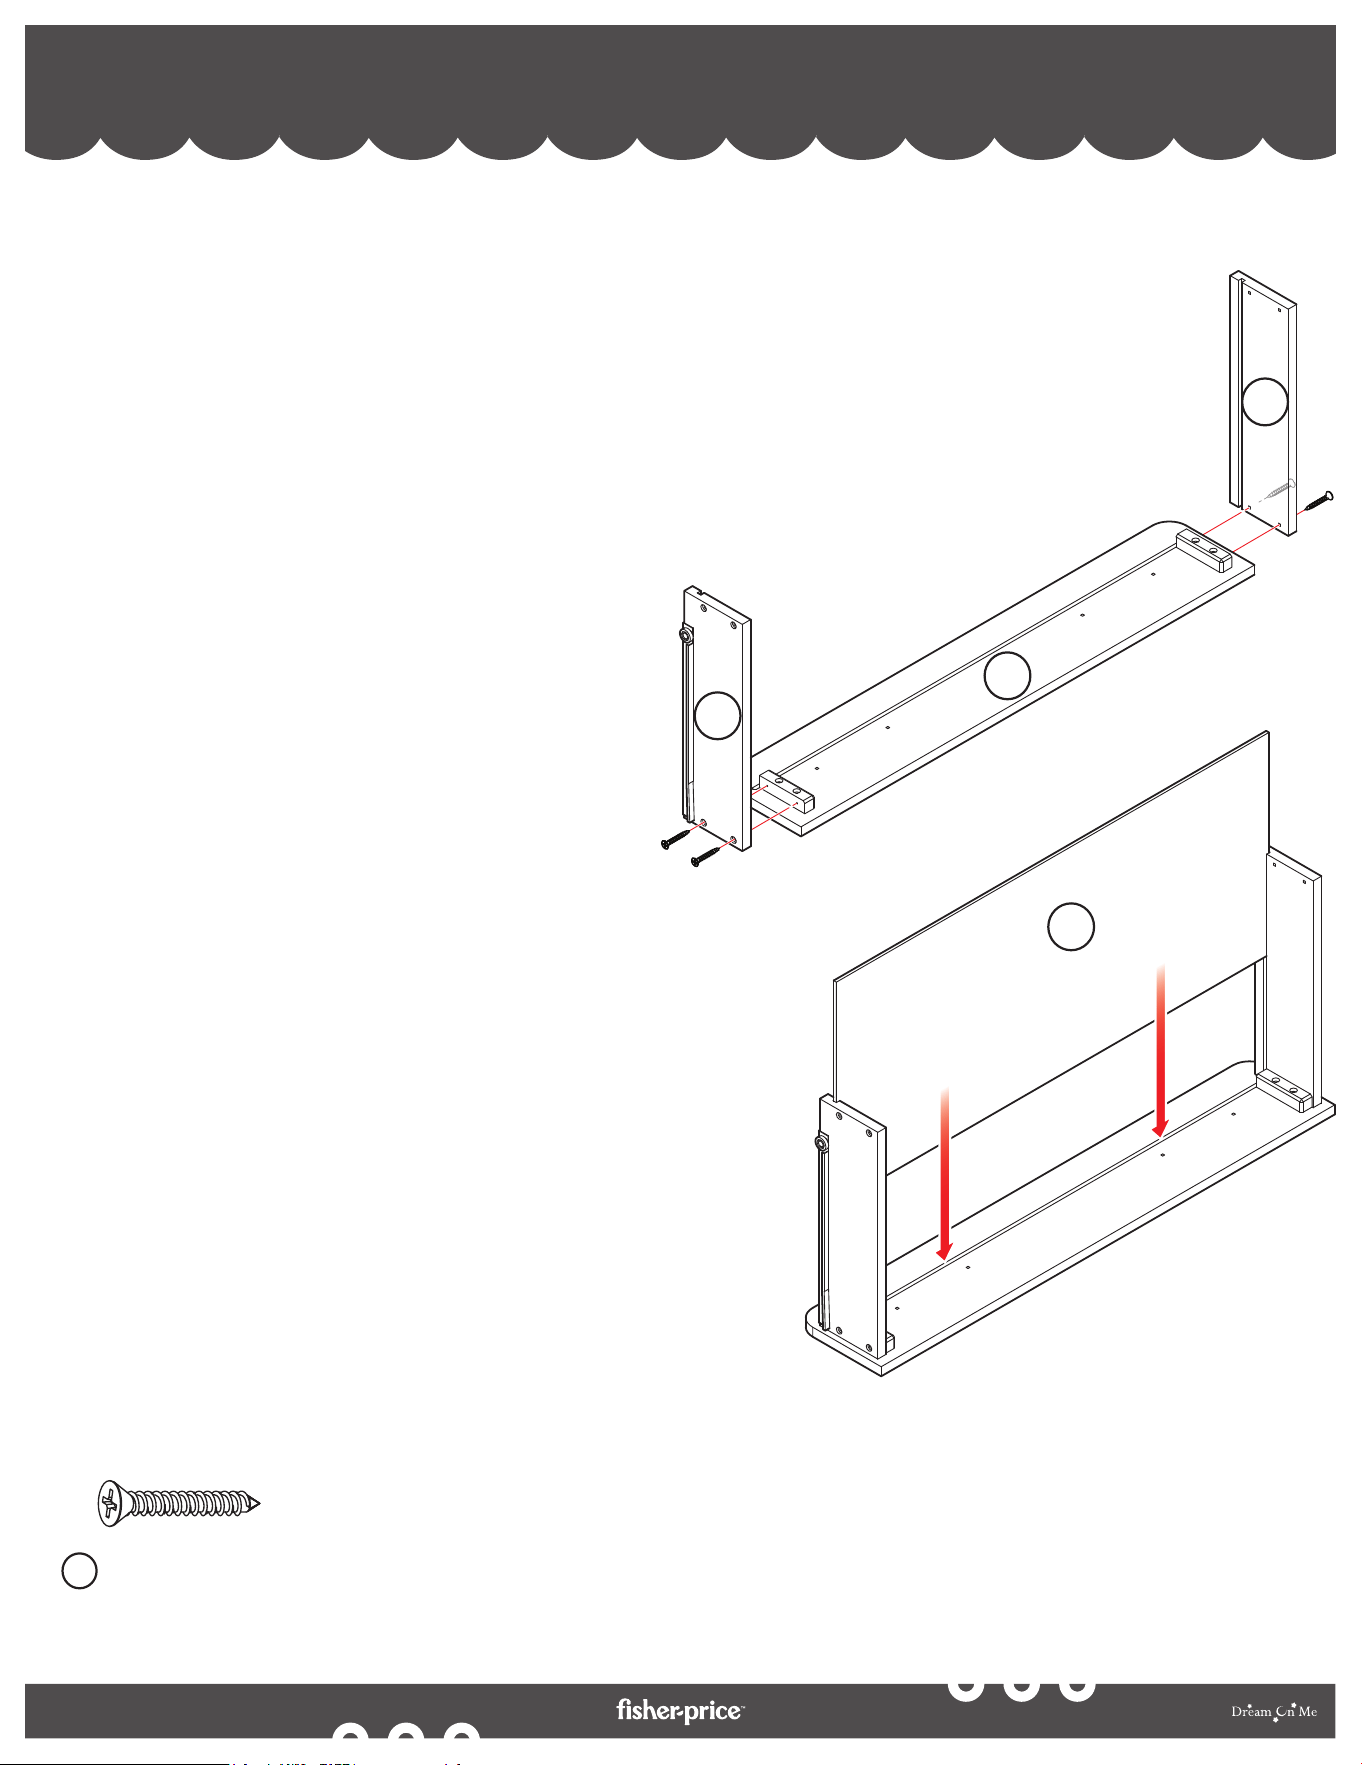
2a. Place the Top Rail (16), Middle Rail (17), and Bottom Rail (18) flat on
a soft, level surface and align the Left Rear Post (1) and the Right Rear Post
(3) to the sides of the rails.
2b. Position the Barrel Nuts (C) in the bottom insertions of the middle and
bottom rails. Similarly, place the Crescent Washer (O) in the slots of
the top rail.
2c. Position the Wooden Dowels (E) between the rails and the posts.
2d. Position and insert the Bolts (D) through the crescent washers,
Bolts (A) in the middle insertions of the posts, and Bolts (B) in
the bottom insertions of the posts as shown in the illustration.
2e. Tighten the bolts using the Allen Key (P) to assemble the rear
panel securely.
2a. Coloque el riel superior (16), el riel medio (17) y el riel inferior (18) planos
sobre una superficie suave y nivelada y alinee el poste trasero izquierdo (1) y
el poste trasero derecho (3) a los lados de los rieles.
2b. Coloque las tuercas cilíndricas (C) en las inserciones inferiores de los
travesaños central e inferior. Del mismo modo, coloque la arandela de media
luna (O) en las ranuras del travesaño superior.
2c. Coloque los tacos de madera (E) entre los travesaños y los postes.
2d. Coloque e inserte los pernos (D) a través de las arandelas de media luna, los
pernos (A) en las inserciones centrales de los postes y los pernos (B) en las
inserciones inferiores de los postes, como se muestra en la ilustración.
2e. Apriete los pernos con la llave Allen (P) para ensamblar firmemente el panel
trasero.
2a. Placer le rail supérieur (16), le rail central
(17) et le rail inférieur (18) à plat sur
une surface souple et plane et aligner
le montant arrière gauche (1) et le
montant arrière droit (3) sur les
côtés des rails.
2b. Positionnez les écrous
cylindriques (C) dans les
insertions inférieures des rails
du milieu et du bas. De même,
placez la rondelle en croissant
(O) dans les fentes du rail
supérieur.
2c. Positionnez les chevilles en bois (E)
entre les rails et les poteaux.
2d. Positionnez et insérez les boulons (D) dans les
rondelles en croissant, les boulons (A) dans les
insertions centrales des poteaux, et les boulons (B)
dans les insertions inférieures des poteaux, comme
indiqué sur l'illustration.
2e. Serrez les boulons à l'aide de la clé Allen (P) pour
assembler solidement le panneau arrière.
21
By
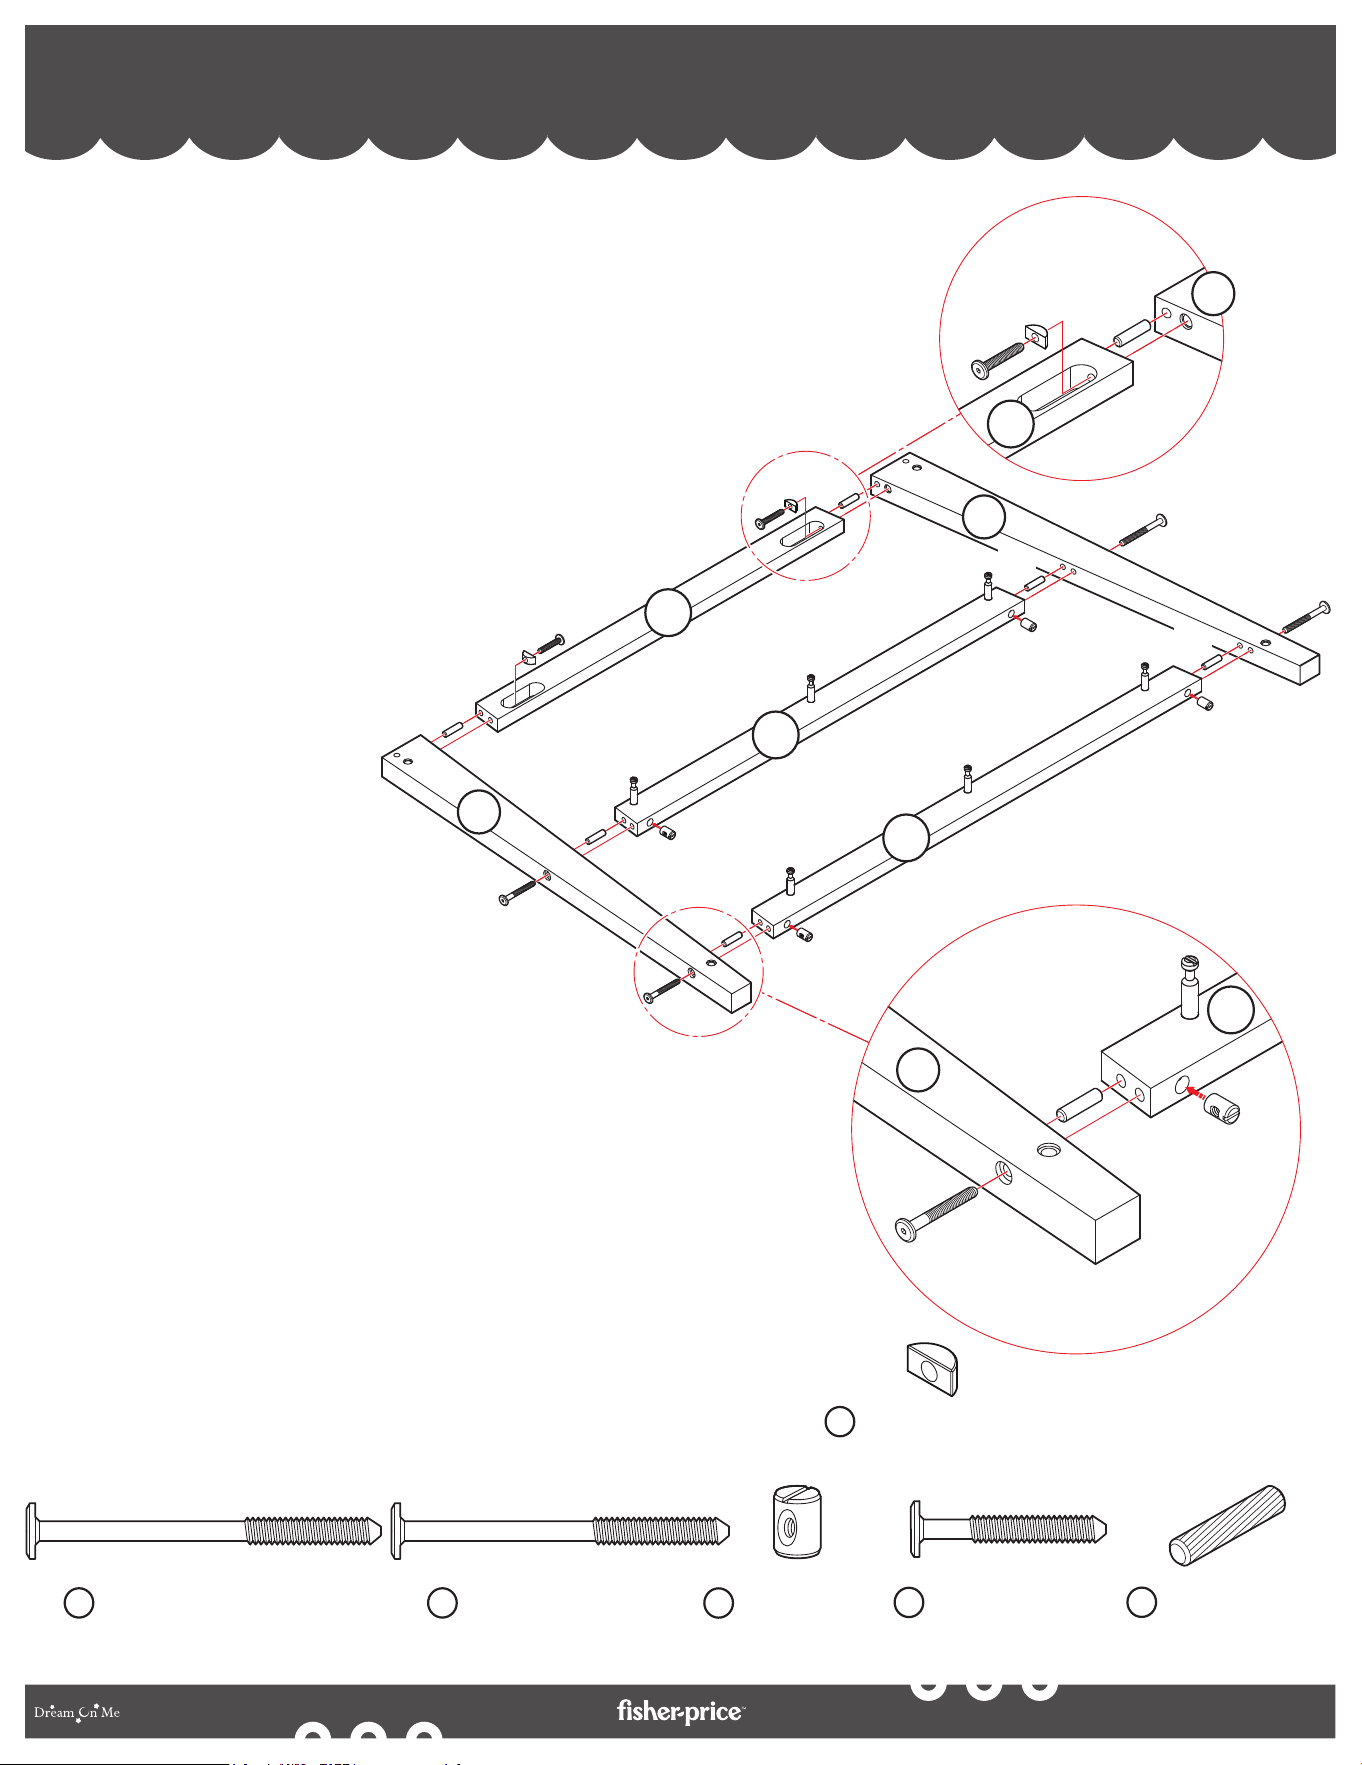
CHANGING TABLE ASSEMBLY - FRONT PANEL ASSEMBLY
ASSEMBLAGE DE LA TABLE À LANGER - ASSEMBLAGE DU PANNEAU AVANT
MONTAJE DEL CAMBIADOR - MONTAJE DEL PANEL FRONTAL
3
(A)
(A)
(B)
(B)
(E)
(E)
(E)
(C)
(C)
(C)
(C)
16
16
17
18
18
4
2
2
(E)
(D)
(D)
(O)
(O)
(E)
(E)
4
3a. Place the Top Rail (16), Middle Rail (17), and Bottom Rail (18) flat on
a soft, level surface and align the Left Front Post (2) and the Right Front
Post (4) to the sides of the rails.
3b. Position the Barrel Nuts (C) in the bottom insertions of the middle and
bottom rails. Similarly, place the Crescent Washer (O) in the slots of
the top rail.
3c. Position the Wooden Dowels (E) between the rails and the posts.
3d. Position and insert the Bolts (D) through the crescent washers,
Bolts (A) in the middle insertions of the posts, and Bolts (B) in
the bottom insertions of the posts as shown in the illustration.
3e. Tighten the bolts using the Allen Key (P) to assemble the front
panel securely.
3a. Coloque el riel superior (16), el riel medio (17) y el riel inferior (18)
planos sobre una superficie suave y nivelada y alinee el poste delantero
izquierdo (2) y el poste delantero derecho (4) a los lados de los rieles.
3b. Coloque las tuercas cilíndricas (C) en las inserciones inferiores de los
travesaños central e inferior. Del mismo modo, coloque la arandela de media
luna (O) en las ranuras del travesaño superior.
3c. Coloque los tacos de madera (E) entre los travesaños y los postes.
3d. Coloque e inserte los pernos (D) a través de las arandelas de media luna, los
pernos (A) en las inserciones centrales de los postes y los pernos (B) en las
inserciones inferiores de los postes, como se muestra en la ilustración.
3e. Apriete los pernos con la llave Allen (P) para ensamblar firmemente el panel
frontal.
Barrel Nut (x4)
Écrou de baril (x4)
Tuerca de barril (x4)
C
Crescent Washer (x2)
Rondelle à croissant (x2)
Arandela Crescent (x2)
O
Wooden Dowel (x6)
Cheville en bois (x6)
Clavija de madera (x6)
E
Bolt M6 X 85 MM (x2)
Boulon M6 X 85 MM (x2)
Perno M6 X 85 MM (x2)
A
Bolt M6 X 75 MM (x2)
Boulon M6 X 75 MM (x2)
Perno M6 X 75 MM (x2)
B
Bolt M6 X 45 MM (x2)
Boulon M6 X 45 MM (x2)
Perno M6 X 45 MM (x2)
D
3a. Placez le rail supérieur (16), le rail central
(17) et le rail inférieur (18) à plat sur
une surface souple et plane et alignez
le montant avant gauche (2) et le
montant avant droit (4) sur les
côtés des rails.
3b. Positionnez les écrous
cylindriques (C) dans les
insertions inférieures des rails
du milieu et du bas. De même,
placez la rondelle en forme de
croissant (O) dans les fentes du
rail supérieur.
3c. Positionnez les chevilles en bois (E)
entre les rails et les poteaux.
3d. Positionnez et insérez les boulons (D) dans les
rondelles en croissant, les boulons (A) dans les
insertions centrales des poteaux, et les boulons (B)
dans les insertions inférieures des poteaux, comme
indiqué sur l'illustration.
3e. Serrez les boulons à l'aide de la clé Allen (P) pour
assembler solidement le panneau avant.
22
By
Crescent Washer (x4)
Rondelle à croissant (x4)
Arandela Crescent (x4)
O
Wooden Dowel (x2)
Cheville en bois (x2)
Clavija de madera (x2)
E
F
Cam Lock (x6)
Verrou à came (x6)
Cierre de leva (x6)
Bolt M6 X 45 MM (x4)
Boulon M6 X 45 MM (x4)
Perno M6 X 45 MM (x4)
D
CHANGING TABLE ASSEMBLY - SHELVES & RAILS ASSEMBLY
ASSEMBLAGE DE LA TABLE À LANGER - ASSEMBLAGE DES TABLETTES ET DES RAILS
MONTAJE DEL CAMBIADOR - MONTAJE DE ESTANTES Y RAÍLES
4
(D)
(D)
(O)
(D)
(O)
(O)
(D)
(O)
(E)
(F)
(F)
(F)
(E)
20
21
21
20
20
10
11
(F)
4a. Align the insertions on the Middle Shelf
(10), and Bottom Shelf (11), to the cam bolts
on the middle and bottom rails, the Top Side
Rails (20) to the top of the posts, and the
Bottom Side Rails (21) to the bottom of the
posts as shown in the illustration.
4b. Position and insert the Cam Locks (F) in the
insertions provided on the shelves. Tighten
them using a Philips Screwdriver (NOT
INCLUDED).
4c. Position the Crescent Washers (O) in the
slots provided in the rails and the Wooden
Dowels (E) between the rails and posts.
4d. Position and insert the Bolts (D) through
the crescent washers. Tighten the bolts
using the Allen Key (P) to assemble the
rails securely.
4a. Alinee las inserciones del estante central (10) y del estante inferior (11) con los pernos de leva de los rieles central e inferior, los
rieles laterales superiores (20) con la parte superior de los postes y los rieles laterales inferiores (21) con la parte inferior de los
postes, como se muestra en la ilustración.
4b. Coloque e inserte los cierres de leva (F) en las inserciones previstas en los estantes. Apriételos con un destornillador de estrella
(NO INCLUIDO).
4c. Coloque las arandelas de media luna (O) en las ranuras previstas en los raíles y los tacos de madera (E) entre los raíles y los postes.
4d. Coloque e inserte los pernos (D) a través de las arandelas de media luna. Apriete los pernos con la llave Allen (P) para ensamblar los
travesaños de forma segura.
4a. Aligner les insertions de la tablette
centrale (10) et de la tablette inférieure
(11) sur les boulons à came des rails
central et inférieur, les rails latéraux
supérieurs (20) sur le haut des
montants et les rails latéraux inférieurs
(21) sur le bas des montants, comme
indiqué sur l'illustration.
4b. Positionnez et insérez les verrous à
came (F) dans les insertions prévues sur
les étagères. Serrez-les à l'aide d'un tournevis
Philips (NON INCLU).
4c. Positionnez les rondelles en forme de croissant (O)
dans les fentes prévues dans les rails et les chevilles en
bois (E) entre les rails et les poteaux.
4d. Positionnez et insérez les boulons (D) dans les rondelles en
forme de croissant. Serrez les boulons à l'aide de la clé Allen
(P) pour assembler les rails en toute sécurité.
23
By
Crescent Washer (x4)
Rondelle à croissant (x4)
Arandela Crescent (x4)
O
Wooden Dowel (x2)
Cheville en bois (x2)
Clavija de madera (x2)
E
F
Cam Lock (x6)
Verrou à came (x6)
Cierre de leva (x6)
Bolt M6 X 45 MM (x4)
Boulon M6 X 45 MM (x4)
Perno M6 X 45 MM (x4)
D
CHANGING TABLE ASSEMBLY - FRONT PANEL ASSEMBLY
ASSEMBLAGE DE LA TABLE À LANGER - ASSEMBLAGE DU PANNEAU AVANT
MONTAJE DEL CAMBIADOR - MONTAJE DEL PANEL FRONTAL
5
(D)
(O)
(D)
(O)
(D)
(O)
(E)
(F)
(F)
(F)
(F)
(F)
(F)
(E)
(D)
(O)
5a. Align the assembled front panel to the half-assembled
changing table as shown in the illustration.
5b. Position and insert the Cam Locks (F) in the insertions
provided on the shelves. Tighten them using a Philips
Screwdriver (NOT INCLUDED).
5c. Position the Crescent Washers (O) in the slots
provided in the rails and the Wooden Dowels (E)
between the rails and posts.
5d. Position and insert the Bolts (D) through the
crescent washers. Tighten the bolts using
the Allen Key (P) to assemble the rails
securely.
5a. Aligner le panneau avant assemblé sur
la table à langer à moitié assemblée,
comme indiqué sur l'illustration.
5b. Positionnez et insérez les verrous à
came (F) dans les insertions prévues
sur les étagères. Serrez-les à l'aide
d'un tournevis Philips (NON INCLU).
5c. Positionnez les rondelles en forme de
croissant (O) dans les fentes prévues
dans les rails et les chevilles en bois (E)
entre les rails et les poteaux.
5d. Positionnez et insérez les boulons (D)
dans les rondelles en forme de
croissant. Serrez les boulons à l'aide
de la clé Allen (P) pour assembler les
rails en toute sécurité.
5a. Alinee el panel frontal montado con el cambiador semimontado
como se muestra en la ilustración.
5b. Coloque e inserte los cierres de leva (F) en las inserciones
previstas en los estantes. Apriételos con un destornillador Philips
(NO INCLUIDO).
5c. Coloque las arandelas de media luna (O) en las ranuras previstas
en los raíles y los tacos de madera (E) entre los raíles y los postes.
5d. Coloque e inserte los pernos (D) a través de las arandelas de
media luna. Apriete los pernos con la llave Allen (P) para
ensamblar los travesaños de forma segura.
24
By
Bolt M6 X 45 MM (x2)
Boulon M6 X 45 MM (x2)
Perno M6 X 45 MM (x2)
D
CHANGING TABLE ASSEMBLY - BOTTOM RAILS ASSEMBLY
ASSEMBLAGE DE LA TABLE À LANGER - ASSEMBLAGE DES RAILS INFÉRIEURS
MONTAJE DEL CAMBIADOR - MONTAJE DE LOS RIELES INFERIORES
6
(D)
(D)
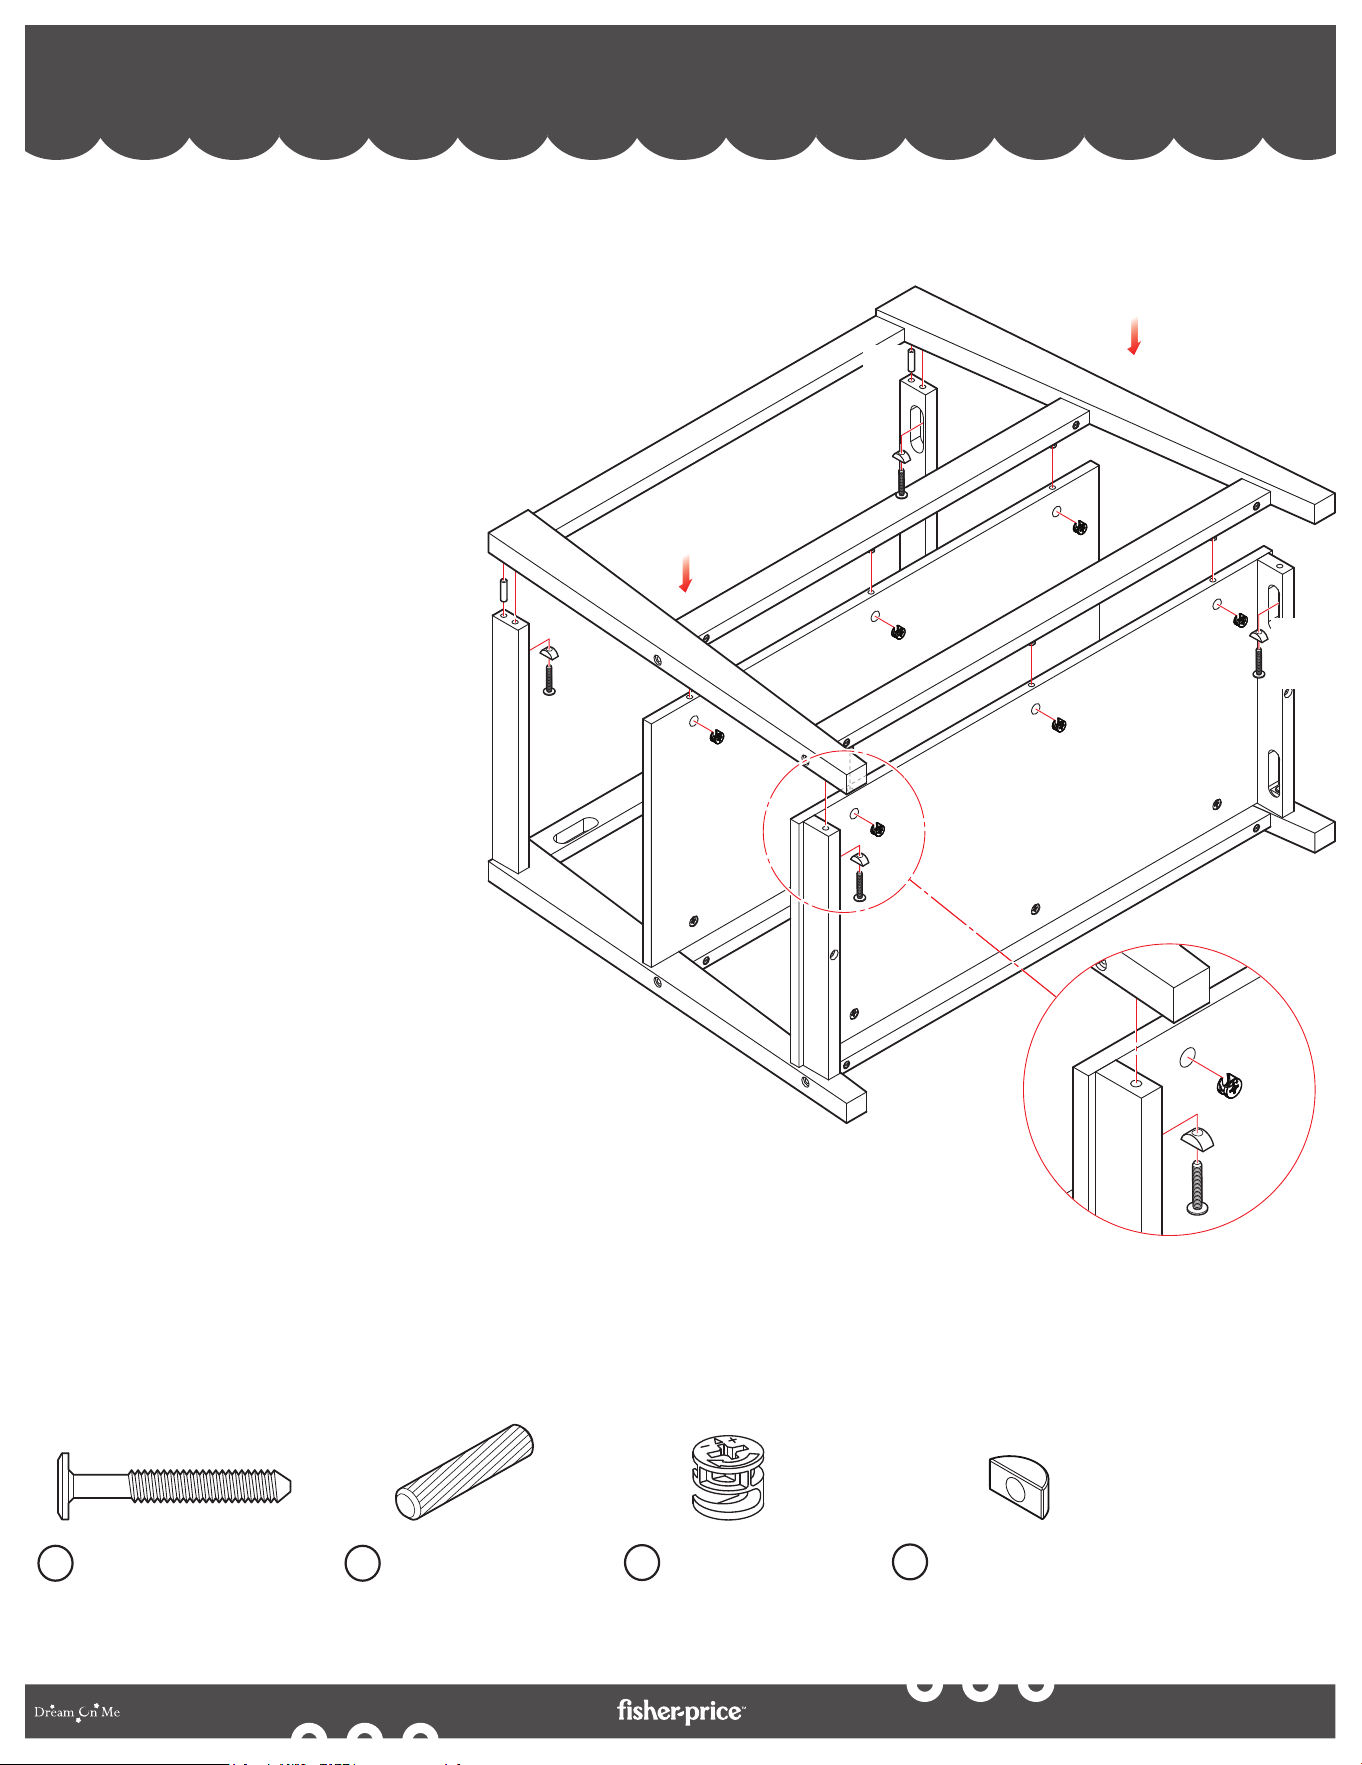
6a. Position and insert the Bolts (D) in the
insertions provided on the Bottom Side
Rails. Tighten the bolts using the Allen
Key (P) to assemble the rails securely.
6a. Positionnez et insérez les boulons
(D) dans les insertions prévues sur
les rails latéraux inférieurs. Serrez
les boulons à l'aide de la clé Allen
(P) pour assembler les rails en
toute sécurité.
6a. Coloque e inserte los Pernos (D)
en las inserciones previstas en los
Rieles Laterales Inferiores.
Apriete los pernos con la llave
Allen (P) para ensamblar los raíles
de forma segura.
5
8
25
By
F
Cam Lock (x2)
Verrou à came (x2)
Cierre de leva (x2)
CHANGING TABLE ASSEMBLY - REAR RAIL ASSEMBLY
ASSEMBLAGE DE LA TABLE À LANGER - ASSEMBLAGE DU RAIL ARRIÈRE
MONTAJE DEL CAMBIADOR - MONTAJE DEL RAÍL TRASERO
7
(F)
(F)
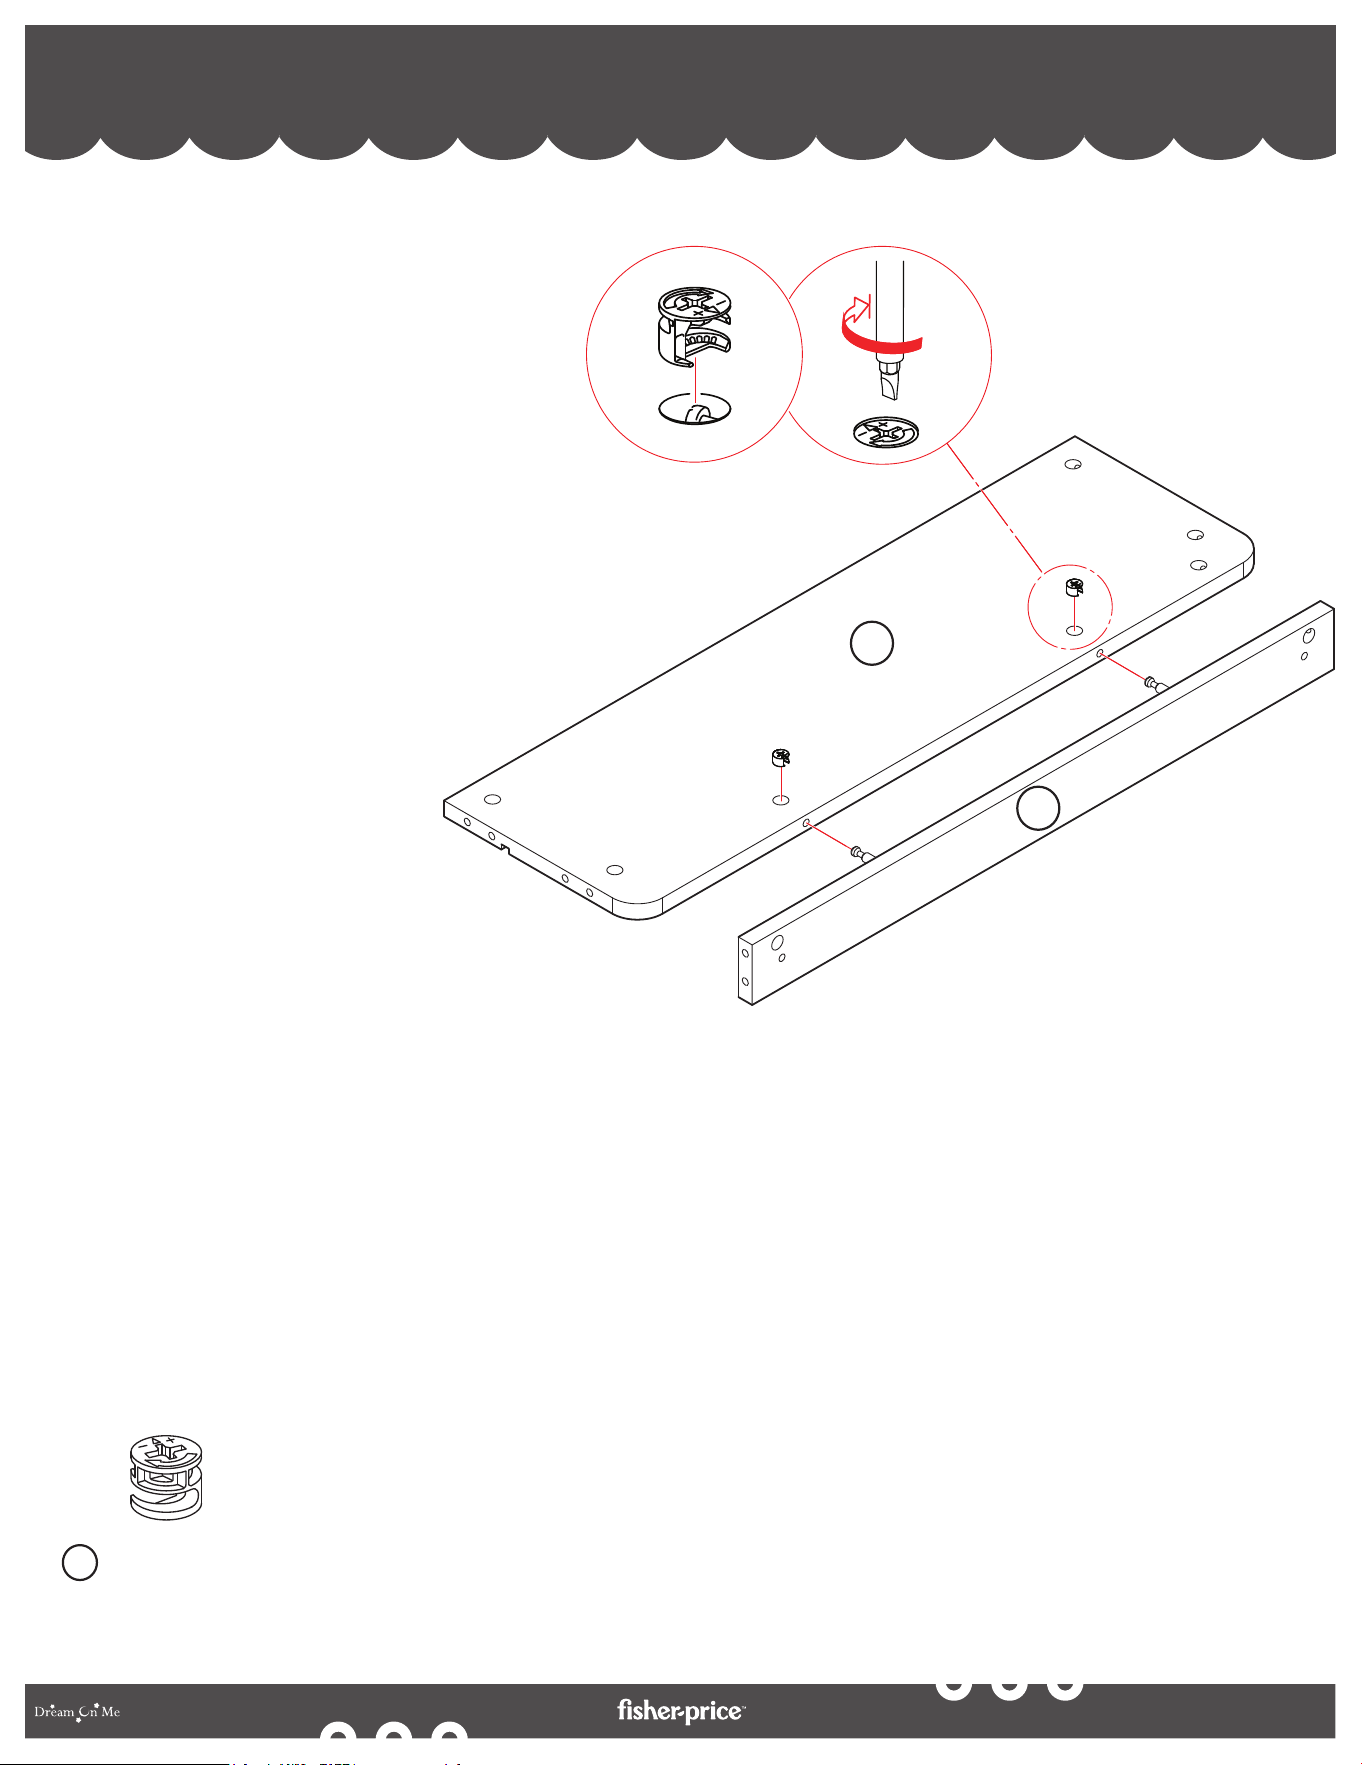
7a. Align the cam bolts on the Drawer
Rear Rail (8) to the insertions on the
Rear Rail (5) as shown in the
illustration.
7b. Position and insert the Cam Locks (F)
in the insertions on the rear rail.
Tighten them using the Philips
Screwdriver (NOT INCLUDED).
7a. Aligner les boulons à came
du rail arrière du tiroir (8)
sur les insertions du rail
arrière (5) comme indiqué
sur l'illustration.
7b. Positionner et insérer les
verrous à came (F) dans
les insertions du rail
arrière. Serrez-les à l'aide
du tournevis Philips (NON
INCLU).
7a. Alinee los pernos de leva del riel trasero del cajón
(8) con las inserciones del riel trasero (5) como
se muestra en la ilustración.
7b. Coloque e inserte los cerrojos de leva (F) en las
inserciones del riel trasero. Apriételos con el
destornillador Philips (NO INCLUIDO).
5
5
8
8
26
By
Wooden Dowel (x4)
Cheville en bois (x4)
Clavija de madera (x4)
E
F
Cam Lock (x6)
Verrou à came (x6)
Cierre de leva (x6)
CHANGING TABLE ASSEMBLY - CHANGER RIGHT SIDE ASSEMBLY
ASSEMBLAGE DE LA TABLE À LANGER - ASSEMBLAGE DU CÔTÉ DROIT DU CHANGEUR
MONTAJE DEL CAMBIADOR - MONTAJE DEL LADO DERECHO DEL CAMBIADOR
8
(F)
(F)
6
7
(F)
(F)
(F)
(F)
(E)
(E)
(E)
(E)
22
22
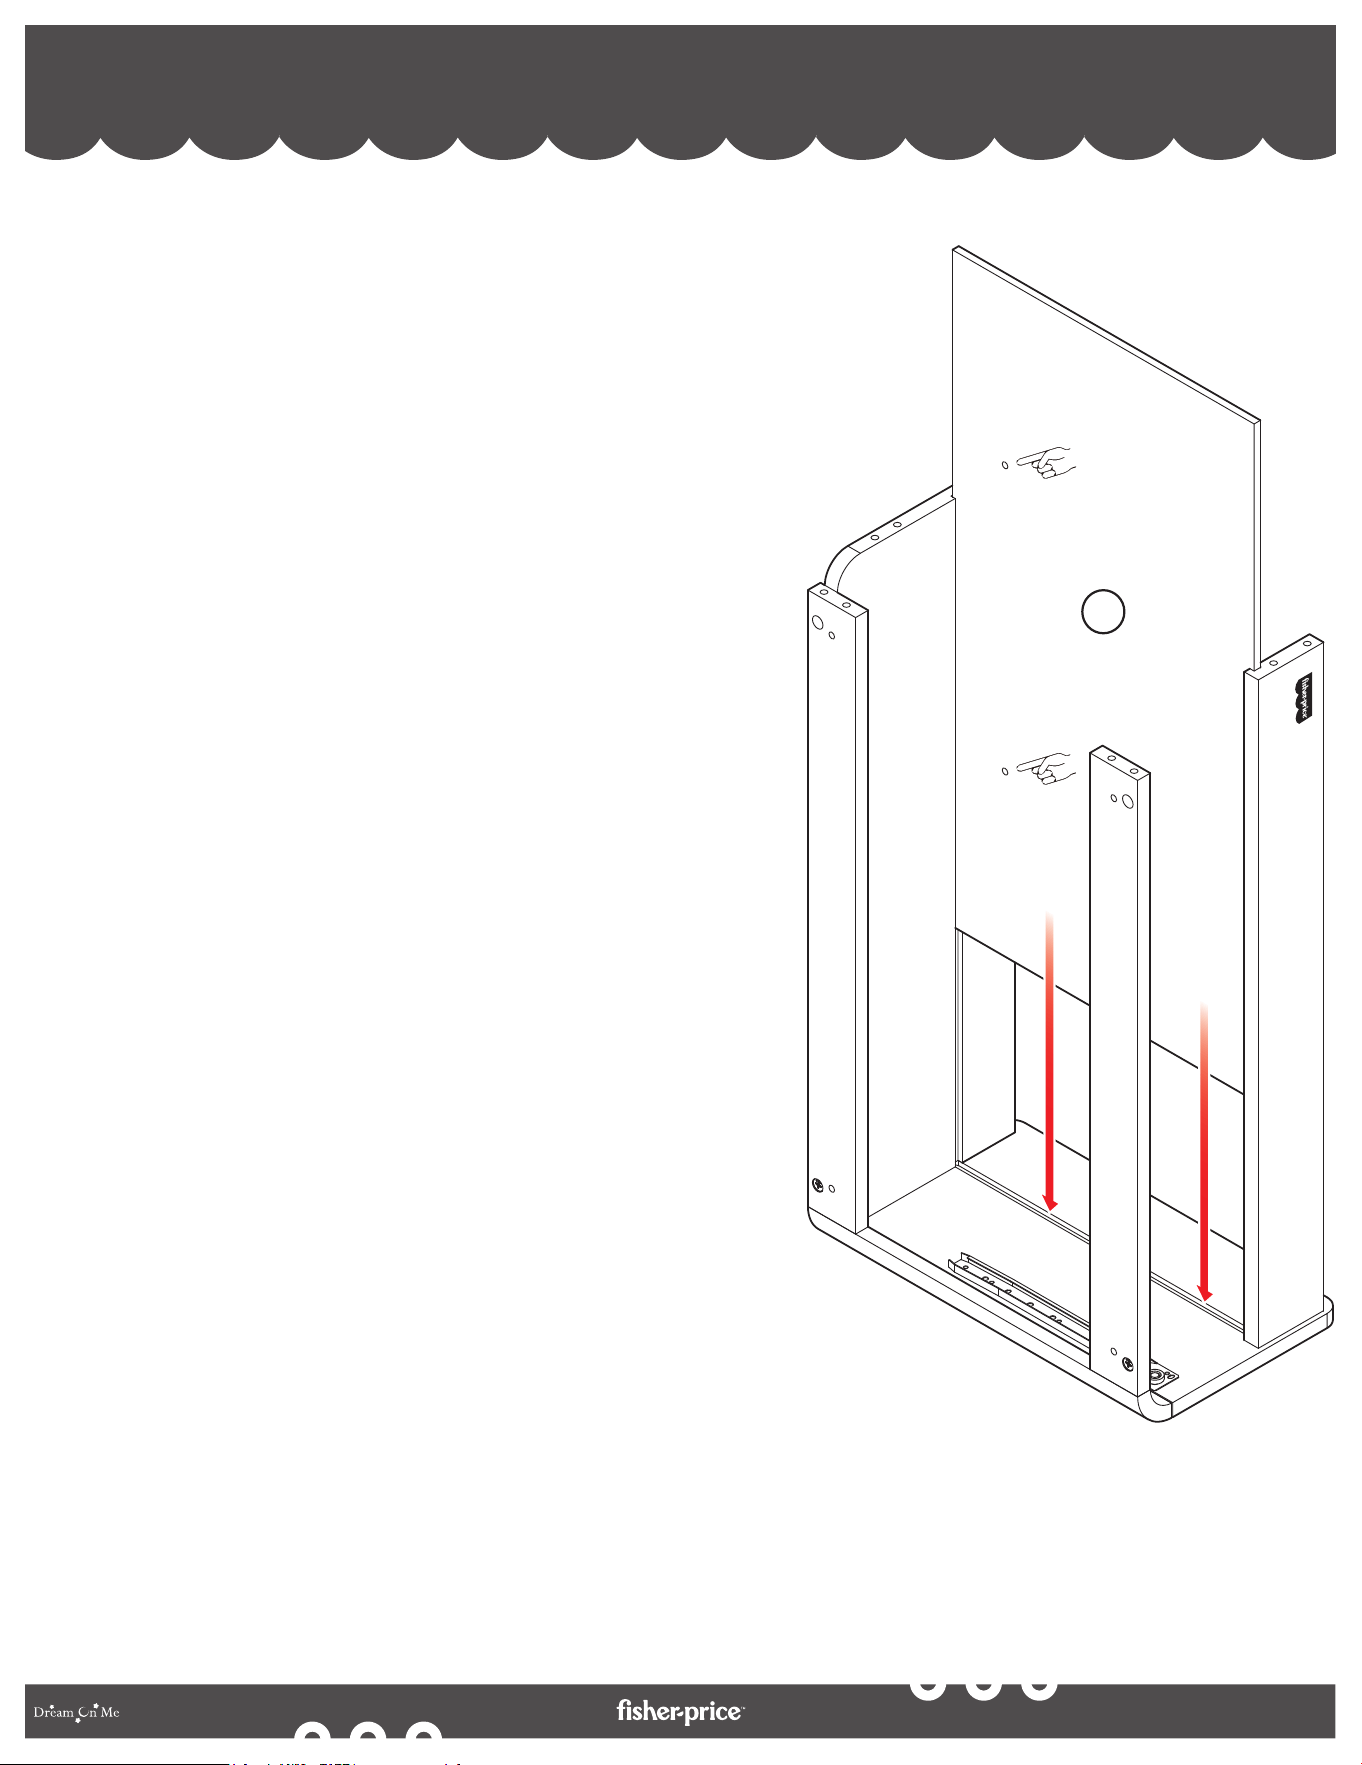
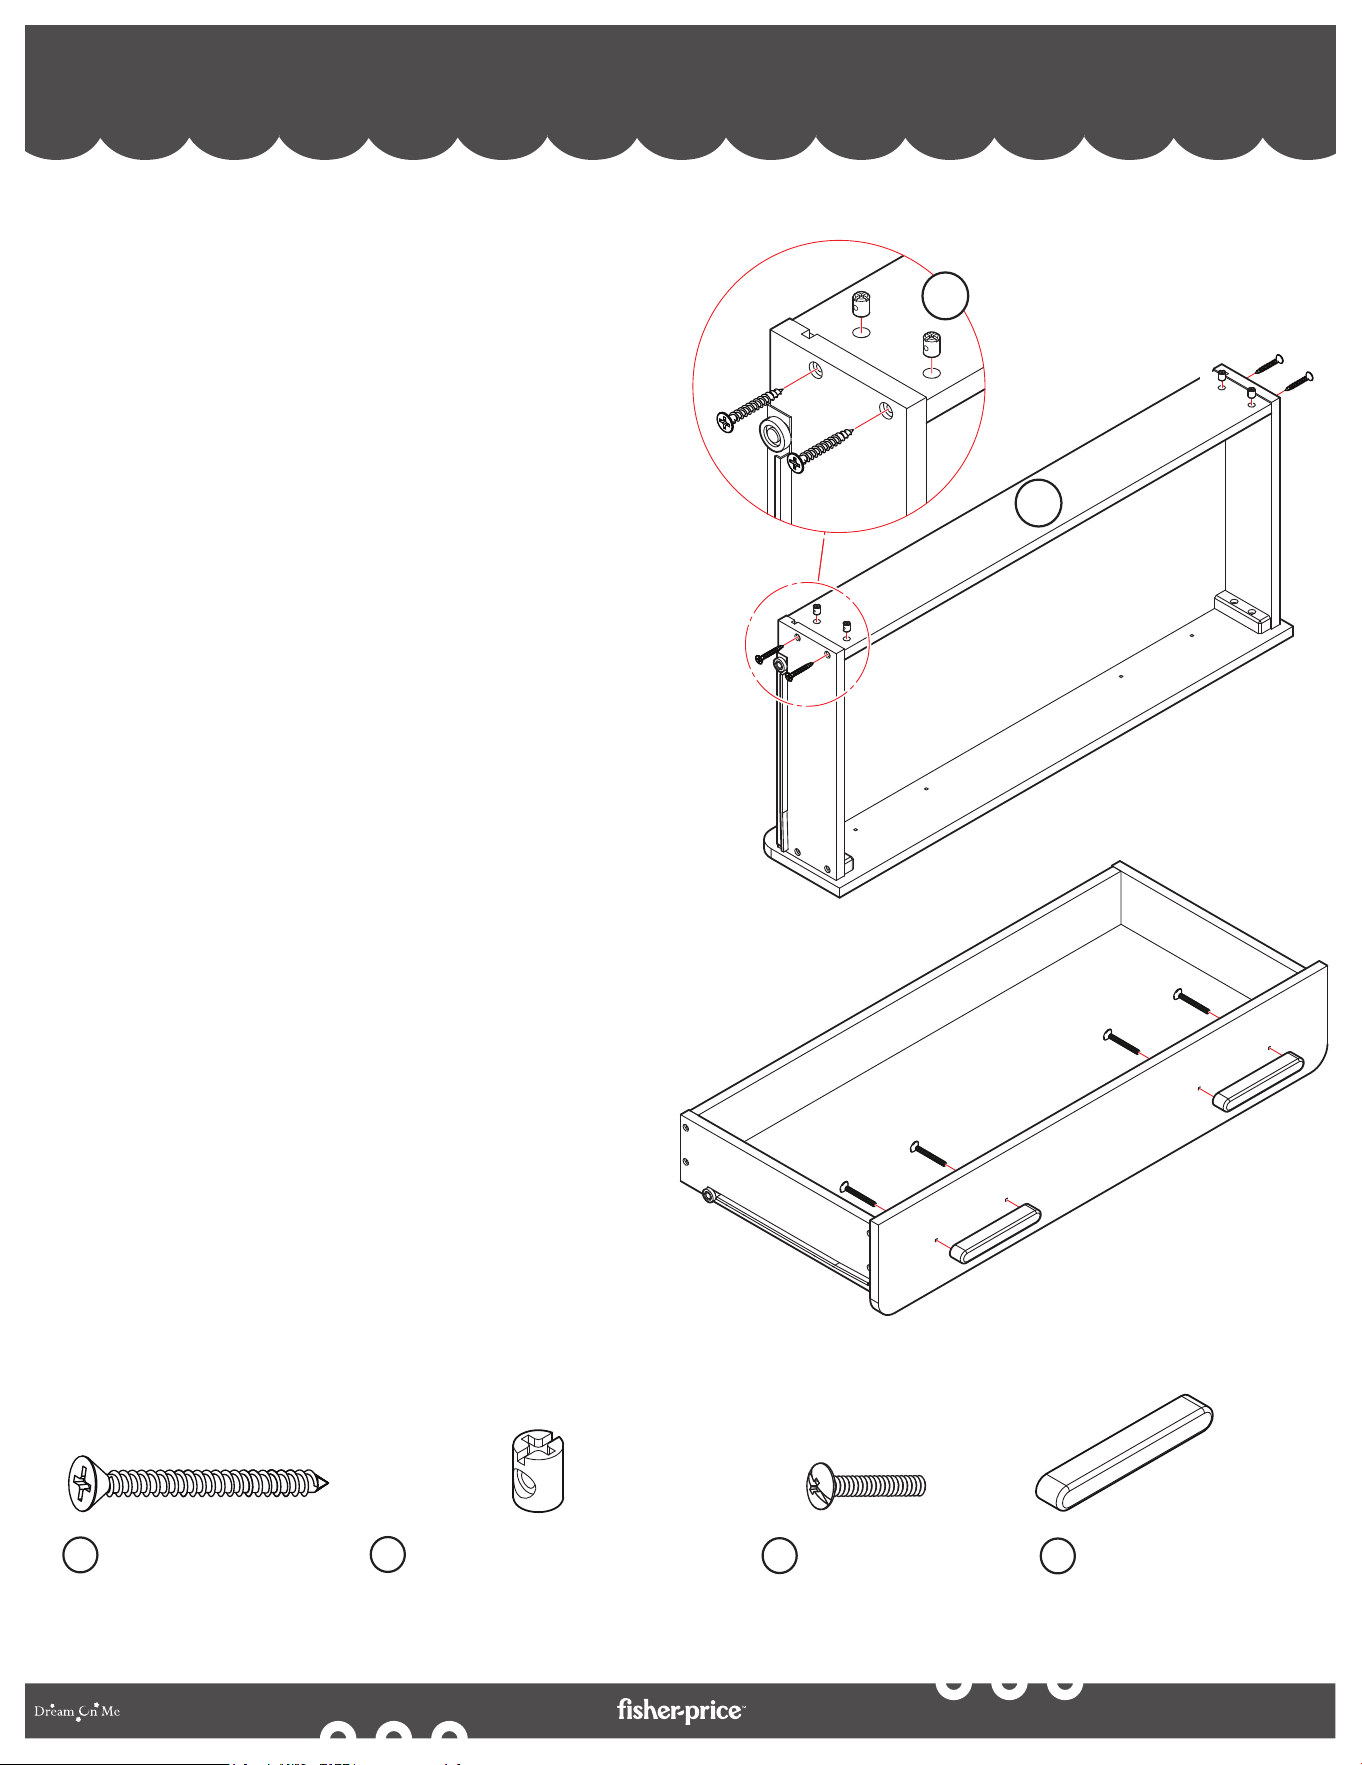
8a. Align the insertions on the assembled rear rail, Changing Top Front
(6) and the Drawer Front Rail (7) to the cam bolts on the Changer
Right Side (22) as shown in the illustration.
8b. Position the Wooden Dowels (E) between the rear rail,
drawer rear rail and the drawer front rail.
8c. Position and insert the Cam Locks (F) in the insertions
provided on the rear rail, changing top front and
drawer front rail. Tighten them using the Philips
Screwdriver (NOT INCLUDED).
8a. Aligner les insertions du rail arrière assemblé, de la
partie supérieure avant du changeur (6) et du rail avant
du tiroir (7) sur les boulons à came du côté droit du
changeur (22), comme indiqué sur l'illustration.
8b. Positionner les chevilles en bois (E) entre le rail arrière,
le rail arrière du tiroir et le rail avant du tiroir.
8c. Positionnez et insérez les verrous à came (F) dans les
insertions prévues sur le rail arrière, le rail supérieur
avant du changeur et le rail avant du tiroir. Serrez-les à
l'aide du tournevis Philips (NON INCLU).
8a. Alinee las inserciones en el riel trasero ensamblado, el
frente superior del cambiador (6) y el riel frontal del
cajón (7) con los pernos de leva en el lado derecho
del cambiador (22) como se muestra en la ilustración.
8b. Coloque los tacos de madera (E) entre el riel trasero,
el riel trasero del cajón y el riel delantero del cajón.
8c. Coloque e inserte los cierres de leva (F) en las
inserciones previstas en el riel trasero, el riel
delantero superior del cambiador y el riel delantero
del cajón. Apriételos utilizando el destornillador
Philips (NO INCLUIDO).
27
By
CHANGING TABLE ASSEMBLY - TOP PANEL ASSEMBLY
ASSEMBLAGE DE LA TABLE À LANGER - ASSEMBLAGE DU PANNEAU SUPÉRIEUR
MONTAJE DEL CAMBIADOR - MONTAJE DEL PANEL SUPERIOR
9
9
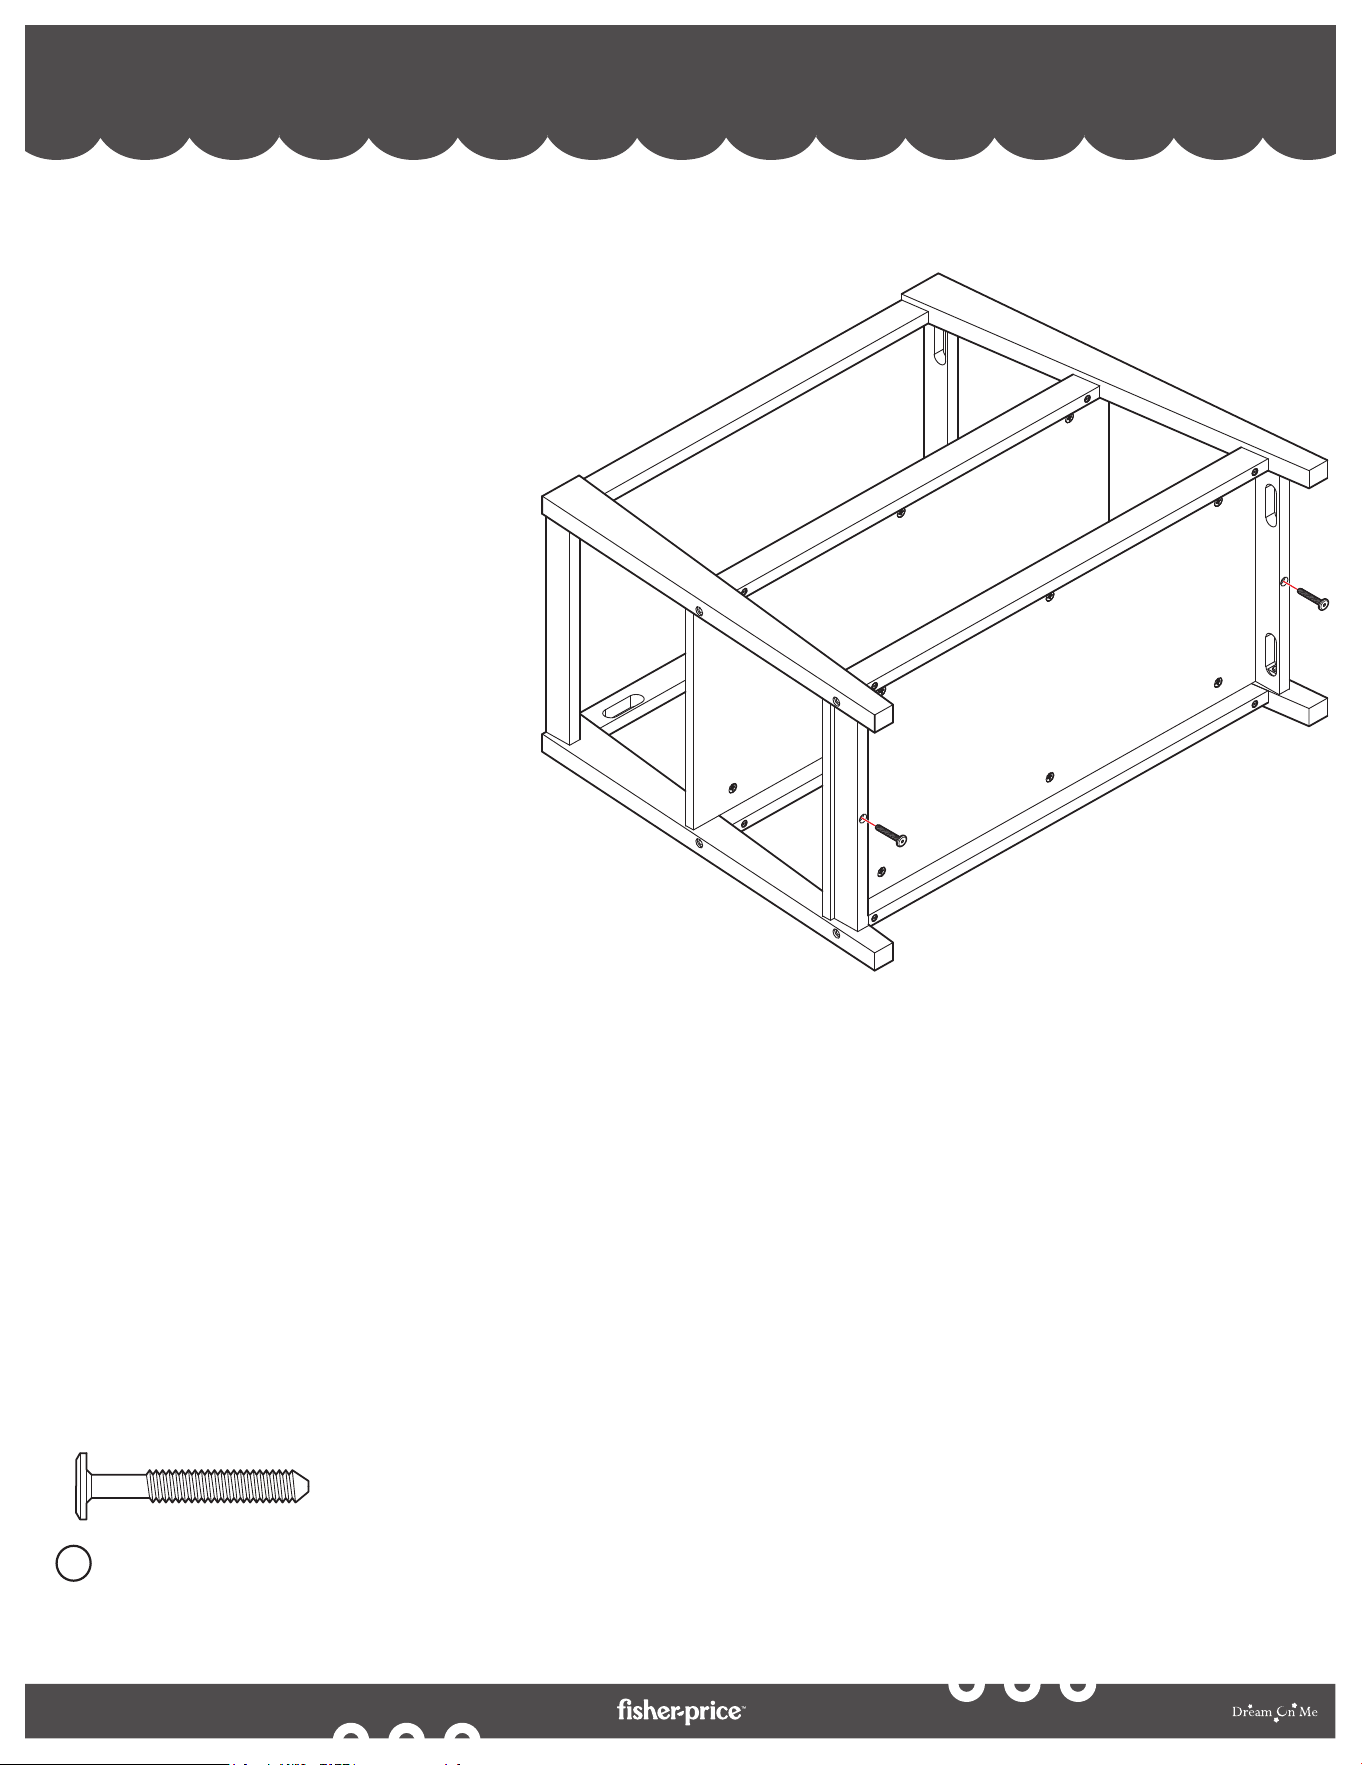
9a. Align and insert the Top Panel (9) in it’s slot
between the rear rail and the changing top front
as shown in the illustration.
9a. Alignez et insérez le panneau supérieur (9) dans
son emplacement entre le rail arrière et l'avant de
la table à langer, comme indiqué sur l'illustration.
9a. Alinee e inserte el panel superior (9) en su ranura
entre el riel trasero y el frente del cambiador
como se muestra en la ilustración.
28
By
Wooden Dowel (x4)
Cheville en bois (x4)
Clavija de madera (x4)
E
F
Cam Lock (x6)
Verrou à came (x6)
Cierre de leva (x6)
CHANGING TABLE ASSEMBLY - CHANGER LEFT SIDE ASSEMBLY
ASSEMBLAGE DE LA TABLE À LANGER - ASSEMBLAGE DU CÔTÉ GAUCHE DU CHANGEUR
MONTAJE DEL CAMBIADOR - MONTAJE DEL LADO IZQUIERDO DEL CAMBIADOR
10
23
23
(E)
(E)
(E)
(E)
(F)
(F)
(F)
(F)
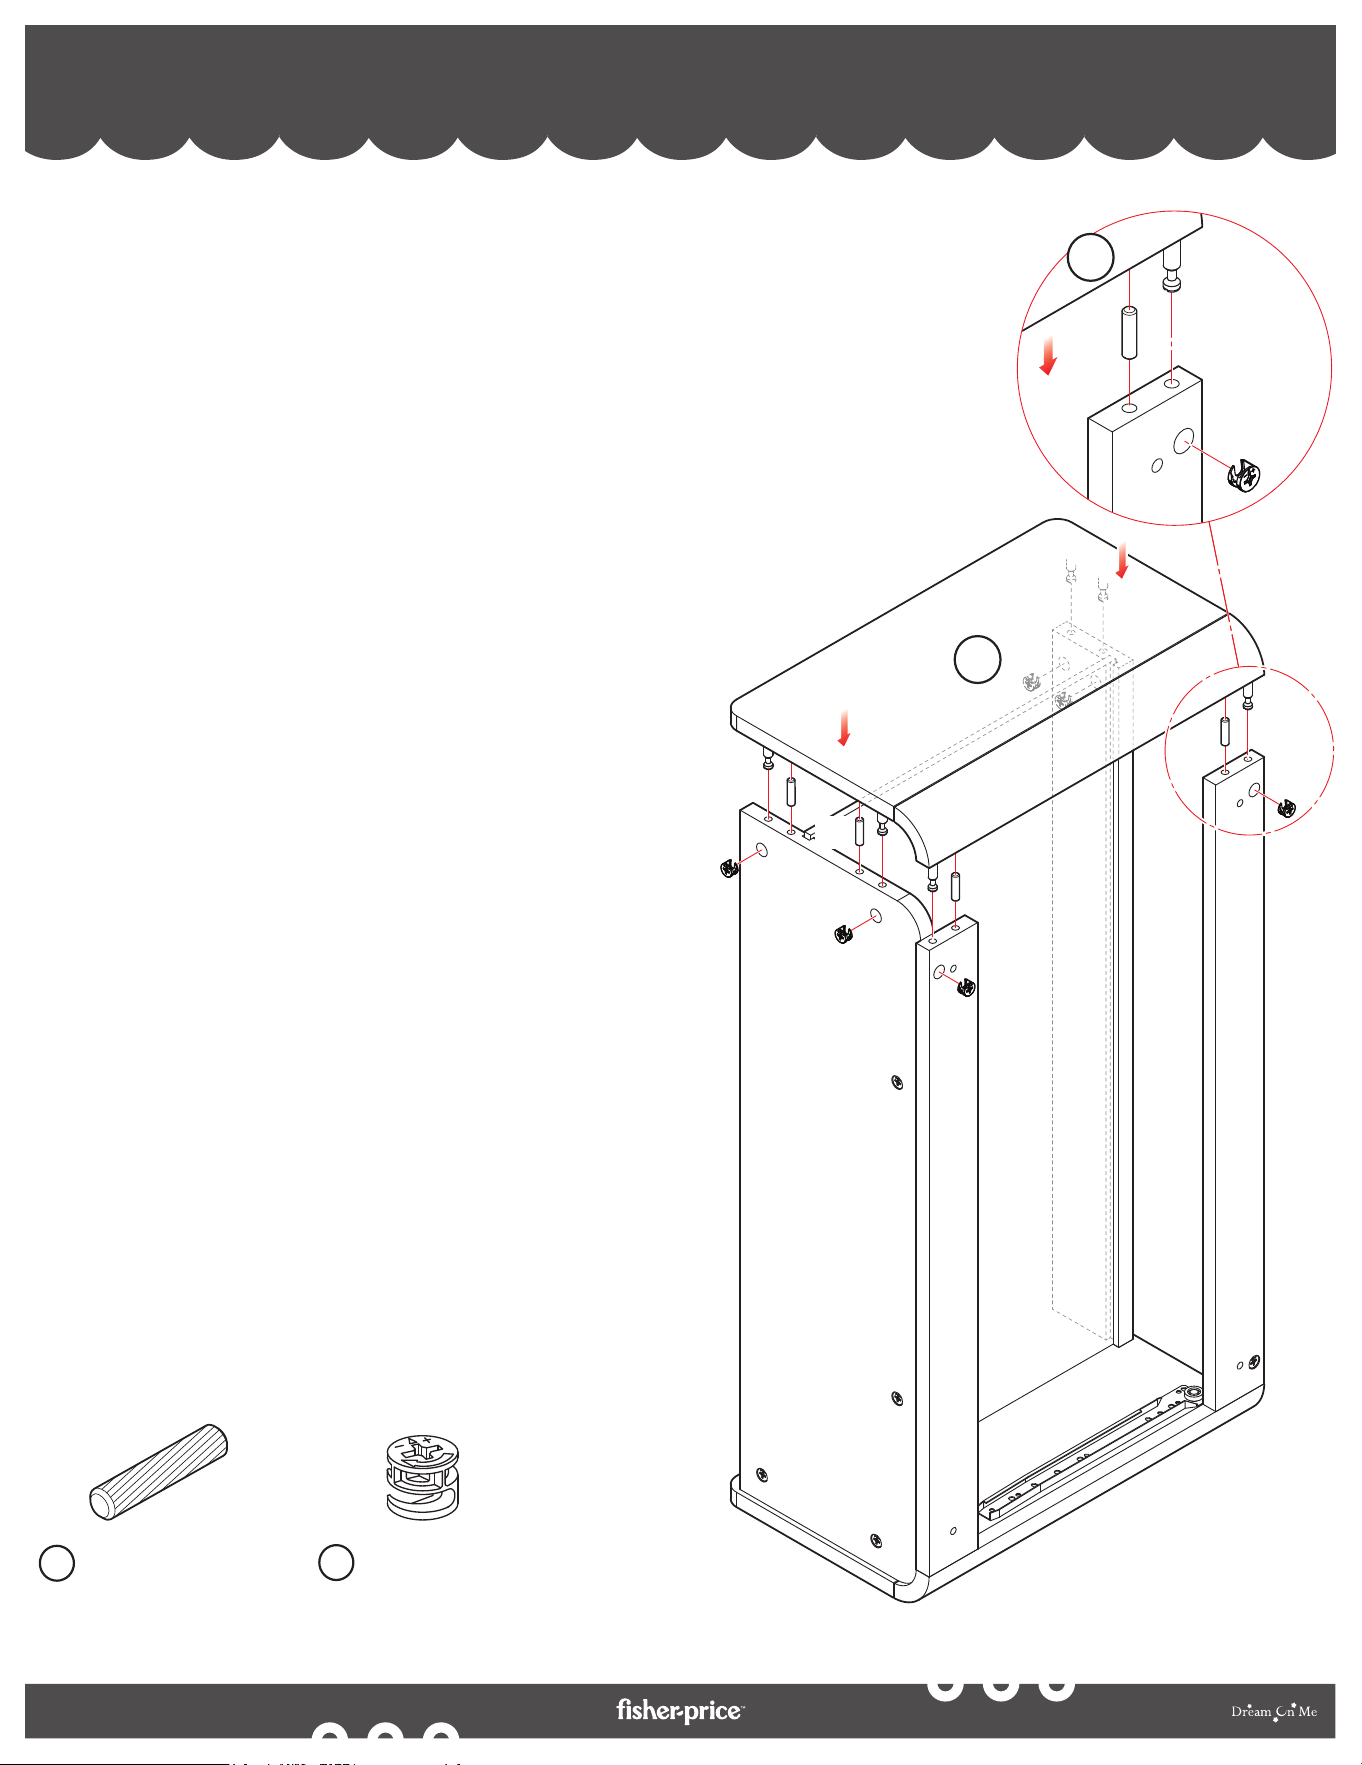
10a. Align the cam bolts on the Changer Left Side (23) over the
half-assembled changing top as shown in the illustration.
10b. Position the Wooden Dowels (E) between the changer left
side and the rails.
10c. Position and insert the Cam Locks (F) in the insertions
provided on the rear rail, drawer rear rail and drawer front
rail. Tighten them using the Philips Screwdriver (NOT
INCLUDED).
10a. Aligner les boulons à came du côté gauche du
changeur (23) sur le plateau à langer à moitié
assemblé, comme indiqué sur l'illustration.
10b. Positionner les chevilles en bois (E) entre le
côté gauche du changeur et les rails.
10c. Positionner et insérer les verrous à came (F)
dans les insertions prévues sur le rail arrière,
le rail arrière du tiroir et le rail avant du tiroir.
Serrez-les à l'aide d'un tournevis Philips
(NON INCLU).
10a. Alinee los pernos de leva del lado izquierdo
del cambiador (23) sobre el cambiador
semimontado como se muestra en la
ilustración.
10b. Coloque los tacos de madera (E) entre el lado
izquierdo del cambiador y los rieles.
10c. Coloque e inserte los cierres de leva (F) en las
inserciones previstas en el riel trasero, el riel
trasero del cajón y el riel delantero del cajón.
Apriételos con el destornillador Philips (NO
INCLUIDO).
29
By
Bolt M6 X 45 MM (x4)
Boulon M6 X 45 MM (x4)
Perno M6 X 45 MM (x4)
D
CHANGING TABLE ASSEMBLY - CHANGING TOP ASSEMBLY
ASSEMBLAGE DE LA TABLE À LANGER - ASSEMBLAGE DU PLATEAU À LANGER
MONTAJE DEL CAMBIADOR - MONTAJE DEL CAMBIADOR
11
(D)
(D)
(D)
(D)
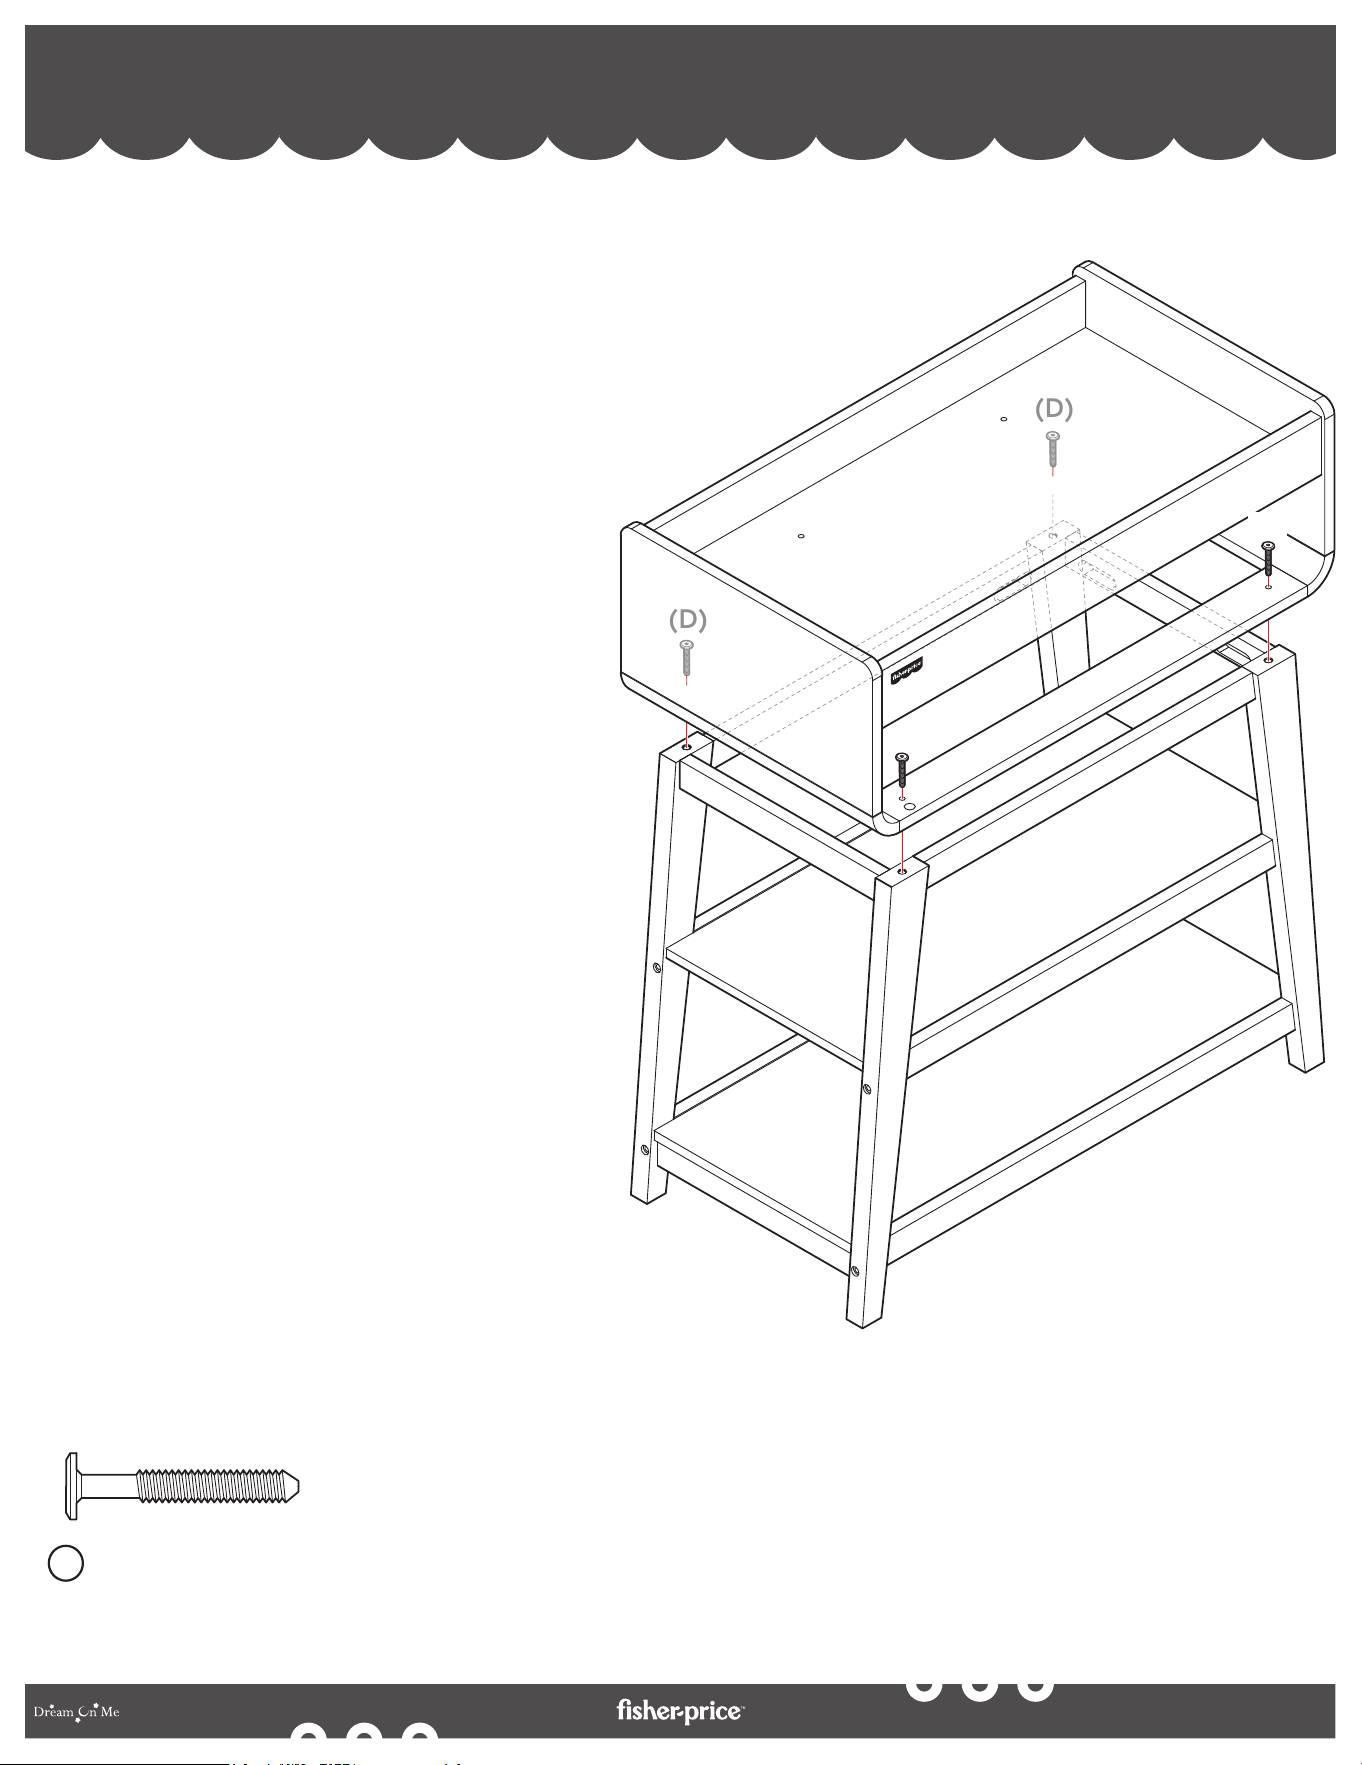
11a. Align the assembled changing top over
the half-assembled changing table as
shown in the illustration.
11b. Position and insert the Bolts (D) in the
insertions provided on the four corners
of the changing top.
11c. Tighten the bolts using the Allen Key
(P) provided to securely fix the
changing top to the changing table.
11a. Aligner le plan à langer assemblé sur la
table à langer à moitié assemblée,
comme indiqué sur l'illustration.
11b. Positionner et insérer les boulons (D)
dans les insertions prévues aux quatre
coins du plateau interchangeable.
11c. Serrez les boulons à l'aide de la clé Allen
(P) fournie pour fixer solidement le plan
à langer à la table à langer.
11a. Alinee el cambiador montado sobre el
cambiador a medio montar como se
muestra en la ilustración.
11b. Coloque e inserte los pernos (D) en las
inserciones previstas en las cuatro
esquinas del cambiador.
11c. Apriete los tornillos con la llave Allen (P)
suministrada para fijar firmemente el
cambiador a la mesa.
30
By
CHANGING TABLE ASSEMBLY - DRAWER PANEL ASSEMBLY
ASSEMBLAGE DE LA TABLE À LANGER - ASSEMBLAGE DU PANNEAU DU TIROIR
MONTAJE DEL CAMBIADOR - MONTAJE DEL PANEL DEL CAJÓN
12
(K)
(K)
(K)
13
14
15
K
Screw 25 MM (x4)
Vis 25 MM (x4)
Tornillo 25 MM (x4)
19
12a. Align the Drawer Front (13), Drawer Left Panel (14)
and the Drawer Right Panel (15) to each other as
shown in the illustration.
12b. Position and insert the Screws (K) in the insertions
provided in the drawer left and right panel.
12c. Tighten the screws using the Philips Screwdriver (NOT
INCLUDED) to fix the drawer panels securely.
12d. Position and insert the Drawer Bottom (19) in its slot
between the drawer left and right panel.
12a. Aligner la façade du tiroir (13), le panneau
gauche du tiroir (14) et le panneau droit du
tiroir (15) comme indiqué sur l'illustration.
12b. Positionner et insérer les vis (K) dans les
insertions prévues dans les panneaux
gauche et droit du tiroir.
12c. Serrez les vis à l'aide du tournevis Philips
(NON INCLU) pour fixer solidement les
panneaux du tiroir.
12d. Positionnez et insérez le fond de tiroir (19)
dans son emplacement entre les panneaux
gauche et droit du tiroir.
12a. Alinee el frente del cajón (13), el panel izquierdo
del cajón (14) y el panel derecho del cajón (15)
entre sí como se muestra en la ilustración.
12b. Coloque e inserte los tornillos (K) en las inserciones
previstas en el panel izquierdo y derecho del cajón.
12c. Apriete los tornillos con el destornillador Philips
(NO INCLUIDO) para fijar firmemente los paneles
del cajón.
12d. Coloque e inserte el fondo del cajón (19) en su
ranura entre el panel izquierdo y derecho del cajón.
31
By
L
Knob Screw (x4)
Vis du bouton (x4)
Perilla Tornillo (x4)
Plastic Barrel Nut (x4)
Écrou de baril en plastique (x4)
Tuerca de barril de plástico (x4)
J
Screw 45 MM (x4)
Vis de 45 mm (x4)
Tornillo 45mm (x4)
H
Knob (x2)
Bouton (x2)
Pomo (x2)
M
CHANGING TABLE ASSEMBLY - DRAWER ASSEMBLY
ASSEMBLAGE DE LA TABLE À LANGER - ASSEMBLAGE DU TIROIR
MONTAJE DEL CAMBIADOR - MONTAJE DEL CAJÓN
13
(H)
(L)
(L)
(M)
(M)
(L)
(L)
(H)
(H)
(H)
(J)
(J)
(J)
(J)
13a. Align the Drawer Back (12) to the half-assembled drawer.
13b. Position and insert the Plastic Barrel Nuts (J) in the
insertions provided in the drawer back panel.
13c. Position and insert the Screws (H) in the insertions
provided in the drawer left & right panel. Tighten the
bolts using the Flat-head Screwdriver (NOT INCLUDED)
to fix the drawer back securely.
13d. Align the Knobs (M) to the drawer front. Position and
insert the Screws (L) in the insertions provided in the
drawer front panel.
13e. Tighten the screws using the Flat-head Screwdriver (NOT
INCLUDED) to fix the knobs securely.
13a. Aligner le dos du tiroir (12) sur le tiroir à moitié assemblé.
13b. Positionner et insérer les écrous cylindriques en plastique (J)
dans les insertions prévues dans le panneau arrière du tiroir.
13c. Positionnez et insérez les vis (H) dans les insertions prévues
dans les panneaux gauche et droit du tiroir. Serrez les vis à
l'aide d'un tournevis à tête plate (NON INCLU) pour fixer
solidement le tiroir à l'arrière.
13d. Alignez les boutons (M) sur la façade du tiroir. Positionnez et
insérez les vis (L) dans les insertions prévues dans le panneau
avant du tiroir.
13e. Serrez les vis à l'aide d'un tournevis à tête plate (NON
INCLUS) pour fixer solidement les boutons.
13a. Alinee el respaldo del cajón (12) con el cajón a medio
montar.
13b. Coloque e inserte las tuercas de barril de plástico (J) en
las inserciones previstas en el panel posterior del cajón.
13c. Coloque e inserte los tornillos (H) en las inserciones
previstas en el panel izquierdo y derecho del cajón.
Apriete los tornillos con el destornillador plano (NO
INCLUIDO) para fijar el respaldo del cajón de forma
segura.
13d. Alinee los pomos (M) con el frontal del cajón. Coloque e
inserte los tornillos (L) en las inserciones previstas en el
panel frontal del cajón.
13e. Apriete los tornillos con el destornillador plano (NO
INCLUIDO) para fijar los pomos de forma segura.
12
12

32
By
CHANGING TABLE ASSEMBLY - DRAWER ASSEMBLY (Contd.)
ASSEMBLAGE DE LA TABLE À LANGER - ASSEMBLAGE DU TIRAGE (suite)
MONTAJE DEL CAMBIADOR - MONTAJE DEL CAJÓN (Cont.)
13
13f. Align and securely insert the
assembled drawer in its slot of the
changing top.
13f. Alignez et insérez fermement le
tiroir assemblé dans sa fente du
plateau à langer.
13f. Alinee e inserte firmemente el cajón
montado en su ranura del
cambiador.

33
By
FURNITURE CARE INSTRUCTIONS
ROOM CLIMATE CONTROL:
• Wood, when first cut contains more than 50 percent water. When it is prepared for
furniture construction it is placed in a Kiln and the moisture content is brought
down to 8 to 10 percent. Wood is porous and responds to its environment. If the
room has high humidity it will absorb it and expand and if the humidity is low it will
lose moisture and shrink.
• It is important that the humidity levels in the room be controlled from extremes of
too much humidity or too little. Furniture should not be placed close to the
air-conditioning outlets, fire places, radiators, space heaters, humidifiers or
dehumidifiers. Exposure to extreme variations of temperature and humidity can
damage any fine wood product.
THE IDEAL ENVIRONMENT FOR FINE FURNITURE:
• Fine wood furniture will have fewer problems when its environment is controlled at
a temperature between 65 and 75 degrees and a relative humidity between 35 and
40 percent. Wood placed in an environment outside of those limits can and will
shrink or expand and may develop some small cracks which are not material or
structural defects.
AVOID DIRECT SUNLIGHT:
• Keep the furniture out of direct sunlight. Ultraviolet rays will fade colors and in
some cases darken them. It can also cause crazing or hair line cracks in the finish.
White finishes will yellow naturally over time and exposure to direct sunlight will
hasten this natural process along with some woods darkening naturally over time;
this is not considered to be a quality defect.
PROPER STORAGE:
• If you need to put your furniture in storage for any period of time do not store
them in a damp basement or hot dry attic. Allow air movement around the furniture
and do not stack anything on it.

34
By
FURNITURE CARE INSTRUCTIONS (cont.)
IN GENERAL:
• DO NOT USE BLEACH OR DETERGENT.
• DO NOT USE ABRASIVE CLEANERS WHICH CAN SCRATCH THE FINISH.
• WITH PROPER CARE, THE QUALITY FINISH WILL LAST A LONG TIME. WOOD SURFACES
MAY BE TREATED WITH A LIGHT APPLICATION OF NON-TOXIC FURNITURE POLISH.
• DO NOT SCRATCH OR CHIP THE FINISH.
• INSPECT THE PRODUCT PERIODICALLY, AND CONTACT DREAM ON ME FOR
REPLACEMENT PARTS OR QUESTIONS.
• DO NOT STORE THE PRODUCT OR ANY PARTS IN EXTREME TEMPERATURES AND
CONDITIONS SUCH AS A HOT ATTIC OR A DAMP, COLD BASEMENT. THESE EXTREMES
CAN CAUSE A LOSS OF STRUCTURAL INTEGRITY.
• TO PRESERVE THE LUSTER OF THE HIGH-QUALITY FINISH ON YOUR PRODUCT, IT IS
RECOMMENDED TO PLACE A DOILY OR FELT PAD UNDER ANY ITEMS YOU PLACE ON
THE FINISH.
• CLEAN WITH A DAMP CLOTH, THEN A DRY CLOTH TO PRESERVE THE ORIGINAL LUSTER
AND BEAUTY OF THIS FINE FINISH.
• DO NOT SPRAY CLEANERS DIRECTLY ONTO THE FURNITURE.
• LIFT SLIGHTLY WHEN MOVING ON CARPETING TO PREVENT LEG BREAKAGE.
• THE USE OF A VAPORIZER NEAR FURNITURE WILL CAUSE THE WOOD TO SWELL AND
FINISH TO PEEL.
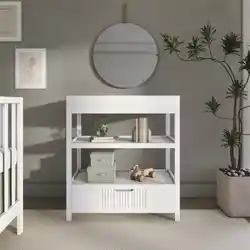
YOU DID IT!
Congratulations Mom & Dad!
It's time to create your dream nursery. A safe, elegant
handcrafted Changing Table that grows with your little one.

35
By
INSTRUCTIONS D'ENTRETIEN DU MOBILIER
CONTRÔLE DU CLIMAT DE LA PIÈCE :
• Le bois, lorsqu'il est coupé, contient plus de 50 % d'eau. Lorsqu'il est préparé pour la
construction de meubles, il est placé dans un four et son taux d'humidité est ramené à 8
ou 10 %. Le bois est poreux et réagit à son environnement. Si l'humidité de la pièce est
élevée, il l'absorbera et se dilatera et si l'humidité est faible, il perdra de l'humidité et
rétrécira.
• Il est important que le taux d'humidité de la pièce soit contrôlé pour éviter qu'il ne soit
trop élevé ou trop bas. Les meubles ne doivent pas être placés près des sorties d'air
conditionné, des cheminées, des radiateurs, des appareils de chauffage, des
humidificateurs ou des déshumidificateurs. L'exposition à des variations extrêmes de
température et d'humidité peut endommager tout produit en bois fin.
L'ENVIRONNEMENT IDÉAL POUR LES MEUBLES DE QUALITÉ :
• Les meubles en bois fin auront moins de problèmes si leur environnement est contrôlé à
une température comprise entre 65 et 75 degrés et une humidité relative comprise entre
35 et 40 pour cent. Le bois placé dans un environnement en dehors de ces limites peut
et va se rétracter ou se dilater et peut développer quelques petites fissures qui ne sont
pas des défauts matériels ou structurels.
ÉVITEZ LA LUMIÈRE DIRECTE DU SOLEIL :
• Gardez les meubles à l'abri de la lumière directe du soleil. Les rayons ultraviolets
décolorent les couleurs et, dans certains cas, les assombrissent. Ils peuvent également
provoquer des craquelures ou des fissures dans le fini. Les finitions blanches jaunissent
naturellement avec le temps et l'exposition à la lumière directe du soleil accélère ce
processus naturel, de même que certains bois s'assombrissent naturellement avec le
temps ; ceci n'est pas considéré comme un défaut de qualité.
STOCKAGE APPROPRIÉ :
• Si vous devez entreposer vos meubles pour une certaine période, ne les entreposez pas
dans un sous-sol humide ou un grenier chaud et sec. Laissez l'air circuler autour du
meuble et n'empilez rien dessus.
36
By
INSTRUCTIONS D'ENTRETIEN DES MEUBLES (suite)
EN GÉNÉRAL :
• N'UTILISEZ PAS D'EAU DE JAVEL OU DE DÉTERGENT.
• NE PAS UTILISER DE NETTOYANTS ABRASIFS QUI PEUVENT RAYER LA FINITION.
• AVEC UN ENTRETIEN APPROPRIÉ, LA FINITION DE QUALITÉ DURERA LONGTEMPS. LES
SURFACES EN BOIS PEUVENT ÊTRE TRAITÉES AVEC UNE LÉGÈRE APPLICATION DE CIRE
POUR MEUBLES NON TOXIQUE.
• NE PAS RAYER OU ÉCAILLER LA FINITION.
• INSPECTEZ LE PRODUIT RÉGULIÈREMENT ET CONTACTEZ DREAM ON ME POUR OBTENIR
DES PIÈCES DE RECHANGE OU POSER DES QUESTIONS.
• NE PAS STOCKER LE PRODUIT OU DES PIÈCES DANS DES TEMPÉRATURES OU DES
CONDITIONS EXTRÊMES TELLES QU'UN GRENIER CHAUD OU UN SOUS-SOL HUMIDE ET
FROID. CES CONDITIONS EXTRÊMES PEUVENT ENTRAÎNER UNE PERTE D'INTÉGRITÉ
STRUCTURELLE.
• POUR PRÉSERVER L'ÉCLAT DE LA FINITION DE HAUTE QUALITÉ DE VOTRE PRODUIT, IL EST
RECOMMANDÉ DE PLACER UN NAPPERON OU UN TAMPON DE FEUTRE SOUS TOUS LES
OBJETS QUE VOUS POSEZ SUR LA FINITION.
• NETTOYEZ AVEC UN CHIFFON HUMIDE, PUIS AVEC UN CHIFFON SEC AFIN DE PRÉSERVER
L'ÉCLAT ET LA BEAUTÉ D'ORIGINE DE CETTE BELLE FINITION.
• NE PAS VAPORISER DE NETTOYANTS DIRECTEMENT SUR LE MEUBLE.
• SOULEVEZ LÉGÈREMENT LE MEUBLE LORSQUE VOUS LE DÉPLACEZ SUR UNE MOQUETTE
AFIN D'ÉVITER DE CASSER LES PIEDS.
• L'UTILISATION D'UN VAPORISATEUR PRÈS D'UN MEUBLE FERA GONFLER LE BOIS ET
DÉCOLLERA LA FINITION.
VOUS AVEZ RÉUSSI !
Félicitations à maman et papa !
Il est temps de créer la chambre d'enfant de vos rêves. Une
table à langer sûre et élégante, fabriquée à la main, qui
grandira avec votre enfant.

37
By
INSTRUCCIONES PARA EL CUIDADO DE LOS MUEBLES
CLIMATIZACIÓN DE LA HABITACIÓN:
• La madera, cuando se corta por primera vez, contiene más del 50% de agua. Cuando
se prepara para la construcción de muebles, se coloca en un horno y el contenido de
humedad se reduce a un 8 o 10 por ciento. La madera es porosa y responde a su
entorno. Si la habitación tiene mucha humedad, la absorberá y se expandirá, y si la
humedad es baja, perderá humedad y se encogerá.
• Es importante que los niveles de humedad en la habitación se controlen para evitar
los extremos de demasiada o poca humedad. Los muebles no deben colocarse cerca
de las salidas de aire acondicionado, chimeneas, radiadores, calefactores,
humidificadores o deshumidificadores. La exposición a variaciones extremas de
temperatura y humedad puede dañar cualquier producto de madera fina.
EL ENTORNO IDEAL PARA LOS MUEBLES FINOS:
• Los muebles de madera fina tendrán menos problemas cuando su entorno esté
controlado a una temperatura de entre 65 y 75 grados y una humedad relativa de
entre 35 y 40 por ciento. La madera colocada en un ambiente fuera de esos límites
puede y se encogerá o expandirá y puede desarrollar algunas pequeñas grietas que
no son defectos materiales o estructurales.
EVITE LA LUZ SOLAR DIRECTA:
• Mantenga los muebles fuera de la luz solar directa. Los rayos ultravioleta destiñen los
colores y en algunos casos los oscurecen. También pueden causar grietas o rayas en
el acabado. Los acabados blancos amarillean de forma natural con el tiempo y la
exposición a la luz solar directa acelera este proceso natural junto con el
oscurecimiento natural de algunas maderas con el tiempo; esto no se considera un
defecto de calidad.
ALMACENAMIENTO ADECUADO:
• Si necesita guardar sus muebles durante algún tiempo, no los almacene en un sótano
húmedo o en un ático seco y caliente. Permita el movimiento de aire alrededor de los
muebles y no apile nada sobre ellos.
38
By
INSTRUCCIONES PARA EL CUIDADO DE LOS MUEBLES (cont.)
EN GENERAL:
• NO UTILICE LEJÍA NI DETERGENTE.
• NO UTILICE LIMPIADORES ABRASIVOS QUE PUEDAN RAYAR EL ACABADO.
• CON EL CUIDADO ADECUADO, EL ACABADO DE CALIDAD DURARÁ MUCHO TIEMPO. LAS
SUPERFICIES DE MADERA PUEDEN TRATARSE CON UNA LIGERA APLICACIÓN DE CERA PARA
MUEBLES NO TÓXICA.
• NO RAYE NI ASTILLE EL ACABADO.
• INSPECCIONE EL PRODUCTO PERIÓDICAMENTE Y PÓNGASE EN CONTACTO CON DREAM ON
ME SI TIENE PREGUNTAS O NECESITA PIEZAS DE REPUESTO.
• NO GUARDE EL PRODUCTO NI NINGUNA DE SUS PIEZAS EN TEMPERATURAS O
CONDICIONES EXTREMAS, COMO UN ÁTICO CALIENTE O UN SÓTANO HÚMEDO Y FRÍO.
ESTOS EXTREMOS PUEDEN CAUSAR UNA PÉRDIDA DE LA INTEGRIDAD ESTRUCTURAL.
• PARA PRESERVAR EL BRILLO DEL ACABADO DE ALTA CALIDAD DE SU PRODUCTO, SE
RECOMIENDA COLOCAR UNA SERVILLETA O UNA ALMOHADILLA DE FIELTRO DEBAJO DE
CUALQUIER OBJETO QUE COLOQUE SOBRE EL ACABADO.
• LIMPIE CON UN PAÑO HÚMEDO Y LUEGO CON UN PAÑO SECO PARA CONSERVAR EL BRILLO
Y LA BELLEZA ORIGINALES DE ESTE FINO ACABADO.
• NO PULVERICE LIMPIADORES DIRECTAMENTE SOBRE LOS MUEBLES.
• LEVANTE LIGERAMENTE EL MUEBLE AL MOVERLO SOBRE LA MOQUETA PARA EVITAR QUE
SE ROMPA.
• EL USO DE UN VAPORIZADOR CERCA DE LOS MUEBLES HARÁ QUE LA MADERA SE HINCHE Y
EL ACABADO SE PELE.
¡LO HAN HECHO!
¡Felicidades mamá y papá!
Ha llegado el momento de crear la habitación infantil de tus
sueños. Un cambiador seguro, elegante y hecho a mano
que crece con tu pequeño.

45 VERONICA AVENUE
SOMERSET NEW JERSEY 08873
5375 BOULEVARD DES GRANDES
PRAIRIES ST LEONARD, QUÉBEC H1R 1B1
FISHER-PRICE™ and associated trademarks are owned by
and used under license from Mattel. ©2023 Mattel.
FISHER-PRICEMC ainsi que les marques et les logos
afférents appartiennent à Mattel Europa B.V. et sont utilisés
sous licence. © 2023 Mattel.
FISHER-PRICE™ y las marcas comerciales asociadas son
propiedad de Mattel y se usan bajo licencia de Mattel.
©2023 Mattel.
www.dreamonme.com
by
Scan the QR code to register your product
Scannez le code QR pour enregistrer votre produit
Escanee el código QR para registrar su producto