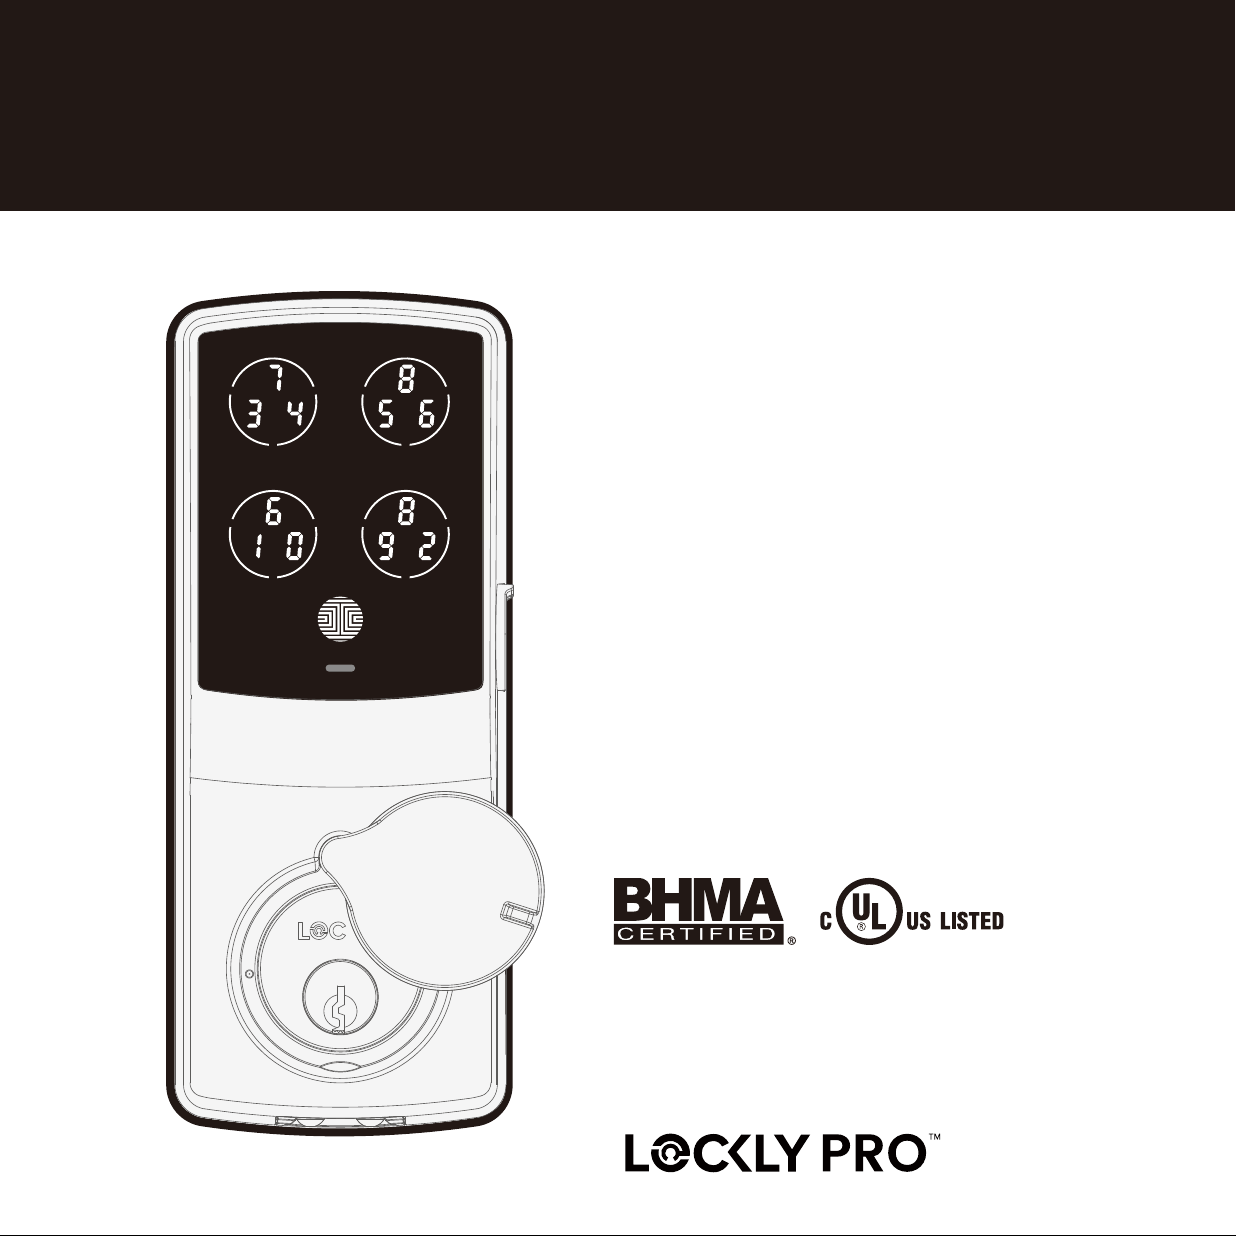
USER MANUAL
www.LocklyPRO.com
LOCKLY GUARD
™
DEADBOLT 728W
For comme
rcial use & professional installation
PGD728WPU
33
Table of Contents
TABLE OF CONTENTS
2.1 Product Overview - Exterior
2.2 Product Overview - Interior
2.3 Understanding Your New Lock
2.4 Reset Button
2.5 Keypad Display Switch
2.6 Rebooting Your Lock
2.7 Low Battery
2.8 Changing The Battery
Section 1 - Product Highlights
Section 2 - Product Overview
Section 3 - Using Your Smart Lock
3.1 Configuring Access
3.2 Entering Programming Mode
3.3 Adding an Access Code
3.4 Deleting an Access Code
3.5 Checking an Access Code
3.6 Adding a Fingerprint
3.7 Fingerprint Scanning Directions
3.8 Fingerprint Scanning Tips & Troubleshooting
3.9 Deleting Stored Fingerprints
3.10 Adding Secure Link
Section 4 - Locking and Unlocking
1.1 Product Features
4.2 Unlocking using Fingerprints
4.3 Locking / Unlocking using App
4.4 Locking / Unlocking using Physical Key
4.5 Unlock with QR Code
4.6 Locking / Unlocking with Voice Assistants
4.7 Safe Mode
4.8 Rain Mode
4.9 Shine Mode
4.10 Welcome Mode
Section 5 - Advanced Features
5.1 Offline Access Code
TM
(OAC)
5.2 Sub-Admin Access
Section 6 - Re-keying
6.1 Re-keying
Section 7 - Important Notes
7.1 Important Notes
Section 8 - Cleaning
8.1 Cleaning
For additional support, visit Lockly
PRO.com/
support or email prosales@Lockly.com
1
2
3
4
5
5
6
7
8
9
10
11
13
15
16
19
20
21
22
23
24
25
26
26
27
28
30
31
31
32
33
34
35
Section 9 - Safety Precautions
9.1 Safety Precautions
36
4.1 Unlocking using Access Codes

SECTION 1.1 1
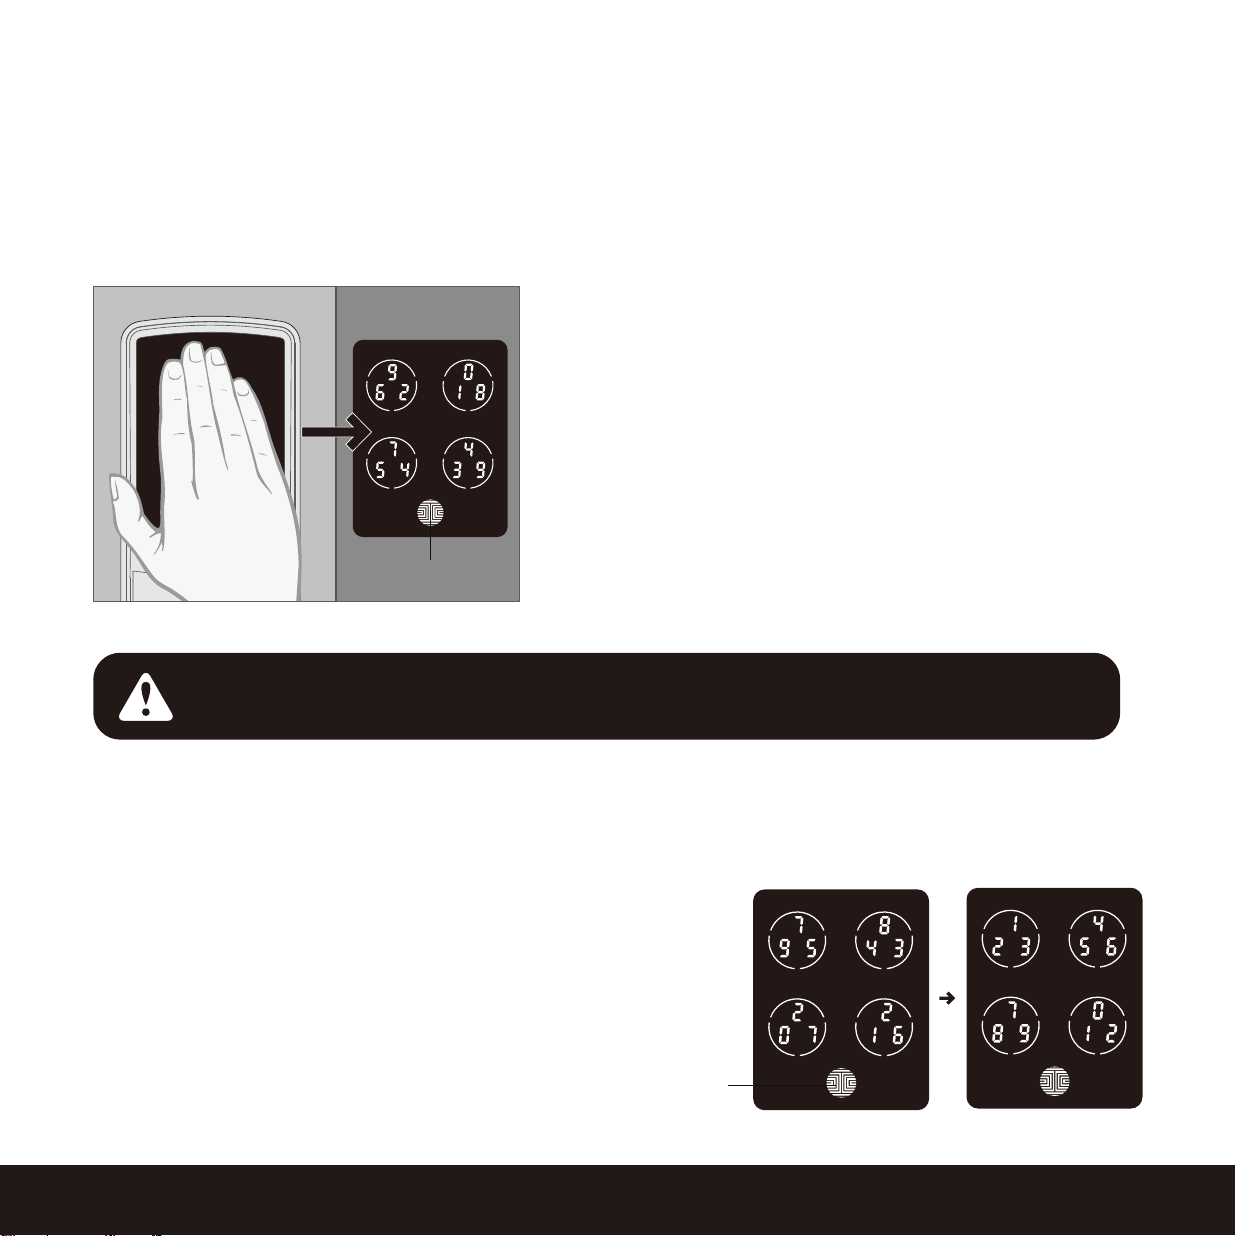
Patented Hack-Proof PIN Genie Keypad
Digits are randomly displayed on the keypad ensuring access codes to be undetectable to
intruders after repeated use. Numbers are randomly distributed across 4 buttons, with 3 numbers
in each button. Users can press any button showing their number. Location of the numbers are
always different every time someone uses the keypad, making it hard for prying eyes to guess the
correct code.
Multiple Access Codes & Monitoring
Store up to 52 Access Codes for family, friends and guests, as well as monitor entry and exit
records.
Advanced 3D Fingerprint Recognition
Biometric Fingerprint Recognition protocol allows up to 99 registered fingerprints to be used and
accepts only actual fingerprints - preventing lifted prints from being used.
Live Monitoring and Voice Control
Through your smartphone, monitor door access from anywhere in the world and securely control
who comes and goes. You can also control your Lockly smart lock using your voice with Amazon
Alexa or Google Assistant-enabled devices.(requires Secure Link Wi-Fi Hub, Included on Secure
Pro Models)
Complete Privacy
The exterior displayed keypad can be locked and switched off using the simple ON/OFF toggle
from the inside panel. The owner can prevent others trying to input the passcode from the
outside and entering the home.
Offline Access Code™ (OAC)
The Offline Access Code™ can allow owners to issue access codes, set the allowed access
duration, all without Lockly ever connecting to the internet, so in case of power outage, you can
still magically and remotely issue Access Codes without any connection to the web.
Auto-Lock
Users no longer have to worry about forgetting to lock the door. With Auto Lock enabled, Lockly
will automatically auto-lock the door based on your customized timing set between 5-300
seconds.
Backup Keys and 9V Battery Socket
The door can be opened with physical backup keys. There is also a 9V battery connection socket
for emergency power backup to access the keypad in case your smart lock runs out of battery.
1.1 Product Features

2.1 Product Overview - Exterior
SECTION 2.12
Reboot
Welcome /Safe Mode
Indicator
Battery Indicator
OK Button
Key Hole Cover
9V Battery Socket
Key Hole
Fingerprint Sensor
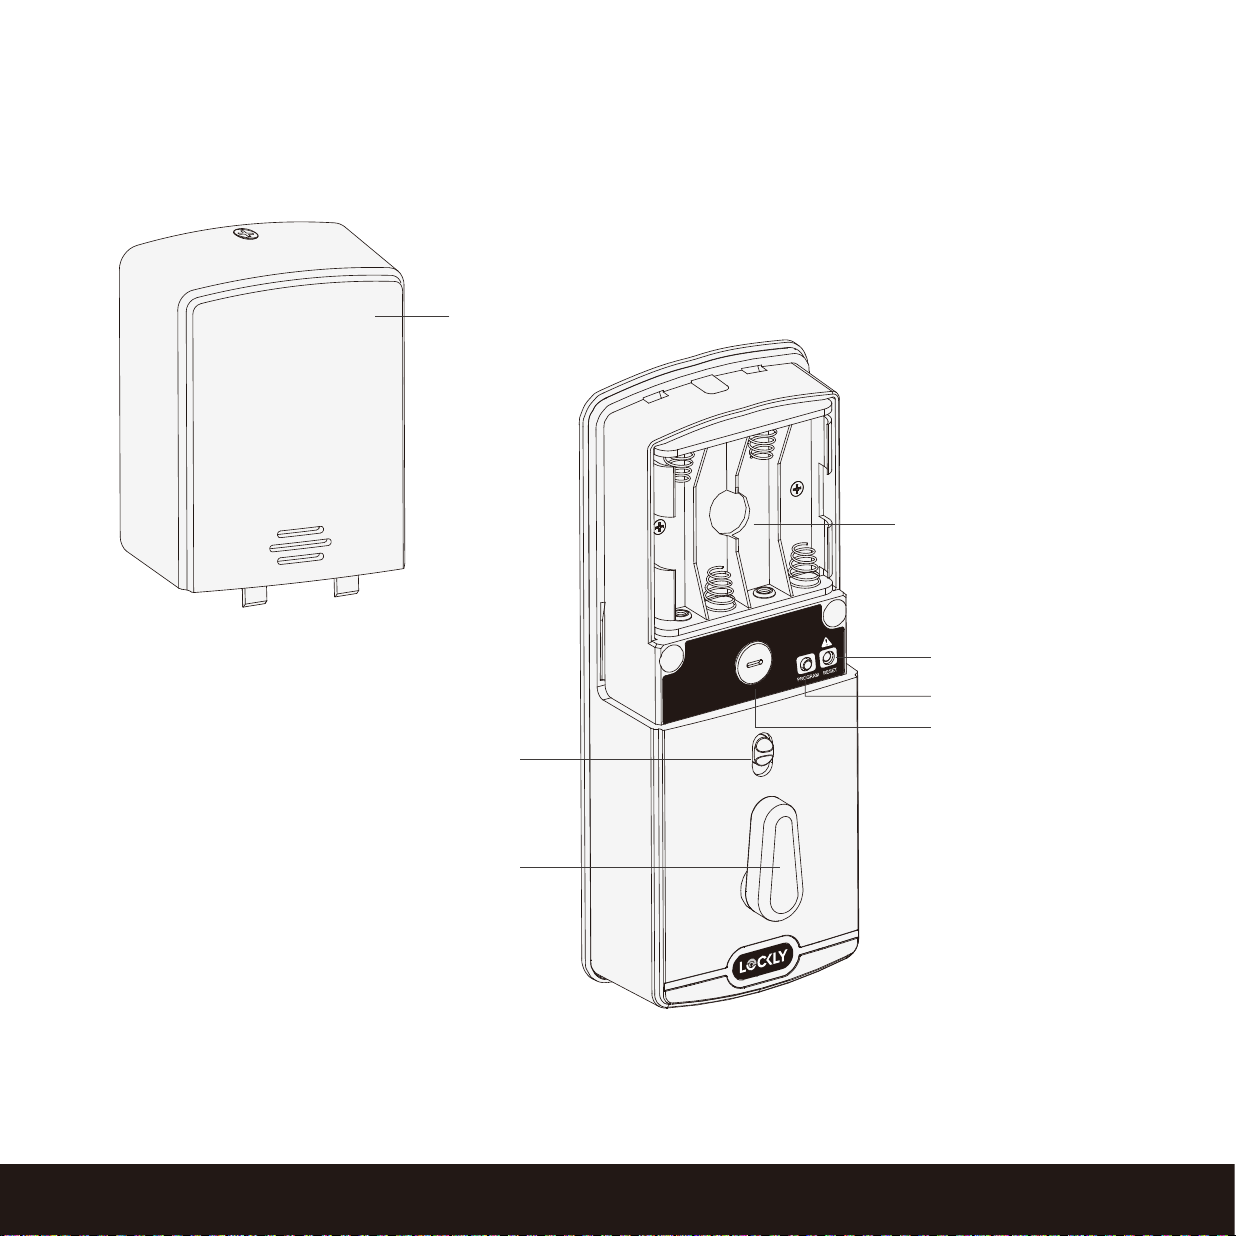
2.2 Product Overview - Interior
SECTION 2.2
3
Battery Compartment
( Operated by 4 x AA Batteries)
Battery Cover
Display Keypad Switch
Thumbturn
Beep Alert
Program Button
Reset Button
SECTION 2.3
2.3 Understanding Your New Lock
Af
ter the installation of your new Lockly, understanding some key functions of operating your smart
lock is important. The following guides will walk you through resetting a lock, adding/ deleting
Access Codes, adding/deleting fingerprints, configuring your Offline Access Code™ (OAC) and
other features of your lock.
For any questions you can always visit LocklyPRO.com/support for assistance.
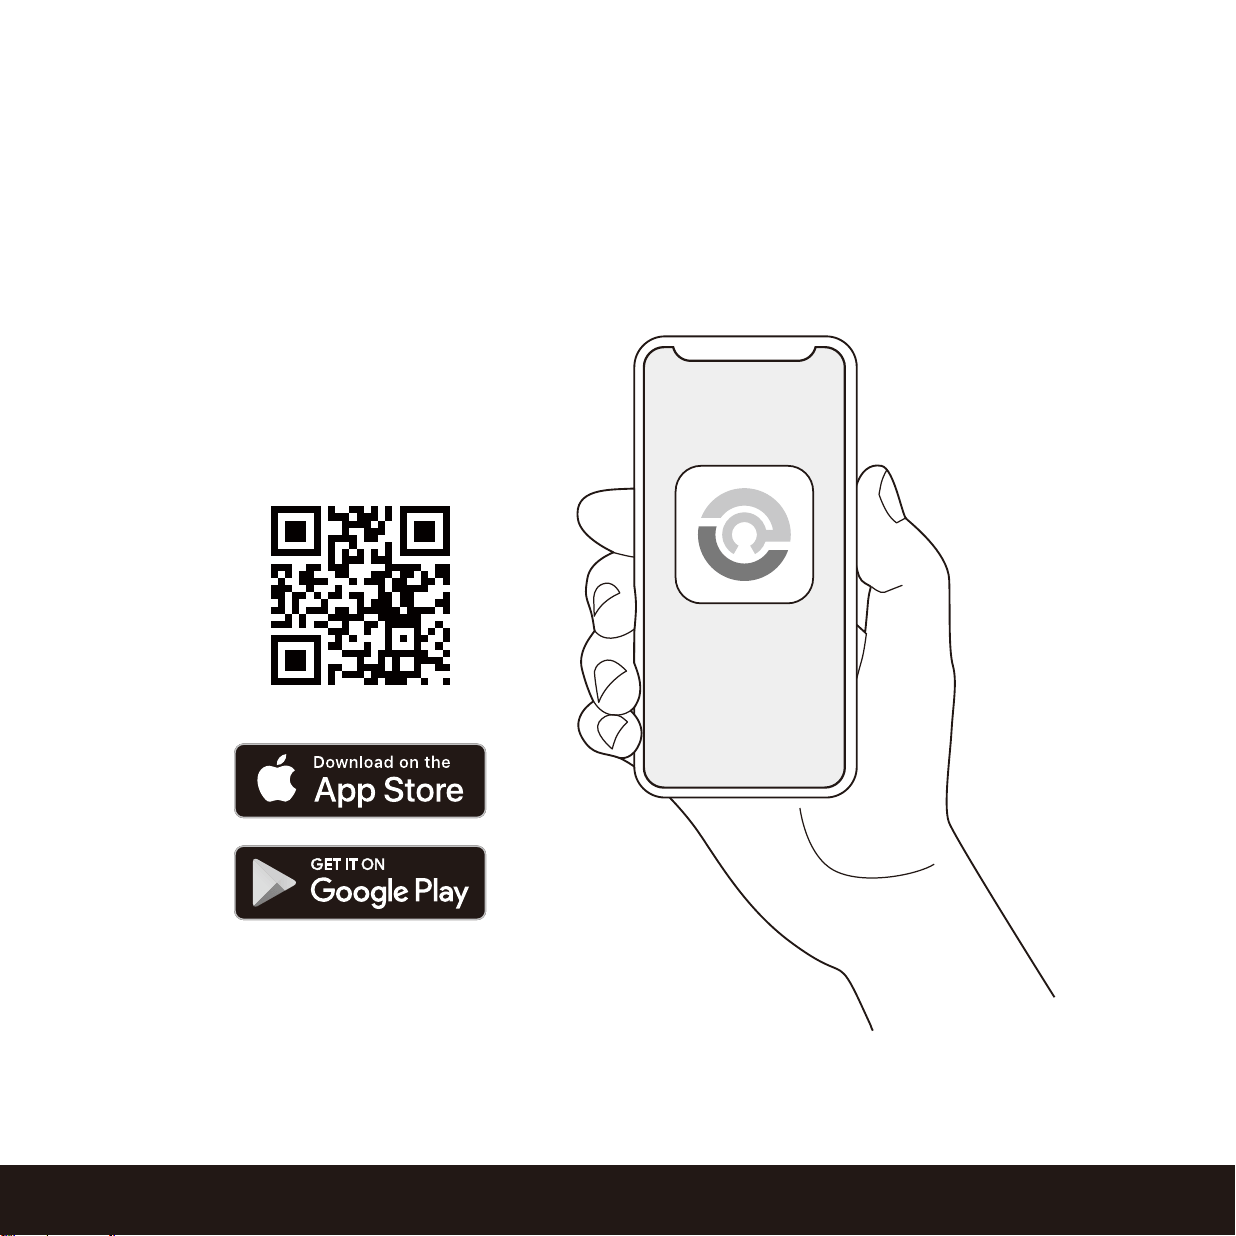
Don’t forget that Lockly Secure works best with our iOS and Android
™
app. Please download the app
by visiting the link below.
4
Scan or visit LocklyPRO.com/app
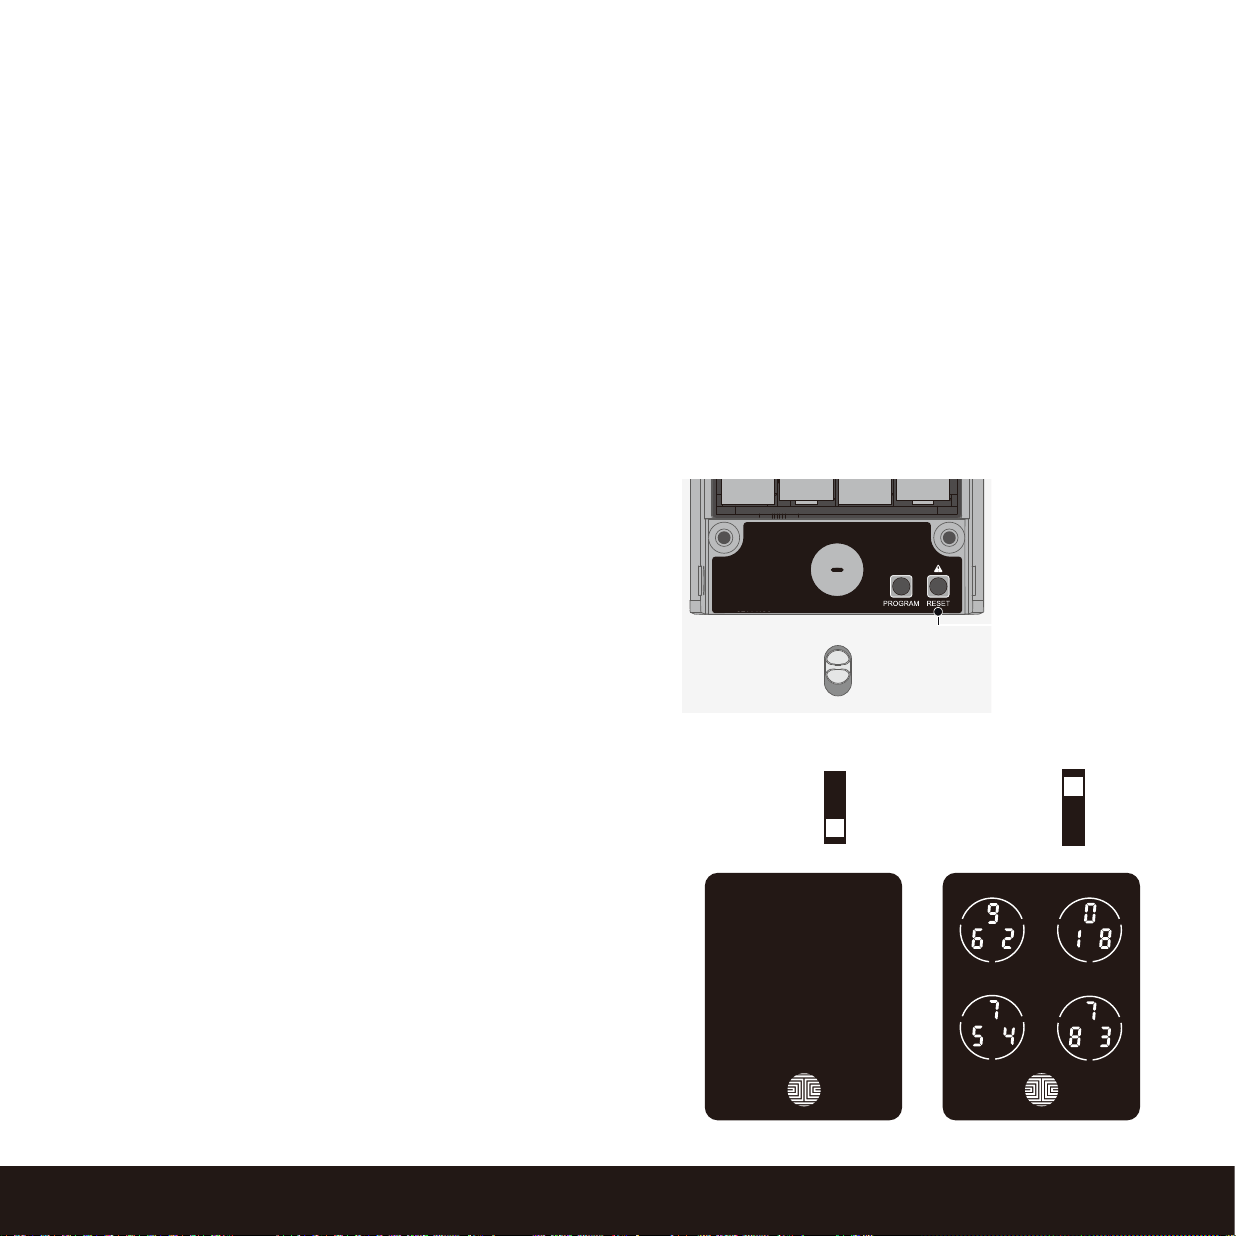
2.4 Reset Button
SECTION 2.4 ~ 2.5
2.5 Keypad Display Switch
The exterior keypad screen can be locked and
turned off by using the ON/OFF switch at the back
panel
(interior) of the smart lock. When it is switched
off,
people who are outside cannot enter any
access
codes to unlock the door.
5
OFF
ON
Reset Button
If you need to reset, you must have your Activation Code available. The Activation Code can be
found on the Activation Code Card that came with your smart lock. Once the smart lock has been
reset, all the data previously stored will be deleted. See below which Reset procedure applies for
you.
Never Connected to App
Press Reset Button for 3 seconds, and the smart lock will restart and reset.
Connected to App
In the Settings menu of the App, select Perform Factory Reset. The smart lock will restart and reset.
After reset, you’ll need the Activation Code to reconnect the App.
Note:
If you replace a new smartphone device, log in
your existing Lockly account on the smartphone
and reconnect to the smart lock according to the
APP prompts.
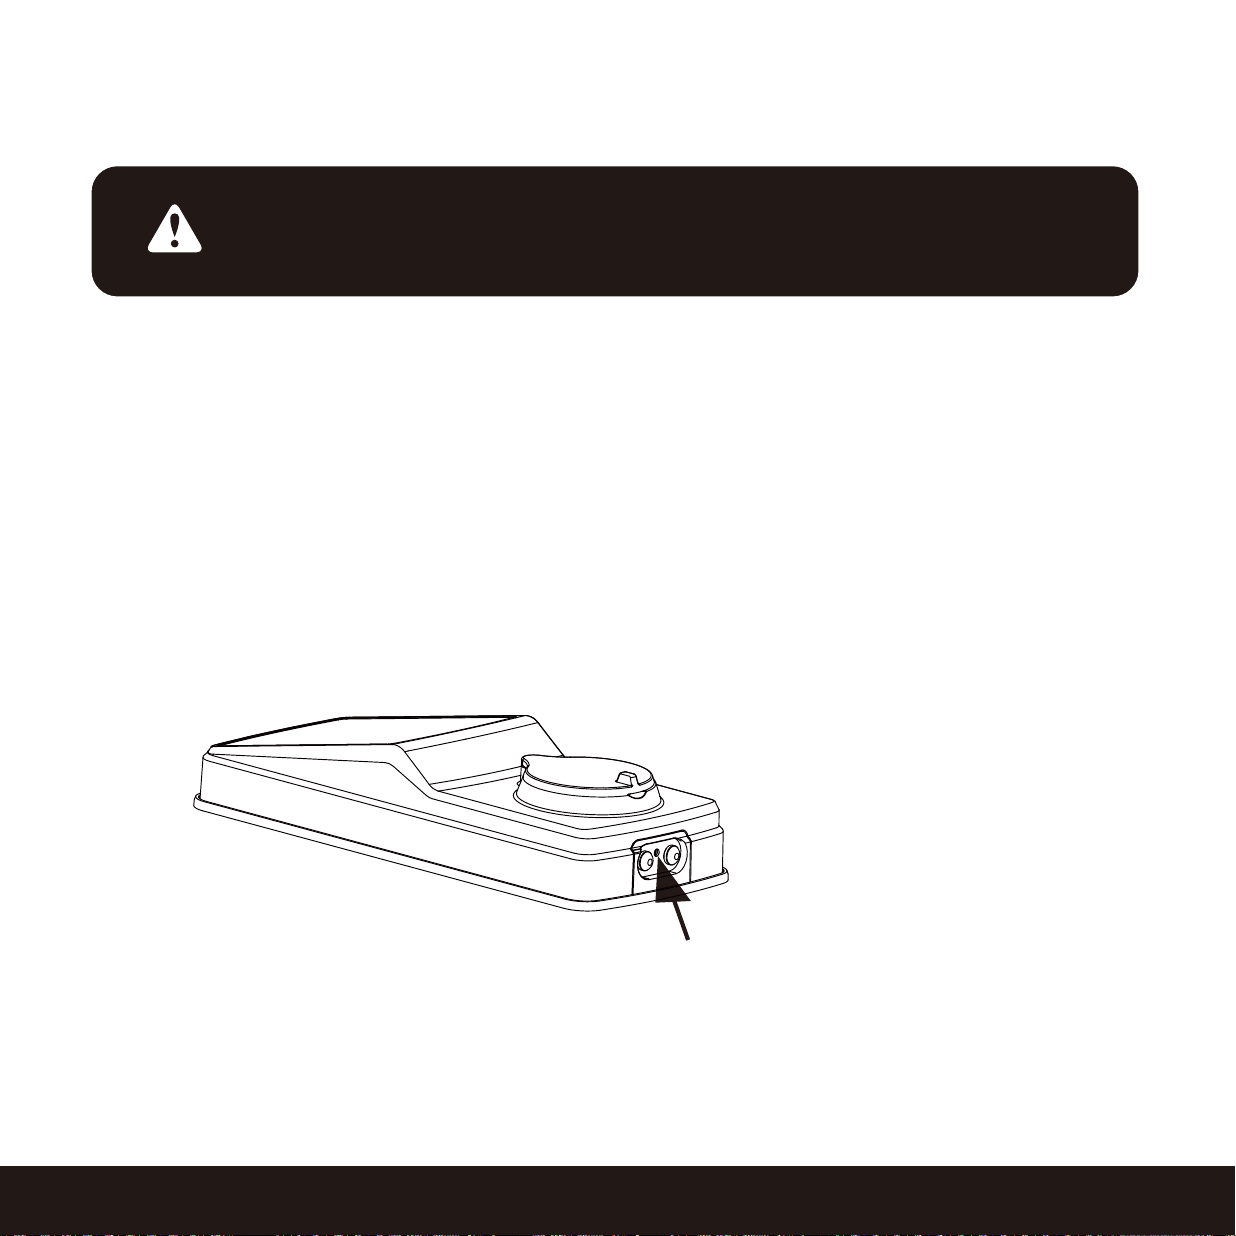
2.6 Rebooting Your Lock
SECTION 2.6
NOTICE
Reboot Lockly
in case of dead battery or malfunction. No
settings will be changed and all Access Codes will still be
stored within Lockly.
Press and release the reboot button when you want to reboot the lock. Your Lockly will beep once
after reboot. Only reboot when necessary.
To reboot, find the reboot button located on the bottom of the exterior side of Lockly lock. The
reboot button is located in the middle of the two 9V battery backup sockets.
You will need something small such as a paperclip, to press the reboot button. Insert the paperclip
and press down firmly and let go. Your screen should restart and the lock should reboot automatically.
Reboot Button
6
2.7 Low Battery
SECTION 2.7
When the battery is in seriously low condition, Lockly will make continuous beeping sounds in addi
tion
to the flashing low battery icon on the touch screen. You should replace batteries immediately
to
avoid your smart lock from shutting down.
When your smart lock low-battery warning alert finally dies, you will have 3 chances to unlock your
smart lock either by a password, APP or fingerprint. If the unlock was successful, the low-battery
warning alert will be on for 1 minute. After which, the smart lock will go to dead battery mode and
will lock auto lock in 5 seconds and the screen will display a low-battery icon.
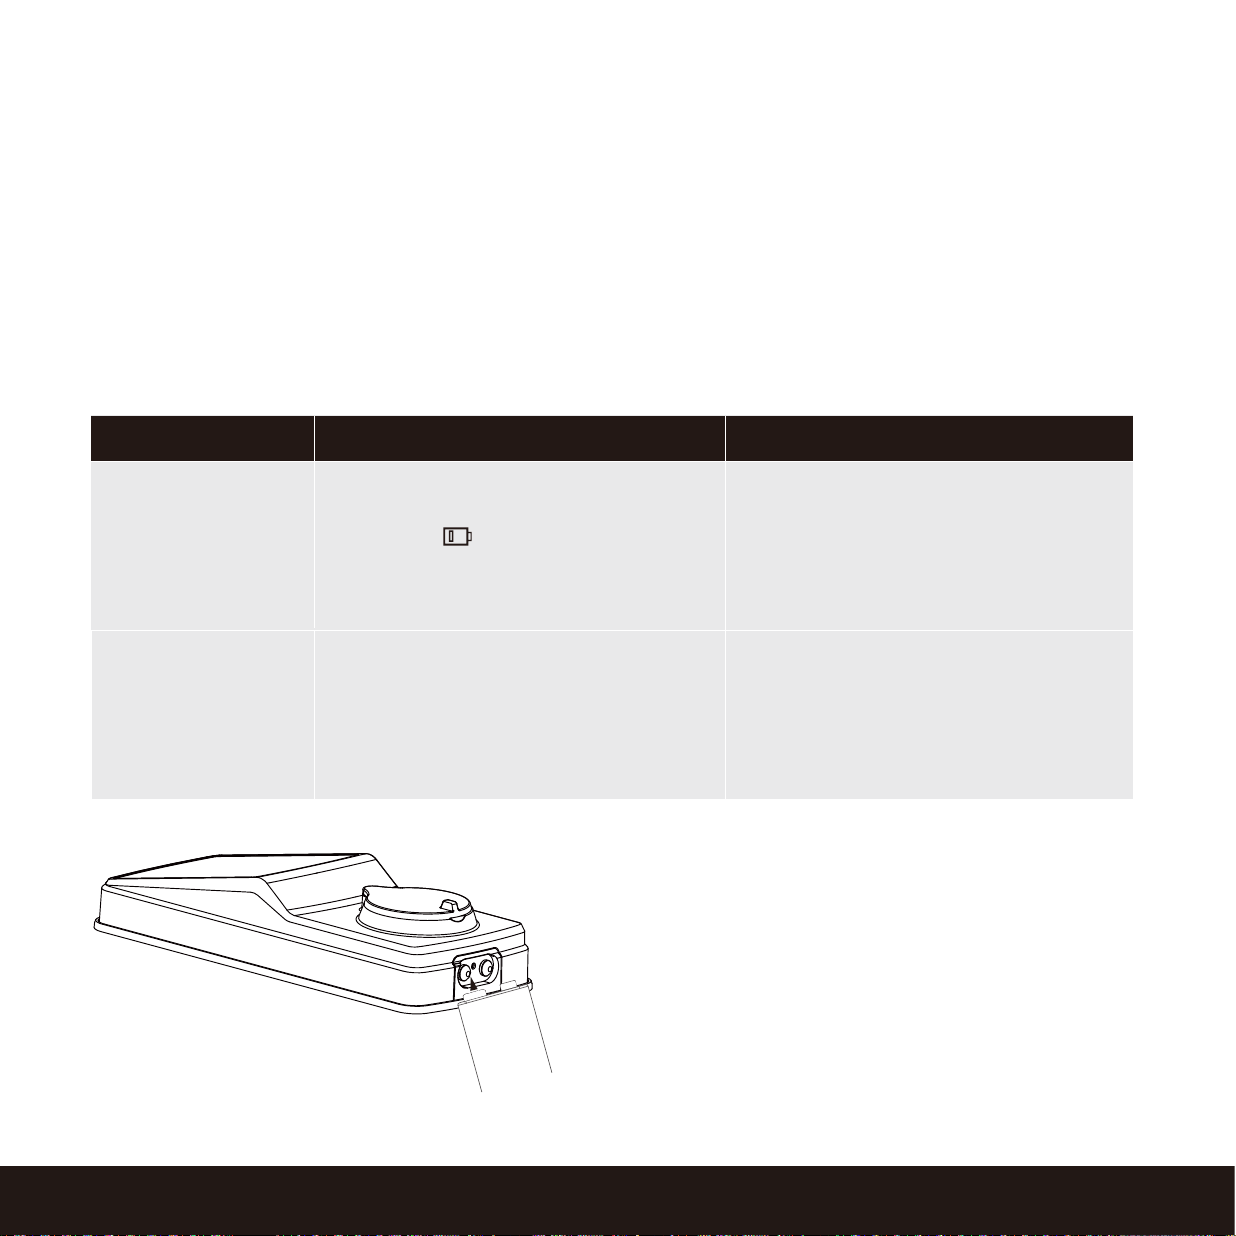
Dead Battery
Condition Indicator Solution
Low Battery
Battery Icon on the display
keypad will light up to indicate
low
battery . At the same time,
Lockly logo on the interior panel
will flash red to reminder users
that battery is low.
Replace batteries immediately to
avoid battery failure. Lockly Secure
can still operate up to 300 cycles
in low battery condition.
When there is no display
and
sounds; and screen is
non-func-
tional.
Replace batteries immediately.
Supplied physical backup keys
can be used to unlock the door.
Alternatively, use a 9V battery as
shown below to temporarily activate
the lock.
Your Lockly will automatically
detect battery
polarity. So hold your 9V
battery lead in place
against bottom of
the Lockly to temporarily
activate
t
he screen to enter your Access Code.
Be sure to hold the 9V battery against
the
contact points located at the bottom
of the
lock until you have successfully
unlocked your
door with your Access
Code. Once unlocked,
batteries should
be replaced immediately.
7
9V Battery
-
+
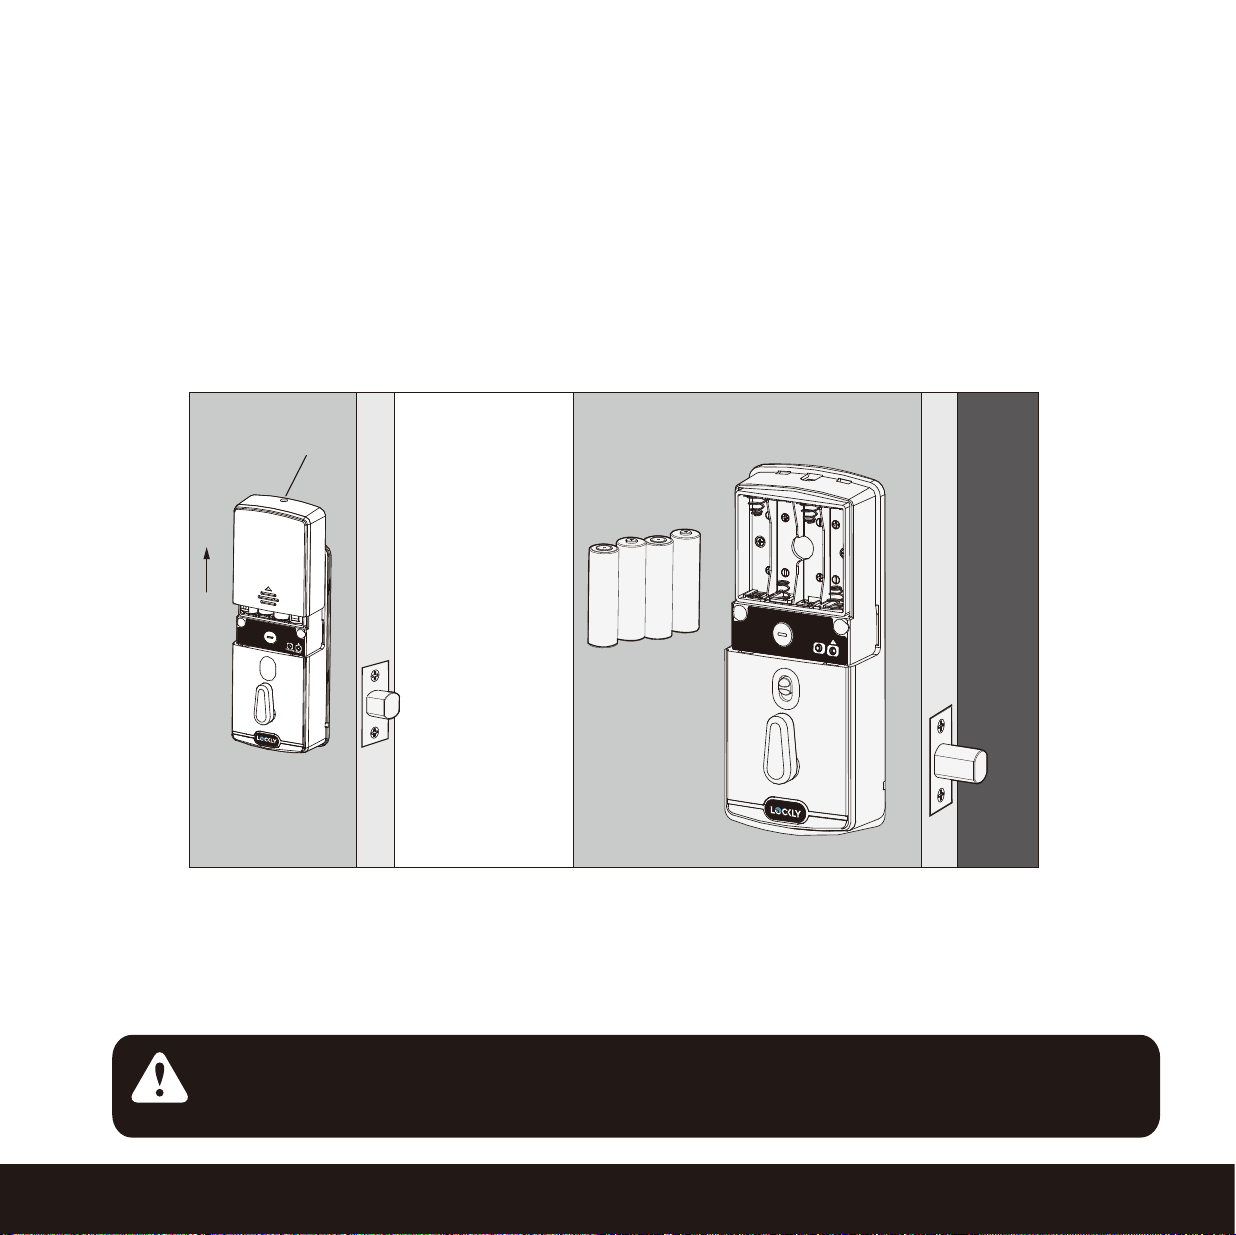
2.8 Changing The Battery
SECTION 2.8
Under normal use, the Lockly battery will last up to a year. Please check battery levels regularly
and change your batteries when the low battery notification is issued. For best practice, always
use new batteries by a major brand.
Open the battery compartment cover and insert four (4) new AA alkaline batteries as shown. Be sure
to unscrew the screw located on the top of the cover first by unscrewing counter clockwise before
sliding the cover up.
-
Make sure the batteries are oriented correctly by matching the orientation displayed.
- Replacing the batteries do not reset stored Access Codes.
- To see a list of recommended brands, please visit http://Lockly.com/battery.
8
+
+
-
+
-
-
+
-
Screw
IMPORTANT
RESET
PROGRAM
Whenever batteries are replaced, reconnecting the smart lock to your smartphone
App is required. If you have not yet downloaded the app, visit:
LocklyPRO.com/app
3.1 Configuring Access
SECTION 3.1
The Default Access Code is
NOTICE
1 2 3 4 5 6
9
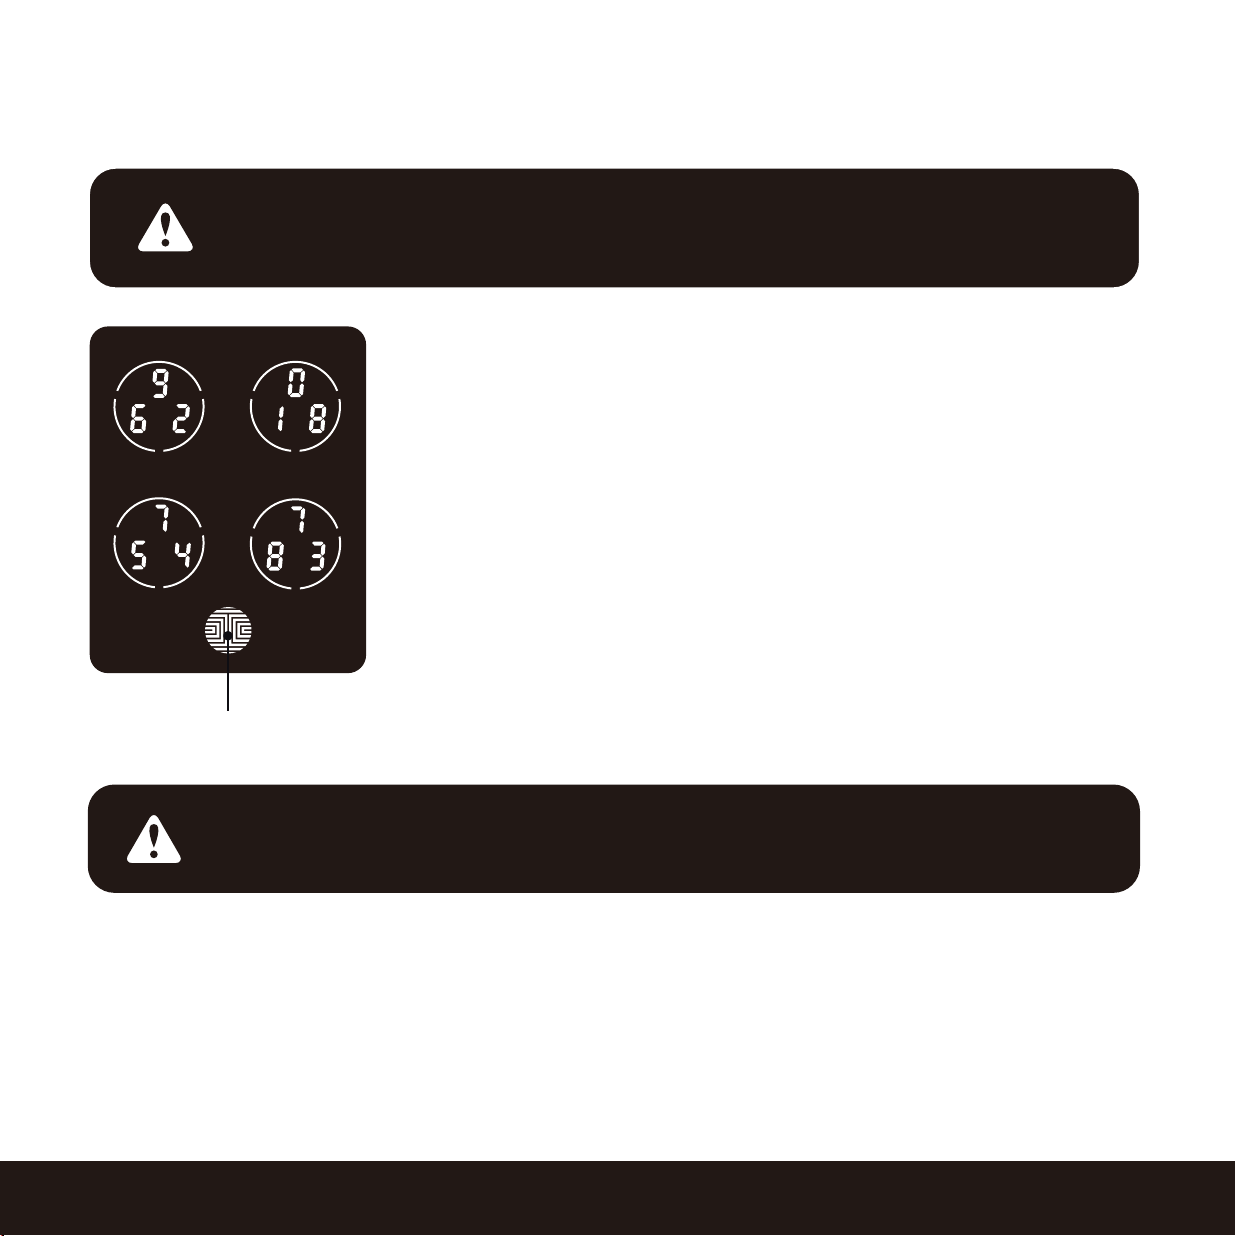
How to Use the Keypad
There are a total of five (5) buttons on the keypad as shown in
the example image to the left. The numbers in each button may
differ than what is shown on your device than
what is displayed
here.
To enter your required digit, just simply press the circle where your
number is shown. You do not need to press the actual number
as anywhere within the circle will suffice.
The button on the bottom is the OK button. You will be pressing
this button when you are done entering your Access Code.
OK Button
We recommend pairing your lock to your smart phone to manage your
access
codes. Section 3.1 - 3.9 refers to locks not paired with a smart
phone. Once
paired with a smart phone, the Program button will be
disabled.
Your new Lockly Access Code can be any combination of 6 to 8 digits. Once a new Access Code
is entered, the Default Access Code of 123456 would be deleted. A maximum of 52 sets of Access
Codes can be stored for use at any given time. To add more than 52 sets of Access Codes, you
must delete an existing Access Code before adding a new code.
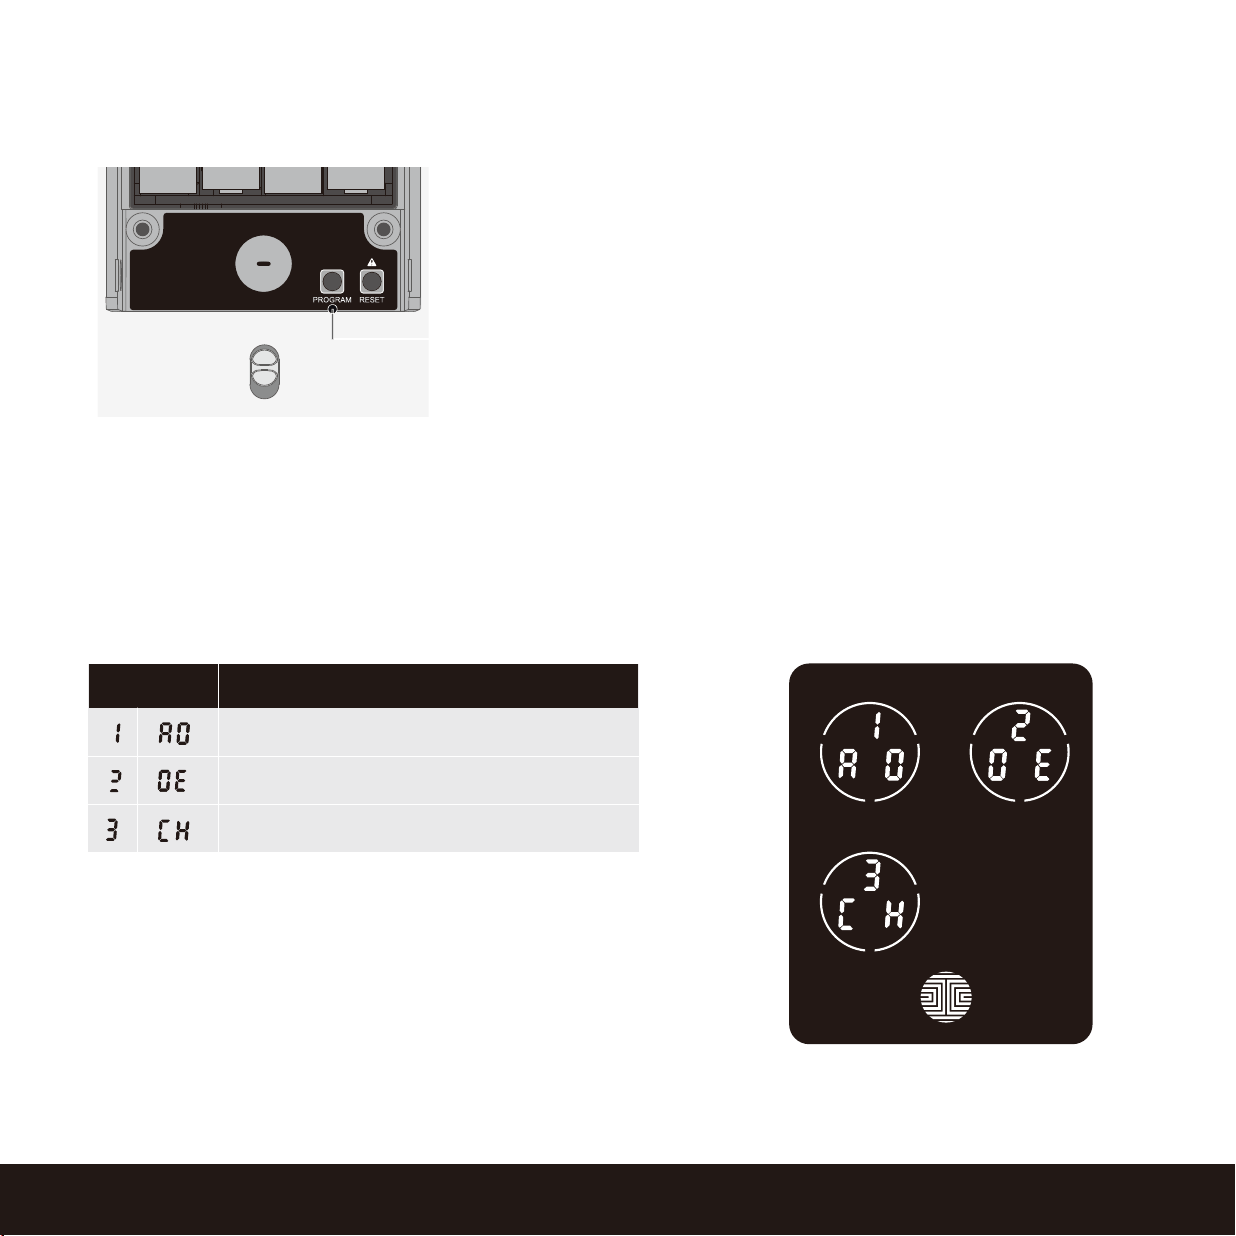
3.2 Entering Programming Mode
SECTION 3.2
Add Access Code
ModeNumber
Delete Access Code
View Access Code
To enter Programming Mode, remove the
battery compartment cover on the interior side
of the Secure to expose the Reset and Program
buttons (See page 8).
Simply press the Program button to enter
programming mode.
Note: Program button will be disabled once
synced to a smart phone. Configure all settings
via synced smart phone. Access Codes previ-
ously added by Programming mode will be
cleared.
To end Programming Mode, press the Program button anytime.
Programming Mode will automatically exit if the keypad is inactive for more than thirty (30) seconds.
After entering Programming Mode, you should see
the screen as displayed to the right on your Lockly
keypad. Follow the following steps to add, delete,
or check your Access Codes.
10
Program Button
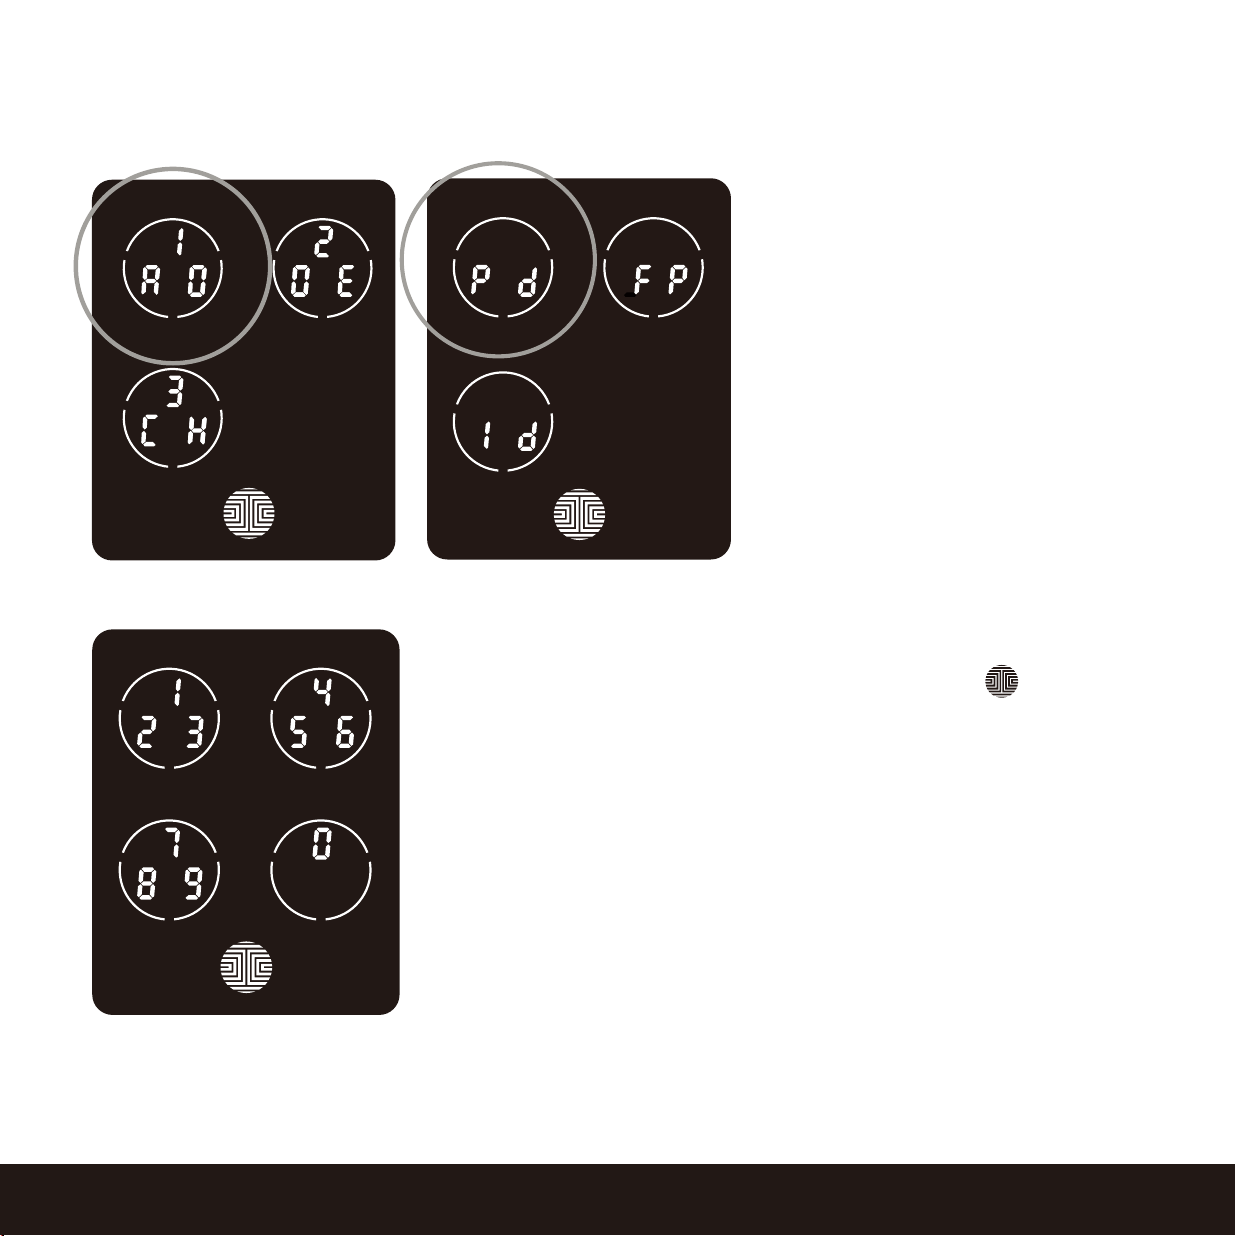
3.3 Adding an Access Code
SECTION 3.3
While in Programming Mode, select
“1AD” to add an Access Code. If you
are not in
Programming Mode, please see
Section 3.2 to enter Programming
Mode.
After pressing “1AD” press “Pd” to
add an Access Code.
11
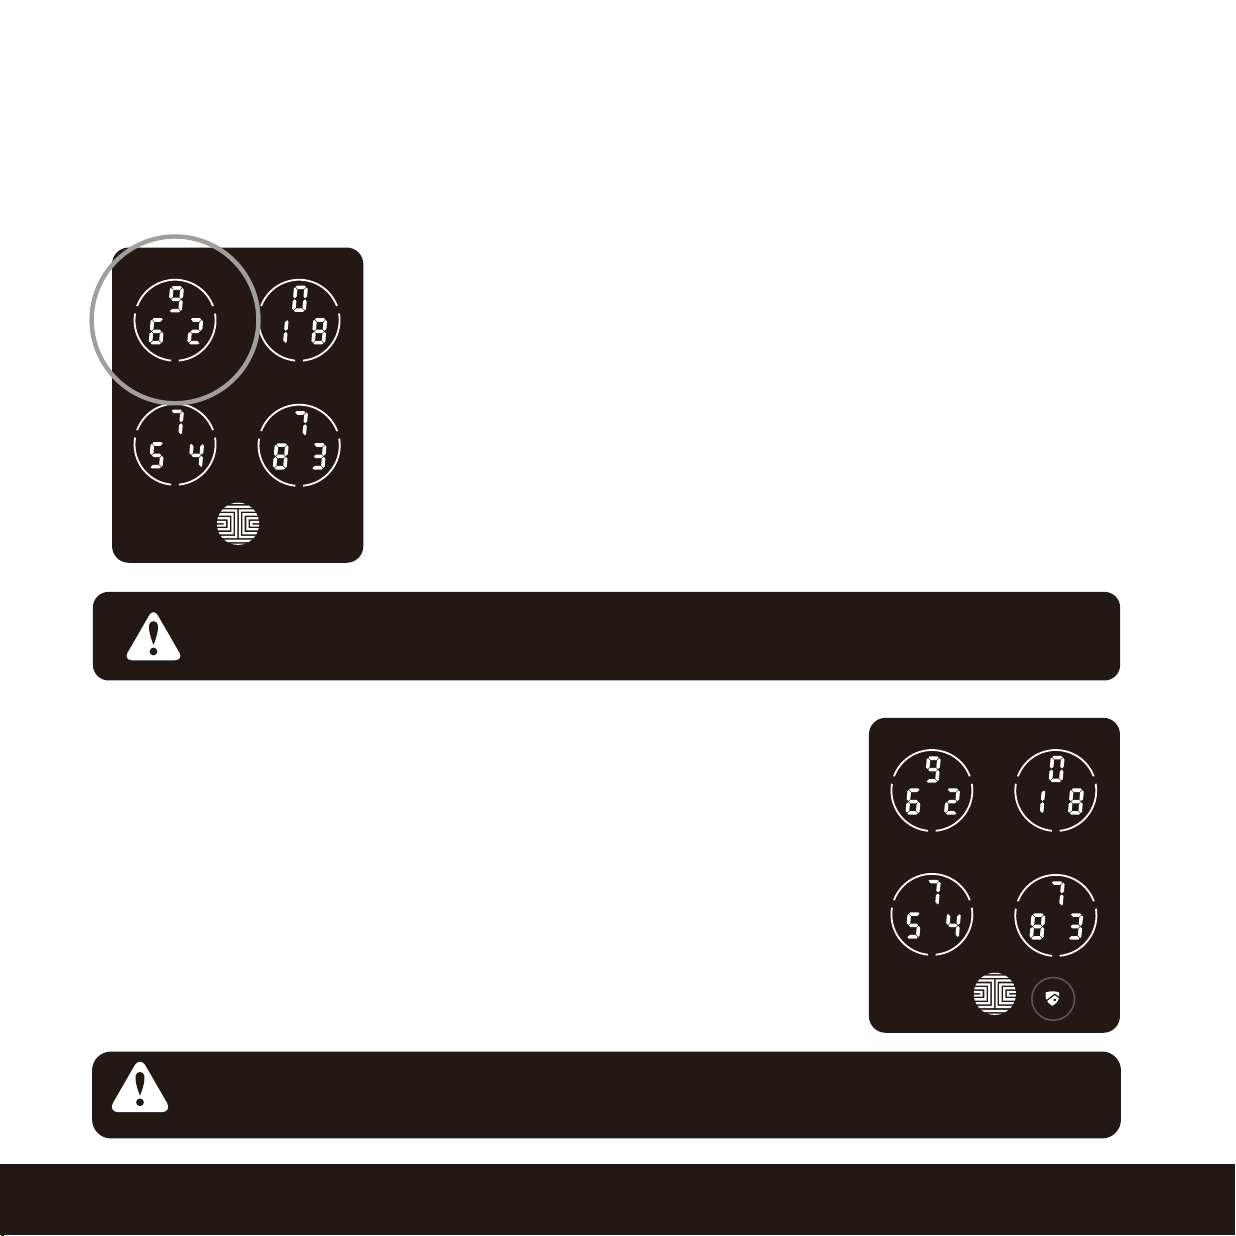
Enter your new 6 - 8 digit Access Code and press when you
are finished. You will then re-enter the code to confirm your new
Access Code.
Remember, just touch the digit you need within the circle around
each 3 numbers. There is no need to touch the exact location of
the number. For example, based on the example image to the
left, if you need “1”, you can touch the upper left button. For “6”,
you would touch the upper right button.
3.3 Adding an Access Code (Continued)
SECTION 3.3
If you have successfully entered your new Access Code twice,
you will see the new code displayed here. In this example, we
chose 654321. Press to Confirm or to cancel.
To exit or cancel, you can always press or
If the two (2) Access Codes you entered does not match, an
error message will appear on the screen (As shown to the left).
Press OK Button to return to the Programming Screen and try
again. See Section 3.2
OK Button
12
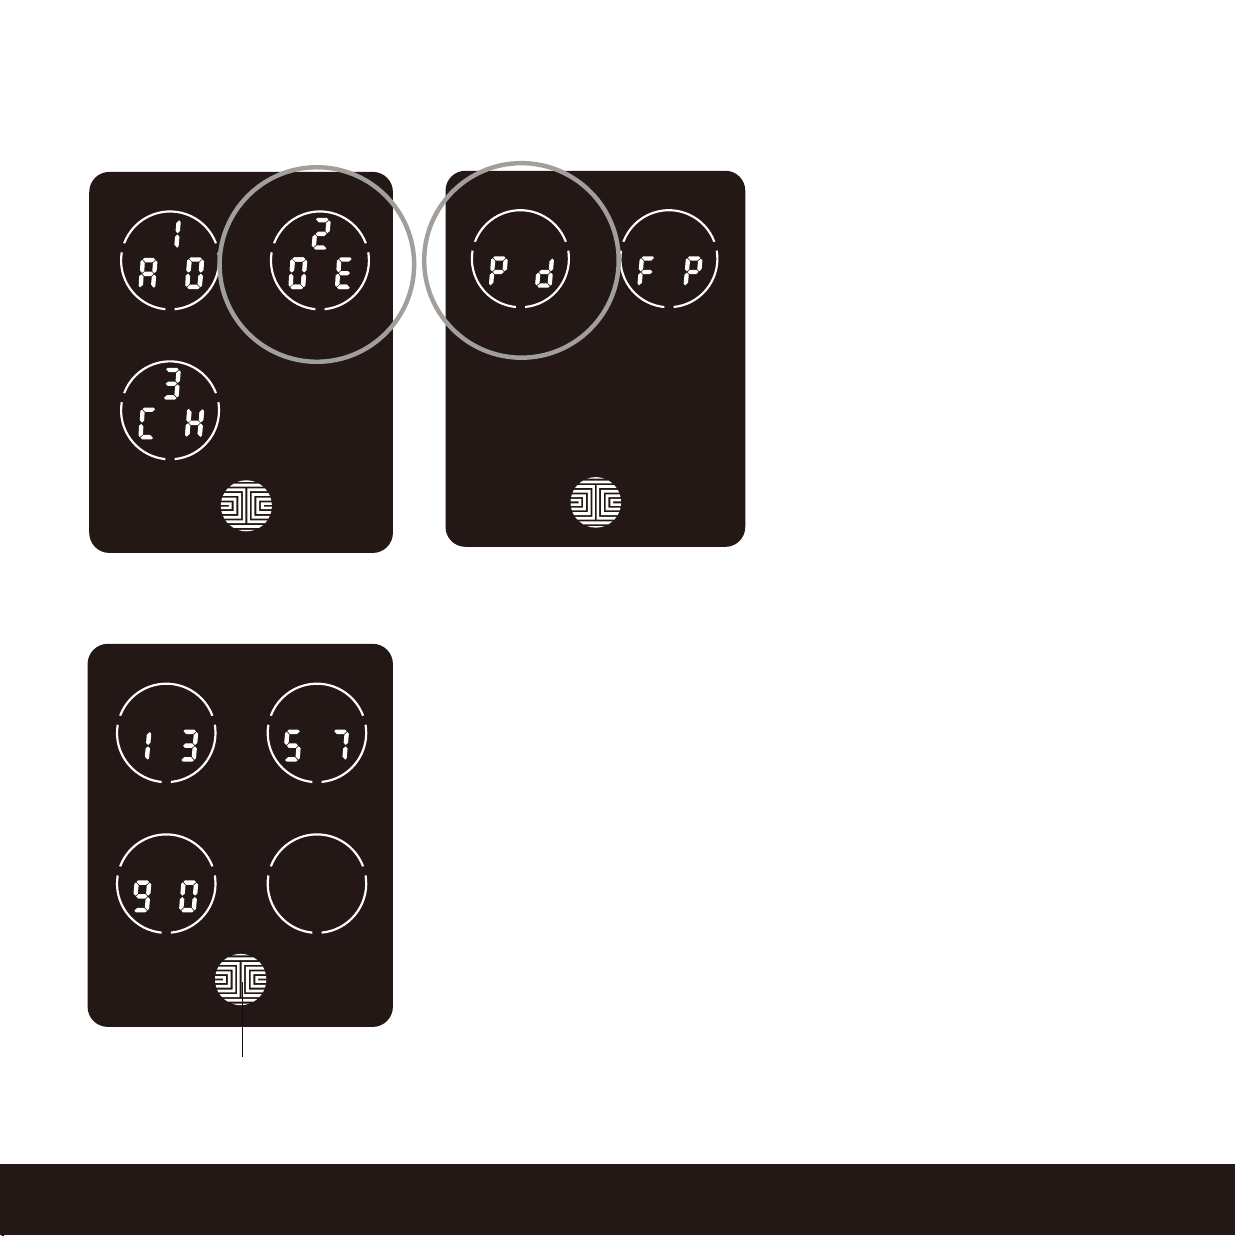
3.4 Deleting an Access Code
SECTION 3.4
While in Programming Mode, select
“2DE” to delete an Access Code.
If you are not in Programming Mode,
please see Section 3.2 to enter
Programming Mode.
After pressing “2DE” press “Pd” to
delete an Access Code.
OK Button
Example Only
Active Access Codes will then be displayed on the screen in
sequence from left to right, top to bottom. In the example shown
on the left, the Access Code displayed is 1 3 5 7 9 0 .
Rotate through different Access Codes shown by touching any
number on the screen. If you find the Access Code you want
to delete, simply hold the OK Button for 3 seconds. (Continue
on next page)
13
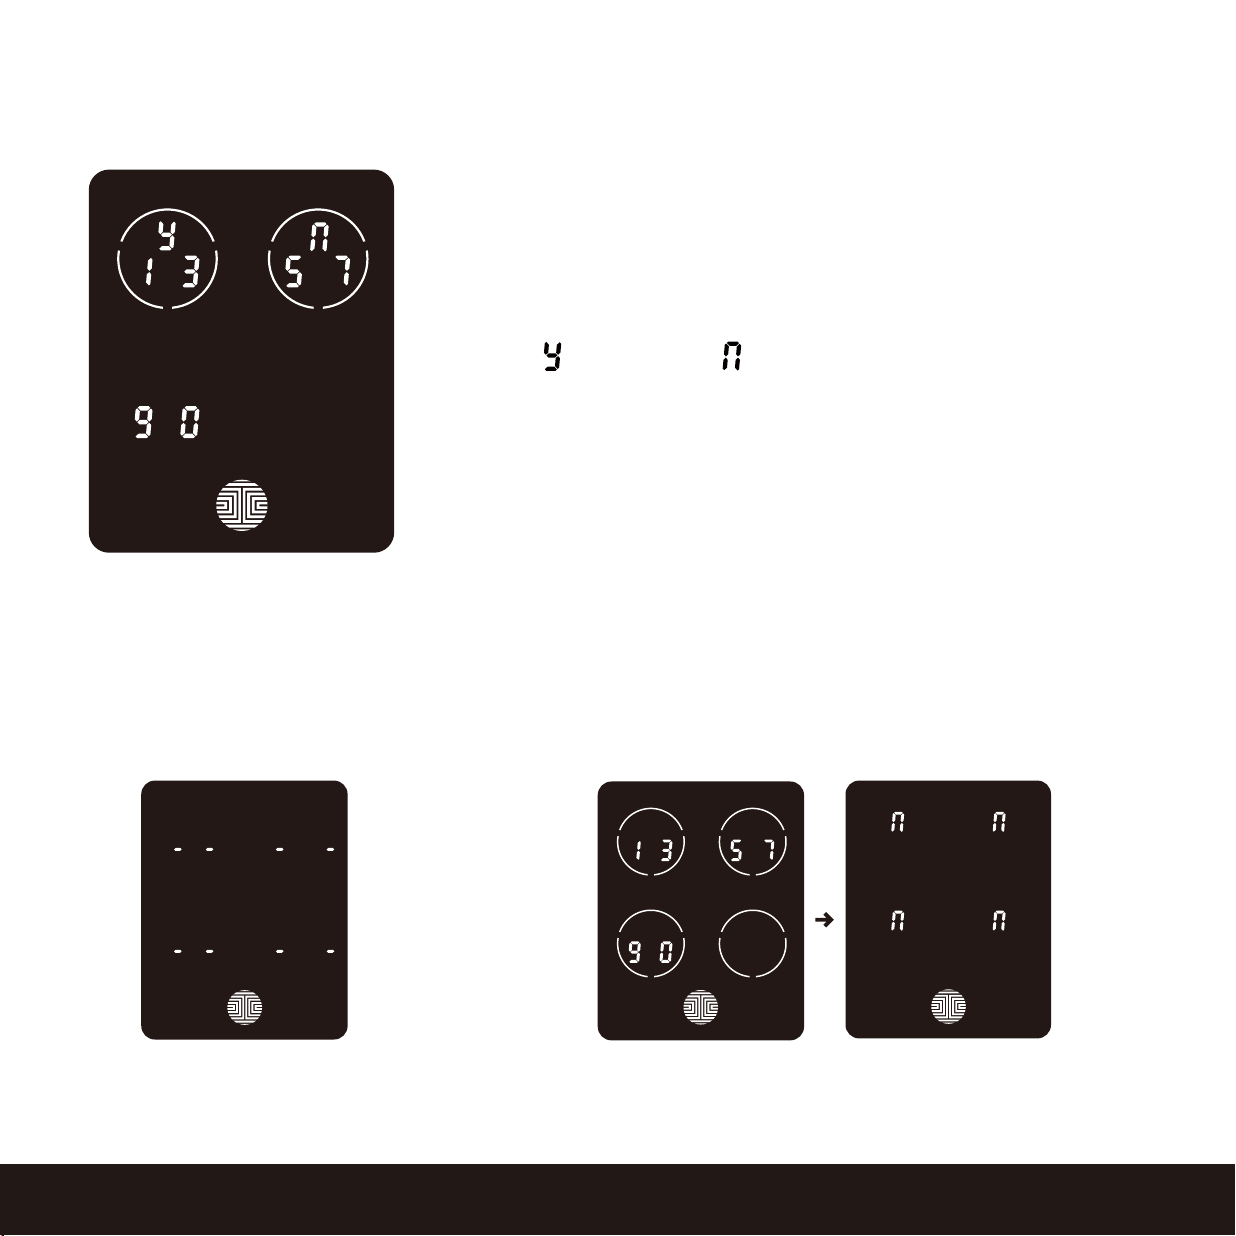
3.4 Deleting an Access Code (Continued)
SECTION 3.4
Once you have selected the Access Code you want to delete,
Lockly will ask you to confirm deletion by showing you the Access
Code you are deleting, in this example, 1 3 5 7 9 0.
Press to delete, or to cancel.
There are two incidents where your Access Code cannot be deleted.
NOTE:
Only one Active Access CodeNo Access Codes Set
There are no Access Codes
set. The factory default Access
Code cannot be deleted.
There is only one (1) Access Code saved in the smart lock.
At least one code must be registered. Please add another
Access Code before attempting to delete the existing
code.
14

3.5 Checking the Access Codes
SECTION 3.5
While in Programming Mode, select “3CH”
to check registered Access Codes. If you
are not in Programming Mode, please see
Section 3.2 to enter Programming Mode.
Active Access Codes will then be displayed
on the screen in sequence from left to right,
top to bottom. In the example shown on
the left, the Access Code displayed is 1 3
5 7 9 0 .
OK Button
Rotate through the different Access Codes by touching any number on the screen.
To exit Check Access Code screen, simply press the OK Button.
If there are no Access Codes registered in your smart lock, Check
Access Code mode will be invalid. The default Access Code will
not be shown on the display keypad, and you will see the following
screen shown to the left instead.
15

3.6 Adding a Fingerprint
SECTION 3.6
In this section, you will learn how to register a fingerprint to your new smart lock.
We are using an advanced biometric sensor, providing the most secure fingerprint authentication.
For security reasons, Lockly
will only accept fingerprint patterns that consist of cross intersection
points. Patterns with no cross intersection points will not be acceptable.
Please check your fingers before registration to make sure the finger you want to register will be
acceptable by our system. Otherwise, use an alternative finger to ensure successful registration.
The following examples show which types of fingerprint patterns will be acceptable. It is highly
recommended to enroll at least one finger from each hand in case the hand you are using is
unavailable, such as, in instances like if you are holding items in that hand or have sustained an
injury.
Your smart lock can register up to ninety-nine (99) fingerprints. Please read the following
sections if you want to add or delete fingerprints. We recommend using your app to add fingerprints,
however, the following section can show you how to add and remove fingerprints if you did not
pair your lock with a smart phone.
Fingerprint Pattern with Cross
Intersection Lines
Concentric or Parallel Pattern
with no Cross Intersection Lines
Fingerprint with Scars or Worn
Out Ridges
OK Not OK Not OK
16
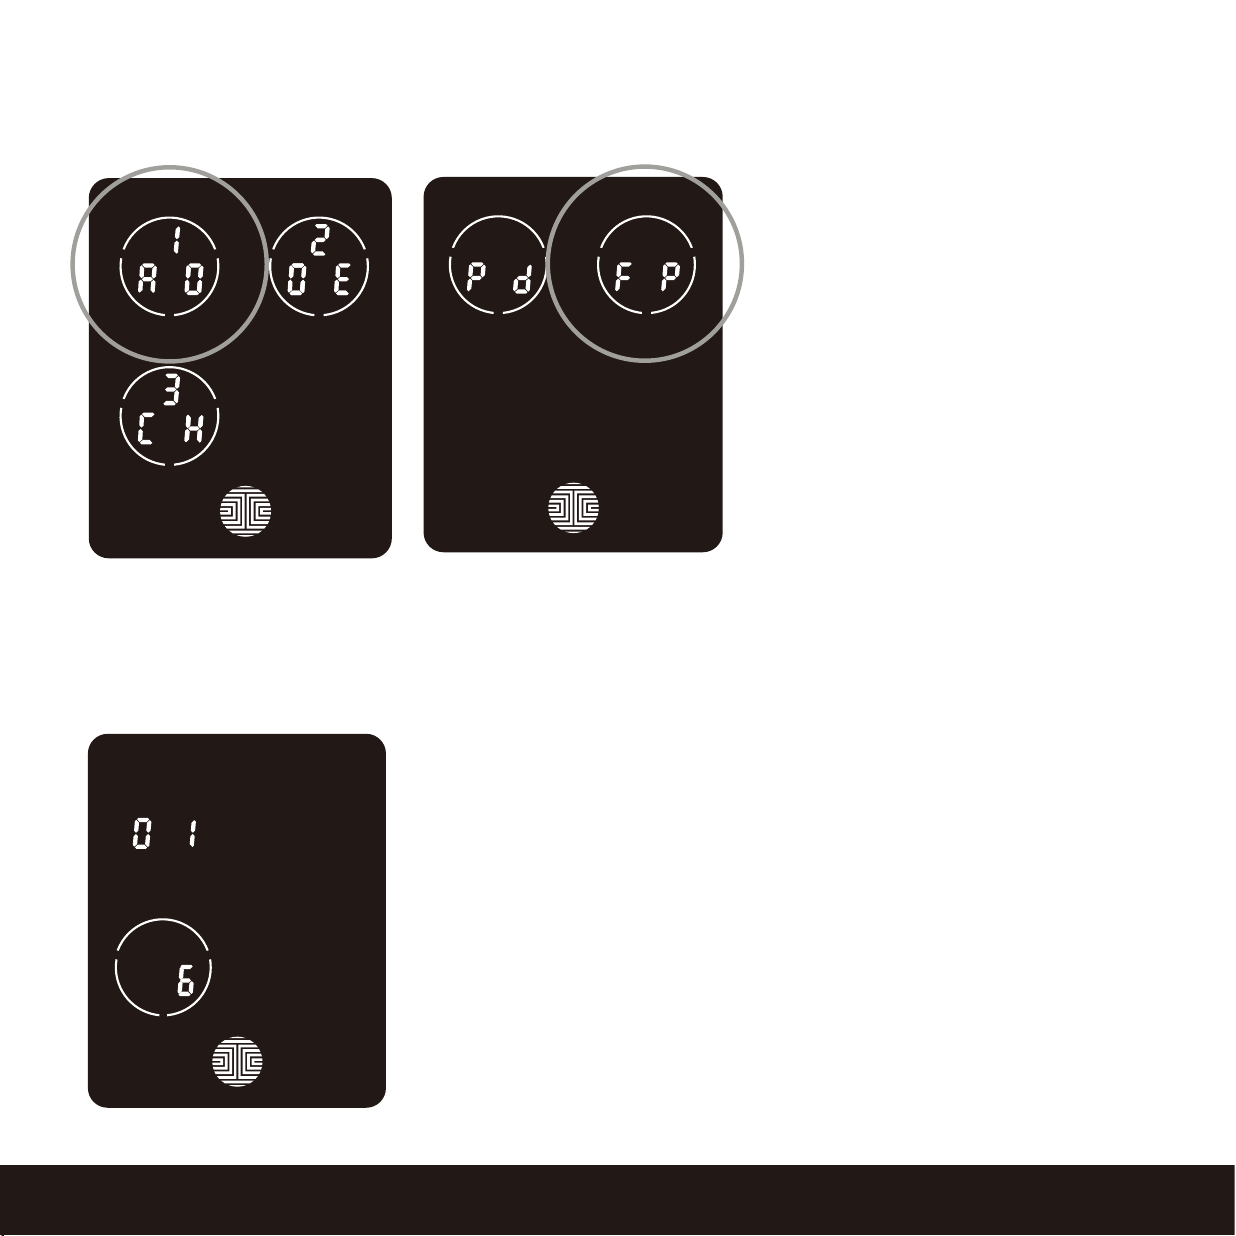
While in Programming Mode*, select
“1AD” to add an Access Code. If you
are not in Programming Mode, please
see Section 3.2 to enter Program-
ming Mode.
After pressing “1AD” press “FP” to
register a Fingerprint.
Upon pressing “FP”, you will enter Fingerprint Registration Mode and you will see a green LED ring
light up on the fingerprint panel on the exterior side of Lockly Secure Plus / Pro.
3.6 Adding a Fingerprint (Continued)
SECTION 3.6
Once you’re in Fingerprint Registration Mode you will see two numbers
displayed on keypad. The top number is your Fingerprint Registration
number, in this example to the left, “1”. The bottom number will always
start with a “6”.
You must successfully scan your fingerprint six (6) times for it to properly
register. Every time you scan your fingerprint, the number on the bottom
will change, starting from 6 - then 5, 4, 3, 2, 1, until the fingerprint is
successfully registered.
Note: For reference, please keep a record of your fingerprint registration
number to distinguish whom it was registered to.
17
*Only works when lock is not paired with a smart phone device.
SECTION 3.6
3.6 Adding a Fingerprint (Continued)
Scan your finger by lightly placing your designated finger on the sensor until you hear a beep. Lift
your finger and repeat the process slowly until the digit “6” shown on the screen becomes “1”.
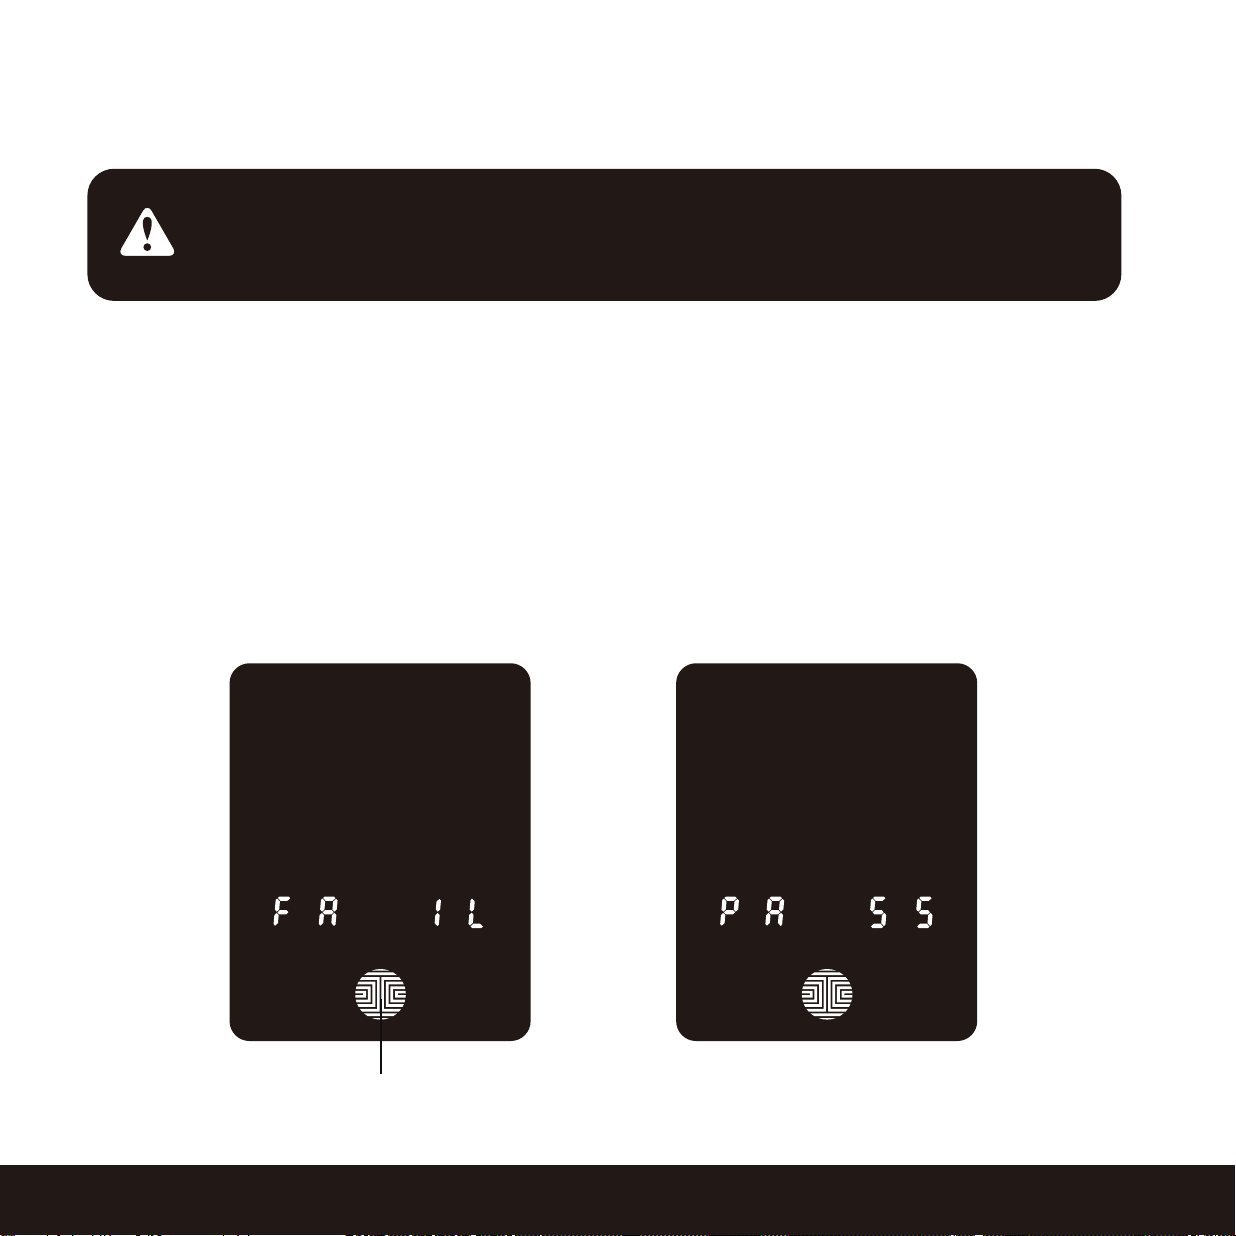
If you have successfully scanned and registered your fingerprint, you will hear a long beep, and
the Bluetooth icon will flash green.
PASS will show on the keypad and press OK Button to exit. If you did not successfully register
your fingerprint, FAIL will show on the keypad. If FAIL is displayed, press OK Button to return to
the previous screen to rescan your finger.
For instructions on scanning an optimal fingerprint, please proceed to Section 3.7.
OK Button
NOTICE
Please make sure your fingers are clean from dirt and oils before scanning
your fingerprint. Make sure the sensor is also clean by taking a soft cloth
and wiping the surface.
18
Top View
Side View
OK X X
OK X X
SECTION 3.7
Correct
Incorrect
19
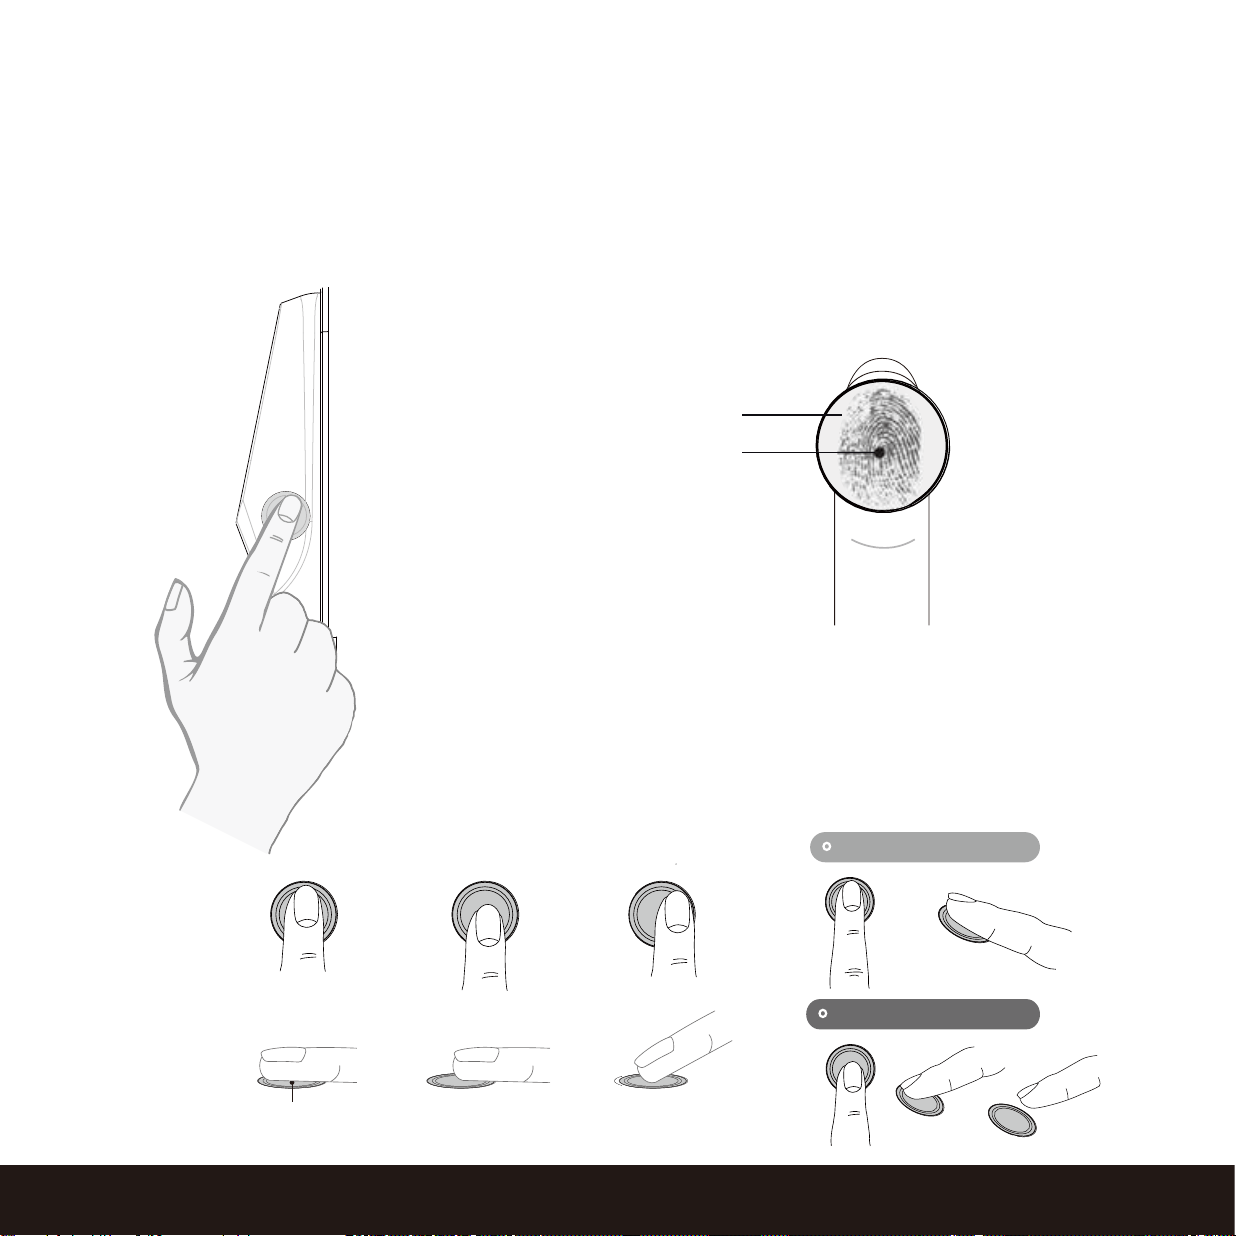
3.7 Fingerprint Scanning Directions
The fingerprint sensor equipped in your smart lock is loaded with powerful fingerprint algorithms to
extract quality features from fingers, even in poor conditions. Placing your finger on the sensor
correctly helps consistency in fingerprint recognition. The following directions and tips will guide
you on how to scan an optimal fingerprint image.
Sensor
Core
Position your finger on the
center of the sensor

3.8 Fingerprint Scanning Tips & Troubleshoot
SECTION 3.8
Tips for Fingerprint Enrollment and Recognition
• Place your finger to completely cover the sensor with maximum contact surface.
• Position the center of your finger (core) to the center of the sensor.
• Hold your finger still for more than a second until you hear a beep.
• Scan a finger that is clean and free from dirt.
• Children ages 12 and under are not recommended to use fingerprint access due to the constant
changes of their fingers during growth.
• Elderly with fading fingerprints may have difficulty in recognition.
• If your finger has a cut, scar, or cracked skin due to dryness, try another finger.
• If your fingerprint reader is having issues recognizing your fingerprint to unlock due to varying
physical and weather conditions such as moist, sweaty, cold or dry; please add an extra scanning
of the finger in such condition. This will improve the fingerprint reader’s speed and recognition.
Troubleshooting Fingerprints
In case of poor fingerprint conditions
• If wet - wipe excess moisture from finger before scanning
• If dirty - wipe stains and dirt off from finger before scanning
• Make sure the sensor is clean from dirt or smudges - wipe sensor with soft cloth regularly
For more troubleshooting help, visit LocklyPRO.com/support
20
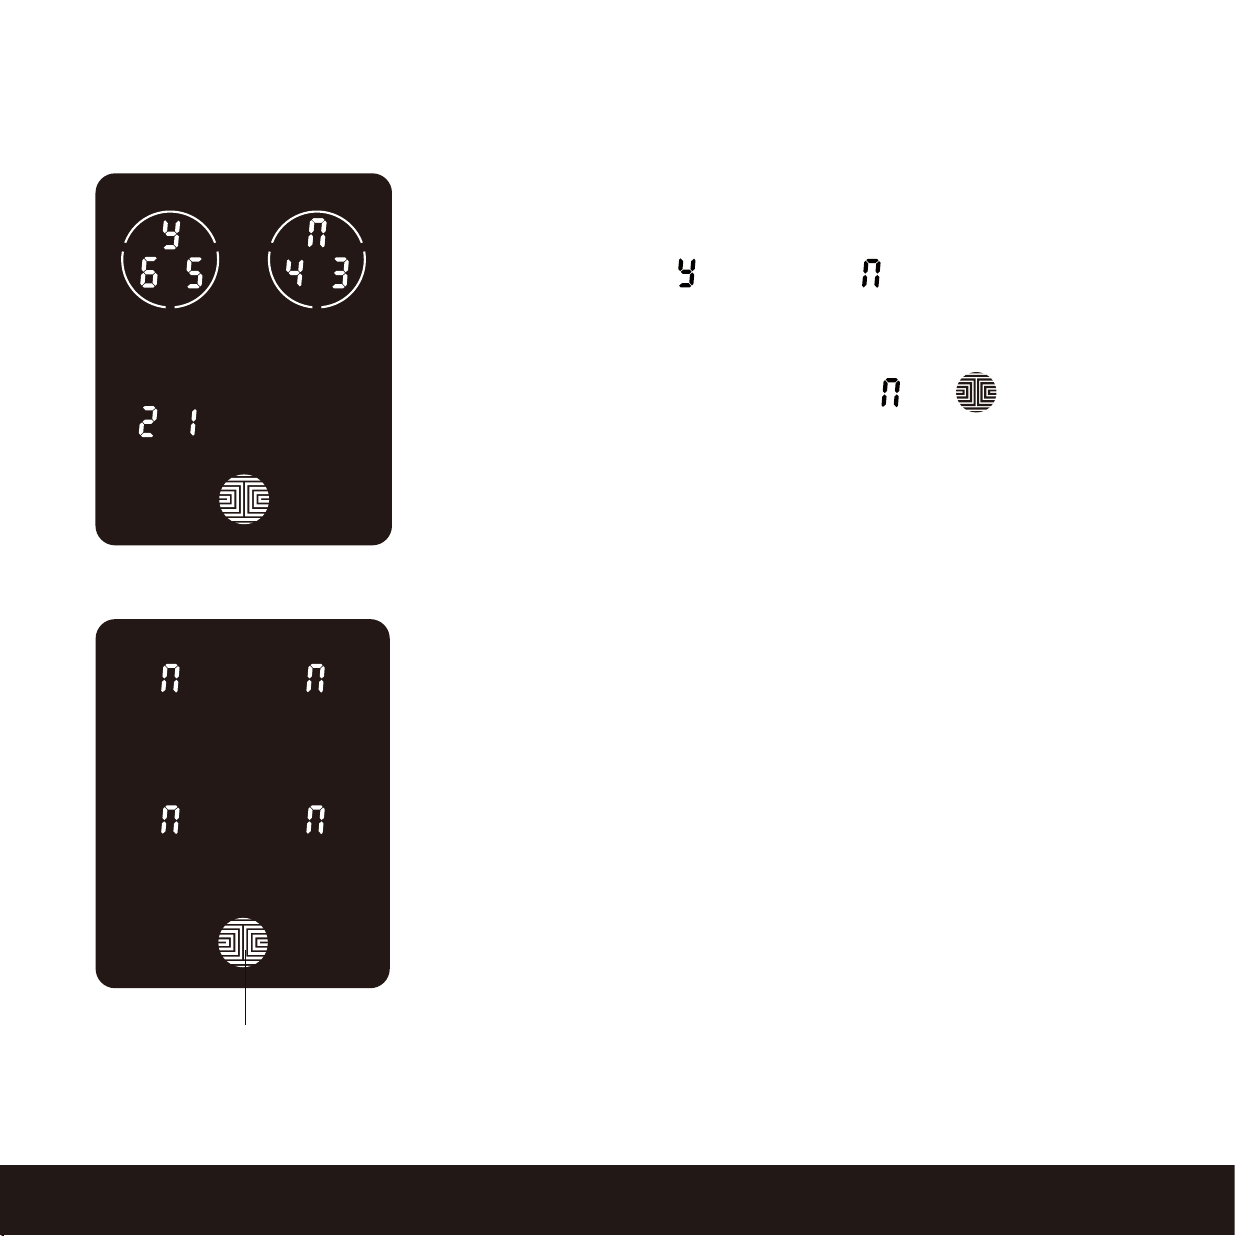
3.9 Deleting Stored Fingerprints*
SECTION 3.9
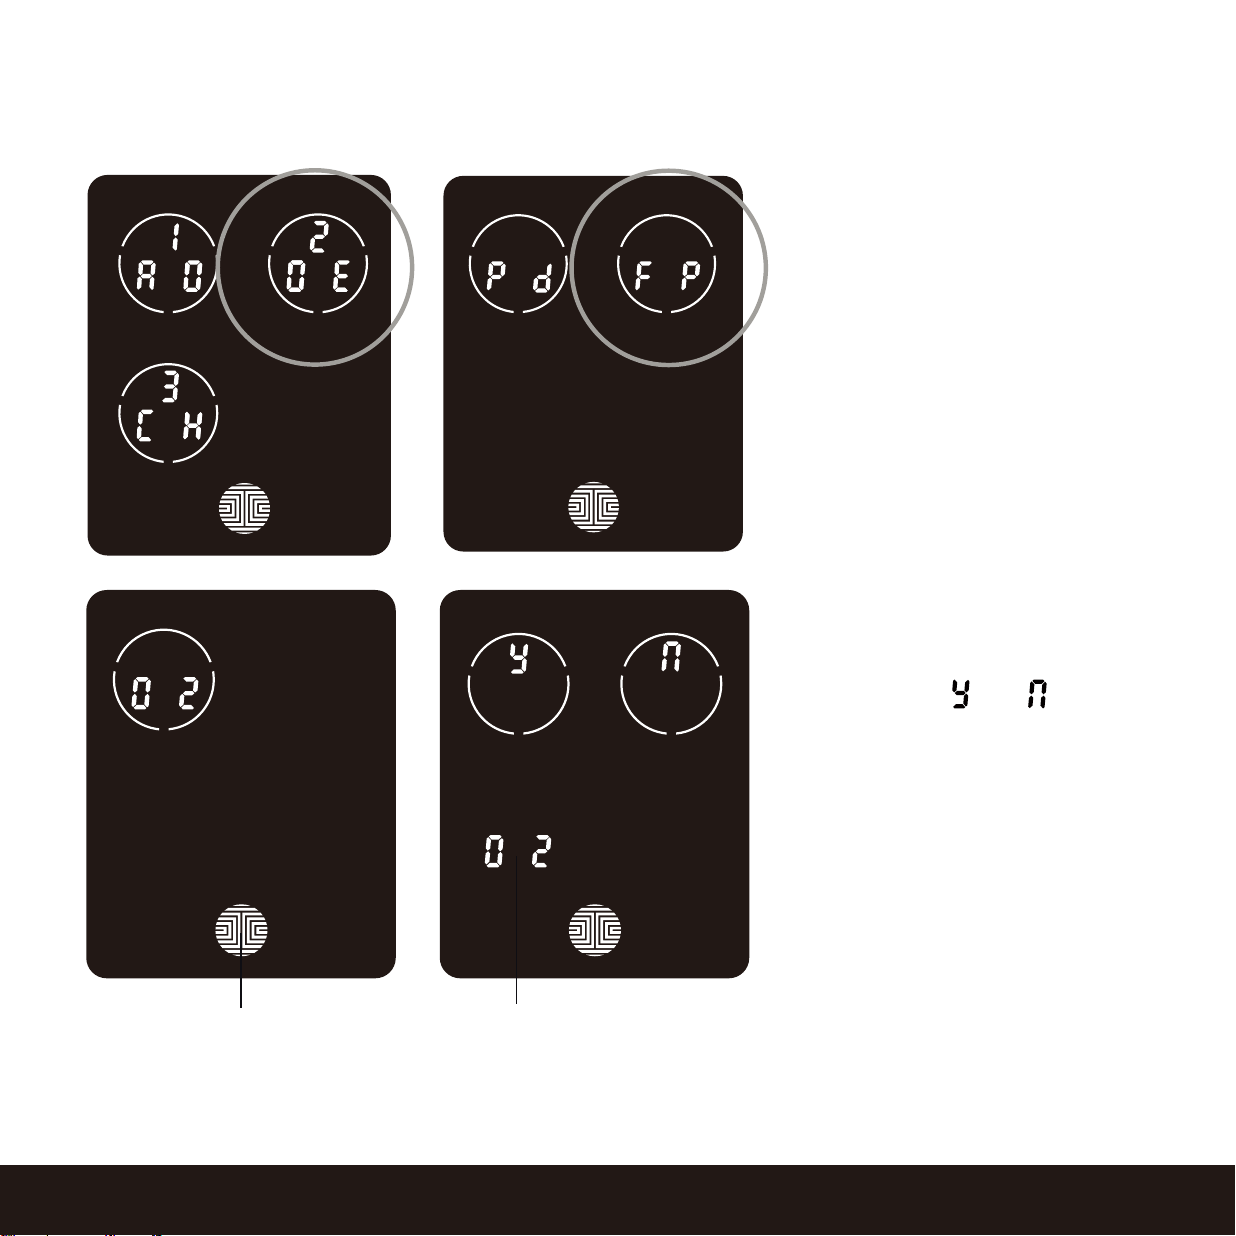
While in Programming Mode, select
“2DE” to delete a Fingerprint. If you
are not in Programming Mode, please
see Section 3.2 to enter Program-
ming Mode.
After pressing “2DE” to delete, press
“FP” to delete a fingerprint.
Your registered fingerprint numbers
will be displayed on the screen. Tap
number to rotate to the next regis-
tered fingerprint. When you have
found the fingerprint ID you want
to delete, press and hold the OK
button for 3 seconds to delete.
(Example shown - “02”)
You will then see a confirmation
page displaying and with the
fingerprint number you are deleting
displayed in the lower left. Select Y
to delete or N to cancel.
Alternatively, while on Programming
Mode, select 2DE, then press FP and
place the registered fingerprint you
want to delete on the fingerprint
sensor. Your smart lock will identify
the fingerprint and jump to confir-
mation
page displaying Y and N.
Select Y to delete or N to cancel.
OK Button
Fingerprint ID Number
21
*Only works when lock is not paired with a smart phone device. If paired to a device please delete
your fingerprints from the administrative device paired to your lock.

3.10 Adding Secure Link
SECTION 3.10
Lockly
Secure Link¹ adds live status monitoring and voice control capabilities to your Lockly Smart
Lock. If you purchased a Secure Pro model, the Secure Link is included in your package. For all other
Lockly products, the Secure Link can be purchased and added anytime.
To set up the Lockly Secure smart lock with Secure Link Wi-Fi Hub and Door Sensors, launch the Lockly
App on your iOS or Android
™
device. From the main menu drop down located on the upper left
of the screen, select “Add a New Device” then select “Secure Link Wi-Fi Hub”. Follow the in-app
instructions to set up your Secure Link.
To activate voice commands, you will need Amazon Alexa or Hey Google. Make sure you enable
the Lockly Action on Google or the Amazon Alexa Skill before you can configure your voice to perform
voice commands.
22
¹Included in Secure Pro and sold separately for other models.
Visit the link below to purchase:
https://Lockly.com/hub
4.1 Unlocking using Access Codes
Lockly Smart Lock can be unlocked using multiple ways - via your stored Access Code, registered
fingerprint, smartphone with Bluetooth, the physical key supplied with your lock, or voice (Secure
Pro only or Secure Plus with Secure Link Wi-Fi Hub installed)
OK Button
Five consecutive wrong attempts will put Lockly in “Safe Mode”. (See Section 4.7)
Slide your hand across the screen to activate the
keypad.
Enter your 6 to 8 digit Access Code followed by the
OK button. Press OK anytime to reset if you entered
the wrong digit.
If the Access Code entered is correct, the door will
unlock. If the Access Code entered is incorrect, Lockly
will flash red light.
Hold OK Button (3 sec)
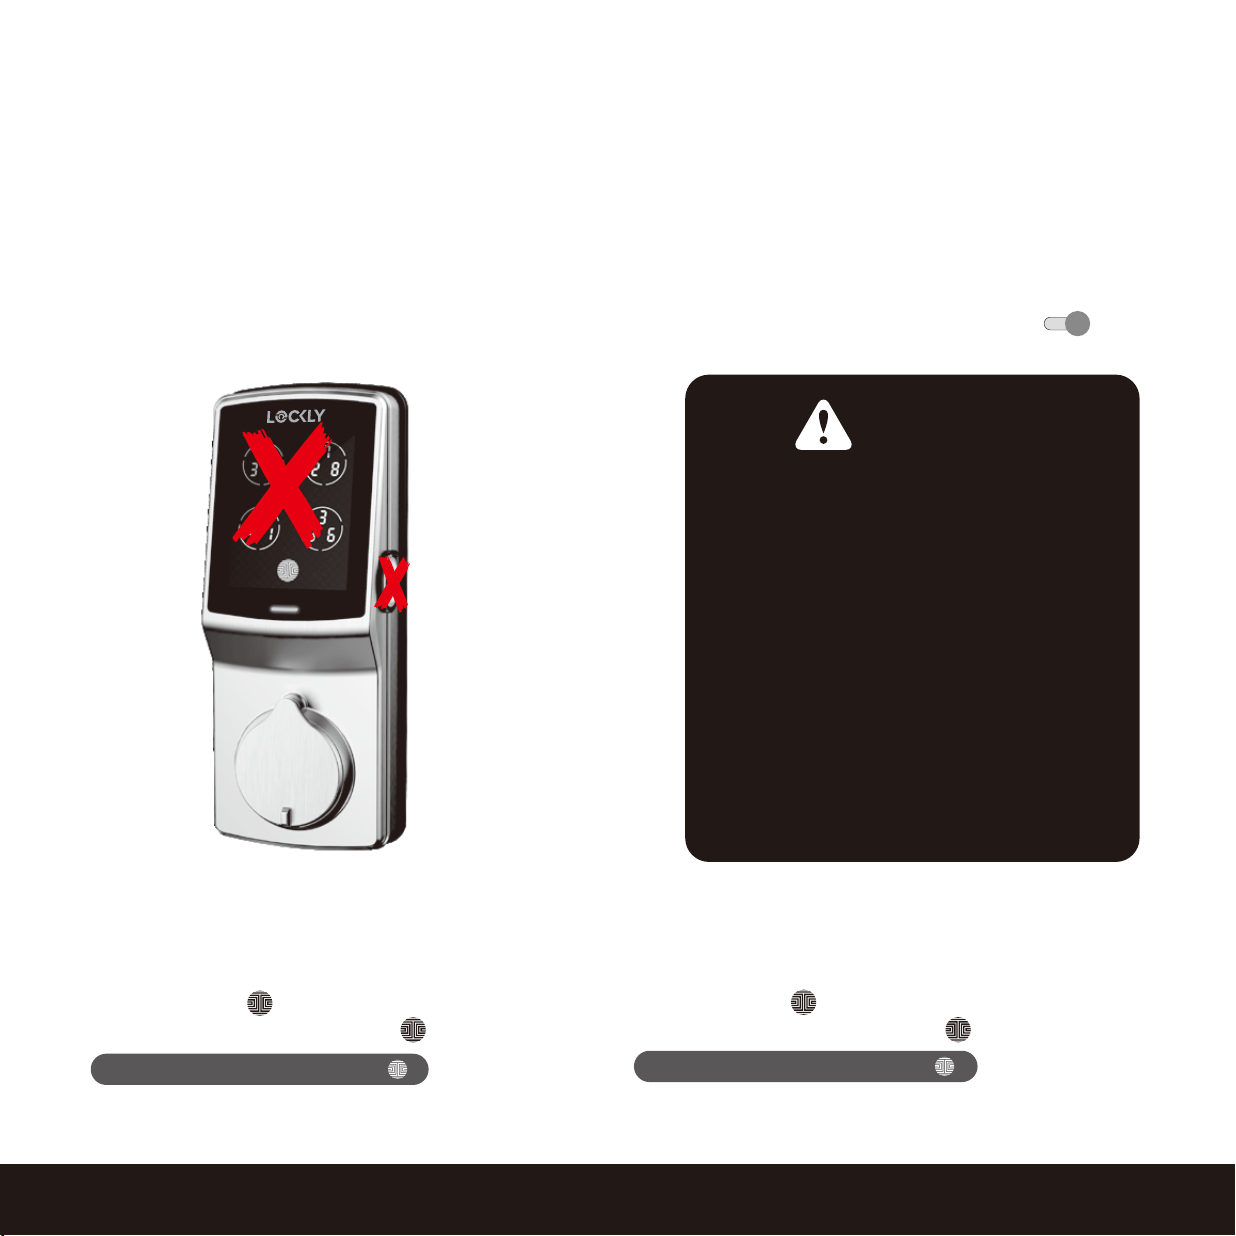
You may toggle between two types of keypad displays to
enter your Access Code. The fixed digit version and the PIN
Genie
version (Recommended). Press and hold the OK Button
for 3 seconds to toggle back and forth between the two
keypads.(Sample display shown only)
PIN Genie
Fixed Digit
23SECTION 4.1
Lock your Lockly by pressing the OK Button or by brushing your hand across the screen anytime when
the door is closed. The smart lock will also auto-lock after unlocking based on your set auto-lock
settings.

24
SECTION 4.2
4.2 Unlocking using Fingerprints
Place a registered finger to the fingerprint scanner located
on the exterior side of the lock to the right.
To register a fingerprint, please see Section 3.6.
If your fingerprint is registered and acknowledged, you
will hear a “beep” sound and a Green LED will light up
on the fingerprint scanner. You can then open the door.
If you see a Red LED, it means your fingerprint is not
recognized. Try again or use another registered fingerprint.
For best fingerprint scanning practices, see Section 3.7.
To lock your smart lock, press the OK Button anytime
or brush your hand across the screen when the lock is
unlocked.
OK Button
Locking
Unlocking
4.3 Locking/Unlocking using App
25
SECTION 4.3
You must have the Lockly iOS or Android
™
app installed in order to lock and unlock with smartphone
and connect with your Amazon Alexa or Google Assistant-enabled devices.
Please download the app by visiting the link below or search “Lockly” from the correct app store.
Scan or visit
LocklyPRO
.com/app
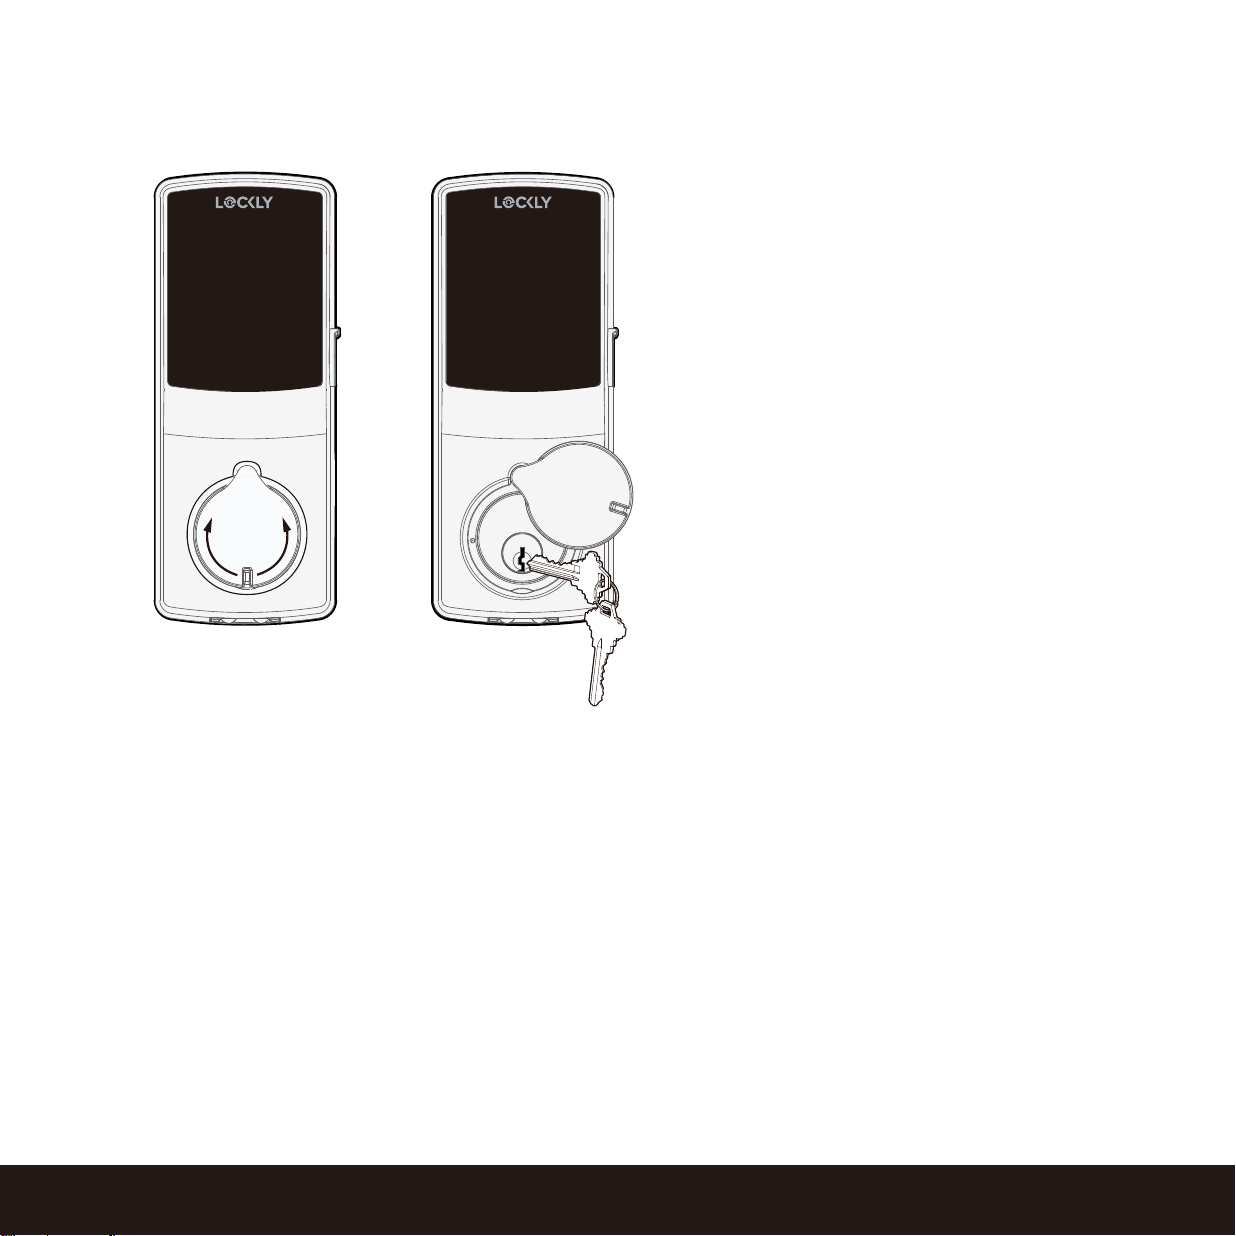
4.4 Locking/Unlocking with Physical Key
Exterior View
To unlock your lock using the physical key
(included), open the key cover by sliding
the cover on either left or right direction to
reveal the keyhole.
Insert key and turn clockwise (right swing
door) or counterclockwise (left swing door)
to unlock the door.
26
SECTION 4.4 ~ 4.5
4.5 Unlock with QR Code
If you have multiple Lockly door locks, you can use the Lockly app code scanner to unlock.
A QR code sticker (blue color) comes together with your lock. Open the Lockly app and scan it to
unlock. You may also generate a unique QR code via Lockly app for your smart lock.
You can generate QR code, print according to the size you want and stick it next to your door.
27SECTION 4.6
Once your Lockly Smart Lock and Secure Link¹ Wi-Fi Hub has been installed and configured correctly,
make sure you enable the Lockly Action on Google or the Amazon Alexa Skill before you can
configure your voice to perform voice commands.
You can ask your questions such as door status or request for your door to be locked or unlocked
4.6 Locking/Unlocking with Voice Assistants
*Unlock requests will require additional voice security codes.
You may configure it in the settings page.
¹Included in Secure Pro and sold separately for other models
Google, Android, Google Play and Google Home are trademarks of Google LLC.
- Alexa, unlock my Front Door.*
- Alexa, is my Front Door locked?
- Alexa, lock my Front Door.
- Alexa, is my Front Door unlocked?
- “Hey Google, unlock the Back Door”
- “Hey Google, is the Back Door locked?”
- “Hey Google, lock the Back Door”
- “Hey Google, is the Back Door unlocked?”
Pre-setup is required in the Google Home app in order for
these queries to work. The user would need to the name
the lock "Back Door" or as appropriate.
4.7 Safe Mode - Overview
SECTION 4.7
Lockly
will enter Safe Mode when five (5) consecutive wrong Access Codes are entered within
5
minutes. When in Safe Mode, the lock status icon will start to flash.
To disable Safe Mode, you must unlock the door using the correct fingerprint or enter the correct
Access Code twice in a row. Activate the keypad by pressing and holding for 3 seconds.
Once the screen is activated, enter the correct Access Code carefully twice, pressing after
every time.
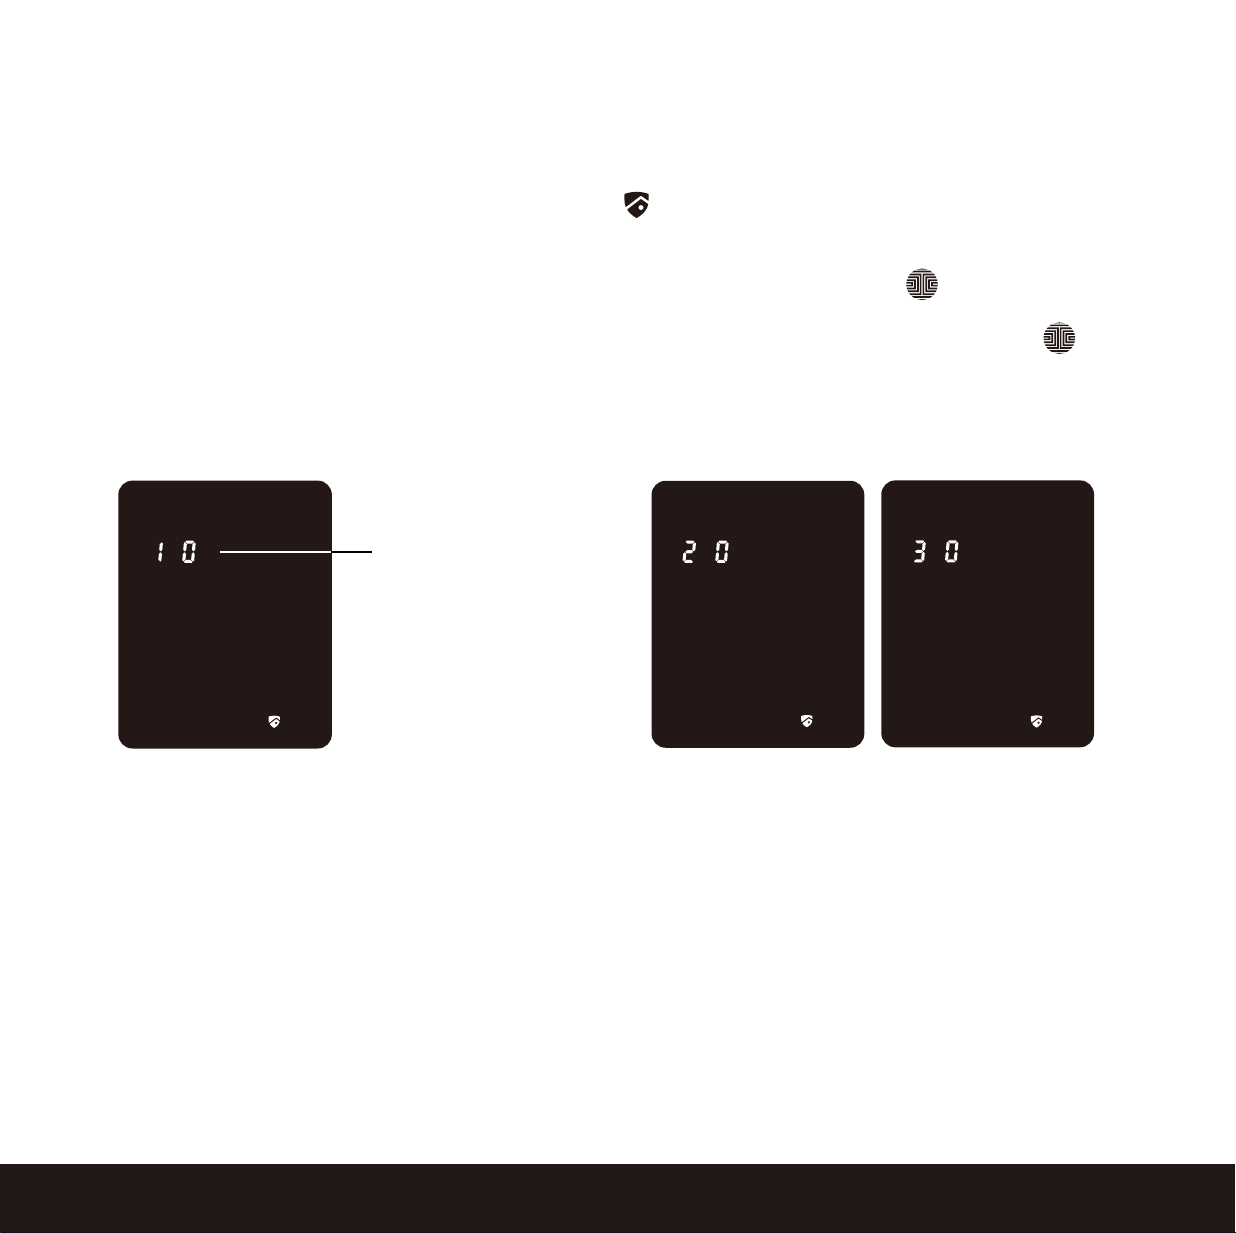
If you enter the wrong code, the keypad will then be disabled for 10 minutes.
Countdown Prompt
(Displayed in Minutes)
Will start with 10 and
countdown until 0.
You will see a “10” on the screen, notifying the number of minutes that the keypad is disabled for.
After 10 minutes, you may attempt to enter the correct Access Code to unlock the door. After the
second incorrect attempt to unlock the lock with the wrong Access Code, Lockly will disable the
keypad for 20 minutes, displaying a “20” on the screen. After the third wrong attempt to unlock the
door with the correct Access Code, the screen will be disabled for 30 minutes. (Example A and
Example B above).
Note: In order to conserve power, the countdown prompt will only be displayed for 3 seconds. You
can reactivate the screen by sliding your hand across the screen.
Example A Example B
28

Option 1 - Entering Correct Access Code
Activate the keypad by pressing and holding for 3 seconds.
Enter the correct Access Code twice (2) when the keypad is available, pressing after every
time the Access Code is entered.
Option 2 - Lockly
Bluetooth App
Use the app that is synced to your Lockly
to disable Safe Mode by unlocking the door. If you have
not downloaded the app to use with your smart lock, you won’t be able to use this option to disable
Safe Mode.
Option 3 - Physical Key
There is a pair of keys supplied with your new lock. You may use the keys to manually unlock the
door and disable Safe Mode. To learn how to use your physical keys, see Section 4.4.
Option 4 - Registered Fingerprint
Use any registered fingerprint to reactivate the keypad. The door will unlock and reactivate the
keypad once a registered fingerprint is used.
4.7 Disabling Safe Mode
29SECTION 4.7
There are four (4) ways to disable Safe Mode.
SECTION 4.830
Like other digital electronic products water can trigger to activate the touchscreen and fingerprint
sensor which may cause the batteries to drain. To protect the lock and extend battery life, you can
setup your Lockly to enter Rain Mode to shut off keypad and fingerprint reader whenever rain or
water is detected.
Activate this feature on the Lockly app. While you are within the Bluetooth range or remotely con-
nected thru Wi-Fi hub (Secure Link), go to Settings > Rain Mode and toggle the button to
turn ON.
If you have not yet connected your device to Lockly App, follow below steps to activate the rain
mode feature:
When RAIN MODE is ON, the keypad
and fingerprint sensor cannot be used.
Unlock via Lockly App, physical key, or
voice control with Amazon Alexa
or Google Assistant-enabled devices.
Rain Mode auto exits every 30-mins
and re-enters if water or rain is still
present.
If you are using the Lockly app, you
will be notified when Lockly entered
rain mode and it will be recorded in
your access history.
4.8 Rain Mode
RAIN MODE ON
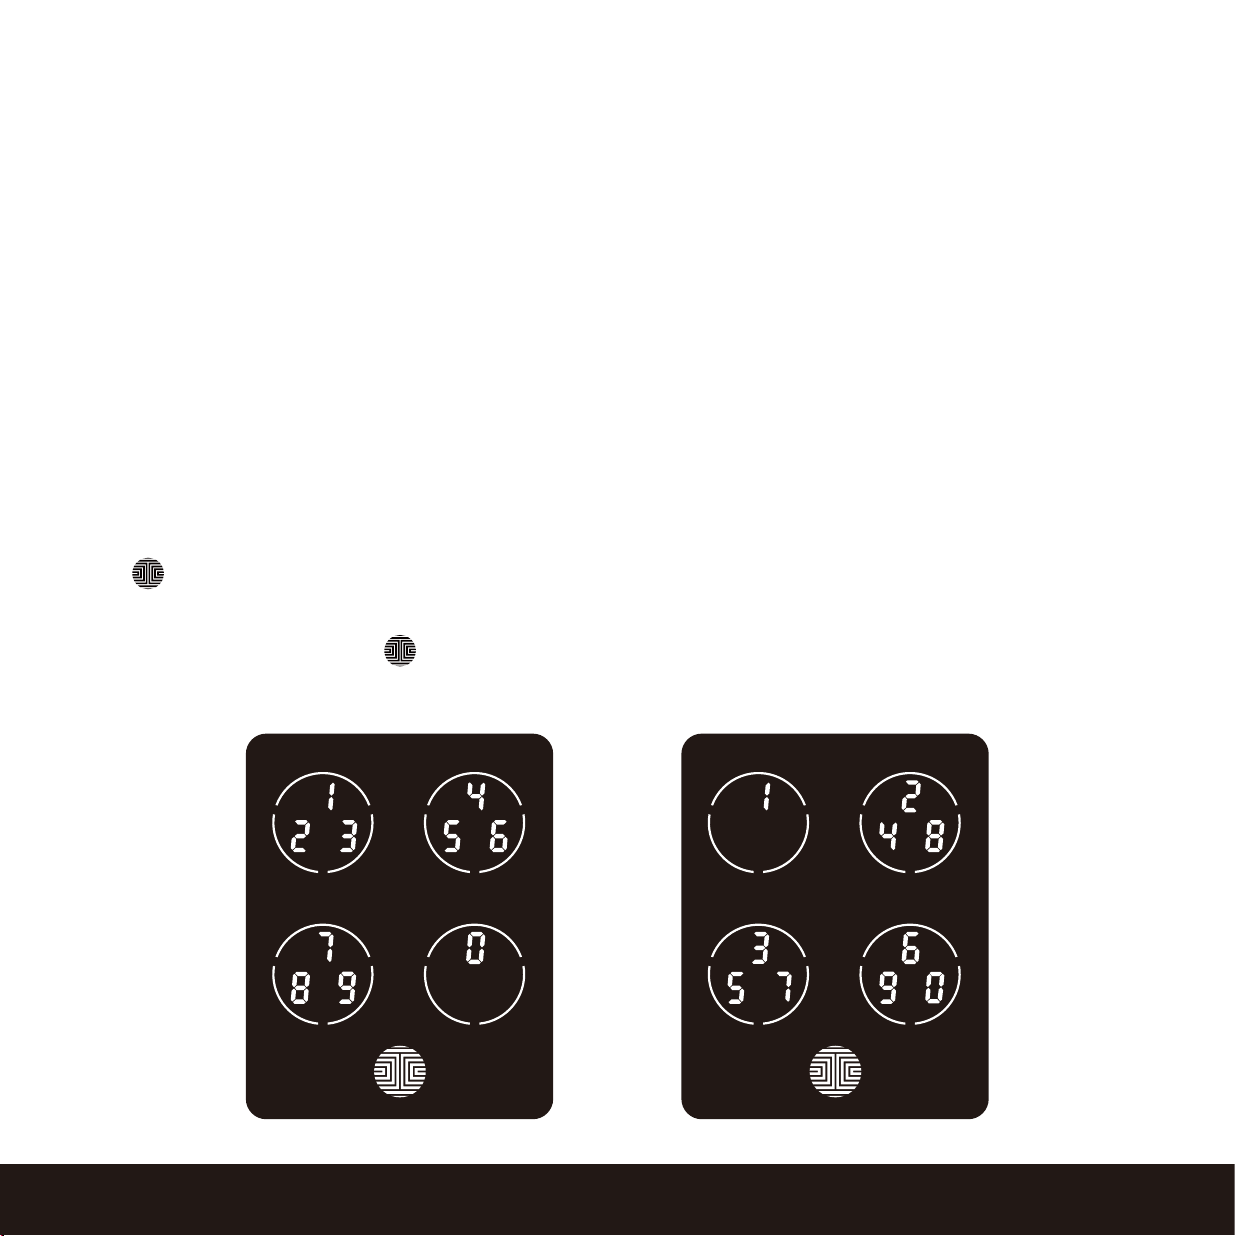
1. Long press to enter fixed digit keypad.
2.
Enter
access code +234+ .
3. You will hear a short beep and Bluetooth
indicator flashes green once Rain Mode is ON.
RAIN MODE OFF
1. Long press to enter fixed digit keypad.
2. Enter access code +890+ .
3. You will hear a long beep and Bluetooth
indicator flashes green once Rain Mode is OFF.
example: 135790 + 234 +
example: 135790 + 890 +
IMPORTANT
SECTION 4.9 ~ 4.10 31
4.10 Welcome Mode
4.9 Shine Mode
Lockly touchscreen keypad brightness was designed for optimum battery life. However, some users
may need to adjust the brightness to their convenience to enter access codes.
Swipe your fingers across the keypad to light up to its normal brightness.
To adjust brightness, long
press the upper left button for 3 seconds.
The touchscreen keypad with automatically return to normal brightness after the
screen dimmed.
Welcome Mode temporarily disables auto locking, keeping the
door open for a specified period of time eliminating the need to
enter access codes, fingerprint or using Mobile App.
Enable this feature through the Lockly App. Go to > Settings >
Enable Welcome Mode, then slide button to enable and set the
specific time you require your door unlocked. The Welcome Mode
icon will remain displayed while in effect.
NOTICE
To ensure Welcome Mode works normally after replacing the battery,
reconnect the lock to the Lockly app to synchronize the time.
The Offline Access Code
™
(OAC) is a unique feature of our smart lock. It allows you to grant access
to guests remotely without guests needing to download the app.
To use the OAC feature, make sure you download the Lockly app for iOS or Androi
™
first, and sync
your smart lock to your mobile device. OAC can only be issued by the administrative owner of the
lock.
From there, you can then issue an Offline Access Code
™
within the app.
Go to “Access” and choose “Add a New User, then select Offline Access Code
™
(OAC)” and follow
on screen instructions to generate your Offline Access Code
™
.
Understanding Offline Access Code
™
(OAC)
OAC are issued to the guest by asking them to enter 4-12 digit number after a double - click on
the . Your Lockly randomly generates the Offline Access Code
™
which can be shared to your
guests together with the instructions generated using the Lockly app.
After a double-click on the , touchscreen will display numbers on Fixed Digit mode, then guest
can enter the Offline Access Code
™
5.1 Offline Access Code
™
(OAC)
SECTION 5.132
SECTION 5.2 ~ 6.1 33
Sub-Admin Access can be created to grant access for others to be able to control your lock and
grant access to others via Bluetooth when within range of your Lockly smart lock. The sub-admin
permission can be setup through the Lockly App then Add A New User.
You can select the Validity Period and User Permissions of the sub-admin.
Sub Admins will not be able to access the lock remotely but Sub Admin will be able to grant limited
access codes to users when within Bluetooth range. Once Sub Admin control is setup, you as the
Admin will no longer be able to issue Offline Access Code™ (OAC)
The Sub-Admin access is ideal for long term property leasing and Airbnb tenants.
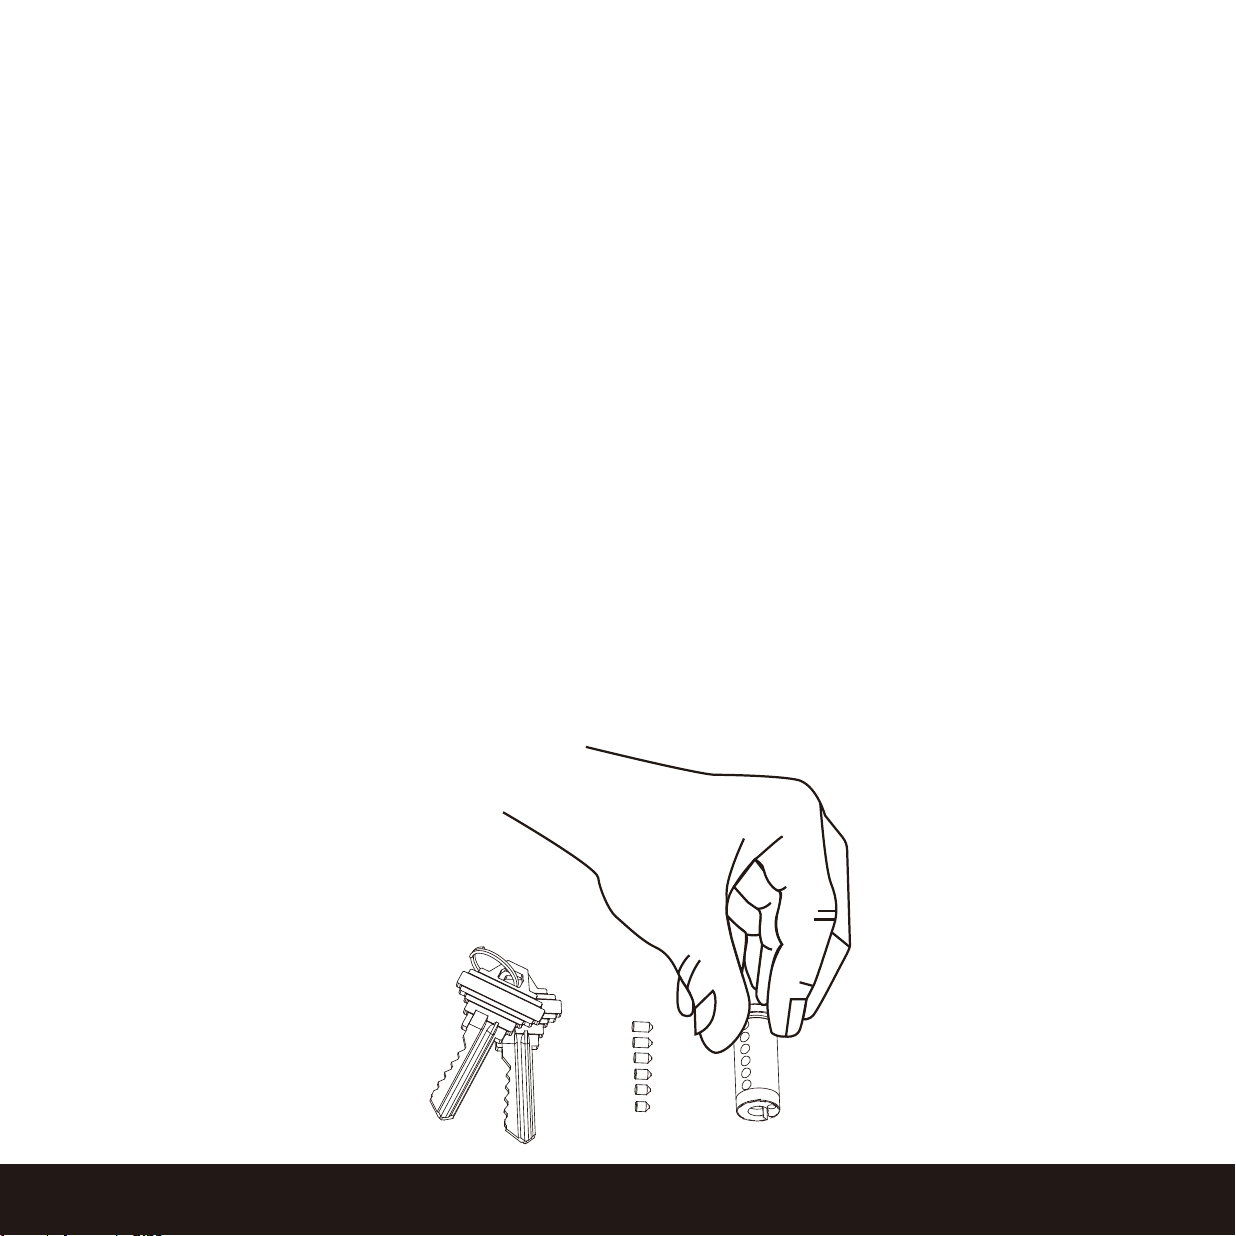
Lockly smart lock comes with a 6-pin cylinder which can be replaced with regularly purchased DIY
re-keying kit available in the market.
If you are not familiar with this process, please contact a professional locksmith. For more information,
visit: http://support.Lockly.com/faq/rekeying/
5.2 Sub-Admin Access
6.1 Re-keying

SECTION 7.1
7.1 Important Notes
Auto Lock Feature
Your lock can be programmed to auto-lock between 5-300 seconds after the door opening. You
can select the timing through the Lockly App. If auto-lock is not activated and door is still open,
the touchscreen will remain lighted, simply press the on the keypad to lock.
One-Touch Locking
You can always manually do a quick lock by touching anywhere on the touchscreen. Lockly smart
lock is shipped with this feature already activated. You may deactivate this feature through the
Lockly App.
9V Backup Access
When your Lockly is out of power, you can temporarily activate the keypad by using a 9V battery
against the bottom of the exterior side of the smart lock. Please see Section 2.7 for more info.
Physical Keys
Even though you have your fingerprints registered and Access Codes stored, it’s always best
practice to carry your physical keys with you at all times in case for any reason your lock falls
into Safe Mode.
Activation Code
You may find an Activation Card with an Activation Code included in your package. It is very crucial
that you do not lose this card. Please store this card safely as you will need the default Activation
Code on that card to master reset your lock in case, for any reason, you have lost the phone paired
to Lockly and also forgot your Access Code
.
Troubleshooting
Please visit LocklyPRO.com/support for troubleshooting and the most frequently asked
questions and answers.
34
8.1 Cleaning
SECTION 8.1
Making sure your Lockly is clean is best practice to ensure optimal product use. Follow the DOs and
DON’Ts below.
DO DON’T
•
Rinse the touchscreen with warm
water prior to cleaning.
• Use the application of soap with a
damp, lukewarm cloth.
•
Air dry or wipe dry with a soft
microfiber cloth to avoid scratches.
• Don’t use abrasives, high alkaline
cleaners, or gasoline to clean your
lock.
•
Don’t apply cleaning detergent
directly in sunlight or at high tem-
peratures.
•
Don’t leave cleaning detergent on
the display keypad for long periods
of time - wash immediately.
•
Don’t use scrapers, squeegees, or
razors.
35

9.1 Safety Precautions
SECTION 9.1
Please read all instructions carefully. Remind all Lockly
users of the safety precautions.
Read the following instructions for your own safety
Do not attempt to disassemble the smart lock by yourself. It can cause product damage,
void warranty, and cause injuries.
Do not use any inappropriate tools that can cause damages or malfunction to your lock.
Always make sure your door is securely closed and locked when you leave your house to
prevent unwanted entry.
Please keep your Access Codes safe. Restrict access to the back panel of your smart lock
and check your settings regularly to ensure Access Codes have not been changed without
your knowledge.
Always dispose of used batteries according to your local laws. DO NOT BURN.
Unauthorized changes and modifications may void your product warranty. If you
have questions or any problems while using your Lockly
Secure Smart Lock, contact
our customer service department at prosales@Lockly.com or visit
LocklyPRO.com/support for technical assistance.
36

FCC Warning:
This device complies with Part 15 of the FCC Rules. Operation is subject to the following two conditions:
(1) This device may not cause harmful interference, and (2) this device must accept any interference
received, including interference that may cause undesired operation.
NOTE 1: This equipment has been tested and found to comply with the limits for a Class B digital device,
pursuant to part 15 of the FCC Rules. These limits are designed to provide reasonable protection against
harmful interference in a residential installation. This equipment generates, uses and can radiate radio
frequency energy and, if not installed and used in accordance with the instructions, may cause harmful
interference to radio communications. However, there is no guarantee that interference will not occur in a
particular installation. If this equipment does cause harmful interference to radio or television reception,
which can be determined by turning the equipment off and on, the user is encouraged to try to correct the
interference by one or more of the following measures:
- Reorient or relocate the receiving antenna.
- Increase the separation between the equipment and receiver.
- Connect the equipment into an outlet on a circuit different from that to which the receiver is connected.
- Consult the dealer or an experienced radio/TV technician for help.
NOTE 2: Any changes or modifications to this unit not expressly approved by the party responsible for compliance
could void the user's authority to operate the equipment.
FCC Radiation Exposure Statement
This equipment complies with FCC radiation exposure limits set forth for an uncontrolled environment. It should
be installed and operated with minimum distance 20cm between the radiator & your body.
IC WARNING
This device contains licence-exempt transmitter(s) that comply with Innovation, Science and Economic
Development
Canada’s licence-exempt RSS(s).
Operation is subject to the following two conditions:
(1) This device may not cause interference.
(2)
This device must accept any interference, including interference that may cause undesired
operation of the device.
L’émetteur/récepteur exempt de licence contenu dans le présent appareil est conforme aux CNR d’Innovation,
Sciences et Développement économique Canada applicables aux appareils radio exempts de licence.
L’exploitation est autorisée aux deux conditions suivantes:
1. L’appareil ne doit pas produire de brouillage;
2. L’appareil doit accepter tout brouillage radioélectrique subi, même si le brouillage est susceptible
d’en compromettre le fonctionnement.
IC Radiation Exposure Statement
This equipment meets the exemption from the routine evaluation limits in section 2.5 of RSS-102. It should be
installed and operated with a minimum distance of 20cm between the radiator and any part of your body.
Cet équipement est conforme à l'exemption des limites d'évaluation habituelle de la section 2.5 de lanorme
RSS-102. Il doit être installé et utilisé à une distance minimale de 20 cm entre le radiateur et toute partie de
votre corps.
WARNING: This product can expose you to chemicals including Lead, which is known to the State of
California to cause cancer. For more information go to www.P65Warnings.ca.gov.
UMPGD72820230414
We’re here to help!
pros
ales@Lockly.com
LocklyPRO.com/support
For digital versions and instructional videos, please visit the following link:
LocklyPRO.com/
support
© Copyright 2023 Lockly All rights reserved
US Patent NO. US 9,881,146 B2 | US Patent NO. US 9,853,815 B2 | US Patent NO. US
9,875,350 B2 | US Patent NO. US 9,665,706 B2 | US Patent NO. US 11,010,463 B2 | AU Patent
NO. 2013403169 | AU Patent NO. 2014391959 | AU Patent NO. 2016412123 | UK Patent
NO. EP3059689B1 | UK Patent NO. EP3176722B1 | Other Patents Pending
The Bluetooth
®
word mark and logos are registered trademarks owned by the Bluetooth
SIG, Inc. , and any use of such marks by Lockly is under license. Other trademarks and
trade names are those of their respective owners. Google, Android, Google Play and
Google Home are trademarks of Google LLC. , Amazon, Alexa and all related logos are
trademarks of Amazon.com, Inc., or its affiliates.
TOTAL ACCESS SOLUTION