Sept 2021
QSG1_A
Reolink Wireless Camera
User Manual

Reolink Wireless Camera
User Manual
1
contents
1. Camera Introduction
.............................................................................................................
3
Device Overview
....................................................................................................................
3
Status Light
............................................................................................................................
8
2. Setup and Installation
..........................................................................................................
8
Set up the Camera
..............................................................................................................
8
Install the Camera
.............................................................................................................
22
3. View Your Camera
...............................................................................................................
10
Live View
................................................................................................................................
10
Display Settings
...................................................................................................................
18
4. Alarm and Detection
..........................................................................................................
29
Set up Motion Detection
.................................................................................................
29
Set up Motion Alerts
........................................................................................................
33
Set up Motion Recording
................................................................................................
43
4. Recording and Playback
....................................................................................................
46
Set up Recording
................................................................................................................
46
Playback and Download Recordings
..........................................................................
48
Time Lapse
............................................................................................................................
55
Cloud Recording
..................................................................................................................
61
6. Use the Reolink App
............................................................................................................
75
Share Your Devices with Others
..................................................................................
75
Scene Modes
.........................................................................................................................
78

Reolink Wireless Camera
User Manual
2
Add or Delete a Camera
...................................................................................................
4
Register Account
.................................................................................................................
10
App Settings
.........................................................................................................................
12
7. Camera Settings
....................................................................................................................
15
Network and WiFi Connection
......................................................................................
15
FTP Settings
.........................................................................................................................
19
SD Card Storage
.................................................................................................................
23
Device Information
............................................................................................................
29
Device Password
.................................................................................................................
31
Date and Time
....................................................................................................................
33
Reboot and Restore
...........................................................................................................
34
Firmware Upgrade
............................................................................................................
35
8. FAQs and Troubleshooting
................................................................................................
53
FAQs
.........................................................................................................................................
53
Troubleshooting
...................................................................................................................
55
Note:
This user manual takes a camera model that supports most features as an example.
Your own model may not support certain features mentioned here. Please refer to
the specifications of your camera model.
Reolink Wireless Camera
User Manual
3
1. Camera Introduction
Device Overview
E1, E1 Pro, E1 Zoom
The E1 series are indoor cameras that are compact and can be seamlessly integrated
into your home. Loaded with smart features, they can do many things like rotate
at your disposal to reach more areas. Or send you customized motion alerts. With
unbeatable price, they make smart and high-quality home protection accessible to
everyone.
1
Speaker
2
Power Port
3
Ethernet Port
4
Lens
5
Status LED
6
Built-in Mic
7
Micro SD Card Slot
Reolink Wireless Camera
User Manual
4
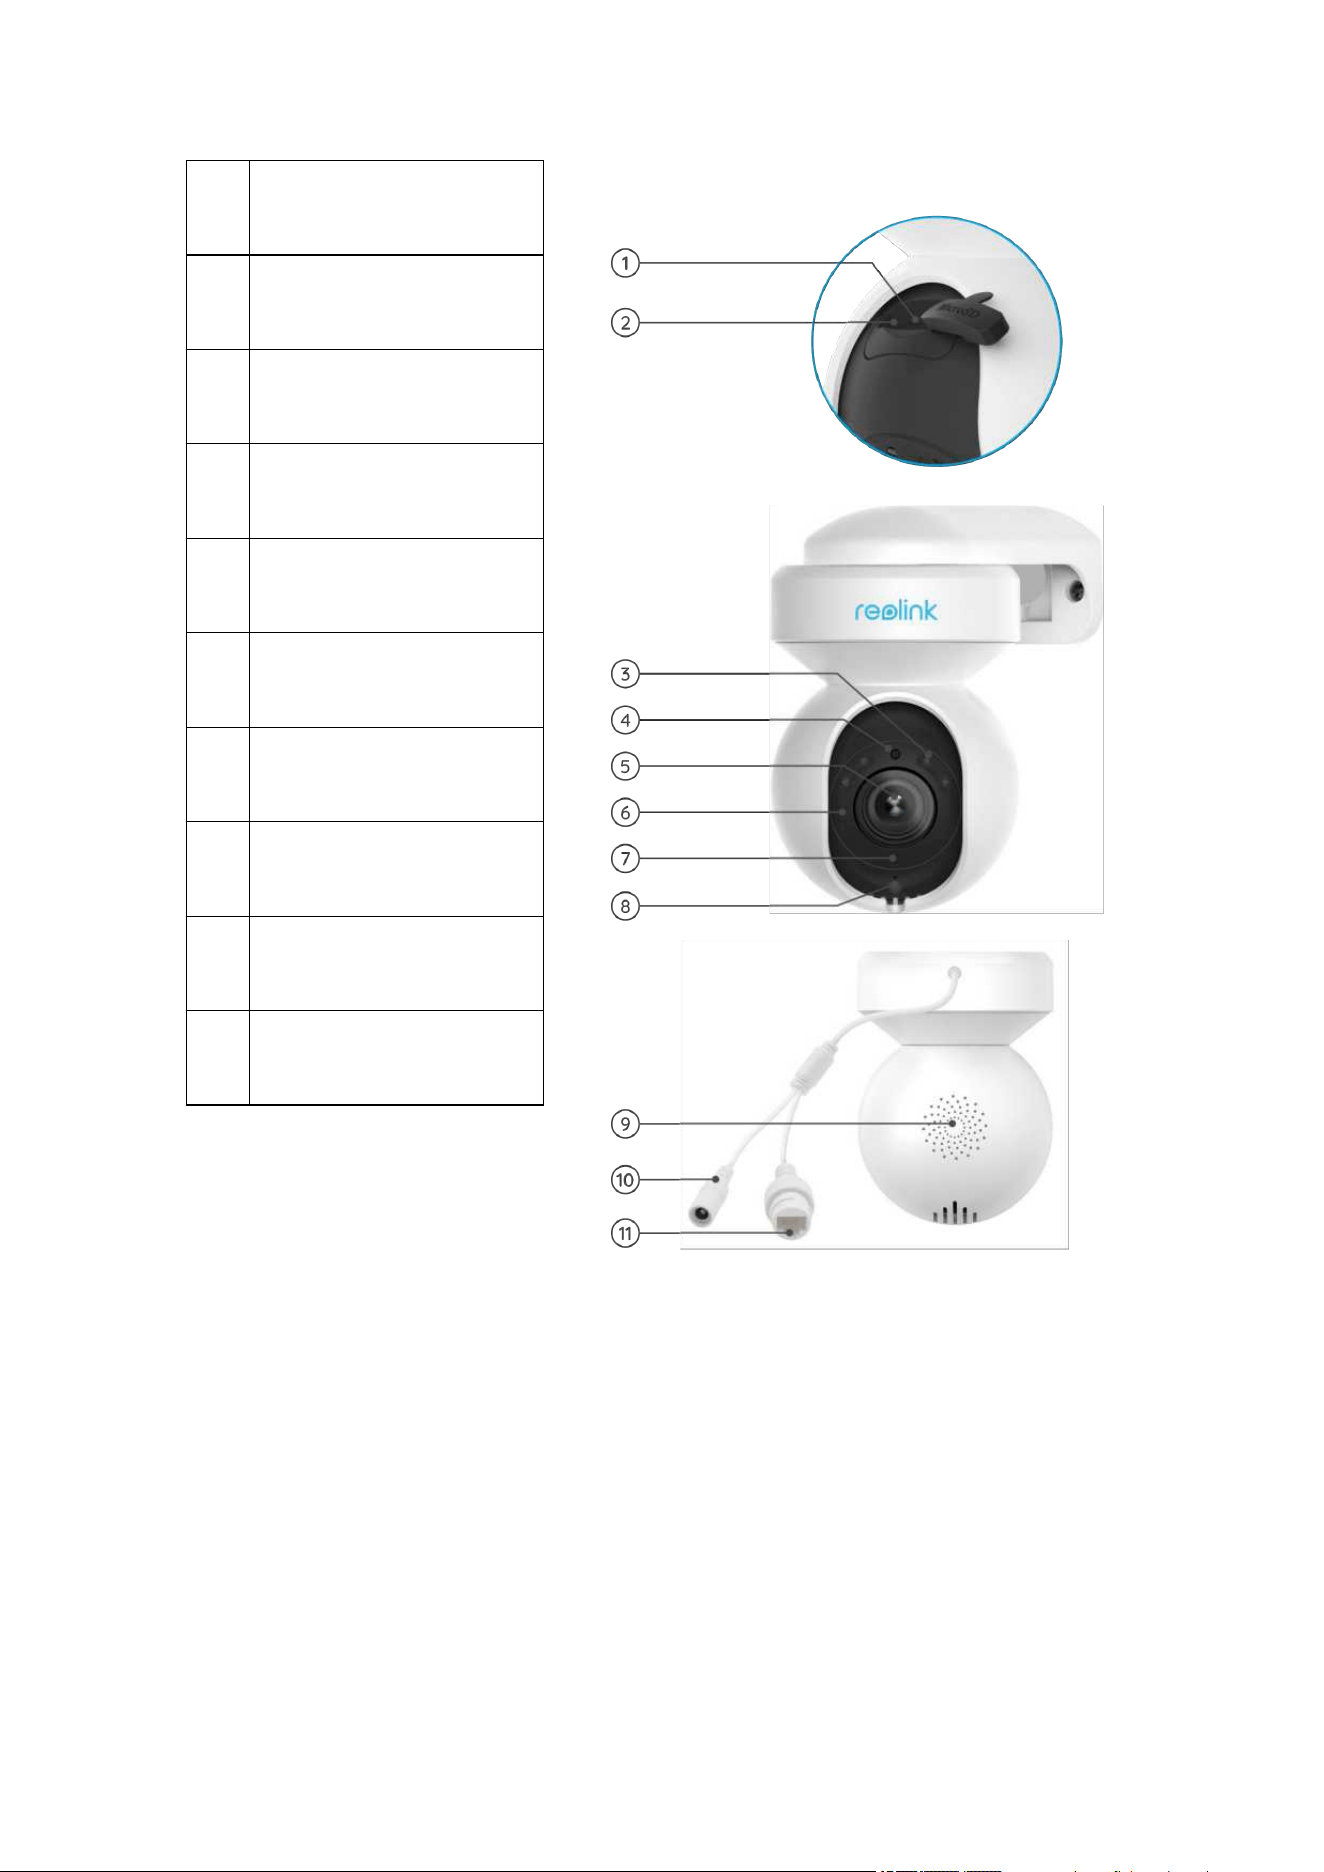
E1 Outdoor
E1 Outdoor is equipped with smart technology that detects humans and vehicles,
allows real-time remote communication and offers color night vision with spotlights
on.
8
Reset Button
1
Micro SD Card Slot
Reolink Wireless Camera
User Manual
5
2
Reset Button
3
Spotlight
4
Daylight Sensor
5
Lens
6
Infrared Lights
7
Status LED
8
Built-in Mic
9
Speaker
10
Power Cable
11
Ethernet Port
Reolink Wireless Camera
User Manual
6
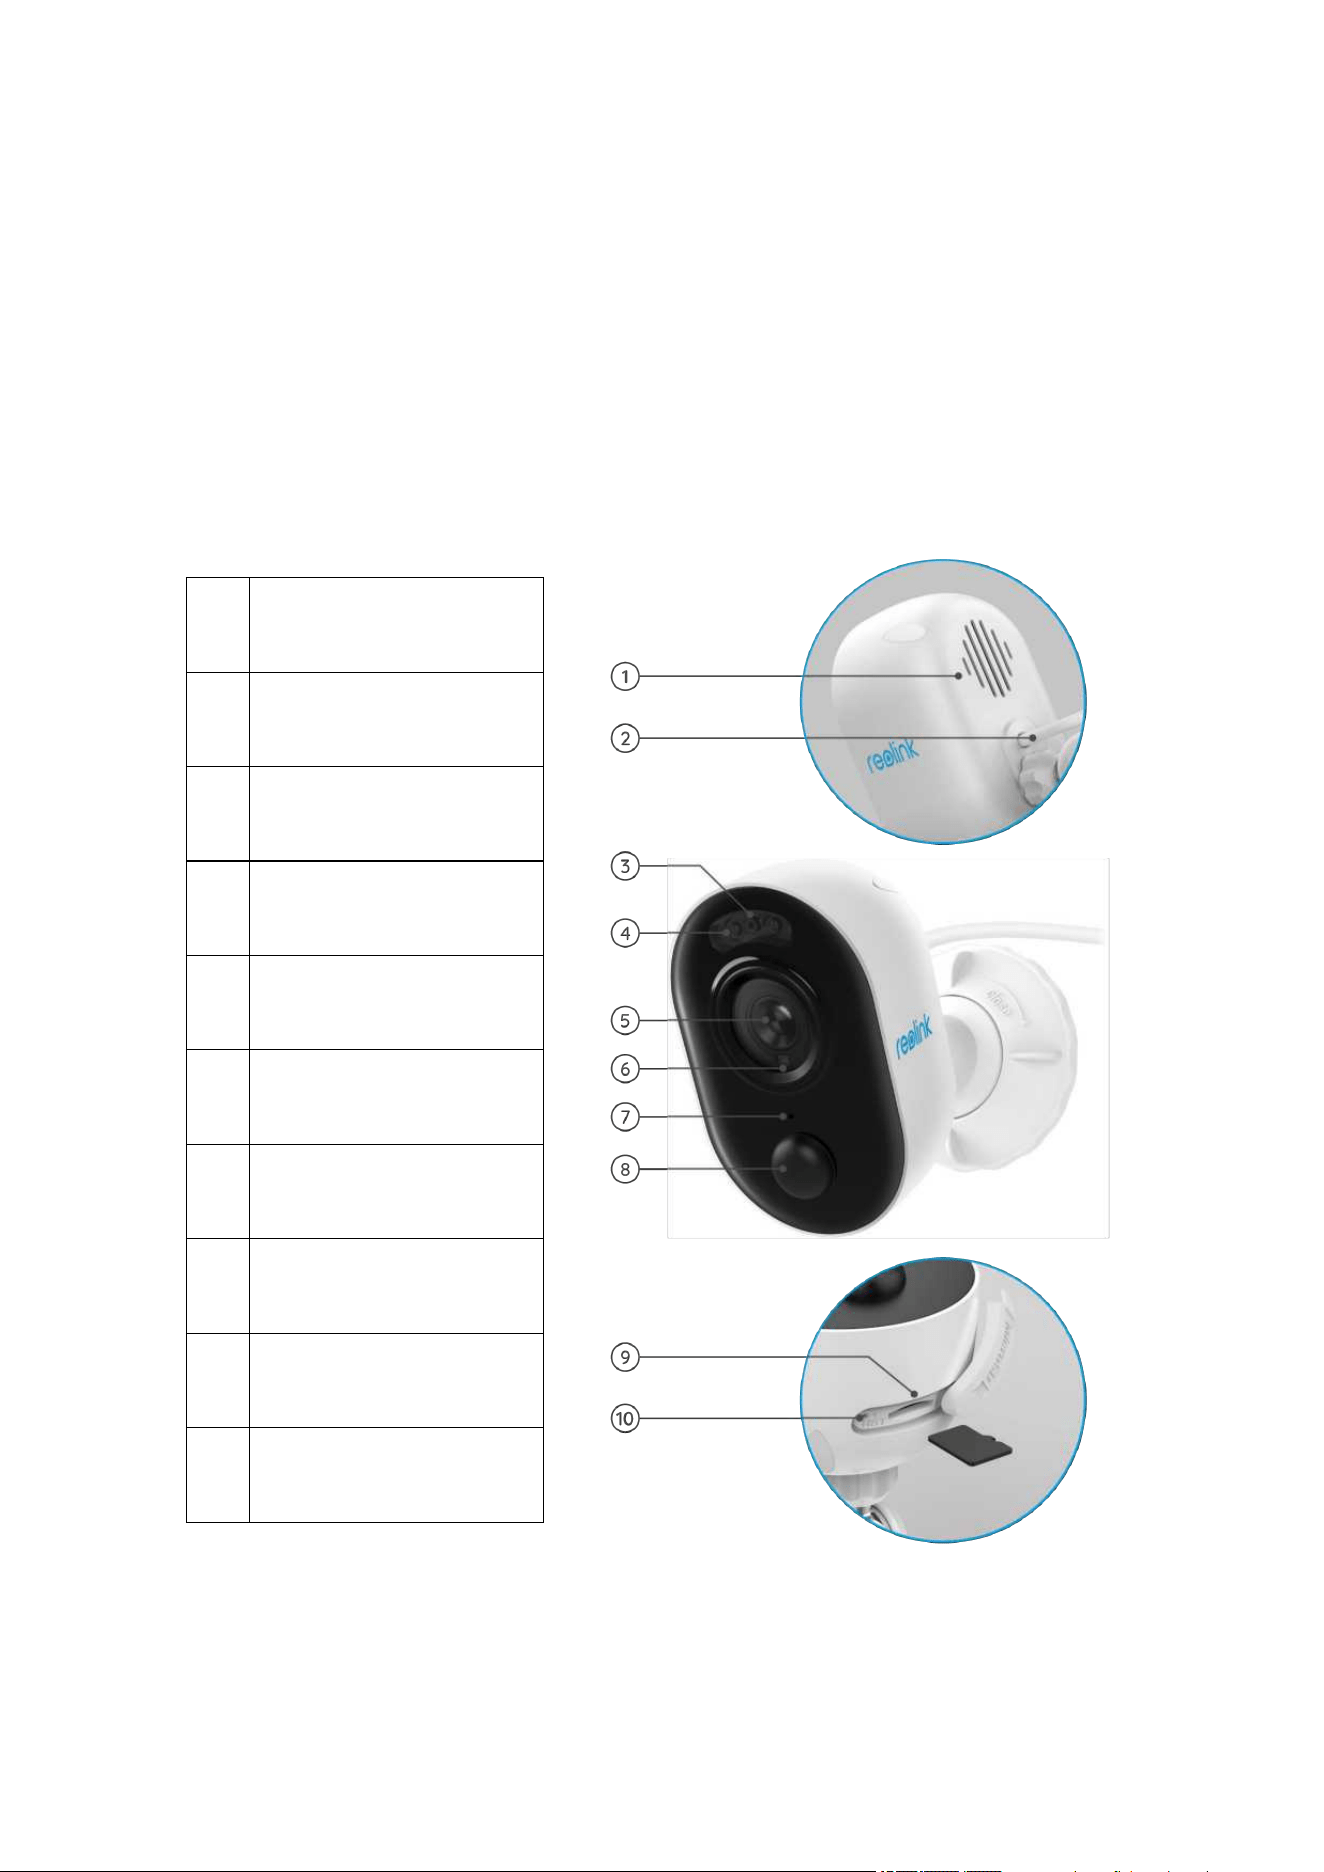
Reolink Lumus
Reolink Lumus adds the bright motion-triggered LED spotlight to the IP camera,
which allows for color night vision and powerful deterrent effect for criminals.
Loading with smart features like PIR and motion detection and siren, this outdoor
spotlight cam gives you one-of-a-kind protection.
1
Speaker
2
Power Cable
3
Status LED
4
Spotlight
5
Lens
6
Daylight Sensor
7
Built-in Mic
8
PIR Motion Sensor
9
Micro SD Card Slot
10
Reset Button
Reolink Wireless Camera
User Manual
1
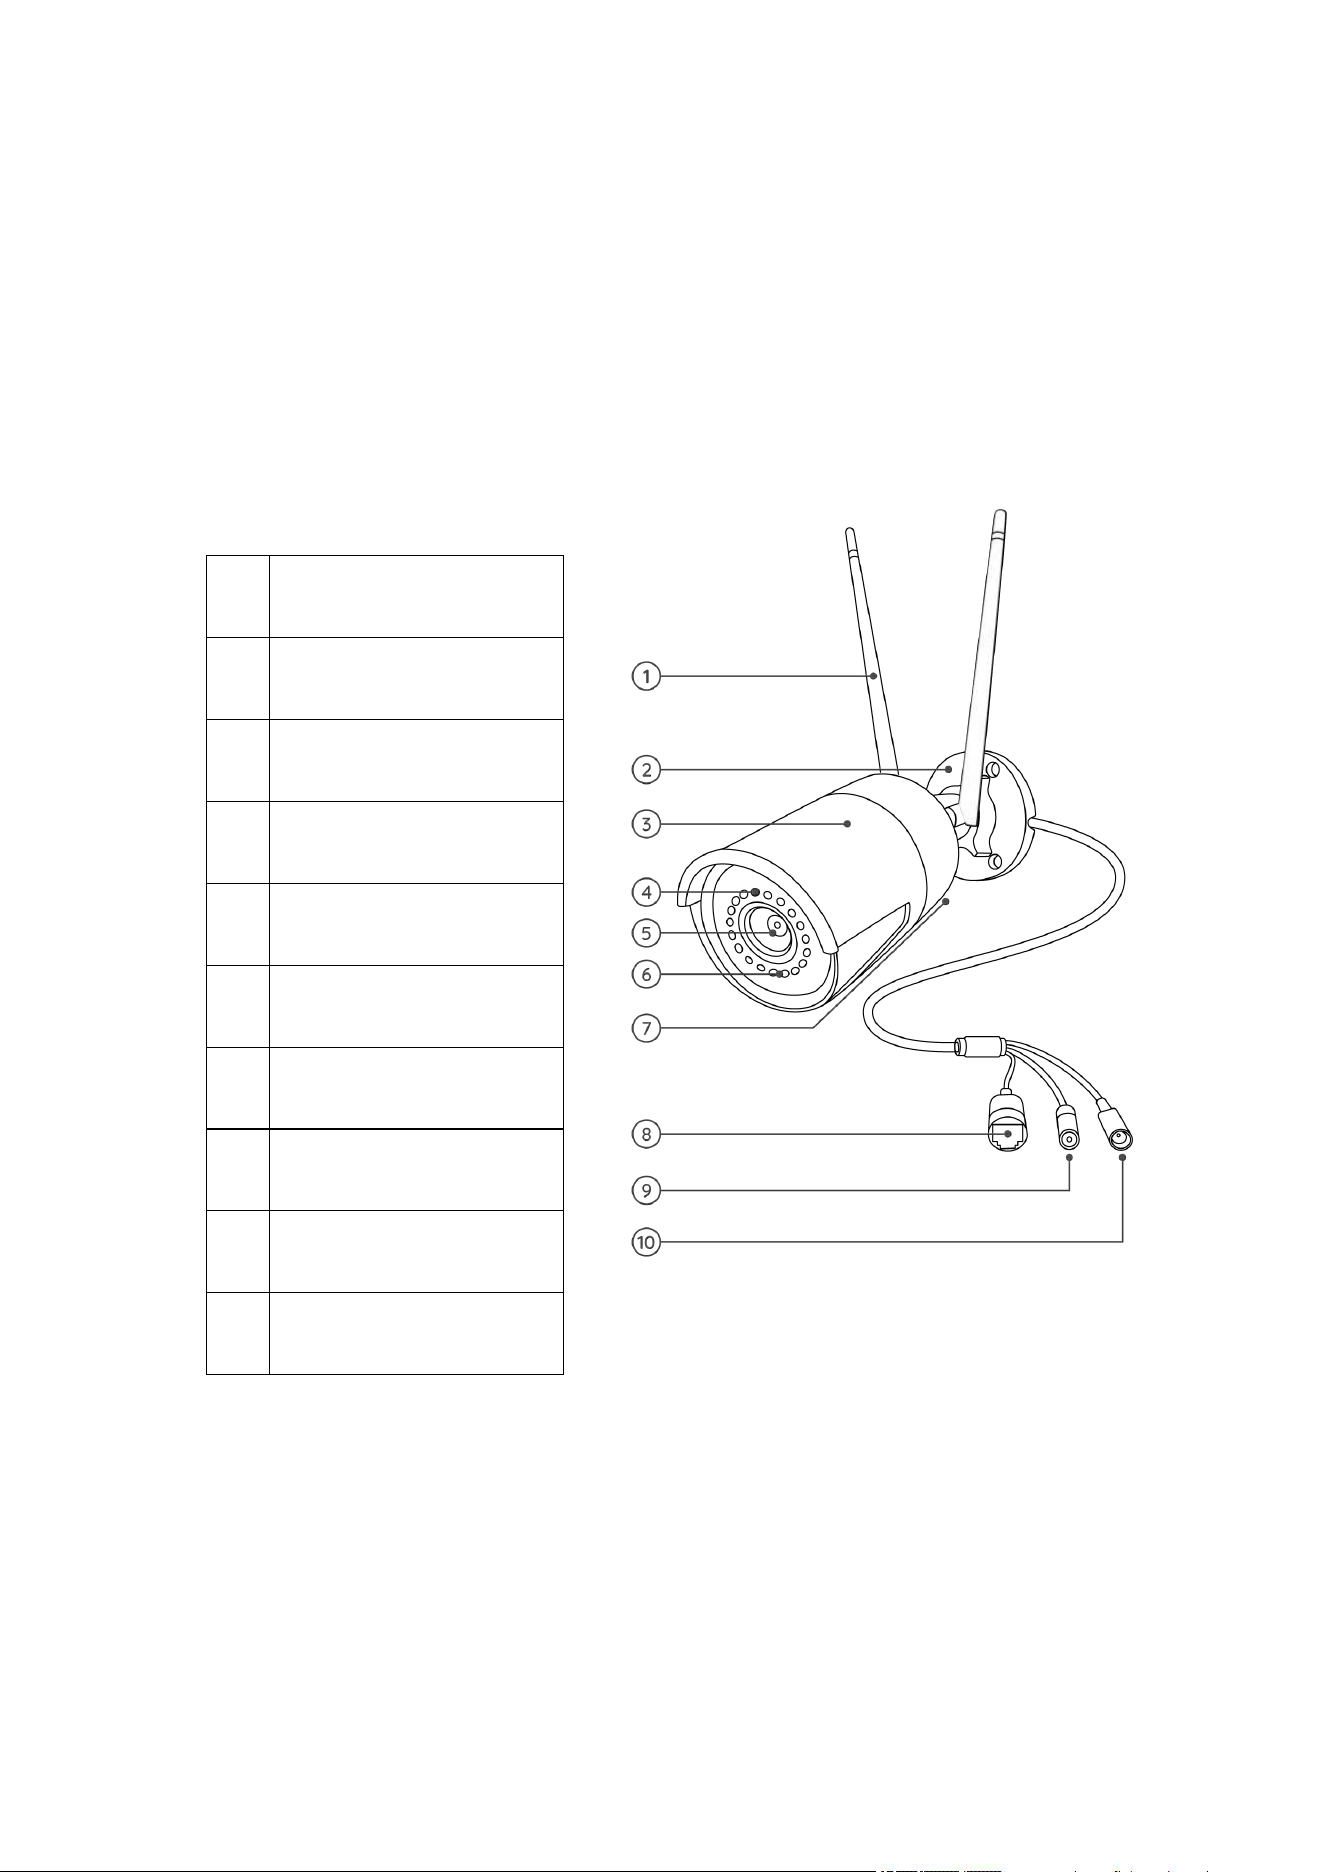
RLC-410W/RLC-511W/RLC-511WA/RLC-510WA
RLC-410W: With 2560x1440 high resolution, this camera captures more beautiful
and smoother 4-megapixel live video streaming and clips than 720p and 1080p
cameras. It sees your home security more clearly. No details will be missed!
1
Antenna
2
Mount
3
Metal Aluminum Case
4
Infrared Lights
5
High Definition Lens
6
Daylight Sensor
7
Built-in Mic
8
Ethernet Port
9
Reset Button
10
Power Cable
Reolink Wireless Camera
User Manual
1
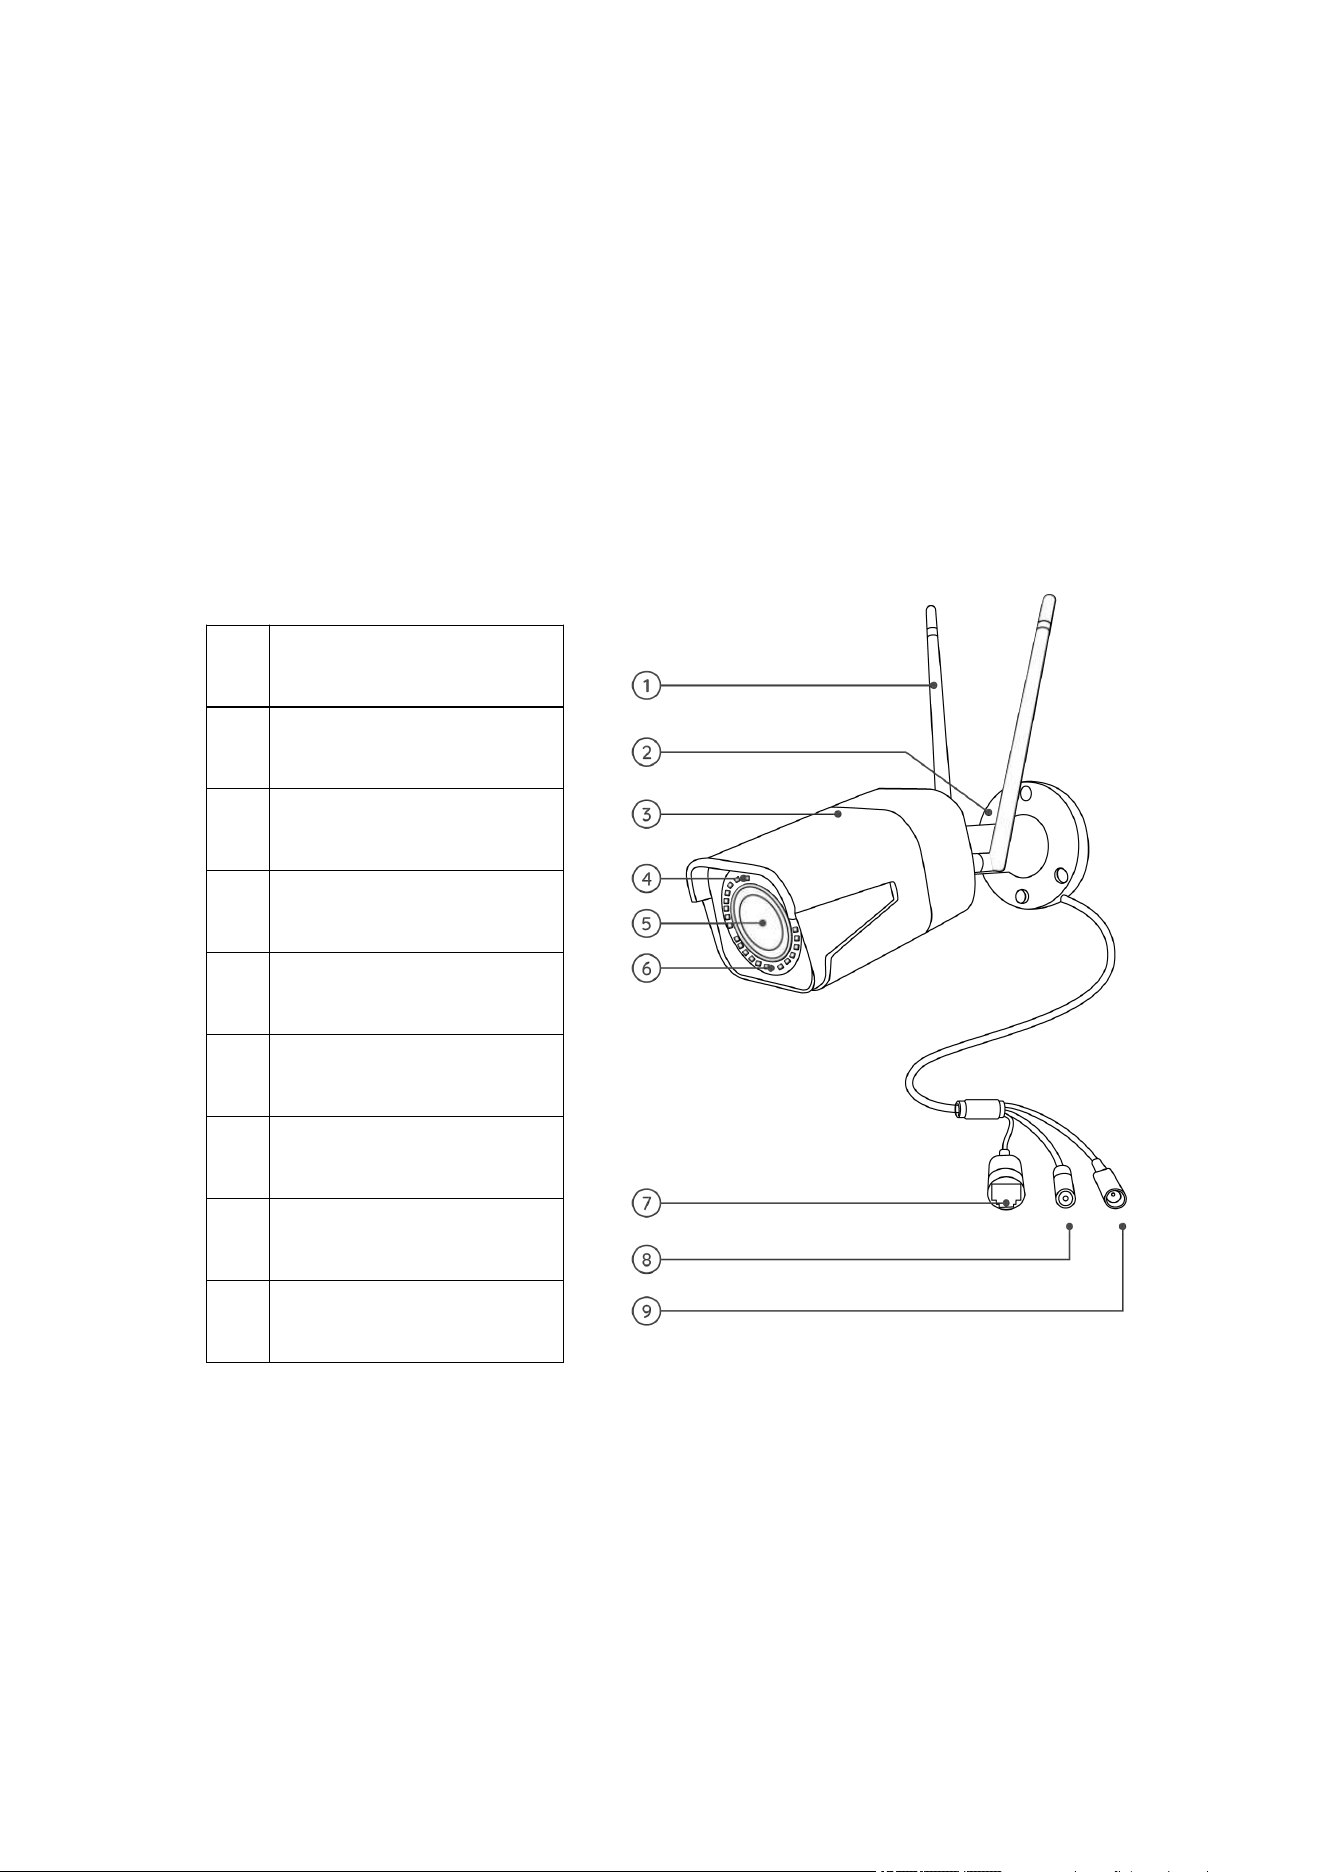
RLC-511W:
For security, higher resolution makes a big difference. RLC-511W WiFi IP camera
features 5-megapixel (2560x1920), which is nearly 2.4X the resolution of 1080p
Full HD, and even 1.3X the resolution of 1440p. It sees your home security more
clearly, with more details.
.
1
Antenna
2
Mount
3
Metal Aluminum Case
4
Infrared Lights
5
High Definition Lens
6
Daylight Sensor
7
Ethernet Port
8
Reset Button
9
Power Cable

Reolink Wireless Camera
User Manual
2
Reolink Wireless Camera
User Manual
3
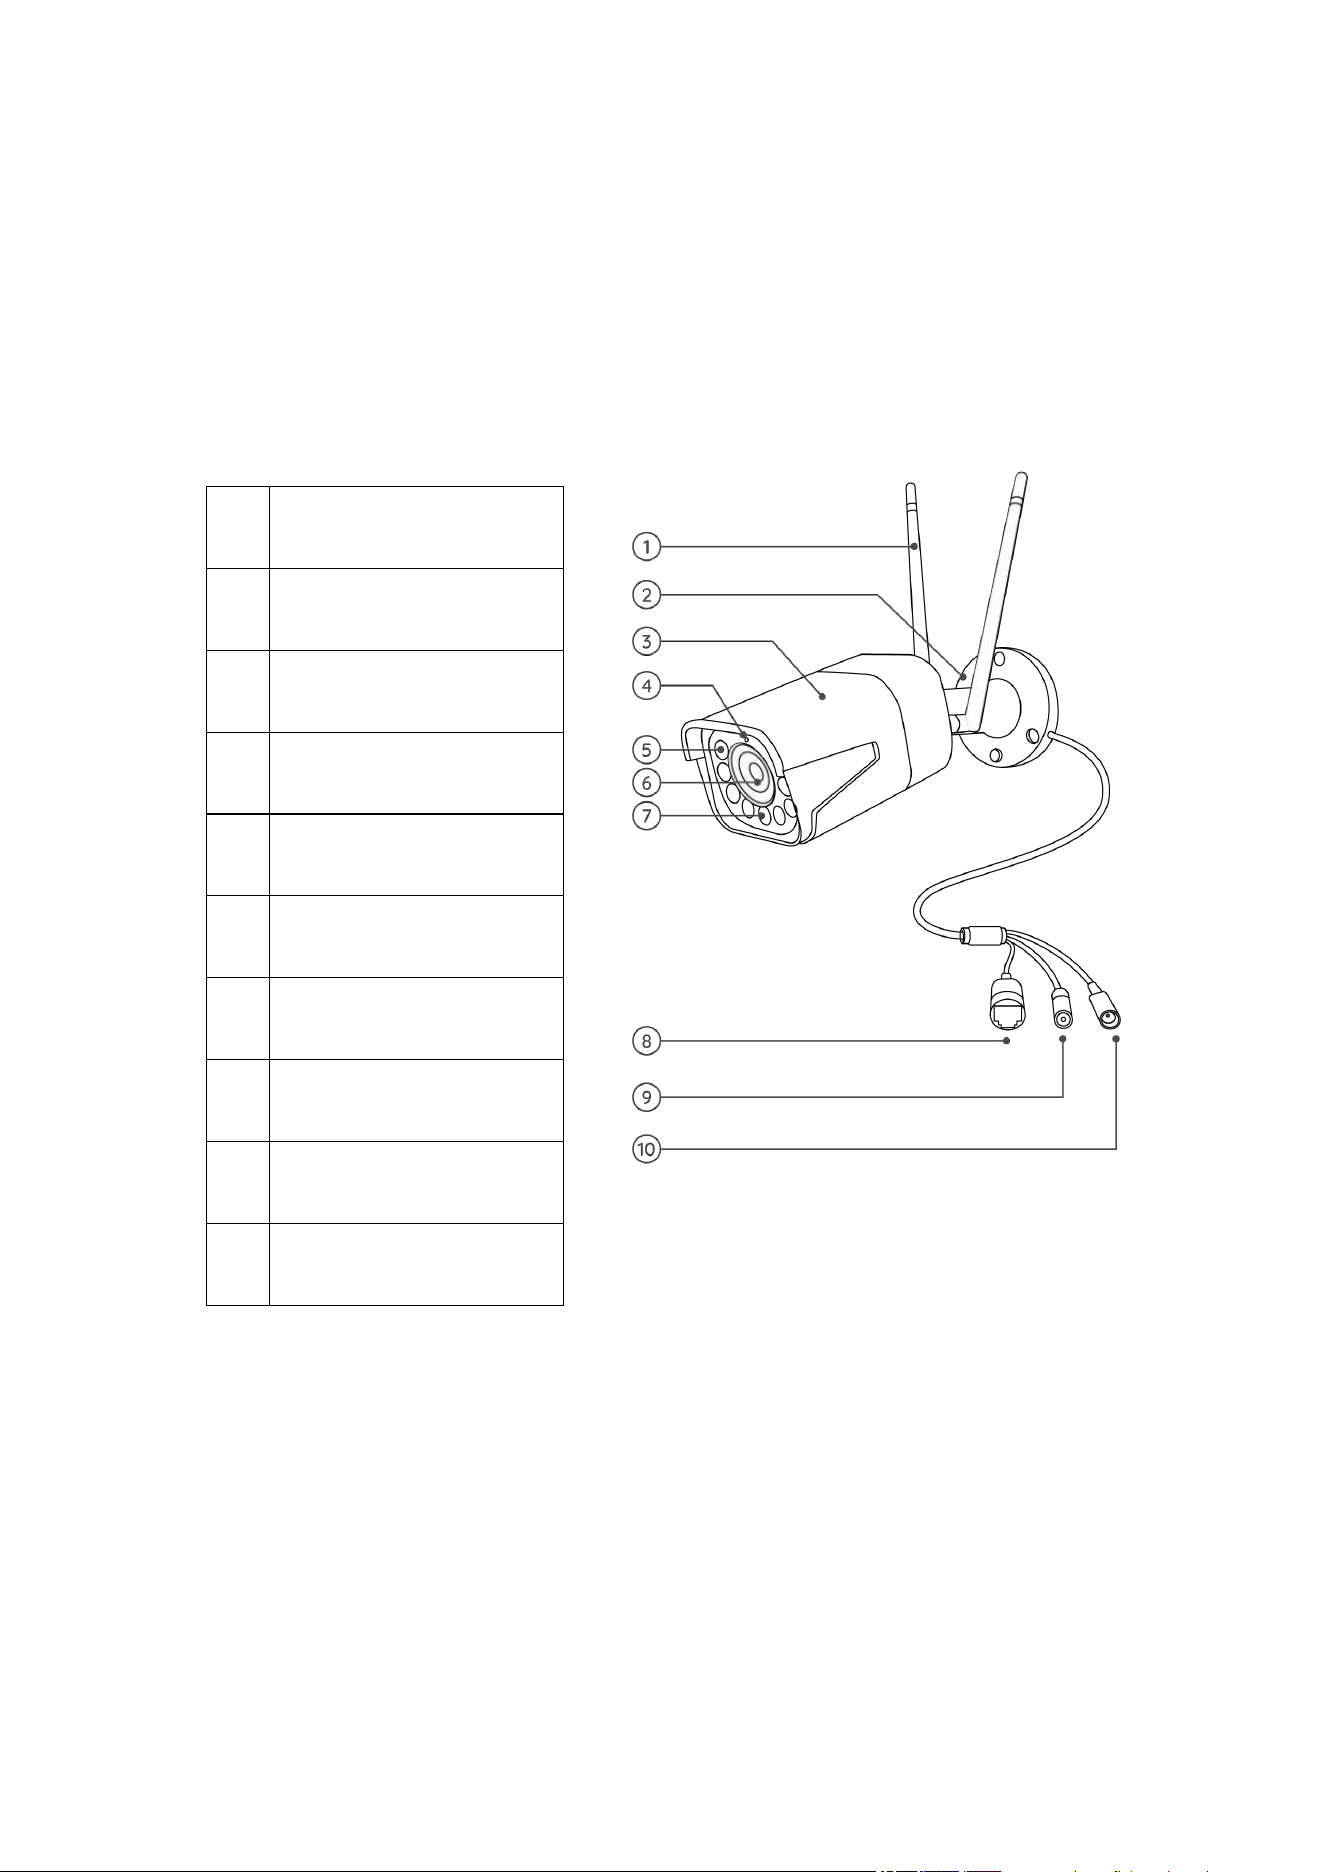
RLC-511WA/RLC-510WA: With 5MP super HD, this camera provides you with a
clearer visual quality & smoother live viewing experience.
Y
ou can stay better
informed with the hard-to-see details captured by the camera.
1
Antenna
2
Mount
3
Metal Aluminum Case
4
Daylight Sensor
5
Infrared Lights
6
High Definition Lens
7
Spotlight
8
Ethernet Port
9
Reset Button
10
Power Cable
Reolink Wireless Camera
User Manual
4
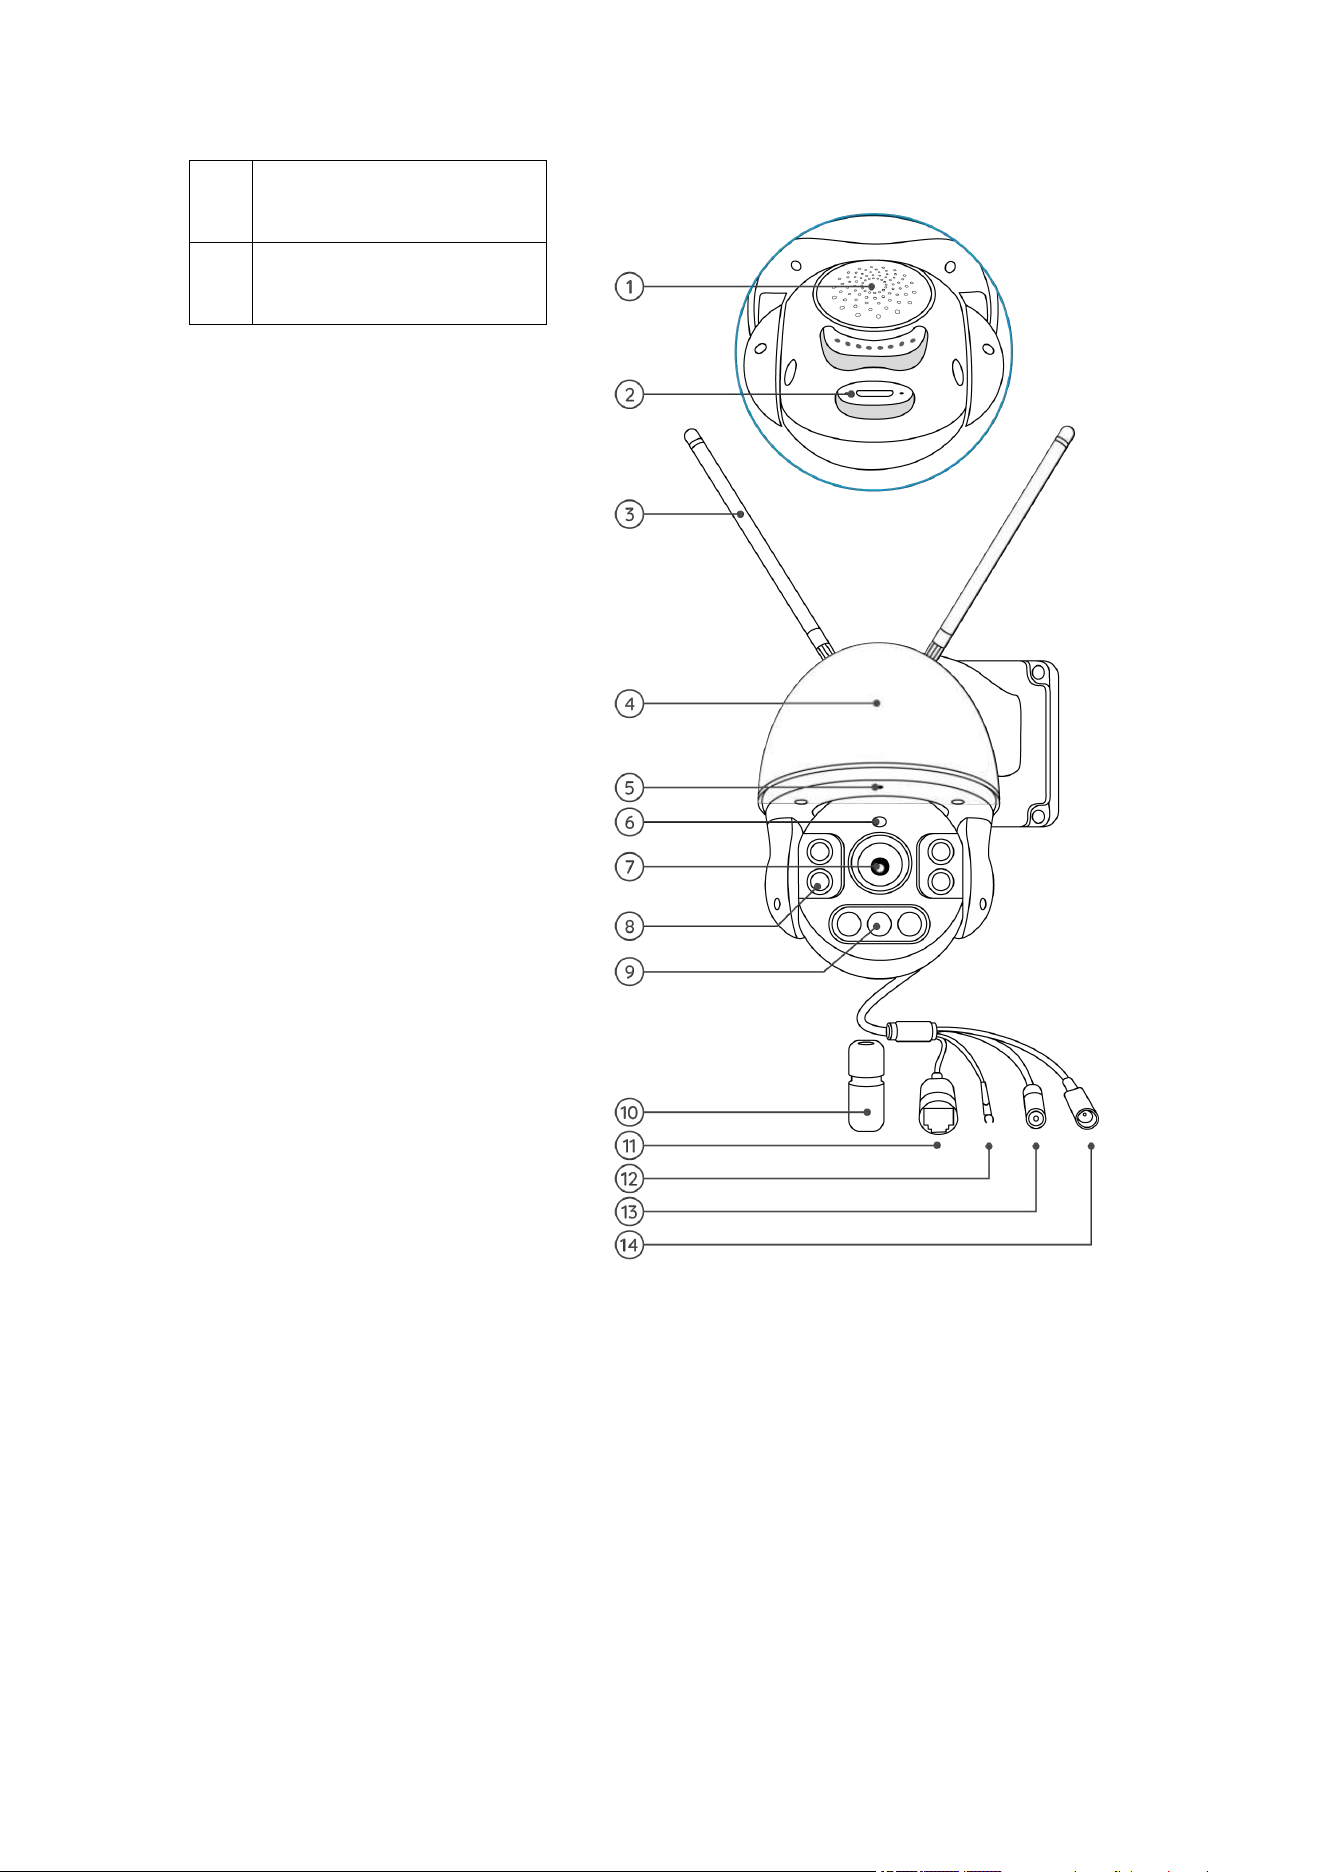
RLC-523WA/RLC-542WA
RLC-523WA: This camera comes with built-in motion-triggered LED spotlight
that allows for color night vision and powerful deterrent effect for criminals. Loaded
with smart features like human and vehicle motion detection and siren, this outdoor
spotlight cam gives you one-of-a-kind protection. It supports both 2.4 GHz and 5
GHz, and with pan and tilt feature, this camera allows you to view your world from
every angle and can follow the moving person automatically.
1
Speaker
2
SD Card Slot
3
Antenna
4
Metal Aluminum Case
5
Built-in Mic
6
Daylight Sensor
7
Lens
8
Infrared Lights
9
Spotlight
10
Waterproof Lid
11
Ethernet Port
12
Earth Wire
Reolink Wireless Camera
User Manual
5
13
Reset Button
14
Power Port (Optional)
Reolink Wireless Camera
User Manual
6
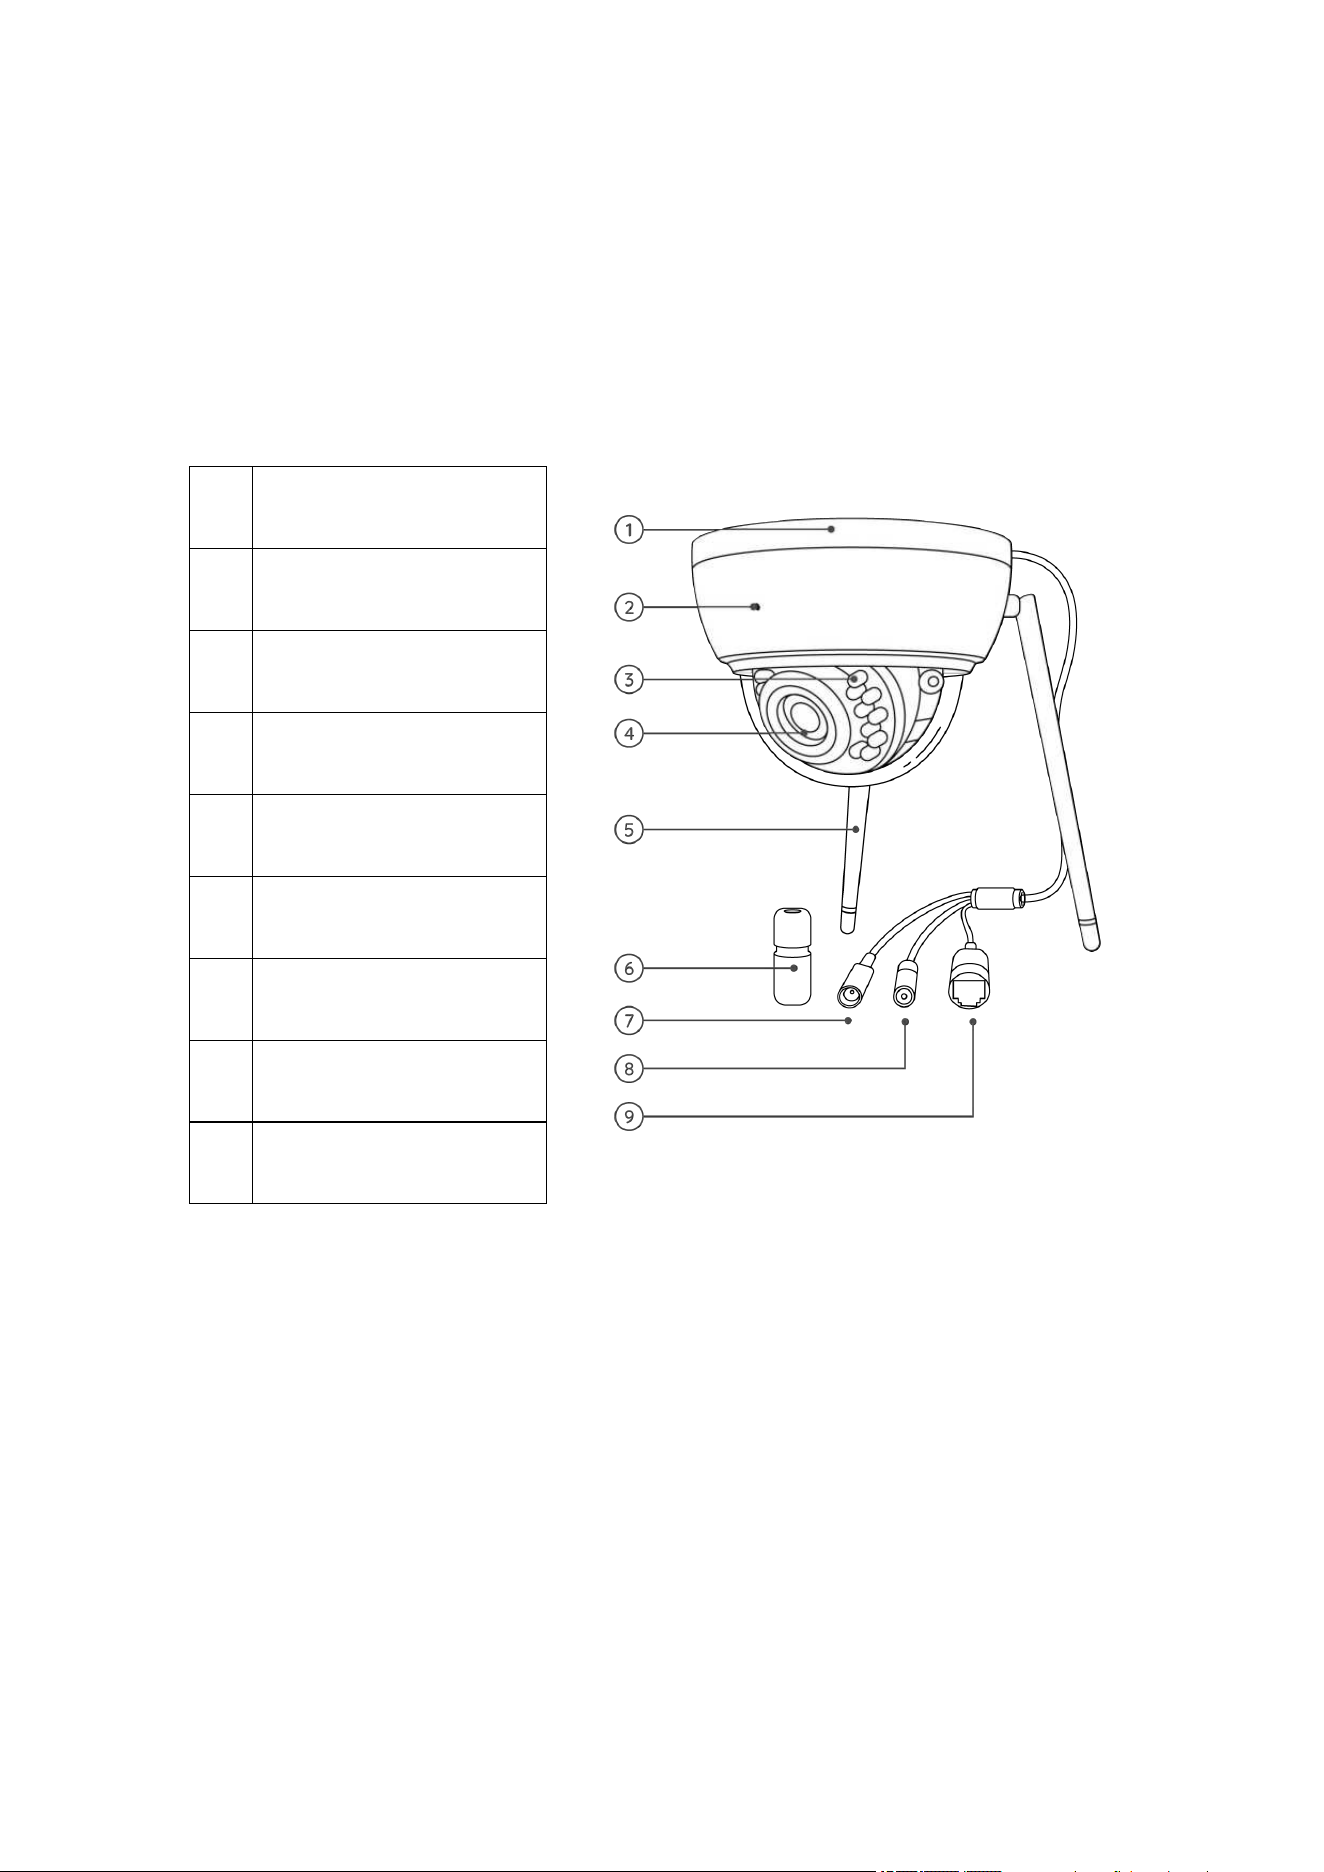
RLC-542WA: The 5MP dual-band WiFi camera supports optical zoom. With 5MP
super HD, this camera provides you with a clearer visual quality & smoother live
viewing experience.
1
Mount
2
Built-in Mic
3
lnfrared Lights
4
Lens
5
Antenna
6
Waterproof Lid
7
Power Port (Optional)
8
Reset Button
9
Ethernet Port
Reolink Wireless Camera
User Manual
7
Reolink Duo WiFi
Designed with two lenses, this camera provides you with a 150˚ wide viewing angle.
You can appreciate much broader images with less distortion. By controlling two
displays at the same time, you nearly have everything under control without blind
spots. Equipped with advanced person/vehicle detection, Reolink Duo WiFi focuses
on what you care about most and sends you accurate alerts in real time.
1
Antenna
2
Lens
3
Daylight Sensor
4
Mic
5
Spotlights
6
Infrared Lights
7
Mounting Bracket
8
Waterproof Lid
9
Ethernet Port
10
Power Port
Reolink Wireless Camera
User Manual
8
Status Light
For cameras that have status LED lights.
Status Light
Camera Status
Solid Blue
Camera is starting up/
WiFi connection succeeded
Blinking Blue
WiFi is not configured/
WiFi connection failed
2. Setup and Installation
Set up the Camera
Set up the Camera Without Ethernet port
Please follow the steps below to do initial setup for the WiFi cameras without an
Ethernet port via the Reolink App.
1. Connect the power adapter to the camera and wait for it starting up. After
hearing a startup sound, you will hear repeated Ding sounds or "Please run Reolink
App, add the camera and set it up", which means you can scan the QR code on the
camera and start the setup process.
Note:
If you are not sure whether you hear the right sound, you may tap "Demo" to hear
the sample sound. If you couldn't hear the repeated Ding sounds, please reset your


Reolink Wireless Camera
User Manual
10
3. Scan the QR code on the back of the camera. If the phone doesn't respond, please
tap Input UID/IP and then manually type in the UID (16-digit characters under the
QR code of the camera).
Note: You may tap Light to enable flash light when setting up in a dark
environment.
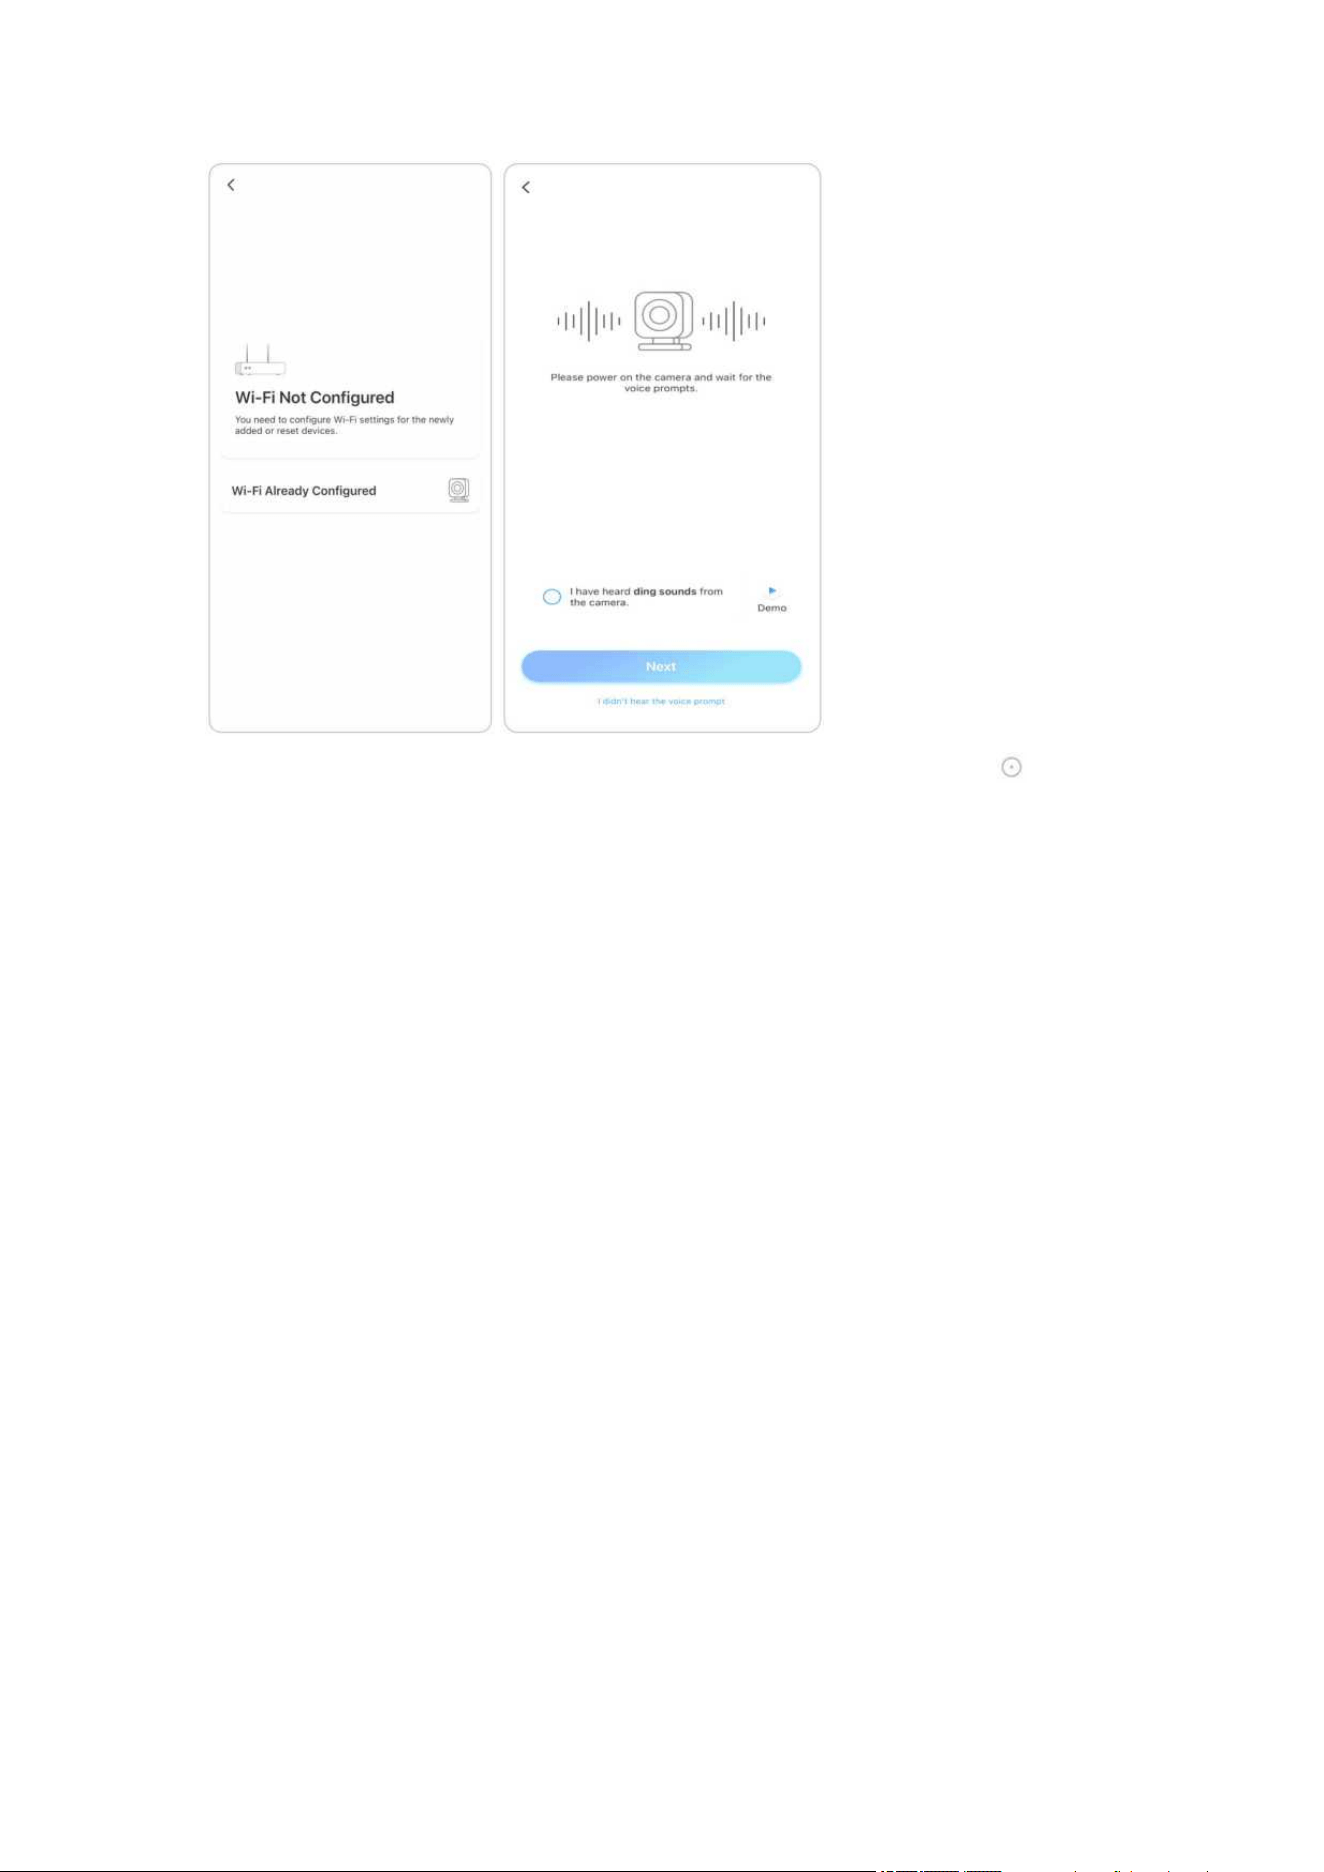
4. Select Wi-Fi Not Configured. If you hear the camera speaking “Please run App,
add the camera and set it up” or the ding sounds, please tick “I have heard the voice
prompt from the camera” or “I have heard ding sounds from the camera”, then
tap Next.
Reolink Wireless Camera
User Manual
11
5. Enter the Wi-Fi password of the selected Wi-Fi network (you may tap to see
the Wi-Fi password you entered and double-check that the password is correct) and
then tap Next.
6. A QR code will be generated and displayed on your phone. Please place the QR
code on your phone in front of the camera’s lens at a distance of about 20 cm (8

Reolink Wireless Camera
User Manual
12
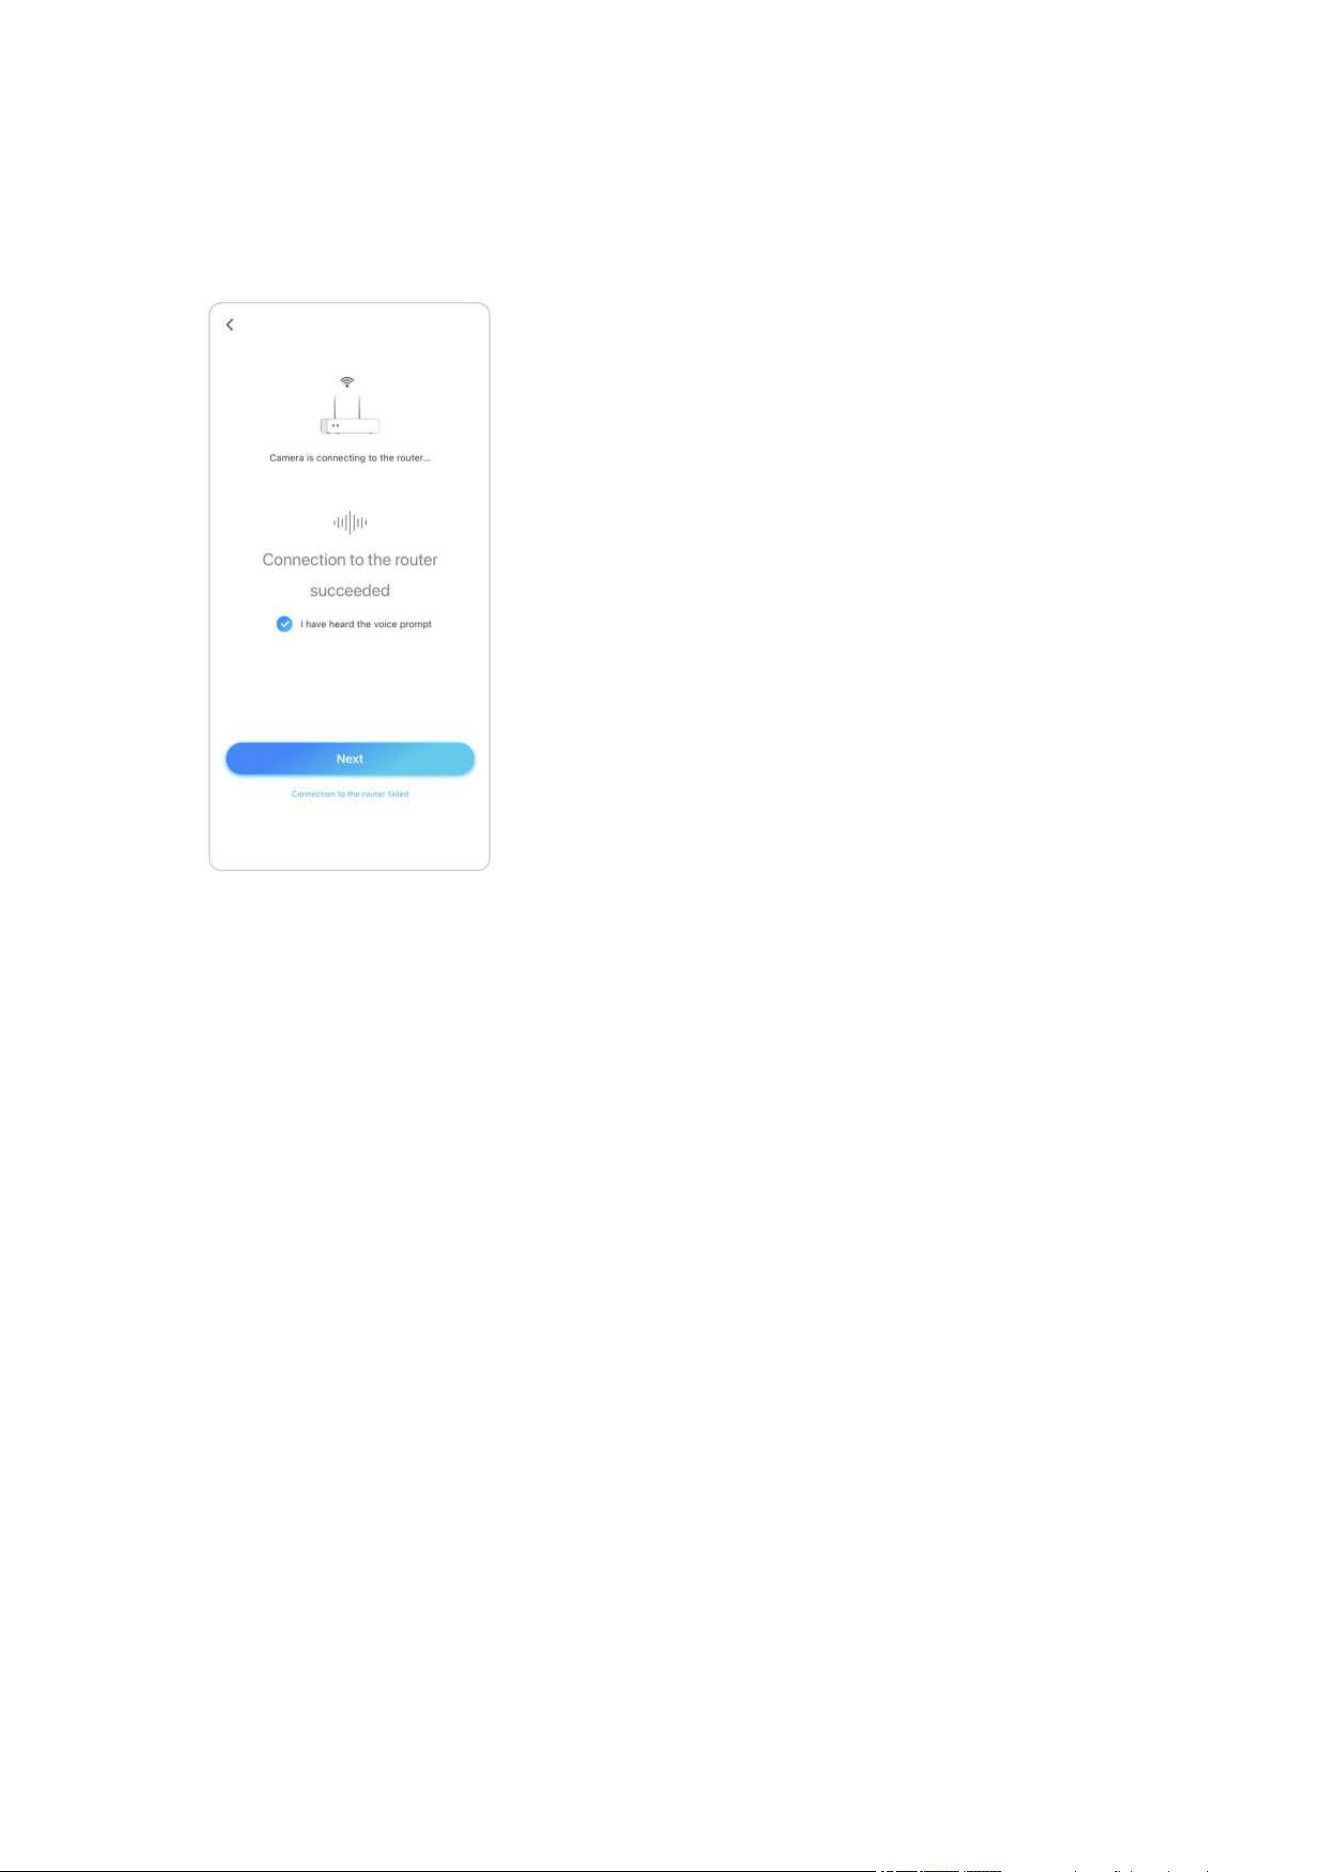
inches) and let the camera scan the QR code. After the QR code is scanned
successfully, tick “I have heard a beep sound from the camera” or “I have heard the
voice prompt” and tap Next.
Notes:
1. Please rip off the protection film of the camera’s lens.
2. You may double tap on the QR code to enlarge it.
Reolink Wireless Camera
User Manual
13
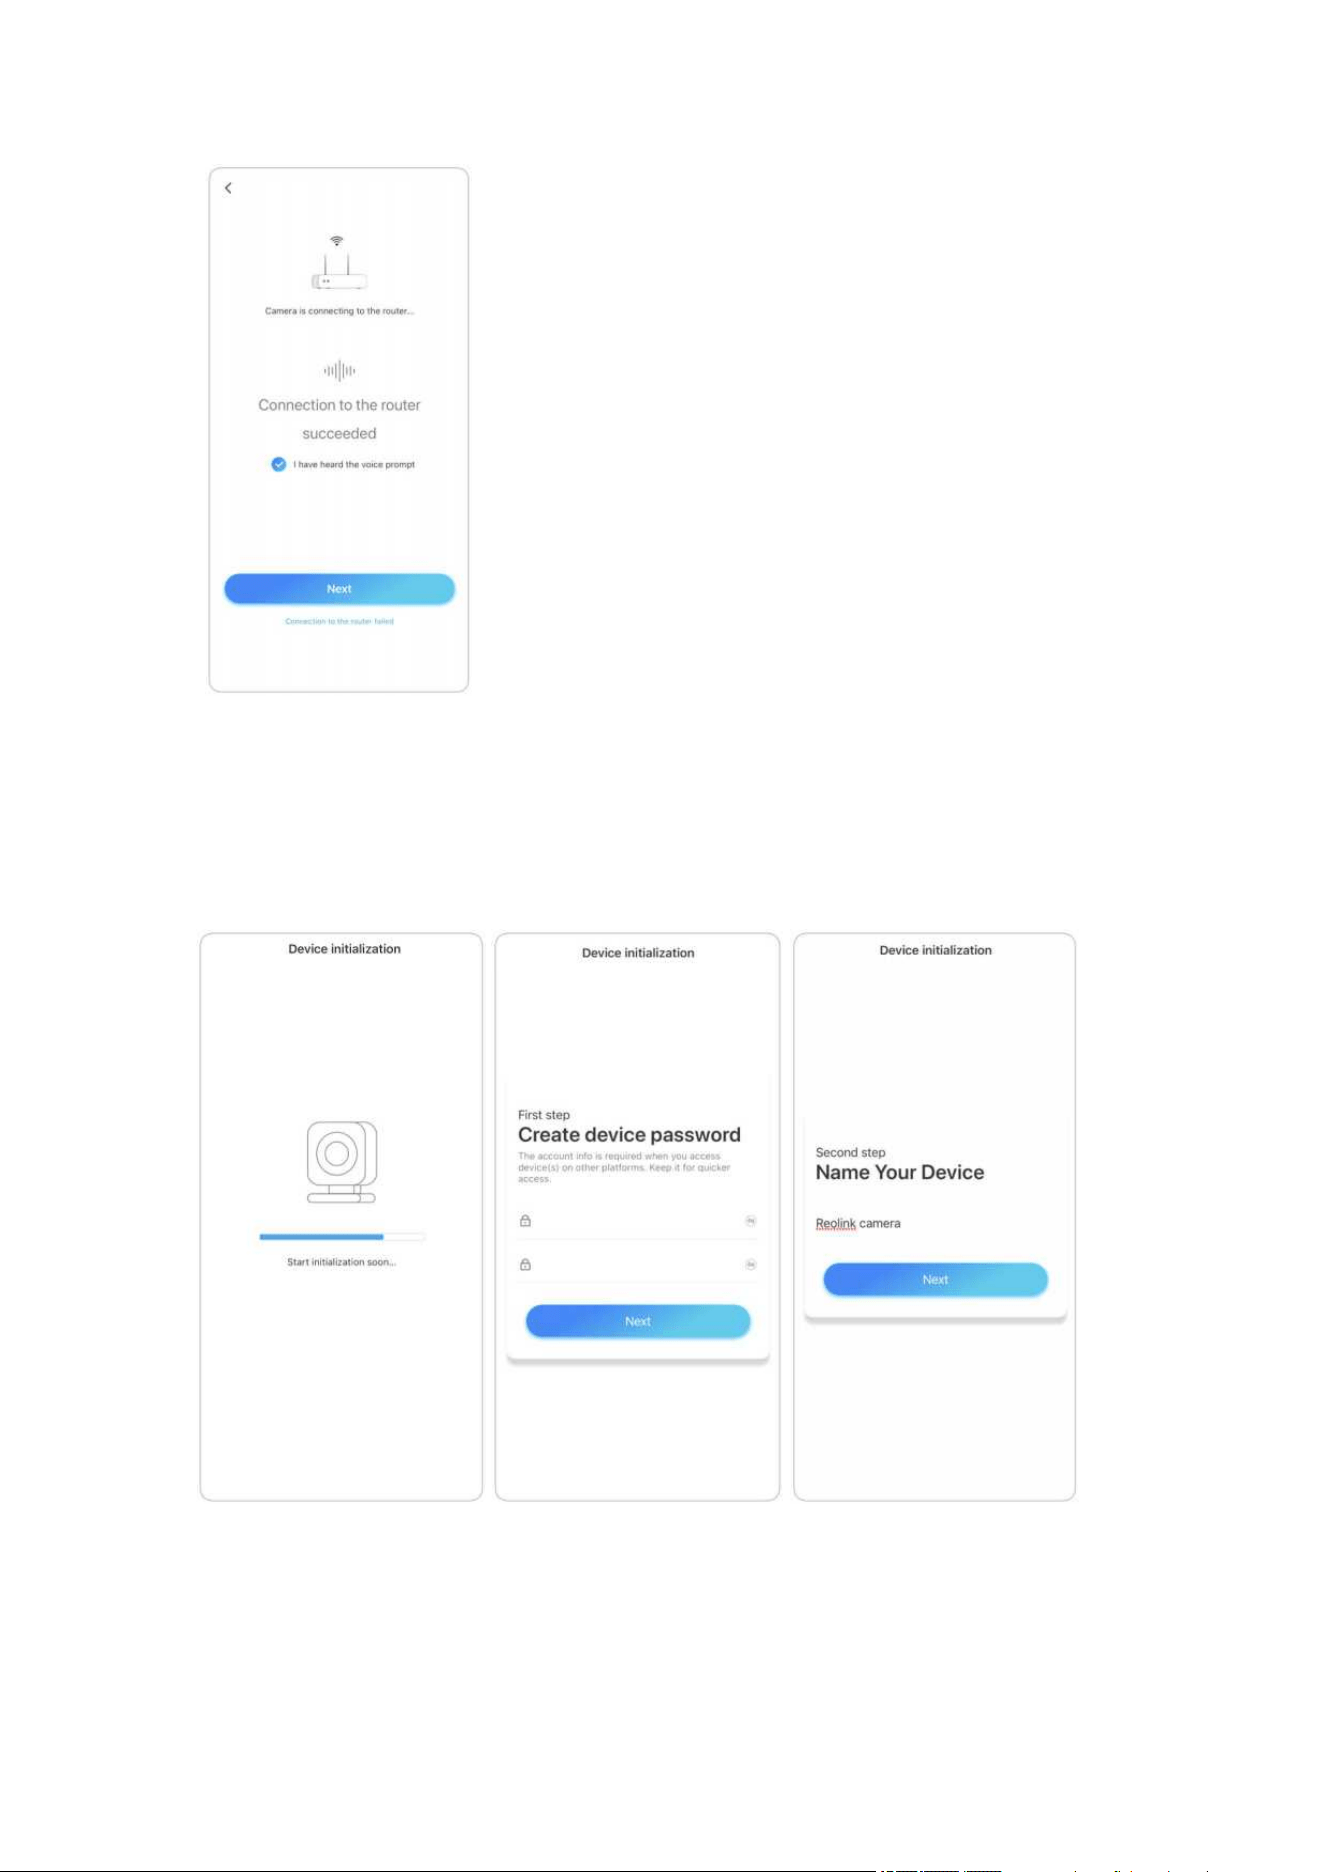
7. After the beep sound, the camera will try to connect to the router, please wait
for 60 seconds.
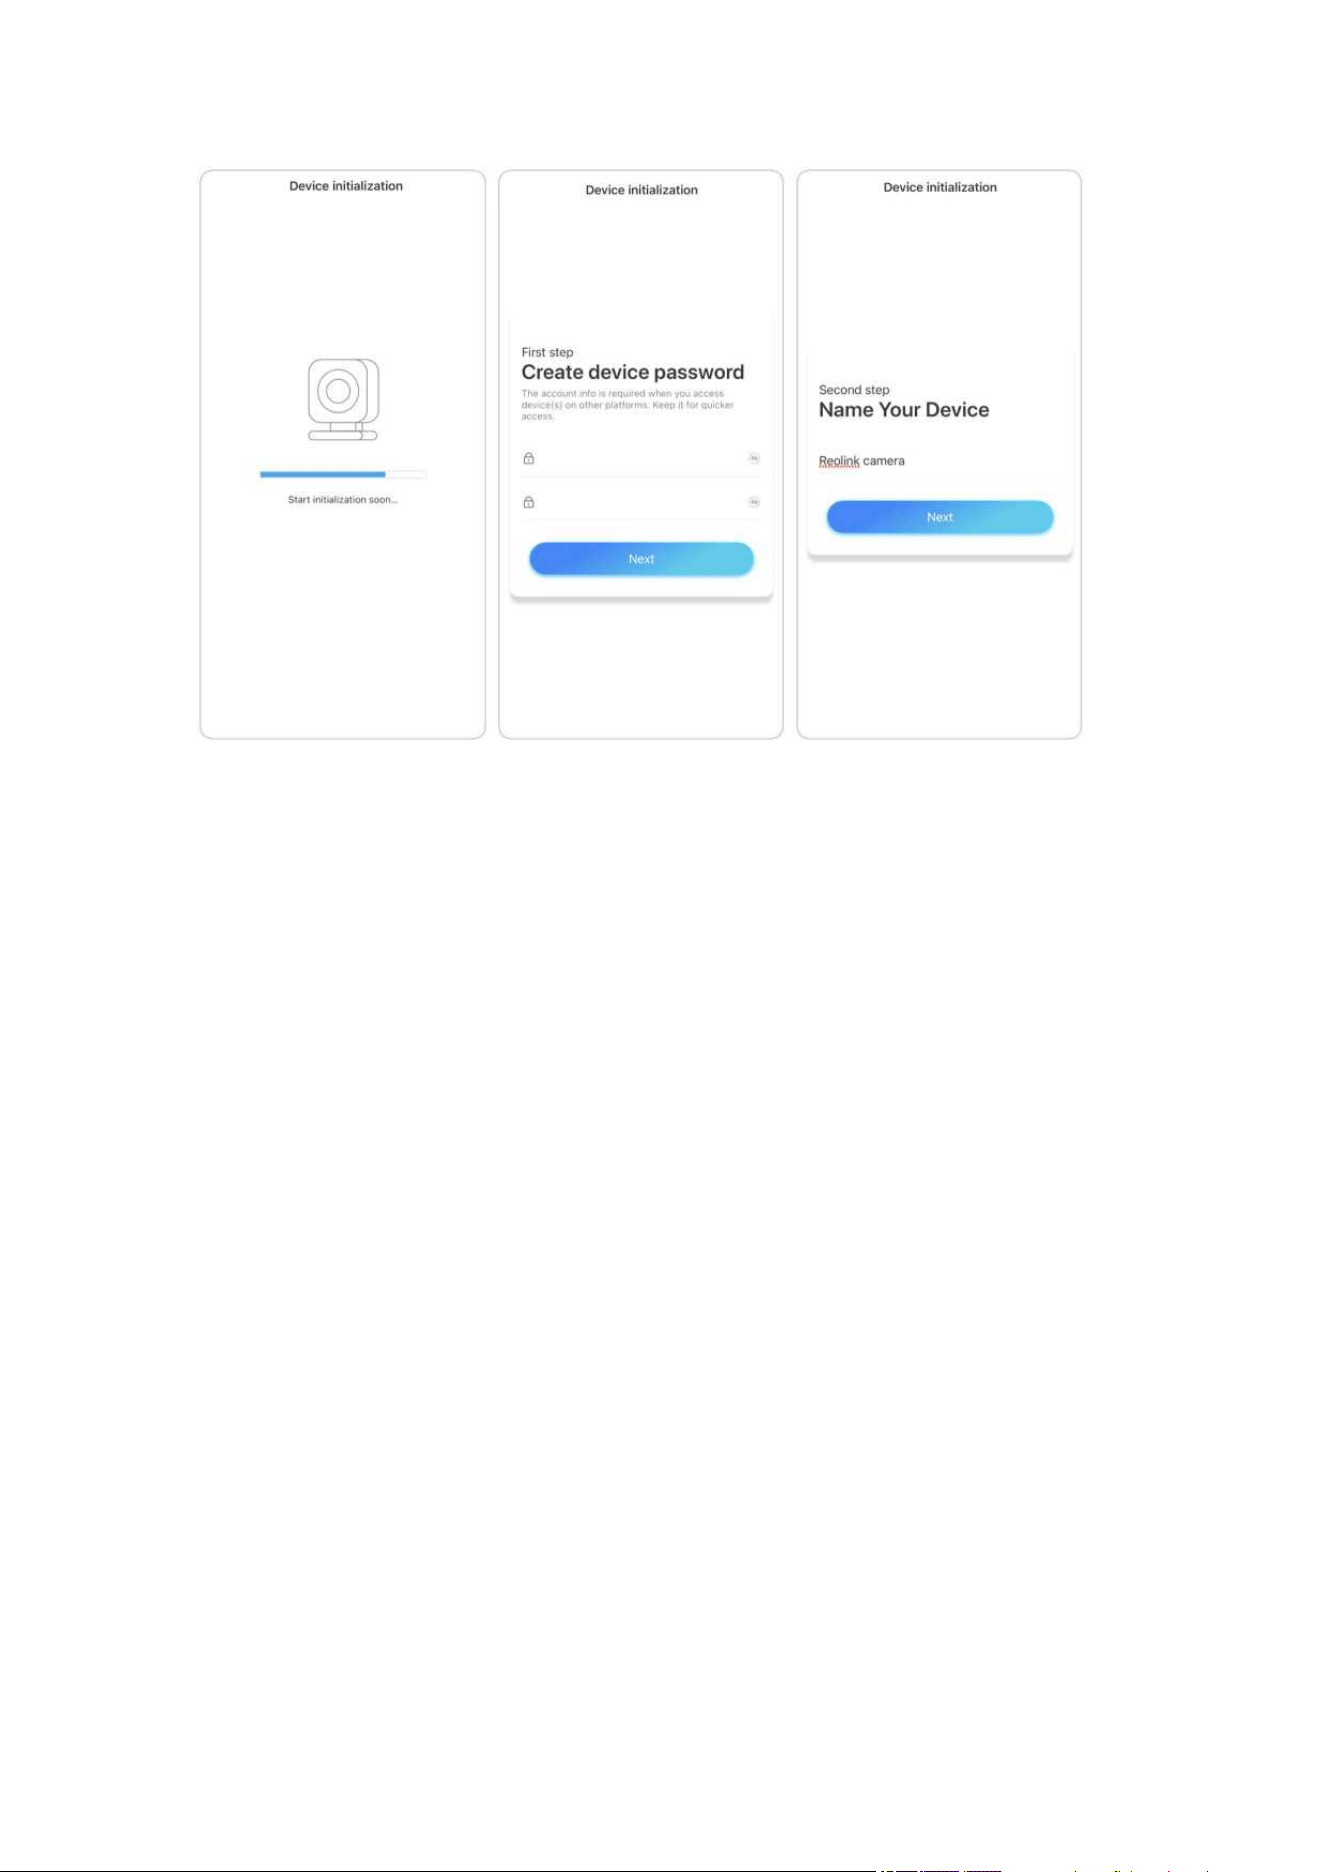
8. You may initialize your camera: Create device password and Name Your Device.
Forgetting this password could be troublesome in the future, please remember it for
your convenience.
Reolink Wireless Camera
User Manual
14
9. Initialization finished. Tap Use now and start to preview now.

Reolink Wireless Camera
User Manual
15
Once the initial setup is completed, you may choose a good position to mount
your camera.
Set up the Camera with Ethernet Port
Please follow the steps below to do initial setup for the Wi-Fi camera with an
Ethernet port via Reolink App.
1. Connect the power adapter to the camera, and connect the camera to the router
with an Ethernet cable. And then wait for it starting up.

Reolink Wireless Camera
User Manual
16
2. Tap on the icon in the top right corner to start the initial setup.
3. Scan the QR code on the back or body of the camera. If the phone doesn't respond,
please tap Input UID/IP and then manually type in the UID (16-digit characters
under the QR code of the camera).
Note: You may tap Light to enable flash light when setting up in a dark
environment.

Reolink Wireless Camera
User Manual
17
Reolink Wireless Camera
User Manual
18
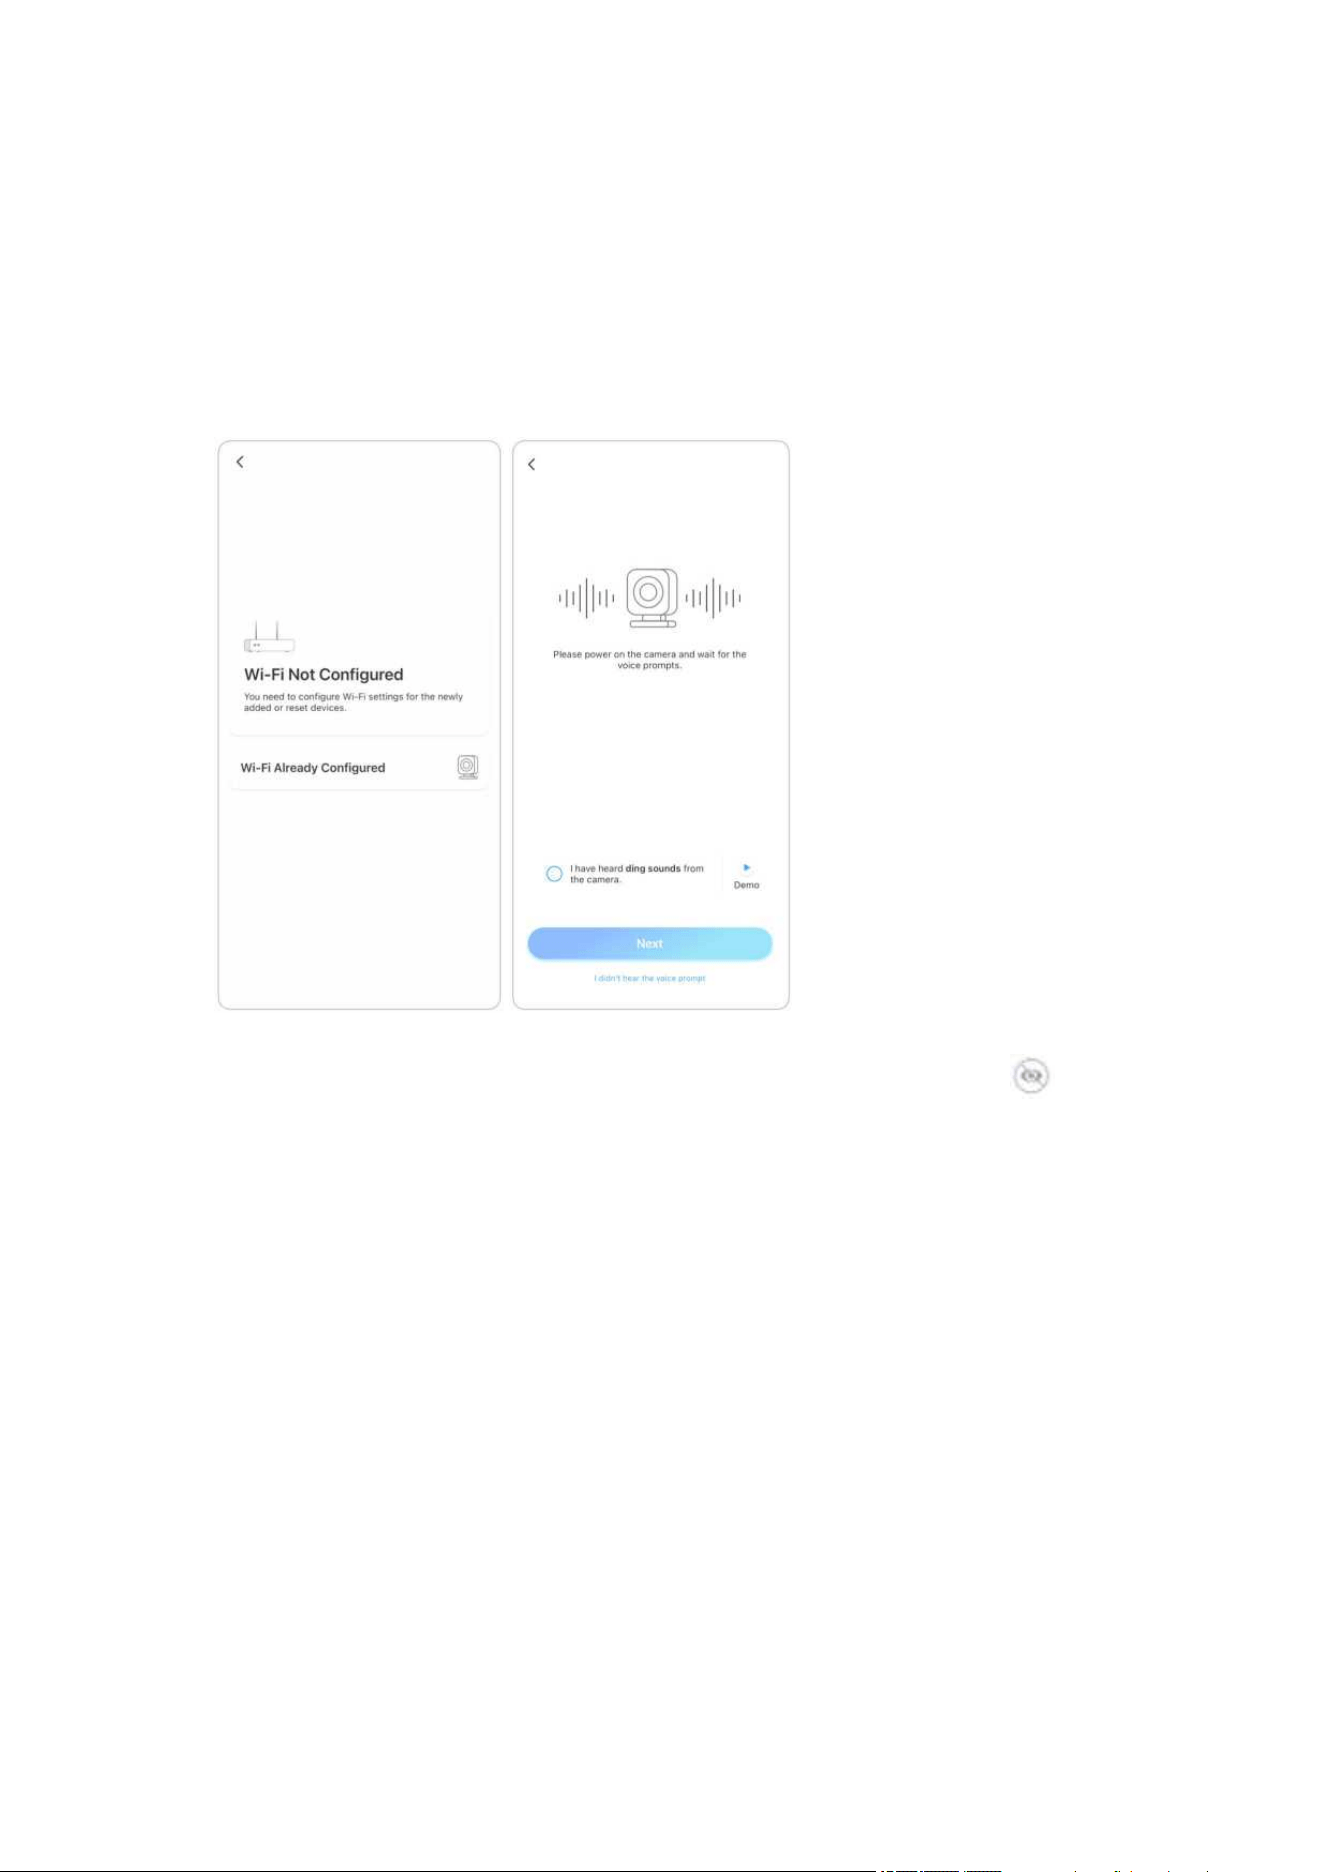
4. Select Wi-Fi Not Configured. If you hear the camera speaking “Please run App,
add the camera and set it up” or the ding sounds, please tick “I have heard the voice
prompt from the camera” or “I have heard ding sounds from the camera”, then
tap Next.
5. Enter the Wi-Fi password of the selected Wi-Fi network (you may tap to see
the Wi-Fi password you entered and double-check that the password is correct) and
then tap Next.

Reolink Wireless Camera
User Manual
19

Reolink Wireless Camera
User Manual
20
6. A QR code will be generated and displayed on your phone. Please place the QR
code on your phone in front of the camera’s lens at a distance of about 20 cm (8
inches) and let the camera scan the QR code. After the QR code is scanned
successfully, tick “I have heard a beep sound from the camera” or “I have heard the
voice prompt” and tap Next.
Notes:
1. Please rip off the protection film of the camera’s lens.
2. You may double tap on the QR code to enlarge it.
7. After the beep sound, the camera will try to connect to the router, please wait
for 60 seconds.
Reolink Wireless Camera
User Manual
21
8. You may initialize your camera: Create device password and Name Your Device.
Forgetting this password could be troublesome in the future, please remember it for
your convenience.
9. Initialization finished. Tap Use now and start to preview now.

Reolink Wireless Camera
User Manual
1
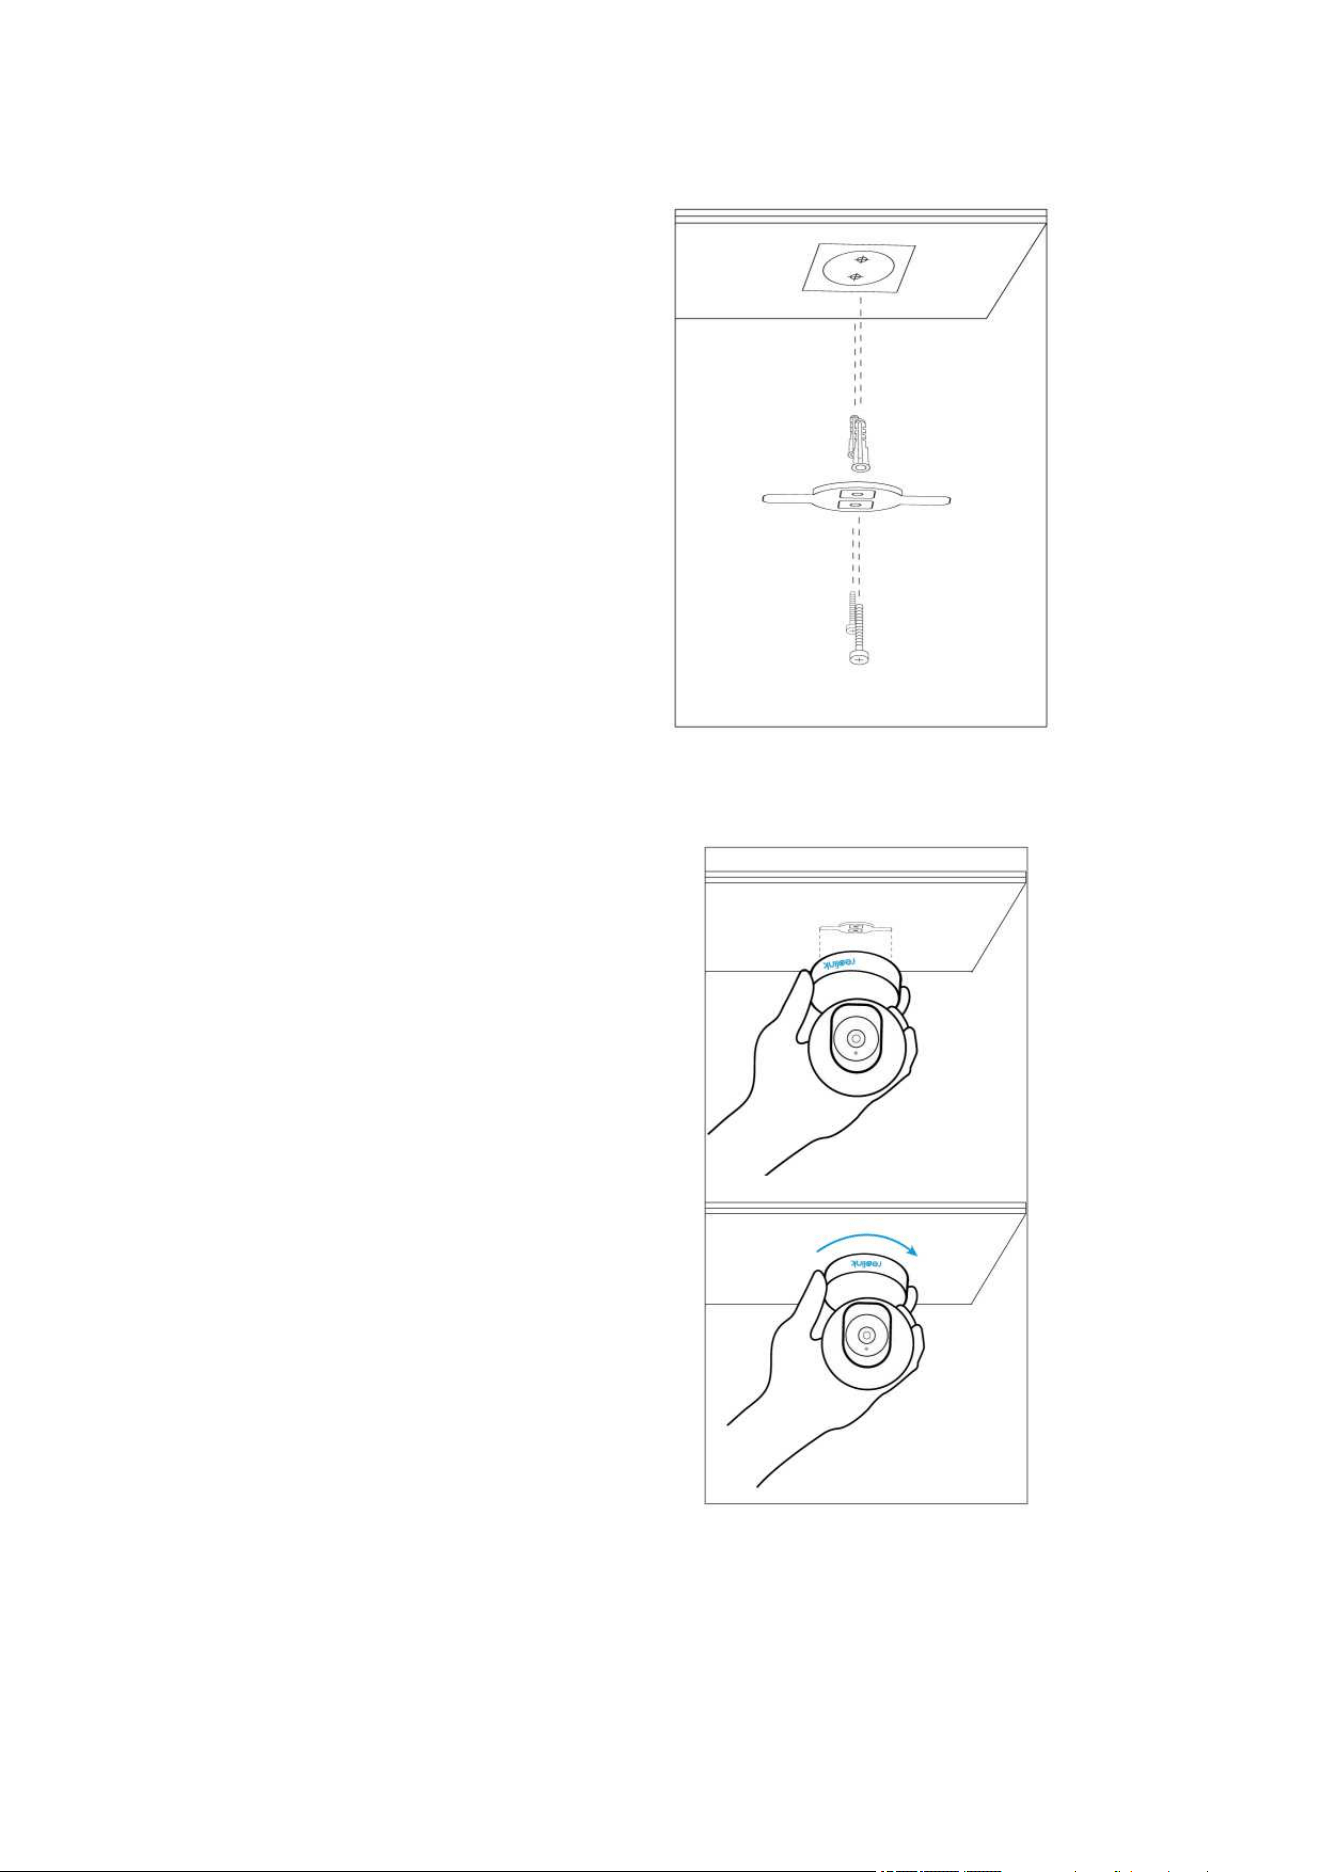
Step 1 Drill two holes on the
wall according to the mounting
hole template.
Step 2 Insert the two plastic
anchors into the holes.
Step 4 Align the camera with the
bracket and turn the camera unit
clockwise to lock it in position.
NOTES:
1. To remove it from the wall, turn
the camera anticlockwise.
2. In case your camera is mounted

Reolink Wireless Camera
User Manual
2
Mount E1 Outdoor
Mount the camera to the wall
For outdoor use, E1 Outdoor must be installed upside down for better waterproof
performance.
Reolink Wireless Camera
User Manual
3
Mount the camera to the ceiling
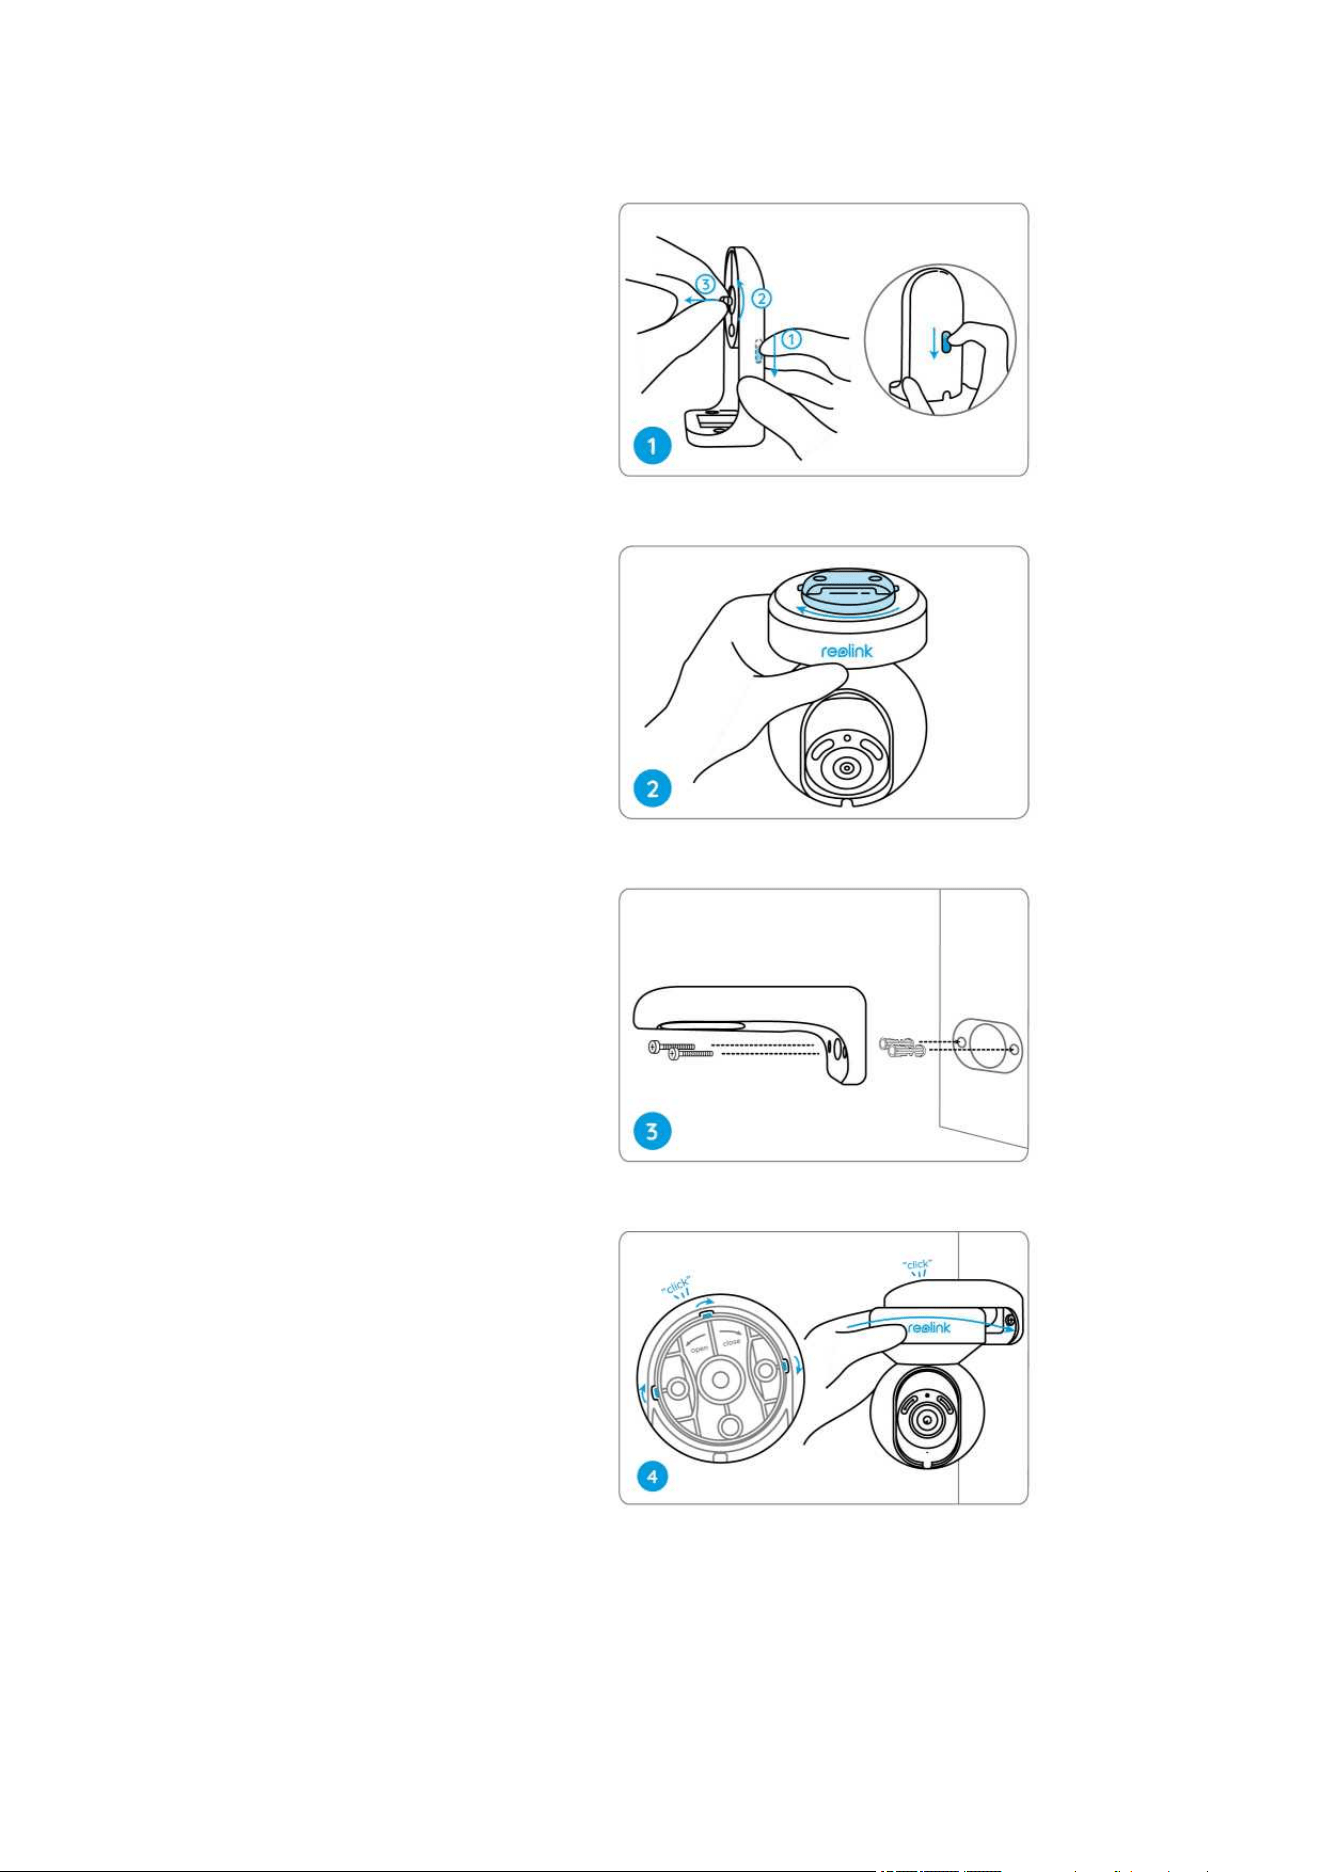
Pull the button of the security mount and unscrew the ceiling bracket from the
Pull the button of the security
mount and unscrew the
bracket to separate the two
parts.
Screw the bracket to the
bottom of the camera.
Drill holes in accordance with
the mounting template and
screw the security mount to
the wall.
Choose a proper direction of
the camera and then align the
bracket to the security mount
and lock the camera in place
NOTE: Use the drywall anchors included in the package if needed.

Reolink Wireless Camera
User Manual
4
mount.
Install the bracket to the ceiling. Align the camera with the bracket and turn the
camera unit clockwise to lock it in position.
Mount Reolink Lumus
Reolink Wireless Camera
User Manual
5
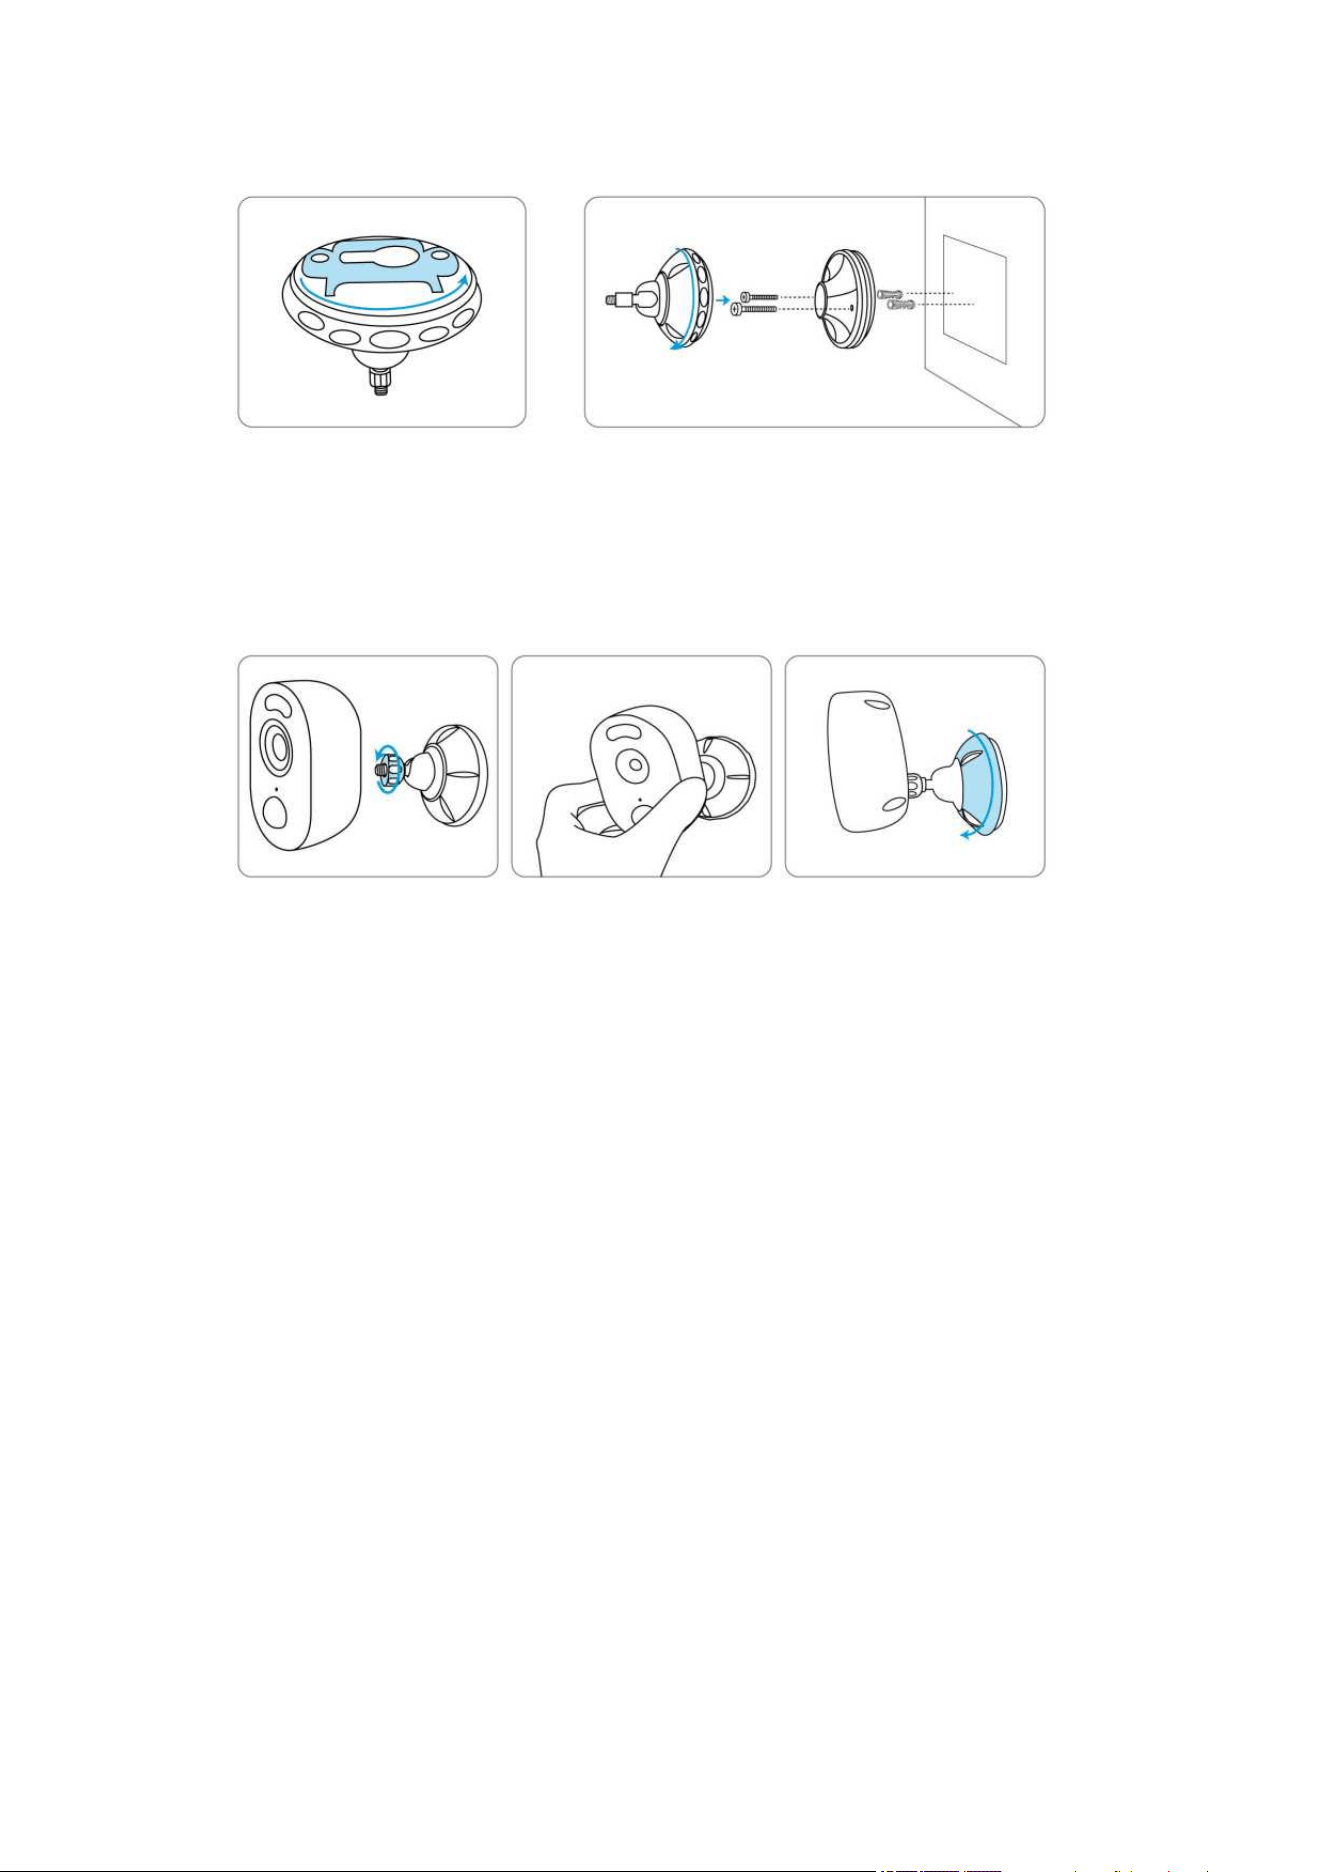
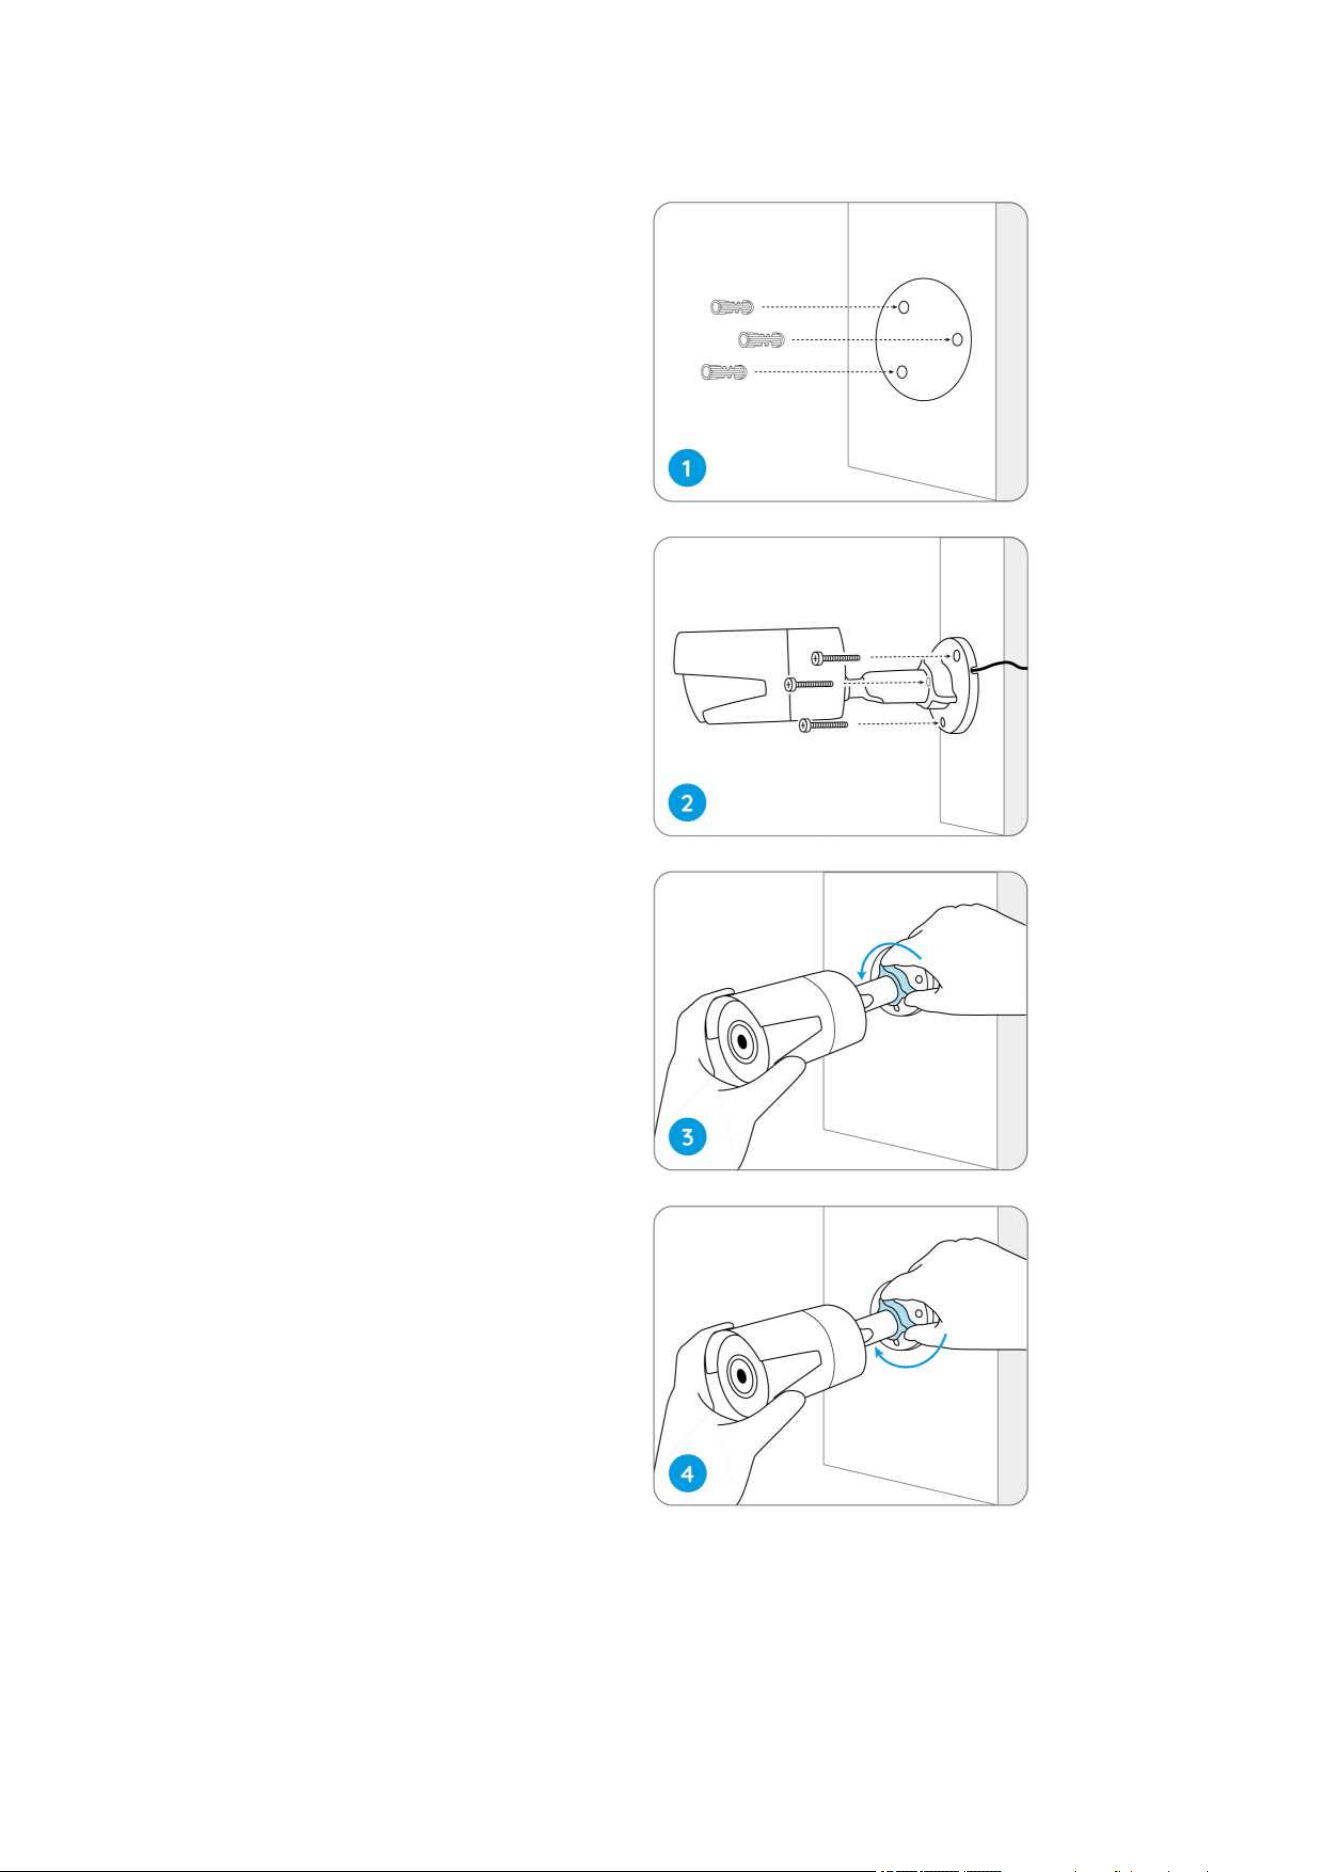
Mount Bullet Cameras
Rotate to separate parts
Drill holes in accordance with the
mounting hole template and screw the
base of the bracket onto the wall. Next,
Fasten the camera to
the bracket by turning
the screw identified in
Adjust the camera
angle to get the
best field of view.
Secure the camera by
turning the part on the
bracket identified in the
Reolink Wireless Camera
User Manual
6
Drill holes in accordance with
the mounting hole template.
NOTE: Use the drywall
Install the mount base with
the mounting screws included
in the package.
To get the best field of view,
loosen the adjustment knob
on security mount and turn
the camera.
Stiffen the adjustment knob
to lock the camera.

Reolink Wireless Camera
User Manual
7
NOTE: If your camera has another mount without the adjusting knob, please loosen
the adjusting screw with the provided hex key and turn the camera as shown below
to adjust the angle.
Mount Dome Cameras
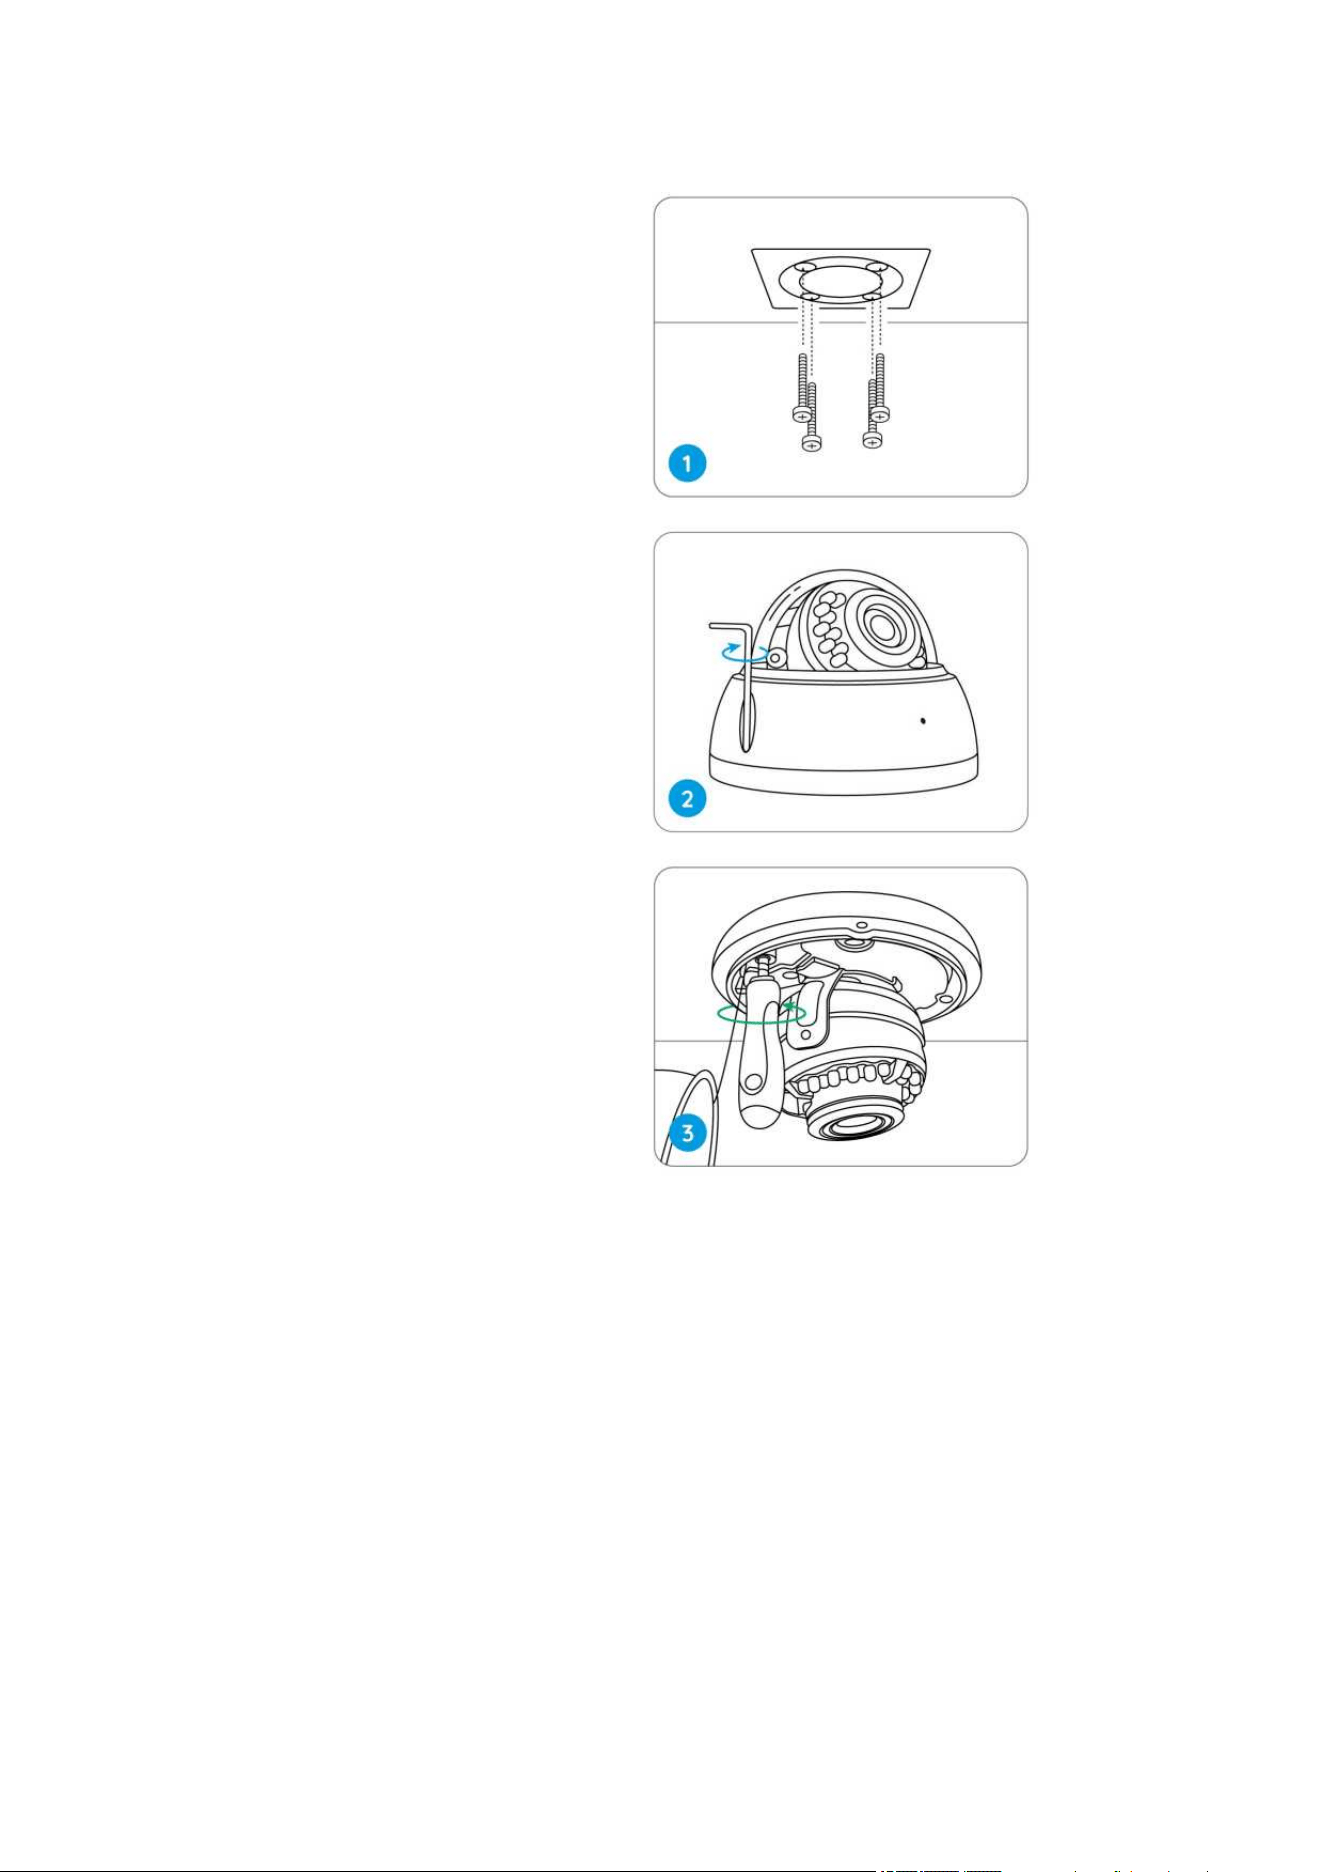
Reolink Wireless Camera
User Manual
8
Put the mounting template on
the ceiling and drill holes at the
indicated locations.
Screw the dome cover off with
the mounting wrench.
Screw the camera to the ceiling.
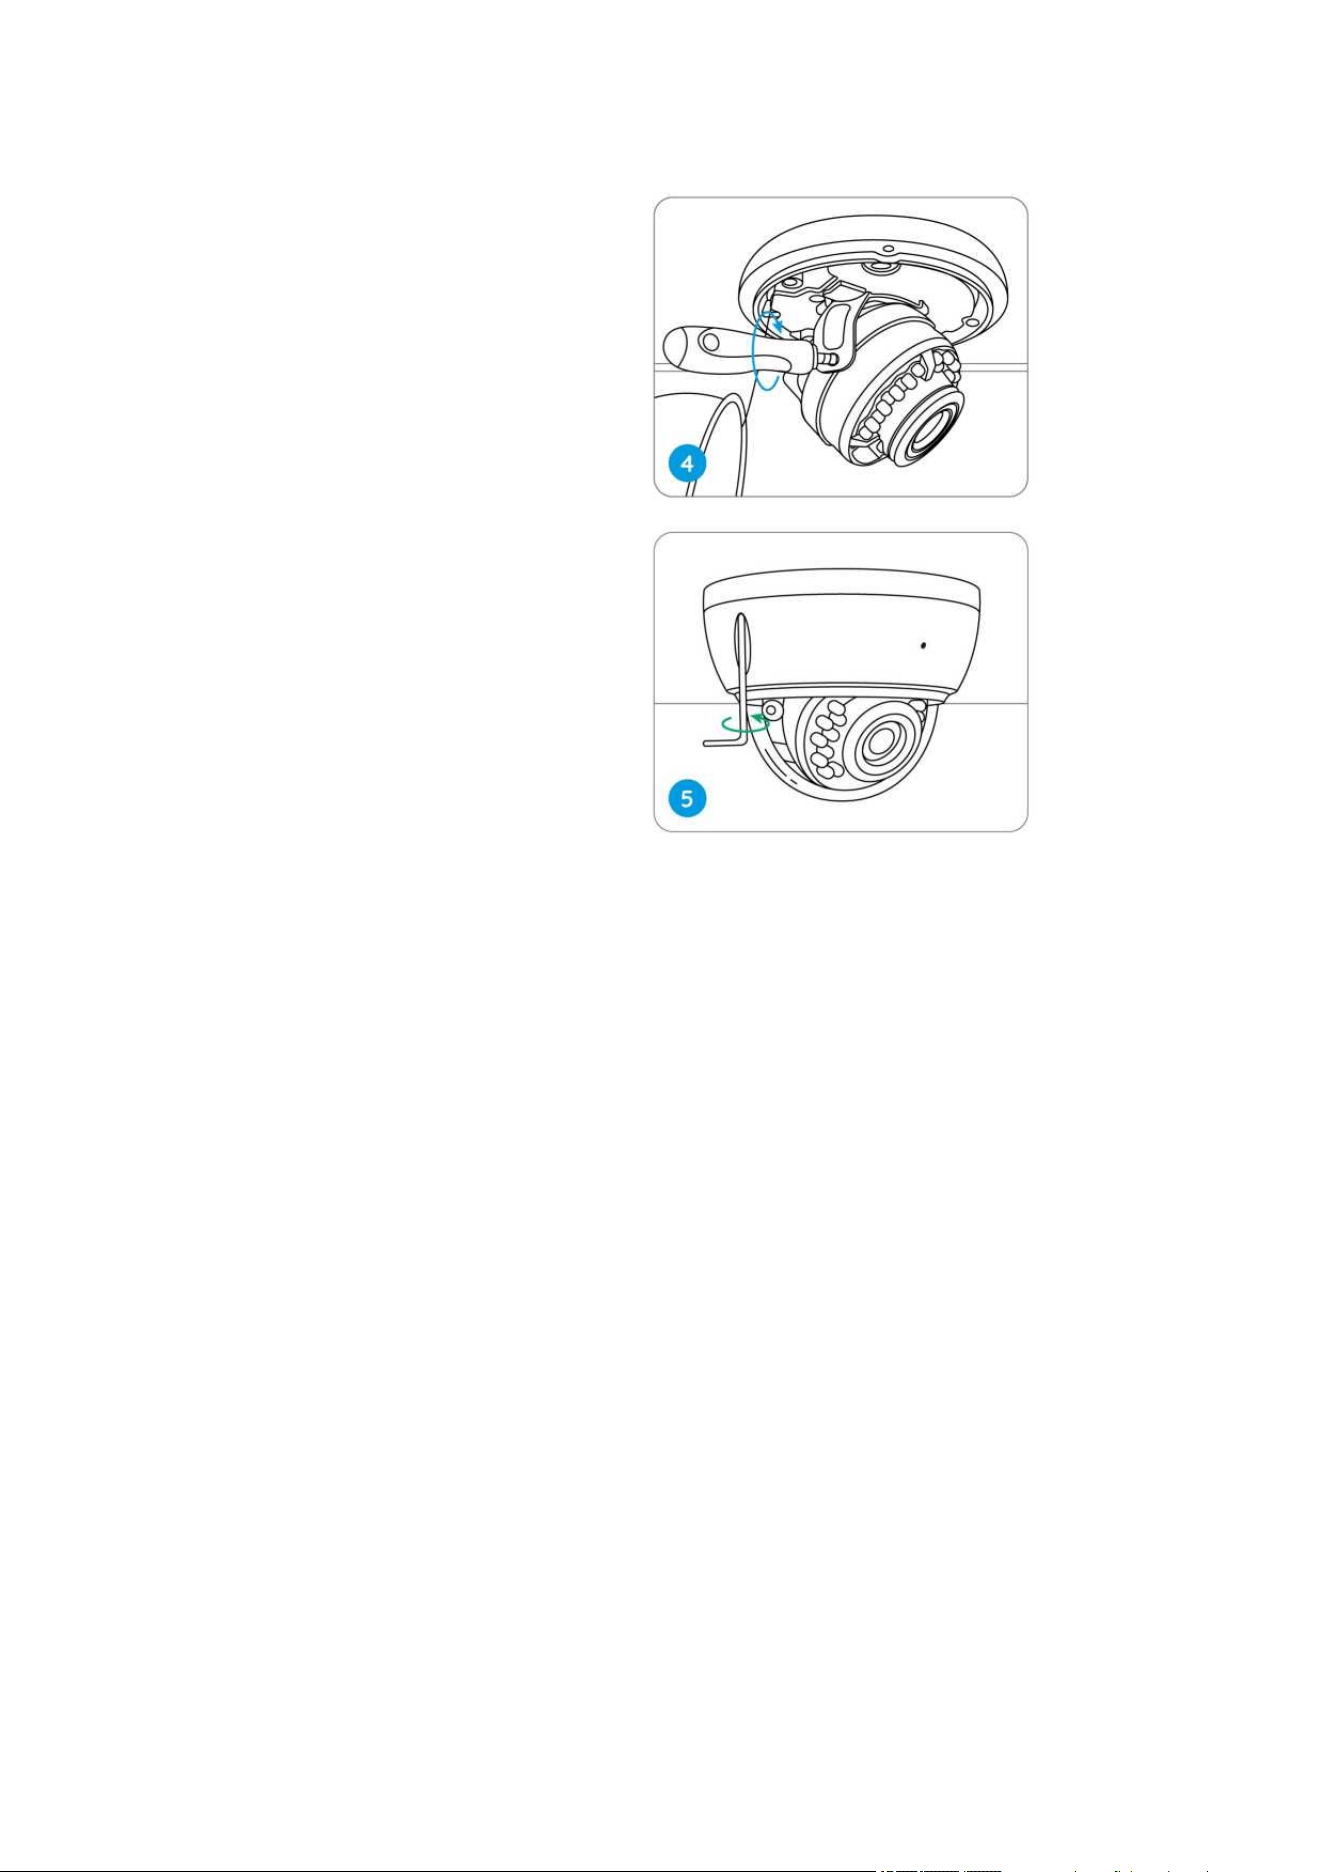
Reolink Wireless Camera
User Manual
9
Loosen the two screws on both
sides of the camera and adjust
the camera viewing angle.
NOTE: The installation method takes the PoE camera as an example and also
applies to the WiFi camera.
Tighten the screws and screw
the cover back to the camera.
Reolink Wireless Camera
User Manual
10
3. View Your Camera
Live View
Icon
Meaning
Settings: Provide access to a camera’s settings such as system information,
detection alarm and camera recording.
More options of live view: Channel Selection, Day and Night, Immersive.
Siren: Trigger audio alarm.
Spotlight (only for cameras with
built-in spotlight)
Turn on the spotlight
Multiple views
Reolink Wireless Camera
User Manual
11
Display
Pause
Audio
Enable audio
Manually capture
Manually record
Manually recording
Live view in sub-stream mode
Live view in main stream
mode
View your camera in a full-screen mode.
Talk: Tap to talk (two-way audio).
Clip: Drag the rectangle to the position you want to see.
PTZ: Pan,tilt and zoom.
Playback: Reply the recordings saved to the SD card.
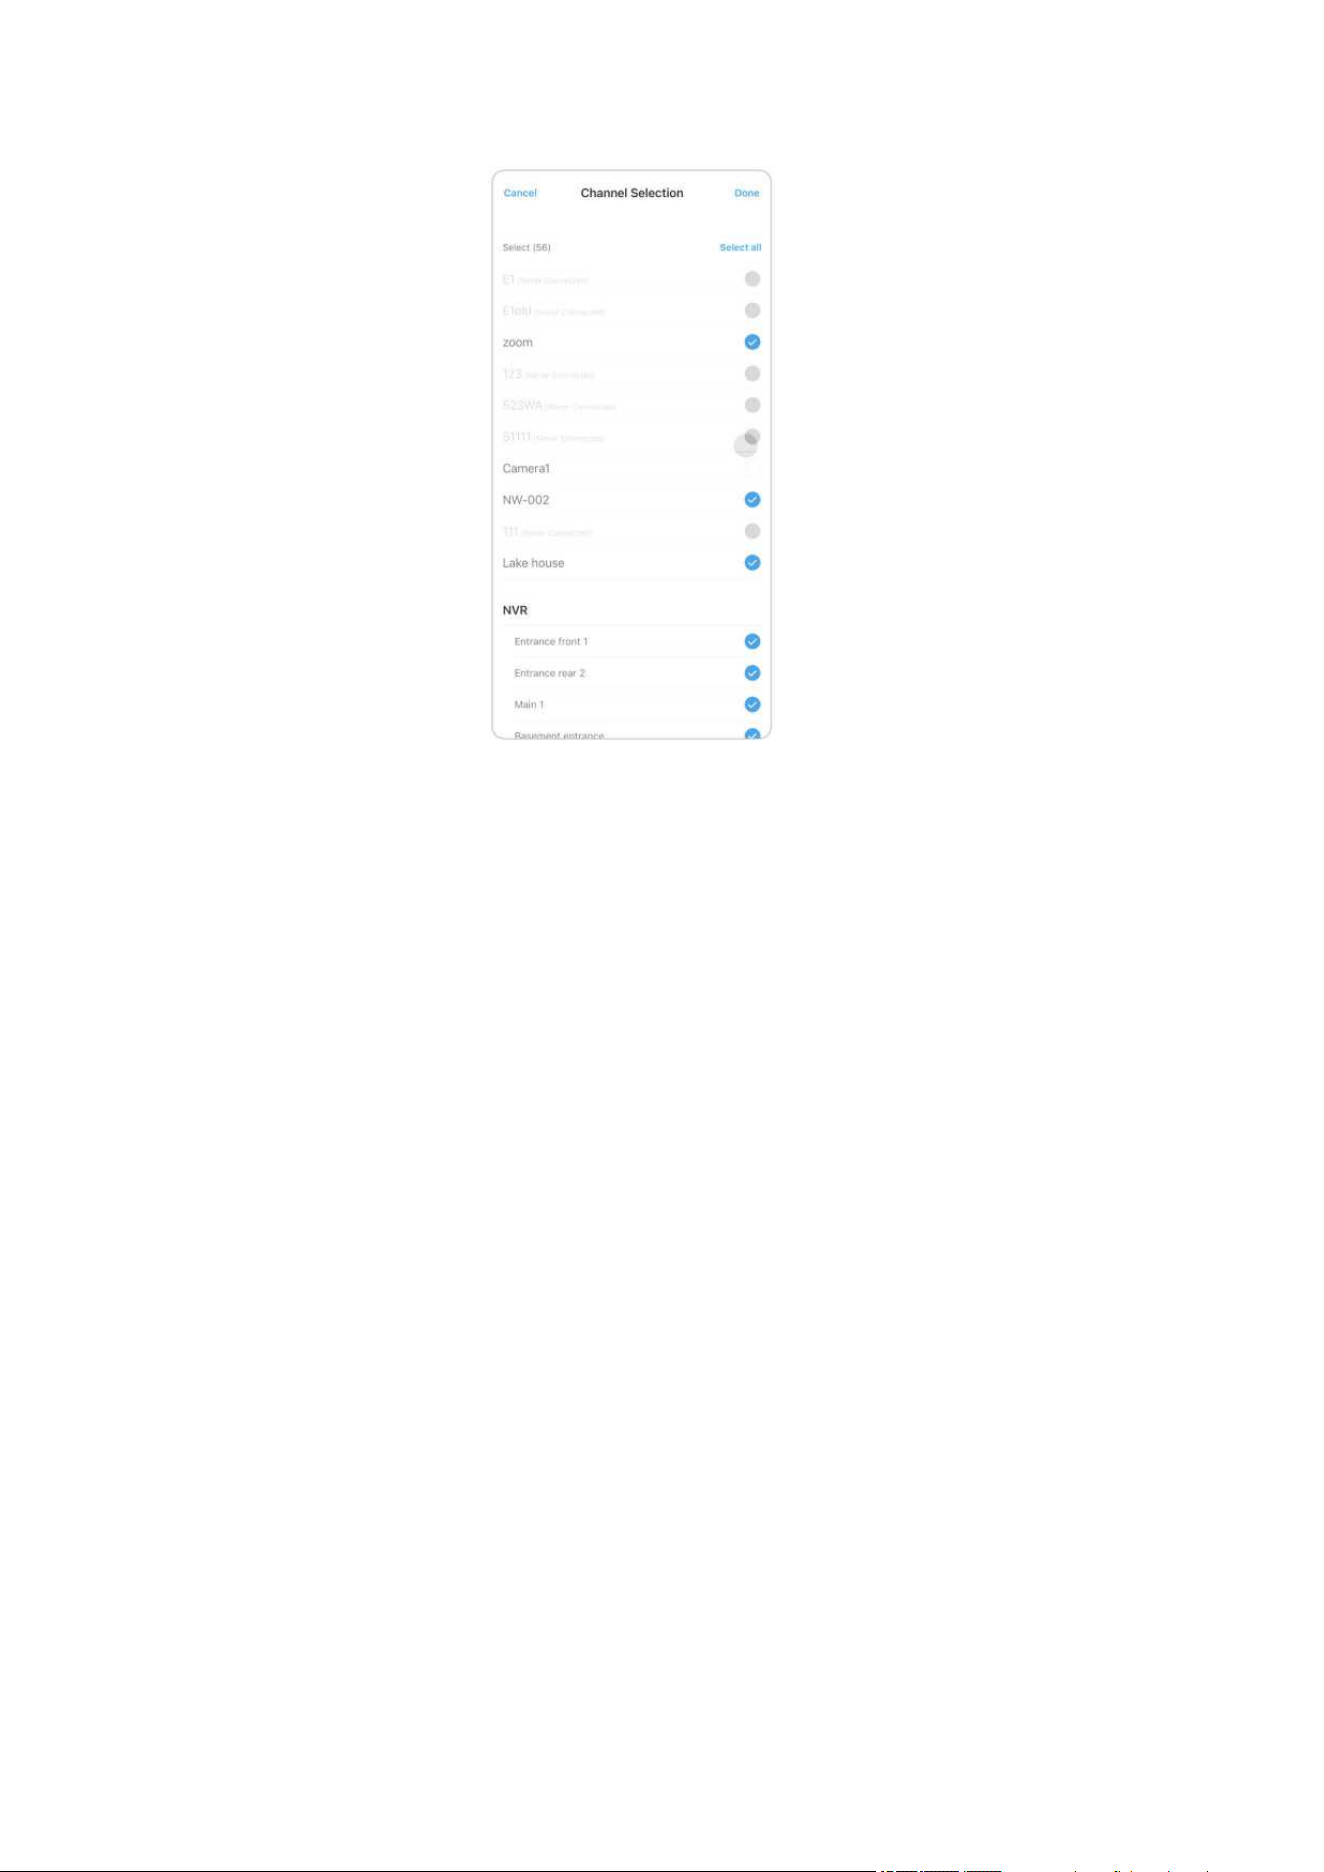
Channel Selection
You can choose the devices you want on the device list.
Reolink Wireless Camera
User Manual
12
Day and Night
Set the camera’s color mode during different times of the day and night.
-Color: The camera will capture color images that usually appear during the day.
-Black & White: The camera will capture black-and-white images that usually
appear during the night with the IR LEDs on.
-Auto: The camera will automatically switch between Color and Black & White
modes according to the light conditions.

Reolink Wireless Camera
User Manual
13
Use Immersive Mode
The immersive mode has a larger viewing area with less interference and focuses on
previewing. It is suitable for viewing 2 or 3 cameras on one screen.
Note:
One screen can accommodate up to three cameras. You could slip the screen to
preview other cameras.

Reolink Wireless Camera
User Manual
14
Multiple Views
If you have several cameras added in your Reolink App, you can view multiple
streams at the same screen on Reolink App.

Reolink Wireless Camera
User Manual
15
Full-Screen View
Tap
icon to enter into the full-screen mode.
Tap to exit the full screen.

Reolink Wireless Camera
User Manual
16
Two-Way Audio
1. Tap
to enter into the two-way audio page;
2. Tap to talk.
Clip
1. Tap
to enter into the clip page;
2. Drag the rectangle to
the position you want to see.

Reolink Wireless Camera
User Manual
17

Reolink Wireless Camera
User Manual
18
PTZ
1. Tap
to enter into the PTZ page;
2. Choose the direction you want the camera to pan and tilt.
Display Settings
Flip
Tap , then the image will be turned upside down.

Reolink Wireless Camera
User Manual
19
Reolink Wireless Camera
User Manual
20
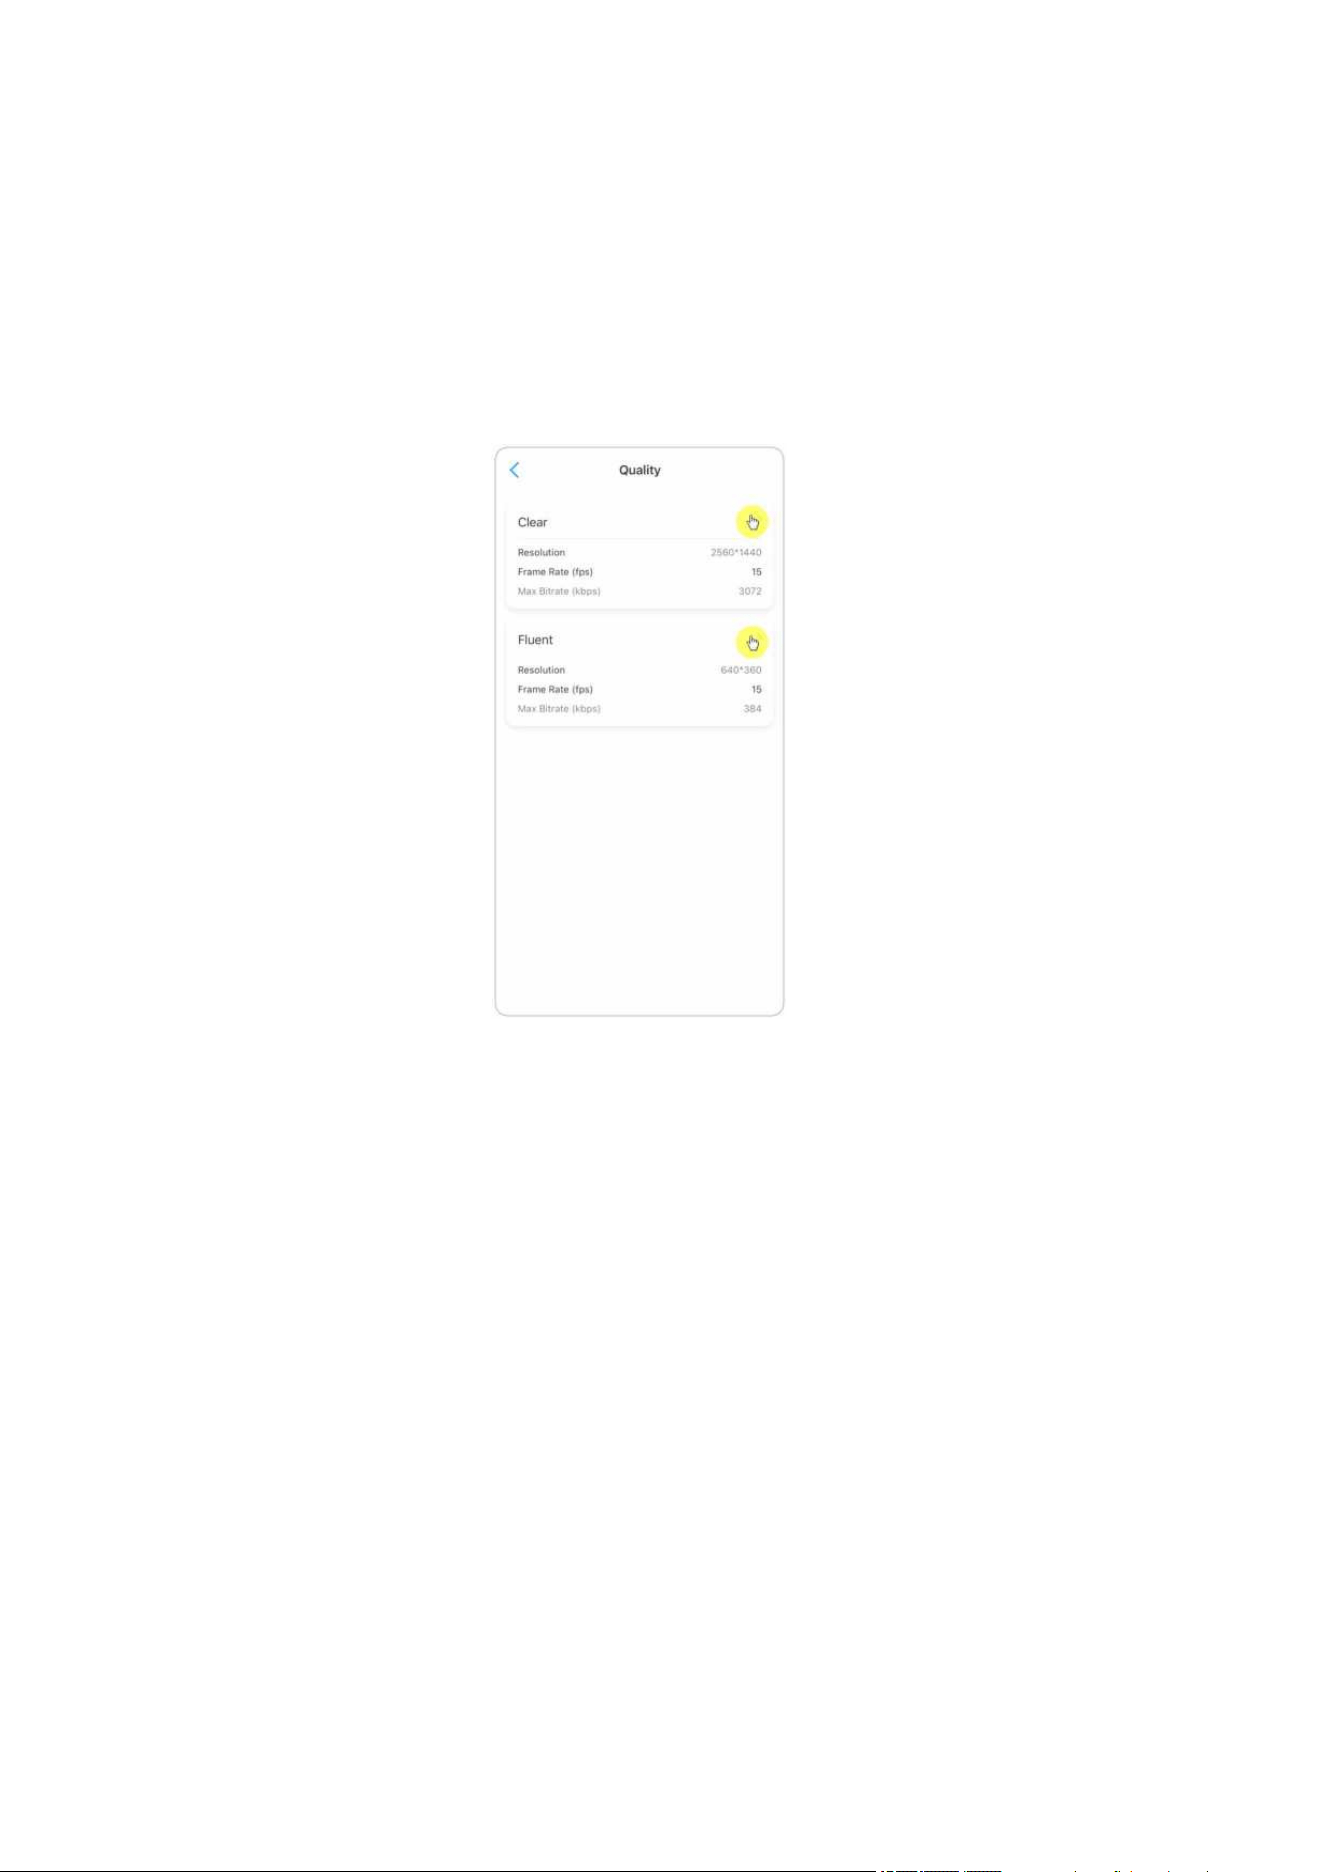
Quality
1. Tap Quality to enter into the Quality page;
2. Tap Clear mode or Fluent mode to enter into the settings page for Clear mode or
Fluent mode;
3. Tap Save to save the settings.

Reolink Wireless Camera
User Manual
21

Reolink Wireless Camera
User Manual
22
Anti-flicker
Use this feature if some devices such as TV screens and lights are flickering.
- 50Hz: Used for Australia and the UK.
- 60Hz: Used for the USA and Canada.
1. Tap Anti-flicker.
2. Choose the option from Other, 50Hz, 60Hz or Off.
Day and Night
Tap Day and Night to enter into the settings page.
Note:
It is the same as the settings on the Live View part.

Reolink Wireless Camera
User Manual
23
Brightness
Drag the circle in the progress bar to adjust the brightness of the image.
Camera Name
You can set the position of the camera name on the screen.

Reolink Wireless Camera
User Manual
24

Reolink Wireless Camera
User Manual
25
Date
You can set the position of the date on the screen.
Watermark
Tap to disable the watermark shown on the screen.

Reolink Wireless Camera
User Manual
26
Privacy Mask
If you don’t want others to view some parts in the image, you can set the privacy
mask to protect your privacy.
Press and drag to draw a black rectangle (up to 3 rectangles) on the screen to block
out a specific area.
Lights and LED
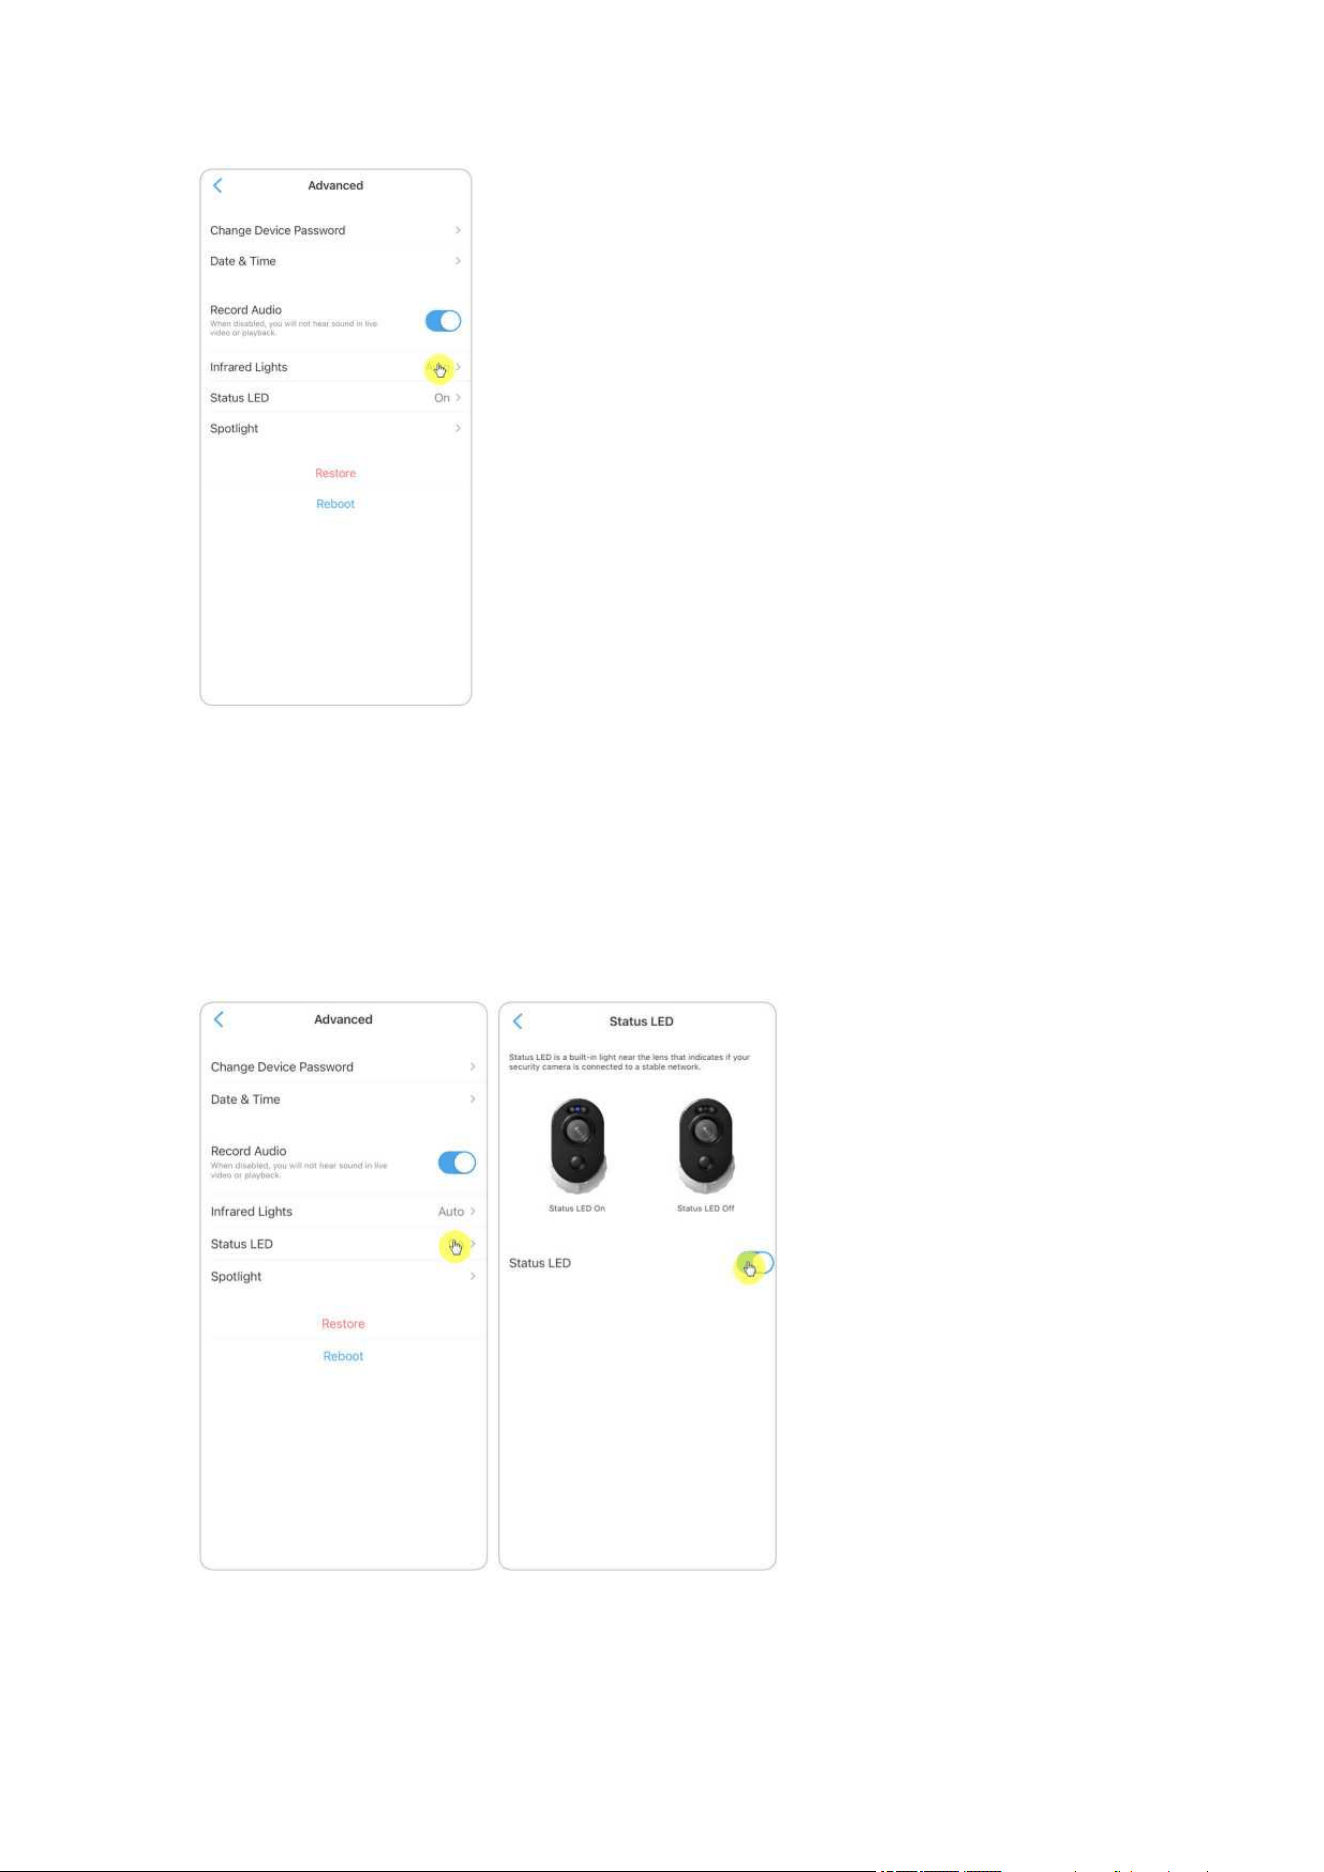
Infrared Lights
By default, the infrared lights on the cameras are set to Auto. They will be
automatically turned on in dim environment. If there is enough illumination, you
may choose to turn off the lights.
Reolink Wireless Camera
User Manual
27
Status LED
You can turn off the status LED if you don't want others to see it.
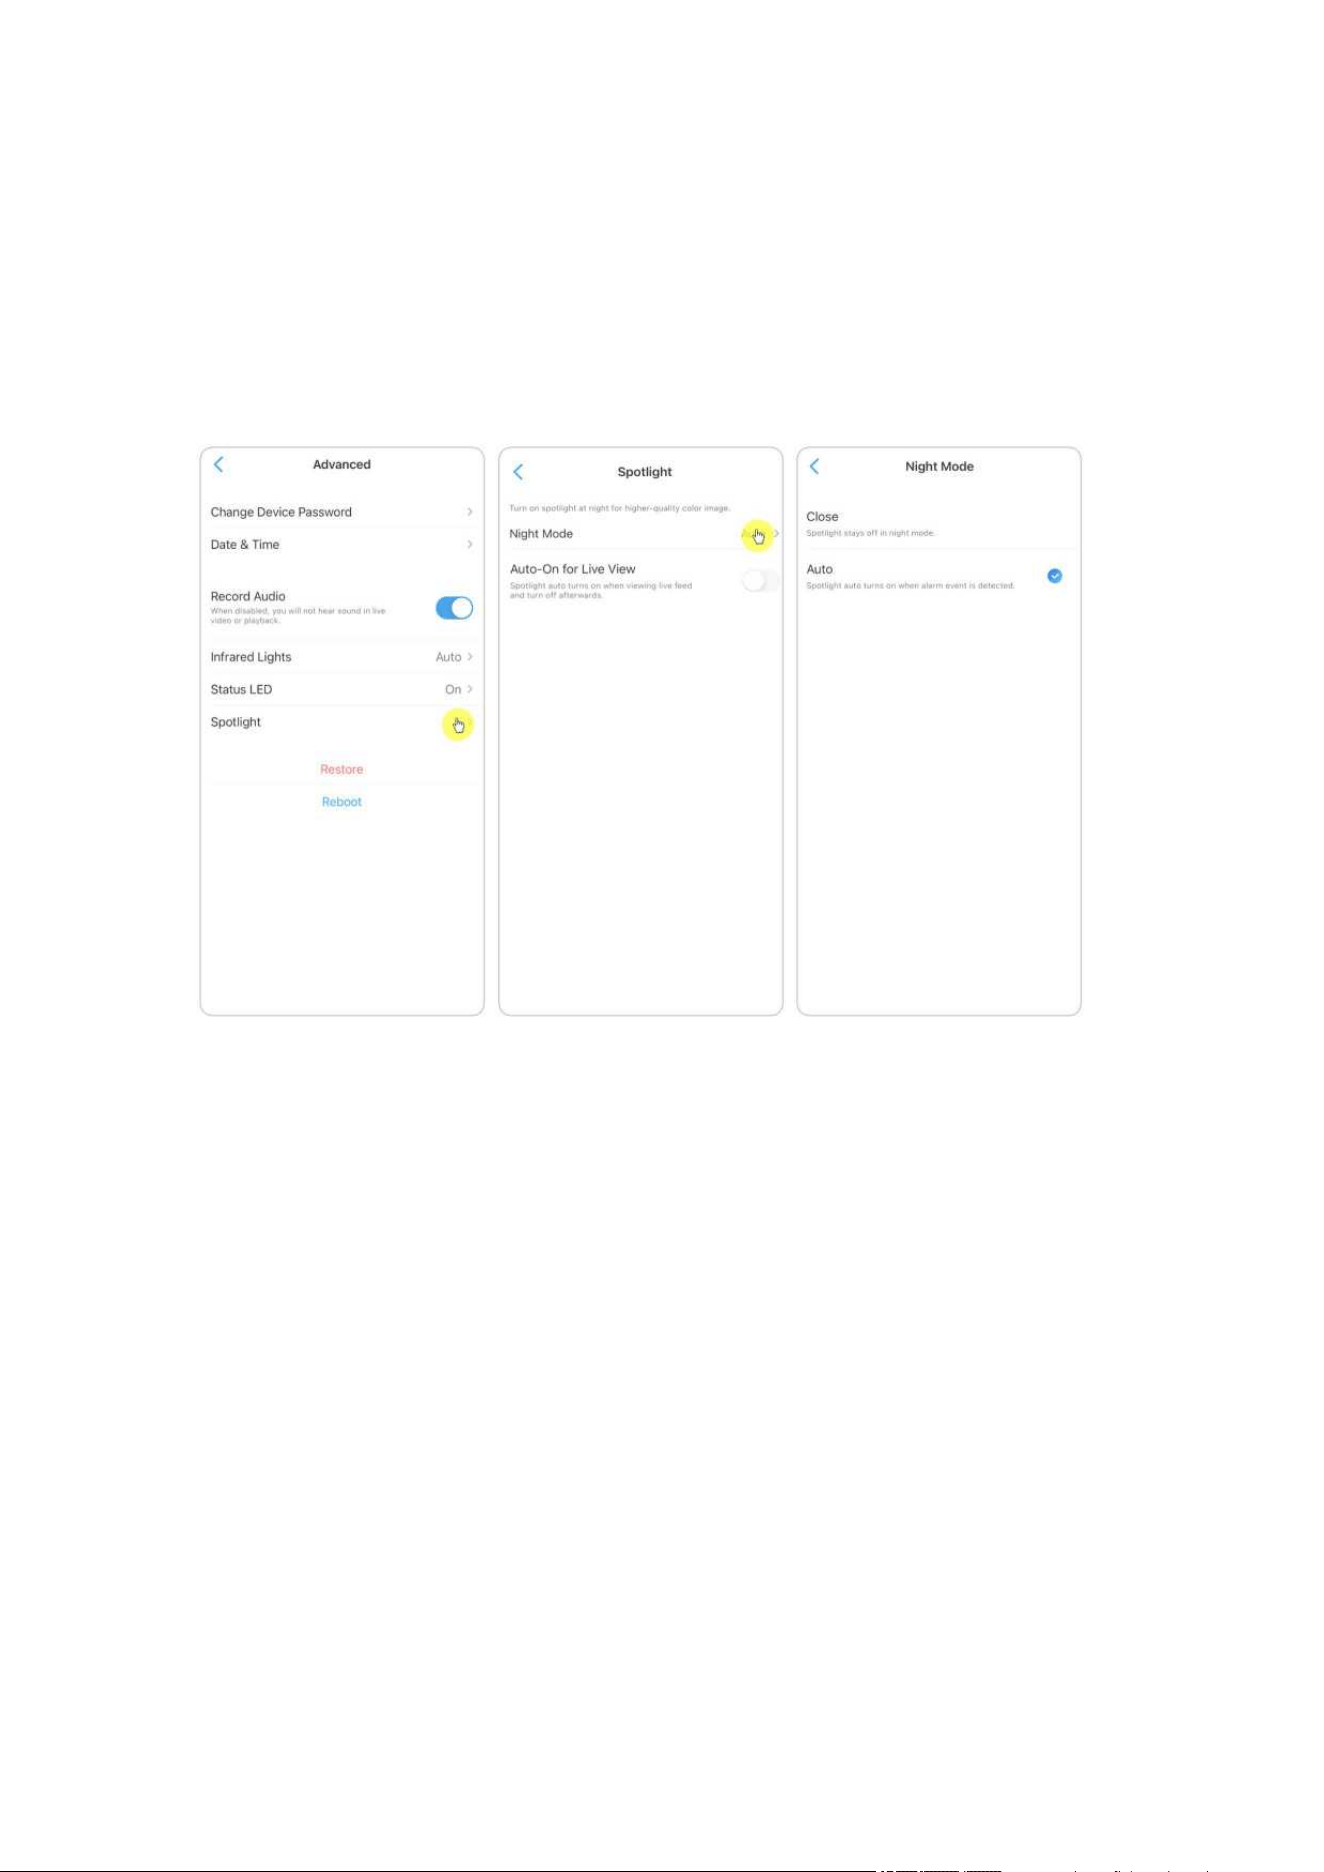
Go to camera’s Settings > Advanced > Status LED, tap to turn it off.
Spotlight
Reolink Wireless Camera
User Manual
28
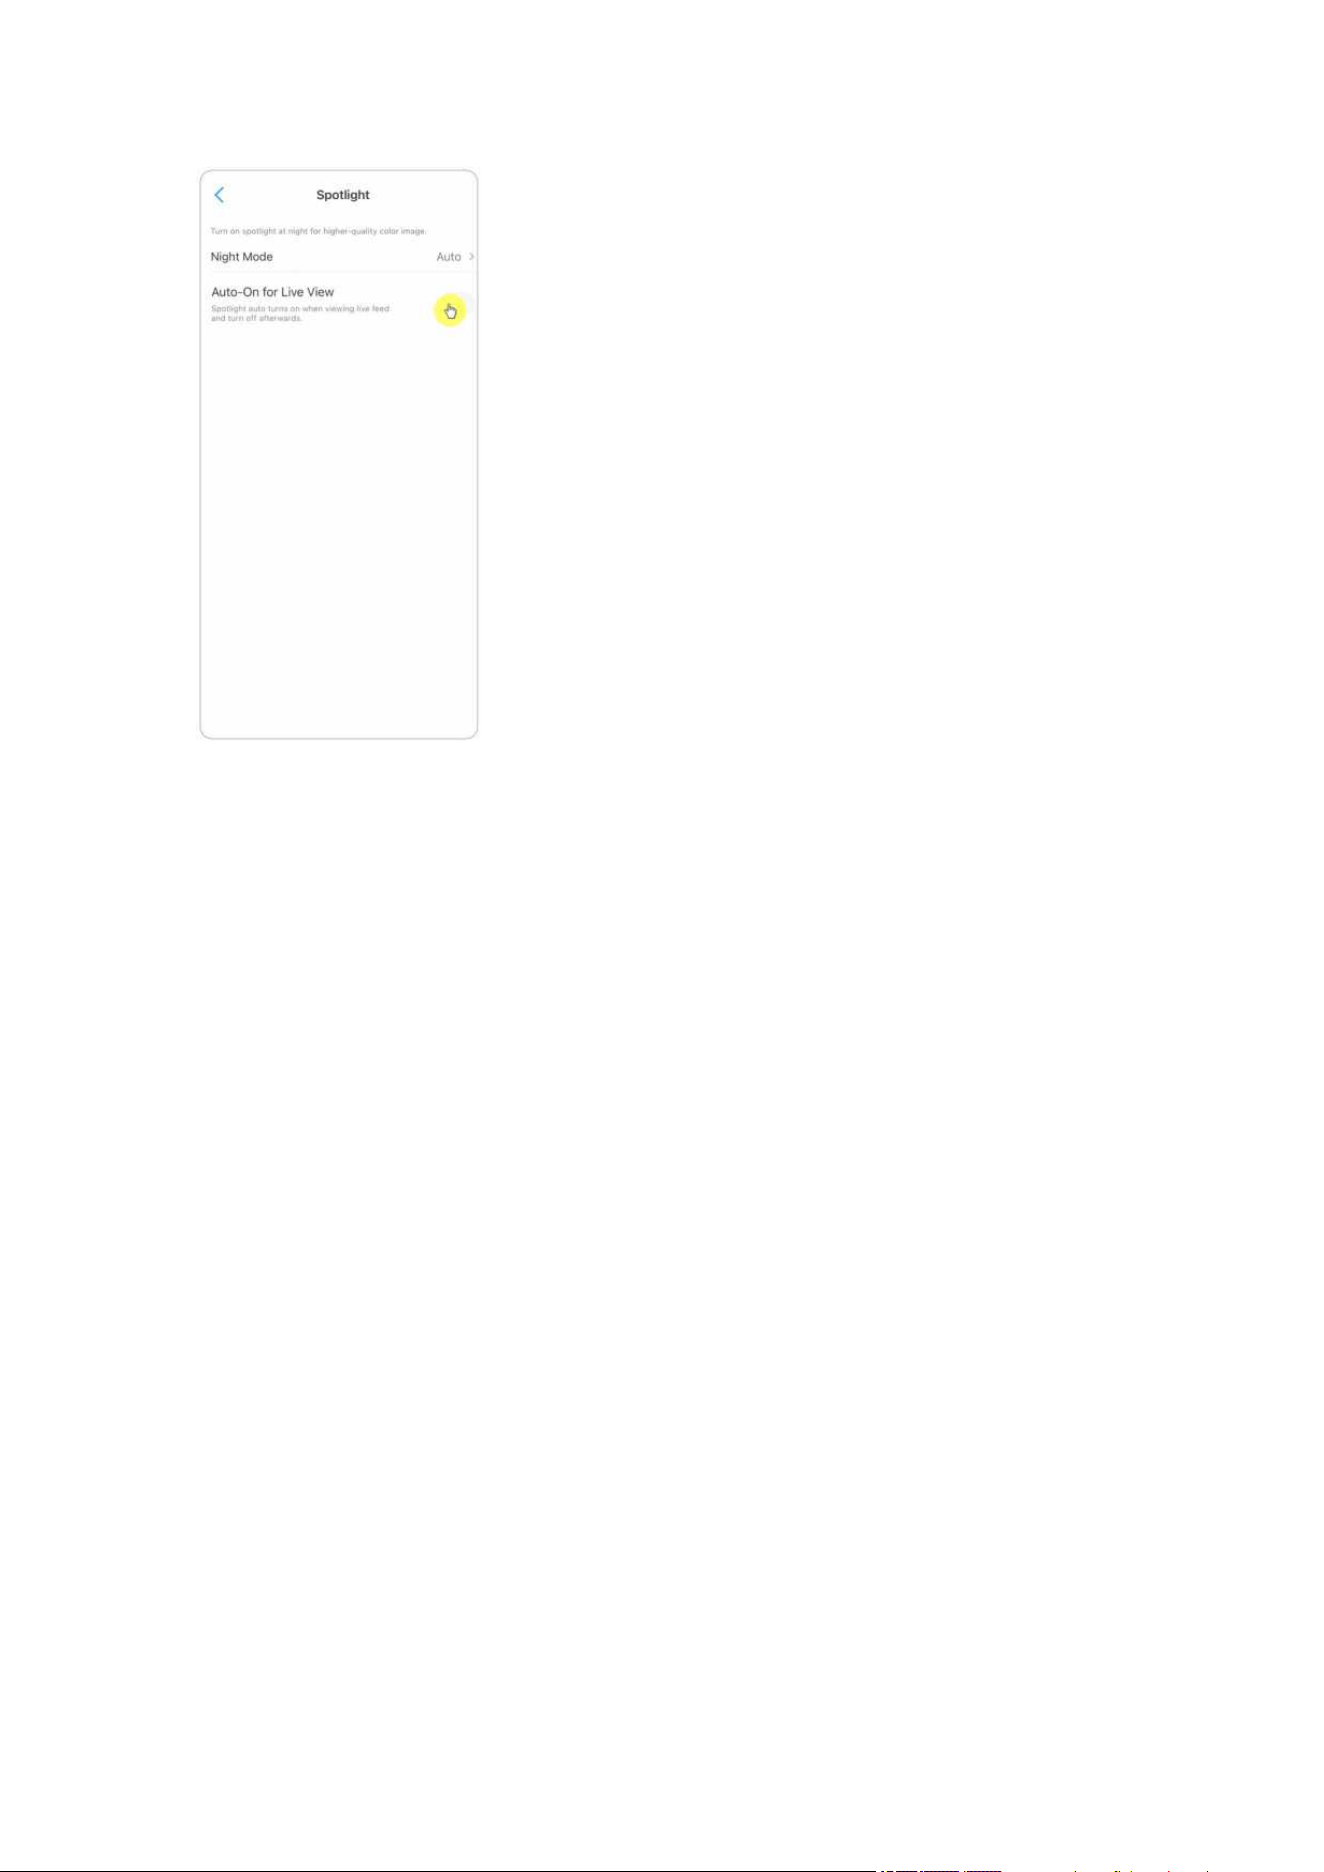
For cameras that have a built-in spotlight, when an alarm event is detected, the
spotlight will be automatically turned on. And the spotlight can also add light
sources to produce full-color images.
By default, the Night Mode is set as Auto.
And you can also enable the Auto-On for Live View, which means the spotlight will
automatically turn on when viewing the live feed and turn off afterwards.
Reolink Wireless Camera
User Manual
29
4. Alarm and Detection
Set up Motion Detection
About Motion Detection
Reolink WiFi camera determines whether each macroblock has moved by dividing
the grid. When the number of moved blocks reaches a certain proportion of the
number of armed blocks, the alarm will start.
The working principle of motion detection is that camera will judge it as motion
when differences in 2 frames reach 0.5%-10% (customize by adjusting motion
sensitivity) of the image. When the picture changes, the number calculated and
compared will exceed the threshold and instruct the system to automatically make
corresponding process.

Reolink Wireless Camera
User Manual
30
For Reolink Lumus, it also has a PIR sensor that works together with the motion
detection. And for models such as RLC-510WA, RLC-511W, RLC-511WA,
RLC-523WA, RLC-542WA and Reolink Duo WiFi, they also support human
detection and vehicle detection.
Reolink Wireless Camera
User Manual
31
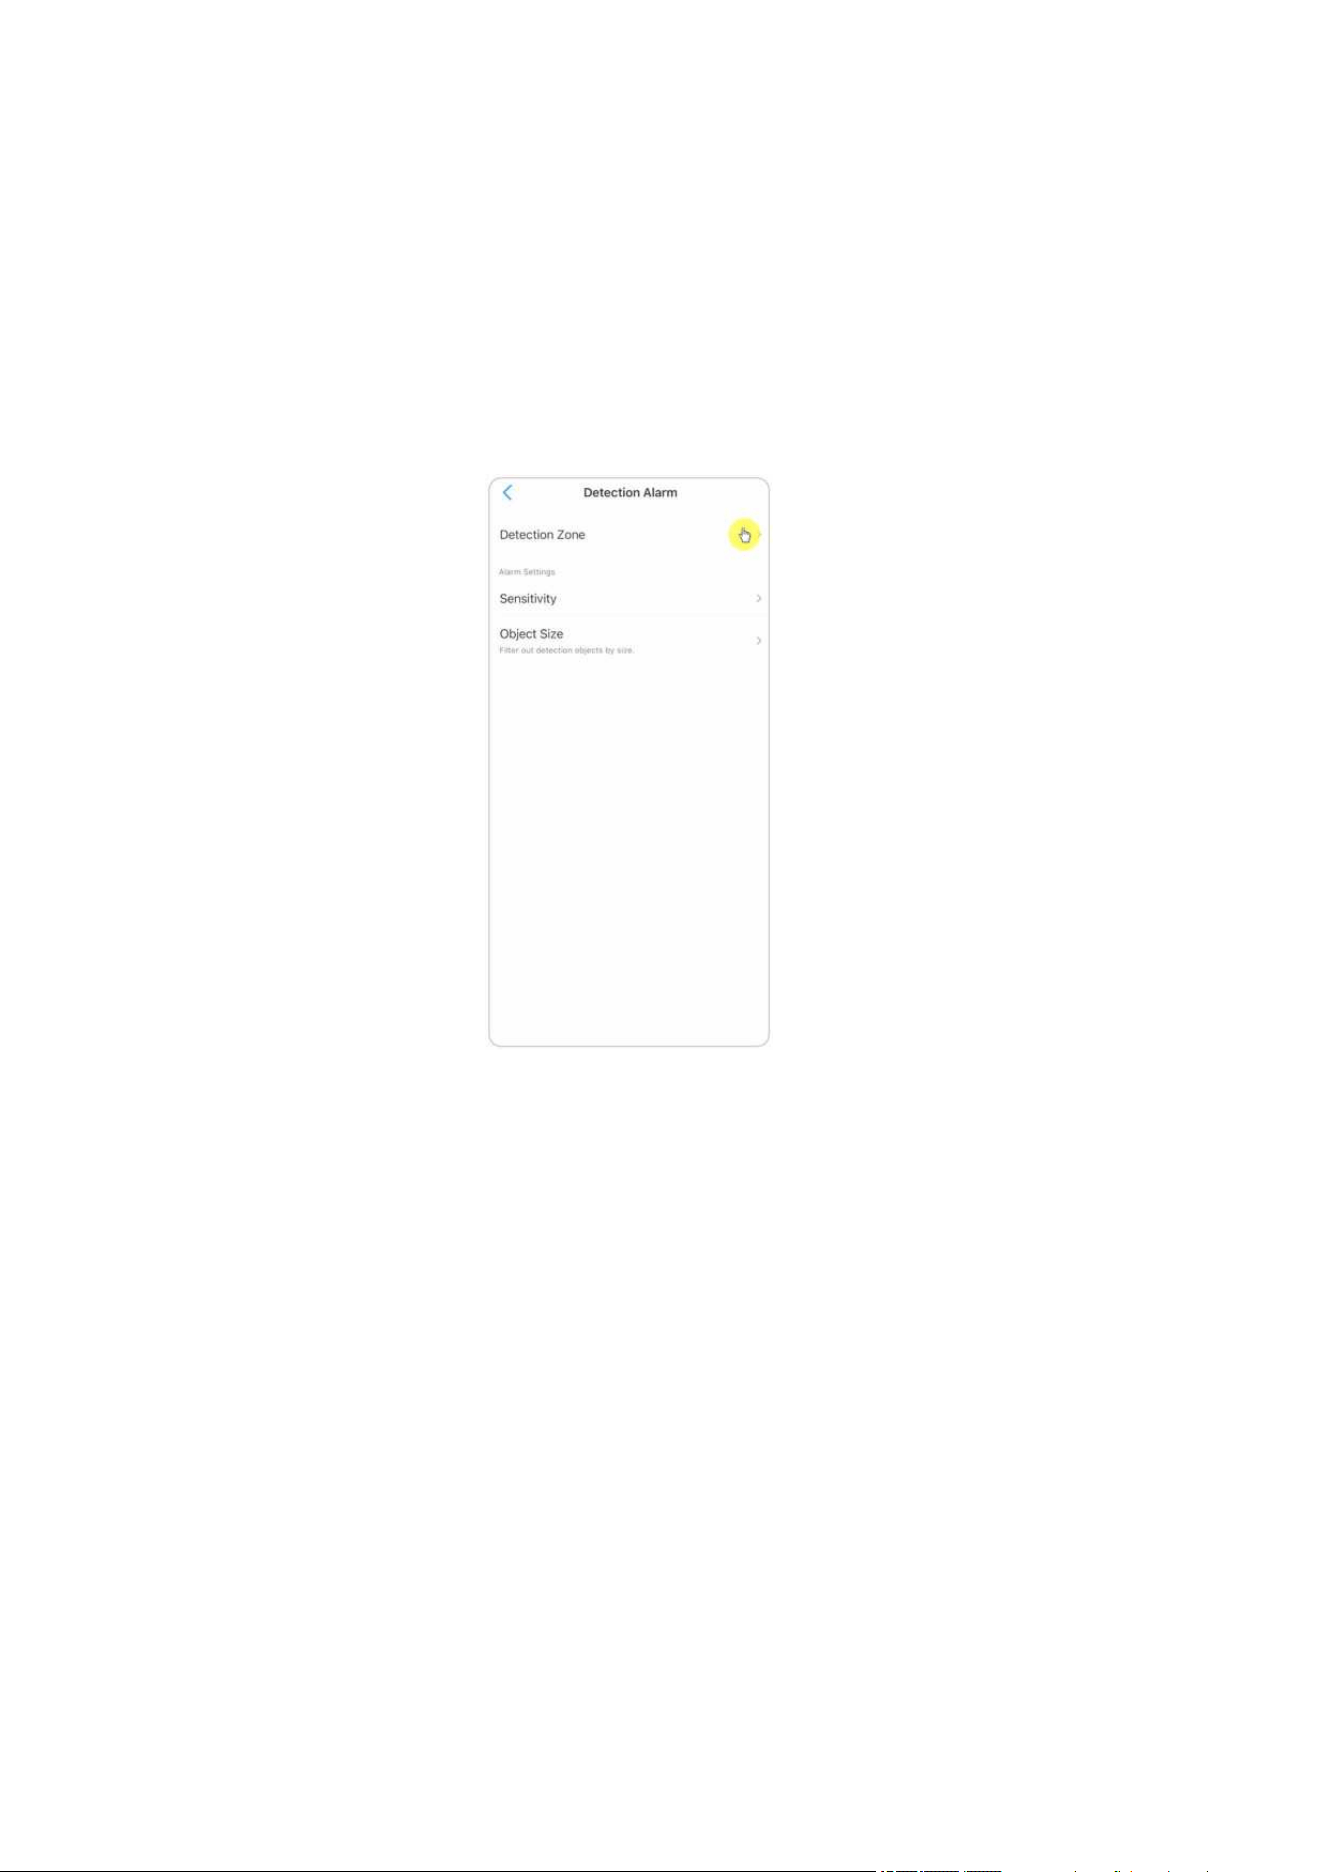
Set up Detection Zone
Go to camera Settings > Detection Alarm > Detection Zone. Here create a zone over
the area you don’t want to receive alerts about. After done, click Save to save the
detection zone settings.
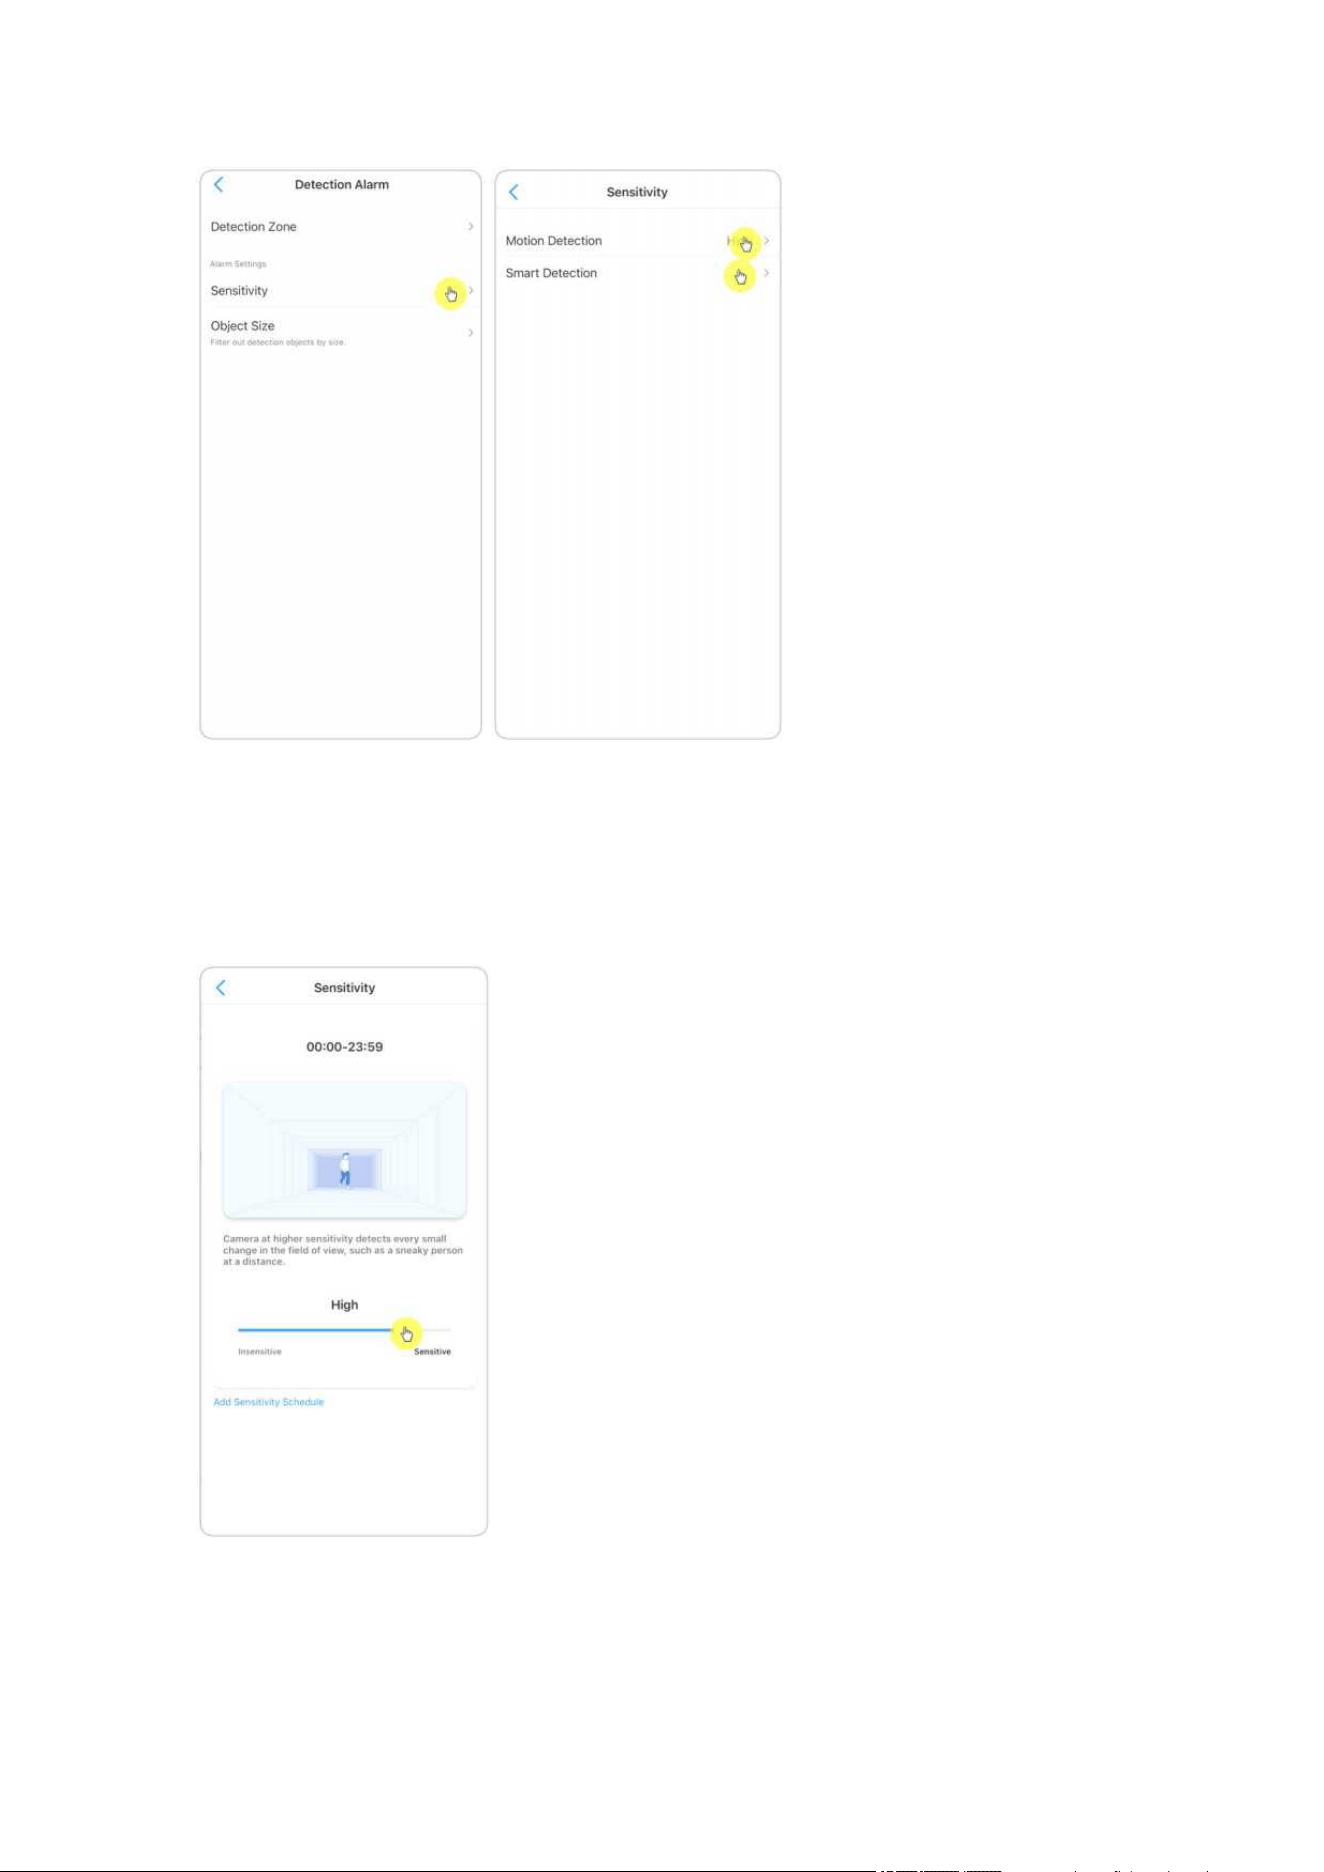
Set up Sensitivity
Go to
camera Settings > Detection Alarm > Sensitivity. The
sensitivity can be set
for motion detection and smart detection. The Smart Detection is only
availability for cameras with human/vehicle detection.
Reolink Wireless Camera
User Manual
32
Drag the bar to adjust the sensitivity from low, mid to high.
For the sensitivity of motion detection, you can also add a sensitivity schedule to set
up diffident sensitivity level for different hours.
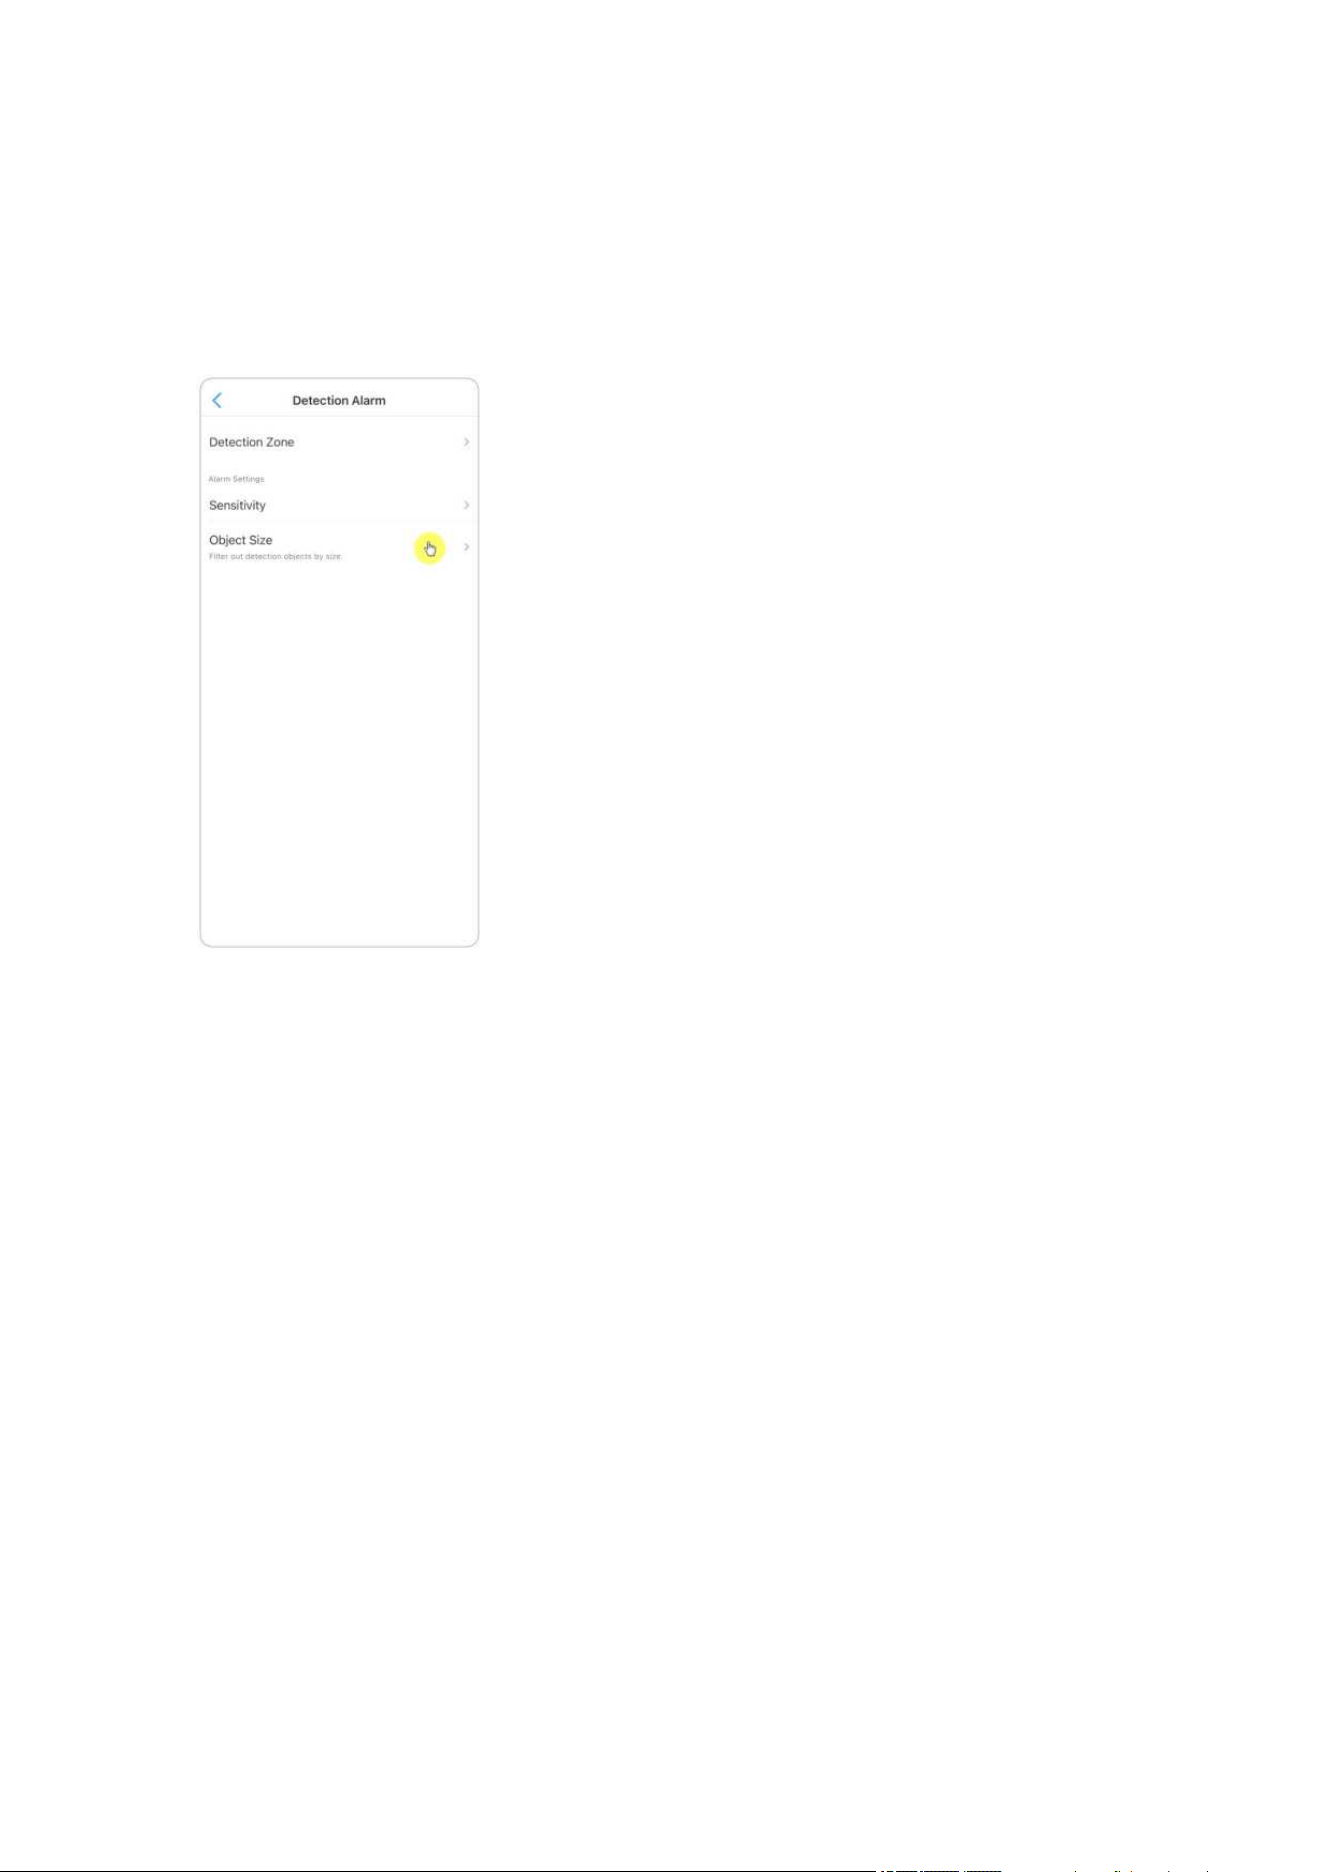
Set up Object Size
Reolink Wireless Camera
User Manual
33
For
cameras with human/vehicle detection, y
ou can set the minimum object size
and the maximum object size. Moving objects that are smaller or bigger than the size
will not trigger alarm.
Set up Motion Alerts
Push Notification
When the camera detects a motion, it will send a push notification, which pops up
on your mobile phone.
Set up Push Notification
1. Tap on .

Reolink Wireless Camera
User Manual
34
2. Tap on Push Notifications to enable this function.
3. Set a push Schedule if you need. For cameras with human/vehicle detection, you
can also select Person, Vehicle or Others.

Reolink Wireless Camera
User Manual
35
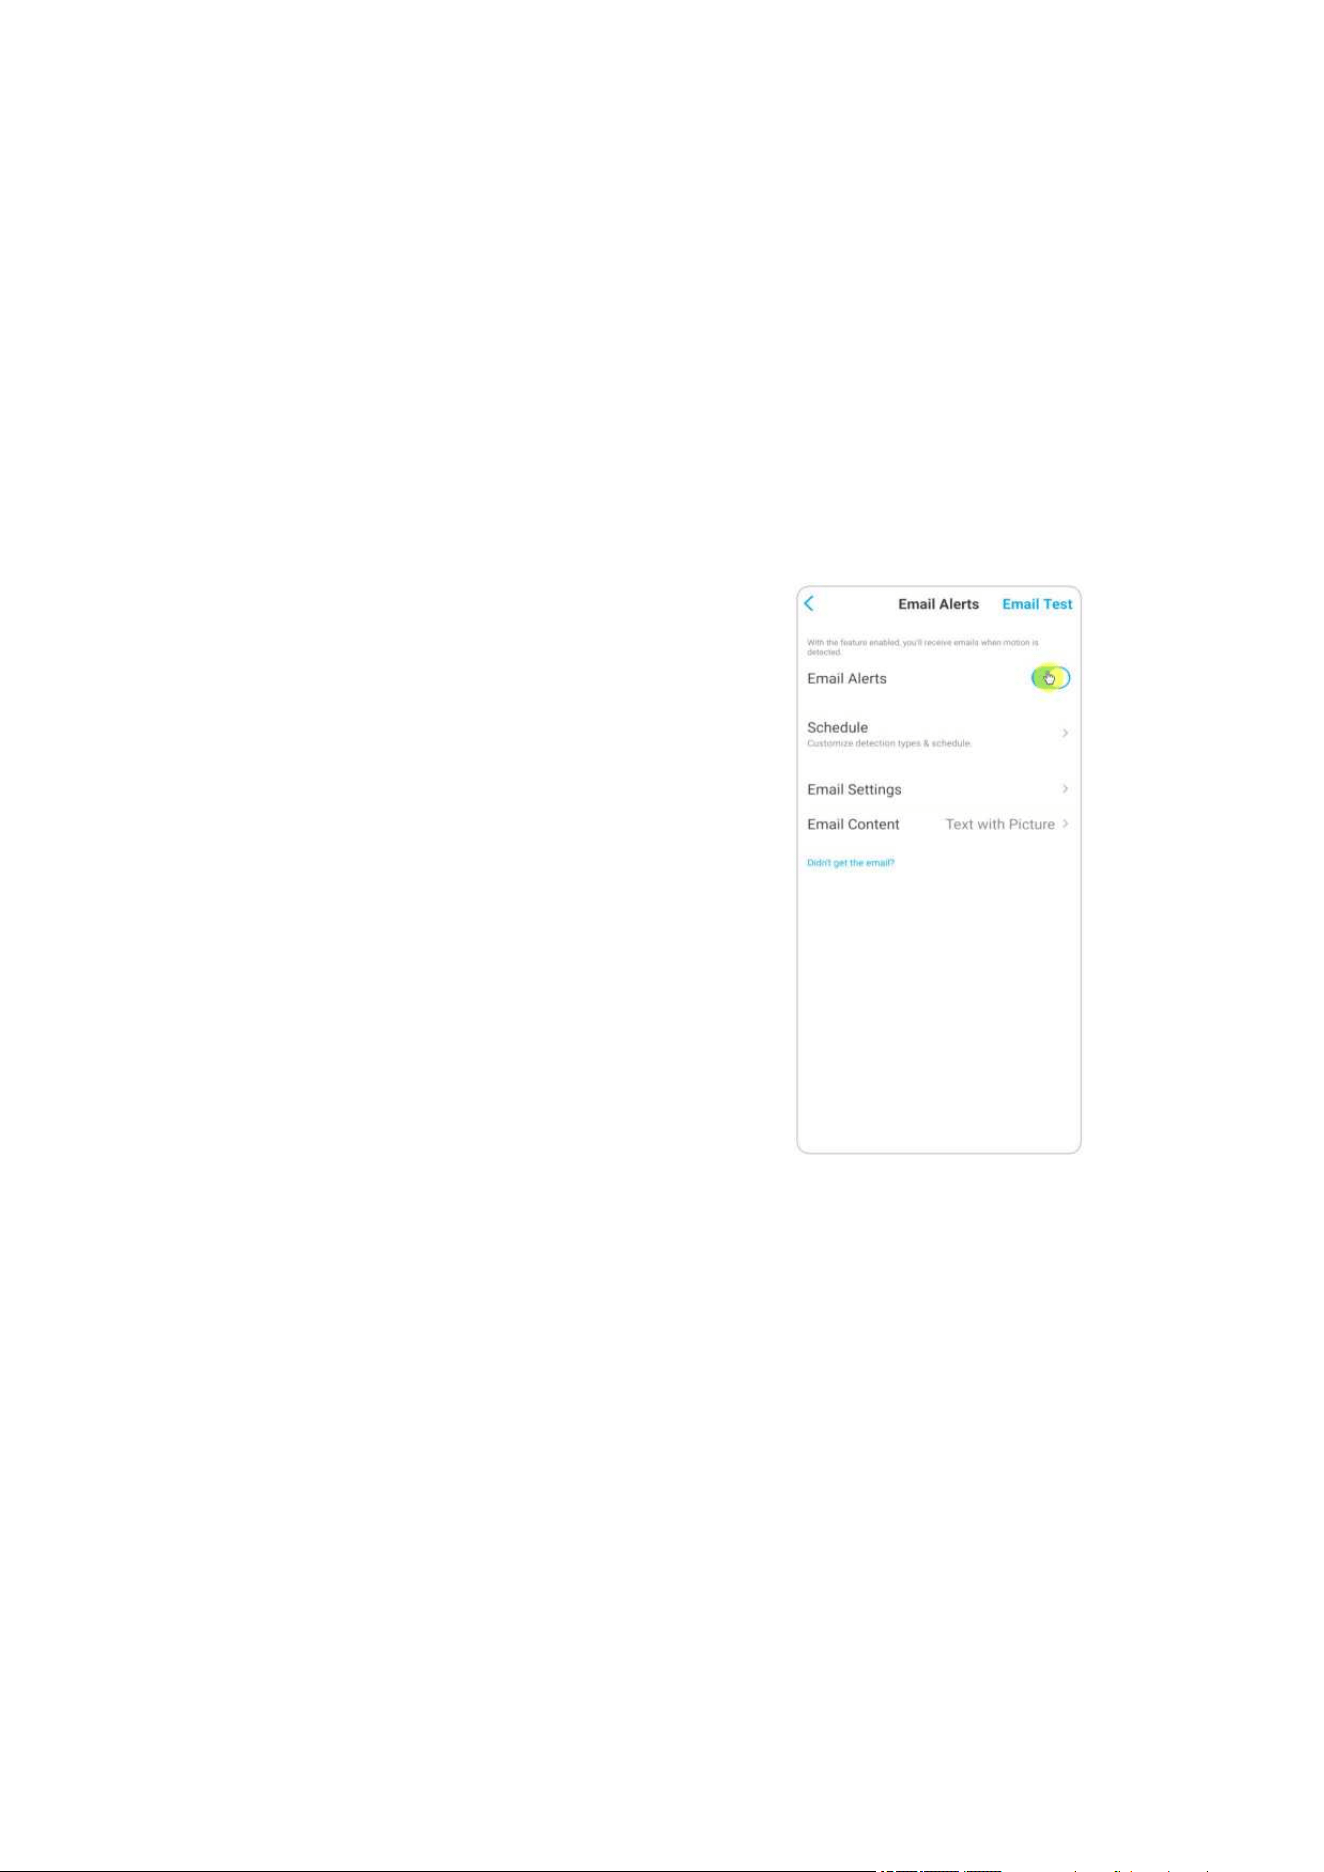
4. Set your phone to allow Reolink App to send push notifications. Go to your phone
Settings, find Notifications and among the App list find the Reolink App. Make sure
the Reolink App can send notifications.
Reolink Wireless Camera
User Manual
36
Alarm Email
When the camera detects a motion, it will send an alarm email with plain texts or
the camera’s live image.
Set up Alarm Email
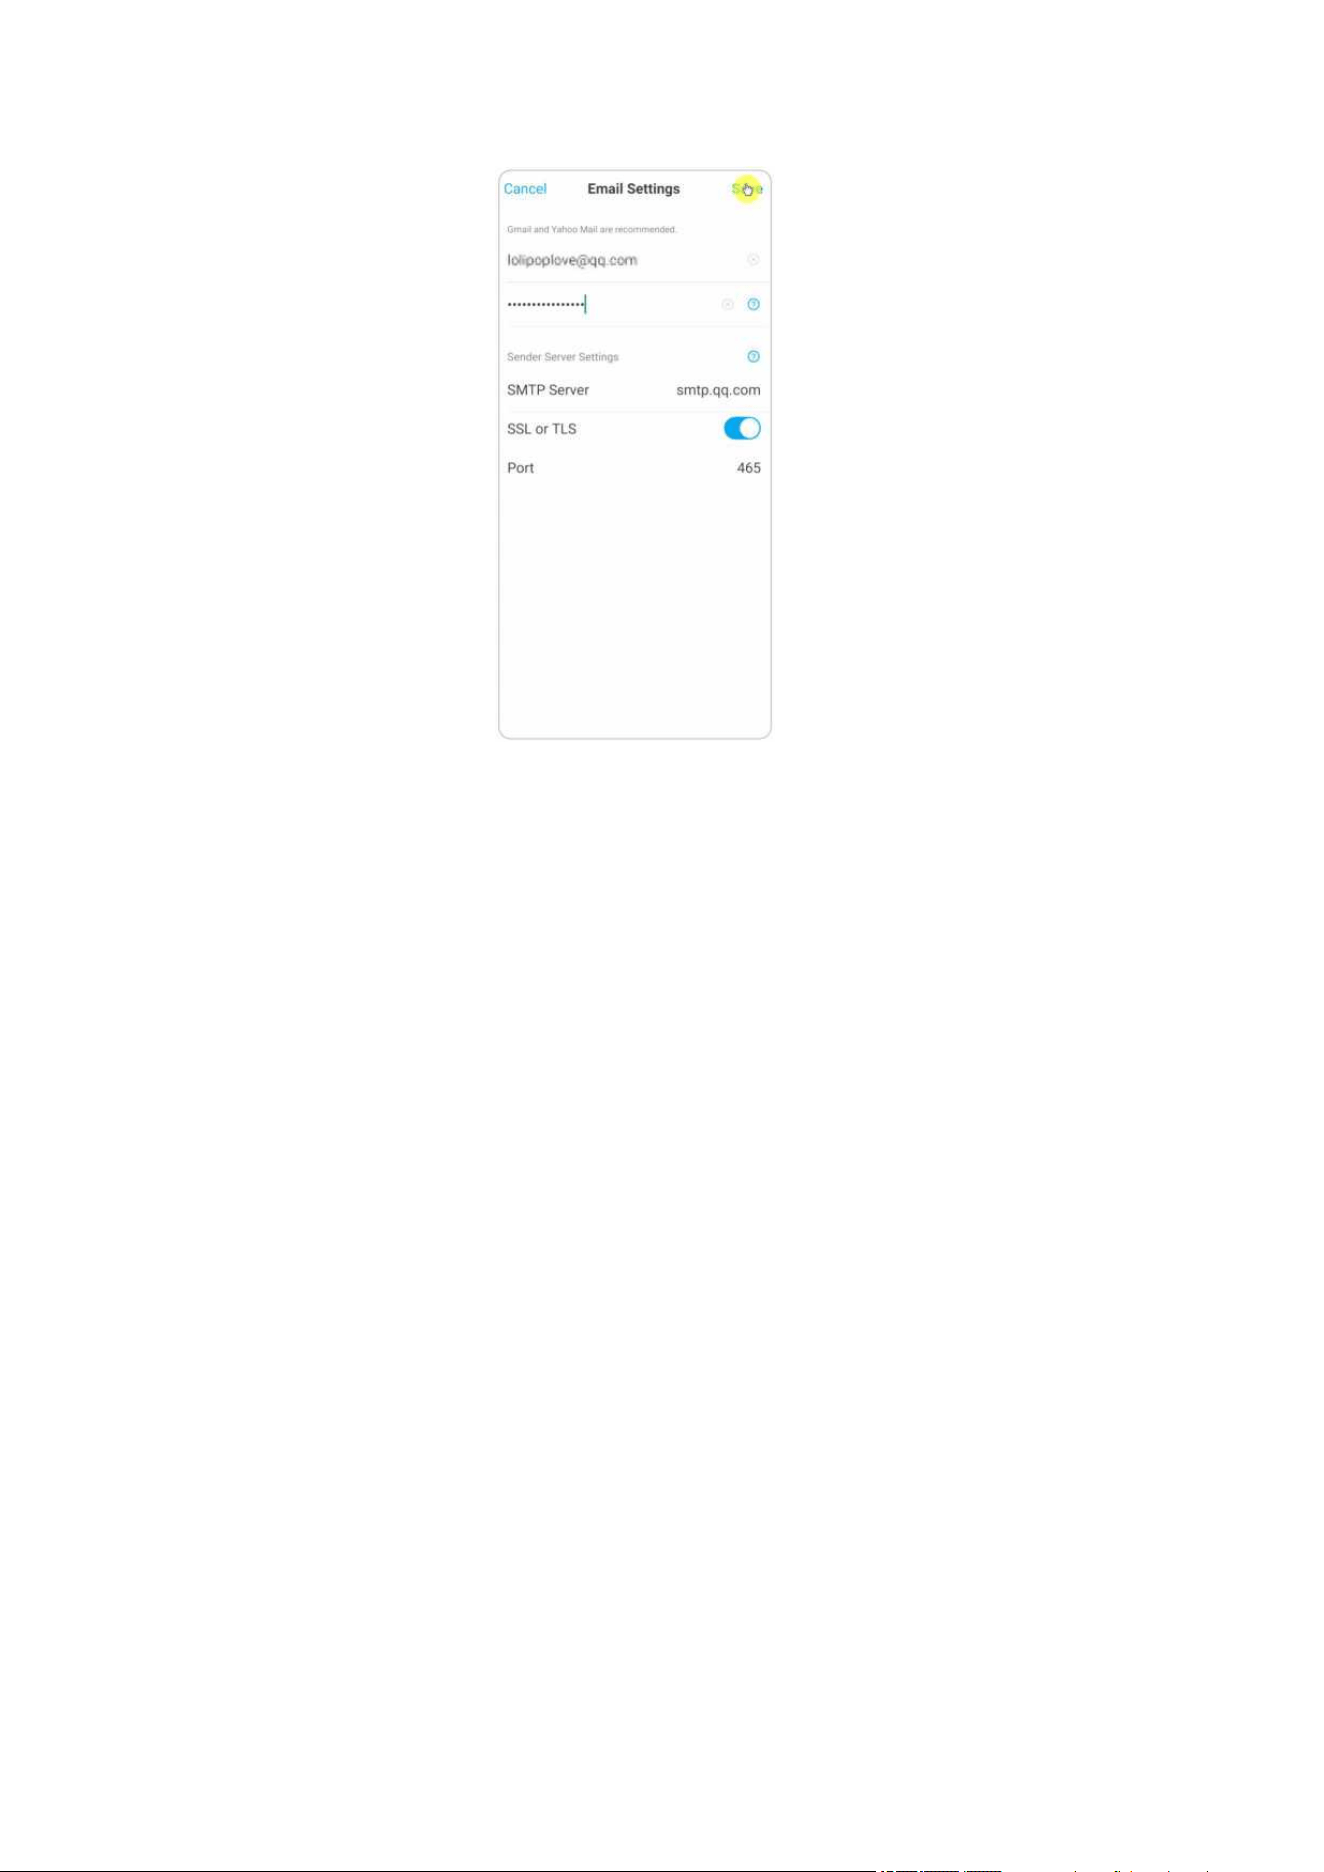
1. Tap on , then tap Email Alerts and enable this function.
2. Tap Set up Now to enter Email Settings, and enter the Email address and Email
password, SMTP server and port. Then tap on Save.
Reolink Wireless Camera
User Manual
37
3. Tap Schedule to set up a schedule when you’d like to receive the email alerts, and
tap Save.
For cameras with human/vehicle detection, you can also choose the Detection Type:
Person, Vehicle or Others.
Reolink Wireless Camera
User Manual
38
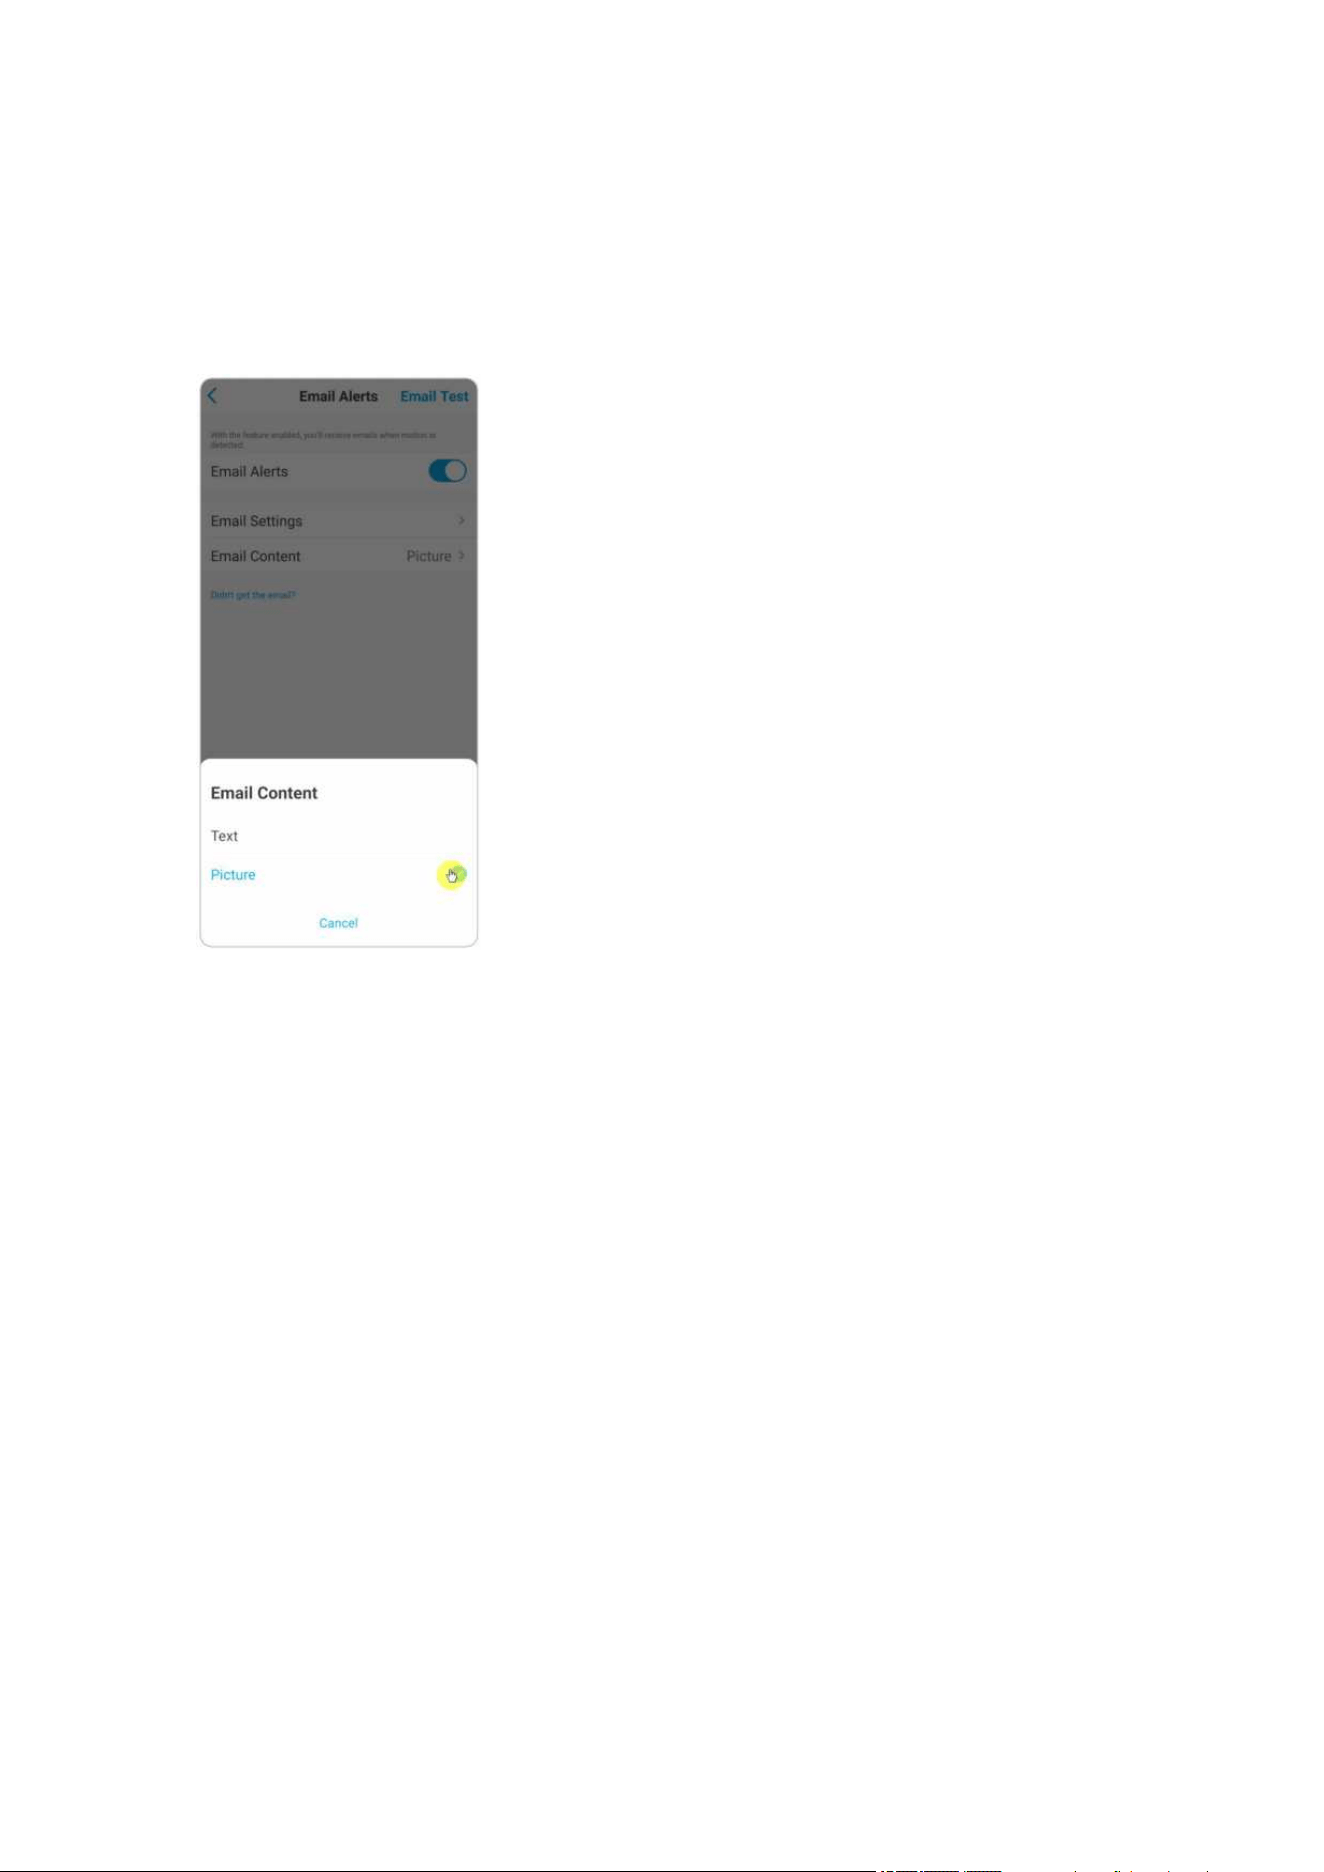
4. Tap Email Content to choose for the camera to send email with Text, Picture,
Text with Picture or Text with Video.
Reolink Wireless Camera
User Manual
39
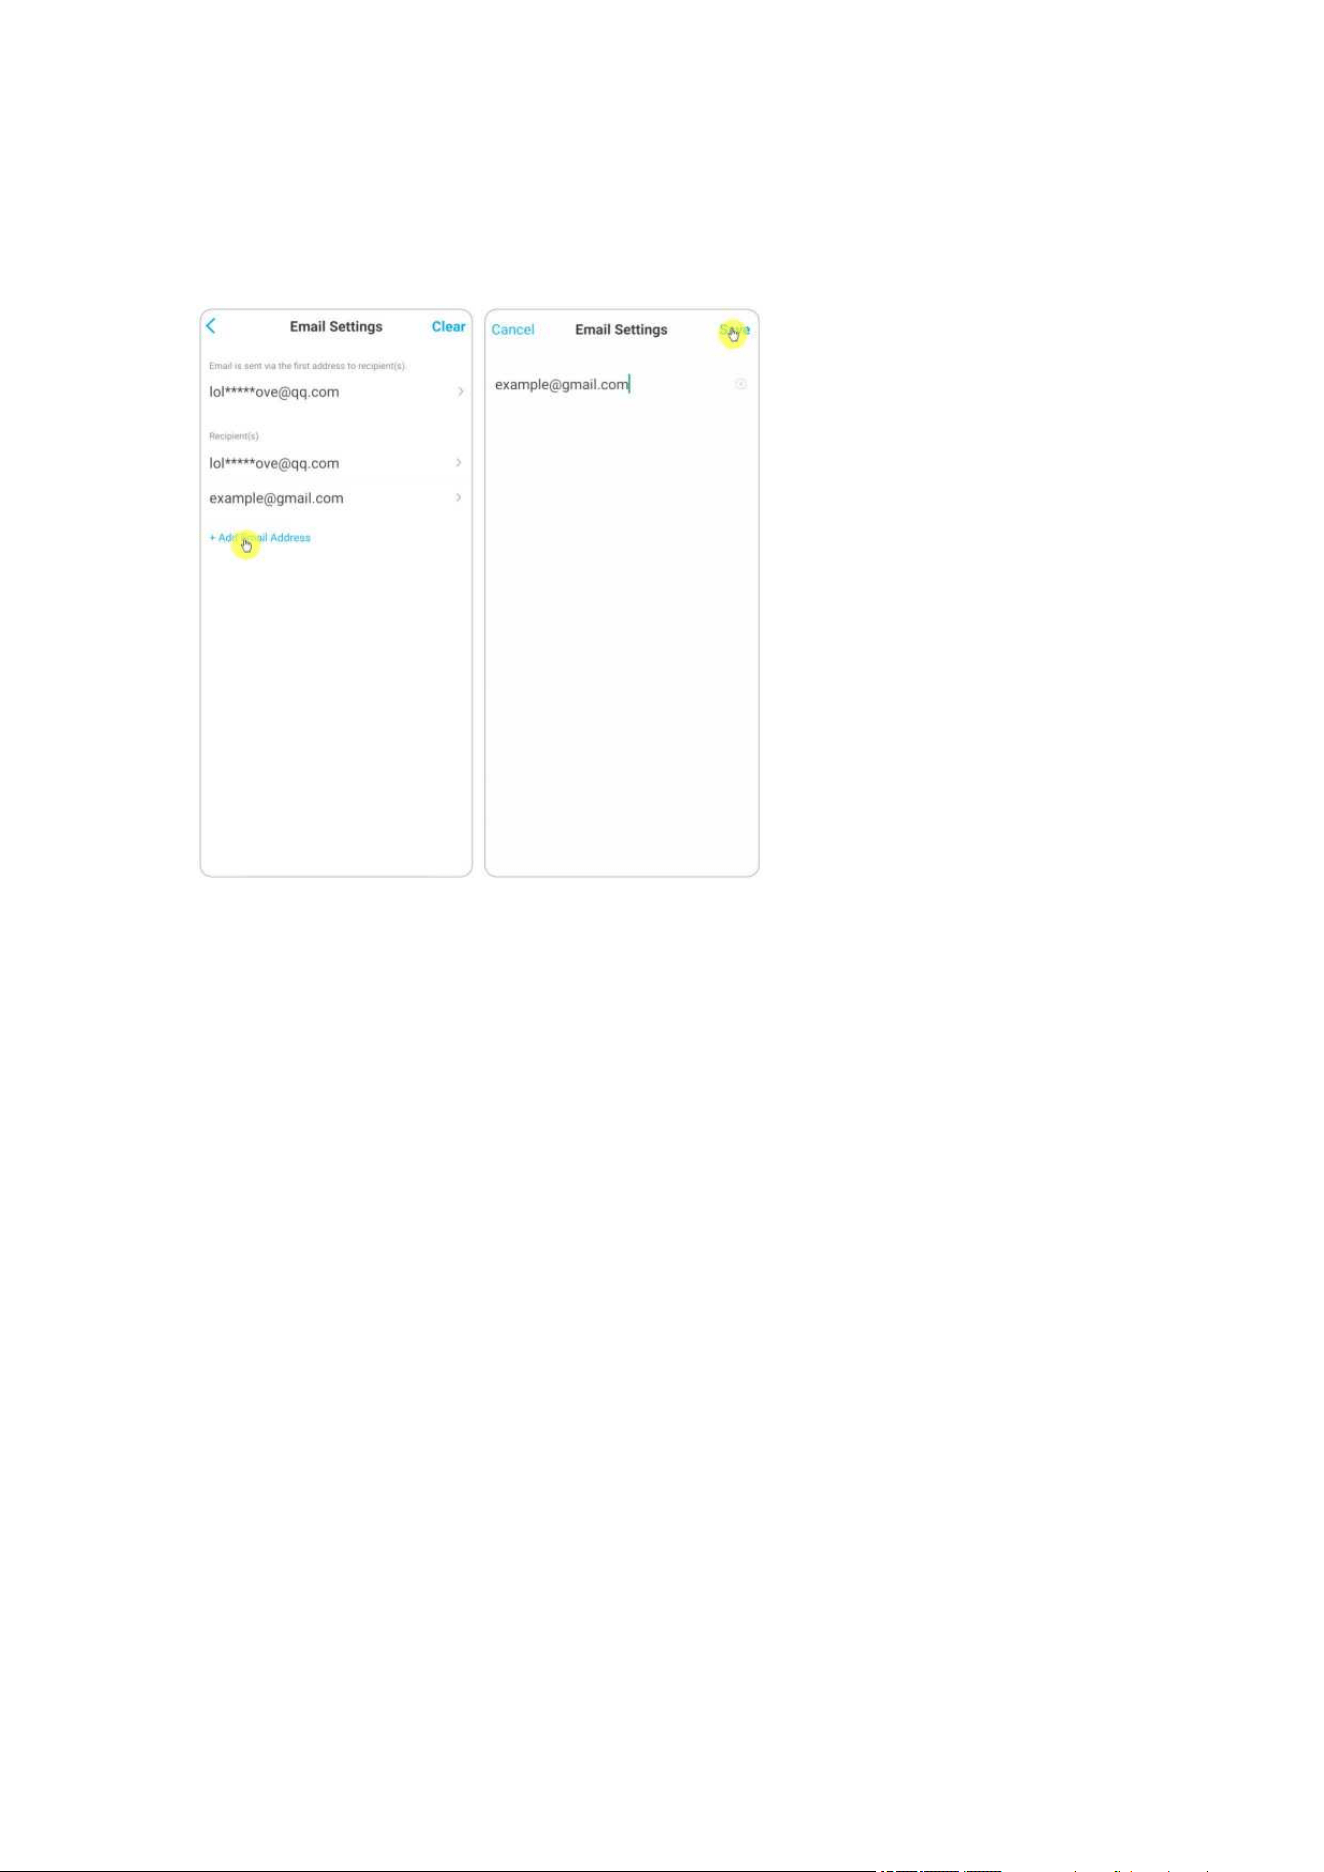
5. Tap Email Settings, then +Add Email Address to add more recipients of email
alerts, then tap Save.
Alarm Siren
For cameras that support siren, you can set up the camera siren to make an alert
sound when a motion is detected.
Set up Siren
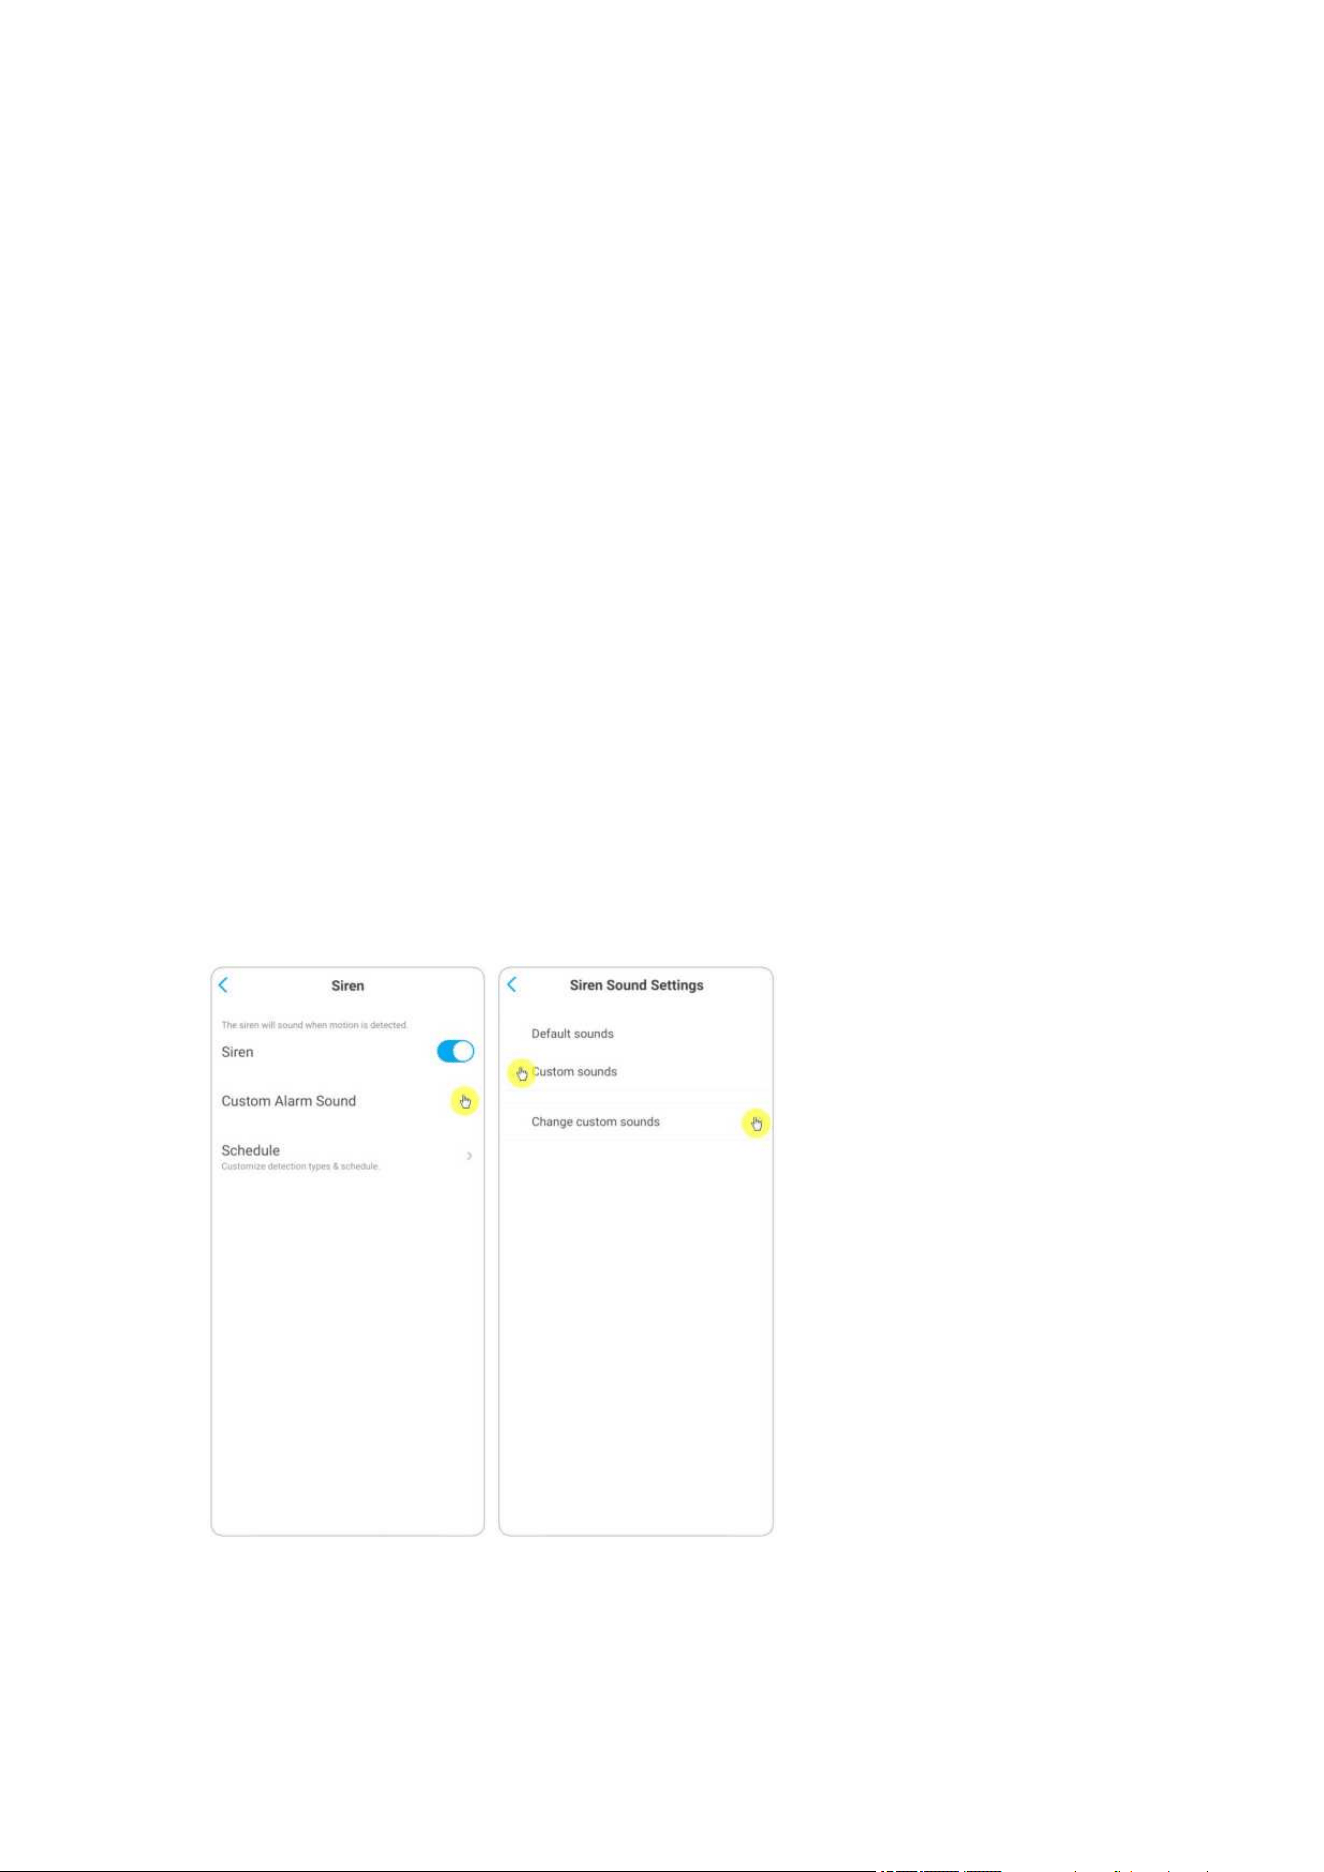
1. Tap on . Tap on Siren and enable Siren.
Reolink Wireless Camera
User Manual
40
2.
Tap on Custom Alarm Sound, if you want to use a custom sound. Tap Custom
sounds, then tap Change custom sounds to record an up-to-5-second sound.
3.
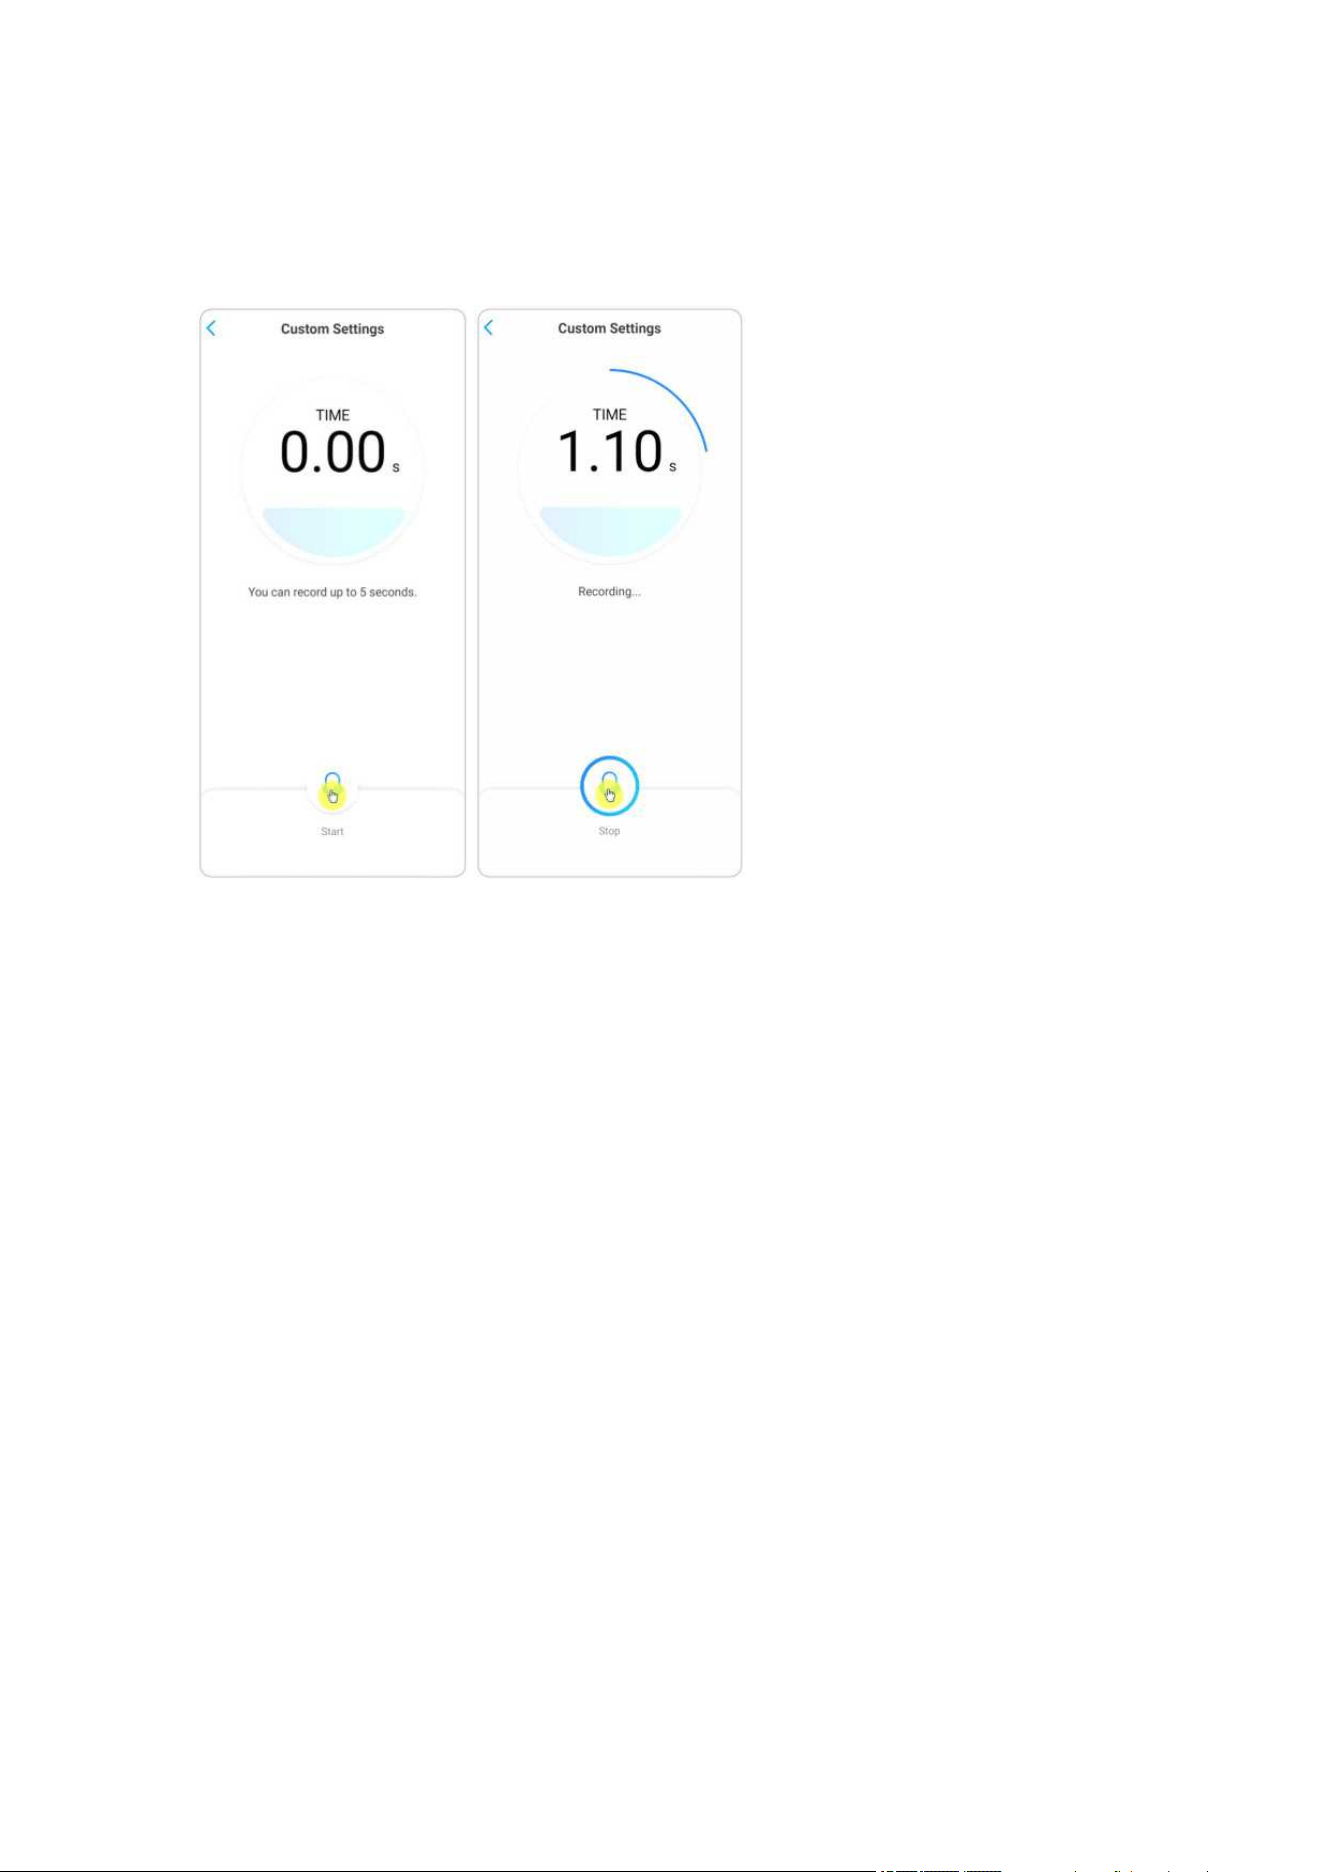
Tap Start to start recording or tap Stop to stop recording. Tap on Sound Test
Reolink Wireless Camera
User Manual
41
to test the recorded sound or tap Re-record to record again till you’re satisfied. Then
tap Apply to save the changes.

Reolink Wireless Camera
User Manual
42
4.
Tap Schedule to set up a schedule when you want the siren to work, then tap Save.
For cameras with human/vehicle detection, you can also choose the Detection Type:
Person, Vehicle or Others.
Alarm Spotlight
For cameras with built-in spotlights, the spotlight can automatically turn on at
night when a motion is detected.
Set up Alarm Spotlight
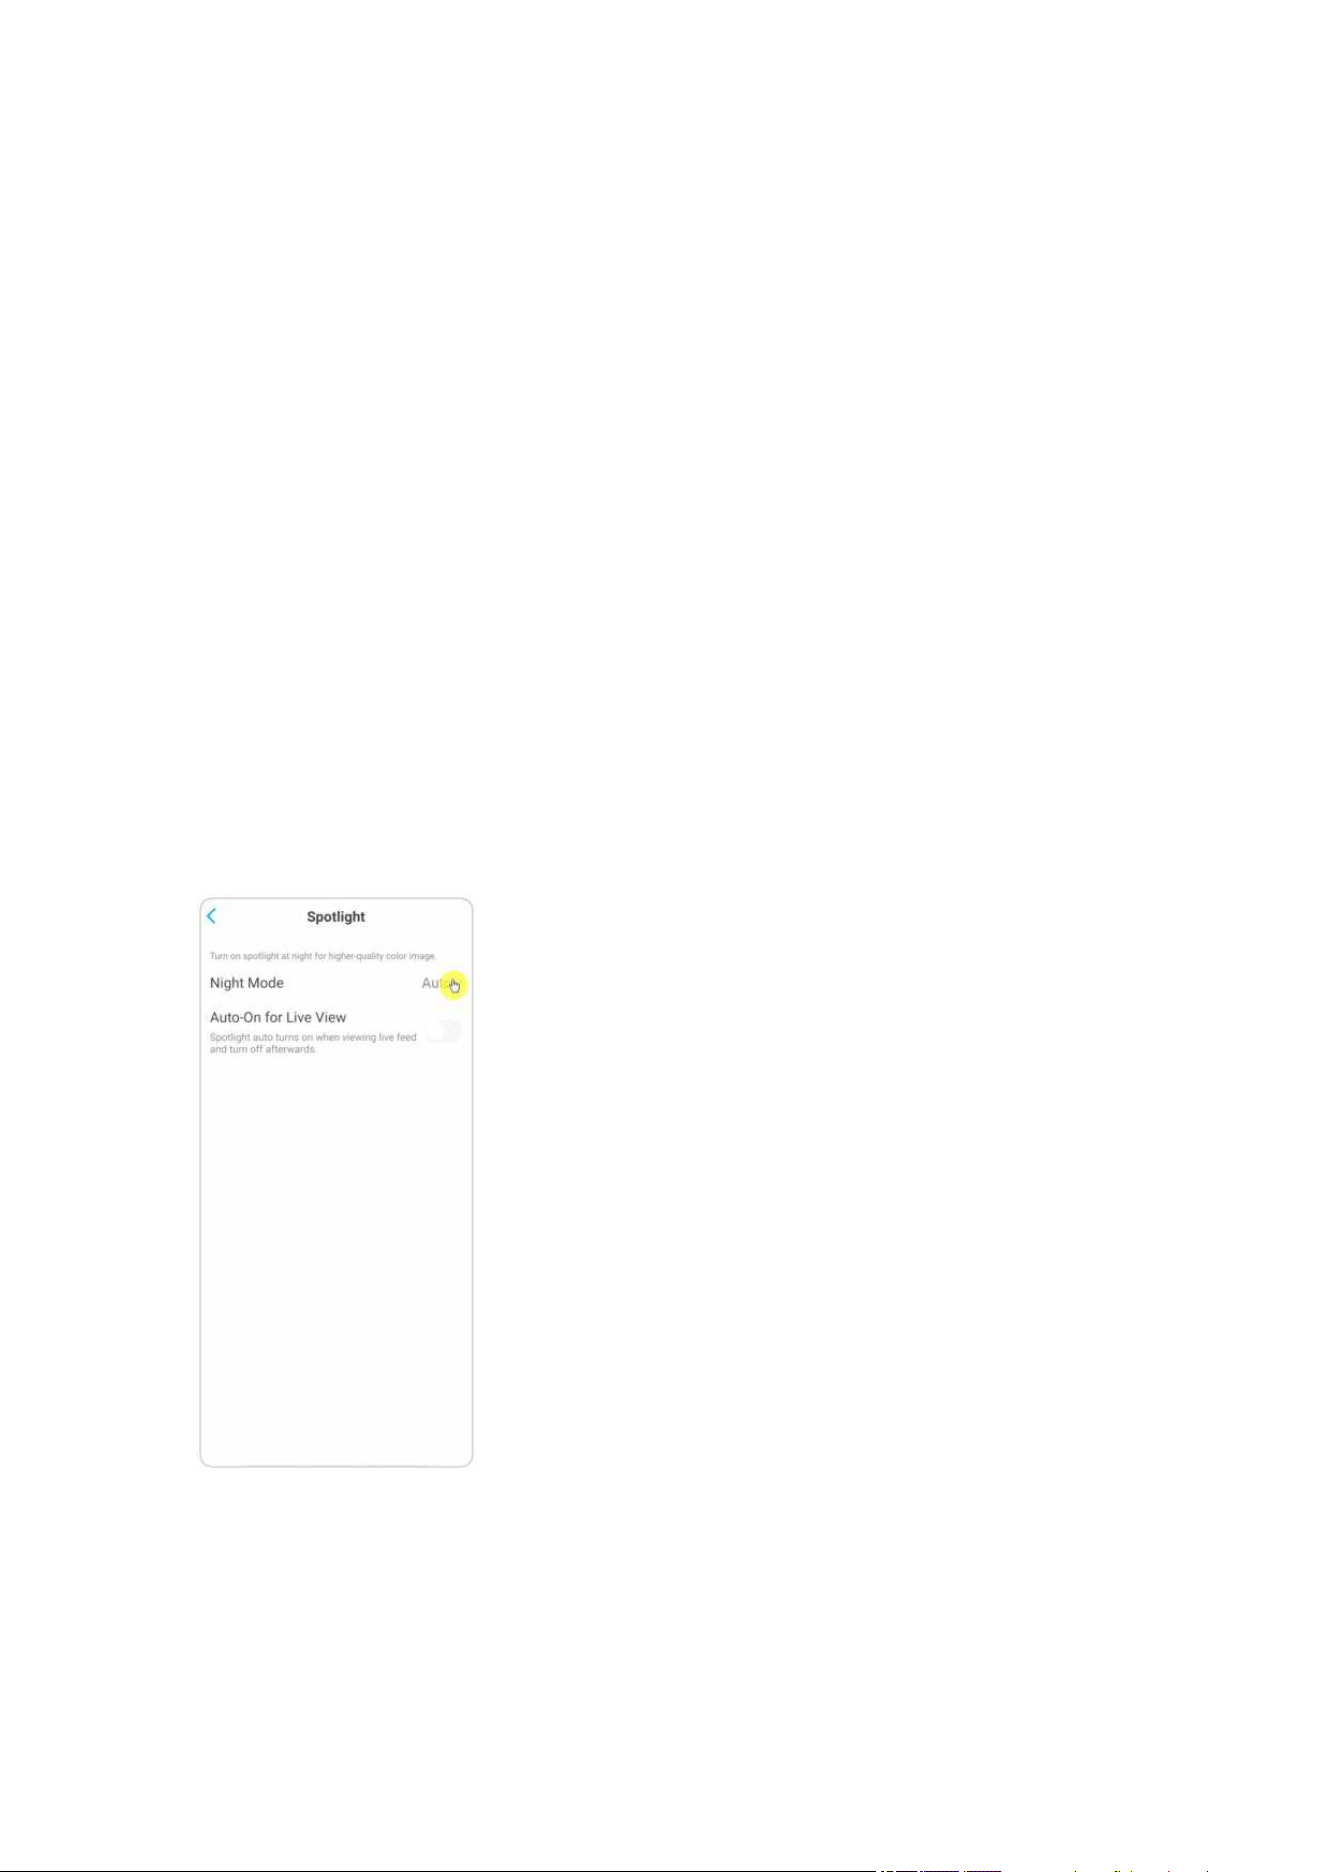
1. Tap on . Then tap Advanced, then tap Spotlight.
Reolink Wireless Camera
User Manual
43
2. Tap Night Mode to set it as Auto. In this way, when a motion is detected during
night time, it’ll automatically turn on the spotlight.
Set up Motion Recording
When the camera detects a motion, it can record and save motion recordings to the

Reolink Wireless Camera
User Manual
44
SD card automatically. You need to install an SD card to the camera, refer to the
part of SD Card Storage in Chapter 7 for choosing the correct SD card and learn
how to insert the SD card.
Set up Motion Recording
1. Tap on . Then tap on Camera Recording, tap again to enable it.
2. Tap Schedule to set up a schedule when you want the camera to save motion
recordings, then tap Save. For cameras with human/vehicle detection, you can also
choose the Detection Type: Person, Vehicle or Others.

Reolink Wireless Camera
User Manual
45
3. Tap Post-Motion Record Duration to set up the motion recording length, here
you can choose a desired length.

Reolink Wireless Camera
User Manual
46
Tips for Reducing False Alarms
For motion detection cameras, the factors like moving trees, cloud, sunlight and
shadow, rain and snow, external light changes and so on, will all trigger the false
alarms. It’s better to mount cameras in locations where avoid these factors.
And adjust settings below to help reduce false alarms.
1. Set different sensitivity levels for different hours of the day, and adjust the
sensitivity level to best suit the usage scenario.
2. Set detection zone to help avoid false alarms from the non-detection area.
For cameras with human/vehicle detection, set the human or vehicle detection
schedule to help reduce other type of false alarms.
3. Adjust the mounting angel to help reduce false alarms.
4. Recording and Playback
Set up Recording
With an SD card installed, the camera can save motion alarm recordings to the SD
card. For setup steps, please refer to the part of Set up Motion Recordings in Chapter
4.
Set up Continuous Recording
To save the continuous recording to the SD card, please choose Timer from the

Reolink Wireless Camera
User Manual
47
Schedule of Camera Recording. Enable the schedule on Timer, then camera will
record continuously at the set time.
Note:
For cameras that support FTP, you can also save recordings to the FTP server. For
the setup steps, please refer to the part of FTP Settings in Chapter 7.
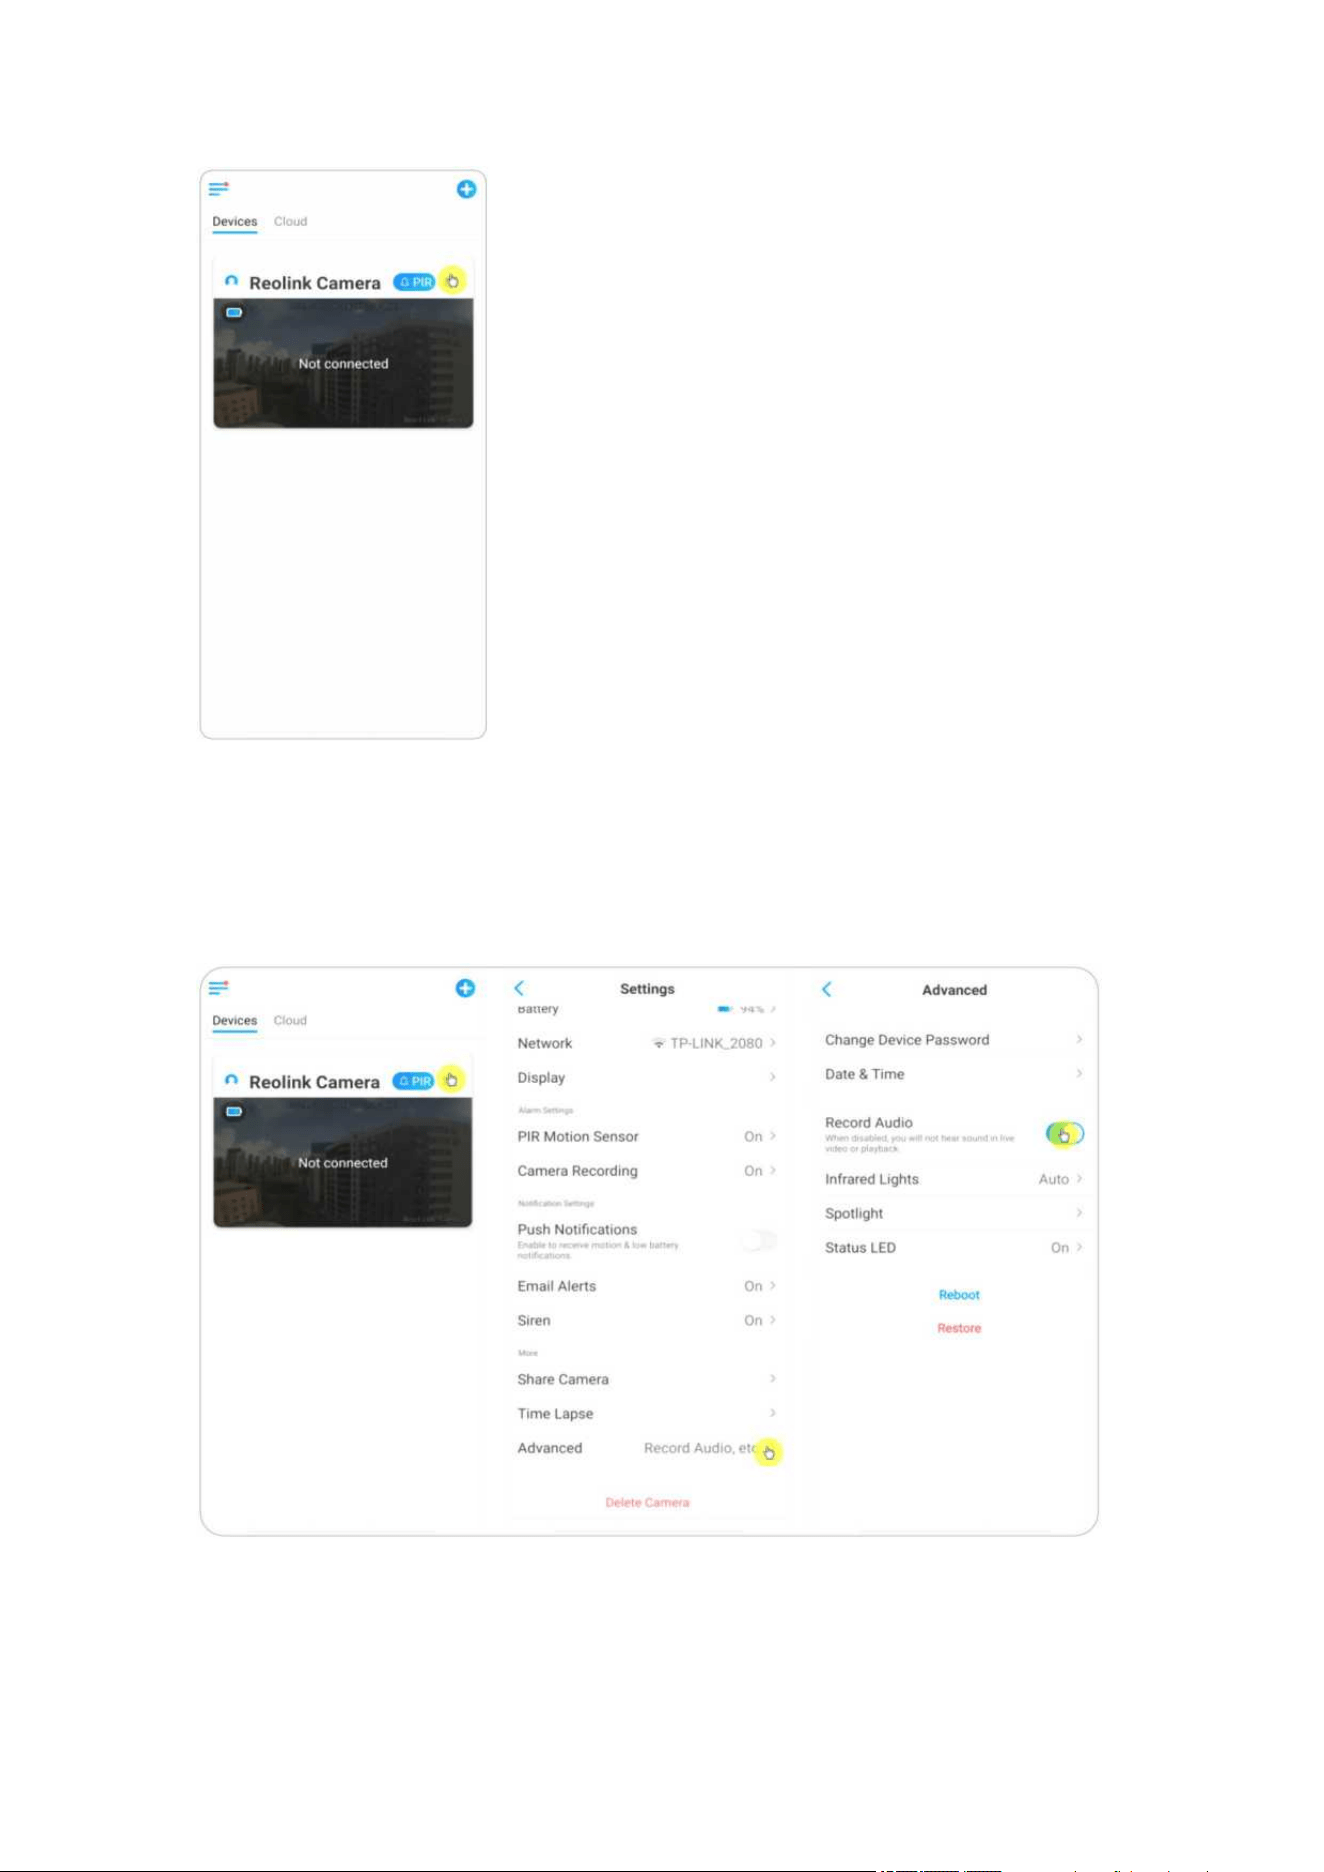
Record with Audio
1. Tap on .
Reolink Wireless Camera
User Manual
48
2. Tap on Advanced and then find Record Audio, tap to enable this option. Then the
camera will record audio in video recordings.
Playback and Download Recordings

Reolink Wireless Camera
User Manual
49
Play back Recording
1. Open live view of the camera. Then tap on Playback on the bottom.
2. Select a date to search the recordings. Slide through the timeline to find the
recordings you want to replay, tap on the selected recording and it’ll automatically
start to play.

Reolink Wireless Camera
User Manual
50
3. Tap on to choose Fluent or Clear to replay the recordings in clear mode or
fluent mode.
4. Tap show alarm icon on the bottom to show the alarm recordings only. For

Reolink Wireless Camera
User Manual
51
cameras with human/vehicle detection, you can select motion recording type of
Person,Vehicle or Others to replay.

Reolink Wireless Camera
User Manual
52
5. To replay the recording in slow or fast speed, please tap on the icon and then
choose the playback speed at 0.25X, 0.5X or 1X.
Download Recordings
1. Open live view of the camera. Tap on Playback on the bottom.

Reolink Wireless Camera
User Manual
53
2. Select a date to search the recordings. Slide through the timeline to find the
recordings you want to replay, tap on the selected recording and then tap on the
Download icon .
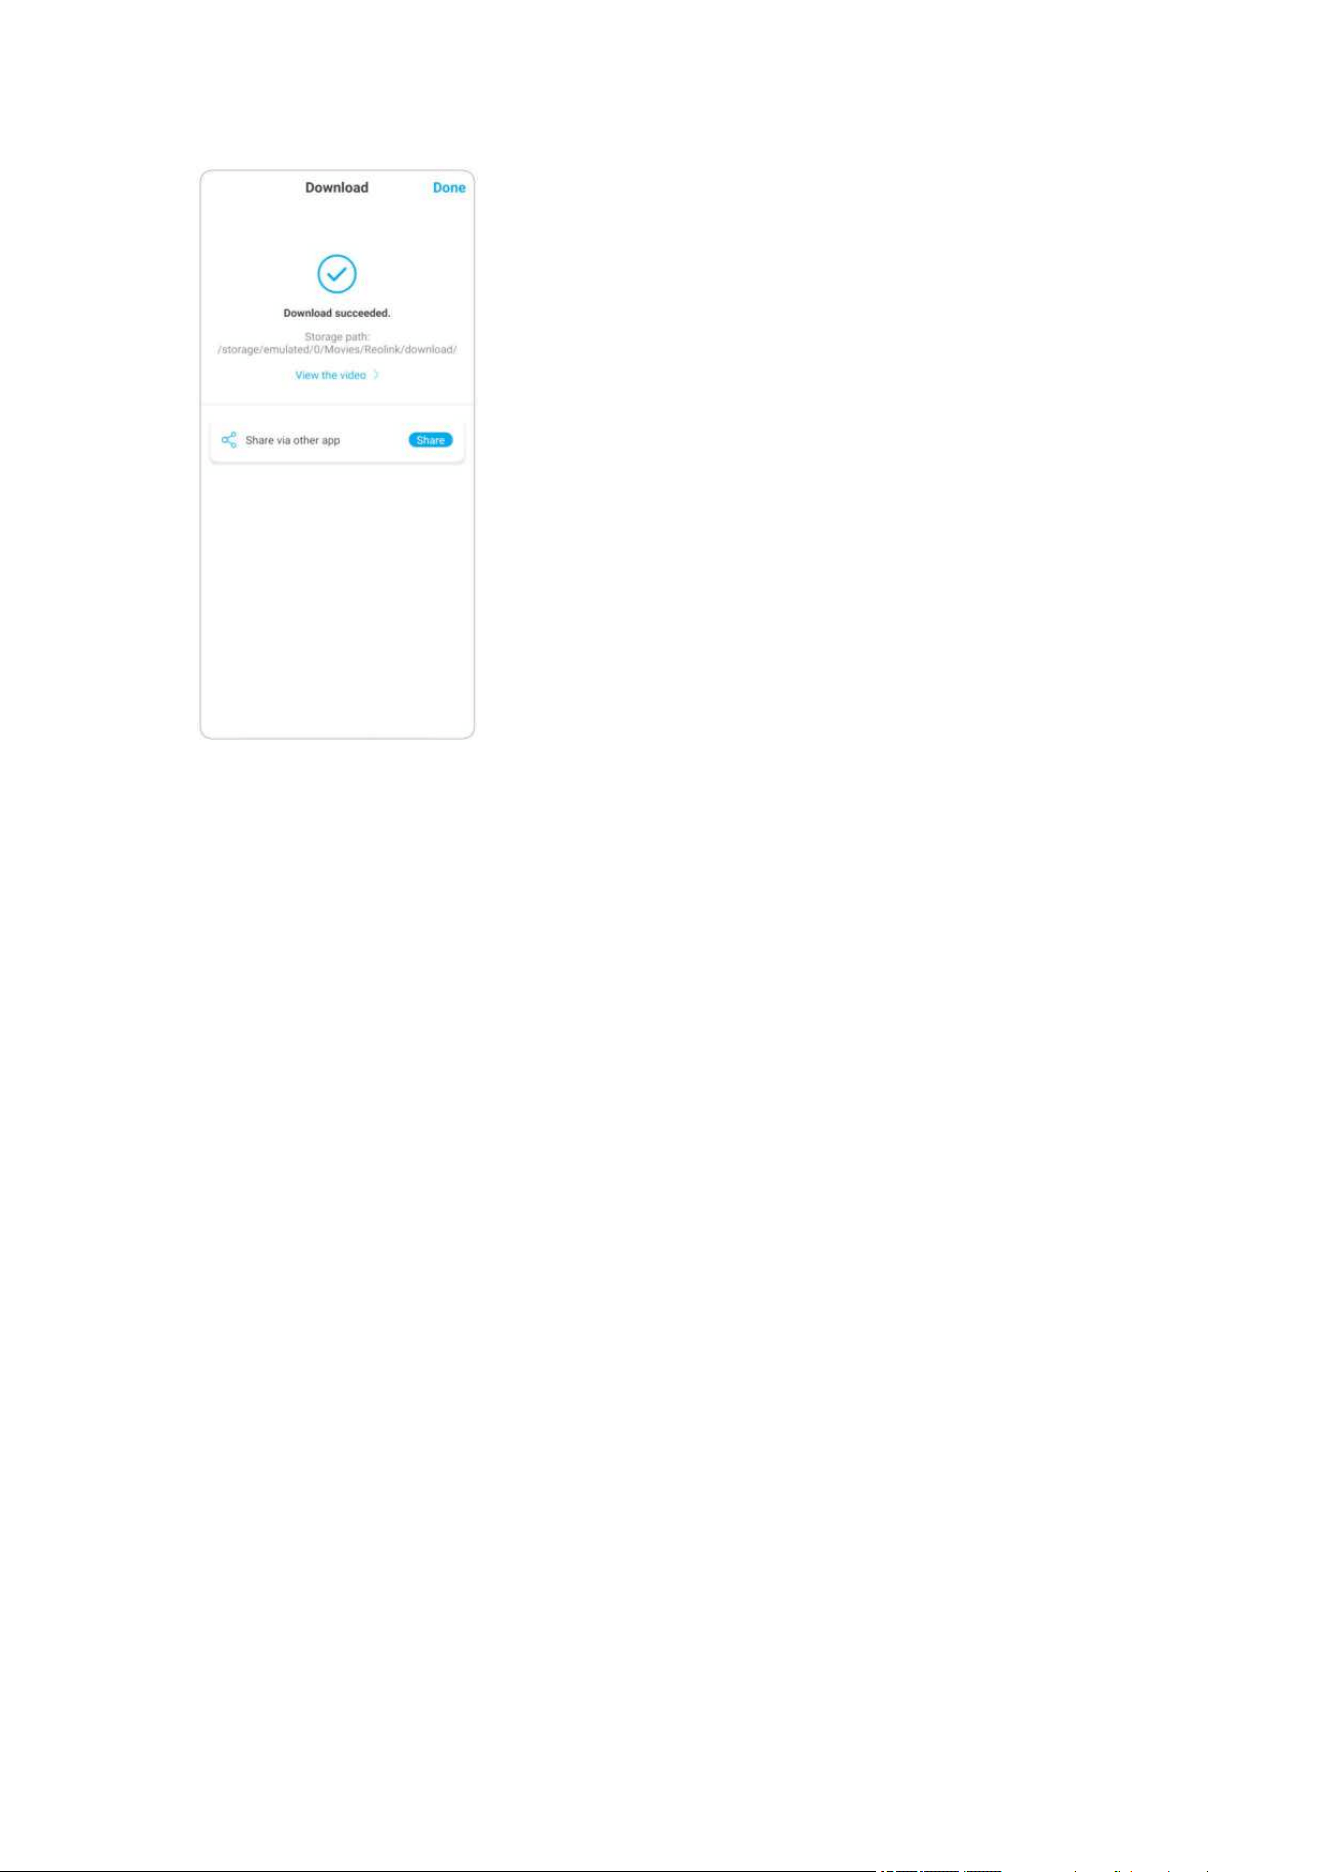
3. Drag on the timeline to cut the recordings up to 120 seconds, then tap on
Download to download the recording to your phone.
Reolink Wireless Camera
User Manual
54

Reolink Wireless Camera
User Manual
55
Delete Recordings
Reolink cameras don’t support deleting selected recordings. The camera will
automatically delete and overwrite the older recordings when the SD card is full. Or
you can manually format the SD card to delete all recordings.
Time Lapse
Time-lapse photography, also known as time-lapse video, is a shooting technique
that compresses time. It shoots a group of photos or videos, by connecting photo
series or extracting video frames, the process of several minutes, hours, or even
several years is compressed into a short period of time and played as a video. In a
time-lapse video, the process of slowly changing objects or scenes is compressed into
a short period of time, presenting a wonderful scene that is usually undetectable by
the naked eyes.
The process of shooting time-lapse photography with a camera is similar to making
a stop motion animation (Stop Motion), connecting a single still picture in series to
get a dynamic video. It is a means of recording at regular intervals, and reproducing
the slow changing process of the scene with obviously changing images. For cameras
that support time lapse, please set it up with the steps below.
Set up Time Lapse
1. Tap on . Then tap on Time Lapse.

Reolink Wireless Camera
User Manual
56
Reolink Wireless Camera
User Manual
57
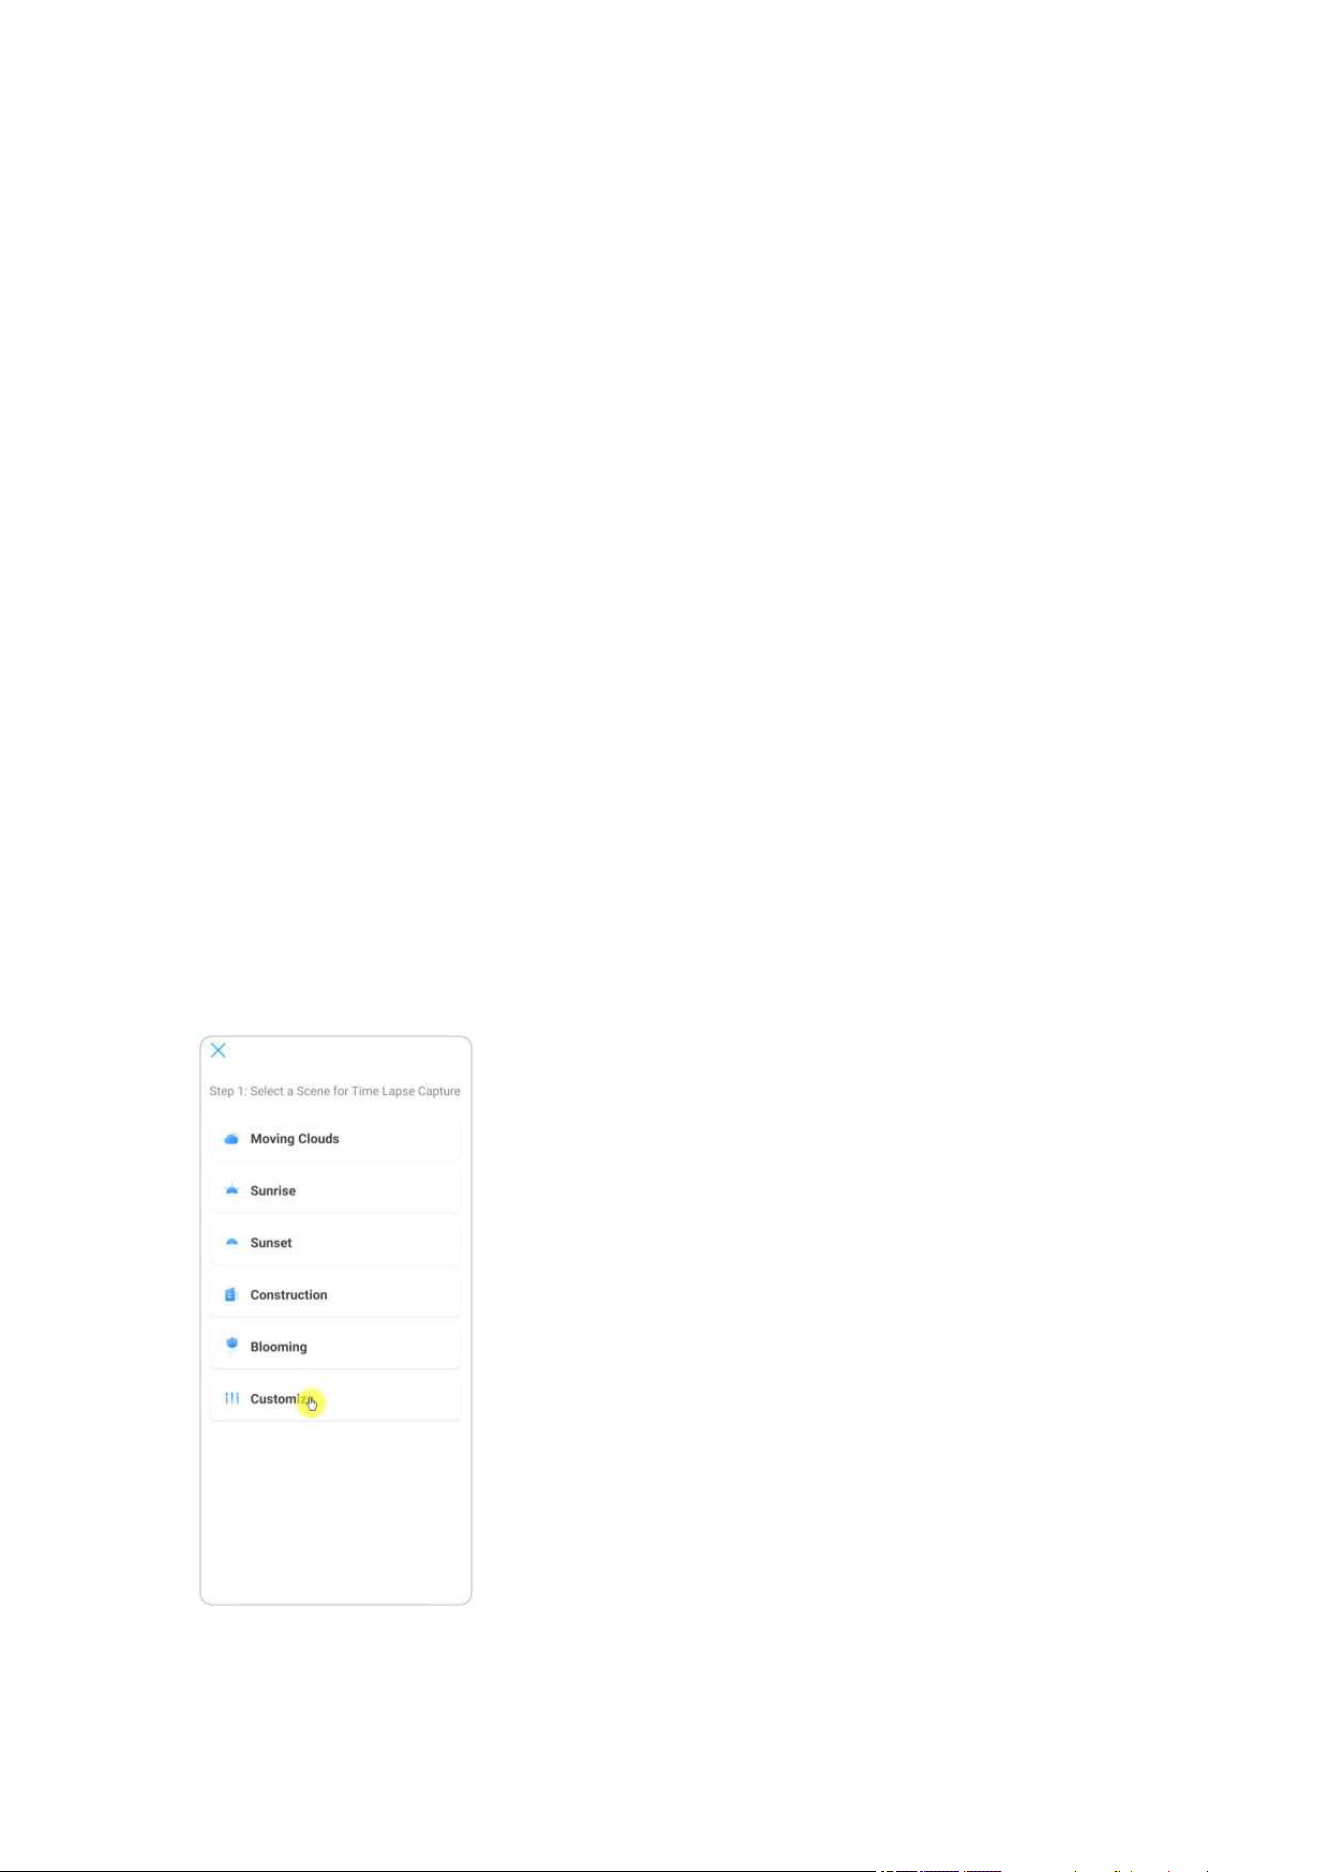
2. Tap Try Now or Create New Time Lapse Capture.
3. Select a scene from the list or tap on Customize to create a customized time lapse
capture.
Reolink Wireless Camera
User Manual
58
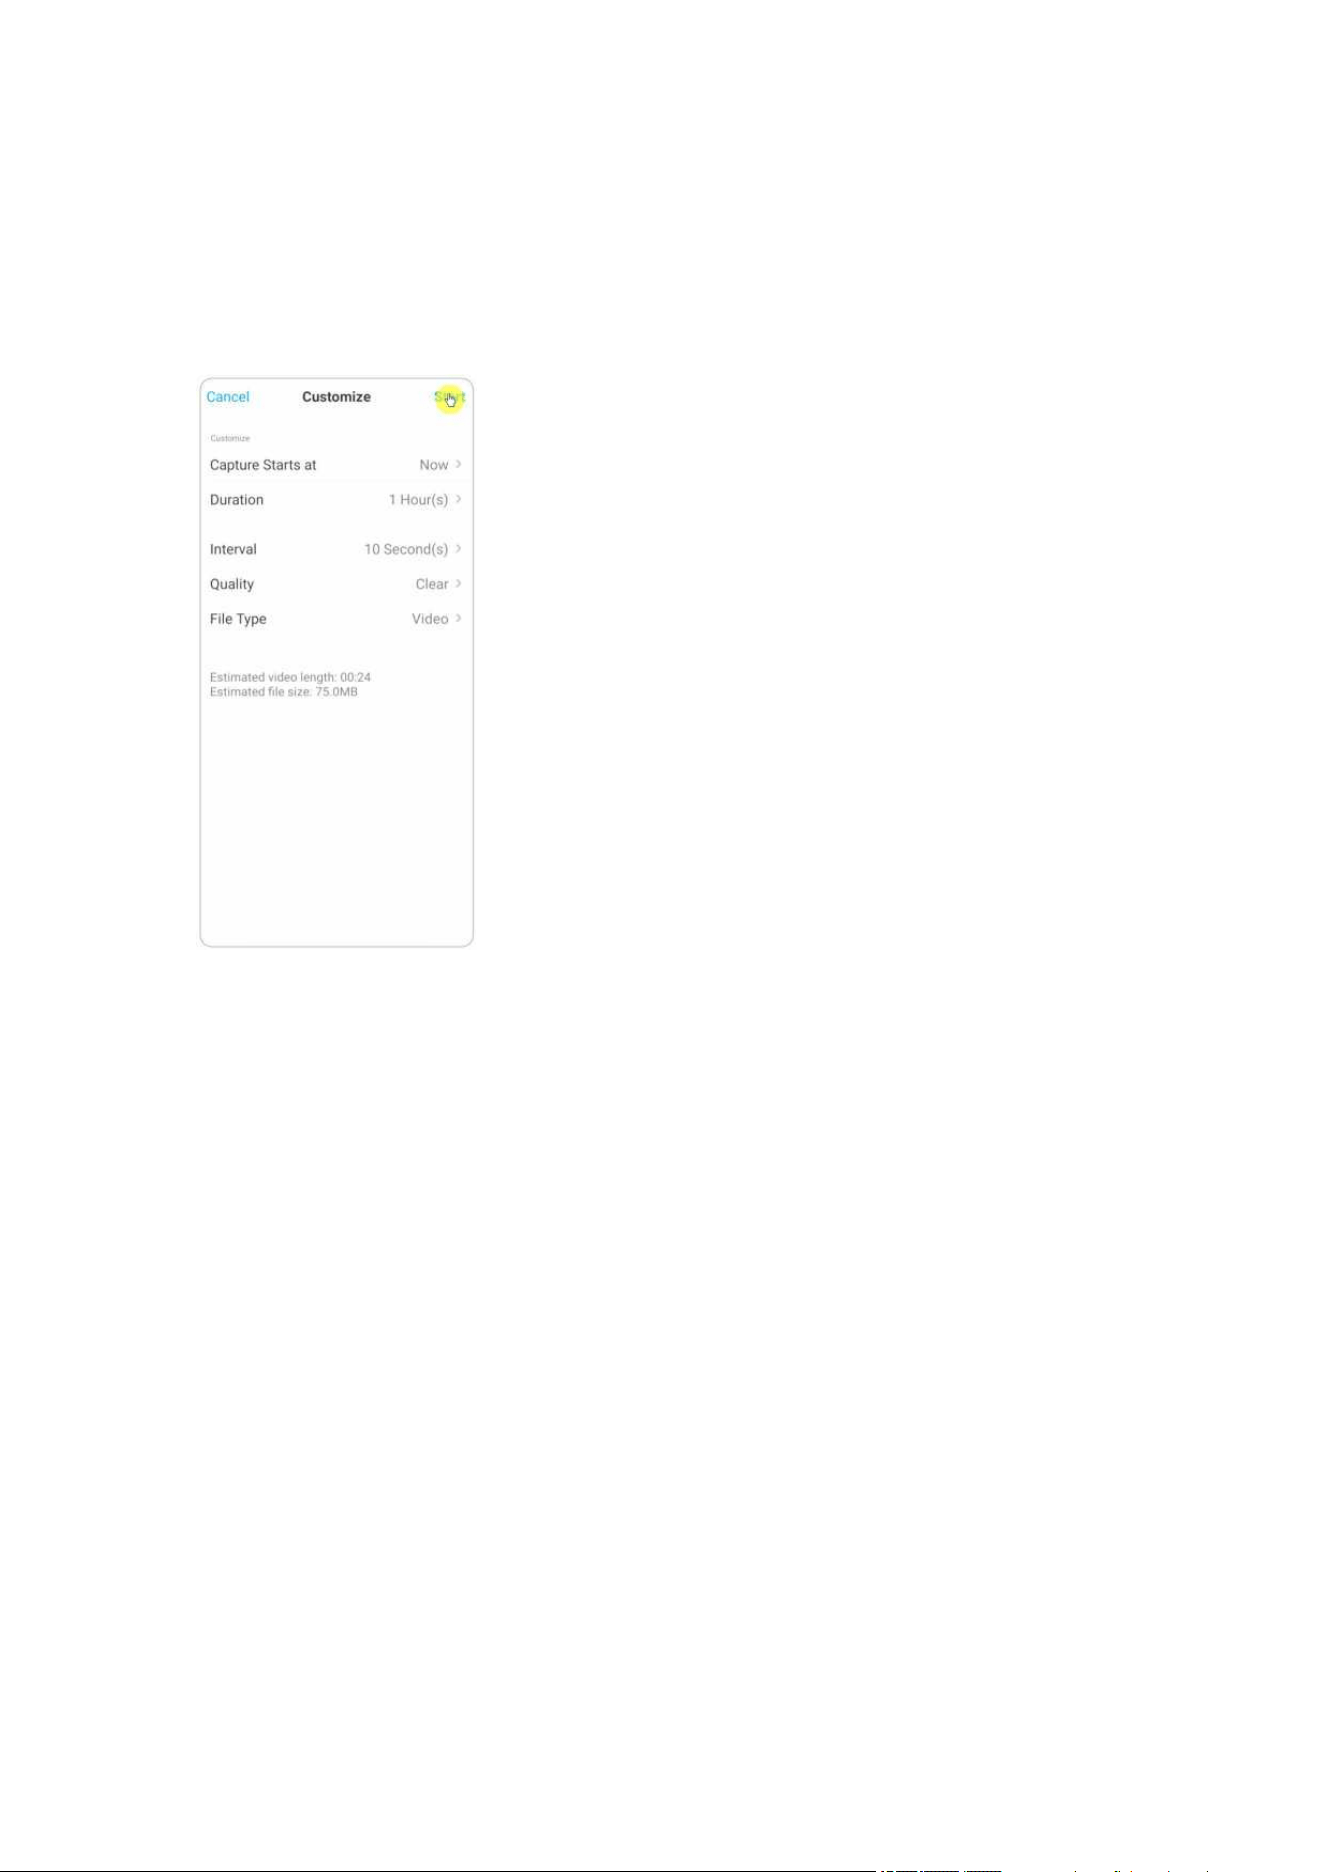
4. Customize the settings of Capture Starts at, Duration, Interval, Quality and File
Type, then tap on Start. The camera will automatically start to capture at the set
time.
5. Later when the time lapse video is created, you can tap on View on the Time
Lapse page to play back or download it. It usually takes several seconds or minutes
for the time lapse video to cache before playback starts. You can also tap on the trash
icon to manually delete the time lapse video.

Reolink Wireless Camera
User Manual
59
Reolink Wireless Camera
User Manual
60
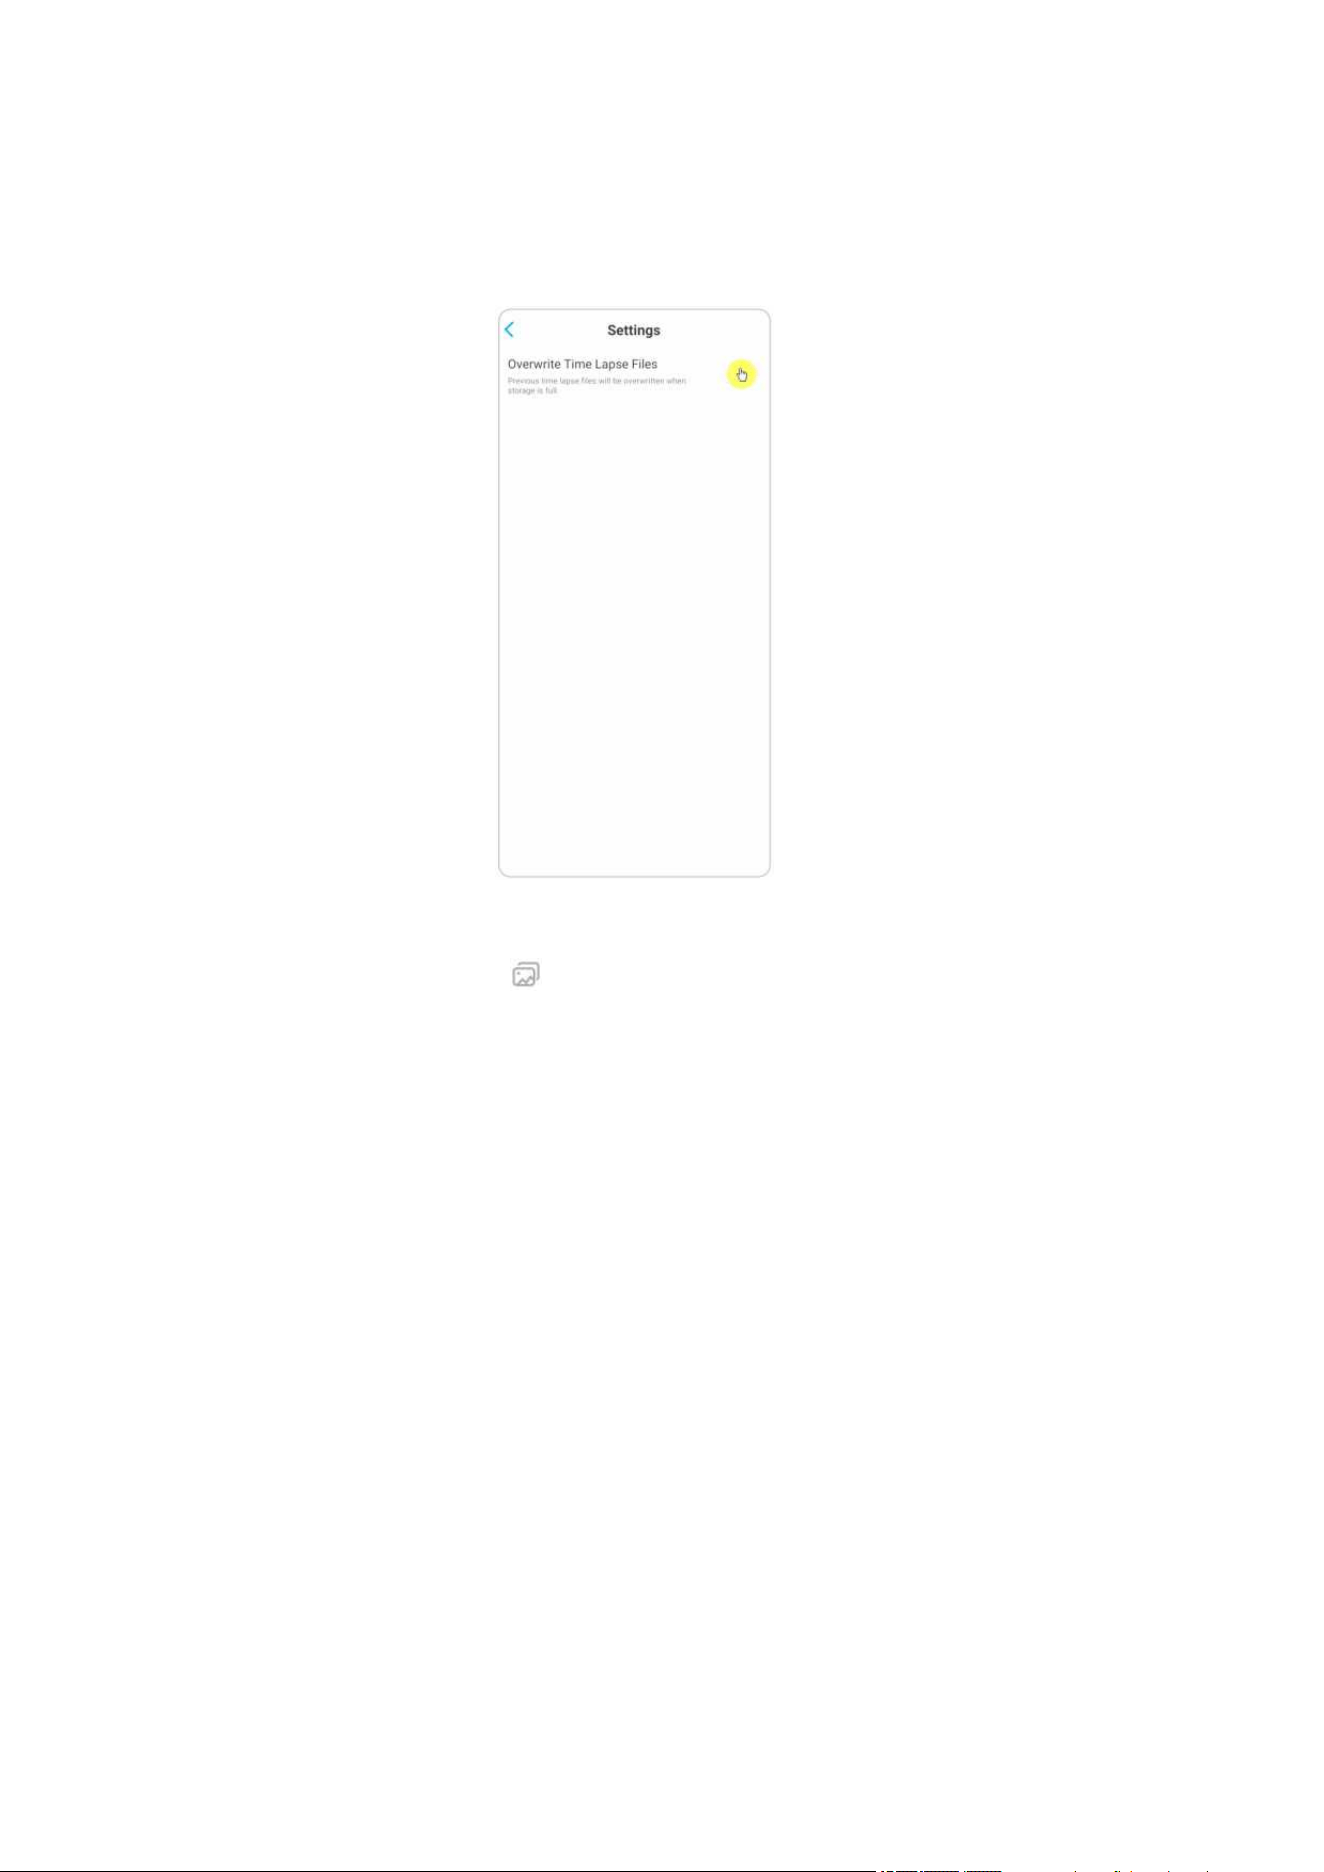
6. Tap on Settings icon, here you can turn on or off the option Overwrite Time Lapse
Files.
7. Tap on the pictures icon to view the Time Lapse Gallery. Here you can view
or manage all time lapse videos.

Reolink Wireless Camera
User Manual
61
Cloud Recording
Introduce Reolink Cloud Recording
Reolink Cloud Recording allows the camera to upload and save motion alarm
recordings to the cloud server, asides from saving recordings to SD card. You can
access your cloud video history via Reolink App or web page anytime, from
anywhere. Reolink provides free basic plan that supports uploading one camera’s
video to cloud, as well as paid plans for multiple cameras. More information can be
found on Reolink Cloud website.
Supported Models and Countries
For Reolink WiFi cameras, model E1, E1 Pro, E1 Zoom and Reolink Lumus support
cloud recording.
And Reolink Cloud recording is currently available in the United States, Canada,
Australia, New Zealand, Thailand, Vietnam, Malaysia, South Korea, Philippines,
Indonesia, Hong Kong (China), Macau (China), Israel, Qatar, Bahrain, United Arab
Emirates, Saudi Arabia, Kuwait, Lebanon, Singapore.
Register an Account and Set up to Upload Cloud Recording
Register an Account

Reolink Wireless Camera
User Manual
62
1. Open up Reolink App, and tap on Cloud, then tap Cloud Storage.
Reolink Wireless Camera
User Manual
63
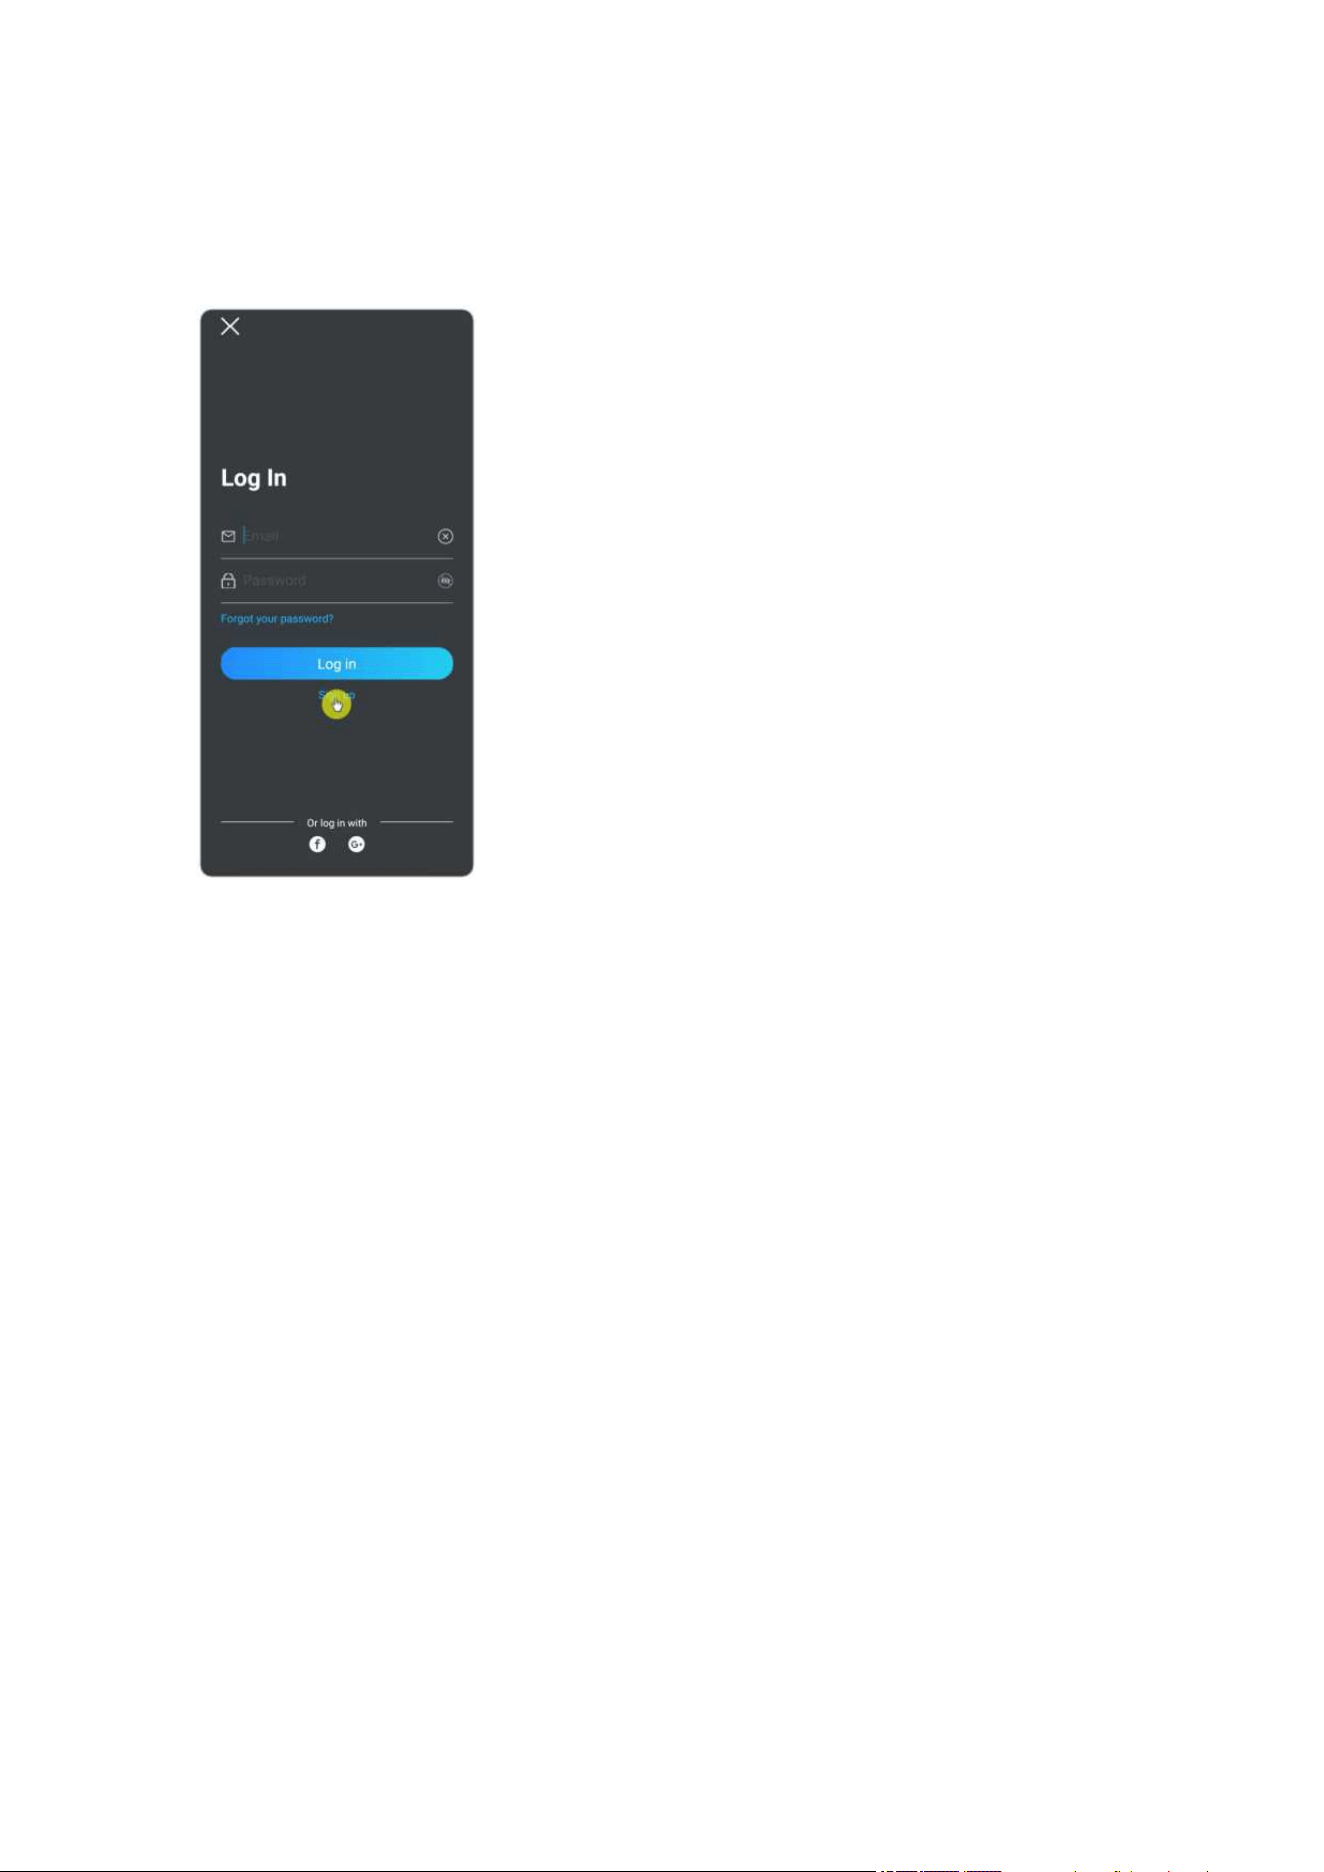
2. Tap Sign up, then enter your Email address and password. Tick terms and
conditions, and then tap on Sign up to register an account.
3. A register confirmation email will be sent to your inbox. Tap the link in the email
to verify your account.
4. Then you can use the registered account to Log in Reolink App.

Reolink Wireless Camera
User Manual
64

Reolink Wireless Camera
User Manual
65
Subscribe To a Cloud Plan And Bind The Camera To Cloud
1. Tap Cloud Storage then tap Subscribe. Choose to buy the free basic plan or a paid
plan.
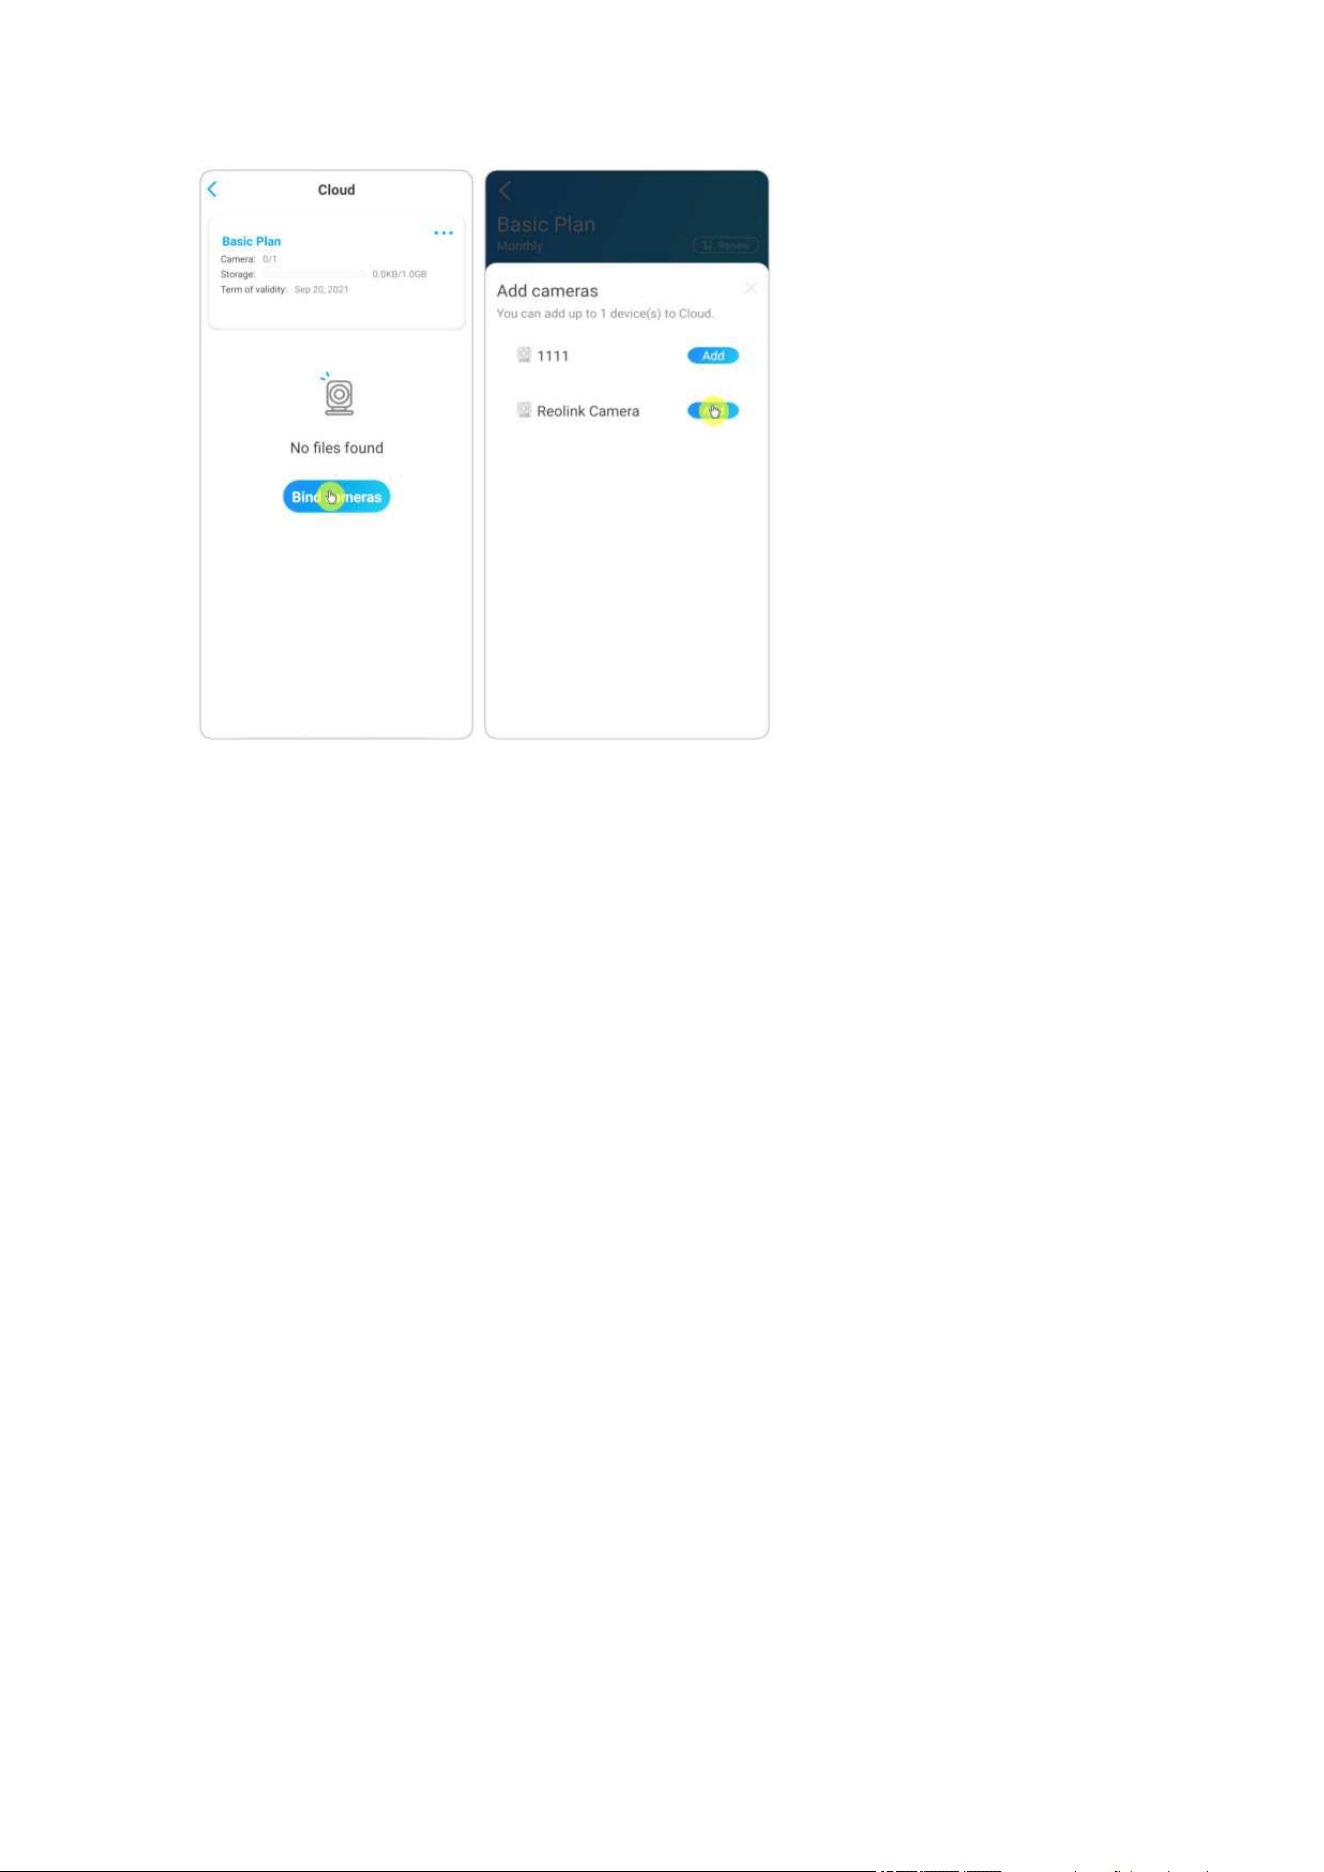
2. After buying a plan, tap Bind cameras, and it’ll search all the cameras that
support Cloud. Choose the camera you want to bind to Cloud and tap Add.
Reolink Wireless Camera
User Manual
66
Reolink Wireless Camera
User Manual
67
Note:
If your camera firmware is outdated, it’ll show Upgrade. Tap Upgrade to update the
firmware to the latest first, then tap Add to bind the camera.
Turn On/Off Cloud Recording And Unbind The Camera
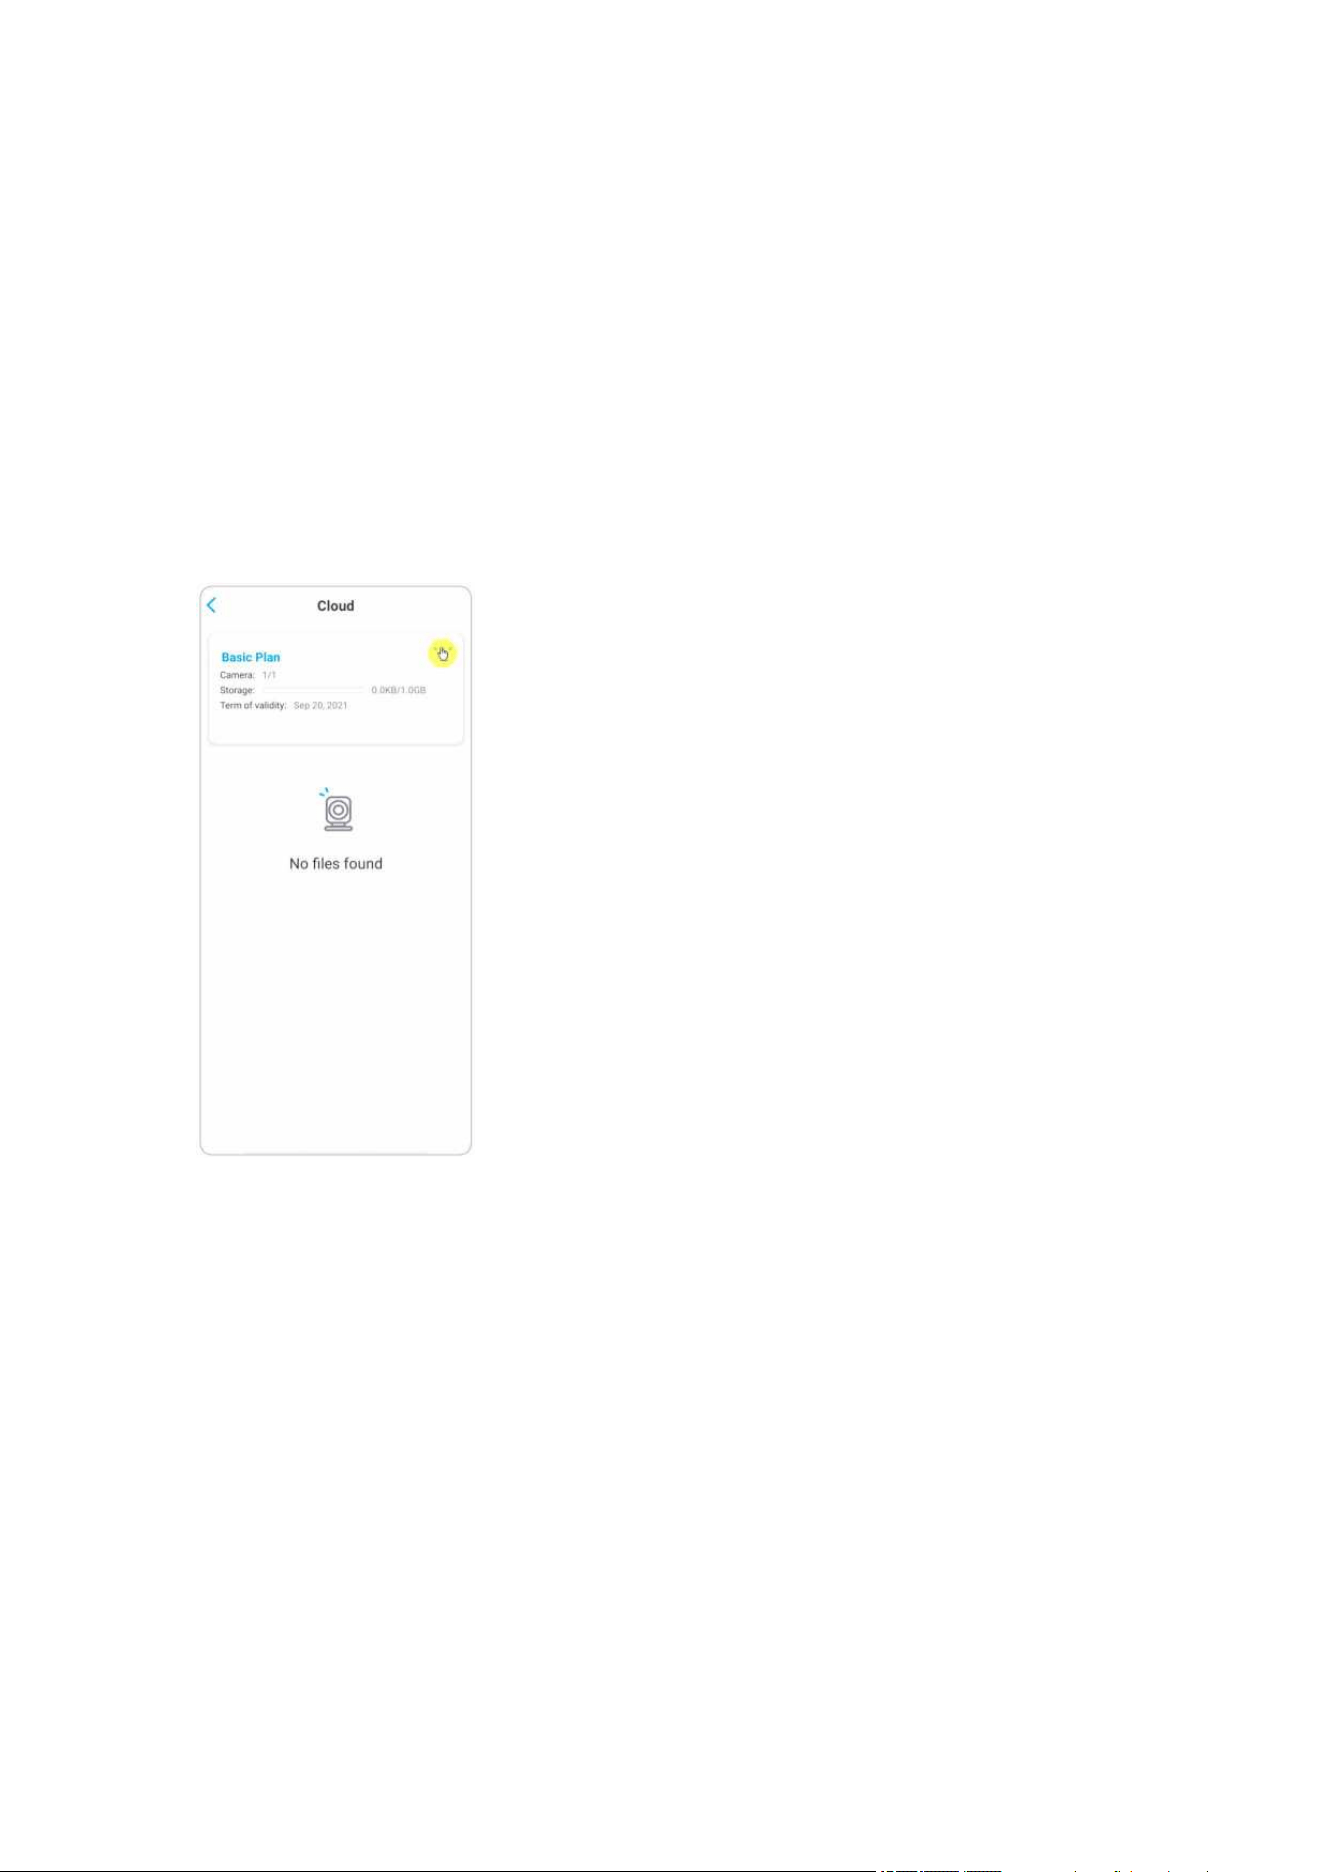
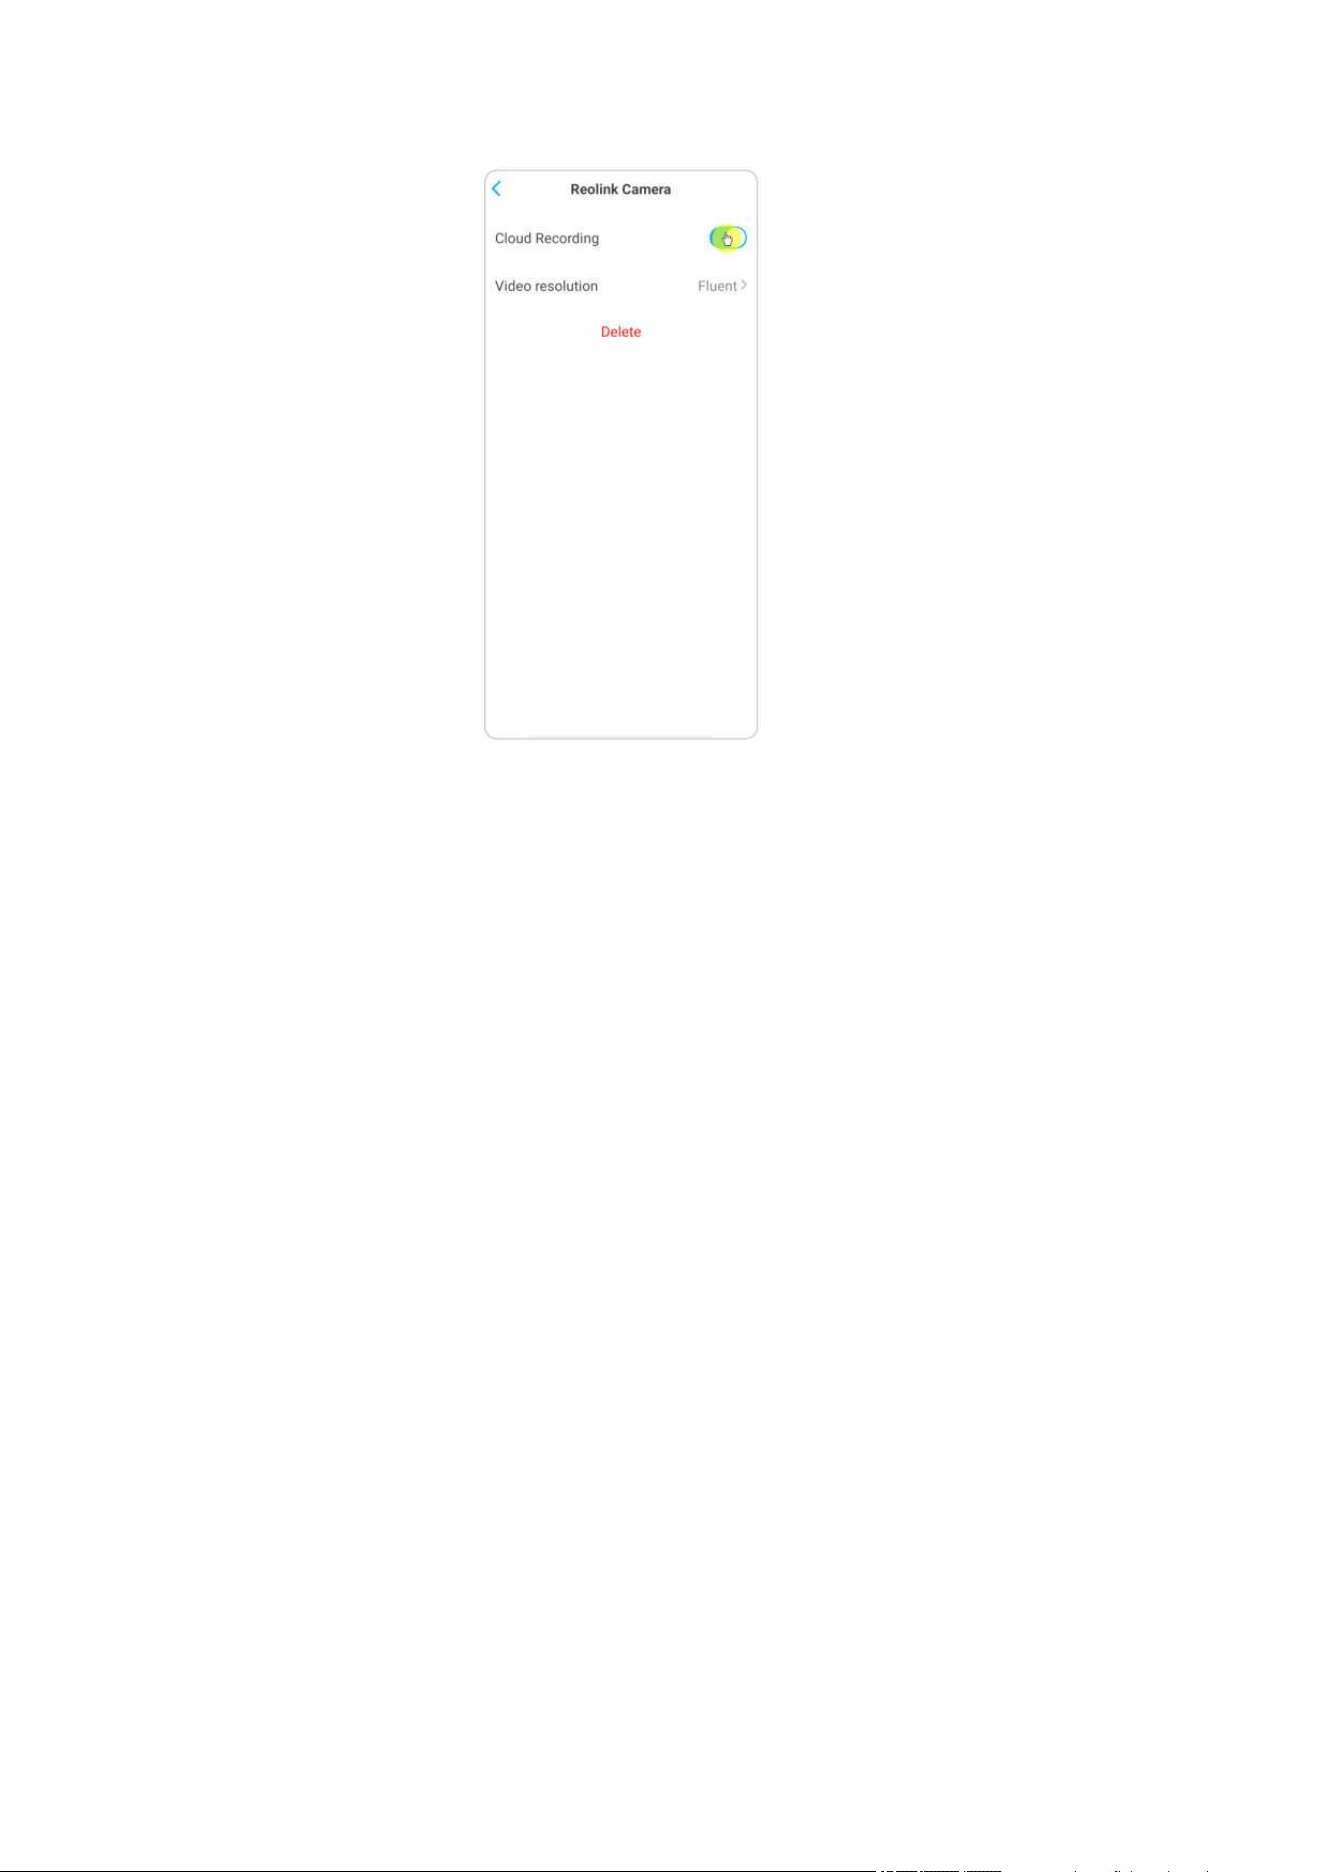
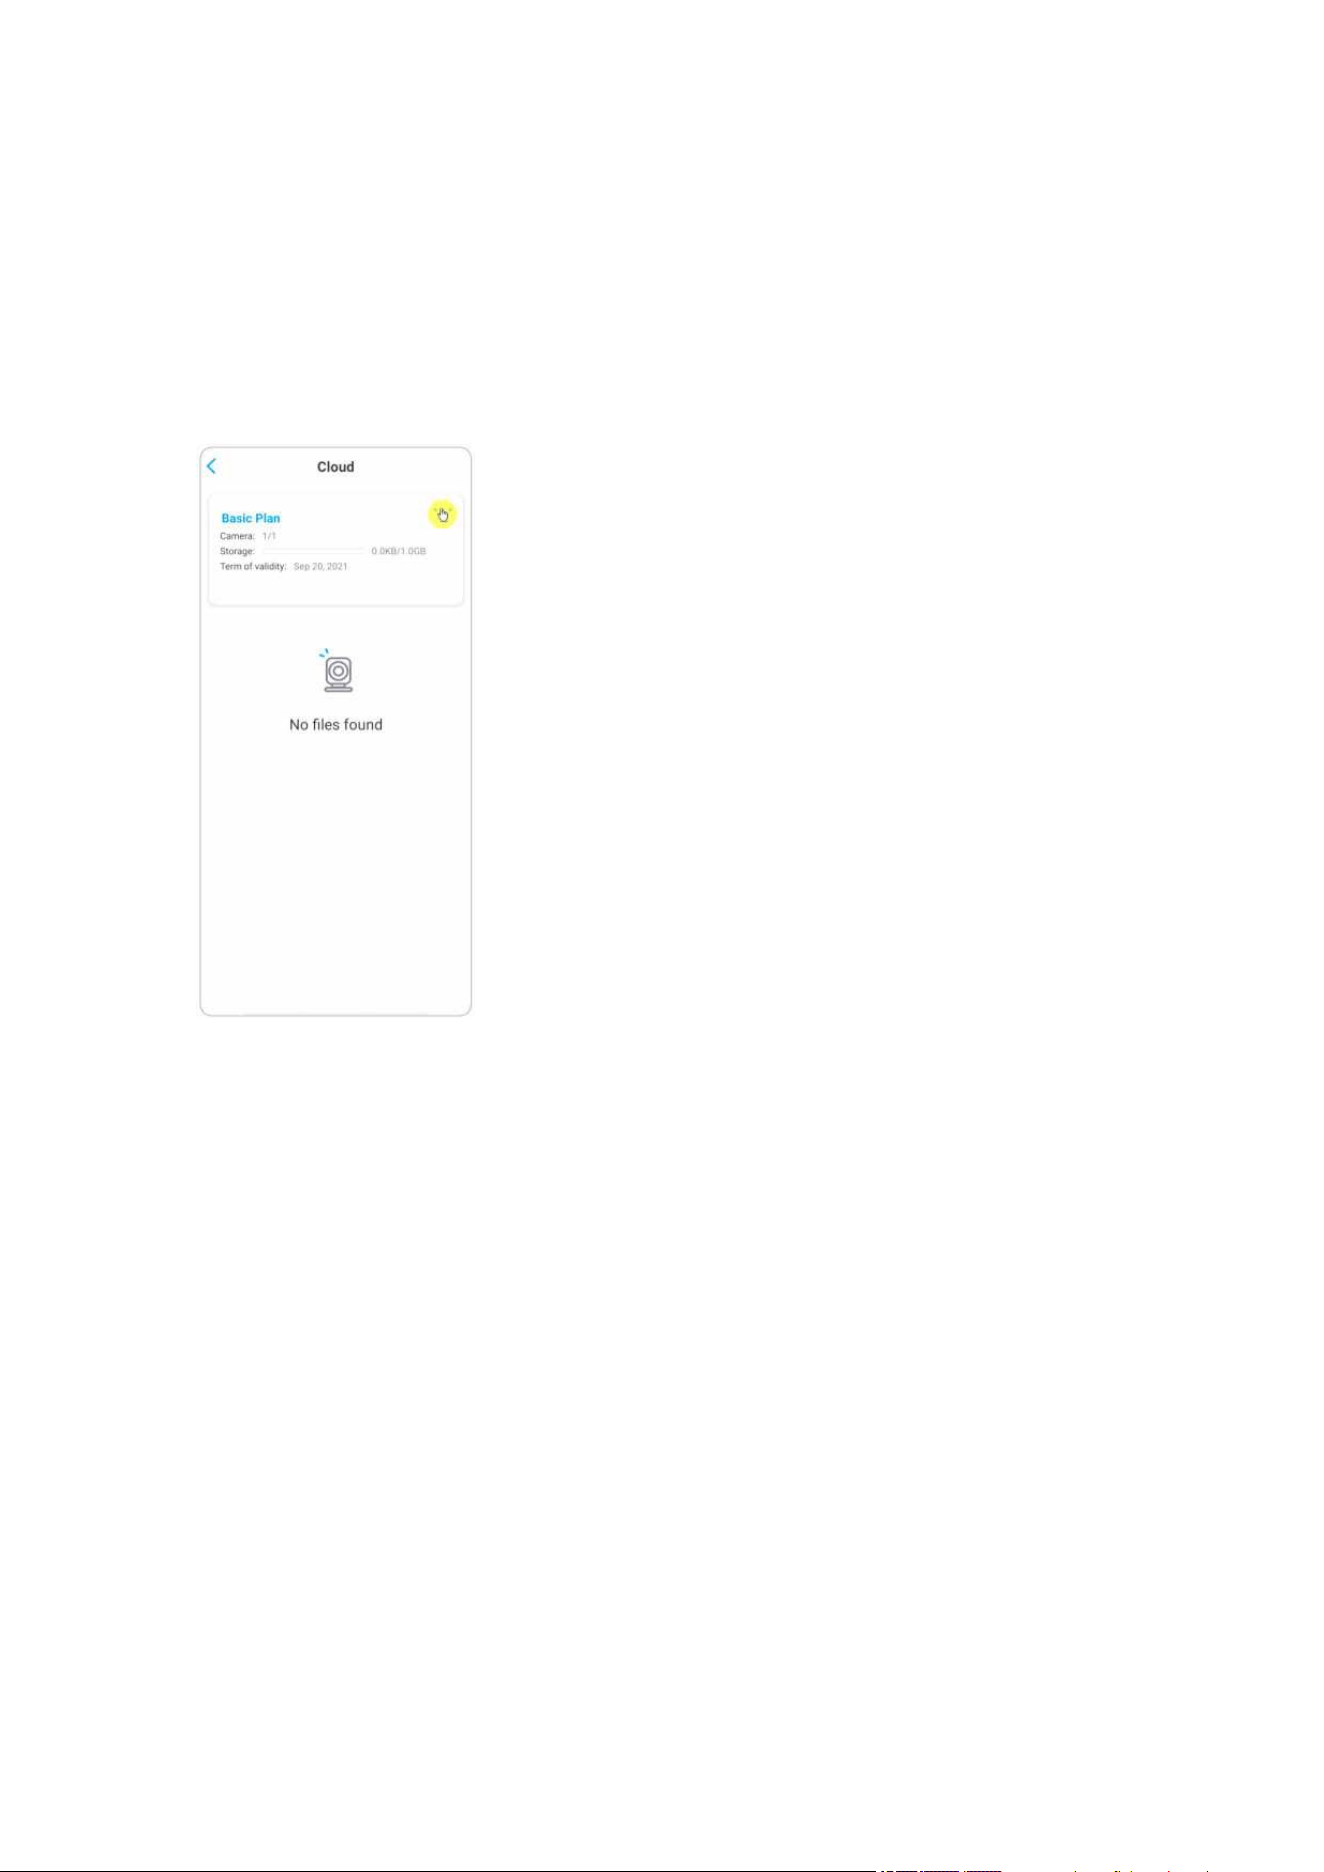
1. Tap Cloud Storage, then tap the three dots on the right side of your plan.
2. Tap your camera. Here you can tap to turn off or turn on Cloud Recording.
Reolink Wireless Camera
User Manual
68
Reolink Wireless Camera
User Manual
69
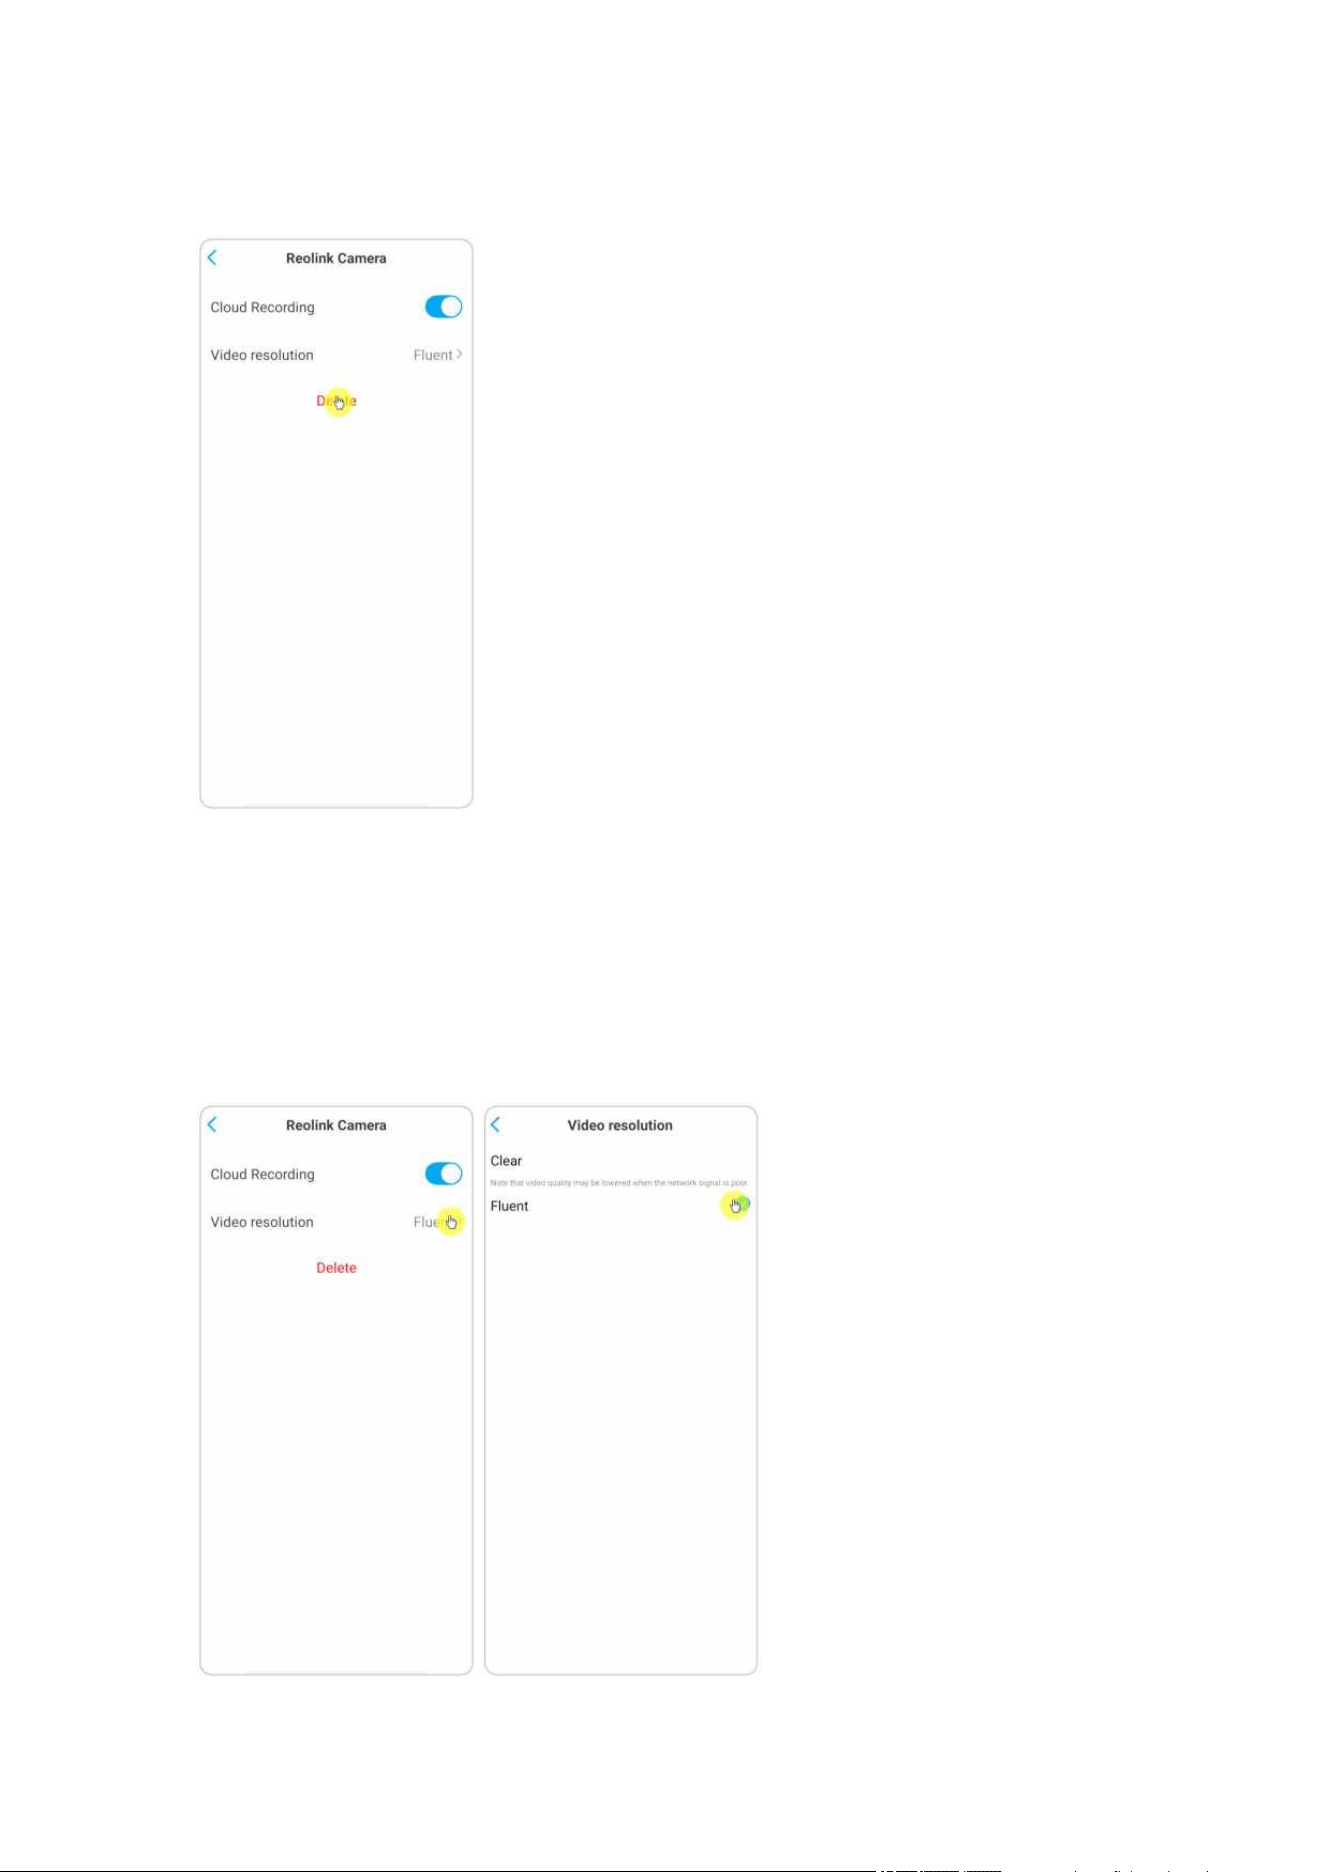
3. Tap Delete, and it’ll unbind this camera from Cloud plan.
Change Uploaded Video Resolution
Tap Video Resolution, and choose Fluent or Clear to change the resolution of
uploaded videos.
Reolink Wireless Camera
User Manual
70
Upgrade the Cloud Recording Plan
1. Tap Cloud Storage, then tap the three dots on the right hand corner of your plan
card.
2. At the bottom, tap on Switch.
3. Choose the plan you want to upgrade to, then tap Continue to checkout. Once
upgraded, all cameras currently bound will be updated to the new plan.

Reolink Wireless Camera
User Manual
71

Reolink Wireless Camera
User Manual
72
Play back and Download the Cloud Recording
Via Reolink App
1. Tap Cloud Storage, and it’ll show uploaded recordings automatically.
2. Select the device and date to find the recordings you want to play back, then tap
the video to play back.

Reolink Wireless Camera
User Manual
73

Reolink Wireless Camera
User Manual
74
3. Tap to start downloading the recording.
4. To delete the cloud recordings, tap on Edit, then select the videos you want to
delete. Tap on Delete icon to delete the selected videos.

Reolink Wireless Camera
User Manual
75
6. Use the Reolink App
Share Your Devices with Others
1. Launch Reolink App on your phone, then tap to enter the Device
Settings page.
2. Tap Share Camera to get the camera’s QR code.
3. Launch the Reolink App in another smart phone and tap button to scan the
QR code.

Reolink Wireless Camera
User Manual
76
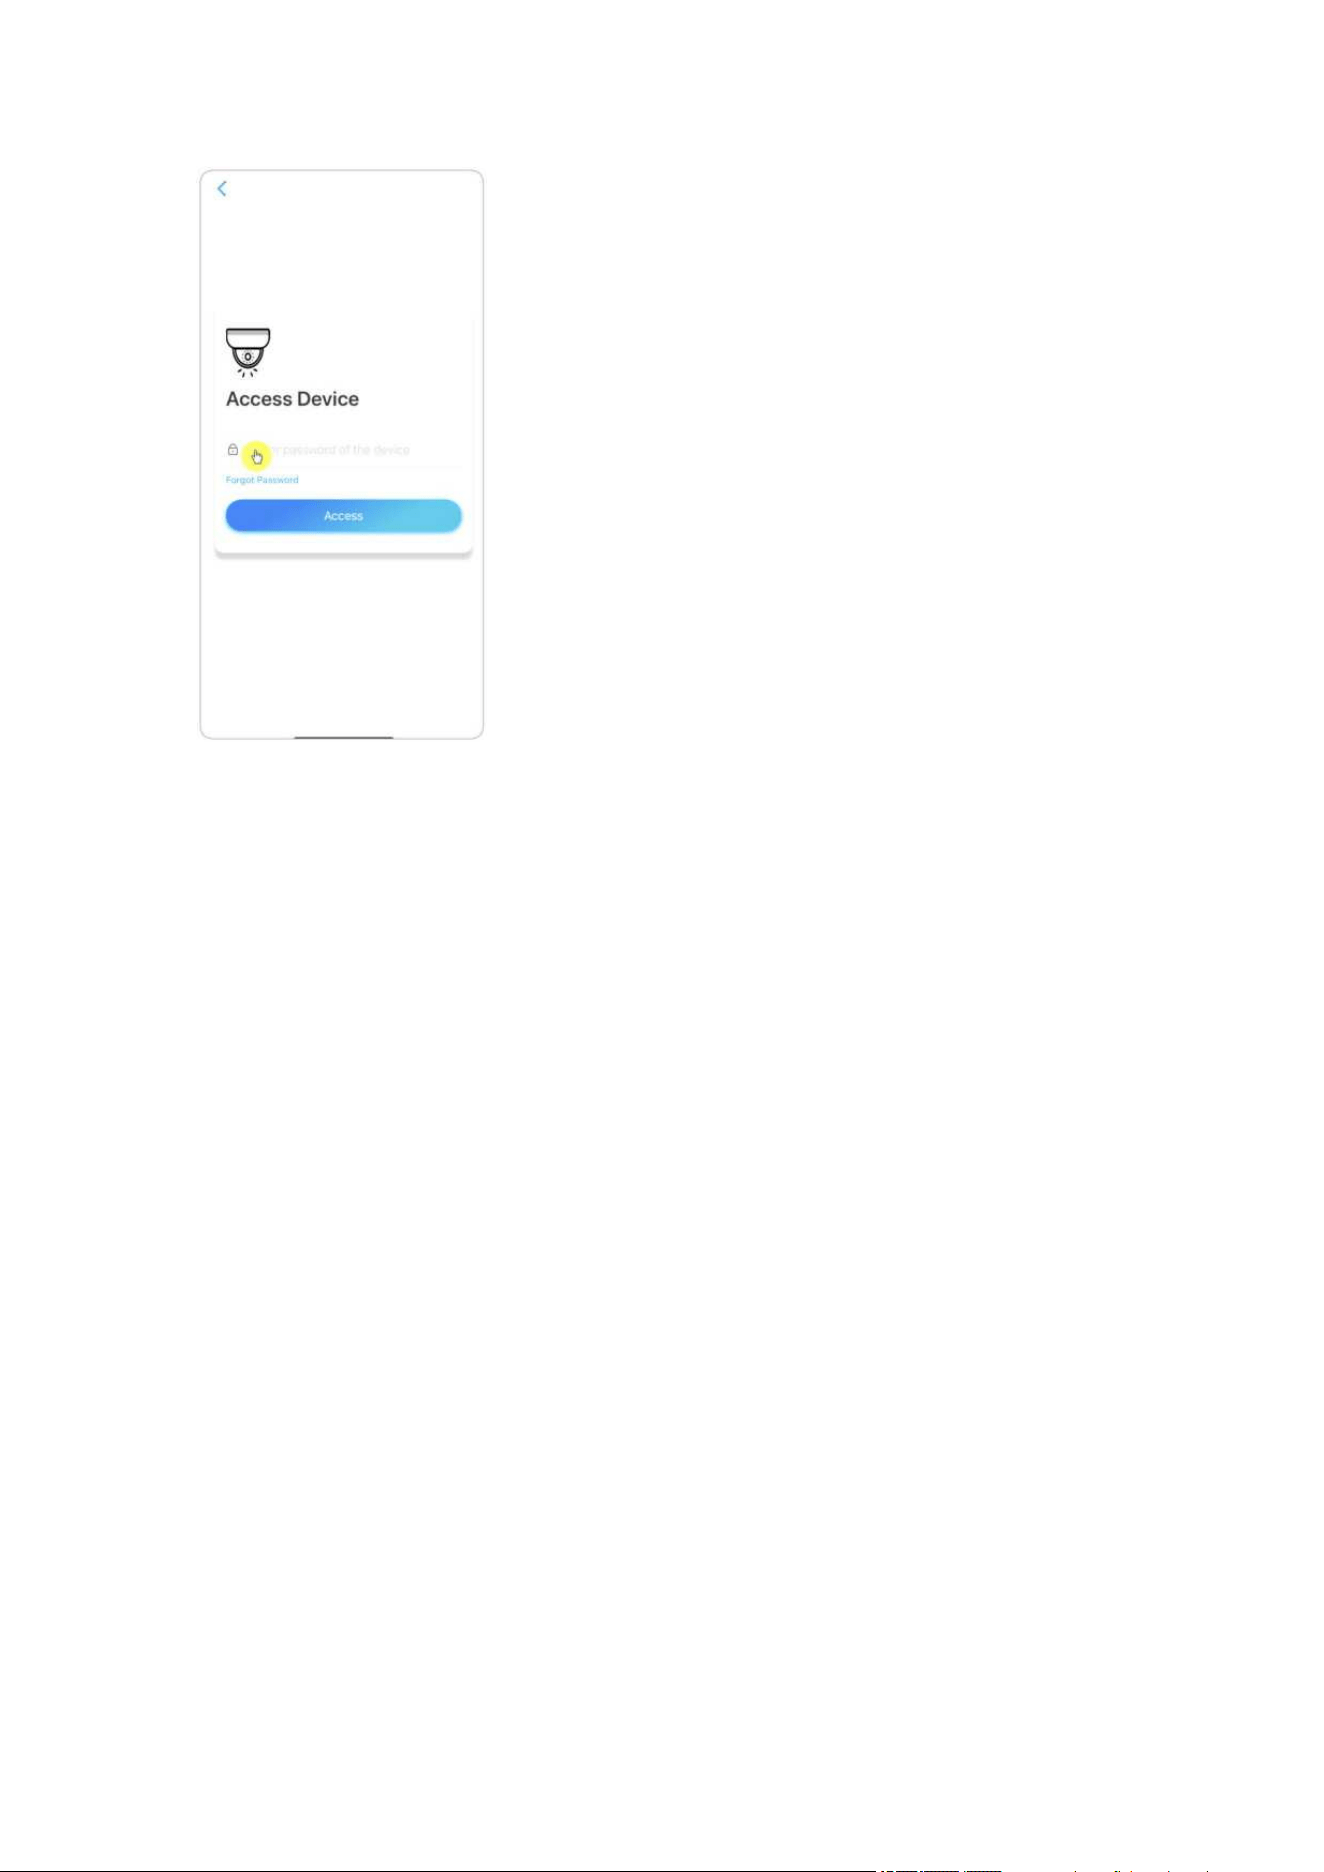
Or you can manually input the camera’s UID to add the device. The camera UID
consists of 16 digits that start with 9527000xxxxxxxxx.
After entering the UID, please tap Next to enter the camera password to log in.
Reolink Wireless Camera
User Manual
77
Reolink Wireless Camera
User Manual
78
Scene Modes
The Scene Modes settings is designed for different usage scenarios. You could control
all your cameras under different modes as you need. For instance, you could disable
all cameras alarm under home mode when you're home, but enable all the alarms
under outside mode when you are away.
1. Scroll down the Devices list to find the Scene Modes configuration entrance.
2. Tap it to name the
scene
and select a scene.
1
Name the scene
2
Select a scene icon
3
Select devices
4
Customize the alarm settings

Reolink Wireless Camera
User Manual
2
Reolink Wireless Camera
User Manual
3
3. Select devices for this scene and customize the alarm settings.
If you want to receive push, email, audio alarm under this scene mode that you can
enable the alarm settings with
push, email, audio, alarm. Blue
icon means enabled, grey
means disabled.
4. Tap Save in the upper right corner to save the settings.
Note:
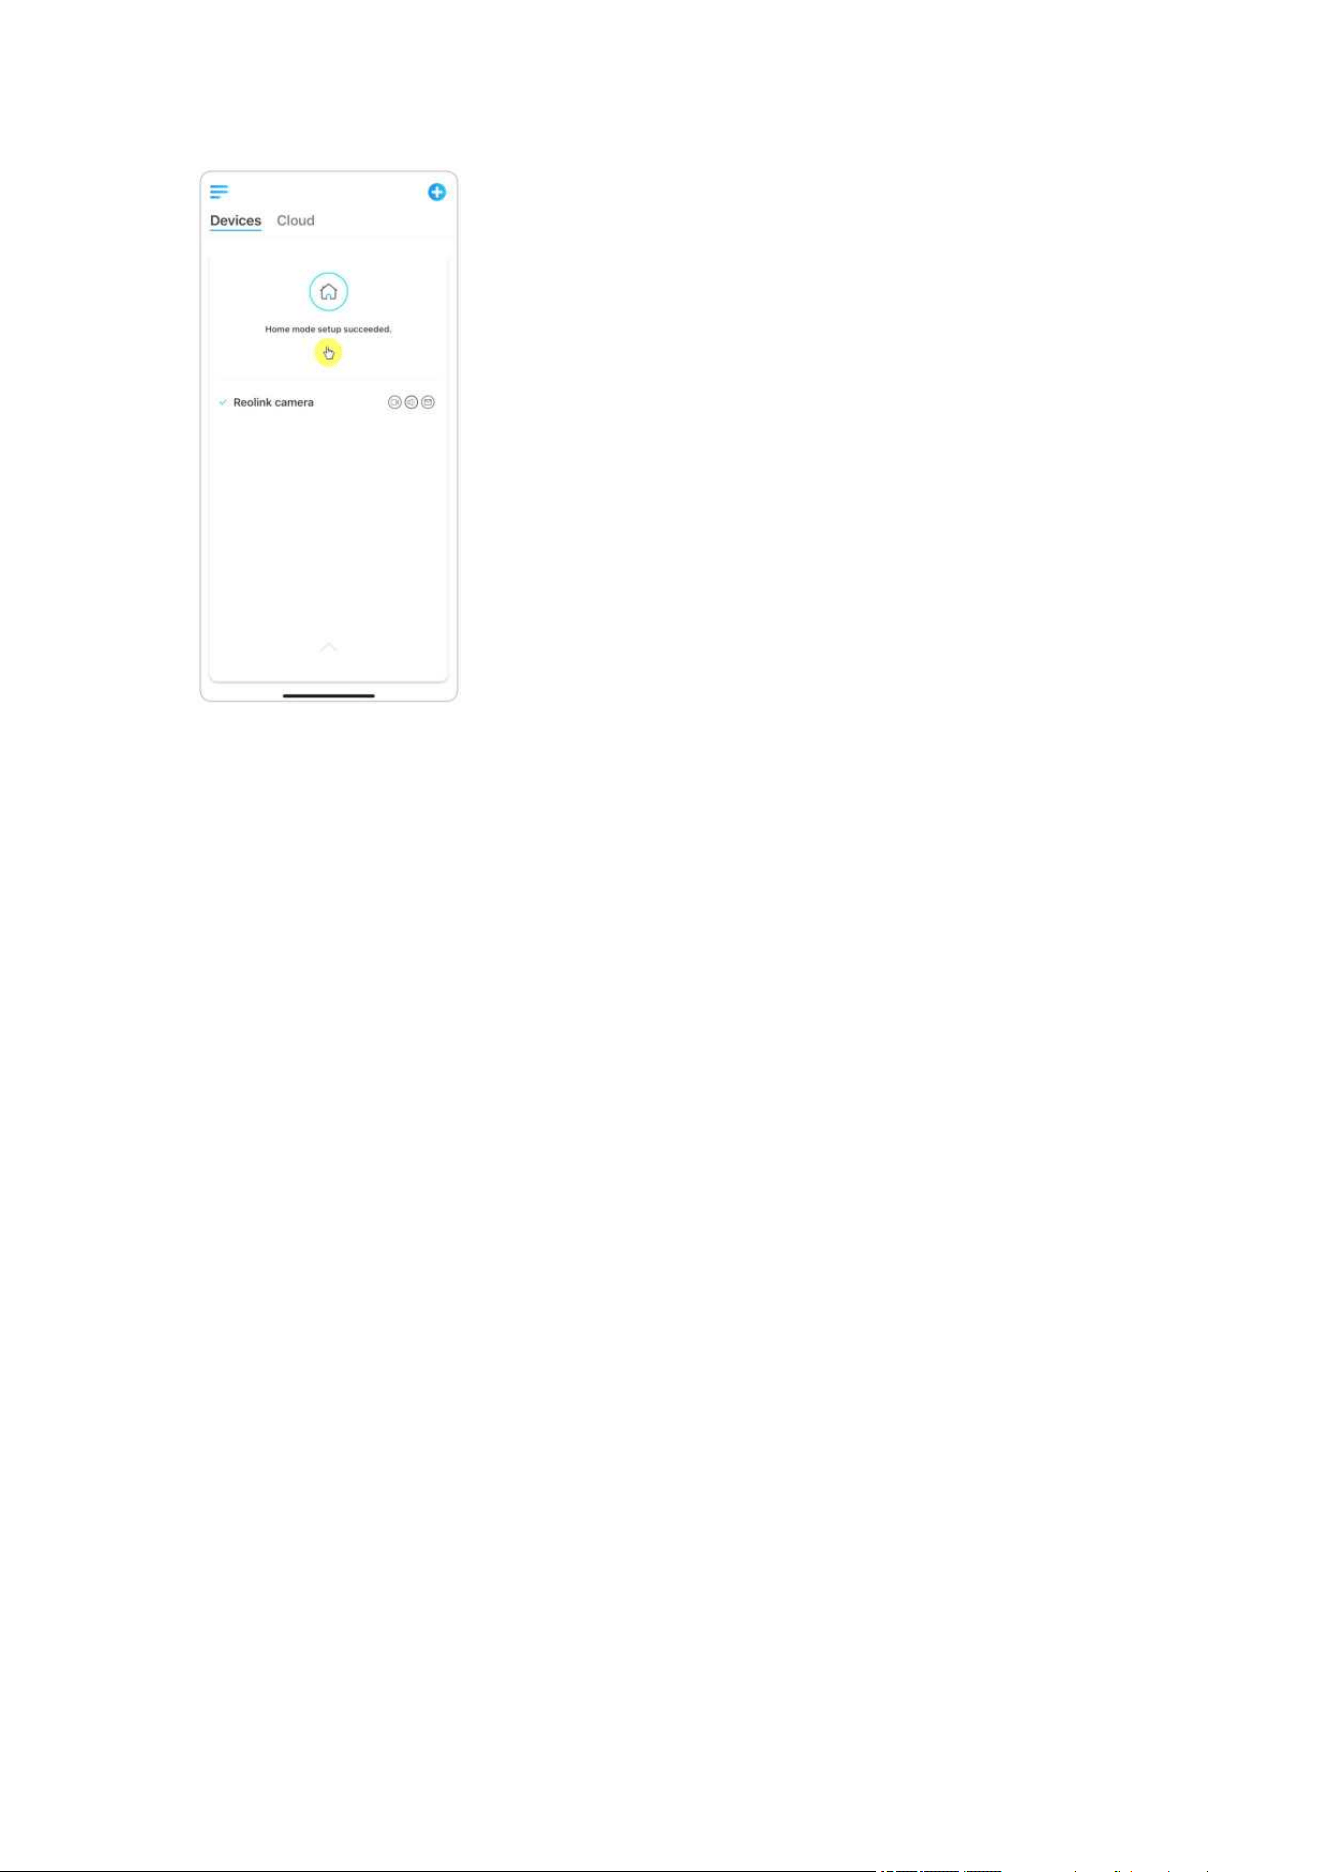
If the selected cameras are successfully activated, the prompt of xxx mode setup
succeeded will be displayed as the picture shown below.
push notifications, blue means enabled,
grey means disabled
recording, blue means enabled, grey
means disabled
audio alarm, if the motion triggered
the camera, it will alarm with siren,
blue means enabled, grey means
disabled
email notifications, blue means
enabled, grey means disabled
Reolink Wireless Camera
User Manual
4
5. If you want to make some changes to an existing scene, long-press the scene
button to edit or delete the scene. The camera you selected will stay in this mode
until you change to another mode.
Add or Delete a Camera
Add the Camera in LAN
1.
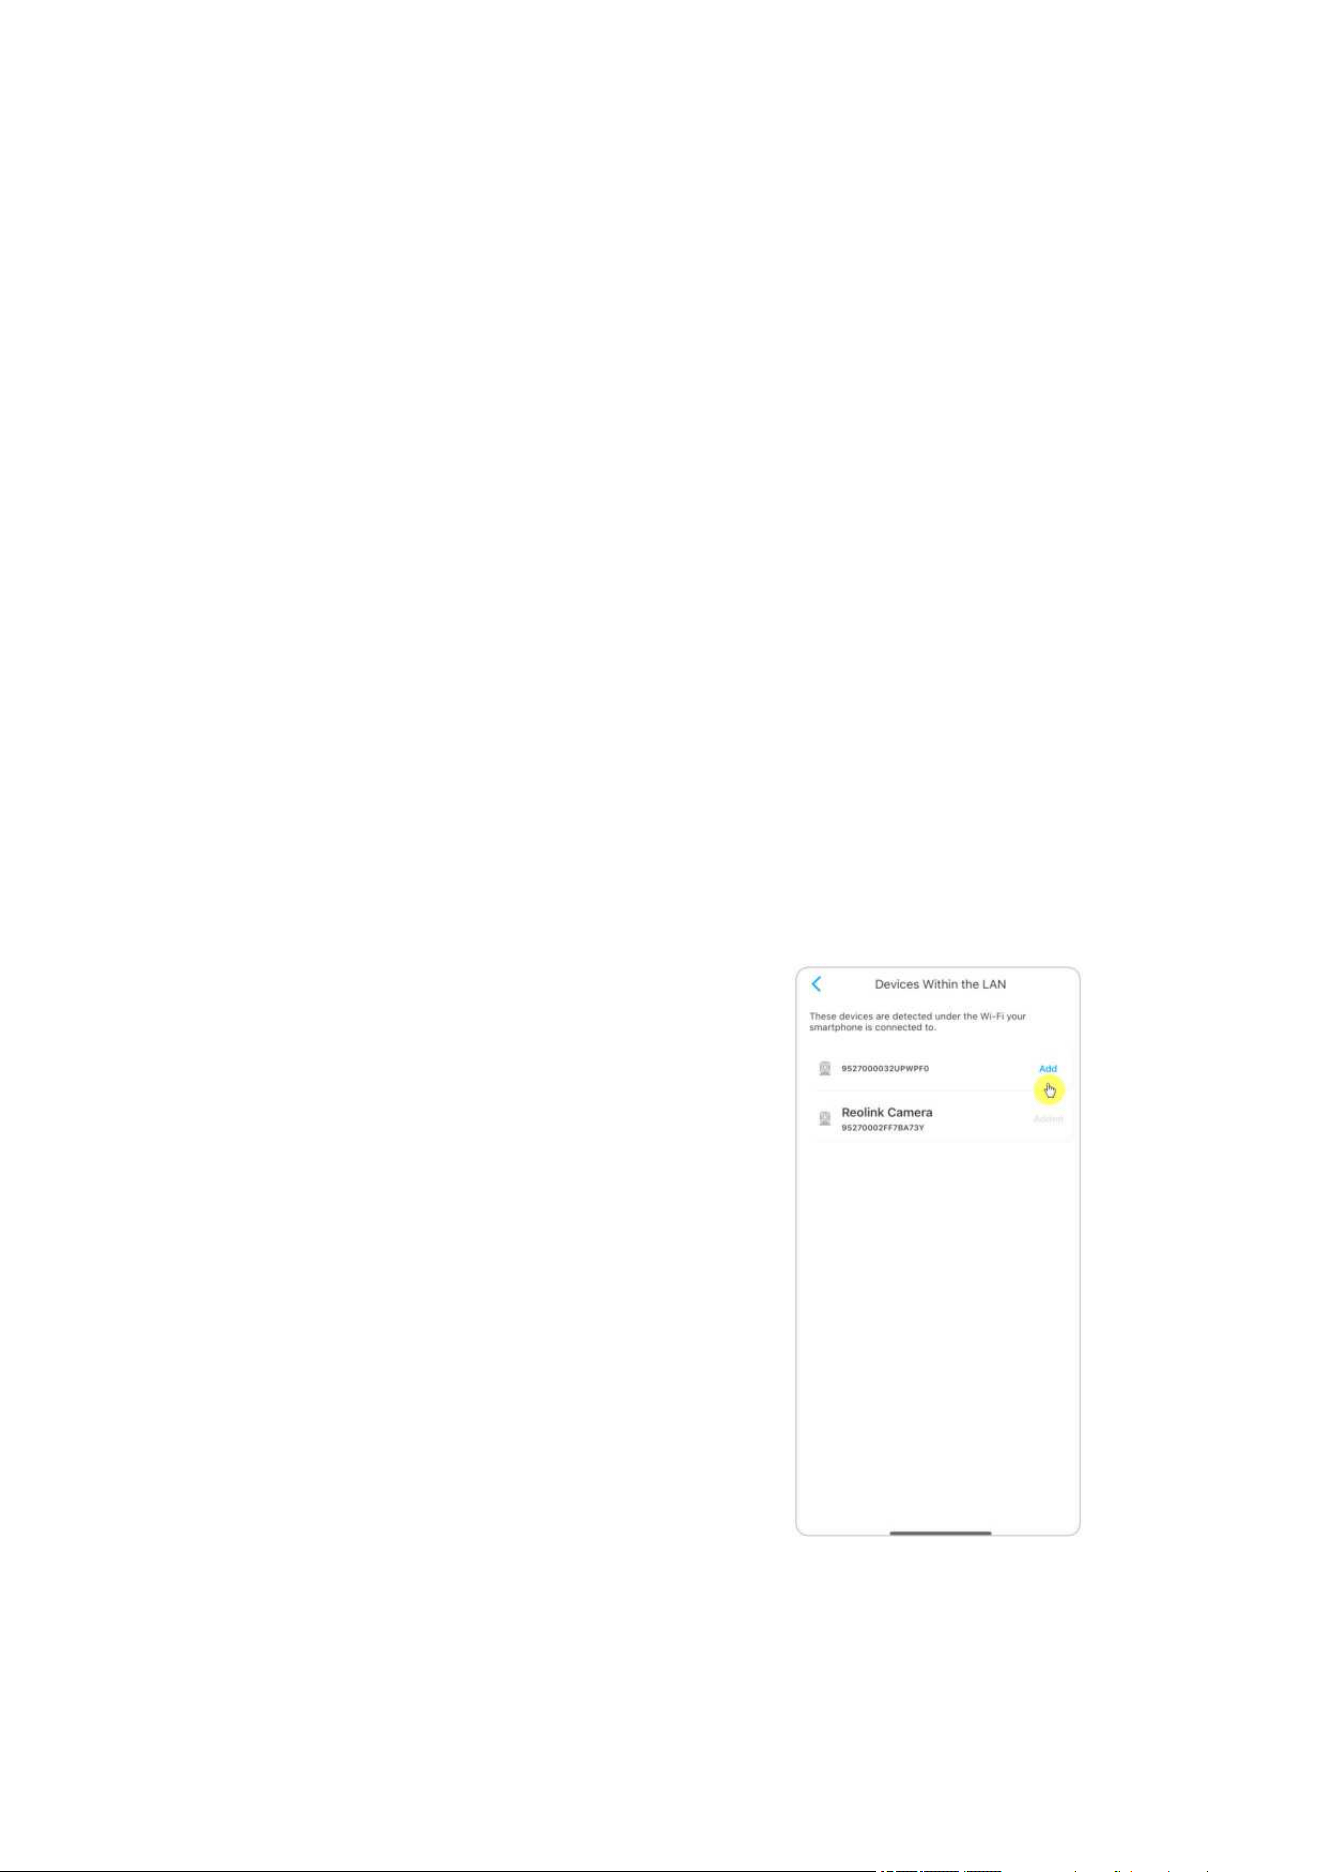
If you want to add the camera in LAN, we recommend that you enable the
Add Devices Automatically option. O
nce your smart phone and camera are
connected the same network, the Reolink App can find the Reolink device
automatically in LAN.
2. Tap and go to Settings > Add Devices Automatically.
Reolink Wireless Camera
User Manual
5
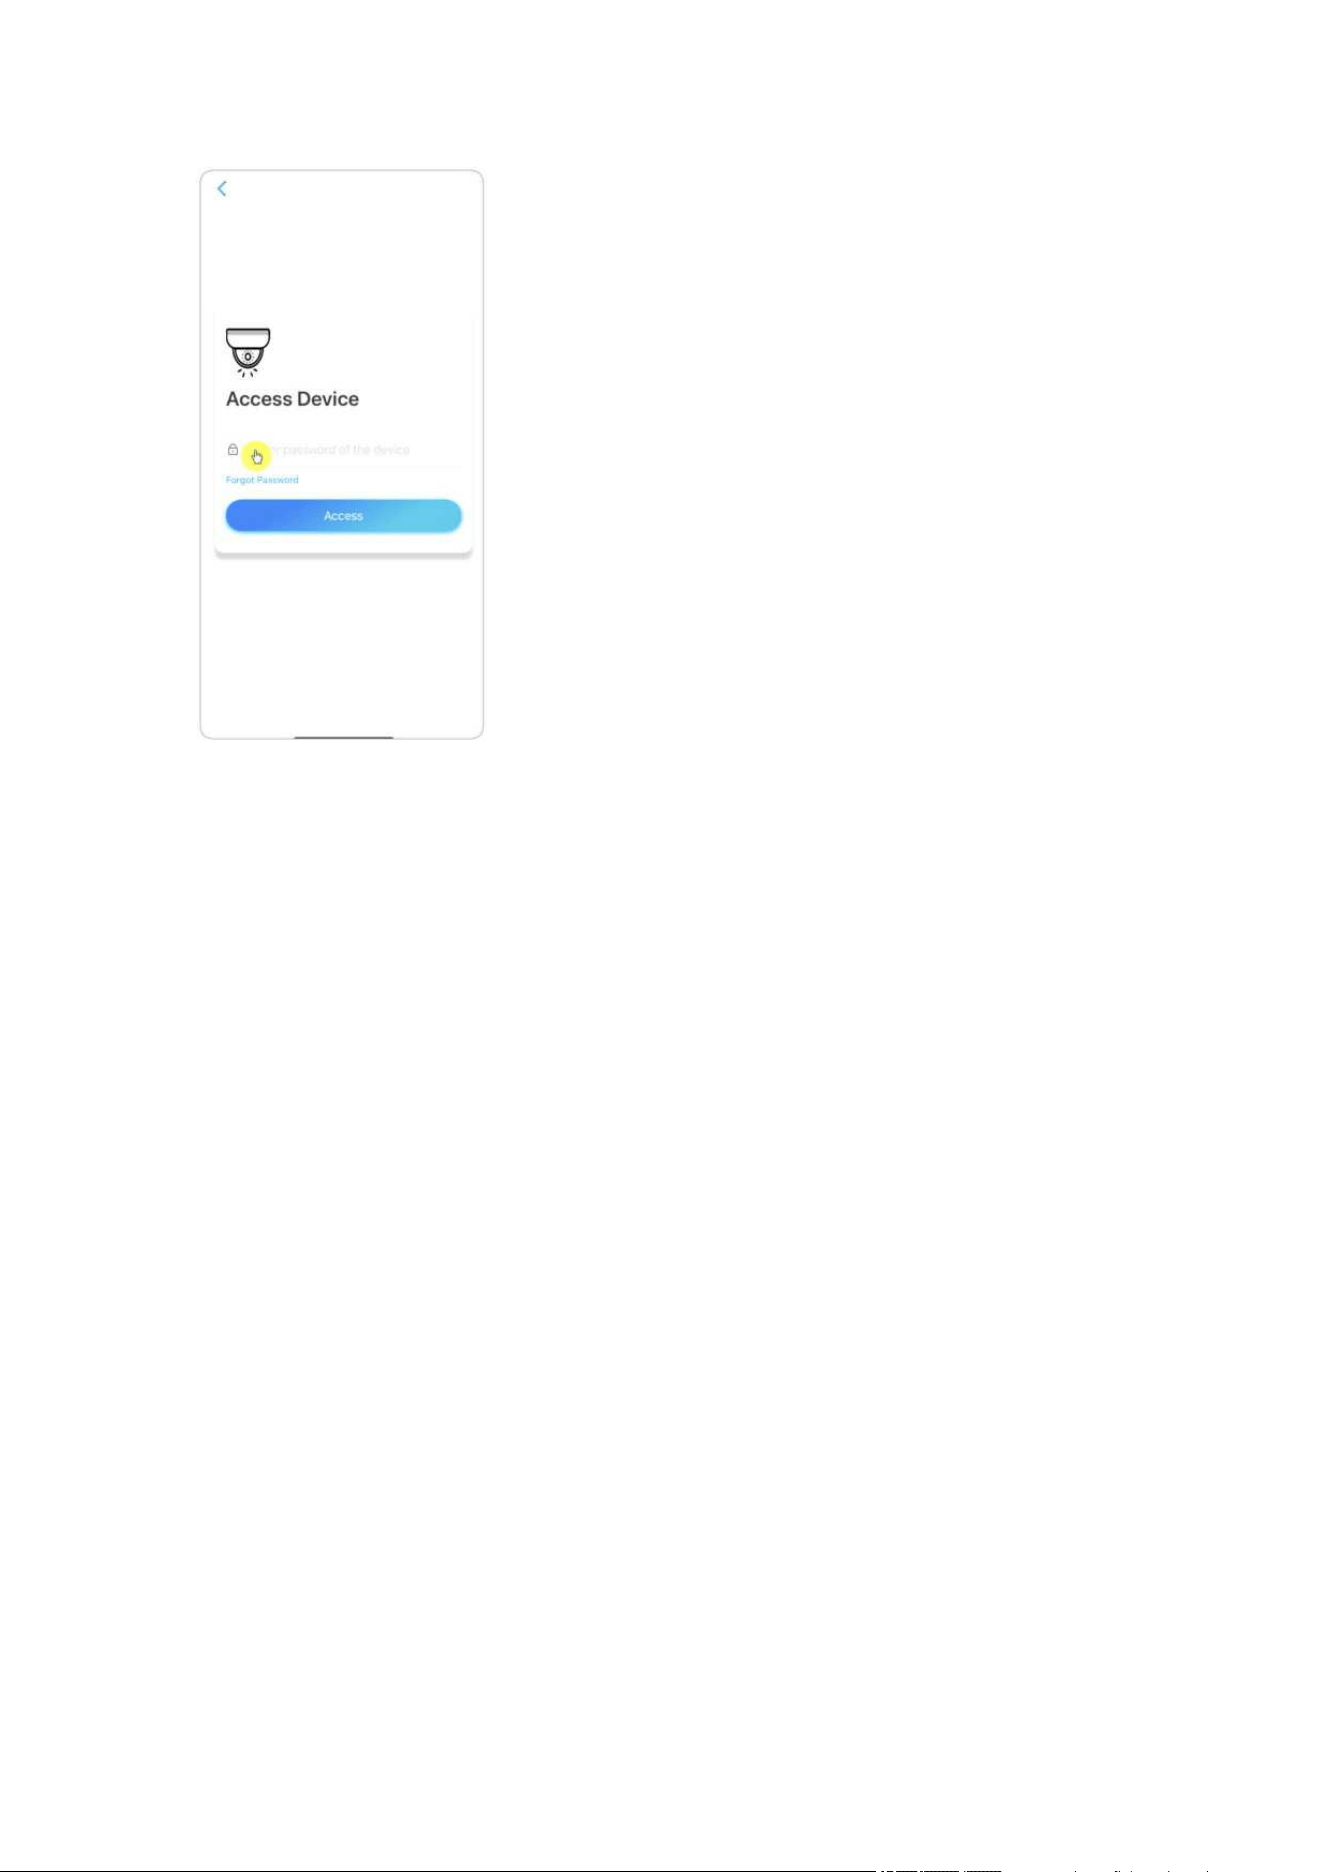
Or you can go to the home page and tap > LAN and select the camera you want
to add.
3. Enter the camera password to log in.
Reolink Wireless Camera
User Manual
6
Reolink Wireless Camera
User Manual
7
Add Camera by Scanning the Camera QR Code
1. Tap and scan the QR code on the camera body.
2. Enter the camera password to log in.

Reolink Wireless Camera
User Manual
8
Add Camera by Entering the Camera UID
1. Select Input UID/IP, please note that you are unable to add the camera with IP
address.
Note:
The camera UID consists of 16 digits that start with 9527000xxxxxxx.
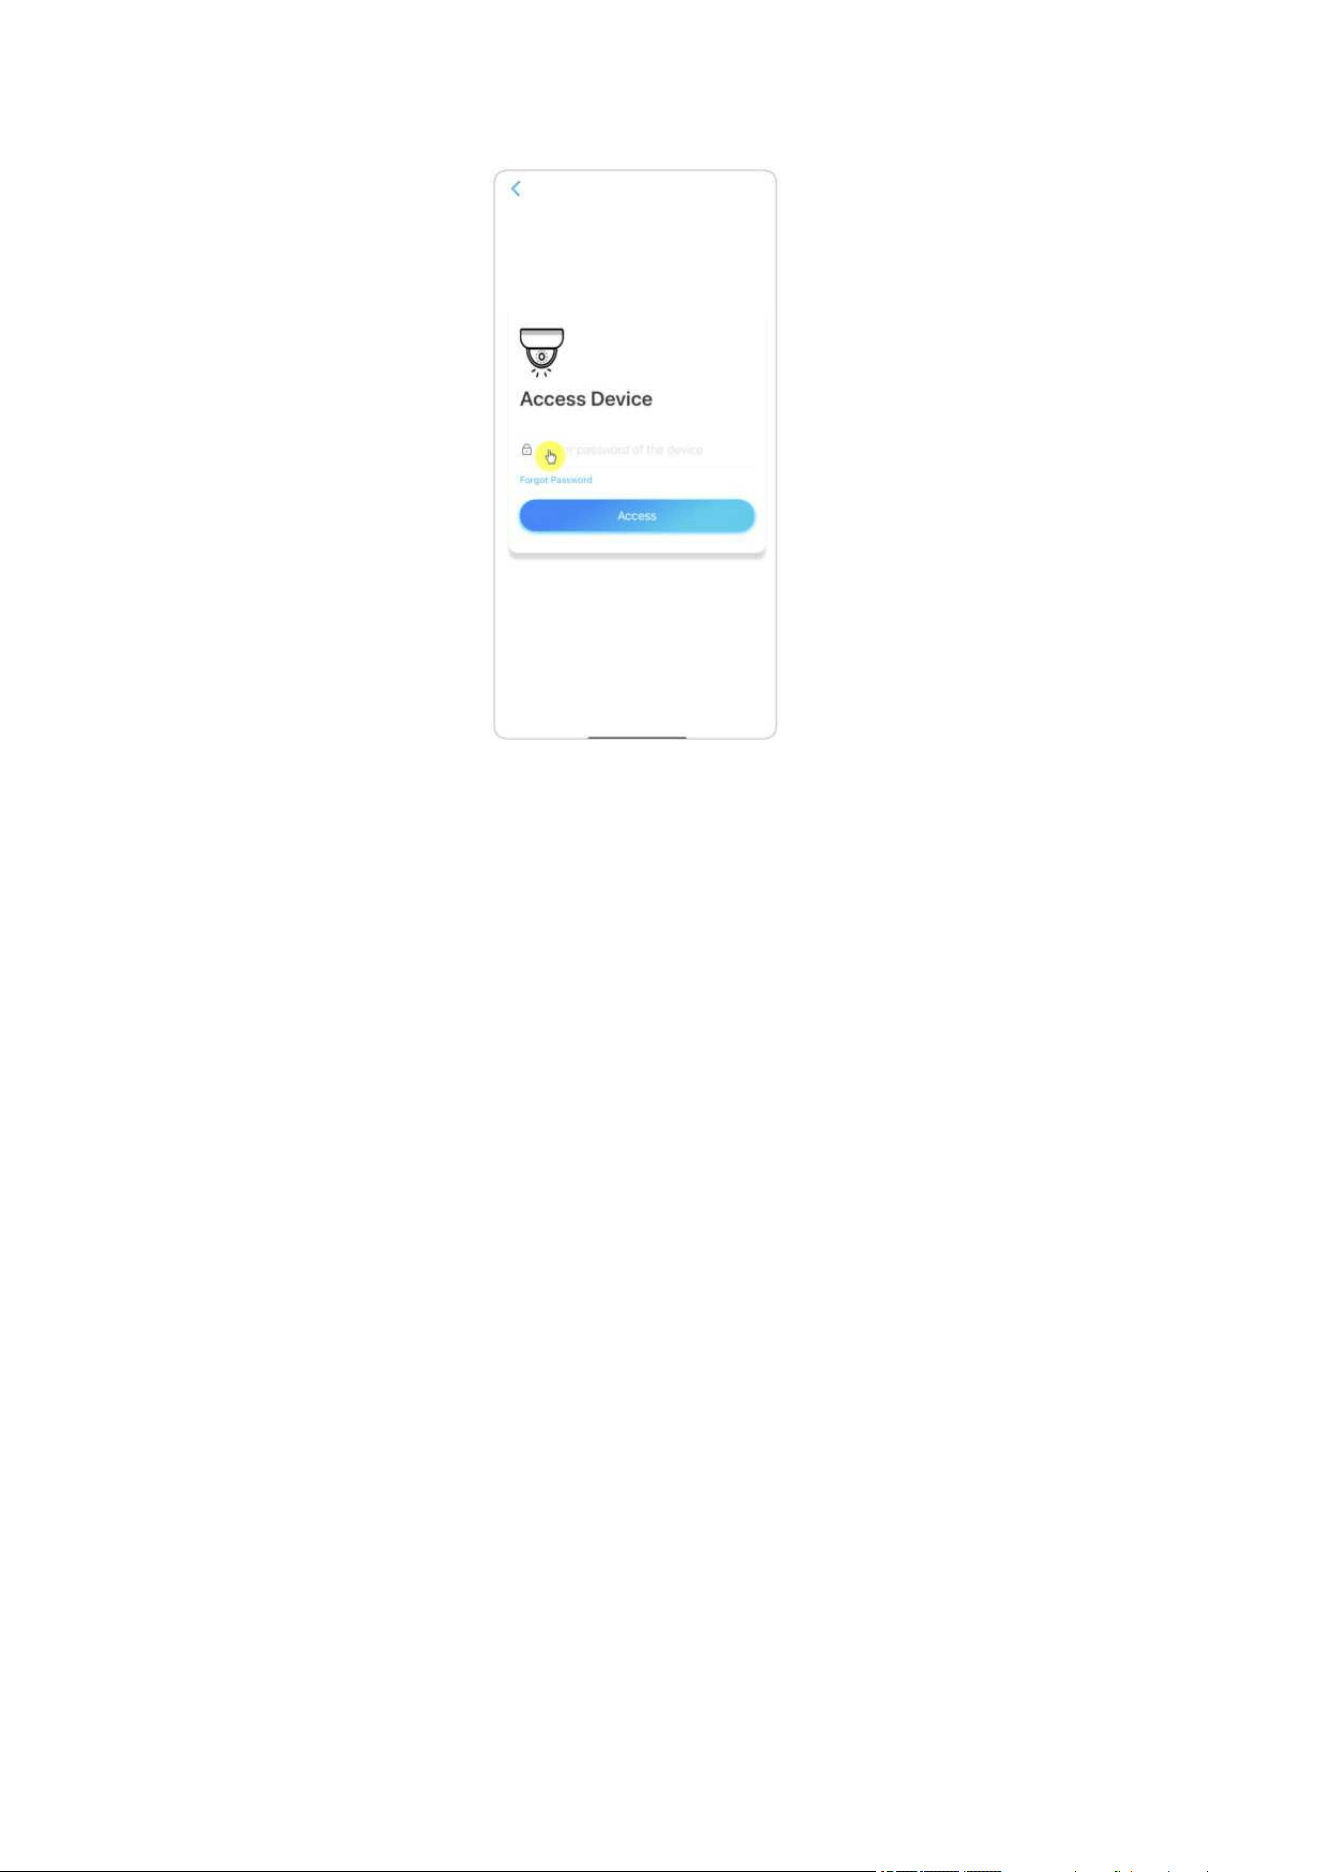
2. Enter the camera UID, tap Next to log in with the camera password.
Reolink Wireless Camera
User Manual
9
Reolink Wireless Camera
User Manual
10
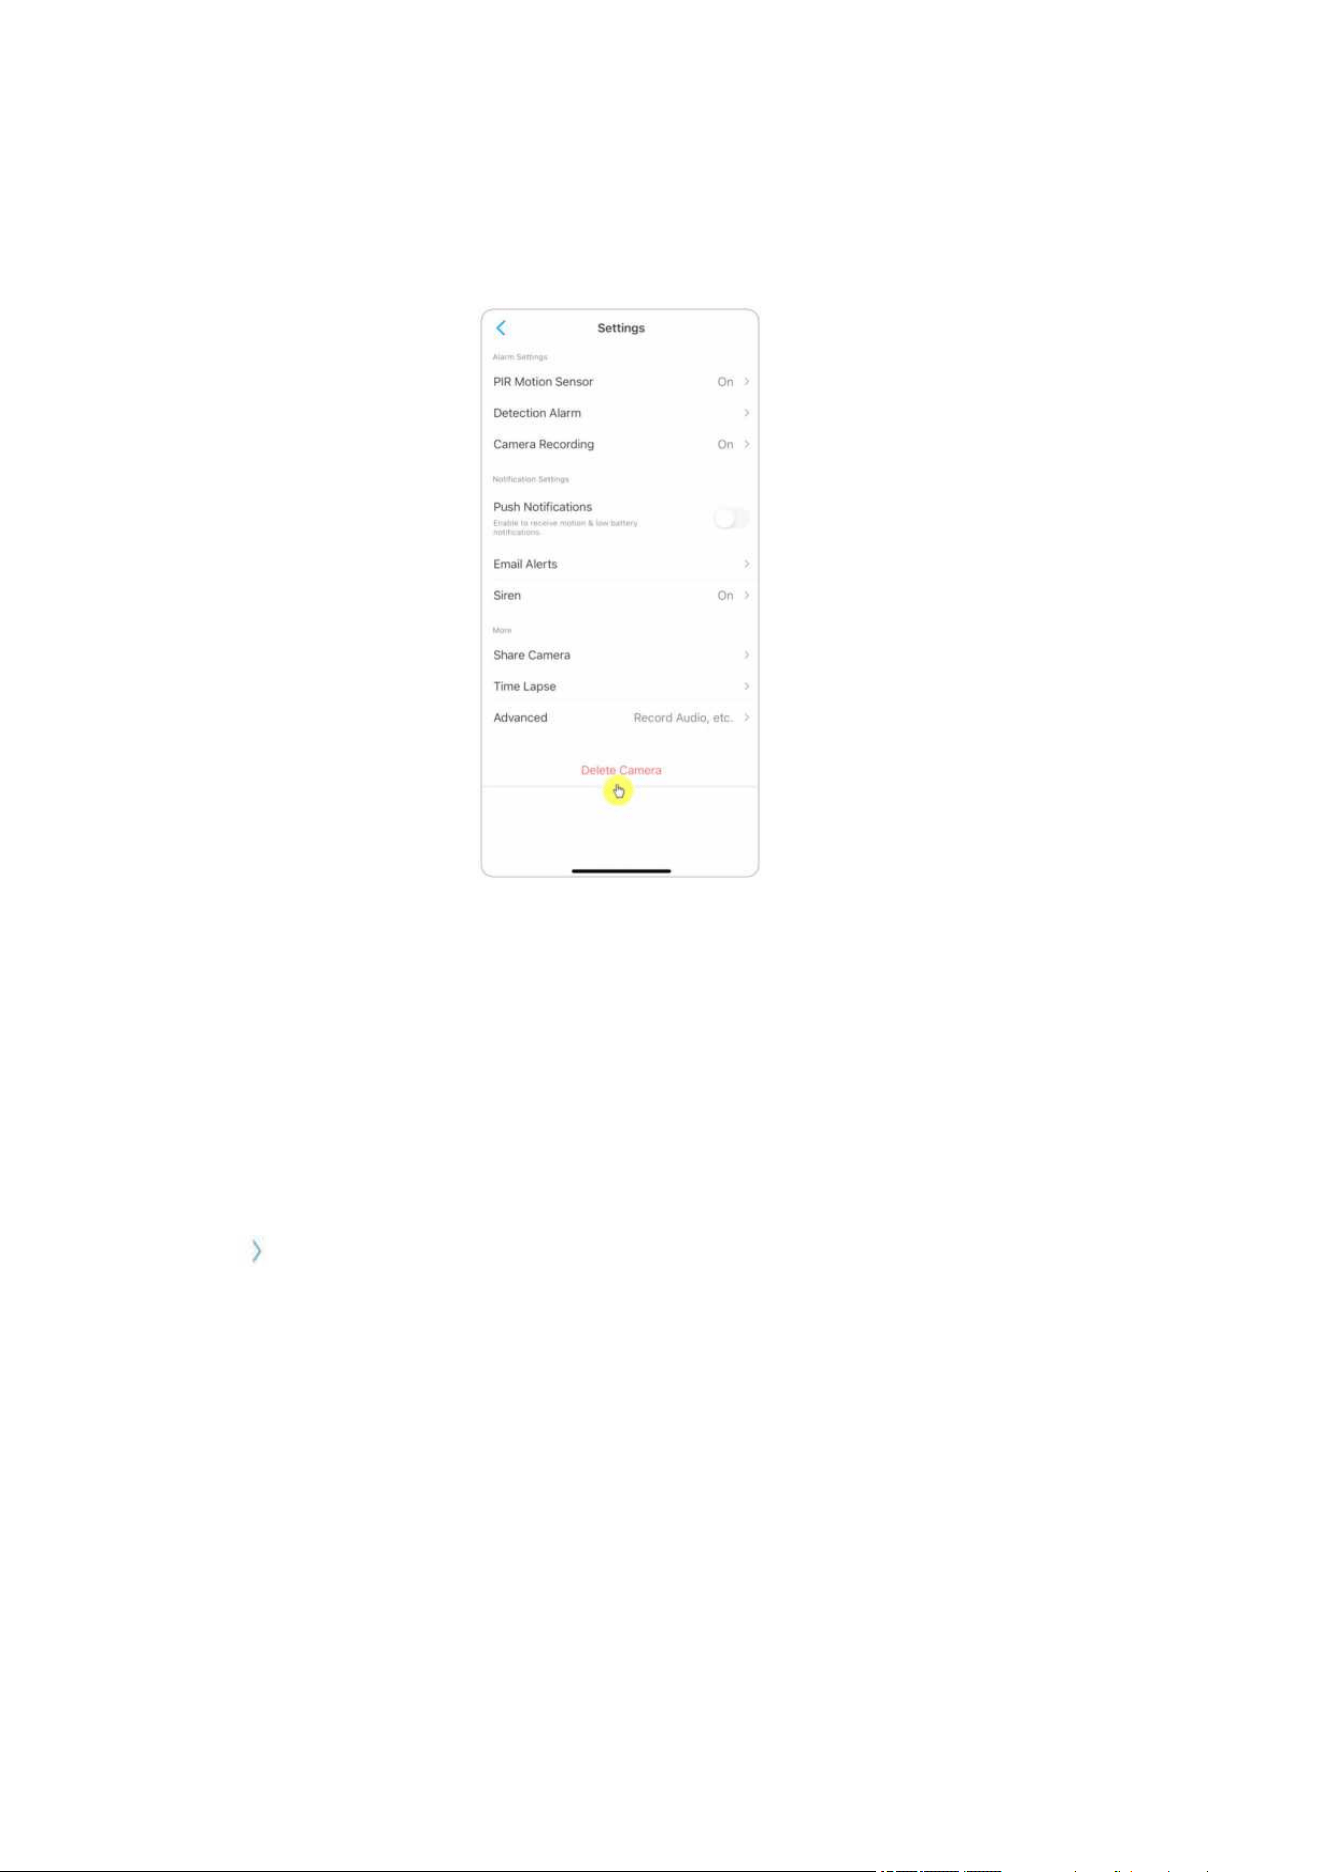
Delete a Camera from Reolink App
Tap then scroll down the page to delete the device.
Register Account
A Reolink account can be used to place orders on the Reolink website, check order
history, and log in to Reolink Cloud or smart home like Google Home or Alexa.
You can follow up the steps below to register a Reolink Account.
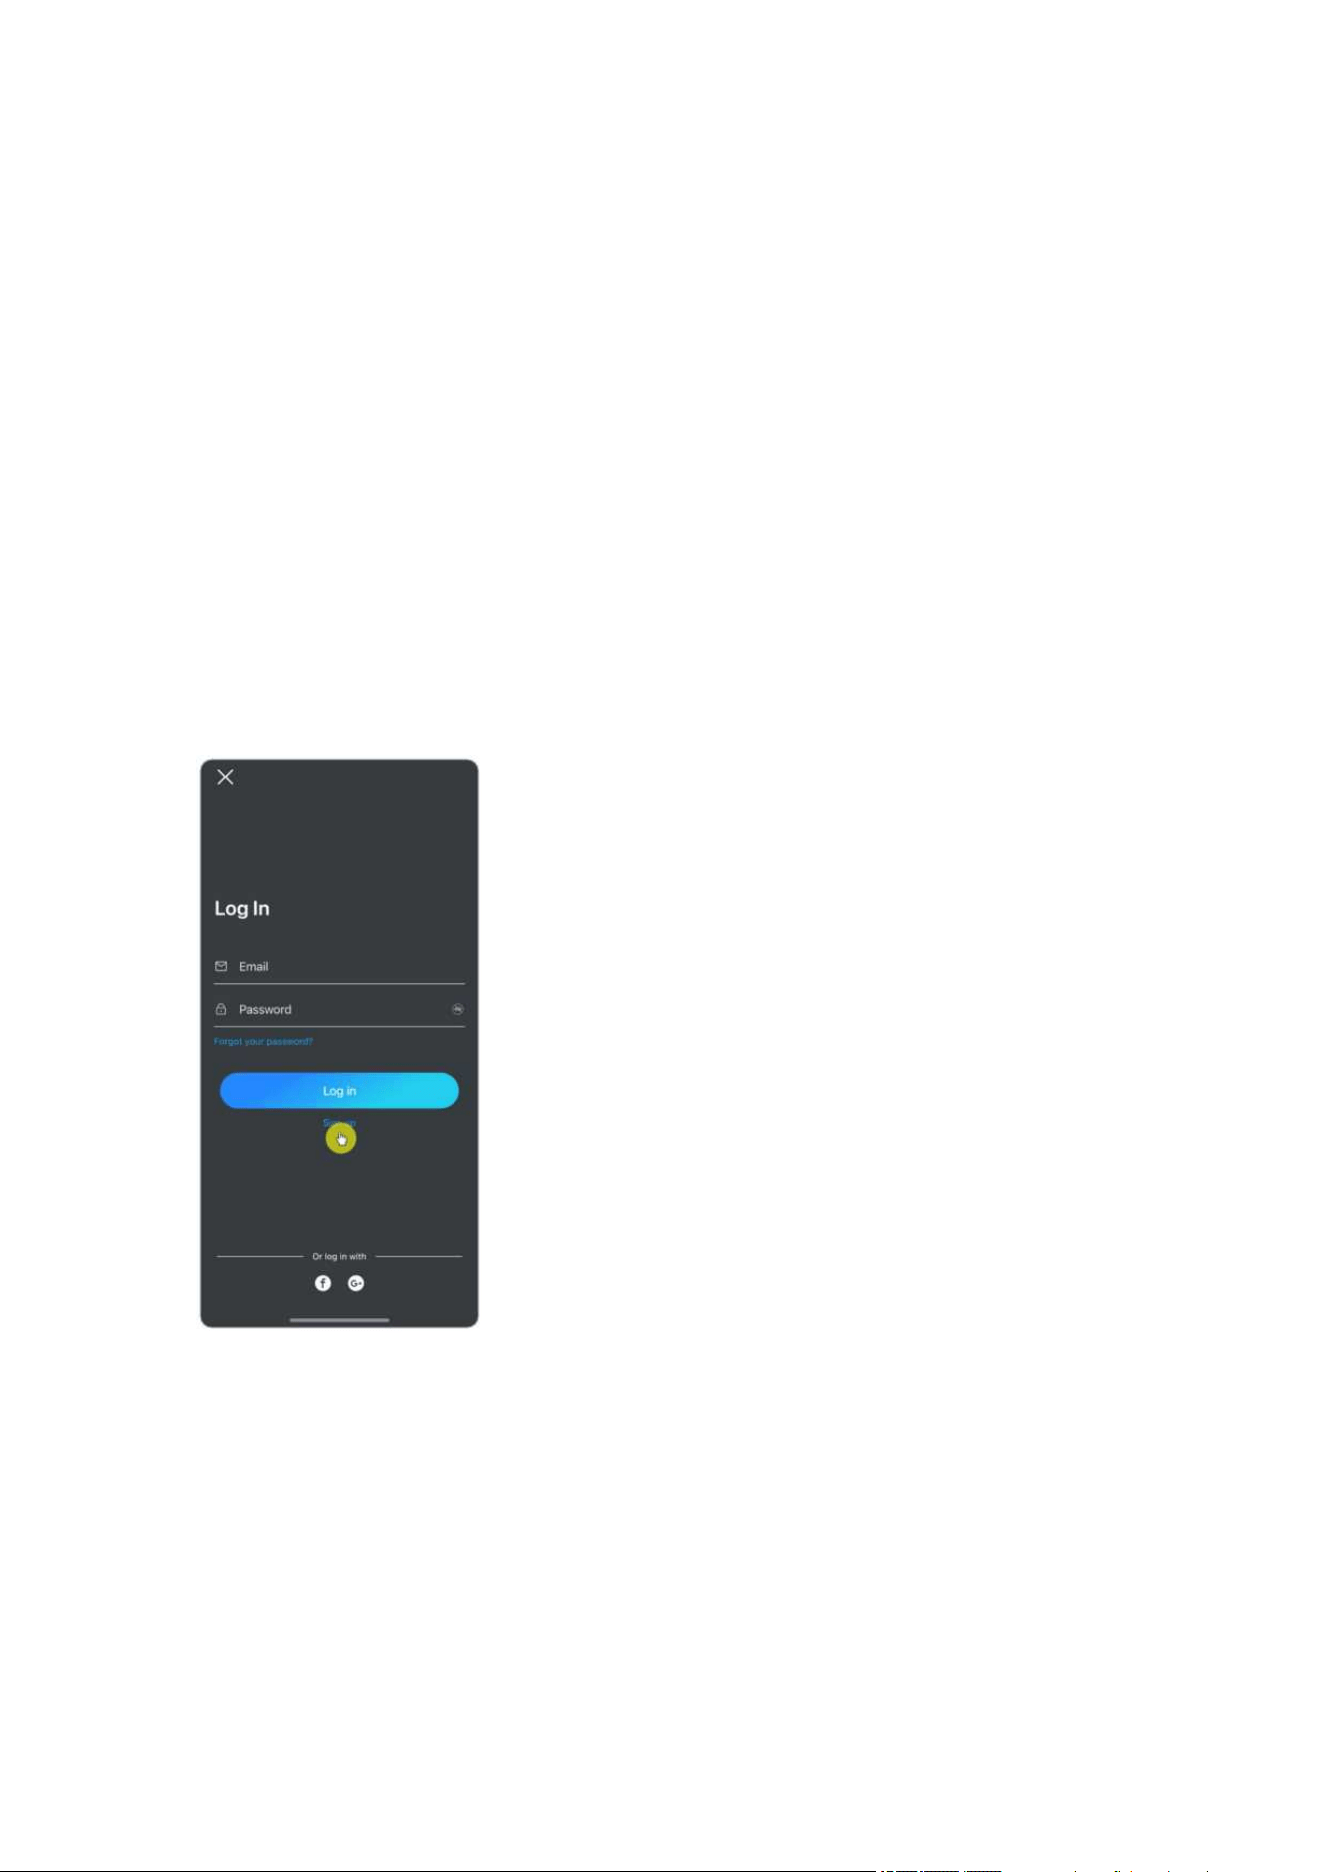
Tap and enter your email address and password to sign up.
Note: Only check “I have read and agree to Terms & Conditions and Privacy Policy”.
Reolink Wireless Camera
User Manual
11
After that you will receive a verify email. Once finished to verify the email, you can
log in your Reolink Account.

Reolink Wireless Camera
User Manual
12
App Settings
Launch the Reolink App. Tap and you can adjust the device order, change sound
settings, App password, clean cache, etc.
Adjust Device Order: Adjust order for a quicker access to the devices you want,
tap and drag the device to the channel as you want.
Reolink Wireless Camera
User Manual
13
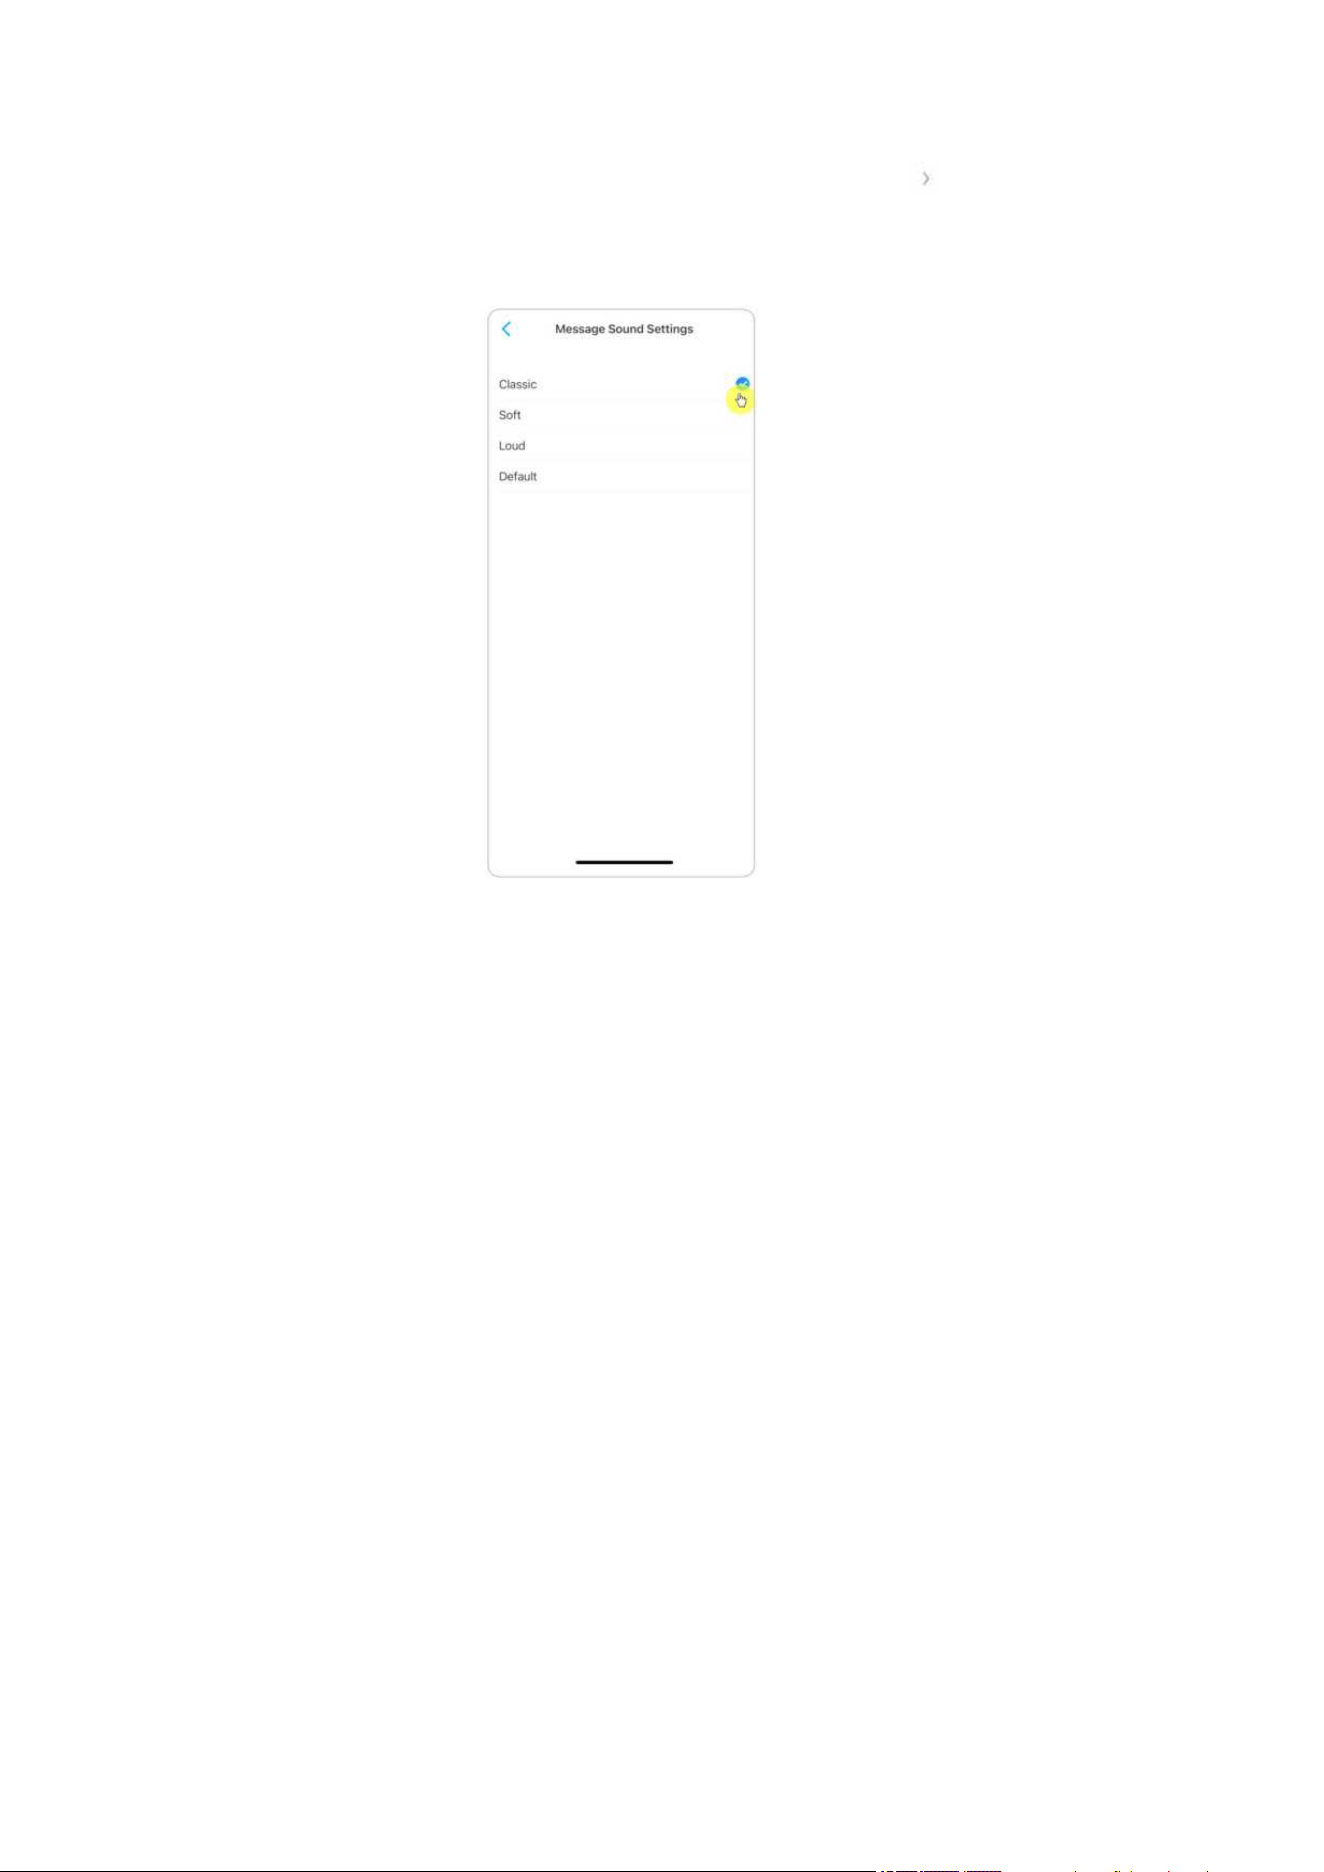
Message Sound Settings: Like the push notification sounds, tap and you can choose
the notification sound you like.
App Password: You can set up an App password to protect the App.
Appearance: There are three modes to choose: light mode, dark mode, follow
system.
Clear Cache: Clean the Reolink App cache. Cache is the temporary data generated
when you use the app. Clearing cache will not affect the normal use of Reolink App.
Auto Live View: When you launch the Reolink App, the App will start the live stream
automatically.
Add Devices Automatically: It will add the Reolink devices in LAN automatically.
Data Usage Warning: You will get a warning like “play over cellular data” when
trying to see the live feed.
Stretch Mode: Play on stretched aspect ratios.

Reolink Wireless Camera
User Manual
14
Hardware Decoding: You may disable or enable it, if you have problems while playing
back the videos.
Join User Experience Program: Help improve our product & service.

Reolink Wireless Camera
User Manual
15
7. Camera Settings
Network and WiFi Connection
Check the WiFi and Signal
You can see which WiFi network this camera connected and how about the wireless
signal.
Launch the Reolink App and go to camera Settings, then tap on Network menu and
you’d see which WiFi the camera is connected to and how is the signal strength.
Check the Network Information
1. Launch the Reolink App and tap on Device Settings, then tap camera name and
go to Device Info.
Reolink Wireless Camera
User Manual
16
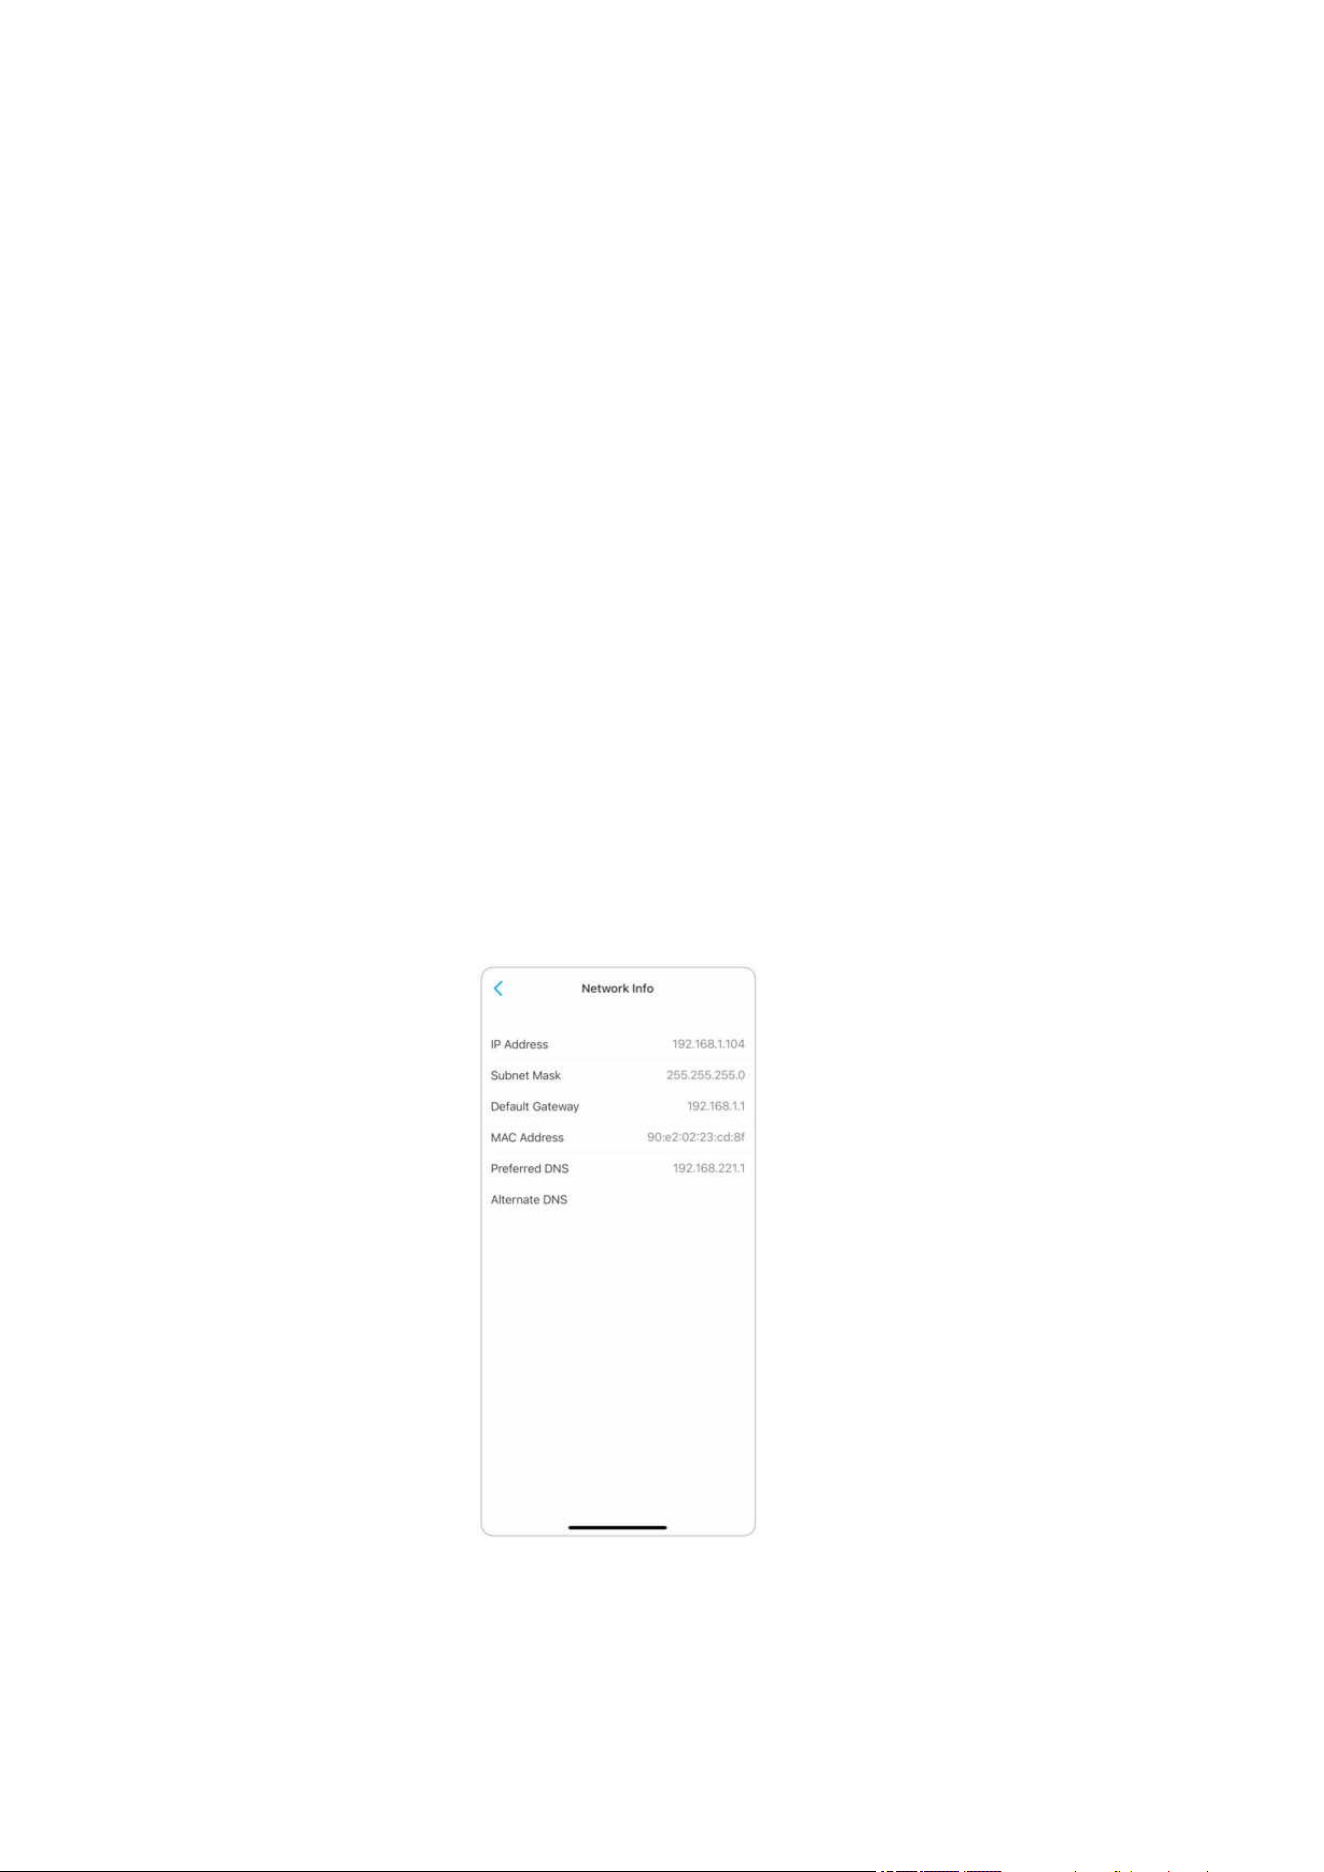
2. Tap Network Info and you will see the camera’s IP address, default gateway and
DNS info.

Reolink Wireless Camera
User Manual
17
Change WiFi Connection of the Camera
1. Tap on camera Device Settings, then tap Network menu.
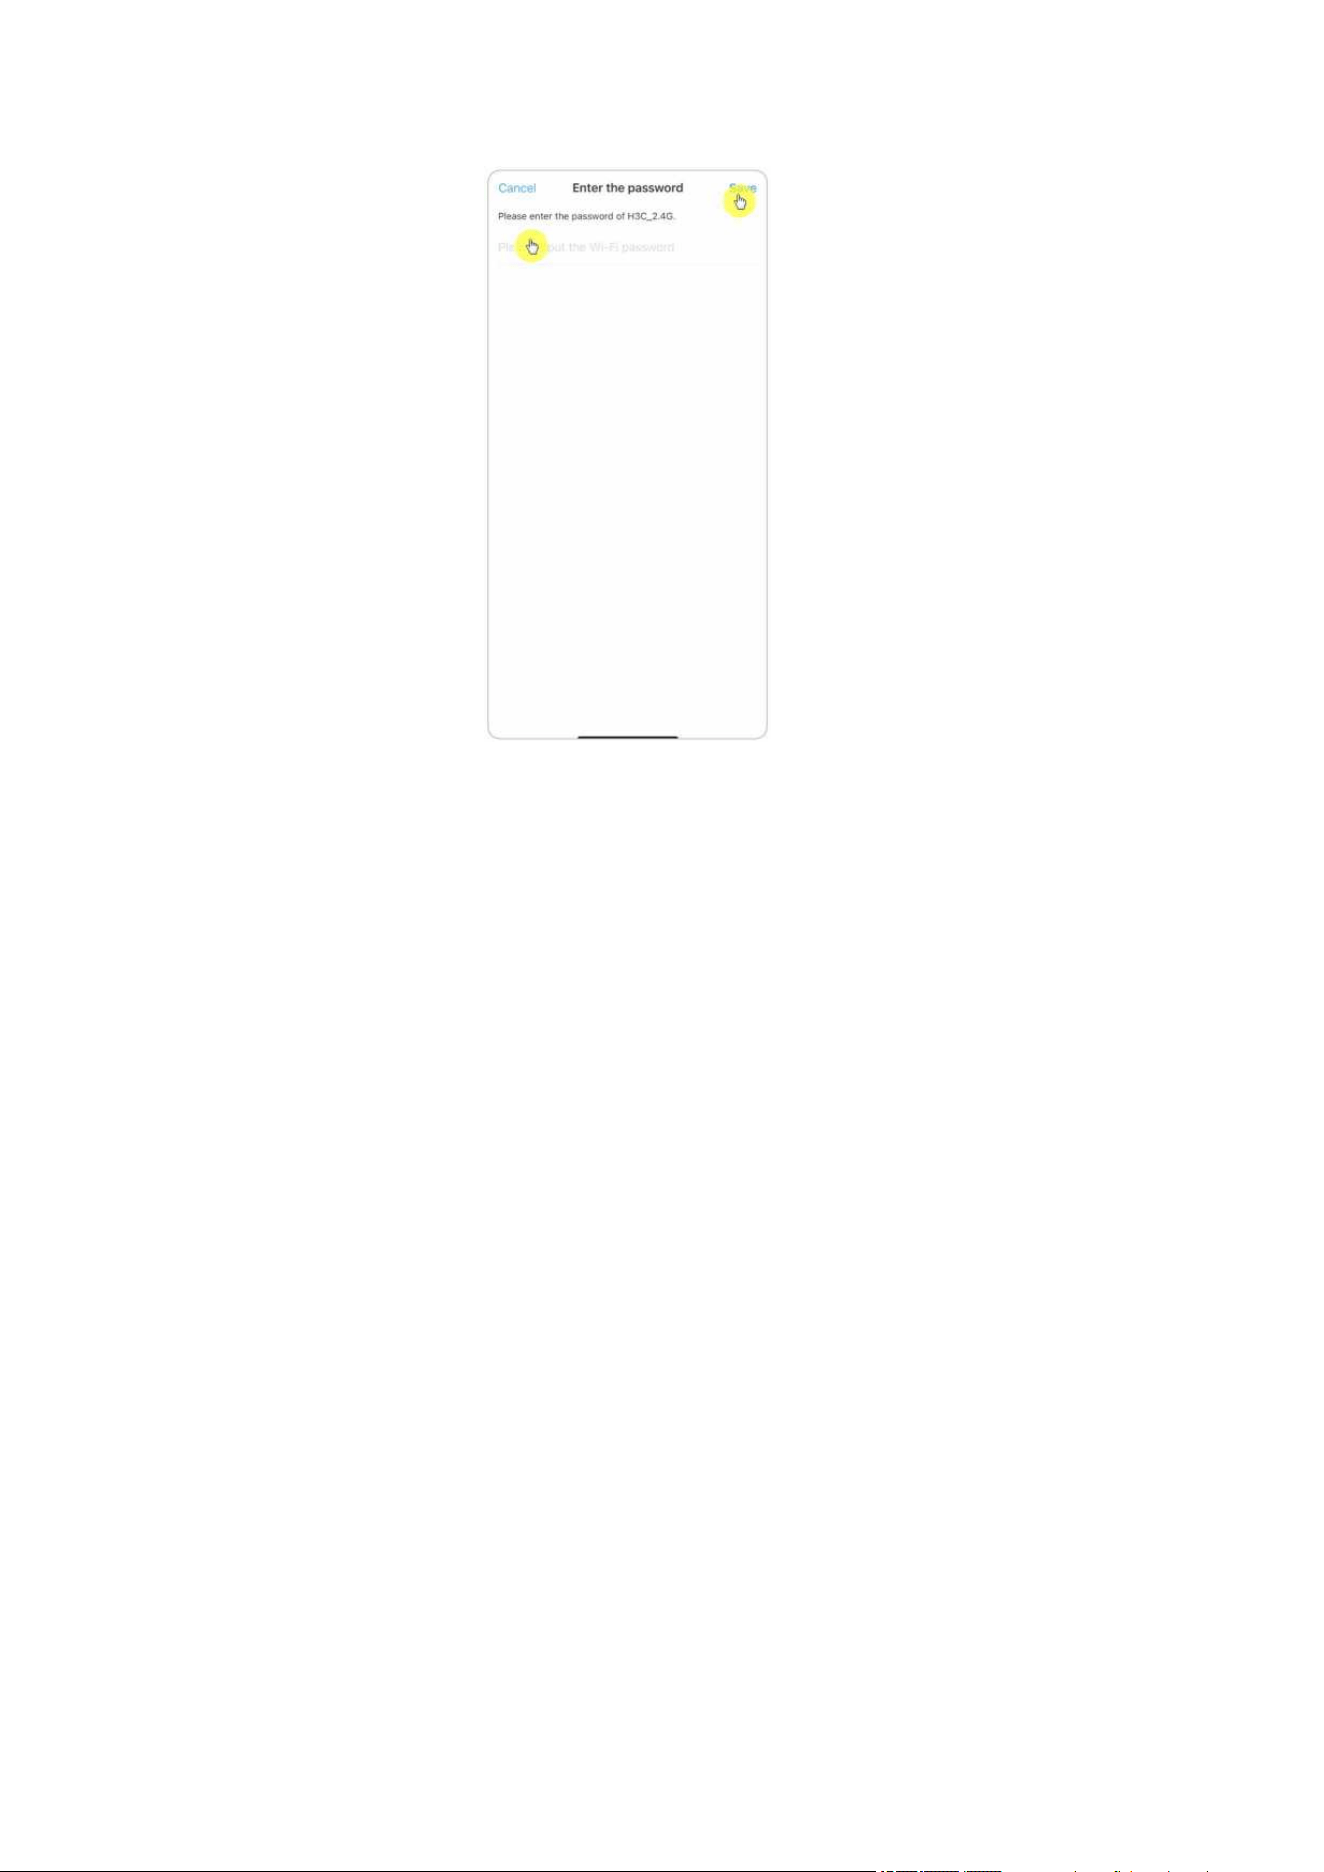
2. Choose the available Wi-Fi you want the camera to connect to, and input the
Wi-Fi password. Then tap Save to connect. It’ll take a minute for the camera to
re-connect to the new Wi-Fi.
Reolink Wireless Camera
User Manual
18

Reolink Wireless Camera
User Manual
19
Warm Tips
The Wi-Fi signal strength of wireless cameras can be interfered with by numerous
factors, such as other Wi-Fi networks around, the distance from the router/hot spot,
walls/obstacles in between, transmitting power of the router/extender, etc.
Make sure that the wireless signal is three bars or at least two bars. One bar signal
is too weak to establish a stable connection.
If the Wi-Fi signal strength is low/weak, you may refer to the following guides to
improve the Wi-Fi signal strength of the wireless camera.
·Shorten the distance between your wireless camera and the router.
·Change the wireless channel on your router to avoid interference from Wi-Fi
networks around.
·Keep the wireless camera away from appliances or electronic devices like a
microwave, computer, wireless router, etc.
·Install the wireless camera to somewhere with fewer walls and obstacles in between
with the router.
·Fasten the antennas on the wireless camera.
·Change a router which has higher wireless transmitting power.
·Install a Wi-Fi extender.
FTP Settings
Reolink Wireless Camera
User Manual
20
For cameras that support FTP, you can set up FTP settings for the camera to upload
pictures or videos to the FTP server.
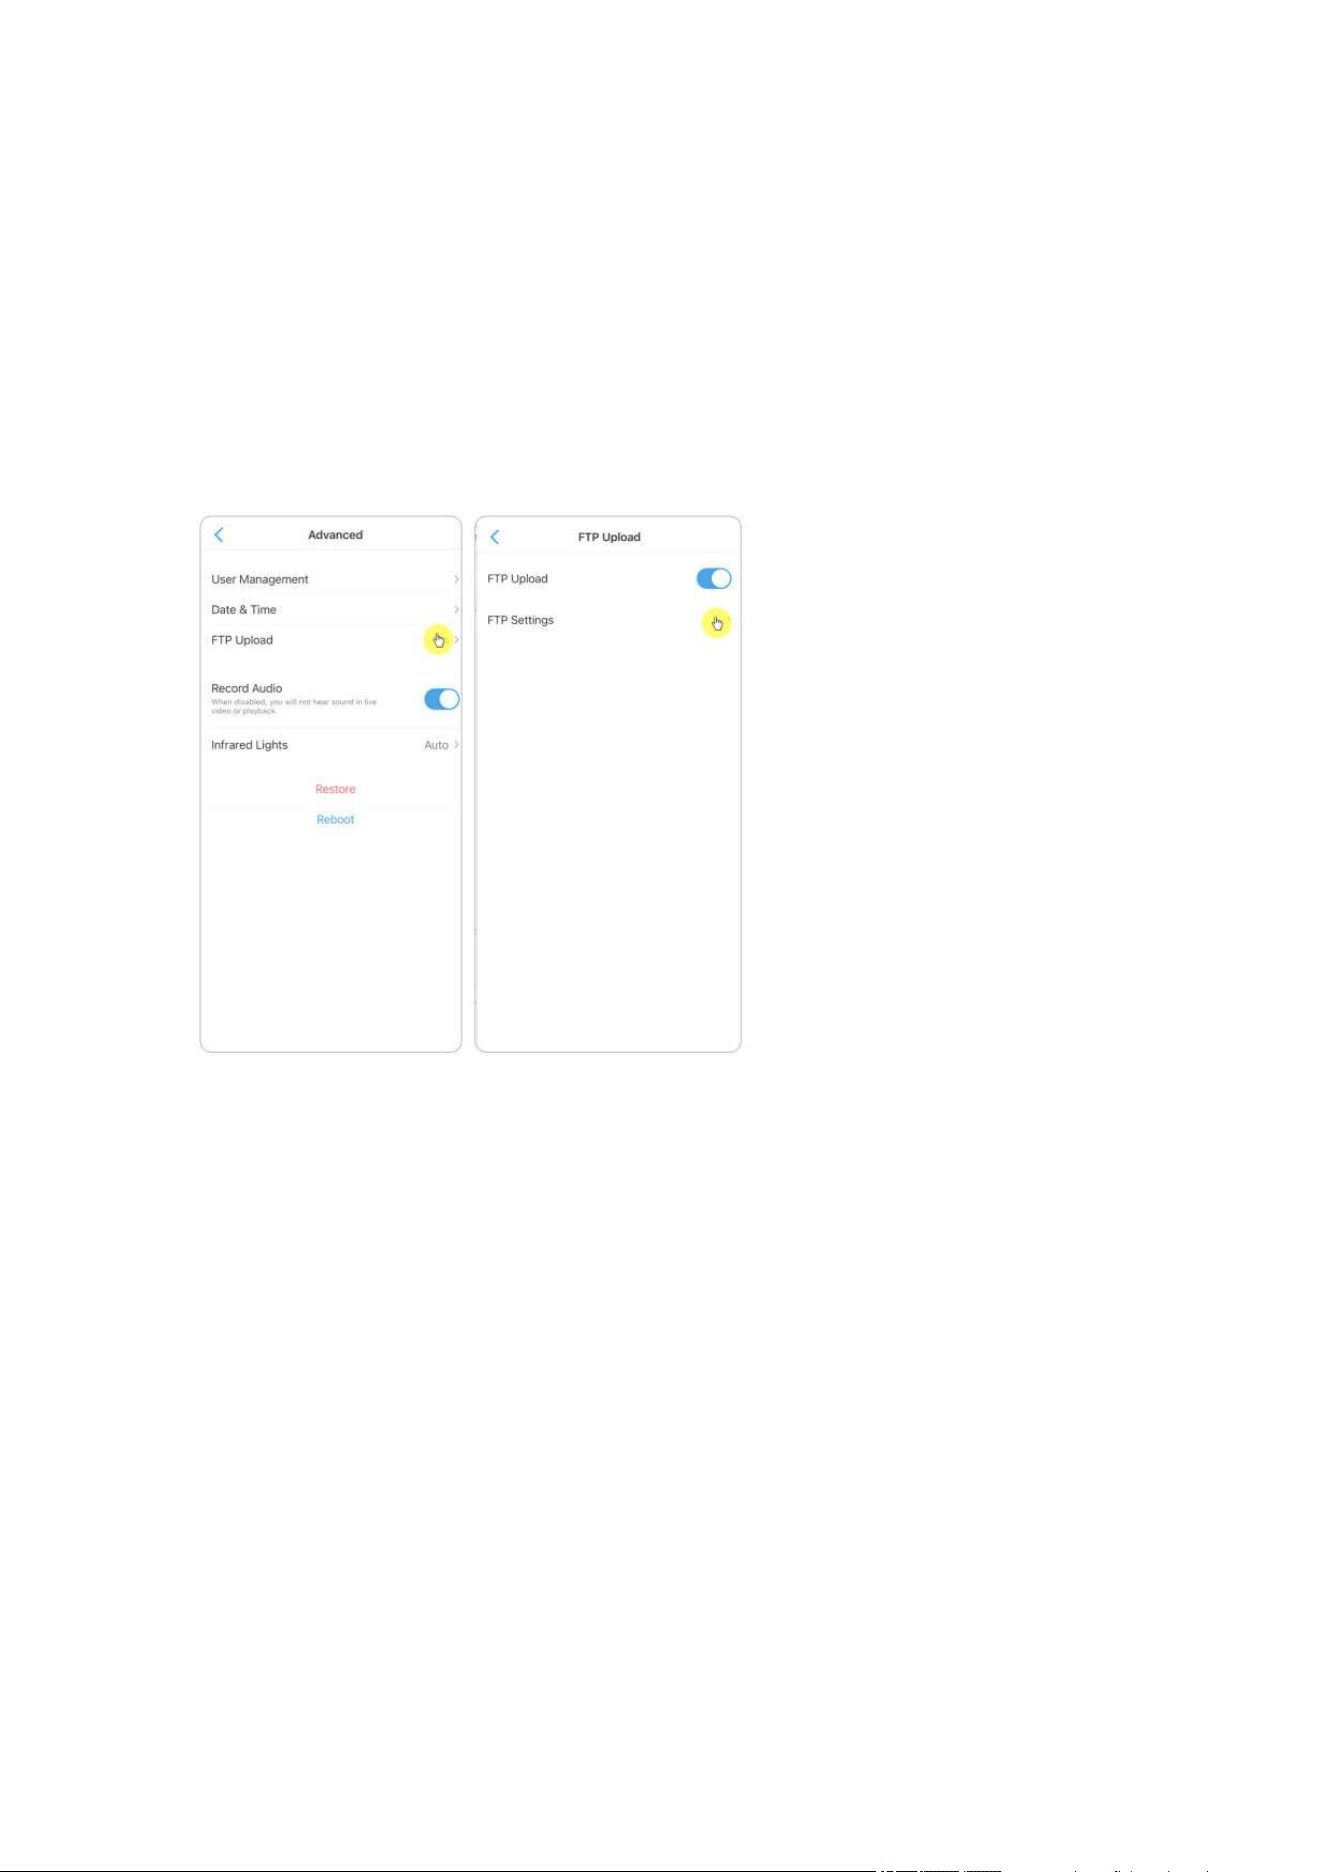
Step 1. Go to camera settings, on Advanced > FTP Upload page, enable FTP
Upload option.
Step 2. Tap FTP Settings to complete the information required and click Save to
save all the settings.

Reolink Wireless Camera
User Manual
21
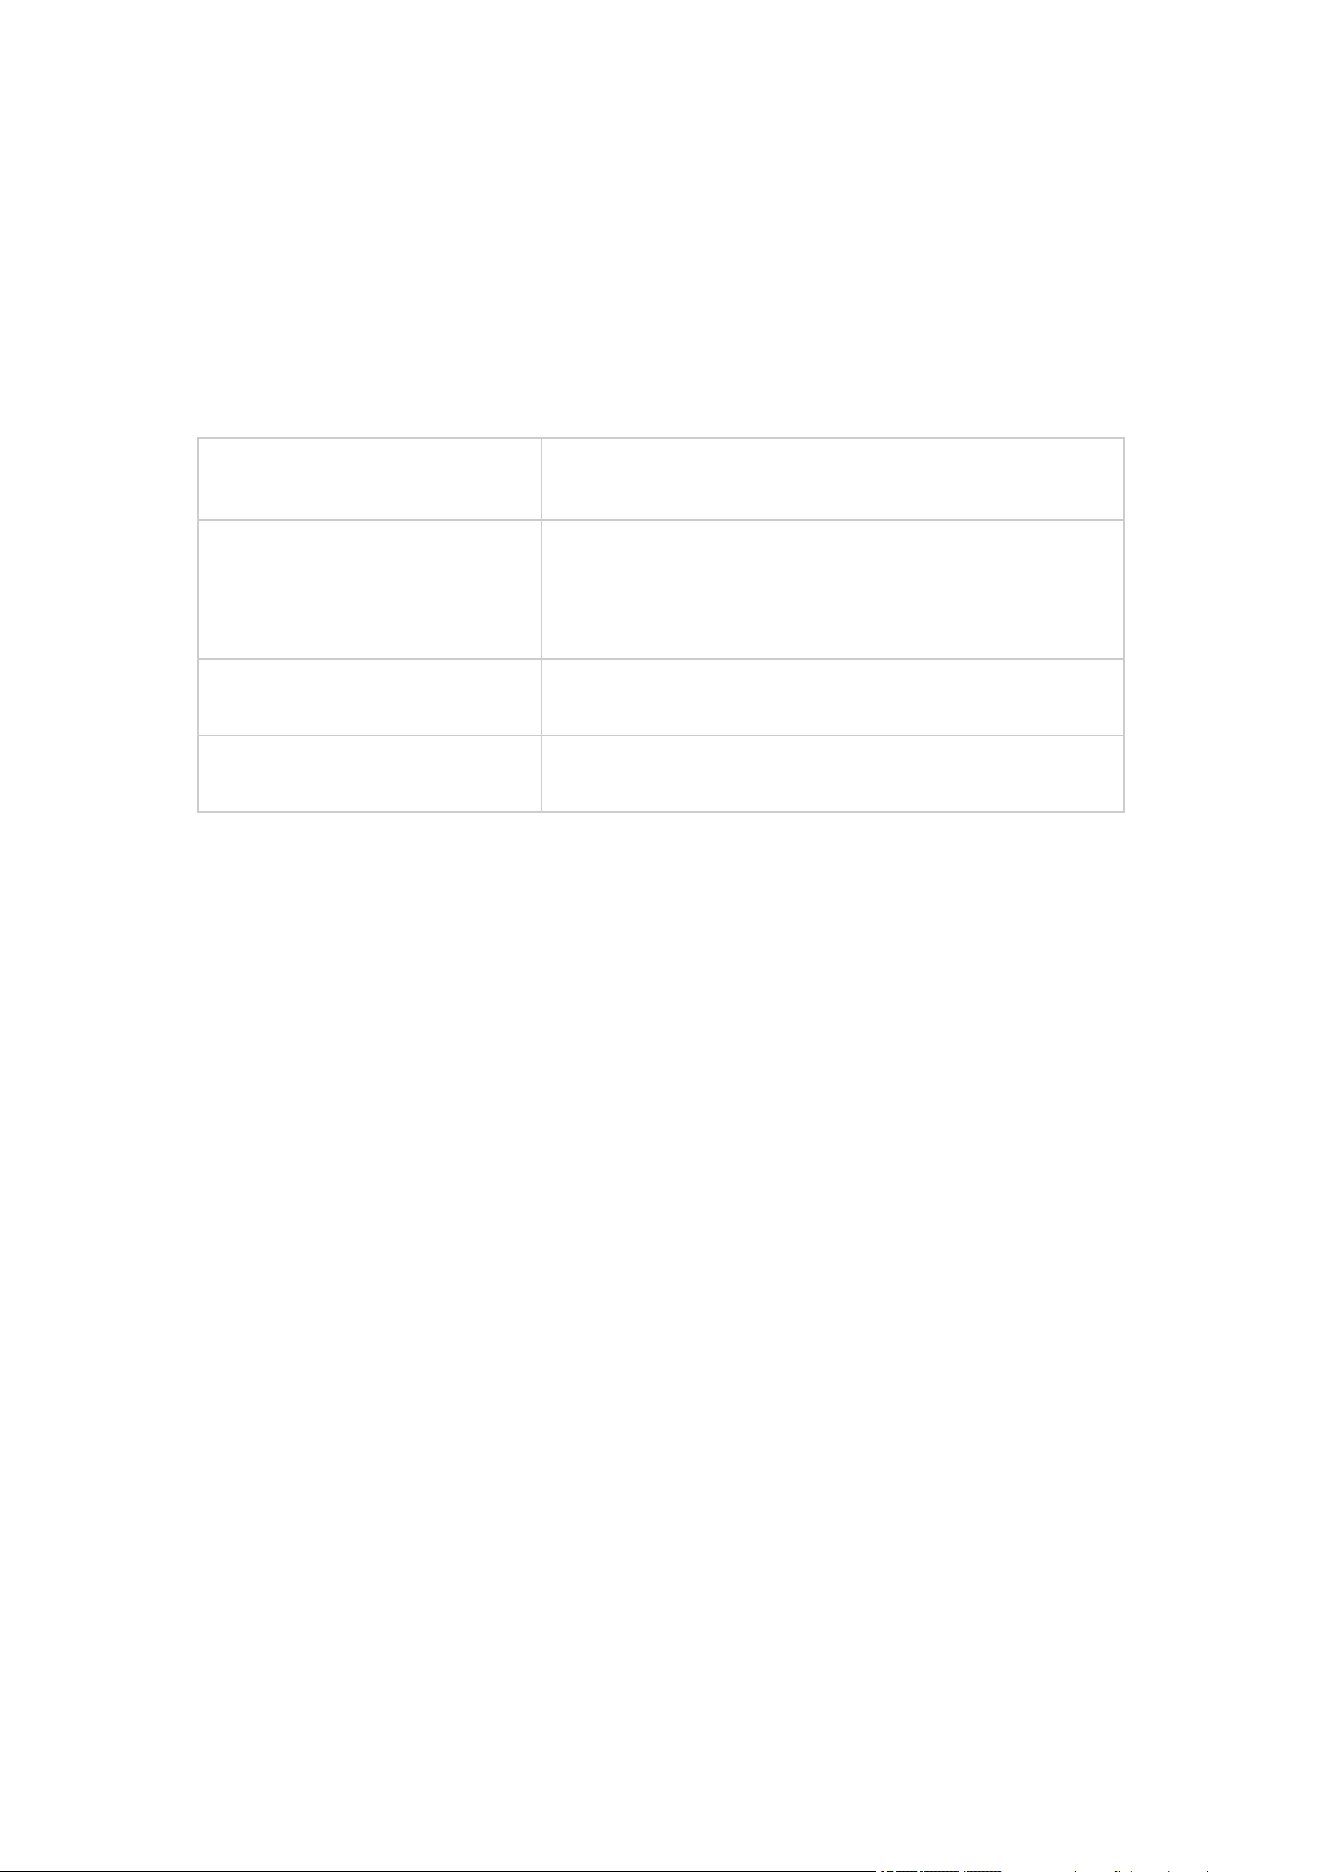
Server Address: Type in the address of your FTP server and FTP Port. The default
FTP Port for Reolink products is 21.
User Name and Password: Enter the User Name and Password of your FTP server.
If there is no username and password required, please enable Anonymous FTP.
Upload Directory: Set an upload directory for device video recording. You may also
leave it blank.
Maximum File Length: You can enter the file length here.
File Type: Choose to upload both video and picture or picture only.
FTP Postpone: Set the record time limit after a motion is detected. This option is
only available when File Type is Video and FTP Schedule is Motion.
Transfer Mode: This option consists of Auto, PORT, and PASV three modes. We
recommend you choose the Auto option.

Reolink Wireless Camera
User Manual
22
Reolink Wireless Camera
User Manual
23
SD Card Storage
Choose a Proper SD card
Please choose a SD card with specifications below so it can be compatible with the
camera.
Item
Requirement
Capacity
Up to 64GB (For model RLC-410W,
RLC-511W, E1, E1 Pro, E1 Zoom, Reolink
Read and Write Speed
Class 10 or higher/≥26Mbps
Format
FAT32
Install the Micro SD Card
Bullet Cameras
1. Power off the camera before inserting the SD card. Find the micro SD card slot
at the back of the camera and unscrew the screws to open it.

Reolink Wireless Camera
User Manual
24

Reolink Wireless Camera
User Manual
25
2. Insert the micro SD card like the way in the picture below, please use your
fingernail (or use the provided reset needle) to push the micro SD card in until you
it is locked, and you will hear a click sound and the micro SD card will not pop out
if it is inserted in properly.
3. Screw back the screws to close the cover tightly.

Reolink Wireless Camera
User Manual
26
E1 Series
1. Power off the camera before inserting the SD card. Move up the lens to find the
micro SD card slot.
2. Insert the micro SD card into the card slot in the correct direction.
Note:
Please use your fingernail or something sharp like the reset pin to push the micro SD
card in until it's locked or you hear a "click" sound.
Remove the Micro SD Card
1. Please switch off the camera before removing the SD card. For cameras that has
a metal SD card slot cover, please unscrew to remove the cover first. And for
cameras with a rubber SD card slot cover, please directly open the cover.

Reolink Wireless Camera
User Manual
27
2. Find the micro SD card slot and please use something sharp such as the reset pin
or a paperclip or your fingernail to push the SD card to make it pop out.
Check the Micro SD Card Status
1. Launch the Reolink App and tap , then tap the camera name to enter Device
Info page.

Reolink Wireless Camera
User Manual
28
Reolink Wireless Camera
User Manual
29
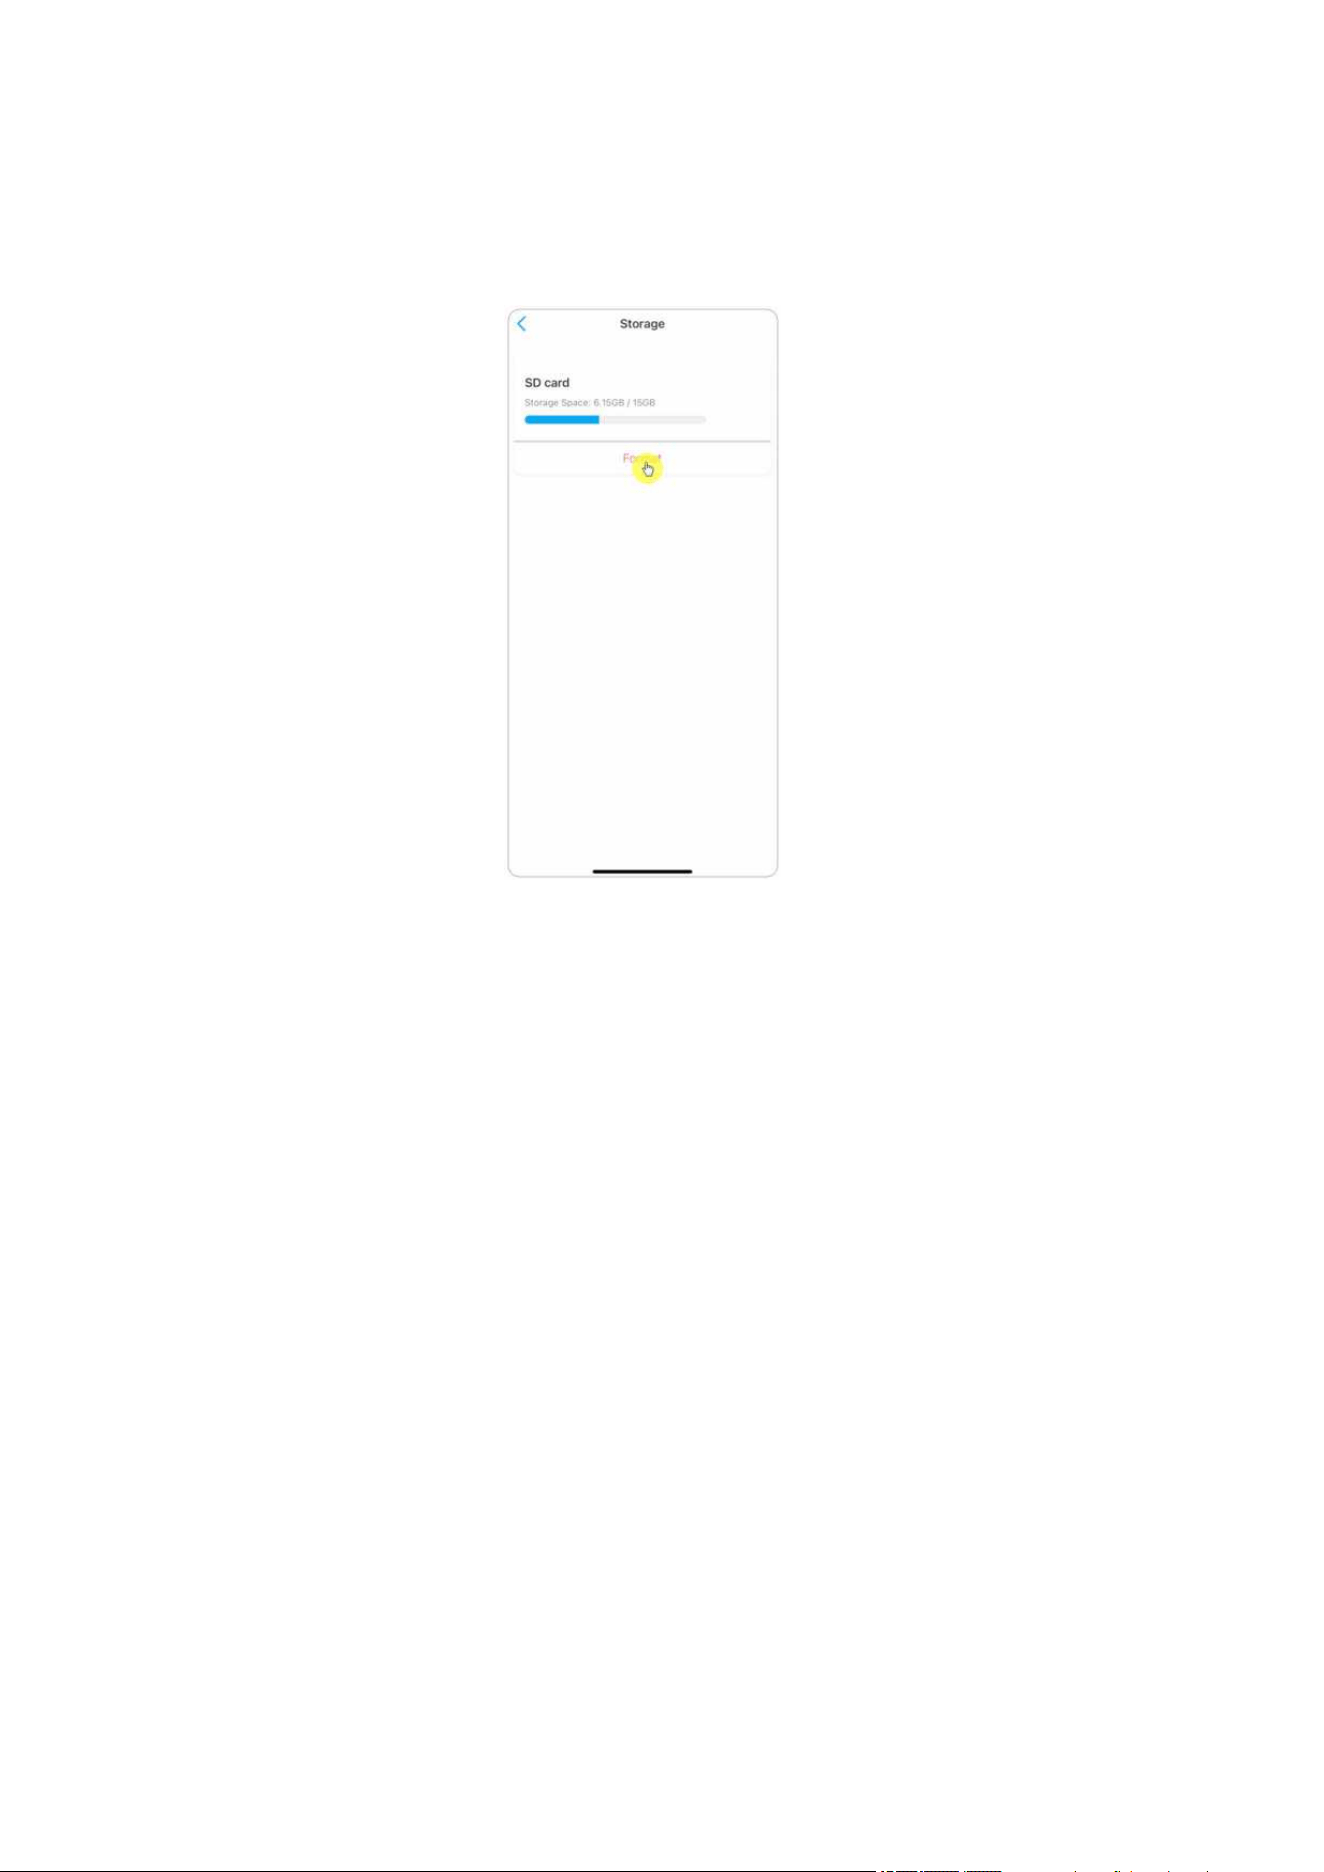
2. Tap Storage, and you can see the SD card used space/total storage space. Tap
Format to format the SD card.
Device Information
From device information page, you can check the basic information about your
camera include Model No., UID, and Firmware Version.
1. Launch the Reolink App then tap , then go to Device Info.

Reolink Wireless Camera
User Manual
30
Reolink Wireless Camera
User Manual
31
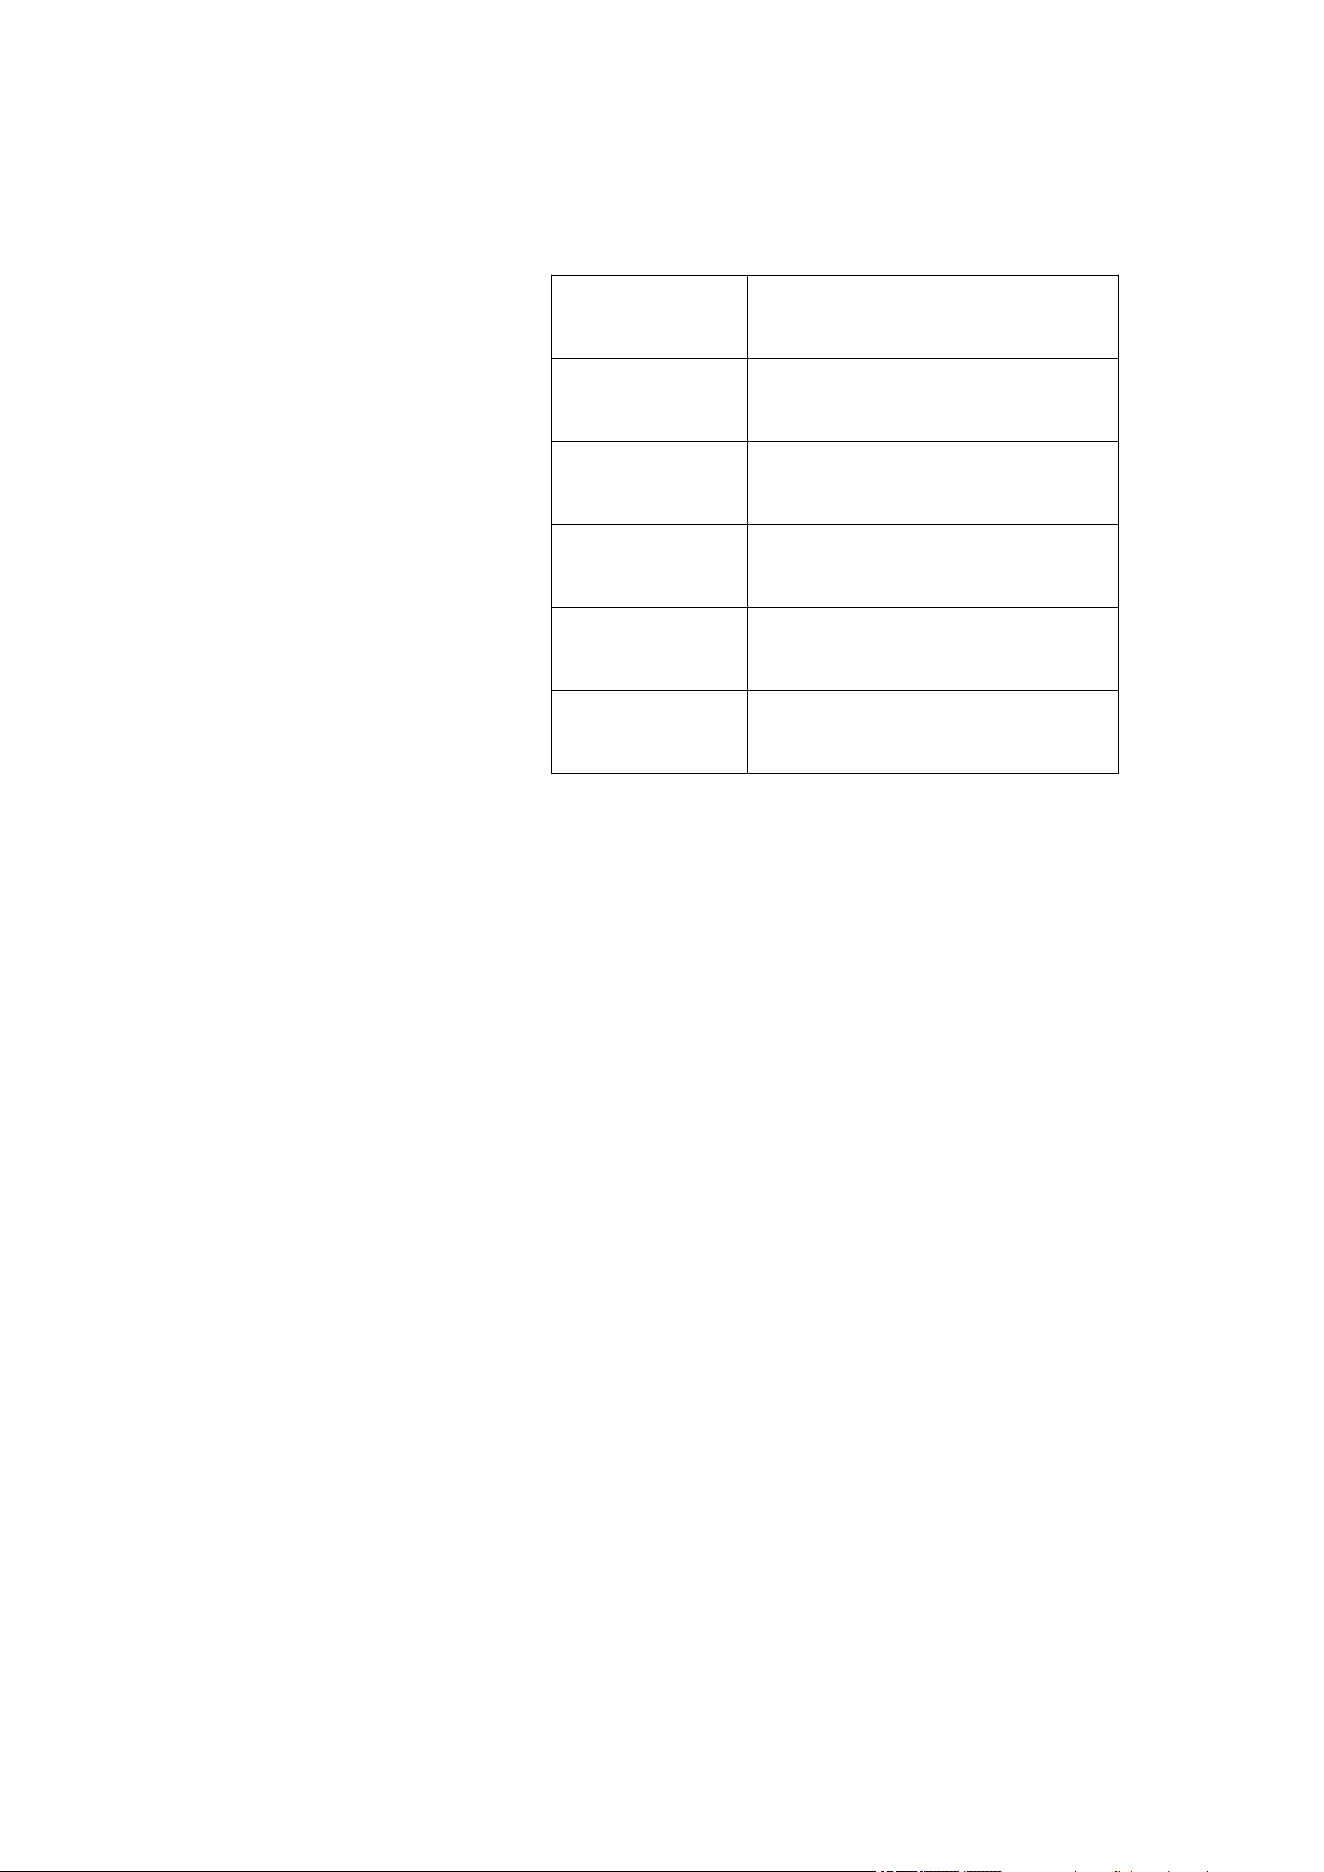
2. Here you can check the camera’s basic information such as camera model and
UID. And check System Info
section about its firmware
information.
Device Password
To access and use camera, a password is required. The default username is admin
and password is blank (no password). When you set up the camera for the first time,
it’ll ask for creating a password before you can access the camera.
Change Device Password
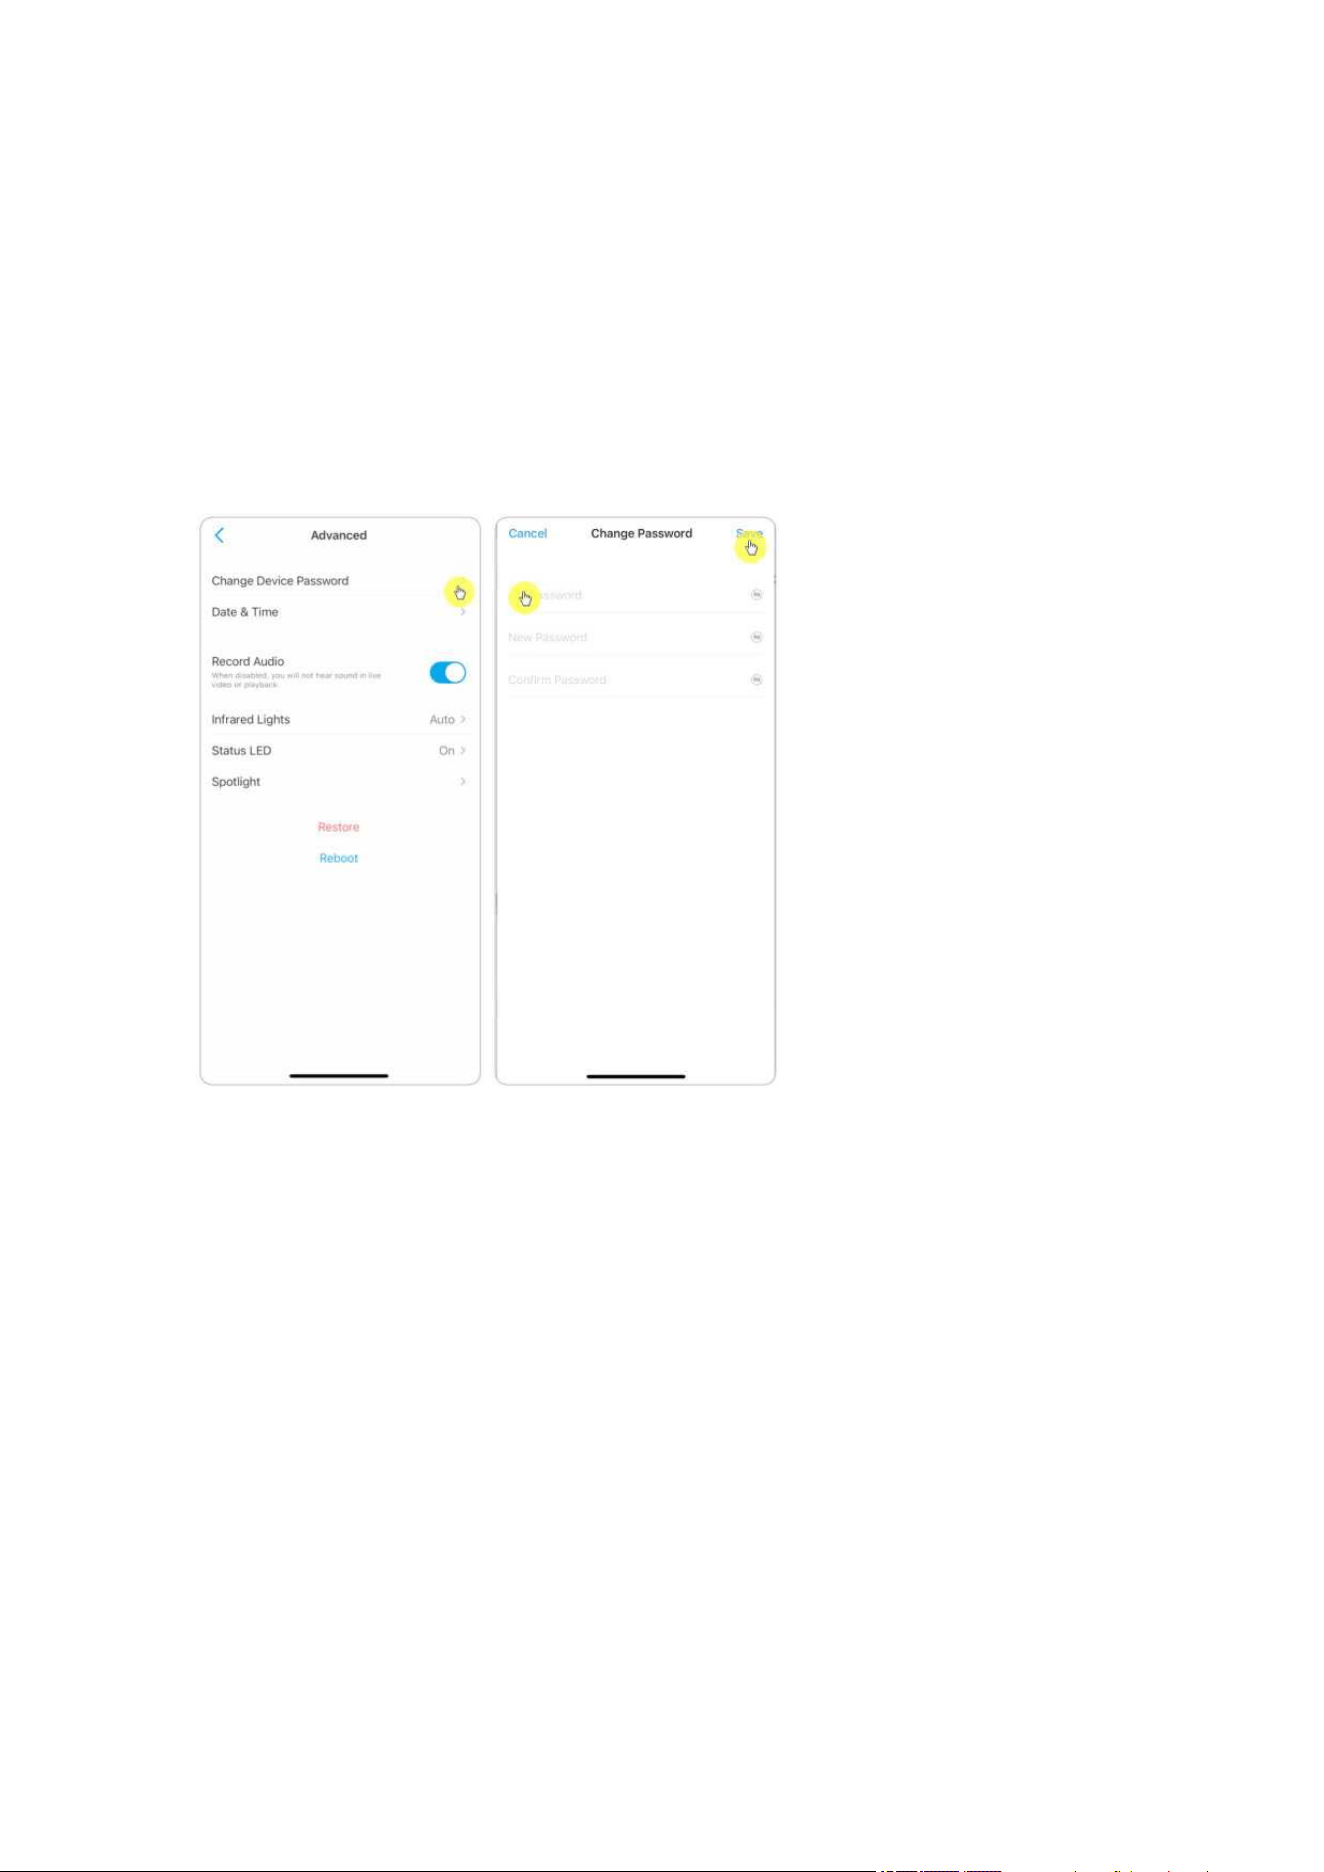
1. Launch Reolink App and tap settings icon > Advanced > Change Device
Password.
Device name
Camera name
Model
camera model No.
UID
starts with 9527xxxxxxxx
Storage
SD card storage
Network Info
Camera IP address
Firmware Ver
camera firmware version

Reolink Wireless Camera
User Manual
32
Reolink Wireless Camera
User Manual
33
2. Enter the old and new password, then tap on Save.
Note:
The confirm password should be the same as the new password.
Date and Time
Sync Camera Time With Your Smart Phone
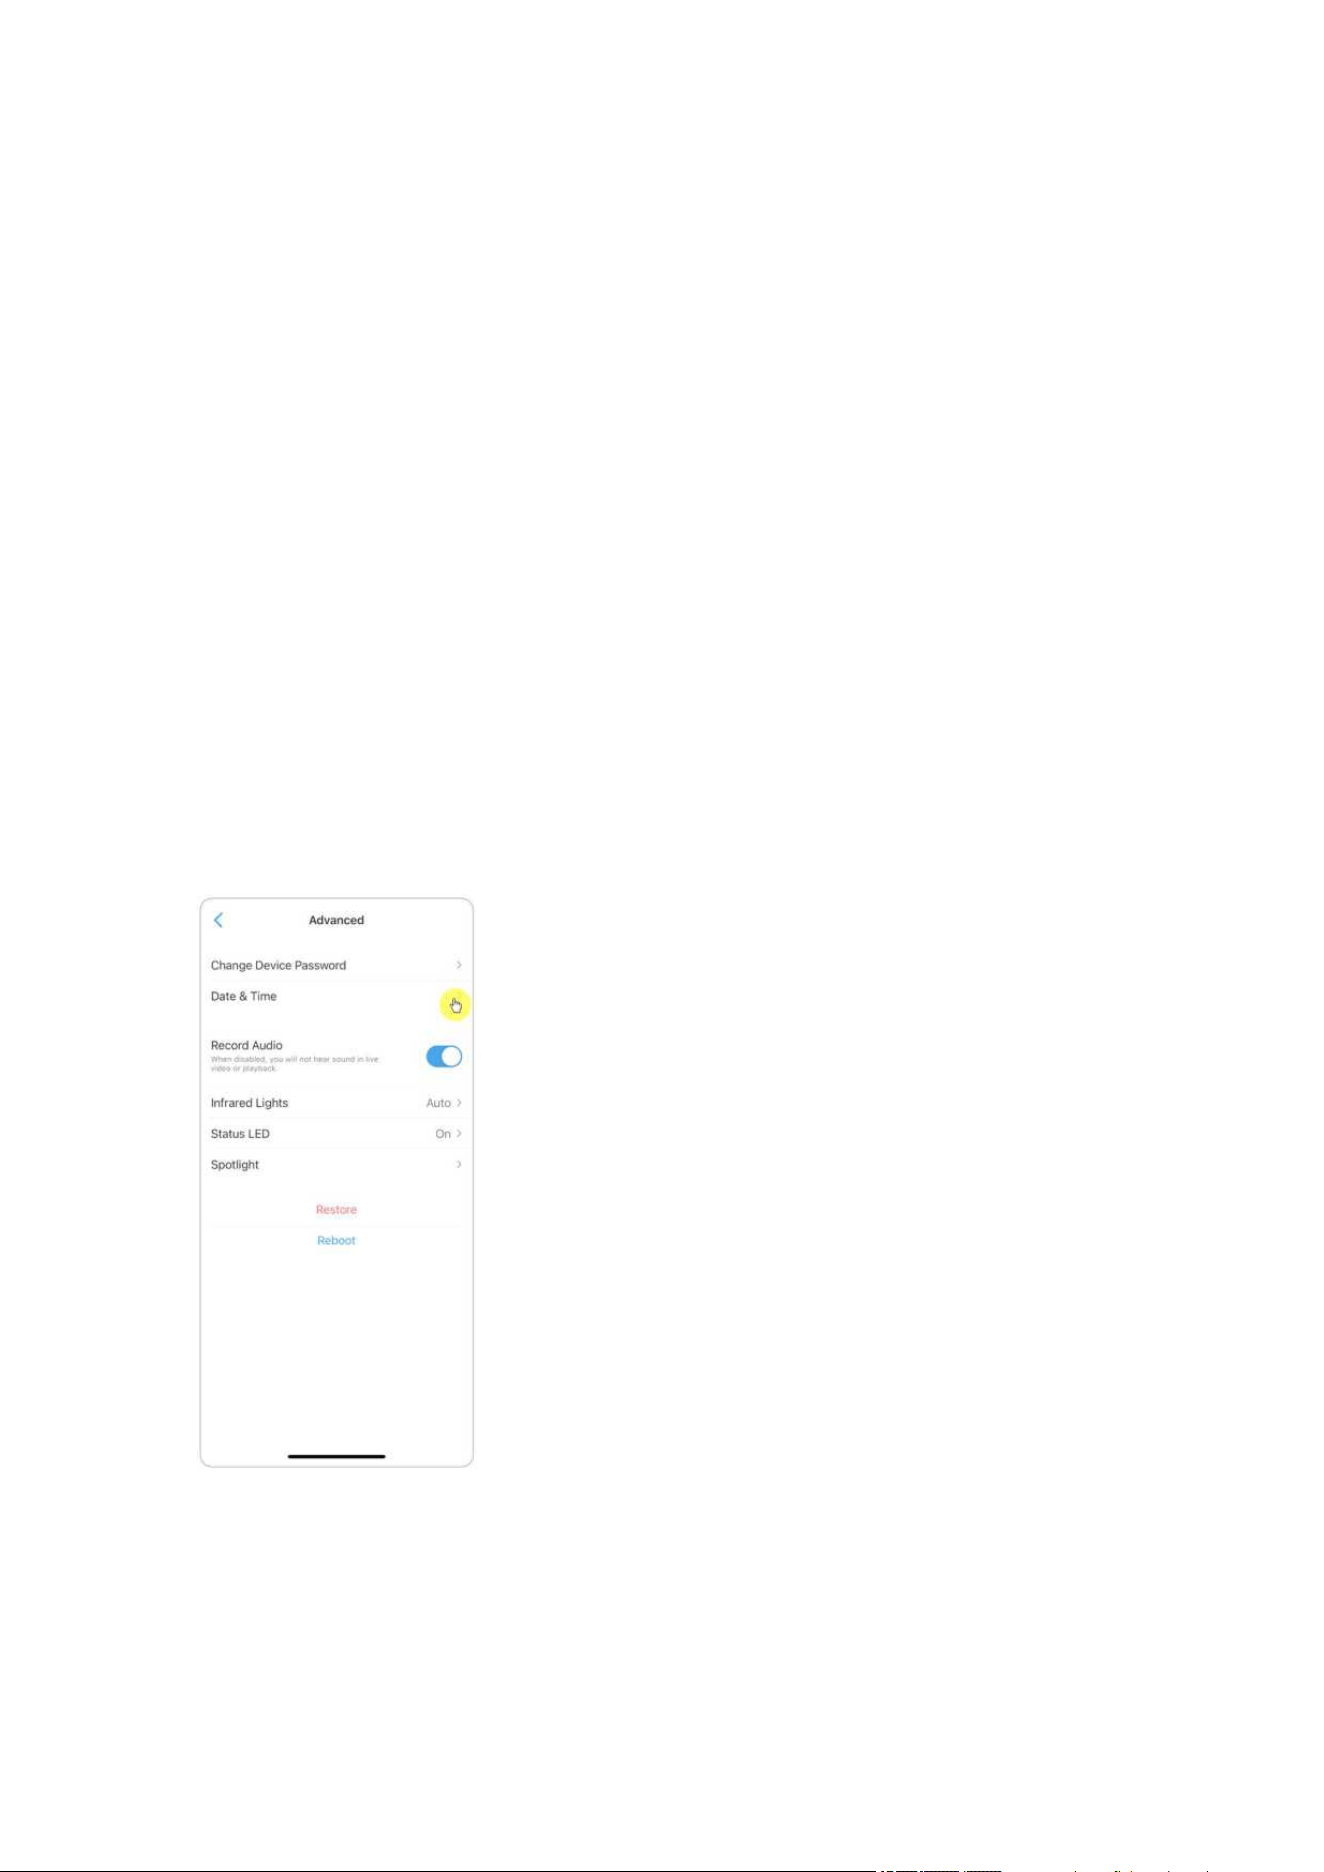
1. Launch Reolink App and tap > Advanced > Date and Time.
Reolink Wireless Camera
User Manual
34
2. Then tap Synchronize phone time. If your camera already has the same date and
time as your phone, this option is not available.
Reboot and Restore
Reolink Wireless Camera
User Manual
35
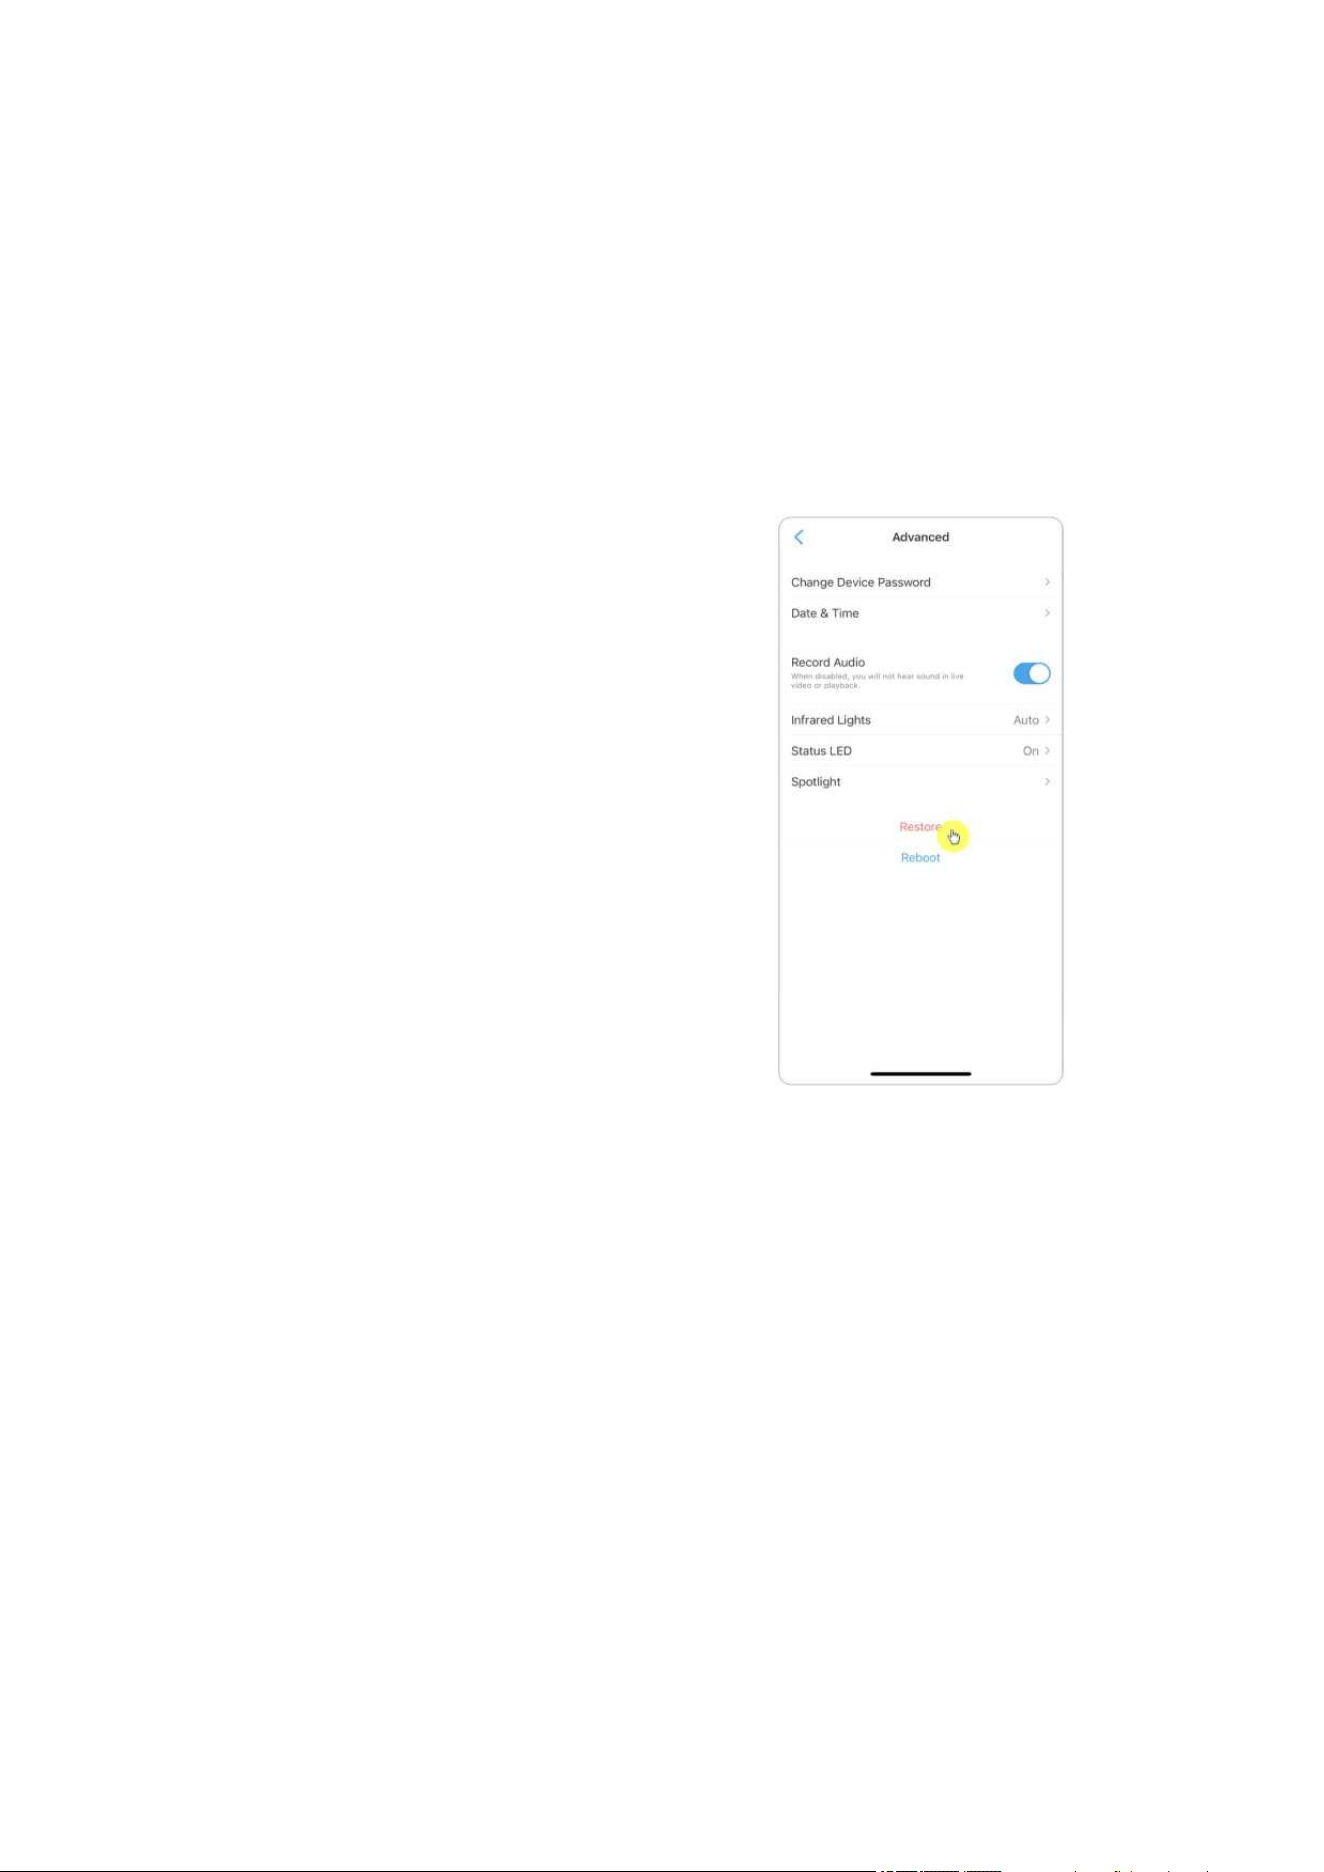
Launch the Reolink App and tap > Advanced > Reboot or Restore. Here you can
choose to reboot the camera or restore the camera to default.
Note:
Restoring will remove all the camera settings including camera password, camera
name, PIR settings, etc.
Firmware Upgrade
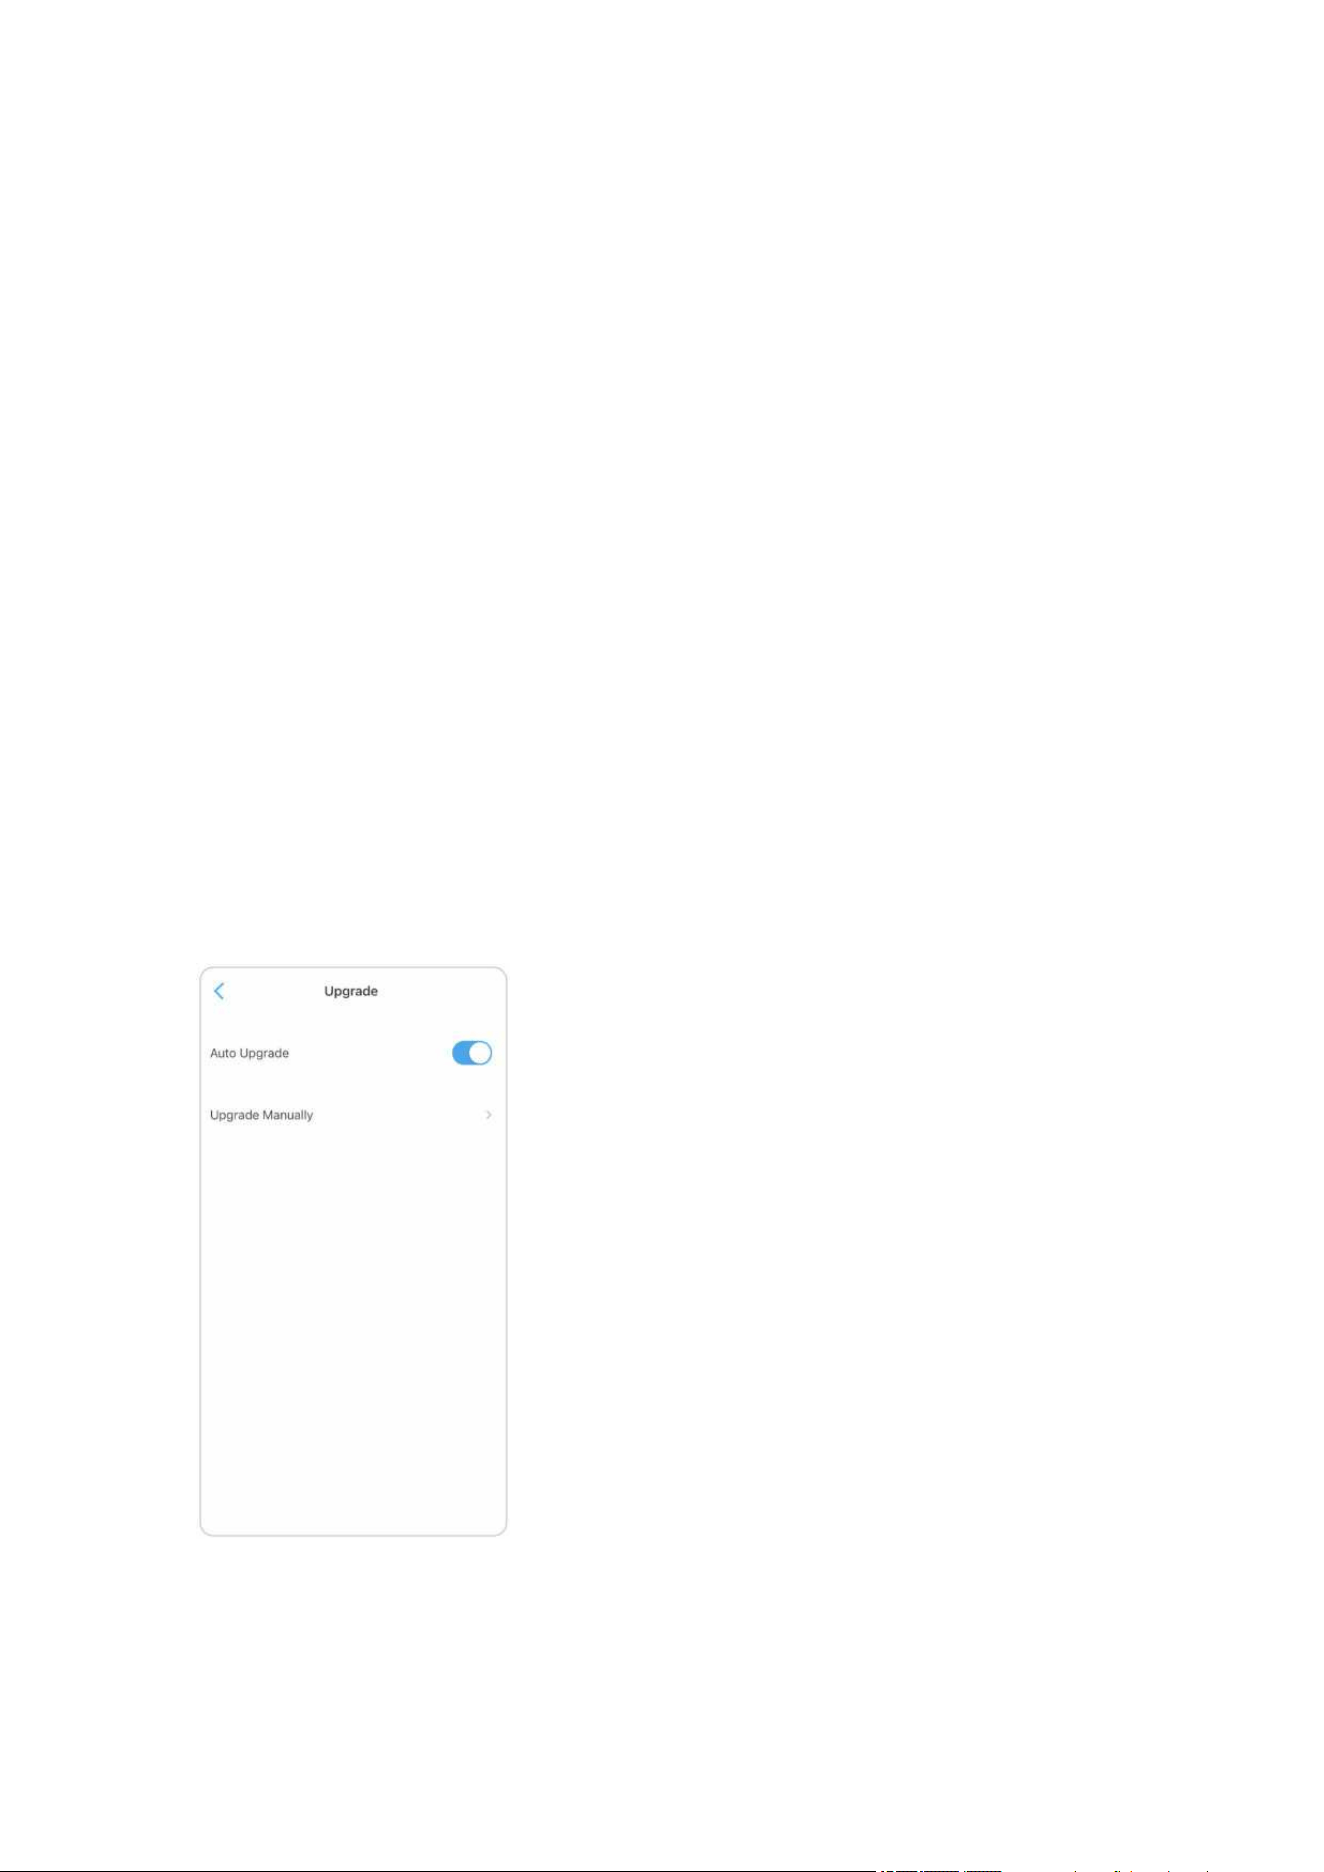
1. Launch the Reolink App and tap > Device Info > Upgrade Device.
Reolink Wireless Camera
User Manual
36
2. If Auto upgrade turns on, the camera will upgrade to the latest firmware
automatically.
Reolink Wireless Camera
User Manual
37
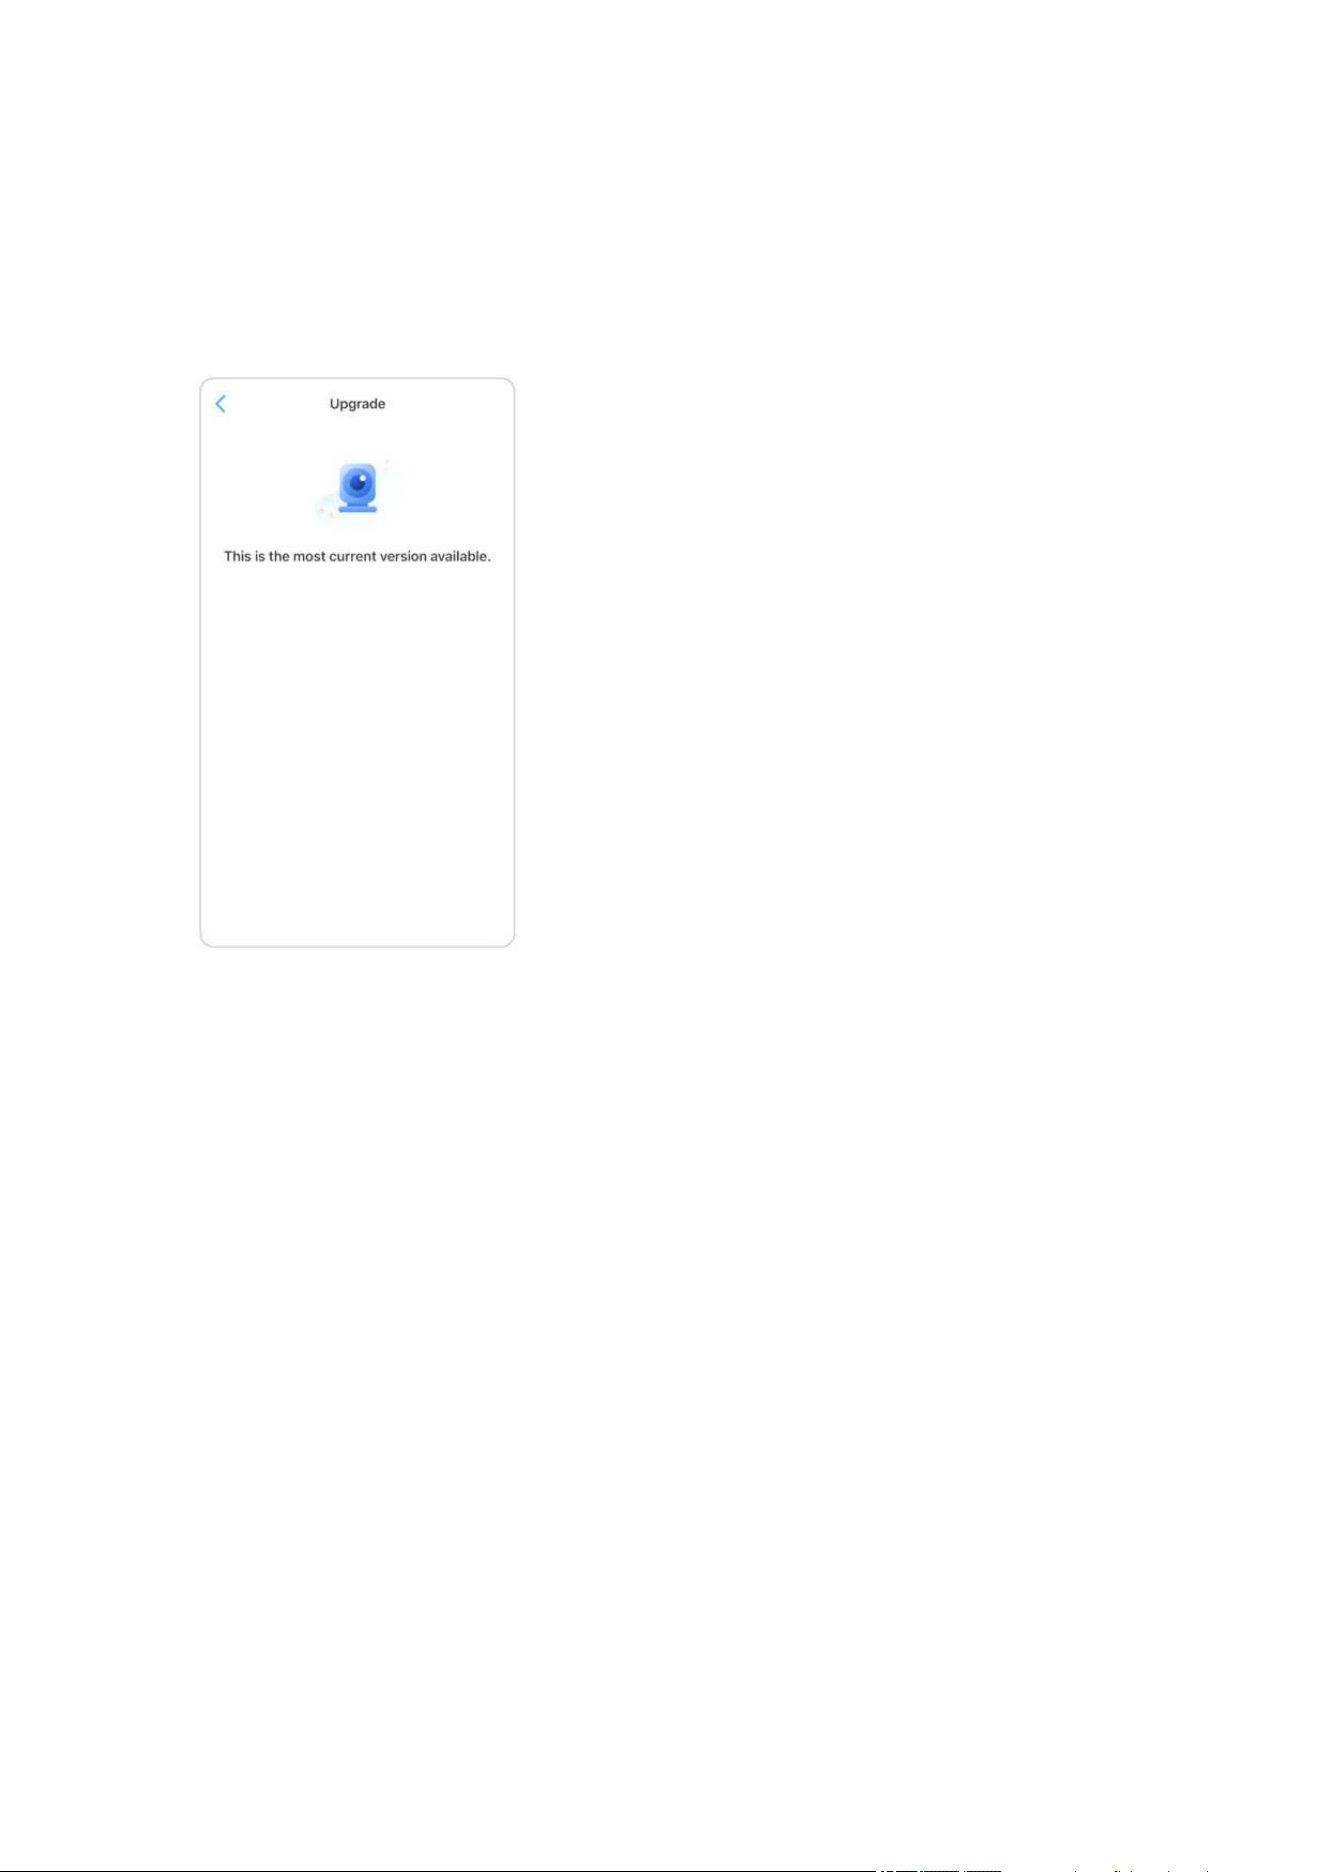
3. If Auto upgrade is off, you can choose to upgrade manually. When you see the
image below that means the camera’s firmware is already the latest one, there is no
newer firmware to upgrade.
Note:
The online upgrading is only available for cameras with the hardware version of
IPC_523, but it will not take into effect unless there is online firmware released.
Smart Homes
For smart homes, Reolink cameras have supported displaying videos on Google Home
or Amazon Alexa. For Reolink WiFi camera, the model E1, E1 pro, E1 zoom, Reolink
Lumus, E1 outdoor and cameras with hardware IPC_513, IPC_515 and IPC_523
support the smart home feature.

Reolink Wireless Camera
User Manual
38
Reolink Wireless Camera
User Manual
39
Google Home
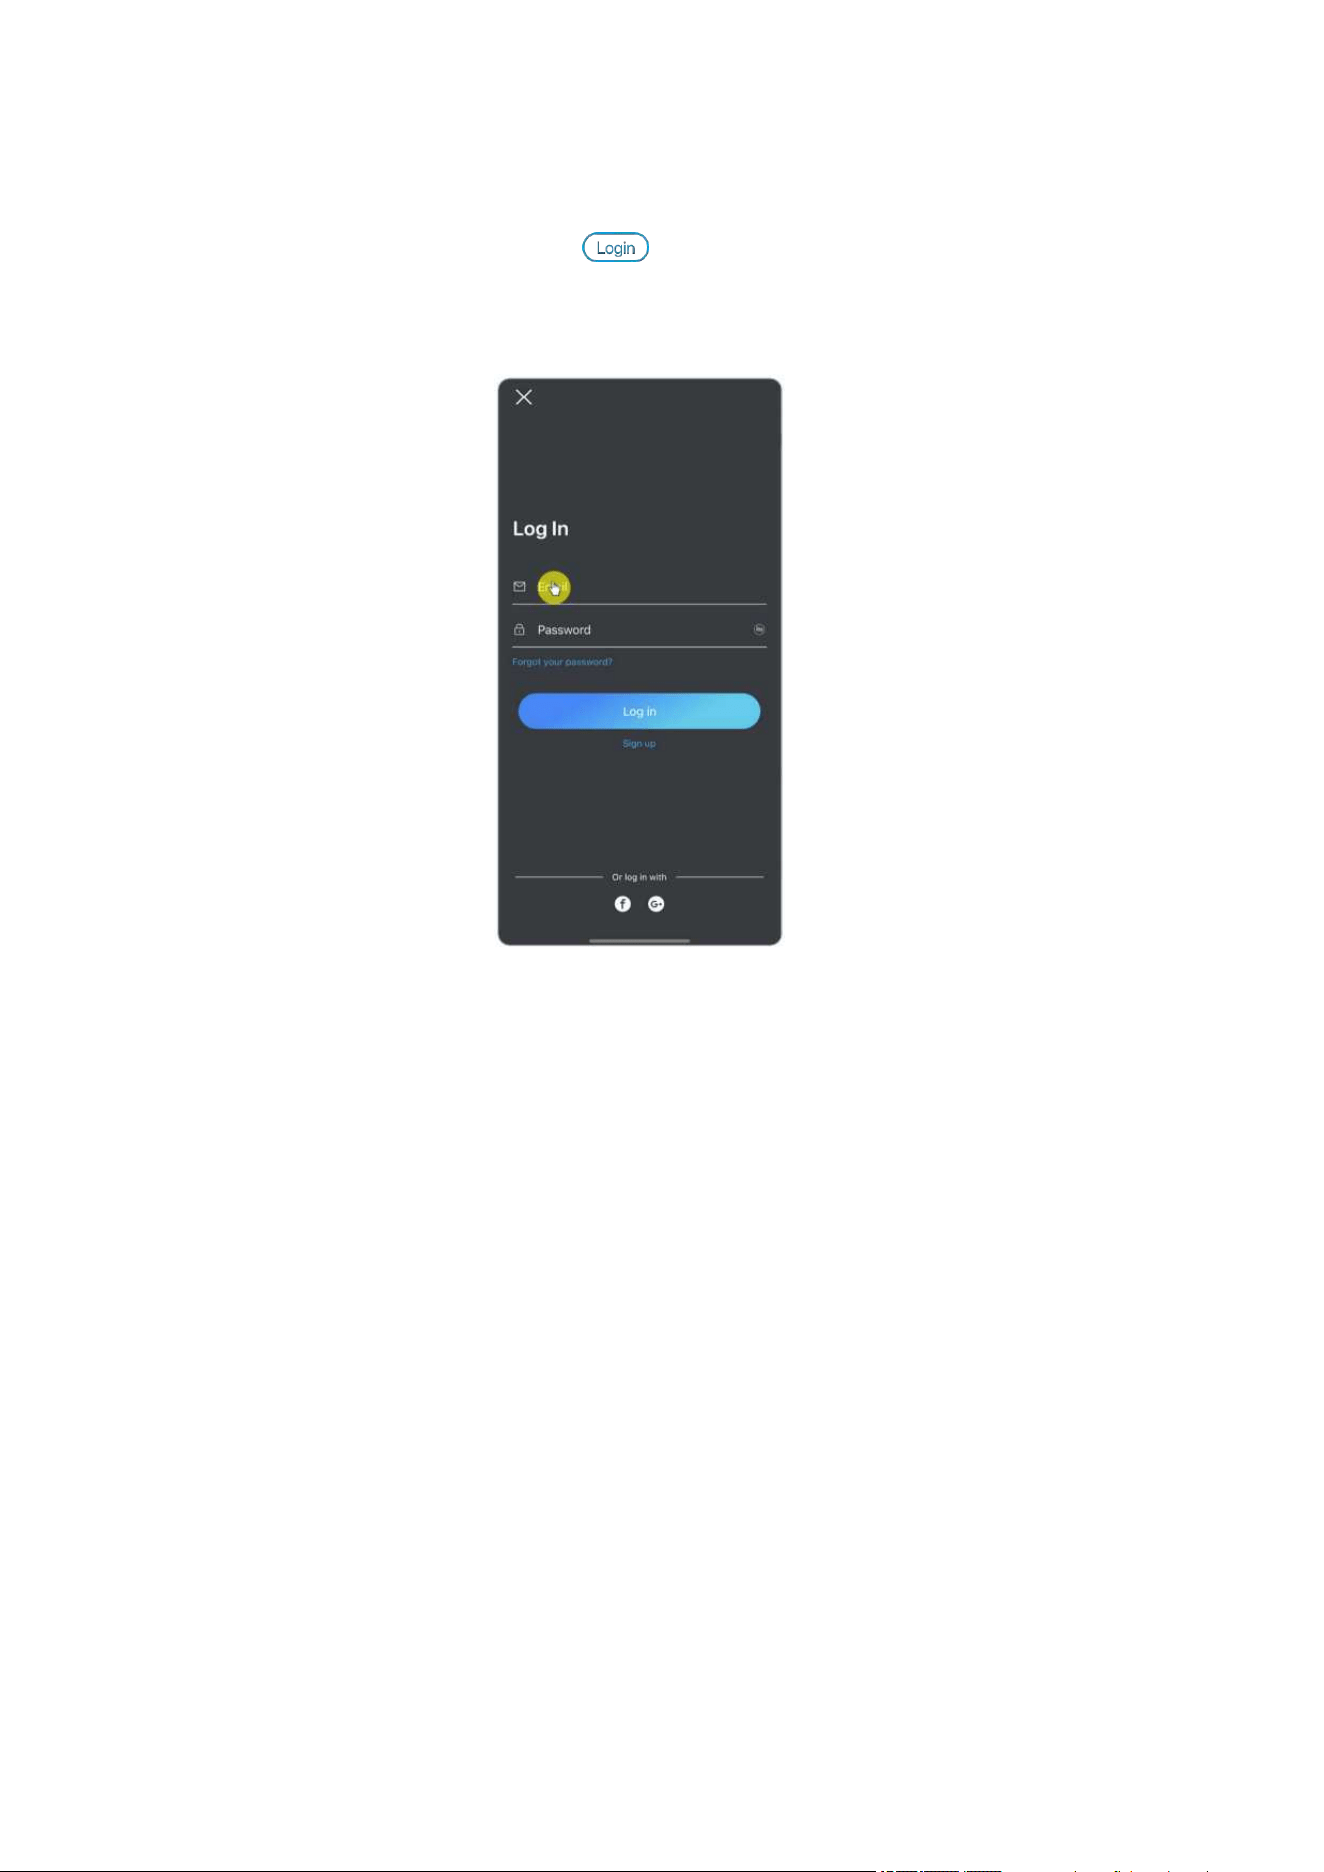
1. Launch the Reolink App to tap to log in your Reolink account and go to
cloud > Smart home.
2. Tap Enable to add the device to Google Home in the Smart Home page.
Note: Only when it turns to disable that means the smart home feature is enabled.

Reolink Wireless Camera
User Manual
40
Reolink Wireless Camera
User Manual
41
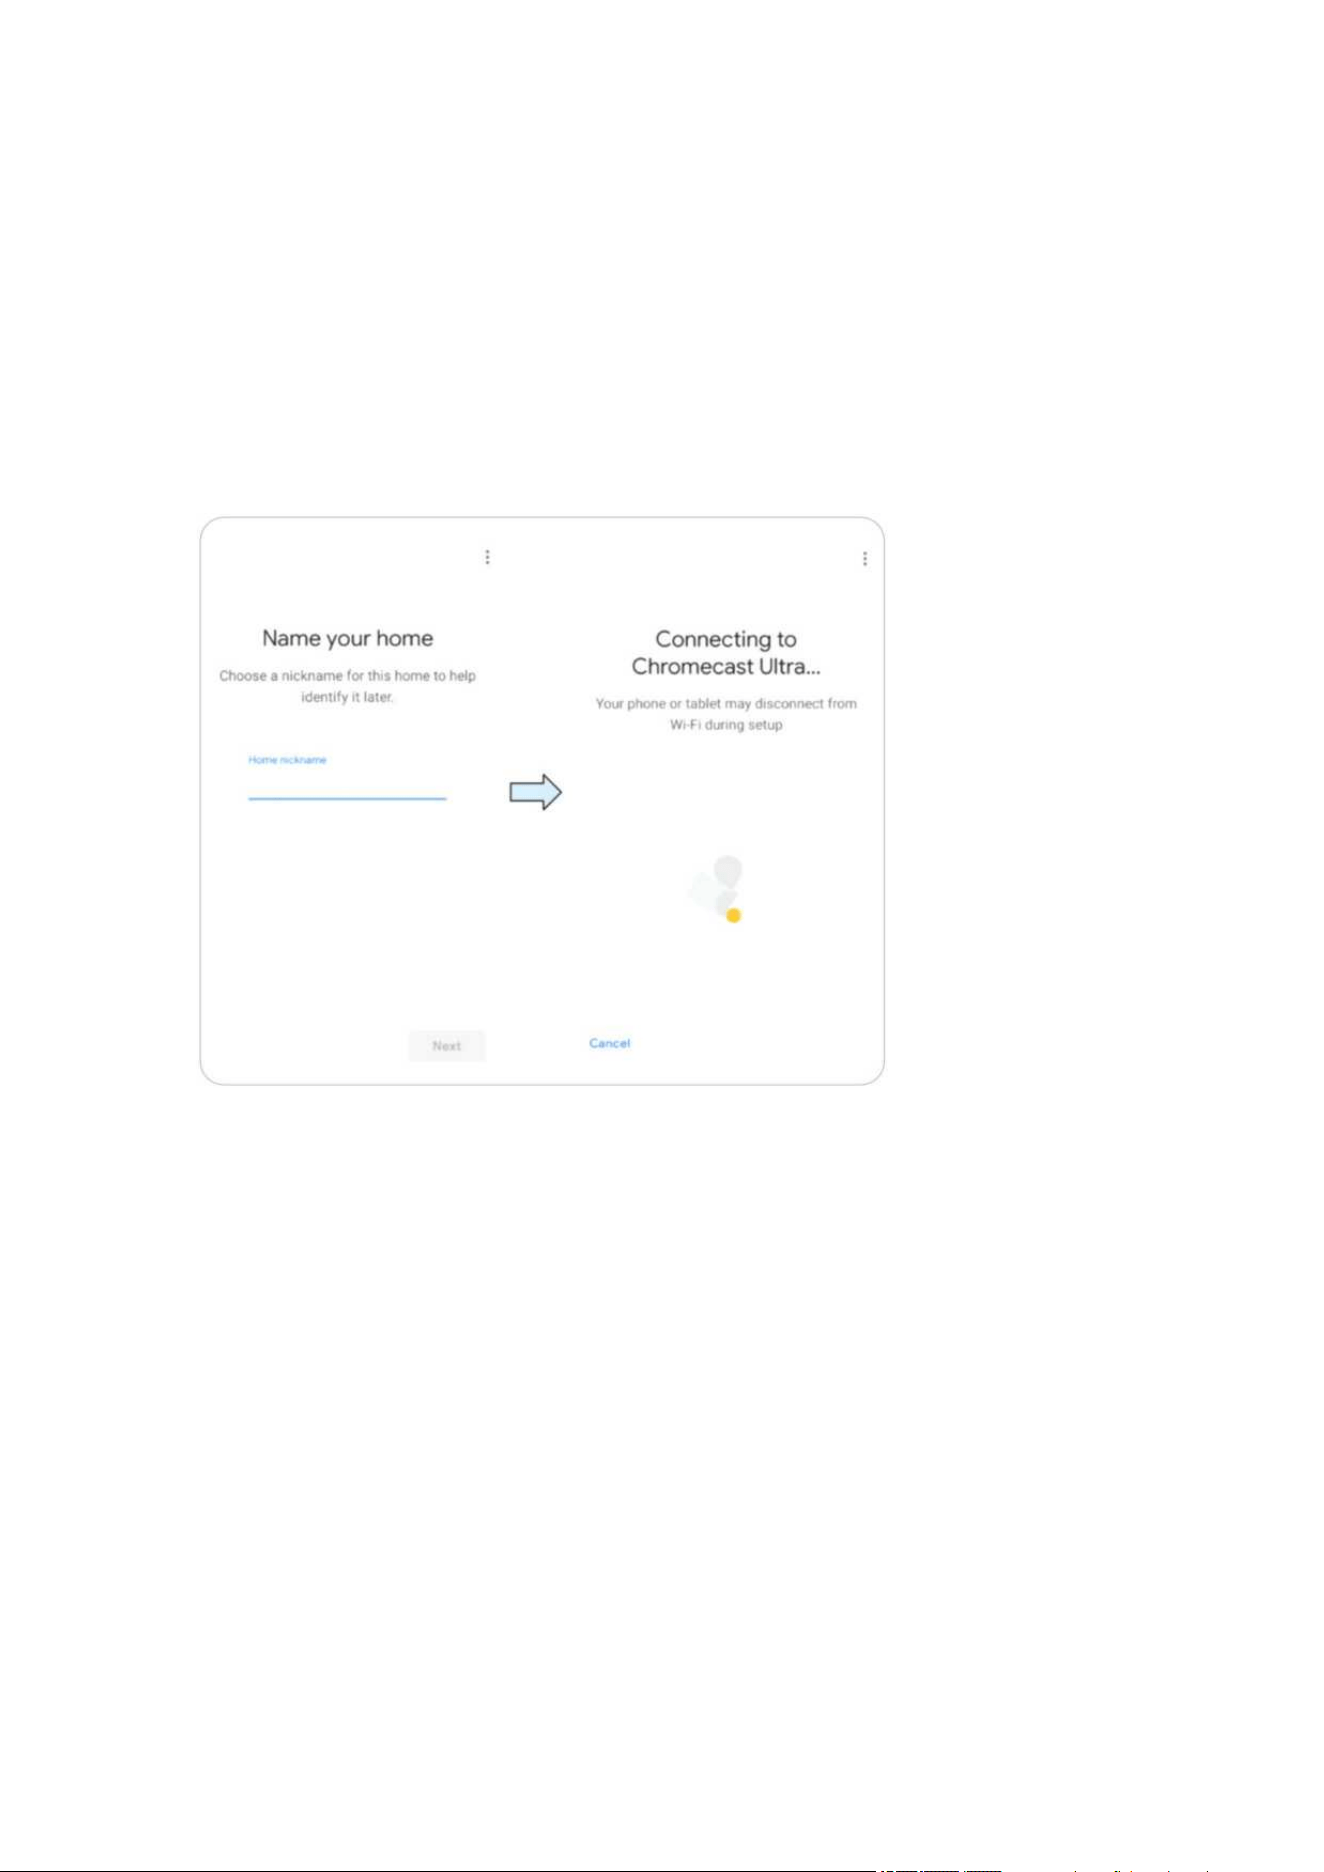
3. Launch the Google Home App, sign in your account and then tap Get Started to
create a home.
4. Name your home and tap Next to build a connection between
the Chromecast and the Google Home.
5. After the Chromecast found, please check the code shown on your TV and
tap Yes to continue.

Reolink Wireless Camera
User Manual
42
Reolink Wireless Camera
User Manual
43
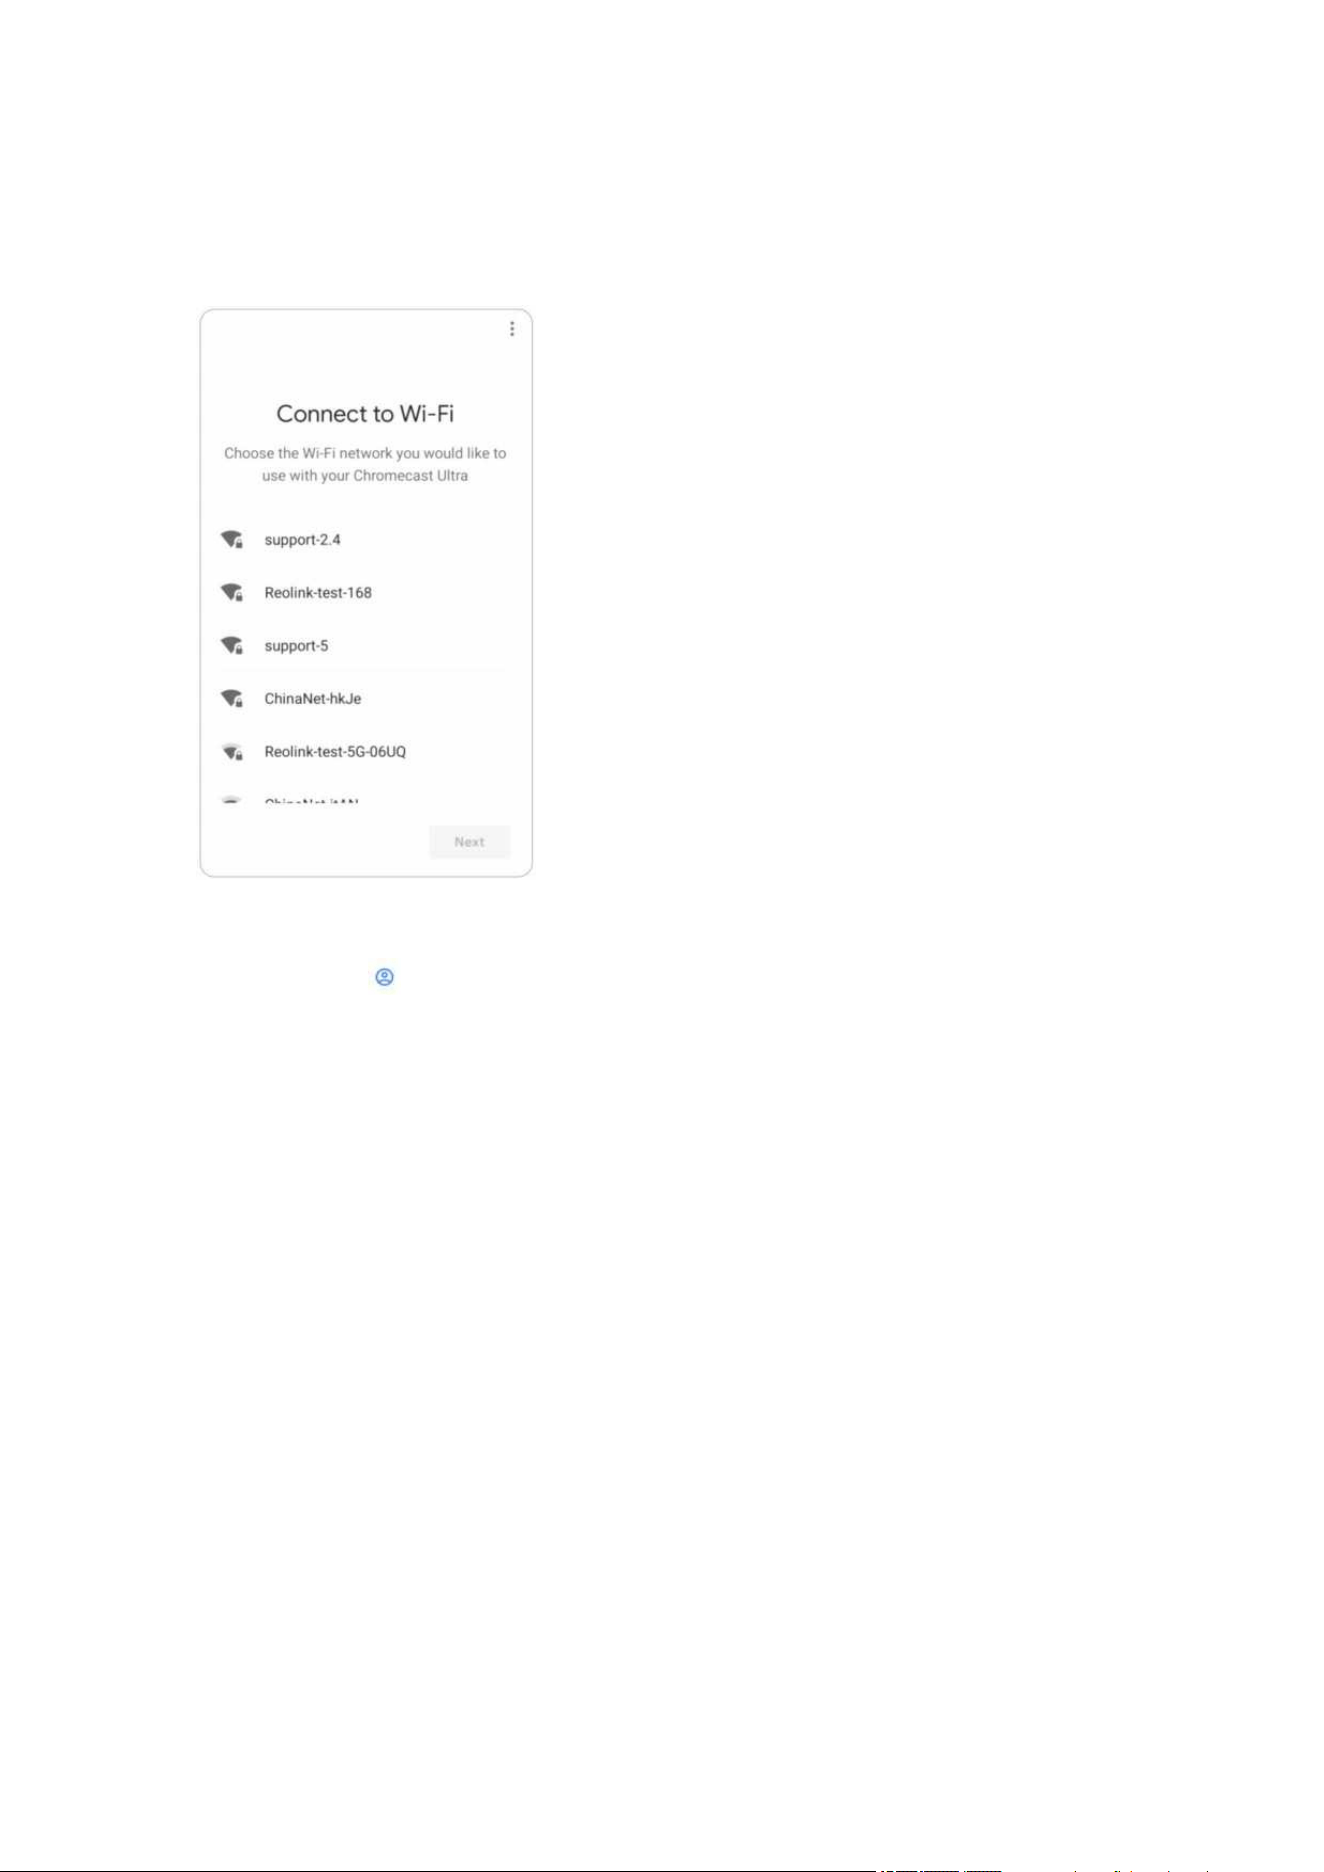
6. Connect the Wi-Fi network you would like to use with your Chromecast, then you
can customize a room name, which will be added to your room list.
7. Now tap the button to enter the account page, and then tap Settings >
Assistant > Home Control.

Reolink Wireless Camera
User Manual
44

Reolink Wireless Camera
User Manual
45
8. Tap the button and search Reolink in the search bar.
9. Enter your Reolink account and password to log in first, then tap Allow.

Reolink Wireless Camera
User Manual
46
10. Assign the room for the camera you enabled in the Cloud account via Reolink
App.
11. Done! Now you've added the Reolink camera to the Google Home successfully.
To test your camera, please launch the Google Assistance and say “Hey Google,
show [name of room where the camera is placed] on [name of Chromecast device].”
Amazon Alexa
To connect your camera to Alexa, make sure you have 3 devices at hand: a Reolink
camera, an Amazon Alexa device (such as Amazon Echo Show, Amazon Echo Dot)
and your mobile phone; and 2 apps on your phone: the Reolink App and Amazon
Alexa App.

Reolink Wireless Camera
User Manual
47
Alexa doesn't support all countries currently; it is only available for the countries
below:
America: United States, Brazil, Canada, Mexico
Europe: Germany, Spain, France, Italy, United Kingdom
Asia & Oceania: Japan, India, Australia
Reolink Wireless Camera
User Manual
48
1. Launch the Reolink App to tap to log in your Reolink account and go to
Cloud > Smart Home.
2. Tap Enable to add the device to Amazon Alexa in the Smart Home page.
Note: Only when it turns to disable that means the smart home feature is enabled.
Reolink Wireless Camera
User Manual
49
3. Launch the Amazon Alexa App, sign in to your Alexa account and then tap on
Devices in the bottom right corner.
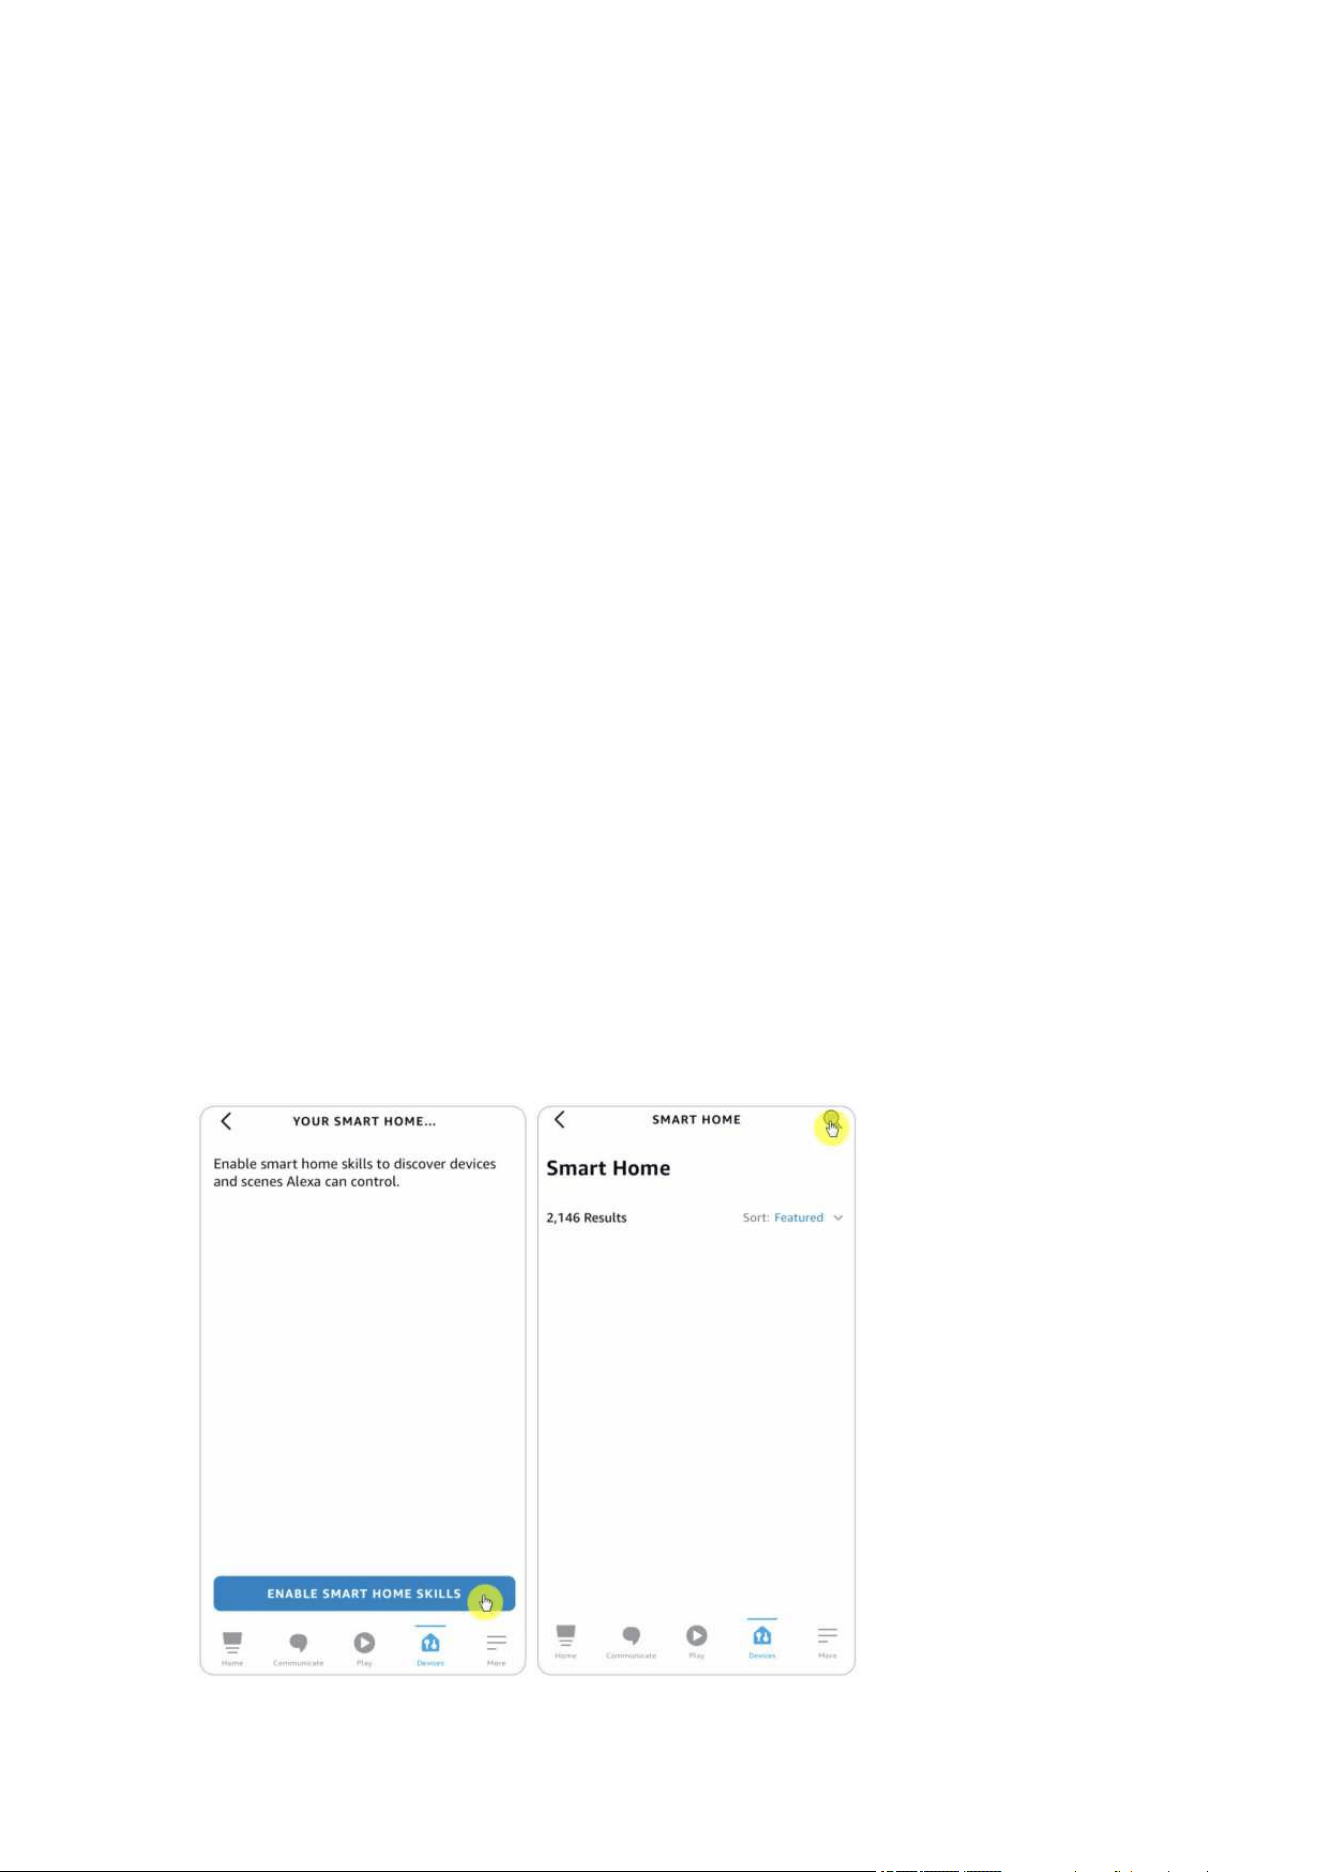
4. Select Your Smart Home Skills and tap Enable Smart Home Skills. Please tap the
Search icon at the top right corner and search Reolink Smart Home.

Reolink Wireless Camera
User Manual
50
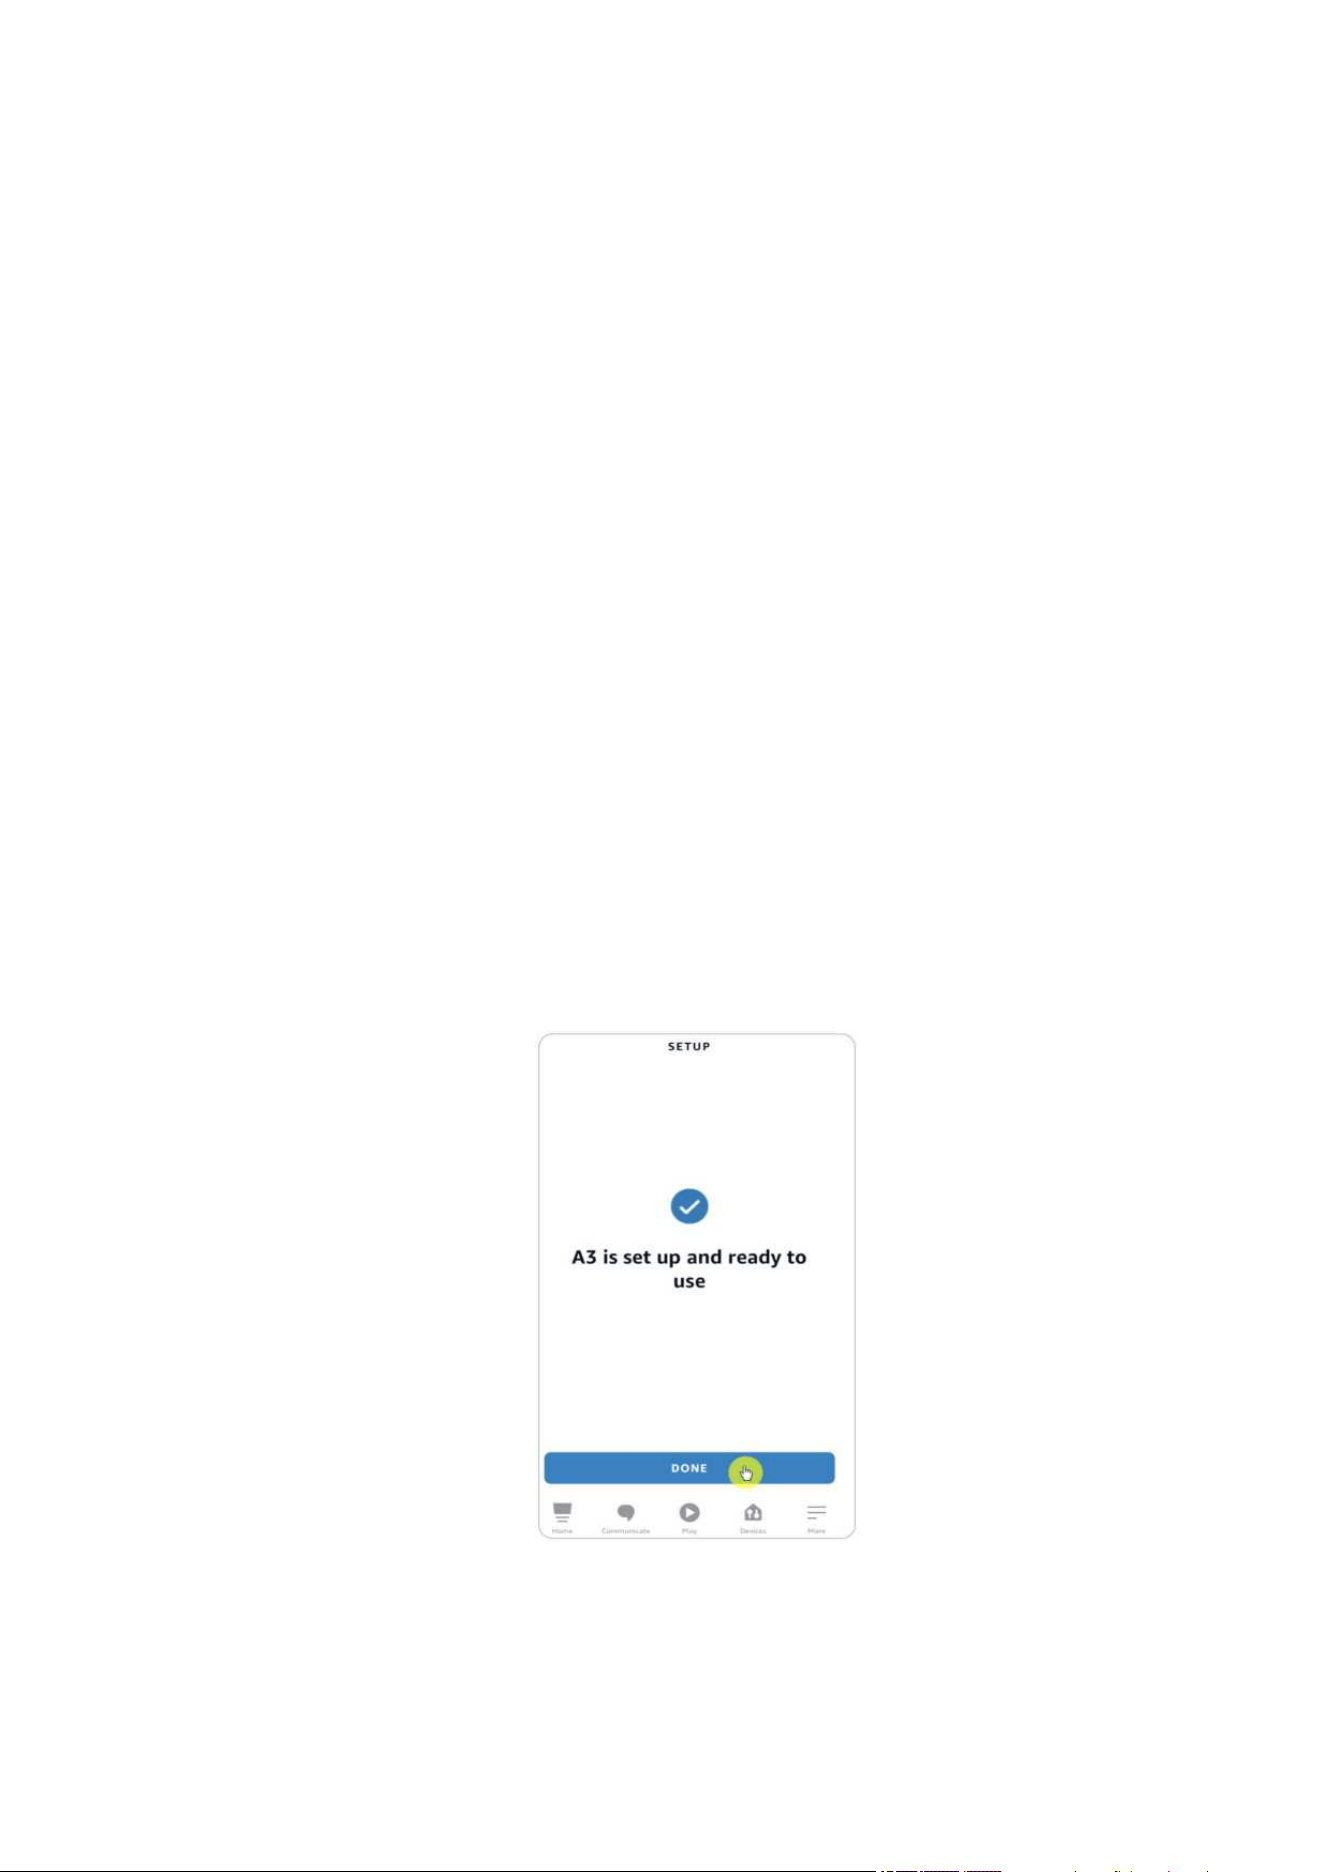
5. After search and find Reolink Smart Home, tap ENABLE TO USE.
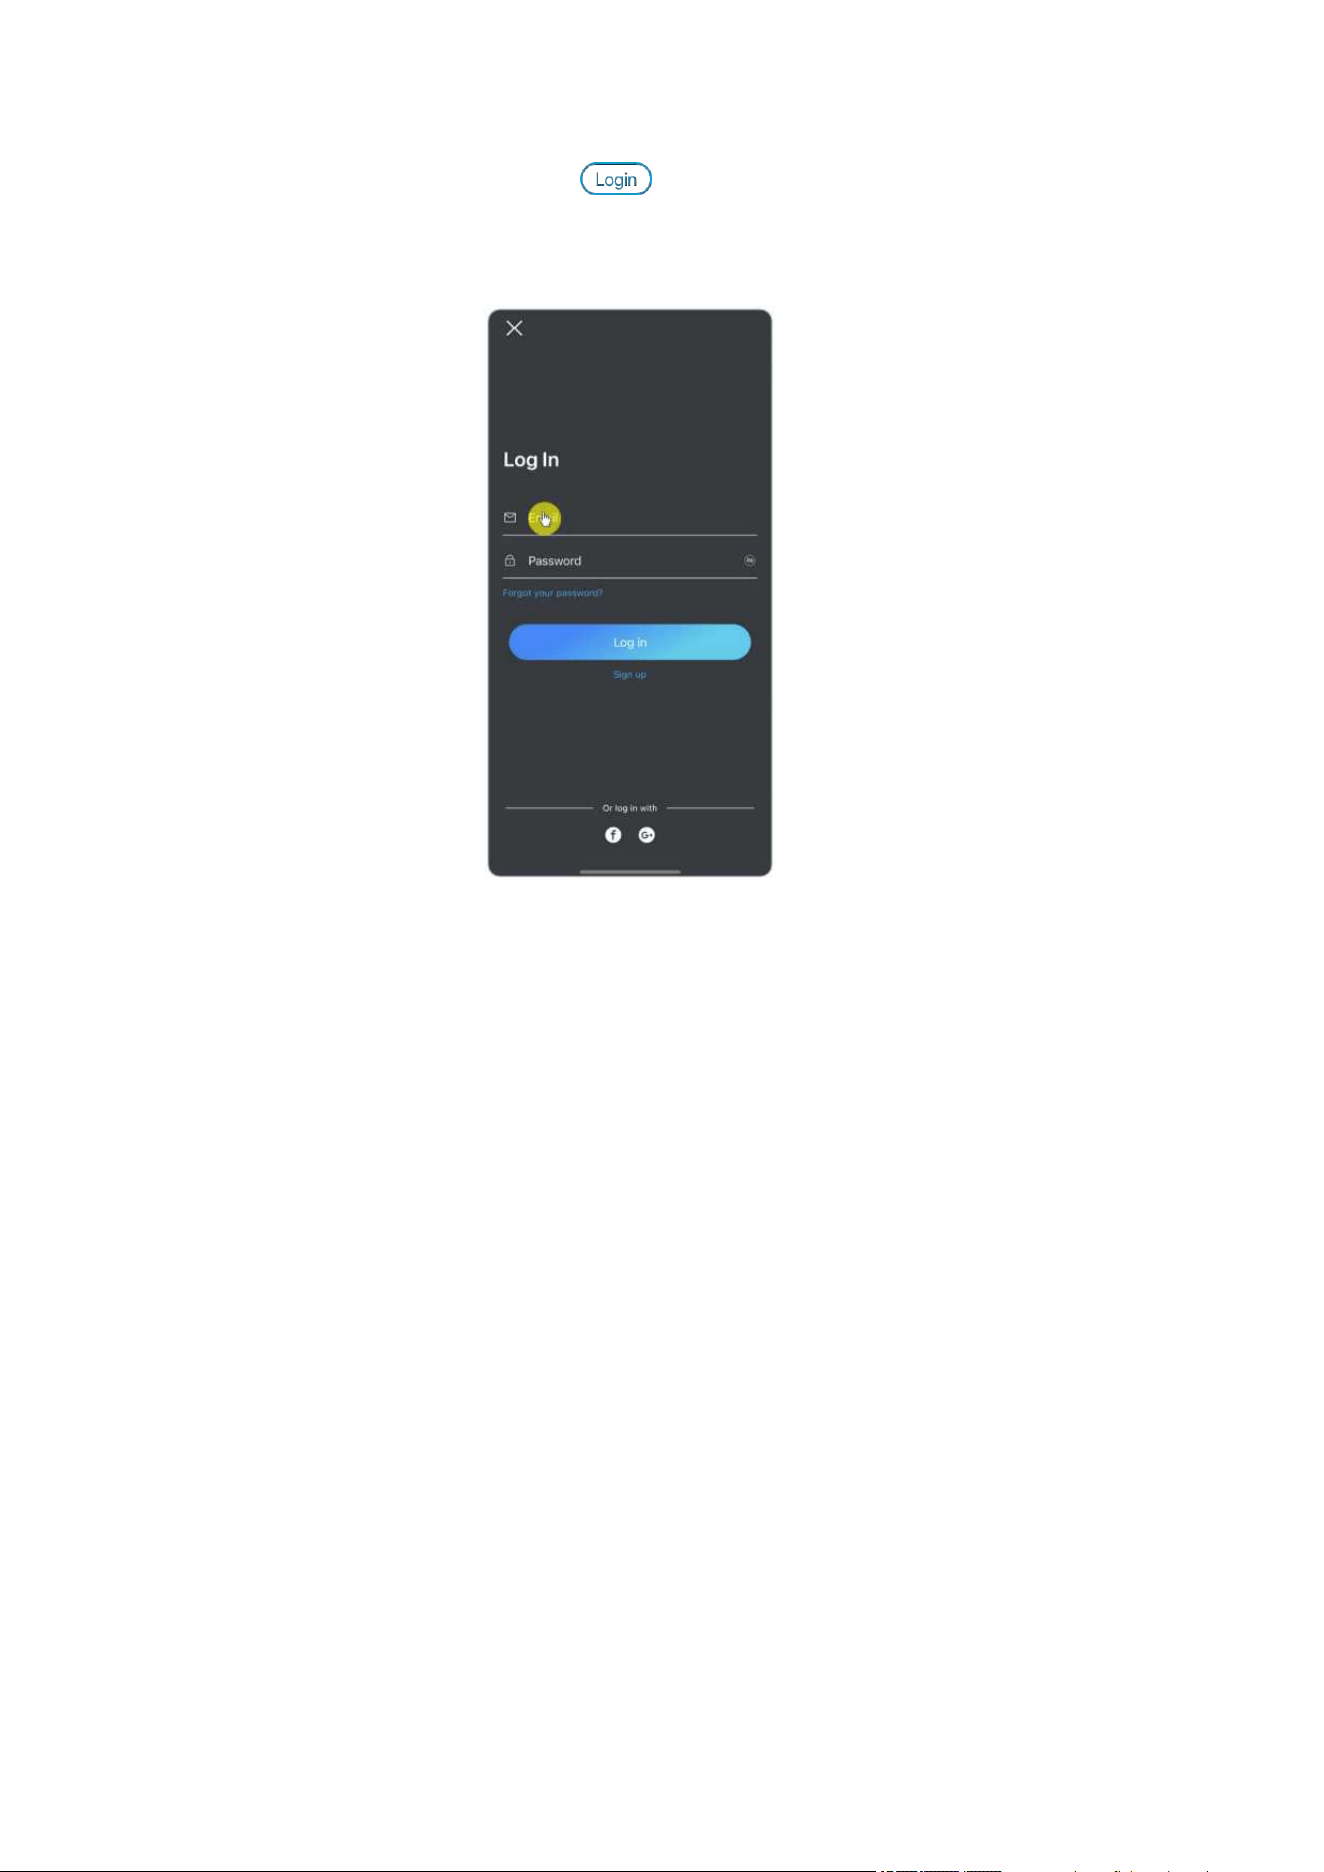
6. Type in your Reolink account, and then tap Log in. After logging in successfully,
then tap Allow, the App will remind that “Reolink Smart Home has been successfully
linked”. Tap Close to go to the next step.
Reolink Wireless Camera
User Manual
51
7. Tap on Discover Devices or say the voice command "Alexa, discover devices". Alexa
will scan and show the cameras bound to your Reolink account.
8. Tap Set up Device. You can tap Choose Group to add your device to a group if you
want to, or you can skip this step and tap Close to finish the setup.
9. Done! Now you've added the Reolink camera to Amazon Alexa successfully.

Reolink Wireless Camera
User Manual
52
To test your camera, turn on the Amazon device and say "Alexa, show [name of the
camera] " to view the live feed and say "Alexa, stop [name of the camera]" to stop
the live feed.

Reolink Wireless Camera
User Manual
53
8. FAQs and Troubleshooting
FAQs
Q1: Can customers from European countries use Cloud service?
A: No, the Cloud service is not available in European countries. We recommend that
you install a micro SD card to record footage.
Q2: Can this camera work with 256GB micro SD card?
A: No, the camera can only support up to 128GB with format FAT32, class 10 or
above. (Note: Some of the cameras can only support up to 64GB SD card).
Q3: Can my friend access the camera with his or her smart phone?
A: Yes, your friend can access the camera with his or her smart phone. The camera
can support up to 8 simultaneous video streams (6 sub streams & 2 mainstreams).
You can share the camera to a friend through camera Settings > Share Camera.
Q4: Can Reolink WiFi cameras work with Reolink NVR?
A: Yes, WiFi cameras can work with the NVR. You just need to connect the camera
to the same router as the NVR is.
Q5: Can Reolink WiFi cameras work with Blue iris, Synology, QNAP or other
branded third party software?

Reolink Wireless Camera
User Manual
54
A: Yes, Reolink WiFi cameras can work with third-party software and device such
as Blue iris, Synology and QNAP. But for better stability and compatibility, it’s
suggested to use Reolink Client or App to manage the Reolink cameras.
Q6: Can I use a power extension cable?
A: Yes, you can use the Reolink official 4.5-meter power extension cable. You can
connect up to two power extension cables.
Q7: What’s the specification of the power adapter for the Reolink WiFi cameras?
A: For E1 Series and Reolink Lumus, the power adapter is 5V 1A or 5V 2A. For the
other RLC-X WiFi cameras, the power adapter is 12V 1A or 12V 2A.
Q8: How to protect camera from water intrusion?
A: Please avoid using indoor cameras outdoors. And for outdoor cameras you can
check precautions below to help protect camera from water infiltration.
·For E1 Outdoor, please mount it upside down to be waterproof.
·Mount cameras under eaves or other covers,instead of directly in the open air .
·When the camera must be mounted directly in the open air, it is recommended to
use a conjunction box to protect the bullet/dome camera’s cords. Or install the
waterproof lid and use waterproof tap to wrap up the bullet/dome camera’s cords.
·Avoid open up or disassemble the camera when mounting the camera, as it’ll
damage the camera’s airtightness.

Reolink Wireless Camera
User Manual
55
Q9: How to upgrade the camera’s firmware?
A: To upgrade the camera, please do it on the Reolink Client software on the
computer. And the latest firmware can be downloaded at the Download Center. If
you’re not sure which is the correct firmware for your camera, please contact
Reolink Support for help.
Q10: Can I use the camera without a router or internet access?
A: Without a router or internet access, the camera can still work to detect motion
and save recordings to SD card after its setup. Only that, without a router or
internet access, you’d be unable to connect the camera to view live video or play back
video easily. And all the features that require an internet access to work, such as
alarm email and push notification, will stop working.
Troubleshooting
Camera Is Not Powering on
When Reolink WiFi camera is not starting up, please try the following solutions:
·Please ensure to connect the correct power adapter.
·Try with another power socket.
·Try with another power adapter.
·Make sure the DC connector is tight and properly connected to the camera body.
If these don’t work, please contact Reolink Support.

Reolink Wireless Camera
User Manual
56
Camera Failed to Scan QR Code on the Phone
When camera cannot scan the QR code on your phone during the initial setup
process, please try the following solutions:
·Remove the protective film from the camera lens.
·Wipe the camera lens with a dry paper/towel/tissue.
·Tap the QR code on the phone to make it in full screen, or use a tablet to set it up.
·Adjust the phone screen brighter if the screen is dark.
·Adjust the distance between your camera and the mobile phone so that the camera
can focus better.
·Make sure there is enough illumination.
If these don’t work, please contact Reolink Support.
Camera Failed to Connect to Wi-Fi During Initial Setup Process
If the camera fails to connect to WiFi or prompts “Connection to router failed”,
please try the following solutions:
·Make sure that you have entered the correct Wi-Fi password.
·Put the camera closer to your router to ensure strong Wi-Fi signals.
·Make sure the router’s band and wireless channel is supported by the camera, for
some cameras they can only work with 2.4 Ghz WiFi.

Reolink Wireless Camera
User Manual
57
·Change the encryption method of the Wi-Fi network to WPA2-PSK/WPA-PSK
(safer encryption) on your router interface.
·Change your Wi-Fi SSID or password and make sure the SSID is within 31
characters and the password is within 64 characters.
·Set your password using only the characters available on the keyboard.
·If these don’t work, please contact Reolink Support.
Cannot Access the Camera Remotely
The camera can connect properly at the same network, but cannot connect when
you’re away. Please check the trouble shooting steps below:
·Check at the camera’s Network Status page to ensure the camera has obtained DNS
server numbers.
·Reboot the camera and router.
·Ensure the UDP ports of the camera in your router are enabled. And if you are not
sure how to check it, please contact your router or internet provider.
·Check on the computer or phone, there’s no firewall, proxy, VPN, and so on that
may block the camera’s connection.
·Switch to try both WiFi and 4G connection on the phone.
·Test the camera with another phone or computer.
·At last, contact Reolink Support with the camera’s UID for further help.
Camera Shows Incorrect Password

Reolink Wireless Camera
User Manual
58
When you add or connect the camera’s video, it shows incorrect password, please
follow the solutions below:
If you still have a phone or computer that can access the camera, please directly
restore the device via the software. After restoring, you can create a new password.
For Reolink App, go to camera Settings > Advanced page, click Restore.
For Reolink Client, go to camera Settings > System > Maintenance, click Restore.
If currently no device has access to the camera, you have to reset it by pressing the
reset button on the camera. Then set up the camera again from the start.
Please find the detailed steps about reset in this article: How to Reset Reolink Devices
on Reolink website.
Camera Can’t Detect the SD Card
After installing the SD card, the camera cannot detect or recognize the SD card,
please follow the steps below to trouble shoot.
·Please ensure the SD card specification meet the camera’s requirement.
·Ensure to format the SD card to FAT32 format.
·Ensure the SD card is correctly installed, and restart the camera to check again.
·Try another SD card.