1
Owner’s Manual
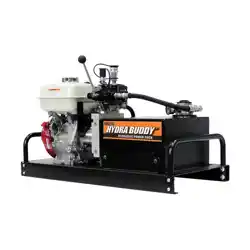
Brave Hydra Buddy™ Hydraulic Power Pack
OPERATION AND MAINTENANCE
About Your Hydraulic Power Pack
Product Suitability and Limitations
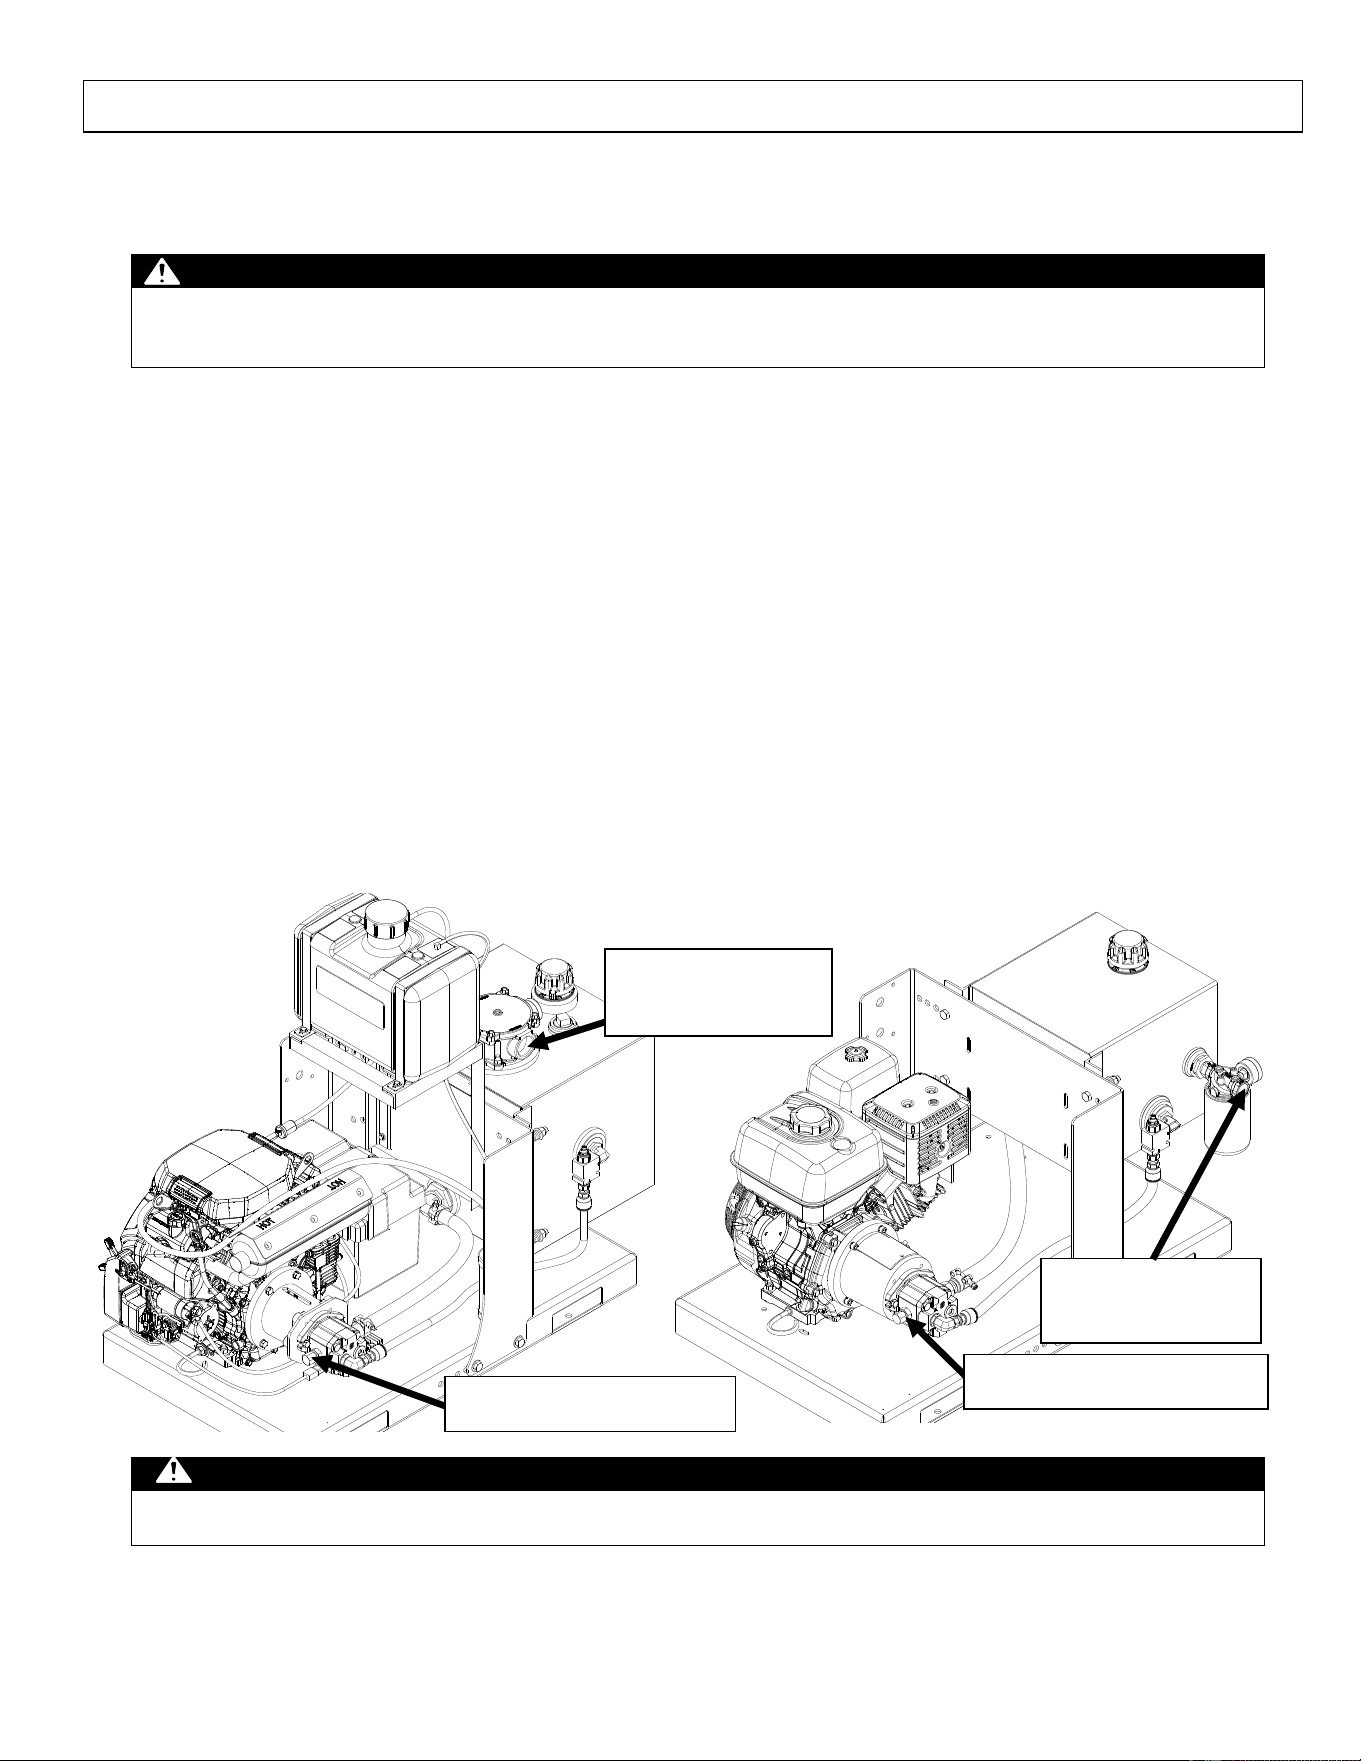
Our self-contained hydraulic power units are compact and offer portable hydraulic power for remotely powering
hydraulic equipment. Our power units can also be mounted into equipment as a primary hydraulic power source given
the flow, pressure, reservoir capacity, and duty cycle are carefully considered. Typical applications include agriculture,
construction, trades, lifting, jacking, equipment repair, and fabrication work. This unit is not intended to be plumbed
into a closed center hydraulic system.
HBHR units come factory with a 4-way directional control valve with integral system relief valve. HBHR units are
equipped with ½” quick-disconnects that are installed into the work ports of the directional control valve. HBHS units
come factory with a system relief valve.
The HBHS units can also be field retrofitted to include optional bulkhead mounted ½” quick-disconnects with
appropriate plumbing kit, and a single 4-way directional control valve with integral relief valve.
The HBHS units driven by the Honda GX630 V-Twin engine can also be field retrofitted with a return line heat
exchanger for applications that run more continuous and require additional cooling of the hydraulic fluids. The return
line heat exchanger kit comes with a mounting bracket assembly, 12 VDC fan cooler, appropriate plumbing, wire
harness, and hardware.
Each unit has a specific flow and pressure rating that should be carefully reviewed to ensure the power pack will provide
adequate system flow, pressure, & reservoir capacity for the given application being considered.
Only the HPHS units with the Honda V-Twin engine can support the 12 Volt heat exchanger (cooler) due to the required
amp draw from the 12 VDC fan and on-board charging system of the Honda GX630 engine.
Power packs without a return cooler should not be used in applications where hydraulic oil temperatures exceed 180
degrees F for any amount of time. If the hydraulic system reaches 180 degrees F. the system should be shut down
immediately and the application should be reviewed.
Contact Brave Customer Service at 1-800-350-8739 about the appropriate use of this Hydraulic Power Pack, optional
accessories or any other questions.
Hydraulic Hose and Fitting Requirements
The rated working pressure of hydraulic hoses must be equal to or higher than the maximum pressure rating of the
hydraulic unit. Each of the HBHR and HBHS units have a unique pressure rating they are capable of achieving. Please
refer to the specific assembly flow and pressure rating and size hydraulic hose and fittings appropriately.
½” quick-disconnects can be provided for each HBHS unit upon request. If the couplers provided do not interchange
with the powered equipment, replace with couplers that match. Brave recognizes that couplers are a necessity for quickly
connecting and disconnecting equipment however feel that if the self-contained power pack is mounted into a piece of
equipment for final assembly that quick-disconnects, adapter fittings, and hydraulic hose plumbing are carefully reviewed
to maximize the performance of the hydraulic system. Adding unnecessary couplers, adapter fittings, etc. will increase
pressure drop in a hydraulic system and reduce the efficiency of the hydraulic system.
MHBHR280A.3
Model Number: HBHR280GX, HBHR280GXE,
HBHR350GX, HBHR350GXE HBHS300GX,
HBHS300GXE, HBHS310GX, HBHS310GXE,
HBHS600GXE, HBHS610GXE, HBHS620GXE

2
Warranty Registration
Please fill in the warranty registration information in the back of this manual and have it on hand when you call in about a
warranty claim or for replacement parts you may need.
Renting or Loaning
NOTICE: Make Owner’s Manual Available
All persons to whom you rent/loan the Hydraulic Power Pack must have access to and read this manual. Keep
this owner’s manual with the Hydraulic Power Pack at all times and advise all persons who will operate the
machine to read it. You must also provide instruction on how to safely operate the Hydraulic Power Pack and
remain available to answer any questions a renter/borrower might have.
Any Questions, Comments, Problems, or Parts Orders
Call your dealer or Brave Customer Service 1-800-350-8739

3
Table of Contents
About Your Hydraulic Power Pack ............................................................................................................................................ 1
Receiving and Transporting ......................................................................................................................................................... 4
Machine Component Identification ........................................................................................................................................... 5
Specifications..................................................................................................................................................................................... 6
Safety .................................................................................................................................................................................................... 7
Safety Decal Locations .................................................................................................................................................................... 8
Safety Decals ...................................................................................................................................................................................... 9
Operation .......................................................................................................................................................................................... 10
Starting and Warm-up Before Use ........................................................................................................................................... 12
Using Hydraulic Motor Implement .......................................................................................................................................... 13
Using Hydraulic Cylinder Implement ..................................................................................................................................... 15
Refueling ........................................................................................................................................................................................... 16
Storing ................................................................................................................................................................................................ 17
Maintenance & Repair .................................................................................................................................................................. 18
Troubleshooting ............................................................................................................................................................................. 23
Summary of Important Safety Information .......................................................................................................................... 25
Special Safety Information on Static Electricity .................................................................................................................. 29
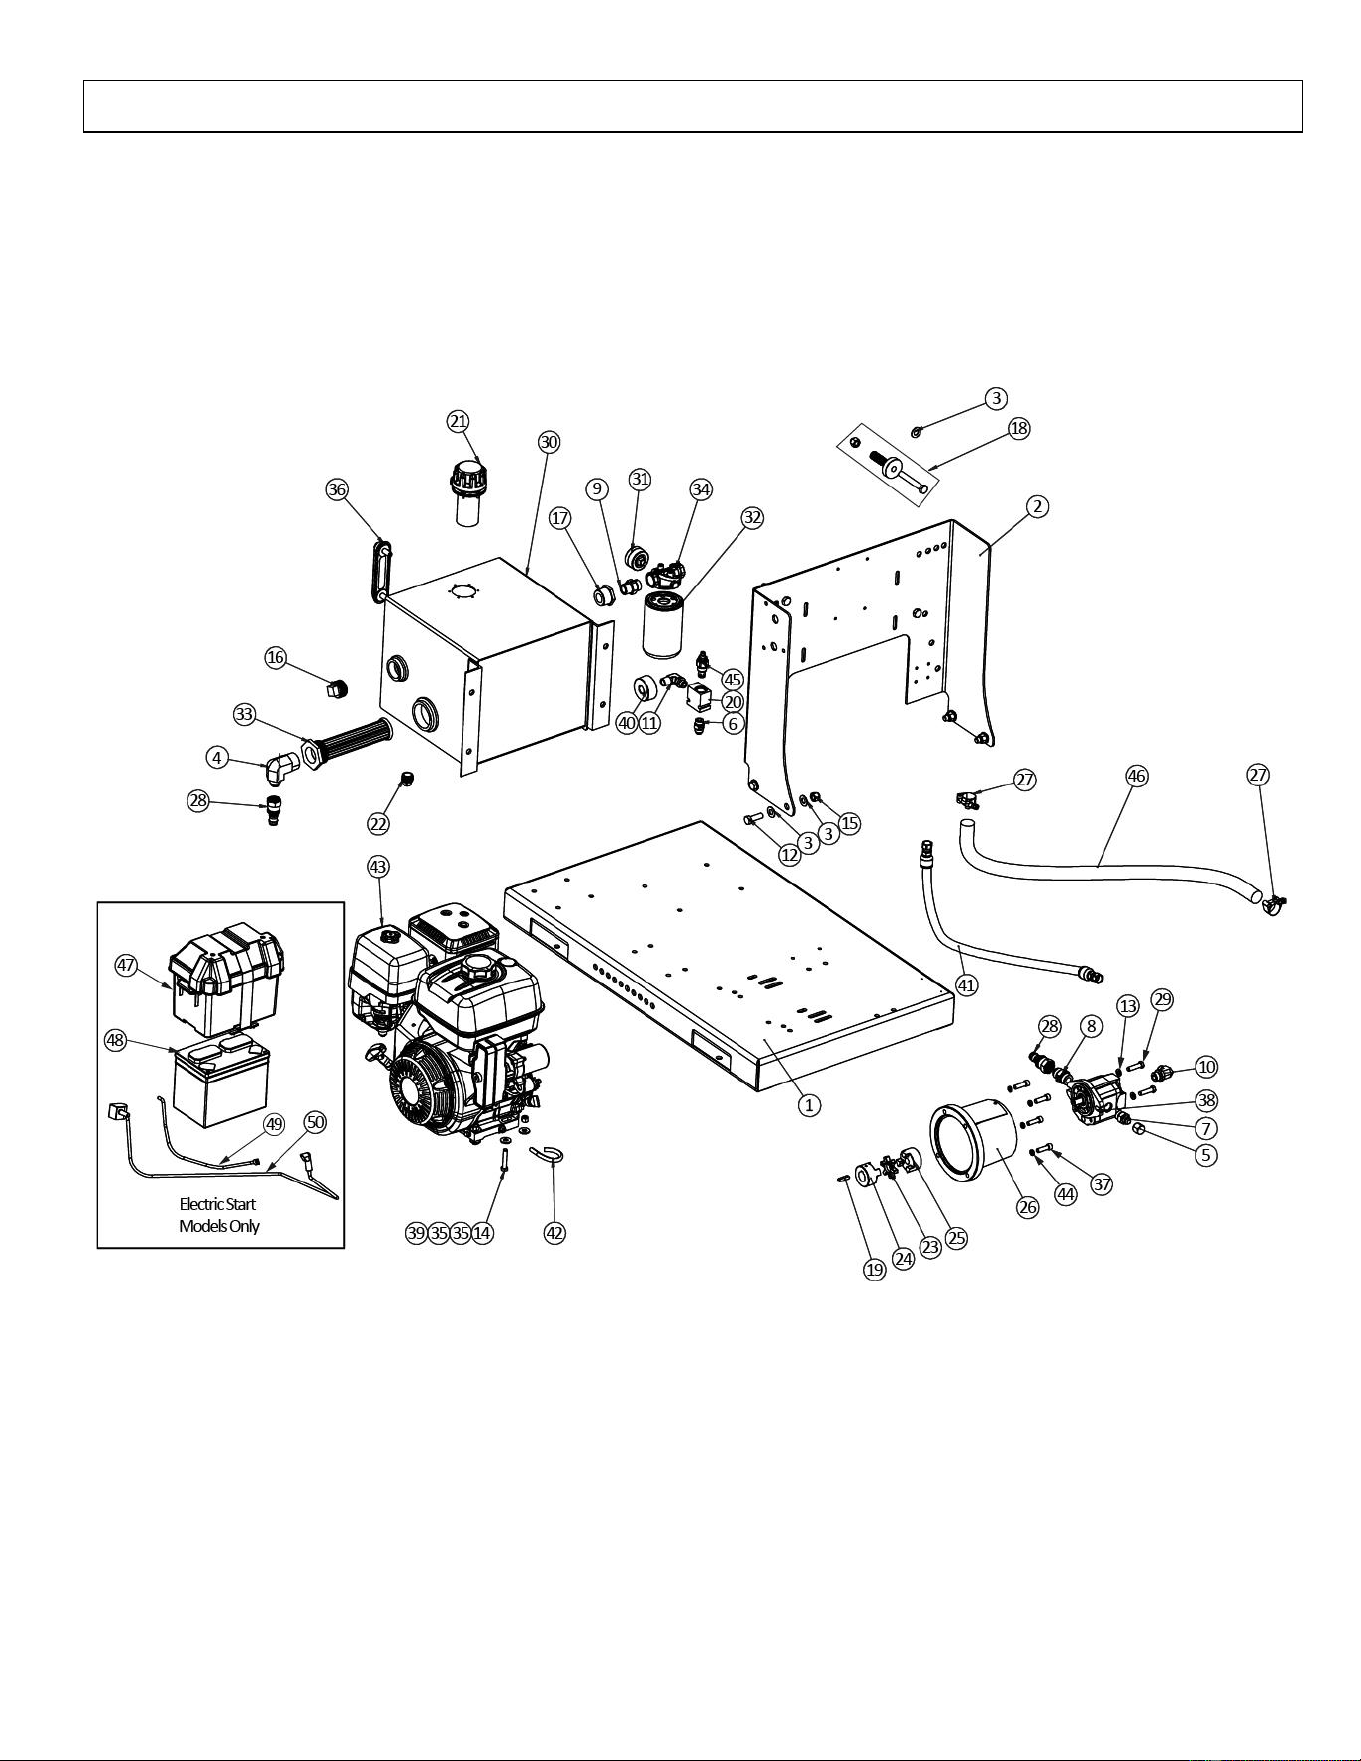
HBHR350GX & HBHR280GX Exploded View – Rev A......................................................................................................... 30
HBHR350GX & HBHR280GX Parts List - Rev A .................................................................................................................... 31
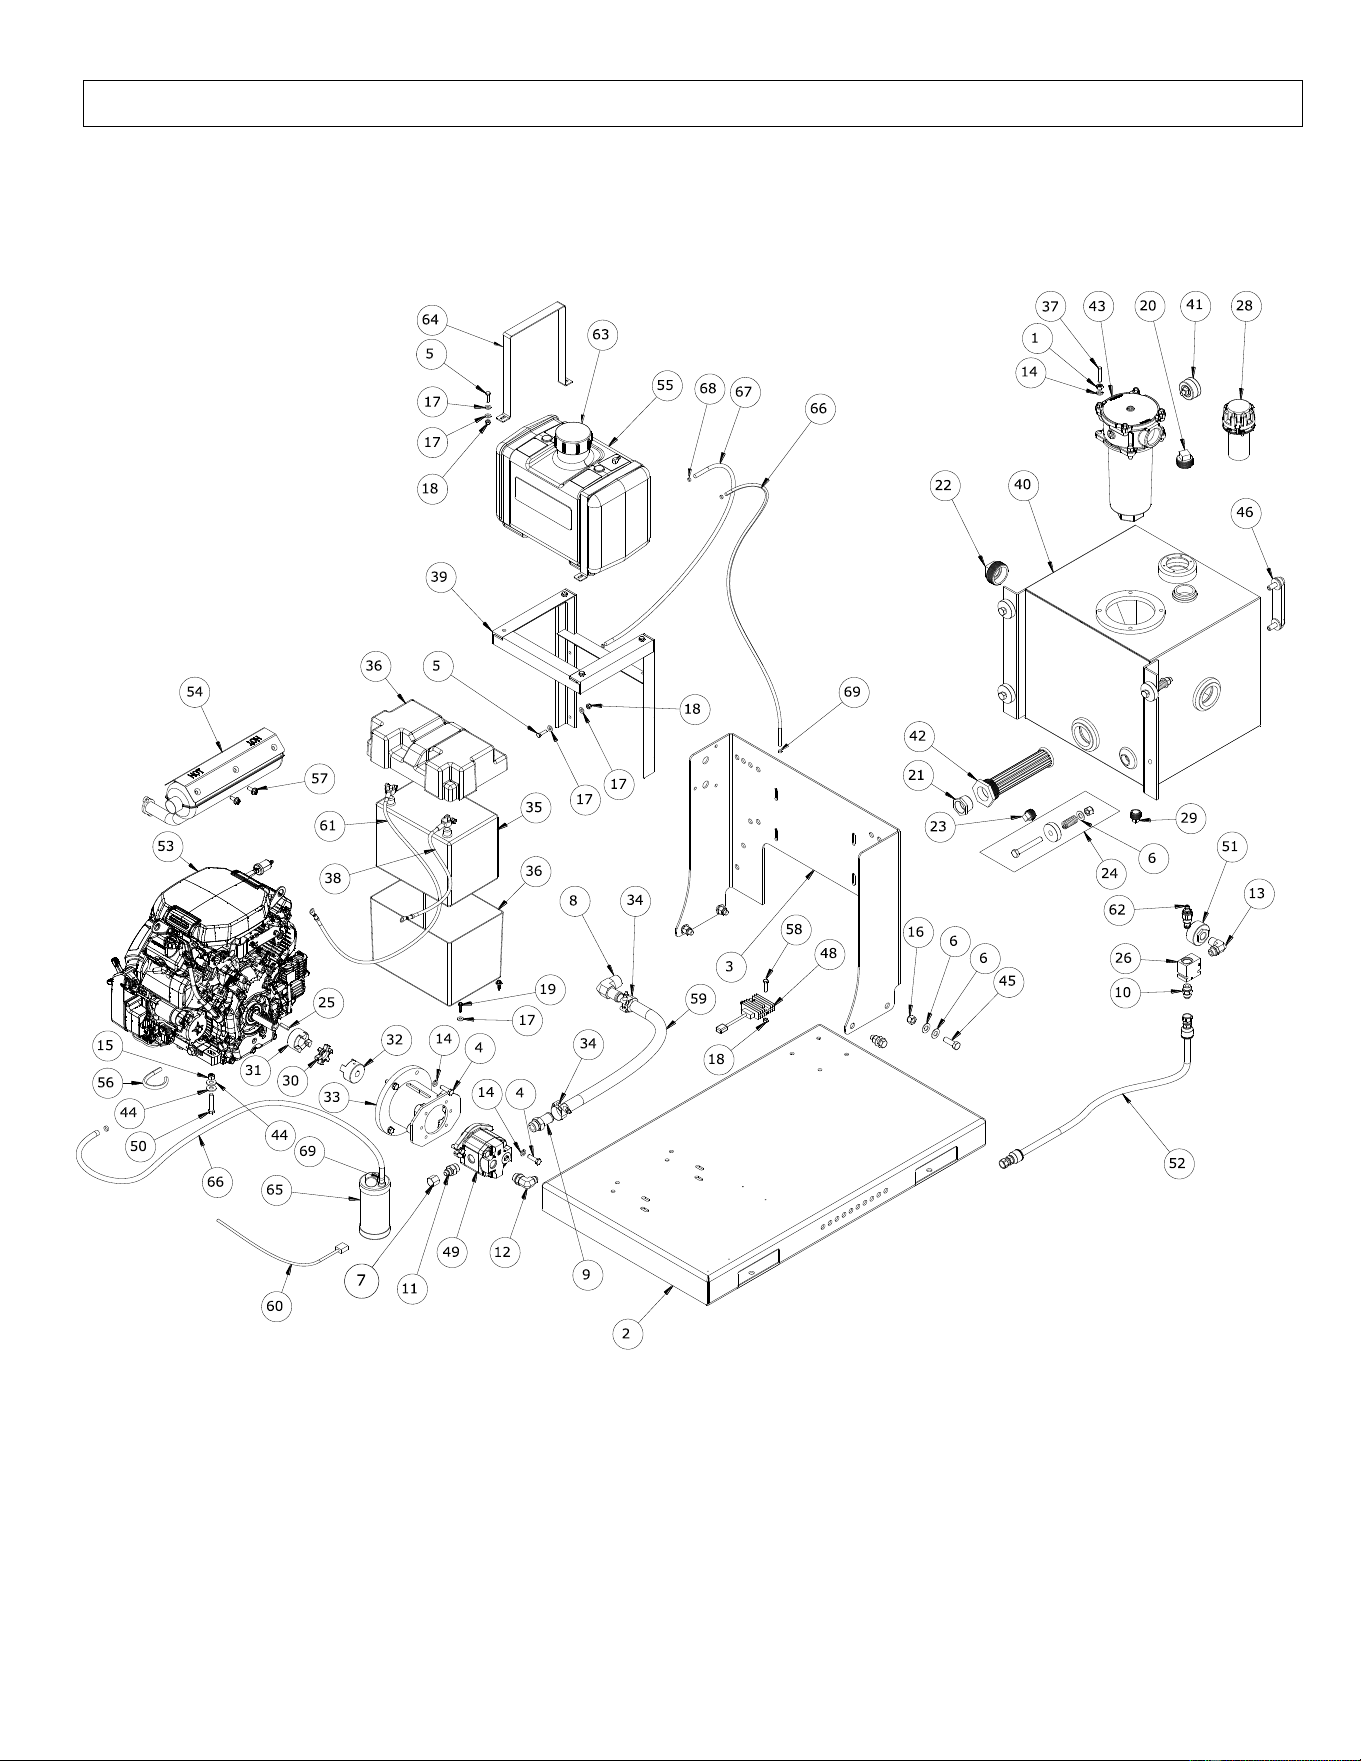
HBHS300GX & HBHS310GX Exploded View – Rev A .......................................................................................................... 32
HBHS300GX & HBHS310GX Parts List - Rev A ..................................................................................................................... 33
HBHS600GXE, HBHS610GXE, & HBHS620GXE Exploded View – Rev A ....................................................................... 34
HBHS600GXE, HBHS610GXE, & HBHS620GXE Parts List - Rev A .................................................................................. 35
Limited Warranty Policy ............................................................................................................................................................. 36
California Proposition 65 Information……………………………………………………………………………………………………...38

4
Receiving and Transporting
Initial Inspection: Regardless of the source, immediately inspect the Hydraulic Power Pack for damage or any
missing components. See the “Machine Component Identification” section of this manual for a diagram of the
Hydraulic Power Pack and its components.
Your purchase will result in delivery through one of the following sources:
Truck Delivery
Note: Shipping damage claims are not covered by Brave warranty.
For any shipping damage, make sure the delivery driver acknowledges the
damage and notes the damage on the shipping documents.
Some assembly may be required with truck delivery. This is detailed in the
“Operation: Pre-Start Checklist” section.
Store Purchase
Some assembly may be required. This is detailed in the “Operation: Pre-Start
Checklist” section.
From a Dealer
Your unit should have been delivered completely assembled and ready to
run.
Read the “Operation: Pre-Start Checklist” section and verify that the unit has
been properly ‘prepped’ before initial use.
Transporting: The Hydraulic Power Pack should be secured to prevent rolling and tipping when transporting
in a vehicle or trailer.
Any Questions, Comments, Problems, or Parts Orders
Call your dealer or Brave Customer Service 1-800-350-8739
5
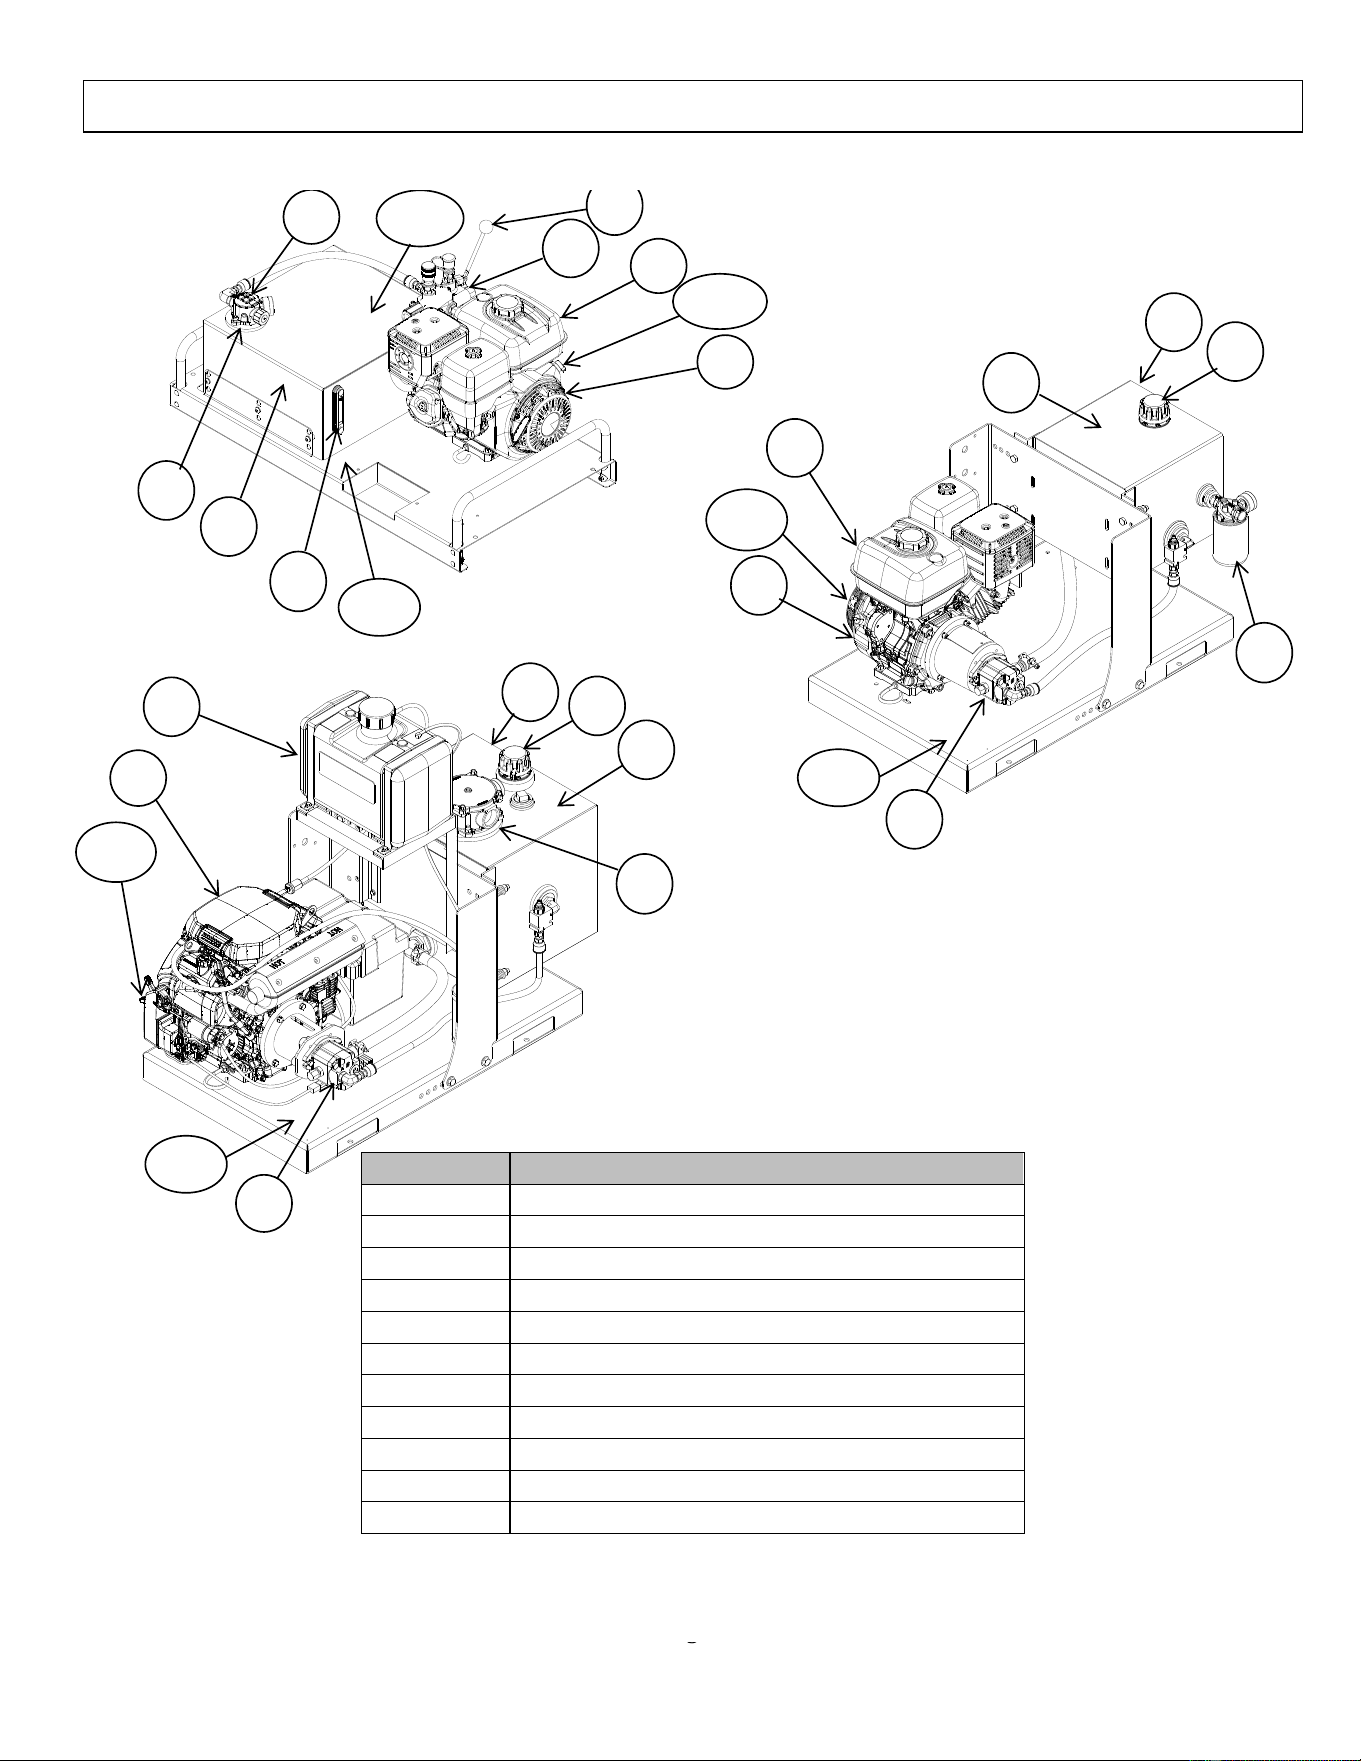
Machine Component Identification
Reference
Part Description
1
Hydraulic Tank
2
Hydraulic Fill Cap
3
Control Valve Handle (HBHR only)
4
Return Line Filter
5
Control Valve (HBHR only)
6
Hydraulic Pump
7
*Engine
8
Sight Gauge
9
Fuel Tank
10
Engine On/Off Switch
11
Nameplate/serial number
4
1
8
4
6
6
7
7
7
2
3
10
5
^6
1
9
10
HBHS300GX, GXE and HBHS310GX, GXE
11
11
2
HBHS600GXE, HBHS610GXE, and HBHS620GXE
2
1
*See Engine Manual for Engine Component Identification
^Pump is located in tank
4
HBHR280GX, GXE and HBHR350GX, GXE
8
8
9
9
10
11

6
Specifications
HBHR280GX
HBHR350GX
HBHS300GX
HBHS310GX
HBHS600GXE
HBHS610GXE
HBHS620GXE
Engine
Honda GX270
Honda GX390
Honda GX390
Honda GX390
Honda GX630
Honda GX630
Honda GX630
Engine Oil Type
Use Engine Manufacturer’s Recommended Oil
Pump Capacity
5.5 GPM
7 GPM
5 GPM
7 GPM
9 GPM
12 GPM
14 GPM
Pump Displacement
.36 CIR
.51 CIR
.36 CIR
.51 CIR
.66 CIR
.88 CIR
1.02 CIR
Hydraulic Fluid Type
AW32 or ISO 32 Recommended. ISO 46 can be used in warmer climate applications
Hydraulic Tank Volume
(nominal, actual, useable)
8, 7.3, 5.4
15, 13.6, 10.3
9.7, 8.5, 5.75
9.7, 8.5, 5.75
19.2, 17.5, 13.5
19.2, 17.5, 13.5
19.2, 17.5, 13.5
Hydraulic Tank Material
12 gauge steel
Hydraulic Relief Setting
2000 PSI
2000 PSI
3000 PSI
2000 PSI
3000 PSI
2250 PSI
2000 PSI
Hydraulic Valve Type
3-position, 4-way spring to center
direction control valve with integral
adjustable main relief valve
N/A (kits available)
Connection Ports
ISO 7241-1
Series A
interchange
ISO 7241-1
Series A
interchange
Return, Female
-12 SAE ORB;
Supply, Male -8
JIC
Return, Female
-12 SAE ORB;
Supply, Male -8
JIC
Return, Female
-20 SAE ORB;
Supply, Male -8
JIC
Return, Female
-20 SAE ORB;
Supply, Male -8
JIC
Return, Female
-20 SAE ORB;
Supply, Male -8
JIC
Filter Replacement Part
Number
1090490
1090490
1090169
1090169
1090368
1090368
1090368
Overall Dimensions
38.25” L x 19”
W x 20” H
44.50” L x 24.5”
W x 20” H
44” L x 24.5”
W x 26” H
44” L x 24.5”
W x 26” H
48” L x 24.5”
W x 43” H
48” L x 24.5”
W x 43” H
48” L x 24.5”
W x 43” H
Dry Weight
155 lbs.
198 lbs.
240 lbs.
240 lbs.
368 lbs.
368 lbs.
368 lbs.
HBHR280GXE
HBHR350GXE
HBHS300GXE
HBHS310GXE
Engine
Honda GX270
Electric Start
Honda GX390
Electric Start
Honda GX390
Electric Start
Honda GX390
Electric Start
Engine Oil Type
Use Engine Manufacturer’s Recommended Oil
Pump Capacity
5.5 GPM
7 GPM
5 GPM
7 GPM
Pump Displacement
.36 CIR
.51 CIR
.36 CIR
.51 CIR
Hydraulic Fluid Type
AW32 or ISO 32 Recommended. ISO 46 can be used in warmer climate
applications
Hydraulic Tank Volume
(nominal, actual, useable)
8, 7.3, 5.4
15, 13.6, 10.3
9.7, 8.5, 5.75
9.7, 8.5, 5.75
Hydraulic Tank Material
12 gauge steel
Hydraulic Relief Setting
2000 PSI
2000 PSI
3000 PSI
2000 PSI
Hydraulic Valve Type
3-position, 4-way spring to center
direction control valve with integral
adjustable main relief valve
N/A (kits available)
Connection Ports
ISO 7241-1
Series A
interchange
ISO 7241-1
Series A
interchange
Return, Female
-12 SAE ORB;
Supply, Male -8
JIC
Return, Female
-12 SAE ORB;
Supply, Male -8
JIC
Filter Replacement Part
Number
1090490
1090490
1090169
1090169
Overall Dimensions
38.25” L x 19”
W x 20” H
44.50” L x 24.5”
W x 20” H
44” L x 24.5”
W x 26” H
44” L x 24.5”
W x 26” H
Dry Weight
175 lbs.
218 lbs.
260 lbs.
260 lbs.

7
Safety
Hazard Signal Word Definitions
This is the safety alert symbol. It is used to alert you to
potential personal injury hazards. Obey all safety
messages that follow this symbol to avoid possible
injury or death.
DANGER
DANGER (red) indicates a hazardous situation, which if
not avoided, will result in death or serious injury.
WARNING
WARNING (orange) indicates a hazardous situation,
which if not avoided, could result in death or serious
injury.
CAUTION
CAUTION (yellow), used with the safety alert symbol,
indicates a hazardous situation, which if not avoided,
could result in minor or moderate injury.
CAUTION
CAUTION (yellow), without the safety alert symbol, is
used to address practices not related to personal injury.
NOTICE
NOTICE is used to address practices not related to
personal injury.
8
HBHS600GXE, HBHS610GXE, and HBHS620GXE
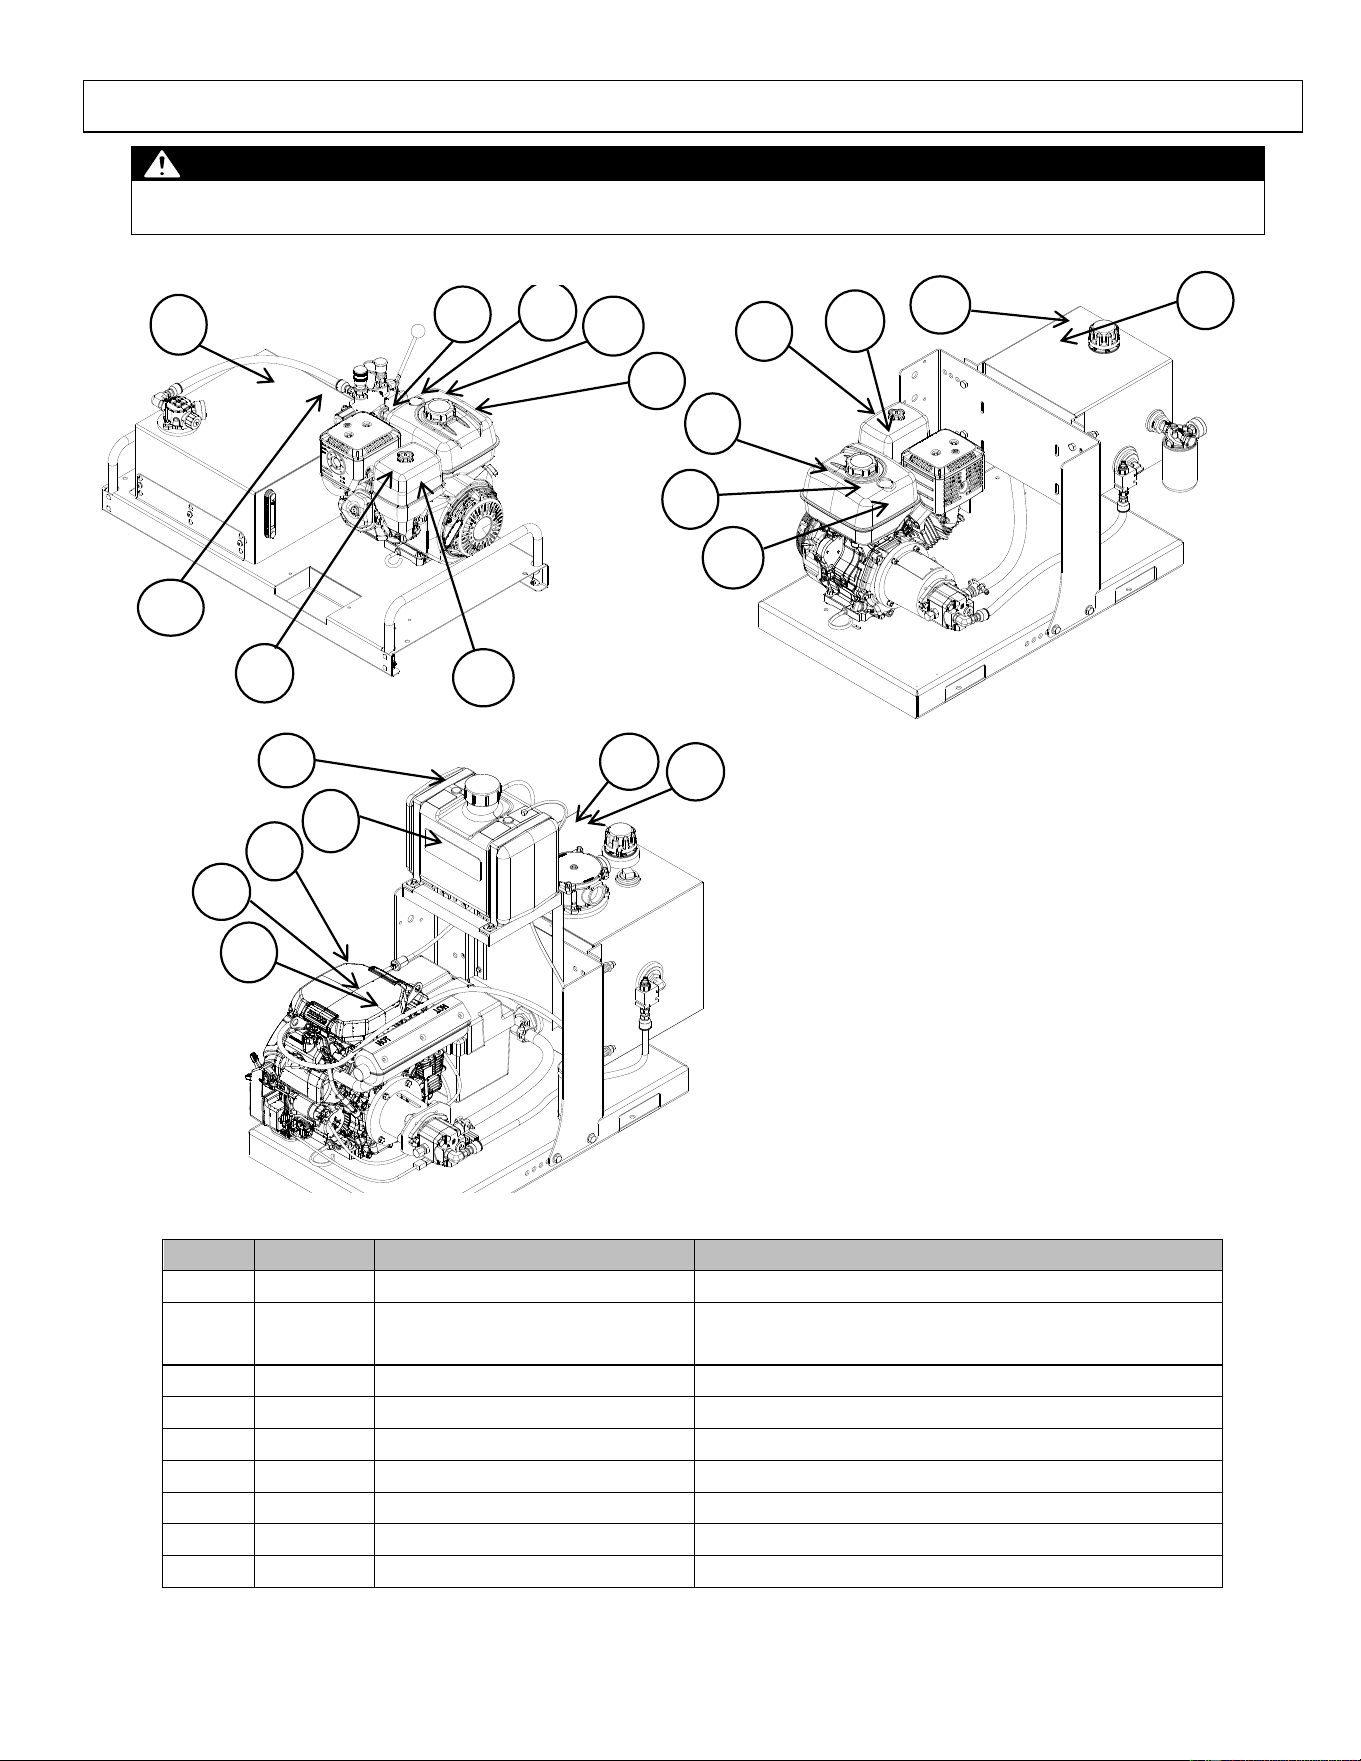
Safety Decal Locations
WARNING
ALWAYS make sure safety labels are in place and in good condition. If a safety label is missing or not legible,
order new labels from Brave Customer Service at 1-800-350-8739.
Ref#
Part#
Part Description
Model
1
800119
Control Handle
HBHR280GX, GXE, HBHR350GX, GXE
2
788937
Carbon Monoxide Warning
HBHR280GX, GXE, HBHR350GX, GXE,
HBHS300GX, HBHS310GX
3
787387
Fire Hazard Warning
All
4
786635
Muffler Warning
All
5
787637
Inspect Lubricate
All
6
800069
Hydraulic Fill
All
7
787395
Hydraulic Fluid Warning
All
8
799546
Proposition 65
All
9
800249
Gasoline Only
HBHS600GXE, HBH610GXE, HBH620GXE
HBHS300GX, GXE and HBHS310GX, GXE
3
4
6
7
HBHR280GX, GXE and HBHR350GX, GXE
6
7
8
1
2
4
6
7
8
3
5
5
8
2
9
3
4
5
9
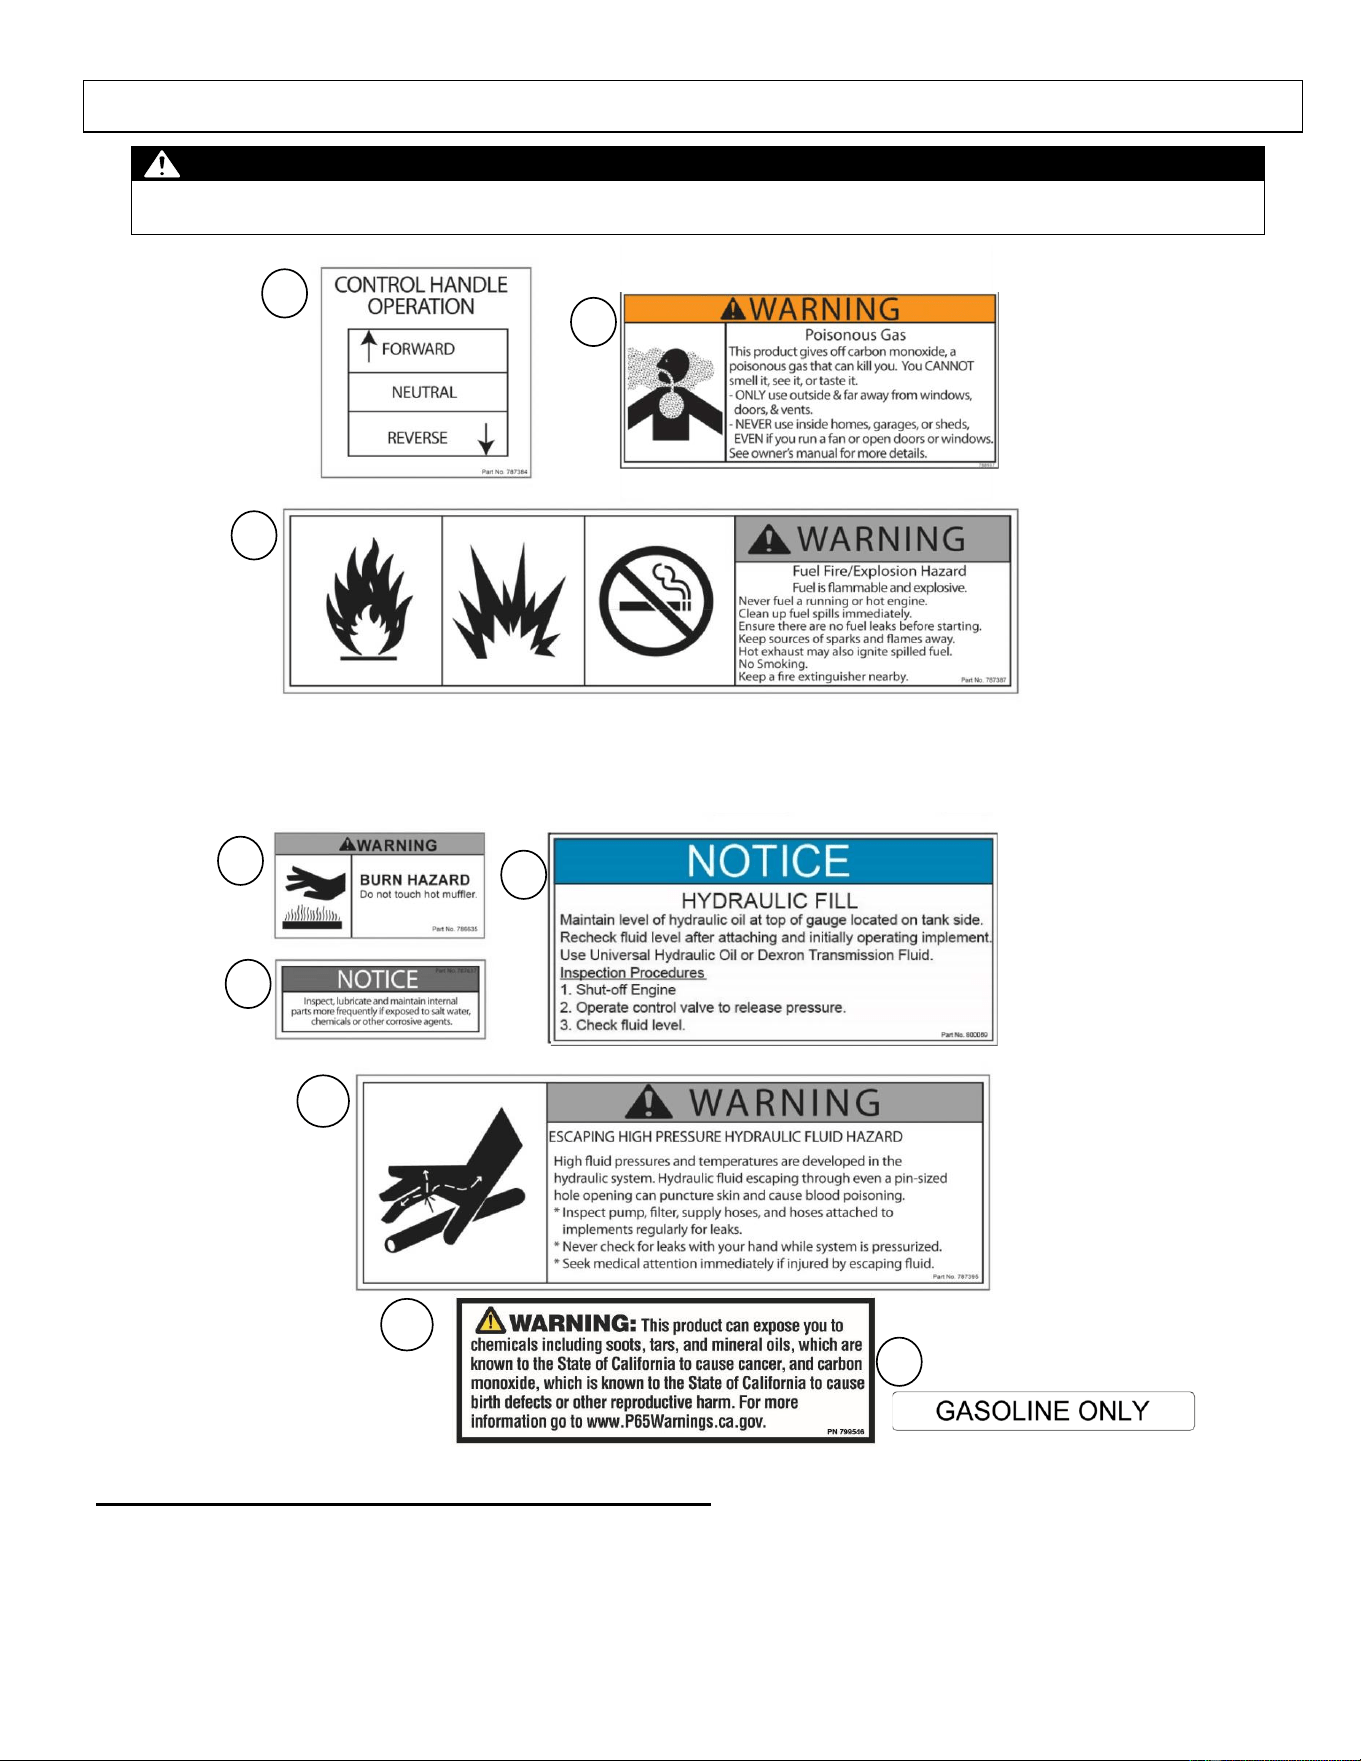
Safety Decals
WARNING
ALWAYS make sure safety labels are in place and in good condition. If a safety label is missing or not legible,
order new labels.
Any Safety Questions, Comments or Problems
Call your dealer or Brave Customer Service 1-800-350-8739
3
4
5
6
7
1
2
1
8
9
1

10
Operation
Pre-Start Checklist
CAUTION: No Oil in Engine Crankcase
Add the correct amount of oil to engine crankcase or engine will be damaged beyond repair and not covered by
warranty.
CAUTION: No Hydraulic Oil in Tank
Add the correct amount of hydraulic oil to the reservoir before use.
1. All HBHS600 series units will require the fuel system to be mounted to the fuel tank bracket; all
HBHS300 series units will require the oil filter head and canister be installed; all HBHR units will
require the valve handle be mounted and quick connect fittings be installed (if desired).
2. Check / add engine crankcase oil
3. Check / add hydraulic oil
4. Inspect hydraulic system (with engine off)
5. Check Implement Hydraulic System
6. Fill engine gasoline tank (upper tank)
7. Inspect fuel system for leaks (with engine off)
These procedures are discussed in detail below:
1. See separate assembly instruction insert applicable to your unit.
2. Check / add engine crankcase oil
• Check the oil level daily using the dipstick and add oil as needed.
• Using a funnel, add oil up to the FULL mark on the dipstick with the recommended oil type for your
engine and expected ambient conditions.
• Replace engine crankcase fill cap to finger tight.
• (See engine Owner’s Manual for oil type and capacity, and more detailed oil check/fill instructions.)
3. Check / add hydraulic oil
• Verify that the oil is at the top of the gauge on the hydraulic reservoir.
• If hydraulic oil level is low: Remove hydraulic tank fill cap and add 10 wt. AW32, ASLE H-150, or
ISO 32 oil up to the top of the gauge.
• Replace hydraulic tank fill cap.
WARNING: Hot Oil Hazard
NEVER remove the hydraulic oil fill cap when the engine is running or hot. Hot oil can escape causing severe
burns. Allow the Hydraulic Power Pack to cool completely before removing hydraulic oil fill cap.
NOTICE: Attached Implement Hydraulic Oil: Refer to the attached implement owner’s manual for its recommended
oil. If you are using an implement that requires different oil, it may be incompatible with the above recommended oil,
contact Brave.
4. Inspect hydraulic system (with engine off)
• Visually inspect all Hydraulic Power Pack hoses, tubing, clamps/fittings, pump, and cylinder for cracks,
fraying, kinks, or other damage.
• Check all components for oily residue, which may indicate a leak.
• Do NOT operate the Hydraulic Power Pack if there is any indication of damage or oily residue.

11
Operation (Continued)
5. Check implement hydraulic system
Check hydraulic system and lines of the implement to be attached to the Hydraulic Power Pack. Small
leaks in hydraulic lines can be an indication of catastrophic failure in the near future. The life of
hydraulic hoses may be from a few months to a few years, depending on use and storage patterns.
WARNING: Pressurized Fluid Hazard
High fluid pressures and temperatures are developed in Hydraulic Power Packs.
NEVER check for leaks with your hand. Leaks can be located by holding a piece of cardboard or wood (at least
two feet long) with your hand at one end and passing the other end over the suspected area (wear eye
protection). Look for discoloration on the cardboard or wood.
STOP the engine, disconnect the spark plug, and move all control valve handles back and forth to relieve
pressure before changing or adjusting hydraulic system components such as hoses, tubing, fittings, or other
components.
NEVER adjust the pressure setting of the pump or valve
Hydraulic fluid escaping through a pin-sized opening can burn or puncture skin, resulting in wounds that could
cause blood poisoning, infection, disability, gangrene, amputation, or death.
If injured by escaping fluid, no matter how small the wound is, see a doctor at once. A typical injection injury
may be a small puncture wound that does not look serious. However, severe infection or reaction can result if
proper medical treatment is not administered immediately by a doctor who is familiar with injection injuries.
6. Fill engine gasoline tank (the upper tank)
• Check gasoline tank level.
• Fill tank with fresh unleaded gasoline from a UL approved portable container.
WARNING: Gasoline Vapor Hazard While Fueling
Gasoline is highly flammable and explosive. Heat, sparks, and flames can ignite gasoline vapors which spread
over a large area during fueling. A flash fire ignition and/or explosion will likely result in serious injury or death.
The following conditions could result in gasoline ignition/explosion:
Refueling and refueling spills
Gas vapor collection inside enclosures
Static electric sparks
Sparks from electric wiring, batteries, or running engines
Sources of heat (such as a hot engine exhaust)
Open flames, including pilot lights
7. Inspect fuel system for leaks (with engine off)
Inspect the entire fuel system. Look for signs of: leaks or deterioration; chafed or spongy fuel hose; loose
connections; loose or missing fuel hose clamps; damaged gasoline tank; or a defective gasoline shut-off
valve.
WARNING: Fuel Leak Hazard
A leaking fuel line or spilled fuel no matter how small can be the source of a fire or explosion when starting or
operating the engine.
If Hydraulic Power Pack is in an enclosed area and you smell gas, DO NOT start engine! DO NOT light a
match. DO NOT flip on an electrical switch.
Exit area immediately leaving doors open and call fire department.
12
Starting and Warm-up Before Use
1. If the hydraulic power unit is equipped with a directional control valve, place the Hydraulic
valve handle in the neutral position. If unit not equipped with a directional control valve,
skip directly to step 6.
CAUTION: HBHS users without installed directional control valve
If the unit is not equipped with a directional control valve, please ensure the power unit is properly plumbed to
the powered equipment prior to attempting to start the engine. Unit cannot be run without implement attached.
Damage to engine and hydraulic components can occur.
2. Start the engine per the manufacturer’s instructions.
3. Once the engine has started, move the throttle down to the mid-range position and allow the
engine to run for ten (10) minutes to warm engine and hydraulic oil.
4. Turn engine off.
5. Clear line pressure by moving the Hydraulic Power Pack valve (if equipped) to the forward
position for four (4) or five (5) seconds, then to the reverse position for four (4) or five (5)
seconds to relieve pressure.
6. Attach implement’s hydraulic hoses (if applicable).
Your Hydraulic Power Pack is now ready for attachment to an implement.
For units that are plumbed directly to equipment, without a valve on the power pack, see the following
diagrams which show the supply and return ports and what type of connection is provided at these ports.
Remove port plugs/caps in order to attach to these ports.
WARNING: Personal Protective Equipment
Never use the Hydraulic Power Pack or any powered equipment without proper protective equipment, such as
eye protection.
HBHS300GX , GXE and HBHS310GX, GXE
HBHS600GXE, HBHS610GXE, and HBHS620GXE
Return, Female
-12 SAE ORB
Return, Female
-20 SAE ORB
Supply, Male -8 JIC
Supply, Male -8 JIC
13
Using Hydraulic Motor Implement
NOTICE: Match Quick Disconnect Couplers
If necessary, replace coupler fittings with implement-matching couplers. Brave does not recommend using
multiple adapters; they may restrict flow and limit operation.
1. Connect Hoses (Engine Off)
• Before connecting your implement hoses to the Hydraulic Power Pack, you must determine which hose
is the pressure or forward acting hose. Consult your implement owner’s manual or labels to determine
which hose is the “SUPPLY” hose.
• Models HBHR are equipped with a spring to center 3 position 4-way hydraulic valve. The handle will
center itself to neutral when the operator removes his hand from the valve. This type of valve can cycle
both hydraulic cylinders and hydraulic motors. Refer to the diagram below to determine what port is
supply and return when the handle is shifted in either direction. Exercise caution when powering
equipment where damage can occur if the oil flow is reversed. Understand the flow of oil with respect
to the handle operation on your power unit if equipped with a directional control valve.
• Models HBHS can be ordered with quick coupler plumbing kits, directional control valve plumbing
kits, and HBHS600 units can be equipped with a return line heat exchanger kit. Please refer to the kit
directions to determine the supply & return ports of the directional control valve or quick coupler
plumbing kit.
2. Start Engine:
• If equipped with control valves, confirm the valve handle is in the neutral position.
• If equipped without a control valve, confirm supply and return lines are properly plumbed to the driven
equipment safely and securely.
• Start engine per manufacturer’s instructions.
• Place the engine throttle control lever in the fast position.
3. Normal Operation Mode:
• Forward-Reverse operations are activated when the operator cycles the spring to center valve (if
equipped) on the power unit. If the power unit isn’t equipped with a directional control valve, please
refer to the power equipment owner’s manual for proper operation of the power equipment.
CAUTION: Reverse Operation Equipment Damage
The Hydraulic Power Pack has a bidirectional valve that allows you to reverse the direction of an implement
motor (or pump). Before using the reverse feature, consult your implement owner’s manual to make sure the
motor (or pump) can be reversed. Using reverse oil flow in a non-reversing pump or motor can result in damage
to your implement.
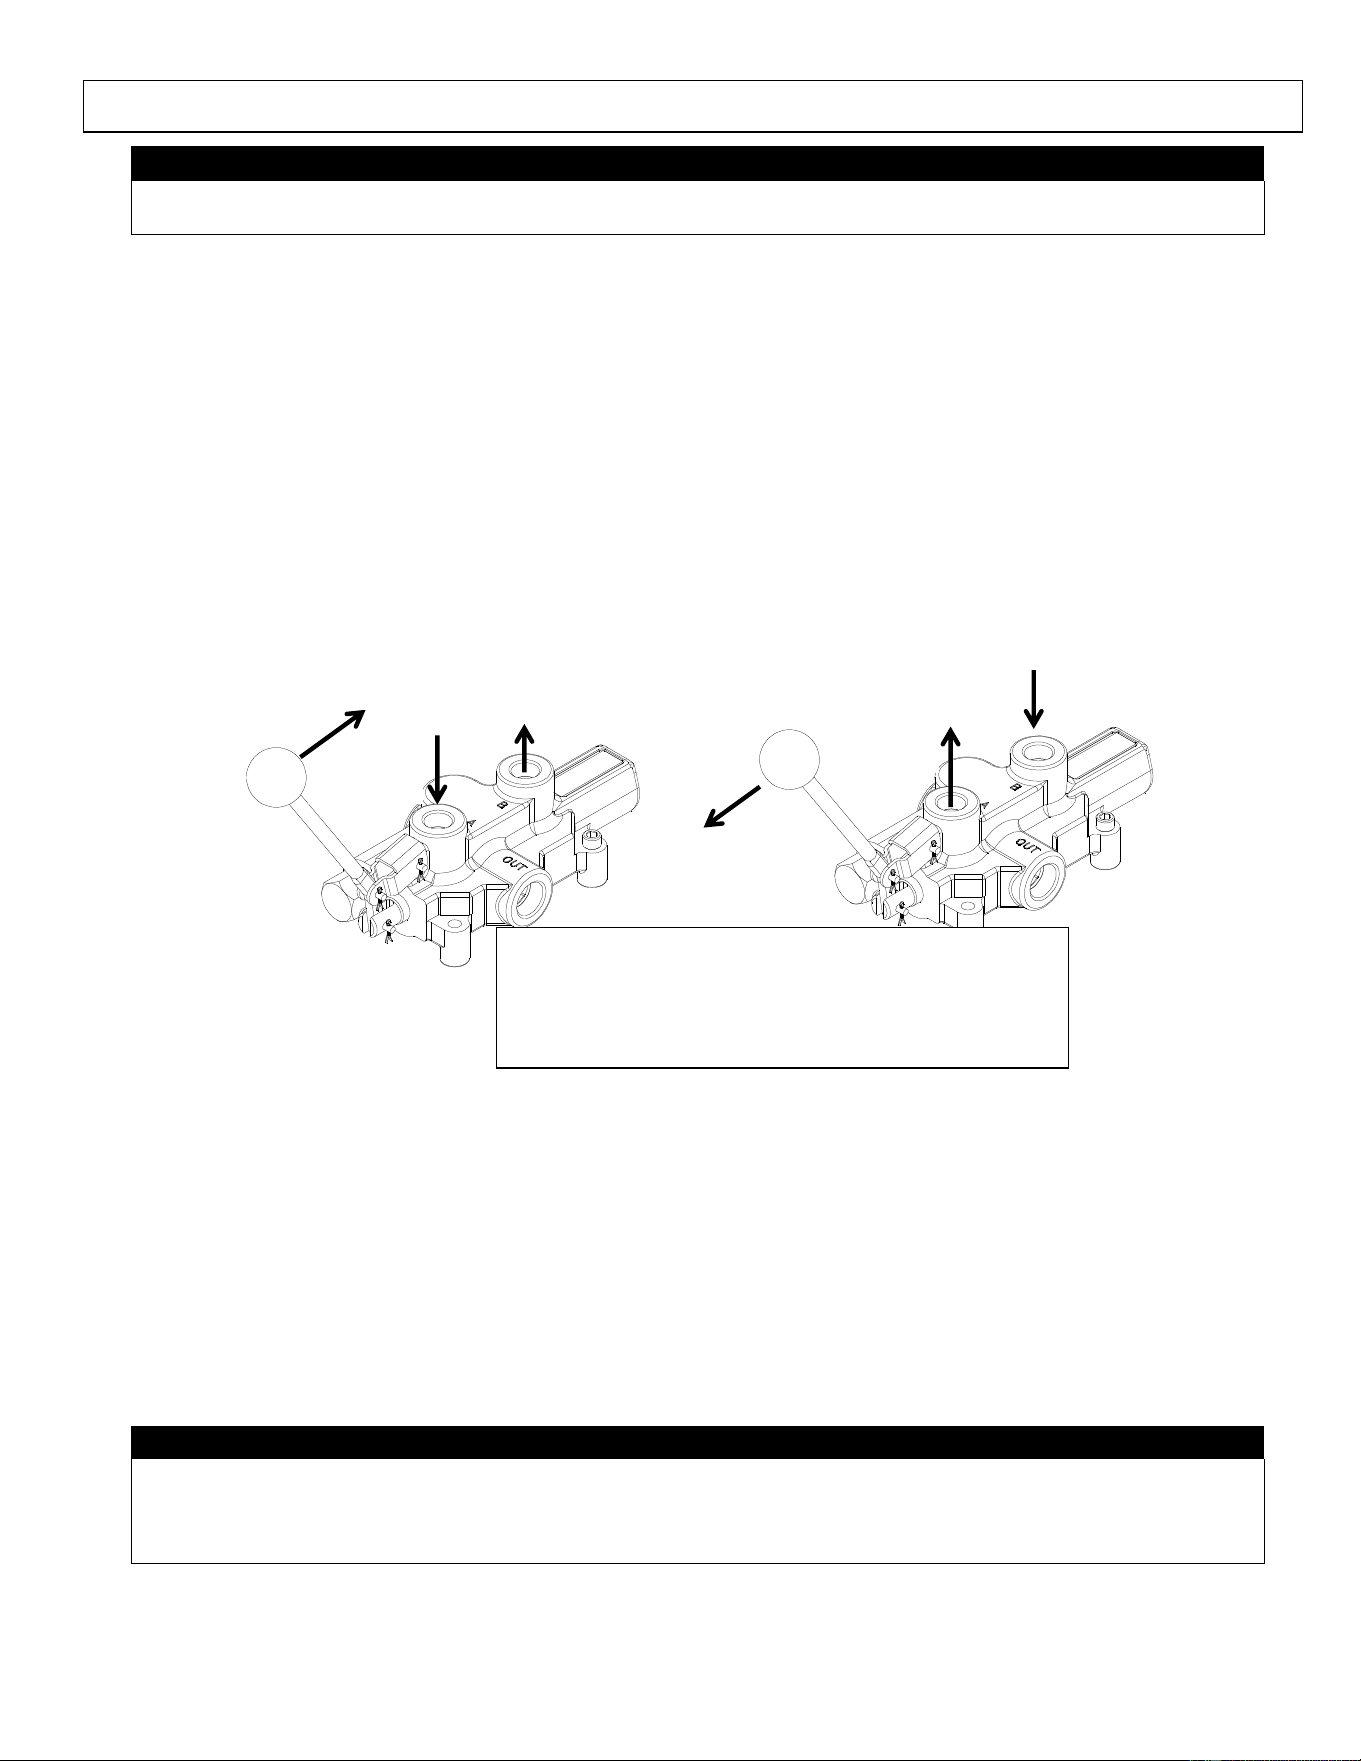
Forward
Port A
Port B
Reverse
Port A
Flow
Port B
• Port B is Supply and Port A is Return when lever
is actuated in the Forward direction.
• Port A is Supply and Port B is Return when lever
is actuated in the Reverse direction.

14
Using Hydraulic Motor Implement (Continued)
4. Stopping or Removing Attached Implement with Hydraulic Motor:
• To turn off the engine, verify the valve handle is in the center (neutral) position which should cause the
hydraulic motor to come to a complete stop.
• Turn the engine off using on/off switch located on engine.
• Confirm the hydraulic motor has come to a complete stop.
• Operate any switches or valves in the system to relieve pressure.
• Move the Hydraulic Power Pack valve handle to the forward position for four (4) to five (5) seconds,
then to the reverse position for four (4) to five (5) seconds to relieve pressure.
• Operate any other valves or switches on accessory items to relieve pressure.
• If hoses are connected with quick disconnects, disconnect the hoses.
15
Using Hydraulic Cylinder Implement
NOTICE: Match Quick Disconnect Couplers
If necessary, replace coupler fittings with implement-matching couplers. Brave does not recommend adapters;
they may restrict flow and limit operation.
1. Connect Hoses (Engine Off)
• Before connecting your implement hoses to the Hydraulic Power Pack, you must determine which hose
is the pressure or forward acting hose. Consult your implement owner’s manual or labels to determine
which hose is the “SUPPLY” hose.
• Models HBHR are equipped with a spring to center 3 position 4-way hydraulic valve. The handle will
center itself to neutral when the operator removes his hand from the valve. This type of valve can cycle
both hydraulic cylinders and hydraulic motors. Refer to the diagram below to determine what port is
supply and return when the handle is shifted in either direction. Exercise caution when powering
equipment where damage can occur if the oil flow is reversed. Understand the flow of oil with respect
to the handle operation on your power unit if equipped with a directional control valve.
• Models HBHS can be ordered with quick coupler plumbing kits, directional control valve plumbing
kits, and HBHS600 units can be equipped with a return line heat exchanger kit. Please refer to the kit
directions to determine the supply & return ports of the directional control valve or quick coupler
plumbing kit.
WARNING: Crush Hazard
The Hydraulic Power Pack valve does not have a positive locking device to hold the cylinder in position. Always
use a mechanical lock to prevent the cylinder from creeping/drifting.
WARNING
Applications with large cylinders can excessively deplete the Hydraulic Power Pack’s hydraulic tank.
DO NOT use this unit in applications where more than 75% of the hydraulic fluid is purged from the hydraulic
tank or with a cylinder storing a larger oil reserve than the Hydraulic Power Pack.
DO NOT attempt to add more hydraulic fluid during operation to extend the hydraulic capacity.
Failure to follow these warnings could result in damage to property/equipment, personal injury, and death in
serious cases.
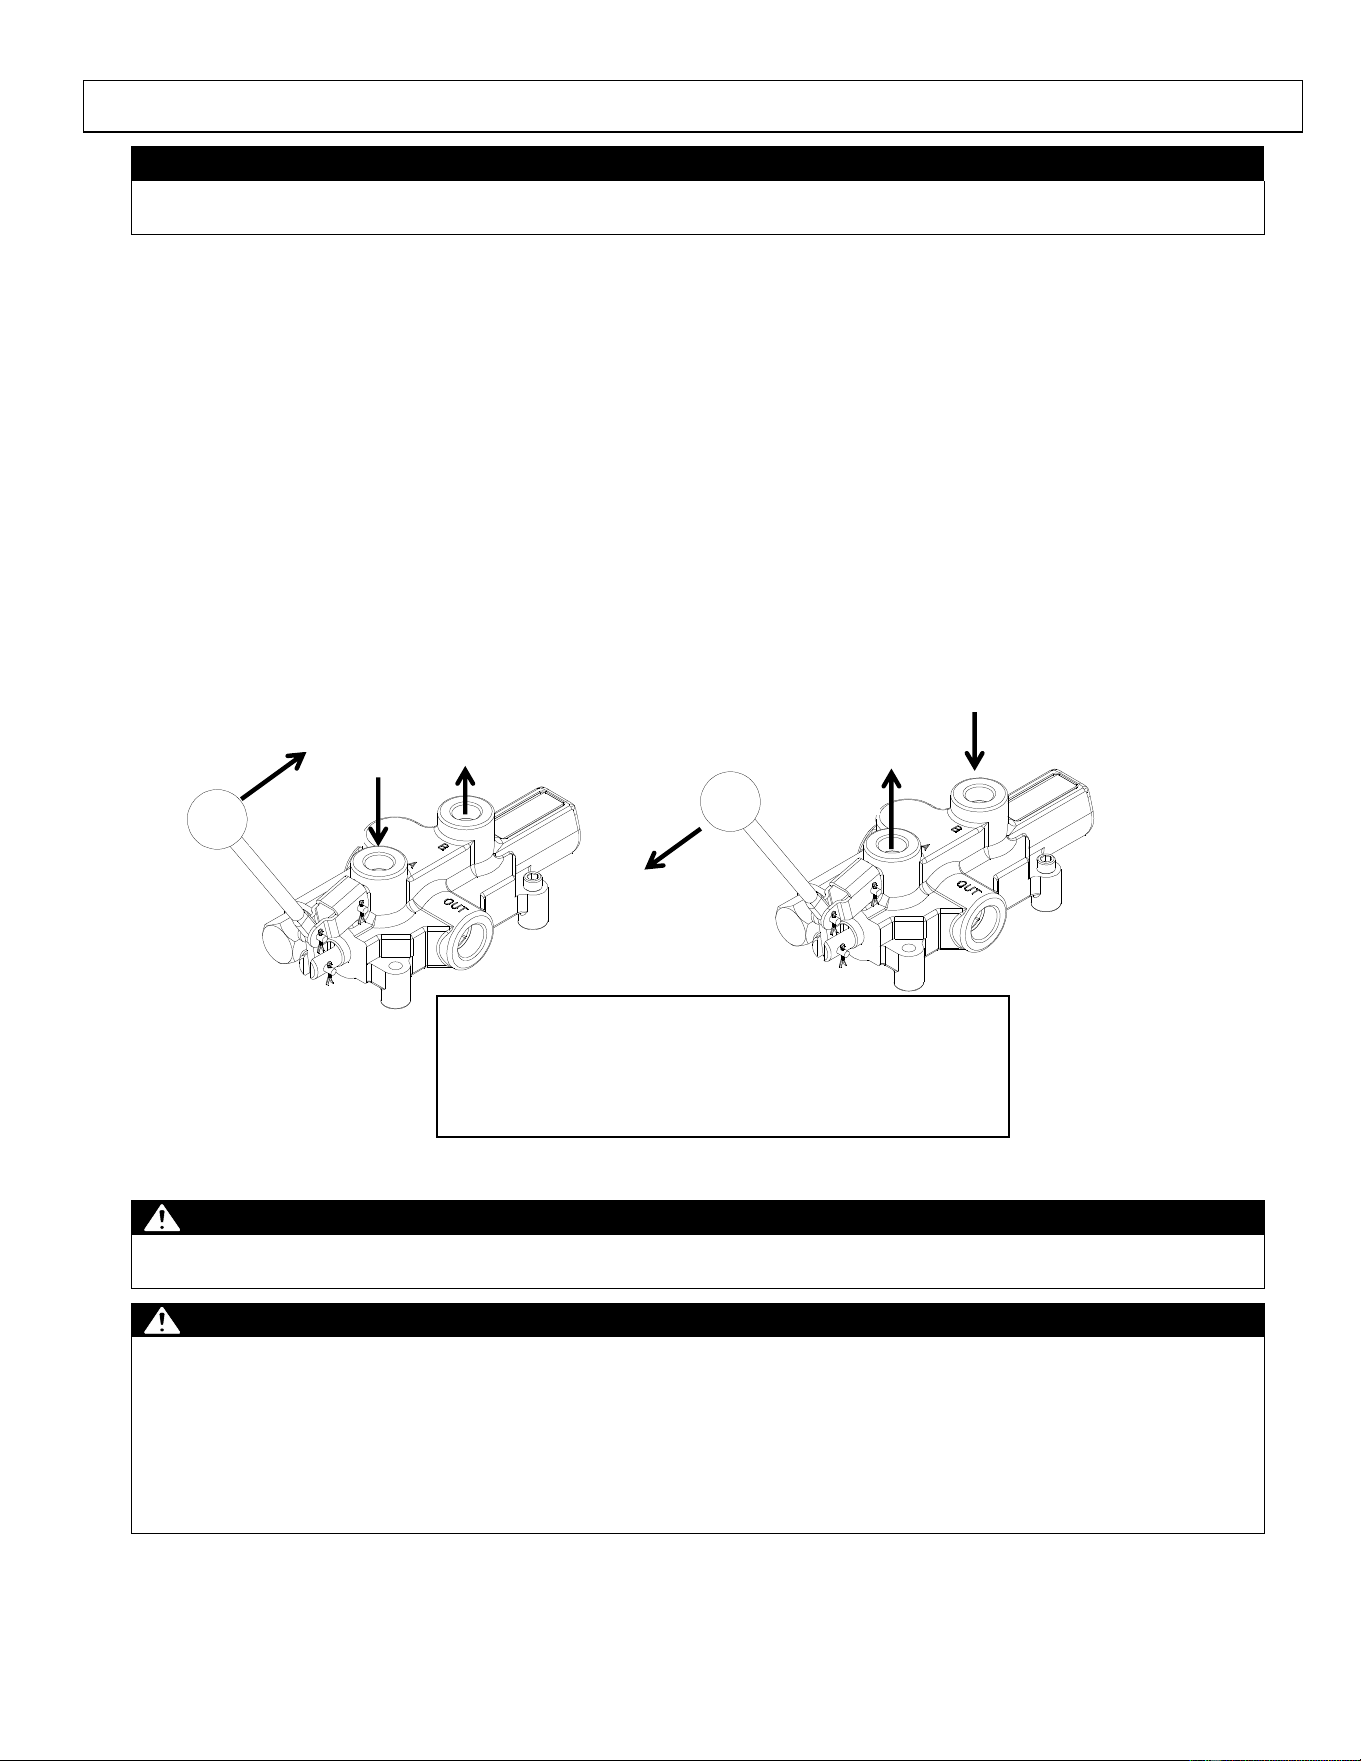
Forward
Port A
Port B
Reverse
Port A
Port B
• Port B is Supply and Port A is Return when lever
is actuated in the Forward direction.
• Port A is Supply and Port B is Return when lever
is actuated in the Reverse direction.
16
Using Hydraulic Cylinder Implement (Continued)
2. Start Engine:
• Confirm the valve handle is in the neutral position (all units used to run cylinders should have a valve
present in the system).
• Confirm supply and return lines are properly plumbed to the driven equipment safely and securely.
• Start engine per manufacturer’s instructions.
• Place the engine throttle control lever in the fast position.
3. Normal Operation:
• To raise the cylinder, push the handle in the forward direction until the desired height is reached, then
release the handle (it will automatically return to the center position). Important: block or lock the
implement at the desired height. If the implement is not locked into position, the Hydraulic Power Pack
will allow the cylinder to drift.
• To lower the cylinder, push the handle in the reverse direction until the desired height is reached, then
release the handle (it will automatically return to the center position).
4. To Stop or Remove Attached Implement with Hydraulic Cylinder(s):
• To remove the unit, first place the implement cylinder in the fully retracted position (so the rod is inside
the cylinder barrel).
• Then, verify the valve handle is in the center (neutral) position.
• Turn the engine off using on/off switch located on engine.
• Move the valve handle to the forward position for four (4) to five (5) seconds, then to the reverse
position for four (4) to five (5) seconds to release system pressure.
• If hoses are connected with quick disconnects, disconnect the hoses.
Refueling
WARNING: Fire Hazard
Allow the engine to cool for at least five (5) minutes before refueling, moving to storage or transporting. A hot
engine can be a fire hazard.
Refueling at Work Sites:
• Before removing gas cap, turn engine off and allow to cool for at least FIVE (5) minutes.
• Remove gasoline cap
• Use only a UL-approved portable gasoline container to transfer the gasoline to the Hydraulic Power
Pack’s gas tank
• Add gasoline through the fill opening
• Clean up gasoline spills /splashes immediately
• Replace gasoline cap securely
• If possible, move the Hydraulic Power Pack away from spilled gasoline on the ground
• Wipe up spilled gasoline and wait five (5) minutes for excess gasoline to evaporate before starting
engine
• Gasoline soaked rags are flammable and should be disposed of properly
• If gasoline is spilled on your skin or clothes, wash skin and change clothes immediately
• Store extra gasoline in a cool, dry place in a UL listed, tightly sealed container
17
Refueling at Gas Stations:
WARNING: Static Electric Spark Hazard
A static electric spark can explosively ignite gasoline vapor, resulting in a flash fire that could cause serious
injury or death. See “Special Safety Information on Static Electricity” at end of this manual.
• Use only a UL listed portable gasoline containers
• Never fill the gasoline tank directly from the fuel pump. The tank is not grounded and high velocity
flow from the pump can cause static electricity build-up.
• Use a portable container made of metal or conductive plastic. This is preferred because it dissipates
static charge to ground more readily.
• ALWAYS place container on the ground to be filled. Never fill a portable gasoline container while it
is sitting inside a vehicle, trailer, trunk, or pick-up truck bed.
• Keep nozzle in contact with container while filling. Do not use a nozzle lock-open device.
Storing
Allow engine to cool before inspecting and storing
1. Inspect for worn or damaged parts
2. Choose a covered storage location
3. Start engine every 4 weeks;
-OR-
4. Prepare engine for long-term (seasonal) storage if needed.
1. Inspect for worn or damaged parts:
Inspect the Hydraulic Power Pack for worn or damaged parts and tighten any nuts or screws that may have
become loose. Check for any fuel or hydraulic system leaks.
2. Choose a covered storage location:
Store the Hydraulic Power Pack in a location that is:
• Clean and dry.
• Away from sources of heat, open flames, sparks, and pilot lights, even if the gas tank is empty.
(Residual gasoline fumes can still ignite)
• Away from extreme high or low temperatures.
• Cover for extra protection.
WARNING: Stored Gasoline Vapor Fire Hazard
Gasoline is highly flammable and explosive. Drain the fuel into an approved container OUTDOORS and far
away from open flame.
NEVER store an engine with fuel in the tank indoors or in poorly ventilated spaces where fuel vapor can come in
contact with:
Static electric sparks;
Sparks from electric wiring, batteries, or running engines;
Sources of heat (such as hot engine or exhaust);
Open flames, including pilot lights.
18
3. Start engine every 4 weeks:
For future easy starting and to minimize maintenance requirements, the Hydraulic Power Pack should be
started at least every four weeks and run for 10 to 15 minutes.
Monthly exercising of the engine will dry out any moisture that has accumulated, lubricate cylinders, and clean
out old gas in the carburetor. Moisture, old gas, and dry mechanical parts cause deterioration in stored engines.
CAUTION: HBHS users without installed directional control valve
If the unit is not equipped with a directional control valve, please ensure the power unit is properly plumbed to
the powered equipment prior to attempting to start the engine. Unit cannot be run without implement attached.
Damage to engine or hydraulic components can occur.
Storing (Continued)
4. Prepare engine for long-term (seasonal) storage if needed:
If you will not be able to start the engine regularly, you must prepare the engine for long term storage to
prevent gum deposits from forming and causing malfunction of the engine.
Prepare engine for long-term storage by either removing all gasoline from the tank and carburetor, OR by
adding fuel stabilizer to the gasoline. Follow fuel stabilizer manufacturer’s instructions, which usually include
these steps:
• Ensure gas tank is full.
• Add fuel stabilizer to fuel tank.
• Run engine at least 10 minutes after adding stabilizer to allow it to enter the fuel system.
• Shut off engine.
• Disconnect spark plug wire and remove spark plug.
• Add one teaspoon oil through spark plug hole.
• Place rag over spark plug hole and turn starter (or pull the recoil) a few times to lubricate the
combustion chamber.
• Replace spark plug, but do not reconnect the spark plug wire.
Maintenance & Repair
Regular Maintenance
Perform regular maintenance to keep the Hydraulic Power Pack in safe and functional working condition.
WARNING
ALWAYS shut off the engine, make sure the engine is cool, and disconnect the spark plug before cleaning,
adjusting, or servicing the Hydraulic Power Pack.
1. Follow safety rules:
Turn off the Hydraulic Power Pack. To prevent accidental starting, always turn off the Hydraulic Power
Pack and remove spark plug or spark plug wire.
Avoid burns. Muffler, crankcase oil and hydraulic oil will remain hot for several minutes even after unit is
stopped. Allow to cool before servicing.

19
2. Perform periodic engine maintenance:
Perform engine maintenance as specified in the engine owner’s manual. Engine maintenance items include:
• Oil and oil filter changing
• Air filter check/replacement
• Spark plug cleaning and replacement
• Fuel filter check/replacement
• Fuel tank cleaning
3. Inspect fuel system/check for leaks:
Inspect the fuel system and check for leaks on a regular basis.
Look for: signs of leaks or deterioration, chafed or spongy fuel hose, loose connections, loose or missing fuel
hose clamps, damaged gasoline tank, or defective gasoline shut-off valve.
WARNING: Fuel Leak Hazard
A leaking fuel line no matter how small can be the source of a fire or explosion when starting or operating the
engine.
4. Inspect hydraulic system/check for leaks:
The hydraulic system (hoses and pump) should be carefully inspected before each use. Also inspect the
mechanical parts at the same time. Make sure all hoses, clamps, nuts, bolts, fittings, etc., are properly installed
and tightened.
Always replace frayed, kinked, or cracked hoses and/or other damaged hydraulic components with Brave
authorized parts and components specified in the “Parts List” section of this manual.
Should it become necessary to loosen or remove any hydraulic fitting or hose, be sure to relieve all hydraulic
pressure by shutting off the engine, removing spark plug wire, and moving the valve control handle back and
forth several times.
WARNING: Hot Oil Hazard
NEVER remove the hydraulic oil fill cap when the engine is running or hot. Hot oil can escape causing severe
burns. Allow the Hydraulic Power Pack to cool completely before removing hydraulic oil fill cap.
Maintenance & Repair (Continued)
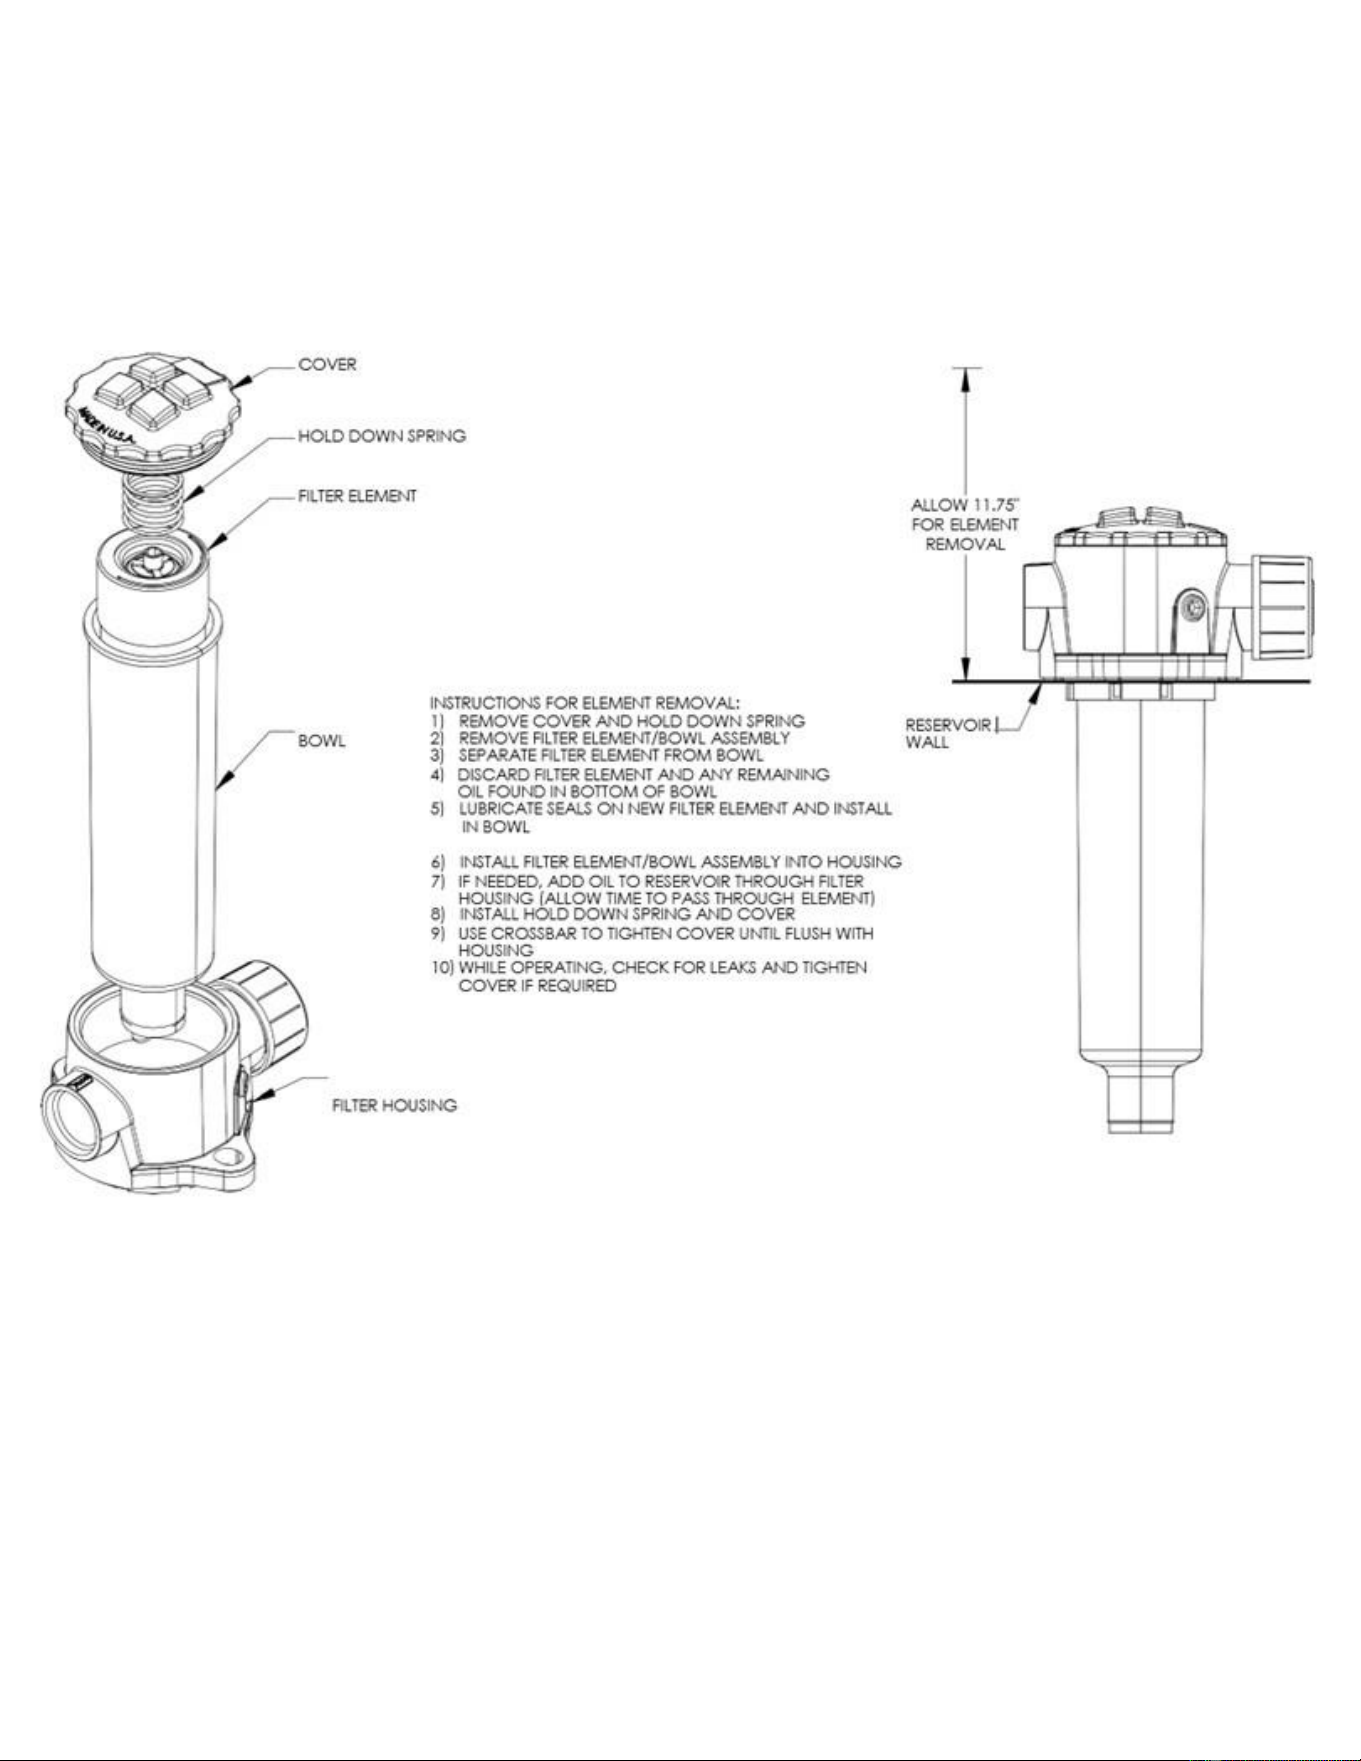
5. Hydraulic oil & filter change:
Each self-contained HBHR and HBHS unit is equipped with a filter condition indicator gauge. This gauge
should be monitored and when the indicator gauge is no longer in the green the filter element should be
replaced. In the event that water is present in the hydraulic oil the system should be completely drained, lines
flushed, and oil replaced. Brave recommends an oil change every 100 hours of operation. Add 10 wt. AW32,
ASLE H-150, or ISO 32 oil to the top of gauge located on side of tank. See filter change instructions insert
(separate from owner’s manual). Magnetic drain plug can be found on the bottom of the hydraulic tank.
WARNING
Never run the Hydraulic Power Pack unless the hydraulic oil level is at the top of gauge located on side of tank.
20
In Tank -SLF1 – Models HBHR280GX, GXE & HBER350GX, GXE
21
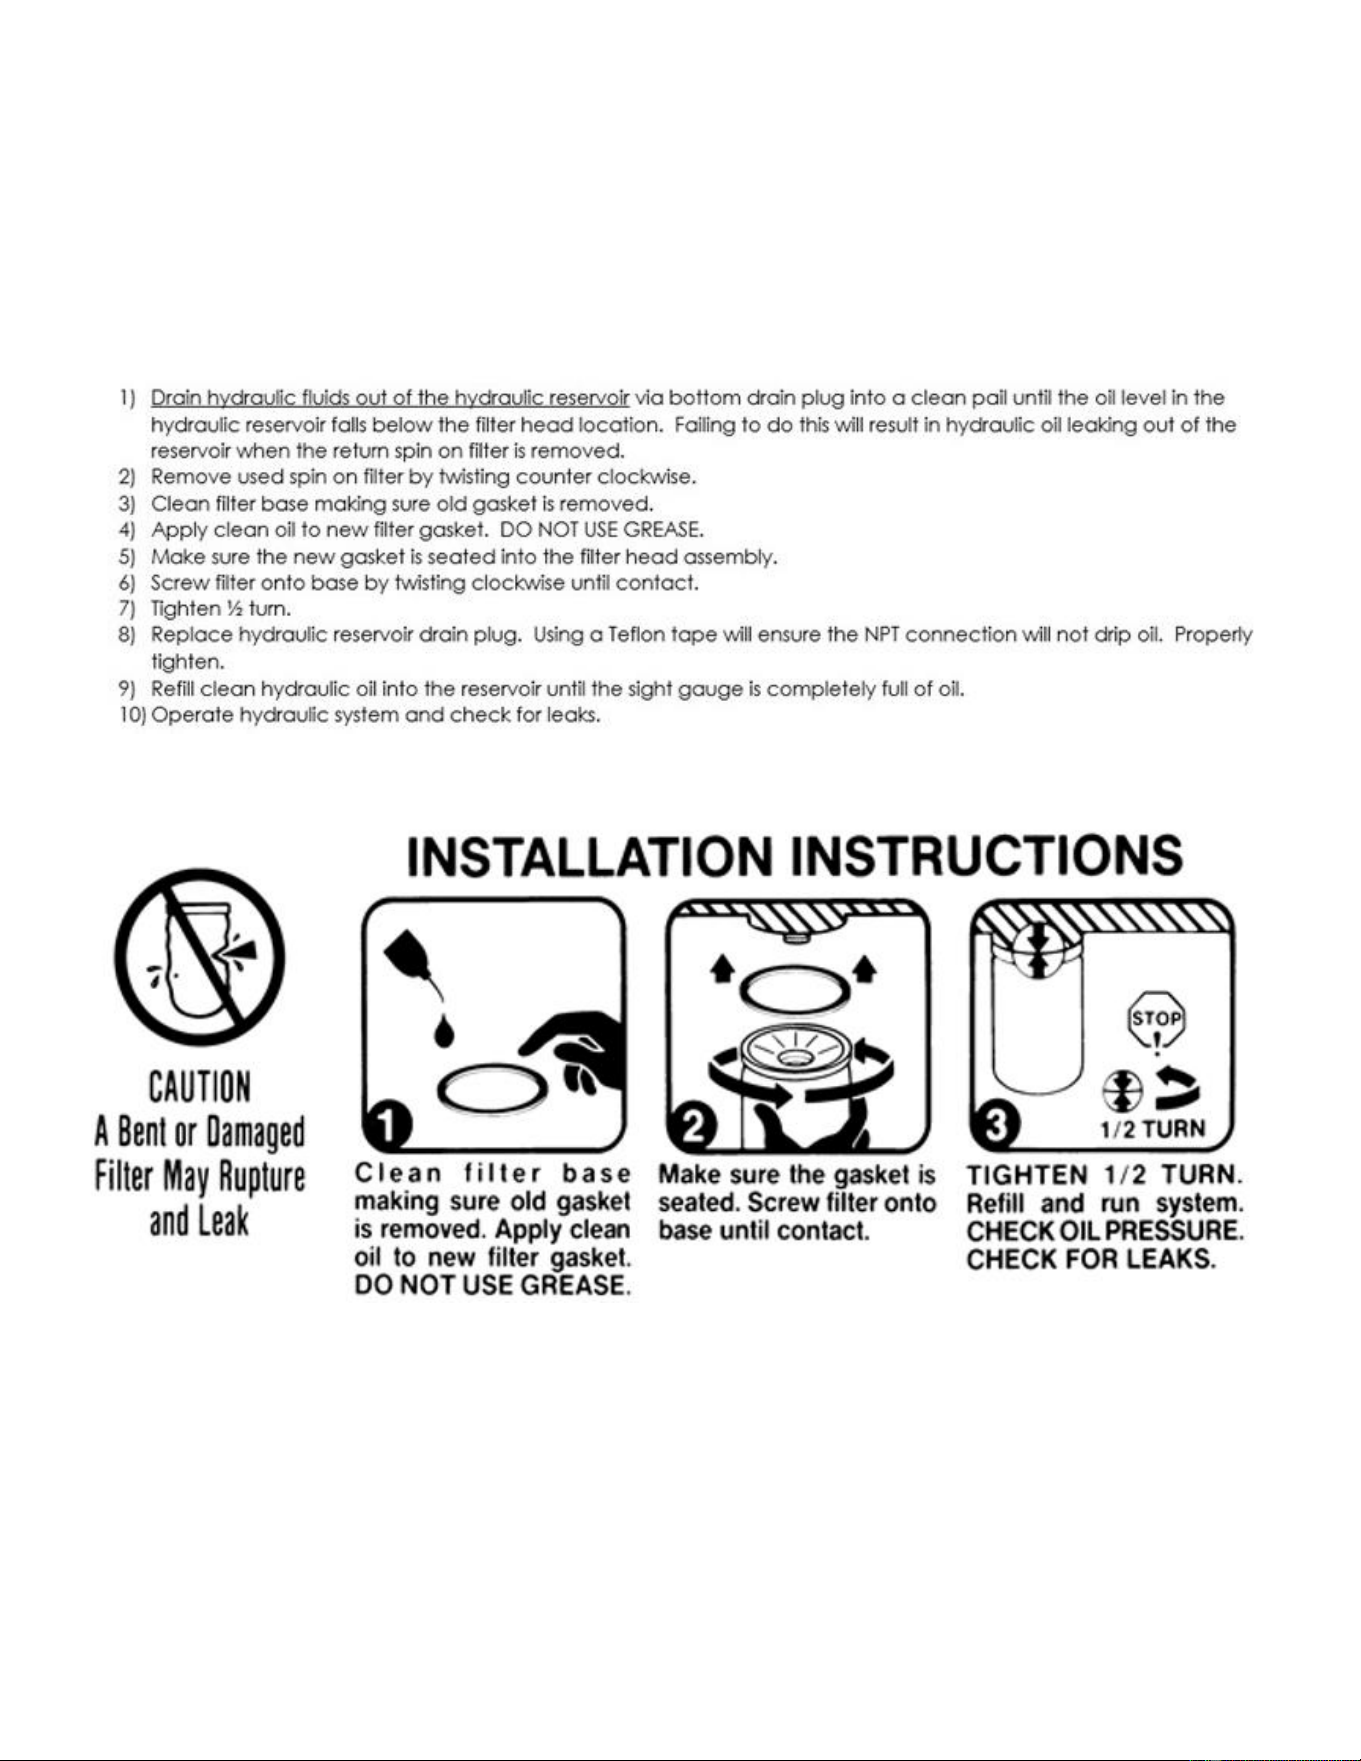
Directions to change out Hydraulic Filter Element
Spin-on Type – Models HBHS300GX, GXE & HBHS310GX, GXE
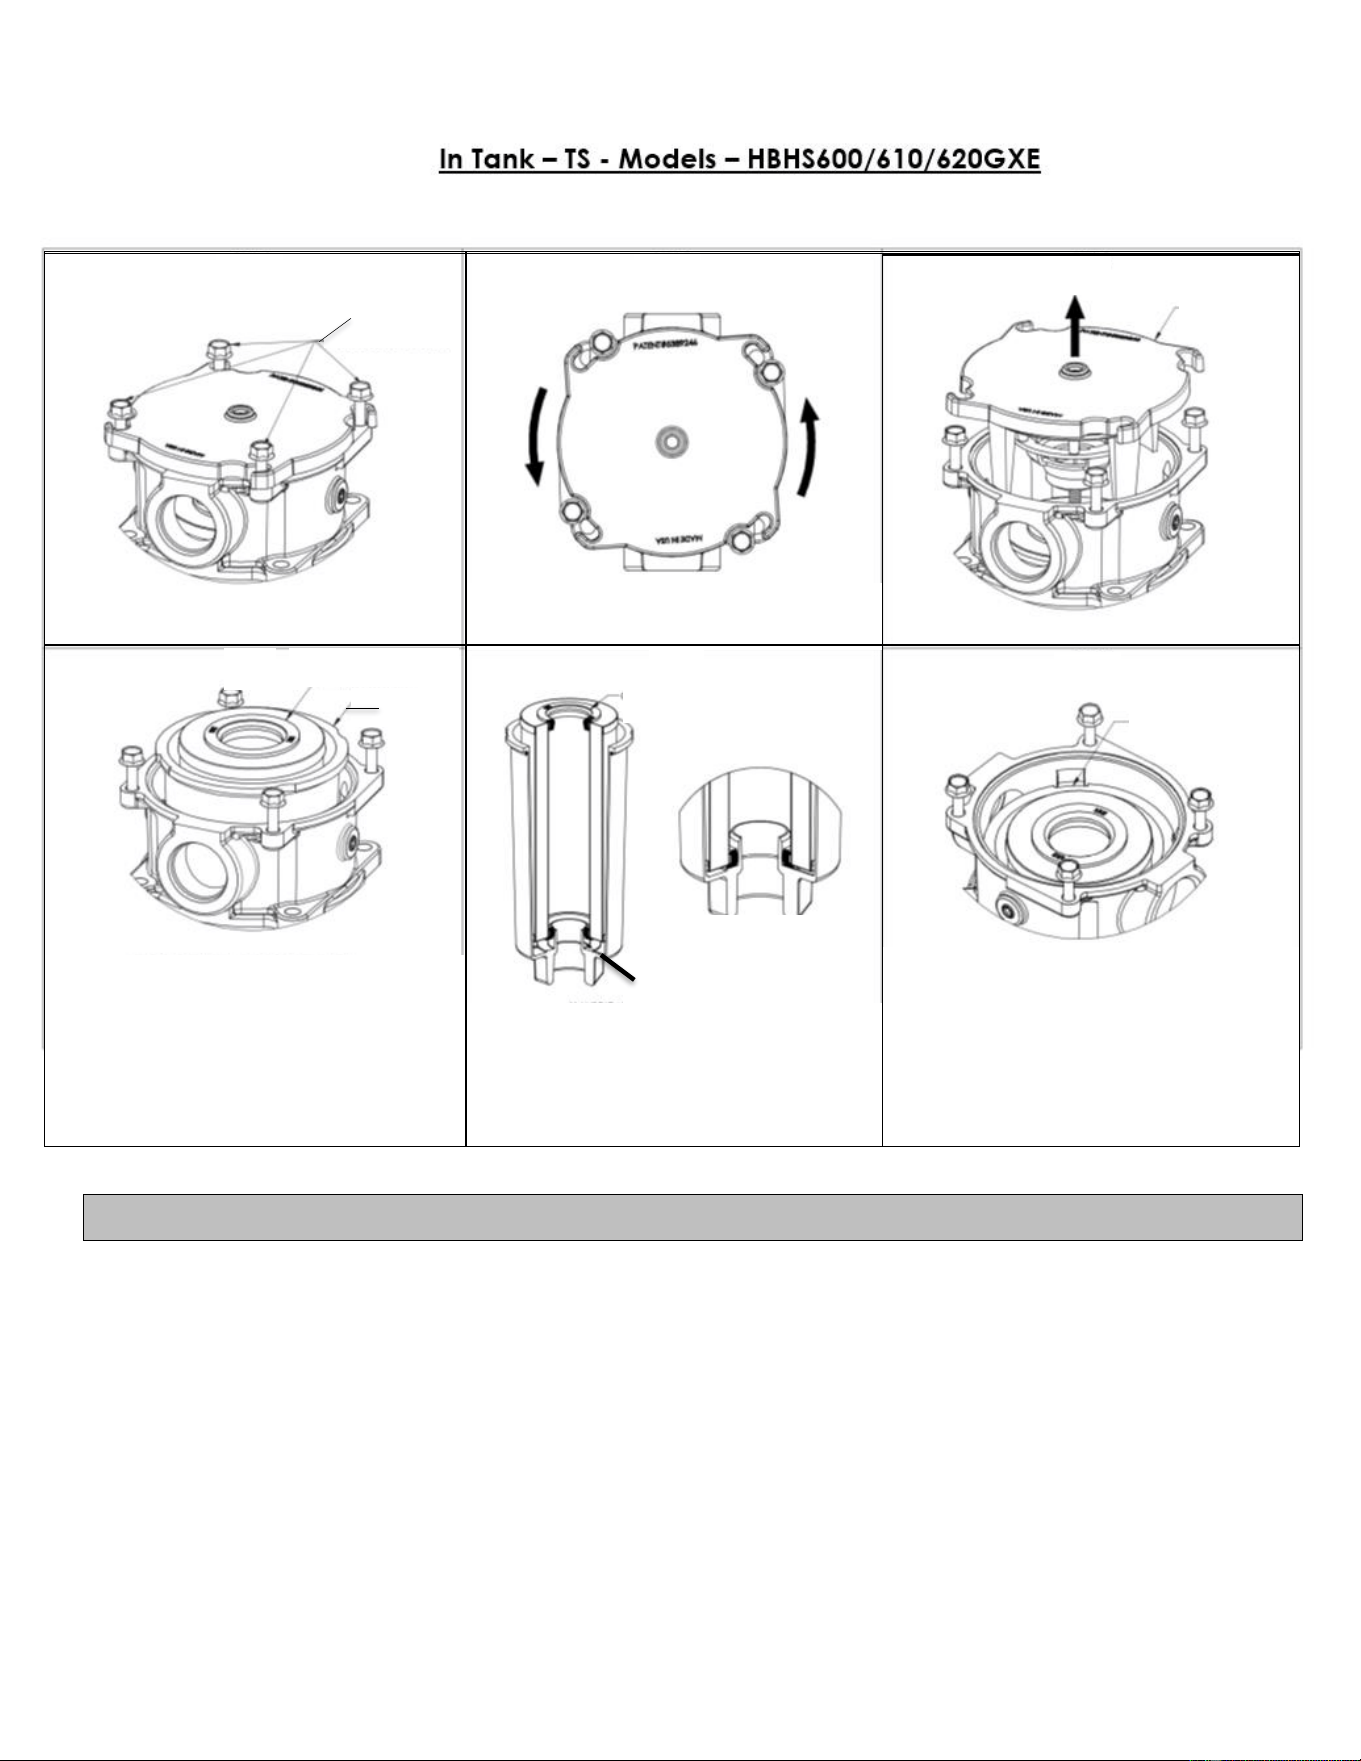
22
Repairs and Parts
Repairs. Major service, including the installation or replacement of parts, should be performed only by a
qualified technician.
Replacement parts. If a part needs replacement, only use factory approved repair parts. Replacement parts
from secondary suppliers (not original Brave replacement parts) can lead to product damage and/or personal
injury, and will void the warranty. Also, replacement parts that do not meet specifications may result in a safety
hazard or poor operation of the Hydraulic Power Pack. Obtain factory-approved parts from Brave Customer
Service at 1-800-350-8739.
Loosen
cover
bolts
A- Lubricate grommets (Both ends)
B- Center grommet over bowl nipple
C- Firmly push down on element until
seated.
Bowl nipple
Element installed
Grommet
1
6
A- Align square notch to reinstall
bowl/filter
B- Reverse steps 1-3
C- Cross tighten cover bolts and torque
to 22 ft. lbs.
5
3
2
4
Square notch
Remove
cover
Slightly turn cover as shown
Filter element
Bowl
Remove used filter element and dispose
23
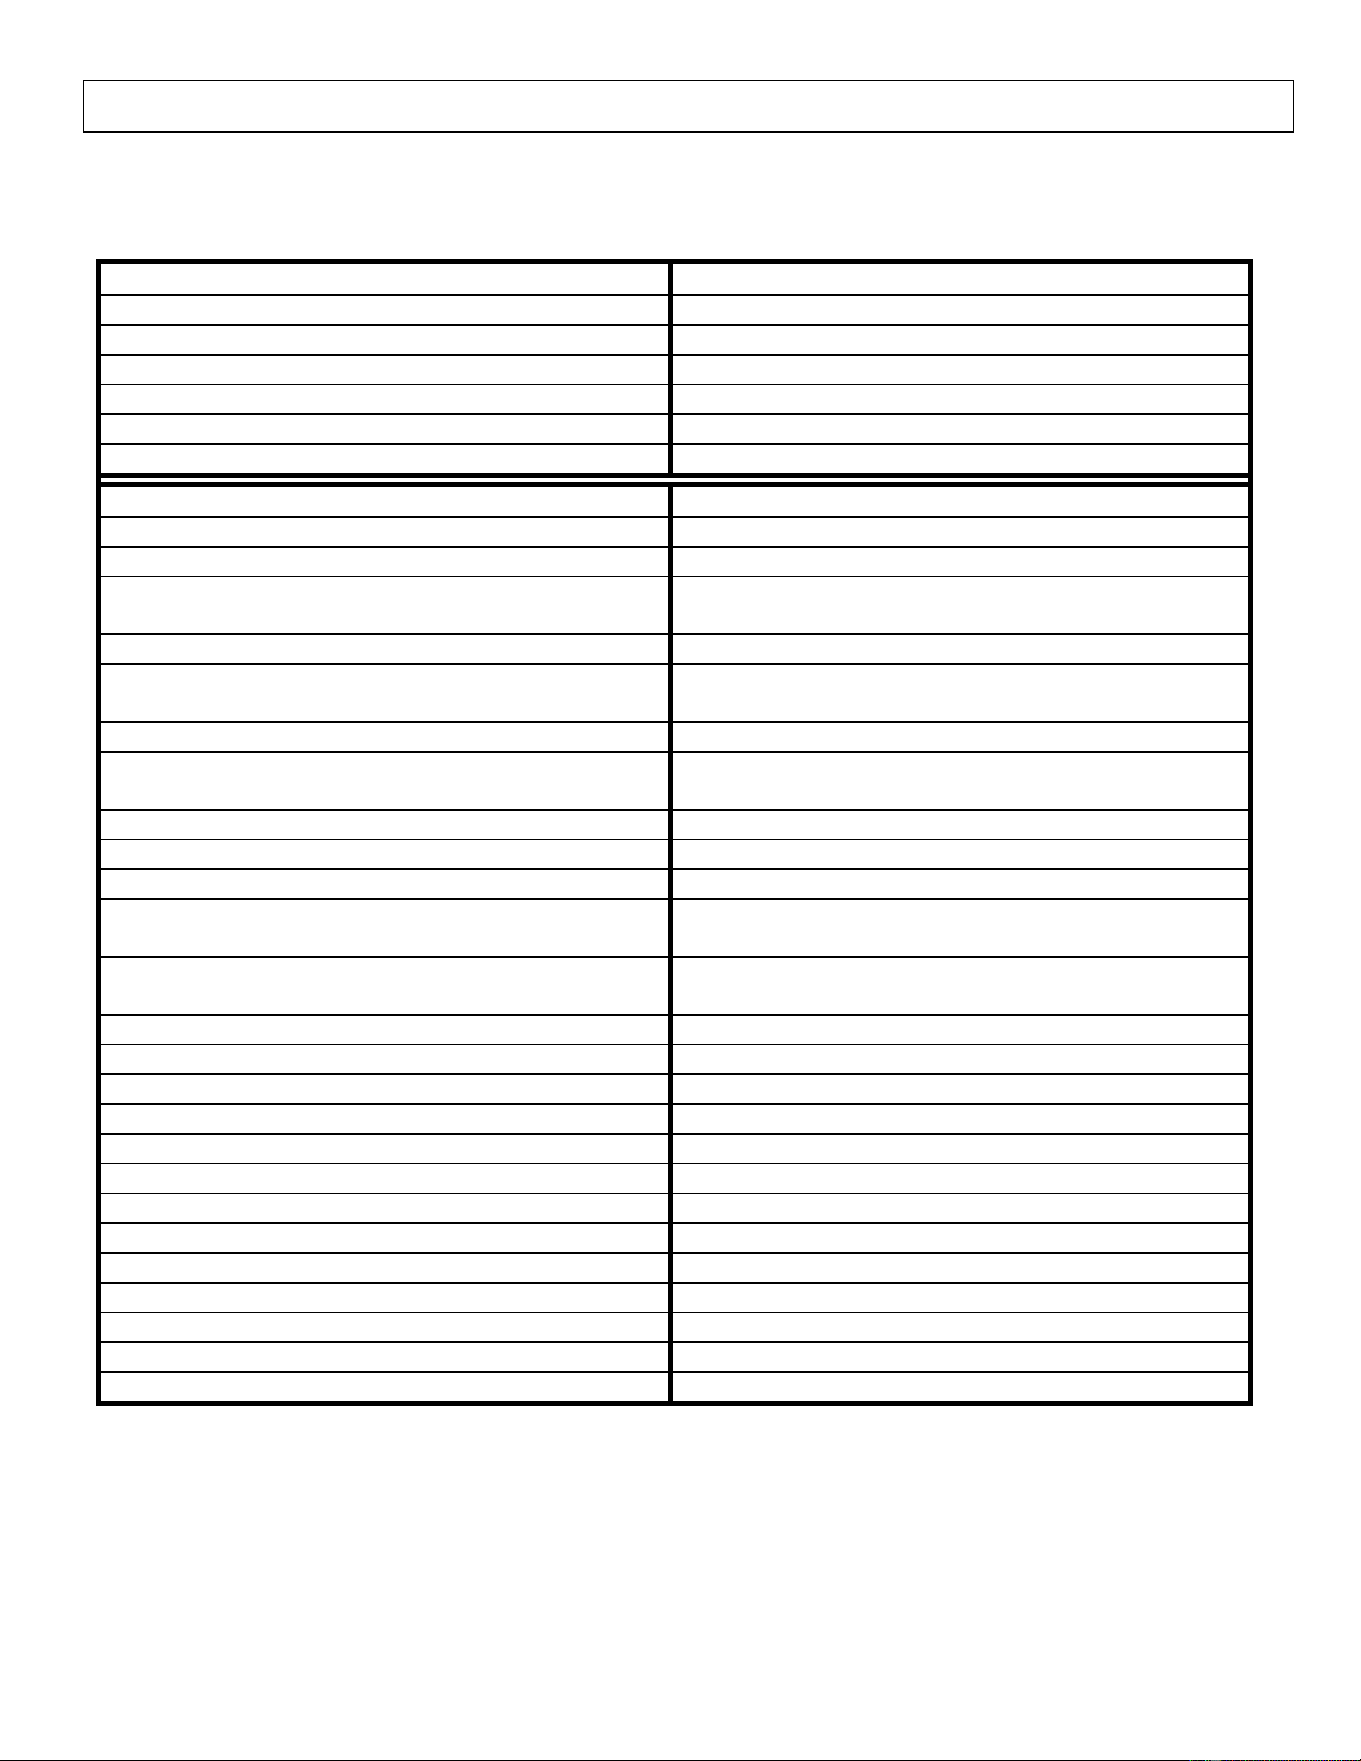
Maintenance Schedule
Troubleshooting
WARNING
Before troubleshooting or attempting to service, read the following safety instructions to avoid serious injury to
the operator or bystanders from moving parts that can crush or cut, burns, fire or explosion, or escaping high
pressure hydraulic fluid.
Important Safety Instructions:
Engine off. Always make sure the engine is off before cleaning, repairing or adjusting the Hydraulic Power
Pack, except as recommended by the manufacturer.
Hydraulic safety. High fluid pressures and temperatures are developed in the Hydraulic Power Pack .
Hydraulic fluid escaping through a pin hole sized opening can burn or puncture skin, resulting in wounds that
could cause blood poisoning, infection, disability, gangrene, amputation, or death. Therefore, the following
instructions should be heeded at all times when inspecting or servicing the hydraulic components of the log
splitter:
• Stop the engine, disconnect the spark plug, and move all control valve handles back and forth to relieve
pressure before changing or adjusting hydraulic components such as hoses, tubing, fittings, or other
components.
• Do not remove the hydraulic oil fill cap when the engine is running. Hot oil can escape causing severe
burns. Allow the log splitter to cool completely before removing the hydraulic oil fill cap.
• Do not adjust the pressure setting to the pump or valve.
• Do not check for leaks with your hands. Leaks can be located by holding a piece of cardboard or wood (at
least 2 feet long) with your hand at one end and passing the other end suspected area (wear eye protection).
Look for discoloration of the cardboard or wood.
• If injured by escaping fluid, no matter how small the wound is, see a doctor at once. A typical injection
injury may be a small puncture that does not look serious. However, severe infection or reaction can result if
proper medical treatment is not administered immediately by a doctor who is familiar will injection injuries.
Type of Maintenance
Frequency
Check Hydraulic Oil Level
Daily
Check Hydraulic Oil is Clean
Daily
Change Hydraulic Oil
Annually/100 hrs.
Clean Magnetic Drain Plug
Each Hydraulic Oil Change
Replace Return Line Filter
First 50 hrs. / 250 hrs.
Check Coupling Assembly
250 hrs.
24
Troubleshooting (Continued)
Problem
Engine stalls when valve engaged
Cause: 1, 2, 4, 22, 24
Motor or cylinder moves slow
Cause: 1, 3, 5, 7, 22, 24, 25
Engine appears to be seized
Cause: 1, 2, 6, 7, 8, 24
Motor or cylinder moves erratically
Cause: 3, 9, 10, 11, 12, 18, 19, 20, 22, 23, 24, 25
Engine won’t turn or stalls at no load
Cause: 10, 14, 16, 21, 23, 24
Pump shaft seal leaks
Cause: 9, 11, 12, 13, 14, 15, 16, 17
Cause
Solution
1. Bad connection at hydraulic coupler. (E, J)
A. Keep oil tank full and clean.
2. Lines reversed. (C)
B. Clean vent hole.
3. Worn ball seat on coupler. (E)
C. Slowly reverse position of valve handle. If implement
moves shut down and reverse lines.
4. Auger plugged or jammed.
D. Shut engine off, remove debris.
5. Lower hydraulic oil in reservoir. (A, H)
E. Shut off engine, remove and inspect the hydraulic
coupler for worn area, if found remove and replace.
6. Pressure lock. (B, D, E, J)
F. Flush and clean hydraulic system.
7. Defective pump. (L)
G. Shut down engine and inspect oil levels. Fill to
adequate levels or change.
8. Defective engine. (L)
H. Remove pump and check to see that it moves freely.
9. Air in system (A, I)
I. Shut engine off then restart.
10. Insufficient oil to pump. (A, E, F, G, H, J)
J. Check hoses for damage and correct placement.
11. Tank breather plugged. (B)
K. Precise alignment of engine and pump is necessary
(do not force).
12. Shaft seal improperly vented. (L)
L. Return component to dealer/manufacture for
necessary repairs.
13. Leakage through pump check valve. (L)
14. Pump high pressure gear set damaged. (L)
15. Pump gear set worn. (L)
16. Pump seized-up. (H, L)
17. Drive shaft broken. (L)
18. Internal leakage in directional valve. (F, H, L)
19. Directional valve damaged. (L)
20. Obstruction in directional valve. (F, H, L)
21. Obstruction in hydraulic lines. (F, H, J, L)
22. Weak engine-low horsepower. (D, L)
23. Low engine speed. (D, L)
24. Improper engine/pump alignment. (K, L)
25. Shaft coupling loose. (K, L)

25
Summary of Important Safety Information
This section provides a summary of the various safety procedures and measures that have been presented
through the manual. Keep this summary handy and refer to it to refresh your memory about how to safely use
your Hydraulic Power Pack.
WARNING
Carefully read and make sure you understand the following safety information before using the Hydraulic Power
Pack. Improper use or maintenance of the Hydraulic Power Pack can result in serious injury or death to the
operator and/or bystanders from fire/explosion, carbon monoxide poisoning, injection injuries, or burns.
General
Read manual. Read this Owner’s Manual and the engine Owner’s Manual completely before attempting to use and
service the Hydraulic Power Pack. Serious injury or death can result if safety instructions are not followed.
Instruct operators. The Hydraulic Power Pack owner or rental company must instruct all operators in safe Hydraulic
Power Pack set-up and operation. Do not allow anyone to operate the Hydraulic Power Pack who has not read
the Owner’s Manual and been instructed in its safe use.
Adults only. Only trained adults should operate and service the Hydraulic Power Pack. Do not let children operate.
Under the influence. Never operate, or let anyone else operate, the Hydraulic Power Pack while under the influence of
alcohol, drugs, or medication.
Intended use. Carefully read about and understand the intended use of this Hydraulic Power Pack. Do not use for other
purposes, as unforeseen hazards or equipment damage may result.
Controls and safety labels. Learn how to use the machine and its controls. Understand and follow all safety labels.
Prohibition Against Modifications
Never modify or alter the Hydraulic Power Pack in any way. Modifications can create serious safety hazards and will
also void the warranty.
Fuel/exhaust system. Never modify the exhaust system, fuel tanks, or fuel lines. Carbon monoxide poisoning, fire, or
explosion could result.
Pressure setting. Never increase the pressure setting of the pump or control valve.
Safety – Before Use
Know how to operate. Be thoroughly familiar with all controls and with the proper and safe use of the equipment. Know
how to stop and de-energize the Hydraulic Power Pack quickly if needed.
Getting Ready
Operate OUTSIDE only – dangerous carbon monoxide exhaust! Hydraulic Power Packs give off carbon monoxide
exhaust, a poisonous gas that can kill. You CANNOT smell it, see it, or taste it. ONLY run Hydraulic Power
Pack OUTDOORS and away from building air intakes. NEVER run Hydraulic Power Pack inside homes,
garages, sheds, or other semi-enclosed spaces. These spaces can trap poisonous gases.
Cooling ventilation. The Hydraulic Power Pack needs adequate, unobstructed flow of air to allow for proper cooling of
engine. Do not allow debris to accumulate and block airflow.
Transporting. When transporting, take precautions to make sure Hydraulic Power Pack will not tip over and cause a
fuel leak hazard. Tie down in upright position during transportation. Where engine includes a fuel shut-off, shut
off fuel.

26
Summary of Important Safety Information (Continued)
Hot exhaust – fires. Exhaust from engine can be extremely hot and cause fire. Position muffler at least 7 feet from
combustible objects during operation.
Fire extinguisher. Keeping a fire extinguisher rated “ABC” by the National Fire Protection Association nearby is
always recommended when using gasoline-operated machinery. Keep it properly charged and be familiar with
its use.
Personal Protective Equipment
Hearing protection. The use of earplugs or other hearing protection device is recommended for those in close proximity
to the Hydraulic Power Pack while it is operating.
Eye protection. Wear ANSI-approved eye protection when operating the Hydraulic Power Pack.
Loose/dangling. Loose or dangling apparel, jewelry or hair can become entangled in moving parts. Never wear jewelry
or loose-fitting clothing when operating the Hydraulic Power Pack and attached implements.
Gasoline Safety
Gasoline is highly flammable and explosive. You can be burned or seriously injured. Use extreme care when handling
gasoline.
Fuel outdoors. Fill fuel tank outdoors – never indoors. Gasoline vapors can ignite if they collect inside an enclosure.
Explosion can result.
Use approved container. Never pump fuel directly into engine at service station. Static charge can build and ignite
fuel. Use a UL listed fuel container to transfer gasoline to the engine.
Running/hot engine. A running engine is hot enough to ignite fuel. Never add fuel or remove gas cap if engine is
running or still hot. Stop the engine and allow to cool at least five minutes before adding fuel.
Heat/flames/sparks. Keep sources of heat, flame, or sparks away while adding fuel.
Don’t fill to the top. DO NOT overfill the gasoline tank. Allow at least 1” of empty space below the fill neck to allow
for fuel expansion and operation on slopes.
Replace cap. Replace gasoline cap securely before starting engine.
Spills. Clean up fuel spills immediately. Move Hydraulic Power Pack away from spilled fuel on the ground. Wipe fuel
off engine and wait 5 minutes for excess fuel to evaporate before starting engine. Gasoline-soaked rags should
be disposed of properly.
On skin/clothes. If gasoline is spilled on your skin or clothes, wash skin and change clothes immediately.
Inspect fuel system. Check fuel system on a regular basis. Look for signs of leaks, deterioration, chafed or spongy fuel
hose, loose or missing fuel hose clamps, damaged fuel tank, or a defective fuel shut-off valve. Do not start
Hydraulic Power Pack until needed repairs have been completed.
Gasoline storage. Store gasoline in a cool, dry place in a UL listed, tightly sealed container away from children.
Hydraulic System Safety
Check the hydraulic system (hoses, tubing, clamps/fittings, pump, and cylinder) carefully before each use. Do not
operate the Hydraulic Power Pack or its attachments with frayed, kinked, cracked, or damaged hydraulic hoses,
fittings, or tubing.
High fluid pressures and temperatures are developed in Hydraulic Power Packs. Hydraulic fluid escaping through a pin-
size opening can burn or puncture skin, resulting in wounds that could cause blood poisoning, infection,
disability, gangrene, amputation, or death.
Do not remove the hydraulic oil fill cap when the engine is running. Hot oil can escape causing severe burns. Allow
Hydraulic Power Pack to cool completely before removing hydraulic oil fill cap.

27
Summary of Important Safety Information (Continued)
Do not adjust the pressure setting of the pump or valve.
Do not check for leaks with your hand. Leaks can be located by holding a piece of cardboard or wood (at least two feet
long) with your hand at one end and passing the other end over the suspected area (wear eye protection). Look
for discoloration of the cardboard or wood.
Stop the engine, disconnect the spark plug, and move all control valve handles back and forth to relieve pressure before
changing or adjusting hydraulic system components such as hoses, tubing, fittings, or other components.
If injured by escaping fluid, no matter how small the wound is, see a doctor at once. A typical injection injury may be a
small puncture wound that does not look serious. However, severe infection or reaction can result if proper
medical treatment is not administered immediately by a doctor who is familiar with injection injuries.
Safety – During Use
Safety equipment/controls. Always operate the Hydraulic Power Pack with all controls properly adjusted for safe
operation.
Check for gasoline leak before starting. After opening gasoline valve, smell for gasoline before starting engine. If you
smell gasoline, DO NOT start engine. DO NOT light a match. DO NOT flip on an electrical switch. Exit area
immediately and call fire department.
Operating speed. Always operate the Hydraulic Power Pack at the manufacturer’s recommended speed. The maximum
speed of the engine pump is preset within safe limits.
Know how to stop. Know how to stop the Hydraulic Power Pack quickly if needed. Do the following in order until unit
is stopped. (1) First, use on/off switch on engine. (2) Alternatively, engage full choke to flood engine. (3) Pull
spark plug wire using an electrically insulated tool or glove.
Damaged. Do not operate the Hydraulic Power Pack with damaged, missing, incorrectly adjusted, or broken parts.
Carbon monoxide exhaust. The running engine gives off carbon monoxide, a poisonous gas that can kill you. You
CANNOT smell it, see it, or taste it. If you start to feel sick, dizzy, or weak while using the Hydraulic Power
Pack, shut off the engine and get to fresh air RIGHT AWAY. See a doctor. You may have carbon monoxide
poisoning.
Other exhaust dangers. This product contains or emits chemicals known to the State of California to cause cancer, birth
defects or other reproductive harm. Avoid inhalation of exhaust.
Smoking/sparks. Never smoke near the running Hydraulic Power Pack, and never operate near sources of sparks or
flames.
Hot muffler. Never touch hot muffler or hot exhaust manifold. Exhaust and engine parts can be very hot and will burn
you.
Moving parts. Keep hands, feet, and apparel away from moving parts of unit or its attachments.
Refueling. DO NOT refuel the engine until it has cooled at least five minutes.
Malfunction during operation. Always shut the machine off if any unusual noise or vibration occurs.
Vibration. Overexposure to any machine vibration daily may lead to circulatory or nerve damage.
Adjusting/repairing. Always turn off Hydraulic Power Pack and remove spark plug or spark plug wire before working
on the Hydraulic Power Pack to prevent accidental starting.

28
Summary of Important Safety Information (Continued)
Safety – After Use
Cool engine before storing. Let engine cool for at least five (5) minutes before storing. A hot engine can be a fire
hazard.
Shut off fuel supply. If equipped, make sure gasoline shut-off lever is in the closed position (to the left).
Prevent accidental starting. When Hydraulic Power Pack is not in use, remove key from starter (electric start engines)
and secure in a safe location, or remove spark plug in order to ensure that Hydraulic Power Pack cannot be
started in a storage location or by untrained persons.
Storage location. Store the Hydraulic Power Pack in a dry location away from sources of heat, open flames, sparks or
pilot lights, such as water heaters, space heaters, furnaces, clothes dryers, or other gas appliances, EVEN IF the
Hydraulic Power Pack’s gas tank is empty. Residual gasoline could ignite.
Exercise regularly. Exercise the Hydraulic Power Pack’s engine every four (4) weeks to dry out moisture that
accumulates in the windings. If engine cannot be exercised on a regular basis, prepare it for long-term (seasonal)
storage.
Safety – Inspection/Maintenance
Inspect and maintain your Hydraulic Power Pack on a regular basis and repair as needed to keep it in safe working
condition:
Turn off Hydraulic Power Pack. Always turn off Hydraulic Power Pack and remove spark plug or spark plug wire
before working on the engine or Hydraulic Power Pack to prevent accidental starting.
Burns. Do not touch hot muffler. Muffler will be hot even if unit is stopped. Allow unit to cool before servicing.
Burns. Do not remove hydraulic oil fill cap when the engine is running or hot. Hot oil can escape and cause severe
burns. Allow Hydraulic Power Pack to cool completely before removing hydraulic oil fill cap.
Replacement parts. If a part needs replacement, only use parts that meet the manufacturer’s specifications.
Replacement parts that do not meet specifications may result in a safety hazard or poor operation of the
Hydraulic Power Pack and will void the warranty.
Any Safety Questions, Comments or Problems
Call your dealer or Brave Customer Service 1-800-350-8739

29
Special Safety Information on Static Electricity
Accidents Involving Static Electricity
Static electricity and filling gasoline containers. Static electricity can initiate from ungrounded gasoline tanks or
containers, from flowing gasoline, and from persons carrying a static electric charge.
Static electricity on numerous occasions has explosively ignited gasoline vapors that were present during fueling
processes, resulting in serious burns to nearby persons. To avoid static electricity while fueling, certain steps
must be followed before and during the fueling process in order to minimize and safely dissipate static charge
build-up.
Filling Portable Containers at Service Stations:
Use a portable container to fill Hydraulic Power Pack tank. Never fill the Hydraulic Power Pack’s gasoline tank
directly from the service station’s fuel dispenser pump – the Hydraulic Power Pack’s tank is not grounded and
the high velocity flow of gasoline from a fuel pump can cause static electric build-up. Use a UL-approved
portable container to transfer gasoline to the Hydraulic Power Pack’s tank.
Use a portable container made of metal or conductive plastic. It will dissipate charge to ground more readily.
Fill container on the ground. Never fill the portable gasoline container while it is sitting inside a vehicle, trailer, trunk,
or pick-up truck bed. ALWAYS place container on the ground to be filled.
Touch a grounded metal object before starting. Always dissipate static charge from your body before beginning the
fueling process by touching a grounded metal object that is a safe distance away from fuel sources.
Keep nozzle in contact with container. Keep fuel dispenser nozzle in contact with the portable container at all times
while filling at a service station. Do not use the nozzle lock-open device on the dispenser hose.
About static electricity and fueling
Many common objects can accumulate and retain a static electric charge. Objects made of non-conductive materials
(e.g., plastics) easily accumulate and retain static electric charge, as can objects made of conductive material
(e.g., metal, water) if they are not electrically grounded. The static electric charge on an object, such as a human
body or plastic fuel tank/container, can reach as high as several thousand volts!
A static electric spark can be generated if the static electric charge stored on an object “jumps” to another, less charged
object. Such a spark can ignite invisible gasoline vapors that are present during fueling situations.
Typical sources of static electric hazards during fueling
The following objects can accumulate a static electric charge and cause an ignition spark in typical fueling situations:
Ungrounded tanks/containers. Any ungrounded fuel tank or container can accumulate a static electric charge as a
result of contact with other objects or friction during transportation. This static electricity can discharge as a
spark to the grounded gasoline dispenser nozzle, as the nozzle is first brought close to the tank/container at the
beginning of the fueling process.
Flowing gasoline. Most people are not aware that gasoline accumulates static electric charge while flowing through a
hose or pipe. This charge then transfers to and accumulates in the gasoline tank or container that is being filled.
The total amount of charge accumulation depends on the amount of gasoline pumped into the container, the
speed with which it is pumped, and whether or not the tank/container is grounded. If sufficient static electric
charge accumulates in the fuel tank or container during the fueling process, the tank/container may discharge a
spark to the grounded gasoline dispenser nozzle.
Persons. A person dispensing the gasoline can carry a static electric charge on their body, typically resulting from
contact with their car seat or electronics. The static electricity can discharge as a spark between that person’s
hand and either the grounded dispenser nozzle or the fuel tank opening.
30
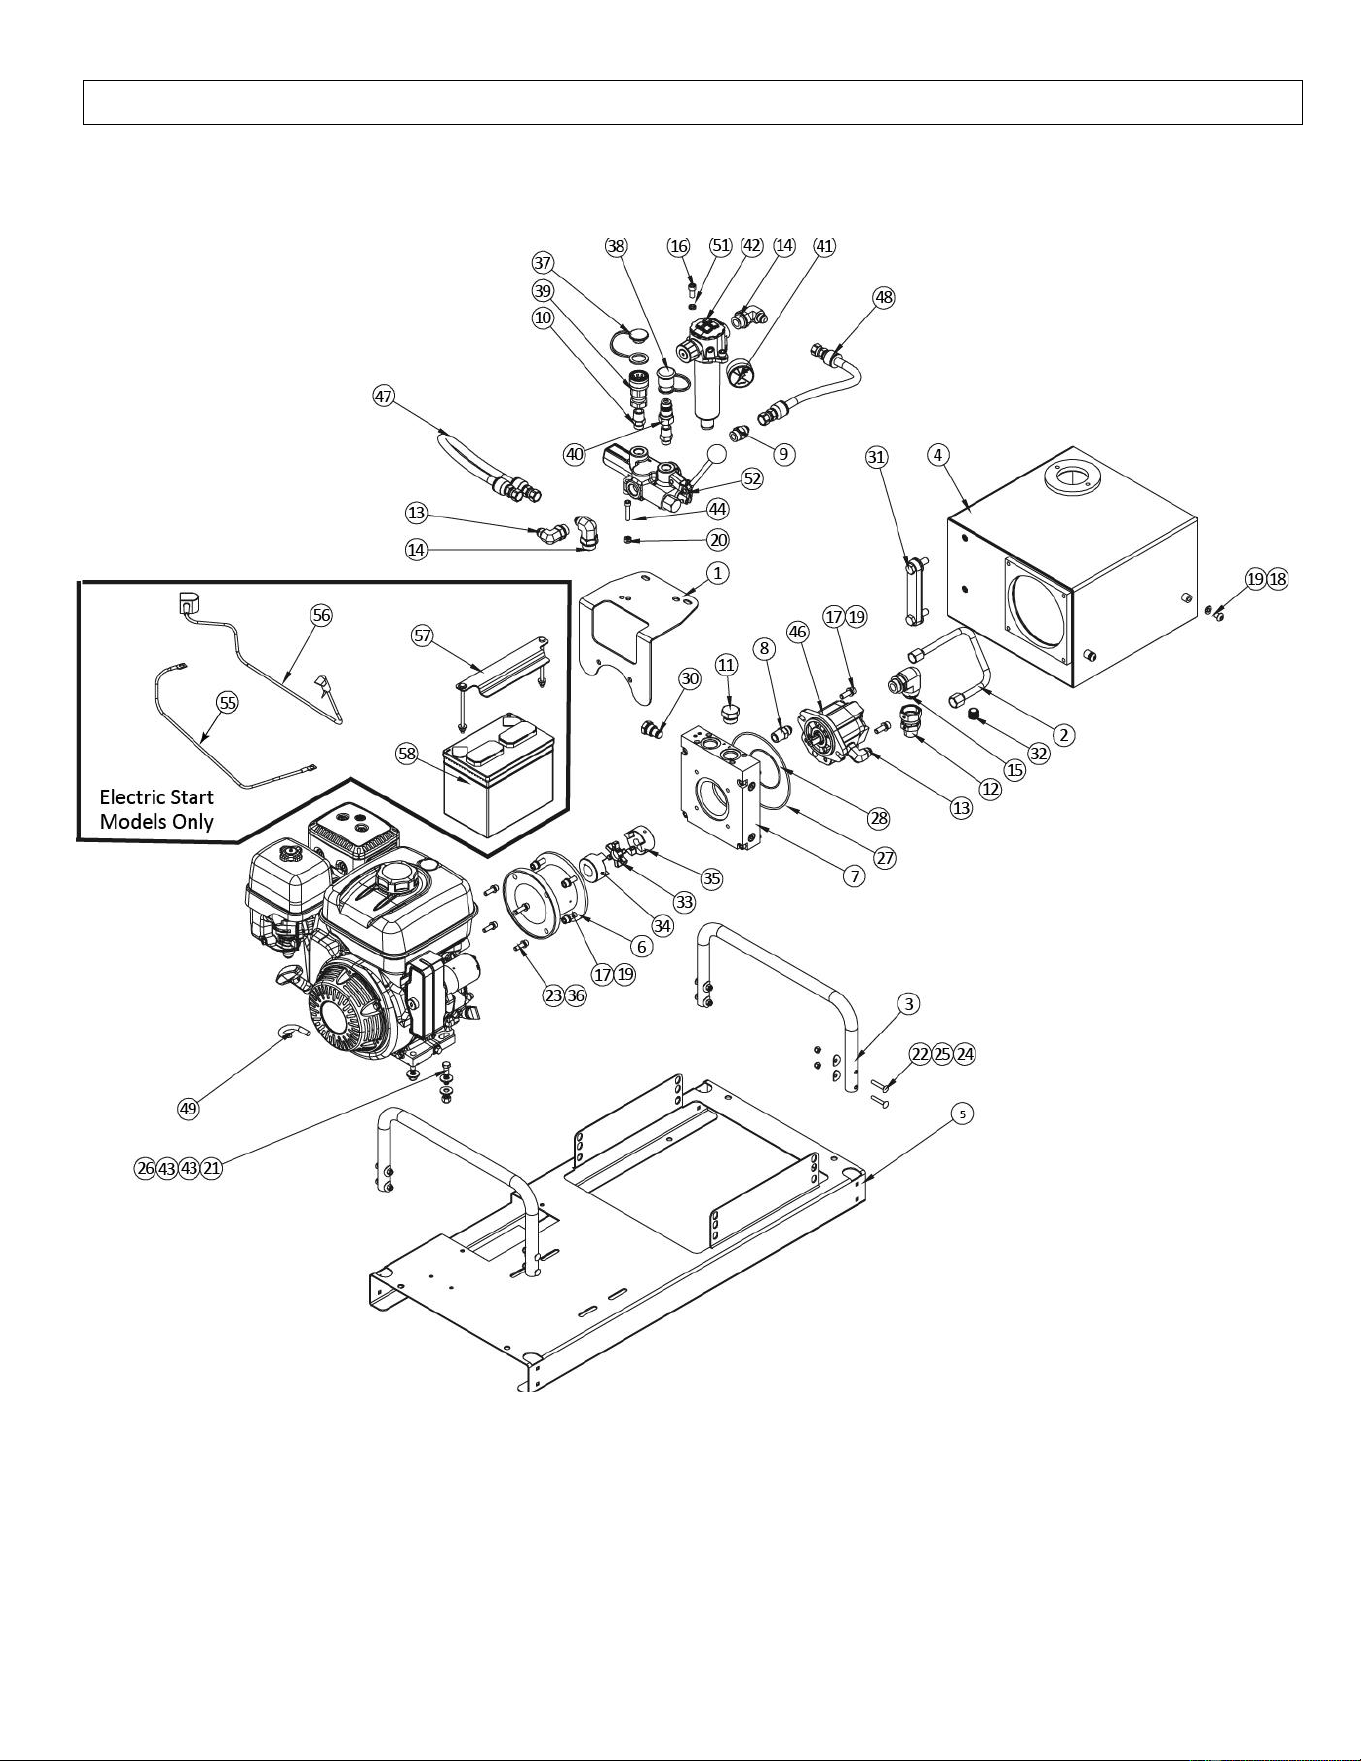
HBHR350GX, HBHR350GXE, HBHR280GX & HBHR280GXE Exploded View

31
HBHR350GX, HBHR350GXE, HBHR280GX & HBHR280GXE Parts List - Rev A
Ref #
Part
Description
Qty
Used On
1
1010330
LS-3000/ RD2500 BRACKET, MODULAR POWER UNIT
1
ALL
2
1010353
TUBE, -8 FJIC X -8 FJIC ASM
1
ALL
3
1010427
GRAB HANDLE, HPU
2
HBHR350GX-GXE
1010264
GRAB HANDLE, HPU
2
HBHR280GX-GXE
4
1010433
TANK WELDMENT, HPU RES-15
1
HBHR350GX-GXE
1010249
TANK WELDMENT, HPU RES-8
1
HBHR280GX-GXE
5
1010435
WELDMENT, BASE, HPU RES-15
1
HBHR350GX-GXE
1010419
WELDMENT, BASE, HPU RES-8
1
HBHR280GX-GXE
6
1010464
HONDA ENGINE COUPLING, MODULAR POWER
1
ALL
7
1012902
ASSY, PUMP HEAD ASSM, HPU MODULAR SAE-A
1
ALL
8
1013178
08 Male JIC X -08 Male NPT
1
ALL
9
1013939
FITTING STRAIGHT -8 MJIC X -10 MORB
1
ALL
10
1014003
#08 Male ORB X 1/2 Male NPT
2
ALL
11
1014103
HEX PLUG, -12 MORB
1
ALL
12
1014236
FEMALE -16 JIC X MALE -12 NPT ADAPTER
1
ALL
13
1014312
FITTING 90 DEG -8 MJIC / -10 MORB
2
ALL
14
1014313
FITTING 90 DEG -8 MJIC / -12 MORB
2
ALL
15
1014328
FITTING 90 DEG -16 MJIC X -12 MORB
1
ALL
16
1014938
3/8"-16 x 3/4" SHCS BLACK OXIDE
2
ALL
17
1014939
3/8"-16 x 1" SHCS BLACK OXIDE
6
ALL
18
1014952
3/8"-16 x 1/2" BHCS BLACK OXIDE
6, 4
HBHR350GX-GXE, HBHR280GX-GXE
19
1014971
3/8" SCREW SIZE LOCK WASHER, ZINC
12, 10
HBHR350GX-GXE, HBHR280GX-GXE
20
1014985
5/16"-18 NYLON-INSERT HEX LOCK NUT, GR2, ZINC
3
ALL
21
1014986
3/8"-16 NYLON-INSERT HEX LOCK NUT, GR5, ZINC
4
ALL
22
1015055
1/4"-20 x 1-1/2" CARRIAGE BOLT, ZINC
8
ALL
23
1015063
5/16"-24 x 1" SHCS BLACK OXIDE
4
ALL
24
1015073
1/4"-20 NYLON-INSERT HEX LOCK NUT, GR2, ZINC
8
ALL
25
1015194
1/4" SCREW SIZE CURVED WASHER FOR 1" TUBE, ZINC
8
ALL
26
1015206
3/8"-16 x 1-3/4" HHCS, GR5, ZINC
4
ALL
27
1023992
O-RING / OLD #8152
1
ALL
28
1024201
O-RING / OLD #138
1
ALL
29
1037197
1/4 X 1/4 X 1-1/4 Steel Key
1
ALL
30
1058437
CP10-20-N, CAVITY PLUG
1
ALL
31
1102641
5" SIGHT GAUGE
1
ALL
32
1067976
PLUG, MAGNETIC ALLEN HEAD, 1/2"-14 NPTF, STL
1
ALL
33
1068113
SOX SPACER SPIDER, 68514411070
1
ALL
34
1068117
L095 HUB, 1" BORE, 1/4" x 1/8" KEYWAY
1
ALL
35
1068125
L095 HUB, 5/8" BORE, 5/32" x 5/64" KEYWAY
1
ALL
36
1080421
5/16" SCREW SIZE LOCK WASHER, ZINC
4
ALL
37
1081058
1/2 BODY DUST PLUG WITH RUBBER STRAP NEW STYLE
1
ALL
38
1081070
1/2 DUST CAP NEW STYLE
1
ALL
39
1085800
F.bir 12 NPT - 1/2" NPT Coupler
1
ALL
40
1085801
M.bir 12 NPT - 1/2" NPT Tip
1
ALL
41
1086823
0-60 PSI Bypass Gauge - 1/8 NPT
1
ALL
42
1090366
25GPM TANK TOP FILTER HEAD (includes filter)
1
ALL
1090490
10 Micron Filter Element only (Not Shown)
1
ALL
43
1091091
3/8" FLAT WASHER, USS, ZINC
8
ALL
44
1094966
5/16"-18 x 1-1/2" SHCS BLACK OXIDE
3
ALL
45
1120799
3/8"-16 x 1-3/4" SHCS BLACK OXIDE
4
ALL
46
1124188
.51CID 2 BLT A 5/8 KEYED CW DUAL #12 X #10 PORTS
1
HBHR350GX-GXE
1124173
.36CID 2 BLT A 5/8 KEYED CW DUAL #12 X #10 SIDE/REAR
1
HBHR280GX-GXE
47
1157987
EC21508-08Z-608-608-18.5 OAL
1
ALL
48
1157988
EC21508-08Z-608-608-24.5 OAL
1
ALL
49
1158867
OIL DRAIN EXTENSION HOSE, 12mm
1
HBHR350GX-GXE
50
HONDA GX390, Recoil
1
HBHR350GX
HONDA GX270, Recoil
1
HBHR280GX
HONDA GXE390, Electric Start
1
HBHR350GXE
HONDA GXE270, Electric Start
1
HBHR280GXE
51
1158954
3/8" HIGH COLLAR LOCK WASHER, ZINC
2
ALL
52
1159418
SINGLE SPOOL MONO-BLOCK 20 GPM VALVE
1
ALL
53
1162902
Filter Head Cap
1
ALL
54
1082100
Valve Handle
1
ALL
55
1077761
4GA Starter Cable, 3/8" std hole
1
HBHR350GXE, HBHR280GXE
56
1084339
Positive Battery Cable
1
HBHR350GXE, HBHR280GXE
57
1010398
Assembly, Battery Hold Down
1
HBHR350GXE, HBHR280GXE
58
1097406
#U-1 Rated Battery 12V
1
HBHR350GXE, HBHR280GXE
32
HBHS300GX & HBHS310GX Exploded View – Rev A

33
HBHS300GX, HBHS300GXE, HBHS310GX & HBHS310GXE Parts List
Ref
#
Part
Description
Qty
Used On
1
1010412
FFP, FORMED SHEET, POWER UNIT SKIDFRAME BASE, PC
1
ALL
2
1010413
FFP, FORMED SHEET, POWER UNIT SKIDFRAME UPRIGHT
1
ALL
3
1011765
1/2" SCREW SIZE FLAT WASHER, STEEL
12
ALL
4
1013333
FITTING, ELBOW, -12 MJIC x 1-1/4" MNPT
1
ALL
5
1013500
FITTING CAP -8 JIC
1
ALL
6
1013938
FITTING STRAIGHT -8 MJIC X -8 MORB
1
ALL
7
1013939
FITTING STRAIGHT -8 MJIC X -10 MORB
1
ALL
8
1013952
FITTING STRAIGHT -12 MJIC X -12 MORB
1
ALL
9
1014008
FITTING STRAIGHT -12 MORB x 3/4" MP
1
ALL
10
1014312
FITTING 90 DEG -8 MJIC / -10 MORB
1
ALL
11
1014425
FITTING 90 DEG -8 MORB / -8 MP
1
ALL
12
1014905
1/2"-13 x 1-1/2" HHCS, GR5, ZINC
4
ALL
13
1014971
3/8" SCREW SIZE LOCK WASHER, ZINC
2
ALL
14
1014986
3/8"-16 NYLON-INSERT HEX LOCK NUT, GR5, ZINC
4
ALL
15
1014987
1/2"-13 NYLON-INSERT HEX LOCK NUT, 18-8 STAINLESS
8
ALL
16
1030822
1-1/4 SQUARE-HEAD PLUG
1
ALL
17
1030832
1-1/4 x 3/4 - HEXBUSH
1
ALL
18
1031121
MOUNTING KIT FOR UPRIGHT RES.
1
ALL
19
1037197
1/4 X 1/4 X 1-1/4 Steel Key
1
ALL
20
1046260
2-WAY BODY, SAE -8 PORTS - ALUMINUM
1
ALL
21
1067914
FILLER/BREATHER, 40 MICRON, SS MESH
1
ALL
22
1067982
PLUG, MAGNETIC SQUARE HEAD, 3/4"-14 NPTF, STL
1
ALL
23
1068113
SOX SPACER SPIDER, 68514411070
1
ALL
24
1068117
L095 HUB, 1" BORE, 1/4" x 1/8" KEYWAY
1
ALL
25
1068125
L095 HUB, 5/8" BORE, 5/32" x 5/64" KEYWAY
1
ALL
26
1068422
PUMP BRACKET
1
ALL
27
1069273
Hc-70 Hose Clamp 1.12" To 1.25"
2
ALL
28
1072535
3/4" Straight JIC Female Swivel
2
ALL
29
1080381
3/8"-16 x 1-1/2" MODIFIED HHCS, GR5, ZINC
2
ALL
30
1086461
WELDMENT, RES-10, PC
1
ALL
31
1087964
GAUGE, FILTER INDICATOR, 0-60 PSI
1
ALL
32
1090169
10 Micron Cellulose Spin On Ae10 Plain Can No Logo
1
ALL
33
1090428
STRAINER, 2" NPTF MALE THREAD, 1-1/4" NPTF OUTLET
1
ALL
34
1090478
#12 SAE SPIN ON FILTER HEAD
1
ALL
35
1091091
3/8" FLAT WASHER, USS, ZINC
8
ALL
36
1102641
5" SIGHT/TEMP GAUGE, M12x1.75, PLASTIC GUARD
1
ALL
37
1115360
3/8"-16 x 1-1/4" SHCS BLACK OXIDE
4
ALL
38
1124173
.36CID 2 BLT A 5/8 KEYED CW DUAL #12 X #10 PORTS
1
HBHS300GX, GXE
1124188
.51cid 2 Blt A 5/8 Keyed CW Dual #12 X #10 Side/Rear Ports
1
HBHS310GX, GXE
39
1124332
3/8"-16 x 2" HHCS, GR5, ZINC
4
ALL
40
1157513
REDUCER, 2" MNPT X 1/2" FNPT, HEX, BLK STEEL
1
ALL
41
1157974
EC21508-08Z-608-608-45 OAL
1
ALL
42
1158867
OIL DRAIN EXTENSION HOSE, 12mm
1
ALL
43
1158869
HONDA GX390, GXE390
1
ALL
44
1158954
3/8" HIGH COLLAR LOCK WASHER, ZINC
4
ALL
45
1159419
Relief Valve - Pilot Operated – 3000 PSI
1
HBHS300GX, GXE
1159421
Relief Valve - Pilot Operated – 2000 PSI
1
HBHS310GX, GXE
46
1159422
3/4" Suction Hose Eaton Puma Hose
1
ALL
47
1077747
Group U1 Battery Enclosure
1
HBHS300GXE, HBHS310GXE
48
1097406
BCI #U1 Rated Battery, 12V
1
HBHS300GXE, HBHS310GXE
49
1077761
4GA20" Black Starter Cable 3/8" Stud Hole
1
HBHS300GXE, HBHS310GXE
50
1084339
Assembly, MB5 Cable, Positive
1
HBHS300GXE, HBHS310GXE
34
HBHS600GXE, HBHS610GXE, & HBHS620GXE Exploded View – Rev A

35
HBHS600GXE, HBHS610GXE, & HBHS620GXE Parts List - Rev A
Ref #
Part
Description
Qty
Used On
1
1010303
3/8"-16 HEX NUT, GR5, ZINC
4
ALL
2
1010412
FFP, FORMED SHEET, POWER UNIT SKIDFRAME BASE, PC
1
ALL
3
1010413
FFP, FORMED SHEET, POWER UNIT SKIDFRAME UPRIGHT, PC
1
ALL
4
1010572
3/8"-16 x 1-1/4" HHCS, GR5, ZINC
6
ALL
5
1011119
1/4"-20 x 1" HHCS, GR5, ZINC
8
ALL
6
1011765
1/2" SCREW SIZE FLAT WASHER, STEEL
12
ALL
7
1013500
ADAPTER CAP NUT 3/4 X 16 JIC FOR TUBE OD 1/2"
1
ALL
8
1013618
ADAPTER 90 DEG ELBOW, MHB X MNPT, STEEL
1
ALL
9
1013649
ADAPTER STRAIGHT 1" MALE HOSE NIPPLE X 1-1/16 X 12 MALE ORB
1
ALL
10
1013938
08 MALE JIC X #08 MALE ORB
1
ALL
11
1013939
08 MALE JIC X #10 MALE ORB
1
ALL
12
1014312
ADAPTER 90 DEG ELBOW 3/4 X 16 MALE JIC X 7/8 X 14 MALE ORB
1
ALL
13
1014425
ADAPTER 90 DEG ELBOW 3/4 X 16 MALE ORB X 1/2" MALE NPT
1
ALL
14
1014971
3/8" SCREW SIZE LOCK WASHER, ZINC
10
ALL
15
1014986
3/8"-16 NYLON-INSERT HEX LOCK NUT, GR5, ZINC
4
ALL
16
1014987
1/2"-13 NYLON-INSERT HEX LOCK NUT, 18-8 STAINLESS
8
ALL
17
1015046
1/4" FLAT WASHER, GENERAL PURPOSE, ZINC
20
ALL
18
1015073
1/4"-20 NYLON-INSERT HEX LOCK NUT, GR2, ZINC
10
ALL
19
1015115
#12-14 x 1" SELF DRILLING SCREW, UNSLOTTED HEX WASHER
4
ALL
20
1030822
1-1/4 SQUARE-HEAD PLUG
1
ALL
21
1030828
1-1/4 x 1 - HEXBUSH
1
ALL
22
1030867
2 NPT SQUARE-HEAD PLUG
1
ALL
23
1030883
3/4 PLUG, BLACK STEEL
1
ALL
24
1031121
MOUNTING KIT FOR 50 GALLON UR-50-MK UPRIGHT RES
4
ALL
25
1037197
1/4 X 1/4 X 1-1/4 STEEL KEY
1
ALL
26
1046260
STANDARD BODY, C10-2 SAE-8 PORTS
1
ALL
28
1067914
FILLER/BREATHER, 40 MICRON, SS MESH
1
ALL
29
1067982
PLUG, MAGNETIC SQUARE HEAD, 3/4"-14 NPTF, STL
1
ALL
30
1068112
HYTREL SPACER SPIDER 68514425310
1
ALL
31
1068117
L095 HUB, 1" BORE, 1/4" x 1/8" KEYWAY
1
ALL
32
1068125
L095 HUB, 5/8" BORE, 5/32" x 5/64" KEYWAY
1
HBHS600GXE, HBHS610GXE
1068122
L095 HUB, 3/4" BORE, 3/16" x 3/32" KEYWAY
1
HBHS620GXE
33
1068417
PUMP/ENGINE MOUNT, SAE A, 5" LENGTH (MAGNALOY)
1
ALL
34
1069269
HC-100 1" T-BOLT HOSE CLAMP
2
ALL
35
1073513
BATTERY, 35/75, 450 CCA
1
ALL
36
1074713
BATTERY BOX, HM300BK, GROUP 24
1
ALL
37
1080381
3/8"-16 x 1-1/2" MODIFIED HHCS, GR5, ZINC
4
ALL
38
1083941
4 GA BATTERY CABLE "BLACK" 20" LONG W/ENDS
1
ALL
39
1086154
WELDMENT, TANK MOUNTING BRACKET
1
ALL
40
1086478
WELDMENT, HYDRAULIC TANK 20 GAL WITH FILTER HOLE
1
ALL
41
1087964
GAUGE, FILTER INDICATOR, 0-60 PSI
1
ALL
42
1090428
STRAINER, 2" NPTF MALE THREAD, 1-1/4" NPTF OUTLET PORT
1
ALL
43
1090443
SUCTION / RETURN LINE TANK TOP FILTER (ZINGA)
1
ALL
1090368
Filter Element (only)
1
ALL
44
1091091
3/8" FLAT WASHER, USS, ZINC
8
ALL
45
1096207
1/2"-13 x 1-1/2" HHCS, GR8, ZINC
4
ALL
46
1102641
5" SIGHT GAUGE
1
ALL
47
1112688
1/2"-13 x 3-1/2" HHCS, GR8, ZINC
4
ALL
48
1117685
REGULATOR/RECTIFIER
1
ALL
49
1124189
.66CID 2 BLT A 5/8 KEYED CW DUAL #12X#10 SIDE/REAR PORTS
1
HBHS600GXE
1124190
.88CID 2 BLT A 5/8 KEYED CW DUAL #12X#10 SIDE/REAR PORTS
1
HBHS610GXE
1124161
1.02CID 2 BLT A 3/4 KEYED CW DUAL #12X#10 SIDE/REAR PORTS
1
HBHS620GXE
50
1124332
3/8"-16 x 2" HHCS, GR5, ZINC
4
ALL
51
1157513
REDUCER, 2" MNPT X 1/2" FNPT, HEX, BLK STEEL
1
ALL
52
1157973
EC21508-08Z-608-608-36 OAL
1
ALL
53
1158881
ENGINE, 22.1 HP (HONDA)
1
ALL
54
1158883
MUFFLER FOR GX630
1
ALL
55
1158884
FUEL TANK KIT, 5 GAL, FOR GX 630
1
ALL
56
1158888
OIL DRAIN EXTENSION HOSE, 20 MM
1
ALL
57
1158898
M8-1.25 X 20 HEX FLANGE BOLT, ZINC
2
ALL
58
1158979
1/4"-20 x 1" HHCS, 18-8 STAINLESS
2
ALL
59
1159247
1" SUCTION HOSE
1
ALL
60
1159249
RECTIFIER ELECTRICAL HARNESS
1
ALL
61
1159251
34",4 GAUGE,POSITIVE BATTERY CABLE,LUG & CLAMP W/TERMINAL
1
ALL
62
1159419
CART, P.O. RELIEF VALVE
1
HBHS600GXE
1159420
CART, P.O. RELIEF VALVE
1
HBHS610GXE
1159421
CART, P.O. RELIEF VALVE
1
HBHS620GXE
63
080175AE
Fuel Tank Cap
1
ALL
64
468975A
Fuel Tank Strap
2
ALL
65
468888A
Carbon Canister
1
ALL
66
468894A
Carbon Canister Hose
2
ALL
67
468851A
Fuel Hose
1
ALL
68
468898A
Fuel Hose Clamp
2
ALL
69
468850A
Carbon Canister Hose Clamp
4
ALL
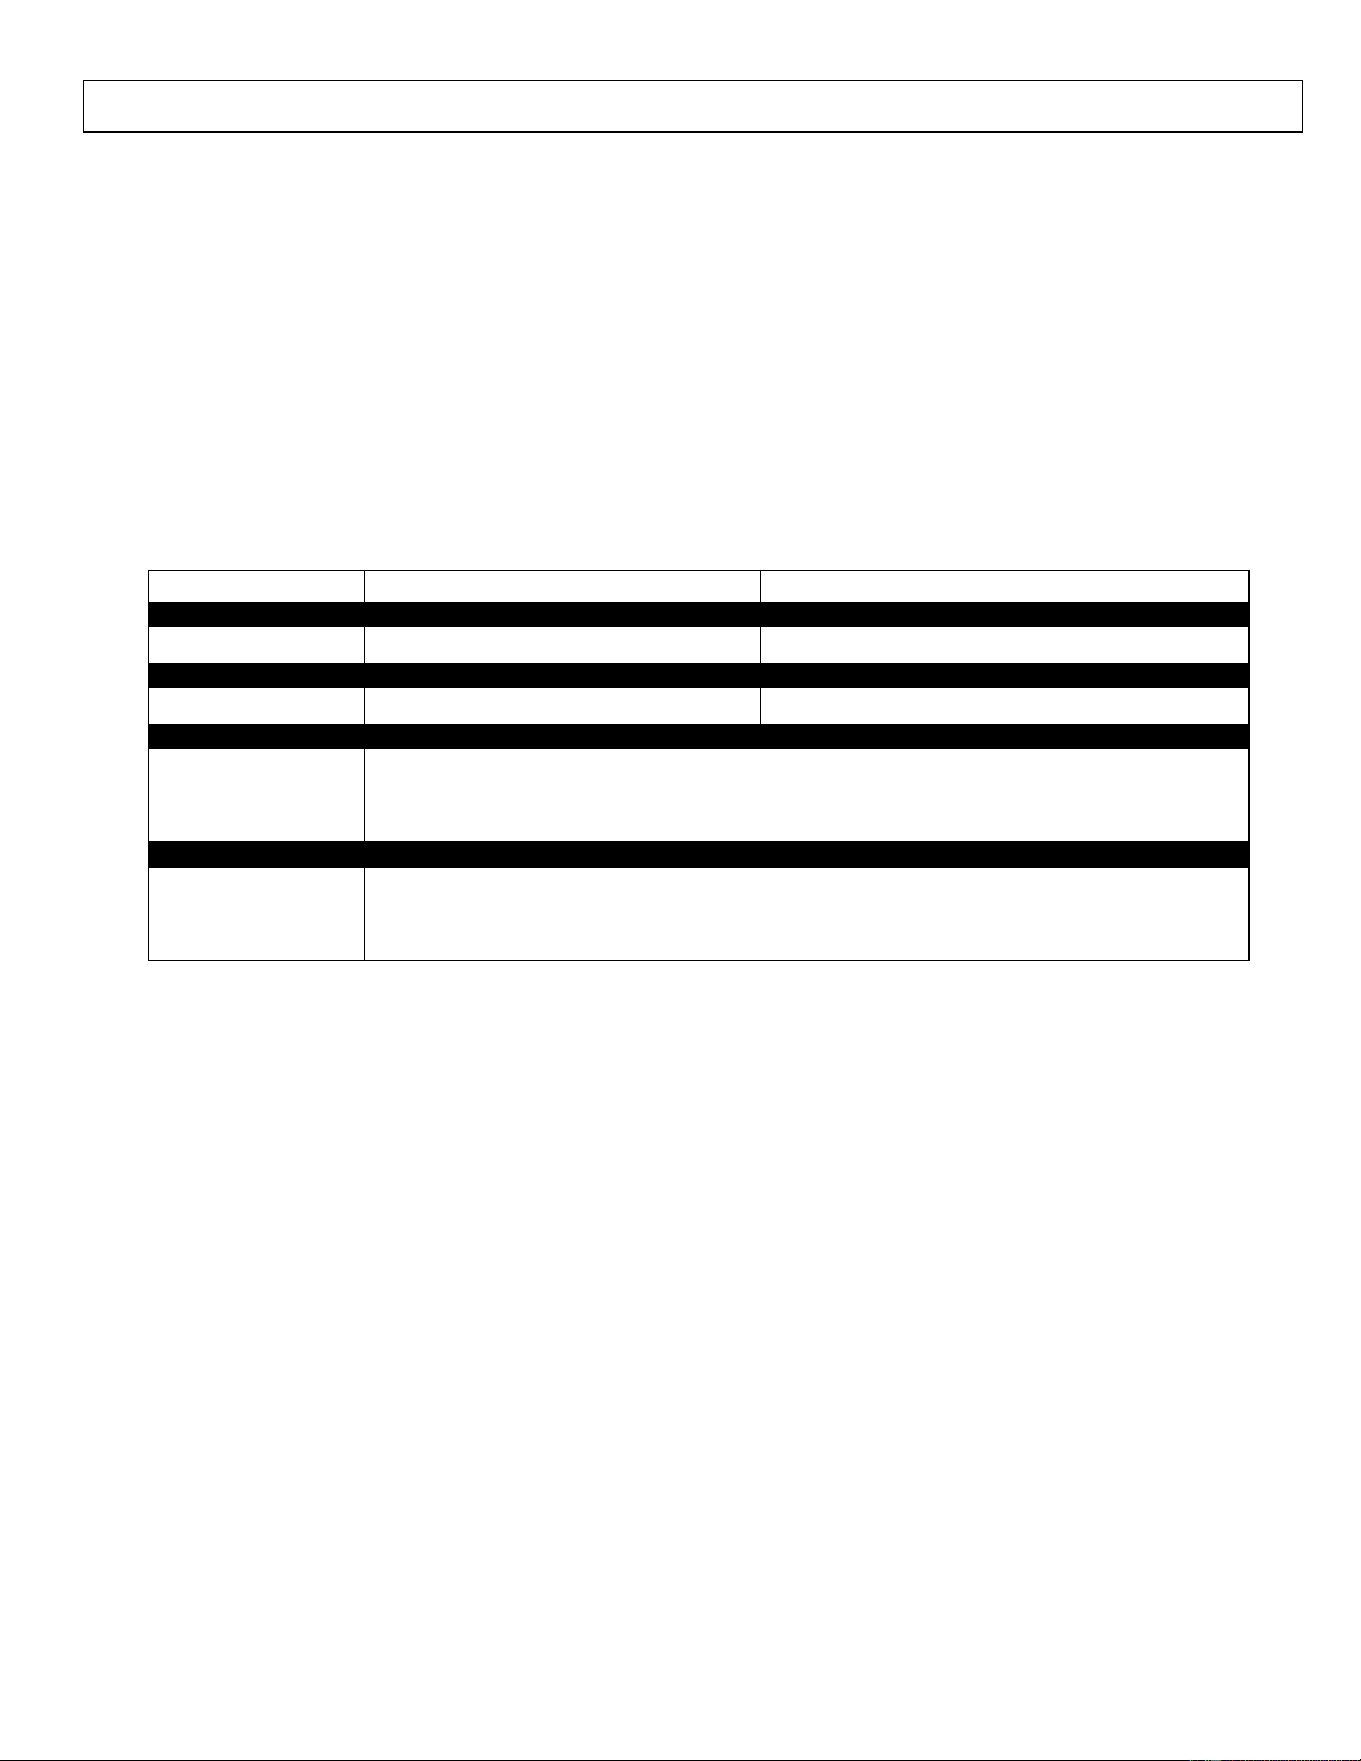
36
Limited Warranty Policy
Dear Valued Customer:
The Brave product you just purchased is built with the finest material and craftsmanship. Use this product properly and enjoy the benefits
from its high performance. By purchasing a Brave product, you show a desire for quality and durability. Like all mechanical equipment this
unit requires a due amount of care. Treat this unit like the high quality piece of machinery it is. Neglect and improper handling may impair its
performance.
Thoroughly read the instructions and understand the operation before using your product. Always contact Brave Product Support at
1-800-350-8739 prior to having any service or warranty work performed, as some services performed by parties other than Brave approved
service centers may void this warranty. This limited warranty is in lieu of any other warranty expressed or implied, written or oral and Brave
assumes no other responsibility or liability outside that expressed within this limited warranty.
Limited Warranty for Brave and Brave Pro Hydra Buddy Models:
HBHR280GX HBHR280GXE HBHR350GX HBHR350GXE HBHS300GX HBHS300GXE HBHS310GX HBHS310GXE
HBHS600GXE HBHS610GXE HBHS620GXE
Consumer Warranty Period
Commercial Warranty Period
Weldments
2 years from date of purchase by user
2 year from date of purchase by user
Valves and Pumps
2 years from date of purchase by user
1 year from date of purchase by user
Wear Parts
In addition to the normal warranty, Brave shall warrant some normal wear items from defects in material or
workmanship for a period of 30 days from the date of purchase by user. Normal wear items covered under
this warranty are limited to: clamps, couplers, filters, mounts, hoses, hardware. Routine maintenance items
such as lubricants, clutch adjustments, tune ups are not covered under warranty.
Engines
The engine warranty is covered under the terms and conditions as outlined by the engine manufactures
warranty contained herein and is the sole responsibility of the engine manufacturer. Normal engine
maintenance such as spark plugs, oil changes, air filters, adjustments, fuel system cleaning and obstruction
due to build up is not covered by this Brave limited warranty.
“Consumer use” means personal residential household use by a consumer. “Commercial use” means all other uses, including, but not limited
to, use for commercial, income producing or rental purposes or when purchased by a business.
This limited warranty applies to the original purchaser of the equipment (verification of purchase, in the form of a receipt, is the responsibility
of the buyer), is non-transferable, and covers parts and labor. Parts will be replaced or repaired at no charge, except when the equipment has
failed due to lack of proper maintenance. If a part is no longer available, the part may be replaced with a similar part of equal function. Any
misuse, abuse, alteration or improper installation or operations will void warranty. Determining whether a part is to be replaced or repaired is
the sole decision of Brave. Brave will not provide replacement of complete products due to defective parts. Any costs incurred due to
replacement or repair of items outside of a Brave approved facility is the responsibility of the buyer and not covered under warranty.
Transportation costs to and from service center and/or service calls are the responsibility of the customer.
This limited warranty specifically excludes the following: failure of parts due to damage caused by accident, fire, flood, windstorm, acts of
God, applications not approved by Brave in writing, corrosion caused by chemicals, use of replacement parts which do not conform to
manufacturer’s specifications, damage related to rodent and/or insect infestation and damage caused by vandalism. Additional exclusions: loss
of running time, inconvenience, loss of income, or loss of use, including any implied warranty of merchantability of fitness for a specific use.
Also, outdoor power equipment needs periodic parts and service to perform well, and this limited warranty does not cover instances when
normal use has exhausted the life of a component or the engine.
This limited warranty does not cover any personal injury or damage to surrounding property caused by failure of any part, misuse or inability
to use the product. Alteration of the product, including safety features, shall void this limited warranty.
Repair or replacement of parts does not extend the warranty period. This limited warranty gives you specific legal rights. You may also have
other rights that vary by state.
Please have model number, item number and serial number on hand prior to making a warranty claim or inquiry.

37
Your Information
Full Name:
Last
First
M.I.
Address:
Street Address
Apartment/Unit #
City
State
ZIP Code
Home Phone:
Alternate
Phone:
Email Address:
Purchased From
Company:
Address:
Street Address
Apartment/Unit #
City
State
ZIP Code
Model Information
Purchase Date:
Application Type:
□ Homeowner
□ Commercial
□ Rental
Model (i.e. HBHR350GX)
Serial # (i.e. HBHR350GXA01234567)
Signature:
Brave
Product Registration Form
38
20195 S. Diamond Lake Rd, Ste 100
Rogers, MN 55374
1-800-350-8739