1
OPERATION MANUAL / MANUEL DE FONCTIONNEMENT
BEDIENUNGSANLEITUNG / MANUAL DE FUNCIONAMIENTO
Please read this manual carefully before using.
Veuillez lire attentivement ce manuel avant utilisation.
Bitte lesen Sie diese Anleitung vor der Benutzung sorgfältig durch.
Lea atentamente este manual antes del uso.
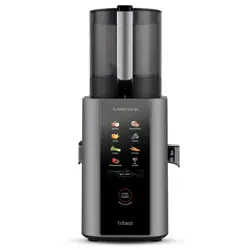
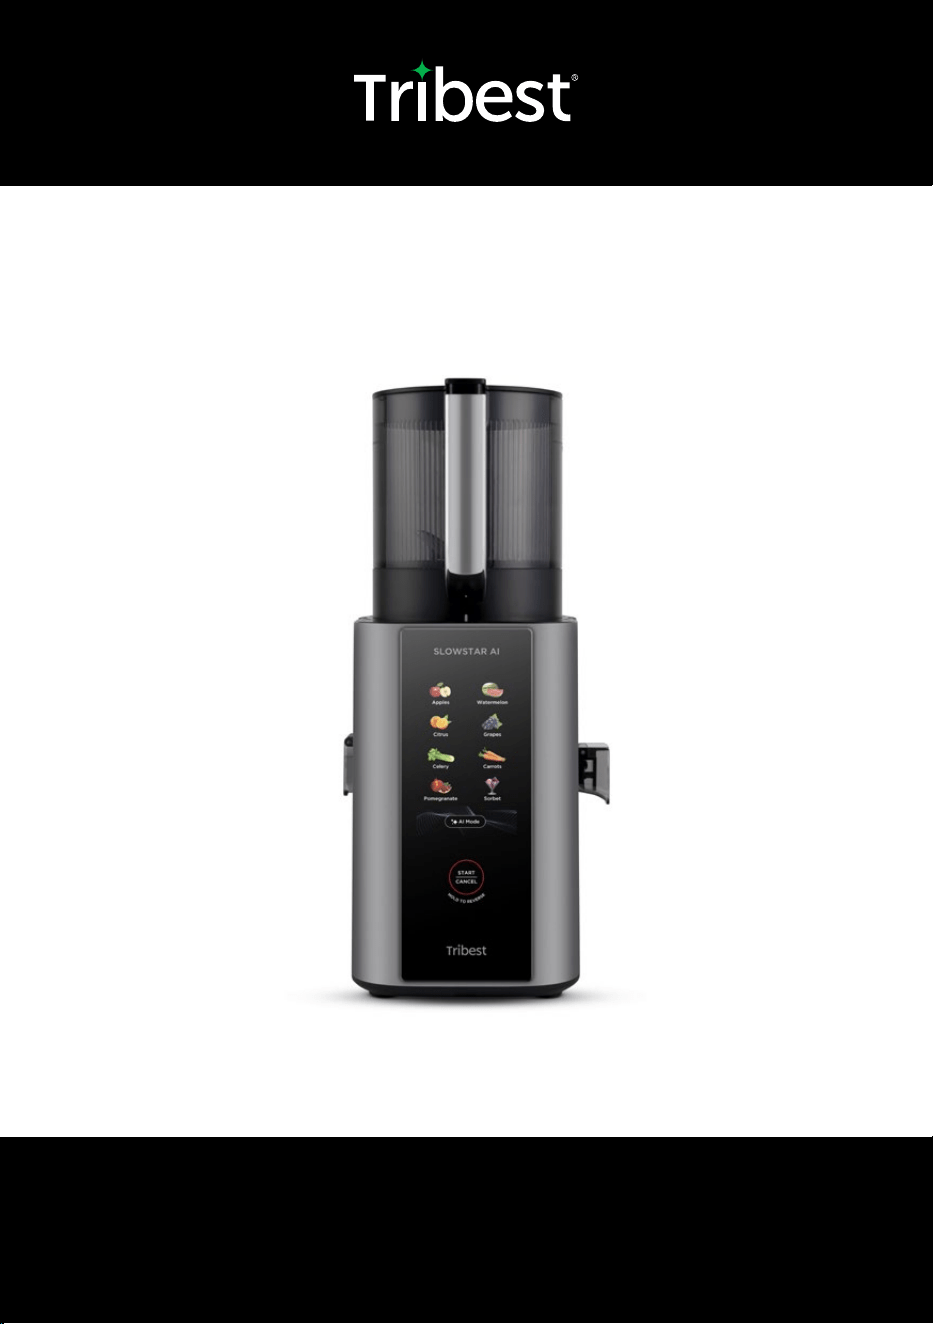
SLOWSTAR AI
Vertical Hopper Juicer with Automatic Intelligent Optimization
SWA-3

WELCOME TO THE TRIBEST FAMILY!
Tribest Corporation
Anaheim, California
Toll-Free USA: 1 (888) 254-7336
International: +1 714 879 7150
tribest.com
© 2025 Tribest
Congratulations! You are now the proud owner of the Tribest Slowstar AI Vertical Hopper Juicer with
Automatic Intelligent Optimization. The Slowstar AI pushes juicing into the next generation with AI
optimization of the cold press masticating juicing process. Fruits and vegetables come in all different sizes
and textures with different amounts of juice and pulp. Soft fruits need a very gentle squeeze for a longer
amount of time to get the most juice out. Hard vegetables need to be squeezed harder for a shorter amount
of time. Traditional juicers only have one speed and one set pressure and therefore must compromise
between the different types of ingredients.
The Slowstar AI is equipped with sensors that detect the type of ingredient being juiced, whether it’s a hard
vegetable, leafy green, or soft fruit. Its AI engine uses those inputs to automatically and intelligently optimize
the juicing process for each type of ingredient, resulting in higher juice yields with less pulp mixed in no
matter what you’re juicing.
You can mix and match different types of ingredients in the extra large 1.5 L Hopper and the Slowstar AI will
make automatic adjustments as it detects each different type of produce. The stainless steel cutting blade
bites the whole ingredients in the hopper into smaller pieces that get crushed and squeezed in the juicing
chamber. When you’re done juicing, the Slowstar AI features an innovative lter that makes cleanup quick
and easy, with absolutely no scrubbing stubborn pulp out of a screen. All you get is delicious cold pressed
juice without all the work.
LET’S GET STARTED!
Before rst use, we recommend washing all parts, except for the motor, with warm water and mild soap.
Never use a scouring pad. A simple sponge is perfect! Once all parts are cleaned, you are ready to begin
juicing. Please take the time to read through the entire operation manual for proper use and care instructions
before starting.
Follow us @tribestlife

English ................................................................................................................................ 4
Español .............................................................................................................................. 34
Deutsch ............................................................................................................................. 24
Français ............................................................................................................................. 14
LANGUAGES
EN
DE
ES
FR
Recipes / Recettes / Rezept / Recetas ..................................................................... R1-R17
RECIPES

4
1. Important Safeguards ....................................................................................................... 5
2. Precautions & Juicing Tips ............................................................................................... 6
3. Parts ............................................................................................................................... 7
4. Touch Screen Display ...................................................................................................... 8
5. Assembly & Operation .................................................................................................... 9
6. Cleaning & Maintenance ................................................................................................ 12
7. Troubleshooting ............................................................................................................. 13
• Recipes .................................................................................................................. R1-R17
Product
Tribest Slowstar AI Vertical Hopper Juicer
with Automatic Intelligent Optimization
Model SWA-3
Power Rating 120V, 60Hz, 150W / 220V, 50Hz, 150W
Continuous Operation Time Up to 15 minutes per session
Size (W x D x H) 8.1 × 8.8 × 17.6 in / 205 × 225 × 449 mm
Weight 12.6 lbs / 5.7 kg
Made in China
TABLE OF CONTENTS
PRODUCT SPECIFICATIONS

5
1. IMPORTANT SAFEGUARDS
EN
WARNING: Misuse of the product may result in serious injury or death.
When using electrical appliances, basic safety precautions should always
be followed, including the following:
CAUTION: Pay attention to risks that may cause personal injury or
property damage.
1. Read all instructions carefully before operating.
2. The instructions for appliance warn of potential injury from misuse.
3. Keep out of the reach of children. Do not let children or disabled persons operate the appliance
unattended.
4. Do not plug in or unplug the power cord with wet hands to avoid electric shock.
5. Do not wash, immerse, or spray the Main Body with water or other liquids to prevent damage or
electrical leakage.
6. Do not insert hands, chopsticks, or other sharp objects into the Hopper or Juice Outlet to avoid
injury or product damage.
7. Do not remove the Quick Fill Top lid of the Hopper to prevent injury.
8. Do not process ingredients hotter than 140°F (60°C). This can damage the parts and create a
scalding risk.
1. This product is for household use only. Do not use it for any other purposes.
2. Before connecting to a power source, check whether the voltage/frequency matches the local
voltage. Voltage higher or lower than the specified value may affect performance or damage
electrical components. It is recommended to use a voltage stabilizer to ensure proper operation.
3. Before, during, or after use, if any damage or visible cracks are found on the Main Body, Auger
Housing, Filter, Auger Assembly, or Hopper, stop using the machine immediately to prevent injury.
4. Before disassembling any parts, turn off the machine and disconnect the power supply.
5. To ensure optimal performance and prevent motor overheating, limit continuous operation of the
machine to a maximum of 15 minutes. For extended sessions, allow the machine to cool down for
at least 15 minutes between uses.
6. Some parts may become stained after juicing certain ingredients. This is a normal phenomenon
and does not affect usage.
7. Do not place any parts in a dishwasher, microwave, disinfection cabinet, or water above 140°F
(60°C) for cleaning or sterilization. Do not use other heating devices to warm parts, as this may
cause deformation or damage.
SAVE THESE INSTRUCTIONS

6
2. PRECAUTIONS & JUICING TIPS
PRECAUTIONS FOR SAFE USE:
PRECAUTIONS DURING USE:
TIPS FOR OPTIMAL JUICING:
1. Read all instructions before use.
2. Avoid contact with moving parts.
3. Always unplug the appliance before cleaning or assembling/disassembling parts.
1. Do not let the cord hang over the edge of a table or counter.
2. Ensure the Hopper is securely fastened before turning on the machine.
3. Turn off the machine after each use and wait for the motor to stop completely before
disassembling.
1. Fruits high in protein and fat, such as durian, jackfruit, and avocado, are not suitable for
juicing alone. They can be mixed with high-water-content produce like apples or celery for
better results.
2. Fruits with pits, hard seeds, or thick skins (such as apples, peaches, apricots, mangoes,
persimmons, and cherries) should have their pits, seeds, or thick skins removed before
juicing to prevent damage to the machine.
3. Lemons contain strong acidic juice. They should be juiced together with other fruits and
vegetables, and the amount should not exceed 20g (approximately 3 thin slices) per session.
4. Fibrous and hard ingredients like carrots, celery, and ginger should be cut into small pieces
before juicing to extend the machine's lifespan.
5. Manually clearing the Pulp Outlet during juicing can help improve pulp discharge. For
fiber-rich ingredients, clean the juicing components after processing every 2 lbs (1 kg) of
ingredients.
6. Leafy and stalk vegetables (such as celery and kale) should be cut into 2-inch (5-6cm)
pieces or smaller before juicing. As these ingredients contain a lot of fiber, they may wrap
around the Auger Assembly. Manually clearing the Pulp Outlet during juicing can help ensure
smooth pulp discharge.
SAVE THESE INSTRUCTIONS
7
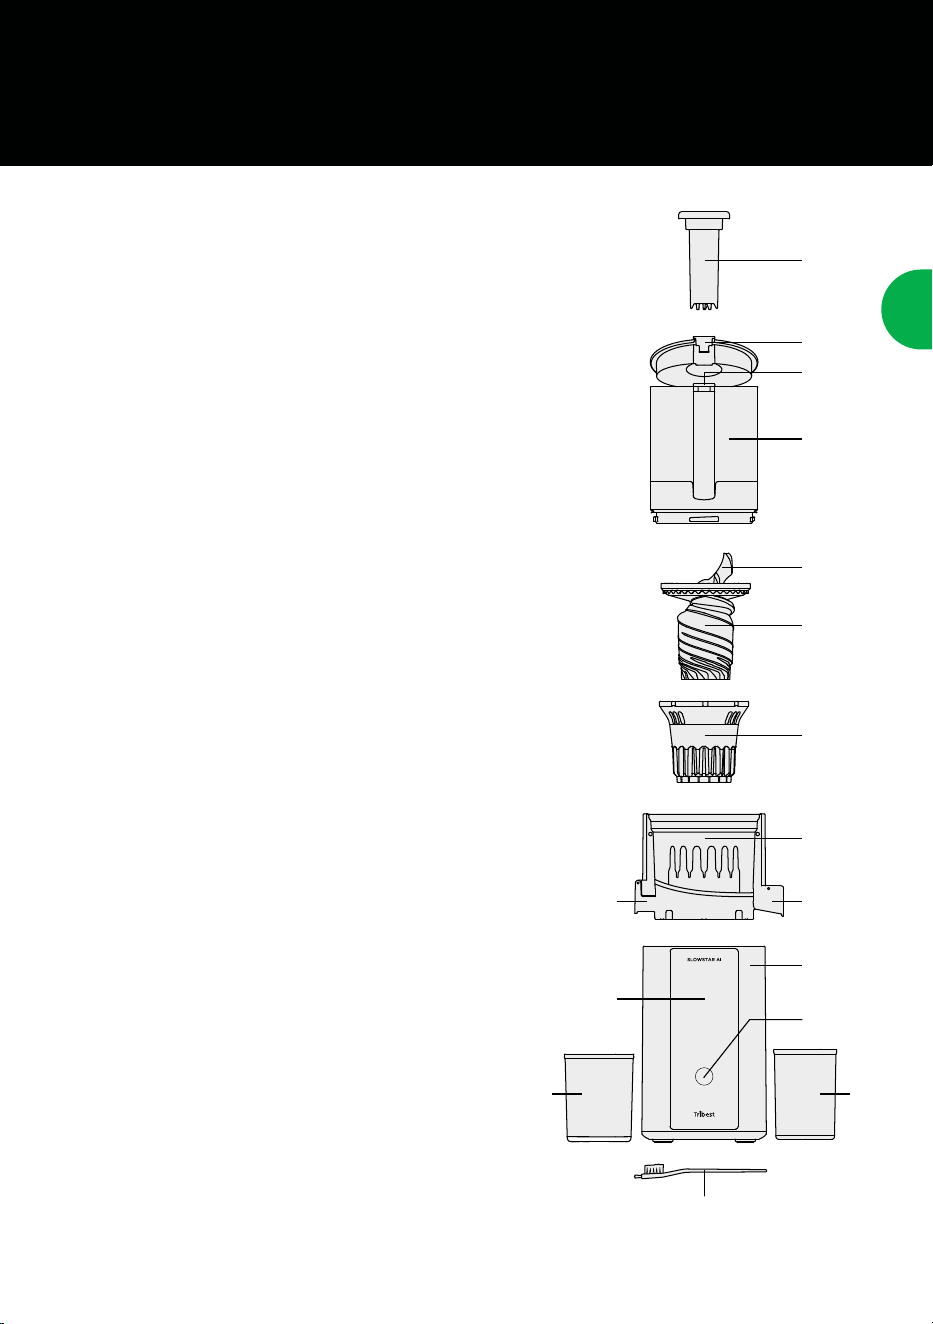
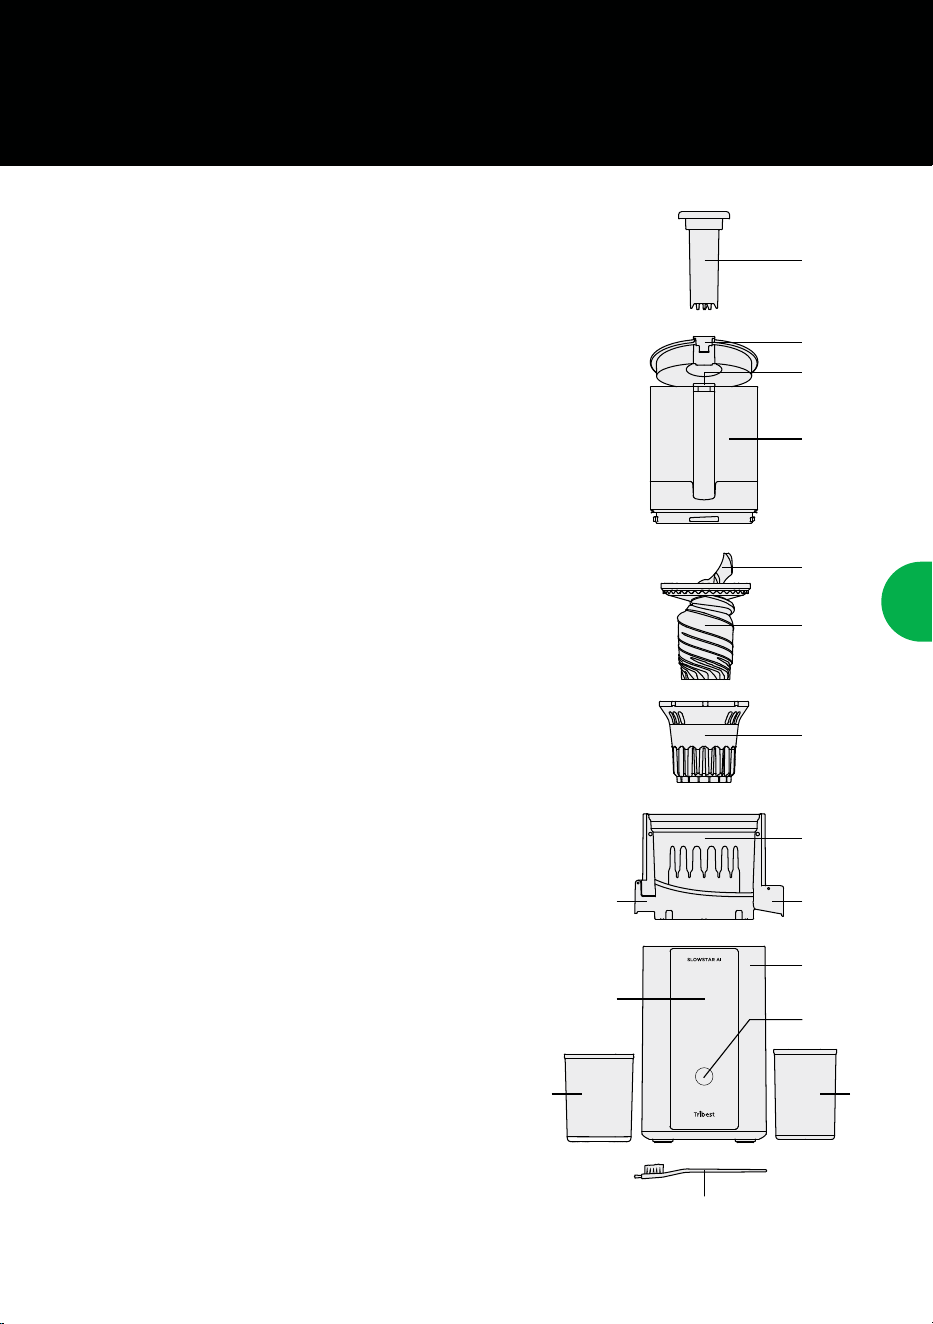
3. PARTS
EN
1
2
3
4
6
7
8
9
5
1
PUSHER
Quickly supports produce feeding into the QUICK FILL TOP.
2
QUICK FILL TOP
Continuously feeds the HOPPER for higher juicing volume when needed.
Press the RELEASE BUTTON on top of the handle to flip open.
3
RELEASE BUTTON
Press the button on top of the HANDLE to flip open the QUICK FILL
TOP, then insert produce.
4
PRODUCE HOPPER WITH HANDLE
Pre-fill the HOPPER with a wide variety of fruits and vegetables.
5
STAINLESS STEEL CHOPPER
Crafted from durable Type 304 stainless steel to chop and feed your produce.
6
AUGER
Completes the juice extraction by crushing the pulp.
7
EASY-CLEAN SCREENLESS FILTER
The FILTER fits seamlessly inside the internal ridges of the AUGER
HOUSING to ensure maximum filtration. Since there's no screen,
cleanup is faster and easier!
8
AUGER HOUSING
Houses the FILTER, AUGER and CHOPPER.
JUICE OUTLET
Lift the JUICE CAP to release your juice.
TOUCH SCREEN DISPLAY
Select from 8 presets or use AI mode.
START/CANCEL BUTTON
Press this button to start after selecting an option
or to cancel a running cycle.
PULP CONTAINER
Collects pulp.
JUICE CONTAINER
Catches your fresh juice.
CLEANING BRUSH
Makes cleaning quick and easy.
9
PULP OUTLET
Pulp exits through this opening.
MAIN BODY
8
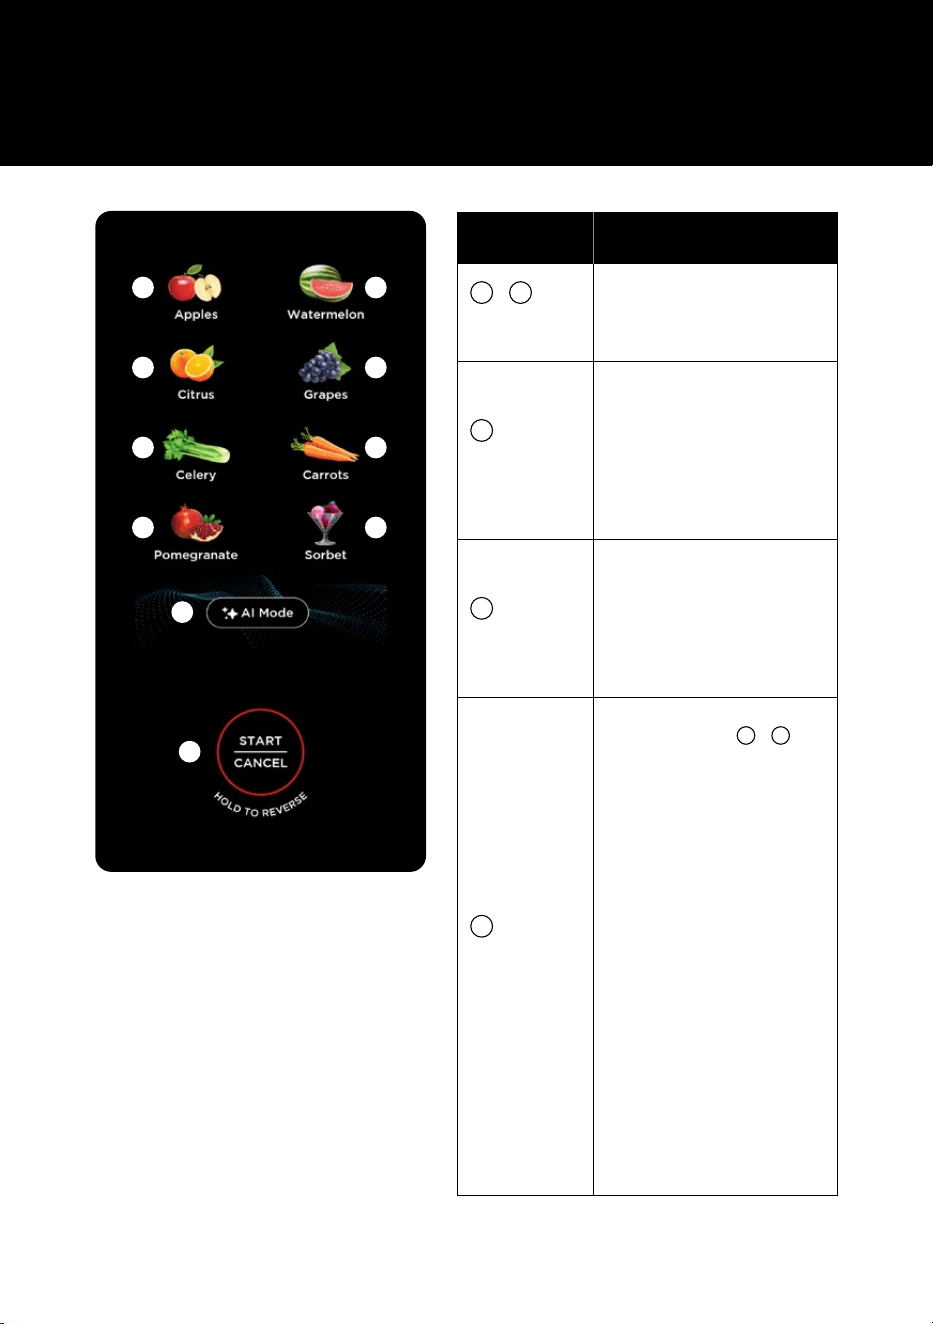
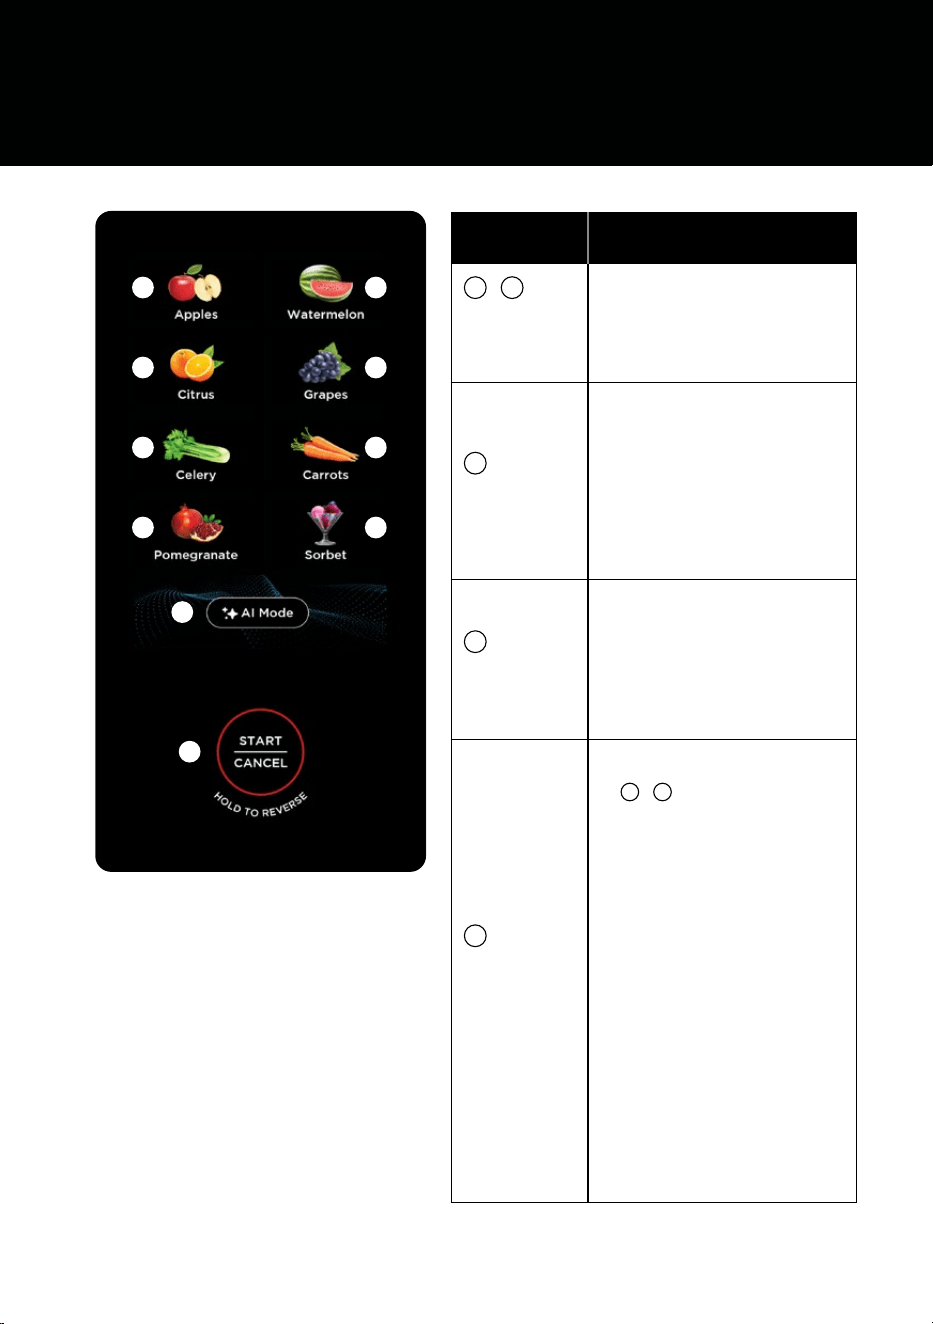
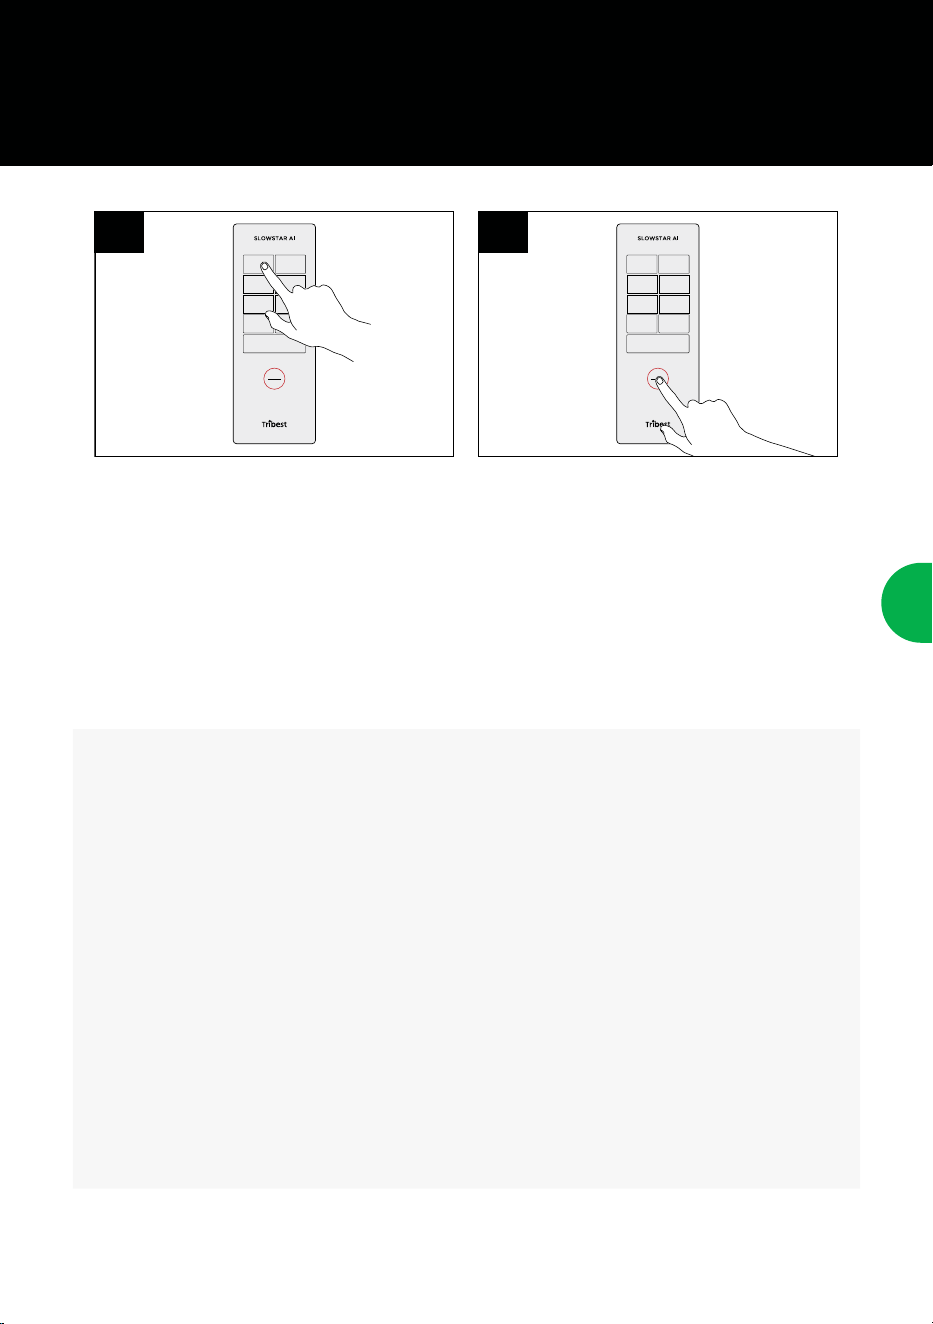
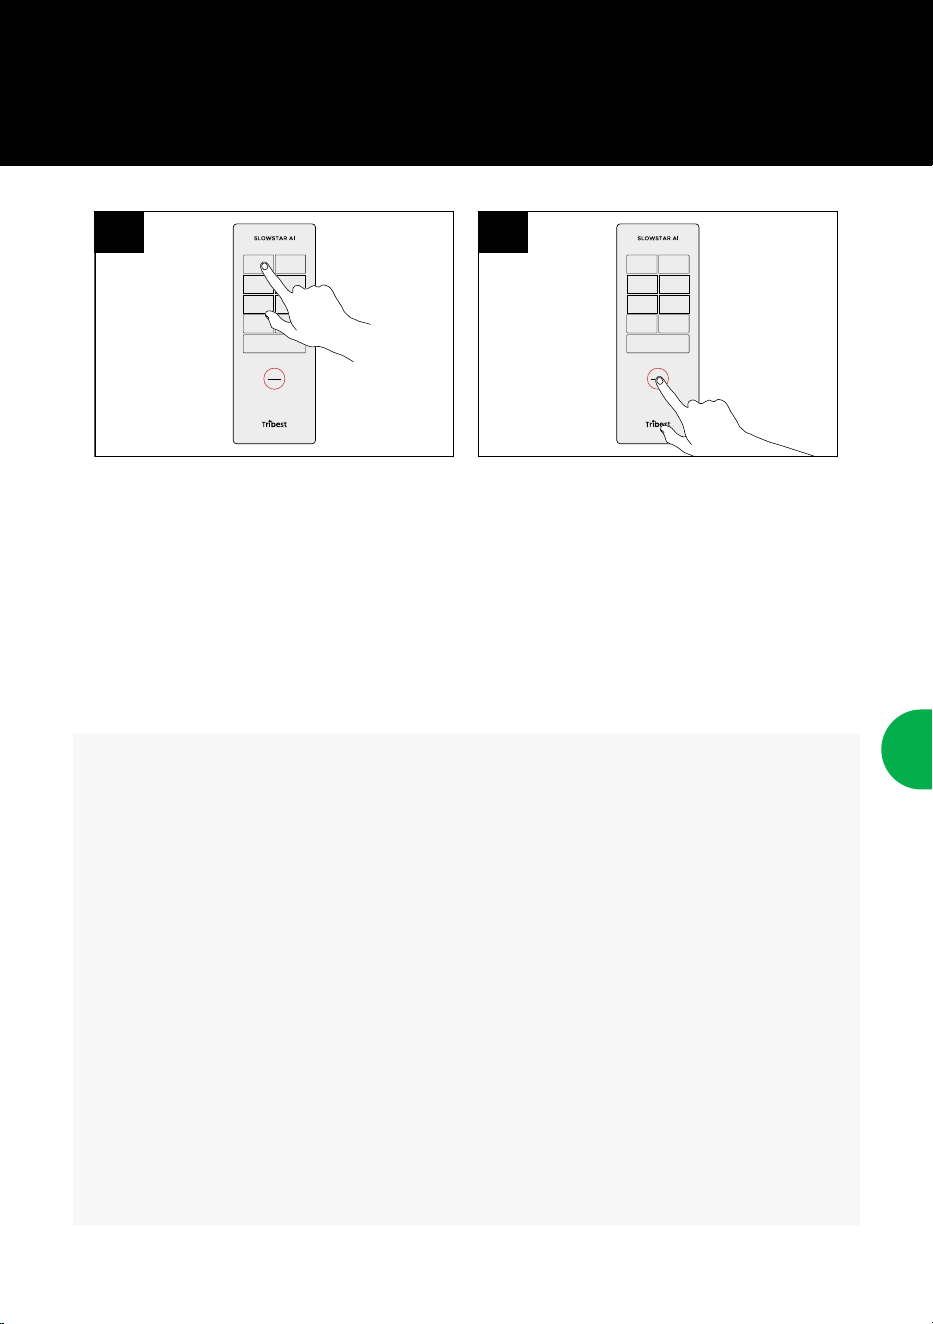
4. TOUCH SCREEN DISPLAY
To save power, the TOUCH SCREEN DISPLAY
will automatically turn off after 5 minutes
of
inactivity. Tap the center of the screen to turn
it back on.
FUNCTION DESCRIPTION
1
–
7
SINGLE FRUIT
PRESETS
Automatically adjusts to the
optimal speed based on the
selected fruit type for maximum
extraction.
8
SORBET
PRESET
For best results, cut frozen
fruits like bananas, pineapples,
mangoes (pit removed), or berries
into 1-inch (3 cm) pieces. Freeze
for 6+ hours or until fully frozen
solid. Thaw for 5–10 minutes
before processing. Add 6-8
pieces at a time into the HOPPER.
9
AI MODE
Featuring intelligent speed control,
the AI Mode automatically senses
the processing effort required
based on food resistance and
adjusts to the optimal speed. This
is ideal when juicing any variety of
fruits or vegetables.
10
START/CANCEL
OR REVERSE
1. START
Select a function
1
–
9
; its
light will start blinking. Then
press the START/CANCEL
button to start the cycle.
2. CANCEL
To cancel a running cycle,
press the START/CANCEL
button during operation.
This will stop the cycle
for 2 seconds and then
automatically reverse
for 3-5 seconds before
stopping completely to make
disassembly easier.
3. REVERSE
A long press of the START/
CANCEL button will make the
motor reverse continuously
until the button is let go.
This can be used to help
loosen parts for disassembly
after juicing or dislodge any
remaining ingredients.
1 2
3 4
5 6
7
9
10
8
DISPLAY SLEEP MODE

9
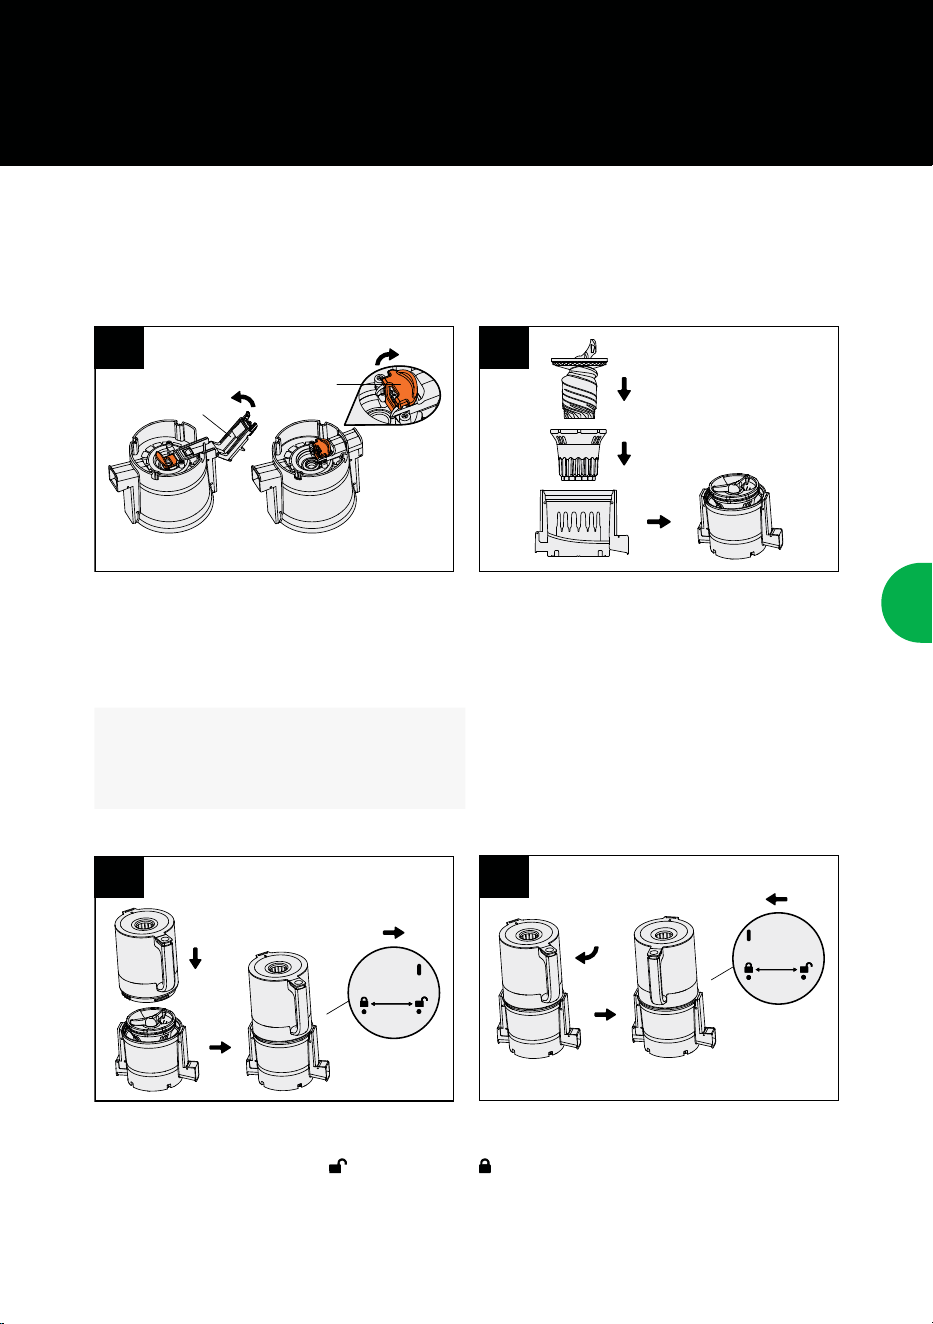
5. ASSEMBLY & OPERATION
EN
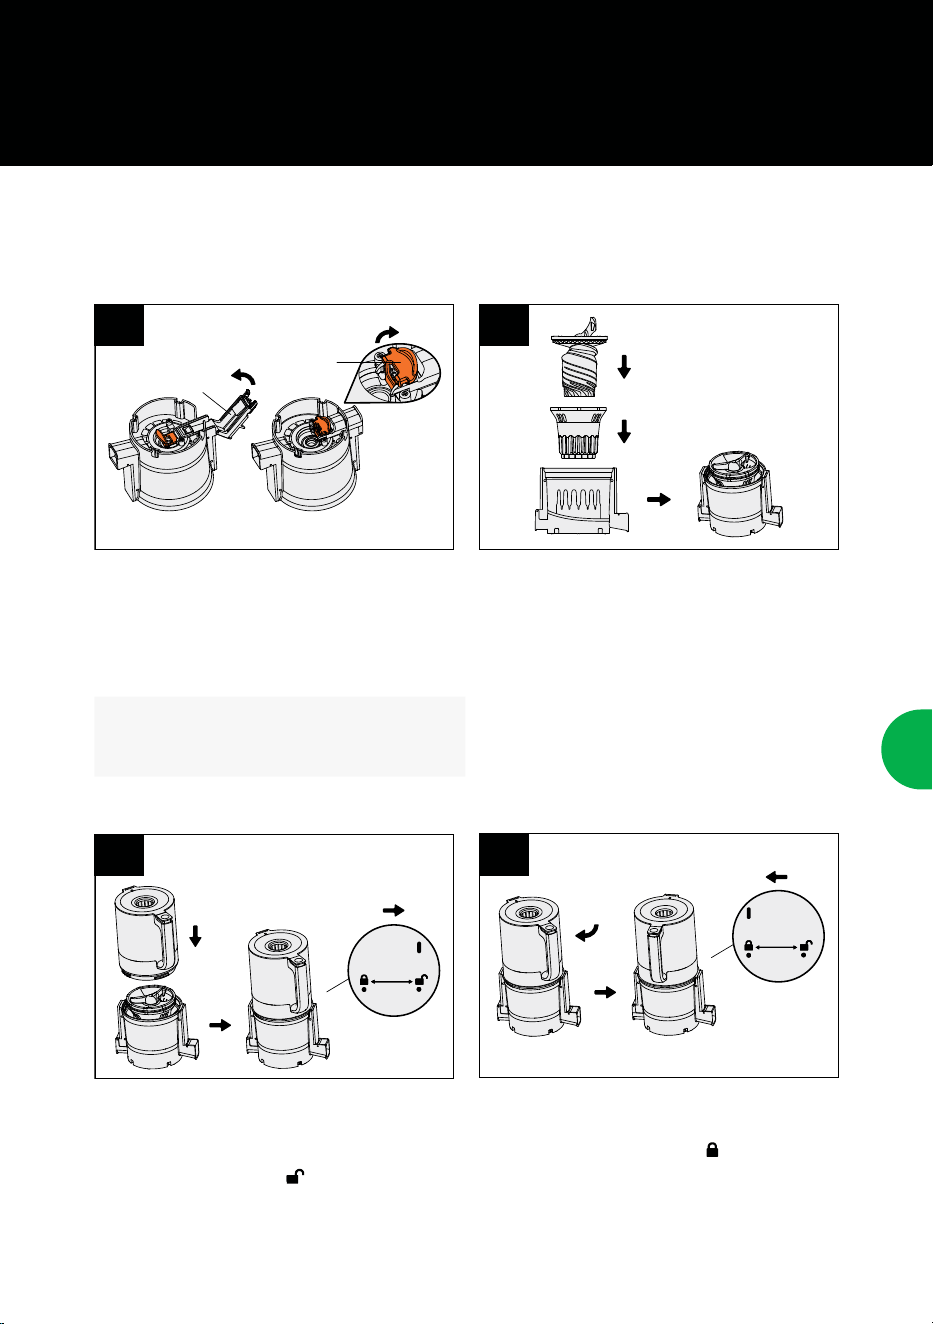
Make sure the Slowstar is ready before starting:
Ensure the PULP OUTLET is folded inward and
the orange LATCH under the HOUSING is securely
locked to prevent leaking.
NOTE: Remember to open the PULP OUTLET
when cleaning and close it before juicing.
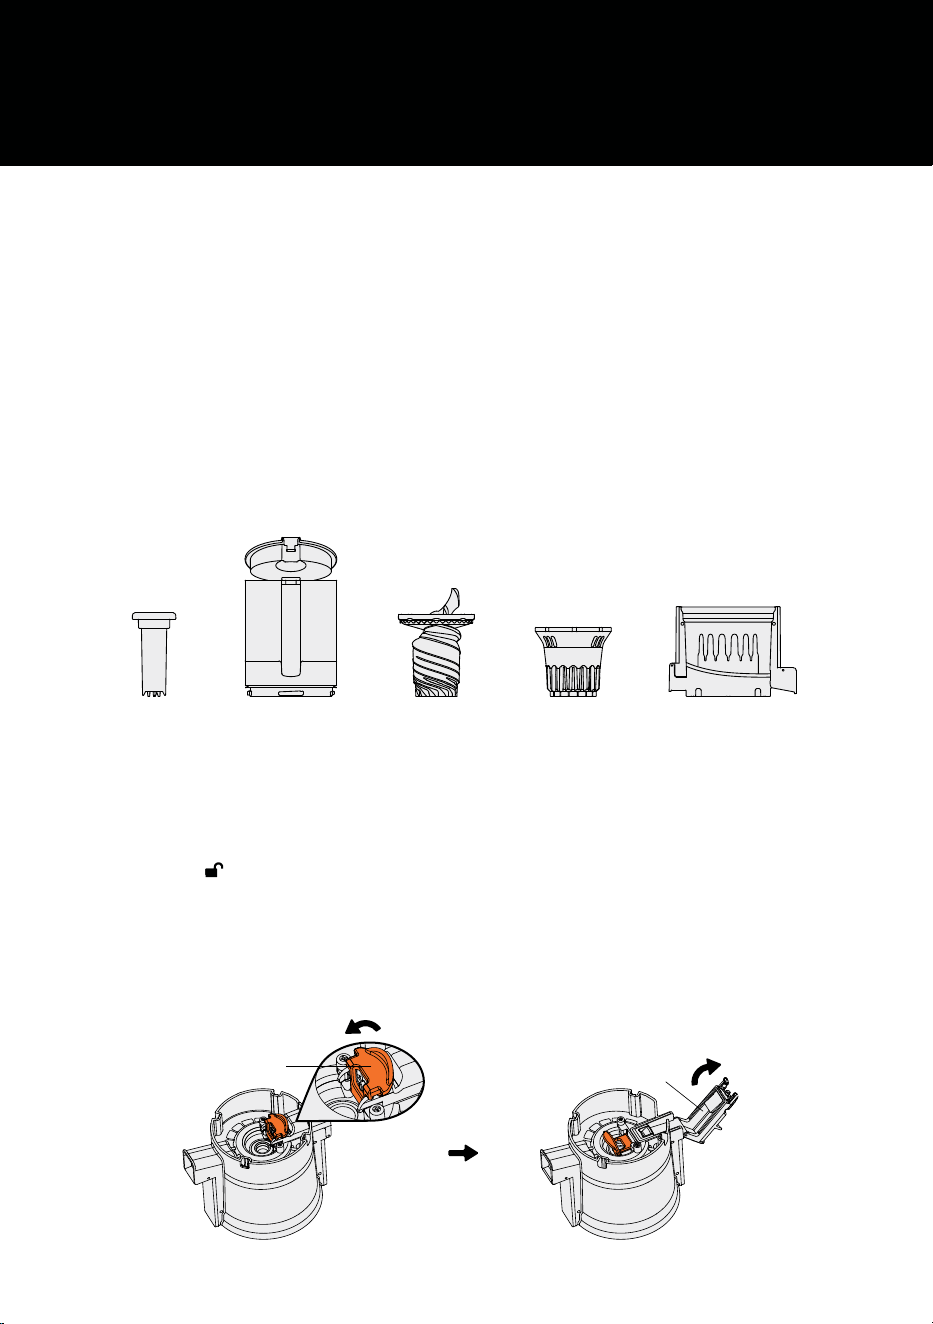
Position the HOPPER on top of the assembled
HOUSING so that the line indicator below the
HANDLE aligns with the unlocked symbol
.
Place the FILTER inside the AUGER HOUSING.
Insert the CHOPPER/AUGER into the FILTER,
pressing down rmly until it is securely seated.
Using the HANDLE, rotate the HOPPER to the left
until the line indicator is in the locked position
.
1
3
2
4
BEFORE YOU BEGIN
Before using for the rst time, wash all parts (except the MOTOR) with warm water and mild soap.
PULP
OUTLET
LATCH
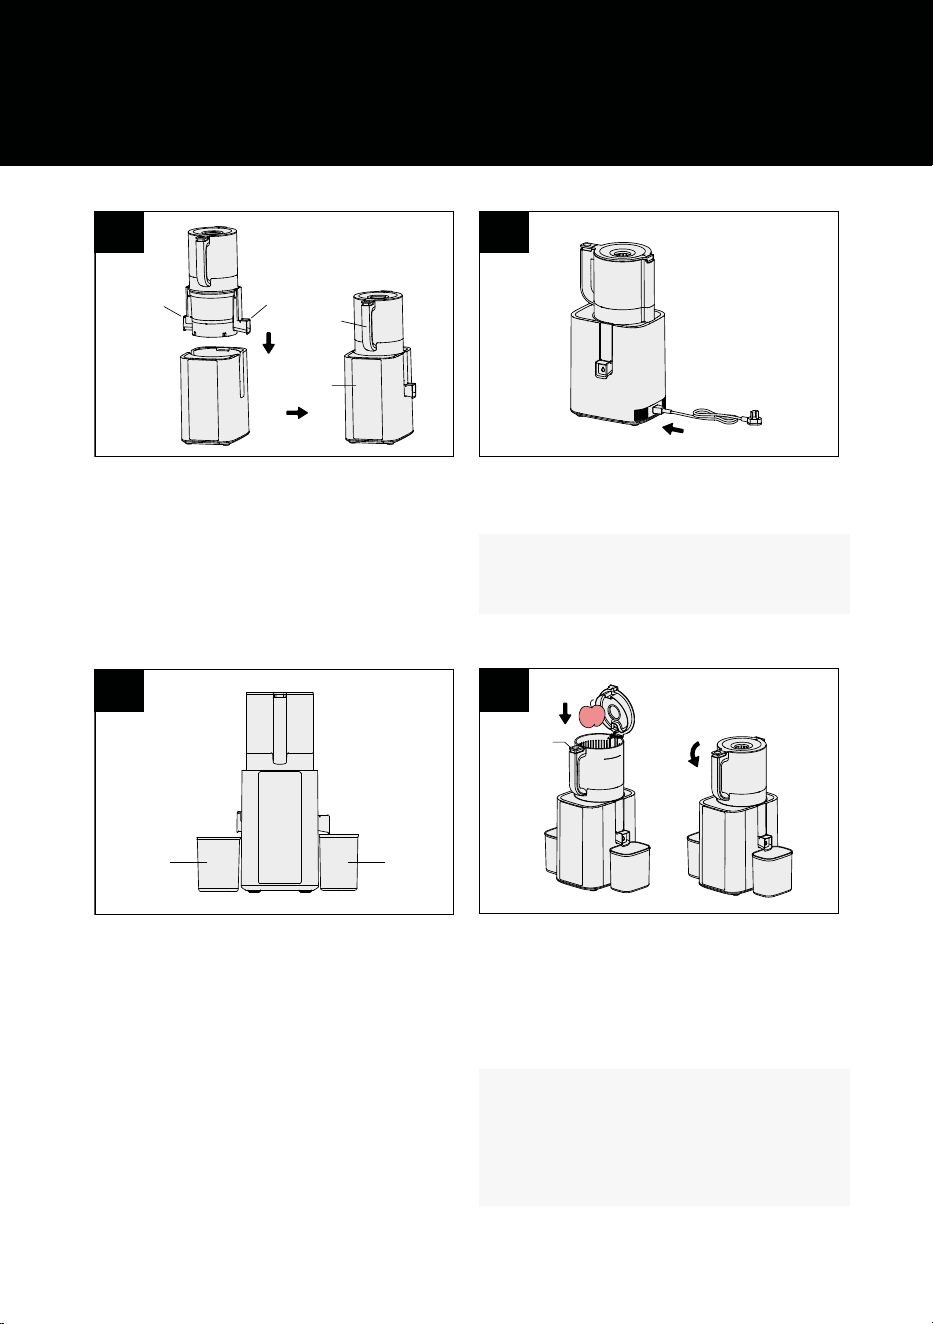
10
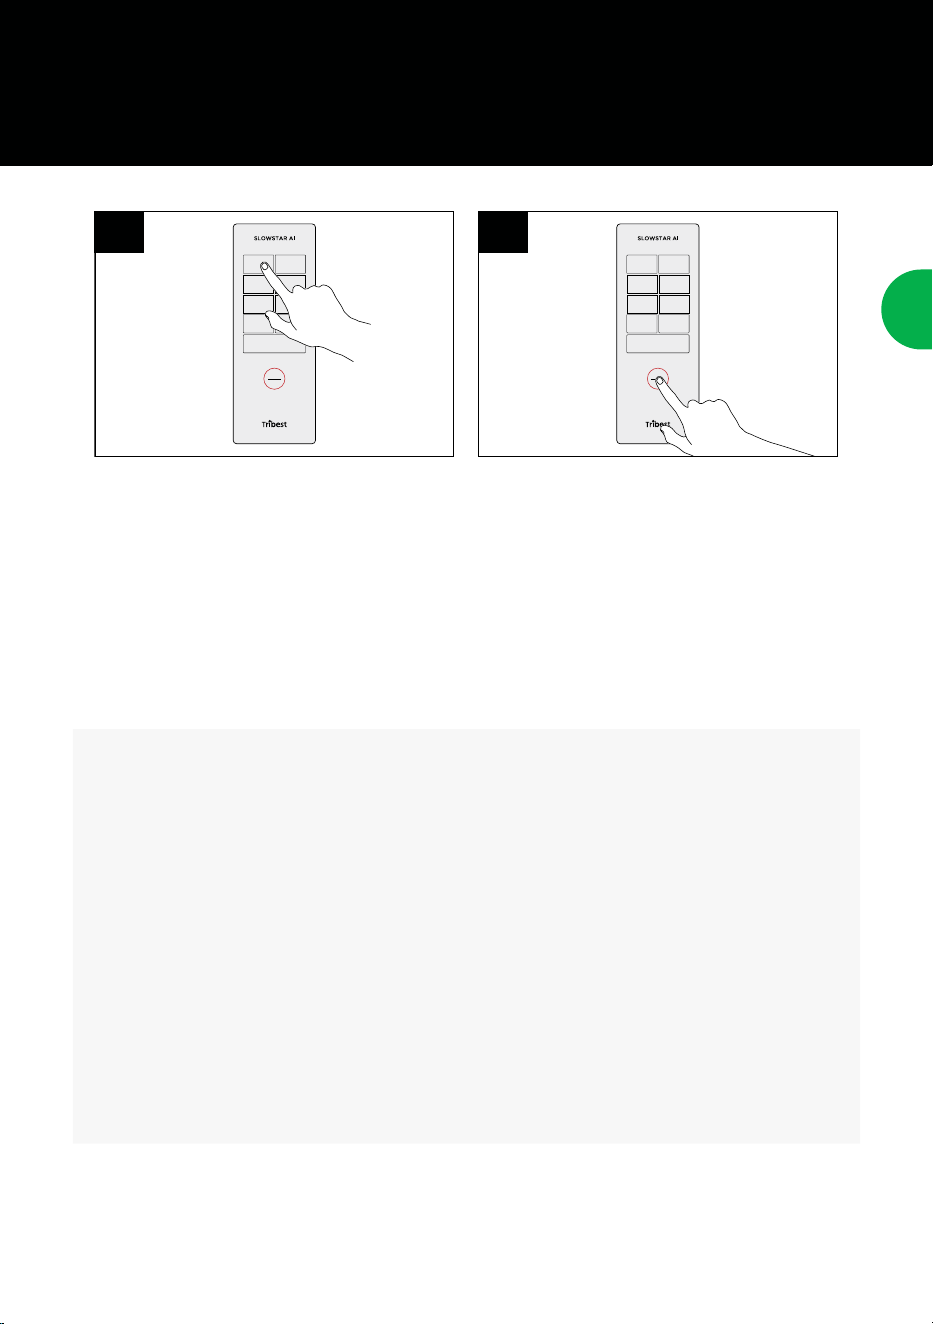
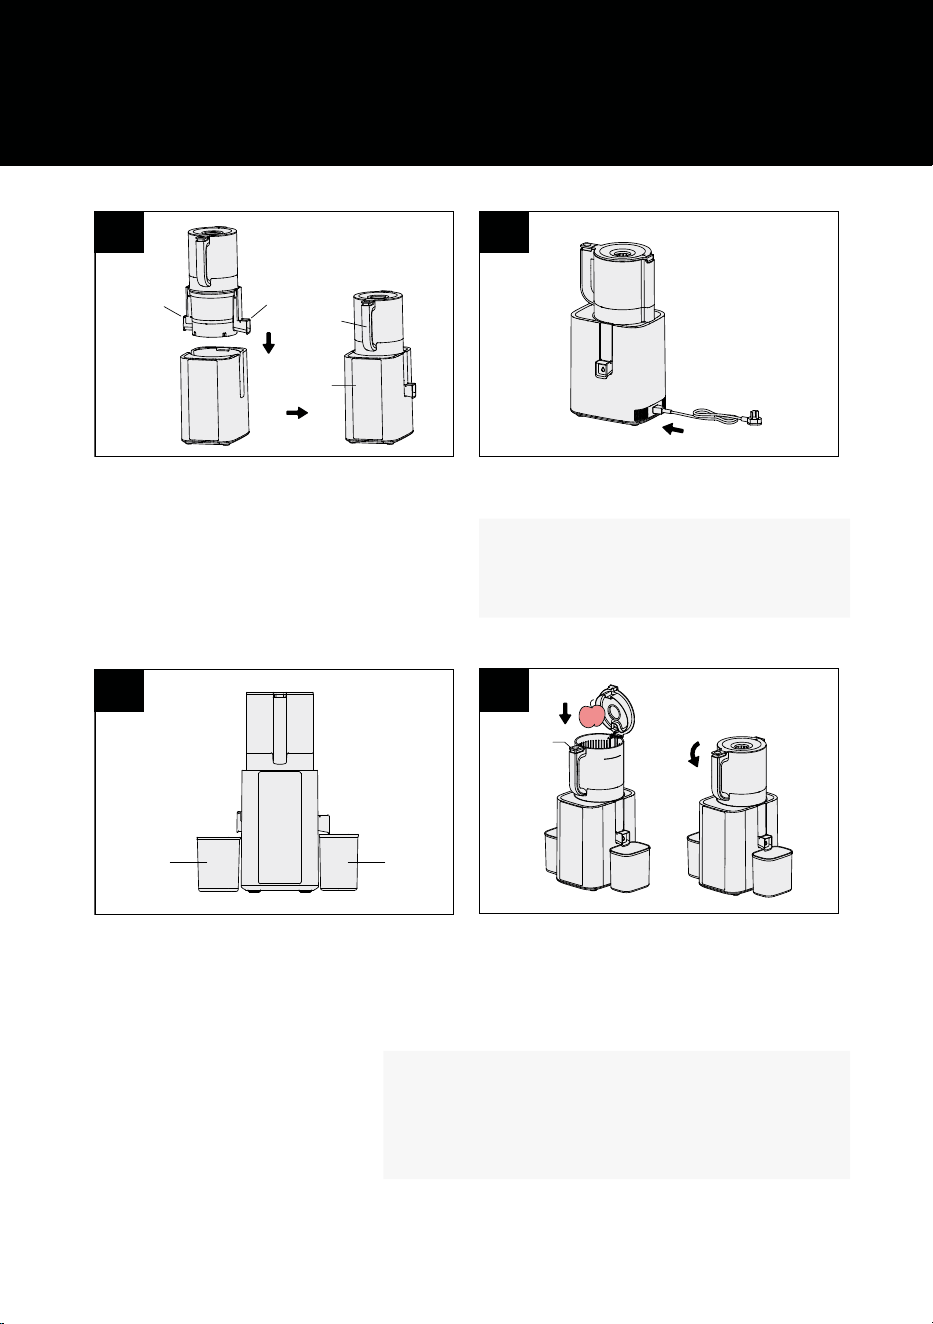
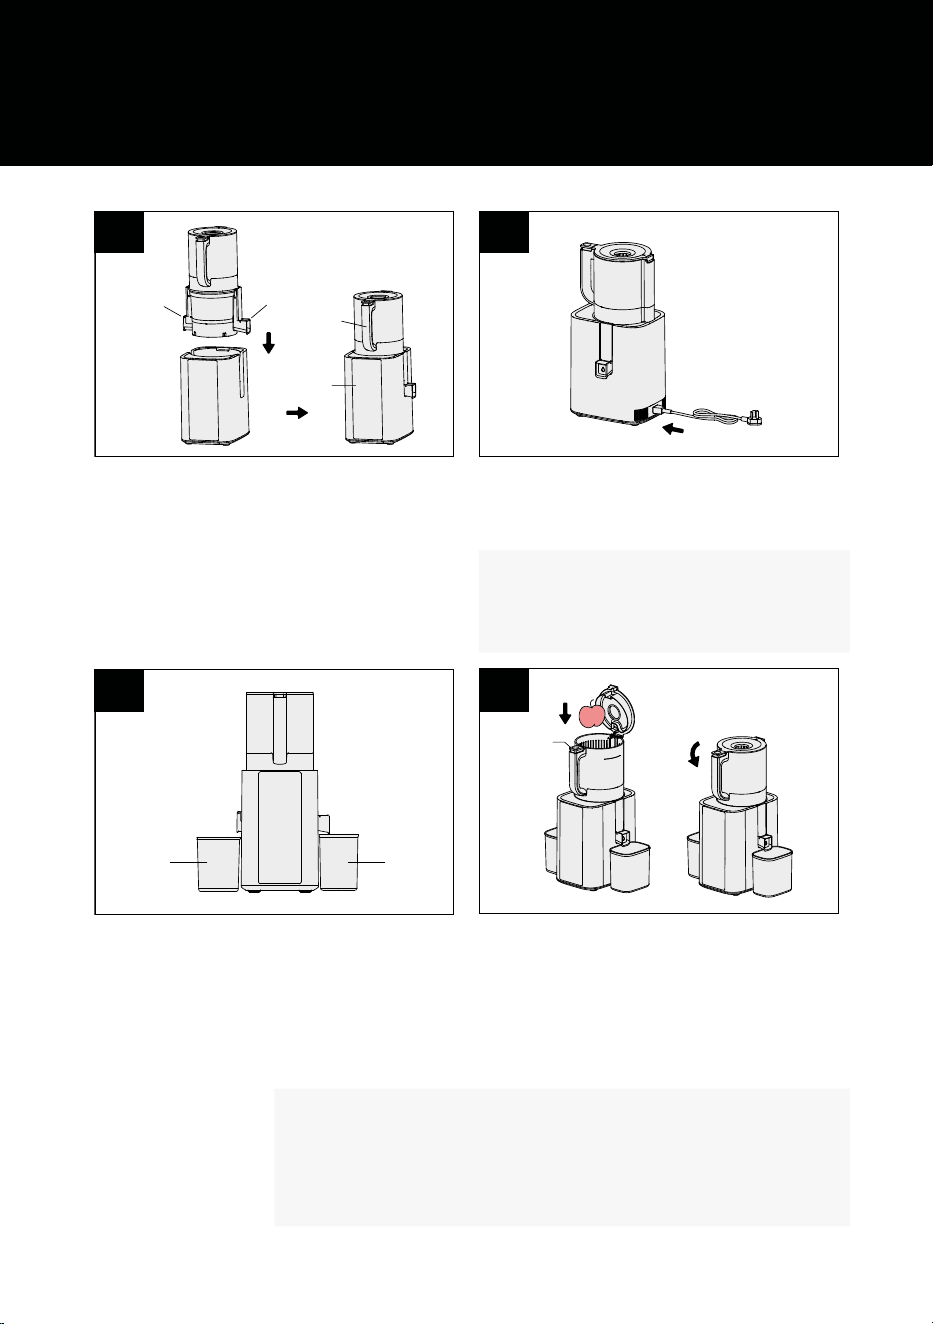
Lift the entire assembly by the HANDLE and lower
it into the MAIN BODY, making sure the HANDLE
is facing the TOUCH SCREEN DISPLAY at the
front.
Place the PULP CONTAINER and JUICE
CONTAINER under the relevant outlets to
complete the assembly.
Connect the POWER CORD into the inlet located
on the back of the MAIN BODY.
Press the RELEASE BUTTON to pop open the
QUICK FILL TOP. Place your ingredients inside the
HOPPER, making sure not to ll past the maximum
capacity line indicated on the HOPPER. Then close
the QUICK FILL TOP until it clicks rmly into place.
SAFETY FEATURE: If you open the QUICK FILL
TOP while the Slowstar is running, it will stop
automatically. To resume juicing, ensure the
QUICK FILL TOP is securely closed.
PULP
OUTLET
JUICE
OUTLET
HANDLE
SCREEN
5. ASSEMBLY & OPERATION
5
7
6
8
NOTE: Insert the POWER CORD rmly and
completely to ensure proper operation.
JUICE
CONTAINER
RELEASE
BUTTON
PULP
CONTAINER
11
5. ASSEMBLY & OPERATION
EN
Plug the other end of the POWER CORD into an
electrical outlet. The TOUCH SCREEN DISPLAY will
light up immediately. Select your desired preset
(see page 8). Its light will start blinking to conrm
your selection.
Press the START/CANCEL button to start the
cycle. To add more ingredients during operation,
either insert them through the QUICK FILL
TOP opening or press the RELEASE BUTTON
to open the top. To end the cycle, press the
START/CANCEL button to stop. The machine will
automatically reverse for 3-5 seconds before
stopping completely to make disassembly easier.
START
CANCEL
H
O
L
D
T
O
R
E
V
E
R
S
E
START
CANCEL
H
O
L
D
T
O
R
E
V
E
R
S
E
9 10
IMPORTANT:
• Do not run the machine without ingredients inside the HOPPER.
• Make sure the JUICE CAP on the JUICE OUTLET is closed before juicing.
• For ingredients that aren't feeding properly, use the PUSHER to push them down. Wiggle the PUSHER
side-to-side while pushing to guide the ingredients into the CHOPPER. Another option is to use the
reverse function by pressing and holding the START/CANCEL button for about 5 to 10 seconds.
• When processing a small amount of ingredients, there may be little to no pulp. This is normal and
does not impact the machine's operation.
• Avoid keeping the JUICE CAP closed for too long while juicing, as this can cause juice to back up into
the HOPPER.
• When juicing various types of produce, the recommended sequence for optimal avor is to add softer
ingredients (like oranges) rst, then harder ingredients (like carrots).
• When you are done with juicing, close the JUICE CAP before removing the JUICE CONTAINER to
prevent drips.
12
6. CLEANING & MAINTENANCE
Be sure to clean your Slowstar AI Juicer thoroughly after every use. All parts are NOT dishwasher safe
and should only be hand washed.
CLEANING
1. For your safety, always unplug the POWER CORD before washing or storing the unit.
2. Clean the MAIN BODY by wiping it with a damp cloth, then dry it thoroughly. Do not submerge the
MAIN BODY in water.
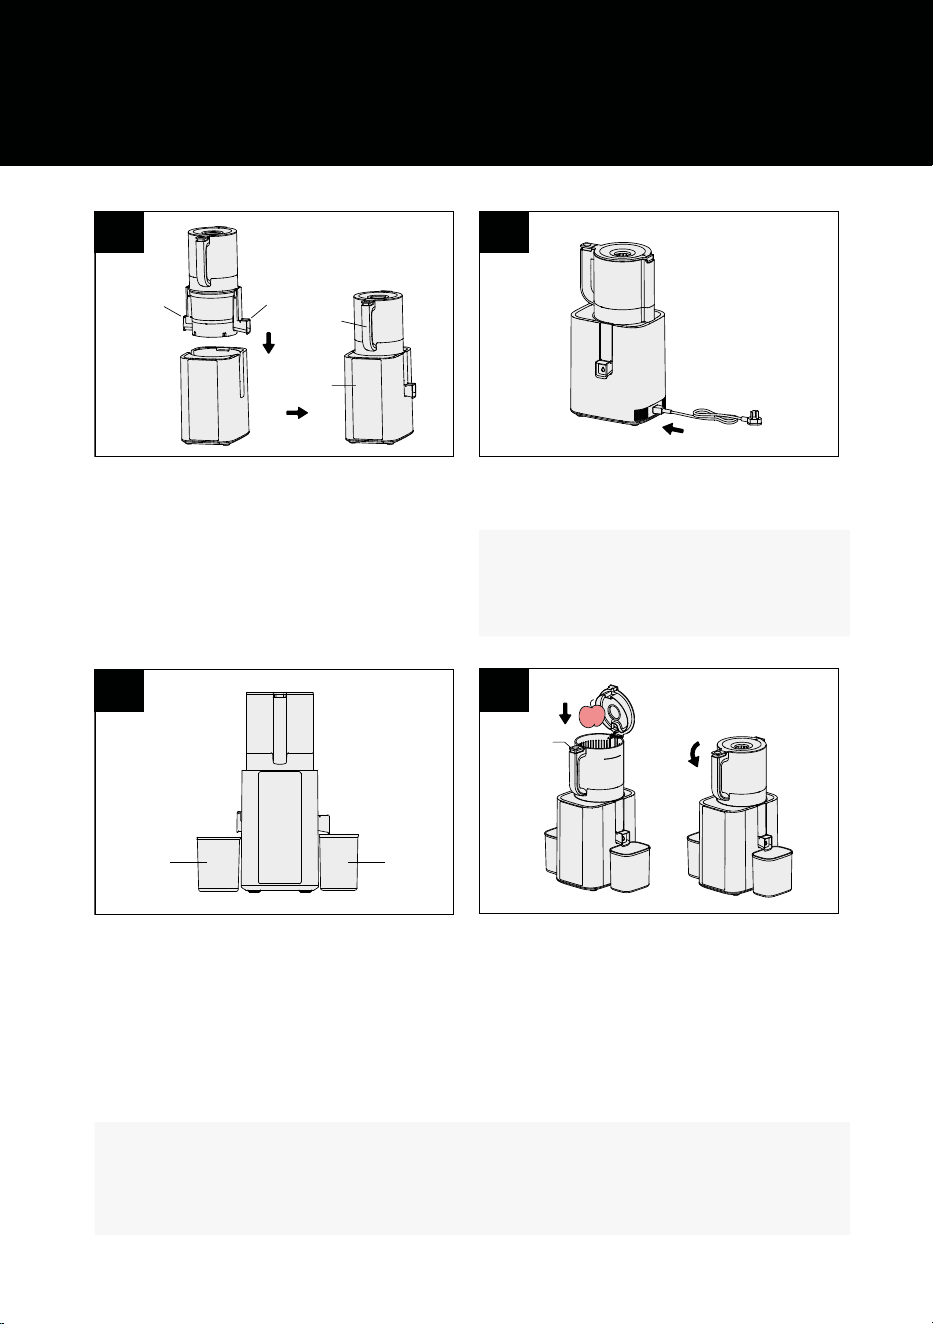
3. Wash the PUSHER, HOPPER, CHOPPER/AUGER, FILTER, and AUGER HOUSING (illustrated below)
under lukewarm running water using a soft sponge and neutral detergent to prevent scratches. The
CLEANING BRUSH can be used for gently cleaning hard-to-reach spots. Do NOT use steel wool,
abrasive cleaners, or harsh chemicals like bleach. Thoroughly rinse all soap from the parts and dry
them completely. Then, store them in a ventilated area away from direct sunlight.
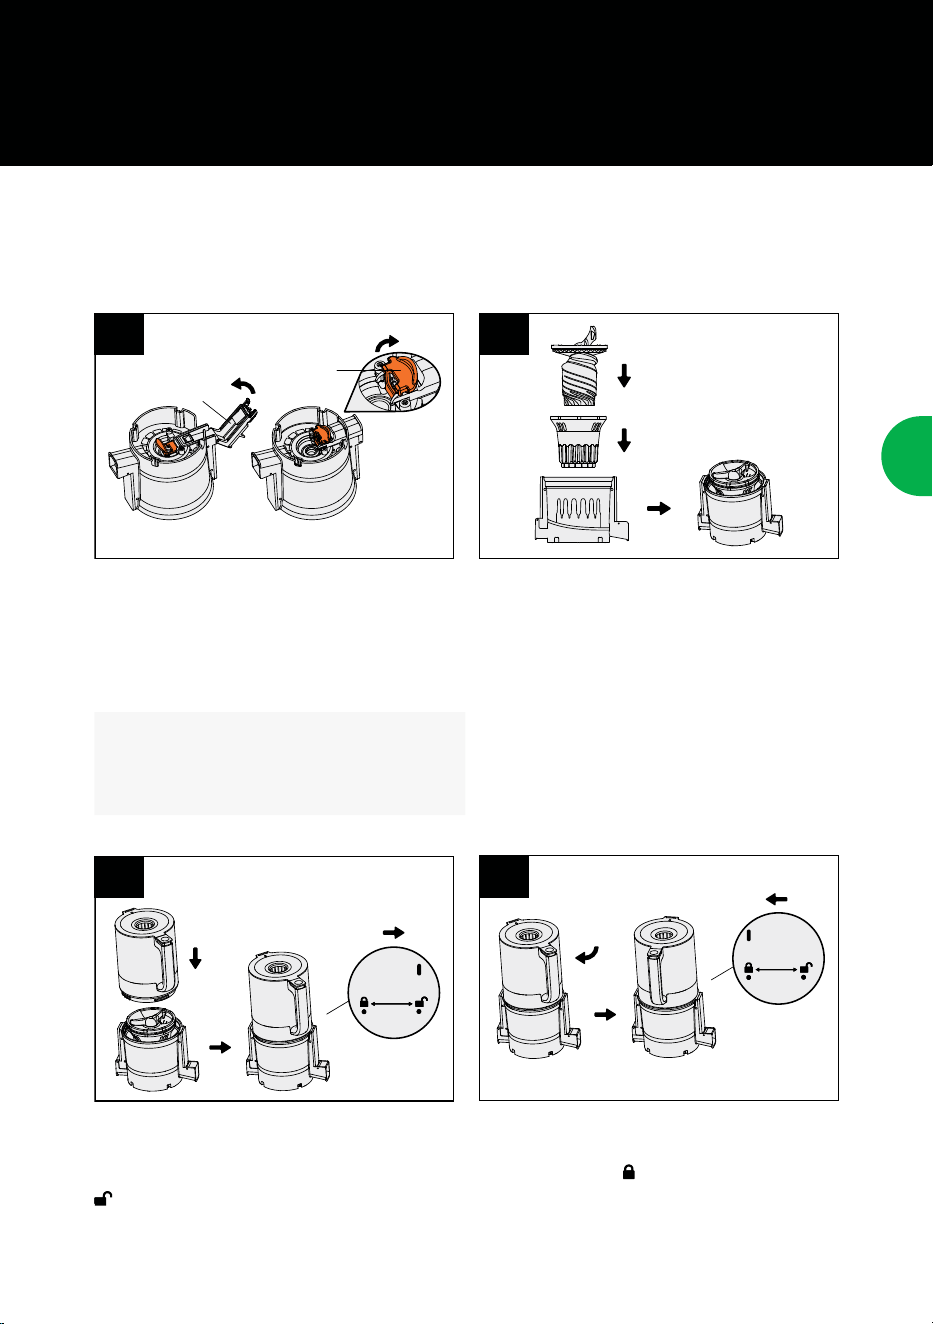
DISASSEMBLING JUICING PARTS
1. Use the HANDLE to lift the juicing assembly out of the MAIN BODY and carefully carry the assembly
to the sink for cleaning.
2. To unlock the HOPPER, rotate the HANDLE to the right until it is in the unlocked position
.
3. Lift the HOPPER, then remove the CHOPPER/AUGER and FILTER from the AUGER HOUSING.
4. Turn the AUGER HOUSING upside down. Pull open the orange LATCH to unlock the PULP OUTLET.
Swing the PULP OUTLET open, then clean and remove any pulp from the slot. Remember to close
and lock the PULP OUTLET before juicing again.
PUSHER HOPPER CHOPPER/AUGER FILTER AUGER HOUSING
PULP
OUTLET
LATCH

13
7. TROUBLESHOOTING
PROBLEM SOLUTION
The machine won't turn on or
is not working.
• Verify that the power source is active. Insert the POWER CORD'S
appliance connector (at end) into the power inlet on the back of the
MAIN BODY. Plug the POWER CORD'S plug end into an electrical
outlet.
• Make sure all parts are correctly assembled (see page 9).
• Do not add ingredients beyond the maximum capacity line indicated
on the HOPPER.
The machine is making
beeping noises (3 short beeps
+ 1 long beep) after pressing
the START/CANCEL button.
• Make sure the HOPPER and AUGER HOUSING assembly are in the
locked position before placing them onto the MAIN BODY.
• Make sure the QUICK FILL TOP is fully closed.
• Make sure the HANDLE of the HOPPER is facing the TOUCH SCREEN
DISPLAY at the front.
There is a signicant amount
of pulp in the juice.
The FILTER may be damaged. Contact customer support for service.
The machine is vibrating
excessively or making loud
noises during operation.
The FILTER or motor may be damaged. Contact customer support for
service.
The machine suddenly stopped
working during operation.
There are beeping noises.
The Automatic Overload Protection will cause the motor to shut down
if too much or very hard food is processed for too long. This built-in
feature is designed to protect the motor and prevent your machine from
overheating. Should this occur, allow the machine to rest for 10 minutes
before resuming operation.
Juice is leaking onto the Main
Body.
Ensure the PULP OUTLET under the AUGER HOUSING is fully closed
(folded in). Then, securely lock it using the orange LATCH (see page 9).
CUSTOMER SUPPORT
In the event that you have any questions concerning the use, care, or service for this product, please
feel free to call us or send us an email. If you purchased your product outside of the United States,
please refer to your warranty card for your nearest service center.
UNITED STATES
Tribest Corporation
1143 N. Patt St.
Anaheim, CA 92801
Toll-Free: 1-888-254-7336
INTERNATIONAL
Tribest Corporation
1143 N. Patt St.
Anaheim, CA 92801
Telephone: +1 714 879 7150
EN

14
1. Avertissements importants ............................................................................................ 15
2. Précautions et conseils pour l'extraction de jus .............................................................. 16
3. Pièces du produit ........................................................................................................... 17
4. Écran tactile .................................................................................................................. 18
5. Assemblage et fonctionnement ..................................................................................... 19
6. Nettoyage et entretien ................................................................................................... 22
7. Dépannage .................................................................................................................... 23
• Recettes ................................................................................................................. R1-R17
Produit
Extracteur vertical Tribest Slowstar AI avec trémie automatique et
optimisation intelligente
Modèle SWA-3
Puissance nominale 120V, 60Hz, 150W / 220V, 50Hz, 150W
Durée de fonctionnement en continu Jusqu’à 15 minutes par session
Dimensions (l x p x h) 205 × 225 × 449 mm / 8,1 × 8,8 × 17,6 in
Poids 5,7 kg / 12,6 lbs
Fabriqué en Chine
SOMMAIRE
CARACTÉRISTIQUES DU PRODUIT

15
1. AVERTISSEMENTS IMPORTANTS
AVERTISSEMENT : Une mauvaise utilisation du produit peut entraîner des blessures
graves voire mortelles. Lors de l’utilisation d’appareils électriques, les précautions
de sécurité de base doivent toujours être respectées, notamment les suivantes :
ATTENTION : Faites preuve de vigilance face aux risques pouvant causer des
blessures corporelles ou des dommages matériels.
1. Lisez attentivement toutes les instructions avant d’utiliser l’appareil.
2. Les instructions de l’appareil mettent en garde contre les risques de blessures en cas de mauvaise
utilisation.
3. Tenir cet appareil hors de portée des enfants. Ne pas laisser les personnes inaptes et les enfants utiliser
cet appareil sans surveillance.
4. Ne branchez ni ne débranchez le cordon d’alimentation avec les mains mouillées afin d’éviter tout risque
de choc électrique.
5. Ne lavez pas, n’immergez pas et ne pulvérisez pas le corps principal avec de l’eau ou tout autre liquide
afin d’éviter tout dommage ou risque de fuite électrique.
6. N’insérez pas vos mains, baguettes ou tout autre objet pointu dans la trémie ou le capuchon de sortie de
jus afin d’éviter toute blessure ou dommage au produit.
7. Ne retirez pas le couvercle à remplissage rapide de la trémie afin d’éviter tout risque de blessure.
8. Ne traitez pas d’ingrédients dont la température dépasse 140 °F (60 °C). Cela peut endommager les
pièces et présenter un risque de brûlure.
1. Ce produit est destiné uniquement à un usage domestique. Ne l’utilisez pas à d’autres fins.
2. Avant de brancher l’appareil à une source d’alimentation, vérifiez que la tension/fréquence correspond
à la tension locale. Une tension supérieure ou inférieure à la valeur spécifiée peut affecter les
performances ou endommager les composants électriques. Il est recommandé d’utiliser un stabilisateur
de tension pour garantir un fonctionnement correct.
3. Avant, pendant ou après l’utilisation, si des dommages ou des fissures visibles sont constatés sur le
corps principal, le corps de la vis sans fin, le filtre, l’ensemble de la vis sans fin ou la trémie, cessez
immédiatement d’utiliser la machine afin de prévenir tout risque de blessure.
4. Avant de démonter quelconque pièce, éteignez la machine et débranchez-la de la source d’alimentation.
5. Pour garantir des performances optimales et éviter la surchauffe du moteur, limitez le fonctionnement
continu de la machine à un maximum de 15 minutes. Pour des sessions prolongées, laissez la machine
refroidir pendant au moins 15 minutes entre chaque utilisation.
6. Certaines pièces peuvent se tacher après l'extraction de certains ingrédients. Il s'agit d'un phénomène
normal qui n'affecte pas l'utilisation.
7. Ne placez aucune pièce dans un lave-vaisselle, un micro-ondes, une armoire de désinfection, ni dans de
l’eau à plus de 60°C (140°F) pour le nettoyage ou la stérilisation. N’utilisez pas d’autres dispositifs de
chauffage pour chauffer les pièces, car cela pourrait provoquer leur déformation ou endommagement.
CONSERVEZ CES INSTRUCTIONS
FR

16
2. PRÉCAUTIONS ET CONSEILS POUR
L'EXTRACTION DE JUS
LES PRÉCAUTIONS À PRENDRE POUR UNE UTILISATION SÛRE :
PRÉCAUTIONS D'EMPLOI :
CONSEILS POUR UNE EXTRACTION DE JUS OPTIMALE :
1. Lisez toutes les instructions avant utilisation.
2. Évitez tout contact avec les pièces en mouvement.
3. Débranchez toujours l'appareil avant de le nettoyer ou de monter/démonter les pièces.
1. Ne laissez pas le cordon pendre au bord d’une table ou d’un comptoir.
2. Assurez-vous que la trémie est bien fixée avant de mettre la machine en marche.
3. Éteignez la machine après chaque utilisation et attendez l'arrêt complet du moteur avant de la
démonter.
1. Les fruits riches en protéines et en matières grasses, tels que le durian, le jacquier et l’avocat, ne
conviennent pas à une extraction de jus en solo. Vous pouvez les mélanger à des produits à forte
teneur en eau, comme les pommes ou le céleri, pour obtenir de meilleurs résultats.
2. Les fruits avec des noyaux, des graines dures ou des peaux épaisses (comme les pommes,
les pêches, les abricots, les mangues, les kakis et les cerises) doivent être retirés avant d'être
pressés afin d'éviter d'endommager l'appareil.
3. Les citrons contiennent un jus fortement acide. Ils doivent être pressés avec d'autres fruits et
légumes, et la quantité ne doit pas dépasser 20 g (environ 3 fines tranches) par séance.
4. Les ingrédients fibreux et durs comme les carottes, le céleri et le gingembre doivent être coupés
en petits morceaux avant d'être pressés afin de prolonger la durée de vie de l'appareil.
5. Le dégagement manuel de l'orifice de sortie de la pulpe pendant la préparation du jus peut aider à
améliorer l'évacuation de la pulpe. Pour les ingrédients riches en fibres, nettoyez les composants
de l'extracteur après avoir traité tous les 2 livres (1 kg) d'ingrédients.
6. Les légumes à feuilles et à tiges (comme le céleri et le chou frisé) doivent être coupés en
morceaux de 5-6 cm ou plus petits avant d'être pressés. Comme ces ingrédients contiennent
beaucoup de fibres, ils peuvent s’enrouler autour de l’ensemble de la vis sans fin. Le dégagement
manuel de la sortie de pulpe pendant l’extraction du jus peut aider à assurer un écoulement fluide
de la pulpe.
CONSERVEZ CES INSTRUCTIONS

17
3. PIÈCES DU PRODUIT
1
2
3
4
6
7
8
9
5
1
POUSSOIR
Facilite rapidement l’introduction des aliments dans le COUVERCLE À REMPLISSAGE RAPIDE.
2
COUVERCLE À REMPLISSAGE RAPIDE
Alimente en continu la TRÉMIE pour augmenter le volume de jus lorsque c'est nécessaire.
Appuyez sur le BOUTON DE DÉVERROUILLAGE situé sur le dessus de la poignée pour l'ouvrir.
3
BOUTON DE DÉVERROUILLAGE
Appuyez sur le bouton situé sur le dessus de la POIGNÉE pour ouvrir le
COUVERCLE À REMPLISSAGE RAPIDE, puis insérez le produit.
4
TRÉMIE À ALIMENTS AVEC POIGNÉE
Permet de pré-remplir la TRÉMIE avec une grande variété de fruits et légumes.
5
HACHEUR EN ACIER INOXYDABLE
Fabriqué en acier inoxydable durable de type 304 pour hacher et nourrir vos produits.
6
VIS SANS FIN
Termine l’extraction du jus en broyant la pulpe.
7
FILTRE SANS ÉCRAN FACILE À NETTOYER
Le FILTRE s’insère parfaitement à l’intérieur des rainures internes du CARTER DE
LA VIS SANS FIN pour assurer une filtration optimale. Comme il n'y a pas d'écran,
le nettoyage est plus rapide et plus facile !
8
CARTER DE LA VIS SANS FIN
Contient le FILTRE, la VIS SANS FIN et le HACHEUR.
CAPUCHON DE SORTIE DE JUS
Soulevez le capuchon à jus pour libérer votre jus.
ÉCRAN TACTILE
Sélectionnez parmi 8 préréglages ou utilisez le AI Mode.
TOUCHE START/CANCEL
Appuyez sur cette touche pour démarrer après avoir sélectionné une
option ou pour annuler un cycle en cours.
CONTENANT À PULPE
Récupère la pulpe.
CONTENANT À JUS
Recueille votre jus frais.
BROSSE DE NETTOYAGE
Permet un nettoyage rapide et facile.
9
SORTIE DE PULPE
La pulpe s’évacue par cette ouverture.
CORPS PRINCIPAL
FR
18
4. ÉCRAN TACTILE
Pour économiser de l'énergie, L'ÉCRAN
TACTILE s'éteint automatiquement après 5
minutes d'inactivité. Appuyez sur le centre de
l'écran pour le réactiver.
FONCTIONNEMENT DESCRIPTION
1
–
7
FRUIT UNIQUE
PRÉRÉGLAGES
S'adapte automatiquement à la
vitesse optimale en fonction du type
de fruit sélectionné pour un maximum
d'efficacité extraction.
8
PRÉRÉGLAGE DU
SORBET
Pour de meilleurs résultats, coupez les
fruits congelés comme les bananes,
les ananas, les mangues (noyau retiré)
ou les baies en morceaux de 3 cm (1
pouce). Congeler pendant plus de 6
heures ou jusqu'à ce que le produit
soit complètement congelé. Laissez-les
décongeler 5 à 10 minutes avant de
les mixer. Ajoutez 6 à 8 morceaux à la
fois dans la TRÉMIE.
9
AI MODE
Doté d’un contrôle intelligent de
la vitesse, le AI Mode détecte
automatiquement l’effort de traitement
requis (en fonction de la résistance
des aliments) et s’adapte à la vitesse
optimale. C'est l'idéal pour faire des
jus de fruits ou de légumes variés.
10
START/CANCEL
OU REVERSE
1. START
Sélectionnez une fonction
1
–
9
; son voyant commence
à clignoter. Appuyez ensuite
sur la touche START/CANCEL
(DÉMARRER/ANNULER) pour lancer
le cycle.
2. CANCEL
Pour annuler un cycle en
cours, appuyez sur la touche
START/CANCEL pendant le
fonctionnement. Le cycle s'arrête
alors pendant 2 secondes, puis
s'inverse automatiquement pendant
3 à 5 secondes avant de s'arrêter
complètement pour faciliter le
démontage.
3. INVERSE
Une pression prolongée sur la
touche START/CANCEL fait tourner
le moteur en sens inverse de façon
continue jusqu'à ce que vous
relâchiez le bouton. Il peut être
utilisé pour desserrer les pièces
à démonter après l'extraction du
jus ou pour déloger les ingrédients
restants.
1 2
3 4
5 6
7
9
10
8
AFFICHAGE MODE VEILLE
19
5. ASSEMBLAGE ET FONCTIONNEMENT
Assurez-vous que le Slowstar est prêt avant de
commencer : vériez que la SORTIE DE PULPE est
repliée vers l'intérieur et que le VERROU orange
sous le boîtier est bien verrouillé pour éviter les
fuites.
REMARQUE : N'oubliez pas d'ouvrir la SORTIE
DE PULPE lors du nettoyage et de la fermer
avant d'extraire le jus.
Placez la TRÉMIE sur le dessus du COUVERCLE
assemblé de manière à ce que le repère sous la
POIGNÉE soit aligné avec le symbole déverrouillé
.
Placez le FILTRE à l'intérieur du CARTER DE LA
VIS SANS FIN. Insérez le HACHEUR/la VIS SANS
FIN dans le FILTRE en appuyant fermement
jusqu’à ce qu’il soit bien en place.
A l'aide de la POIGNÉE, tourner la TRÉMIE vers la
gauche jusqu'à ce que l'indicateur de ligne soit en
position verrouillée
.
1
3
2
4
AVANT DE COMMENCER
Avant la première utilisation, lavez toutes les pièces (sauf le MOTEUR) à l'eau chaude et au savon doux.
SORTIE DE
PULPE
VERROU
FR
20
Soulevez l'ensemble de l'assemblage par
la POIGNÉE et abaissez-le dans le CORPS
PRINCIPAL, en veillant à ce que la POIGNÉE soit
orientée vers l'ÉCRAN TACTILE à l'avant.
Placez le CONTENEUR DE PULPE et le
CONTENEUR DE JUS sous les sorties
correspondantes pour terminer l'assemblage.
Branchez le cordon d'alimentation dans la prise
située à l'arrière du corps principal.
Appuyez sur le BOUTON DE DÉVERROUILLAGE
pour ouvrir le COUVERCLE DE REMPLISSAGE
RAPIDE. Placez vos ingrédients dans la TRÉMIE,
en veillant à ne pas dépasser la ligne de capacité
maximale indiquée sur la TRÉMIE. Fermez ensuite
le COUVERCLE DE REMPLISSAGE RAPIDE jusqu'à
ce qu'il s'enclenche fermement.
DISPOSITIF DE SÉCURITÉ : Si vous ouvrez le couvercle de remplissage rapide pendant que le
Slowstar est en marche, il s'arrêtera automatiquement. Pour reprendre l'extraction de jus, assurez-
vous que le COUVERCLE DE REMPLISSAGE RAPIDE est bien fermé.
SORTIE DE
PULPE
SORTIE DE
JUS
POIGNÉE
ÉCRAN
5. ASSEMBLAGE ET FONCTIONNEMENT
5
7
6
8
REMARQUE : Insérez fermement et
complètement le cordon d'alimentation pour
garantir un fonctionnement correct.
CONTENANT
À JUS
BOUTON
CONTENANT
À PULPE
21
5. ASSEMBLAGE ET FONCTIONNEMENT
Branchez l’autre extrémité du CORDON
D’ALIMENTATION dans une prise électrique.
L'ÉCRAN TACTILE s'allume immédiatement.
Sélectionnez la présélection de votre choix (voir
page 18). Son voyant se met à clignoter pour
conrmer votre sélection.
Appuyez sur la touche START/CANCEL pour
démarrer le cycle. Pour ajouter des ingrédients
en cours de fonctionnement, insérez-les dans
l'ouverture COUVERCLE DE REMPLISSAGE RAPIDE
ou appuyez sur le BOUTON DE DÉVERROUILLAGE
pour ouvrir le couvercle. Pour terminer le cycle,
appuyez sur la touche START/CANCEL pour l'arrêter.
La machine recule automatiquement pendant 3 à
5 secondes avant de s'arrêter complètement pour
faciliter le démontage.
START
CANCEL
H
O
L
D
T
O
R
E
V
E
R
S
E
START
CANCEL
H
O
L
D
T
O
R
E
V
E
R
S
E
9 10
IMPORTANT :
• Ne faites pas fonctionner la machine sans ingrédients à l'intérieur de la TRÉMIE.
• Assurez-vous que le BOUCHON DE JUS sur la SORTIE DE JUS est fermé avant de presser.
• Pour les ingrédients qui ne descendent pas correctement, utilisez le POUSSOIR pour les enfoncer.
Agitez le POUSSOIR d'un côté à l'autre tout en poussant pour guider les ingrédients dans le
HACHEUR. Une autre option consiste à utiliser la fonction de marche arrière en appuyant sur la
touche START/CANCEL et en la maintenant enfoncée pendant 5 à 10 secondes.
• Lors de la transformation d'une petite quantité d'ingrédients, il se peut qu'il n'y ait que peu ou pas
de pulpe. Ce phénomène est normal et n'a pas d'incidence sur le fonctionnement de la machine.
• Évitez de maintenir le BOUCHON DE JUS fermé trop longtemps pendant l'extraction du jus, car cela
peut provoquer un refoulement du jus dans la TRÉMIE.
• Lorsque vous extrayez différents types de produits, l'ordre recommandé pour une saveur optimale
est d'ajouter d'abord les ingrédients les plus tendres (comme les oranges), puis les ingrédients les
plus durs (comme les carottes).
• Lorsque vous avez terminé votre jus, fermez le BOUCHON DE JUS avant de retirer le RÉCIPIENT À
PULPE an d’éviter les gouttes.
FR
22
6. NETTOYAGE ET ENTRETIEN
Assurez-vous de nettoyer soigneusement votre extracteur Slowstar AI après chaque utilisation. Toutes les
pièces ne passent pas au lave-vaisselle et doivent être lavées à la main.
ENTRETIEN
1. Pour votre sécurité, débranchez toujours le CORDON D’ALIMENTATION avant de laver ou de ranger l’appareil.
2. Nettoyez le CORPS PRINCIPAL en l'essuyant avec un chiffon humide, puis séchez-le soigneusement.
N'immergez pas le CORPS PRINCIPAL dans l'eau.
3. Lavez le POUSSOIR, la TRÉMIE, LE HACHEUR/LA VIS SANS FIN, LE FILTRE et LE CARTER DE LA VIS SANS
FIN (illustrés ci-dessous) à l’eau tiède sous un jet, en utilisant une éponge douce et un détergent neutre
an d’éviter les rayures. La BROSSE DE NETTOYAGE peut être utilisée pour nettoyer en douceur les endroits
difciles d'accès. N'utilisez PAS de laine d'acier, de nettoyants abrasifs ou de produits chimiques agressifs
comme l'eau de Javel. Rincez soigneusement toutes les traces de savon sur les pièces et séchez-les
complètement. Conservez-les ensuite dans un endroit ventilé, à l'abri de la lumière directe du soleil.
DÉMONTAGE DES PIÈCES DE L'EXTRACTEUR DE JUS
1. Utilisez la POIGNÉE pour soulever l’ensemble d’extraction du CORPS PRINCIPAL et transportez-le avec
précaution jusqu’à l’évier pour le nettoyage.
2. Pour déverrouiller la TRÉMIE, tourner la POIGNÉE vers la droite jusqu'à ce qu'elle soit en position
déverrouillée
.
3. Soulevez la TRÉMIE, puis retirez LE HACHEUR/LA VIS SANS FIN et le FILTRE du CARTER DE LA VIS SANS
FIN.
4. Retournez le CARTER DE LA VIS SANS FIN à l’envers. Tirez sur la LINGUETTE orange pour déverrouiller la
SORTIE DE PULPE. Ouvrez la SORTIE DE PULPE, puis nettoyez et retirez la pulpe de la fente. N’oubliez pas
de refermer et de verrouiller la SORTIE DE PULPE avant de recommencer à presser.
POUSSEUR TRÉMIE HACHEUR/
LA VIS SANS FIN
FILTRE CARTER DE LA
VIS SANS FIN
SORTIE DE
PULPE
VERROU

23
7. DÉPANNAGE
PROBLÈME SOLUTION
L'appareil ne s'allume pas ou ne
fonctionne pas.
• Vériez que la source d'alimentation est active. Insérez le connecteur du cordon
d'alimentation (extrémité plate) dans la prise d'alimentation située à l'arrière du
corps principal. Branchez l'extrémité de la che du cordon d'alimentation sur une
prise électrique.
• Assurez-vous que toutes les pièces sont correctement assemblées (voir page 19).
• N'ajoutez pas d'ingrédients au-delà de la ligne de capacité maximale indiquée
sur la TRÉMIE.
L'appareil émet des bips (3 bips
courts + 1 bip long) après avoir
appuyé sur la touche START/
CANCEL.
• Assurez-vous que l’assemblage de la TRÉMIE et le CARTER DE LA VIS SANS FIN
est en position verrouillée avant de le placer sur le CORPS PRINCIPAL.
• Assurez-vous que le COUVERCLE DE REMPLISSAGE RAPIDE est complètement
fermé.
• Assurez-vous que la POIGNÉE de la TRÉMIE est orientée vers l'ÉCRAN TACTILE
à l'avant.
Le jus contient une quantité
importante de pulpe.
Le FILTRE peut être endommagé. Contactez le service clientèle pour obtenir de l'aide.
La machine vibre de manière
excessive ou émet des bruits forts
pendant son fonctionnement.
Le FILTRE ou le moteur peuvent être endommagés. Contactez le service client pour
toute assistance.
La machine s'est soudainement
arrêtée en cours de
fonctionnement. Il y a des bruits
de bip.
La protection automatique contre les surcharges arrêtera le moteur si une quantité
excessive ou des aliments trop durs sont traités pendant une durée prolongée. Cette
fonction intégrée est conçue pour protéger le moteur et éviter que votre machine ne
surchauffe. Dans ce cas, laissez la machine se reposer pendant 10 minutes avant de
la remettre en marche.
Du jus s'écoule sur le corps
principal.
Assurez-vous que la SORTIE DE PULPE située sous le CARTER DE LA VIS SANS FIN
est complètement fermée (repliée vers l’intérieur). Ensuite, verrouillez-la fermement à
l’aide de la LINGUETTE orange (voir page 19).
SERVICE À LA CLIENTÈLE
Pour toutes vos préoccupations concernant l’utilisation, l’entretien ou le service après-vente de ce produit, n’hésitez
pas à nous appeler ou à nous envoyer un e-mail. Si vous avez acheté votre produit en dehors des États-Unis,
reportez-vous à votre carte de garantie pour connaître le centre de service après-vente le plus proche.
ÉTATS-UNIS
Tribest Corporation
1143 N. Patt St.
Anaheim, CA 92801
Appel gratuit: 1-888-254-7336
INTERNATIONAL
Tribest Corporation
1143 N. Patt St.
Anaheim, CA 92801
Téléphone: 1-714-879-7150
FR

24
1. Wichtige schutzmassnahmen ......................................................................................... 25
2. Vorsichtsmaßnahmen und Tipps zum Entsaften ............................................................. 26
3. Bestandteile ................................................................................................................... 27
4. Touchscreen-Display ...................................................................................................... 28
5. Montage und Betrieb ...................................................................................................... 29
6. Reinigung und wartung .................................................................................................. 32
7. Problembehebung .......................................................................................................... 33
• Rezept .................................................................................................................... R1-R17
Produkt
Tribest Slowstar AI Vertikaler Trichter-Entsafter
mit automatischer intelligenter Optimierung
Modell SWA-3
Nennleistung 120V, 60Hz, 150W / 220V, 50Hz, 150W
Dauerbetriebszeit Bis zu 15 Minuten pro Nutzung
Maße (B x T x H) 205 × 225 × 449 mm / 8,1 × 8,8 × 17,6 in
Gewicht 5,7 kg / 12,6 lbs
Hergestellt in China
INHALTSVERZEICHNISTENTS
PRODUKTSPEZIFIKATIONEN

25
1. WICHTIGE SCHUTZMASSNAHMEN
WARNHINWEIS: Die falsche Verwendung des Produkts kann zu schweren Verletzu-
ngen oder zum Tod führen. Bei der Verwendung von Elektrogeräten sind stets die
grundlegenden Sicherheitsvorkehrungen zu beachten, einschließlich der folgenden:
VORSICHT: Auf Risiken achten, die zu Verletzungen oder Sachschäden führen können.
1. Vor der Inbetriebnahme alle Anweisungen sorgfältig durchlesen.
2. Die Gebrauchsanweisung des Geräts warnt vor möglichen Verletzungen durch unsachgemäßen
Gebrauch.
3. Außerhalb der Reichweite von Kindern aufbewahren. Achten Sie darauf, dass Kinder oder Personen mit
einer Beeinträchtigung das Gerät nicht unbeaufsichtigt bedienen.
4. Das Netzkabel nicht mit nassen Händen ein- oder ausstecken, um einen Stromschlag zu vermeiden.
5. Das Hauptgehäuse nicht in Wasser eintauchen oder mit Wasser und anderen Flüssigkeiten waschen oder
besprühen, um Schäden oder elektrische Lecks zu vermeiden.
6. Keine Hände, Essstäbchen oder spitze Gegenstände in den Trichter bzw. den Saftauslass einführen, um
Verletzungen und Produktschäden zu vermeiden.
7. Den Quick-Fill-Aufsatz des Trichters nicht abnehmen, um Verletzungen zu vermeiden.
8. Keine Zutaten verarbeiten, die heißer als 60 °C (140 °F) sind. Diese könnten Geräteteile beschädigen
und Personen verbrühen.
1. Dieses Produkt ist nur für den Hausgebrauch bestimmt. Es sollte nicht für andere Zwecke eingesetzt
werden.
2. Vor dem Anschluss an eine Stromquelle prüfen, ob die Spannung/Frequenz der örtlichen
Spannung entspricht. Eine höhere oder niedrigere Spannung als der angegebene Wert kann die
Leistung beeinträchtigen oder elektrische Komponenten beschädigen. Es wird empfohlen, einen
Spannungsstabilisator zu verwenden, um einen ordnungsgemäßen Betrieb zu gewährleisten.
3. Werden vor, während oder nach dem Gebrauch Schäden oder sichtbare Risse am Standfuß, am
Schneckengehäuse, am Filter, an der Schneckenbaugruppe oder am Trichter festgestellt, ist der Betrieb
des Geräts sofort einzustellen, um Verletzungen zu vermeiden.
4. Das Gerät ausschalten und aus der Steckdose ziehen, bevor irgendwelche Teile demontiert werden.
5. Um eine optimale Leistung zu gewährleisten und eine Überhitzung des Motors zu vermeiden, ist der
Dauerbetrieb des Geräts auf maximal 15 Minuten zu beschränken. Das Gerät zwischen den einzelnen
Anwendungen mindestens 15 Minuten lang abkühlen lassen.
6. Einige Teile können sich nach dem Entsaften bestimmter Zutaten verfärben. Dies ist ein normales
Phänomen und beeinträchtigt die Nutzung nicht.
7. Keines der Teile zur Reinigung oder Sterilisation in einen Geschirrspüler, die Mikrowelle, einen
Desinfektionsschrank oder über 60 °C (140 °F) heißes Wasser geben. Keine Heizgeräte verwenden, um
Teile des Geräts zu erwärmen, da dies zu Verformungen oder Schäden führen kann.
ES EMPFIEHLT SICH, DIESE
ANWEISUNGEN AUFZUBEWAHREN.
DE

26
2. VORSICHTSMASSNAHMEN
UND TIPPS ZUM ENTSAFTEN
VORSICHTSMASSNAHMEN FÜR DEN SICHEREN GEBRAUCH:
VORSICHTSMASSNAHMEN WÄHREND DER VERWENDUNG:
TIPPS FÜR OPTIMALES ENTSAFTEN:
1. Vor dem Gebrauch alle Anweisungen durchlesen.
2. Den Kontakt mit beweglichen Teilen vermeiden.
3. Das Gerät immer aus der Steckdose ziehen, bevor es gereinigt oder Teile montiert/demontiert werden.
1. Das Kabel nicht über die Kante eines Tisches oder einer Theke hängen lassen.
2. Vor dem Einschalten muss sichergestellt werden, dass der Trichter sicher befestigt ist.
3. Vor dem Auseinanderbauen das Gerät stets ausschalten und warten, bis der Motor vollständig zum
Stillstand gekommen ist.
1. Früchte mit hohem Eiweiß- und Fettgehalt wie Durianfrüchte, Jackfrüchte und Avocados eignen
sich nicht dazu, allein entsaftet zu werden. Es empfiehlt sich, diese mit Zutaten mit einem hohen
Wasseranteil wie beispielsweise Äpfeln oder Sellerie zu mischen, um ein optimales Ergebnis zu
erzielen.
2. Früchte mit Kernen, harten Samen oder einer dicken Schale (z. B. Äpfel, Pfirsiche, Aprikosen,
Mangos, Kakis und Kirschen) sollten vor dem Entsaften von Kernen, Samen oder der dicken
Schale befreit werden, um Schäden am Gerät zu vermeiden.
3. Zitronen enthalten einen stark säurehaltigen Saft. Es empfiehlt sich, diese zusammen mit anderen
Obst- und Gemüsesorten zu entsaften, wobei nicht mehr als 20 g (etwa 3 dünne Scheiben) pro
Vorgang verwendet werden sollten.
4. Faserige und harte Zutaten wie Karotten, Sellerie und Ingwer vor dem Entsaften am besten in
kleine Stücke schneiden, um die Lebensdauer des Geräts zu verlängern.
5. Die manuelle Freilegung des Fruchtfleischauslasses während des Entsaftens kann den
Fruchtfleischauswurf optimieren. Werden ballaststoffreiche Zutaten verwendet, sollten die
Entsaftungskomponenten nach der Verarbeitung von 1 kg (2 lbs) der Zutaten jeweils gereingt
werden.
6. Blatt- und Stängelgemüse (wie Sellerie und Grünkohl) ist vor dem Entsaften in maximal 5–6 cm (2
Zoll) große Stücke zu schneiden. Da diese Zutaten viele Fasern enthalten, können sie sich um die
Schneckenbaugruppe wickeln. Die manuelle Freilegung des Fruchtfleischauslasses während des
Entsaftens kann einen reibungslosen Fruchtfleischauswurf fördern.
ES EMPFIEHLT SICH, DIESE
ANWEISUNGEN AUFZUBEWAHREN.
27
3. BESTANDTEILE
1
2
3
4
6
7
8
9
5
1
STOPFER
dient zum schnelleren Einfüllen der Zutaten in den QUICK-FILL-AUFSATZ.
2
QUICK-FILL-AUFSATZ
Versorgt den TRICHTER bei Bedarf kontinuierlich, um eine höhere Saftmenge zu
erzielen. Zum Öffnen die ENTRIEGELUNGSTASTE an der Oberseite des Griffs drücken.
3
ENTRIEGELUNGSTASTE
Den Knopf oben am GRIFF drücken, um den QUICK-FILL-AUFSATZ
aufzuklappen und die Zutaten hineinzugeben.
4
PRODUKTTRICHTER MIT GRIFF
Den TRICHTER mit verschiedenen Obst- und Gemüsearten befüllen.
5
ZERKLEINERER AUS EDELSTAHL
Hergestellt aus langlebigem rostfreiem Edelstahl (Typ 304) zum Zerkleinern und Entsaften der Zutaten.
6
SCHNECKENAUFSATZ
Vervollständigt die Entsaftung durch Zerkleinern des Fruchtfleisches.
7
EINFACH ZU REINIGENDER SIEBLOSER FILTER
Der FILTER lässt sich nahtlos in die inneren Rillen des SCHNECKENGEHÄUSES
einführen, um eine maximale Filterung zu gewährleisten. Da es kein Sieb gibt,
kann das Gerät schneller und einfacher gereinigt werden!
8
SCHNECKENGEHÄUSE
Enthält den FILTER, den SCHNECKENAUFSATZ und den ZERKLEINERER.
SAFTAUSLASS
Die SAFTKAPPE herausziehen, damit der Saft austreten kann.
TOUCHSCREEN-DISPLAY
Es stehen 8 Voreinstellungen oder der „AI Mode“ zur Auswahl.
START/CANCEL-TASTE
Diese Taste drücken, um nach der Auswahl einer Option zu
starten oder um einen laufenden Zyklus abzubrechen.
FRUCHTFLEISCHBEHÄLTER
Darin wird das Fruchtfleisch gesammelt.
SAFTBEHÄLTER
Fängt den frischen Saft auf.
REINIGUNGSBÜRSTE
Ermöglicht eine schnelle und einfache Reinigung.
9
FRUCHTFLEISCHAUSLASS
Durch diese Öffnung tritt das Fruchtfleisch aus.
STANDFUSS
DE
28
4. TOUCHSCREEN-DISPLAY
Um Strom zu sparen, schaltet sich das
TOUCHSCREEN-DISPLAY nach 5 Minuten
Inaktivität automatisch ab. Auf die Mitte
des Bildschirms tippen, um es wieder
einzuschalten.
FUNKTION BESCHREIBUNG
1
–
7
EINZELNE
FRUCHT/FRÜCHTE
VOREIN-
STELLUNGEN
Je nach der verwendeten Obstsorte wird
die optimale Geschwindigkeit automatisch
eingestellt, um die bestmögliche Entsaftung
zu gewährleisten.
8
SORBET-
VOREINSTELLUNG
Das beste Ergebnis wird erzielt, wenn
gefrorene Früchte wie Bananen, Ananas,
Mangos (ohne Kern) oder Beeren in etwa
3 cm (1 Zoll) große Stücke geschnitten
werden. Mindestens 6 Stunden lang
bzw. bis zum vollständigen Einfrieren
in das Gefrierfach geben. Vor der
Weiterverarbeitung 5–10 Minuten antauen
lassen. 6–8 Stücke gleichzeitig in den
TRICHTER geben.
9
AI MODE
(KI-MODUS)
Dank der intelligenten
Geschwindigkeitssteuerungsfunktion
erkennt der KI-Modus den erforderlichen
Verarbeitungsaufwand (basierend auf dem
Widerstand der Lebensmittel) und stellt die
entsprechende optimale Geschwindigkeit
automatisch ein. Dies ist ideal für das
Entsaften aller Arten von Obst und Gemüse.
10
START/CANCEL
(EIN/AUS)
ODER REVERSE
(RÜCKLAUF)
1. START (EIN)
Nach der Auswahl einer Funktion
1
–
9
, beginnt das entsprechende
Lämpchen an zu blinken. Anschließend
die Taste START/CANCEL drücken, um
den Zyklus zu starten.
2. CANCEL (AUS)
Um einen laufenden Zyklus
abzubrechen, während des Betriebs
die Taste START/CANCEL drücken.
Daraufhin wird der Zyklus 2 Sekunden
lang angehalten, wonach sich
der Rücklauf 3–5 Sekunden lang
automatisch einschaltet, bevor das
Gerät vollständig ausgeschaltet wird,
sodass das es auseinandergebaut
werden kann.
3. REVERSE (RÜCKLAUF)
Wird die Taste START/CANCEL lange
gedrückt gehalten, dreht sich der Motor
kontinuierlich rückwärts, bis die Taste
losgelassen wird. Diese Funktion trägt
zu einem leichteren Demontieren der
Teile nach dem Entsaften sowie zum
Entfernen von Zutatenresten bei.
1 2
3 4
5 6
7
9
10
8
DISPLAY-ENERGIESPARMODUS
29
5. MONTAGE UND BETRIEB
Vor dem Einschalten überprüfen, ob der
Slowstar bereit ist d. h. sicherstellen, dass der
FRUCHTFLEISCHAUSLASS nach innen geklappt und
die orangefarbene LASCHE unter dem Gehäuse sicher
aufgesetzt ist, um ein Auslaufen zu verhindern.
HINWEIS: Darauf achten, den
FRUCHTFLEISCHAUSGANG beim Reinigen zu öffnen
und vor dem Entsaften zu schließen.
Den TRICHTER so auf das zusammengebaute GEHÄUSE
stellen, dass die Strichmarkierung unter dem GRIFF mit
dem Entriegelungssymbol bündig ist
.
Den FILTER in das SCHNECKENGEHÄUSE geben. Den
ZERKLEINERER/SCHNECKENAUFSATZ in den FILTER
einführen und fest nach unten drücken, bis er richtig
eingerastet ist.
Den GRIFF festhalten und den TRICHTER nach links
drehen, bis die Linienanzeige in der verriegelten Position
steht.
1
3
2
4
VOR DEM GEBRAUCH
Vor dem ersten Gebrauch alle Teile (außer dem MOTOR) mit warmem Wasser und einem milden
Reinigungsmittel reinigen.
FRUCHTFLEISCH
-AUSLASS
LASCHE
DE
30
Die gesamte Baugruppe am GRIFF festhalten und nach
unten in den STANDFUSS drücken. Darauf achten,
dass der GRIFF zum TOUCHSCREEN-DISPLAY an der
Vorderseite hin zeigt.
Den FRUCHTFLEISCHBEHÄLTER und den
SAFTBEHÄLTER unter die entsprechenden Auslässe
stellen, um den Zusammenbau abzuschließen.
Das NETZKABEL an die Buchse auf der Rückseite des
STANDFUSSES anschließen.
Den ENTRIEGELUNGSKNOPF drücken, um den QUICK-
FILL-AUFSATZ zu öffnen. Die Zutaten in den TRICHTER
geben und darauf achten, dass die auf dem TRICHTER
angegebene maximale Füllhöhe nicht überschritten wird.
Den QUICK-FILL-AUFSATZ schließen, bis er fest einrastet.
SICHERHEITSFUNKTION: Wird der QUICK-FILL-AUFSATZ geöffnet,
während der Slowstar läuft, wird das Gerät automatisch angehalten.
Vor dem Fortsetzen des Entsaftungsvorgangs darauf achten, dass
der QUICK-FILL-AUFSATZ sicher geschlossen ist.
FRUCHTFLEISCH
-AUSLASS
SAFTAUSLASS
GRIFF
SCREEN
5. MONTAGE UND BETRIEB
5
7
6
8
HINWEIS: Das NETZKABEL fest und vollständig
einstecken, um einen ordnungsgemäßen Betrieb zu
gewährleisten.
SAFT-
BEHÄLTER
ENTRIEGELUNG-
SKNOPF
FRUCHTFLEISCH-
BEHÄLTER
31
5. MONTAGE UND BETRIEB
Den Stecker des Netzkabels an eine Steckdose
anschließen. Das TOUCHSCREEN-DISPLAY leuchtet
sofort auf. Die gewünschte Voreinstellung (siehe Seite
28) wählen. Das Lämpchen beginnt zu blinken, um die
Auswahl zu bestätigen.
Die Taste START/CANCEL drücken, um den Zyklus zu
starten. Um weitere Zutaten während des Betriebs
hinzuzufügen, können diese in den QUICK-FILL-AUFSATZ
oder nach Drücken der ENTRIEGELUNGSTASTE und Öffnen
des Deckels direkt in den Behälter gegeben werden. Um
den Zyklus zu beenden, die Taste START/CANCEL drücken,
um das Gerät auszuschalten. Das Gerät läuft automatisch
3–5 Sekunden lang rückwärts, bevor es vollständig anhält,
damit das Gerät auseinandergebaut werden kann.
START
CANCEL
H
O
L
D
T
O
R
E
V
E
R
S
E
START
CANCEL
H
O
L
D
T
O
R
E
V
E
R
S
E
9 10
WICHTIG:
• Das Gerät nicht ohne Zutaten im TRICHTER einschalten.
• Vor dem Entsaften ist sicherzustellen, dass die Saftkappe am Saftauslass geschlossen ist.
• Bei Zutaten, die nicht richtig eingezogen werden, den STOPFER verwenden, um sie nach unten
zu drücken. Den STOPFER beim Drücken seitlich hin- und herbewegen, um die Zutaten in den
ZERKLEINERER einzuführen. Es kann auch die Rückwärtsfunktion verwendet werden, indem die Taste
START/CANCEL etwa 5 bis 10 Sekunden lang gedrückt wird.
• Wenn eine kleine Menge an Zutaten entsaftet wird, kann es vorkommen, dass wenig oder gar kein
Fruchteisch austritt. Das ist normal und hat keinen Einuss auf den Betrieb des Geräts.
• Die SAFTKAPPE während des Entsaftens nicht zu lange geschlossen halten, da dies dazu führen
kann, dass Saft in den TRICHTER zurückießt.
• Beim Entsaften verschiedener Obst- und Gemüsesorten empehlt es sich, zuerst die weicheren
Zutaten (z. B. Orangen) und dann die härteren (z. B. Karotten) hinzuzufügen, um einen optimalen
Geschmack zu erzielen.
• Nach dem Entsaften die SAFTKAPPE schließen, bevor der SAFTBEHÄLTER entnommen wird, um ein
Nachtropfen zu vermeiden.
DE

32
6. REINIGUNG UND WARTUNG
Darauf achten, den Slowstar AI Juicer nach jedem Gebrauch gründlich zu reinigen. Sämtliche Teile sind
NICHT spülmaschinenfest und sollten nur von Hand gewaschen werden.
REINIGUNG
1. Zur Sicherheit sollte vor dem Reinigen oder Aufbewahren stets der Stecker aus der Steckdose gezogen werden.
2. Zur Reinigung den STANDFUSS mit einem feuchten Tuch abwischen und anschließend gründlich abtrocknen. Den
STANDFUSS nicht in Wasser eintauchen.
3. Den STOPFER, TRICHTER, ZERKLEINERER/SCHNECKENAUFSATZ, FILTER und das SCHNECKENGEHÄUSE (siehe
Abbildung unten) unter lauwarmem, ießendem Wasser mit einem weichen Schwamm und einem neutralen
Reinigungsmittel reinigen, um Kratzer zu vermeiden. Die REINIGUNGSBÜRSTE kann für die sanfte Reinigung von
schwer zugänglichen Stellen verwendet werden. KEINE Stahlwolle, Scheuermittel oder aggressiven Chemikalien
wie Bleichmittel verwenden. Das Reinigungsmittel gründlich von den Teilen abwaschen und diese vollständig
abtrocknen. Die Teile anschließend an einem gut belüfteten Ort ohne direkte Sonneneinstrahlung aufbewahren.
AUSEINANDERBAUEN DER ENTSAFTERTEILE
1. Den GRIFF festhalten, um die Entsaftereinheit aus dem HAUPTGEHÄUSE zu heben. Die Einheit dann vorsichtig zum
Spülbecken tragen, um sie zu reinigen.
2. Um den TRICHTER zu entriegeln, den GRIFF nach rechts drehen, bis er sich in der entriegelten Position bendet .
3. Zuerst den TRICHTER, dann den ZERKLEINERER/SCHNECKENAUFSATZ und anschließend den FILTER aus dem
SCHNECKENGEHÄUSE herausnehmen.
4. Das SCHNECKENGEHÄUSE umdrehen. An der orangefarbenen LASCHE ziehen, um den FRUCHTFLEISCHAUSLASS zu
öffnen. Den FRUCHTFLEISCHAUSLASS öffnen und anschließend die Öffnung reinigen, indem die Fruchteischreste
entfernt werden. Darauf achten, den Fruchteischauslass vor einer erneuten Entsaftung zu schließen und zu
verriegeln.
STOPFER TRICHTER ZERKLEINERER/
SCHNECKENAUFSATZ
FILTER SCHNECKENGEHÄUSE
FRUCHTFLEISCH
-AUSLASS
LASCHE

33
7. PROBLEMBEHEBUNG
PROBLEM LÖSUNG
Das Gerät lässt sich nicht
einschalten oder es funktioniert
nicht.
• Überprüfen, ob die Steckdose funktioniert. Den Gerätestecker des
Netzkabels (aches Ende) in den Stromanschluss auf der Rückseite
des STANDFUSSES stecken. Den Netzstecker des Netzkabels an eine
Steckdose anschließen.
• Darauf achten, dass alle Teile richtig angebracht sind (siehe Seite 29).
• Nur so viele Zutaten hineingeben, dass die auf dem TRICHTER angegebene
maximale Füllhöhe nicht überschritten wird.
Das Gerät gibt Pieptöne von sich
(3 kurze Pieptöne + 1 langer
Piepton), nachdem die Taste
START/CANCEL gedrückt wird.
• Es ist sicherzustellen, dass der TRICHTER und das SCHNECKENGEHÄUSE
richtig eingerastet sind, bevor sie am STANDFUSS angebracht werden.
• Zudem ist darauf zu achten, dass der QUICK-FILL-AUFSATZ vollständig
geschlossen ist.
• Der GRIFF des Trichters muss zum TOUCHSCREEN-DISPLAY an der
Vorderseite hin zeigen.
Der Saft enthält eine
beträchtliche Menge an
Fruchteisch.
Der FILTER könnte beschädigt sein. Für Serviceleistungen bitte an den
Kundensupport wenden.
Das Gerät vibriert übermäßig
oder macht während des
Betriebs laute Geräusche.
Der FILTER oder der Motor könnte beschädigt sein. An den Kundensupport
wenden, um Serviceleistungen zu erhalten.
Das Gerät hat den Betrieb
plötzlich eingestellt. Es sind
Piepgeräusche zu hören.
Der automatische Überlastungsschutz schaltet den Motor ab, wenn zu viele
oder sehr harte Lebensmittel zu lange verarbeitet werden. Diese eingebaute
Funktion dient dem Schutz des Motors und verhindert eine Überhitzung des
Geräts. Sollte dies vorkommen, das Gerät vor dem nächsten Gebrauch 10
Minuten lang ausgeschaltet lassen.
Der Saft tritt aus und ießt auf
den Standfuß.
Sicherstellen, dass der FRUCHTFLEISCHAUSLASS unter dem
SCHNECKENGEHÄUSE vollständig geschlossen (eingeklappt) ist. Den Auslass
mit der orangefarbenen LASCHE (siehe Seite 29) sicher verriegeln.
KUNDENDIENST
Falls Sie Fragen zur Verwendung, Pege oder Instandhaltung dieses Produkts haben, rufen Sie uns gerne an oder
senden Sie uns eine E-Mail. Wenn Sie das Produkt außerhalb der USA gekauft haben, sehen Sie bitte auf Ihrer
Garantiekarte nach, wo sich das nächstgelegene Servicecenter bendet.
VEREINIGTE STAATEN
Tribest Corporation
1143 N. Patt St.
Anaheim, CA 92801
Gebührenfrei: 1-888-254-7336
INTERNATIONAL
Tribest Corporation
1143 N. Patt St.
Anaheim, CA 92801
Telefon: +1 714 879 7150
DE

34
1. Consideraciones importantes .......................................................................................... 35
2. Precauciones y consejos para hacer zumos .................................................................... 36
3. Piezas ........................................................................................................................... 37
4. Pantalla táctil ................................................................................................................ 38
5. Montaje y funcionamiento .............................................................................................. 39
6. Limpieza y mantenimiento ............................................................................................. 42
7. Solución de problemas y asistencia ............................................................................... 43
• Recetas .................................................................................................................. R1-R17
Producto
Exprimidor de tolva vertical Tribest Slowstar AI
con optimización automática inteligente
Modelo SWA-3
Potencia nominal 120V, 60Hz, 150W / 220V, 50Hz, 150W
Tiempo de trabajo continuo Hasta 15 minutos por sesión
Medidas (An x Pr x Al) 205 × 225 × 449 mm / 8,1 × 8,8 × 17,6 in
Peso 5,7 kg / 12,6 lbs
Fabricado en China
ÍNDICE
ESPECIFICACIONES DEL PRODUCTO

35
1. CONSIDERACIONES IMPORTANTES
ADVERTENCIA: Un uso indebido del producto puede provocar lesiones
graves o incluso la muerte. Al utilizar aparatos eléctricos, deben seguirse
siempre las precauciones básicas de seguridad, incluidas las siguientes:
PRECAUCIÓN: Preste atención a los riesgos que puedan causar lesiones
personales o daños materiales.
1. Lea todas las instrucciones detenidamente antes de utilizar el producto.
2. Las instrucciones del aparato advierten de posibles lesiones por un uso incorrecto.
3. Manténgase fuera del alcance de los niños. No permita que niños ni personas dis capacitadas
manejen el aparato estando desatendidos.
4. No enchufe ni desenchufe el cable de alimentación con las manos mojadas para evitar descargas
eléctricas.
5. No lave, sumerja ni rocíe el cuerpo principal con agua u otros líquidos para evitar daños o fugas
eléctricas.
6. No introduzca las manos, palillos u otros objetos afilados en la tolva o en la salida de zumo para
evitar lesiones o daños en el producto.
7. No retire la tapa superior de llenado rápido de la tolva para evitar lesiones.
8. No procese ingredientes a más de 60 °C (140 °F). Esto puede dañar las piezas y crear un riesgo
de quemaduras.
1. Este producto es solo para uso doméstico. No lo utilice para otros fines.
2. Antes de conectarse a una fuente de alimentación, compruebe si la tensión/frecuencia coincide
con la tensión local. Una tensión superior o inferior al valor especificado puede afectar al
rendimiento o dañar los componentes eléctricos. Se recomienda utilizar un estabilizador de tensión
para garantizar un funcionamiento correcto.
3. Antes, durante o después del uso, si se detectan daños o grietas visibles en el cuerpo principal, la
carcasa del tamiz de tornillo sinfín, el filtro, el conjunto del tamiz de tornillo sinfín o la tolva, deje de
utilizar la máquina inmediatamente para evitar lesiones.
4. Antes de desmontar cualquier pieza, apague la máquina y desconecte la fuente de alimentación.
5. Para garantizar un rendimiento óptimo y evitar el sobrecalentamiento del motor, limite el
funcionamiento continuo de la máquina a un máximo de 15 minutos. Para sesiones prolongadas,
deje que la máquina se enfríe durante al menos 15 minutos entre cada uso.
6. Es posible que algunas piezas se manchen tras exprimir ciertos ingredientes. Se trata de un
fenómeno normal y no afecta al uso.
7. No coloque ninguna pieza en un lavavajillas, microondas, armario de desinfección o en agua a más
de 60 °C (140 °F) para su limpieza o esterilización. No utilice otros dispositivos de calentamiento
para calentar las piezas, ya que podría provocar deformaciones o daños.
GUARDE ESTAS INSTRUCCIONES
ES

36
2. PRECAUCIONES Y CONSEJOS
PARA HACER ZUMOS
PRECAUCIONES PARA UN USO SEGURO:
PRECAUCIONES DE USO:
CONSEJOS PARA HACER ZUMOS DE FORMA ÓPTIMA:
1. Lea todas las instrucciones antes de usar este producto.
2. Evite el contacto con las piezas móviles.
3. Desenchufe siempre el aparato antes de limpiar o montar/desmontar piezas.
1. No deje que el cable cuelgue del borde de una mesa o encimera.
2. Asegúrese de que la tolva está bien sujeta antes de encender la máquina.
3. Apague la máquina después de cada uso y espere a que el motor se pare completamente antes de
desmontarla.
1. Las frutas ricas en proteínas y grasas, como el durián, el jackfruit y el aguacate, no son
adecuadas para exprimirlas solas. Pueden mezclarse con productos con alto contenido en
agua, como manzanas o apio, para obtener mejores resultados.
2. A las frutas con hueso, semillas duras o piel gruesa (como las manzanas, los melocotones,
los albaricoques, los mangos, los caquis y las cerezas) deben quitárseles el hueso, las
semillas o la piel gruesa antes de exprimirlas para evitar daños en la máquina.
3. Los limones contienen un zumo fuertemente ácido. Deben exprimirse junto con otras frutas
y verduras, y la cantidad no debe superar los 20 g (aproximadamente 3 rodajas finas) por
sesión.
4. Los ingredientes fibrosos y duros como las zanahorias, el apio y el jengibre deben cortarse
en trozos pequeños antes de exprimirlos para prolongar la vida útil de la máquina.
5. Despejar manualmente la salida de pulpa durante el exprimido puede ayudar a mejorar
la descarga de pulpa. Para los ingredientes ricos en fibra, limpie los componentes del
exprimidor después de procesar cada kg (2 lb) de ingredientes.
6. Las verduras de hoja y tallo (como el apio y la col rizada) deben cortarse en trozos de 5-6
cm (2 pulgadas) o más pequeños antes de licuarlas. Como estos ingredientes contienen
mucha fibra, pueden enrollarse alrededor del conjunto del tamiz de tornillo sinfín. Despejar
manualmente la salida de pulpa mientras se exprime puede ayudar a garantizar una
descarga suave de la pulpa.
GUARDE ESTAS INSTRUCCIONES

37
3. PIEZAS
1
2
3
4
6
7
8
9
5
1
EMPUJADOR
Ayuda a introducir rápidamente los alimentos a exprimir en la TAPA DE LLENADO RÁPIDO.
2
TAPA DE LLENADO RÁPIDO
Alimenta continuamente la TOLVA para obtener un mayor volumen de zumo cuando sea necesario.
Pulse el BOTÓN DE LIBERACIÓN situado en la parte superior del asa para abrir la tapa.
3
BOTÓN DE LIBERACIÓN
Pulse el botón situado en la parte superior del ASA para abrir la TAPA DE LLENADO
RÁPIDO y, a continuación, introduzca los alimentos que desee exprimir.
4
TOLVA CON ASA PARA PRODUCTOS
Llene previamente la TOLVA con una amplia variedad de frutas y verduras.
5
TROCEADOR DE ACERO INOXIDABLE
Fabricada en acero inoxidable duradero tipo 304 para picar y procesar sus alimentos.
6
TAMIZ DE TORNILLO SINFÍN
Completa la extracción del zumo triturando la pulpa.
7
FILTRO SIN REJILLA FÁCIL DE LIMPIAR
El FILTRO encaja a la perfección dentro de los rebordes internos de la CARCASA
DEL TAMIZ DE TORNILLO SINFÍN para garantizar la máxima filtración. Al no tener
rejilla, ¡la limpieza es más rápida y sencilla!
8
CARCASA DEL TAMIZ DE TORNILLO SINFÍN
Aloja el FILTRO, el TAMIZ y el TROCEADOR.
SALIDA DE ZUMO
Levante la TAPA DEL ZUMO para que salga el zumo.
PANTALLA TÁCTIL
Seleccione entre 8 modos prestablecidos o utilice el AI Mode.
BOTÓN DE INICIAR/CANCELAR
Pulse este botón para iniciar después de seleccionar una
opción o para cancelar un ciclo en curso.
RECIPIENTE PARA LA PULPA
Recoge la pulpa.
RECIPIENTE PARA EL ZUMO
Recoge su zumo fresco.
CEPILLO DE LIMPIEZA
Facilita y agiliza la limpieza.
9
SALIDA DE LA PULPA
La pulpa sale por esta abertura.
CUERPO PRINCIPAL
ES

38
4. PANTALLA TÁCTIL
MODO DE SUSPENSIÓN DE LA PANTALLA
Para ahorrar energía, la PANTALLA TÁCTIL se
apagará automáticamente tras 5 minutos de
inactividad. Toque el centro de la pantalla para
volver a encenderla.
FUNCIÓN DESCRIPCIÓN
1
–
7
FRUTO ÚNICO
MODOS
PRESTABLECIDOS
Se ajusta automáticamente a la velocidad
óptima en función del tipo de fruta
seleccionada para obtener la máxima
extracción.
8
MODO
PRESTABLECIDO
PARA SORBETES
Para obtener mejores resultados, corte
frutas congeladas como plátanos,
piñas, mangos (sin hueso) o bayas en
trozos de 3 cm (1 pulgada). Congelar
durante más de 6 horas o hasta que
esté completamente sólido y congelado.
Descongélelas de 5 a 10 minutos antes
de procesarlas. Añada de 6 a 8 trozos
cada vez en la TOLVA.
9
AI MODE
Con control inteligente de la velocidad,
el AI Mode detecta automáticamente
el esfuerzo de procesado necesario
(en función de la resistencia de los
alimentos) y se ajusta a la velocidad
óptima. Es ideal para hacer zumo de
cualquier variedad de frutas o verduras.
10
INICIAR/
CANCELAR O
INVERTIR
1. INICIAR
Seleccione una función
1
–
9
; su luz empezará a parpadear. A
continuación, pulse el botón INICIAR/
CANCELAR para comenzar el ciclo.
2. CANCELAR
Para cancelar un ciclo en marcha,
pulse el botón INICIAR/CANCELAR
durante el funcionamiento. Esto
detendrá el ciclo durante 2 segundos
y luego retrocederá automáticamente
durante 3-5 segundos antes de
detenerse por completo para facilitar
el desmontaje.
3. INVERTIR
Una pulsación larga del botón
INICIAR/CANCELAR hará que el
motor gire en sentido inverso de
forma continua hasta que se suelte
el botón. Se puede utilizar para
ayudar a aflojar las piezas para
desmontarlas después de exprimir o
para desprender cualquier resto de
ingredientes.
1 2
3 4
5 6
7
9
10
8
MODO DE SUSPENSIÓN DE LA
PANTALLA
39
5. MONTAJE Y FUNCIONAMIENTO
Asegúrese de que el Slowstar está listo antes de
empezar. Asegúrese de que la SALIDA DE PULPA
esté plegada hacia dentro y que el ENGANCHE
naranja situado debajo de la carcasa está bien
cerrado para evitar fugas.
NOTA: Recuerde abrir la SALIDA DE PULPA al
limpiar y cerrarla antes de exprimir el zumo.
Coloque la TOLVA encima de la CARCASA
montada de forma que el indicador en forma de
línea situado debajo del ASA quede alineado con
el símbolo de desbloqueo
.
Coloque el FILTRO dentro de la CARCASA DEL
TAMIZ DE TORNILLO SINFÍN. Introduzca el
TROCEADOR/TAMIZ DE TORNILLO SINFÍN en el
FILTRO, presionando rmemente hasta que quede
bien asentado.
Agarrando la TOLVA por el ASA, gire hacia la
izquierda hasta que el indicador en forma de línea
esté en la posición de bloqueo
.
1
3
2
4
ANTES DE EMPEZAR
Antes del primer uso, lave todas las piezas (excepto el MOTOR) con agua tibia y jabón suave.
SALIDA DE
PULPA
ENGANCHE
ES
40
Levante todo el conjunto por el ASA y bájelo hasta
el CUERPO PRINCIPAL, asegurándose de que el
ASA quede orientada hacia la PANTALLA TÁCTIL
de la parte delantera.
Coloque el RECIPIENTE PARA LA PULPA y el
RECIPIENTE PARA EL ZUMO bajo las salidas
correspondientes para completar el montaje.
Conecte el CABLE DE ALIMENTACIÓN en la
toma situada en la parte posterior del CUERPO
PRINCIPAL.
Pulse el BOTÓN DE LIBERACIÓN para abrir la TAPA
DE LLENADO RÁPIDO. Coloque sus ingredientes
dentro de la TOLVA, asegurándose de no sobrepasar
la línea de capacidad máxima indicada en la TOLVA.
A continuación, cierre la TAPA DE LLENADO RÁPIDO
hasta que encaje con rmeza en su sitio.
CARACTERÍSTICA DE SEGURIDAD: Si abre la TAPA DE LLENADO RÁPIDO
mientras el Slowstar está en marcha, se detendrá automáticamente. Para
reanudar la proceso de licuado, asegúrese de que la TAPA DE LLENADO
RÁPIDO esté bien cerrada.
SALIDA DE
PULPA
SALIDA DE
ZUMO
ASA
PANTALLA
5. MONTAJE Y FUNCIONAMIENTO
5
7
6
8
NOTA: Inserte completamente el CABLE DE
ALIMENTACIÓN con rmeza para garantizar un
funcionamiento correcto.
RECIPIENTE
PARA EL
ZUMO
BOTÓN
DE
LIBERACIÓN
RECIPIENTE
PARA LA
PULPA
41
5. MONTAJE Y FUNCIONAMIENTO
Enchufe el otro extremo del CABLE DE
ALIMENTACIÓN a una toma de corriente. La
PANTALLA TÁCTIL se encenderá inmediatamente.
Seleccione el modo prestablecido que desee
(consulte la página 38). La luz empezará a
parpadear para conrmar su selección.
Pulse el botón INICIAR/CANCELAR para comenzar
el ciclo. Para añadir más ingredientes durante el
funcionamiento, introdúzcalos por la abertura de la
TAPA DE LLENADO RÁPIDO o pulse el BOTÓN DE
LIBERACIÓN para abrir la parte superior. Si desea
nalizar el ciclo, pulse el botón INICIAR/CANCELAR
para detenerlo. La máquina dará marcha atrás
automáticamente durante 3-5 segundos antes de
detenerse por completo para facilitar el desmontaje.
START
CANCEL
H
O
L
D
T
O
R
E
V
E
R
S
E
START
CANCEL
H
O
L
D
T
O
R
E
V
E
R
S
E
9 10
IMPORTANTE:
• No haga funcionar la máquina sin ingredientes dentro de la TOLVA.
• Asegúrese de que la TAPA DEL ZUMO de la correspondiente SALIDA esté cerrada antes de extraer
el zumo.
• Si algún ingrediente no entra correctamente, utilice el EMPUJADOR para presionarlo hacia abajo.
Mueva el EMPUJADOR de un lado a otro mientras empuja para guiar los ingredientes hacia el
TROCEADOR. Otra opción es utilizar la función de marcha atrás manteniendo pulsado el botón
INICIAR/CANCELAR durante unos 5 o 10 segundos.
• Cuando se procesa una pequeña cantidad de ingredientes, puede haber poca o ninguna pulpa. Esto
es normal y no afecta al funcionamiento de la máquina.
• Evite mantener la TAPA DEL ZUMO cerrada durante demasiado tiempo mientras exprime, ya que
esto puede hacer que el zumo retroceda hacia la TOLVA.
• Al hacer zumo de distintos tipos de productos, la secuencia recomendada para obtener un sabor
óptimo es añadir primero los ingredientes más blandos (como las naranjas) y después los más duros
(como las zanahorias).
• Cuando termine de exprimir, cierre la TAPA DEL ZUMO antes de retirar el RECIPIENTE PARA EL
ZUMO para evitar goteos.
ES
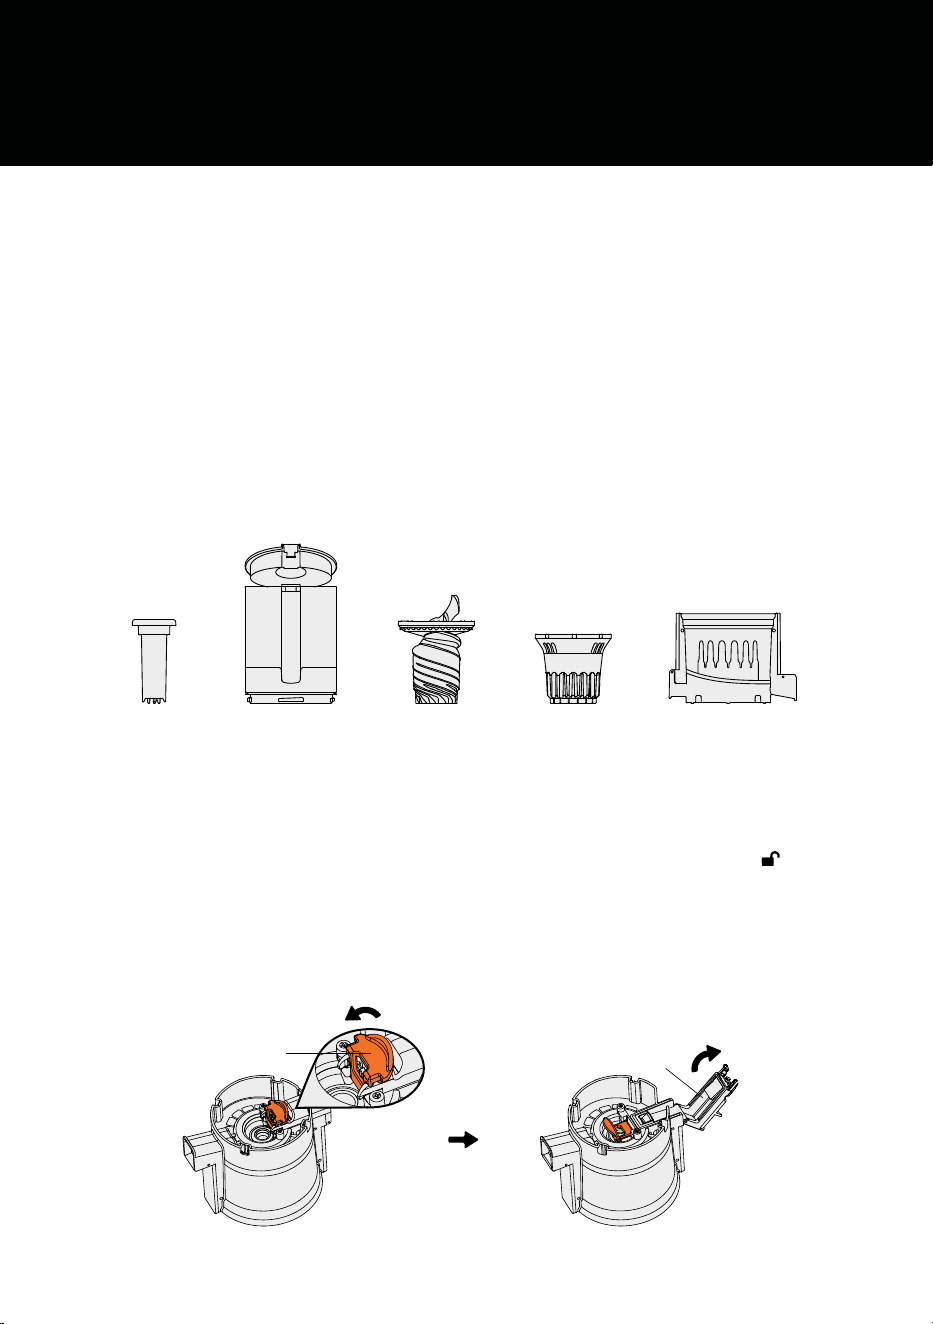
42
6. LIMPIEZA Y MANTENIMIENTO
Asegúrese de limpiar a fondo su exprimidor Slowstar AI después de cada uso. Las piezas NO son aptas
para lavavajillas, por lo que deben lavarse únicamente a mano.
LIMPIEZA
1. Por su seguridad, desenchufe siempre el CABLE DE ALIMENTACIÓN antes de lavar o almacenar la unidad.
2. Con un paño húmedo, limpie el CUERPO PRINCIPAL y, a continuación, séquelo bien. No sumerja el CUERPO
PRINCIPAL en agua.
3. Lave el EMPUJADOR, la TOLVA, el TROCEADOR/TAMIZ DE TORNILLO SINFÍN, el FILTRO y la CARCASA DEL
TAMIZ DE TORNILLO SINFÍN (mostrados a continuación) bajo agua tibia usando una esponja suave y detergente
neutro para evitar rasguños. El CEPILLO DE LIMPIEZA puede utilizarse para limpiar con suavidad los lugares de
difícil acceso. NO utilice estropajos de acero, limpiadores abrasivos ni productos químicos fuertes como la lejía.
Enjuague a fondo todas las partes para eliminar el jabón y séquelas completamente. Después, guárdelas en un
lugar ventilado y alejado de la luz solar directa.
DESMONTAJE DE LAS PIEZAS DEL EXPRIMIDOR
1. Utilice el ASA para levantar el conjunto exprimidor y sacarlo del CUERPO PRINCIPAL y llévelo con cuidado al
fregadero para limpiarlo.
2. Para desbloquear la TOLVA, gire el ASA hacia la derecha hasta que quede en posición desbloqueada .
3. Levante la TOLVA y, a continuación, extraiga el TROCEADOR/TAMIZ DE TORNILLO SINFÍN y el FILTRO de la
CARCASA DEL TAMIZ DE TORNILLO SINFÍN.
4. Dé la vuelta a la CARCASA DEL TAMIZ DE TORNILLO SINFÍN. Tire del ENGANCHE naranja para desbloquear
la SALIDA DE PULPA. Abra la SALIDA DE PULPA y, a continuación, limpie y retire la pulpa del hueco
correspondiente. Recuerde cerrar y bloquear la salida de pulpa antes de volver a exprimir.
EMPUJADOR TOLVA TAMIZ DE TORNILLO
SINFÍN
FILTRO CARCASA DEL TAMIZ DE
TORNILLO SINFÍN
SALIDA DE
PULPA
ENGANCHE

43
7. SOLUCIÓN DE PROBLEMAS
PROBLEMA SOLUCIÓN
La máquina no se enciende o no
funciona.
• Verique que la fuente de alimentación está activa. Inserte el conector del
CABLE DE ALIMENTACIÓN (extremo plano) en la entrada de alimentación situada
en la parte posterior del CUERPO PRINCIPAL. Enchufe el extremo del CABLE DE
ALIMENTACIÓN a una toma de corriente.
• Asegúrese de que todas las piezas estén correctamente montadas (consulte la
página 39).
• No añada ingredientes por encima de la línea de capacidad máxima indicada
en la TOLVA.
La máquina emite pitidos (3 pitidos
cortos + 1 pitido largo) después de
pulsar el botón INICIAR/CANCELAR.
• Asegúrese de que el conjunto de la TOLVA y la CARCASA DEL TAMIZ DE
TORNILLO SINFÍN estén en la posición de bloqueo antes de colocarlos en el
CUERPO PRINCIPAL.
• Asegúrese de que la TAPA DE LLENADO RÁPIDO esté completamente cerrada.
• Asegúrese de que el ASA de la TOLVA esté orientada hacia la PANTALLA TÁCTIL
de la parte delantera.
Hay una cantidad importante de
pulpa en el zumo.
El FILTRO puede estar dañado. Póngase en contacto con el servicio de atención al
cliente.
La máquina vibra excesivamente
o hace ruidos fuertes durante el
funcionamiento.
El FILTRO o el motor pueden estar dañados. Póngase en contacto con el servicio de
atención al cliente.
La máquina se ha parado
repentinamente durante su
funcionamiento. Se oyen pitidos.
La protección automática contra sobrecargas hará que el motor se apague si se
procesan demasiados alimentos o muy duros durante demasiado tiempo. Esta
función incorporada está diseñada para proteger el motor y evitar que su máquina
se sobrecaliente. Si esto ocurriera, deje reposar la máquina durante 10 minutos
antes de volver a utilizarla.
El zumo está goteando sobre el
cuerpo principal.
Asegúrese de que la SALIDA DE PULPA situada debajo de la CARCASA DEL TAMIZ
DE TORNILLO SINFÍN esté completamente cerrada (plegada hacia dentro). A
continuación, bloquéela con rmeza mediante el ENGANCHE naranja (consulte la
página 39).
ATENCIÓN AL CLIENTE
En el caso de que tenga alguna pregunta sobre el uso, cuidado o servicio de este producto, no dude en llamarnos o
enviarnos un correo electrónico. Si compró su producto fuera de los Estados Unidos, consulte su tarjeta de garantía
para ver el centro de servicio más cercano o póngase en contacto con el establecimiento donde adquirió el aparato.
ESTADOS UNIDOS
Tribest Corporation
1143 N. Patt St.
Anaheim, CA 92801
Llamada gratuita: 1-888-254-7336
INTERNACIONAL
Tribest Corporation
1143 N. Patt St.
Anaheim, CA 92801
Teléfono: 1-714-879-7150
ES

Follow us @tribestlife
Recipe Book
Vertical Hopper Juicer with Automatic Intelligent Optimization
SLOWSTAR AI
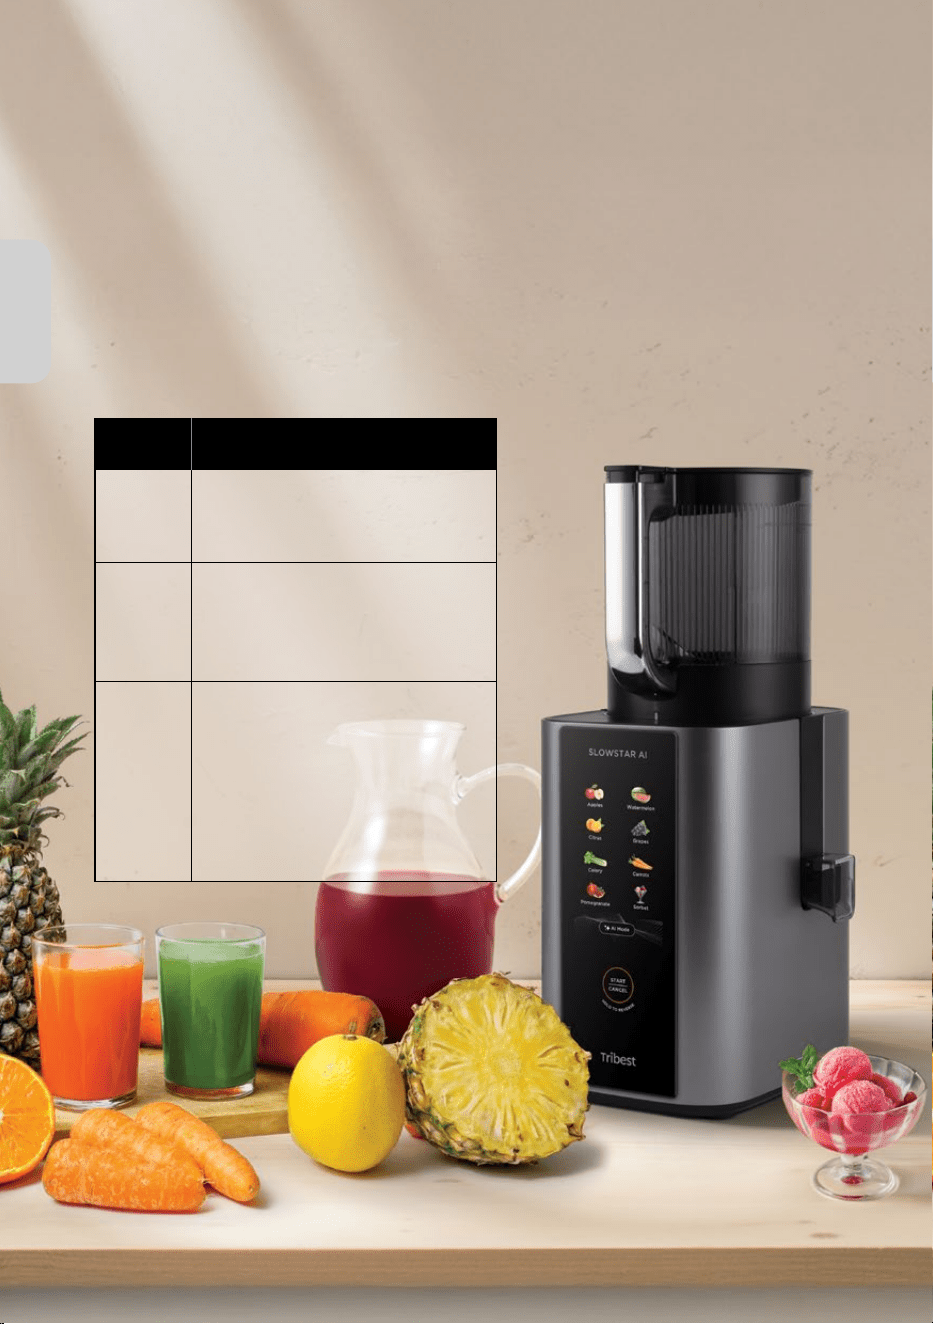
RECIPES
JUICE SMARTER, NOT HARDER
WITH THE SLOWSTAR AI JUICER
The Slowstar AI pushes juicing into the next generation with AI optimization of the cold press
masticating juicing process, extracting more juice with less pulp. Its brushless DC motor provides
powerful, whisper-quiet operation for enhanced durability. With a large hopper for minimal prep and a
screenless lter for scrub-free cleaning, the Slowstar AI delivers maximum results with minimum effort.
GET TO KNOW YOUR PRESETS
PRESET DESCRIPTION
SINGLE
FRUIT
Automatically adjusts to the optimal
speed based on the selected fruit type
for maximum extraction.
SORBET
Cut frozen fruits (pit removed) into
1-inch (3 cm) pieces. Freeze for 6+
hours or until fully frozen solid. Add
6-8 pieces at a time into the hopper.
AI MODE
Featuring intelligent speed control,
the AI Mode automatically senses
the processing effort required based
on food resistance and adjusts to
the optimal speed. This is ideal
when juicing any variety of fruits or
vegetables.

TABLE OF CONTENTS
JUICES
SORBET
Wheatgrass Cocktail.....................................R4
Turmeric Twist..............................................R4
Liver Cleansing Cocktail................................R5
Lemon Ginger Blast.......................................R5
Green Goodness Juice..................................R6
Fennel Celery Cocktail...................................R6
Cabbage Crusher..........................................R7
Glow Up Juice..............................................R7
Turmeric Spinach Juice.................................R8
Celery Cilantro Lime......................................R8
Parsley Passion............................................R9
Grapefruit Power-Up......................................R9
Mango Colada............................................R16
Berry Bliss..................................................R16
Refreshing Strawberry Sorbet......................R17
Peachy Papaya...........................................R17
Pineapple Celery.........................................R10
Golden Beet Cleanser..................................R10
Green Mint Magic.......................................R11
Tomato Basil Soup Sipper............................R11
Sprouted Juice...........................................R12
Celery Honeydew........................................R12
Tropical Twist..............................................R13
Watermelon Lemonade...............................R13
Green Machine Juice..................................R14
Root Down Power Juice...............................R14
Carrot-Pineapple Zing.................................R15
Cucumber Parsley Twist..............................R15

RECIPES
R4
Wheatgrass Cocktail
Juicing is one of the ways
I keep my immune system
strong by flooding my body
with micronutrients including
vitamins, minerals and
phytonutrients.
– JOHN KOHLER
Serving: 1
4 large
carrots
½ cup
wheatgrass leaves
¼ cup
green apple
4 grosses carottes
1/2 tasse de feuilles d'agropyre
¼ tasse de pomme verte
4 große Karotten
1/2 Tasse Weizengrasblätter
¼ Tasse grüner Apfel
2 tazas de remolacha
1/2 taza de hojas de pasto de trigo
¼ taza de manzana verde
Turmeric Twist
To ensure good health:
eat lightly, breathe
deeply, live moderately,
cultivate cheerfulness,
and maintain an
interest in life.
– WILLIAM LONDEN
Serving: 1
2 large carrots
1 Tbsp
coconut oil
2 inches
turmeric
1 inch
ginger
1 pinch
black pepper
2 grosses carottes
2 pouces de curcuma
1 pouce de gingembre
1 pincée de poivre noir
1 cuillère à soupe d'huile de coco
2 große Karotten
2 Zoll Kurkuma
1-Zoll-Ingwer
1 Prise schwarzer Pfeffer
1 EL Kokosöl
2 zanahorias grandes
2 pulgadas de cúrcuma
1 pizca de gengibre
1 pizca de pimienta negra
1 cucharada de aceite de coco

R5
Liver Cleansing Cocktail
The doctor of the future
will give no medicine,
but will instruct his
patients in care of the
human frame, in diet,
and in the cause and
prevention of disease.
– THOMAS EDISON
Serving: 1
4 ribs celery
1 inch
ginger
1 cup
green apple
1 cup
beets
1 cup
lemon, peeled
4 côtes de céleri
1 tasse de pomme verte
1 tasse de betteraves
1 tasse de citron, pelé
1 pouce de gingembre
4 Rippen Sellerie
1 Tasse grüner Apfel
1 Tasse Rüben
1 Tasse Zitrone, geschält
1-Zoll-Ingwer
4 costillas de apio
1 taza de manzana verde
1 taza de remolacha
1 taza de limón, pelado
1 pizca de gengibre
Lemon Ginger Blast
Keep your vitality. A life
without health is like a
river without water.
– MAXIME LAGACÉ
Serving: 1
2 cups green
apple
2 cups
lemon, peeled
1 cup ginger root
2 tasses de pomme verte
2 tasses de citron pelé
1 tasse de racine de gingembre
2 Tassen grüner Apfel
2 Tassen Zitrone, geschält
1 Tasse Ingwerwurzel
2 tazas de manzana verde
2 tazas de limón, pelado
1 taza de raíz de jengibre

Green Goodness Juice
Fennel Celery Cocktail
Three things in life
– your health, your
mission, and the people
you love. That’s it.
– NAVAL RAVIKANT
When diet is wrong,
medicine is of no use.
When diet is correct,
medicine is of no need.
– AYURVEDIC PROVERB
Serving: 1
Serving: 1
8 ribs
celery
2 cups
fennel
4 cups
dark greens (chard,
mustard, kale, spinach)
8 ribs
celery
1 cup
green apple
(optional)
1 cup
lemon, peeled
½ cup
lemon, peeled
8 côtes de céleri
4 tasses de feuilles vertes foncées
1 tasse de pomme verte (facultatif)
½ tasse de citron, pelé
2 tasses de fenouil
8 côtes de céleri
1 tasse de citron, pelé
8 Rippen Sellerie
4 Tassen dunkles Blattgemüse
1 Tasse grüner Apfel (optional)
½ Tasse Zitrone, geschält
2 Tassen Fenchel
8 Rippen Sellerie
1 Tasse Zitrone, geschält
8 costillas de apio
4 tazas de verduras de hoja verde
1 taza de manzana verde (opcional)
½ taza de limón, pelado
2 tazas de hinojo
8 costillas de apio
1 taza de limón, pelado
RECIPES
R6

Cabbage Crusher
Glow Up Juice
A journey of a thousand
miles begins with a
single step.
– LAO TZU
The first wealth is health.
– RALPH WALDO EMERSON
Serving: 1
Serving: 1
4 cups
cabbage
1 cup
cabbage
1 cup
green apple
4 large
carrots
1 cup
beets
1 cup lemon,
peeled (optional)
1 cup
lemon, peeled
1 cup
carrots
¼ cup
ginger (optional)
1 cup
celery
4 tasses de chou
4 grosses carottes
1 tasse de citron, pelé
¼ tasse de gingembre (facultatif)
1 tasses de chou
1 tasse de betteraves
1 tasse de carottes
1 tasse de céleri
1 tasse de pomme verte
1 tasse de citron pelé (facultatif)
4 Tassen Kohl
4 große Karotten
1 Tasse Zitrone, geschält
¼ Tasse Ingwer (optional)
1 Tassen Kohl
1 Tasse Rüben
1 Tasse Karotten
1 Tasse Sellerie
1 Tasse grüner Apfel
1 Tasse Zitrone, geschält (optional)
4 tazas de repollo
4 zanahorias grandes
1 taza de limón, pelado
¼ de taza de jengibre (opcional)
1 tazas de repollo
1 taza de remolacha
1 taza de zanahorias
1 taza de apio
1 taza de manzana verde
1 taza de limón, pelado (opcional)
R7

Turmeric Spinach Juice
Celery Cilantro Lime
Success is the sum of
small efforts—repeated
day-in and day-out.
– ROBERT COLLIER
Let food be thy medicine,
thy medicine shall be thy
food.
– HIPPOCRATES
Serving: 1
Serving: 1
4 cups
spinach
4 cups
celery
2 large
carrots
1 cup
lime, peeled
1 cup
turmeric
½ cup
cilantro
¼ cup green
apple or lemon
4 tasses d'épinards
2 grosses carottes
1 tasse de curcuma
¼ tasse de pomme verte ou de citron
4 tasses de céleri
1 tasse de citron vert, pelé
½ tasse de coriandre
4 Tassen Spinat
2 große Karotten
1 Tasse Kurkuma
¼ Tasse grüner Apfel oder Zitrone
4 Tassen Sellerie
1 Tasse Limette, geschält
½ Tasse Koriander
4 tazas de espinacas
2 zanahorias grandes
1 taza de cúrcuma
¼ taza de manzana verde o limón
4 tazas de apio
1 taza de lima, pelada
½ taza de cilantro
RECIPES
R8

Parsley Passion
Happiness lies first of
all in health.
– GEORGE WILLIAM
CURTIS
Serving: 1
1 bunch
parsley
1 cup
lemon, peeled
1 cup
green apple
(optional)
1 bouquet de persil
1 tasse de citron, pelé
1 tasse de pomme verte (facultatif)
1 Bund Petersilie
1 Tasse Zitrone, geschält
1 Tasse grüner Apfel (optional)
1 manojo de perejil
1 taza de limón, pelado
1 taza de manzana verde (opcional)
Grapefruit Power-Up
Take care of your body.
It's the only place you
have to live.
– JIM ROHN
Serving: 1
2 whole
grapefruits,
peeled
1 pink lady apple
2 pamplemousses entiers, pelés
1 pomme Pink Lady
2 ganze Grapefruits, geschält
1 Pink Lady Apfel
2 pomelos enteros, pelados
1 manzana rosa dama
R9

Pineapple Celery
People who love to eat
are always the best
people.
– ULIA CHILD
Serving: 1
4 cups
celery
2 cups
pineapple, skin on
1 inch
ginger (optional)
4 tasses de céleri
2 tasses d'ananas, avec la peau
1 pouce de gingembre (facultatif)
4 Tassen Sellerie
2 Tassen Ananas, mit Schale
1 Zoll Ingwer (optional)
4 tazas de apio1 taza de piña congelada
2 tazas de piña, con piel
1 pulgada de jengibre (opcional)
Golden Beet Cleanser
Juicing is like a miracle
drug. It can take you from
sluggish and stressed to
vibrant and healthy in a
matter of minutes.
– KRIS CARR
Serving: 1
2 cups
golden beets
1 inch
turmeric
2 large
carrots
1 cup
orange, peeled
1 inch
ginger
2 tasses de betteraves dorées
2 grosses carottes
1 tasse d'orange, pelée
1 pouce de gingembre
1 pouce de curcuma
2 Tassen Gelbe Bete
2 große Karotten
1 Tasse Orange, geschält
1-Zoll-Ingwer
1 Zoll Kurkuma
2 tazas de remolacha dorada
2 zanahorias grandes
1 taza de naranja, pelada
1 pizca de gengibre
cúrcuma de 1 pulgada
RECIPES
R10
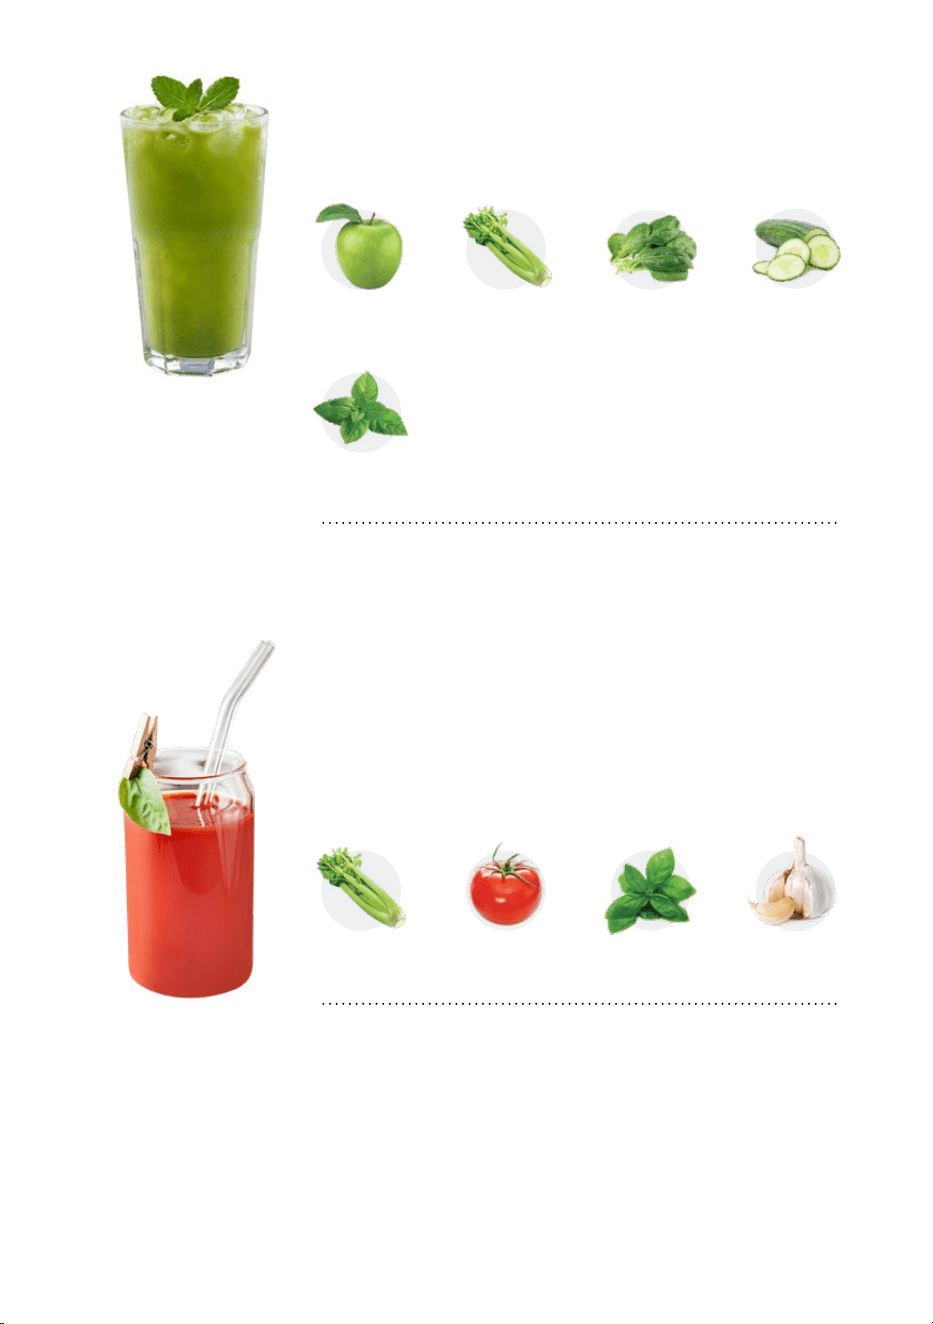
Tomato Basil Soup Sipper
It’s difficult to think
anything but pleasant
thoughts while eating a
homegrown tomato.
– LEWIS GRIZZARD
Serving: 1
4 cups
celery
1 cup
tomato
1 cup
basil
1 clove
garlic
4 tasses de céleri
1 tasse de tomate
1 tasse de basilic
1 gousse d'ail
4 Tassen Sellerie
1 Tasse Tomate
1 Tasse Basilikum
1 Knoblauchzehe
4 tazas de apio
1 taza de tomate
1 taza de albahaca
1 diente de ajo
Green Mint Magic
A healthy outside starts
from the inside.
– ROBERT URICH
Serving: 1
2 cups
green apple
¼ cup
mint leaves
2 cups
celery
2 cups
spinach
1 cup
cucumber
2 tasses de pomme verte
2 tasses de céleri
2 tasses d'épinards
1 tasse de concombre
¼ tasse de feuilles de menthe
2 Tassen grüner Apfel
2 Tassen Sellerie
2 Tassen Spinat
1 Tasse Gurke
¼ Tasse Minzblätter
2 tazas de manzana verde
2 tazas de apio
2 tazas de espinacas
1 taza de pepino
¼ de taza de hojas de menta
R11

Celery Honeydew
Juice is the essence of life.
Juice is the most efficient
way to get the nutrients
from the foods we eat.
– JAY KORDICH
Serving: 1
4 cups
celery
2 cups honeydew
melon, skin on
1 cup
spinach
1 cup
lemon, peeled
4 tasses de céleri
2 tasses de melon miel, avec la peau
1 tasse d'épinards
1 tasse de citron, pelé
4 Tassen Sellerie
2 Tassen Honigmelone, mit Schale
1 Tasse Spinat
1 Tasse Zitrone, geschält
4 tazas de apio
2 tazas de melón dulce, con piel
1 taza de espinacas
1 taza de limón, pelado
Sprouted Juice
My juicer became my
magic wand for a
healthier, happier me!
– UNKNOWN
Serving: 1
2 cups
celery
1 cup
spinach
2 cups
green apple
1 cup
lemon, peeled
1 cup leafy
green sprouts
2 tasses de céleri
2 tasses de pomme verte
1 tasse de citron, pelé
1 tasse de choux verts feuillus
1 tasse d'épinards
2 Tassen Sellerie
2 Tassen grüner Apfel
1 Tasse Zitrone, geschält
1 Tasse Blattgemüse-Sprossen
1 Tasse Spinat
2 tazas de apio
2 tazas de manzana verde
1 taza de limón, pelado
1 taza de brotes de hojas verdes
1 taza de espinacas
RECIPES
R12
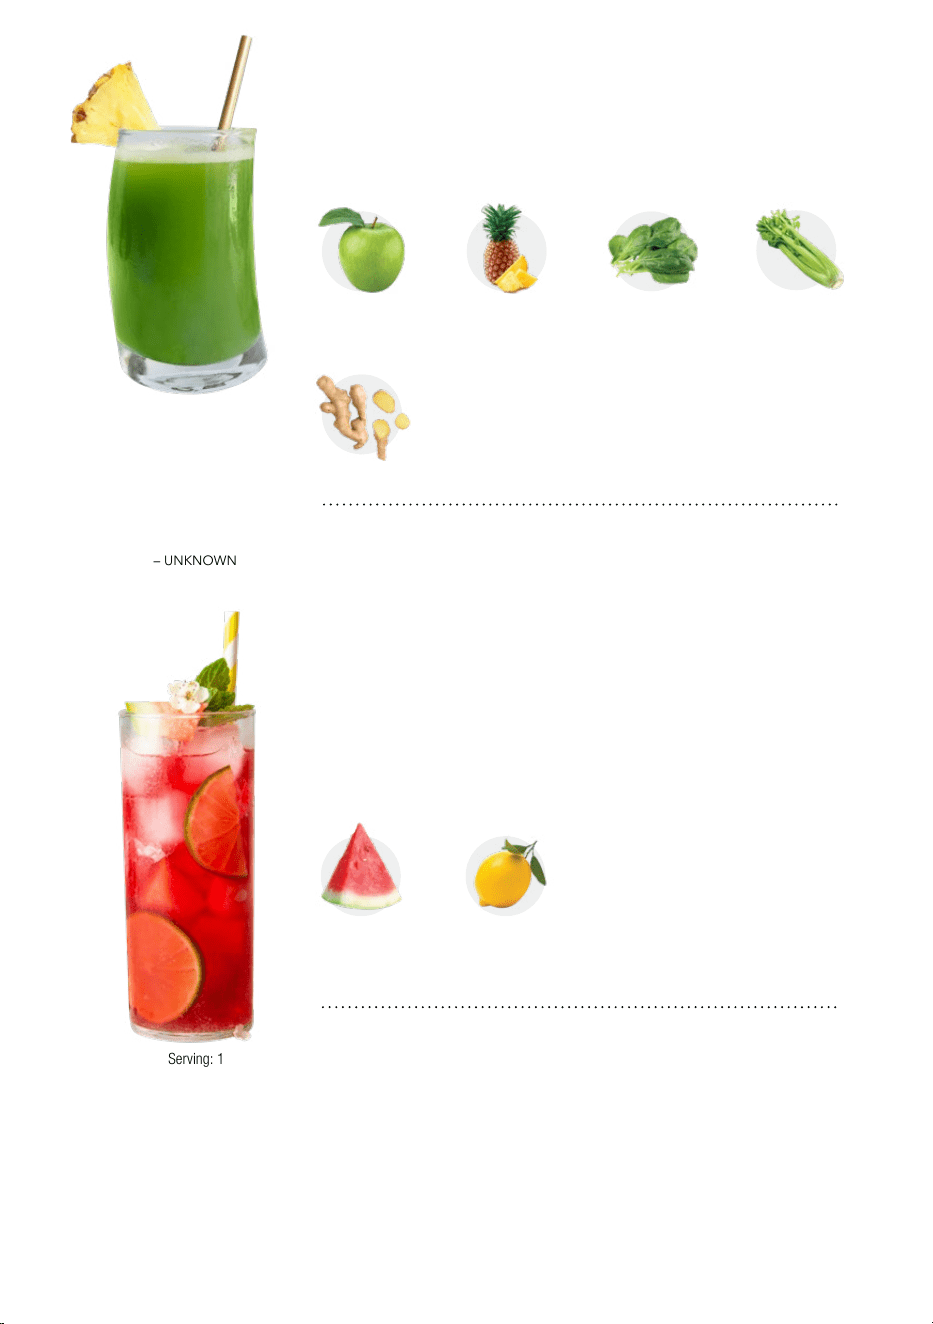
Tropical Twist
Sipping on juice is like
taking a refreshing plunge
into a pool of flavor and
nutrition.
– UNKNOWN
Serving: 1
1 cup green
apple
1 inch ginger
1 cup pineapple 1 cup spinach
2 cups celery
1 tasse de pomme verte
1 tasse d'ananas
1 tasse d'épinards
2 tasses de céleri
1 pouce de gingembre
1 Tasse grüner Apfel
1 Tasse Ananas
1 Tasse Spinat
2 Tassen Sellerie
1-Zoll-Ingwer
1 taza de manzana verde
1 taza de piña
1 taza de espinacas
2 tazas de apio
1 pizca de gengibre
Watermelon Lemonade
I have chosen to be happy
because it is good for my
health.
– VOLTAIRE
Serving: 1
4 cups
watermelon,
skin on
2 cups
lemon, peeled
4 tasses de pastèque, avec la peau
2 tasses de citron pelé
4 Tassen Wassermelone, mit Schale
2 Tassen Zitrone, geschält
4 tazas de sandía, con piel
2 tazas de limón, pelado
R13
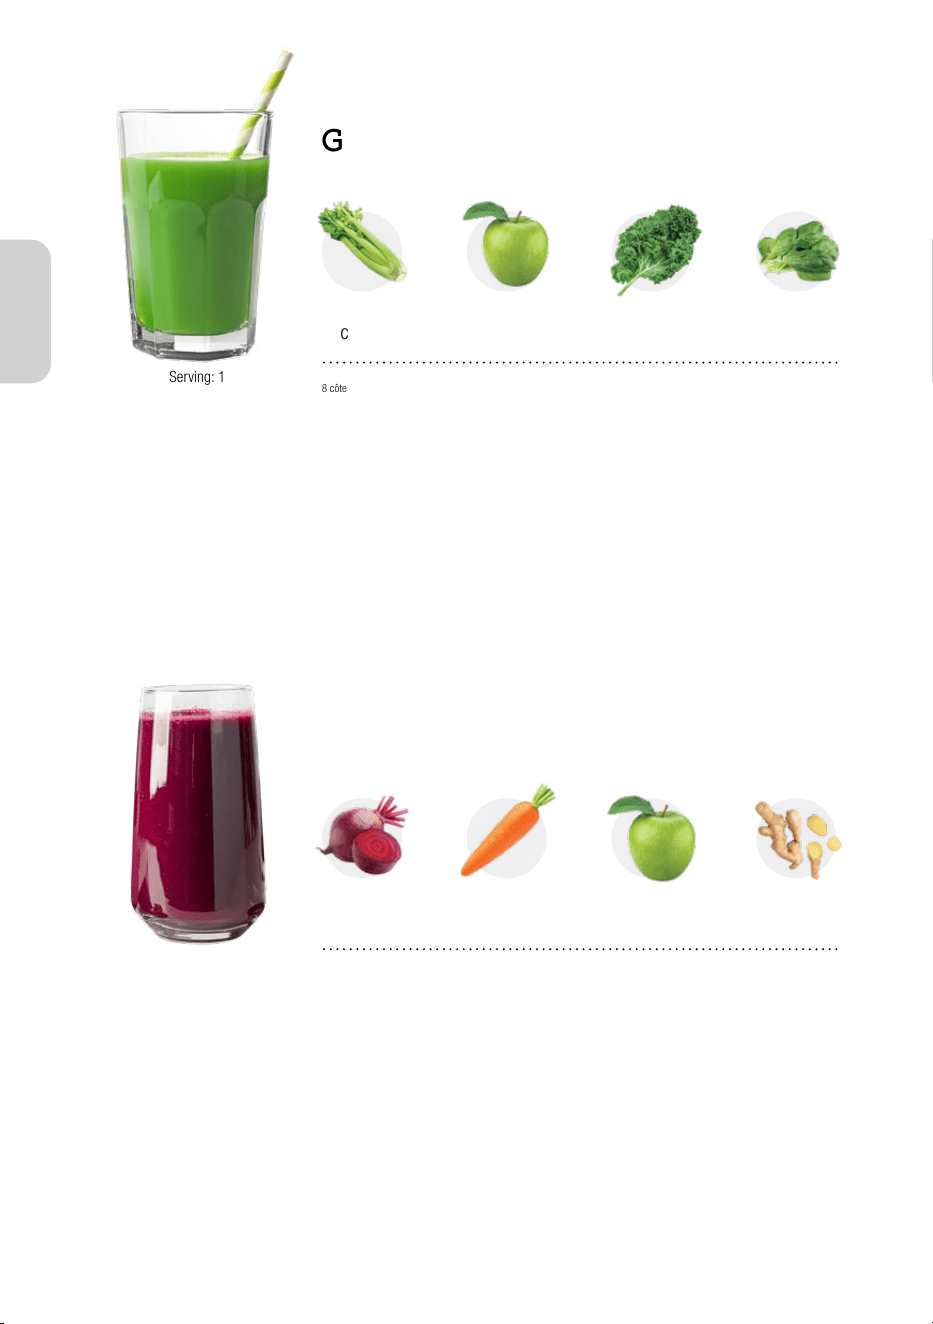
Root Down Power Juice
It is health that is the
real wealth, and not
pieces of gold and silver.
– MAHATMA GANDHI
Serving: 1
2 cups
beets
4 large
carrots
1 cup
green apple
2 inches
ginger (optional)
2 tasses de betteraves
4 grosses carottes
1 tasse de pomme verte
2 pouces de gingembre
2 Tassen Rüben
4 große Karotten
1 Tasse grüner Apfel
2 Zoll Ingwer
2 tazas de remolacha
4 zanahorias grandes
1 taza de manzana verde
2 pulgadas de jengibre
Green Machine Juice
Good health is not
something we can buy.
However, it can be an
extremely valuable savings
account.
– ANNE WILSON SCHAEF
8 côtes de céleri
1 tasse de pomme verte
8 feuilles de chou frisé
2 tasses d'épinards
8 Rippen Sellerie
1 Tasse grüner Apfel
8 Grünkohlblätter
2 Tassen Spinat
8 costillas de apio
1 taza de manzana verde
8 hojas de col rizada
2 tazas de espinacas
Serving: 1
8 ribs
celery
1 cup
green apple
8 leaves
kale
2 cups
spinach
RECIPES
R14

Carrot-Pineapple Zing
The greatest medicine of all
is teaching people how not
to need it.
– HIPPOCRATES
5 zanahorias grandes
2 tasses d'ananas
1 citron pelé
2 pouces de gingembre
5 große Karotten
2 Tassen Ananas
1 Zitrone, geschält
2 Zoll Ingwer
5 zanahorias grandes
2 tazas de piña
1 limón, pelado
2 pulgadas de jengibre
5 large
carrots
2 cups
pineapple
1 lemon,
peeled
2 inches ginger
Serving: 1
Cucumber Parsley Twist
He who has health, has
hope; and he who has
hope, has everything.
– THOMAS CARLYLE
Serving: 1
1 bunch
parsley
1 cup
lemon, peeled
3 large
carrots
2 ribs
celery
1 cup
cucumber
1 bouquet de persil
3 grosses carottes
2 côtes de céleri
1 tasse de concombre
1 tasse de citron, pelé
1 Bund Petersilie
3 große Karotten
2 Rippen Sellerie
1 Tasse Gurke
1 Tasse Zitrone, geschält
1 manojo de perejil
3 zanahorias grandes
2 costillas de apio
1 taza de pepino
1 taza de limón, pelado
R15

Berry Bliss
Mango Colada
TIP: Enjoy fresh or with superfood toppings like hemp seeds, shredded coconut, cacao nibs, and fresh mint.
ASTUCE : à déguster frais ou agrémenté de graines de chanvre, de noix de coco râpée, de pépites de cacao et de menthe fraîche.
TIPP: Genießen Sie es frisch oder mit Superfood-Toppings wie Hanfsamen, Kokosraspeln, Kakao-Nibs und frischer Minze.
CONSEJO: disfrútelo fresco o con coberturas de superalimentos como semillas de cáñamo, coco rallado, grué de cacao y menta fresca.
If you really want to make a
friend, go to someone’s house
and eat with him...the people
who give you their food give
you their heart.
– CESAR CHAVEZ
The happiness of your life
depends upon the quality of
your thoughts.
– MARCUS AURELIUS
Servings: 3
Servings: 2
2 cups frozen
mango
2 cups frozen
mixed berries
2 cups frozen
pineapple
2 cups frozen
banana
2 cups frozen
banana
1 cup
young Thai
coconut
2 tasses de mangue surgelée
2 tasses d'ananas surgelé
2 tasses de banane congelée
1 tasse de noix de coco
2 tasses de petits fruits mélangés surgelés
2 tasses de banane congelée
2 Tassen gefrorene Mango
2 Tassen gefrorene Ananas
2 Tassen gefrorene Banane
1 Tasse Kokosnuss
2 Tassen gefrorene gemischte Beeren
2 Tassen gefrorene Banane
2 tazas de mango congelado
2 tazas de piña congelada
2 tazas de plátano congelado
1 taza de coco
2 tazas de bayas mixtas congeladas
2 tazas de plátano congelado
RECIPES
R16

Peachy Papaya
Let food be thy medicine and
medicine be thy food.
– HIPPOCRATES
The food you eat can be either
the safest and most powerful
form of medicine or the
slowest form of poison.
– ANN WIGMORE
Servings: 2
Refreshing Strawberry Sorbet
4 tasses de fraises surgelées 4 Tassen gefrorene Erdbeeren 4 tazas de fresas congeladas
Servings: 2
4 cups frozen
strawberries
3 cups frozen
papaya
2 cups frozen
peach
3 tasses de papaye congelée
2 tasses de pêches surgelées
3 Tassen gefrorene Papaya
2 Tassen gefrorener Prsich
3 tazas de papaya congelada
2 tazas de durazno congelado
R17
