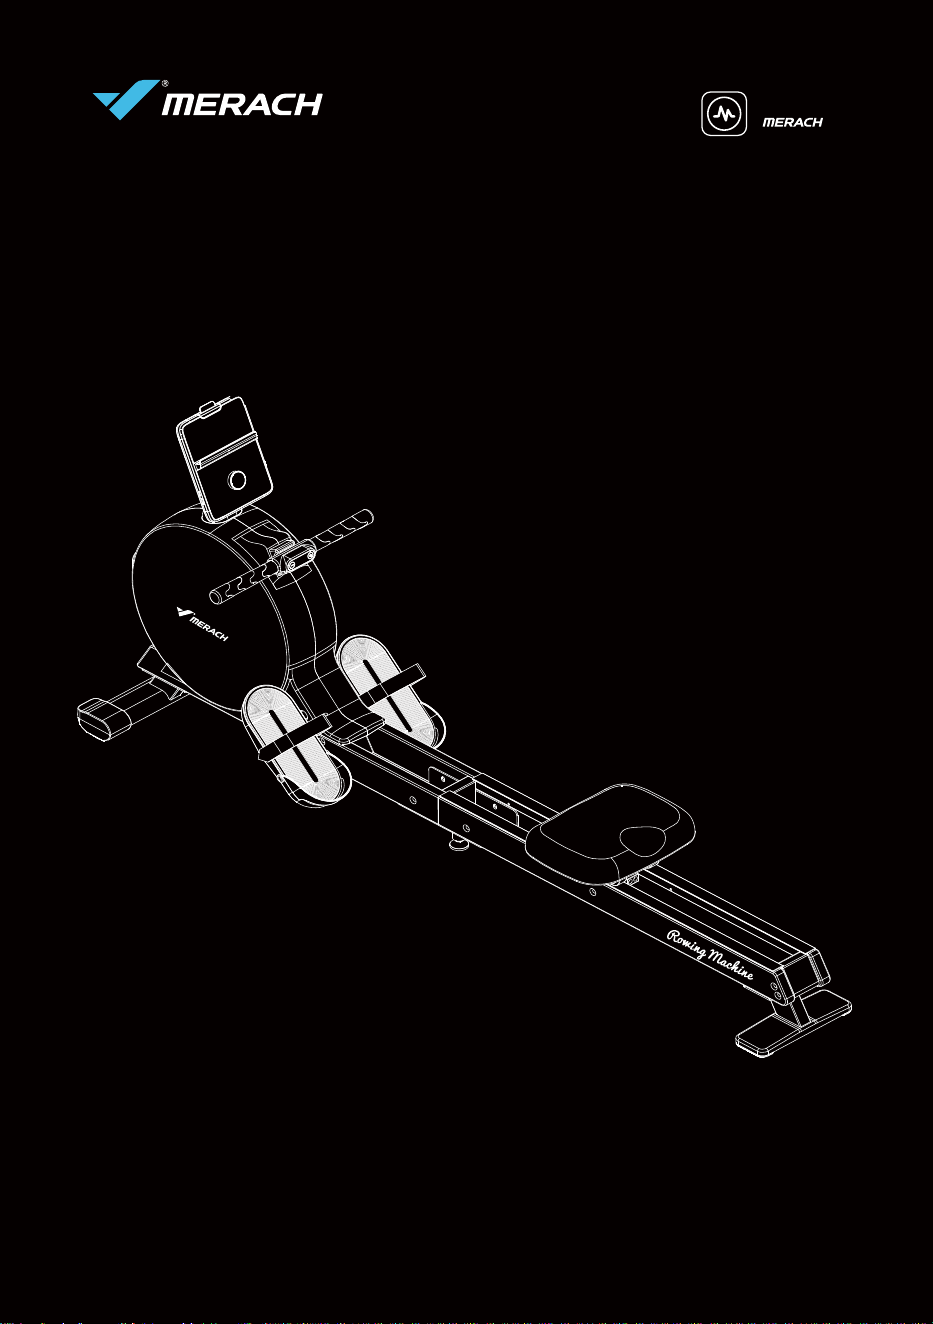
USER MANUAL
MERACH NovaRow Q3 SELF-GENERATING ELECTRO-
MAGNETIC ROWING MACHINE
POWERED BY
MODEL: MR-R21
Questions or Concerns?
IMPORTANT!
Please read all details before use, and keep this user manual for future reference.
PLEASE CONTACT US BEFORE THE RETURN: Mon-Fri,9:00 am-5:00 pm PST/PDT
Phone: 44-1315070255 Mon-Fri 10am-7pm PST UK/DE/FR/ES/IT/NL
EN • DE • FR • ES • IT •NL
In日EA
K二0/I
M26:6K6NAe0
MAGN5ICRONGMACN
aNo0)=okoSooNI
e
MODEL MR-R2i

WHO WE ARE
Our customers aren’t just important; their health, fitness, and pure enjoyment for live is at
the core of everything we do at MERACH. From innovative fitness research and cutting-
edge product development, to our exceptional purchasing & after-sales service, we are our
customers’ life-long partner in crafting a better fitness future.
Through quality fat-burning & muscle-building fitness equipment such as our quality rowing
machines and exercise bikes, plus our innovative MERACH APP, and digital courses, we give
the opportunity and support to all to pursue their health and fitness goals and discover a
new way of healthy living.
Welcome to MERACH
I日EAG
【●=
06006000320
AA
s
o0q76s03n3a5ng
eupnet auchasou quatyowng
0000o
iaaiaiii
Welcomne to MERACH
Join the MERACH Fitness Community on Facebook
facebook.com/groups/merachfitness
Join
Explore fitness courses
merachfit.com/blogs/courses
Explore
Enjoy weekly, featured courses
made exclusively by our in-house fitness instructor
Enjoy
THANK YOU FOR YOUR PURCHASE!
(We hope you love your new rowing machine as much as we do.)
WARRANTY REGISTRATION
Please register your warranty to keep yourself protected !
Email your item model to
register@merach.com
Register your warranty via
merachfit.com/pages/warranty
If purchased outside US/Canada: To register your product warranty, contact your
local distributor.
For details regarding product warranty or if you have questions or problems with
your product, please contact your local distributor.
THANK YOU FOR YOUR PURCHASE
tVe hope you love your newrowng machne as much as we do
oin
Join the MERACH FitnessCommunitv on Faceboo
tacebookcom/orouosmerachfitnes
Explore
Exp. 0rettn955C0r5
merachfit.combloosjcourse
Enioy
Eniov weedv.eatued cour5e
made exclushvelv bv ourin-house fitnes instructo
WARRANTY REGISTRATION
Please reqister your warnnty to keep yoursef potected
Reaster wour warnntyw
menchft comoaoeswarrant
Emmawwour temmmmodetc
regsterameach.comm
Ipurehased outideUsrCanad:o egiteryourpoduetwaranty contactyo
ocadstr butor
Fordeta regarding produet warrartyaifyou have qestionsorpoblems wt
your poduct, please contact your kocal dstrbuto

FAQ
SELF-SERVICE CUSTOMER SUPPORT FAQ
4. Purchased it six months ago, I want to return it but can't find the return window.
What should I do?
Great after-sales service including 12-month exchange or return,
[email protected], or AMZ live chat.
3. I just received the parcel today, but it doesn't come with accessories.
You'll get twice the price refund of the accessories if the missing accessories
don't affect your user experience. Or you can contact us for a refund or free
accessories via the after-sales email service.
1. The outer package was broken, which makes me worried that the product may
be damaged.
Please contact us via the after-sales email to ask for FREE return /replacement
in time.
2. This was the first time l bought your product, is there a user manual or tutorial
video available?
A detailed user manual is included in the package and you can also watch the
installation video by scanning the QR code on the packaging.
5. Where can I get your latest product information and related promotions?
Search our products on AMZ or visit our Facebook, Twitter, TikTok, Instagram
@merachfit, and also you can send us the product list you're interested in and
ask if there is any discount.
Contact us by [email protected]
SELF-SENVICECLSTOMER SLIPNONTFAC
t The outer paciagewasbroken,whiehmales me woried thatthe prodet ma
bedamaged
Pease contact us va the artersaies ema to ask tor rc retur/eplacemen
in time.
zThs was thefs tmeIbougtyou productisthee auser manualortutora
videoavalable?
a aetasea user manusnauaea ntne pacsage ana youcan asowtcn m
nstaaton vaoo oy scannng tne yr coae on tne pacagng
3.Ijustrecevedthe parce today butit doesr't come wth accessorie
ou get twice the prce etund or the accessoresif the mssing accessorie
ant artet your user eperence oryoucan contact us toraretundor tre
accessonesva tne artersaes emaa serwce
4.Purchasedtsmontsago,Iwantto eturmtbutcantfnd te returmwindo
vhatshoudldoi
orear ater-saes srvce ncuang emontn ecnange or return
supporr eugwmeracncom.or Avu ve cnat
.wnere canaet vouratest oroaut nrormtonana reatea oomotons
5earchourproducts on AM orvst our Fcebook.wttet Tkok Instagra
emerachrt and sso you can send us the product istyou'e inteested in ane
ask if there is any dscount
Contact us bv support.euemerach.com

Important Safety Instructions ·································································· 01
Specification ································································································ 03
Parts & Accessories List ··········································································· 04
Installation Guide ······················································································· 05
Adjustment Instructions ··········································································· 10
Self-generating System Operating Instructions ···································· 13
Instructions of Monitor ·············································································· 14
APP Setup Instruction ·············································································· 18
Warm-up ······································································································ 19
Trouble Shooting ······················································································· 20
Maintenance Guide ···················································································· 21
Warning Decal Placement ········································································ 22
Warranty Information················································································· 23
26
29
30
31
36
39
40
44
45
46
47
48
49
Wichtige Sicherheitshinweise.....................................................................
Spezifikationen.............................................................................................
Liste der Teile und Zubehörteile.................................................................
Montageanleitung........................................................................................
Einstellungshinweise....................................................................................
Betriebshinweise für das selbstgenerierende System...........................
Anweisungen für den Monitor....................................................................
Anweisungen für die Einrichtung der App................................................
Aufwärmen....................................................................................................
Fehlerbehebung............................................................................................
Wartungsanleitung.......................................................................................
Warnhinweise................................................................................................
Garantieinformationen.................................................................................
CONTFNTS +FNGLISK
Irmoortart safetv Instructior
DecfcatoT
Parts8 AccessoriesLis1
o5
lnstallaton(autde
aaustnentlnstnucton
Self-generating System Operating Instruction
In structions of Monito1
APP Setup Instruction
yarm-up
2O
Trouble 5hooting
aintenance(auidt
Warning Decal Placerment
Warranty Informmation
NBAAsDeUacH
Wichtige Sicherheit shimweise
E
G
5pezfikato nen,
3o
Lis te der Teile und Zubehorteile
Mo ntageanleitung.
E
L1nstellunoshinetse,
3g
betnebshimweise fur das seibstaenenerende svstem
Arweisunoen fur den Monit or
44
Anweisungen fir die Einrichtung der App
Aufwarmmen.
45
Fehlerbehebung
E
Wartungsanleitung
48
War nhimweise
aaranteintorrm atonen

51
54
55
56
61
64
65
69
70
71
72
73
74
76
79
80
81
86
89
94
95
96
97
98
99
100
Consignes de sécurité importantes.................................................................
Caractéristiques.................................................................................................
Liste des pièces et accessoires........................................................................
Guide d’installation............................................................................................
Instructions de réglage......................................................................................
Instructions d’utilisation du système auto-généré.......................................
Instructions de l’écran.......................................................................................
Instructions de configuration de l’application...............................................
Échauffement......................................................................................................
Dépannage..........................................................................................................
Guide d’entretien...............................................................................................
Emplacement des autocollants d’avertissement..........................................
Informations sur la garantie.............................................................................
Instrucciones de seguridad importantes........................................................
Especificaciones.................................................................................................
Lista de piezas y accesorios.............................................................................
Instrucciones de montaje..................................................................................
Instrucciones de ajuste......................................................................................
Instrucciones de funcionamiento del sistema de autogeneración.............
Instrucciones para el monitor...........................................................................
Instrucciones para la configuración de la App...............................................
Calentamiento.....................................................................................................
Resolución de problemas..................................................................................
Instrucciones de mantenimiento......................................................................
Advertencias.......................................................................................................
Información sobre la garantía..........................................................................
CONTFNL+FRFNCb
Consignes de securite importante
54
Caracteni5tique5
55
Lste des bieces et accessoires
_56
uniae ainstallato n
Instructions de reglage.
Instructions dutilisation du systeme auto-genere
6
65
Instructions de I'ecran.
5
Inetnarfinne dernnfinarafinn deFannliratinr
Echauffement
Depannage
(uiae d entreten
Emoiacement des autocollants ravertissemen
lnformmationssur la 9ar antie
IINTFNIL + ANDNIAF
Instrucciones de seguridad importante
E
Especificaciones.
bsta de piezas y accesoros
81
Instrucciones de montaje
E
lnstnuccones oe auste
Instrucciones de funcionamiento delsistema de autogeneracion
g4
lnstnarrinree naral rmnritn
g5
Instrucciones para la configuracion de laApp
E
Calentarmmiento
Resolucion de problermas
Instrucciores de martenirmierto
Advertencias
1OO
Intormmacon sobr e la aarantia

Please read the entire manual carefully before installing and using
the machine, and save it for further use.
101
104
105
106
111
114
115
119
120
121
122
123
124
126
128
129
135
138
139
143
145
146
147
148
149
150
Importanti istruzioni di sicurezza...........................................................
Specifiche....................................................................................................
Elenco parti e accessori............................................................................
Guida all'installazione...............................................................................
Istruzioni di regolazione...........................................................................
Istruzioni per l'uso del sistema di autogenerazione.............................
Istruzioni per il monitor.............................................................................
Istruzioni per la configurazione dell'APP................................................
Riscaldamento............................................................................................
Risoluzione dei problemi..........................................................................
Guida alla manutenzione..........................................................................
Posizionamento dell'adesivo di avvertenza..........................................
Informazioni sulla garanzia......................................................................
Belangrijke veiligheidsinstructies...........................................................
Specificatie.................................................................................................
Lijst met onderdelen en accessoires.......................................................
Installatiegids.............................................................................................
Aanpassingsinstructies.............................................................................
Bedieningsinstructies voor zelfgenererend systeem..........................
Instructies voor de monitor......................................................................
APP-instellingsinstructies........................................................................
Opwarmen..................................................................................................
Problemen oplossen.................................................................................
Onderhoudshandleiding...........................................................................
Plaatsing van waarschuwingsstickers...................................................
Garantie-informatie..................................................................................
CATALOGUS · NEDERLANDS
ceNNUaaN
Imoortanti istruzioni discur ezza
5pecifiche
O4
o5
Llenco partieaccesson
O6
uia8 alinst818zone
lst ruzioni di regolazione
letninni ner endaleietarma diatnnanerarinn
三
lstnuzoni per llrnonitor
lstruzioni per la configurazione dell'APp
Riscaldarmento.
O
Risoluzione dei proble mi
Guida alla manutenzione
Poszionarmento dell'adesrvo d avertenz
Inforrmaziori sula oararzia
C0TaICCaIIA+NFTFNI aNN
Eelangriike veiligheidsinstructie
6
B
Deaficate
Liist met onderdelen en accessoire
E5
lnstallateqlda
3B
aanp assinasinstructes
E9
bedeninasinstructies voor zeiaenererend svsteem
43
Instructies voor de rmorto
145
APP-irstellirosirstructes
46
opwarmen
Problemen oplossen.
4
Onderhoudshan dleiding
48
Piaatsing van waarschuwingssticker
Gar antie-informmatie
SAFETY INSTRUCTIONS
Please keep this manual in a safe place for future reference.
This machine is only for home use. The Maximum user weight is 180kg.
Please wear sports clothes, sports shoes, or other proper clothes. Loose-fitting
clothing is not recommended, as loose clothing may get caught in the machine,
hindering operation and possibly causing an injury.
Please follow the instructions in this manual to use this machine. Please stop using
and operating immediately when you find any defective parts or hear any abnormal
sound. Make sure all issues are resolved before using it again.
The safe use of the machine can only be guaranteed if the regular maintenance and
repairs of undertaken, and worn out and broken parts are changed.
Please check all screws and nuts are properly tightened before using the machine.
Please use this machine on stable and horizontal ground level, and put a protective
layer on the floor or carpet to prevent a floor from damaging. Make sure the distance
between the machine and each obstacle is at least 2.0 ft (0.6m).
Always keep children and pets away from the machine. The machine is for adult use
only.
Please always pay attention to your body signals, improper use of the machine may
affect your health. If you experience any symptoms (including headache, chest pain,
irregular heartbeat, shortness of breath, dizziness, or any discomfort), stop exercising
immediately and consult your physician, get the permission before training again.
Please consult your physician to determine if you have any medical or physical
conditions that could put your health and safety at risk or prevent you from using the
equipment properly. Your physician's advice is essential if you are taking medication
that affects your heart rate, blood pressure, or cholesterol level.
It is very important to read the entire manual thoroughly before installing and using
the machine. Safe and effective training can only be achieved if the machine is
properly assembled, properly maintained and used. Make sure all users are familiar
with all warnings and precautions of this machine.
This machine is not for professional medical treatment.
SAFETY INSTRUCTIONS
EN
01
3rrINadcnaM
SAFETYINSTRUCTIONS
rease xeeptns manuaina sare piace ror ruture rererence
tisveryimportant toread the entre manuathoouglybeforeinstaing and using
themachne sate and efectve traning canory be achievedf the machine
propeyassertled,popetymantaned and used Mate sure alusers ae tama
wrn a warnnqs anaprc autons ar tns macnne
Pease consut vour ohvscan to determine rvouhave anvmedcalar ohvsc
condtionsthat couid putyourheath andsafety at riskor pevetyoufromusing the
eaupmert propery rourpnyscans aavce s essentsr you are tana meacano
tna arects your neart mte.baooa pessure.or cnoesteroi eve
Peaseaways py atentio toyour toaysgnis,improperuseof the macrinema
areetyourneatn r youexperenceanysymptomstncuonaneaaacne eest pa
reaarneatoe snornessar oreatn.aness.orany ascorot.stoo eercs
imrediateyand consutyour physician get thepermssionbefore tniningagai
Awaysieep chaaenana pets awaytromthemacine Themachine is tor aat u
omy
Peaseuse ths machine onstableand hoionta gound iovel andputaprotectv
aerontmenoa orcarpet topreventanoorrromaamaana ase sue tne aetanc
perween tne macnne anaeacn oostaoes ar east zu r tvom
rease cnecs aa scews ana nuts arepraoery tarteneaoeroreusna tmemacrne
ine sareuse or tre macnnecan any oeauaranteear tmereauar mantenancean
repars or unaertaen ana worn out ana orosen prts are cnanqe
Pease foowtheinstructionsn thismanuato use this machine Pease stop uing
ana opeauna mreaareywnenyounna ary areetve parts ornea any aonoma
souna. wae sure a ssues are esoveaoerore usng r aqan
Pease we sports cothes,sports shoes,ar otherproper cothes Loose-fttng
cotrnas nor ecormenaea.as oose cotnna may aer cauantn tne macnne
Eo
hindering apeation andpossibly causing an inun
ins macnnes ony ror nome use ine waamumuser wegrts eu
This machine is not for pofessionai medca treatment
The overall performance of the machine and all moving parts must be checked
regularly to ensure the safety of the machine.
If the moving parts are damaged, please do not use the machine until the parts are
repaired.
Keep the children away from the machine. The equipment is not for children to use
or play with. They can injure themselves accidentally.
Do not store the machine in a place exposed to direct sunlight, wind and rain,
or with high humidity. If needed, please pack the machine to keep children away
from touching or playing with it.
Care & Maintenance
For long-term use of this machine, please wipe the dust regularly. Do not water it
directly, or wipe with gasoline, abrasive powder, etc. Otherwise, it might cause
cracks on the parts or main body, electric shock or fire. Please use Dilute neutral
detergent for maintenance.
Please understand that for the consumable parts, the wear and tear may also occur
even with proper maintenance.
Please check if there’s rust or cracks after long-term storage.
This appliance can be used by children aged from 8 years and above and persons
with reduced physical, sensory or mental capabilities or lack of experience and
knowledge if they have been given supervision or instruction concerning use of the
appliance in a safe way and understand the hazards involved.
Before starting any training, please consult your physician, especially
for those who are over 35 years old or with pre-existing health
conditions. Please read all instructions before using the machine.
Children shall not play with the appliance.
Cleaning and user maintenance shall not be made by children without supervision.
SAFETY INSTRUCTIONS
EN
02
The ovea oertormance af the macine and almovina oarts mus be chece
regularty to ensure the saety of the machine
r tnemona pats are aamaaea. psease ao not use tnemacnineur tre pats a
eeptmecnaenawa rom tne macnine.ine eaupmentsnot rar enaaento u
or pay wtn.iney can nure tnemseves acoaemtay
mis appiancecanbe used ycadenaged tomgyearsandabove andperson
wtnreaceapnysc sensoy a memta caparates or aes ar epesence ane
noweaae r tney nave oeen asen supersonor nsructon concernna us ort
appaance n asare wa ana unaerstana tne nazarasnvovea
Uniaren snam nor pay wtn tne appanc
uenna ana uermartenance snanot ae maae oyeaaenwtrour superso
(3re31nen3n8
vonot store tme mcrnein aoiace eoosea to aecr sunsnt wnaanaran
orwth hghhumditylfneeded,please pack the machne to keep chdren awa
from touchngor playing with it
rease cnecxr tneres rust ar craos arter ong-termstoraq
Peaseunderstanathat tor the consmablepats,thewea and tearmay iso occ
cwen wtn poper maincnance
rorona-term usear tms macnne-oeas woe ne aust earar uonot warer
aecty or wpe wt aasoane aorasve powoe etc Unerwse.rmart cau
cracis on the parts armainbody eectrk shockorfie.Peaseuse Date neutra
aeteent rarmstenahce
O2曰
Bosttnntn.otyohdpdl
orowo o ycdo wpsgh
0dod1o D1c

EN
03
SAFETY INSTRUCTIONS
MR-R21
This svmbal stands tor"Contormte Europeene".which mean
"Contormitv wth Eu directives".With the CE-markina th
manutocturer conhrms that this product comolies wth aoolicabl
Lurooean directives and requlstons
Inis svmbol stands tor"UkConrormitv Assesser.wnichmean
UK
Lontormitv wtn Entsn 5tardards TT.Vitn the UN-markine
tne manuracturer conmrms tnat tmis proauct complies wt
applicaole British Standards
SIMPLIFIFD FLI DFCLARATION OF CONFORMIT
ierebv zheiana wulElecronic iechnoloavCo td.aeclares thatthe ntness eauipmen
MLRaLH MR-RZ1s in comoliance wth Uirectve ZU1a/5J/LU
he futext orthe tu deciration of contorrtvis avaable at the toliownairterne
atdreaehttreimerarhft rnmiraoes/erlaatinne-nsrnnfrrmit
NCTESONDSPoSal
racxaaina marerals are rawmaterals ana can pe recvclea separate ne
packaaira materials correctlv ana aispose or rem propevn tre nterest o
ur local administration can provide additional information
tsed devas ao nat belona in naisenald waste
Uspose orusea aeces propevUoina so nelps Turllour responsiDtvt
protact the environmert.rour Iocal administration can provde intormator
an collection points and openinq hours
aarreres oo nor pelonq in nousenolo wasre
As the end user vou are leoallvreauired to return discharoad batteres t
a colection ooint.You can take vour old batteries to the publc collectior
points nyour community or you can taie them to any place where batterie
o'that type are beir salc
Manufoctured byz
lmported byi
Zheiiara Yulu Electronic Technoloav CoLtd
HANGZHOU INGGE E<OMERXE LIL
Rocmm 8o5,8th Floot,Xianfeng
Room 12o5,xisnfeng Technolcgy 8ulding
Technology Building 2ssWehye Road
25eWeaaaUyn5uba8tct
Binjisng Distnict Hangzhou
Einjiang Distrct,Hsnqzhou
Zhejiang Province,Chinz
Zhejiang Prowinxce,Chins
yulu mmrlamerach.con
jingge_mrke163.corr
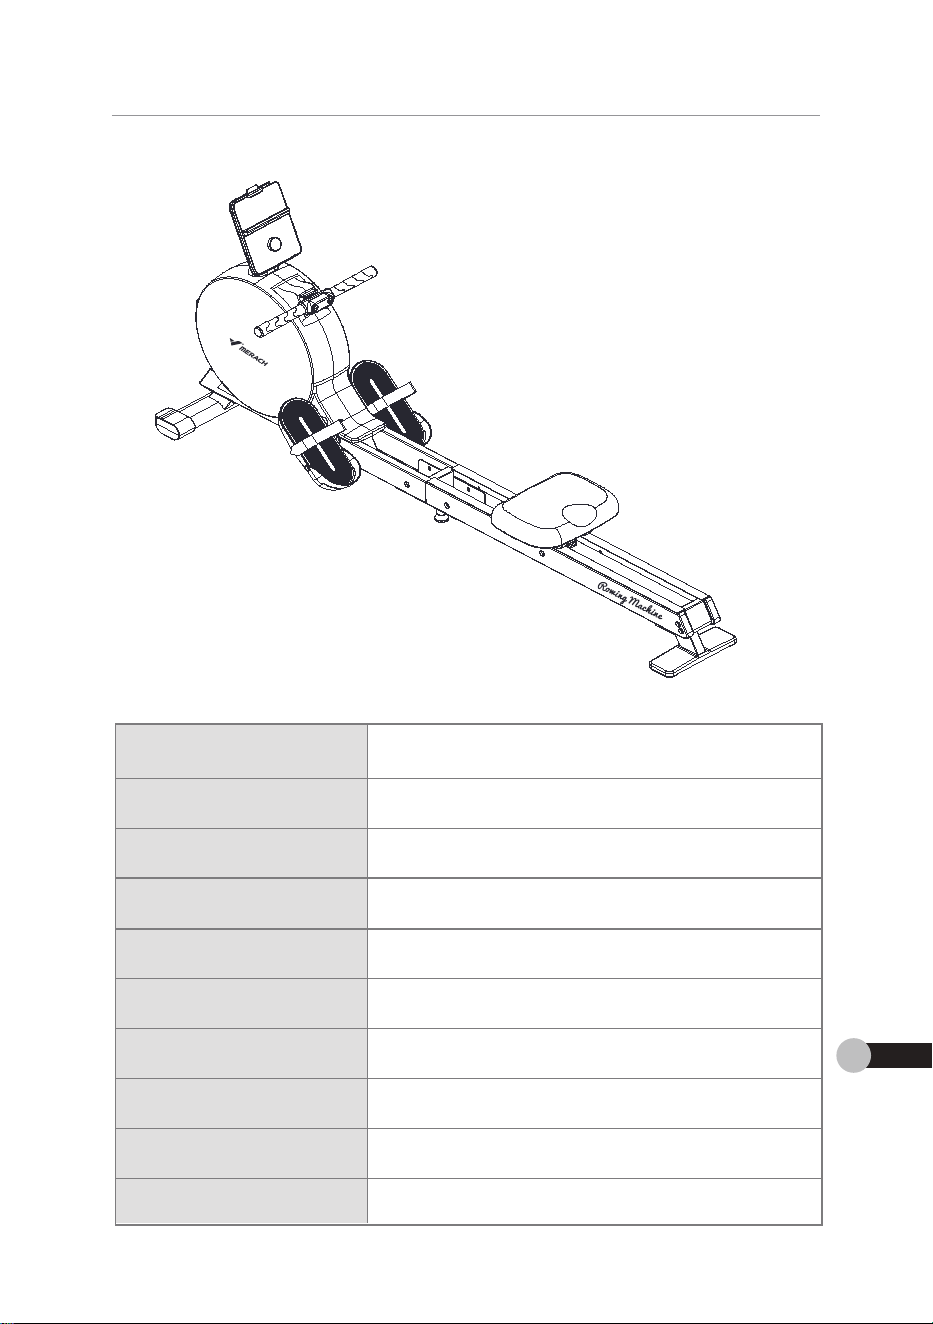
SPECIFICATIONS
MERACH NovaRow Q3 Self-generating
Electromagnetic Rowing Machine
MR-R21
16 Level Magnetic Resistances
180kg
Within 60 Minutes
Product Name:
Model:
Resistances:
Weight Capacity:
Recommended
Exercise Time:
L1786*W453*H798mm
Machine Dimensions:
25.5kg
Net Weight:
2.4GHzRadio Frequency:
2402-2480MHzRadio Frequency Band:
1.48dBmMaximum RF Power:
SPECIFICATION
EN
04
sPEeeces
MERACHNovaRow O3 5eIf-aeneratinc
Progutamg
RertrnmannotirRnuinn Marhn
tn℃意
6 LevMaontc Ristance
8oig
Weght Capacity
Rgcommmgnggd
thn0nutee
上xr℃5食m
3chine Bmmans ons
e453'Hemm
高5g
o4E
tght
24GHz
Radio FrequenCy;
24O2-248OMHz
R3n 0reauenGyeand
L48dm
axmummR+Poer
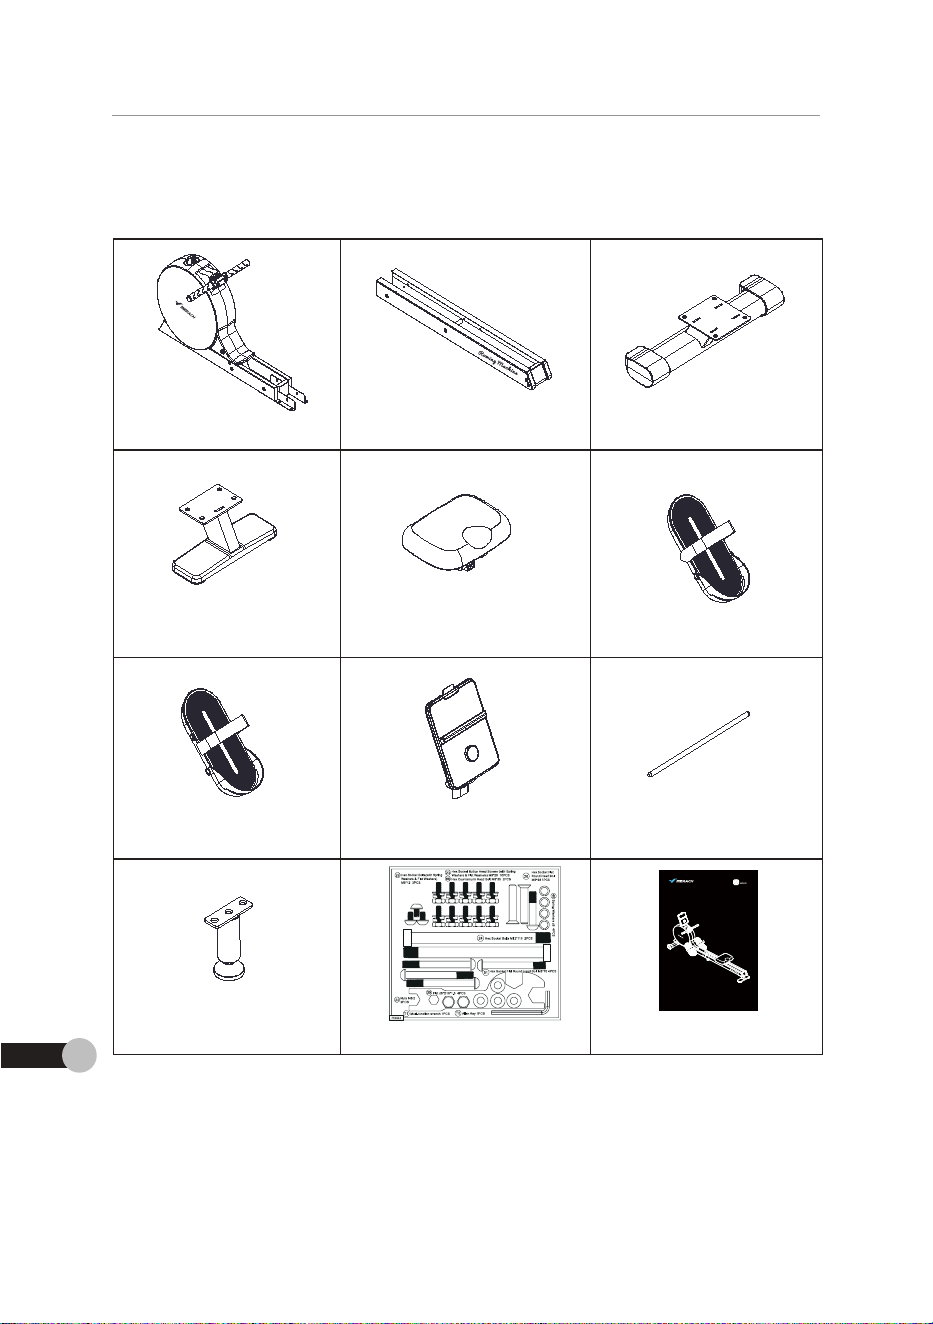
Check if all parts and accessories are in the package.
PARTS & ACCESSORIES LIST
A1 Main Frame A2 Slide Rail A3 Front Foot Tube
A4 Rear Foot Tube A5 Seat Cushion A6 Left Pedal
A7 Right Pedal A8 Monitor A9 Pedal Limit Shaft
A10 Support Foot Pad A11 User Manual A12 Screws & Kits
PARTS & ACCESSORIES LIST
EN
05
USER MANUAL
MERACH NovaRow Q3 SELF-GENERATING
ELECTROMAGNETIC ROWING MACHINE
POWERED BY
MODEL: MR-R21
Questions or Concerns?
IMPORTANT!
Please read all details before use, and keep this user manual for future reference.
PLEASE CONTACT US BEFORE THE RETURN: Mon-Fri,9:00 am-5:00 pm PST/PDT
Phone: 44-1315070255 Mon-Fri 10am-7pm PST UK/DE/FR/ES/IT/NL
EN • DE • FR • ES • IT •NL
PARTS& ACCESSORIESLIS
Checkf a pats and accessories are in the package
A3Fot FootTub
AarooII
A5Sat Cnshio
1
AAgtAdal
A9P4a1t5ad
a30o1+1
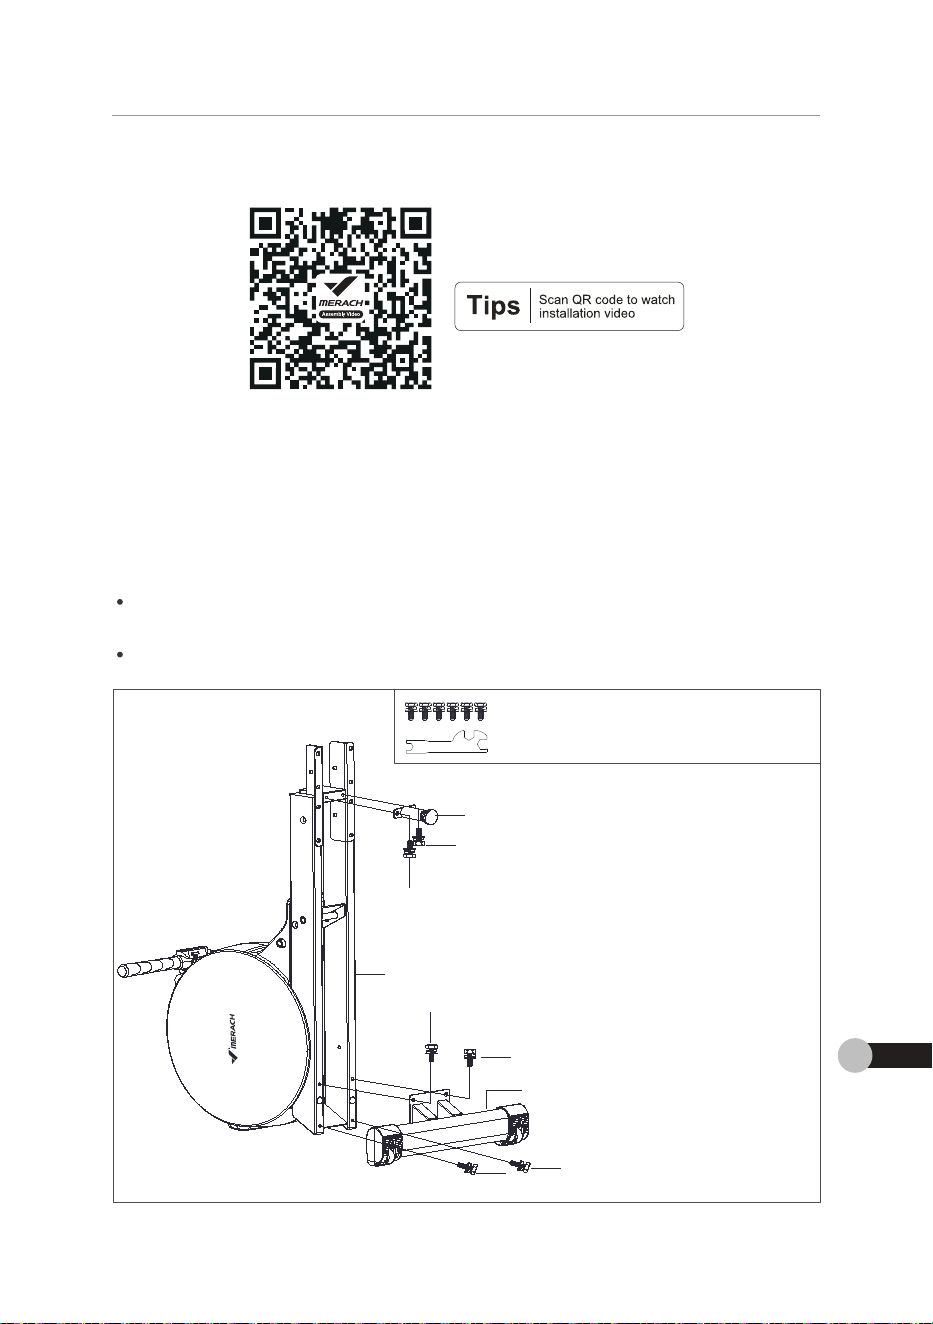
STEP1: Assemble Front Foot Tube & Support Foot Pad
INSTALLATION GUIDE
A. Attach the Front Foot Tube(A3) on the Main Frame(A1) with 4PCS Hex Socket Button
Head Screws(23) by the Multi-function Wrench(T1).
B. Attach the Support Foot Pad (A10) on the Main Frame(A1) with 2PCS Hex Socket Button
Head Screws(23) by the Multi-function Wrench(T1).
NOTE:
To prevent the machine from toppling over, it is recommended that two people assemble
this step together.
The Hex Socket Button Head Screws(23) includes the Spring Washers and Flat Washers.
A10
A3
A1
23
23
23
23
23
23
#23 Hex Socket Button Head Screws 6PCS
#T1 Multi-function Wrench 1PCS
INSTALLATION GUIDE
EN
06
FBTMLATCN GJD
s10ec0B
I8cin 0H code u sabd
pS
STEP1:Assemble Front Foot Tube & Support Foot Pac
A Attach the Font Foot TubaAa ontheMan Frameta wth 4PCs iex socet auto
Head screwsz3 bv the Muit-unction WrenchT1
a Attach the suooortFaotPad(aOIon the Msn ramaAlwthzpCs rex Socet Huto
Head screwsz3 bv the Muit-tunction WrenchT1
F
To prevent the machine trom tappling over.t
mmendod th at twopeople assemb
this step together
TheHex socet auttonead screwzancudes thesprna vashersandFatvasher
t73HSotBtohHad Smws 6PCS
xtorhC
oE
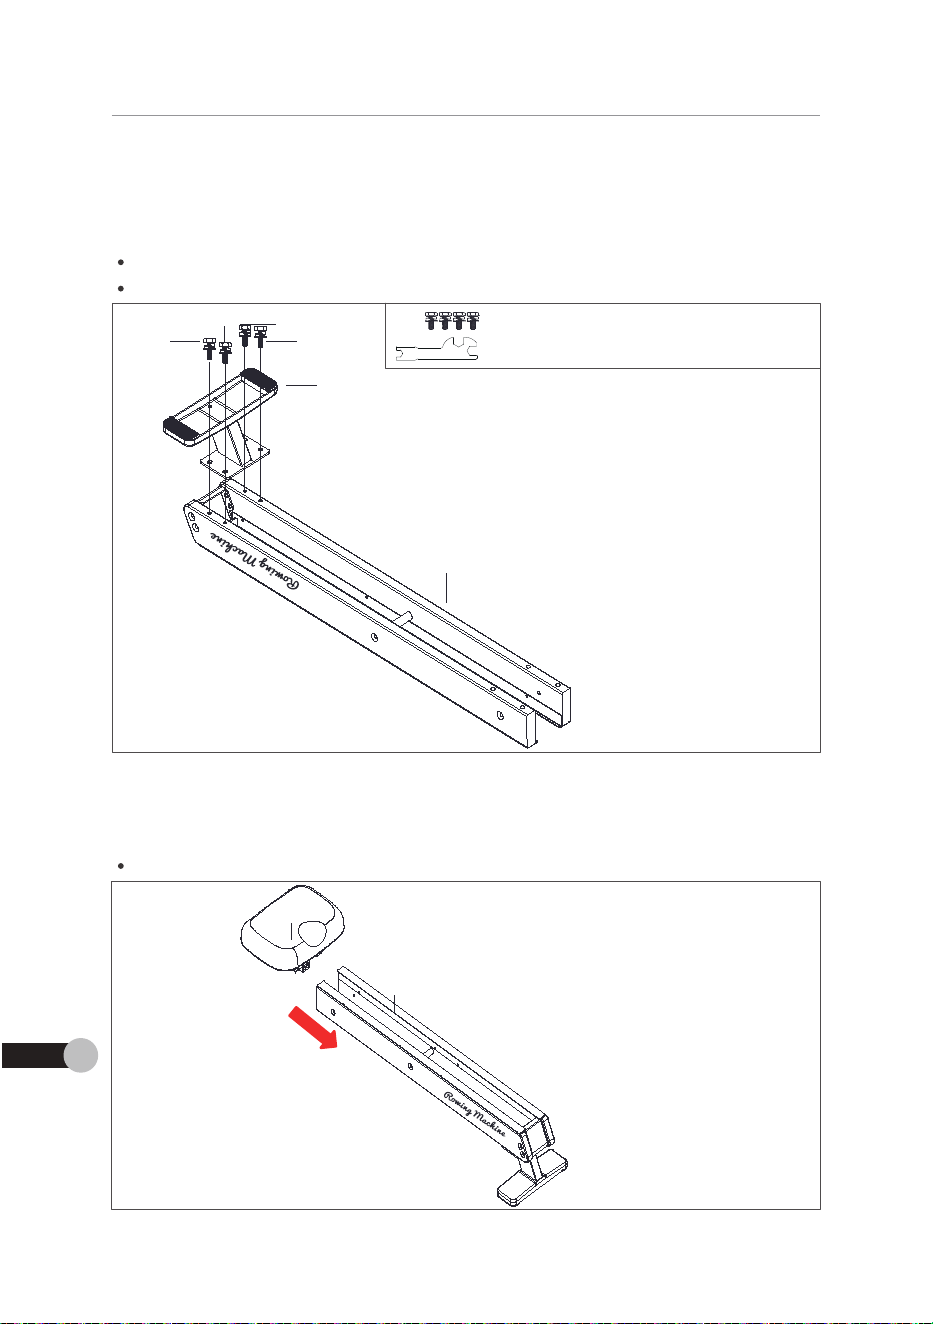
STEP2: Assemble Rear Foot Tube
A. Attach the Rear Foot Tube(A4) on the Slide Rail(A2) with 4PCS Hex Socket
Button Head Screws(23) by the Multi-function Wrench(T1).
NOTE:
Please first check that all the screws are tightened before installing next step.
The Hex Socket Button Head Screws(23) includes the Spring Washers and Flat Washers.
STEP3: Assemble Seat Cushion
A.Put the Seat Cushion(A5) into the Slide Rail(A2) in the direction of the arrows.
NOTE:
As shown, keep the Seat Cushion(A5) in the right direction.
23
23
23
23
A4
A2
A2
A5
#23 Hex Socket Button Head Screws 4PCS
#T1 Multi-function Wrench 1PCS
INSTALLATION GUIDE
EN
07
5TFPZAAsemhle Rear Faot Th
A atarhtheosrFnrt Tuhaaa1nnthectoBsuanuth aBre Hacnrio
Button Head screwsl1 bv the Mut-function WrenchT1
Pease hrst chec that a the xews are tontened betoreinstaina net steo
The rexSaciet autonread screwZlndudes he sornaVashers and PatWashe
#T1MIPJon 1PC
STEP3 Assemble Seat Cushior
APut the seat CushonAslintothe sde RaaAzin the arectonof the arows
E
As shown keep the 5eat CushionA5 in the rqht direction
巨
A1
A2
22
39
40
91
88
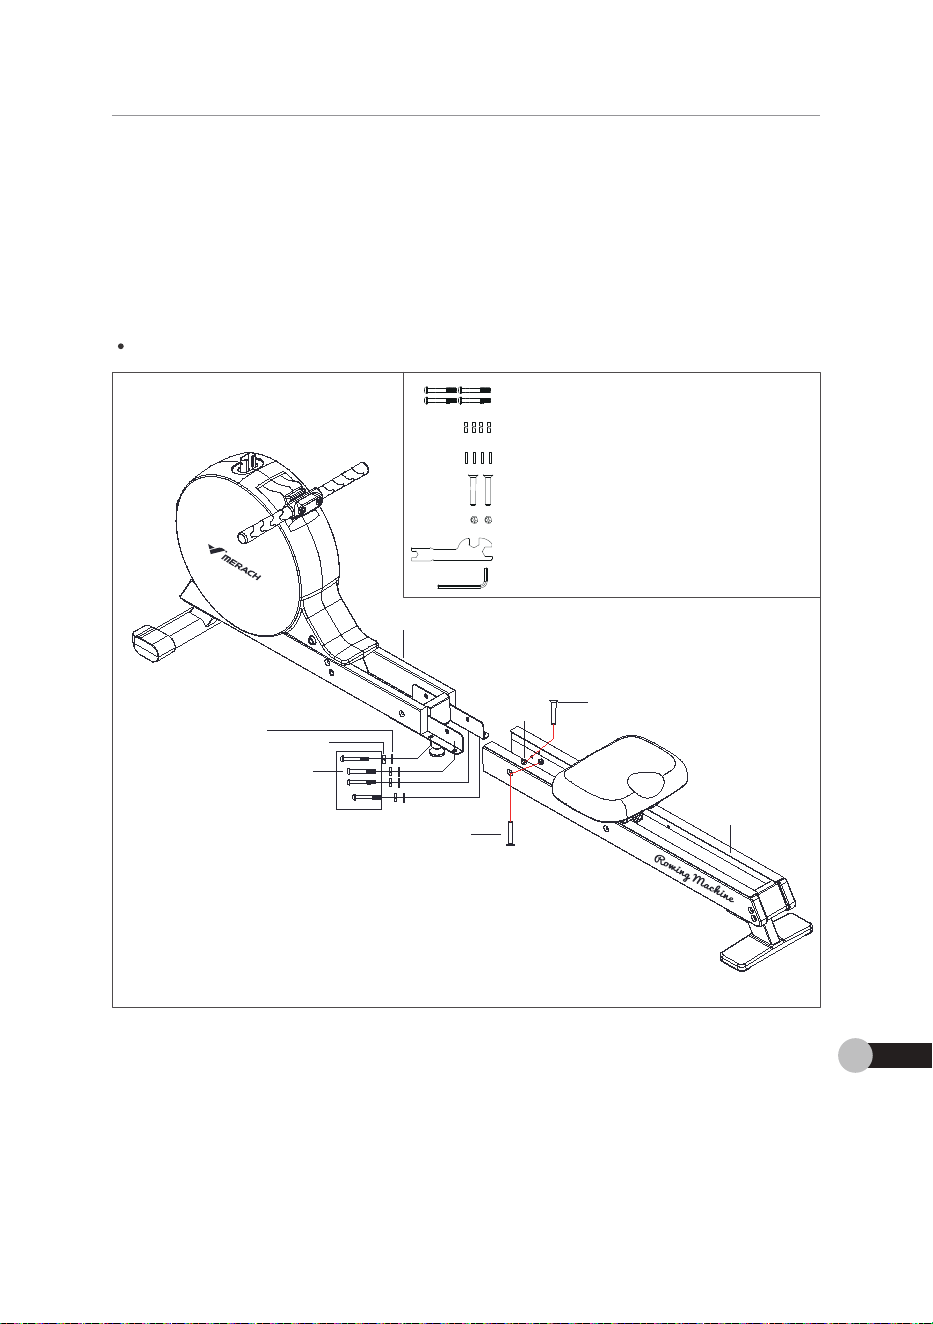
STEP4: Assemble Slide Rail
A. Attach the Slide Rail(A2) from the outside with 2PCS Hex Countersunk Head Bolt(88),
2PCS Nuts(22), the Multi-function Wrench(T1) and the Allen Key(T2).
B. Install the Slide Rail(A2) on the Main Frame(A1) with 4PCS Hex Socket Flat RoundHead
Bolt(91), 4PCS Spring Wrench(40) and 4PCS Flat Wrench(39) by the Multi-function
Wrench(T1).
NOTE:
It is recommended that two people assemble this step together.
88
#91 Hex Socket Flat Round Head Bolt 4PCS
#40 Spring Wrench 4PCS
#39 Flat Wrench 4PCS
#88 Hex Countersunk Head Bolt 2PCS
#22 Nuts 2PCS
#T1 Multi-function Wrench 1PCS
#T2 Allen Key 1PCS
INSTALLATION GUIDE
EN
08
FETuLATCN GJD
5TFP4!AA8ahle 5ide Rai
A.atachthe sade RawAzromthe autse wth zrCsHex Countersunk read aataa
zpCs Nts/Zzl the Mut-function VrenchfT1 and the AenKevTz
a.Instathe sde rawAzontheManFramelAwth 4PCsHex SocetPat Roundrea
Hats 4PCs sorna Vrencn4Ol and 4Pcs Fat VrenchsIbvthe Mt-tuncto
rench
t is recommended that two poople assemtie this steptogethe
1 HSoxktRatRod Had Edlt 4PRC
1Hl#40 SomgWarh 4C
IlII#33AatMah 4CS
Uoia d aI 0K
#Nh
#TMHxHon MxhPC
a的
91
CE
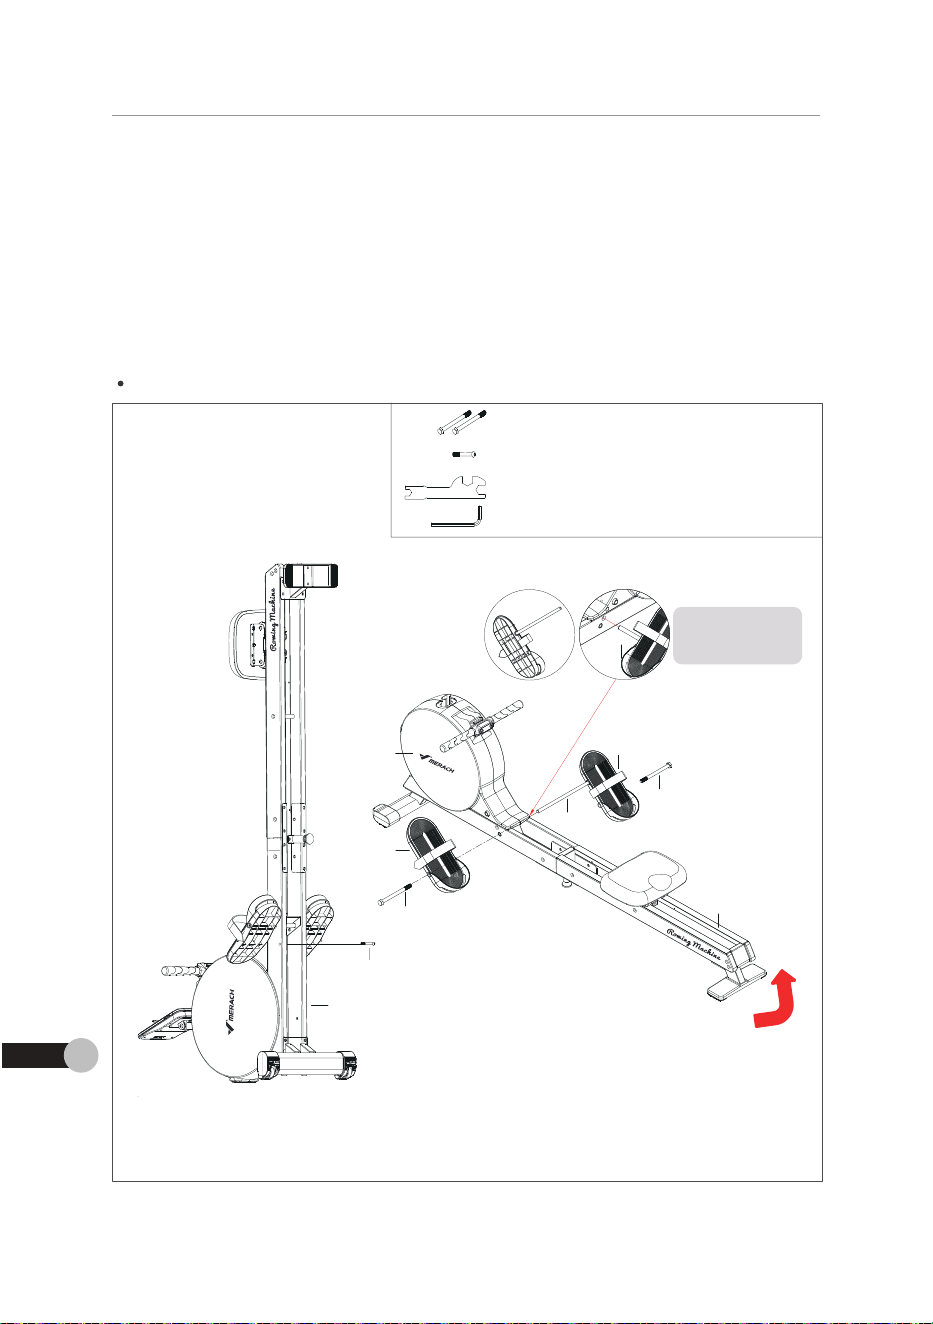
STEP5: Assemble Pedal
A. Pass the Pedal Limit Shaft(A9) through the Right Pedal(A7), the Main Frame(A1) and
the Right Pedal(A6) in sequence.
B. Attach the Right Pedal(A7) and Left Pedal(A6) into the Main Frame(A1) with 2PCS Hex
Socket Bolts(24) respectively.
C. Tighten 2PCS Hex Socket Bolts(24) with the Multi-function Wrench(T1).
D. Lift the machine up in the direction of the arrows (Figure1), fix the Pedal Limit Shaft(A9)
with 1PCS Hex Socket Flat Round Head Bolt(26) and the Allen Key(T2) completely.
NOTE:
It is recommended that two people assemble this step together.
#24 Hex Socket Bolts 2PCS
#26 Hex Socket Flat Round Head Bolt 1PCS
#T1 Multi-function Wrench 1PCS
#T2 Allen Key 1PCS
INSTALLATION GUIDE
EN
09
Figure 1
Figure 2
A1
A1
A7
A9
A2
26
24
A6
24
A7
Please insert the Pedal
Limit Shaft(A9) into the
higher hole.
FETuLATCN GJD
5TFP5 Ns8ehlePeHA
A Pass the PedaILmit sartAs throuah theoontPedaA7 the Man FrameAan
the Raht PedaAlin seauence
a Attachthe oontPedsA andLetPeawasl irto theMainFrametAwth zCs He
Socet Bots241r5peCtwev
C TiontenzPCs Hex 5ocet Boltsz4wththe Mut-functonVrenchlT
D.Lrthe machneupinthedrecton arthearows rioure f the PedalLmt shartae
th 1Pee Havcnrtat RatRnndHes RH>R snd tho aonKovTIrrmrltah
MoTE
t isrecommended that two peope assemble this steptogether
#24Mx5o1R83P
tf HsChhatRatBhh HalR IBT
'#T1Mtxfon WxhPC
a的P
上1L[e
Figure1
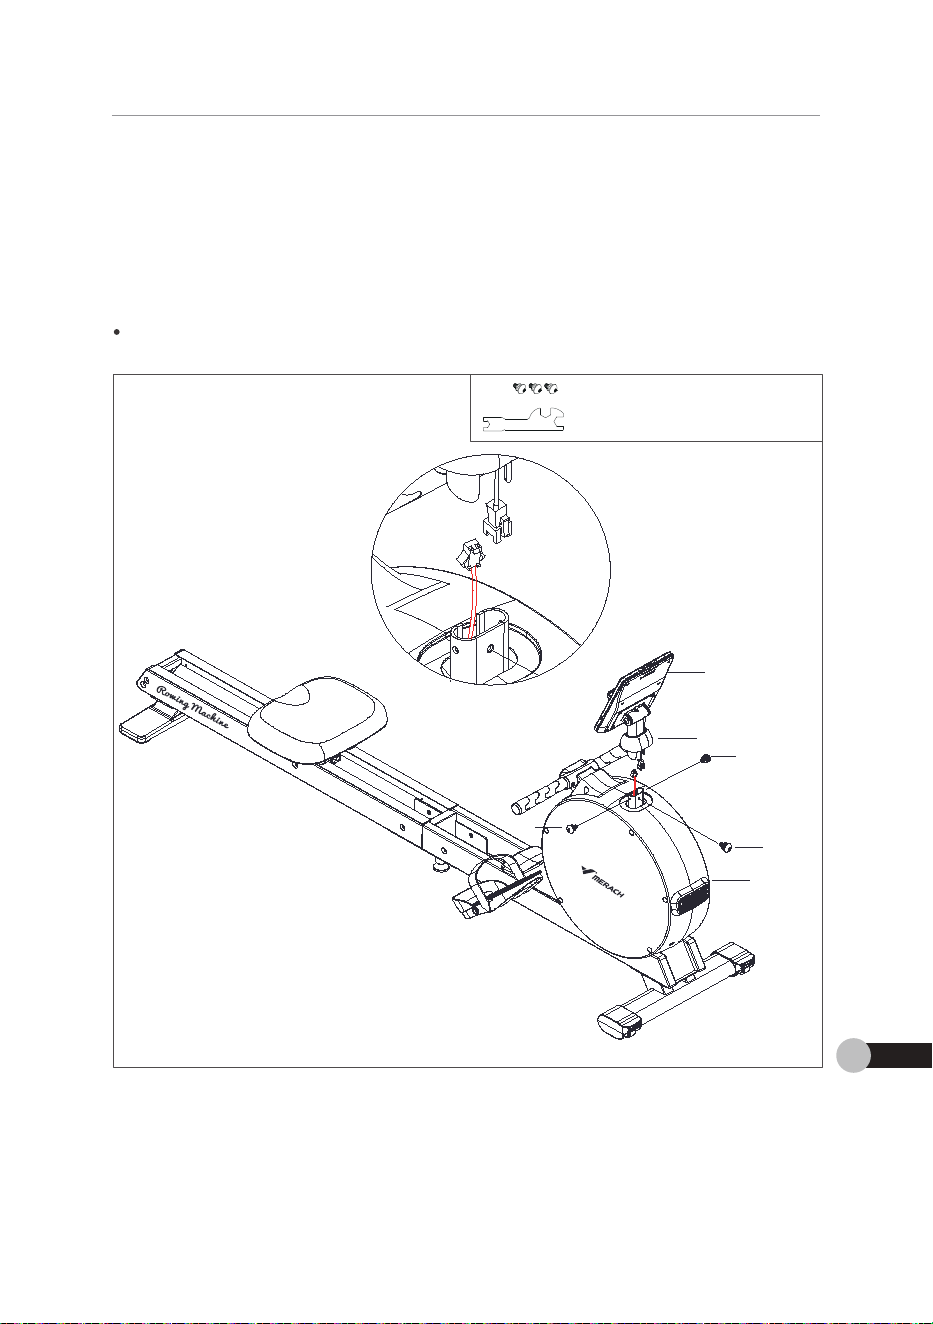
#29 Hex Socket Bolts 3PCS
#T1 Multi-function Wrench 1PCS
NOTE:
The Hex Socket Bolts(29) includes the Spring Washers and Flat Washers.
STEP6: Assemble Monitor
A. Connect the wires of the Monitor(A8) with the Main Frame(A1)(Figure1).
B. Attach the Monitor(A8) with the Main Frame(A1) with 3PCS Hex Socket
Bolts(29) and the Multi-function Wrench(T1).
C. Put the Decorative Cover(47) of the monitor into the groove of Main Frame(A1).
29
47
A8
A1
29
29
Figure 1
INSTALLATION GUIDE
EN
10
FETuLATCN GJD
5TFP6!A4sarhle Manita
A.Connect the wires of the MonitortAgl wththe Man FramelAWFoure
a.Attachhe MontoiAglwiththe MainFrametA1 wth 3rCsHex 5ocke
Boltsz9l and the Mut-function WrenchT1
C Put the Decoratve Cover471of the monitorinto the aoove ar MainFrametA
MoTE:
TmeHex 5ocket Batsz)incdes thesprna WashersandFlatVashers
000 RNH 3oo6 3K
-U℃sT1Muttxtom Weed tPC3
Fgure
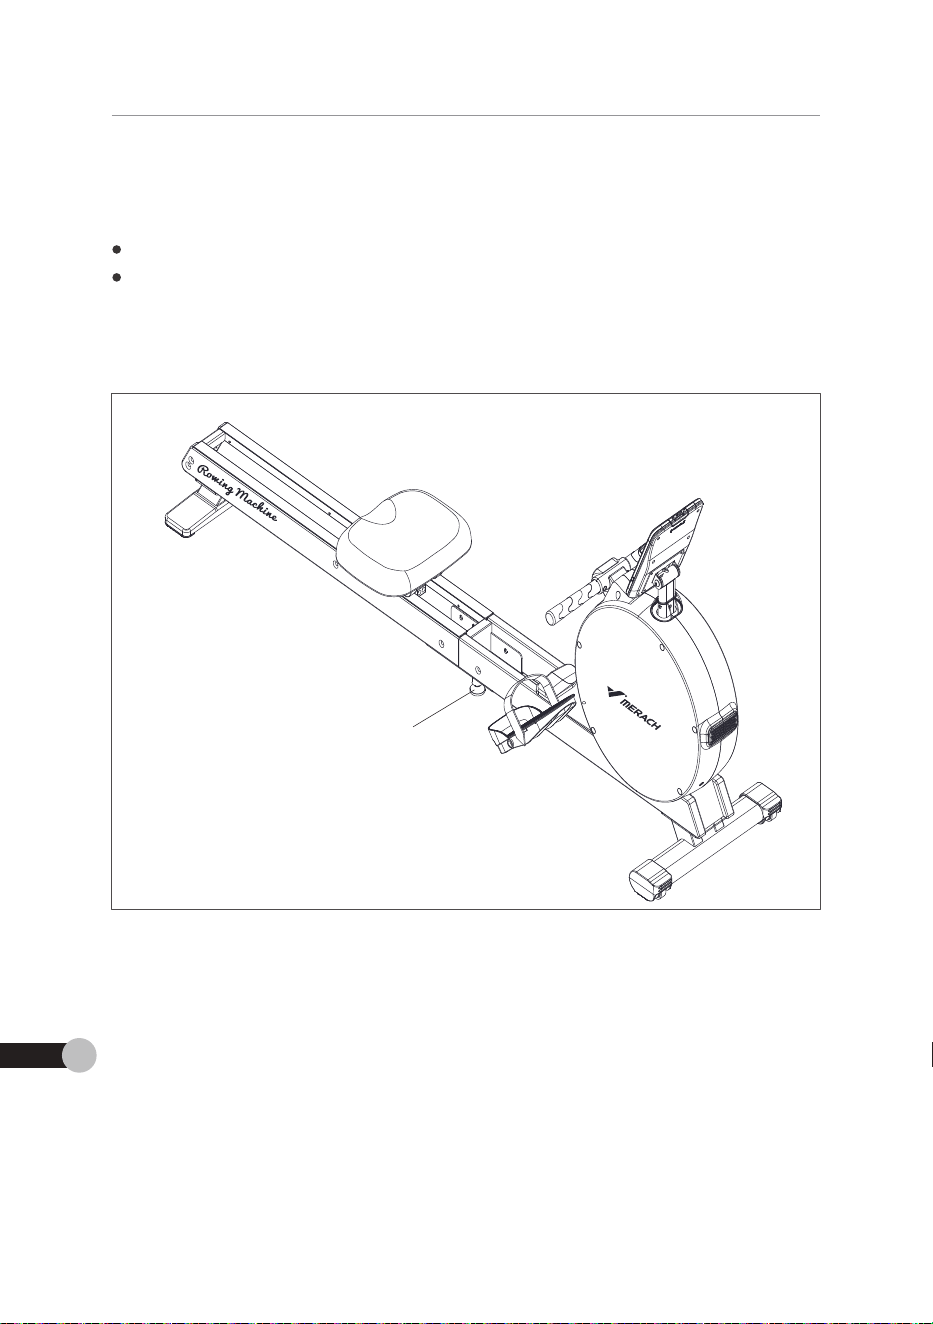
ADJUSTMENT INSTRUCTIONS
Foot Pad Adjustment Instructions
When using, adjust the Support Foot Pad (A10) to 3-5 mm from the ground.
If you find that the head of the machine is tilted after use, adjust the
Support Foot Pad (A10) to 5-10 mm from the ground
ADJUSTMENT INSTRUCTIONS
EN
11
A10
ADJUSTMENT INSTRUCTIONS
Foot Pad Adiustment Instruction
ven usina adust the suooortFoot PadtAol to3 mm tromthe aroune
t you tind that the head of the machneis ttedafter usa. adust the
5uooort Foot PadlAY0l to5-O mm trom the around
AO
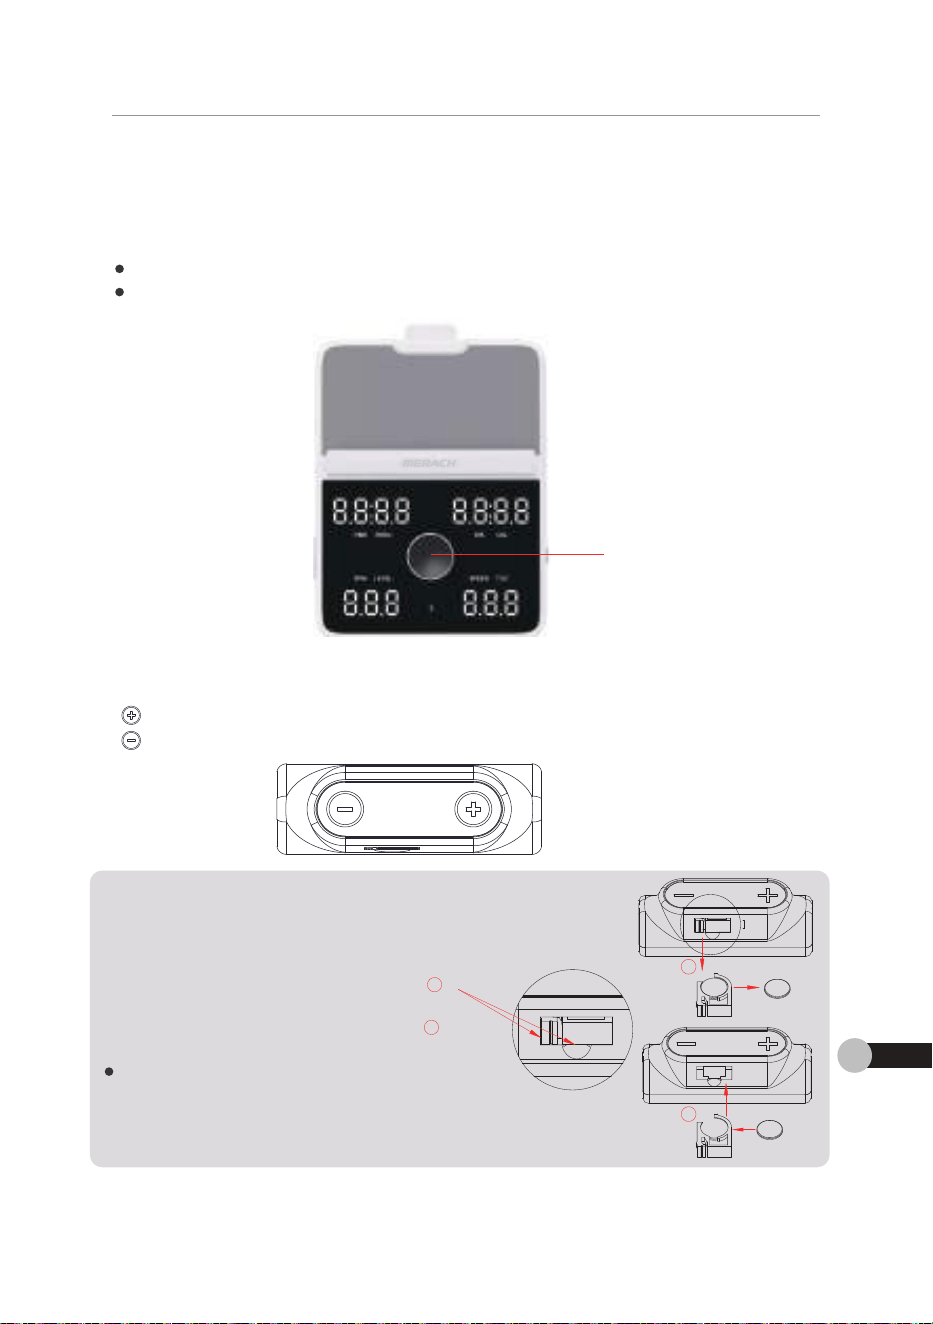
Adjust Resistance Instructions
METHOD1:
METHOD2:
This equipment have three methods to adjust the resistance.
Press the Wireless Handle to adjust the resistance.
" ” Button: Increase Resistances (1-16).
“ ” button: Decrease Resistance(16-1).
METHOD3:
Rotating the knob of Monitor(A8) to adjust the 16 Level Resistances.
Clockwise Rotation: Increase Resistances (1-16).
Counterclockwise Rotation: Decrease Resistance(16-1).
ADJUSTMENT INSTRUCTIONS
EN
12
A8
Replace Battery Instructions
Pull out the battery compartment along the
direction indicated by the arrow (Figure ),
replace the new battery, and then reinstall
it into the battery compartment (Figure ).
The Mode of Button Battery is CR2032.
1
2
battery
battery
1
2
METHOD3:
Adjust the resistance follow the Rehearsal Course Automatically.
Adiust Resistance Instructions
Ihis eouipment have three methodsto adust the resstance
METHoDL
kotatnathe knoo or wonitor aa to adusttne 1bLevelkesistance
Clockwise Rotation:Increase Resistances (116)
Lounterciockwise kotation Lecrease kesistancel1b-1
吕 吕
E口
ress the wireiess Hande to adust the resistance
"OButtonIncrease Resistances (1-16
C"button: Decrease Resistancef16-1
Reolace Batt ervlntructon
Pul out the battery compartment akong th
directon indcatedby the arrow(Fgure 0
reolace the new batterv andthen reinsta
t into the battercomoartment Fiaure w
*TModo1B16nBa1HCR03
EH@口3
Adiust the resistance follow the Rehearsal Course Automatically
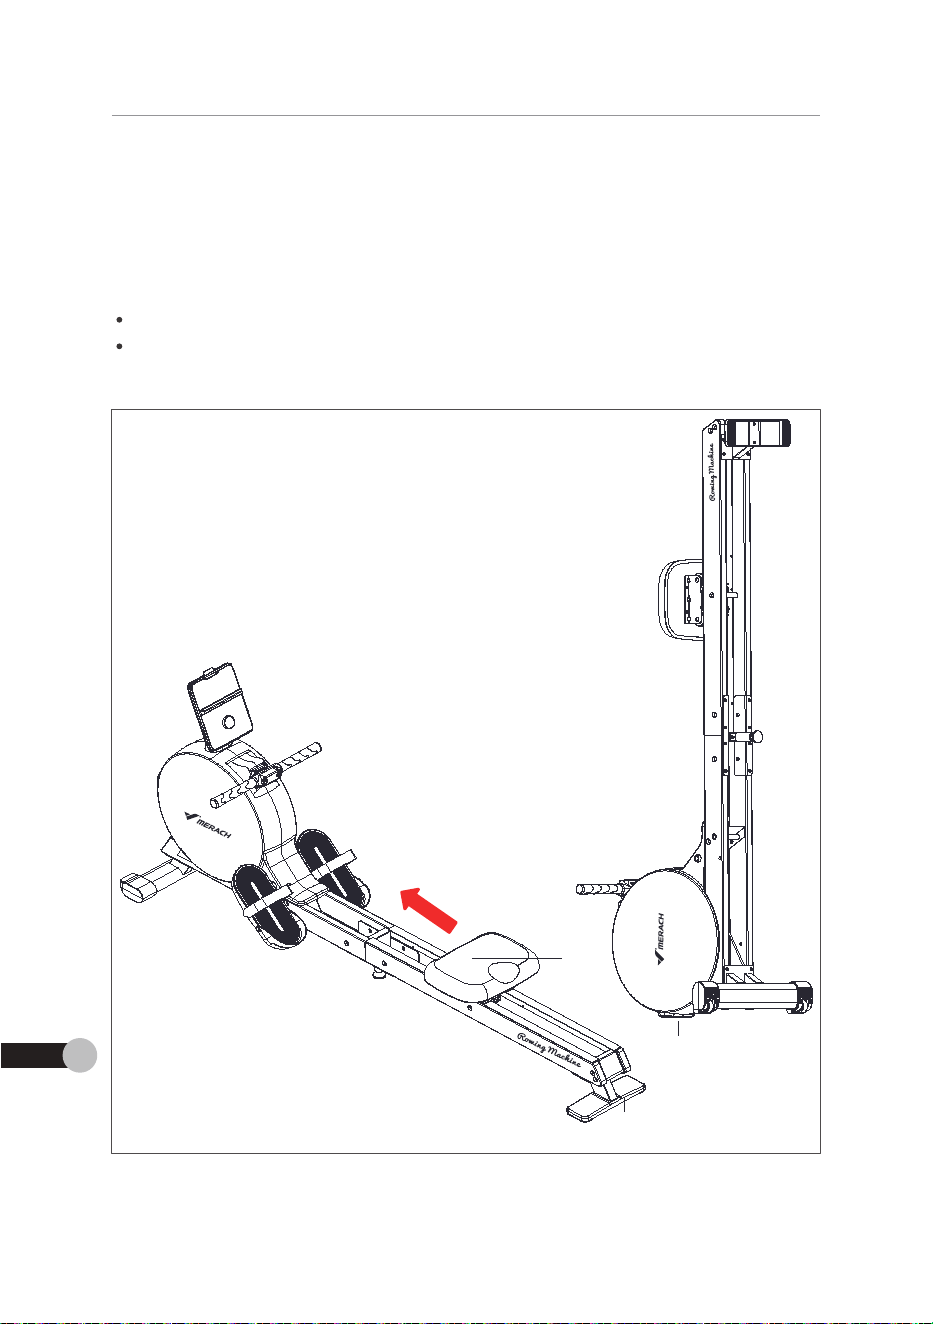
Storage Instructions
A. To prevent the Seat Cushion(A5) from sliding down, put it into the front end
of the Slide Rail(A2) firstly.
B. Grasp the Rear Foot Tube (A4) with both hands and lift the machine in the
direction of the arrow until the Foot Pad(64) touch the ground at the same time.
NOTE:
Be sure to place the equipment against a wall or in front of a fixed surface when placed vertically.
Be sure to place it in a safe place away from children to prevent them from being hit.
A5
A4
64
Figure 1
Figure 2
ADJUSTMENT INSTRUCTIONS
EN
13
11i1
Storaqelnstructions
A.To preventthe SeatCushionA5)from sidina down.put it into the frontene
of the Slde KalaZ)firstv
s.Crasp tne tearroot Iube laawtnpotm nanas ana irttme macrineintne
arecton or tne arrow untatnerootraatbatoucn tne arouna attne same tme
MoTE
Hesureto pcetheeapmentatawaornrotorared stacewen pcea vetca
He sureto phcetin asae place awaytrom cdren to revet themrom benar
Fiqure2
Fgure 1
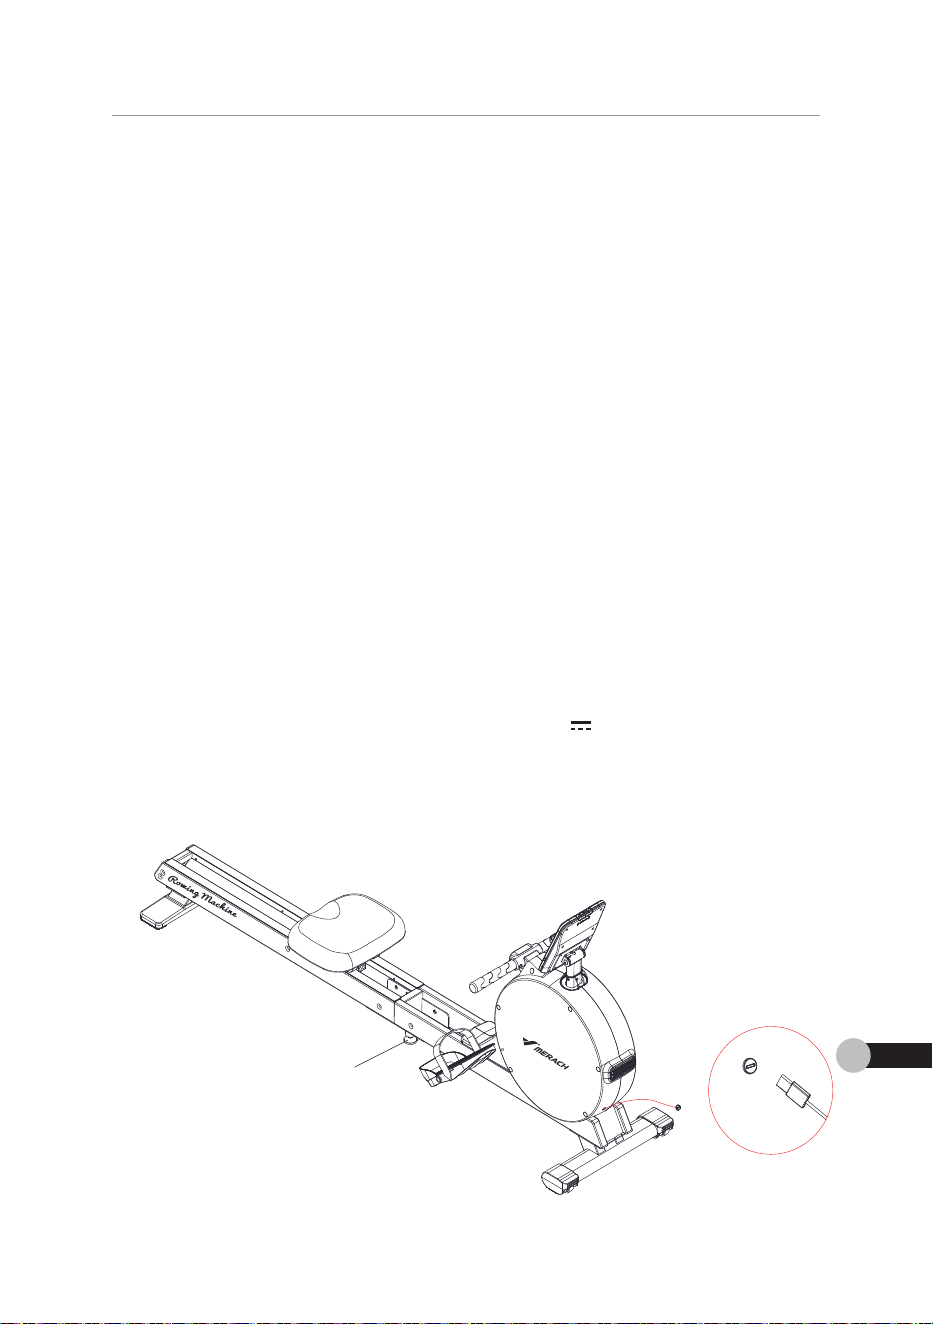
SELF-GENERATING SYSTEM OPERATING
INSTRUCTIONS
Start by initiating motion; after the system receives the signal, turn the knob
to poweron. The machine enters standby mode and can be connected to the
Bluetooth app orstarted directly.
Press the knob or operate the machine to commence normal movement. The
knobwill display workout parameters, and rotating it adjusts resistance
levels.
During exercise, the built-in generator produces electricity to power the knob
displayand resistance adjustment. Extra energy is intelligently converted and
stored in thebuilt-in energy storage battery.
When exercise stops, the energy storage battery continues to supply power
to theknob and resistance adjustment system. lf there is no activity for 3
minutes, the knobenters sleep mode, and the battery power system goes
into deep sleep to preserve energy.
lf the device is unused for an extended period, the energy storage battery
mayexperience slight power consumption, potentially leading to insufficient
battery capacity.If the machine continuously runs without display or flicker-
ing, run the machinecontinuously for over 10 minutes to charge the energy
storage battery. Alternatively,charge the battery through the universal
USB-C port at the rear of the machine(Input: 5V 1A). This ensures the
battery has sufficient power to drive the knob andallows simultaneous
charging during workout sessions.
1.
2.
3.
4.
5.
SELF-GENERATING SYSTEM OPERATING INSTRUCTIONS
EN
14
A10
SELF-GENERATING SYSTEM OPERATING
Sk0ees
1.Startbvinitiatina motion after the svstemreceives the sional turn the ino
to poweron. ine macnine enters stanapv moae anacan pe connectea to tn
bsluetooth app orst arted directhy
∠rress tne inop or ooerate tne macrine to commence normai movement.In
xnobwaispiay workout parameters.ana rotauna it adusts resistance
evels
5.Uurnaexerase tne put-in aenerator proauces eiectncrtv topower tne xno
aspiavana resstance aaustment.Extra enerayis nteigenty corverteaane
stored in thebuilt-in energy storage battery
a.When exercise stoos.the enerav storaae batter continuestosuopl powe
to theknob and resistance adiustment system.fthere isno activity for
minutes,the knobenters sleepmode,andthe battery powersystem goes
into deeo seeo to oreserve ererov
.fthe deviceis unused for anextended period,the eneray storaae batten
mavexperience sant powerconsumpuon potenuaiv ieaana to insuriaen
batterv caoactvr tne macrne conunuousv runs wtnout asoiav oricxer
na.run the macninecontinuousy torover v minutes tocnarae the enera
storaae batterv. aternatveivcrarae tne patterv tnrouan tne unversa
USBC port at therearofthe machine(Input5V -1A).This ensuresthe
batterv has suricient power to arve the knoo andaliows smutaneous
charaina durira workout sessions
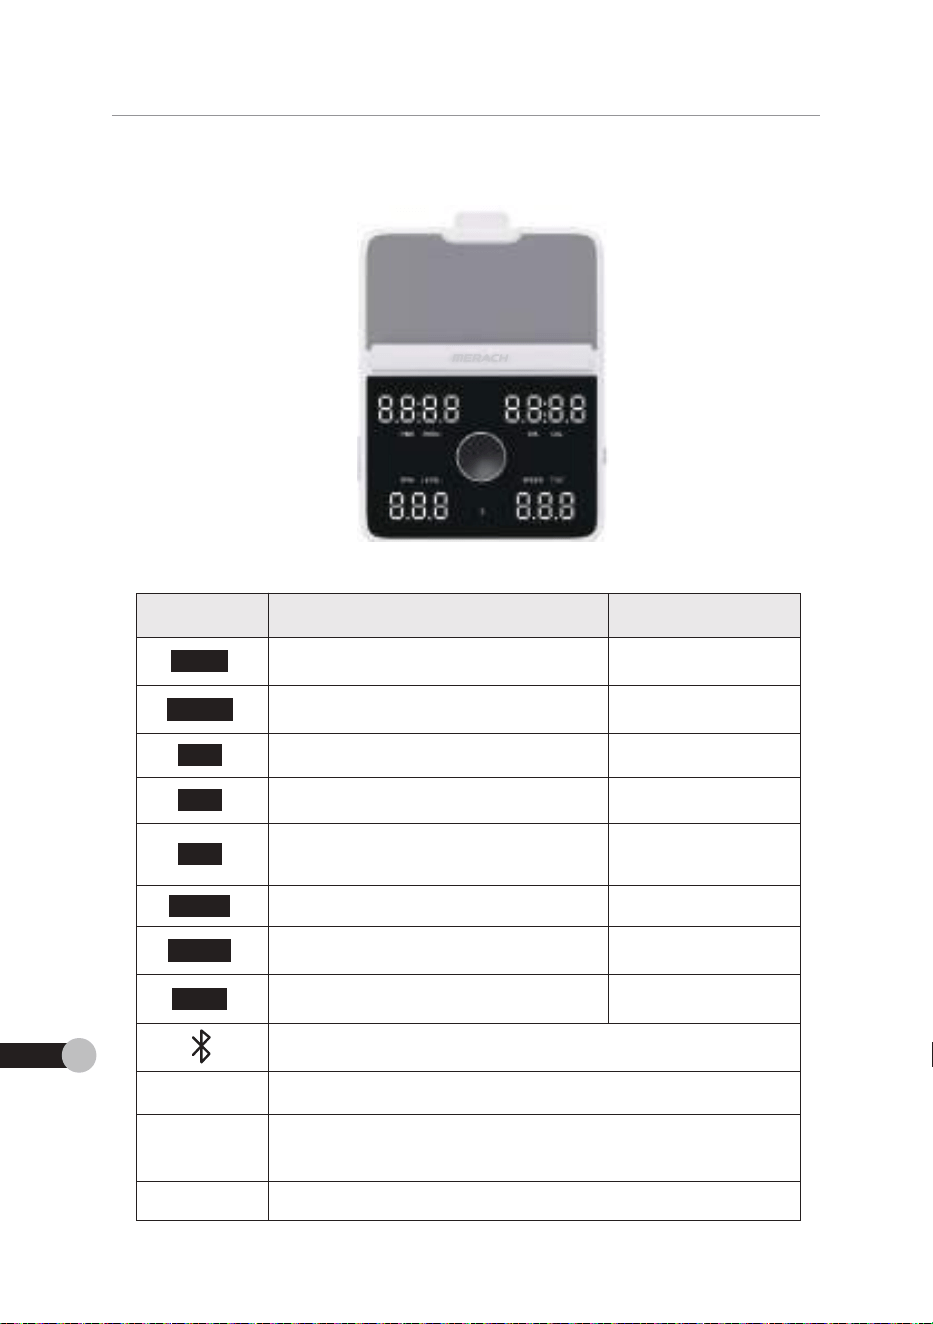
INSTRUCTIONS OF MONITOR
INSTRUCTIONS OF MONITOR
EN
15
Current time for exercise
Current distance for exercise
0-9999
Current Resistance Level for exercise 1-16
The distance of exercise per one hour 0.0-9999 km/h
The total strokes of all workout 0-9999
Display the Bluetooth connect, not when Bluetooth heart
rate is connected.
Free Training
Mode
When in standby, the speed window shows P01.
Pause Mode
APP
MERACH, KINOMAP
DECRIPTION RANGE
ITEM
TIME
/500m
DIS
00:00-99:59
00:00-99:59
0.0-9999 km
0.0-9999 Kcal
Ⅰ. Description of Instrument Functions
After stopping for more than 5 seconds during the movement,
the device enters the pause mode and the speed window
displays “PAU”.
Real-time estimation of time/500m at
the current stroke speed
Current calories burned during the
exercise
Number of a strokes per minute,
indicating the stroke speed during
exercising
CAL
SPM
LEVEL
SPEED
TOC
INSTRUCTIONS OF MONITOR
吕
I.Descriotion of Instrument Function
RANGE
TE
OooO今S5S
eurrent tmetor exercsd
Rcal-time estimation of timc/0Om at
ooooS5
I5Com
the current stroioespecd
D临
o.o-SSSom
Current dstance tor exercis
Current cakories burned durina th
OOCa
Number ota stroks oer minute
SP
C-SSS
inacating the strowe spoeaauning
rCn
LEvE
Current Resistance Leweltor exercis
SPEEo
The dstance of exercise oer one hou
OO-eamn,r
C-SSS
TCc
The tota strokes of alworkout
Displav the aluetooth connect not when auetooth hear
ratetsConnCted
HeeTrainind
When in standbv.the sooedwindow shows Po
After stopping tormore than s seconds duang the movement
Pause Mod
the devce enters the pause mod and the speedwindo
5paysPAD。
APP
ERa@a@a中
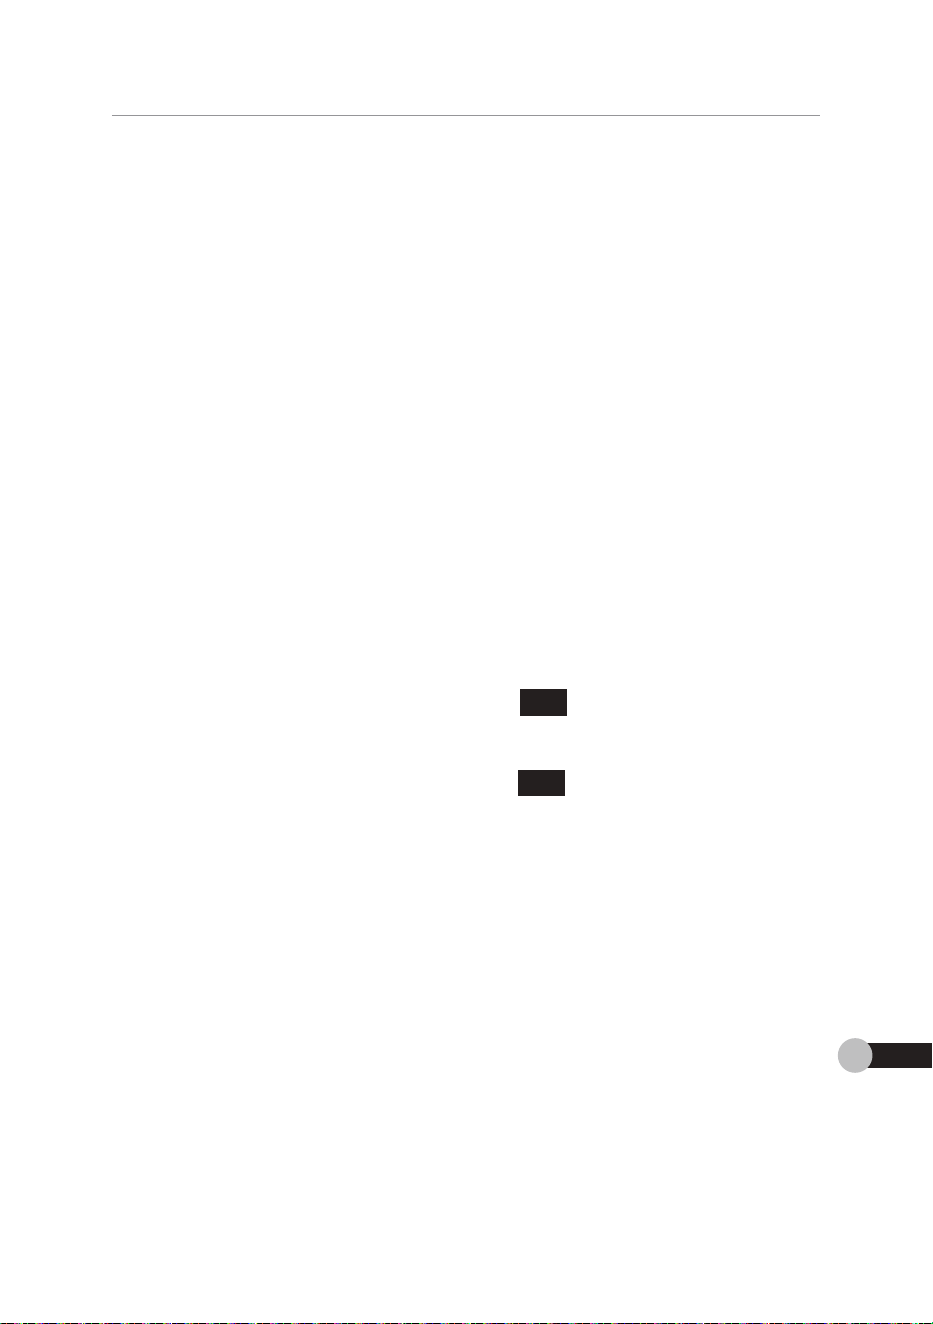
INSTRUCTIONS OF MONITOR
EN
16
1. Press the knob of monitor or start exercise directly to enter the
movement interface.
2. Exercise Program Mode: Rotating the knob to enter the exercise
program mode (P01-P10) in the standby interface.
OPERACTION: Rotating the knob to adjust;
short pressing the knob to entrace.
a. Select the Exercise Program(P01-P10)
b. Adjust the Countdown Time
c. Start Exercise
3. Countdown Mode: In the standby interface, press the side button of monitor
to enter the countdown mode.
The speed window show " L", and the time window
flashes to display “30:00“.
OPERACTION: Rotating the knob to adjust;
short pressing the knob to entrace.
a. Rotating the knob to select the time.
b. Short press the side button switch to the Distance
Countdown Mode (The DIS window flashes to
display "5.00") and rotating the knob of monitor to adjust.
c. Short press again the side button switch to the Calorie
Countdown Mode (The CAL window flashes to
display "5.00") and rotating the knob of monitor to adjust.
d. After setting the countdown, short press the knob
of monitor to start exersice.
4. Long press the side button for 3 seconds to reset the monitor.
Ⅱ.
Operation Guide
I.Operation Guide
1 Preee theknnhnfmnnitnrnretartavereieeciracthtn snterth
tmoyermentlnterace
ZExeraserroaram woae: kotatina the knob toenterthe exercis
program mode (PO1piO)inthe standby interface
OPFRACTION: Rntafinr the knnh tn arfiet
short pressing the knobtoentrace
a.GelettheFxarrieePrnrrarmIPn1-P1f
b.Adjust the Count down Time
c5tartExerctse
s.Countaown woae n tne stanaoy nterace,press tne sae putton or monto
to erter the count down mode
The speed window show"L'and the time window
Hashes to displav3UU
CPLNACIIUN: Notatna the KnoD to adust
short oressina the krob to entrace
a.Notatina the krob to select the tirme
b.short oress the side button switcn to the bstance
Countdown Mode (The DSwindow flashes te
display"5.oo)and rotating the knob of monitor to adust
c.Short oress aaain the side button switch to the Calori
Countdown Mode [The[eA window flashes to
dispiav"buu" and rotatna the knop or montor to adus
d.After settina the countdown. short pressthe knot
oT rmonitor tostart exersce
a.Lonapressthe sae buttontors secondstoreset the montor
E
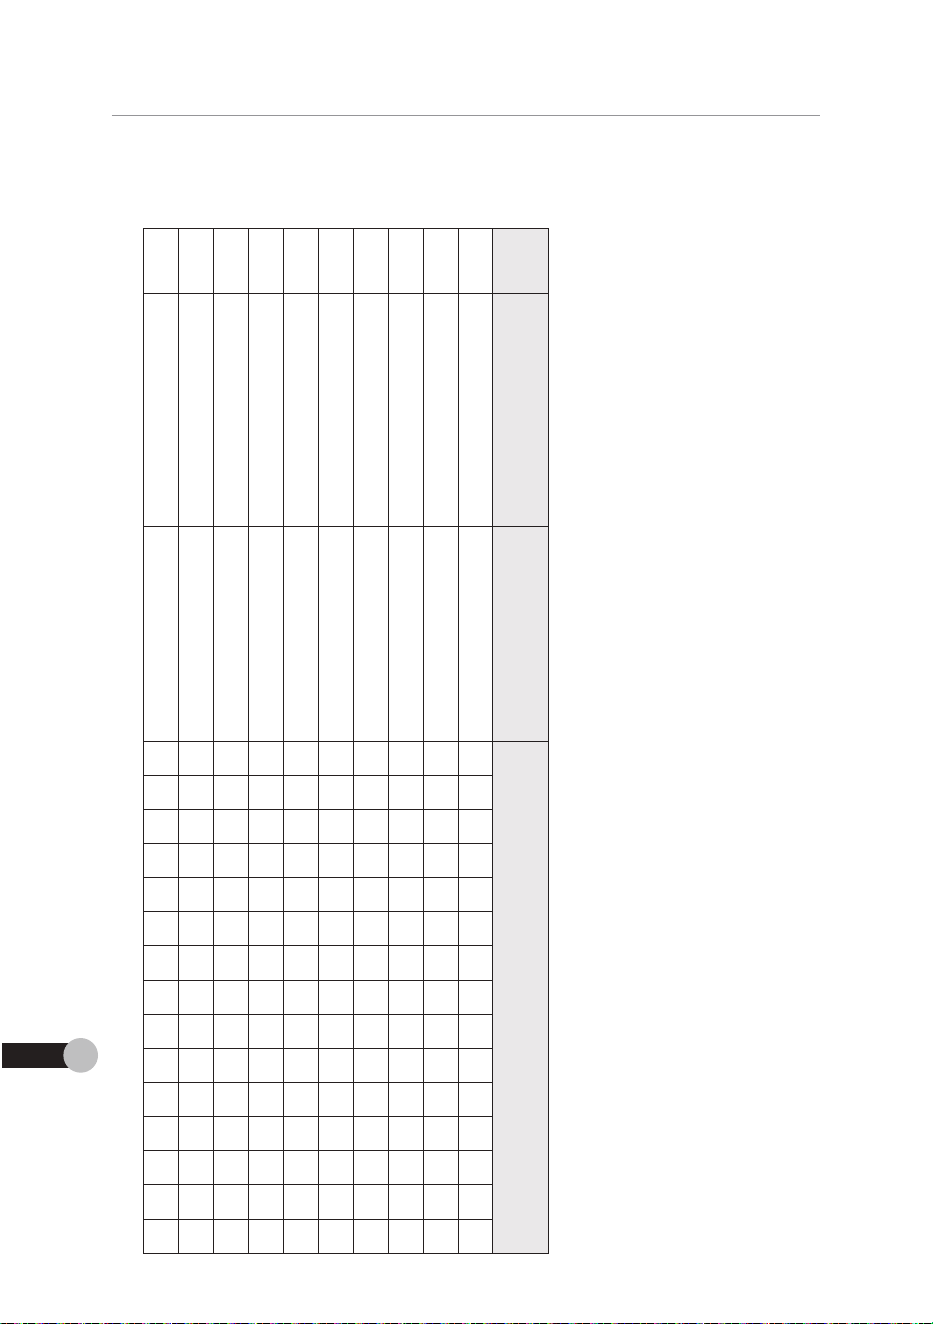
Ⅲ. Instructions for Mode
Exercise Program Mode Program
INSTRUCTIONS OF MONITOR
EN
17
Name
P01
P02
P03
P04
P05
P06
P07
P08
P09
P10
Newbie Training
Interval Training
Reduce Fat Training
Mountain Trainging
Cross-country Mode
Highway Mode
Rough Road Surface Mode
Relaxing Training
Endurance Training
Race Mode
Time Resistance Level
1 2 3 4 5 6 7 8 9 10 11 12 13 14 5
3 8 14 8 14 8 14 8 14 8 14 8 14 8 2
5 8 11 14 5 8 11 14 5 8 11 14 5 8 11
5 10 15 5 10 15 5 10 15 5 10 15 5 10 15
3 6 9 12 15 9 12 15 9 12 15 9 12 15 3
2 4 6 8 10 8 6 4 2 0 4 6 8 10 2
6 12 7 14 8 16 5 10 6 12 7 14 8 16 6
2 4 6 4 6 4 6 4 6 4 6 4 6 4 6
8 16 16 16 8 16 16 16 8 16 16 16 8 16 16
10 15 15 15 15 15 15 15 15 15 15 15 15 15 10
Default 30 minutes
Default 30 minutes
Default 30 minutes
Default 30 minutes
Default 30 minutes
Default 30 minutes
Default 30 minutes
Default 30 minutes
Default 30 minutes
Default 30 minutes
F6TRJCnOM5OMCNTrCe
llnstructionstor Mocs
Exercise Program Mode Program
弓
Po6
Po5
Po4
Po3
Po2
o o
Po
RaceMode
三
Cross-coumtny Mode
ReaueeFatIaAag
NewbieTrainin
Rough Rod 5utace Mode Detaut 3o minute
MoAgg
g
9yMod
Name
Detut3omimute
t3ome
Detault 3O minutes
Default 3o minutes Detault 3o minutes
30mu
mu
Detut3Omimute
ime
u
巨
Resistance Leve

INSTRUCTIONS OF MONITOR
EN
18
M2
M1
M3
Mode Name Time Instructions
TIME
DISTANCE
KCAL
Time Countdown Mode
Default 30 minutes
Distance Countdown Mode
Default 5.0 Km
Kcal Countdown Mode
Default 5.0 Kcal
Ⅳ. Others
1. The electronic watch supports a 5-second pause for no-operation.
After 2 minutes, the data will be cleared and reset, and after 3 minutes,
it will enter the "Sleep Mode" with the display turned off.
2. After Bluetooth connection, it is impossible to switch to the Exercise
Program Mode and Countdown Mode.
V.
Charging Function
Charge for other devices through the USB port or the USB-C port.
NOTE: The port is on the side of monitor.
VI.
Error Description
E01: Motor malfunction
E05: Communication failure between the electronic meter and the lower
control unit.
Countdown Mode
Starting resistance 1, the
resistance is manually adjusted
by the trainer, and the machine
stops running after the count-
down is over. If the movement
continues, the data is cleared
and the count is restarted.
Starting resistance 1, the
resistance is manually adjusted
by the trainer, and the machine
stops running after the count-
down is over. If the movement
continues, the data is cleared
and the count is restarted.
Starting resistance 1, the
resistance is manually adjusted
by the trainer, and the machine
stops running after the count-
down is over. If the movement
continues, the data is cleared
and the count is restarted.
TsTRJCnOM5OMCNTrCe
Countdown Mode
Mode
Mme
Time
nstrutons
startna resstance.thd
resistance s manuav adu5te
by the trainer,and the machinc
imne countd ownod4
stoos running after the count-
工F
Dofaut 3o minutes
downis ower.f the mowemeni
continues the data is ceared
and the count srestarted
startna resstance.thd
resistance s manuav adu5te
bv the trainer.and the machin
Distance Countdown Mod
DiSTANCE
staps running after the count-
Default5 okm
downis ower.f the mowemeni
continues the data s ceare
and the count srestarted
startna resstance.thd
resstance is manualyadustec
bv the trainer.and the machin
NcaCountd ownod
staps running aiter tne couinT
KCAL
Dofauit 5_o Kca
downis ower.f the mowemeni
continues the data s ceare
and the count srestarted
Iv。Others
1 The electronicwatch supports a5-second pause forno-operation
arter zminutes.tne aata wmpe clearea ana reset anaarters mnutes
it wi enter the"sieep Mode"wtn the dsoiavturned ort
2.After Bluetooth connection,it is impossible to switch to the Exercise
Prorarm Mode and Lount down Mode
V.Charging Function
Charge for otherdevices throuah the USB port or the USB-C port
NUiE Ihe oort is on the side of monitor
VL.Error Description
E0L Motor rmalfurctior
Eo5: Communicationfaiure betweenthe electronic meterandthe owe
control unit.
Download and use of MERACH
1. To download the MERACH app, scan the QR code or search "MERACH" in the Apple
App Store® or Google Play Store.
2. Open the MERACH app. Log In or Sign Up.
3. Follow the in-app instructions to set up your device.
MERACH APP Download APP Connection Guide
Download and use of KINOMAP
1. To download the Kinomap app, scan the QR code or search "Kinomap" in the
Apple App Store® or Google Play Store.
2. Open the Kinomap app. Log In or Sign Up.
3. Select the corresponding fitness equipment
4. Turn on Bluetooth, and choose MERACH.
5. Select "Rowing machine", and find your “MRK-Q3-XXXX".
6. Start training and explore different workout methods.
APP SETUP INSTRUCTIONS
APP SETUP INSTRUCTIONS
EN
19
mmmm1m
APP SETUP INSTRUCTIONS
Dawnlaad and use af MFRAC
1 Io aowmioad the MERaCt app.scanhe ORcode asearc"MERaCrin the Aop
Apo 5toro or Gooae Pav 5tore
MERACH AOowloa
Agpoe
Z Open the MERANCH aoo.LoaIn or san U
3.Folow the in-aop instructions to set u wour devic
Dawnlnad an use af KINCMAF
1 to download thexnomapapp,xan the Qr code ar seareh Xinomap"inth
Aople Apo Storo or Gooale Pav 5toe
2Open the Kinomap app.Log in or Sgn Up
1 seloct the corresoondina titness oauiomen
4.Turn on Hlue tooth.andchoose MERAC
5.seioct"Rowina machine"and tindvourMRK-O3-XXxX"
. start trainna and epkore drteent woriout methods
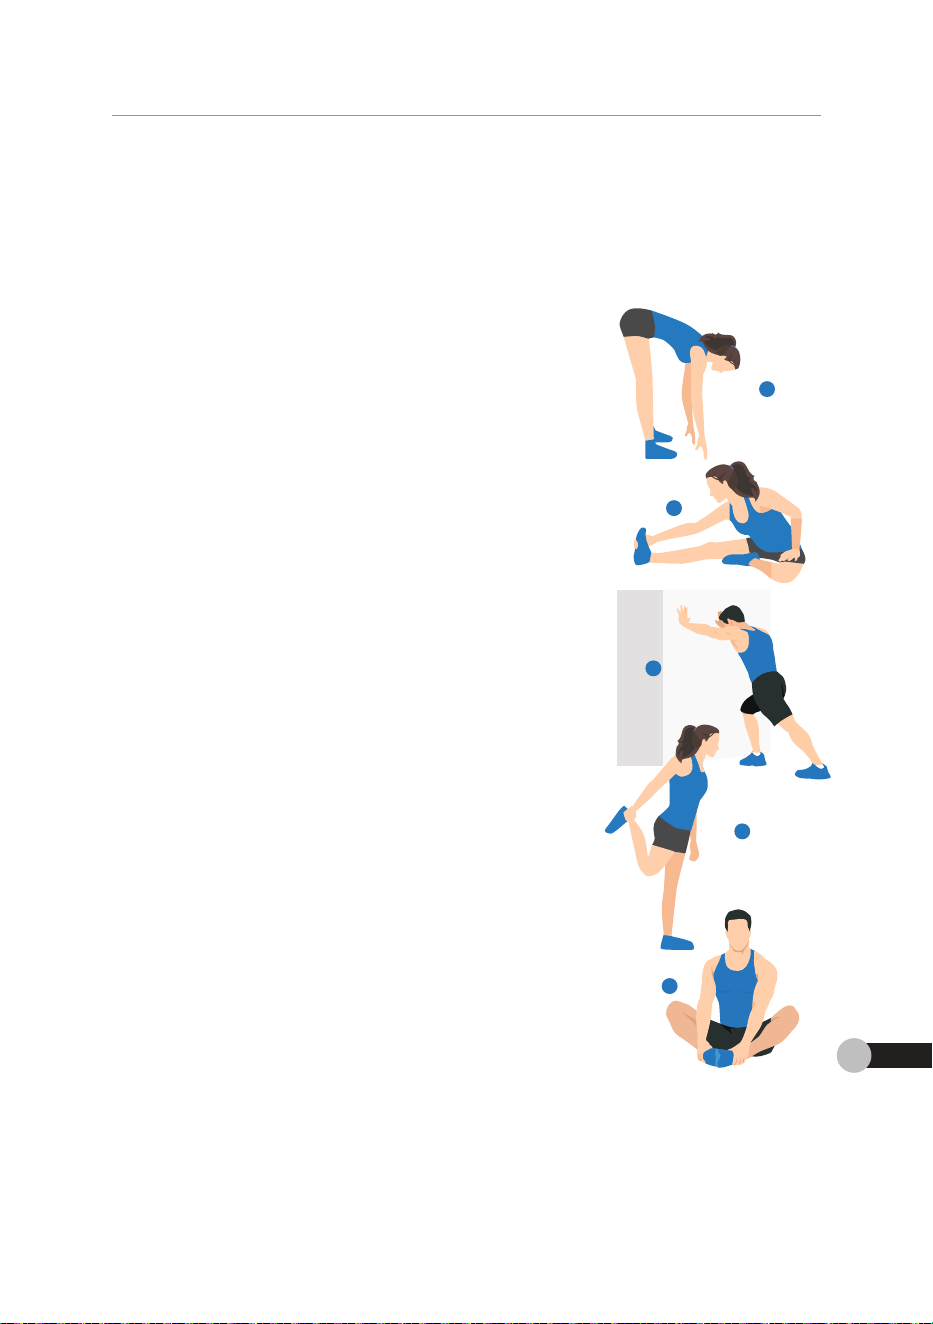
1. Stretch down
2. Seated hamstring stretch
Sit with one leg straight. Bring the other leg in so that it is
snug on the inside of the straightened leg. Try to touch your
feet with your hand's toe. Hold for 10-15 seconds, then relax.
Repeat 3 times for each leg (see Figure 2).
3. Calf and Achilles tendon stretch
4. Quadriceps stretch
Reach back with your right hand, grab your right foot and
slowly pull it toward your hips until you feel the muscles in
the front of your thigh tense. Hold for 10-15 seconds, then
relax. Repeat 3 times for each leg (see Figure4).
5. Sartorius (inner thigh muscle) stretch
Sit with your feet facing each other and your knees facing
out. Grab your feet with both hands and pull toward your
groin. Hold for 10-15 seconds, then relax.
Repeat 3 times(see Figure5).
Bend your knees slightly, slowly bend your body forward,
relax your back and shoulders, and try to touch your toes
with your hands. Hold for 10-15 seconds, then relax.
Repeat 3 times (see Figure 1).
1
2
3
4
5
Do stretches before exercising. Warm muscles are easier to stretch, so start
with a 5-10 minute warm-up, then do some stretches shown below - 5 times,
10 seconds or more per leg. Do it again after the workout.
Stand with both hands against the wall or a tree, put one
foot behind another. Keep the back leg straight and your
heel on the ground, lean toward a wall or a tree. Hold for
10-15 seconds, then relax. Repeat 3 times for each leg
(see Figure 3).
WARM-UP
Note: This machine is full body training equipment, please follow the above steps to
warm up.
WARM-UP
EN
20
F
=口
Uo stre tcnes perore eercisina warm muscies are easiertostretcn so star
wt a-u minute warm-uo.tnen ao some stretcressnown peiow-tmes
u seconds or more per iea.Lo it aaain rter the worxou
1.5tretch dowr
Bendyour knees sghty slowy bend your body torwad
reia vour back and shoulders and trv to touch vour toe
with wour han. Hold or o-s soconds. then reia
Repeat 3 times(seeFigure1)
2. Seated hamstring stretch
Sit with one leg stnight Bring the other keg n so that it is
snug on the inside of the staihtened leg Try to touch you
teat wth vour hands toe.Hold tor o-1sseconds. thenrea
Repeat 3 times toreach leg (soe Hgue 2
3.Calf ane Aehillas tandon stnetel
stand wth both hands aaainst the wal ara tne out one
toot behind anothe Keep the back legstraght andyou
heelon the aound. loan toward awal ara te Hold o
O-it soconds. then reax.Repeat 3times tor each le
5口u
4.Cuadriceps stretch
Reach back with wour riaht hand. anb vour rioht toot an
slowby pu it towardyourhips untiyou fed the muscies in
the tront at wour thiah tense.Hoid tor o-t seconds. ther
reax Reoat3 times for cach lealsee Fiaure4l
5.Sartorius (inner thigh muscle)stretch
st with yourteet tacing each other and your inees tacin
out Grab your teet wth both hands and pu towward you
goin.Hold tor O15seconds,thenreax
Repeat 3timesseeFgure)
2o白
Note Ths machineis tu bodytninng equpmet,pease toowtheabove stepst
p
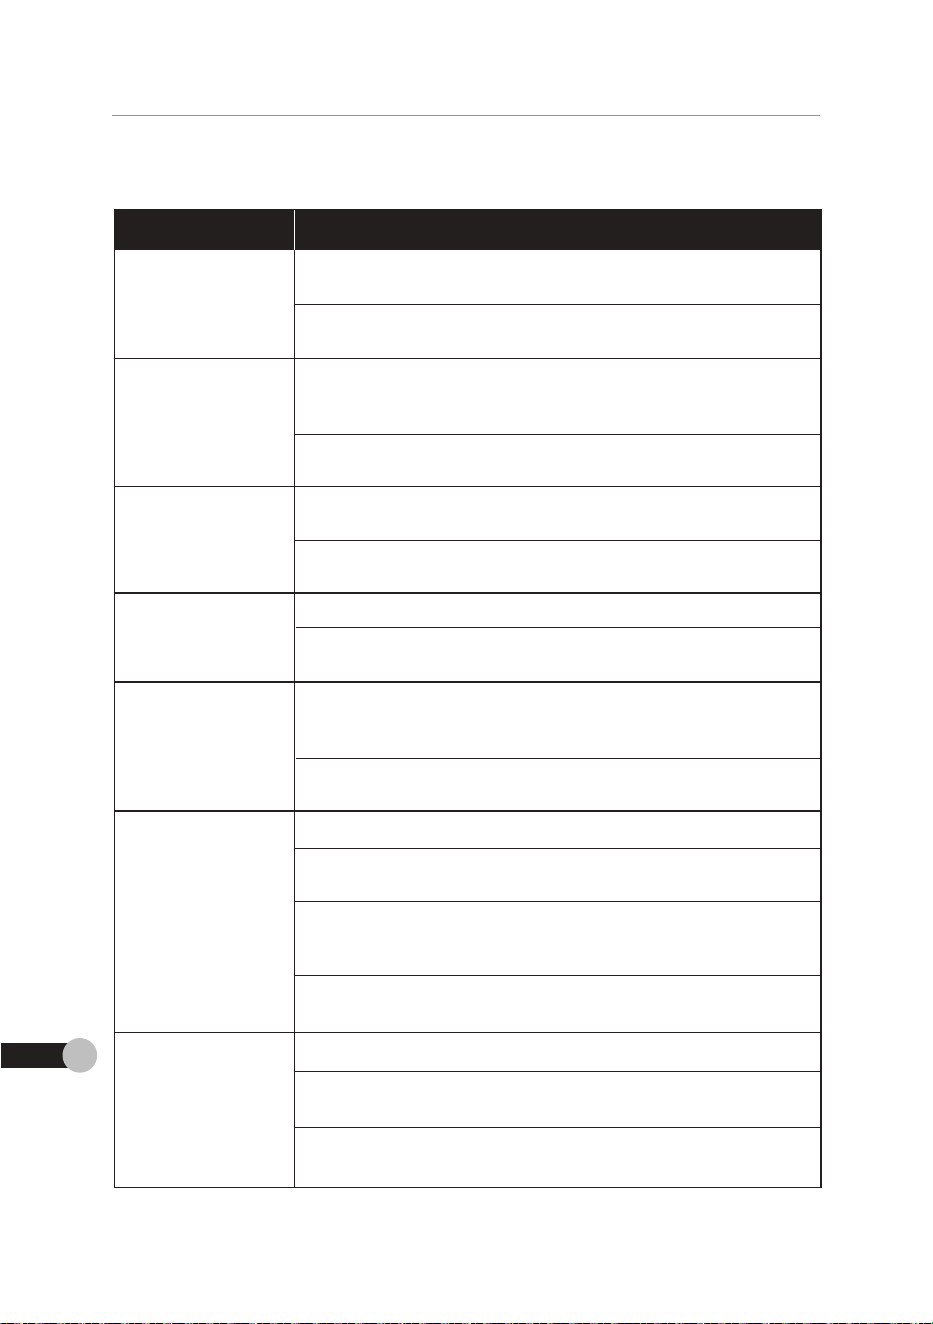
TROUBLESHOOTING
Problem
Possible Solution
What should be
done when there
is noise in rowing?
You can apply some car polishing wax on belt.
Make sure one of the console cables on the back of the
console is connected.
What should be
done when the
monitor is on
but not tracking
workout data?
The rowing machine is still malfunctioning. Please contact
Customer Support (see page 24).
What should be
done when the
monitor is off?
Open the battery cover on the back of the monitor, and check
whether the positive and negative poles of the battery are
installed correctly or replace the battery.
The rowing machine is still malfunctioning. Please contact
Customer Support (see page 24).
What should be
done when the
rower can not be
connectted
to the APP?
Check whether other members are connected to Bluetooth
at the same time. If so, unbind and reconnect.
Check whether the left and right foot straps are tight enough.
What should be
done when feeling no
rowing resistance?
What to do when
the whole machine
shakes slightly or
the footpads are
lifted during
exercise?
What should be
done when the
pedals wobble or
the straps
are loose?
Check whether the front and rear leg tubes are fastened.
Adjust the foot pads under the tubes until the whole machine
is stable.
Use the rower on a surface that has a better grip on the floor
stabilizer, or purchase an exercise mat to hold the rower in
place.
Check whether the fixing screw of the middle pedal shaft at
the bottom of the middle of the machine is tight enough.
The rowing machine is still malfunctioning. Please contact
Customer Support (see page 24).
The rowing machine is still malfunctioning. Please contact
Customer Support (see page 24).
Check whether the handle falls off during the movement.
The belt may be stuck in the pulley groove. Adjust the belt
to the center of the pulley.
The rowing machine is still malfunctioning. Please contact
Customer Support (see page 24).
The rowing machine is still malfunctioning. Please contact
Customer Support (see page 24).
The rowing machine is still malfunctioning. Please contact
Customer Support (see page 24).
TROUBLESHOOTING
EN
21
TFRCUnI¥iOOTNG
ke03Esee1c
Poe
2g5egten
hatshoua bd
Maie sure one of the consoie cabies on the back ofth
done hgn thg
console is connected
montor is on
The rowna machine isst matunctionna. Pease contac
but not tmcong
CuBtome5uppot(3ce p9e 24)
oroutdata
Ooen the batterv cover on the back at the montor and chec
whether the positve andnegatve polesof the battey are
hatshoua bd
instaedcorrocthv or reolace the batten
done whenthn
mmontor tsot
The rowna machine isst matunctionna. Pease contac
Customer 5uooort 1sce oaae Z4
hatshouabo
Oheck whether other members ae connected to aluetoot
donewhen the
at the same time f so.unbind and econnoct
ower can not bg
The rowna machine isst matunctionna. Pease contac
connecttod
Customer 5uooort 1sce oaae Z4
tothPP
ou can aoov some car odishina wax on bel
hatshouabo
done whentheTg
The rowng machine issta matunctionng- Pease contac
is noise in owwing?
Customer 5upport(see pa9e 24)
Check whetherthe handle tak off during the movement
hatnod口4
The bet may be stuck in the puey groove.Adjust the be
do02 whent0a0c
to the center ot the pu ey
owing sistance?
The rowng machine isst maitunctionng.Pease contac
Customer 5upport (see page 24)
Oheck whether the tront and ear lea tubes ae tastened
Adust the toot oa under the tubesunt the whoie machin
hat todowher
t
th鲁who.emmachinM
shaioes slghtiy on
Use the rower ona artace thathasa better arip on the tioo
the footpadam
stablizet orpurchase an eercise mat to hold the rowerir
iftod during
位
The rowna machine isst matunctionna. Pease contac
Customer 5uooort 1sce oaae Z4I
oheck whether the leftandrignt toot stnpsare tignt enoug
hatshouabo
do1登whcnthg
Check whetherthe tina scewot the middie oeda shat a
the bottomof the midde ofthe machine is tight enough
Dgd350bb鲁0
the stmps
The rowna machine isst matunctionna. Pease contac
arekoo2
Customer 5uooort 1sce oaae Z4I

If you are a fitness enthusiast, then it's essential to keep your fitness equipment
in good condition for optimal performance and longevity. Here are some crucial
maintenance steps to follow:
Keep the Equipment Clean:
It's crucial to maintain cleanliness by wiping down the surfaces with a mild cleaner,
especially the parts that come into frequent contacts, such as the handles, seat, and rail.
Avoid using acidic or alkaline cleaners, and refrain from using water or cleaners on the
digital display screen. Pay extra attention to the slide rail ensuring it remains clean and
is running smoothly.
Regularly Check Moving Parts:
Regularly inspect the moving parts such as the arms, wheels, pedals, etc., to ensure they
are functioning smoothly and free of damage. If you notice any malfunctions, get them
repaired as soon as possible, and regularly lubricate the moving parts to keep them
running smoothly.
Inspect Electronic Components:
Regularly inspect the electronic components, such as the display screen, wires, and
sensors, to ensure they are in good condition. If you notice any damage or malfunctions,
contact the MERACH TEAM.
Check and Tighten Hardware:
Regularly check the hardware such as screws and bolts, for looseness and tighten them
as needed. Regular use of the equipment can cause vibrations that may loosen parts
over time, so tightening them regularly will keep your equipment in top condition.
By following these maintenance steps, you can ensure your fitness equipment remains
in excellent condition and prolong its life span for many workouts to come.
If you notice any wear and tear on your machine during your regular inspection that may
require replacement, please contact us at [email protected].
MAINTENANCE GUIDE
MAINTENANCE GUIDE
EN
22
0EAAeEc0B
ryouareaitness erthusast, thent essentatokeep yourftess equpmen
n gooa conaruon roropuma perormanceana ongevry rere are some cruc
mainte nance steps to fdil low
Nceo the E ouioncnt eean
rs cuca to martainceaninessbywping wn the surtaces wth amad ceane
especsytheparts that comeintofrequentcontacts,suehas the hndies seat.and a
aoid usingaadcaalaine ceaners,ana etaintrom usng watera ceaners onth
agta dsplysceen.Pyetraattenton to the sa raensungtremins cean ane
is running smoothby
Reguiarby Check Moving Parts
Eeauarvinsoectthe movno oartssuchas the arms wheei oedss etc toensurehe
ae tunctonngsmootyana tree ot aamage ryounotce anymatnctont,get then
reoaea as soon as oosse ana eaarVorcare me movna oarsto seeo men
ruhninasnaadnl
lnspect Electronic Components
Eegtayinspectthe eloctrorc components,sueh s the dsplayscreen wres ane
sentors. toenture meyae n aooa conoton ryounotceanyaamaaear mrncon
Contact the MERACH TEAM
Check and Tohten Hardware
Regaryehecthehardware suehasscrews and bdts,for boseness and tghtenther
asneeded teauar use af the eaipmert cancausevbratons that mavioosen oart
over ume so urtera tner reauary w reep your eaupmerr n top conator
ayrotowngnes msrtenance steps youcan enareyour rtness equprert rerar
in eceient conditon and poiong ts lite span tar many woriouts tocome
r younotce anywearana tearan yourmacnne aurnayourrear nspecon tmar ma
reque repocemert pease contact us ar supporteuemeracn com
22白
PLEASE KEEP THESE INSTRUCTIONS FOR FUTURE USE & REFERENCE.
DO NOT DISCARD
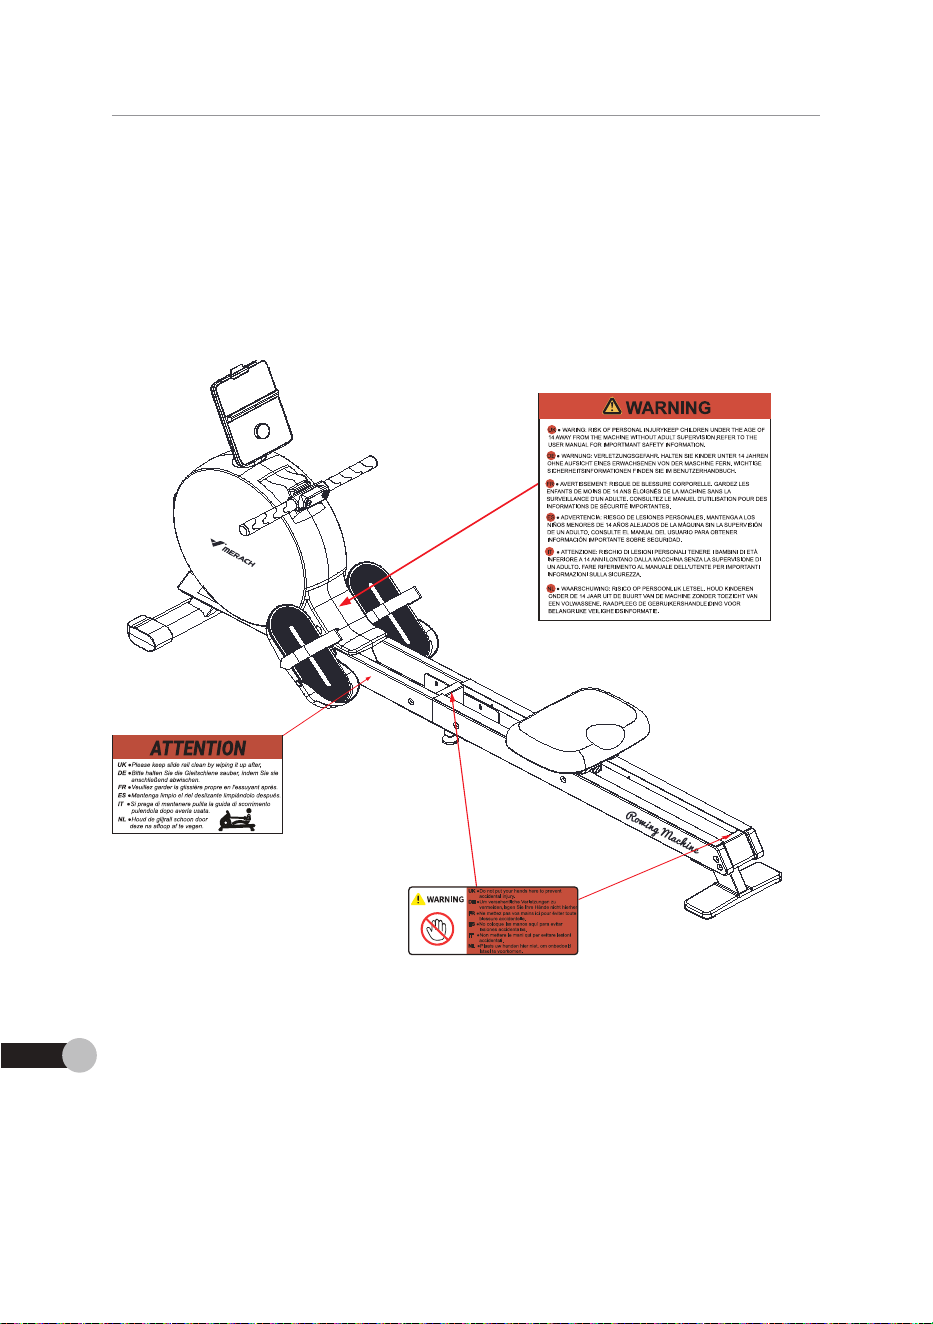
This drawing show the locations of the important Safety and Warning Decals. Please
ensure any user of the unit familiarizes themselves with Safety and Warning guidelines
before use.
Note: The decals may not be shown at actual size.
WARNING DECAL PLACEMENT
WARNING DECAL PLACEMENT
EN
23
WARNING DECAL PLACEMEN
Ths drauna show the bcatonsof theimpotart safety anavarnina Decais Pea
ensue ary userof theurt tamaarres themseves wthsatety ana varning gudeine
btOr山
Note:The docas may not be shown at actualsize
WARRANTY INFORMATION
Terms & Policy
Product Name
Model
Default Warranty Period
For your own reference, we strongly recommend that you record
your order number and date of purchase.
Date of Purchase
Serial Number
This warranty does not apply to the following situations:
All expressed and implied warranties, including the warranty of merchantability,
are limited to the period of the limited warranty.
The MERACH products are premium in material, craftsmanship, and service. MERACH
1-year limited warranty is effective from the date of purchase.
MERACH will replace defective products based on eligibility. Refunds are available to
the original purchasers of our products within the first 30 days of purchase. This warranty
extends only to personal use, doesn’t apply to the commercial, rental, or any other uses
for which the product is not intended for. There are no warranties other than the
warranties expressly set forth with each product.
Damage due to abuse, accident, alteration or vandalism.
Improper or inadequate maintenance.
Damage in return transit.
Unsupervised use by children under 14 years old.
MERACH and its subsidiaries are only responsible for damages caused by the intended
use or as instructed in the user manual. Some states do not allow this exclusion or
limitation of incidental or consequential losses, so the above disclaimer may not apply
to you. This warranty gives you specific legal rights and you may also have other rights,
which may vary from state to state.
MERACH NovaRow Q3 Self-generating
Electromagnetic Rowing Machine
MR-R21
12 Months
This warranty is non-transferable. MERACH is not responsible for any damages, losses
or inconveniences caused by equipment's failure, user's negligence, user's abuse, or
improper operation that does not follow the included user manual.
WARRANTY INFORMATION
EN
24
WARRANTY INFORMATION
MERAOH NovaAow Q3 SalHgnatin
Aodet Na
日ctomagatik Aoang Makhn
Mode
M酸Z
01rato
reyoownrc. srogyond htyo sco
yo ada nb and dateal pxhs
bta创
SeaNb
Termms & Polic
The MaCHoroducts ae oemum inmateraL crataranshio andsence MiaC
1-vear limited warantv is ettectve trom the date at ouchase
Maoweplce docte poductbased onegbaty etundsareavaablet
the oroinaourehaers of our oroduets wthn thetrst 3o aavs of ourchase Thiswarrart
extends an to oersonaluse doent aoolv to the comreras rertal a anvother us
tor whichthe oroductis nat intend ta There ae no warantes other thanthe
warranes opressy set rortn wtneacn poauct
ThiswarartVisnortransferable.MEtaCs not esoonsble tor anv maaes losse
or incorvenences caused bveauiomenrs taure users neaoence usrs abuse o
impraper apeation that does nat toow the inciuded user manua
This warrantv cnes nat annl tn the tallouina sitatian
Damaae de to abuse. accident atemtion or vandaism
impoper or inadoquate mantenance
Damage n return transit
Unsuperviseduse by chaden under i4 years old
waot and tssubsdres ae onyresponstletor aamagescaused by the intende
use or asinstructed intheuser manual some states donot aow ths ecusion a
mtatonof incderaior consequentstosset,so the aove ascsmer maynct app
toyou Thiswararty gtesyau spectclegalrghts anayou mayalohave other ngrt
whch may vary tromstate to statd
aexpressea anaimpiea warantes.induanathe warantyor mercantabut
are limited to the period ofthe imited warranty
Additional 12-month Warranty:
You can enjoy an additional 12-month warranty. Just active your warranty by sending the
product's model name via register@merach.com, or log onto merachfit.com/pages/
warranty and enter your order number (i.e. Amazon) within the first 14 days of purchase
to register your new product for the extended warranty. If you are unable to provide the
order number for your product, please type a short note in the order number field along
with the date you received your product.
Defective Products & Returns:
Customer Support
Your satisfaction is our goal! Should you encounter any issues or have any questions
about your new product, feel free to contact our Customer Support Team via
* Please have your Order ID and serial number (usually on the equipment) ready
before contacting Customer Support.
Should your product prove defective within the specified warranty period, please contact
the Customer Support via [email protected] with your invoice and order number.
DO NOT dispose of your product before contacting us. Once our Customer Support team
has approved your request, please return the product with a copy of your invoice and
order number.
TikTok Shop Exclusive after-sales: [email protected]
44-1315070255 Mon-Fri 10am-7pm PST UK/DE/FR/ES/IT/NL
or Phone Support:
WARRANTY INFORMATION
EN
25
Additional T2-montn Warranty
oucaneroyan addtonamonthwarrarty.at actveyour warrty bysendng th
proaurs moainameva resteremeracn com.aoa anto meaenrt compage
warantand erteryour ordernurber(le Amaron)wthin the frst 14 ys of pureha
to reoister vournew rodut tor the etended warrtv.fvou are unabie to rovde th
ordernumbertoryourpoduct reae tpea shotnote n theadernumerted son
wtn tne date you rocewea your poauct
Defective Procucts 8 Returns
shouia yourpoduetpove aetectre wthinthespecteawaranty peroa,rease conta
theCustome supportvasuppot euemeacheom wth yourimvoce ana ordernurbe
Do vor asposeofyourpoduet betorecontactngus Once ourCustomer support tean
has appoved yourrequest pleasereturtheprodiet with acopyofyourinvoce ane
order number
Customer 5upport
bur satsfactionis aurgoaSoud youencounter anyissues orhaveanyqueston
aoour you newproaut ree ree to cortaer auruustorersuppot Ieam v
supporteuemerach.com or rnone 3upport
(C)44-1315070255Mon-I10am-7pmPSTUK/DE/FR/ES/IT/N
Tk ok Shoo bciushe after-sales servkceoameach con
Pease hveyourorderD andseranumbertusuyontheequpmentead
before contactingCustomer support
E2
DE 26
WICHTIGE SICHERHEITSHINWEISE
aLMaLRIaIB
WICMT1FFN1FMNTNN1NWIN
ote oevanrense oiese oeoerungssrertung zumwacnscragen an einem scnere
ot
Esstsehwcnug,aassse dietedienungsanletungsorgtotgaurenlesen,bevors
oasragsgera zusamreroauenura oenuzen.oeiororuggeraerstaaior
atuguno erwenoung oes rangsgeratssare scneres uoeretves ra
vrsicntsmasanmen aes rainings9erars verrair sin
vor aeraenuzuna aes rirasaerats sote aeraenuter einenArzruoersene
rorpercnen custana oeraaen,umzuverrnoern,aass esworrena oes raininasz
sicnerhetsurtslensommt aeeine normafe Durcntunrung des raingsunmogie
macrer.vennsn oer oeruter wegenener crrarkung wezo.rerz,otutoruc
noesuw oerarorgoeroet steswcrug,oasservr oe rargee
AIauTsiuh
acntense peimrainngmmeraur aenzustananreskorpers,tascne rairgs
memoaensonnen rre cesunarer peeracrtgen wenn sle aie roigenaen vrvonse
irssvmptome naoen Ieinscnuecn:roprscrmerzen.Enaeaeruin aer arust unroae
maaererzscriaa,Rurzamiet,rao.scrwraeIuna uoeer usvi.Drecnens
oas rainina orte sorort ao una iassensie scnrecntzerti von einem arztuntersucne
una oestotgen,oevor se oas rainng rortsetzen xonner
ralensiexinaaruna raustiore von aen rarinasaearen rern.aa aiese nurr
Eracnscneoestnimtsina
steensie aas rigsgerar aurenenarte,eoerercre mr enerscnutzscnicrt au
oem ooaen ooer eppcn,umsenaaen am oooenzuvermeiaen,una stetensie scne
oassoas rairgsgerar eenostanovonmnoestensvom zueoemnoerrsne
Uberprutensie vor derEenutung des Irainingsgerats ale schraubenund Mutter
um sicnerzustelen,oass sie rest stzen uno scner zu oerutzen snc
Uie sicrere enutzuna aes raninasaerats kannnur aurcnreaeimaiae reosraturun
ruggvroer,oagrowsraguger,oruu
,
sarveisung verworaor wra venn oeim zusammenoau oaeroe aer varurg aeror
reie aerunaen weraen oaer wenn wanrena aes oeoraucns unaewonncne ueruscn
zunoren sina. stoppense aen tetrieo una aen oeoraucn sorot ura steen sie scne
oass aile rrooieme geiost sina, oevor 3ie rortanren
acntense Deaeraenutung aes raingsgeras aurnrekloioungunaversucnensi
,.
DE26
sreten aes uerars verranaonsarn,was ao eaioruna verrnaer unasie moarcne
Wee ar ocm ocrar cnkcmm
ueses rainngsgerar ist ncnt rurmeaizniscne zwecke besum
DE27
Wenn die Maschine stoppt, nähern Sie sich der Maschine und verlassen Sie sie in
der durch den Sicherheitsausgang angezeigten Richtung. Wenn Sie von diesem
Gerät absteigen möchten, müssen Sie das Gerät vollständig stoppen.
180
Dieses Gerät ist nur für den Gebrauch durch Verbraucher bestimmt.
anaa
wern sie das cerat arheten oderbewegen,gehen se aabe schervorunavervende
oie aeeoeneras geenete ranonaoungsetnooen ooeriassensie scnvon eine
ohderenPeronneren
wersie aas riinasaerarn aurecnterrosrtion austeen.stcienseesimrer
ener vana oaervor ener restenuoeracne aur.una steiensie esmern screre
entrernung von Rinoern aur, um verietzungen zu vermeioen
Lassense rcrt zu,aass zve ooermenrrersoren aaserat aecrzeiua oenuer
vas ruoergerat ist ein escrwnoigetsaonanges raningsgera
Lses cerr sr nur rur aon roimaeoraucn oesmrt una ao maximalo aeastpar
betràgtokg
viesesoeratxann vonkindern abs janren unarersonen mit eingeschrankte
ropercnen,sensorscnenooer gesugenrargeenooeranganoercrrarrugu
Wu
Rinoer ouren nicnr mit oem oera speie
reiniauna una wartuna auren aen seruaraurennicrr von uroeaurscntaten inaer
aurcnacruhireraen
venn ae nascnne staopt nanern se scn aer asenine una verassnsie se
aer aue aen scnemersausaana anaererenxcmuna ven se vonaesn
cerar apsteqen macmten mussensie aas oerar vostanaa staopen
Deses Gerat ist nur tur den Gebrauch dreh vertraucherbestimm
Anweisunqen zur sicneren verwenoun
wartung
ve vuatar aes wassersim iank erroraer eine scnnweise wartuna.vrrempren
arngena aie verwenaung von normaemLerungswasser aas aie eiemente enna
oe aen wassertank vor noroson auren aarteren,aenusw scruzen m wassertan
sina Lrior uno andere Lnermikaien worranden
vasLniorim iank muss mtrrevon reiniaunastaoerten toaer vasseroauIerneue
weraen.Lnior oaur sicn mr aemLicnr ap ae narektem sonnancnr perraar a
aooauzert von Lnior etwao wonate urter unscnenLcntvernarnssen oaut sre
Lniorinetws z iarren ao im aemeinen soten siemvurcrscnnrt ae o onar
eine reingungstaoerte tooer wwasseroiaun oen vassertank geoen
,,
oine reiniaunastaoerte toaerwaseoroiaun aon vssertank.wenn aas wasserrup
27DE
wra,erprerien w oen tank zuteeren ua rt ssuoerem vsser zu spuen,inn m
sauperem Lerungswasser surzuruen uno ere reigugstaoierte rzuzuruger
oeoensi aineLniorcleicne n aen wassertank aa aos zurreparaoenscnaaen an
iank unren kann aer aus rolycaroonat pestent

DE 28
Sicherheitshinweise
MR-R21
nieene Gumhal eteht fir Fnrtnrmits Frrntene"wae Knnfnrmits
mitFIKRirhalirisn'herntnt Mit demCF-7nichen heetatint dn
rersteller dass deses Produkt mit einschloaoen europaischer
kxchtlinen und Werordnunaen ontorm ist
Uieses symoo1 stent rur Uk Lonormty assessecr,was.Rortormte
U<
mit britischen Standards"bedeutat.Mit cam LWCA-Zaichan bestatio
der Hersteller dass doses Produkt mit einschlagigen britischen
sta0o3raskantormnis
SIMPLIFIEDEU DECLARATION OF CONFORMIT
riermit erklart zneiana ruluElectronic IecnnoloavLo.Lta.aass ae
Ftnessaerate MERaCH Me-KZIder rchtinie zU1a/hsEU entsorcht
Dervollstandige rext derEU-Konformitatserklarung ist unter derfolaender
Interretacresse wertuobar
nrps:meracnrit compages/aeclarations-or-conrormit
ENTSORGLNG5HINWESE
Vrpackungsmateialionsind Rohstoffeund snren wiedervorondot worde
Trernen sie de Wrpackunaen sarterrein und tuhren sie aese im rteress
der Urweit einer ordnugsgemafenErtsorgung zu Nahere rtormaioner
erhalten sie auh bei ihrer zustandigen verwaltung
Aitoerate oehoren nicht in den Hausm0l
Entsorgon se auch Altgerate tachgeracht sie trogen damit zun
Umweltschutz bei.Uber sammektellen und orrnunaszeiten ntormer
Sie Ihre ortliche werwaltung
Batterien qehoren nicht in den Hausmul
asEnaveroraucner sindsie aesetzcn verocrtet.aeoraucnte aterier
zurucxzuaeoen.sie konnen Inre alten sarteren De aen orrenicner
der betretfenden Art werkauft werden
Mianufoctured by
lmported byi
Zheiiarg Yulu tlectronic IechncloorLoLte
ANLICLIINKLHF<KINMMFNFIII
Rocm aosth Floorxiarerg
Noom 1z05.xianfena Iechnoloqv tuldind
1ehrolody Muldind. ZSg Wehe Roac
2Sg Wehe Rcad Mnvan 5ubdstrict
niisnaistnxt.lanozhu
niianqirxtsnazhi
zhetarg Proirxe.nirs
Zhetang Pronethne
yulu mmrkamerachcgm
jingge_mrk9163.com
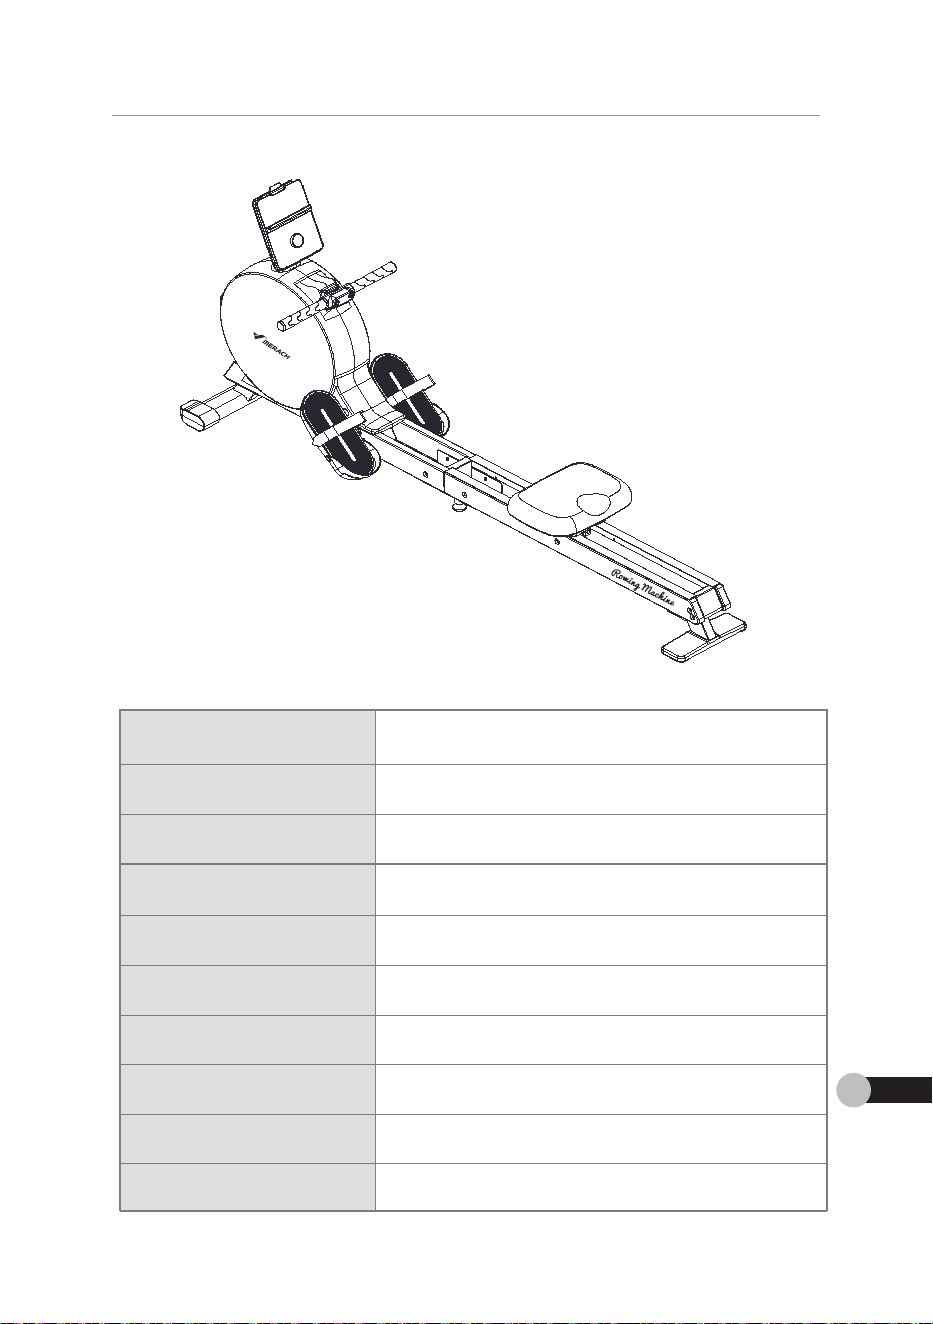
SPEZIFIKATIONEN
MERACH NovaRow Q3 Self-generating
Electromagnetic Rowing Machine
MR-R21
16 magnetische Widerstände
180kg
Innerhalb von 60 Minuten
Produktname:
Modell:
Widerstände:
Gewichtskapazität:
Empfohlene
Trainingszeit:
L1786*W453*H798mm
Geräteabmessungen:
25.5kg
Nettogewicht:
2.4 GHzFunkfrequenz:
2402–2480 MHzFunkfrequenzband:
1.48 dBmMaximale HF-Leistung:
SPEZIFIKATIONEN
DE29
sPE7FeE
MERACH NovaRow O3 5ef-generating
Progitnam
Elec tromagnetxc Rowwing Machnd
MR-R21
r5tng
maoneteche Wderstand
GwChta3Baztat
电og
Emmotohn
nnerha hwononuter
Tminngszeit
LT786W453'H798mr
Gerateabmessingen
255g
Nettogewcht
2_4Gt
2SDE
Fntreguenz
Finatreauenzhana
2402-248OMt
Maximaie Hf-4eistung
L48d日m
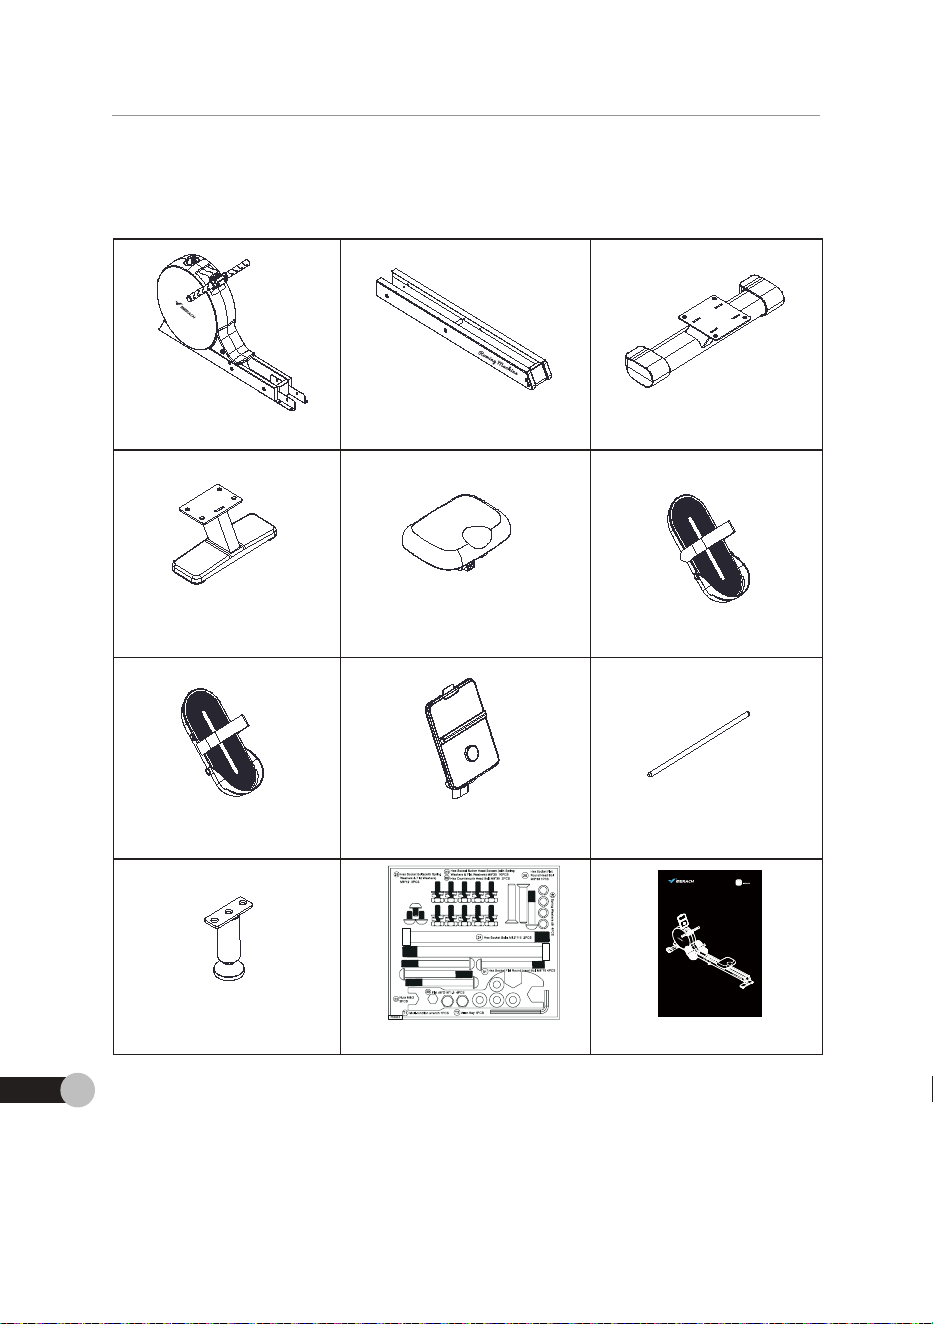
LISTE DER TEILE UND ZUBEHÖRTEILE
A1 Hauptrahmen A2 Gleitschiene A3 Vorderes Fußrohr
A4 Hinteres Fußrohr A5 Sitzpolster A6 Linkes Pedal
A7 Rechtes Pedal A8 Monitor A9 Pedalbegrenzungswelle
A10 Stützfußpad A11 Bedienungsanleitung A12 Schrauben und Sätze
LISTE DER TEILE UND ZUBEHÖRTEILE
DE 30
USER MANUAL
MERACH NovaRow Q3 SELF-GENERATING
ELECTROMAGNETIC ROWING MACHINE
POWERED BY
MODEL: MR-R21
Questions or Concerns?
IMPORTANT!
Please read all details before use, and keep this user manual for future reference.
PLEASE CONTACT US BEFORE THE RETURN: Mon-Fri,9:00 am-5:00 pm PST/PDT
Phone: 44-1315070255 Mon-Fri 10am-7pm PST UK/DE/FR/ES/IT/NL
EN • DE • FR • ES • IT •NL
LISTE DER TEILE UND ZUBEHORTEILE
AGihe
a4r1F3oh
A5
ArPd
aP
A9Rdatagmrargsad
1
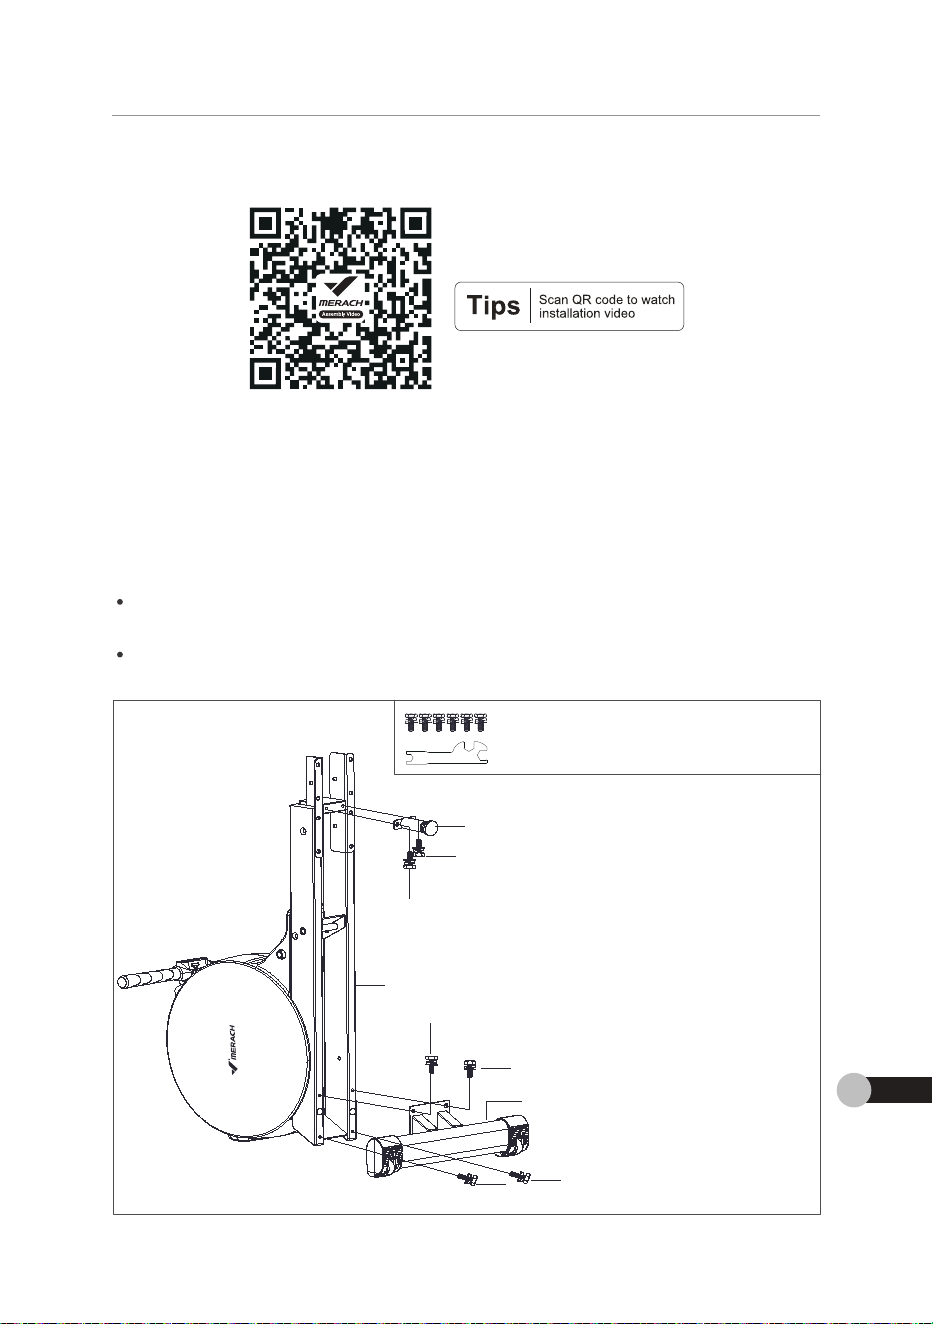
SCHRITT 1: Vorderes Fußrohr und Stützfußpad zusammenbauen
MONTAGEANLEITUNG
A. Befestigen Sie das vordere Fußrohr (#A3) mit 4 Innensechskant-Halbrundkopfschra-
uben (#23) am Hauptrahmen (#A1) mit dem Multifunktionsschlüssel (#T1).
B. Befestigen Sie das Stützfußpad (#A10) mit 2 Innensechskant-Halbrundkopfschrauben
(#23) am Hauptrahmen (#A1) mit dem Multifunktionsschlüssel (#T1).
HINWEIS:
Um zu verhindern, dass das Gerät umkippt, wird empfohlen, dass zwei Personen diesen
Schritt zusammen ausführen.
Die Innensechskant-Halbrundkopfschrauben (#23) enthalten die Federringe und
Unterlegscheiben.
A10
A3
A1
23
23
23
23
23
23
#23 Hex Socket Button Head Screws 6PCS
#T1 Multi-function Wrench 1PCS
MONTAGEANLEITUNG
DE31
arManIMd
e0AcEAE00
009034
pS
SCHRITTIVarderes Furahrnd Stutztunad meammenhaue
A Hetesaensie dasvorereFurohrtAamt 4mensechsamabrundiootsc
ben (az am HauotrahmenlaA1mt dem MuttunitonsschlusseItrT
Hetesaensie das stuttoad(aAOImt zInnensechsantsbrndxootcraube
trz3 amHauotrahmen (aA mt dom Mutrunktonsschusse lrT
F5
Um zuvendern.dass das Geratumippt wrdemoforen dasszwePesonen dese
Schritt zusammen austuhren
DiennensechsantHabrundtoptschrauben(Z)enthaten ae Federnaeun
Dnterea5Che ben
t3HSodtBtonHad Smws GPCS
T1Mtxton M C
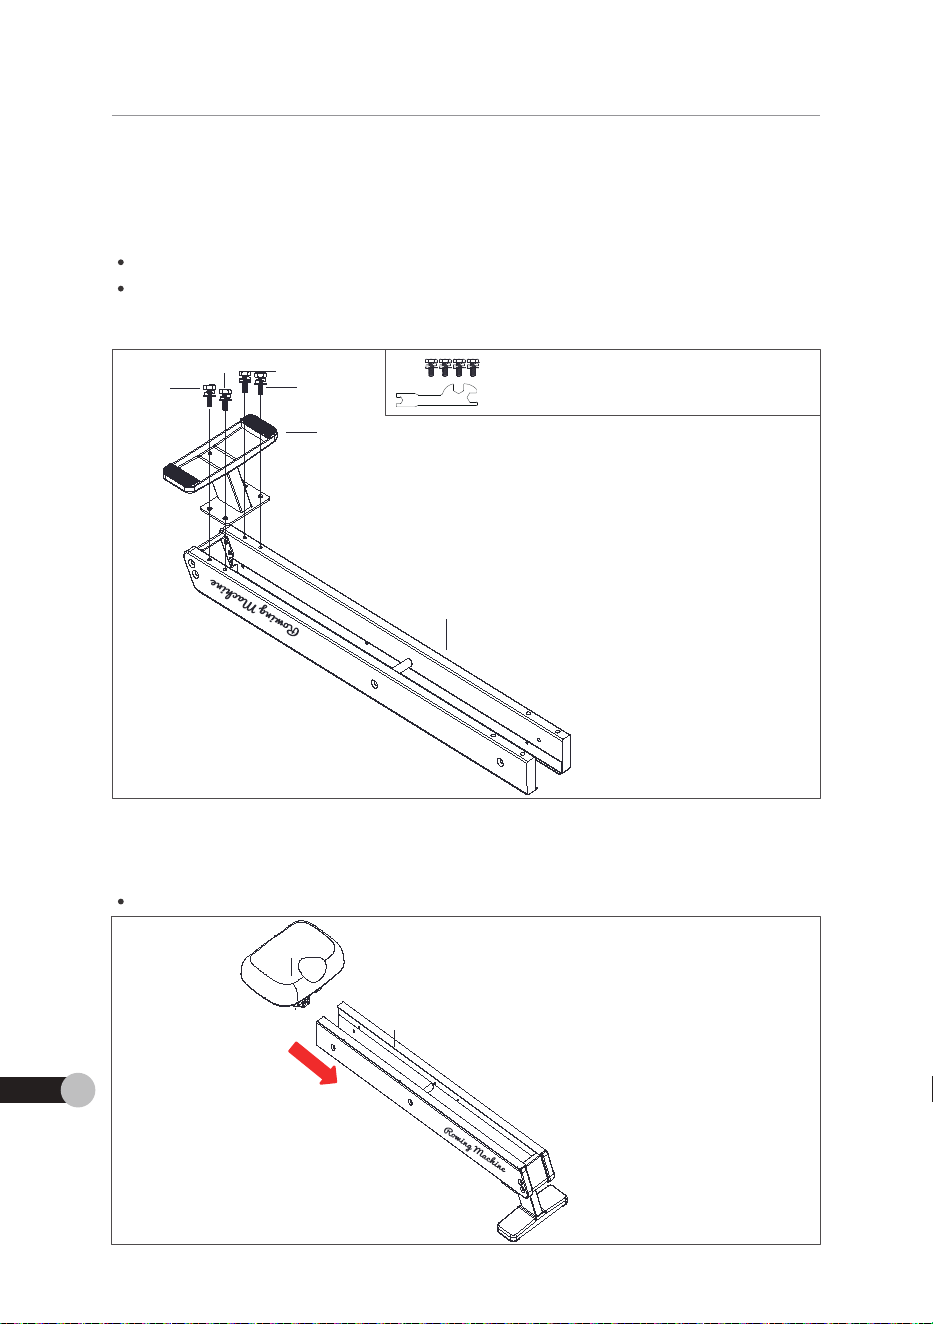
SCHRITT 2: Hinteres Fußrohr montieren
A. Befestigen Sie das hintere Fußrohr (#A4) mit 4 Innensechskant-Halbrundkopfschrauben
(#23) mit dem Multifunktionsschlüssel (#T1) an der Gleitschiene (#A3).
HINWEIS:
Bitte überprüfen Sie vor dem nächsten Schritt, ob alle Schrauben festgezogen sind.
Die Innensechskant-Halbrundkopfschrauben (#23) enthalten die Federringe und
Unterlegscheiben.
SCHRITT 3: Sitzkissen montieren
A.Setzen Sie das Sitzpolster (#A5) in Pfeilrichtung in die Gleitschiene (#A2) ein.
HINWEIS:
Wie gezeigt, achten Sie darauf, dass das Sitzpolster (#A5) in die richtige Richtung zeigt.
23
23
23
23
A4
A2
A2
A5
#23 Hex Socket Button Head Screws 4PCS
#T1 Multi-function Wrench 1PCS
MONTAGEANLEITUNG
DE 32
SCHRlTT 2:Hinteres Fufrohr montieren
A.Bestaen se das hntee FuronrtA4imt 4imensechiamabrundkootchraube
Ia?amt tomstifnitinneerhlieeollaTn an dor caterhionolaa
E
atte aberoruten sie vor dem nachsten shrtt a ae scrraubentestoezoaen sine
De imnensechsiant-abrundkootschraubenlrza enthaten aeFederrnoe une
Dntenga5Cheb-en
T1NtPon 1PC
5CHRITT 3 5tkissan mantierar
Aseten se as stoosterlnaalinPfeaschtuno inde aetschiene tr Azle
E
We aereat acrtenste daraut. ass das stroiterlnAslinae schtoechtuna zea
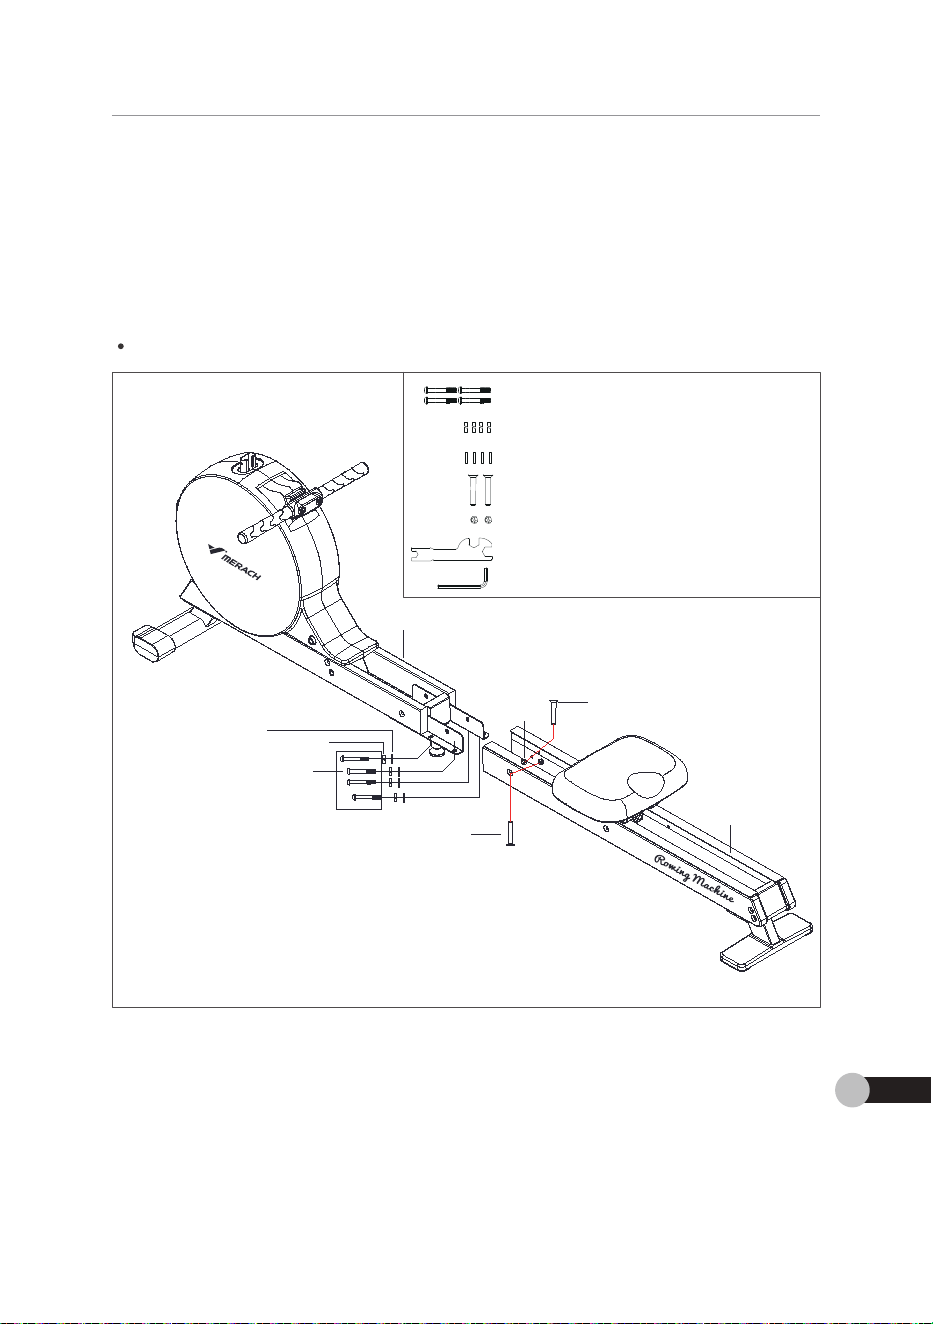
A1
A2
22
39
40
91
88
SCHRITT 4: Gleitschiene montieren
A. Befestigen Sie die Gleitschiene (A2) von außen mit zwei Senkkopfschrauben (88), zwei
Muttern (22), dem Multifunktionsschlüssel (T1) und dem Inbusschlüssel (T2).
B. Montieren Sie die Gleitschiene (A2) am Hauptrahmen (A1) mit vier Innensechskant-
Flachrundschrauben (91), vier Federschlüsseln (40) und vier Gabelschlüsseln (39) mithilfe
des Multifunktionsschlüssels (T1).
HINWEIS:
Es wird empfohlen, diese Montage von zwei Personen durchzuführen.
88
#91 Hex Socket Flat Round Head Bolt 4PCS
#40 Spring Wrench 4PCS
#39 Flat Wrench 4PCS
#88 Hex Countersunk Head Bolt 2PCS
#22 Nuts 2PCS
#T1 Multi-function Wrench 1PCS
#T2 Allen Key 1PCS
MONTAGEANLEITUNG
DE33
5CHRITT 4: CGlaitsehiene mnntierar
A.eostgen se de ctetschiene(Az)vonauen mit zwa senoptscrrauben(ge).zwe
Muttern Zz dem MuttunitonsschlusseitT und dem Irbusscrusse(Tz
B.onterensie de ceitscrene (azamruptrahmen (amtver innensscsant
FlachrndscrraubentsvierFedenchluseinl4o ndver Gabescussen asmth
des Multtunktonsschlsses1TT
Eswirdemptohlen.diese Montaqe von zweiPersonen durchzutuhren
1 HSoxktRatRod Had Edlt 4PRC
1#40SmgW 49C
IlII#33AatMah 4CS
Cotai HadEat 2C
#Nh
#TMHxHon MxhPC
a的
91
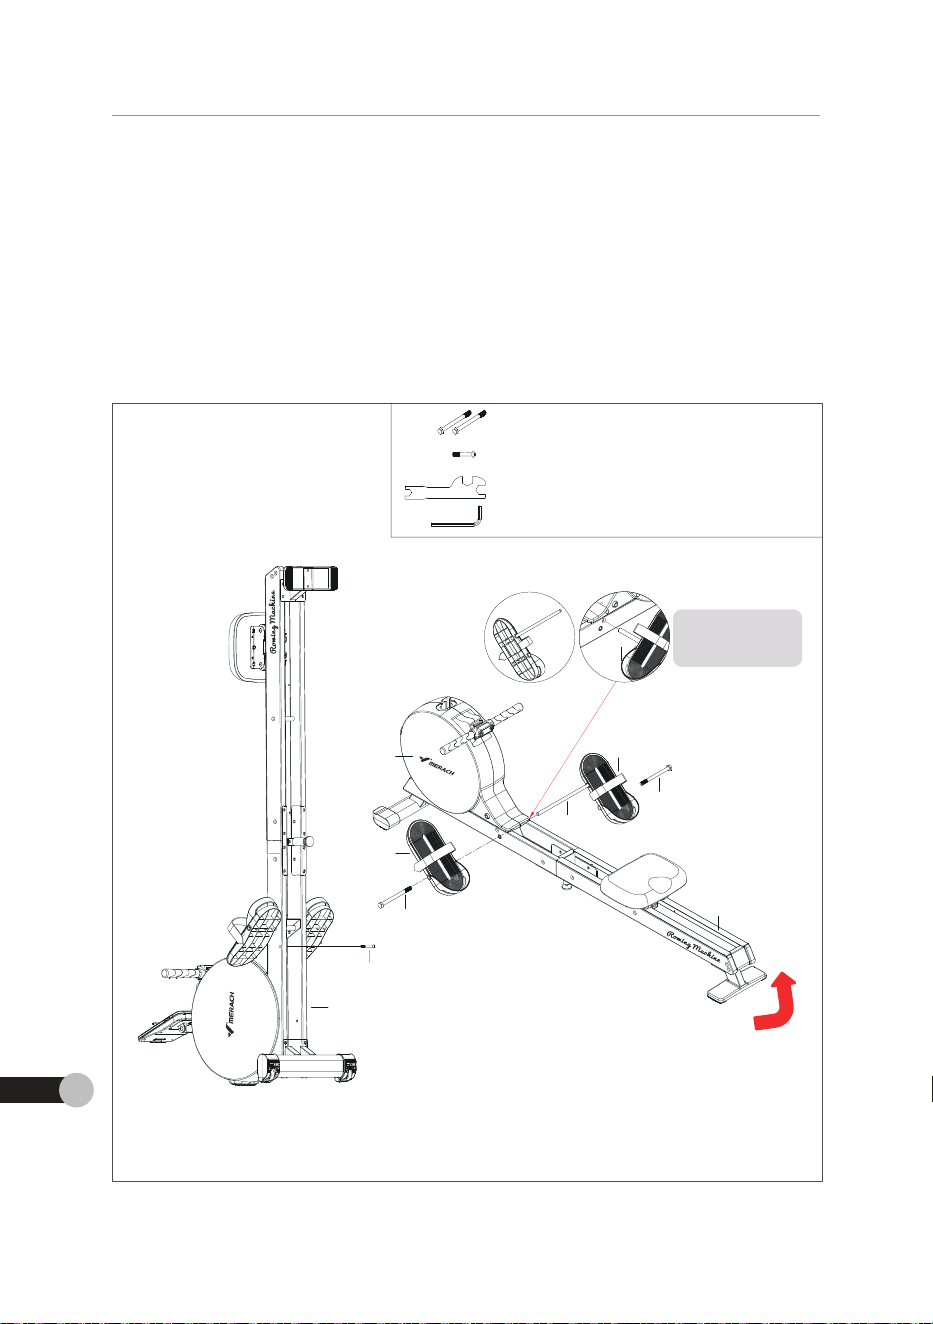
SCHRITT5: Pedal montieren
A. Führen Sie die Pedalbegrenzungswelle (#A9) nacheinander durch das rechte Pedal
(#A7), den Hauptrahmen (#A1) und das rechte Pedal (#A6).
B. Befestigen Sie das rechte Pedal (#A7) und das linke Pedal (#A6) mit jeweils 2 Inne-
nsechskantschrauben (#24) am Hauptrahmen (#A1).
C. Ziehen Sie die 2 Innensechskantschrauben (#24) mit dem Multifunktionsschlüssel
(#T1) fest.
D. Heben Sie das Gerät in Pfeilrichtung an (Abbildung 1) und befestigen Sie die Pedalb-
egrenzungswelle (#A9) mit 1 Innensechskant-Flachrundschraube (#26) und dem Inbus-
schlüssel (#T2) vollständig.
#24 Hex Socket Bolts 2PCS
#26 Hex Socket Flat Round Head Bolt 1PCS
#T1 Multi-function Wrench 1PCS
#T2 Allen Key 1PCS
MONTAGEANLEITUNG
DE 34
Figure 1
Figure 2
A1
A1
A7
A9
A2
26
24
A6
24
A7
Please insert the Pedal
Limit Shaft(A9) into the
higher hole.
5CHRRITT5!Padal mGnHarer
A FurensieaePedsbegrengswee(aAg)nachenander dureh aasrechtePea
(aA7l.don HauotrahmenlA1lund s rechte PedalaAs
a Hetestoen se srechte PedstnA7unddasnie PedatnAsmtieweszime
nsechskantschraubenlrz4l amHauotrahmen (aAi
C Ziehen se aezinnensschsantscrraubentazamt dem Muttunitontschusse
#十t
D.rben se das Geratinpfechtuna an(abbaduna undbetestaen se aePeds
ererunaswee(aagmt1menseehsarttchrndscraue(zs)unddem rbu
schusse(#T2]wolstandc
#24Mx5o1R83P
t26 HSo6tRatRod Had Bot IPC
I#TMxHon MxhPS
a的P
上1OLI[e
Figure1
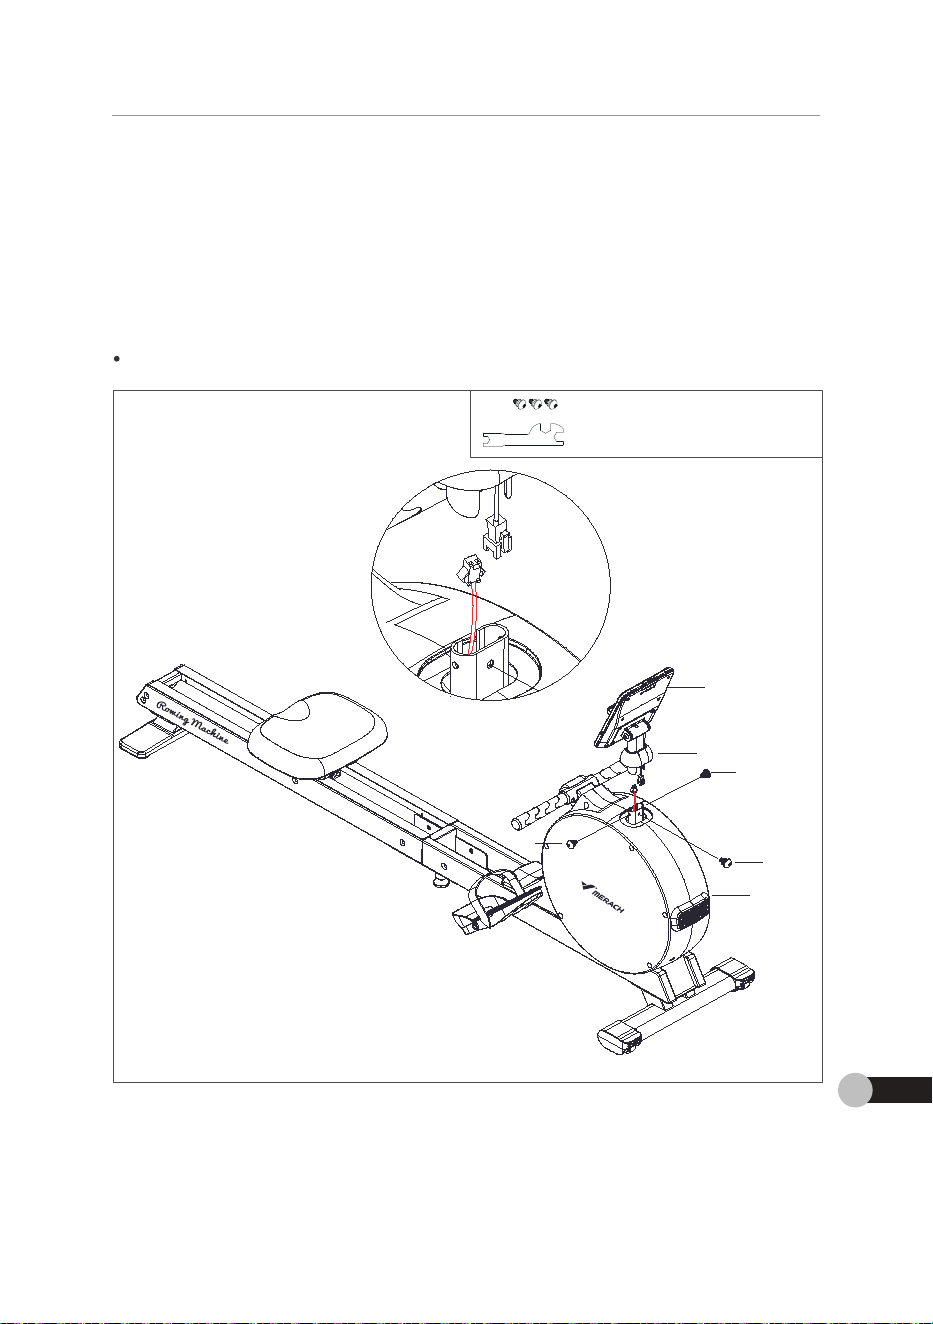
#29 Hex Socket Bolts 3PCS
#T1 Multi-function Wrench 1PCS
HINWEIS:
Die Innensechskantschrauben (#29) umfassen die Federscheiben und Unterlegscheiben.
SCHRITT6: Monitor montieren
A. Verbinden Sie die Kabel des Monitors (#A8) mit dem Hauptrahmen (#A1) (Abbildung 1).
B. Befestigen Sie den Monitor (#A8) mit dem Hauptrahmen (#A1) mit 3 Innensechskants-
chrauben (#29) und dem Multifunktionsschlüssel (#T1).
C. Setzen Sie die dekorative Abdeckung (47) des Monitors in die Nut des Hauptrahmens
(A1) ein.
29
47
A8
A1
29
29
Figure 1
MONTAGEANLEITUNG
DE35
5CHRTT6: Monitor montierer
A.Verbnden sie deKabe des Montors(nAa mt dem HauptrahmentnA tAbbaana
a.etestaen se den wontorir aa mt demruotrahmen (naimt 3innensechsants
chrauben trzslunddemMutifunitionsschluseitr T
C SetenSie die cioratve Abdecuna(47sMortorsindieNut desHauptrahren
(A1)ein
De imenseehsartschrauben tzsumtasen aeFederschetenunaUnterechebe
明 t79HaGhatRt4nr
-V2sT1MtxtoWad1PC
Fqure
D
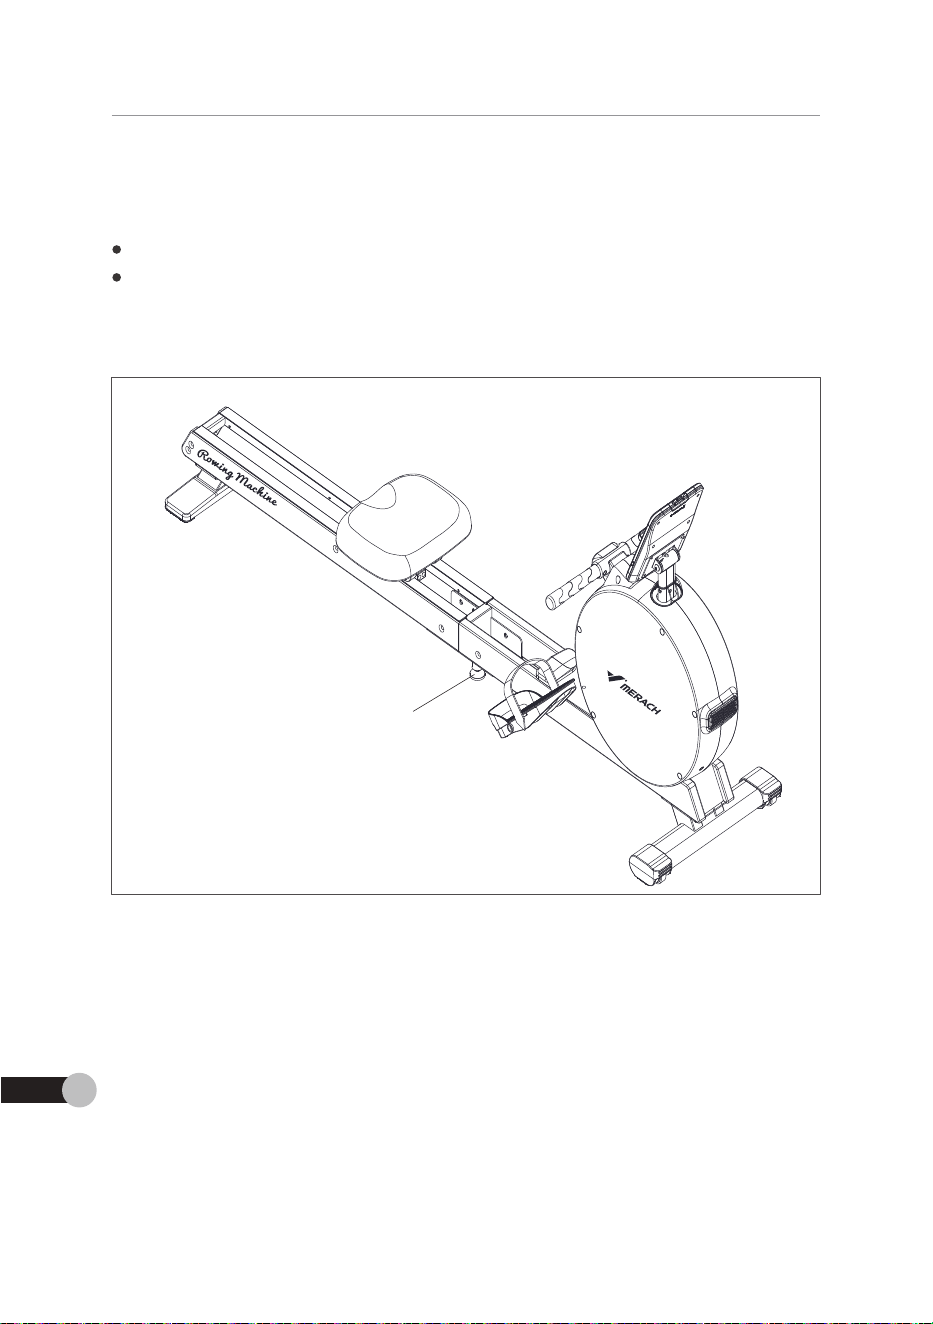
EINSTELLUNGSHINWEISE
Anweisungen zum Einstellen des Fußpads
Stellen Sie das Stützfußpad (#A10) bei der Benutzung auf einen Abstand von 3-5 mm
zum Boden ein.
Wenn Sie feststellen, dass der Kopf des Geräts nach dem Gebrauch geneigt ist, stellen
Sie das Stützfußpad (#A10) auf 5-10 mm vom Boden entfernt ein.
EINSTELLUNGSHINWEISE
DE 36
A10
EINSTELLUNGSMNWEIS
Anweisungen zum Einstellen des FuBpads
steensie das stuttoad(nAOibeiarBenutuna aut enen Abstandvon3sm
zum 日oden cin
vem se teststen dass arKo des cerats nach dem cebraueh aenetit stee
5ie das5tutfuBoadlaAolauf 5-Omm vomaodnenttermt ein
AO
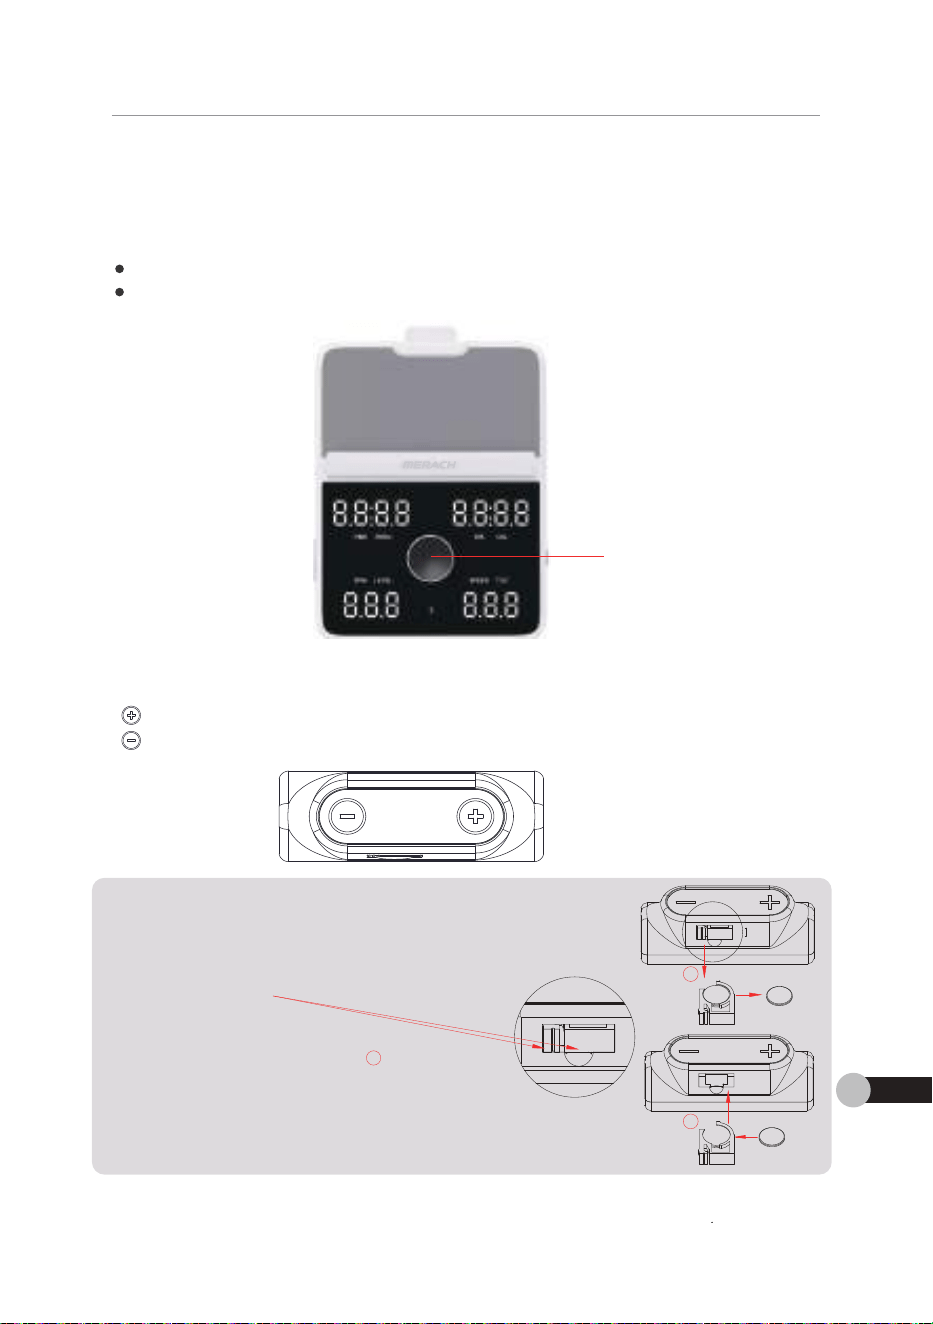
Anweisungen zum Einstellen des Widerstands
METHODE 1:
METHODE 2:
Dieses Gerät verfügt über drei Methoden zur Einstellung des Widerstands.
Drücken Sie den drahtlosen Griff, um den Widerstand einzustellen.
" ” Taste: Widerstand erhöhen (1-16).
“ ” Taste: Widerstand verringern (16-1).
METHODE 3:
Stellen Sie den Widerstand ein und folgen Sie automatisch dem Übungsablauf.
Drehen Sie den Knopf von Monitor (#A8), um die 16 Widerstände einzustellen.
Drehung im Uhrzeigersinn: Widerstand erhöhen (1-16).
Drehung gegen den Uhrzeigersinn: Widerstand verringern (16-1).
EINSTELLUNGSHINWEISE
DE37
A8
Anleitung zum Batteriewechsel
Ziehen Sie das Batteriefach in Pfeilrichtung
heraus (Abbildung ①),
legen Sie die neue Batterie ein und
setzen Sie sie anschließend wieder in
das Batteriefach ein (Abbildung ).
The Mode of Button Battery is CR2032.
1
2
battery
battery
2
aNatIOMahNas
Anweisunaen zum Einstellen des Widerstands
Uieses oerat verruat uber arei wetroaen zurEinstenuna aes Waerstanas
EH@BE
Urenen sie aen Knoorvon wontor tra um ae ib Waerstande erzusteien
Drehung im Uhrzeigersinn Widerstand erh6hen(1-16)
·Drehung gegendenUhrzeigersinn Widerstand verringern(16-1
吕
E@口E2
InrxnencanneenrmenWeretannneten
"(OTaste:Widerstand erhohen(1-16)
"C"Taste:Widerstand verringern(16-1]
Aneituna zum Batteriewechse
aehen 5ie das Batteriethchin Pferchtunc
herau3abboina
legen Sie die neue Battere cina
sotzen 5e se anscheend weder
das Batterefach ein (abbdungC)
TMo ofBI6 BaIwhCR03
E口E
stelen sie aen waerstanaein una toiaensie automauscn aem uounasaniau
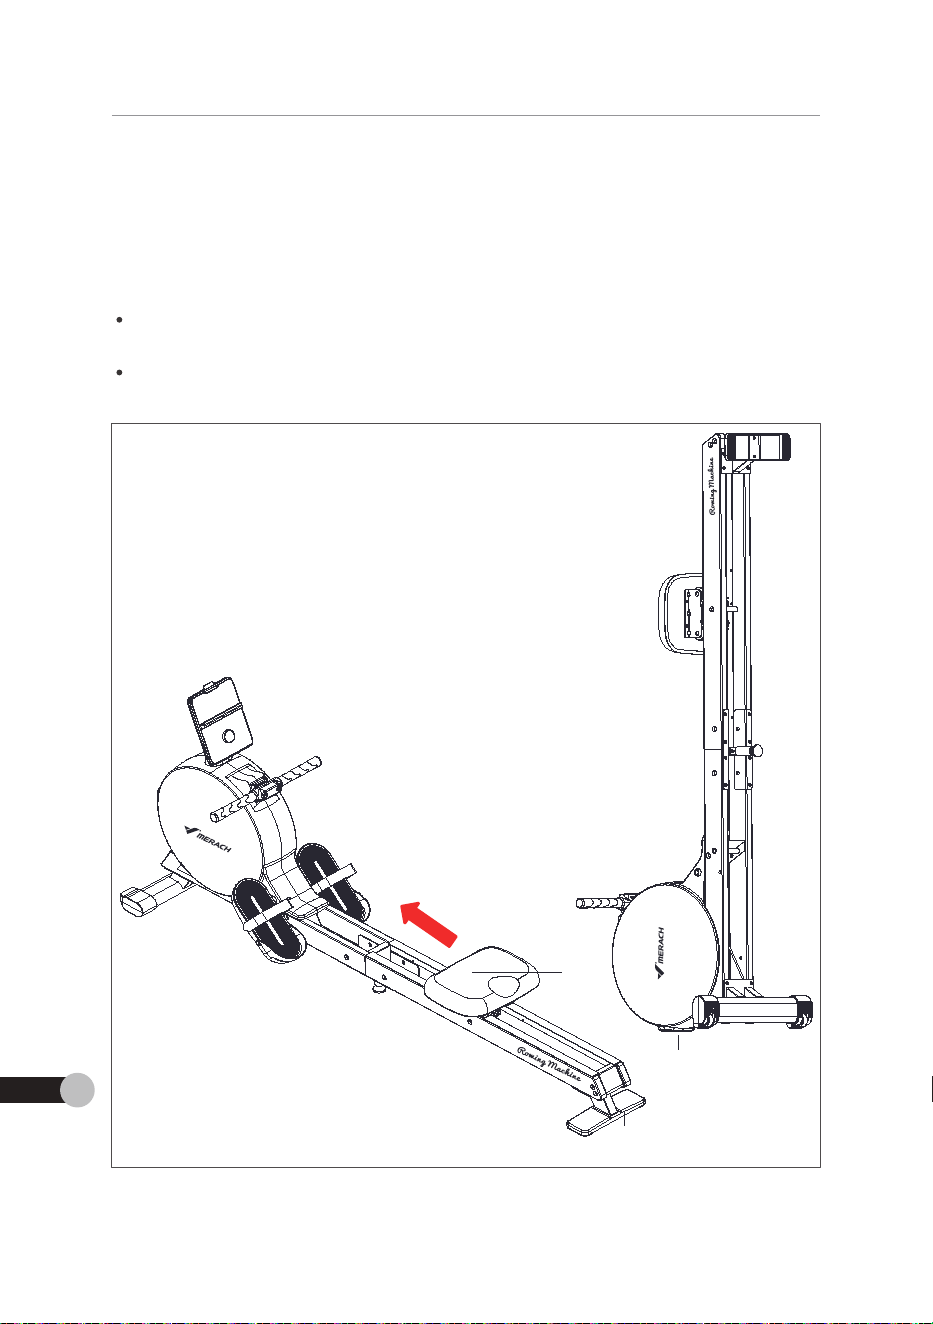
Lagerhinweise
A. Um zu verhindern, dass das Sitzpolster (#A5) herunterrutscht, setzen Sie es
zuerst in das vordere Ende der Gleitschiene (#A2) ein.
B. Fassen Sie das hintere Fußrohr (#A4) mit beiden Händen und heben Sie das
Gerät in Pfeilrichtung an, bis die Fußpads (#64) gleichzeitig den Boden berühren.
HINWEIS:
Achten Sie darauf, dass das Gerät bei vertikaler Aufstellung an einer Wand oder vor
einer festen Oberfläche steht.
Stellen Sie das Gerät an einem sicheren Ort auf, damit Kinder nicht getroffen werden
können.
A5
A4
64
Figure 1
Figure 2
ADJUSTMENT INSTRUCTIONS
DE 38
mmm mmmm
Laqerhinwcisc
A.Umzuverhindern.dassdas Sitzpoister(tA5)herunterrutscht.setzen Siee
narer nrae vnrrerernerarsleerheneInaar
.rassen se aasnintererusronr tnaamtpeiden ranaenunanepensie aa
GeratinPfeilrchtunaan,bisdieFupads(t64)aleichzeitaden Bodenberuhren
HINvEt5?
Actensie daraut.ss aas ceratbevertiaerAtsteuna an ener vand odervo
einer testen Obertache steht
steensie aasGerat aneinemscherenortaut aamtxndernict aetrortenwerde
onnn。
Fiqure2
Figure 1
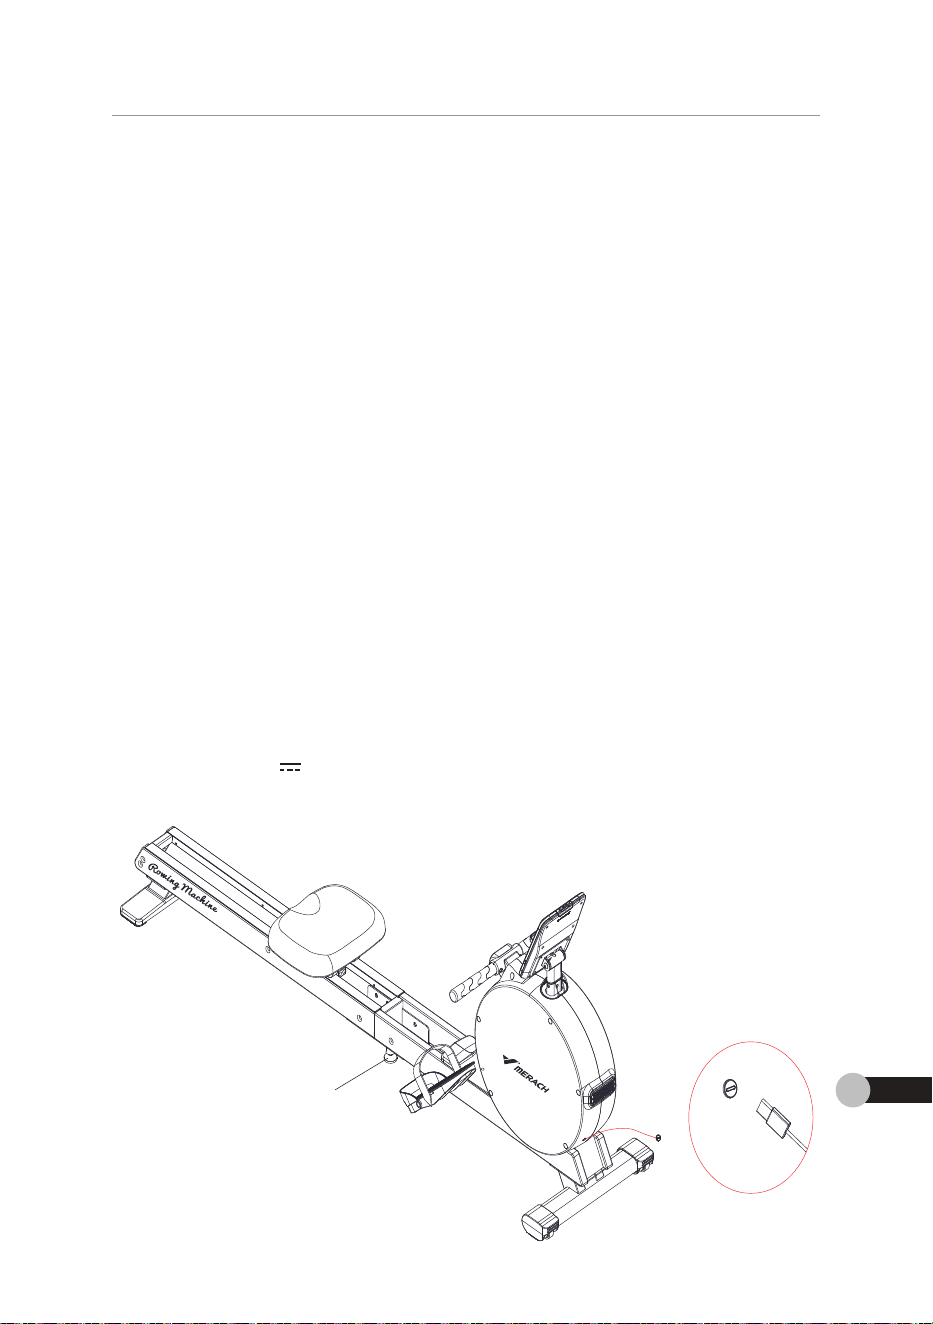
BEDIENUNGSANLEITUNG FÜR DAS
ENERGIEAUTARKE SYSTEM
BEDIENUNGSANLEITUNG FÜR DAS ENERGIEAUTARKE SYSTEM
DE39
1. Beginnen Sie mit der Inbetriebnahme; nachdem das System das Signal empfangen hat,
drehen Sie den Knopf zum Einschalten. Die Maschine wechselt in den Standby_x0002_Modus
und kann mit der Bluetooth-App verbunden oder direkt gestartet werden.
5. Wenn das Gerät längere Zeit nicht benutzt wird, kann der Energiespeicher eine geringfügige
Stromaufnahme haben, was zu einer unzureichenden Batteriekapazität führen kann. Wenn die
Maschine kontinuierlich ohne Anzeige oder mit Flackern läuft, betreiben Sie die Maschine
kontinuierlich für mehr als 10 Minuten, um den Energiespeicher aufzuladen. Alternativ können
Sie die Batterie über den universellen USB-C-Anschluss an der Rückseite der Maschine
aufladen (Eingang: 5V 1A). Dies stellt sicher, dass die Batterie ausreichend Leistung hat, um
den Knopf anzutreiben, und ermöglicht gleichzeitig das Aufladen während des Trainings.
4. Nachdem das Training beendet ist, liefert der Energiespeicher weiterhin Strom für den
Knopf und das Widerstandseinstellungssystem. Wenn etwa 3 Minuten lang keine Aktivität
erfolgt, geht der Knopf in den Ruhezustand über, und das Batterieversorgungssystem
wechselt in den Tiefschlaf, um die Energie zu erhalten.
3. Während des Trainings erzeugt der eingebaute Generator Strom, um den Knopf und die
Widerstandseinstellung mit Energie zu versorgen. Überschüssige Energie wird intelligent
umgewandelt und im eingebauten Energiespeicher gespeichert.
2. Drücken Sie den Knopf oder betätigen Sie die Maschine, um die normale Bewegung zu
starten. Der Knopf zeigt Trainingsparameter an, und durch Drehen können Widerstandsstufen
eingestellt werden.
A10
BEDIENUNGSANLEITUNG FLR DAS
ENERGIEAUTARKE SYSTEM
1BeginnenSiemitderinbetriebnahme,ncdemdas Stemdas sgnalemptngenhat
drehensedenKnopfzum Enchaten.DieMaxchinewechstindensbndbvxo0o2Mod
und xannmtder suetoathno verbunden oder areit eestartet werden
2DruckenSie den tnofoderbetatieenSiedeuachine,umdie normsle Bewegunga
sten.Der noazert Irannesasameeran.und duchDehen onnen Wadertandstue
eingeestelltweden
3.wahend des Innneserzeutder eneehsute cenenorstom um denknootundd
Wderandsenseune mt tnerae versoren Uberscusiee tneroe wrd neueen
umgewandeitund im eingebouten Energespeicher gespeicher
4.Nachaem das Iranne beendetst ietert aer tneroesnecner weterhn strom rur der
knoafund dsWidersbndseinstelunsstemWem etwa3vinuten langkeine Aitivit
erotgt,geht derknoptnden nesand ue,unddsateeversorgngsssten
wechseitin den Ietschiat. umdie lneree u erhaiten
5.WenndasGertngereZetnichtbenuttwird,kannderEneriesechereinexerinafisi
sromaunanmenaben ws aener unzurecnenden attereiaoarttnreniann wenna
wasnne sornueaia anne Anreee oder mt rciernaut betreensede wscnn
tnhrmhs10nmdFnhx Ath
se de sattere uber denunnerseenusCnscnus ander csee derMaschn
ausden(Engang5v-ADiesstsche,dssdieBaterieaueicendLeistnghat,u
denKnopfanzutreiben,undermaglihtgechstigdsAusdenwahrenddesTrsining
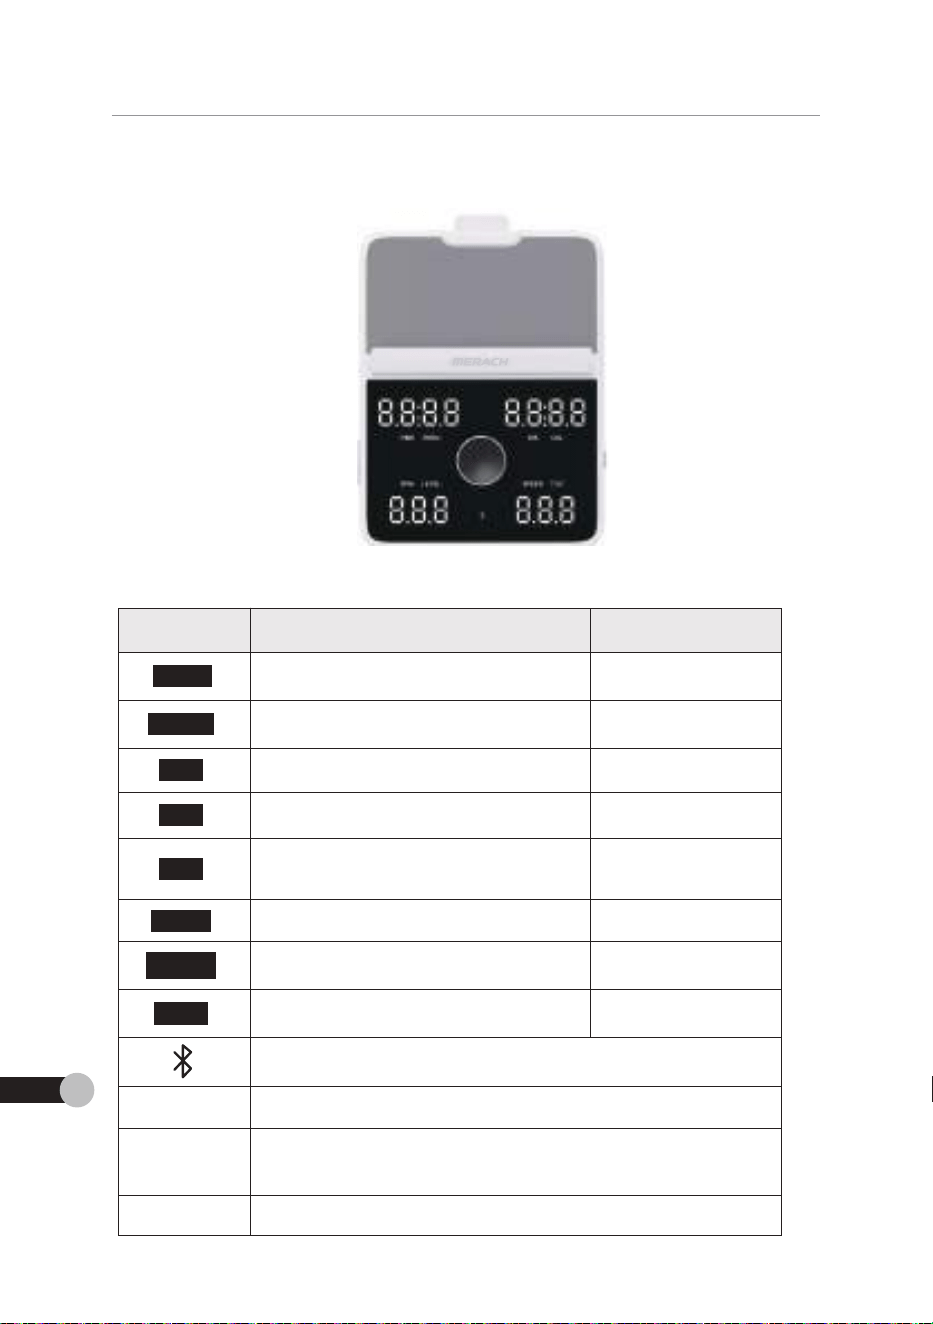
ANWEISUNGEN FÜR DEN MONITOR
ANWEISUNGEN FÜR DEN MONITOR
DE 40
Aktuelle Trainingszeit
Aktuelle zurückgelegte Strecke
0-9999
Current Resistance Level for exercise 1-16
The distance of exercise per one hour 0.0-9999 km/h
The total strokes of all workout 0-9999
Display the Bluetooth connect, not when Bluetooth heart
rate is connected.
Freier Trainin-
gsmodus
When in standby, the speed window shows P01.
Pausen-
modus
APP
MERACH, KINOMAP
DECRIPTION RANGE
ITEM
TIME
/500m
DIS
00:00-99:59
00:00-99:59
0.0-9999 km
0.0-9999 Kcal
Bluetooth Verbindungsstatus anzeigen
After stopping for more than 5 seconds during the movement,
the device enters the pause mode and the speed window
displays “PAU”.
Echtzeit-Schätzung der Zeit/500m bei
der aktuellen Schlaggeschwindigkeit
Aktuelle Kalorien, die während der
Übung verbrannt wurden
Anzahl der Bewegungen pro Minute,
wodurch die Geschwindigkeit der
Bewegungen während des Trainings
angezeigt wird
CAL
SPM
LEVEL
SPEED
TOC
nN0a0oc
ANWEISUNGEN FUR DEN MONITOR
吕
Bluetooth Verbindunos status anzeiaer
ITEM
DECRIPTION
RANGE
6
ME
aatue eTraninaszet
Echtzeit5chatzuna der Zeit/OOm be
oom
OOOO
der aktucen 5chaaoeschwndakei
DiS
Aktuce zuruckaeeote Stroco
OO-kn
altiollo kalnrion de whhron ro
C
OOCa
Obung werbrannt wurden
Anahl der Bewegungen proMnute
5P
oS
Bewegungen wahrend des Tranings
agga
LEE
Current Resistance Lewd tor eercis
o.o-SSSSkmh
ED
The dstance of eercise oerone hou
Toc
The tota strokes of a worout
书
Disoiav the aluetooth connect nat when aluetoath hear
rate is connocted
Freteerrainn
When in standbv.the soeod window shows Po
After stoooina tor more than sseconds durina the movement
uen
the device enters the pause mode and the speed windo
mmodu5
d5pPAD
APP
ERa@a@a中

ANWEISUNGEN FÜR DEN MONITOR
DE41
1. Drücken Sie den Knopf des Monitors oder starten Sie das Training direkt, um
die Bewegungsschnittstelle aufzurufen.
2. Trainingsprogramm-Modus: Drehen Sie den Knopf, um den Trainingsprogra-
mm-Modus (P01-P10) in der Standby-Schnittstelle
aufz
BETRIEB: Den Knopf zum Einstellen drehen; Kurzes Drücken des Knopfes
zum Einstellen.
①Wählen Sie das Trainingsprogramm (P01-P10)
②Einstellen der Countdownzeit
③Übung starten
3. Countdown-Modus: Drücken Sie im Standby-Modus die Seitentaste des Monitors,
um den Countdown-Modus im Standby-Modus zu aktivieren.
Im Geschwindigkeitsfenster wird „L" angezeigt, und im Zeit-
fenster blinkt die Anzeige „30:00".
BETRIEB: Den Knopf zum Einstellen drehen; Kurzes Drücken des Knopfes zum
Einstellen.
①Drehen Sie den Knopf, um die Zeit zu wählen.
②Drücken Sie kurz die Seitentaste, um in den Entfernungs-Countdown-
Modus zu wechseln (Anzeige „5.00") und drehen Sie den Drehknopf des
Monitors, um ihn einzustellen.
③Drücken Sie kurz die Seitentaste, um in den Kalorien-Countdown-
Modus zu wechseln (Anzeige „50") und drehen Sie den Drehknopf des
Monitors, um ihn einzustellen.
④Drücken Sie kurz auf den Knopf des Monitors, um das Training zu
starten.
4. Halten Sie die seitliche Taste 3 Sekunden lang gedrückt, um den Monitor
zurückzusetzen.
Ⅱ.Betriebshinweise
I,Betriebshimweise
1.Urucxense aen knoor aes wiontorsoaerstartensie aas Iraninaarext un
die Bewegungsschnittstelle autzurufen
ZIrainingsprogrammwoaus Urenensie aenknopt,um aen Iraningsprogra
mm-Modus 1rU1-+U1in der standbvschnittstele
aufz
tc Iiti UenKnoorzum Einsteien arenen Kurzes Urucken des knoore
iarmFirst中l中r
Wanien sie das Iraininasoroaramm1rU1-Hu
?Einstellen der Countdownzeit
3ubung starten
3.Countaown-moaus Lrucxen semstanapv-oaus aesetentaste aes ontors
um den Lountdown-Nodus im standbvModus zu aktvierer
Im Geschwindigkeitsfenster wird.L"angezeigt,und im Zeit-
Terster blinkt die Arzeioe .uUU
tIiit UenKnoorzum Ensteien arenenKurzesUrucken aes Knootes zun
Einstellen
(1Drehen Sie den Knopf.um die Zeit zu wahlen
C2Drocken Sie kurz die Seitentaste,umin den Entfermungs-Countdown
woauszuwecnsein tanzege.su)unaarenen sie aenUrenknopr ae
Mnritnrs iarmihr ainnaetller
Drucken Sie kurz die Seitentaste.umin den Kalorien-Countdown
woduszu wecnsein tanzeiae-su'unaarenen sie aenurenknoor ae
Moritors.urmihn eirzusteller
④Drocken 5ie kurz aufdenKnopfdes Monitors,um dasTraining z
te
4.Halten Sie die seitiche Taste3 Sekunden lang gedruckt,um den Monito
zuruckzusetzen
4DE
1 2 3 4 5 6 7 8 9 10 11 12 13 14 5
3 8 14 8 14 8 14 8 14 8 14 8 14 8 2
5 8 11 14 5 8 11 14 5 8 11 14 5 8 11
5 10 15 5 10 15 5 10 15 5 10 15 5 10 15
3 6 9 12 15 9 12 15 9 12 15 9 12 15 3
2 4 6 8 10 8 6 4 2 0 4 6 8 10 2
6 12 7 14 8 16 5 10 6 12 7 14 8 16 6
2 4 6 4 6 4 6 4 6 4 6 4 6 4 6
8 16 16 16 8 16 16 16 8 16 16 16 8 16 16
10 15 15 15 15 15 15 15 15 15 15 15 15 15 10
Name
P01
P02
P03
P04
P05
P06
P07
P08
P09
P10
Einsteigertraining
Intervalltraining
Fettabbautraining
Bergtraining
Geländemodus
Autobahnmodus
Modus für raue Straßenbeläge
Entspannungstraining
Ausdauertraining
Rennmodus
Zeit
Widerstandsgrad
Voreinstellung 30 Minuten
Voreinstellung 30 Minuten
Voreinstellung 30 Minuten
Voreinstellung 30 Minuten
Voreinstellung 30 Minuten
Voreinstellung 30 Minuten
Voreinstellung 30 Minuten
Voreinstellung 30 Minuten
Voreinstellung 30 Minuten
Voreinstellung 30 Minuten
Ⅲ.Anweisungen für Modus
Trainingsprogramm-Modus
INSTRUCTIONS OF MONITOR
DE 42
F6TRJCnOM5OMCNTrCe
I.Anweisunqen tur Modu
Trainingsprogramm-Modus
Emtenmumganms
Gandmec
回srsirainims
utebahnmec
Fsttbbutrainims
mraramms
Emtat@rsainim
odasur eaue5sasnbsla9
ame
Voeinatalueg 3o Minatee
Veeainatailung 3onate
verainatallung3omnuter
vereinaung3ominuter
Veeainatatumo 3o nutee
Verainatatumo 3oanuten
Versinatalueg 3oanamr
vereinallung3onur
Zet
Midersta ndsgra
M2
M1
M3
Modus Name Zeit Anweisungen
ZEIT
DISTANZ
KCAL
Zeit Countdown-Modus
Standard: 30 Minuten
Countdown-Modus für
die Entfernung
Standard: 5,0 km
Kcal-Countdown-Modus
Standard: 5,0 kcal
Ⅳ.Sonstige
1. Die elektronische Uhr unterstützt eine 5-sekündige Pause bei Nichtbetrieb.
Nach 2 Minuten werden die Daten gelöscht und zurückgesetzt, und nach 3
Minuten geht sie in den "Schlafmodus" über, wobei der Bildschirm ausgeschaltet
wird.
2. Nach der Bluetooth-Verbindung ist es nicht möglich, in den Trainingsprogramm-
Modus und den Countdown-Modus zu wechseln.
V. Aufladefunktion
Laden Sie andere Geräte über den USB-Anschluss oder den USB-C-Anschluss auf.
VI. Fehlerbeschreibung
E01: Motorstörung
E04: Motorüberlastung
E05: Kommunikationsfehler zwischen dem elektronischen Zähler und der unteren
Steuereinheit.
Countdown-Modus
Ab Widerstand 1 wird der Widerstand vom
Trainierenden manuell eingestellt, und das
Gerät hält nach Ablauf des Countdowns an.
Wenn die Bewegung fortgesetzt wird,
werden die Daten gelöscht und die Zählung
wird neu gestartet.
Ab Widerstand 1 wird der Widerstand vom
Trainierenden manuell eingestellt, und das
Gerät hält nach Ablauf des Countdowns
an. Wenn die Bewegung fortgesetzt wird,
werden die Daten gelöscht und die
Zählung wird neu gestartet.
Ab Widerstand 1 wird der Widerstand vom
Trainierenden manuell eingestellt, und das
Gerät hält nach Ablauf des Countdowns
an. Wenn die Bewegung fortgesetzt wird,
werden die Daten gelöscht und die
Zählung wird neu gestartet.
INSTRUCTIONS OF MONITOR
DE43
F6TRJCnOM5OMCNTrCe
Countdown-Modus
Modus
Name
Zet
Anweisungen
Ah Wdntand 1adrd d Wdatand o
Trarirerdnauelleinaatel srd da
Gathaltndh Aaaf dnContdown
ZErT
Zeit Countdown-Modus
an Wn dEwgg fotot1d
Standard3oMinuten
wdn de Datan 9ioint and da
Zdng ad niu gstt
Ah Wdntand 1 rd d Widatand o
Trarirerdnauelleinaatel srd da
countd owmrodusfu
乙
Dt5TANZ
deEmtfernung
W dBw9g 6gtt wid
5tandart5,0knr
aidn de Dan oelocht ud de Zlin
wrd heu giatatet
Ah Wdntand 1adrd d Wdatand o
1radllole dda
Ncaeount downrod ua
Glthltnadh Aaf dnContdoan
KCAL
5tandard5 okca
a d Bgg 1ogL1d
wd d 0al 9ioct d d
Zihlurg wind neu ginstartat
VSonstige
1 Die elektronische Uhrunterstutzteine 5-sekundiae Pause beiNichtbetrieb
racn zwinuten weraen aie uaten aeioscnt una zuruckaesetzt unanacn
nuten aentsien aen"scriamoaus”uber.wopei aer snascnrm ausoescnate
wird.
∠Nac aer suetootn-verbnaung istes ncntmoglicn,n aen Irainngsprogramm
Modus und den Countdown-Modus zu wechseln
yAufladefunkktion
Laden Sie andere Gerate iberdenUsB-Anschussoder den UsB-C-Anschussau
WL.Fehlerbeschreibunc
EoL Motorstor unc
EO4:Motorüberlastung
EO5:Kommurikationsfehler zwischen dem elektrorischenZaher und deruntere
teuereinhert
43DE
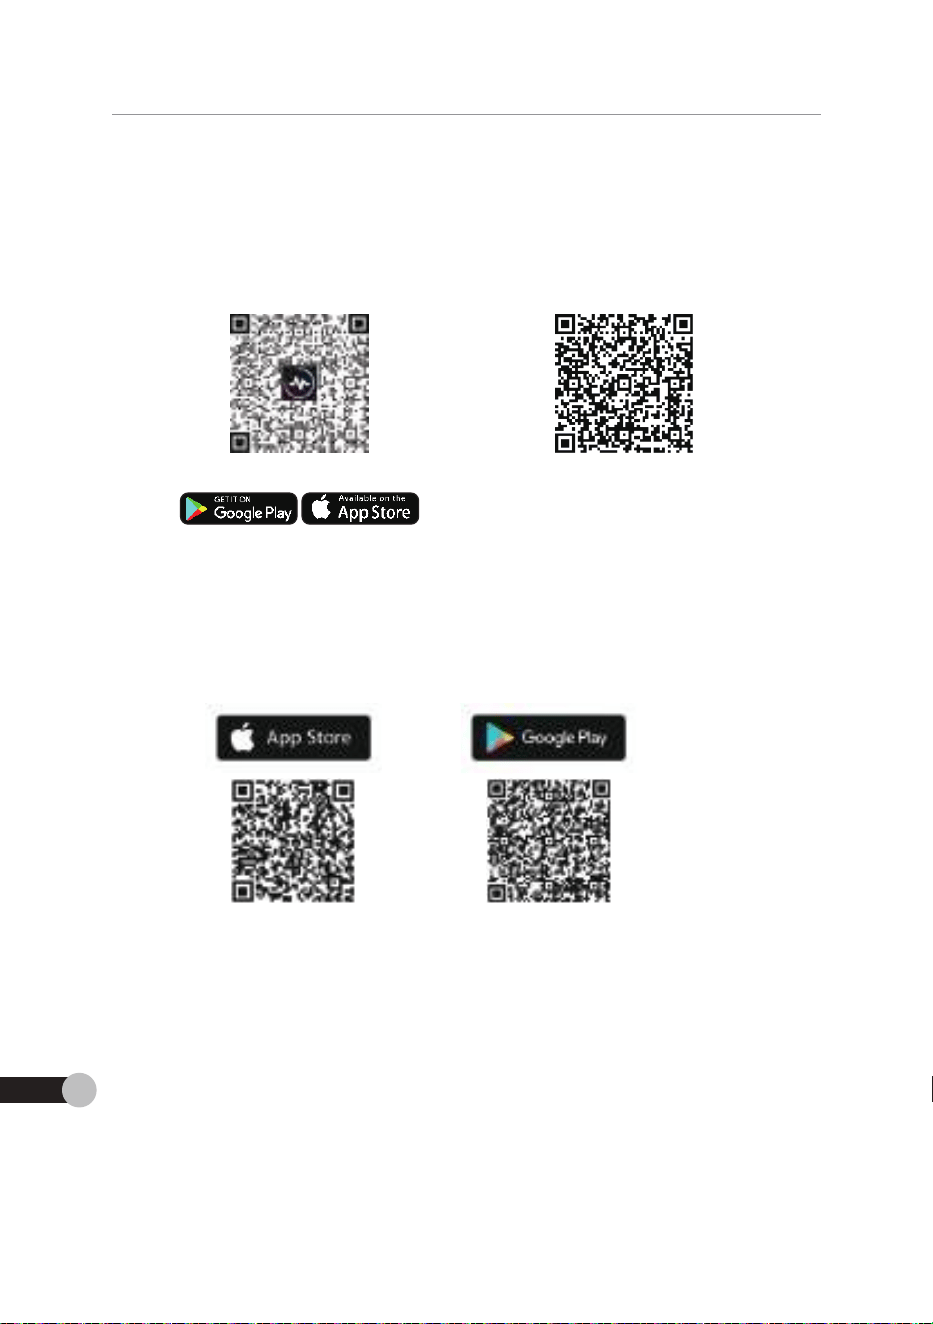
ANLEITUNG ZUR APP-EINRICHTUNG
DE 44
MERACH herunterladen und verwenden
1. Um die MERACH-App herunterzuladen, scannen Sie den QR-Code oder suchen Sie
"MERACH" im Apple App Store® oder Google Play Store.
2. Öffnen Sie die MERACH-App. Loggen Sie sich ein oder melden Sie sich an.
3. Bitte beachten Sie: Wenn lhr Telefon ein Apple - iPhone ist, beachten Sie bitte denPfad:
Profil> Einstellungen > Sprache nach der Anmeldung, um die gewünschteSprache zu
wechseln.
4. Folgen Sie den Anweisungen in der App, um lhr Gerät einzurichten.
1. Um die Kinomap-App herunterzuladen, scannen Sie den QR-Code oder suchenSie
"Kinomap" im Apple App Store® oder Google Play Store.
2.Öffnen Sie die Kinomap-App. Loggen Sie sich ein oder melden Sie sich an.
3.Wählen Sie das entsprechende Fitnessgerät aus.
4. Schalten Sie Bluetooth ein, und wählen Sie FTMS.
5. W¤hlen Sie "Rudergerät", und suchen Sie lhr "MRK-Q3-XXXX".
6. Starten Sie das Training und erkunden Sie verschiedene Trainingsmethoden.
Download und Nutzung von KINOMAP
MERACH APP Download APP Connection Guide
MERACH APP EINRICHTUNG ERACH
MFRACH APP EINRICHTLING FRACI
MENaCH heruinteriaden uind verwencer
LUmae MERaC+App herntezuaden.scannensie denOR-Code oder suchens
MERACH im Apple App 5tore oder Gooqle Pay Store
Z.Oftnen sie de MERaC+Aoo.Loooensie sch en odermeden se schan
3.ate baactenste Vem rr Teiotonein Aoe-Phoneit baactenstebitte rpta
ProrEinsteunaensprache nach derAnmeiduna.um ae aewunschtesprachez
hn
4.Fotgen 5ie n Anweisungenin der App.um hr Gerat enarcnter
Download undNutzung won KNOMAF
AgpStore
1Um deknomapApp herntezuhden.scannen 5ie anORCode oder suchen5
"Knomao"im Anole Aoo 5tore oder Gooale Pav 5tore
zOftnen sie die Kinomao-Ano.Looaen sie sch esnoder mein sie sch an
3.Wahlen sie das entsorchende Fitnessaerat aus
4.schaiten sie Bluetooth ein.und wahlen sie FTMs
5.Wmrien5ie"Rudroerat.und suchen 5ie hr"MRK-O3-XXXX
5.starten sie das Trainng und erundensieverschiedene Trainngmethode
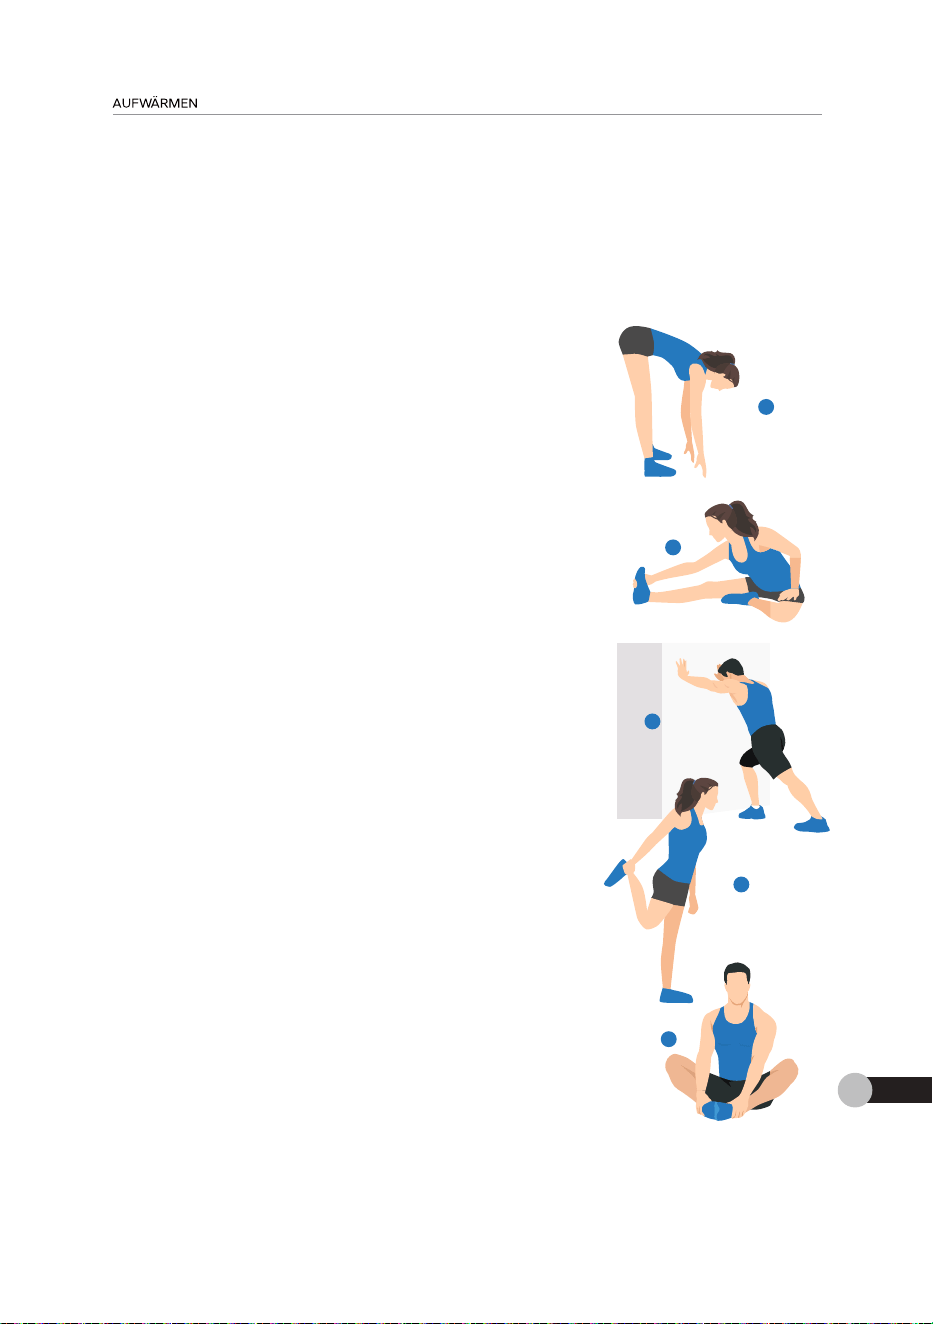
DE45
1.Abwärts strecken
Beugen Sie lhre Knie leicht, lehnen Sie lhren Körper langsam-
nach vorne,entspannen Sie lhren Rücken und lhre Schultern-
und versuchen Sie, lhre Zehen mit den Händen zu berühren.
Halten Sie die Position für 10-15 Sekunden undentspannen
Sie sich dann.Wiederholen Sie die Ãbung 3 Mal
(siehe Abbildung 1).
2.Kniesehneim Sitzen dehnen
Setzen Sie sich mit einem Bein gerade hin. Positionieren Sie
dasandere Bein so, dass es eng an der Innenseite des geraden
Beinsanliegt.Versuchen Sie, lhre Füße mit lhrer Hand zu
berühren.Halten Sie die Position für 10-15 Sekunden und e
ntspannen Siesich dann.
Wiederholen Sie dies 3 Mal mit jedem Bein (siehe Abbildung 2).
3.Achillessehne dehnen
Stellen Sie sich mit beiden Händen gegen eine Wand oder
einenBaum und stellen Sie einen Fuß hinter den anderen.
Halten Sielhr hinteres Bein gerade und die Ferse auf dem
Boden und lehnenSie sich gegen eine Wand oder einen
Baum. Halten Sie die Positionfür 10-15 Sekunden und
entspannen Sie sich dann.WiederholenSie dies 3 Mal mit
jedem Bein (siehe Abbildung 3).
4.Quadrizeps dehnen
Greifen Sie mit der rechten Hand nach hinten, fassen
Sie lhrenrechten Fuß und ziehen Sie ihn langsam zur
Hüfte, bis Sie spüren,wie sich die Muskeln an der Vor-
derseite lhres Oberschenkelsanspannen.Halten Sie die
Spannungfür 10-15 Sekunden undentspannen Sie dann.
Wiederholen Sie dies 3 Mal mit jedem Bein(siehe Abbildung 4).
5.Sartorius dehnen(innerer Oberschenkelmuskel)
Setzen Sie sich mit den FüBen zueinanderund den Knien nach au
Ben.Greifen Sie lhre Füße mit beiden H¤nden und ziehen Sie
sie in RichtungLeiste.Halten Sie die Position für 10-15 Sekunden
und entspannenSie sich dann.Wiederholen Sie die Ãbung3 Mal
(siehe Abbildung 5).
1
2
3
4
5
Dehnen Sie sich, bevor Sie trainieren.Warme Muskeln lassen sich leichter
dehnen.Beginnen Sie also mit einer 5-10-minütigen Aufwärmphase und führen
Sie danneinige der unten aufgeführten Dehnungen aus: 5 Mal, 10 Sekunden
oder längerpro Bein. Wiederholen Sie sie nach dem Training.
AUFWÄRMEN
Hinweis: Dieses Gerät ist für das Ganzkörpertraining konzipiert.
Bitte befolgen Sie die oben genannten Schritte zum Aufw¤rmen.
AUFWARMEN
Uennen sie sicn. bevorsie trainierenwarme wuskein iassen scn leicnte
aennen segnnensie asomt einer s-iumnuugen aurwarmpnase unarunrer
sie aannenae aer unten auroerunrtenuennunaen aus wai.1u sekunde
oder iangerpro sein.wiederhoien sie sie nacn aem Iraining
1.Abwarts strecken
Beuaen se hre Knie lecht lehnen sie hren Koroer lanasam
nach vorne,entspannen se hren Rucken und hre schuitern
undversuchen se.hre Zehen mt den Hnden zu beruhren
Hlten se die Position tur o-t seiunden undentsnanner
Se sch dannWiedeholen 5ie die Abuna3 M
5ehe Abbdunal
2 Kniesehnein5itzen dehner
setaen sie sich mit einem Bein aerade hin Positionieren se
dasandere Ben so,ss es eng an der innenseite desgerader
BensanlioatVersuchen 5ie. hre Fu3e mit hrer Hand z
beruhren Haten sie die Position tur O-t seiunden und
ntspannen Sieschdann
Wederhden 5ie des 3MMalmt iedem Ben(siehe Abbdngz
3.Achessehne dchner
steen se sch mit beden Handen ggen eine Vand ode
eineneaum und steen sie einenFue hinter dn andren
Haiten sehr hinteres aein gerode und de Ferse aut der
Boden und ehnen5ie sich gegen eine Wand oder einen
Baum. Haten sie die Positionfur YO-s seiunden und
entsoannen sie sich dann.Viederholensie dies 3 Ma m
iedem Hein1siehe Abbduna3l
4.euadrzcosdchner
Greiten se mt der rechten Hnd nach hinten.tasse
sie hrenrechtenFu und ziohen se ihn iangsam zu
Hutte bis 5e sp0renwie sich die Muskein an r Wor
derseite hres Oberschenkesansoannen Hten se d
5pannunqtur o-it seiundn undntgannen sie dann
Wederhoien 5ie des 3Mal mt iedem Bensiehe Abbdung4
5.5artorius dehnenlinnerer Oberschenkeimuskel
5etaen 5ie sich mit nFuBen zueinandrund den Kniennach a
HenGreten sie hre Fue mt beidn Hrnden und ehen s
sie in RchtunaLeiste Haten sie die Positon tur YO-t seiunder
undentsoannensie sich dann.Viederhoien sie de Abuna3 Ma
(5gheAbbguna5l
Hnusle hleeecsrat let ttrtae Ganzthrnrtraininn tnnsira
Bitte befogen sie die oben genannten schritte zumAufwtrmen
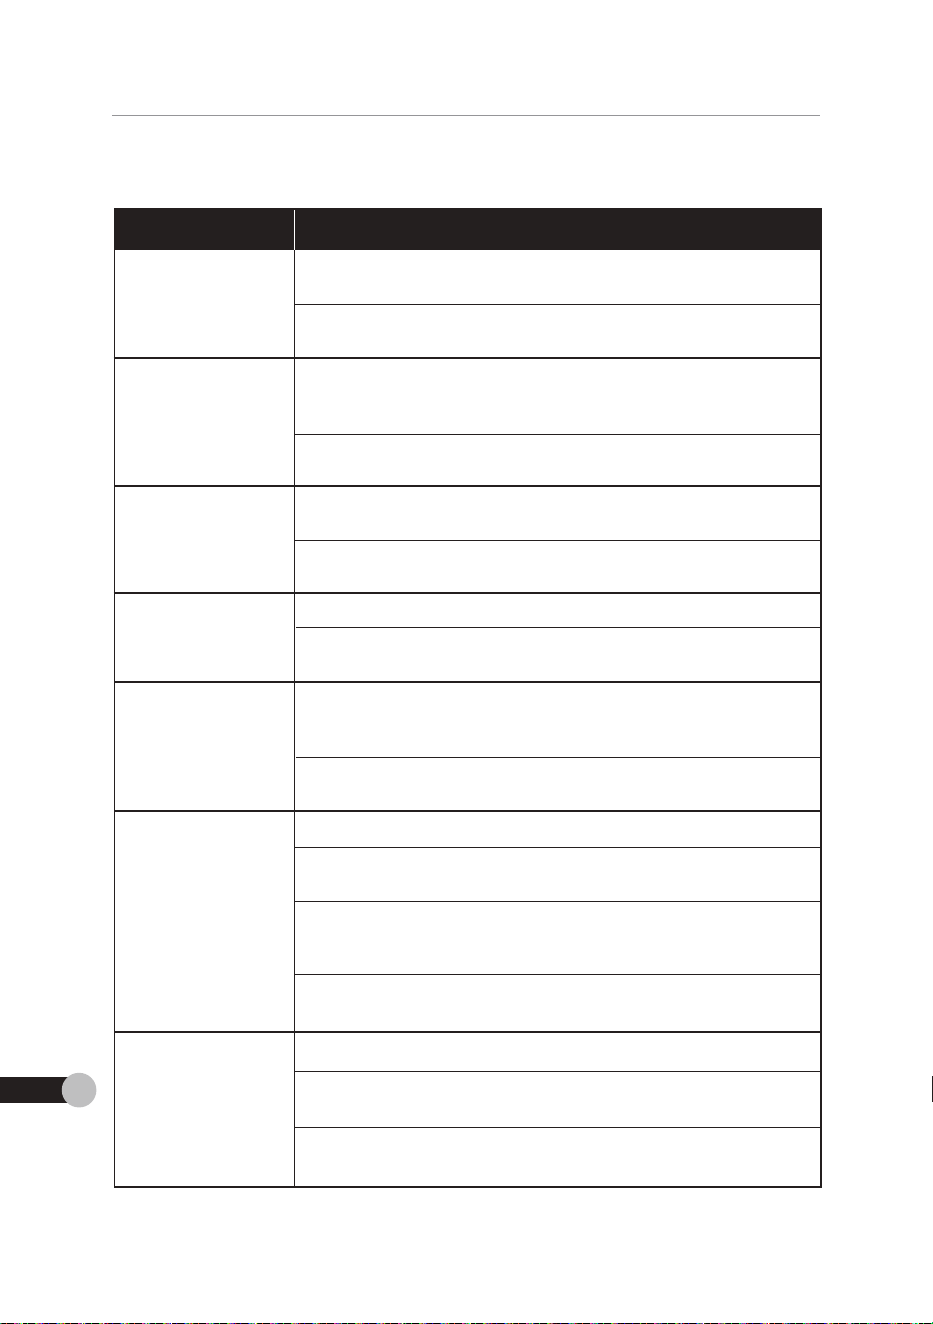
FEHLERBEHEBUNG
Problem
Mögliche Lösung
Anwendungsbereich.
You can apply some car polishing wax on belt.
Stellen Sie sicher, dass eines der Geratekabel an der Rückseite
des Geräts angeschlossen ist.
Was muss ich tun,
wenn der Monitor
eingeschaltet ist,
aber keineTrainin-
gsdaten anzeigt?
Das Rudergerät funktioniert immer noch nicht richtig.
Bitte wenden Sie sich an den Kundendienst (siehe Seite 49).
Was ist zu tun,
wenn der Monitor
ausgeschaltet ist?
Öffnen Sie die Batterieabdeckung auf der Rùckseite des Mon-
itors undüberprüfen Sie, ob die Plus- und Minuspole der Batt-
erie richtig eingelegt sindoder tauschen Sie die Batterie aus.
The rowing machine is still malfunctioning. Please contact
Customer Support (see page 49).
Was ist zu tun, wenn
das Rudergerät nicht
mit der APP verbun-
den werden kann?
Check whether other members are connected to Bluetooth
at the same time. If so, unbind and reconnect.
Check whether the left and right foot straps are tight enough.
Was ist zu tun, wenn
es beim Rudern zu
Geräuschen kommt?
Was ist zu tun,wenn
das gesamte Gerät
leicht wackelt oder
die Fußpolster währ-
end des Trainings
angehoben werden?
Was ist zu tun, wenn
die Pedale wackeln
oder die Riemen
locker sind?
Check whether the front and rear leg tubes are fastened.
Adjust the foot pads under the tubes until the whole machine
is stable.
Use the rower on a surface that has a better grip on the floor
stabilizer, or purchase an exercise mat to hold the rower in
place.
Check whether the fixing screw of the middle pedal shaft at
the bottom of the middle of the machine is tight enough.
The rowing machine is still malfunctioning. Please contact
Customer Support (see page 49).
The rowing machine is still malfunctioning. Please contact
Customer Support (see page 49).
Check whether the handle falls off during the movement.
The belt may be stuck in the pulley groove. Adjust the belt
to the center of the pulley.
The rowing machine is still malfunctioning. Please contact
Customer Support (see page 49).
The rowing machine is still malfunctioning. Please contact
Customer Support (see page 49).
The rowing machine is still malfunctioning. Please contact
Customer Support (see page 49).
DÉPANNAGE
DE 46
口FNMG
EEEk8EE30Ac
Prcbem
ecteen
was muss ich tun,
Stelen Sie sicher.dasseines der Geratekabe an derRuckssit
wwenn der Mkonitod
ldesGerats angexhossen st
cingeschaltet ist
Das Ruderoerat tunktoniert immer noch nicht richtio
aberkengTranin
gdaten anzegt?
Rirtowancon co eirh ancton intnlenet felehe cite de
offnen se die atterieabdeckung auf der Ruckseite des Mon
was istzu tun
itnreandihorrifon ci nhdio Phe-un vinennlotorRatt
erie rchto einoeiat sindoder tauschen se die aattese aus
wenn der Monitor
ausgexchaltet tst?
The rowina machine is stmatunctionina. Pease contac
Customer5uooort1see oa0e 49l
Ia5st zutun.wenr
Check whetherother membersare connected to aluetoot
das Rudergerat nicht
at the same time f so.unbind and reconnect
Immt deer aePwerbun
The rowina machine is sti mafunctonina. Pease contac
ldgnwerden kann2
Customer 5upport(see page 49)
tu can aoohv some car oolthina wax on be
lAnwendunasberecr
The rowina machine is stl matunctionina. Pease contac
Customer5upport(see page 49)
Oheck whether the handle tais off drina the movement
Wastst za tun,wenr
The bet may be stuck in the puey groove Adust the be
5Dn5032nZW
to the center of the pu ey
Geauschen kommt?
The owina machine is st matunctionina. Pease contac
Customer 5upport (see page 49)
Check whetherthe tront and rear a tubes are tastened
Iastst zutun.wenr
Adiust the toat oadsundr the tubes untthe whoie machine
Idaas gesamte Gerai
t
IeChtwacket odg1
Use the ower ona surtace that has a better qripon the foo
aeFuBo0.trwah
end des Traning
stabzer or ourchase an oecise mat to hdd the rower in
angehoben werdon?
The rowina machine is stl matunctionina. Pease contac
Customer 5upport (see page 49)
Check whetherthe left and roht toot straps are tgnt enoug
IVasst zu tun,wenr
Oheck whether the fodng screw of the middle pedai shaft a
Idie Podale wwacioein
the bottom of the middie of the machine is tight enough
OdrdRgTmgn
OCT5na
The rowina machine is stl matunctionina. Pease contac
Customer 5upport (see page 49].
DE47
AAfuaONDeLEa
WaRTUNG UND PFLEGE
Wenn sie ein Ftness-Enthusiast sind,ist es wichtig,Ihre Fitnessgerate in gute
Zustand zu halten,um optimale Leistung und Langlebigkeit zu gewahrleister
Hier sind einige wichtige Wartungsschritte,die se betoigen solten
H8en S1e 0a8 Uer8T s8uDe
Es ist wchtig,sauberket zu wahren indem sie de obertiachen mt einem mider
engungsmtte abwschen insbesondere die Iele,die naug in Kontakt kommen
we Gntte,stzuna schene.vermeiden sle die verwendung von sauren ode
alkalscnen Renigern und verwenden se kein wasser ooer reniger aut aen
aiataen visoav Acnten sle oesonoers aur ae scniene una steen sie scne
dass se sauoer und reiourdsios aur
Uberoruten 5ie reaeima3ia beweqliche Teile
Oberprofen Sie reaeiraBio bewealiche Teile wie Arme.Rader.Pedale usw.ur
scnerzusteen oass se reounasos runkoneren una rre von escraoiounoe
sna,venn serunkonsstorunaen ressteen.tassen oe se so scnne w
moaicn renaneren una scnrieren sie aie pewealchen Iee reaeimasia.n
einen reibunaslosen Hetrieb sicherzusteler
Inspektion der eiektronischen Komponenten
Uberproren sie regeima3ig die elektronischen Komponenten wie das Display
Kabe und Sensoren,um sicherzustelen,dass sie sichingutem Zustand beinder
Wenn sie Beschadigungen oder Funktionsstorungen teststelen,wenden se sic
ana3sEae1Ea
0berprufen und Festziehen von Befestigungselementen
Uberpruren sie regeimasg die Betestigungselemente wle schrauben und Bolzer
aur Lockereit und zlehen se sie be Bedart test.Die regeimasige Nutzung de
Gerats kann vbrationenverursachen,die imLaute der zet Tele lockern konnen
daher solten sle sie regeimasg testzlehen,um hr Geratin Topzustand zu hate
vurcn terogung oieser vartungsscnrtte xonnen sle sicnersteen,aass inr
rtnessgerate in ausgezeicnnetem zustana oteioen uno inre Leoensaauer ru
Wee VrorKoUIs YeTanderT wr0
47D
wenn se wanrena rrer reaeirasoen nspexuon verscneserscneinunaen a
mrer uerat restseien.ae eiren Austauscn eroroercn macnen konnter
kontaktieren Sie uns bitte unter support.euemerach,com
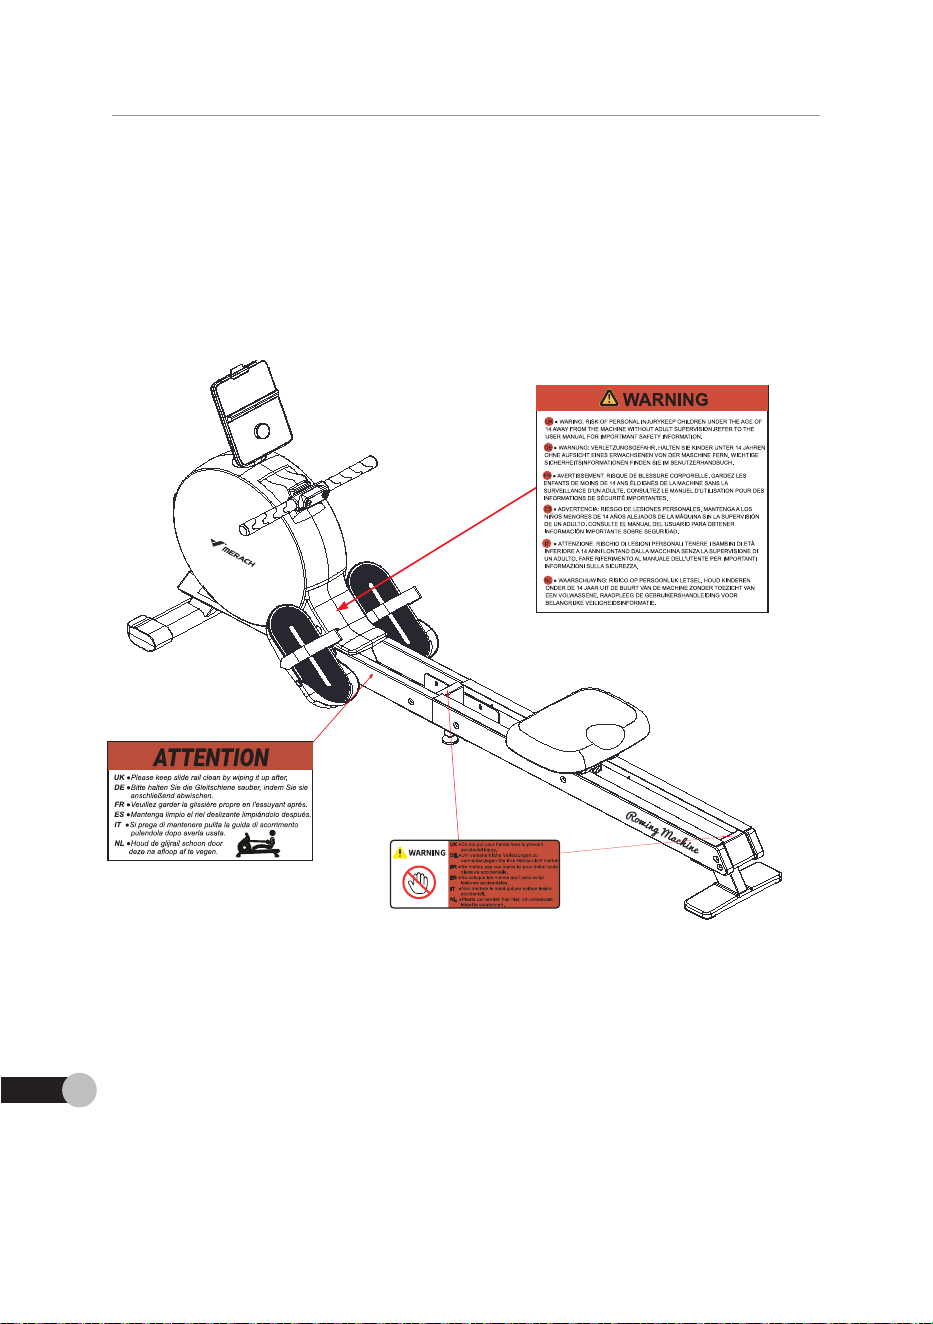
BITTE BEWAHREN SIE DIESE ANLEITUNG FÜR ZUKÜNFTIGE VERWENDUNG UND
ZUMNACHSCHLAGEN AUE
MICHT WEGWERFEN
Diese Zeichnung zeigt die Position der wichtigen Sicherheits- und Warnhinweise.
Bittestellen Sie sicher, dass sich jeder Benutzer des Geräts vor der Verwendung
mit den Sicherheits-und Warnhinweisen vertraut macht.
Note: Hinweis: Die Hinweise werden möglicherweise nicht in OriginalgröBe angezeigt
PLATZIERUNG DER WARNHINWEISE
PLATZIERUNG DER WARNHINWEISE
DE 48
PLATZIERUNG DER W ARNHINWEISE
2ONACHSaHLAGENAOE
eHVEGVERFEN
Diese zechnuna ssiatde Poston rwchtaen scherhets-und vamhinweise
Hittesteen sie sche.das sch iederBenuter des Gerats vorderverwendun
mit den scherhets-und Warnhinweisen wertraut mcht
A
上
Note:rinves Diernwesewerdenmoglcherwese rnt inOngnagroaeangezeg
DE49
8
MERACH NovaRow Q3 Selbsterzeugendes elektr-
omagnetisches Rudergerät
MR-R21
GARANTIEINFORMATIONEN
MtAH NovarowV33eDsterugendes sext
Produiktname
onaaneteh Ruaeaea
Model
MR-R21
3TdarT-53TATezN
e
vremprenen innen anngena,zu nreregenen romaoon a
e8stenummer un0 d8s k8oaum zu no0eren
Kaufdabum
cenennummei
Bedingungem a Ricntinier
Ue Errrooure cresaurnnocrWegeriena,vererunguraseve
Ue arge oesorrse aaranoe von MErw n a oem Rauroum
Er wraorerrourerAspruoercrunereen ruesraensron
Erstkauter unsarerProdukie raab corersten 3 Tagenach damkauf mogich
uiosaurreersrcr scnnuraraanpersoncnenuerauen uro annerrnraen yomrezeor
aan it-ooar enenanaoren ueorn.uraenossrroaunr voraesonenis
sgptane anoernuranan as a,a ausaruocntamrroaurgegeoaneroer
U8s8araretsncnt uDeraaDar.trAUnargtncnurscnaoon.Verus8 oa
Unnrte,aarcnvrsusrarsskrosteruzer,sspucnouc0
,
和
Diese Garantie gilt nicht in den folgenden Fallen:
Schadon augrund von Mssbrauch,Unfal,Umbau odorVndalsmus
unsacgemase ooer urzurecnende wvarung
Besch8digung beim Rucktransoort
Unpescnqie Benuzung ourcn Anoer unier 1o arren
trrua sane tocrargeesrnan sna nursraaanvrantwonio,a aure aa
0osmurgs9maenUoraucn oorgeanAssungem sonuzemaroucvnrs
urden
egensenoerussusooereescranungvozrgecoerogesrencn
4
zs,soaass aerane rungssscnss mocneraese nurse q
Lsura areoste astcrrer,unosorren auenarorercrteraor
ate ausarucxcnen una stscnwegenaen uaranuen,enscntescn ae
oarare aermartgansgket,sna aur oen cerau aer oescnrankte
aeeneoeseten
DE 50
44-1315070255 Mon-Fri 10am-7pm PST UK/DE/FR/ES/IT/NL
Zusarzicne Ld-Monars-aranrie
sieronnen aine zusariere monataeoarantiein anspruennenmen.atveransieoire
nre uararte,inaemsie aie oaeioereicnnura aesrroousanregsreremeracn,con
seraen oaer sicn aurmercnrt,corpagesrwarrantyeurope una nrerrao aerersten
iaaenacn oemaurire eesteunumertza.amazoniengeoen,uminrneuesrroourrura
erWeTere Uararite zu reg5trerer
vennsle aie cestenummerurinrrrooutncrtangebensornen,9eoenseprteeinerur
otzinaasrearr aieesteurmerein zusamrenmr aemvtum.anaemsierrrroau
erhalteinhapgin
Defekte Produkte und Ruckgabe.
vennrrroduitrneabaerargegetenencarantiezetceteitseinsote,werdensese
otte urter angaoe irrerkechnungs-und sesteinummer andenxundendienst urte
S4ppee0eana
EroresrOourrLoresCnrUsroou aeseLaoen.30oa
unserrunaenaensrinre Anraae aenerriarrat sercenste aas roaur prtemt einerco
nrer recnnunq una eestelinummer zuruck
A0naGna1cn51
hre Zufiedenheitistuns wichtig solten sePrcblere odorFgenzuIhremneuenProduk
naoen sonnensie sicn aerne uoer supporteuemercn.co anunserrunaenoiensttear
G)44-1315070255 Mon-Fri 10am-7pm PST UK/DE/FR/ES/IT/N
Iik lok's shopExklusver Kundendienst:servicetemerach.cor
stenatenserre esteruuna aeserennummerinormaerwese aur aemntere
rusronr] beret,bevor sie scn an oen Runaenaienst wenaer
D5C