Cordless Air Pump
Original Instruction Manual
English

IMPORTANT SAFETY INFROMATION
Thank you for purchasing Mellif cordless air pump.
Read all safety warnings and all instructions before using.
Failure to follow the warnings and instructions may result in electric shock, fire and/or serious injury.
Save all warnings and instructions for future reference.
If you accidentally lose the instruction manual, please contact us for an electrical one.
1.Risk of fire or explosion - do not spray flammable liquid in a confined area or towards a hot surface. Spray area must
be well-ventilated. Do not smoke while spraying or spray where spark or flame is present. Arcing parts - keep compressor
at least 20 feet away from explosive vapors, such as when spraying with a spray gun.
2.Risk of bursting - do not adjust regulator higher than marked maximum pressure of attachment.
3.Risk of injury - do not direct air stream at people or animals.
4.Do not use to supply breathing air.
5.Do not leave compressor unattended for an extended period while powered. Disconnect power from compressor
after working.
6. Keep compressor well-ventilated. Do not cover compressor during use.
7. Do not remove the valve cover or adjust internal components.
8. Do not use the air hose to move the compressor.
9. The use of accessories or attachments not recommended by the manufacturer may result in a risk of injury to persons.
10. All air line components, including hoses, pipe, connectors, filters, etc., must be rated for a minimum working pressure
of 150 PSI, or 150% of the maximum system pressure, whichever is higher.
11. Do no expose to rain or wet conditions.
12. People with pacemakers should consult their physician(s) before use. Electromagnetic fields in close proximity to heart
pacemaker could cause pacemaker interference or pacemaker failure .
13. Do not leave the tool unattended when the Battery Pack is connected. Turn off the tool, and remove the Battery Pack
before leaving.
14. The warnings, precautions, and instructions discussed in this instruction manual cannot cover all possible conditions
and situations that may occur.
It must be understood by the operator that common sense and caution are factors which cannot be built into this
product, but must be supplied by the operator.
SAFETY WARNINGS
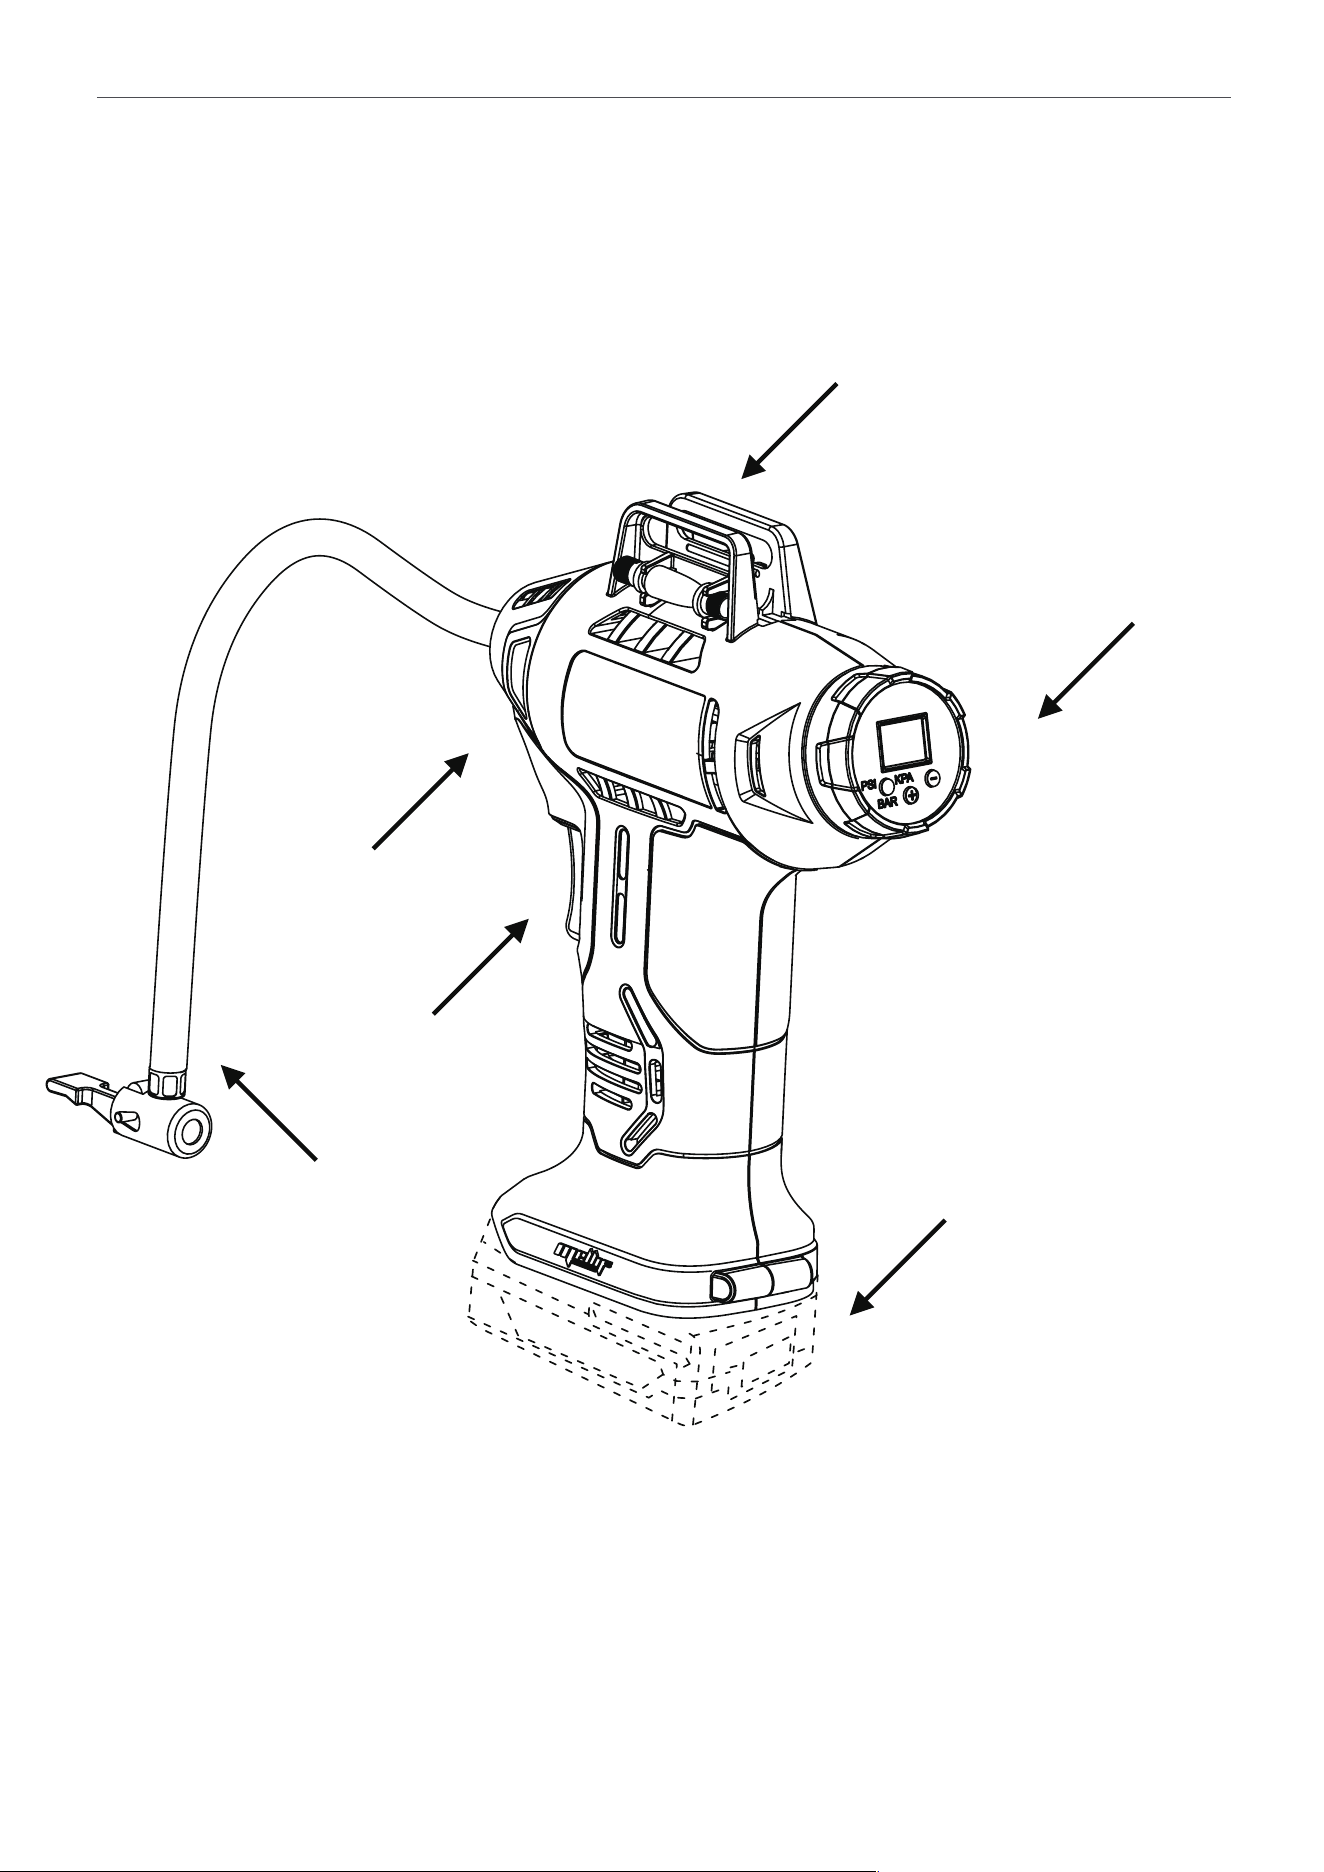
Pressure Gauge
Accessories
Trigger On/Off
Tire Inflator
Battery 20V NOT Included
Indicator
FUNCTIONS:

Operating Instructions
Read the IMPORTANT SAFETY INFORMATION and SAFETY WARNINGS
section at the beginning of this manual including all text under
subheadings therein before set up or use of this product.
GENERAL OPERATION:
MAINTENANCE AND SERVICING :
WARNING! TO PREVENT INJURY AND BLINDNESS, wear ANSI-approved eye protection during use.
1.Insert a fully charged Battery Pack (NOT included), making sure it clicks into place.
2.Inflating Car Tires: Remove the tire’s valve cap. Move the Tire Inflator’s Lever straight up and push it over tire’s valve stem.
Move the Lever to the locked position.
3.Inflating Bicycle Tires: a.Schrader Valve - Remove tire’s valve cap. Move Tire Inflator’s Lever straight up and push it over the
tire’s valve stem. Move the Lever to the locked position. b.Presta Valve - Remove tire’s valve cap. Open the valve tip. Thread
Presta Valve Adapter on to valve stem. Move Tire Inflator’s Lever straight up and push it over the Presta Valve Adapter.
Move the Lever to the locked position.
NOTICE: Lock Tire Inflator firmly in place before turning on the Inflator.
4.Inflating Small Inflatables: a. Move Tire Inflator’s Lever straight up and insert adapter. Move the Lever to the locked position.
b.Connect adapter to item to be inflated
5.WARNING! TO PREVENT SERIOUS INJURY AND DEATH FROM EXPLOSION: Before inflating, check item manufacturer’s
recommended air pressure. Do not exceed that pressure. Over inflation may result in an explosion.
6.To start inflating, squeeze the Trigger.Setting the Automatic Shut-Off Pressure
NOTE: The digital readout will only show inflation pressure when the inflator is being used. In both inflation and pump mode the
unit will show battery status
1. To which between the different units (psi, bar or kPa) press the pressure mode/reset button
(1) until the required units are displayed.
2. Press the - or + pressure setting buttons
(2) unit the required pressure is displayed.
3. To start the inflator press the mode power Trigger switch.
4. When the item to be inflated has reached the preset value the unit will automatically turn off.
5. Disconnect inflatable and remove Battery Pack after use. Clean, then store the unit indoors out of children’s reach.
NOTICE: The Inflator can become hot during use. Allow the Inflator / Deflator to cool for 15 minutes
after 10 minutes of continued use.
NOTE: When inflating items to 10 PSI or less, inflate in short bursts and check item’s pressure after each burst.
NOTE: Allow Inflator to cool 30 minutes before storing away.
Procedures not specifically explained in this manual must
be performed only by a qualified technician.
TO PREVENT SERIOUS INJURY FROM ACCIDENTAL OPERATION: Make sure that the Trigger is in the offposition and
remove its Battery Pack before performing any procedure in this section.
TO PREVENT SERIOUS INJURY FROM TOOL FAILURE: Do not use damaged equipment. If abnormal noise or vibration
occurs, have the problem corrected before further use.

Cleaning, Maintenance, and Lubrication
1.BEFORE EACH USE, inspect the general condition of the tool. Check for:
•leaking, swollen, or cracked battery pack,
•loose hardware,
•misalignment or binding of moving parts,
•cracked or broken parts,
•any other condition that may affect its safe operation.
2.AFTER USE, wipe external surfaces of the tool with clean cloth.
3.Using vacuum, clean debris from the external air vents.
4.Li-Ion BATTERY MUST BE RECYCLED OR DISPOSED OF PROPERLY. Do not open crush, heat above 140° F or incinerate.
5.Disconnect battery pack and store battery pack, charger, and tool in dry, indoor area out of reach of children and away
from metal objects (i.e., paperclips, coins) to prevent shorting.
TROUBLESHOOTING
Problem Possibili Cause Likely Solutions
Tool will not start.
1.Battery Pack not properly
connected.
2.Battery Pack not properly
charged.
3.Battery Pack burnt-out.
Internal damage or wear.
1. Remove Battery Pack, make sure there are no
obstructions, reinsert the Battery Pack according to its
shape (it should only fit one way), and press firmly until
the Battery Pack locks in place. 2. Make sure Charger is
connected and operating properly. Give enough time for
Battery Pack to recharge properly.
3. Dispose of old Battery Pack properly or recycle.
Replace Battery Pack.
4. Have technician service tool.
Tool operates slowly.
1.Forcing tool to work too
fast.
Battery Pack wearing out.
1.Allow tool to work at its own rate.
2. Dispose of old Battery Pack properly or recycle.
Replace Battery Pack.
Excessive noise or
rattling.
Internal damage or wear. Have technician service tool.
Overheating.
1.Forcing tool to work too
fast.
Blocked motor housing vents.
1.Allow tool to work at its own rate.
Using vacuum, clean debris from Air Intake vents.
Follow all safety precautions whenever diagnosing or servicing the tool.
Disconnect Battery Pack and Charger power supply before service.

NOT HAPPY?
If there is anything wrong with your order, even if you have simply changed your mind, please reach out immediately.
We will make it right within 24 hours. If you purchased through Amazon, go to Orders, and click “Return or replace items”
or email [email protected].
Need help with your item?
Return or replace items
If you are happy, a review is greatly appreciated!
2
Year Limited
Warranty
