
Contents
Unpacking .............................................................................................................................3
Product Overview ................................................................................................................4
Top View ..........................................................................................................................................................4
Rear View.........................................................................................................................................................5
Connections ..........................................................................................................................6
Connecting a Mobile Device ...................................................................................................................6
Connecting a Microphone .......................................................................................................................6
Connecting a Guitar ....................................................................................................................................7
Charging the Unit ........................................................................................................................................8
Battery Life .....................................................................................................................................................8
Basic Operating ....................................................................................................................9
Switching ON / OFF .....................................................................................................................................9
Standby Power Mode .................................................................................................................................9
Selecting Modes ...........................................................................................................................................9
Adjust the Speaker Level Settings and Eects .................................................................................9
Adjust the LED light ....................................................................................................................................9
FM Radio Operation ...........................................................................................................10
Tuning in a Station .................................................................................................................................... 10
USB Device Playback .........................................................................................................11
LINE IN (AUX IN) Operation ...............................................................................................11
Bluetooth® Operation ........................................................................................................12
Maintenance .......................................................................................................................12
Cleaning the Unit .......................................................................................................................................12
Hints and Tips .....................................................................................................................13
Product Fiche and Specifications .....................................................................................15
MX-D519PB_IB_Final200616V4.indd 2 17/06/2020 16:59
3
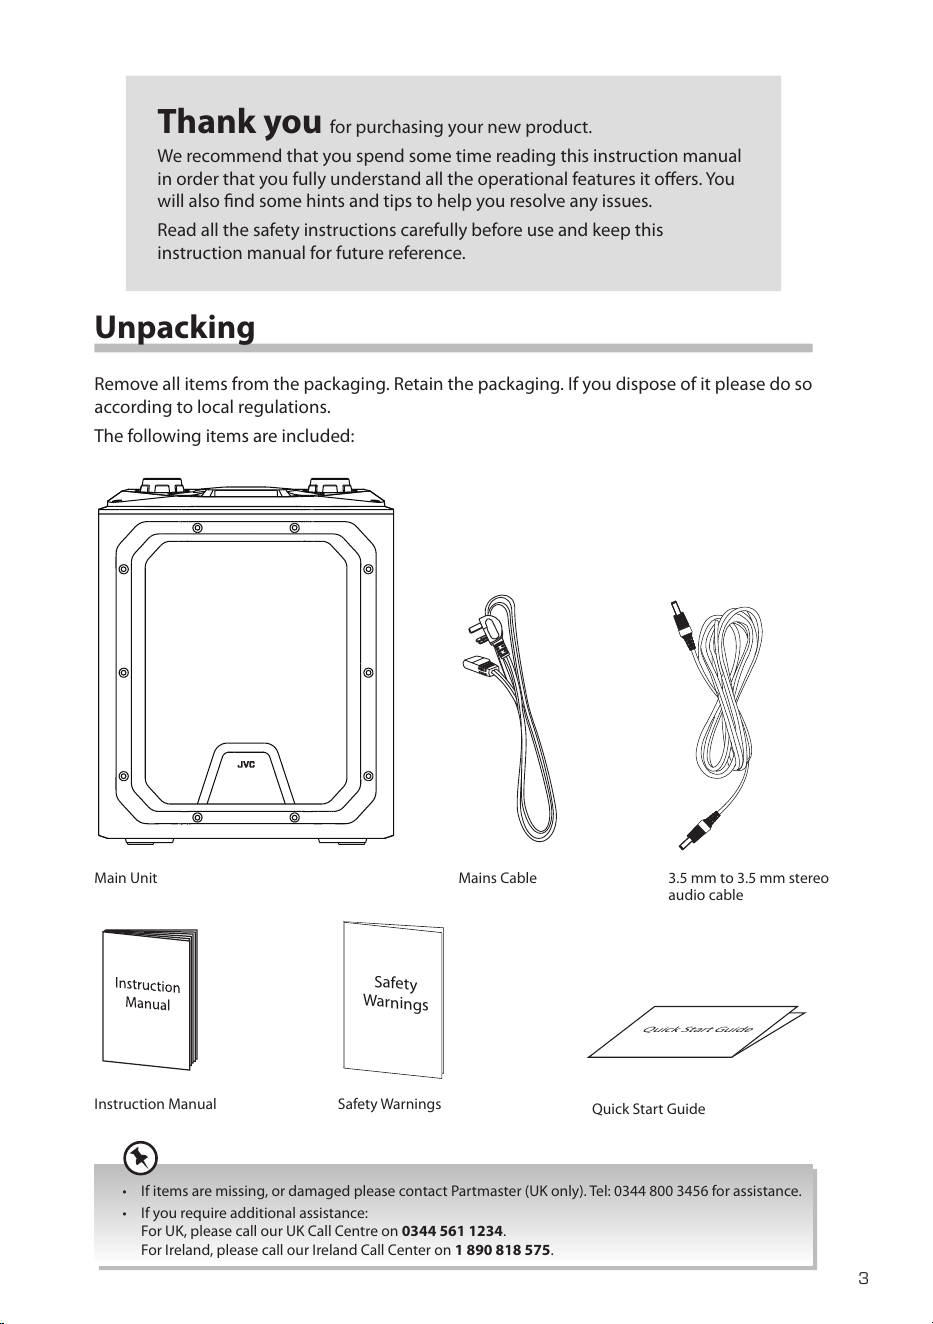
Unpacking
Remove all items from the packaging. Retain the packaging. If you dispose of it please do so
according to local regulations.
The following items are included:
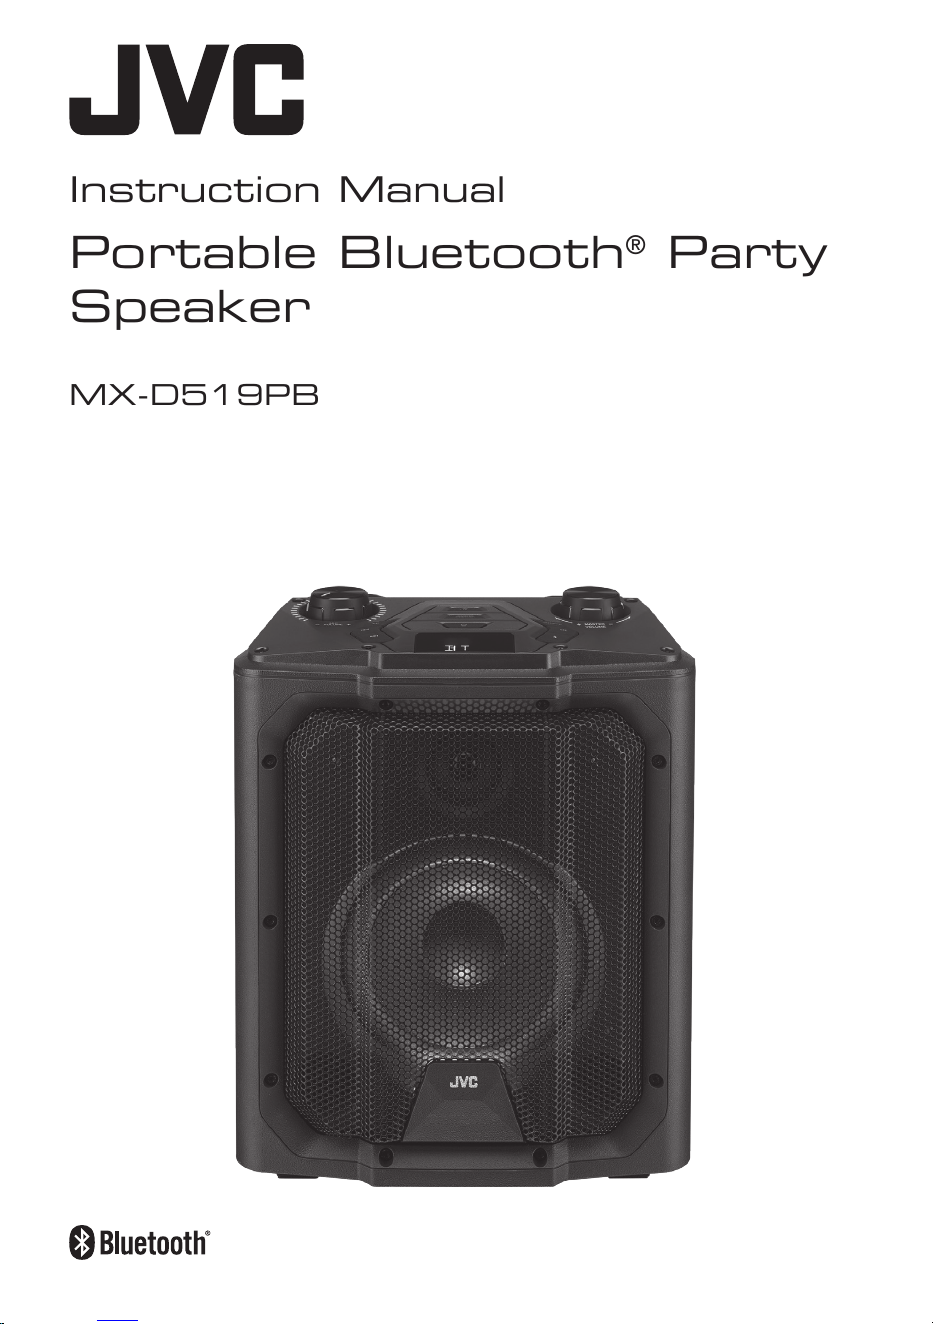
Thank you for purchasing your new product.
We recommend that you spend some time reading this instruction manual
in order that you fully understand all the operational features it oers. You
will also nd some hints and tips to help you resolve any issues.
Read all the safety instructions carefully before use and keep this
instruction manual for future reference.
Main Unit
Instruction Manual Safety Warnings
Mains Cable
Safety
Warnings
• If items are missing, or damaged please contact Partmaster (UK only). Tel: 0344 800 3456 for assistance.
• If you require additional assistance:
For UK, please call our UK Call Centre on 0344 561 1234.
For Ireland, please call our Ireland Call Center on 1 890 818 575.
Quick Start Guide
3.5 mm to 3.5 mm stereo
audio cable
Quick Start Guide
MX-D519PB_IB_Final200616V4.indd 3 17/06/2020 16:59
4
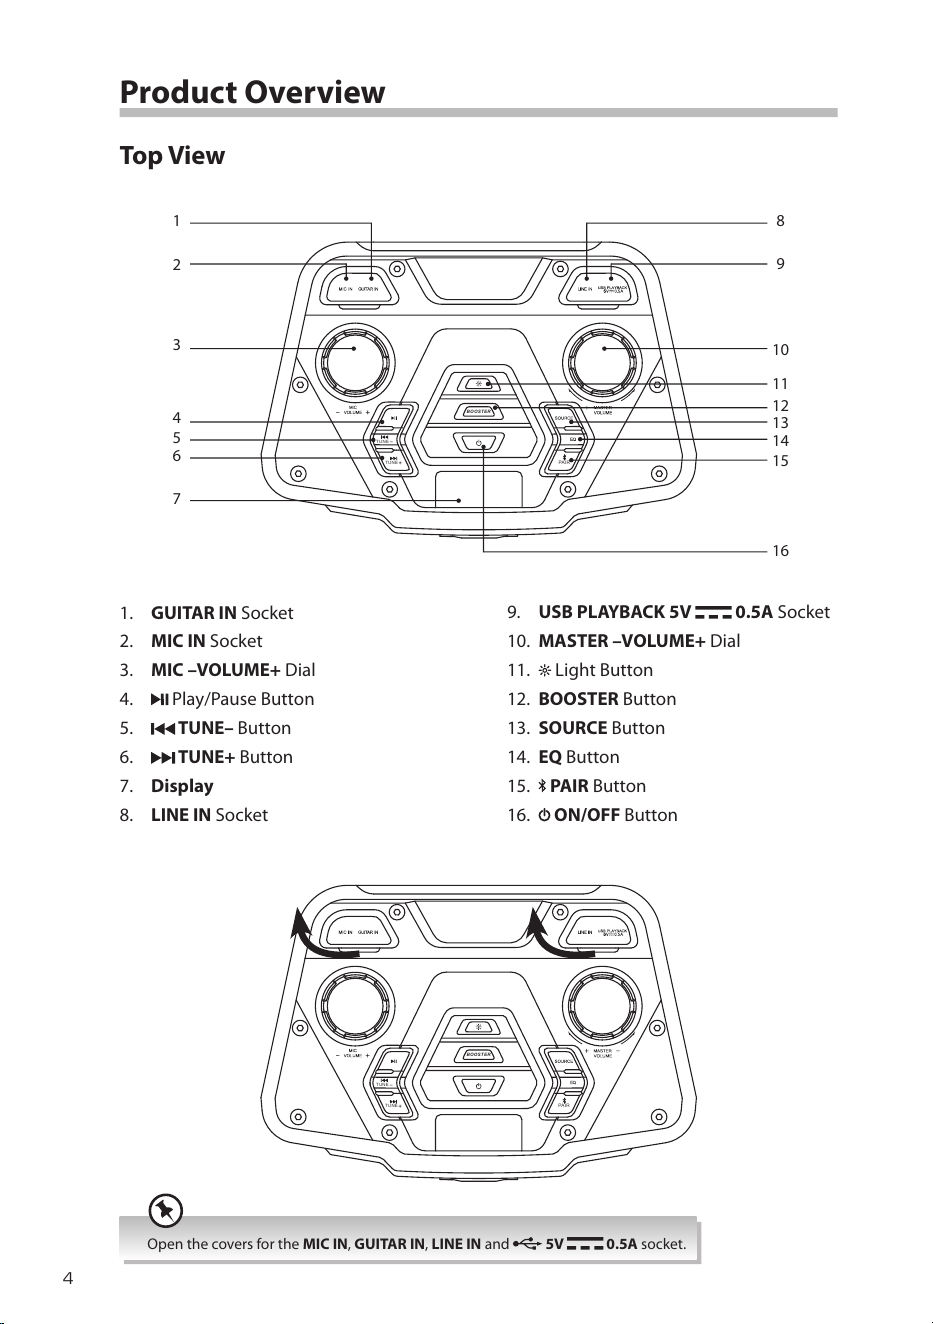
Product Overview
Top View
1. GUITAR IN Socket
2. MIC IN Socket
3. MIC –VOLUME+ Dial
4.
Play/Pause Button
5.
TUNE– Button
6.
TUNE+
Button
7. Display
8. LINE IN Socket
BOO ST ER
TUN E
TUN E
PAIR
1
3
2
4
5
6
7
8
9
10
11
12
13
14
15
16
9. USB PLAYBACK 5V 0.5A Socket
10. MASTER –VOLUME+ Dial
11.
Light Button
12. BOOSTER Button
13. SOURCE Button
14. EQ Button
15.
PAIR Button
16.
ON/OFF Button
BOO ST ER
TUN E
TUN E
PAIR
Open the covers for the MIC IN, GUITAR IN, LINE IN and 5V 0.5A socket.
MX-D519PB_IB_Final200616V4.indd 4 17/06/2020 16:59
5
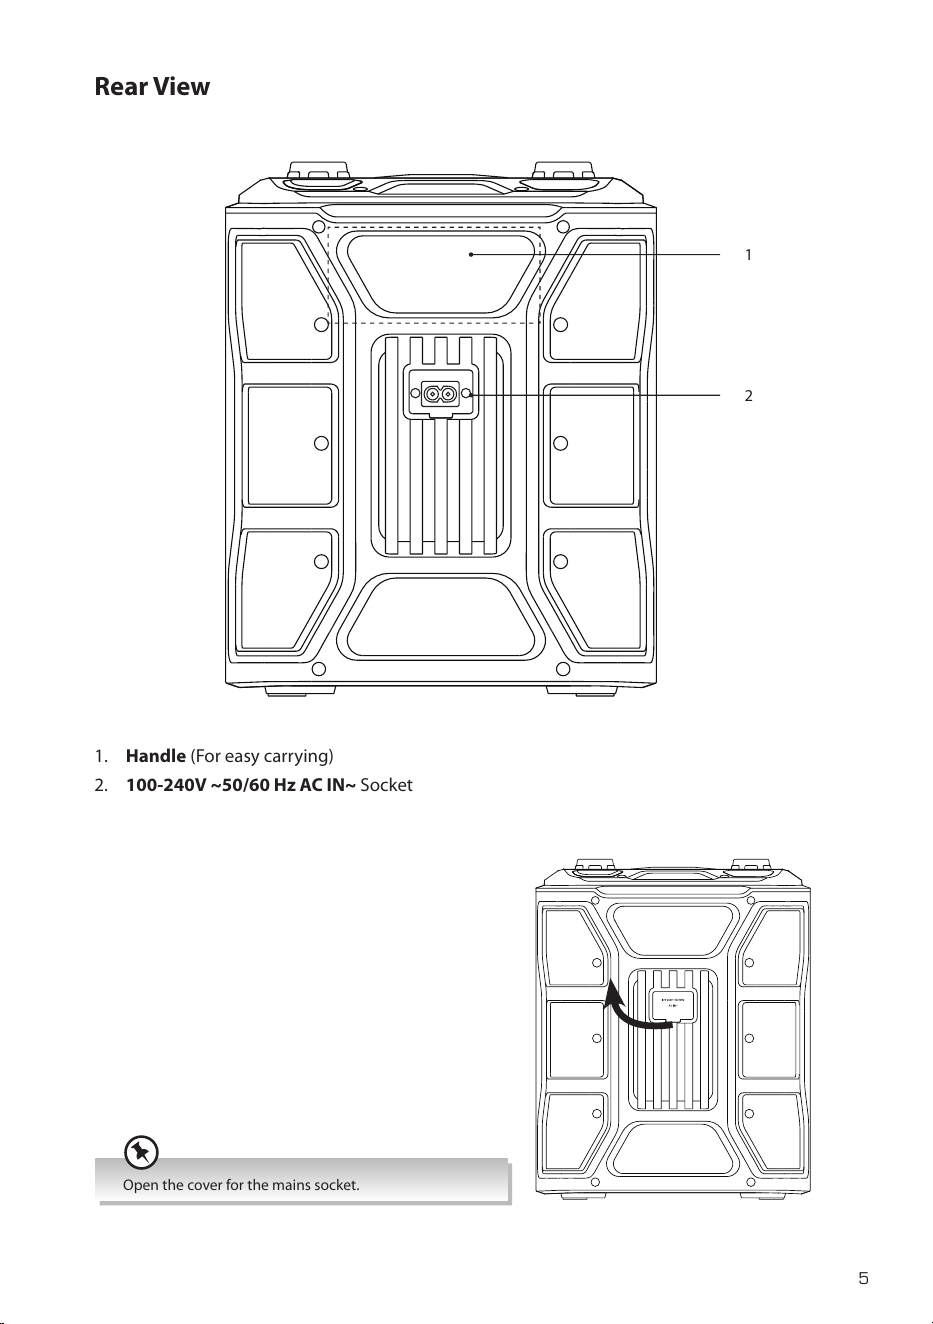
Rear View
1. Handle (For easy carrying)
2. 100-240V ~50/60 Hz AC IN~ Socket
2
1
Open the cover for the mains socket.
MX-D519PB_IB_Final200616V4.indd 5 17/06/2020 16:59
6
Connections
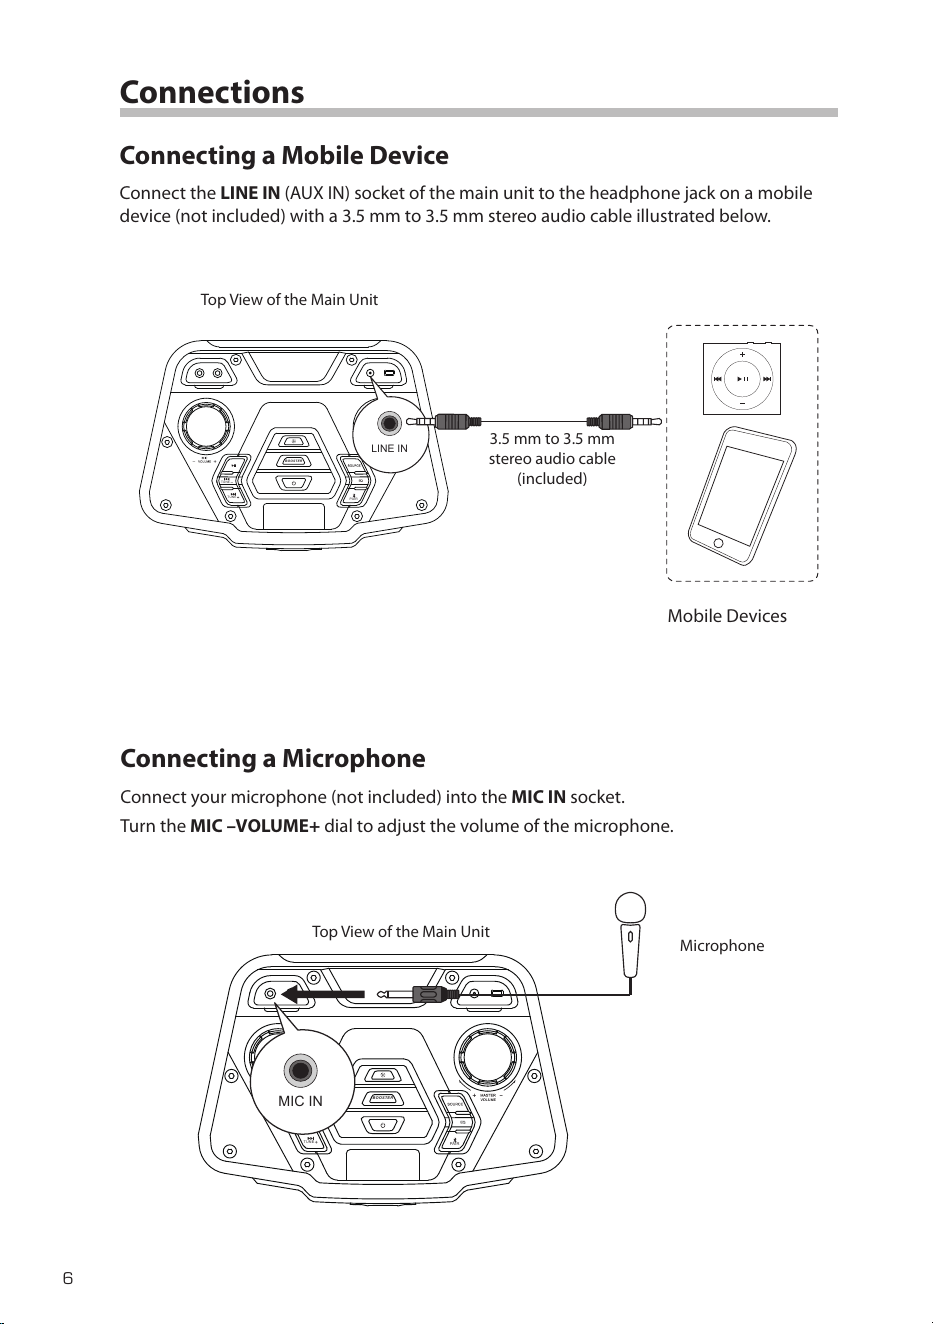
Connecting a Mobile Device
Connect the LINE IN (AUX IN) socket of the main unit to the headphone jack on a mobile
device (not included) with a 3.5 mm to 3.5 mm stereo audio cable illustrated below.
BOOS TER
TUNE
TUNE
PAIR
LINE IN
3.5 mm to 3.5 mm
stereo audio cable
(included)
Top View of the Main Unit
Mobile Devices
Connecting a Microphone
Connect your microphone (not included) into the MIC IN socket.
Turn the MIC –VOLUME+ dial to adjust the volume of the microphone.
BOO STE R
TUN E
TUN E
PAIR
MIC IN
Top View of the Main Unit
Microphone
MX-D519PB_IB_Final200616V4.indd 6 17/06/2020 16:59
7
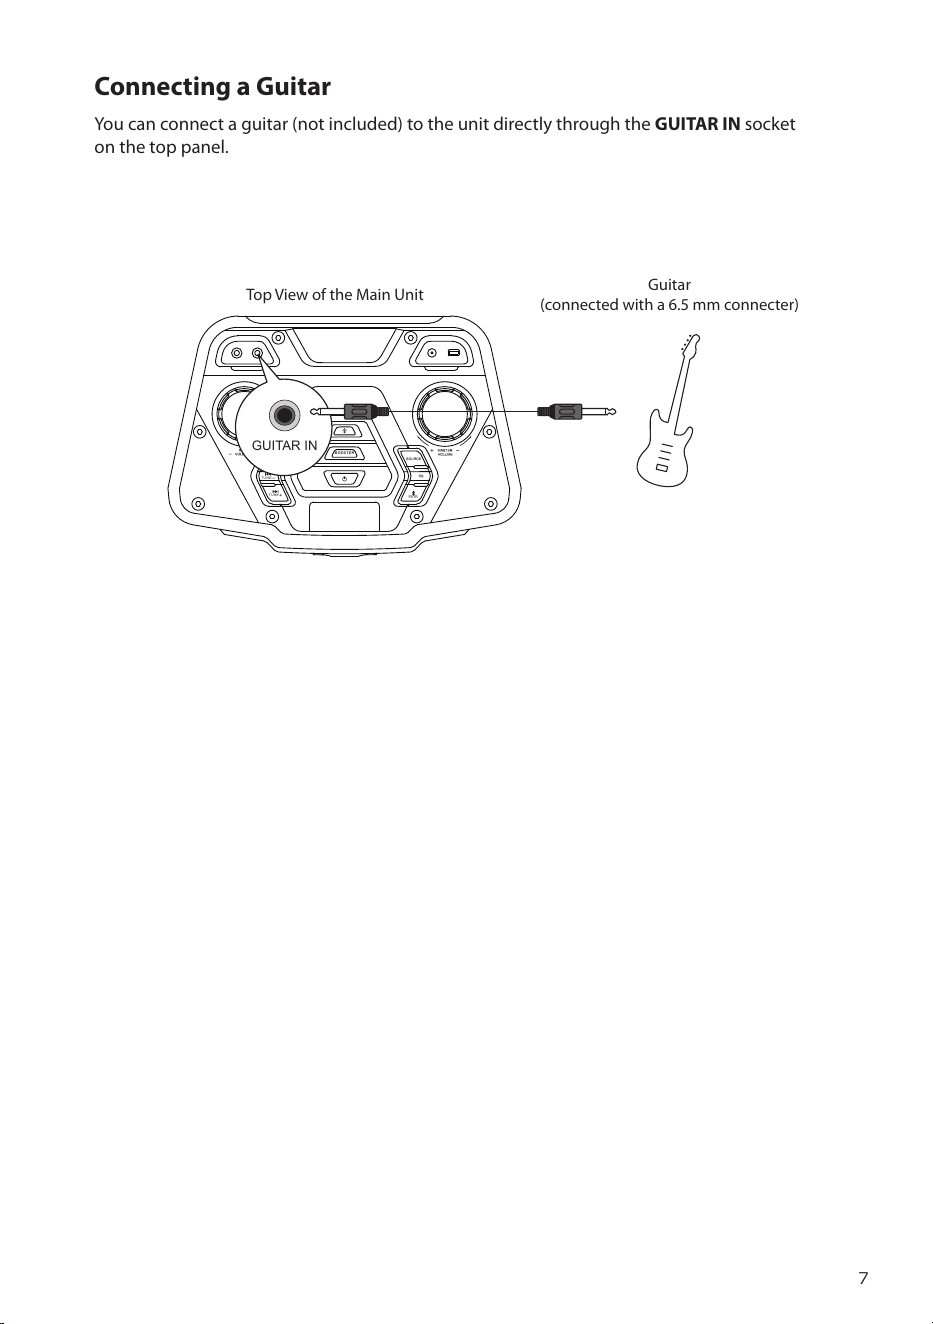
Connecting a Guitar
You can connect a guitar (not included) to the unit directly through the GUITAR IN socket
on the top panel.
BOO STE R
TUN E
TUN E
PAIR
GUITAR IN
Top View of the Main Unit
Guitar
(connected with a 6.5 mm connecter)
MX-D519PB_IB_Final200616V4.indd 7 17/06/2020 16:59
8
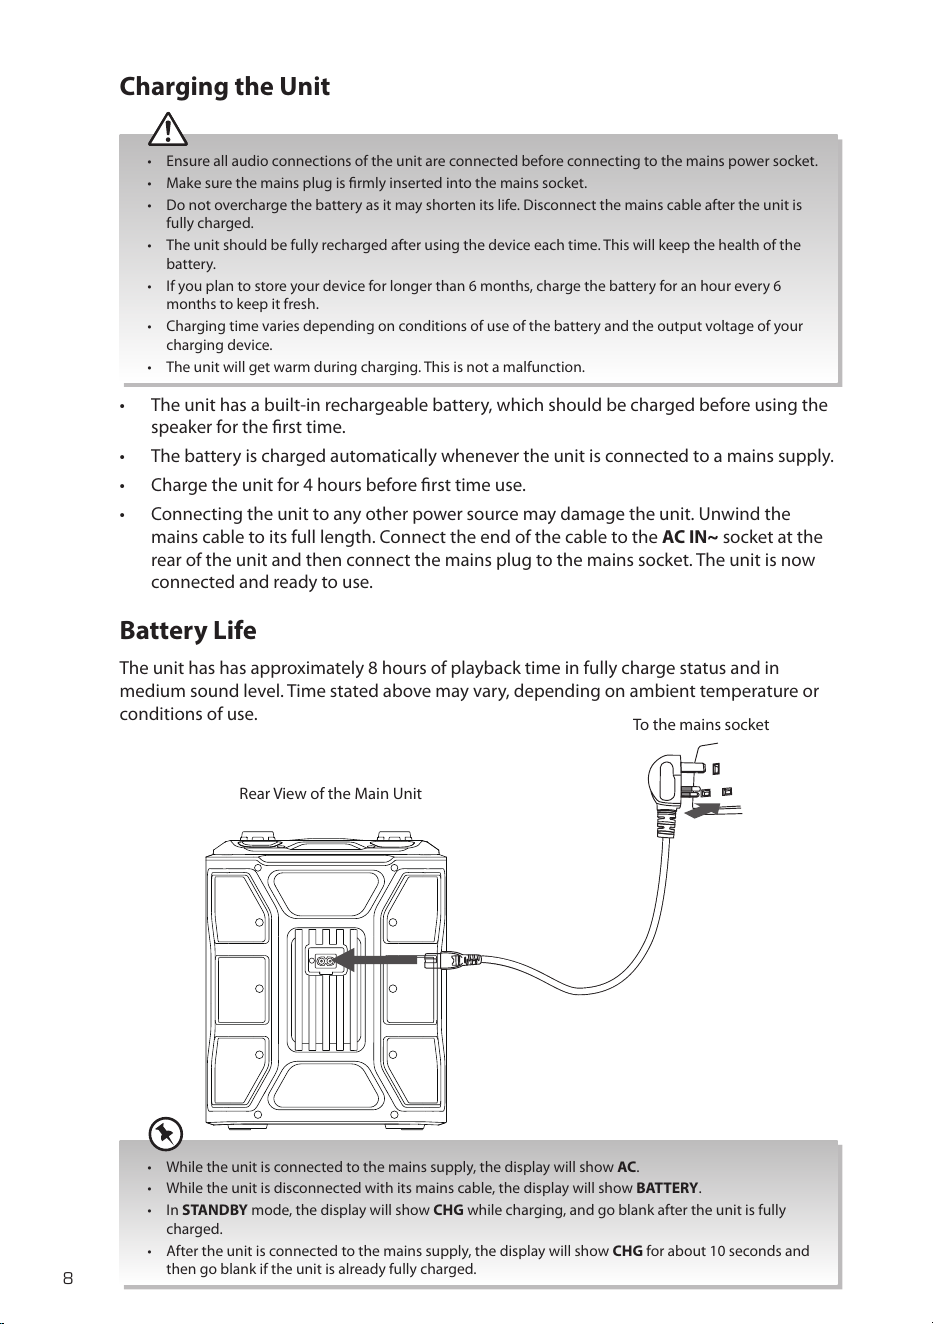
To the mains socket
Rear View of the Main Unit
Charging the Unit
• Ensure all audio connections of the unit are connected before connecting to the mains power socket.
• Make sure the mains plug is rmly inserted into the mains socket.
• Do not overcharge the battery as it may shorten its life. Disconnect the mains cable after the unit is
fully charged.
• The unit should be fully recharged after using the device each time. This will keep the health of the
battery.
• If you plan to store your device for longer than 6 months, charge the battery for an hour every 6
months to keep it fresh.
• Charging time varies depending on conditions of use of the battery and the output voltage of your
charging device.
• The unit will get warm during charging. This is not a malfunction.
• The unit has a built-in rechargeable battery, which should be charged before using the
speaker for the rst time.
• The battery is charged automatically whenever the unit is connected to a mains supply.
• Charge the unit for 4 hours before rst time use.
• Connecting the unit to any other power source may damage the unit. Unwind the
mains cable to its full length. Connect the end of the cable to the AC IN~ socket at the
rear of the unit and then connect the mains plug to the mains socket. The unit is now
connected and ready to use.
Battery Life
The unit has has approximately 8 hours of playback time in fully charge status and in
medium sound level. Time stated above may vary, depending on ambient temperature or
conditions of use.
• While the unit is connected to the mains supply, the display will show AC.
• While the unit is disconnected with its mains cable, the display will show BATTERY.
• In STANDBY mode, the display will show CHG while charging, and go blank after the unit is fully
charged.
• After the unit is connected to the mains supply, the display will show CHG for about 10 seconds and
then go blank if the unit is already fully charged.
MX-D519PB_IB_Final200616V4.indd 8 17/06/2020 16:59
9
Basic Operating
Switching ON / OFF
• Press button to switch the unit on. The display will show “ON”. Then, the system will
switch to the last selected source.
• Press and hold
button to show the in-built battery status (“BATT EMPTY “ / “BATT
LOW” / “BATT HALF” / “BATT HIGH” / “BATT FULL”).
• Press
button to switch the unit back to standby mode. The display will show
“STANDBY” and then go blank.
While the battery level is low, the display will show BATT LOW every 30 seconds.
Standby Power Mode
The unit features an Standby Power mode. It automatically turns o if the unit is idle or the
external unit is disconnected, switched o or the volume is too close to mute for about 15
minutes.
Selecting Modes
Press the SOURCE button to switch between TUNER (FM), LINE IN, USB and BT (Bluetooth®)
modes. The selected mode will show on the display.
Adjust the Speaker Level Settings and Eects
Adjusting the Volume
To increase or decrease the volume, turn the MASTER –VOLUME+ dial.
Preset Equalizer
During playback, press the EQ button repeatedly to select: ROCK / JAZZ / SAMBA / POP /
FLAT / FUNK.
BOOSTER
Press BOOSTER button to switch on/o the booster eect. The volume level will be
boosted immediately.
The EQ cannot work under BOOSTER mode. The display will show “EQ INVALID“ if you press EQ
button.
Adjust the LED light
Press the Light b repeatedly to select the LED eect between LED1, LED2, LED3, LED4,
LED5, LED6 and OFF.
MX-D519PB_IB_Final200616V4.indd 9 17/06/2020 16:59
10
FM Radio Operation
• The search may not stop at a station with a very weak signal.
• If reception is poor, move the unit to a stronger signal location.
Press SOURCE button repeatedly to select the tuner source. The display will show “TUNER”.
Tuning in a Station
Auto Tuning
1. Press and hold
button to start auto tuning. The screen will show AUTO and then start
auto tuning. Press
button again to stop the auto tuning.
2. The searched radio stations will be stored as preset station.
The search may not stop at a station with a very weak signal.
Recalling a preset station
1. Press button and the display will show P-XX (from P-01 to P-30).
2. Press
TUNE– / TUNE+ button to select your desired preset station.
Manual Tuning
Press and hold or button to start the forward or reverse scanning. The display will
show the frequency being searched. Once a station has been found, the scanning will stop
automatically.
With FM radio it may be necessary to ne tune each station by pressing or button repeatedly.
Each press will adjust the frequency by 0.05MHz. If reception is still poor, try moving the unit to another
location.
MX-D519PB_IB_Final200616V4.indd 10 17/06/2020 16:59
11
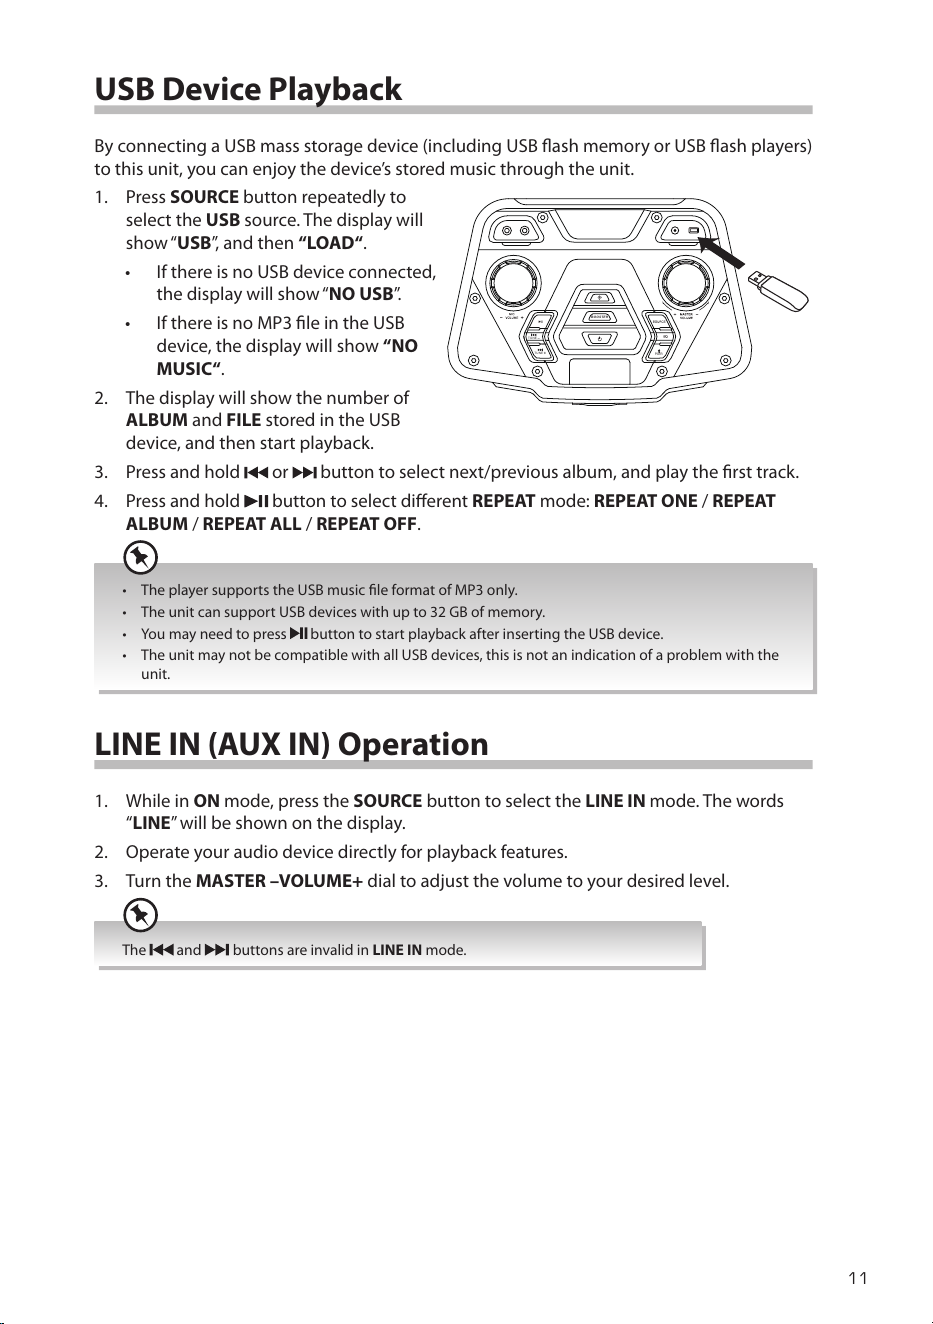
USB Device Playback
By connecting a USB mass storage device (including USB ash memory or USB ash players)
to this unit, you can enjoy the device’s stored music through the unit.
1. Press SOURCE button repeatedly to
select the USB source. The display will
show “USB”, and then “LOAD“.
• If there is no USB device connected,
the display will show “NO USB”.
• If there is no MP3 le in the USB
device, the display will show “NO
MUSIC“.
2. The display will show the number of
ALBUM and FILE stored in the USB
device, and then start playback.
3. Press and hold
or button to select next/previous album, and play the rst track.
4. Press and hold
button to select dierent REPEAT mode: REPEAT ONE / REPEAT
ALBUM / REPEAT ALL / REPEAT OFF.
• The player supports the USB music le format of MP3 only.
• The unit can support USB devices with up to 32 GB of memory.
• You may need to press
button to start playback after inserting the USB device.
• The unit may not be compatible with all USB devices, this is not an indication of a problem with the
unit.
LINE IN (AUX IN) Operation
1. While in ON mode, press the SOURCE button to select the LINE IN mode. The words
“LINE” will be shown on the display.
2. Operate your audio device directly for playback features.
3. Turn the MASTER –VOLUME+ dial to adjust the volume to your desired level.
The and buttons are invalid in LINE IN mode.
BOOS TER
TUNE
TUNE
PAIR
MX-D519PB_IB_Final200616V4.indd 11 17/06/2020 16:59
12
Bluetooth® Operation
Pairing the unit with a Bluetooth® device to listen to music:
1. Press the SOURCE button to select the Bluetooth® mode. The display will show “BT“, and
then “BT PAIRING”.
2. Activate your Bluetooth® device and select the search mode. “MX-D519PB” will appear
on your Bluetooth® device list.
3. Select “MX-D519PB” and enter “0000” for the password if necessary. After the
connection, the display will show “BT” and the unit will make a beep sound.
4. To disconnect the Bluetooth® function,
• Switch to another function on the unit or disable the function from your Bluetooth®
device. The unit will make a beep sound.
• Press and hold
Bluetooth button.
The unit will make a beep sound twice and then the display will show “BT PAIRING“.
If your Bluetooth
® device supports A2DP, play music via your device.
• To pause / resume playback, press
.
• To skip to a track, press
or .
• Turn the MASTER –VOLUME+ dial to increase or decrease the volume.
• The operational range between the unit and the device is approximately 10 metres.
• Before connecting a Bluetooth® device to the unit, ensure you know the device’s capabilities.
• Compatibility with all Bluetooth® devices is not guaranteed.
• Any obstacle between the device and the unit can reduce operational range.
• Keep this player away from other electronic devices that may cause interference.
• The player will also be disconnected when your device is moved beyond the operational range.
Maintenance
Cleaning the Unit
Ensure the unit is fully unplugged from the mains socket before cleaning.
• To clean the units, wipe the case with a slightly moist, lint-free cloth.
• Do not use any cleaning uids containing alcohol, ammonia or abrasives.
• Do not spray aerosol at or near the unit.
MX-D519PB_IB_Final200616V4.indd 12 17/06/2020 16:59
13
Hints and Tips
If a problem does occur, it may often be due to something very minor. The following table
contains various tips. If you require additional assistance
• For UK, please call our UK Call Centre on 0344 561 1234.
• For Ireland, please call our Ireland Call Center on 1 890 818 575.
General
Problem Solution
No power. • Ensure the mains plug is connected, and the unit is fully
charged.
• Make sure that you select the ON mode.
No sound from the unit. Please try either one of the solutions below:
• Make sure that the unit is not muted. Turn the MASTER –
VOLUME+ dial to resume normal listening.
• Press
button to switch the unit to standby mode. Then
press the button again to switch the unit on.
• Unplug the unit from the mains socket, then plug them
again. Switch on the unit.
Sound is distorted • Volume is too high. Adjust the volume control.
Not charging • Ensure that the mains cable is correctly connected with
the unit.
The unit does not
respond when pressing
any buttons.
• The unit may freeze up during use. Switch the unit o and
then on again to reset the unit.
Radio
Problem Solution
Poor radio reception. • Electrical interference in your home can cause poor
reception. Move the unit away from them (especially those
with motors and transformers).
Desired station not
found.
• Weak signal. Search manually.
• If reception is still poor, adjust the position of the unit.
USB
Problem Solution
Unable to insert USB
device
• Insert the USB device the other way round.
Cannot play some les
from USB device
• Check the le format.
• Only MP3 le formats are supported.
MX-D519PB_IB_Final200616V4.indd 13 17/06/2020 16:59
14
Bluetooth®
Problem Solution
I cannot nd
“MX-D519PB” on my
Bluetooth® device.
• Ensure the Bluetooth® function is activated on your
Bluetooth® device.
• Ensure you have paired your unit with the Bluetooth®
device.
• The unit has a Bluetooth® function that can receive a
signal within 10 metres. Keep a distance within10 metres
between the unit and your Bluetooth® device.
If any functional abnormality is encountered, unplug the unit from the mains socket and reconnect it
again.
MX-D519PB_IB_Final200616V4.indd 14 17/06/2020 16:59

15
Product Fiche and Specifications
Brand JVC
Model MX-D519PB
System Section
Power Supply AC 100 - 240 V ~50/60 Hz
Power Consumption 40 W
Working Environment - Temperature 0 ~ 35 °C
Working Environment - Relative Humidity 5% ~ 90%
Unit Dimension (W) × (D) × (H) 280mm × 190mm × 350mm
Speakers Section
Output RMS Power 30 Watts RMS output
Frequency Response ±6 dB (50 Hz ~ 20 kHz)
Bluetooth Section
Bluetooth Version V4.2
Maximum Transmitted Power 4 dBm
Frequency Bands 2402 MHz ~ 2480 MHz
Radio Section
Frequency Range FM 87.5 – 108 MHz
USB Section
USB Memory Stick
Memory Size
Up to 32 GB
Features and specications are subject to change without prior notice.
MX-D519PB_IB_Final200616V4.indd 15 17/06/2020 16:59

The product is distributed and warranted exclusive by DSG Retail Ltd.
“JVC” is the trademark of JVCKENWOOD Corporation, used by DSG Retail Ltd. under license.
(IB-MX-D519PB-200616-V4)
For Help and Support Call
UK: 0344 561 1234
Ireland: 1890 818 575
Hereby, DSG Retail Ltd., declares that this product is in
compliance with Directive 2014/53/EU. The full text of the EU
declaration of conformity is available at the following internet
address: https://www.teamknowhow.com
Click on SEARCH and enter the model number.
Declaration of Conformity
MX-D519PB_IB_Final200616V4.indd 16 17/06/2020 16:59