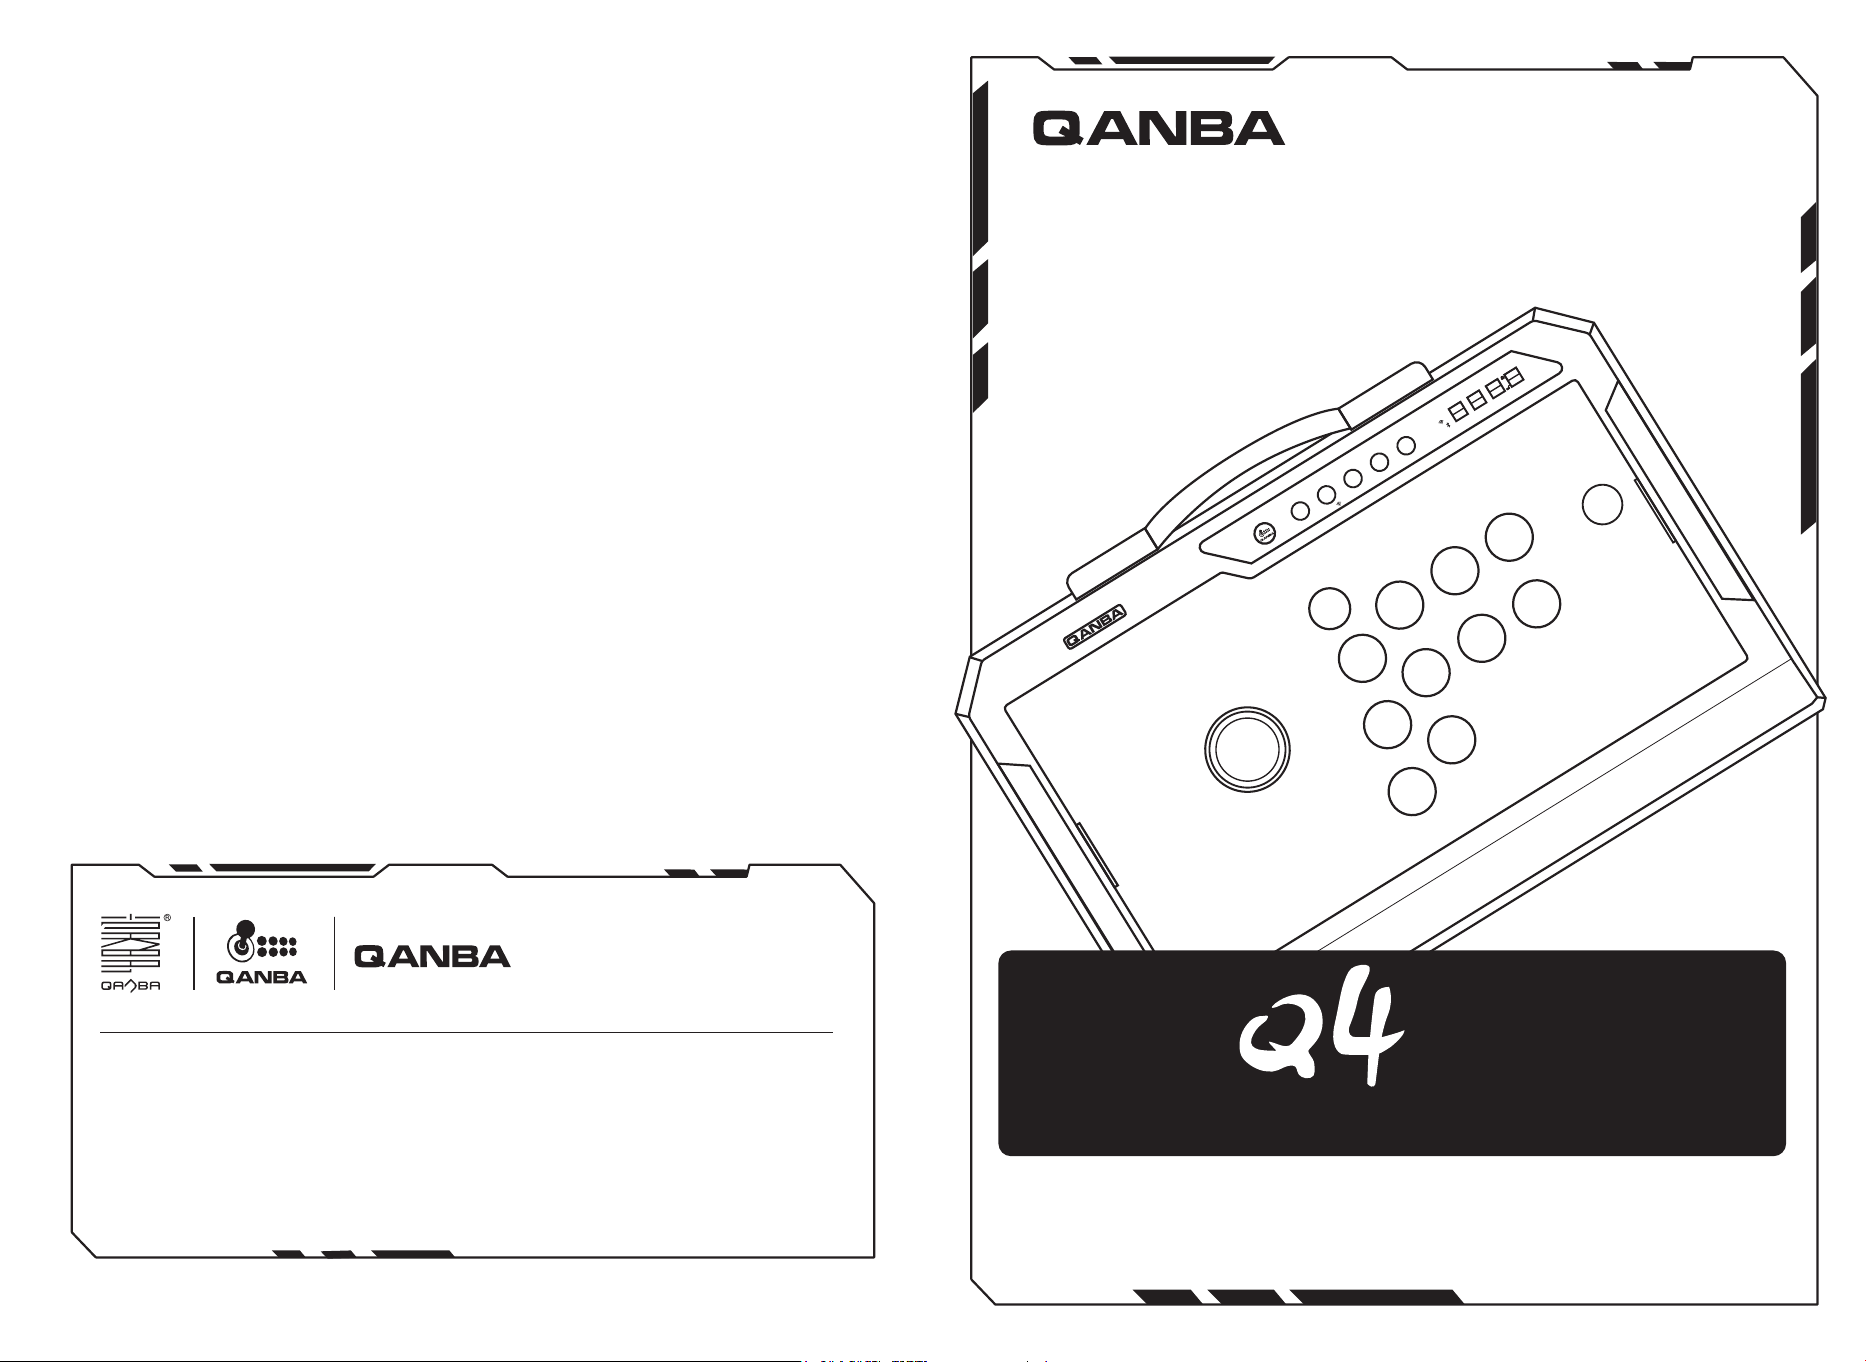
产品名称: 拳霸 Q4 Pro 街机摇杆
型号: Q4P-01/Q4P-02/Q4P-03/Q4P-04/Q4P-CW/Q4P-KOF
制造商: 深圳市拳霸科技开发有限公司
地址: 深圳市宝安区松岗街道潭头社区广
深路松岗段 2 号厂房 2 栋 401
服务电话: 0755-29171459
服务邮箱: [email protected]
企业标准号: Q/SZQB001-2019
Product Name: Qanba Q4 Pro Arcade Joystick
Model Name: Q4P-01/Q4P-02/Q4P-03/Q4P-04/Q4P-CW/Q4P-KOF
Manufacturer Name: Shenzhen Qanba Technology Development Co.,LTD
Address: 401, building 2, No.2 factory building, Songgang section, Guangshen
Road, Tantou community, Songgang sub district office,
Bao'an District, Shenzhen City, China
TEL: 0755-29171459
E-mail: [email protected]
Enterprise Standard Code: Q/SZQB001-2019
Instruction Manual
Model: Q4P-01/Q4P-02/Q4P-03/
Q4P-04/Q4P-CW/Q4P-KOF
Arcade Joystick
SET 2.4G L3 R3 Back
X
M1
Y
A
L1
START
B
R1
L2
R2
M3
M2
X
D
A
DP
LS
2.4G
USB
BT
Pro
SET 2.4G L3 R3 Back
X
M1
Y
A
L1
START
B
R1
L2
R2
M3
M2
X
D
A
DP
LS
2.4G
USB
BT
X
D
A
DP
LS
2.4G
USB
BT
15 16 17
6
20
9 10
11 12
13
8
14
1
2 4
5
3
18
19
7
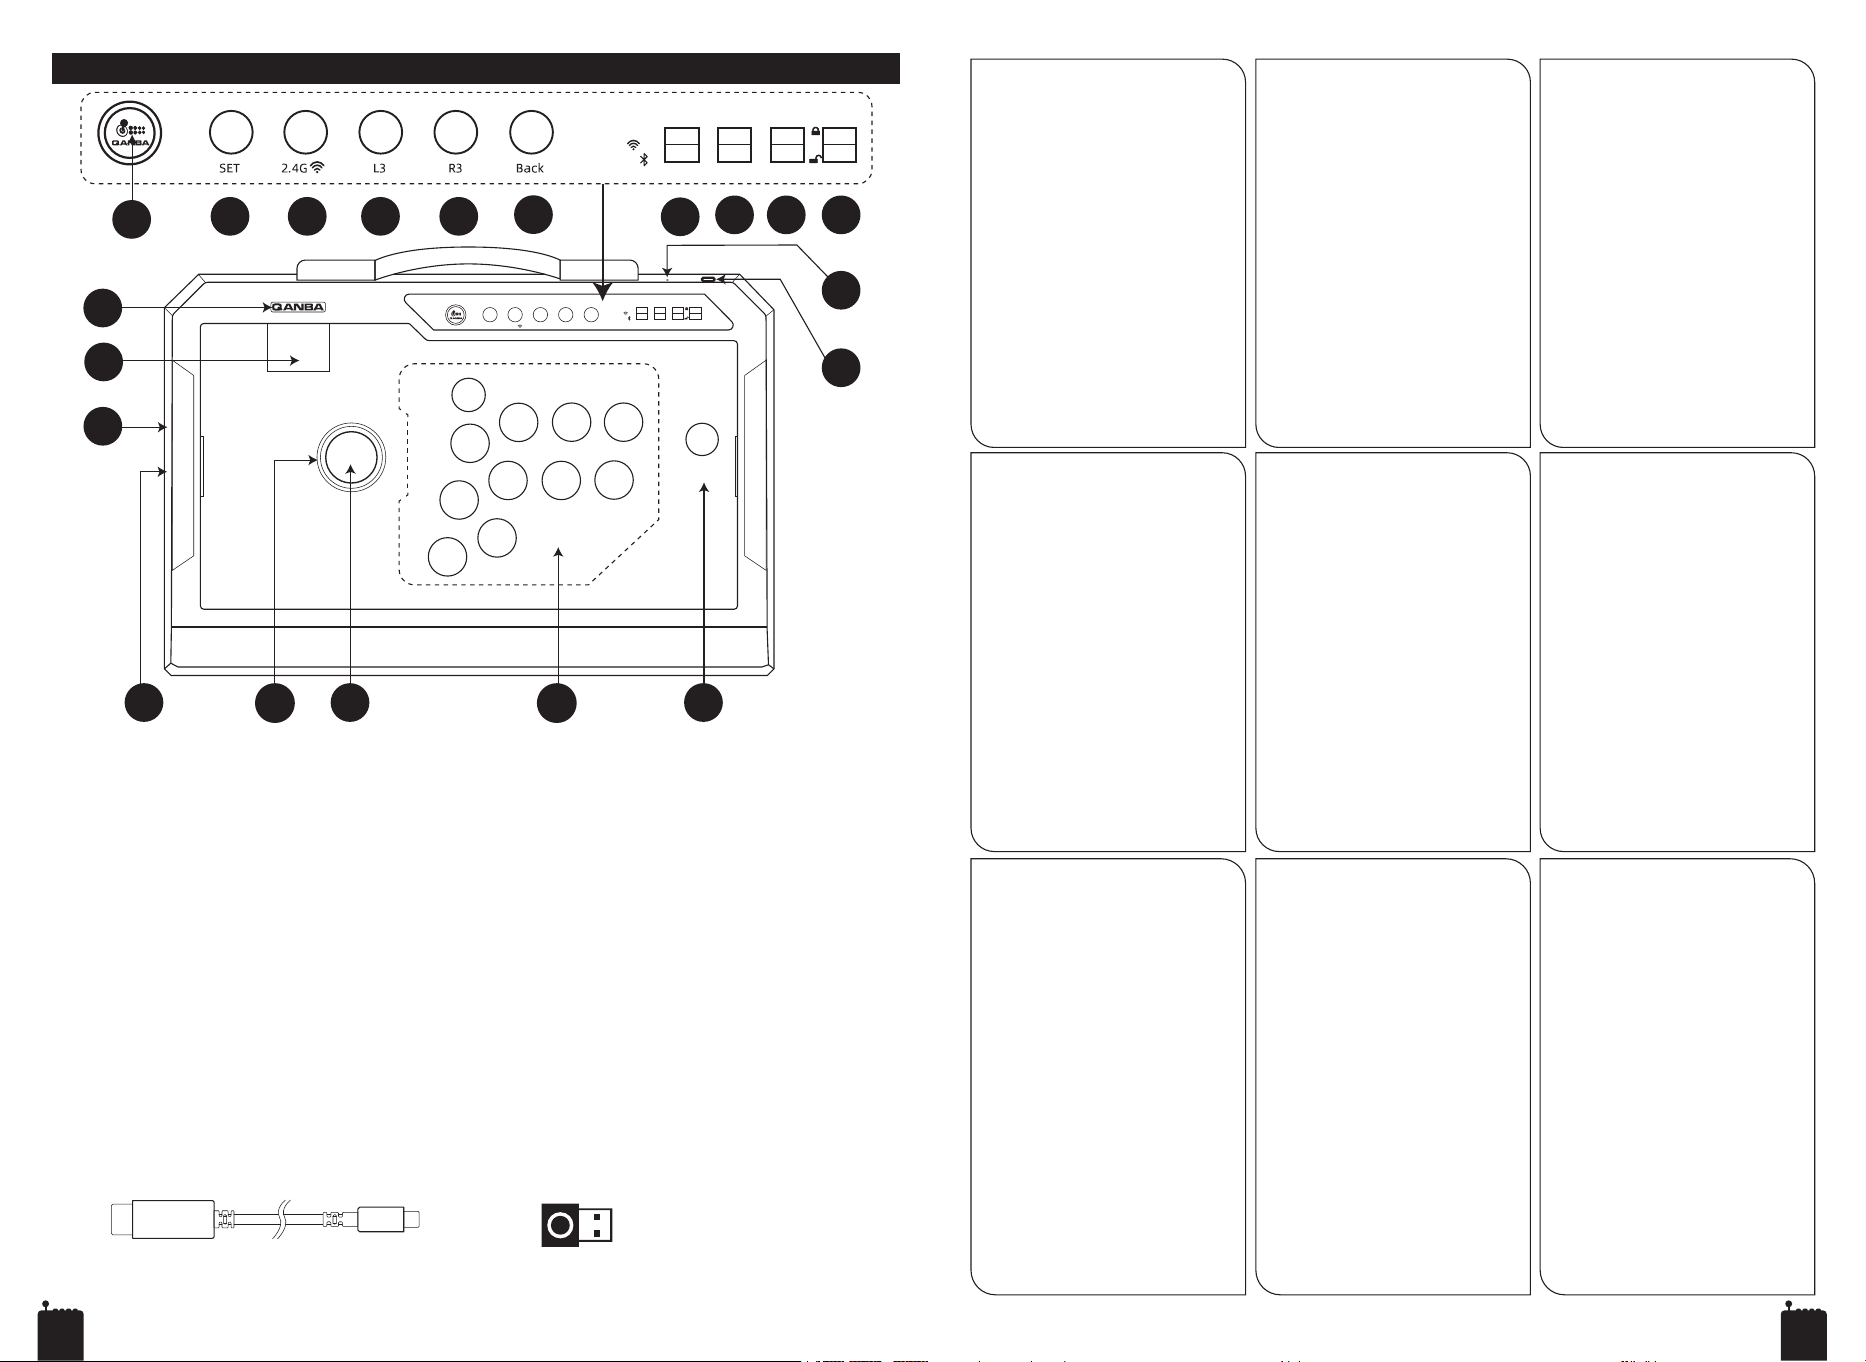
• USB Cable (A)
• USB Dongle button (B)
1.USB-C cable and USB Dongle
storage compartment
2.Joystick LED light
3.8-direction joystick
4.Action buttons
5.START button
6.LED display screen
7.Status Indicator
8.Home button
9.SET button
10.2.4G wireless button
11.L3 button
12.R3 button
13.BACK button
14.Connection switch
15.Compatibility switch
16.DP/LS
Mode switch
17.Lock / Unlock switch
18.RESET button
19.USB-C cable port
20.USB Dongle
Features
产品信息
1. USB-C 线缆与 USB 无线接收器收纳室
2. 摇杆 LED 灯
3. 8 方向摇杆
4. 动作按键
5. START 按键
6. 屏幕显示功能设置
7. 工作状态指示灯
8. Home 按键
9. SET 按键
10. 2.4G 无线按键
11. L3 按键
12. R3 按键
13. BACK 按键
14. 连接转换开关
15. 兼容性开关
16. DP/LS 模式开关
17. 锁定/解锁开关
18. 复位按键
19. USB-C 线缆接口
20. USB 无线接收器
• USB 线 (A)
• USB 无线接收器按键 (B)
中文简体
各部名称
1. USB‑C ケーブル&USB ドング
ル収納スペース
2. ジョイスティック LED ライト
3. 8 方向ジョイスティック
4. アクションボタン
5. START ボタン
6. LED ディスプレイ
7. 動作状態インジケーター
8. HOME ボタン
9. SET ボタン
10. 2.4G ワイヤレスボタン
11. L3 ボタン
12. R3 ボタン
12. BACK ボタン
14. 接続切替スイッチ
15. 互換性切替スイッチ
16. DP/LS モード切替スイッチ
17. ロック/アンロックスイッチ
18. RESET ボタン
19. USB‑C ポート
20. USB ドングル
• USB ケーブル (A)
• USB ドングルボタン(B)
日本語
제품 정보
1.USB-C 케이블 및 USB 동글 수납함
2.조이스틱 LED 조명
3.8방향 조이스틱
4.액션 버튼
5.START 버튼
6.LED 디스플레이 화면
7.상태 표시등
8.HOME 버튼
9.SET 버튼
10.2.4G 무선 버튼
11.L3 버튼
12.R3 버튼
13.BACK 버튼
14.연결 전환 스위치
15.호환성 스위치
16.DP/LS 모드 스위치
17.잠금/잠금 해제 스위치
18.RESET 버튼
19.USB-C 케이블 포트
20.USB 동글튼
• USB 케이블 (A)
• USB 동글 버튼 (B)
한국어
產品資訊
1. USB-C 線纜與 USB 無
線接收器收納室
2. 搖桿 LED 燈
3. 8 方向搖桿
4. 動作按鍵
5. START 按鍵
6. LED 顯示螢幕
7. 工作狀態指示燈
8. Home 按鍵
9. SET 按鍵
10. 2.4G 無線按鍵
11. L3 按鍵
12. R3 按鍵
13. BACK 按鍵
14. 連接轉換開關
15. 相容性開關
16. DP/LS 模式開關
17. 鎖定 / 解鎖開關
18. 復位按鍵
19. USB-C 線纜接口
20. USB 無線接收器
• USB 線 (A)
• USB 無線接收器按鍵 (B)
1. Compartiment de rangement pour
câble USB-C et dongle USB
2. Voyant LED du joystick
3. Joystick 8 directions
4. Boutons d’action
5. Bouton START
6. Écran d’affichage LED
7. Voyant d'état
8. Bouton HOME
9. Bouton SET
10. Bouton sans fil 2,4G
11.Bouton L3
12.Bouton R3
13.Bouton BACK
14.Interrupteur de commutation de
connexion
15.Interrupteur de compatibilité
16.Interrupteur mode DP/LS
17.Interrupteur de verrouillage /
déverrouillage
18.Bouton RESET
19.Port de câble USB-C
20.Dongle USB
• Câble USB (A)
• Bouton du dongle USB (B)
Français
Points forts
Español
Destacados
1. Compartimento para cable USB‑C y
dongle USB
2. Luz LED del joystick
3. Joystick de 8 direcciones
4. Botones de acción
5. Botón START
6. Pantalla LED
7. Indicador de estado
8. Botón HOME
9. Botón SET
10. Botón inalámbrico 2.4G
11. Botón L3
12. Botón R3
13. Botón BACK
14. Interruptor de cambio de conexión
15. Interruptor de compatibilidad
16. Interruptor de modo DP/LS
17. Interruptor de bloqueo/desbloqueo
18. Botón RESET
19. Puerto para cable USB‑C
20. Dongle USB
• Cable USB (A)
• Botón del Dongle USB (B)
Italiano
Punti salienti
1. Scomparto di archiviazione per
cavo USB-C e USB Dongle
2. Spia LED del joystick
3. Joystick a 8 direzioni
4. Pulsanti azione
5. Pulsante START
6. Display LED
7. Indicatore di stato
8. Pulsante Home
9. Pulsante SET
10. Pulsante wireless 2.4G
11. Pulsante L3
12. Pulsante R3
13. Pulsante BACK
14. Interruttore di commutazione
connessione
15. Interruttore di compatibilità
16. Interruttore modalità DP/LS
17. Interruttore Blocca/Sblocca
18. Pulsante RESET
19. Porta cavo USB-C
20. USB Dongle
• Cavo USB (A)
• Pulsante del USB Dongle (B)
1. USB‑C‑Kabel‑ und USB‑Dongle‑Fach
2. Joystick‑LED
3. 8‑Richtungs‑Joystick
4. Action‑Tasten
5. START‑Taste
6. LED‑Display
7.Statusanzeige
8. HOME‑Taste
9.SET‑Taste
10. 2,4G‑Drahtlos‑Taste
11.L3‑Taste
12.R3‑Taste
13.BACK‑Taste
14.Verbindungs‑Umschalter
15.Kompatibilitäts‑Umschalter
16.DP/LS-Modusumschalter
17.Sperre/Entsperrung‑Umschalter
18.RESET‑Taste
19.USB‑C‑Anschluss
20.USB‑Dongle
• USB-Kabel (A)
• USB-Dongle-Taste (B)
Deutsch
Höhepunkte
Legenda
1. Compartimento para cabo
USB-C e Dongle USB
2. Luz LED do joystick
3. Joystick de 8 direções
4. Botões de ação
5. Botão START
6. Tela de exibição LED
7. Indicador de Status
8. Botão Home
9. Botão SET
10. Botão 2.4G sem fio
11. Botão L3
12. Botão R3
13. Botão BACK
14. Interruptor de alternância de
conexão
15. Interruptor de compatibilidade
16. Interruptor de modo DP/LS
17. Interruptor de bloqueio/des
bloqueio
18. Botão RESET
19. Entrada para cabo USB-C
20. Dongle USB
• Cabo USB (A)
• Botão do Dongle USB (B)
Português
繁體中文
English
1 2
X
D
A
2.4G
USB
BT
Smart TV PC Laptop Tablet TV Box
Mobile
Phone
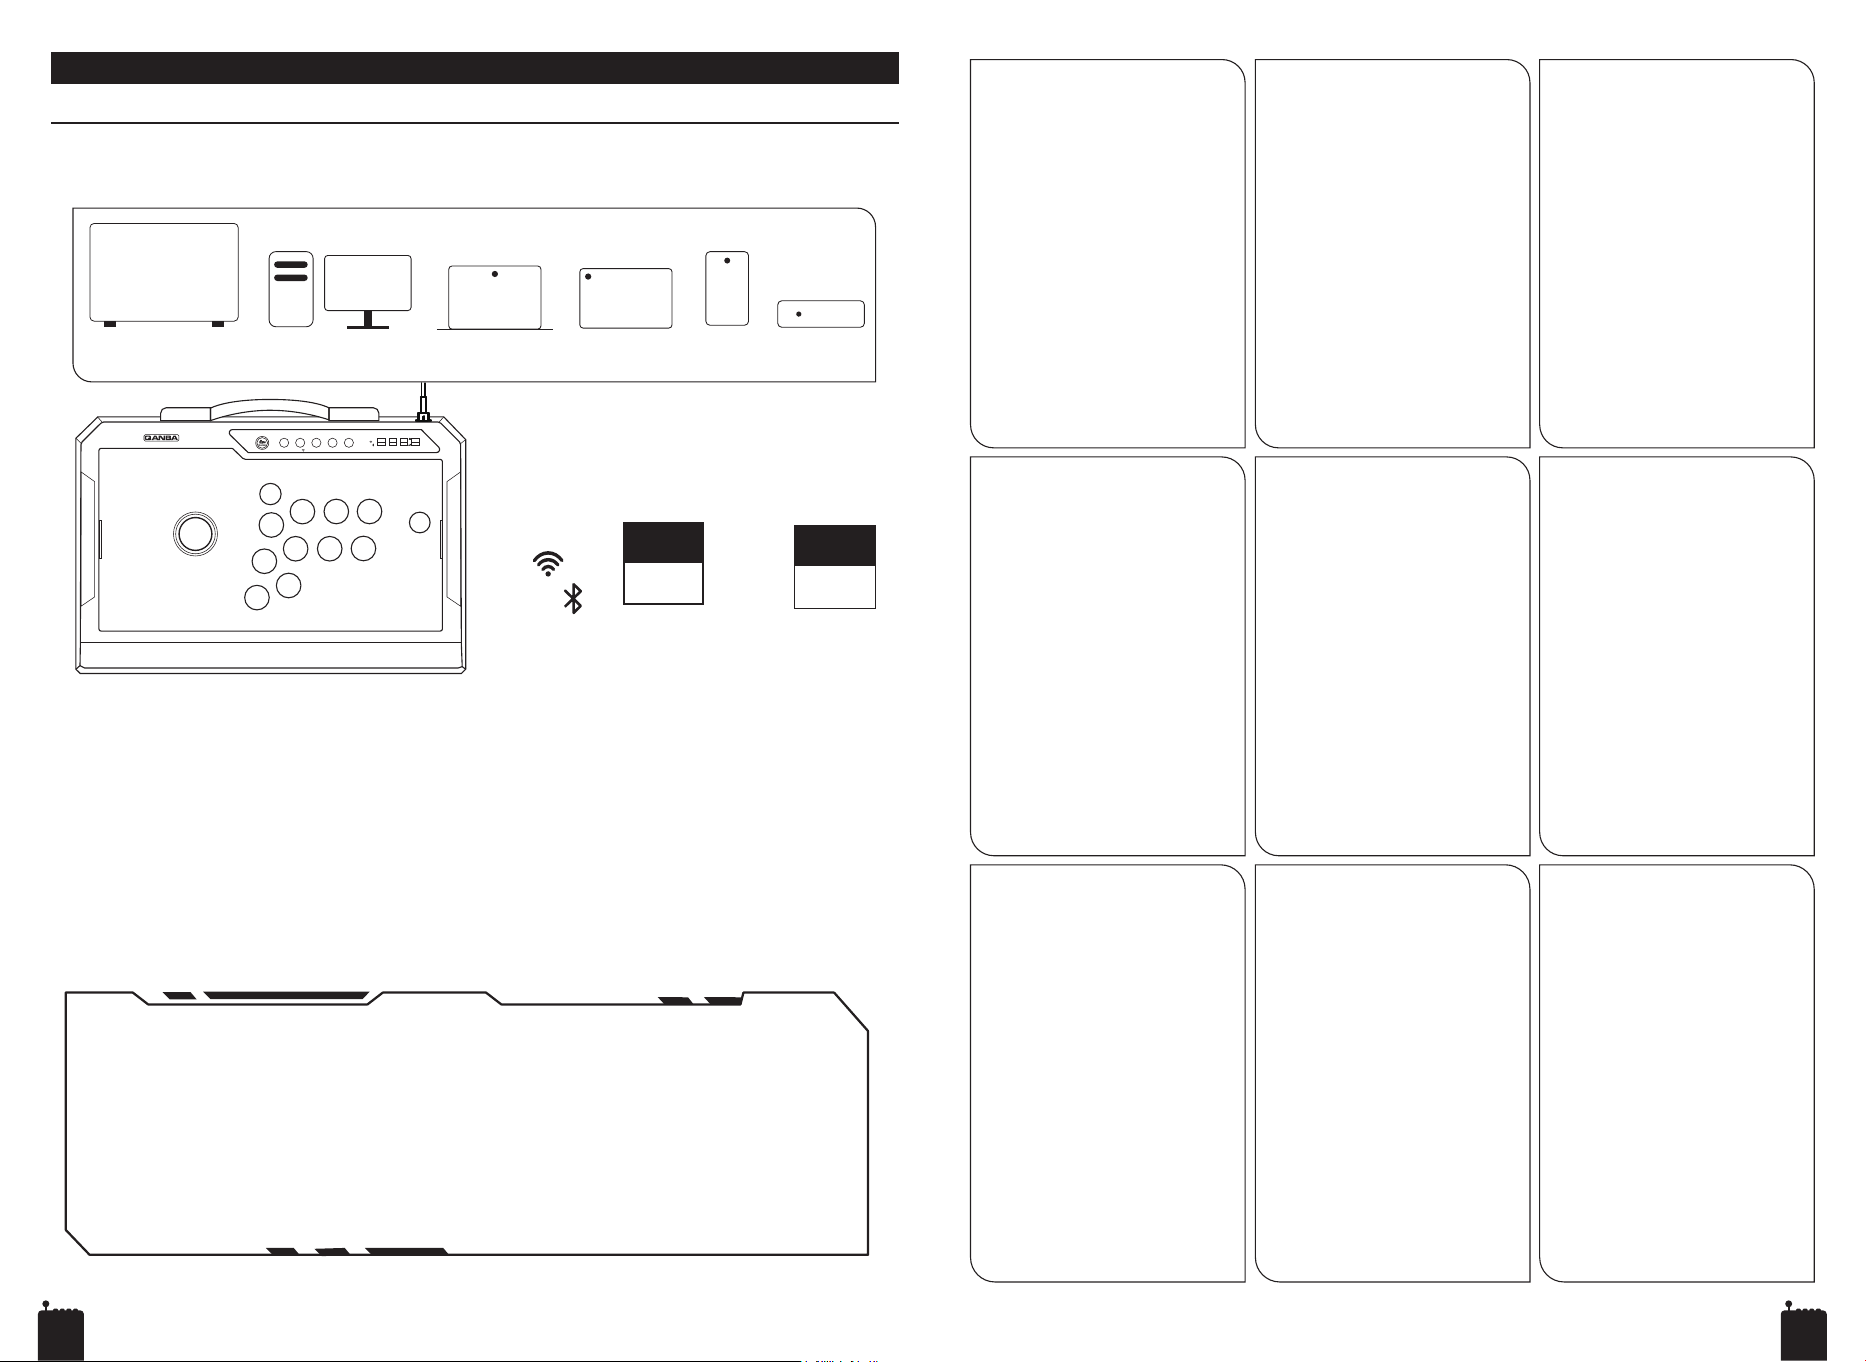
Connecting to Host Devices
Connect to PC, game console, mobile phone and other devices
Wired Connection
• Ensure your device is powered on.
• Connect the USB Cable (A) to the device. The status indicator of the Q4 Pro will light up.
• Slide the Connection switching switch (14) to the USB position.
• Select Xinput (Default), Android or Dinput mode via the compatibility switch (15)
according to the connected host device.
Product Operation
SET 2.4G L3 R3 Back
X
M1
Y
A
L1
START
B
R1
L2
R2
M3
M2
X
D
A
DP
LS
2.4G
USB
BT
* Smart TV / PC / Laptop / Tablet / Mobile Phone / TV Box * ス マ ート TV / PC / ノート PC
/ タブレット / ス マ ートフォン / TV ボックス * 智能电视 / PC / 笔记本 / 平板电脑 / 手机/ 电
视盒 * 智能電視 / PC / 筆記型電腦 / 平板電腦 / 手機 / 電視盒 * TV connectée / PC
/ Ordinateur portable / Tablette / Téléphone portable / Boîtier TV * Televisor inteligente
/ PC / Portátil / Tableta / Teléfono móvil / Caja de TV * Smart TV / PC / Laptop / Tablet
/ Telefono cellulare / TV Box * Smart-TV / PC / Laptop / Tablet / Mobiltelefon / TV-Box
* TV Inteligente / PC / Computador portátil / Tablet / Telefone móvel / TV Box
产品操作
连接主机设备
连接 PC 主机或手机等设备
有线连接
• 确保设备电源已打开。
• 将 USB 线 (A) 连接到设备 (Q4 Pro 工作状
态指示灯亮)。
• 使用连接转换开关 (14) 拨动到 USB 处 。
• 根据接入的设备主机,选择使用兼容性开
关 (15) 选择 Xinput (默认)、Android 或
Dinput 模式。
中文简体日本語
製品操作
ホスト機器への接続方法
PC、スマートフォン、その他の機器に接
続できます
有線接続
• 機器の電源が入っていることを確認してください。
• USB ケーブル (A) を機器に接続してください (Q4
Pro のステータスインジケーターが点灯します)。
• 接続切替スイッチ (14) を USB 側にスライドさせ
てください。
• 接続先の機器に応じ、互換性切替スイッチ (15) で
Xinput(初期設定)、Android、Dinput のいずれ
かのモードを選択してください。
產品操作
連接主機設備
連接 PC 主機或手機等設備
繁體中文
有線連線
• 確保設備電源已開啟。
• 將 USB-C 線 (A) 連接至設備 (Q4 Pro 工作狀
態指示燈亮起)。
• 將連接轉換開關 (14) 撥至 USB 位置。
• 依據連接的主機裝置,透過相容性開關 (15)
選擇 Xinput(預設)、Android 或 Dinput
模式。
Français
Fonctionnement du produit
Connexion aux appareils hôtes
Se connecter à un PC, un téléphone
portable ou d’autres appareils
Connexion filaire
• Assurez-vous que l’appareil est sous
tension.
• Branchez le câble USB (A) sur
l’appareil (Le voyant d’état du Q4 Pro
s’allume).
• Faites glisser l’interrupteur de
sélection de connexion (14) sur la
position USB.
• Sélectionnez le mode Xinput (par
défaut), Android ou Dinput à l'aide de
l'interrupteur de compatibilité (15)
selon l'appareil hôte connecté.
제품 조작
호스트 기기 연결
PC, 휴대폰 또는 기타 기기에 연결합니다
한국어
유선 연결
• 기기의 전원이 켜져 있는지 확인하세요.
• USB 케이블(A)을 기기에 연결하세요(Q4 Pro의
상태 표시등이 켜집니다).
• 연결 전환 스위치(14)를 USB 위치로 밀어주세요.
• 연결한 호스트 기기에 맞춰 호환 스위치(15)로
Xinput(기본값), Android 또는 Dinput 모드를
선택하세요.
Funcionamiento del producto
Conexión a dispositivos host
Conectar a PC, teléfono móvil u
otros dispositivos
Español
Conexión por cable
• Asegúrese de que el dispositivo esté
encendido.
• Conecte el cable USB (El indicador de
estado del Q4 Pro se encenderá).
• Deslice el interruptor de cambio de
conexión (14) hasta la posición USB.
• Seleccione el modo Xinput (predetermi-
nado), Android o Dinput mediante el
interruptor de compatibilidad (15),
según el dispositivo host conectado.
Conexão com Fio
• Certifique-se de que o dispositivo
esteja ligado.
• Conecte o cabo USB (A) ao dispositivo
(O indicador de status do Q4 Pro
acenderá).
• Deslize o interruptor de alternância de
conexão (14) para a posição USB.
• Selecione o modo Xinput (Padrão),
Android ou Dinput por meio do
interruptor de compatibilidade (15), de
acordo com o dispositivo host
conectado.
Português
Operação do Produto
Conexão a Dispositivos Host
Conecte a um PC, celular ou
outros dispositivos
Funzionamento del prodotto
Connessione ai dispositivi host
Connessione a PC, telefono cellulare
o altri dispositivi
Italiano
Connessione cablata
• Assicurati che il dispositivo sia acceso.
• Collega il cavo USB (A) al dispositivo
(L’indicatore di stato del Q4 Pro si
accenderà).
• Sposta l’interruttore di commutazione
connessione (14) sulla posizione USB.
• Selezionare la modalità Xinput
(predefinita), Android o Dinput tramite
l'interruttore di compatibilità (15) in base
al dispositivo host collegato.
Produkt Betrieb
Verbindung zu Host-Geräten
Verbinden Sie das Gerät mit einem
PC, Mobiltelefon oder anderen
Geräten
Deutsch
Kabelgebundene Verbindung
• Stellen Sie sicher, dass das Gerät
eingeschaltet ist.
• Schließen Sie das USB-Kabel (A) an das
Gerät an (Die Statusanzeige des Q4 Pro
leuchtet auf).
• Schieben Sie den Verbindungsumschal-
ter (14) auf die Position USB.
• Wählen Sie über den Kompatibilitätsum-
schalter (15) je nach angeschlossenem
Host-Gerät den Modus Xinput
(Standard), Android oder Dinput aus.
English
3 4
* Smart TV / PC / Laptop / Tablet / Mobile Phone / TV Box * ス マ ート TV / PC / ノート PC
/ タブレット / ス マ ートフォン / TV ボックス * 智能电视 / PC / 笔记本 / 平板电脑 / 手机/ 电
视盒 * 智能電視 / PC / 筆記型電腦 / 平板電腦 / 手機 / 電視盒 * TV connectée / PC
/ Ordinateur portable / Tablette / Téléphone portable / Boîtier TV * Televisor inteligente
/ PC / Portátil / Tableta / Teléfono móvil / Caja de TV * Smart TV / PC / Laptop / Tablet
/ Telefono cellulare / TV Box * Smart-TV / PC / Laptop / Tablet / Mobiltelefon / TV-Box
* TV Inteligente / PC / Computador portátil / Tablet / Telefone móvel / TV Box
产品操作
连接主机设备
连接 PC 主机或手机等设备
无线连接
• 确保设备电源已打开 (确保设备有充足的剩
余电量)。
• 将 USB-C 无线接收器 (20) 插入设备主机。
• 根据接入的设备主机,选择使用兼容性开关
(15) 选择 Xinput (默认)、Android 或
Dinput 模式
• 使用连接转换开关 (14) 拨动到 2.4G 无线
处 。
• 按 Home 按钮 (8) 开启 2.4G 无线模式运行
并与USB无线接收器回连。
• 长按 2.4G 无线按键(10)完成配对;设备
首次连接主机时需执行此操作。
注:当连接转换开关 (14) 拨至 2.4G 位置时。
摇杆接入有线线路,设备仍默认以2.4G 无线
模式运行。
中文简体日本語
製品操作
ホスト機器への接続方法
PC、スマートフォン、その他の機器に接
続できます
無線接続
• 本機の電源が入っており、バッテリー残量が十分
であることを確認してください。
• USB ドングル (20) を本体に接続してください。
• 接続先の機器に合わせ、互換性切替スイッチ
(15) で Xinput(初期設定)、Android、Dinput
のいずれかのモードを選択してください。
• 接続切替スイッチ (14) を 2.4G 無線側へスライ
ドしてください。
• HOME ボタン (8) を押すと 2.4G 無線モードが起
動し、USB ワイヤレスレシーバーと再接続され
ます。
• 2.4G 無線ボタン (10) を長押ししてペアリングを完
了させてください。本機を接続先機器に初めて接
続する際はこの操作が必要です。
※ ご注意:接続切替スイッチ (14) を 2.4G 側に
切り替えた場合、ジョイスティックを有線ケーブ
ルで接続していても、本機は初期設定で 2.4G 無
線モードで動作します。
無線連線
• 確認裝置電源已開啟 (並確保裝置電量充足)。
• 將 USB‑C 無線接收器 (20) 插入設備主機。
• 依據連接的主機裝置,透過相容性開關 (15)
選擇 Xinput(預設)、Android 或 Dinput
模式。
• 將連接轉換開關 (14) 切換至 2.4G 無線位置。
• 按下 Home 按鍵 (8) 啟動 2.4G 無線模式,
並與 USB 無線接收器重新連線。
• 長按 2.4G 無線按鍵 (10) 完成配對;裝置首
次連接主機時須執行此操作。
備註:若連線切換開關 (14) 切換至 2.4G 位
置,即使搖桿接上有線線路,裝置仍預設以
2.4G 無線模式運作。
產品操作
連接主機設備
連接 PC 主機或手機等設備
繁體中文
Français
Fonctionnement du produit
Connexion aux appareils hôtes
Se connecter à un PC, un téléphone
portable ou d’autres appareils
Funcionamiento del producto
Conexión a dispositivos host
Conectar a PC, teléfono móvil u otros
dispositivos
Connexion sans fil
• Vérifiez que l'appareil est allumé et que
sa batterie est suffisamment chargée.
• Insérez le dongle USB (20) sur l'appareil
principal.
• Sélectionnez le mode Xinput (par
défaut), Android ou Dinput à l'aide de
l'interrupteur de compatibilité (15) selon
votre appareil hôte.
• Faites glisser l’interrupteur de
commutation de connexion (14) sur la
position 2,4G Sans fil.
• Appuyez sur le bouton HOME (8) pour
activer le mode sans fil 2,4G et vous
reconnecter au récepteur USB sans fil.
• Maintenez enfoncé le bouton sans fil
2,4G (10) pour terminer l’appariement.
Cette manipulation est nécessaire lors
de la première connexion de l’appareil à
l’appareil hôte.
Remarque : Lorsque l'interrupteur de
connexion (14) est positionné sur 2,4G,
l'appareil fonctionne par défaut en mode
sans fil 2,4G, même si le joystick est relié
par câble filaire.
제품 조작
호스트 기기 연결
PC, 휴대폰 또는 기타 기기에 연결합니다
한국어
무선 연결
• 기기 전원이 켜져 있고 배터리 잔량이
충분한지 확인하세요.
• USB 동글(20)을 본체에 삽입하세요.
• 사용하는 호스트 기기에 맞춰 호환성
스위치(15)로 Xinput(기본값), Android 또는
Dinput 모드를 선택하세요.
• 연결 전환 스위치(14)를 2.4G 무선 위치로
밀어주세요.
• 홈 버튼(8)을 눌러 2.4G 무선 모드를
활성화하고 USB 무선 리시버와 재연결하세요.
• 2.4G 무선 버튼(10)을 길게 눌러 페어링을
완료하세요. 기기를 호스트 기기에 최초 연결할
때 해당 작업을 진행해야 합니다.
참고: 연결 스위치(14)를 2.4G 위치로 전환하면
유선 케이블로 연결한 상태에서도 기본적으로
2.4G 무선 모드로 작동합니다.
Español
Conexión inalámbrica
• Asegúrese de que el dispositivo esté
encendido y con batería suficiente.
• Inserte el Dongle USB (20) en la unidad
principal.
• Seleccione el modo Xinput (predetermina-
do), Android o Dinput mediante el
interruptor de compatibilidad (15), según su
dispositivo host.
• Deslice el interruptor de cambio de conexión
(14) hasta la posición 2.4G Inalámbrico.
• Presione el botón Home (8) para activar el
modo inalámbrico 2.4G y volver a
conectarse con el receptor inalámbrico
USB.
• Mantenga pulsado el botón inalámbrico
2.4G (10) para finalizar el emparejamien-
to. Esta operación es necesaria al
conectar el dispositivo al equipo host por
primera vez.
Nota: Al deslizar el interruptor de conexión
(14) a la posición 2.4G, el dispositivo
funcionará por defecto en el modo
inalámbrico 2.4G, incluso si el joystick
está conectado por cable.
Conexão Sem Fio
• Certifique-se de que o dispositivo esteja
ligado e com bateria suficiente.
• Insira o Dongle USB (20) na unidade
principal.
• Selecione o modo Xinput (padrão), Android
ou Dinput por meio do interruptor de
compatibilidade (15), de acordo com o seu
dispositivo host.
• Deslize o interruptor de alternância de
conexão (14) para a posição 2.4G Sem
Fio.
• Pressione o botão Home (8) para ativar o
modo sem fio 2,4G e reconectar ao receptor
sem fio USB.
• Pressione e segure o botão sem fio 2,4G
(10) para concluir o emparelhamento.
Essa operação é necessária ao conectar
o dispositivo ao host pela primeira vez.
Observação: Quando o interruptor de
conexão (14) for ajustado para a posição
2,4G, o dispositivo funcionará por padrão
no modo sem fio 2,4G, mesmo que o
joystick esteja conectado via cabo com fio.
Português
Funzionamento del prodotto
Connessione ai dispositivi host
Connessione a PC, telefono cellulare
o altri dispositivi
Produkt Betrieb
Verbindung zu Host-Geräten
Verbinden Sie das Gerät mit einem PC,
Mobiltelefon oder anderen Geräten
Operação do Produto
Conexão a Dispositivos Host
Conecte a um PC, celular ou outros
dispositivos
Italiano
Connessione wireless
• Assicurarsi che il dispositivo sia acceso e
che la batteria sia sufficientemente carica.
• Inserire il USB Dongle (20) nell'unità
principale.
• Selezionare la modalità Xinput
(predefinita), Android o Dinput tramite
l'interruttore di compatibilità (15) in base al
dispositivo host in uso.
• Spostare l’interruttore di commutazione
connessione (14) sulla posizione 2.4G
Wireless.
• Premere il pulsante Home (8) per attivare
la modalità wireless 2.4G e riconnettersi al
ricevitore wireless USB.
• Tenere premuto il pulsante wireless 2.4G
(10) per completare l’accoppiamento.
Questa operazione è obbligatoria alla
prima connessione del dispositivo al
dispositivo host.
Nota: Quando l'interruttore di connessione
(14) è impostato sulla posizione 2.4G, il
dispositivo funziona di default in modalità
wireless 2.4G anche se il joystick è collegato
tramite cavo.
Deutsch
Drahtlosverbindung
• Stellen Sie sicher, dass das Gerät
eingeschaltet ist und über ausreichend
Akkuleistung verfügt.
• Stecken Sie den USB-Dongle (20) in das
Hauptgerät ein.
• Wählen Sie je nach Host-Gerät über den
Kompatibilitätsumschalter (15) den Modus
Xinput (Standard), Android oder Dinput aus.
• Schieben Sie den Verbindungsumschalter
(14) auf die Position 2,4G Drahtlos.
• Drücken Sie die Home-Taste (8), um den
2,4G-Drahtlosmodus zu aktivieren und eine
erneute Verbindung zum USB-Drahtlosemp-
fänger herzustellen.
• Halten Sie die 2,4G-Drahtlostaste (10)
gedrückt, um die Kopplung abzuschließen.
Dieser Vorgang ist erforderlich, wenn Sie das
Gerät zum ersten Mal mit dem Host-Gerät
verbinden.
Hinweis: Wenn der Verbindungsumschalter
(14) auf die Position 2,4G geschaltet ist,
arbeitet das Gerät standardmäßig im
2,4G-Drahtlosmodus, auch wenn der
Joystick per Kabel verbunden ist.
2.4G
USB
BT
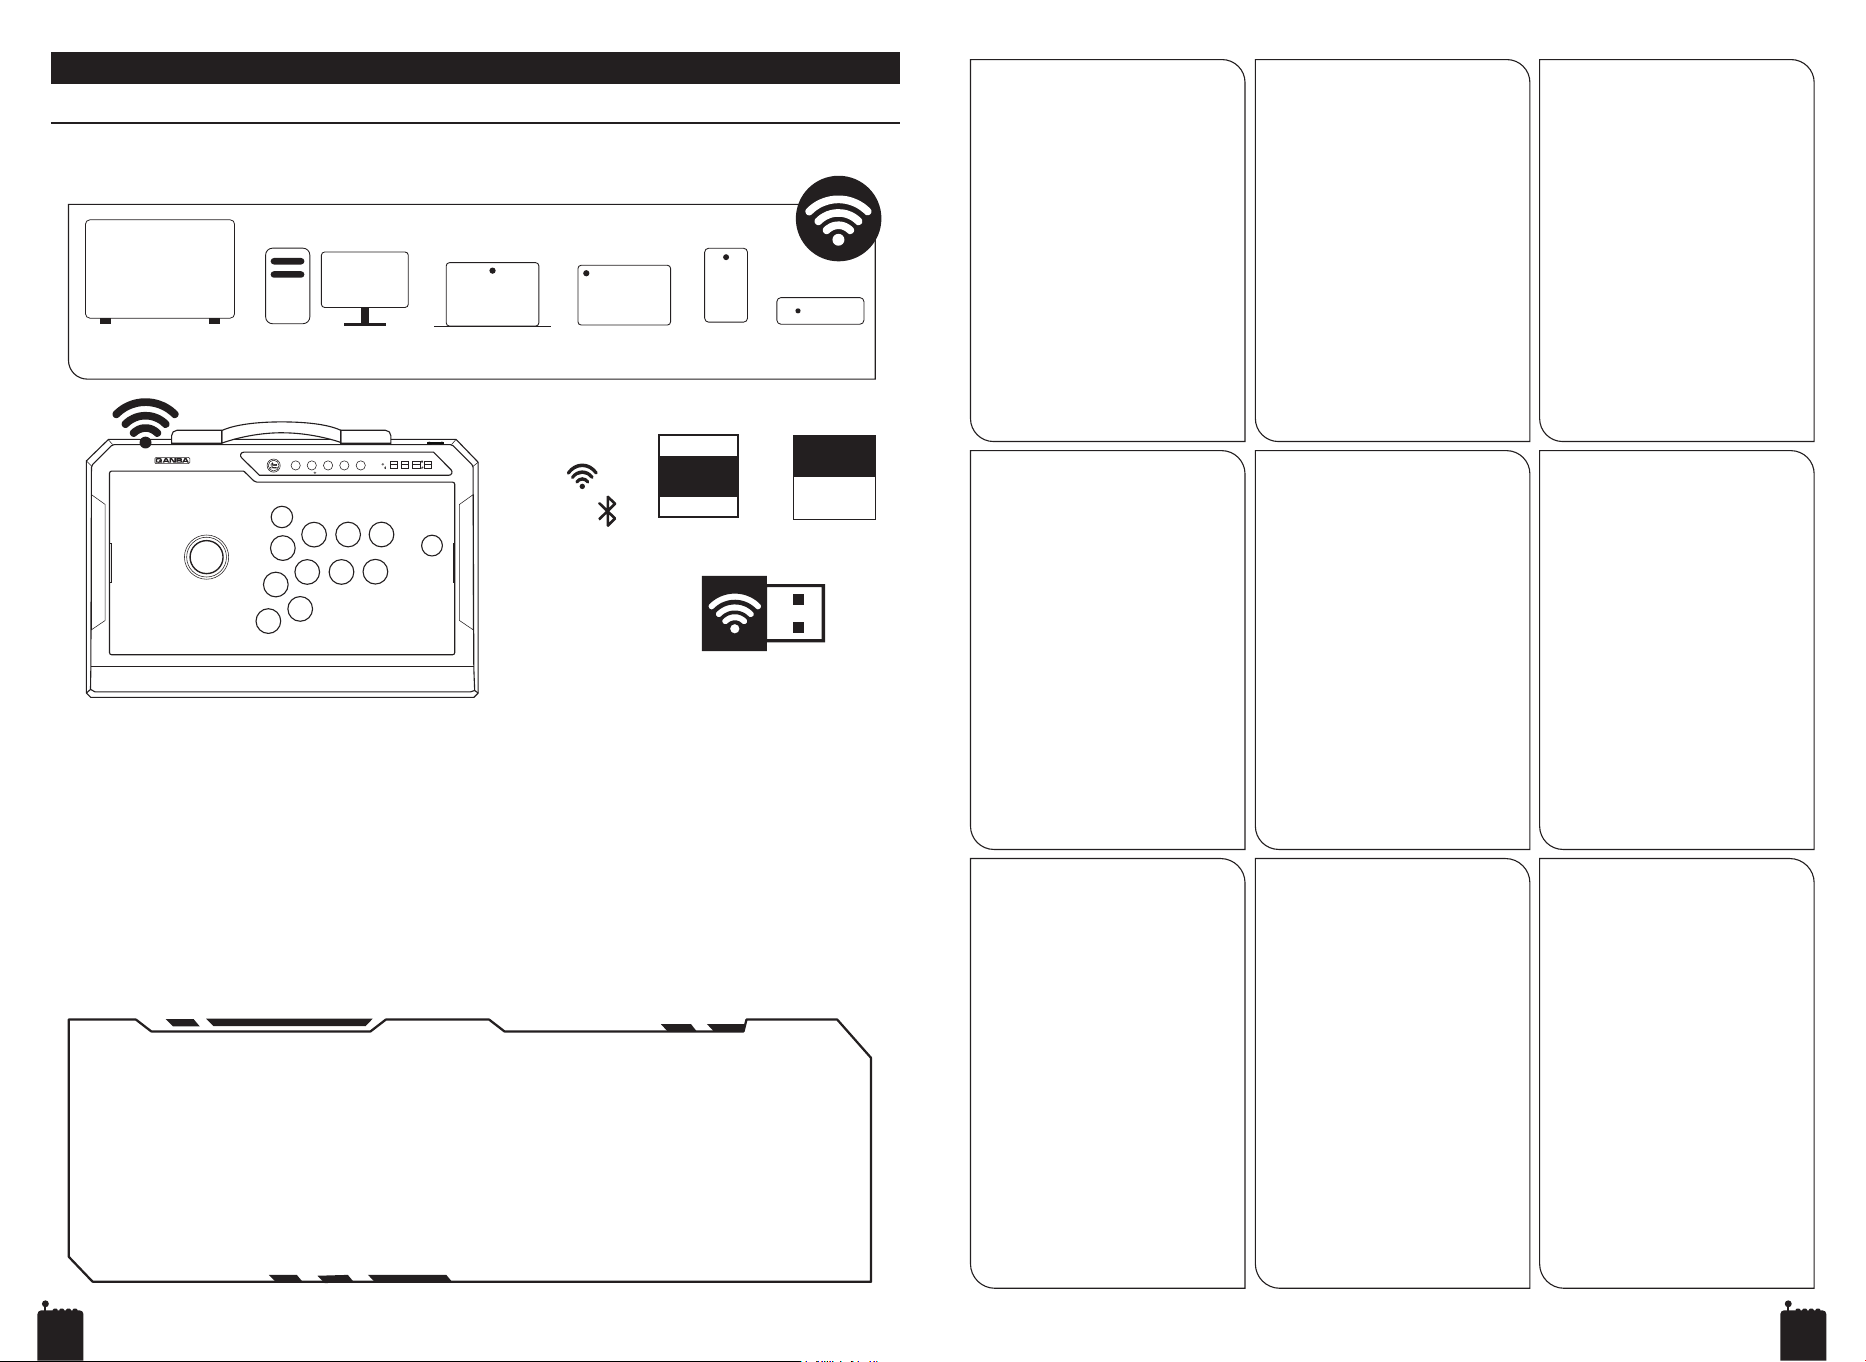
Connecting to Host Devices
Connect to PC, game console, mobile phone and other devices
SET 2.4G L3 R3 Back
X
M1
Y
A
L1
START
B
R1
L2
R2
M3
M2
X
D
A
DP
LS
2.4G
USB
BT
X
D
A
Smart TV PC Laptop Tablet TV Box
Mobile
Phone
Wireless Connection
• Make sure the device is turned on with enough battery.
• Insert the USB Dongle (20) into the main unit.
• Select Xinput (default), Android or Dinput mode via the Compatibility Switch (15) according
to your host device.
• Slide the Connection switching switch (14) to the 2.4G Wireless position.
• Press the Home Button (8) to activate 2.4G wireless mode and reconnect with the USB
wireless receiver.
• Press and hold the 2.4G wireless button (10) to complete pairing. This operation is required
when connecting the device to the host for the first time.
Note: When the connection switch (14) is switched to the 2.4G position, the unit will operate
in 2.4G wireless mode by default even when the joystick is connected via a wired cable.
USB Dongle (20)
Product Operation
English
5 6
* PC / Laptop / Tablet / Mobile Phone * PC / ノート PC / タブレット / スマ ートフォン
* PC / 笔记本 / 平板电脑 / 手机 * PC / 筆記型電腦 / 平板電腦 / 手機 * PC / Ordinateur
portable / Tablette / Téléphone portable * PC / Portátil / Tableta / Teléfono móvil
* PC / Laptop / Tablet / Telefono cellulare * PC / Laptop / Tablet / Mobiltelefon
* PC / Computador portátil / Tablet / Telefone móvel
产品操作
连接主机设备
连接 PC 主机或手机等设备
蓝牙连接
• 确保设备电源已打开 (确保设备有充足的剩
余电量)。
• 使用连接转换开关 (14) 拨动到蓝牙无线处。
• 根据接入的设备主机,选择使用兼容性开关
(15) 选择Xinput、Android 模式。
• 按 Home 按钮 (8) 开启蓝牙模式运行。
• 长按 2.4G 无线按键(10)完成配对;设备
首次连接主机时需执行此操作。
• 在设备主机找到 APP 蓝牙功能开启,并搜索
“Qanba Arcade Q4 Pro”,点击连接, 在
弹出窗口中点击配对按钮;配对成功后将显
示 “Qanba Arcade Q4 Pro 已连接”。
中文简体日本語
製品操作
ホスト機器への接続方法
PC、スマートフォン、その他の機器に接
続できます
Bluetooth 接続
• 本機の電源が入り、バッテリー残量が十分である
ことを確認してください。
• 接続切替スイッチ (14) を Bluetooth 無線側へスラ
イドしてください。
• 接続先の本体に合わせ、互換性切替スイッチ (15)
を切り替えて Xinput または Android モードを選
択してください。
• HOME ボタン (8) を押すと Bluetooth モードが起
動します。
• 2.4G 無線ボタン (10) を長押ししてペアリングを完
了させてください。本機を接続先機器に初めて接
続する際はこの操作が必要です。
• ホスト機器の Bluetooth 機能を有効にし、Qanba
Arcade Q4 Pro を検索してタップし接続してくださ
い。ポップアップ画面内のペアリングボタンをタッ
プしてください。ペアリングが正常に完了すると、
「Qanba Arcade Q4 Pro 接続済み」と表示され
ます。
產品操作
連接主機設備
連接 PC 主機或手機等設備
繁體中文
藍牙連線
• 確認裝置電源已開啟 (並確保裝置電量充足)。
• 將連接轉換開關 (14) 撥至藍牙無線位置。
• 依據連接的主機裝置,透過相容性開關 (15)
選擇 Xinput 或 Android 模式。
• 按下 Home 按鍵 (8) 啟動藍牙模式。
• 長按 2.4G 無線按鍵 (10) 完成配對;裝置首
次連接主機時須執行此操作。
• 於設備主機開啟 APP 藍牙功能,搜尋
「Qanba Arcade Q4 Pro」並點選連線;於
彈出視窗點擊配對按鈕,配對成功後將顯示
「Qanba Arcade Q4 Pro 已連線」。
Français
Fonctionnement du produit
Connexion aux appareils hôtes
Se connecter à un PC, un téléphone
portable ou d’autres appareils
Funcionamiento del producto
Conexión a dispositivos host
Conectar a PC, teléfono móvil u
otros dispositivos
Connexion Bluetooth
• Assurez-vous que l'appareil est allumé et
dispose d'une charge de batterie
suffisante.
• Faites glisser l’interrupteur de
commutation de connexion (14) sur la
position Bluetooth Sans fil.
• Basculez l'interrupteur de compatibilité
(15) pour choisir le mode Xinput ou
Android selon l'appareil hôte connecté.
• Appuyez sur le bouton HOME (8) pour
activer le mode Bluetooth.
• Maintenez enfoncé le bouton sans fil 2,4G
(10) pour terminer l’appariement. Cette
manipulation est nécessaire lors de la
première connexion de l’appareil à l’appareil
hôte.
• Activez la fonction Bluetooth sur votre
appareil hôte, recherchez Qanba Arcade
Q4 Pro et appuyez dessus pour vous
connecter. Cliquez sur le bouton
d’appariement dans la fenêtre
contextuelle. Une fois l’appariement
réussi, le message Qanba Arcade Q4 Pro
Connecté s’affichera.
제품 조작
호스트 기기 연결
PC, 휴대폰 또는 기타 기기에 연결합니다
한국어
블루투스 연결
• 기기 전원이 켜져 있고 배터리 잔량이 충분한지
확인하세요.
• 연결 전환 스위치(14)를 블루투스 무선 위치로
밀어주세요.
• 연결할 본체에 맞춰 호환성 스위치(15)를
전환하여 Xinput 또는 Android 모드를
선택하세요.
• 홈 버튼(8)을 눌러 블루투스 모드를
활성화하세요.
• 2.4G 무선 버튼(10)을 길게 눌러 페어링을
완료하세요. 기기를 호스트 기기에 최초 연결할
때 해당 작업을 진행해야 합니다.
• 호스트 기기의 블루투스 기능을 활성화한 후
Qanba Arcade Q4 Pro를 검색해 터치하여
연결하세요. 팝업 창의 페어링 버튼을 누릅니다.
페어링이 정상 완료되면 Qanba Arcade Q4
Pro 연결됨으로 표시됩니다.
Español
Conexión Bluetooth
• Asegúrese de que el dispositivo esté
encendido y cuente con nivel de batería
suficiente.
• Deslice el interruptor de cambio de
conexión (14) hasta la posición Bluetooth
Inalámbrico.
• Cambie el interruptor de compatibilidad
(15) para seleccionar el modo Xinput o
Android según la unidad principal
conectada.
• Presione el botón Home (8) para activar el
modo Bluetooth.
• Mantenga pulsado el botón inalámbrico
2.4G (10) para finalizar el emparejamien-
to. Esta operación es necesaria al
conectar el dispositivo al equipo host por
primera vez.
• Active la función Bluetooth en su
dispositivo host, busque Qanba Arcade
Q4 Pro y pulse para conectar. Pulse el
botón de emparejamiento en la ventana
emergente. Una vez realizado el
emparejamiento con éxito, aparecerá el
mensaje Qanba Arcade Q4 Pro
Conectado.
Conexão Bluetooth
• Certifique-se de que o dispositivo esteja
ligado e com carga de bateria suficiente.
• Deslize o interruptor de alternância de
conexão (14) para a posição Bluetooth
Sem Fio.
• Altere o interruptor de compatibilidade
(15) para selecionar o modo Xinput ou
Android, de acordo com a unidade
principal conectada.
• Pressione o botão Home (8) para ativar o
modo Bluetooth.
• Pressione e segure o botão sem fio 2,4G
(10) para concluir o emparelhamento.
Essa operação é necessária ao conectar
o dispositivo ao host pela primeira vez.
• Ative a função Bluetooth no seu
dispositivo host, pesquise por Qanba
Arcade Q4 Pro e toque para conectar.
Toque no botão de emparelhamento na
janela pop-up. Após o emparelhamento
bem-sucedido, será exibida a mensagem
Qanba Arcade Q4 Pro Conectado.
Português
Funzionamento del prodotto
Connessione ai dispositivi host
Connessione a PC, telefono cellulare
o altri dispositivi
Produkt Betrieb
Verbindung zu Host-Geräten
Verbinden Sie das Gerät mit einem PC,
Mobiltelefon oder anderen Geräten
Operação do Produto
Conexão a Dispositivos Host
Conecte a um PC, celular ou outros
dispositivos
Italiano
Connessione Bluetooth
• Assicurarsi che il dispositivo sia acceso e
con batteria sufficientemente carica.
• Spostare l’interruttore di commutazione
connessione (14) sulla posizione Bluetooth
Wireless.
• Commutare l’interruttore di compatibilità
(15) per selezionare la modalità Xinput o
Android in base all’unità principale
collegata.
• Premere il pulsante Home (8) per attivare la
modalità Bluetooth.
• Tenere premuto il pulsante wireless 2.4G
(10) per completare l’accoppiamento.
Questa operazione è obbligatoria alla prima
connessione del dispositivo al dispositivo
host.
• Attivare la funzione Bluetooth sul
dispositivo host, cercare Qanba Arcade Q4
Pro e toccare per connettersi. Premere il
pulsante di accoppiamento nella finestra
pop-up. Una volta completato l’accoppia-
mento, verrà visualizzato Qanba Arcade Q4
Pro Connesso.
Deutsch
Bluetooth-Verbindung
• Stellen Sie sicher, dass das Gerät
eingeschaltet ist und über einen
ausreichenden Akkustand verfügt.
• Schieben Sie den Verbindungsumschalter
(14) auf die Position Bluetooth Drahtlos.
• Schalten Sie den Kompatibilitätsumschal-
ter (15) um, um je nach verbundenem
Hauptgerät den Modus Xinput oder
Android auszuwählen.
• Drücken Sie die Home-Taste (8), um den
Bluetooth-Modus zu aktivieren.
• Halten Sie die 2,4G-Drahtlostaste (10)
gedrückt, um die Kopplung abzuschließen.
Dieser Vorgang ist erforderlich, wenn Sie das
Gerät zum ersten Mal mit dem Host-Gerät
verbinden.
• Aktivieren Sie die Bluetooth-Funktion auf
Ihrem Host-Gerät, suchen Sie nach Qanba
Arcade Q4 Pro und tippen Sie zum
Verbinden. Tippen Sie im Popup-Fenster
auf die Kopplungstaste. Nach
erfolgreicher Kopplung wird angezeigt:
Qanba Arcade Q4 Pro Verbunden.
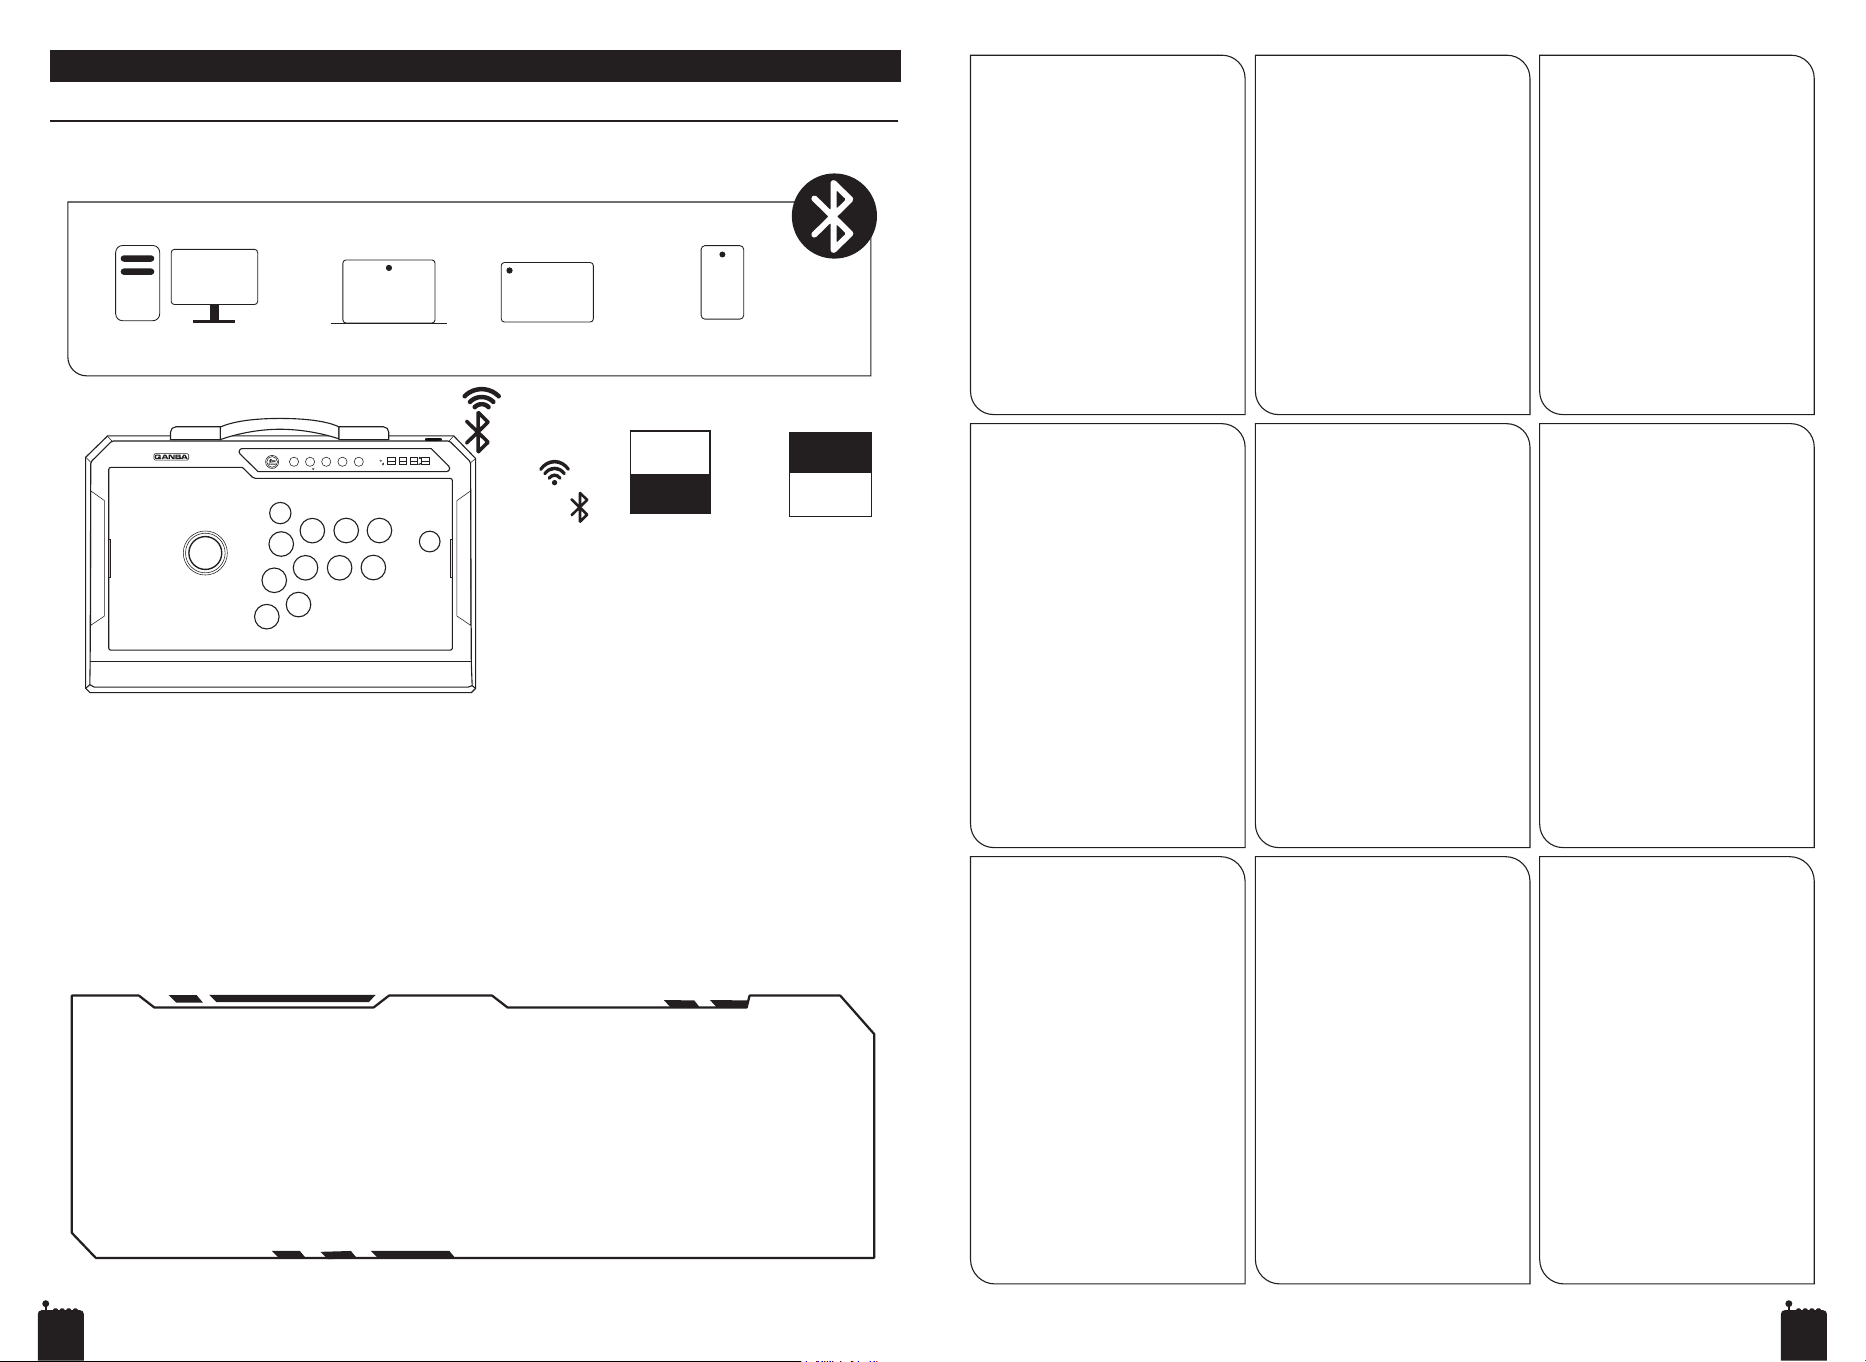
Connecting to Host Devices
Connect to PC, game console, mobile phone and other devices
2.4G
USB
BT
SET 2.4G L3 R3 Back
X
M1
Y
A
L1
START
B
R1
L2
R2
M3
M2
X
D
A
DP
LS
2.4G
USB
BT
X
D
A
PC Laptop Tablet
Mobile
Phone
Bluetooth Connection
• Ensure the device is powered on with sufficient battery level.
• Slide the Connection switching switch (14) to the Bluetooth Wireless position.
• Toggle the compatibility switch (15) to select Xinput or Android mode according to the
connected main unit.
• Press the Home button (8) to activate Bluetooth mode.
• Press and hold the 2.4G wireless button (10) to complete pairing. This operation is required
when connecting the device to the host for the first time.
• Enable the Bluetooth function on your host device, search for Qanba Arcade Q4 Pro, and tap to
connect. Tap the pairing button in the pop-up window. Once paired successfully, it will show
Qanba Arcade Q4 Pro Connected.
Product Operation
English
7 8
产品操作
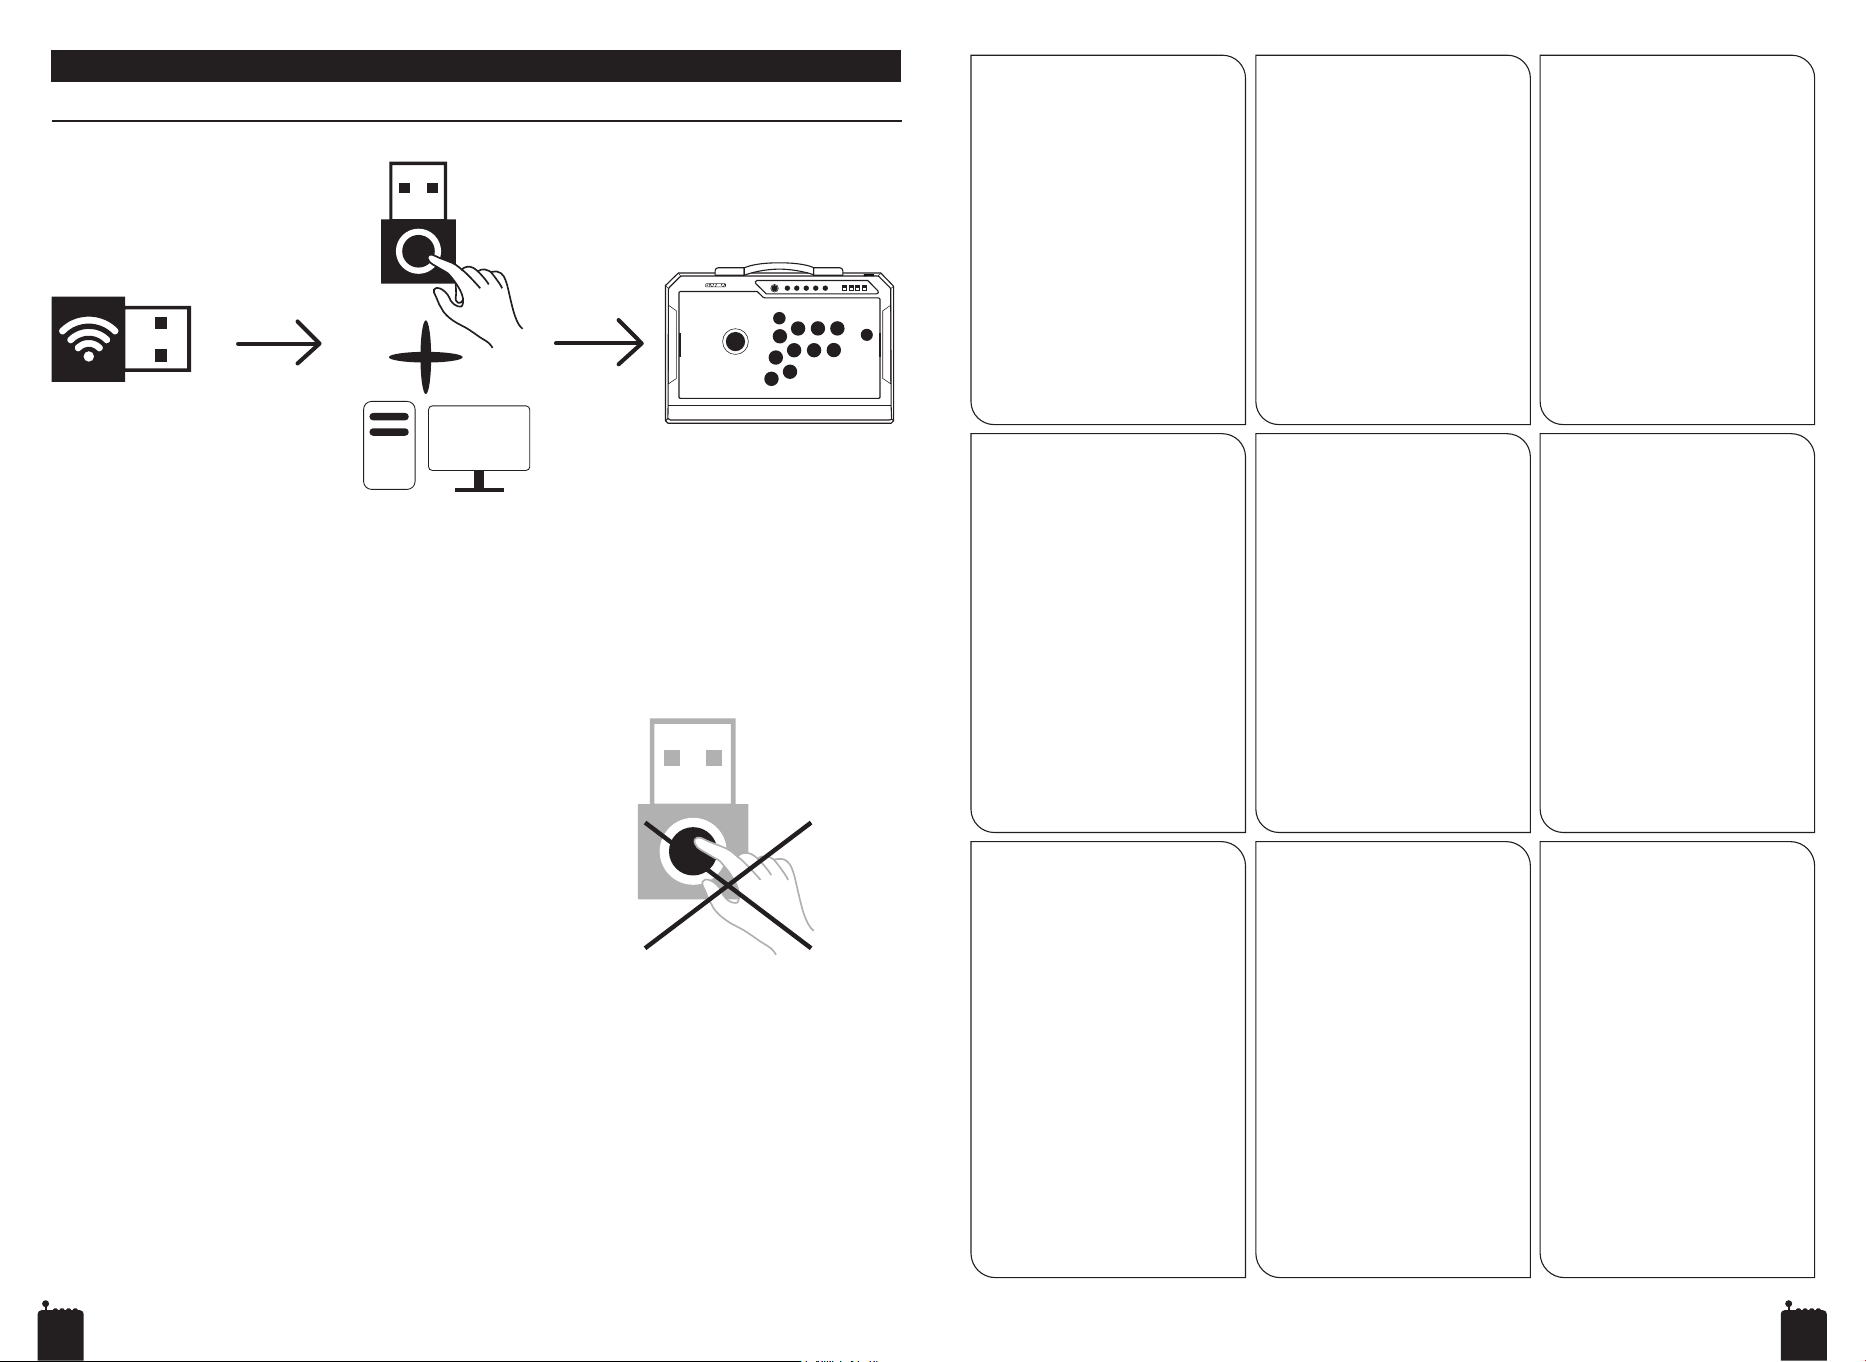
USB 无线接收器重新配对控制器
•
如果连接丢失或者更换 USB 无线接收器 (20) ,
连接转换开关 (14) 在 2.4G 位置; 按下
Home 键开启 2.4G 无线模式运行,USB 无
线接收器按键 (B) 插入主机设备的 USB 口。
• 长按 USB 无线接收器 (B) 配对键,USB 无线
接收器按键 (B) 上的指示灯快速闪烁;再长
按摇杆 2.4G 按键,指示灯常亮即表示配对完
成。
注意:
若Q4 Pro 街机摇杆无需与 USB 无线接收器 (20)
重新配对,插拔 USB 无线接收器 (20) 时请
勿按住按 USB 无线接收器键 (B)。
中文简体
日本語
製品操作
USB ワイヤレスドングル 再ペアリング
•
接続が切断された場合、または USB ドングル (20)
を交換した際は、接続切替スイッチ (14) を 2.4G
側に切り替えてください。HOME ボタンを押して
2.4G 無線モードを有効にした後、USB ドングル
(B) を接続先機器の USB ポートに挿し込んでくだ
さい。
• USB ドングル (B) のペアリングボタンをインジケー
ターランプが高速点滅するまで長押ししてください。
続いてジョイスティックの 2.4G ボタンを長押しし、
ランプが常時点灯になればペアリング完了です。
ご注意:
Q4 Pro アーケードジョイスティックを USB ドングル
(20) と再ペアリングする必要がない場合は、レシー
バーの抜き差し時に USBドングルボタン (B) を長押
ししないでください。
產品操作
USB 無線接收器重新配對控制器
繁體中文
• 若連線中斷或更換 USB 無線接收器 (20),請先
將連接轉換開關 (14) 切換至 2.4G 位置,按下
Home 鍵啟動 2.4G 無線模式,再將 USB 無線
接收器按鍵 (B) 插入主機裝置的 USB 插孔。
• 長按 USB 無線接收器按鍵 (B) 的配對鍵,
USB 無線接收器按键 (B) 指示燈會快速閃爍;
接著長按搖桿上的 2.4G 按鍵,待指示燈恆亮
即代表配對完成。
注意:
若 Q4 Pro 街機搖桿不需與 USB 無線接收器 (20)
重新配對,插拔 USB 無線接收器 (20) 時,請
勿按住 USB 無線接收器按鍵 (B)。
Français
Fonctionnement du produit
Réappariement du dongle USB sans fil
Funcionamiento del producto
Reemparejamiento del Dongle
Inalámbrico USB
• Si la connexion est perdue ou si vous
remplacez le dongle USB (20),
positionnez l’interrupteur de
connexion (14) sur la position 2,4G.
Appuyez sur le bouton HOME pour
activer le mode sans fil 2,4G, puis
branchez le dongle USB (B) sur le port
USB de l’appareil principal.
• Maintenez enfoncé le bouton
d’appariement du dongle USB (B)
jusqu’à ce que son voyant clignote
rapidement. Ensuite, maintenez
enfoncé le bouton 2,4G du joystick.
L’appariement est terminé lorsque le
voyant reste allumé fixe.
Remarque :
Si le joystick d'arcade Q4 Pro n'a pas
besoin d'être réapparié avec le dongle
USB (20), ne maintenez pas enfoncé le
bouton du dongle USB (B) lors du retrait
et du rebranchement du récepteur.
제품 조작
USB 무선 동글 재페어링
한국어
• 연결이 끊어졌거나 USB 동글(20)을 교체한
경우, 연결 스위치(14)를 2.4G 위치로
설정하세요. 홈 버튼을 눌러 2.4G 무선
모드를 활성화한 뒤 USB 동글 버튼(B)이
달린 동글을 본체 기기의 USB 포트에
삽입하세요.
• USB 동글의 페어링 버튼(B)을 표시등이
빠르게 깜박일 때까지 길게 누릅니다. 그 다음
조이스틱의 2.4G 버튼을 길게 누르세요.
표시등이 상시 켜지면 페어링이 완료됩니다.
참고:
Q4 Pro 아케이드 조이스틱를 USB 동글(20)과
다시 페어링할 필요가 없는 경우, 리시버를
분리하거나 재삽입할 때 USB 동글 버튼(B)을
길게 누르지 마세요.
Español
• Si se pierde la conexión o sustituye el
Dongle USB (20), coloque el interruptor de
conexión (14) en la posición 2.4G.
Presione el botón Home para activar el
modo inalámbrico 2.4G y, después,
conecte el Dongle USB (B) al puerto USB
del dispositivo principal.
• Mantenga pulsado el botón de
emparejamiento del Dongle USB (B) hasta
que su luz indicadora parpadee
rápidamente. A continuación, mantenga
pulsado el botón 2.4G del joystick. El
emparejamiento finalizará cuando la luz
indicadora quede encendida de forma fija.
Nota:
Si el joystick arcade Q4 Pro no requiere
volver a emparejarse con el Dongle USB (20),
no mantenga presionado el botón del
Dongle USB (B) al desconectar y volver a
insertar el receptor.
Conexão Bluetooth
• Se a conexão for interrompida ou você
trocar o Dongle USB (20), coloque o
interruptor de conexão (14) na posição
2,4G. Pressione o botão Home para
ativar o modo sem fio 2,4G e, depois,
conecte o Dongle USB (B) na porta
USB do dispositivo principal.
• Pressione e segure o botão de
emparelhamento do Dongle USB (B)
até sua luz indicadora piscar
rapidamente. Em seguida, pressione e
segure o botão 2,4G no joystick. O
emparelhamento estará concluído
quando a luz indicadora permanecer
acesa continuamente.
Observação:
Se o Joystick Arcade Q4 Pro não
precisar ser reemparelhado com o
Dongle USB (20), não pressione nem
segure o botão do Dongle USB (B) ao
desconectar e reinserir o receptor.
Português
Funzionamento del prodotto
Riaccoppiamento Dongle Wireless USB
Produkt Betrieb
Erneute Kopplung des USB-Draht-
los-Dongles
Operação do Produto
Reemparelhamento do Dongle
Sem Fio USB
Italiano
• Se la connessione si interrompe o si
sostituisce il USB Dongle (20),
impostare l’interruttore di connessione
(14) sulla posizione 2.4G. Premere il
pulsante Home per attivare la modalità
wireless 2.4G, quindi inserire il pulsante
(B) del USB Dongle nella porta USB del
dispositivo principale.
• Tenere premuto il pulsante di
accoppiamento sul pulsante (B) del
USB Dongle finché la relativa spia
lampeggia rapidamente. Successiva-
mente, tenere premuto il pulsante 2.4G
sul joystick. L’accoppiamento è
completato quando la spia rimane
accesa in modo fisso.
Nota:
Se il joystick arcade Q4 Pro non deve
essere riaccoppiato con il USB Dongle
(20), non tenere premuto il pulsante del
USB Dongle (B) durante lo scollegamento
e il reinserimento del ricevitore.
Deutsch
• Wenn die Verbindung abbricht oder Sie
den USB-Dongle (20) austauschen, stellen
Sie den Verbindungsumschalter (14) auf
die Position 2,4G. Drücken Sie die
Home-Taste, um den 2,4G-Drahtlosmodus
zu aktivieren, und stecken Sie
anschließend den USB-Dongle mit Taste
(B) in den USB-Anschluss des
Hauptgeräts.
• Halten Sie die Kopplungstaste am
USB-Dongle (B) gedrückt, bis dessen
Anzeige schnell blinkt. Halten Sie danach
die 2,4G-Taste am Joystick gedrückt. Die
Kopplung ist abgeschlossen, sobald die
Anzeige dauerhaft leuchtet.
Hinweis:
Falls der Q4 Pro Arcade-Joystick nicht
erneut mit dem USB-Dongle (20) gekoppelt
werden muss, halten Sie beim Ein- und
Ausstecken des Empfängers die
USB-Dongle-Taste (B) nicht gedrückt。
USB Wireless Dongle Re-pairing
• If the connection is lost or you replace the USB Dongle (20), set the connection switch (14) to the 2.4G
position. Press the Home button to enable 2.4G wireless mode, then plug the USB Dongle button (B)
into the USB port of the main device.
• Press and hold the pairing button on the USB Dongle button (B) until its indicator light flashes rapidly.
Next, press and hold the 2.4G button on the joystick. The pairing is complete when the indicator light
stays solid on.
Note:
If the Q4 Pro Arcade Joystick does not need to be
re-paired with the USB Dongle (20),
do not press and hold the USB Dongle
button (B) when unplugging and
reinserting the receiver.
Product Operation
English
9 10
产品操作
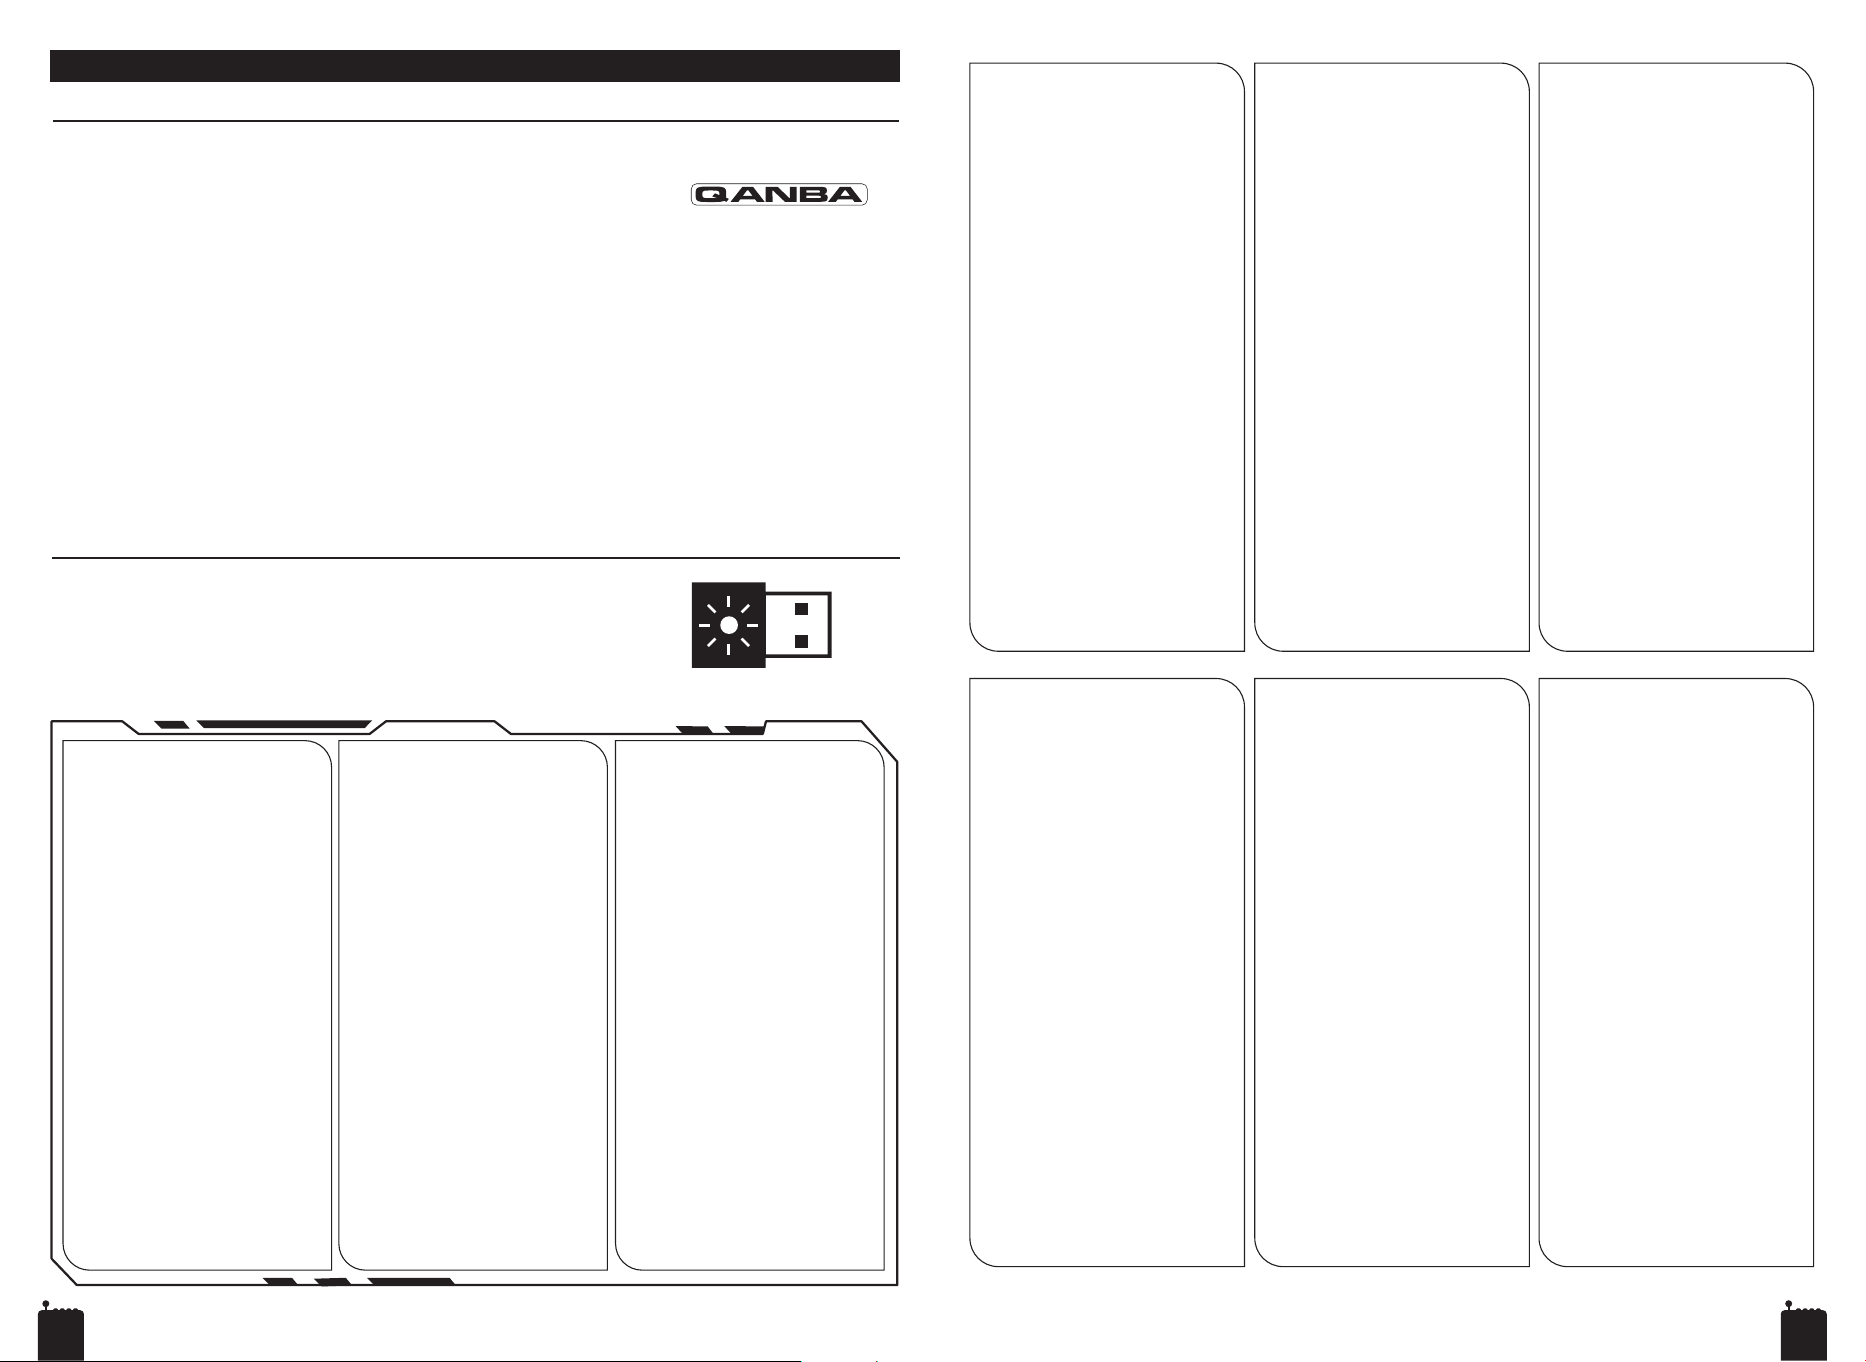
电源指示灯
USB 线连接
• 将 USB 线 (A) 插入 USB-C 线缆接口 (19)
通电,工作状态指示灯 (7)亮起。
• 若电池电量较低,插入 USB 线 (A)并通电
后,工作状态指示灯 (7) 慢闪,表示正在充
电;充满电后指示灯常亮。
2.4G 无线连接模式
• 按下 HOME 按键 (8) 开机并开始搜索,工
作状态指示灯 (7) 闪烁;与 USB 无线接收
器 (20) 配对成功后,指示灯常亮。
• 使用 Q4 Pro 设备时,若电池电量较低,工
作状态指示灯 (7) 闪烁,提示需要充电。
* 注:2.4G 无线模式下请勿插入 USB 线,否
则设备将默认切换为 USB 线连接模式。
开机后2分钟内未连接,或连接成功后10
分钟内无操作会自动关机。
USB 无线接收器 (20) 指示灯
在 2.4G 无线连接模式下:
• USB 无线接收器 (20) 指示灯闪烁表示正
在搜索,配对成功后常亮。
中文简体
產品操作
繁體中文
電源指示燈
USB 線連線
• 將 USB 線 (A) 插入 USB‑C 線纜接口 (19)
供電,工作狀態指示燈 (7) 亮起。
• 若電池電量偏低,插入 USB 線 (A) 並通電
後,工作狀態指示燈 (7) 慢閃,代表正在
充電;充滿電後指示燈恆亮。
2.4G 無線連線模式
• 按下 HOME 按鍵 (8) 開機並開始搜尋,工
作狀態指示燈 (7) 閃爍;與 USB 無線接收
器 (20) 配對成功後,指示燈恆亮。
• 使用 Q4 Pro 裝置時,若電池電量不足,
工作狀態指示燈 (7) 會閃爍,提醒需進行
充電。
備註:2.4G 無線模式下請勿插入 USB 線,
否則裝置將自動切換為 USB 有線連線模式。
開機後 2 分鐘內未完成連線,或連線成功
後 10 分鐘內無任何操作,將自動關機。
USB 無線接收器 (20) 指示燈
於 2.4G 無線連線模式下:
• USB 無線接收器 (20) 指示燈閃爍代表正在
搜尋配對,配對成功後恆亮。
日本語
製品操作
電源インジケーター
USB 接続
• USB ケーブル (A) を USB-C ポート (19)
に接続して本機の電源を入れてくださ
い。ステータス表示ランプ (7) が点灯し
ます。
• バッテリー残量が少ない状態で USB ケー
ブル (A) を接続すると、ステータス表示
ランプ (7) がゆっくり点滅し、充電中であ
ることを示します。充電が完了するとラ
ンプが常時点灯になります。
2.4G 無線接続モード
• HOME ボタン (8) を押して電源を入れ、接
続検索を開始してください。ステータス
インジケーター (7) が点滅します。USB
ドングル (20) とのペアリングが成功する
と、常時点灯になります。
• Q4 Pro 使用中、バッテリー残量が低下す
るとステータスインジケーター (7) が点滅
し、充電を促します。
※ ご注意:
2.4G 無線モード時に USB ケーブルを接続
しないでください。自動的に USB 有線接続
モードに切り替わります。
電源投入後 2 分以内に接続が確立されない
場合、または接続成功後 10 分間操作がない
場合、本機は自動的に電源オフとなります。
USB ドングル (20) インジケーターランプ
2.4G 無線接続モード時:
・USB ドングル (20) のインジケーターラン
プは接続検索中に点滅し、ペアリング成
功後は常時点灯します。
Français
Fonctionnement du produit Funcionamiento del producto
Voyant d’alimentation
Connexion USB
• Branchez le câble USB (A) sur le port
USB-C (19) pour allumer l'appareil. Le
voyant d'état (7) s'allume.
• Lorsque la batterie est faible, le voyant
d'état (7) clignote lentement après
branchement du câble USB (A), signalant
que la charge est en cours. Il reste allumé
fixe une fois la batterie entièrement
chargée.
Mode connexion sans fil 2,4G
• Appuyez sur le bouton HOME (8) pour
mettre l’appareil sous tension et lancer la
recherche. Le voyant d’état (7) clignote. Il
reste allumé fixe après un appariement
réussi avec le dongle USB (20).
• Pendant l’utilisation du Q4RAF Pro, le
voyant d’état (7) clignote lorsque la
batterie est faible, vous invitant à
recharger l’appareil.
Remarque : Ne branchez pas le câble USB
en mode sans fil 2,4G ; sinon, l’appareil
basculera automatiquement en mode
connexion USB filaire.
L’appareil s’éteint automatiquement si
aucune connexion n’est établie dans les 2
minutes suivant la mise sous tension, ou
en l’absence de toute opération pendant
10 minutes après une connexion réussie.
Voyant du dongle USB (20)
En mode connexion sans fil 2,4G :
• Le voyant du dongle USB (20) clignote
pendant la recherche de connexion et
reste allumé fixe une fois l’appariement
réussi.
제품 조작
한국어
전원 표시등
USB 연결
• USB 케이블(A)을 USB-C 포트(19)에
연결하여 기기 전원을 켭니다. 상태
표시등(7)이 켜집니다.
• 배터리 잔량이 부족할 경우 케이블 연결 후
상태 표시등(7)이 느리게 깜박이며 충전
중임을 나타냅니다. 완충되면 표시등이
계속 켜진 상태를 유지합니다.
2.4G 무선 연결 모드
• HOME 버튼(8)을 눌러 전원을 켜고
검색을 시작하세요. 상태 표시등(7)이
깜박이며, USB 동글(20)과 페어링 성공 시
상시 켜진 상태를 유지합니다.
• Q4 Pro 사용 중 배터리가 부족하면 상태
표시등(7)이 깜박여 충전을 알려줍니다.
참고: 2.4G 무선 모드에서는 USB 케이블을
연결하지 마세요. 연결할 경우 기기가
자동으로 유선 USB 연결 모드로
전환됩니다.
전원을 켠 후 2분 이내에 연결이 이루어지지
않거나, 연결 성공 후 10분 동안 조작이
없으면 기기가 자동으로 전원이 꺼집니다.
USB 동글(20) 표시등
2.4G 무선 연결 모드 시:
• USB 동글(20)의 표시등은 연결 검색 중
깜박이고, 페어링
성공 시 상시 켜진
상태를 유지합니다.
Español
Indicador de encendido
Conexión USB
• Conecte el cable USB (A) al puerto USB-C
(19) para encender el dispositivo. El
indicador de estado (7) se encenderá.
• Cuando la batería esté baja, la luz
indicadora de estado (7) parpadeará
lentamente al conectar el cable USB (A), lo
que indica que la carga está en curso.
Permanecerá encendida de forma fija
cuando la batería esté completamente
cargada.
Modo de conexión inalámbrica 2.4G
• Presione el botón HOME (8) para encender
el dispositivo e iniciar la búsqueda. El
indicador de estado (7) parpadea.
Permanecerá encendido de forma fija tras
emparejarse correctamente con el Dongle
USB (20).
• Durante el uso del Q4RAF Pro, el indicador
de estado (7) parpadea cuando la batería
está baja, recordando que debe cargar el
dispositivo.
Nota: No conecte el cable USB en el modo
inalámbrico 2.4G; de lo contrario, el
dispositivo cambiará automáticamente al
modo de conexión USB por cable.
El equipo se apagará automáticamente si no
se establece ninguna conexión en los 2
minutos siguientes al encendido, o si no
hay ninguna operación durante 10 minutos
tras una conexión exitosa.
Luz indicadora del Dongle USB (20)
En el modo de conexión inalámbrica 2.4G:
• La luz indicadora del Dongle USB (20)
parpadea durante la búsqueda de conexión
y permanece encendida de forma fija al
completarse el emparejamiento.
Indicador de Energia
Conexão USB
• Conecte o cabo USB (A) na porta USB-C
(19) para ligar o dispositivo. O indicador de
status (7) acenderá.
• Quando a bateria estiver fraca, a luz
indicadora de status (7) piscará
lentamente após conectar o cabo USB (A),
indicando que o carregamento está em
andamento. A luz permanecerá acesa de
forma contínua quando a bateria estiver
totalmente carregada.
Modo de Conexão Sem Fio 2,4G
• Pressione o botão HOME (8) para ligar e
iniciar a busca. O indicador de status (7)
piscará. Permanecerá aceso de forma fixa
após o emparelhamento bem‑sucedido
com o Dongle USB (20).
• Durante o uso do Q4RAF Pro, o indicador
de status (7) piscará quando a bateria
estiver baixa, lembrando você de carregar
o dispositivo.
Observação: Não conecte o cabo USB no
modo sem fio 2,4G; caso contrário, o
dispositivo mudará automaticamente para
o modo de conexão USB com fio.
O aparelho desligará automaticamente se
não estabelecer conexão em até 2 minutos
após ser ligado, ou se não houver
nenhuma operação por 10 minutos após
uma conexão bem‑sucedida.
Luz Indicadora do Dongle USB (20)
No modo de conexão sem fio 2,4G:
• A luz indicadora do Dongle USB (20) pisca
durante a busca por conexão e permanece
acesa de forma fixa quando o
emparelhamento for concluído com
sucesso.
Português
Funzionamento del prodotto Produkt Betrieb
Operação do Produto
Italiano
Indicatore di alimentazione
Connessione USB
• Collegare il cavo USB (A) alla porta USB-C
(19) per accendere il dispositivo. La spia di
stato (7) si accende.
• Quando la batteria è scarica, dopo aver
collegato il cavo USB (A), la spia di stato
(7) lampeggia lentamente a indicare che la
carica è in corso. Una volta completa-
mente carica, la spia rimane fissa.
Modalità connessione wireless 2.4G
• Premere il pulsante HOME (8) per
accendere il dispositivo e avviare la
ricerca. L’indicatore di stato (7) lampeggia.
Rimarrà acceso in modo fisso dopo aver
completato l’accoppiamento con il USB
Dongle (20).
• Durante l’utilizzo del Q4RAF Pro,
l’indicatore di stato (7) lampeggia quando
la batteria è scarica, per ricordare di
ricaricare il dispositivo.
Nota: Non collegare il cavo USB in modalità
wireless 2.4G; in caso contrario il
dispositivo passerà automaticamente alla
modalità connessione USB cablata.
Il dispositivo si spegne automaticamente se
non viene stabilita alcuna connessione
entro 2 minuti dall’accensione, oppure se
non si esegue alcuna operazione per 10
minuti dopo una connessione riuscita.
Spia luminosa USB Dongle (20)
In modalità connessione wireless 2.4G:
• La spia del USB Dongle (20) lampeggia
durante la ricerca di connessione e rimane
fissa una volta completato l’accoppiamen-
to.
Deutsch
Betriebsanzeige
USB-Verbindung
• Verbinden Sie das USB-Kabel (A) mit dem
USB-C-Anschluss (19), um das Gerät
einzuschalten. Die Statusanzeige (7)
leuchtet auf.
• Bei niedrigem Akkustand blinkt die
Statusanzeige (7) nach dem Anschließen
des USB-Kabels (A) langsam – der
Ladevorgang läuft. Sobald der Akku voll
geladen ist, leuchtet die Anzeige dauerhaft.
2,4G-Drahtlosverbindungsmodus
• Drücken Sie die HOME‑Taste (8), um das
Gerät einzuschalten und die Suche zu
starten. Die Betriebsanzeige (7) blinkt.
Nach erfolgreicher Kopplung mit dem
USB‑Dongle (20) leuchtet sie dauerhaft.
• Während der Verwendung des Q4RAF Pro
blinkt die Betriebsanzeige (7) bei niedrigem
Akkustand und erinnert Sie daran, das
Gerät aufzuladen.
Hinweis: Schließen Sie im 2,4G‑Drahtlosmo-
dus kein USB‑Kabel an; andernfalls
wechselt das Gerät automatisch in den
kabelgebundenen USB‑Verbindungsmodus.
Wird innerhalb von 2 Minuten nach dem
Einschalten keine Verbindung hergestellt
oder erfolgt nach erfolgreicher Verbindung
10 Minuten lang keine Bedienung, schaltet
sich das Gerät automatisch aus.
Im 2,4G-Drahtlosverbindungsmodus:
• Die Anzeige des USB‑Dongle (20) blinkt
während der Verbindungssuche und
leuchtet dauerhaft bei erfolgreicher
Kopplung.
USB Connection
• Connect the USB cable (A) to the USB-C port (19) to power on the
device. The status indicator (7) illuminates.
• When the battery level is low, the Status Indicator Light (7) will flash
slowly after connecting the USB cable (A), indicating charging is in
progress. The light will stay on steadily once fully charged.
2.4G Wireless Connection Mode
Power Indicator
USB Dongle (20) Indicator Light
Under 2.4G wireless connection mode:
• The indicator light of the USB Dongle (20)
flashes while searching for a connection, and
stays solid once pairing is successful.
Product Operation
• Press the HOME button (8) to power on and start searching. The status indicator (7) flashes. It will
remain steadily lit after successful pairing with the USB Dongle (20).
• While using the Q4 Pro, the status indicator (7) will flash when the battery is low, reminding you to
charge the device.
* Note: Do not connect the USB cable in 2.4G wireless mode; otherwise, the device will automati-
cally switch to wired USB connection mode.
The unit will power off automatically if no connection is established within 2 minutes after
power-on, or if there is no operation for 10 minutes after a successful connection.
English
11 12
产品操作
RESET 复位按键 (18)
• 按 RESET 按键 (18) 可以复位。
MODE(摇杆方向模式选择)
• 将模式开关 (16) 拨至 DP 位置时,十字方
向(DP)模式启用(默认)。
• 将模式开关 (16) 拨至 LS 位置时,左方向摇
杆(LS)模式启用。
* 注:部分复古模拟器仅支持 LS 功能。若摇
杆无响应,请切换方向模式。
1. 十字方向(DP)
2. 左方向摇杆(LS)
中文简体
日本語
製品操作
RESET リセットボタン (18)
• リセットボタン (18) を押してリセットし
てください。
MODE(ジョイスティック方向モード選択)
• モード切替スイッチ (16) を DP 側にスライドす
ると、十字キー (DP) モードが有効になります
(初期設定)。
• モード切替スイッチ (16) を LS 側にスライドす
ると、左スティック (LS) モードが有効になりま
す。
※ ご注意:
一部レトロエミュレーターは LS 機能にしか対応して
い
ません。ジョイスティックが反応しない場合は、方
向
モードを切り替えてください。
1.十字キーモード(DP)
2.左スティックモード(LS)
產品操作
繁體中文
RESET 復位按鍵 (18)
• 按下 RESET 按鍵 (18) 即可執行復位。
MODE(搖桿方向模式切換)
• 將模式開關 (16) 切換至 DP 位置,啟用十字
方向鍵(DP)模式(預設)。
• 將模式開關 (16) 切換至 LS 位置,啟用左類
比搖桿(LS)模式。
備註:部分復古模擬器僅支援 LS 功能。若搖
桿沒有反應,請切換方向模式。
1.十字方向鍵(DP)
2.左類比搖桿(LS)
Français
Fonctionnement du produit
Bouton de réinitialisation RESET (18)
• Appuyez sur RESET (18) pour réinitialiser
l'appareil.
MODE (Sélection du mode de direction du
joystick)
• Faites glisser l’interrupteur de mode (16)
sur la position DP pour activer le mode
Croix directionnelle (DP) (par défaut).
• Faites glisser l’interrupteur de mode (16)
sur la position LS pour activer le mode
Manche gauche (LS).
Remarque : Certains émulateurs rétro
ne prennent en charge que la fonction
LS. Si le joystick ne répond pas,
basculez le mode de direction.
1.Croix directionnelle (DP)
2.Manche gauche (LS)
제품 조작
한국어
RESET 리셋 버튼(18)
• 리셋 버튼(18)을 눌러 초기화하세요.
MODE (조이스틱 방향 모드 선택)
• 모드 스위치(16)를 DP 위치로 밀면
십자키(DP) 모드가 활성화됩니다(기본 설정).
• 모드 스위치(16)를 LS 위치로 밀면 왼쪽
스틱(LS) 모드가 활성화됩니다.
참고: 일부 레트로 에뮬레이터는 LS 기능만
지원합니다. 조이스틱이 반응하지 않을 경우
방향 모드를 전환해 주세요.
1.십자키 모드(DP)
2.왼쪽 스틱 모드(LS)
Funcionamiento del producto
Español
Botón de reinicio RESET (18)
• Presione RESET (18) para reiniciar.
MODO (Selección de modo de dirección
del joystick)
• Deslice el interruptor de modo (16) hasta
la posición DP para activar el modo
D‑Pad (DP) (predeterminado).
• Deslice el interruptor de modo (16) hasta
la posición LS para activar el modo
Palanca Izquierda (LS).
Nota: Algunos emuladores retro solo
admiten la función LS. Si el joystick no
responde, cambie el modo de dirección.
1.D-Pad (DP)
2.Palanca Izquierda (LS)
Botão de Reset RESET (18)
• Pressione RESET (18) para reiniciar.
MODO (Seleção do Modo de Direção do
Joystick)
• Deslize o interruptor de Modo (16) para
a posição DP para ativar o modo D-Pad
(DP) (padrão).
• Deslize o interruptor de Modo (16) para
a posição LS para ativar o modo
Alavanca Esquerda (LS).
Observação: Alguns emuladores retrô
suportam apenas a função LS. Se o
joystick, não responder, altere o modo de
direção.
1.D-Pad (DP)
2.Alavanca Esquerda (LS)
Português
Funzionamento del prodotto
Produkt Betrieb
Operação do Produto
Italiano
Pulsante di ripristino RESET (18)
• Premere RESET (18) per eseguire il
ripristino.
MODE (Selezione modalità direzione
joystick)
• Spostare l’interruttore Modalità (16) sulla
posizione DP per attivare la modalità
D-Pad (DP) (predefinita).
• Spostare l’interruttore Modalità (16) sulla
posizione LS per attivare la modalità
Levetta Sinistra (LS).
Nota: Alcuni emulatori retrò supportano
solo la funzione LS. Se il joystick non
risponde, cambiare la modalità
direzionale.
1.D-Pad (DP)
2.Levetta Sinistra (LS)
Deutsch
RESET-Taste (18) – Reset-Funktion
• Drücken Sie die RESET-Taste (18) zum
Zurücksetzen.
MODE (Auswahl des Joystick-Richtungs-
modus)
• Schieben Sie den Modus-Umschalter
(16) auf die Position DP, um den
D-Pad-Modus (DP) zu aktivieren
(Werkseinstellung).
• Schieben Sie den Modus-Umschalter
(16) auf die Position LS, um den
Linker-Stick-Modus (LS) zu aktivieren.
Hinweis: Einige Retro-Emulatoren
unterstützen nur die LS-Funktion. Falls der
Joystick nicht reagiert, wechseln Sie bitte
den Richtungsmodus.
1.D-Pad (DP)
2.Linker Stick (LS)
DP
LS
DP
LS
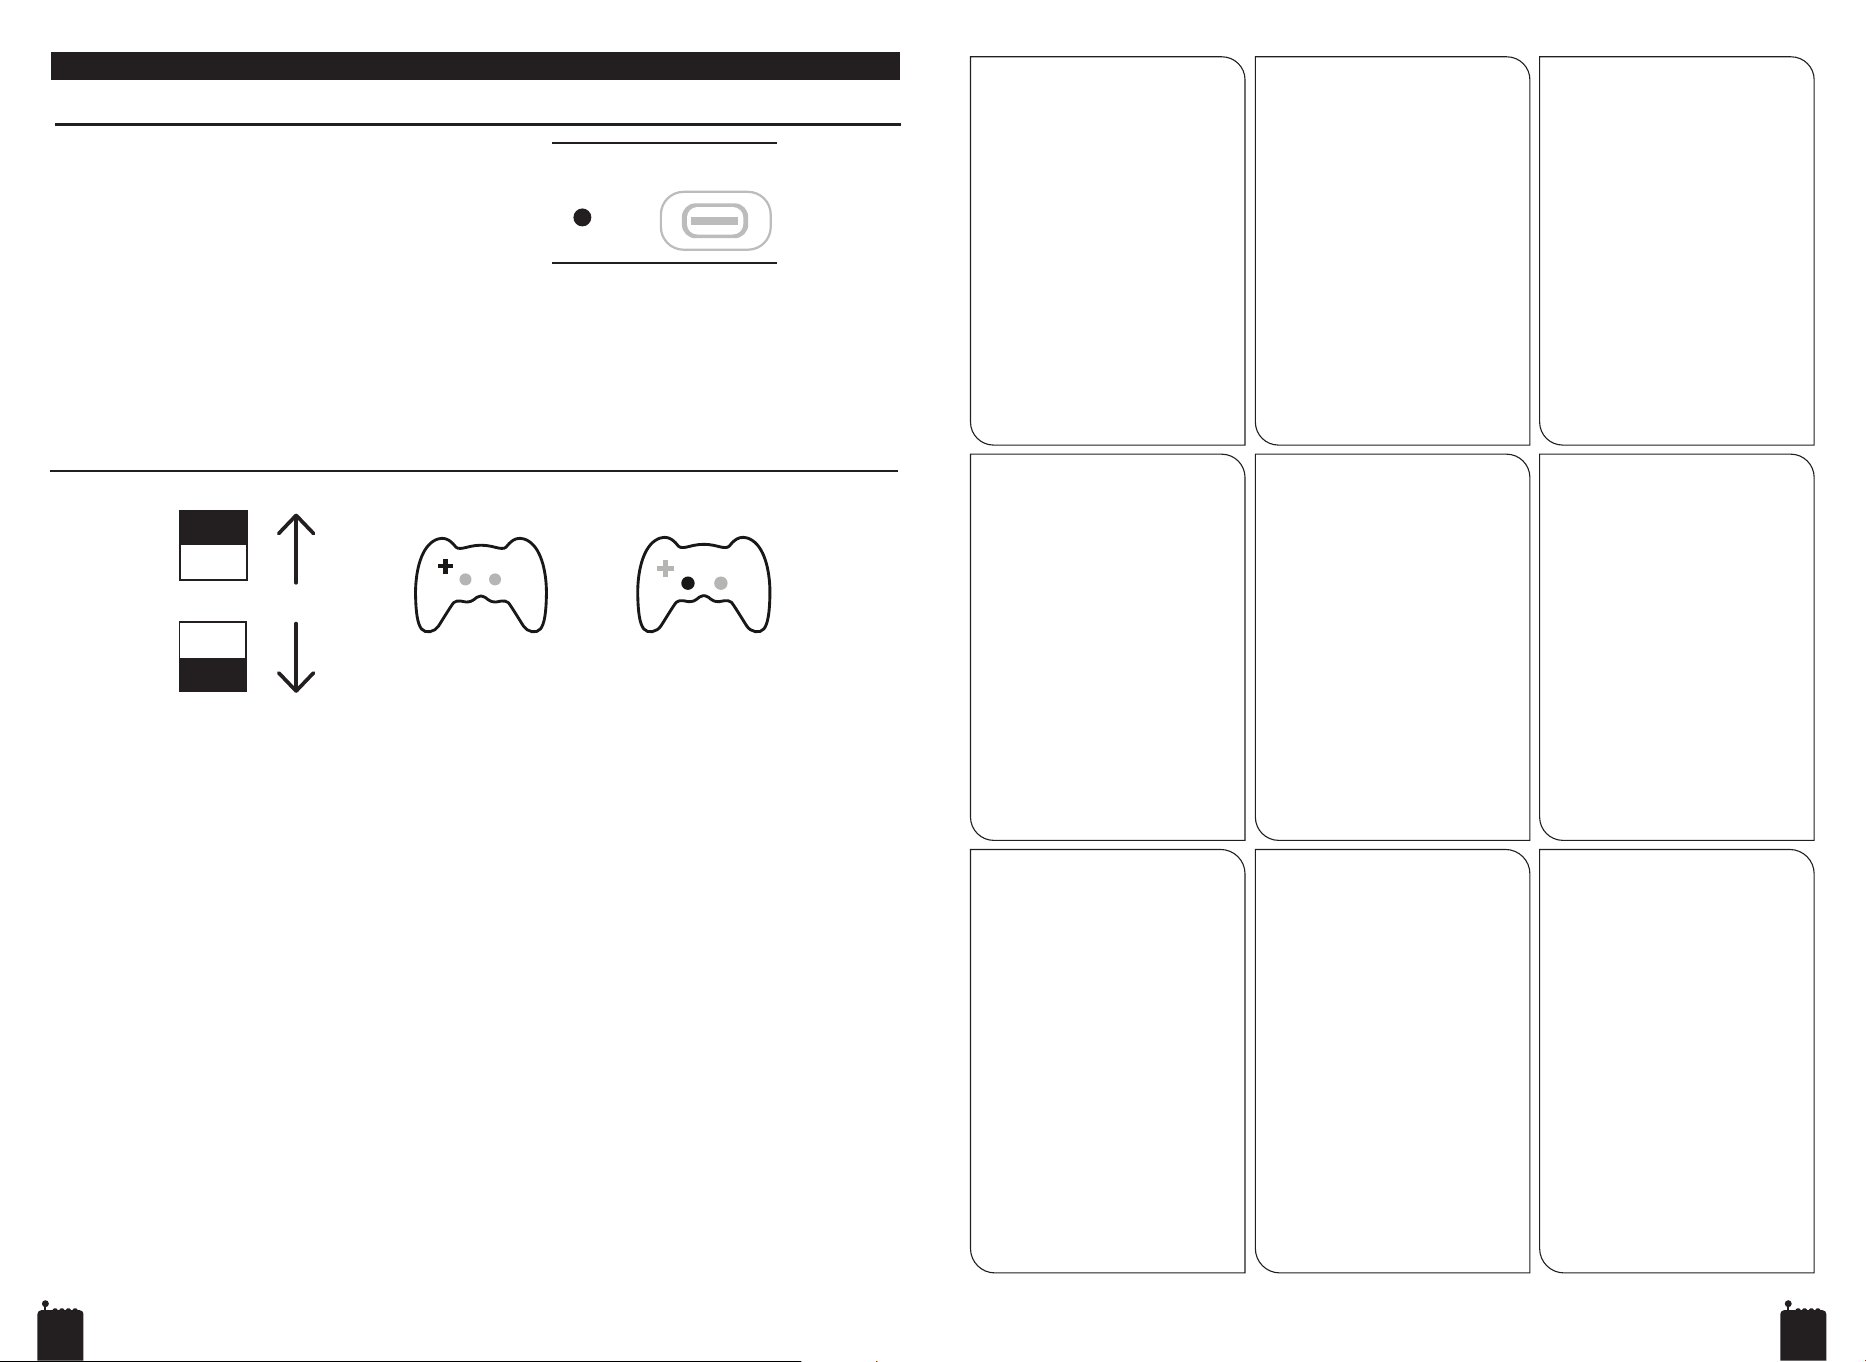
MODE (Joystick Direction Mode Selection)
RESET Reset Button (18)
• Press RESET (18) to reset.
1. D-Pad(DP) 2. Left Stic(LS)
• Slide the Mode switch (16) to the DP position to enable the D‑Pad (DP) mode (default).
• Slide the Mode switch (16) to the LS position to enable the Left Stick (LS) mode.
* Note: Some retro emulators only support the LS function. If the joystick does not respond, please
switch the direction mode.
Product Operation
English
13 14
产品操作
锁定 / 解锁开关(锦标赛模式)
• 要启用锦标赛模式,将锁定 / 解锁开关
(17) 滑动到锁定设置。
这些按钮将被禁用:
• HOME 按钮 (8)
• START 按键 (5)
• 要禁用锦标赛模式,请将锁定开关 (17)
滑至解锁设置。
中文简体日本語
製品操作
ロック/アンロックスイッチ(トーナメント
モード)
• トーナメントモードを有効にするには、ロッ
ク/アンロックスイッチ (17) をロック側へ
スライドしてください。
以下のボタンが無効になります:
• HOME ボタン (8)
• START ボタン (5)
• トーナメントモードを無効にするには、ロッ
ク/アンロックスイッチ (17) をアンロック
側へスライドしてください。
產品操作
繁體中文
鎖定 / 解鎖開關(錦標賽模式)
• 欲啟用錦標賽模式,將鎖定 / 解鎖開
關 (17) 滑動至鎖定位置。
以下按鍵將被停用:
• HOME 按鍵 (8)
• START 按鍵 (5)
• 欲關閉錦標賽模式,請將鎖定 / 解鎖
開關 (17) 滑動至解鎖位置。
Interruptor de Bloqueio / Desbloqueio (Modo
Torneio)
• Para ativar o Modo Torneio, deslize o
interruptor de Bloqueio / Desbloqueio
(17) para a posição Bloqueado.
Os seguintes botões serão
desativados:
• Botão HOME (8)
• Botão START (5)
• Para desativar o Modo Torneio,
deslize o interruptor de Bloqueio /
Desbloqueio (17) para a posição
Desbloqueado.
Português
Funzionamento del prodotto Produkt Betrieb
Operação do Produto
Italiano
Interruttore Blocca / Sblocca (Modalità
Torneo)
• Per attivare la Modalità Torneo,
spostare l’interruttore Blocca /
Sblocca (17) sulla posizione
Bloccato.
Verranno disabilitati i seguenti
pulsanti:
• Pulsante HOME (8)
• Pulsante START (5)
• Per disattivare la Modalità Torneo,
spostare l’interruttore Blocca /
Sblocca (17) sulla posizione
Sbloccato.
Deutsch
Sperr-/Entsperr-Umschalter
(Turniermodus)
• Um den Turniermodus zu aktivieren,
schieben Sie den Sperr-/Entsperr-Um-
schalter (17) auf die Position
Gesperrt.
Folgende Tasten werden deaktiviert:
• HOME-Taste (8)
• START-Taste (5)
• Um den Turniermodus zu deaktivieren,
schieben Sie den Sperr-/Entsperr-Um-
schalter (17) auf die Position
Entsperrt.
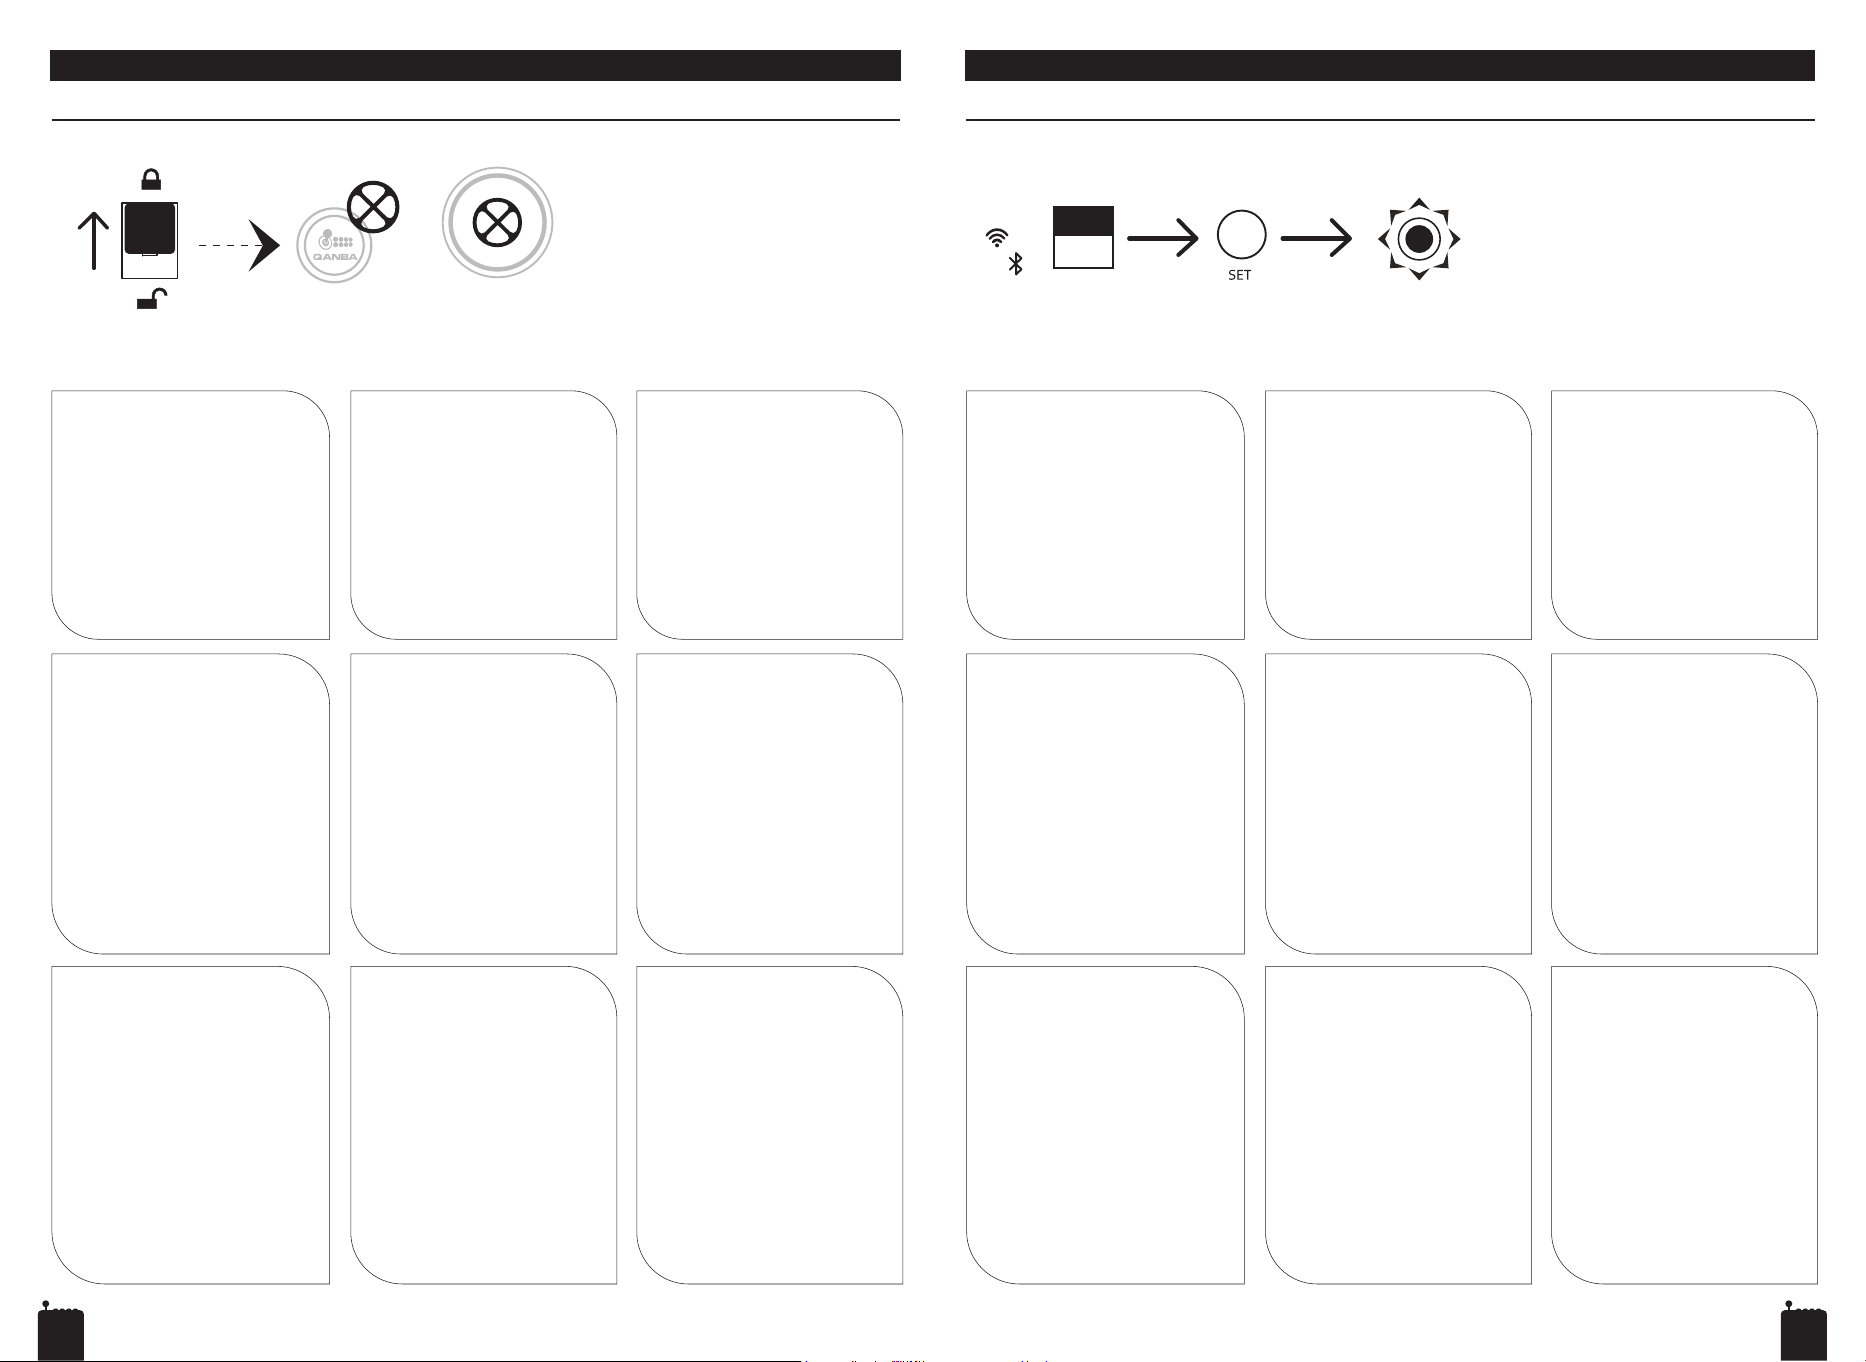
Product Operation
Lock / Unlock Switch (Tournament Mode)
• To enable Tournament Mode,
slide the Lock / Unlock Switch
(17) to the Locked position.
The following buttons will be
disabled:
• HOME Button (8)
• START Button (5)
• To disable Tournament Mode,
slide the Lock / Unlock Switch
(17) to the Unlocked position.
START
Français
Fonctionnement du produit Funcionamiento del producto
Interrupteur Verrouiller / Déverrouiller
(Mode Tournoi)
• Pour activer le Mode Tournoi, faites
glisser l’interrupteur Verrouiller /
Déverrouiller (17) sur la position
Verrouillé.
Les boutons suivants seront
désactivés :
• Bouton HOME (8)
• Bouton START (5)
• Pour désactiver le Mode Tournoi, faites
glisser l’interrupteur Verrouiller /
Déverrouiller (17) sur la position
Déverrouillé.
제품 조작
한국어
잠금/잠금 해제 스위치 (토너먼트 모드)
• 토너먼트 모드를 활성화하려면 잠금/잠금
해제 스위치(17)를 잠금 위치로 밀어주세요.
다음 버튼이 비활성화됩니다:
• HOME 버튼(8)
• START 버튼(5)
• 토너먼트 모드를 비활성화하려면 잠금/잠금
해제 스위치(17)를 잠금 해제 위치로
밀어주세요.
Español
Interruptor Bloquear / Desbloquear
(Modo Torneo)
• Para activar el Modo Torneo, deslice
el interruptor Bloquear / Desbloquear
(17) a la posición Bloqueado.
Se desactivarán los siguientes
botones:
• Botón HOME (8)
• Botón START (5)
• Para desactivar el Modo Torneo,
deslice el interruptor Bloquear /
Desbloquear (17) a la posición
Desbloqueado.
产品操作
屏显功能设置
1. Q4 ARF Pro使用屏幕显示功能设置 (6) 时
,连接转换开关 (14) 拨动到 USB 位置。
2. 长按 SET 按键 (9) 3 秒进入菜单页面设置。
3.进入菜单页面设置以后,请用 8 方向摇杆
(3) 移动选择:按键、轮询、LED、连发、
屏幕、本机六大功能设置,按 A 键确认,
X 键重置,B 键返回,即可自定义摇杆各
项功能。
中文简体日本語
製品操作
オンスクリーン表示設定
1. Q4 ARF Pro のオンスクリーン表示機能 (6)
を使用するには、接続切替スイッチ (14) を
USB 側へスライドしてください。
2. SET ボタン (9) を 3 秒間長押しすると、設
定メニューに入ります。
3. メニュー内では 8 方向ジョイスティック (3)
を操作し、ボタン設定、ポーリングレート、
LED、ターボ、表示、本体設定の 6 項目から
選択してください。A ボタンで決定、X ボタ
ンでリセット、B ボタンで戻ることができ、
各種機能を自由にカスタマイズ可能です。
產品操作
繁體中文
螢幕顯示功能設定
1. 使用 Q4 ARF Pro 螢幕顯示功能設定
(6) 時,請將連線切換開關 (14) 撥至
USB 位置。
2. 長按 SET 按鍵 (9) 三秒,進入選單頁
面進行設定。
3. 進入選單後,透過八向搖桿 (3) 移動選
取:按鍵、輪詢、LED、連發、螢幕、
本機六大功能項目;按下 A 鍵確認、X
鍵重設、B 鍵返回,即可自訂搖桿各項
功能。
Configurações da Exibição na Tela
1.Para usar a função de exibição na
tela (6) do Q4 ARF Pro, deslize o
interruptor de conexão (14) para a
posição USB.
2.Pressione e segure o botão SET (9)
por 3 segundos para acessar o menu
de configurações.
3.No menu, utilize o joystick de 8
direções (3) para selecionar as seis
opções: Configurações de Botões,
Taxa de Polling, LED, Turbo, Exibição
e Configurações do Dispositivo.
Pressione o botão A para confirmar, o
botão X para reiniciar e o botão B
para voltar. Agora você pode
personalizar as funções do joystick.
Português
Funzionamento del prodotto Produkt Betrieb
Operação do Produto
Italiano
Impostazioni visualizzazione a schermo
1.Per utilizzare la funzione di visualizzazi-
one a schermo (6) del Q4 ARF Pro,
spostare l’interruttore di connessione
(14) sulla posizione USB.
2.Tenere premuto il pulsante SET (9) per 3
secondi per accedere al menu delle
impostazioni.
3.All’interno del menu, utilizzare il joystick
a 8 direzioni (3) per selezionare le sei
opzioni: Impostazioni pulsanti,
Frequenza di polling, LED, Turbo,
Schermo e Impostazioni dispositivo.
Premere il pulsante A per confermare, il
pulsante X per ripristinare e il pulsante B
per tornare indietro. È ora possibile
personalizzare le funzioni del joystick.
Deutsch
Einstellungen der Bildschirmanzeige
1.Um die Bildschirmanzeige (6) des Q4
ARF Pro zu nutzen, schieben Sie den
Verbindungsumschalter (14) auf die
Position USB.
2.Halten Sie die SET-Taste (9) 3 Sekunden
lang gedrückt, um das Einstellungs-
menü aufzurufen.
3.Wählen Sie im Menü mit dem
8-Richtungs-Joystick (3) aus sechs
Optionen: Tasteneinstellungen,
Abfragerate, LED, Turbo, Anzeige und
Geräteeinstellungen. Drücken Sie die
A-Taste zur Bestätigung, die X-Taste
zum Zurücksetzen und die B-Taste zum
Zurückkehren. Sie können nun die
Joystick-Funktionen individuell
anpassen.
Product Operation
On-Screen Display Settings
1.To use the on-screen display function (6)
on Q4 ARF Pro, slide the connection
switch (14) to the USB position.
2.Press and hold the SET button (9) for 3
seconds to enter the settings menu.
3.In the menu, use the 8-direction joystick
(3) to select the six options: Button
Settings, Polling Rate, LED, Turbo,
Display and Device Settings. Press the A
button to confirm, the X button to reset,
and the B button to return. You may now
customize the joystick functions.
Français
Fonctionnement du produit
Funcionamiento del producto
Réglages de l'affichage à l'écran
1.Pour utiliser la fonction d'affichage à
l'écran (6) du Q4 ARF Pro, faites
glisser l'interrupteur de connexion (14)
sur la position USB.
2.Maintenez le bouton SET (9) pendant
3 secondes pour accéder au menu
des réglages.
3.Dans le menu, utilisez le joystick 8
directions (3) pour sélectionner l'une
des six options : Réglages des
boutons, Fréquence d'interrogation,
LED, Turbo, Affichage et Réglages de
l'appareil. Appuyez sur le bouton A
pour valider, sur le bouton X pour
réinitialiser et sur le bouton B pour
revenir en arrière. Vous pouvez
désormais personnaliser les fonctions
du joystick.
제품 조작
한국어
화면 표시 설정
1. Q4 ARF Pro의 화면 표시 기능(6)을 사용하려면
연결 스위치(14)를 USB 위치로 밀어주세요.
2. SET 버튼(9)을 3초 동안 길게 눌러 설정 메뉴에
진입하세요.
3. 메뉴 내에서 8방향 조이스틱(3)으로 버튼 설정,
폴링 레이트, LED, 터보, 디스플레이, 기기 설정
총 6가지 항목을 선택할 수 있습니다. A 버튼은
확인, X 버튼은 초기화, B 버튼은 뒤로 가기
기능이며, 원하는 대로 조이스틱 기능을 사용자
설정할 수 있습니다.
Español
Configuración de la visualización en
pantalla(Modo Torneo)
1.Para usar la función de visualización en
pantalla (6) del Q4 ARF Pro, deslice el
interruptor de conexión (14) a la posición
USB.
2.Mantenga presionado el botón SET (9)
durante 3 segundos para acceder al
menú de configuración.
3.Dentro del menú, utilice el joystick de 8
direcciones (3) para seleccionar las seis
opciones: Configuración de botones,
Frecuencia de muestreo, LED, Ráfaga,
Pantalla y Configuración del dispositivo.
Presione el botón A para confirmar, el
botón X para restablecer y el botón B
para volver. Ya puede personalizar las
funciones del joystick.
2.4G
USB
BT
EnglishEnglish
15 16
Product Name
Model
Buttons
Joystick
Dimensions
Weight
USB Cable Length
Charging Instructions
• Charge via the USB port on a computer, or use the wired mode to charge while playing.
• Use a standard charger with 5V, 1–2A output.
Product Operation
Qanba Q4 Pro Arcade Joystick
Q4P-01/Q4P-02/Q4P-03/Q4P-04/Q4P-CW/Q4P-KOF
Main Function Buttons
8-direction joystick
330 mm x 226 mm x 23 mm / 13.0 in x 8.9 in x 0.9 in
0.82 kg / 1.81 lbs
2 m / 6.56 ft
This product complies with the following regulatory information and safety tests:
• USB 2.0 compliant
• FCC: This device complies with Part 15 of the FCC Rules.
Operation is subject to the following two conditions:
1.This device may not cause harmful interference.
2.This device must accept any interference received, including interference that may
cause undesired operation.
• Read this instruction manual carefully.
• Do not use alcohol or liquids to clean this product; use a dry cloth instead.
• Do not disassemble the interior.
• When not in use, unplug this product and store the USB cable to prevent tripping hazards.
• Store this product in a cool, dry place away from liquids, fumes, and chemicals.
• Do not leave this product in hot climates, such as in the trunk of a car for a long time on a hot summer day.
• Do not stack other items on top of this product.
• Commercial use of this product is prohibited.
• The design and specifications of this product are subject to change without prior notice.
• The product is not suitable for children under 12 years old.
• Please keep this manual for easy reference.
• QANBA CN TECH will repair or replace product at its discretion 12 months from purchase date.
• Telephone: +86 755 29171459
• Email: [email protected]
Specifications
Product Operation
Compliance
Warnings, Safety, and Warranty
Customer support
English
製品名
型番
ボタン
レバー
寸法
重量
USB ケーブル長
Product Operation
Qanba Q4 Pro
アー ケードジョイスティック
Q4P-01/Q4P-02/Q4P-03/Q4P-04/Q4P-CW/Q4P-KOF
主要機能ボタン
8 方 向 ジョイス ティック
330 mm x 226 mm x 23 mm / 13.0 in x 8.9 in x 0.9 in
0.82 kg / 1.81 lbs
2 m / 6.56 ft
製品仕様
充電方法
• コンピューターの USB ポートから充電するか、有線モードでプレイしながら充電してください。
• 出力 5V、1~2A の標準充電器を使用してください。
コンプライアンス情報
この製品は規定に沿った安全性のテストが記録されています。
• USB: 2.0 準拠。
• FCC: この製品は 15 のFCCルールに準拠しており、また、製品は、次の二つの条件を満たすものです本機は、有害なノイズを発生させない。
本機は、望ましくない動作を引き起こす可能性のあるノイズも含め、受信したいかなるノイズにも耐えうるものでなければならない。
安全に使用していただくために
警告
注意
製品本体のセットアップの仕方や使い方、お手入れの仕方が正しくない場合、大けがや死亡など、人身事故の原因となる可能性があります。また、
製品本体やゲーム機本体が故障する原因となる可能性があります。
本製品について異常を感じた場合には、USBプラグをゲーム機本体から抜いてください。次のような場合はすぐにUSBプラグをゲーム機本体か
ら抜き、窓口までご連絡ください。
• 本製品から煙や異臭が出ている場合。
• 本製品の上に液体をこぼした場合。
• USBプラグや、USBケーブルが損傷している場合。
感電や火災により、死亡やけがの原因となる可能性がありますので、次の指示に従ってください。
• 雷が鳴り出したら、本製品に触れないでください。感電の原因となります。
• 濡れた手で本製品に触れないでください。感電や故障の原因となります。
• 本製品の使用後は、必ずゲーム機本体から本製品のUSBプラグを抜いて、本製品への通電を切ってください。
• 直射日光に当たる場所や、熱器具の近くなど高温になるところに置かないでください火災や故障の原因となります。
• 防水仕様ではありません。水が掛かるところや雨や湿気にさらしたりしないでくだ火災や故障の原因となります。
• 水や洗剤などを含んだ布で拭かないでください。感電や火災、故障の原因となります。
• 分解や改造、自分での修理は絶対にしないでください。感電や火災、故障の原因となり、また、製品保証対象外となります。
• ケーブルを引っ張らないでください。感電や火災、故障の原因となります。
日本語
17 18
保証期間内に、取扱説明書に基づいた正常な使用状況下で、万一発生した故障については、無償 で 修 理・交 換 を さ せ て 頂 きま す。
但し、この保証の権利は、ご購入頂いたお客様本人に限られ、他の第三者への譲渡は認められません。
1. 本保証は、日本国内のみ有効です。
2. 保証期間は、使用開始時期・使用期間に関わらず、販売店の購入証明書 (領収 書 、レ シ ー ト )が発行された購入日から90日 間です。
3. 修理・交換後も保証期間に変更はありません。
4. この保証の範囲は、本製品または後継機など同等品との交換、修 理を最大の限度とします。 本製品の使用上で生じた直接または間接の損害につ
いては、弊社は一切その責任を負いかねます。
5. 次の場合は保証期間内でも保証は無効です。
(1) 保証書と領収書等のご提示・添付が無い場合。
(2) 保証書または領収書等に購入年月日・購入店名の記入、捺印またはそれに代わるものが無い場合、あるいは字句を書き換えられた場合。
(3) 使用上の誤り、または当社以外での改造、修理による故障や損傷。
(4) 火災またはその他の天災による故障や損傷。
(5) 落下などの衝撃や水没などによる故障や損傷。
(6) 本製品を分解した場合。 および、ケーブルを取り外し、ボタンやレバーを交換した場合を含む。
(7) 購入後の輸送、管理・保管上の不備により生じた故障や損傷。
(8) 一般家庭以外(業務等)で使用したことによる故障や損傷。
保証規定
• 床に置かないでください。踏みつけないようにご注意ください。
• 小さなパーツやコネクター、ケーブルなどを口に入れないでください。また、小さなお子様が近づかないようにご注意ください。
• ケーブルを身体に巻き付けたり、人が通る場所に這わさないでください。
• プラグやコネクター部に指や金属で触ったりしないでください。
• シンナーやベンジンなどの揮発油、アルコールなどでは拭かないでください。本製品は乾いた布で軽く拭いてください。
• 本製品は所定の用途以外には使用しないでください。
• 本製品には、プラスチック、金属部品が含まれています。廃棄する場合は、各自治体の指示に従ってください。
• 発作について:以前に発作を起こしたことがない場合でも、テレビ、テレビゲームで映し出される光の点滅によって発作や失神が引き起こされる場合が
あります。発作、意識喪失、またはその他のてんかんに関連する症状を経験した事がある方は、テレビゲームをする前に医師に相談する必要があります
。保護者の方はお子様がテレビゲームをする時間を把握し、定期的に観察する必要があります。お客様自身、またはお子様に次の症状がある場合ゲー
ムの使用を止め、医師に相談してください。けいれん、意識喪失、不随意運動、眼または筋肉のけい縮、テレビゲームをする際には次の項目に従ってく
ださい。
• 画面からできるだけ遠く離れてください。
• 疲れているときや休息が必要なときはゲームをしないでください。
• 明るい部屋でゲームをしてください。
• 1時間ごとに休憩をとってください。
• 手、手首、腕、指先などに痛みやひりひり感、疲れを感じる場合は、ゲームを中止してください。痛みやひりひり感が続く場合は、医師に相談してください。
国内正規品サポート窓口
アタッサ カスタマ ー センター
電話番号:0 3-6310-6288
Eメール:support@attasa.com
営業時間:月-金、午前10-12時、午後1-5時、ただし土日祝日及び会社休業日を除く
Product Operation
简体中文
充电说明
• 使用电脑的 USB 口充电,或在有线模式下边充边玩。
• 使用标准是 5V, 1-2A充电器。
• 仔细阅读本使用说明书。
• 切勿用酒精或液体清洁本产品,使用干布即可。
• 切勿拆卸内部。
• 不用时, 应拔下本产品并收纳起 USB 线缆,以防造成绊倒
危险。
• 将本产品置于阴凉干燥处, 远离液体、 烟雾和化学品。
• 切勿将本产品置于炎热气候条件下, 例如在炎热夏天, 长
时间放置在汽车后备箱中。
• 切勿在本产品顶部堆叠其他物品。
• 禁止将本产品用以商业用途。
• 本产品设计和规格如有变更, 恕不另行通知。
• 产品不适宜 12 岁以下儿童使用。
• 请保存好本手册以便随时查阅。
• 本产品提供一年质保。
合规性信息
本产品符合以下法规信息和安全检测:
• USB: 2.0 兼容
• FCC: 本设备符合 FCC 规则的第 15 部分规定。 操作时应遵循
以下两个条件: (1)本设备不会造成有害干扰,(2)本设备须
接受任何接收的干扰, 包括: 可能导致意外操作的干扰。
产品名称
型号
按键
摇杆
尺寸
重量
USB 有线电缆长度
拳霸 Q4 Pro 街机摇杆
Q4P-01/Q4P-02/Q4P-03/Q4P-04/Q4P-CW/Q4P-KOF
11 x 主功能按键
8方向摇杆
412 mm x 278 mm x 126 mm / 16.2 in x 10.9 in x 5.0 in
3.3 千克 / 7.28 磅
2 米 / 6.56 英尺
客户服务
• 电话: +86 755 29171459
• 邮箱: [email protected]
规格
警告、安全和保修
保修卡
(享受售后服务范围: 非人为损坏,3个月包换、1年保修)
(注:非拳霸官方途径购买产品,售后请您联系购买商家)
用户姓名
联系电话
联系地址
售后要求
售后原因
订单编号
19 20
Product Operation
繁體中文
產品名稱
型號
按鍵
搖杆
尺寸
重量
USB 有線電纜长度
拳霸 Q4 Pro 街機搖桿
Q4P-01/Q4P-02/Q4P-03/Q4P-04/Q4P-CW/Q4P-KOF
11 x 主功能按鍵
八向搖桿
412 mm x 278 mm x 126 mm / 16.2 in x 10.9 in x 5.0 in
3.3 千克 / 7.28 磅
2 米 / 6.56 英尺
规格
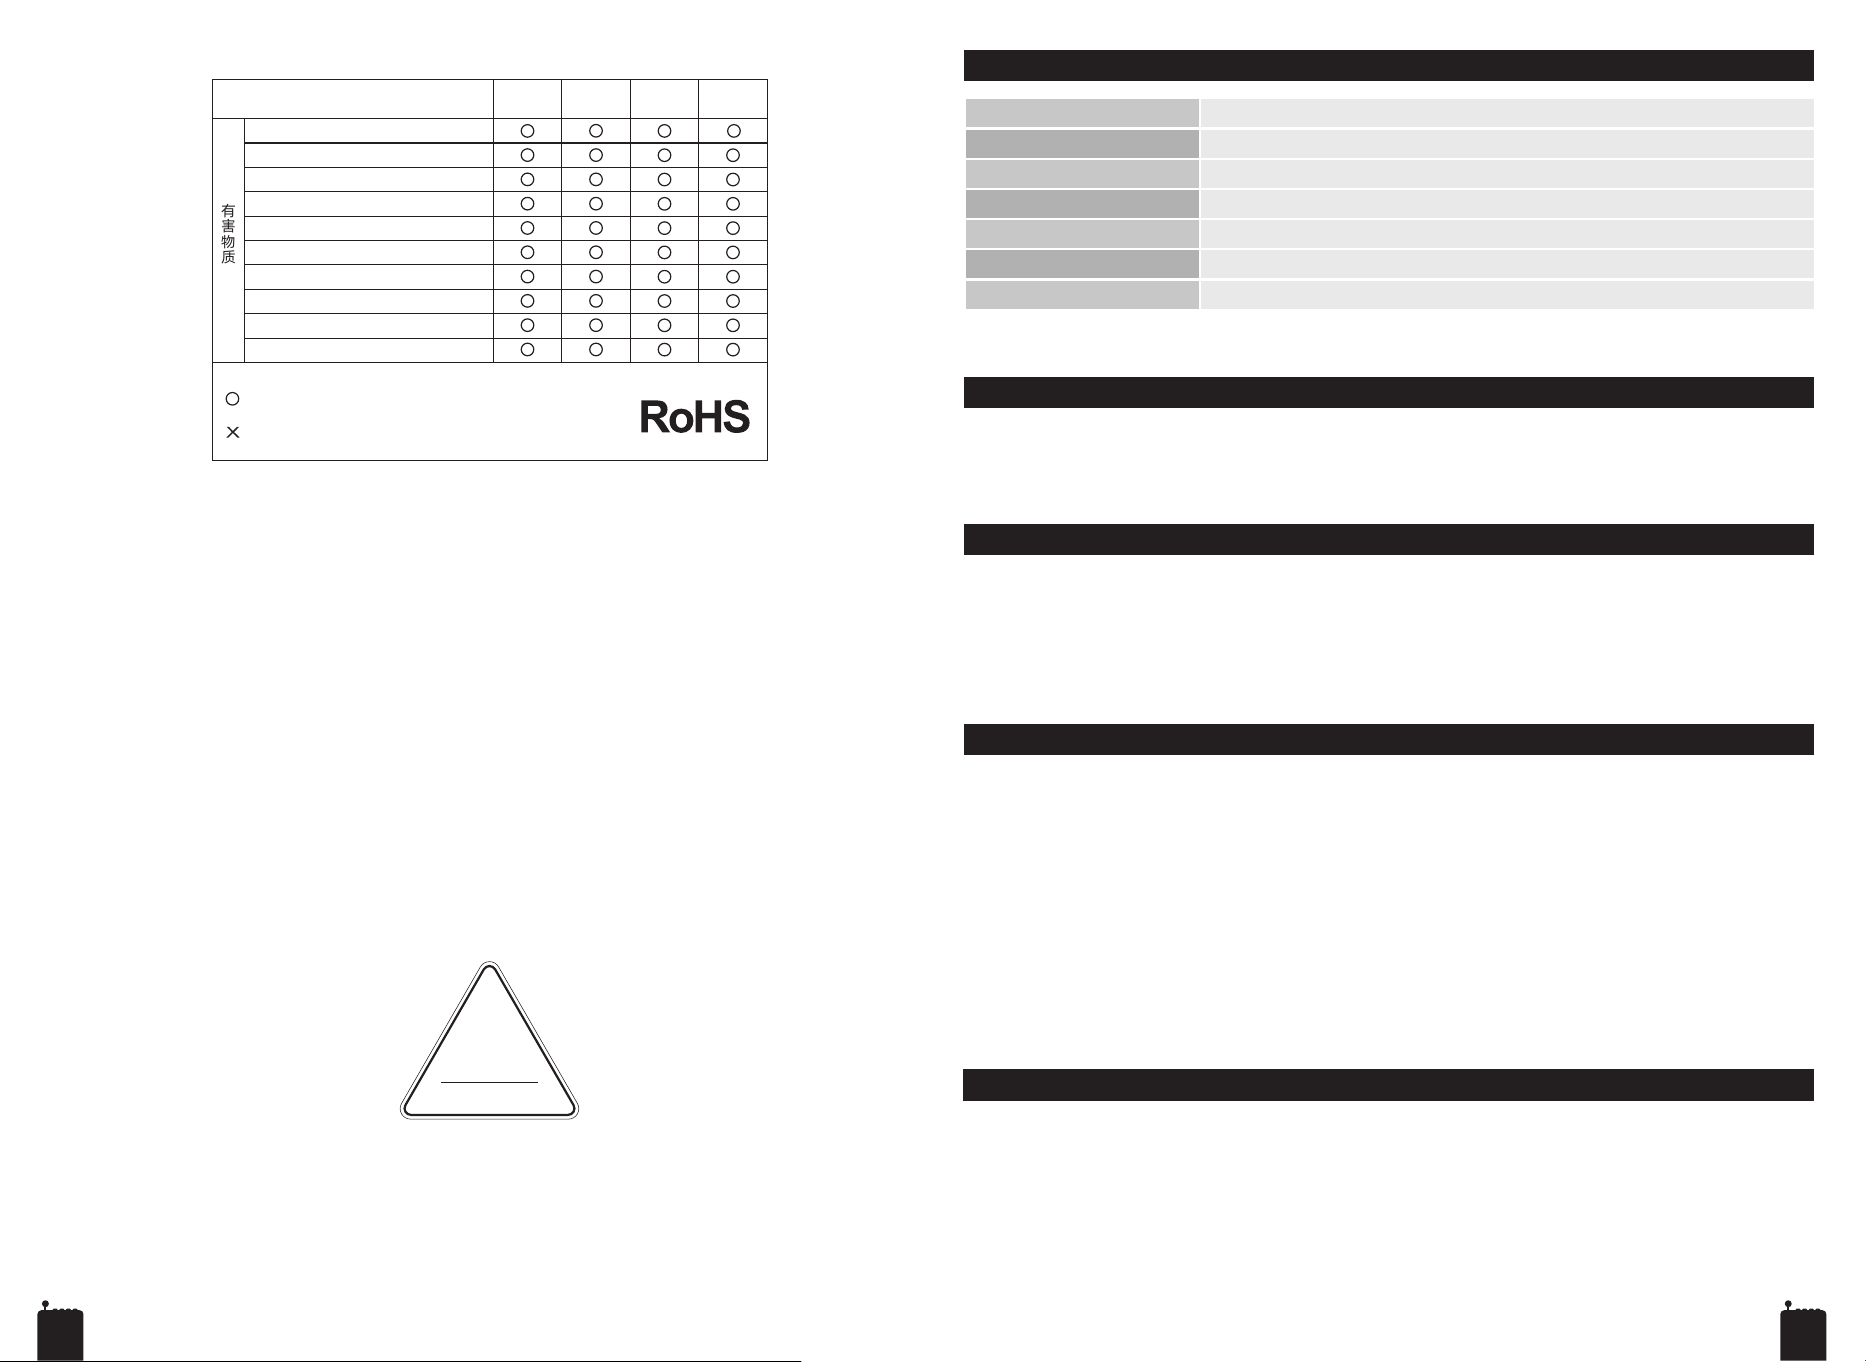
铅(Pb)
汞(Hg)
镉(Cd)
六价铬(Cr6+))
多溴联苯(PBBs)
多溴二苯醚(PBDEs)
邻苯二甲酸丁基苄酯(BBP)
邻苯二甲酸二正丁酯(DBP)
邻苯二甲酸二(2-乙基已基)酯(DEHP)
邻苯二甲酸二异丁酯(DIBP)
部件名称
有害物质
外壳 PCBA 线缆 附件
本表格依据 RoHs 的规定编制。
: 表示该有害物质在该部件所有均质材料中的含量均在 RoHS
规定的限量要求以下通过。
: 表示该有害物质至少在该部件的某-均质材料中的含量超出
RoHS 规定的限量要求以下不通过。
充電說明
• 使用電腦的 USB 埠充電,或是有線模式下邊充邊玩。
• 使用標準為 5V、1–2A 充電器。
• 仔細閱讀本使用說明書。
• 切勿用酒精或液體清潔本產品,使用干布即可。
• 切勿拆卸內部。
• 不用時,應拔下本產品並收納起 USB 線纜,以防造成絆倒危險。
• 將本產品置於陰涼干燥處,遠離液體、煙霧和化學品。
• 切勿將本產品置於炎熱气候條件下,例如在炎熱夏天,长時間放置在汽车後備箱中。
• 切勿在本產品頂部堆疊其他物品。
• 禁止將本產品用以商業用途。
• 本產品設計和規格如有變更,恕不另行通知。
• 產品不適宜12歲以下儿童使用。
• 請保存好本手册以便隨時查閱。
• 自購買之日起 12 個月內, QANBA CN TECH 將自行負責維修或更換產品。
警告、安全和保修
客戶服務
• 電話: +86 755 29171459
• 郵箱: [email protected]
合規性資訊
本產品符合以下法規資訊和安全檢測:
• USB: 2.0 相容
• FCC: 本設備符合 FCC 規則的第 15 部分規定。 操作時應遵循以下兩個條件:
(1)本設備不會造成有害干擾,(2)本設備須接受任何接收的干擾,包括:
可能導致意外操作的干擾。
合格证
型号: Q4 Pro系列
检验员:06
21 22
Product Operation
한국어
Qanba
Q4 Pro
아케이드 조이스틱
Q4P-01/Q4P-02/Q4P-03/Q4P-04/Q4P-CW/Q4P-KOF
11 x
주 기능 버튼
8방향 조이스틱
412 mm x 278 mm x 126 mm / 16.2 in x 10.9 in x 5.0 in
3.3 kg / 7.28 lb
2 m / 6.56 ft
제품스펙
충전 방법
• 컴퓨터의 USB 포트를 통해 충전하거나, 유선 모드로 플레이하면서 충전할 수 있습니다.
• 출력 5V, 1–2A의 표준 충전기를 사용하세요.
경고, 안전 및 A/S
고객센터
규정준수정보
본 제품은 다음과 같은 적합성 내용 및 안전성 테스트를 준수합니다.
• USB: 2.0 호환.
• FCC: 본 장치는 FCC규정 제15항 규정을 준수합니다. 작동 시 다음 두가지
조건이 적용됩니다. (1) 본 장치는 유해 간섭을 유발하지 않으며 (2) 본 장치는
원하지 않는 작동을 유발할 수 있는 간섭을 포함하여 수신된 모든 간섭을
수용해야 합니다.
•
전화: +86 755 29171459
• E-mail: [email protected]
• 이 사용 설명서를 주의 깊게 읽으세요.
• 알코올이나 액체로 제품을 닦지 말고 마른 천을 사용하세요.
• 내부를 분해하지 마세요.
• 제품을 사용하지 않을 때는 걸려 넘어질 위험을 방지하기 위해 제품을 분리하고 USB 케이블을
보관하세요.
• 액체, 연기, 화학물질이 닿지 않는 서늘하고 건조한 곳에 보관하세요.
• 더운 여름철에는 자동차 트렁크와 같이 더운 날씨에 제품을 장시간 방치하지 마세요.
• 제품 위에 다른 물건을 쌓아 두지 마세요.
• 이 제품을 상업적 목적으로 사용하지 마세요.
• 본 제품의 디자인과 사양은 예고 없이 변경될 수 있습니다.
• 이 제품은 만 12세 미만의 어린이를 위한 제품이 아닙니다.
• 이 설명서를 잘 보관하세요.
• 쿠반바 CN 테크는 구매일로부터 12개월 이내에 자사의 재량에 따라 제품을 수리 또는 교체해 드립니다.
제품명
모델명
버튼
레버
제품 사이즈
제품 무게
USB 케이블 길이
Product Operation
Français
Qanba
Q4 Pro Arcade Joystick
Q4P-01/Q4P-02/Q4P-03/Q4P-04/Q4P-CW/Q4P-KOF
11 x
Boutons de fonction principaux
Joystick 8 directions
412 mm x 278 mm x 126 mm / 16.2
po
x 10.9
po
x 5.0
po
3.3 kg / 7.28 lb
2 m / 6.56
pi
Spécifications
Nom du produit
Modπle
Boutons
Manette de jeu
Dimensions
Poids
Longueur du câble USB
Garanties
• QANBA CN TECH fournit une garantie de 24 mois pour ses produits contre les défauts de fabrication � compter de la date d'achat.
• Si, pour une raison quelconque, vous n'tes pas satisfait de votre achat, contactez-nous par courrier électronique � [email protected]
avec les détails de votre commande, vos coordonnées et une b�ve description de votre problπme.
Charging Instructions
• Charge via the USB port on a computer, or use the wired mode to charge while playing.
• Use a standard charger with 5V, 1–2A output.
Avertissements et sécurité
• Lisez attentivement ce manuel d'instructions.
• Ne pas utiliser d'alcool ou de liquides pour nettoyer ce produit ; utiliser plutôt un chiffon sec.
• Ne démontez pas l'intérieur de l'appareil.
• Lorsque vous n'utilisez pas ce produit, débranchez-le et rangez le câble USB afin d'éviter tout risque de trébuchement.
• Conservez ce produit dans un endroit frais et sec, à l'abri des liquides, des fumées et des produits chimiques.
• Ne laissez pas ce produit dans des climats chauds, par exemple dans le coffre d'une voiture pendant une longue période lors d'une chaude
journée d'été. une chaude journée d'été.
• Ne pas empiler d'autres objets sur ce produit.
• L'utilisation commerciale de ce produit est interdite.
• La conception et les spécifications de ce produit peuvent être modifiées sans préavis.
• Le produit ne convient pas aux enfants de moins de 12 ans.
• Conservez ce manuel pour pouvoir vous y référer facilement.
23 24
Qanba
Q4 Pro Arcade Joystick
Q4P-01/Q4P-02/Q4P-03/Q4P-04/Q4P-CW/Q4P-KOF
11 x
Main Function Buttons
8-direction joystick
412 mm x 278 mm x 126 mm / 16.2
in
x 10.9
in
x 5.0
in
3.3 kg / 7.28 libras
2 m / 6.56
pies
Instrucciones de carga
• Cargue a través del puerto USB de una computadora, o use el modo cableado para cargar mientras juega.
• Utilice un cargador estándar con salida de 5V, 1–2A.
• Lea atentamente este manual de instrucciones.
• No utilice alcohol ni líquidos para limpiar este producto; utilice en su lugar un paño seco.
• No desmonte el interior.
• Cuando no utilice este producto, desenchúfelo y guarde el cable USB para evitar riesgos de tropiezos.
• Guarde este producto en un lugar fresco y seco, alejado de líquidos, vapores y productos químicos.
• No deje este producto en climas cálidos, como en el maletero de un coche durante mucho tiempo en un caluroso día de verano.
• No apile otros objetos encima de este producto.
• Se prohíbe el uso comercial de este producto.
• El diseño y las especificaciones de este producto están sujetos a cambios sin previo aviso.
• El producto no es adecuado para niños menores de 12 años.
• Conserve este manual para poder consultarlo con facilidad.
Especificaciones
Advertencia y Seguridad
Garantía
Español
• QANBA CN TECH ofrece una garantía de 24 meses para sus productos contra defectos de fabricación desde la fecha de compra.
• Si por alguna razón no está satisfecho con su compra, póngase en contacto con nosotros por correo electrónico en [email protected] con
los detalles de su pedido, su información de contacto y una breve descripción de su problema.
Nombre del Producto
Modelo
Botones
Joystick
Dimensiones
Peso
Longitud de cable USB
Qanba
Q4 Pro Arcade Joystick
Q4P-01/Q4P-02/Q4P-03/Q4P-04/Q4P-CW/Q4P-KOF
11 x
Pulsanti funzioni principali
Joystick a 8 direzioni
412 mm x 278 mm x 126 mm / 16.2
in
x 10.9
in
x 5.0
in
3.3 kilogrammi / 7.28 libbre
2 metri / 6.56 piedi
Specifiche
Italiano
Nome del Prodotto
Modello
Tasti
Joystick
Dimensioni
Peso
Lunghezza Cavo USB
Istruzioni di ricarica
• Ricaricare tramite la porta USB di un computer, oppure utilizzare la modalità cablata per
ricaricare durante il gioco.
• Usare un caricatore standard con uscita 5V, 1–2A.
Avertissements et sécurité
Garanzia
• Leggere attentamente il presente manuale di istruzioni.
• Non utilizzare alcol o liquidi per pulire il prodotto, ma un panno asciutto.
• Non smontare l'interno.
• Quando non si utilizza il prodotto, staccare la spina e riporre il cavo USB per evitare il rischio di inciampare.
• Conservare il prodotto in un luogo fresco e asciutto, lontano da liquidi, fumi e sostanze chimiche.
• Non lasciare il prodotto in ambienti caldi, ad esempio nel bagagliaio di un'auto per lungo tempo in una calda giornata estiva.
• Non sovrapporre altri oggetti al prodotto.
• È vietato l'uso commerciale di questo prodotto.
• Il design e le specifiche di questo prodotto sono soggetti a modifiche senza preavviso.
• Il prodotto non è adatto a bambini di età inferiore ai 12 anni.
• Conservare questo manuale per una facile consultazione.
• QANBA CN TECH fornisce una garanzia di 24 mesi per I suoi prodotti contro i difetti di
fabbricazione dalla data di acquisto.
• Se per qualsiasi motivo non sei soddisfatto del tuo acquisto, ti preghiamo di contattarci via
email presso [email protected] con I dettagli dell'ordine, le tue informazioni di contatto
e una breve descrizione del tuo problema.
25 26
Qanba
Q4 Pro Arcade Joystick
Q4P-01/Q4P-02/Q4P-03/Q4P-04/Q4P-CW/Q4P-KOF
11 x
Hauptfunktionstasten
8-Richtungs-Joystick
412 mm x 278 mm x 126 mm / 16.2
Zoll
x 10.9
Zoll
x 5.0
Zoll
3.3 kilogrammi / 7.28 libbre
2 Meter / 6.56 Fuß
Spezifikationen
Deutsch
Produktbezeichnung
Modell
Tasten
Joystick
Abmessungen
Gewicht
Kabelgebundenes USB Kabellänge
Qanba
Q4 Pro Arcade Joystick
Q4P-01/Q4P-02/Q4P-03/Q4P-04/Q4P-CW/Q4P-KOF
11 x
Botões de Funções Principais
Joystick de 8 direções
412 mm x 278 mm x 126 mm / 16.2
pol
x 10.9
pol
x 5.0
pol
3.3 kg / 7.28
libras
2 M / 6.56 pés
Especificações
Português
Nome do Produto
Modelo
Botões
Joystick
Dimensões
Peso
Comprimento do Cabo USB
Ladeanweisungen
• Laden Sie über den USB-Anschluss eines Computers oder verwenden Sie den
Kabelmodus, um während des Spielens zu laden.
• Verwenden Sie ein Standard-Ladegerät mit einer Ausgabe von 5V, 1–2A.
製品仕様
• Lesen Sie diese Bedienungsanleitung sorgfältig durch.
• Verwenden Sie zur Reinigung dieses Produkts keinen Alkohol oder Flüssigkeiten, sondern ein trockenes Tuch.
• Nehmen Sie das Innere nicht auseinander.
• Wenn Sie das Gerät nicht benutzen, ziehen Sie den Netzstecker und bewahren Sie das USB-Kabel auf, um Stolperfallen zu vermeiden.
• Bewahren Sie dieses Produkt an einem kühlen, trockenen Ort auf, fern von Flüssigkeiten, Dämpfen und Chemikalien.
• Lassen Sie dieses Produkt nicht in heißem Klima liegen, wie z. B. an einem heißen Sommertag im Kofferraum eines Autos.
• Stapeln Sie keine anderen Gegenstände auf diesem Produkt.
• Die kommerzielle Nutzung dieses Produkts ist verboten.
• Das Design und die technischen Daten dieses Produkts können ohne vorherige Ankündigung geändert werden.
• Das Produkt ist nicht für Kinder unter 12 Jahren geeignet.
• Bitte bewahren Sie diese Anleitung zum Nachschlagen auf.
Garantie
• QANBA CN TECH bietet eine 24-monatige Garantie für seine Produkte gegen Herstellungsfe-
hler ab Kaufdatum.
• Wenn Sie aus irgendeinem Grund nicht mit Ihrem Kauf zufrieden sind, kontaktieren Sie uns
bitte per E-Mail an [email protected] mit Ihren Bestellangaben, Ihren
Kontaktinformationen und einer kurzen Beschreibung Ihrer Ausgabe.
Warnungen und Sicherheit
The European Union (EU) Waste Electrical and Electronic
Eq uipment Directive (EU WEEE Directive) requires producers
of electrical and electronic eq uip ment to finance the take back
and recycling of their products placed on the EU market after
August 13, 2005.
Qanba products in scope of the EU WEEE Directive are
labelled with a crossed-out "wheelie-bin" symb ol as required
by this d irectiv
e. The symb ol indicates that the product was
placed on the market after August 13, 2005 and that end users
should segregate the product from other waste at end -of- life.
Instruções de Carregamento
• Carregue através da porta USB de um computador ou use o modo com fio para carregar enquanto joga.
• Use um carregador padrão com saída de 5V e 1–2A.
• Leia este manual de instruções com atenção.
• Não use álcool ou líquidos para limpar este produto; use um pano seco em seu lugar.
• Não desmonte o interior.
• Quando não estiver em uso, desconecte o produto da tomada e guarde o cabo USB para evitar riscos de tropeço.
• Guarde o produto em um local fresco e seco, longe de líquidos, vapores e produtos químicos.
• Não deixe o produto em climas quentes, como no porta-malas de um carro por muito tempo em um dia quente de verão.
• Não empilhe outros objetos sobre o produto.
• O uso comercial deste produto é proibido.
• O design e as especificações deste produto estão sujeitos a alterações sem aviso prévio.
• O produto não é adequado para crianças menores de 12 anos.
• Guarde este manual para consulta fácil.
• A Qanba USA, LLC irá reparar ou substituir o produto, a seu critério, dentro de 12 meses a partir da data de compra.
Product Operation
Avisos, Segurança e Garantia
Informações de Conformidade
Este produto está em conformidade com os seguintes testes de conformidade e segurança:
• USB: Compatível com a versão 2.0.
• FCC: Este dispositivo está em conformidade com a Parte 15 das Regras da FCC.O funcionamento está sujeito às duas condições seguintes:
(1) Este dispositivo não pode causar interferência prejudicial; e (2) este dispositivo deve aceitar qualquer interferência recebida, incluindo
interferência que possa causar funcionamento indesejado.
Declaração de Garantia
• A Qanba CN Tech oferece uma garantia de 24 meses para seus produtos a partir da data
de compra, cobrindo defeitos de fabricação.
• Se você não estiver satisfeito com o produto adquirido por qualquer motivo, entre em
contato conosco por e-mail em [email protected]. Inclua os detalhes do seu pedido,
informações de contato e uma descrição sucinta do problema no e-mail.
27 28
FCC ID: 2BSVL-Q4P-01
FCC Caution:
This device complies with part 15 of the FCC Rules. Operation is subject to the following two conditions: (1) This
device may not cause harmful interference, and (2) this device must accept any interference received, including
interference that may cause undesired operation.
Any changes or modifications not expressly approved by the party responsible for compliance could void the
user's authority to operate the equipment.
NOTE: This equipment has been tested and found to comply with the limits for a Class B digital device, pursuant
to Part 15 of the FCC Rules. These limits are designed to provide reasonable protection against harmful
interference in a residential installation. This equipment generates, uses and can radiate radio frequency energy
and, if not installed and used in accordance with the instructions, may cause harmful interference to radio
communications. However, there is no guarantee that interference will not occur in a particular installation.
If this equipment does cause harmful interference to radio or television reception,
which can be determined by turning the equipment off and on, the user is encouraged to try to correct the
interference by one or more of the following measures:
-- Reorient or relocate the receiving antenna.
-- Increase the separation between the equipment and receiver.
-- Connect the equipment into an outlet on a circuit different
from that to which the receiver is connected.
-- Consult the dealer or an experienced radio/TV technician for help.
The device has been evaluated to meet general RF exposure requirement.
The device can be used in portable exposure condition without restriction.
U.S. Authorized Representative
Company Name:LOBOS IOWA INC
FRN:0036413961
Contact Name:Harley Li
Address:4623 Bittercreek Dr Colorado Springs CO 80922 US
Phone:+1 8188180538
Email:[email protected]om
Online technical support:
Scan the QR code to access the Fighter
Q4 Pro operating instructions manual.
For more services, visit:
www.qanba.com
Contact Us
https://qanba.com/pages/supportdownload
Technical Support Download:
29 30
219-266003