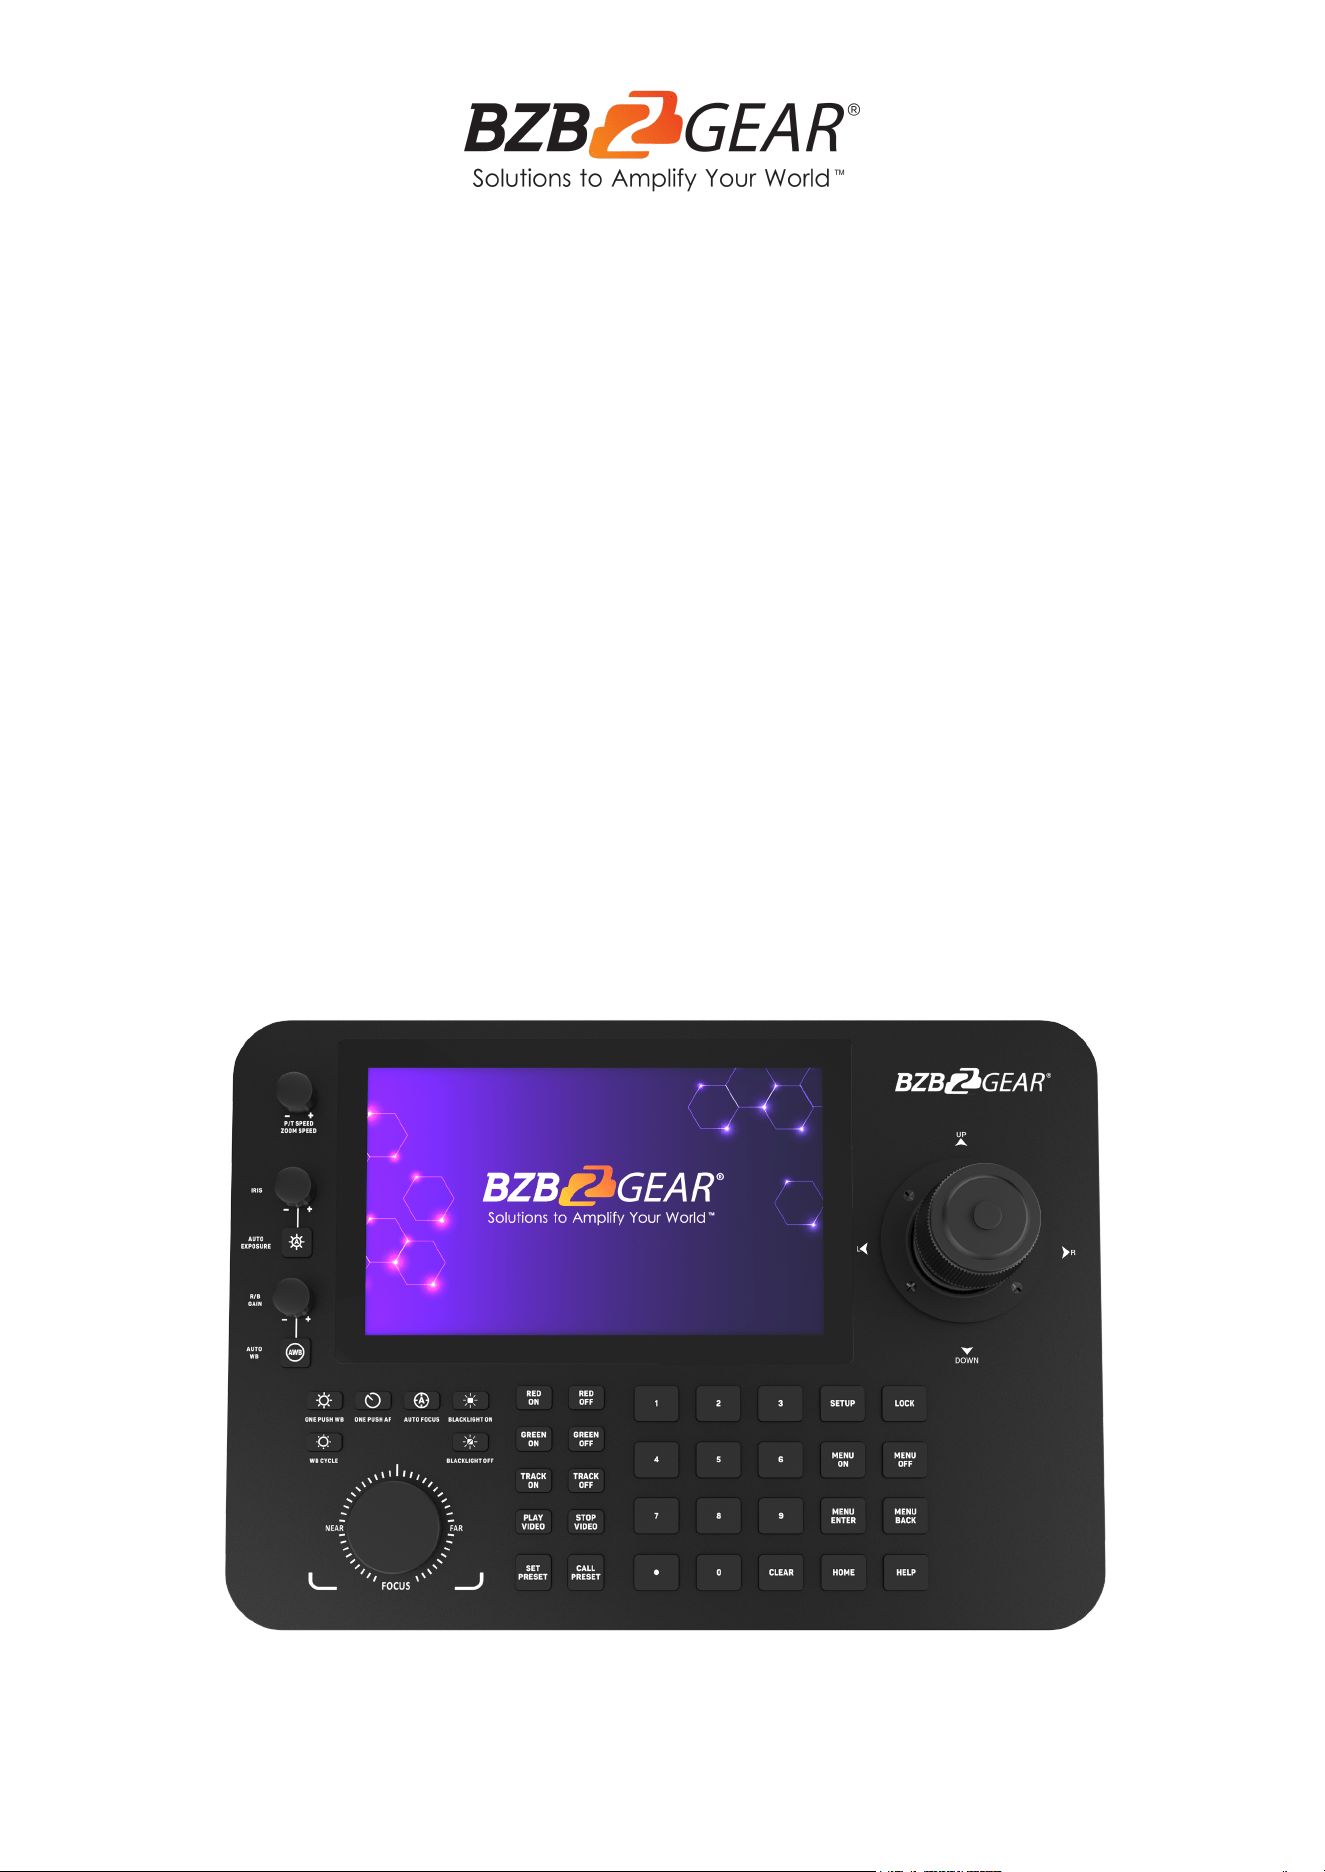
BG-COMMANDER-PRO
Professional Serial and IP Joystick Controller with 7” Touchscreen
User Manual

BZBGEAR BG-COMMANDER-PRO PRODUCT MANUAL
Address: 830 National Drive #140, Sacramento, CA 95834, USA · Tel: +1(888)499-9906 · Email: support@bzbgear.com 2

BZBGEAR BG-COMMANDER-PRO PRODUCT MANUAL
Table of Contents
Statement 4
Safety Precaution 4
Introduction 5
Features 5
Package Contents 6
Specifications 6
Dimensions 7
Application Example 7
Panel Descriptions 8
Button Descriptions 9
Joystick Controls 11
Login Screen 12
Main Menu 12
Settings 13
Accounts 17
Network Settings 18
Adding Cameras 21
Controlling Cameras 25
Camera Control Options 26
Patrol 29
Firmware Upgrade 32
Troubleshooting 33
Tech Support 34
Limited Product Warranty Terms 34
Mission Statement 34
Copyright 34
Address: 830 National Drive #140, Sacramento, CA 95834, USA · Tel: +1(888)499-9906 · Email: support@bzbgear.com 3

BZBGEAR BG-COMMANDER-PRO PRODUCT MANUAL
Statement
Please read these instructions carefully before connecting, operating, or configuring this
product. Please save this manual for future reference.
Safety Precaution
● To prevent damaging this product, avoid heavy pressure, strong vibration, or immersion
during transportation, storage, and installation.
● The housing of this product is made of organic materials. Do not expose to any liquid,
gas, or solids which may corrode the shell.
● Do not expose the product to rain or moisture.
● Unplug this device during lightning storms
● Clean only with a soft dry microfiber cloth.
● To prevent the risk of electric shock, do not open the case. Installation and maintenance
should only be carried out by qualified technicians.
● Do not use the product beyond the specified temperature, humidity, or power supply
specifications.
● This product does not contain parts that can be maintained or repaired by users.
Damage caused by dismantling the product without authorization from BZBGEAR is not
covered under the warranty policy.
● Installation and use of this product must strictly comply with local electrical safety
standards.
● Only use accessories specified by the manufacture
● Product specifications may be subject to technical upgrades without further notice
● Do not hot plug when it is working.
Address: 830 National Drive #140, Sacramento, CA 95834, USA · Tel: +1(888)499-9906 · Email: support@bzbgear.com 4

BZBGEAR BG-COMMANDER-PRO PRODUCT MANUAL
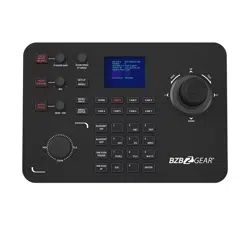
Introduction
The BG-COMMANDER-PRO is a powerful PTZ camera joystick controller featuring
a 7" touch screen for real-time video previews. This versatile unit runs on the
Android 11 operating system and supports H.265/H.264 decoding. It can display
four RTSP streams simultaneously or one large full-screen image directly on its
screen.
The BG-COMMANDER-PRO also includes HDMI projection, enabling it to output
four additional RTSP streams to a connected display for easier monitoring. Users
can quickly and easily manage PTZ controls, including preset positions, focus,
zoom, and exposure settings. Additionally, it can directly access a camera's web
interface if available.
Designed with our award-winning BG-ADAMO line of cameras in mind, the
BG-COMMANDER-PRO offers quick access buttons to control their red/green tally
lights and toggle auto-tracking on and off.
Features
● 7” Capacitive touchscreen with Android 11 operating system
● H.264/H.265 compression
● Live view up to 8 RTSP streams when an HDMI display is connected (4 directly on
the device, and 4 other streams using the TV Wall function)
● PTZ control including presets, focus, zoom, exposure, and more
● Integrated Patrol feature to have cameras automatically path between presets
● Built with the BG-ADAMO in mind and allows for easy tracking and tally light control
● Capture photos and video directly on the controller or to a connected USB flash
drive or micro SD card.
● Integrated search functions assist in easily adding cameras
● Most popular control protocols supported: VISCA (TCP/UDP), Pelco-P, Pelco-D,
ONVIF, and NDI
● Supports over 2000 devices
● Firmware is easily upgradable using a USB or Micro-SD storage device
● 1 RS232 port to support legacy systems
Address: 830 National Drive #140, Sacramento, CA 95834, USA · Tel: +1(888)499-9906 · Email: support@bzbgear.com 5
BZBGEAR BG-COMMANDER-PRO PRODUCT MANUAL
Package Contents
● 1 x BG-Commander-Pro
● 1 x Power Adapter (12V DC 2A)
● 1 x User Manual
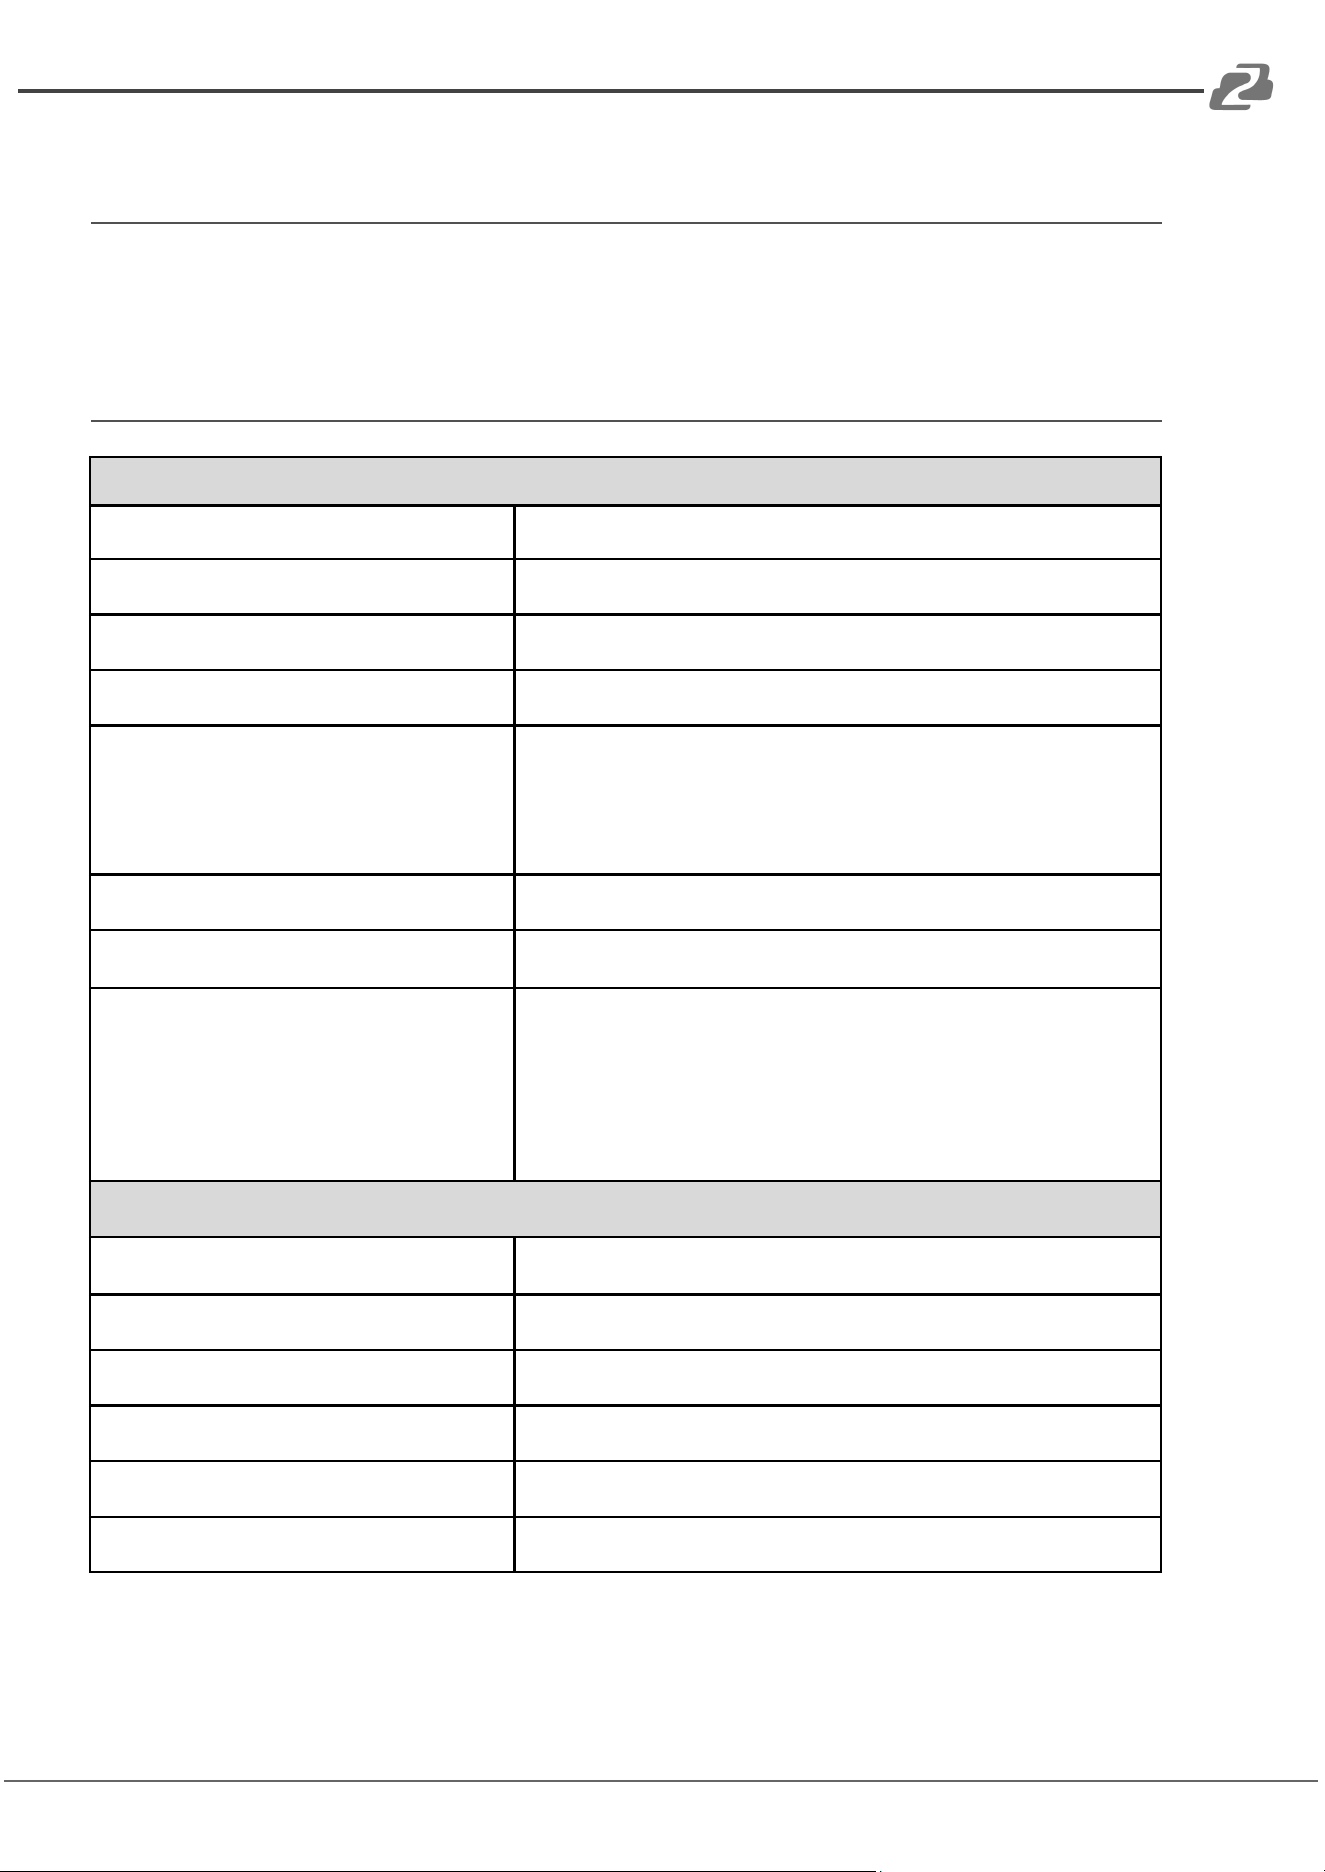
Specifications
Technical Specifications
Operating System
Android 11
Screen Size
7” capacitive touchscreen / resolution 1024x600
Video Output
HDMI 4K@30Hz
Video Output Connectors
1x HDMI Type A, 19-pin, female
Decoding
1. Supports H264/H265
2. Max supported H264: 4x1080p@30fps
3. Max supported H264: 16x720p@30fps
4. Max supported H265: 1x4K@60fps
Protocols
IP VISCA, ONVIF, NDI, VISCA, Pelco-P, Pelco-D
Power
Standard 5.5/2.1 power interface, DC 12V2A±10%
Interface Ports
1. 1x RJ45 (Network)
2. 1x RS232 (RJ45)
3. 1x RS422/485 (RJ45)
4. 1x HDMI output
5. 1x USB 3.0
6. 1x Micro-SD card slot
Mechanical Specifications
Power Consumption
<1.5W
Working Humidity
10%-90% RH(no frost)
Working Temperature
14°F ~ 122°F / -10°C ~ 50°C
Storage Temperature
-40°F ~ 140°F / -40°C ~ 60°C
Dimensions
14 * 9.6 * 6.1in [365 * 245 * 155mm]
Weight
3.75 Lbs [1.7kg]
Address: 830 National Drive #140, Sacramento, CA 95834, USA · Tel: +1(888)499-9906 · Email: support@bzbgear.com 6
BZBGEAR BG-COMMANDER-PRO PRODUCT MANUAL
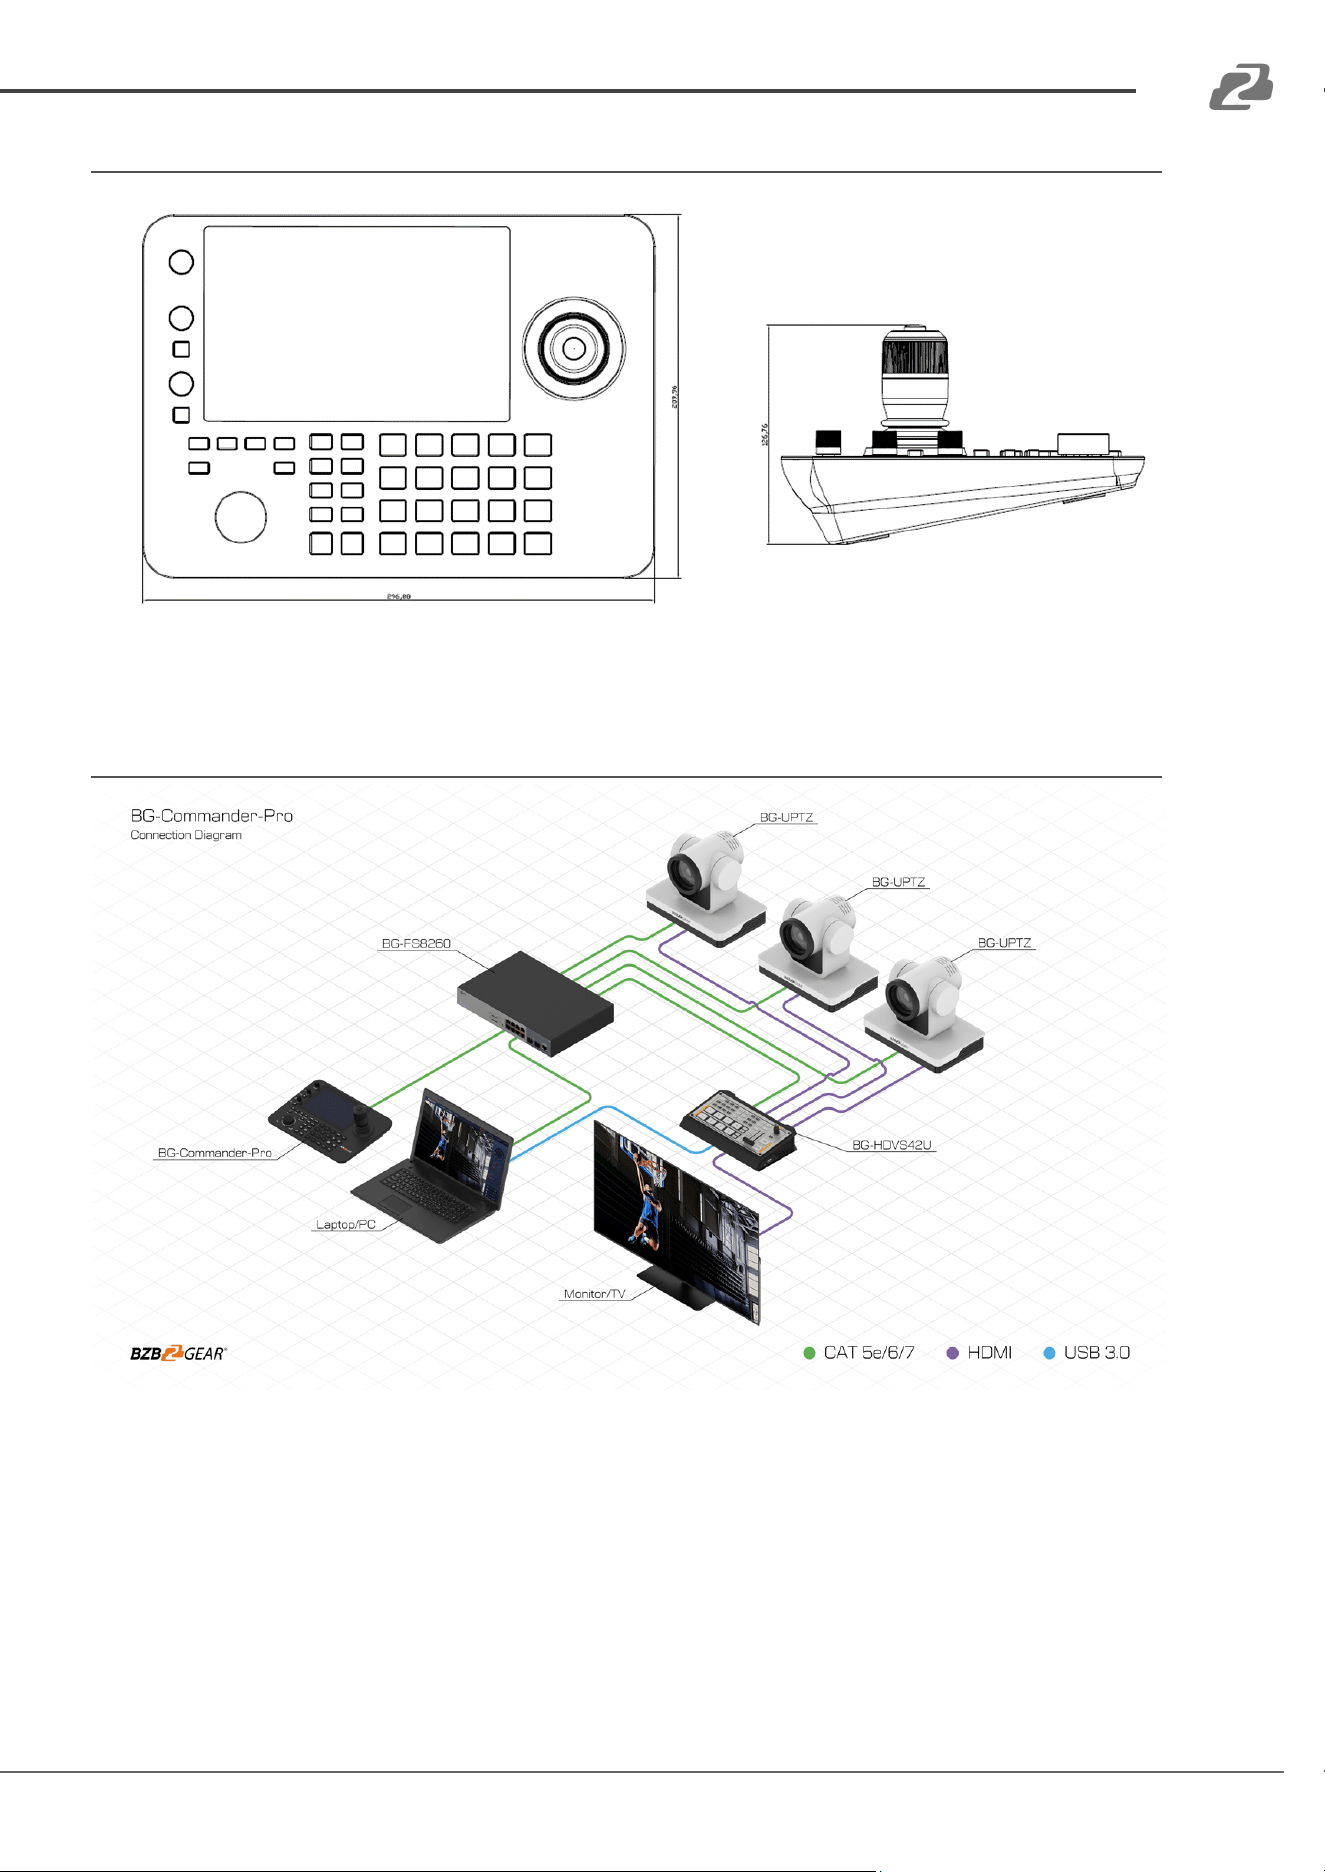
Dimensions
Application Example
Address: 830 National Drive #140, Sacramento, CA 95834, USA · Tel: +1(888)499-9906 · Email: support@bzbgear.com 7
BZBGEAR BG-COMMANDER-PRO PRODUCT MANUAL
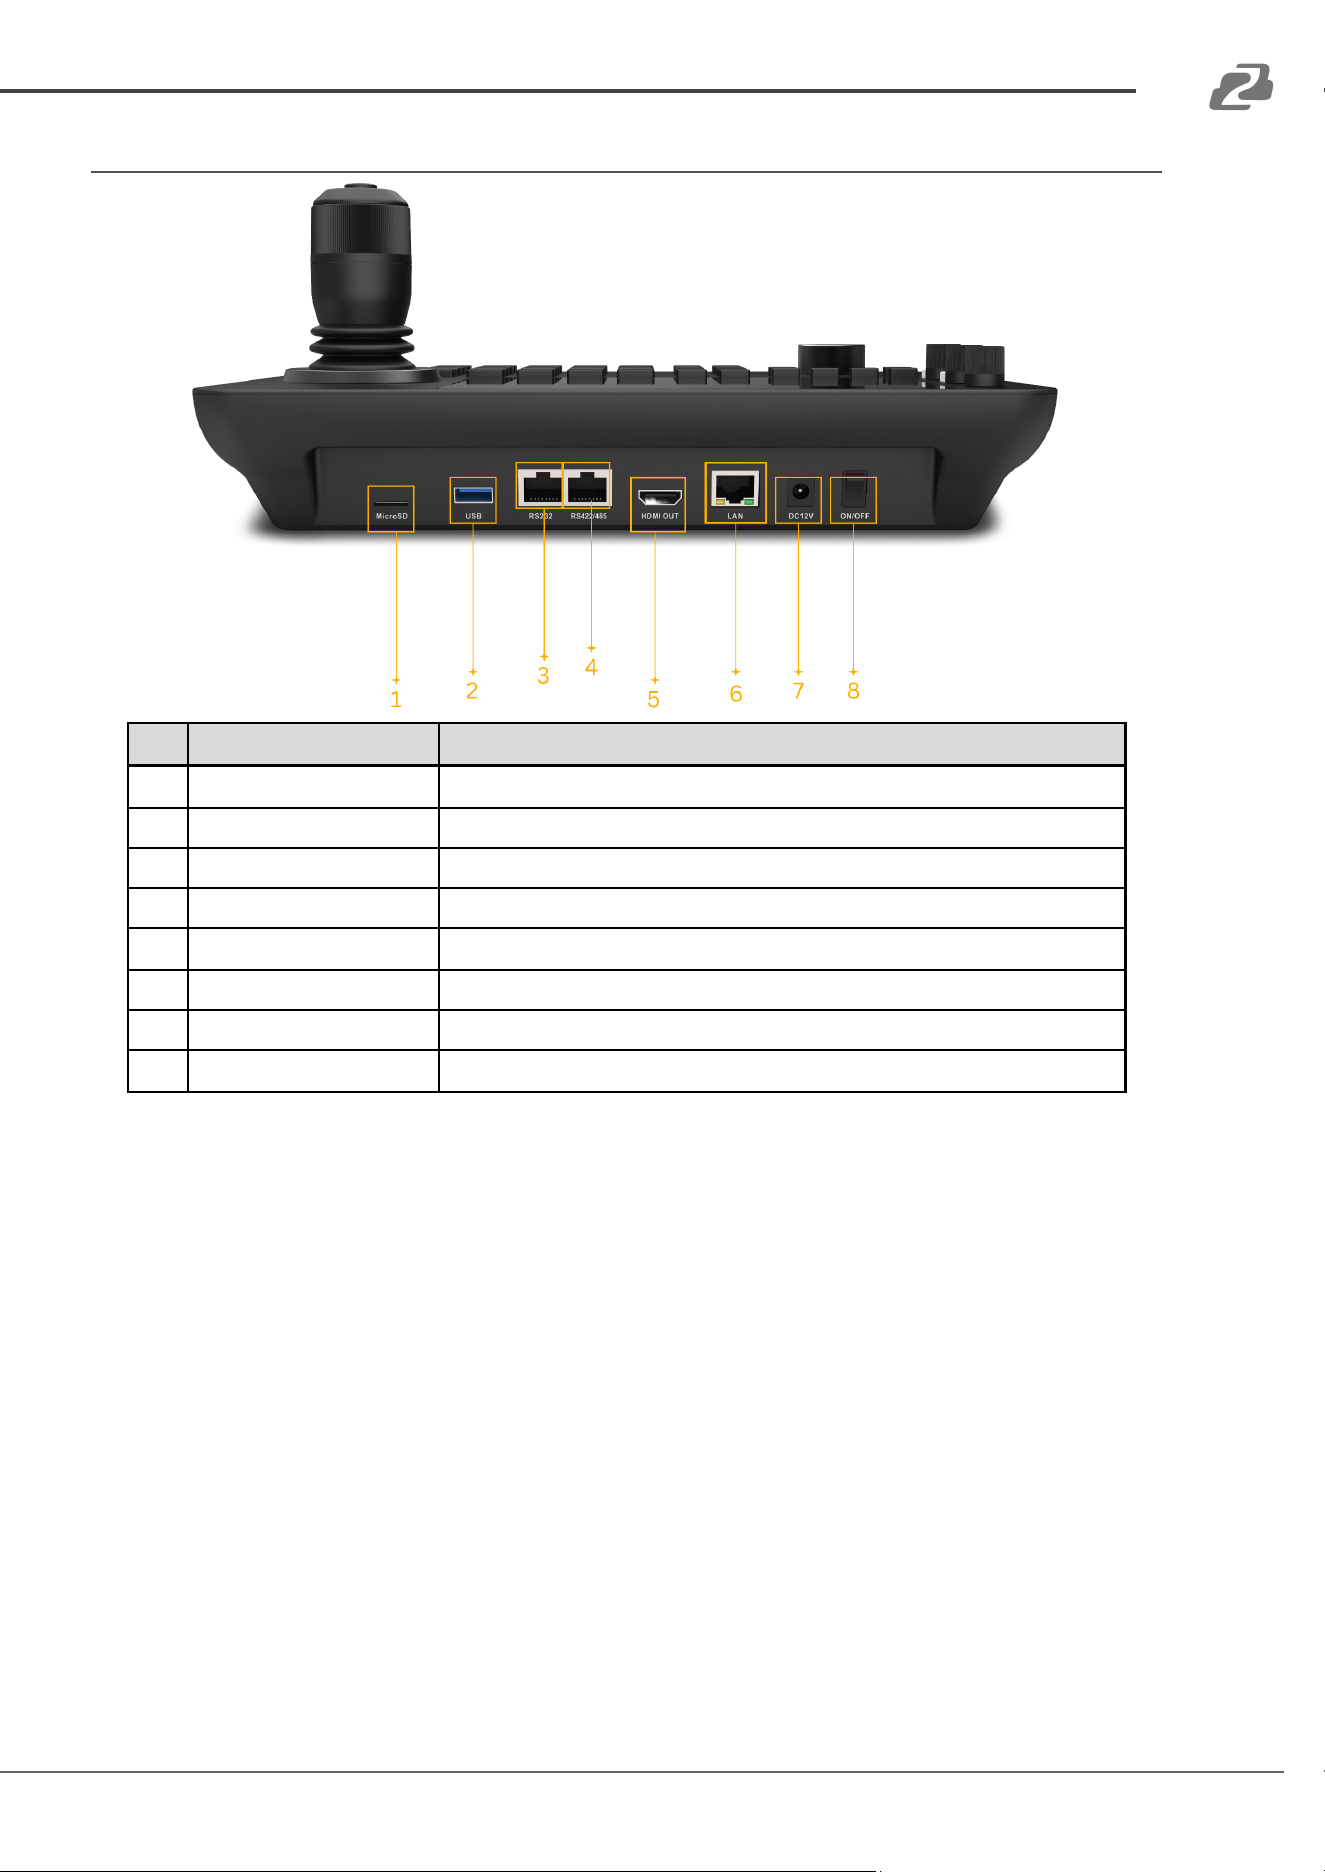
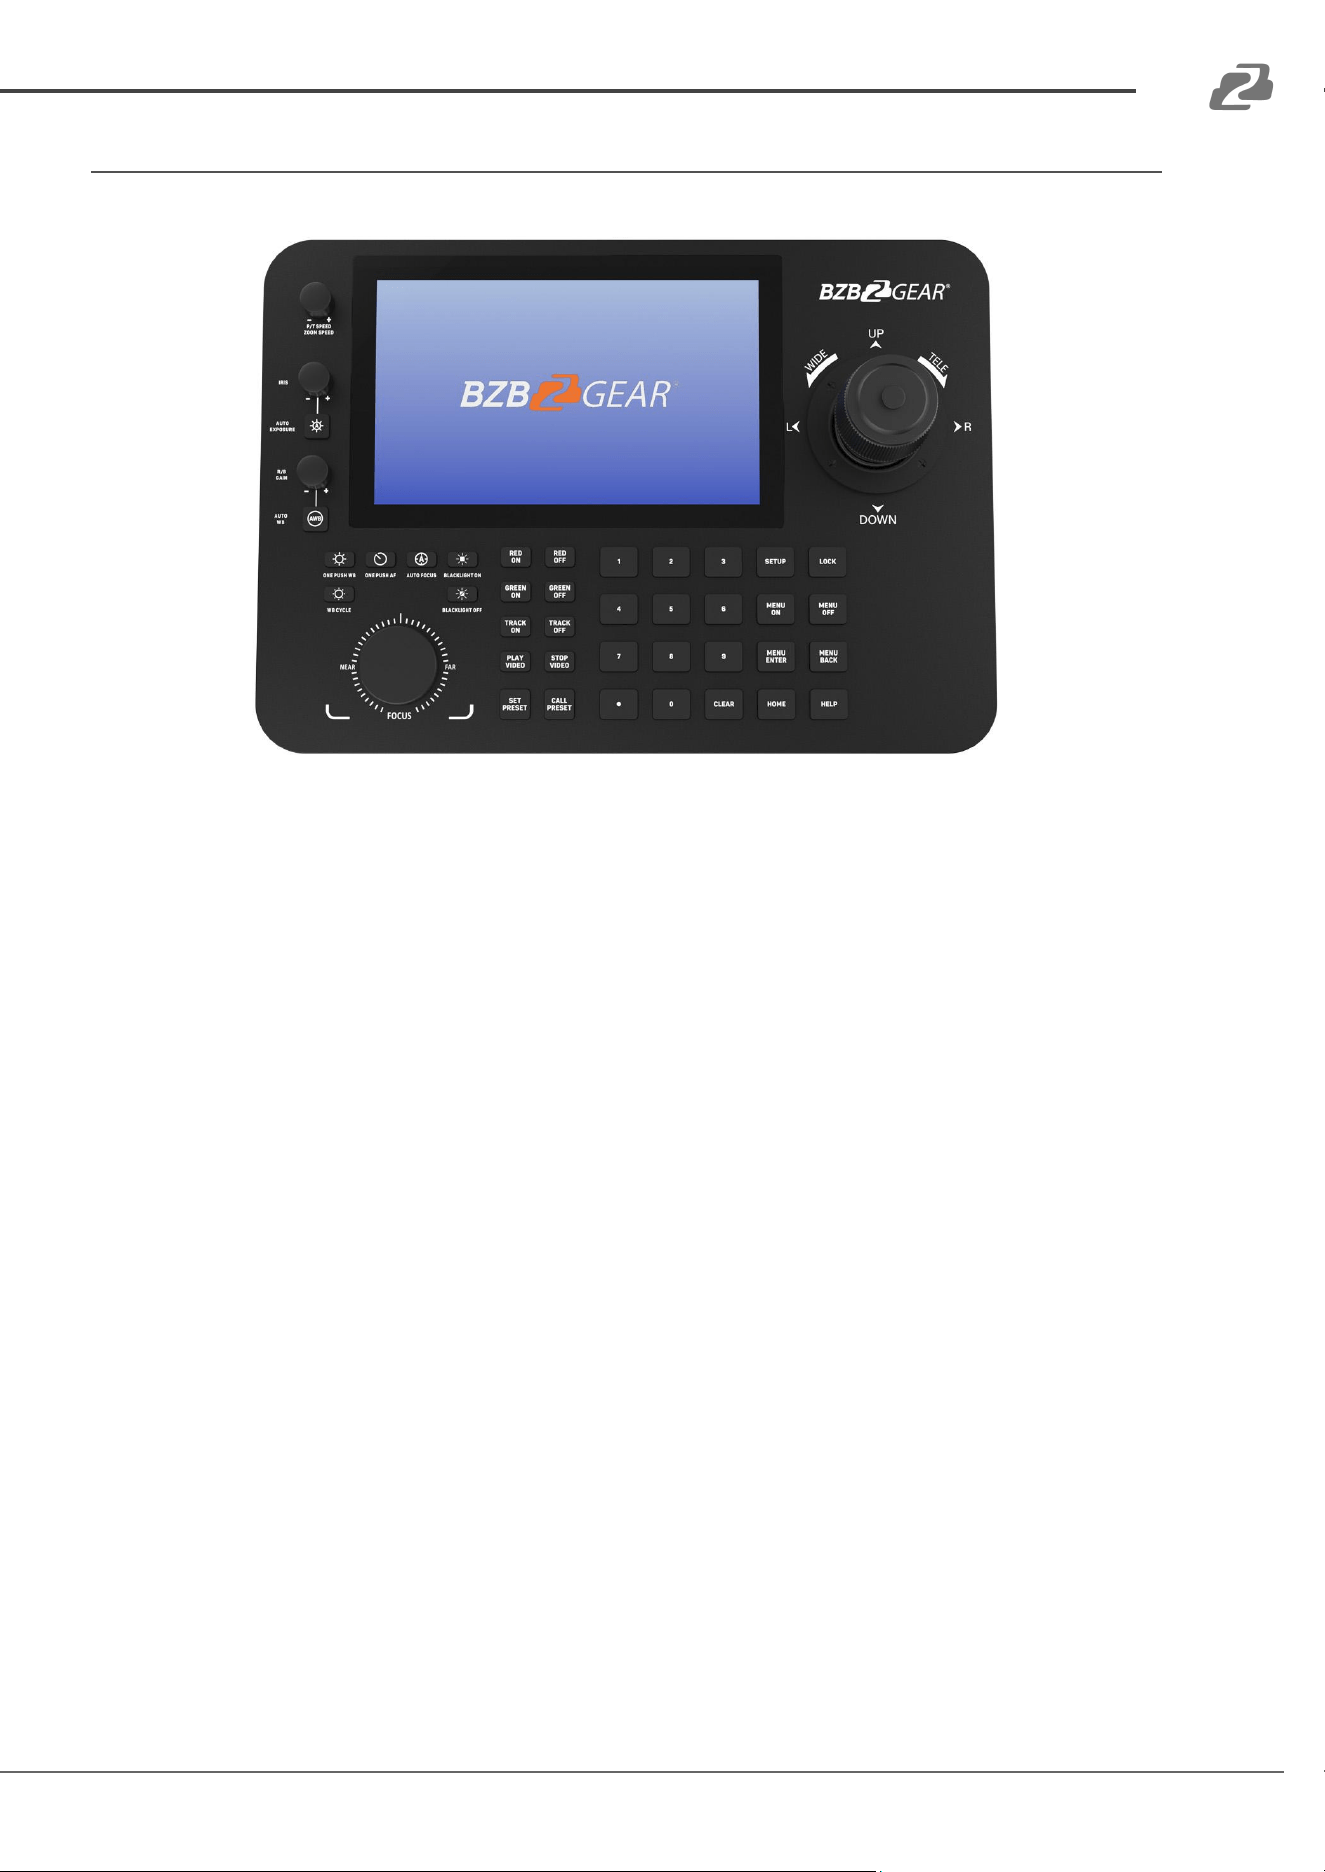
Panel Descriptions
No.
Name
Function Description
1
MicroSD
x1 Micro-SD card slot
2
USB 3.0
x1 USB Type-A female
3
RS232
x1 RJ45
4
RS422/485
x1 RJ45
5
HDMI OUT
x1 HDMI Type A, 19-pin, female
6
ETHERNET
x1 RJ45 TCP/IP connection
7
DC 12V
x1 12V 2A power supply port
8
POWER
x1 Power toggle switch
Address: 830 National Drive #140, Sacramento, CA 95834, USA · Tel: +1(888)499-9906 · Email: support@bzbgear.com 8
BZBGEAR BG-COMMANDER-PRO PRODUCT MANUAL
Button Descriptions
● [P/T Speed]: Adjust the pan, tilt, and zoom speed of the joystick. Press the knob down to
switch between the two speed modes, fixed and variable.
● [IRIS]: Manually open or close the selected camera’s IRIS.
● [Auto Exposure]: set the selected camera to automatically adjust its exposure levels.
● [R/B Gain]: Adjust the Red or Blue gain of the selected camera. Press the knob down to
toggle between the different modes.
● [Auto WB]: Set the selected camera to automatically adjust its white balance.
● [Bright+]: Increase the selected camera’s brightness.
● [Bright-]: Decrease the selected camera’s brightness.
● [Patrol]: The selected camera will automatically follow a predetermined path using the
camera presets. See the “Patrol” section for more information.
● [Auto Focus]: Set the selected camera's focus to automatic.
● [Backlight On]: Turn on the camera's backlight if available.
● [Backlight Off]: Turn off the camera's backlight if available.
● [Red On]: Turn on the red tally light of the selected BG-ADAMO or BG-ADAMO-JR
camera.
● [Red Off]: Turn off the red tally light of the selected BG-ADAMO or BG-ADAMO-JR
camera.
Address: 830 National Drive #140, Sacramento, CA 95834, USA · Tel: +1(888)499-9906 · Email: support@bzbgear.com 9

BZBGEAR BG-COMMANDER-PRO PRODUCT MANUAL
● [Green On]: Turn on the green tally light of the selected BG-ADAMO or BG-ADAMO-JR
camera.
● [Green Off]: Turn off the green tally light of the selected BG-ADAMO or BG-ADAMO-JR
camera.
● [Track On]: Turn on the “Presenter” tracking mode on a BG-ADAMO and BG-ADAMO-JR
camera.
● [Track Off]: Turn off the “Presenter” tracking mode on a BG-ADAMO and BG-ADAMO-JR
camera.
● [Play Video]: When a camera is selected in the PTZ Control or PTZ Wall modes, “Video
On” will display the RTSP stream from the camera. Press and Hold the button for 3
seconds to start the stream of all cameras on the grid.
● [Stop Video]: When a camera is selected in the PTZ Control or PTZ Wall modes, “Video
Off” will turn off the RTSP stream from the camera. Press and hold the button for 3
seconds to stop all streams currently shown on the grid.
● [Set Preset]: Press “Set Preset”, type in the desired preset address number (1-254), and
press “Set Preset” again to save a camera preset.
● [Call Preset]: Press “Call Preset”, type in the desired preset address number (1-254), and
press “Call Preset” again to recall a camera preset.
● [Num 0-9]: Long press for 3 seconds to set presets 0-9; short press to recall presets 0-9.
● [Clear]: Clear the selected menu item.
● [Setup]: From the Main Screen or the PTZ Control menu pressing the “Setup” button will
open the controller settings menu.
● [Lock]: Tap once to lock the controller screen. Press and hold anywhere on the screen to
unlock.
● [Menu On]: Open the camera's OSD Menu (NOTE: Depending on the model of the
camera, the OSD menu may only be shown on the camera's physical output and not on
the RTSP stream to the controller. The controller may still open the camera menu and
navigate.).
● [Menu Off]: Close the camera’s OSD menu.
● [Menu Enter]: Advance one level on the camera’s selected OSD menu item.
● [Menu Back]: Return one level in the camera's OSD menu.
● [Home]: Returns the selected camera to its ‘Home’ position.
● [Help]: Opens the built-in manual.
Address: 830 National Drive #140, Sacramento, CA 95834, USA · Tel: +1(888)499-9906 · Email: support@bzbgear.com 10
BZBGEAR BG-COMMANDER-PRO PRODUCT MANUAL
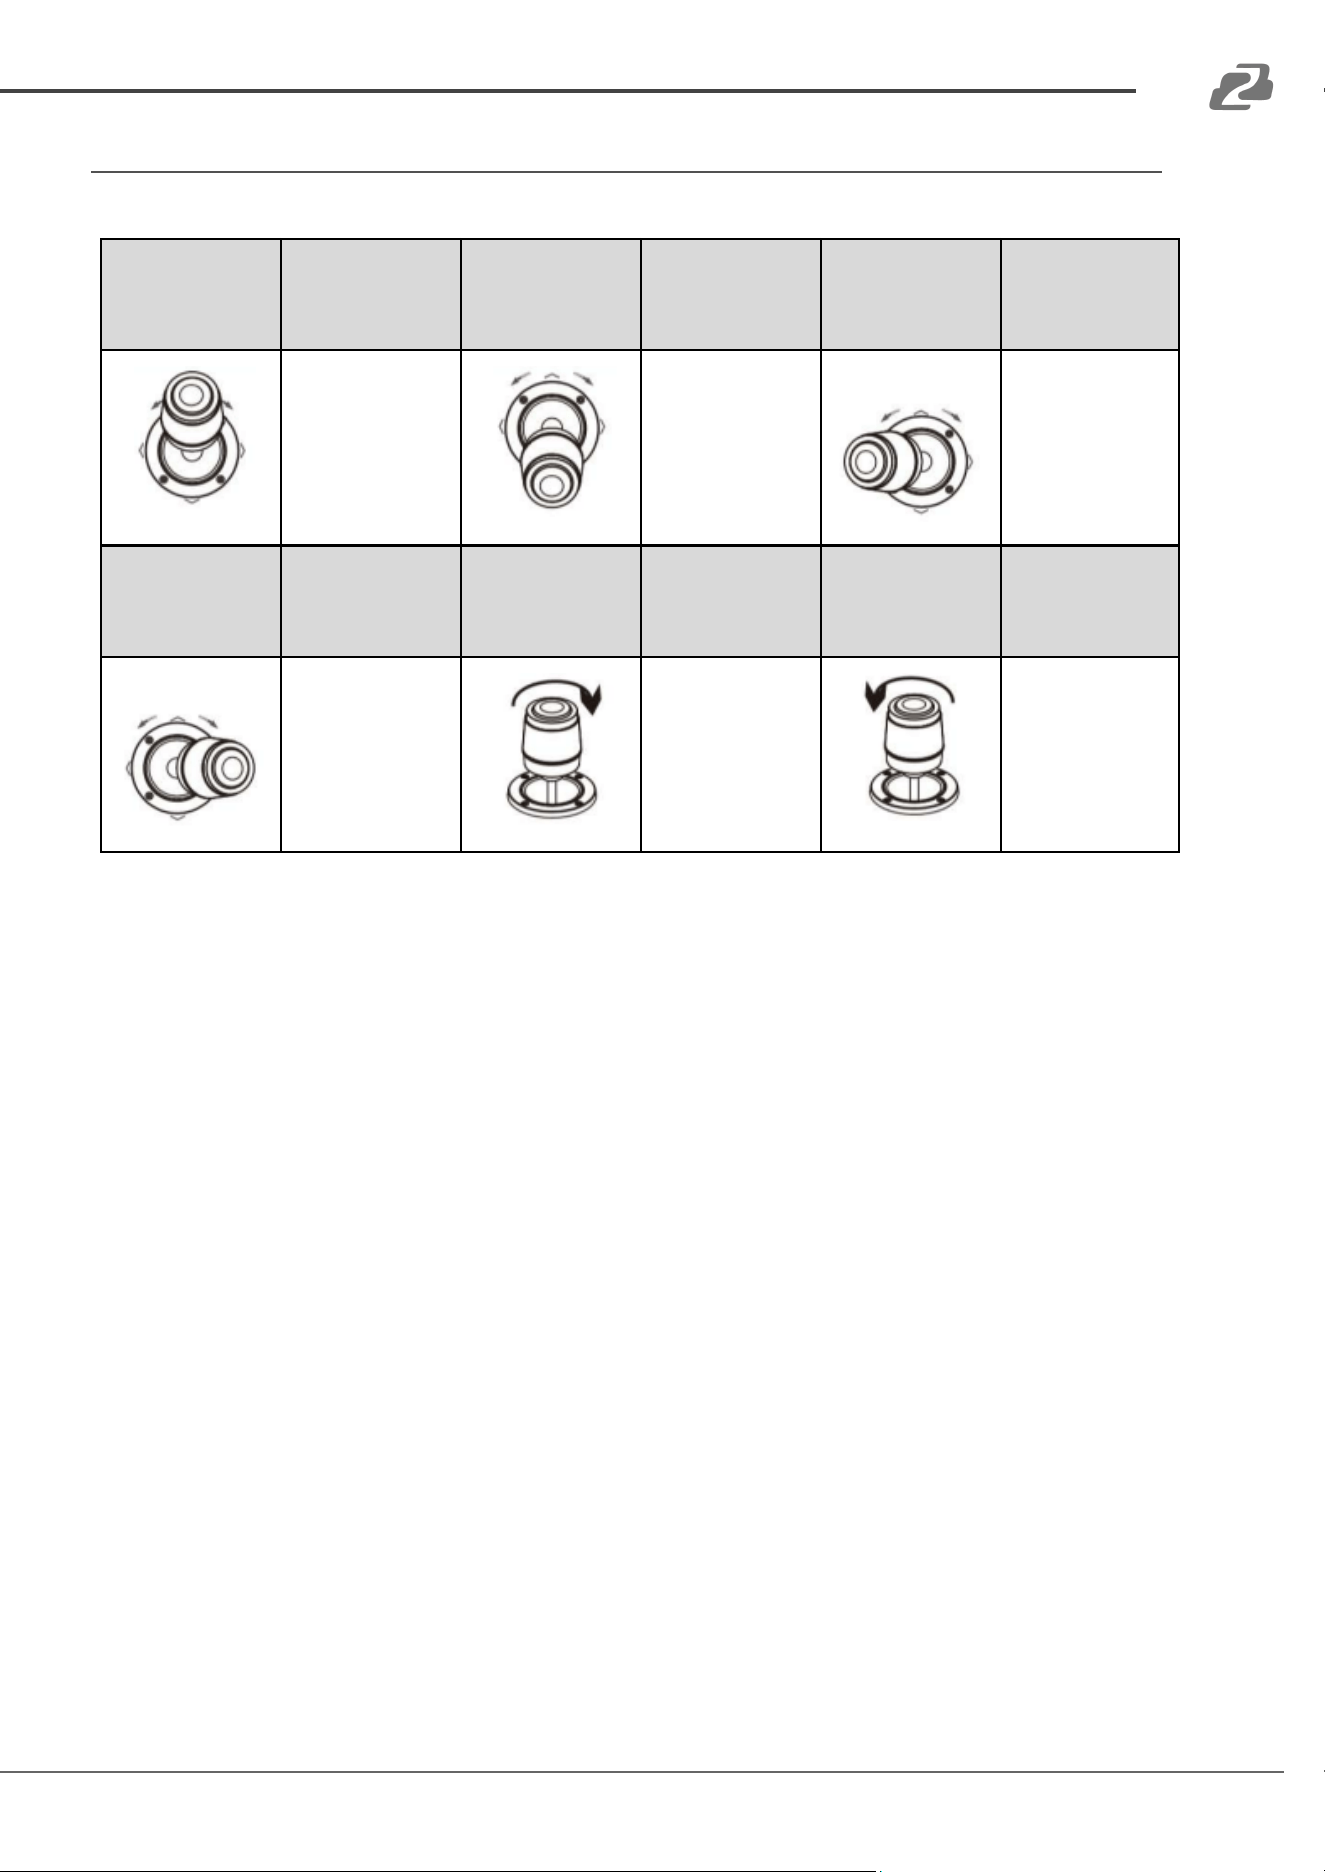
Joystick Controls
Operation
Output
control
Operation
Output
control
Operation
Output
control
Up
Down
Left
Operation
Output
control
Operation
Output
control
Operation
Output
control
Right
Zoom+
Zoom-
Address: 830 National Drive #140, Sacramento, CA 95834, USA · Tel: +1(888)499-9906 · Email: support@bzbgear.com 11
BZBGEAR BG-COMMANDER-PRO PRODUCT MANUAL
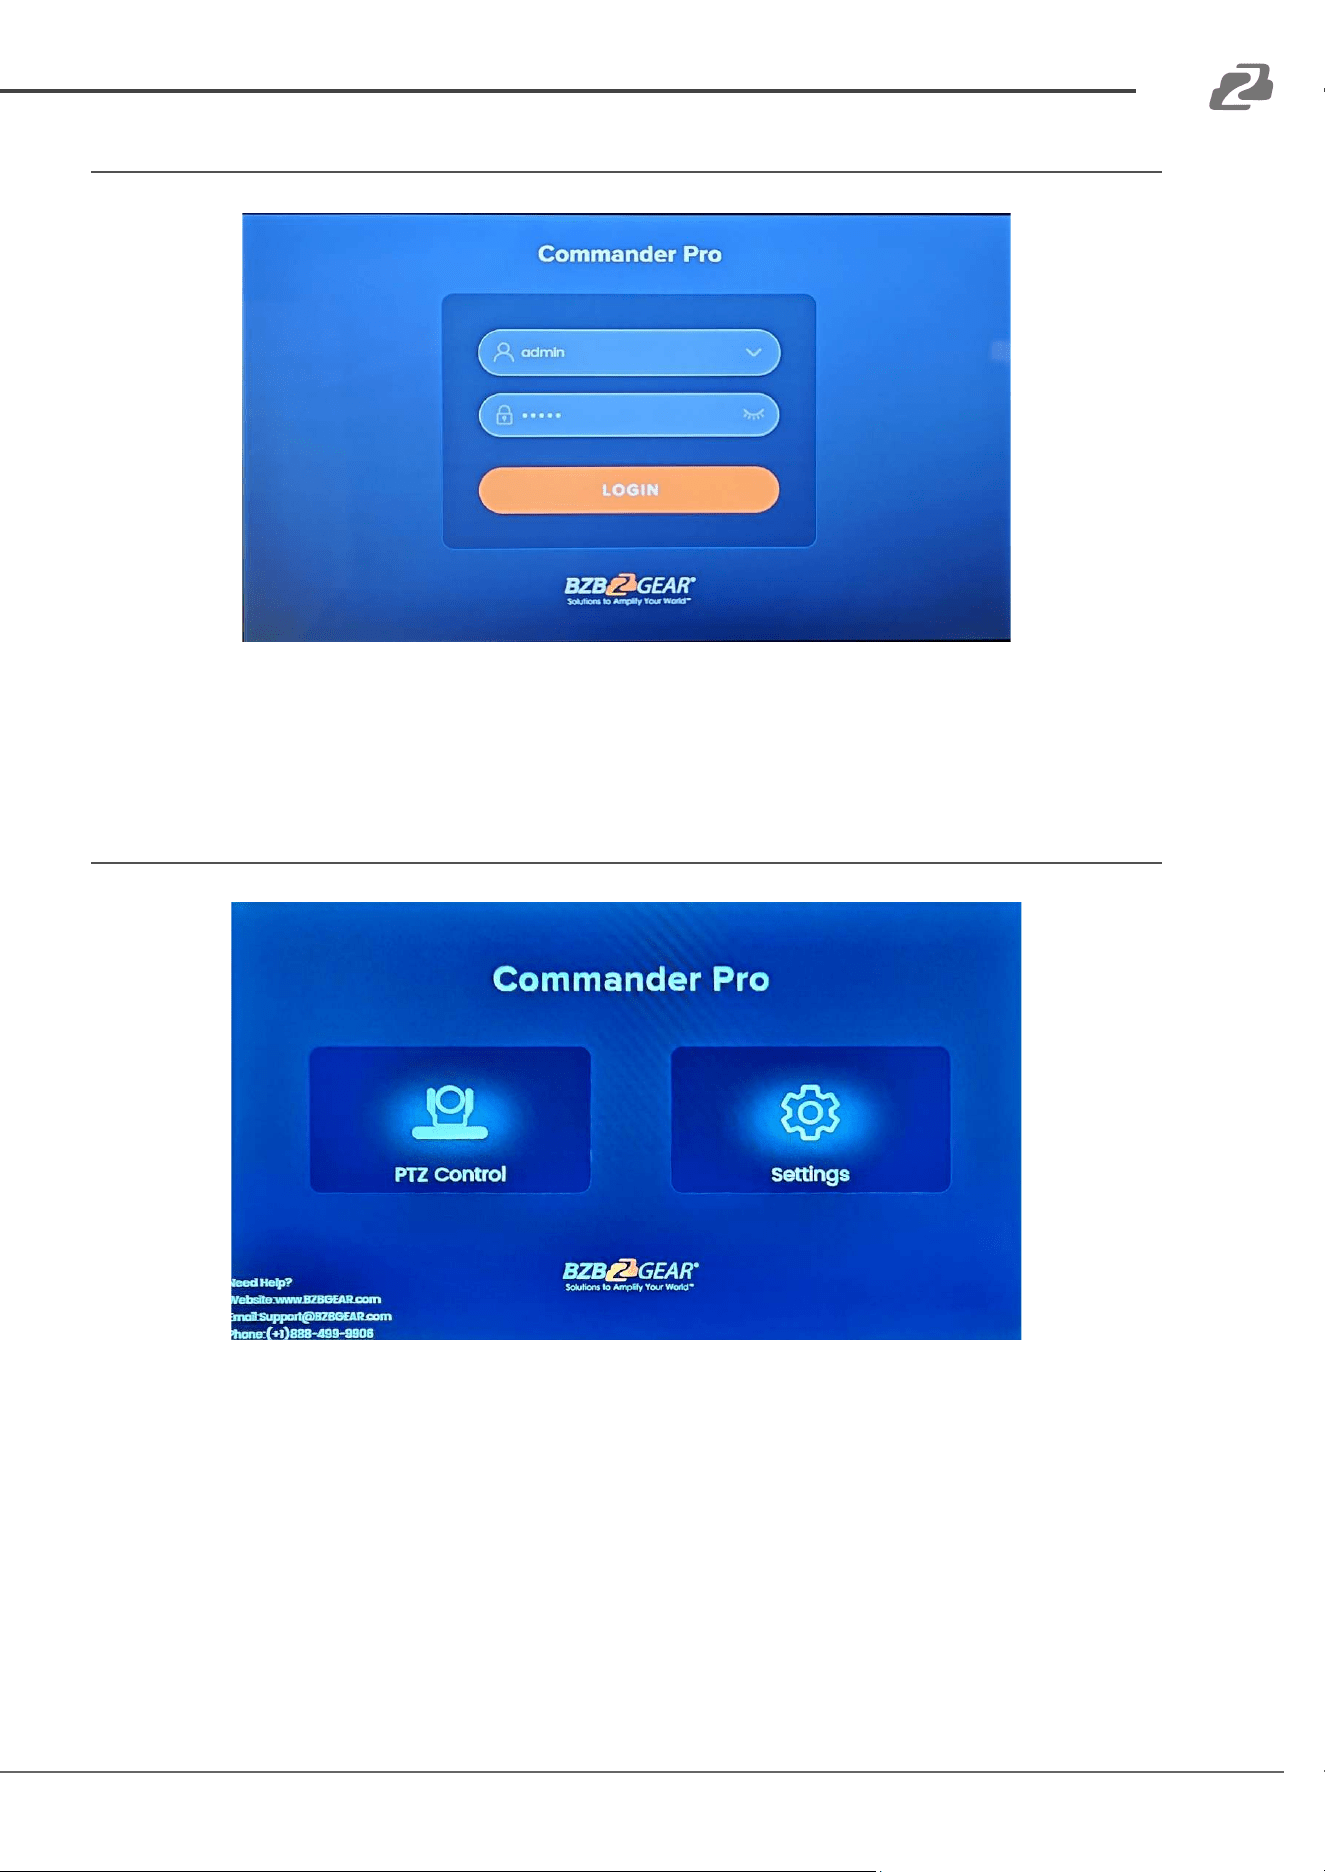
Login Screen
● On initial login, type in the default Username and Password and then press “Login”.
○ Default Username: admin
○ Default Password: admin
Main Menu
● From the main menu, users can select from 2 options: PTZ Control or Settings.
○ PTZ Control: Access the BG-Commander-Pro’s PTZ interface to control connected
PTZ cameras.
○ Settings: Access the controller's settings for items such as adding or editing a
camera, network settings, language, local recordings, and more.
Address: 830 National Drive #140, Sacramento, CA 95834, USA · Tel: +1(888)499-9906 · Email: support@bzbgear.com 12
BZBGEAR BG-COMMANDER-PRO PRODUCT MANUAL
Settings
The Settings menu can be accessed from the main screen or by pressing the Settings button in
either PTZ or Video Wall modes. There are several sub-menus within settings which include
Camera List, Sequence, System Setting, Factory Debug, Local Camera, Camera Record, Version,
and Accounts.
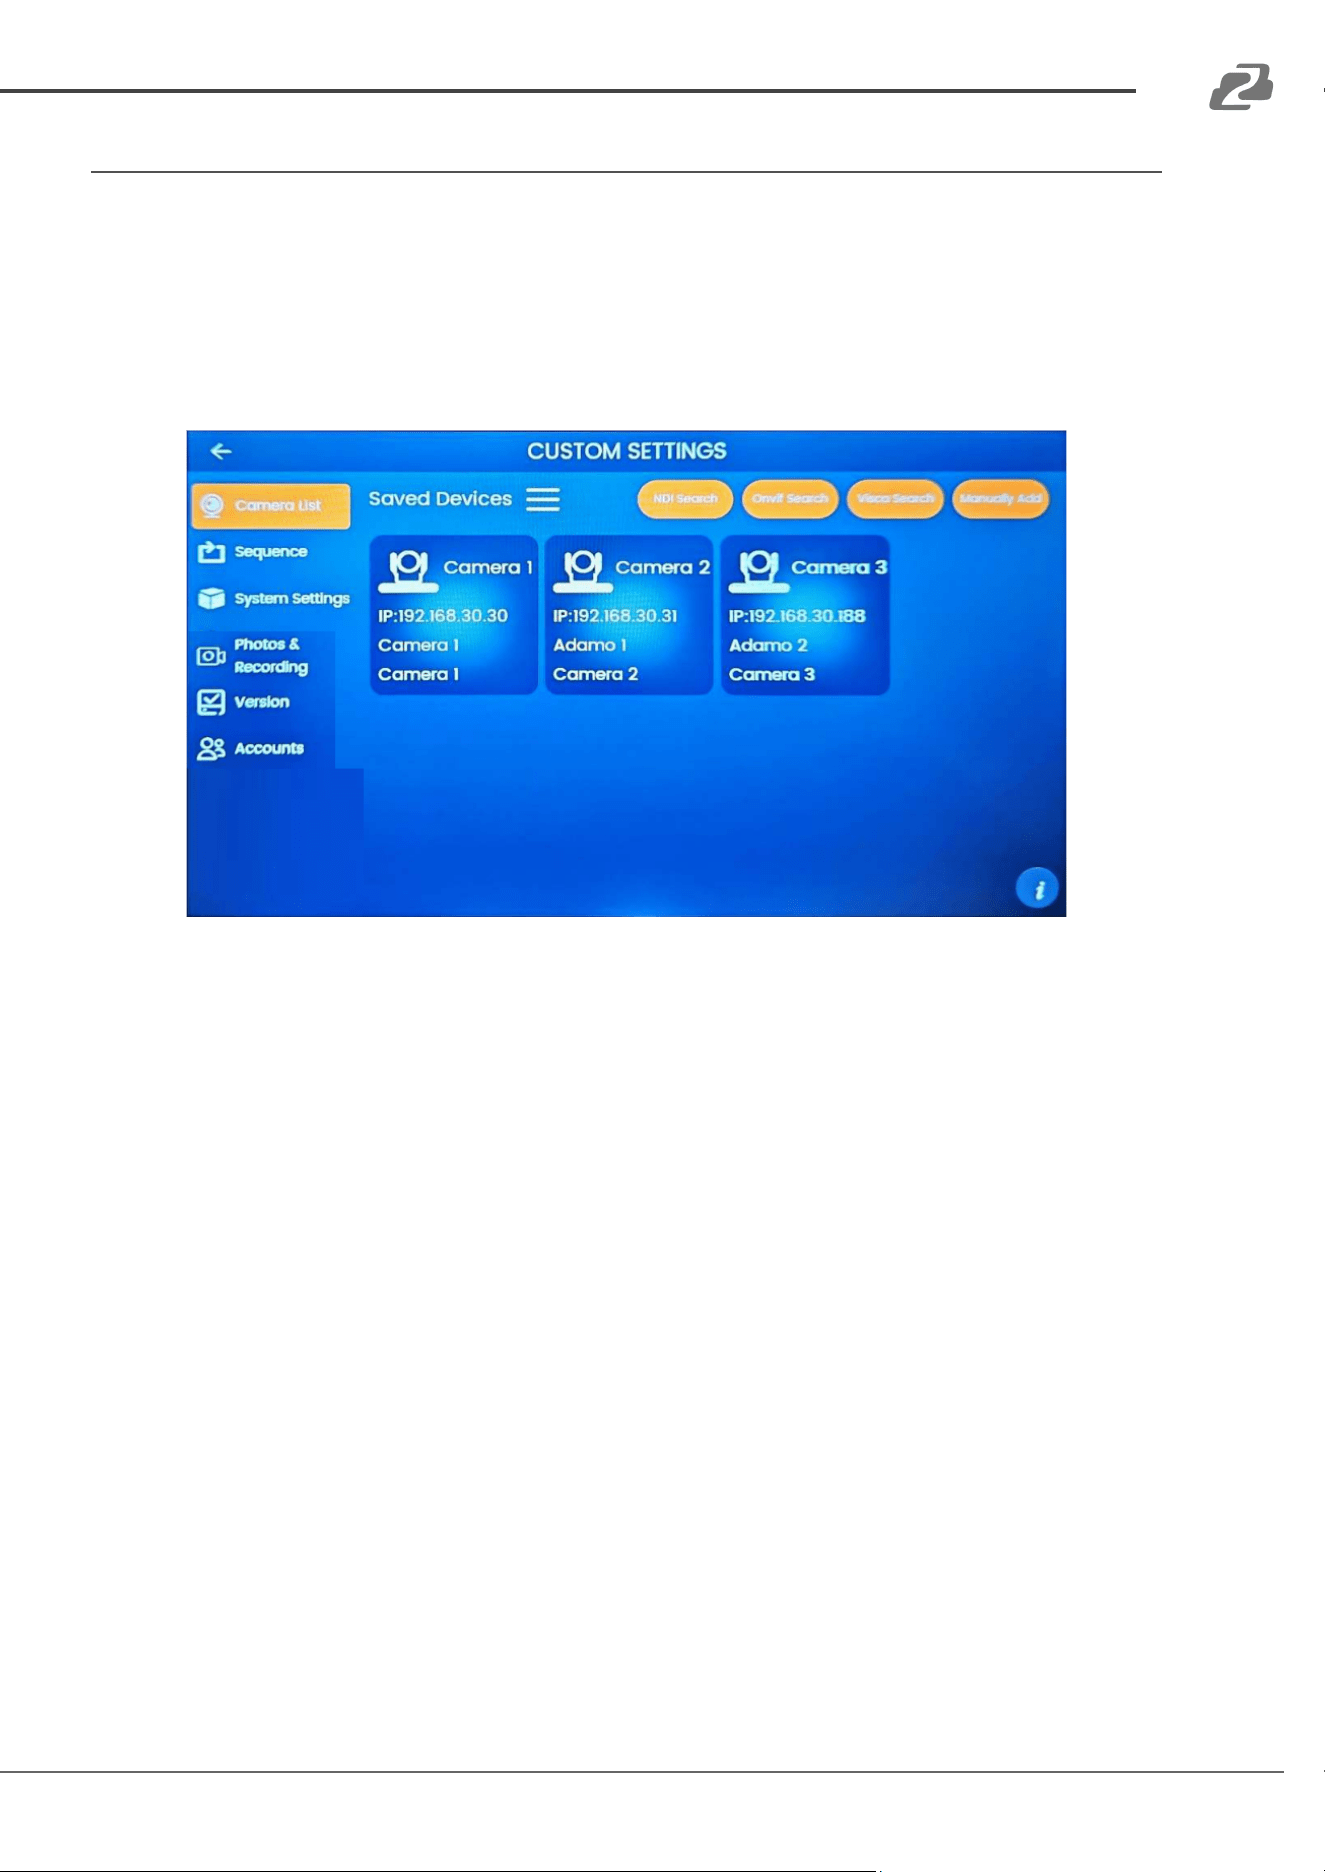
Camera List
● Camera List is used for adding and managing cameras in the system. See the “PTZ
Control and Managing Cameras” section of this manual for more information.
Address: 830 National Drive #140, Sacramento, CA 95834, USA · Tel: +1(888)499-9906 · Email: support@bzbgear.com 13
BZBGEAR BG-COMMANDER-PRO PRODUCT MANUAL
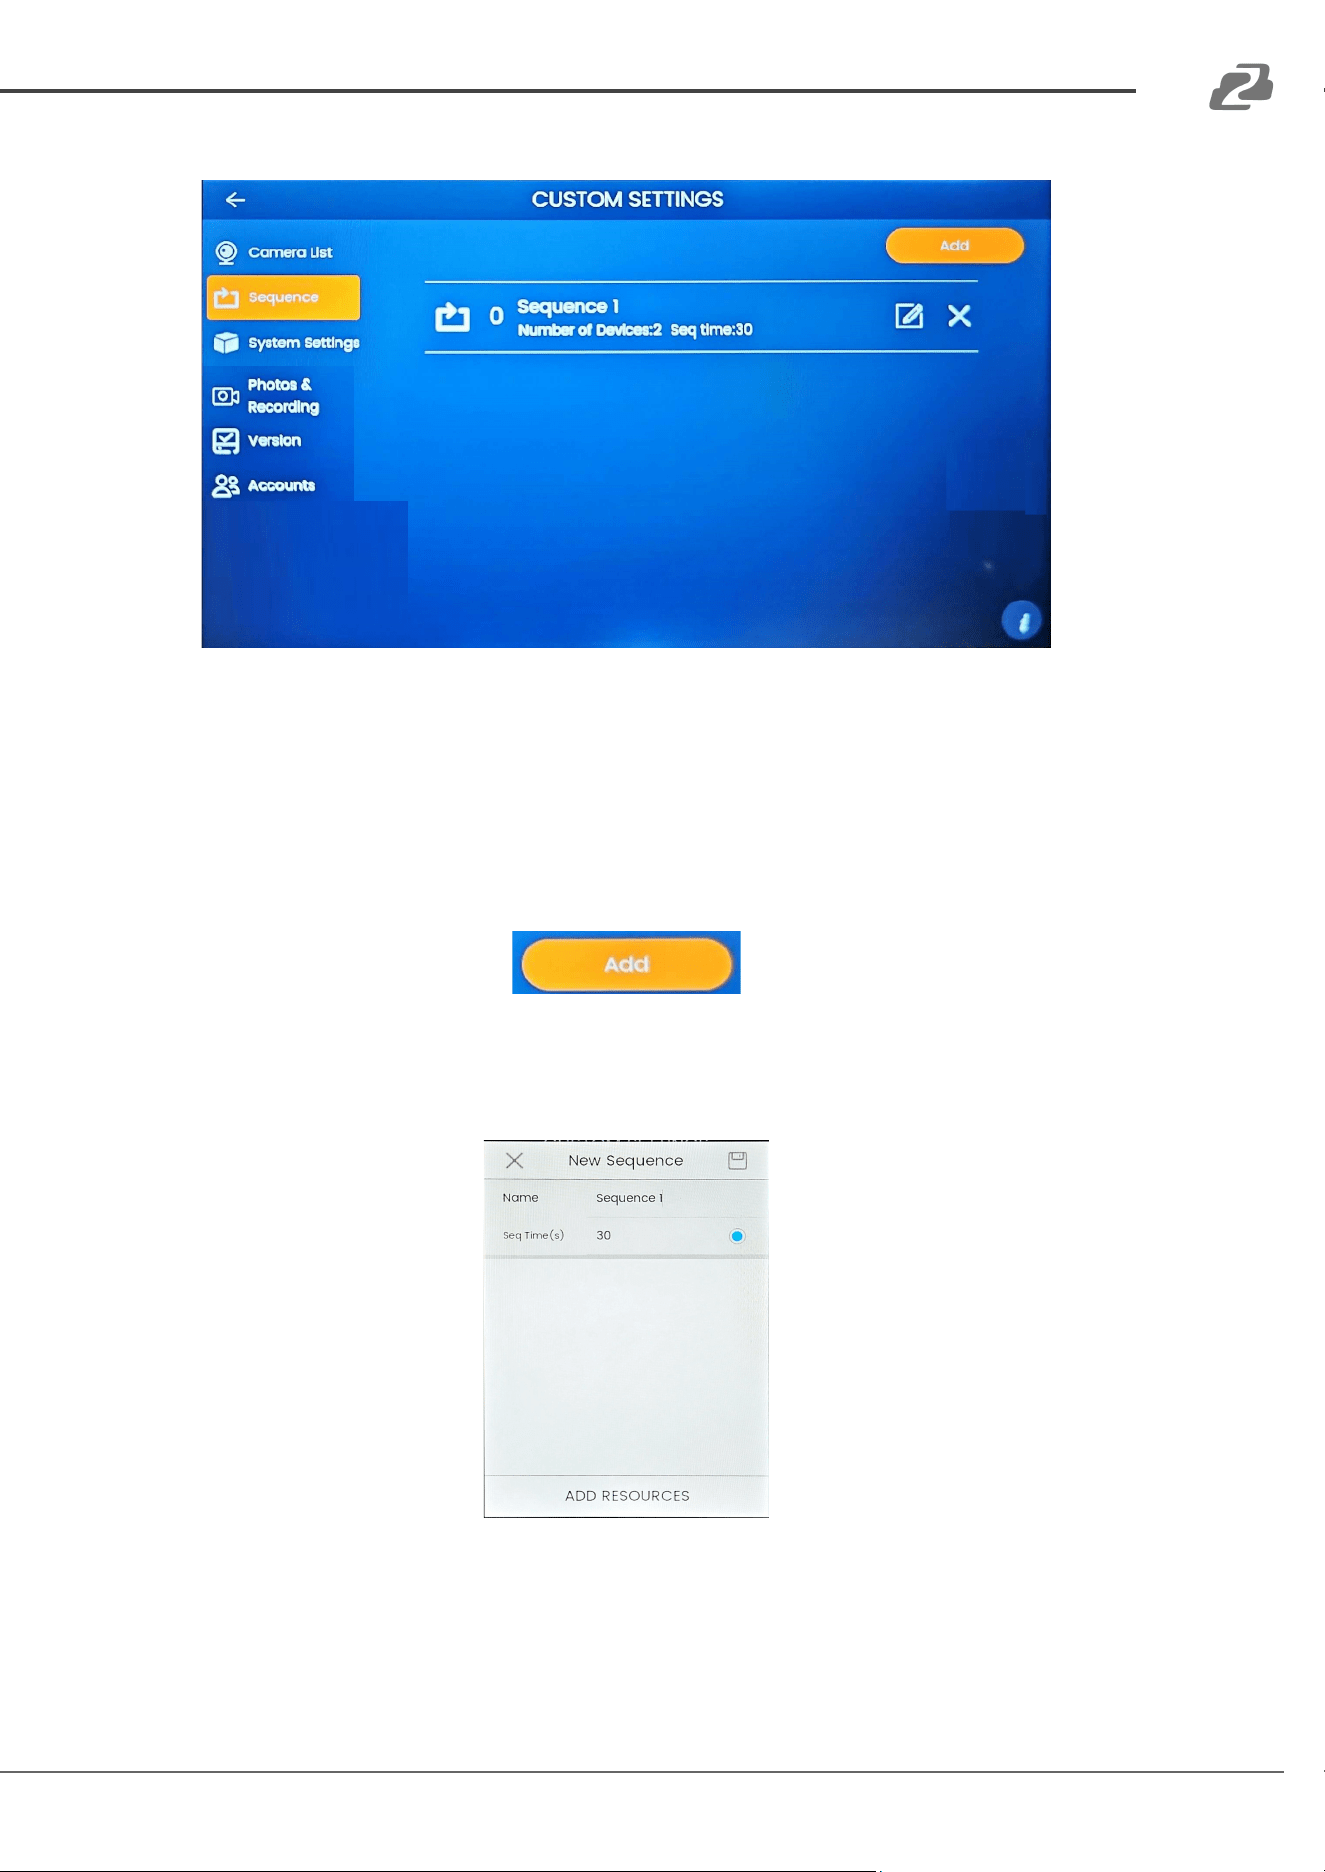
Sequence
● The Sequence function can be used in conjunction with the TV Wall mode but can be used
in PTZ control mode as well. Users can create a custom configuration of multiple cameras
that will cycle their live stream image at a given time frame.
○ This feature is convenient when users have to monitor more than 4 cameras at
once or have camera shots they would periodically like to see an image preview of.
○ Click the “Add” button in the top right corner to create a new sequence.
○ In the pop-up window name your new sequence so it can be identified easily on the
camera list and adjust the “Seq Time” or time between camera changes to the
desired length.
Address: 830 National Drive #140, Sacramento, CA 95834, USA · Tel: +1(888)499-9906 · Email: support@bzbgear.com 14
BZBGEAR BG-COMMANDER-PRO PRODUCT MANUAL
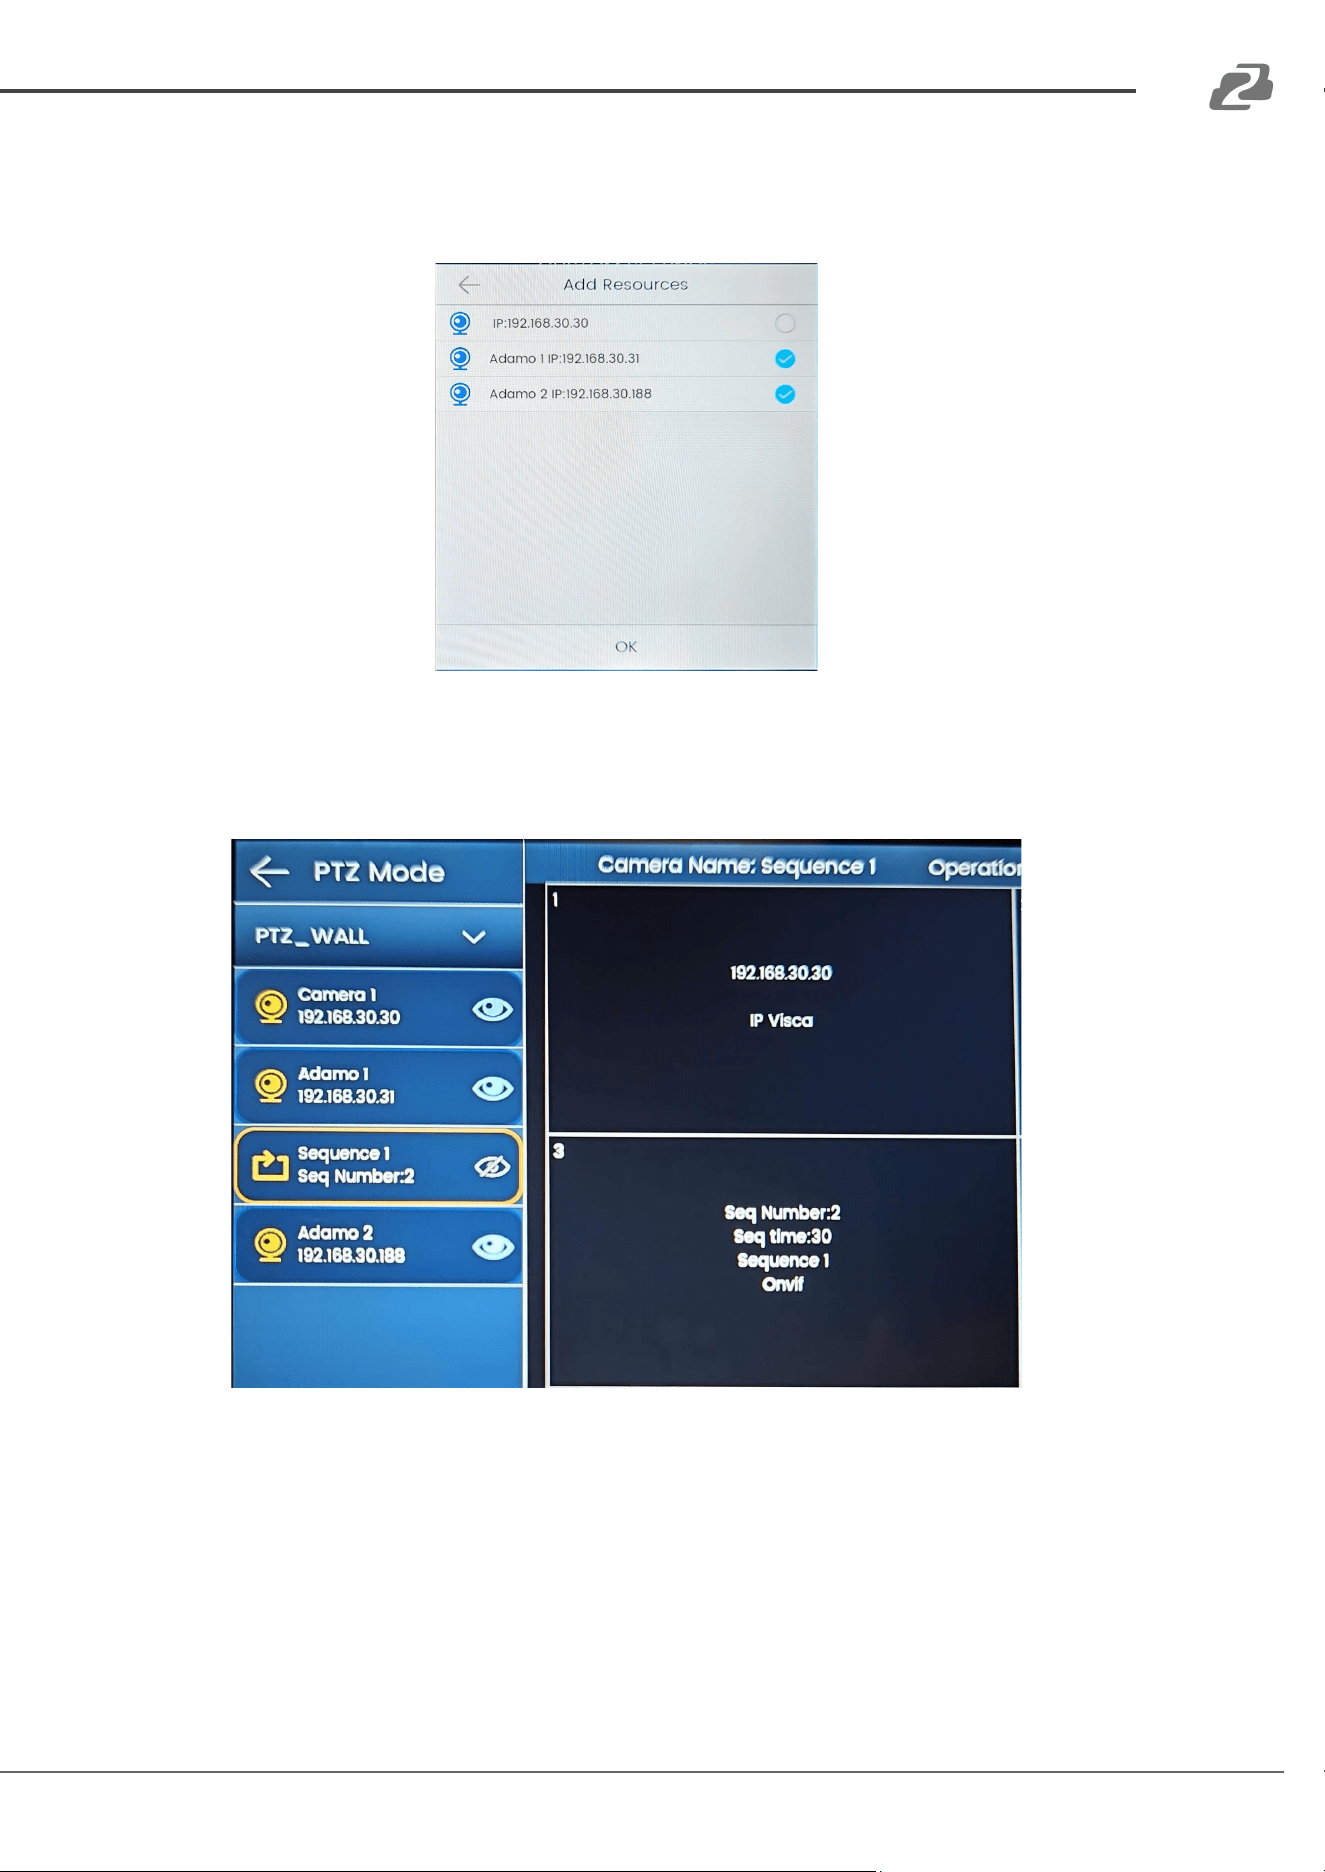
○ Next press the “ADD RESOURCES” button at the bottom to select your cameras
controlled by the unit to become part of the sequence and press OK.
○ The Sequence can now be added to the PTZ Wall or TV Wall grids as if it were a
camera.
○ Click the “Play” button to start the sequence playback.
■ NOTE: Sequences can only be viewed and cannot be controlled.
Address: 830 National Drive #140, Sacramento, CA 95834, USA · Tel: +1(888)499-9906 · Email: support@bzbgear.com 15
BZBGEAR BG-COMMANDER-PRO PRODUCT MANUAL
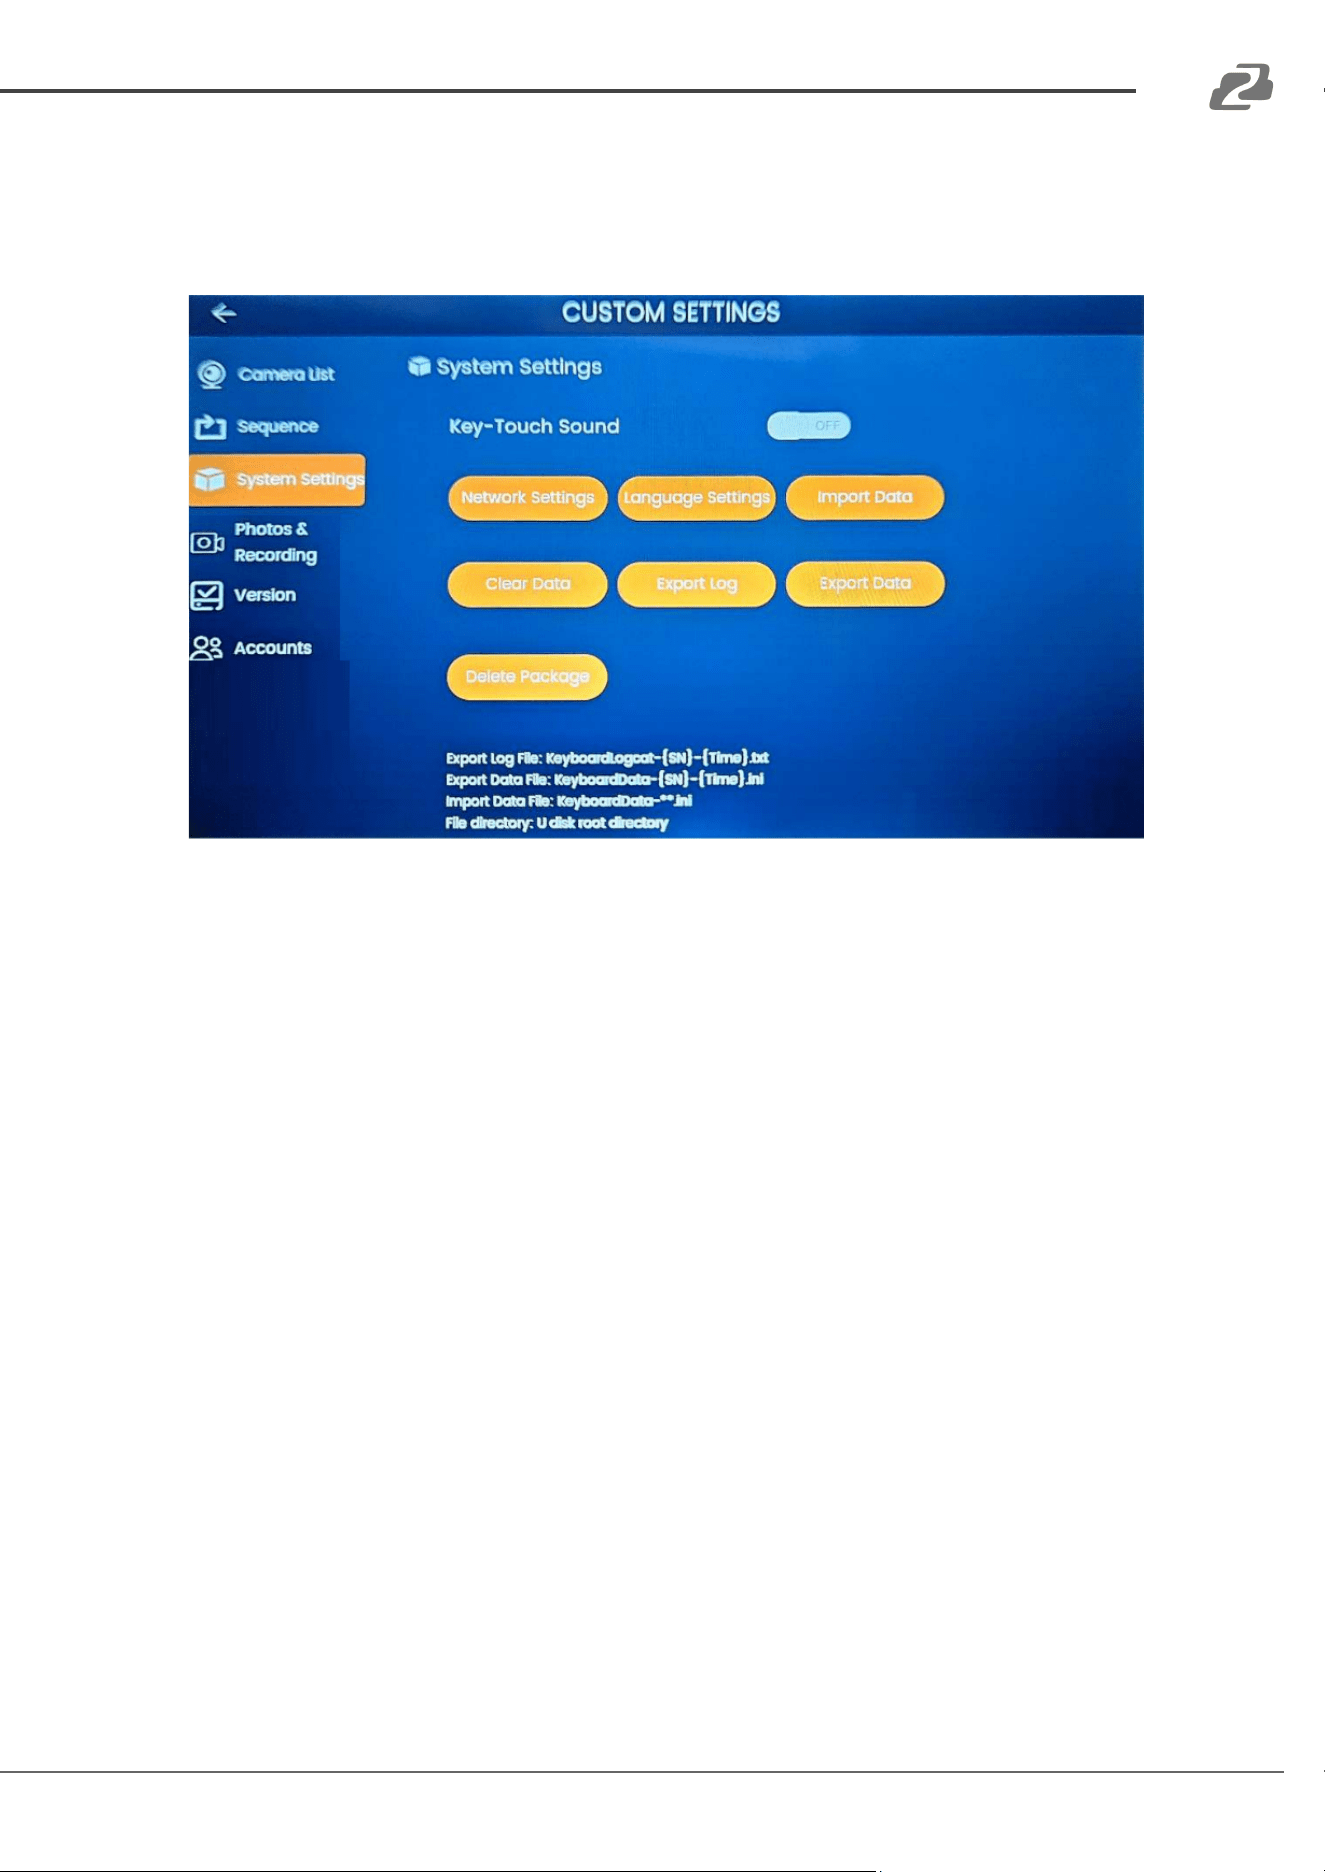
System Setting
● System Settings contains several sub-menus including turning on/off key sounds, Network
Setting, Language Settings, Import Data, Clear Data, Export Log, Export Data, and Delete
Package.
○ Network Setting: Click Network Setting to manage the controller's ethernet
settings. The controller is set to DHCP by default. NOTE: While other options such
as WiFi are available on the Network Settings page they are not functional. See the
“Network Settings” section for more information.
○ Language Setting: Use this submenu to add more languages to the tablet (default
English and Chinese only).
○ Clear Data: Clear all added devices and restore the app to its original settings
○ Export Log: Export the system log.
○ Export Data: Export the current app configuration and add devices.
○ Import Data: Import saved app configuration data.
○ Delete Package: Restore the controller to its original factory settings.
● Photos & Recording: View, manage, and export screenshots or stream recordings
captured from the PTZ Control or Video Wall modes that were saved directly to the unit.
● Version: View software version information and perform application updates or system
updates.
● Accounts: Add/remove accounts, and modify usernames and passwords.
Address: 830 National Drive #140, Sacramento, CA 95834, USA · Tel: +1(888)499-9906 · Email: support@bzbgear.com 16
BZBGEAR BG-COMMANDER-PRO PRODUCT MANUAL
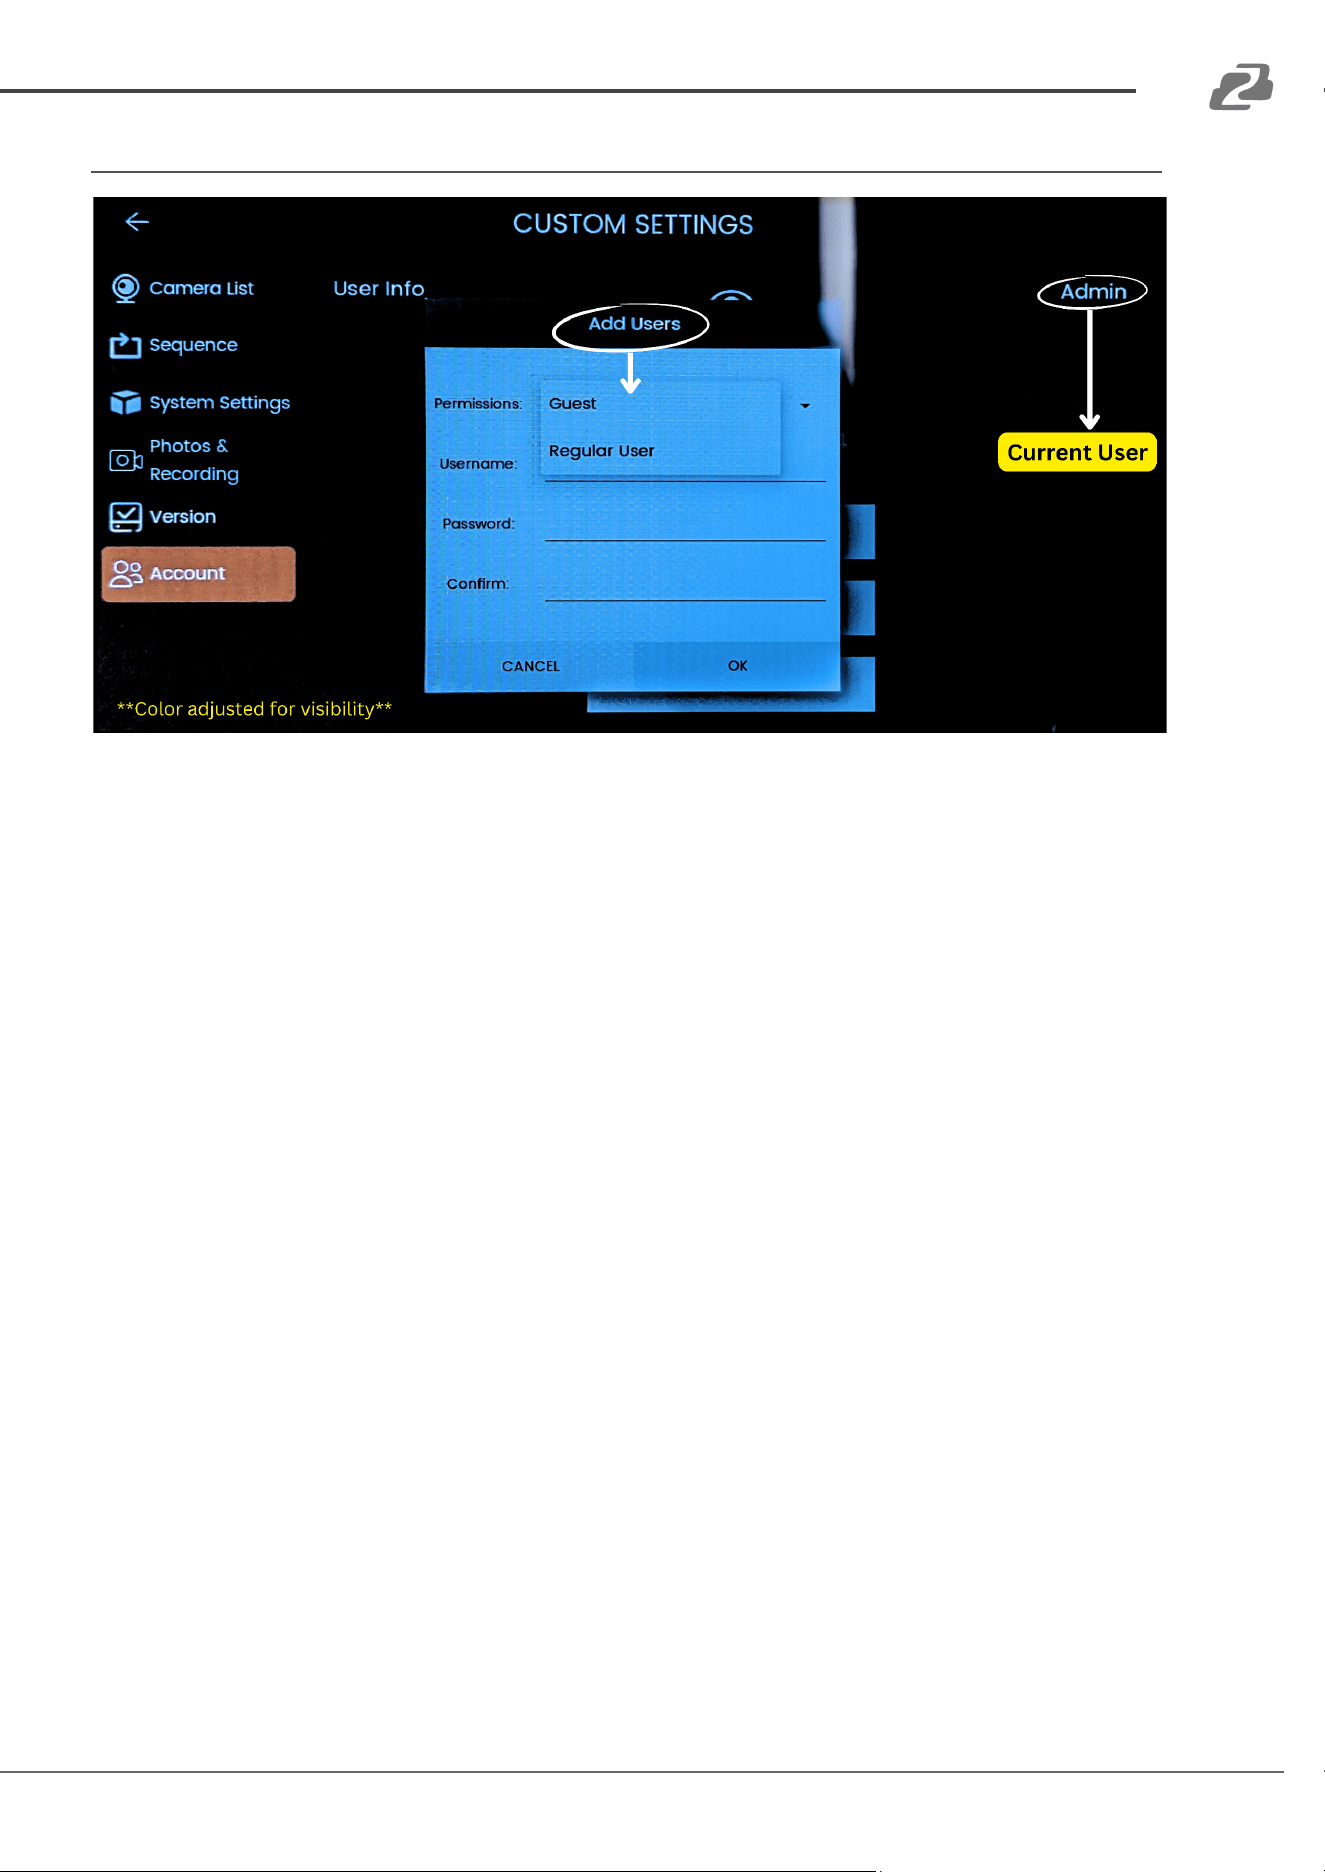
Accounts
1. Admin: The admin can access all settings and cameras.
2. Regular User: A regular user can manage and control the cameras but cannot access the
settings or web interfaces of the cameras.
3. Guest: The guest account can only view the camera feeds; all other settings and
functionalities are restricted.
Note: Please take note of your username and password once an account is created.
Address: 830 National Drive #140, Sacramento, CA 95834, USA · Tel: +1(888)499-9906 · Email: support@bzbgear.com 17
BZBGEAR BG-COMMANDER-PRO PRODUCT MANUAL
Network Settings
The BG-Commander-Pro is set to DHCP by default. This means, if a router or DHCP server is
present on the network, the controller will be automatically assigned an IP address by the
network. If needed, the controller can be assigned a static IP address so it does not change.
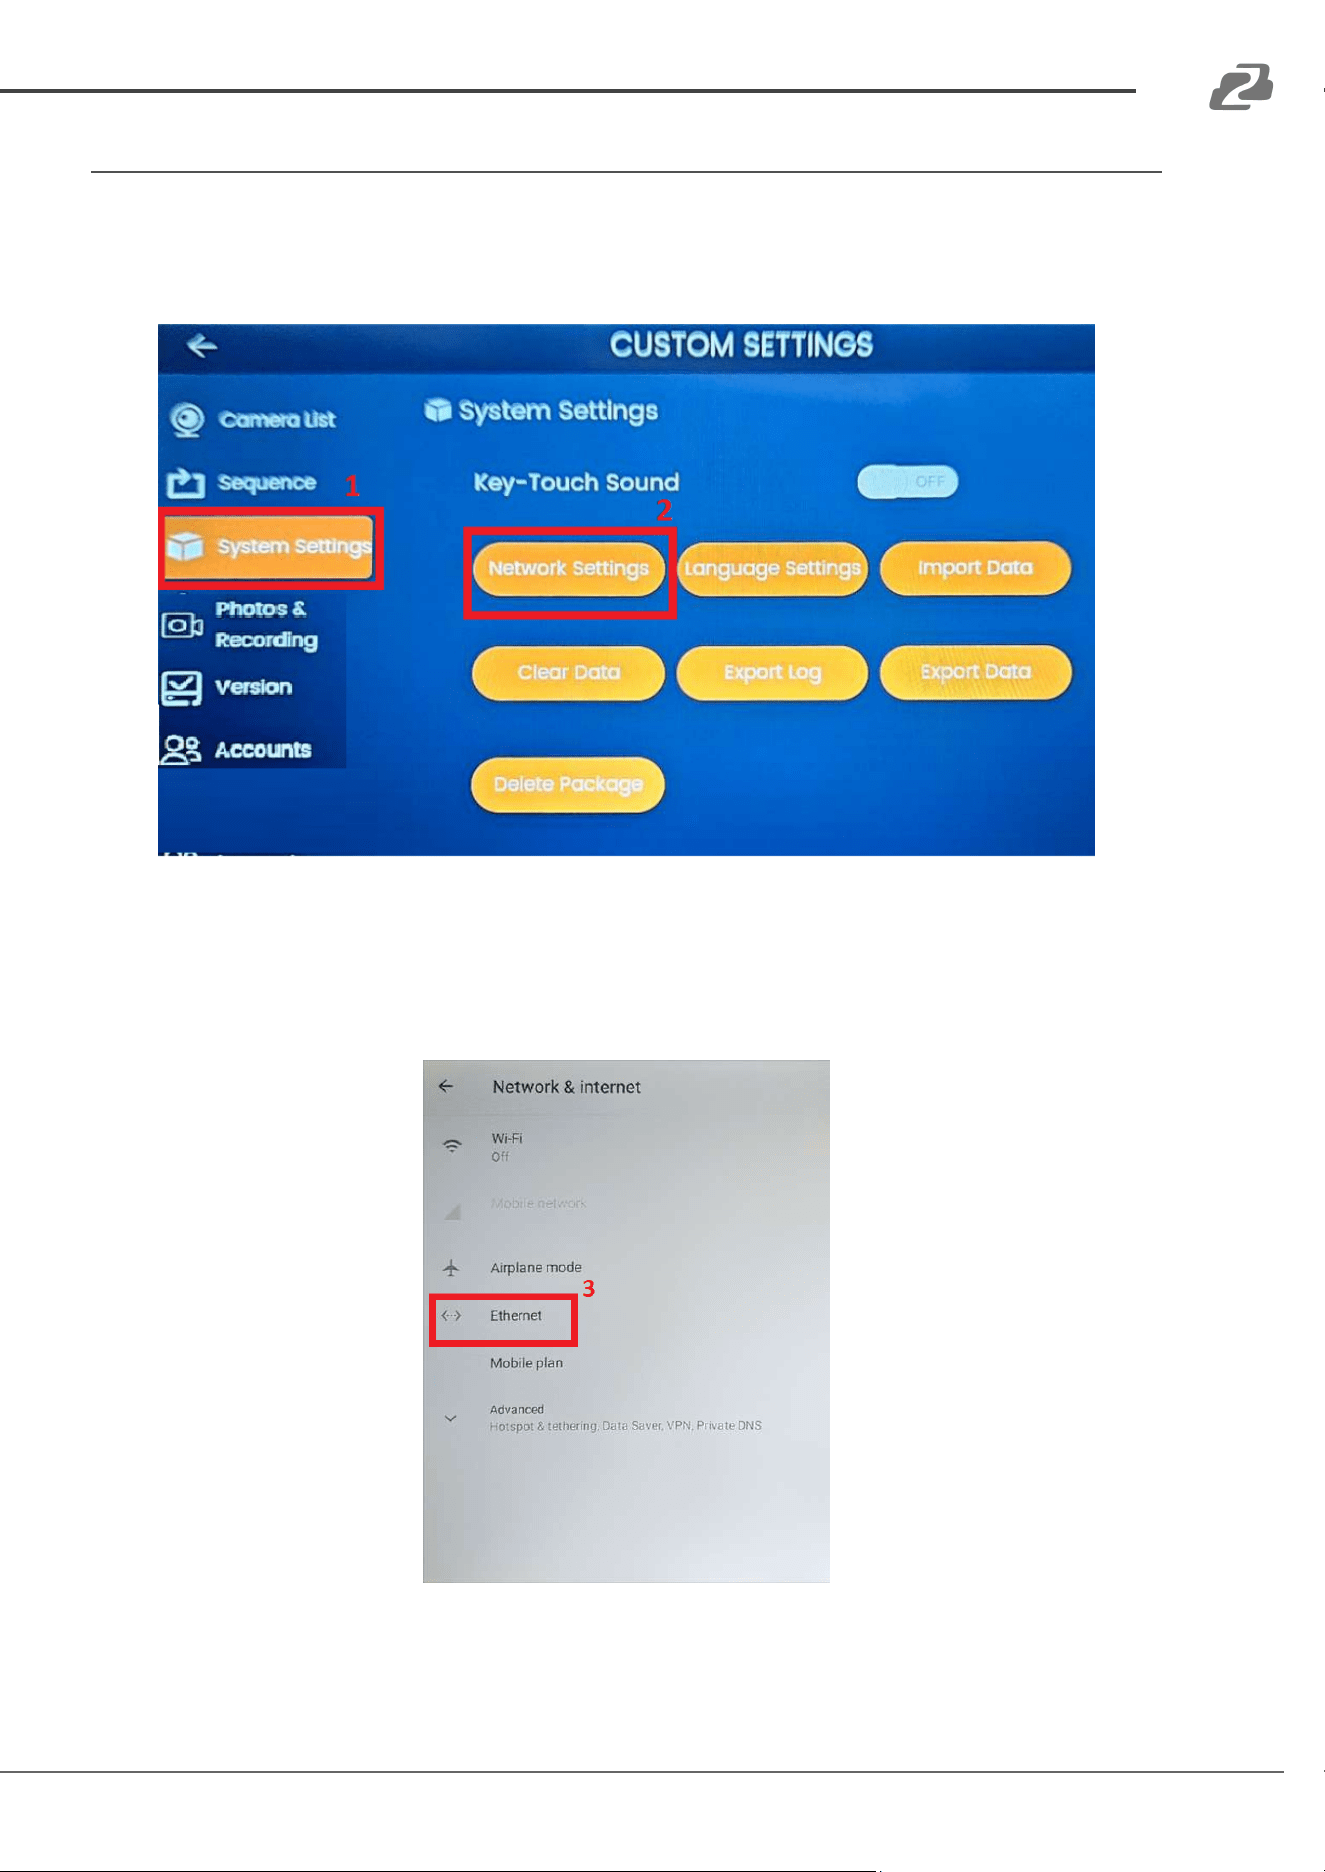
1. To modify your network settings, press the “System Settings” tab in the settings
2. Press the “Network Settings” option to open the Android settings menu.
3. On the Network & Internet page press “Ethernet”.
Note: The other settings on this page such as “Wi-Fi” and “Airplane” mode are not
functional.
Address: 830 National Drive #140, Sacramento, CA 95834, USA · Tel: +1(888)499-9906 · Email: support@bzbgear.com 18
BZBGEAR BG-COMMANDER-PRO PRODUCT MANUAL
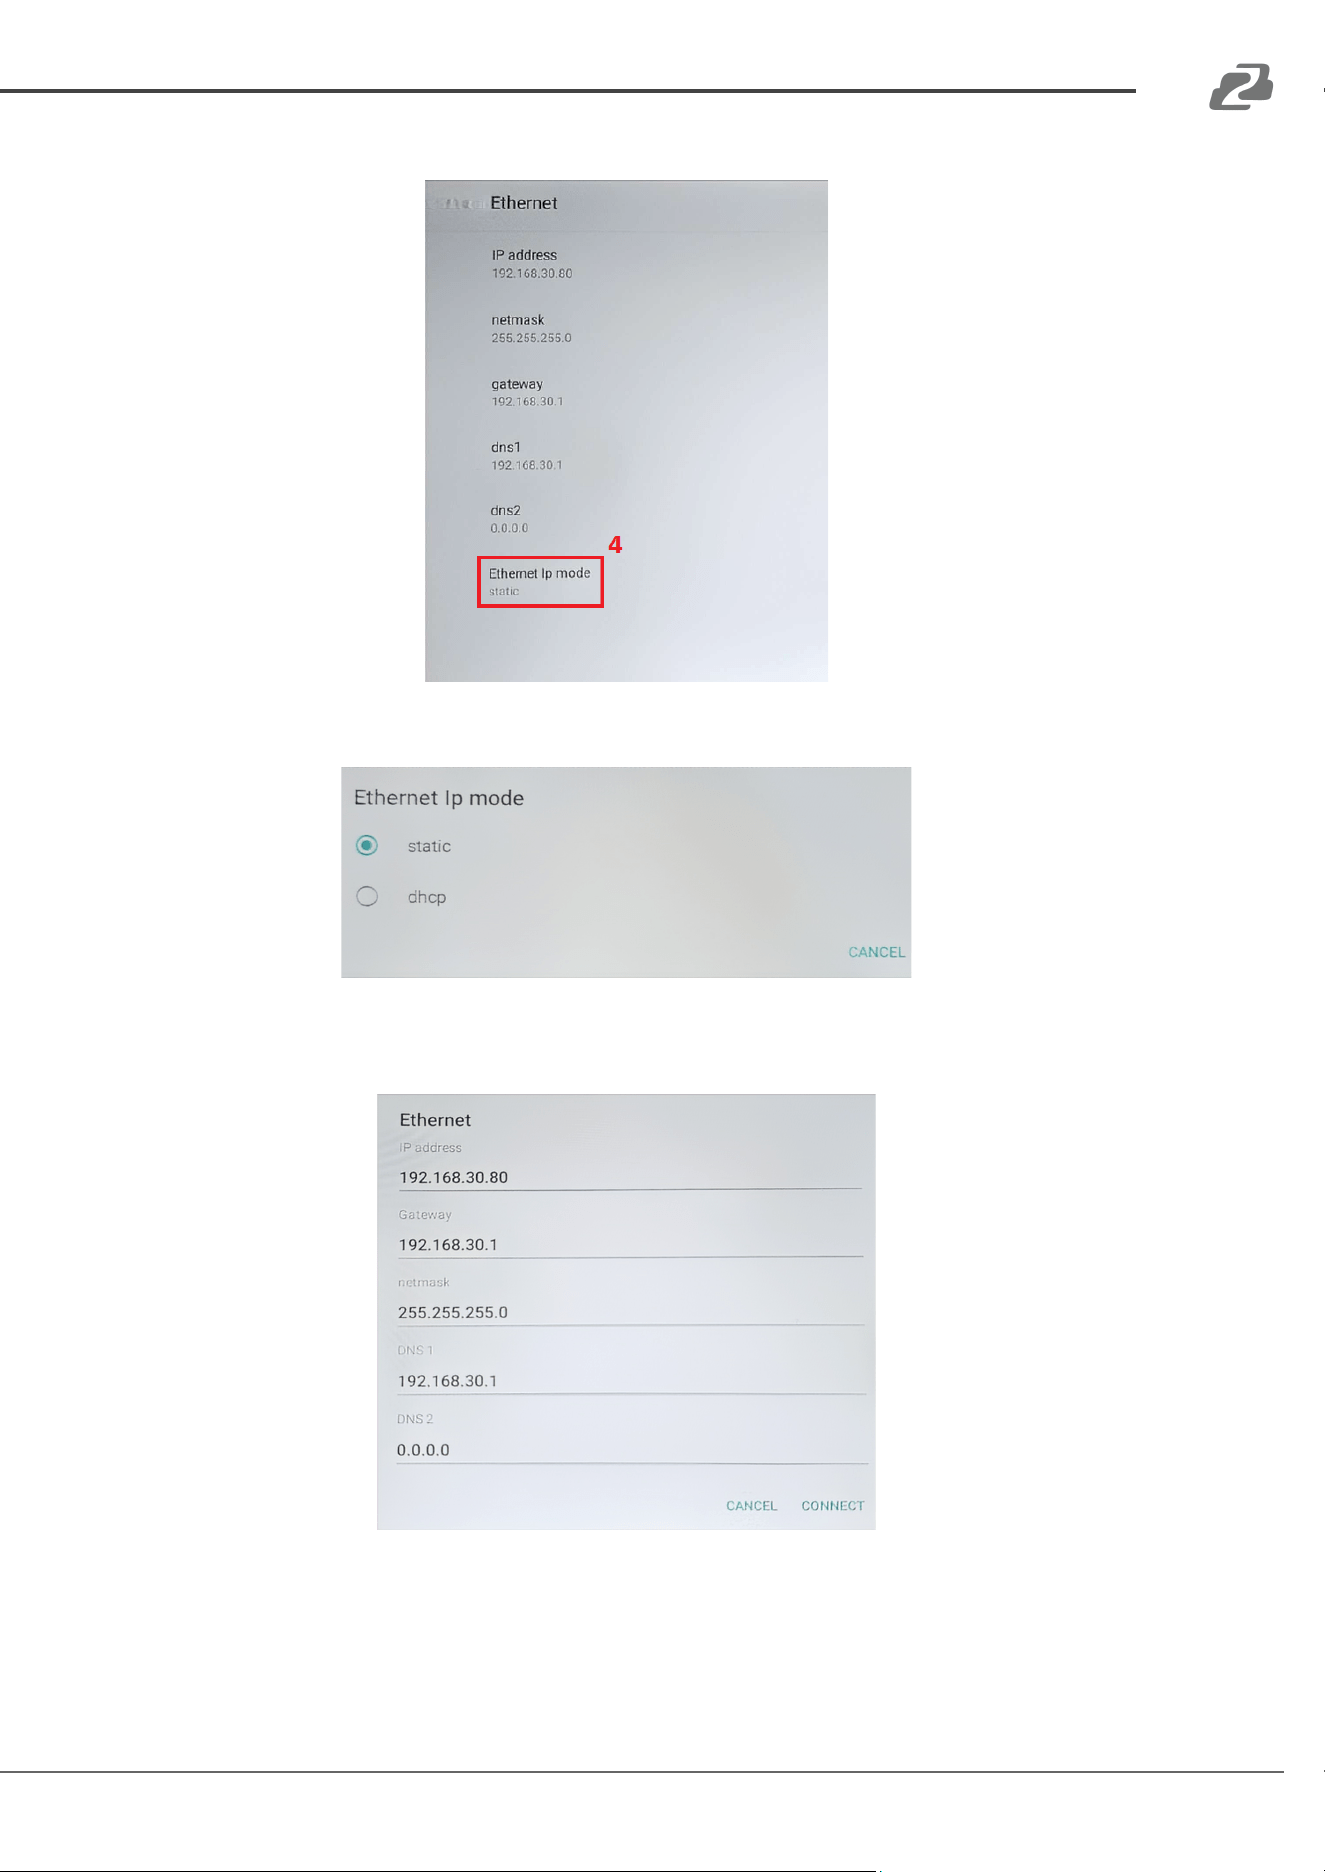
4. On the Ethernet page tap on the “Ethernet IP Mode” to begin modifying the settings.
5. Select the button for “Static” to open the IP settings.
6. Enter the desired information such as IP address, Gateway, Netmask, and then click
“Connect” at the bottom to save your configuration.
Address: 830 National Drive #140, Sacramento, CA 95834, USA · Tel: +1(888)499-9906 · Email: support@bzbgear.com 19
BZBGEAR BG-COMMANDER-PRO PRODUCT MANUAL
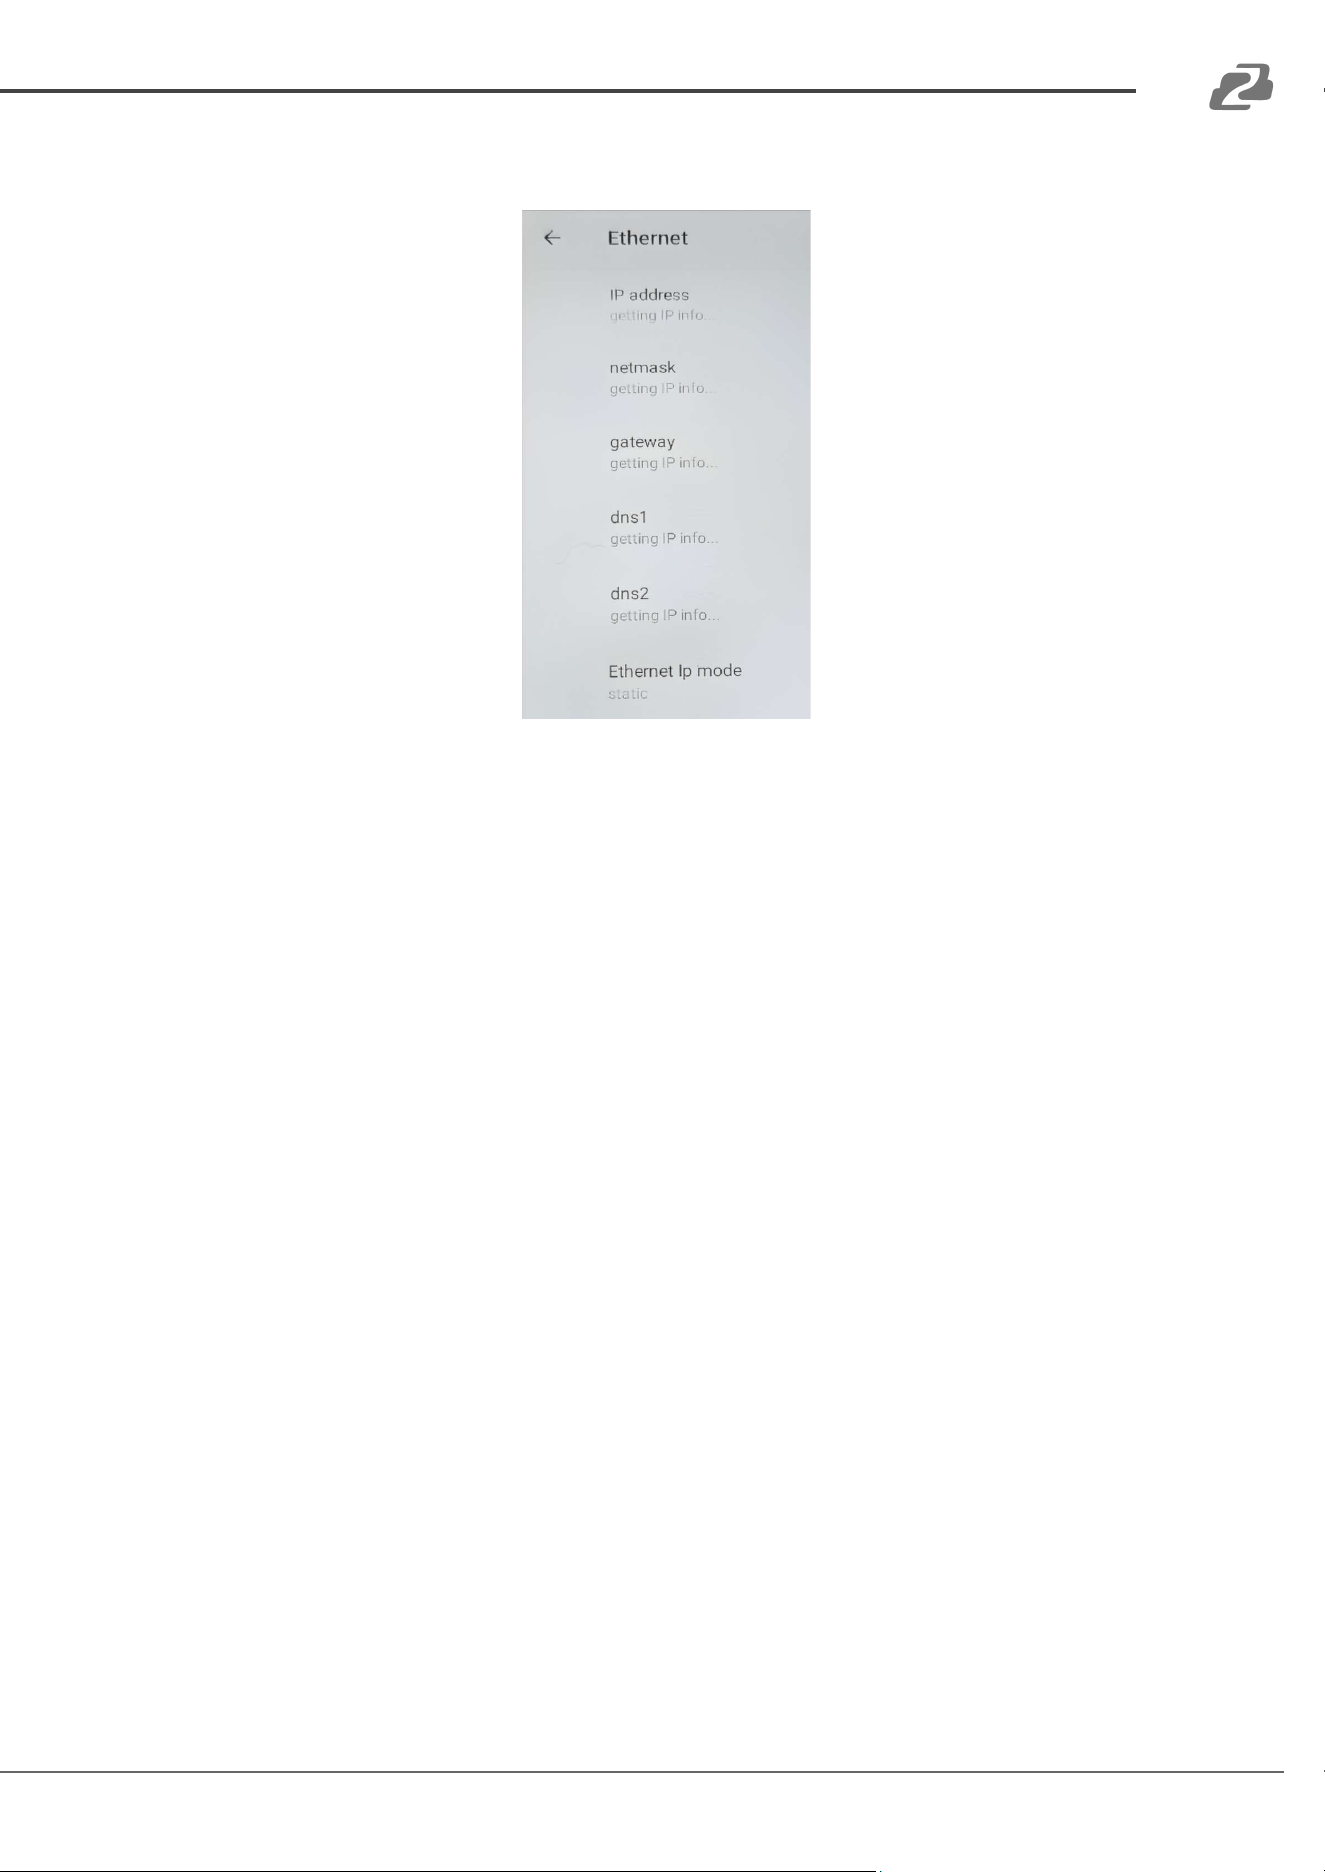
● You will be returned to the Ethernet menu which will display “getting IP info…” for each of
the settings.
○ Note: Wait on this screen until the configuration finalizes and then it will be safe to
reboot or navigate to the main screen.
Address: 830 National Drive #140, Sacramento, CA 95834, USA · Tel: +1(888)499-9906 · Email: support@bzbgear.com 20
BZBGEAR BG-COMMANDER-PRO PRODUCT MANUAL
Adding Cameras
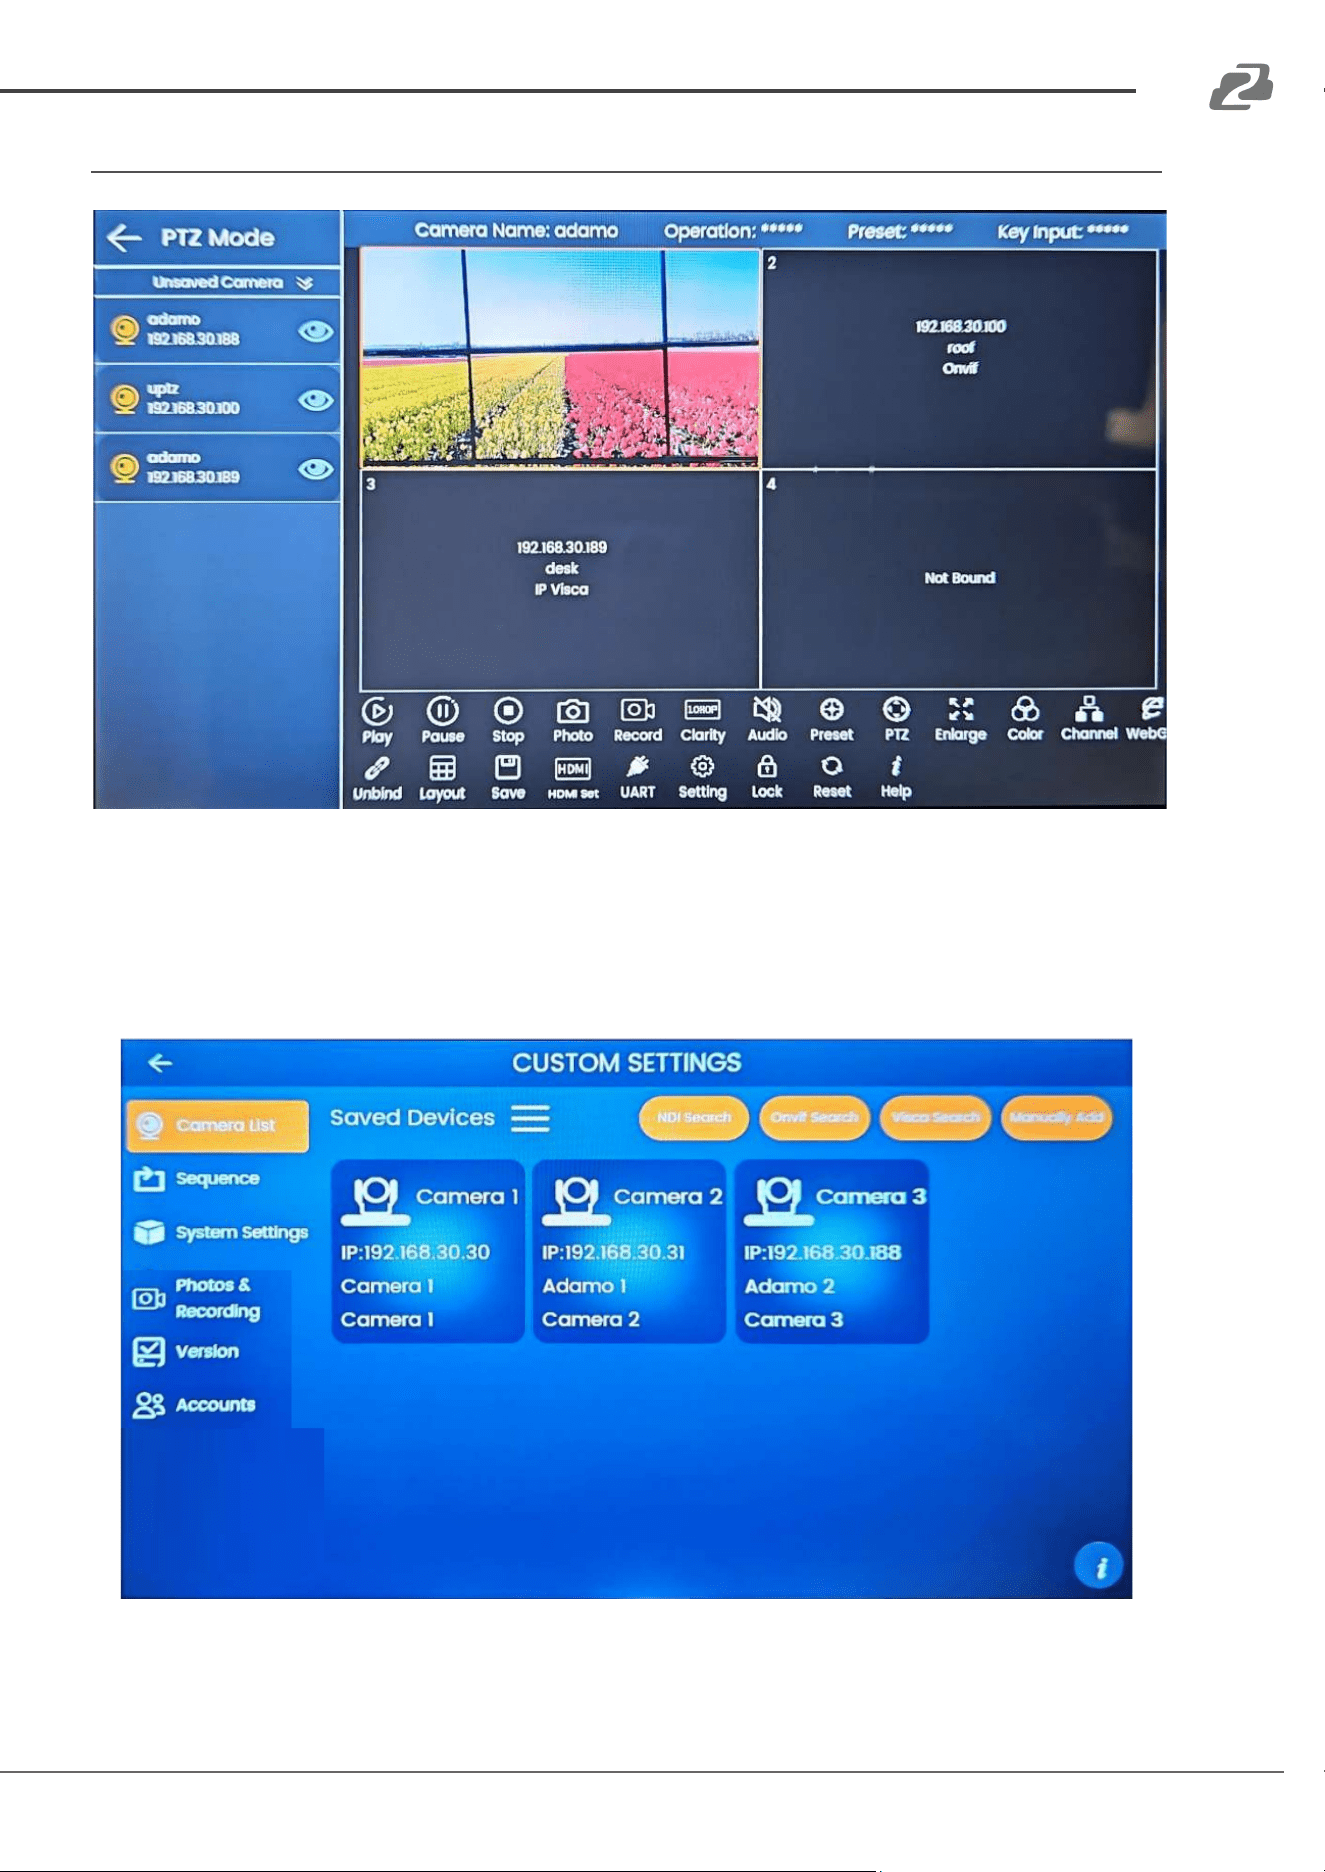
From the PTZ Control screen, users will have several options to manage and control cameras.
To start, it will be necessary to add a camera(s) to the unit for control. Press the “Settings” button
at the top of the main menu screen, at the bottom of the PTZ mode screen (shown above), or
press the physical “Setup” button on the keyboard while in the PTZ Mode screen. This will open
the “Camera List” settings menu as shown below.
Address: 830 National Drive #140, Sacramento, CA 95834, USA · Tel: +1(888)499-9906 · Email: support@bzbgear.com 21
BZBGEAR BG-COMMANDER-PRO PRODUCT MANUAL
Using the Protocol Search Functions to Add a Camera
By default, the controller is set to DHCP so it only needs to be connected to your network to begin
functioning and looking for devices. If there is no DHCP server or router present, see this manual's
“Network Settings” section for further instructions before continuing.
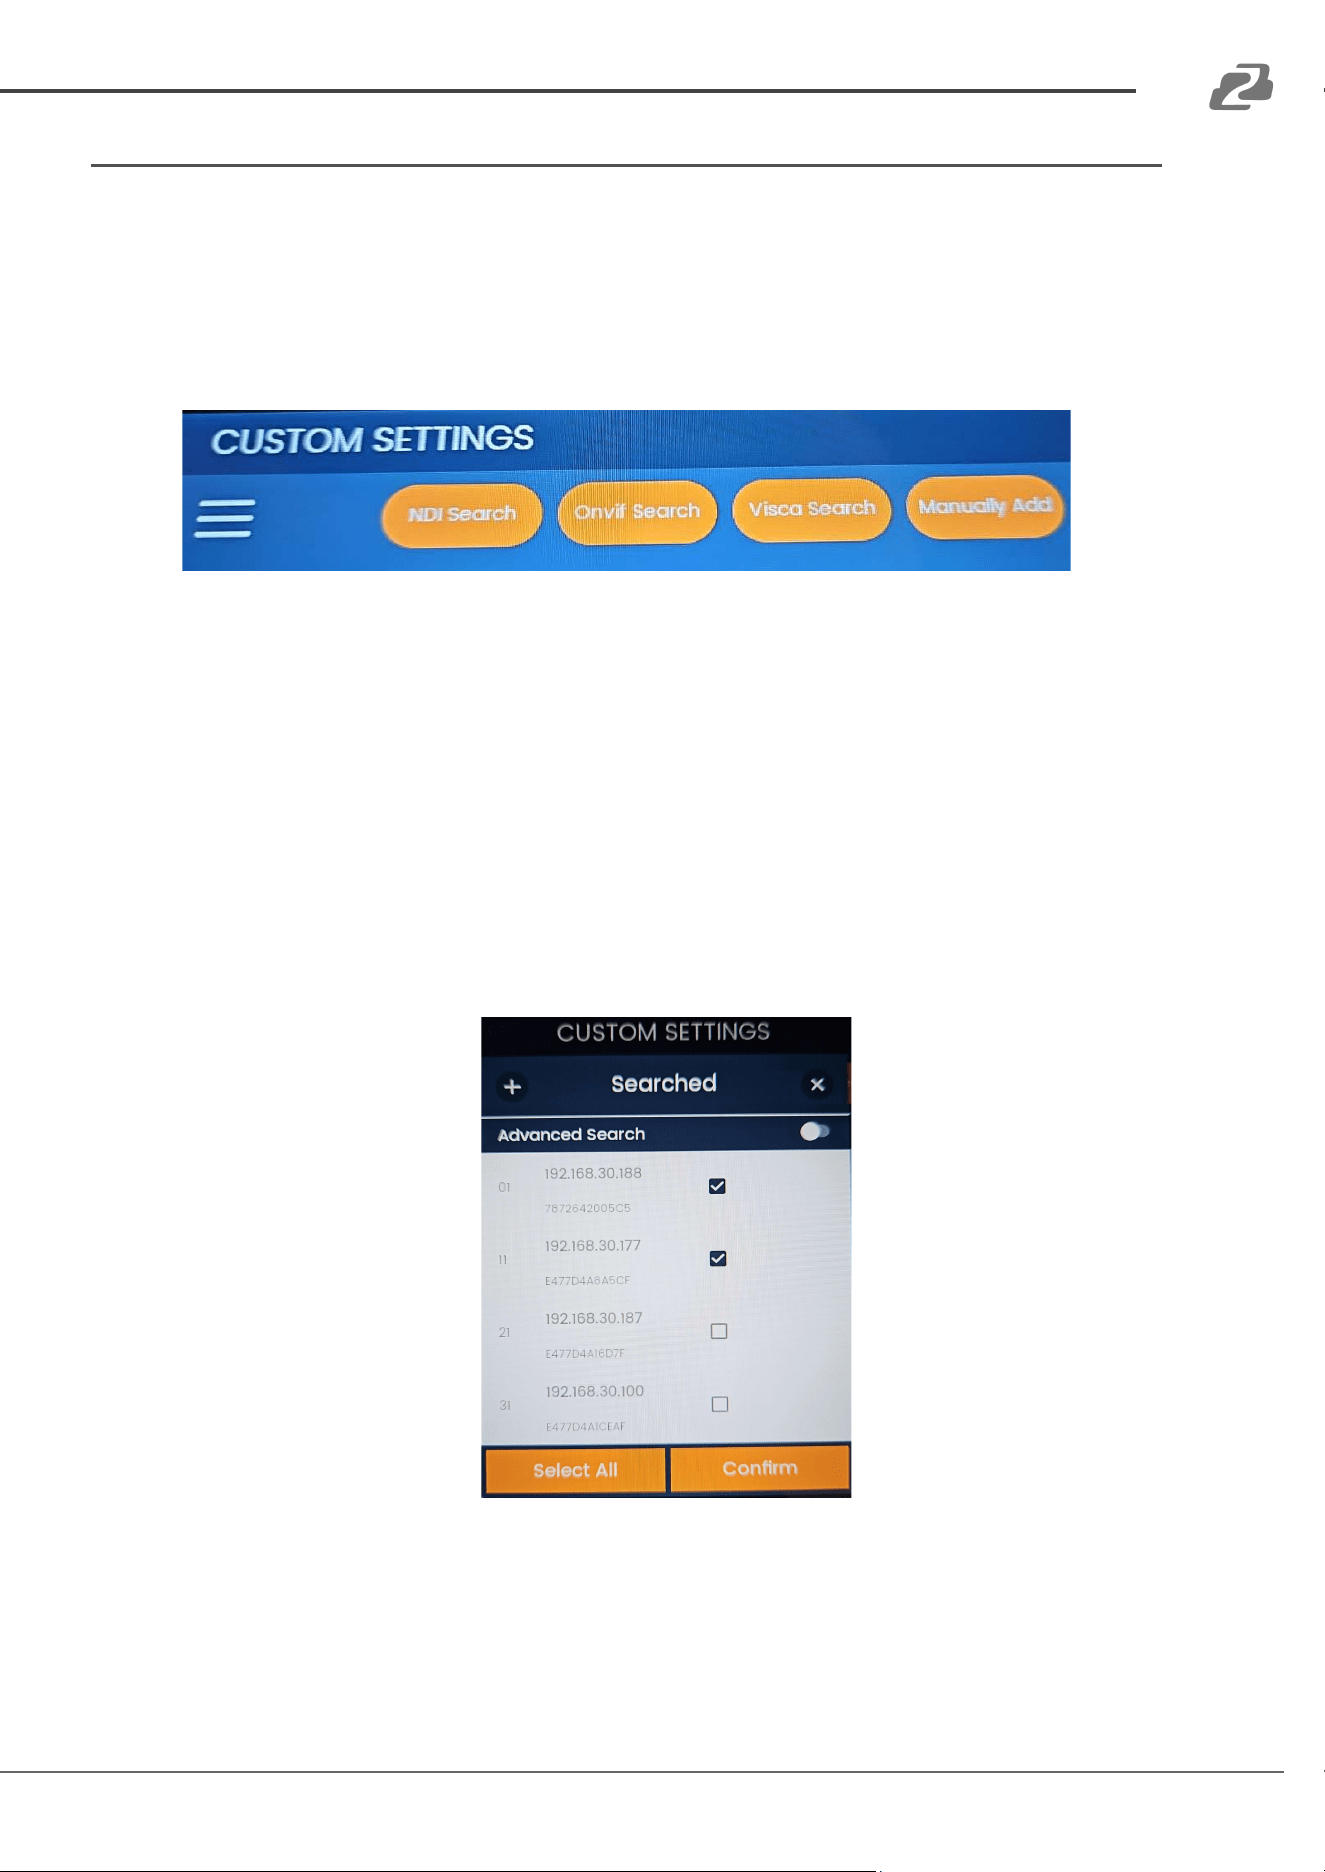
● To add a camera, select one of the control protocol search options at the top to
automatically search your network for available cameras, or use the “Manually Add”
function if none are found.
NOTE: The automatic searches are based on camera control protocols (ONVIF, VISCA, and NDI),
and not every camera supports every protocol. Choose your search function based on what your
camera(s) support. Likewise, please also keep in mind that due to the complexity of some
networks and devices, some or all cameras may not appear in the search results. In this case, it is
recommended to use the “Advanced Search” and “Manually Add” functions.
● After selecting a control protocol to search used by the cameras connected to the network,
a window will appear with any available units that the controller can see.
○ For BZBGEAR Cameras, it is recommended to use the VISCA Search / IP Visca
control protocols for the best compatibility and the most control options.
● Simply click the checkbox(s) to select a camera(s) to add, and then click “Confirm”.
● If no cameras or the desired cameras were not found in the initial search, ensure the
correct search protocol was used. Otherwise, use the toggle at the top of the window to
enable “Advanced Search”.
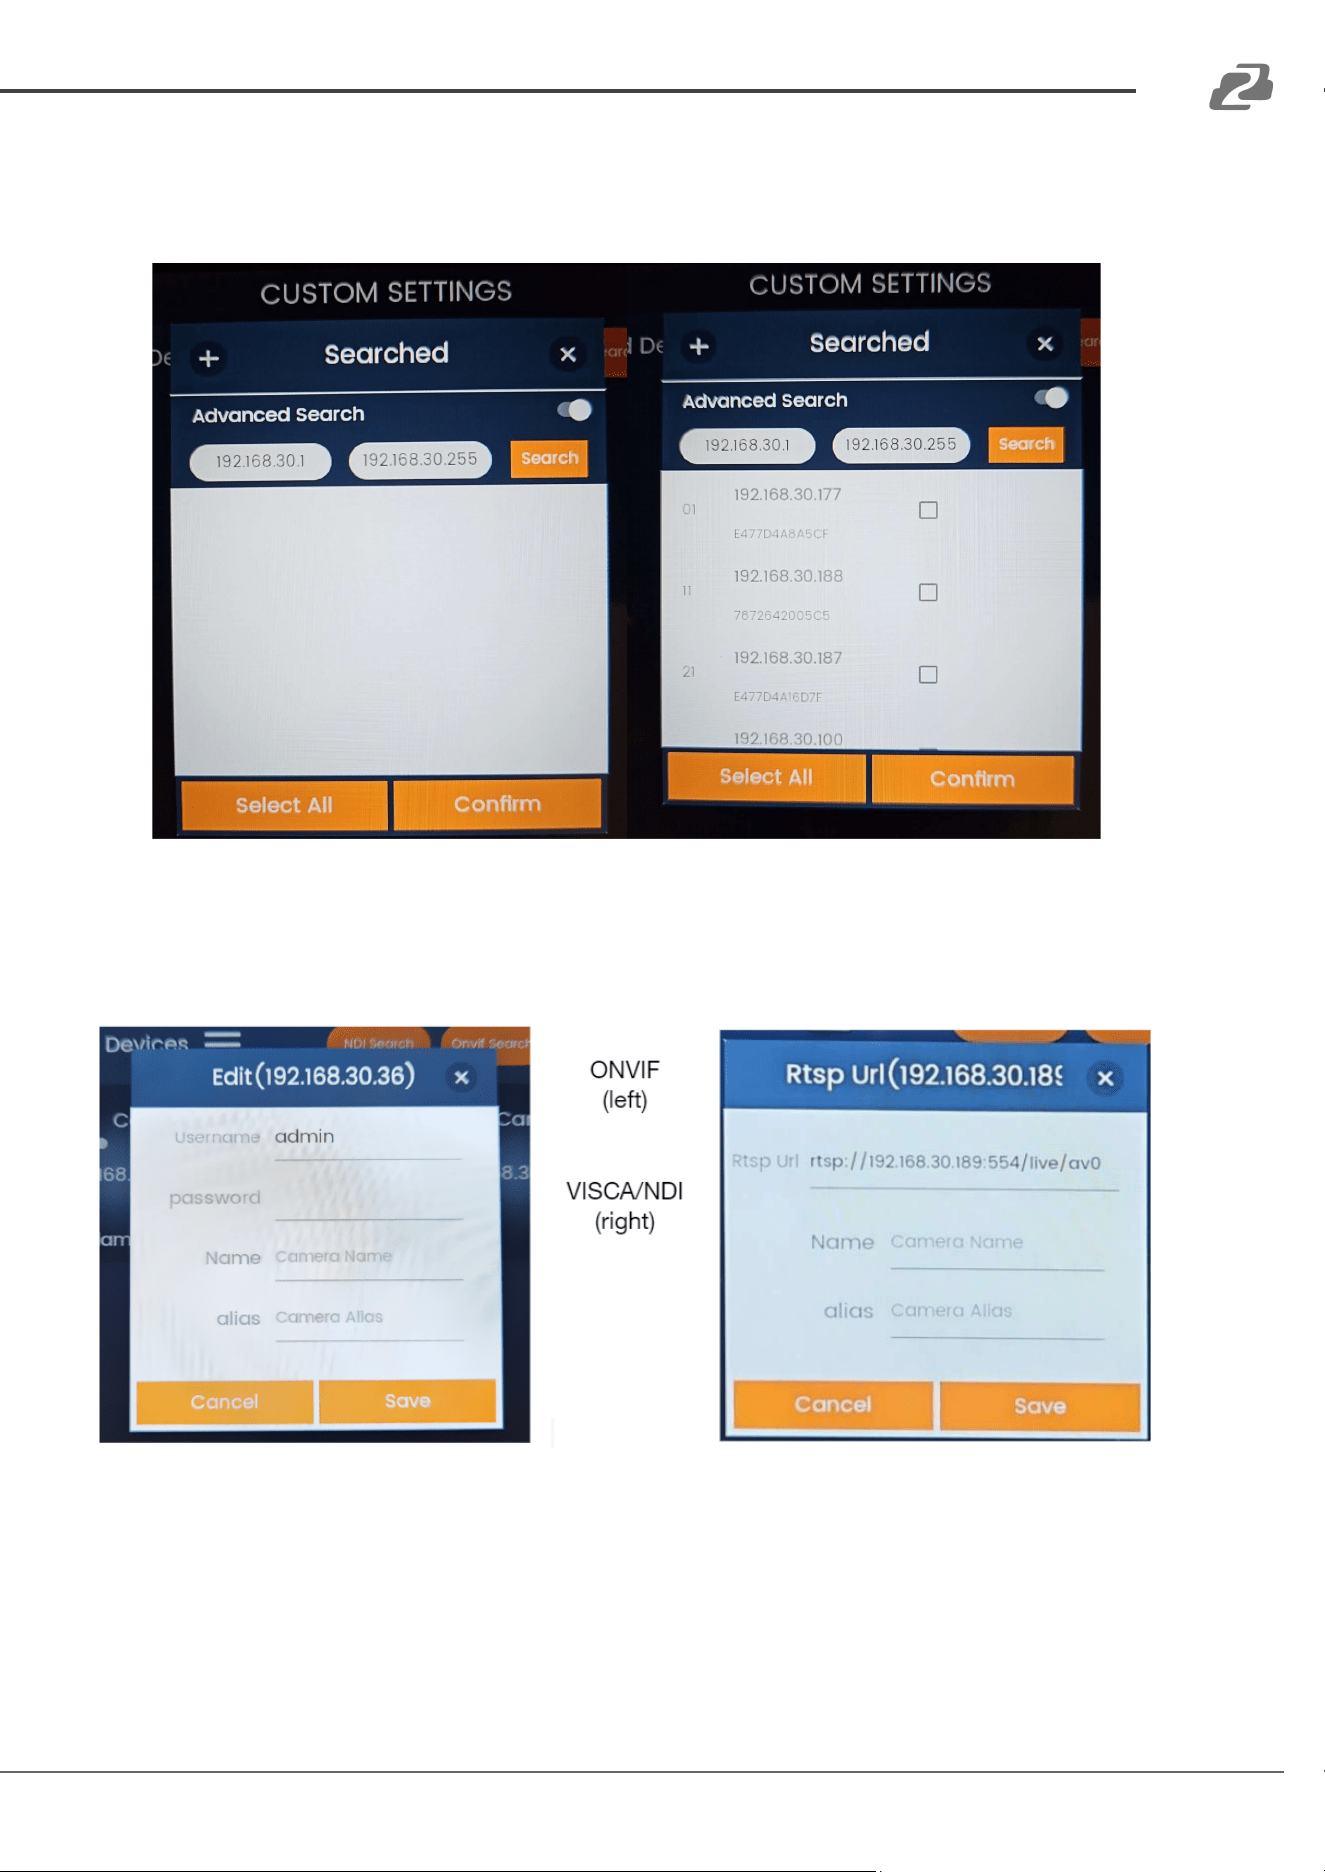
○ Advanced Search will automatically populate the IP Range of the subnet that the
controller is connected with as shown in the next figure. The IP Range should be
verified that it matches with what is expected and modified if necessary.
Address: 830 National Drive #140, Sacramento, CA 95834, USA · Tel: +1(888)499-9906 · Email: support@bzbgear.com 22
BZBGEAR BG-COMMANDER-PRO PRODUCT MANUAL
Note: Controller network settings may also need to be adjusted. See the
“Network Settings” section of this manual for more information.
○ Press the “Search” button to see if your cameras are now discoverable.
● Select the desired camera(s) and click “Confirm” to begin adding them to the system.
● Depending on the search mode used, one of two window options will appear as shown
below. If multiple cameras are selected the window will pop up for each unit.
● For ONVIF cameras, the camera’s password will be required (BZBGEAR cameras use
“admin” by default).
○ Enter a camera Name and Alias if desired to make the camera(s) easily identifiable
on the camera list.
○ If no Name or Alias is entered, the system will automatically generate a name based
on the order the camera was added.
Address: 830 National Drive #140, Sacramento, CA 95834, USA · Tel: +1(888)499-9906 · Email: support@bzbgear.com 23
BZBGEAR BG-COMMANDER-PRO PRODUCT MANUAL
● For VISCA and NDI searches, the RTSP stream link for BZBGEAR cameras will be listed at
the top and can be edited if necessary for 3rd party units.
○ Enter a camera Name and Alias if desired to make the camera(s) easily identifiable
on the camera list.
○ If no Name or Alias is entered, the system will automatically generate a name based
on the order the camera was added.
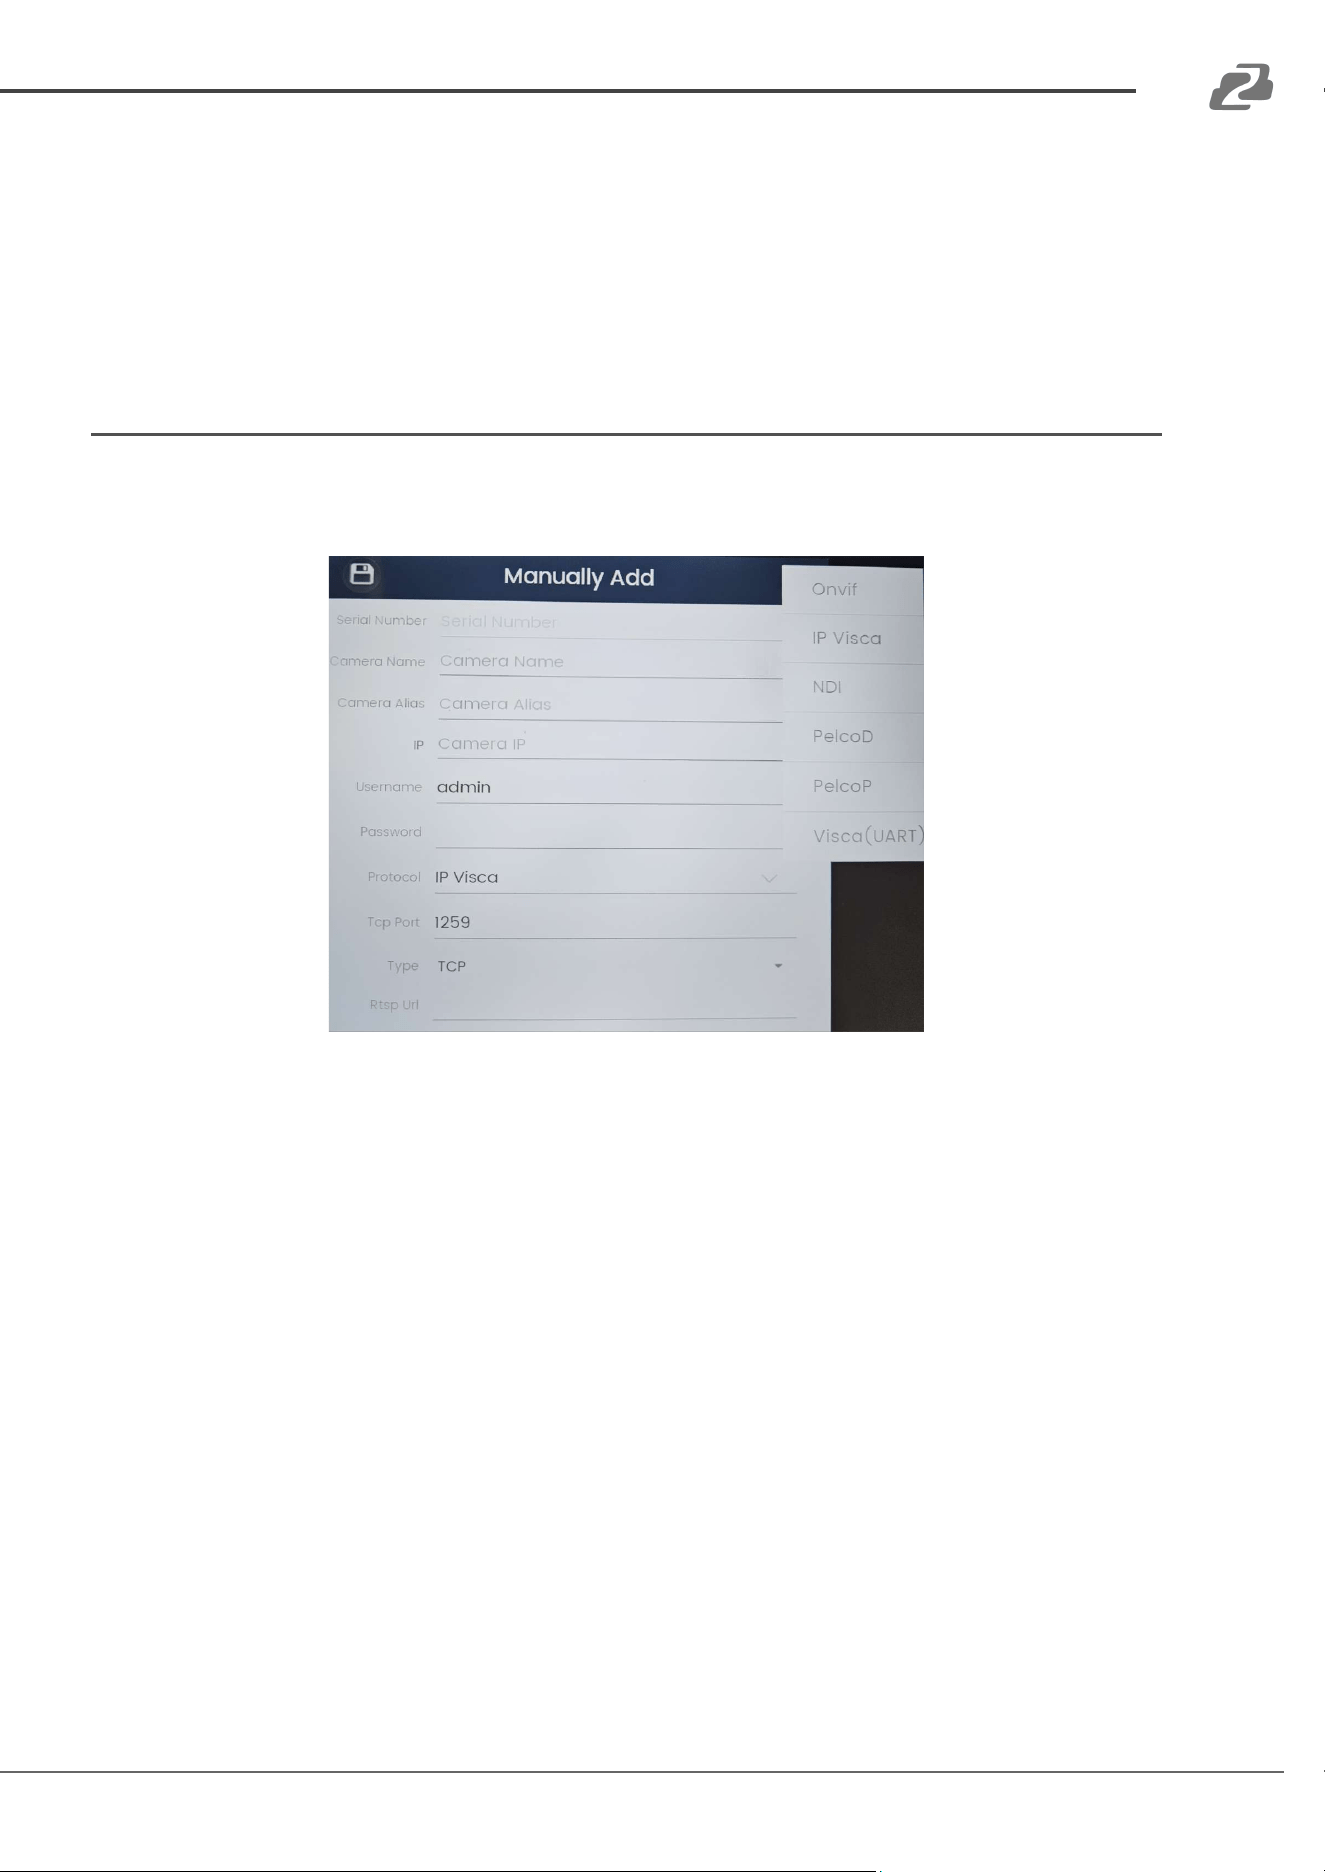
Manually Adding a Camera
● Use the “Manually Add” option if the search functions are having difficulty locating a
camera(s) on your network.
1. Select a “Protocol” from the dropdown menu that can be used to control the camera (IP
Visca is the default).
2. Type in the Port number used by the camera for the selected control protocol.
a. Ensure the control type (TCP or UDP) is correct for your camera.
3. Enter a Camera Name and Alias
4. Enter the Camera IP address
5. Type in the camera’s username and password
6. Type in the camera’s RTSP stream URL.
7. Once complete, press the save icon in the top left corner.
Address: 830 National Drive #140, Sacramento, CA 95834, USA · Tel: +1(888)499-9906 · Email: support@bzbgear.com 24
BZBGEAR BG-COMMANDER-PRO PRODUCT MANUAL
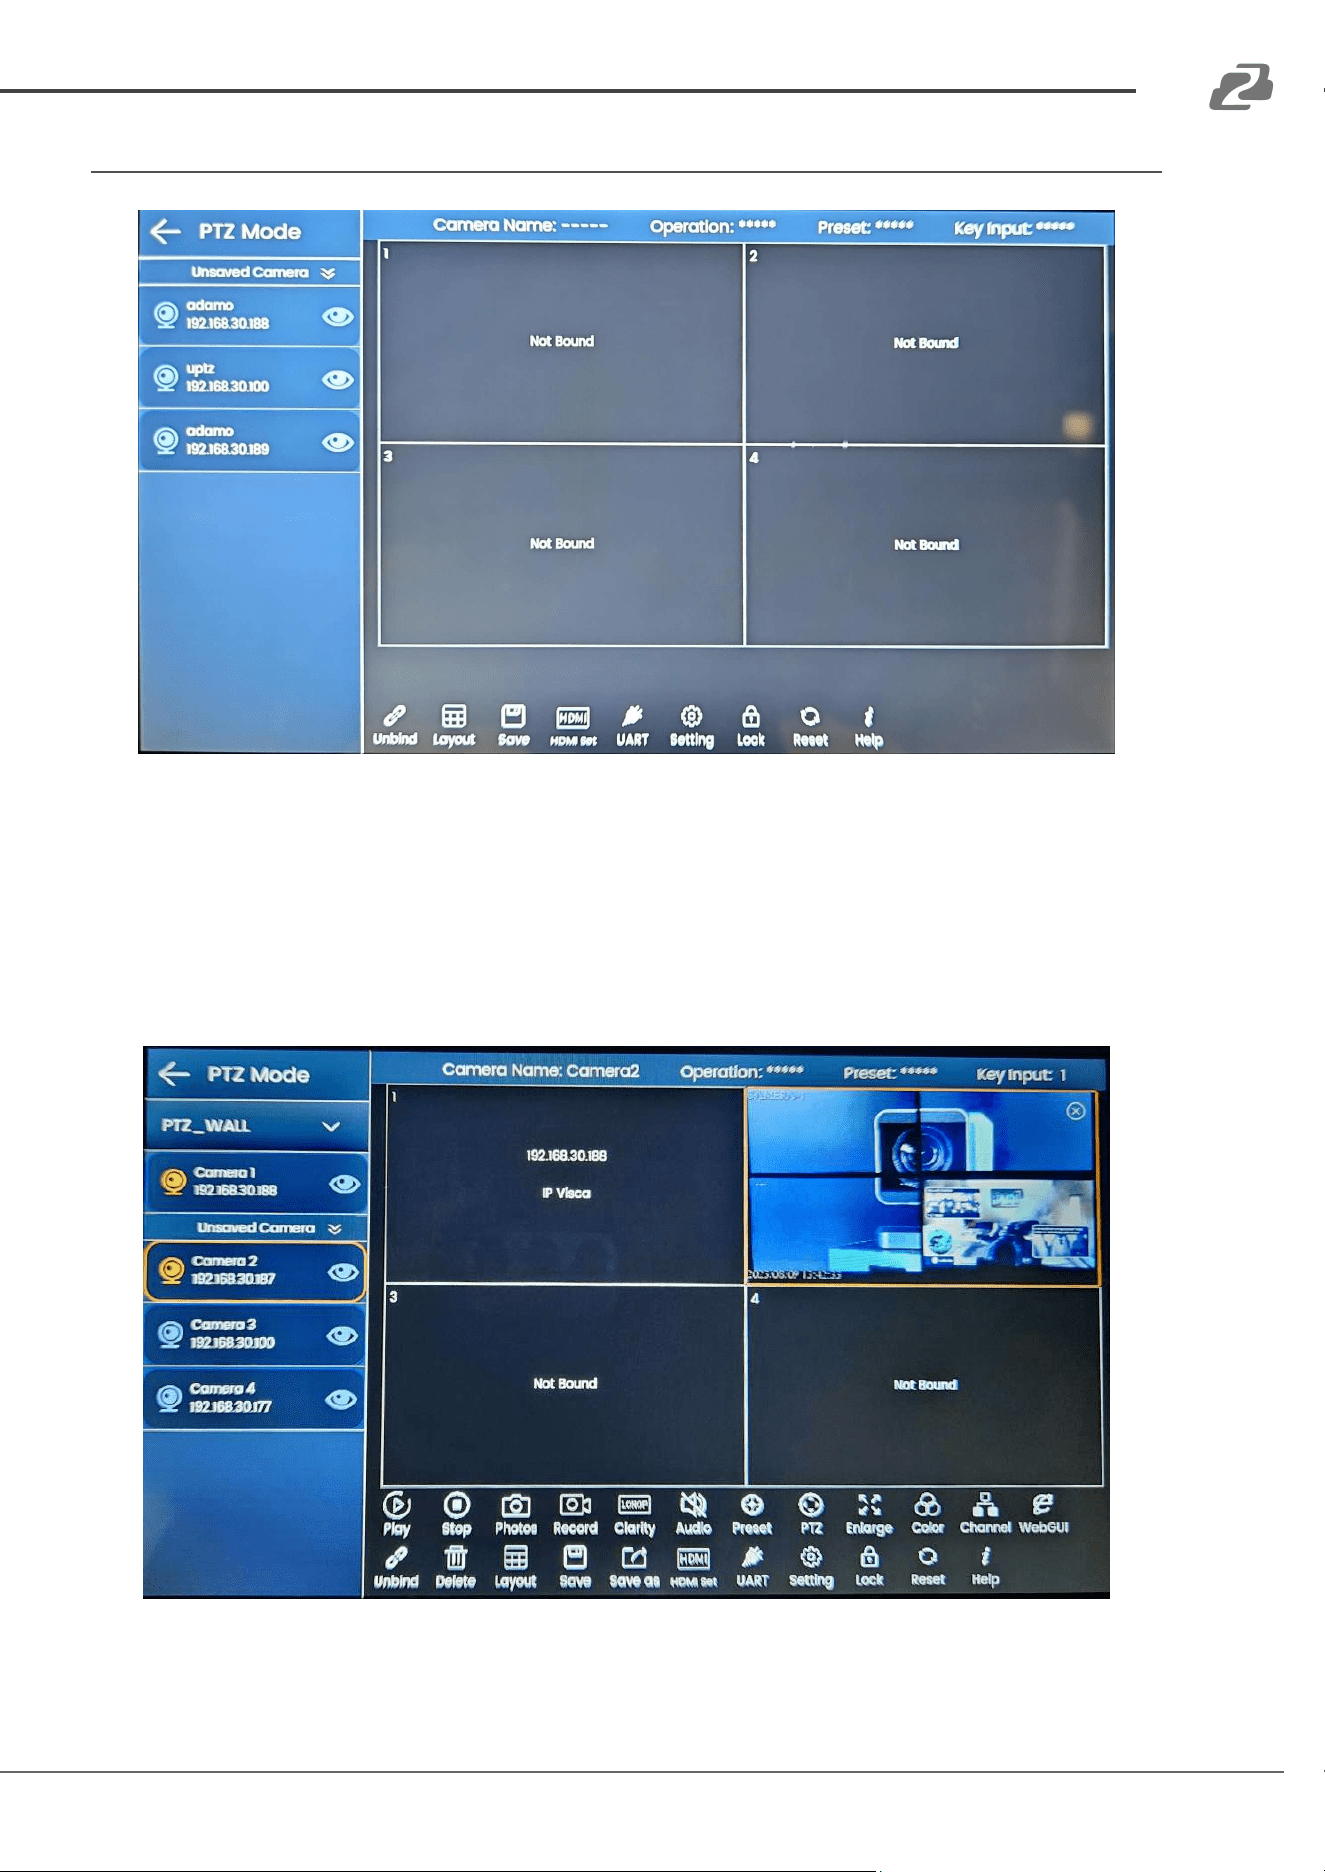
Controlling Cameras
● After successfully adding cameras to the controller they will be shown in the list to the left
of the PTZ grid.
● To control a camera, drag the camera to a position on the PTZ grid or tap the camera on
the list.
● Tapping a grid square or camera name will highlight the selected camera to be controlled
in an orange box and additional options will be shown across the bottom of the screen.
Address: 830 National Drive #140, Sacramento, CA 95834, USA · Tel: +1(888)499-9906 · Email: support@bzbgear.com 25
BZBGEAR BG-COMMANDER-PRO PRODUCT MANUAL
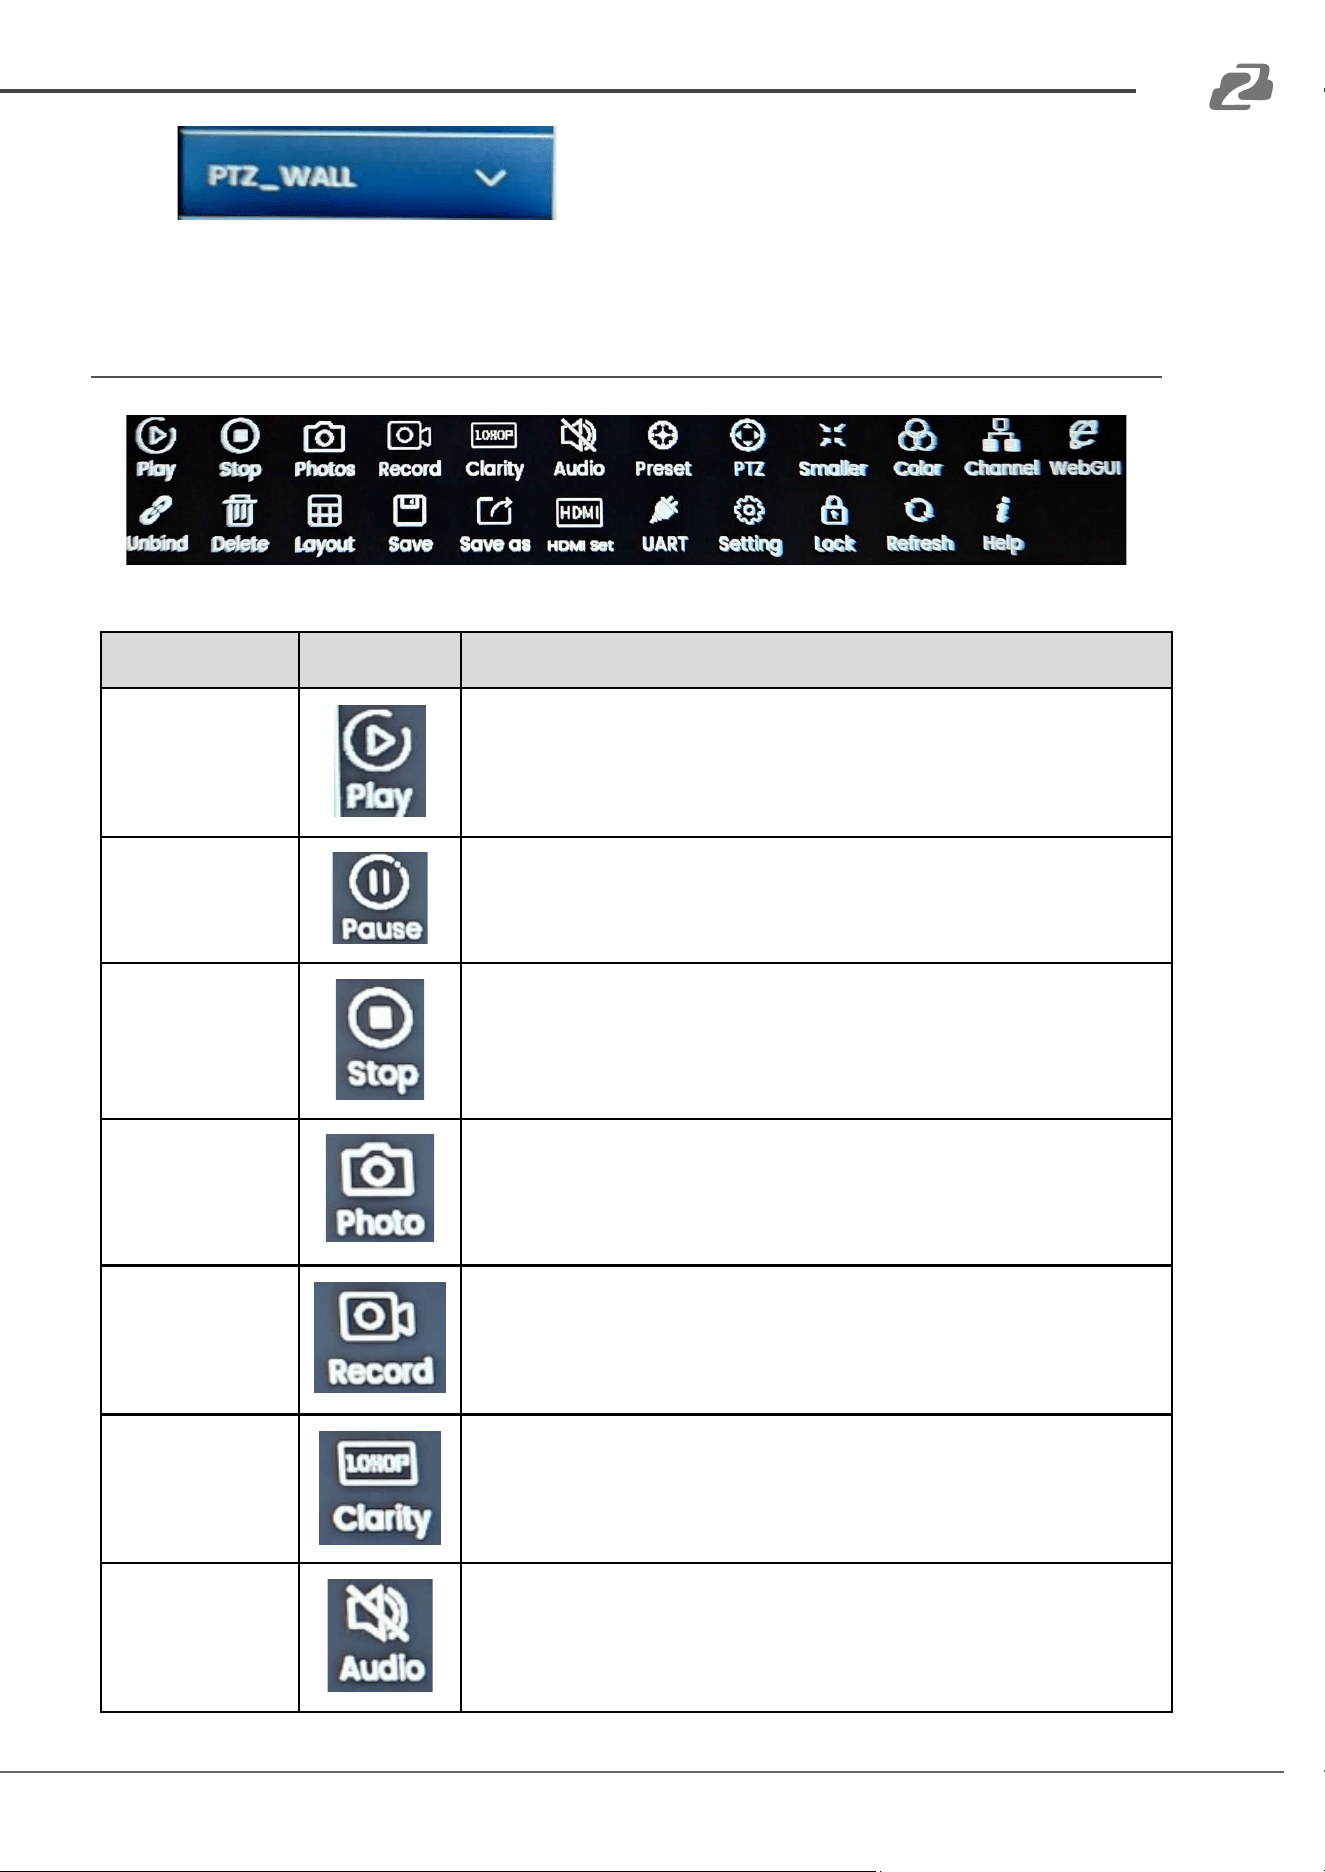
●
Pressing the “PTZ_Wall” or Scene dropdown at the
top of the list will allow users to select and recall previously saved grid configurations if
they are available.
Camera Control Options
● There are several camera control options once a camera is added to the unit and selected.
Button Name
Button Icon
Description
Play
Play will display the RTSP stream of the selected camera in the
grid.
Pause
Pause will freeze the current image of the RTSP stream shown
for the selected camera. Pressing play again will resume the
play back.
Stop
Stop will turn off the RTSP stream of the selected camera on
the controller.
Photo
Photo will take a screenshot from the selected camera’s RTSP
stream playback. Photos can be exported using Micro-SD
cards or USB flash drives.
Record
Record will start a capture of the selected camera's RTSP
stream and save it to the controller. Recorded files are saved
as .MP4 and can be exported using Micro-SD cards or USB
flash drives.
Clarity
Switch the resolution of the RTSP playback on the controller
between 1080p and HD.
Audio
Enable or disable the audio from the RTSP stream if available.
Audio is captured while using the Record option or output
through the 3.5mm Stereo mini audio port on the back of the
unit.
Address: 830 National Drive #140, Sacramento, CA 95834, USA · Tel: +1(888)499-9906 · Email: support@bzbgear.com 26
BZBGEAR BG-COMMANDER-PRO PRODUCT MANUAL
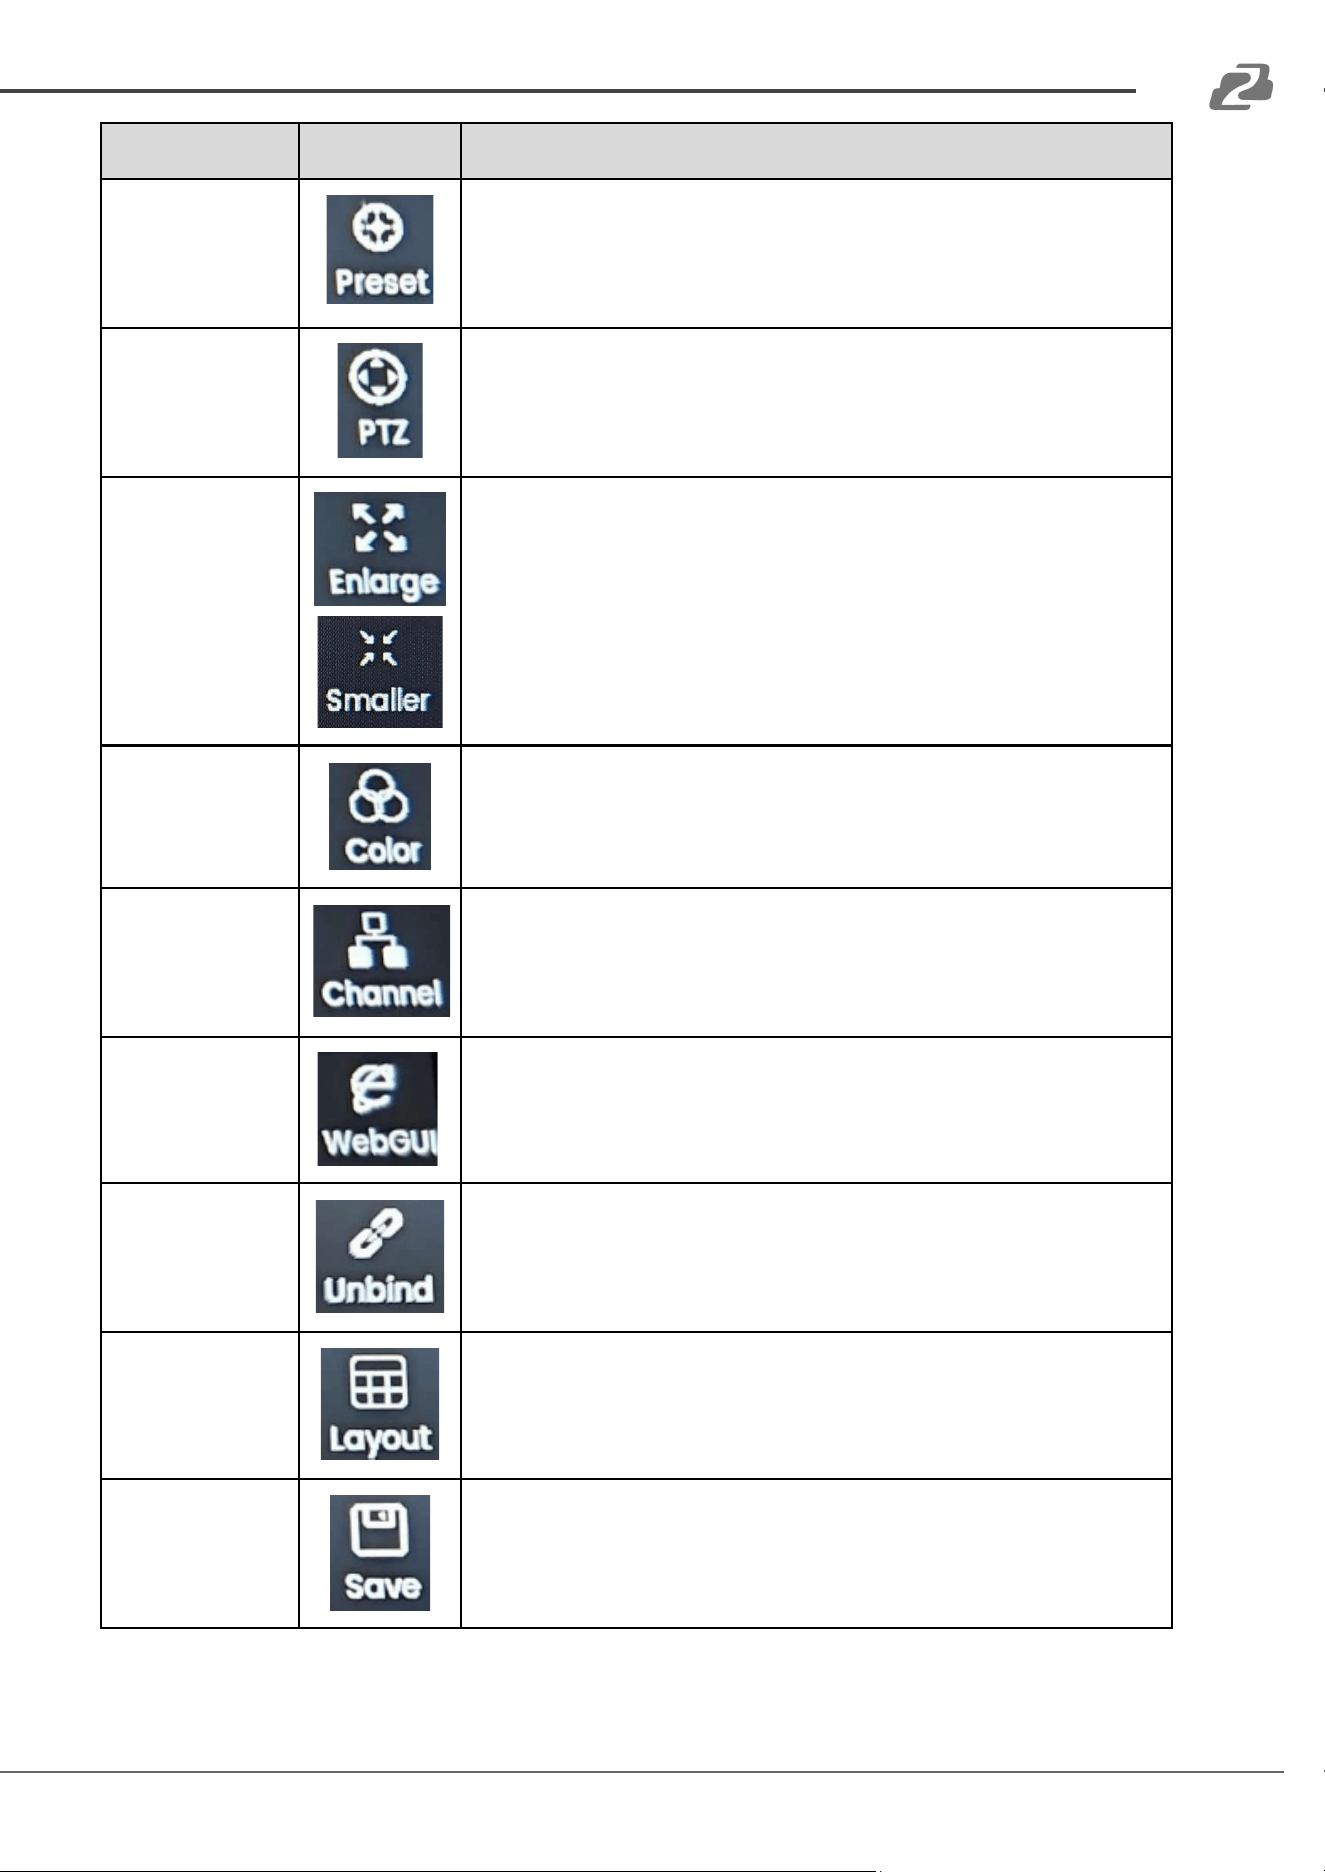
Button Name
Button Icon
Description
Preset
Preset opens a menu on the left hand side of the screen. Users
can view/recall saved presets, edit preset names, delete
presets, and add new presets. Presets added using the
physical button methods can also be modified.
PTZ
PTZ will display an on screen joystick controller for the
selected camera, the Patrol settings menus, as well as some
basic camera settings such as auto focus, PTZ speed, and
IRIS control.
Enlarge
&
Smaller
Enlarge will play the selected RTSP stream playback in full
screen on the tablet. Pressing Smaller will return the controller
to its normal working mode.
Color
Color gives you the ability to control several camera settings
on screen such as Brightness, Red Gain, Blue Gain, Exposure,
Auto White Balance, and Auto Exposure.
Channel
Channel will display the camera address depending on the
protocol that was chosen when it was initially added.
WebGUI
WebGUI will open the web interface of the camera if one is
available and display the current user credentials across the
top to login. The web interface functions as if you had
accessed your camera from a web browser on a computer.
Unbind
Unbind will remove all Saved cameras from the PTZ control
grid.
Layout
Change the PTZ control grid size (1x1 or 2x2).
Save
Save the active PTZ Wall’s current camera layout. When the
unit is rebooted or a user logs in the grid will populate
automatically.
Address: 830 National Drive #140, Sacramento, CA 95834, USA · Tel: +1(888)499-9906 · Email: support@bzbgear.com 27
BZBGEAR BG-COMMANDER-PRO PRODUCT MANUAL
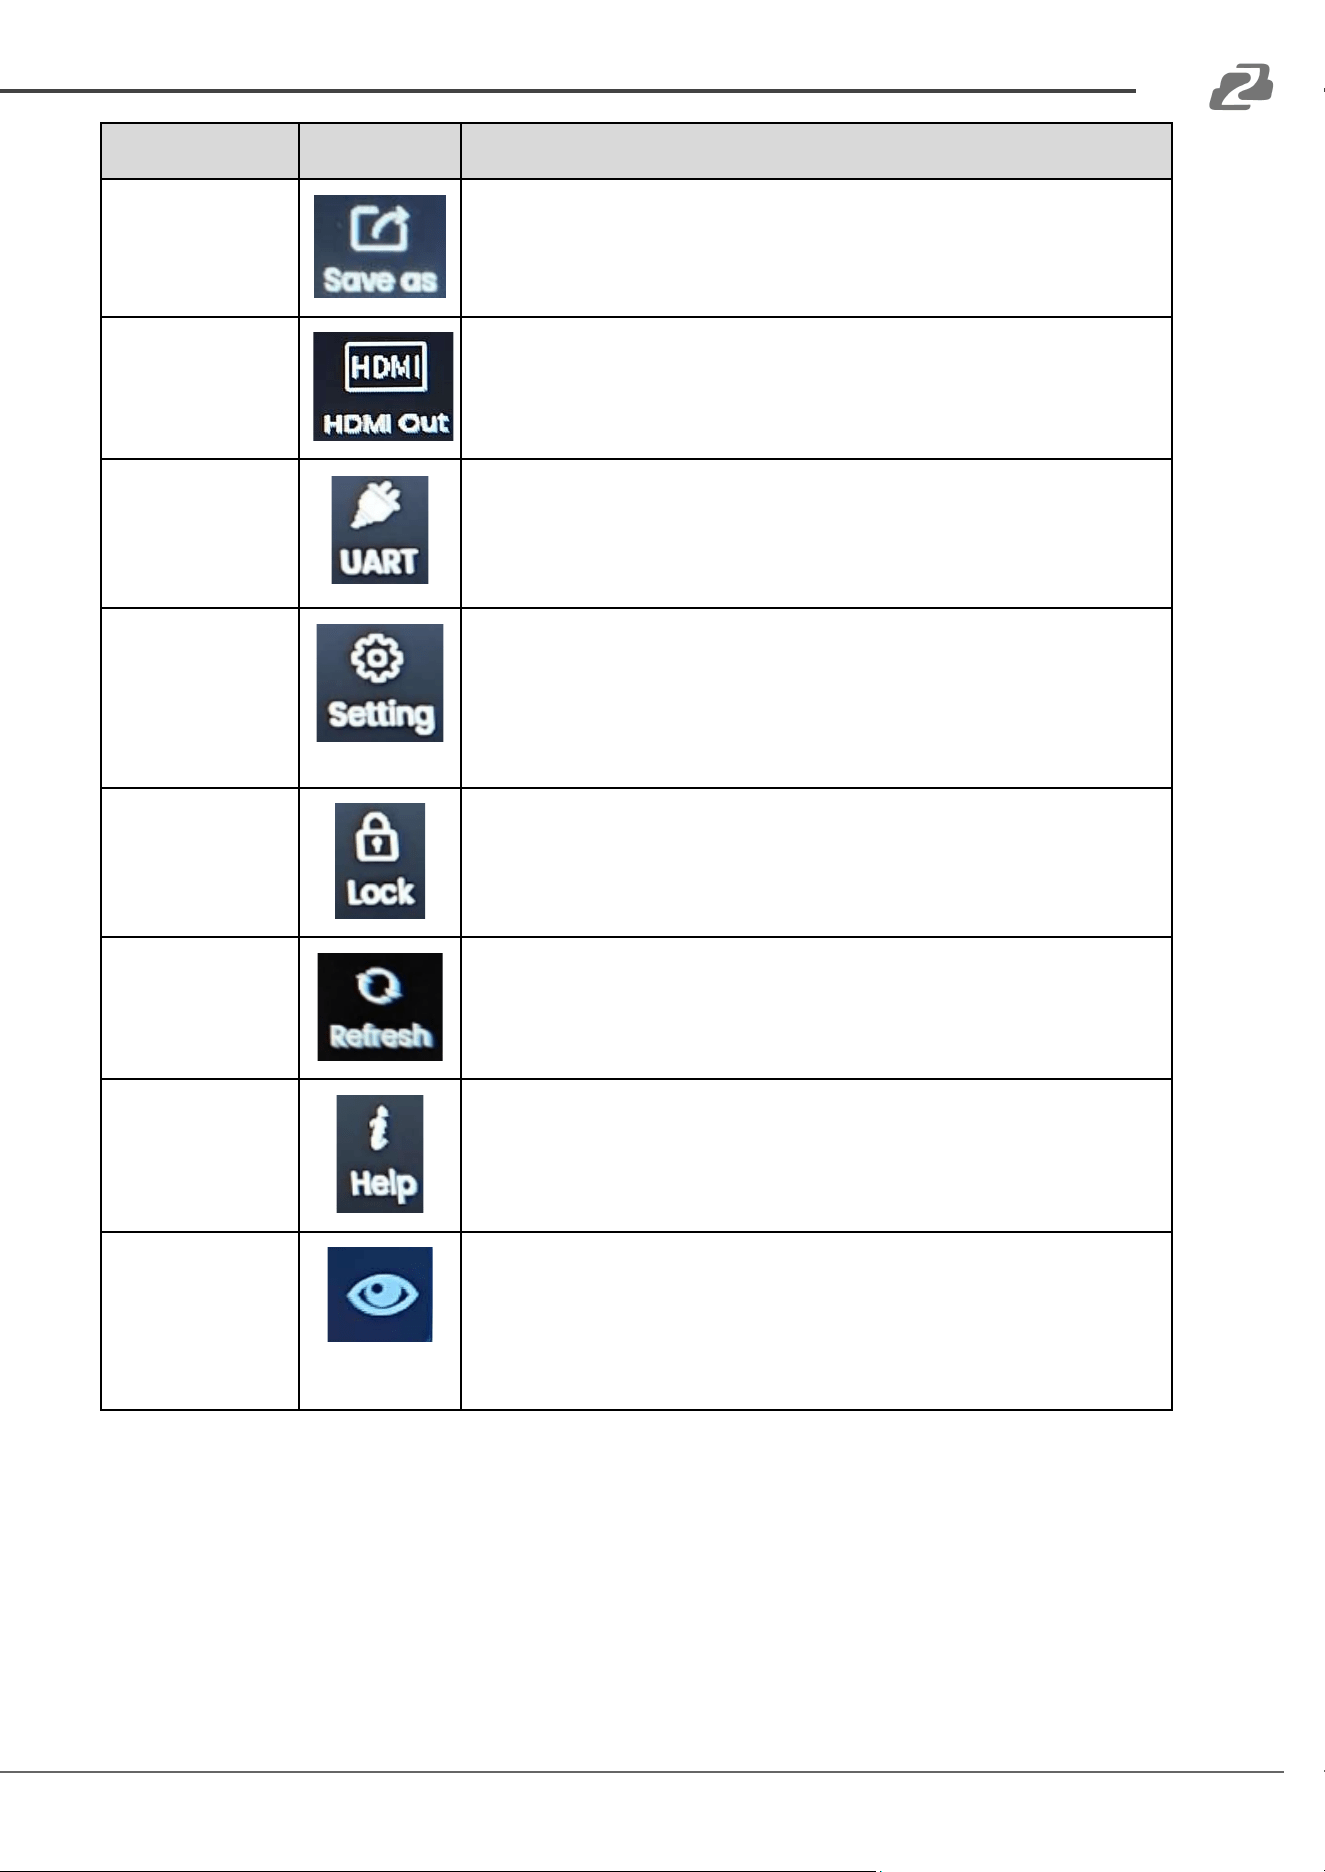
Button Name
Button Icon
Description
Save as
Save the PTZ Wall’s current camera configuration as a new
layout.
HDMI Out
Set the HDMI output to mirror the control interface, a full
screen image of the current camera, or a saved PTZ grid
scene as a 2x2 multiview.
UART
Use UART to add and manage serial controlled cameras.
Change settings such as camera name, address, RTSP
stream, Com port in use on the controller, Baud rate, and
protocol.
Setting
Open the controller settings menu to control device settings.
Add/remove cameras or set camera sequences for TV Wall
mode. View and edit system settings such as network, display,
language, and more. View and export screenshots, recording,
or view and update the controllers firmware.
Lock
Press Lock to lock the touch screen. Press and hold anywhere
on the screen to unlock
Refresh
Refresh the PTZ wall camera streams and information.
Help
Open the on board user manual.
Stream Preview
Pressing the eye will open a small preview stream of the
selected camera if one is available. For “Unsaved” cameras
that are not on the grid but highlighted in orange on the list,
they can be controlled with the help of this preview mode, but
will have reduced options across the bottom of the screen.
Address: 830 National Drive #140, Sacramento, CA 95834, USA · Tel: +1(888)499-9906 · Email: support@bzbgear.com 28

BZBGEAR BG-COMMANDER-PRO PRODUCT MANUAL
Patrol
The Patrol feature allows users to set multiple PTZ cameras to automatically path between a
selection of chosen preset positions. This is especially useful when monitoring large areas with
multiple cameras. It can be useful to have cameras not controlled by the joystick user checking
predetermined locations automatically.
In environments where multiple cameras are present, it may be useful to utilize this function in
conjunction with TV Wall mode for extra monitoring capabilities. Multiple cameras can be set to
Patrol simultaneously.
Patrol patterns are set individually for each camera using their unique presets. Each camera can
have multiple patrol patterns saved but only one pattern per camera can be active at a time.
● On the desired camera, first set your preset positions. There needs to be at least 2 preset
positions on a camera for the Patrol feature to work properly.
○ See the previous “Camera Control Options” chart, or “Button Descriptions” section
of this manual for instructions on managing presets.
● With the desired camera selected, press and hold the “Patrol” button on the keypad for 3
seconds or until a message instructing you to release the button appears to show the
Patrol pop-up window.
1. Press the “+” button in the top right corner to create a new patrol pattern for the selected
camera.
Address: 830 National Drive #140, Sacramento, CA 95834, USA · Tel: +1(888)499-9906 · Email: support@bzbgear.com 29
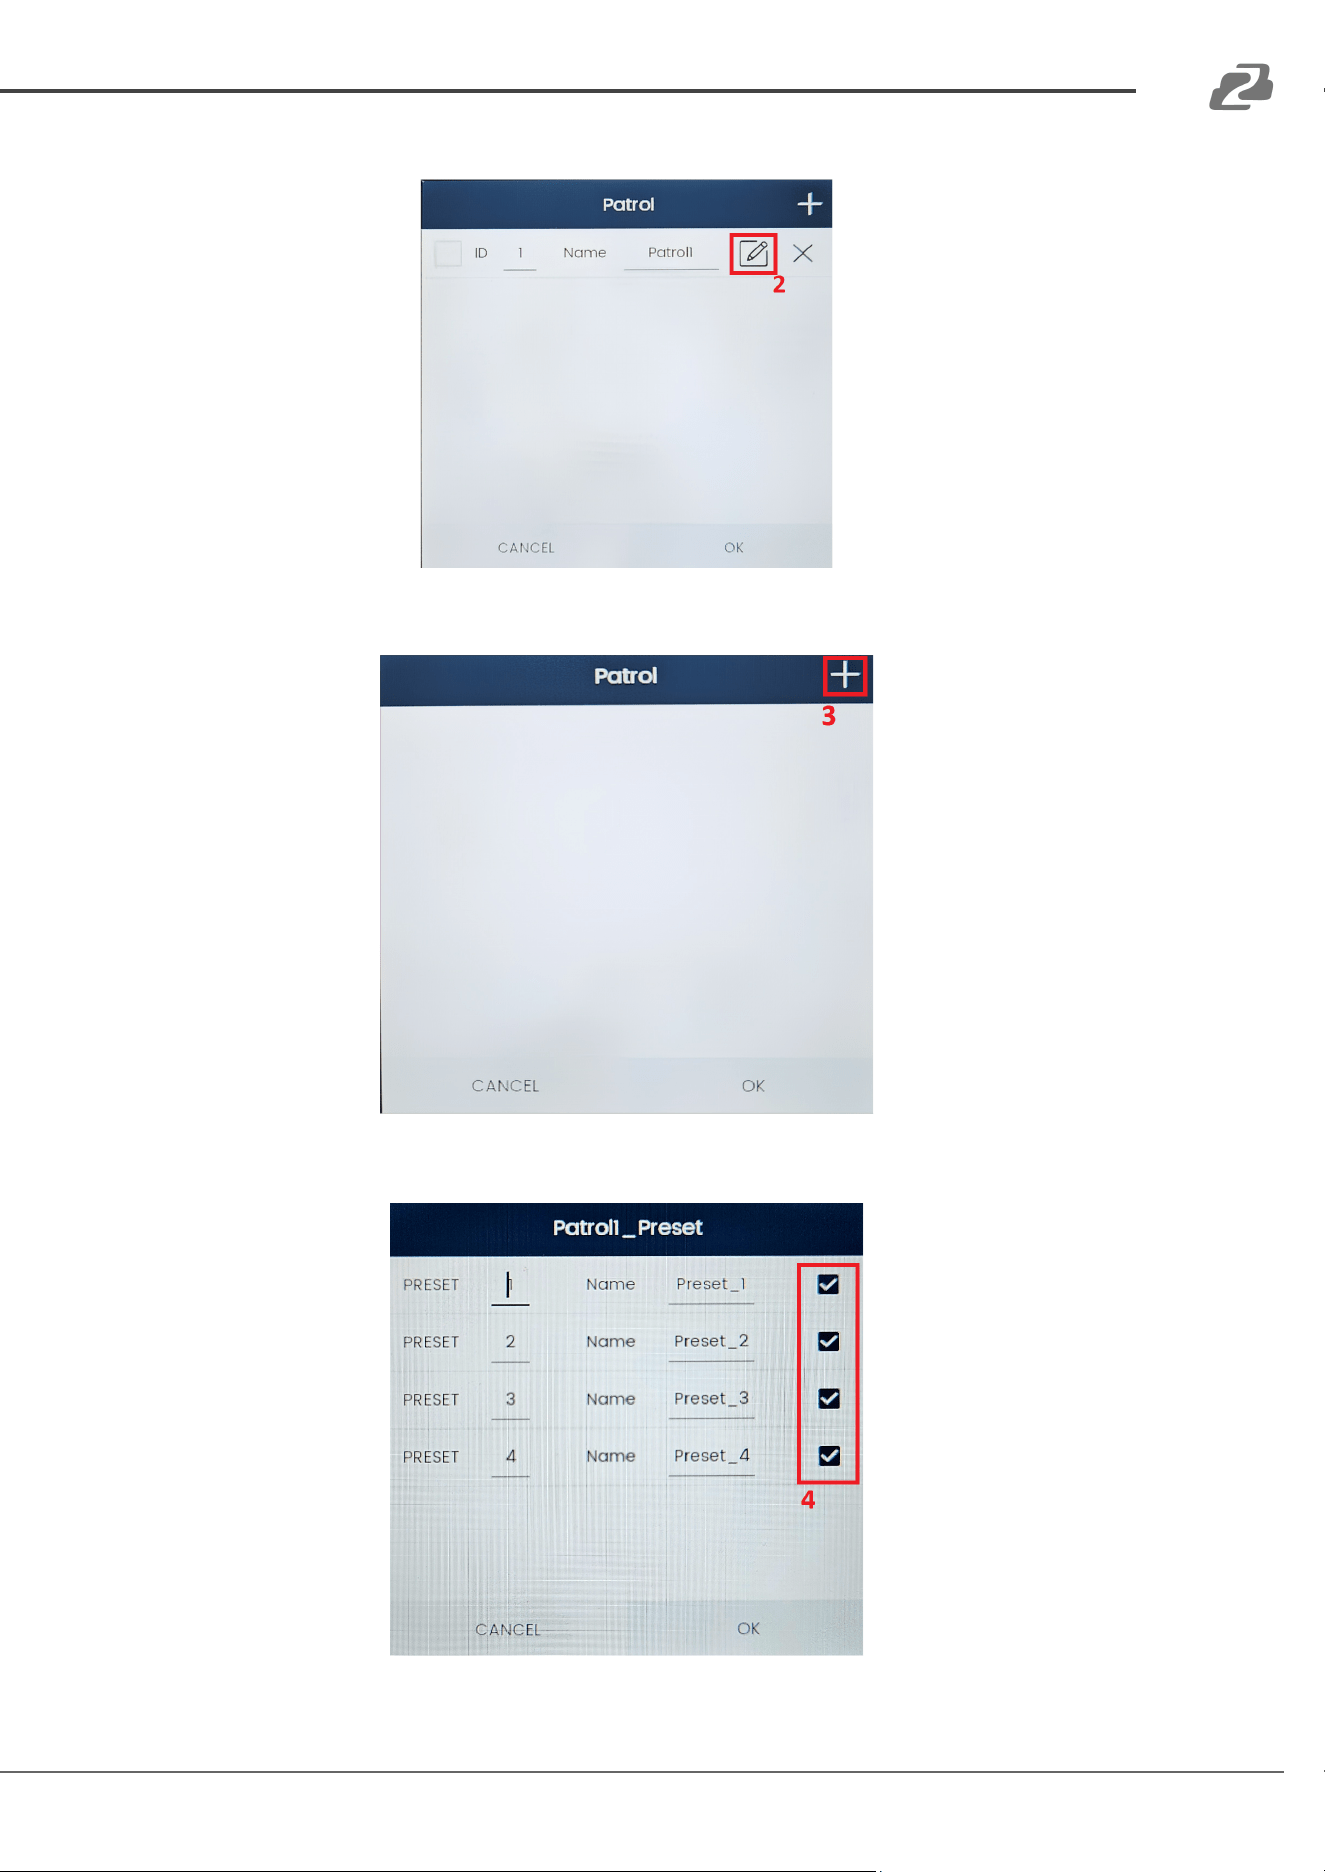
BZBGEAR BG-COMMANDER-PRO PRODUCT MANUAL
2. Press the “Edit” button to manage or add presets to the patrol pattern.
3. Press the “+” again to open the menu and select the preset positions to add.
4. Check the boxes for the presets to add to the patrol and then press “OK.”
Address: 830 National Drive #140, Sacramento, CA 95834, USA · Tel: +1(888)499-9906 · Email: support@bzbgear.com 30
BZBGEAR BG-COMMANDER-PRO PRODUCT MANUAL
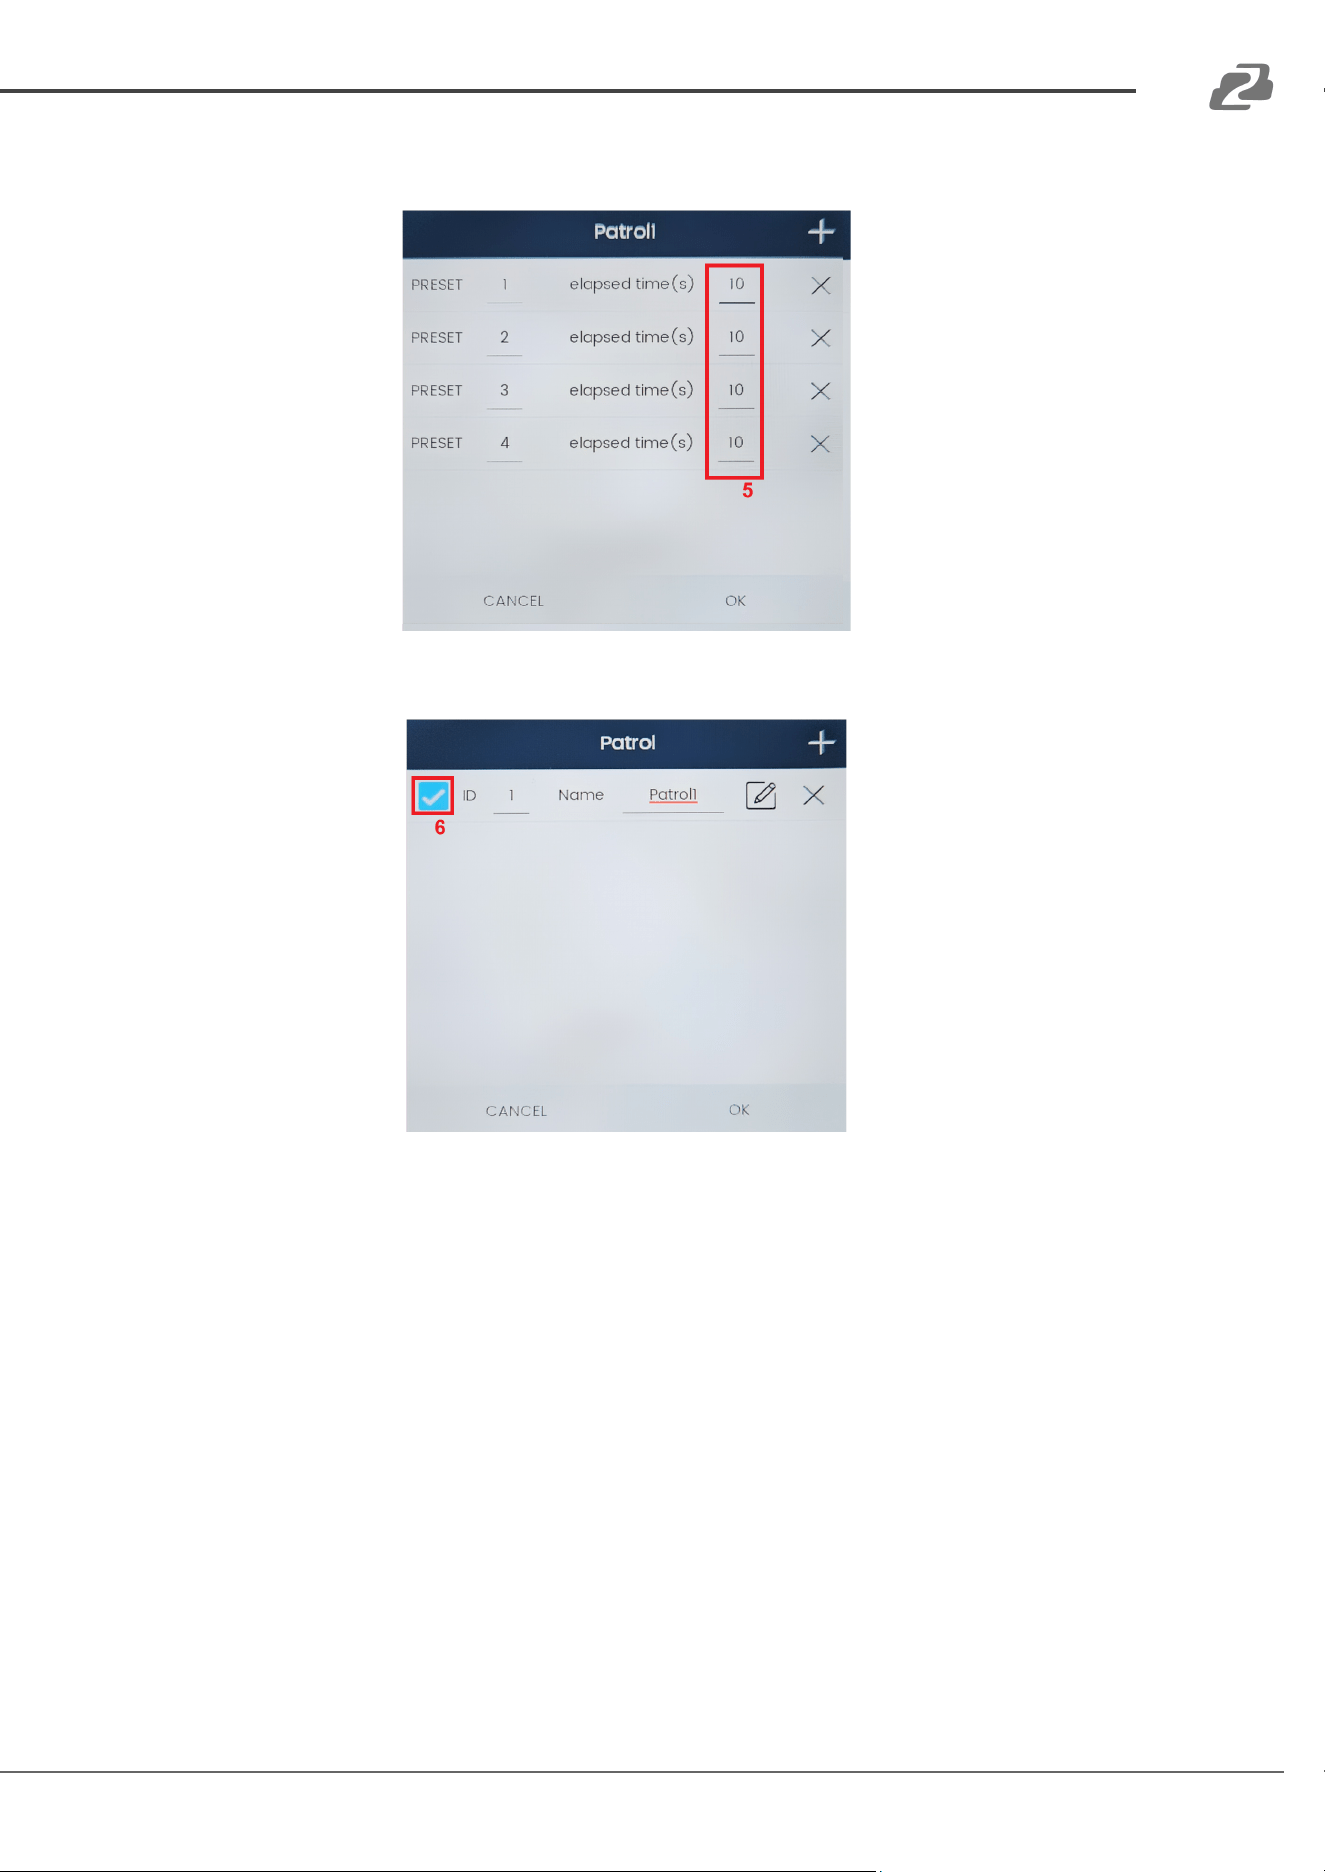
5. Set the elapsed time for each preset position (0 - 120 seconds). This is how long the
camera will wait at a given position. Once complete press OK.
6. Press the check box to enable the selected patrol for the camera and press OK.
7. To activate the patrol, select the camera from the list or on the grid and then tap the
“Patrol” button. The camera will then automatically change between the selected preset
positions.
Address: 830 National Drive #140, Sacramento, CA 95834, USA · Tel: +1(888)499-9906 · Email: support@bzbgear.com 31
BZBGEAR BG-COMMANDER-PRO PRODUCT MANUAL
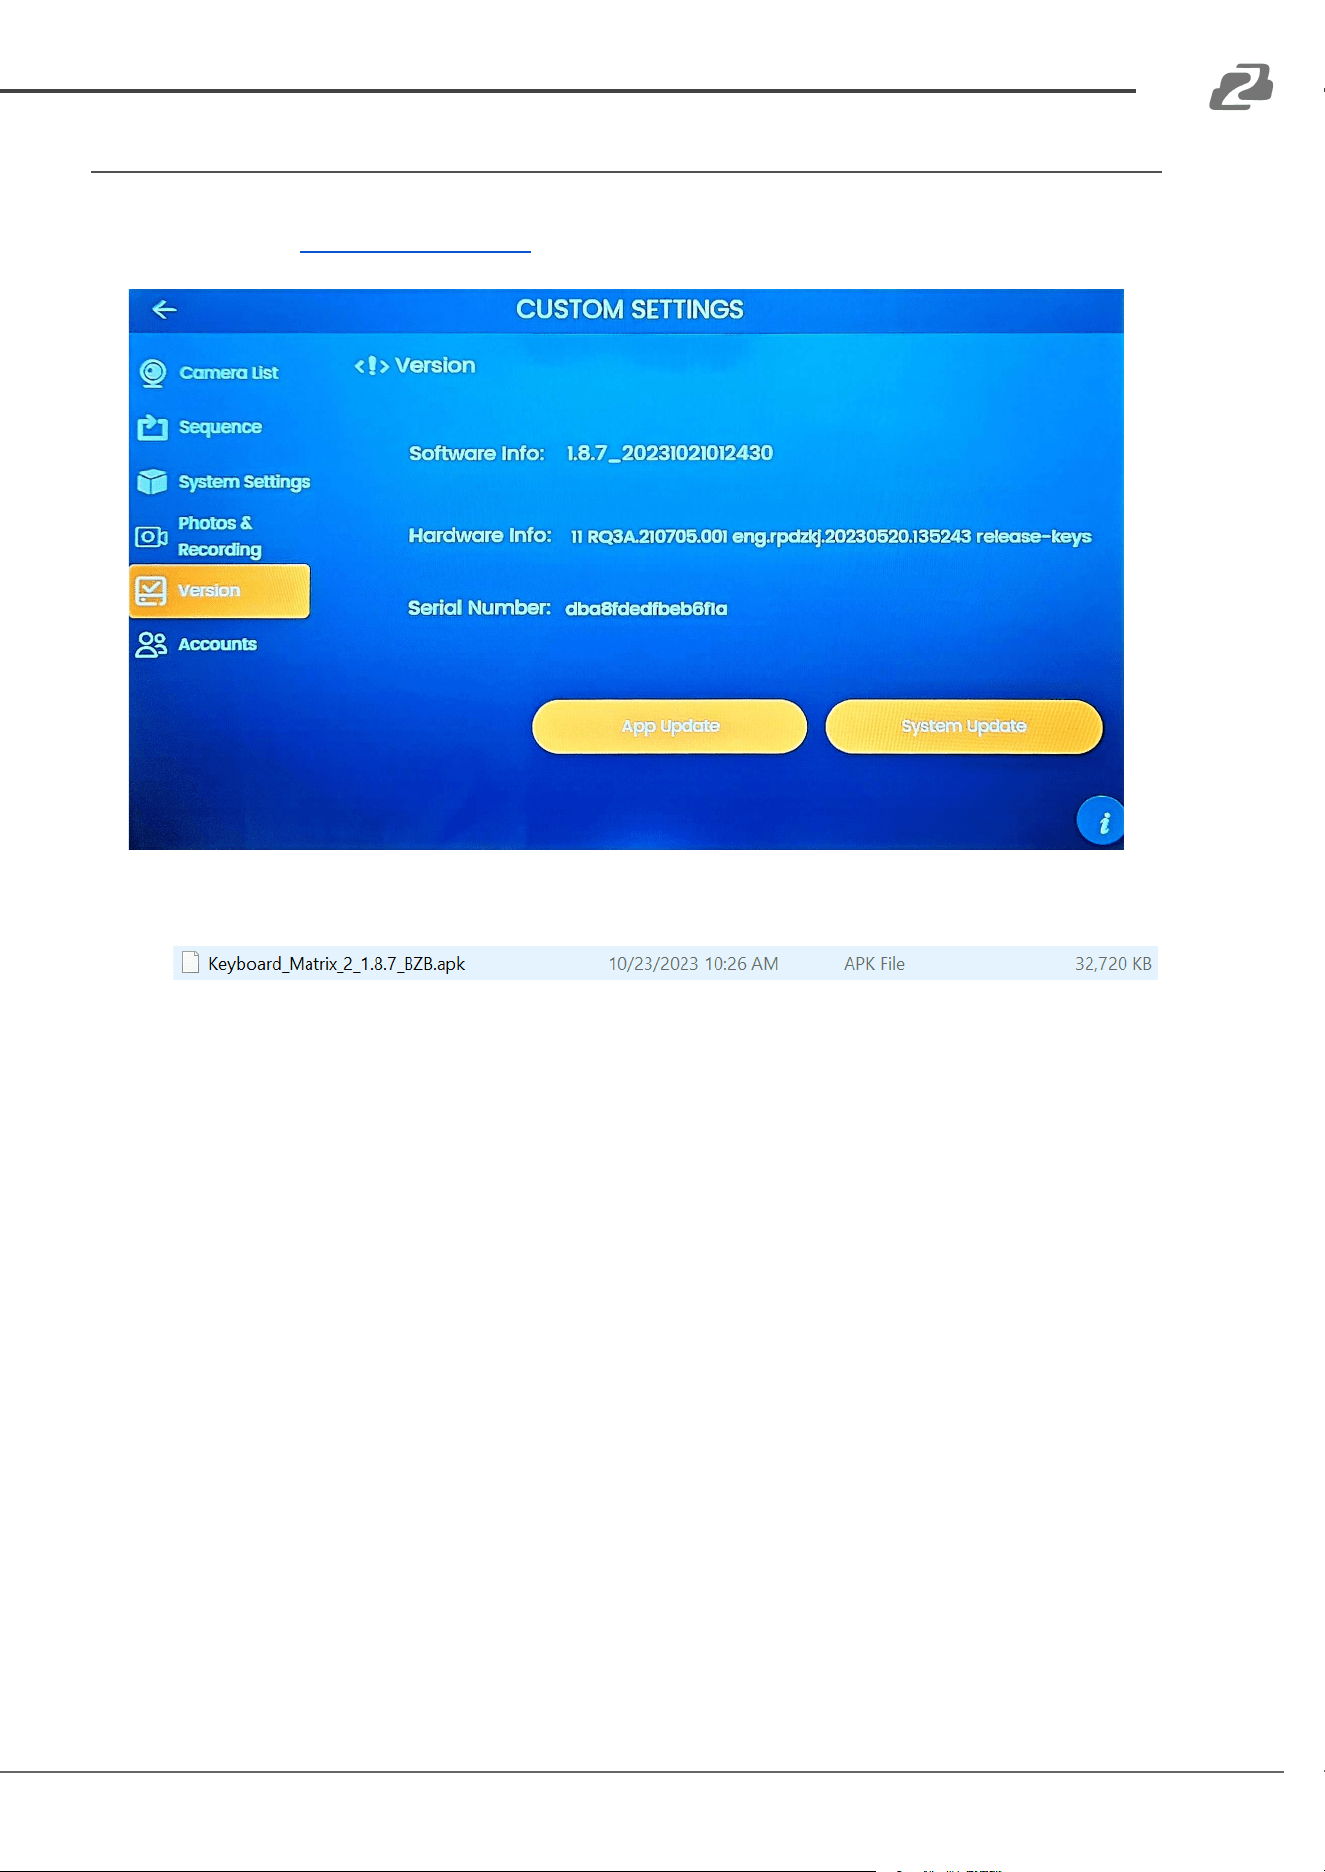
Firmware Upgrade
To upgrade the BG-Commander-Pro system software, first download the firmware from the
product page from www.BZBGEAR.com.
1) Copy the .apk file to the root directory of a blank USB flash drive.
2) Navigate to the “Version” settings page in the controller's Settings menu.
3) Insert the USB flash drive containing the firmware into the USB port on the rear of the
controller
4) Press “App Update” and then follow the on-screen instructions.
5) Once the upgrade is complete, power cycle the controller and remove the flash drive.
Address: 830 National Drive #140, Sacramento, CA 95834, USA · Tel: +1(888)499-9906 · Email: support@bzbgear.com 32

BZBGEAR BG-COMMANDER-PRO PRODUCT MANUAL
Troubleshooting
Factory Reset
To factory reset the controller navigate to the System Settings menu and press the “Clear Data”
button.
NOTE: This will remove all currently connected devices, system configurations, and data from the
controller and return it to its original settings.
Black or Frozen Camera Stream(s) on Controller Screen
1) If a stream is frozen that was previously working, press the “Refresh” button at the bottom
of the PTZ control screen to refresh all camera streams.
2) If the stream is still frozen, reboot the camera in question. Once the camera fully reboots
press the “Refresh” button.
3) If the stream is black ensure your RTSP stream settings on the camera and in the controller
settings match/are correct and the RTSP stream is enabled on the camera if applicable.
Black or Frozen Camera Stream(s) on HDMI Out
1) If a stream is frozen that was previously working, try selecting a different HDMI out scene,
or camera to refresh the stream.
2) If the stream is black ensure your RTSP stream settings on the camera and in the controller
settings match/are correct and the RTSP stream is enabled on the camera if applicable.
Changing Camera Settings
It is highly recommended to reboot the controller after editing any previously added camera
settings such as device name, IP address, or RTSP stream address to ensure proper functionality.
Address: 830 National Drive #140, Sacramento, CA 95834, USA · Tel: +1(888)499-9906 · Email: support@bzbgear.com 33
BZBGEAR BG-COMMANDER-PRO PRODUCT MANUAL
Tech Support
Have technical questions? We may have answered them already!
Please visit BZBGEAR’s support page (bzbgear.com/support) for helpful information and tips
regarding our products. Here you will find our Knowledge Base (bzbgear.com/knowledge-base)
with detailed tutorials, quick start guides, and step-by-step troubleshooting instructions. Or
explore our YouTube channel, BZB TV (youtube.com/c/BZBTVchannel), for help setting up,
configuring, and other helpful how-to videos about our gear.
Need more in-depth support? Connect with one of our technical specialists directly:
Phone
1.888.499.9906
Email
support@bzbgear.com
Live Chat
bzbgear.com
Limited Product Warranty Terms
Pro Line: 5-year warranty from the date of purchase for AV/Broadcasting products bought on or
after August 1, 2024.
Essential Line: 3-year warranty from the date of purchase for AV/Broadcasting products bought on
or after August 1, 2024.
Cables: Lifetime Limited Product Warranty.
For complete warranty information, please visit bzbgear.com/warranty.
For questions, please call 1.888.499.9906 or email support@bzbgear.com.
Mission Statement
BZBGEAR is a breakthrough manufacturer of high-quality, innovative audiovisual equipment
ranging from AVoIP, professional broadcasting, conferencing, home theater, to live streaming
solutions. We pride ourselves on unparalleled customer support and services. Our team offers
system design consultation, and highly reviewed technical support for all the products in our
catalog. BZBGEAR delivers quality products designed with users in mind.
Copyright
All the contents in this manual and its copyright are owned by BZBGEAR. No one is allowed to
imitate, copy, or translate this manual without BZBGEAR’s permission. This manual contains no
guarantee, standpoint expression or other implies in any form. Product specification and
information in this manual is for reference only and subject to change without notice.
All rights reserved. No reproducing is allowed without acknowledgment.
Address: 830 National Drive #140, Sacramento, CA 95834, USA · Tel: +1(888)499-9906 · Email: support@bzbgear.com 34