
SES 6000BK
EN
FULLY AUTOMATIC
ESPRESSO MACHINE
Translation of the original manual
SES 6000BK
A
6
2
3
4
5
8
9
11
12
1
7
10
13
14
15
16
17
B
11 10 9 8
1 2 3 4 5 6 7
C
PUSH
D1 D2
9
1
3
5
7
11
13
15
1
3
5
7
9
11
13
15

– 1 –
12/2024
2024, .
EN
Fully Automatic Espresso Machine
Important Safety Instructions
READ CAREFULLY AND STORE FOR FUTURE USE.
• This appliance is not to be used by children. Keep this
appliance and its power cord out of the reach of children.
• The appliance may be used by persons with reduced
physical, sensory or mental abilities or lack of experience
and knowledge, provided they are supervised or have
been instructed on the safe use of the appliance and
understand the potential hazards.
• Children must not play with the appliance.
• Cleaning and maintenance must not be carried out by
children.
• If the power cord is damaged, have it replaced in
aprofessional service centre in order to prevent
adangerous situation. It is forbidden to use the appliance
with the power cable damaged.
• Always clean the parts of the appliance that come into
contact with food with clean warm water and alittle neutral
dishwashing liquid, rinse them with clean water and wipe
dry.
WARNING: Incorrect use may lead to injury.
• Always disconnect the appliance from the power supply
when leaving it unattended and before assembly,
disassembly or cleaning.
FULLY AUTOMATIC ESPRESSO MACHINE
– 2 –
12/2024
2024, .
• This appliance is intended for household use. It is not
intended for use in areas such as:
– kitchenettes in shops, offices and other workplaces;
– spaces in agriculture;
– hotel, motels and other residential areas for guests;
– bed and breakfast establishments.
WARNING: Avoid spilling on the plug.
WARNING: The outer surface of the appliance heats
up during use and may be hot for some time after
use. Be very careful.
• The appliance must not be placed in acabinet when in
use.
WARNING: The filling hole must not be opened during use.
Do not do submerge the power cable, plug or appliance in
water or any other liquid.
• Before connecting the appliance to apower socket, make sure that its nominal voltage indicated on the rating plate matches the electrical voltage of
the socket.
• Connect the appliance only to aproperly earthed socket. For safety reasons, we do not recommend using adaptors or extension cords.
• Do not place the appliance on windowsills, sink drain trays or unstable surfaces. Always place the appliance on astable, flat and dry surface.
• Do not place the appliance on an electric or gas stove or near an open flame.
• Never use the appliance in the immediate vicinity of abath, shower or swimming pool.
• Use the appliance only for its intended purpose.
• Use the appliance according to the instructions in this user manual. Failure to do so may result in injury, damage to the appliance, or ahazardous
situation.
• Use the appliance only with the original accessories supplied with it.
• During operation, aclear space of at least 15 cm must be left around and above the appliance to ensure sufficient air circulation.
• Only use the top surface of the appliance to heat up cups. Do not use it to store items.
• Fill the water tank with clean, cold water. Do not pour hot water or other liquids into it or place any objects inside it.
• Before turning on the appliance, make sure that:
• the drip tray with grid is installed in its place;
• the water tank is filled with asufficient amount of water and is properly installed in its position.
• The water level must not exceed the maximum mark.
• Take extra care when operating the appliance to avoid scalding with hot water or steam.
• The hot water function may only be used continuously for amaximum of one emptying of the entire water tank.
• When using the appliance, check the water level in the water tank regularly. If the water level falls below the minimum mark, refill the water tank.
Before adding water, first turn the appliance off and disconnect it from the power socket.
• Use the built-in coffee grinder only for grinding coffee beans. Do not use it for any other purposes.
• Ensure that no hair or other items enter the grinder area during the grinding process. The coffee bean hopper lid should always be properly closed
unless you are refilling coffee beans or adjusting the grinding coarseness.
• The appliance is equipped with abuilt-in thermal fuse that shuts it off when the pump is idling to prevent damage. If such asituation occurs, unplug
the power cable and allow the appliance to cool down for at least 30 minutes. Then you can use it again.
• Do not move the appliance with acup of coffee placed on the drip tray grid or with cups placed on the surface designed to heat them up.
• Ensure that the power cable does not come into contact with hot surfaces.

– 3 –
12/2024
2024, .
• Unplug the appliance from the power socket by pulling the plug, not the power cable. Otherwise, damage to the power cable or the socket may
occur.
• Do not submerge the appliance, power cable or plug in water or any other liquid.
• Make sure that the power cable and plug do not come into contact with water or other fluids.
• To avoid the risk of electric shock, do not repair or modify the appliance yourself. All repairs should be carried out by an authorised service centre.
Tampering with the appliance may result in the loss of your legal rights regarding faulty performance or warranty for quality.
– 4 –
12/2024
2024, .
• Thank you for purchasing our SENCOR product; we hope it will serve
to your satisfaction.
• Before using this appliance, please familiarise yourself with the user
manual, even if you are already familiar with using similar types of
appliances. Use the appliance only as described in this user manual.
Keep the manual for future reference.
• It is recommended to keep the original packaging, packing material,
receipt and confirmation of the extent of the seller'sliability or warranty
certificate at least for the duration of the legal right of defective
performance or quality guarantee. When transporting the appliance,
we recommend packaging it again in the original box provided by the
manufacturer.
. . . . . . . . . . . . . . . . . . . . . . . . . . . . . . . . . . . . . . . . . . . . . . . . . . . . . . . . . . . . . . . . . . . .
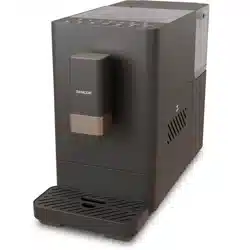
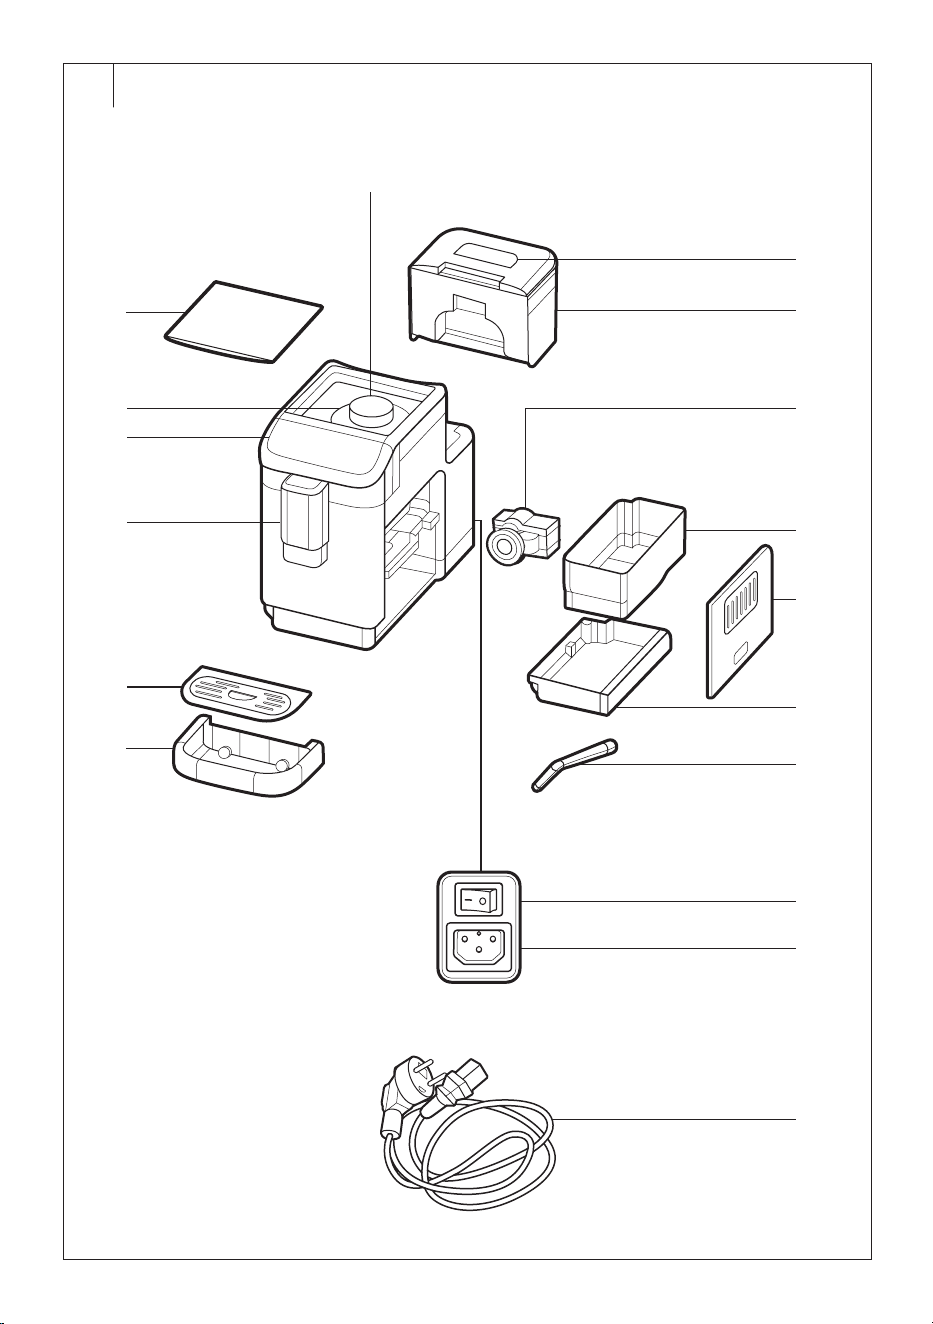
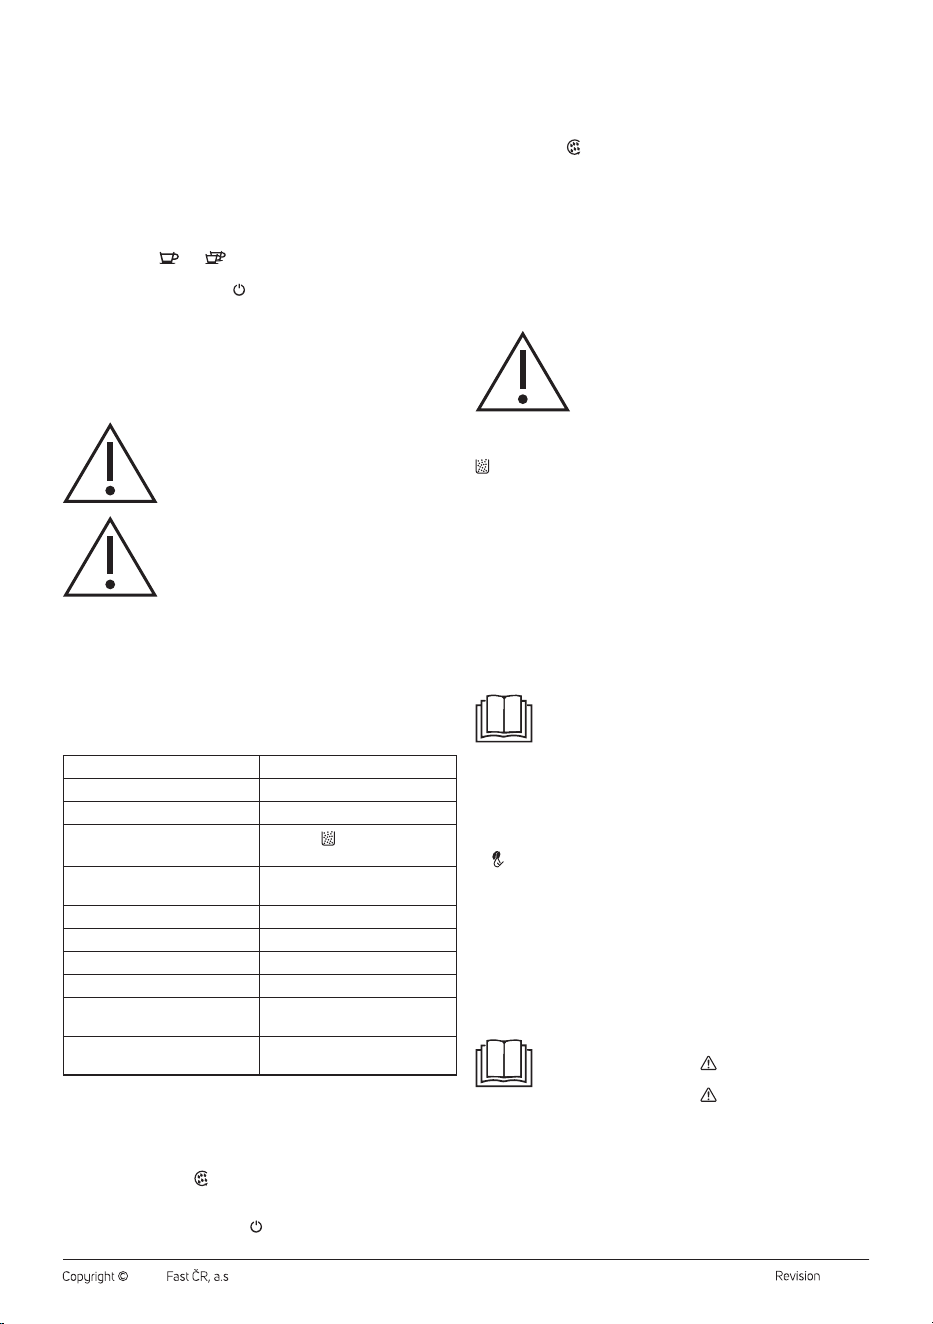
DESCRIPTION OF THE APPLIANCE
A1 Grinding coarseness regulator
A2 Coffee bean hopper lid
A3 Coffee bean hopper
A4 Control panel
A5 Coffee spout head (height is
adjustable)
A6 Drip tray grid
A7 Drip tray
A8 Water tank lid
A9 Water tank, capacity 1.4 l
A10 Brewing unit
A11 Coffee grounds container
A12 Service door
A13 Inner tray
A14 Cleaning brush
A15 Main power switch
A16 Power cord socket
A17 Power cable
. . . . . . . . . . . . . . . . . . . . . . . . . . . . . . . . . . . . . . . . . . . . . . . . . . . . . . . . . . . . . . . . . . . .
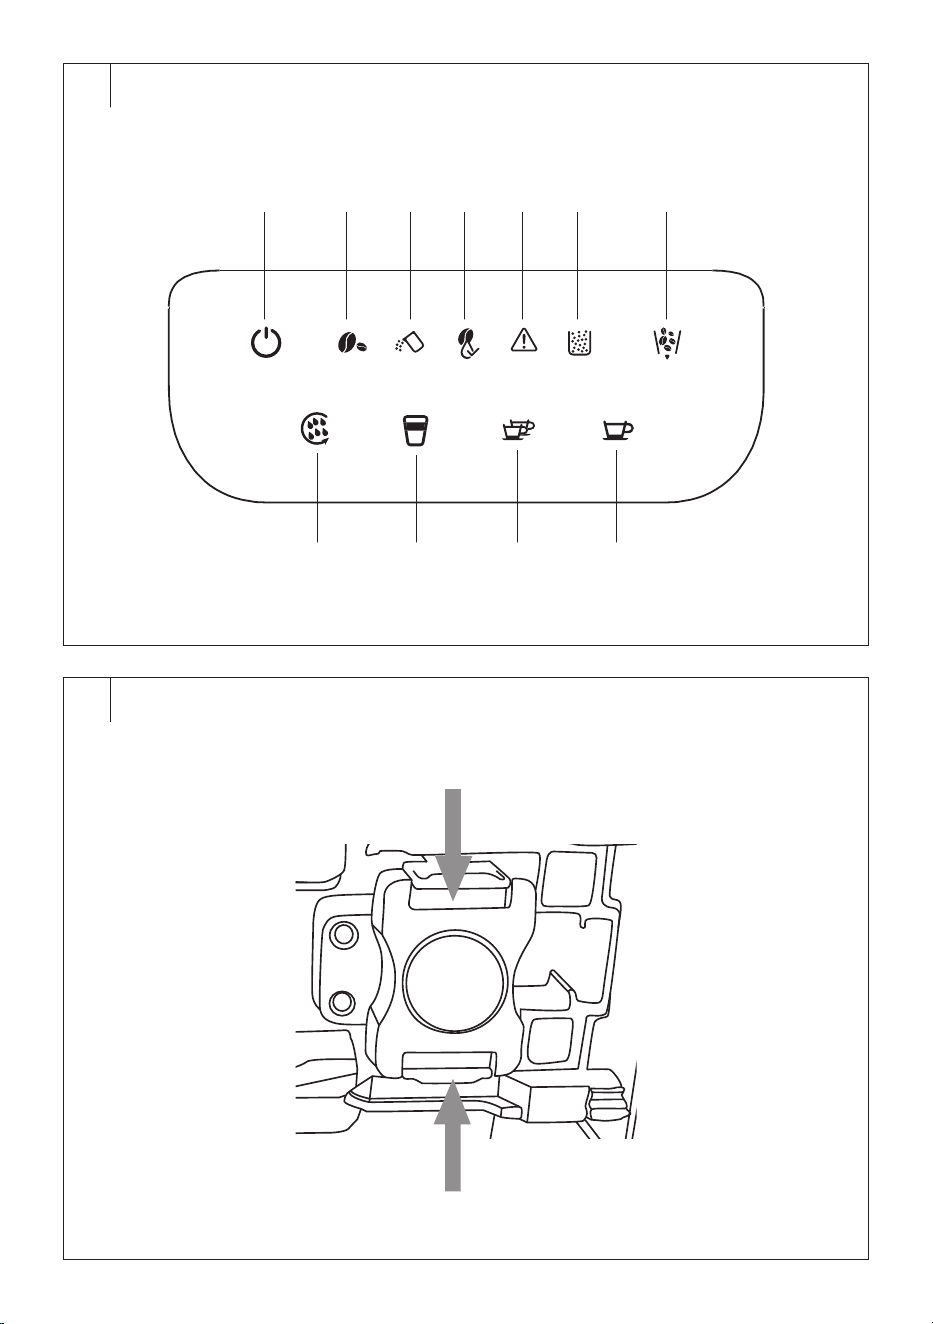
DESCRIPTION OF THE CONTROL PANEL
B1 Button :
coffee machine on/off
B2 Indicator light :
warning indicator light for
empty bean hopper
B3 Indicator light :
warning indicator light for
empty water tank
B4 Indicator light :
warning indicator light for
cleaning the brewing unit
B5 Warning indicator light
B6 Indicator light :
warning indicator light for full
coffee grounds container
B7 Button :
grinder emptying
B8 Button :
start brewing Espresso (1 cup)
B9 Button :
start brewing Espresso (2
cups)
B10 Button :
start brewing Americano
B11 Button :
manual cleaning
. . . . . . . . . . . . . . . . . . . . . . . . . . . . . . . . . . . . . . . . . . . . . . . . . . . . . . . . . . . . . . . . . . . .
BEFORE FIRST USE
• Before first use, remove the appliance and its accessories form the
packaging and discard all promotional labels and tags. Check that
neither the appliance nor any of its components is damaged.
• Install the appliance on aflat, dry and clean surface.
• Remove the water tank, rinse it with clean water and asmall amount
of neutral kitchen detergent. Then rinse it properly with clean water,
dry it and put it back in place.
• Wash the drip tray, grid, inner drip tray, coffee grounds container
inwarm water with asmall amount of neutral dish soap. Then rinse it
properly with clean water, dry it and put it back in place.
• Wipe the outer surface of the appliance with aslightly damp cloth and
then wipe dry properly.
• Fully unwind the power cable and connect it to the socket at the back
of the appliance.
. . . . . . . . . . . . . . . . . . . . . . . . . . . . . . . . . . . . . . . . . . . . . . . . . . . . . . . . . . . . . . . . . . . .
PREPARING THE COFFEE MACHINE BEFORE USE
Filling the Water Tank
1. Hold the water tank by its lid. It also serves as acarrying handle. Lift
it up and remove the water tank from the machine.
2. Fill the water tank with clean water up to the maximum mark and
insert it back into the machine. Make sure that the water tank is
properly installed in its place.
Note:
The water you pour into the water tank should ideally be at
room temperature (approximately 25 °C). Water that is too
cold can adversely affect the final taste of the coffee drink.
Warning:
The maximum capacity of the water tank is 1.4 l. Do
not overfill it.
Never fill the water tank with warm or hot water,
sparkling water or other liquids such as milk. This
could damage the appliance.
Never fill the water tank by pouring water into in while
it is inserted inside the appliance. There is arisk of
spilling the appliance or overfilling the water tank.
3. Do not leave water in the water tank for more than one day. For
preparing quality fresh coffee, it is necessary to always use fresh
water. Otherwise, the taste of the resulting drink may be adversely
affected.
Filling the Coffee Bean Hopper
1. Remove the coffee bean hopper lid.
2. Pour roasted coffee beans into the hopper and close the lid. Do not
leave the lid of the hopper open, otherwise the coffee beans will lose
their aroma more quickly.
Warning:
Themaximum capacity of the hopper is
approximately 200 g of coffee beans. Do not overfill
it. Never fill the bean hopper with ground or instant
coffee, caramelised or otherwise specially treated
coffee beans, cocoa beans or other items that may
cause damage to
the appliance.
Grinding Coarseness Regulator
Use the grinding coarseness regulator to adjust the appropriate
coarseness of the ground coffee. Grinding coarseness adjustment is
possible only when the grinder is in operation. The new coarseness
setting will take effect after the second or third coffee preparation following
the grinding coarseness change.
1. You can adjust the coarseness of the grinding in 15 levels by using
the grinding coarseness regulator, which is located inside the bean
hopper.
2. For first use, we recommend setting the grinding coarseness to 8
and then adjusting as needed.
3. Turn the regulator towards number 1 to set afiner grind, or turn
towards number 15 to set acoarser grind. Number 1represents
the finest grinding level while number 15represents the coarsest
grinding level.
4. Only adjust the grinding coarseness when the grinder is running.
Otherwise, damage to the appliance may occur.
5. If the brewed coffee flows out very slowly, it means that the beans
are ground too finely and acoarser grind should be set. If the brewed
coffee flows out too quickly, it means that the grains are ground too
coarsely and afiner grind should be set.
EN
Fully Automatic Espresso Machine
User Manual

– 5 –
12/2024
2024, .
Warning:
Always adjust the grinding coarse by1 value to
prevent damage to the grinder.
Brewing Head Height Adjustment
The brewing head can be moved up/down according to the height of the
cup in which you will be preparing the coffee. First, place the cup under
the brewing head and then adjust the height.
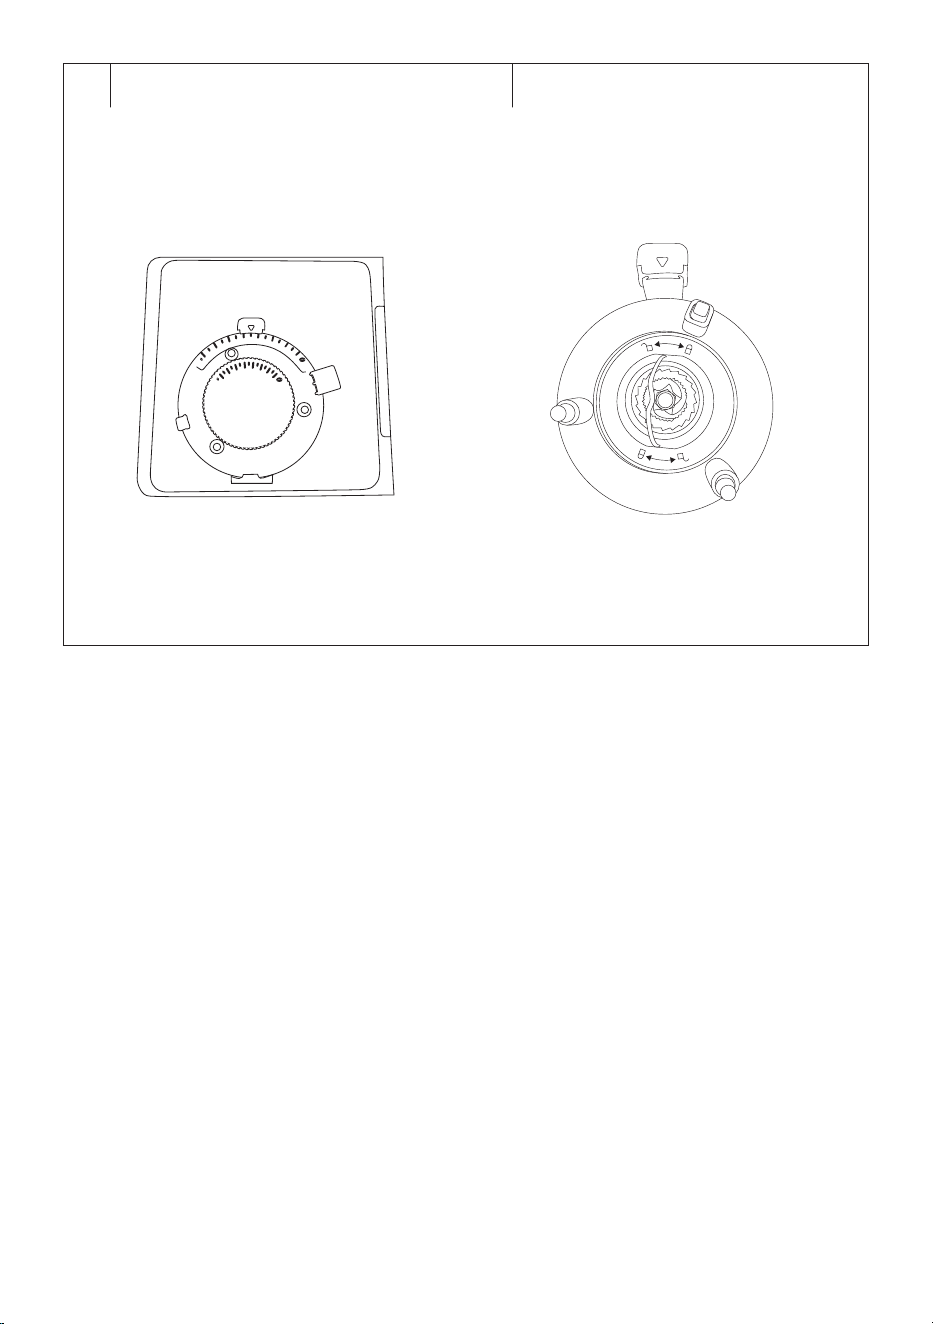
Brewing Unit
Gently press on the bottom part of the service door where the indentation
is located. The service door will swing open. Remove it and check it the
brewing unit is properly installed in its place. When inserting the brewing
unit into the coffee machine, align the arrow on the brewing unit with the
arrow above the brewing unit compartment. After checking, reattach the
service door.
If you remove and reinsert the brewing unit and hear aclick, it indicates
that the brewing unit is properly installed.
• If the warning indicator light is continuously on, the brewing unit is
not installed correctly.
• If the warning indicator light blinks when you press the beverage
preparation button, the service door is not closed properly.
Coffee Grounds Container and Inner Tray
• Gently press on the bottom part of the service door where the
indentation is located. The service door will swing open. Remove it and
check if the coffee grounds container and the inner tray are properly
installed in their place.
• If the warning indicator light is continuously on, the inner tray or
coffee grounds container is not installed correctly.
Drip Tray
• Attach the grid to the drip tray.
• Place the folded drip tray against the lower front wall of the coffee
machine and press it slightly into the machine.
• The tray must be securely in place to prevent the cup with hot
beverage from tipping over during preparation.
• Water from the outlet flows into the drip tray during each rinsing, self-
cleaning, and also coffee brewing, which may cause spills. Therefore,
clean and empty the drip tray daily.
. . . . . . . . . . . . . . . . . . . . . . . . . . . . . . . . . . . . . . . . . . . . . . . . . . . . . . . . . . . . . . . . . . . .
USING THE COFFEE MACHINE
• Place the coffee machine on aflat, dry and clean surface at
asufficient distance from the power socket. Ensure there is enough
space around it for manipulation, at least 15 cm around the entire
coffee machine.
• Make sure that the water tank is refilled with fresh water, the bean
hopper has an adequate amount of coffee beans, and that the
appliance is properly assembled.
• Plug the power cable connector into the socket in the coffee machine
and connect the power cable plug to the power socket.
• The control panel is equipped with touch buttons. Use the pads of your
fingers to press the buttons, not the tips. It is important to maintain
constant contact with the button when pressing it. Do not press the
buttons with force.
Note:
When refilling water and coffee beans, always follow the
instructions provided in sections “Filling the Water Tank”
and “Filling the Coffee Bean Hopper”.
Connecting the Power Cord andPlugging into the Socket
Insert the connector of the power cord into the end cap at the back of
the coffee machine and press firmly so that the end cap is plugged in
correctly.
Plug the mains plug into aproperly grounded power socket.
Coffee Machine On
1. Switch the main power switch to position I(on). The coffee machine
beeps briefly and all the indicator lights on the control panel turn on
momentarily. Then they turn off.
2. Press and hold the button briefly to switch on the coffee machine.
The button will start flashing and the coffee machine will start
checking the internal system.
3. The button will light up on the control panel. The coffee machine
starts heating up, and the preparation process begins, during which
water is pumped into the internal circuit, the grinder is checked, and
the coffee spout is rinsed, with asmall amount of water flowing into
the cup. Alternatively, you can place amug with acapacity of at
least 100 ml under the head. During this time, the grinder and pump
will briefly operate. This is anormal occurrence.
4. Once the machine is preheated, the , , , , buttons on
the control panel will light up.
Standby Mode and Switching off the Coffee Machine
• When you have finished using the machine, press and hold the
button briefly to switch the machine off and enter standby mode. In
this mode, the control panel will be off and no buttons will function.
• To end the standby mode, press andbriefly hold the button. The
coffee machine switches on and starts to preheat.
• If you need to switch off the coffee machine completely, switch the
main switch to position “0” (off), unplug the power cord from the
mains socket.
Note:
The coffee maker is equipped with an automatic shut-off
and standby function. This occurs after approximately 28
minutes of inactivity. This is anormal occurrence.
Preparing Espresso (1 and 2 Cups) and Americano
1. Place acup, mug or glass under the brew head. Adjust the height of
the brew head by moving it up or down depending on the size of the
cup, mug or glass.
2. Press and briefly hold the (1 cup Espresso), (2 cups
Espresso) or (Americano) button. The selected button will light up.
3. The coffee machine will automatically start the grinding, dosing,
tamping and dispensing process.
4. As soon as the process is complete, the control buttons light up.
If you need to cancel the coffee preparation, press and hold the selected
button briefly.
Preparing 2 cups of Espresso involves two consecutive preparations of
1 cup of Espresso. Do not remove the cup from under the brewing head
until the preparation of the second cup is complete.
Preparation of Americano coffee consists of preparing 1 cup of Espresso
and hot water. Do not remove the cup from under the brew head until the
hot water dispensing is finished.
If you wish to adjust the volume of coffee dispensed, follow the
instructions in the chapter “User settings”.
Note:
During the coffee preparation process, you may hear the
sound of the grinder and pump, and after preparation, the
sound of used ground coffee being expelled into the coffee
grounds container. These are normal sounds.
Note:
At the beginning of the coffee dispensing process, coffee
may drip slowly (2 to 3 seconds after brewing), and then
the full coffee dispensing will start. After the dispensing is
complete, the coffee may drip from the outlet for about 6 to
8 seconds. This is anormal occurrence.
. . . . . . . . . . . . . . . . . . . . . . . . . . . . . . . . . . . . . . . . . . . . . . . . . . . . . . . . . . . . . . . . . . . .
USER SETTINGS
Setting the Volume of Coffee Dispensed
The coffee machine allows you to adjust the volume of dispensed coffee
according to your preferences. The settings you make will be saved to the
memory of the coffee machine.
1. Place acup, mug or glass under the brew head.
2. Press andbriefly hold the beverage button ( , or ) for the
drink you want to prepare. The pressed button will light up.
3. Once the machine starts dispensing coffee, press and hold the
selected beverage button for 2 seconds until the beep sounds and
the selected beverage button blinks.
– 6 –
12/2024
2024, .
4. Keep the button pressed until the desired volume of coffee is
dispensed into the cup. Release the button and the volume of
dispensed coffee will be saved to the appliance memory.
The range of coffee volume is as follows:
• 1 cup of Espresso: 30–100 ml
• 2 cups of Espresso: 2× (30–100 ml)
• Americano: 110–180 ml
Restoring Factory Default
If you need to restore the factory settings and erase all your customised
settings, perform afactory reset.
Press the buttons and simultaneously for 2 seconds. You will
hear asound alert indicating the factory reset has been competed. The
control panel goes out, then the button flashes briefly. Once the control
buttons light up, the recovery has been successfully performed.
. . . . . . . . . . . . . . . . . . . . . . . . . . . . . . . . . . . . . . . . . . . . . . . . . . . . . . . . . . . . . . . . . . . .
CLEANING AND MAINTENANCE
Before cleaning, turn off the coffee machine and switch the main power
switch to the “0” (off) position. Unplug the power cord from the power
socket and let the appliance cool down.
Warning:
Do not use abrasive cleaning agents, solvents, or any
substances to clean any parts of the appliance that
could damage the surface of the appliance. None of
the components of this appliance is dishwasher safe.
Warning:
To prevent the risk of electric shock, do not immerse
the appliance, power cable, or plug into water or any
other liquid.
Regular Cleaning and Maintenance
• Regular cleaning and maintenance are crucial for the proper
functioning and longevity of the appliance.
• Before cleaning, turn off the appliance, unplug it and allow it to cool
down.
• In the table below you will find recommended cleaning
andmaintenance times for individual parts of the coffee machine that
the user is allowed to clean.
Coffee machine part Cleaning and maintenance time
Rinsing the coffee machine After each use
Drip Tray Every day
Coffee Grounds Container and
Inner Tray
When the warning light
comes on
Brewing Unit At the same time as the coffee
grounds container
Water Tank Once aweek
Coffee Bean Hopper and Grinder Once aweek
Brewing Unit Holder Once aweek
Filling Tube Once aweek
Coffee spout (coffee dispensing
nozzles in thehead)
After each use
Outer Surface of the Coffee
Machine
Once aweek
Manual Rinsing
We recommend cleaning the coffee outlet after each use. This is also
recommended when the appliance has not been used for an extended
period of time.
1. Place acup of at least 100 ml under the head.
2. Press and hold the button briefly to initiate the manual rinsing
process.
3. The manual rinsing process will automatically stop, and you will
hear asound alert, the button may briefly blink, indicating that
the coffee machine is heating up to operating temperature. Once the
control panel lights up, the coffee machine is ready to make another
coffee.
4. Pour out the water from the cup.
5. You can cancel the manual rinsing process by pressing and briefly
holding the button.
Drip Tray
• Carefully pull out the drip tray from the coffee machine. Remove the
grid.
• Carefully place the drip tray over the sink and pour the contents into
the sink.
• Clean the drip tray and grid with warm water and alittle dishwashing
detergent. Rinse and wipe dry.
• Place the grid back onto the drip tray and insert into the coffee
machine.
Warning:
Be careful not to scald yourself when handling the
tray. It may contain hot water.
Coffee Grounds Container and Inner Tray
Empty the coffee grounds container whenever the warning indicator light
comes on. The coffee grounds container has acapacity of 8 coffee
servings. When emptying the container, ensure the coffee machine is
turned on to reset the counter.
1. Gently press on the bottom part of the service door where the
indentation is located. The service door will swing open. Remove
it and carefully slide out the inner tray with the coffee grounds
container.
2. Empty the coffee grounds container into the municipal waste or
compost.
3. Empty the contents of the drip tray over the sink.
4. Clean the inner tray and coffee grounds container with warm water
and alittle dishwashing detergent. Rinse and wipe dry.
5. Insert the coffee grounds container into the inner tray and slide the
inner tray back into the coffee machine. Reattach the service door.
Note:
Empty the coffee grounds container and clean the brewing
unit whenever the coffee machine is turned on. If you
empty the container or clean the brewing unit while the
coffee machine is turned off, the counter will not reset.
Brewing Unit
We recommend cleaning the brewing unit at the same time as emptying
the coffee grounds container.
Clean the brewing unit when the indicator light on the control panel lights
up .
1. Gently press on the bottom part of the service door where the
indentation is located. The service door will swing open. Remove it.
2. Press both latches on the brewing unit and remove it from the coffee
machine (Figure C).
3. Wash it under running water and then dry it properly.
4. Insert the brewing unit back into the coffee machine, aligning the
arrow on the brewing unit with the arrow above the brewing unit
compartment. Aclick indicates that the brewing unit is correctly
installed.
5. Reattach the service door.
Note:
If the warning indicator light is continuously on, the
brewing unit is not installed correctly.
If the warning indicator light blinks when you press the
beverage preparation button, the service door is not closed
properly.
Water Tank
Remove the water tank, rinse it with clean water and asmall amount of
neutral kitchen detergent. Then rinse it properly with clean water, dry it
and put it back in place.
– 7 –
12/2024
2024, .
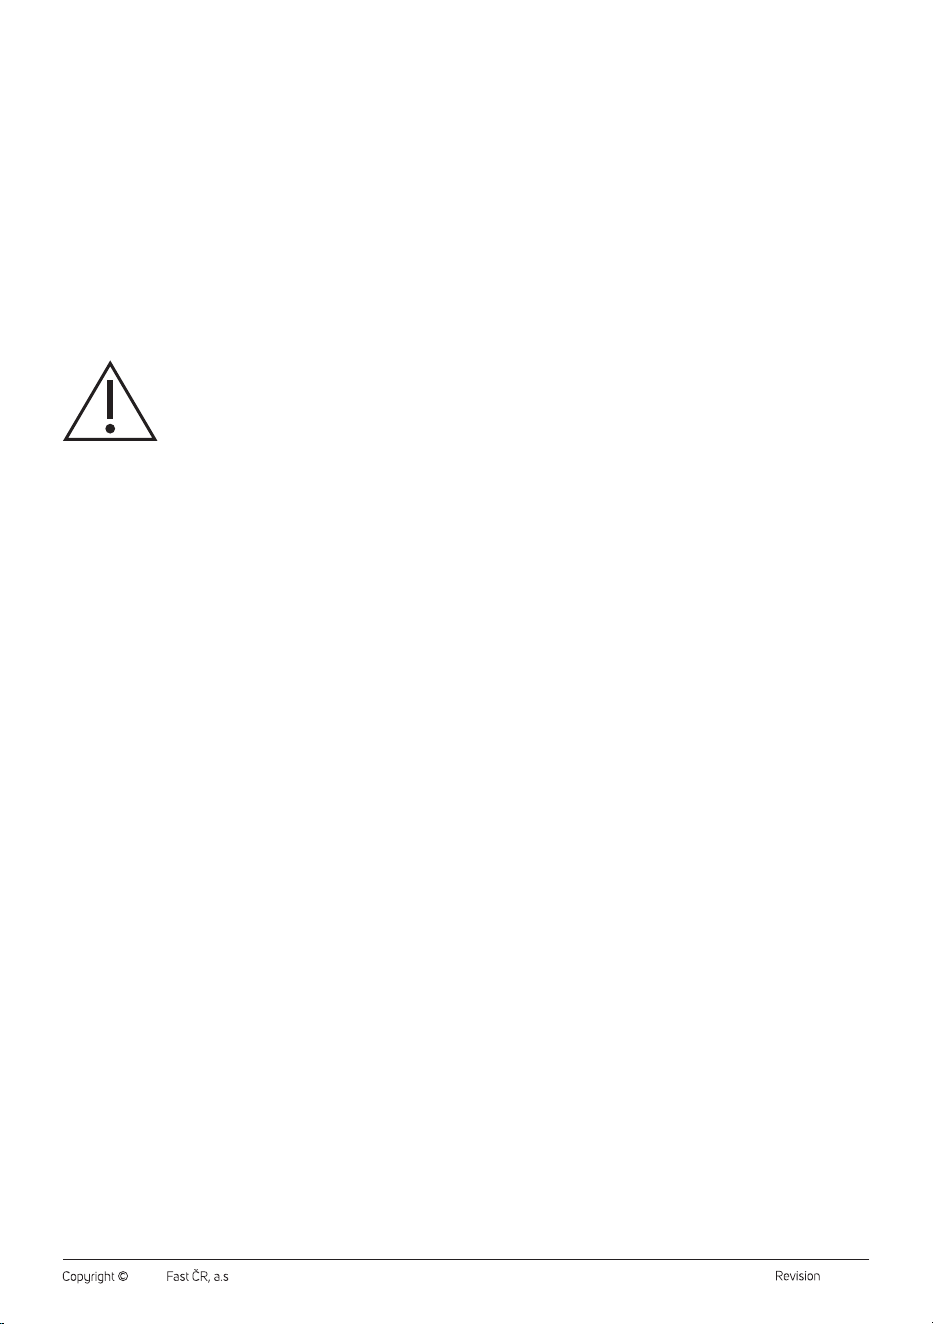
Coffee Bean Hopper and Grinder
Clean the coffee bean hopper andgrinder at least once aweek, or when
replenishing new coffee beans.
1. Empty the coffee beans from the hopper and store them in an
airtight container.
2. Start the emptying function of the grinder
3. Turn the grinding coarseness regulator counterclockwise until the
tabs on the regulator are aligned with the notches on the grinder
(Figure D1).
4. Lift the regulator upward and remove it from the grinder.
5. Lift the handle of the upper grinding stone and turn it
counterclockwise in the direction of the “ ” symbol.
6. Remove the upper grinding stone and clean it using acleaning
brush.
7. Clean the lower grinding stone and chamber using acleaning brush.
8. Insert the upper grinding stone into the grinding chamber, aligning
the “ ” symbol with the arrow on the grinder outlet (Figure D2).
9. Rotate the handle of the upper grinding stone clockwise in the
direction of the “ ” symbol. Lower the handle.
10. Attach the grinding coarseness regulator, ensuring that the tabs
on the regulator fit onto the notches on the grinder (Figure D1), and
rotate the regulator clockwise.
Brewing Unit Holder
1. When the coffee machine is switched on, press and hold the and
buttons briefly for 1 second until the buttons flash.
2. The brewing unit holder will enter the brewing coffee position (move
forward).
3. Open the service door and wipe the holder and the area underneath
it.
4. After cleaning, close the service door andpress andbriefly hold the
and buttons for 1 second. The holder will retract back to its
original position.
Filling Tube
The filling tube can be cleaned using the following steps.
1. Press andbriefly hold the and buttons for 1 second until they
start blinking.
2. The filling tube cover, which is located above the tamper, opens.
3. Open the service door and use acleaning brush to remove any dirt
from the tube. The dirt will fall into the coffee grounds container.
Clean the container as well.
4. When the filling tube is clean, close the service door andbriefly hold
the and buttons for 1 second. The cover of the filling tube will
close.
Note:
You can also clean the filling tube when cleaning the
grinder after emptying it – see the section “Coffee Bean
Hopper and Grinder”.
Note:
If you notice that the ground coffee is too fine or the coffee
grounds are smaller than usual, check the filling tube
andclean it.
Coffee Spout
Wipe the coffee spout with asoft, slightly dampened sponge and then
wipe with adry cloth.
Outer Surface of the Coffee Machine
To clean the outer surface of the appliance, use aclean, slightly damp
cloth. Afterwards, wipe it dry thoroughly.
. . . . . . . . . . . . . . . . . . . . . . . . . . . . . . . . . . . . . . . . . . . . . . . . . . . . . . . . . . . . . . . . . . . .
DESCALING
Mineral deposits from water can accumulate in the internal circuit of the
coffee machine with regular use. It is anatural process. Therefore, regular
descaling is necessary. Mineral deposits can adversely affect the taste of
the coffee being brewed. Therefore, once the descaling alert is displayed,
it is necessary to perform the descaling process.
Use adescaling agent suitable for Espresso-type machines and follow
the instructions provided in the accompanying documentation of the
descaling agent. Do not use vinegar, citric acid or other agents to descale
the coffee machine.
The coffee machine is equipped with abuilt-in counter that keeps track
of the number of prepared coffees, and once it reaches 500 coffees, the
descaling process should be performed. In such acase, the buttons
and will start blinking.
1. Fill the water tank with asolution of water and descaling agent.
Use adescaling agent suitable for Espresso-type machines and
follow the instructions given in the descaling agent'saccompanying
documentation.
2. Place abowl under the brewing head.
3. Press and briefly hold the and buttons simultaneously. The
coffee machine will enter the descaling mode.
4. The descaling process takes about 10 minutes. The control buttons
, , and will slowly blink from left to right. Allow the
coffee machine to complete the descaling process.
5. Once the descaling process is complete, the buttons will turn off.
6. Remove the water tank and refill it with clean, cold water. Put back
into the coffee machine and start the manual rinsing of the coffee
machine with the button.
Warning:
Hot water is flowing out of the coffee machine. When
handling the drip tray, be careful to avoid scalding.
Note:
Follow the same procedure if you need to descale before
the warning appears.
. . . . . . . . . . . . . . . . . . . . . . . . . . . . . . . . . . . . . . . . . . . . . . . . . . . . . . . . . . . . . . . . . . . .
GRINDER EMPTYING
This function is used to empty the grinder and remove any coffee beans
inside it if you won't be using the coffee machine for an extended period to
prevent them from deteriorating.
1. Empty the bean hopper.
2. Press and hold button briefly to start the grinder emptying
function. The button will light up.
3. The grinder will stop after about 15 seconds. If the grinder is still full,
run the function again.
4. Empty the coffee grounds hopper.
You can cancel the emptying function by pressing and briefly holding the
button.
Storage
If the appliance will not be used for an extended period, unplug it from
the power socket, let it cool down, and clean it following the instructions
provided above.
Before storing, ensure that the appliance and all accessories are
thoroughly clean and dry.
Store the appliance in adry, clean, and well-ventilated place away from
extreme temperatures and out of the reach of children or pets.

– 8 –
12/2024
2024, .
TROUBLESHOOTING
Problem Cause Solution
The indicator light is blinking.
Insufficient water in the tank. Refill the water tank.
The warning indicator light is blinking.
The grinding coarse regulator is not properly
installed, the decorative door is not properly
inserted or the inner tray is not in its place.
Correctly install the grinding coarse regulator, correctly
install the decoration door or put the inner tray in
place.
The warning indicator light is on.
The brewing unit is not inserted correctly. Insert the brewing unit correctly into the coffee maker.
The indicator light is on.
Insufficient coffee beans in the hopper. Add coffee beans to the hopper.
The indicator light is on.
The coffee grounds container is full. Empty the coffee grounds container and inner tray.
The indicator light is on.
Brewing unit needs to be cleaned. Remove the brewing unit and clean it. Then, reinsert it.
The button and warning indicator light
are blinking simultaneously.
Grinder motor malfunction. Turn off the coffee machine, wait for awhile, then turn
it on again.
The indicator lights and are
blinking simultaneously.
The coffee machine has ground coffee for 16
cycles with each grinding time being less than
5 minutes.
Turn off the coffee machine and disconnect it from the
power source. Let it cool down for 5 minutes and then
you can use it again.
The button and warning indicator light
are blinking simultaneously.
The flow meter has no signal and the water
dispensing is abnormal.
Add water to the water tank.
The buttons and and warning
indicator light are blinking
simultaneously.
Hall sensor has no signal and brewing unit is
not functioning properly.
Turn off the coffee machine, wait for awhile, then turn
it on again.
Weak milk froth The ground coffee is too coarse. Turn the coarseness regulator clockwise to adjust the
grinder setting.
You are using unsuitable roasted coffee beans. Use roasted coffee beans specially for Espresso
machines.
Slow or dripping coffee flow. The ground coffee is too fine. Turn the coarseness regulator counterclockwise and
adjust the grinder setting.
Coffee machine does not dispense coffee. The coffee spout is clogged. Clean the coffee outlet, for example, using athin
object.
Coffee machine cannot be turned on. The plug is not inserted correctly into the
power socket.
Check the plug connection in the power socket.
The power cord is not inserted correctly in the
socket at the back of the coffee machine.
Check the power cord connection.
Main power switch is in the “0” position. Switch the main power switch to the “I” position.
You didn't press the button. Press the button to turn the appliance on.
The brewing unit cannot be removed. The coffee machine is not fully turned off.
Turn off the coffee machine with the button
andthen move the main power switch to the “0”
position.
The brewing unit is blocked. Contact an authorised service centre.
Indicator lights and are on.
Coffee grounds container needs to be emptied
and brewing unit needs to be cleaned.
Empty the coffee grounds container and clean the
brewing unit.
Wait about 3 seconds before reinstalling.
The indicator light is on, but the coffee
grounds container is empty.
The internal counter has not been reset after
emptying the tank or cleaning the brewing unit.
Always wait for about 3 seconds for the counter to
reset after emptying the coffee grounds container or
cleaning the brewing unit. Empty the coffee grounds
container and clean the brewing unit after switching on
the machine. If you empty the container or clean the
brewing unit while the coffee machine is turned off, the
counter will not reset.
The grinder grinds but does not dispense
ground coffee.
Deeply roasted beans may have oil on their
surface. If the coffee beans are wet or have too
much oil on their surface, the filling tube will
become blocked.
Press and hold the buttons and simultaneously
for 2 seconds, and they will start blinking.
Open the door and remove the ground coffee from the
filling tube with abrush. Close the service door once
the ground coffee starts to falls freely.
Press and briefly hold the buttons and and
they will turn off.
The coffee machine is too noisy. It is normal for the coffee machine to make
noise during operation.
If the coffee machine starts to make adifferent kind of
noise, lubricate the brewing unit.
If the problem is not listed in the table or if the problem persists, turn off the coffee machine, disconnect it from the power source, and contact an
authorised service centre.
. . . . . . . . . . . . . . . . . . . . . . . . . . . . . . . . . . . . . . . . . . . . . . . . . . . . . . . . . . . . . . . . . . . . . . . . . . . . . . . . . . . . . . . . . . . . . . . . . . . . . . . . . . . . . . . . . . . . . . . . . . . . . . . . . . . . . . . . . . . .
– 9 –
12/2024
2024, .
TECHNICAL SPECIFICATIONS
Rated voltage range ..............................................................................220−240 V~
Rated frequency ...................................................................................................50 Hz
Rated input ..........................................................................................................1350 W
Noise level ......................................................................................................<65 dB(A)
The declared noise emission level of this appliance is <65dB(A),
representing the A-weighted sound power level relative to the reference
sound power level of 1pW.
We reserve the right to change the text and technical specifications.
. . . . . . . . . . . . . . . . . . . . . . . . . . . . . . . . . . . . . . . . . . . . . . . . . . . . . . . . . . . . . . . . . . . .
INSTRUCTIONS AND INFORMATION ON DISPOSAL OF USED
PACKAGING MATERIAL
Dispose of used packaging material at the location designated by the
municipality for waste disposal.
DISPOSAL OF USED ELECTRICAL AND ELECTRONIC EQUIPMENT
This symbol on the products or accompanying documents
indicates that used electrical and electronic products
should not be disposed of with regular municipal waste.
For proper disposal and recycling of these products, deliver
them to designated collection points. Alternatively, in some
European Union states or other European countries the
products can be returned to the local retailer when buying
an equivalent new product. By properly disposing of this
product, you help preserve valuable natural resources and contribute to
preventing potential negative impacts on the environment and human
health resulting from improper waste disposal. For further details, contact
your local authorities or the nearest collection point. Fines may be
imposed for improper disposal of this type of waste in accordance with
national regulations.
For Business Entities in European Union States
To dispose of electric or electronic equipment, request necessary
information from your retailer or supplier.
Disposal in Other Countries Outside the European Union
This symbol is valid in the European Union. To dispose of this product
elsewhere, request necessary information on the correct disposal method
from local authorities or your retailer.
This product complies with all the essential requirements of
the applicable EU directives.