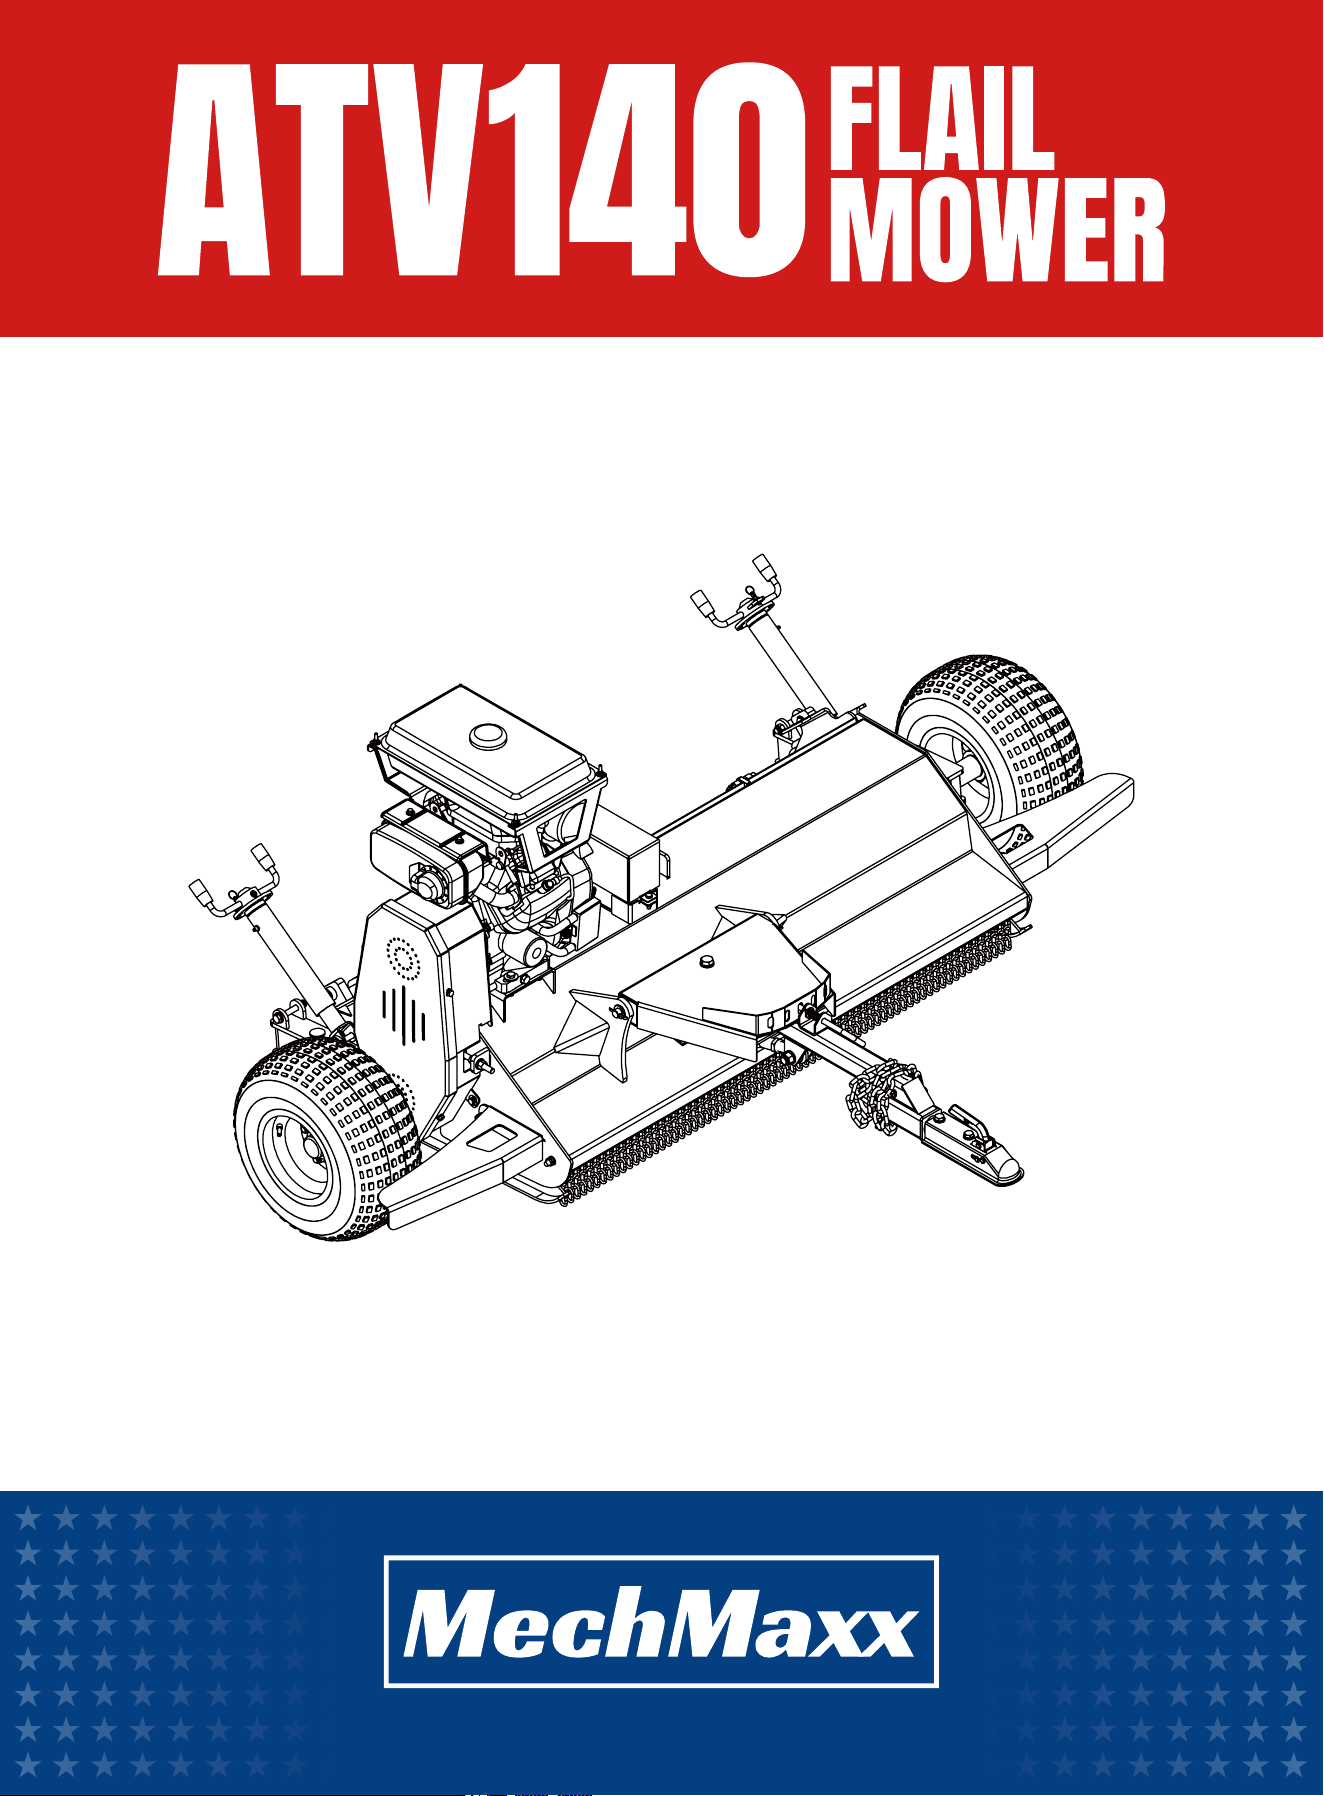
Operator’s Manual
www.mechmaxx.com


TABLE OF CONTENTS
TABLE OF CONTENTS
SPECIFICATIONS
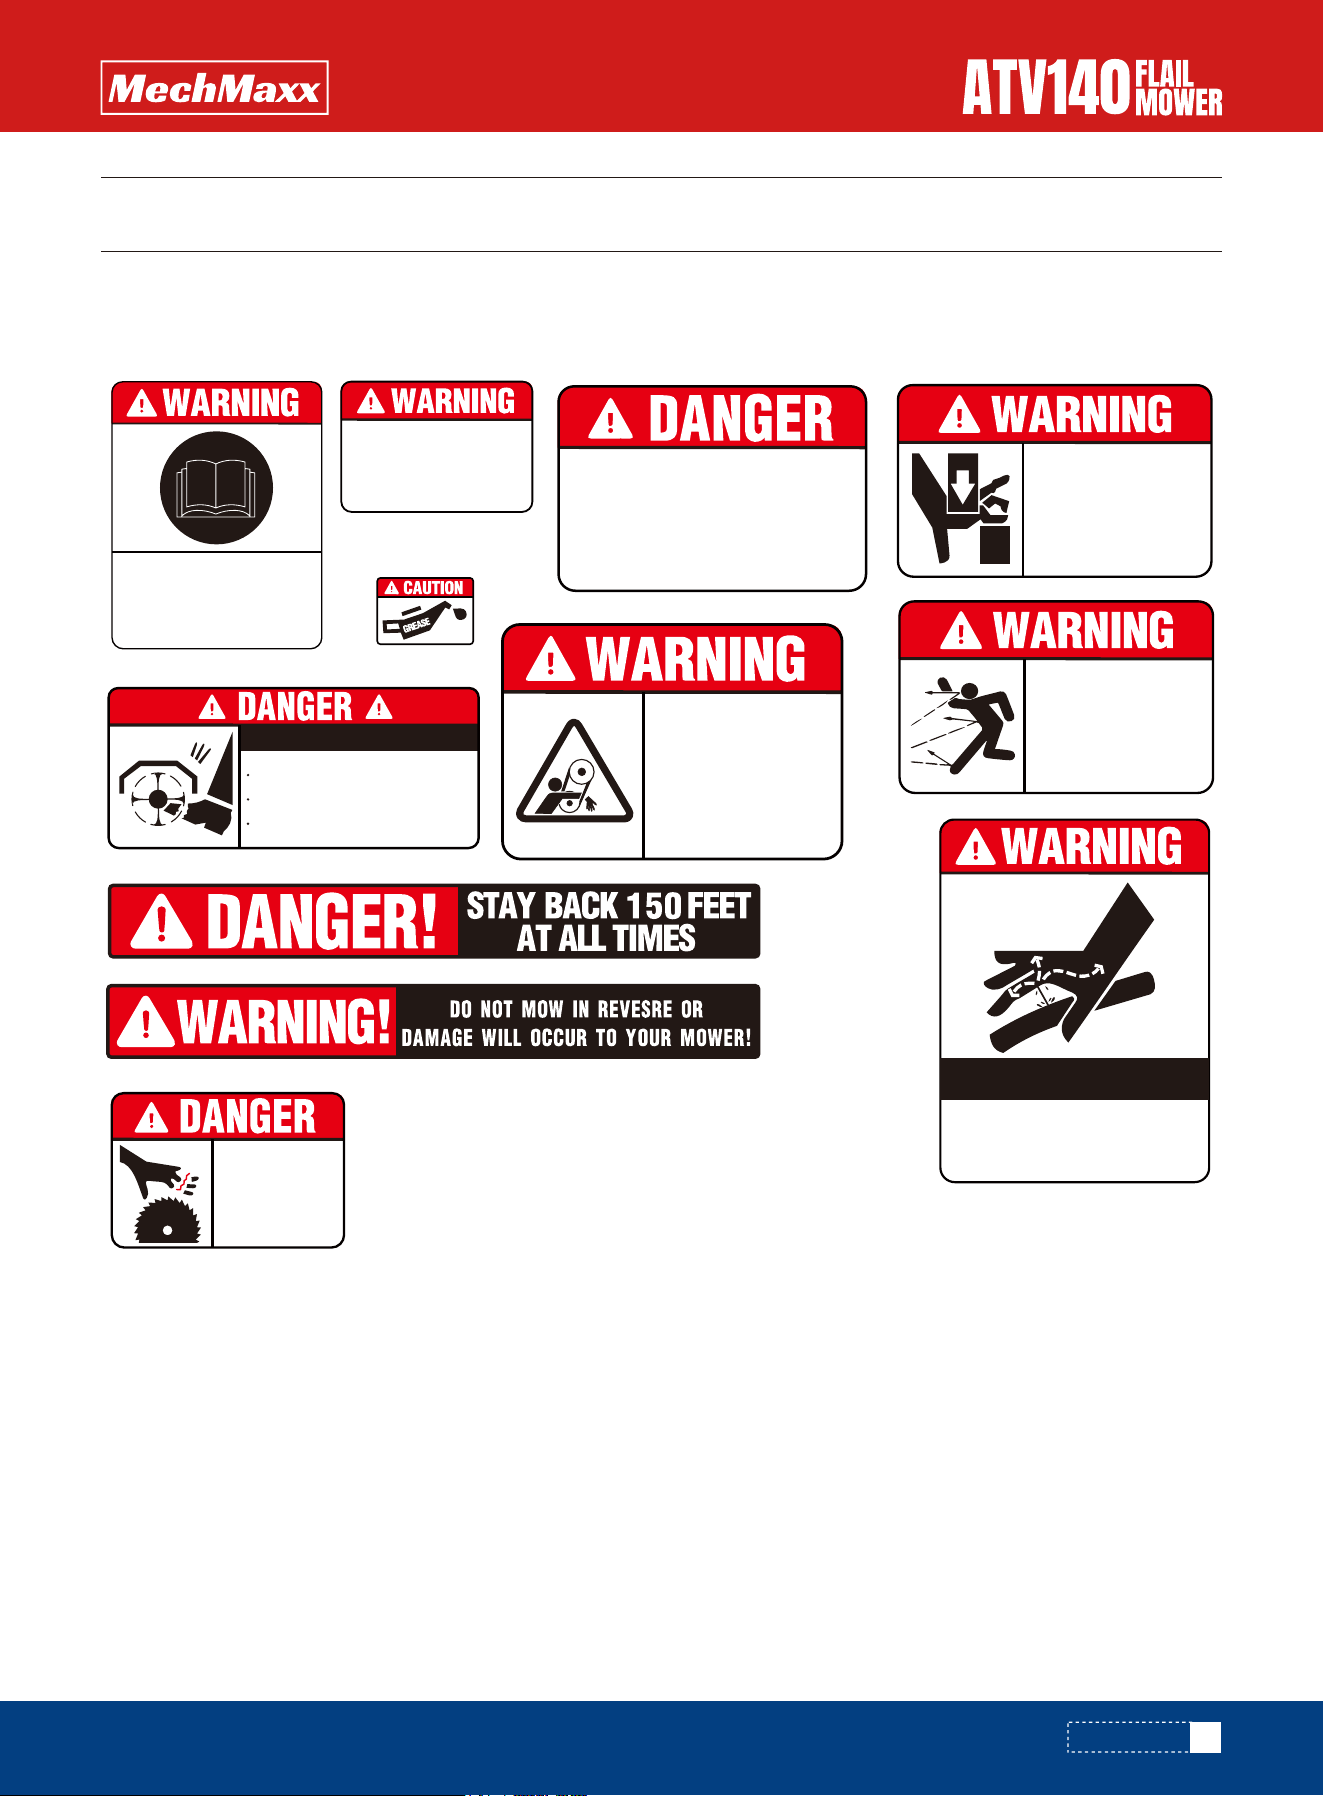
SAFETY SIGNS
INTRODUCTION
1
2
ENGINE
EXCESS CROP BUILD UP
14
14
VISUAL CHECK
14
TYRE PRESSURES
14
ROTOR BEARING INSPECTION
14
WHEEL BEARING INSPECTION
14
OIL 1.96 IN COUPLING/BUSH WEAR
14
GENERAL INSPECTION
14
ROTOR FLAIL MAINTENANCE
14
INTRODUCTION
TOWED EQUIPMENT
WEIGHT RATIOS
4
4
4
BRAKING
4
HITCHING AND LOADS
4
IN THE INTEREST OF SAFETY:DO NOT
IN THE INTEREST OF SAFETY:DO
INSTRUCTION&WARNING DECALS
6
6
6
INITIAL CHECK
ADD OIL TO ENGINE
ADD GASOLINE TO ENGINE
STARTING ENGINE
DRAWBAR ADJUSTMENT
TO ADJUST
10
10
10
QUICK OFFSET DRAWBAR
MOWER CUTTING HEIGHT
CUTTING HEIGHT ADJUSTMENT:
10
10
10
STARTING THE ENGINE
11
FORWARD SPEED
STOPPING THE MOWER
STOPPING THE MOWER
11
11
11
ANTI-SCALPING ROLLER/SIDE SKIDS
12
TYRES AND WHEELS
4
MAXIMUM TOWED WEIGHT
4
MOUNTED EQUIPMENT
5
INSTRUCTIONS FOR MOUNTED AND
TRAILED EQUIPMENT
5
USING AN ATV
5
TRAINING
5
HELMETS
5
3
4
6
SAFETY
TOW BAR
WHEEL FRAME
WHEELS
7
7
7
HAND-CRANK ADJUSTMENT ROD
WHEEL GUARD
FUEL TANK
8
8
8
BATTERY WIRING
8
7
ASSEMBLY
9
9
9
9
OPERATING INSTRUCTIONS AND ADJUSTMENTS
13
MAINTENANCE
15
PARTS DIAGRAM
16
PARTS LIST
1
www.mechmaxx.com
TABLE OF CONTENTS

SPECIFICATIONS
2
www.mechmaxx.com
SPECIFICATIONS
Engine
Engine Type
Displacement
Working Width
Overall Width
Cutting Height
Number of Blades
Blade Type
Size of Blades
Blade Weight
Blade Material
Rotor Bearing
Rotor Rotation
Drive Type
Number of Belts
Belt Size
Tire Size
Finsh
Warranty
Net Weight/Gross Weight
ZONSEN GB680 II
Dual Cylinder ( 90° V Type ), 4 Stroke, Forced Air Cooling
679 cc; 23 HP
55 in
89 in
0.4-2.5 in
22
Hammers
4x2.6 in
0.8 lbs
Cast Steel
FKD Bearing
Reverse
Belt Drive
3
AV17 X 1090 Li
18*9.5-8
Powder Coat Paint Galvanized Steel
1 Year
672.4/791.5 lbs
Model ATV140
3
www.mechmaxx.com
SAFETY SIGNS
The rating plate on your machine may show symbols. These represent important information about the product or instruc-
tions on its use.
SAFETY SIGNS
Do not open or remove safety shields while
engine is running.
PINCH POINT
HAZARD
Keep clear
GUARD MISSING
WHEN THIS IS VISIBLE
DO NOT OPERATE
ENTANGLEMENT HAZARD
BELT DRIVE:
HAND AND ARM
ENTANGLEMENT
HAZARD.
FLYING OBJECTS
HAZARD
Keep clear.
The PTO Driveline MUST be
measured and cut (if required) as
per the Owner's Manual.
Failure to do so will result in
damage to both the tractor
and the implement.
Read and understand
operators manual
before using this
machine.
ROTATING
BLADES
KEEP HANDS
AWAY
DO NOT go under frame when rotor is turning or engine
is running. Keep others away.
ROTATING KNIVES HAZARD
Disconnect & lockout power source BEFORE adjusting
or servicing.
Keep hands, feet, hair, and clothing away from moving
parts.
To prevent serious injury or death from rotating knives:
Relieve pressure before disconnecting lines.
Do Not use hands to check for leaks.
Consult physician immediatly if skin
penetration occurs.
HIGH PRESSURE FLUID
HAZARD

4
www.mechmaxx.com
INTRODUCTION
INTRODUCTION
With the purchase of your FLAIL MOWER you have made
an excellent choice.
This machine should give first class service for a long
time, if used correctly, and maintained as described in
this manual.
Fitted with an easy to start engine it has been designed
to cope with a wide range of conditions. The ATV – Flail
mower incorporates easy height adjustment, range of
engine options and a full width anti-scalping roller to
avoid damage to machine and sward.
The mower is constructed from 4mm steel for added
strength; all fittings are of high quality to ensure years of
trouble free use.
Different wheel options are available for the ATV Flail
Mower
Engines used may wary, but all are accompanied by the
maker’s usual warranty.
1.Brakes to trailed equipment.This helps prevent
jack-knifing when braking or traveling downhill;
2.Over-run brakes which come into action whenever
theATV brakes are applied;
3.A manually operated parking brake operable from the
driving position.This provides control for use when going
up slopes.
Stability is also improved if:
1.Some weight is transferred from the trailer onto
theATV draw-bar;
2.The draw-bar has a swivel hitch and the ATV a ball
hitch having a large head to neck ratio.This makes it
easier for the draw-bar hitch to swivel and cope with
undulating ground;
3.The load is positioned as near to the centre of the
trailer as possible.
1.Check tyre pressures regularly with a pressure gauge
capable of reading low pressures accurately;
2.Check tyres regularly for damage and wear;
3.Select equipment which has tyres and wheels that can
cop with speeds over 20mph and occasional higher
speeds;
4.Use wheels with bead locks on the rims if the main
use is going to be on sloping ground.This prevents tyre
run-off on side slopes.
Follow the advice given by manufacturers on the maxi-
mum trailed weight.This will be found on the equipment
or in the instruction handbook.
Note:Universal road going trailers will normally have the
maximum gross weight stated on a separate notice.
This information sheet gives advice to users on how to
use all Terrain vehicles(ATVs)safely with towed and
mounted equipment.
Plan the use of an ATV carefully and take particular note of
ground conditions and slopes,as these may vary consider-
ably,depending on the terrain,weather conditions,ground
surface and the crop under the wheels.
1.The safe ratio between the trailed laden maximum
weight and unladen weight of the ATV must be assessed
for each operation.
2.Always take note of information given in the manufac-
ture’s handbook when making this assessment.
3.As a guide research shows that on level ground,4 x
unladen weight of the ATV for braked trailed equipment
and 2 x unladen weight of the ATV for unbraked trailed
equipment are the appropriate maximum retios.
Choose equipment which matches your ATV. Stability of
towed equipment is affected by:
Note:For work on slopes or uneven ground the ratio will
need to be reduced.
Fit:
INTRODUCTION
BRAKING
HITCHING AND LOADS
TYRES AND WHEELS
MAXIMUM TOWED WEIGHT
TOWED EQUIPMENT
WEIGHT RATIOS

5
www.mechmaxx.com
INTRODUCTION
ATVs using mounted equipment are safer if the equipment
has:
• A low centre of gravity.This improves stability.
• A gross weight within the limits approved by ATV manu-
facturer.
• No dangerous projections to injure the operator or
bystanders;
• No forward projections which stop head protection
beingworn;
• Controls which are easy to work and which do not creat
a hazard to the operator
Take note of the manufacturer’s instructions on:
• Operating on slopes;
• Where to place loads so as to give fore/aft and lateral
stability;
• The risks of using equipment with negative drawbar
nose weight,ie loss of traction;
• The maximum operating speed;
• The effect that equipment carried on front and/or rear
racks will hace on longitudinal and lateral stability;
• Securing loads;
• The use of ballast,if any,to improve stability;
• The need to select and use safe routes.
• Read the manufacturer’s instruction book and take note
of the safety advice given;
• Choose an ATV with enough power for the work you want
it to do
• Four-wheel driver will give better traction and mobility
and may provide a margin of safety;
• Choose a safe route;
• Be aware that increased speed greatly increases the
risk of instability and the risk of an overturn;
Train everyone who has to use an ATV whether with
mounted or trailed equipment or as a solo machine.The
training should emphasise the factoes affecting stabili-
ty,the need for care and concentration,and how to recog-
nise the conditions which may affect the safety of opera-
tion,It is important for trainees to familiarize themselves
with the handing and control of the machine on level open
ground before tackling rough hill terrain.
Suitable training courses are run by bodies such as ATB
Landbase and the forestry Authority.
MOUNTED EQUIPMENT
INSTRUCTIONS FOR MOUNTED AND
TRAILED EQUIPMENT
USING AN ATV
TRAINING
Wear head protection which protects the head and
neck.Helmets are suitable.Some users find open faced
helmets more suitable than full face helmets.
HELMETS

6
www.mechmaxx.com
SAFETY
IN THE INTEREST OF SAFETY:
INSTRUCTION&WARNING DECALS
IN THE INTEREST OF SAFETY:
SAFETY
1. DO NOT–Operate the mower without all the correct
guards fitted.
2. DO NOT–Alter engine settings unless stated by Engine
manufacturer.
3. DO NOT–Touch any moving or rotating parts,during
working conditions
4. DO NOT–Stop the engine immediately after heavy use.
5. DO NOT–Operate the mower without suitable ear and
eye protection
6. DO NOT–Allow passengers.
7. DO NOT–Leave machine un-attended while operating
8. DO NOT–Run the engine in an enclosed area,exhaust
gases containCarbon Monoxide and are fatal if in haled.
9. DO NOT–Operate the mower on excessively steep
slopes.
10. DO NOT–Operate the mower unless all safety features
are fitted to the mower and are used correctly.
11. DO NOT–Operate the mower until you have read and
understood the entire operators manual
12. DO NOT–Wear loose fitting clothing,to avoid catching
on parts of the machine
13. DO NOT–Try to remove blockages while the engine is
running.Ensure engine is stopped and the rotor has
finished rotating,before any servicing takes place to your
mower.
14. DO NOT–Operate the mower in Dark conditions unless
suitable artificial light is used.
15. DO NOT–Operate if excessive vibration occurs,stop
the machine immediately and view maintenance chart.
16. DO NOT–Climb on the mower.
5. DO reduce speed when operating on hillsides or rough
terrain.
6. DO be aware that components may be hot after
operation.
7. DO follow all towing guidelines specified by the ATV
manufacturer.
8. DO use caution when refueling with gasoline, especial-
ly if engine components are hot.
9. DO ensure all safety decals are in good condition;
replace any that are damaged or missing.
10. DO keep hands and feet away from rotating blades.
11. DO ensure the mower is in the transport position
before moving it from the work area.
KEEP WHEEL NUTS TIGHT CHECK DAILY
REFER TO THE OPERATORS MANUAL FOR CORRECT TYRE
INFLATION
PRESSURE OBSERVE TOWING VEHICLE MAX TOWING
LIMITS OR TRAILER MAX WEIGHTS
1.DO follow the engine manufacturer’s guidelines.
2.DO ensure all spectators are at a safe distance during
operation.
3.DO perform regular servicing and inspections before
use.
4.DO clear the cutting area of any objects that could
cause damage.
Your responsibilities before operating
this machine are:
• Read Understand and Follow the safety
procedures manual
• Train operators before using & review
safety procedures regularly
• Ensure that all guards are in place before
operating
• Keep Hand, Feet, Hair and Clothing away
from all moving parts
• Avoid wearing loose clothing whenever
possible
• Maintain as per schedule in the safety
procedures. Especially Blades and Secur-
ing Hardware, due to the hazard they pres-
ent should any part break loose during
operation
• During maintenance, use suitable
support stands
• DO NOT allow any persons to ride on the
equipment
7
www.mechmaxx.com
TOW BAR
WHEEL FRAME
WHEELS
ASSEMBLY
ASSEMBLY
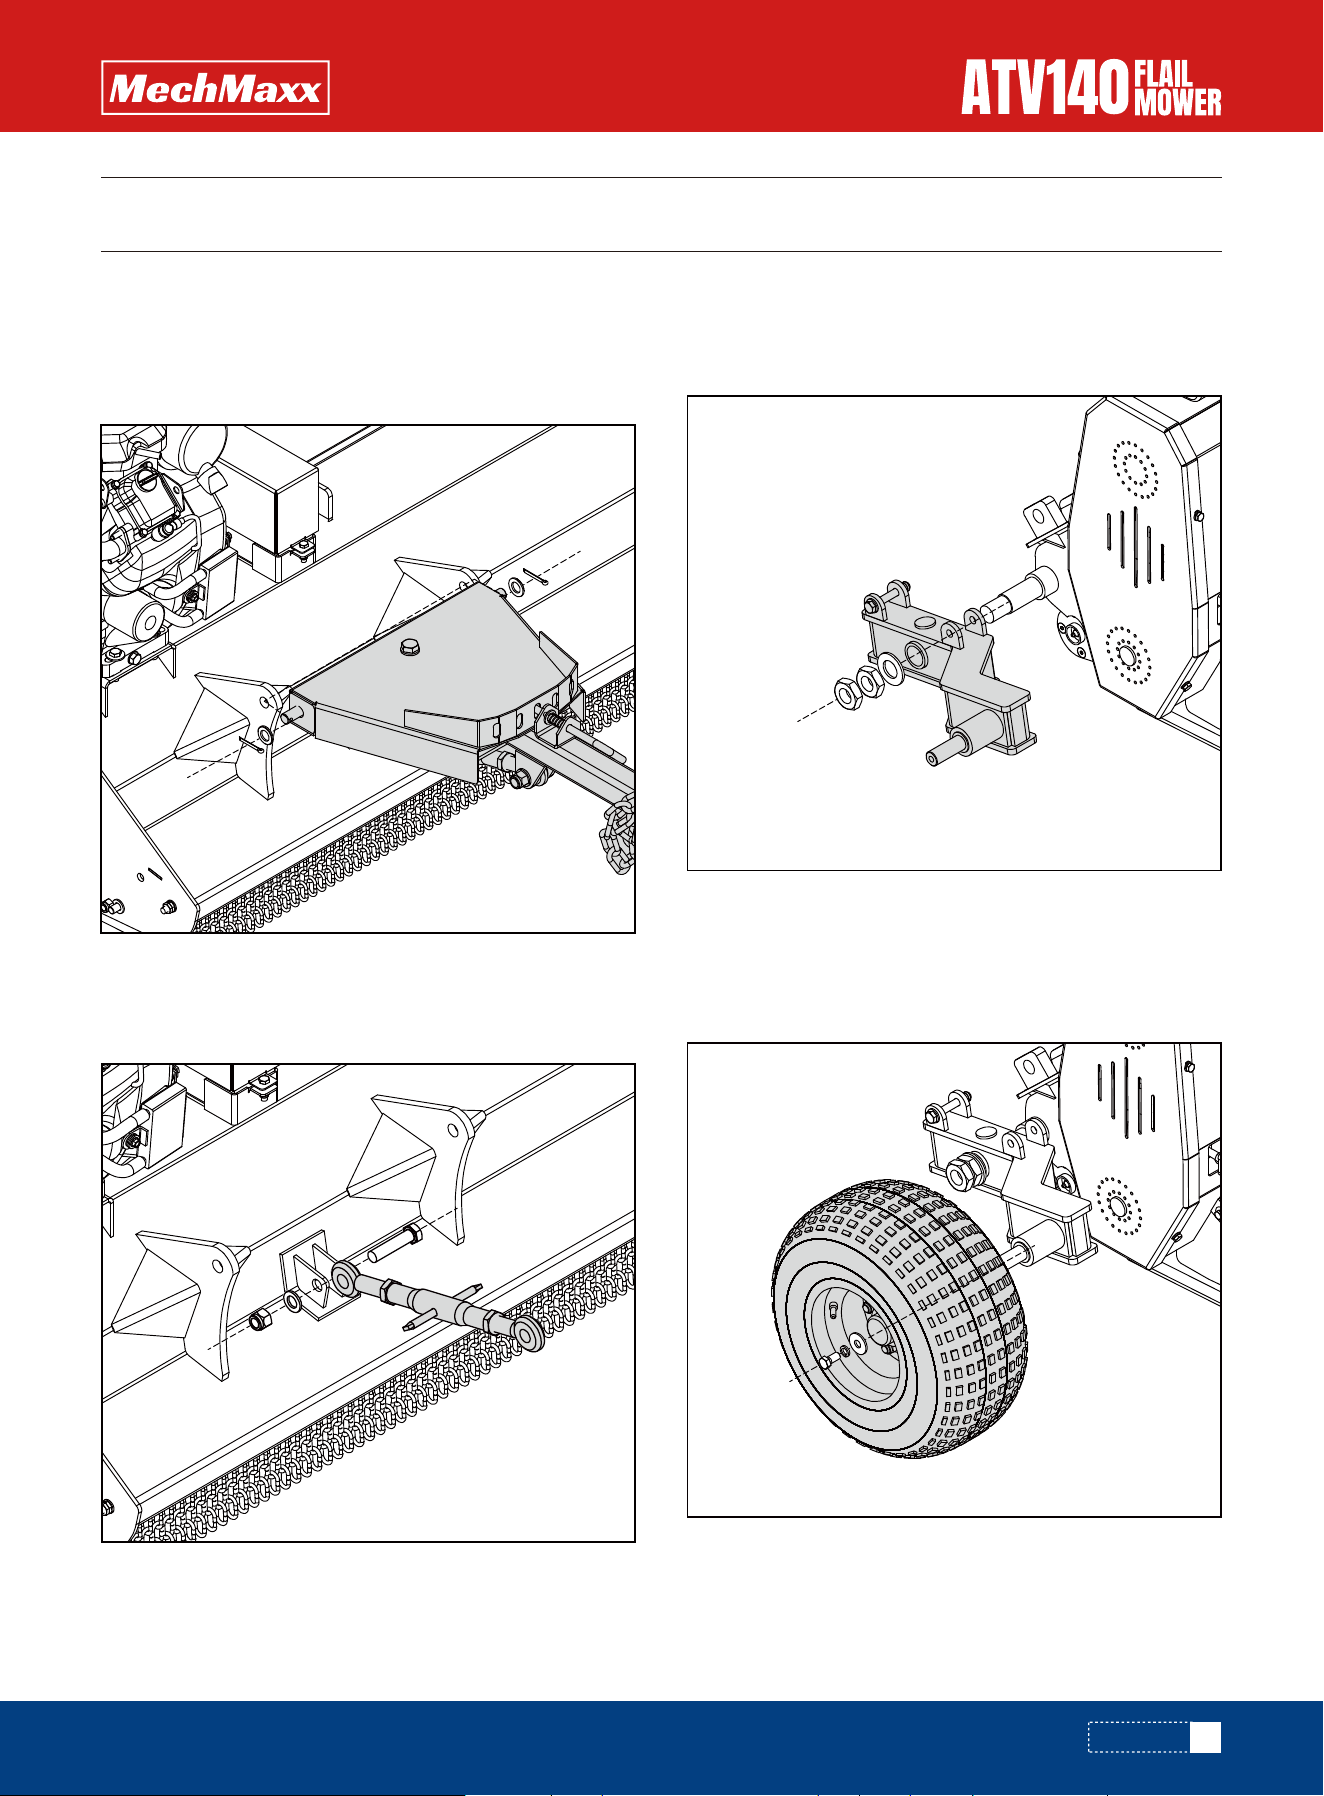
Secure the tow bar in the position shown using the long
pin shaft, then install the cotter pin (5×40) and flat
washer (16) to lock it in place.
Assemble the wheel frame to the mower frame using
two hex thin nuts (M30) and flat washers (30).
To install the wheel, first open the wheel cover. Secure
the wheel to the wheel axle using the shaft end cap, hex
head bolt (M12×25), and spring washer (12).
Assemble the connection bar at the bottom of the tow
bar using a hex head bolt (M16×70), lock nut (M16), and
flat washer (16).
8
www.mechmaxx.com
HAND-CRANK ADJUSTMENT ROD FUEL TANK
BATTERY WIRING
WHEEL GUARD
ASSEMBLY
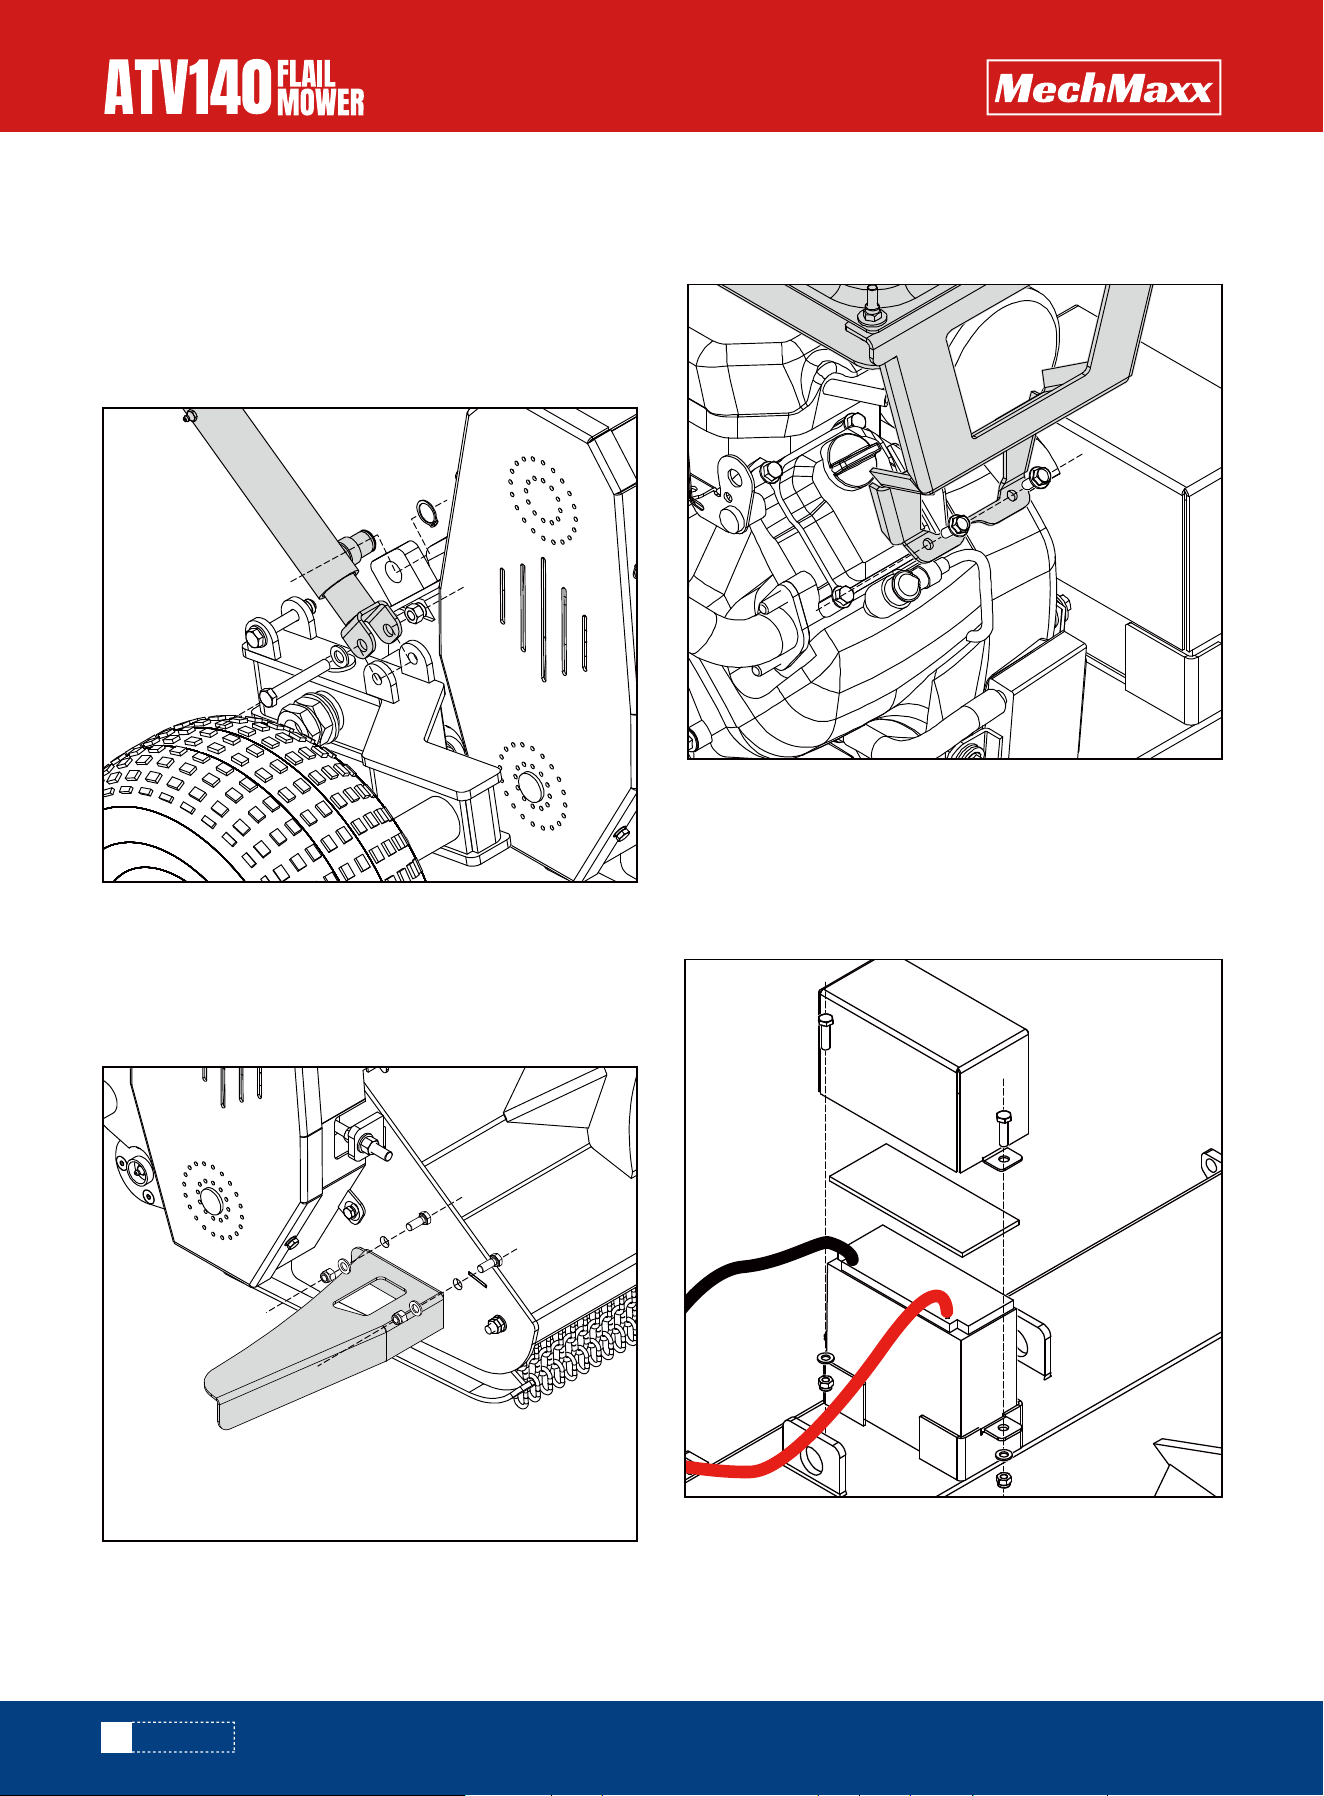
When installing the hand-crank adjustment rod, first
remove the retaining ring from the adjustment rod. Then
install the hand-crank adjustment rod onto the wheel
axle using a lock nut (M12), flat washer (12), and hex
head bolt (M12×80). Finally, reinstall the retaining ring
to secure it in place.
Assemble the fuel tank bracket to the engine using a hex
head bolt (M6×16).
First, remove the battery protective cover. Connect the
black cable to the negative (–) terminal and the red
cable to the positive (+) terminal. Then reinstall the
battery protective cover.
Install the wheel guard onto the mower frame using a
hex head bolt (M12×30), lock nut (M12), and flat washer
(12).
9
www.mechmaxx.com
OPERATING INSTRUCTIONS AND ADJUSTMENTS
OPERATING INSTRUCTIONS AND ADJUSTMENTS
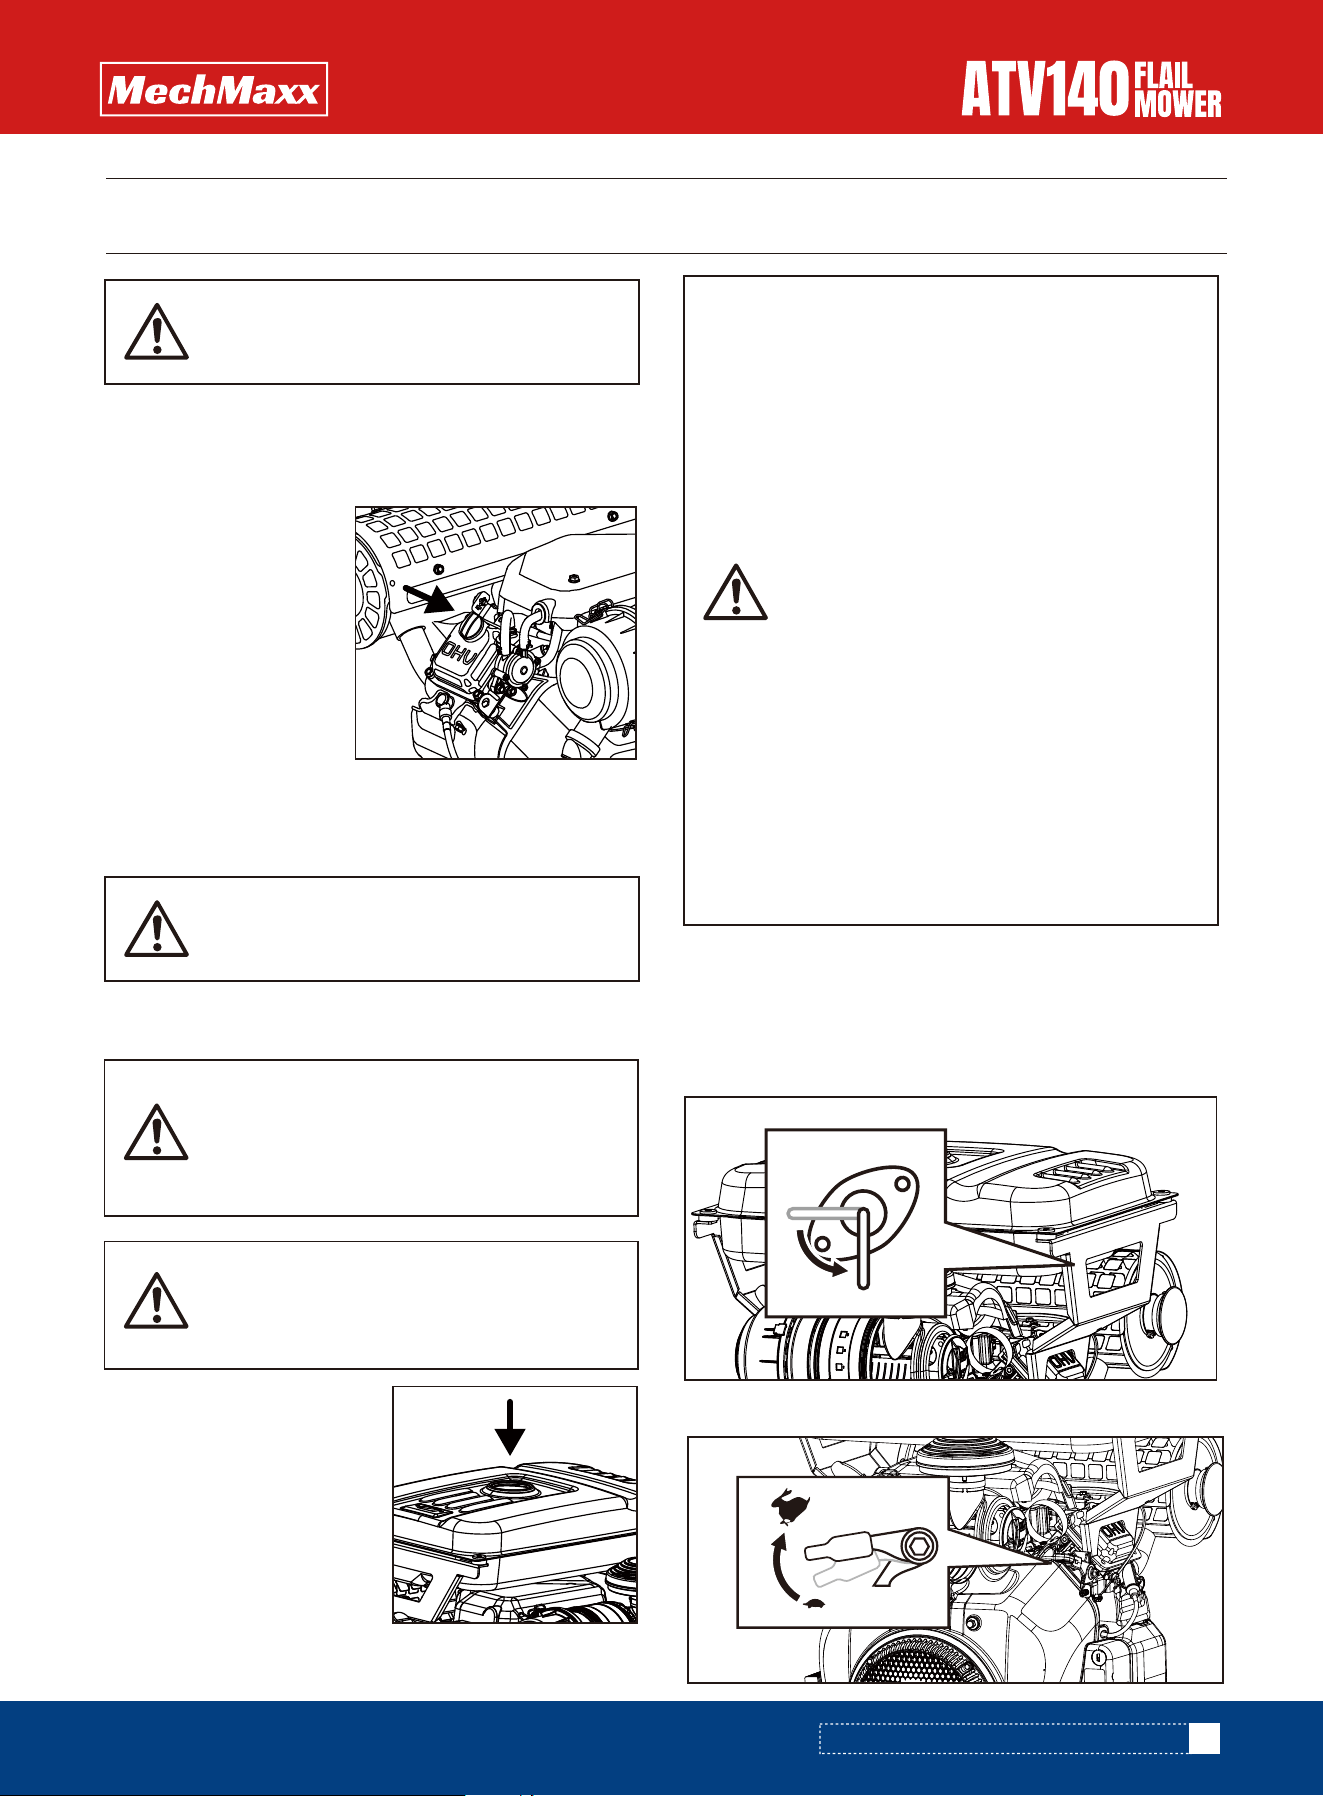
3. Using a funnel, add oil up to the FULL mark on the
dipstick. (See engine manual for oil capacity, oil recom-
mendation, and location of fill cap.).
The engine is shipped without oil. Do not
start the engine before adding oil.
DO NOT OVERFILL. Check engine oil level
daily and add as needed.
ADD OIL TO ENGINE
1. Make sure the mower is on a flat, level surface.
2. Remove the oil fill cap/
dipstick to add oil.
1. The engine must be off and
allowed to cool at least two
minutes before adding fuel.
2. Remove the fuel filler cap
and fill the tank. (See engine
manual for fuel capacity, fuel
recommendation, and location
of fuel cap.)
Gasoline is highly flammable and explo-
sive. You can be burned or seriously
injured when handling fuel. Use extreme
care when handling gasoline.
Fill the fuel tank outdoors, never indoors.
Gasoline vapors can ignite if they collect
inside an enclosure. Explosion can result.
ADD GASOLINE TO ENGINE
This equipment and/or its engine may
include evaporative emissions control
system components, required to meet
EPA and/or CARB regulations, that will
only function properly when the fuel tank
has been filled to the recommended level.
Overfilling may cause permanent damage
to evaporative emissions control system
components. Filling to the recommended
level ensures a vapor gap required to
allow for fuel expansion. Pay close atten-
tion while filling the fuel tank to ensure
that the recommended fuel level inside
the tank is not exceeded. Use a portable
gasoline container with an appropriately
sized dispensing spout when filling the
tank. Do not use a funnel or other device
that obstructs the view of the tank filling
process.
3. Reinstall the fuel cap and tighten. Always clean up
spilled fuel.
IMPORTANT:DO NOT OVERFILL!
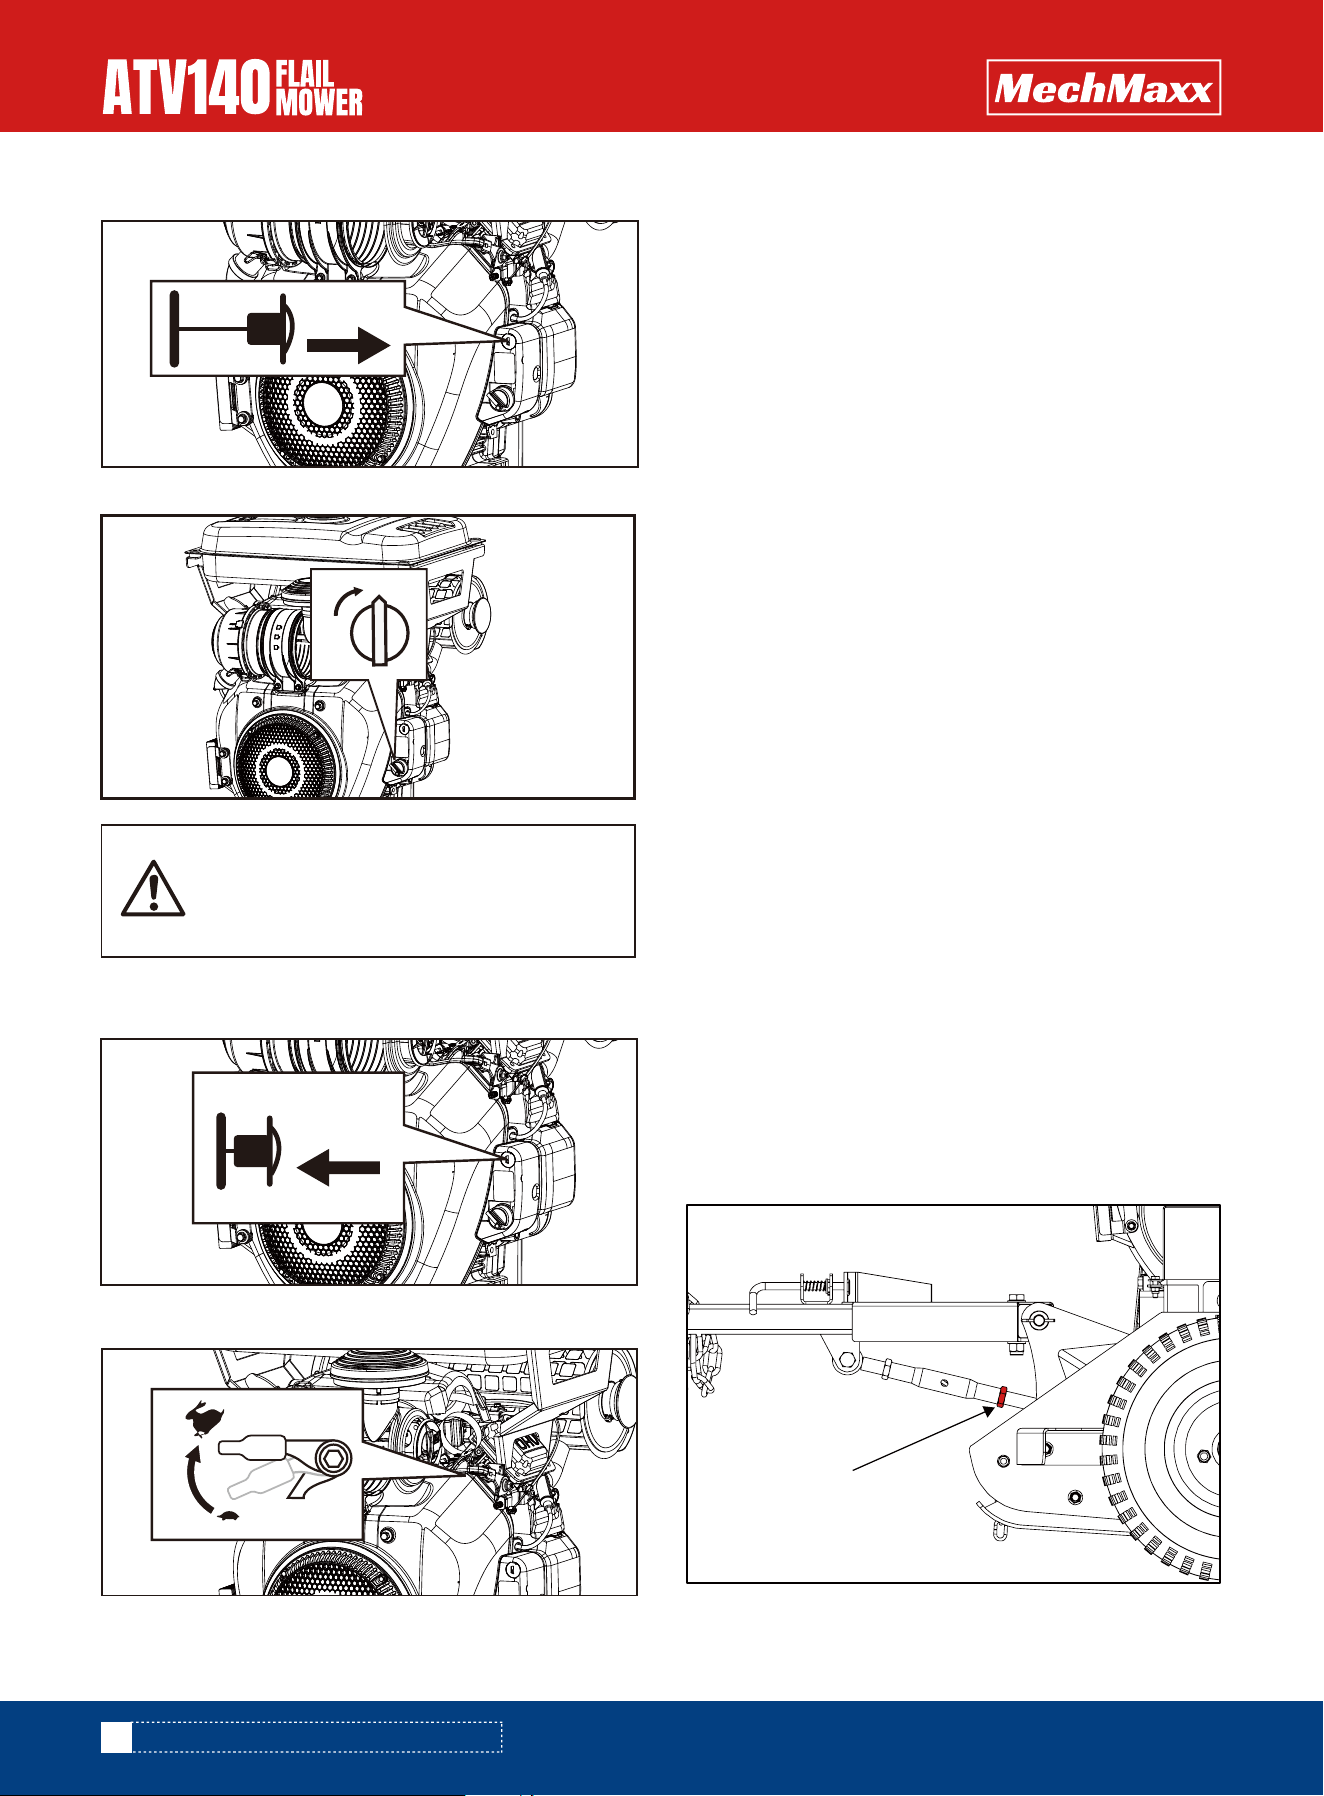
1. Open the oil pipe switch under the fuel tank.
STARTING ENGINE
ON
OFF
2. Move the throttle slightly.
INITIAL CHECK
DRAWBAR ADJUSTMENT
TO ADJUST
OPERATING INSTRUCTIONS AND ADJUSTMENTS
The ATV Flail Mower is designed to provide safe and
reliable service when operated according to the instruc-
tions and intended use.
Read and understand this manual before operating the
mower. Failure to do so may result in personal injury or
equipment damage.
When the mower is used with an ATV or compact tractor,
hearing protection should be worn. Under normal operat-
ing conditions, a noise level of approximately 83 dB(A)
may occur; therefore, hearing protection is recommended.
1.Makesure tha tall nuts,bolts and fitting sare securely-
fixed,and that all packaging materials e.g.wire bands,tape
etc have been removed.(Remove tape from the front
stone deflectors from the underside of the body.
2.Check the there is oil in the engine and petrol in the
tank.
3.Check tyre pressures.
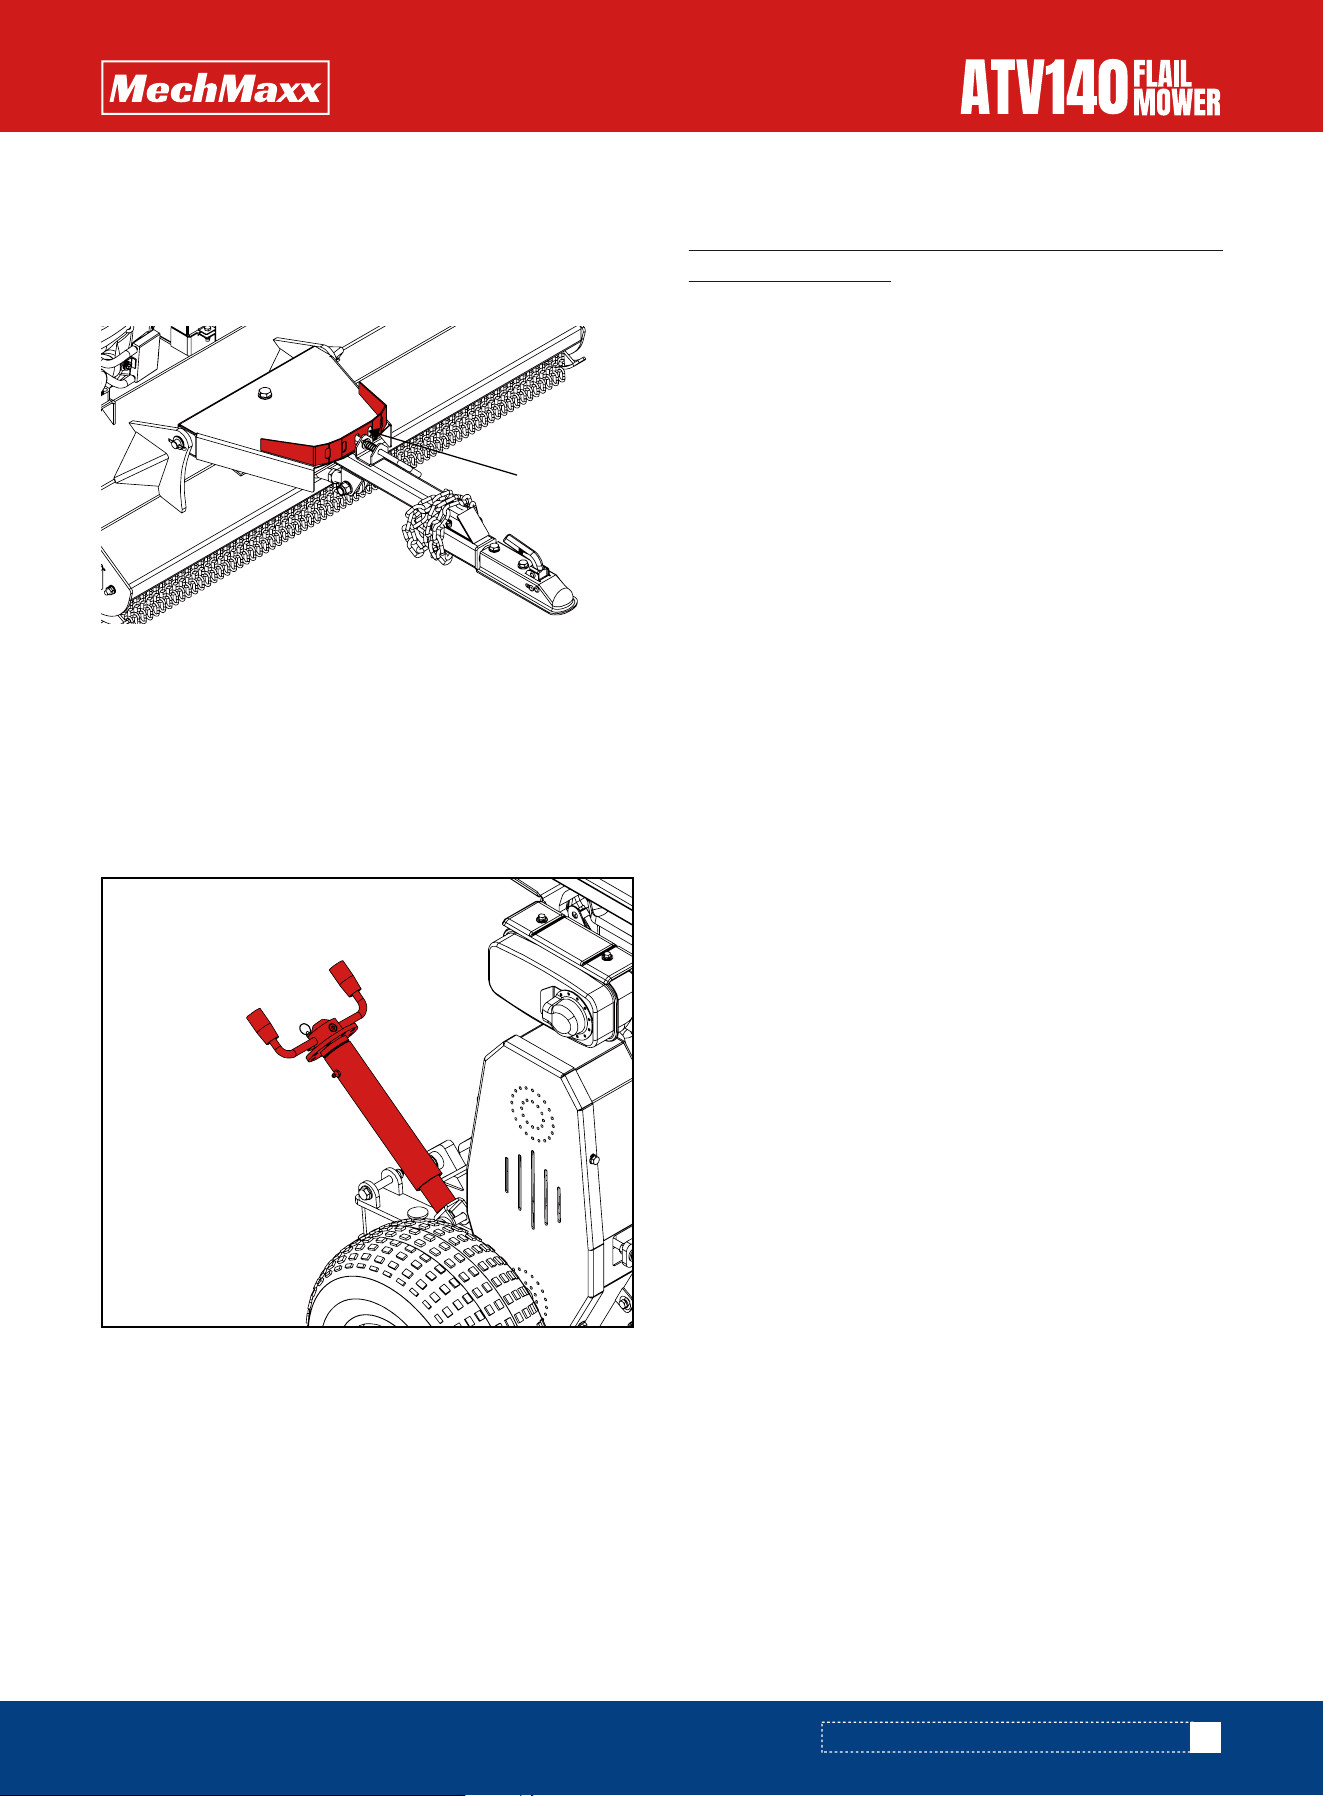
The draw barattach ment height of the towing vehicle can
vary. To accom modate adjustment,a screw link is located
beneath the drawbar. This should be lengthened or short-
ened so that the cutting deck is horizontal to level
ground. (This ensures a better cutting efficiency)
1. Unlock the locking nut (A)
2. Lengthen the link to lower the front of the deck or
shorten to raise the deck.
3. Once the deck is level, re-tighten locking nut (A).
10
www.mechmaxx.com
A
When starting the machine for the first
time, you need to start it several times
when starting the key.
3.Pull the throttle lever out and move it to the off position.
5.Push the throttle lever in and move it to the closed
position.
4. Move the engine switch to the ON position.
6. Move the throttle lever slightly to the FAST speed.
ON
OFF
OPEN
CLOSE
QUICK OFFSET DRAWBAR
MOWER CUTTING HEIGHT
CUTTING HEIGHT ADJUSTMENT:
OPERATING INSTRUCTIONS AND ADJUSTMENTS
Pull back the locking pin; slide the drawbar to the desired
position, and release the locking pin into the securing
hole, as shown.
Observe all safety precautions. Keep hands and feet away
from the rotor and all moving parts. Keep spectators at a
safe distance.
1.Make sure there is adequate clearance between the
blades and the ground or crop.
2.Select an area free of loose debris that could be picked
up by the machine.
3.Set the engine choke and adjust the throttle to a
suitable idle speed.
4.Place one foot firmly on the deck housing to maintain a
stable, balanced position. Pull the starter cord firmly,
then allow the cord to return slowly to the housing. One
or two strong pulls should start the engine.
5.After allowing the engine to warm up at idle speed for a
few seconds, move the throttle to the factory preset
working position to achieve a normal operating engine
speed of up to 3600 RPM (max).
FAILURE TO DO THIS WILL RESULT IN CLUTCH SLIP AND
ULTIMATELY SEVERE DAMAGE TO THE CLUTCH AND DRIVE
BELTS.
NORMAL FORWARD SPEED (1 kph–very heavy use–10
kph–very light use) Start off in the slowest speed possi-
ble,ensure the mower is working efficiently with the
engine set at maximum RPM and not labouring.(If this is
not possible due to very heavy cutting conditions,raise
cutting height of blades and be prepared to go over twice
with machine set lower on 2nd pass,leave at least 24
hours in between 1st and 2nd cut to allow grass to dry
out) Increase forward speed until the RPM of the engine
starts to slow down (This is working the engine too hard
for conditions) – slow down, let the engine regain full RPM
and go throughthe same process but stop shortof speed-
which made engine labour previously. It is important
always to listen tonote of engine to en sure engine and
mower are working efficiently, slow down or stop once
engine starts to labour.
The amount of grass or weeds to be cut dictates the
forward speed;slow forwardspeeds give better results in
most cases.Ensure you follow the procedure below.
STARTING THE ENGINE
FORWARD SPEED
READ AND UNDERSTAND THE ENGINE OPERATORS
MANUAL BEFORE USE
The main cutting height adjustment is achieved by using
the screw jack, to raise or lower the cutting deck as
necessary.
Turn the handle to raise or lower as necessary.
11
www.mechmaxx.com
Hole settings
12
www.mechmaxx.com
OPERATING INSTRUCTIONS AND ADJUSTMENTS
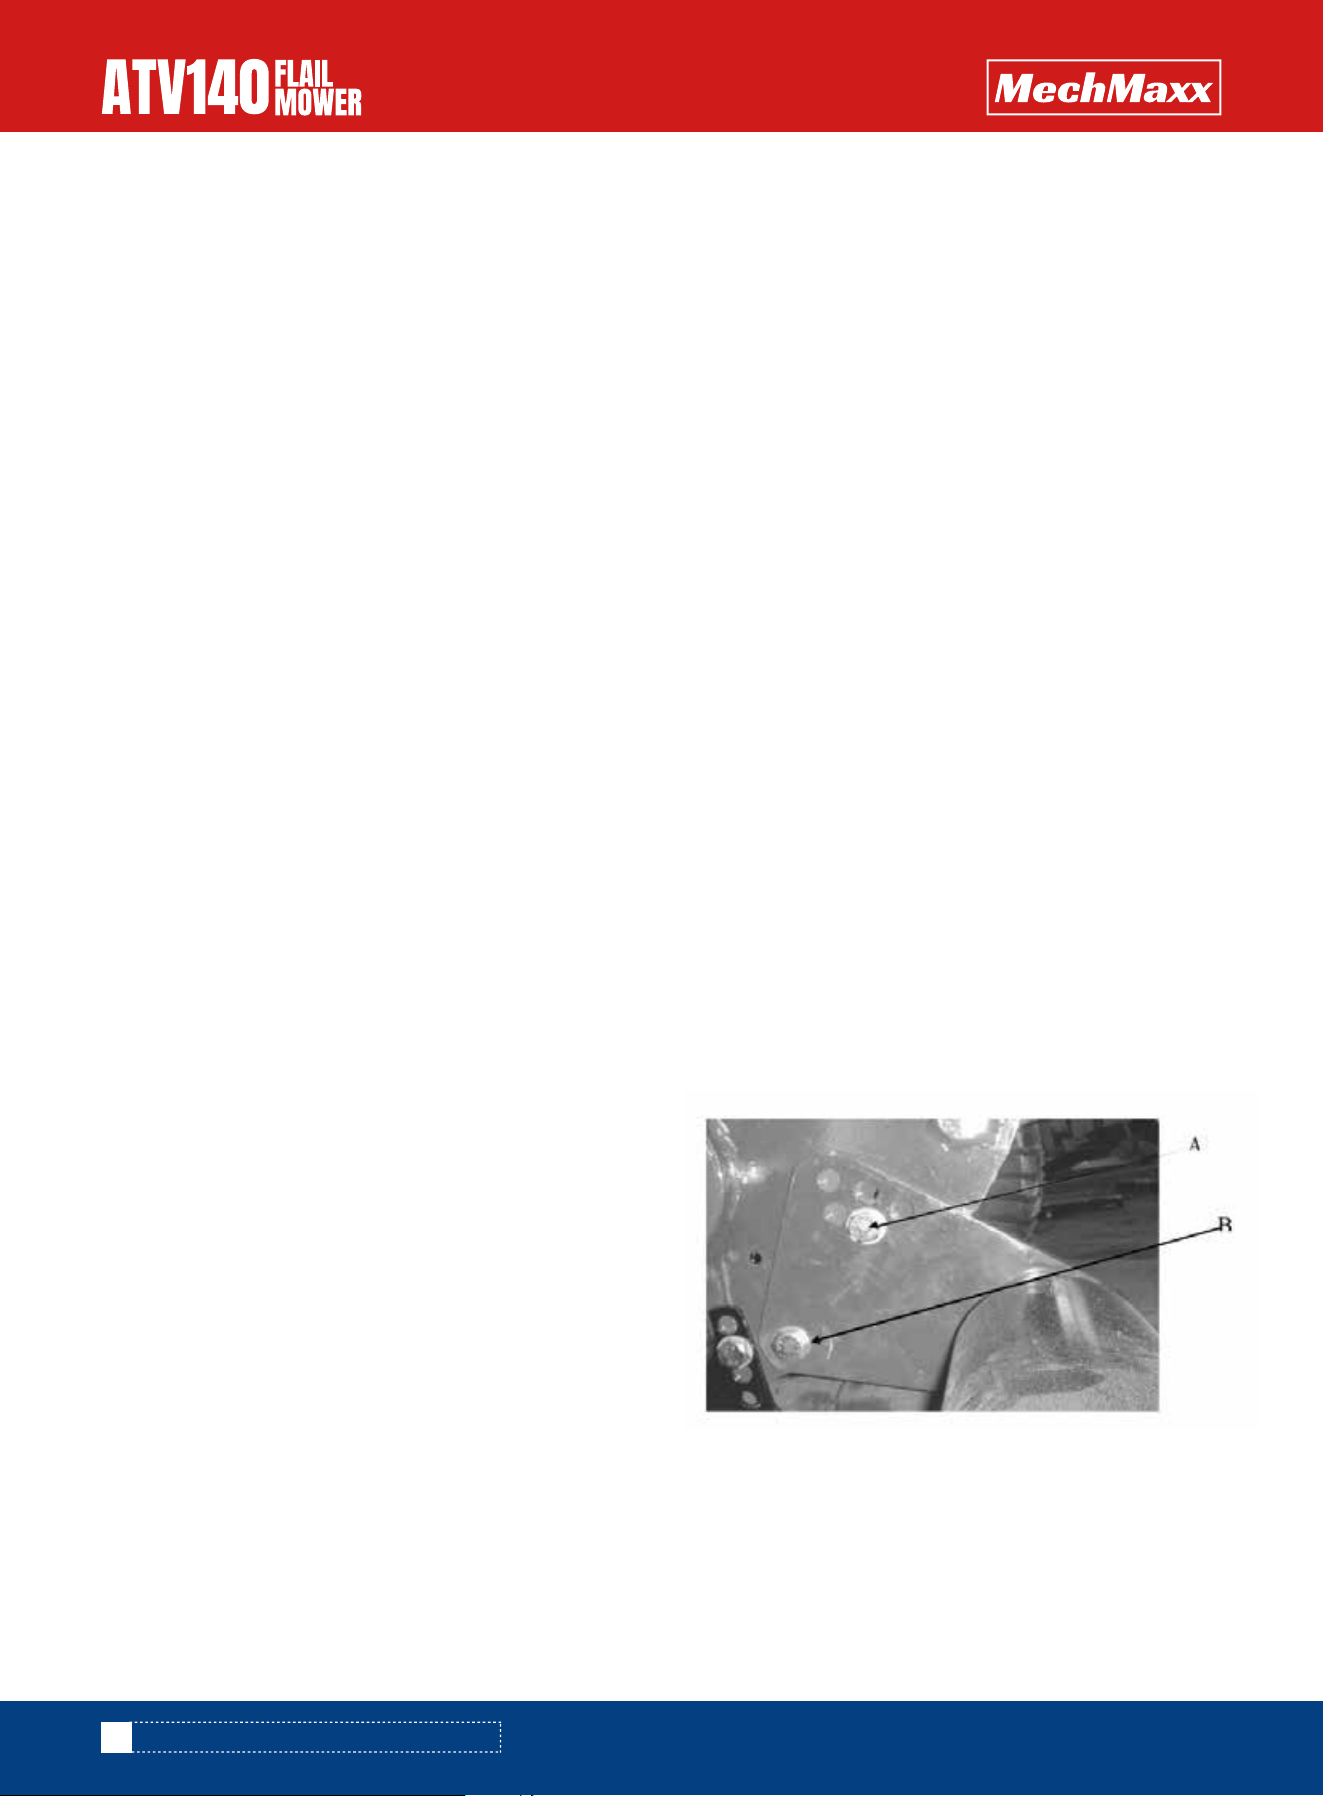
The main purpose of the anti scalping roller is to prevent damage. If a wheel drops into a hole, or there is uneven ground
between the wheels, the roller takes the weight of the mower, avoiding the flails scalping the ground; combined with the
side skids the mower provides good protection to the rotor.
The anti scalping roller has the added advantage of enabling kerb side grass to be cut with no difficulty, by allowing the
wheel to hang over the kerb edge.
The factory pre-set position of the anti scalping roller and side skids are suitable for most situations.
However,ifthe moverisusedinroughconditions orregularly inheavy crops,theroller and side skids should be lowered, to
increase the clearance between the flail and the ground when the roller comes into use.
In circumstances where the mower is being used as a “Finishing Mower” and a striped appearance is desired, the roller
can be set down using the various hole positions to give the required cutting height, then the wheels can be lifted clear
of the ground.
TO ADJUST THE ROLLER:
Slacken pivot bolt “A”.
Slacken and remove bolt
“B”(Repeat for both ends of the roller)
Select another hole and
Replace bolt “B”. Tighten bolts “A” and
“B”. TO ADJUST THE SIDE SKIDS:
Remove the bolt at the
Front of the skid and the rear of the skid (Shown as “C”) Select
new setting, replace the bolts and tighten. Repeat for the oppo-
site skid; always ensure both skids are set to
After prolonged heavy use, before stopping the mower, run the machine at half operating speed while stationary for at
least 4 minutes to allow the drive belts to cool down.
1.Use caution around hot components—such as the engine exhaust and belts—after the engine has been shut off.
2.Ensure the mower drawbar is adjusted so the mower runs directly behind the towing vehicle and is not offset.
3.After the mower has fully cooled (minimum 1 hour after last use), make sure all grass and debris are removed from the
engine cooling fins, drive belt area, and rotors before operating the mower again.
When the mower is being moved from one site to another it is advisable to raise the deck to the highest position
The engine must be stopped and the blades at a standstill before adjusting to the transport position.
Remove any crop debris from the deck before leaving the field.
Never move from one site to another with the engine running.
Please note the ATV – Flail Mower is not road legal, and should not be used on public roadways
STOPPING THE MOWER
ANTI-SCALPING ROLLER/SIDE SKIDS
STOPPING THE MOWER
13
www.mechmaxx.com
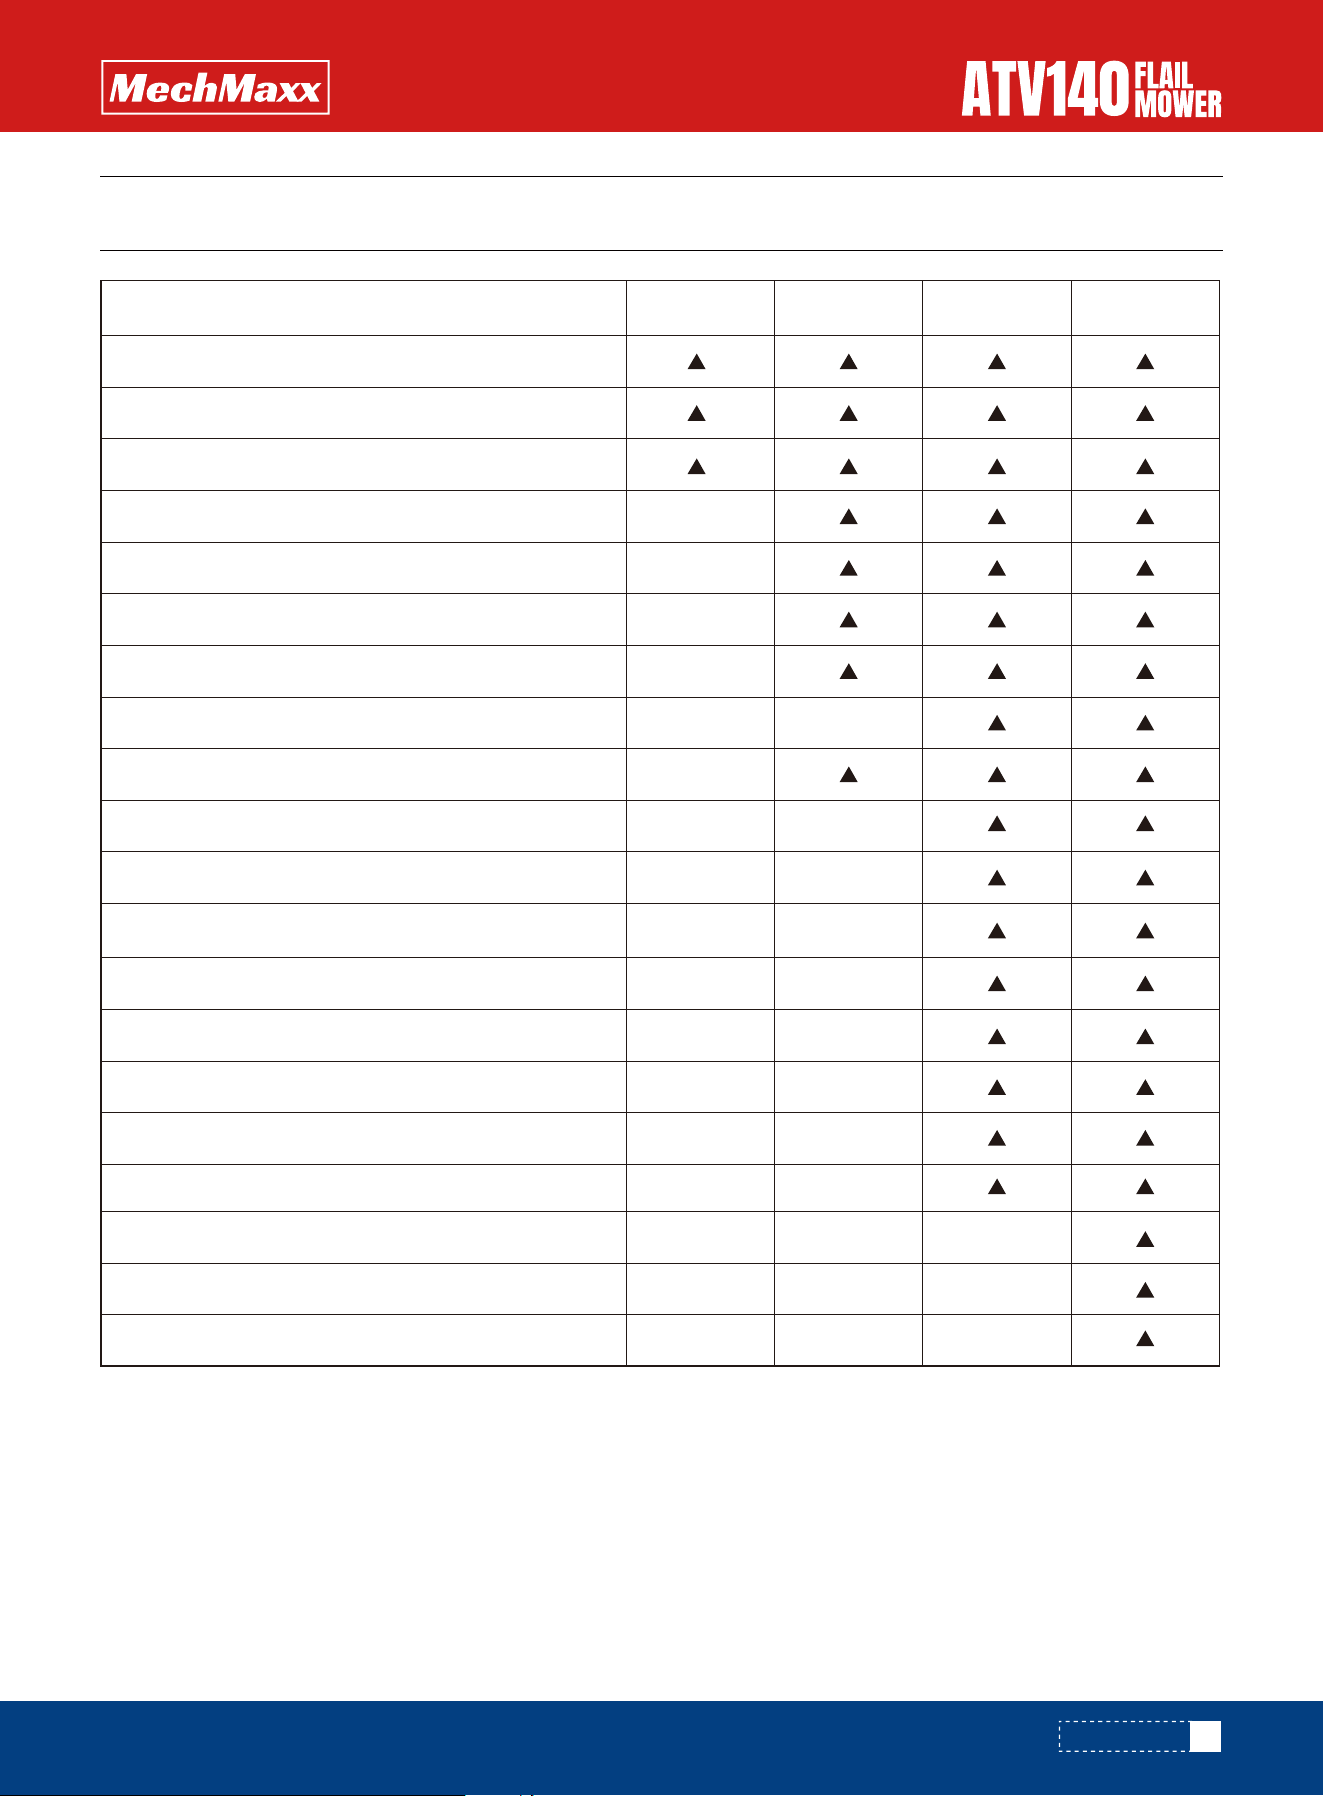
MAINTENANCE
MAINTENANCE
Hourly
Maintenance Operation:
Daily Weekly Seasonal
Engine (See Engine manufacturers manual)
Remove excess crop gathered on deck
Remove excess crop wrapped around rotor ends
Visual check to ensure nothings loose
Grease Height Adjuster
Grease Rear Roller
Grease Rotor Bearings
Tyre Pressures
Drive belt inspection
Rotor Bearing inspection
Wheel Bearing Inspection
Oil 1.96 in coupling
Swivel hitch Bush Wear
Check All Fastener’s are tight and intact
Safety Chain Guard inspection
Safety Decals intact
Safety Guards Intact
Check Blade wear / condition
Check Metal Fatigue
Clutch Wear / Function
14
www.mechmaxx.com
Refer to engine manufacturers manual, for servicing and
maintenance of the engine.
Remove all crop deposits from the deck, and engine area.
Build up of crop deposits could result in heat build and
fires
Disconnect the spark plug lead.
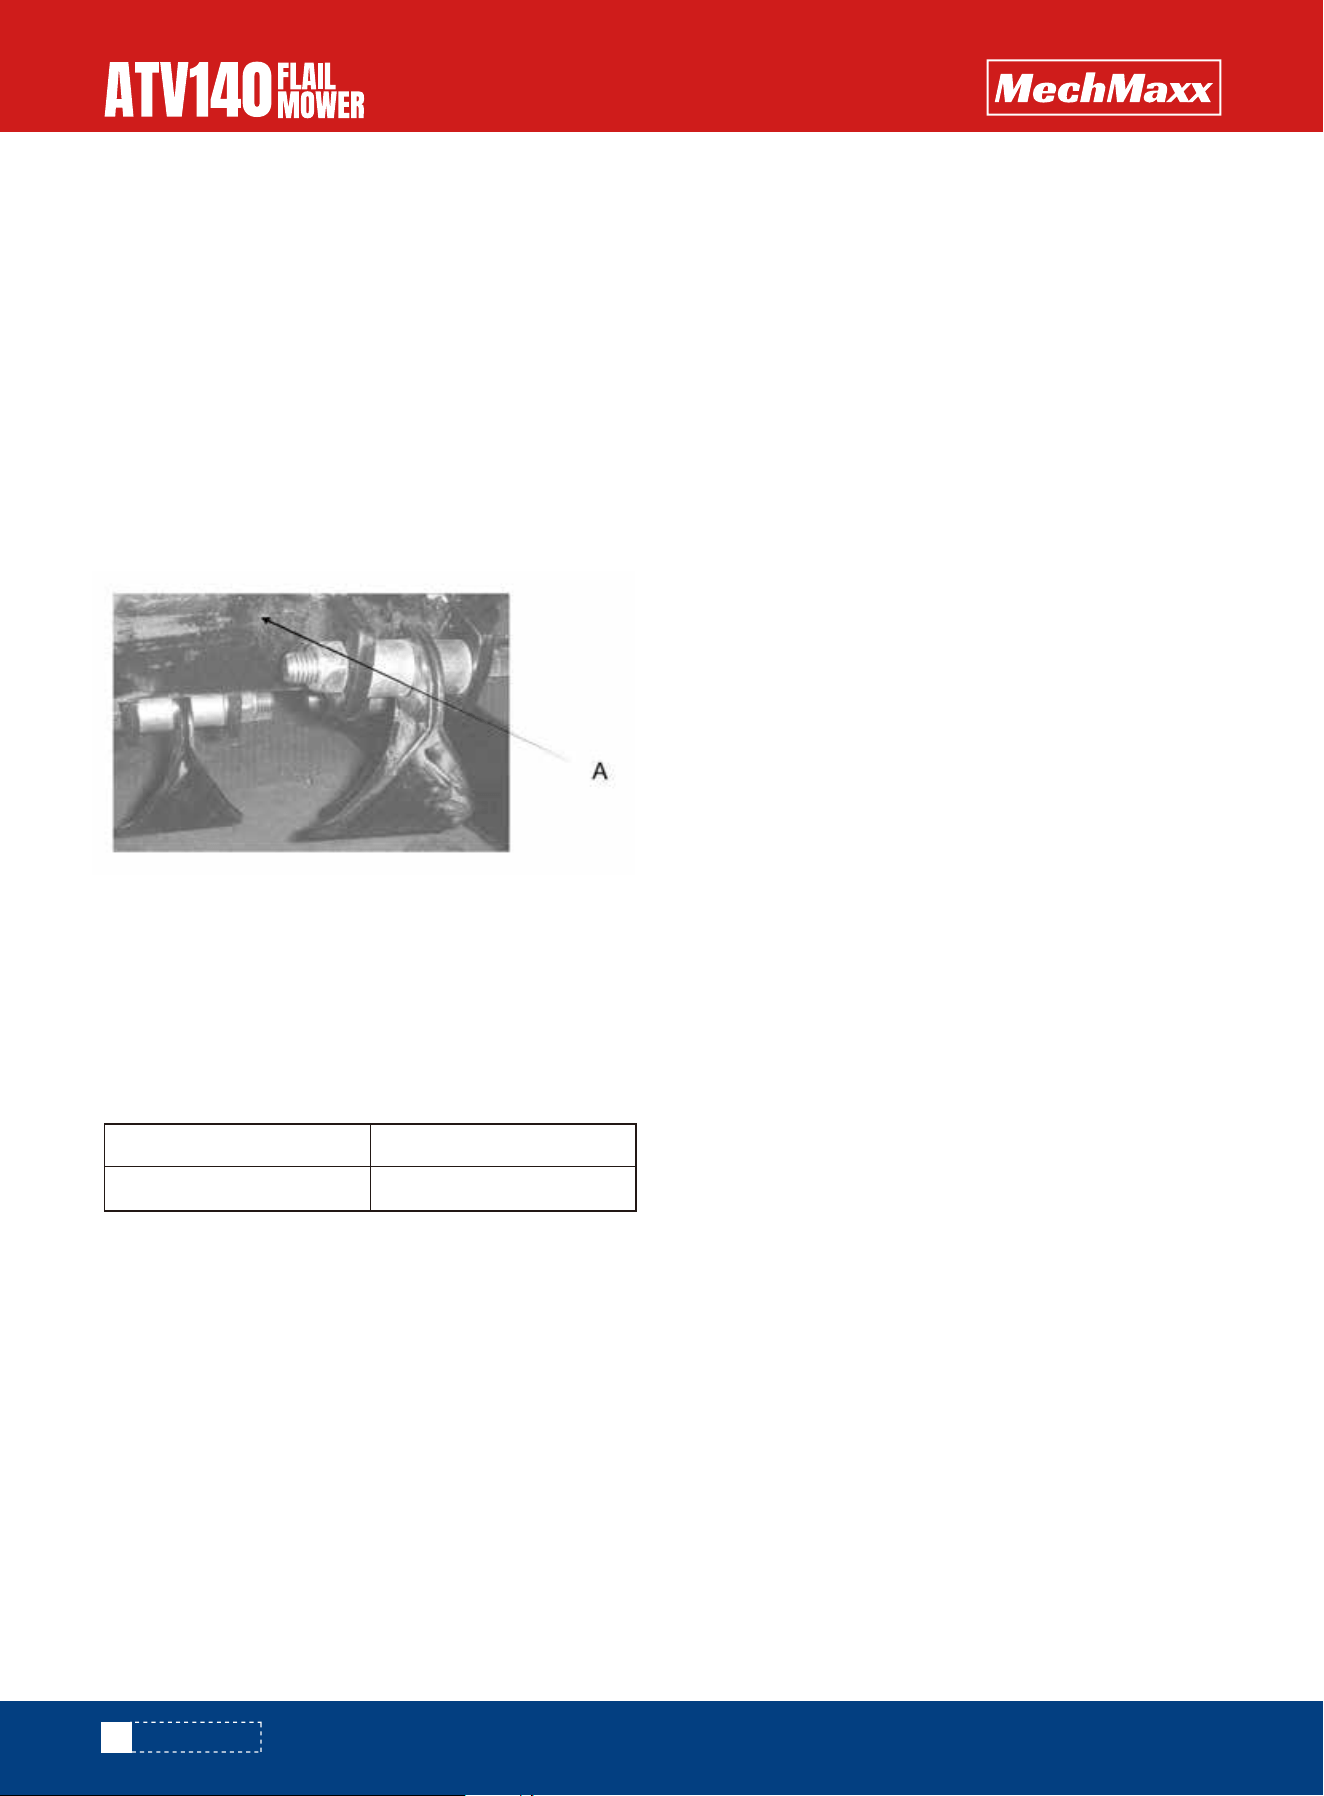
Remove any crop that is wrapped around the end of the
rotor (A) or on the underside of the deck. Raise the deck
to its max height to assist access to the rotor shaft.
Make a visual check around the mower, check for missing
/ loose parts or damaged / worn components. All faults
must be either repaired or replaced.
Check coupling for signs of damage or wear, swivel the
coupling 36. degrees and check that the bushes are not
too worn. Replace any worn or damaged parts.
Oil the coupling regularly as shown below.
Check the mower to ensure all fasteners are tight and all
safety guards / chains are intact and fitted securely.
Check all safety-warning decals, Replace any defective
guards or damaged decals.
Rotate rotor shaft by hand and feel for any roughness in
the bearings. Also try to pull the shaft from side to side to
see if any movement is found. If symptoms persist strip
down the rotor-housing unit and inspect bearings.
Jack one side of the mower body up, so the wheel is just
off the ground. Rotate the wheel by hand, and check the
wheel alignment. To check the bearings, try to move the
wheel from left to right and feel for any play in the
bearings, ensure the wheel-locating bolt is tight before
you start and follow any jacking procedures. If any
play is found remove the wheel and inspect bearings.
Replace any faulty bearings.
DO NOT exceed recommended tyre pressures
ENGINE
EXCESS CROP BUILD UP
OIL 1.96 IN COUPLING/BUSH WEAR
GENERAL INSPECTION
At the time of replacement, the opposite knife on the
rotor should be checked for wear. If it is partially or well
worn then it should be changed to maintain an accurate
weight balance.
When the first cutting edge is becoming blunt, the whole
set off ails should be turned around. (Using blunt knives
will reduce the cutting efficiency and increase fuel
consumption).
Replacing or reversing the knives follows this simple
procedure:
1.Ensure mower engine has stopped and the knives have
stopped rotating.Switch of the fuel tap and let the
machine cool down for 5 minutes. Remove the spark
plug to ensure the engine cannot be started.
2.Raise the mower to its max cutting height.
3.Carefully raise the draw bar to an incline position, so
that the height adjuster bar at the rear of the mower
takes the weight. NB: Do not attempt this with the
wheels behind version; raise the front jack to its max
height.
a.Slacken and take out the shackle bolt.
b.Replace or turn around blades (Note the direction of
rotation)
c.Replace shackle bolt securely, but still allowing the
shackle to swing on the fixing bush.
NOTE:Never use cracked or repaired shackles when
replacing knives. If the shackle fixing has become
damaged or worn, replace with new parts
ROTOR FLAIL MAINTENANCE
VISUAL CHECK
TYRE PRESSURES
ROTOR BEARING INSPECTION
WHEEL BEARING INSPECTION
MAINTENANCE
22×1100 -8
16.5×6.50 -8
7 – 10 PSI
28 PSI (Max)
15
www.mechmaxx.com
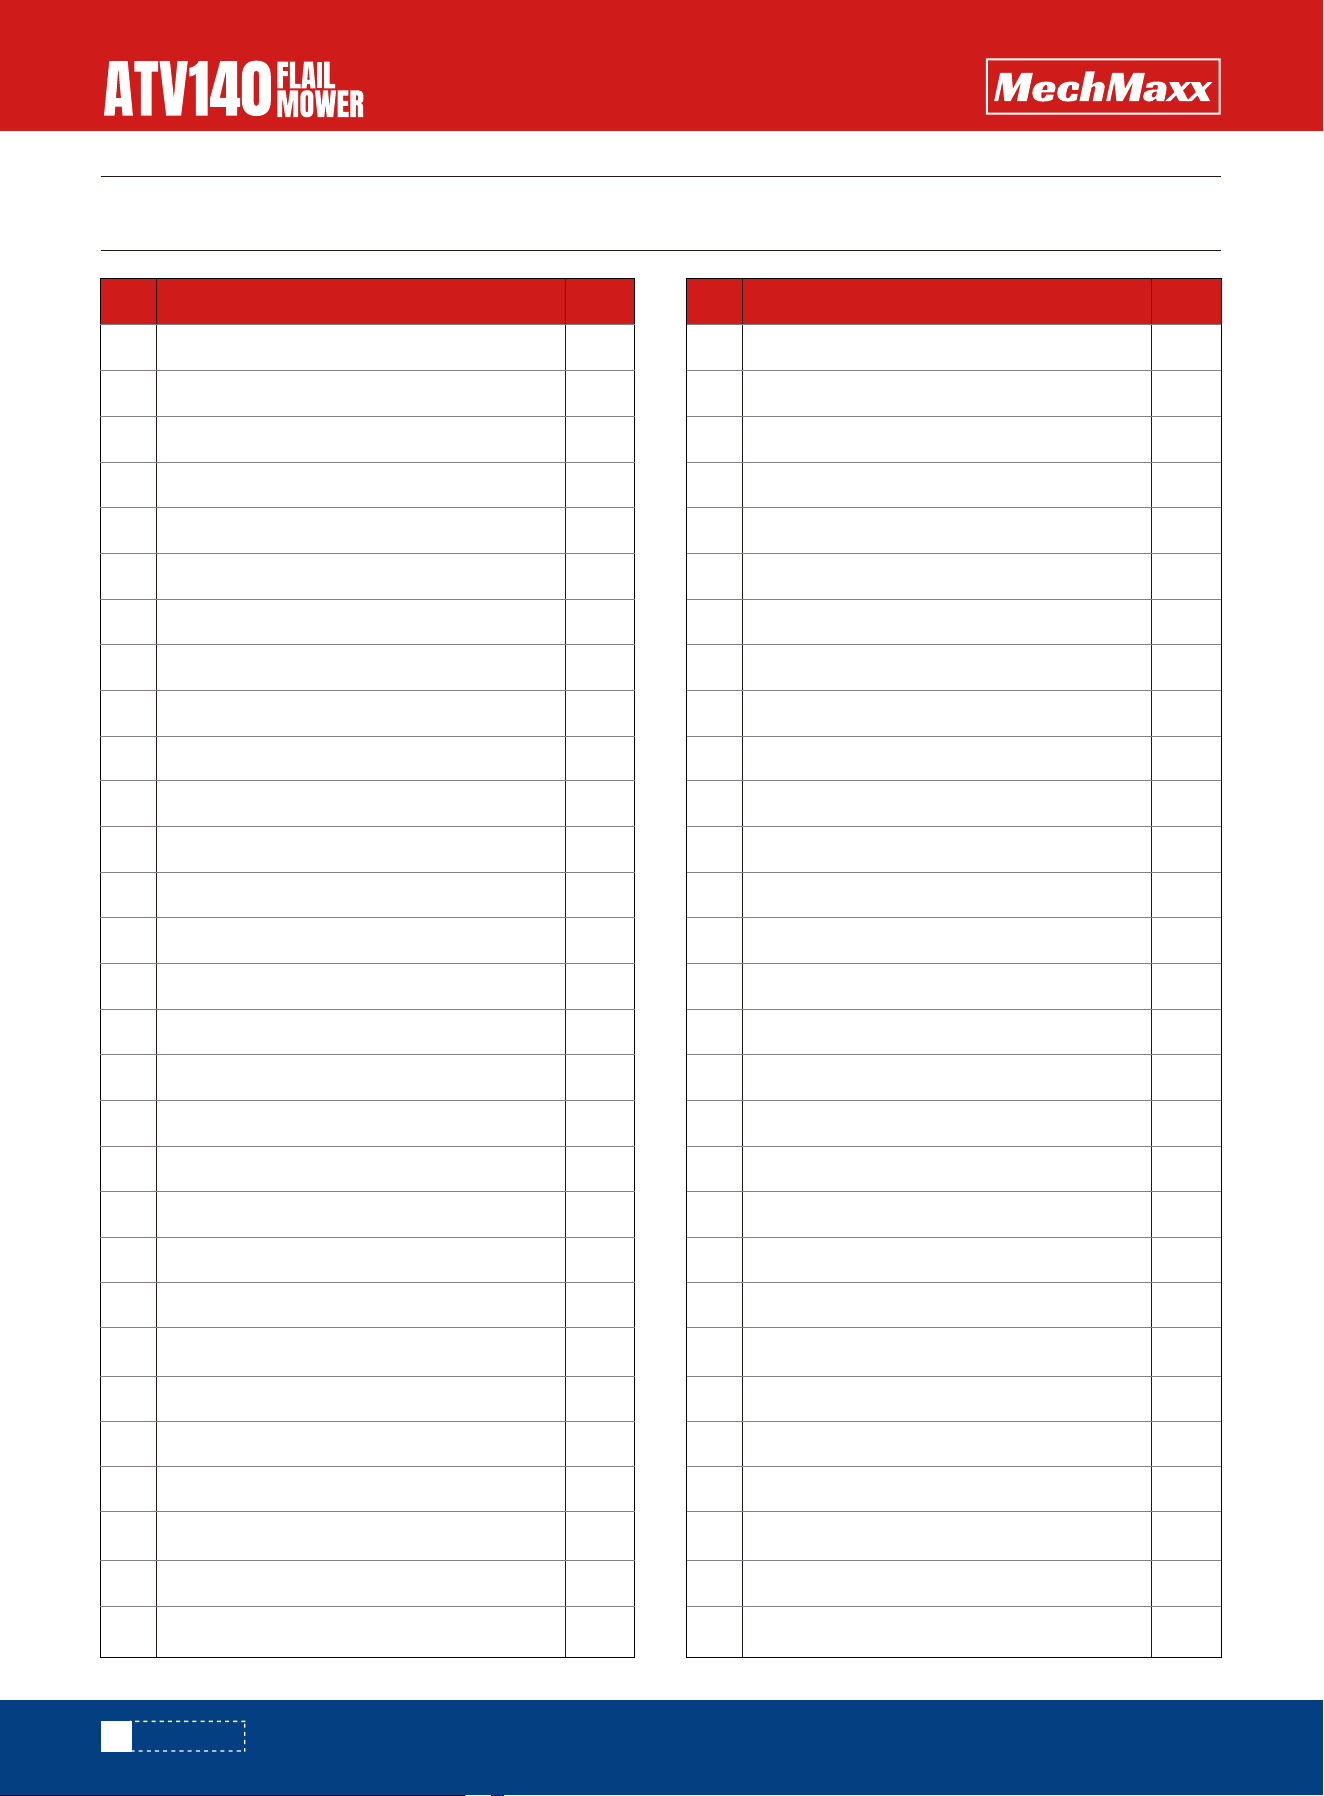
PARTS DIAGRAM
PARTS DIAGRAM
46
48
41
47
45
43
42
49
26
39
26
30
11
9
36
114
67
75
31 33
32
35
38
40
37
34
102
62
64
44
85
86
18
70
39
91
29
65
81
32
88
104
142
33
32 35
52
51
78
79
80
50 11 35
77
9
78
79
92
61
83
58
73
80
98
69
70
60
59
105
25
20
24
21
23
19
11 22
27
28
54
56
55
57
26
58
100
76
11
107
84
14
13
7
10
9
99
11
5
2
18
17
16
8
3
15
6
9
2
12
14
13
84
89
4
82
95
96
97
106
93
94
106
103
66
108
72
68
101
1
16
www.mechmaxx.com
PARTS LIST
PARTS LIST
No. Description Qty.
1
2
3
4
5
6
7
8
9
10
11
12
13
14
15
16
17
18
19
20
21
22
23
24
25
26
27
28
29
Housing
Trailer tow bar
Bent pin
Long pin shaft
Nylon bushing
Spring
Trailer coupler
Trailer safety chain shackle
Flat washer 12
Hex head bolt M12×70
Lock nut M12
Hex head bolt M16×90
Lock nut M16
Flat washer 16
Cotter pin 3×25
Hex head bolt, fully threaded M10×90
Chamfered flat washer, Grade A 10
M10 nut
Knife roller shaft weldment
Bushing
Bearing housing
Thick washer
Set-screw locking insert ball bearing
Oil seal, double-lip rubber covered type
Hex socket set screw, flat point M8×8
Tapered grease fitting M8×1
350 g cutter blade
Hex head bolt M12×80
Small pulley
1
1
1
1
2
1
1
1
29
2
43
1
3
4
1
1
2
5
1
1
2
44
2
1
1
7
22
22
1
No. Description Qty.
30
31
32
33
34
35
36
37
38
39
40
41
42
43
44
45
46
47
48
49
50
51
52
53
54
55
56
57
58
Wheel support leg weldment
Ø52 hub dust cap
Spring washer 12
Hex head bolt M12×25
Bearing
Large washer 12
Hex head bolt M12×80
Hex head bolt M14×40
Hex lock nut M14
Rubber cap
Flat washer 12
Handle weldment
Sleeve weldment
Threaded rod
Threaded rod sleeve weldment
One-way thrust ball bearing
M12 plastic handle
Hex socket head cap screw M8×30
Self-locking knob plunger M12-8
External retaining ring, type B 24
Idler roller bracket
Belt idler roller
Bearing
Hex thin nut M20
Roller
Bearing housing UC205
Set-screw locking insert ball bearing
Side plate
Hex head screw M8×20
1
1
11
2
2
3
2
4
4
2
4
2
2
2
2
4
4
2
2
2
1
1
2
2
1
2
2
1
9

17
www.mechmaxx.com
PARTS LIST
No. Description Qty.
59
60
61
62
63
64
65
66
67
68
69
70
71
72
73
74
75
76
77
78
79
80
81
82
83
84
85
86
87
88
89
Fender shaft
Spacer
Wheel guard
Key
Shaft end cap
Engine retaining ring
Shrink disc coupling
Battery seat pad
Flat washer, Grade A 30
Hex head bolt, fully threaded M12×30
Hex thin nut, no chamfer M10
Flat washer, Grade A 10
Hex head bolt, fully threaded M12×35
Hex head bolt, fully threaded M8×30
Hex lock nut M8
Flat washer, Grade A 8
Hex thin nut M30
Hex socket head cap screw M12×70
Hex nut, Grade C M12
Hex head bolt, fully threaded M8×20
Standard spring washer (assembly) 8
Large washer, Grade A 8
Hex head bolt M12×25
Cotter pin 5×40
Hex head bolt, fully threaded M8×25
Hex head bolt M16×70
Hex head bolt M10×50
Large washer, Grade A 10
Belt idler roller
Shaft end cap
Chamfered flat washer, Grade A 16
1
69
1
1
1
1
1
2
2
20
4
6
2
2
3
2
4
2
2
8
9
6
1
2
1
2
4
4
1
1
2
No. Description Qty.
90
91
92
93
94
95
96
97
98
99
100
101
102
103
104
105
106
107
108
Pulley guard
Cover
Flat washer 8
Rear fuel tank support
Front fuel tank support
Hex lock nut M6
Large washer, Grade A 6
Hex head bolt, fully threaded M6×35
Baffle plate
Pin shaft tube
Rear cover
Trailer guard
Wheel axle
Battery cover
Clutch
Chain
Fuel tank
Battery
Connection bar
1
1
4
1
1
4
8
4
1
1
1
1
1
1
2
69
1
1
1