EN
01
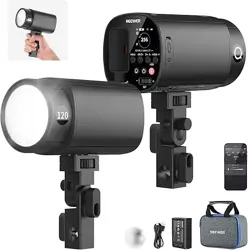
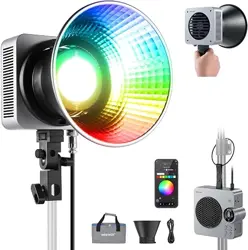
The newly launched NEEWER HS200C is a portable full-color LED video
light, featuring an upgraded full RGB light source that ensures powerful
light output and an ultra-lightweight build for effortless transport to
wherever you need a creative lighting setup.
Whether indoors or outdoors, the HS200C delivers stable, high-quality
illumination to satisfy all your lighting needs, with multiple lighting modes
for versatile shooting and flexible control options for streamlined and
multifunctional operation.
Compatible with all Bowens mount accessories, this light works seamlessly
with your existing light shapers. It supports AC power for indoor use and a
wide 42-48V DC input for outdoor use, ensuring long-lasting and stable
illumination wherever you are.
The HS200C is an ideal choice for photography and videography lighting,
infusing every creation with unlimited possibilities.
Safety notes
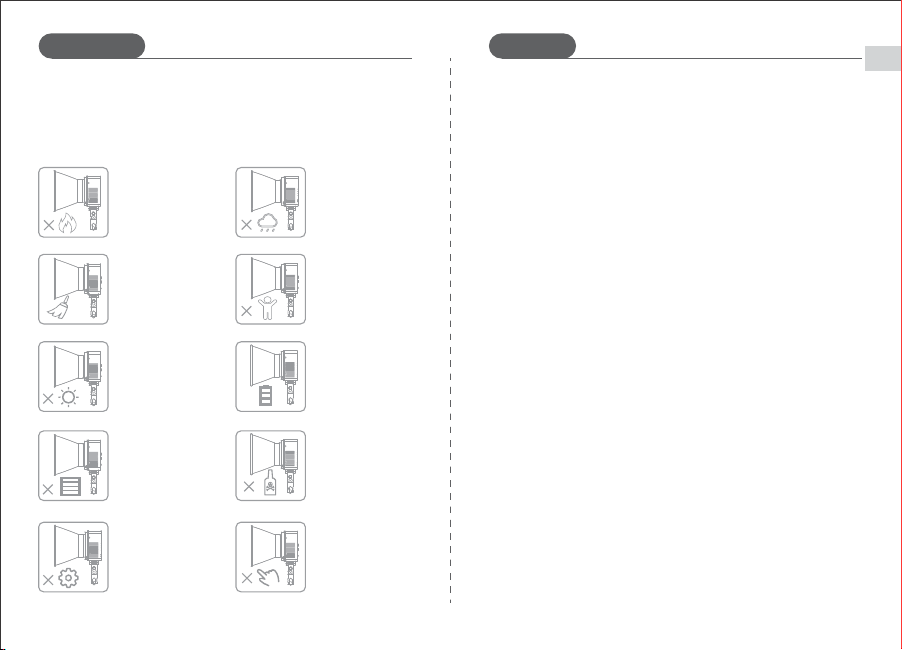
To ensure your safety and that of others, please ensure you read the following
safety advice before using this product. Please pay attention to the precautions
highlighted in the manual. The product should be checked prior to use and
not used if damaged.
Do not place
flammable materials
near the constant
video light
Do not use in the rain,
a humid environment,
or other adverse
weather conditions.
Please use a blower
brush or clean cloth
to remove dust and
moisture.
Keep the working
environment clear of
cables . Keep this
product out of reach
of children and pets.
Do not expose the
product to direct
sunlight for long
periods of time. The
product should not be
stored in direct sunlight.
Please turn off and
remove the power
supply before
maintenance, and
installing or removing
accessories.
Do not cover the
ventilation holes at
any time.
Do not use chemicals
or liquids to clean the
lamp. Do not immerse
any part of the device
in liquid.
Do not attempt to
disassemble or repair
the device.
The constant video light
will heat up during use.
Do not touch hot
components with your
hands.
Overview
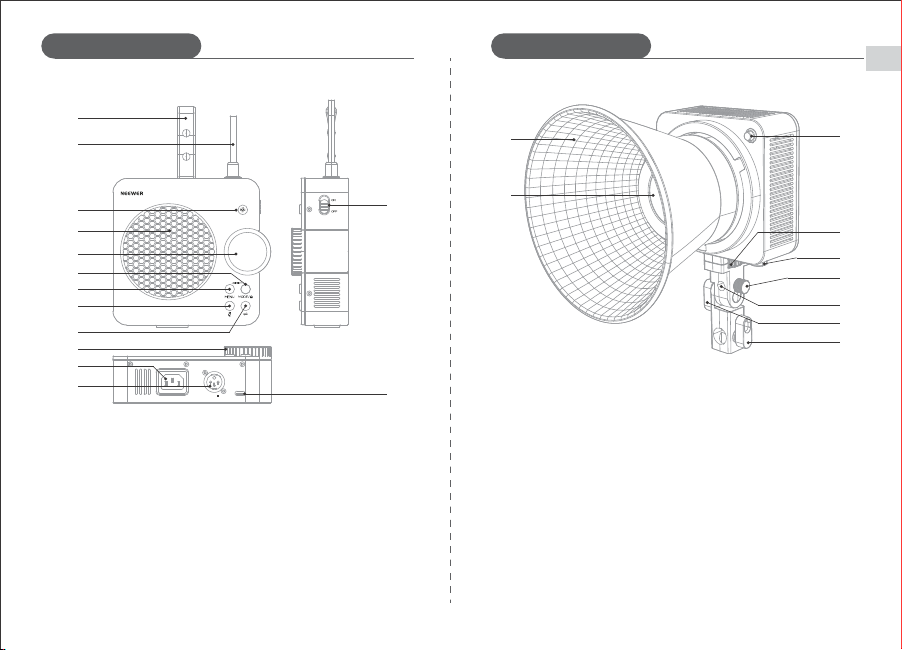
① Leather Loop
② Power Cord
③ Short Press: Adjusts
Operating Mode
④ Fan
⑤ Display
⑥ Short Press: Mode Switch
Long Press: Button Lock
⑦ Short Press: Menu Selection
⑧ Short Press: Temperature Check
⑨ Short Press: Parameter Selection
⑩ Rotate: Parameter Adjustment
⑪ AC Input
⑫ DC Input
⑬ Power Switch
⑭ DMX Interface
EN
02
Product Illustration Product Illustration
① Reflector
② Light Mixing Chamber
③ Reflector Release Button
④ Handle Locking Knob
⑤ Umbrella Handle locking Knob
⑥ Umbrella Handle Hole
⑦ Angle Adjustment Knob
⑧ Stand Locking Knob
⑨ Power Cable Port
②
②
④
④
①
①
③
③
⑤
⑤
⑥
⑥
⑦
⑦
⑧
⑧
⑨
⑨
⑩
⑪
⑫
⑬
⑭
DMXAC IN 100-240V/50Hz/60Hz
DC IN 48V 7A
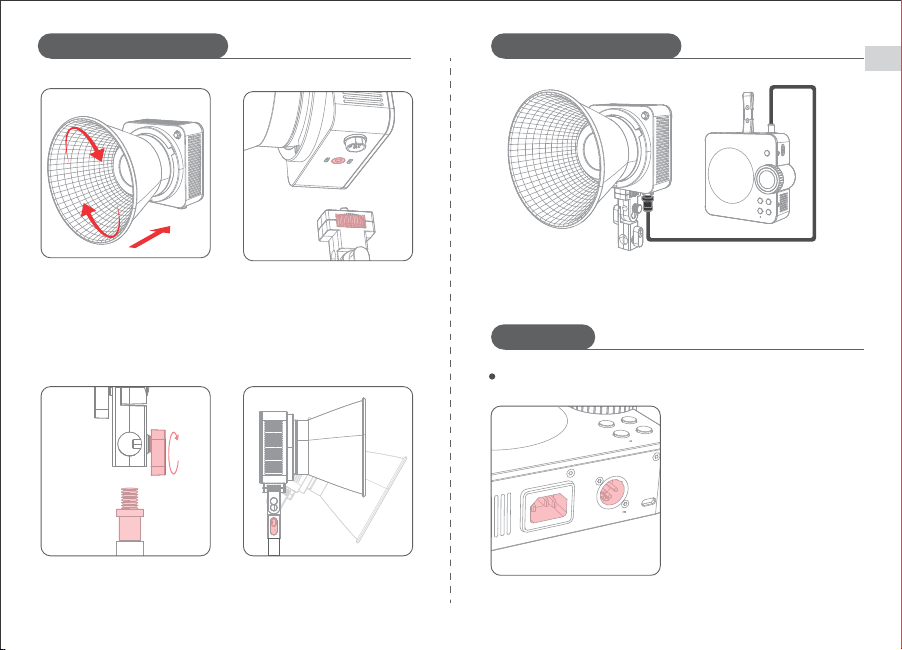
⑤ Connect the power cable from the controller to the light body,
then tighten the knob to secure it.
03
EN
① Use AC power cable for power
connection.
② Use a 48V portable power source.
Power supply method
AC IN 100-240V/50Hz/60Hz
DC IN 48V 7A
②
①
Installation Instructions Installation Instructions
② Attach the support mount to
the studio light and secure it
by rotating the knob.
③ Drop the adapter base onto the
light stand and tighten the fixing
knob.
④ Adjust the lighting angle of the
studio light by rotating the angle
adjustment knob.
① Align the three metal tabs of
the reflector with the three gaps
on the front of the studio light,
push the reflector inwards, and
rotate it clockwise until it is
securely locked.
How to Use
04
EN
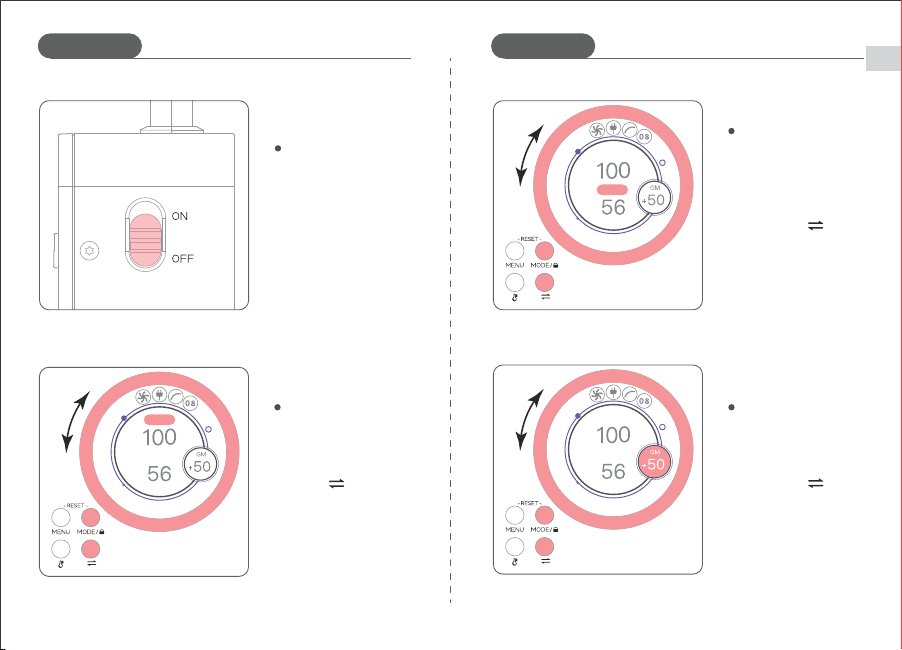
Flip the ON/OFF switch
to power on/off.
Power On/Off
Short press the MODE button
to select any mode, then
press the ' ' button to
choose 'INT'. Turn the
adjustment knob to adjust
the brightness.
Brightness Adjustment
CCT
00K
CCT
INT
Short press the MODE
button to select CCT mode,
then press the ' ' button
to choose 'CCT'. Turn the
adjustment knob to adjust
the color temperature.
Color Temperature
Adjustment
Short press the MODE
button to select CCT mode,
then press the ' ' button
to choose 'GM'. Turn the
adjustment knob to adjust
the GM value.
GM Value Adjustment
CCT
00K
INT
CCT
CCT
00K
INT
CCT
How to Use How to Use
05
EN
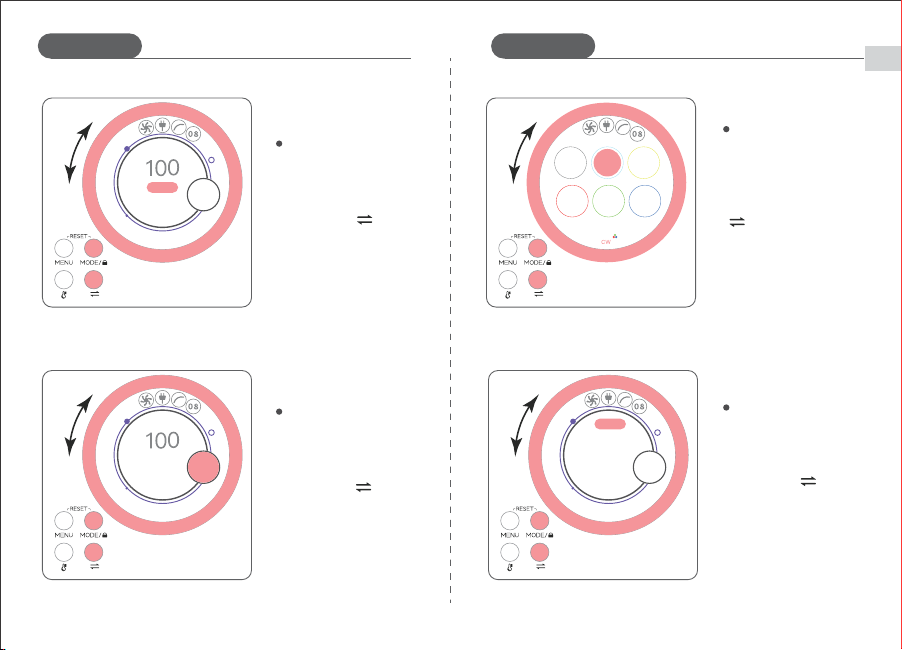
Short press the MODE
button to select HSI mode,
then press the ' ' button
to choose 'H'. Turn the
adjustment knob to adjust
the hue value.
Hue Adjustment
Short press the MODE
button to select HSI mode,
then press the ' ' button
to choose 'S'. Turn the
adjustment knob to adjust
the saturation value.
Saturation Adjustment
Short press the MODE
button to select XY mode,
then press the ' ' button
to choose X or Y. Turn the
adjustment knob to adjust
their values.
XY Mode
Short press the MODE
button to select RGBCW
mode, then press the
' ' button to choose
R/G/B/C/W value. Turn
the adjustment knob to
adjust their values.
RGBCW Mode
HSI
INT
360
100
S
H
C
255
W
100
R
100
G
255
B
100
RGB
INT
100
HSI
INT
360
H
100
S
XY
100
INT
Y
0.001
0.001
X
How to Use How to Use
06
EN
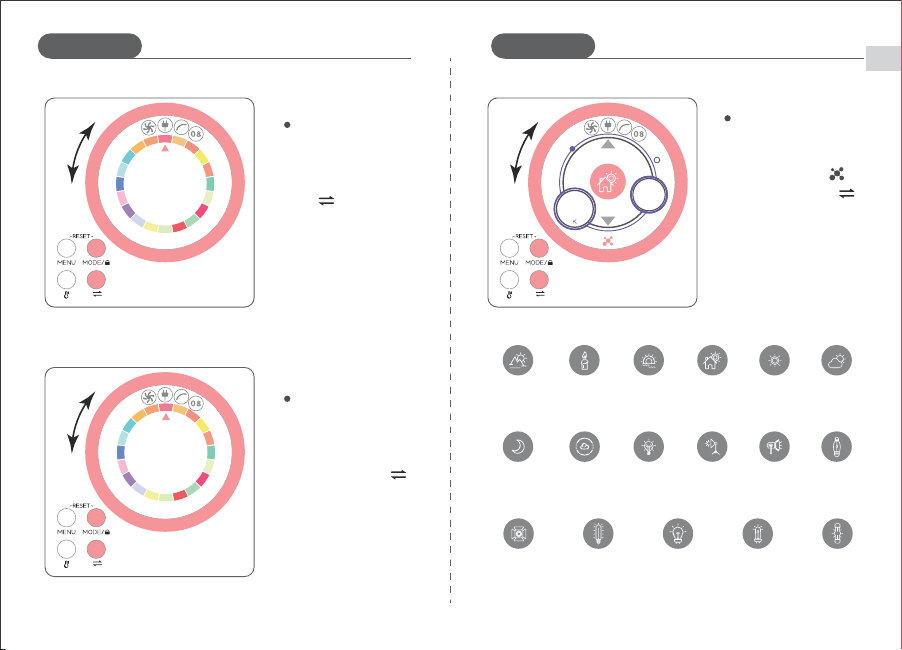
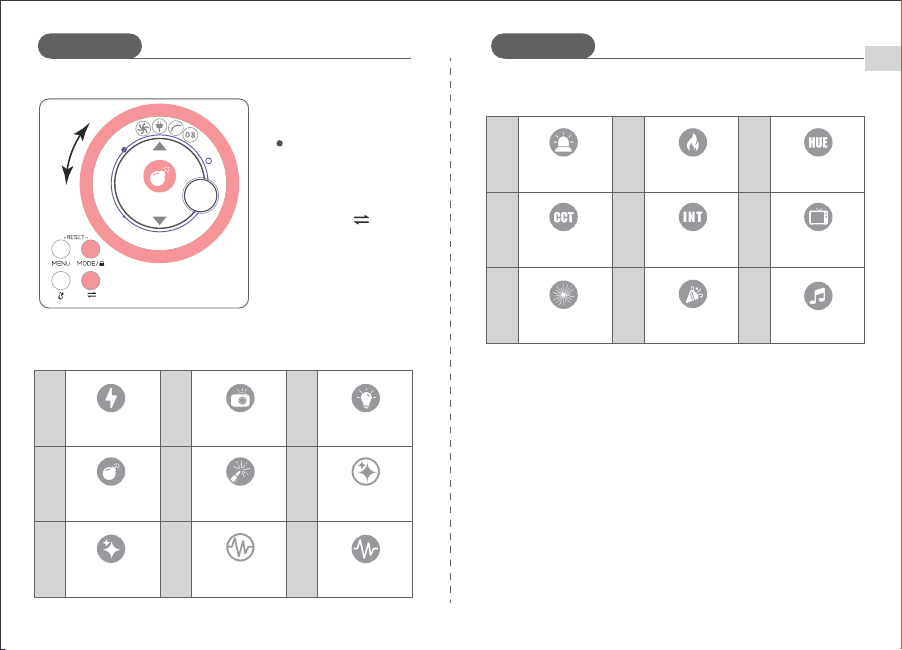
Short press the MODE
button to select ' '
mode, then press ' '
button to choose light
source adjustment.
Turn the adjustment
knob to switch between
the 17 light sources.
Light Source Mode
Short press the MODE
button to select LEE mode.
Press ' ' button to
choose gel adjustment.
Turn the adjustment knob
to select the desired color
filter.
LEE Mode
Short press the MODE
button to select ROSC
mode, the press the ' '
button to choose gel
adjustment. Turn the
adjustment knob to select
the desired color filter.
ROSC Mode
LEE
002
INT
100
100
3600
INT
CCT
ROSC
R
3800
INT
100
How to Use How to Use
Cloudy
7000K
5600 Dysprosium
Lamp
5600K
Sunrise/Sunset
1800K
Moonlight
8000K
Daylight
Dysprosium Lamp
6000K
Candlelight
1900K
Blue Sky
10000K
Sodium-Vapor
Lamp
2200K
Dawn
5000K
Incandescent
Lamp
3200K
Warm White
Halogen Lamp
2700K
Daytime
5500K
Video Lamp
3300K
White Halogen
Lamp
4300K
Daylight
6500K
Modeling
Lamp
3400K
Xenon Short
-Arc Lamp
6200K
EN
07
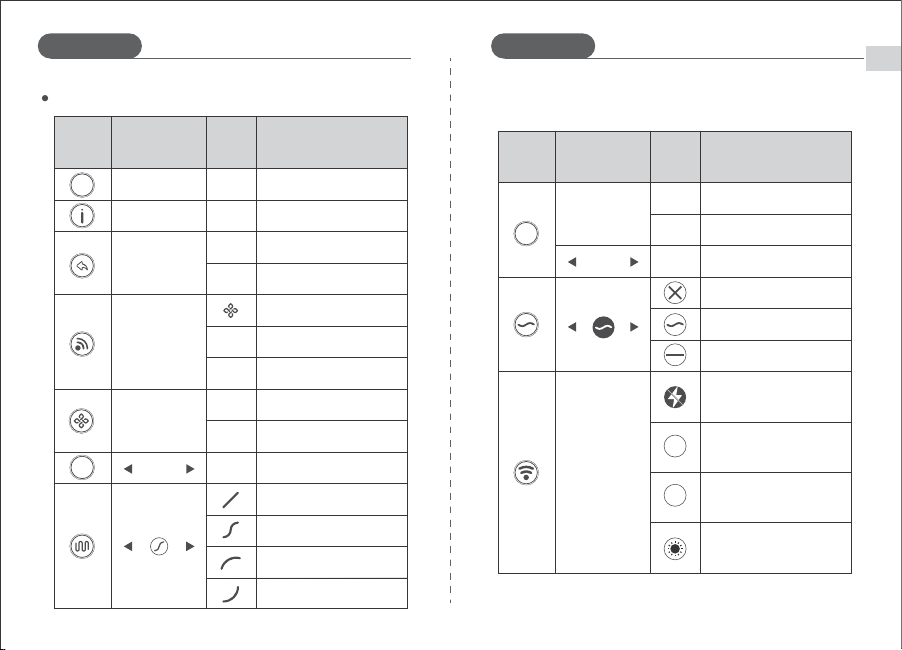
Short press the MODE
button to select FX mode,
then press the ' ' button
to choose a scene. Turn the
adjustment knob to switch
between different scenes.
Scene
FX
100
INT
F04
How to Use How to Use
F13 F14 F15
F16 F17 F18
F10 F11 F12
Available Lighting Effects
CCT loop INT loop TV screen
PartyFireworks
Cop car Candlelight HUE loop
F01
F05
F02
F06
F03
F07
F04
F08 F09
Available Lighting Effects
Lightning
Hue flash CCT Pulse HUE Pulse
Paparazzi Defective
bulb
Explosion Welding CCT Flash
Music
EN
08
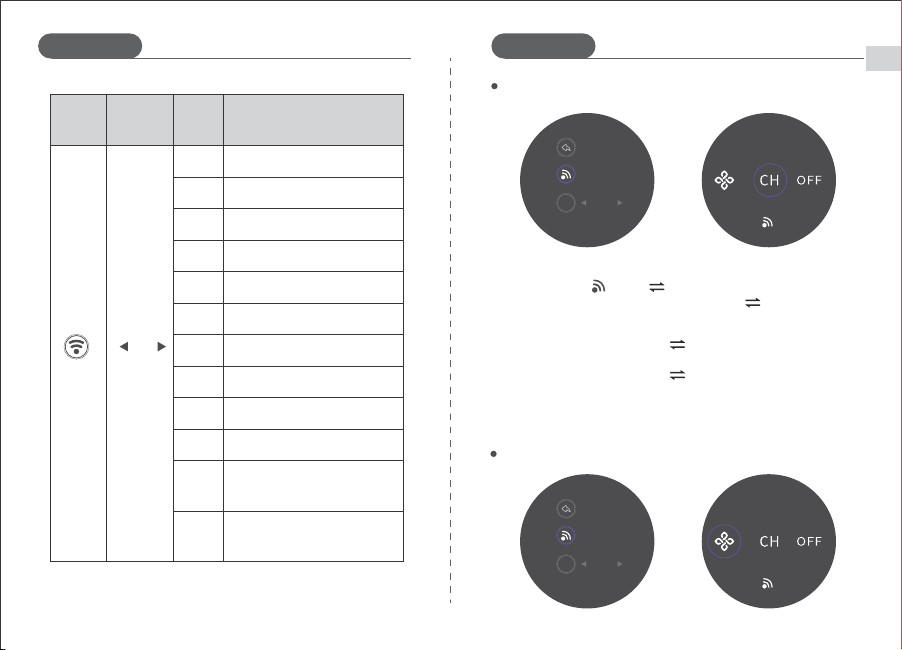
Menu
YES
NO
Turn off one minute
after DMX signal loss
60S
Turn off two minutes
after DMX signal loss
Remember the last used
settings after DMX signal loss
Immediately turn
off after DMX signal loss
DMX smooth off
DMX smooth
DMX super smooth
DMX
1~512
Enable DMX connection
Disable DMX connection
DMX channel address
99
120S
How to Use How to Use
Icon Function
100W
Setting Description
Icon Function Setting Description
2.4G mode
Channel settings
Linear dimming curve
Exponential dimming curve
Logarithmic dimming curve
S-curve dimming curve
Disable wireless connection
Infinity mode
Infinity Reset
P
V1.1.7
YES
NO
CH
OFF
1~99
RESET ALL
SETTINGS
INFINITY
CH
Current power
Current software version
Restore factory settings
CH
99
YES
NO
INFINITY
RESET
09
EN
③ In 2.4G mode, set multiple LED lights to the same channel, say CH88.
When adjusting one of the lights, the others will change synchronously.
① Short press the MENU button to enter the menu and turn the adjustment
knob to choose ' '. Press ' ' to enter the submenu, turn the
adjustment knob to select CH, and short press ' ' to confirm and exit.
② Short press the MENU button to enter the menu and turn the adjustment
knob to choose CH. Then press ' ' to enter the submenu and rotate
the adjustment knob to choose one of the channels within the range
CH00~CH99. Finally short press ' ' to confirm and exit.
2.4G Mode
Infinity Mode
INFINITY
CH
RESET ALL
SETTINGS
08
CH
MENU
INFINITY
CH
RESET ALL
SETTINGS
08
CH
MENU
1
2
3
4
5
6
7
8
9
10
11
12
12
How to Use How to Use
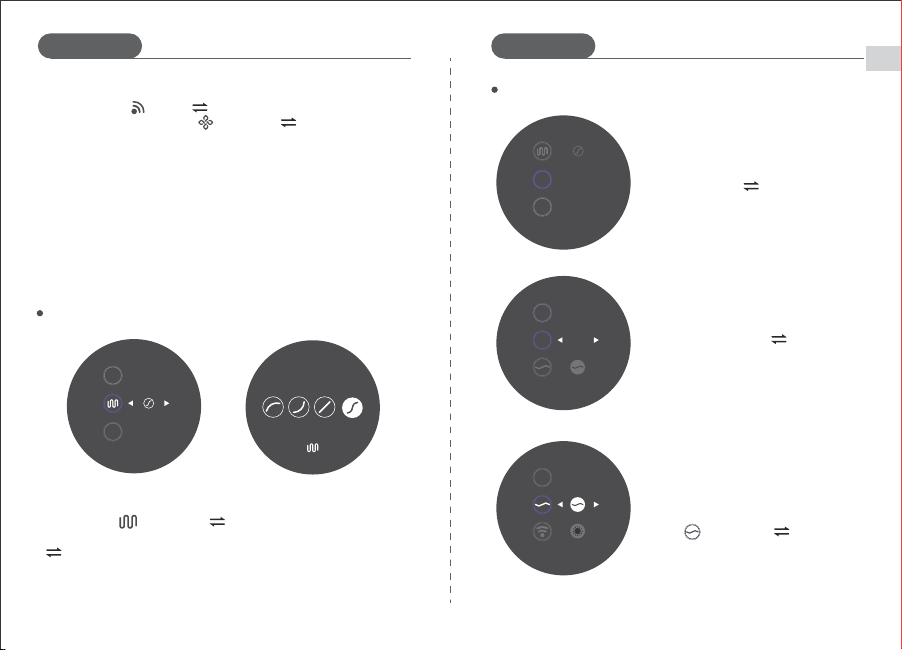
Icon Function Setting Description
DMX MODE1: CCT&RGB(8 bit)
DMX MODE2: CCT(8 bit)
DMX MODE3: CCT&HSI(8 bit)
DMX MODE4: RGB(8 bit)
DMX MODE5: HSI(8 bit)
DMX MODE6: GEL(8 bit)
DMX MODE7: XY(8 bit)
DMX MODE8: Source(8 bit)
DMX MODE9: FX(8 bit)
DMX MODE10: RGBCW(8 bit)
DMX MODE11:
Ultimate mode(8 bit)
DMX MODE12:
NEEWER mode(8 bit)
EN
② The LED light can be controlled using the 'NEEWER' App via a Bluetooth
connection. To access further information please scan the QR code on the
APP Guide Page from the APP guide card.
Short press the MENU button to enter the
menu and turn the adjustment knob to
select DMX. Press ' ' to enter the
submenu, and then rotate the adjustment
knob to choose 'ON' or 'OFF' to activate or
deactivate DMX.
① Enabling/Disabling DMX
② Adjusting DMX Channel
※ Please reset Infinity before connecting to the APP. Short press the MENU
button to enter the menu. Then turn the adjustment knob and select
INFINITY RESET to reset the Infinity connection.
Dimming Curves
DMX Connection Console
08
CH
MENU
OFF
DMX
8
DMX
MENU
ON
DMX
8
DMX
MENU
ON
DMX
① Short press the MENU button to enter the menu and turn the adjustment
knob to select ' '. Press ' ' to enter the submenu, turn the
adjustment knob to choose ' ', and press ' ' to confirm and exit.
Short press the MENU button to enter the
menu and turn the adjustment knob to
select DMX. Then press ' ' to enter the
submenu and turn the adjustment knob to
choose from the channel range 1~512.
※ In DMX mode, please refer to the attached
'HS200C DMX Channel Table' for relevant
control methods.
③ DMX Smoothing
Short press the MENU button to enter the
menu and turn the adjustment knob to
select ' '. Then press ' ' to enter the
submenu and turn the adjustment knob
to adjust DMX smoothing.
8
DMX
MENU
Short press the MENU button to enter the menu and turn the adjustment
knob to select ' '. Then press ' ' to enter the submenu and rotate the
adjustment knob to choose S, Log, Exp, or Linear curve. Finally short press
' ' to confirm and exit.
10
How to Use How to Use
EN
11
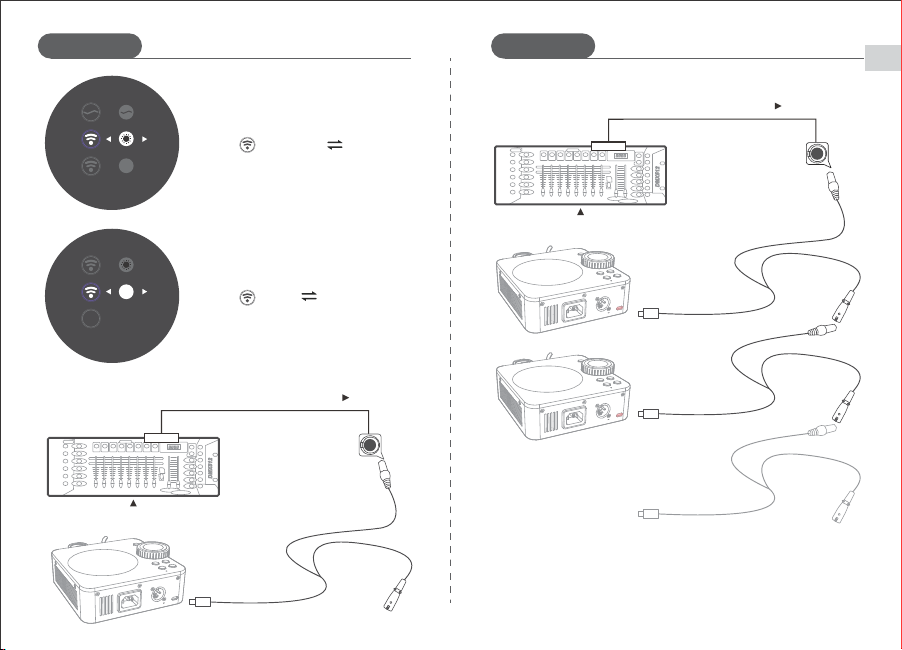
Connecting one unit
OUTPUT
DMX512
Connecting multiple units
OUTPUT
DMX512
AC IN 100-240V/50Hz/60Hz
DC IN 48V 7A
DMX
AC IN 100-240V/50Hz/60Hz
DC IN 48V 7A
DMX
AC IN 100-240V/50Hz/60Hz
DC IN 48V 7A
DMX
④ DMX Signal Loss
Short press the MENU button to enter the
menu and turn the adjustment knob to
select ' '. Then press ' ' to enter the
submenu and turn the adjustment knob to
adjust DMX signal loss.
2
MENU
⑤ DMX Mode
⑥ DMX Connection Illustration
Short press the MENU button to enter the
menu, then turn the adjustment knob to
select ' '. Press ' ' to enter the
submenu and turn the adjustment knob
to select DMX mode 1~12.
2
P
120W
MENU
How to Use How to Use
EN
12
33
C
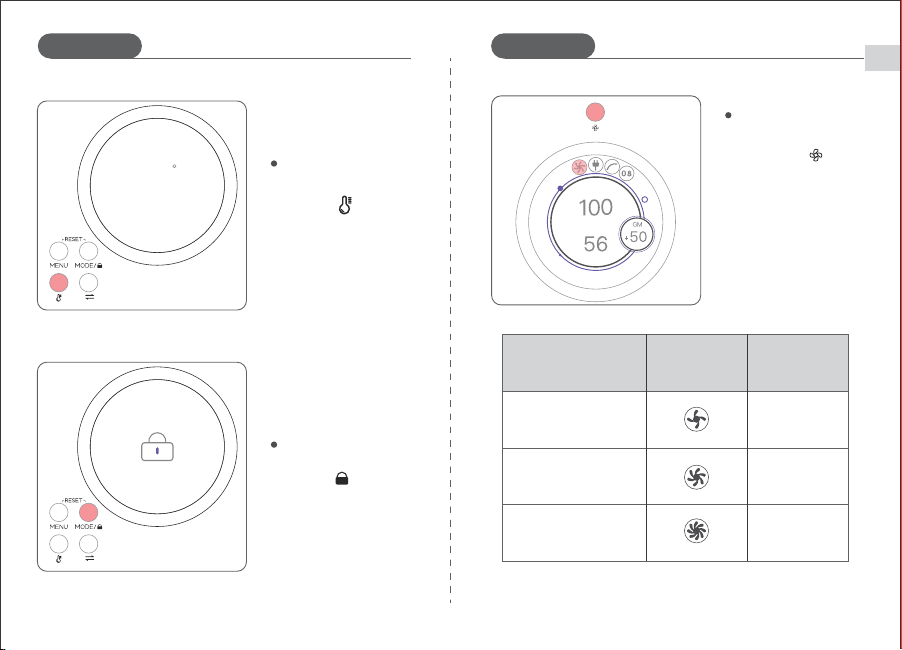
Short press the ' ' button
to switch between Silent,
Constant Power, and Boost
mode.
Operating Mode
CCT
00K
CCT
INT
How to Use How to Use
Short press " " to view
the current temperature.
Temperature Check
Long press " " to lock
or unlock the buttons on
the control panel.
Control Panel Lock
Heat dissipation mode
Booster mode: Automatically adjusts to the maximum output up to
280W based on the light source's temperature.
Silent mode
Constant Power Mode
Booster mode
Display symbols Maximum power
100W
210W
280W
EN
AC 100-220V/50~60 Hz, DC 48V/7A
HS200C
Specifications
13
How to Use
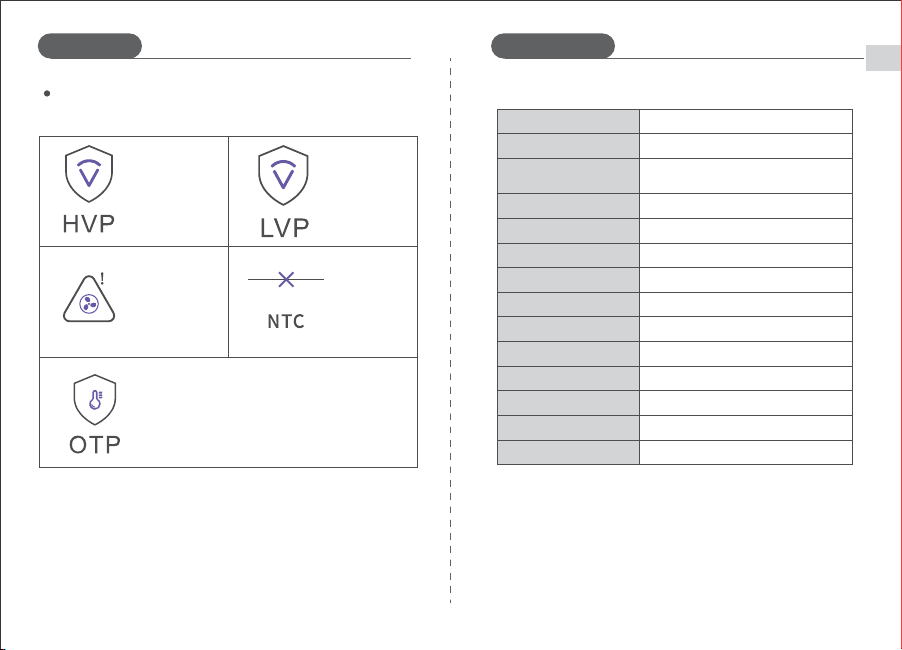
Overvoltage
protection
Over-temperature protection
NTC
abnormality
Fan
abnormality
Undervoltage
protection
Warning Prompts
18
0~100
2500K~7500K
0.0000-0.8000
-50~+50
0~360
0~100
0~255
CRI ≥95, TLCI ≥97
Silent: 100W / Constant Power: 210W /
Boost: 280W
Input
Special effects
Brightness range
Color temperature range
X/Y color coordinates
GM value
Hue
Saturation
R/G/B/C/W
Power
CCT/HSI/RGBCW/XY/GEL/SOURCE/FXLighting mode
Color rendering index
Model
17Light source
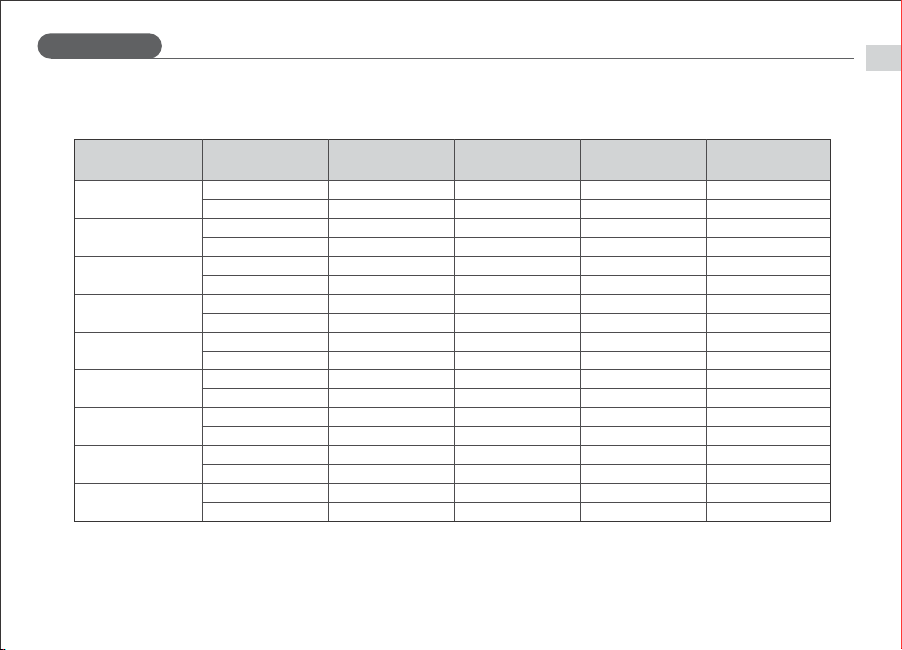
Illumination:
Color Temperature Distance
Unmodified Light
(Boost Mode)
Standard Reflector
(Boost Mode)
0.5m 22700 Lx 86000 Lx
1m 5570 Lx 17100 Lx
0.5m 30200 Lx 113000Lx
1m 7400 Lx 22600 Lx
0.5m
9990 Lx 30200 Lx1m
40800 Lx 150000 Lx
0.5m
9550 Lx 28600 Lx1m
38700 Lx 142000 Lx
0.5m
8810 Lx 26400 Lx1m
35900 Lx 131000 Lx
0.5m
8050 Lx 24100 Lx1m
32700 Lx 120000 Lx
0.5m 4560 Lx 15300 Lx
1m 1120 Lx 3120 Lx
0.5m 23000 Lx 80200 Lx
1m 5690 Lx 16500 Lx
0.5m 5230 Lx 18700 Lx
1m 1290 Lx
Unmodified Light
(Constant Power Mode)
22500 Lx
5400 Lx
27300 Lx
6610 Lx
7720 Lx
31800 Lx
8040 Lx
33100 Lx
8060 Lx
33100 Lx
7990 Lx
32800 Lx
4560 Lx
1120 Lx
23000 Lx
5690 Lx
5230 Lx
1290 Lx3820 Lx
Standard Reflector
(Constant Power Mode)
85900 Lx
16900 Lx
102000Lx
20400 Lx
23500 Lx
117000 Lx
24300 Lx
121000 Lx
24400 Lx
121000 Lx
24100 Lx
120000 Lx
15300 Lx
3120 Lx
80200 Lx
16500 Lx
18700 Lx
3820 Lx
2500K
3200K
4400K
5600K
6500K
7500K
R
G
B
EN
Specifications
14
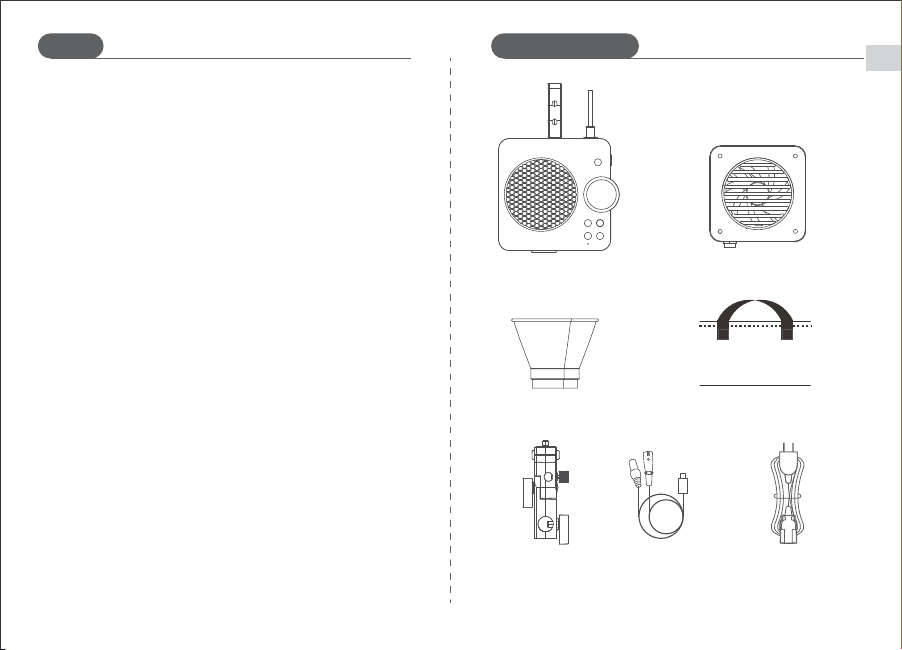
Package Contents
EN
15
Power Cable ×1DMX Cable ×1Stand ×1
Reflector ×1
Controller ×1 Light Unit ×1
Carrying Bag ×1
Notes
1. Avoid dropping, or subjecting the product to strong physical impact.
2. Do not look directly at the light when in use, to prevent damage to eyesight.
3. Keep the product away from flammable or explosive materials.
4. Avoid using the product in rainy or humid environments.
5. Do not touch the product with wet hands.
6. Remember to turn off the power when not in use.
7. Store the product in a well ventilated, dry area, away from heat sources and
magnetic fields, if not in use for a long time.