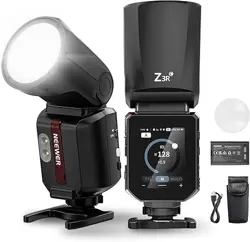
130W RGB LED Video Light
Instruction Manual
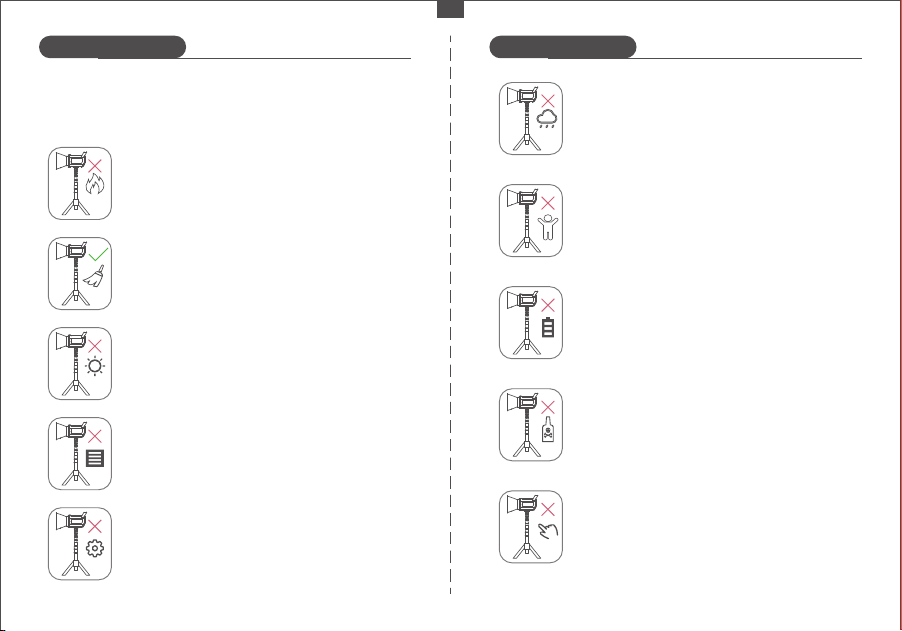
Safety Information Safety Information
Before using the product for the first time, please read the
following precautions, ensure the product is complete and in
good condition. Please refrain from using damaged spare parts.
Avoid placing flammable materials near the
studio light.
Use a hair dryer with brush attachment or clean,
soft paper to remove dust and moisture.
Avoid prolonged exposure to and avoid storing
the product in direct sunlight.
Ensure the ventilation holes are not blocked
during use and avoid covering them at any
time.
Refrain from attempting to disassemble or repair
the unit yourself.
Avoid using the product in rainy, wet conditions,
or other unfavorable weather conditions.
Keep the product out of the reach of children
and pets.
Prior to maintenance, ensure the power is
turned off and disconnected. Turn off the
power when installing or removing accessories.
Do not use chemicals or liquids to clean the
light. Avoid immersing any part of the machine
in liquid.
The studio light may become hot during use,
so refrain from touching it with bare hands.
- 01 -
EN
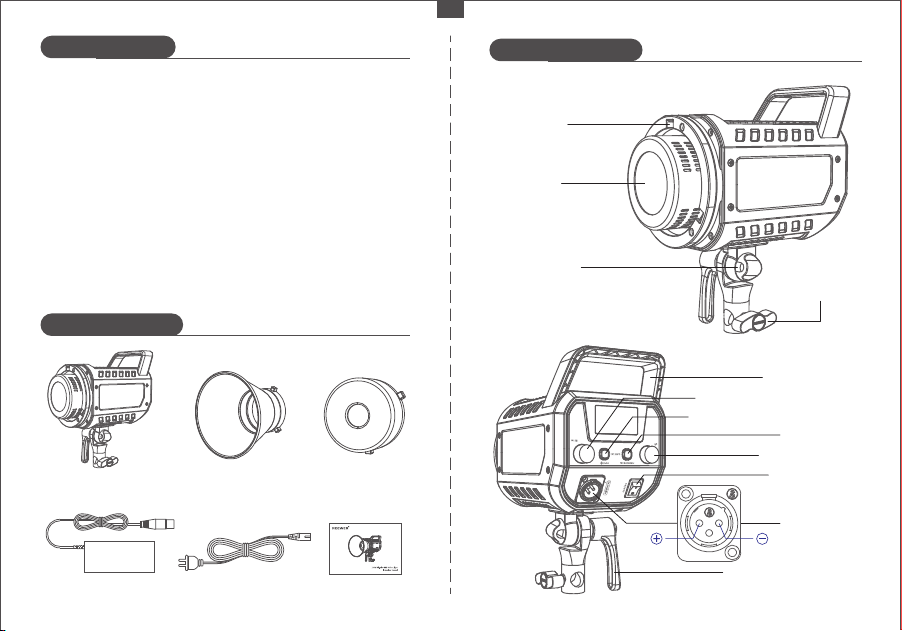
Product Overview
Product illustration
Package Contents
High brightness light source with an advanced optical design
and standard scale reflector, providing illumination up to
19800 lx at 1m, which is ample brightness for your various
lighting requirements.
Wide color temperature range from 2500K to 7500K, allowing for
seamless switching between warm and cold color temperatures,
without the need for the use of color filters.
Built-in 17 common special effects scenes with customizable
settings. Users can easily simulate a variety of scenes and achieve
dynamic effects without the need for complex lighting control.
Improved aesthetic design combining plastic with aluminium
alloy, for increased strength and reduced weight, creating a
compact and portable product.
1 x Reflector
1 x Studio Light
1 x Power Adapter 1 x Power Cord 1 x User Manual
1 x Protective Cover
Light Cover
Mounting Hole
LED Beads
Soft Umbrella
Mounting Hole
Angle Adjustment Lever
Brightness Adjustment Knob
Carrying Handle
ON/OFF Button
Communication Mode Button
MODE Button
Power Socket
Stand
Attachment
Knob
- 02 -
EN
Mode Switch Dial
1 2
3
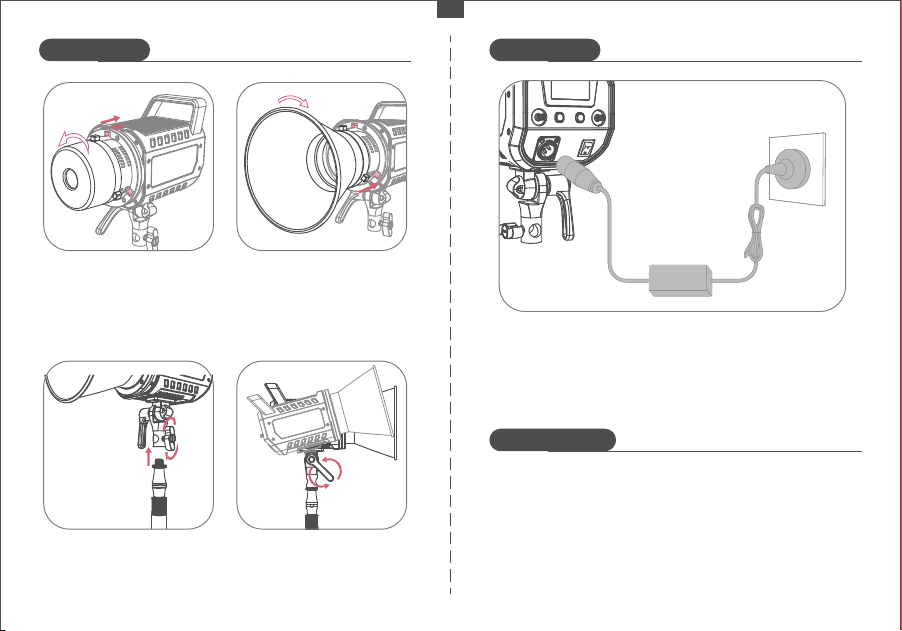
⑤ Connect the studio light to power using the provided power
cable and adapter.
How to Install How to Install
Battery warning
③ Place the light stand into
the adapter base and tighten
the "stand attachment knob"
clockwise to secure it.
④ Loosen the "angle adjustment
lever" by turning it counterclock-
wise. Adjust the angle of the studio
light to suit your requirements
② Insert the reflector's metal
tab into the hole on the studio
light and rotate it clockwise
until it is tightly secured.
① Pull the light cover latch
back and rotate the cover
counterclockwise until the
latch aligns with the hole
in the light body. Remove
the cover.
- 03 -
※ Alternatively, you can power the studio light with a V-port
battery using the V-Mount battery box (relevant accessories
need to be purchased separately).
EN
1. Do not attempt to detach, modify, and repair the battery by
yourself. Any unauthorized operation may cause battery leakage,
overheating, burning, and other hazards.
2. Be sure to use the provided or certified chargers to prevent
overcharging and shortcuts.
3. If unusual charging speed and indicator flashing occur, please
stop charging and contact our customer service immediately.
4. Keep away from inflammable and explosive items.
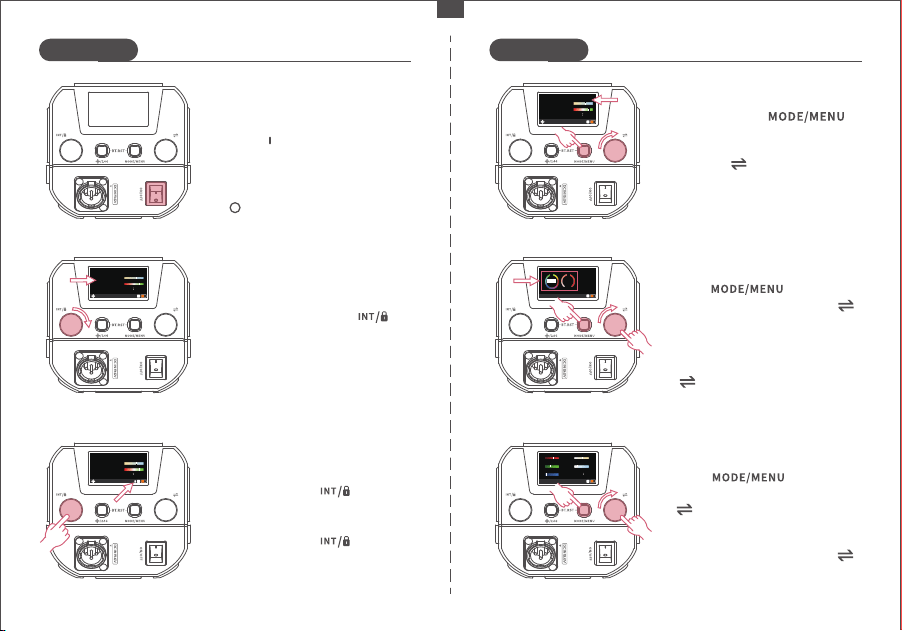
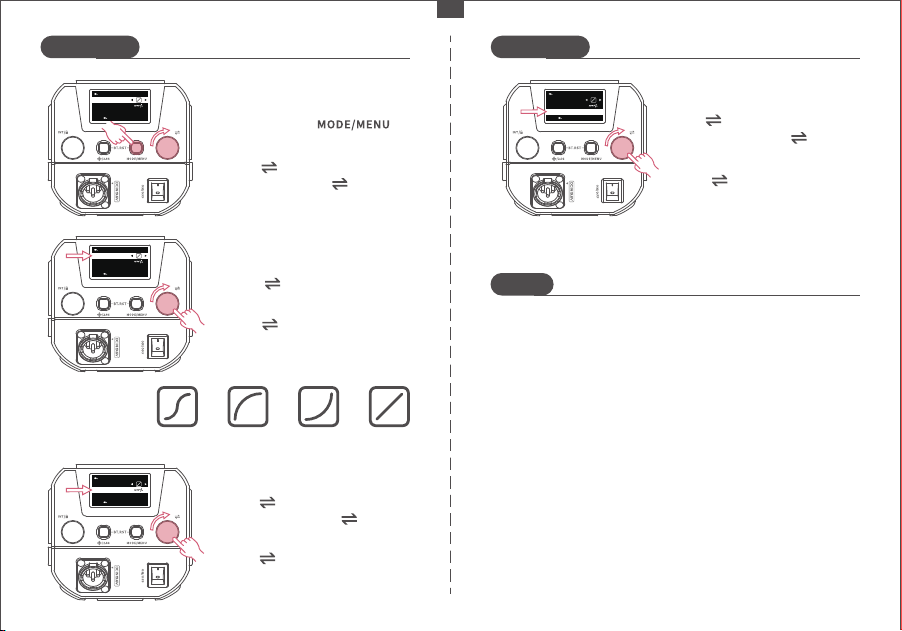
After selecting an item, turn" "
dial to adjust its values.
After selecting a sub-mode, turn
" " dial to adjust its values.
Press " " button to
enter HSI mode, then press " "
button to select either the sub-
mode HUE or SAT.
After powering on, set the switch
to the " " position to turn the
studio light on.
Return the switch to the position
" " to turn off the studio light.
Turning On/Off:
In any mode, turn the " "
knob to adjust the brightness
from 0 to 100%.
Brightness Adjustment:
Color Temperature Adjustment:
Short press the " "
button to enter CCT mode.
Turn the " " knob to adjust the
color temperature from 2500K to
7500K. After setting the tempera-
ture, press any button to exit.
Long press the " " knob to
lock the device and its controls.
Long press the " " knob
again to unlock.
Operation Lock:
How to Use How to Use
- 04 -
EN
CCT
INT
90
3600K
+50GM
CCT
INT
90
3600K
+50GM
CCT
INT
50
4600K
+50GM
Press " " button to
enter RGBCW mode, then press
" " button once to choose from
R/G/B/C/W.
RGBCW
225
R
G
B
C
W
265
230
250
216
100INT
HSI Mode:
100
H
255
S
HSI
INT
CH08
360
RGBCW Mode:
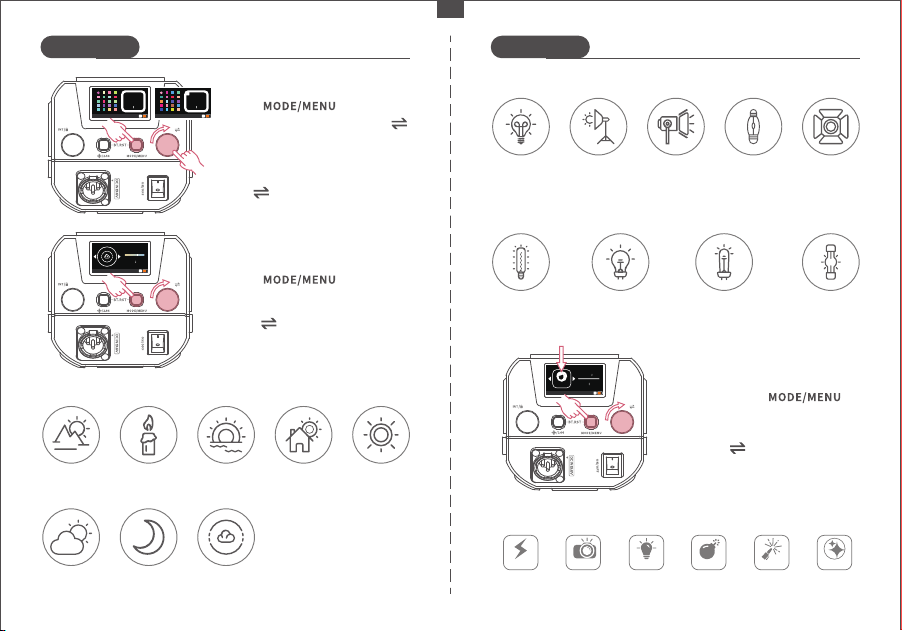
Turn " " dial to choose from
17 different light sources.
After selecting a gel filter type,
turn" " dial to pick the required
gel filter.
How to Use How to Use
Short press the " "
button to enter FX mode.
Turn the " " knob to select one
of the special effect scenes from
FX F01 to F17.
Special Scene Effects:
- 05 -
EN
Sunrise/Sunset
1800K
Candlelight
1900K
Dawn
5000K
Daytime
5500K
Daylight
6500K
Cloudy
7000K
Moonlight
8000K
Blue Sky
10000K
Natural Light Sources:
Press " " button to
enter GEL mode, then press " "
button to select gel filter type
(LEE or ROSCO).
GEL Mode:
GEL-l ee
100INT
00 2
GEL-r osco
100INT
60 2
R
Press " " button to
enter source match mode.
Source Match Mode:
SOURCE
100INT
3600K
Scene Effects:
Lightning
Incandescent
Lamp
3200K
Video Lamp
3300K
Modeling
Lamp
3400K
5600
Dysprosium
Lamp
5600K
Sodium-
Vapor Lamp
2200K
Warm White
Halogen Lamp
2700K
White Halogen
Lamp
4300K
Xenon Short-
Arc Lamp
6200K
Daylight
Dysprosium
Lamp
6000K
Paparazzi Defective
Bulb
Explosion Welding CCT Flash
F01
F02
F03
F04
F05
F06
F03
100INT
06FRQ
FX
Video Lamp Light Sources:
Other Light Sources:
Connect your smartphone's
Bluetooth through the "NEEWER"
app and use it to control the LED
lights. Refer to the "APP prompt
card" for instructions. Scan the
QR code on the APP guide page
to access the app.
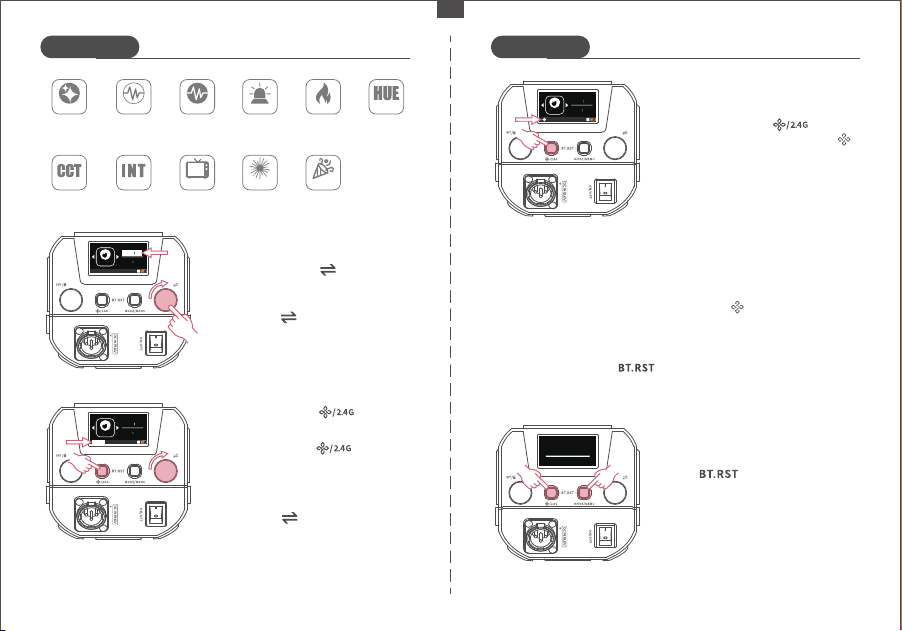
※ Press and hold the " " buttons simultaneously to reset the
Infinity connection before connecting the APP.
Turn the " " knob to select a
channel from 0 to 99. Press any
button to exit.
In Infinity mode, press and hold
the " " buttons simultane-
ously to enter the Bluetooth reset
interface.
Long press the " " button
and the "CH" icon on the screen
will flash to indicate channel
selection.
How to Use How to Use
Short press the " " button
to switch to 2.4G mode.
2.4G Mode:
Frequency Adjustment:
Short press the " " knob to
select "FRQ".
Turn the " " knob to adjust the
frequency from 01 to 10. Press
any button to exit.
Bluetooth Reset:
When "BT RESET" appears, the
reset is successful.
Infinity Mode:
To activate the Infinity mode,
simply press the " " button
briefly. Upon activation, the " "
icon will start flashing.
When the " " icon stops flashing,
it indicates a successful Bluetooth
connection has been made.
※ In 2.4G mode, when multiple LEDs are set to the same channel (e.g.,
CH88), adjusting one light will automatically synchronize the settings
with the others on the same channel.
- 06 -
EN
F03
100INT
FX
6FRQ
BT RESET
FireworksINT Loop
CCT Pulse
CCT Loop Party
Hue Flash Hue Pulse Cop Car Candlelight Hue Loop
F11 F12
F13 F14 F17
TV Screen
F15 F16
F07
F08
F09 F10
F03
100INT
FX
6FRQ
F03
100INT
FX
6FRQ
CH15
Turn " " dial to select YES or
NO.
Turn " " dial to choose one
of the four dimming curves.
Turn " " dial to select menu
items, then press " " dial to
enter the selected item.
Notes
1. Avoid dropping, bumping, or subjecting the product to
strong impacts to prevent damage.
2. Refrain from looking directly into the light, as it may cause
visual impairment.
3. Keep the product away from flammable and explosive
materials.
4. Do not use the product in rainy or humid environments.
5. Avoid touching the product with wet hands.
6. Turn off the power when the product is not in use.
7. If the product will not be used for an extended period, store
it in a well-ventilated and dry place away from heat and
magnetic fields.
Dimming Curve
Types:
How to Use How to Use
- 07 -
EN
Press and hold " "
button to enter the menu,
Go to Menu:
DIMMING CURVE
MENU
FAN MODE
V1.00
OK
EXIT
FACTORY R ESET
Turn" "dial to select "FACTORY
RESET", then press " " dial to
enter it.
Factory reset:
Press " " button to select
"DIMMING CURVE".
Dimming Curves:
Turn " " dial to select "FAN
MODE", then press " " dial
to enter it.
Fan mode:
DIMMING CURVE
MENU
FAN MODE
V1.00
OK
EXIT
FACTORY R ESET
DIMMING CURVE
MENU
FAN MODE
V1.00
OK
EXIT
FACTORY R ESET
DIMMING CURVE
MENU
FAN MODE
V1.00
OK
EXIT
FACTORY R ESET
Turn " " dial to choose
between AUTO or MUTE fan
mode.
Exponential
type
logarithmic
type
S type line type
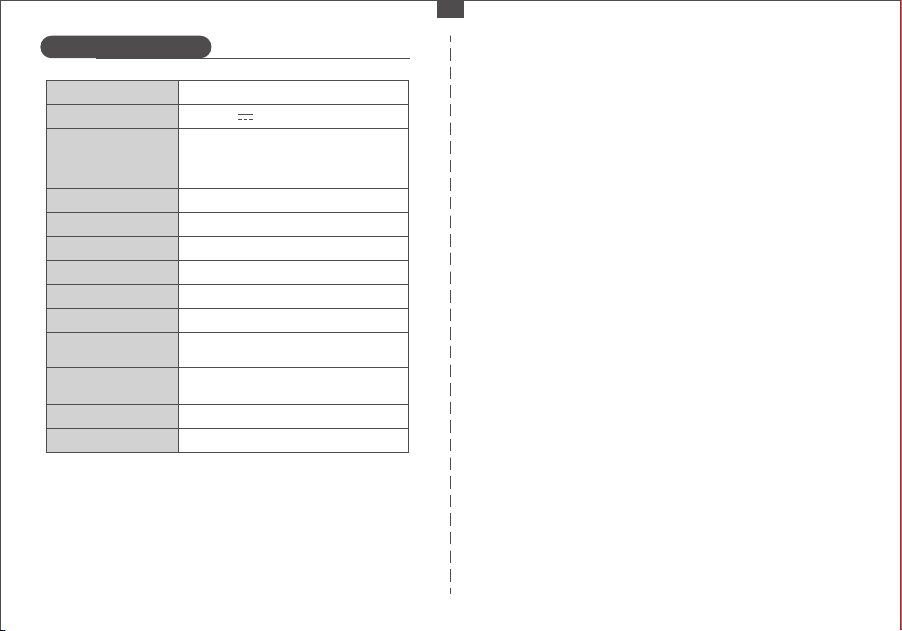
Product Specifications
- 08 -
EN
Product Model
Adapter Input Voltage
FS150C
DC 19.6V 8A
Frequency
Scene Effects
0~100
2500-7500K
00~99
≥97
≥98
130W
Brightness Range
Channel Range
CRI
TLCI
Power
V Port Battery Input
Voltage
DC 12V-26V
(Use the V-port battery to connect a
three-hole adapter)
1~10
17
42400 lx/1m
Color Temperature Range
Max Illuminance
(Standard diffuseur)
*The light-intensifying reflector is sold separately.
19800 lx/1m
Max Illuminance (light-
intensifying reflector)