
Safety Information
Product Overview
- �� -
For your safety and that of others' , please read the safety information before
using this product for the first time and pay attention to all highlighted
precautions in this manual. The device should be checked periodically and
damaged components should never be used.
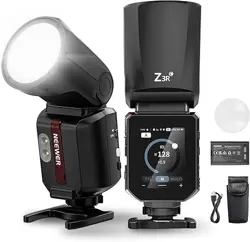
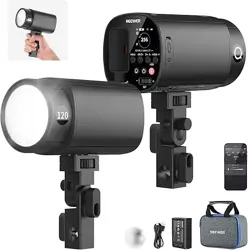
The compact and portable Q��� Outdoor Flash features TTL, M, and Multi
modes, along with HSS. The built-in wireless �.�G Q-system is compatible
with Canon, Sony, Nikon, and other cameras. It also supports Bluetooth
app control for intuitive operation.
※ Keep away from flammable materials.
※ Do not use in rainy, humid, or other unsuitable weather conditions.
※ Use a blower brush or clean tissue paper to remove dust and moisture.
※ Keep this product out of the reach of children and pets.
※ Avoid extended exposure and storage under direct sunlight.
※ Before carrying out any maintenance, turn off and unplug the power
source. Turn off the power before installing or removing accessories.
※ Keep the ventilation holes free of blockages at all times.
※ Do not clean with chemical agents or liquids. Do not immerse any part
of the flash in liquid.
※ Do not attempt to disassemble or repair by yourself.
※ Certain parts of the flash will become hot during use and should never
be touched with bare hands.
EN
- �� -
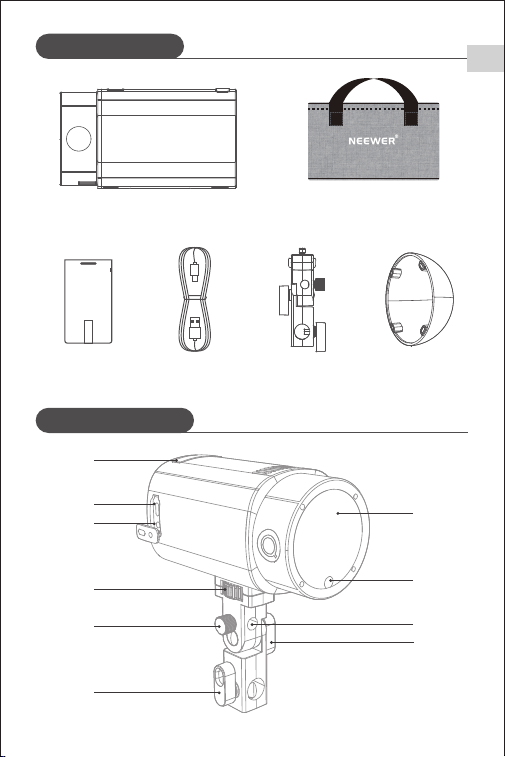
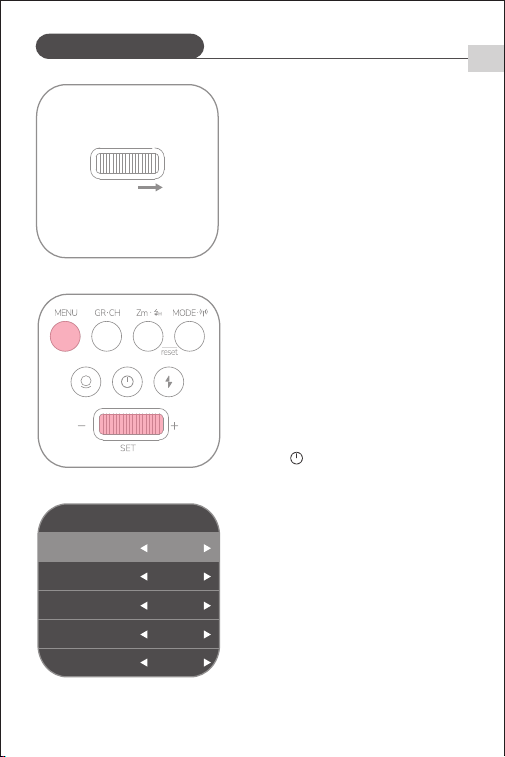
Package Contents
Product Illustration
Handle
�
Battery
�
Charging Cable
�
Diffuser
�
Carry Bag �
Flash �
➄
➅
➆
➇
➈
➉
➁
➃
➂
➀
EN
Product Illustration
EN
- �� -
➆
➇
➈
➉
⑪
➄
➅
➁
➃
➂
➀
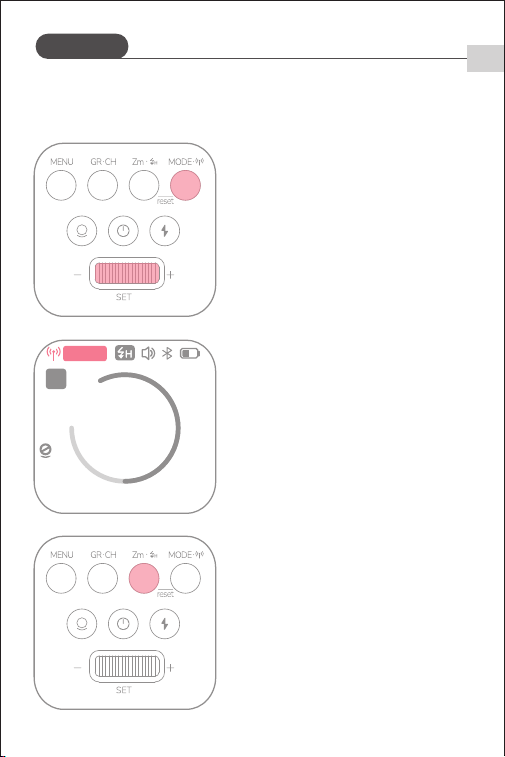
➀ Li-ion Battery
➁ Short Press: Switches Groups; Long press: Adjusts Channels
➂ Menu
➃ Modeling Lamp
➄ Battery Release Button
➅ Screen
➆ Short Press: Focal Length; Long Press: HSS
➇ Short Press: Switches Modes; Long Press: Wireless On/Off
➈ Long Press: Powers device On/Off
➉ Test Flash
⑪ Short Press: Selects Items; Scroll: Adjusts Values
➀ Optical Receiver
➁ USB-C Port for Firmware Upgrade
➂ �.�mm Sync Jack
➃ Handle Locking Knob
➄ Umbrella Locking Knob
➅ Stand Locking Knob
➆ Optical Lens
➇ Modeling Lamp
➈ Umbrella Hole
➉ Angle Adjustment Knob
Product Illustration
EN
- �� -
➁
➃
➂
➄
➄
➅
➅
➆ ➇
➈
➉
⑪
➀
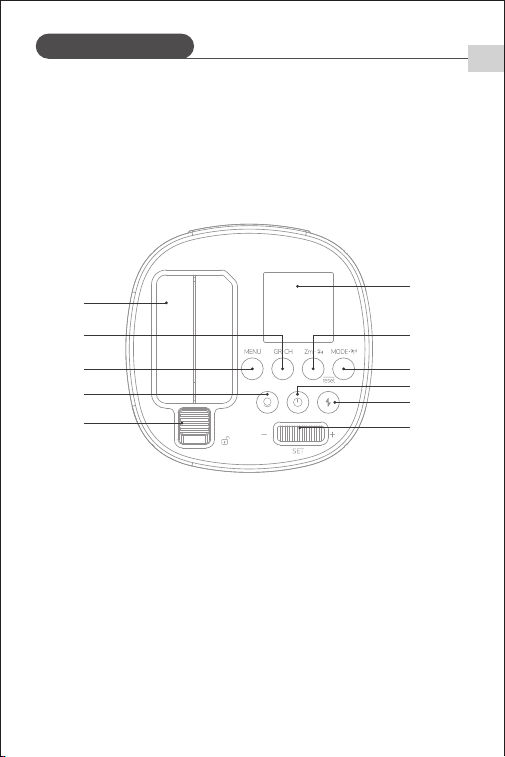
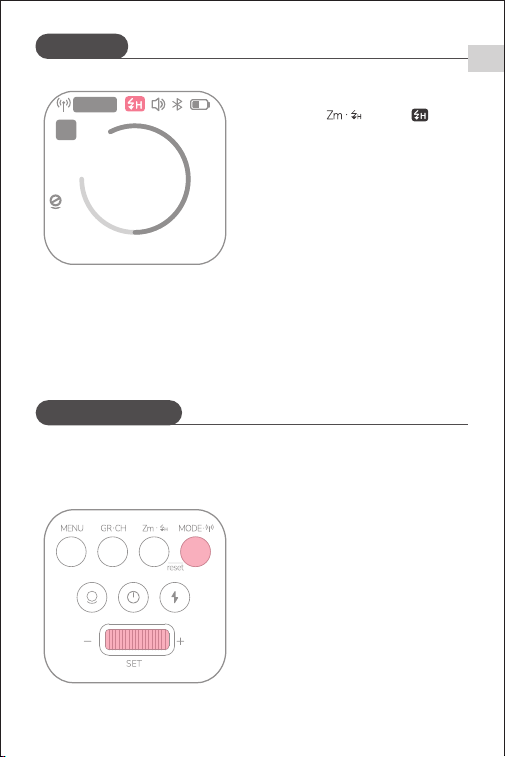
➀ Flash Mode: M/TTL/MULTI
➁ Flash Output Power
➂ Modeling Lamp Status
➃ Flash Duration
➄ S�/S� Mode
➅ HSS
➆ Audible Prompt
➇ Battery Level Indicator
➈ Mask Function
➉ Continuous Shooting Mode
⑪ Focal Length
➀ Wireless Transmission
➁ Group
➂ Number of Flashes
➃ Flash Frequency
➄ Channel
➅ Delay Time
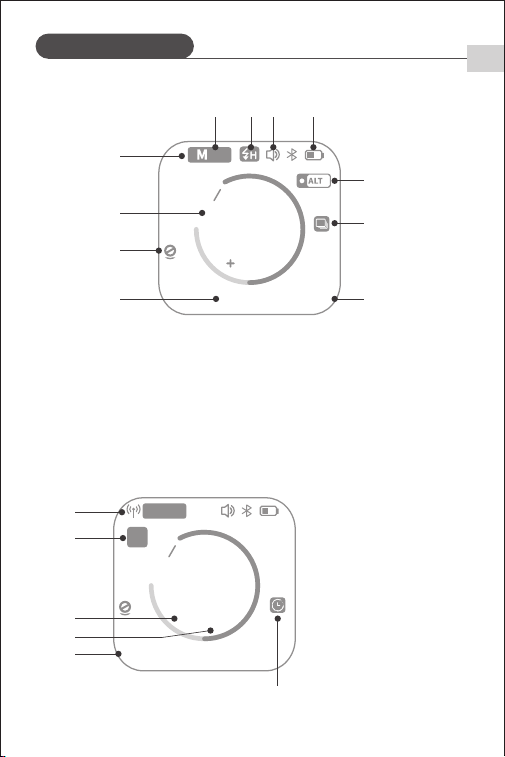
�/����� �� mm
�
�
�.�
256
EV
S�
Screen
➁
➃
➂
➀
�� mmCH:��
�
�- �Hz
256
Multi
A
- �� -
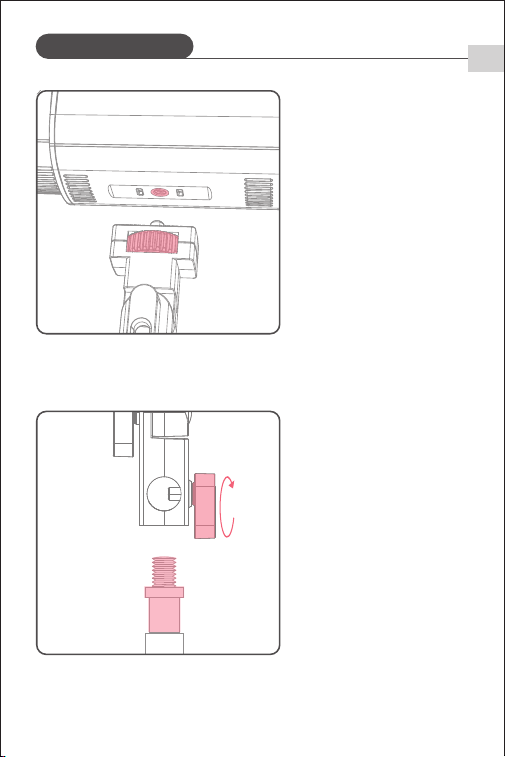
Attach the support mount
to the underside of the
flash and secure it by
tightening the locking
knob.
The support mount will
drop down over the top
of the light stand and is
secured using the locking
knob.
➀
➁
Mounting the Flash
EN
- �� -
Power Management
Rotate the angle adjustment
knob to adjust the angle of
the flash.
➂
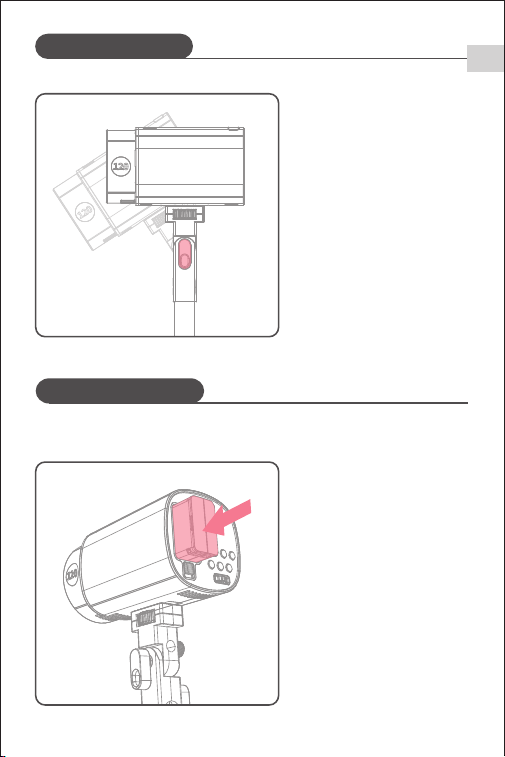
�. How to install and remove the battery
Installation:
Insert the battery into the
battery compartment in the
direction shown until it
clicks into place.
➀
Mounting the Flash
EN
- �� -
Power Management
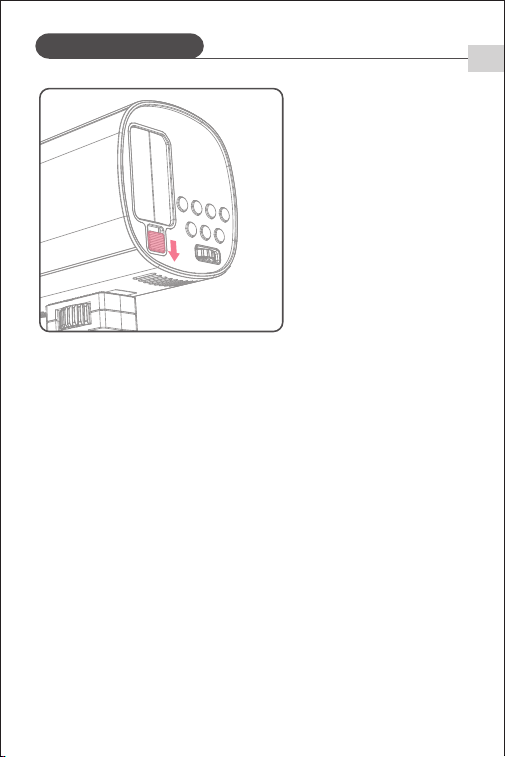
Removal:
Slide the latch in the
direction shown to release
and remove the battery.
➁
�. Features
➀ The Li-ion battery supports up to ��� charge‒discharge cycles for a long
lifespan.
➁ With built-in protection against overcharging, overdischarging, overcurrent,
and short circuits.
�. Precautions
➀ Avoid short-circuiting the positive and negative terminals.
➁ Do not immerse the battery in water.
➂ Keep the battery out of reach of children.
➃ Do not charge the battery for more than �� hours.
➄ Store the battery in a cool, dry, and well-ventilated place.
➅ Keep the battery away from heat sources and open flames.
➆ Dispose of the battery in accordance with local regulations after it reaches
the end of its service life.
➇ If the battery is not used for more than three months, fully charge it before
storage.
EN
Long press < >button to power off.
Short press < > button: screen displays
<UNLOCK>, then scroll <SET> to the right
to power on.
Power Management
EN
- �� -
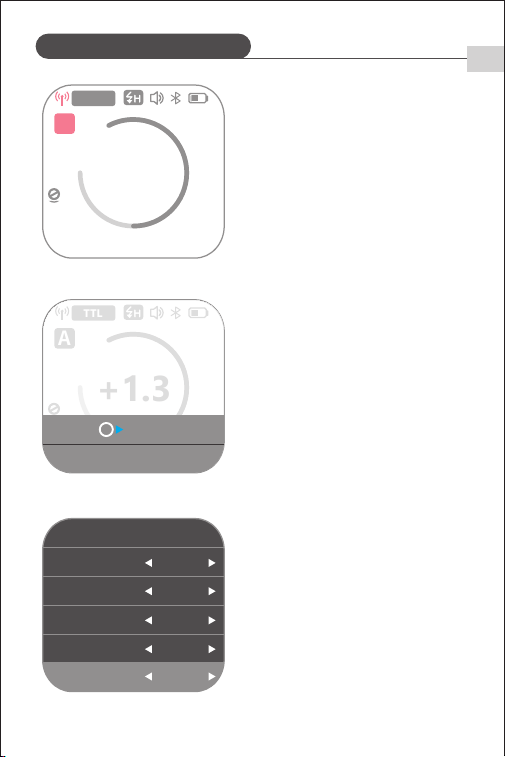
Power On/Off
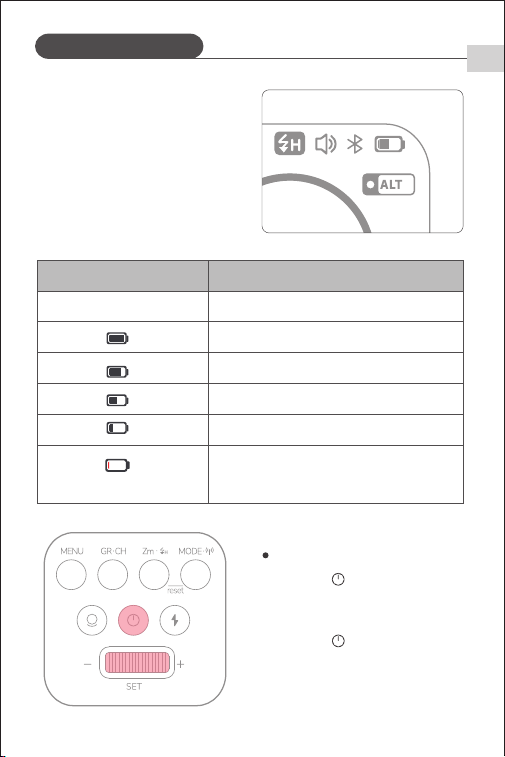
�. Battery Level Indicator
Ensure that battery has been correctly
installed to power the flash. During
use, check the battery level indicator
on the screen to monitor remaining
battery at any time.
��%~���%
��%~��%
��%~��%
�%~��%
The battery icon will continuously flash,
prompting the user to charge or replace
the battery.
电池电量显示
Low Battery/Charging Reminder
(Applies to the entire
flash system)
Battery Icon Status
Battery Percentage
�
�/����� �� mm
�
�
�.�
256
EV
S�
MENU �&��
STANDBY �min
v�.�.�
COLOR ON
MODEL CONT
BURST MODE ON
PROP OFF
Power Management
EN
- �� -
UNLOCK
If not in use for an extended period, turn
off the device. The flash features an
automatic sleep function.
Short press <MENU> to access the menu,
scroll and short press <SET> to select
<Standby>, then scroll <SET> to choose
sleep duration.
When the flash is in sleep mode, short
press < > button to wake the device.
- �� -
TTL Mode
�� mmCH: ��
+1.3
TTL
A
In TTL mode, the camera metering system detects flash light reflected from the
subject and automatically adjusts flash output to achieve balanced exposure
for both subject and background.
Long press <MODE> to enable wireless
mode. Short press <MODE> until <TTL>
appears on the screen—this sets the
flash to TTL mode.
※ TTL mode is only available when
wireless mode is activated.
Scroll <SET> to adjust flash exposure
compensation. �.� represents �/�
stop, �.� represents �/� stop.
�. Flash Exposure Compensation
�. HSS Mode
HSS (high-speed sync) allows flash
use at any shutter speed—especially
useful for fill flash in aperture-priority
portrait shooting.
EN
- �� -
TTL Mode
M (Manual) Mode
�� mmCH: ��
+1.3
TTL
A
Short press <MODE> until <M> appears
on screen. The flash mode is now set
as M (manual).
Long press < > until < >
appears on screen. HSS requires a
compatible wireless transmitter
(e.g., Q/QPRO/QZ).
The master trigger must also have
HSS enabled.
※ In HSS mode, higher shutter speeds reduce the effective flash range.
※ MULTI flashes mode will remain unavailable if HSS is activated.
The flash output power is adjustable from �/��� to �/�. To achieve the correct
exposure, please use a handheld flash meter to measure the flash output.
EN
- �� -
M (Manual) Mode
�/����� �� mm
�
�
�.�
256
EV
S�
Short press <MENU> to enter menu,
scroll and short press <SET> to select
<Slave S�/S�>, then scroll <SET> to
choose S� or S� mode.
�. S�/S� Mode
※ Setting the S� Unit
In M (manual) mode, use the S� function to set the flash as a slave unit for
multiple lighting effects. The flash will trigger in sync with the first burst from
the master unit and delivers the same result as a wireless flash trigger.
※ Setting the S� Unit
Note: S�/S� optical triggering is only
supported in M (manual) mode.
In M (manual) mode, use the S� function to set the flash as a slave unit in TTL
flash settings. With pre-flash prevention, the flash will trigger in sync with the
second burst from the master unit.
Scroll <SET> to adjust flash output power.
MENU �&��
�.�G ON
v�.�.�
S�S� S�
BEEP ON
STEP +�.�ev
BLUETOOTH ON
EN
M (Manual) Mode
EN
- �� -
MENU
STANDBY �min
COLOR ON
MODEL CONT
BURST MODE ON
PROP OFF
�&��
v�.�.�
MENU �&��
STANDBY �min
v�.�.�
COLOR ON
MODEL CONT
BURST MODE ON
PROP OFF
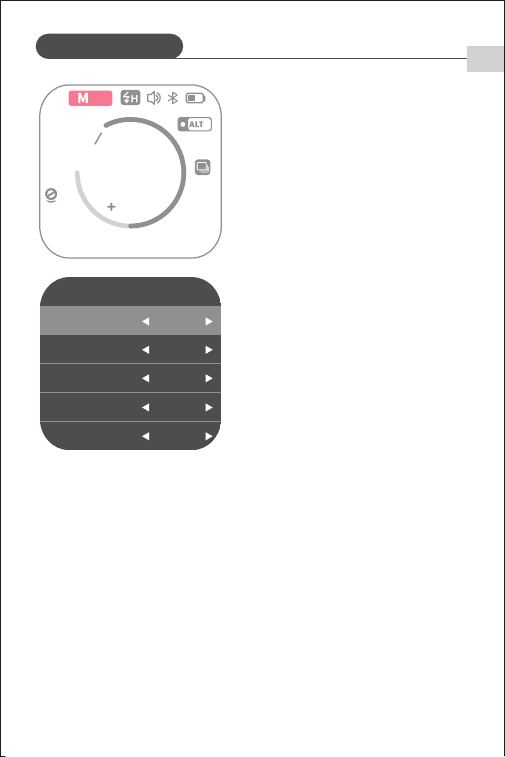
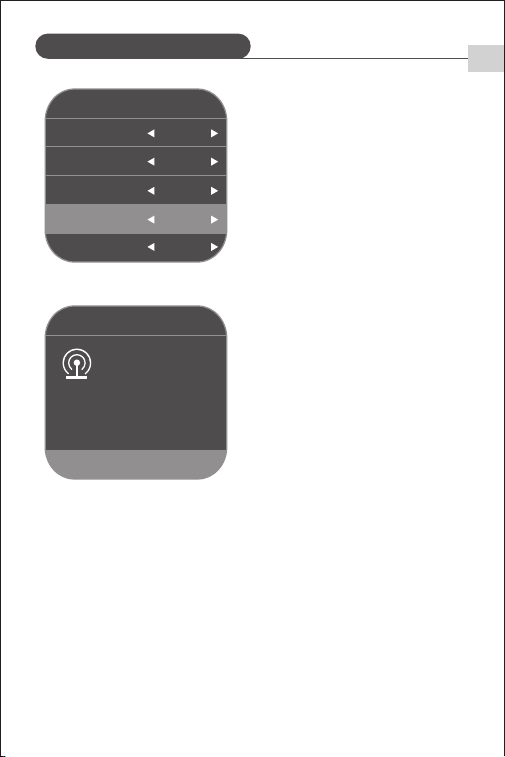
Short press <MENU> to enter the menu.
Rotate and short press <SET> to select
<Consistent Color Temperature>, then
rotate <SET> to enable.
�. Consistent Color Temperature
※ Consistent Color Temperature is
available only in M mode.
MENU �&��
UNITS �ALT
v�.�.�
ALT ALT�
DELAY OFF
WL SYNC ON
ID ��
Short press <MENU> to enter the menu,
then scroll and short press <SET> to
select <Continuous Shooting Mode>,
and scroll <SET> to enable it.
�. Continuous Shooting Mode
※ Continuous Shooting Mode is
supported only in M mode without HSS.
※ Flash output power must be set to
�/�� or lower.
Short press <MENU> to enter the menu,
then scroll and short press <SET> to
select <Sequence>, and scroll <SET> to
choose the desired item.
Sequence �, Sequence �, Sequence �,
and Sequence � (sequence can be null)
indicate when the flash will trigger.
�. Mask Function
M (Manual) Mode
EN
MULTI (Stroboscopic) Mode
- �� -
�� mm
�
�- �Hz
256
Multi
Short press <MODE>. When <MULTI>
appears on the screen, the flash is set
to <MULTI> mode.
➀ Scroll <SET> to adjust flash output
power.
If a sound prompt is heard after enabling this function, it means the
function is temporarily unavailable due to high flash capacitor energy that
may cause overexposure. Fire the flash to discharge, then shoot again.
MULTI mode emits a series of rapid flashes that allow you to capture multiple
images of a moving subject in a single photo.
※
MULTI (Stroboscopic) Mode
EN
- �� -
Short press <SET> to select <Flash
Count>, then scroll <SET> to set number
of flashes.
To prevent overheating and damage to the flash, do not emit more than ��
consecutive stroboscopic flash sequences. After �� sequences, allow the
flash to cool for at least �� minutes. If more than �� consecutive sequences
are emitted, the flash may stop automatically to prevent overheating. If this
occurs, let it cool for at least �� minutes.
"Bulb" is also available in MULTI mode.
Stroboscopic flashes cannot be set when flash output is �/� or �/�.
Use of a tripod and remote is recommended.
Stroboscopic flashes are most effective when shooting highly reflective
subjects against a dark background.
Shutter Speed Calculation
During stroboscopic flashes, the shutter must remain open until flashing stops.
Use the formula below to calculate shutter speed and set it on the camera.
Flash Count / Flash Frequency = Shutter Speed
For example, if the flash count is �� and the frequency is � Hz, shutter speed
must be at least � seconds.
�
�� mm
�
�- �Hz
256
Multi
Times: �
Freq: �Hz
➁
Short press <SET> to select <Frequency>,
then scroll <SET> to set flash frequency.
➂
※
※
※
※
※
MULTI (Stroboscopic) Mode
EN
�.�G Wireless Transmission
- �� -
Long press <MODE> until < > appears
on the screen.
�. �.�G Wireless Setup
The Q��� features a �.�G wireless Q system to work seamlessly with compatible
NEEWER models. When used as a slave unit, it supports Canon E-TTL II, Nikon
i-TTL, and Sony TTL. The flash automatically switches according to the master
unit, with no manual setting required.
As a slave unit, the Q��� can be wirelessly controlled by a master unit,
including: QPro, QZ, Z�, Z�, Z�, Z���, Z��� series, etc.
Maximum Stroboscopic Flash Count
�/�
� � � � � �-� �-� �� �� ��-�� ��-�� ��-�� ��-���
� � � � � � � � � � � � �
�� �� �� �� � � � � � � � � �
�� �� �� �� �� �� �� � � � � � �
�� �� �� �� �� �� �� �� �� �� �� �� ��
�� �� �� �� �� �� �� �� �� �� �� �� ��
�� �� �� �� �� �� �� �� �� �� �� �� ��
��� ��� ��� �� �� �� �� �� �� �� �� �� ��
�/�
�/��
�/��
�/��
�/���
�/���
Hz
Flash Output
※
�.�G Wireless Transmission
MENU �&��
UNITS �ALT
v�.�.�
ALT ALT�
DELAY OFF
WL SYNC ON
ID ��
Short press the <MENU> to enter the
menu. scroll and short press <SET> to
select <Wireless ID>, then scroll<SET>
to set an ID from ��‒��.
The master unit and the Q��� must
be set to the same channel and ID.
�. Setting Wireless IDs
�
�� mmCH: ��
+1.3
TTL
A
CH: ��
Short press <GR·CH> to select a group
from A / B / C / D / E.
�. Setting Groups
EN
- �� -
�� mmCH: ��
+1.3
TTL
A
Long press <GR·CH> to enter channel
adjustment, then scroll <SET> to select
a channel from ��‒��.
�. Setting Channels
※
�.�G Wireless Transmission
WIRELESSSYNC
WIRELESSSYNC
Cancel
Please confirm wireless
sync on the transmitter
MENU �&��
UNITS �ALT
v�.�.�
ALT ALT�
DELAY OFF
WL SYNC START
ID ��
Short press <MENU> to enter the menu,
scroll and short press <SET> to select
<Wireless Sync>, then scroll <SET>
and select <Start>.
Wireless sync must be enabled on
both the master and slave unit. The
channel and ID of the master unit
will automatically sync to the slave
unit for quick wireless pairing.
※
EN
- �� -
When wireless triggering is required,
the wireless sync function can quickly
match the channel and ID between
the master and slave unit.
�. Wireless Sync

�.�G Wireless Transmission
EN
MENU �&��
RX COMPAT ON
v�.�.�
Language English
RESET --
- �� -
Short press <MENU> to enter the menu,
scroll and short press <SET> to select
<Slave Compatibility>.
Scroll <SET> and select <Off> to use Q
system triggers.
Scroll <SET> and select <On> to use X
system triggers.
�. Slave Mode Compatibility
�� mmCH: ��
+1.3
TTL
A
X
�.�G Wireless Transmission
EN
- �� -
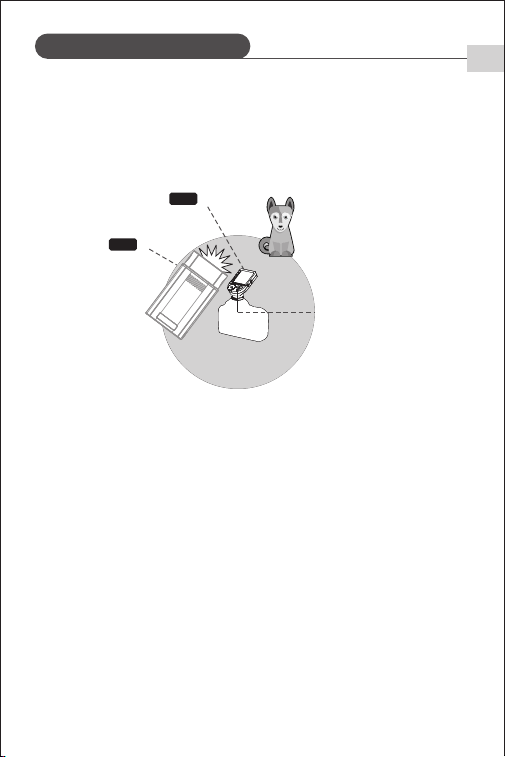
Positioning and operating range (example for wireless flash shooting)
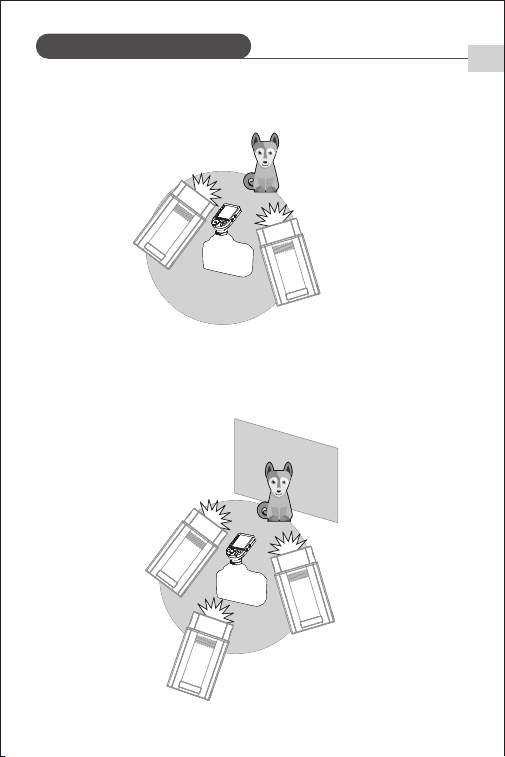
Wireless Multi-Flash Shooting: Slave units can be divided into two or three
groups to perform TTL automatic flash while adjusting flash ratios. Different
flash modes can also be set for each flash group.
➀ Using a single slave unit for automatic flash shooting.
�. Wireless Flash Shooting
(
Slave
)
(
Master
)
Transmission range
approx. 100m
TX
RX
Transmission range may be shorter depending on location, environment,
and weather conditions.
●
Perform test flashes and test shots before shooting.
●
Use a master unit with wireless transmission function as the trigger.
●
�.�G Wireless Transmission
EN
- �� -
➁ Using two slave units for automatic flash shooting.
➂ Using three slave units for automatic flash shooting.
A
B
C
A
B

�.�G Wireless Transmission
Other Functions
EN
- �� -
➀ External �.�G signal interference (e.g., wireless base stations, �.�G Wi-Fi
routers, Bluetooth devices, etc.)
→ Adjust the channel on master unit (recommended: +��) to find an
interference-free channel, or turn off other �.�G devices during operation.
➁ Ensure flash is fully recycled and ready to keep up with the speed of
continuous shooting (ready indicator on). Check that the flash is not in
overheat protection or other abnormal states.
→ Reduce flash power. If using TTL, try switching to M mode.
➂ Transmitter and flash too close (<�.�m)
→ Enable ""Short Distance Wireless Mode"" on the master unit. For QPro
series: set C.Fn-DIST to �‒��m.
➃ Low battery on both master and slave units
→ Replace batteries. Recommended: �.�V disposable alkaline batteries for
the transmitter.
Insert a sync cable or trigger plug into the �.�mm sync jack to sync the flash.
※ When using the sync jack, disable �.�G wireless mode and S�/S� modes.
※ Sync speed using the sync jack: ≤�/���s.
�. Common Causes and Solutions for �.�G Wireless Misfires
�. Sync Jack Trigger
Other Functions
EN
- �� -
※ Can be used as a rear-curtain flash.
MENU �&��
UNITS �ALT
v�.�.�
ALT ALT�
DELAY �.��sec
WL SYNC ON
ID ��
Short press <MENU> to enter the menu.
Scroll and short press <SET> to select
<Delayed Flash>, then scroll <SET> to
enable.
�. Delayed Flash
�
�� mm
�
�- �Hz
256
Multi
��mm
Short press <Zm> to enter focal length
adjustment. Scroll <SET> to adjust
between ��‒���mm.
�. Focal Length Setting

Other Functions
EN
- �� -
Short press < > when the value
symbol appears. Long press < > to
enter brightness adjustment, then scroll
<SET> to set brightness setting
between ��‒��.
Short press < > when the symbol
shows <prop>. When adjusting flash
output power, modeling lamp
brightness changes accordingly—higher
power, higher brightness.
※ Enable <Brightness Follow> in the menu.
�. Modeling Lamp
�/�����
prop
�� mm
�
�.�
256
EV
S�
➀
➁
�
�/�����
��
�� mm
�
�.�
256
EV
S�
Bright: ��
MENU �&��
STANDBY �min
v�.�.�
COLOR ON
MODEL CONT
BURST MODE ON
PROP OFF
MENU �&��
�.�G ON
v�.�.�
S�S� S�
BEEP ON
STEP +�.�ev
BLUETOOTH ON
Other Functions
EN
Short press <MENU> to enter the
menu. Scroll and short press <SET>
to select <Modeling Lamp Mode>,
then scroll <SET> to choose
<Continuous> or <Intermittent>.
Short press <MENU> to enter the menu.
Scroll and short press <SET> to select
<Bluetooth>, then scroll <SET> to
enable.
Connect to your phone via Bluetooth.
When the < > icon stops flashing,
the connection is successful. Use the
NEEWER APP to control the flash.
�. APP Control
- �� -
�
�/����� �� mm
�
�
�.�
256
EV
S�
➂
➀
➁
For detailed instructions, scan the QR
code on the "APP Prompt Card".
➂
Custom Settings
- �� -
EN
ON
OFF
ON
OFF
STANDBY Auto Sleep
COLOR
Consistent Color
Temperature
OFF
�min
��min
��min
��min
Disable
-
-
M (non-HSS)
mode
Automatically sleeps
after inactivity
Symbol Function Setting Description Range
ON
OFF
MODEL
Modeling Lamp
Mode
On
Pause
Modeling lamp stays on
Modeling lamp stays paused
BURST
MODE
Continuous
Shooting
M≤�/��
ON
OFF
Brightness
Follow
Modeling lamp
brightness follows
flash power
M/MULTI
ON
OFF
ON
OFF
Delayed
Flash
Delayed Shooting
M/MULTI
OFF
�.��~��.�s
OFF
As Rear-Curtain Flash
Mask Number of Units
Use simulta
-neously in
M mode
� Masks
� Masks
Sequence Mask Shooting
� devices
� devices
� Masks � devices
OFF OFF
Trigger response during
�st flash
Trigger response during
�nd flash
Trigger response during
�rd flash
Trigger response during
�th flash
Sequence �
Sequence �
Sequence �
Sequence �
Custom Settings
EN
ON
OFF
OFF
- �� -
Symbol Function Setting Description Range
WL SYNC Wireless Sync
�.�G
START
OFF
ID ID Number
�.�G
OFF
��~��
Set ID
�.�G
Wireless
Transmission
-
-
-
-
-
ON
OFF
ON
OFF
Sound
Prompt
Beep
ON
OFF
ON
OFF
Power
Adjustment
Increment
Bluetooth Mode
M
+�.�ev
+�.�ev
±�.�ev
±�.�ev
BLUETOOTH
ON
OFF
ON
OFF
RESET
Restore Factory
Settings
OK
--
Restore Factory Settings
RX COMPAT
Slave
Compatibility
�.�G
ON
OFF
ON
OFF
Language
Display Language
Chinese
English
Chinese
English
Chinese
S�S�
Optical Trigger
Mode
M
OFF
S�
Enable
S�
S�
S�
�. To prevent flash head overheating and damage, do not perform more than
�� rapid consecutive flashes at �/� power. After �� flashes, allow the flash
to cool for at least � minutes.
�. When the overheat protection activates, " " will appear on the screen.
Protection Features
Error Prompts
EN
- �� -
�/�
�/�
�/�
�/�
�/��
�/��
�/��
��
���
���
���
���
���
����
Power Number of Flashes
Number of Consecutive Flashes Before Overheat Protection Activates:
E�
E�
E�
E�
High-Voltage
Capacitor
Overvoltage
Recycle Error
(Over �s)
Fan Malfunction
Temperature
Sensor Error
(Disconnected/
Open Circuit)
MENU �&��
RX COMPAT ON
v�.�.�
Language English
RESET --
Press and hold both <Zm> and
<MODE> to restore factory settings.
Or, select <Reset> in the menu and
short-press <SET>; when <OK>
appears, the device will reset to
factory settings.
The device supports firmware upgrades via the USB port. The latest firmware
will be available on the official website.
▪ The product does not include a USB cable; please purchase separately. It
supports USB-C cables only.
▪ Firmware upgrades require the ""Neewer_Firmware_Update"" software.
Before upgrading, download and install the software, then select the
corresponding firmware file.
▪ As the product receives firmware updates, please refer to the digital user
manual for up-to-date information.
Firmware Upgrade
Factory Reset
- �� -
EN

�. Do not place the product in environments above ��°C.
�. The recommended operating temperature is below ��°C.
�. Avoid dropping the product or subjecting it to collisions or strong impacts.
�. Do not flash the light directly into eyes (especially infants), as it may cause
temporary vision impairment.
�. This product is not waterproof; avoid rain or damp environments.
�. Do not disassemble the product yourself. Any repairs must be performed by
the manufacturer or authorized service personnel.
�. Do not dismantle, strike, crush, or expose the product to fire. If the battery
or unit shows severe swelling, stop using it immediately.
�. In case of any malfunction, turn off the power immediately.
�. Do not use the flash near chemicals, flammable gases, or other sensitive
substances, as sudden intense light may trigger fire or electromagnetic
interference. Adhere to any warning signs in these types of environments.
Safety Precautions
Specifications
- �� -
EN
Model
Wireless Off
Wireless Slave Mode
Flash Modes
Compatible Cameras
(Wireless Slave)
TTL/M/MULTI
M/MULTI
Q���
Nikon
Sony
Canon
FUJIFILM
Specifications
- �� -
EN
Modeling Lamp Brightness
Levels
Modeling Lamp Power
Triggering Methods
ID
CH
Max Full-Power Flashes
Power Supply
Battery Capacity
Flash Dimensions
Weight (with battery)
���Ws
�/���~�/�
�-��
�.� GHz / S� Optical / S� Optical / �.� mm Sync Jack
��~��
��~��
���-���
Lithium Battery
�.�V/����mAH
�/���S-�/�����S
Flash Output Power
Flash Duration (t�.� approx.)
Flash Power Range
Delay Flash
A,B,C,D,E
���M
Groups (GR)
Transmission Distance
�.��~��S
�W
Stroboscopic Flash
Yes (Max Count: ���; Frequency: ��� Hz)
Sync Modes
HSS, First-Curtain, Rear-Curtain
Flash Duration Display
✓
Recycle Time
�.�� ‒ �.�s
�������mm
���g
Frequency Range
Max Transmit Power
����.��MHz-����.��MHz
�.��dBm