Version: 8.3.4.0
Updated: January 29
th
, 2026
ANAFI UKR
User Guide
2
1. Documentaon changelog
This secon details the major changes to Parrot’s technical documentaon since version 8.3.3.1
released on January 12
th
, 2026.
What changed
Where
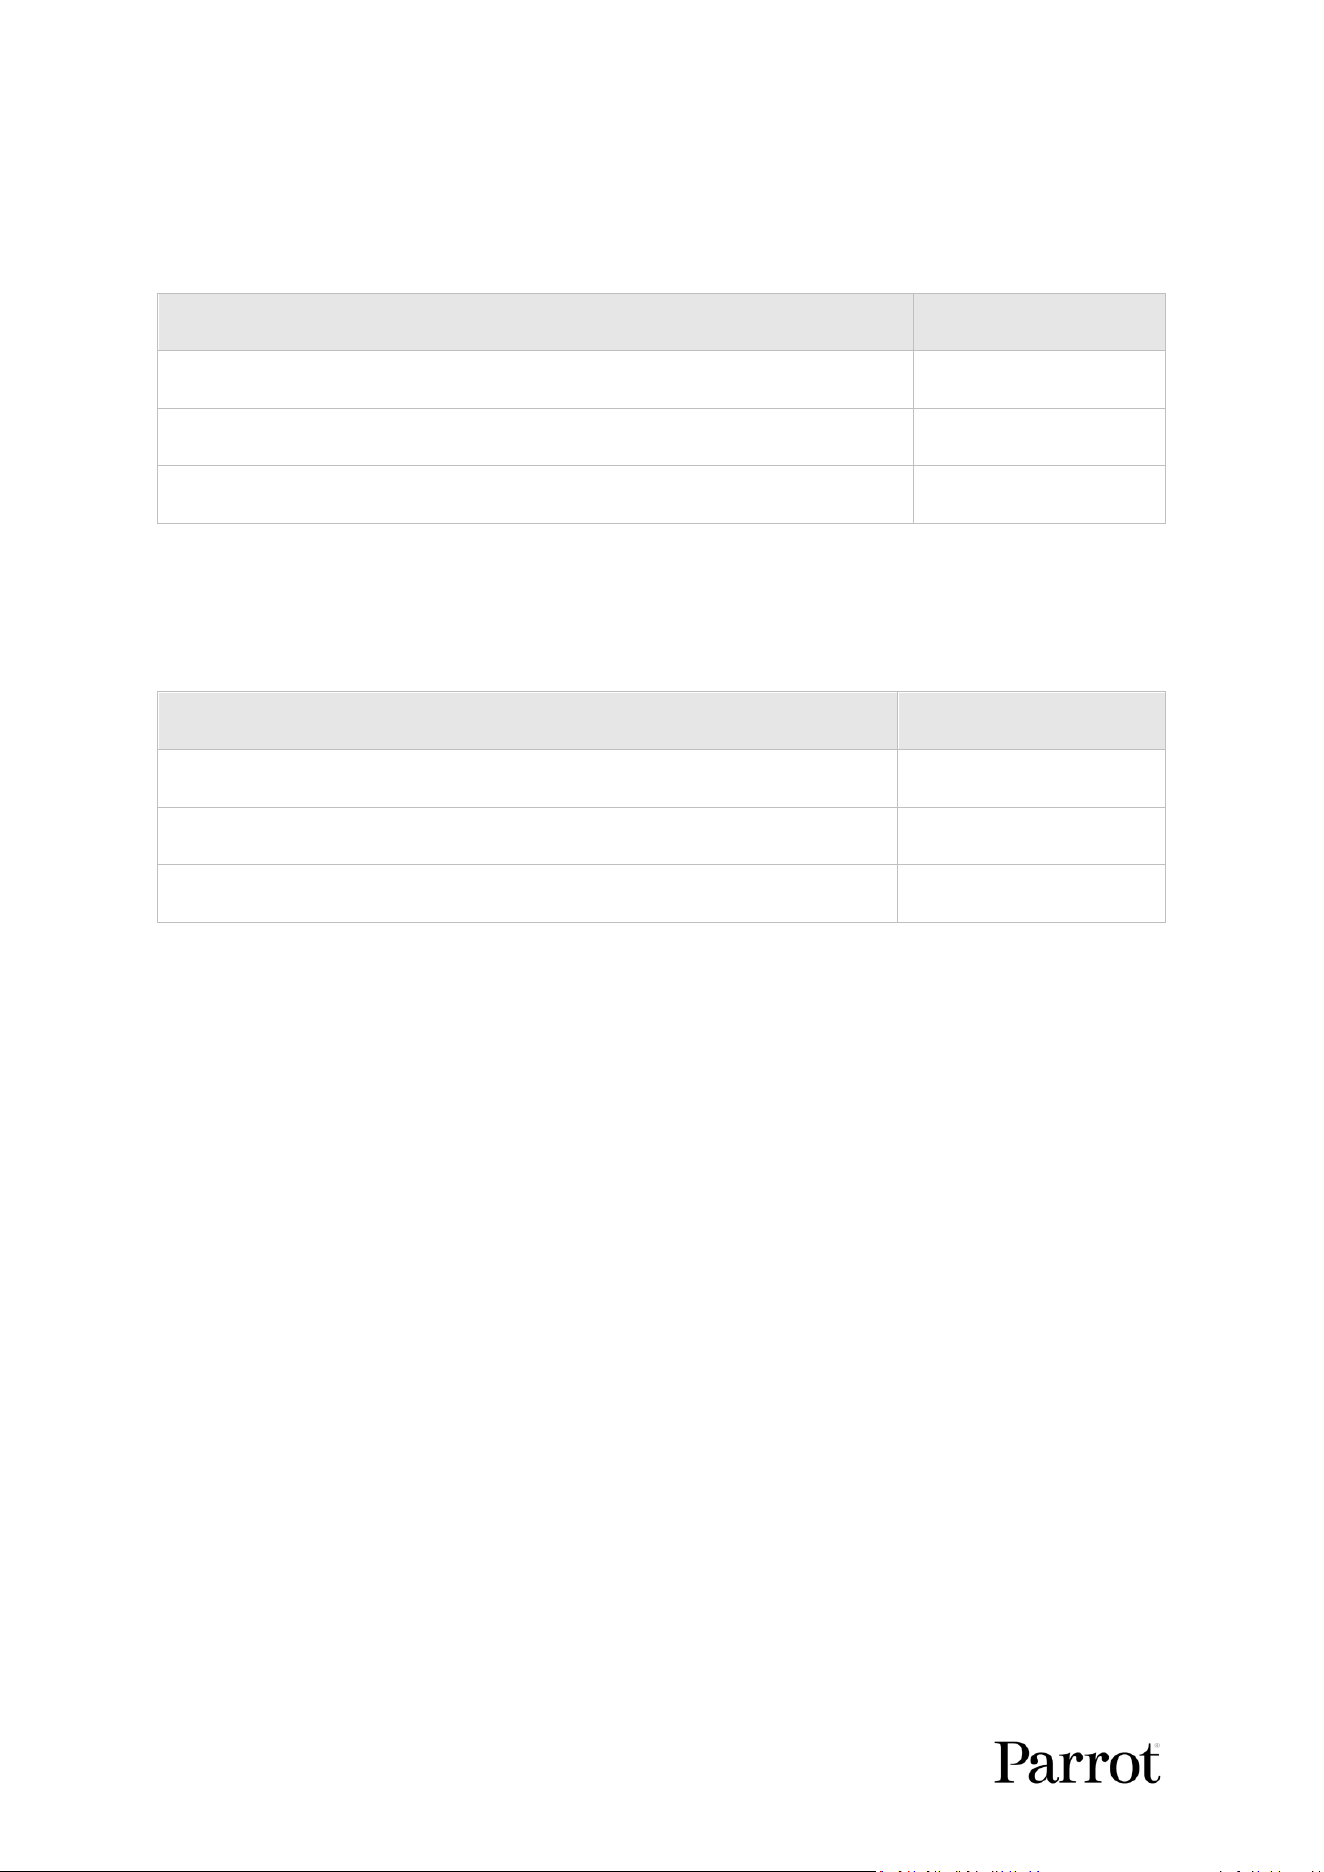
Ecosystem versions subchapter updated.
Page 2
ANAFI UKR aircra chapter updated.
Page 19
Standard baery installaon subchapter updated.
Page 25
1.1. Ecosystem versions
This secon details the soware versions for the full ecosystem available at the me of wring this
user guide:
Ecosystem element
Soware version
Drone
8.3.4
Sphinx simulator
2.23.0
FlightCharts
8.3.0

A N A F I U K R
3
© 2026 Parrot Drones SAS. All Rights Reserved.
2. Using this guide
Parrot recommends that you read the following user guide thoroughly before your rst ight. This
user guide completes the ANAFI UKR documentaon, which also includes the:
- Skycontroller UKR & FreeFlight 8 user guide.
- ANAFI UKR Flight Safety Guide – available upon request.
- ANAFI UKR release notes – available upon request.
Read the Flight Safety Guide to have complementary informaon about safety, operaonal limitaons
for use and maintenance of the ecosystem. Always verify that you are using the latest version of the
user guide.
This guide is specic to a single drone conguraon, consisng of:
- The Parrot ANAFI UKR drone.
- The Parrot Skycontroller UKR.
- The FreeFlight 8 ight applicaon.
NOTE: ANAFI UKR requires the FreeFlight 8 app to y, and to ensure that the drone and controller are
fully up to date with the latest features.
Read enrely at least once. It answers most quesons that most users may encounter when they use
ANAFI UKR.
Keep it for reference and stay alert for updates. Updates are mandatory and must be systemacally
performed prior to any ight to ensure maximum performance and safety.
The Table of contents, starng on page 4, is acve. Click a tle to access the corresponding secon.
This user guide has no index. the keyboard shortcut Ctrl + F (Windows) or Command + F (Mac) to
browse all occurrences of any keyword (ight, sengs, obstacle avoidance, gimbal, photo, ISO, etc)

4
3. Table of contents
1. Documentaon changelog .................... 2
1.1. Ecosystem versions ...................... 2
2. Using this guide ..................................... 3
3. Table of contents ................................... 4
4. Foreword ............................................... 6
4.1. ANAFI UKR ecosystem and variants
..................................................... 6
4.2. Overhead power lines and pylons 6
4.3. Radiaon elds ............................. 6
4.4. GPS ............................................... 6
4.5. 4K video formats .......................... 7
4.6. ANAFI UKR smart baeries .......... 7
4.7. Technical support ......................... 7
4.8. Informaon related to Privacy
Rights ..................................................... 7
5. Technical specicaons ......................... 8
5.1. ANAFI UKR .................................... 8
5.2. ANAFI UKR GOV ........................... 9
5.3. ANAFI UKR XLR ........................... 10
6. Pack contents ....................................... 12
6.1. ANAFI UKR .................................. 12
6.2. ANAFI UKR GOV ......................... 13
6.3. ANAFI UKR XLR ........................... 14
6.4. ANAFI UKR Mission .................... 15
7. Pre-ight checklist ............................... 16
7.1. Transport & handling ................. 16
7.2. Equipment .................................. 16
7.3. Regulaons ................................. 16
7.4. Flight condions ......................... 16
8. Geng started ..................................... 17
9. ANAFI UKR aircra ............................... 19
9.1. Connecvity ............................... 21
9.2. LEDs and assistance lights .......... 22
9.3. Installing a nano SIM card/microSD
card ................................................... 23
9.4. Compable microSD cards ......... 24
10. Smart baery ...................................... 25
10.1. Standard baery installaon ..... 25
10.2. XLR baery installaon .............. 26
10.3. Baery care and safety .............. 27
10.4. Baery charging ......................... 28
10.5. Power bank mode ...................... 29
10.6. External payload ........................ 29
11. Simulator & FlightCharts Live USB key 31
11.1. ANAFI UKR simulator ................. 34
11.2. FlightCharts ................................ 38
12. Maintenance and troubleshoong ..... 43
12.1. Changing propeller blades ......... 43
12.2. ANAFI UKR drone hard reset ..... 44
12.3. Smart baery hard reset ........... 44
12.4. Webserver.................................. 44
12.5. Update via drone internal storage
................................................... 45
12.6. Update via external storage ....... 46
12.7. Imaging metadata ...................... 46
12.8. Ecosystem logs for technical
support ................................................... 46
12.9. Recover ANAFI UKR.................... 46
12.10. Drone end of service life ............ 47
13. Appendix 1: Operaonal checklist ...... 48
13.1. Soware update & calibraon ... 48
13.1. Skycontroller UKR & Aircra o 48
13.2. Skycontroller UKR & Aircra on . 48
13.3. Before Take-o ........................... 49
13.4. Aer Take-o ............................. 49
13.5. Before landing ............................ 49


6
4. Foreword
ANAFI UKR is designed and opmized to y without addional accessories. If you install an accessory,
its size, mass, or power consumpon can change the drone’s performance. These changes can aect
many performance parameters, including but not limited to aerodynamics, autonomy, ight stability,
radio link, and navigaon sensor reliability.
IMPORTANT: The maximum take-off mass (MTOM) of ANAFI UKR is 1,450 g (3.20 lb). If you equip
your drone with an accessory, it can reduce its autonomy.
CAUTION: Do not alter the center of gravity of the drone. Do not block or obstruct in any way the
front stereo cameras, the bottom stereo cameras, or the Time-of-Flight sensor. Any obstruction of
the sensors, even partial obstruction of the field of view may cause ANAFI UKR to read false data, to
have erratic flight behavior, resulting in a crash. The required Field of View for the stereo cameras
and the Time-of-Flight sensor is 86° (2x43°). Do not put any object under the Time-of-Flight sensor.
Keep a clear cylindrical exclusion zone with a diameter of 4 cm directly below the sensor.
Parrot recommends that you do not aach a payload to ANAFI UKR’s top cover. Payloads aached to
the top cover can impede or degrade GNSS/IMU performance.
4.1. ANAFI UKR ecosystem and variants
In the following pages, the word ecosystem refers to the drone (ANAFI UKR), its controller
(Skycontroller UKR) and the ight applicaon (FreeFlight 8). The word device refers to the tablet on
which FreeFlight 8 is installed.
This user guide documents 4 Parrot aircra ecosystem variants:
• ANAFI UKR
• ANAFI UKR GOV
• ANAFI UKR XLR
• ANAFI UKR Mission
Available radios, and radio bands depend on individual conguraons.
4.2. Overhead power lines and pylons
Flying close to power installaons may impact the behavior of ANAFI UKR. Higher voltage and/or
current creates higher electromagnec interference, which can aect the aircra’s communicaons.
CAUTION: Do not y within 3 m (9 ) of a power installaon.
4.3. Radiaon elds
The proximity of high intensity radiaon eld may impact the behavior of the drone, for example,
airport radar.
CAUTION: Do not y within:
• 500 m of a high intensity radar beam.
• 50 m of a radar installaon.
4.4. GPS
ANAFI UKR does not require a satellite synchronizaon, or x, to take o (for example, GPS,
GLONASS, Galileo, BeiDou). It can therefore be piloted indoors and through cluered areas, stabilized
by its onboard sensors.

A N A F I U K R
7
© 2026 Parrot Drones SAS. All Rights Reserved.
Parrot recommends ANAFI UKR pilots to always set up, start, and nish their automated and assisted
ights from wide open areas.
4.5. 4K video formats
4K video formats are professional grade media which may not be read navely by slower computers.
If the media do not read properly on your equipment, shoot in 1080p or use a video converter to turn
your ANAFI UKR’s 4K videos into a more manageable format, such as 1080p. The video coding format
(H.264 or H.265) can be chosen. H.265 is more recent and more ecient but can lead to compability
issues on older video systems. If you are experiencing compability issues, consider choosing H.264.
4.6. ANAFI UKR smart baeries
One smart battery comes preinstalled on ANAFI UKR. If you remove the battery, you must reinstall it
in the same orientation.
ANAFI UKR baery enters a Wintering mode when not in use for ten consecuve days. You must
wake the baery up and charge it completely before you y ANAFI UKR for the rst me.
4.7. Technical support
CAUTION: If you do not share flight data / logs for the purposes of receiving support, you limit your
ability to receive technical support, warranty, or both from Parrot.
4.8. Informaon related to Privacy Rights
For more informaon about the appearance of individuals in videos and photos taken by a drone,
refer to the Flight Safety Guide (available on request).
WARNING: If you choose to y without GPS, you must ensure that the ground has sucient
texture, and is suciently illuminated in order to opmize the visual odometry algorithm.
Subopmal condions such as non-textured, or poorly illuminated ground may cause ANAFI UKR
to dri.
WARNING: Obstacle avoidance may not work opmally during indoor ight.
8
5. Technical specicaons
5.1. ANAFI UKR
AIRCRAFT
• Size folded: 245 x 160 x 116 mm (9.6 x 6.3 x 4.6")
• Size unfolded: 350 x 665 x 116 mm (13.8 x 26.2 x 4.6 ")
• Mass: 1,024 g (2.26 lb)
• Maximum take-off mass (MTOM): 1,450 g (3.20 lb)
• Maximum transmission range (LOS – Line of Sight) with
Skycontroller UKR:
o MARS: 40 km (24.85 mi)
o LoRa: 40 km (24.85 mi)
• Maximum flight time: 38 min at 6 m/s airspeed
• Maximum flight distance: 23.1 km (14.35 mi) at 10 m/s airspeed
[1]
• Maximum horizontal airspeed: 17 m/s (38.1 MPH)
• Maximum horizontal ground speed: 29.6 m/s (66.2 MPH)
[2]
• Maximum ascent speed: 8 m/s (17.9 MPH)
• Maximum descent speed: 8 m/s (17.9 MPH)
• Maximum wind resistance:
o During flight: 15 m/s (33.5 MPH)
o During take-off and landing: 15 m/s (33.5 MPH)
• Maximum propeller speed: 8,500 RPM
• Sound power level: 77 dBA
[3]
• Service ceiling: 5,000 m above MSL (Mean Sea Level)
• Operating temperature: -36 °C to 50 °C (-33 °F to 122 °F)
• No take-off temperature limitation - if battery temperature is
maintained between -20 °C and 50 °C (-4 °F to 122 °F)
• IP53: Rain and dust resistant
• Maximum static thrust: 27 N
• Thrust to weight ratio: 2.7
• No NFZ (no-fly zone) limitation
• Takes off from / lands in the hand of the operator
• Full capability in GNSS denied flight conditions
• Indoor flight
• Connectivity and storage:
o USB-C port
o MicroSD card slot
o 512 GB internal memory
• Deployment time: < 2 min
SENSORS
• Satellite navigation:
o GPS
o GLONASS
o Galileo
o BeiDou
• Barometer
• Magnetometer
• Front stereo cameras, vertical stereo cameras and vertical range
sensor
• 4 inertial measurement units. Each IMU includes:
o 3-axis accelerometers
o 3-axis gyroscopes
CYBERSECURITY
• Zero data shared without user consent
• TAA & NDAA compliant
• Blue sUAS program approved
• Manage your data privately between drone and device OR share
anonymous data on secured European servers
• MicroSD card AES-XTS encryption with a 512-bit key
• Digitally signed firmware
• Compliant with FIPS140-2
EO IMAGE CHAIN
• 2x Sensors: 1/2.4’’
• Digital zoom: 35x
• Electronic shutter speed: 1/25 s to 1/10,000 s
• ISO range: 100-12,800
• Video resolution: 4k (2160p) / FHD (1080p)
• Video format: MP4 (H.264 & H.265)
• Photo resolution: 21 MP, 4K - 24, 25, 30 fps, 1080 – 50, 60 fps
o Wide: 84° HFOV;
o Rectilinear: up to 75.2° HFOV
• Photo formats: JPEG, DNG (Digital Negative raw)
IR IMAGE CHAIN
• Sensor: FLIR BOSON
• Resolution: 640x512
• Temperature range: -40 °C to 250 °C (-40 °F to 482 °F)
• Thermal sensitivity: <60 mK
• Measured IR wavelength range: 8 to 14 micrometers
• Photo format: JPEG, PNG
• Video format: MP4 (H.264 & H.265)
• Video recording resolution: UHD, 8.6 fps
IMAGE STABILIZATION
• 3-camera IR/EO stabilized gimbal:
o Hybrid: 3-axis
o Mechanical: 3-axis
o Electronic (EIS): 3-axis
• Controllable gimbal tilt range: -90° to +90°
STANDARD SMART BATTERY
• Size: 136 x 73 x 46 mm (5.4 x 2.9 x 1.8")
• Mass: 354 g (0.78 lb)
• Type: High density LiPo (225 Wh/kg)
• Capacity: 6,800 mAh
• Voltage (nominal): 11.55 V (3 x 3.85 V cells)
• USB-C port
• Charges fully in 2 h 30 min with a USB-PD (Power Delivery) charger
included in the pack
• Maximum charging power: 45 W
•
RADIO LINK
• MARS
o Over 1.5 GHz bandwidth spread across 8 bands 1.8 – 5 GHz
[4]
o TX & RX differentiated frequencies
o Radio-jamming resistance through Frequency hopping
o Direct video stream resolution: 1080p 30 fps
o AES 256 encryption: packet and radio level
• LoRa:
o Activates when main link is lost
o AES 128 and ChaCha20 encryption
o Frequency bands: EU - 863 to 870 MHz, US - 902 to 928 MHz
CARRY CASE
• Size: 405 x 503 x 192 mm (15.9 x 19.8 x 7.6")
• Mass: 6,659 g (14.68 lb)
[1] Extreme temperatures, or suboptimal conditions may affect maximum range,
battery autonomy, and drone speed.
[2] Maximum ground speed depends on current wind speed. Active cruise control
is enabled by default (and cannot be disabled). At 12 m/s airspeed the range in
km is maximized.
[3] 77 dBA is the guaranteed sound power level, however, in typical flight
conditions ANAFI UKR has a sound power level of 75 dBA.
[4] Available bands depend on individual configurations.

A N A F I U K R
9
© 2026 Parrot Drones SAS. All Rights Reserved.
5.2. ANAFI UKR GOV
AIRCRAFT
• Size folded: 245 x 160 x 116 mm (9.6 x 6.3 x 4.6")
[1]
• Size unfolded: 350 x 665 x 116 mm (13.8 x 26.2 x 4.6 ")
• Mass:
o With standard smart battery: 1,024 g (2.26 lb)
o With XLR smart battery: 1,356 g (2.99 lb)
• Maximum take-off mass (MTOM): 1,450 g (3.20 lb)
• Maximum transmission range (LOS – Line of Sight) with
Skycontroller UKR:
o Wi-Fi: 5 km (3.11 mi)
o LoRa: 40 km (24.85 mi)
o 5G: Unlimited (provided there is 5G coverage)
• Maximum flight time: 70 min at 6.5 m/s airspeed
• Maximum flight distance: 40 km (24.85 mi) at 14 m/s airspeed
[2]
• Maximum horizontal airspeed: 17 m/s (38.1 MPH)
• Maximum horizontal ground speed
[3]
:
o With standard smart battery: 29.6 m/s (66.2 MPH)
o With XLR smart battery: 28.6 m/s (64.0 MPH)
• Maximum ascent speed: 8 m/s (17.9 MPH)
• Maximum descent speed: 8 m/s (17.9 MPH)
• Maximum wind resistance:
o During flight: 15 m/s (33.5 MPH)
o During take-off and landing: 15 m/s (33.5 MPH)
• Maximum propeller speed: 8,500 RPM
• Sound power level: 77 dBA
[4]
• Service ceiling: 5,000 m above MSL (Mean Sea Level)
• Operating temperature: -36 °C to 50 °C (-33 °F to 122 °F)
• No take-off temperature limitation - if battery temperature is
maintained between -20 °C and 50 °C (-4 °F to 122 °F)
• IP53: Rain and dust resistant
• Maximum static thrust: 27 N
• Thrust to weight ratio: 2.0
• No NFZ (no-fly zone) limitation
• Takes off from / lands in the hand of the operator
• Full capability in GNSS denied flight conditions
• Indoor flight
• Connectivity and storage:
o USB-C port
o MicroSD card slot
o SIM card port
o 512 GB internal memory
• Deployment time: < 2 min
SENSORS
• Satellite navigation:
o GPS
o GLONASS
o Galileo
o BeiDou
• Barometer
• Magnetometer
• Front stereo cameras, vertical stereo cameras and vertical range
sensor
• 4 inertial measurement units. Each IMU includes:
o 3-axis accelerometers
o 3-axis gyroscopes
CYBERSECURITY
• Zero data shared without user consent
• TAA & NDAA compliant
• Blue sUAS program approved
• Manage your data privately between drone and device OR share
anonymous data on secured European servers
• MicroSD card AES-XTS encryption with a 512-bit key
• Digitally signed firmware
• Compliant with FIPS140-2
EO IMAGE CHAIN
• 2x Sensors: 1/2.4’’
• Digital zoom: 35x
• Electronic shutter speed: 1/25 s to 1/10,000 s
• ISO range: 100-12,800
• Video resolution: 4k (2160p) / FHD (1080p)
• Video format: MP4 (H.264 & H.265)
• Photo resolution: 21 MP, 4K - 24, 25, 30 fps, 1080 – 50, 60 fps
o Wide: 84° HFOV;
o Rectilinear: up to 75.2° HFOV
• Photo formats: JPEG, DNG (Digital Negative raw)
IR IMAGE CHAIN
• Sensor: FLIR BOSON
• Resolution: 640x512
• Temperature range: -40 °C to 250 °C (-40 °F to 482 °F)
• Thermal sensitivity: <60 mK
• Measured IR wavelength range: 8 to 14 micrometers
• Photo format: JPEG, PNG
• Video format: MP4 (H.264 & H.265)
• Video recording resolution: UHD, 8.6 fps
IMAGE STABILIZATION
• 3-camera IR/EO stabilized gimbal:
o Hybrid: 3-axis
o Mechanical: 3-axis
o Electronic (EIS): 3-axis
• Controllable gimbal tilt range: -90° to +90°
STANDARD SMART BATTERY
• Size: 136 x 73 x 46 mm (5.4 x 2.9 x 1.8")
• Mass: 354 g (0.78 lb)
• Type: High density LiPo (225 Wh/kg)
• Capacity: 6,800 mAh
• Voltage (nominal): 11.55 V (3 x 3.85 V cells)
• USB-C port
• Charges fully in 2 h 30 min with a USB-PD (Power Delivery) charger
included in the pack
• Maximum charging power: 45 W
XLR SMART BATTERY
[5]
• Size: 156 x 105 x 49 mm (6.1 x 4.1 x 1.9")
• Mass: 686 g (1.51 lb)
• Type: High density Li-ion (300 Wh/kg)
• Capacity: 20,200 mAh
• Voltage (nominal): 10.20 V (3 x 3.40 V cells)
• USB-C port
• Charges fully in 5 h 15 min with a USB-PD (Power Delivery) charger
included in the pack
• Maximum charging power: 45 W
CARRY CASE
• Size: 405 x 503 x 192 mm (15.9 x 19.8 x 7.6")
• Mass: 6,659 g (14.68 lb)
•
RADIO LINK
• Wi-Fi:
o Wi-Fi 802.11ax
o Direct video stream resolution: 1080p 30 fps
o AES 256 encryption: Packet and radio level
o Operating frequencies: 2.4 GHz, 5GHz UNII-1, & UNII-3
• LoRa:
o Activates when main link is lost
o AES 128 and ChaCha20 encryption
o Frequency bands: EU - 863 to 870 MHz, US - 902 to 928 MHz
• Cellular:
o Cellular connectivity: 5G NR with 4G LTE fallback
o AES 256 encryption: Packet level
o Seamless 5G / Wi-Fi switching
o Flies Beyond Visual Line of Sight
[1] Folding is not possible with the XLR smart battery installed.
[2] Extreme temperatures, or suboptimal conditions may affect maximum range,
battery autonomy, and drone speed.
[3] Maximum ground speed depends on current wind speed. Active cruise control
is enabled by default (and cannot be disabled). At 12 m/s airspeed the range in
km is maximized.
[4] 77 dBA is the guaranteed sound power level, however, in typical flight
conditions ANAFI UKR has a sound power level of 75 dBA.
[5] Only available for ANAFI UKR XLR, and ANAFI UKR GOV
10
5.3. ANAFI UKR XLR
AIRCRAFT
• Size folded: 245 x 160 x 116 mm (9.6 x 6.3 x 4.6")
[1]
• Size unfolded: 350 x 665 x 116 mm (13.8 x 26.2 x 4.6 ")
• Mass:
o With standard smart battery: 1,024 g (2.26 lb)
o With XLR smart battery: 1,356 g (2.99 lb)
• Maximum take-off mass (MTOM): 1,450 g (3.20 lb)
• Maximum transmission range (LOS – Line of Sight) with
Skycontroller UKR:
o MARS: 40 km (24.85 mi)
o LoRa: 40 km (24.85 mi)
o 5G: Unlimited (provided there is 5G coverage)
• Maximum flight time: 70 min at 6.5 m/s airspeed
• Maximum flight distance: 40 km (24.85 mi) at 14 m/s airspeed
[2]
• Maximum horizontal airspeed: 17 m/s (38.1 MPH)
• Maximum horizontal ground speed
[3]
:
o Standard smart battery: 29.6 m/s (66.2 MPH)
o XLR smart battery: 28.6 m/s (64.0 MPH)
• Maximum ascent speed: 8 m/s (17.9 MPH)
• Maximum descent speed: 8 m/s (17.9 MPH)
• Maximum wind resistance:
o During flight: 15 m/s (33.5 MPH)
o During take-off and landing: 15 m/s (33.5 MPH)
• Maximum propeller speed: 8,500 RPM
• Sound power level: 77 dBA
[4]
• Service ceiling: 5,000 m above MSL (Mean Sea Level)
• Operating temperature: -36 °C to 50 °C (-33 °F to 122 °F)
• No take-off temperature limitation - if battery temperature is
maintained between -20 °C and 50 °C (-4 °F to 122 °F)
• IP53: Rain and dust resistant
• Maximum static thrust: 27 N
• Thrust to weight ratio: 2.0
• No NFZ (no-fly zone) limitation
• Takes off from / lands in the hand of the operator
• Full capability in GNSS denied flight conditions
• Indoor flight
• Connectivity and storage:
o USB-C port
o MicroSD card slot
o SIM card port
o 512 GB internal memory
• Deployment time: < 2 min
SENSORS
• Satellite navigation:
o GPS
o GLONASS
o Galileo
o BeiDou
• Barometer
• Magnetometer
• Front stereo cameras, vertical stereo cameras and vertical range
sensor
• 4 inertial measurement units. Each IMU includes:
o 3-axis accelerometers
o 3-axis gyroscopes
CYBERSECURITY
• Zero data shared without user consent
• TAA & NDAA compliant
• Blue sUAS program approved
• Manage your data privately between drone and device OR share
anonymous data on secured European servers
• MicroSD card AES-XTS encryption with a 512-bit key
• Digitally signed firmware
• Compliant with FIPS140-2
EO IMAGE CHAIN
• 2x Sensors: 1/2.4’’
• Digital zoom: 35x
• Electronic shutter speed: 1/25 s to 1/10,000 s
• ISO range: 100-12,800
• Video resolution: 4k (2160p) / FHD (1080p)
• Video format: MP4 (H.264 & H.265)
• Photo resolution: 21 MP, 4K - 24, 25, 30 fps, 1080 – 50, 60 fps
o Wide: 84° HFOV;
o Rectilinear: up to 75.2° HFOV
• Photo formats: JPEG, DNG (Digital Negative raw)
IR IMAGE CHAIN
• Sensor: FLIR BOSON
• Resolution: 640x512
• Temperature range: -40 °C to 250 °C (-40 °F to 482 °F)
• Thermal sensitivity: <60 mK
• Measured IR wavelength range: 8 to 14 micrometers
• Photo format: JPEG, PNG
• Video format: MP4 (H.264 & H.265)
• Video recording resolution: UHD, 8.6 fps
IMAGE STABILIZATION
• 3-camera IR/EO stabilized gimbal:
o Hybrid: 3-axis
o Mechanical: 3-axis
o Electronic (EIS): 3-axis
• Controllable gimbal tilt range: -90° to +90°
STANDARD SMART BATTERY
• Size: 136 x 73 x 46 mm (5.4 x 2.9 x 1.8")
• Mass: 354 g (0.78 lb)
• Type: High density LiPo (225 Wh/kg)
• Capacity: 6,800 mAh
• Voltage (nominal): 11.55 V (3 x 3.85 V cells)
• USB-C port
• Charges fully in 2 h 30 min with a USB-PD (Power Delivery) charger
included in the pack
• Maximum charging power: 45 W
XLR SMART BATTERY
[5]
• Size: 156 x 105 x 49 mm (6.1 x 4.1 x 1.9")
• Mass: 686 g (1.51 lb)
• Type: High density Li-ion (300 Wh/kg)
• Capacity: 20,200 mAh
• Voltage (nominal): 10.20 V (3 x 3.40 V cells)
• USB-C port
• Charges fully in 5 h 15 min with a USB-PD (Power Delivery) charger
included in the pack
• Maximum charging power: 45 W
CARRY CASE
• Size: 405 x 503 x 192 mm (15.9 x 19.8 x 7.6")
• Mass: 6,659 g (14.68 lb)
•
RADIO LINK
• MARS
o Over 1.5 GHz bandwidth spread across 10 bands 1.8 – 5.85 GHz
[6]
o TX & RX differentiated frequencies
o Radio-jamming resistance through Frequency hopping
o Direct video stream resolution: 1080p 30 fps
o AES 256 encryption: packet and radio level
• LoRa:
o Activates when main link is lost
o AES 128 and ChaCha20 encryption
o Frequency bands: EU - 863 to 870 MHz, US - 902 to 928 MHz
• Cellular:
o Cellular connectivity: 5G NR with 4G LTE fallback
o AES 256 encryption: Packet level
o Seamless 5G / MARS switching
o Flies Beyond Visual Line of Sight
[1] Folding is not possible with the XLR smart battery installed.
[2] Extreme temperatures, or suboptimal conditions may affect maximum range,
battery autonomy, and drone speed.
[3] Maximum ground speed depends on current wind speed. Active cruise control is
enabled by default (and cannot be disabled). At 12 m/s airspeed the range in
km is maximized.
[4] 77 dBA is the guaranteed sound power level, however, in typical flight conditions
ANAFI UKR has a sound power level of 75 dBA.
[5] Only available for ANAFI UKR XLR, and ANAFI UKR GOV
[6] Available bands depend on individual configurations.
A N A F I U K R
11
© 2026 Parrot Drones SAS. All Rights Reserved.
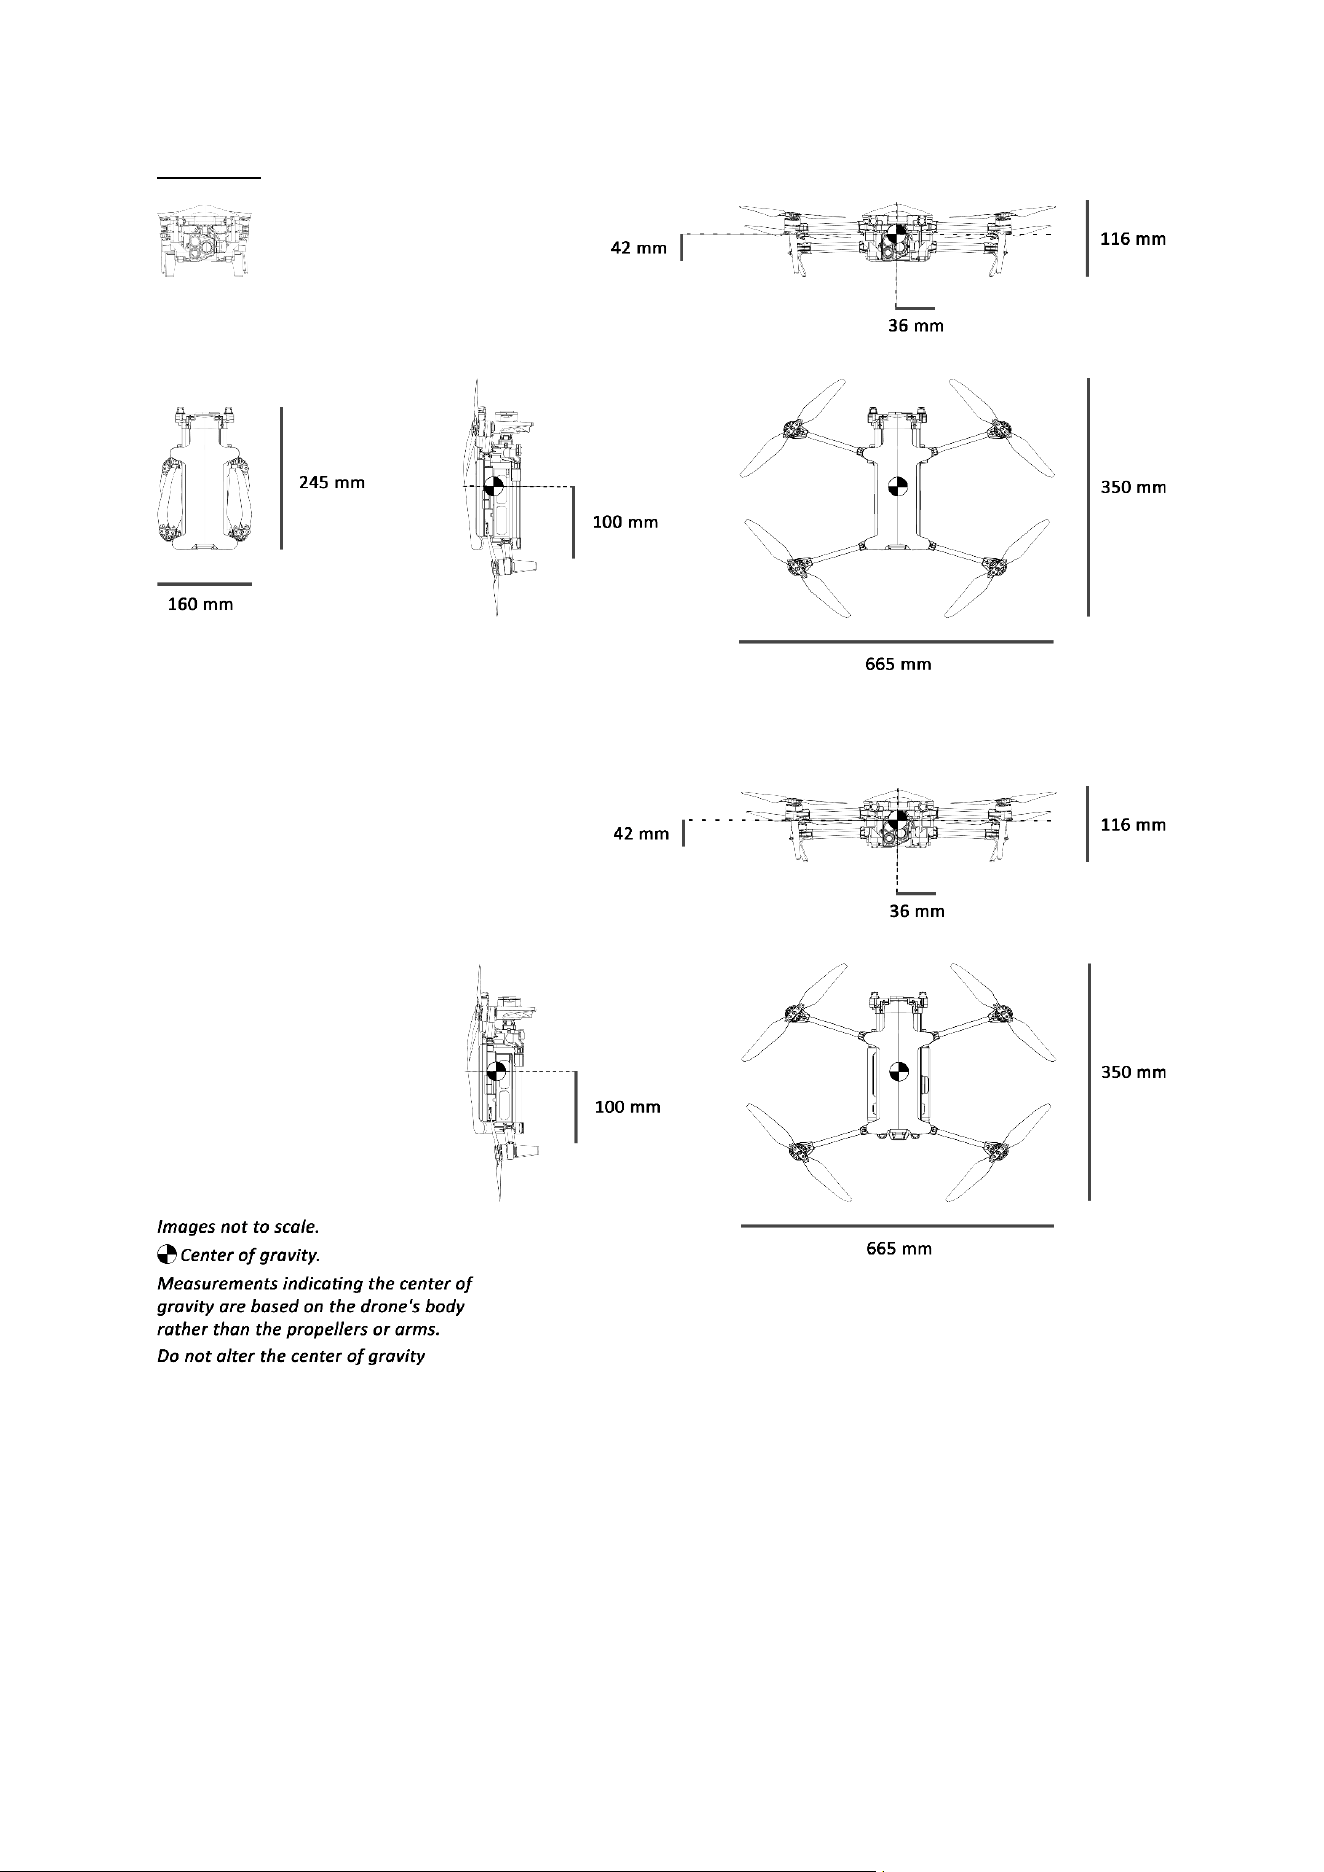
DIMENSIONS
Figure 1: ANAFI UKR and ANAFI UKR GOV (standard smart baery) dimensions and center of gravity
Figure 2: ANAFI UKR XLR (XLR smart baery) dimensions and center of gravity
12
6. Pack contents
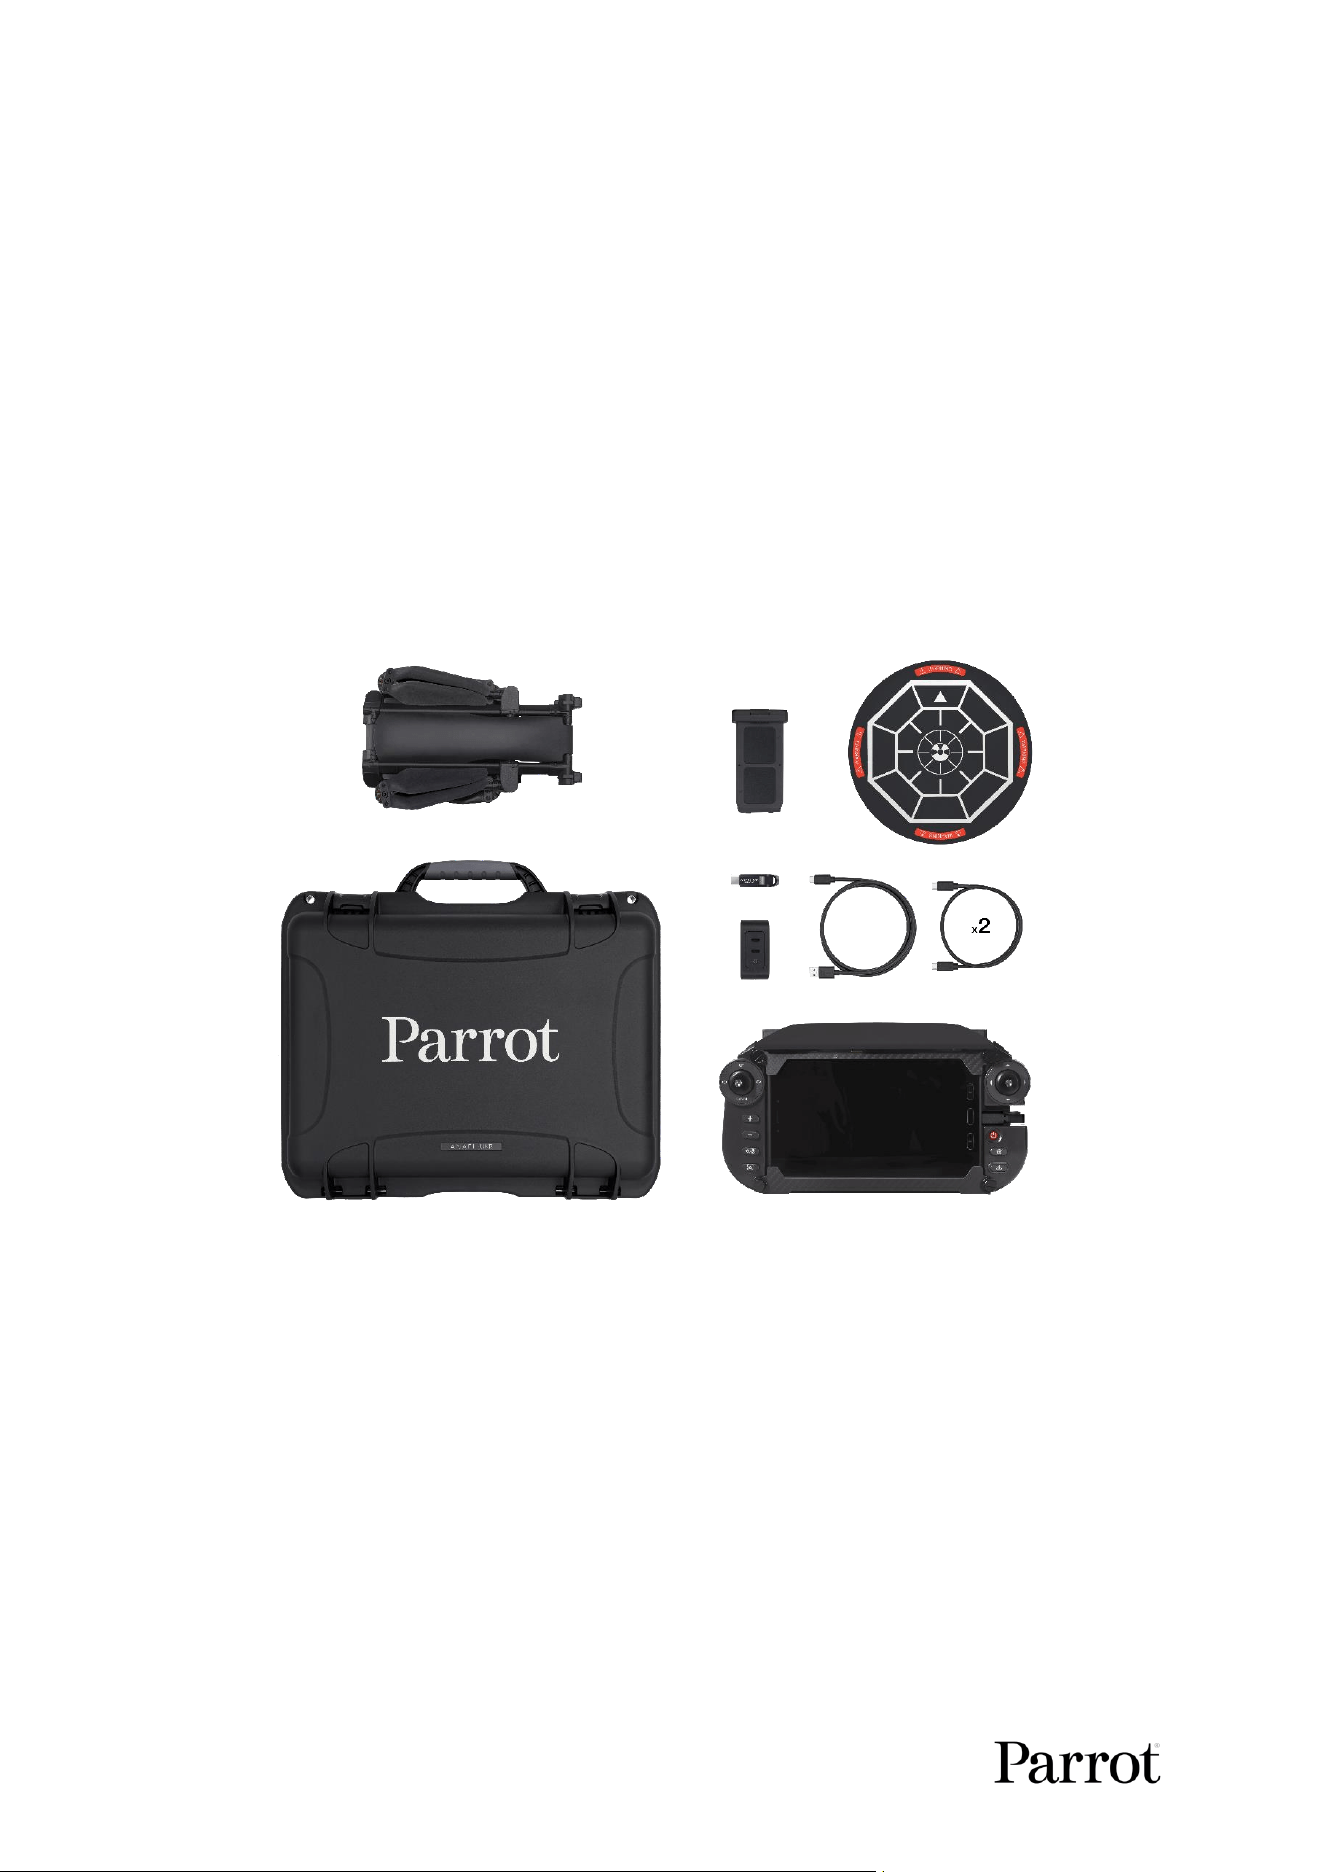
6.1. ANAFI UKR
Your ANAFI UKR pack contains:
- 1 ANAFI UKR aircraft
- 1 Skycontroller UKR ground control station
- 1 ANAFI UKR Simulator and FlightCharts Live USB key
- 1 landing pad*
- 1 standard smart battery
- 1 standard smart battery adapter
- 1 USB-PD charger
- 1 USB-A/USB-C cable (1 m)
- 2 USB-C/USB-C cables (0.5 m)
- 1 gimbal protecon cover
- 1 hard case
Figure 3: ANAFI UKR system pack contents
*Subject to conguraon.
A N A F I U K R
13
© 2026 Parrot Drones SAS. All Rights Reserved.
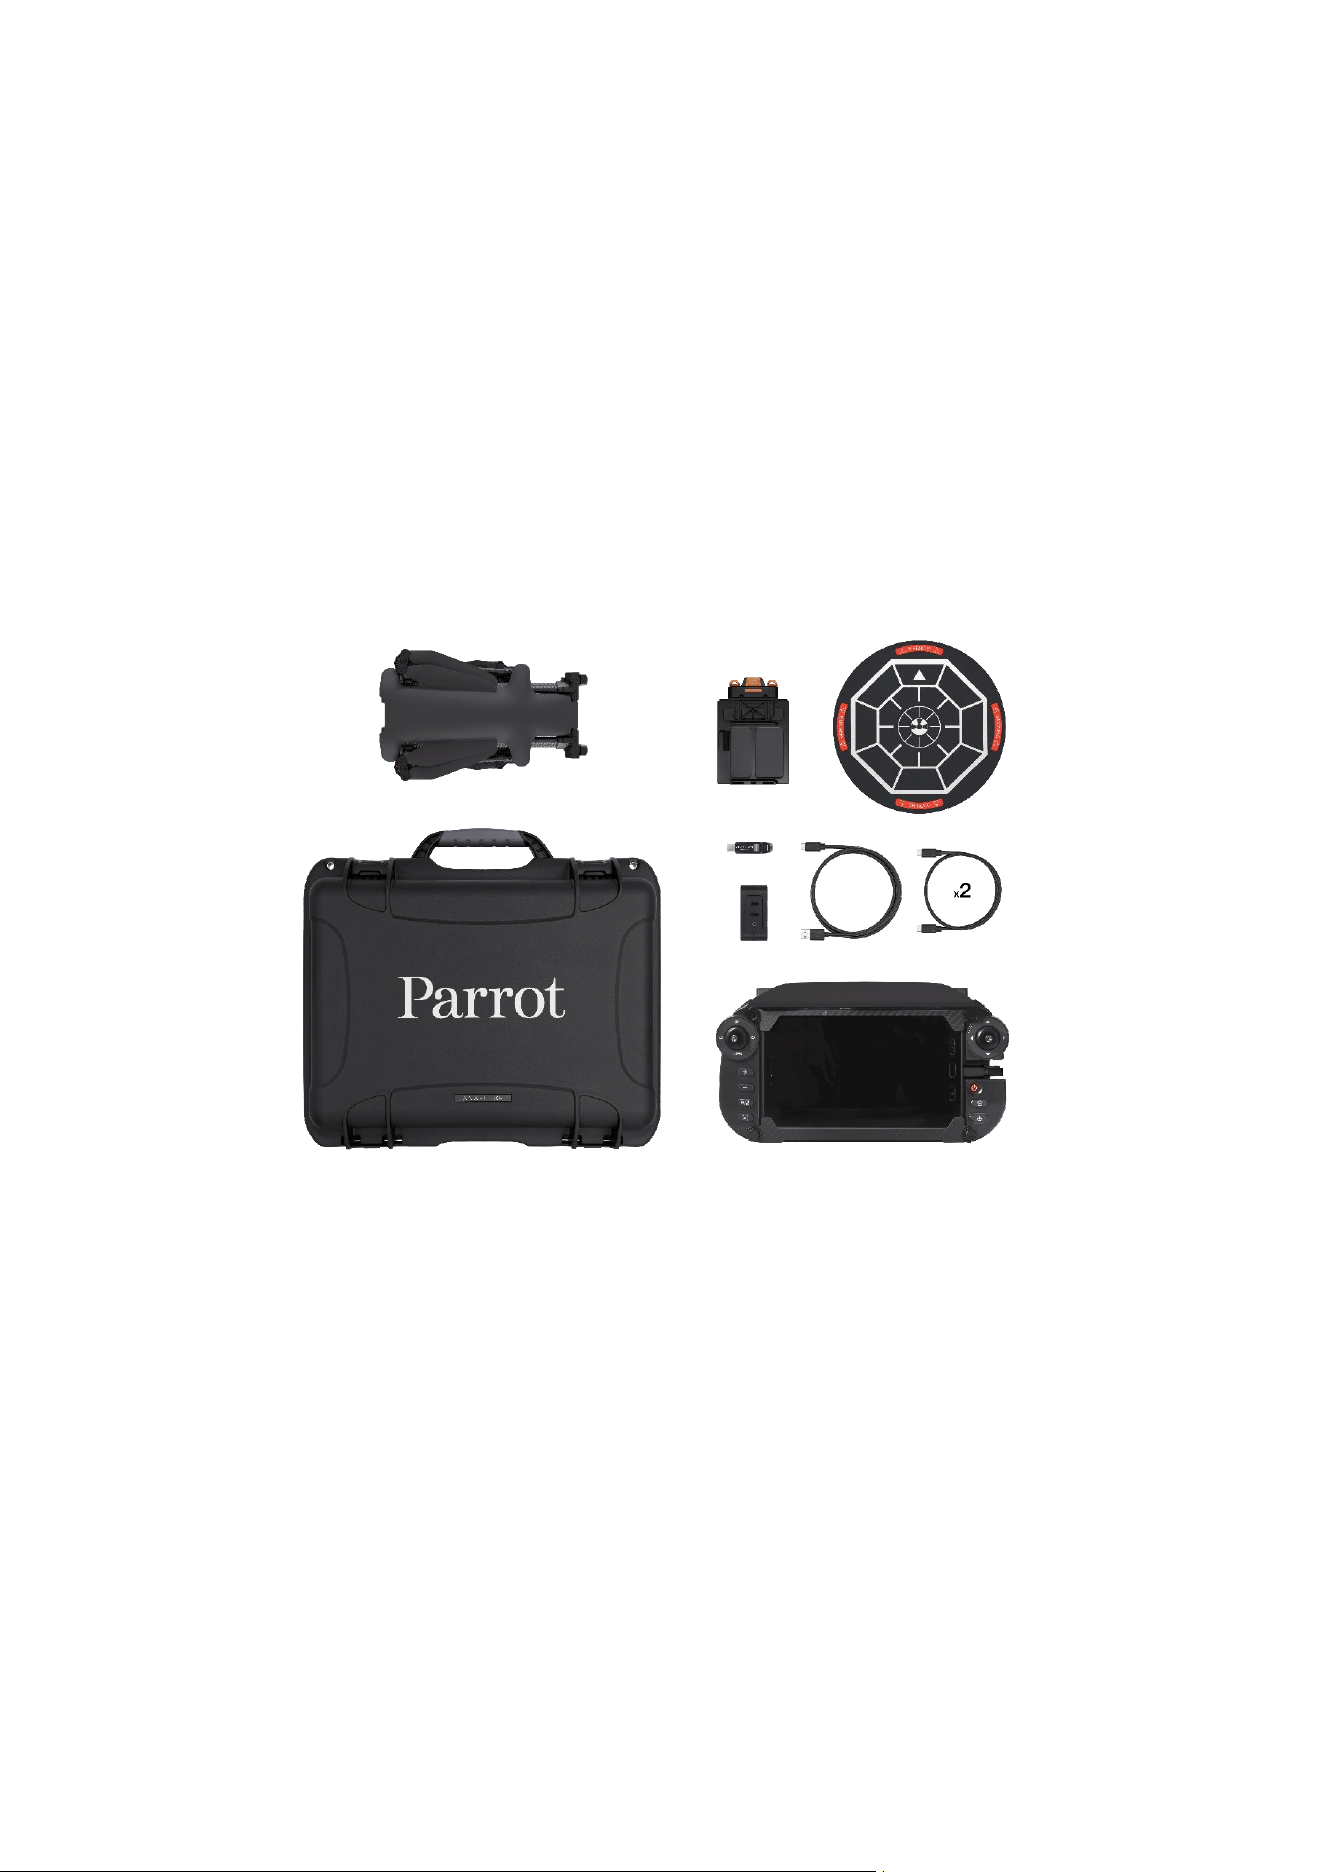
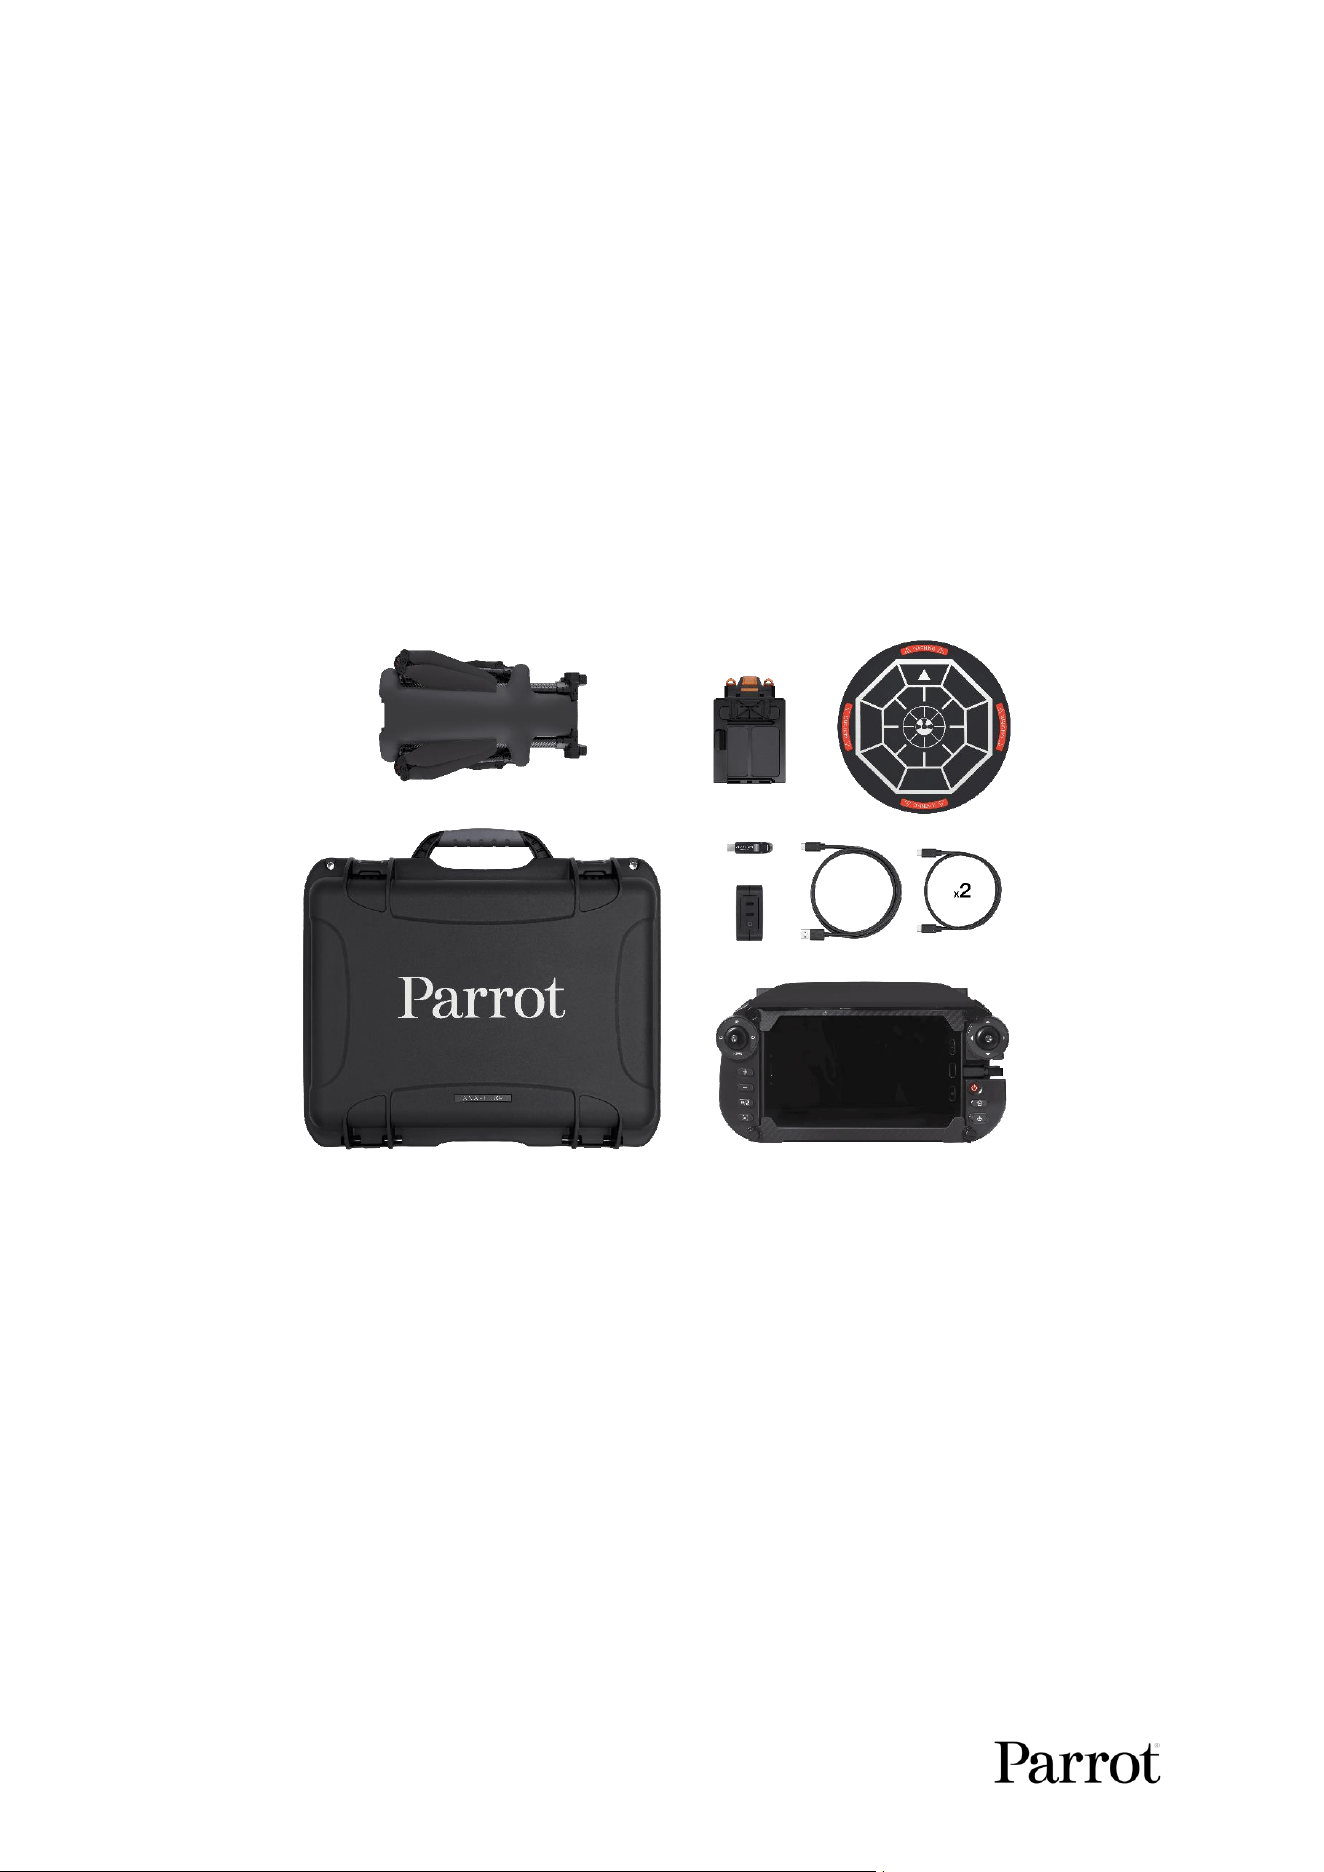
6.2. ANAFI UKR GOV
Your ANAFI UKR GOV pack contains:
- 1 ANAFI UKR aircraft
- 1 Skycontroller UKR ground control station
- 1 ANAFI UKR Simulator and FlightCharts Live USB key
- 1 landing pad*
- 1 XLR smart battery
- 1 XLR smart battery interface
- 1 Standard smart battery adapter
- 1 USB-PD charger
- 1 USB-A/USB-C cable (1 m)
- 2 USB-C/USB-C cables (0.5 m)
- 1 gimbal protecon cover
- 1 hard case
Figure 4: ANAFI UKR GOV system pack contents
*Subject to conguraon.
14
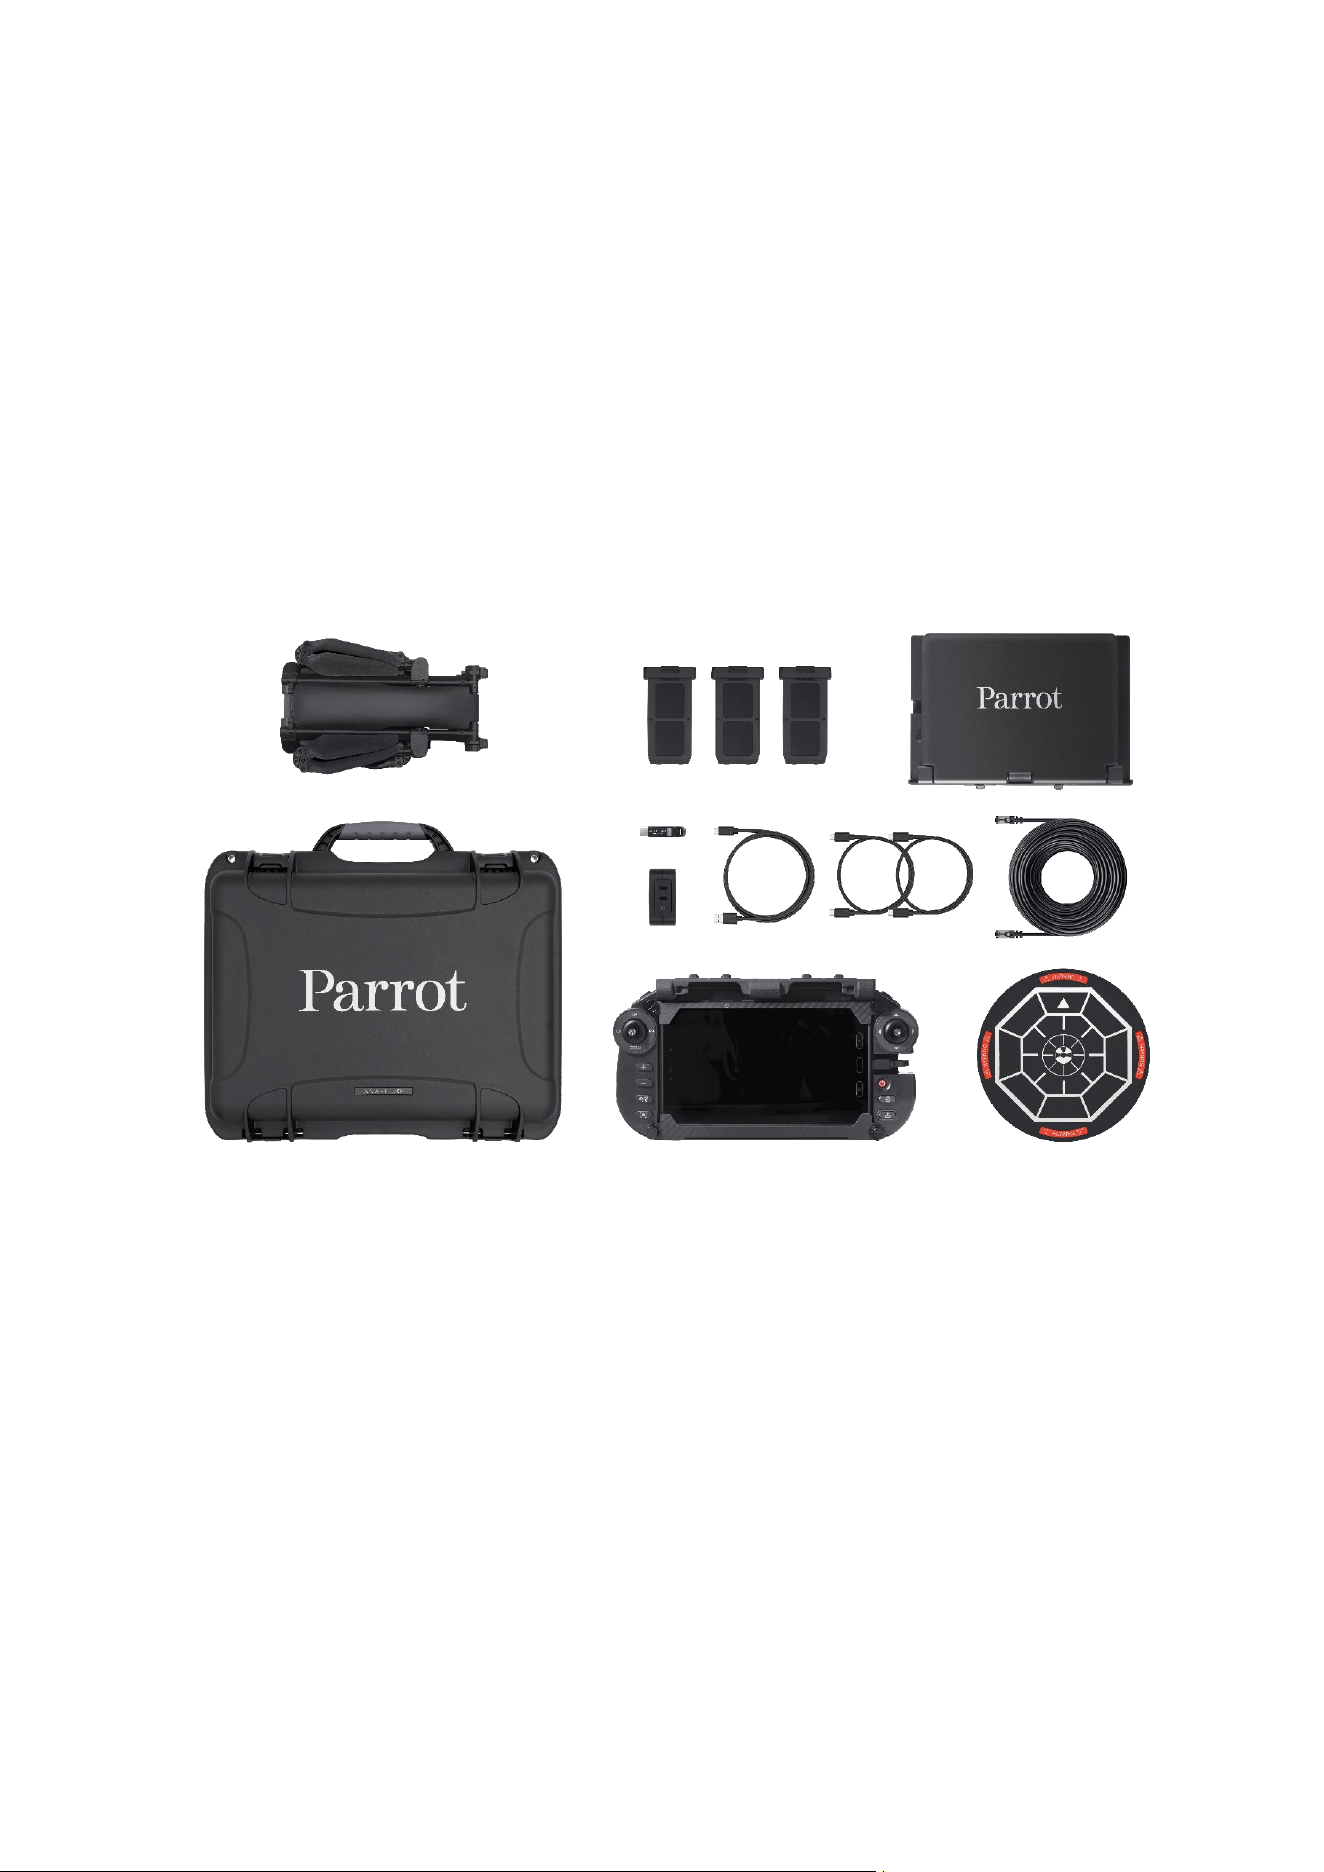
6.3. ANAFI UKR XLR
Your ANAFI UKR XLR pack contains:
- 1 ANAFI UKR aircraft
- 1 Skycontroller UKR ground control station
- 1 ANAFI UKR Simulator and FlightCharts Live USB key
- 1 landing pad*
- 1 XLR smart battery
- 1 XLR smart battery interface
- 1 Standard smart battery adapter
- 1 USB-PD charger
- 1 USB-A/USB-C cable (1 m)
- 2 USB-C/USB-C cables (0.5 m)
- 1 gimbal protecon cover
- 1 hard case
Figure 5: ANAFI UKR XLR system pack contents
*Subject to conguraon.
A N A F I U K R
15
© 2026 Parrot Drones SAS. All Rights Reserved.
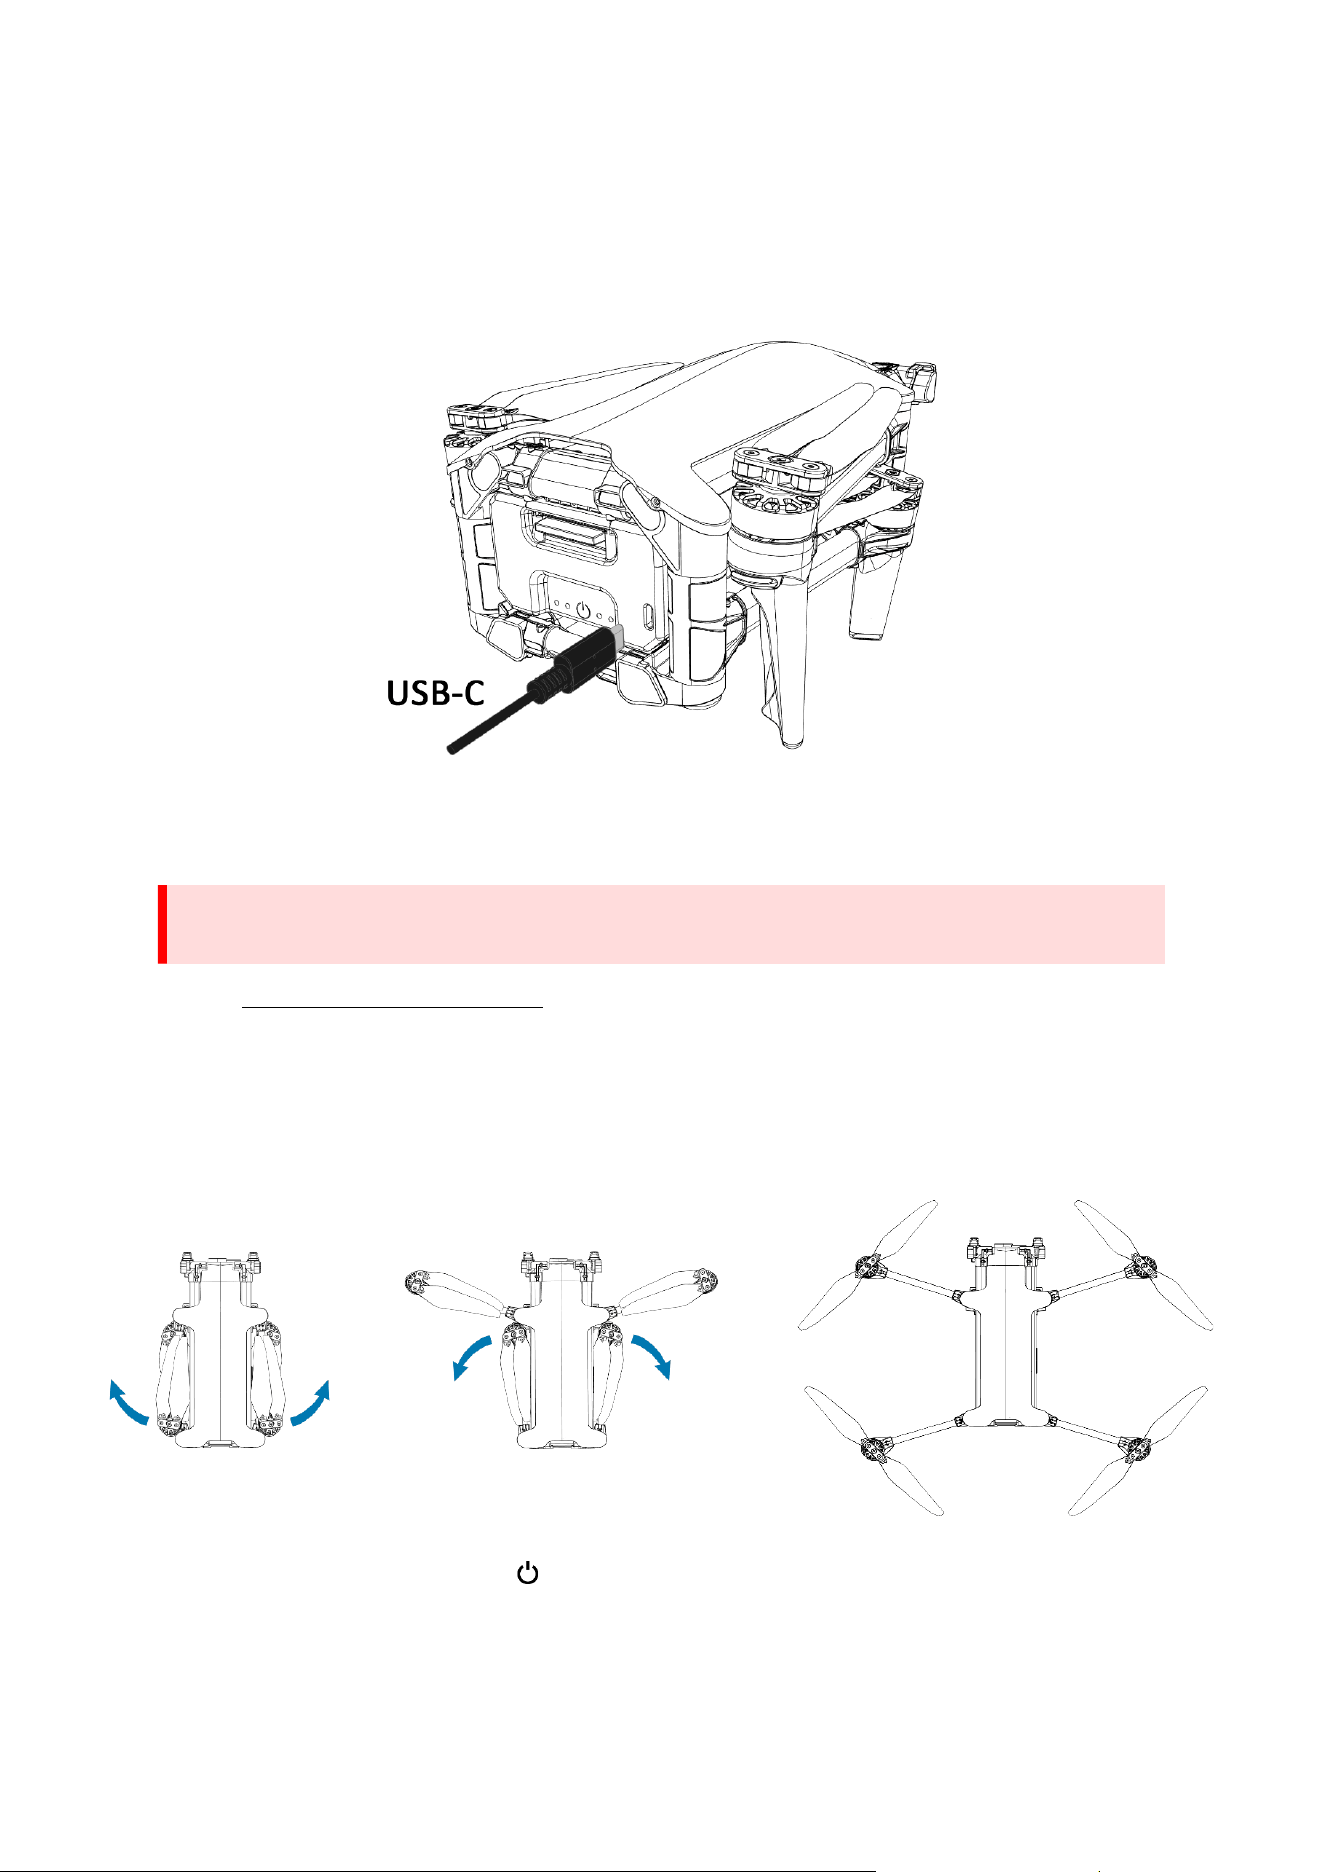
6.4. ANAFI UKR Mission
Your ANAFI UKR Mission pack contains:
- 1 ANAFI UKR aircraft
- 1 Skycontroller UKR Mission ground control station
- 1 MARS Ranger remote antenna and tripod holder
- 1 ANAFI UKR Simulator and FlightCharts Live USB key
- 1 Ethernet cable (30 m)
- 1 landing pad*
- 3 standard smart batteries
- 1 USB-PD charger
- 1 USB-A/USB-C cable (1 m)
- 2 USB-C/USB-C cables (0.5 m)
- 1 gimbal protecon cover
- 1 hard case
Figure 6: ANAFI UKR Mission system pack contents
*Subject to conguraon.

16
7. Pre-ight checklist
7.1. Transport & handling
- Always transport ANAFI UKR in its hard case, safely posioned, with the gimbal’s protecon
cover on.
- Protect the baery from temperature extremes, both low and high. Try to keep the baery as
close as possible to ambient temperatures.
- Always handle the ANAFI UKR with care. Do not apply pressure to the drone and generally
avoid touching the sensive camera and gimbal.
- Always keep the hard case with the drone and baery in dry places.
7.2. Equipment
- Ensure that your ANAFI UKR is up to date with the latest version of rmware.
IMPORTANT: Updates are mandatory and must be performed systemacally prior to any ight to
ensure maximum performance and safety.
- Ensure that you unfold all four foldable arms of the drone.
- Ensure that the propellers are clean, intact, and unobstructed.
- Ensure that ANAFI UKR’s baery is fully charged.
- Ensure that you always use genuine Parrot smart baeries. Non-genuine baeries are
forbidden, and their use will void the warranty and impact safety requirements.
- Ensure that the drone’s baery is securely installed on the drone’s body.
- Ensure that the drone’s gimbal protecve cover is removed.
- Ensure that the drone’s lenses are clean. If the lenses require cleaning, clean them before
you press Power on the drone. Hold the gimbal between two ngers so that you do not
apply pressure to the mechanism. Gently wipe the lens with a microber cloth.
7.3. Regulaons
- Ensure that drone use is permied where you intend to y.
7.4. Flight condions
- Ensure that the ying zone is safe and clear.
- Do not y ANAFI UKR over unauthorized airspaces such as airports, train staons, power
plants, naonal reserves, etc.
- Check the weather. Do not y ANAFI UKR in fog, snow, hail, salt spray, thunderstorms,
sandstorms, bird ocks, or in wind exceeding 15 m/s (33.5 mph).
- Parrot recommends you do not y ANAFI UKR low over water and other reecve surfaces,
such as mirrors, glass, etc.
- Parrot recommends you do not y ANAFI UKR at night, as all visual posioning will be
impaired.
A N A F I U K R
17
© 2026 Parrot Drones SAS. All Rights Reserved.
8. Geng started
Refer to the enclosed Quick Start Guide (QSG) if you require illustrated guidance to get started.
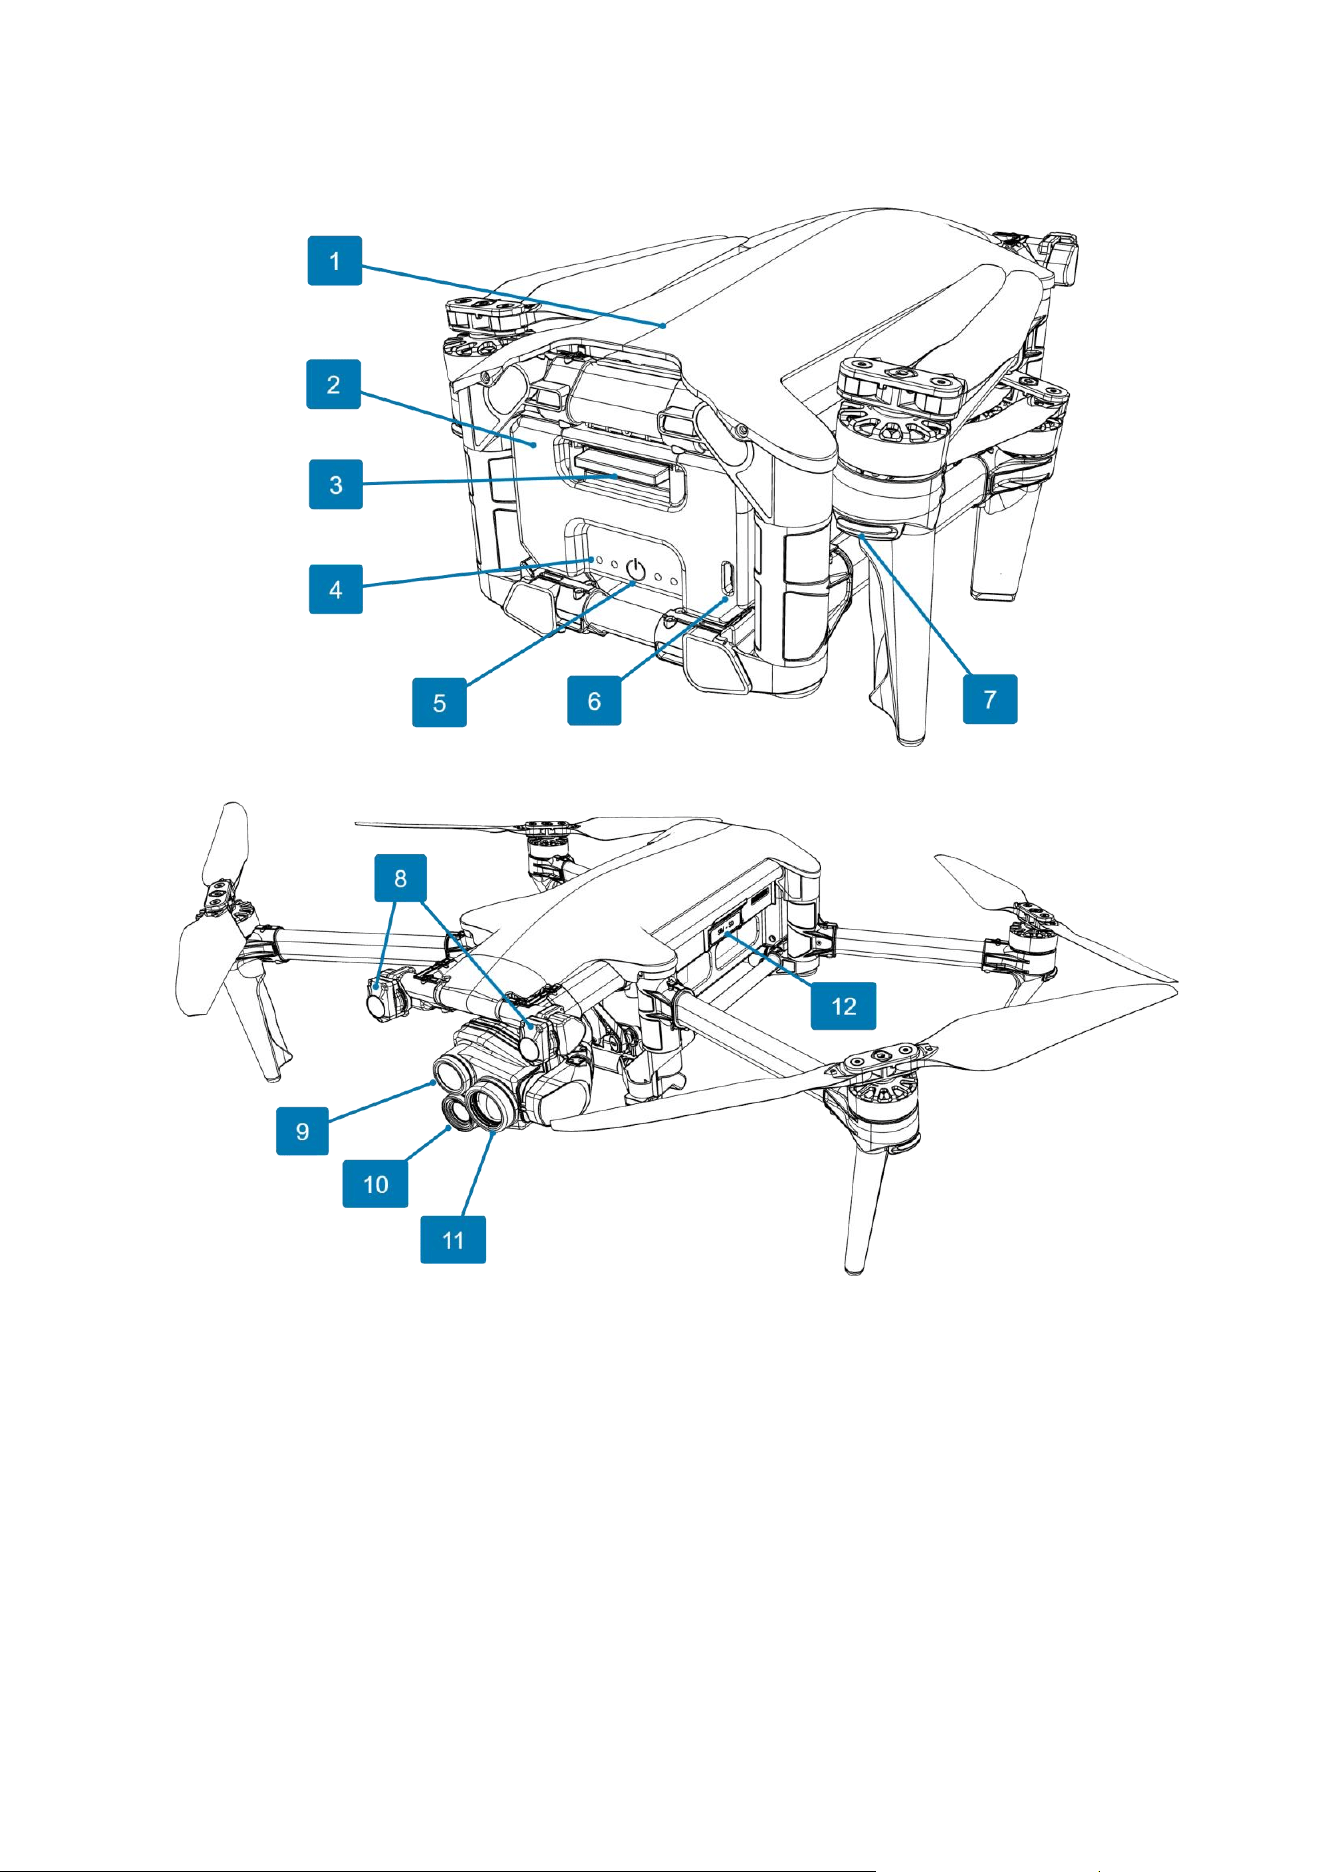
1. Connect ANAFI UKR's smart baery to the enclosed USB-PD charger with one of the enclosed
USB-C to USB-C cables.
Figure 7: ANAFI UKR rear view ready for charging
The baery’s LEDs light up progressively indicang that the baery is awake.
Refer to chapter 10. Smart LiPo Baery for more informaon.
2. Remove the gimbal protecve cover.
3. Unfold ANAFI UKR's arms.
a. Unfold the front arms.
b. Unfold the rear arms.
c. Unfold the propellers
Figure 8: ANAFI UKR arm unfolding procedure
4. Press and hold ANAFI UKR’s Power buon for 4 seconds to power it on.
The 4 green LEDs turn on one aer the other, the drone’s fan starts to turn, and the electronics start.
The drone’s 4 motors beep, and the propellers rotate slowly to check that the motors are fully
funconal. The gimbal also calibrates and rotates.
WARNING: It is mandatory to fully charge the smart baery at least one me before the rst ight.
Failure to do so can limit the capacity and impact safety.

18
Do not touch the propellers or gimbal during the boong phase
NOTE: To ensure opmal performance, maintain the smart baery at a minimum temperature of 0°C
before take-o.
5. Place ANAFI UKR on a at horizontal surface
6. Check for ecosystem updates to ensure maximum performance and safety.
IMPORTANT: Regularly refer to the Release Notes ANAFI UKR available upon request, to ensure that
you have the latest versions of the drone rmware.
7. Calibrate ANAFI UKR if required. Follow the instrucons on your Skycontroller UKR's screen.
ANAFI UKR is ready for ight.
A N A F I U K R
19
© 2026 Parrot Drones SAS. All Rights Reserved.
9. ANAFI UKR aircra
Figure 9: ANAFI UKR rear view folded
Figure 10: ANAFI UKR front view unfolded
1. GNSS Antenna
7. Arm LED (1 of 4)
2. Standard smart battery
8. Front stereo cameras
3. Standard smart battery release latch
9. 35x telephoto EO 4K camera
4. Standard smart battery status LEDs
10. Wide angle EO 4K camera
5. Power button
11. Thermographic FLIR boson camera
6. Standard smart battery USB-C charging port
12. MicroSD card and SIM card port*
*depends on individual conguraons.
20
Figure 11: ANAFI UKR underside view
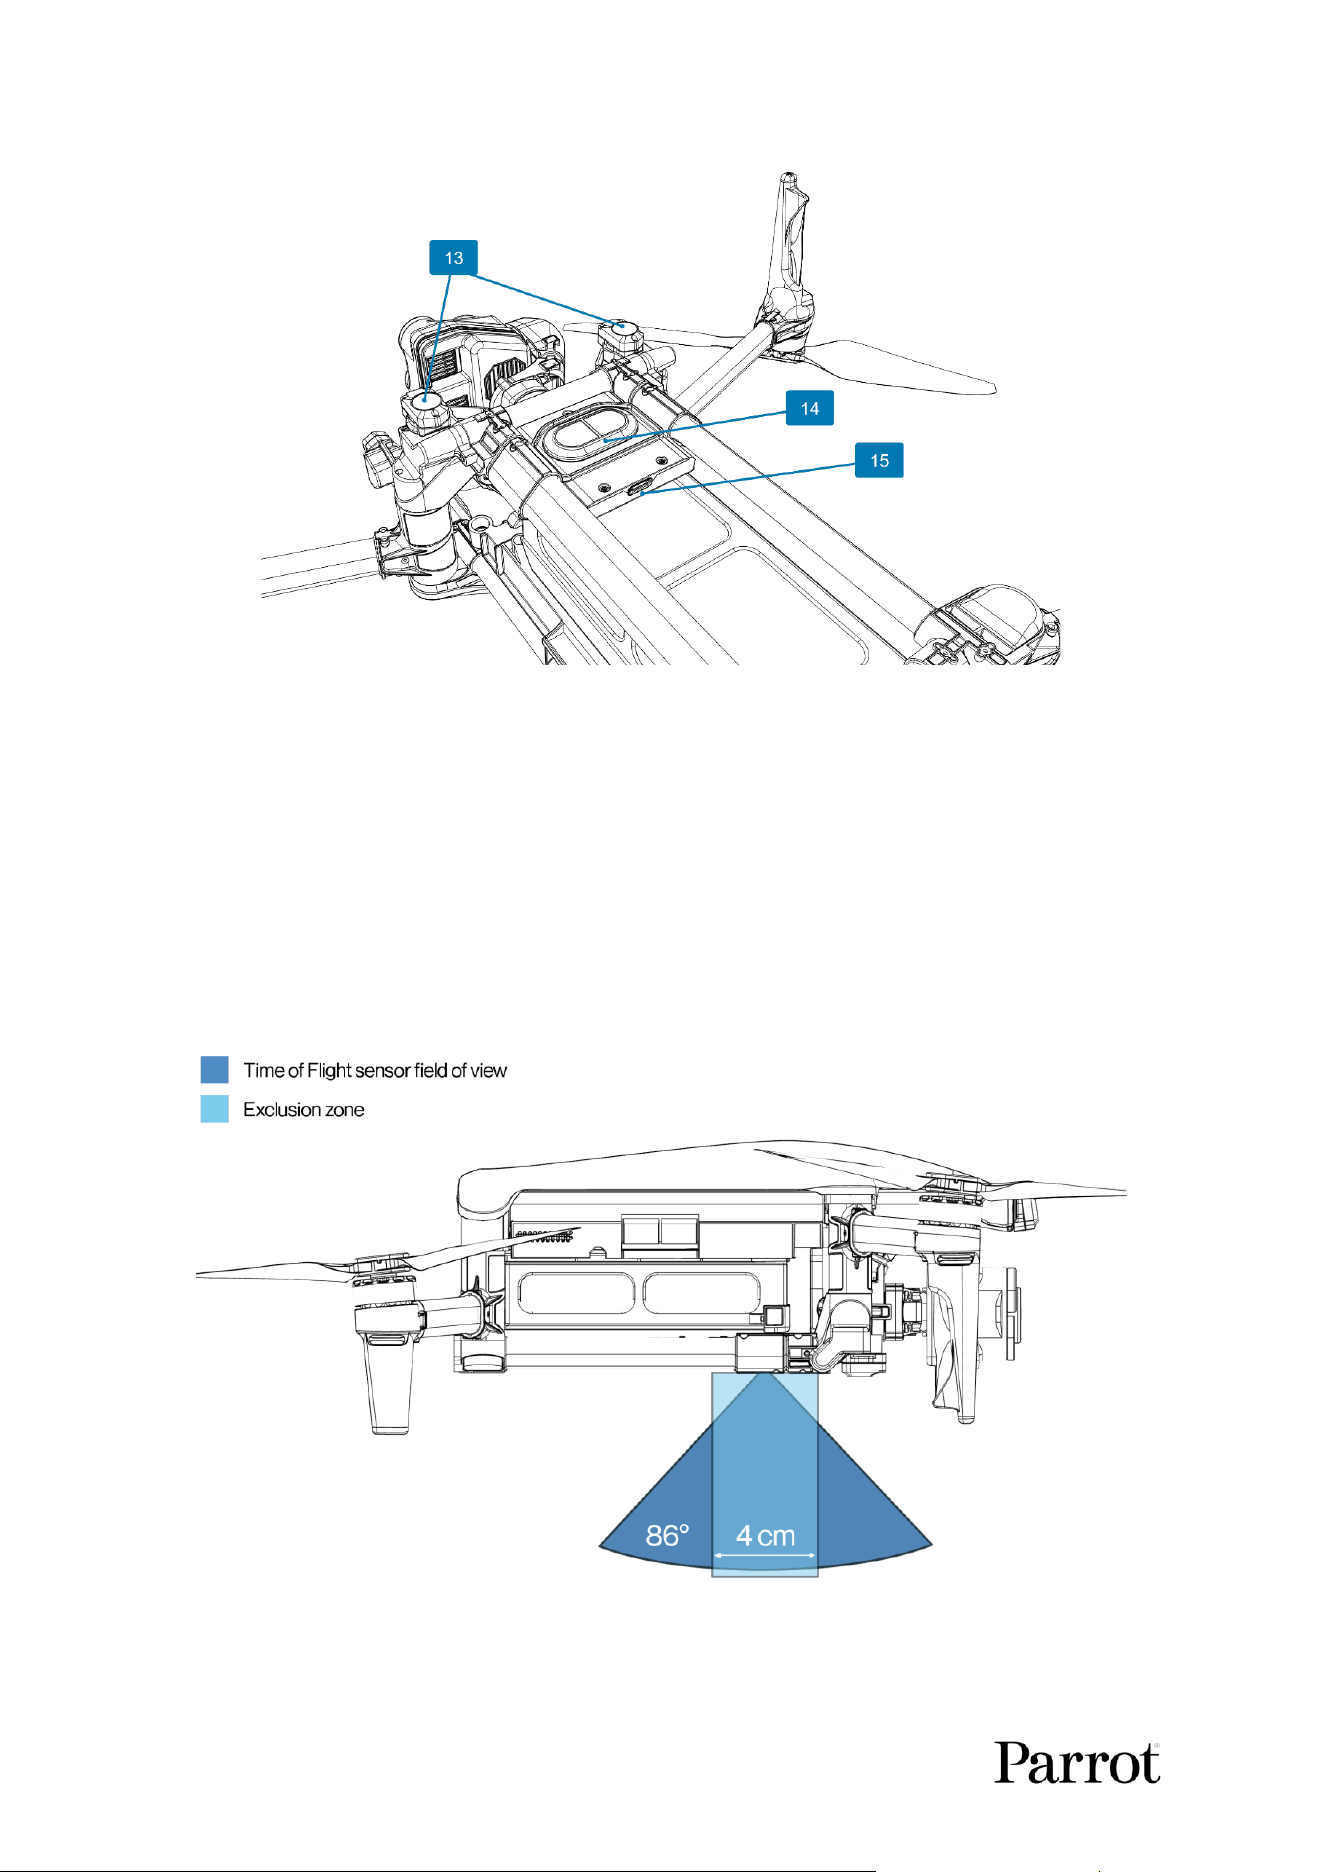
13. Bottom stereo cameras
15. Pairing/data USB-C port
14. Time of Flight (ToF) sensor
CAUTION: Do not alter the center of gravity of the drone. Do not block or obstruct in any way the
front stereo cameras, the boom stereo cameras, or the Time-of-Flight sensor. Any obstrucon of the
sensors, even paral obstrucon of the eld of view may cause ANAFI UKR to read false data, to have
errac ight behavior, resulng in a crash. The required Field of View for the stereo cameras and the
Time-of-Flight sensor is 86° (2 x 43°). Do not put any object under the Time-of-Flight sensor. Keep a
clear cylindrical exclusion zone with a diameter of 4 cm directly below the sensor.
Figure 12: Time of Flight sensor Field of View and exclusion zone

A N A F I U K R
21
© 2026 Parrot Drones SAS. All Rights Reserved.
CAUTION: If you must y with a payload that interferes with the Time of Flight (ToF) sensor, Parrot
recommends that you disable ANAFI UKR’s ToF sensor. Refer to the Skycontroller UKR & FreeFlight 8
user guide (chapter: Sengs / Flight parameters) for more informaon on how to disable the ToF
sensor. Disabling the ToF sensor signicantly aects the drone’s behavior, especially below an altude
of 8 m. When the ToF sensor is disabled, ANAFI UKR relies only on vision-based ight algorithms. You
must only y with the ToF sensor disabled if you are an experienced pilot. This ight conguraon
requires extreme care, especially during descent and ground approach.
When the ToF sensor is disabled:
• Do not y at night or in low-light condions.
• Do not perform prolonged ights below an altude of 8 m.
• Do not y at high-speed close to or just above the ground.
Failure to follow these instrucons can result in loss of control of ANAFI UKR.
A motor overheang alert appears in FreeFlight 8 if the aircra motors reach a temperature of 130°C.
Motor temperature can increase in these condions:
• When you y the aircra indoors. Indoor ight reduces the airow around the motors.
• When you y the aircra with an external payload. A heavier payload increases motor
temperature.
• When you y the aircra with an external payload that does not respect the aircra’s center
of gravity. An incorrect center of gravity can overload 1 or more motors and cause
overheang.
• When you y the aircra in condions that cause high vibraons or oscillaons.
To decrease the motor temperature:
• Increase the airow around the motors. To do this, make the aircra y with roll or pitch
movements.
If you cannot increase the airow around the motors, land the aircra.
Motor overheang does not occur, even with an external payload, if the aircra airspeed is more than
6 m/s.
9.1. Connecvity
ANAFI UKR has the following connectors:
• Nano SIM card port (No. 12 in Figure 10) - Used for 5G connecvity (ANAFI UKR GOV, and
ANAFI UKR XLR only)
• MicroSD card port (No. 12 in Figure 10) - Used for external media storage.
• USB-C port (No. 15 in Figure 11) - Used for drone/controller pairing, media access, and
webserver access. The maximum available output power is 5V/2A.
WARNING: Avoid touching the motors immediately aer ight. ANAFI UKR’s motors may become
hot aer a full ight, and touching the motors may result in burns. Allow the motors to cool down
before touching.
22
9.2. LEDs and assistance lights
ANAFI UKR features LEDs on each arm. LEDs ensure ANAFI UKR’s visibility, and help visualize the
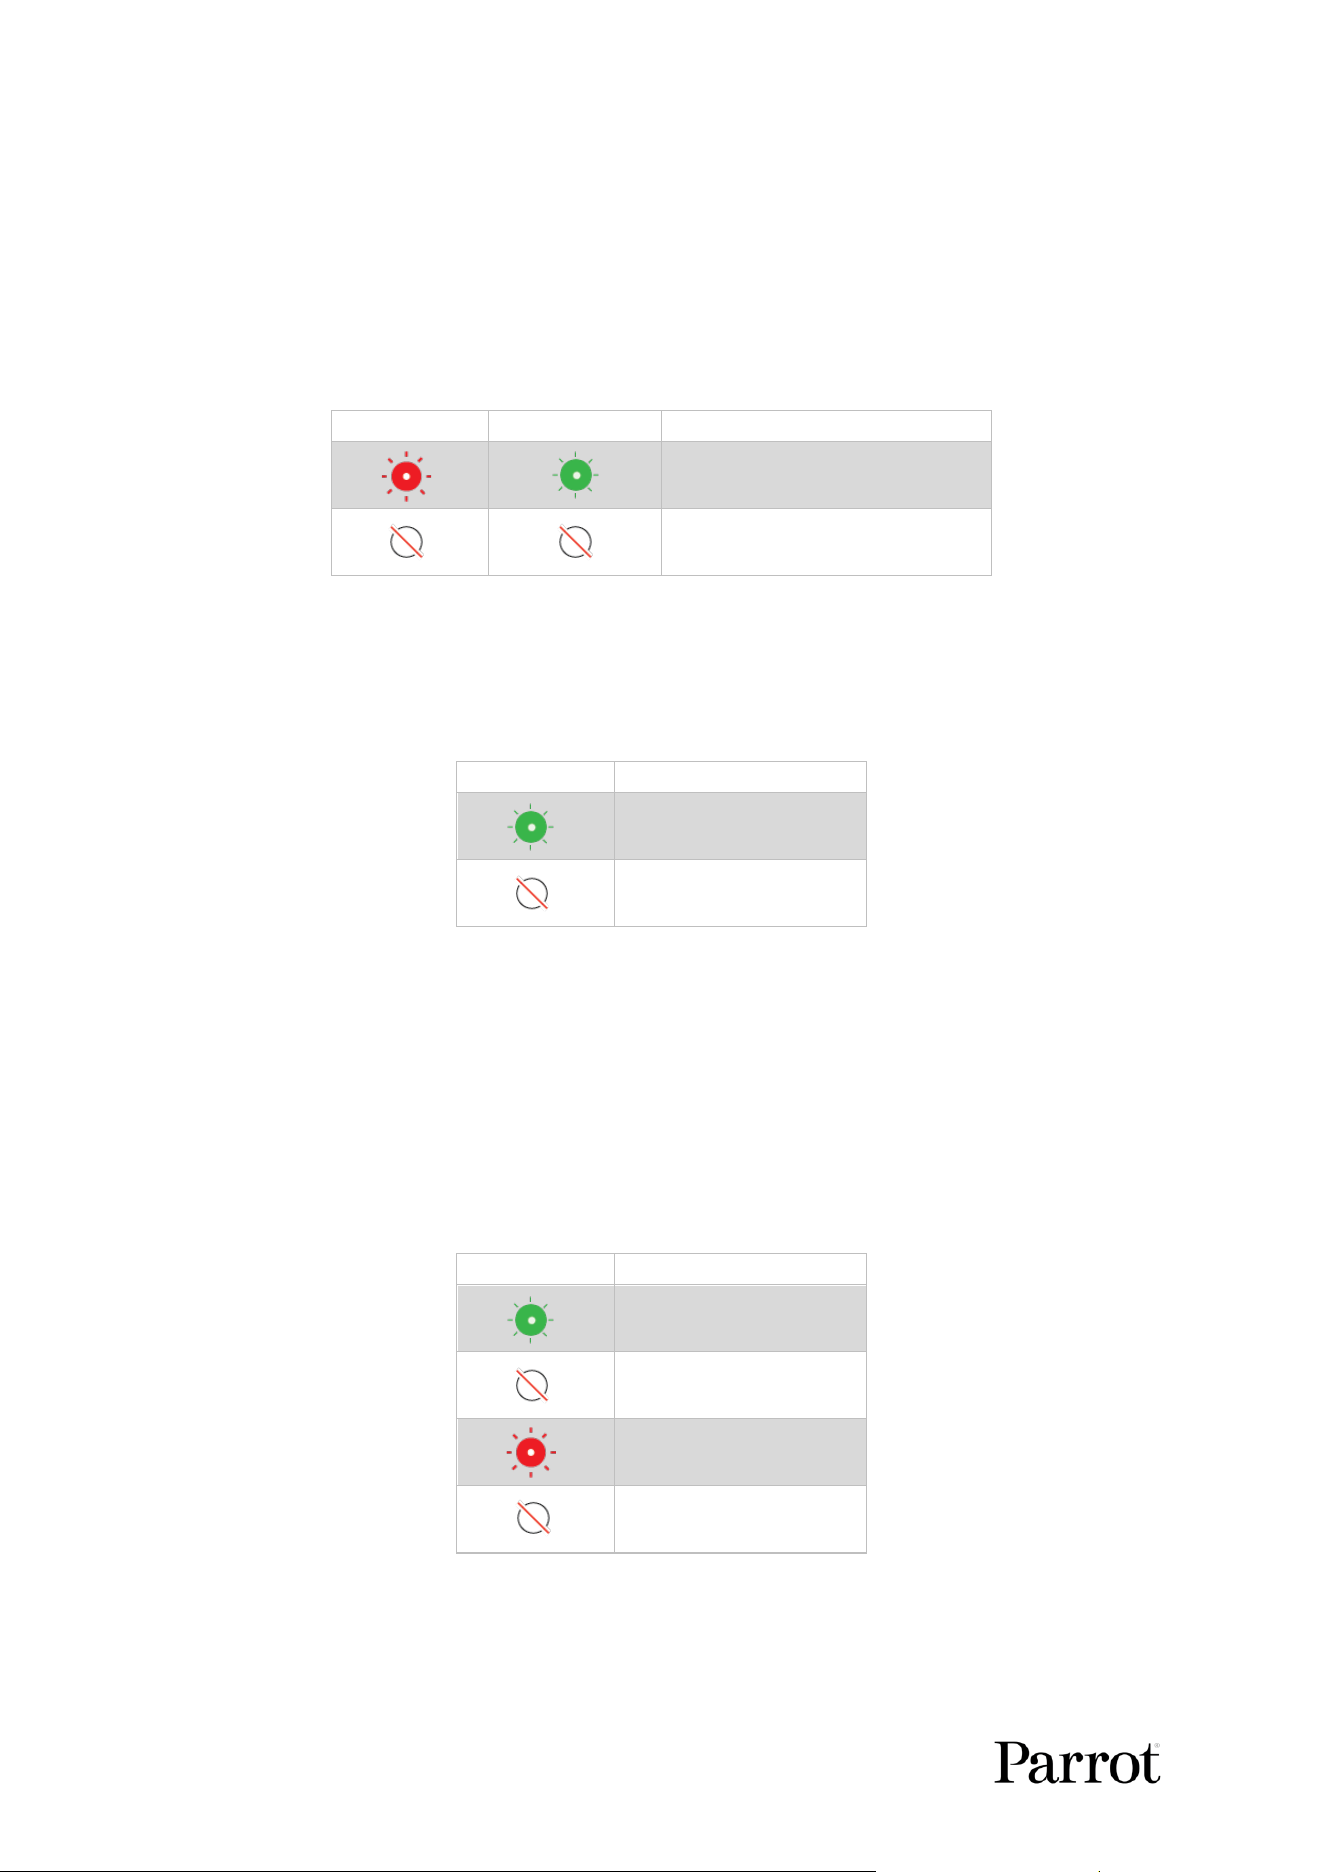
drone’s orientaon in ight. LED color paerns change depending on situaon.
9.2.1. On the ground
Both right and le LEDs are dimmed when the drone is landed.
Le and right LEDs ash in a 2-second cycle:
LEFT LEDS
RIGHT LEDS
LED DURATION
0.3 seconds
1.7 seconds
9.2.2. During ight
All LEDs ash in a 2-second cycle:
ALL LEDS
LED DURATION
0.3 seconds
1.7 seconds
LED luminosity increases with the drone’s height over its take-o point, up to 5 meters.
LEDs are switched o in Operaon mode.
ANAFI UKR also features infrared LEDs on each arm which can be controlled in Operaon mode in
FreeFlight 8. For more informaon, refer to the Skycontroller UKR & FreeFlight 8 user guide (chapter:
Sengs / Flight parameters)
9.2.3. During an emergency
All LEDs ash in a 4-second cycle:
ALL LEDS
LED DURATION
0.3 seconds
1.7 seconds
0.3 seconds
1.7 seconds
A N A F I U K R
23
© 2026 Parrot Drones SAS. All Rights Reserved.
9.2.4. Updang maps
All LEDs ash red rapidly in a 0.4-second cycle:
ALL LEDS
LED DURATION
0.2 seconds
0.2 seconds
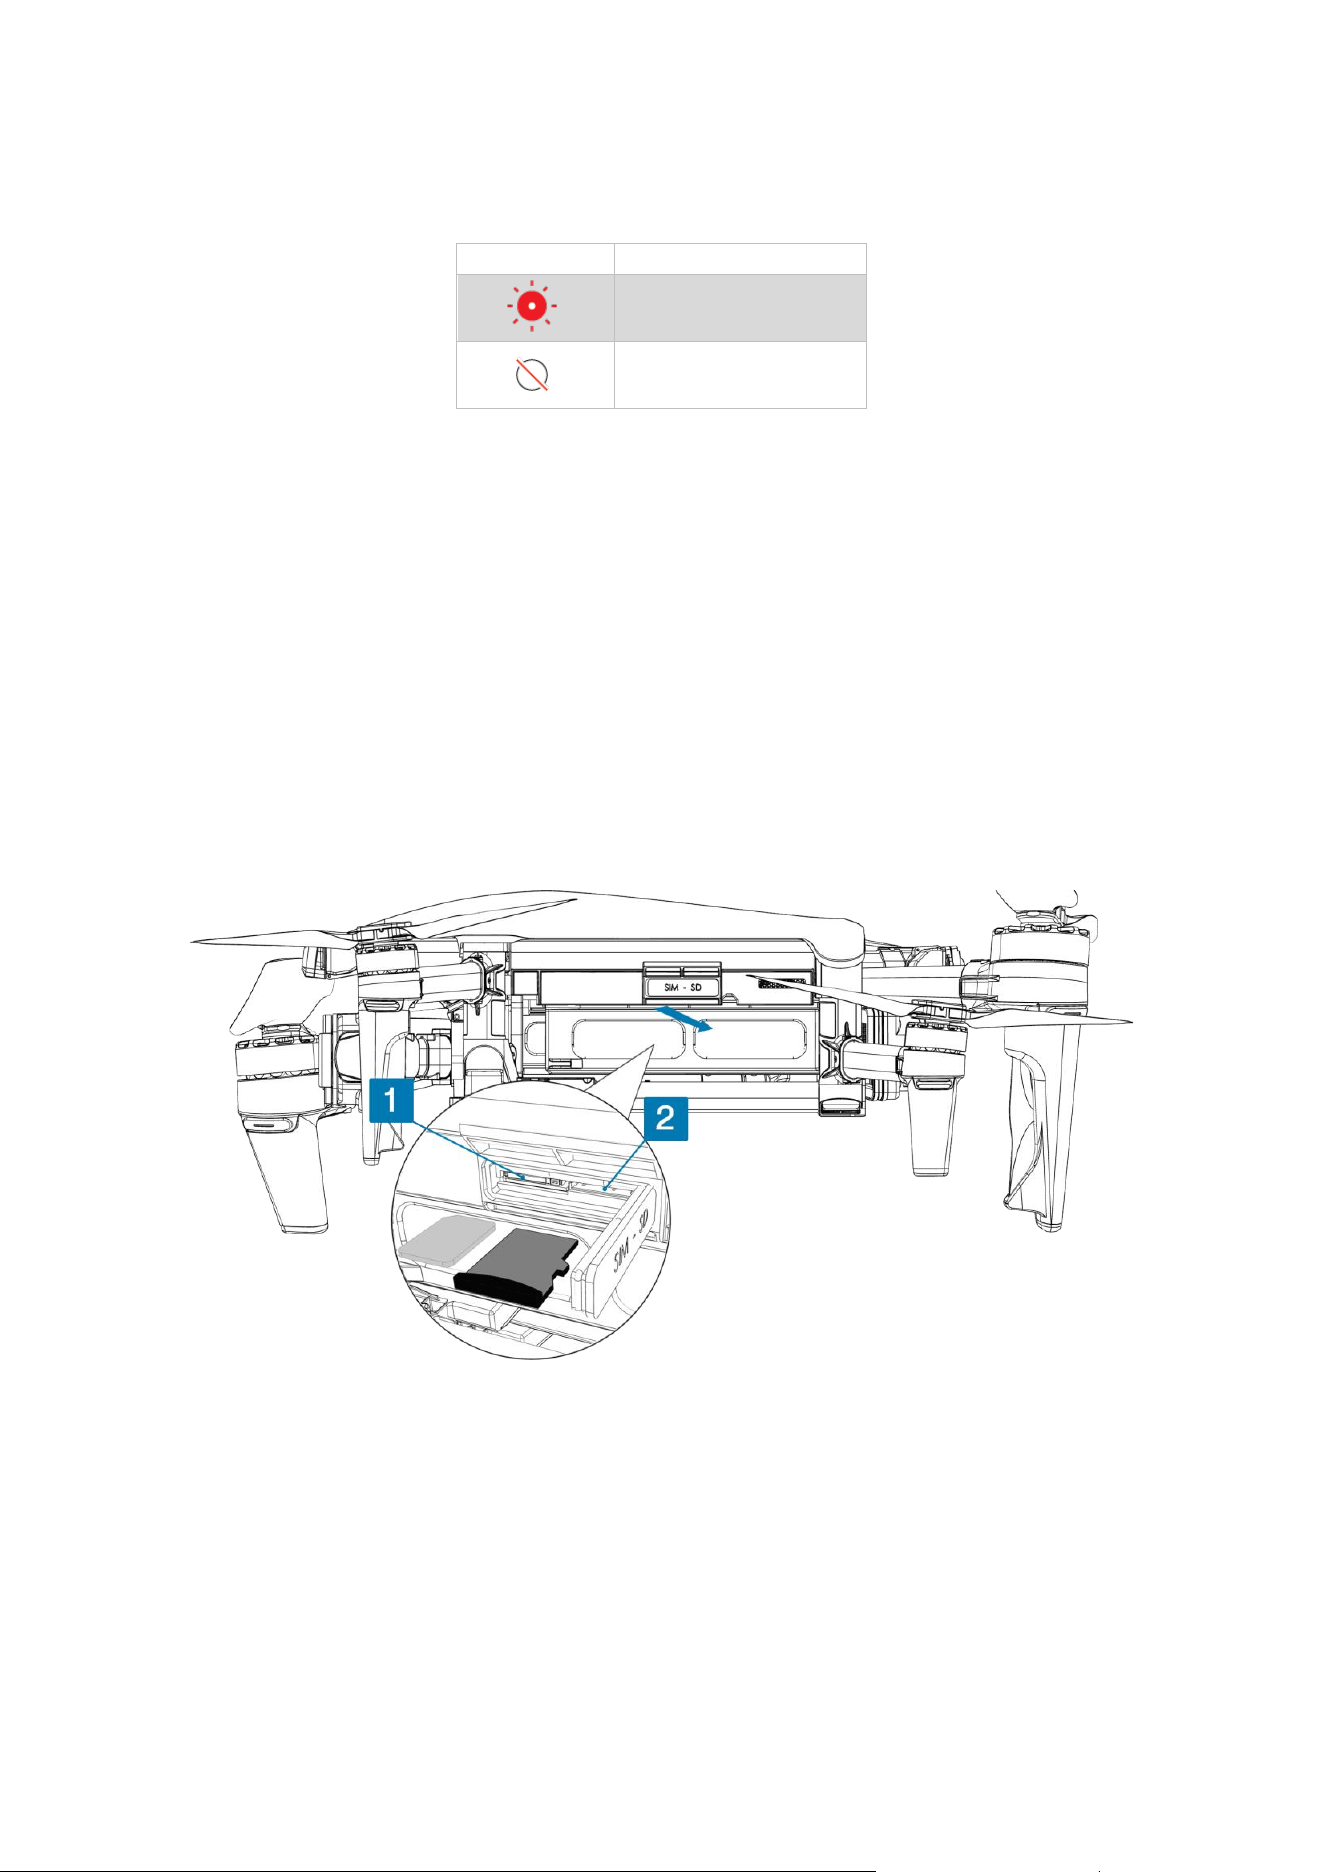
9.3. Installing a nano SIM card/microSD card
This secon explains how and where to install a nano SIM card and/or a microSD card in ANAFI UKR.
NOTE: A nano SIM card is required for 5G connecvity. 5G connecvity is only available on ANAFI UKR
GOV, and ANAFI UKR XLR.
Inserng a microSD card into ANAFI UKR is oponal, it is not required for normal ight.
When a microSD card is inserted, all media is saved to the card.
If no microSD card is inserted, or if the microSD card is full, media is automacally saved to the
drone’s internal memory.
The ANAFI UKR nano SIM card and microSD card slots are located on the le-hand side of the drone
behind the SIM - SD card cover.
Figure 13: Nano SIM card/MicroSD card inseron
To install a nano SIM card/microSD card:
1. Open the SIM - SD card cover to expose the nano SIM card/microSD card slots.
a. Insert the nano SIM card into the le-hand keyed slot (No. 1 in Figure 13).
b. Insert the microSD card into the right-hand keyed slot (No. 2 in Figure 13).
The card slots make a slight click when the cards are properly inserted.

24
IMPORTANT:
• For the nano SIM card: the metal contacts must face the boom of the drone, and the cutout
must face the drone.
• For the microSD card: the metal contacts must face the boom of the drone.
2. Close the SIM - SD card cover.
9.4. Compable microSD cards
The following microSD cards have been tested with ANAFI UKR and are recommended for best
performance:
• SanDisk Extreme Pro - 64 GB, 128 GB, 256 GB, 512 GB
• SanDisk Max Endurance - 32 GB, 64 GB, 128 GB
• SanDisk High Endurance - 64 GB, 128 GB
• Kingston Canvas Go! - 256 GB, 512 GB
• Lexar Silver Plus – 256 GB, 512 GB
NOTE: Other microSD cards may work, but cards with lower write speeds can lead to unreliable
performance, parcularly when recording video or capturing photos. Certain features, such as
FlightCharts require a microSD card formaed by ANAFI UKR via the formang procedure in
FreeFlight 8. For more informaon, refer to the Skycontroller UKR & FreeFlight 8 user guide (chapter:
Sengs / Storage).
A N A F I U K R
25
© 2026 Parrot Drones SAS. All Rights Reserved.
10. Smart baery
Users can charge the smart battery when installed on ANAFI UKR, or when removed from ANAFI
UKR. Always use genuine Parrot smart batteries. Non-genuine batteries are forbidden, and their use
will void the warranty and impact safety requirements.
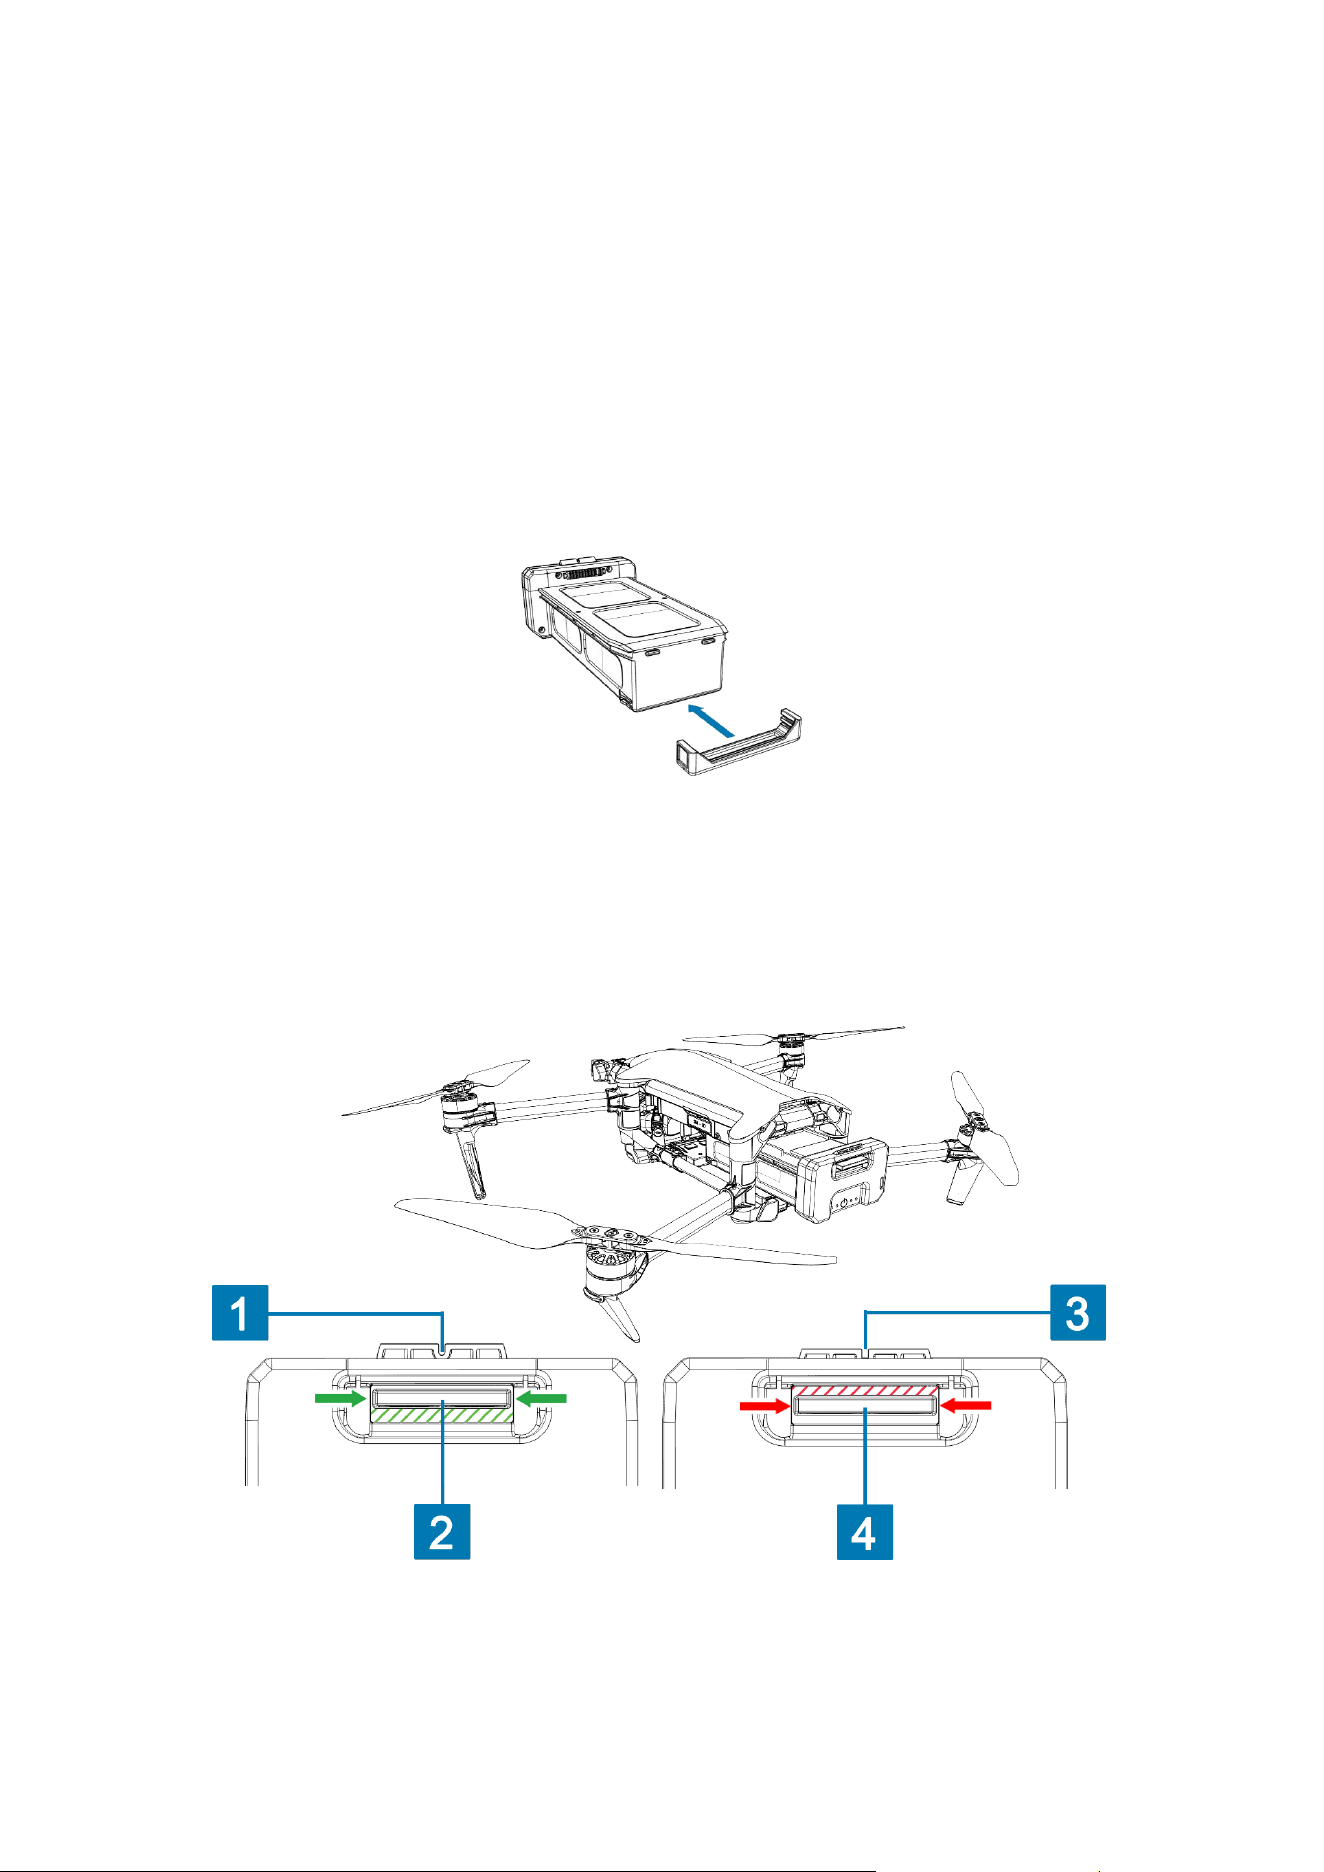
10.1. Standard baery installaon
To install the standard smart battery on the drone:
1. For ANAFI UKR version PF728440DA and later, ANAFI UKR GOV (all versions), ANAFI UKR XLR
(all versions) and ANAFI UKR XLR MISSION (all versions), it is mandatory that a standard
smart battery adapter is attached to the standard smart battery: slide the standard smart
battery adapter onto the front bottom edge of the standard smart battery.
Figure 14: Standard smart baery adapter
2. Position the battery’s slide grooves (located on the top edge of both sides of the battery) into
the drone’s corresponding slide rails.
3. Slide the battery into the drone.
4. Use your thumbs to press firmly on both sides of the battery removal latch.
5. Ensure that the battery is tightly secured into the drone.
Figure 15: Smart baery installaon procedure
1. Correctly seated locking mechanism
3. Incorrectly seated locking mechanism
2. Correctly seated latch handle
4. Incorrectly seated latch handle
26
To remove the smart baery from the drone, press down on the removal latch located on top of the
baery and disengage it from the drone by gently sliding it toward the back of the drone.
10.2. XLR baery installaon
A larger baery is available for ANAFI UKR. Contact Parrot or your Parrot reseller to purchase the XLR
baery.
NOTE: The XLR baery is only compable with ANAFI UKR XLR, and ANAFI UKR GOV versions.
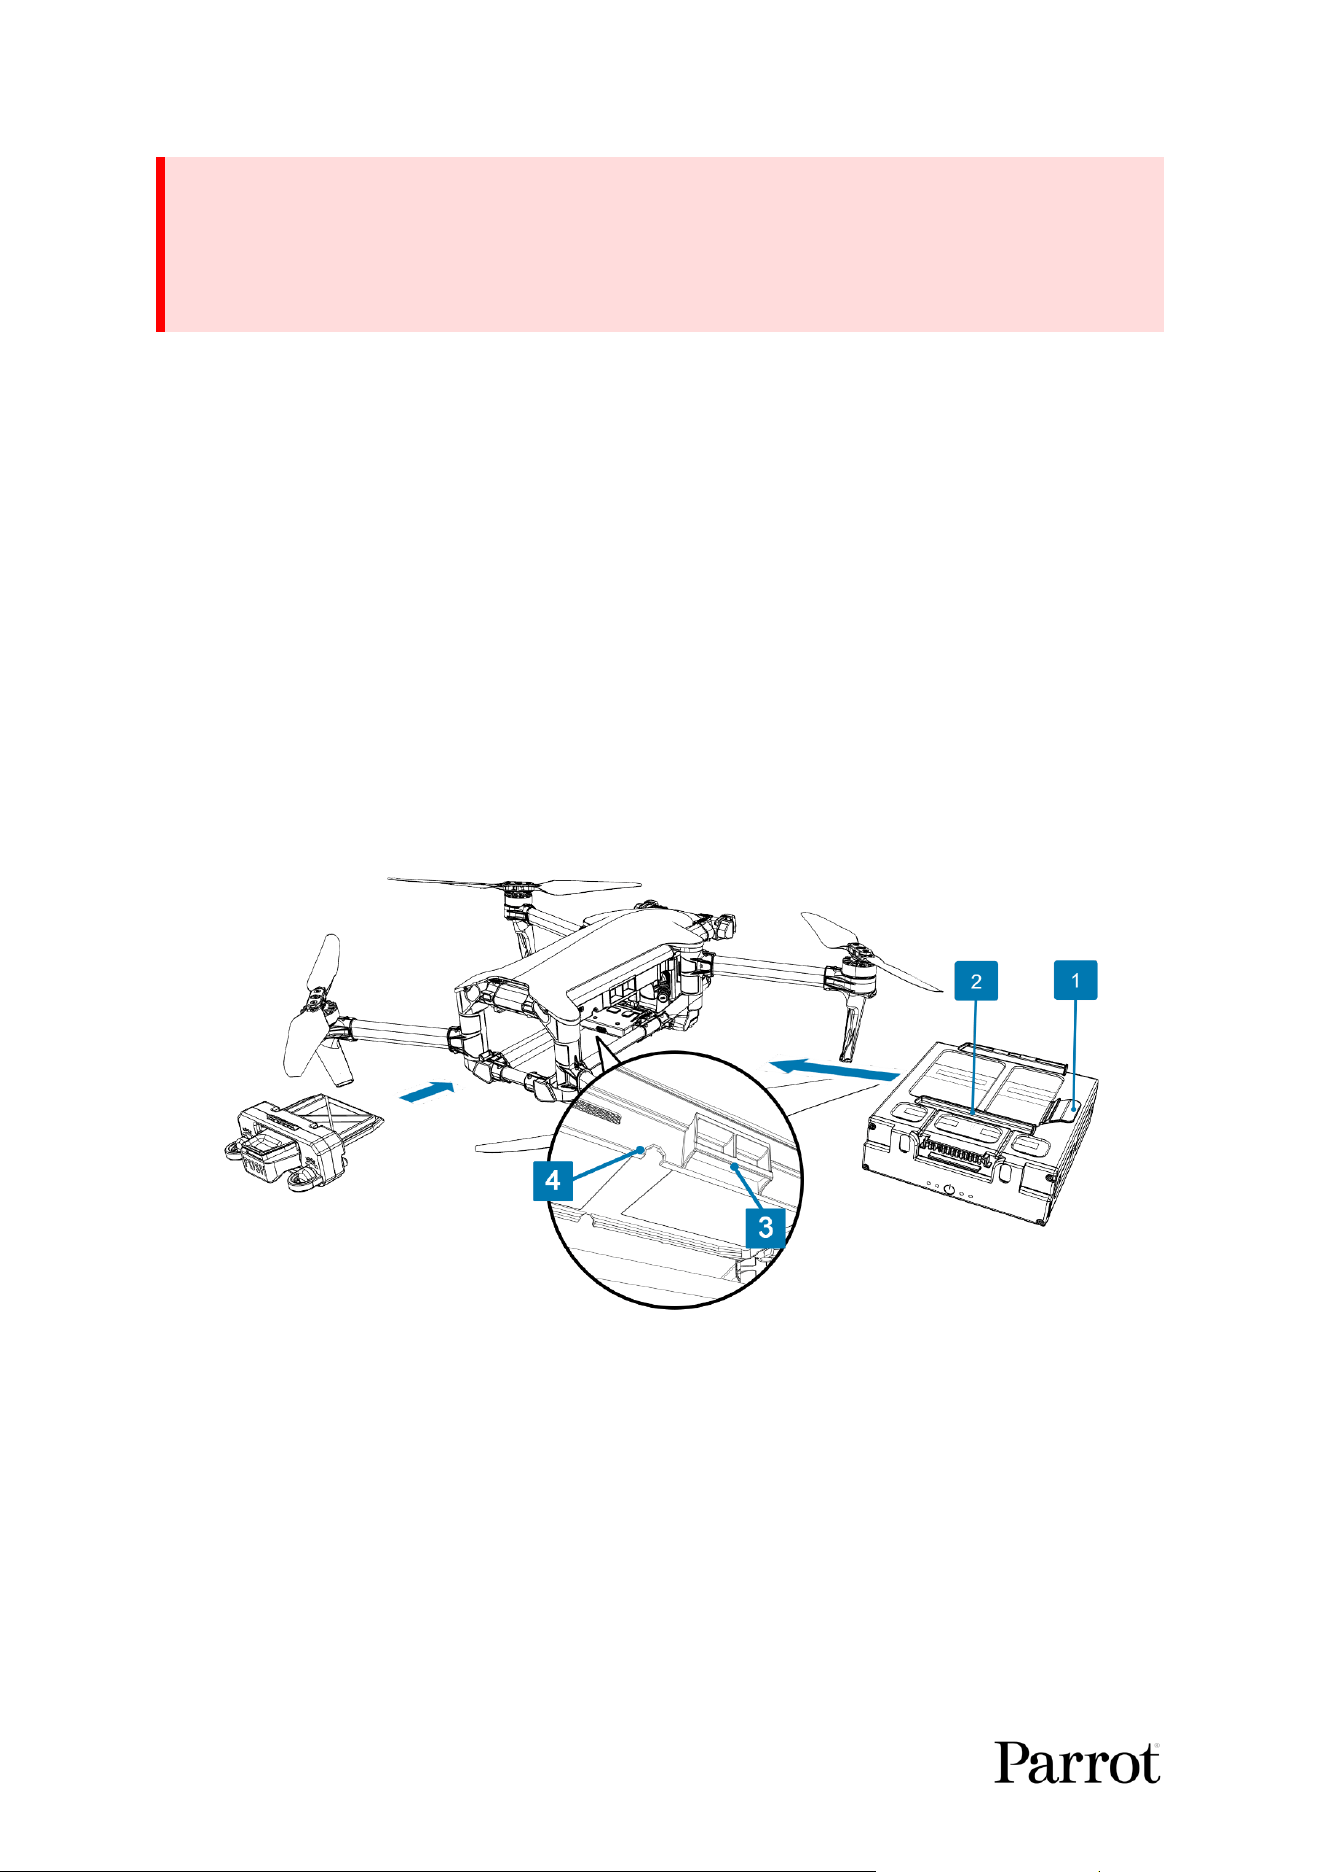
To install the XLR smart baery on ANAFI UKR:
1. Insert the XLR baery from the right-hand side of ANAFI UKR.
2. Posion the baery’s slide rail, located on the top face of the baery (No. 2 in Figure 16), into
the drone’s corresponding slide groove (No. 4 in Figure 16).
3. Slide the baery into the drone.
4. Ensure that the latch (No. 1 in Figure 16) is correctly seated in the latch receptor (No. 3 in
Figure 16).
Figure 16: ANAFI UKR XLR baery inseron
1. XLR battery latch
3. ANAFI UKR battery latch receptor
2. XLR battery slide rail
4. ANAFI UKR slide groove
5. On the XLR baery locking interface, rotate the twist-lock mechanism counterclockwise, unl
the twist-lock tabs match the orientaon of the corresponding slots on the baery).
6. Slide the XLR baery locking interface into the rear of ANAFI UKR.
7. PUSH the buon to allow the interface to engage ANAFI UKR and the XLR baery.
8. Rotate the twist-lock mechanism 90° clockwise to LOCK the interface, and the XLR baery, in
place.
WARNING: Do not y ANAFI UKR if the baery removal latch is not fully engaged in the drone.
When the baery is correctly locked in place, the baery removal latch is in the fully up posion,
and the locking mechanism is correctly seated (Refer to No. 1 and No. 2 in Figure 15 for a visual
representaon of a correctly seated latch). If the baery removal latch is not correctly seated, the
baery is not fully locked and can be pushed out without touching the removal latch.
A N A F I U K R
27
© 2026 Parrot Drones SAS. All Rights Reserved.
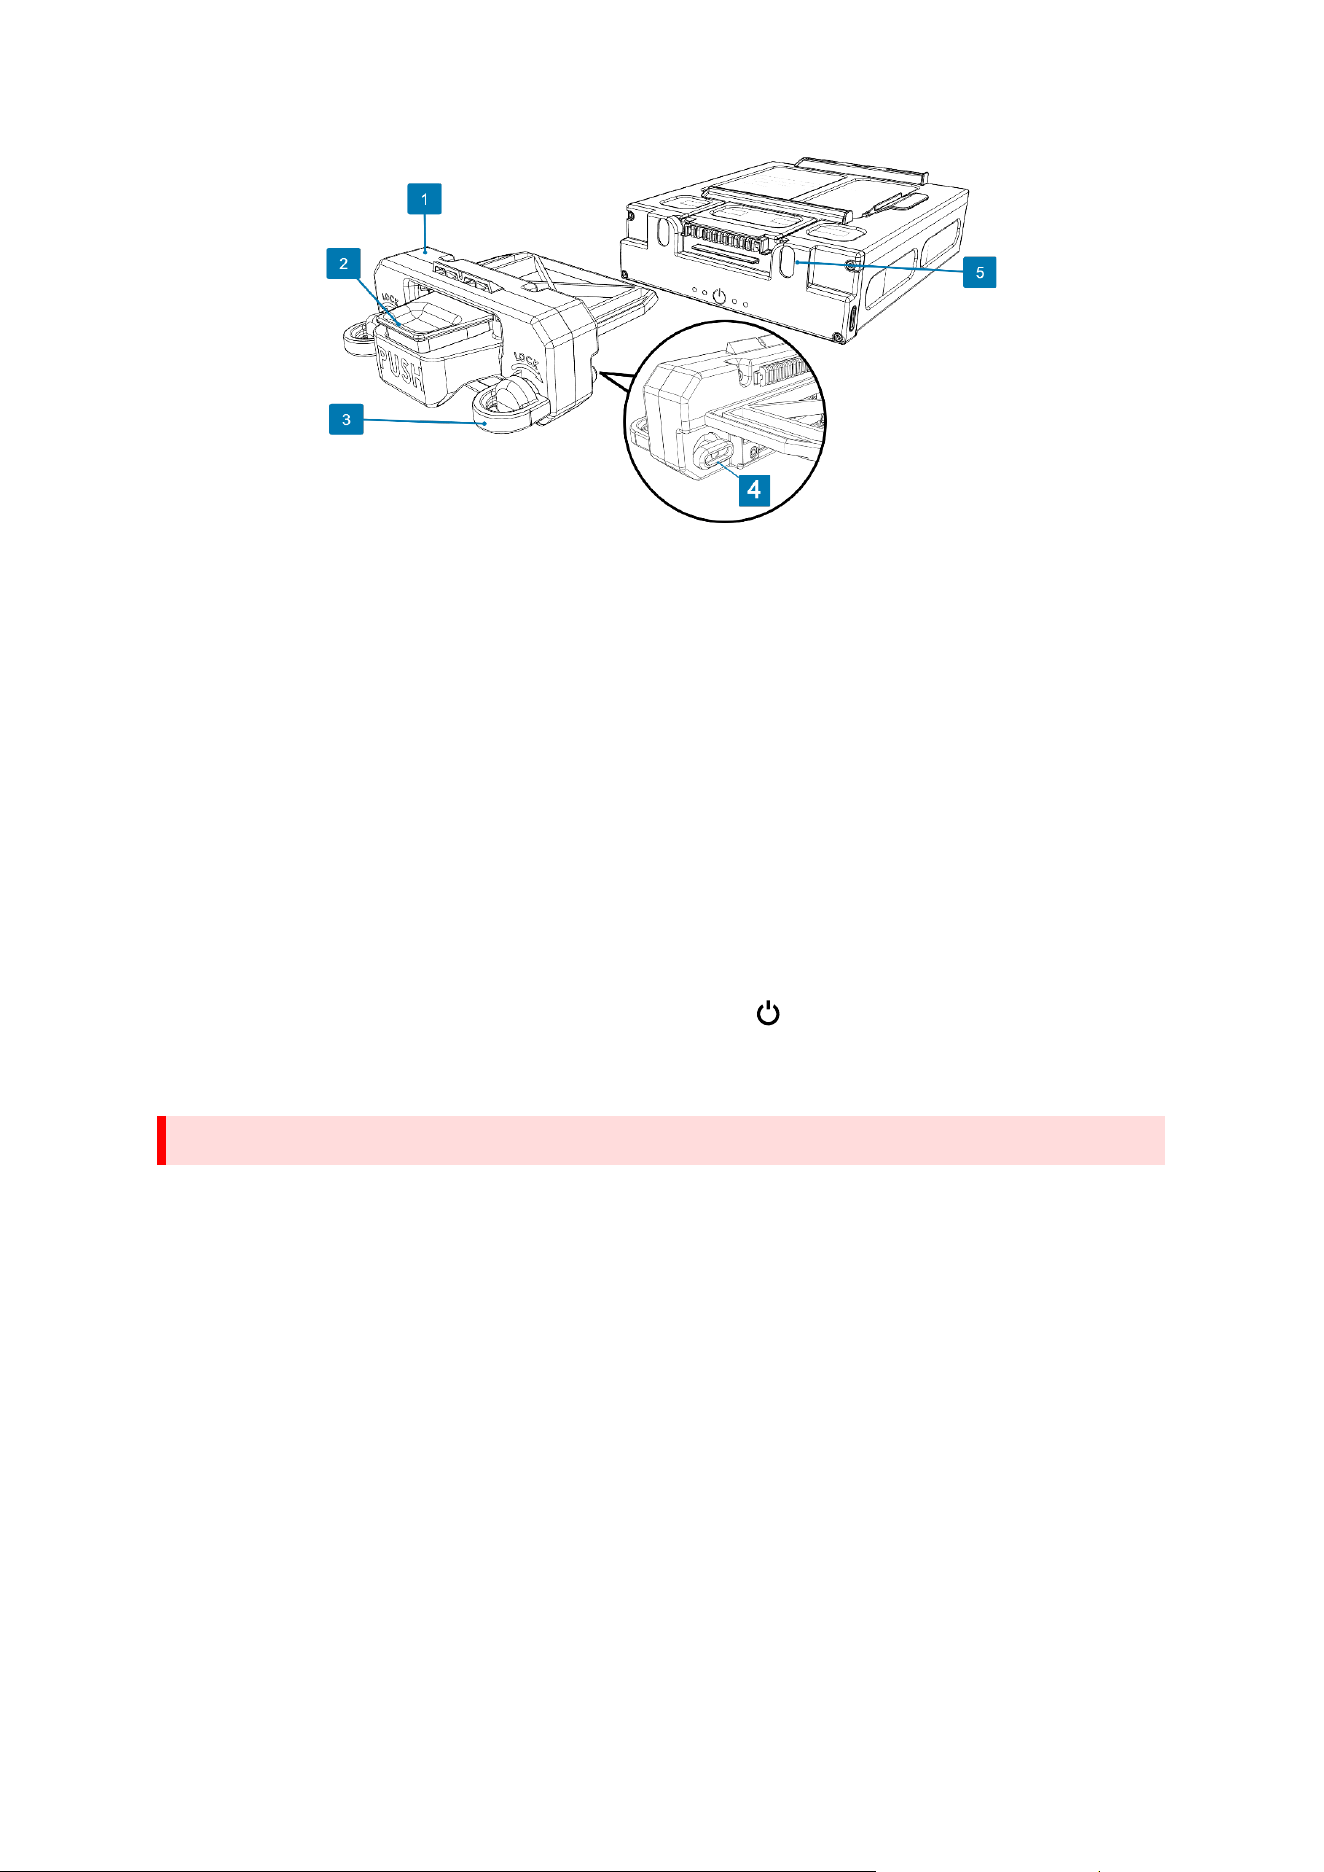
Figure 17: XLR baery and interface
1. XLR battery interface
4. Twist-lock mechanism tab
2. Latch PUSH button
5. Battery twist-lock tab corresponding slot
3. Twist-lock mechanism*
*Ensure that the twist-lock mechanism matches the orientaon of the corresponding slots on the
baery before inserng the baery interface.
10.3. Baery care and safety
ANAFI UKR’s smart battery features a wintering mode, designed to increase its durability and
facilitate its storage. Ideally, when not in use for a prolonged period, batteries should be stored half-
charged. When not in use for 10 days, ANAFI UKR’s smart battery discharges itself, if required, to
60% charge, over a 48h period.
After a maximum of 12 days without use, the smart battery enters wintering mode with a charge
level which never exceeds 60%. During wintering mode, the Power button does not activate the
charge level LED indicators. You must charge the battery to exit the wintering mode and start
operating as described in the earlier paragraphs. This behavior preserves the battery over time.
ANAFI UKR’s smart battery must be handled, transported and stored with care:
- Do not store the baery long-term (1 month or more) with a charge level below 30%;
- Never leave a battery unattended while charging;
- Never expose a battery to extreme temperatures, neither hot, nor cold;
- Never charge a battery which is still warm from use (wait for at least 20 minutes);
- Never use or recharge a damaged or swollen battery;
- Always store your battery in a dry, ventilated place, at a temperature close to 20°C (68°F);
- Always carry your battery in a fire-retardant bag or case (unless it is installed on ANAFI
UKR: it can then be transported with the drone, inside its carrying case).
IMPORTANT: the ideal long-term storage condions for the baery are:
• at room temperature 23°C +/- 2°C;
• at a relave humidity of 65% (rh) ± 10%;
NOTE: Flight time and drone speed are reduced when flying at temperatures approaching -10°C
(+14°F). The ideal operating temperature of the smart battery is 20°C (68°F). Ensuring that the smart
battery remains as close as possible to 20°C (68°F) before starting a flight minimizes the reduction in
the smart battery’s capacity in cold environments.
WARNING: Always run a full charge of your smart baery before ying ANAFI UKR.
28
CAUTION: Do not take off ANAFI UKR with the XLR battery if the battery temperature is below 0°C
and the battery has less than 40% charge. Refer to chapter 10.4 Battery charging for more
information on how to verify the state of charge.
TIP: Use your body heat to maintain the temperature of the baery. Keep the baery in your pocket
prior to ying in a cold environment.
10.4. Baery charging
To charge the smart baery, use the enclosed USB-C to USB-C cable to connect the baery to its
enclosed charger.
ANAFI UKR standard baery charging me is 2 h 30 minutes with a 45 W charger.
ANAFI UKR XLR baery charging me is 3 h with a 100 W charger.
Parrot recommends that you charge the smart baery with the provided USB-C wall charger. If you
charge the smart baery with a dierent charger, it must be a USB power adapter with a minimum
output power of 45 W and compable with PD3.0 PDO 15V/3A; 20V/3A.
You can charge the drone baery when installed on, or when removed from the drone.
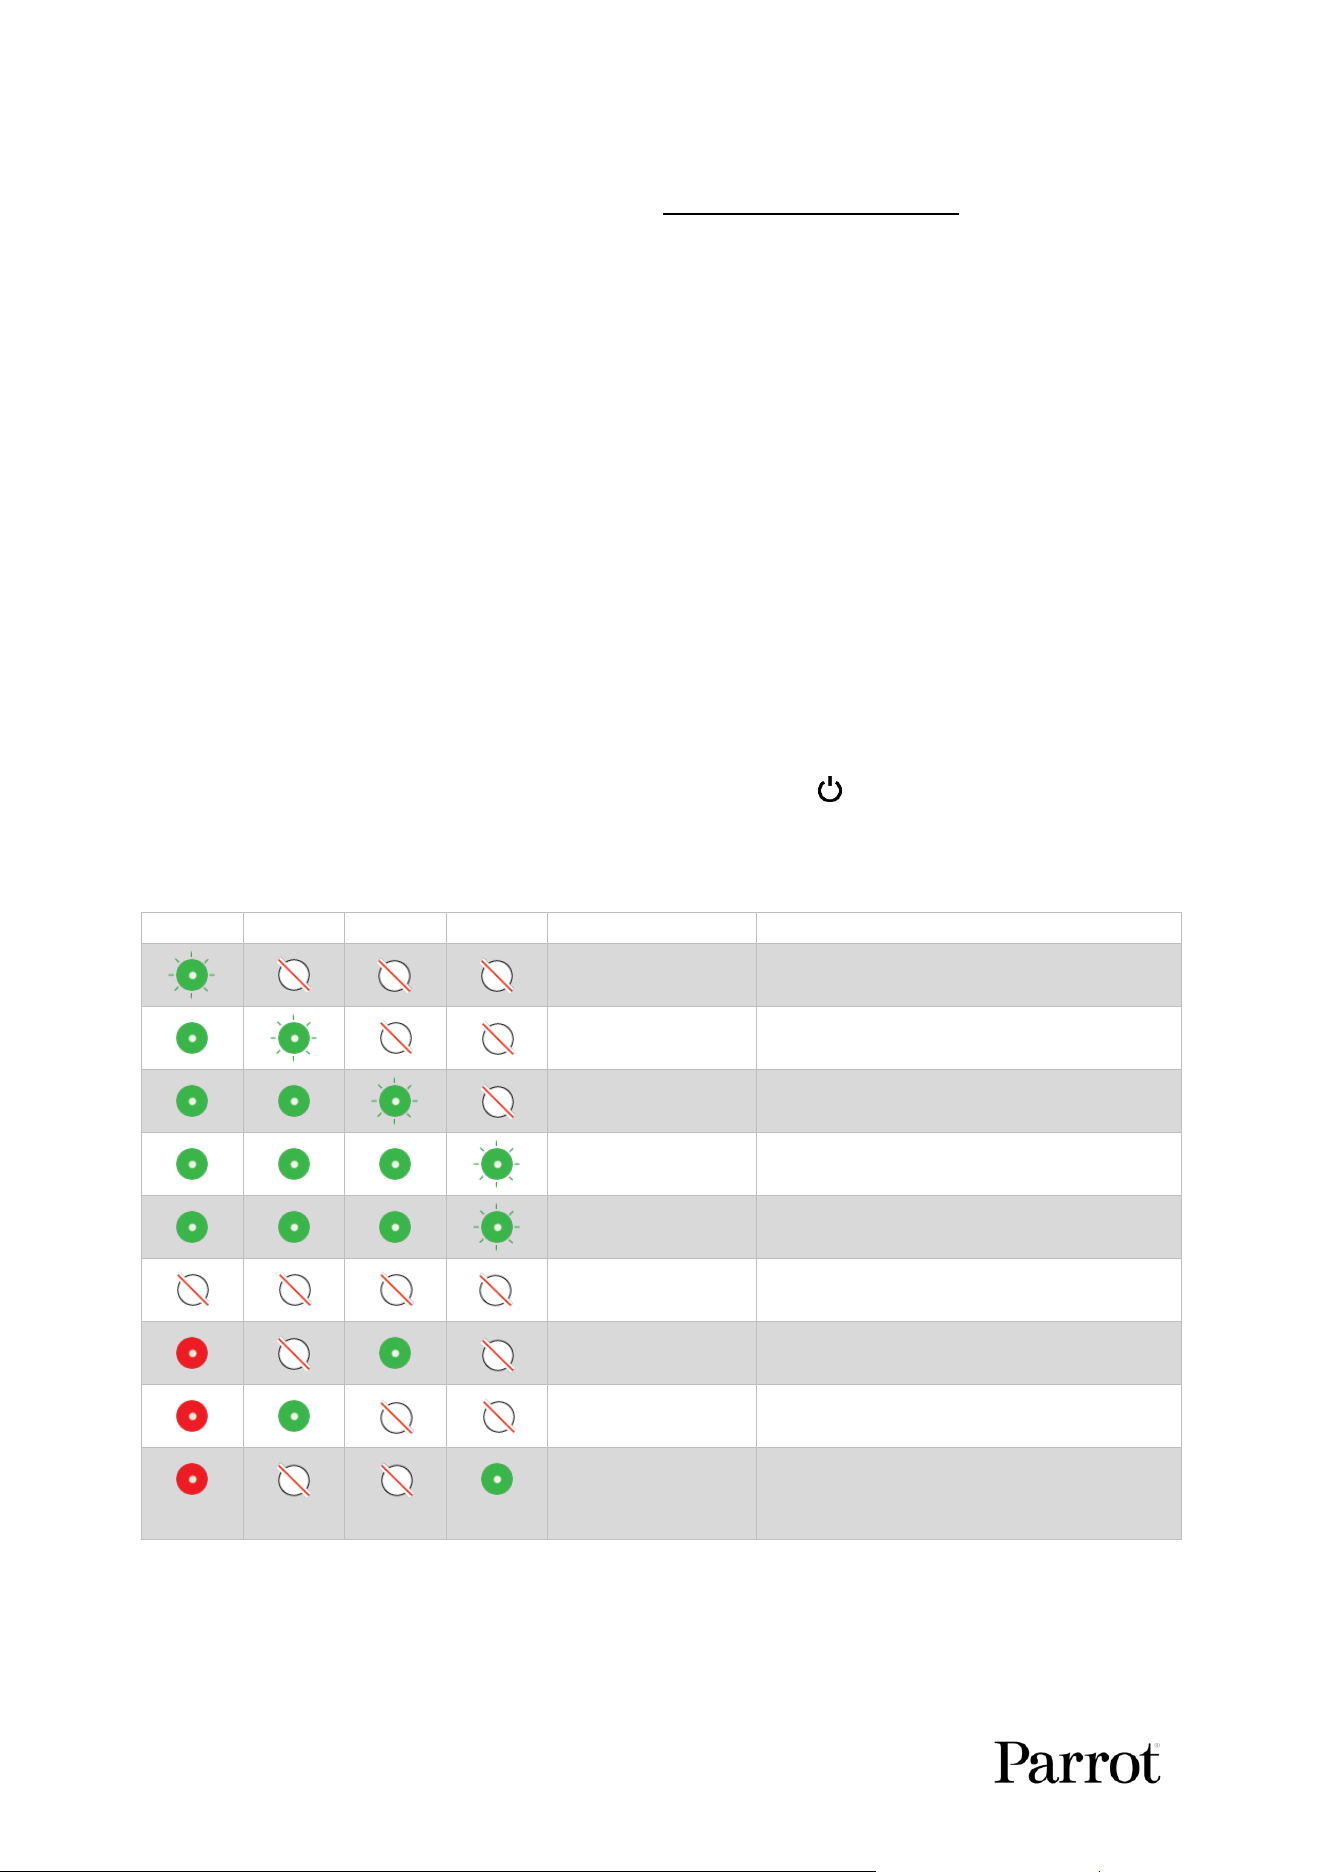
The drone’s smart baery has 4 LEDs that indicate the charge level in real me. The LEDs turn o
when charging is complete. To verify the state of charge, press the Power buon on the smart
baery.
The following table describes the behavior of the LEDs at dierent charge levels during charging:
LED 1
LED 2
LED 3
LED 4
LED BLINK SPEED
CHARGE LEVEL
1 sec blink delay
0 - 20% charged
1 sec blink delay
21 - 40% charged
1 sec blink delay
41 - 60% charged
1 sec blink delay
61 - 80% charged
500 ms blink delay
81 - 99% charged
N/A
Fully charged
N/A
Charging unavailable – Battery too hot
N/A
Charging unavailable – Battery too cold
N/A
Battery removed from powered on
drone during flight
NOTE: For safety reasons, the smart baery does not charge in extreme temperatures. Charging is
only available between 10°C and 45°C.
A N A F I U K R
29
© 2026 Parrot Drones SAS. All Rights Reserved.
CAUTION: Never charge the baery via the 8-pin connector, you must only charge the baery via the
USB-C port on the baery (No. 6 in Figure 9).
NOTE: If the smart baery’s gauge temperature surpasses 85°C, the maximum drone inclinaon is
progressively limited to allow the gauge cool down. When the gauge temperature returns below
75°C, all autopilot limitaons are removed. FreeFlight 8 does not inform the pilot of this limitaon.
If the smart baery’s cell temperature surpasses 65°C, the drone iniates an RTH. This RTH can be
overruled by the pilot, but the baery’s future health and performance may be degraded.
If the cell temperature surpasses 75°C, the drone iniates an auto landing (in training mode only).
10.5. Power bank mode
ANAFI UKR’s smart baery can also be used as a power bank to charge any device with a USB-C
charging port, including Skycontroller UKR.
In power bank mode, the USB-c port provides a maximum power output of 12V/3A.
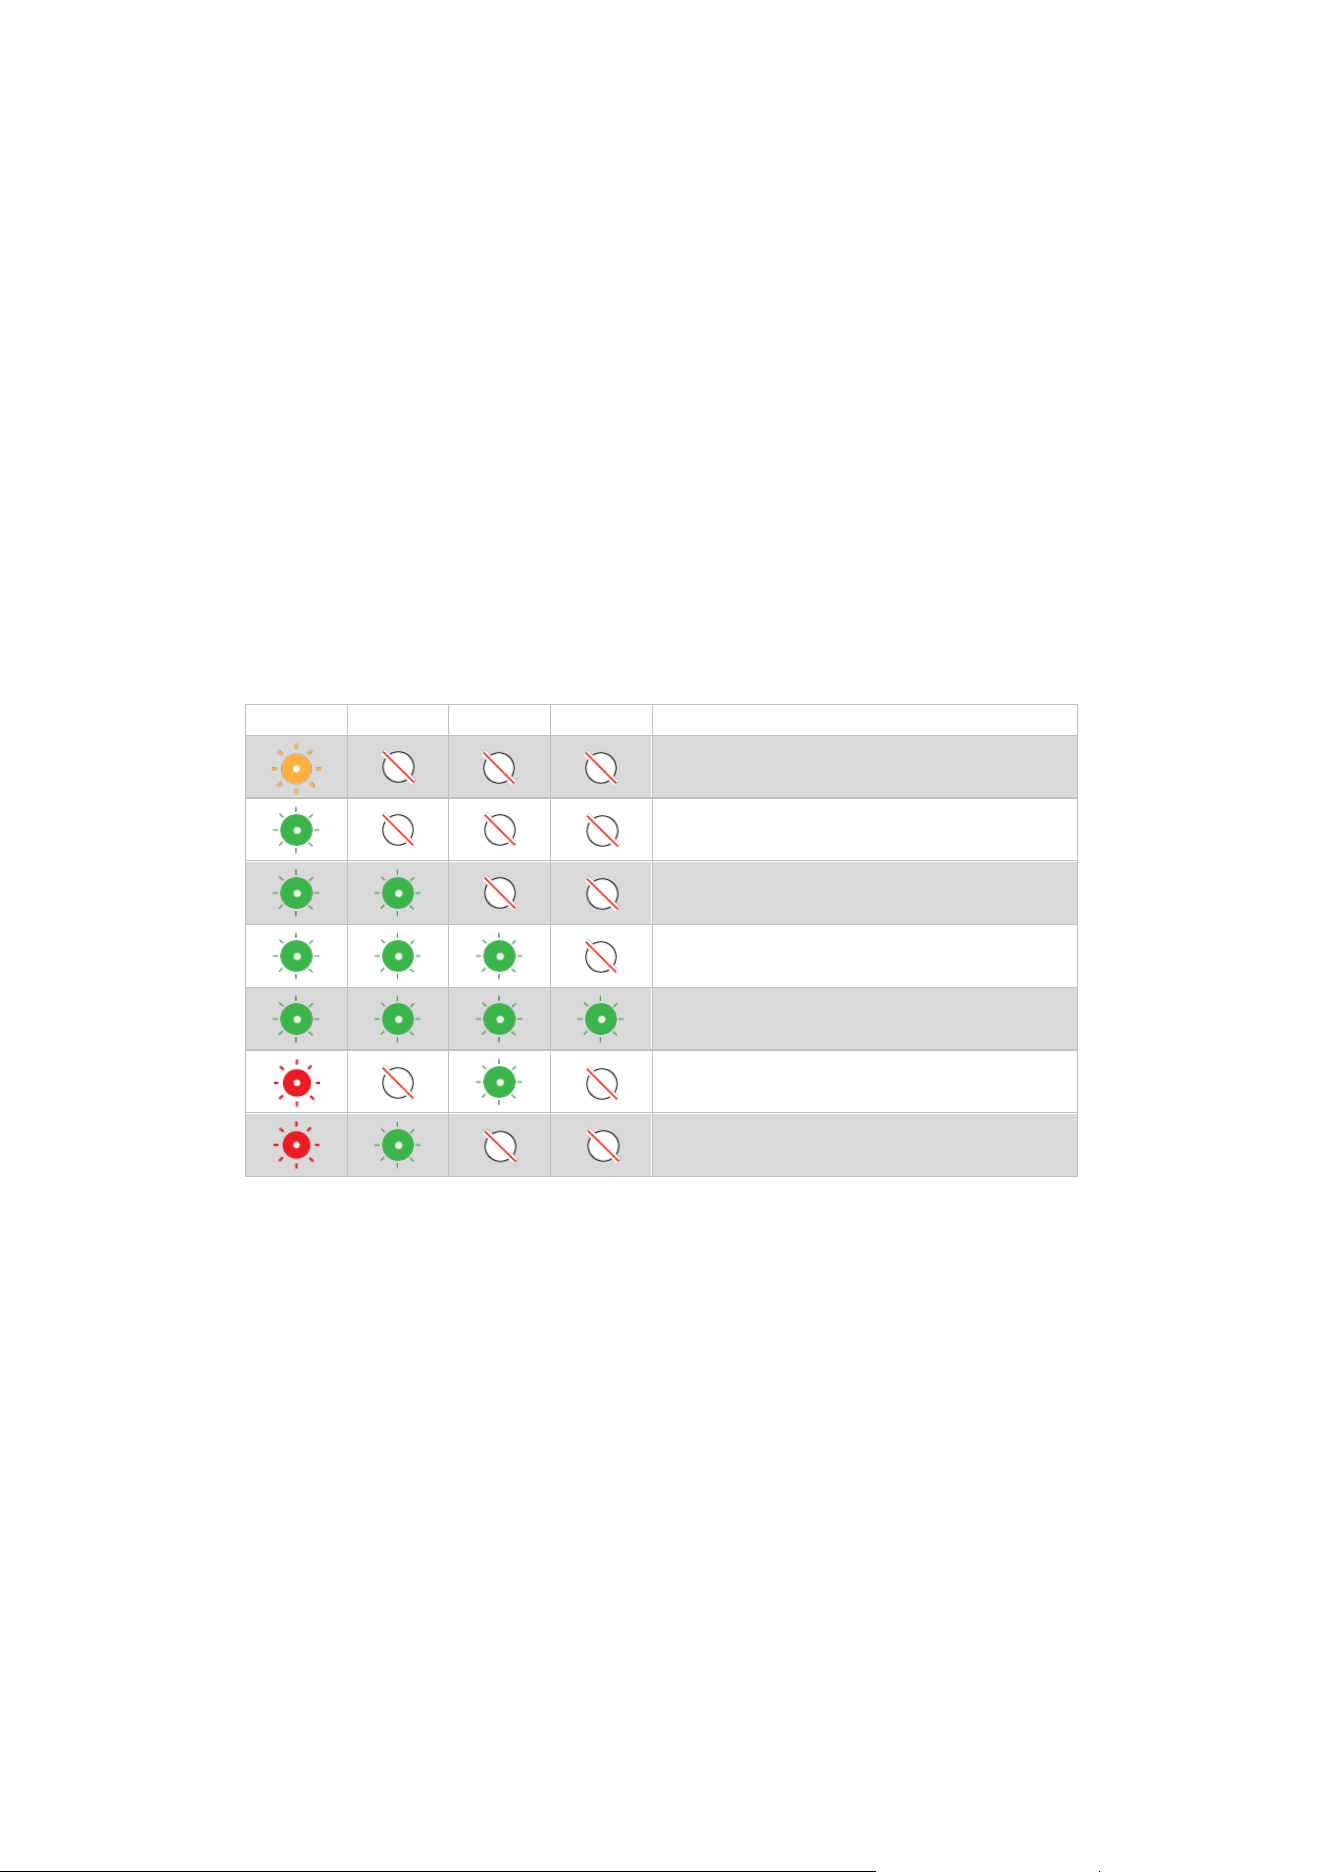
The following table describes the behavior of the LEDs at dierent charge levels in power bank mode:
LED 1
LED 2
LED 3
LED 4
CHARGE LEVEL
0 - 20% charged
21 - 40% charged
41 - 60% charged
61 - 80% charged
81 - 100% charged
Charging unavailable – Battery too hot
Charging unavailable – Battery too cold
10.6. External payload
ANAFI UKR can y with external payloads. The maximum mass of the external payload that ANAFI
UKR can carry depends on the baery installed in ANAFI UKR:
• Standard smart baery: up to 400 g.
• XLR smart baery: up to 100 g.
CAUTION: Do not alter the center of gravity of the drone. Do not block or obstruct in any way the
front stereo cameras, the boom stereo cameras, or the Time-of-Flight sensor. Any obstrucon of the
sensors, even paral obstrucon of the eld of view may cause ANAFI UKR to read false data, to have
errac ight behavior, resulng in a crash. The required Field of View for the stereo cameras and the
Time-of-Flight sensor is 86° (2x43°). Do not put any object under the Time-of-Flight sensor. Keep a
clear cylindrical exclusion zone with a diameter of 4 cm directly below the sensor.
Parrot recommends that you do not aach a payload to ANAFI UKR’s top cover. Payloads aached to
the top cover can impede or degrade GNSS/IMU performance.
30
Perform a drone calibraon:
• Aer an external payload is aached to the drone.
• Aer an external payload is removed from the drone.
Parrot recommends that the user always evaluates drone ight behavior with the external payload
before ying the drone at higher altudes. Short ights at low altudes help to conrm the drone
behavior is sll acceptable with the external payload.
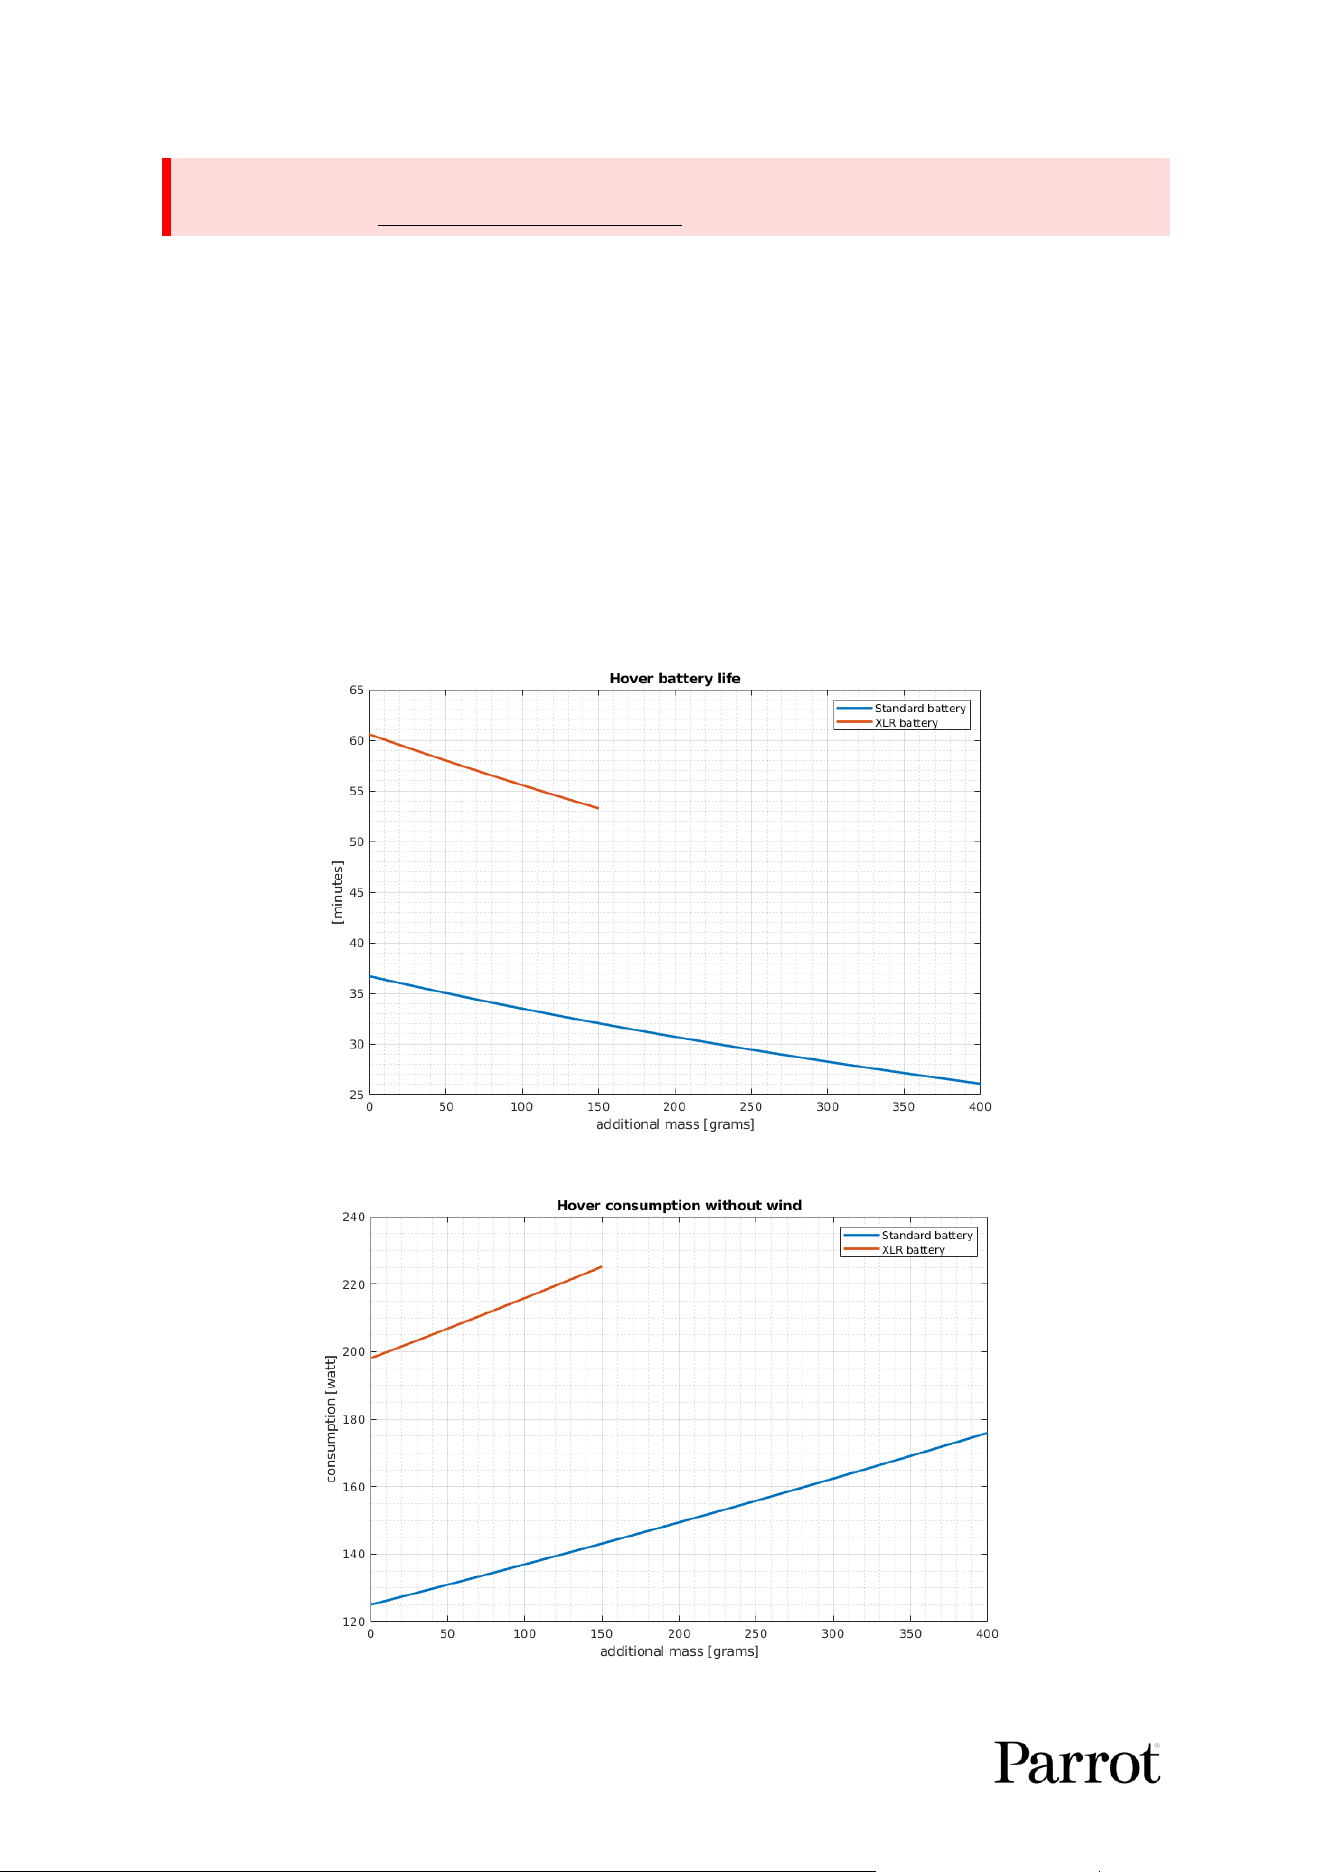
When an external payload is aached to ANAFI UKR, the addional weight increases the total power
consumpon of the drone. As a consequence, ight autonomy decreases.
With a payload of 350 g, ANAFI UKR’s power consumpon is 180 W, instead of 123 W without an
external payload. The hover autonomy reduces to 25 minutes instead of 38 minutes without an
external payload.
Figure 18: Hover me as a funcon of added external payload mass
Figure 19: Hover power consumpon as a funcon of added external payload mass
WARNING: An external payload may cause the aircra’s motors to overheat under certain
condions. Refer to chapter 19. ANAFI UKR aircra for more informaon.
A N A F I U K R
31
© 2026 Parrot Drones SAS. All Rights Reserved.
11. Simulator & FlightCharts Live USB key
The Simulator & FlightCharts Live USB key contains:
• The Linux Ubuntu operang system
• A compable drone rmware image
• ANAFI UKR simulator
• FlightCharts soware
NOTE: The Simulator & FlightCharts Live USB key does not use any hard disks or other non-volale
storage devices on the PC. It exclusively reads and writes data onto the PC's RAM memory.
Do not remove the Simulator & FlightCharts Live USB key from the PC while the soware (ANAFI UKR
simulator or FlightCharts) is running.
To access the soware on the Simulator & FlightCharts Live USB key, follow this procedure:
1. Insert the Simulator & FlightCharts Live USB key into your PC.
2. Turn on or restart your PC.
3. Immediately press the boot menu key – you may need to press the key repeatedly.
The boot menu key varies by PC manufacturer, consult your PC’s user guide or look for a message
during startup, for example Press F12 for Boot Menu. Common boot menu keys include: F12, F9, ESC,
or F2.
NOTE: On some PCs, you may need to enable the boot menu key in the BIOS/UEFI sengs.
4. Use the Up/Down Arrow keys to select UEFI – SanDisk SanDisk 3.2 Gen1
A2003CC0122C6C58.
5. Press Enter.
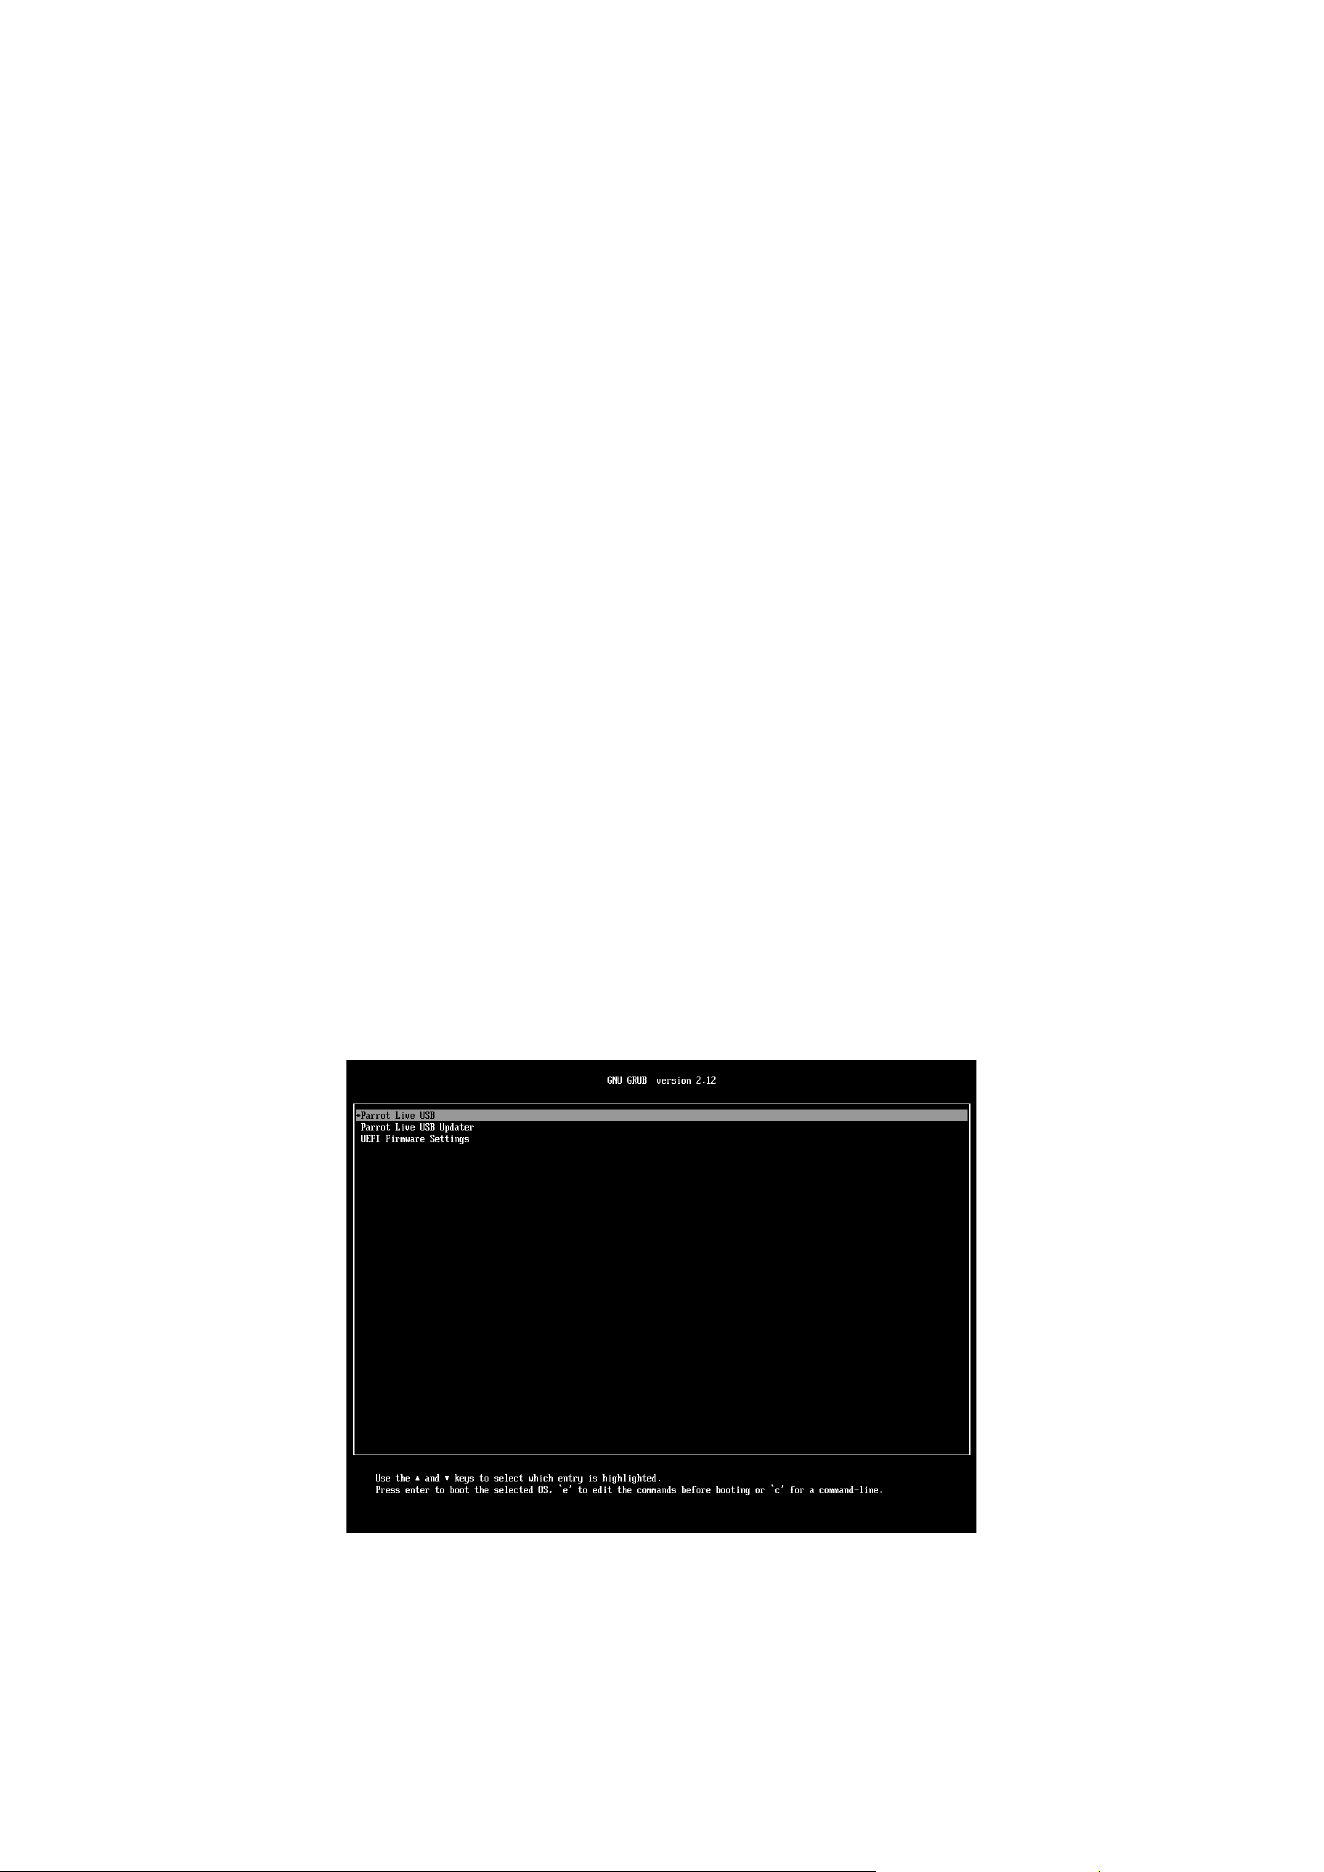
Aer successfully boong from the Live USB key, a GNU GRUB menu opens with 3 opons:
Figure 20: Simulator & FlightCharts Live USB key GNU GRUB menu
32
a. Parrot Live USB* – Opens the Linux desktop where you can use ANAFI UKR Simulator and
FlightCharts.
b. Parrot Live USB Updater* - Updates ANAFI UKR Simulator, the drone rmware, and
FlightCharts to the latest versions.
c. UEFI Firmware Sengs – Shows opon about disabling secure boot, conguring the boot
order management so that your PC automacally boots from the Simulator & FlightCharts
Live USB key rst.
*Older versions of the Simulator & FlightCharts Live USB key GNU GRUB menu opons may read
Parrot Sphinx, and Parrot Sphinx Updater.
6. Use the Up/Down Arrow keys on the keyboard to select one of the 3 opons.
7. Press Enter on the keyboard.
To update the Simulator & FlightCharts Live USB key:
1. Use the Up/Down Arrow keys to highlight Parrot Live USB updater, seen in Figure 20.
2. Press Enter on the keyboard.
3. Press Y on the keyboard.
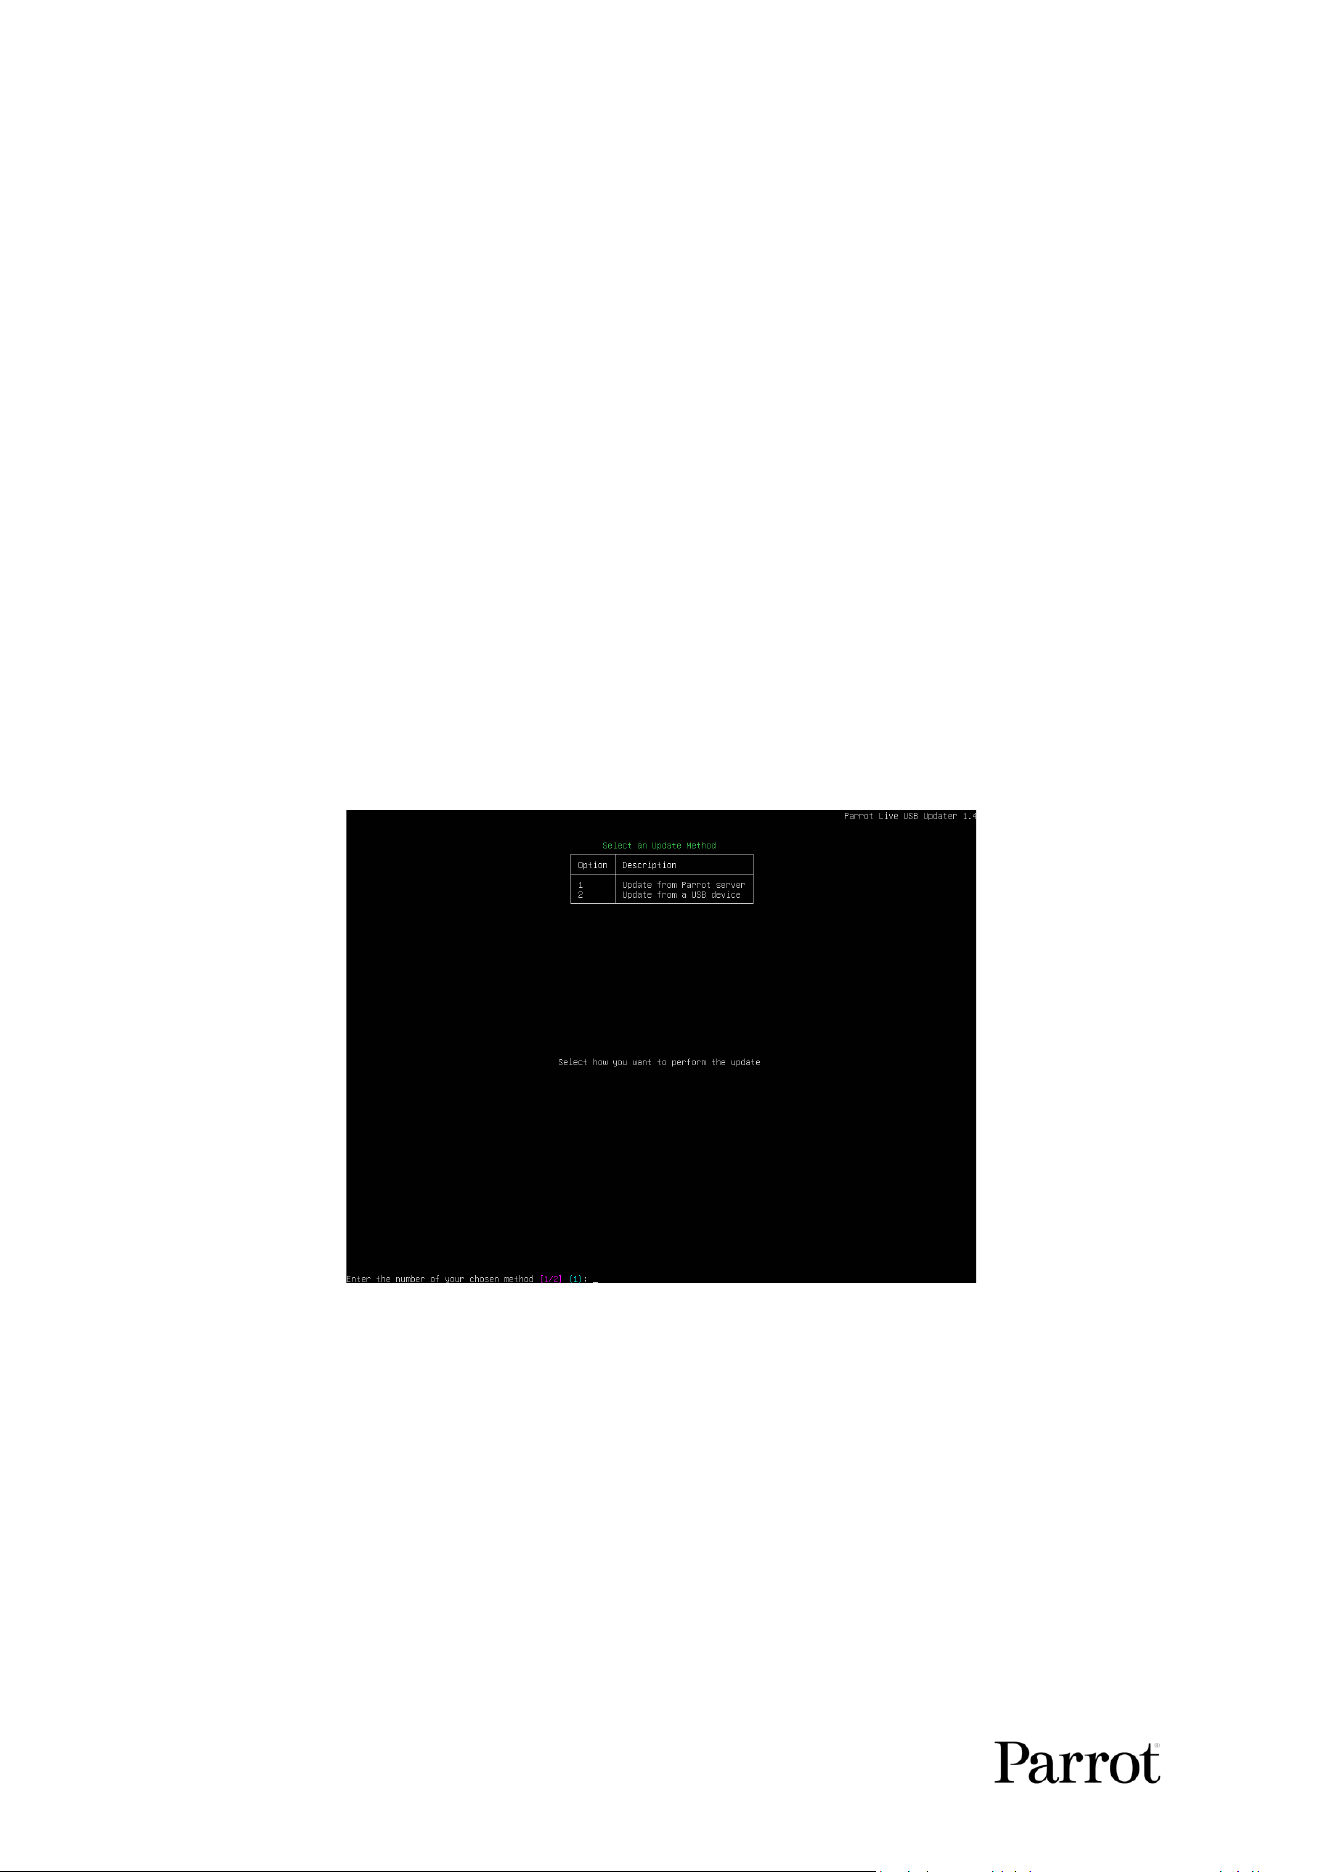
The Select an Update Method screen opens:
Figure 21: Select an Update Method screen
There are 2 methods to update:
1. Update from Parrot server – used for online updates.
2. Update from a USB device – used for oine updates.
To update from Parrot server (online update), you will need:
• A stable internet connecon.
• A non-authencated Ethernet connecon.
A N A F I U K R
33
© 2026 Parrot Drones SAS. All Rights Reserved.
NOTE: You cannot use Wi-Fi, or any Ethernet connecon that needs a password or login.
1. Press 1 on the keyboard.
2. Press Enter on the keyboard.
Parrot Live USB updater automacally downloads the operang system and writes it to the Sphinx
paron of the key. This process can take a long me. The duraon depends on your network speed
and reliability.
3. Press Enter on the keyboard to shut down the system when the update is complete.
To update from a USB device (oine update), you will need:
• A USB drive with a minimum of 30 GB of free space, formaed with an exFAT or EXT4 le
system.
• An ISO le in the root folder of the USB drive.
• A Simulator & FlightCharts Live USB key version W51-25.1 or later, with Parrot Live USB
Updater version 1.4.
NOTE: This oine update method is an alternave to the online update. Use the oine update
method only if your PC must operate without an Internet connecon. This method is only available
on specic versions of the Simulator & Flightcharts Live USB key. Contact Parrot or your Parrot
reseller to obtain the ISO le, and an up-to-date Simulator & Flightcharts Live USB key.
1. Press 2 on the keyboard.
2. Press Enter on the keyboard.
3. Insert the USB device that contains the ISO le in its root folder into the PC.
4. Press Enter on the keyboard.
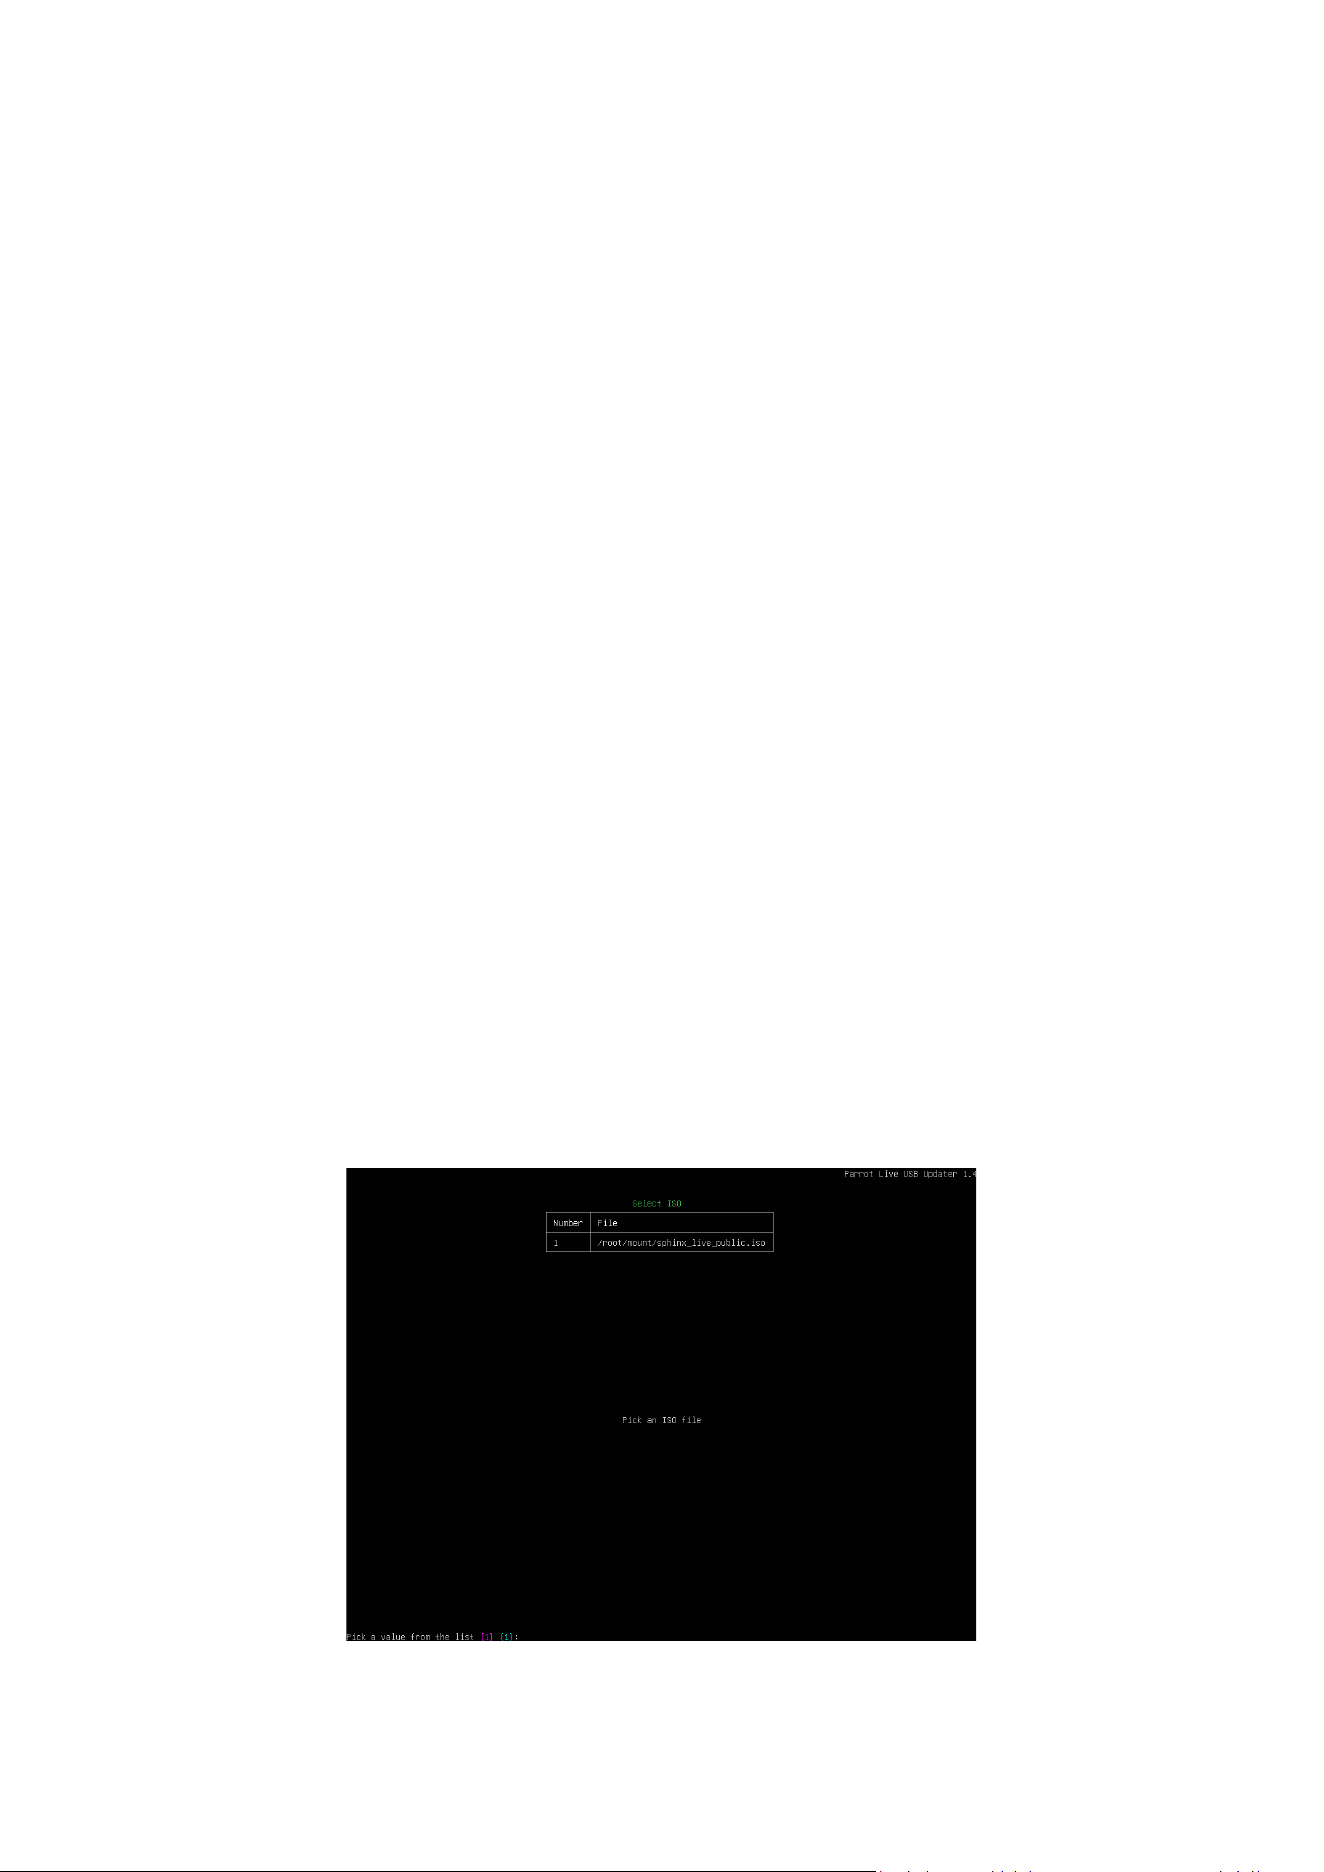
5. Press 1 on the keyboard to select the ISO le from the list.
6. Press Enter on the keyboard.
Figure 22: Select ISO screen

34
Parrot Live USB updater automacally transfers the operang system and writes it to the Sphinx
paron of the key. This process can take a long me.
11.1. ANAFI UKR simulator
ANAFI UKR simulator is a real-me 3D drone simulator built on Parrot Sphinx, and comes fully
packaged on the Simulator & FlightCharts Live USB key provided in the pack contents. Parrot Sphinx is
also available free of charge from developer.parrot.com. The ANAFI UKR simulator executes the
drone’s rmware, with all its embedded sensors and actuators, including cameras, in a visually and
physically realisc environment. This allows the user to see the drone ying from mulple
customizable viewpoints. The simulated ANAFI UKR communicates seamlessly with the real
Skycontroller UKR, and when connected by USB cable to a real ANAFI UKR, it can simulate the
tracking mode, where the gimbal can lock onto a selected character within the scene.
ANAFI UKR simulator provides various 3D scenes, including Planet, which allows the user to y over
any region of the world, provided that you have a Google
©
Developer account.
11.1.1. System requirements
To run smoothly in real-me, ANAFI UKR simulator requires a powerful PC with the following
specicaons:
• 16 GB RAM
• 8 CPU cores @4GHz (x86_64/amd64)
• NVIDIA GPU RTX 4080
NOTE: ANAFI UKR Simulator’s performance depends on individual PCs. Even with the above
specicaons, you may experience latency parcularly if you use some of the larger worlds.
Ensure that UEFI Secure Boot is disabled on your PC as keeping it enabled may cause various
malfuncons.
When possible, Parrot recommends that you run ANAFI UKR simulator on a desktop PC, for beer
performance. If you must run ANAFI UKR simulator on a laptop, keep your laptop plugged into a
power source, for higher real-me performance.
NOTE: Simulated tracking mode requires a USB-3 type C cable (to ANAFI UKR), as well as a USB-3
compliant USB port (to the PC).
11.1.2. Seng up ANAFI UKR Simulator
Follow this procedure to set up ANAFI UKR simulator for the rst me:
1. Connect your Skycontroller UKR device to your FreeFlight 8 device.
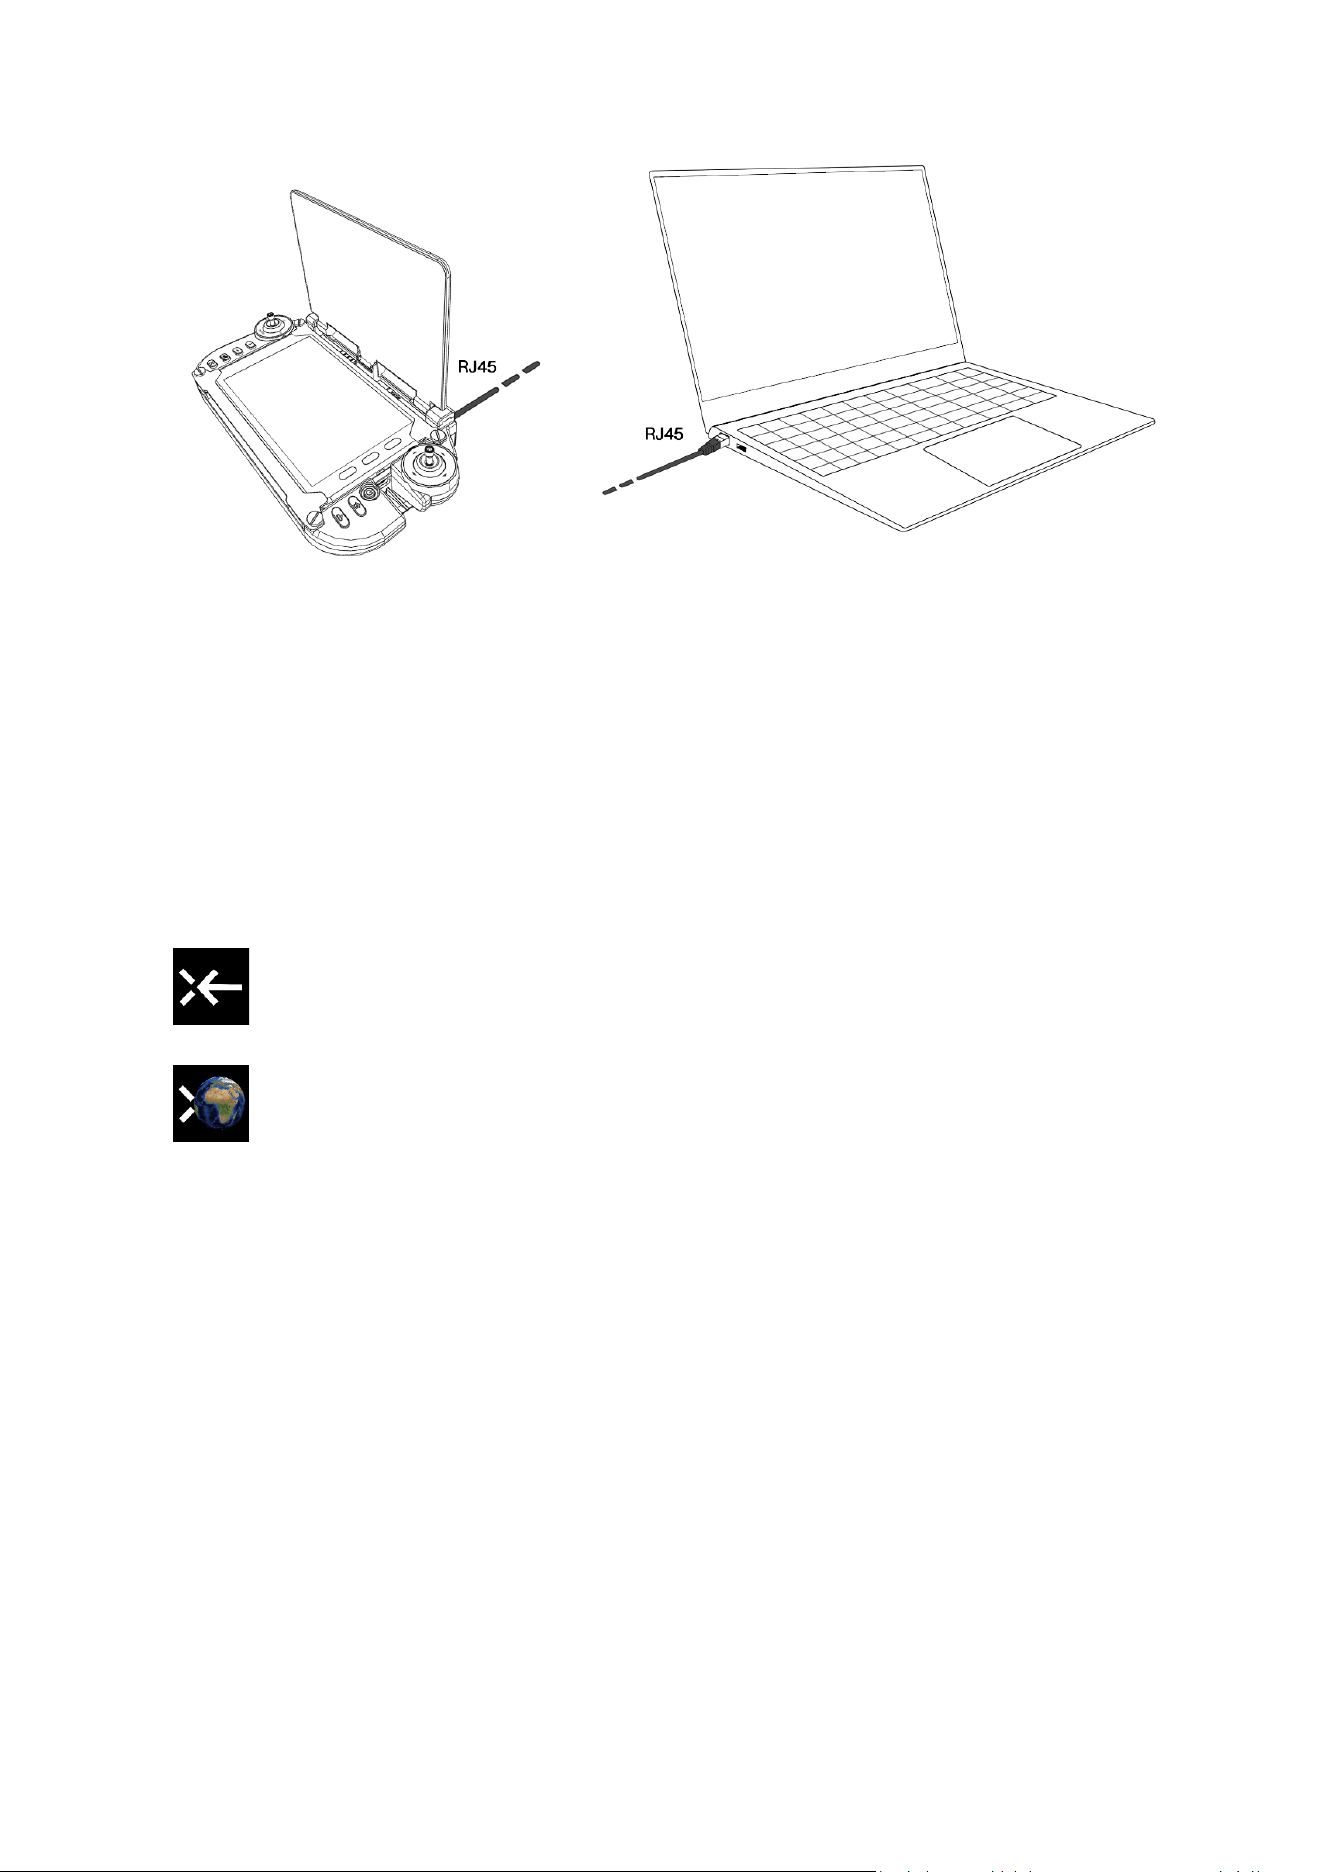
2. Connect the Skycontroller UKR to your PC via an RJ45 Ethernet cable.
3. Power on your Skycontroller UKR and your FreeFlight 8 device.
A N A F I U K R
35
© 2026 Parrot Drones SAS. All Rights Reserved.
Figure 23: Skycontroller UKR/PC connecon via Ethernet cable
4. Open FreeFlight 8 if it doesn’t launch automatically.
The following steps are optional:
A. Connect an ANAFI UKR with a USB-C Type 3 cable and power on the drone. This allows ANAFI
UKR to track an actor.
B. Ensure that you are connected to the Internet. This allows World Planet to function.
NOTE: All cables must be connected before you turn on the devices.
Double-click the Parrot Sphinx icon to launch the simulator (on the Desktop or in the
menus). The shortcut launches everything for you. Shortly after the launch the drone
appears.
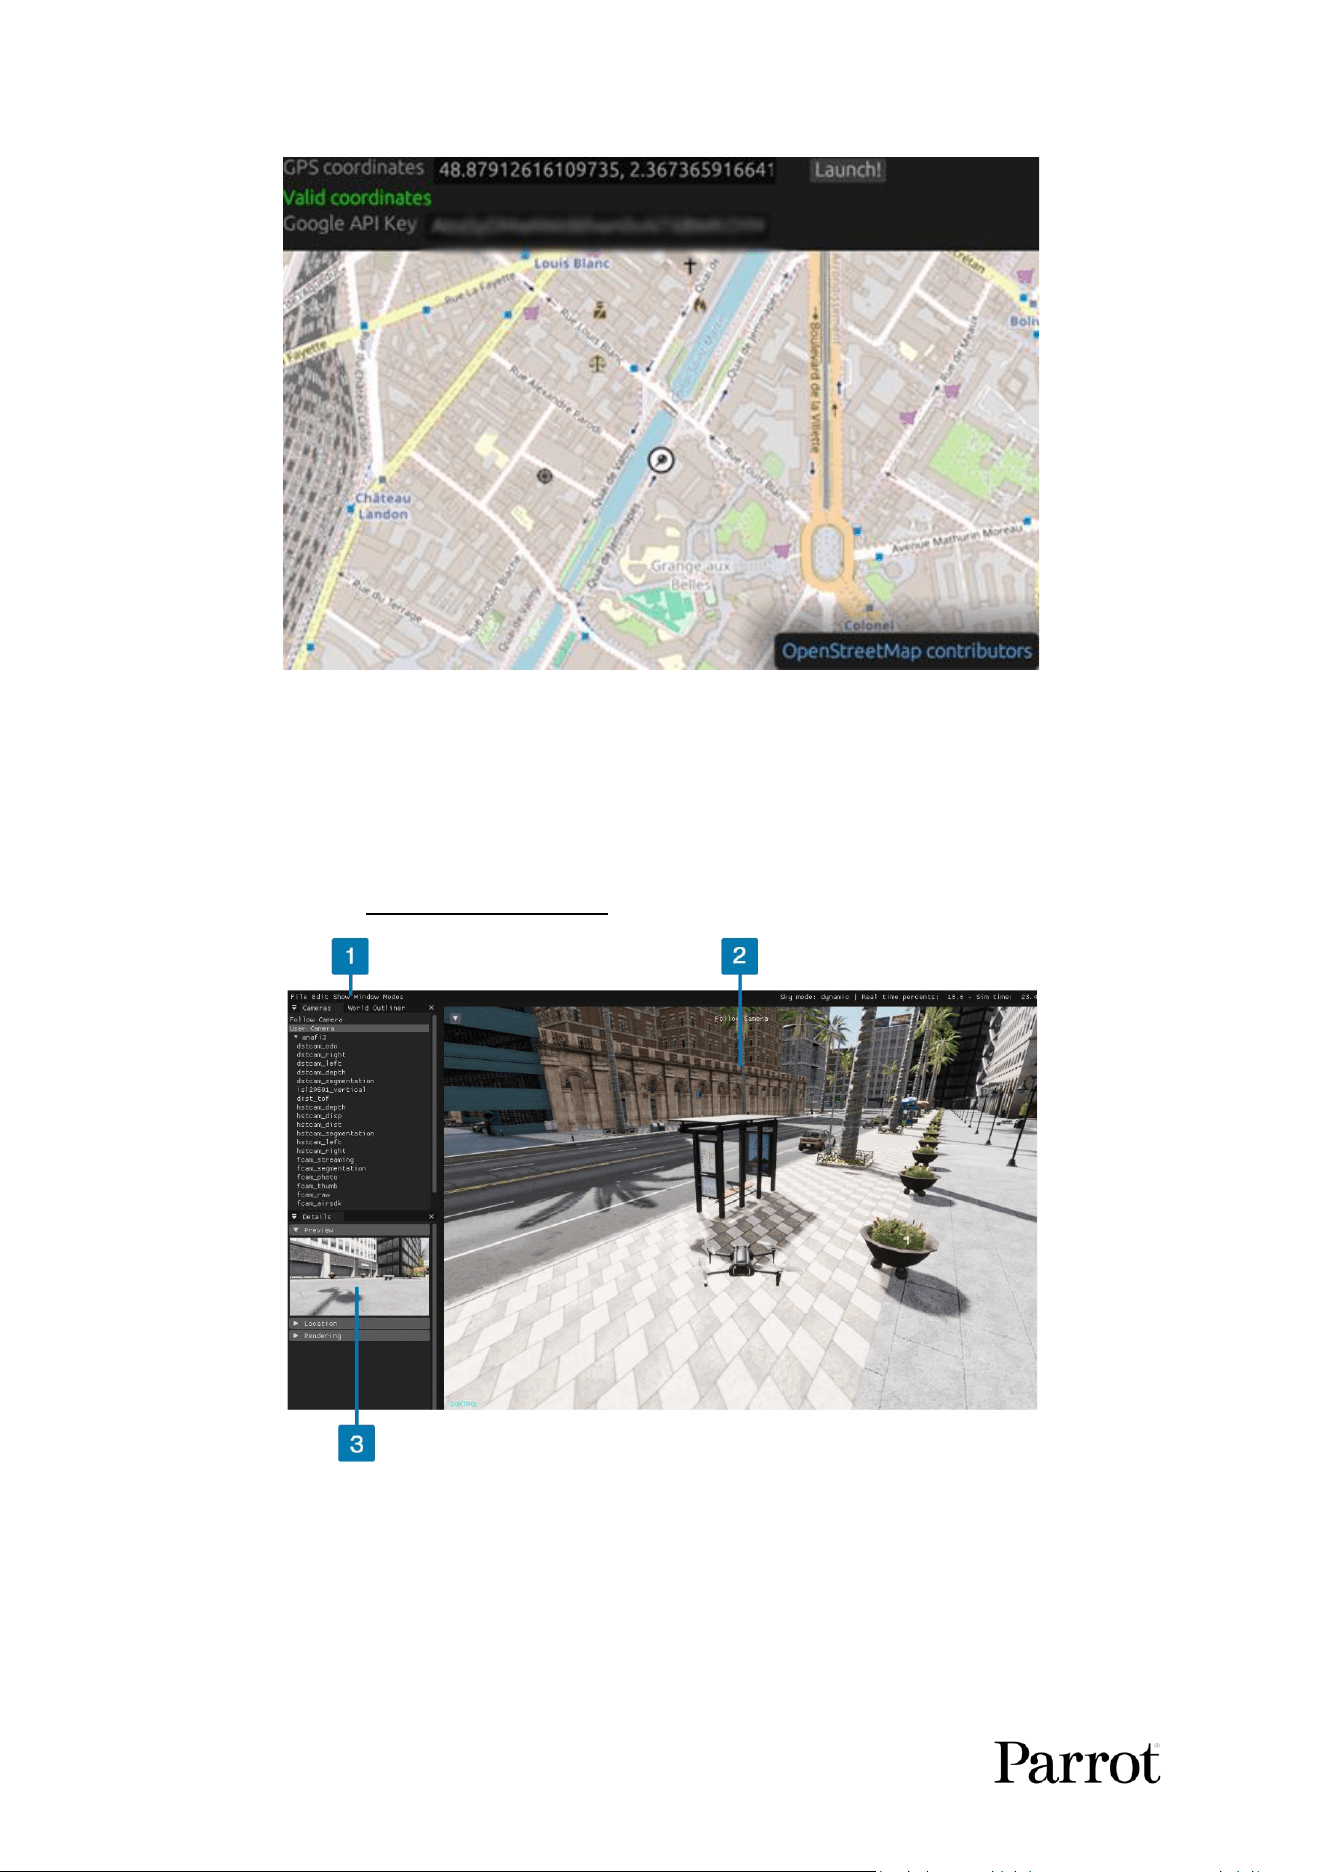
Planet is a special world that allows you to virtually fly around the globe. Upon launch,
a dedicated window appears (see Figure 24), allowing selection of the GPS coordinates
of the scene. It requires a constant and stable connection to the internet. It also
requires a valid Google API key.
In order to get your Google API key, you must:
1. Create your own Google developer account.
2. Acvate the Map elevaon API and the Map les API.
3. Copy and paste the key into the Parrot Planet launcher.
36
Figure 24: Parrot Planet launcher
Manually edit or copy/paste the GPS coordinates in the Parrot Planet launcher where you want to
posion the simulated drone.
11.1.3. Simulaon view
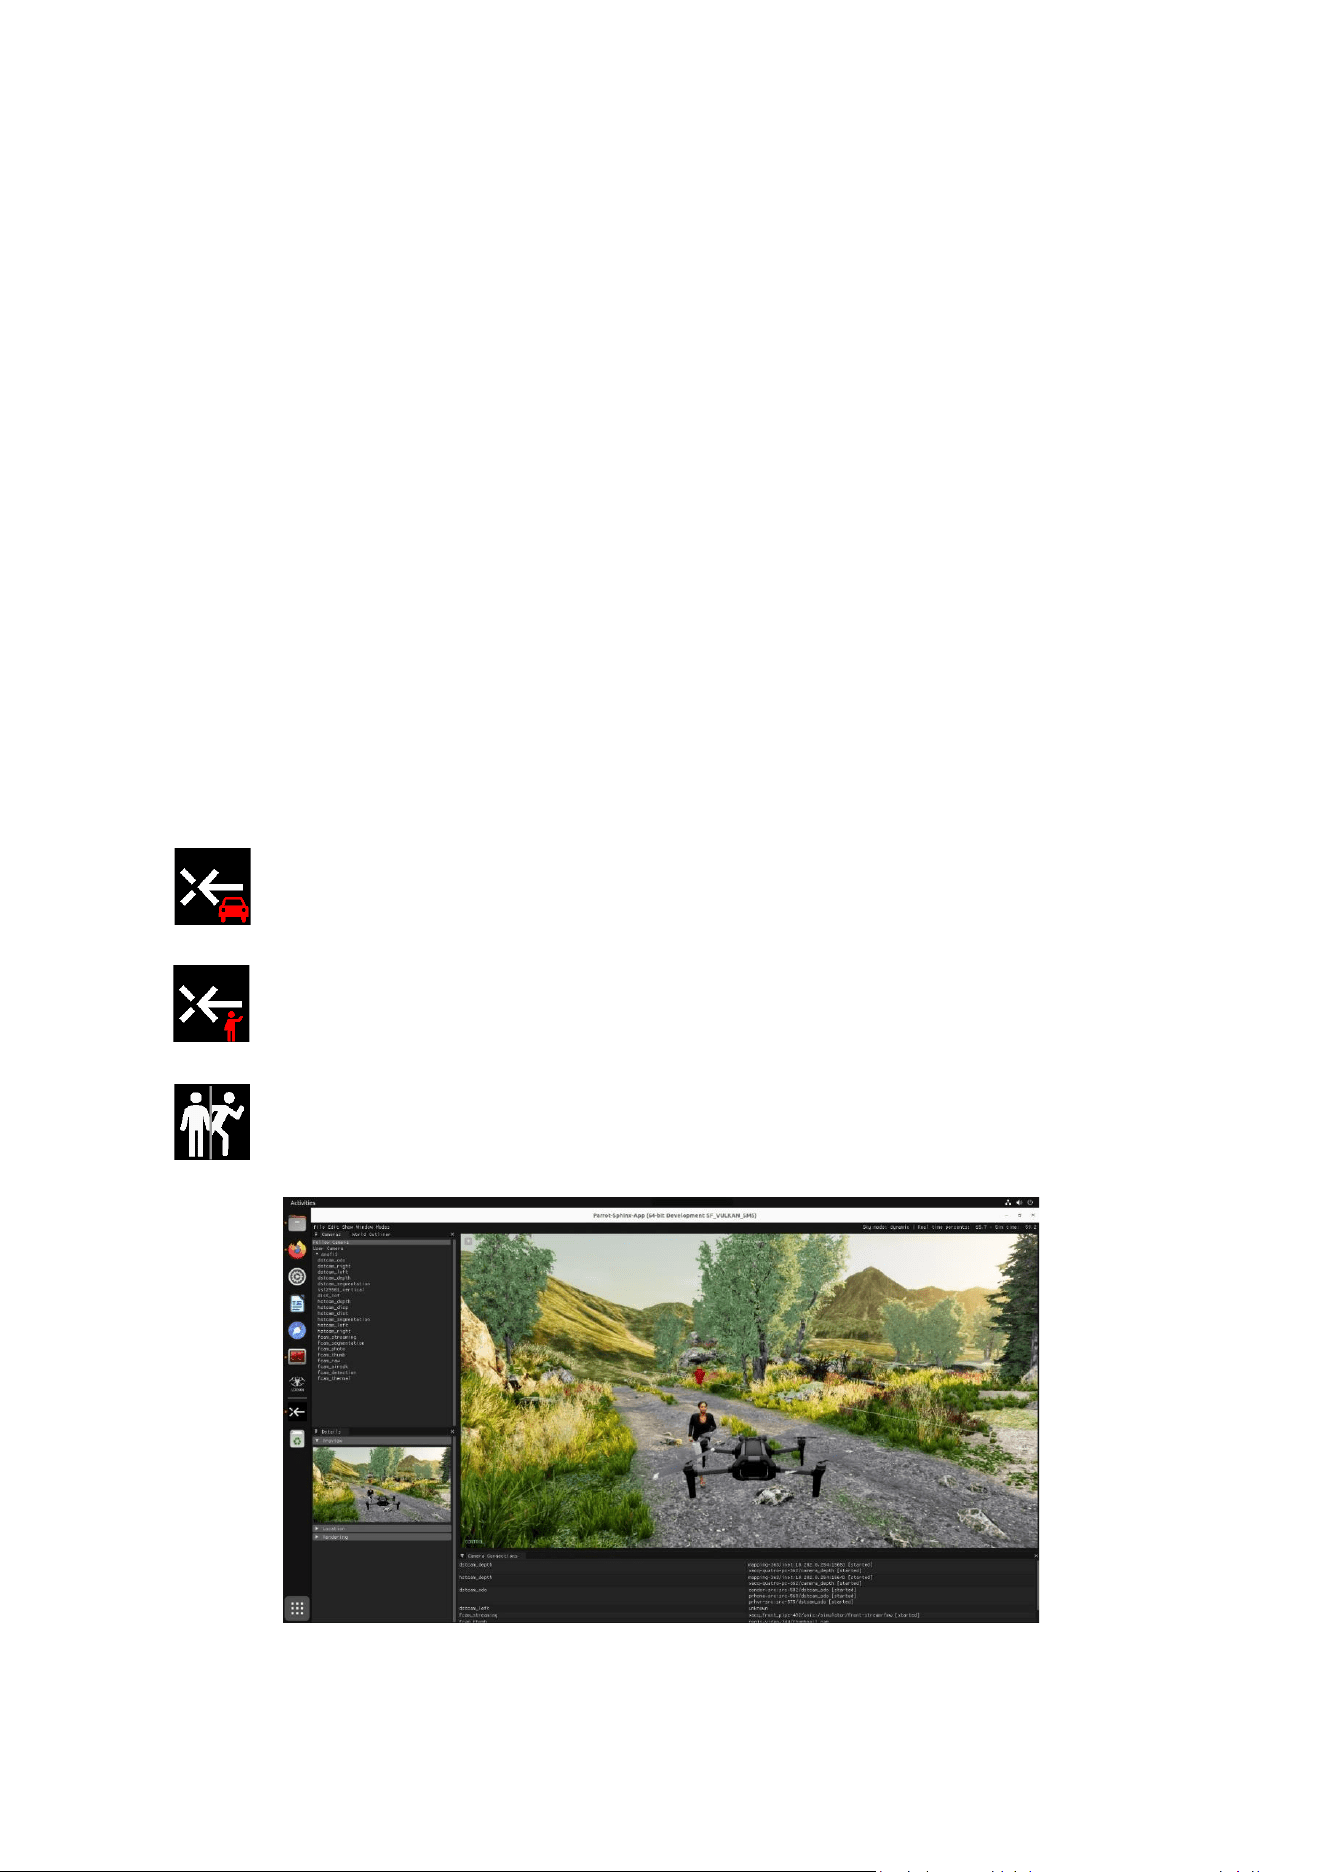
The main view provides informaon about the simulaon, including viewing the cameras. For more
informaon, refer to chapter 11.1.5. Cameras.
Figure 25: Main simulaon view
1. Top menu bar
3. Camera view
2. Main display
A N A F I U K R
37
© 2026 Parrot Drones SAS. All Rights Reserved.
11.1.4. Simulaon reset
To reset the simulator:
1. Click Edit in the top menu bar. A drop-down menu opens.
2. Click Reset World.
Alternavely, use the keyboard shortcut Ctrl+R.
Reseng the simulaon is useful when your drone has crashed or is stuck. You can also use it to reset
the drone to where it started originally.
11.1.5. Cameras
Select a camera in the sidebar to preview it.
You can also select and drag a camera name in the sidebar, and you can then drop it inside the
viewport to see it beer.
• Follow camera: A third-person camera that follows the drone while it ies.
• User camera: A camera that can be freely moved around by the user.
11.1.6. Actors
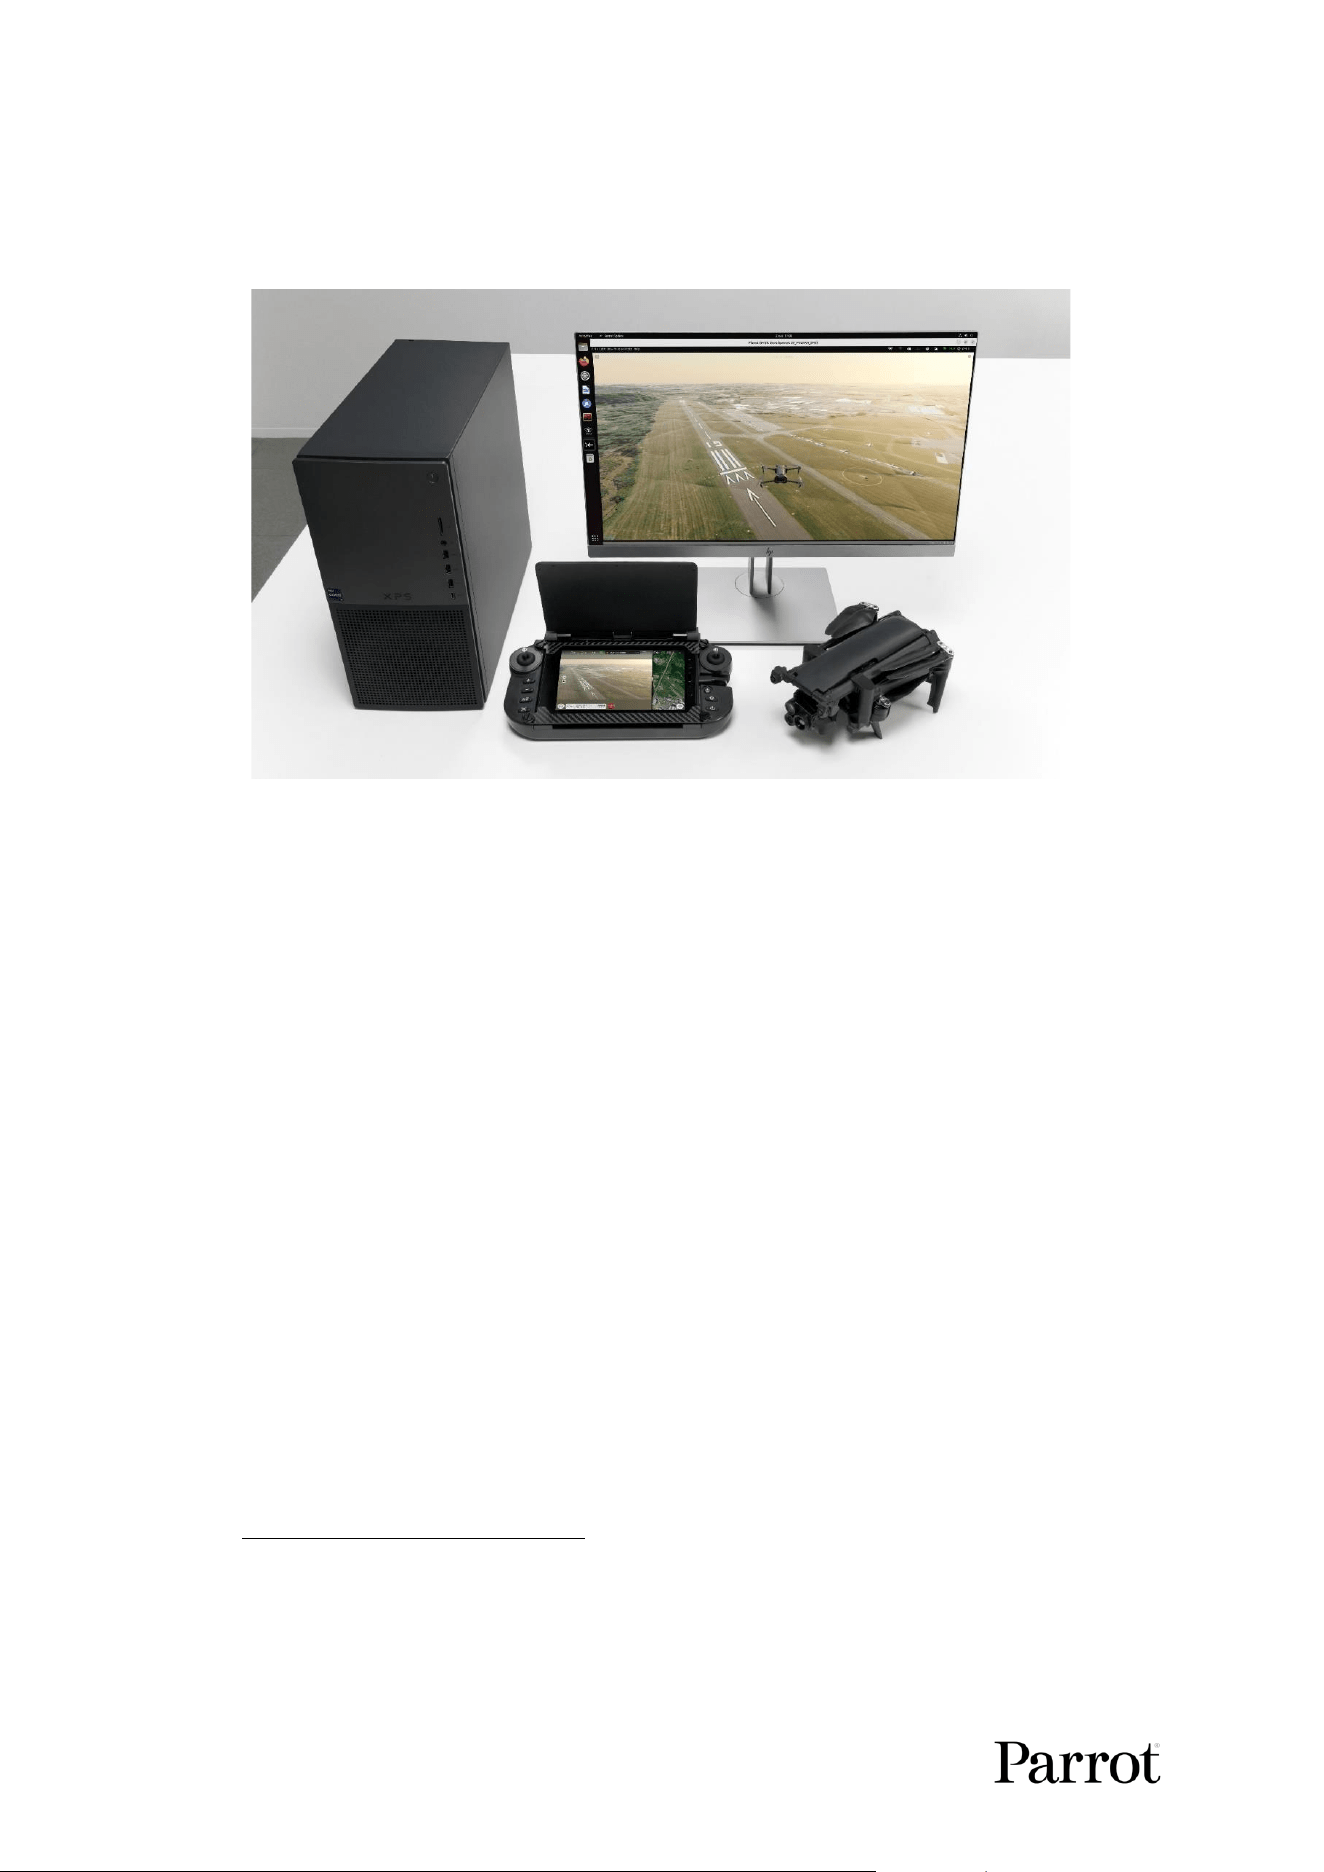
Some worlds have actors that can be used to test tracking funcon. An actor is a character or a
vehicle which travels along a path. You will recognize these worlds by their specic icons:
Vehicle actor
Character actor
Click the desktop icon to toggle the actor between a moving state and a paused state.
Alternatively, use the keyboard shortcut Ctrl+Shift+P.
Figure 26: Simulaon view with character actor
38
Actors do not move by default.
Worlds with actors require a drone connected to the PC via a USB cable. Once connected, Sphinx
communicates with the drone. Tracking mode is simulated using the drone hardware.
Figure 27: ANAFI UKR and Skycontroller UKR connected to a PC for the simulator
NOTE: When you quit the simulaon, you may need to wait several seconds unl the connected
drone nishes its reboot and becomes available again.
11.2. FlightCharts
The FlightCharts soware is included on the Simulator & FlightCharts Live USB key in the system pack.
FlightCharts can generate 2 map types:
• Opcal Navigaon maps – Allows ANAFI UKR to operate in GNSS denied environments.
• DTED maps (Digital Terrain Elevaon Data) – Allows ANAFI UKR to operate in GNSS denied
environments and improves Cursor on Target accuracy.
11.2.1. Prerequisites
FlightCharts requires:
• An unencrypted microSD card formaed by ANAFI UKR via the formang procedure in
FreeFlight 8. Refer to the Skycontroller UKR & FreeFlight 8 user guide for more informaon
(chapter: Sengs / Storage).
• A map source from one of the following opons:
o ArcGIS
©
- Requires an API token.
o Google
©
- Requires an API token.
o A custom map server – May require an API token depending on service used.
Refer to chapter 15. Appendix 3: Disclaimer for more informaon on how to obtain a Google API
token, or an ArcGIS API token.
11.2.2. Running FlightCharts
To use FlightCharts, follow this procedure:
1. Insert the unencrypted and formaed microSD card into your computer.
A N A F I U K R
39
© 2026 Parrot Drones SAS. All Rights Reserved.
2. Insert the Simulator & FlightCharts Live USB key into your computer.
3. Follow the instrucons in chapter 11. Simulator & FlightCharts Live USB Key to open the Linux
operang system.
4. Double click FlightCharts’ icon:
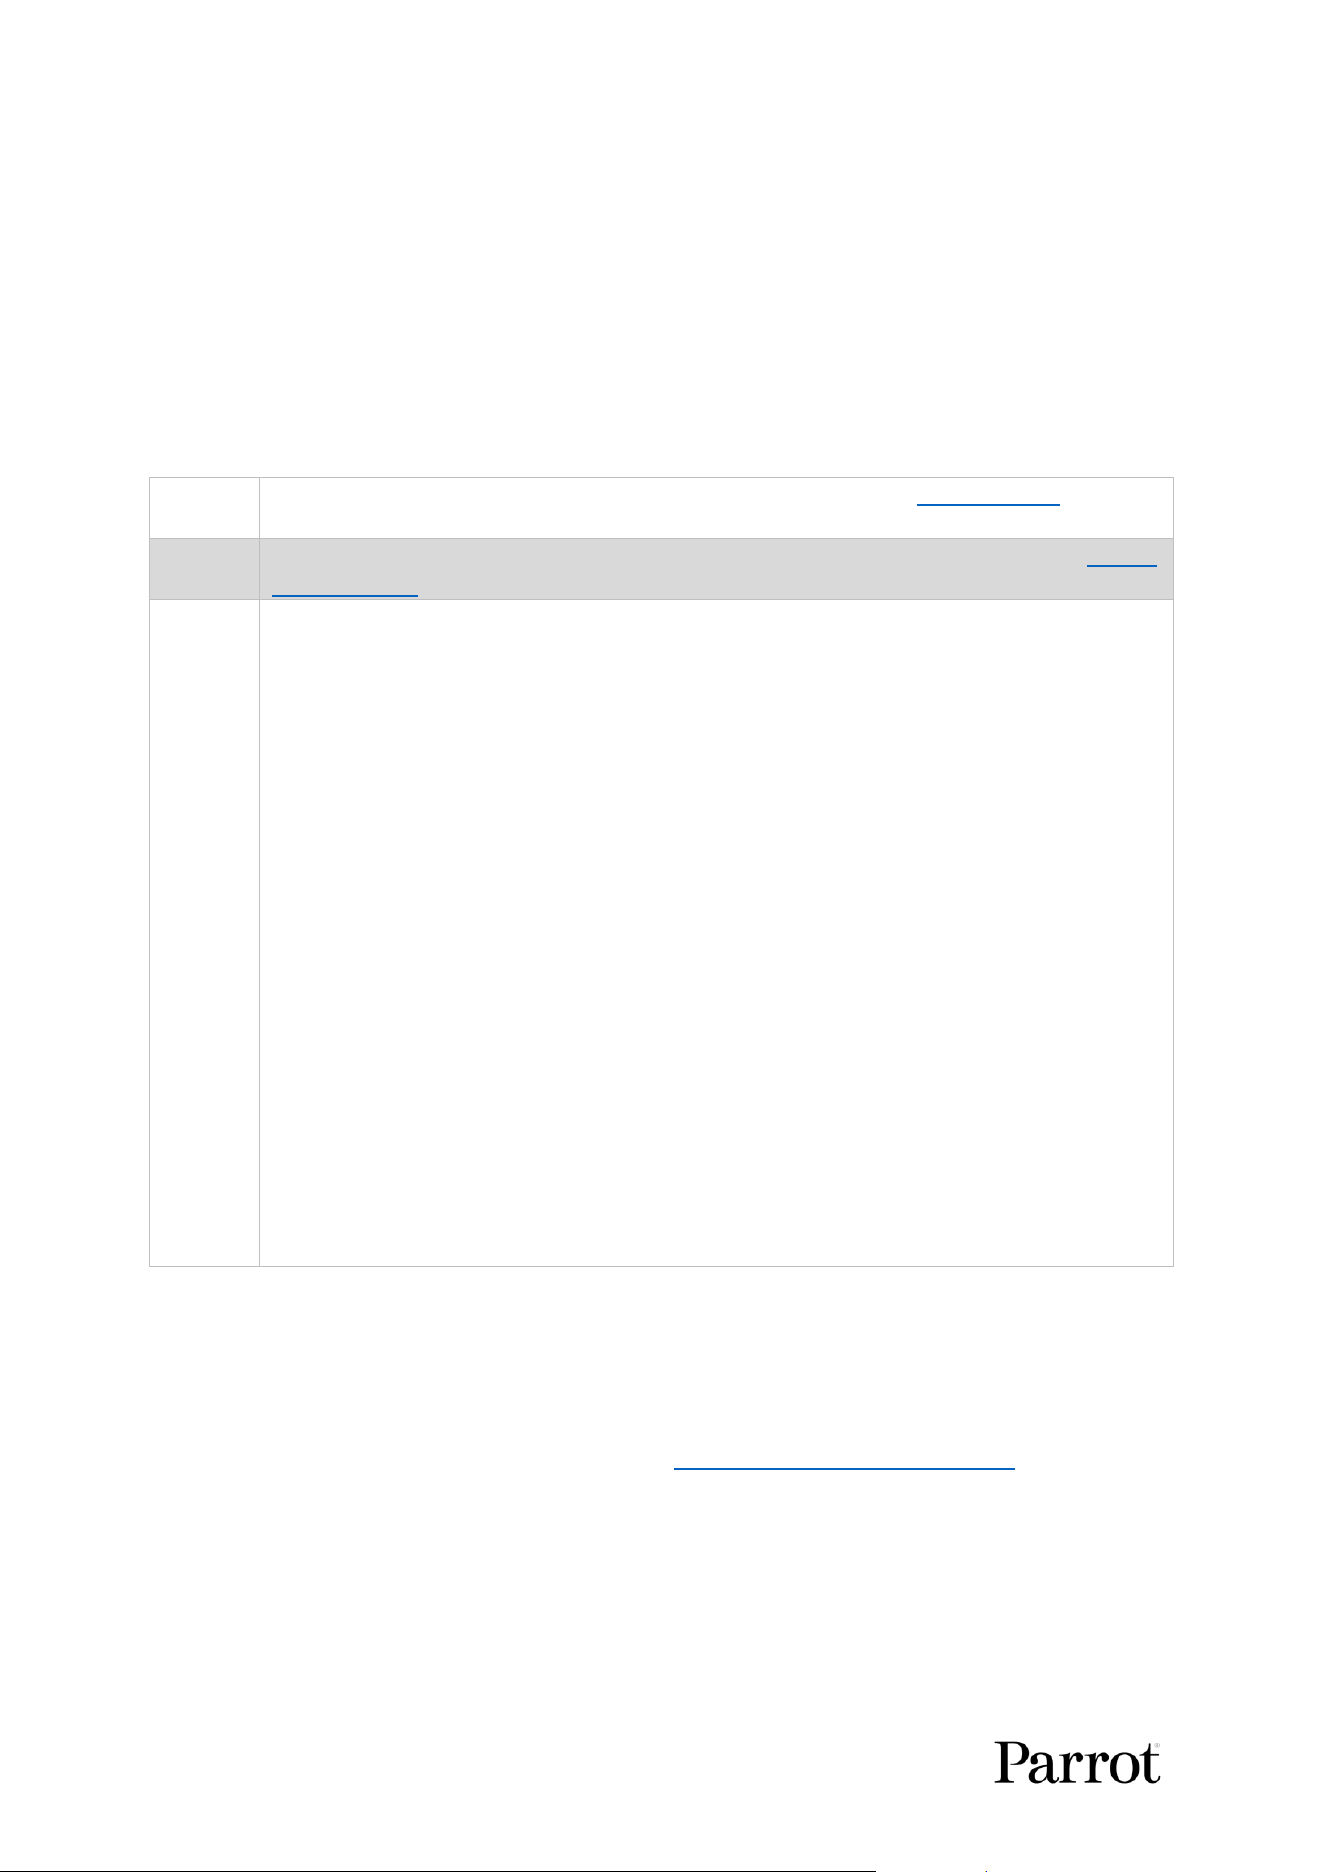
NOTE: The PC must have an internet connecon to use FlightCharts. If the PC does not have internet
access, an ERROR: No Internet access popup appears:
The FlightCharts interface opens:
Figure 28: FlightCharts interface
1. Map Type
9. Open/Close Logs button
2. Map Provider options
10. Map generation cancel button
3. Access Token text field
11. Zoom out button
4. Drone firmware version menu
12. Zoom in button
5. Area of interest geographic information
13. Satellite basemap
6. Export to menu
14. Map search bar
7. Export button
15. Area of interest bounding box
8. Logs
40
IMPORTANT: The FlightCharts interface uses satellite les from ArcGIS
©
or from Google
©
. It is the
user’s responsibility to ensure that they have the correct licenses.
To create a map in FlightCharts for ANAFI UKR:
1. Select the map Type (No. 1 in Figure 28) to create either an Opcal Navigaon map, or a
DTED map.
A. To create an Opcal Navigaon map:
i. Under Conguraon, select your Map provider (No. 2 in Figure 28) from either
ArcGIS, Google, or Custom.
ArcGIS:
In the Access Token text eld, enter your ArcGIS Token – refer to esri Developer for more
informaon on how to obtain an ArcGIS token.
Google:
In the Map Tiles API key text eld, enter your Google Map Tiles API key – refer to Google
Maps Plaorm for more informaon on how to obtain a Map Tiles API key.
Custom:
Select Custom if you want to use your own satellite map server instead of ArcGIS or
Google Maps.
In the Custom URL text eld, enter your Server URL (the address of your le server). The
server must provide satellite raster les using the standard XYZ format (Slippy Map Tiling
Scheme), which denes the map les by zoom level (z) and le coordinates (x, y).
The URL must contain the placeholders {z}, {x}, and {y}.
Example: hps://le.openstreetmap.org/{z}/{x}/{y}
Requirements for custom map servers:
• Tile type: Raster (satellite imagery) without labels or boundaries.
• Tile size: 256 × 256 pixels.
• Image format: JPEG.
• Geographical data: Ortho-reced imagery.
• Projecon: Web Mercator (EPSG:3857).
• Tiling scheme: XYZ (Slippy Map Tiling Scheme).
• Recommended zoom levels: 15 and 16 (for best Opcal Navigaon performance).
Each le is retrieved from the server based on its zoom level (z) and posion (x, y). The
mapping between geographical coordinates (longitude and latude) and le coordinates
follows the standard Web Mercator projecon.
B. To create a DTED map:
i. Under Nasa Credenals, enter in the appropriate text elds:
• your Nasa Login,
• your Nasa password.
NOTE: You must register for an Earthdata prole via urs.earthdata.nasa.gov/users/new to obtain a
NASA login and password.
2. Select the Drone rmware version from the drop-down menu (No. 4 in Figure 28).
3. In the Satellite basemap interface (No. 12 in Figure 28), le-click and drag to the area of
interest.
4. Zoom in or out using the zoom buons (No. 10 & No. 11 in Figure 28) or the mouse scroll
wheel.
A N A F I U K R
41
© 2026 Parrot Drones SAS. All Rights Reserved.
5. Click the Satellite basemap (No. 12 in Figure 28) to create a bounding box.
6. Click and drag the bounding box to move it, click and drag the corner points to resize it.
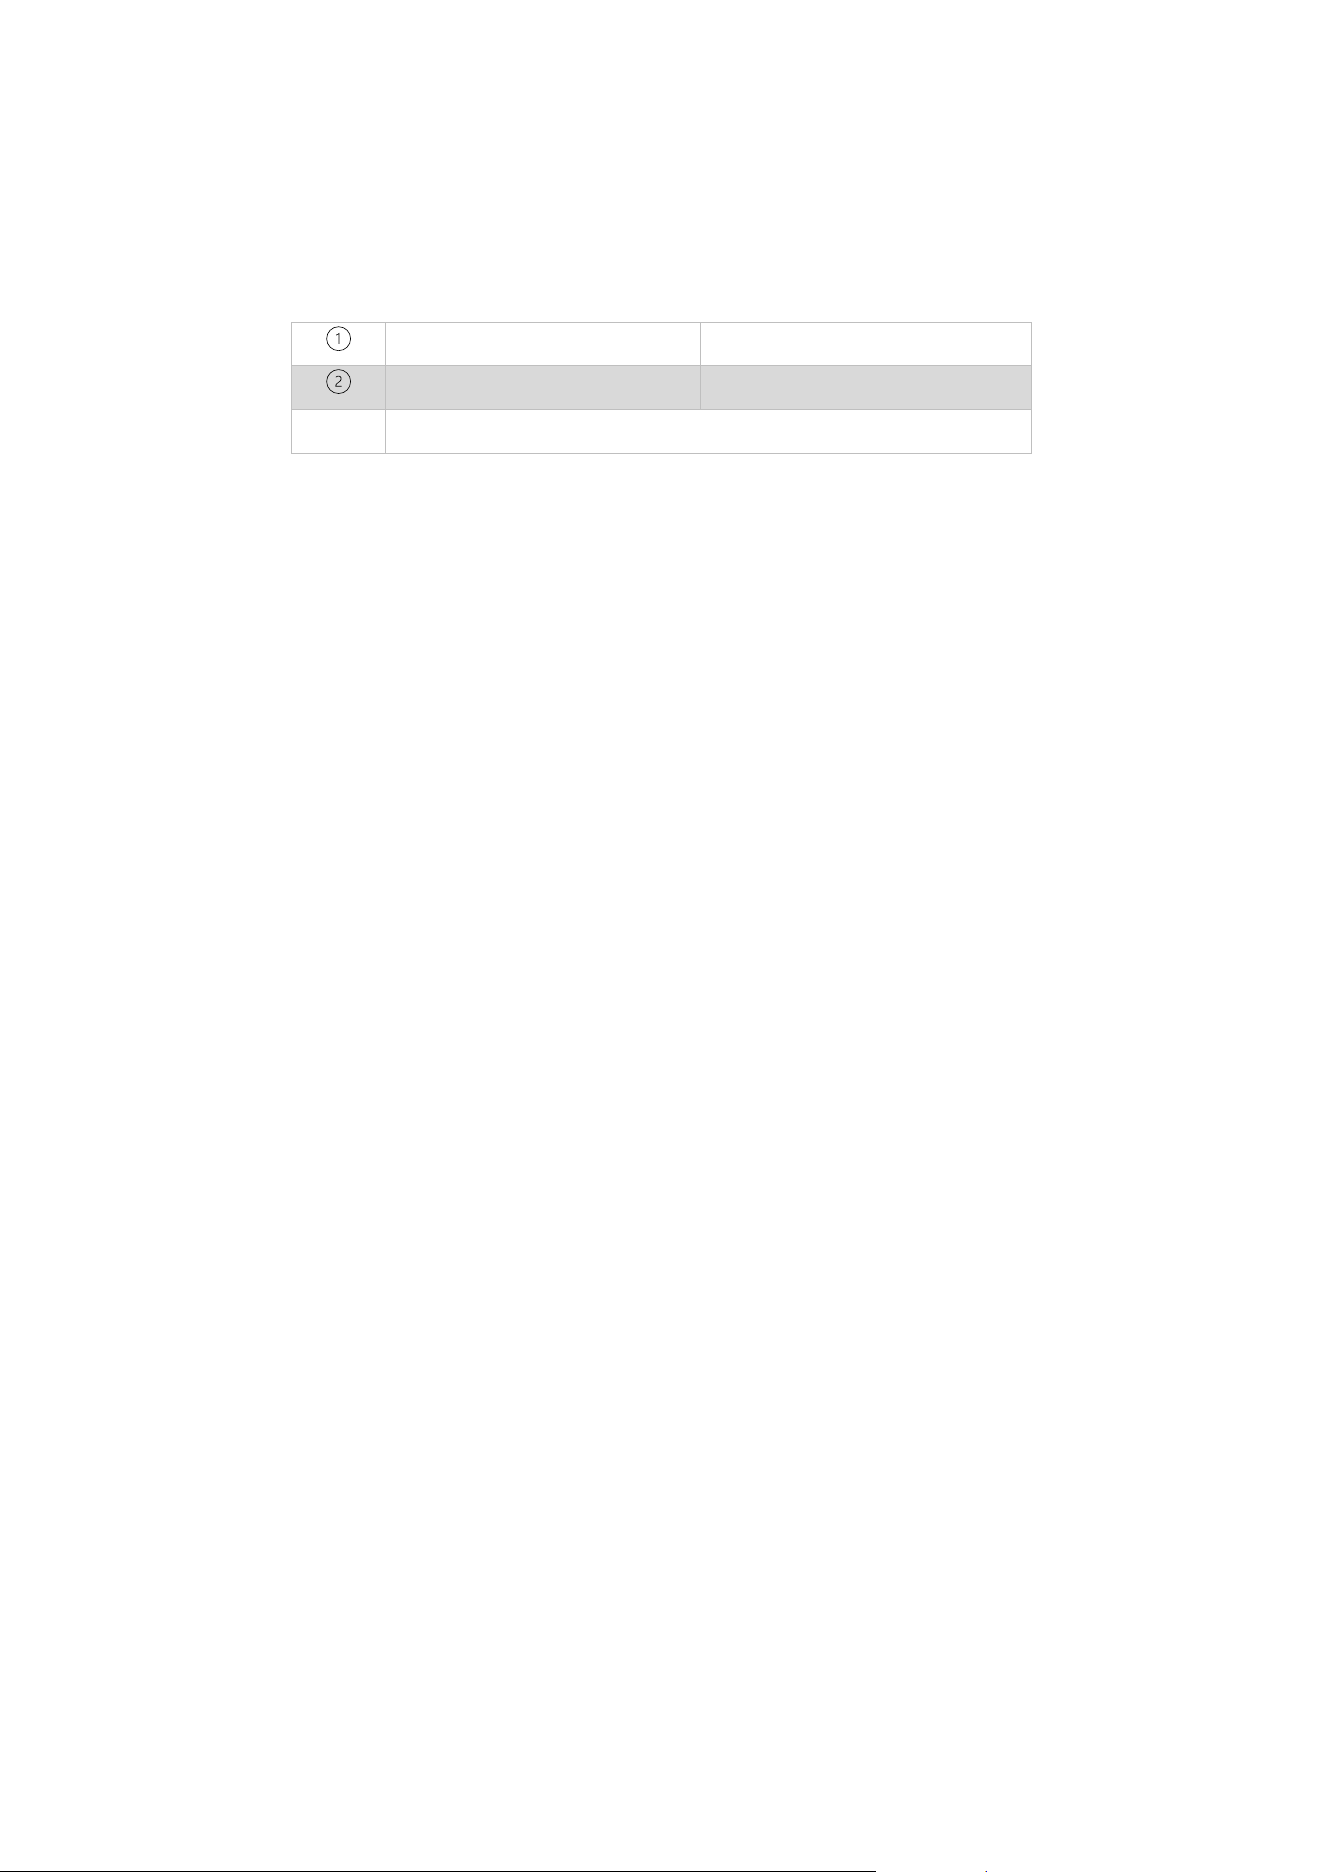
The Area of interest geographic informaon (No. 5 in Figure 28) for the bounding box you created in
step 5 and 6 displays on the right-hand side:
lat (top-left latitude)
long (top-left longitude)
lat (bottom-right latitude)
long (bottom-right longitude)
Total area (Km
2
)
7. Click Export (No. 7 in Figure 28).
The Logs box opens (No. 8 in Figure 28). The Logs box indicates in percentages:
• The downloading les progress,
• The les Processing progress,
• The Zipping progress.
The larger the area of the bounding box you create in step 5 and 6, the longer the compute me.
The informaon saves automacally to the microSD card. The folder contains:
• ANAFI UKR-#Drone Firmware Version number# folder, which contains:
o Binary les: Proprietary les created by Parrot that encode the satellite images.
o A GeoJSON le: Describes the rectangular areas covered by the satellite maps.
• maps_update - A compressed folder required to load Opcal Navigaon binary maps to
the drone (if you chose Opcal Navigaon in step 1) or,
• maps_terrain - A compressed folder required to load elevaon DTED binary maps to the
drone (if you chose DTED in step 1).
There may also be log les detailing download errors, or missing les. Download errors can occur due
to a poor internet connecon, authencaon issues, or missing les from the Map provider. Tiles on
bodies of water are generally unavailable.
Missing les and downloads errors are reported for informaon only. FlightCharts generates GNSS
denied binary les even when some les are missing.
The total map size (in km
2
) that you can copy to ANAFI UKR depends on the storage capacity of the
microSD card. A 128 GB microSD card can store approximately 200,000 km² of map data.
NOTE: The binary les are Parrot proprietary les and are therefore unique to Parrot.
11.2.3. Installing maps on ANAFI UKR
1. Remove the microSD card from the computer.
2. Insert the microSD card into ANAFI UKR.
3. Press ANAFI UKR’s Power buon to switch on the drone.
The contents of the microSD card copy to ANAFI UKR’s internal memory automacally.
42
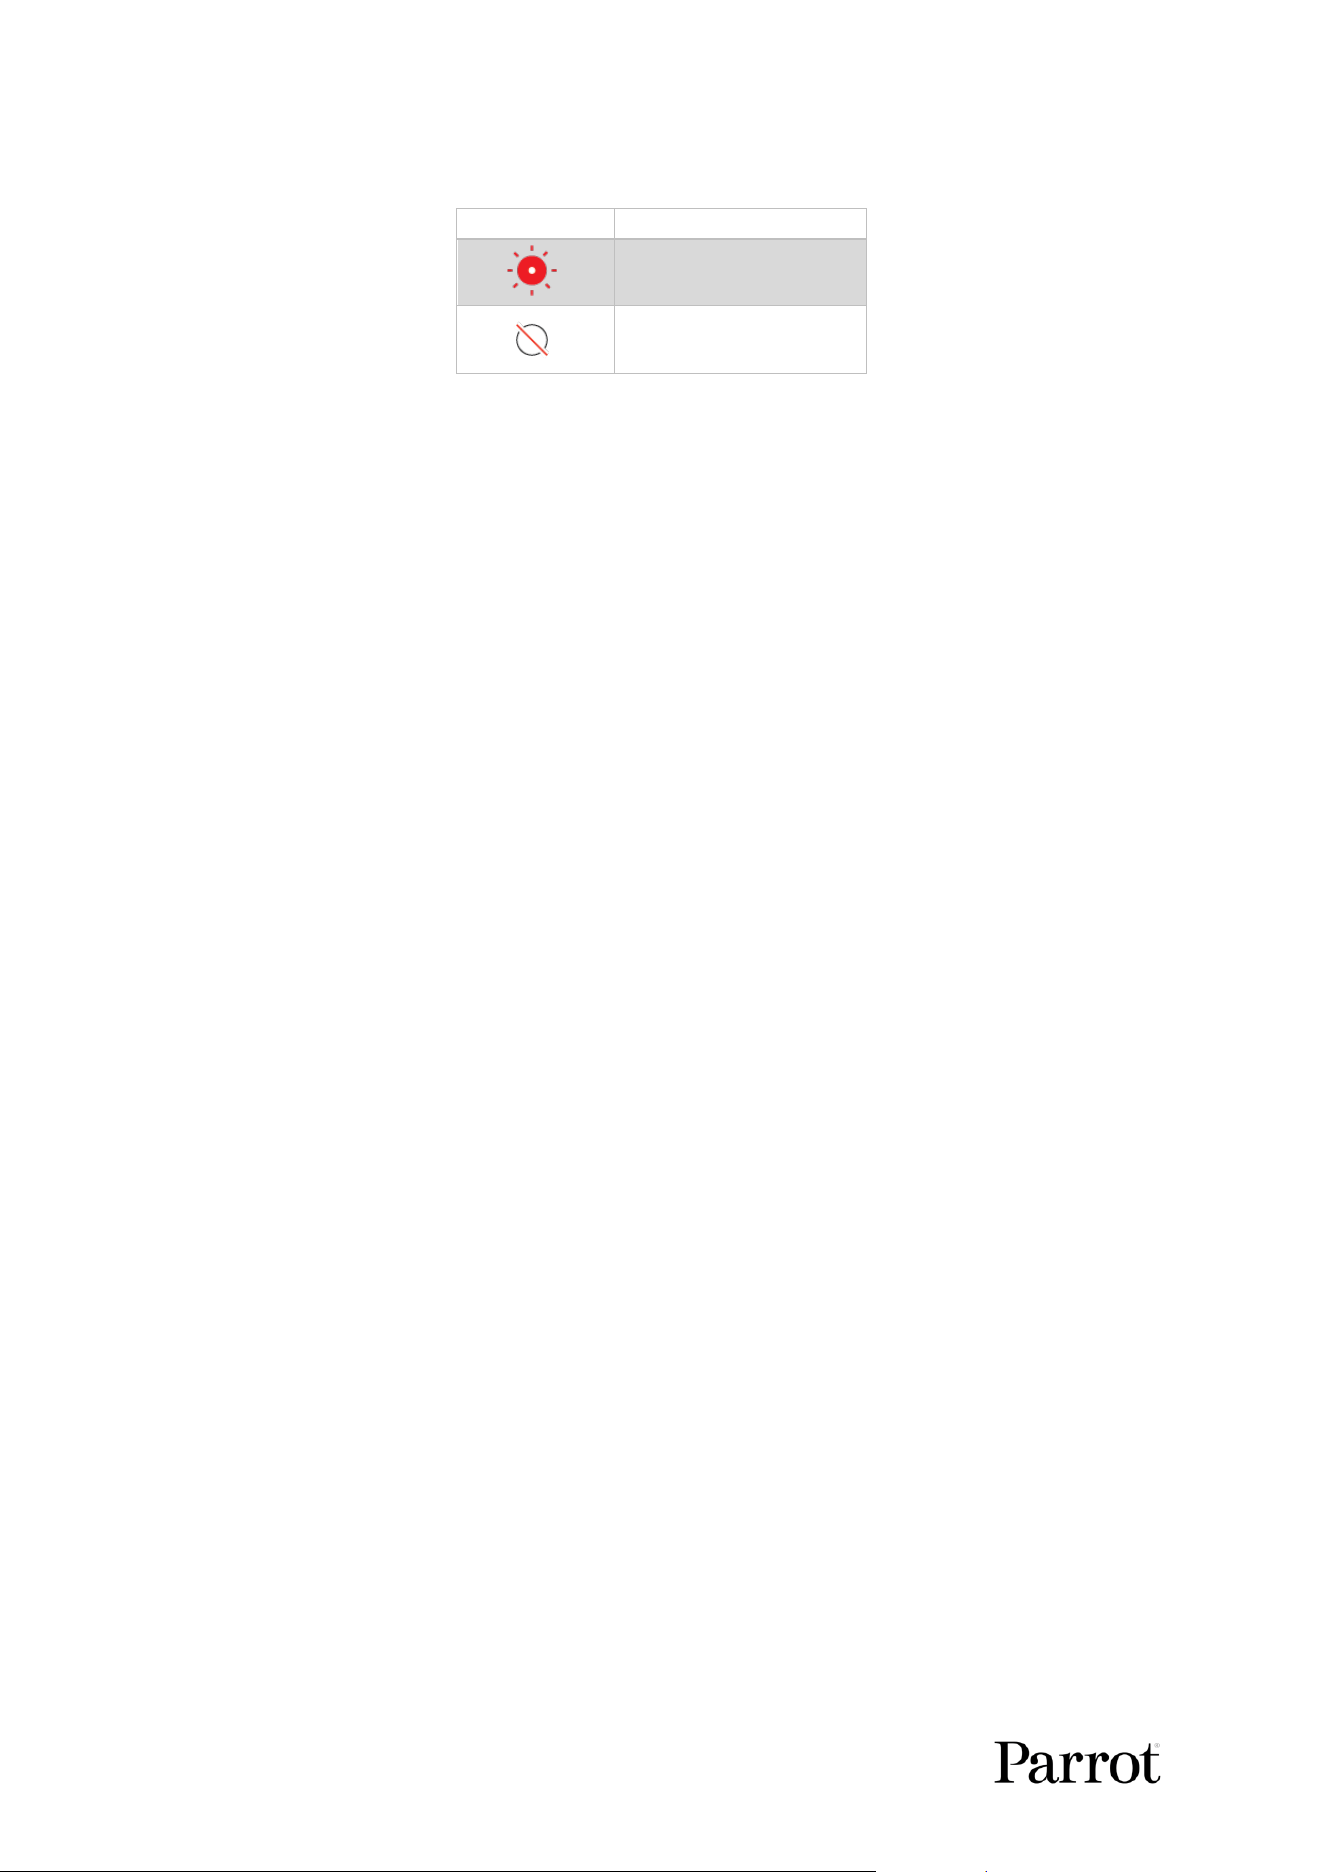
The arm LEDs ash red simultaneously to indicate that the copying process is in progress:
ALL LEDS
LED DURATION
0.2 seconds
0.2 seconds
NOTE: ANAFI UKR’s internal memory is 512 GB. Storing maps on the internal memory reduces the
available space for recording videos or images.
4. Wait for the drone calibraon to complete.
The transfer speed depends on the UHS speed class of the microSD card. With a microSD card with a
UHS-1 speed class, you can expect transfer speeds of up to 6 GB per minute.
The maps created with the FlightCharts soware are now available to use.
5. On the Skycontroller UKR tablet, open FreeFlight 8.
6. Tap Sengs.
7. Tap Maps.
8. Under Interface, tap See on map beside:
a. Display areas covered by elevaon maps (DTED) - if you created a DTED map.
b. Display areas covered by opcal navigaon maps - if you created an Opcal
Navigaon map.
For more informaon, refer to the Skycontroller UKR & FreeFlight 8 user guide (chapter: Sengs /
Maps).
A N A F I U K R
43
© 2026 Parrot Drones SAS. All Rights Reserved.
12. Maintenance and troubleshoong
This secon describes basics procedures to maintain your drone and troubleshoot most issues you
may encounter using ANAFI UKR. In addion, drone and controller reset procedures can be useful
before a change of operator or operang structure.
12.1. Changing propeller blades
TIP: Replace propeller blades if they sustain even minor contacts with the environment. Replace
propeller blades every 100 ight hours, as part of scheduled maintenance.
ANAFI UKR propeller blades can be replaced, instantly without tools. Follow this procedure to replace
a propeller blade:
1. Unfold the arm that supports the blades which require replacement.
2. Hold the motor (round rotang part) of the propeller between your le thumb and index
nger.
3. Unfold the blades.
4. Pinch the propeller hub (between the blades) with your right thumb and index.
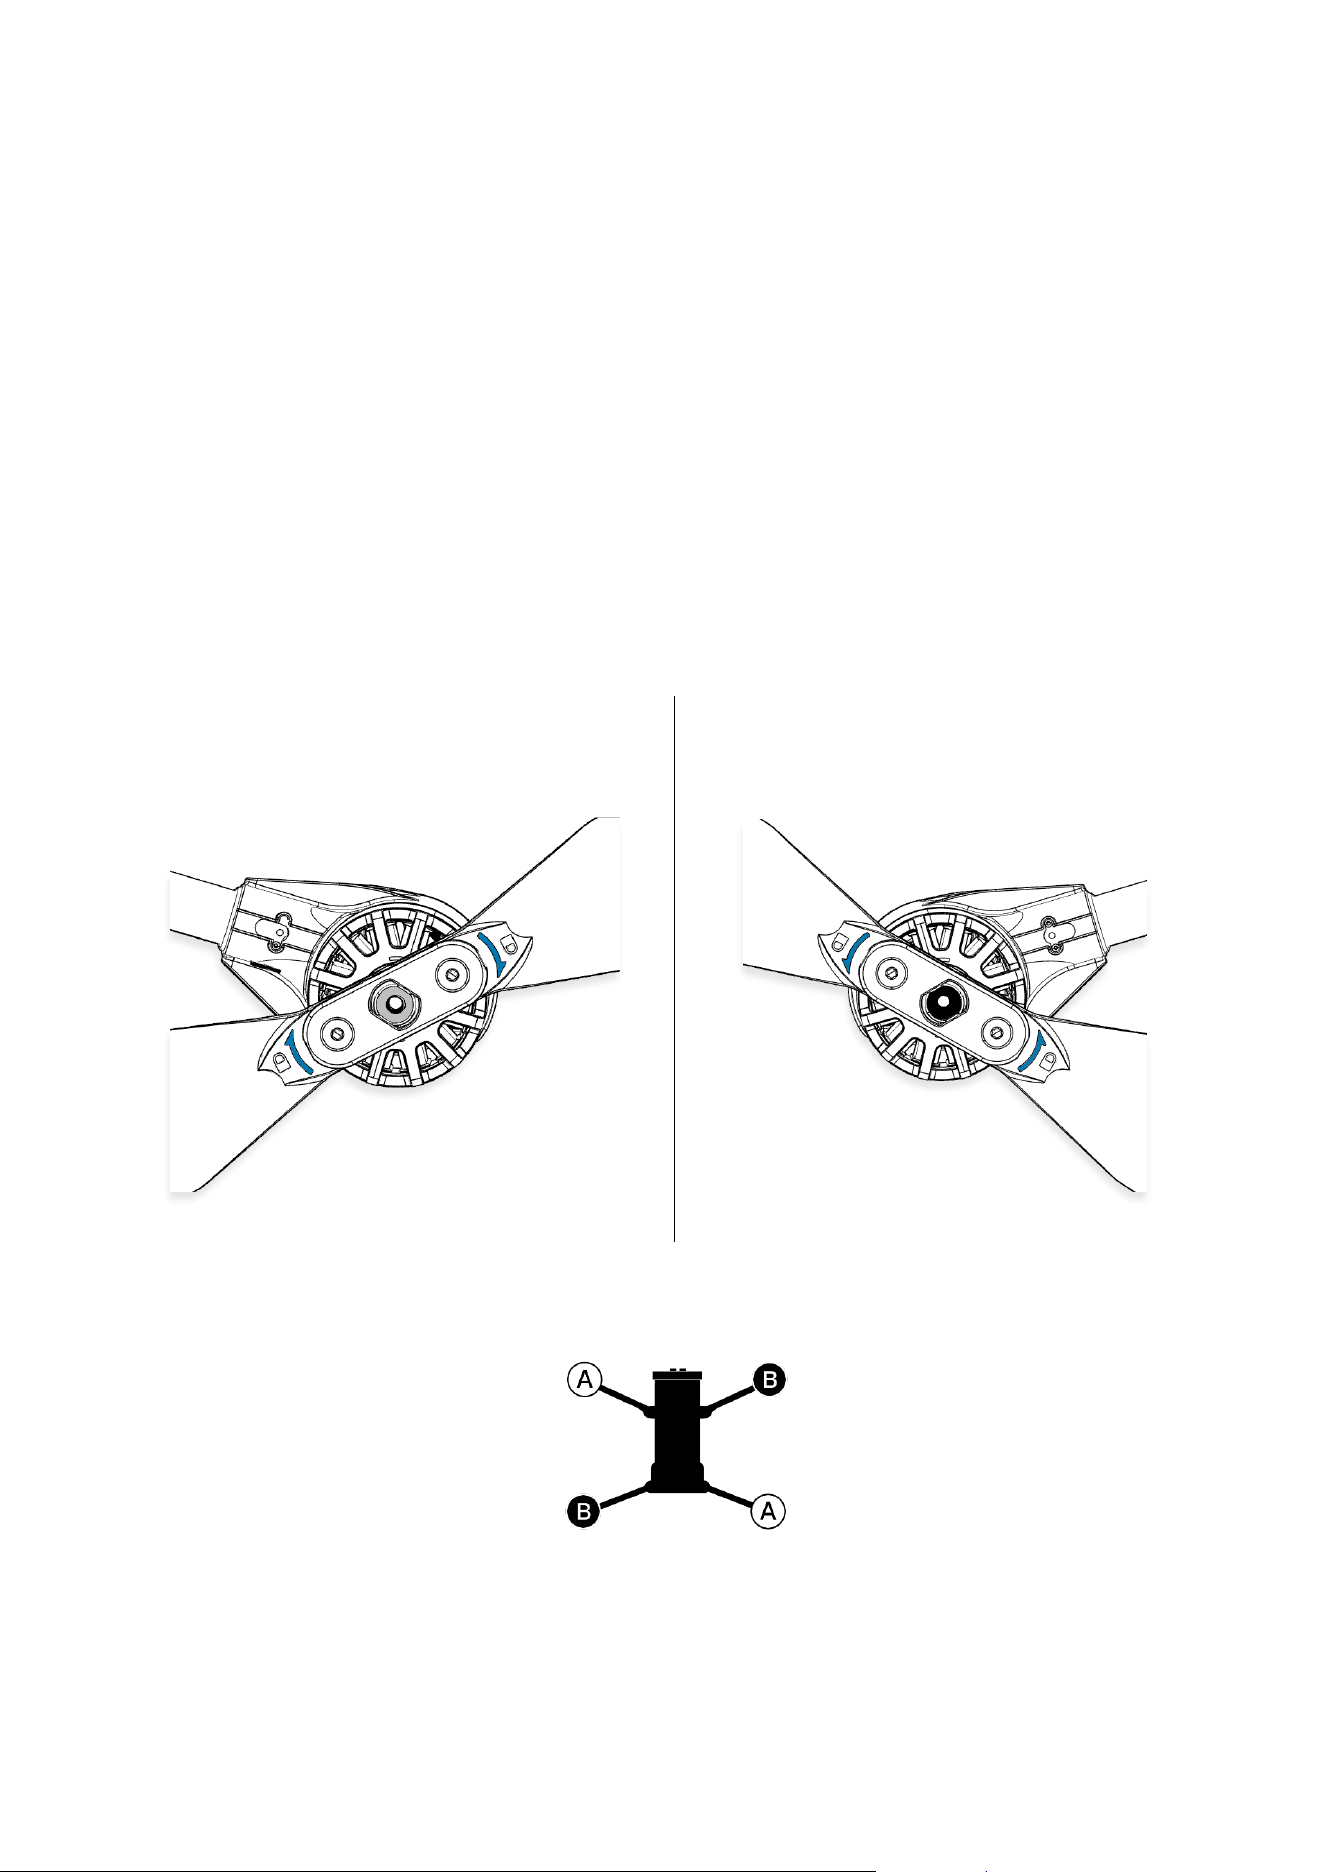
A. blades: unscrew used/damaged A blades (Front
left & rear right) counterclockwise and screw new
ones on clockwise.
B. blades: unscrew used/damaged B blades (Rear
left & front right) clockwise and screw new ones on
counterclockwise.
Figure 29: ANAFI UKR propeller aachment direcon
Ensure that your blades respect the following diagram. The propeller hubs are color coded; A blade
hubs are silver, B blade hubs are black.
ANAFI UKR’s propellers are foldable. It is not necessary to remove the propellers aer they are
screwed on.
CAUTION: Do not remove the propellers unless you need to replace them. Do not overghten the
propeller hubs. Overghtening or frequent removal of the propellers may weaken the thread lock and
reduce the propeller assembly’s xaon quality.
44
12.2. ANAFI UKR drone hard reset
Hard resetting ANAFI UKR reverts the drone’s most recent firmware to its original state. Parrot
recommends the drone hard reset as a first intent procedure for several issues, notably gimbal
calibration troubles. It cleans all media, logs and credentials from the drone. For this reason, ensure
that you back up all your Drone memory FreeFlight 8 media before resetting ANAFI UKR.
To hard reset ANAFI UKR:
1. Power o the ANAFI UKR.
2. Press and hold ANAFI UKR’s Power buon unl the lemost LED ashes red/green
3. Release the Power buon.
ANAFI UKR reboots. The reset is successful.
The same procedure can be performed through the Reset factory sengs buon of ANAFI UKR’s
page, in FreeFlight 8.
12.3. Smart baery hard reset
A hard reset of ANAFI UKR’s battery may correct battery issues. Parrot recommends a battery hard
reset whenever the battery’s behavior is unexpected.
Follow this procedure to hard reset the smart baery:
1. Connect the smart battery to a power source.
2. Regardless of the battery’s behavior, press and hold the Power button for 15 seconds.
3. Release the Power button.
The hard reset is successful if the battery’s first LED alternates green and red, the other LEDs flash one
after the other.
TIP: Replace smart baeries aer 300 charge/discharge cycles to ensure lasng performance.
12.4. Webserver
ANAFI UKR has a webserver feature. This feature allows the user to access addional informaon,
and addional opons for the drone.
Access to the webserver requires:
• A computer
• An internet browser
• A USB-C to USB-A cable
To access the ANAFI UKR webserver:
1. Power on ANAFI UKR
2. Connect ANAFI UKR to a computer with a USB-C to USB-A cable
NOTE: Ensure that the USB-C cable is connected to the USB-C port located underneath ANAFI UKR.
Do not use the USB-C port on the smart battery.
3. Open a web browser on your computer.
4. In the browser's address bar, enter the following IP address:
192.168.43.1

A N A F I U K R
45
© 2026 Parrot Drones SAS. All Rights Reserved.
IMPORTANT: Ensure that the browser does not add https:// before the IP address. Using http:// is
sufficient.
The webserver interface opens:
Figure 30: ANAFI UKR webserver interface
Click 1 of the 10 tabs to display addional informaon about ANAFI UKR, or have addional opons:
• INFO
• MISSIONS
• MEDIA
• UPDATE
• REPORT
• SDK
• FDR
• TERRAINS
• FLIGHTPLANS
• DIAGNOSTICS
12.4.1. Oine drone rmware update via webserver
If the device is to be operated strictly oine, an alternave oine update procedure is available. Your
Parrot reseller can provide you with the update le to be saved on and executed on the device.
Perform an oine update via the webserver feature. To access the webserver, connect ANAFI UKR to
a computer with a USB-C to USB-A cable.
On the webserver:
1. Click the UPDATE tab
2. Select the update file.
12.5. Update via drone internal storage
1. Power on ANAFI UKR.
2. Connect ANAFI UKR to a computer with a USB-C to USB-A cable.
3. On the computer, open the file explorer.
4. Click ANAFI UKR
5. Click Internal
6. Copy the update file archive to the root of internal folder.
Important: The update file must be called ana3-classic.tar.gz
7. Power off ANAFI UKR.
8. Disconnect ANAFI UKR from the computer.
9. Power on ANAFI UKR again.
The drone automatically restarts and performs the update. The update process lasts approximately 3
minutes.
10. When the update is complete, check the firmware version.
11. Follow steps 1 – 4 again.
12. On the computer file explorer, right-click on the device. A menu opens.

46
13. Click Properties.
12.6. Update via external storage
1. Format the MicroSD card via FreeFlight 8
2. Insert the MicroSD card into a computers card reader.
3. Copy the update file archive to the root of MicroSD card.
Important: The update file must be called ana3-classic.tar.gz
Ensure that ANAFI UKR is powered off.
4. Insert the MicroSD card into ANAFI UKR’s MicroSD card slot. Refer to chapter 9.3. Installing a
microSD card for more information.
5. Power on ANAFI UKR.
The drone automatically performs the update. The update process lasts approximately 3 minutes.
12.7. Imaging metadata
Photos produced by Parrot drones embed both standard and custom metadata, including image
capture and drone ight metadata, synchronized with the picture acquision me, both in JPEG and
DNG (raw) formats. For more informaon about photo metadata, refer to this link:
hps://developer.parrot.com/docs/groundsdk-tools/photo-metadata.html
Videos produced by Parrot drones, embed both the streamed and the recorded video metadata that
are publicly accessible, allowing advanced processing from aerial videos. For more informaon about
video metadata, refer to this link: hps://developer.parrot.com/docs/groundsdk-tools/video-
metadata.html
12.8. Ecosystem logs for technical support
You must provide Parrot with the drone and controller logs to receive technical support. For more
informaon, contact sa[email protected]om
Follow this procedure to download the ANAFI UKR logs:
1. Connect ANAFI UKR to a PC with 1 of the enclosed USB-C to USB-C cables
2. Power on the drone
3. In the PC le explorer, double-click ANAFI UKR
4. Double-click the log folder
5. Copy all the available data from the log folder
12.9. Recover ANAFI UKR
In the event of a hazardous situaon, follow this procedure:
1. Press RTH on the Skycontroller UKR to cause the drone to return to its home posion.
2. If the drone does not return, aempt to iniate an automac landing by pressing the
Take-o/Land buon on the Skycontroller UKR.
3. Try to locate the ANAFI UKR posion.
A N A F I U K R
47
© 2026 Parrot Drones SAS. All Rights Reserved.
4. Ensure that this event does not cause a subsequent hazardous situaon based on its last
known posion.
12.10. Drone end of service life
Refer to the ight safety guide manual (available upon request) to nd complementary informaon
on how to recycle this product.
The propeller blades and the carry box are made of plasc, they can be disposed of in a recycle bin.
All the electronic devices (ANAFI UKR, Skycontroller UKR, smart baery) must be returned to a
collecon point (e.g. stores, recycling center) to be recycled. It is indicated by the following logos:
WARNING: If there is a reasonable expectaon that the loss of control will cause injury to a
person, contact the emergency services. Hazardous circumstances may result in a situaon where
normal use of ANAFI UKR is not respected. Read and respect the operaonal requirements
described in chapter 13. appendix 1: Operaonal checklist.

48
13. Appendix 1: Operaonal checklist
This operaonal checklist applies to ANAFI UKR (a quadcopter with foldable arms, and a removable
baery) paired with Skycontroller UKR. Certain elements in the following checklist may not apply to
your individual conguraon.
13.1. Soware update & calibraon
Aircraft
Software up to date
Skycontroller UKR
Software up to date
Tablet
Software up to date
FreeFlight 8
Software up to date
Aircraft gimbal calibration
OK
Aircraft magnetometer calibration
OK
Aircraft thermal calibration
OK
Aircraft Cursor on Target calibration
OK
Aircraft horizon calibration
OK
Aircraft thermal/visible image calibration
OK
Skycontroller UKR magnetometer calibration
OK
Skycontroller UKR joystick calibration
OK
IMPORTANT: Parrot strongly recommends that you regularly refer to the Release Notes Skycontroller
UKR available upon request, to ensure that you have the latest versions of the drone and controller
rmware, and FreeFlight 8 App.
13.1. Skycontroller UKR & Aircra o
Aircraft
Removed from case.
Aircraft arms
Unfolded, locked.
Aircraft gimbal protective cover
Removed.
Aircraft propellers
Intact, free, fully screwed on.
Aircraft battery
No swelling, locking tab FULLY UP, 100% charged.
Aircraft battery LEDs
4 x OK
Aircraft battery temp
Within operational range.
Skycontroller UKR battery
100% charged.
Skycontroller UKR battery LEDs
4 x OK
Tablet battery
OK, 100% charged.
13.2. Skycontroller UKR & Aircra on
Aircraft
On, gimbal stabilization OK
Skycontroller UKR
On, antenna unfolded
Skycontroller UKR / Aircraft radio link
MARS radio link solid green in FreeFlight 8
Tablet
On
Tablet / Skycontroller UKR USB connection
USB-C cable correctly inserted
FreeFlight 8
Launched
System connected
Solid blue LED on Skycontroller UKR
Image feed & telemetry
Live video feed
Mission Mode
Set
Quick settings menu
Verify GPS, obstacle avoidance, Auto record, CoT set
Flight parameters
Set to Standard
RTH and safety
Set
GPS
Verified (enabled)
Flight area
Set
Connection
Radio configured

A N A F I U K R
49
© 2026 Parrot Drones SAS. All Rights Reserved.
Max altitude/Max distance
Set
Geocage
Set if needed
Geoawareness
Activate if needed
Image settings
Set
Skycontroller UKR button configuration
Joysticks inverse / Default, button mode configured
Map on FreeFlight 8
OK, offline map uploaded if required
GNSS settings
Set
Global reactivity
Set
Camera tilt speed
Set
Inclination
Set
Vertical speed
Set
Rotation speed
Set
Final check
All systems ‘green’
13.3. Before Take-o
Weather / Wind
Checked and OK
Take-off Zone
Clear
Aircraft status
In the green
Propellers
No obstructions in propeller arc
Take-off/Land command
Take-off
13.4. Aer Take-o
Precise Home
Set
Right joystick
Pitch and roll confirmed
Left joystick
Yaw and altitude confirmed
Gimbal trigger
Up and down
Zoom trigger
In and out
Video
Clear and visible
Connection
MARS radio link confirmed
13.5. Before landing
Weather / Wind
Checked and OK
Landing Zone
Clear
Aircraft status
Check
Take-off/Land command
Land
13.6. Aer landing
Check motors are stopped
OK
Aircraft status
OK, no alarms
Skycontroller UKR
Off, stored away
Tablet
Off
Aircraft battery
Off
Aircraft
Check drone/gimbal/propellers
Aircraft
Install gimbal protective cover
Aircraft arms
Folded
Aircraft system
Stored away
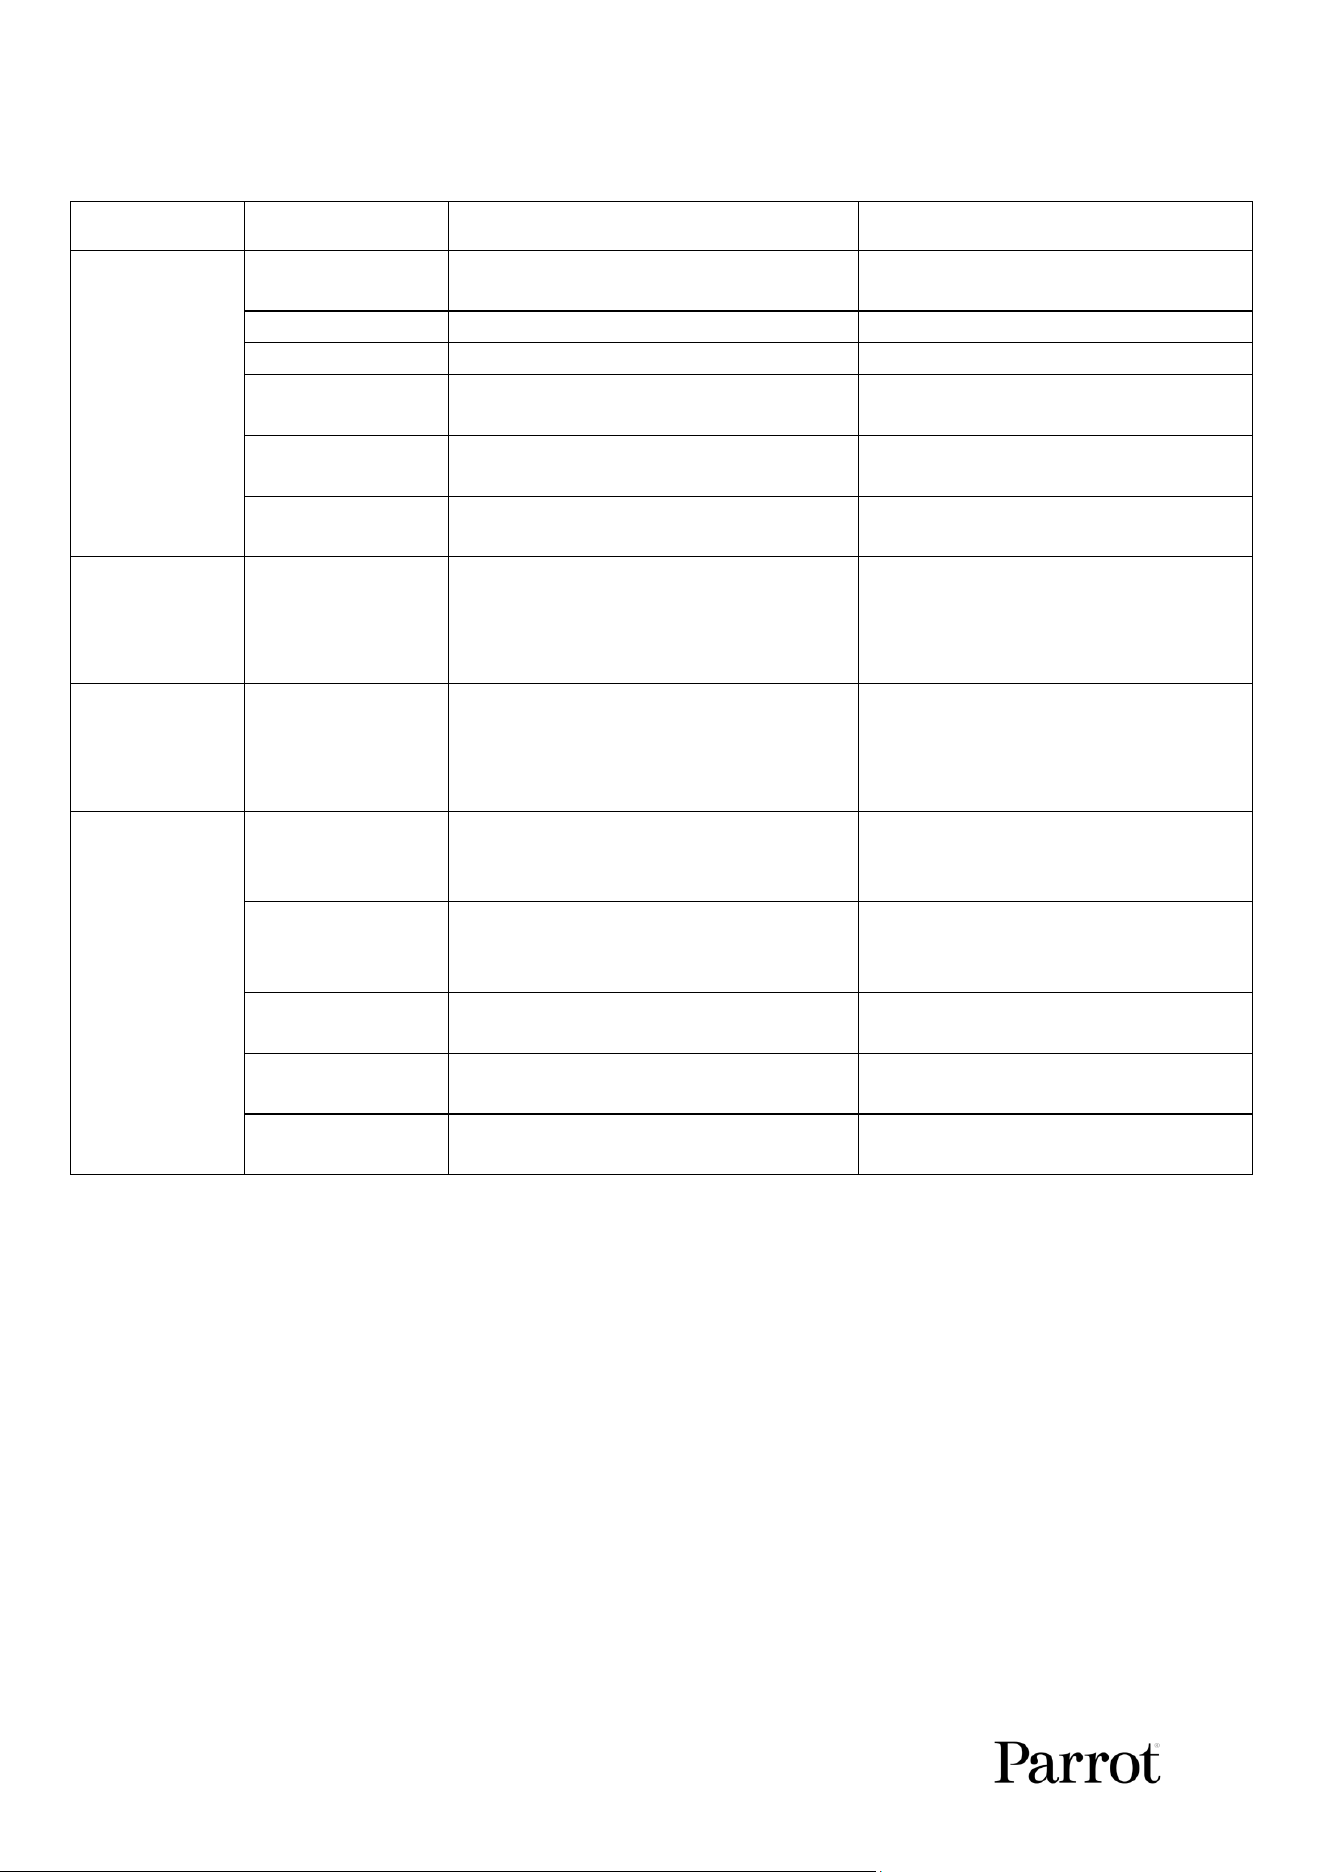
50
14. Appendix 2: System data
Product
Type of files
Path
Data protection
Drone
Recorded media
internal/DCIM/
Storage encryption possible via
FreeFlight 8
Drone full logs
log/FDR/
File encrypted
Drone light logs
log/fdr-lite/
File encrypted
Sensor images
(FCR)
log/FCR/
None
User GPS Denied
maps
internal/maps/
None
User Elevation
(DTED) maps
internal/terrain/
None
Drone SD Card
Recorded media
DCIM/
Storage encryption possible via
FreeFlight 8
Controller
Controller full
logs
logs/
File encrypted
Android
device
Media Gallery
Thumbnails
(cache)
Android/data/com.parrot.freeflight8/
cache/thumbnails/
Android device can be password
protected
Media
downloaded from
drone memory
DCIM/Parrot/Medias/
<drone_serial>/Flights/<date_time>/
Android device can be password
protected
Stream
recordings
DCIM/Parrot/Recordings/
<date_time>/
Android device can be password
protected
Screenshots
DCIM/Screenshots/
Android device can be password
protected
User Offline maps
Android/data/com.parrot.freeflight8/
files/OfflineMaps/
Android device can be password
protected

A N A F I U K R
51
© 2026 Parrot Drones SAS. All Rights Reserved.
15. Appendix 3: Disclaimer
1. ANAFI UKR IS NOT A TOY and must not be used or handled by persons under the age of 18
years.
2. BEFORE USING ANAFI UKR:
(A) CAREFULLY READ the user guide and all informaon and documentaon available upon
request. Documentaon is subject to change and may be updated at any me and
without prior noce (hereinaer referred to as "Parrot Documentaon"). SPECIAL
ATTENTION must be given to the paragraphs marked: WARNING, CAUTION,
IMPORTANT.
(B) Ensure that the complete drone ecosystem is up-to-date. Parrot regularly releases
rmware updates for:
• FreeFlight 8
• ANAFI UKR
• Smart Baery
• Skycontroller UKR
Updates add new features, improve stability, and performance of the complete system. Updates are
mandatory and must be systemacally performed prior to any ight to ensure maximum
performance and safety. Flying with a non-up-to-date system may impact warranty rights and
jeopardize safety requirements.
Due to connuous improvement, the screenshots in this user guide may dier to the user interface
you see on the FreeFlight 8 version installed on your Skycontroller UKR. The most up-to-date version
of the user guide is available on request.
(C) ENSURE YOU ARE AWARE OF THE REGULATIONS APPLICABLE TO THE USE OF DRONES
AND THEIR ACCESSORIES (hereinaer referred to as "Applicable Regulaons");
(D) REMEMBER that ANAFI UKR may expose others and yourself to EQUIPMENT DAMAGE,
PERSONAL INJURY, OR BOTH, which could result in serious harm or death.
3. All Parrot drones must always be used with genuine Parrot smart baeries. Non-genuine
baeries are forbidden, and their use will void the warranty, and impact safety requirements.
4. All Parrot drone systems include a charger. This is the only recommended chargers to use to
charge your Parrot drone’s Smart Baery and Skycontroller UKR. Other generic USB chargers
may be used provided that they are cered according to the country of use and have the
applicable rang/specicaon. Performance and warranty are only guaranteed when using a
genuine charger included in the Parrot drone system. Parrot takes no responsibility (warranty
or safety) for third party USB chargers being used with a Parrot system.
5. Videos and photos promoted and adversed by Parrot Drones SAS and its aliates have been
made by and with experienced professionals and drone pilots. IN CASE OF DOUBT RELATING
TO THE USE OF YOUR ANAFI UKR DRONE AND ITS ACCESSORIES, ALWAYS REFER TO THE MOST
RECENT VERSION OF THE PARROT DOCUMENTATION.
6. Ensure that all calibraons are performed.
IMPORTANT: ANAFI UKR’s warranty is void if you fly the drone without the required calibrations.

52
7. TO THE MAXIMUM EXTENT PERMITTED BY APPLICABLE LAW, PARROT DRONES SAS, ITS
SUBSIDIARIES, AND THEIR RESPECTIVE DISTRIBUTORS AND RESELLERS SHALL NOT BE LIABLE
FOR ANY DAMAGES ARISING FROM, OR IN CONNECTION WITH NON-COMPLIANCE OF
PARROT DOCUMENTATION OR THE APPLICABLE REGULATIONS BY YOURSELF OR ANY PERSON
USING YOUR ANAFI UKR.
8. 3rd party licenses for online and oine maps.
The choice of the map provider is the sole responsibility of the user and may depend on various
factors such as the ight mission, the country, the provider's terms and condions, the available
budget, etc. The user must determine the most suitable map provider, subscribe to the appropriate
license and comply with the terms and condions of the license.
By default, FreeFlight 8 uses a MapTiler
©
license as the online map provider. By using MapTiler
services, soware, or map content (“MapTiler Services”), you agree to be bound by the following
terms which may be updated from me to me: hps://www.mapler.com/terms/
If you do not agree to the MapTiler terms, do not use the MapTiler Services. All worldwide
intellectual property and proprietary rights related to MapTiler Services are the exclusive property of
MapTiler AG, a Swiss company with principal place of business at Hofnerstrasse 98, 6314 Unterageri,
Switzerland (“MapTiler”) or respecve third-party supplier(s). Copyright © MapTiler
hps://mapler.com/copyright/
To use other maps or MBTiles package, you must subscribe to a license and/or obtain a token from
the selected map provider, which may imply extra cost. Certain Map providers may prohibit specic
use cases or countries. You must read the applicable terms and condions carefully. To obtain advice
or a legal opinion on a parcular situaon, consult a licensed legal professional in your jurisdicon.
Oine maps mode requires at least one MBTiles package to be imported into FreeFlight 8. MBTiles
packages can be generated with a tool of your choice.
You may generate MBTiles package with QGIS, an Open-Source Geographic Informaon System.
Copyright © 2004 - 2020 QGIS Development Team. hps://www.qgis.org
QGIS is released under the GNU General Public License (GPL). Developing QGIS under this license
means (inter alia) that you can inspect and modify the source code. You will receive a full copy of the
license with your copy of QGIS, and you can also nd it in Appendix A: GNU General Public License.
Please read all requirements implied by a GPL license carefully, including legal consequences on
derivave works. hps://qgis.org/resources/hub/.
Parrot specically disclaims all liability for any acons resulng from your use of any map provider
soluon or service. There is no guarantee of availability, funconality and eciency of the soluons
and services provided by the map providers.

