14+
for age
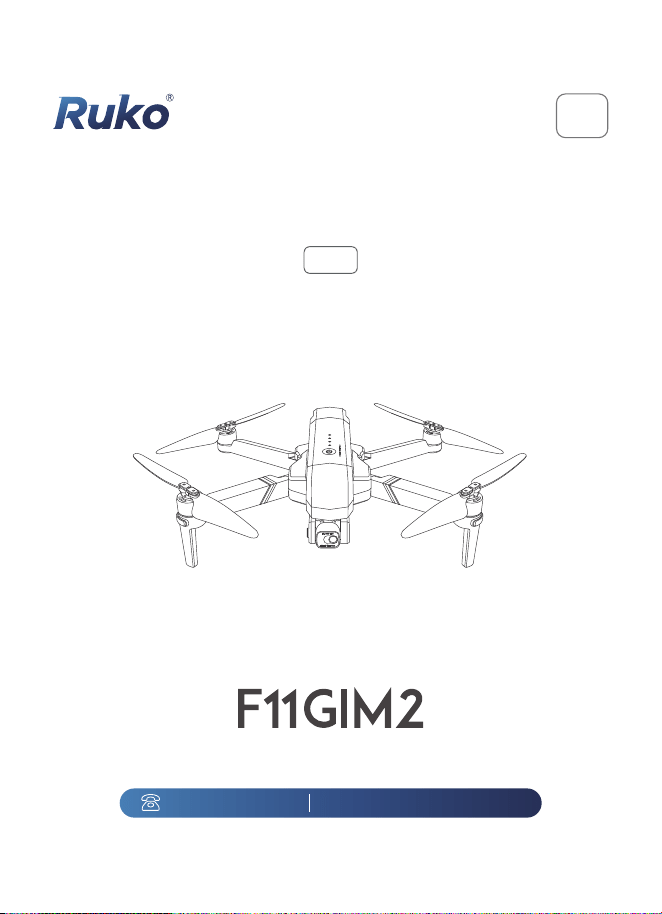
User Manual
v2.0
CONTACT US FOR MORE TECH SUPPORT
+1 (888)892-0155
Mon-Fri 7:00AM - 7:00PM (PST)
+1 (888)892-0155
Mon-Fri 7:00AM - 7:00PM (PST)
CONTACT US FOR MORE TECH SUPPORT
+86 19129317359

Copyright ©2023 Ruko All Rights Reserved.
Contents
1
1 Using This Manual
2 Package Contents
3 Preface
1.1 Legend
1.2 Read Before the First Flight
1.3 Video Tutorials
1.4 Download the App
6.1 Controller Features
6.2 Controlling the Drone
6.3 Optimal Transmission Zone
6.4 Emergency Stop
6.5 Charging the Controller
4
4
4
4
4
5
6
10
13
4 Warning
5 Fly Safety
15
6 Remote Controller
15
16
21
21
22
7.1 Preparing the Aircraft
7.2 Drone Diagram
7.3 Assemble the Propeller
7.4 Intelligent Flight Battery
7.5 Gimbal and Camera
22
7 Drone
22
23
23
24
24

Copyright ©2023 Ruko All Rights Reserved.
2
278 Drone Status Indicators
9 Product Functions Profile
9.1 Return to Home
9.2 Waypoint Flight
9.3 Point of Interest
9.4 GPS Follow Me
9.5 Image Recognition Follow Me
9.6 Hand Gesture
28
28
30
31
32
32
33
10 Connect the APP
10.1 Download the APP
10.2 Connect the APP with Drone
33
33
33
11 APP Functions
11.1 Control
11.2 APP Icons Introduction
34
34
35
12 APP Setting
12.1 Setting
36
36
13 APP Functions
13.1 APP One Key Share Function
13.2 How to Download the Pictures and Videos
38
38
40
14 Flight
14.1 Take Off/Landing Procedures
14.2 Quick Start
42
42
42

Copyright ©2023 Ruko All Rights Reserved.
3
15 Specifications
15.1 Drone
15.2 Gimbal Stabilization
15.3 Camera
15.4 5G Transmission
15.5 APP/Live View
15.6 Remote Controller
15.7 Intelligent Flight Battery
15.8 Charging Cable: Type-c
44
44
44
45
45
45
46
46
49
16 Common Problems
47
17 Accessories Support
52
Read the following documents before using Ruko drone.
User Manual
Quick Start Guide
Disclaimer and Safety Guidelines
It is recommended to watch all the guide videos on our website and
read the disclaimer andsafety guidelines before using for the first
time.
1.1 Legend
1.2 Read Before the First Flight
Recommend Warning Hints & Tips Reference
1 Using This Manual
Scan the QR code to watch the guide videos, which
demonstrate how to use Ruko drone.
1.3 Video Tutorials
①
②
③
F11GIM2 User Manual
Copyright ©2023 Ruko All Rights Reserved.
4
Scan the QR code downlaod "RUKO DRONE" app.
1.4 Download the App
The IOS version of RUKO DRONE is
compatible with IOS v9.0 and later.
QR code of "RUKO DRONE" for Apple IOS system.
The operation system version of RUKO DRONE
is compatible with Android v5.0 and later.
QR code of "RUKO DRONE" for Android system.
The following terms are used throughout the product literature to
indicate various levels of potential harm when operating this product :
Copyright ©2023 Ruko All Rights Reserved.
5
F11GIM2 User Manual
2 Package Contents
Drone Remote Controller Drone Battery
User Manual Allen Wrench Screw
Gimbal Cover Spare Propeller USB Charging Cable

F11GIM2 User Manual
Copyright ©2023 Ruko All Rights Reserved.
6
Important
Safety Precautions
3 Preface
Thank you for purchasing the Ruko-Series GPS aircraft. Please read
all instructions and warnings carefully before operating. Please also
keep this instruction manual for future reference and maintenance.
This product shoud be operated by the people who are over 14 years
old. It is a precision device; integrating machinery and electronics
with air mechanics and high frequency transmission.It requires
correct assembly and debugging to avoid any accident. The user
should operate and control this product in a safe manner. In case of
incorrect operation, it may cause serious injury or damage property.
It can also be lost due to incorrect operation.
This product is suitable for experienced UAV pilots no less than 14
years of age.
In the event of a problem during using, operating, or maintenance,
please contact the local sales agent or retailer or keep in touch with
the responsible staff of our company.
This R/C aircraft can be dangerous when in use, please make sure
you keep it far away from any persons or spectators when flying.
In-correct installation, poor conditions, or users not familiar with
operation may cause damage to the aircraft or injure people or may
cause an unexpected accident. Please pay close attention to flying
safety and learn to recognize more dangerous conditions which may
cause an accident due to your own negligence.

Copyright ©2023 Ruko All Rights Reserved.
7
F11GIM2 User Manual
Keep it far away from any structures or crowds.
This R/C aircraft may vary slightly in speed or sensitivity while flying
and can cause potential danger. Therefore, please keep it far away
from crowds, buildings, trees, structures, high-voltage wire, etc.
Please also avoid flying in adverse weather conditions such as rain,
electrical storms, and high winds to ensure safety of the user, any
spectators, and surrounding property.
Keep it away from any moist environment.
The inside of the aircraft is composed of many precision electronic
and mechanical parts. Therefore, please try to avoid any moisture or
water content from entering the main body of the aircraft as it may
cause a breakdown of the mechanical and electronic parts and thus
cause an accident.
Only operate with included parts for intended use.
Please use the original parts made by Ruko-Series for any re-equip-
ping or maintenance to ensure flying safety. Please operate and use
only under the scope of the product function permitted. Using
un-approved parts will void warranty.
DO NOT use for any illegal purpose or use beyond the scope of which
your local laws and regulations have stipulated.
Avoid controlling it independently.
New users may have certain difficulties during the early stages of
learning to operate this aircraft. Please try to avoid operating the
aircraft alone. When available, always operate this aircraft under the
guidance of a more experienced user.
Do not operate under the influence of drugs or alcohol.
Please operate this R/C aircraft according to your own state and
flying skill. Any fatigue, bad mental state, or incorrect operation may
increase the probability of accidental risk.

F11GIM2 User Manual
Copyright ©2023 Ruko All Rights Reserved.
8
Do not operate under the influence of drugs or alcohol.
Please operate this R/C aircraft according to your own state and
flying skill. Any fatigue, bad mental state, or incorrect operation may
increase the probability of accidental risk.
Please keep a safe range from aircraft when using top speed.
When the operator is flying in high speed, please keep the aircraft far
from the pilot and any surrounding persons or objects so as not to
cause danger or damage.
Store it in a cool, dry place.
The R/C aircraft is composed of material such as metal, fiber, plastic,
electronics, etc. Therefore, please keep it away from any heat source
and avoid prolonged exposure to direct sunlight. Excessive heat
exposure can cause distortion and damage.
Copyright ©2023 Ruko All Rights Reserved.
9
F11GIM2 User Manual
This equipment has been tested and found to comply with the
limits for a Class B digital device, pursuant to part 15 of the FCC
Rules. These limits are designed to provide reasonable protection
against harmful interference in a residential installation. This
equipment generates, uses and can radiate radio frequency
energy and, if not installed and used in accordance with the
instructions, may cause harmful interference to radio
communications.
However, there is no guarantee that interference will not occur in a
particular installation.
If this equipment does cause harmful interfer-ence to radio or
television reception, which can be determined by turning the
equipment off and on, the user is encouraged to try to correct the
interference by one or more of the following measures:
Reorient or relocate the receiving antenna.
Increase the separation between the equipment and receiver.
Connect the equipment into an outlet on a circuit different from
that to which the receiver is connected.
Consult the dealer or an experienced radio/TV technician for help.
Please note that changes or modifications not expressly approved
by the party responsible for compliance could void the use's
authority to operate the equipment.

4 Warning
F11GIM2 User Manual
Copyright ©2023 Ruko All Rights Reserved.
10
There is important information contained in this package and instruc-
tion manual, please keep it for future reference.
You have the responsibility to make sure that this model of aircraft
won't cause injury to others' body or cause any damage to proper-
ty.
Please operate strictly as shown on the instruction manual when
debugging or assembling this aircraft. During the process of flying
or landing, please pay more attention to keep 1-2 meters between
the user and the aircraft to avoid colliding to the head or face or
body, which may cause injury.
Our company and distributors won't be responsible for any incor-
rect operation, which may cause loss or damage or injury to the
body.
Children ages 14 and up should use this product under the guid-
ance of an adult. This product is FORBIDDEN to be used by children
under 14 years old.
Please correctly assemble and use this product as shown on the
instruction manual or packing instruction. Some parts should be
assembled by an adult.
Small parts are included with this product. Please place it beyond
the reach of the children to avoid a CHOKING HAZARD or parts
being mistakenly swallowed.
Playing on the road or near high traffic areas is strictly FORBIDDEN
so as not to cause an accident.
Please dispose of the packing material timely so as not to cause
injury to children.
Please DO NOT disassemble or re-equip the aircraft as it may
cause a breakdown of the aircraft during flying.

F11GIM2 User Manual
Copyright ©2023 Ruko All Rights Reserved.
11
Batteries in the battery compartment of the charger should be
inserted into the designated power source which has the same
logo as the product.
Built-in rechargeable 3.7V lithium polymer battery included in the
transmitter.
Only the original charging cable make from our factory can be
used.
Charging cable is not a toy.
When charging the battery, please conduct it under the surveil-
lance of an adult. Please also keep it far away from any combusti-
ble object when charging. Please keep this aircraft within eyesight
when charging.
Please DO NOT make it short-circuited or squeeze the battery so
as not to cause an explosion.
DO NOT mix the Li-ion battery with a different type of battery.
Intelligent lithium battery is loaded in the Quad-rotor. Both built-in
or external can be used for charging.
Please DO NOT make the battery short-circuited or decompose
the battery or throw the battery into the fire; DO NOT place the
batteries near the high temperature or heated area (such as near
the fire or near the electric heating device).
The aircraft should be kept far away from any other electric com-
pliance or equipment as far as possible or kept far away from the
place where having the magnetic object nearby as they may cause
interference with each other.
Please keep the safe distance from the high-speed rotating rotor
so as not to cause twisted or danger of being wounded or being
cut.
Engine will heat up. Please DO NOT touch it to avoid being burned
or injured.
F11GIM2 User Manual
Copyright ©2023 Ruko All Rights Reserved.12
Please DO NOT close this product to your ear as it may cause injury
to your hearing.
Type-C 5V wall charger recommended for charging. DO NOT use
any charger stronger than 5V.
To comply with the command of the magnetic environment
requirement formulated by the Aviation Radio Bureau and the
related authority, during the regulated period in certain areas,please
stop using the transmitter of this model when such regulation
command is issued.
Keep your UAS within sight.
Never fly over groups of people.
Never fly over stadiums or sports events.
Understand airspace restrictions and requirements.
Product should only be used by adults and children 14 years
and older. Adult supervision required for children under 14
years of age.
F11GIM2 User Manual
Copyright ©2023 Ruko All Rights Reserved. 13
①
②
③
Make sure correctly open the remote control antenna.
Make sure fly in the open area without any interference
and obstacle.
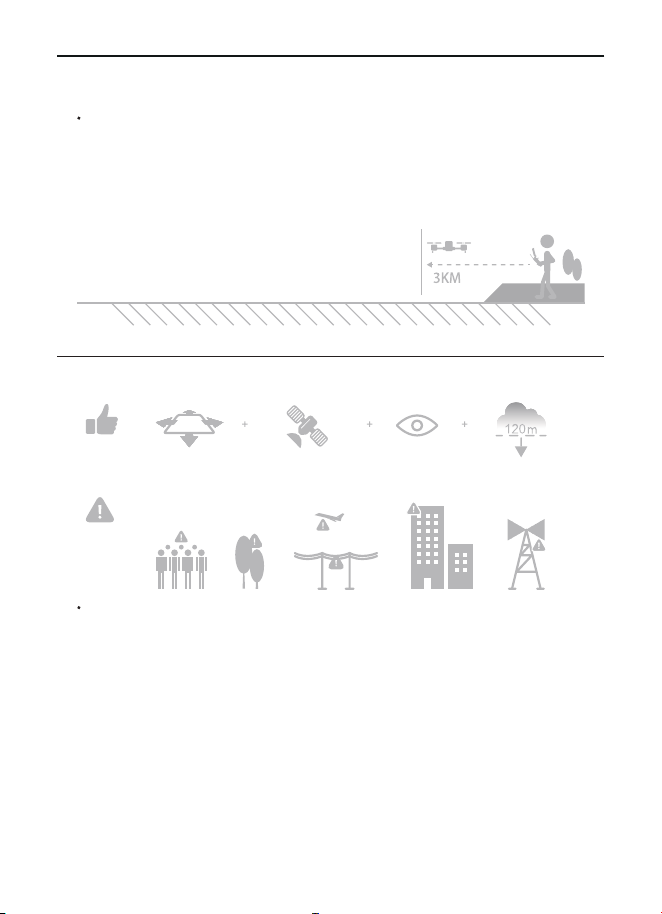
Do not fly against the wind; WIFI transmission distance
is 3KM.
5 Fly Safety
WIFI transmission area requirements:
Fly in Open
Areas
Strong GPS
Signal
Maintain
Line of Sight
Maximum flight
altitude height is
about 120 meters
Avoid flying over or near obstacles, crowds, high voltage power lines,
trees, airport or bodies of water.
DO NOT fly near strong electromagnetic sources such as power
lines and base stations as it may affect the onboard compass.
7m/s
No Fly Zone
Stay away from the rotating
propellers and motors.
F11GIM2 User Manual
Copyright ©2023 Ruko All Rights Reserved.
14
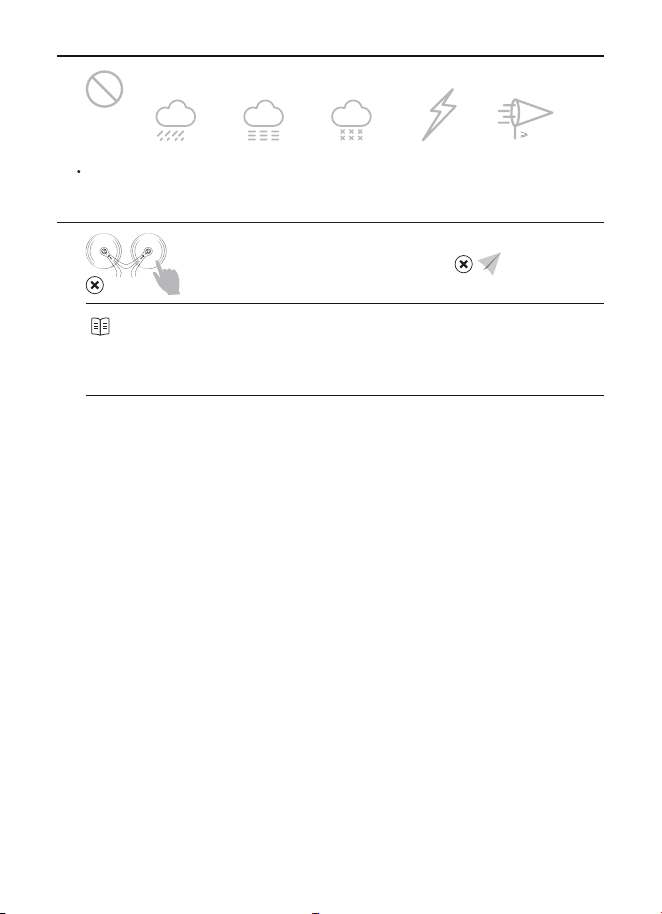
DO NOT use the drone in adverse weather conditions such as rain,
snow, fog and wind speeds exceeding 7 m/s or 16 mph.
It's important to understand basic flight guidelines,for the safety
of both you and those around you. Don't forget to read the Safety
Guidelines before flight.
Copyright ©2023 Ruko All Rights Reserved. 15
F11GIM2 User Manual
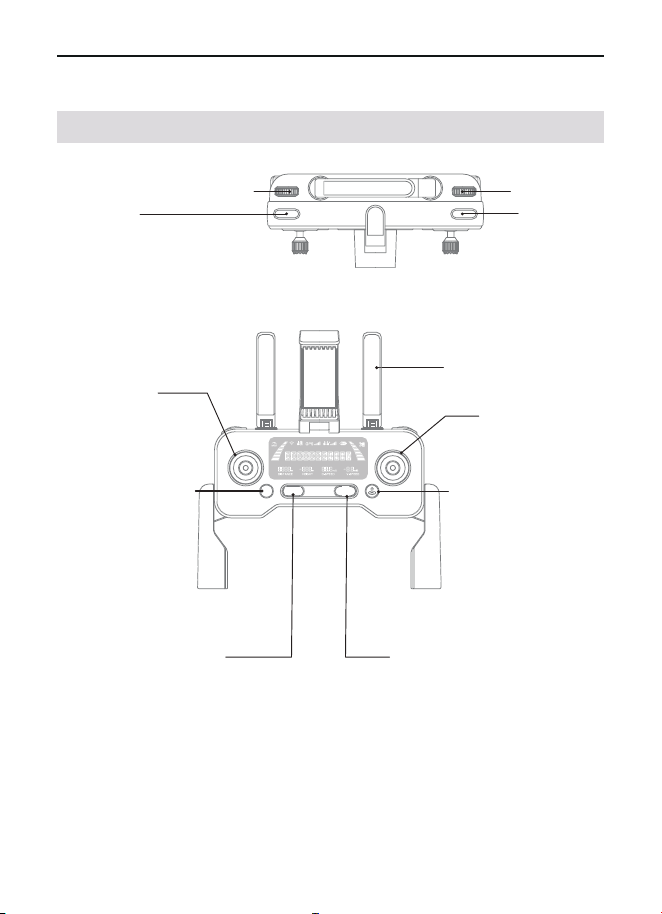
6.1 Controller Features
6 Remote Controller
Camera zoom in and out
Gimbal dial
Shooting
Recording
Throttle stick
Direction stick
Press once, speed
switch; Press and
hold for 5 seconds,
turn off GPS mode
Press once then press
again and hold for 3
seconds to activate
Emergency Stop
Press once check the
battery level, press again
power on.Press once and
then keep pressing
power off
Press once,
Return To Home;
Press again, cancel
Return To Home
Antennas, lift up to
receive signal
F11GIM2 User Manual
Copyright ©2023 Ruko All Rights Reserved.
16
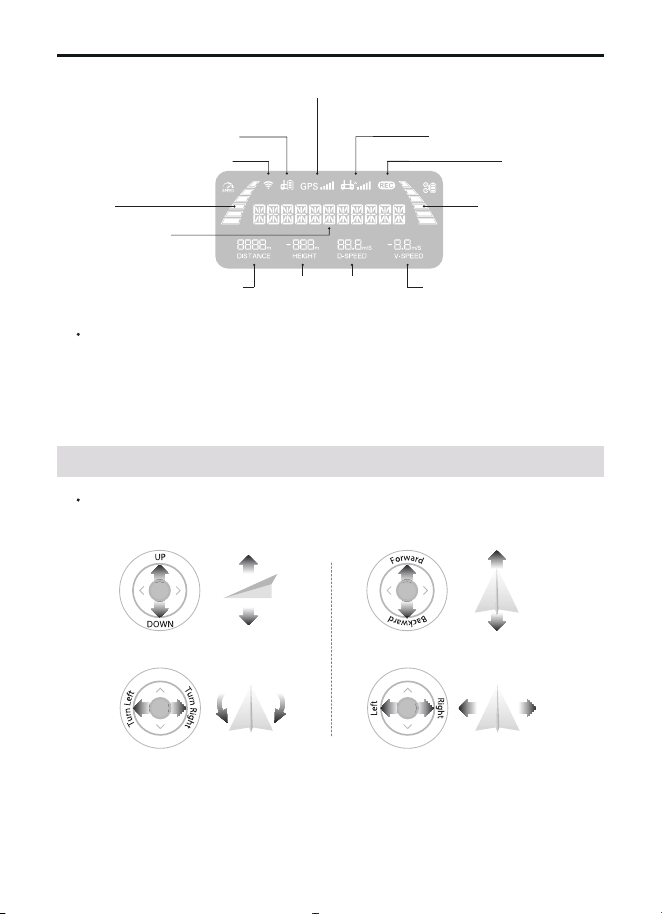
Distance
Status Display
Long-distance Version
Remote Control Battery
GPS signal strength
Remote Control
Signal Strength
Speed
Aircraft Battery
Photo/Video
Height D-speed
V-speed
The F11 GIM2 has three speed mode: Camera mode 14.76 ft/s,
Normal mode 29.53 ft/s, and Sport mode 39.37 ft/s. The default
speed is Normal mode, higher speed will consume battery faster.
Remote Controller Stick Mode-Mode 1 (Default Mode)
6.2 Controlling the Drone
Throttle Joystick
Left Joystick Right Joystick
Direction Joystick
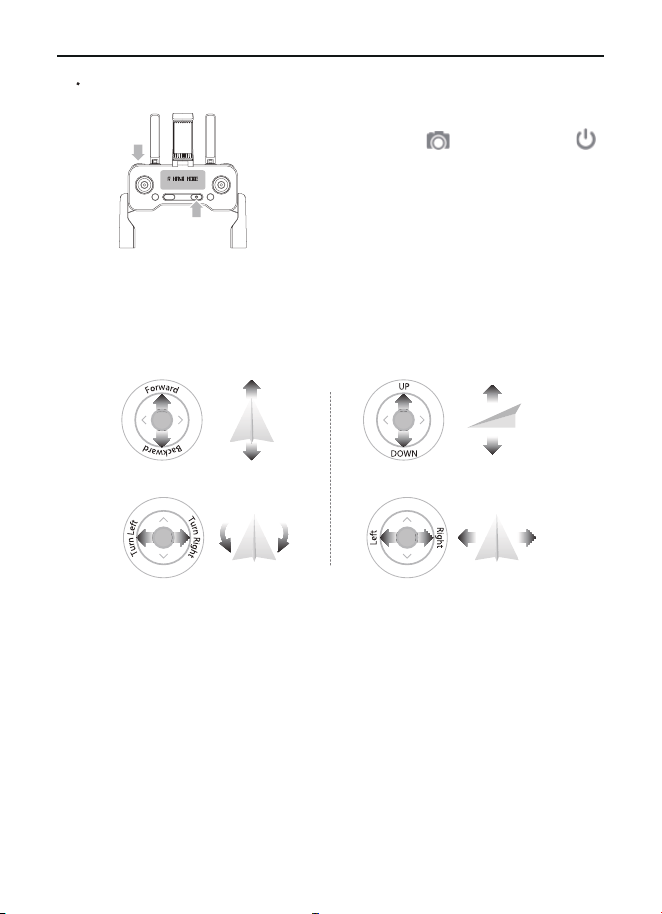
Power off the remote control.
Keep pressing the , clicking the
twice.
(Click once indicating the power level, click
again the remote control beeps three times
and power on, LED screen indicates "RHAND
MODE".)
Note: Once restart, the controller will back to
default mode - Mode 1.
F11GIM2 User Manual
Copyright ©2023 Ruko All Rights Reserved.
17
Switch Remote Controller Stick Mode--Mode 2
Left Joystick Right Joystick
Throttle Joystick
Direction Joystick
F11GIM2 User Manual
Copyright ©2023 Ruko All Rights Reserved.
18
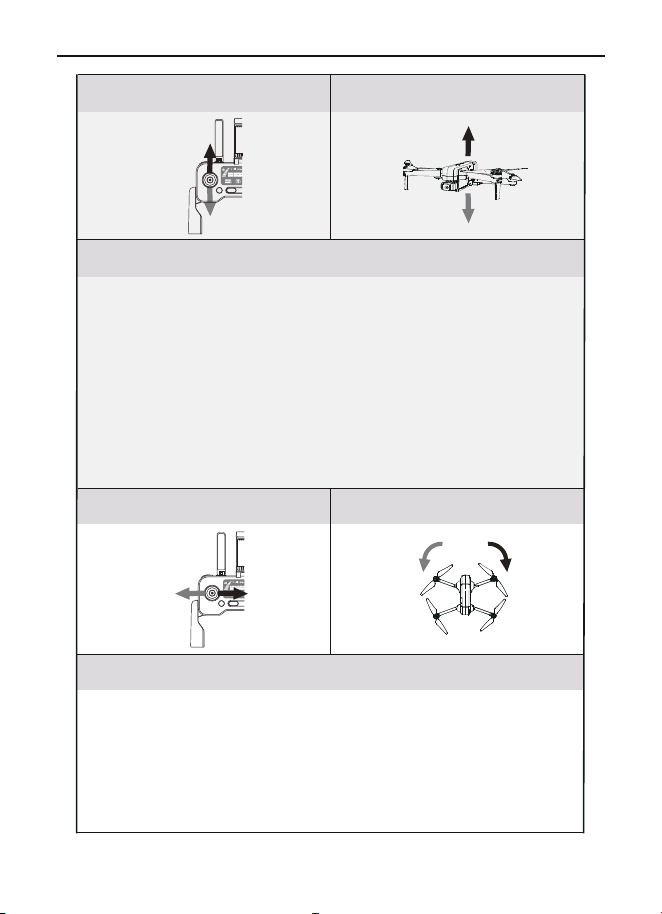
Aircraft DirectionTransmitter (Default Mode)
Aircraft DirectionTransmitter (Default Mode)
Remarks
Remarks
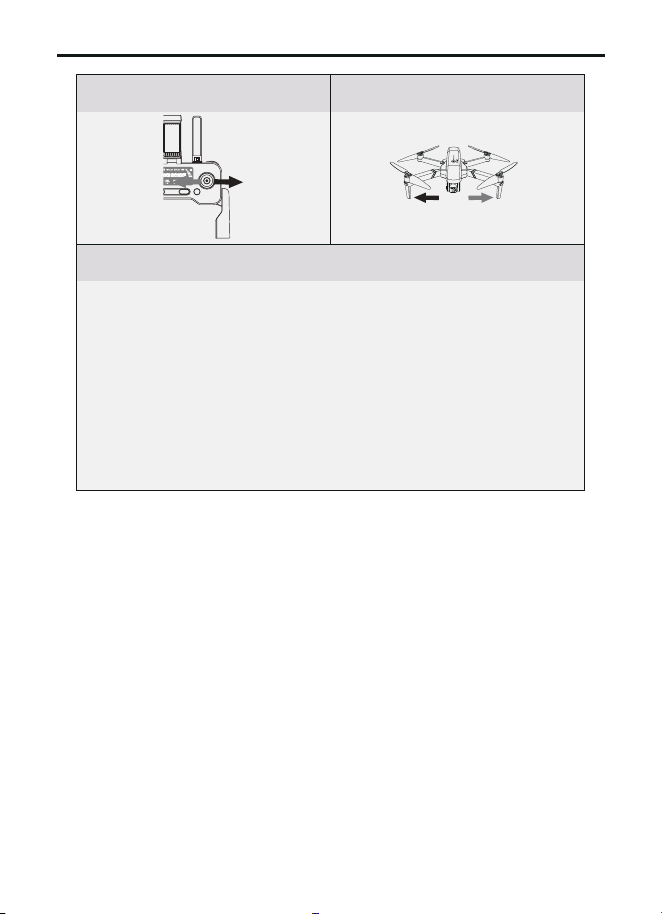
Push up/down the throttle stick to control the aircraft up
and down.
Push up and the aircraft rises. Pull down the lever and the
aircraft lowers. When released, the joystick is in the middle
position and the aircraft remains hovering.
When the aircraft takes, the throttle lever must be pushed
up and the aircraft takes off the ground (please push the
stick slowly to prevent the aircraft from suddenly rush up).
Push the throttle stick left/right to control the aircraft
heading.
Push the stick to the left and the aircraft will rotatecounter-
clockwise. Push the stick to the right and the aircraft
rotates clockwise. In the neutral position, the angular veloc-
ity of rotation is zero, and the aircraft does not rotate.
F11GIM2 User Manual
Copyright ©2023 Ruko All Rights Reserved.
19
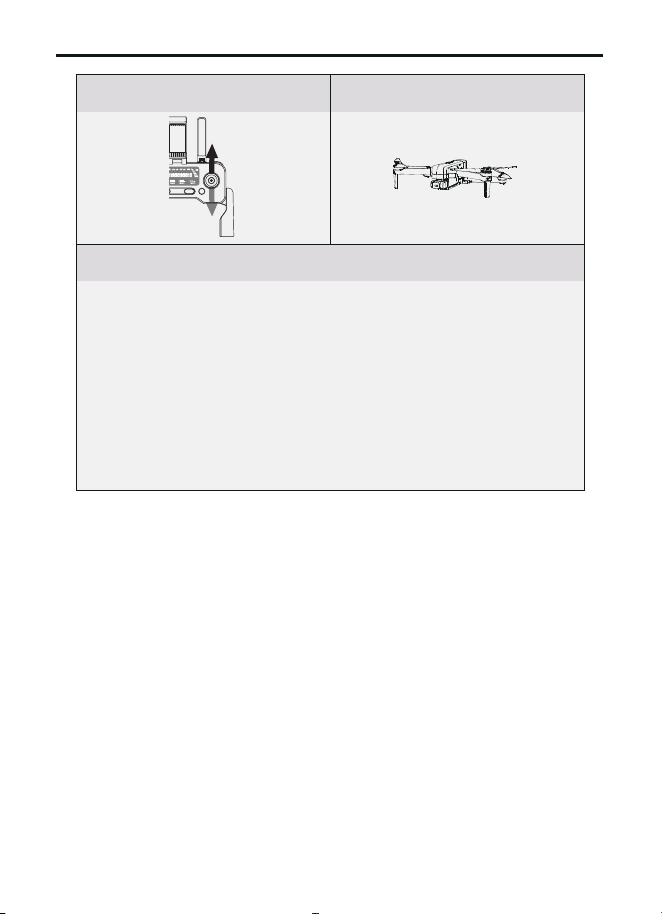
Aircraft DirectionTransmitter (Default Mode)
Remarks
Push up/down the direction bar to control the aircraft to fly
back and forth.
Push the stick up and the aircraft leans forward and flies
forward. Pull down the lever, the aircraft tilts backwards and
flies backwards. The aircraft's front and rear directions
remain level in the neutral position. The joystick offset
corresponds to the angle of the aircraft's front and rear tilt.
The greater the offset, the greater the tilt angle and the
faster the flight speed.
F11GIM2 User Manual
Copyright ©2023 Ruko All Rights Reserved.
20
Push the direction stick left/right to control the aircraft to fly
left and right.
Hit the stick to the left, the aircraft tilts to the left and flies
to the left. Hit the stick to the right, the aircraft tilts to the
right and flies to the right. The left and right directions of
the aircraft remain horizontal in the middle position.
The joystick offset corresponds to the angle of the aircraft
left and right tilt. The greater the offset, the greater the tilt
angle and the faster the flight speed.
Aircraft DirectionTransmitter (Default Mode)
Remarks
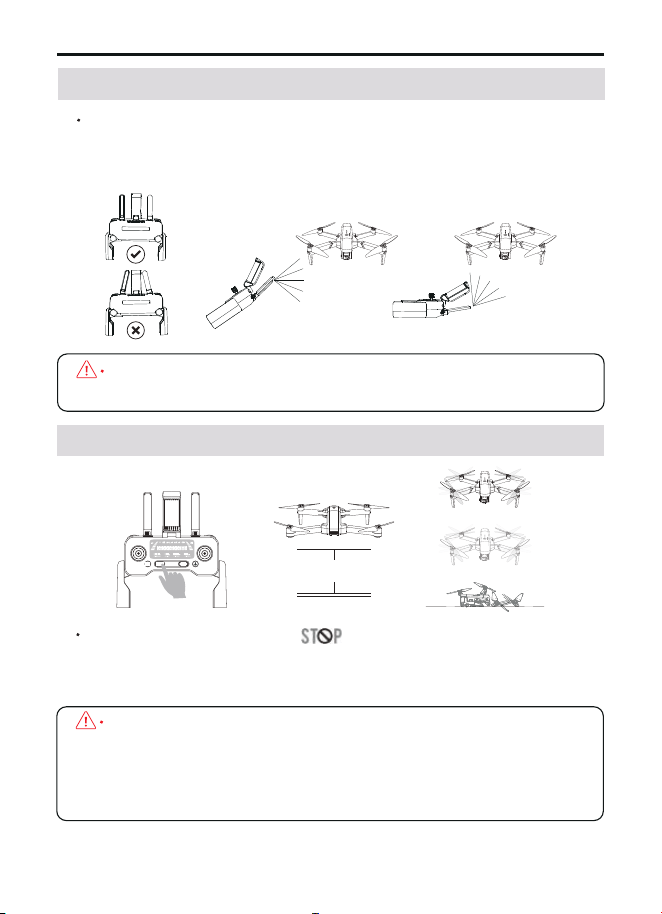
Click once and hold the for 3 seconds to enter into
Emergency Stop mode. It only activated when the drone's flight
altitude within 5-42ft.
F11GIM2 User Manual
6.3 Optimal Transmission Zone
6.4 Emergency Stop
Copyright ©2023 Ruko All Rights Reserved.
21
DO NOT use other wireless devices to avoid interference to the
remote controller.
About 5 feet
The signal between the drone and the remote controller is most
reliable when the antennas are positioned in relation to the aircraft
as shown below.
By using this function the drone motor will stop working
immediately thus fall to the ground, which might cause damage.
Only use this feature when in emergency so as to reduce the
risk of damage or injury.
All aircraft arms are folded before ship out of the factory. Please
follow the steps below to unfold the arms.
F11GIM2 User Manual
6.5 Charging the Controller
7 Drone
Copyright ©2023 Ruko All Rights Reserved.
22
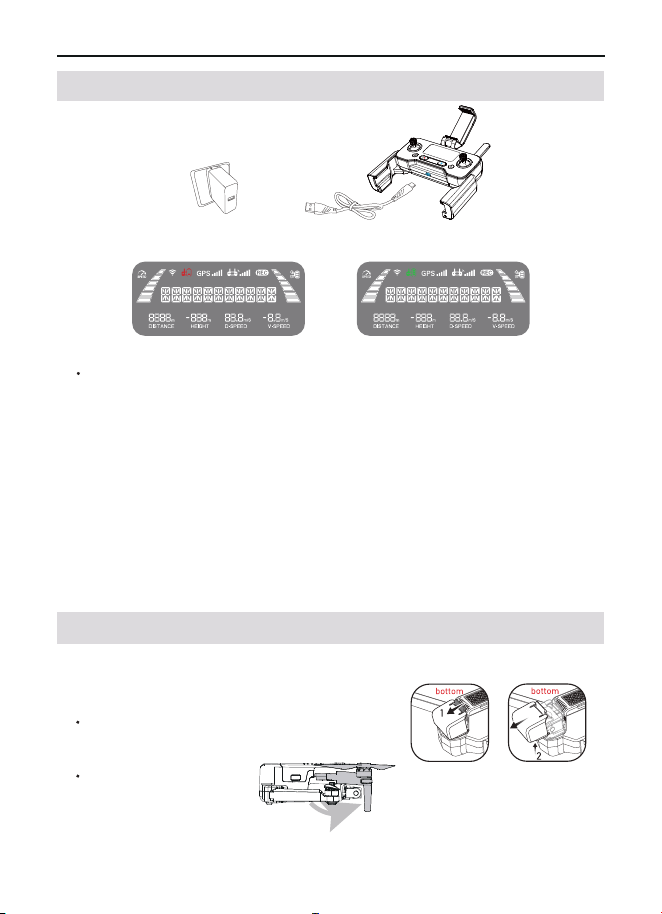
Phone Adapter: 5V--3A
(Not Included)
USB Adapter
(5V/3.0A)
Charging Time: About 2 Hours
(Depending on Charging Adapter)
The Remote Control Is Charging Fully Charged With Remote Control
Unfold the front arms
Take off the Gimbal Cover
7.1 Preparing the Aircraft
When the remote control is charging, the LED screen will indicate
the battery level, when fully charged, it will indicate "BAT 100 PCT"
Controller is built-in 3.7V 1500mAh lithium polymer battery. Use the
original type-C cable to connect an AC power adapter (5V/3A) to
charge. It takes apporximately 2hours to full charge the remote
controller. The charing time depends on what adapter are using,
suggest to use charger with output currency 5V/3A.Never
overcharge.
F11GIM2 User Manual
7.2 Drone Diagram
7.3 Assemble the Propeller
Copyright ©2023 Ruko All Rights Reserved.
23
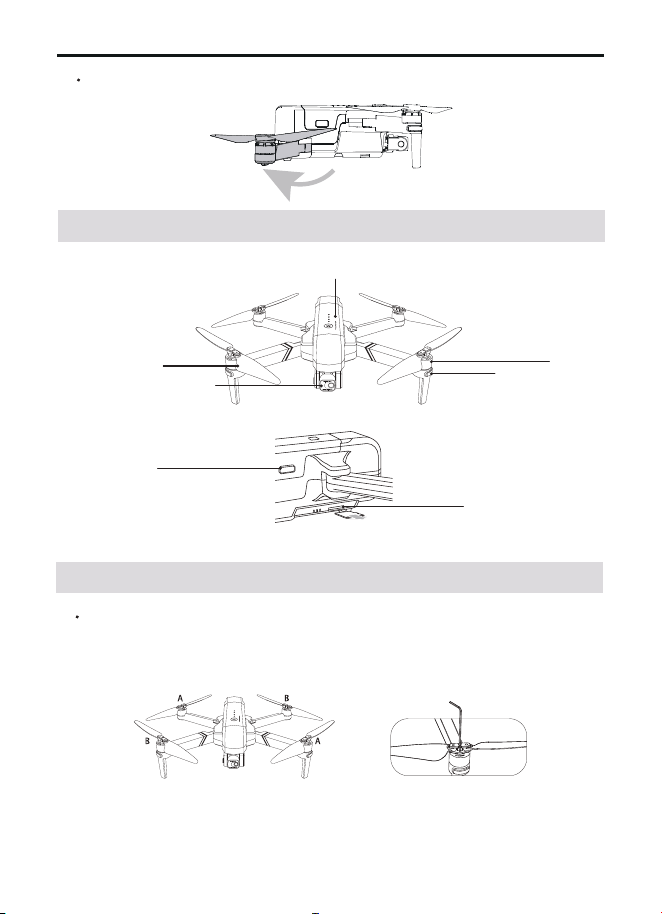
Gimbal and camera
Rotor blades
Motor
LED indicator
Intelligent battery
MicroSD card slot
USB-C port
Unfold the rear arms and then unfold all the propellers
Please note that the letter "A" or "B" is printed on each propeller,
and make sure all the propellers are attached in the correct motor
position.
F11GIM2 User Manual
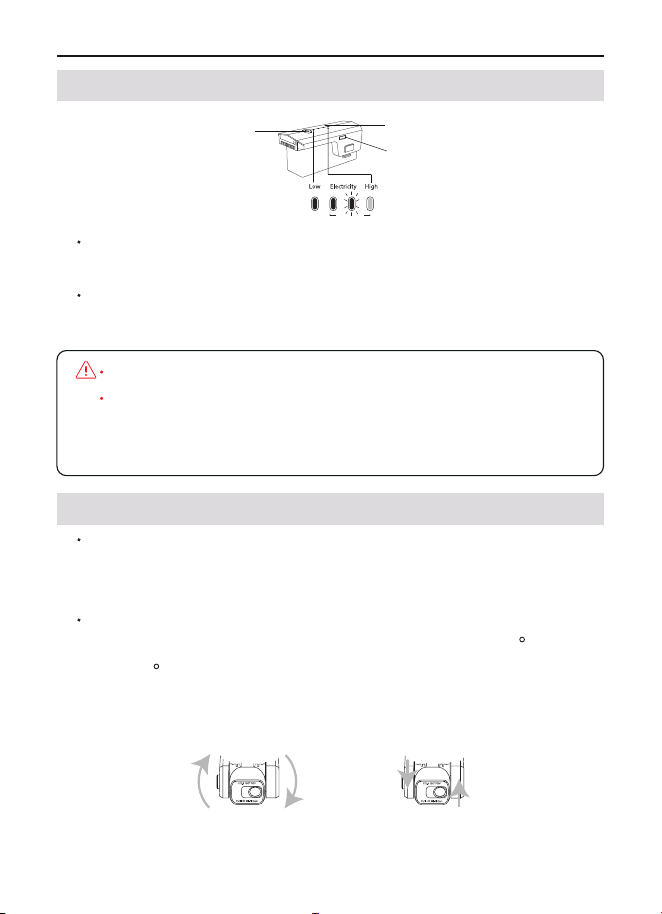
Hold the switch button for 3 sec.power on; then press the button for
3 sec. power off.
Refer to the battery level LED, when only one LED left, charge the
battery.
Copyright ©2023 Ruko All Rights Reserved.
24
7.4 Intelligent Flight Battery
7.5 Gimbal and Camera
Battery switch
Battery level LED
USB charging port
DO NOT install the battery with the power already switched on.
DO NOT charge the battery immediately after flight as the
temperature may be too high.Wait until it cools down to room
temperature before charging again.
The gimbal of F11GIM2 drone ensure the user can capture clear and
stable impage and videos even when the drone is flying, the camera
also equipped with electronic stabilization function.
The camera uses an upgraded 5GHz Wi-Fi FPV real-time transmis-
sion function, equipped with 2-Axis Gimbal 4K EIS, 100 FOV lens
and a 80 adjustable camera, which can stably shoot 4K ultra-clear
videos and images, providing you with a broad field of vision for
unforgettable moments.
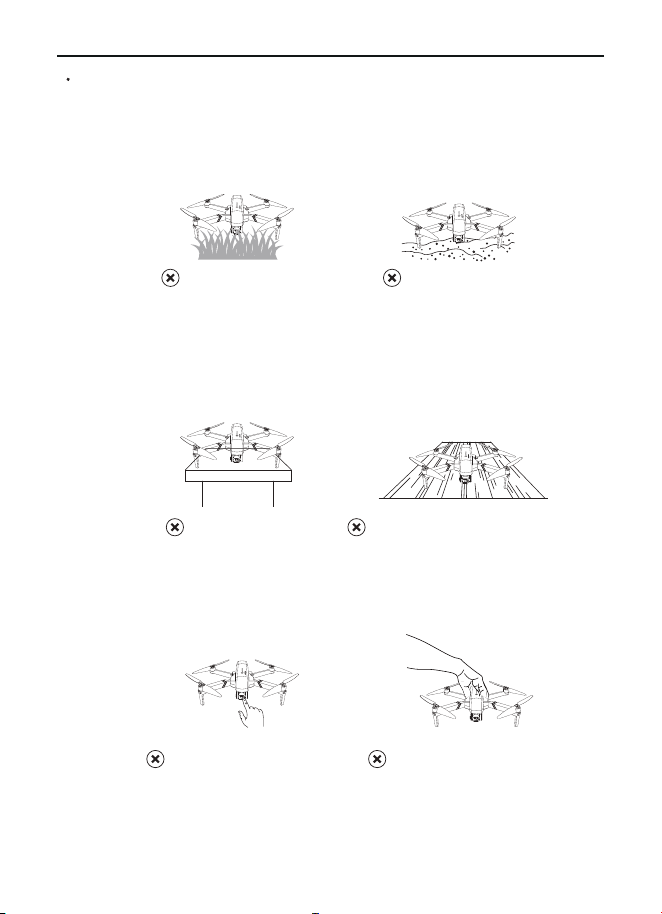
Do not turn on the aircraft when it is on desk or hollow wooden floor.
They will amplify the small vibrations into high-frequency vibrations,
which will cause the gimbal cannot work.
Do not interfere with the gimbal by putting external forces or
picking up the aircraft during calibration. Otherwise, the gimbal will
stop to work.
Camera Guideline:
Please take off the gimbal camera cover before flight.
When taking off from grass or sand, please place the aircraft on
the landing pad or cardboard to keep it level.
①
②
On the sand
On the grass
F11GIM2 User Manual
Copyright ©2023 Ruko All Rights Reserved. 25
③
④
On the hollow wooden floor
On the desk
Picking up the Aircraft
(during self-inspection)
Touching the camera
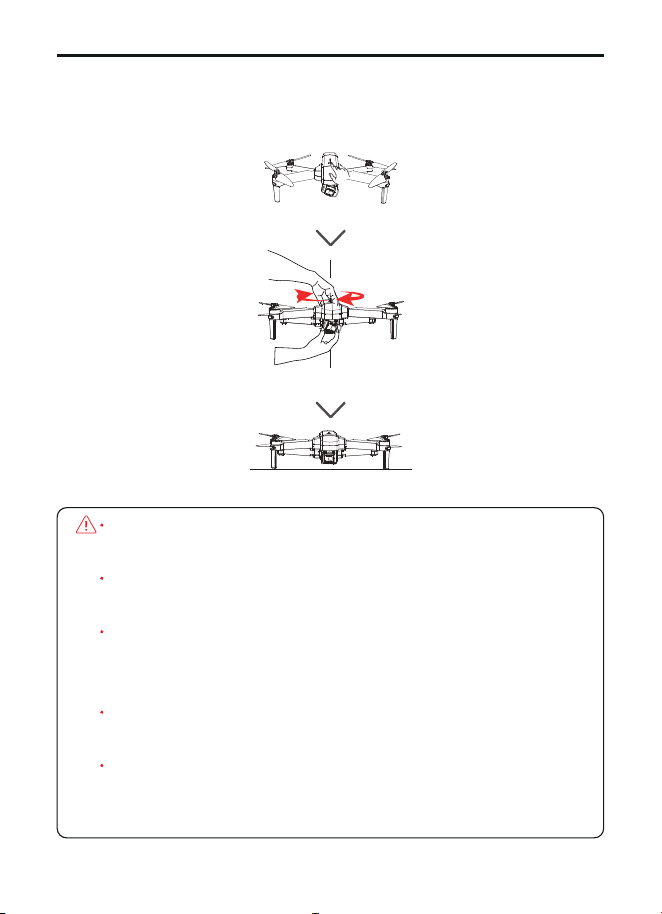
The Gimbal cannot work during the compass and Gyro calibration.
Put the aircraft on a level surface after calibration, then the gimbal will
start to work after 20 seconds.
F11GIM2 User Manual
Copyright ©2023 Ruko All Rights Reserved.
26
⑤
Before Start
During Compass and Gyro calibration
Put on a level surface and wait for 20 seconds
Precision elements in the gimbal may be damaged in a collision
or impact , which may cause the gimbal to function abnormally.
Avoid getting dust or sand on the gimbal and the camera,
especially in the gimbal motors.
DO NOT apply extera force to the gimbal after the gimbal is
powered on, as this may cause the gimbal to function
abnormaly or even lead to pemanentmotor damage.
Make sure to install the gimbal cover when the drone is not in
use.
If the gimbal get wet after flying in wet weather, temporary
failure might occur, make the gimbal and the drone dry so as to
get it recover to full function.
F11GIM2 User Manual
Copyright ©2023 Ruko All Rights Reserved.
27
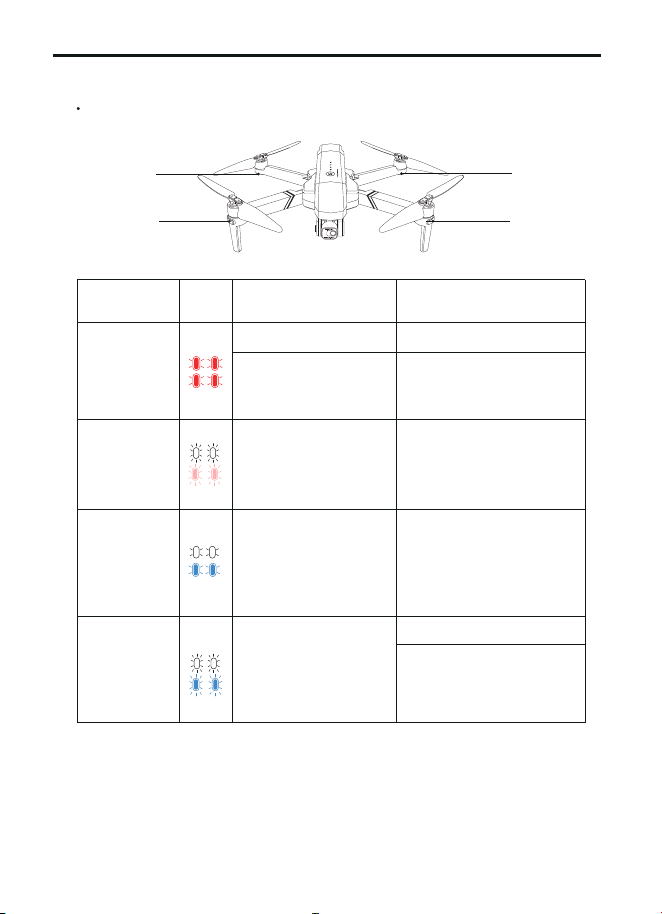
8 Drone Status Indicators
F11GIM2 drone has front and back four LED lights.
Front LED
Back LED
Front LED
Back LED
Front and
back lights
flashing red
Front and
back lights
flashing white
and pink
Front and
back lights
flashing
white and
blue
Front and
back lights
rapid-flash-
ing white and
blue
The controller is not
connected to the
drone
The drone turns to
Compass Calibration
process
Follow the insturction to
rotate the drone to
complete calibration
process
The drone is in
Gyroscope Calibration
process
Wait till the drone
complete calibration
automatically (This only
take 2-3 seonds)
GPS searching
Waiting for GPS signal
Change to another
place and try again
Charge the battery
Restart and wait for the
drone and controller
auto-connection
Low Power
LED light
indicator
Reason Action requiredColor
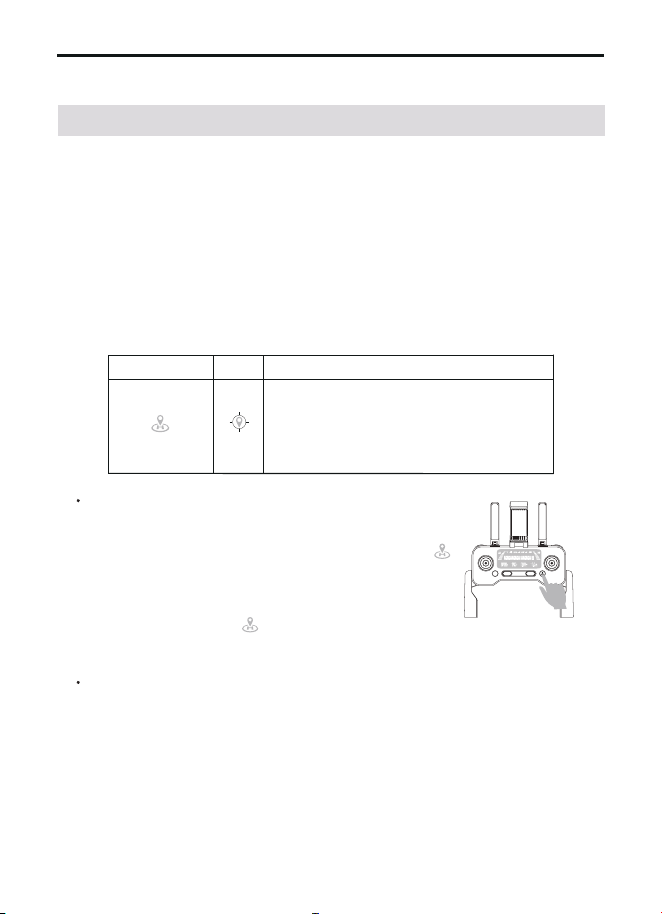
Smart RTH
Smart RTH can bring the drone back to the
Home Point. It is initiated by either clicking the
button once on the remote controller or on the
app, the remote controller will alert with a "DI
DI" sound. Click the button again cancel the
RTH process.
Copyright ©2023 Ruko All Rights Reserved.28
9.1 Return to Home
9 Product Functions Profile
The default Home Point is the first
location where the drone received a
strong or moderately strong GPS
signal (3 or more satellite reception).
Home Point
GPS
Description
F11GIM2 User Manual
The Return to Home (RTH) function brings the drone back to the
Home Point.
This function can only be achieved under GPS mode. There are three
types of RTH: Smart RTH, Low Battery RTH, and Fail connection RTH.
If the drone have successfully recorded the Take off Point and the
GPS signal is strong, the RTH will be triggered when either the Smart
RTH is initiated, the drone battery level is low, or when the signal
between the drone and remote controller is lost.
Fail Connection RTH
If the Home Point has been recorded successfully and the compass
function can work normally, the Fail Connection RTH function will
be triggered once the remote controller signal is lost, the drone will
return to the Home point in straight line. The drone may link to the
remote controller automatically during the RTH process, if
connected successfully, the RTH process will stop.
Smart RTH
Smart RTH can bring the drone back to the
Home Point. It is initiated by either clicking the
button once on the remote controller or on the
app, the remote controller will alert with a "DI
DI" sound. Click the button again cancel the
RTH process.
F11GIM2 User Manual
Copyright ©2023 Ruko All Rights Reserved. 29
Low-Battery RTH
Low-Battery RTH is triggered when the drone battery level is low,
this function is triggered automatically, drone will first rise to the
setted return altitude and fly back to the Home Point, this process is
unable to cancel, but it is allowed to control the drone with direction
joystick to land it in a safe area.
If the battery can't support the drone fly back to the Home Point, it
will land automatically where it is, and the remote controller dirction
joystick is available during landing.
Cautions
Never turn off the remote controller during RTH process.
Set a proper return home altitude on the app before take-off.
NO obstacle avoidance function is available with this drone.
When flight distance less than 98 ft, the drone flies back at the
current altitude instead of setted return altitude, make sure it
flies higher than any other objects surrounding.
When flight distance further than 98 ft, make sure the drone
has enough battery to fly back.
The drone can NOT return to Home Point without a strong GPS
signal.
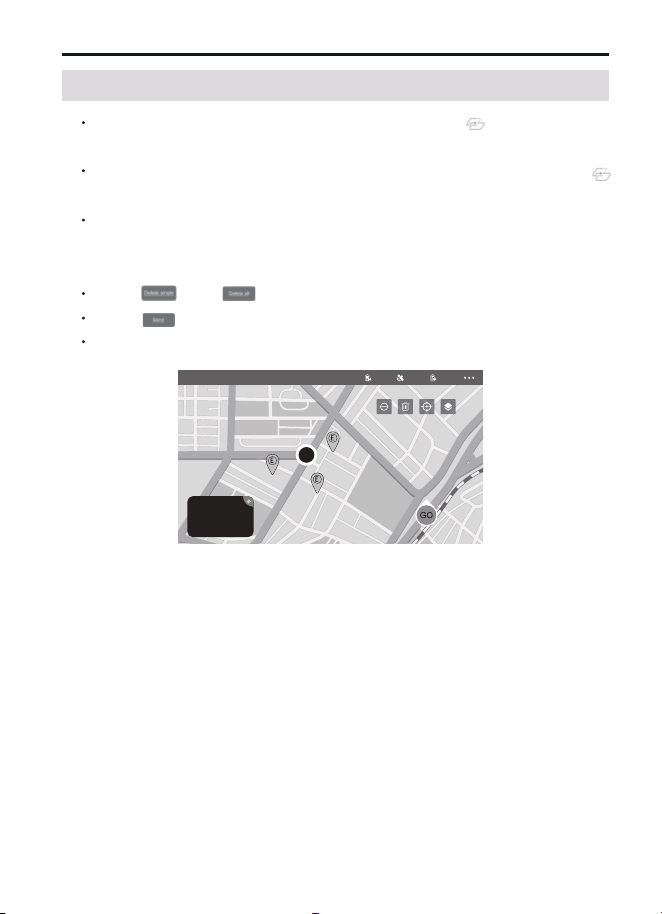
When the phone mobile data is available, select in the app, load
the map data of the area which intended to fly.
Connect the drone's WiFi on the phone, view the map by clicking
on the app.
The red circle is the limited flight range for this function, click to set
points within the red circle to execute the wayponint flight function
(16 points the most).
Click and to reset the points of flight route.
Click , confirm to start Waypoint Flight.
Push the Direction Joystick to cancel the Waypoint Flight .
F11GIM2 User Manual
Copyright ©2023 Ruko All Rights Reserved.
30
9.2 Waypoint Flight
When the phone mobile data is available, select in the app, load
the map data of the area which intended to fly.
Connect the drone's WiFi on the phone, view the map by clicking
on the app.
The red circle is the limited flight range for this function, click to set
points within the red circle to execute the wayponint flight function
(16 points the most).
Click and to reset the points of flight route.
Click , confirm to start Waypoint Flight.
Push the Direction Joystick to cancel the Waypoint Flight .
F11GIM2 User Manual
Copyright ©2023 Ruko All Rights Reserved. 31
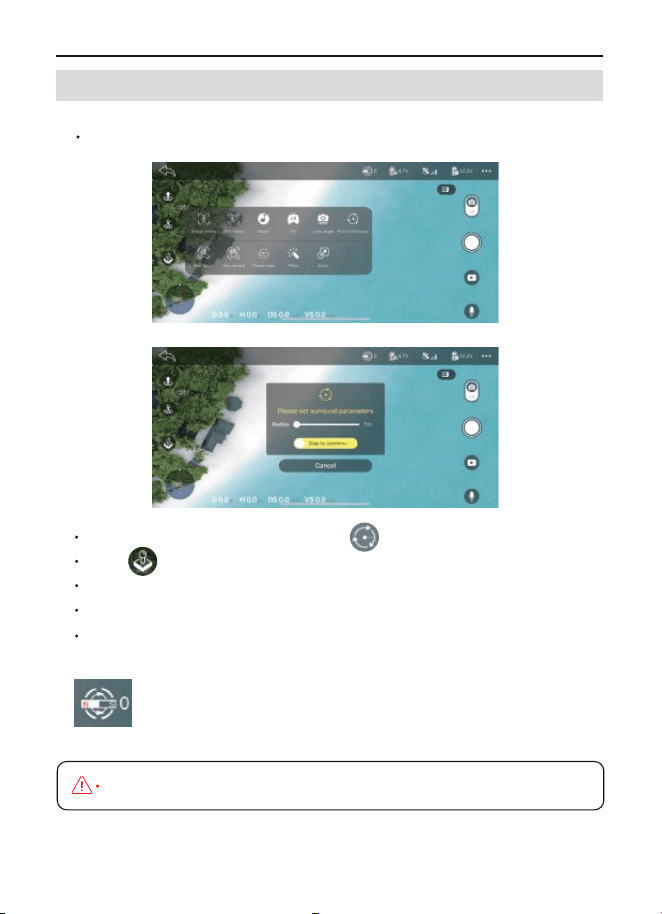
This feature enable the drone to fly around the point in a 360 circle.
9.3 Point of Interest
This function will only be available when the GPS signal is strong.
When the electromagnetic interference value is bigger than
150, please land the drone and complete the compass
calibration again or change to another place to fly.
Open the app,click "CONTROLS"
Click ,click "Point of Interest"
Slide to right to set the surround radius
Slide to confirm to perform Point of Interest
Click "Cancel" to exit Point of Interest
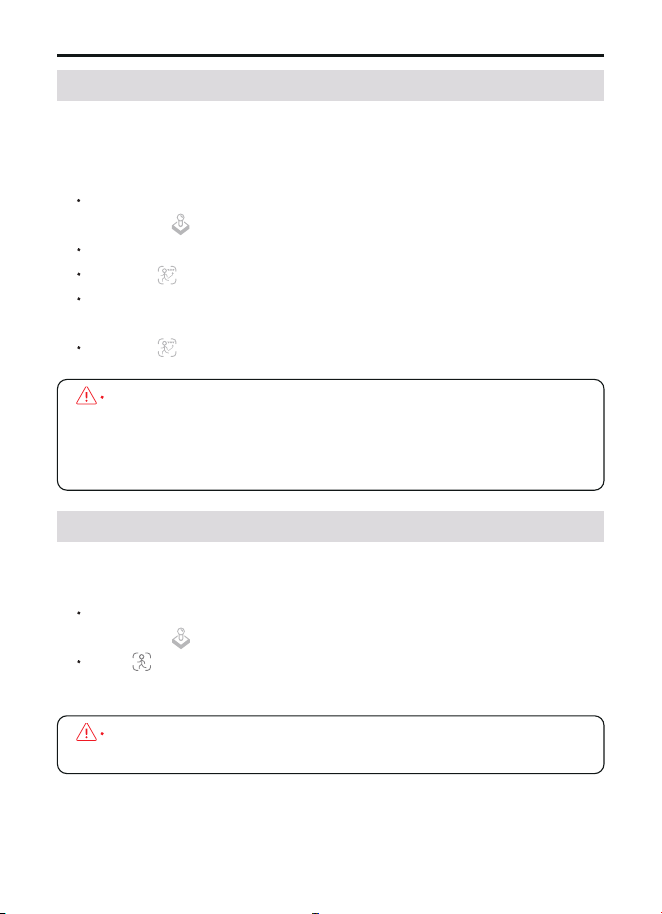
Image Rcognition Follow Me function enables the drone to follow the
object's in circle movement to rotate.
Connect the drone's WiFi on the smart phone, access to the app
CONTROL interface.
Click , tap on the object or person plans to track, tap to confirm
the selection, drone rotates following the object's in circle movement.
Connect the drone's WiFi on the smart phone, access to the app
CONTROL interface.
Make sure the flight distance is within 10-100meters.
Click the on the app.
Waiting for app to indicate drone status "Follow Me Ready", now the
drone will move along with the positioning coordinates on the app.
Click the on the app interface again to exit the Follow Me mode.
GPS Follow Me function requires strong GPS signal, once the function
been initiated, the drone can follow the smart phone whereever it
goes, below are the steps to activate this function:
F11GIM2 User Manual
Copyright ©2023 Ruko All Rights Reserved.
32
9.4 GPS Follow Me
Make sure the size of the frame isn't too large, so as to ensure
the recognization is acheiveable.
9.5 Image Recognition Follow Me
GPS Follow Me function will be affected by the tall structures,
trees and the living areas with WIFI signal inteference. GPS
Follow-me function is not activated when the GPS signal weak
or GPS positioning off on the mobile device.
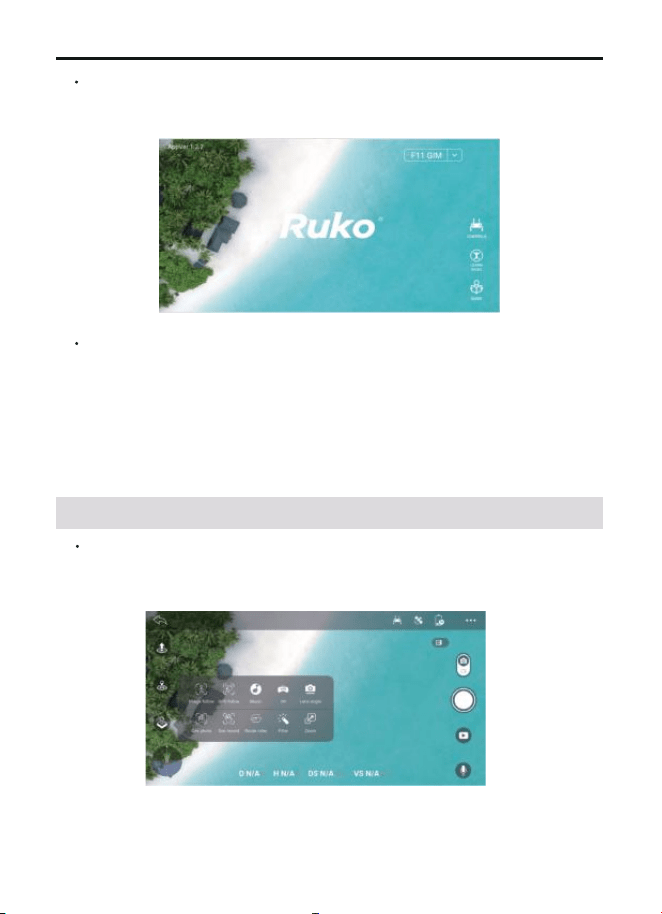
Tips:
Android phones requires user to check a "confirm
connection"after choose the drone's WiFi on the
phone, please wait around 10-30 seconds until
this reminder come up, otherwise the connection
will be failed.
F11GIM2 User Manual
Copyright ©2023 Ruko All Rights Reserved. 33
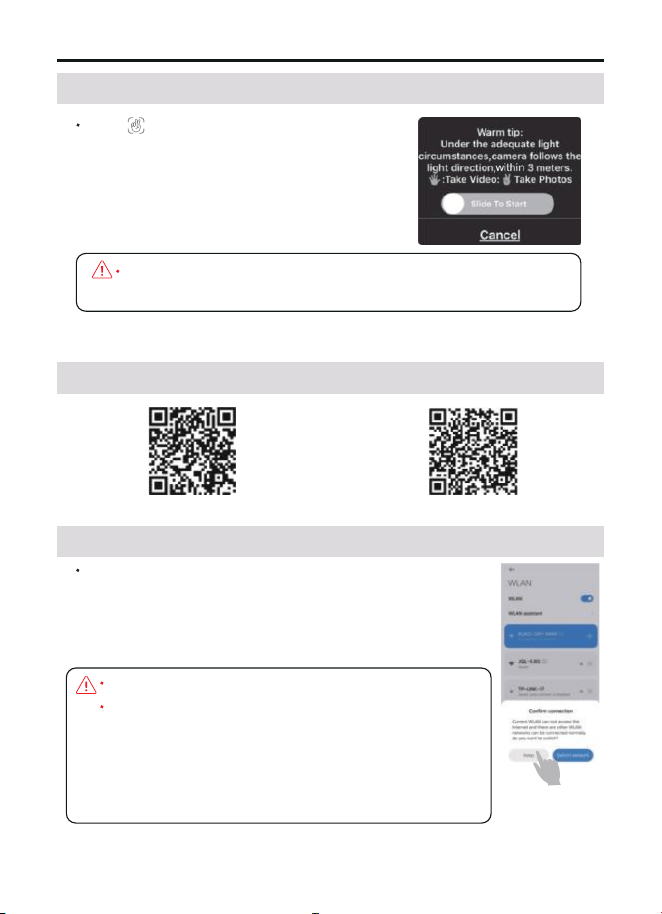
10 Connect the APP
Click on the app, count down 3 seconds
to 0 with hand motion to take photos and
record video. Follow the instruction on
the app.
9.6 Hand Gesture
When raise the hand, make sure to keep the elbow at the
same height of the shoulder.
10.1 Download the App
QR code of "RUKO DRONE" for Apple IOS system. QR code of "RUKO DRONE" for Android system.
10.2 Connect the APP with Drone
Once the drone and remote controller connected,
access "SETTING" on smart phone, open the "WLAN",
find the drone's WiFi which name "RUKO-GIM-XXXX",
open the app.
F11GIM2 User Manual
Copyright ©2023 Ruko All Rights Reserved.
34
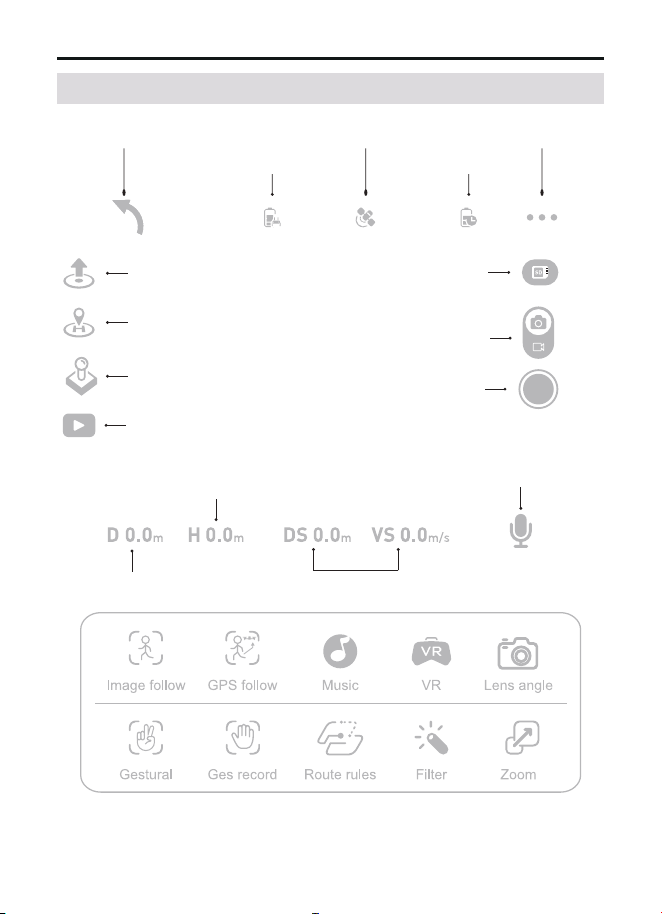
Once the drone WiFi has been connected, the app will recognize the
drone model and connect automatically.
Wait until the drone status says "Ready to Fly" before initiating flight,
access to the control interface.
CONTROLS: tap to access the instant video transmission and drone
control interface.
LEARN TO FLY: tap to watch the guide video.
GUIDE: tap in to read the manual, and watch instructional videoes.
11 APP Functions
11.1 Control
F11GIM2 User Manual
Copyright ©2023 Ruko All Rights Reserved. 35
11.2 APP Icons Introduction
Distance(meters)
Altitude(meters)
Speed(meters/sec)
Sound recording
Back to main menu
Remote Battery
GPS signal
Aircraft battery
Setting
Media gallery
(one key to share)
More functions
GPS return home
Auto take off
Shutter
SD card status
(pls format the SD card
for the 1st time)
Photo/video switching
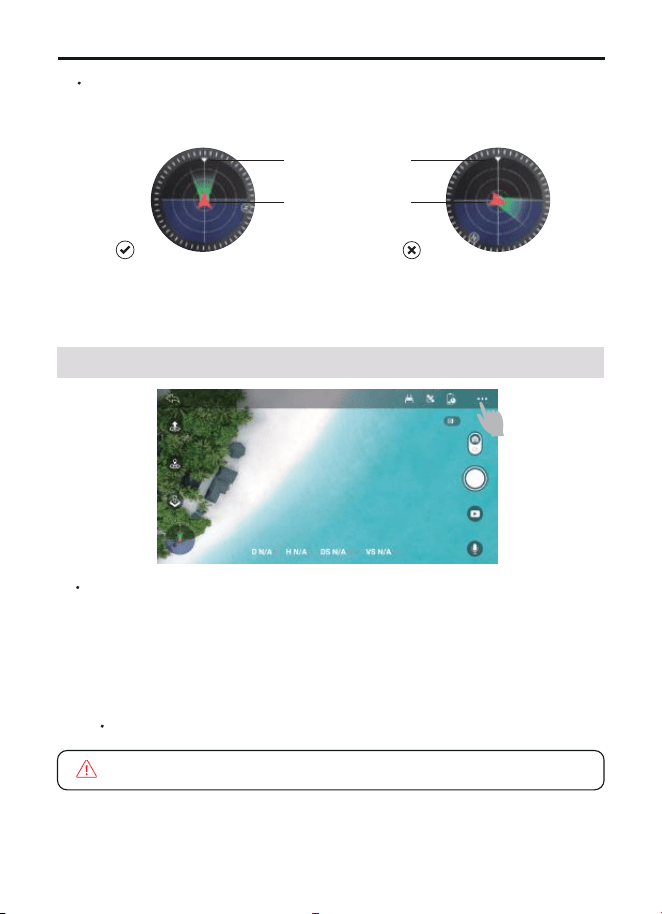
Flight Setting and Out of Beginner Mode
While the drone is under GPS mode, its default mode is Beginner
Mode, Which limites the flight range: Maximum Flight Distance is
30 meters; Maximum Flight Altitude is 30 meters; Setted RTH
Altitude is 20 meters; Follow below picture to turn off the Beginner
Mode and set the proper flight setting in the app.
F11GIM2 User Manual
Copyright ©2023 Ruko All Rights Reserved.
36
The drone must be conneted with the app to save the setting.
12 APP Setting
12.1 Settings
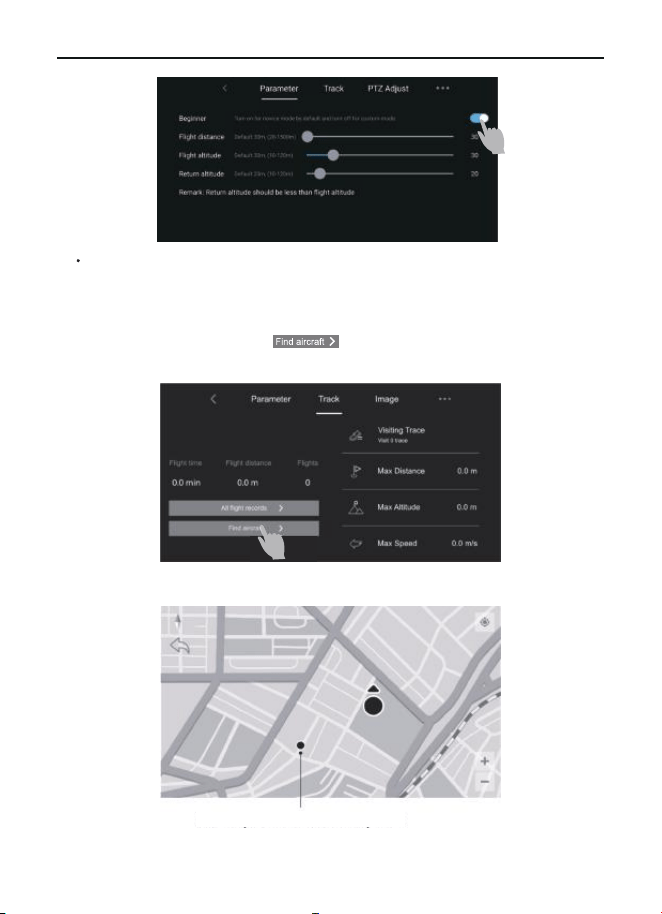
User can refer to the aircraft flight direction from the Attitude
Indicator in the app.
Aircraft
orientation
Remote controller
position
F11GIM2 User Manual
Copyright ©2023 Ruko All Rights Reserved. 37
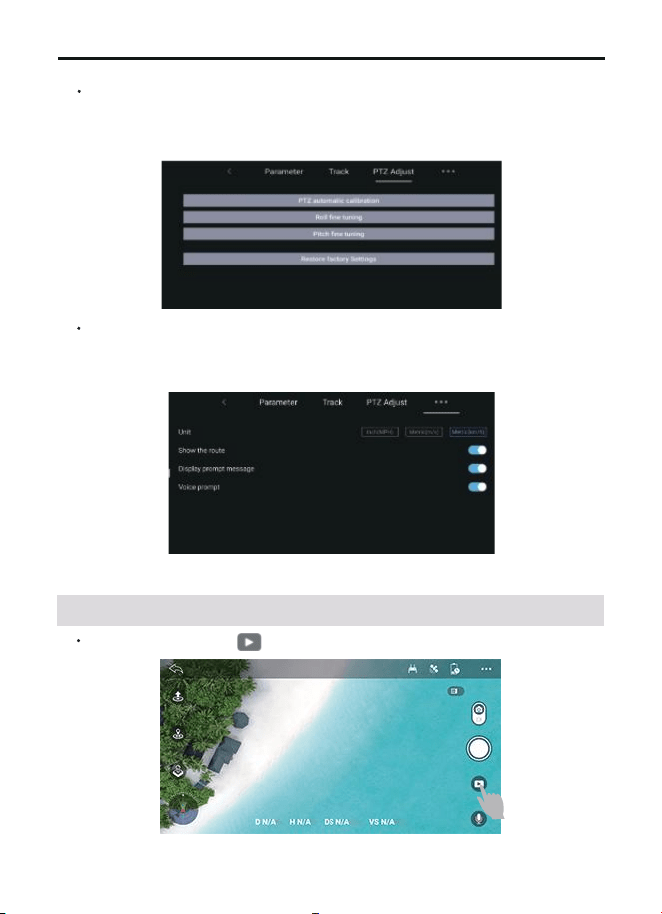
Find the Lost Drone
When the drone has connectted with app, and drone GPS signal is
strong, the drone's locationcan be recorded in the app.
①
Access to "Track", click to open the map surface to search
the drone.
②
The last position of lost drone will be showed on the map.
Current position of the mobile phone
F11GIM2 User Manual
Copyright ©2023 Ruko All Rights Reserved.
38
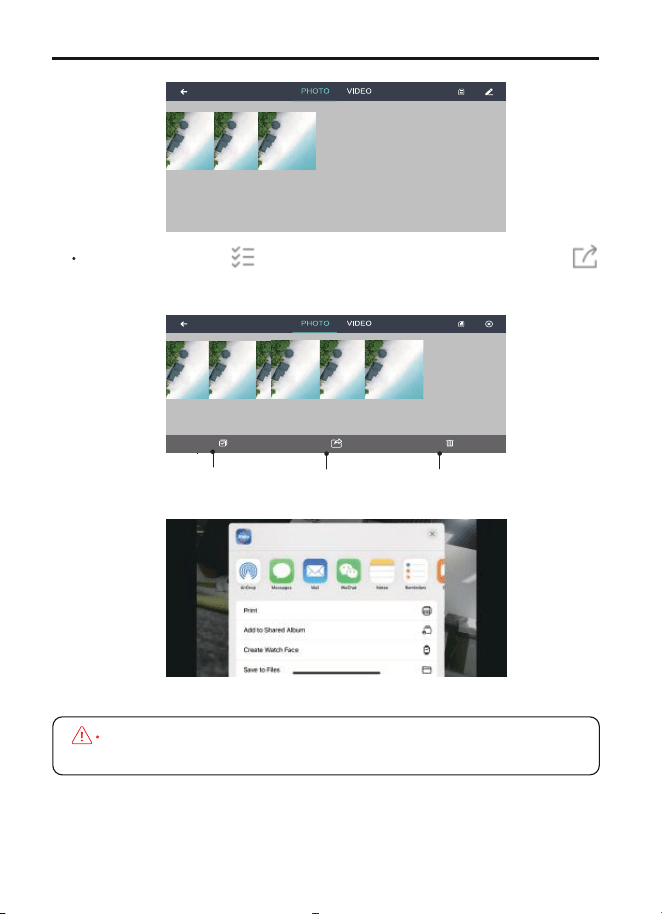
Open the app, click , enter into the file (Pic 1.)
13 APP Functions
13.1 App One Key Share Function
Gimbal Back to Factory Setting
Get the gimbal back to factory setting, access to "PTZ adjust", click "
Restore factory setting"
How to change units
This function enables to switch the units between Inch(MPH),
Meter(m/s), Metric(km/h).
F11GIM2 User Manual
Copyright ©2023 Ruko All Rights Reserved. 39
Click once or press to select the photos which to share, click ,
choose the media to be shared (Pic 3)
Pic 2
Check all Share Delete
It is only allow to share 9 pictures or 1 video the maximum at
one time.
Pic 3
Pic 1
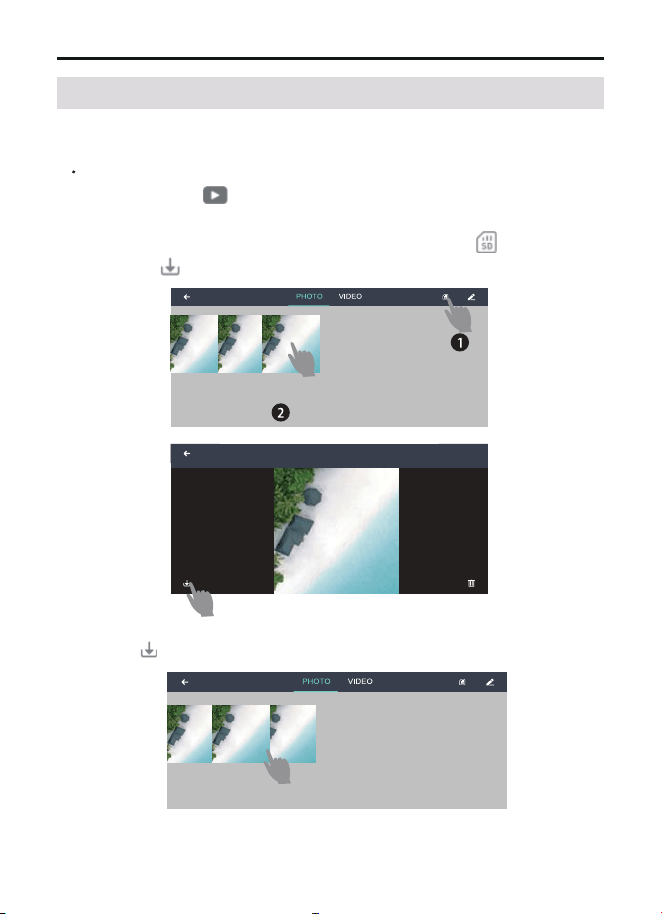
F11GIM2 User Manual
Copyright ©2023 Ruko All Rights Reserved.
40
①
Download the picture and video from SD card, click ,choose files
and click save to the mobile album.
②
Download the picture and video from app album, choose files and
click to save to mobile album.
Connect the drone's WiFi on the phone, access to the app "control"
interface, click , either choose to download the picture and
video from SD card or app album :
13.2 How to Download the Pictures and Videos
After shooting and recording were completed, photo and video save to
both the app album and miroSD card, to download the files:
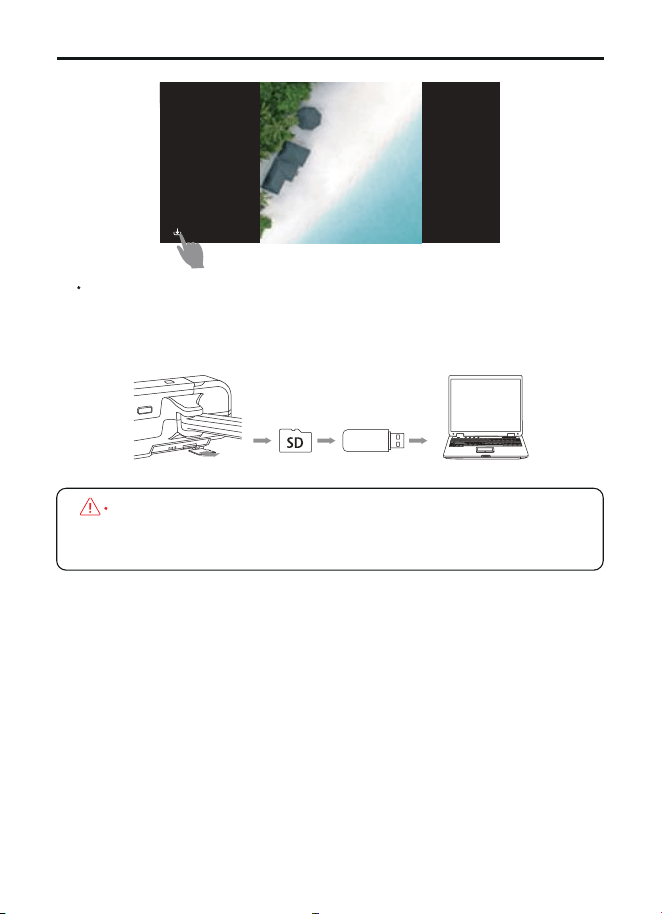
F11GIM2 User Manual
Copyright ©2023 Ruko All Rights Reserved. 41
Take out the SD card from drone, insert the card into a card reader
and read the data on computer, download the video and photo into
a computer.
Video be stored in the app album will be compressed, thus
always suggest to download the video from the SD card to
get the best resolution.
SD Card(sold separately)
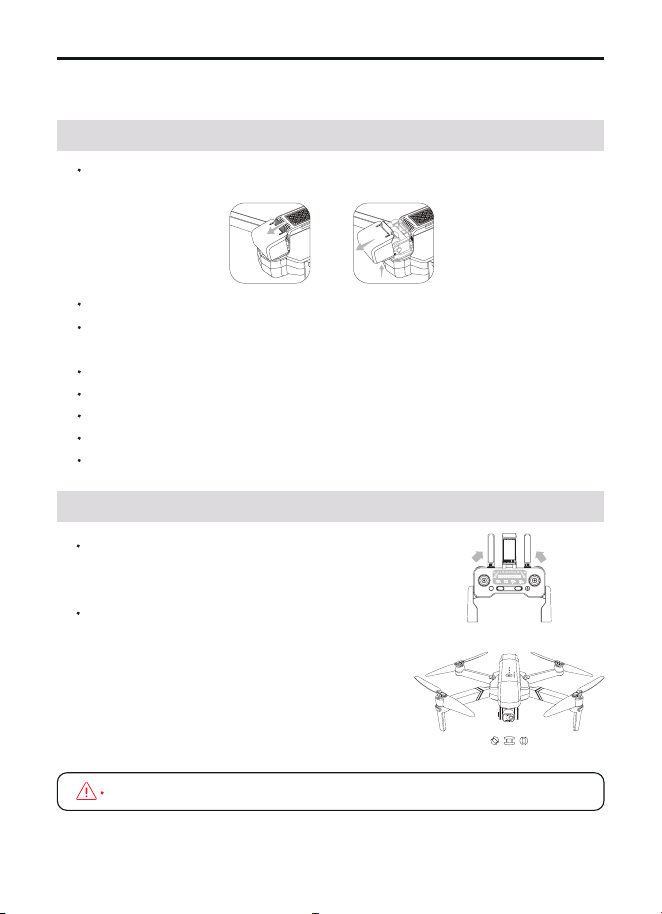
F11GIM2 User Manual
Copyright ©2023 Ruko All Rights Reserved.
42
Place the drone in an open, flat area, remove the gimbal cover.
Power on the remote controller and the drone.
Wait until the remote controller and drone connectted, connect the
app, complete the calibration process.
Keep the drone camera facing forward, start the motors.
Gently push the throttle joystick up to take off.
Pull the throttle joysticks down to land the drone.
Stop the motors after landing.
Power off the drone remote controller, replace the gimbal cover.
14 Flight
14.1 Takeoff/Landing Procedures
bottom bottom
3
2
1
This connect process take around 40seconds.
14.2 Quick Start
Step 1: Turn on the controller
Power on the controller, lift up the antenna to
receive signal.
Step 2: Turn on the drone
Remove the gimbal cover gently, place
the drone on a level surface, power on
the drone. All lights blinking red. Drone
and remote controller connects success-
fully, all lights flashing white and blue
then turn to flashing white and pink.
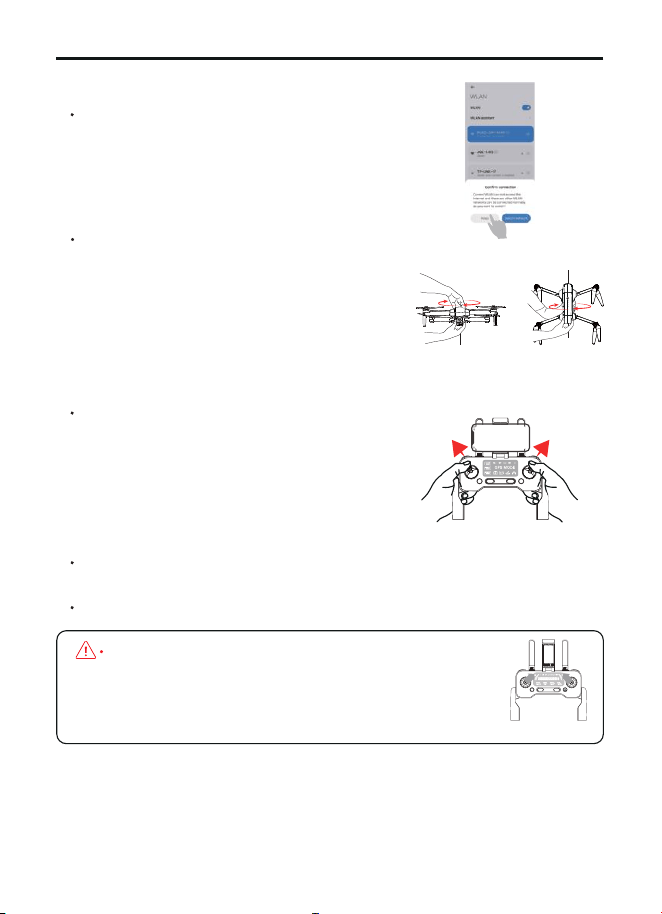
F11GIM2 User Manual
Copyright ©2023 Ruko All Rights Reserved. 43
Step 3: Connect the app
Open the phone's WiFi list, connect the drone's
WiFi which names "RUKO-GIM-XXXX", open the
"RUKO DRONE" app.
Stpe 4: Complete compass calibration
Pick up the drone and hold it levelly, rotate
the drone in one full circle (360°), until hear
a "beep" sound reminder. Hold the drone
vertically with camera facing to the sky,
rotating a full circle (360°), there are two
"beep" sound reminder.
Step 5: Complete the gyroscope calibra-
tion
Put the drone on a level surface, push the
left and right joysticks to the 11' and 1'
o'clock positions, lights flashing white and
blue quickly.
Drone searches for GPS signal automatically, when lights turn to solid
blue and white, drone is ready to fly.
App drone status: "Fly" is displayed in the app, drone is ready to fly.
When it is needed to manually trigger the compass
calibration to adapt to the enviroment, please push
the joystick to 1 & 11 o'clock position, follow the
above steps to rotate the drone.
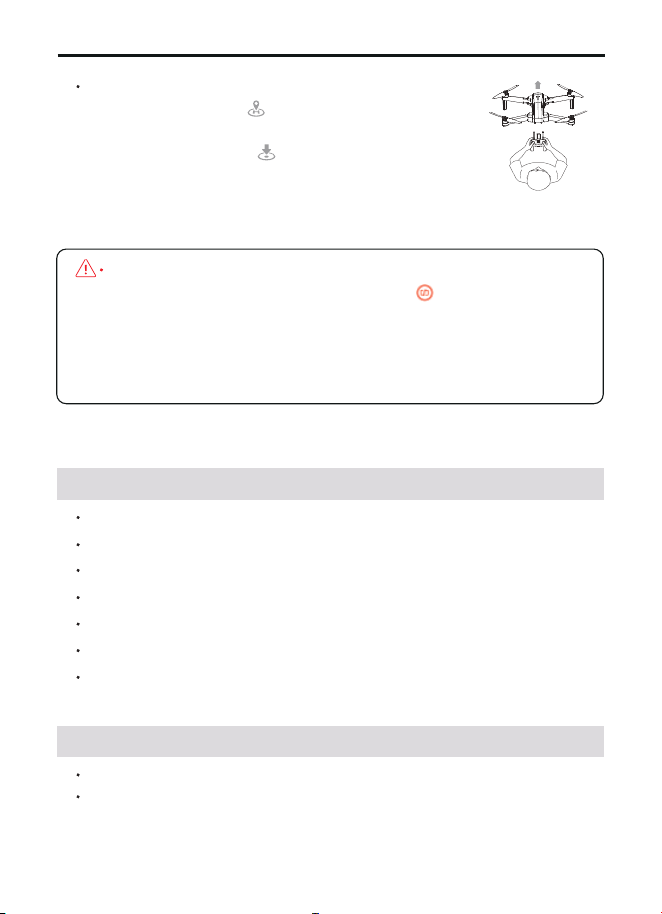
If the drone keep searching for GPS but no success because
of weak GPS signal, keep pressing the button to turn off
the GPS Mode and switch to Manual Control mode, so that it is
able to get the drone take-off. Howerer, under Manual Control
mode, there is high risk that the drone will fly away with the
wind, as no GPS positioning assisted.
Step 6: 3 Ways to land the drone
Press the RTH button , drone will return to the
Home Point.
Press the land button on the app, the drone
will land directly.
Keep pulling Throttle Joystick down until the
drone lands and motors stop.
F11GIM2 User Manual
Copyright ©2023 Ruko All Rights Reserved.44
Always keep the head
of drone facing forward
15.2 Gimbal Stabilization
Machanical Range: Tilt About -100°TO+70°, Roll About -35°TO+35°
Controll Range: Adjusted angle of camera (up and down): About -80°
TO+0°
MODEL: F11 GIM2
Weight (Including Battery): 585g/20.6oz
Flight Time: About 28 mins
Motor Model: 1806
Operating Temperature Range: 32° to 104° F ( 0° to 40° C)
Satellite Systems: GPS/GLONASS
Dimensions (LxWxH): Unfolded: 45X40.5X8(cm)
Folded: 17.6X10.5X8(cm)
15 Specifications
15.1 Drone
F11GIM2 User Manual
Copyright ©2023 Ruko All Rights Reserved. 45
15.3 Camera
15.4 5G Transmission
Operating Frequency: 5.15-5.35 GHz; 5.725-5.825 GHz
Supported Transmission Protocol: 802.11a; 802.11n20; 802.11n40
Video Transmission Frame Rate: 30FPS
Lens:FOV: 100°
Equivalent Focal Length: 60CM
Focus range: Fixed-focus
Resolution of photo: Phone 3840X2160P
SD card 3840X2160P
Resolution of video: Phone 1280X720P
SD card 3840X2160P
Photo Format: JEPG
Video Format: MP4
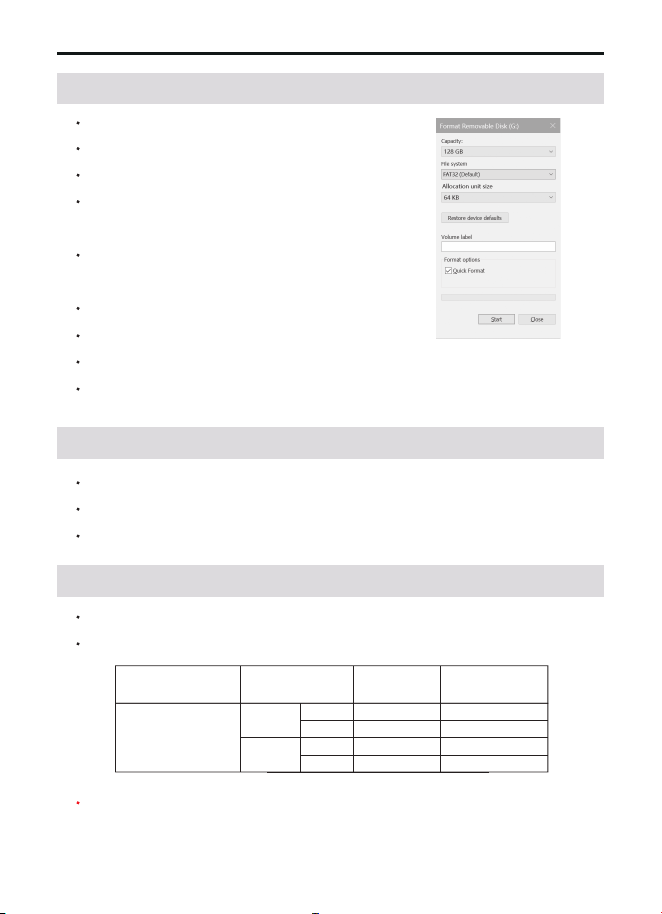
Supported File Systems: FAT32
Supported SD Cards: Micro SD card (Class 10/U1 or later) 32G-128G
15.5 APP / Live View
Mobile App: RUKO DRONE
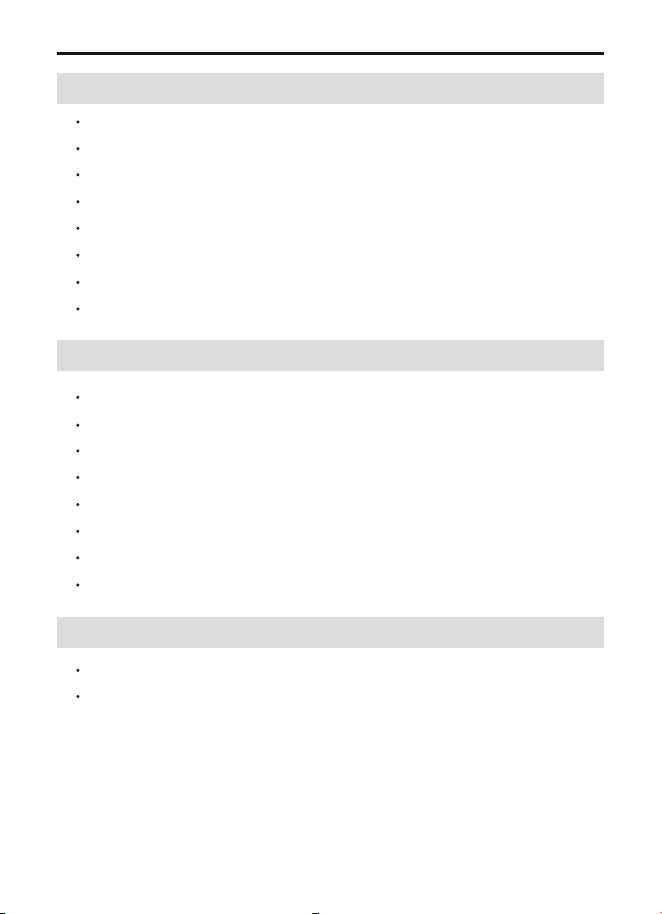
Live View Quality:
Required Operating System: IOS 9.0 or later/Android 5.0 or later
CONFIGURATION
STORAGE
METHOD
RESOLUTION
TRANSMISSION
FRAME RATE
3840X2160P
30fps
30fps3840X2160P
3840X2160P
1280X720P
Phone
Photo
Photo
Video
Video
SD card
4K
F11GIM2 User Manual
Copyright ©2023 Ruko All Rights Reserved.
46
15.7 Intelligent Flight Battery
15.8 Charging cable: Type-C
Compatible Charger (not included): Output currency 5V/3A
Rated Power: ≤15 W
15.6 Remote controller
Operating Frequency: 2.4G + 5G bridge
Max operating distance: Up to 3KM (Outdoor and Unobstructed)
Battery: 1500mAh Li-polymer
Charging time: about 2 hours
Operating time: about 2.5 hours
Operating Voltage: 3.7V
Mobile Device Holder: 4.7 "to 6.5" Smart Phones
Operating Temperature: 32° to 104° F ( 0° to 40° C )
Capacity: 2500 mAh
Voltage: 11.1V
Battery Type: Li-polymer
Energy: 27.75Wh
Net Weight: 195 g / 6.8 oz
Max Charging Power: 15W
Max Charging Time: About 4.5 hours (Depending on Charging Power)
Charging Temperature Range: 32° to 104° F ( 0° to 40° C )
Copyright ©2023 Ruko All Rights Reserved. 47
Common Problems and Solutions
Question Reason Solutions
The motors cannot
be started
Turn on the Aircraft in an
open area with strong GPS
signal
The Aircraft has low
battery. Please
charge the battery in time
The compass is not
calibrated. Please refer to the
"Calibration Before Flight"
section of the user manual
Push the left and right
joysticks simultaneously to 5
o'clock and 7 o'clock for 2
seconds
Weak GPS signal
The red light stays on
The pink light stays
on
The left and right
joystick are not in
place
The gyroscope is not
calibrated
GPS signal is
unstable. Flying near
buildings and in
obstructed places
Please fly the Aircraft in an
open area free of obstacles
within the circle of radius
32.81 ft(10 meters)
Please fly the Aircraft above
9.84ft(3 meters)
Place the Aircraft on a
horizontal surface and
conduct gyroscope/horizon-
tal calibration. Please refer to
the "Calibration Before
Flight" section of the user
manual
Unstable flight
Flying too low,
affected by Aircraft
airflow
The propellers
become deformed
and incomplete
Replace the propellers with
new ones
Copyright ©2023 Ruko All Rights Reserved.
48
Question Reason Solutions
The Transmitter
signal is interfered or
the Aircraft exceeds
the range of remote
control
The drone was placed
on an unlevel surface
such as grass and
sand and so on
The drone was placed
on the surface which
transfer samll
vibration, such as
hollow wooden floor,
desk and so on
Please fly the Aircraft
outdoors without interfer-
ence, and ensure that it is
within a controllable range
Please manually land the
drone in time and calibrate
the compass. Please make
sure to fly away from the
buildings, trees, power lines,
and signal towers
Place the drone on landing
pad or cardboard horizontally,
and ensure a gap between
the camera and the surface
Place the drone on a solid
level ground
Never touch the camera when
the power is on, place the
drone on a level ground until
the gimbal complete
self-check
After complete the compass
calibration, place the drone
on a level ground
Compass interfer-
ence
Out of control,
spinning around on its
own, abnormal sound
The camera is
tilted/Gimbal is not
working/ Can't adjust
the camera angle
Replace the propellers with
new ones
The propellers
become deformed
and incomplete
Keep touching the
camera and gimbal
or holding the drone
before all set
The compass is in
calibrating
Copyright ©2023 Ruko All Rights Reserved. 49
Question Reason Solutions
Video freezes, image
transmission distance
is short
The Aircraft is out of
Wi-Fi range
Fly the Aircraft within the
range of the Wi-Fi
Fly the Aircraft in an
unobstructed open area free
of buildings, high-voltage
wires and signal towers
WiFi image
transmission signal
interference
The transmitter and
the mobile phone are
not pointed at the
direction of the drone
Point the Transmitter and the
mobile device at the flying
direction of the Aircraft to
maintain the strongest signal
connection
Phone performance
freezes
Close unused apps running in
the background to maintain
the best performance of the
phone
App does not show
what the drone's
camera is taking
Connect the drone's Wi-Fi :
Ruko-GIM-****** on the
phone
Set the phone to airplane
mode
Turn off the VPN
The phone is not
connected to the
drone's Wi-Fi
The required device operating
system to work with the app
is Android 6.0 and above, IOS
10.02 and above
The phone operating
system version is too
low
Certain phones'
setting preventing
the app working
normally
The VPN app block
the connection of the
phone and the drone
Didn't keep the
drone's network when
trying to connect the
drone's WiFi
Please do keep the drone's
WiFi connectted when the
phone pop up reminder that
"This network has no internet
access"
Video is not clear
If use APP storage,
the pixels are
1920×720P
Insert the memory card and
storage the video on the
memory card
Copyright ©2023 Ruko All Rights Reserved.
50
APP crashes or
functions
abnormally
Turning on the drone
indoors
Under the tree, next
to the building, in an
obstructed place
Please stay away from
obstacles for more than 32.81
feet(10 meters), and search
for GPS signals in an open
area
GPS signal is weak
GPS signals cannot be found
indoors. Please search for
GPS signals in an open place
outdoors
Provide mobile phone
version and model, we will
adapt and solve it
A few mobile phone
versions are old and
incompatible with
APP
Phone cannot connect
to the drone's Wi-Fi
Try several times or restart
the phone
It will take longer
time for certain
phone to connect
with the drone's Wi-Fi
for the first time
WiFi has not been
activated
The drone's WiFi name
is not displayed in the
list
The WiFi will be available
when the drone and the
transmitter connected, which
take around 40 seconds
Question Reason Solutions
Please don't turn off GPS
suddenly during outdoor
flight. Switch back to GPS
mode in time
GPS signal was
turned off during the
flight
Unable to return
home, drifting and
flying away
Cannot charge
battery/Cannot fully
charge battery
Please use the original
factory charging cable to
charge
Use a mobile USB charger
that ensures constant stable
voltage output(5V) and
amperage output(2-3A)
Using inferior
charging cables
Using inferior
charger or charging
on the computer with
unstable voltage
output
Wrong app
downloaded
Download the correct App
Copyright ©2023 Ruko All Rights Reserved. 51
Question Reason Solutions
Short battery life
We tested all Aircraft
before shipping
The product has slight
marks
In order to give you the best
experience, we tested
functions of all Aircraft
before shipping. Therefore, it
is inevitable that there will be
slight traces. However, it can
be guaranteed that all
Aircraft are 100% brand new
Fully charged with the
correct USB charger before
flying
Flying in windy
weather
Flying in cold
weather
Flying in windy weather will
accelerate power loss
In low temperatures, the
chemical reaction of the
lithium battery is slowed
down and the energy cannot
be fully released
The battery is not
fully charged
Copyright ©2023 Ruko All Rights Reserved.
52
F11GIM2 User Manual
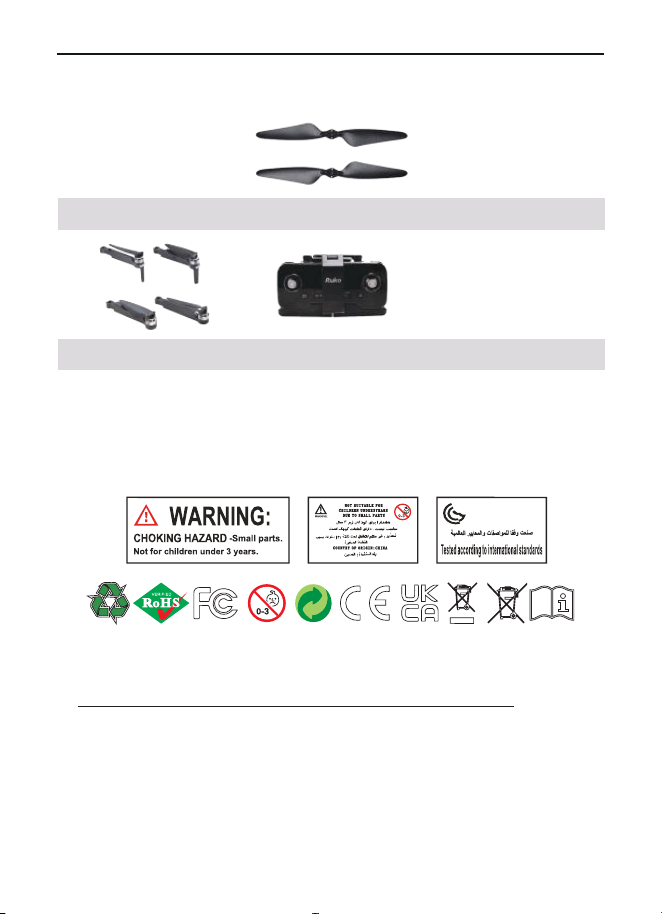
17 Accessories Support
Transmitter
Battery Landing Gear
Arm
Propeller
CONTACT US FOR MORE TECH SUPPORT
Printed in China.
All of the above accessories can be searched and purchased on
Amazon, and you can enter the Ruko store to buy them yourself.
Be sure to use original accessories. The use of non-original
accessories may cause danger to the safe use of the aircraft.

This User Manual is subject to change without notice.
If you have any questions or suggestions about the User Manual,
please contact us via the following email:
You can check the recently updated version of "User Manual"
on Ruko's ocial website
https://rukotoy.com/support-drones
Ruko Tech Support
https://rukotoy.com/support-drones
Ruko is a trademark of Shenzhen Ruike Innovation Technology Co.,Ltd
Copyright 2023 Ruko All Rights Reserved.
CONTACT US FOR MORE TECH SUPPORT
+1 (888)892-0155
Mon-Fri 7:00AM - 7:00PM (PST)
+86 19129317359 rukobrandsto[email protected]