User Manual
v1.0
14+
for age
CONTACT US FOR MORE TECH SUPPORT
+1 (888)892-0155
Mon-Fri 7:00AM - 7:00PM (PST)
F11PRO 2

+1 (888)892-0155
Mon-Fri 7:00AM - 7:00PM (PST)
CONTACT US FOR MORE TECH SUPPORT
+1 (732) 207-0697

Content
1. Reading Tips
1.1 Symbols Explanation
1.2 Read Before the First Flight
1.3 Download App
1.4 Tutorial Videos
1.5 FAA Remote ID Registration Process
1
1
1
1
2
2
2. Product Profile
2.1 Introduction
2.2 Product List
2.3 Diagram
8
8
8
9
3. Aircraft
3.1 Speed Mode
3.2 Aircraft Status Indicator
3.3 Optical Flow Positioning
3.4 Propellers
3.5 Smart Flight Battery
3.6 Camera Overview
13
13
14
15
16
17
21
4. Remote Controller
4.1 Introduction
4.2 Remote Controller Instructions
4.3 Communication Range
4.4 Remote Controller Pairing
24
24
24
28
29

5. Ruko Mini App
5.1 Home Screen
5.2 Control Interface
5.3 Parameter
5.4 Track
5.5 Other
30
30
31
34
36
37
7. Appendix
7.1 Specifications & Parameters
7.2 Accessories Support
7.3 Common Problems and Solutions
60
60
63
64
6.1 Flight Environment Requirements
6.2 Pre-Flight Checklist
6.3 Pairing Remote Controller with Aircraft
6.4 Connect the Data Cable
6.5 Compass Calibration
6.6 Gyroscope Calibration
6.7 Starting/Stopping the Motor
6.8 One-key Takeoff/Landing
6.9 Return to Home (RTH)
6.10 Smart Flight (Route Planning,
GPS Follow, Fly Around, Cruise Control)
6.11 How to take off the Aircraft
6.12 Aerial Photography Tips
38
38
39
39
40
42
44
45
46
48
52
59
60
6 FIight
Copyright ©2024 Ruko All Rights Reserved.
1
F11PRO 2 User Manual
1.1 Symbol Explanation
1.2 Read Before the First Flight
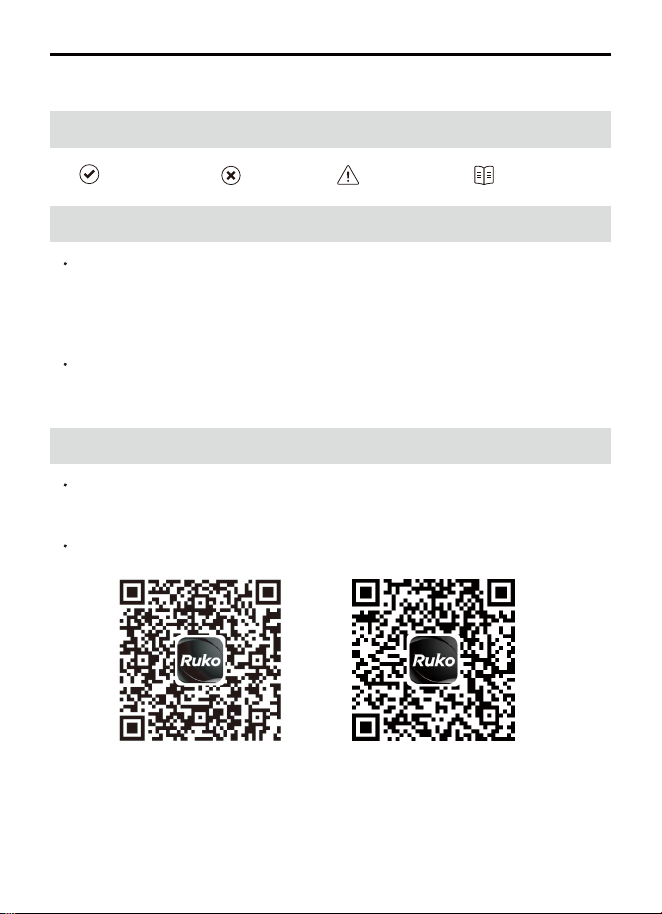
1.3 Download the Ruko Mini App
1. Reading Tips
Recommend Warning Hints & Tips Reference
Read the following documents before using the Ruko F11PRO 2
1. User Manual
2. Flight Guide & Safety Disclaimer
It is recommended to watch all tutorial videos on our website and
read the Flight Guide & Safety Disclaimer before using for the first
time.
Please make sure to use Ruko Mini App during the flight. Scan the
QR code to download the latest version of the app.
Ruko Mini App supports Android 7.1 or higher, iOS 13.0 or higher.
( For iOS )( For Android )
Copyright ©2024 Ruko All Rights Reserved.
2
F11PRO 2 User Manual
1.4 Tutorial Videos
1.5 FAA Remote ID Registration Process
Scan the QR code to watch the tutorial videos to ensure correct and
safe use of the product.
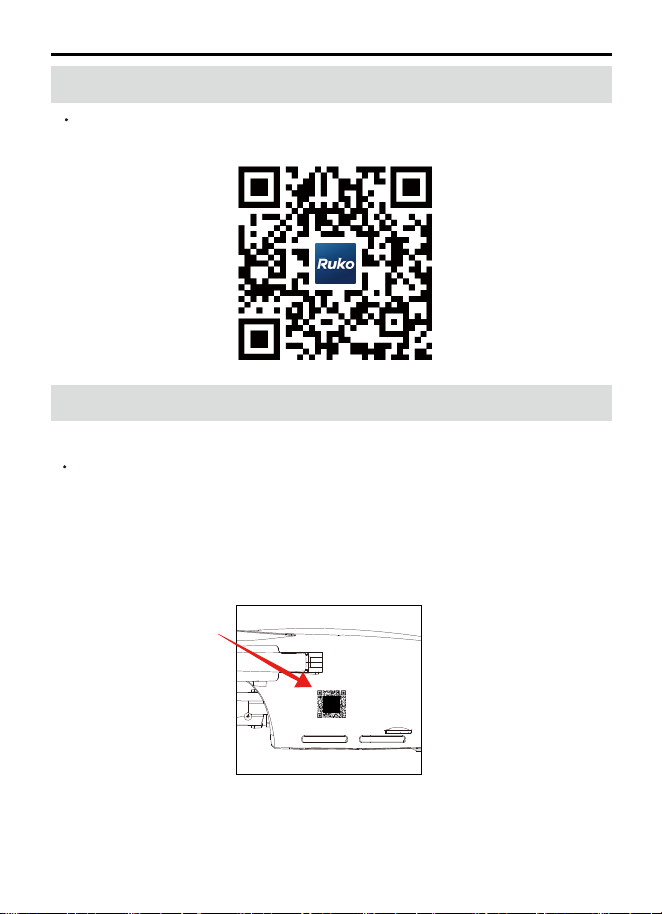
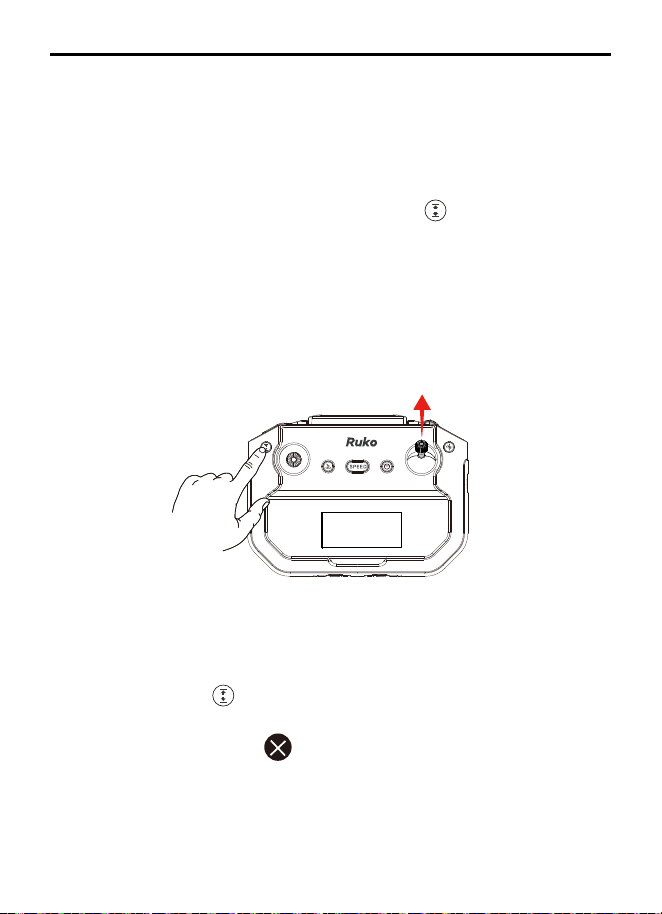
The F11PRO 2 comes with a built-in FAA Remote ID module. You can
obtain the unique Remote ID serial number through the app or on the
aircraft itself. Please register according to your local regulations.
Remote ID serial number on the aircraft.
1.5.1 Find the Serial Number
①
2003ABC0000001
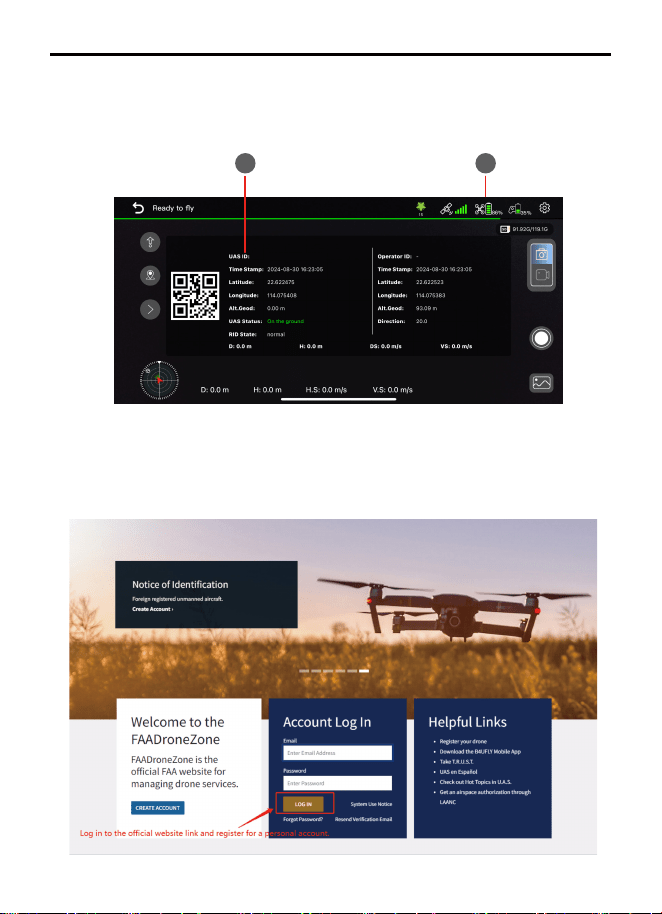
Ruko Mini App: Successfully pair the aircraft with the remote
controller --> Insert the data cable --> enter the “Ruko Mini” app -->
enter CONTROL page --> Click the power icon in the upper right
corner --> the RID information will pop.
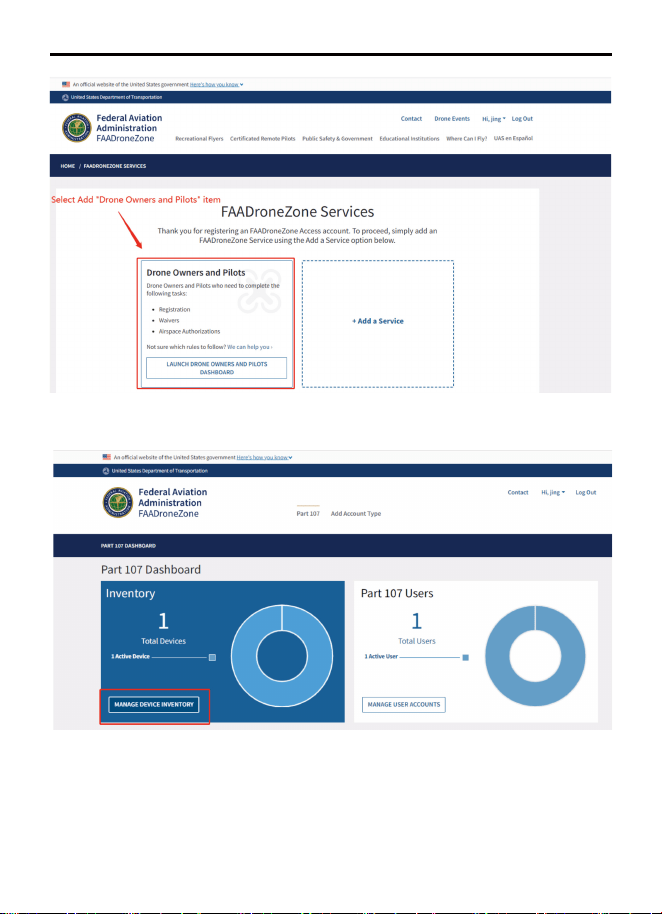
Please go to FAA website: https://faadronezone-access.faa.gov/#/
Please complete and submit the information following these steps.
Copyright ©2024 Ruko All Rights Reserved.
3
F11PRO 2 User Manual
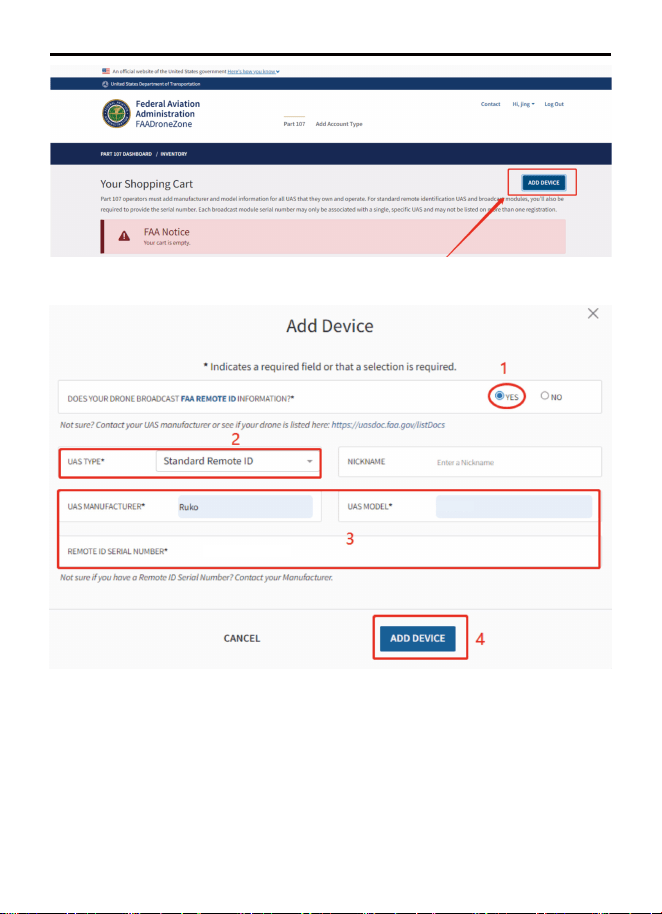
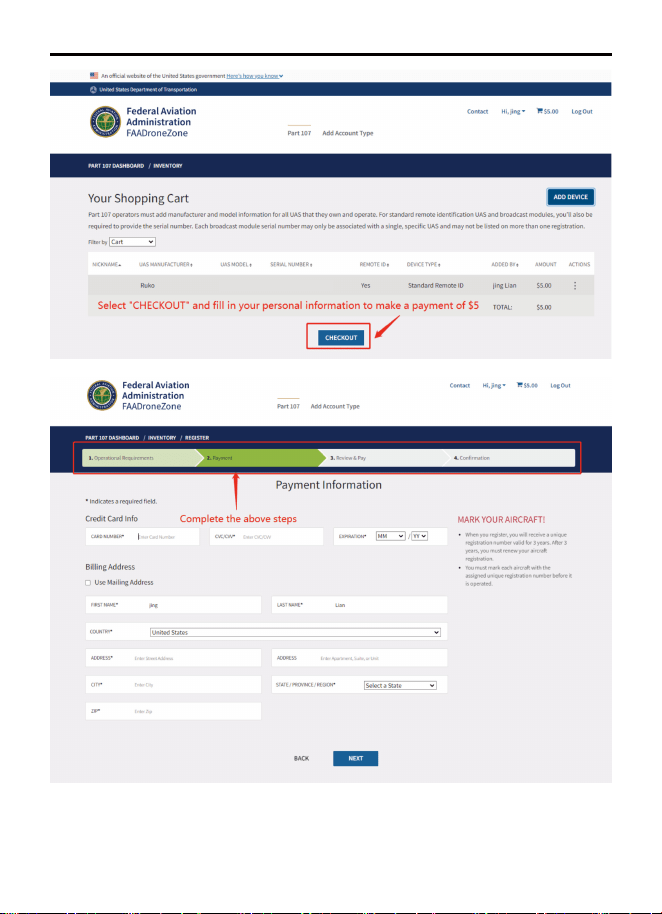
1.5.2 Registration
①
②
②
12
1869BF11P2000001
Copyright ©2024 Ruko All Rights Reserved.
4
F11PRO 2 User Manual
Copyright ©2024 Ruko All Rights Reserved.
5
F11PRO 2 User Manual
1869BF11P2000001
F11PRO 2
Copyright ©2024 Ruko All Rights Reserved.
6
F11PRO 2 User Manual
1869BF11P2000001
F11PRO 2
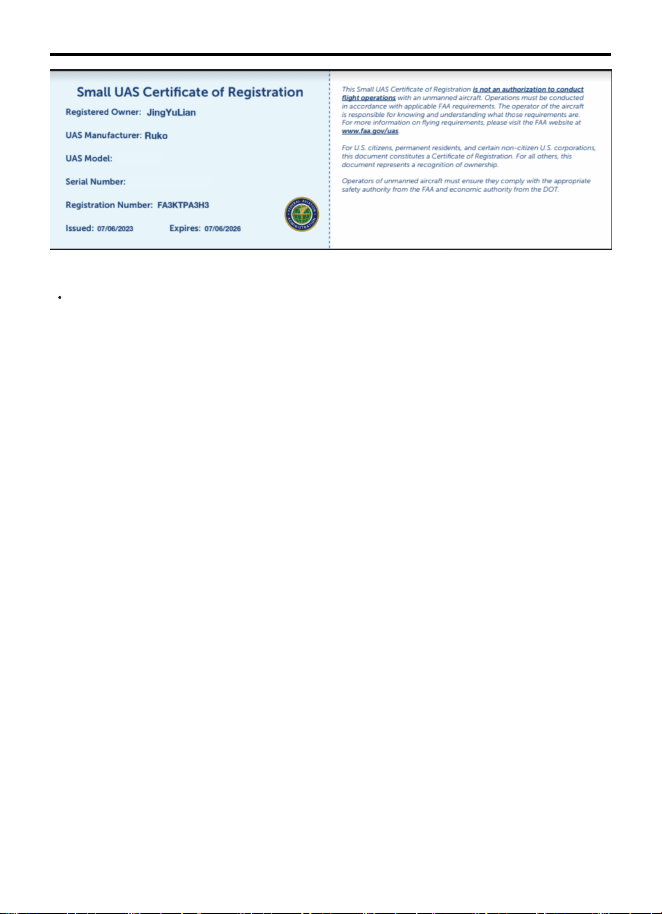
The aircraft will start broadcasting the FAA remote ID signal when
the aircraft's motors begin to spin.
Copyright ©2024 Ruko All Rights Reserved.
7
F11PRO 2 User Manual
F11PRO 2
1869BF11P2000001
2.1 Introduction
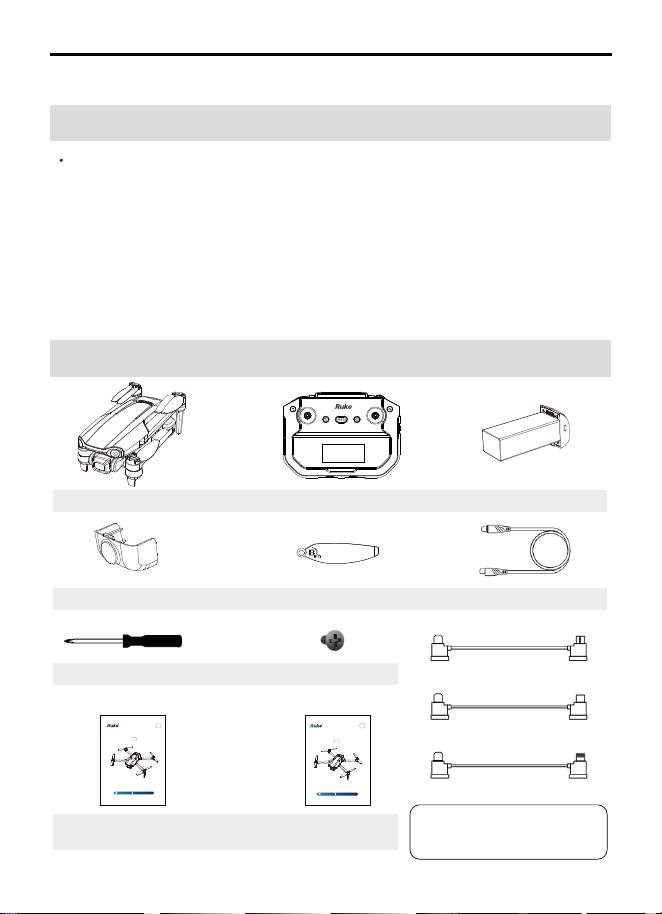
2.2 Product List
2 Product Profile
The Ruko F11PRO 2 features a foldable design and weighs about
357g. It offers stable hovering and flying capabilities outdoors with
impressive shooting performance. Equipped with upgraded 5.8GHz
Wi-Fi FPV real-time transmission, it includes a 75° FOV lens and a
90° adjustable camera. The camera captures 4K HD video and 6K
UHD photos, providing a wide view to capture your moments. The
advanced flight-control system ensures agile, stable, and safe
flying. With auto RTH, the aircraft will automatically return to its
starting point and land if it loses signal or the battery is low. Please
use the product in accordance with local laws and regulations.
Copyright ©2024 Ruko All Rights Reserved.
8
F11PRO 2 User Manual
Drone
Remote Controller
Charging Cable
Screwdriver Screw
Smart Flight Battery
Spare PropellerCamera Cover
User Manual Flight Guide &
Safety Disclaimer
Type-C to Micro-USB cable
Type-C to Type-C cable
Type-C to Lightning cable
User Manual
v1.0
8+
for age
CONTACT US FOR MORE TECH SUPPORT
+1 (888)892-0155
Mon-Fri 9:00AM - 7:00PM (PST)
F11PRO 2
Flight Guide &
Safety Disclaimer
v1.0
14+
for age
CONTACT US FOR MORE TECH SUPPORT
+1 (888)892-0155
Mon-Fri 7:00AM - 7:00PM (PST)
F11PRO 2
Type-C to Type-C cable is stored
inside the remote controller when
shipped.
Copyright ©2024 Ruko All Rights Reserved.
9
F11PRO 2 User Manual
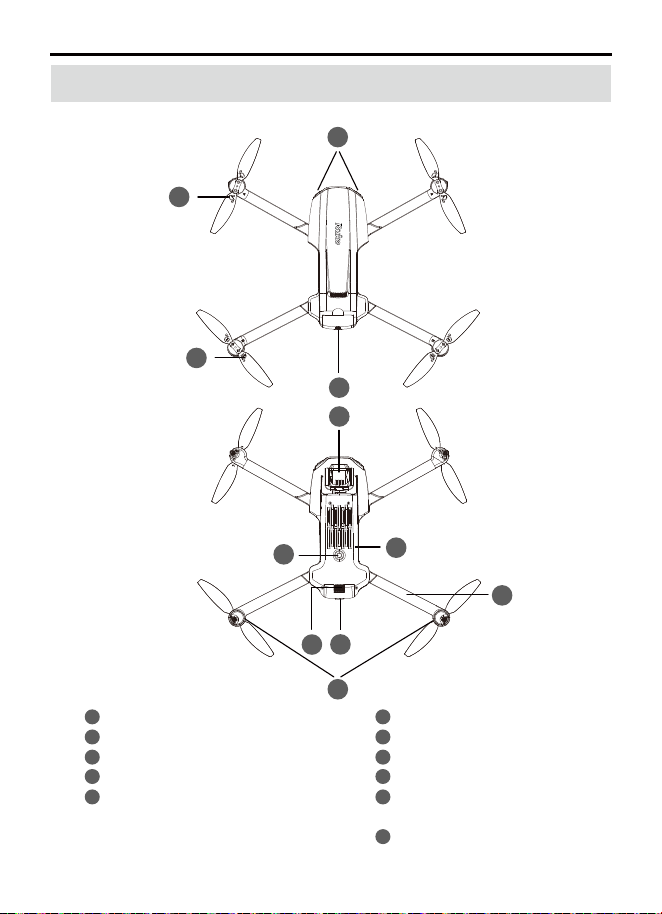
2.3 Diagram
2.3.1 Aircraft Diagram
11
1
1
2
3
4
5
6
7
8
9
10
11
4
3
2
7
6
Propeller
Motor
Smart Flight Battery
LED Light
3 Axis Brushless
Gimbal Camera
SD Card Slot
Optical Flow Sensor
Battery Buckle
Power Button
Aircraft Status
Indicator Light
Arm
9
10
8
5
Copyright ©2024 Ruko All Rights Reserved.
10
F11PRO 2 User Manual
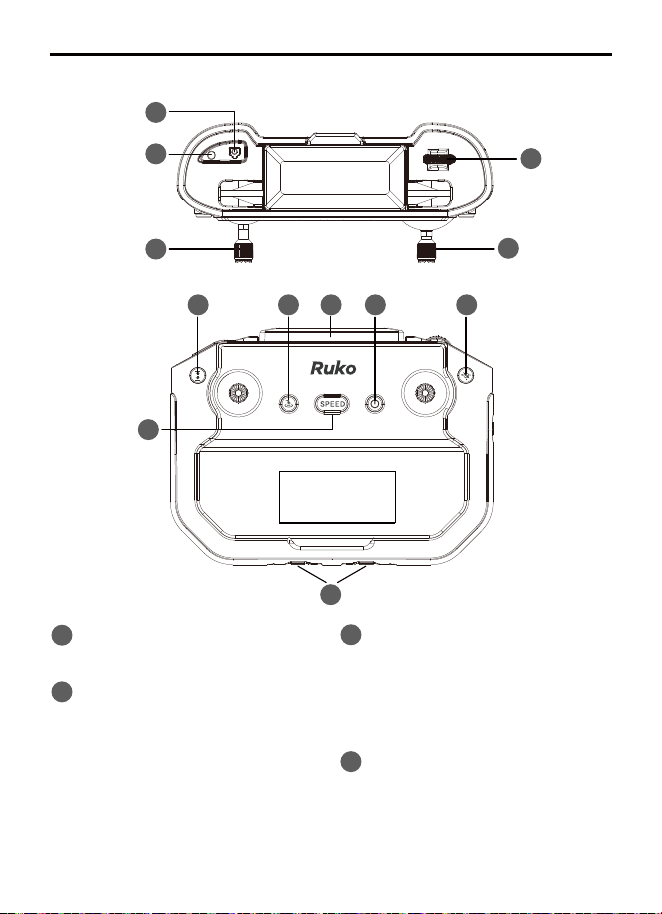
2.3.2 Remote Controller Diagram
1
1
2
2
3
4
3
11
12
4
Shutter Button
Short press once to take a picture.
Record Button
(1) Record: Short press it to
start/stop recording.
(2) Switch to Japanese stick mode:
Hold down the recording button and
then power on the remote controller
(Short-press it then long-press the
power button).
Left Joystick
(American stick mode) Throttle stick,
used to adjust the aircraft’s altitude
and control the direction of the front
of the aircraft. For more details,
please refer to section 4.2.5.
Right Joystick:
Directional stick, used to control the
aircraft’s flight direction
(forward/backward/left/right). For
more details, please refer to
section 4.2.5.
96 107 8
5
Copyright ©2024 Ruko All Rights Reserved.
11
F11PRO 2 User Manual
5 9
10
11
12
6
7
8
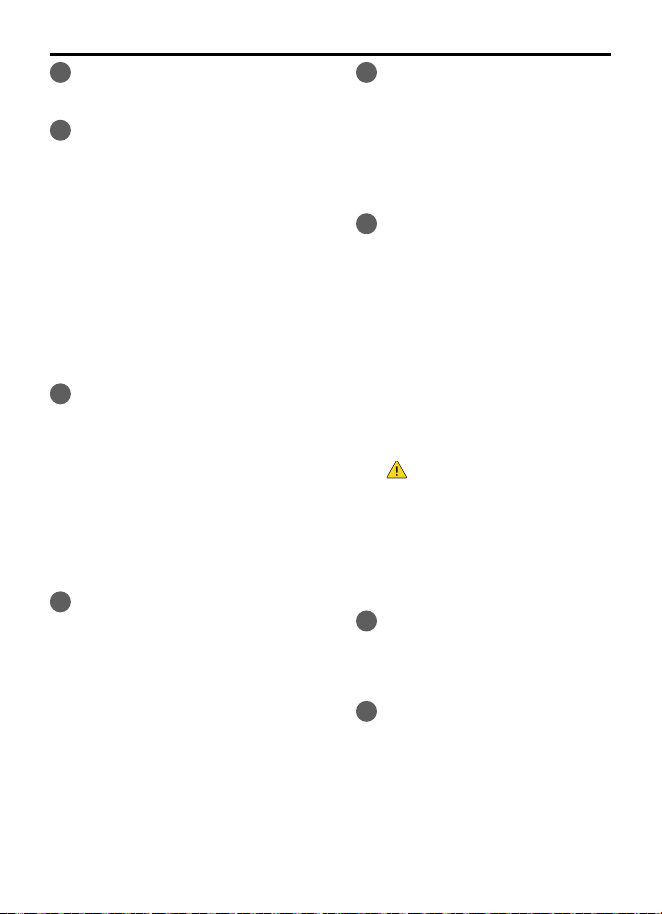
Power Button
(1)Turn on the remote controller:
Short-press it then long-press it
(2)Turn off the remote controller:
Long-press it
(3)Check the power level:
Short-press it once
Compass Calibration Button
(1)Enter compass calibration:
Short press it
(2) GPS mode/ Attitude mode:
① If GPS signal is not found,
press and hold the button for 3
seconds to turn off GPS and
switch the aircraft to
Attitude Mode.
② When the aircraft is in
Attitude Mode, press and hold
the button for 3 seconds to turn
on GPS and switch to GPS Mode.
(GPS is turn on by default
when powering on, please do
not turn it off when flying
outdoors to avoid losing
the aircraft). (Once GPS signal
is acquired, you cannot switch
back to Attitude Mode.)
SPEED Button
Press down for speed adjustment,
(2 speeds in total) default is stable
mode, accelerate is sport mode.
12.Sticks Storage Hole
Gimbal Gear
Adjust the Gimbal Camera Angle.
One-key Takeoff/ Landing and
Cruise Control Button
(1)One-key Takeoff: After unlocking
the motor, long press it and the
aircraft will automatically take off to
a height of about 1.5 meters.
(2)One-key Landing: Long press it
while the aircraft is flying and the
aircraft will descend to the ground
at the existing coordinates.
(3)Cruise Control: Press this button
while operating the joysticks to
activate the Cruise Control.
Smart RTH Button
(1)Press it to initiate automatic
Return-to-Home (RTH), where the
aircraft will return to its takeoff
location and land. (There may be a
deviation of up to 3 meters from the
takeoff position, depending on GPS
signal strength at takeoff.)
(2)To cancel the RTH process, press
the button again during the return.
Mobile Phone Holder
Flip up to open the holder for placing
the mobile phone. The width of the
phone holder is adjustable. The
maximum adjustable width is suitable
for a 6.7-inch phone.
Copyright ©2024 Ruko All Rights Reserved.
12
F11PRO 2 User Manual
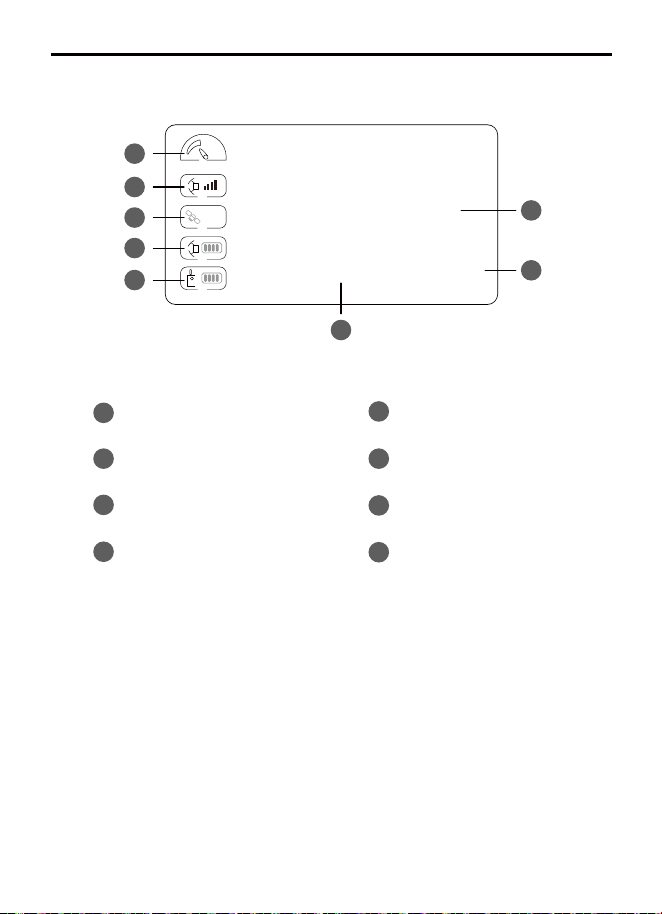
2.3.3 Remote Controller Display
1
2
3
4
1
2
3
4
5
5
6
6
7
7
8
8
Speed
Aircraft Connection Signal
GPS Signal
Aircraft Power
Remote Controller Power
Flight Distance
Flight Height
Status Display
CONNECTING
0 0
m m
Copyright ©2024 Ruko All Rights Reserved.
13
F11PRO 2 User Manual
3.1 Speed Mode
3. Aircraft
F11PRO 2 aircraft consists of a flight control system, a
communication system, an image system, a power system and a
smart flight battery.
F11PRO 2 has two speed modes, Stable Mode and Sport Mode.
After the aircraft is turned on, the stable speed mode is turned on
by default. You can switch by pressing the SPEED button on the
remote controller. The stable mode speed is 6m/s and the sport
mode speed is 8m/s.
When wind speed is high, sport mode should be maintained to
improve wind resistance effect.
When flying in sport mode, the pilot should reserve at least 3
meters of braking distance to ensure flight safety.
When flying in sport mode, the power of the aircraft will be
greatly improved, and the small manipulations of the joysticks on
the remote controller can result in large flight maneuvers of the
aircraft. Please reserve enough flying space to ensure the safety
of the flight.
Copyright ©2024 Ruko All Rights Reserved.
14
F11PRO 2 User Manual
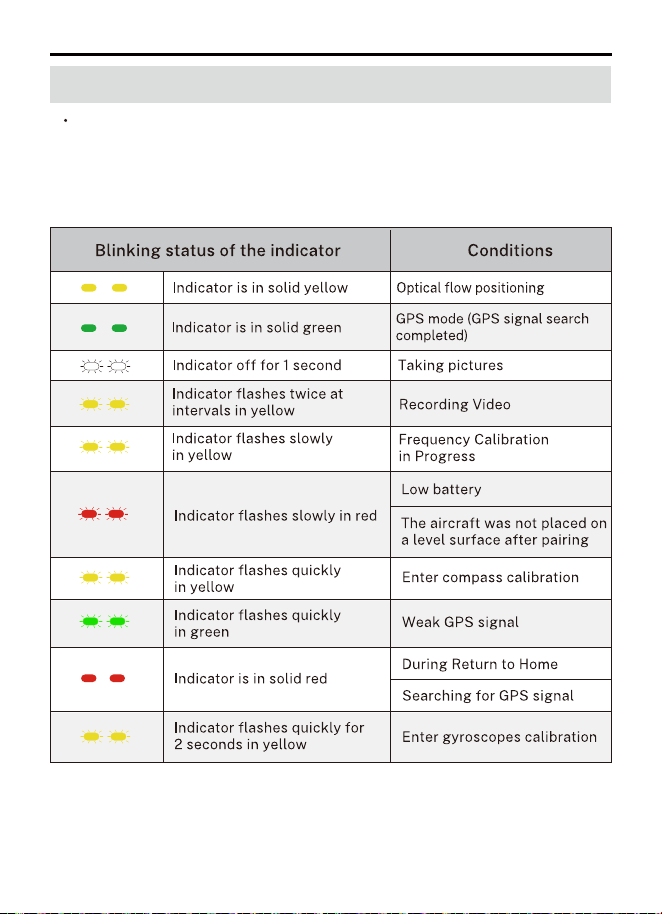
3.2 Aircraft Status Indicator
The F11PRO 2 status indicator light is located above the front
landing gear and is used to display the current status of the flight.
Please refer to the table below to understand what each flashing
pattern indicates.
Copyright ©2024 Ruko All Rights Reserved.
15
F11PRO 2 User Manual
3.3 Optical Flow Positioning
The aircraft is equipped with a downward vision positioning system,
which enhances its ability to adapt to different environments. This
system, composed of downward vision cameras and sensors, allows
the aircraft to hover steadily at low altitudes or indoors, even when
GPS is unavailable or the signal is weak.
Optical flow positioning can only assist flight in environments with
sufficient lighting and textured surfaces. It cannot fully replace
user judgment, so please pay attention to the aircraft's status and
the APP prompts. Do not overly rely on the optical flow positioning.
Optical flow positioning may perform poorly or fail in environments
that are too bright, too dark, mirror-like, smooth single-colored
surfaces, water surfaces, reflective surfaces, or sparsely textured
surfaces.
The optimal working range for optical flow positioning is between
1.64ft (0.5m) to 9.84ft (3m). Beyond this range, the performance of
the downward optical flow vision system may be less effective, so
please fly with caution.
Ensure that the lens of the optical flow vision system is clean, and
avoid blocking or interfering with it.
Optical flow positioning can only be used in attitude mode. When
the aircraft successfully acquires a GPS signal outdoors, it will
automatically switch to GPS positioning mode.
optical flow
positioning
9.8ft
Copyright ©2024 Ruko All Rights Reserved.
16
F11PRO 2 User Manual
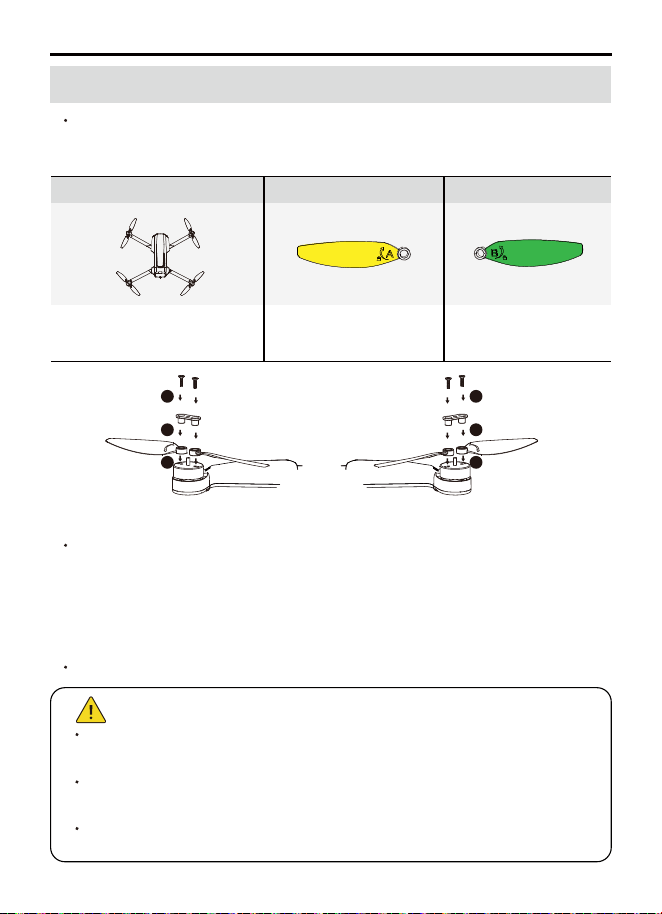
3.4 Propellers
The propellers on the adjacent motors of the F11PRO 2 are forward
and reverse propellers. The two propellers on the same motor are
the same, and the propellers are marked A and B respectively.
Taking the camera direction as the front, the left front arm and
right rear arm must be installed with propellers marked with A; the
right front arm and left rear arm must be installed with propellers
marked with B. Use a screwdriver to install and make sure the
screws are tightened.
Use the screwdriver to detach the propellers from the motors.
Install the propellers
Detach the Propellers
Please use the propellers provided by Ruko, and do not mix
propellers of different types.
Please check whether the propeller is installed correctly and
tightly before each flight.
Please check to make sure that the propellers are in good
condition before each flight.
Installation location
Installed to the motor
with A mark on the arm
Installed to the
motor with B mark
on the arm
Mark A Propellers Mark B
B
B
A
A
1
2
3
A
A
1
2
3
B
B
Copyright ©2024 Ruko All Rights Reserved.
17
F11PRO 2 User Manual
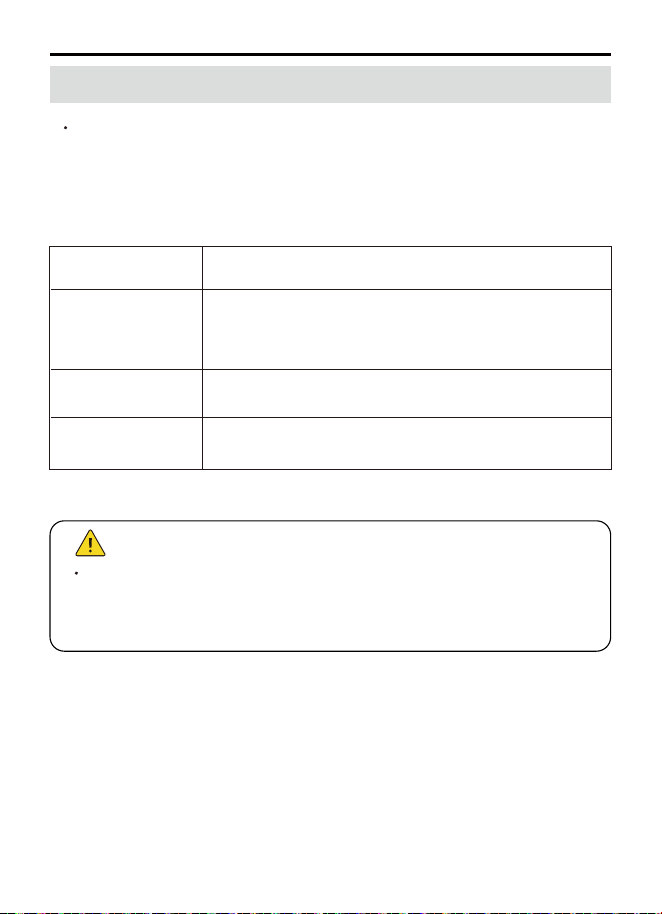
3.5 Smart Flight Battery
The F11PRO 2 smart flight battery has a capacity of 3200mAh, a
rated voltage of 7.7V, and includes charge/discharge management
features. This battery uses high-energy, large-capacity cells to
provide strong support for the aircraft’ s flight time.
Automatically balance the internal battery cell
voltage to protect the battery.
It can avoid damaging the battery due to
over-discharge.
When the battery detects a short circuit, the
output will be cut off to protect the battery.
It can prevent the battery from being
overcharged and causing serious damage to the
battery. When the battery is fully charged,
remove the charger device in time.
3.5.1 Battery Features
Please read carefully and strictly abide by Ruko's Requirements in
this User Manual, Flight Guide & Safety Disclaimer, and stickers on
the battery surface before using the battery. The user shall bear the
consequences caused by failure to use it as required.
Balance
Protection
Overcharge
Protection
Over-discharge
Protection
Short Circuit
Protection
Copyright ©2024 Ruko All Rights Reserved.
18
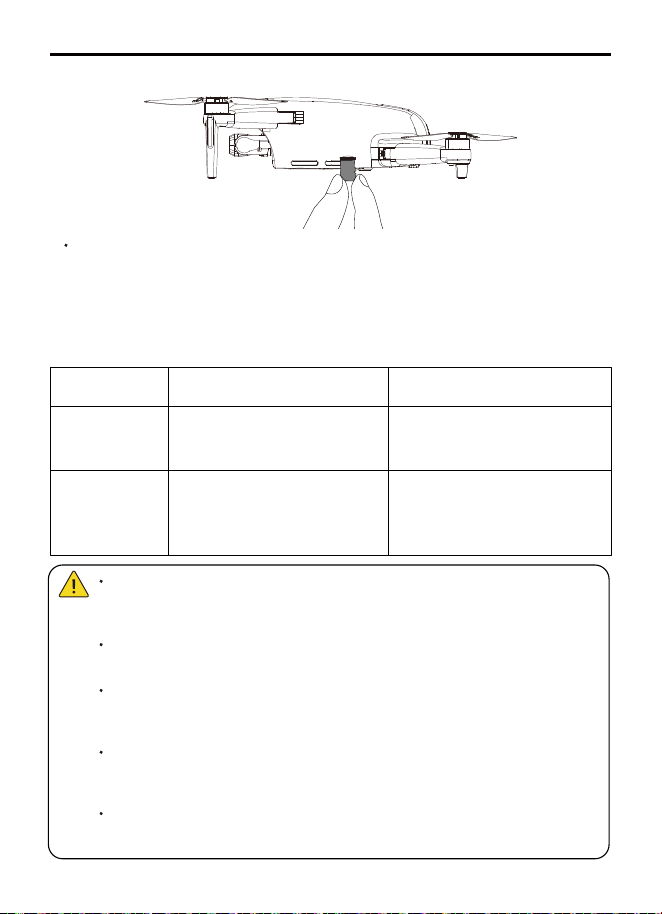
F11PRO 2 User Manual
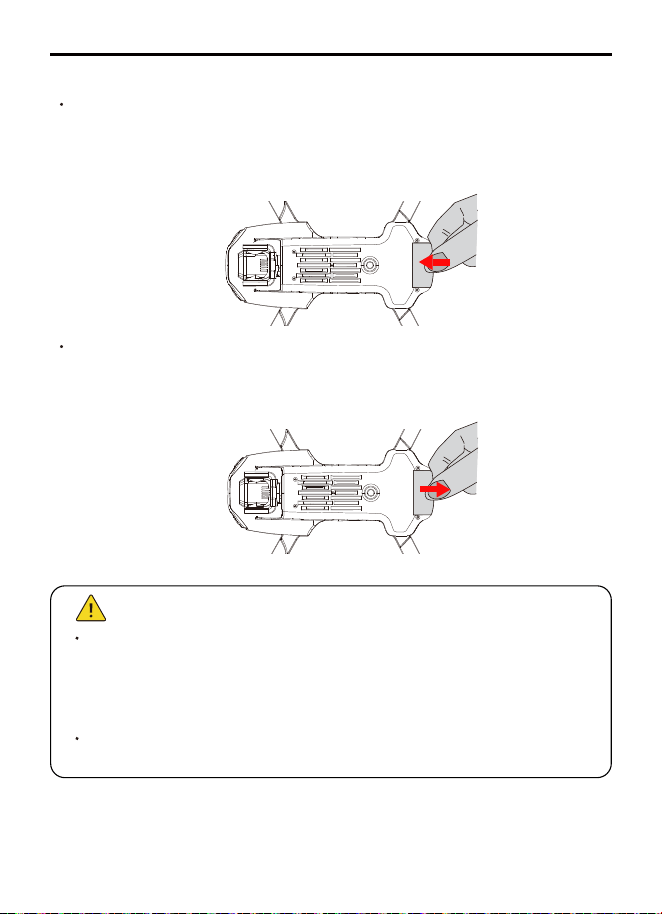
Insert the smart flight battery into the battery compartment and push
it down until you hear a "click" from the battery buckle, indicating
that it pops up and locks. Make sure the battery is in place.
3.5.2 Install / Remove the Battery
Install
To remove the battery, press the buckle on the bottom of the battery
and pull the battery out of the compartment.
Remove
Do not install the battery into the aircraft or remove the battery
from the aircraft when the battery power is turned on. Otherwise,
the poor contact of the battery interface during the operation may
cause the battery to short-circuit and burn the aircraft.
The battery must be installed or removed with the battery power
turned off.
Copyright ©2024 Ruko All Rights Reserved.
19
F11PRO 2 User Manual
Long press the power button to power on or off.
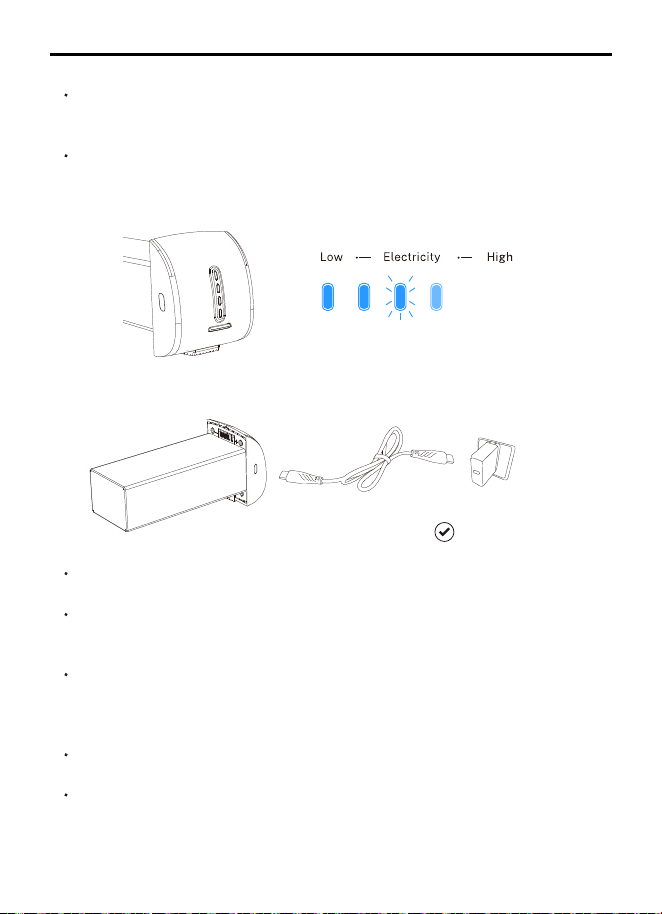
3.5.3 Powering On/Off
Long press the power button until all four bars of the indicator light
up, then release the power button. After powering on, the power
indicator shows the current battery level.
3.5.4 Checking Battery Level
Before using the smart flight battery, be sure to fully charge it.
Please use the USB cable provided in the package for charging.
Support PD, QC3.0 plug.
In the charging state, the battery power indicator will flash and
indicate the current charge level. When the fourth indicator light is
always on, it indicates that the charging is complete.
After charging is complete, please remove the charger in time.
Charging time: 2.5 hours (using the Type-C fast charging cable that
comes with the package).
3.5.5 Charging the Battery
Original charging cable
PD, QC 3.0

Copyright ©2024 Ruko All Rights Reserved.
20
F11PRO 2 User Manual
When using the battery in a low-temperature environment
(32°F-41°F / 0°C-5°C), please make sure that the battery is fully
charged. The flight time will be reduced as the discharge capacity
of the battery will be reduced when working in a low-temperature
environment.
In a low-temperature environment, due to the battery output power
limitation, the aircraft's wind resistance and flight performance will
be reduced. Please be careful.
Pay more attention when flying in low-temperature and
high-altitude environments.
It is recommended to charge and discharge it once a month, do not
store with a full charge, keep 50%-60% of the power, the storage
temperature is 50°F-104°F (10°C-40°C), and the best storage
temperature is 66.2°F-69.8°F (19°C -21°C).
If water enters the battery and the battery protection board fails,
the battery cannot be used normally. Do not use the battery in rain
or in a humid environment, as this may cause the battery to
self-ignite or even explode.
If the battery is squeezed, deformed, and dropped from a high
altitude, it is forbidden to use it again.
Prolonged exposure to high temperatures is forbidden. High
temperatures will cause the internal pressure of the battery to
become too high and cause an explosion.
The positive and negative poles are short-circuited for a long time
(such as the battery contacts have water, short-circuit caused by
hair or foreign objects, etc.). If it exceeds 30 minutes, the protection
board IC will fail and disconnect, and the battery cannot be used
normally.
3.5.6 Low Temperature Notice
3.5.7 Daily Preservation Advice
Copyright ©2024 Ruko All Rights Reserved.
21
F11PRO 2 User Manual
3.6 Camera Overview
The camera uses an upgraded 5.8GHz Wi-Fi FPV real-time
transmission function, equipped with a 120°FOV lens and a 90°
adjustable camera as well as 3-axis brushless gimbal, which can
stably shoot 4K HD video and 6K ultra-clear images, providing you
with a broad field of vision for unforgettable moments.
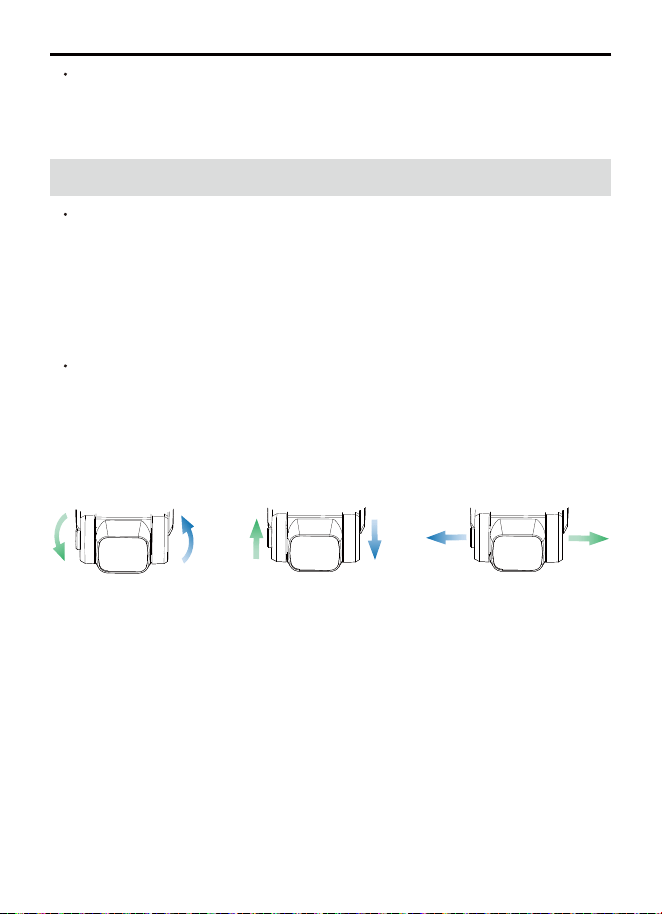
The F11PRO 2 is equipped with a three-axis mechanical stabilization
gimbal, with roll, pitch, and yaw axes powered by brushless motors.
This ensures stable and smooth image transmission.
3.6.1 3-Axis Brushless Gimbal
If the aircraft has not been used for a month, the battery must be
removed to prevent the battery from being discharged for a long
time.
Roll Axis Tilt Axis Yaw Axis
Copyright ©2024 Ruko All Rights Reserved.
22
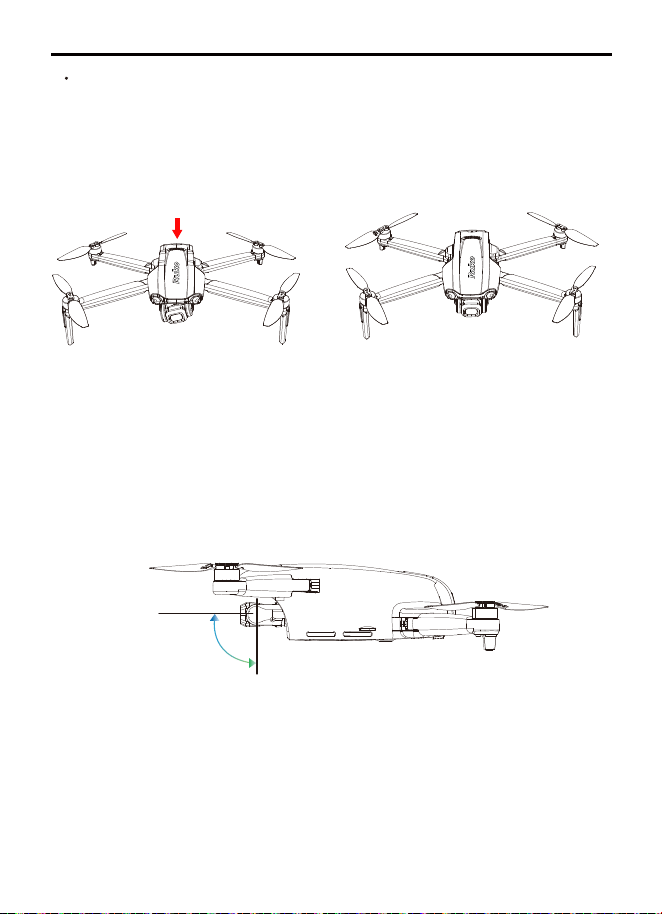
F11PRO 2 User Manual
The gimbal will not function and may appear tilted before it is
powered on and completes its self-check. This is normal. Once
powered on, the gimbal will automatically perform a self-check,
which takes about 20 seconds. After the self-check, the gimbal will
stabilize and level itself automatically.
Before power on and
self-check
(Non-operational state)
After powering on and
completing the self-check
(operational state)
3.6.2 The aircraft adjustment angle is -90° to 0°
0°
-90°
Copyright ©2024 Ruko All Rights Reserved.
23
F11PRO 2 User Manual
The F11PRO 2 is equipped with a micro-SD card slot for expanding
storage capacity. (SD card is not included in package)
①Card speed: 10M/s.
②File format: Support FAT32 format.
③Memory capacity: A memory card with a memory capacity of
128G or less.
3.6.3 Image Storage
Check whether the capacity of the memory card is sufficient. If
the capacity of the memory card is insufficient, videos and
pictures cannot be stored in the memory card.
If you cannot save pictures or videos, try formatting the
memory card.
Do not insert or remove the micro SD card after the aircraft is
powered on, as this may cause damage to the card or result in
data loss.
After the memory card is installed, the picture and video files
will be stored in the memory card, and the pictures and videos
will not be stored on the mobile phone.
After powering on and connecting the aircraft, you can use the
app to download photos or videos stored on the aircraft's
memory card to your mobile device.
App
Picture
1280×720P@25fps
5700×3200P
4096×3072P
3840×2160P
5700×3200P
4096×3072P
3840×2160P
3840×2160P@30fps
2688×1512P@50fps
2688×1512P@30fps
2048×1080P@50fps
SD card
Video
F11PRO 2
Copyright ©2024 Ruko All Rights Reserved.
24
F11PRO 2 User Manual
4.1 Introduction
4.2 Remote Controller Instructions
4 Remote Controller
F11PRO 2 remote controller uses the 5.8 GHz frequency band, and
the remote controller distance is up to 10000ft (unobstructed and
interference-free environment). The retractable handle can
securely hold a phone and supports devices up to 6.7 inches in size.
Remote controller built-in 3600mAh 3.7V capacity battery,
charging time is 3.5 hours, and the longest working time is about 4
hours.
Powering on: Short press then long press the power button.
Powering off: Long press the power button.
Check the remote controller's battery level: Short press the power
button.
4.2.1 Powering On/ Off
Copyright ©2024 Ruko All Rights Reserved.
25
F11PRO 2 User Manual
Record Button: Short press it to start/stop recording.
Shutter Button: Short press it to take a photo.
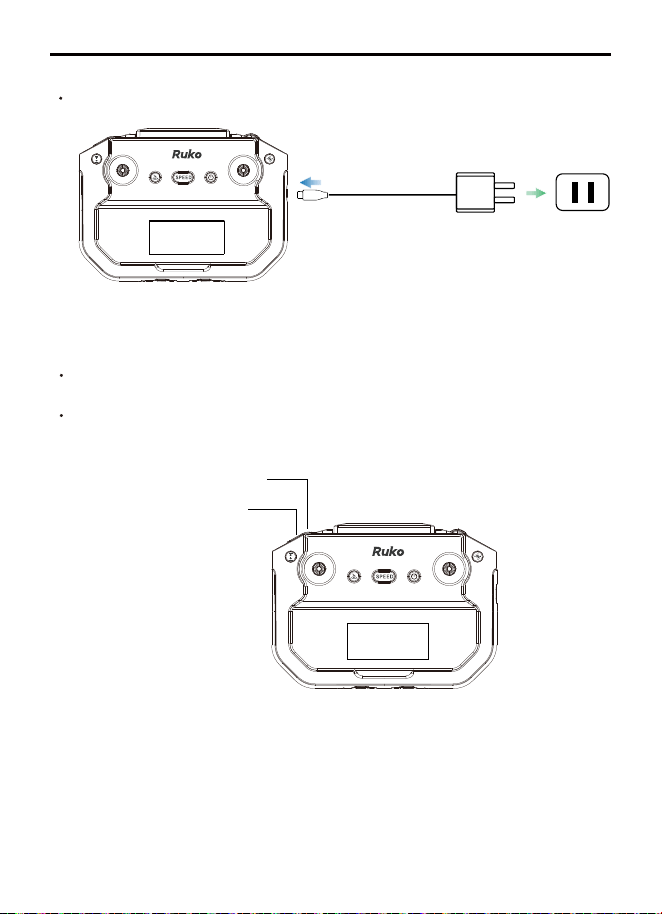
Connect the remote controller Type-C port to the charger to charge it.
4.2.2 Charging
4.2.3 Controlling the Camera
Camera Button
Recording Button
(Not included in package)

Copyright ©2024 Ruko All Rights Reserved.
26
F11PRO 2 User Manual
American stick mode for controlling the aircraft is as follows:
Japanese stick mode for controlling the aircraft is as follows:
Press and hold the record button to turn on the remote controller, it
will be Japanese stick mode after turning on.
It will back to the default American stick mode when turn off the
remote controller and turn on again.
4.2.4 American stick mode and Japanese stick mode
How to Switch
Left Joystick Right Joystick
Right JoystickLeft Joystick
Copyright ©2024 Ruko All Rights Reserved.
27
F11PRO 2 User Manual
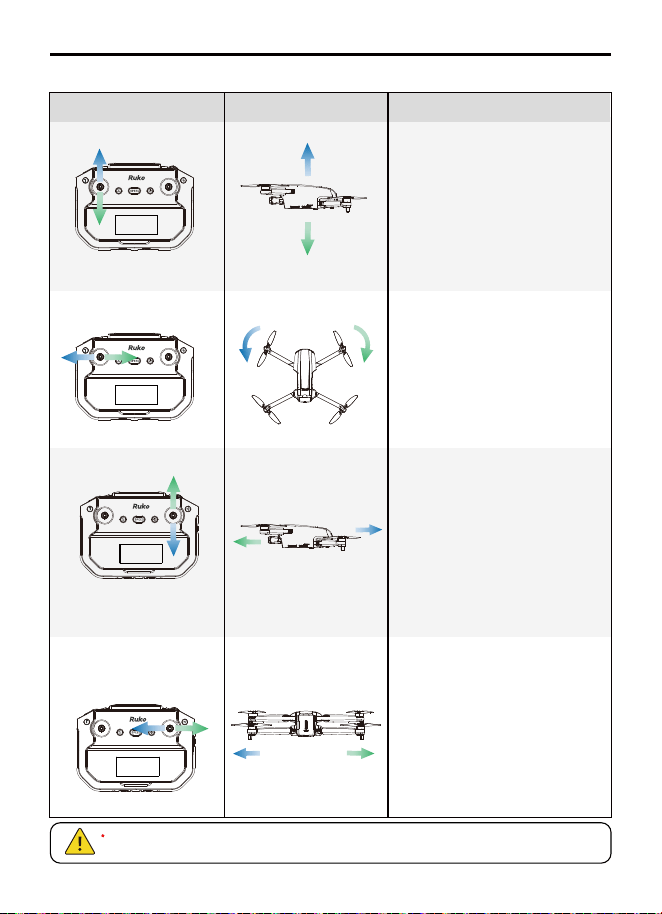
4.2.5 Remote Controller Joystick Operation Instructions
The forward direction of the aircraft is based on the direction
of the nose.
Aircraft Direction
Remote Controller
(Default American Stick Mode)
Operation Instructions
1.Push the stick upward to make the aircraft
ascend.
2. Pull the stick downward to make the
aircraft descend.
3. When the stick is released and returns to
the center position, the aircraft will hover.
(When taking off, the left stick must be
pushed upward to lift the aircraft off the
ground. Push the stick slowly to prevent the
aircraft from suddenly ascending too rapidly.)
1.Push the stick up to make the aircraft fly
forward.
2.Push the stick down to make the aircraft fly
backward.
3.When the stick is in the neutral position, the
aircraft's forward and backward direction
remains level.
4.When the aircraft moves forward or
backward, the body will tilt forward or
backward.
5.The amount you push the stick controls the
flight speed; the greater the push, the larger
the tilt angle and the faster the flight.
1.Push the stick to the left, and the aircraft will
rotate counterclockwise.
2.Push the stick to the right, and the aircraft
will rotate clockwise.
3.The amount you push the stick controls the
rotation speed of the aircraft. The further you
push the stick, the faster the rotation.
1.Push the stick left to make the aircraft fly
to the left.
2.Push the stick right to make the aircraft
fly to the right."
3.When the stick is in the neutral position,
the aircraft's left and right direction
remains level.
4.When the aircraft flies left or right, the
body will tilt in the corresponding direction.
The amount you push the stick controls the
flight speed; the greater the push, the
larger the tilt angle and the faster the
flight.
Copyright ©2024 Ruko All Rights Reserved.
28
F11PRO 2 User Manual
4.3 Communication Range
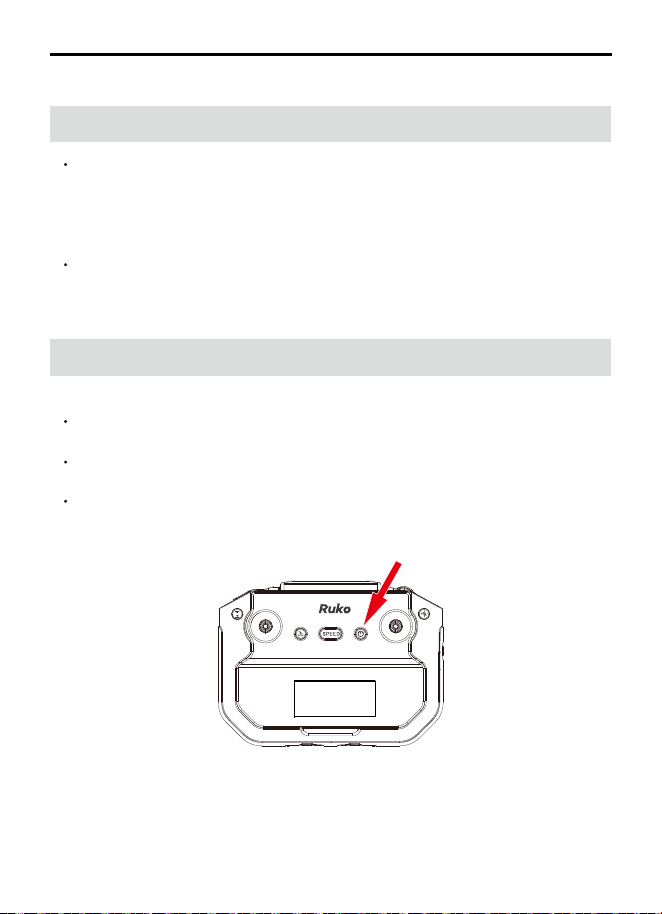
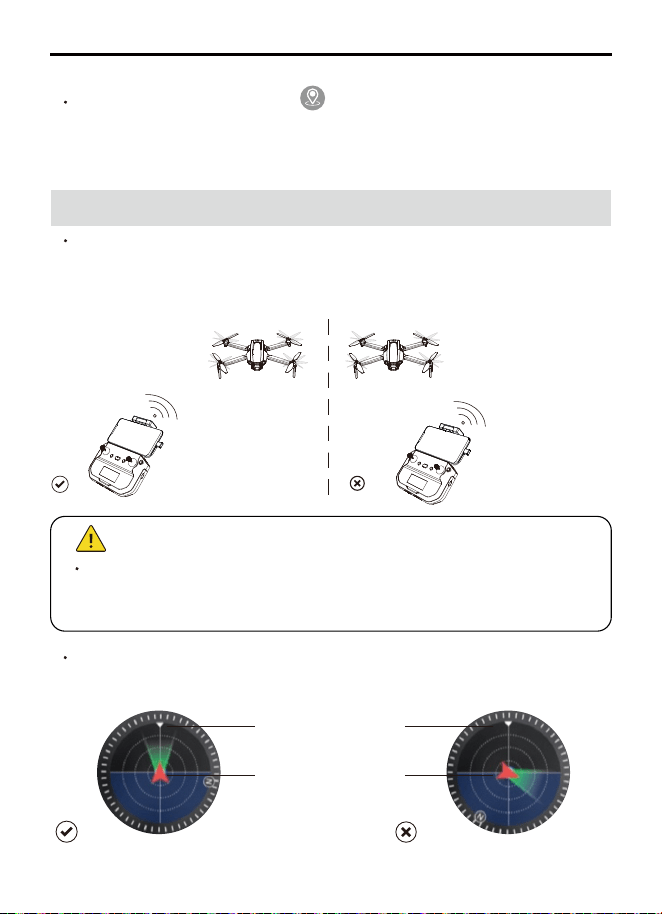
4.2.6 Smart RTH Button
User can refer to the aircraft flight direction from the Attitude
Indicator in the app.
The remote controller antenna is located in front of the phone
mount. During flight, aim the phone mount directly at the aircraft
to achieve the strongest signal transmission.
Press the smart RTH button on the remote controller to activate
the automatic return-to-home function. Press it again to exit RTH.
The aircraft will hover in place midway through the return journey
when you exit, and you can then use the stick to control the aircraft.
When operating the aircraft, adjust the position and distance
between the remote controller and the aircraft as needed. Aim the
remote controller directly at the aircraft to ensure it remains within
the optimal communication range.
Aircraft
orientation
Remote controller
position
Copyright ©2024 Ruko All Rights Reserved.
29
F11PRO 2 User Manual
4.4 Remote Controller Pairing
Before each flight, you need to pair the aircraft with the remote
controller. Pairing takes about 20 seconds, and you can only
operate the aircraft once pairing is successful. Follow these steps
to pair:
(1)Turn on the aircraft.
(2)Turn on the remote controller.
(3)The aircraft and remote controller will pair automatically. During
pairing, the remote controller will emit a 'beep-beep' sound. Pairing
is complete when the sound stops.
Once pairing is successful, the aircraft's LED light will change
from blinking yellow to a solid red (indicating no GPS signal) or to
a solid green (indicating GPS signal acquired).
Before each flight, check the battery level of the remote
controller. The remote controller will emit a warning sound when
the battery is low.
If the remote controller is idle for 10 minutes, it will automatically
power off. To resume normal operation, move the joystick or press
any button.
When using the remote controller with a mounted device, make
sure the device is securely clamped to prevent it from slipping.
Store the remote controller with a battery level of around
3.8-3.9V. Charge the battery approximately every month to
maintain its health.
Copyright ©2024 Ruko All Rights Reserved.
30
F11PRO 2 User Manual
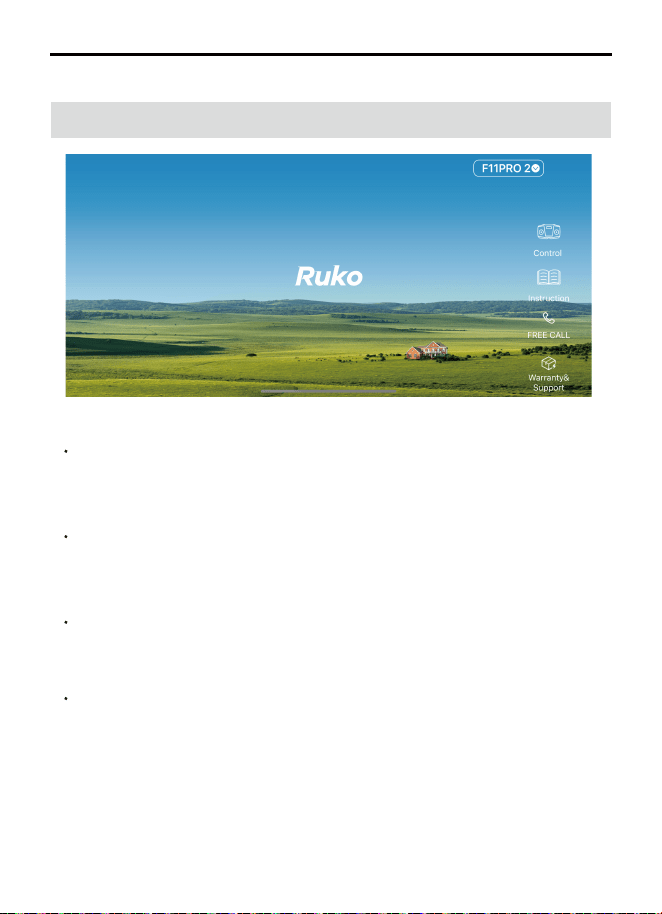
5.1 Home Screen
5 Ruko Mini App
Use the buttons on the app interface to control the aircraft and
view the live video feed from the aircraft's camera.
Control
Tap to view the User Manual, Flight Guide, and Safety Disclaimer,
as well as to access the flight instruction videos.
Instruction
Tap to Call Ruko Customer Service Support.
Free call
Tap to access the support ticket page (warranty and support),
where you can send text, photos, or videos to receive technical
assistance.
Warranty & Support
Copyright ©2024 Ruko All Rights Reserved.
31
F11PRO 2 User Manual
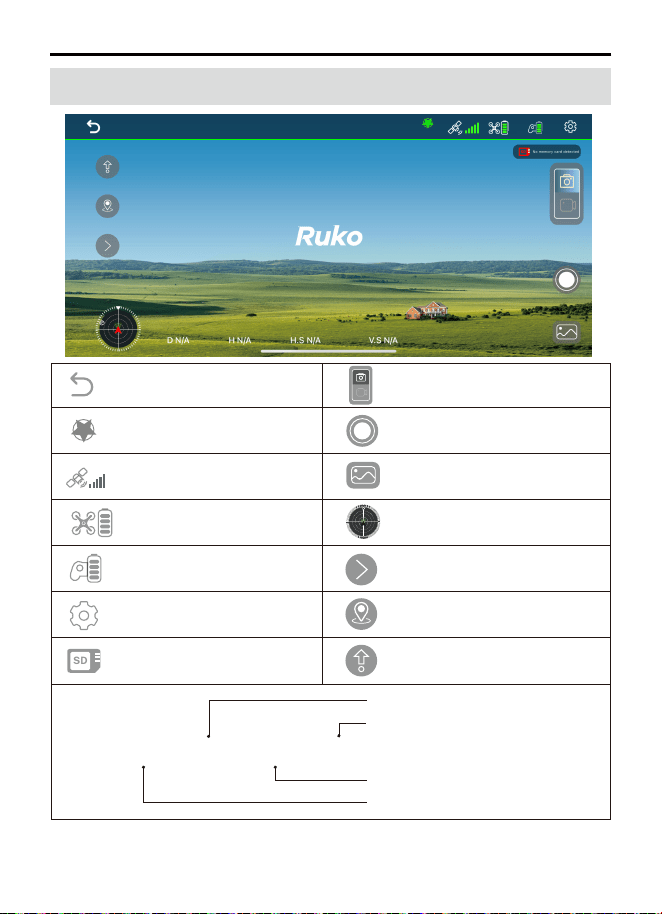
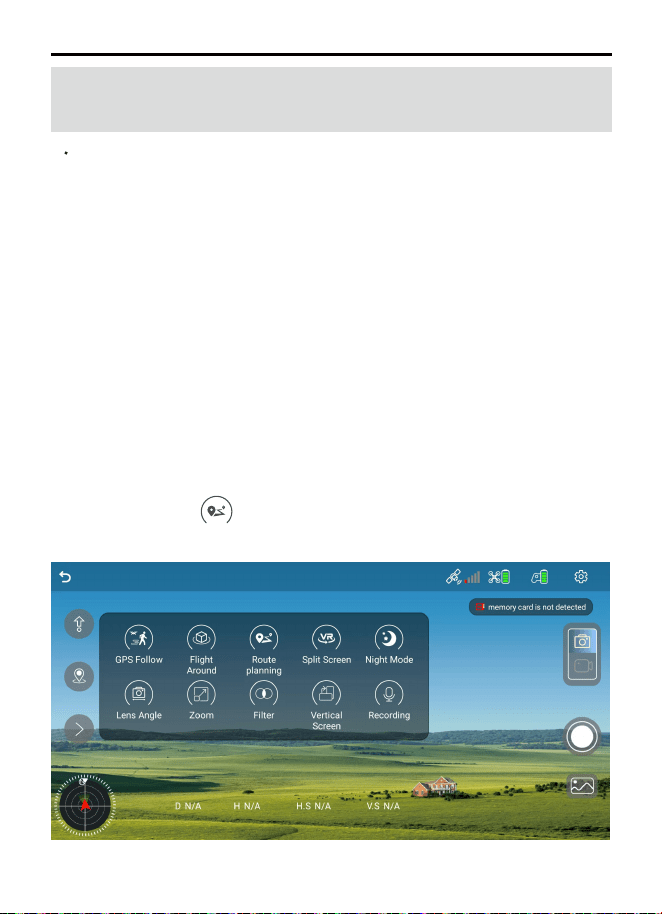
5.2 Control Interface
Back
GPS Status
Aircraft Battery Level/ Remote
ID Information
Controller Battery Level
System Settings
SD Card
Shooting Mode
Shutter/Record Button
Photo Album
Attitude Indicator
RTH
Auto Takeoff/Landing
Compass Interference Value
More Features
SD
N
Flight distance
Speed of horizontal flight
Speed of vertical flight
Flight height
D N/A H N/A H.S N/A V.S N/A
85%85%
15
Copyright ©2024 Ruko All Rights Reserved.
32
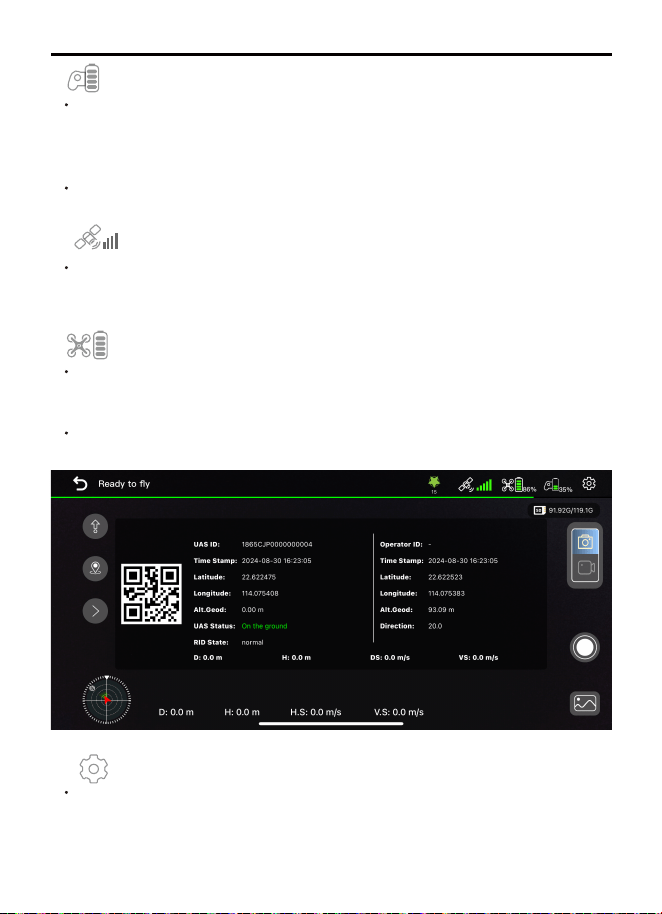
F11PRO 2 User Manual
Display the current remote controller battery power, and the power
progress bar displays.
Remote controller battery level
Display the current smart flight battery power, and the power
progress bar displays.
Tap the battery icon to view Remote ID information.
Aircraft battery level
In flight: Display the flight status of the aircraft and various
warning information.
Aircraft status indicator bar
Used to indicate GPS signal strength: 3 bars mean the GPS signal
is strong enough for flight, while 1 or 2 bars indicate a weak GPS
signal, requiring a change in takeoff location.
GPS status
System settings include flight range settings, data logging, unit
switching, displaying flight paths, showing notifications, and
configuring voice prompts.
System settings
Copyright ©2024 Ruko All Rights Reserved.
33
F11PRO 2 User Manual
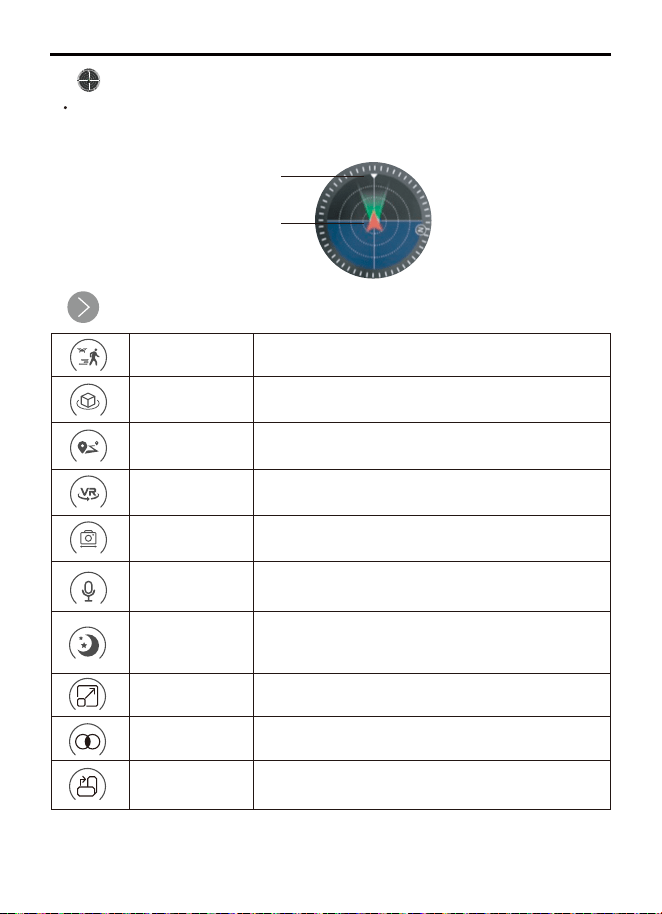
N
Displays information such as the aircraft's heading, tilt angle, and
the positions of the remote controller and home point.
Attitude indicator
More Features
GPS Follow
Aircraft will lock onto the user and can track the
user’s movement as he moves.
The aircraft fly around in circle with the current
position as the center.
Aircraft flies along the path marked on the App.
VR split screen interface, used with VR glasses.
Route Planning
Fly Around
Split Screen
Lens Angle
Adjust the shooting angle of the aircraft camera.
When it is turned on, your video will include ambient
sound.
Optional 5x zoom.
Select a filter for your photo or video.
Switch the image to vertical to take photos and
videos.
Increase the brightness of the live feed in the app
during night flights. It is recommended to enable this
feature at night or in low-light conditions.
Recording
Night Mode
Zoom
Filter
Vertical Screen
Aircraft
orientation
Remote controller
position
Copyright ©2024 Ruko All Rights Reserved.
34
F11PRO 2 User Manual
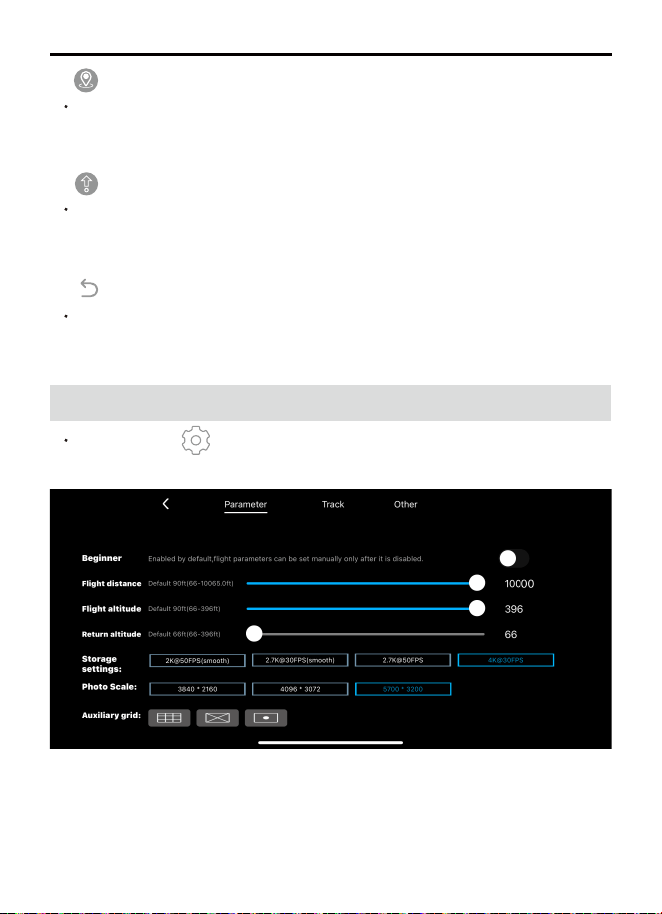
5.3 Parameter
Tap to initiate Smart RTH and have the aircraft return to the last
recorded home point and turn off the motors. Tap it again to cancel
the return.
Tap the icon to enter parameter interface
RTH
After unlocking the motors, tap this icon to make the aircraft take off
automatically; tap it again, and the aircraft will land automatically. You
can cancel the descent by push up the throttle stick.
Tap to return to the homepage.
One-key takeoff/landing
Back

Copyright ©2024 Ruko All Rights Reserved.
35
F11PRO 2 User Manual
Beginner: In this mode, the aircraft's farthest flight distance and
altitude is 30 meters, so that the aircraft can fly more safely within
sight.
Flight distance: Set the longest distance to fly.
Flight altitude: Set the maximum flight altitude.
Return altitude: The default altitude of the aircraft during
performing a return flight is 20 meters, and it is recommended to
set the altitude higher than the height of the surrounding obstacles.
Storage settings: Option to store video recordings of different
resolutions on the SD card.
Photo Scale: Optional picture shoots with different specifications.
Auxiliary grid: Different auxiliary lines can be selected to assist in
composing the shot.
Copyright ©2024 Ruko All Rights Reserved.
36
F11PRO 2 User Manual
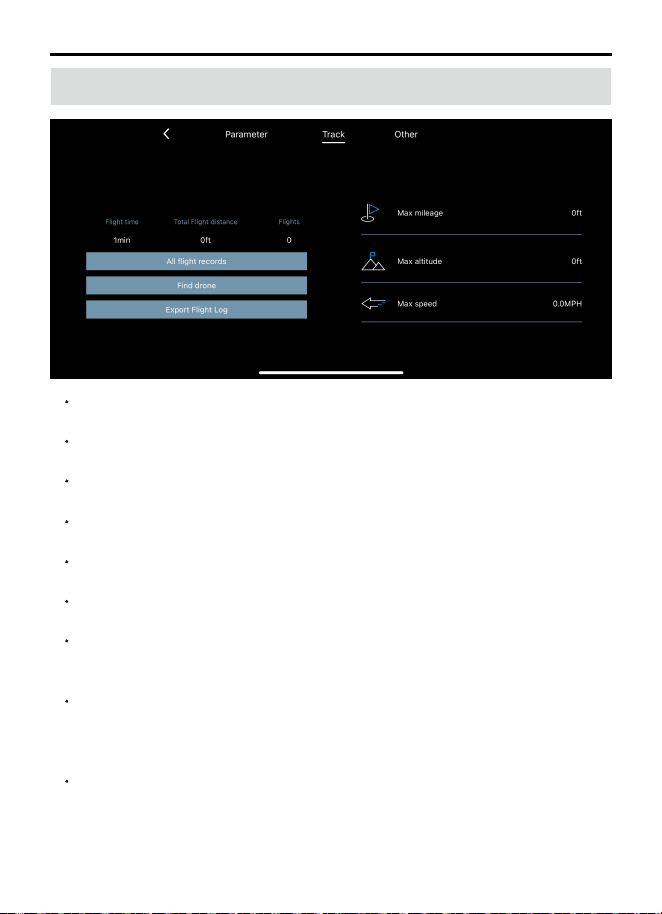
5.4 Track
Flight time: Total flight time
Total Flight distance: Total flight distance
Flights: Number of flights
Max mileage: The longest single flight distance.
Max altitude: The highest single flight altitude.
Max speed: The fastest single flight speed.
All flight records: Date, location, distance, duration, and maximum
altitude for each flight.
Find drone: Shows the last known location when the aircraft lost
video transmission. Open the map to locate the position where the
aircraft disconnected from the app.
Export Flight Log: Allows you to export flight data. (Flight logs on
iPhones are in .txt format, while on Android phones, they are in both
.txt and .logbin formats.)
Copyright ©2024 Ruko All Rights Reserved.
37
F11PRO 2 User Manual
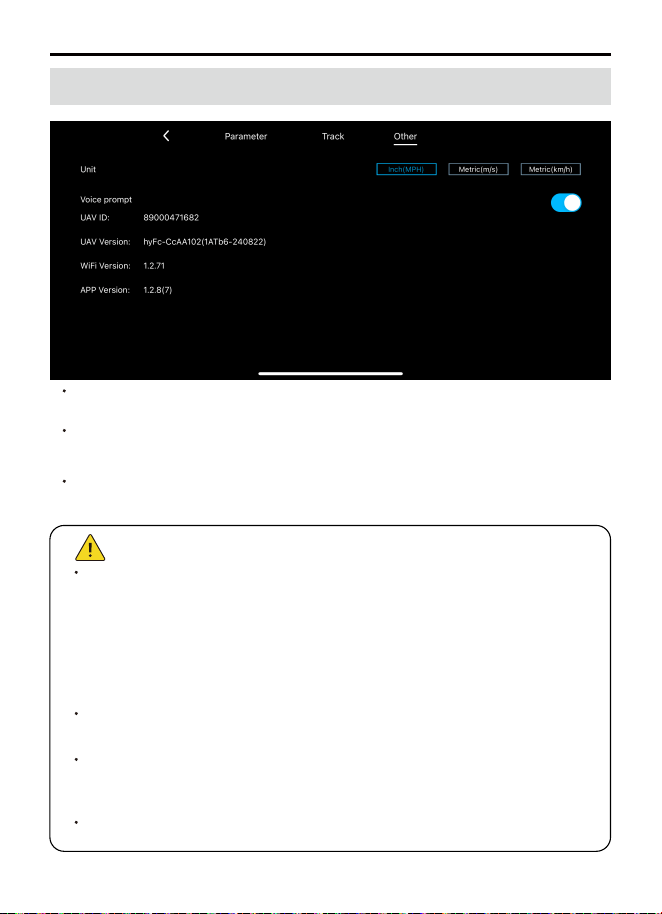
5.5 Other
Before using the Ruko Mini App, make sure to properly enable the
required permissions:
(1) Allow Ruko Mini to access your location. Otherwise, features
like Follow Me won't function.
(2) Correctly set up the options that appear after connecting the
data cable to Ruko Mini.
(3) Grant permissions for other functions such as photo album
access and recording.
When using the Ruko Mini App on your phone, keep your device
running smoothly by closing any unnecessary background apps.
The maps used in the map interface need to be downloaded from
the internet. Before using this feature, connect your mobile device
to the internet to cache the map data.
Please download the correct app, Ruko Mini, to ensure proper
operation with the aircraft.
Unit: Switch between metric and imperial measurement units.
Voice prompt: Turn the app's voice prompts for aircraft status on or
off.
Drone Information Display: Shows the app version, Wi-Fi version,
and ID number.

Copyright ©2024 Ruko All Rights Reserved.
38
F11PRO 2 User Manual
6.1 Flight Environment Requirements
6 Flight
After installing and preparing the product, please first complete
flight training or practice (we recommend doing this in beginner
mode). Choose an appropriate flying environment. The aircraft has
a maximum flight altitude of 120 meters. Always adhere to local
laws and regulations during flight. Be sure to read the 'Flight Guide
and Safety Disclaimer' before flying to understand safety
precautions.
Do not fly in severe weather conditions such as strong winds, snow,
rain, or fog.
Choose an open area free of obstacles for your flight location.
Buildings, mountains, and trees can interfere with the aircraft's
compass and GPS signals. It is recommended to fly in an open
space with at least a 33ft (10m) radius free of obstructions. Flying
at an altitude greater than 49ft (15m) is suggested to avoid ground
obstacles and signal interference.
Keep the aircraft within line of sight during flight, and stay clear of
obstacles and crowds. When flying over water, maintain a distance
of at least 9.8ft (3 meters) from the surface.
Control signals can be disrupted by high-voltage power lines,
communication towers, or transmission towers. Avoid flying near
these areas.
Fly at altitudes below 9842ft (3000 meters) to ensure the aircraft's
barometric altitude hold function operates correctly.
When GPS is active, the aircraft can achieve stable hovering, smart
return-to-home, and smart flight functions. Without GPS, these
functions will not work, and the aircraft may drift with the wind and
fail to hover.

Copyright ©2024 Ruko All Rights Reserved.
39
F11PRO 2 User Manual
6.2 Pre-Flight Checklist
6.3 Pairing Remote Controller with Aircraft
Ensure that the remote controller, smart flight battery, and mobile
device have sufficient power.
Make sure the aircraft's arms are fully extended.
Ensure the battery compartment cover is securely fastened and the
smart flight battery is properly installed.
Check that the propellers are not damaged, worn, or deformed, and
that there are no foreign objects tangled in them. Ensure they are
securely installed.
Make sure GPS is enabled to avoid losing signal, and fly outdoors in
an open area.
Check that the data cable connecting the remote controller and
mobile device is securely installed.
After powering on, verify that all four motors start normally and
that their speeds are consistent.
Ensure the camera is clean.
If replacing parts, always use original manufacturer components.
Using non-original parts can pose a risk to the safe operation of the
aircraft. For details on supported accessories, refer to the
accessories support page in the appendix of the user manual.
Please refer to section 4.4.4.
Copyright ©2024 Ruko All Rights Reserved.
40
F11PRO 2 User Manual
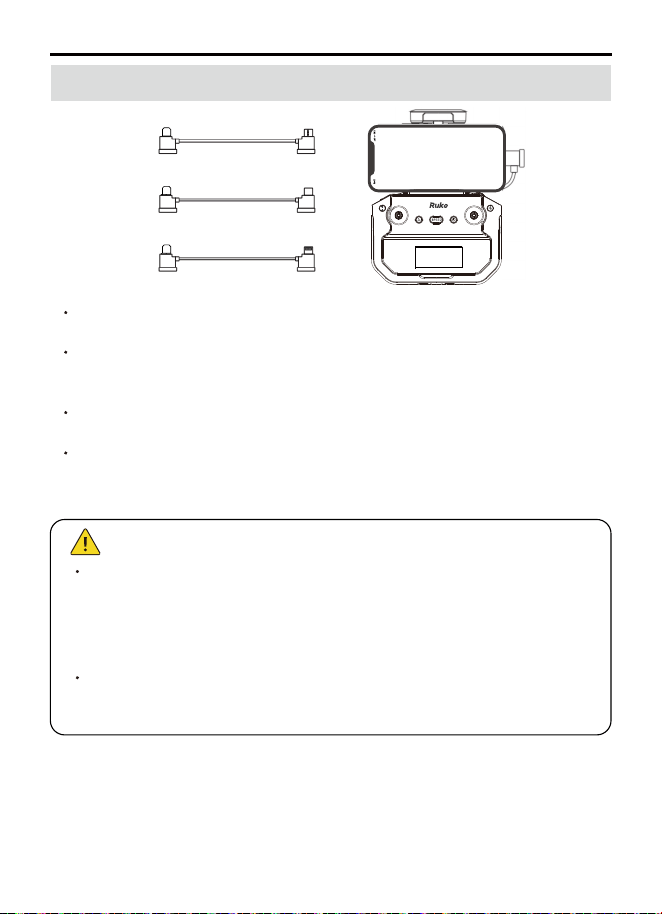
6.4 Connect the Data Cable
Select the appropriate data cable.
Use the data cable to connect the remote controller to the mobile
device.
Open the Ruko Mini App and allow popup permission requests.
Enter the operating interface. If you see the aircraft’ s live video
feed, the connection is successful.
When connecting the data cable to the mobile device, make sure
the cable plug is securely installed. On some phones, the phone
case may prevent the cable plug from seating properly, which can
cause poor contact and result in failed data transfer, preventing
you from seeing the live video feed.
Type-C to Type-C data cable is stored inside the remote controller
when shipped.
Type-C to Micro-USB cable
Type-C to Type-C cable
Type-C to Lightning cable
Copyright ©2024 Ruko All Rights Reserved.
41
F11PRO 2 User Manual
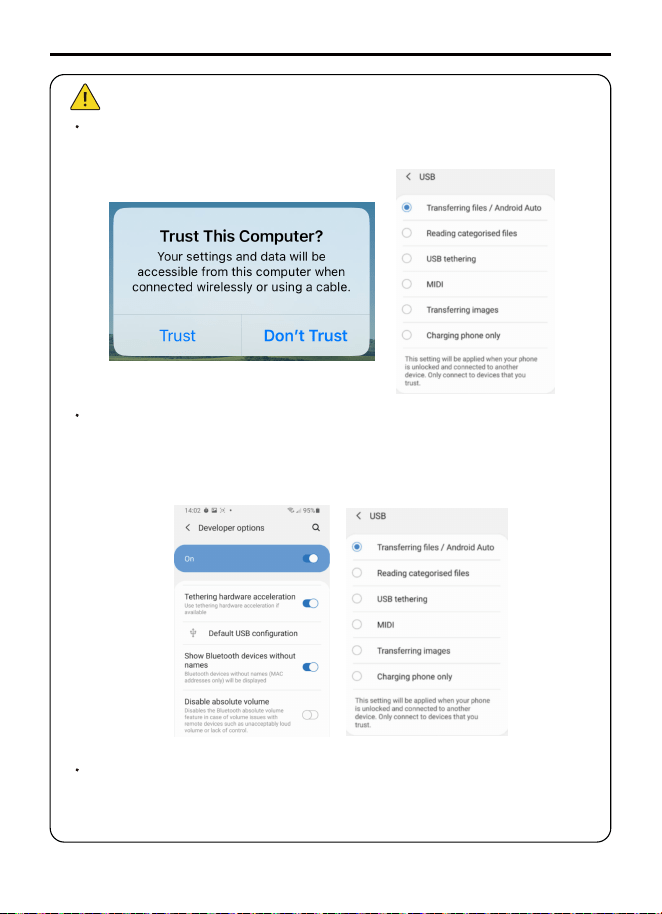
Please set the USB options correctly when prompted: On Android
devices, select 'Transferring Files /Android Auto'; on iPhones,
select 'Trust'.
On some Android devices, USB settings are hidden in the
Developer Options. You need to enable Developer Mode and then
change 'Default USB Configuration' to 'File Transfer' (the method
to enable Developer Mode varies by phone model; you can find
specific instructions by searching Google).
The remote controller does not support fast charging for mobile
devices. Please check the battery level of your mobile device
before use.
Copyright ©2024 Ruko All Rights Reserved.
42
F11PRO 2 User Manual
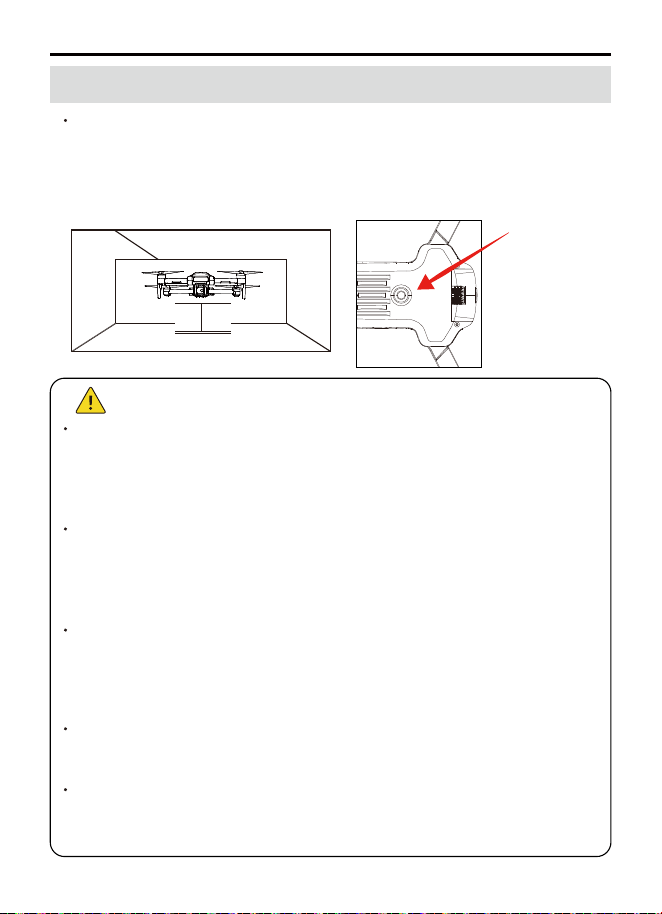
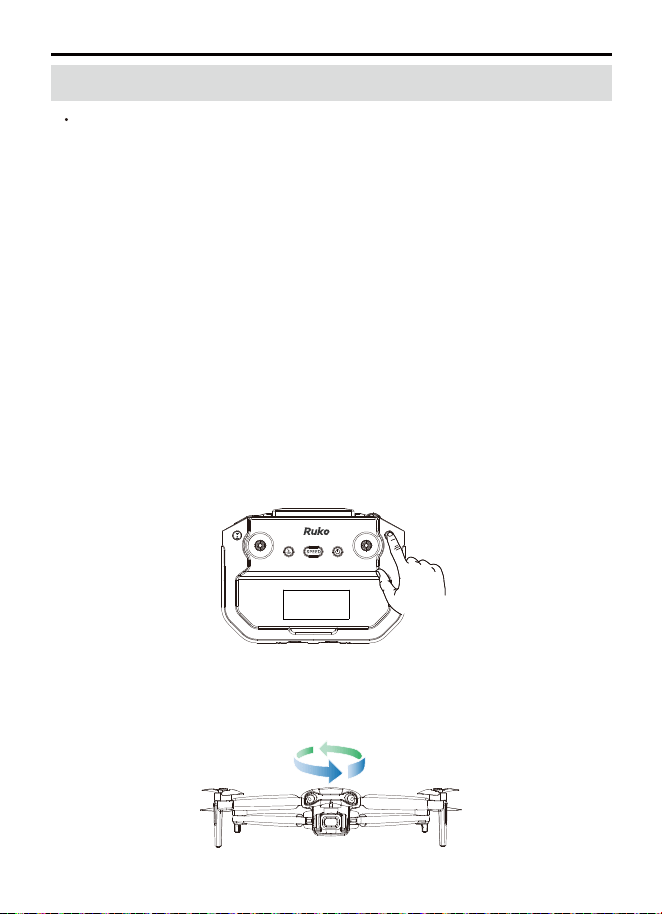
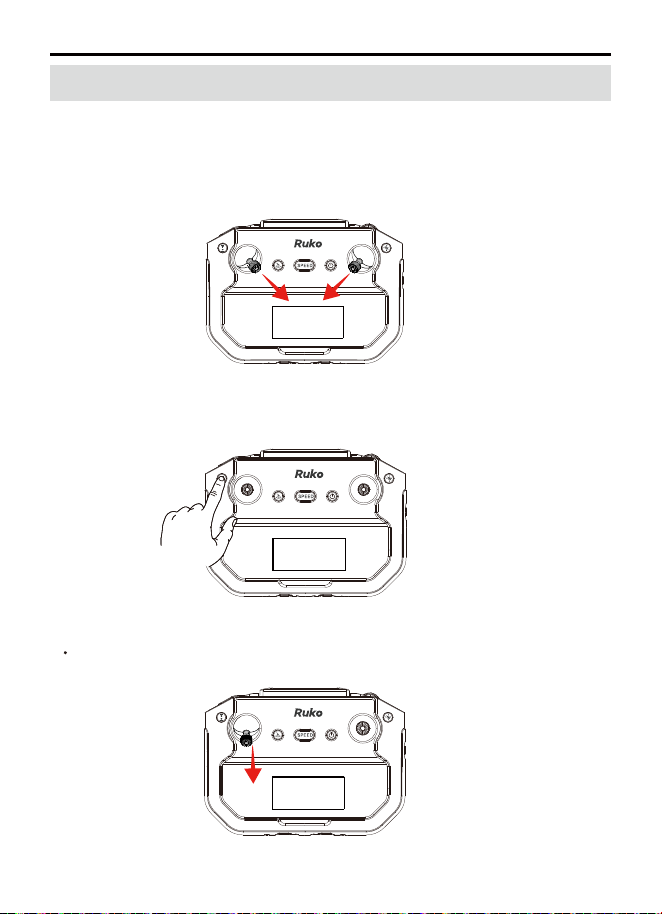
6.5 Compass Calibration
Calibration Steps:
Horizontal Calibration
(1)
(2)
(3)
(4)
If the aircraft is flying in an environment with significant
interference or if you experience unusual behavior indicating
possible loss of control, you can check the compass interference
level using the app. Perform a compass calibration to address this
issue. The main purpose is to prevent sensor interference from
causing abnormalities, which could lead to loss of control and
potential crashes.
Extend the aircraft's four arms and place it on a flat, open surface.
Turn on the aircraft and the remote controller, and ensure they are
paired successfully.
Short press the compass calibration button on the remote
controller; the aircraft's lights will start flashing quickly.
Open the app to see the calibration guide animation.
Short press to enter
compass calibration
Copyright ©2024 Ruko All Rights Reserved.
43
F11PRO 2 User Manual
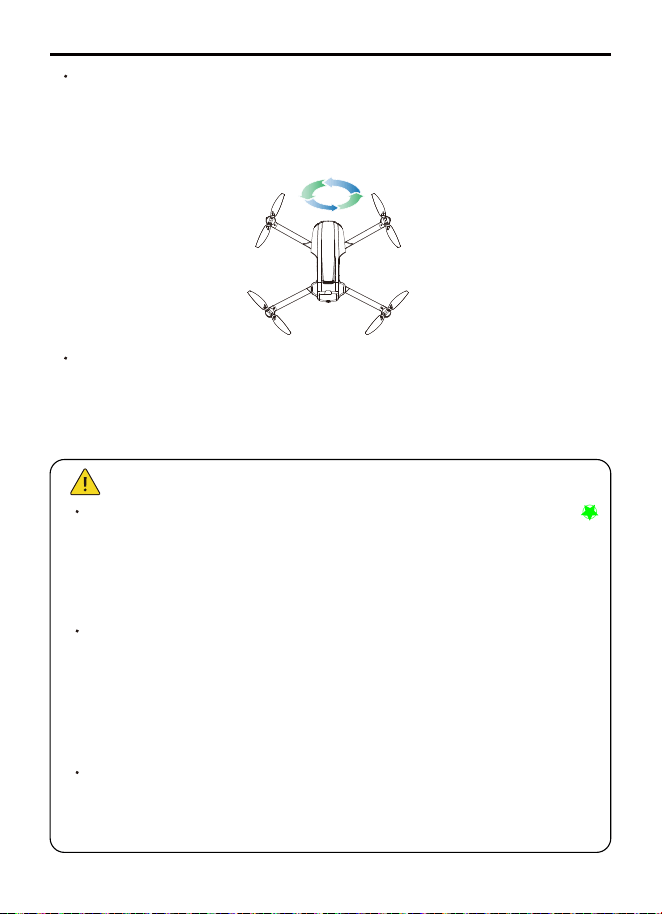
Vertical Calibration
Before flying, monitor the compass interference level in the app .
If the interference level approaches 120, it indicates excessive
interference, you can manually calibrate the compass or choose a
different location to fly. If the interference level exceeds 180, the
aircraft will automatically enter compass calibration.
If the aircraft exhibits uncontrolled behavior, such as spinning or
erratic flight, in a complex environment, it may indicate that the
compass calibration is incorrect or affected by interference. In
this case, promptly land the aircraft manually and perform a
manual calibration (refer to the compass calibration steps for
guidance).
When calibrating the aircraft, extend the arms and ensure the
aircraft is at a height of 3.3ft (1m) above the ground to avoid
magnetic interference.
Follow the app's instructions: Hold the aircraft at a height of 1
meter above the ground, rotate it horizontally 2-3 times until you
hear a beep and the app indicates that it's time to begin vertical
calibration.
Hold the aircraft to a height of 1 meter above the ground with the
camera facing up. Rotate the aircraft vertically 2-3 times until you
hear a beep and the animation on the app interface stops. This
indicates that the compass calibration is complete. The aircraft's
lights will return to their original state.
Copyright ©2024 Ruko All Rights Reserved.
44
F11PRO 2 User Manual
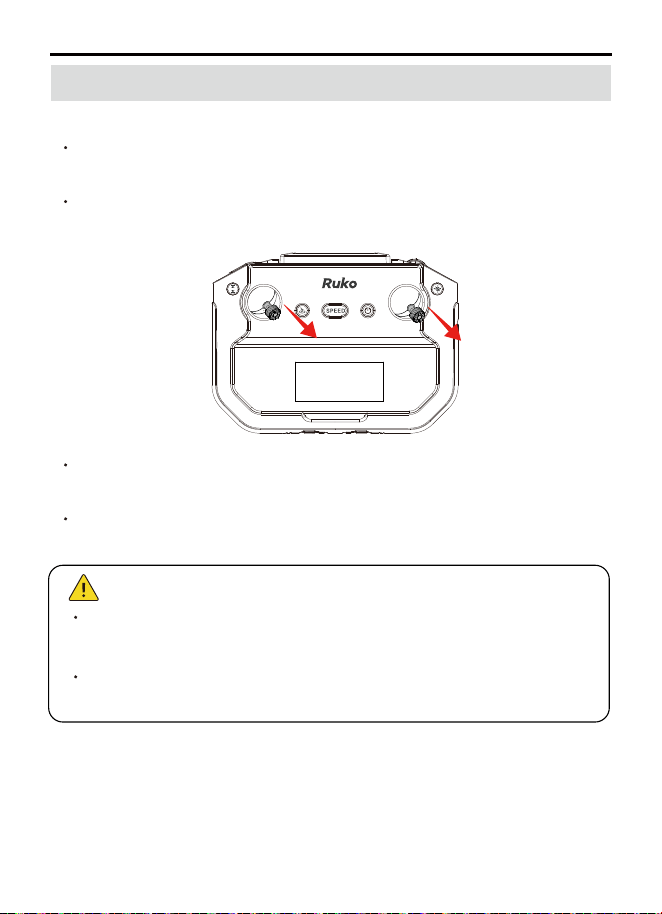
6.6 Gyroscope Calibration
Gyroscope Calibration Steps:
If the aircraft shows tilt or instability during flight, land the
aircraft on a level surface to perform gyroscope calibration.
When resetting the gyroscope calibration, make sure the aircraft
is placed on a flat, level surface.
Ensure the aircraft is placed on a level surface with enough space
below the camera.
Push both the left and right control sticks to the '5 o'clockt position
simultaneously.
Aircraft's lights will flash quickly, indicating that automatic
horizontal calibration is in progress.
When the app calibration prompt disappears and the lights return
to their original state, calibration is complete.
Copyright ©2024 Ruko All Rights Reserved.
45
F11PRO 2 User Manual
6.7 Starting/Stopping the Motor
6.7.1 Starting the Motors
6.7.2 Stopping the Motors
Method 1:
Push the joysticks to the 5 o'clock and 7 o'clock positions
simultaneously. Once the motors start, immediately release the
joysticks.
Push the throttle stick to the lowest position and do not release it
until the motor stops.
Method 2:
When the motors are not running, press and hold the
takeoff/landing button on the remote controller to start them.
Method 1:
After starting the motors, press and hold the takeoff/landing
button on the remote controller. The aircraft will take off
automatically and hover at a distance of 4.9ft (1.5m) from the
ground.
Method 2:
Tap one-key takeoff icon in App, then swipe right in the pop-up
window. The aircraft will take off automatically and hover at a
distance of 4.9ft (1.5m) from the ground.
Copyright ©2024 Ruko All Rights Reserved.
46
F11PRO 2 User Manual
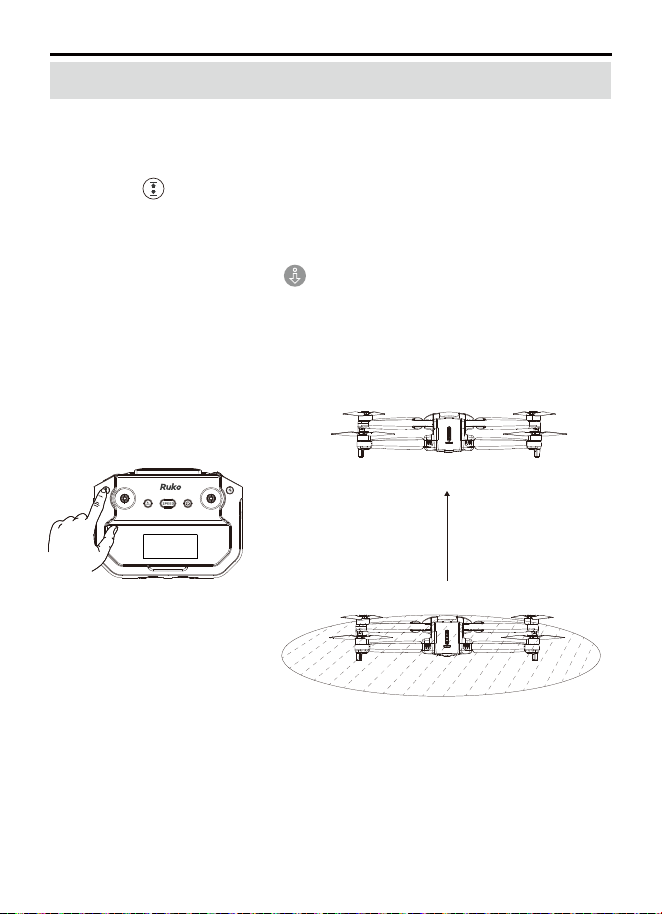
6.8 One-key Takeoff / Landing
6.8.1 One-key Takeoff
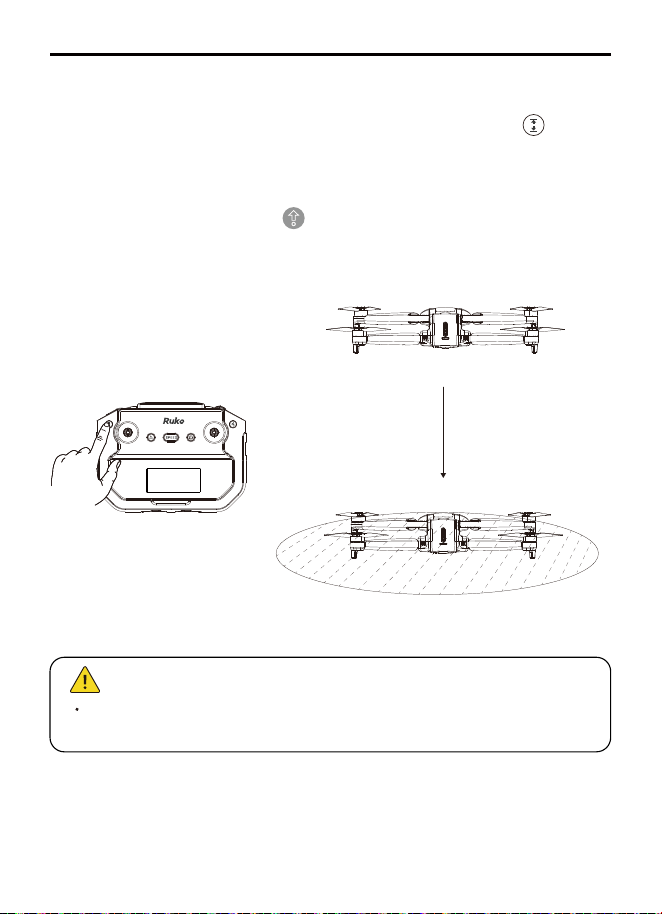
Method 1:
After takeoff, press and hold the takeoff/landing button on the
remote controller. The aircraft will land to the ground and stop the
motors.
Method 2:
Tap one-key landing icon in App, then swipe right in the pop-up
window. The aircraft will land to the ground and stop the motors.
Copyright ©2024 Ruko All Rights Reserved.
47
F11PRO 2 User Manual
6.8.2 One-key Landing
During the aircraft's descent, pushing the throttle stick up on the
remote controller will cancel the automatic landing.
Copyright ©2024 Ruko All Rights Reserved.
48
F11PRO 2 User Manual
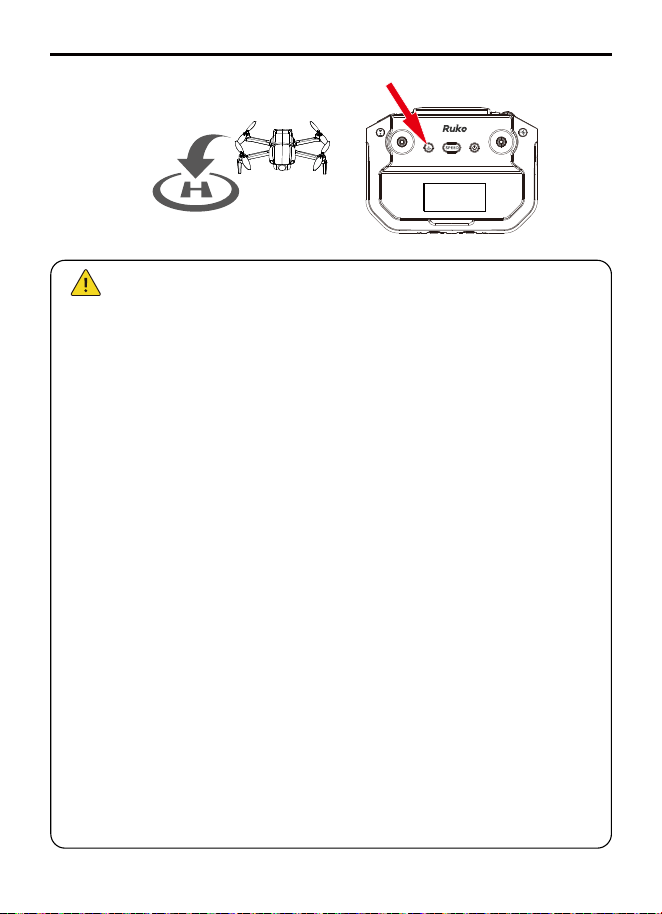
6.9 Return to Home (RTH)
The F11PRO 2 aircraft features a Return to Home (RTH) function in
GPS mode when it has a strong GPS signal. This function returns
the aircraft to the last recorded home point and lands it
automatically. There are three types of RTH: Smart RTH, Low
Battery RTH, and Lost Signal RTH.
During the Smart RTH process, you can maneuver the aircraft to
ascend or descend to avoid obstacles. You can also press the RTH
button again to cancel the return.
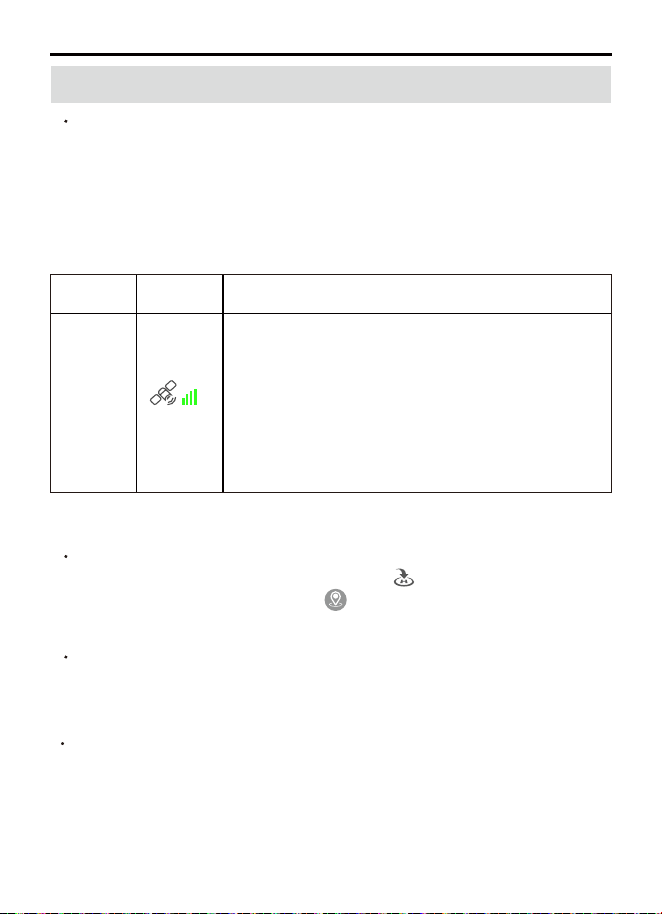
During outdoor flights, when the GPS signal icon
first shows three bars or more, the takeoff
location will be recorded as the return-to-home
point.
During the flight, if you land at a new location, the
new takeoff point will become the latest
return-to-home point, and the return-to-home
function will direct the aircraft to this latest point.
Home
Point
When you need the aircraft to return home automatically, you can
press the Smart Return-to-Home button on the remote controller
or tap the return-to-home icon on the app interface to initiate
automatic return.
During the return-to-home process, pressing the button or tapping
icon again will cancel the return. After canceling Smart RTH, you
can regain control of the aircraft.
6.9.1 Home Point Definition
6.9.2 Smart RTH
GPS Description
Copyright ©2024 Ruko All Rights Reserved.
49
F11PRO 2 User Manual
1. After clicking the return button, the aircraft will return to the
destination in different ways depending on the flight distance,
flight altitude, and whether the return altitude is set in the App.
After pressing the RTH button on the remote controller or tapping
the return icon on App:
(1)If the flight distance is within 16.4ft (5m):
The aircraft will land directly.
(2) If the flight distance is greater than 16.4ft (5m), and the return
altitude is NOT set in App:
① When the aircraft's flight altitude is below 65ft (20m):
It will automatically rise to the default return altitude of 20m and
then return to the Home Point.
② When the aircraft's flight altitude is above 65ft (20m):
It will return to the Home Point from the current altitude.
(3) If the flight distance is greater than 16.4ft (5m) and the return
altitude has been set in the App:
①When the aircraft's flight altitude is lower than the set return
altitude:
The aircraft will rise to the set return altitude and then return to
the Home Point.
②When the aircraft's altitude is higher than the set altitude:
The aircraft will return to the Home Point from the current
altitude.
2. The aircraft is not equipped with obstacle avoidance function,
please make reasonable judgments of the flight conditions during
the flight, avoid obstacles in time, and set the appropriate flight
and return altitude according to the flight environment.
Copyright ©2024 Ruko All Rights Reserved.
50
F11PRO 2 User Manual
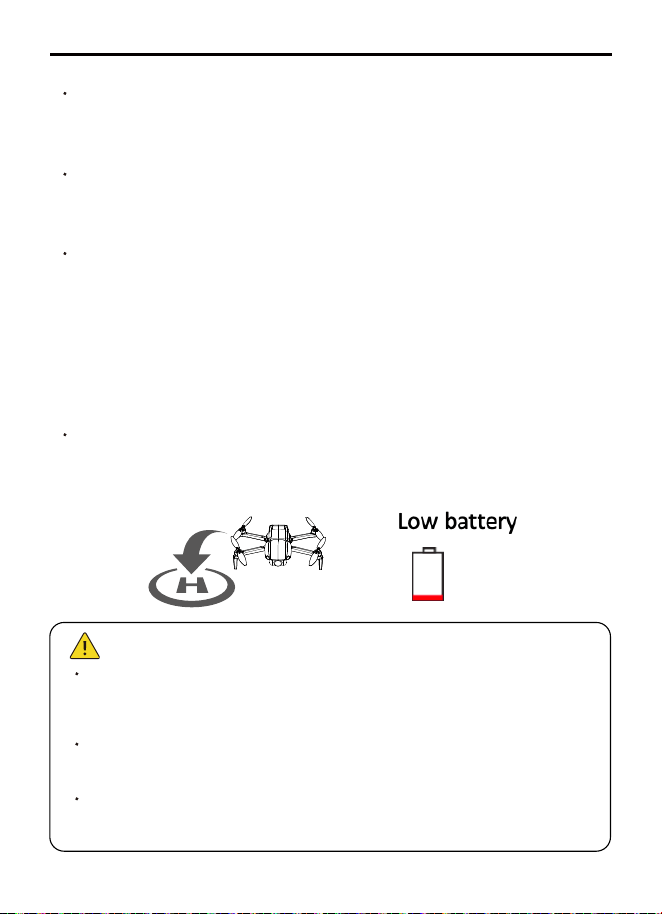
6.9.3 Low Battery RTH
Must pay attention to the flight altitude when the battery is low.
Avoid hitting obstacles due to the low flying altitude when
returning home with the second-level low battery.
The remaining power after returning is related to the return
distance, wind speed, and wind direction.
When the aircraft is low on battery and is returning home, you
cannot cancel the return. You can use the remote controller stick
to avoid obstacles.
When the smart flight battery is too low or there is not enough
power to return home, the user should land the aircraft as soon as
possible to avoid damage to the aircraft or other dangers.
To prevent unnecessary dangers due to insufficient battery power,
the Low Battery RTH function will be automatically triggered when
the aircraft battery power is low.
According to the remaining power after starting returning, there are
2 situations:
① First-level low battery:
After the aircraft triggers the Low Battery RTH, it will automatically
return to the Home Point and hover. After hovering, it can continue
to fly within a 98ft (30m) radius at a height of 98ft (30m).
② Second-level low battery:
The aircraft will land directly to the ground.
When the aircraft's battery is low, the remote controller will emit a
sound. At First-level Low Battery, the remote controller will beep
slowly. At Second-level Low Battery, the remote controller will
beep rapidly.
Copyright ©2024 Ruko All Rights Reserved.
51
F11PRO 2 User Manual
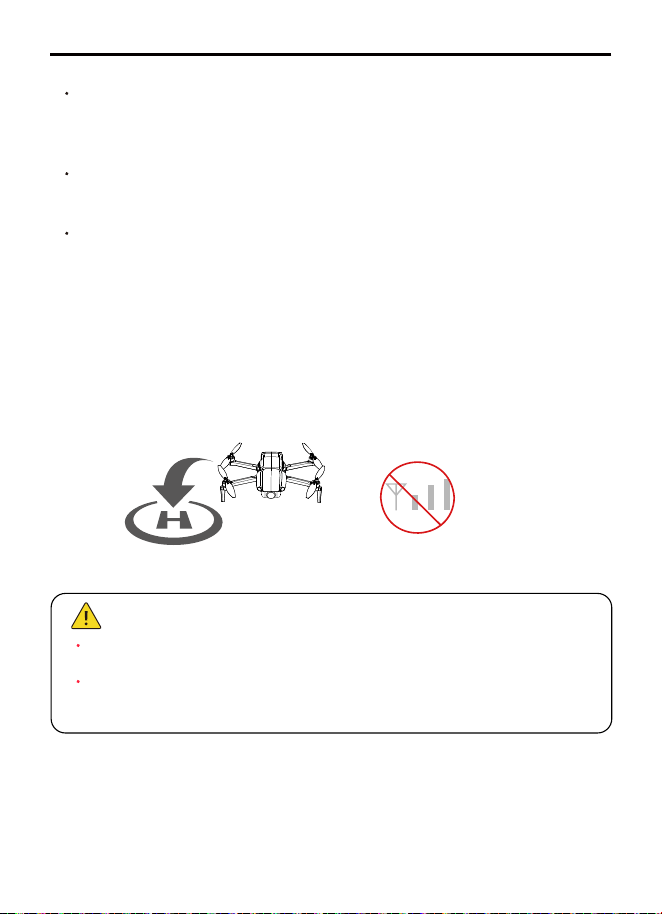
6.9.4 Lost Signal RTH
When out of control, the aircraft cannot avoid obstacles.
When the GPS signal is weak, the aircraft cannot return to home
automatically.
If the remote controller's battery is low, turned off, or lost signal for
10 seconds, the aircraft will enter automatic return-to-home mode
and return to the Home Point.
If the remote controller reconnects during the RTH process and you
wish to cancel the return, you can press the RTH button to cancel it.
Lost Signal RTH process:
(1) Record Home Point. (For information about the Home Point, refer
to section 3.4.1.)
(2) Trigger RTH ( triggered by low battery of remote controller,
signal loss, etc.).
(3) After triggering the RTH, the aircraft adjusts the nose direction
and starts to return home.
(4) The aircraft automatically flies to the Home Point, then starts to
land, and completes the return.
Signal Loss
Copyright ©2024 Ruko All Rights Reserved.
52
F11PRO 2 User Manual
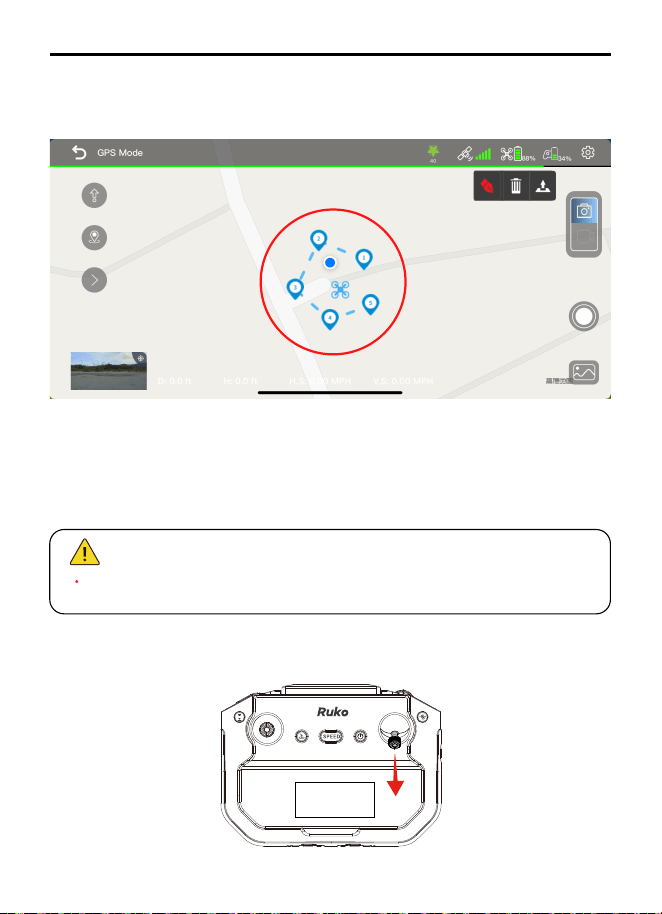
6.10 Smart Flight(Route Planning, GPS Follow,
Fly Around, Cruise Control )
6.10.1 Route Planning
How to Start
F11PRO 2 has four types of smart flight: Route Planning, GPS
Follow, Fly Around, and Cruise Control.
Aircraft flies along the path marked on the App.
(1) Make sure that the Ruko Mini App has been downloaded and
installed on the phone.
(2) Connect your phone to the remote controller with the data cable,
and enter into the App operation interface.
(3) Make sure the map is loaded on the Ruko Mini App before taking
off the aircraft.
(4) Take off the aircraft in GPS mode and ensure flight height is
higher than the nearby obstructions.
(5) Tap the icon on the app interface to start the Route
Planning.
Copyright ©2024 Ruko All Rights Reserved.
53
F11PRO 2 User Manual
How to Exit
If the current flight altitude of the aircraft is lower than 49ft
(15m), Route Planning cannot be started.
Push the right joystick to cancel the waypoint flight function.
(6) You can find a red circle on the map (limited flight range). Mark
the points (up to 10) which you plan to fly the aircraft along within
the circle.
(7)Tap "Delete Single Point" or "Delete All" to reset the marked
point.
(8)Confirm that the marked points are correct and tap“Go”. The
aircraft will start waypoint flight.
Copyright ©2024 Ruko All Rights Reserved.
54
F11PRO 2 User Manual
6.10.2 GPS Flow
How to Start
How to Exit
(1)
(2)
(3)
(4)
(5)
The GPS Follow function only works when the GPS signal is
strong. Please avoid high buildings, trees, and areas where Wi-Fi
signal might be interfered.
Aircraft is not equipped with obstacle avoidance function. Please
use it in open areas free of obstacles.
To use this function, the positioning function of the mobile phone
must be turned on, otherwise, the GPS Follow function
unavailable.
Aircraft will lock onto the user and can track the user's movement
as he moves.
Make sure that the Ruko Mini App has been downloaded and
installed on the phone.
Connect your phone to the remote controller with the data cable,
and enter into the App operation interface.
Take off the aircraft with a strong GPS signal and make sure the
horizontal flight distance is 26.25ft-164.04ft (8m-50m).
Tap the icon on the app interface to start the GPS Follow.
"Follow me mode is ready" will be displayed on the App interface
and the aircraft turns on the “GPS follow”. The aircraft will track
your movements to fly.
Tap the icon again to exit the GPS Follow.
Copyright ©2024 Ruko All Rights Reserved.
55
F11PRO 2 User Manual
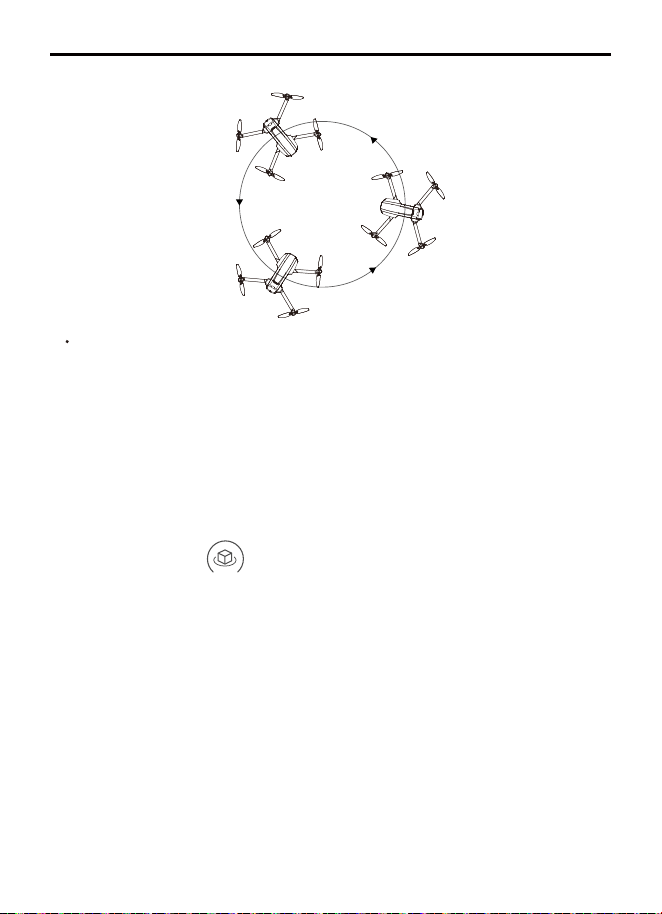
6.10.3 Fly Around
How to Start
The aircraft will fly around the target center point with a radius.
(1) Make sure that the Ruko Mini App has been downloaded and
installed on the phone.
(2) Connect your phone to the remote controller with the data cable,
and enter into the App operation interface.
(3) Take off the aircraft in GPS mode and make it hover around the
center point of the target.
(4) Tap the icon on the app interface to start the Fly Around.
(5) The aircraft will move backward 16ft (5m) (default orbit radius)
and then use the position where the Fly Around function was
initiated as the center to start the surrounding flight.
(6) During the surrounding flight, the pilot can adjust the
surrounding radius using the joystick (the radius range can only be
between 16ft (5m) and 328ft (100m). Pushing the joystick down will
increase the surrounding radius while pushing the joystick up will
decrease the surrounding radius.
(7) By default, the aircraft performs surrounding flight in a
counterclockwise direction. The pilot can change the surrounding
direction by pushing the directional joystick left or right.
Copyright ©2024 Ruko All Rights Reserved.
56
F11PRO 2 User Manual
6.10.4 Cruise Control
How to Exit
If the flight altitude is lower than 16ft (5m) when the Fly Around is
activated, the aircraft will rise to 16ft (5m).
The flying speed of the surrounding radius depends on the
surrounding radius. The larger the radius, the faster the flight
speed.
The aircraft automatically flies at a constant speed according to the
current flight action.
This function requires the use of GPS mode with a strong GPS
signal.
Tap the icon again to cancel the Fly Around.
Copyright ©2024 Ruko All Rights Reserved.
57
F11PRO 2 User Manual
How to Start
How to Exit
(1) Set the desired auto-flight distance and altitude, fly the aircraft
to an altitude above 49ft (15m) (it will be unavailable while below
49ft (15m)).
(2) Keep toggling the left or right joystick to operate the aircraft
forward, backward, ascent, or descent, then press the remote
controller's one-key takeoff/landing button .
(3) Release the joystick, the aircraft will fly automatically according
to your action. (e.g., pushing the right joystick forward will make the
aircraft fly forward automatically.
(4) During cruise control, you can continue to use the joystick to
adjust the aircraft's direction and altitude. Repeat steps 2 and 3,
and the aircraft will automatically fly based on your last joystick
input.
Method 1: During Cruise Control, pressing the one-button
takeoff/landing on the remote controller without operating the
joystick will cancel cruise control.
Method 2: Tap the icon on the App to exit it.

Copyright ©2024 Ruko All Rights Reserved.
58
F11PRO 2 User Manual
1.
2.
3.
4.
5.
6.
This function is unavailable when the flight altitude is below 49ft
(15m).
This function is unavailable when the aircraft battery power is
low. During cruising, if the aircraft's battery is low, it will
automatically exit this function.
The aircraft will automatically exit this function after reaching the
set distance.
When the aircraft is descending in cruise control and reaches an
altitude of 50ft, it will automatically exit this function.
When the remote controller signal is lost, it will automatically exit
this function.
The aircraft doesn't have obstacle avoidance functionality. Ensure
flight safety by ensuring no obstacles in front of the aircraft to
avoid collisions and damage.

Copyright ©2024 Ruko All Rights Reserved.
59
F11PRO 2 User Manual
6.11 Basic Flight
6.11.1 Basic Flight Steps:
6.12 Aerial Photography Tips
(1)
(2)
(3)
(4)
(1)
(2)
(3)
(4)
(5)
(6)
(7)
(8)
(9)
(10)
(11)
Place the aircraft on a flat, open surface with the front of the
aircraft facing forward and the rear facing the pilot.
Press and hold the power button to turn on the aircraft.
Short press then long press the power button on the remote
controller to turn it on. The aircraft and remote controller will
automatically pair, which takes about 20 seconds.
Once pairing is complete, connect the phone to the remote
controller using a data cable.
Open the Ruko Mini app and enter the operating interface.
Wait for the GPS signal search to complete; the aircraft's indicator
light will be solid green.
Unlock and start the motors.
Slowly push the throttle stick up to achieve a smooth takeoff.
Pull down the throttle stick to descend.
After landing, pull the throttle stick to its lowest position and hold
it there until the motors stop.
After stopping the motors, turn off the power of the aircraft and
the remote controller in sequence.
Perform the pre-flight check.
It's recommended to take photos or record videos in Stable Mode.
Choose clear, calm weather for shooting.
During flight, make small, smooth stick movements to keep the
aircraft stable.
Copyright ©2024 Ruko All Rights Reserved.
60
F11PRO 2 User Manual
7.1 Specifications & Parameters
7. Appendix
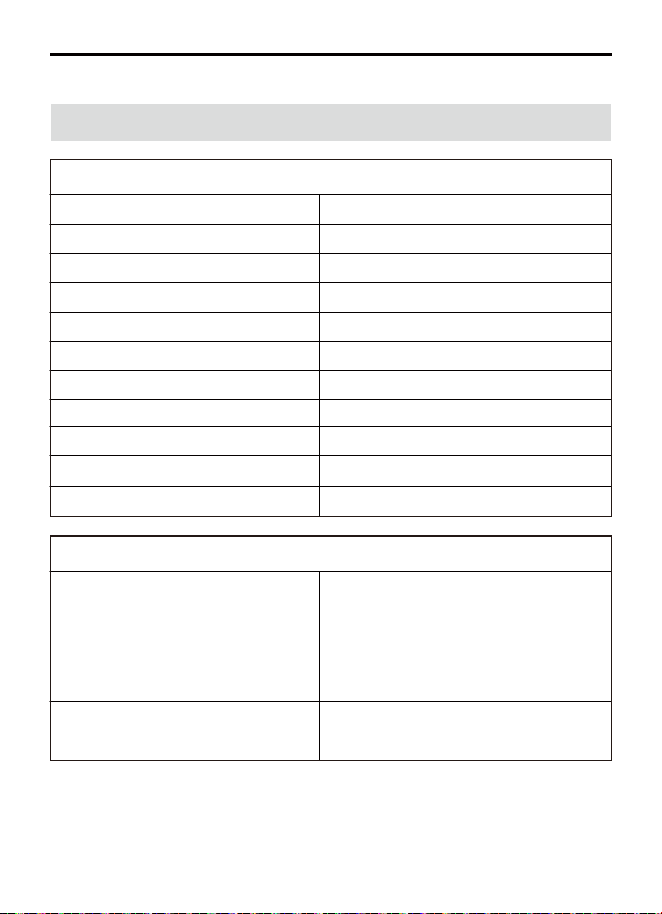
Aircraft
Model
Weight (including battery)
Battery capacity
Satellite system
Maximum flight altitude
Maximum flight distance
Unfolded size
Folded size
Stable mode speed
Sport mode speed
Operating temperature range
F11PRO 2
About 357g/12.6oz
3200mAh
GPS/GLONASS
393.7ft
10000ft
350mmx385mmx65mm
165mmX90mmX65mm
6m/s
8m/s
32°F - 104°F (0°C - 40°C)
Gimbal Stabilization
Mechanical range of gimbal
stabilization
Camera angle adjustment
range
Approximately -90°TO+0°
Tilt axis: approximately -100° to
+70°
Roll axis: approximately -35° to
+35°
Yaw axis: approximately -20° to
+20°
Copyright ©2024 Ruko All Rights Reserved.
61
F11PRO 2 User Manual
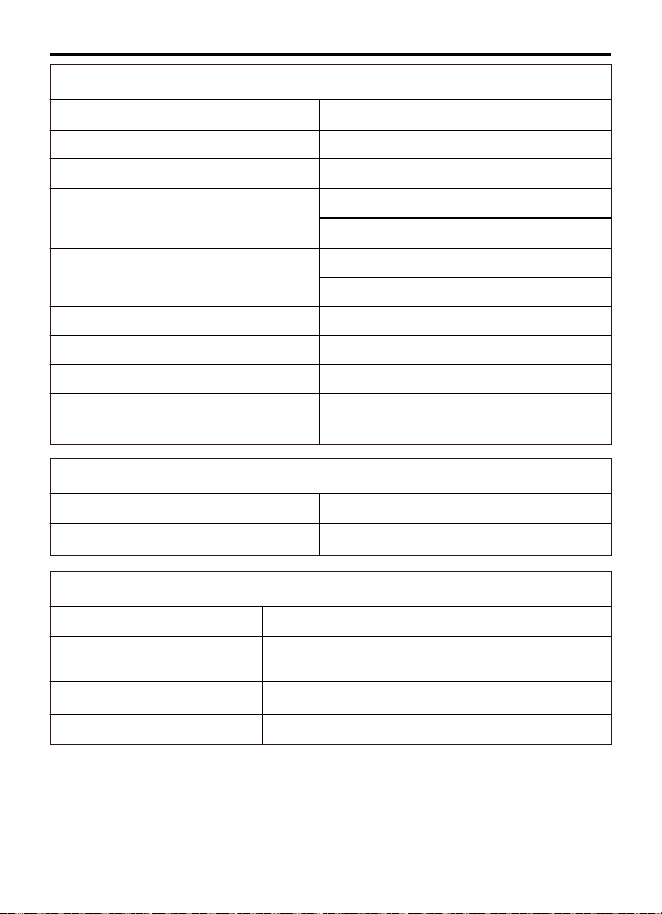
Camera
Lens
Equivalent focal length
Focus range
Photo format
Video format
Supported file system
Supported SD card
JEPG
MP4
FAT32
Micro SD card (Class 10/U1 or
higher) 16GB to 128GB
Maximum photo resolution
Maximum video resolution
FOV 75°
60cm/23.3inche
Fixed focus
App: 5700×3200P
SD card:5700×3200P
App: 1280X720@25fps
SD card: 3840×2160P@30fps
5.8G Transmission
Working frequency
Supported Transmission Protocols
5.725-5.825 GHz
802.11a;802.11n20;802.11n40
App / Live View
Mobile App
Transmission range
Live view quality
Mobile Compatibility
Ruko Mini
10000ft (outdoor, open, interference-free
environment)
1280x720@25fps
Android 7.1 and above, iOS 13.0 and above
Copyright ©2024 Ruko All Rights Reserved.
62
F11PRO 2 User Manual
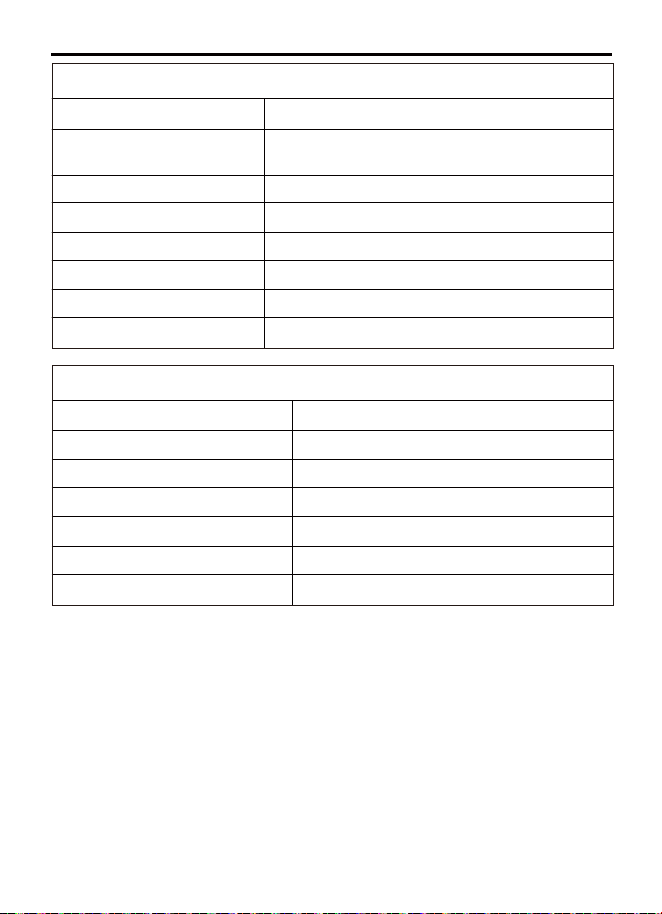
Smart Flight Battery
Battery capacity
Voltage
Battery type
Energy
Net weight
Charging time
Charging temperature range
3200 mAh
7.7V
Li-polymer
24.64Wh
About 126.5 g / 4.46 oz
About 2.5 hours (using PD fast charging)
32°F to 104°F (0°C to 40°C)
Remote Controller
Working frequency
Remote controller range
Battery capacity
Charging time
Operation time
Operating voltage
Mobile device holder
Operating temperature
5.8G
Up to 10,000ft (outdoor, open,
interference-free environment)
3600mAh
About 3.5 hours
About 4 hours
3.7V
3.5 inches
32°F to 104°F (0°C to 40°C)
Copyright ©2024 Ruko All Rights Reserved.
63
F11PRO 2 User Manual
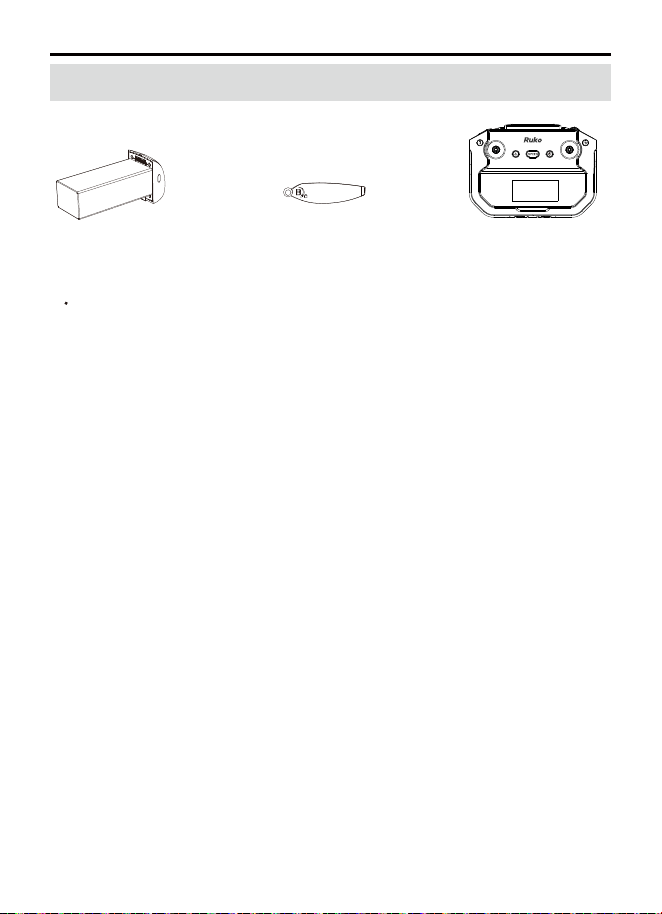
7.2 Accessories Support
All of the above accessories can be purchased by searching on
Amazon and visiting the Ruko store. Be sure to use only original
manufacturer parts. Using non-original parts may pose a risk to the
safe operation of the aircraft.
Battery Propellers
Remote
controller

Copyright ©2024 Ruko All Rights Reserved.
64
F11PRO 2 User Manual
7.3 Common Problems and Solutions
Problems Reason Solutions
Unable to unlock the
motors and take off
Flying too low, affected by
aircraft airflow
Environmental disturbances
cause aircraft data abnomal
GPS signal is unstable. Flying
near buildings and in
obstructed places
Place the aircraft on a horizontal surface
and conduct gyroscope/level calibration.
Please refer to the User Manual for detailed
instructions on the gyroscope/horizontal
calibration section.
Please fly the aircraft in an open area free
of obstacles within the circle of radius
32.81 ft(10 meters).
Unstable flight
Not flying far, bouncing back
after flying a distance
Aircraft flying in the opposite
direction or mismatched to the
remote controller
Out of control, spinning around
on its own, abnormal noise
Replace the propellers with new ones.
The propellers become
deformed and incomplete
Incorrect aircraft placement
during takeoff
The remote controller signal is
interfered or the aircraft
exceeds the range of remote
control
The propellers become
deformed and incomplete
Compass interference
Before takeoff, position the camera facing
forward and the tail towards the pilot.
Please fly the aircraft outdoors without
interference, and ensure that it is within a
controllable range.
Please manually land the aircraft in time
and calibrate the compass. Please make
sure to fly away from the buildings, trees,
power lines, and signal towers.
Replace the propellers with new ones.
Enter the App setting interface, turn off the
beginner mode to set the flight distance
and altitude, and save the settings.
Beginner mode or first-level
low battery is active, limiting
flight to 30 meters in height
and distance.
Please fly the aircraft above 9.84ft(3
meters).
To unlock and take off your aircraft
outdoors, ensure it's in an open area and
has acquired a sufficient GPS signal
strength of 3 bars or more.
Ensure your aircraft is set on a level and
smooth ground prior to taking off.
The compass is not calibrated. Please refer
to the campass calibration section of the
User Manual.
Push the left and right joysticks
simultaneously to 5 o'clock and 7 o'clock for
2 seconds. Alternatively, you can use the
remote controller or the app to activate the
one-key unlock and takeoff feature.
GPS Signal Weak
Indicator flashing red
Indicator flashing yellow
quickly (10 times per second)
The left and right control
sticks not properly aligned

The phone is not connected to
the aircraft
USB permissions set
incorrectly
App does not display the
interface
Video freezing, short image
transmission range
App crashing or malfunctioning
Weak GPS signal
Turning on the aircraft
indoors
Under the tree, next to the
building, in an obstructed place
GPS signals cannot be found indoors.
Please search for GPS signals in an open
place outdoors.
Please stay away from obstacles for more
than 32.81 feet(10 meters), and search for
GPS signals in an open area
Downloaded the wrong APP
Phone version is too old and
not compatible with the App
Download the right APP.
Give us your mobile phone version model and
we will give you a corresponding solution
Please make sure to fly away from the
buildings, trees, power lines, and signal towers.
Adjust the remote controller and the flying
direction of the aircraft, ensuring the
strongest signal connection is maintained
Connect your mobile phone to the remote
controller with the data cable.
Close unused apps running in the
background to maintain the best
performance of the phone
Image transmission signal
iterference
The remote controller and the
mobile phone are not pointed
at the direction of the aircraft
Phone performance freezes
Some phones come with a phone case
resulting in abnormal installation of the
data cable, which can be attempted by
removing the phone case.
After successful pairing, the USB
permission setting will pop up after
connecting the phone and remote
controller cable, please set it correctly.
The aircraft did not pair with
the remote controller
It takes about 20 seconds for the aircraft
to start pairing with the remote controller,
and the aircraft screen will be displayed
only after the pairing is successful.
The data cable is not securely
installed
Copyright ©2024 Ruko All Rights Reserved.
65
F11PRO 2 User Manual
Gimbal not functioning
The aircraft takes off in the
grassland, and the gimbal
touches the grassland and fails
the self-test
Aircrafts takes off in areas with
high vibration sources.
Add aprons or cardboard pads to pad the
aircraft to avoid the gimbal bumping into
foreign objects.
Keep away from vibrations and use in a
vibration-free area.
The aircraft's gimbal is
interfered with by external
human force, or the aircraft is
picked up during the
calibration process
The aircraft has entered into
the compass calibration
Gimbal self-test time typically lasts about
40 seconds, avoid touching during
calibration.
During the calibration period, the gimbal is
inactive. Once calibration is complete,
place the drone on a level surface and it
will automatically calibrate itself.
Reason Solutions
Problems
Copyright ©2024 Ruko All Rights Reserved.
66
F11PRO 2 User Manual
This User Manual is subject to updates without notice.
For the latest version of the User Manual, please visit the official Ruko website.
https://www.rukotoy.com/
If you have any questions or suggestions about the User Manual, please contact us via
the following email:
Ruko is a trademark of Shenzhen Ruike Innovation Technology Co.,Ltd
Copyright ©2024 Ruko All Rights Reserved.
Unable to return home, drifting
away
Turned off the GPS signal and
switched to indoor flight mode
Don't turn off GPS during outdoor flights,
and make sure to promptly switch back to
GPS mode
Fly away from buildings or sheltered areas
Flying near buildings or under
trees can obstruct GPS signals,
leading to loss or instability of
GPS
Long pairing time for the
aircraft and remote controller
Please be patient and wait for the
auto-pairing to be completed.
Unable to charge or not
charging fully
Use high-quality charging connectors and
cables.
Please use the original factory charging
cable to charge.
It takes about 20 seconds to
match the remote controller to
the aircraft
Using inferior charger or
charging on the computer with
unstable voltage output
Using inferior charging cables
Short battery life
Product has slight marks
Flying in windy weather will accelerate
power loss
Please use a correct charger, and fully
charge the battery
Flying in windy weather
The battery is not fully charged
Depending on personal operating
preferences, using the sport speed for
flight can impact the battery life
In low-temperatures, the chemical reaction
of the lithium battery is slowed down and
the energy cannot be fully released.
In order to give you the best experience, we
tested functions of all aircraft before
shipping. Therefore, it is inevitable that
there will be slight traces. However, it can
be guaranteed that all aircraft are 100%
brand new
Flying in sport extreme speed
Flying in cold weather
We tested all aircraft before
shipping
Reason Solutions
Problems


CONTACT US FOR MORE TECH SUPPORT
+1 (888)892-0155
Mon-Fri 7:00AM - 7:00PM (PST)
+1 (732) 207-0697