— F19 DRONE INSTRUCTION MANUAL —

Preface
------------------------------------------------------------
1
Safety Precauons
--------------------------------------------------------
1
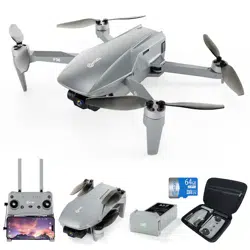
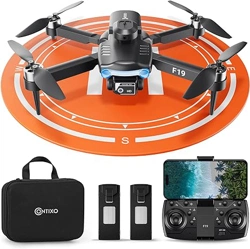
What’s in the Box
--------------------------------------------------------
4
Remote Control Funcons
-------------------------------------
-----------------------------------------------
-------------------------------------
4
Drone Diagram
--------------------------------------------------
5
9
17
22
23
Flight Path
--------------------------------------------------
--------------------------------------------------
--------------------------------------------------
19
Palm follow
--------------------------------------------------
19
Flight
--------------------------------------------------
9
Install the WiFi UAV App
Camera Funcons
18
--------------------------------------------------
Follow Me Mode
18
--------------------------------------------------
Gesture Selfie Mode
14
Fine-tuning Funcon
--------------------------------------------------
--------------------------------------------------
19
3D Roll
15
--------------------------------------------------
Obstacle Avoidance Mode
18
--------------------------------------------------
Headless Mode
Specificaons
Trouble Shoong
-----------------------------------------------
23
Technical Support
Entertainment mode
--------------------------------------------------------
20
Gravity Control Mode
--------------------------------------------------------
20
Gallery
--------------------------------------------------------
21

PREFACE:
Thank you for Purchasing the Conxo F19 RC Drone
The Conxo F19 Drone is a mini quadcopter that’s purposely built for drone
applicaon developers to enable you to get your custom applicaons airborne
quickly.
This development plaorm is intended to be modified by developers according to
their professional judgment. Conxo F19 drone will be shipped with pre-configured
default sengs from the factory, and will have the opon to be customized. There
are no operaonal limitaons to the kit. Developers are responsible for tesng and
ensuring the safety of their configuraon, and establishing the operang limits of
those configuraons.
F19 Drone is designed and engineered by Conxo, Inc. in Southern California,
USA. Made in China.
IMPORTANT:
Please read the instrucons carefully before allowing children, teenagers, and adults
to operate the drone. Adult supervision is advised.
SAFETY PRECAUTIONS:
Safety: F19 drone was designed and manufactured with safety in mind. Your safety
also depends on proper training and thoughul operaon. Do not set up, operate,
perform maintenance, or repair the drone without first reading and understanding
this manual and the labels on the unit.
Owner Responsibility: In order to maintain your drone properly and to ensure
operator safety, it is the responsibility of the drone owner to read and follow
these instrucons:
Follow all setup, operaon, and maintenance instrucons.
Read and follow all safety instrucons. Keep them readily available for operators.
Make sure all operators are properly trained, know how to safely operate, and are
properly supervised.
Do not operate the drone unl you are certain that all parts are in place and
operang correctly.
Carefully inspect the drone on a regular basis and perform all maintenance as
required.
Service and maintain the drone only with approved replacement parts.
Keep all instrucons with the product.
Only use this product if it can be used safely!
- 1 -

WARNING: THIS PRODUCT SHOULD ONLY BE USED BY ADULTS AND
TEENAGERS 14 YEARS AND OLDER. ADULT SUPERVISION REQUIRED
FOR CHILDREN UNDER 14 YEARS OF AGE.
WARNING: CHARGING THE DRONE BATTERY MUST BE SUPERVISED
AT ALL TIMES BY AN ADULT. UNPLUG THE BATTERY WHEN FULLY
CHARGED. DO NOT OVER-CHARGE THE BATTERY.
Thank you for Purchasing the Conxo F19 RC Drone
The Conxo F19 Drone is a mini quadcopter that’s purposely built for drone
applicaon developers to enable you to get your custom applicaons airborne
quickly.
This development plaorm is intended to be modified by developers according to
their professional judgment. Conxo F19 drone will be shipped with pre-configured
default sengs from the factory, and will have the opon to be customized. There
are no operaonal limitaons to the kit. Developers are responsible for tesng and
ensuring the safety of their configuraon, and establishing the operang limits of
those configuraons.
F19 Drone is designed and engineered by Conxo, Inc. in Southern California,
USA. Made in China.
IMPORTANT:
Please read the instrucons carefully before allowing children, teenagers, and adults
to operate the drone. Adult supervision is advised.
SAFETY PRECAUTIONS:
Safety: F19 drone was designed and manufactured with safety in mind. Your safety
also depends on proper training and thoughul operaon. Do not set up, operate,
perform maintenance, or repair the drone without first reading and understanding
this manual and the labels on the unit.
Owner Responsibility: In order to maintain your drone properly and to ensure
operator safety, it is the responsibility of the drone owner to read and follow
these instrucons:
Follow all setup, operaon, and maintenance instrucons.
Read and follow all safety instrucons. Keep them readily available for operators.
Make sure all operators are properly trained, know how to safely operate, and are
properly supervised.
Do not operate the drone unl you are certain that all parts are in place and
operang correctly.
Carefully inspect the drone on a regular basis and perform all maintenance as
required.
Service and maintain the drone only with approved replacement parts.
Keep all instrucons with the product.
Only use this product if it can be used safely!
frequency energy. If not installed and used in accordance with the instrucons,
the equipment may cause harmful interference to radio communicaons.
NOTE: This equipment has been tested and found to comply with the Federal Code
of Regulaon for a class b digital device, pursuant to part 15 of the FCC rules. These
limits are designed to provide reasonable protecon against harmful interference
in a residenal installaon. This equipment generates, uses, and can radiate radio
• However, there is no guarantee that interference will not occur in a parcular
installaon. If your equipment does cause harmful interference to radio or
television recepon(which can be determined by turning the equipment off and
on), the user is encouraged to try to correct the interference by one or more of
the following measures:
• Please note that changes or modificaons not expressly approved by the
party responsible for compliance could void the user’s authority to operate
the equipment.
• Adjust or reposion the receiving antenna.
• Increase the distance between the equipment and receiver.
• Connect the equipment into an outlet with a circuit different from that to which
the receiver is connected.
• Consult the dealer or an experienced radio/TV technician for help.
- 2 -
NO FAA LICENSE NEEDED!
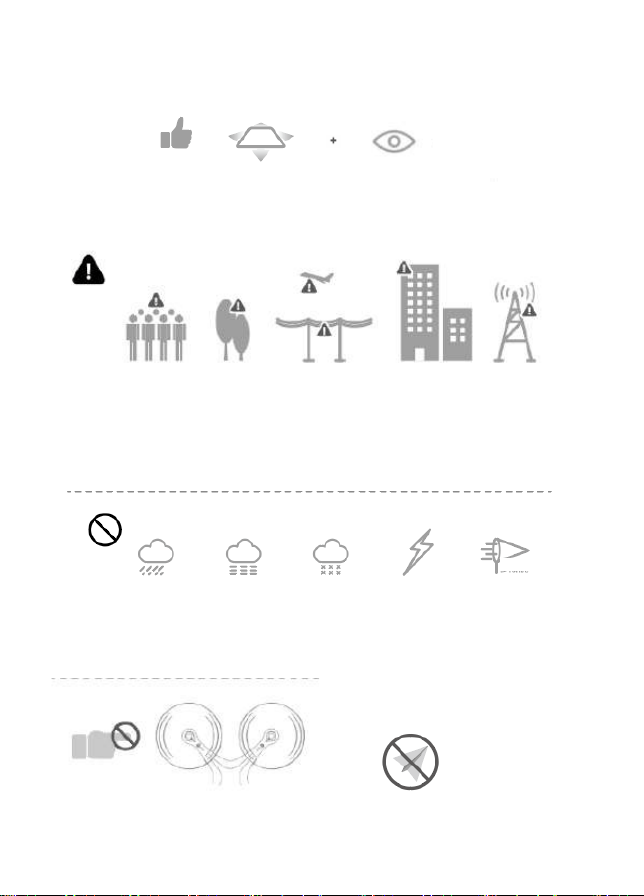
Flight Safety
Fly in Open Maintain Line
Areas
of Sight
Avoid flying over or near obstacles, crowds, high voltage power lines, trees,
Recommended for indoor use or flying below 16 feet (5m).
airport s or water.
DO NOT fly near strong electromagnec sources such as power lines and
base staons as it may affect the onboard compass.
DO NOT use the drone in adverse weather condions such as rain, snow,
fog and wind speeds.
No Fly Zone
Stay away from the rotang
propellers and motors.
- 3 -
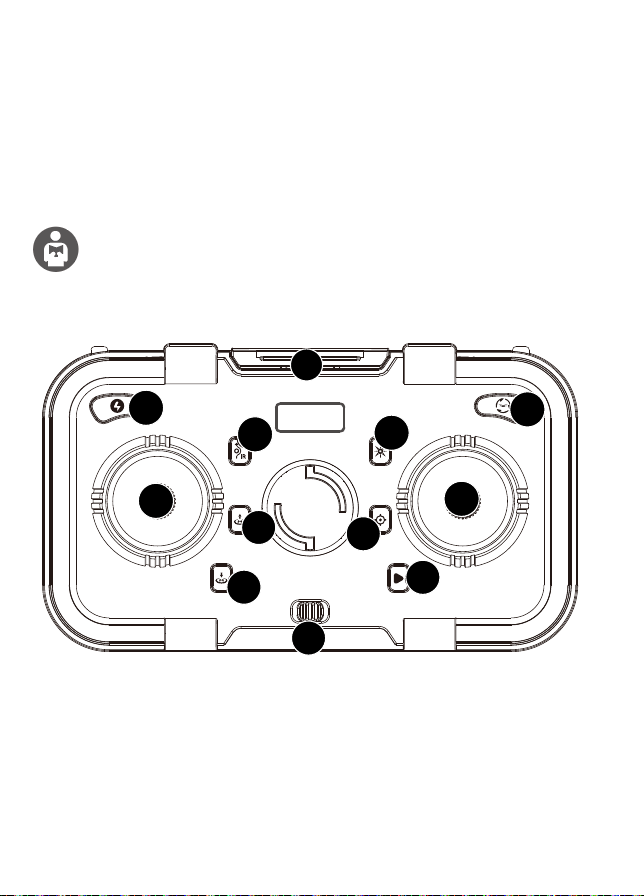
Remote Control Funcons
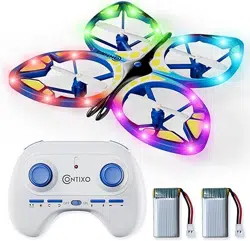
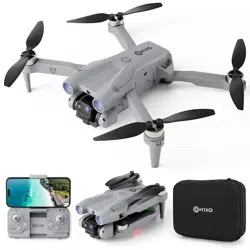
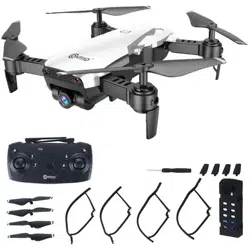
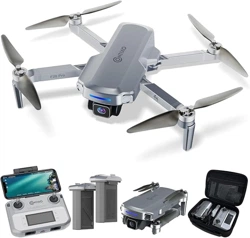
What’s in the Box
It’s important to understand basic flight guidelines for the safety of both
you and those around you. Don’t forget to read the safety guidelines
before flight.
·
1 Drone
·
1 Remote Control
·
2 Baeries
·
2 Propeller Blades
·
4
Propeller Guards
· 1 Instrucon Manual
· 1 Warranty Card
· 1 USB Cable
· 1 Screwdriver
1. Speed
2. One-key Flips&Rolls
3. Obstacle Avoidance
4. Headless Mode
5. Le Joysck
6. Right Joysck
7. One-key Take Off
8. Calibrate Gyroscope
9. One-key Landing
10. Fine-tuning Key
11. Power Switch
12. Mobile Phone Holder
- 4 -
1
7
9
8
4
5
6
2
3
10
11
12

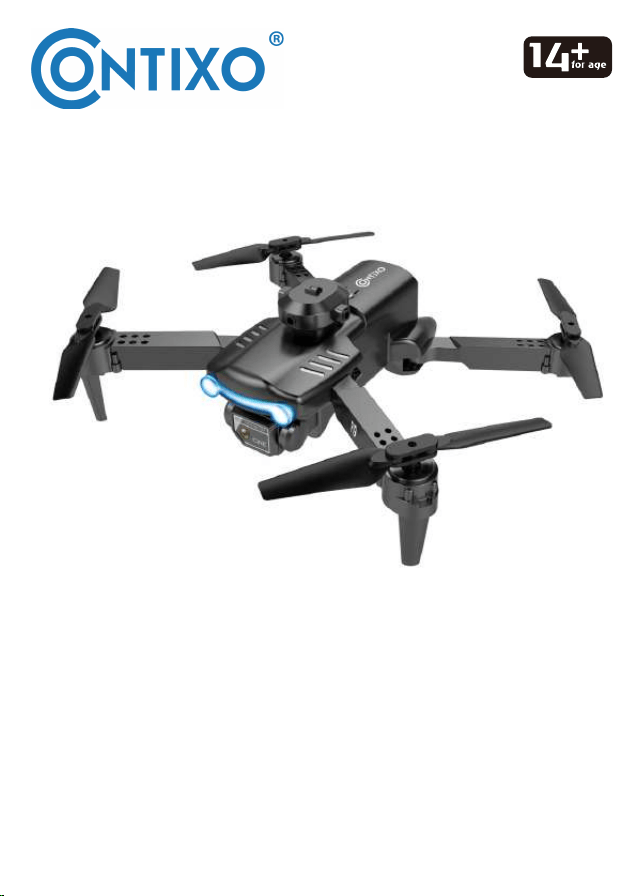
1. Upper Casing
2. Lower Casin
3. Propeller
4. Arm
7. Baery
8. Motor
9. Camera
10. Obstacle Avoidance Head
- 5 -
Drone Diagram
MOBILE PHONE INSTALLATION
1. Open the mobile phone bracket on the remote control.
2. Install the mobile phone on the mobile phone bracket.

- 6 -
1. Install the Propellers
Opening Steps
1. Open the front arm(close to camera)
2. Open the back arm
Fold the back arm firstly and then the front arm when folding.
Align the blades with the motor sha and install them (the arm idenficaon
must be consistent with the blade idenficaon). Tighten the screw clockwise.
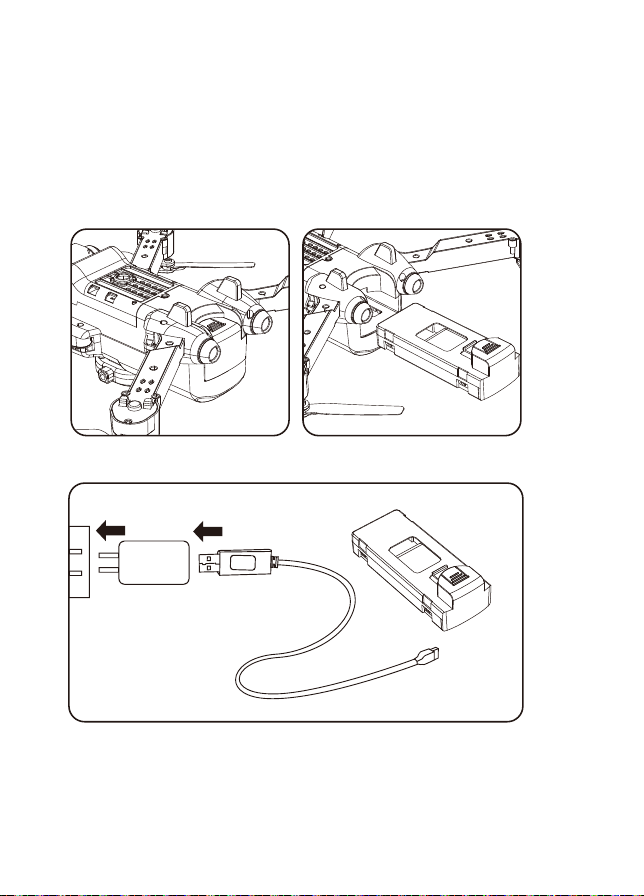
2. Intelligent Flight Baery
3. Charge the Baery
— To power ON, long-press the buon. To power OFF, long-press the buon.
— When the baery is at low power, the power indicator will start flashing.
At this me, return the drone immediately and charge the baery to avoid
unnecessary power failures.
- 7 -
A. Remove the lithium baery from the boom of the drone.
B. Connect USB charging cable with the charging interface of the
lithium baery.
Phone Charger Adapter:
5V/1A(Not included)

4. Lithium Baery Charging Instrucons
a. Charging: Insert the USB cable into the USB port of the charger and connect
to the charging port of the baery to charge.
The LED lights on when charging and red light turn off when full charging
completes.
b. The drone can be charged by a travel or car charger.
c. The drone baery takes about 60-80 minutes for a full charge. Flight me
is about 10 minutes depending on how the drone is being used.
- 8 -
Align the protecve frame with the arm and install it (Figure 1), press it unl
it is in place, and then press the posion (Figure 2) up to fasten the protecve
frame.
5. Assembling protecve guard

- 9 -
WiFi UAV
Install the WiFi UAV App
Search “WiFi UAV” applicaon in APP Store.
Search “WiFi UAV” applicaon in Google Play Store.
Required Operang Systems: IOS 8.0 or higher / Android 5.0 or higher.
Flight
Step 1: Turn on the drone and put down on a level surface
Turn on the drone and the lights of the drone will start blinking. Place the drone
on a level surface.

- 10 -
Step 3: Connect App
— Connect your smartphone to the WiFi of the drone and check the drone’s
status on the “WiFi UAV” app.
— Open the “WiFi UAV” applicaon on your smartphone to access the
control interface.
Conxo - F19 - XXXX
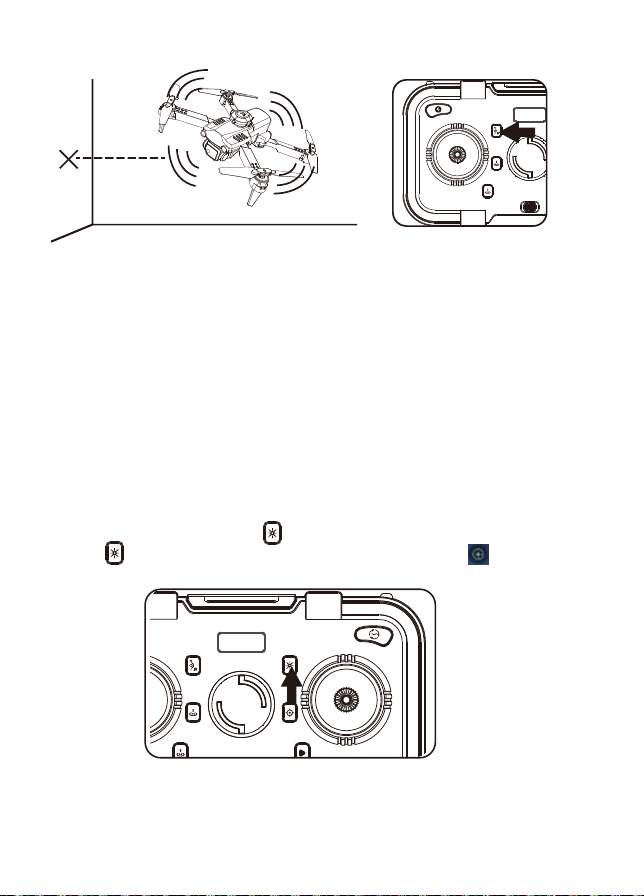
Step 2: Turn On the Remote Control & Pair with Drone
Press the power buon of the remote control to the right to power on the
remote control. Then push the le joysck up then down. When the light of the
drone and remote control stop blinking and changes to a steady light, pairing is
successful.
Throle Joysck
NOTE: You can connect to the drone WiFi signal at this me to view the
current drone on the WiFi UAV app.
This seng only affects the app control mode.
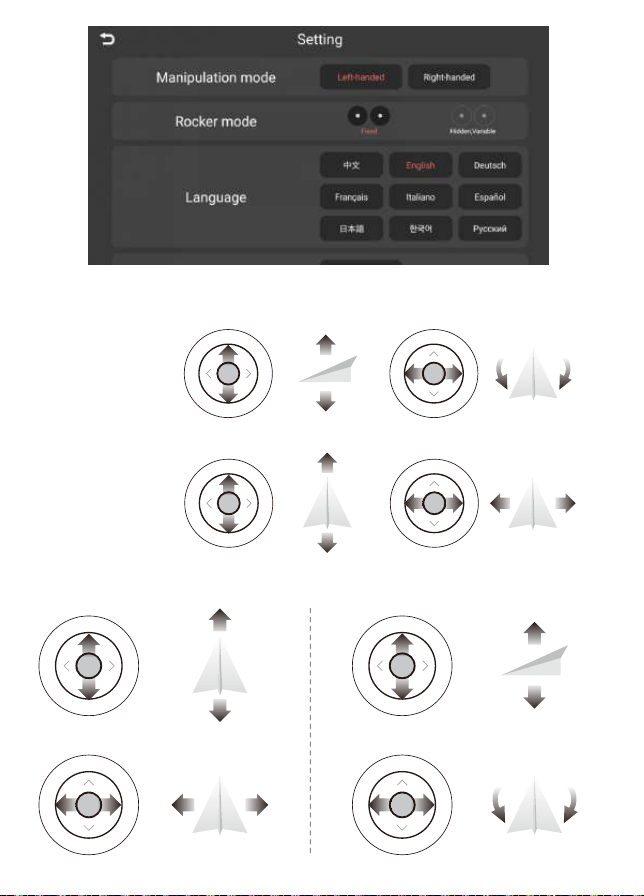
Step 4: Click the seng buon to select the control mode
Turn on the drone and the lights of the drone will start blinking. Place the drone
on a level surface.
- 11 -
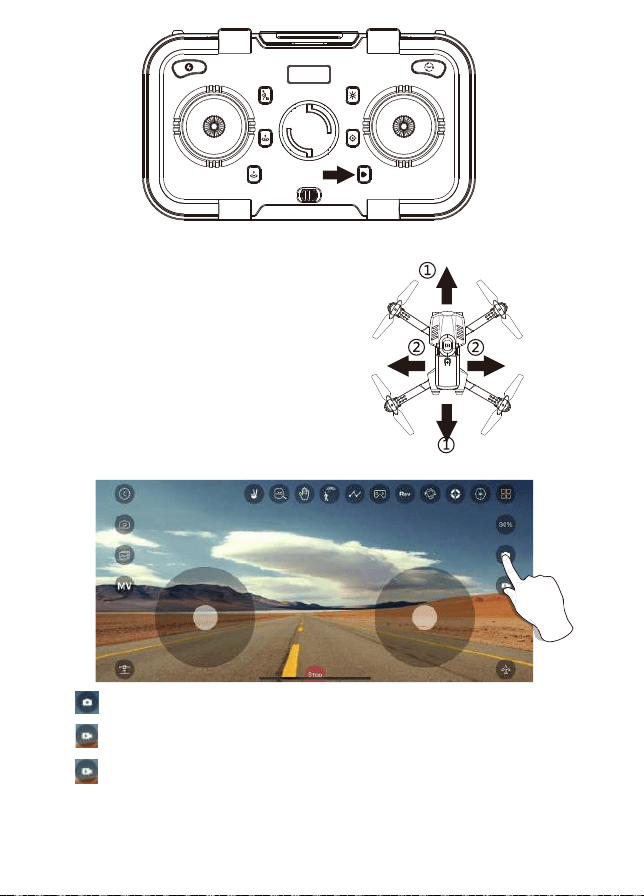
Right Hand Mode Operang Method
Direcon Joysck
Le Hand Mode Operang Method
Throle Joysck
T
u
r
n
L
e
UP
DOWN
T
u
r
n
R
i
g
h
t
F
o
r
w
a
r
d
Le
Right
B
a
c
k
w
a
r
d
UP
DOWN
T
u
r
n
L
e
T
u
r
n
R
i
g
h
t
F
o
r
w
a
r
d
Le
Right
B
a
c
k
w
a
r
d
Throttle Joystick Direction Joystick

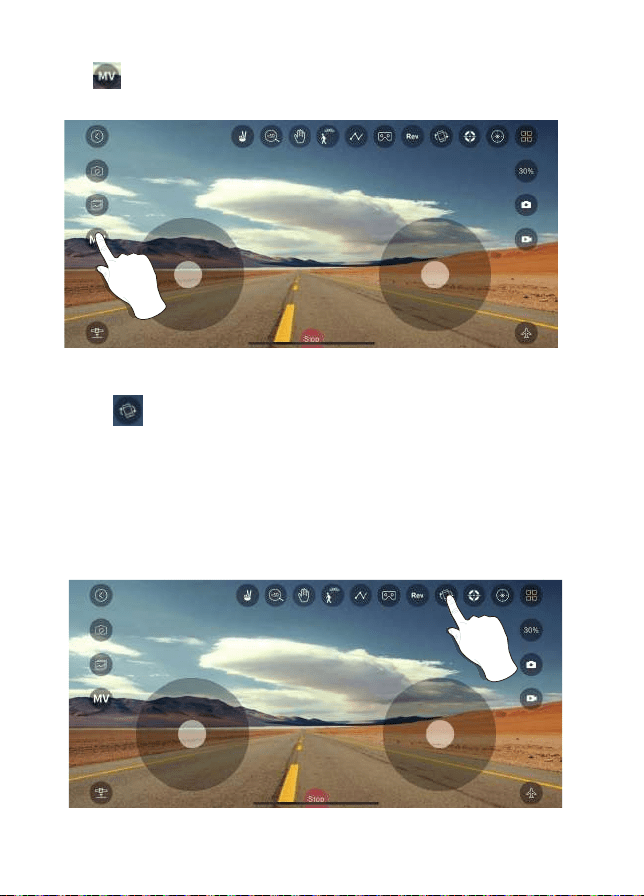
Click “ ” then click “Start”.
1. Gesture Selfie Mode
2. Zoom in or out
3. Palm Follow
4. Follow Mode
5. Flight Path
6. 3D Mode
7. Flip Screen
8. Gravity Control Mode
9. Calibrate gyroscope
10. Headless Mode
11. Hide/Display Buon
12. Switch Speed
13. Take Photo
14. Take Video
15. APP Control On/Off
16. One Key Take off/Landing
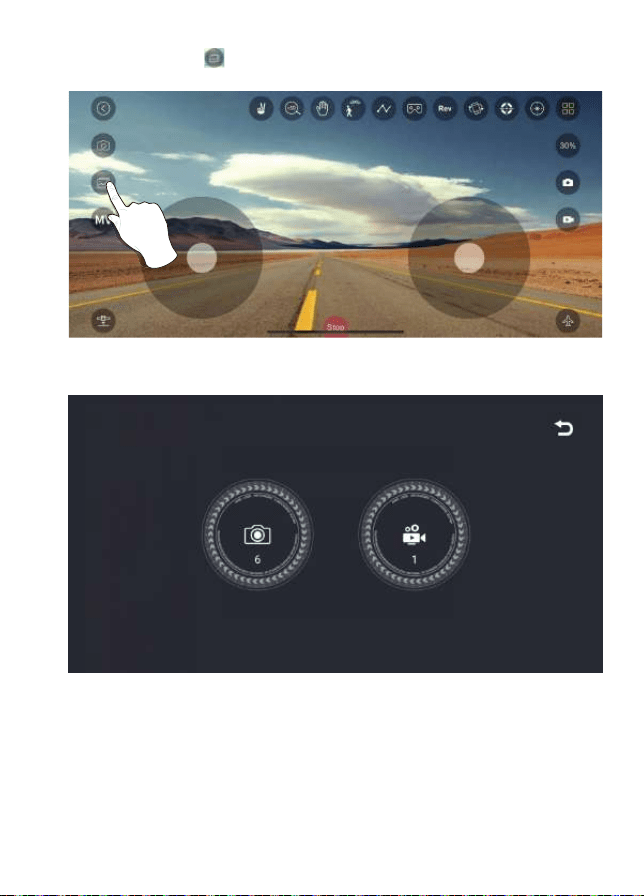
17. Entertainment Mode
18. Gallery
19. Switch Camera
20. Exit
- 12 -
APP Introducon
1 2 3 4 5 6 7 8 9
10
11
15
16
17
18
19
20
12
13
14

Step 5: Reset to Factory Seng/Calibrate Gyroscope
— Push the joyscks into the 7 o’clock (le joysck) & 5 o’clock (right joysck)
posion or click “ ” on the remote control.
— Lights will rapidly blink and change to a steady light.
- 13 -
Take-off/Landing
Once the lights are all steady, you are ready to fly!
— White (rear) and blue (front) lights are all solid (no blinking).
If you want to turn on the app control mode, you need to turn off the remote
control first.
Or click “ ” on the app when the drone is under APP control.
Take-off
Press the 1-Key Take-off buon or click “ ” on the app when the drone is
under APP control.
Rotang propellers can be dangerous. DO NOT start the motors when
there are people nearby.
- 14 -
Landing
Press the 1-Key landing buon or click “ ” on the app when the drone is
under APP control.
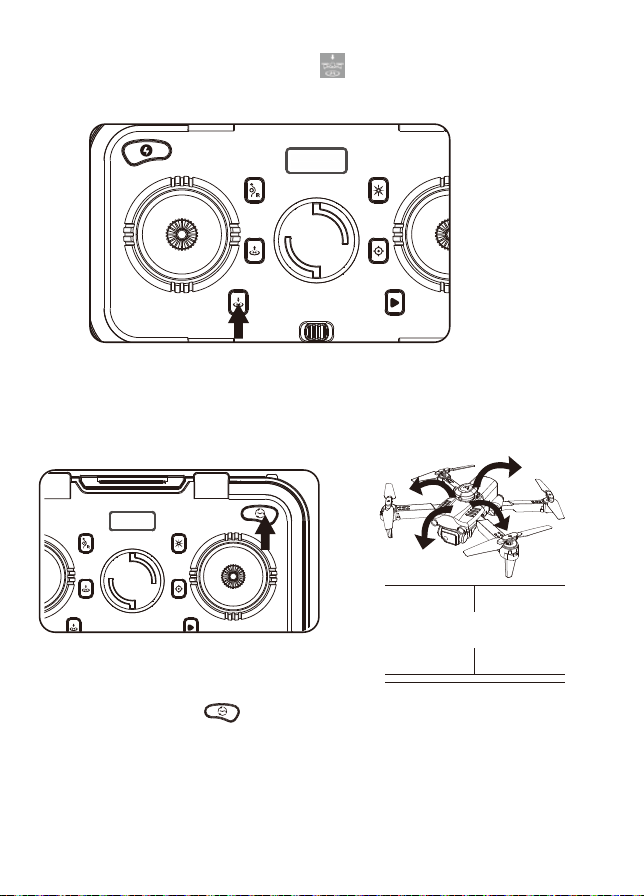
3D Roll: Short press “ ” buon and push the direcon joysck forward,
backward, le or right. The drone will roll in the air in the corresponding direcon.
3D Roll
About 5 feet
Headless Mode
1. The drone defaults to Normal Mode when the drone and remote control are
matched successfully. Click “ ” buon to enter into Headless mode.
Click “ ” buon again to exit Headless mode. Or click “ ” on the app
when the drone is under APP control.
2. Normal Mode: Before takeoff, the camera on the drone indicate the
forward-facing direcon.
3. Headless Mode: Before takeoff, the camera on the drone indicate the
forward-facing direcon. When the drone rotates in flight, the flight direcon
is not changed.
- 15 -
Press the buon to turn on the obstacle avoidance mode, and press again to turn
ohe obstacle avoidance mode.
Avoid obstacles on four sides and when an obstacle is detected, the drone will stop
in place, the remote controller will sound an alarm.
It is recommended to turn on the obstacle avoidance funcon in an indoor flight
environment with a length and width of 6x6 meters (20x20 feet) or more. When the
drone turns on the obstacle avoidance mode, the speed will slow down and the fast
gear cannot be turned on. Therefore, it is recommended to fly indoors when the
obstacle avoidance mode in turned on.
Obstacle Avoidance Mode

Fine-tuning Funcon
Don’t change your direcon. Don’t change your direcon.
The direcon of control when the drone is paired.
While in Headless Mode, the forward direcon is the direcon the pilot faces when
the pilot pairs the drone with the remote control. If the pilot pushes the direcon
joysck forward, the drone will fly forward. If the pilot pushes the direcon joysck
backward, the drone will fly towards him/her. If the pilot moves the right sck le
or right, then the drone will also move le or right, relave to the pilot. It is very
important that the pilot does not change posions or the direcon he or she is
facing because this will cause misdirecon of the drone flight control.
When the drone spins in the air or lts in different direcons, you can use
fine-tuning to correct the acon. Press the fine-tuning buon and hear a beep
sound, then movethe joysck in the opposite direcon to dajust and calibrate unl
the drone does not deviate. If there is no operaon for 5-6 seconds aer entering
the fine-tuning, the fine-tuning funcon will automacally exit.
- 16 -
1. Forward/Backward Fine-tuning
2. Le/Right Side Fly Fine-tuning
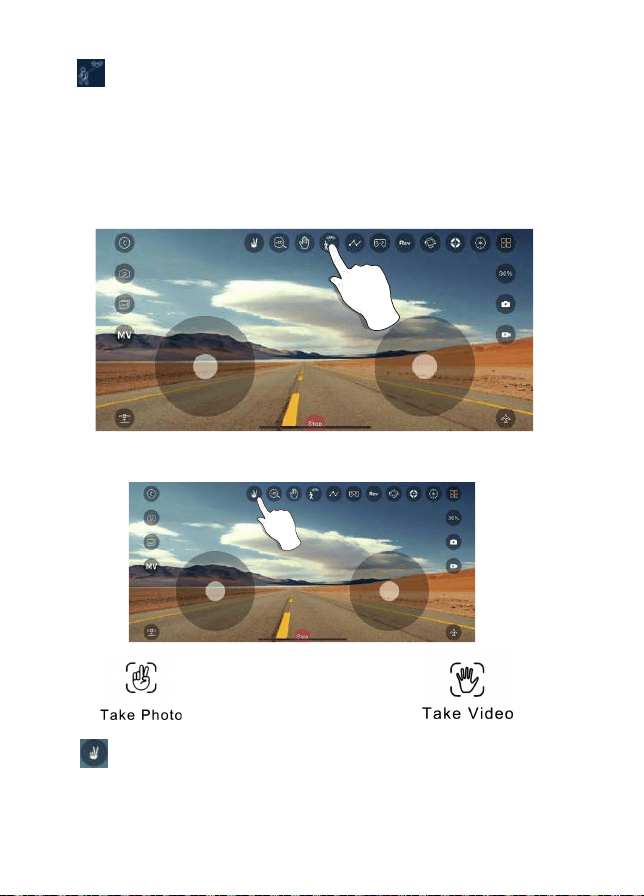
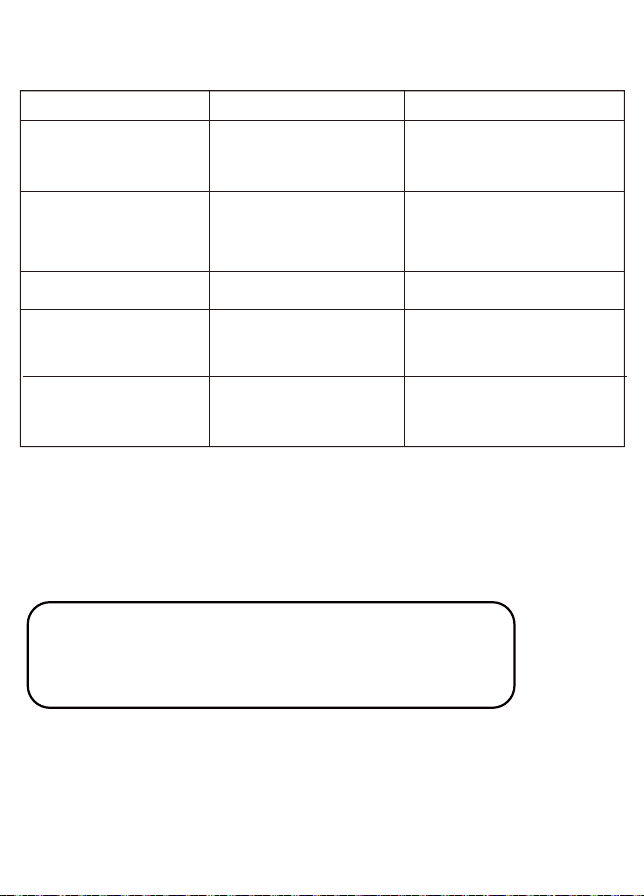
Tap “ ” on the app to take a video.
Tap “ ” on the app to take a picture.
Tap “ ” on the app again to save video.
- 17 -
Photos and videos will be saved in the phone. DO NOT take photos while recording
video.
Camera Funcons
- 18 -
Follow Me Mode
Click “ ” then the camera will automacally recognize the person or
human-shaped object in the lens. Tap on the object or person you want to track,
and the drone will automacally follow the object or person you choose.
NOTE: If there are mulple people on the screen, you can choose one of them to
track. If there is no target on the screen, the drone will enter “waing mode”.
When there is a tracking target on the screen, the system will automacally enter
the tracking mode. (This mode can only be used in APP controlled mode.)
Click “ ” (hand with two fingers) on the App. Hold up 2 fingers to take a picture.
Wave your hand or hold up 3 fingers to begin recording video. There is a 3 second
countdown before taking a video or picture.
NOTE: This funcon can only be used when there is adequate light. Lowlight or
dimly lit areas may prevent the camera from detecng your hand gestures.
Gesture Selfie Mode
- 19 -
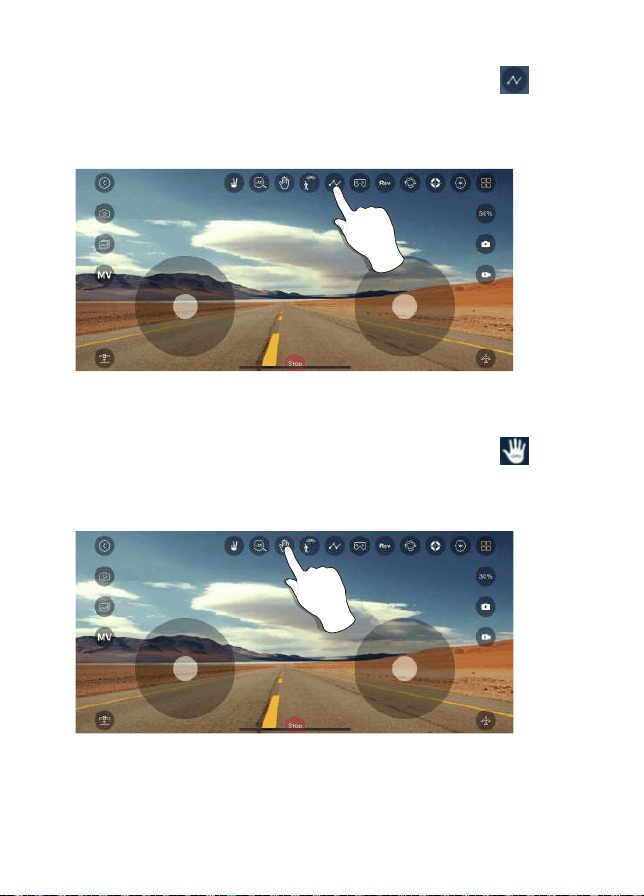
Flight Path
Palm Follow
Successfully connect the drone WiFi with your smartphone,click “ ” on the App.
Find the transparent box on the screen. Mark the path you plan to fly within the
transparent box range on the map. (This mode can only be used in APP controlled
mode.)
Successfully connect the drone WiFi with your smartphone,click “ ” on the App
and put your palm in front of the lens. The drone will automacally recognize the
posion of your palm and follow the movement. (This mode can only be used in APP
controlled mode.)
- 20 -
Entertainment Mode
Gravity Control Mode
Click “ ” to enter entertainment mode.
You can choose photo effects and composite short videos.
Click “ ” to enter gravity control mode. (This mode can only be used in
APP controlled mode.) You can control the flying direcon of the drone
according to the lt angle of the phone.
Tilt the phone forward, the drone flies forward.
Tilt the phone backwards, the drone flies backwards.
Tilt the phone to the le and the drone flies to the le.
Tilt the phone to the right and the drone flies to the right.
- 21 -
Gallery
Open the App, click “ ”(gallery) to access your picture and video files

- 22 -
Specificaons
Drone Model: F19
Drone Weight: 109g/3.8 oz
Baery Type: Lipo Lithium-Ion Baery
Flight Time: About 10 minutes
Max Charging Time: About 80 minutes
Capacity: 1800 mAh
Voltage: 3.7V
Recommend Control Height: 5M (16 feet)
Max RC Control Range: 50M (160 feet) (Unobstructed)
WIFI Camera Range: 25M (80 feet) (Unobstructed, depending on condions
and your mobile device)
Wind resistance level: Level 1 (Flight use during windy condions is NOT
recommended)
Auto-Hovering: Enabled
Remote Control Operang Frequency: 2.4 GHz
Remote Control Baery: 3*AA
Remote Control Operang Voltage: 3.7V
Camera Lens: FOV 90°
Sll Photography Mode: Single shot
Photo Format: JPEG
Video Format: MP4
Operang Temperature Range: 32°to 104°F ( 0°to 40°C)
Mobile App: “WiFi UAV” in App Store & Google Play Store
Live View Working Frequency: 2.4 GHz ISM
1080P
Phone
Photo
Video
1920X1080P
1920X1080P
15 fps
F19
CAMERA STORAGE RESOLUTION
FRAME PER
SECOND
Technical Support
Trouble Shoong
Drone does not respond
to user controls.
The blades spin, but the
drone cannot take off.
The drone shakes
heavily.
Drone does not stabilize
during flight with fine tuning.
1. The blades distorted.
2. Defecve motor.
The blades distorted. Replace the blades.
1. Replace the blades.
2. Replace the motor.
1. Remote is not synced to
the drone.
2. Insufficient baery power.
1. Refer to page 9-10 (Flight).
2. Recharge the baery.
1. Recharge the baery.
2. Replace the blades.
Problem Cause Soluon
Website: www.contixo.com
- 23 -
1. Insufficient baery power.
2. The blades distorted.
3. The blades Side A and Side
B are reversed.
E-mail: support@conxo.com
Mon-Fri 9:00 am - 4:00 pm PST
Have quesons?
Drone cannot takeoff aer
accident.
Four-axis acceleraon sensor
loses balance.
Recalibrate compass.

- 24 -
CONTACT INFORMATION
E-Mail: support@conxo.com
Website: www.conxo.com
©2022 Conxo Inc. All rights reserved. Conxo®, the Conxo logo and
associated characters, trademarks and design elements are owned and
licensed by Conxo Company.

- 25 -