THIS INSTRUCTION BOOKLET CONTAINS IMPORTANT SAFETY INFORMATION.
PLEASE READ AND KEEP FOR FUTURE REFERENCE.
Date 2018-06-04 Rev. 0001-B Factory: DONPEA
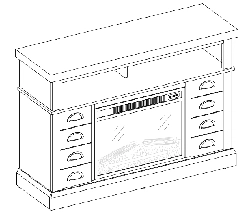
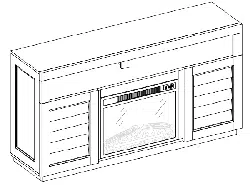
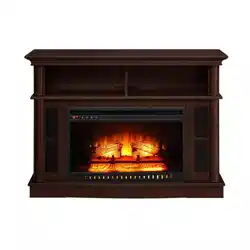
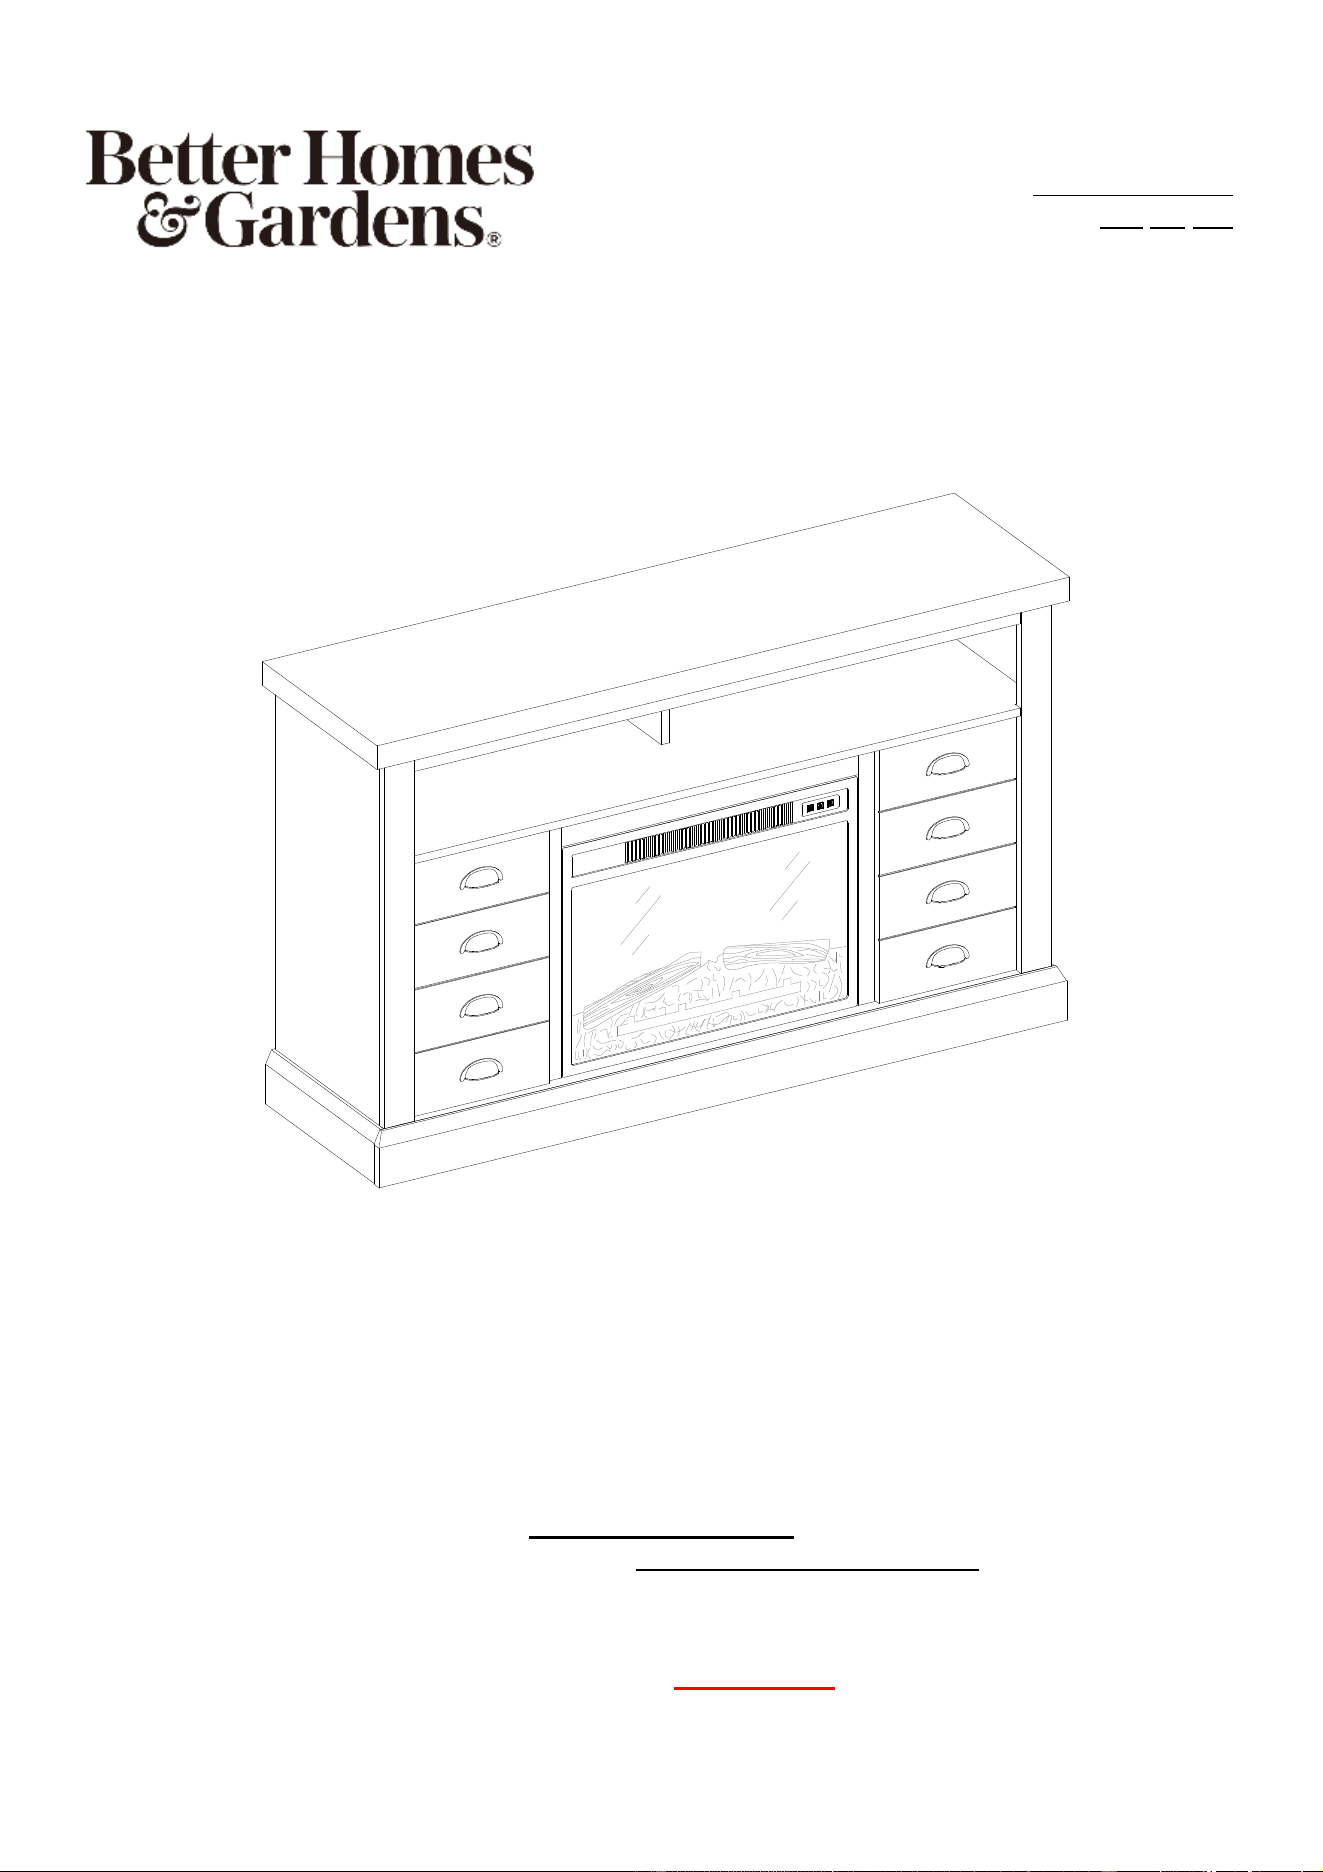
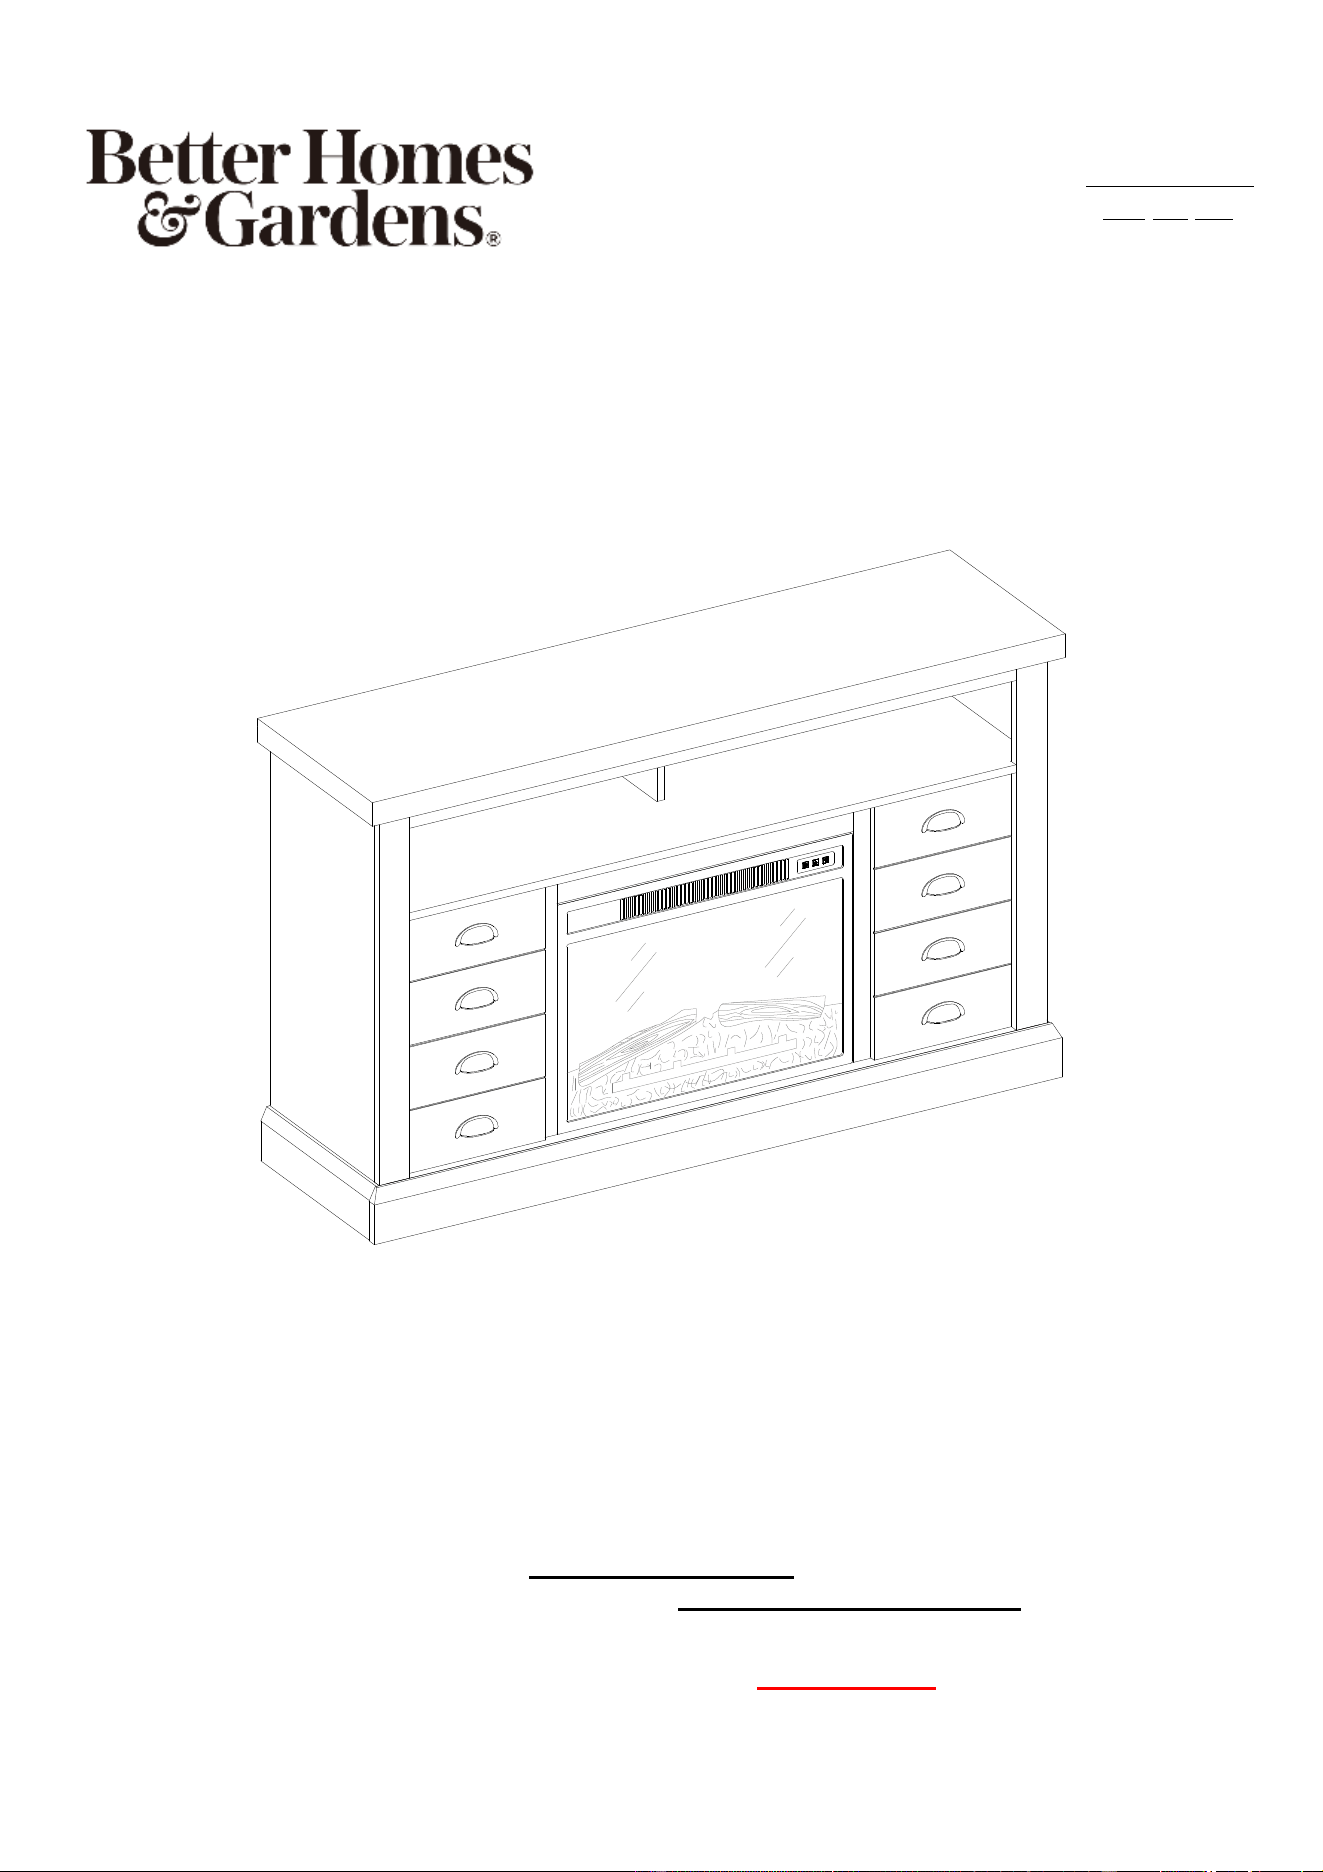
65” Farmhouse Media Fireplace Console
Stock# BH47-084-099-08
ADULT ASSEMBLY REQUIRED
If you have any questions regarding assembly or if parts are missing, DO NOT return this item to the
store where it was purchased. Please call our customer service number and have your instructions
and parts list ready to provide the model name, part name or factory number:
866-942-5362
Pacific Standard Time: 8:30 a.m. - 4:30 p.m., Monday - Friday
Or visit our web site 24 hours a day, 7 days a week for product assistance at
www.whalenstyle.com
Or e-mail your request to parts@whalenfurniture.com
LOT NUMBER:
DATE PURCHASED: / /
2
MANUFACTURER: Whalen Furniture Manufacturing
CATALOG: 65” Farmhouse Media Fireplace Console
MODEL #: BH47-084-099-08
MADE IN CHINA
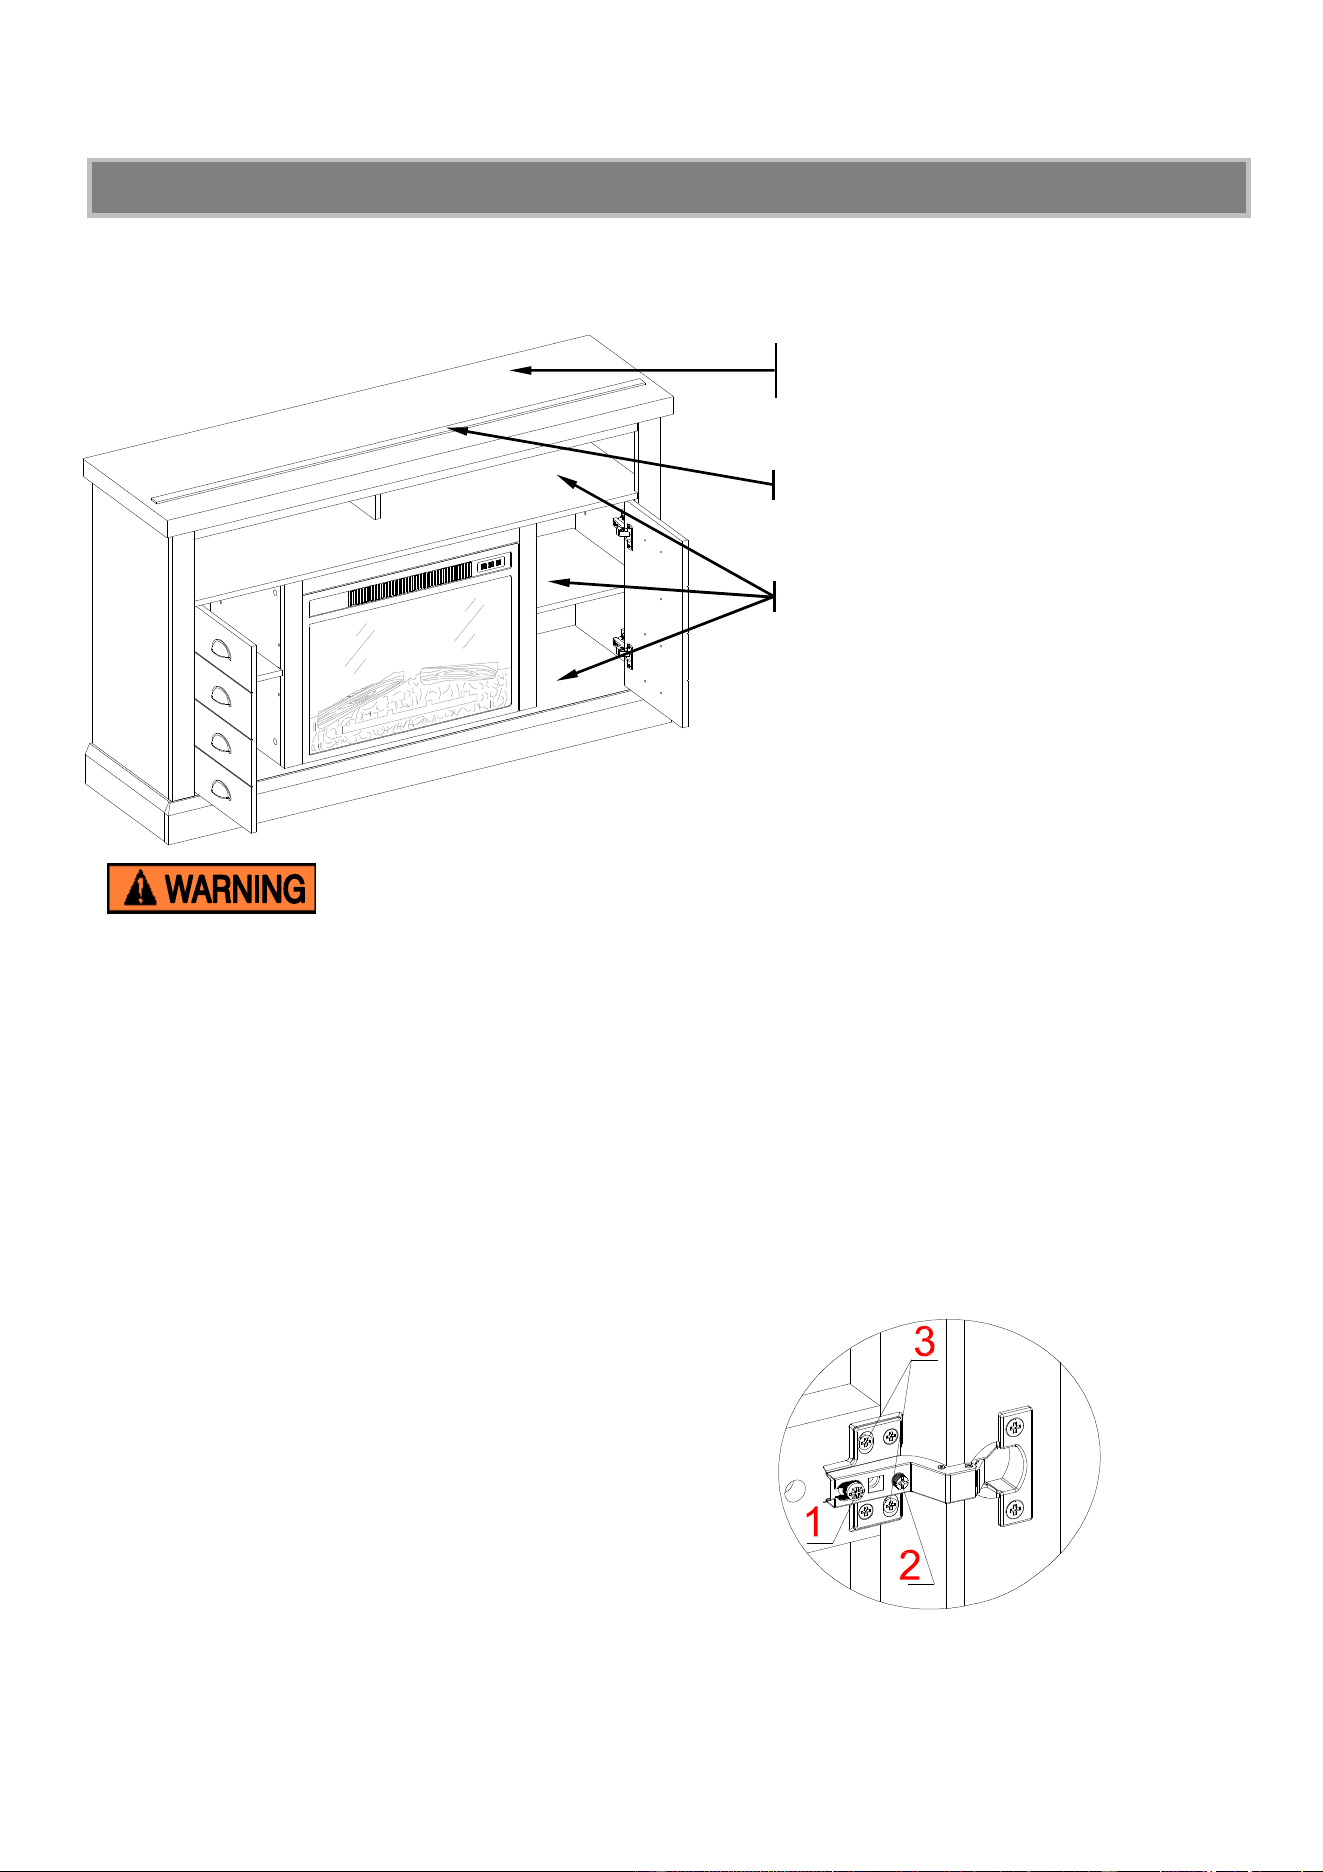
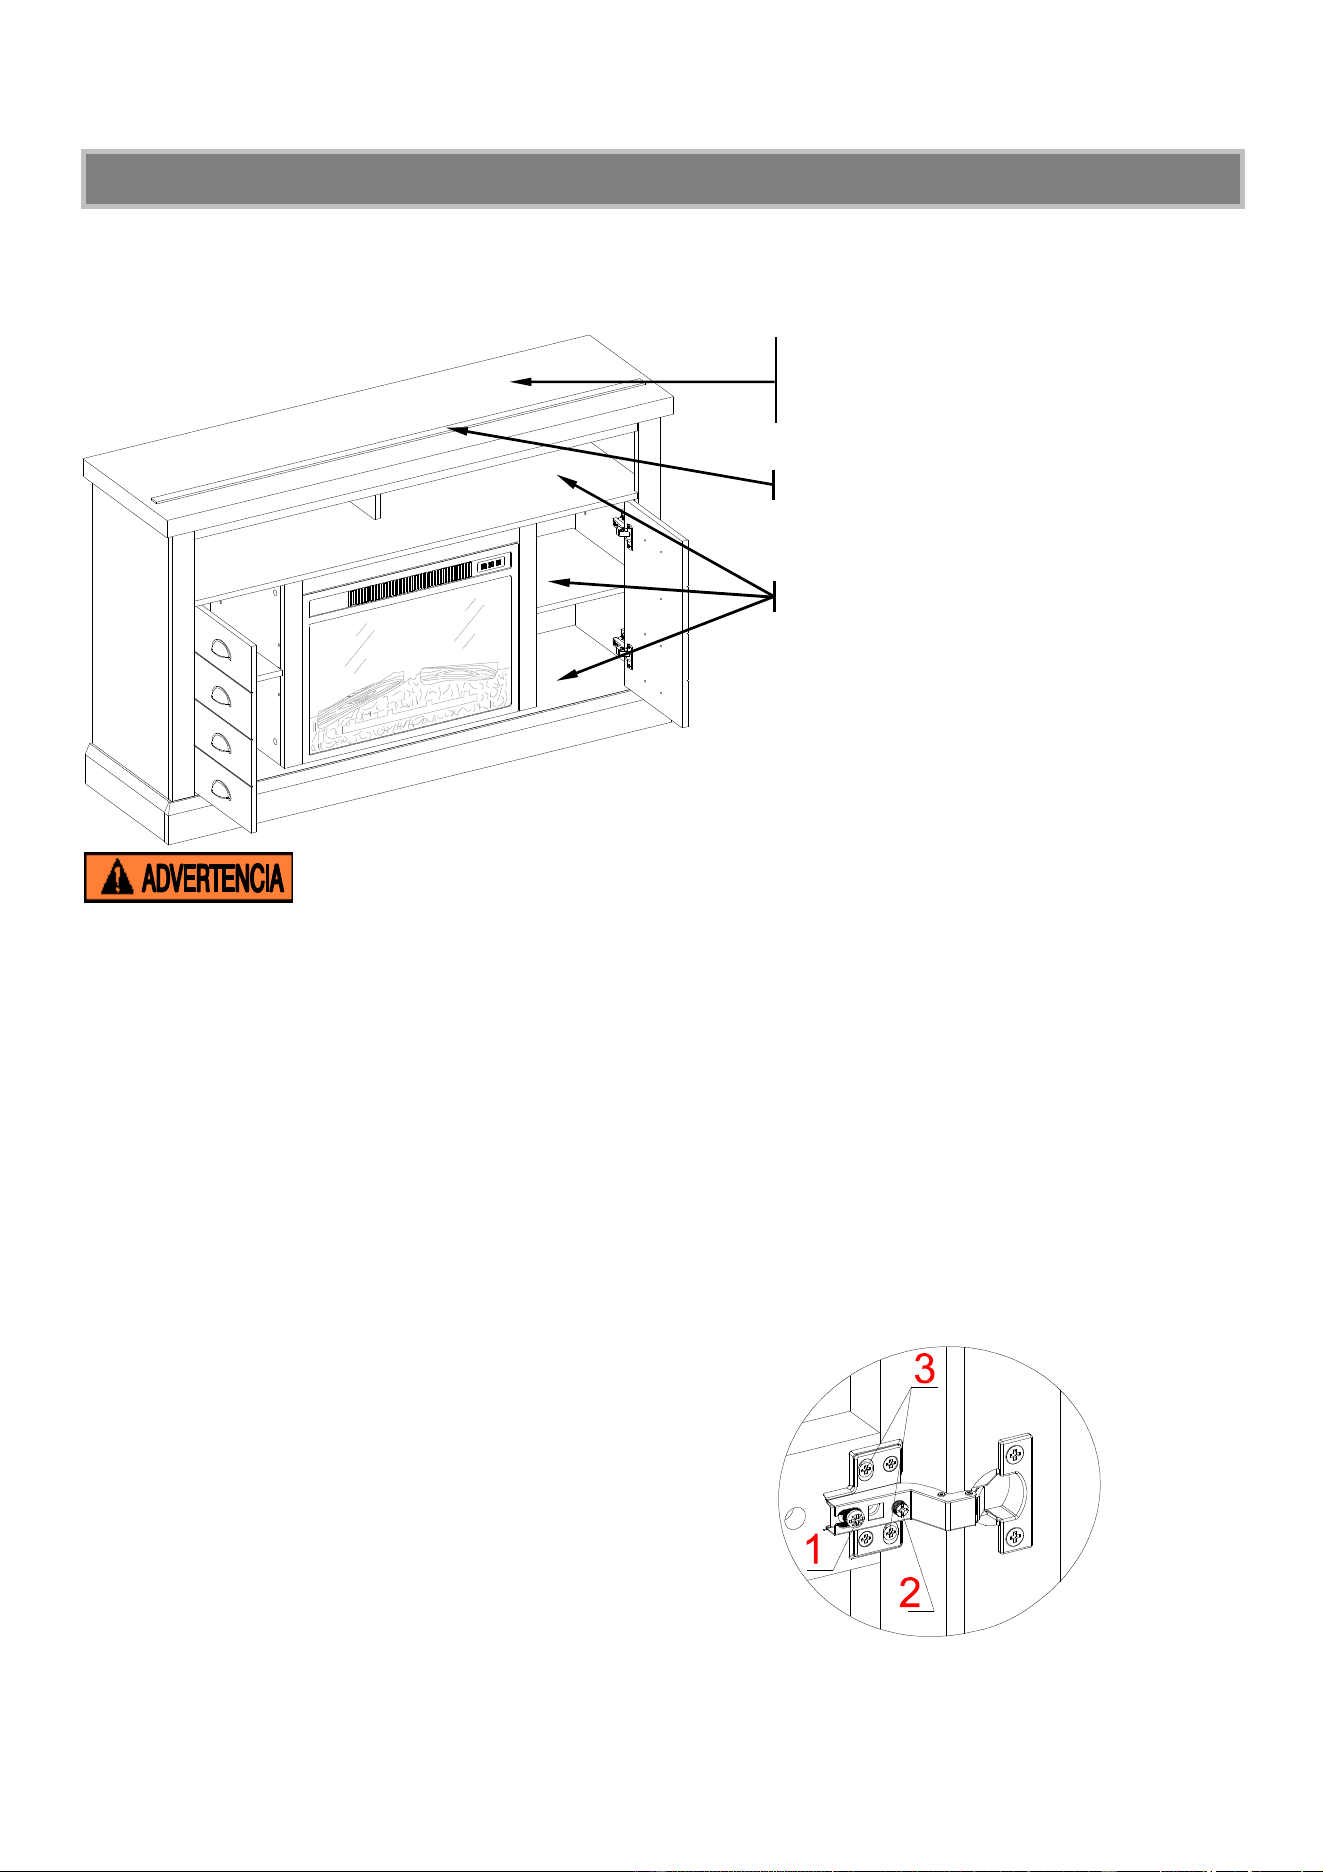
How to adjust the European adjustable hinges on doors
Shipping may cause doors to become out of alignment. If you find that the doors need to be
adjusted slightly, turn the appropriate screw as illustrated below.
1. TO ADJUST THE DOOR FORWARD OR
BACKWARD.
2. TO ADJUST THE DOOR TO RIGHT OR
TO LEFT.
3. TO ADJUST THE DOOR UP OR DOWN.
MAX
IMUM RECOMMENDED WE IGHT LOADS
MAXIMUM LOAD 50 lb. (22.6 kg)
FITS UP TO MOST 65” FLAT PANEL TVs
MAXIMUM LOAD 135 lb. (61.2 kg)
PLACE TV BEHIND THE STOPPER
THIS UNIT IS NOT INTENDED FOR USE WITH CRT TVS. USE ONLY WITH FLAT
PANEL TVS AND AUDIO/VIDEO EQUIPMENT MEETING RECOMMENDED SIZE AND WEIGHT LIMITS.
NEVER USE WITH LARGER/HEAVIER THAN RECOMMENDED FLAT PANEL TVS OR EQUIPMENT. TO
AVOID INSTABILITY, PLACE FLAT PANEL TV IN THE CENTRE OF THE UNIT; THE BASE OF THE
TELEVISION MUST BE ABLE TO REST ON THE SUPPORTING SURFACE OF THE UNIT WITHOUT
OVER-HANGING THE EDGES. IMPROPERLY POSITIONED FLAT PANEL TVS, OR FLAT PANEL TVS
OR OTHER EQUIPMENT THAT EXCEED RECOMMENDED SIZE AND WEIGHT LIMITS COULD FALL
OFF OR BREAK THE UNIT, CAUSING POSSIBLE SERIOUS INJURY.
3
IMPORTANT
Before you begin: Open, identify and count all parts prior to assembly. Lay out parts on a flat and non-
abrasive surface. You will need the parts identified on page 4 and 5 of this instruction manual.
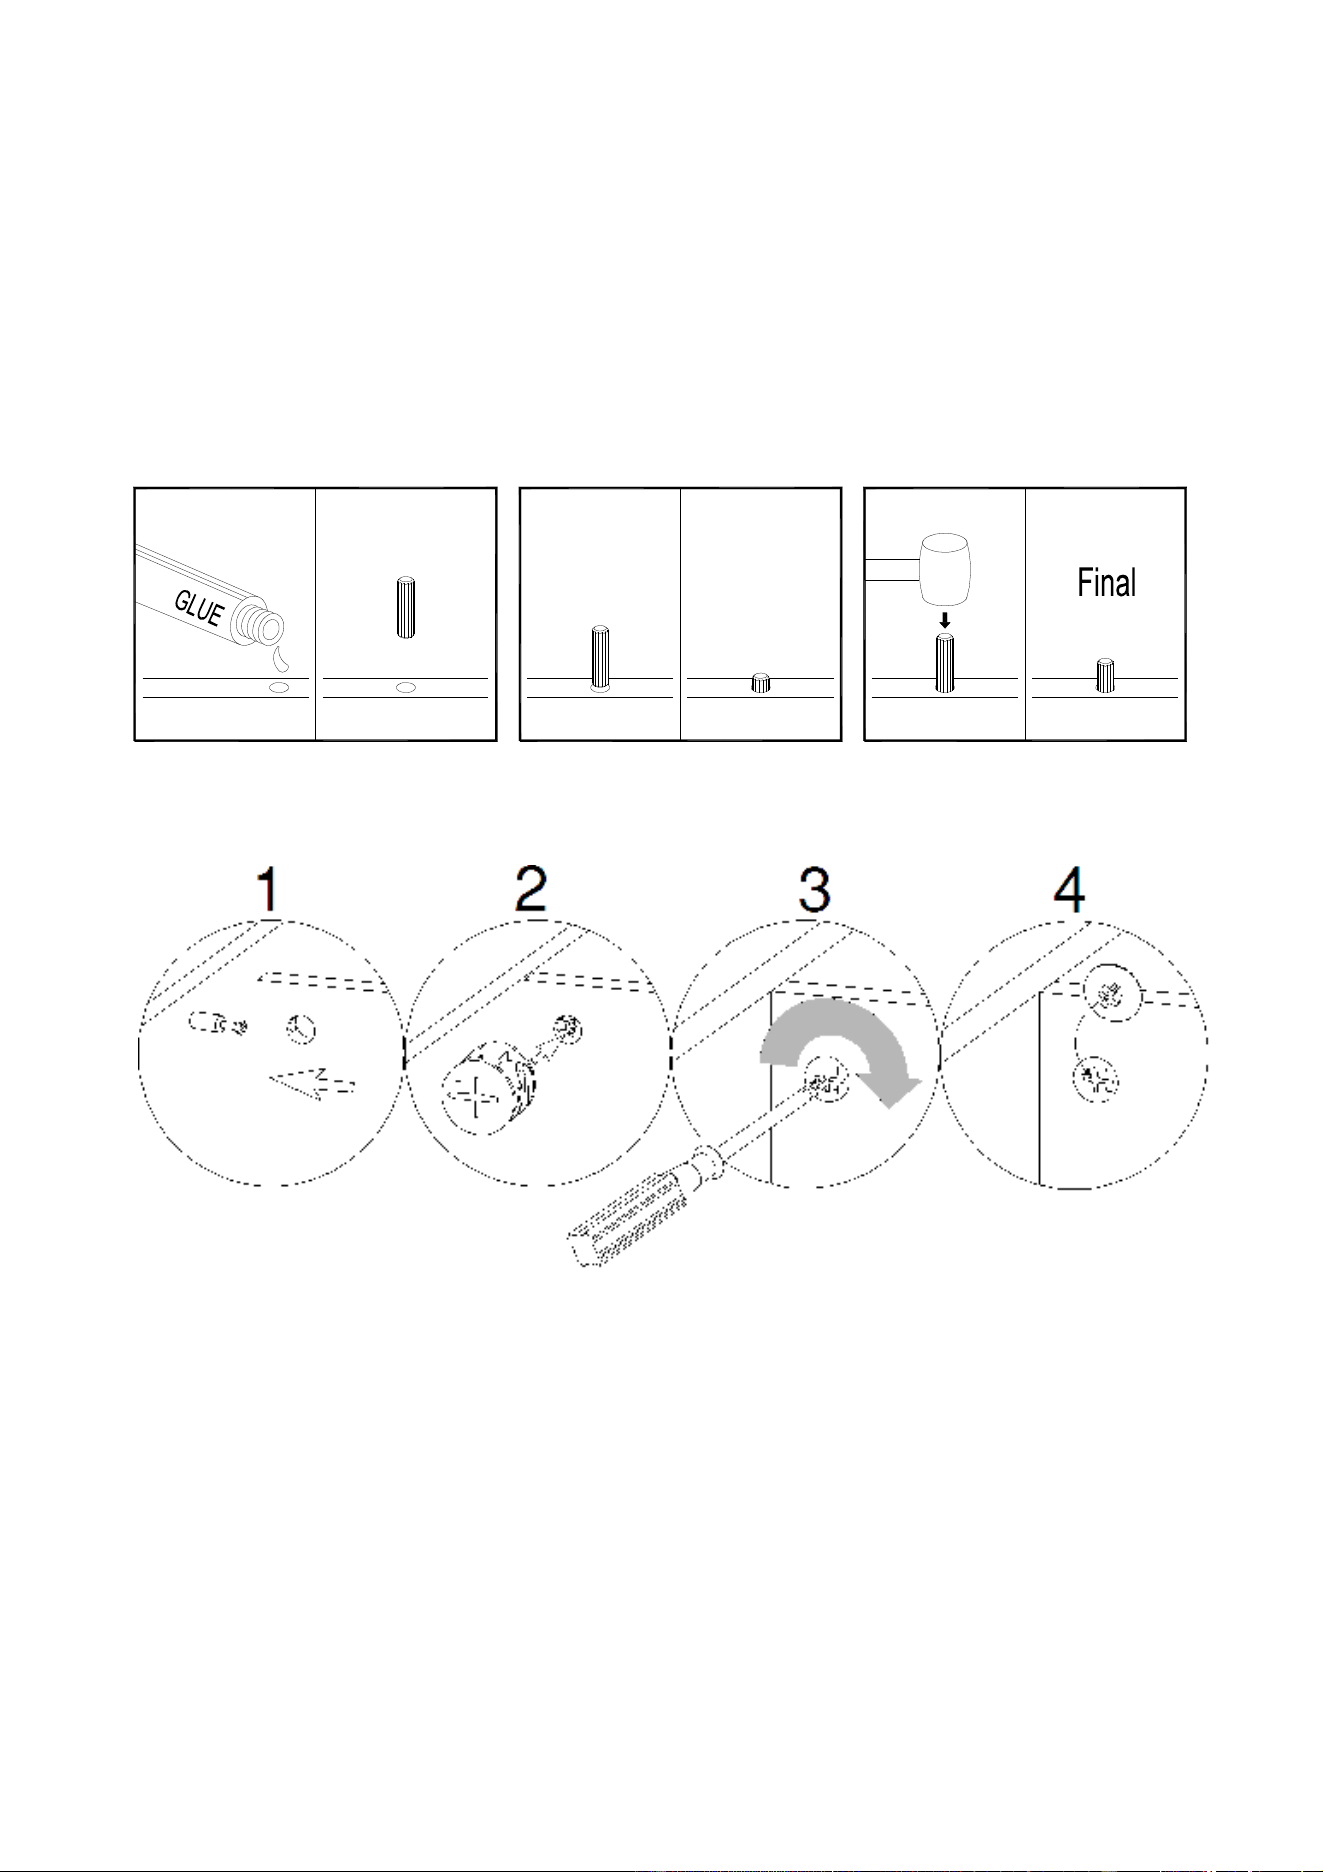
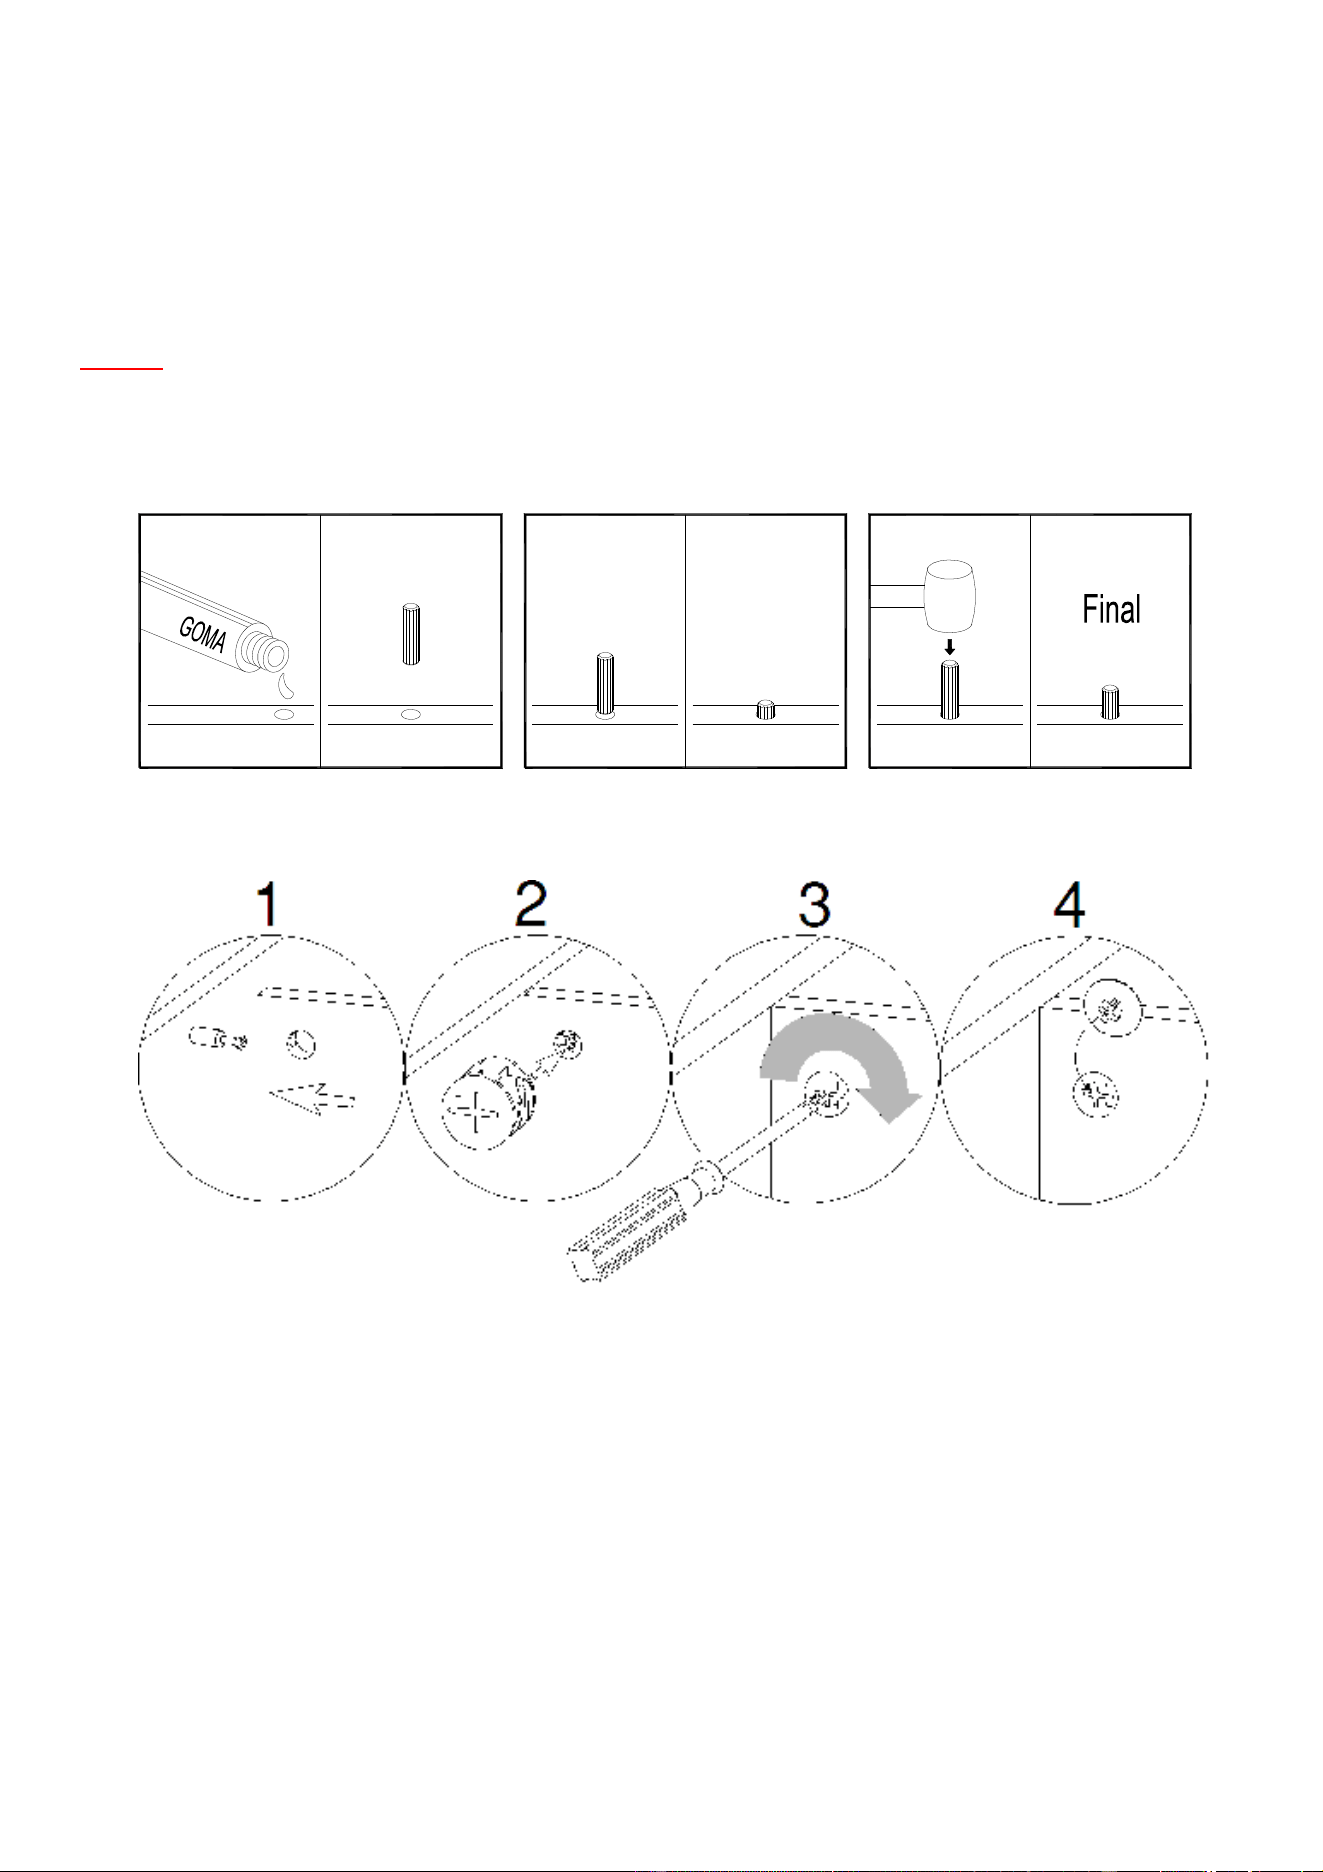
NOTE: IT IS VERY IMPORTANT TO USE GLUE WITH DOWELS. EXCESS GLUE CAN BE WIPED OFF
WITH DAMP CLOTH.
Insert Dowel at least half way by tapping lightly with a rubber mallet IF NECESSARY.
CAM LOCK SYSTEM OPERATION
HOW THE KNOCK DOWN (KD) ASSEMBLY SYSTEM WORKS
1. Screw Cam Bolt into the pre-drilled small holes on panel. Connect both panels together; making sure Cam
Bolt goes into pre-drilled hole on the end of panel with Cam Lock.
2. Insert Cam Lock into pre-drilled large hole on panel. Make sure arrow on Cam Lock is pointed toward
Cam Bolt.
3. Once Cam Bolt is connected inside Cam Lock, take a Phillips screwdriver and tighten Cam Lock
clockwise.
4. Plug Cam Cap into the cross slot of the Cam Locks to conceal the cam.
You are now ready to assemble the KD unit.
X
X
1 2 43
4
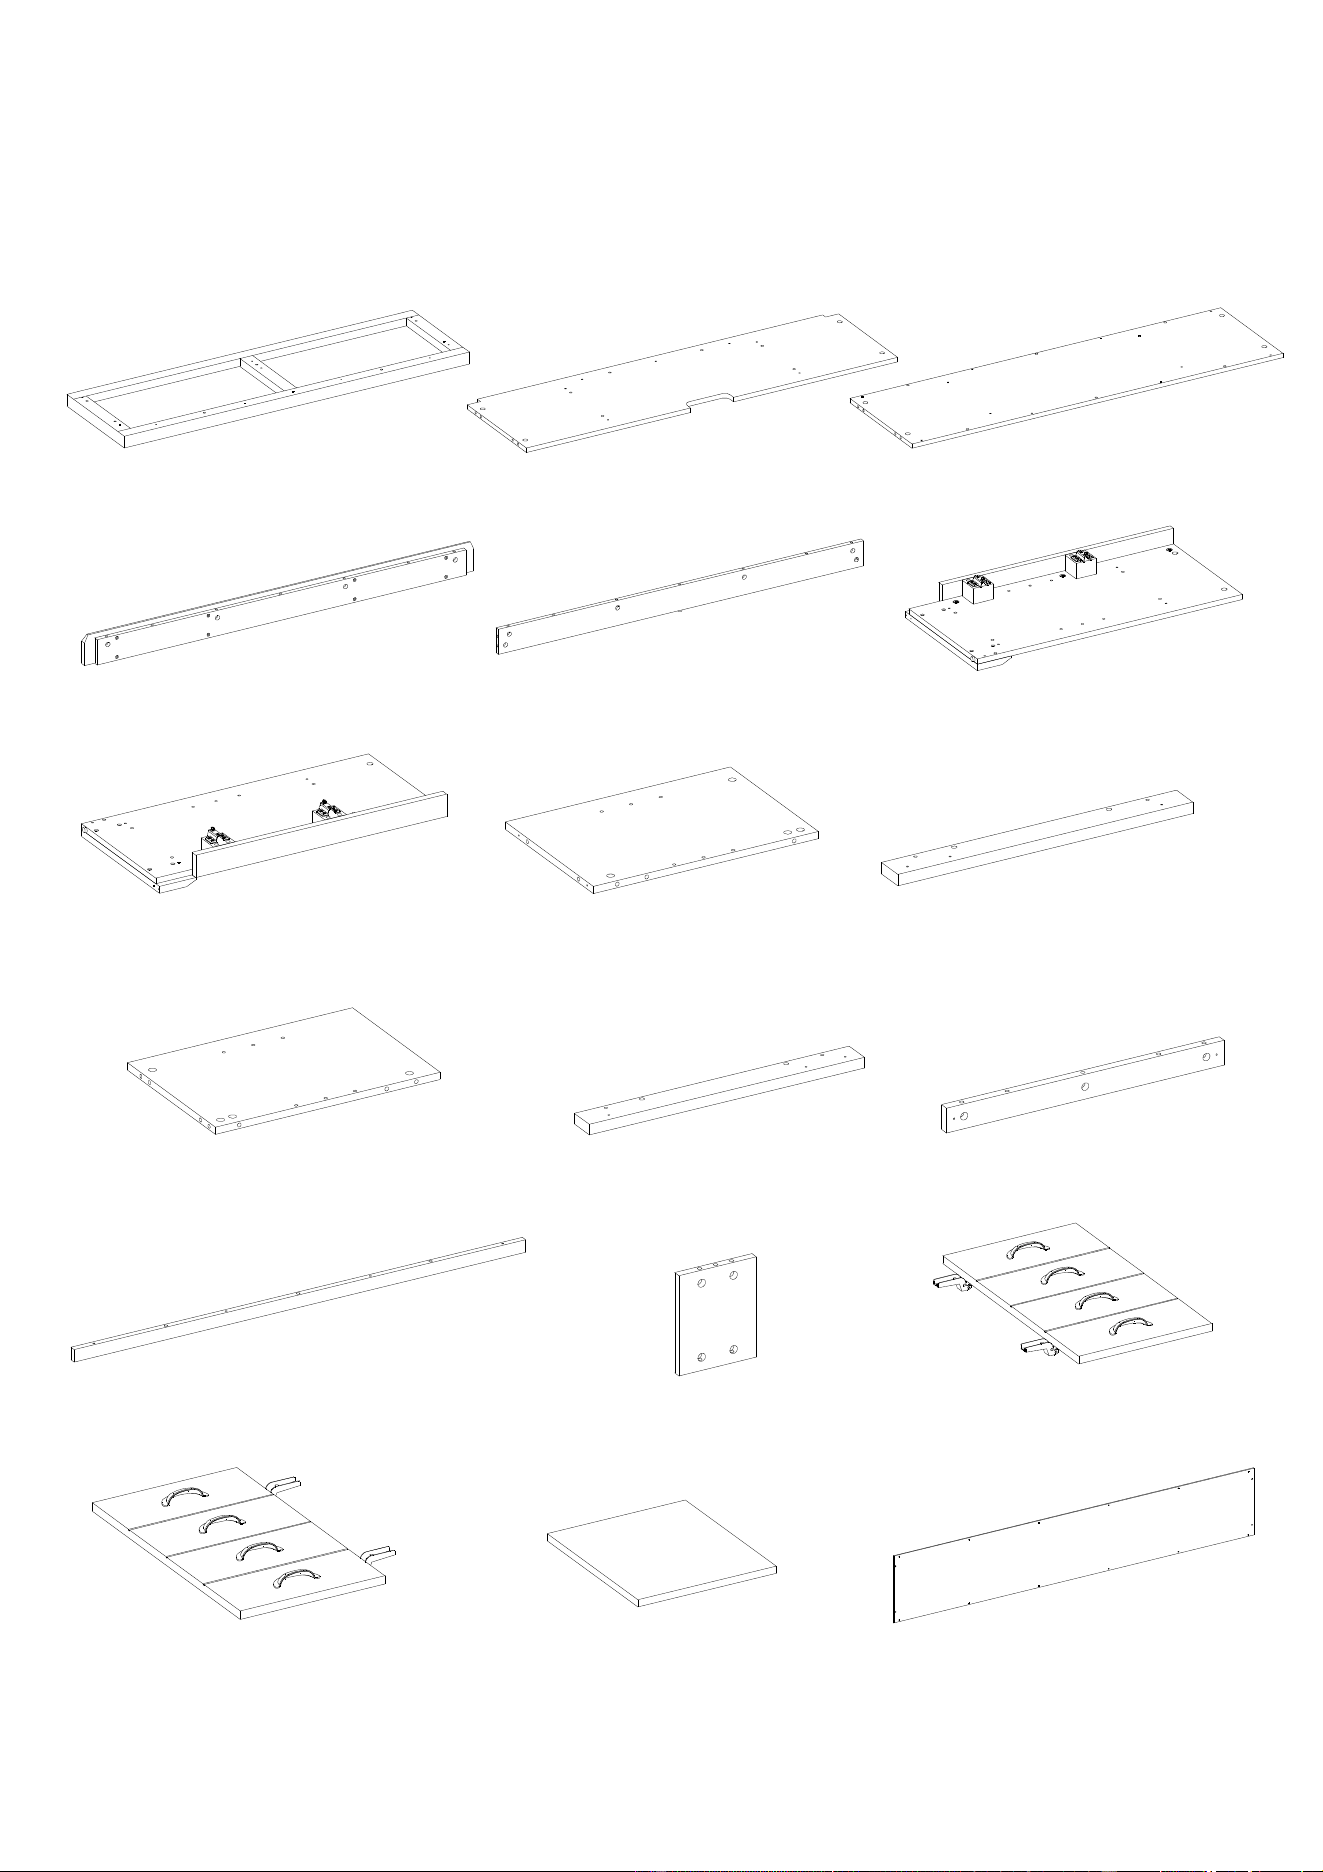
Parts and Hardware List
Please read completely through the instructions and verify that all listed parts and hardware are present
before beginning assembly.
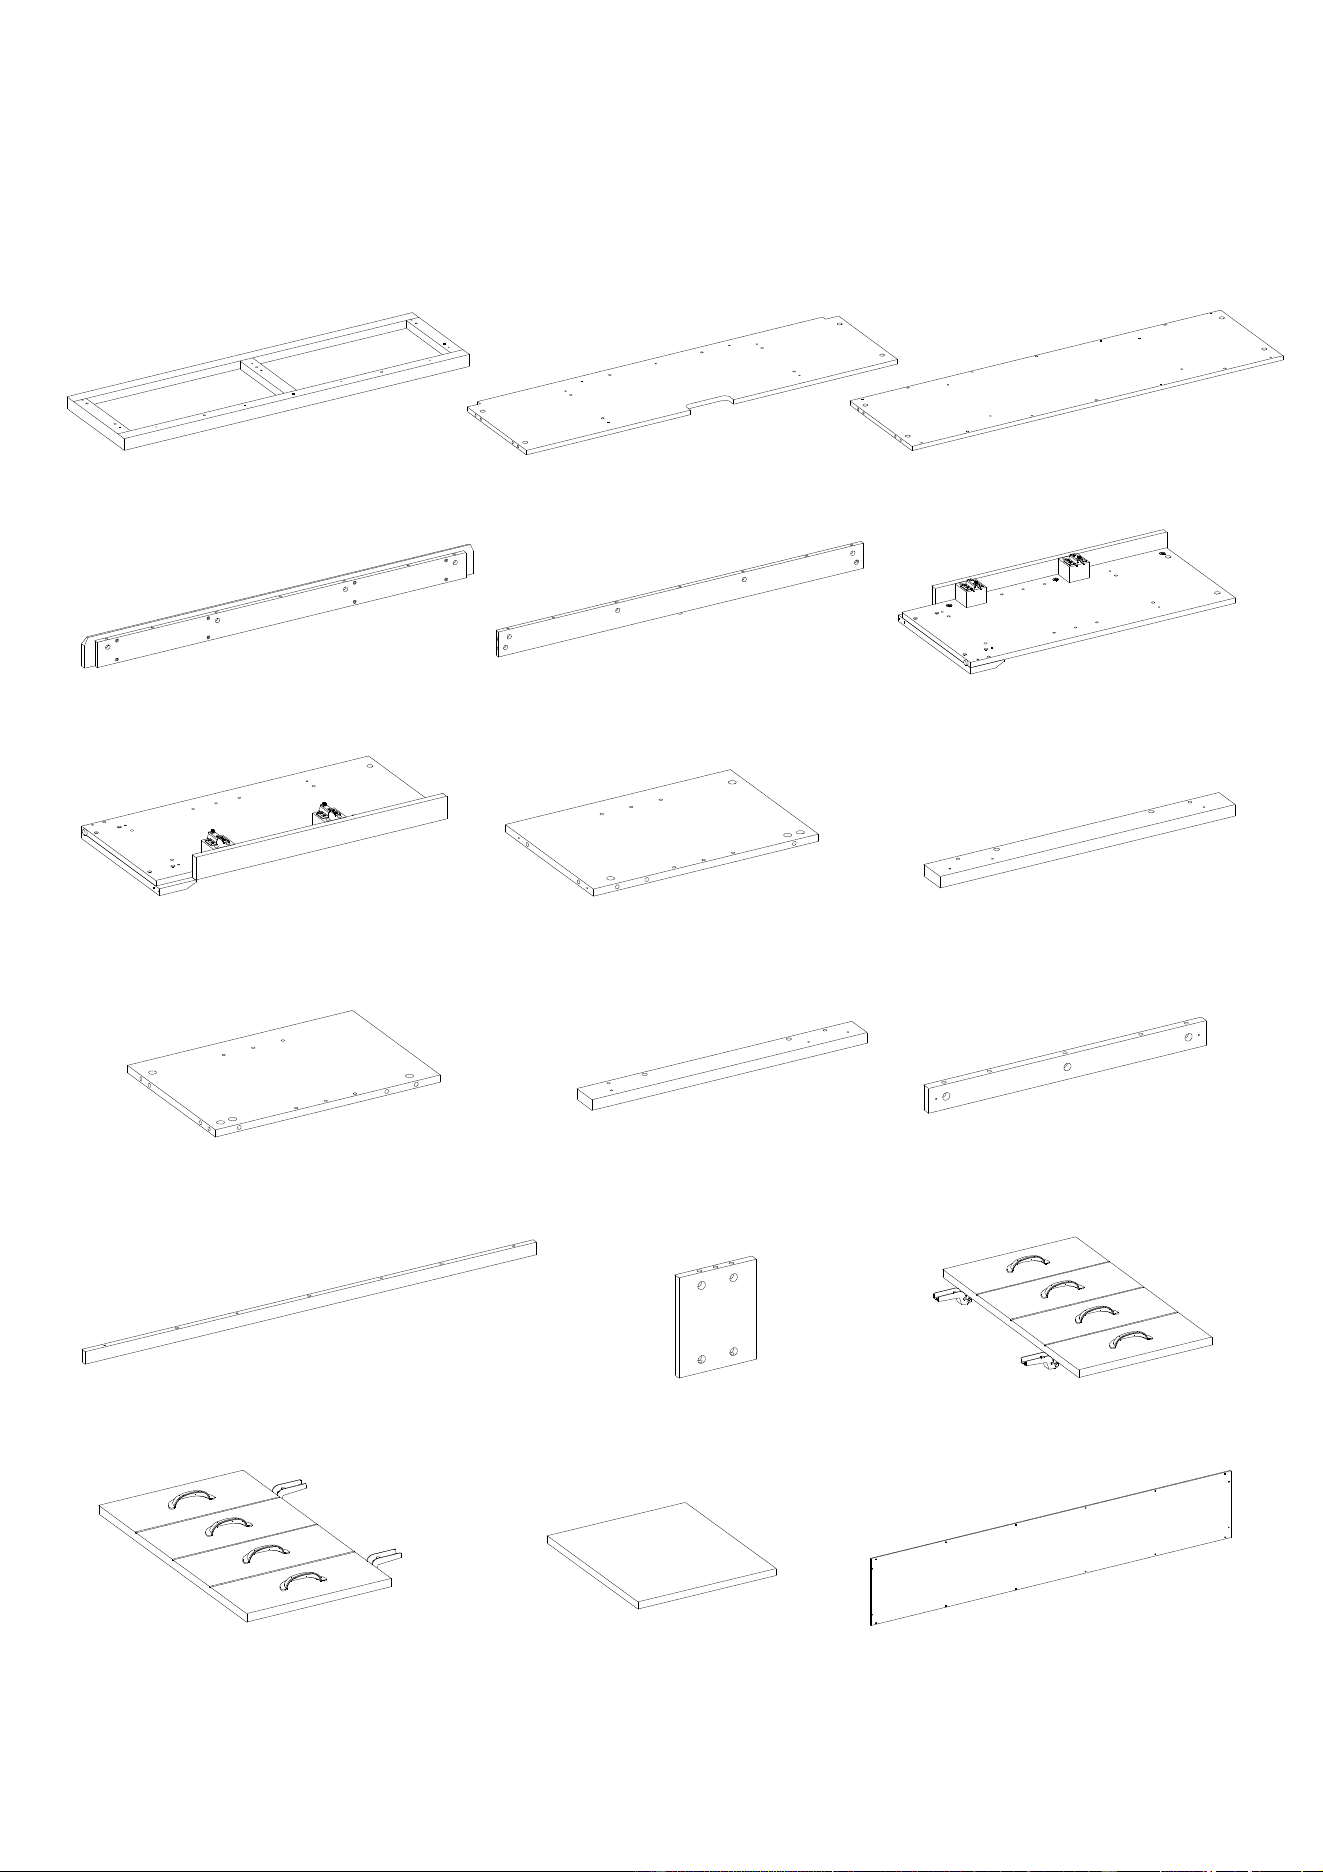
A- Top Panel (Qty. 1) B- Fixed Shelf (Qty. 1) C- Bottom Panel (Qty. 1)
D- Bottom Front Molding (Qty. 1) E- Bottom Back Stretcher (Qty. 1) F- Left Side Panel (Qty. 1)
G- Right Side Panel (Qty. 1) H- Left Lower Partition Panel (Qty. 1) I- Left Middle Stile (Qty. 1)
J- Right Lower Partition Panel (Qty. 1) K- Right Middle Stile (Qty. 1) L- Middle Crossbar (Qty. 1)
M-Top Front Stretcher (Qty. 1) N- Upper Partition Panel (Qty. 1) O- Left Door (Qty. 1)
P- Right Door (Qty. 1) Q- Adjustable Shelf (Qty. 2) R- Upper Back Panel (Qty. 1)
5
Parts and Hardware List
Please read completely through the instructions and verify that all listed parts and hardware are present
before beginning assembly.
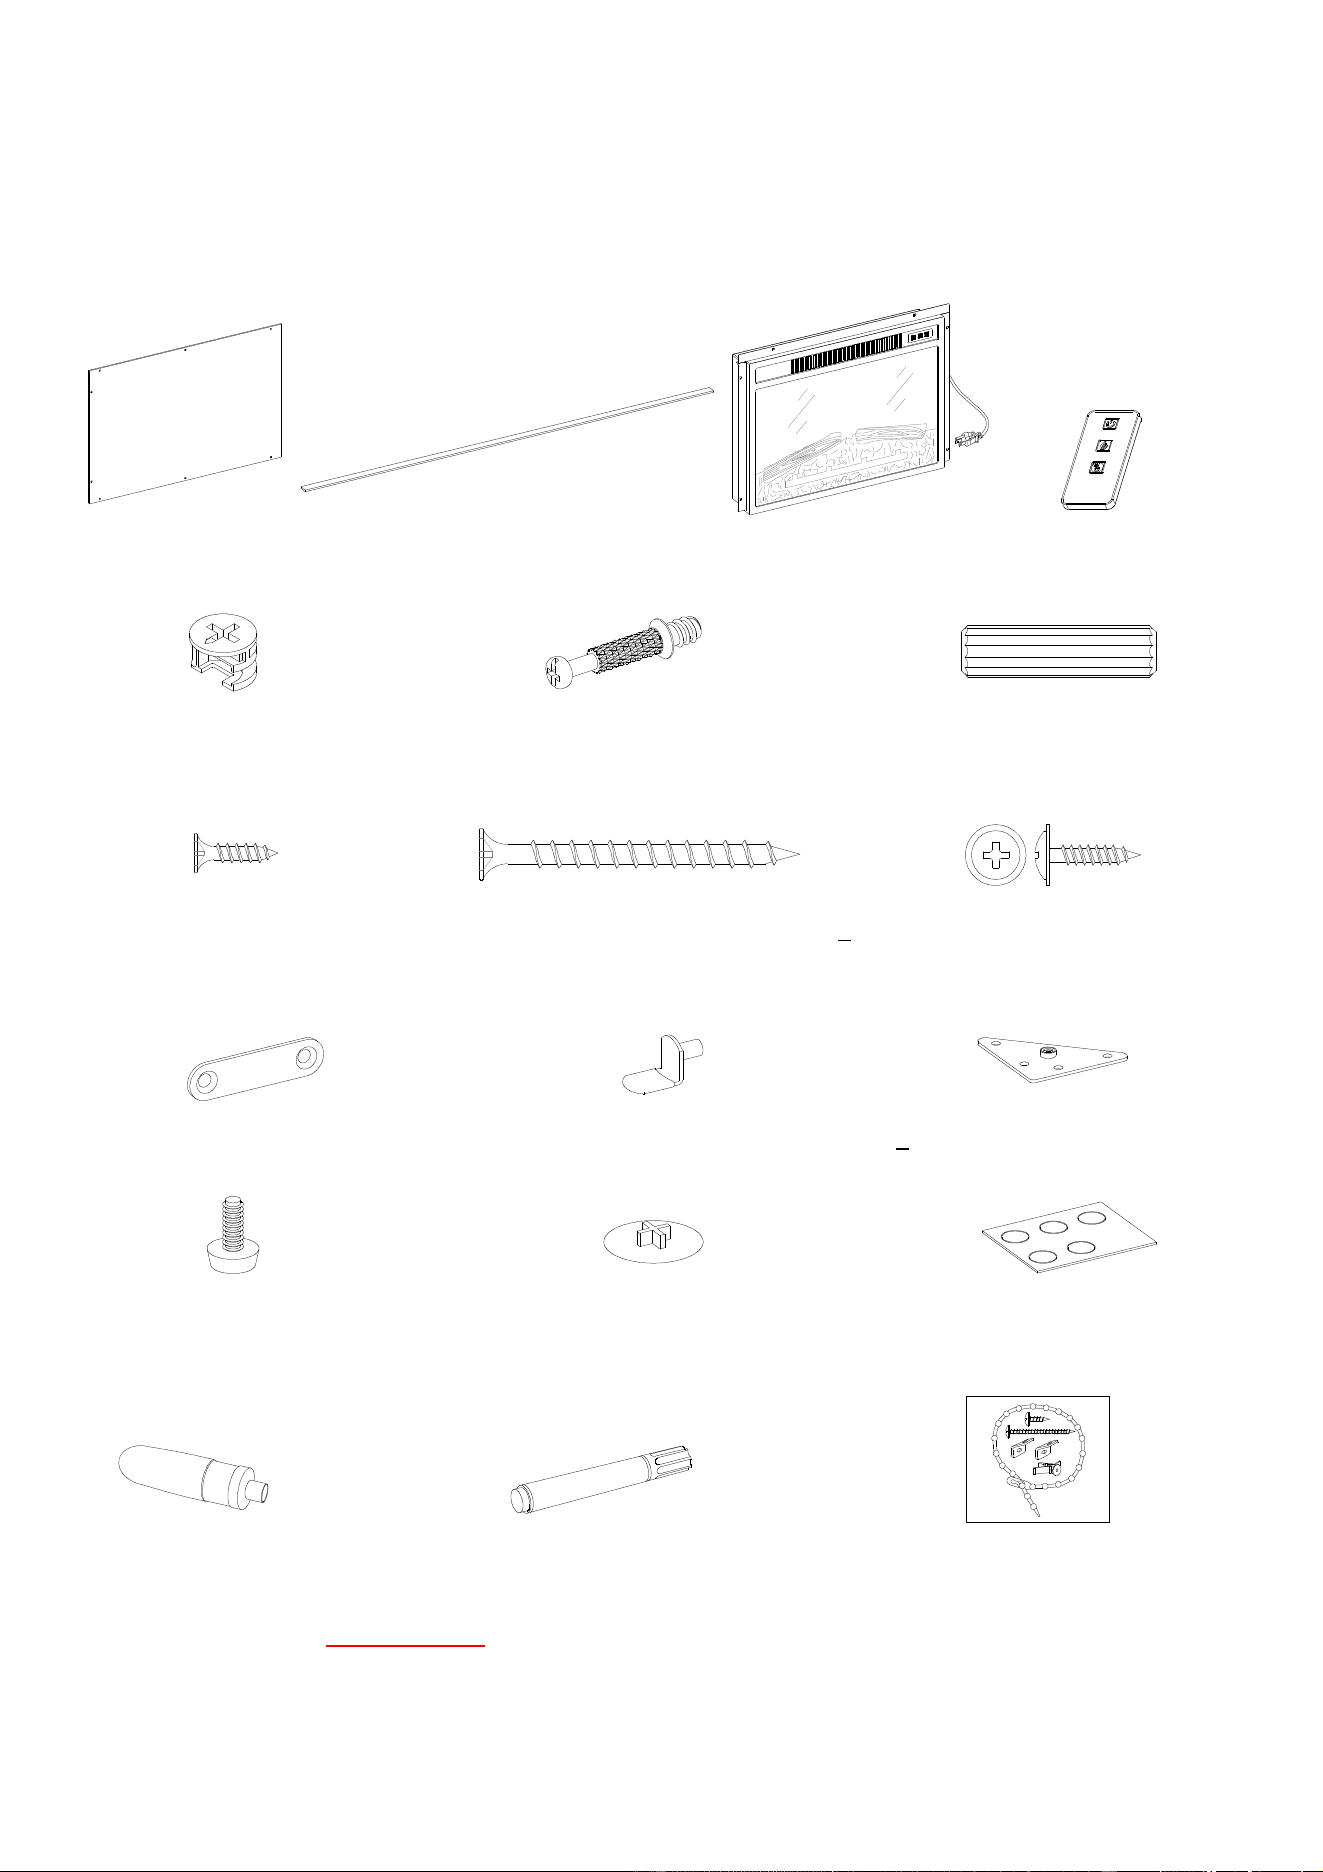
S- Lower Back Panel T- Stop Rail Fireplace Insert Remote control with battery
(Qty. 2) (Qty. 1) (Qty. 1) (Qty. 1)
(1) Cam Lock (2) Cam Bolt (3) M8 x 30 mm Wood Dowel
(Qty. 37+1 extra) (Qty. 37+1 extra) (Qty. 39+1 extra)
(4) M3.5 x 12 mm Screw (5) M4 x 50 mm Screw (6) M3.5 x 15 mm Washer Head Screw
(Qty. 12+1 extra) (Qty. 8+1 extra) (Qty. 32+1 extra)
(7) Straight Metal Bracket (Qty. 2) (8) Shelf Support (Qty. 8+1 extra) (9) Angle Metal Bracket (Qty. 2)
(10) Floor Leveler (11) Cam Lock Cover (12) Rubber Bumper
(Qty. 2) (Qty. 22+1 extra) (Qty. 4+1 extra)
Glue (Qty. 1) Touch-up Pen (Qty. 1) Tipping Restraint Hardware Kit (2)
(Included in plastic bag)
Tools required: Phillips screwdriver and hammer (not provided).
6
Assembly Instructions
1. Unpack the unit and confirm that you have all the hardware and required parts listed. Assemble the unit
on a carpeted floor or the empty carton to avoid any scratch.
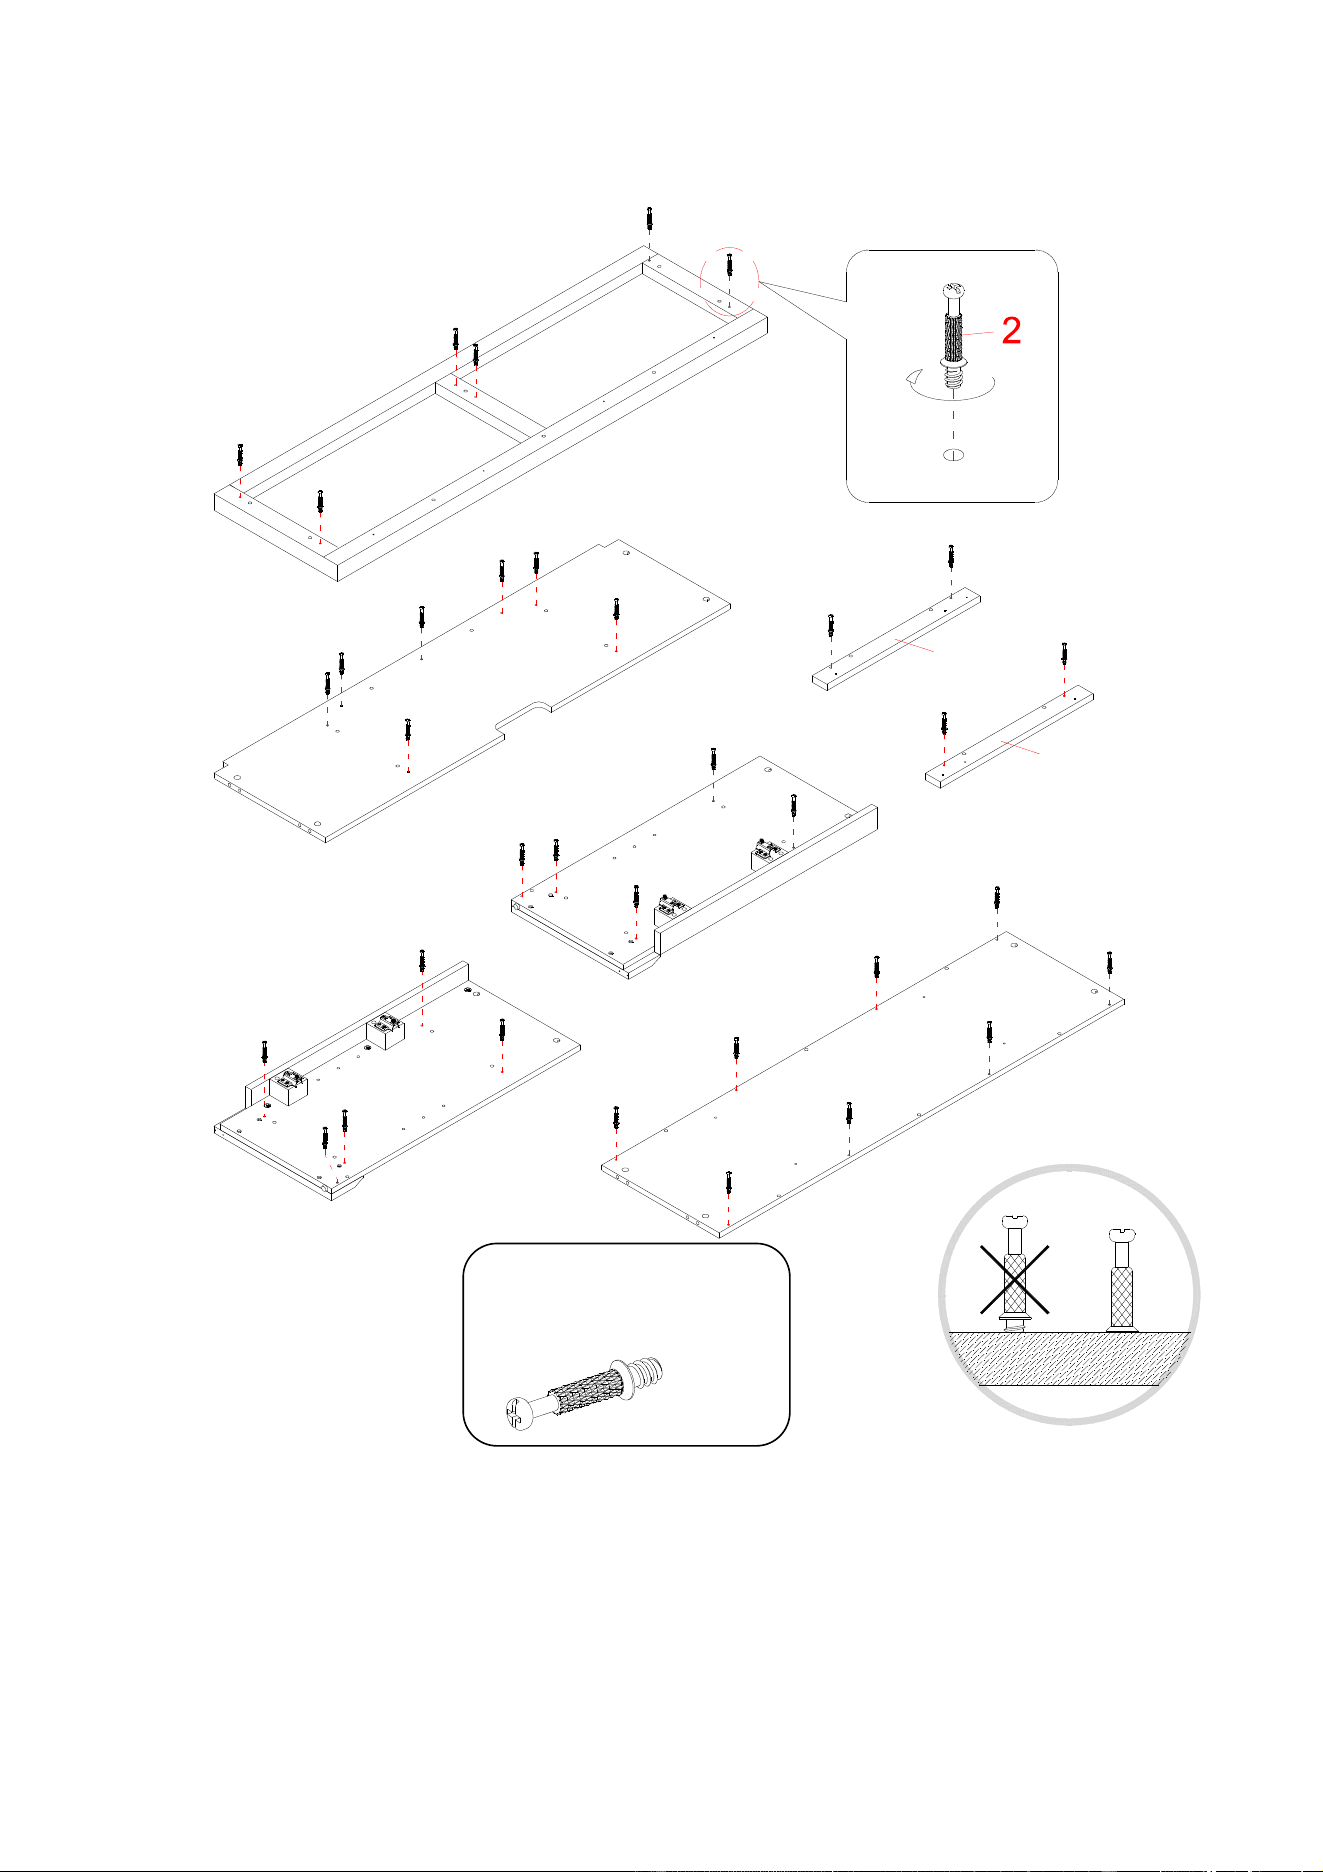
2. Securely screw the Cam Bolts (2) into the designated small holes on the Top Panel (A), the Fixed Shelf
(B), the Bottom Panel (C), the Side Panels (F and G) and the Middle Stiles (I and K) using a Phillips
screwdriver.
Cam Bolt
(35 used in this step)
②
B
A
F
G
C
K
I
7
Assembly Instructions
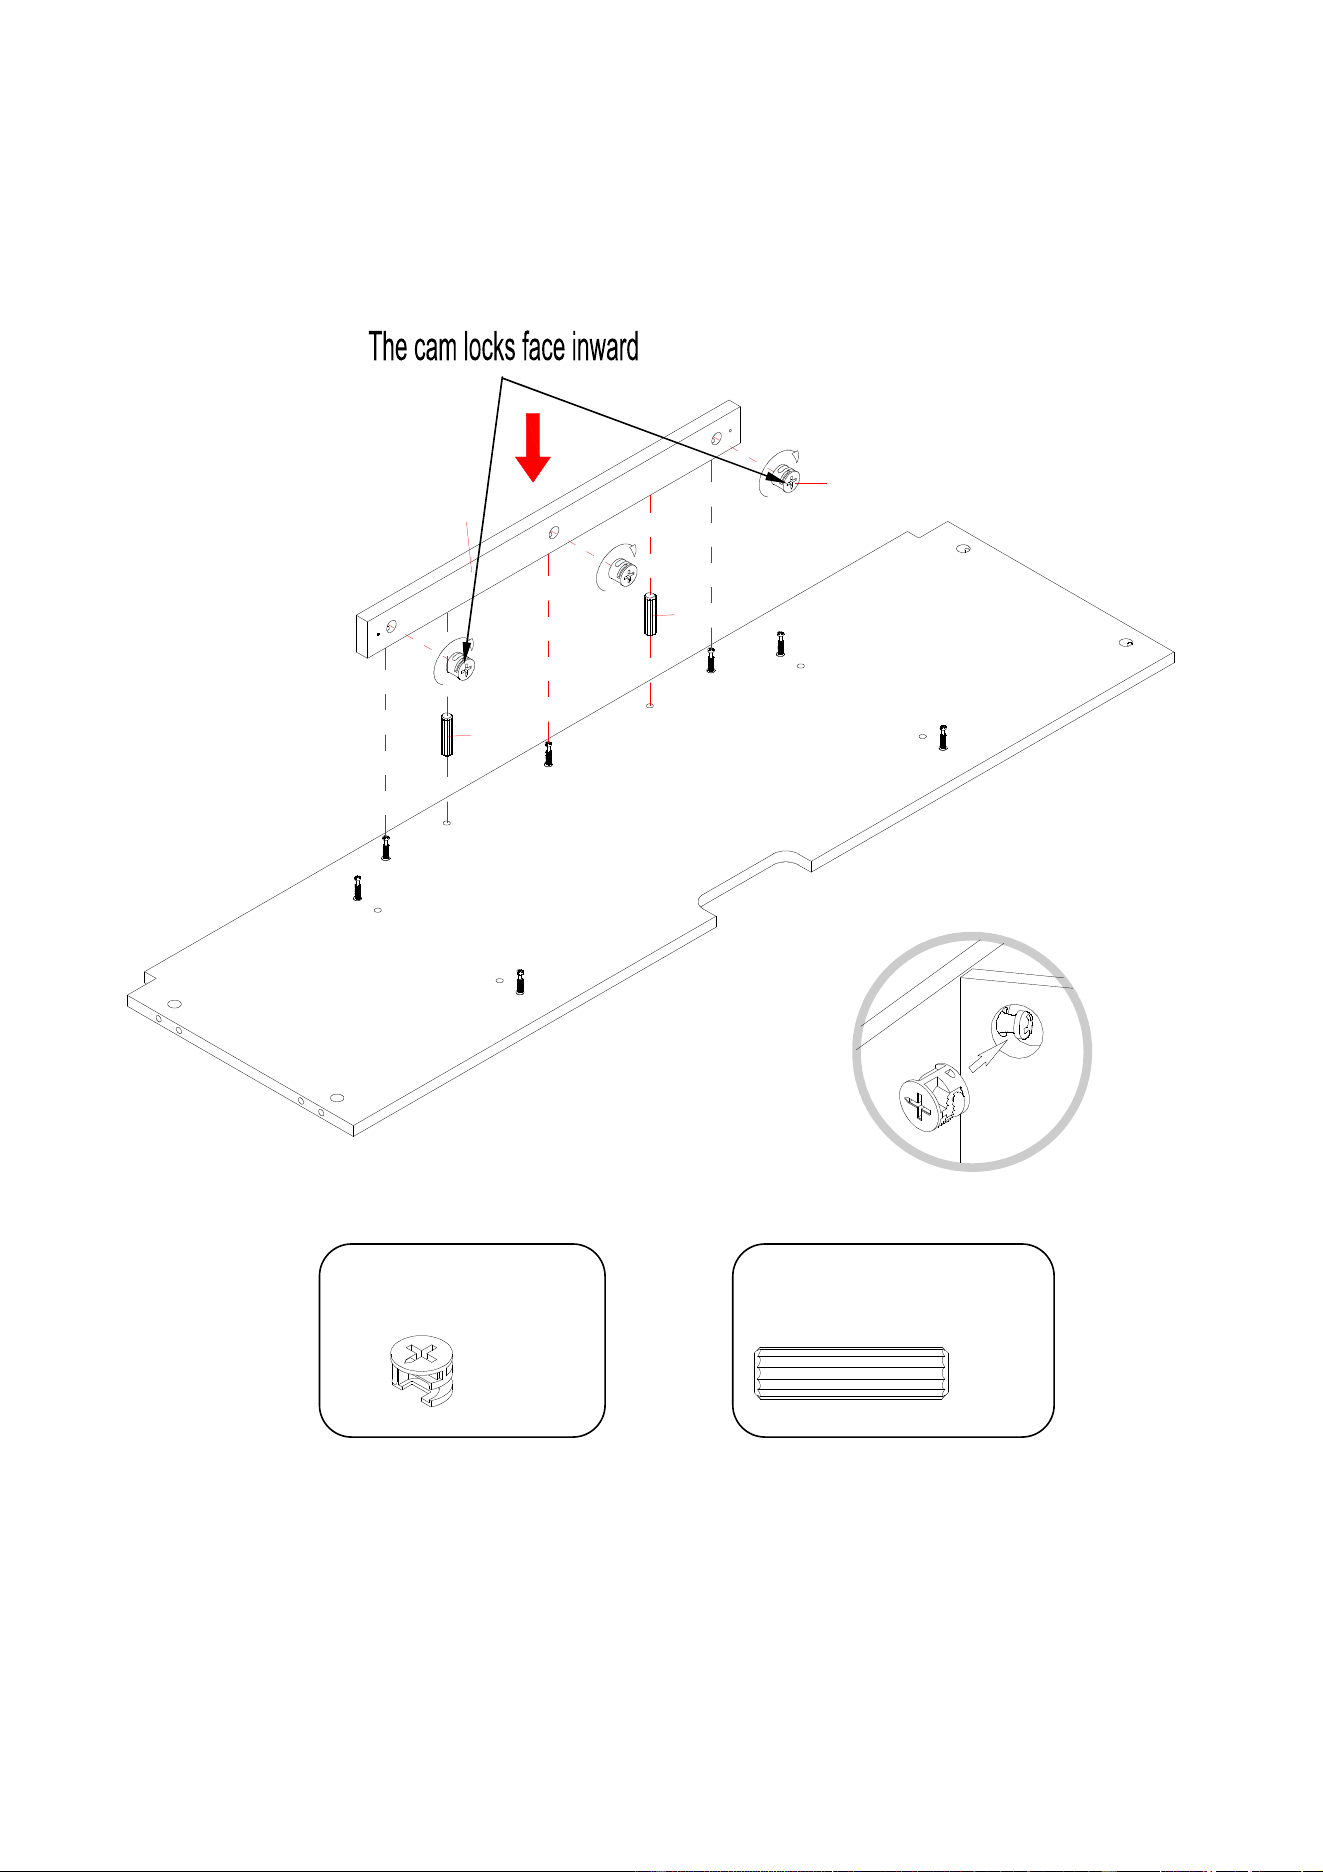
3. Insert two Wood Dowels (3) into the inner holes of the Middle Crossbar (L). Tap it in with a rubber
mallet, if necessary. Make sure that you use a small amount of glue with both ends of all dowels.
4. Align the drilled holes on the Fixed Shelf (B) with the inserted Wood Dowels (3) on the Middle
Crossbar (L), and then press them together. Attach the Middle Crossbar (L) in place by engaging three
Cam Locks (1) (Refer to page 3 on Cam Lock system operation supplement).
Wood Dowel
(2 used in this step)
③
Cam Lock
(3 used in this step)
①
3
1
3
B
L
8
Assembly Instructions
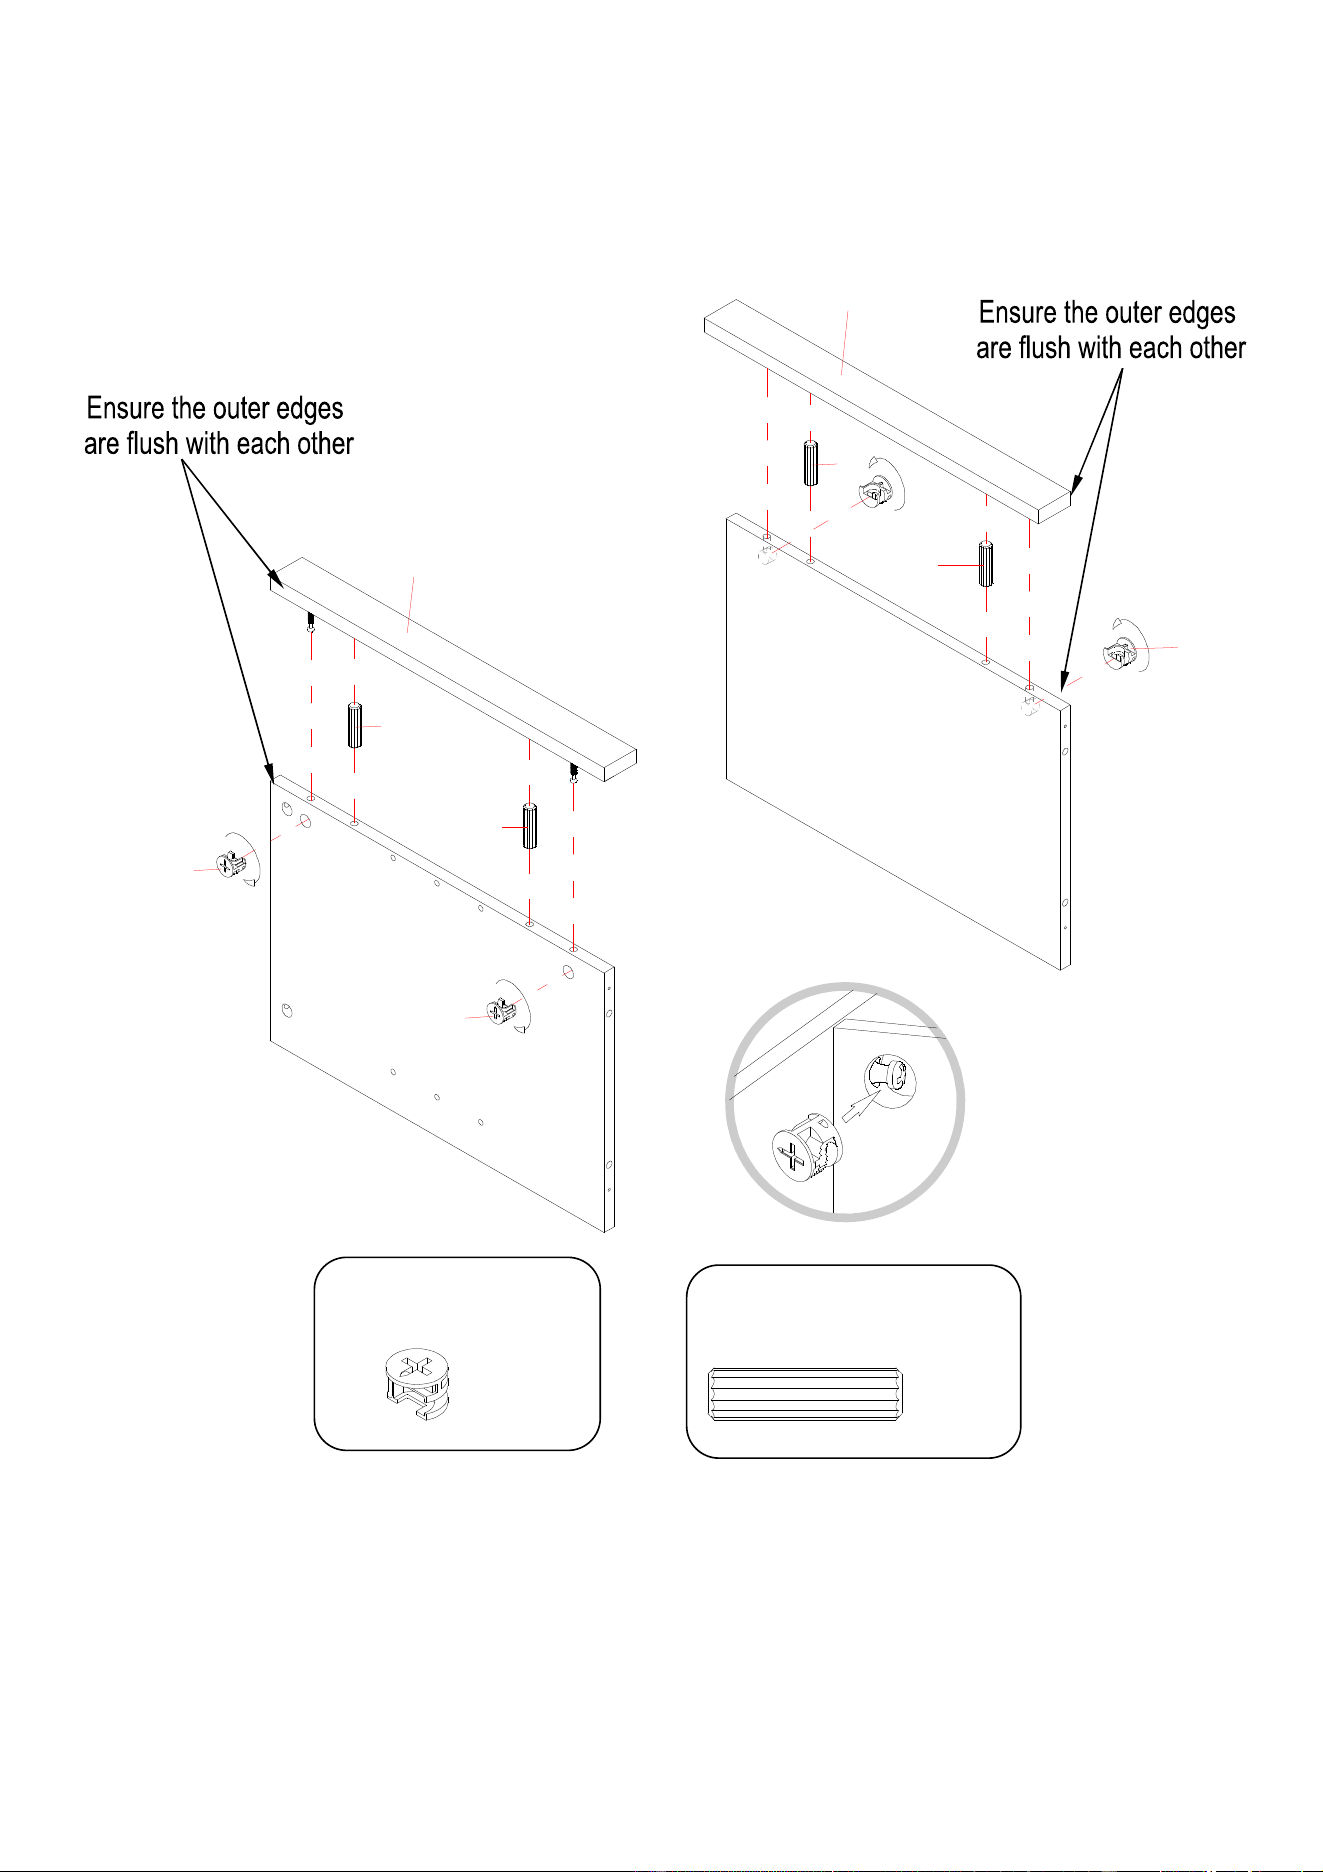
5. Attach the Middle Left Stile (I) to the Left Lower Partition Panel (H) with two 30 mm Wood Dowels (3)
and two Cam Locks (1).
6. Repeat the same procedure to combine the Middle Right Stile (K) with the Right Lower Partition Panel
(J).
3
3
3
3
H
J
K
I
1
1
1
M8 x 30 mm Wood Dowel
(4 used in this step)
③
Cam Lock
(4 used in this step)
①
9
Assembly Instructions
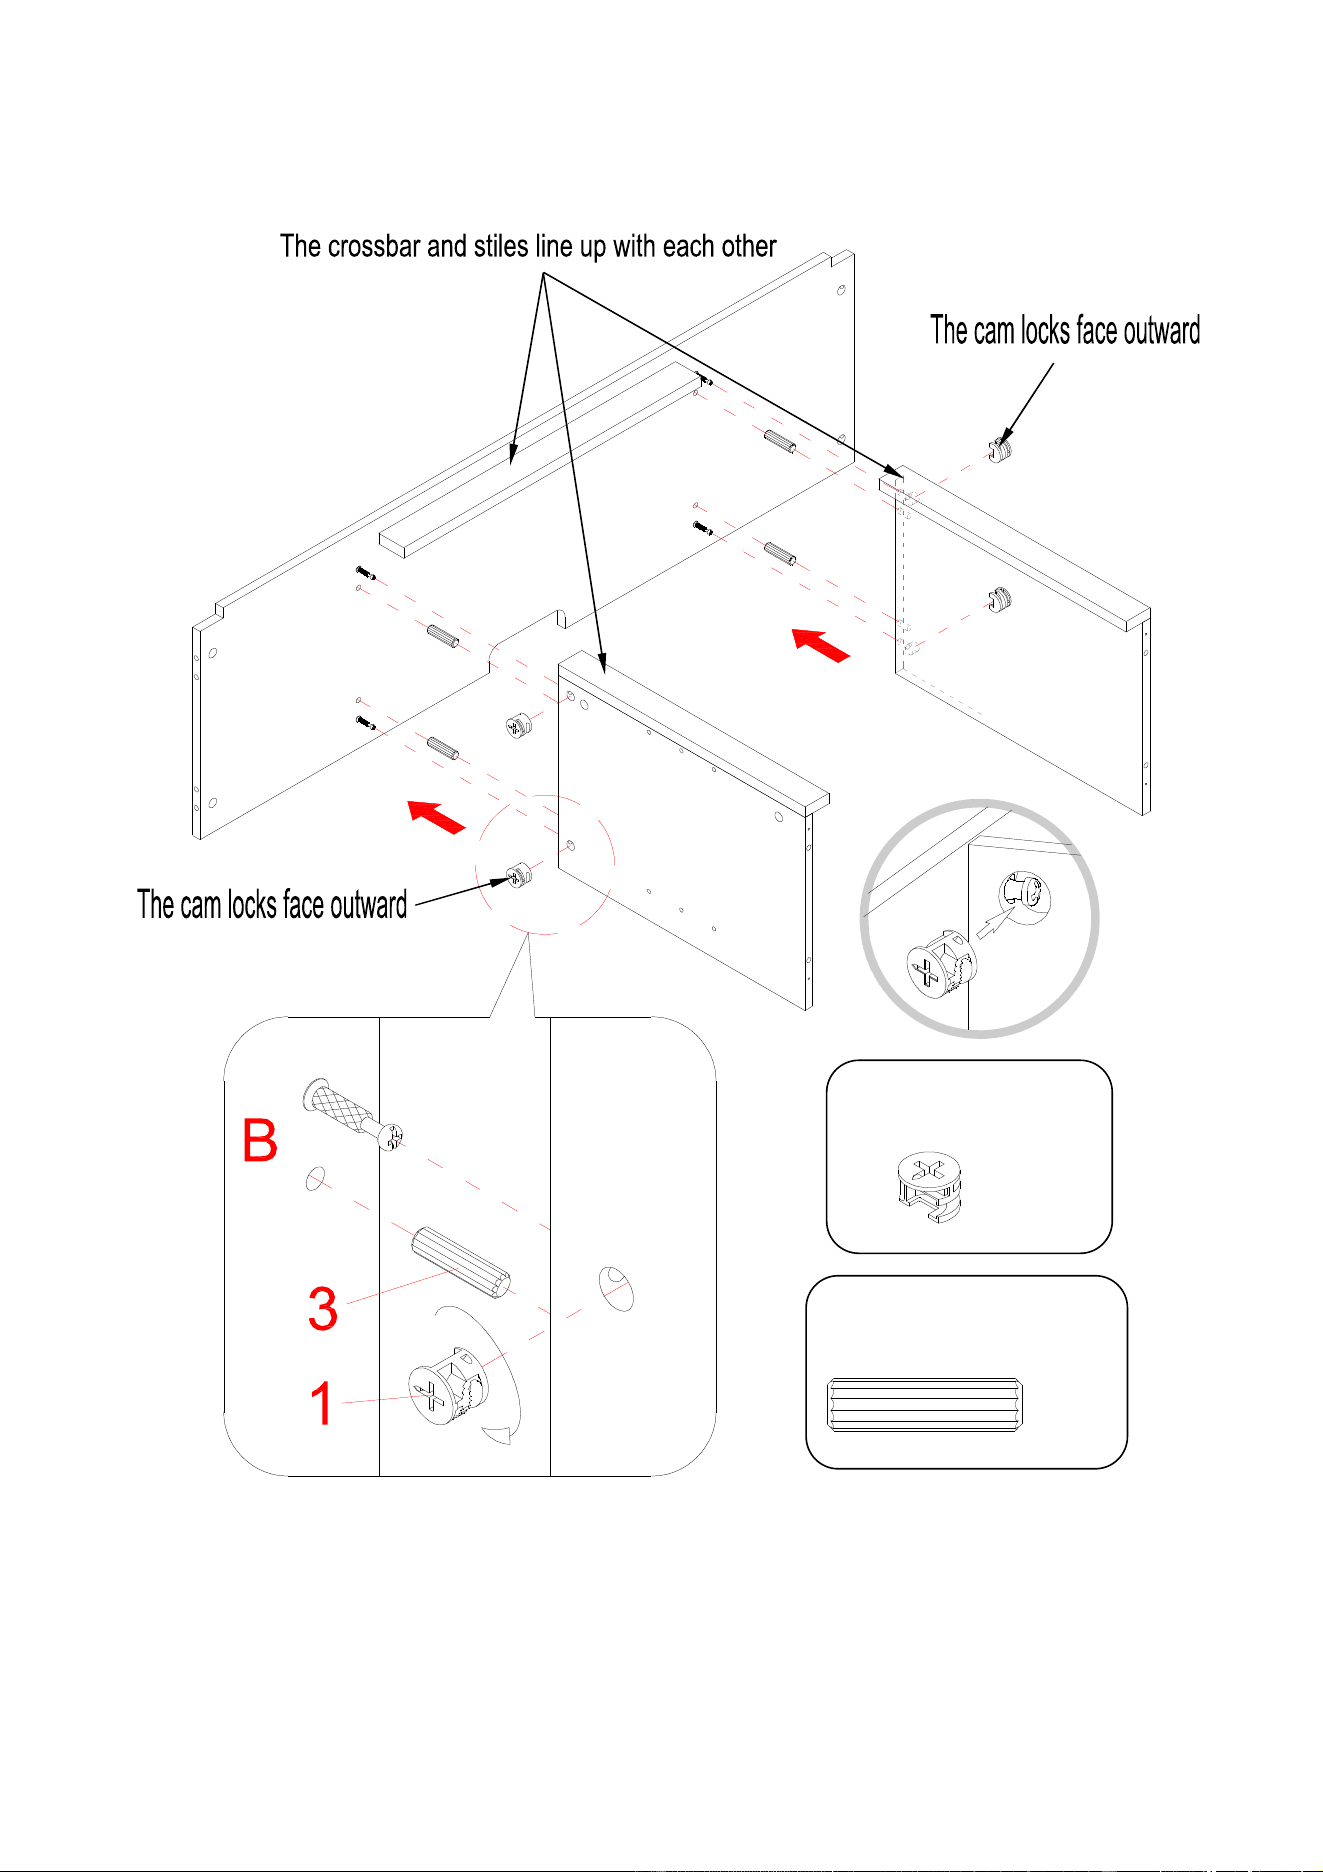
7. Attach the Lower Partition Panels (H and J) to the Fixed Shelf (B) with four 30 mm Wood Dowels (3)
and four Cam Locks (1).
B
H
J
Wood Dowel
(4 used in this step)
③
Cam Lock
(4 used in this step)
①
10
Assembly Instructions
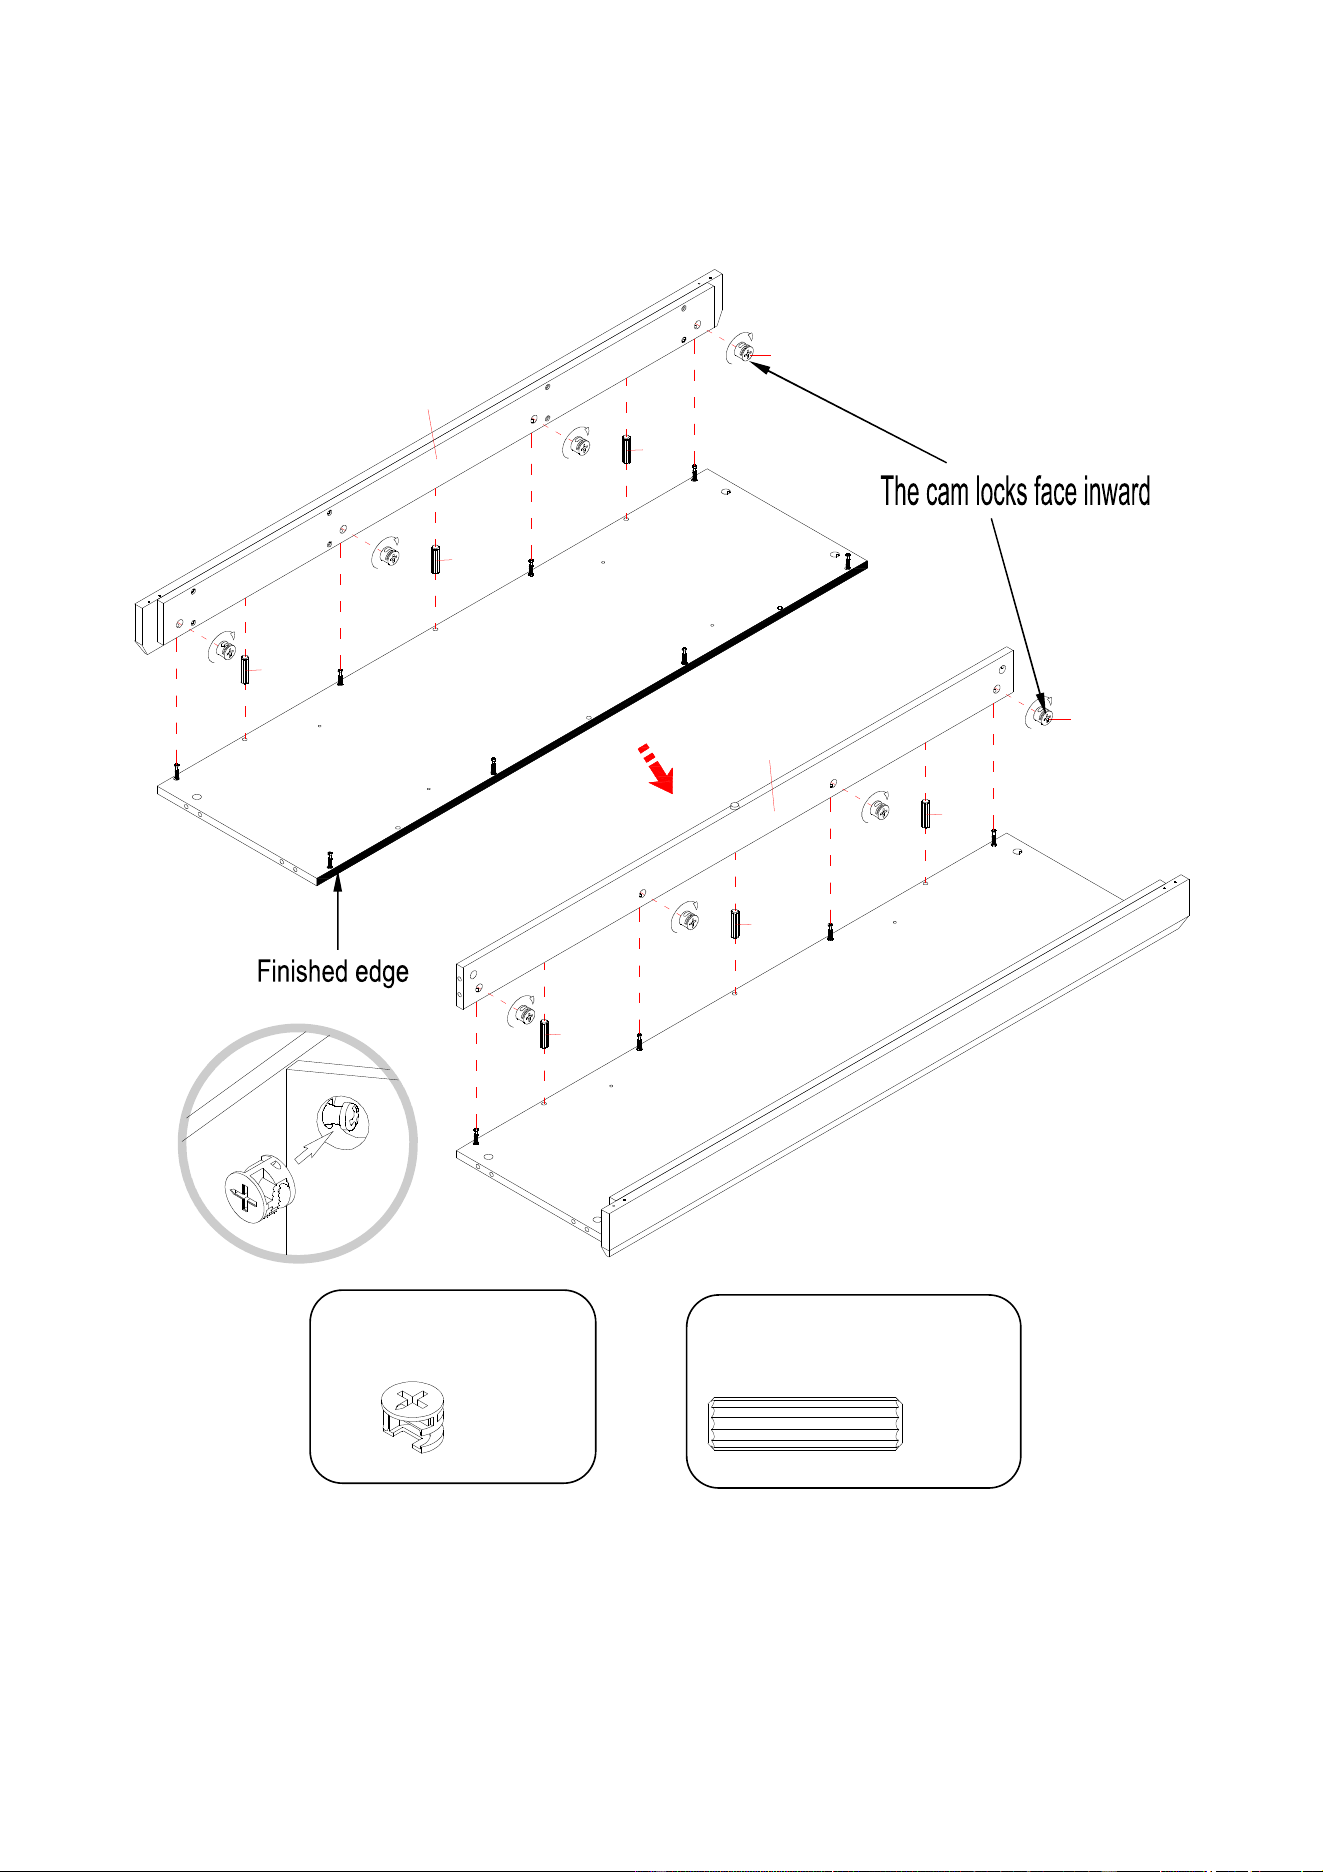
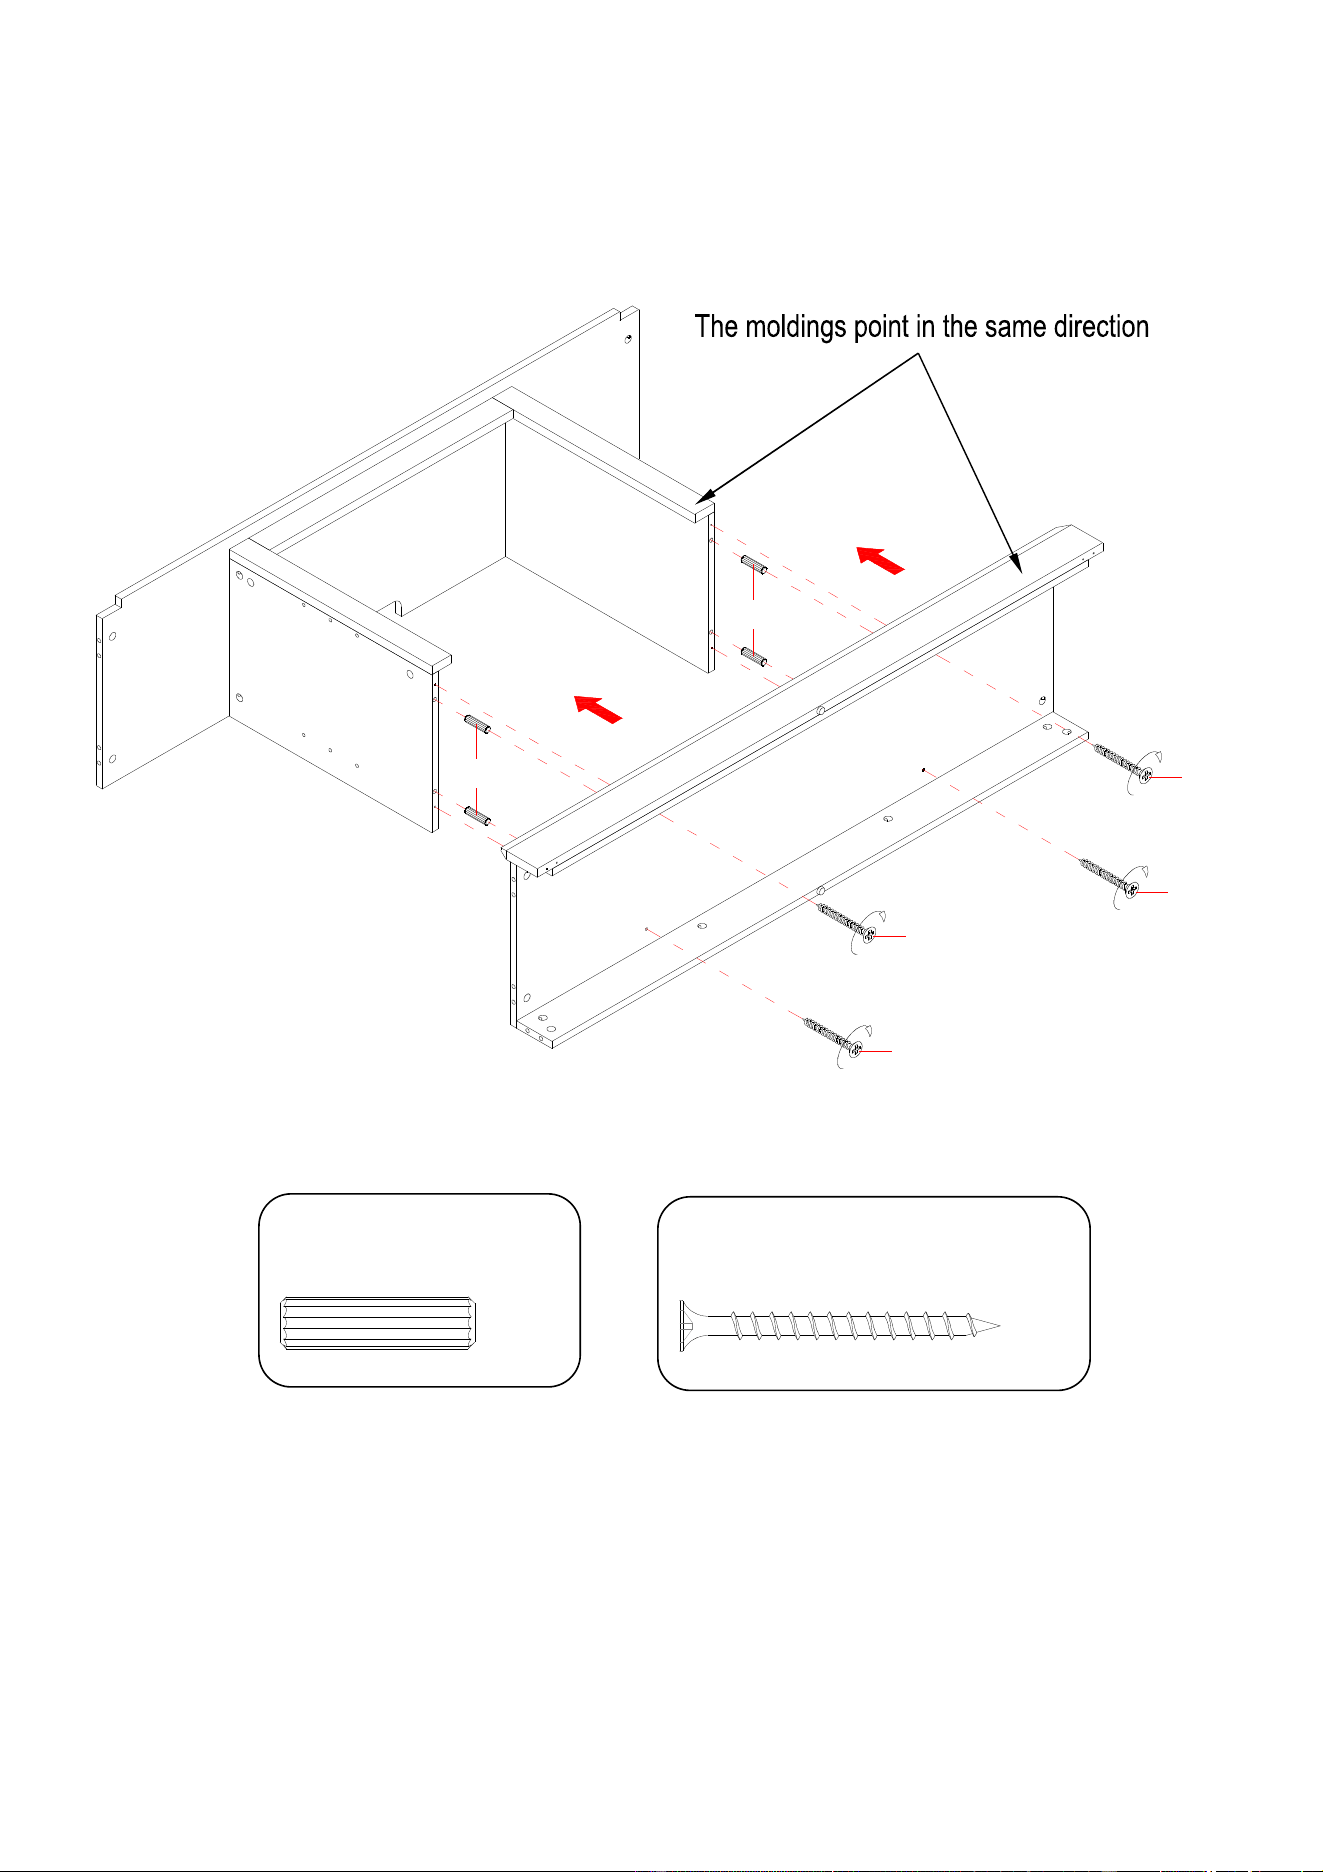
8. Attach the Bottom Front Molding (D) to the Bottom Panel (C) by using three 30 mm Wood Dowels (3)
and four Cam Locks (1).
9. Repeat the same procedure to attach the Bottom Back Stretcher (E) to the Bottom Panel (C).
3
1
3
3
3
1
3
3
C
D
D
E
C
M8 x 30 mm Wood Dowel
(6 used in this step)
③
Cam Lock
(8 used in this step)
①
11
Assembly Instructions
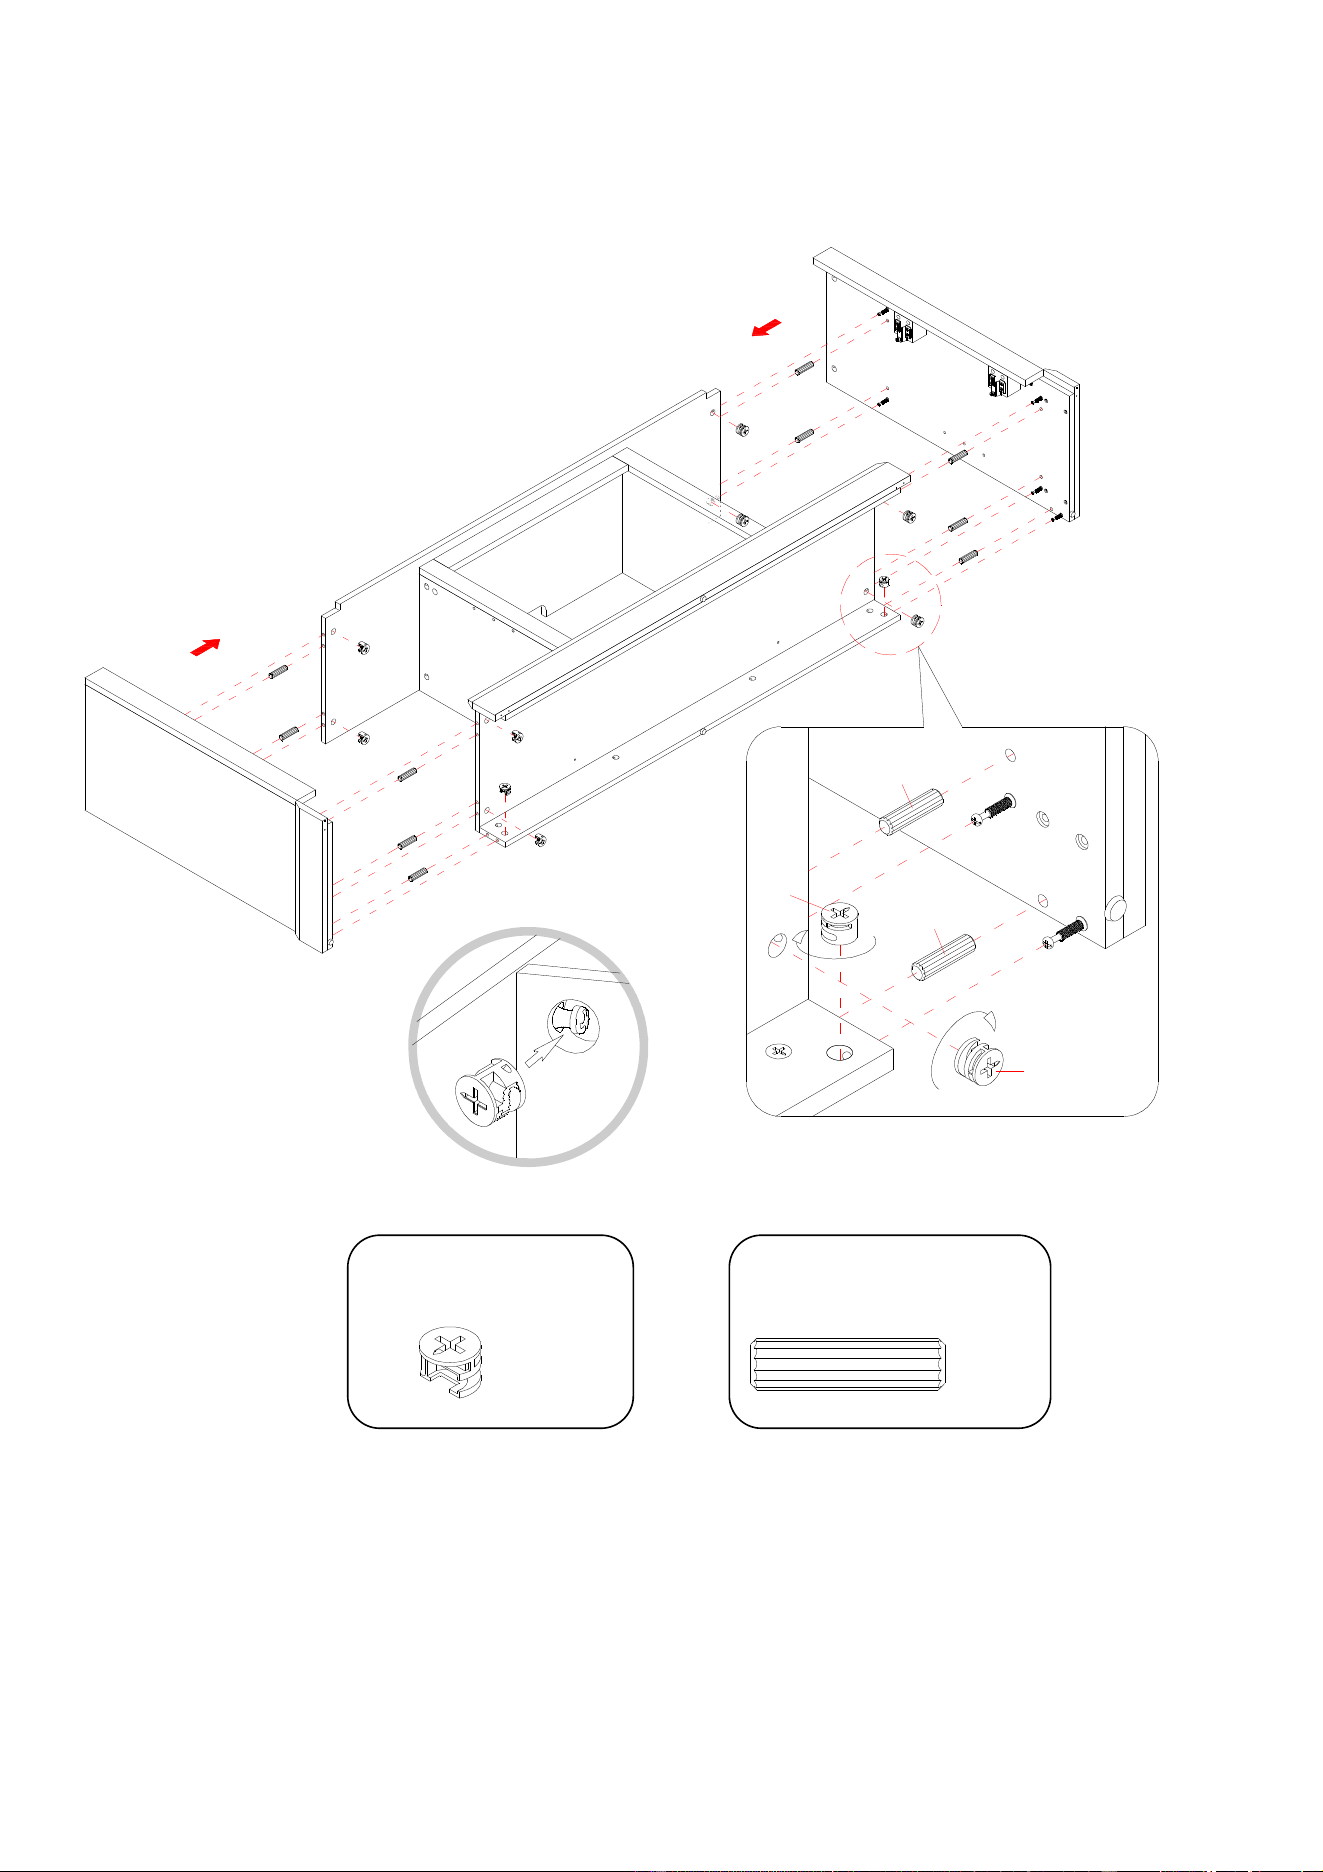
10. Attach the assembled base to the Lower Partition Panels (H and J) with four 30 mm Wood Dowels (3)
and four 50 mm Screws (5).
Wood Dowel
(4 used in this step)
③
M4 x 50 mm Screw
(4 used in this step)
⑤
3
3
5
5
5
5
C
H
J
D
12
Assembly Instructions
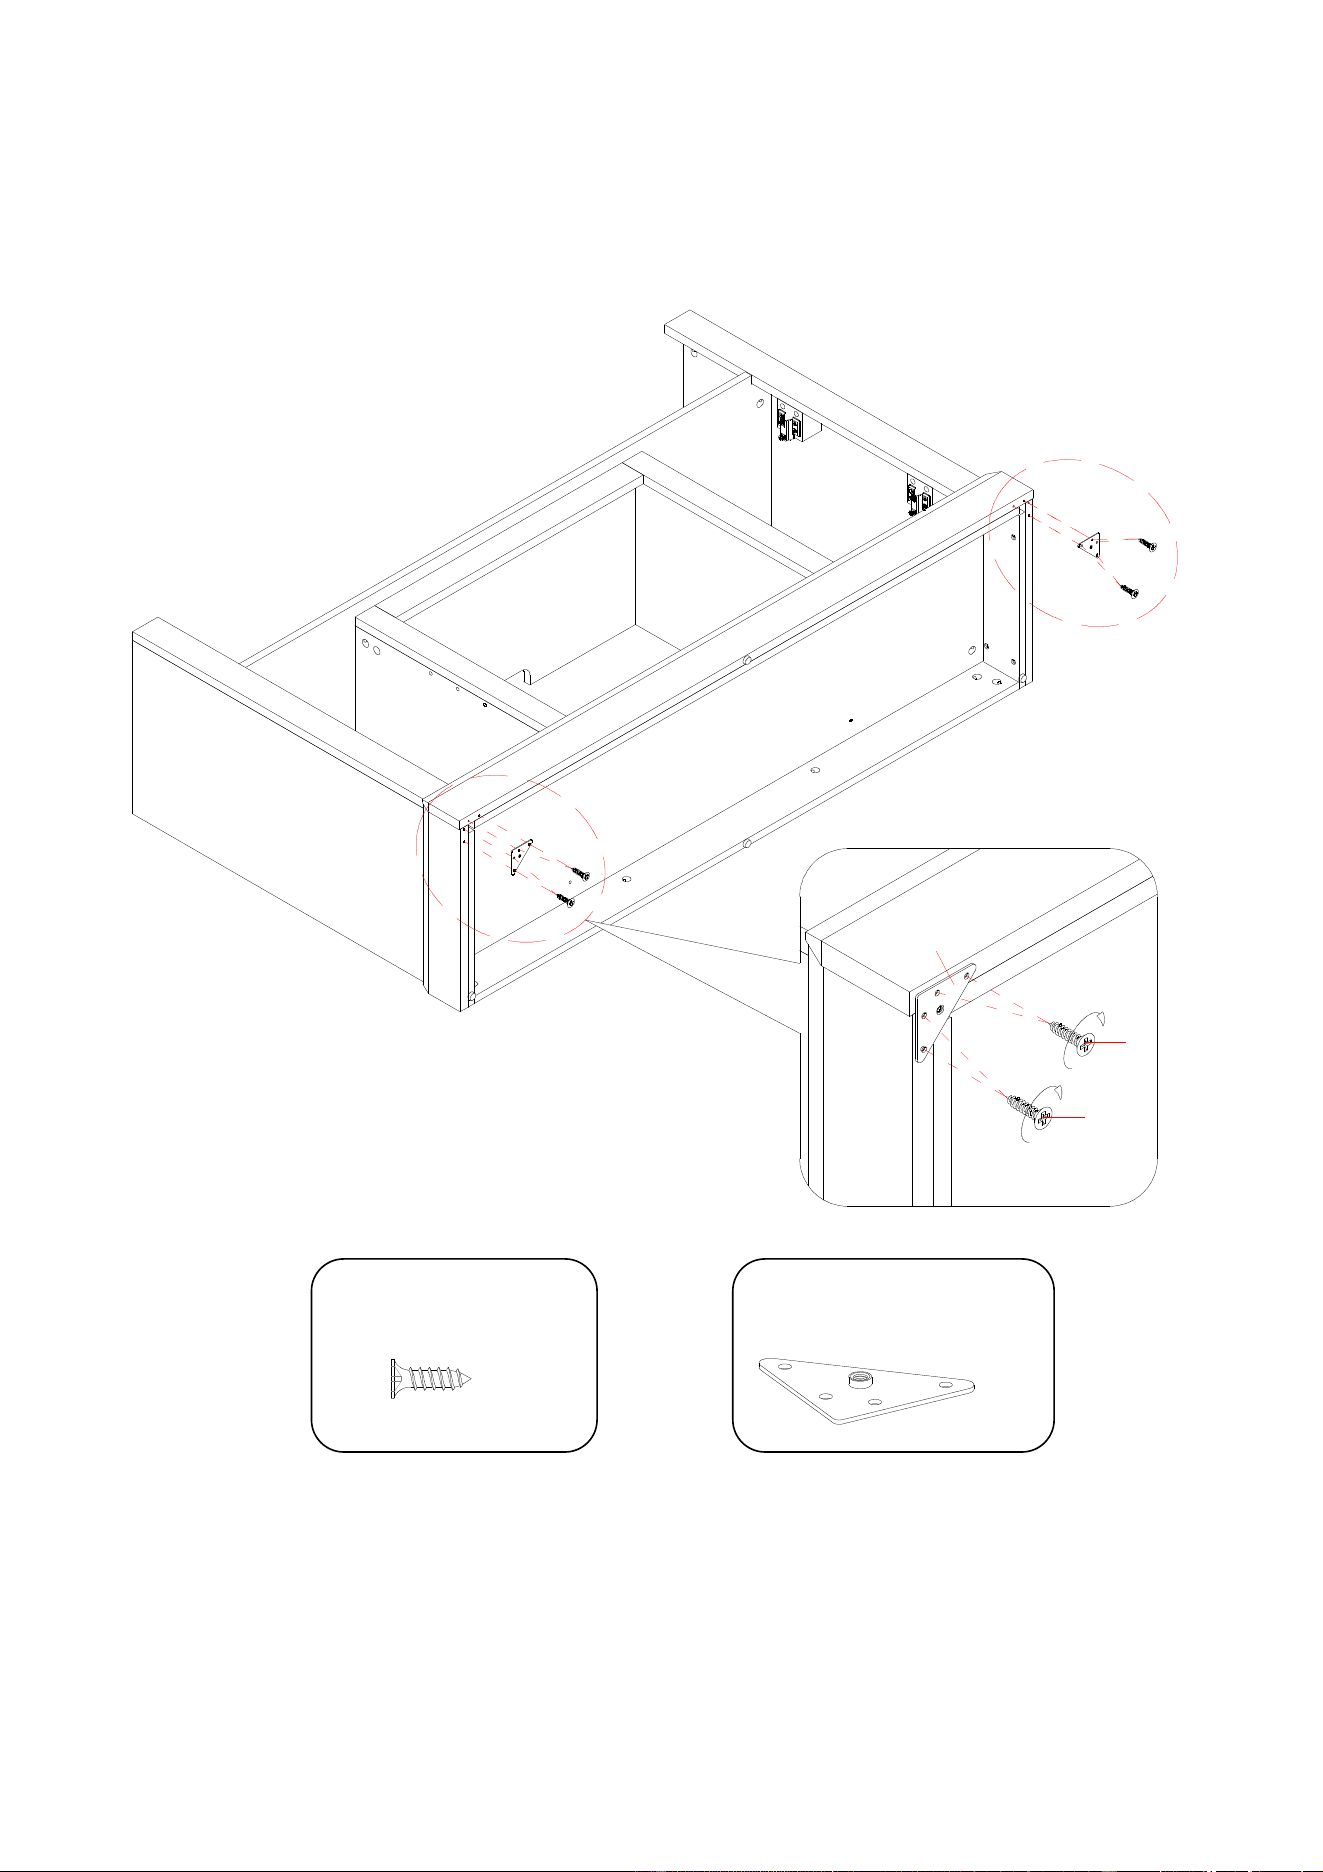
11. Attach the Left Side Panel (F) to the Fixed Shelf (B) and the assembled base with five 30 mm Wood
Dowels (3) and five Cam Locks (1).
12. Repeat the same procedure to attach the Right Side Panel (G) at the opposite end.
1
1
3
3
F
G
B
C
E
D
Wood Dowel
(10 used in this step)
③
Cam Lock
(10 used in this step)
①
13
Assembly Instructions
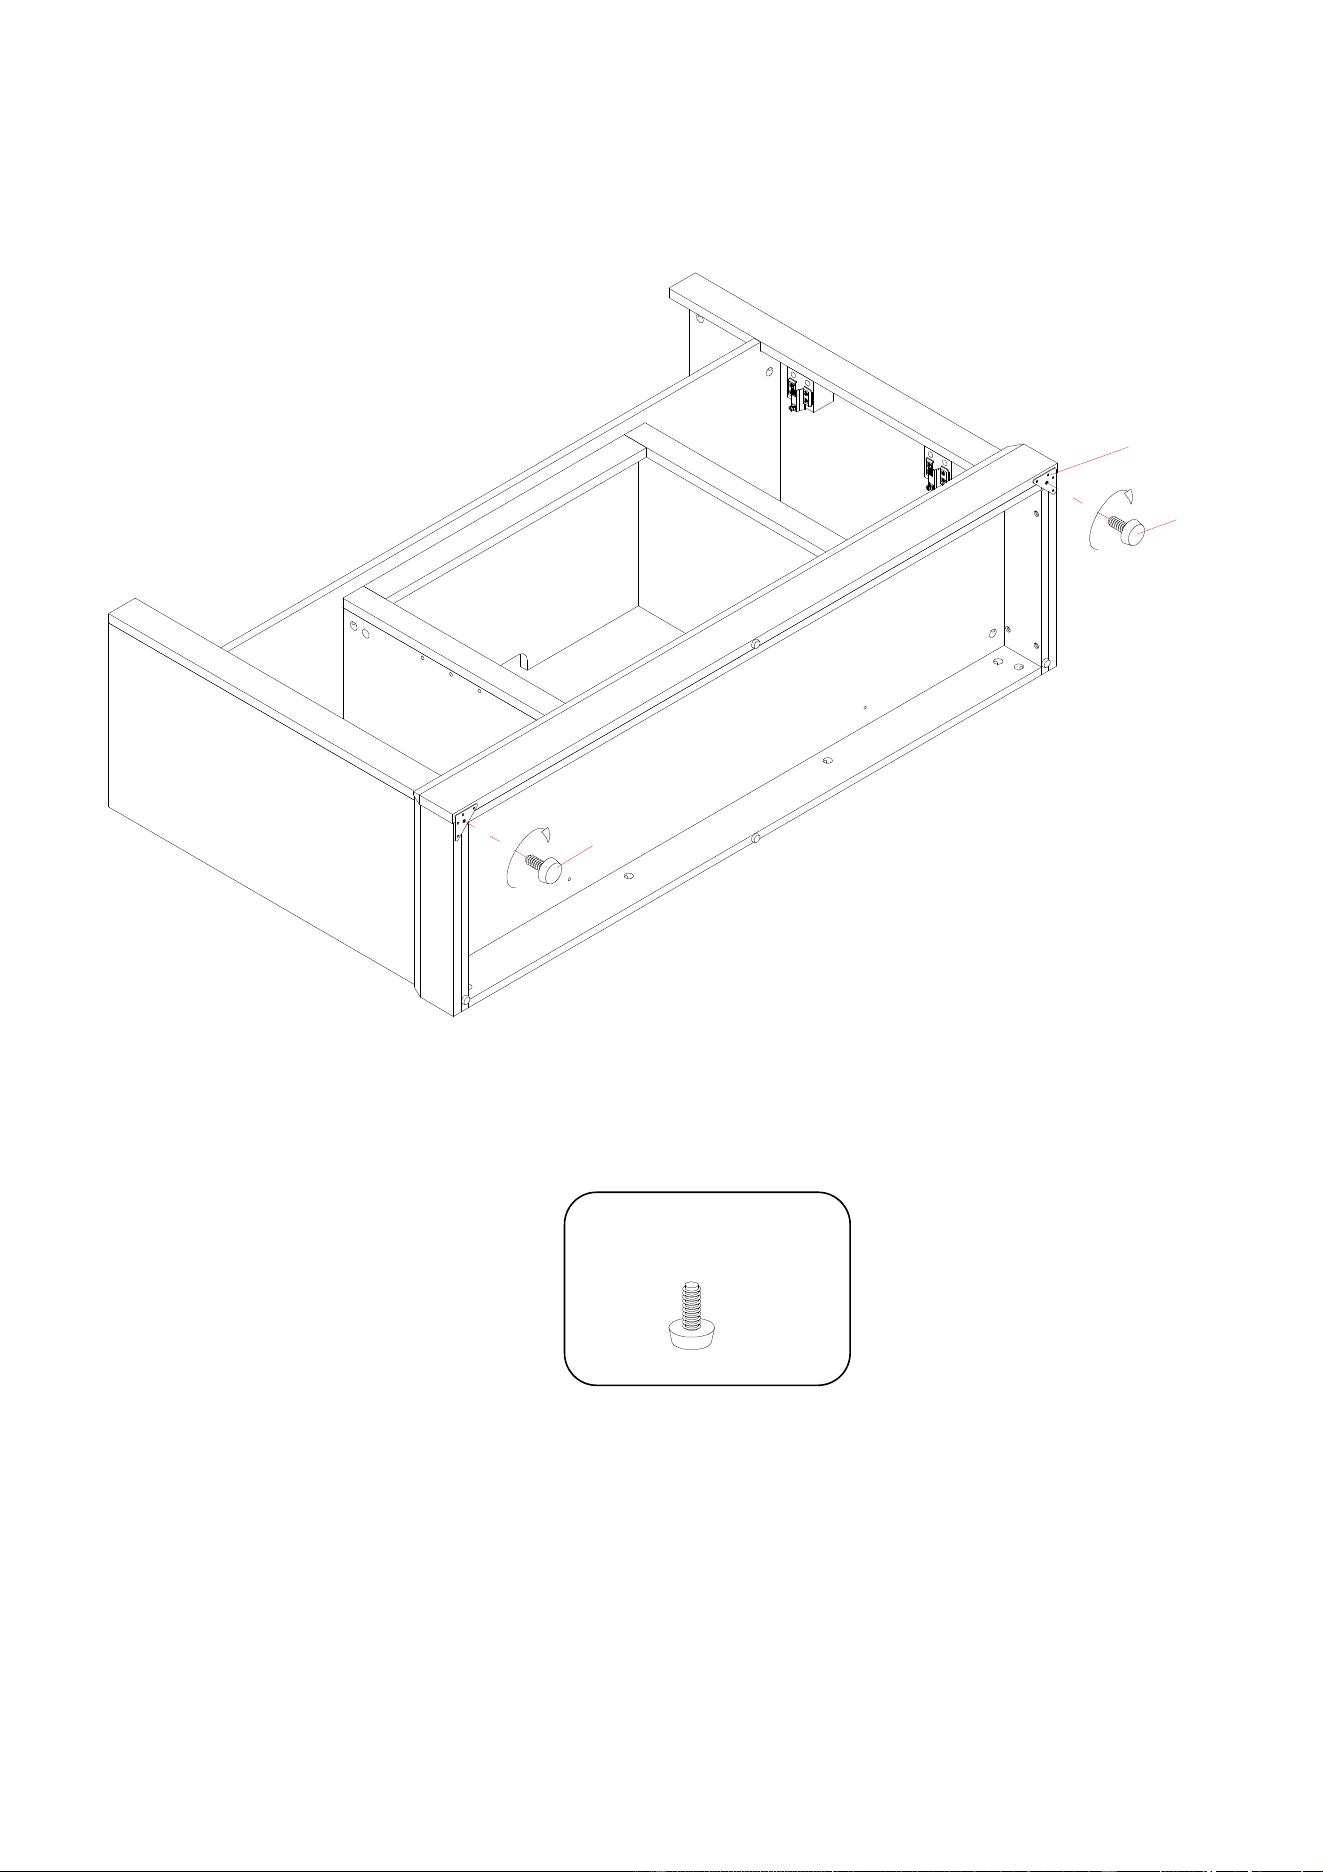
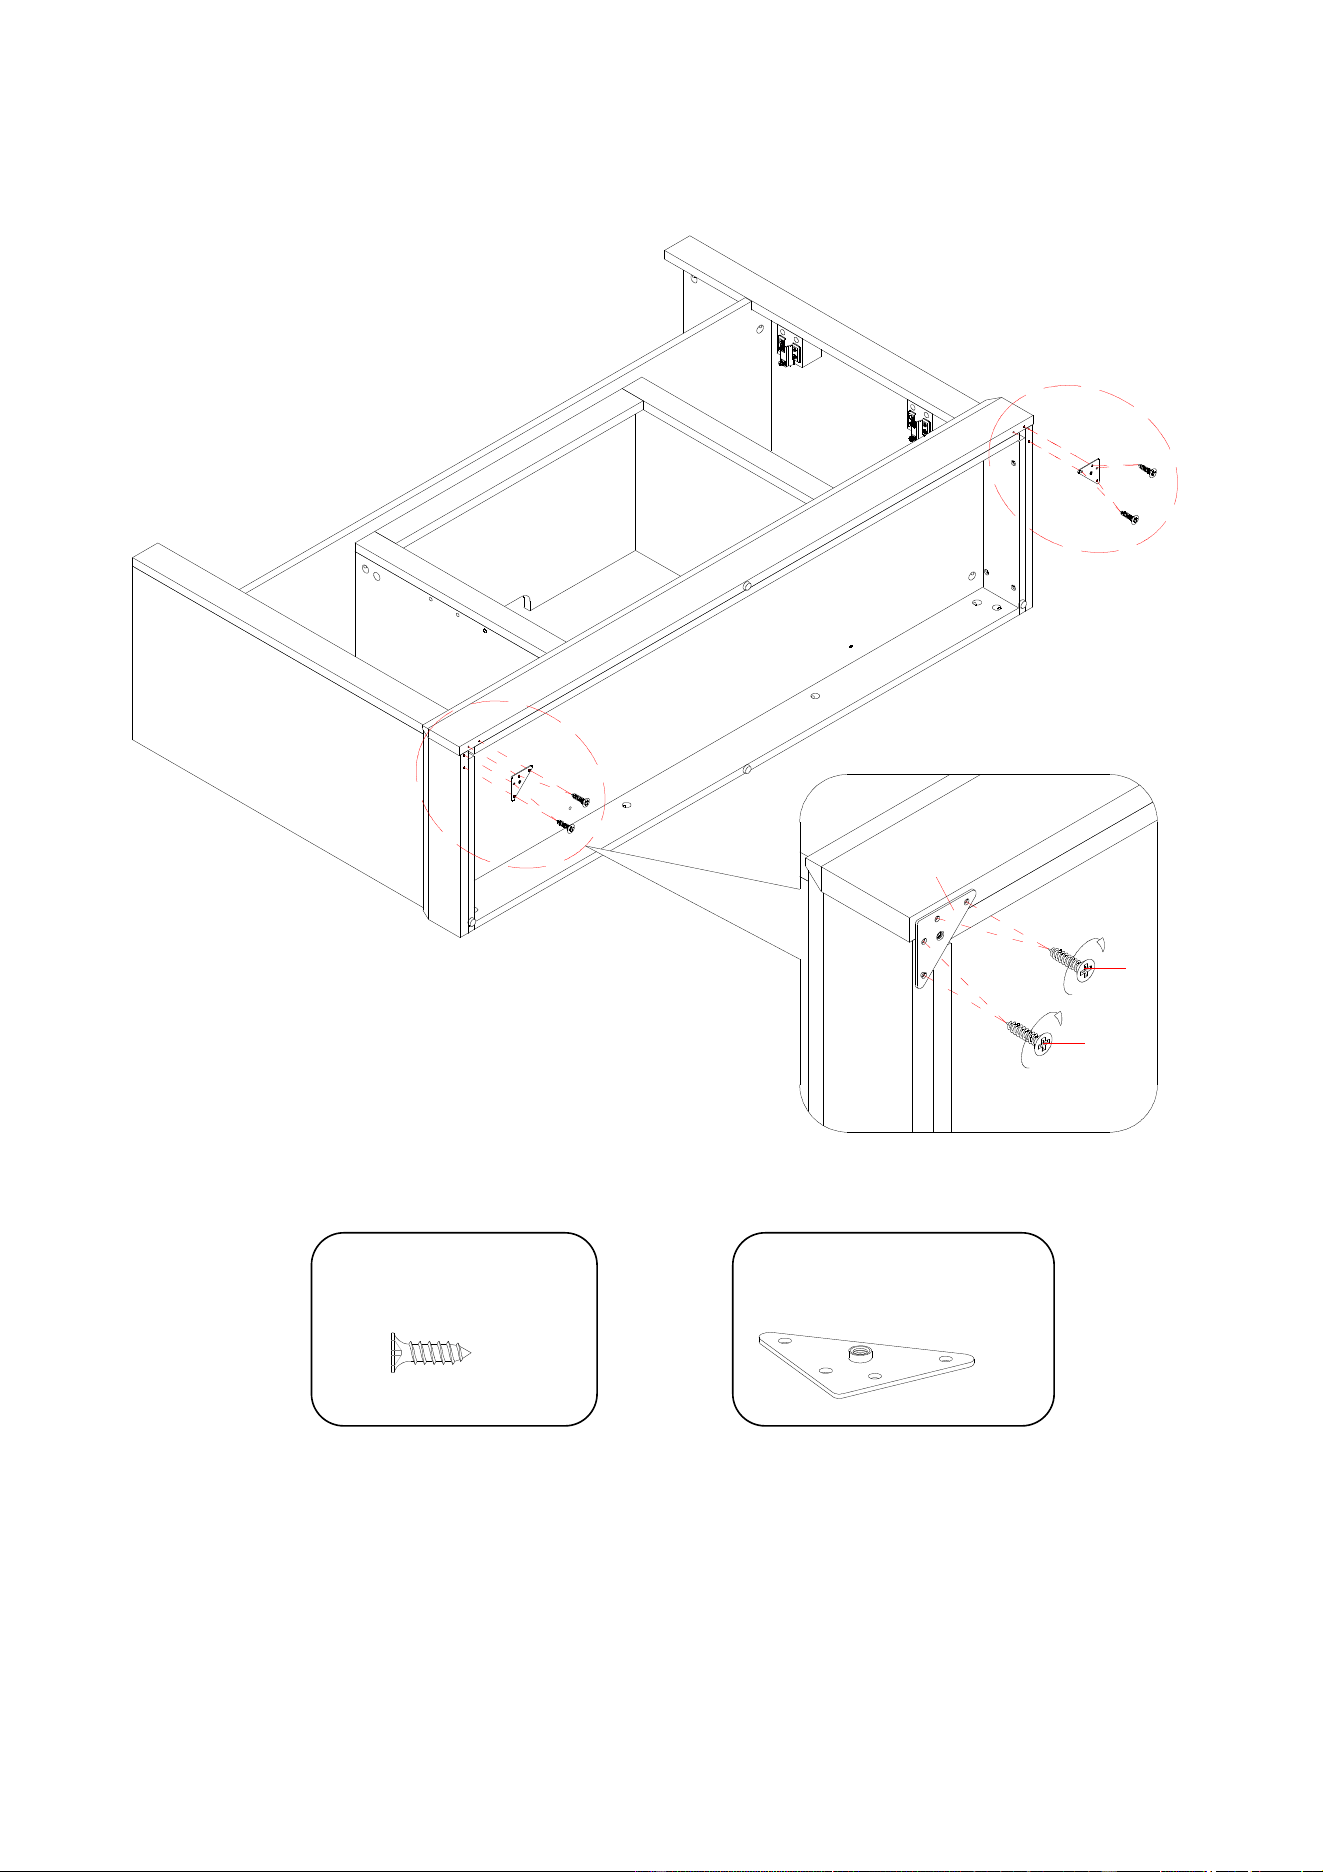
13. With the pilot holes as a guide, align and attach two Angle Metal Brackets (9) to the front corners of the
assembled base, using four 12 mm Screws (4) per bracket.
4
4
9
D
F/G
F
G
C
D
Angle Metal
Bracket
(2 used in this step)
⑨
M3.5 x 12 mm Screw
(8 used in this step)
④
14
Assembly Instructions
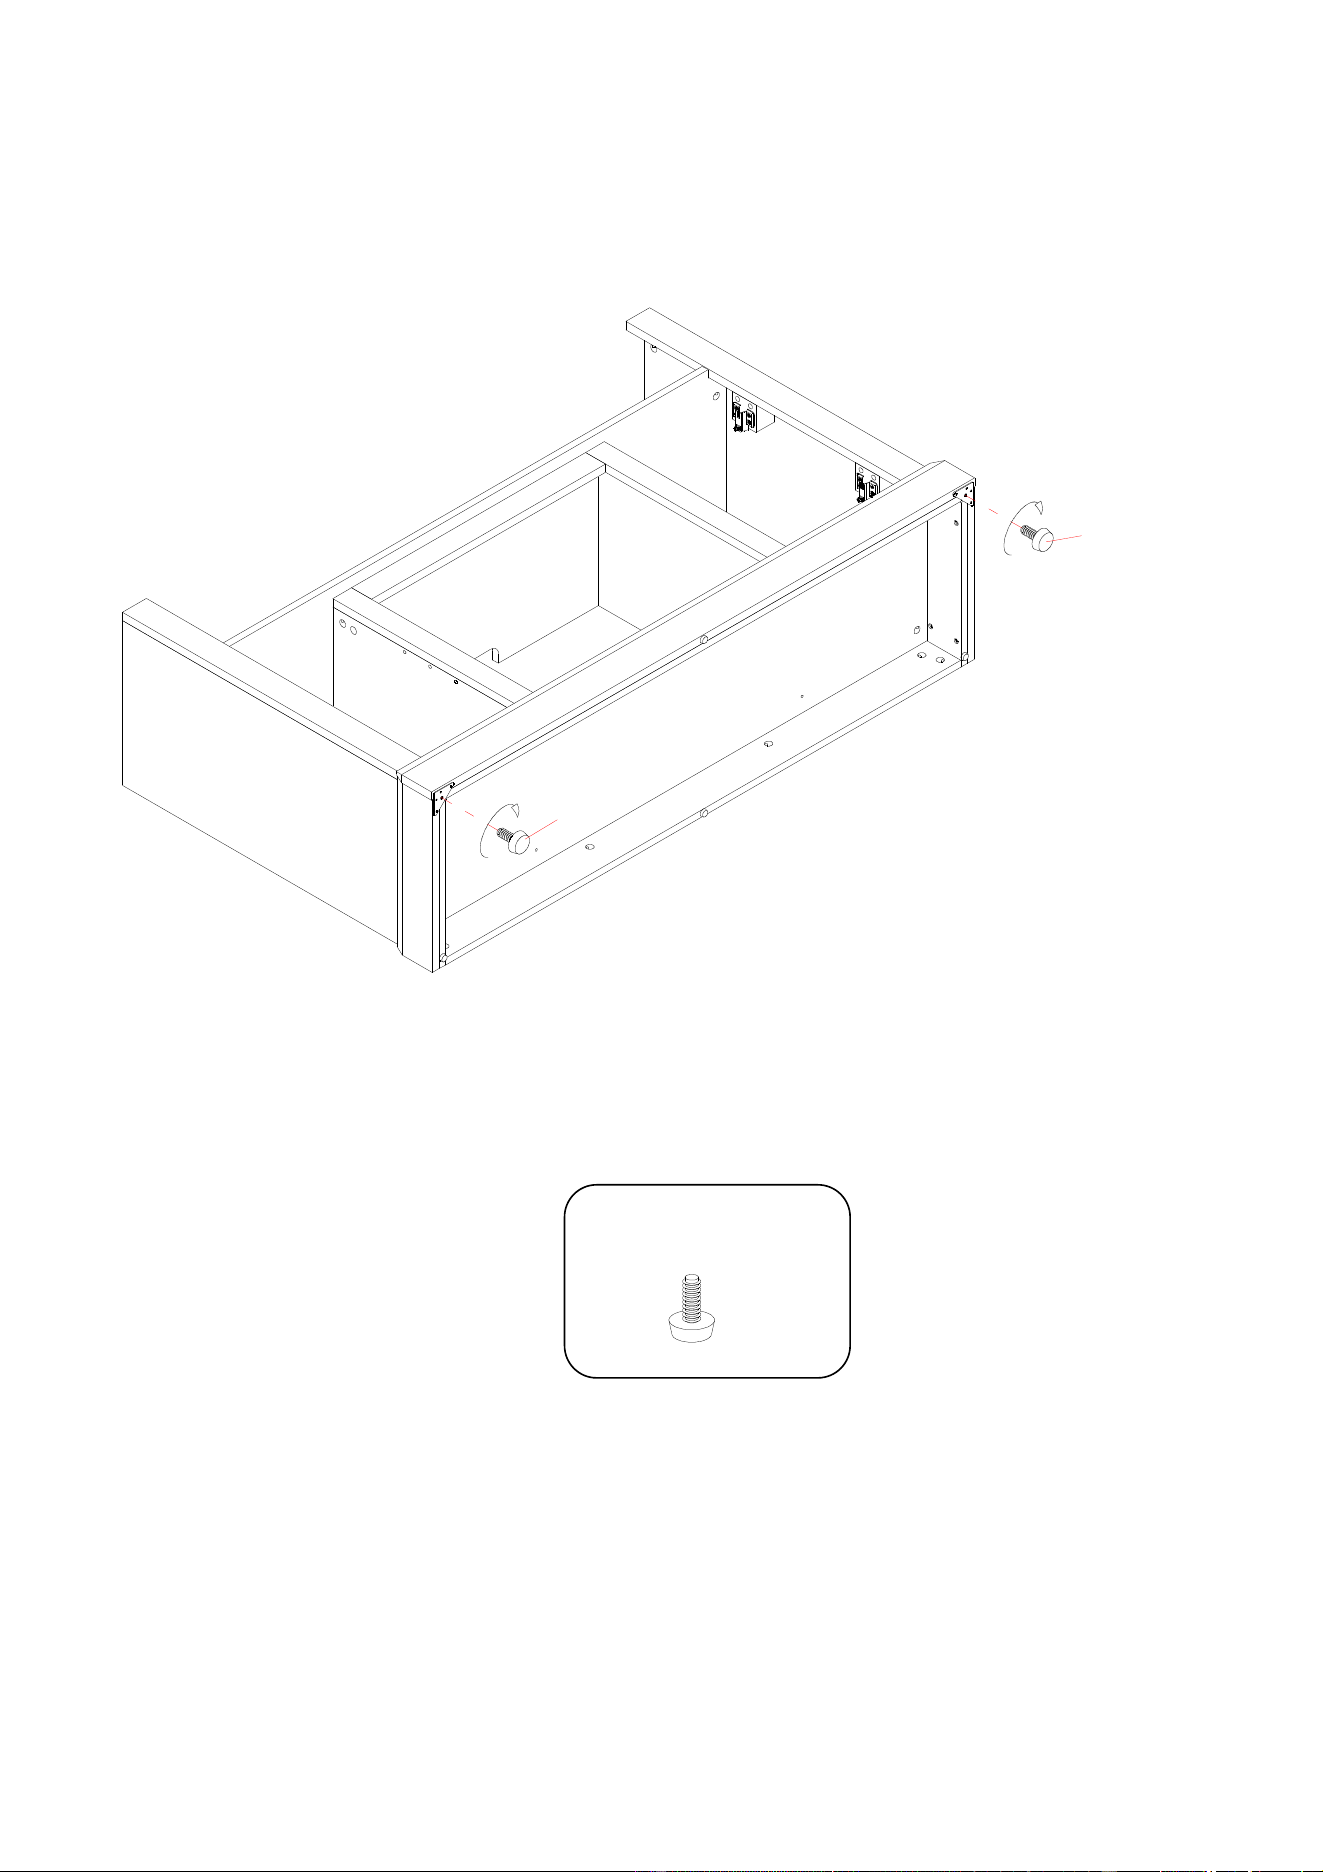
14. Screw two Floor Levelers (10) into the threaded sockets on the Angle Metal Brackets (9) and set them
to the correct height.
Floor Leveler
(2 used in this step)
⑩
9
10
10
F
G
D
15
Assembly Instructions
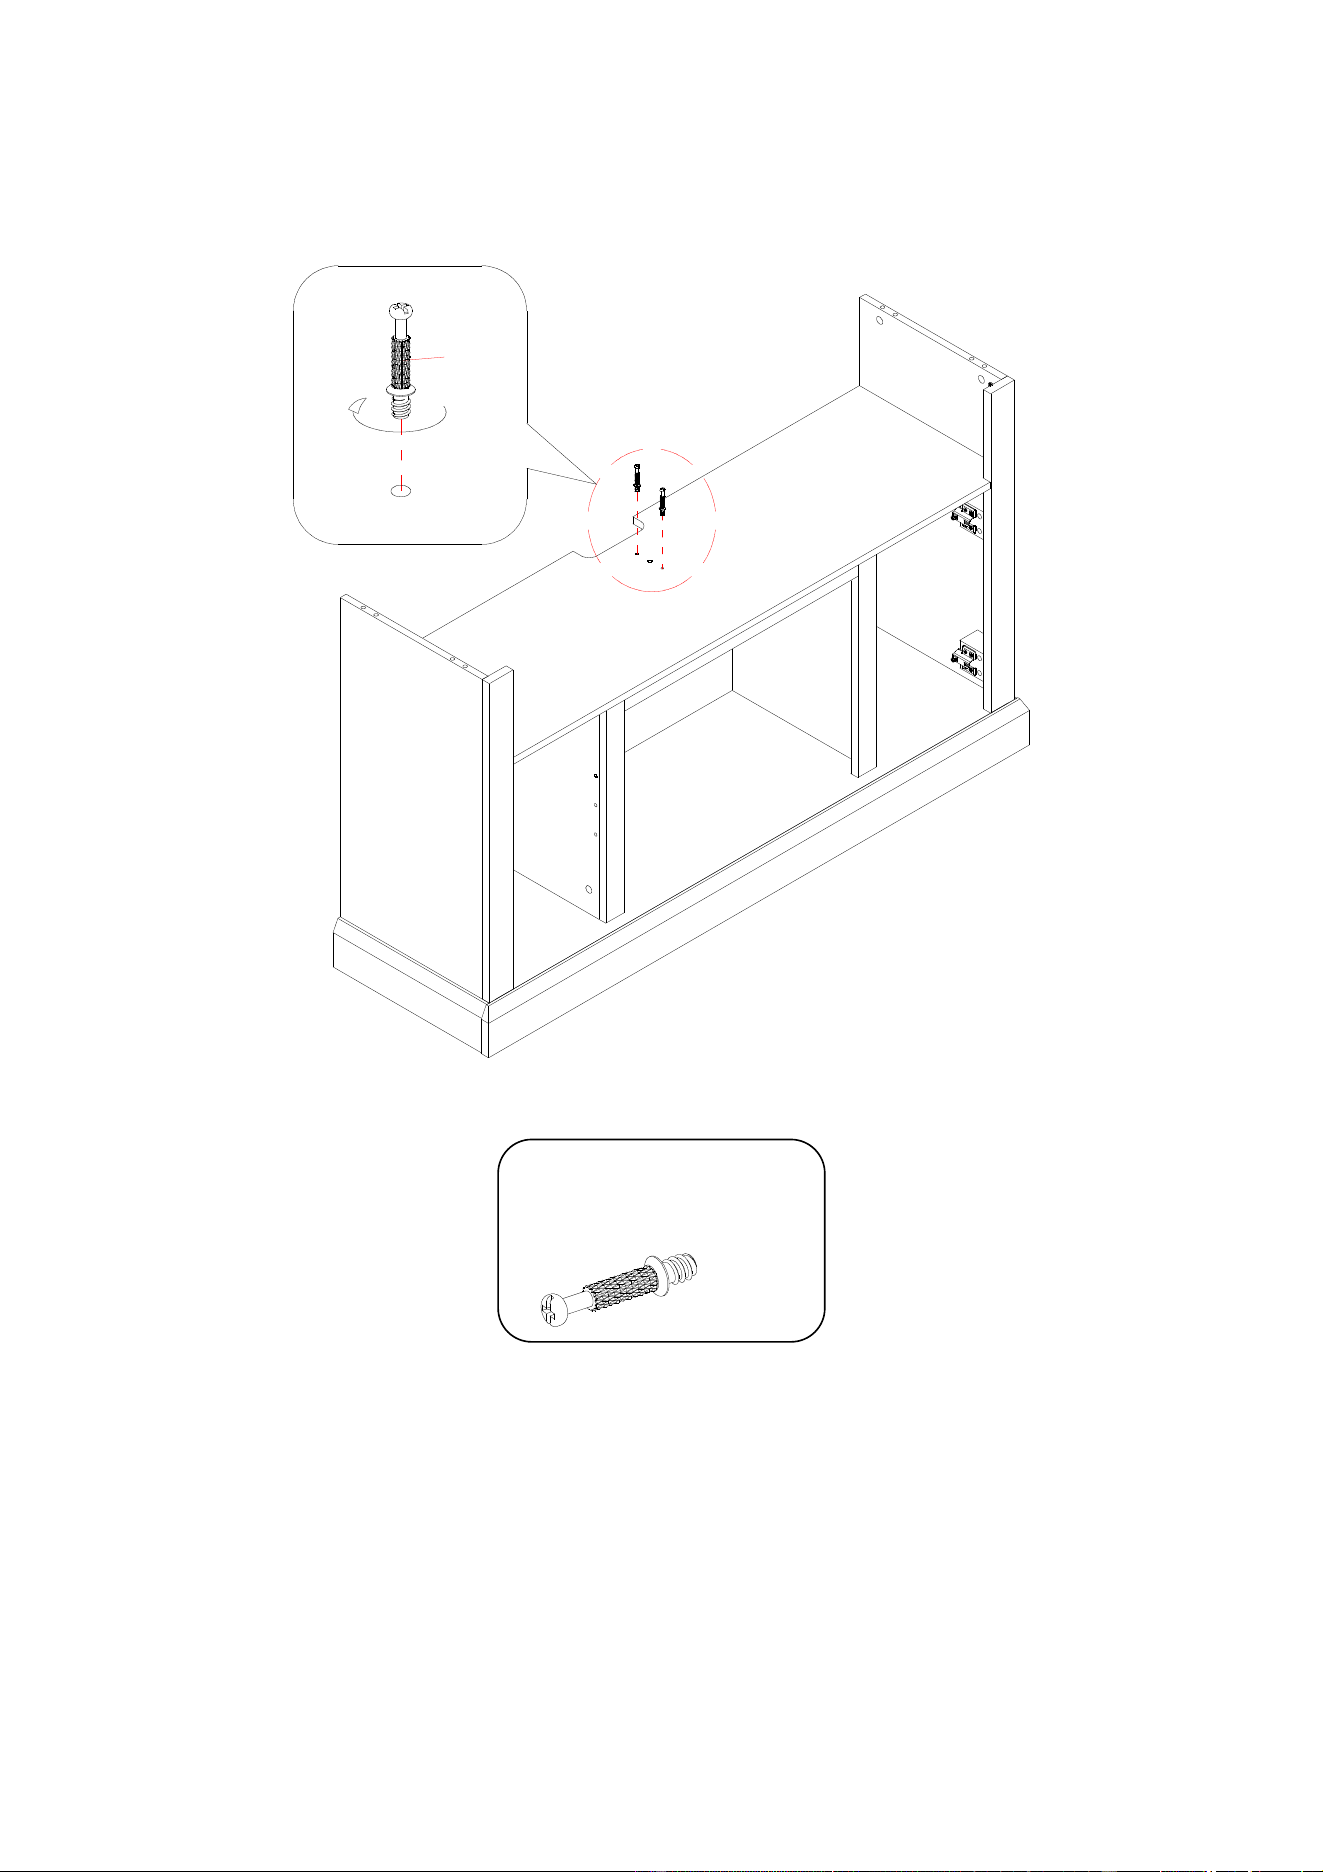
15. Stand the assembled unit upright.
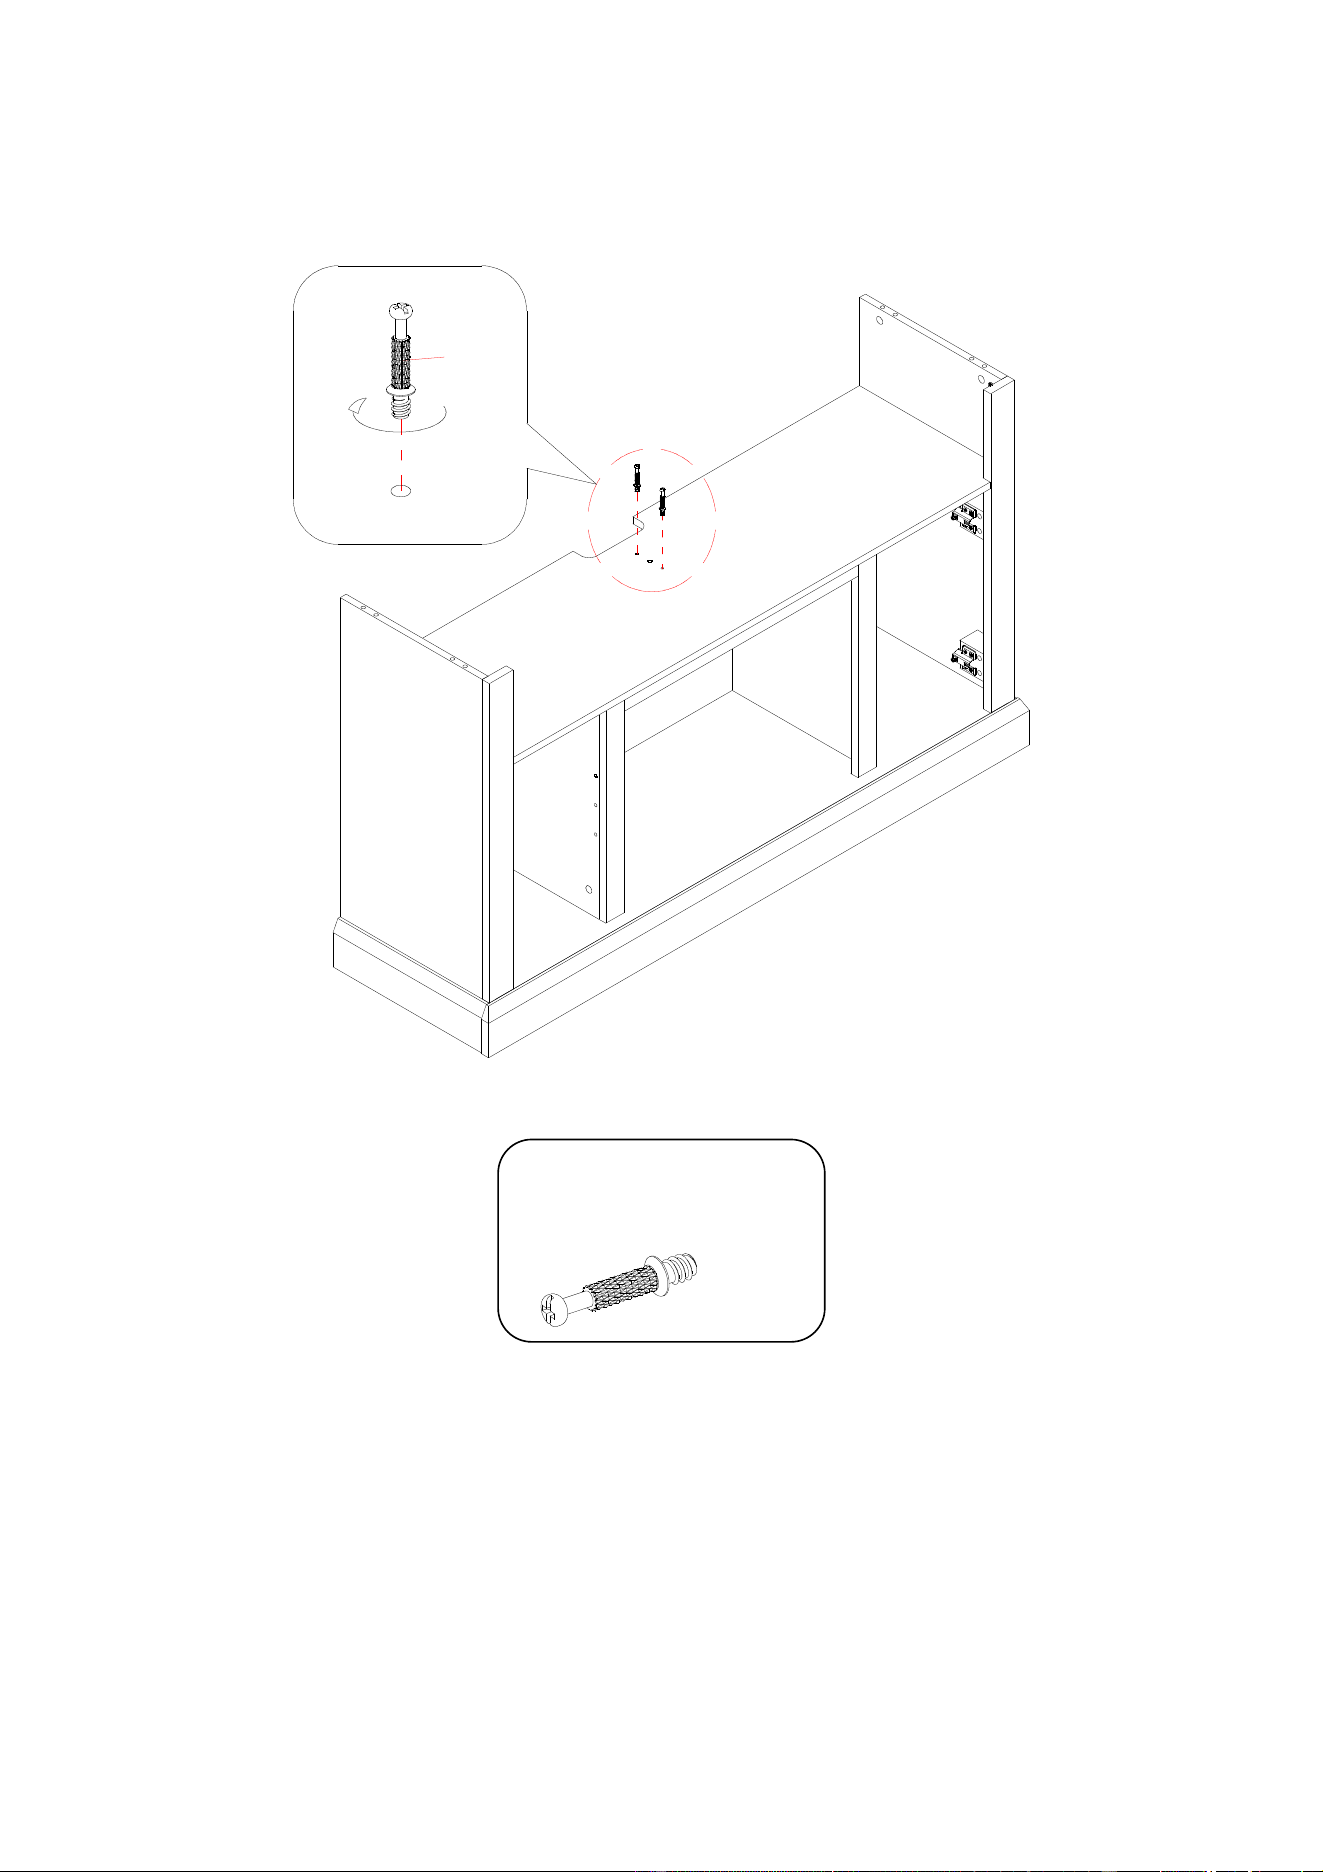
16. Secure screw the Cam Bolts (2) into the designated small holes on the Fixed Shelf (B) using a Phillips
screwdriver.
B
2
Cam Bolt
(2 used in this step)
②
16
Assembly Instructions
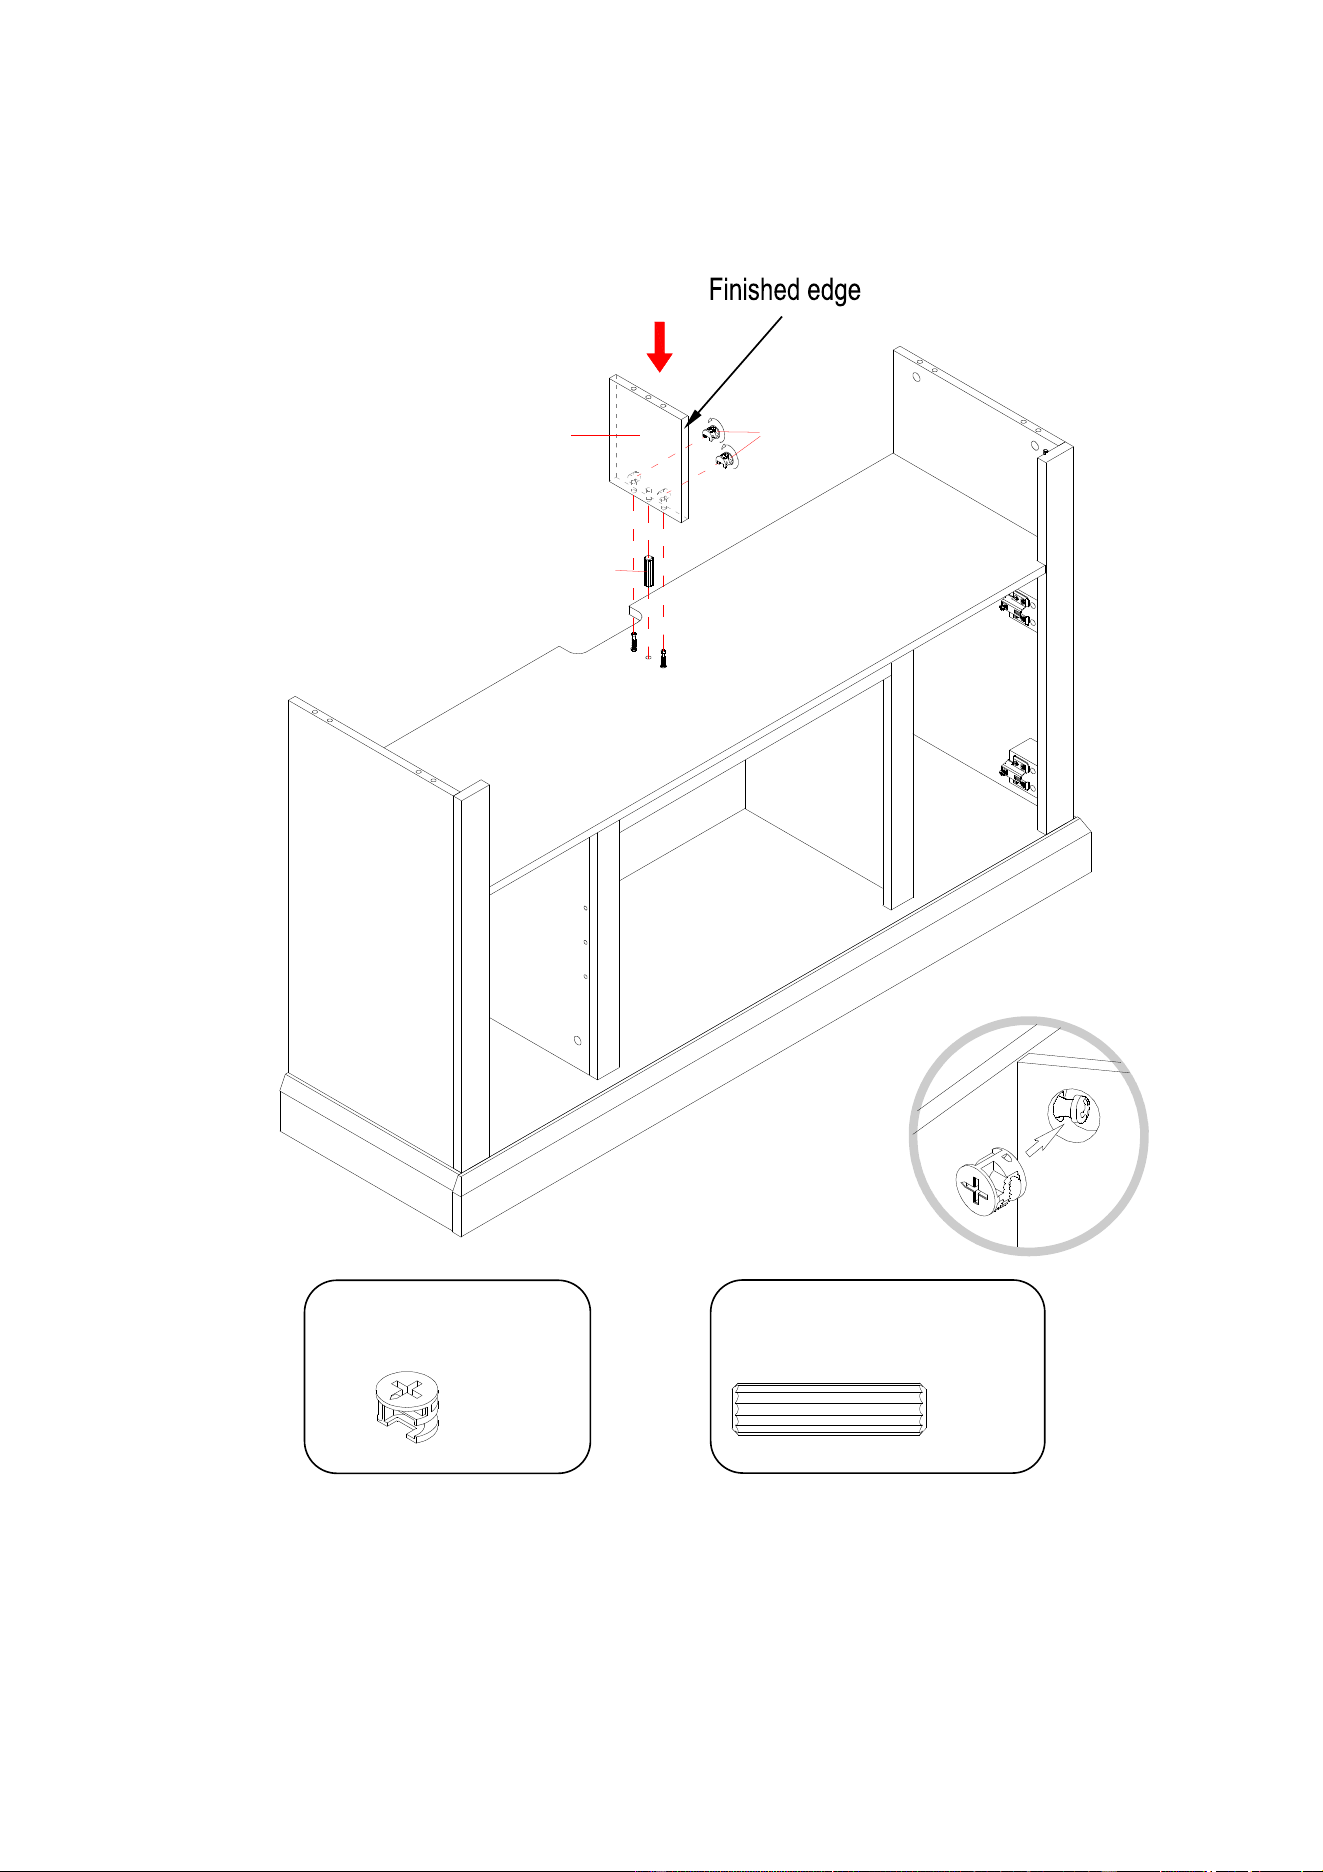
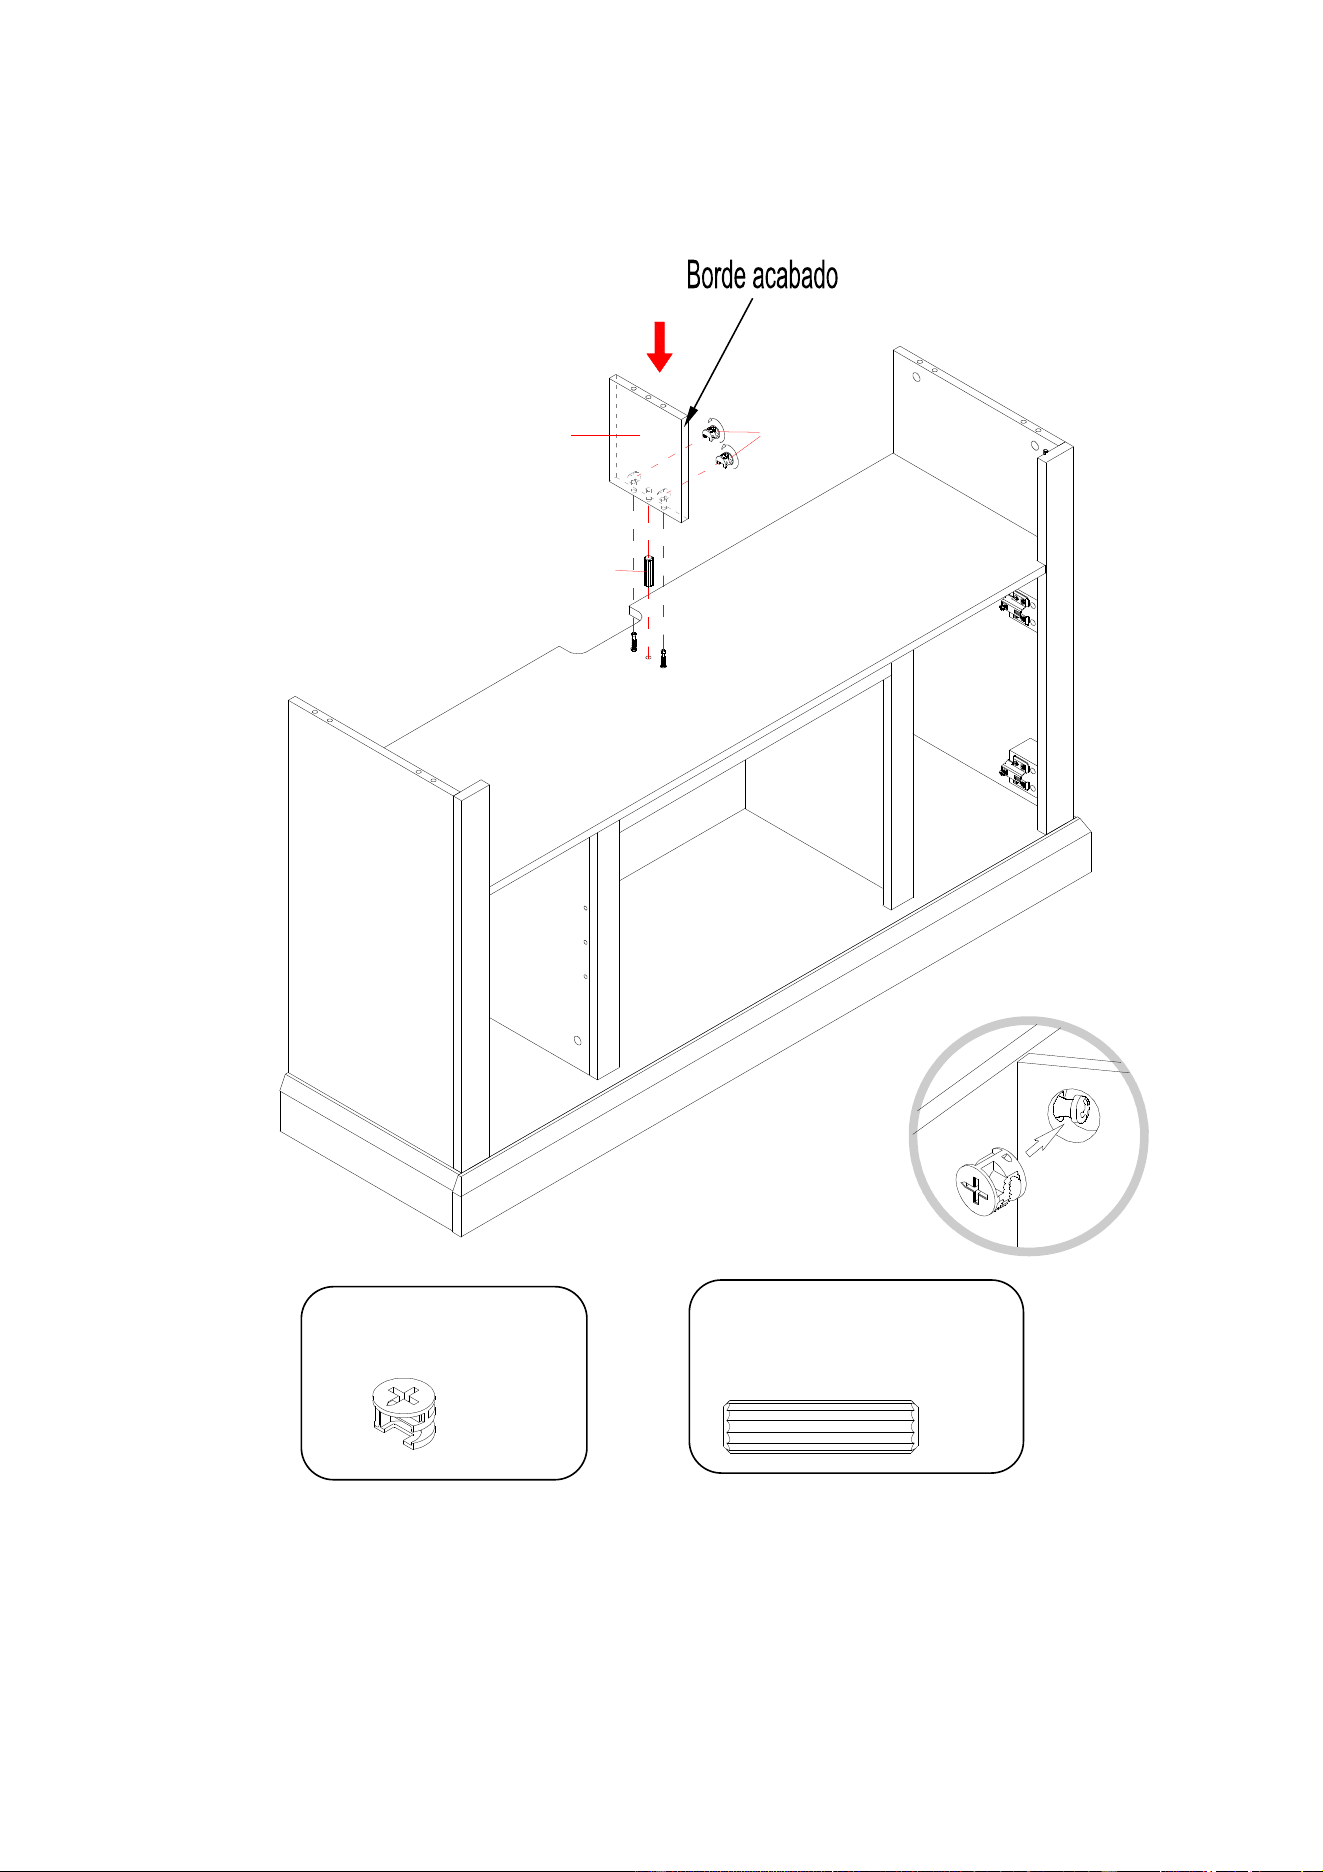
17. Attach the Upper Partition Panel (N) to the Fixed Shelf (B) with one 30 mm Wood Dowel (3) and two
Cam Locks (1).
3
B
1
N
M8 x 30 mm Wood Dowel
(1 used in this step)
③
Cam Lock
(2 used in this step)
①
17
Assembly Instructions
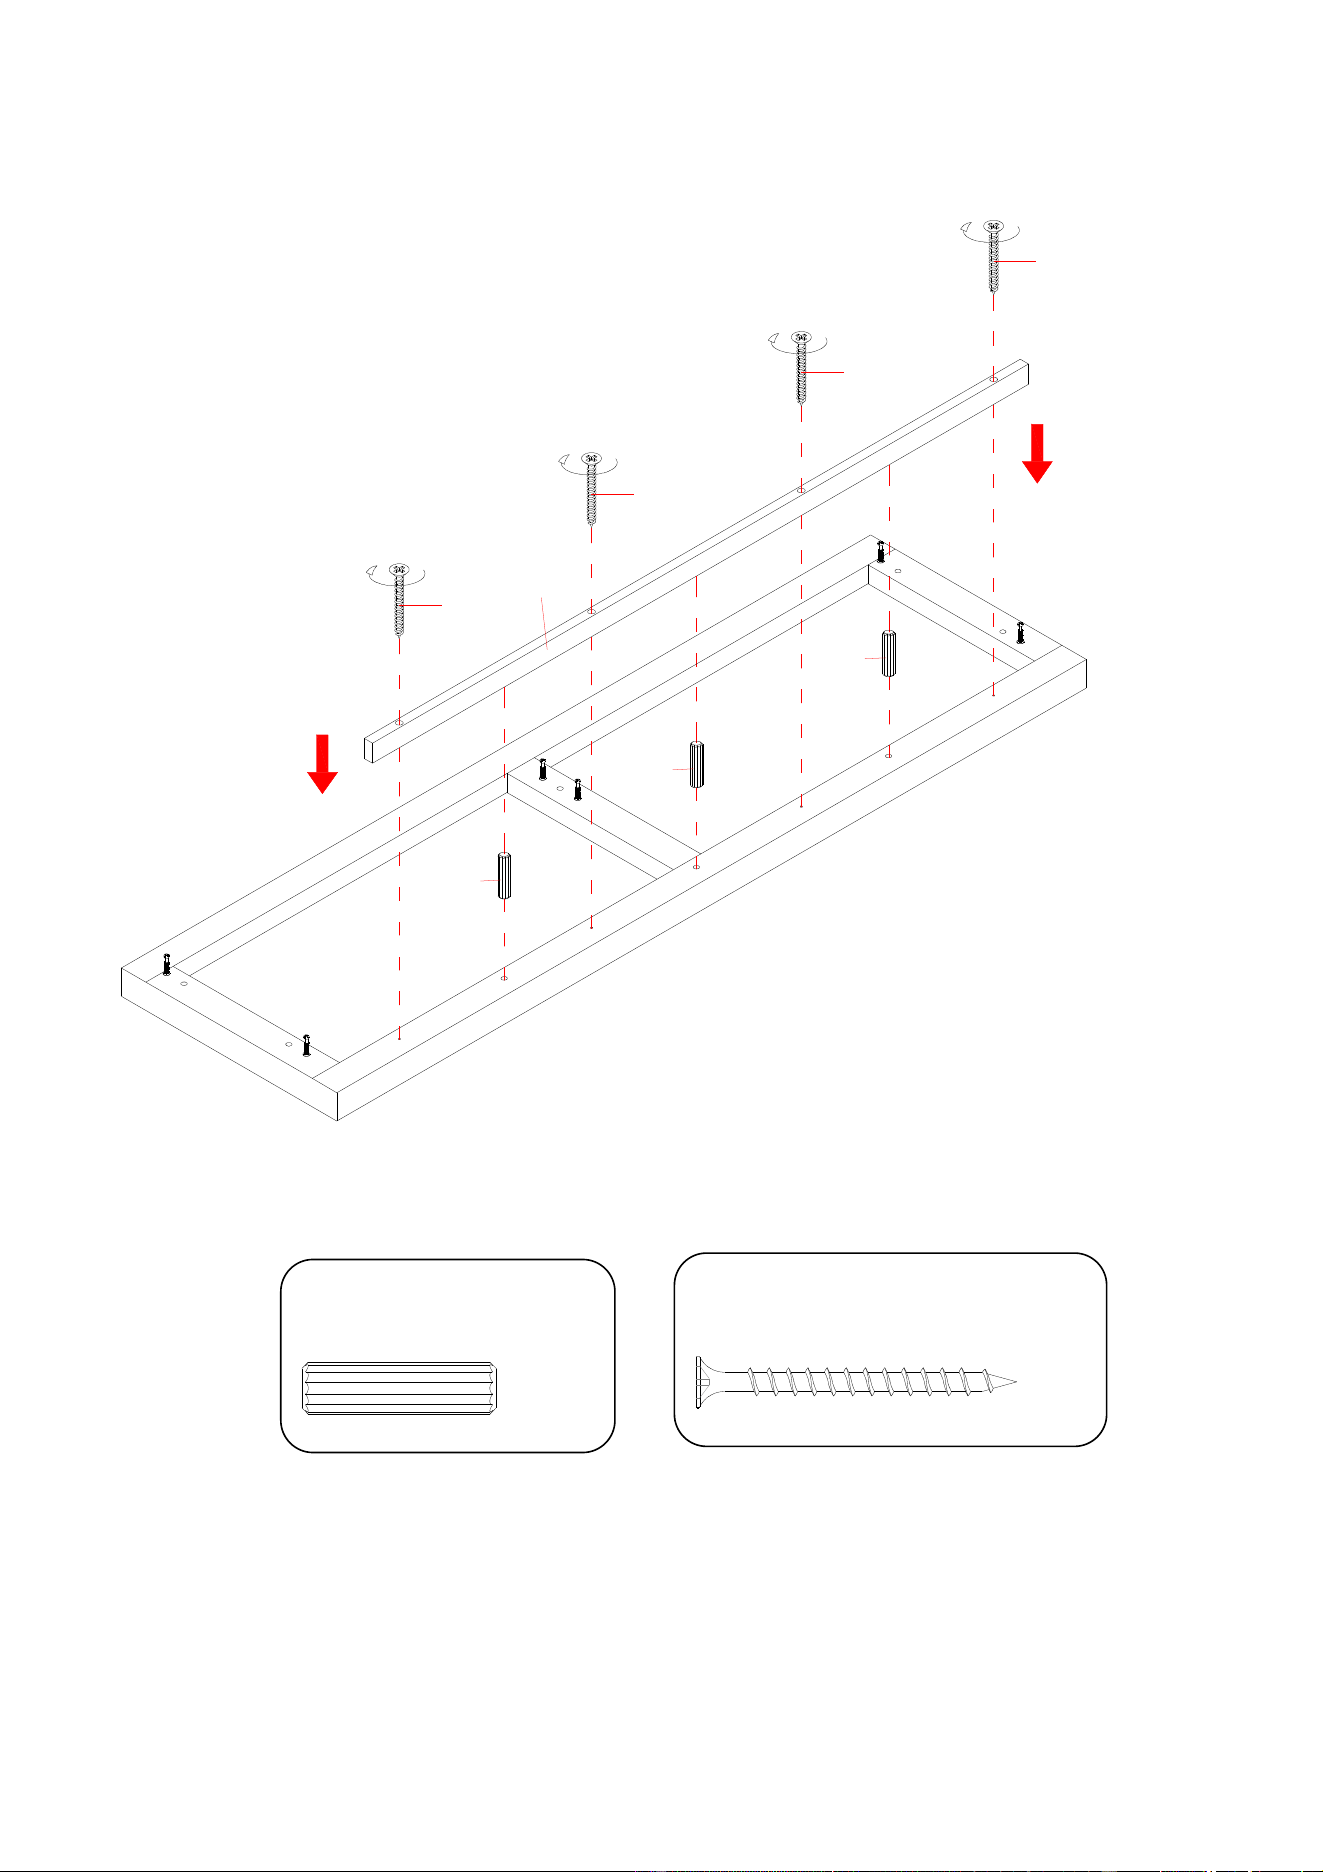
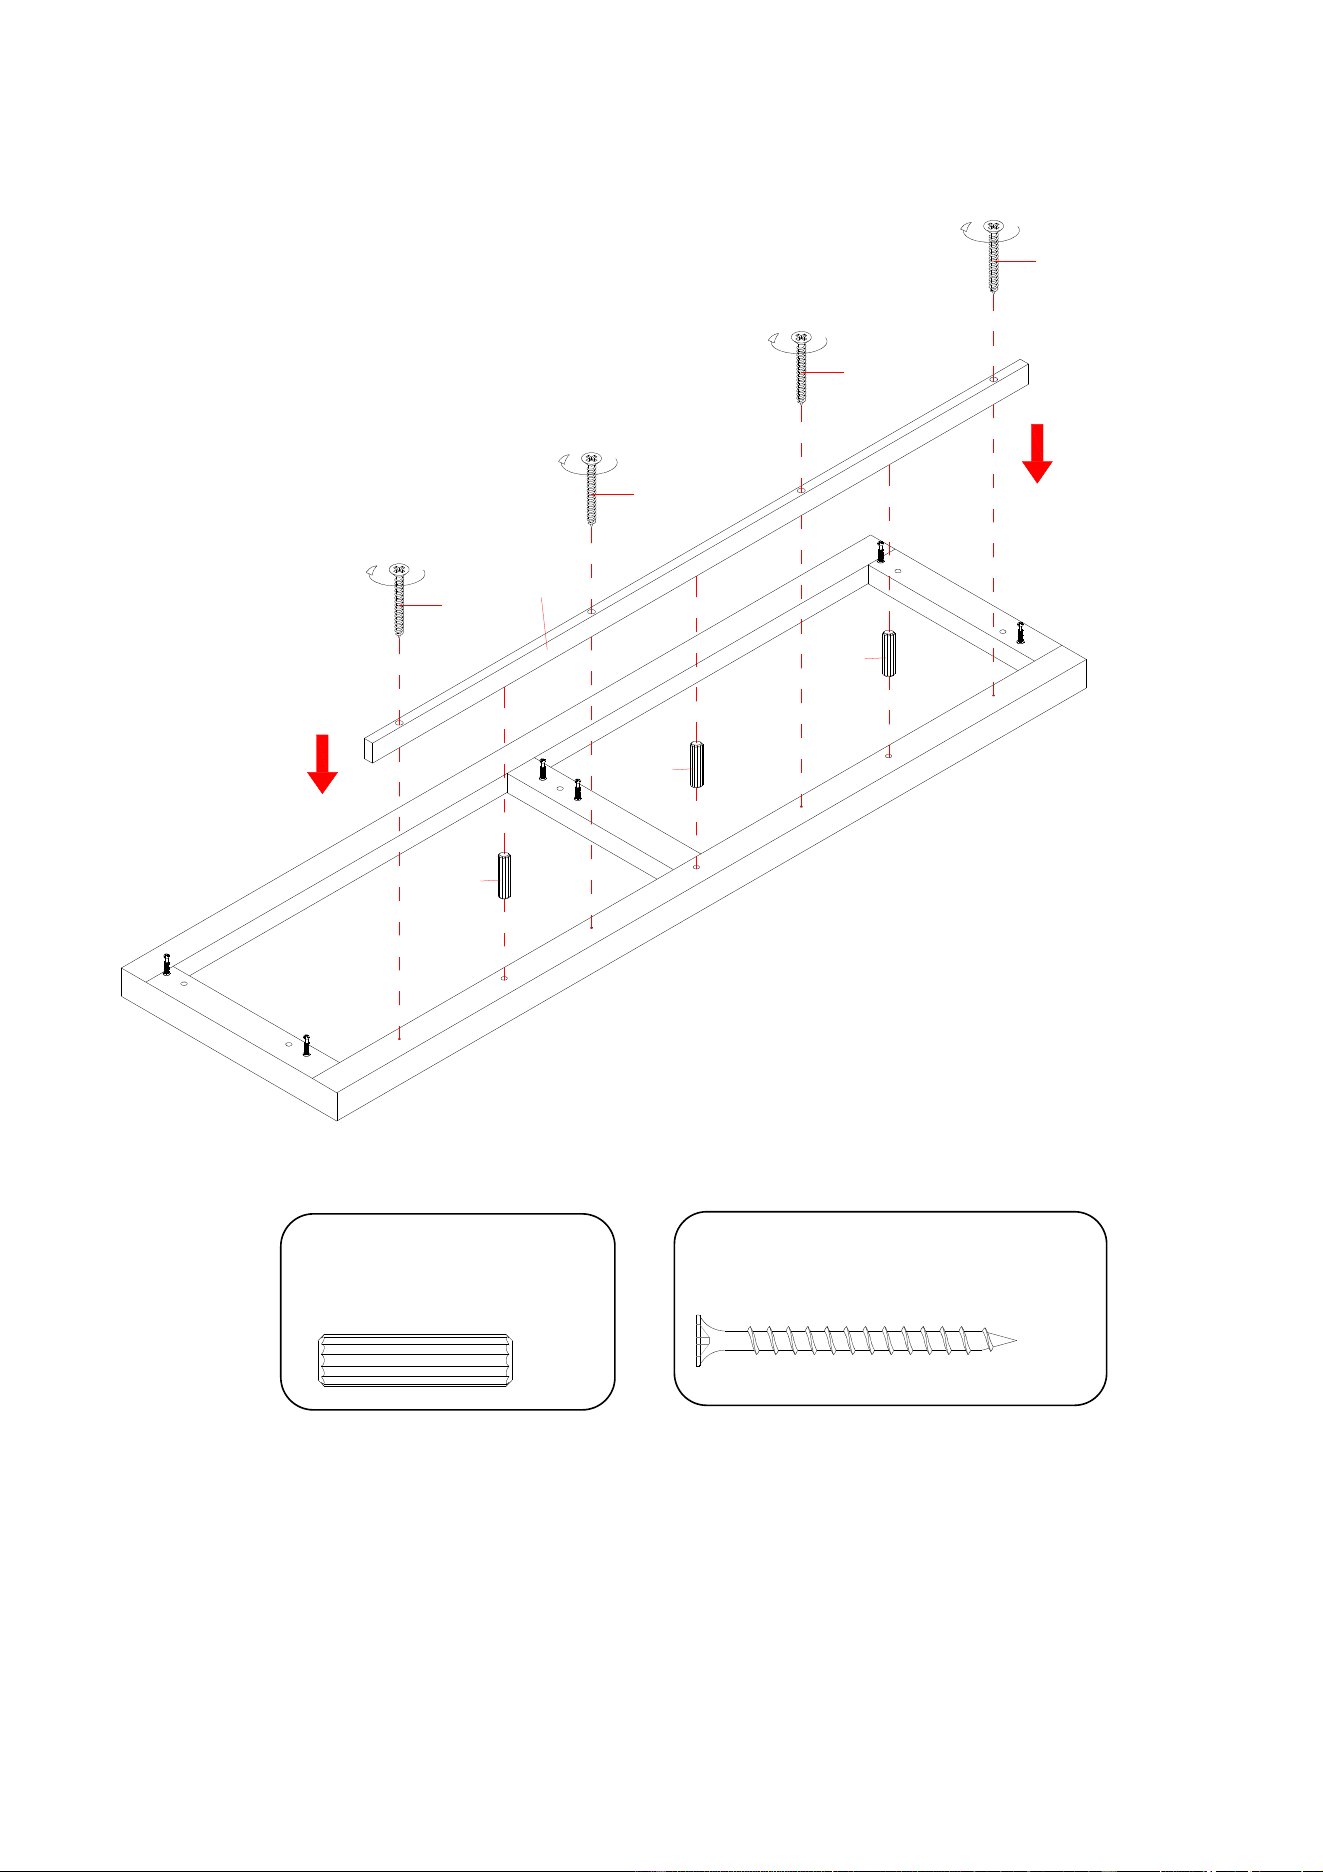
18. Attach the Top Front Stretcher (M) to the Top Panel (A) with three 30 mm Wood Dowels (3) and four
50 mm Wood Screws (5).
M4 x 50 mm Screw
(4 used in this step)
⑤
M8 x 30 mm Wood Dowel
(3 used in this step)
③
3
5
5
5
5
3
3
A
M
18
Assembly Instructions
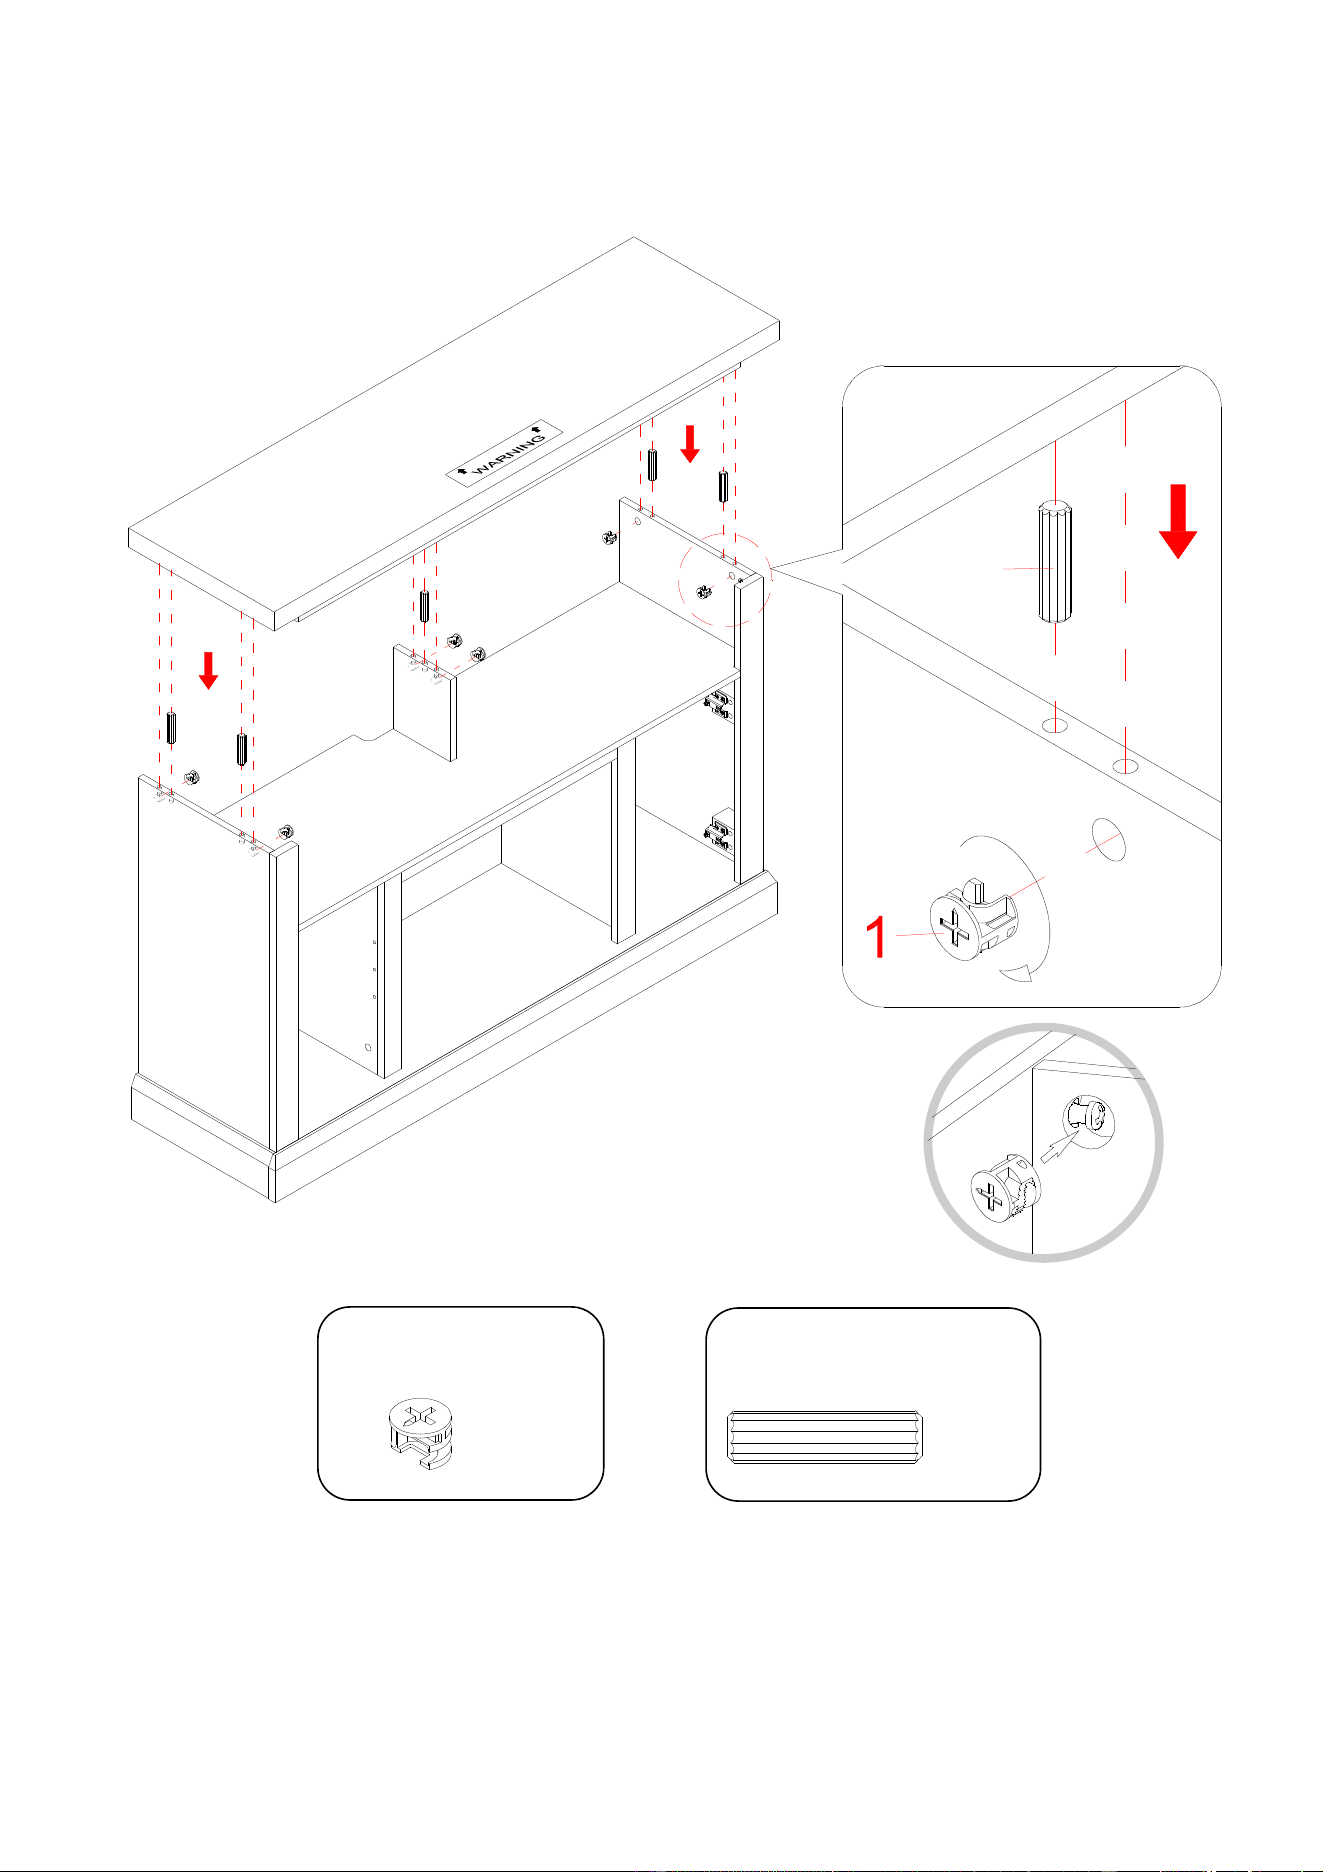
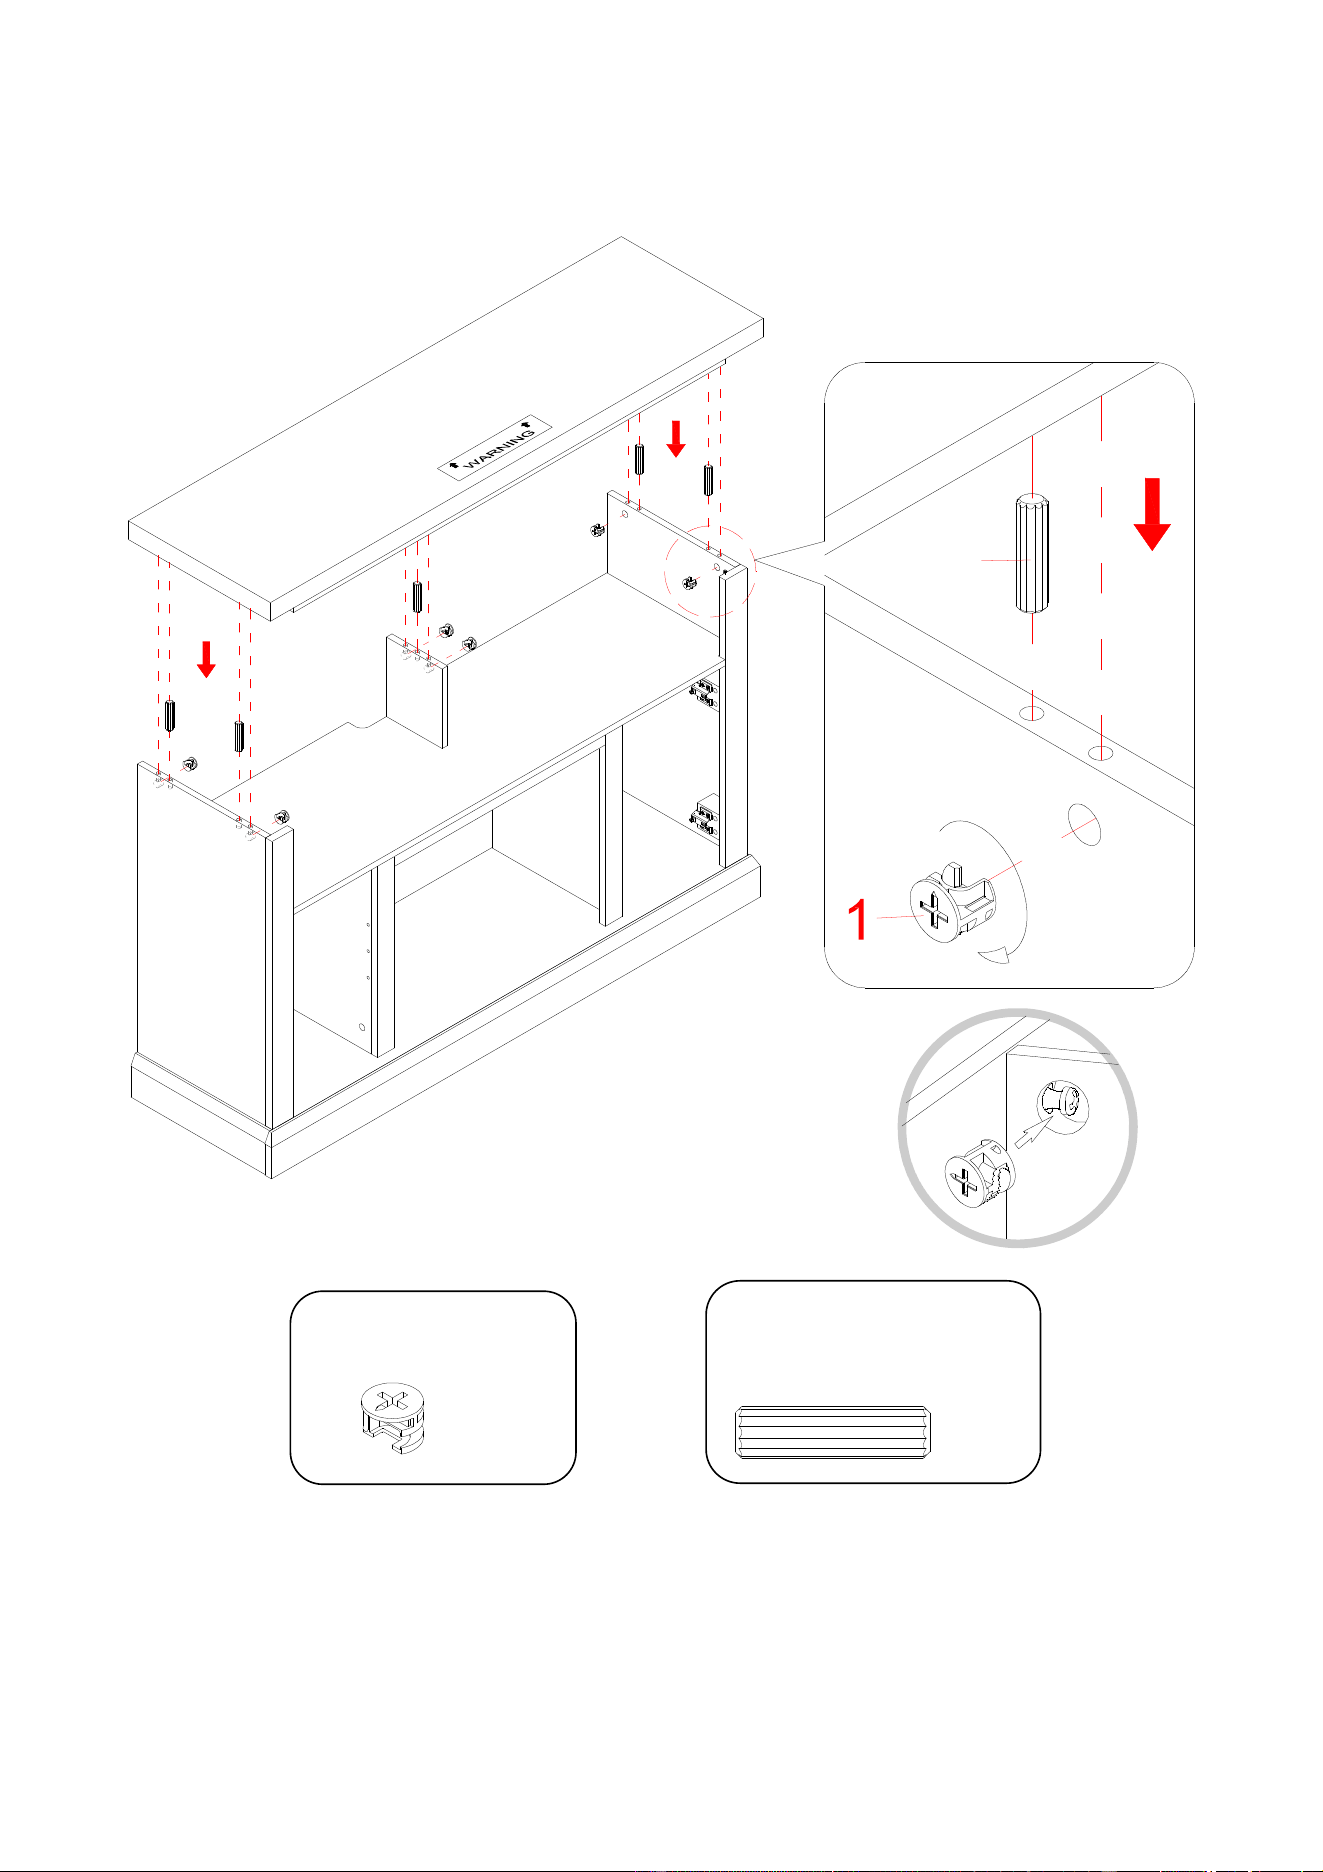
19. Attach the Top Panel (A) to both Side Panels (F and G) and the Upper Partition Panel (N) with five
Wood Dowels (3) and six Cam Locks (1).
Cam Lock
(6 used in this step)
①
M8 x 30 mm Wood Dowel
(5 used in this step)
③
A
N
3
F
G
19
Assembly Instructions
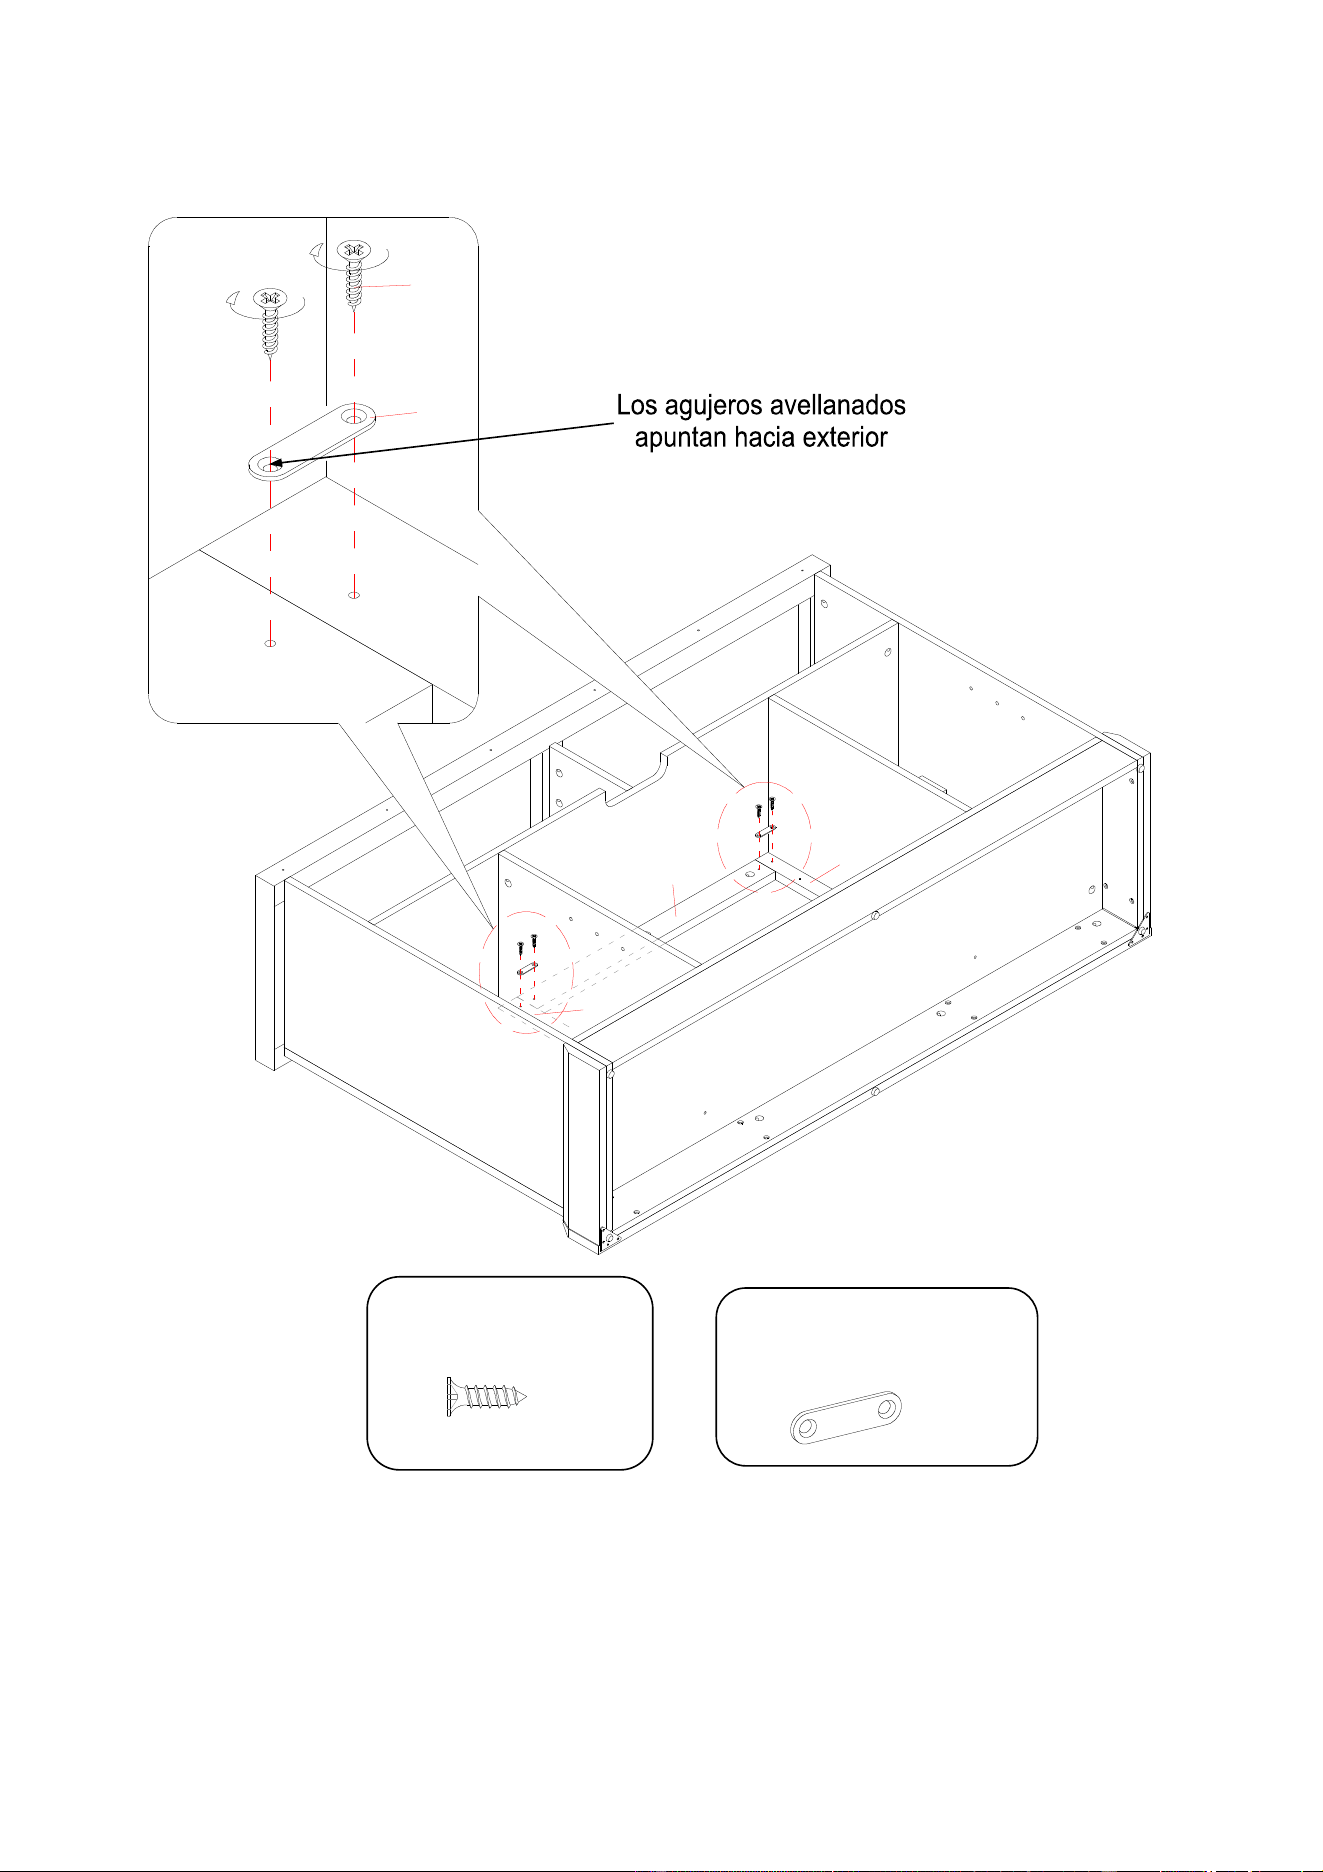
20. Flip the previous assembly around at its front edges.
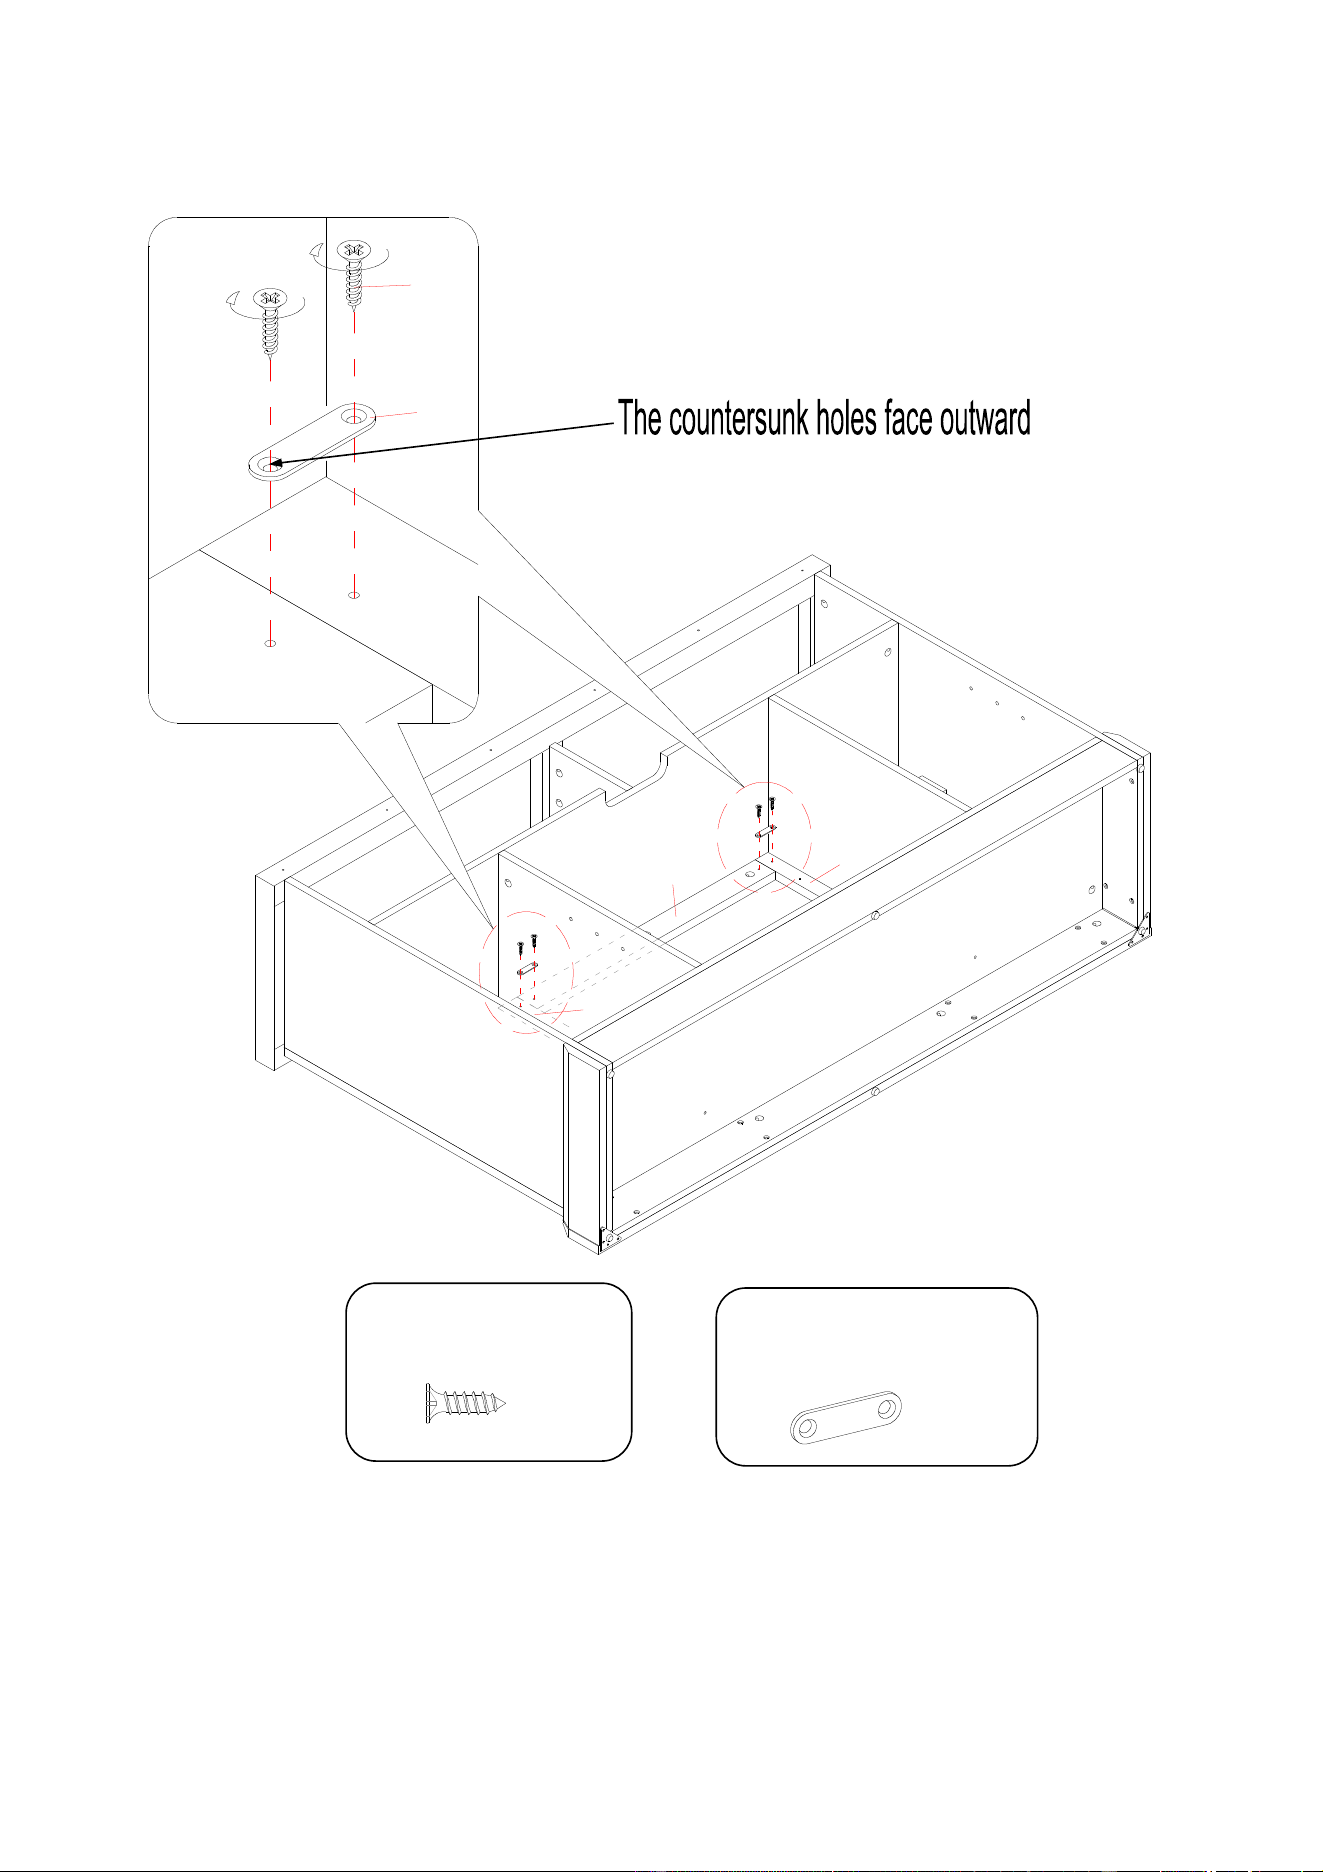
21. Using the pilot holes as a guide, fasten the Middle Crossbar (L) to the Middle Stiles (I and K) by
attaching two Straight Metal Brackets (7) at the joints, using two 12 mm Screws (4) per bracket.
Straight Metal
Bracket
(2 used in this step)
⑦
M3.5 x 12 mm Screw
(4 used in this step)
④
7
4
K
I
L
20
Assembly Instructions
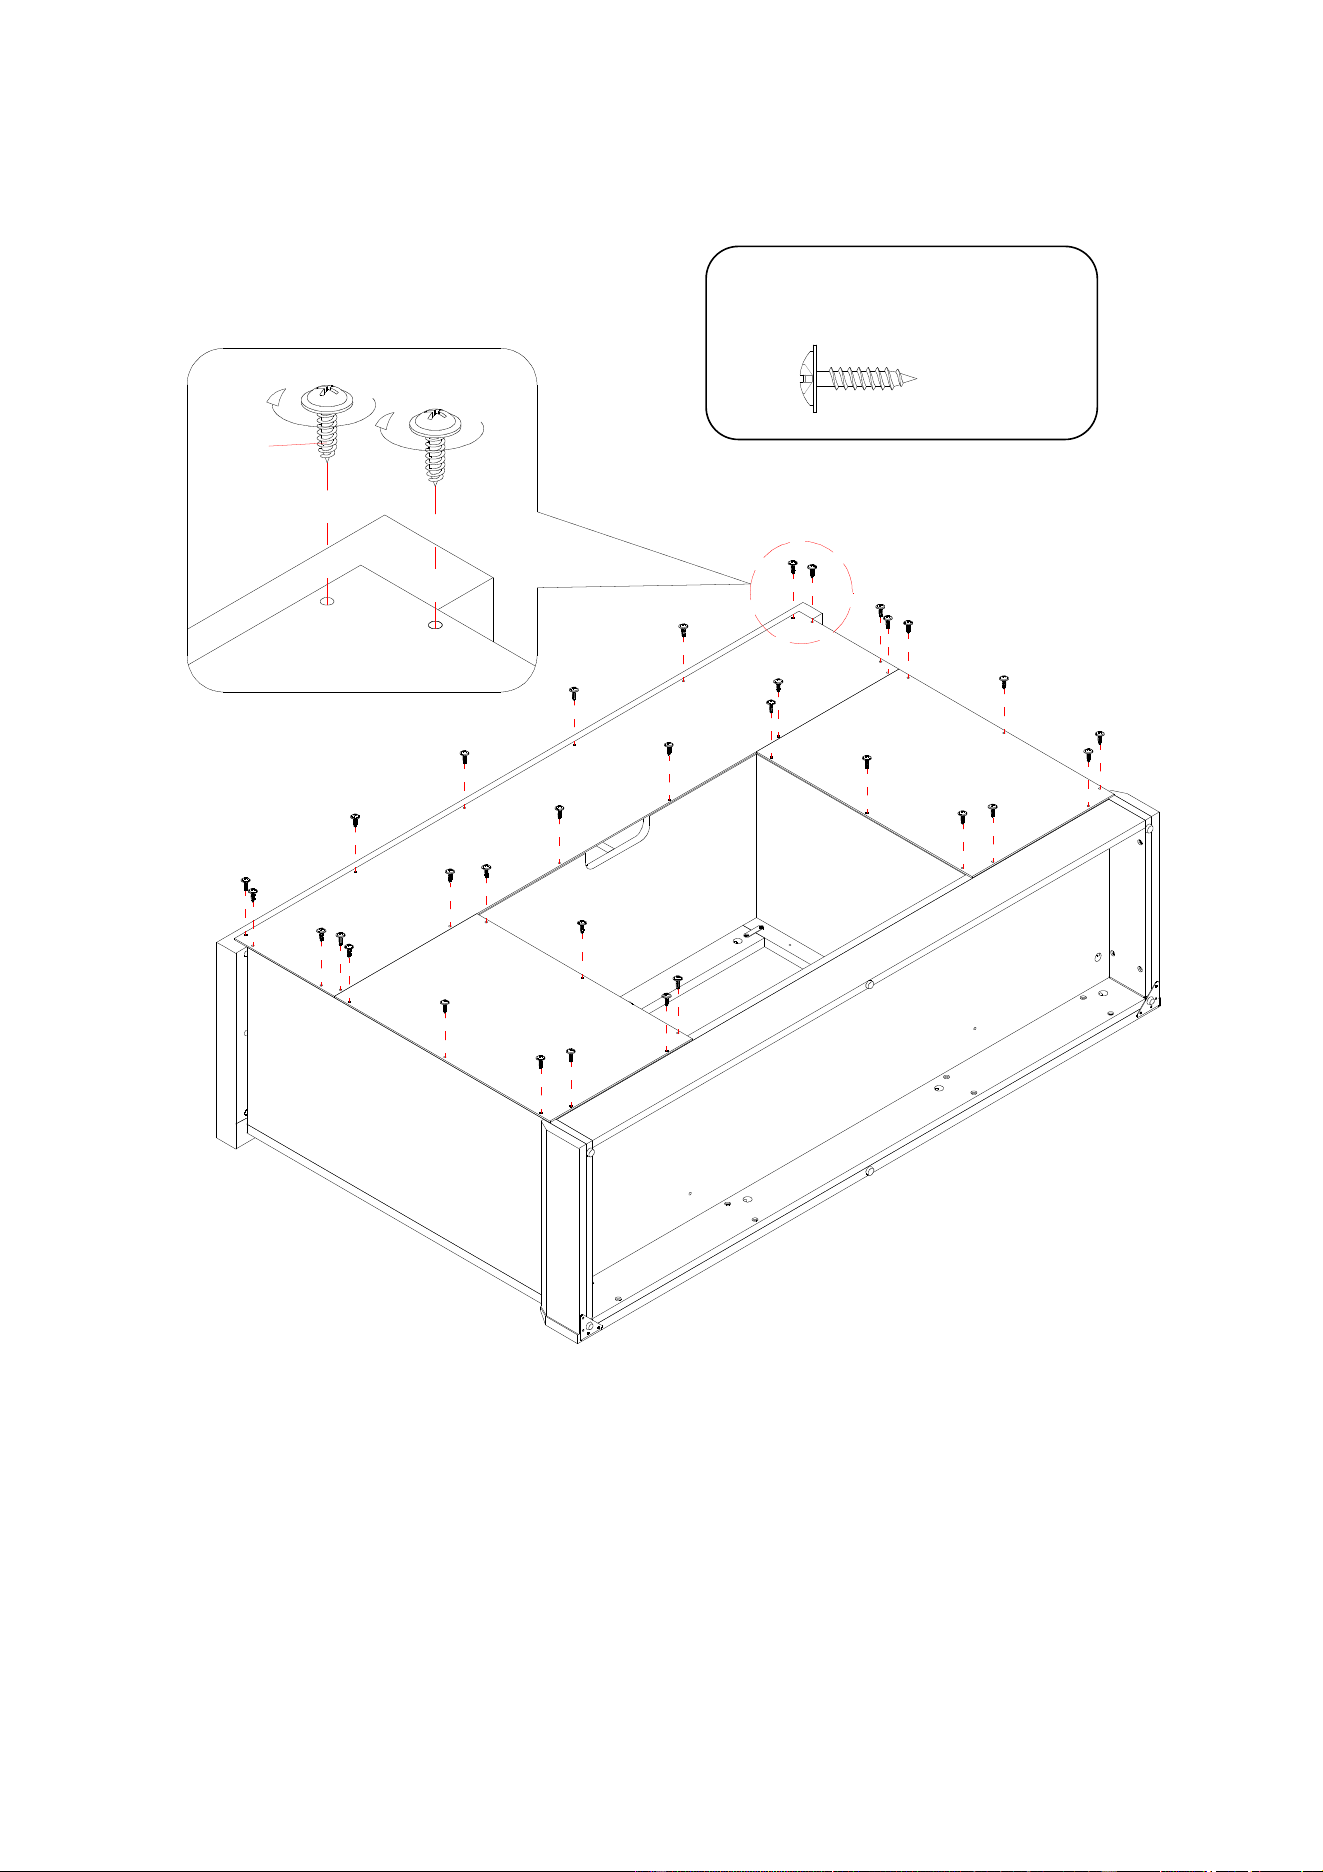
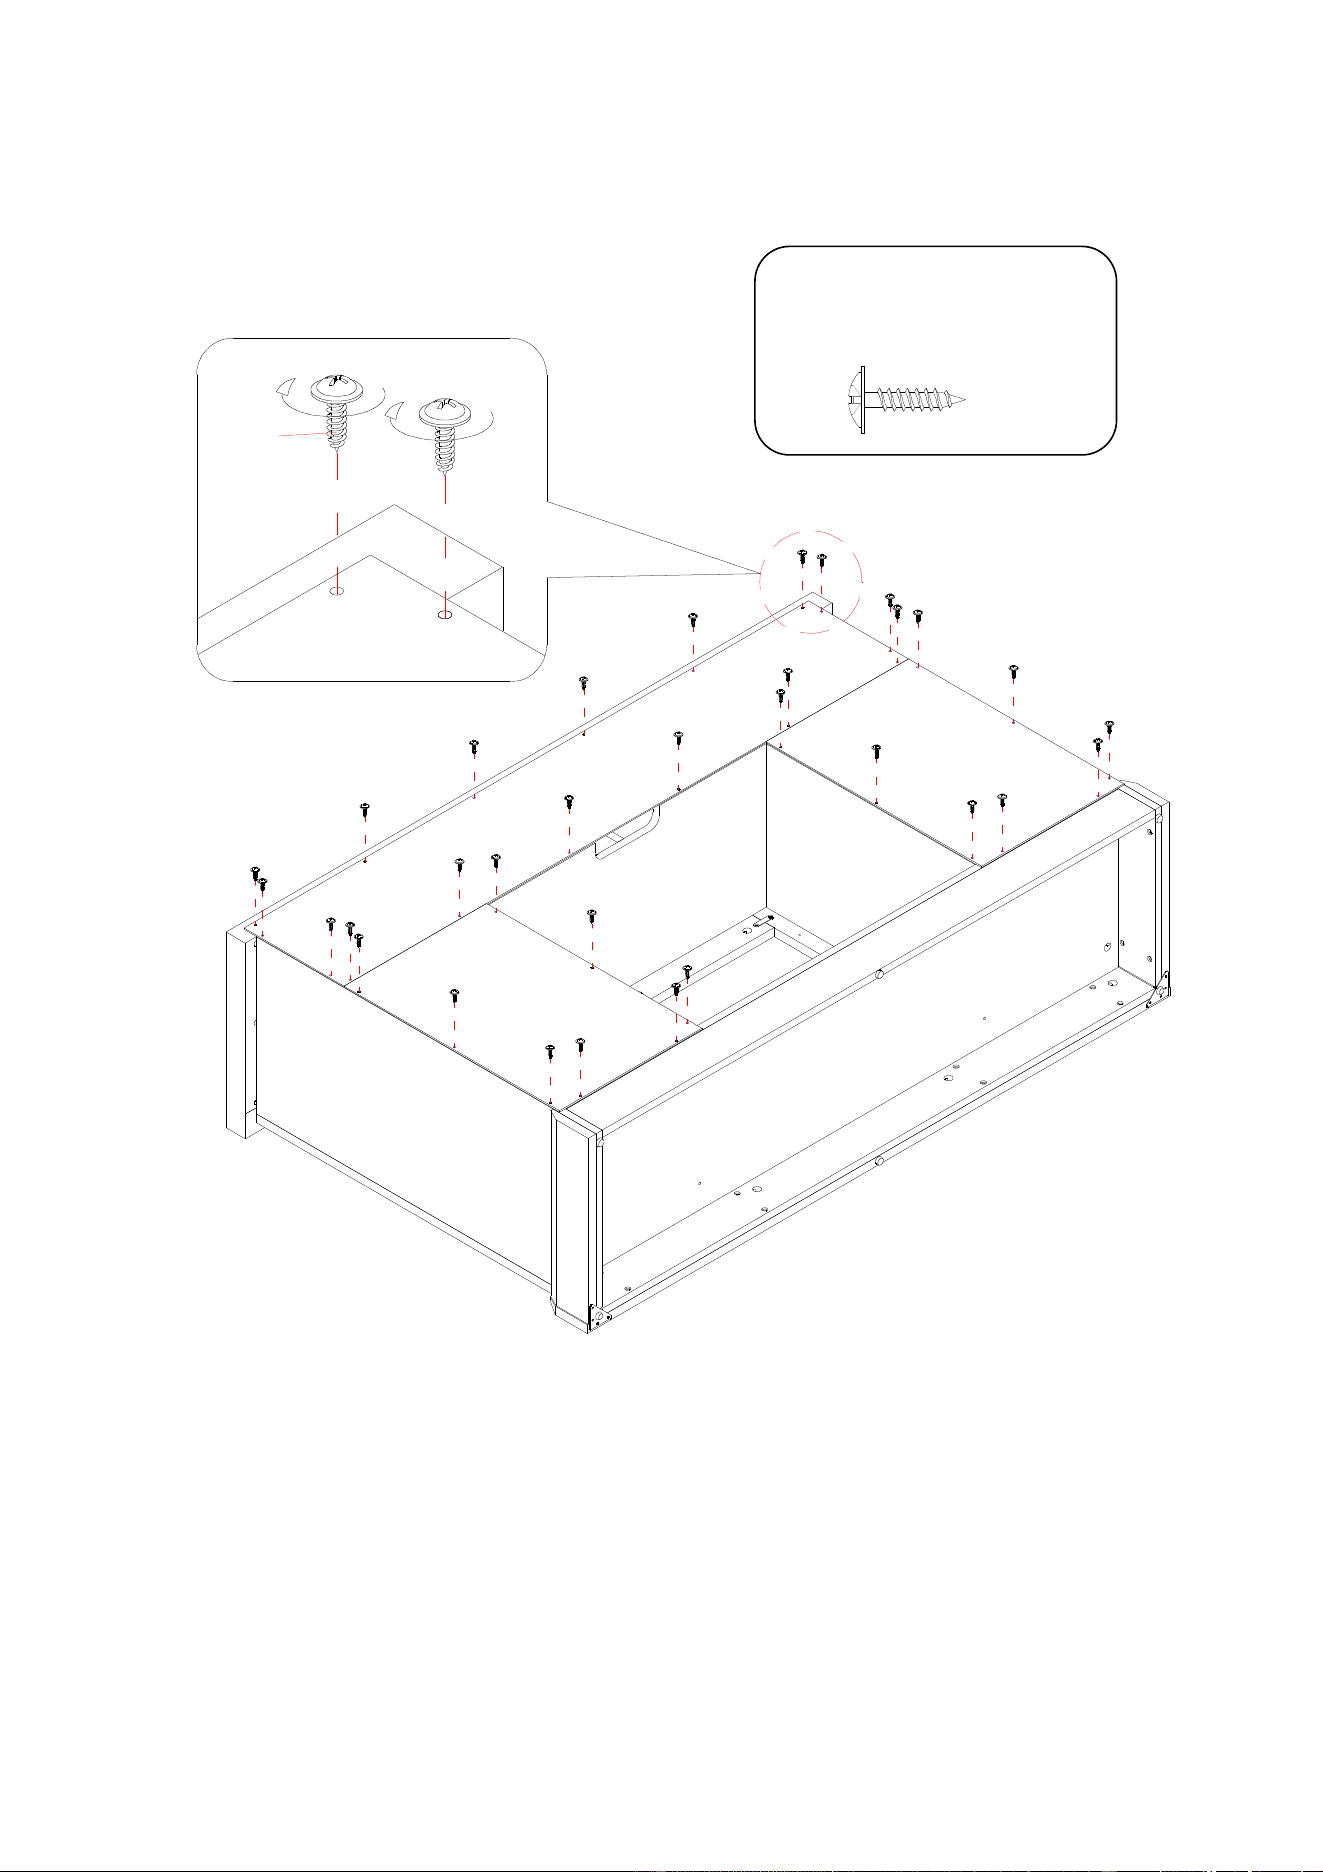
22. Pick up the Upper Back Panel (R) and align the pre-drilled holes against the upper long edge with the
pilot holes on the Top Panel (A). Attach the Back Panel (R) in place using the provided Washer Head
Screws (6).
23. Align and attach two Lower Back Panels (S) to the mantel with the provided Washer Head Screws (6).
6
S
R
S
M3.5 x 15 mm
Washer Head
Screw
(32 used in this step)
⑥
21
Assembly Instructions
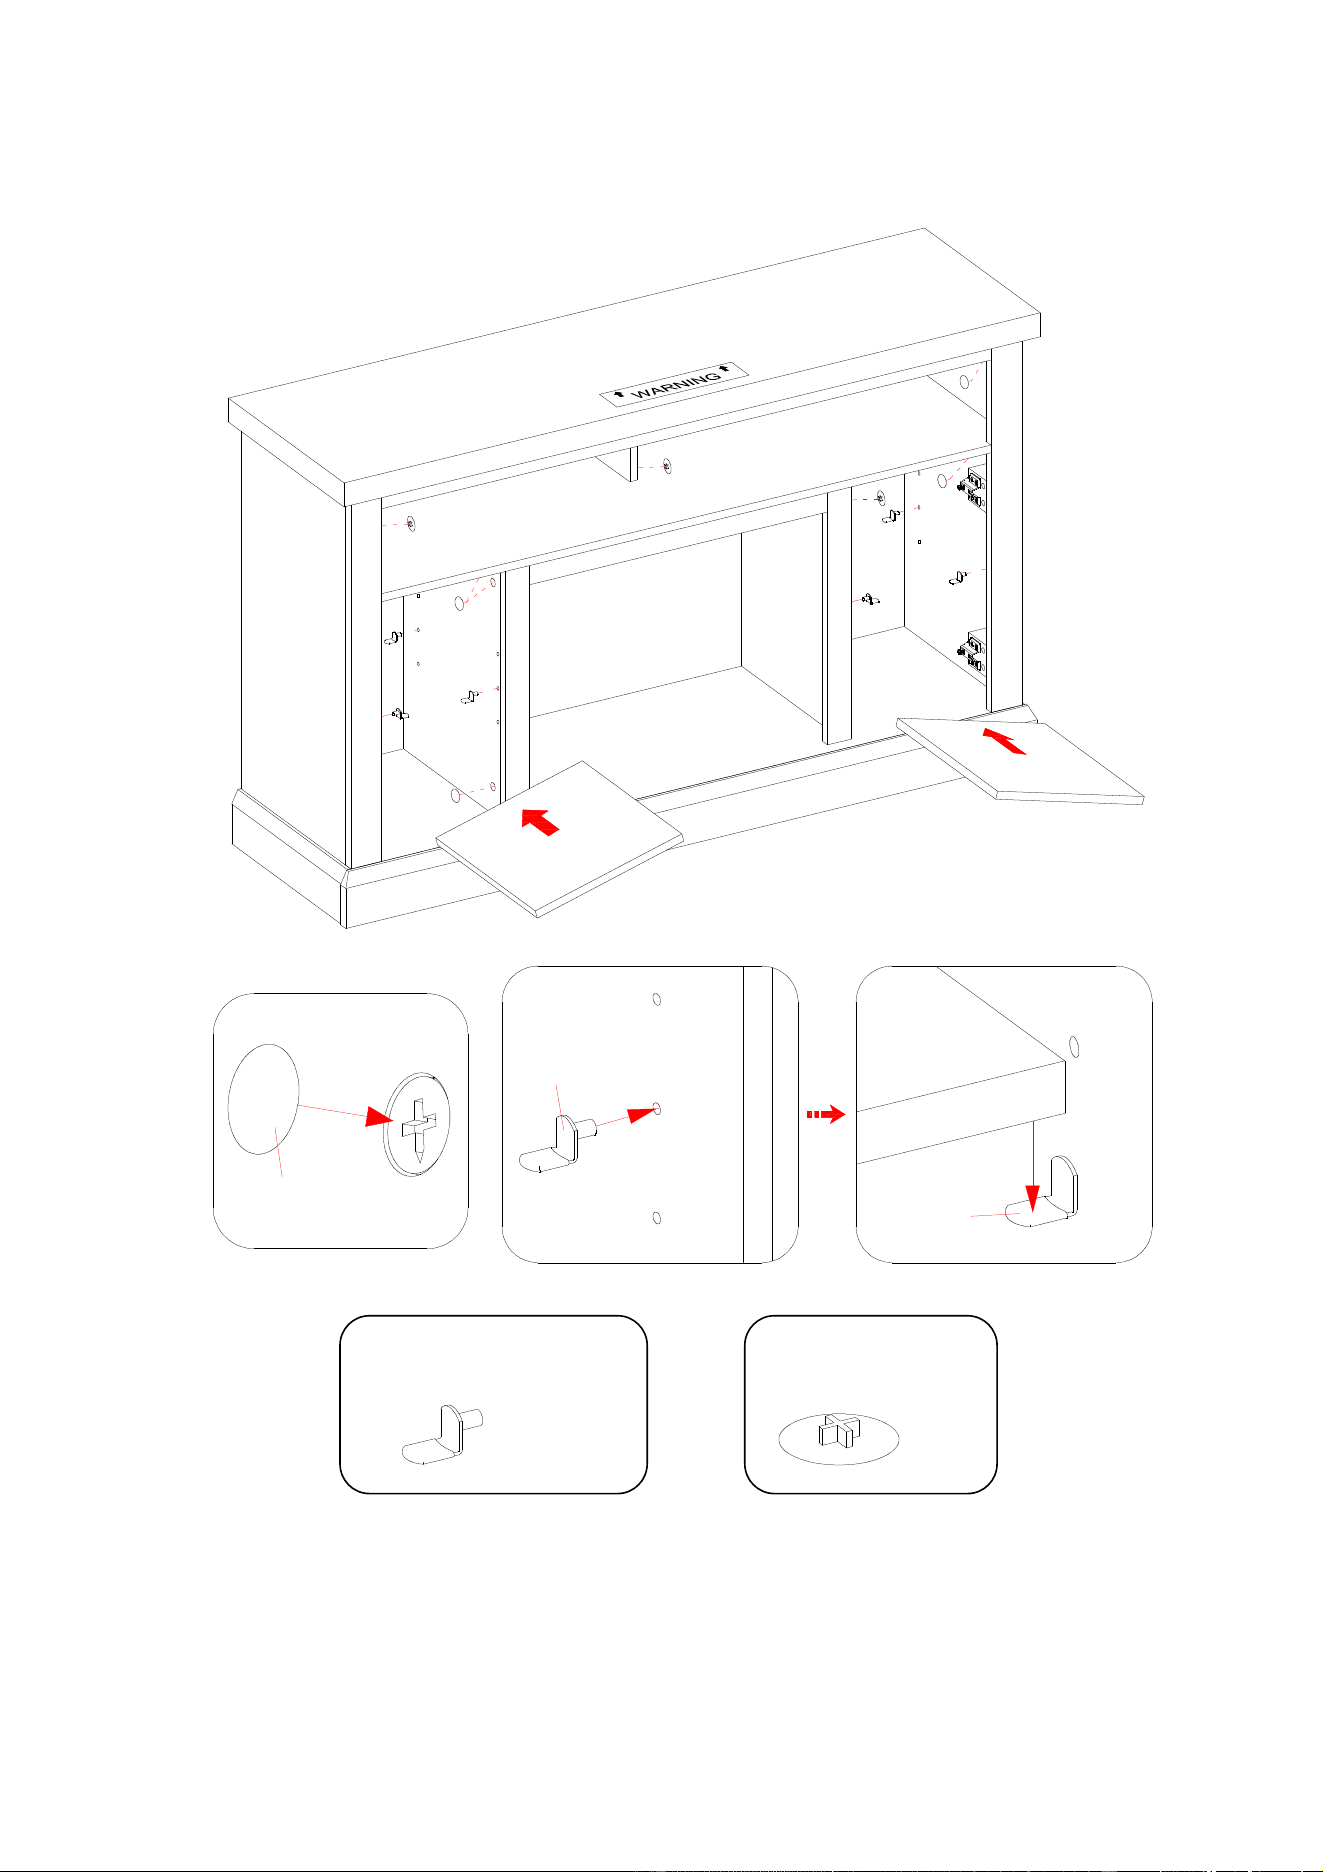
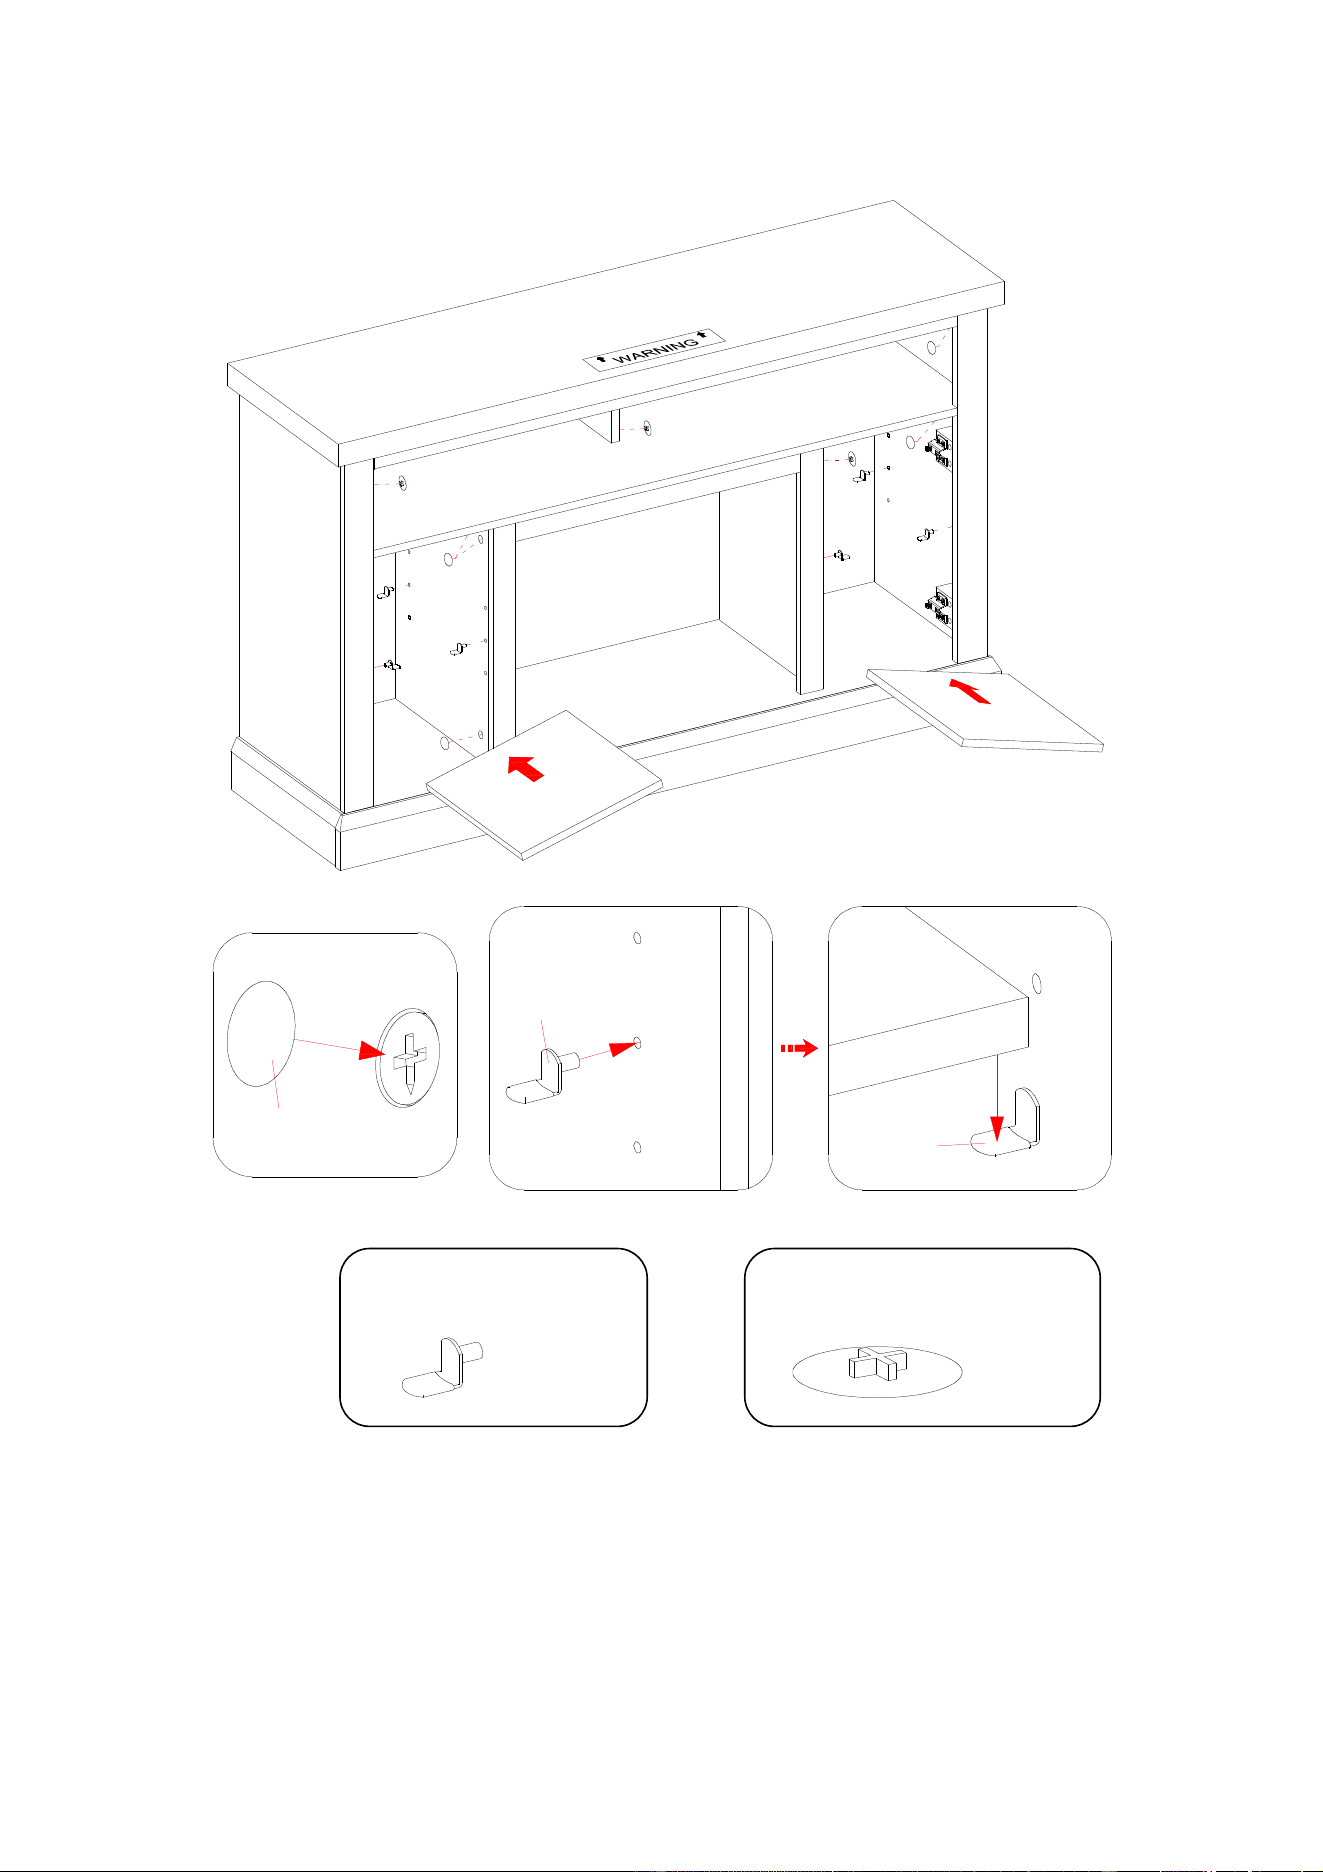
24. Insert four Shelf Supports (8) into the holes at your desired height inside each side compartment. Tilt
and rest the Adjustable Shelves (Q) onto the Shelf Supports (8).
25. Plug the Cam Lock Covers (11) onto the visible cams locks to conceal the cams.
Q
Q
8
Q
8
11
F
G
H
J
Cam Lock Cover
(22 used in this step)
⑪
Shelf Support
(8 used in this step)
⑧
22
Assembly Instructions
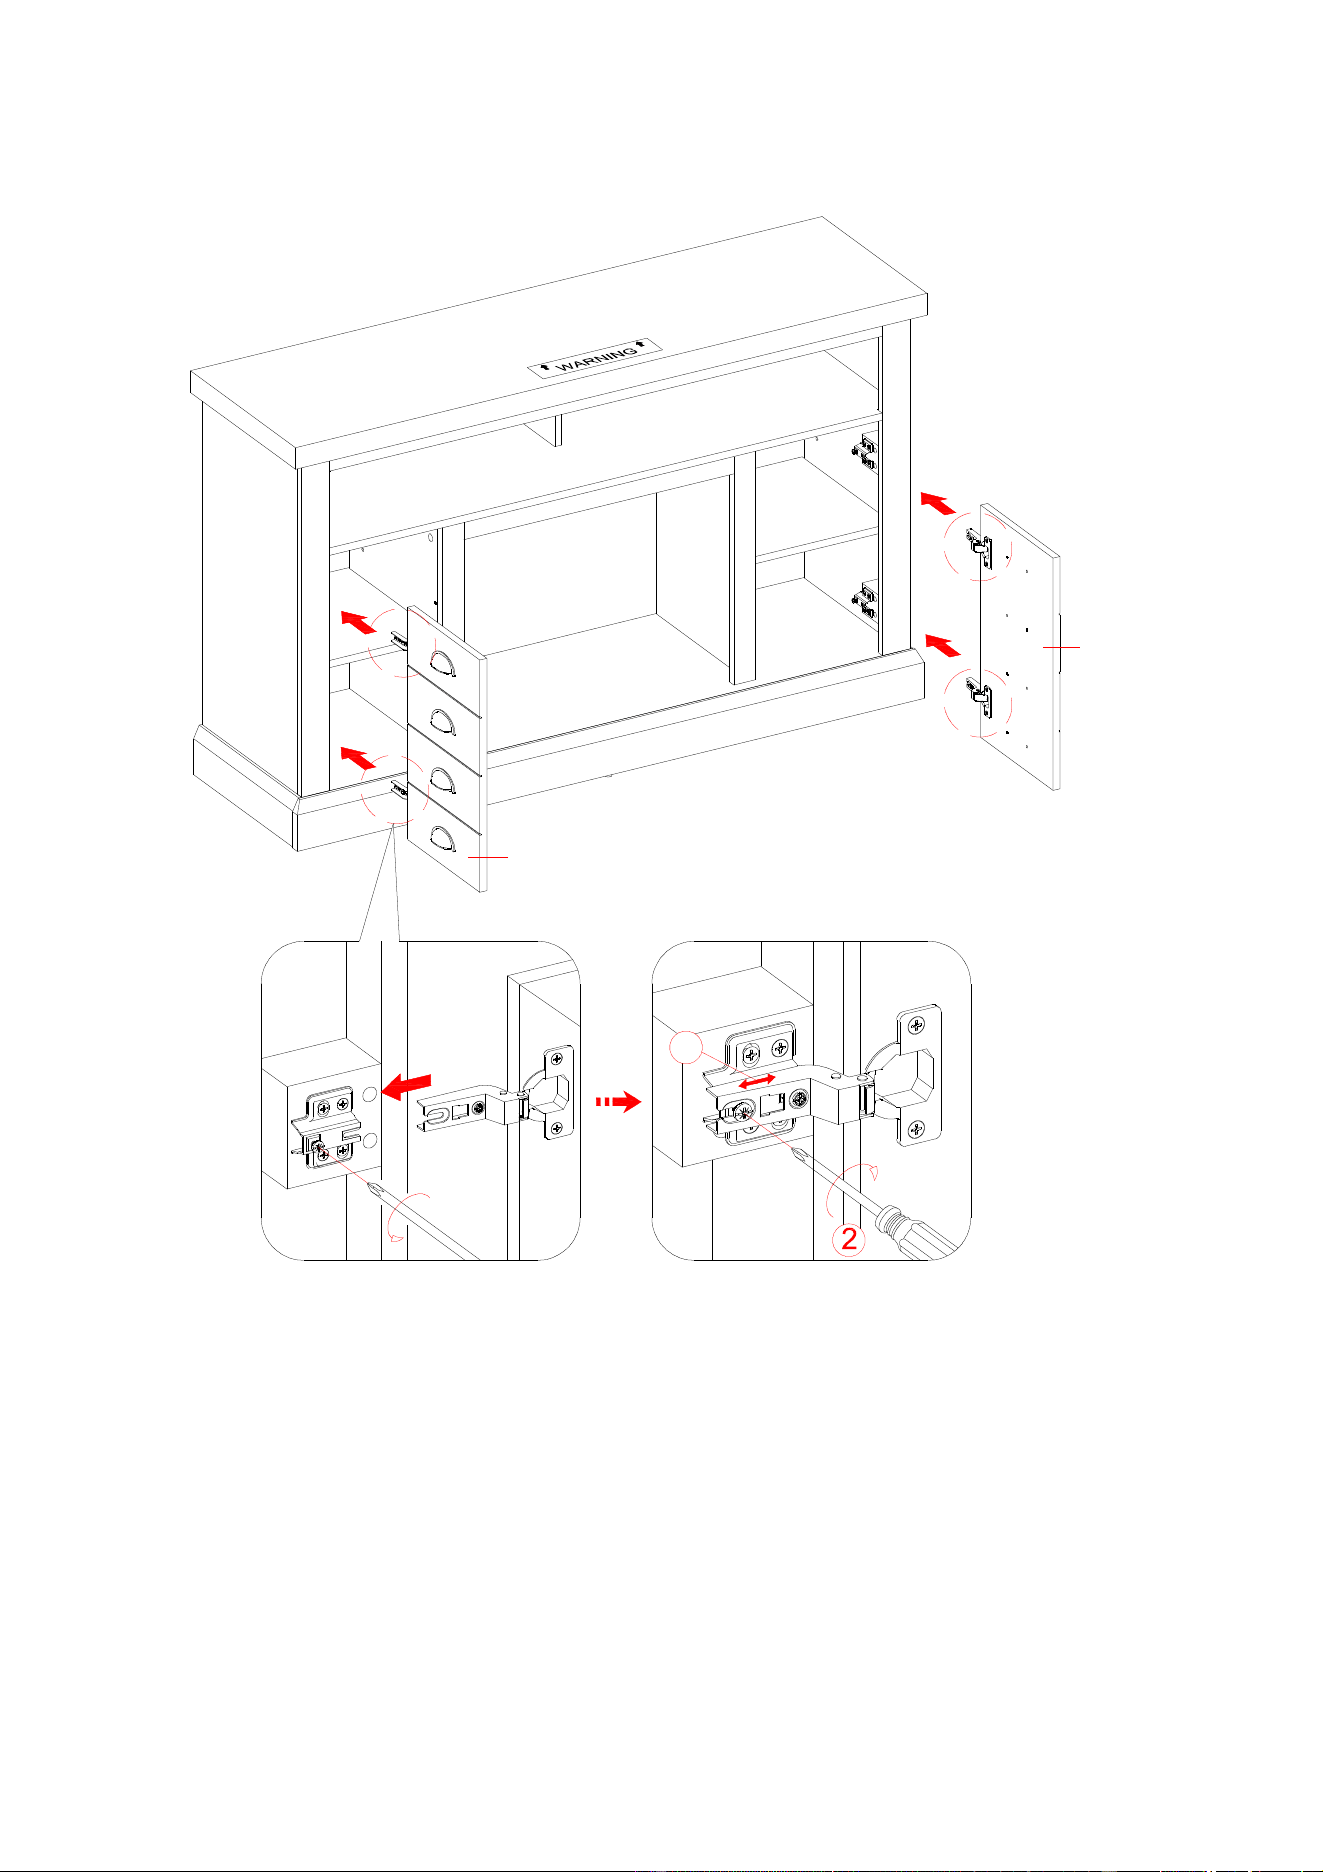
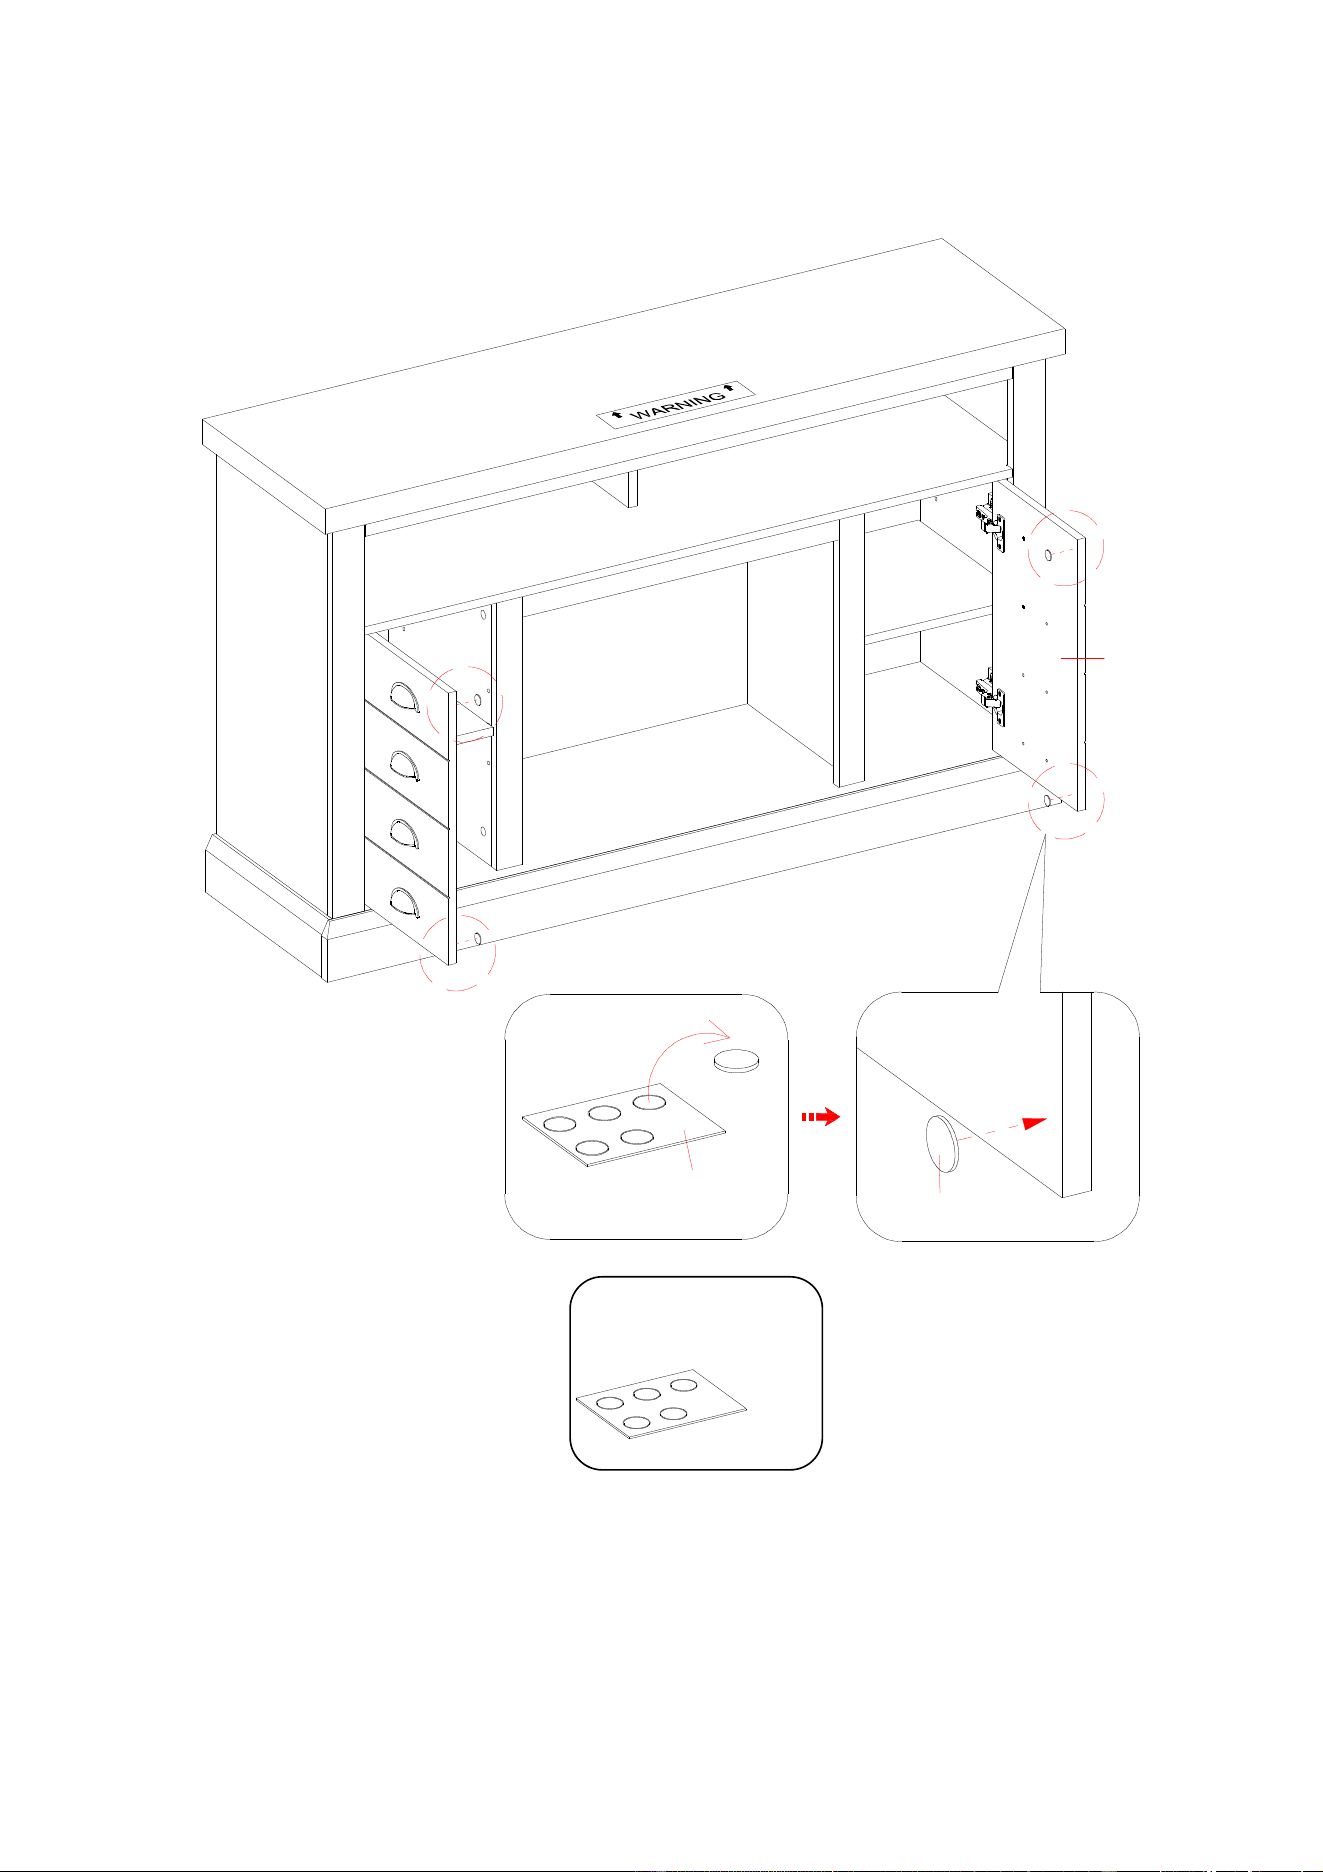
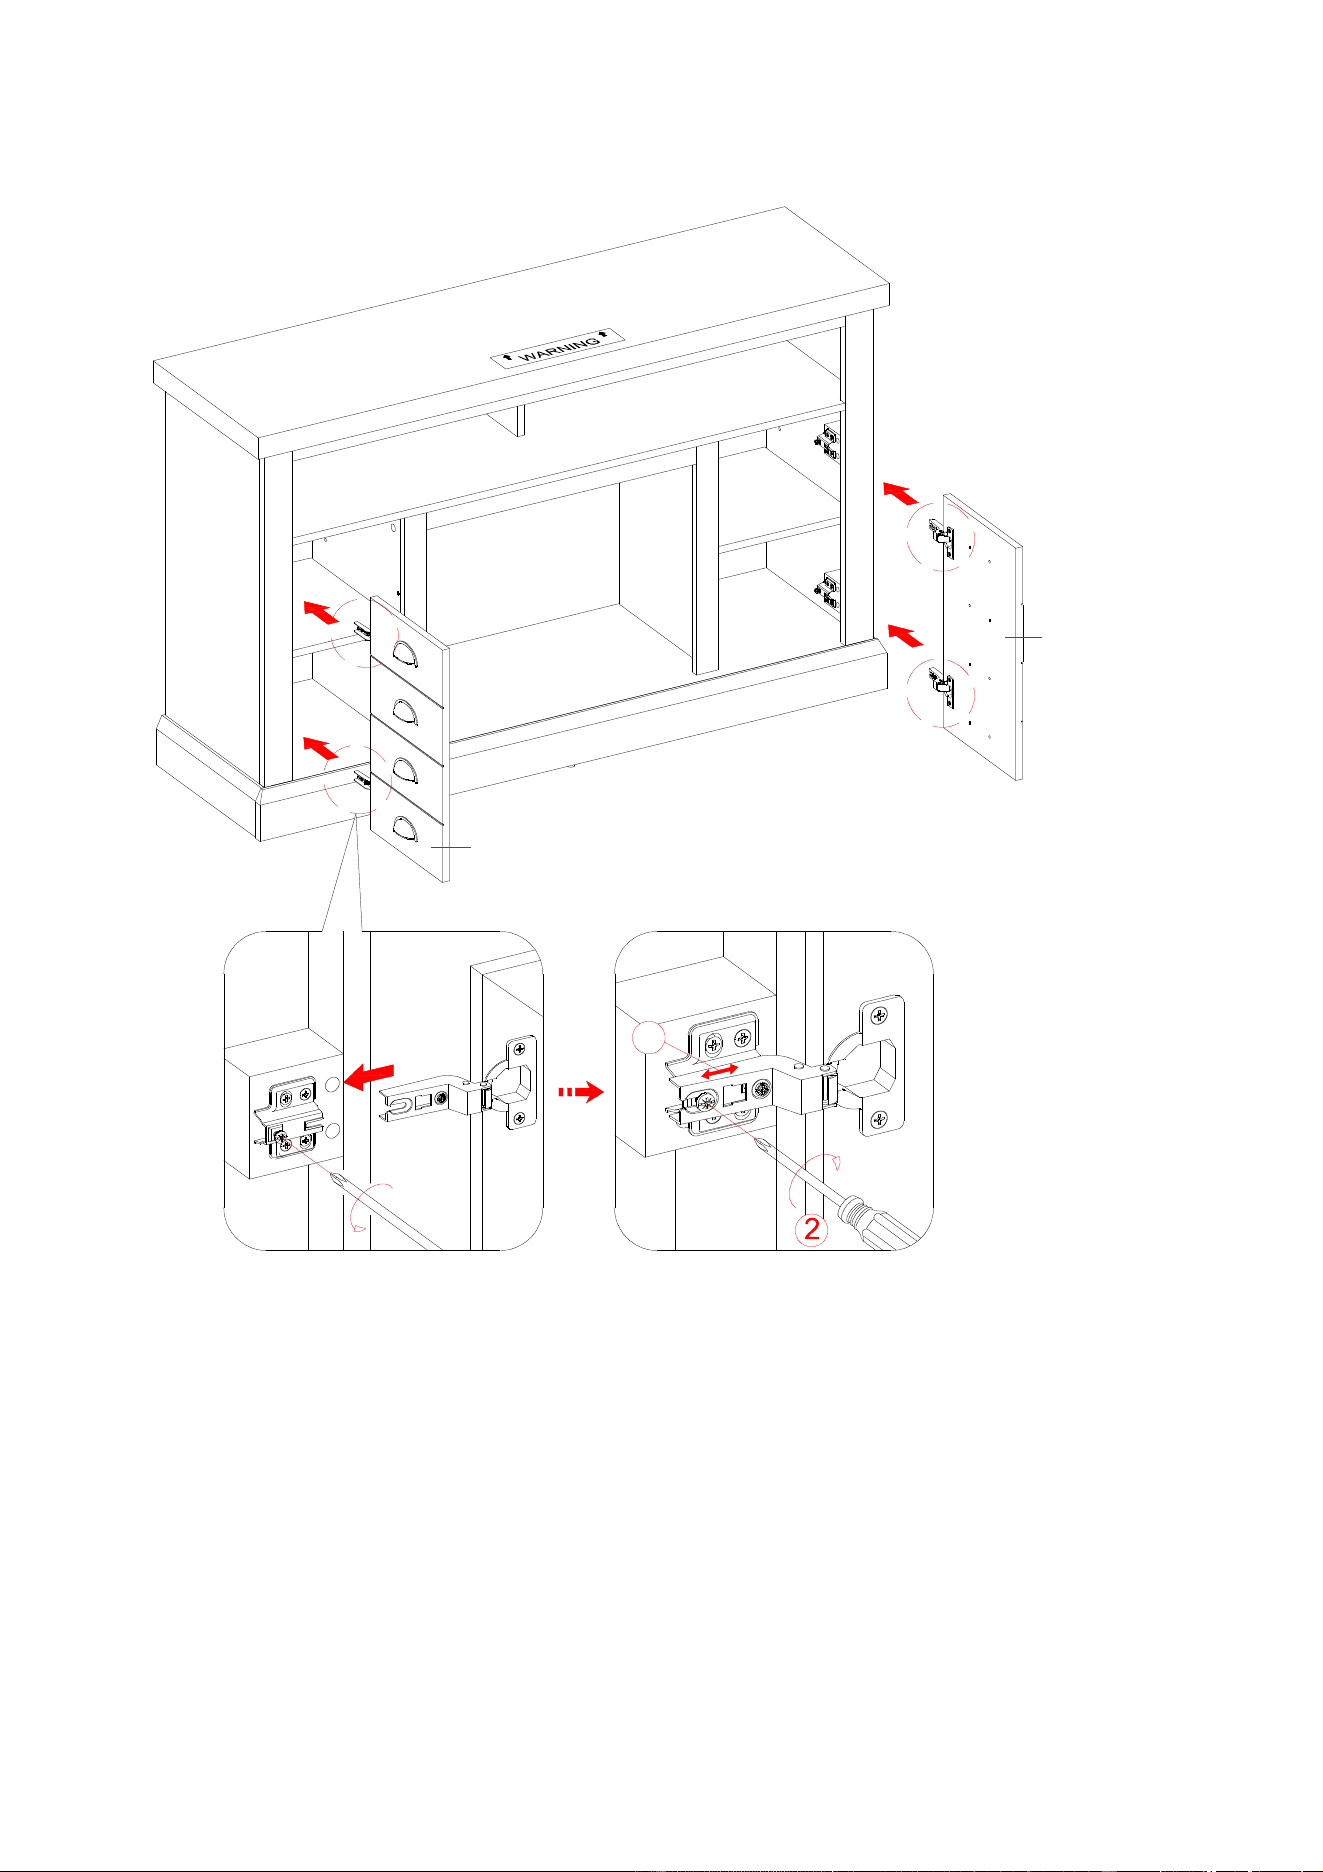
26. Pick up the Left Door (O) and attach the extended hinge arms to the hinge bases installed on the Left
Side Panel (F). Loosen the bolt on the back of the hinge base for an easy fit. Align and insert the “U”
slot on the hinge arm under the bolt head on the back of the hinge base. Make sure that both door hinges
engage and function properly. Tighten the bolt on the hinge base to lock the hinges in place.
27. Repeat the same procedure to attach the Right Door (P) to the Right Side Panel (G).
28. Open and close the doors to make sure they are aligned and shut correctly. If necessary, adjust the
screws for a good fit. Refer to the hinge sticker on door for adjustment.
G
P
F
O
1
23
Assembly Instructions
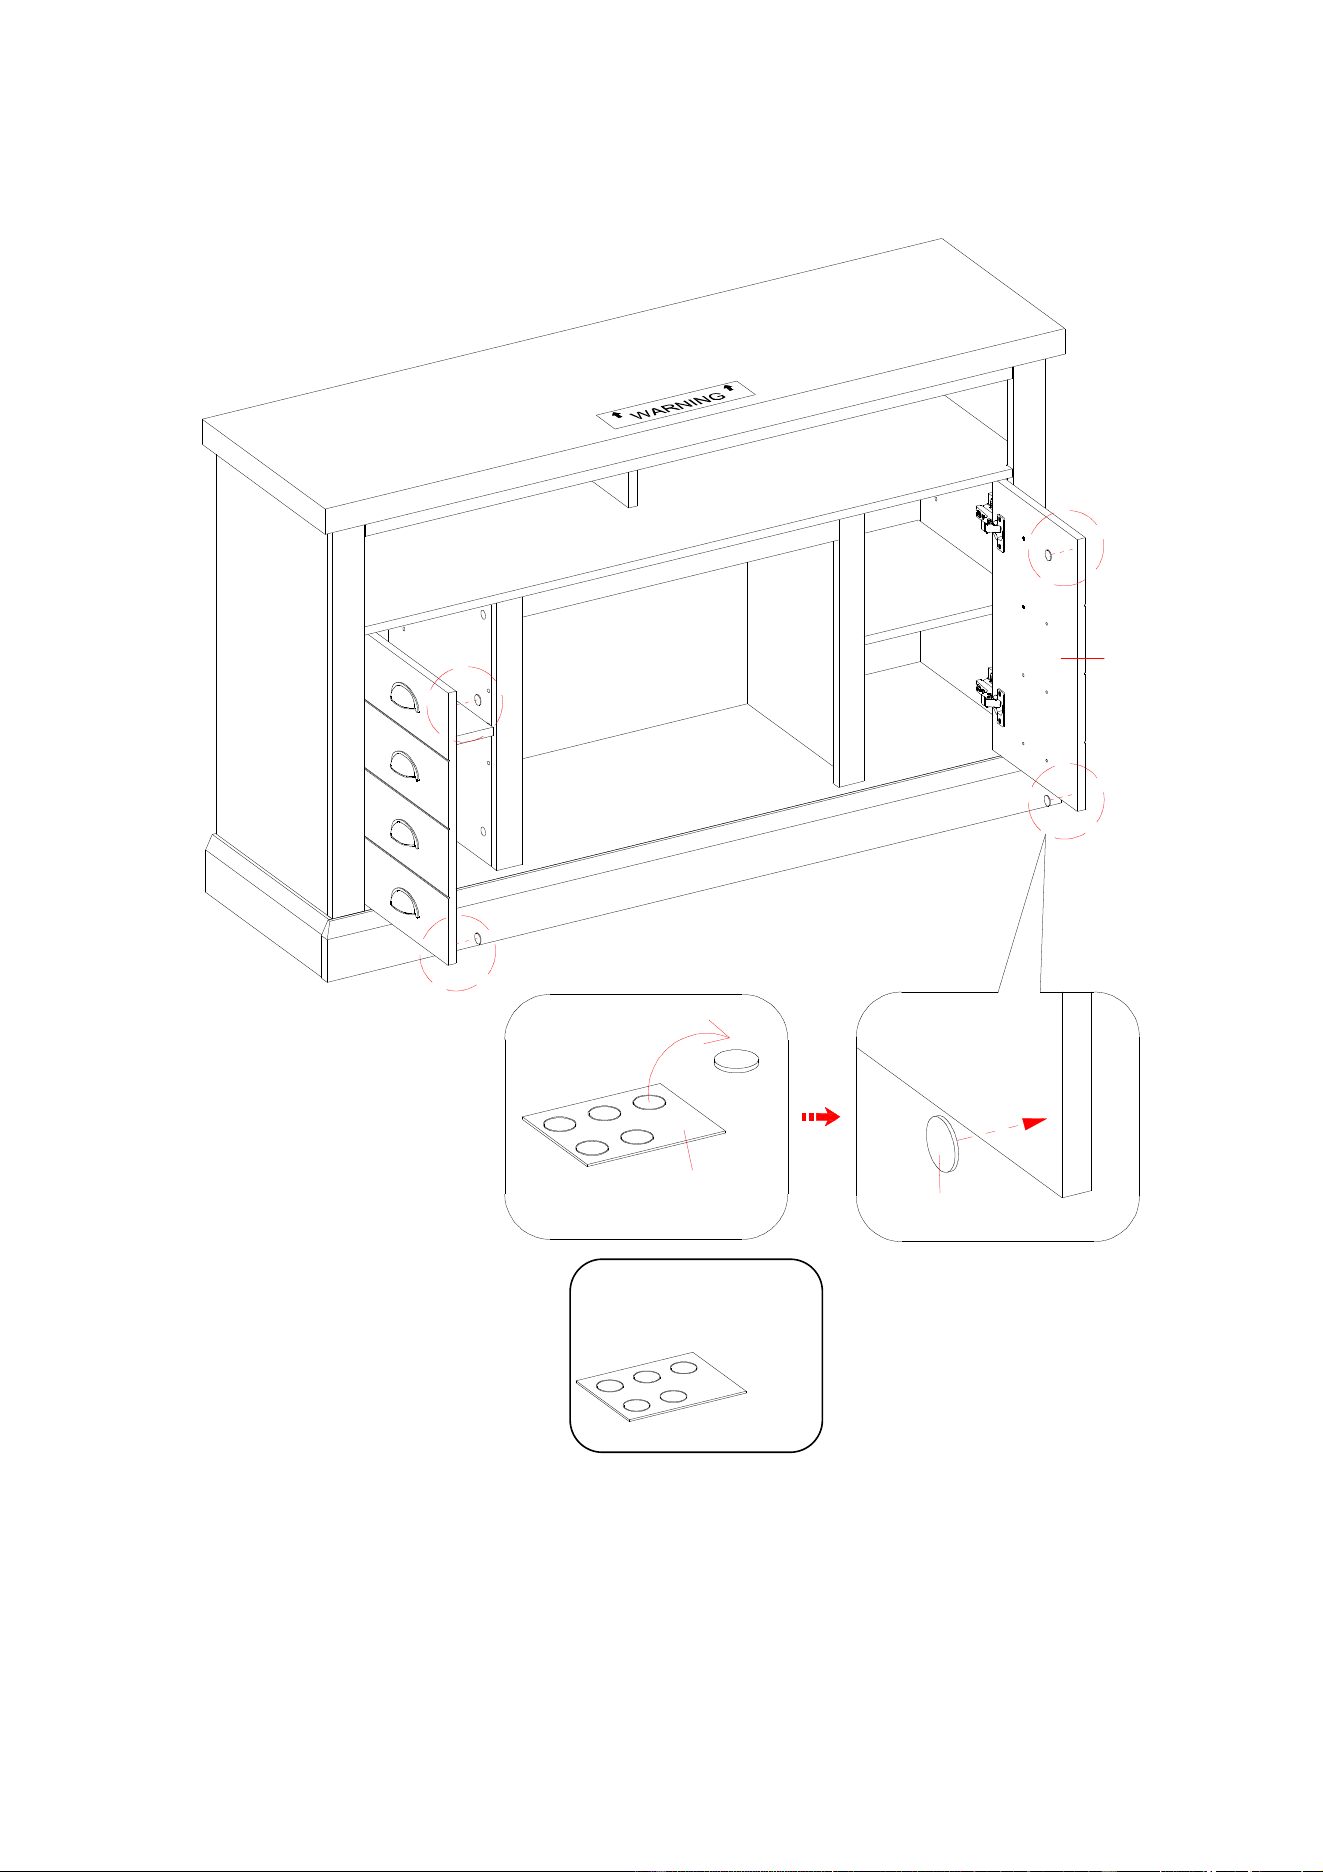
29. Stick the Rubber Bumpers (12) on the outer corners of Left and Right Doors (O and P) where they meet
the Left and Right Stiles (I and K).
Rubber Bumper
(4 used in this step)
⑫
12
12
P
O
24
Assembly Instructions
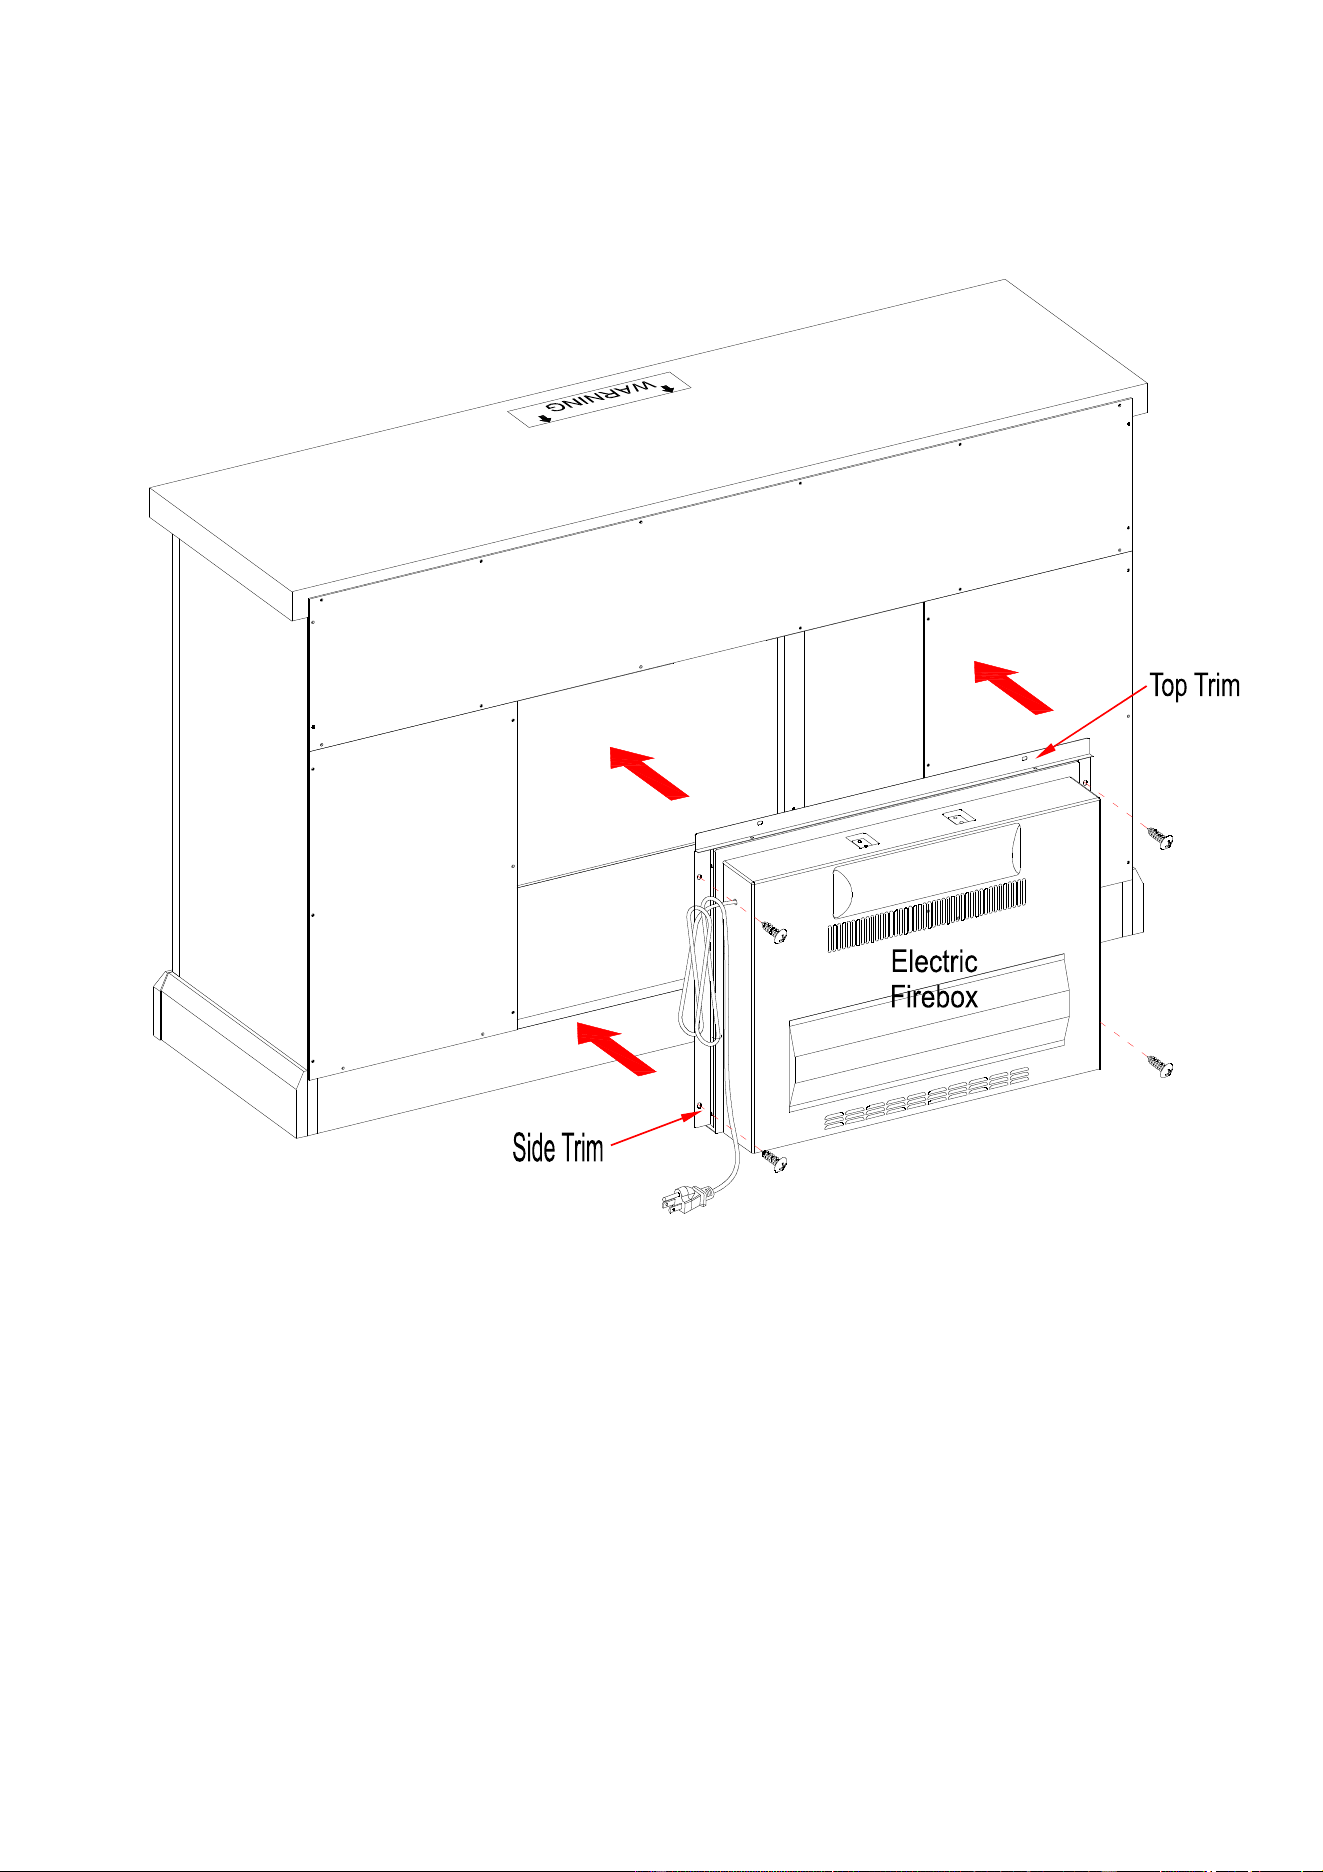
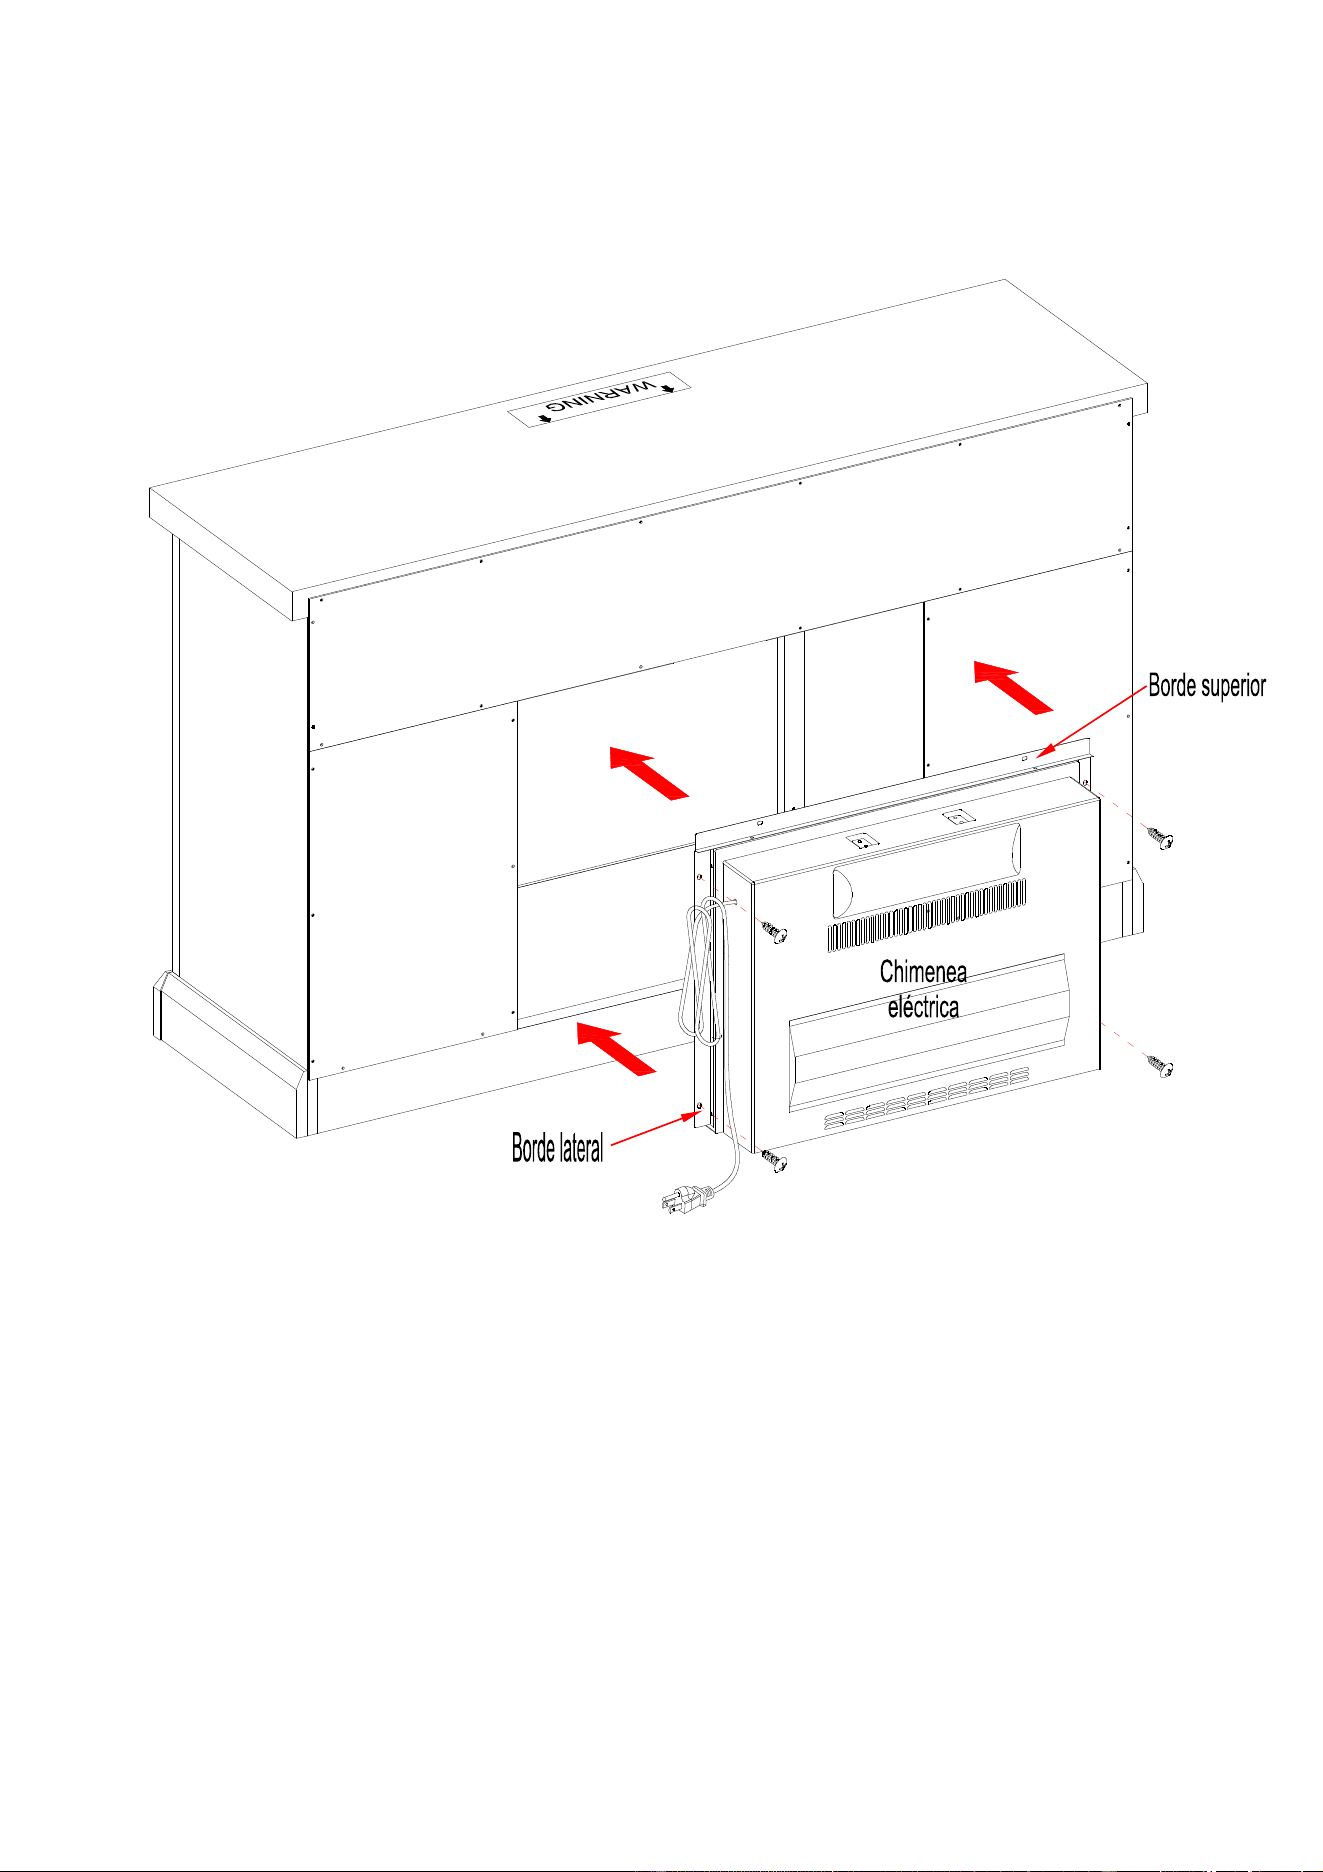
30. Unpack the fireplace insert from the inner box and follow the instructions to install the Top Trim and
Side Trims to the fireplace insert.
31. Lift the fireplace insert carefully into the back of the assembled mantel and center it in the opening.
DO NOT drag the insert across the Bottom Panel (C) as it may scratch the unit.
32. Fasten the fireplace insert to the mantel with four insert screws as shown.
C
A
25
Assembly Instructions
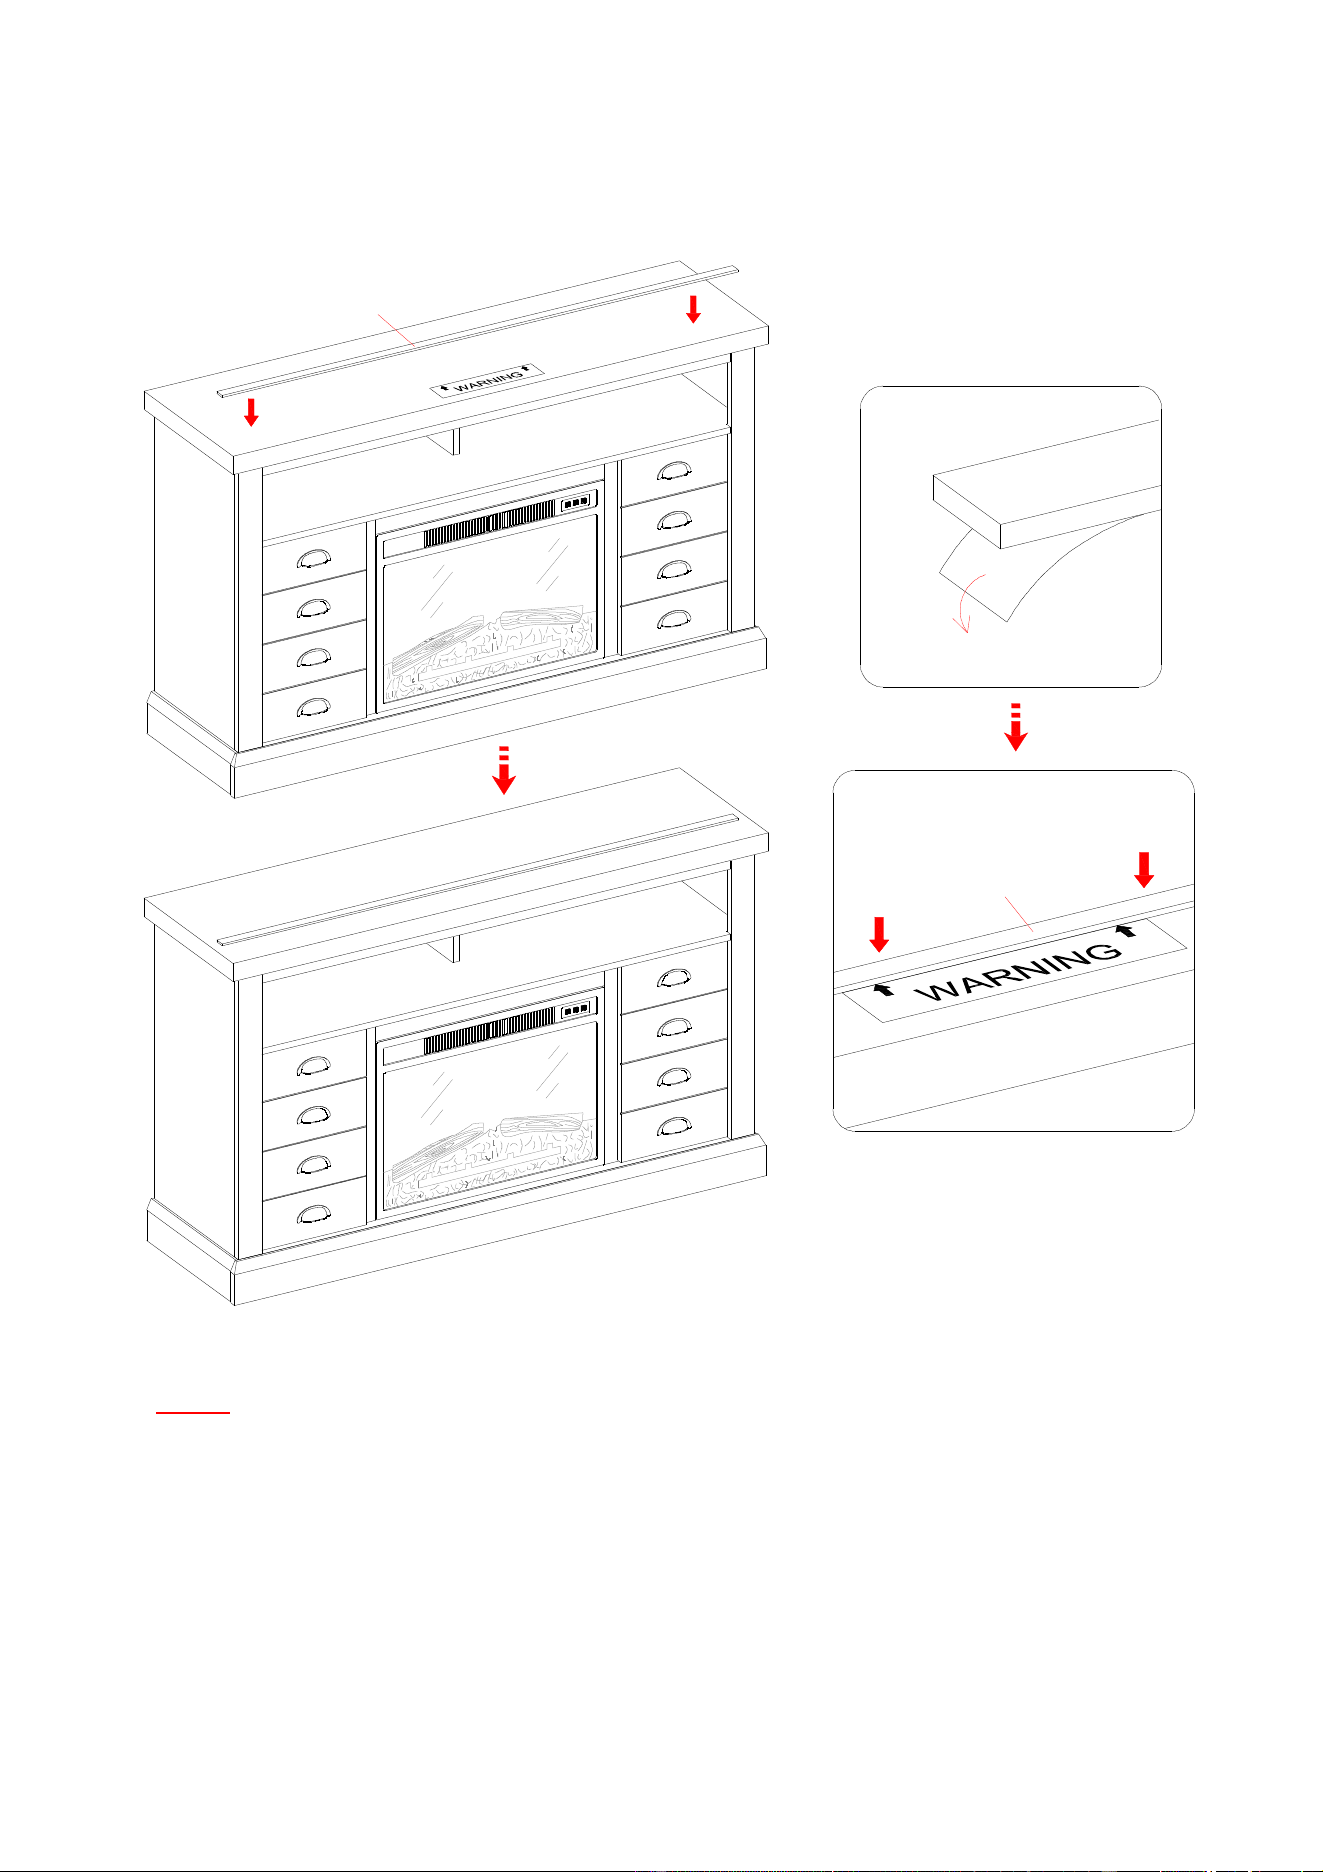
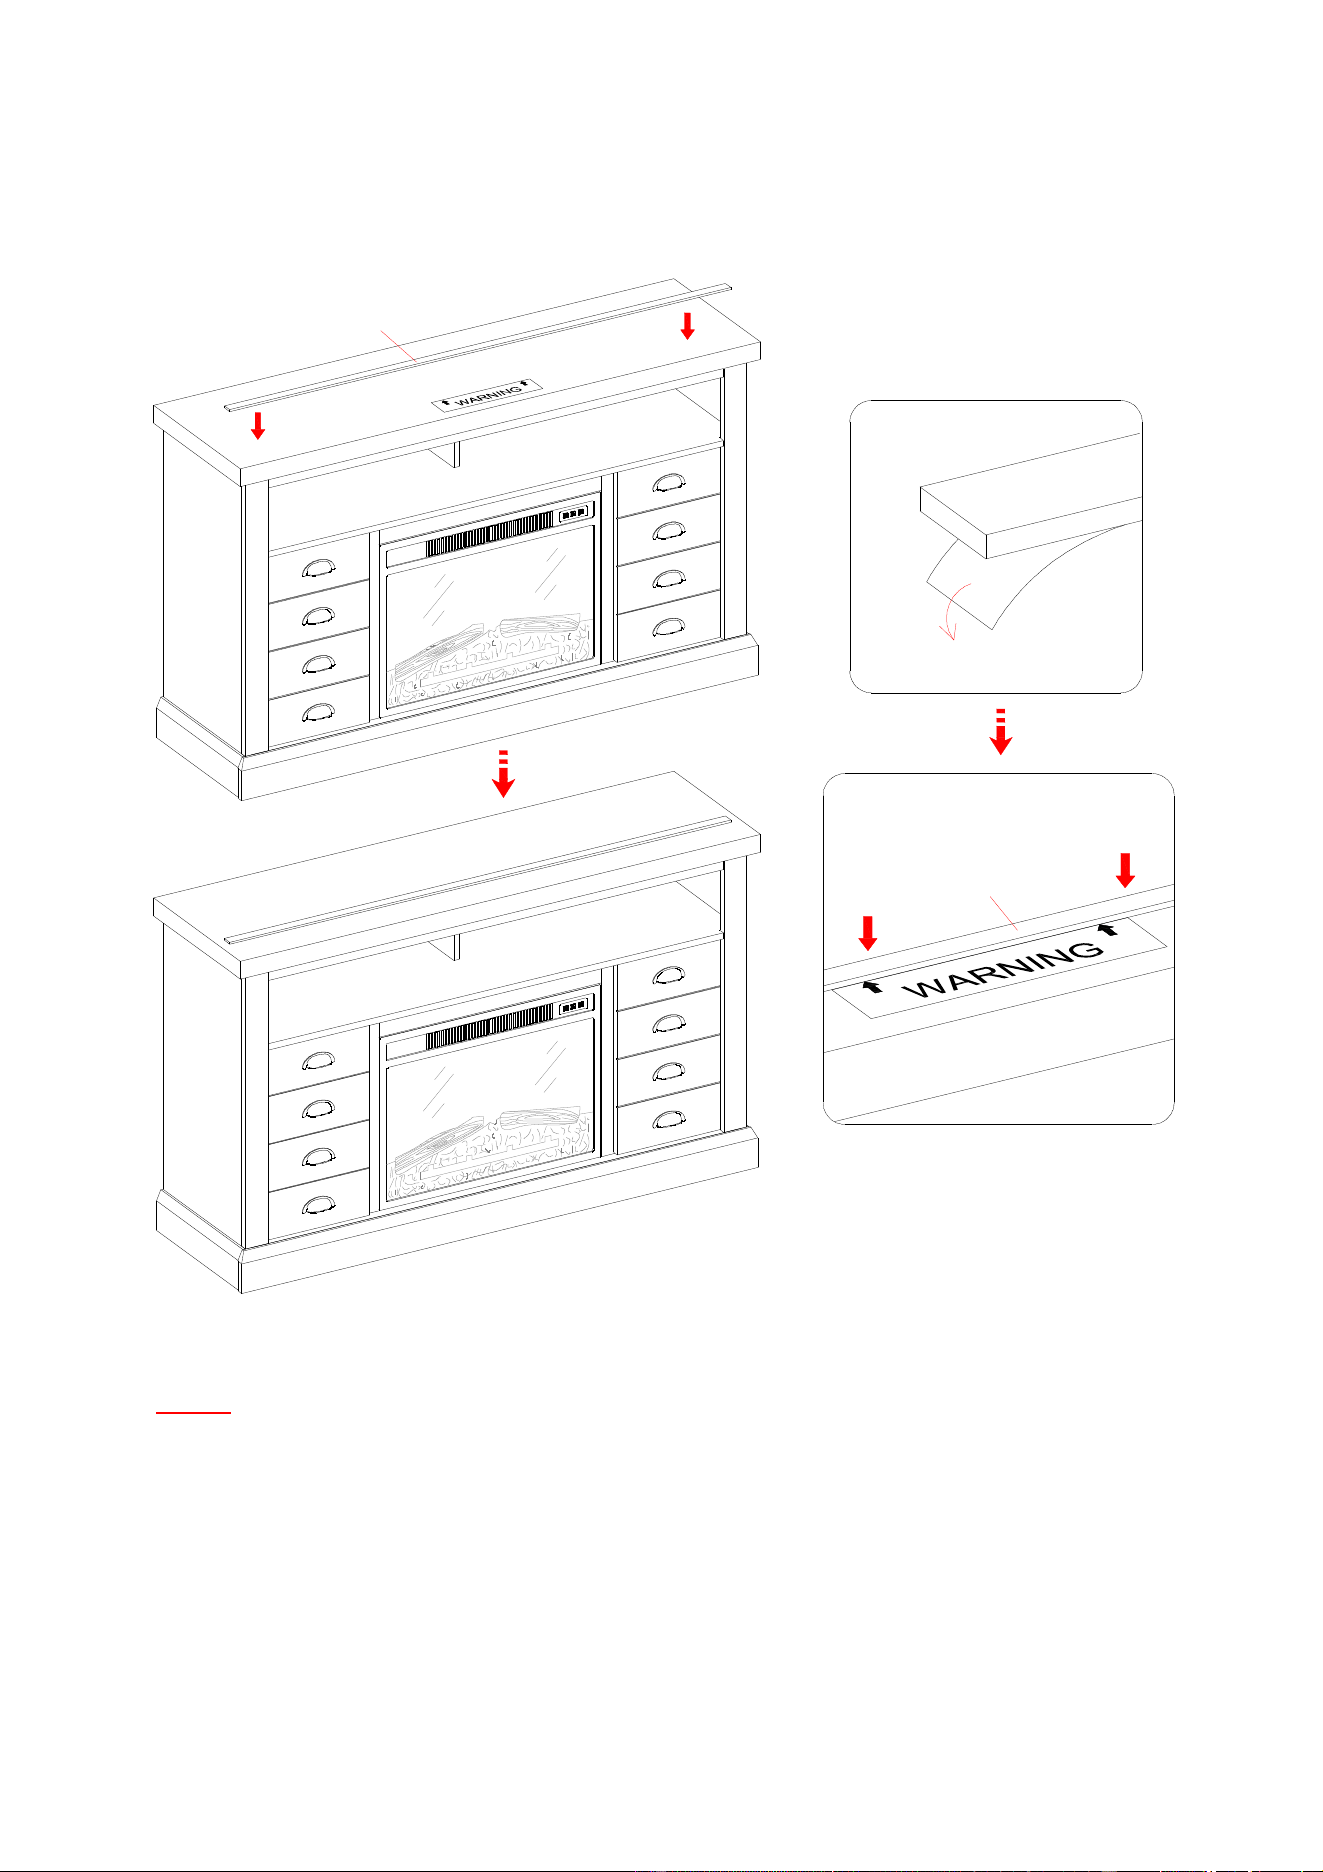
NOTE: To prevent your TV from tipping, you must install the Strip Stopper if you place your flat panel
television directly on the console. Otherwise, skip to step 34.
33. Remove the paper backing from the Stop Rail (T), then properly align the Stop Rail with the top edge of the
stopper template on Top Panel (A). Press down on the Stop Rail to help adhesion.
34. Carefully remove the stopper template from the Top Panel (A).
T
T
A
T
A
A
26
Assembly Instructions
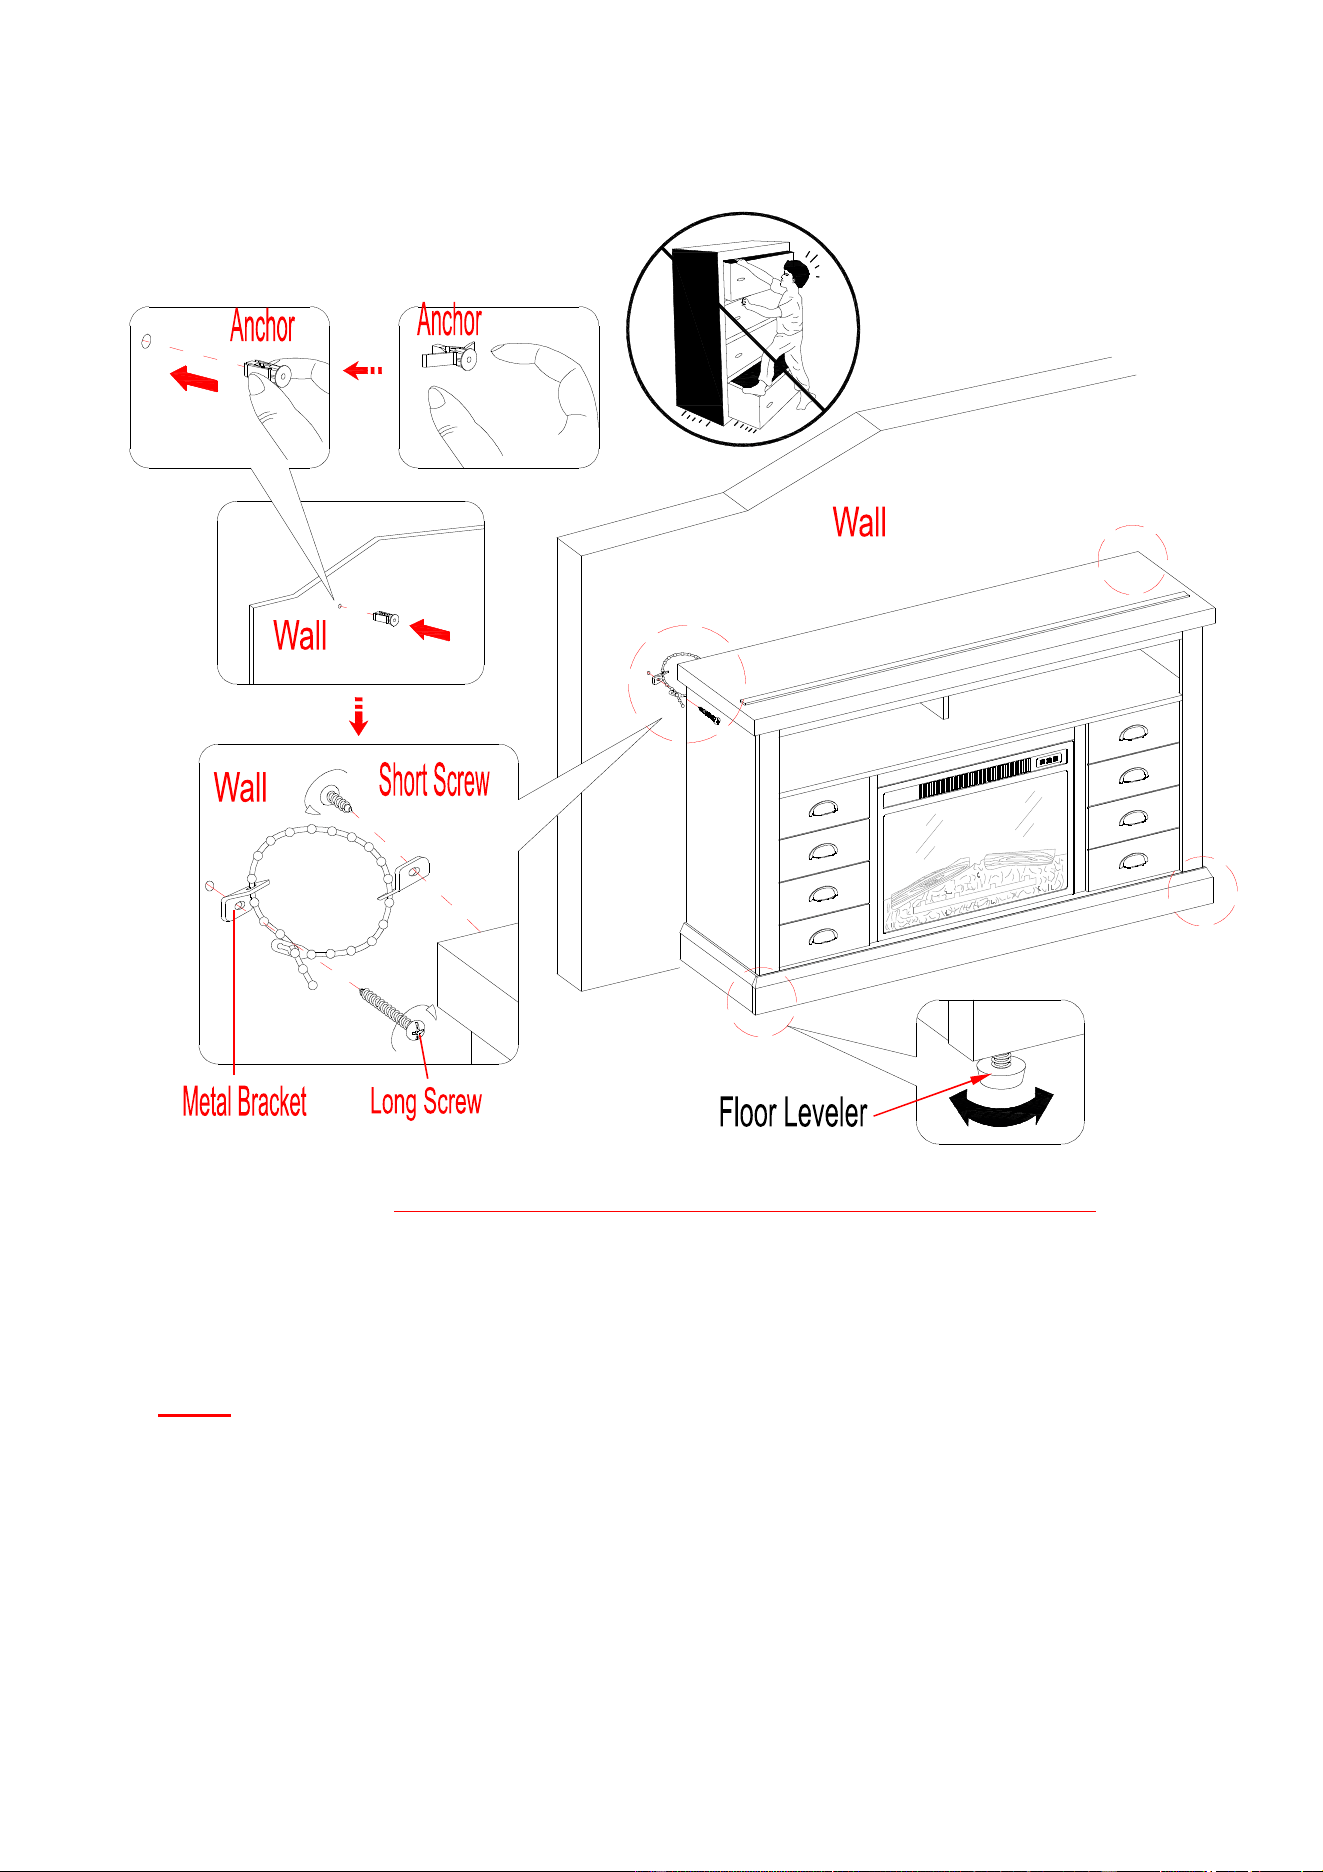
Tools required: Phillips screwdriver, Power Drill, 3/8” Drill Bit and Rubber Mallet.
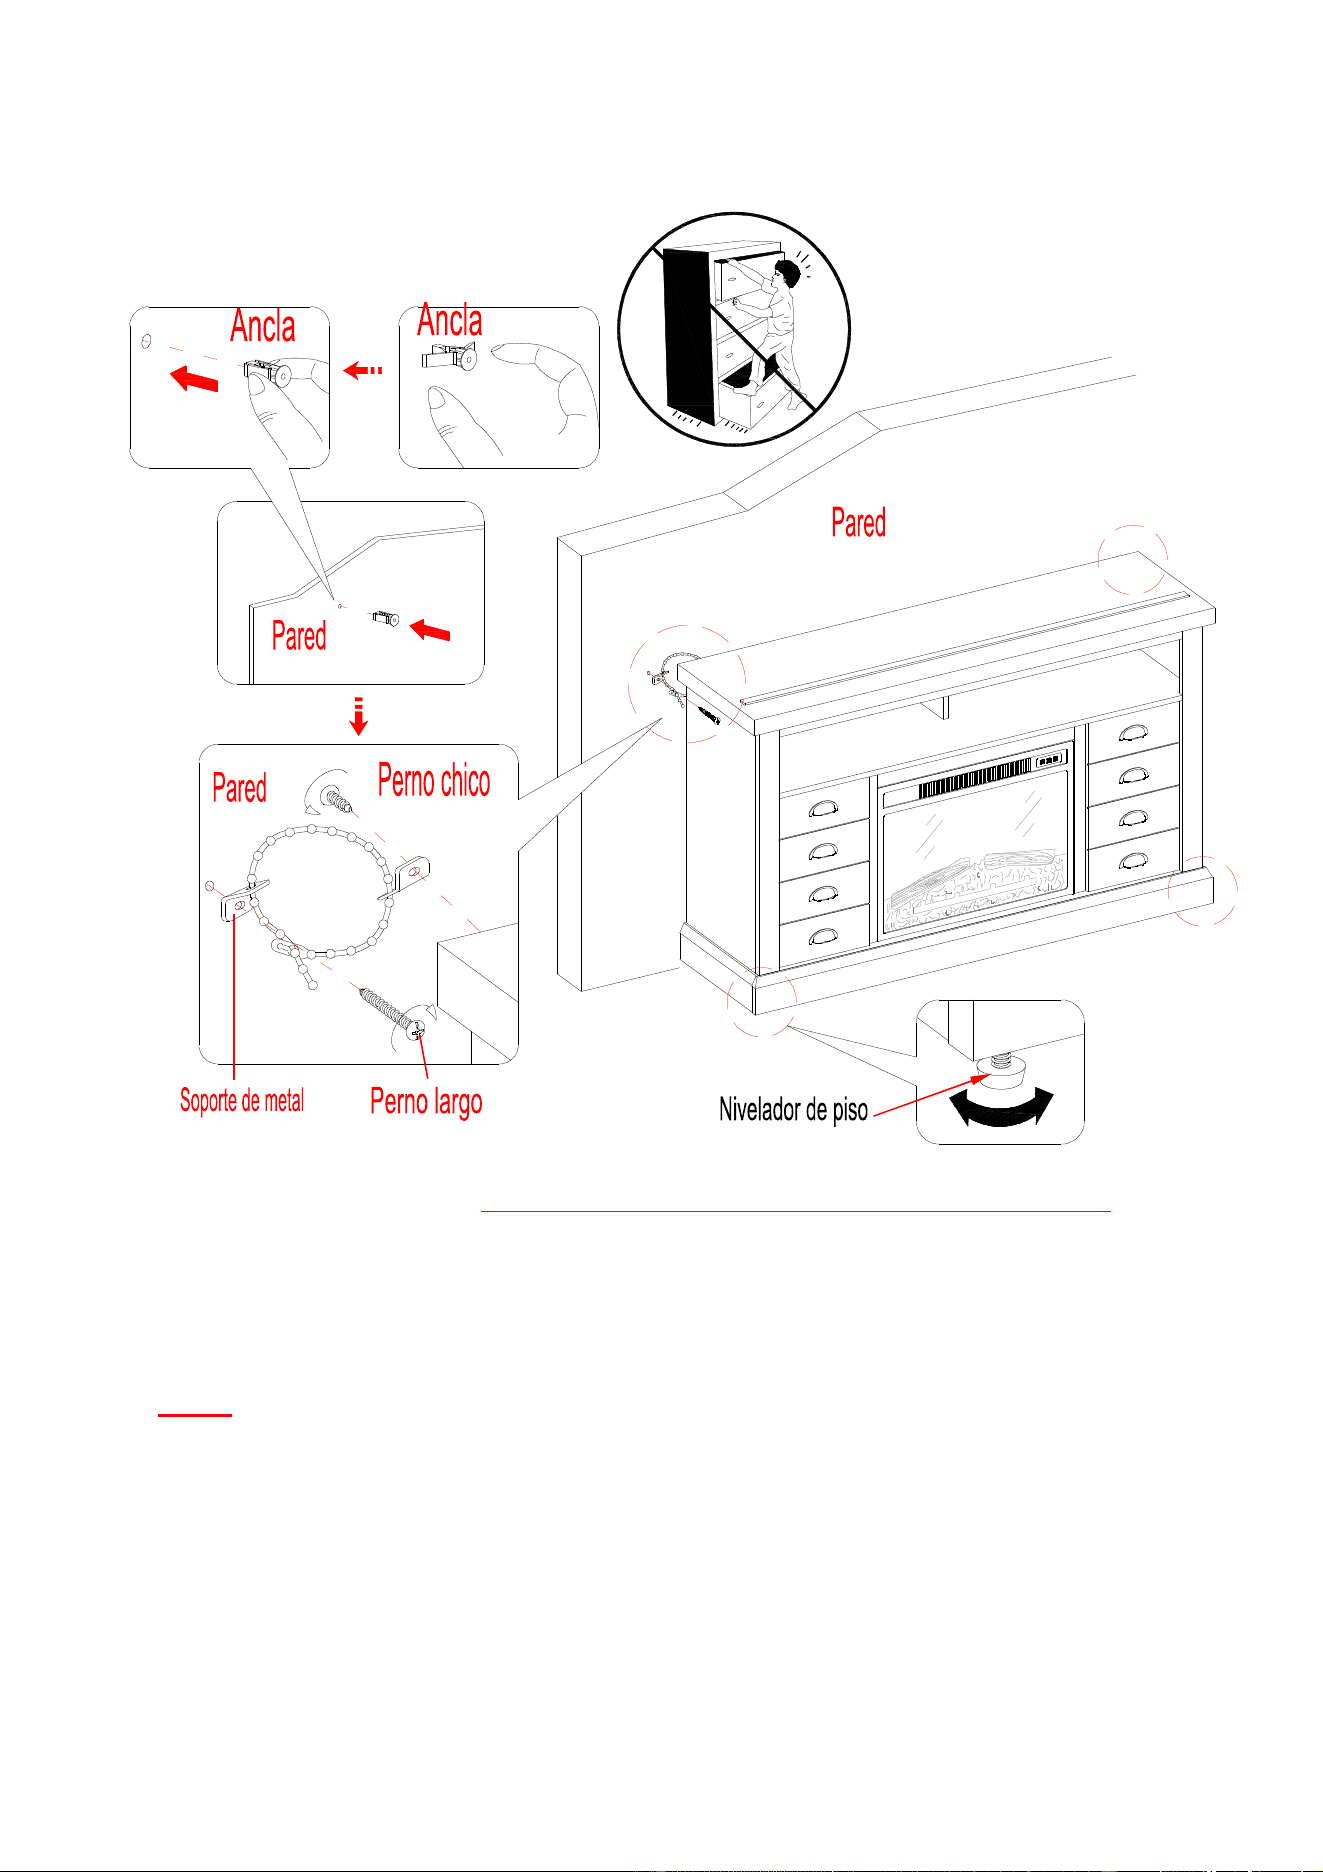
35. Ask for assistance to position the assemble fireplace at the desired location against a wall. If necessary,
adjust the pre-attached Floor Levelers at the bottom of the Base to level the unit. Now, follow the
instructions printed on the plastic bag containing the Tipping Restraint Hardware to attach the tip-over
restraints to the unit and the wall.
NOTE: Young children can be seriously injured by tipping furniture. You must install the Tipping
Restraint Hardware with the unit to prevent the unit from tipping, causing any accidents or damage. The
tipping restraint is intended only as a deterrent, they are not a substitute for proper adult supervision.
The tipping restraint is not an earthquake restraint. If you wish to add the extra security of earthquake
restraints, they must be purchased and installed separately.
36. Connect the fireplace to the power transformer. Follow the operating manual for the electric fireplace
insert to control your fireplace.
A

27
Care and Maintenance
Use a soft, clean cloth that will not scratch the surface when dusting.
Use of furniture polish is not necessary. Should you choose to use polish, test first in an inconspicuous area.
Using solvents of any kind on your furniture may damage your furniture’s finish.
Never use water to clean your furniture as it may cause damage to the finish.
Always use coasters under beverage glasses and flowerpots.
Liquid spills should be removed immediately. Using a soft, clean cloth, blot the spill gently. Avoid rubbing.
Always use protective pads under hot dishes and plates. Heat can cause chemical changes that may create
spotting within the furniture finish.
In the event that your furniture is stained or otherwise damaged during use, we recommend that you call a
professional to repair your furniture.
Check bolts/screws periodically and tighten them if necessary.
Further Advice about Wood Furniture Care
It is best to keep your furniture in a climate-controlled environment. Extreme temperature and humidity
changes can cause fading, warping, shrinking and splitting of wood. It is advised to keep furniture away from
direct sunlight as sun may damage the finish.
Proper care and cleaning at home will extend the life of your purchase. Following these important and helpful
tips will enhance your furniture as it ages.
Cleaning Trim for Fireplace
Clean the metal trim using a soft cloth, slightly dampened with citrus oil based product and buff with a clean
soft cloth. DO NOT use brass polish or household cleaners as these products will damage the metal trim. Citrus
oil based products can be obtained at supermarkets or hardware stores.
A touch-up pen has been provided to repair any small nicks or scratches that may occur during assembly or
shipping.
We hope you enjoy your purchase for many years.
Thank you for your purchase!
QUALITY GUARANTEE
We are confident that you will be delighted with your Whalen Furniture purchase.
Should this product be defective in workmanship or materials or fail under normal use, we will repair or replace
it for up to one (1) year from date of purchase. Every Whalen Furniture product is designed to meet your
highest expectations. We guarantee that you will immediately see the value of our fine furniture.
This warranty gives you specific legal rights and you may also have other rights which vary from State to State.
Customer Service: 866-942-5362
8:30 a.m. - 4:30 p.m., PST, Monday to Friday
www.whalenstyle.com

ESTE INSTRUCTIVO CONTIENE INFORMACION IMPORTANTE DE SEGURIDAD.
POR FAVOR LEA Y MANTENGA PARA USO FUTURO.
Fecha 2018-06-04 Rev. 0001-B Fábrica: DONPEA
Chimenea Consola de 65” para Medios
de Comunicación Farmhouse
Serie # BH47-084-099-08
ENSAMBLE REQUERIDO POR ADULTO
Si tienen alguna pregunta acerca del ensamble o si alguna parte está faltante, no retorne esté producto
a la tienda donde lo compró. Por favor llame a nuestro departamento de ayuda al cliente teniendo su
instructivo y lista de partes para proveer el modelo, nombre de parte o el número de fábrica:
866-942-5362
Hora Estándar del Pacífico: 8:30 a.m. - 4:30 p.m., de Lunes a Viernes
O visite nuestra página de Internet 24 horas al dia, 7 días a la semana para asistencia
www.whalenstyle.com
O mande un correo electrónico a parts@whalenfurniture.com
NÚMERO de LOTE:
FECHA de COMPRA: / /
2
FABRICANTE: Whalen Furniture Manufacturing
CATALOGO: Chimenea Consola de 65” para Medios de Comunicación Farmhouse
MODELO #: BH47-084-099-08
HECHO EN CHINA
Como ajustar las bisagras Europeas ajustables en las puertas
El envio puede causar que las puertas se desalineen. Si encuentra que las puertas necesitan una
ajustada, gire el tornillo apropiado, como esta ilustrado
.
1. PARA AJUSTAR LA PUERTA HACIA ADELANTE O
HACIA ATRAS
.
2.
PARA AJUSTAR LA PUERTA HACIA LA
DERECHA O HACIA LA IZQUIERDA
.
3. PARA AJUSTAR LA PUERTA HACIA ARRIBA O
HACIA ABAJO.
MÁXIMO PE SO RECOMENDADO
CARGA MÁXIMA 50 lb. (22.6 kg)
PARA LA MAYORÍA DE TV’S DE 65”
PANTALLA PLANA
CARGA MÁXIMA 135 lb. (61.2 kg)
PONER LA TV DETRÁS DEL TOPE
ESTA UNIDAD NO DEBE UTILIZARSE CON TELEVISIONES CRT O DE TUBO.
UTILIZARSE ÚNICAMENTE CON TELEVISIONES DE PANTALLA PLANA Y EQUIPO DE
AUDIO/VIDEO QUE TENGAN LA MEDIDA/PESO RECOMENDADO. NUNCA UTILIZAR CON
TELEVISIONES MÁS GRANDES/PESADAS DE LAS RECOMENDADAS. PARA EVITAR
INESTABILIDAD COLOQUE EN EL CENTRO DE LA UNIDAD; LA BASE DE LA TELEVISIÓN DEBE
DE REPOSAR SOBRE LA SUPERFICIE DE SOPORTE DE LA UNIDAD SIN REBASAR LAS ORILLAS.
TELEVISIONES DE PANTALLA PLANA COLOCADAS INAPROPIADAMENTE, O TELEVISIONES DE
PANTALLA PLANA INCLUYENDO EQUIPO QUE SOBREPASA LAS MEDIDAS Y PESOS
RECOMENDADOS PUEDEN CAERSE Y/O ROMPER LA UNIDAD, CAUSANDO POSIBLES DAÑOS O
LESIONES.
3
IMPORTANTE
Antes de comenzar:
Abra, identifique y cuente todas las partes antes del ensamble. Coloque las piezas sobre
una superficie plana y no abrasiva. Tendrá que las partes identificadas en la página 4 y 5 de este manual de
instrucciones.
NOTA: ES MUY IMPORTANTE PARA EL USO DE GOMA CON LOS PERNSO DE MADERA. EL.
EXCESO DE PEGAMENTO SE PUEDE LIMPIAR CON UN PAÑO HÚMEDO.
Inserte el perno por lo menos a la mitad del camino golpeando ligeramente con un mazo de goma, SI ES NECESARIO
.
SISTEMA DE OPERACIÓN DE TUERCA DE FIJACIÓN
CÓMO FUNCIONA LA INSTALACIÓN DE MONTAJE (KD)
1. Fijar los tornillos de fijación en los orificios pequeños. Conectar ambos paneles, cerciorandose que los
tornillos de fijación entren bien y que estos queden en los orificios al final del panel con tuercas de fijación.
2. Inserte las tuercas de fijación en los orificios grandes del panel. Hacer que la flecha en la tuerca este
apuntando hacia la entrada del tornillo de fijación.
3. Una vez que el tornillo este conectado dentro, tome un destornillador de cruz y apriete la tuerca en
dirección de las manecillas del reloj.
4. Coloque la tapa de la tuerca de fijación sobre la misma en la ranura de cruz, ver detalle.
Está listo para el ensamble KD de esta unidad.
X
X
1 2 43
4
Lista de partes y material de ferretería
Por favor lea completamente las instrucciones y verifique que estén todas las partes antes de iniciar el
ensamblado.
A- Panel superior (Cant. 1) B- Repisa fija (Cant. 1) C- Panel inferior (Cant. 1)
D- Moldura inferior frontal (Cant. 1) E- Soporte inferior posterior (Cant. 1) F- Panel izquierdo (Cant. 1)
G- Panel derecho (Cant. 1) H- Panel divisor izquierdo inferior (Cant. 1) I- Moldura media izquierda (Cant. 1)
J- Panel divisor derecho inferior (Cant. 1) K- Moldura media derecha (Cant. 1) L- Soporte medio (Cant. 1)
M-Soporte superior frontal (Cant. 1) N- Panel divisor superior (Cant. 1) O- Puerta izquierda (Cant. 1)
P- Puerta derecha (Cant. 1) Q- Repisa ajustable (Cant. 2) R- Panel superior posterior (Cant. 1)
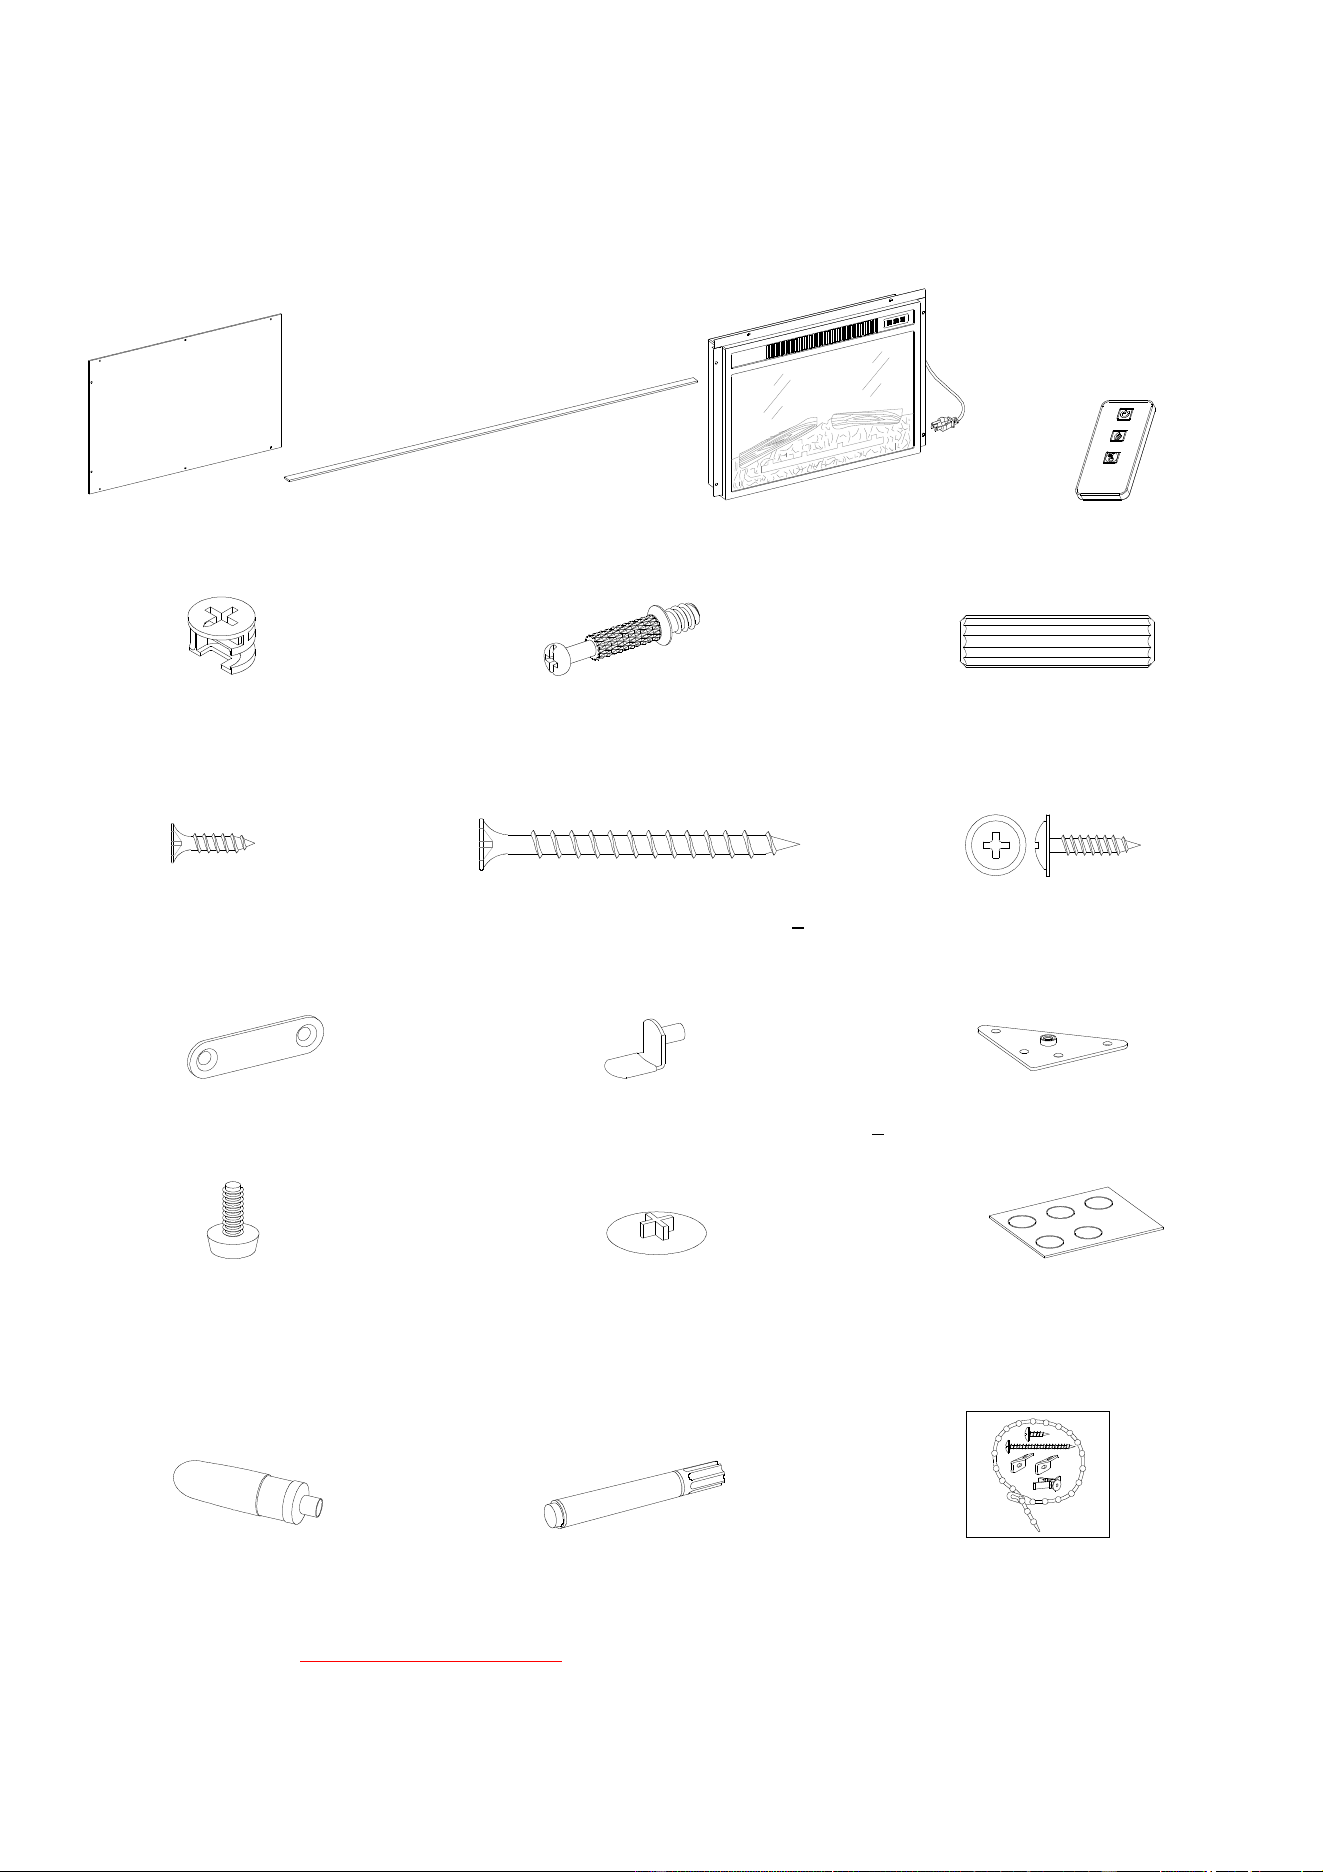
5
Lista de partes y material de ferretería
Por favor lea completamente las instrucciones y verifique que estén todas las partes antes de iniciar el
ensamblado.
S- Panel inferior posterior T- Riel tope Inserto de chimenea Control remoto con baterías
(Cant. 2) (Cant. 1) (Cant. 1) (Cant. 1)
(1) Tuerca de fijación (2) Perno de fijación (3) Clavija de madera de M8 x 30 mm
(Cant. 37+1 extra) (Cant. 37+1 extra) (Cant. 39+1 extra)
(4) Perno de M3.5 x 12 mm (5) Perno de M4 x 50 mm (6) Perno cabeza de arandela de M3.5 x 15 mm
(Cant. 12+1 extra) (Cant. 8+1 extra) (Cant. 32+1 extra)
(7) Soporte de metal recto (Cant. 2) (8) Soporte de repisa (Cant. 8+1 extra) (9) Soporte de metal angular (Cant. 2)
(10) Nivelador de piso (11) Tapa de la tuerca de fijación (12) Tope de plástico
(Cant. 2) (Cant. 22+1 extra) (Cant. 4+1 extra)
Pegamento (Cant. 1) Plumón (Cant. 1) Juego de restricción de movimiento (2)
(Incluido en bolsa de plástico)
Herramientas requeridas: Desarmador estrella y mazo (no proveidos).
6
Instructivo de ensamble
1. Desempacar la unidad y confirmar que se tiene todo el material de ferretería y partes requeridas.
Ensamblar la unidad en un piso alfombrado o en el cartón vacío para evitar rasguños.
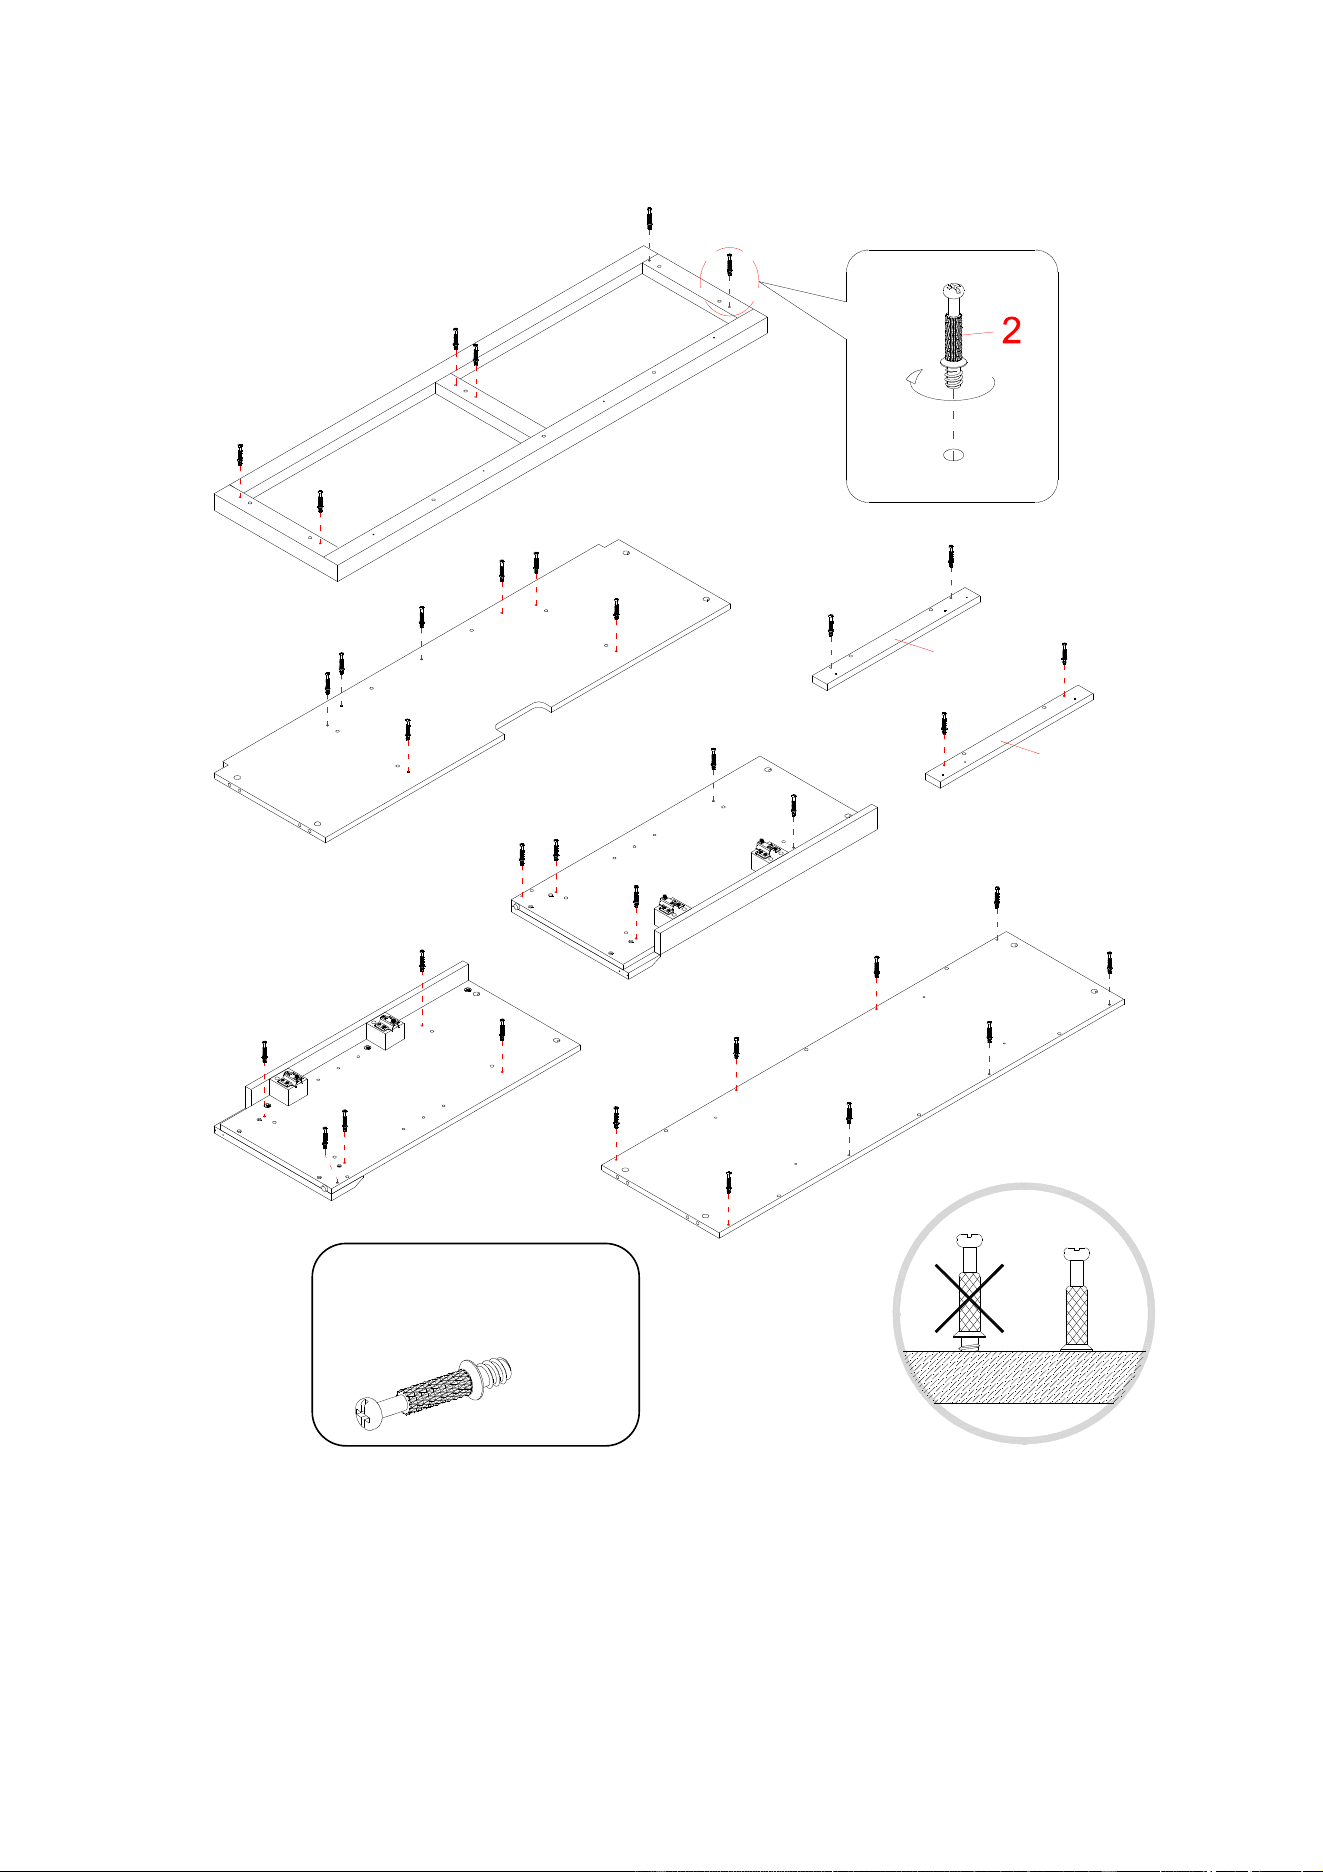
2. Colocar los pernos de fijación (2) en los agujeros chicos designados en el panel superior (A), en la
repisa fija (B), en el panel inferior (C), en los paneles (F y G), y en las molduras medias (I y K) con un
desarmador estrella.
Perno de fijación
(35
usados en este paso
)
②
B
A
F
G
C
K
I
7
Instructivo de ensamble
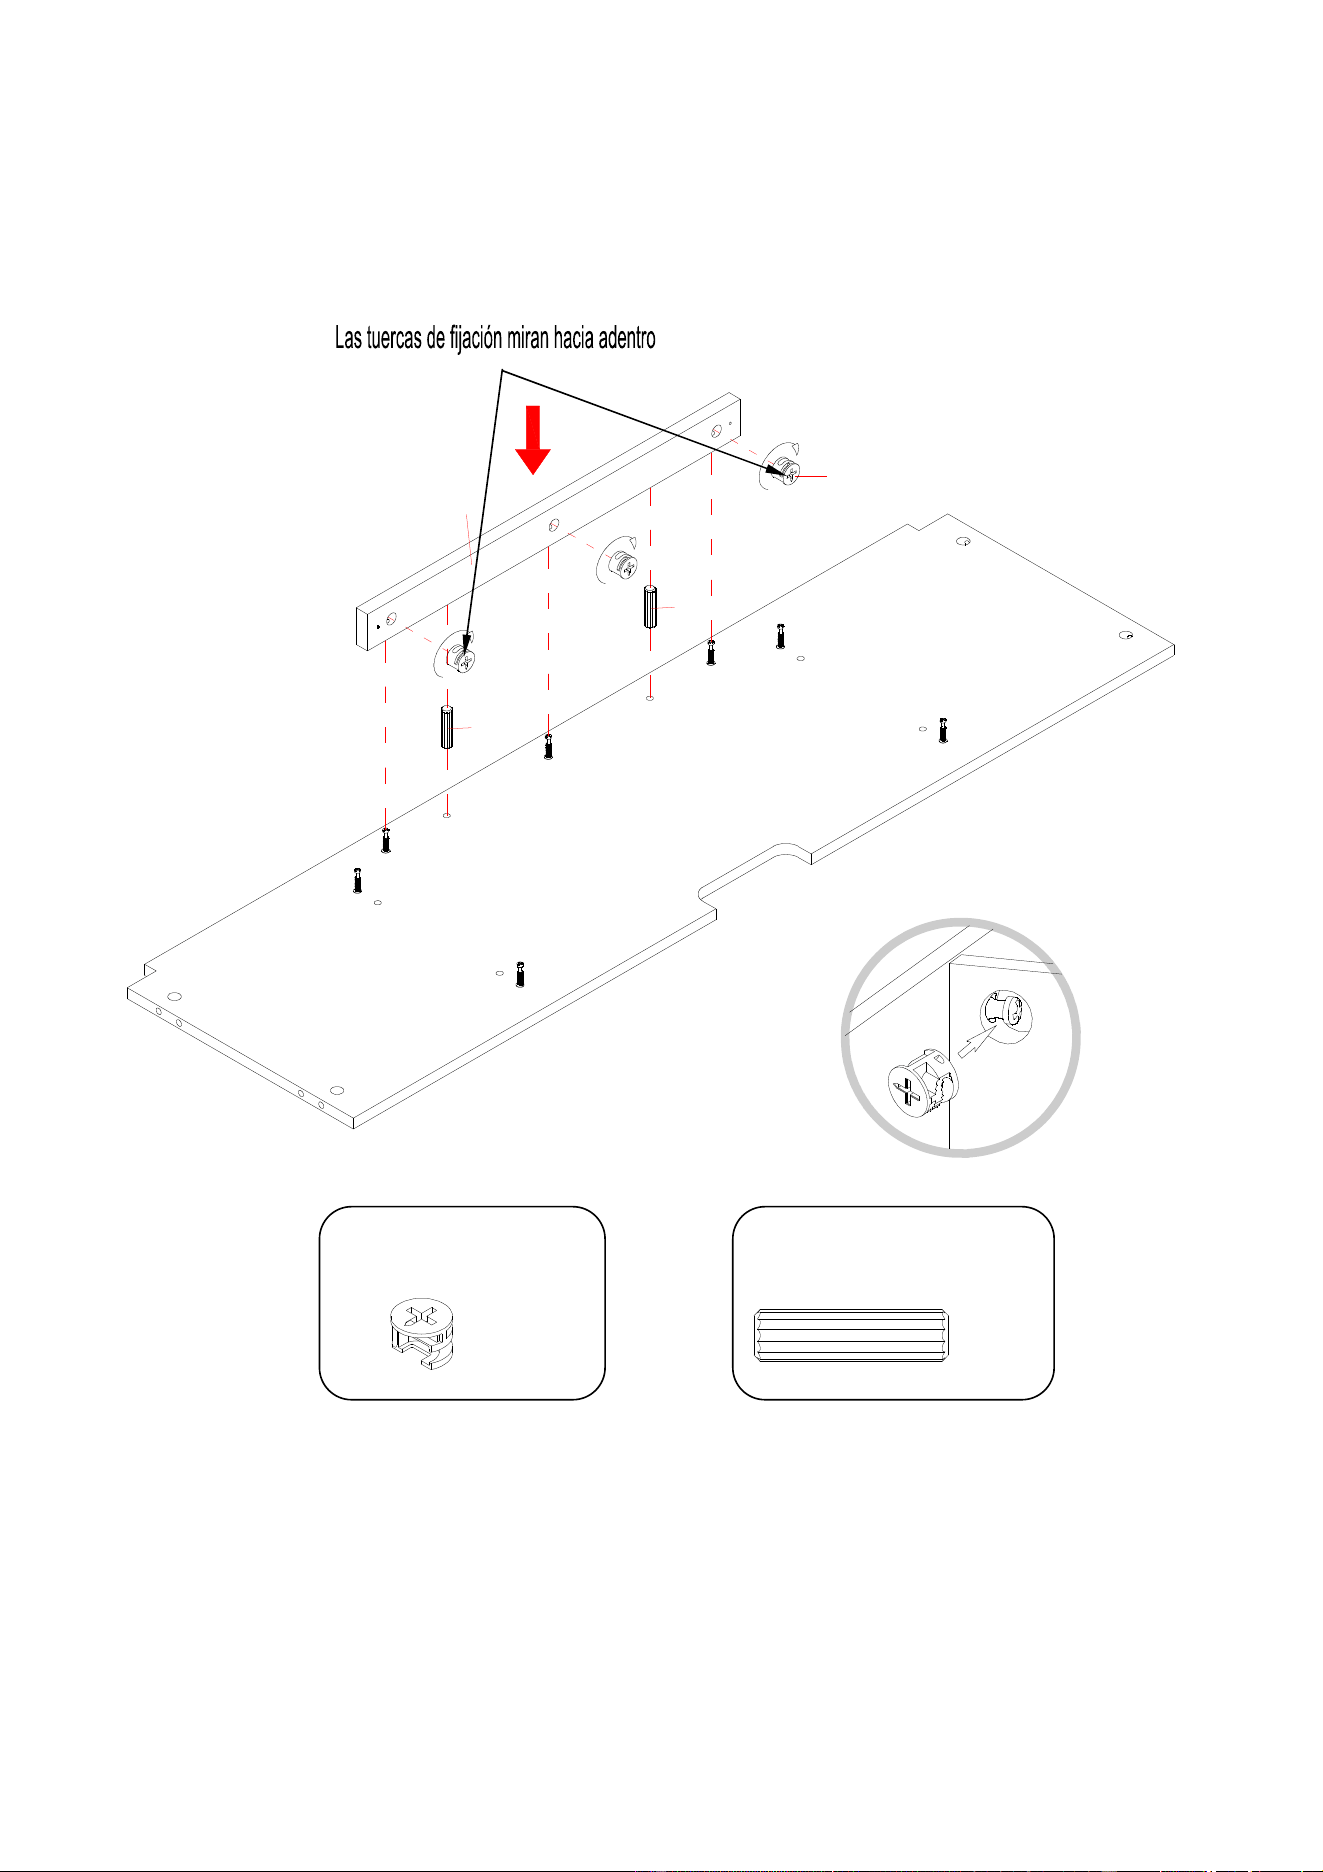
3. Insertar 2 clavijas de madera (3) en los agujeros interior del soporte medio (L). Golpear ligeramente
hacia adentro con el mazo de goma, si fuera necessario. Asegurese de usar poco pegamento para ambos
lados de las clavijas de madera.
4. Alinear los agujeros perforados en la repisa central (B) con los pernos de madera insertados (3) en el
ensamble del soporte medio (L), y luego presionarlos para juntarlos. Adjuntar el soporte medio (L) en
su lugar empleando 3 tuercas de fijación (1) (Consulte la página 3 del sistema de tuerca de fijación).
Clavija de madera
(2
usados en este paso
)
③
Tuerca de fijación
(3
usados en este paso)
①
3
1
3
B
L
8
Instructivo de ensamble
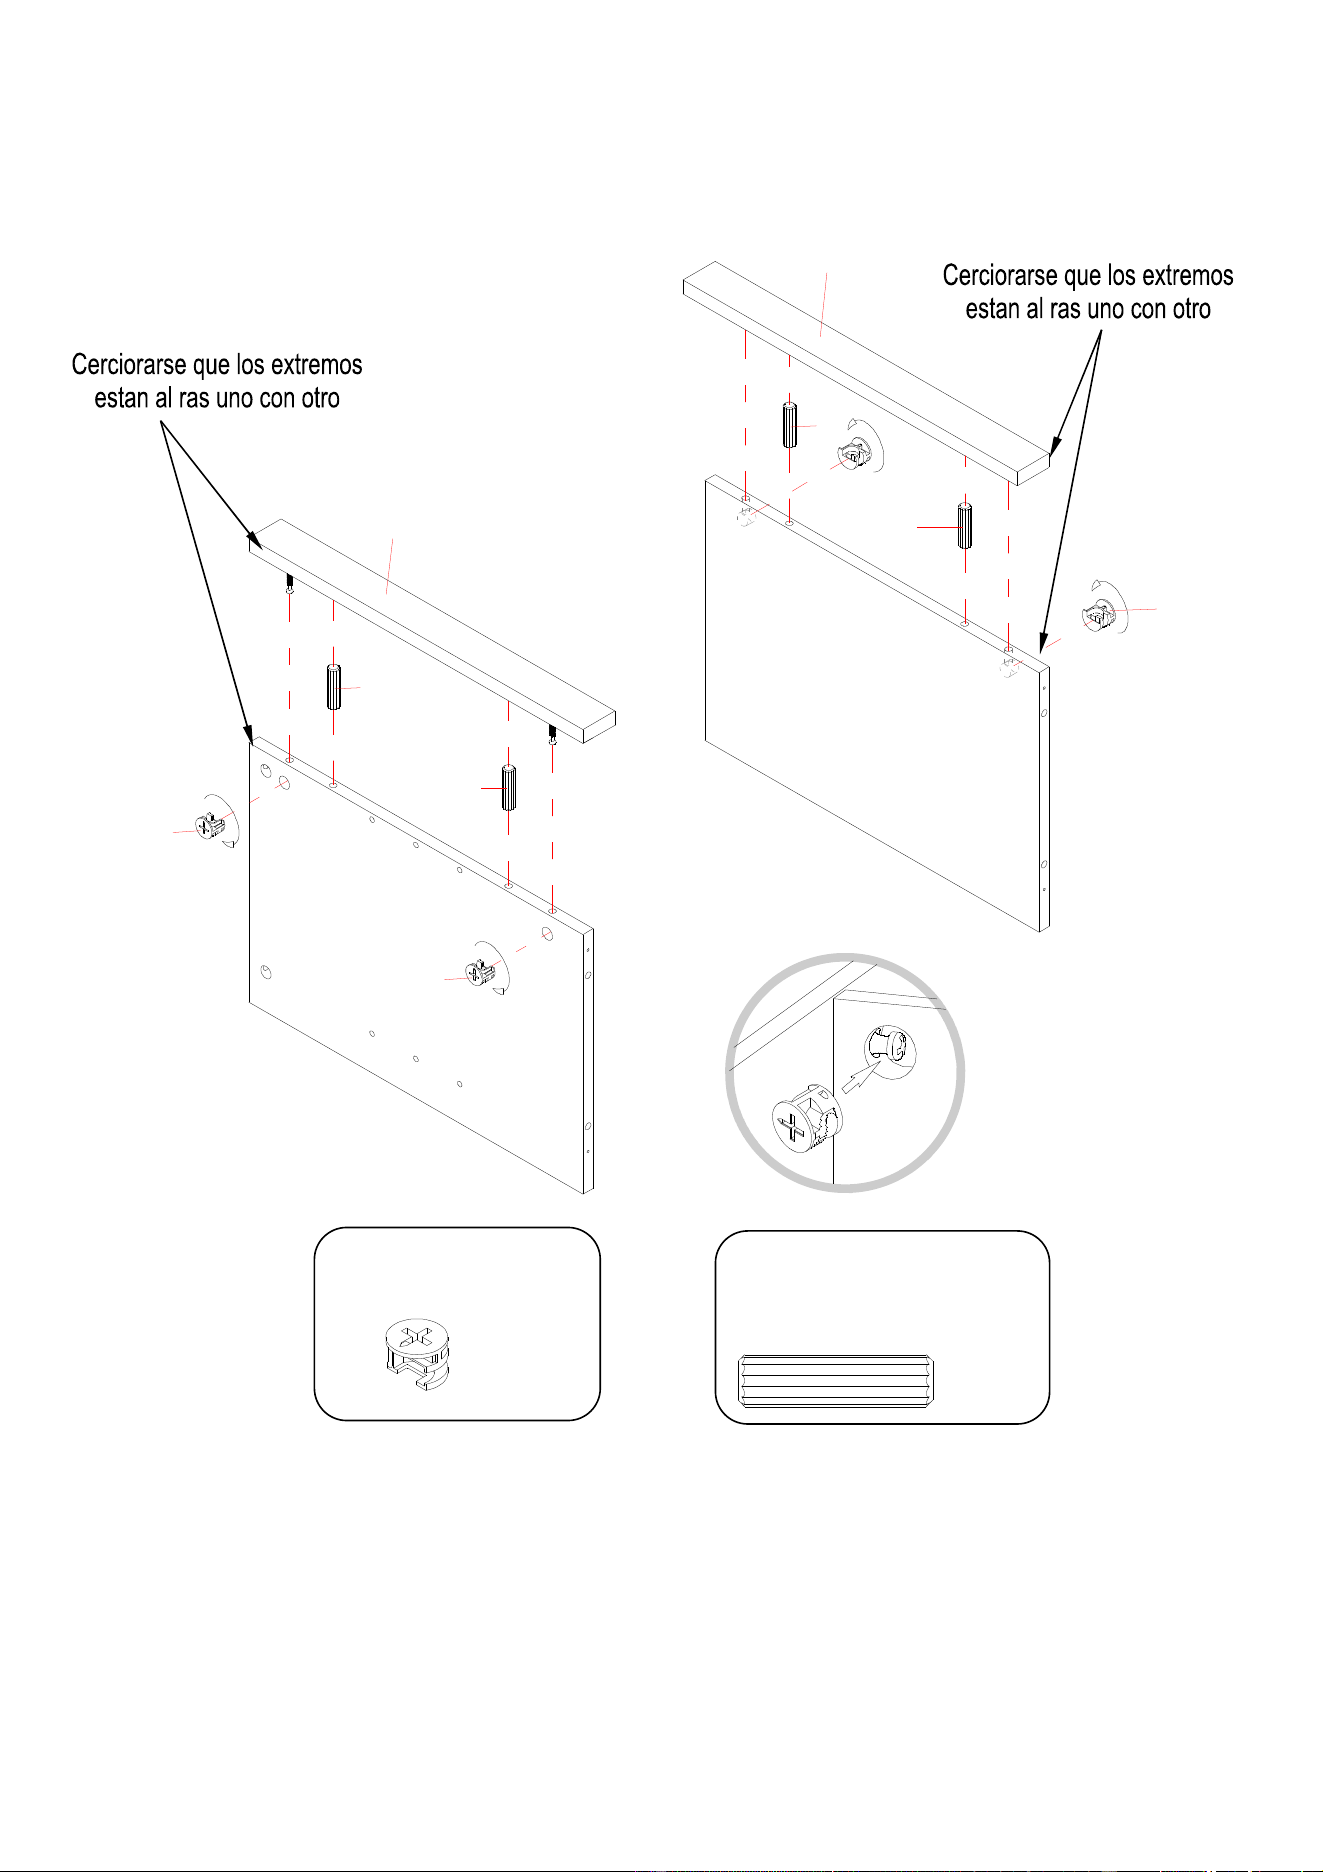
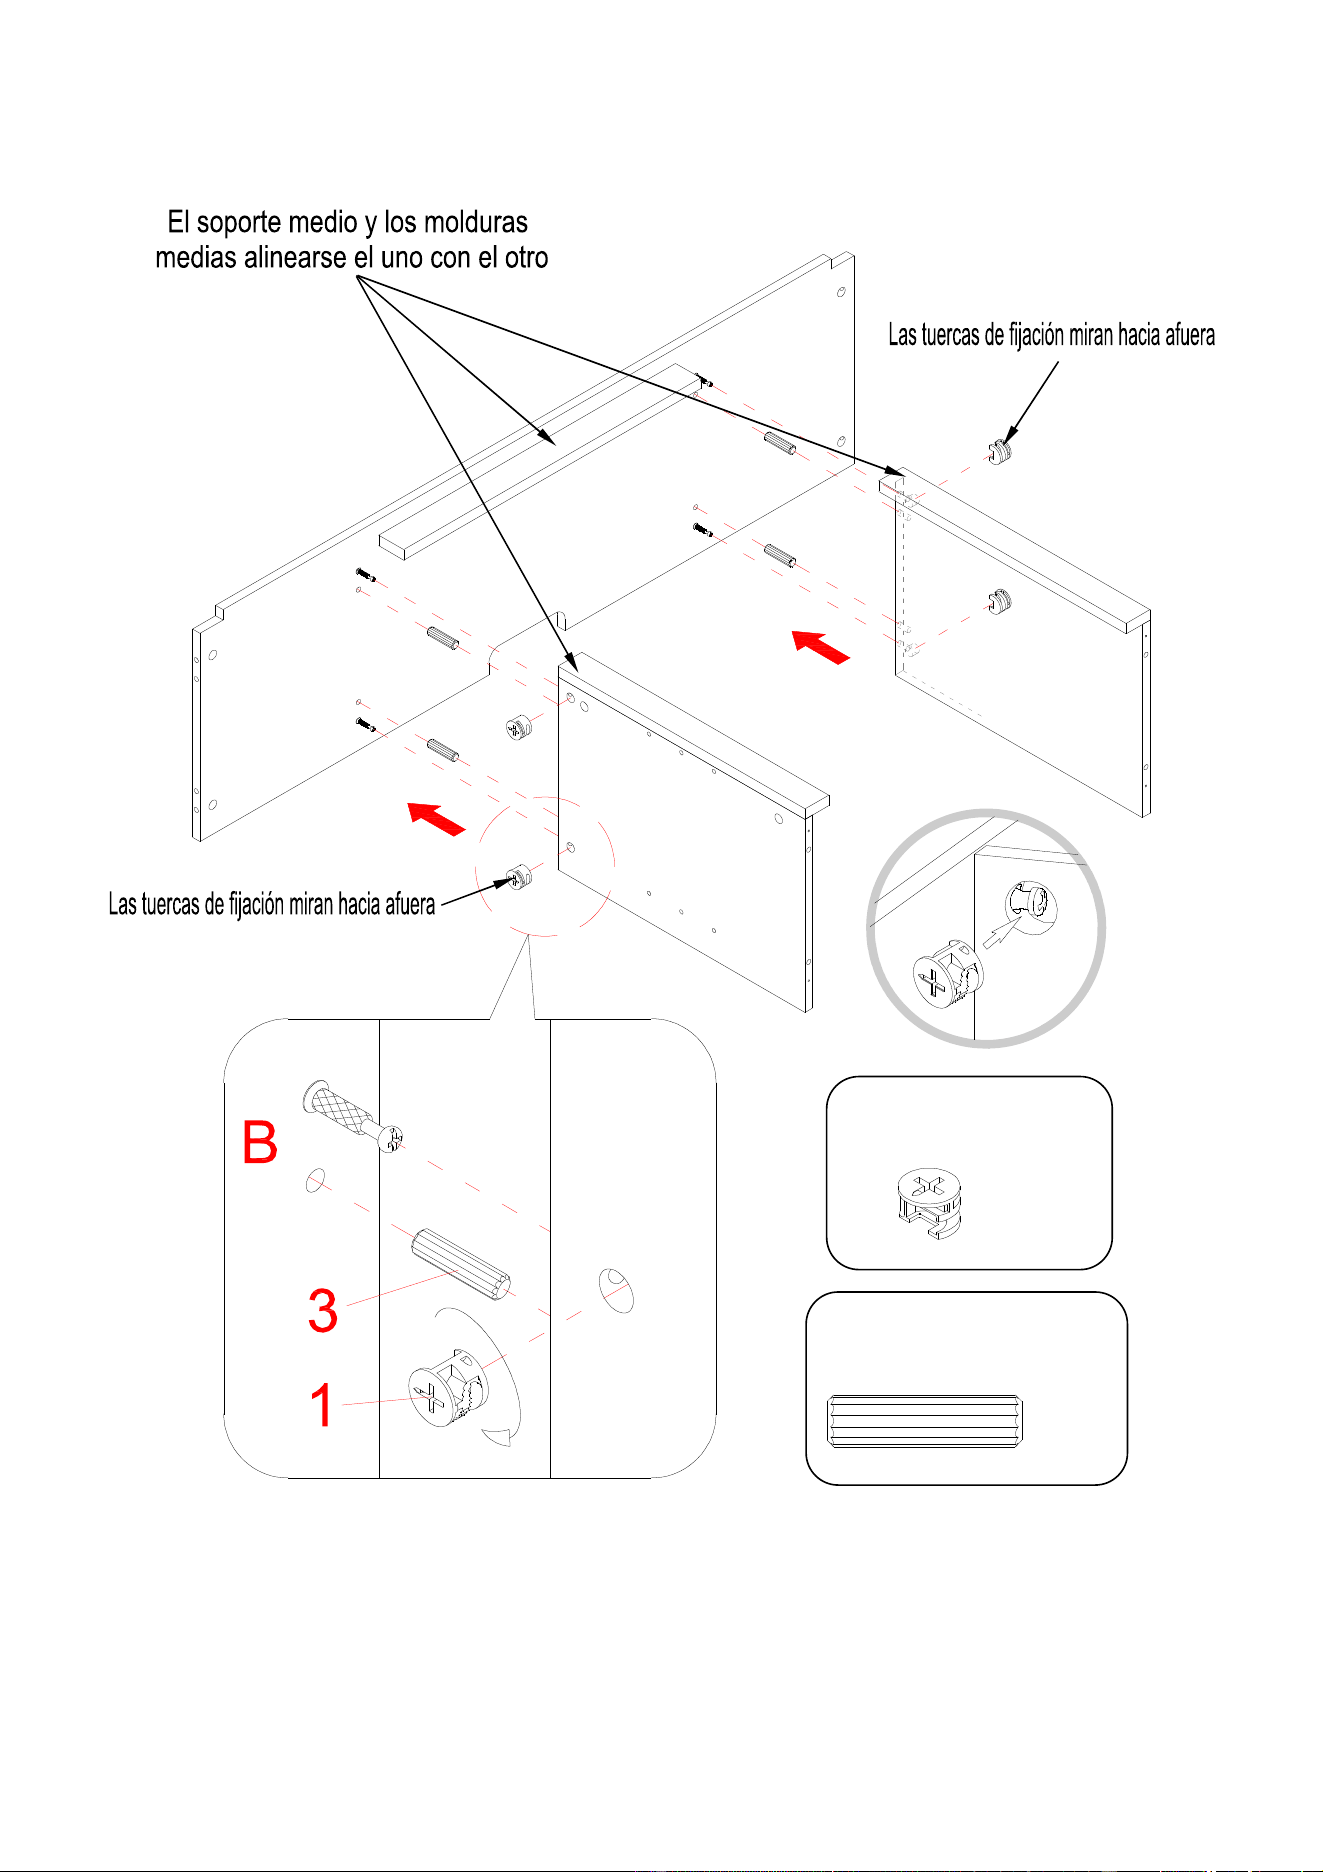
5. Alinear y adjuntar la moldura media izquierda (I) al panel divisor izquierdo inferior (H) con 2 clavijas
de madera de 30 mm (3) y 2 tuercas de fijación (1).
6. Repetir el mismo procedimiento para combinar la moldura media derecha (K) con el panel divisor
derecho inferior (J).
Tuerca de fijación
(4
usados en este paso
)
①
3
3
3
3
H
J
K
I
1
1
1
Clavija de madera de
M8 x 30 mm
(4
usados en este paso
)
③
9
Instructivo de ensamble
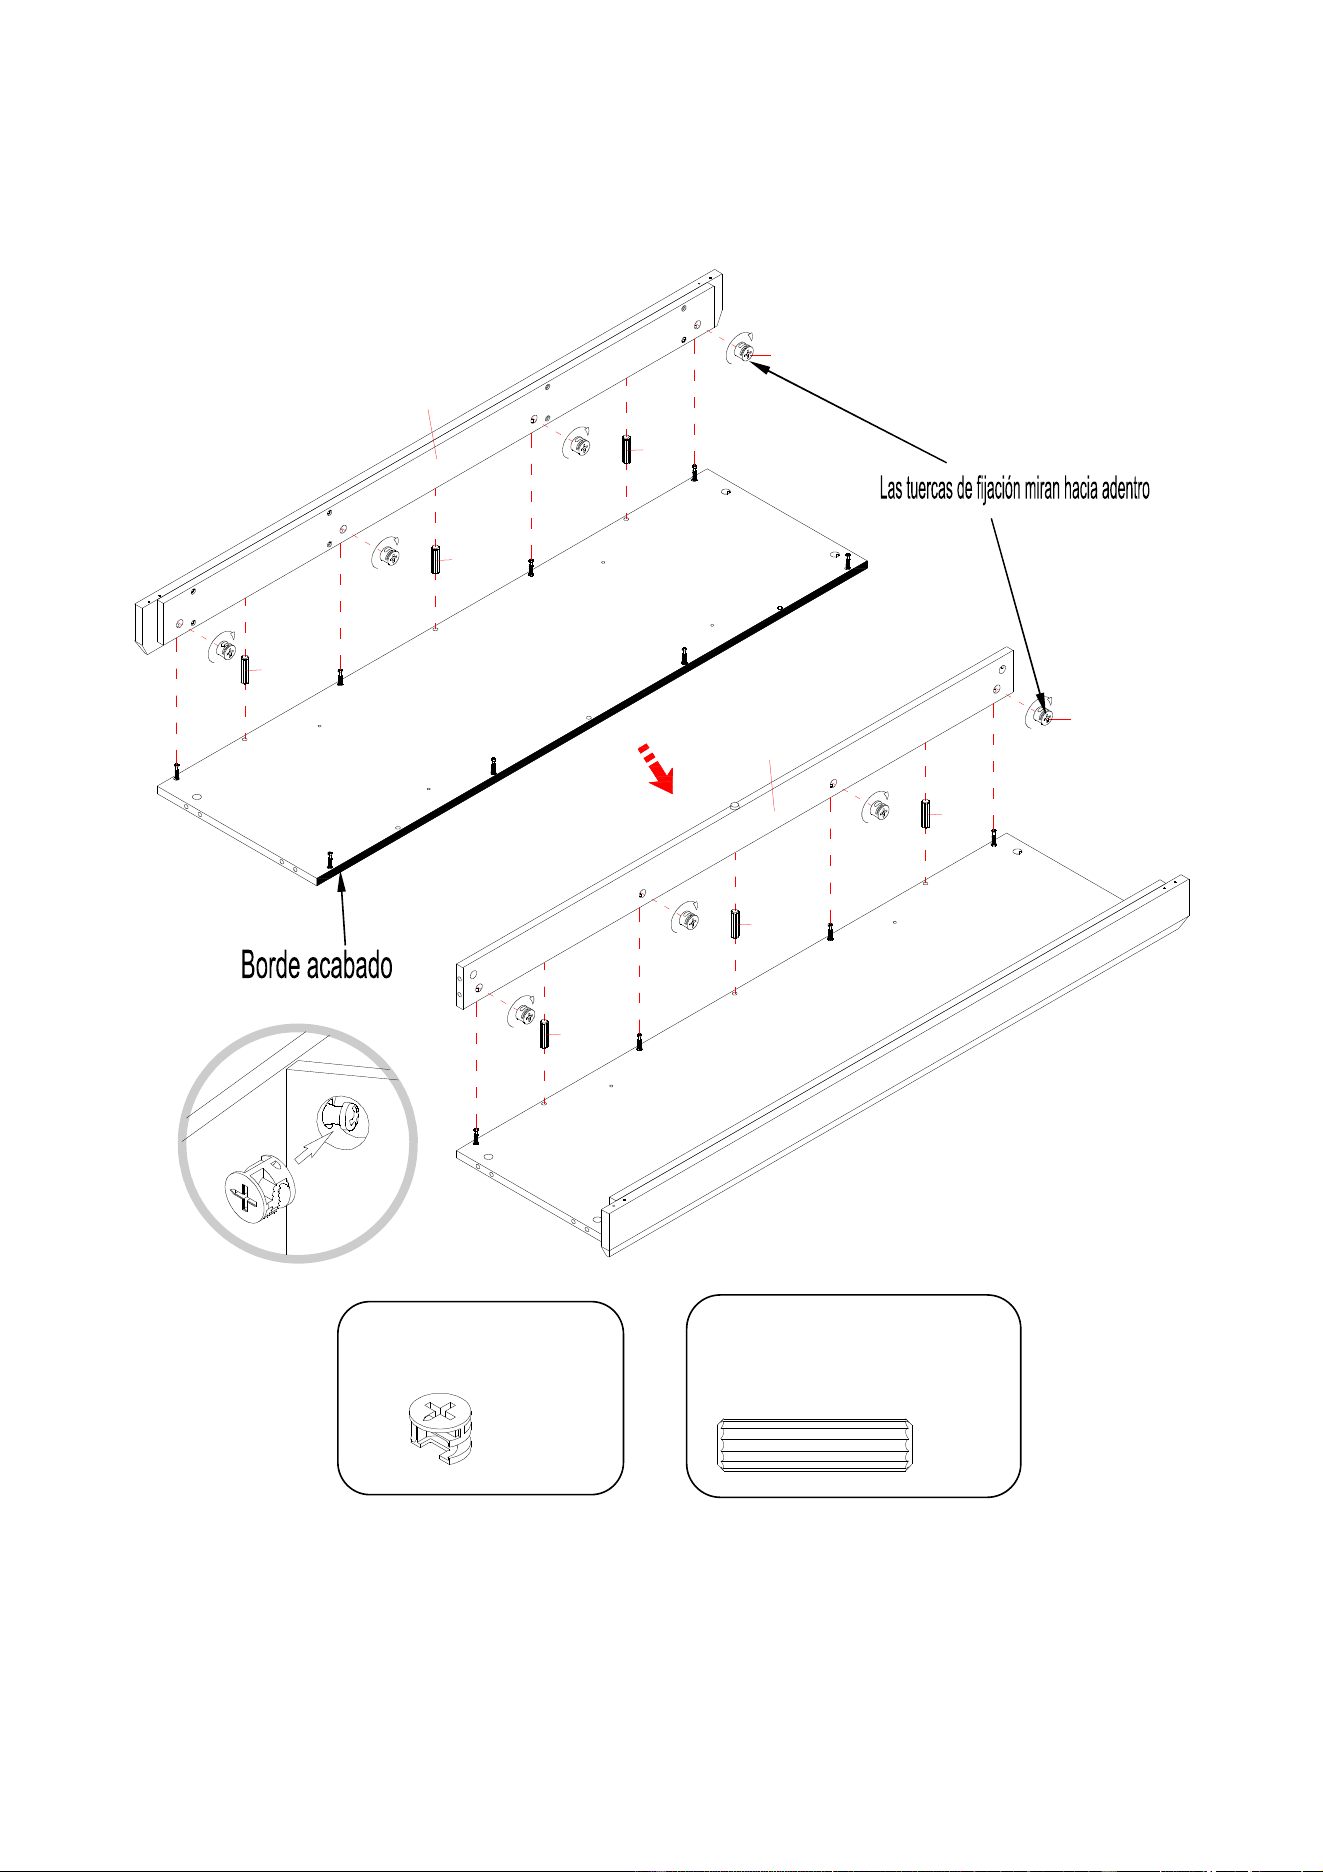
7. Adjuntar los paneles divisores inferiores (H y J) a la repisa fija (B) con 4 clavijas de madera de 30 mm
(3) y 4 tuercas de fijación (1).
B
H
J
Clavija de madera
(4
usados en este paso
)
③
Tuerca de fijación
(4
usados en este paso)
①
10
Instructivo de ensamble
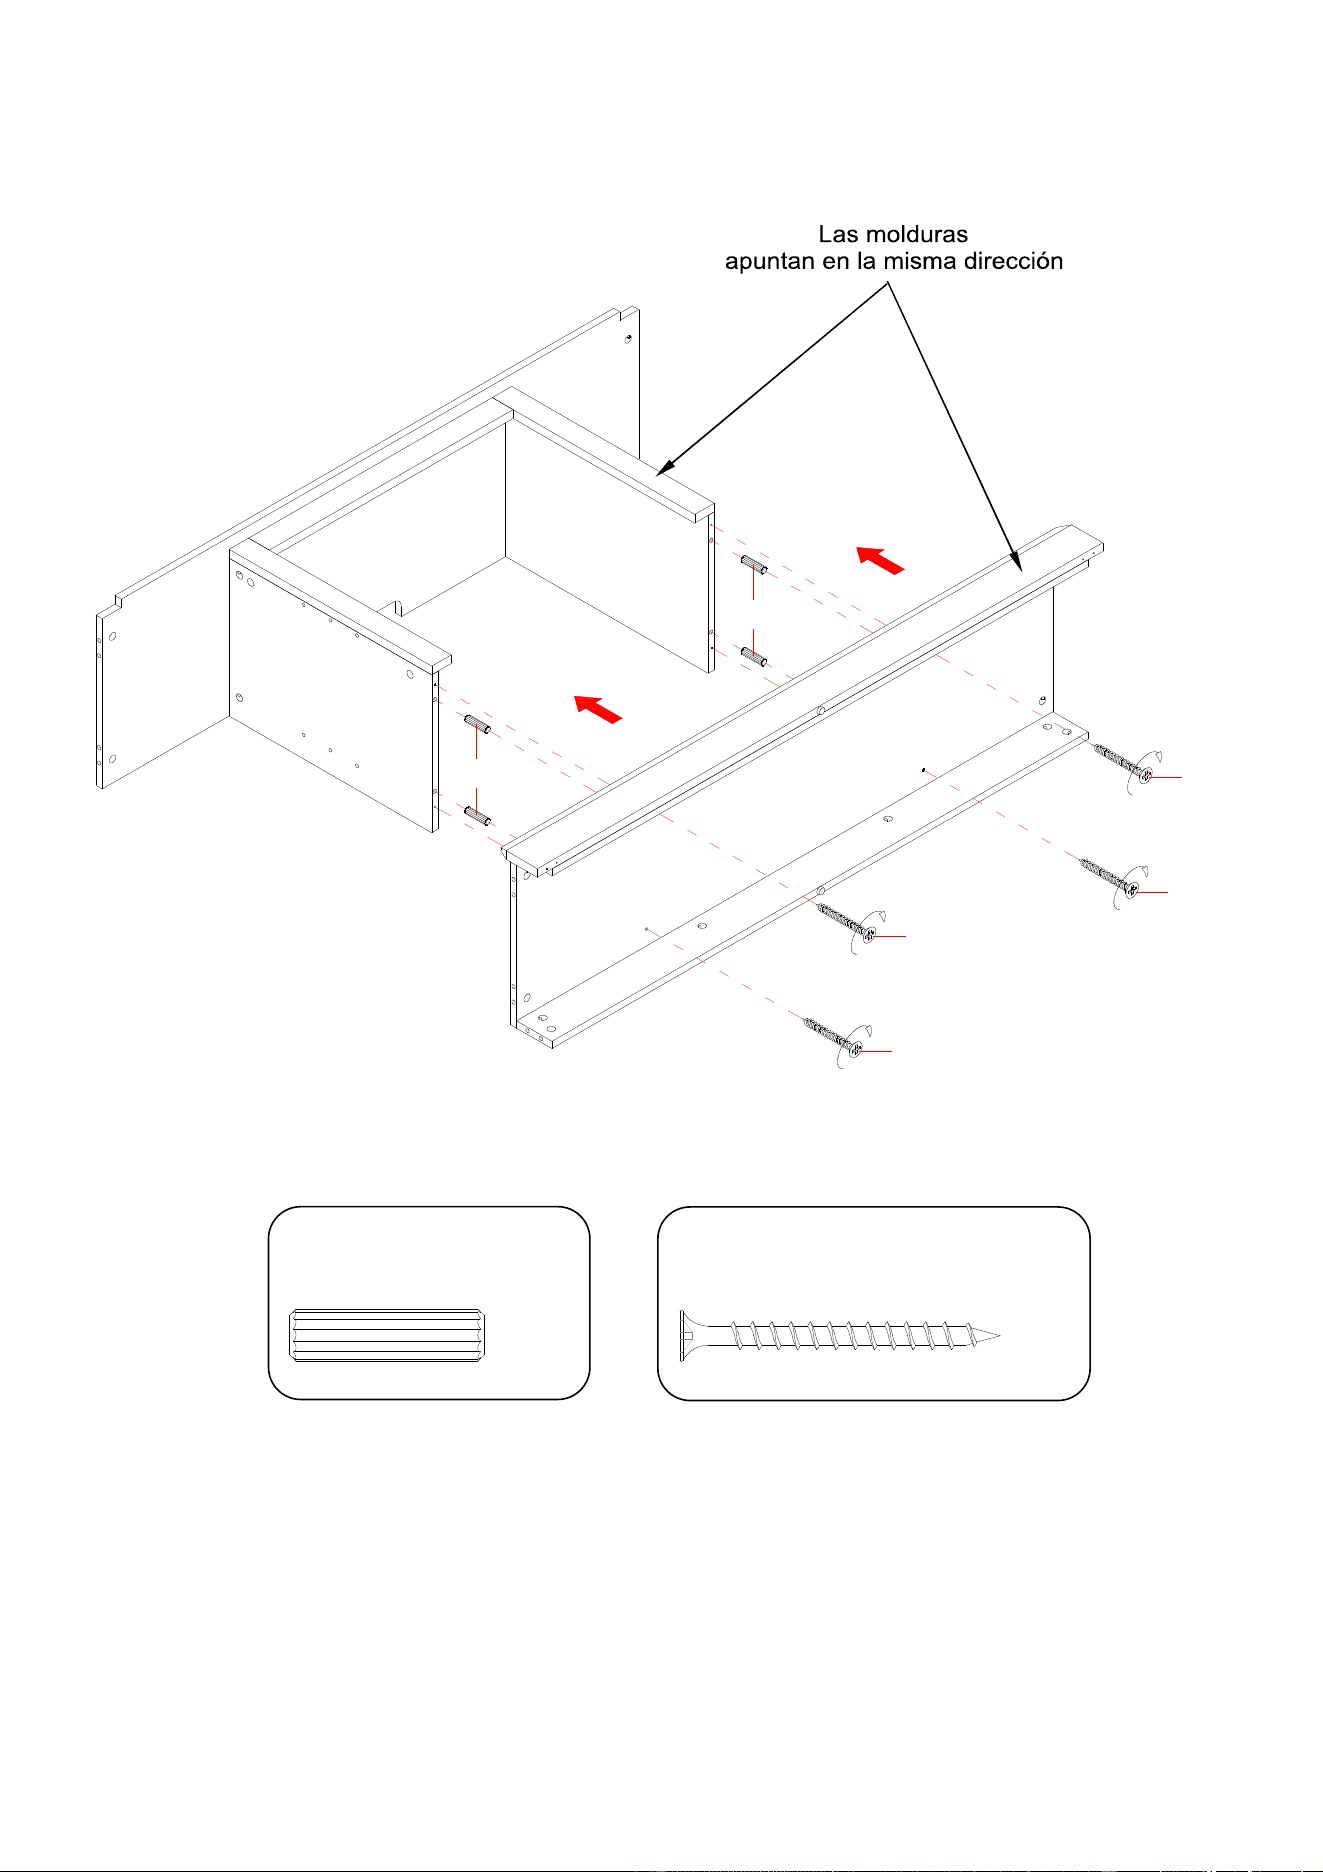
8. Adjuntar la moldura inferior frontal (D) al panel inferior (C) usando 3 clavijas de madera de 30 mm (3)
y 4 tuercas de fijación (1).
9. Repetir el mismo procedimiento para adjuntar el soporte inferior posterior (E) al panel inferior (C).
3
1
3
3
3
1
3
3
C
D
D
E
C
Tuerca de fijación
(8
usados en este paso
)
①
Clavija de madera de
M8 x 30 mm
(6
usados en este paso)
③
11
Instructivo de ensamble
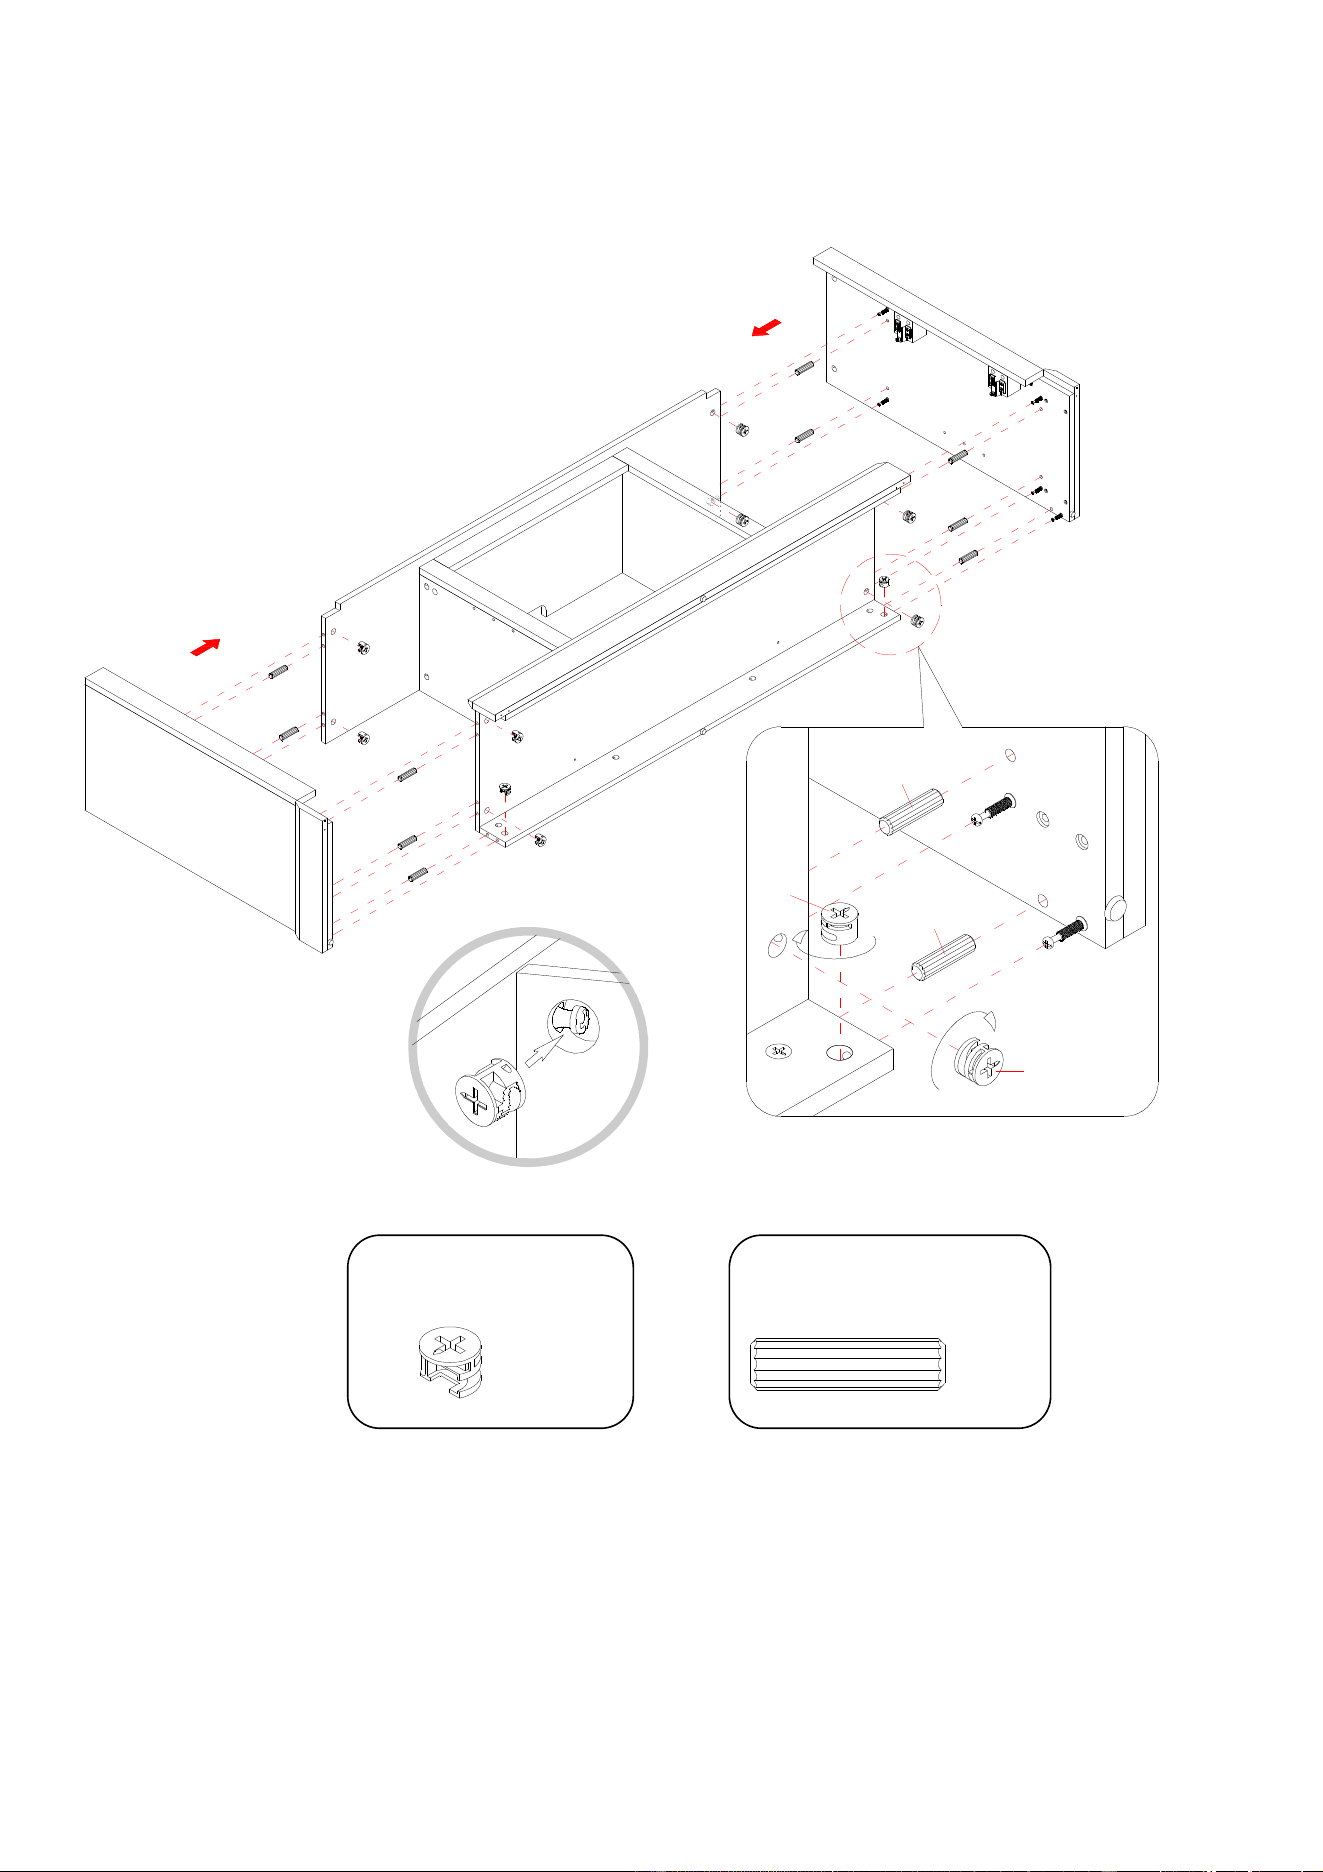
10. Adjuntar la base ensamblada a los paneles divisores inferiores (H y J) con 4 clavijas de madera de 30
mm (3) y 4 pernos de 50 mm (5).
Clavija de madera
(4
usados en este paso
)
③
Perno de M4 x 50 mm
(4
usados en este paso)
⑤
3
3
5
5
5
5
C
H
J
D
12
Instructivo de ensamble
11. Adjuntar el panel izquierdo (F) a la repisa fija (B) y la base ensamblada con 5 clavijas de madera de 30
mm (3) y 5 tuercas de fijación (1).
12. Repetir el mismo procedimiento para adjuntar el panel derecho (G) al lado opuesto.
1
1
3
3
F
G
B
C
E
D
Clavija de madera
(10
usados en este paso
)
③
Tuerca de fijación
(10
usados en este paso)
①
13
Instructivo de ensamble
13. Usando los agujeros pilotos como guía, alinear y adjuntar 2 soportes de metal angulares (9) a las
esquinas frontales de la base ensamblada, usando 4 pernos de 12 mm (4) por soporte.
4
4
9
D
F/G
F
G
C
D
Soporte de metal angular
(2
usados en este paso
)
⑨
Perno de M3.5 x 12 mm
(8
usados en este paso)
④
14
Instructivo de ensamble
14. Atornillar 2 niveladores de piso (10) en los enchufes roscados en los soportes de metal angulares (9) y
fijar los a la altura correcta.
Nivelador de piso
(2
usados en este paso
)
⑩
10
10
F
G
D
15
Instructivo de ensamble
15. Poner la unidad ensamblada en posición vertical.
16. Colocar los pernos de fijación (2) en los agujeros chicos designados en la repisa fija (B) con un
desarmador estrella.
B
2
Perno de fijación
(2
usados en este paso
)
②
16
Instructivo de ensamble
17. Adjuntar el panel divisor superior (N) a la repisa fija (B) con una clavija de madera de 30 mm (3) y 2
tuercas de fijación (1).
3
B
1
N
Tuerca de fijación
(2
usados en este paso
)
①
Clavija de madera de
M8 x 30 mm
(1 usado en este paso)
③
17
Instructivo de ensamble
18. Adjuntar el soporte superior frontal (M) al panel superior (A) con 3 clavijas de madera de 30 mm (3) y 4
pernos para madera de 50 mm (5).
Perno de M4 x 50 mm
(4
usados en este paso
)
⑤
3
5
5
5
5
3
3
A
M
Clavija de madera de
M8 x 30 mm
(3
usados en este paso
)
③
18
Instructivo de ensamble
19. Adjuntar el panel superior (A) a los paneles laterales (F y G) y al panel divisor superior (N) con 5
clavijas para madera (3) y 6 tuercas de fijación (1).
Tuerca de fijación
(6
usados en este paso
)
①
A
N
3
F
G
Clavija de madera de
M8 x 30 mm
(5
usados en este paso
)
③
19
Instructivo de ensamble
20. Voltear el ensamble en sus bordes frontales.
21. Usar los orificios piloto como una guía, sujetar el soporte medio (L) a las molduras medias (I y K)
adjuntando 2 soportes de metal rectos (7) a las articulaciones, usando 2 pernos de 12 mm (4) por soporte.
Soporte de metal recto
(2
usados en este paso
)
⑦
Perno de M3.5 x 12 mm
(4 usados en este paso)
④
7
4
K
I
L
20
Instructivo de ensamble
22. Tomar el panel superior posterior (R) y alinear los agujeros pre-perforados encontra del borde superior
largo con los agujeros pilotos en el panel superior (A). Adjuntar el panel posterior (R) en su lugar
usando los pernos cabeza de arandela (6).
23. Alinear y adjuntar 2 paneles inferiores posteriores (S) a la base mantel con los pernos cabeza de
arandela (6).
6
S
R
S
Perno cabeza de arandela de
M3.5 x 15 mm
(32
usados en este paso
)
⑥
21
Instructivo de ensamble
24. Insertar 4 soportes de repisa (8) en los agujeros de su altura deseada adentro de cada compartimiento.
Voltear y descansar las repisas ajustables (Q) en los soportes de repisa (8).
25. Enchufar las tapas de las tuercas de fijación (11) en las tuercas de fijación visibles para esconder.
Q
Q
8
Q
8
11
F
G
H
J
Tapa de la tuerca de fijación
(22
usados en este paso
)
⑪
Soporte de repisa
(8
usados en este paso)
⑧
22
Instructivo de ensamble
26. Tomar la puerta izquierda (O) y adjuntar los brazos de bisagras extendidos a las bases de bisagra
instaladas en el panel izquierdo (F). Aflojar el tornillo detrás de la base para un ajuste fácíl. Alinear e
insertar el espacio “U” en el brazo abajo de la cabeza del tornillo detrás de la base. Asegurar de que las
bisagras de puerta participen y funcionen correctamente. Apretar los tornillos en la base para trabar las
bisagras en su lugar.
27. Repetir el mismo procedimiento para adjuntar la puerta derecha (P) al panel derecho (G).
28. Abrir y cerrar las puertas para asegurar de que esten alineadas y que se cierren correctamente. Si fuera
necesario, ajustar los tornillos para un buen ajuste. Consultar el sticker de las bisagras en la puerta para
ajustes.
G
P
F
O
1
23
Instructivo de ensamble
29. Pegar los topes de plástico (12) en las esquinas exteriores de las puertas izquierda y derecha (O y P)
donde entran en contacto con las molduras izquierda y derecha (I y K).
Tope de plástico
(4
usados en este paso
)
⑫
12
12
P
O
24
Instructivo de ensamble
30. Desempacar el inserto de chimenea de la caja interior y seguir las instrucciones para instalar los bordes
superior y laterales al inserto de chimenea.
31. Poner el inserto de chimenea en la parte posterior del mantel ensamblado y centrar en la apertura.
NO arrastre el inserto a través de el panel inferior (C) porque puede rayar la unidad.
32. Sujetar el inserto de chimenea al mantel con 4 pernos de inserto como se muestra.
C
A
25
Instructivo de ensamble
NOTA: Para evitar que su televisor se vuelque, se debe instalar la tira tope cuando ponga su televisión
de pantalla plana directamente sobre la consola. De lo contrario, vaya al paso 34.
33. Retirar el respaldo de papel del riel tope (T), luego alinear el riel tope con el borde superior del templete del
tope en el panel superior (A). Presionar el riel tope para ayudar a la adhesión.
34. Retirar el templete del tope del panel superior (A).
T
T
A
T
A
A
26
Instructivo de ensamble
Herramientas requeridas: Desarmador estrella, taladro, broca de 3/8” y mazo de goma.
35. Pida assistencia para posicionar la chimenea ensamblada en el lugar deseado contra la pared. Si fuera
necessario, ajuste los niveladores de piso pre-adjuntados en la parte inferior de la base para nivelar la
unidad. Ahora, seguir las instrucciones impresas en la bolsa de plástico que contiene el juego de
restricción de movimiento para adjuntar los topes de movimiento a la unidad y a la pared.
NOTA: Niños pequeños pueden resultar lastimados por muebles inclinados. Debe instalar el juego de
restricción de movimiento con la unidad en función, para prevenir la inclinación de la unidad, causando
cualquier accidente o daño. El tope de movimiento es solo un impedimiento, no hay substituto para la
supervision adulta. El tope de movimiento no es contra terremoto. Si deseara añadir la seguridad extra
contra terremotos, deben ser comprados e instalados separadamente.
36. Conectar la chimenea al transformador de poder. Siga el manual de operación para el inserto de
chimenea eléctrica para controlar su chimenea.
A

27
Mantenimiento y Cuidados
Use una toalla suave y limpia para evitar daños y rayones.
Uso de cera para pulir muebles no es necesario. Si desea usar cera, pruebela en un área que no sea visible
para revisar su funcionamiento.
Usar solventes de cualquier tipo puede dañar el acabado del mueble.
Nunca use agua para limpiar la unidad, ya que le puede dañar el acabado.
Siempre utilice protección para vasos cuando los ponga sobre la unidad.
Líquidos derramados deben limpiarse inmediatamente, con una toalla suave evitando tallar.
Siempre utilizar protectores en caso de poner cosas calientes. El calor puede provocar una reacción química
en el acabado y dañarlo.
En caso que su unidad sea manchada durante el uso le recomendamos hablar a un profesional para que le ayude.
Revisar los pernos y tornillos periódicamente y apretarlos en caso que sea necesario.
Más recomendaciones para el cuidado de su mueble
Lo mejor es mantener la unidad en una área de clima controlado. Temperatura extrema y cambios de humedad
pueden causar cambios como partes pandas, molduras que se contraigan o que la madera se raje. Es
recommendable mantener la unidad lejos del sol directo ya que puede dañar el acabado.
Cuidados adecuados y limpieza pueden extender la vida útil de su unidad. Siga estas recomendaciones y
mantendra su mueble en buenas condiciones de uso por muchos años.
Limpiando el borde de la chimenea
Limpie el borde metálico usando un paño suave, lijeramente humedecido con productos hecho con aceite
cítrico y pulir con un paño suave y limpio. NO usar latón pulido u otros limpiadores caseros porque estos
productos dañaran el borde metálico. Productos hechos de aceite cítrico se pueden obtener en un supermercado
o en una tienda de material de ferretería.
Un plumón de retoque se ha proporcionado para minimizar los pequeños daños o rayones que pueden haber
ocurrido durante el montaje o el envío.
Esperamos que disfrute su mueble por muchos años.
¡Gracias por su compra!
GARANTÍA DE CALIDAD
Nosotros estamos seguros que usted se encontrará feliz con la compra de esté producto de Whalen Furniture.
Si esté producto tiene algun defecto de ensamble o material, o si tiene alguna falla en uso normal, nosotros lo
repararemos o lo re-emplazaremos hasta por un año a partir de la fecha de compra. Todo producto de Whalen
Furniture es diseñado para alcanzar sus espectativas más altas. Nosotros le garantizamos que inmediatamente
podrá ver el valor de nuestra mercancia de la más alta calidad.
Está garantia le proporciona derechos legales especificos y talvez tenga otros derechos que varian de estado a
estado.
Servicio al cliente: 866-942-5362
Hora Estándar del Pacífico: 8:30 a.m. - 4:30 p.m., de Lunes a Viernes
www.whalenstyle.com