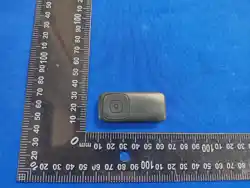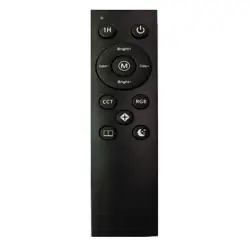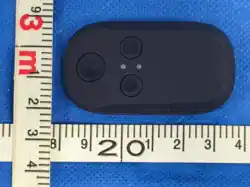

Ⅰ. Packing list
Street Photography Grip*1 Remote Control*1
Instruction manual*1 Charging cable *1
Ⅱ. Product Parameters
Ⅲ. Product Appearance
Power button
Shooting button
Pairing Button
Charging port
Product dimensions
Product weight
Input specifications
Remote compatible models
Battery life
Main materials
55*30*10mm
12g±2g
5V 1A
Action 4/ 5 Pro/ 6, Osmo 360, Insta
360 ONE R/RS/X2/X3/X4/X5/GO 3/GO
3S/Ace/Ace Pro/Ace Pro 2, GoPro
8/9/10/11/12/13/MAX/Mini
Approximately 36 hours for Insta360,
and approximately 16 hours for
Action and GoPro
ABS+PC
Button combinations
Press and hold the power button and the pairing button for 4 seconds to
clear all current camera connection information and enter pairing mode.
Button combinations
Press and hold the power button and the pairing button for 4 seconds to
clear all current camera connection information and enter pairing mode.
Button combinations
Press and hold the power button and the pairing button for 4 seconds to
clear all current camera connection information and enter pairing mode.
IV. Button functions when connecting to Action
Before first use, please charge the remote control to activate it.
Power button
Press and hold: Turn the remote control on or off.
Short press: When the remote control is connected to the camera, you can
switch shooting modes. During video recording, pressing the button
allows you to mark the video.
Shooting button
Press and hold: After the remote control is successfully connected to the
camera, long press the shutter button to put the camera to sleep or wake
it up.
Short press: Take a photo or stop recording. When the camera is in sleep
mode, wake it up and start recording with SnapShot.
*To use the camera wake-up function, you need to enable the relevant
settings on the camera. The settings are as follows: Swipe down from the
top of the touchscreen home screen to enter the system control center.
Select System Settings > Remote Control, and enable the camera wake-up
function.
Pairing Button
Press and hold: The remote control and camera will begin pairing.
Short press: Wakes the camera when the remote control is connected.
Cancels pairing during the pairing process.
V. Button functions when connecting to
Insta360 Camera
Before first use, please charge the remote control to activate it.
Power button
Press and hold: Turn the remote control on or off.
Short press: A short press of the power button controls the camera screen
to turn on/off (requires pairing with Insta360 GPS Remote mode). This
function is not available on the GO Ultra.
Shooting button
Press and hold: After the remote controller is successfully connected to the
camera, long press the shutter button to put the camera to sleep or wake it up.
Short press: Take a photo or stop recording. When the camera is in sleep
mode, wake it up and start recording with SnapShot.
Pairing Button
Press and hold: The remote control and camera will begin pairing. In the
remote control settings interface of the camera's drop-down menu, click
"Insta350 GPS Remote". The camera will indicate that it is connected, and
the remote control's status light will turn solid green, indicating a
successful connection.
Short press: The camera cycles through photo and video modes. A short
press during recording adds highlight markers.
Double-click: After the remote control is successfully connected to the
camera, press and hold the shooting button to switch between
single-lens mode and panorama mode (only available for X2, X3, X4,
X4AIR, and X5 models).
VI. Button Functions When Connecting to a
G*Pro Camera
Before first use, please charge the remote control to activate it.
Power button
Press and hold: Turn the remote control on or off.
Short press: When not recording, a short press of the power button will
cycle through the sub-mode menu (not compatible with GoPro 13).
Pairing Button
Press and hold: The remote control and camera begin pairing. In the
camera's drop-down menu, tap “Pair Device” to enter pairing mode. When
the remote control's status light turns solid green, it is ready to connect to
the camera.
Short press: When not recording, a short press of the pairing button will
switch the main mode menu; During recording, a short press of the
pairing button performs highlight marking.
Shooting button
Press and hold: After the remote controller is successfully connected to
the camera, long press the shutter button to put the camera to sleep or
wake it up.
Short press: Take a photo or stop recording. When the camera is in sleep
mode, wake it up and start recording with SnapShot.
FCC Caution
15.19 Labelling requirements.
This device complies with part 15 of the
FCC Rules. Operation is subject to the following two conditions: (1) This
device may not cause harmful interference, and (2) this device must accept
any interference received, including interference that may cause undesired
operation.
15.21 Information to user.
Any changes or modifications not expressly approved by the partyresponsible
for compliance could void the user's authority to operate the equipment.
15.105 Information to the user.
Note: This equipment has been tested and found to comply with the limitsfor
a Class B digital device, pursuant to part 15 of the FCC Rules. These limits
are designed to provide reasonable protection against harmful interference
in a residential installation. This equipment generates uses and can radiate
radio frequency energy and, if not installed and used in accordance with
the instructions, may cause harmful interference to radio communications.
However, there is no guarantee that interference will not occur in a
particular installation. If this equipment does cause harnnful interference to
radio or television reception, which can be determined by turning the
equipment off and on, the user is encouraged to try to correct the
interference by one or more of the following measures:
-Reorient or relocate the receiving antenna.
-Increase the separation between the equipment and receiver.
-Connect the equipment into an outlet on a circuit different from that to
which the receiver is
connected.
-Consult the dealer or an experienced radio/TV technician for help.
The device has been evaluated to meet general RF exposure requirement.
The device can be used in portable exposure condition without restriction.