58.03.010.0034
Item No. : P931
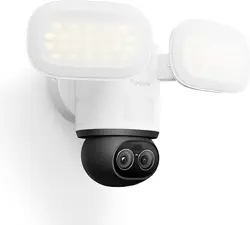
OMVI 3i PoE
Operational Instructions
REOLINK TECHNOLOGY PTE. LTD.
31 KAKI BUKIT ROAD 3, #06-02, TECHLINK, SINGAPORE 417818
English01 English 02
Contents
01
02
03
04
05
06
07
08
09
10
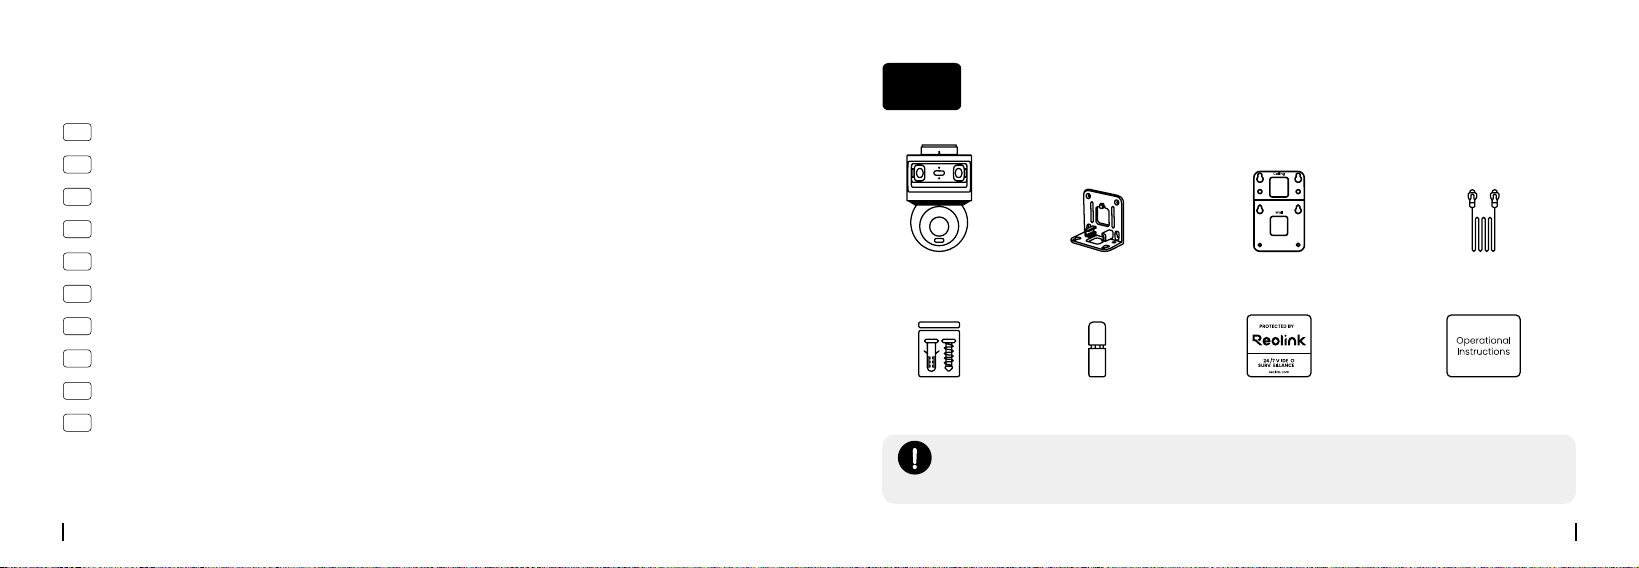
What's in the Box
01
Camera
Operational Instructions
Mounting Bracket Mounting Template
Surveillance Sticker
1m Ethernet Cable
NOTE:
The mount is compatible with the C-type mounting hole pattern on the Reolink
D20 and the RLA-JBL1 junction boxes.(Not included)
What's in the Box ·······································································02
Device Overview ·······································································03
Initial Setup·············································································05
Installation Tips ········································································1 1
Install the Camera · · · · · · · · · · · · · · · · · · · · · · · · · · · · · · · · · · · · · · · · · · · · · · · · · · · · · · · · · · · · · · · · · · · · · 13
Specifications ··········································································22
Important Safety Instructions··························································22
Troubleshooting········································································23
Legal Disclaimer ·······································································26
Notification of Compliance ····························································27
Pack of Screws Waterproof Lid
English03 English 04
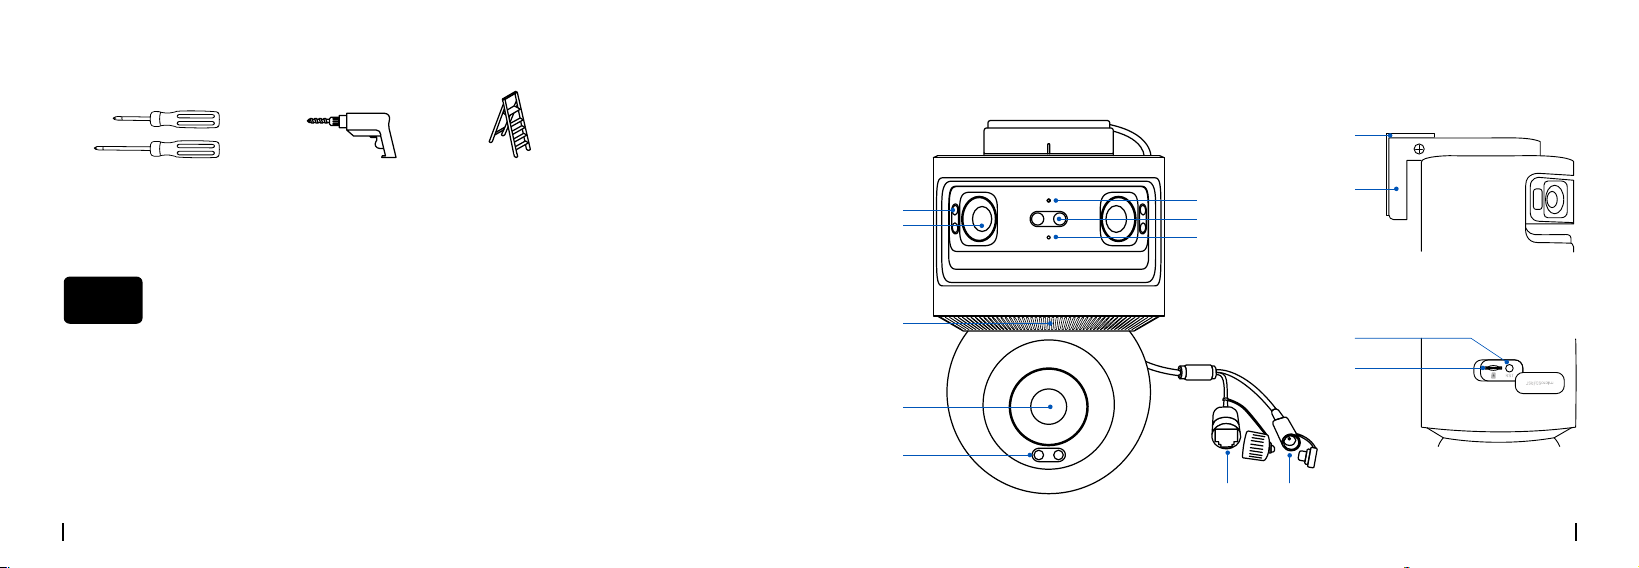
Power Drill Ladder
(If Necessary)
#1 & #2 PH Screwdrivers
What You Also Need
*Not Included
❶❺❼
Infrared Light/Spotlight
❷❹
Lens
❸
Speaker
❻
Status LED
❽
Microphone
❾
PoE Port
❿
Power Port
⓫
Mounting Bracket
⓬
Mounting Base
⓭
Reset Button
⓮
microSD Card Slot
Device Overview
❶
❷
❺
❸
❹
❻
❼
❽
⓭
⓮
❾ ❿
⓫
⓬
02
English05 English 06
Initial Setup
03
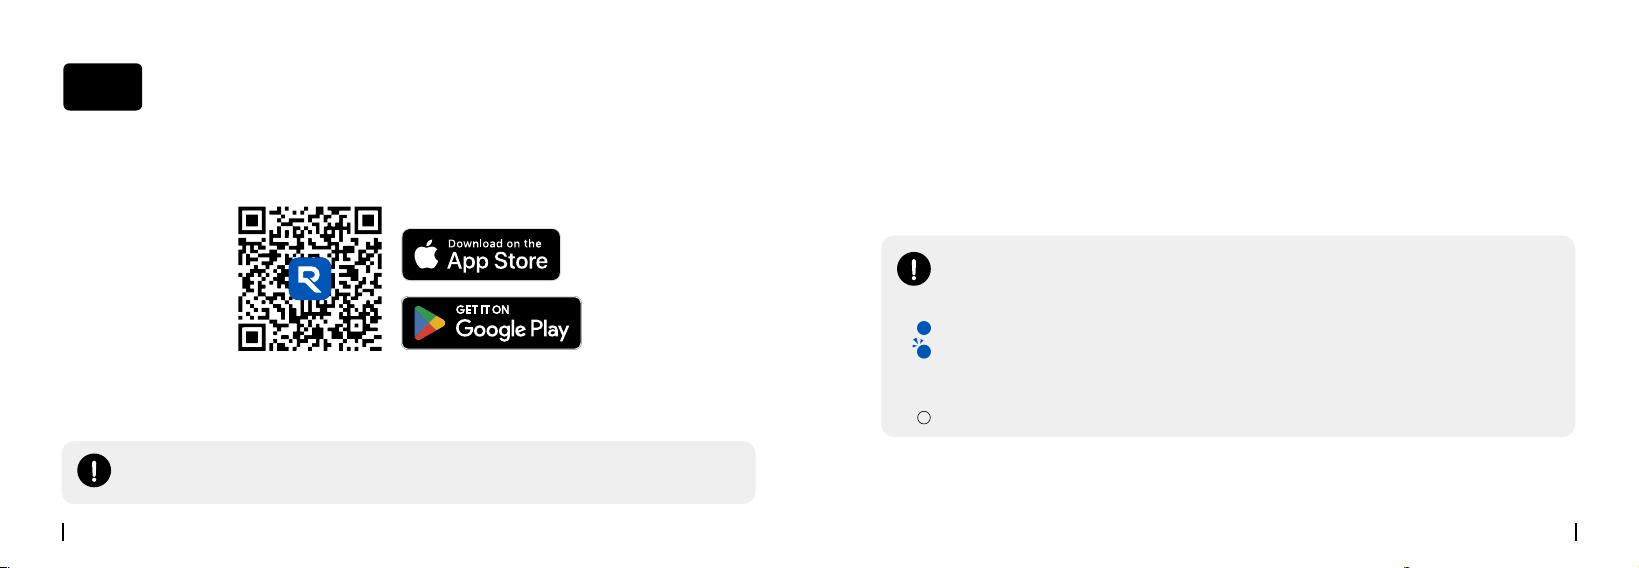
Step 1. Download the Reolink App or Client
• On Smartphone
• On PC
Download the Reolink Client: Go to > Support > Download Center > App & Client.
Step 2. Power on the Camera
1. Connect the camera to a PoE injector with an Ethernet cable.
2. Power on the PoE injector and connect it to your router.
NOTE:
After powering on, the status light will turn blue and flash.
Light Status Indicators:
Solid Blue:
Power on and the network connection succeeded.
Flashing Blue:
A. The device is powering on and initializing.
B. The device has completed initialization but a network error is detected.
No Light:
No power.
NOTE:
To connect the camera to a Reolink PoE NVR, use the NVR interface for setup.

English07 English 08
Camera
Router
PoE Injector*
Power
Adapter
Power Cable
Ethernet Cable
Network Cable
Step 3. Initialize the Camera
Tap the "+" button in the top corner, scan the camera's QR code, and follow the on-screen
instructions to complete the setup.
Devices
Cloud
You haven't added any device. Please click
the"+"button in the top right corner to add
NOTE:
After the initialization, the status light will change from blinking blue to a solid blue.
NOTE:
The camera can be powered via a PoE switch, a PoE injector, a 12V/2A DC
adapter, or a Reolink PoE NVR. (Sold separately)
English09 English 10
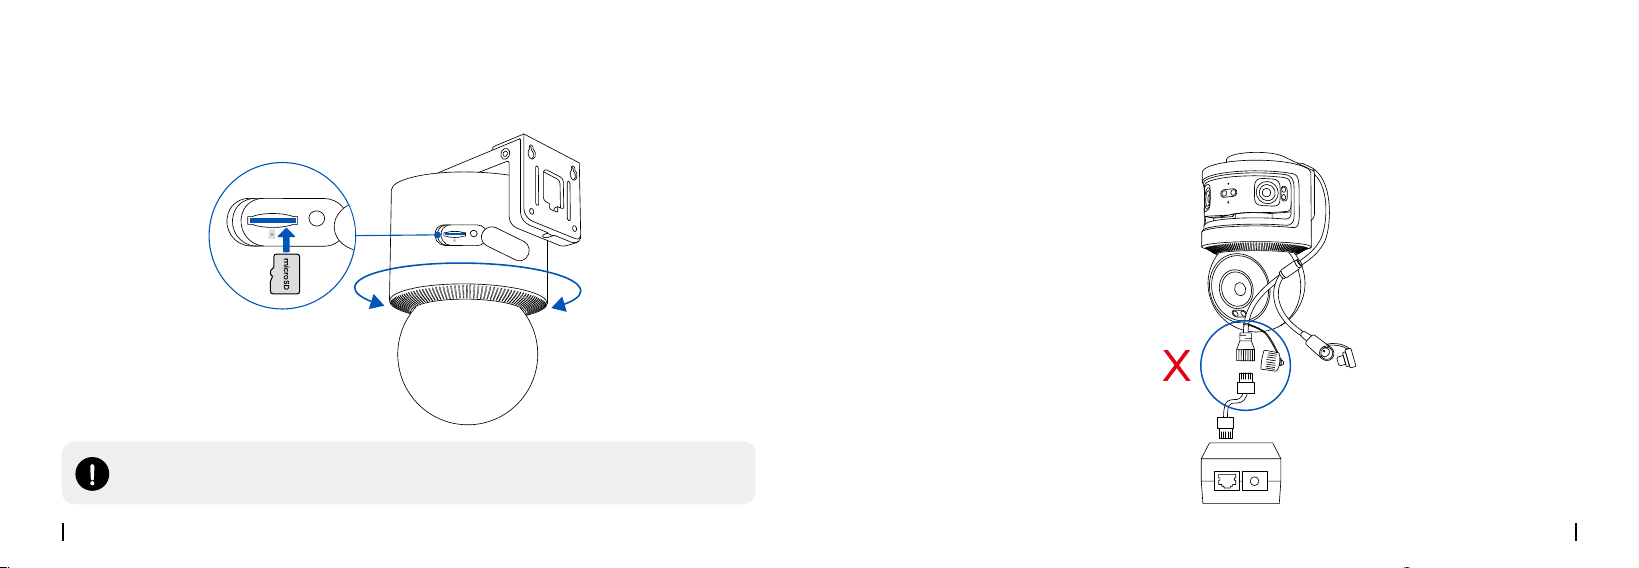
Rotate the mounting base to access the microSD slot. Open the cover, insert the card (not
included), and close it.
Step 4. Insert the microSD Card (Optional)
RST
microSD/RST
RST
microSD/RST
NOTE:
It is recommended to use a Class 10, 512GB microSD card for video storage.
For easier installation, it is recommended to disconnect the camera’s Ethernet cable
before starting. Reconnect them according to the instructions during installation.
Step 5. Disconnect the Ethernet Cable Before Installation
English11 English 12
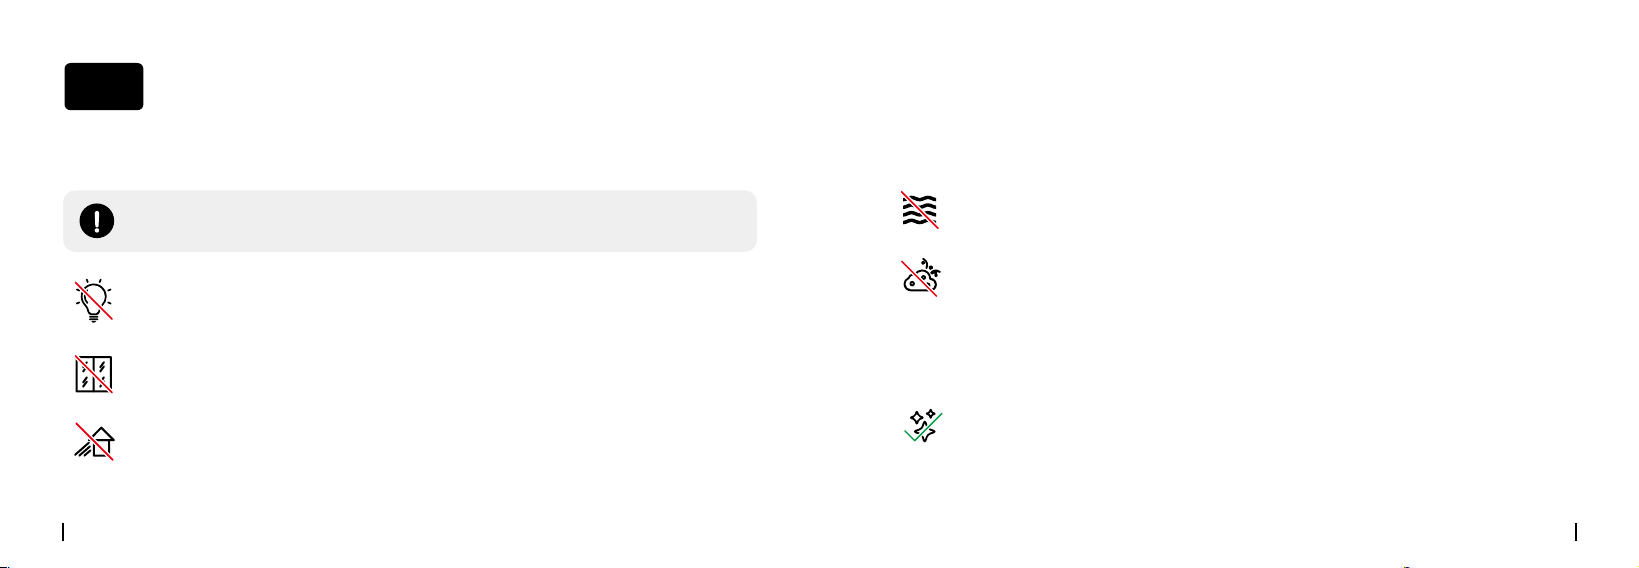
Installation Tips
Tip 1. Proper Mounting Locations
• Do not point the camera directly at light sources.
• Do not point the camera at windows*.
* Pointing cameras at windows may cause glare from infrared LEDs, status lights, or ambient lights.
• Do not place the camera in a shaded area; point it towards a well-lit space.
For optimal image quality, ensure consistent lighting for both the camera and
subject.
Tip 2. Water and Dust Resistance
Tip 3. Regular Cleaning
• Avoid exposing the LAN port and power port to water or moisture.
• Keep the LAN port and power port free from dirt and debris.
• Periodically clean the lens with a soft cloth.
04
English13 English 14
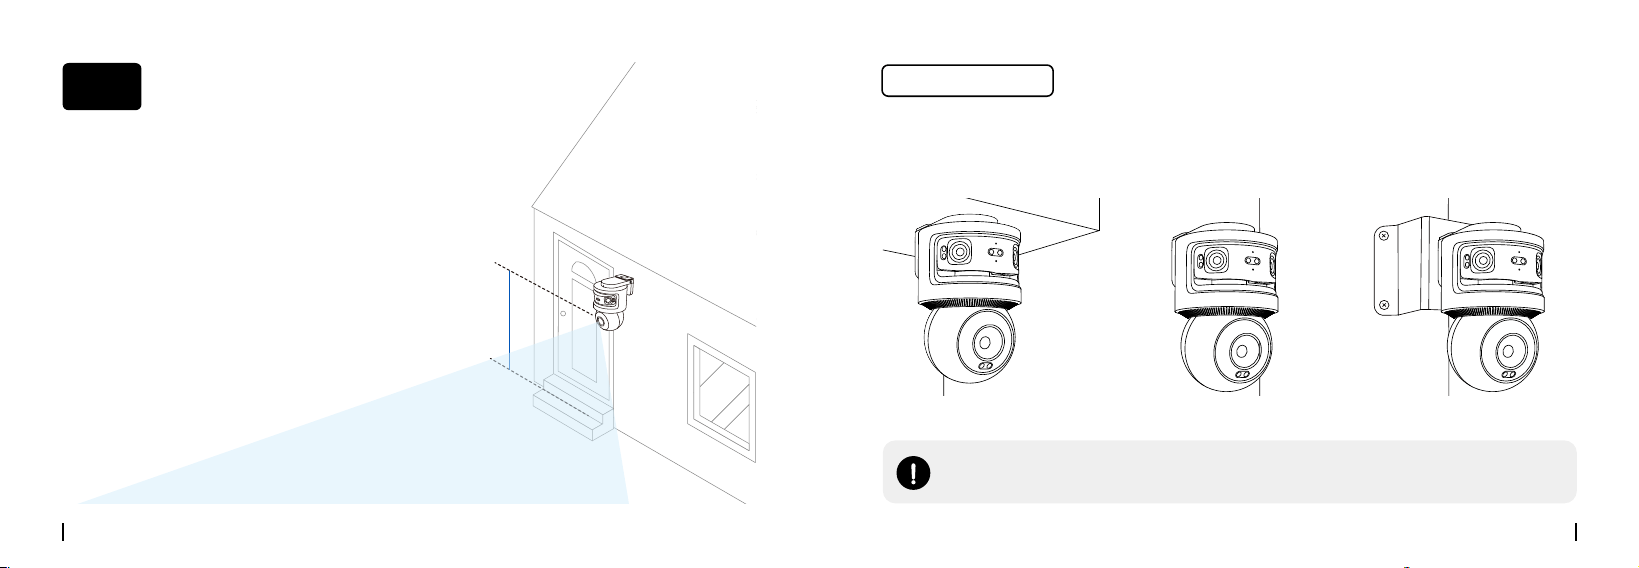
Step 1. Choose a Mounting Location
Wall Mounting Corner MountingCeiling Mounting
Install the Camera
05
Height of 2.5m~3.5m
(8 ft to 11ft)
NOTE:
The corner bracket needs to be purchased separately.
Mounting options
Recommended height: 2.5–3.5 m (8–11 ft)
English15 English 16
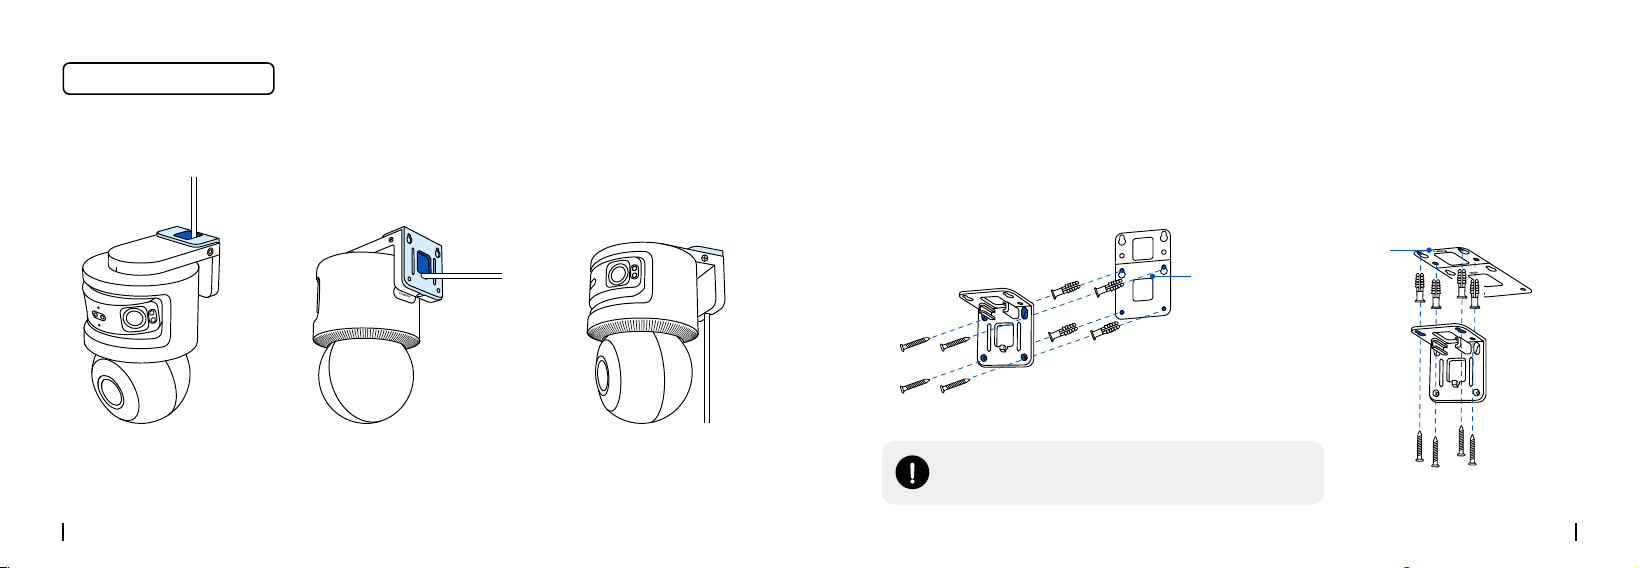
Step 2. Secure the Mounting Bracket
Wall Mounting Ceiling Mounting
A
A B C
B
Wall
Ceiling
Wall
Ceiling
Drill holes as indicated in the mounting template. Use included long screws to secure the
bracket.
NOTE:
Use the included drywall anchors if needed.
Wall
Ceiling
Cable Routing Methods
English17 English 18
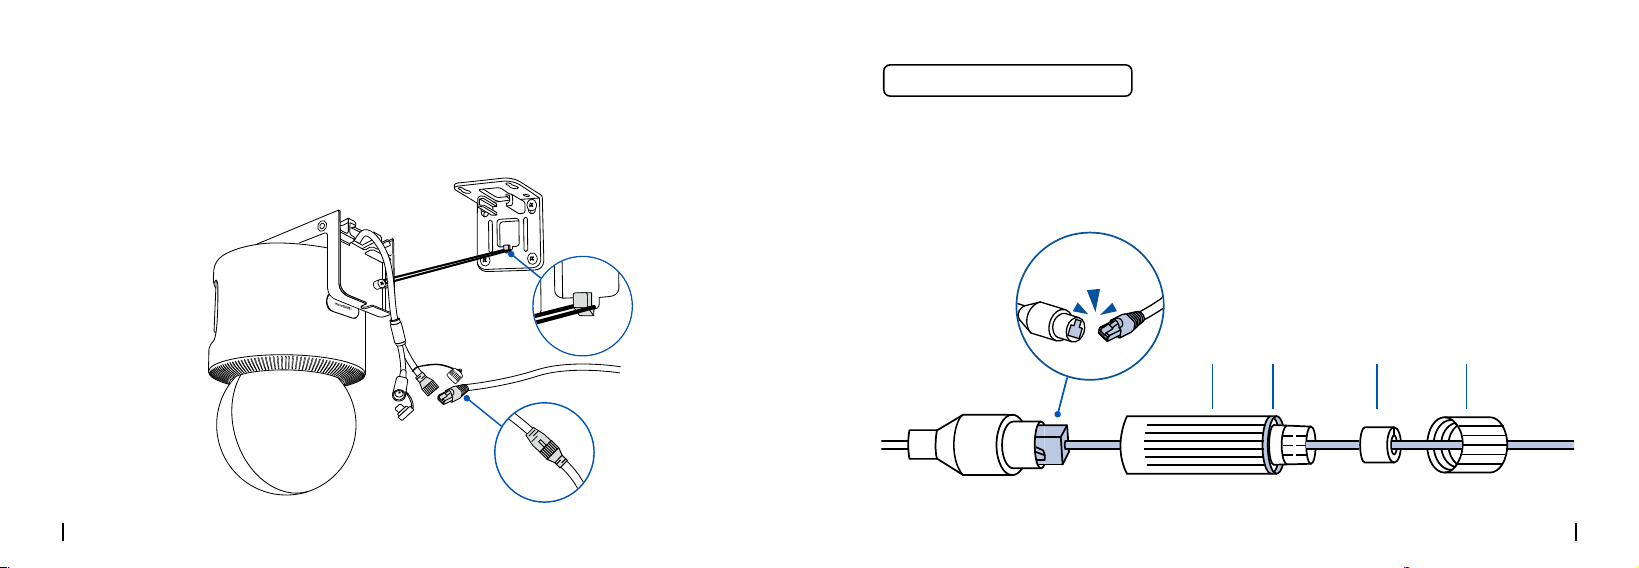
Step 3. Connect the Waterproof Lid and Ethernet Cable
Hang the camera on the mount and connect the Waterproof Lid (refer to next page) and
Ethernet cable. Wait for the indicator light to turn solid blue.
❶ Route the Ethemet cable through the components in this order: A, B, C, then D.
❷ Insert the Ethernet cable into the camera's PoE connector.
❸ Attach component D to the camera's PoE connector and twist to lock it in place.
❹ Insert components C and B into D, then rotate A to secure it to D.
ABCD
click
Waterproof Lid Connection
English19 English 20
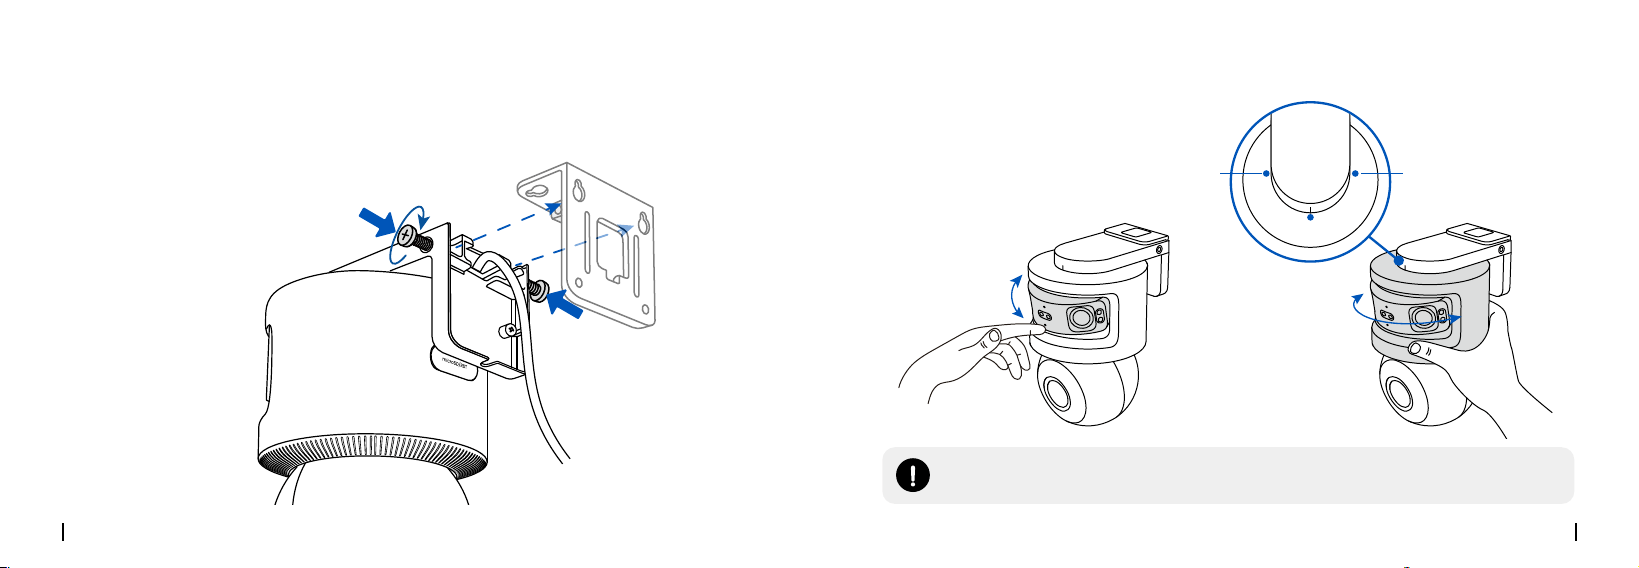
Step 4. Secure the Camera
Align the camera with the bracket, slide it into place, and tighten the screws on both sides
to secure it.
❶
❷
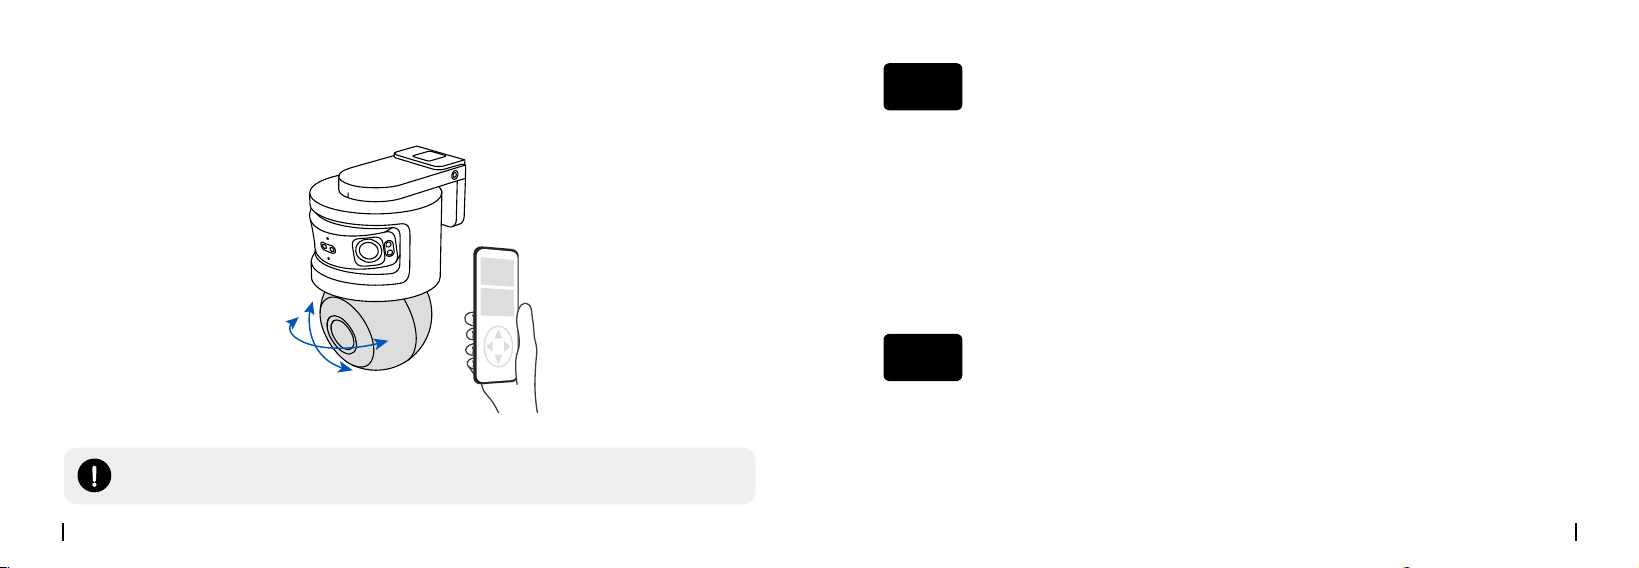
Step 5: Adjust the Camera Angles
0°~20°
-90°~90°
90°
0°
-90°
The upper panoramic cam
NOTE:
Manually adjust the dual lenses to your preferred angle.
English21 English 22
NOTE:
The PTZ lens can be remotely controlled through the Reolink App, Client, or NVR.
The lower PT cam
350°
50°
Specifications
06
Please read the instructions carefully before using the device.
1. Replace only with the same or equivalent type of accessories recommended by Reolink.
2. Do not use the device in an environment that exceeds the recommended temperature
range.
Important Safety Instructions
07
Operating Temperature: -10
℃
~+55
℃
(14°F~131°F)
Operating Humidity: 10%~90%
Weight: 1.3 kg
For additional specifications, please visit.

English23 English 24
3. Do not use the device in an environment that exceeds the recommended humidity
range.
4. Do not attempt to disassemble, repair, or alter the device by yourself.
5. Always follow the local safety laws and regulations when using the device.
6. The device contains (or comes with) small components, small plastic elements, and
other small parts that may cause choking hazards. Keep the device and its accessories
out of reach of children. Consult a physician immediately if small parts are swallowed.
7. The device contains (or comes with) cables or cords that may cause strangulation
hazards. Keep the device and its accessories out of reach of child
.
Camera Is Not Powering On
If your camera is not powering on, please try the following solutions:
Troubleshooting
08
• Make sure your camera is properly powered. This PoE camera requires either a PoE
switch/injector, a Reolink PoE NVR, or a 12V/2A DC power adapter.
• If the camera is connected to a PoE switch or a Reolink PoE NVR, connect the camera to
another PoE port and see if the camera will power on.
• Try again with another Ethernet cable.
If these won't work, contact Reolink support
Picture Is Not Clear
If the picture from the camera is not clear, please try the following solutions:
• Check the camera lens for dirt, dust or spiderwebs, please clean the lens with a soft,
clean cloth.
• Point the camera to a well-lit area, the lighting condition will affect the picture quality a
lot.
• Upgrade the firmware of your camera to the latest version.
• Restore the camera to factory settings and check out again.
lf these won't work, contact Reolink Support

English25 English 26
Spotlight Is Not On
If the spotlight on your camera is not on, please try the following solutions:
• Ensure the spotlight is enabled under Device Settings page via Reolink App/Client.
• Upgrade the firmware of your camera to the latest version.
• Restore the camera to factory settings and check out the spotlight settings again.
If these won't work, contact Reolink Support
Infrared LEDs Stop Working
If the Infrared LEDs of your camera stop working, please try the following solutions:
• Enable infrared lights on Device Settings page via Reolink App/Client.
• Check if the Day/Night mode is enabled and set up auto infrared lights at night on Live
View page via Reolink App/Client.
• Upgrade the firmware of your camera to the latest version.
• Restore the camera to factory settings and check out the infrared light settings again.
If these won't work, contact Reolink Support
Camera Doesn’t Work Properly When Added to the Reolink
NVR or Home Hub
If your Reolink camera isn’t working properly after being added to an NVR or Home Hub,
please make sure the firmware on your camera, NVR, and Hub is updated to the latest
version. If the issue continues after updating, contact Reolink Support at .
To the maximum extent permitted by applicable law, this document and the product described, with its hardware,
software, firmware, and services, are delivered on an "as-is" and "as-available" basis, with all faults and without
warranty of any kind. Reolink disclaims all warranties, express or implied, including but not limited to, warranties
of merchantability, satisfactory quality, fitness for a particular purpose, accuracy, and non-infringement of third-
party rights. In no event will Reolink, its directors, officers, employees, or agents be liable to you for any special,
consequential, incidental or indirect damages, including but not limited to damages for loss of business profits,
business interruption, or loss of data or documentation, in connection with the use of this product, even if Reolink
has been advised of the possibility of such damages.
Legal Disclaimer
09

English27 English 28
Notification of Compliance
10
FCC Compliance Statement
This device complies with part 15 of the FCC Rules. Operation is subject to the following two conditions:
(1) This device may not cause harmful interference, and
(2) this device must accept any interference received, including interference that may cause undesired operation.
To the extent permitted by applicable law, your use of the Reolink products and services is at your sole risk and you
assume all risks associated with internet access. Reolink does not take any responsibilities for abnormal operation,
privacy leakage or other damages resulting from cyber attacks, hacker attacks, virus inspections, or other internet
security risks. However, Reolink will provide timely technical support if required.
The laws and regulations related to this product vary by jurisdiction. Please check all relevant laws and regulations
in your jurisdiction before using this product to ensure that your use conforms to the applicable law and regulation.
During the use of the product, you must comply with relevant local laws and regulations. Reolink is not responsible
for any illegal or improper use and its consequences. Reolink is not liable in the event that this product is used
with illegitimate purposes, such as third-party rights infringement, medical treatment, safety equipment, or other
situations where the product failure could lead to death or personal injury, or for weapons of mass destruction,
chemical and biological weapons, nuclear explosion, and any unsafe nuclear energy uses or anti-humanity
purposes. In the event of any conflicts between this manual and the applicable law, the latter prevails.
ISED Compliance Statements
This Class B digital apparatus complies with Canadian ICES-003.
Cet appareil numérique de la classe B est conforme à la norme NMB-003 du Canada.
Limited Warranty
This product comes with a 2-year limited warranty that is valid only if purchased from Reolink Official Store or a
Reolink authorized reseller. Learn more: .
NOTE:
We hope that you enjoy the new purchase. But if you are not satisfied with the product and plan to return,
we strongly suggest that you reset the camera to factory default settings and take out the inserted SD card before
returning.
Terms and Privacy
Use of the product is subject to your agreement to the Terms of Service and Privacy Policy at
Technical Support
If you need any technical help, please visit our official support site and contact our support team before returning
the products, .
Terms of Service
By using the Product Software that is embedded on the Reolink product, you agree to the terms&conditions
between you and Reolink. Learn more:
Trademarks Acknowledgement
"Reolink" and other Reolink's trademarks and logos are the properties of Reolink. Other trademarks and logos
mentioned are the properties of their respective owners.