InstructionManual

IMPORTANTSAFETYINSTRUCTIONS
When using electrical appliances basic safety precautions should be followed, including the
following:
WARNING – To reduce the risk of burns, electric shock, fire, injury to persons, or exposure to
excessivemicrowaveenergy:
1) Readallinstructionsbeforeusingtheappliance.
2) Read and follow the specific "PRECAUTIONS TO AVOID POSSIBLE
EXPOSURE TO EXCESSIVE
MICROWAVEENERGY"foundonpage2.
3)Thisappliancemustbegrounded.Connectonlytoproperlygroundedoutlet.See"GROUNDING
INSTRUCTIONS"foundonpage2.
4)Installorlocatethisapplianceonlyinaccordancewiththeprovidedinstallationinstructions.
5)Someproductssuchaswholeeggsand
sealedcontainers–forexample,closedglassjars–are
abletoexplodeandshouldnotbeheatedinthisoven.
6)Usethis applianceonlyfor its intended use asdescribedin themanual. Donotuse corrosive
chemicalsorvaporsinthisappliance.Thistypeofovenisspecifically
designedtoheat,cook,ordry
food.Itisnotdesignedforindustrialorlaboratoryuse.
7) HOT CONTENTS CAN CAUSE SEVERE BURNS. DO NOT ALLOW CHILDREN TO USE THE
MICROWAVE.Usecautionwhenremovinghotitems.
8)Donotoperatethisapplianceifithasadamagedcordor
plug,ifitisnotworkingproperly,orif
ithasbeendamagedordropped.
9) This appliance should be serviced only by qualified service personnel. Contact nearest
authorizedservicefacilityforexamination,repair,oradjustment.
10)Donotcoverorblockanyopeningsontheappliance.
11)Donotstore
thisapplianceoutdoors.Donotusethisproductnearwater–forexample,neara
kitchensink,inawetbasement,nearaswimmingpool,orsimilarlocations.
12)Donotimmersecordorpluginwater.
13)Keepcordawayfromheatedsurfaces.
14)Donotletcordhang
overedgeoftableorcounter.
15)Whencleaningsurfacesofdoorandoventhatcomes togetheronclosingthedoor,useonly
mild,nonabrasivesoaps,ordetergentsappliedwithaspongeorsoftcloth
16)Toreducetheriskoffireintheovencavity:
i)Donotovercookfood.
Care fullyattendappliancewhenpaper,plastic,orothercombustible
materialsareplacedinsidetheoventofacilitatecooking.
ii)Removewiretwist‐tiesfrompaperorplasticbagsbeforeplacingbaginoven.
iii)Ifmaterialsinsidetheovenignite,keepovendoorclosed,turnovenoff,and disconnect
the
powercord,orshutoffpoweratthefuseorcircuitbreakerpanel.
iv)Donotusethecavityforstoragepurposes.Donotleavepaperproducts,cookingutensils,
orfoodintheca vitywhennotinuse.
17)Liquids,suchaswater,coffee,orteaareabletobeoverheated
beyondtheboilingpointwithout
appearing to be boiling. Visible bubbling or boiling when the container is removed from the
microwave oven is not always present. THIS COULD RESULT IN VERY HOT LIQUIDS SUDDENLY
BOILINGOVERWHENTHECONTAINERISDISTURBEDORAUTENSILISINSERTEDINTOTHELIQUID.
18)
NoteofOven:
a)Oversizedfoodsoroversizedmetalutensilsshouldnotbeinsertedinamicrowave/toaster

ovenastheymaycreateafireorriskofelectricshock.
b)Do notclean withmetalscouring pads. Piecescanburn offthepadand touchelectrical
partsinvolvingariskofelectricshock.
c)Donotusepaperproductswhenapplianceisoperatedinthetoastermode.
d)
Donotstoreanymaterials,otherthanmanufacturer'srecommendedaccessories,inthis
ovenwhennotinuse.
e)Donotcoverracksoranyotherpartoftheovenwithmetalfoil.Thiswillcauseoverheating
oftheoven.
19)Noteofpower ‐supplycord:
a)Ashortpower‐supply
cordisprovidedtoreducetherisksresultingfrombecomingentangledin
ortrippingoveralongercord.
b)Longercordsetsorextensioncordsareavailableandmaybeusedifcareisexercisedintheir
use.
c)Ifalongcordorextensioncordisused:
1)Themarked
electricalratingofthecordsetorextensioncordshouldbeatleastasgrea tas
theelectricalratingoftheappliance;
2)Theextensioncordmustbeagrounding‐type3‐wirecord;and
3)Thelongercordshouldbearrangedsothatitwillnotdrapeoverthe
countertoportabletop
whereitcanbepulledonbychildrenortrippedoverunintentionally.
20)Thissymbolindicates:Thesurfaceofthisproductishot;usecautionwhentouching.
SAVETHESEINSTRUCTIONS
PRECAUTIONSTOAVOIDPOSSIBLEEXPOSURETOEXCESSIVEMICROWAVEENERGY
(a)Donotattempttooperatethisovenwiththedooropensinceopen‐dooroperationcanresult
inharmfulexposuretomicrowaveenergy.Itisimportantnottodefeatortamperwiththesafety
interlocks.
(b) Do not place any object between the oven front face and the door or
allow soil or cleaner
residuetoaccumulateonsealingsurfaces.
(c)Donotoperatetheovenifitisdamaged.Itisparticularlyimportantthattheovendoorclose
properlyand that thereis no damage to the: (1) door (bent),(2) hinges and latches (broken or
loosened),(3)door
sealsandsealingsurfaces.
GROUNDINGINSTRUCTIONS
Thisappliancemustbegrounded.Intheeventofanelectricalshortcircuit,groundingreducesthe
riskofelectricshockbyprovidinganescapewirefortheelectriccurrent.Thisapplianceisequipped
withacordhavingagroundingwirewithagroundingplug.Theplugmustbepluggedintoan
outlet
thatisproperlyinstalledandgrounded.
WARNING–Improperuseofthegroundingcanresultinariskofelectricshock.
Consult a qualified electrician or serviceman if the grounding instructions are not completely
understood,orifdoubtexistsastowhethertheapplianceisproperlygrounded,andeither:
1)Ifitisnecessarytouseanextensioncord,useonlya3‐wireextensioncordthathasa3‐blade
groundingplug,anda3‐slotreceptaclethatwillaccepttheplugontheappliance.The marked

ratingoftheextensioncordshallbeequaltoorgreaterthantheelectricalratingoftheappliance,
or
2) Donotuseanextensioncord.Ifthepowersupplycordistooshort,haveaqualifiedelectrician
orservicemaninstallanoutletneartheappliance.
PRECAUTIONSTOBEOBSERVEDBEFOREANDDURINGSERVICINGTOAVOIDPOSSIBLEEXPOSURE
TOEXCESSIVEMICROWAVEENERGY
(a) Donotoperateorallowtheoventobeoperatedwiththedooropen.
(b) Makethefollowingsafetychecksonallovenstobeservicedbeforeactivatingthemagnetron
orothermicrowavesource,andmakerepairsasnecessary:(1)interlockoperation,(2)properdoor
closing,(3)sealandsealingsurfaces(arcing,wear,andotherdamage),(4)damagetoorloosening
ofhingesandlatches,(5)evidenceofdroppingorabuse.
(c) Before turning on microwave powerfor any service test or inspection within the microwave
generatingcompartments,checkthemagnetron,waveguideortransmissionline,andcavityfor
properalignment,integrity,andconnection.
(d) Anydefectiveormisadjustedcomponentsintheinterlock,monitor,doorseal,andmicrowave
generation and transmission systems shall be repaired, replaced, or adjusted by procedures
describedinthismanualbeforetheovenisreleasedtotheowner.
(e) AmicrowaveleakagechecktoverifycompliancewiththeFederalPerformanceStandardshould
beperformedoneachovenpriortoreleasetotheowner."
ThisequipmenthasbeentestedandfoundtocomplywiththelimitsforaClassBdigitaldevice,
pursuanttopart15of
theFCCRules.Theselimitsaredesignedtoprovidereasonableprotection
againstharmfulinterferenceinaresidentialinstallation.Thisequipmentgener at es,usesandcan
radiateradiofrequencyenergyand,ifnotinstalledandusedinaccordancewiththeinstructions,
maycauseharmful
interferencetoradiocommunications.However,thereisnoguaranteethat
interference will not occur in a particular installation. If this equipmen t does cause harmful
interferencetoradioortelevisionreception,whichcanbedeterminedbyturningtheequipment
offandon,theuserisencouragedtotrytocorrecttheinterferencebyoneormoreofthefollowing
measures:
—Reorientorrelocatethereceivingantenna.
—Increasetheseparationbetweentheequipmentandreceiver.
—Connecttheequipmentintoanoutleton acircuitdifferentfromthatto whichthereceiveris
connected.
—Consultthedealeroranexperiencedradio/TVtechnicianforhelp.
This device complies with part 15 of the FCC Rules. Operation is subject to the following two
conditions: (1) This device may not cause harmful interference, and (2) this device must accept
any interference received, including interference that may cause undesired operation.
Any changes or modifications not expressly approved by the party responsible for compliance
could void the user's authority to operate the equipment.

UserNotice
Thank you for choosing to
use this product:
·This manual
has
been
made as concise as
possible
for your convenience. Please
be sure to read the manual before use and keep it in a safe place.
·Our company provides consultation services, so if you have any questions during
use, please feel free to
call
our service hotline.
·The functional descriptions, data parameters, and product images mentioned in this
manual are for
reference only. Our company reserves the right to change
product
design
and specifications without
prior notice.
1.Before using this product, please read the contents of this manual carefully.
2.Check if the voltage you are us
ing matches the rated voltage of the product.
3.To prevent electric shock and fire, do not immerse the power cord or plug in
water or other liquids.
4.This product should not be used by individuals with physical, sensory, or
mental disabilities or those lacking experience and knowledge in its use
(including children) unless they are supervised or instructed by a person
responsible for their safety. Children should be supervised to ensure 4. they do
not play with this product. Cleaning and maintenance of the appliance should
not be done by children without supervision.
5.Do not heat flammable or explosive items or liquids sealed in containers,
including eggs in their shells or boiled eggs, to prevent explosions.
6.Us
e this device only for the purposes mentioned in the instruction manual. Do
not use corrosive chemicals or vapors in this device. This device is specifically
designed for heating or cooking food and is not intended for indus
trial or
laboratory use.
7.Do not use non-heat-resistant glass containers, on-heat-resistant plastic
containers, lacquer ware, wood, bamboo products, aluminum containers, or
aluminum boxes in the microwave.
8.If the power cord, microwave door, door seal, or other components are
damaged, stop using the machine immediately. To avoid danger, they must be
replaced by a professional from the manufacturer, its repair department, or a
similar department.
9.This appliance has a grounded plug, ensure that the household socket you use
is properly grounded.

10.Do not cover or block any openings on the device.
11.The appliance should not be operated with an external timer or an
independent remote control system.
12. This
device
is
for
indoor
use only. Do
not
use
it
in high-temperature,
exposed, strong magnetic field, humid, or corrosive environments.
13.Do not touch
hot surfaces
during
microwave use; use
handles
or
knobs to
prevent burns. Ensure
that
the
door is
closed when
operating
the
microwave.
14.Do not let the power cord hang over the edge of the table or come into contact
with hot surfaces.
15. When cleaning this device, use only mild, on-abrasive
soap or a
sponge or
soft cloth
dampened with
a
cleaning
agent. Do not use sharp objects (such
as
scouring pads, spatulas, etc.) to clean this device.
16.Do not use accessories from non-designated
manufacturers
to avoid
damaging the
product, harming
the user, or
posing potential dangers.
17.During
use, pay attention to the following points to
reduce the
risk of fires
in
the cavity:
(1) Avoid
cooking for too
long. When
heating food in plastic
or paper packaging,
always monitor the cooking
process
and set the cooking time
correctly to
prevent overheating, which could
cause
a fire.
(2) Before
placing bags inside
the cavity, remove
any tying
strings
from
paper or plastic bags.
(3) If smoke
is detected, unplug
the power cord immediately and keep
the
oven door closed to suppress the flames.
(4) When
not
in use, do
not place any materials
inside
the cavity, except
for accessories recommended by the manufacturer.
18. Microwaving liquids (such
as beverages) can
cause delayed splattering
and
boiling, so
be
careful
when
removing them. Liquids
like
water, coffee, or
tea
may exceed
their
boiling
points
due to
high
temperatures, even
if
they do
not
appear to be
boiling on
the surface. This phenomenon
is
known as
delayed
boiling, so handle containers with
care when
taking them
out of the
microwave. Visible bubbles
or boiling may not
occur
every time
you
remove a
container
from
the microwave. Interference or inserting
utensils into the
liquid
may cause
a sudden and extremely hot
boil. Do not
heat
liquids
or
other
food
items in closed
containers, as
they may explode.
19.During use, pay
attention to the
following points to reduce
the risk of injury:
(1) Do
not
use
narrow-necked straight-sided
containers; use
wide-
mouthed containers(bottles)instead.
(2) Stir liquids before and during heating.
(3) Avoid overheating liquids.
(4) Be extra careful when inserting a spoon or other utensil into a container;

this can cause delayed boiling.
(5) Allow the container to sit in the microwave for at least 20 seconds after
heating before removing it.
20. Do not place this device in a cupboard or near flammable or explosive
materials.
21.Place this device on a level surface in a well-ventilated and dry
environment, with a distance of at least 10cm from the surroundings to ensure
that any openings on the device are not blocked. Ensure that this device is at
least 2m away from electrical appliances with signal reception, such as
televisions, radios, antennas, etc., to avoid signal interference.
22. Place the glass tray and turntable assembly inside the cavity when
cooking. Handle the glass tray with care and gently place kitchen utensils on it
to avoid damage.
23.Do not puncture the oven door mesh holes to prevent microwave leakage.
24.When using preset programs, place ingredients of the corresponding weight
according to the program instructions.
25. The cavity contains an inner snow safety switch that ensures the power
remains off when the door is open; do not modify it yourself.
26.Do not use the microwave when it is empty to avoid damaging the machine.
Do not operate it without food or with very low moisture content, to avoid
scorching, sparking, or fires. Foods with low moisture content may heat
unevenly during cooking due to different materials' absorption of microwaves;
this is normal.
27. Do not place bacon or similar ingredients directly on the turntable, as
localized overheating may cause the turntable to break.
28.Do not heat baby bottles or baby food in the microwave, as it may result in
uneven heating and high temperatures, causing harm.
29.Do not heat narrow-necked containers such as syrup bottles.
30. Do not attempt deep frying in this device.
31.Do not attempt to place home-canned goods in this device, as it cannot
ensure that all items in the cans reach boiling temperatures.
32. Do not use this device for commercial purposes; it is intended for general
household use only.
33.Regularly clean the microwave and remove all food residues to prevent
dangerous situations caused by deterioration of the appliance's surface.
34. Disconnect the power and unplug it from the socket before not using or
cleaning the device; do not pull on the cord.
35.Do not heat food or beverages in metal packaging, as this may cause fires
or electrical hazards.
36.Do not use metal materials such as steel wool for cleaning this machine, as
it will reduce the microwave oven's lifespan and may increase the risk of fires
during subsequent use.
37.When operating this device in oven mode, do not use paper products.
38.Do not cover the oven rack or any other part of this device with a metal box,
as it can cause overheating.
39. Use containers suitable for the microwave when in microwave mode. For
air fryer mode, choose appropriate containers separately.
40. The microwave function is only for heating food and beverages. Heating
dry food, clothing, heating pads, slippers, sponges, wet cloths, and similar
items may pose a risk of injury, fires, or fire hazards.
41.During microwave air frying, ensure there are no water droplets left on the
glass plate, as water droplets can cause the glass plate to overheat and break.
42. After using this device for extended periods of heating, do not defrost
immediately; wait for the bottom tray to cool before defrosting.
Note:
Danger-Electric Shock Hazard
·Touching certain internal components may result in serious personal injury or death.
Do not disassemble this device.
·Improper grounding can lead to electric shock. Do not plug it into an outlet before
correctly installing and grounding it.
This symbol indicates: The surface of this product is hot; use caution when touching.
Warning: Pacemaker
Most pacemakers can shield interference from electronic devices, including microwaves. Patients
with pacemakers should consult their doctors if they have any concerns.
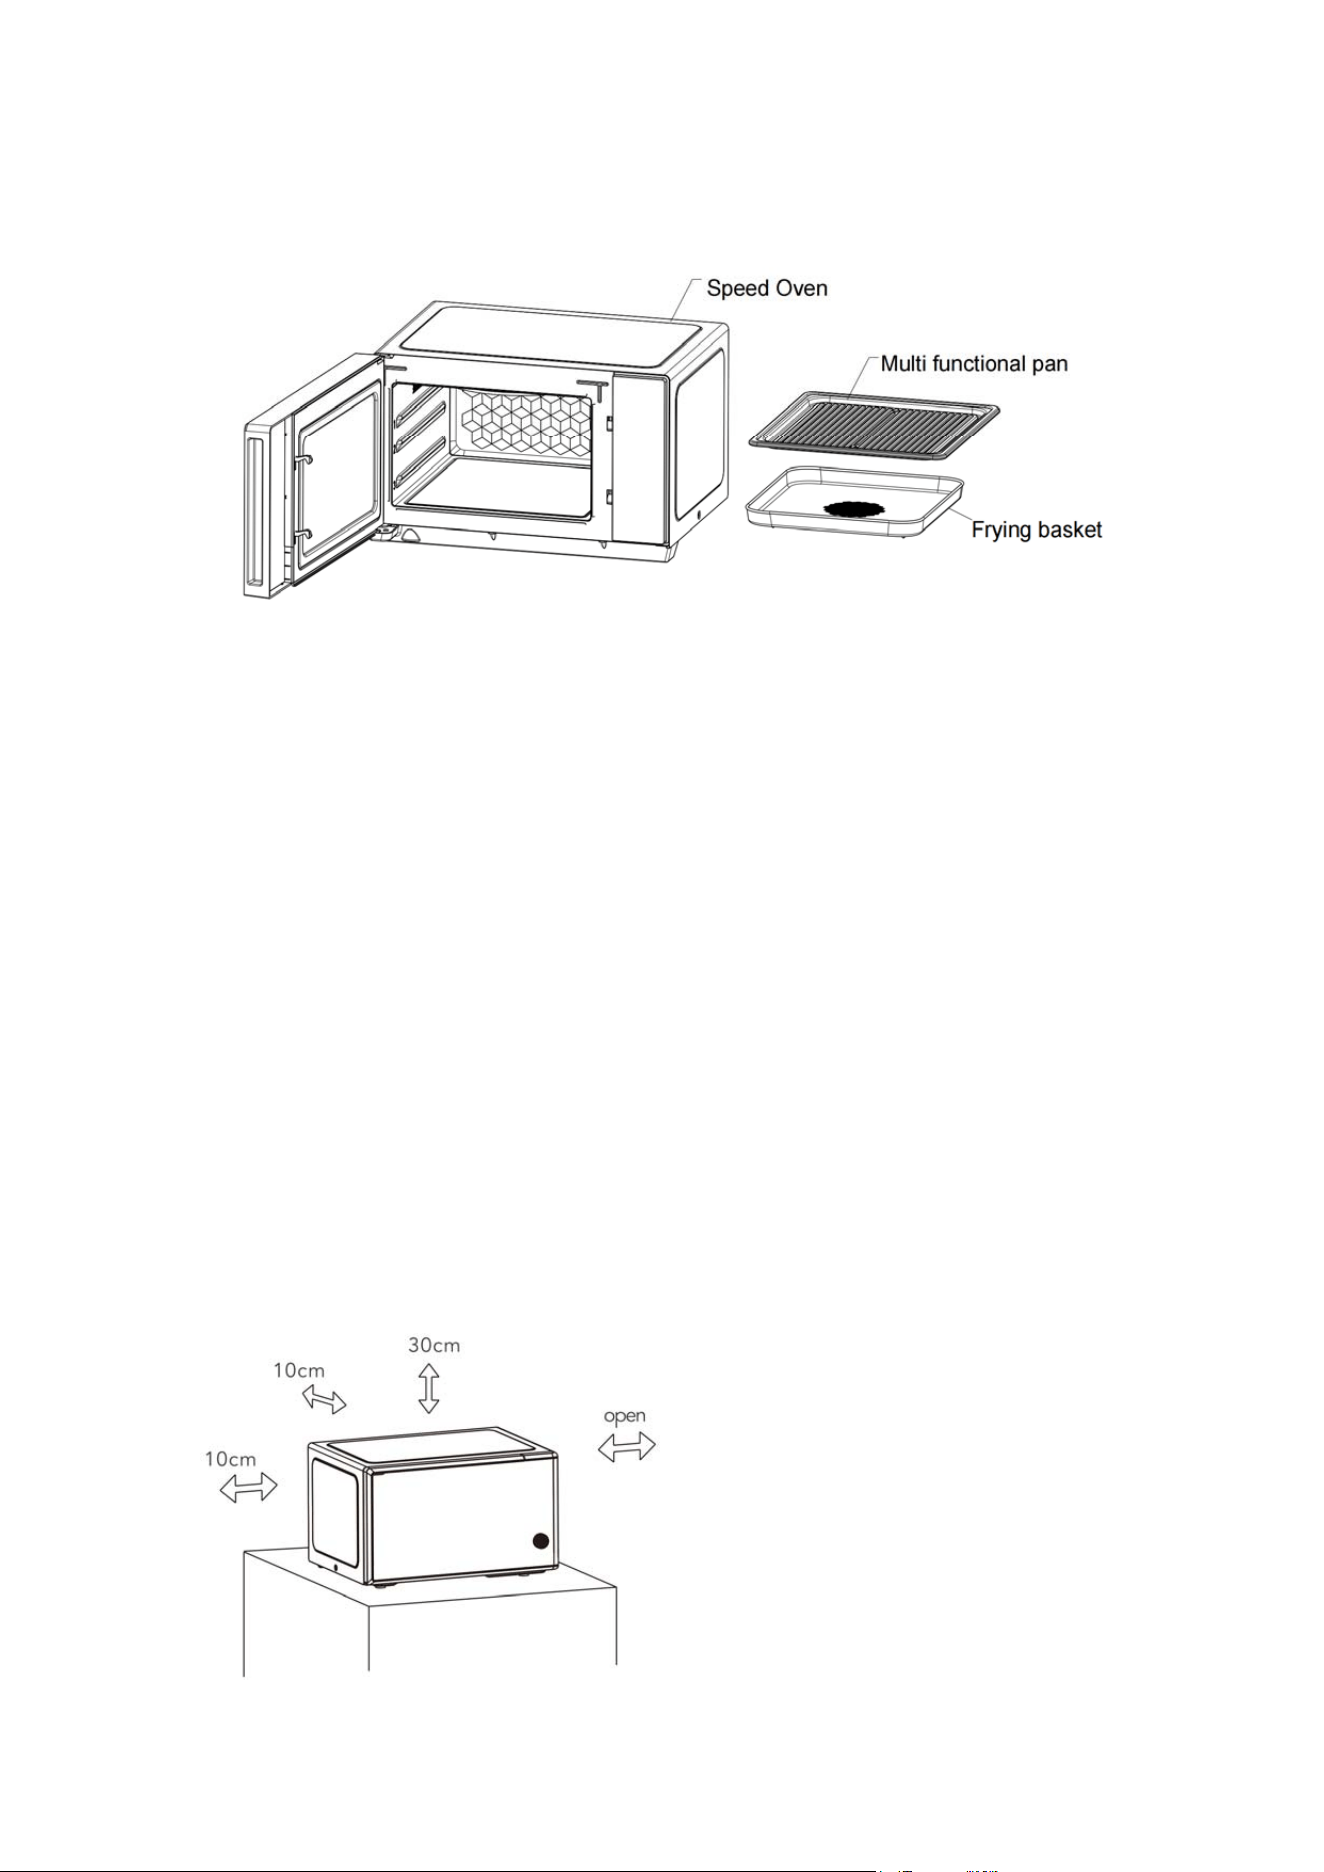
NameofProductComponent
PlacementandPowerConnection
1. Placement-Choose a level surface and leave a gap of at least 30 cm above this device,
and maintain a distance of at least 10cm between the device and
adjacent walls on
all sides (as shown in Figure
1).
Note:
(1)
Blockage of the air intake or exhaust outlet can cause damage to the device.
(2) Do not place any objects on top of this device as the outer casing becomes hot
during
use.
(3)
Please do not install this product on or near heat sources such as stoves or
other appliances that
generate
heat. Improper
installation
near or
above
heat
sources
may
result in damage to the device, and in such cases, it will
not be
covered
by the
warranty.
2.
Remove all protective films from the exterior of the machine.
3. Before plugging in the power cord of this device into a standard household socket, please
ensure that the voltage and frequency match the machine's rated voltage and frequency.
OperationInstruction
1.GeneralRules
DoorOpen/Close:
Duringtheoperationoftheproductorwithin30minutesaftercompletingitsfunctions,longpress
the stop button to unlock it, and then manually open the door handle to open the door. The
productisnotrunningorcanbeopeneddirectlyafter30minutes
ofcompletingitsfunctions.
Afterclosingthedoor,youmustpressthe'Start'buttontocontinueworking.
2.PowerOn
Uponinitialpower‐on,thebuzzersoundsapower‐onprompttone,andkeyindicatorlightsglow
dimly.Iftheuserhasnotsetthelanguage,thesystementerstheinitial
setupstate,requiringthe
usertosetthelanguageandclockformat(12Hor24H).Ifthelanguageorclockhasalreadybeen
set,thesystemdirectlyentersstandbymode.
3.InitialSetup
3.1LanguageSelectionScreen(Languagetypesandorderreferto"LanguageSettings").Defaultis
English.Rotatetheknobto
selectalanguage,thenpresstheknobtoconfirm.Proceedtotheclock
formatselectionscreen.
3.2ClockFormatSelectionScreen:R otatetheknobtochoosebetween12Hor24Hformat(default
is24H).Presstheknobtoconfirmtheformatand proceedto the hoursettingscreen.Pressthe
"Back"keytoreturntothelanguageselectionscreen.
3.3HourSettingScreen:Thedefaulttimeisthecurrenttime.Rotatetheknobtoadjust:for24H
format, range is 0~23; for 12H format, range is 1~12. Press the knob to confirm the hour and
proceedtotheminutesettingscreen
(range0~59).Rotatetheknobtoselectminutes.Pressthe
knobtoconfirmtheminutesetting.Theclockwillrunaccordingtothesettime,andthesystem
entersstandbymode.Pressthe"Back"keytoreturntothehoursettingscreen.
3.4SkippingSetup:Duringinitialsetup,pressingthe
"STOP"keyskipslanguageandtimesettings,
enteringstandby mode with default language as English, 24‐hour clock format, and time set to
"00:00".Thesedefaultsarenotsaved.
4.StandbyMode
Instandbymode,thedisplayshowsthecurrenttime.The"MENU"and"STOP"keyindicatorlights
arebright;otherkey
lightsaredim.
5.ECOMode
5.1EnteringECOMode:Instandby,pause,childlock,orinitialsetupstates,ifthereisnooperation

for1minute,theapplianceentersEnergy‐savingmode.Inthismode,thedisplayturnsoff,touch
keysaredisabled,andallkeyindicatorlightsturnoff.
5.2ExitingECOMode:InECOmode,rotatingtheknoborpressingthe"Start"keyrestoresthestate
priortoenteringECOmode.
6.QuickStart/AddCookingTime
6.1Instandbymodewiththedoorclosed,pressingthe"Start"keydirectlyinitiatesa30‐second
manual microwave heating at 100% power. The display shows a countdown timer and a time
progressbar.Microwaveoperationcyclingreferstothemanualmicrowavemenusettings.
6.2
During manual microwave, manual air fry, manual reheat, timed defrost, and combination
menu operation, pressing the "Start" key increases the working time by 30 seconds. Maximum
timelimitsrefertorespectivemenuparameters.
7.Menu
7.1In standbymode,pressthe"MENU"keyorrotatetheknobtoentertheprimary
menuselection
screen.Thereare14primarymenus:Myfavorite,speedycook,air‐fry,microwave,reheat,defrost,
broil, bake, toast, dehydration, slow cook, combination, Steam clean, setting. If no menus are
favorited,"Speedycook"isthefirstmenu.Iffavoritesexist,"Myfavourite"isthefirstprimarymenu.
7.2PrimaryMenu
Selection:Userscanpressthe"MENU"keyorrotatetheknobtoselectthenext
menu.Afterthelastmenu,selectionloopsbacktothefirst.
7.3FavoriteMenus:
7.3.1Aftersettingportionandcookingparametersforanycookingmenu,the"SAVE"keyindicator
lightsup.Pressthe"SAVE"key
tosavethemenu.Savedmenusarearrangedinchronologicalorder
ofsaving.
7.3.2Amaximumof10menuscanbesaved.If10arealreadysaved,pressing"SAVE"againdisplays
a"Favoritemenufull"promptfor3seconds,andtheselectedmenuisnotsaved.
7.4StartingaFavoriteMenu:
Ontheprimarymenuscreen,select the"Myfavourite"menuand
presstheknobtoenter.Rotatetheknobtoselectasavedmenu.Thedisplayshowsthemenuname
andparameters.Presstheknobtoselectandstartthemenu.
7.5DeletingaFavorite:Afterentering"Myfavourite",r otate
theknobtoselectasavedmenu,then
pressthe"SAVE"key .Thedisplayshowsaconfirmationscreenfordeletion.
7.5.1Pressing"Start"deletestheselectedfavoritemenu.Thesequencenumbersoffavoritesafter
thedeletedonedecreaseby1tofillthegap.Returnstothefavoritesub‐menuscreen.
7.5.2Pressing"BACK"returnstothefavoritesub‐menuscreen.
7.5.3Pressing"STOP"returnstostandbymode.
Note:1.Savablemenusincludeallsub‐menusunderprimarymenusfrom"speedycook"to"toast"
(48sub‐menustotal).
2.Identicalmenuscanbesavedmultipletimes;theyaresortedbysave
order.E.g.,"popcorn50g"
savedtwiceappearsas"POPCORN0150g","POPCORN0250g".
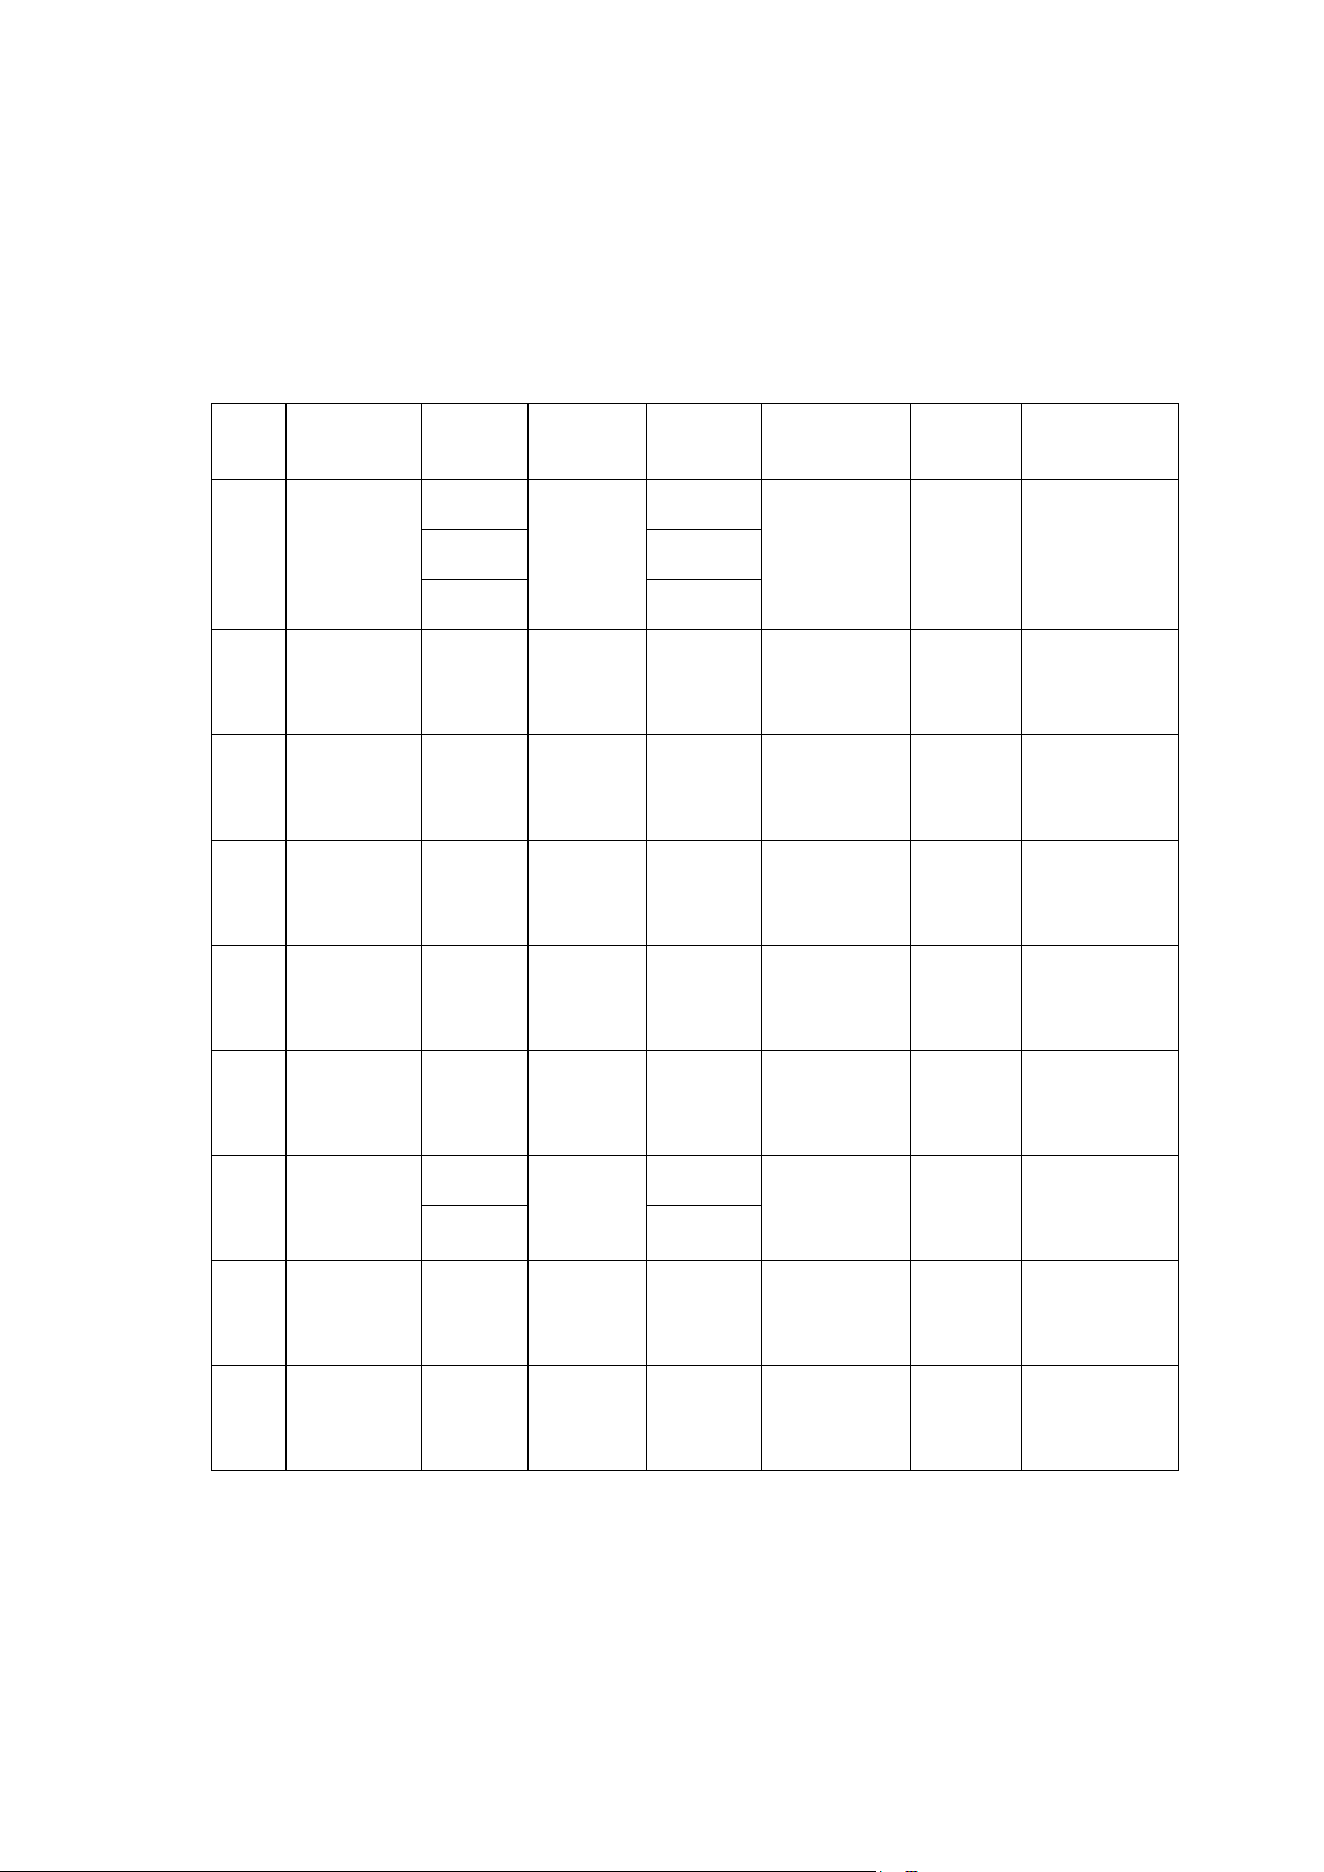
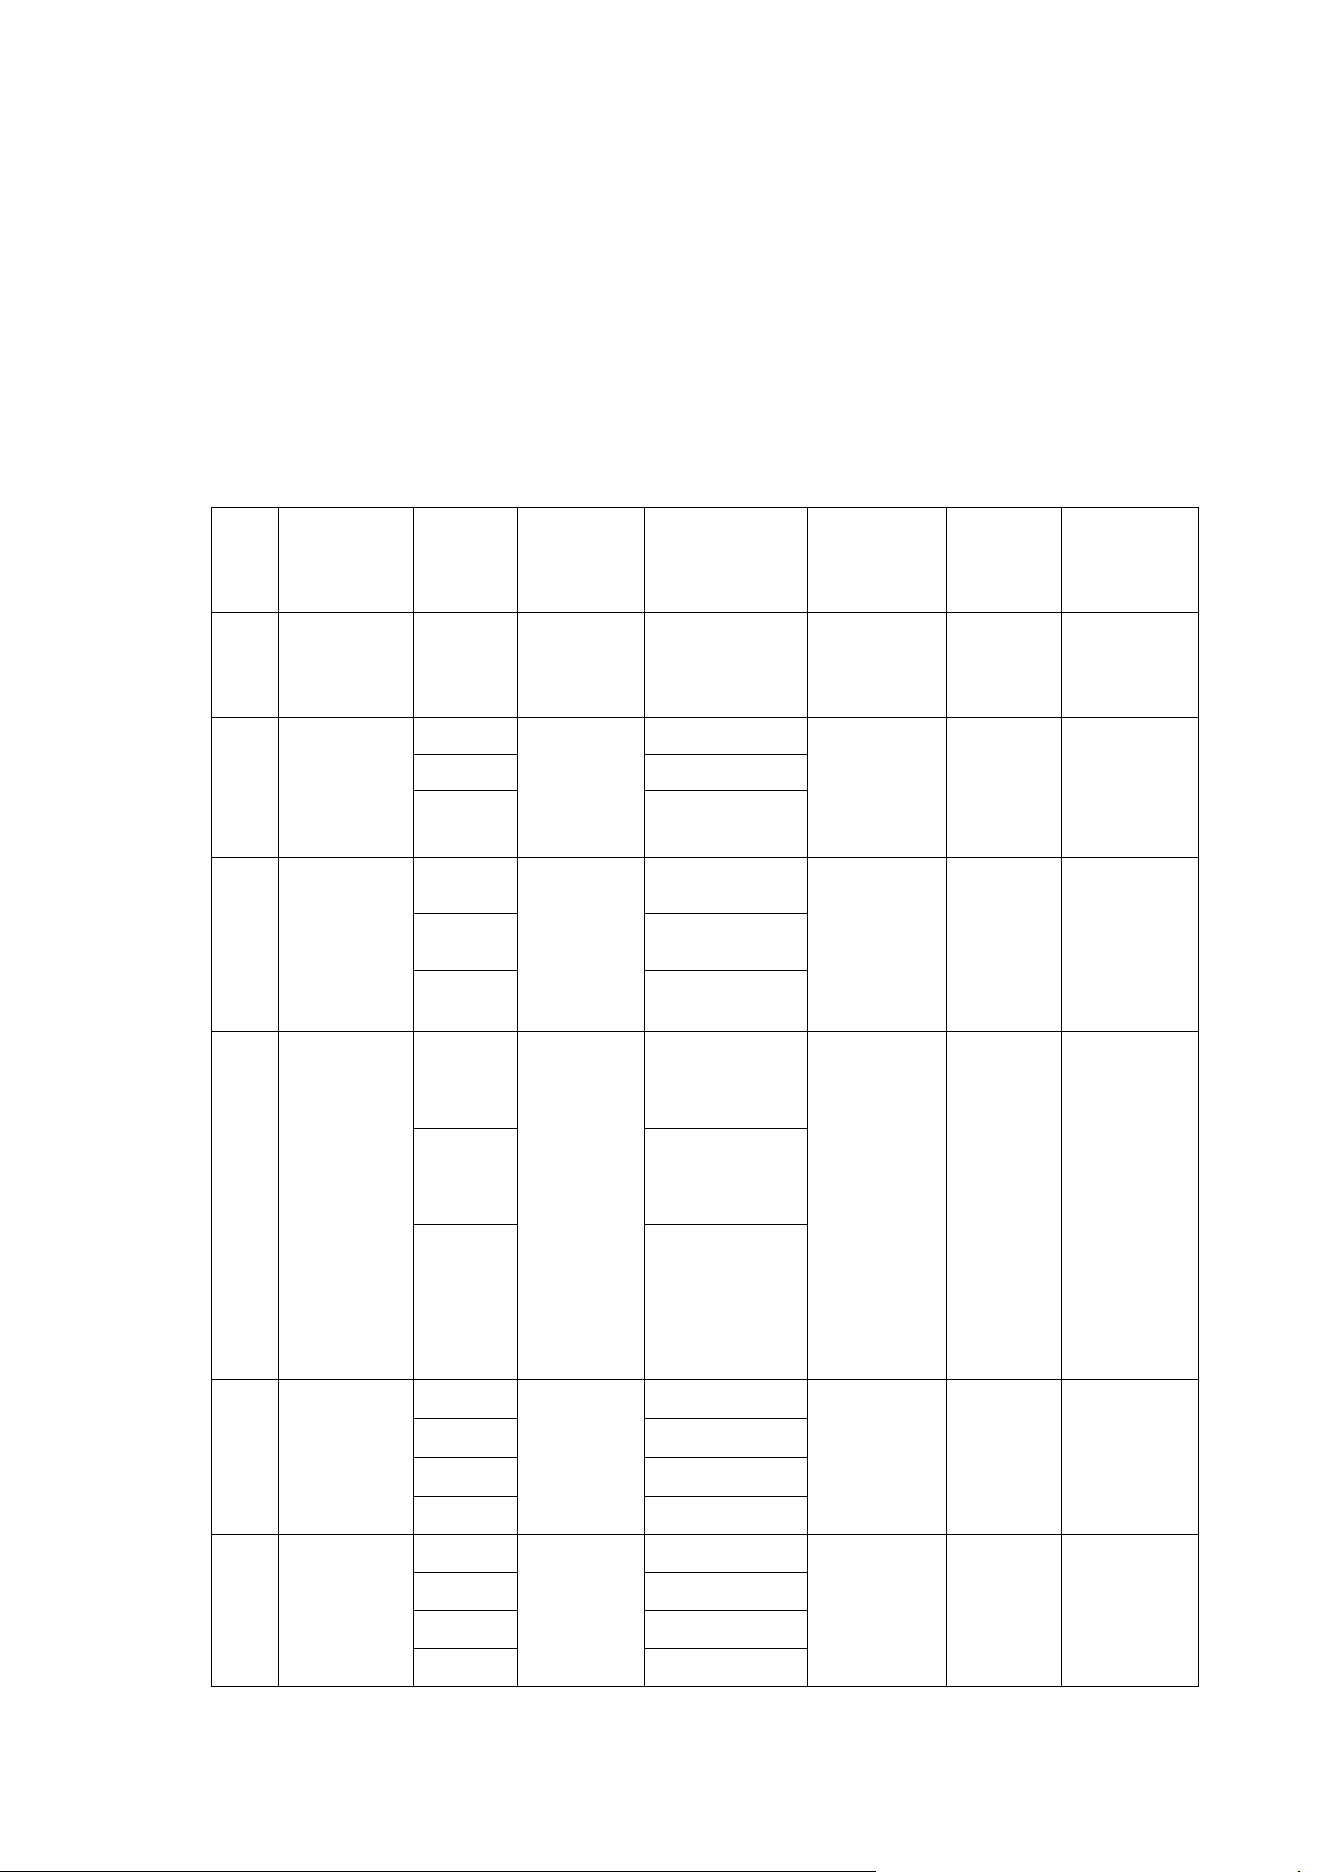
7.6Speedycook
7.6.1Ontheprimarymenuscreen,select"speedycook"andpresstheknobtoenteritssecondary
menuselectionscreen.
7.6.2Rotatetheknobtoselectasecondarymenu."Speedycook"has9menus(seetablebelow).
No.
Menu
Name
Portion
Temp.
/ Power
Cooking
Time
Accessory /
Cookware
Position Remarks
1
Frozen
Pizza
6 inch
200°C +
P100
4′30〞
Multi-
function
Tray
Level 3
Initial Temp:
-18°C
9 inch
5′30〞
12 inch
6′00〞
2
Chicken
Nuggets
500g
200°C +
P70
10′00″
Multi-
function
Tray
Level 3
Initial Temp:
-18°C
3
Chicken
Wings
500g
200°C +
P70
8′00″
Multi-
function
Tray
Level 3
Initial Temp:
-18°C
4
Whole
Chicken
1kg
200°C +
P100
25′00〞
Multi-
function
Tray
Level 3
Initial Temp:
-18°C
5
Popcorn
Chicken
500g
200°C +
P70
7′00〞
Multi-
function
Tray
Level 3
Initial Temp:
-18°C
6
Chicken
Steak
400g
200°C +
P70
12′00〞
Multi-
function
Tray
Level 3
Initial Temp:
-18°C
7 Croissant
1 pc
200°C +
P100
1′30〞
Multi-
function
Tray
Level 3
Initial Temp:
-18°C
2 pcs
2′30〞
8
Onion
Rings
400g
200°C +
P100
6′00〞
Multi-
function
Tray
Level 3
Initial Temp:
-18°C
9
Frozen
Chips
500g P70
10′30〞
Multi-
function
Tray
Level 3
Initial Temp:
-18°C
7.6.3Presstheknobtoentertheportionselectionscreen.Rotatetheknobtoselectportionsize.
7.6.4Withthedoorclosed,presstheknobtostartthemenu.Thedisplayshowsthemenuworking
screen,countdowntimer,andtimeprogressbar.
7.6.5 After thecountdown ends, the buzzersounds a completion prompt tone, and the system
enterstheendstate.
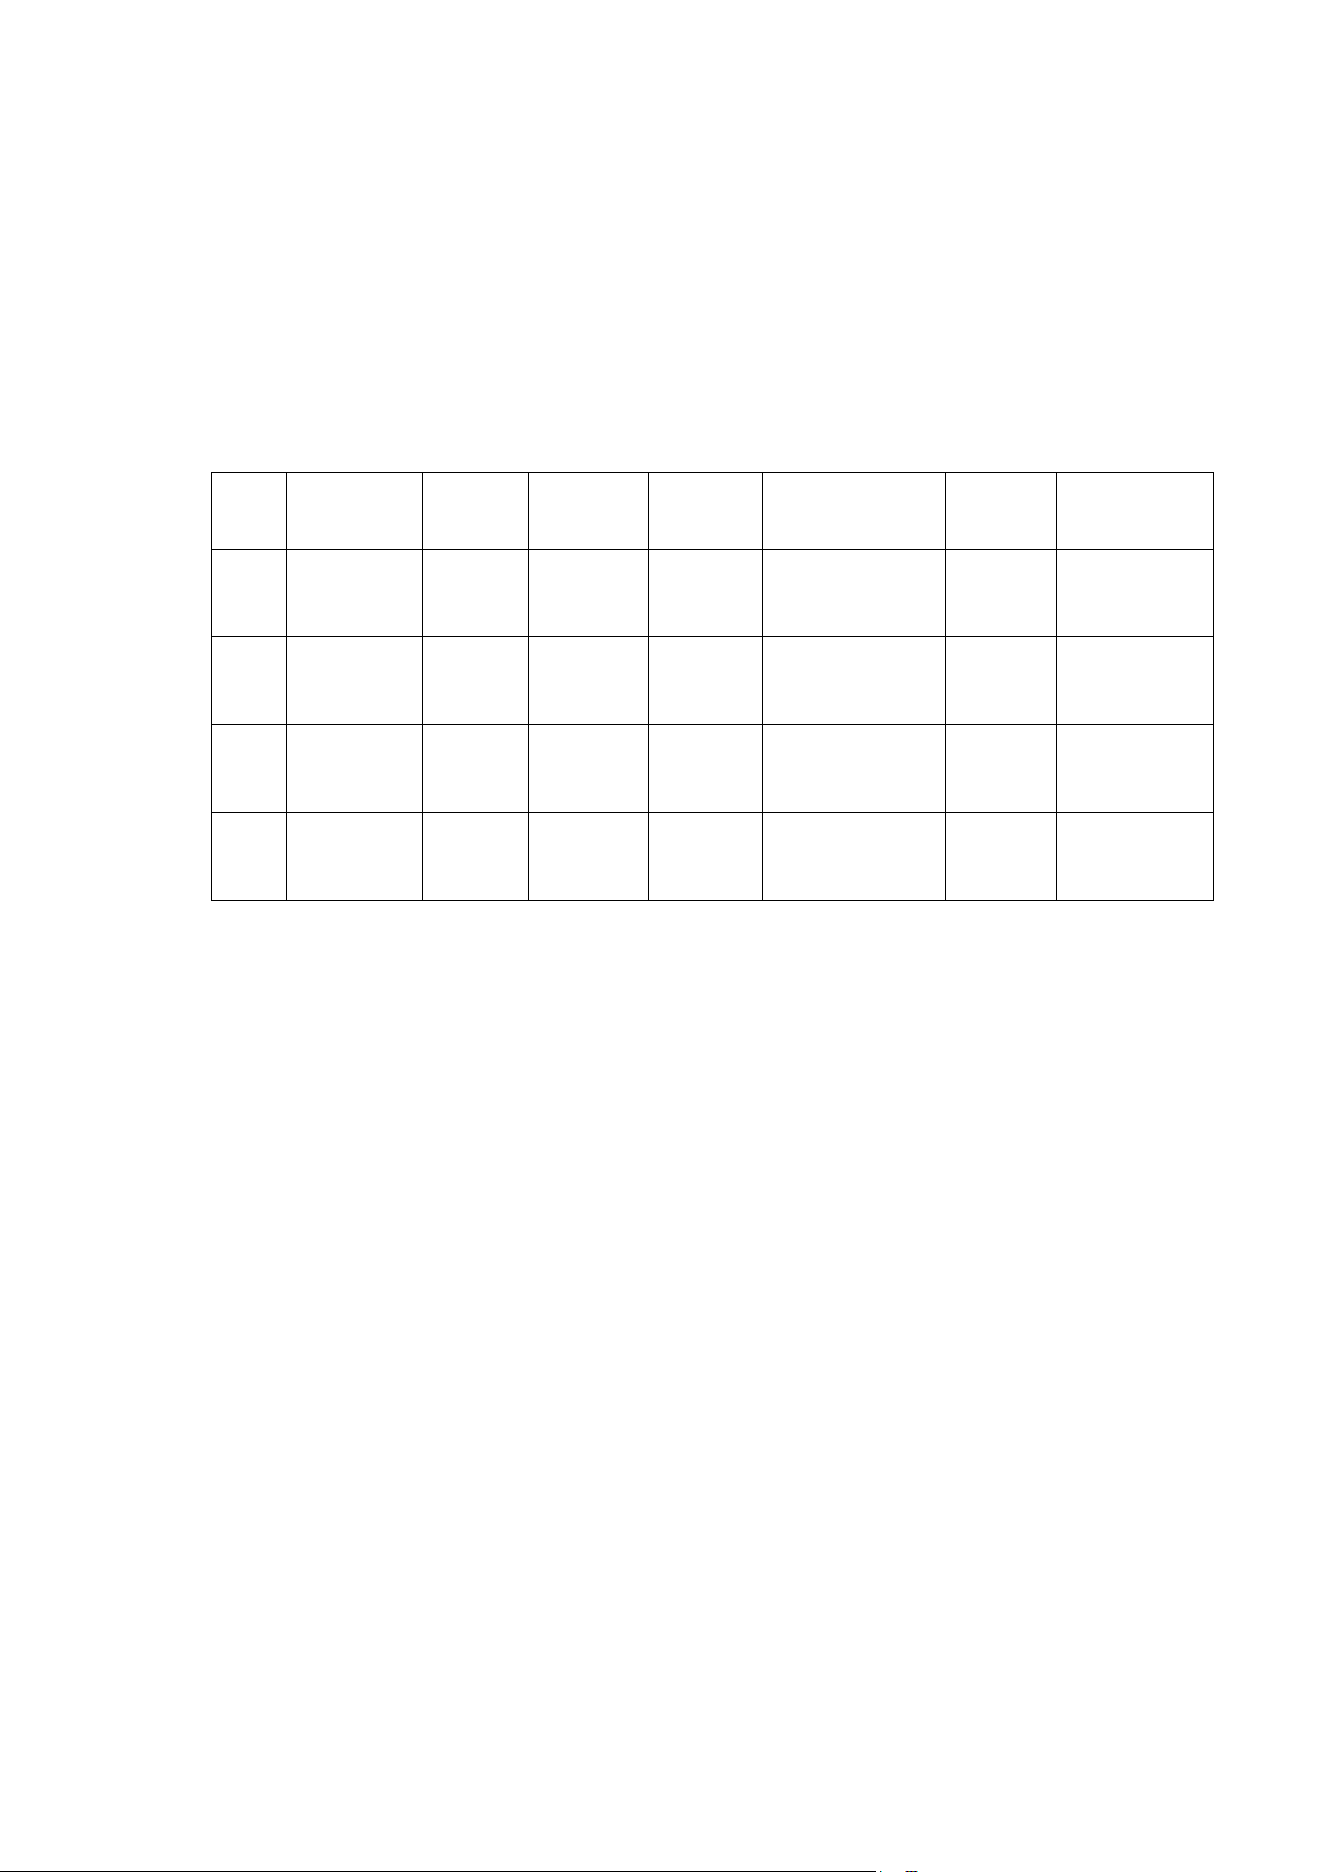
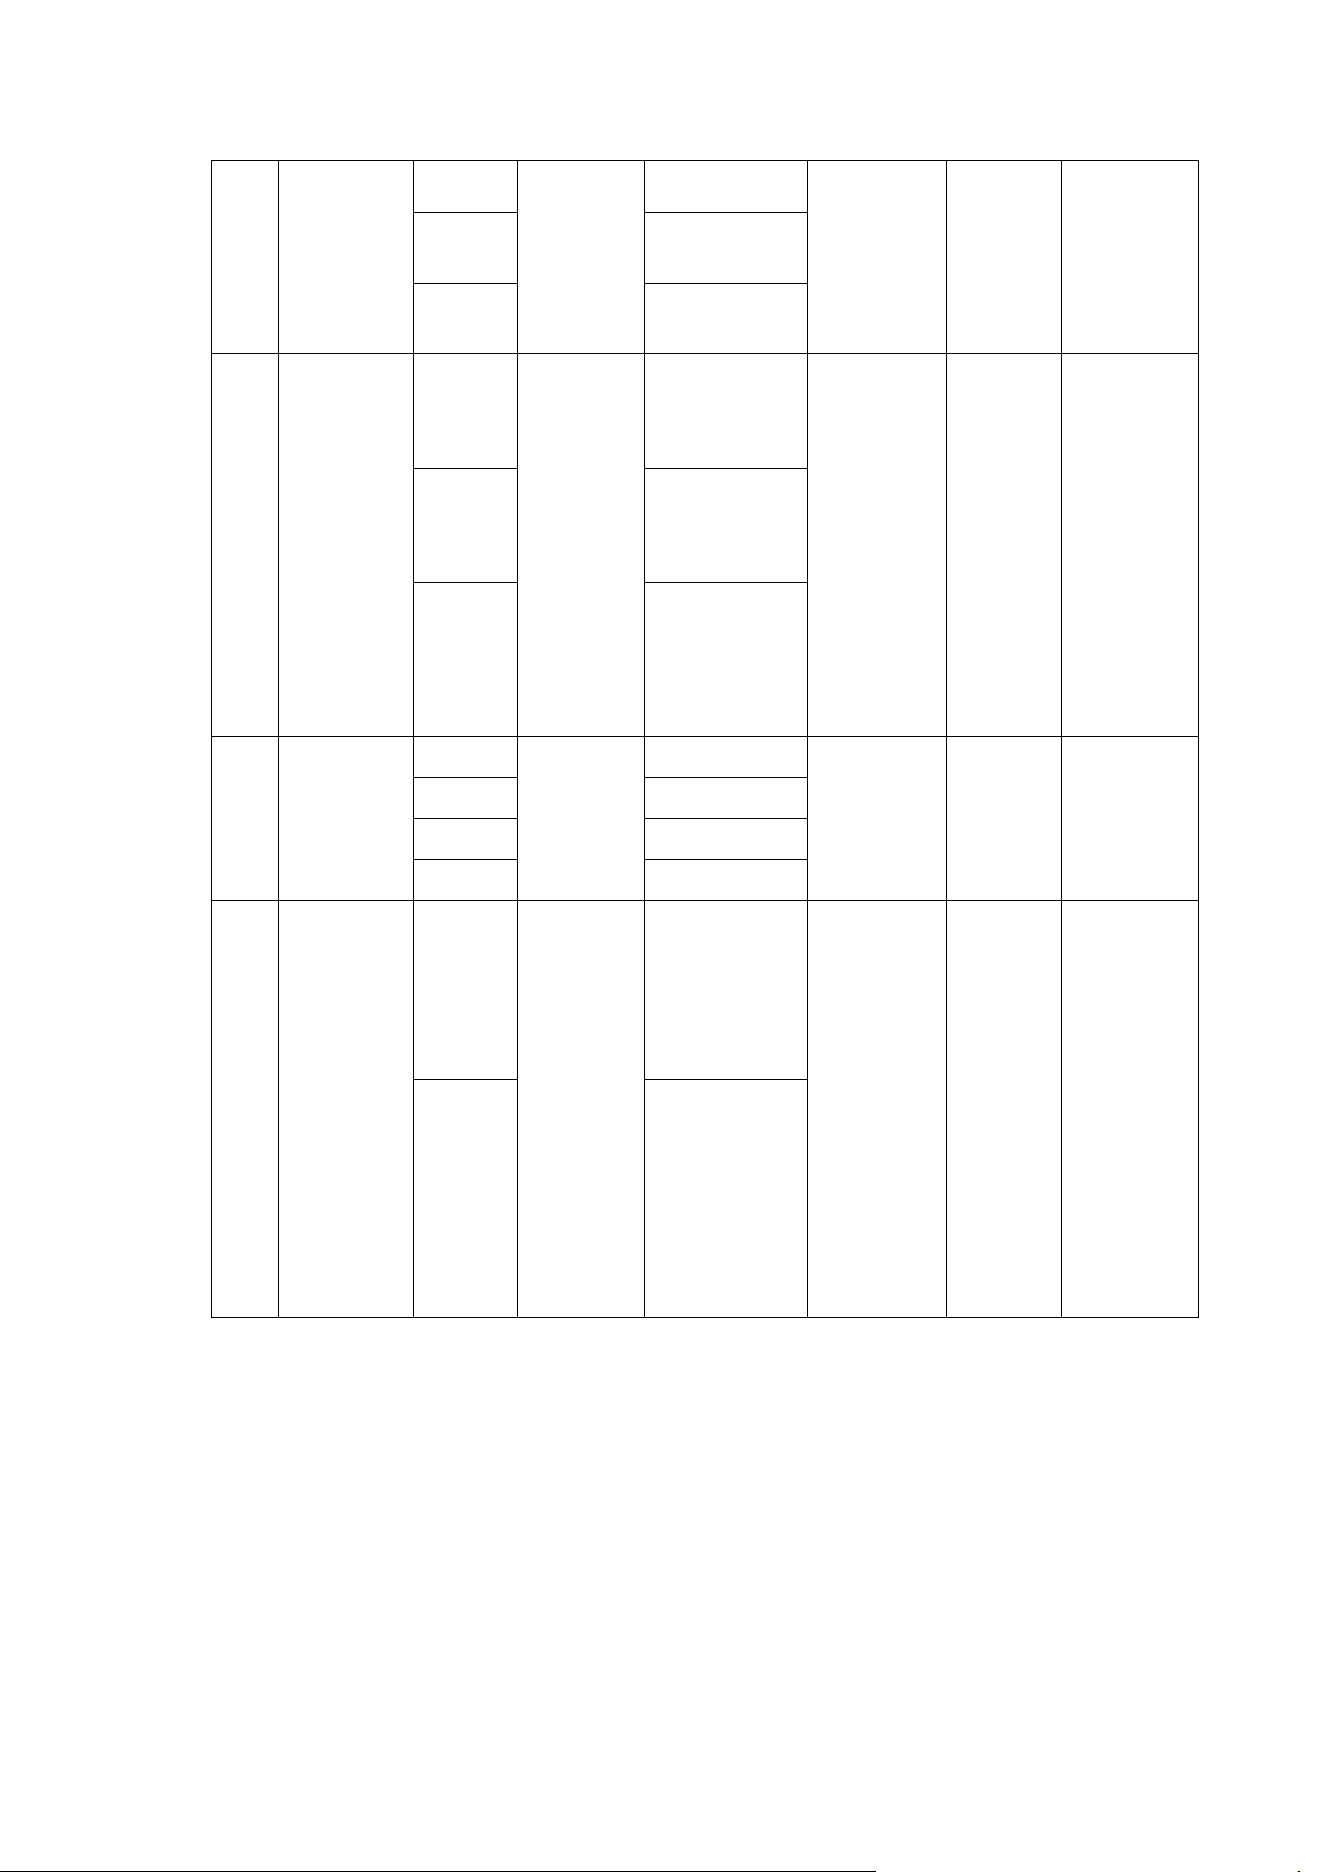
7.7AIRFRY
7.7.1 On the primary menu screen, select "AIR FRY" and press the knob to enter its secondary
menuselectionscreen.
7.7.2Rotatetheknobtoselectasecondarymenu.
"AIRFRY"has5menus(seetablebelow).
No.
Menu
Name
Portion
Temp.
/ Power
Cooking
Time
Accessory /
Cookware
Position Remarks
1
Chicken
drumstick
500g
200°C +
P100
11′30〞
Multi-function
Tray
Level 3
Initial Temp:
-18°C
2 Sausage 500g
200°C +
P70
8′00″
Multi-function
Tray
Level 3
Initial Temp:
Room temp.
3
Chicken
tender
500g
200°C +
P70
10′00″
Multi-function
Tray
Level 3
Initial Temp:
-18°C
4
Mozarela
sticks
300g
200°C +
P100
4′00〞
Multi-function
Tray
Level 3
Initial Temp:
-18°C
7.7.3Presstheknobtoentertheportionselectionscreen.Rotatetheknobtoselectportionsize.
7.7.4Withthedoorclosed,presstheknobtostartthemenu.Thedisplayshowsthemenuworking
screen,countdowntimer,andtimeprogressbar.
7.7.5 After thecountdown ends, the buzzersounds
a completion prompt tone, and the system
enterstheendstate.
7.7.6SelectingAIRFRYmanualfunction:
7.7.6.1 On the secondary menu screen, select "AIR fry manual". Press the knob to enter the
temperatureselectionscreen(default170°C/350°F,cookingtime30minutes).
7.7.6.2Rotatetheknob
toselecttheairfrytemperature.Presstheknobtoconfirmandenterthe
cookingtimesettingscreen.
7.7.6.3Rotatetheknobtoselecttheairfrycookingtime.Presstheknobtoconfirmthetimesetting.
7.7.6.4 With the door closed, press the knob to start the menu. The display
shows the menu
workingscreen,countdowntimer,andtimeprogressbar.
7.7.6.5Afterthecountdownends,thesystementerstheendstate.
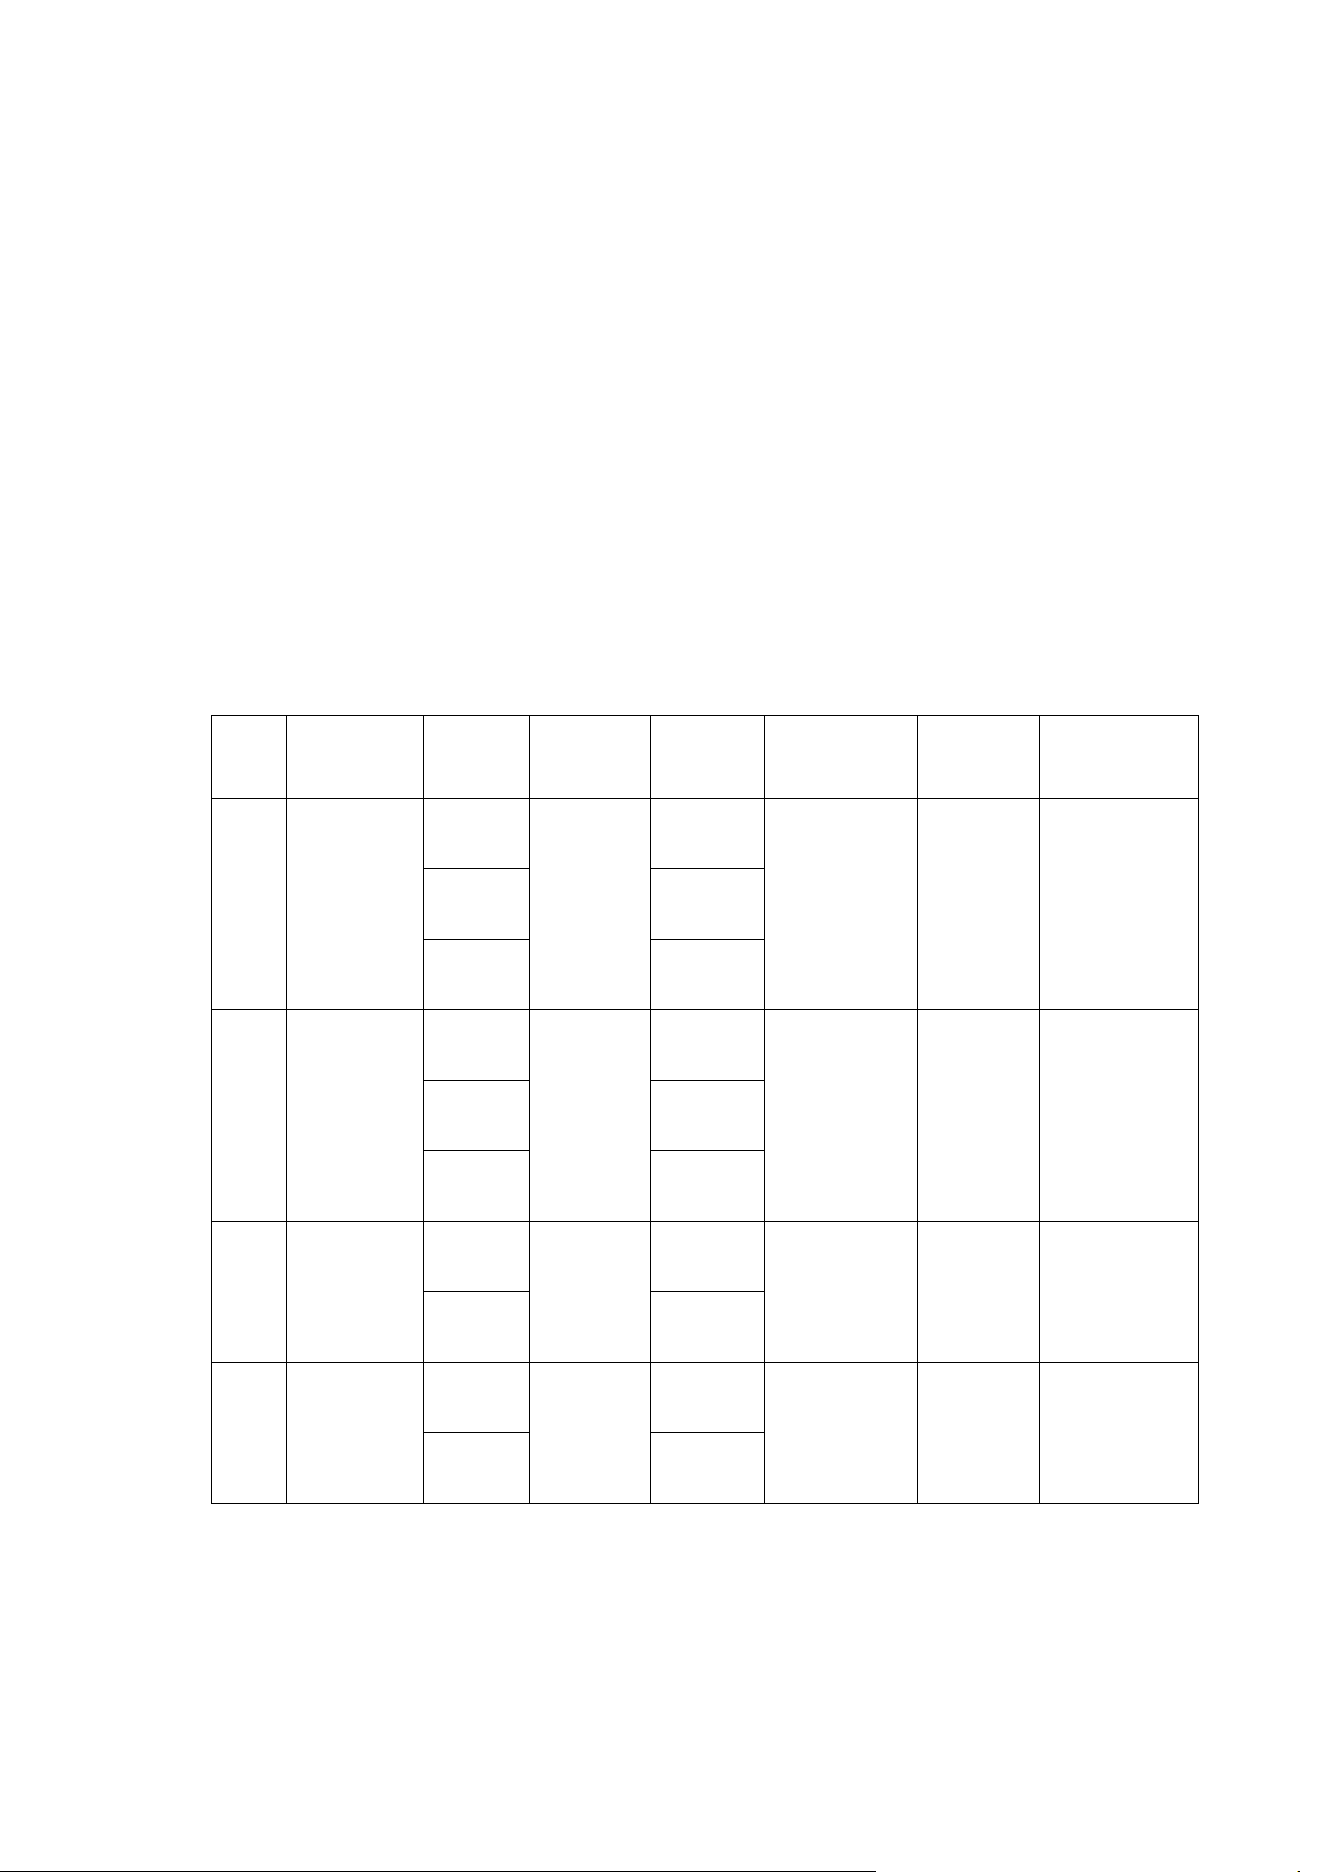
7.8Microwave
7.8.1Ontheprimarymenuscreen,select"Microwave"andpresstheknobtoenteritssecondary
menuselectionscreen.
7.8.2Rotatetheknobtoselectasecondarymenu."Microwave"has11menus(seetablebelow).
No.
Menu
Name
Portion Power
Cooking
Time
Accessory
/
Cookware
Position Remarks
1 Popcorn 100g P100 2′30″
Multi-
function
Tray
Level 3
Initial
Temp: 5
℃
2 Beverage
1 cup
P100
1′20″
/
Oven
Center
Initial
Temp:
Room
Temp
2 cups 2′40″
3 cups 3′40″
3 Potato
1 pc
P100
5′30″
/
For 1
potato:
place
near
edge
Initial
Temp:
Room
Temp
2 pcs 9′00″
3 pcs 13′00″
4
Frozen
Entree
250g
P100
4′00″
/ /
1. Initial
Temp: -
18°C
2. Cover
with lid or
pierced
plastic
wrap
during
cooking
350g 5′30″
450g 7′00″
5
Frozen
Vegetable
200g
P100
5′00″
/ /
Initial
Temp: -
18°C
300g 6′00″
400g 7′15″
500g 8′30″
6
Fresh
Vegetable
200g
P100
3′30″
/ /
Initial
Temp:
Room
Temp
300g 4′30″
400g 5′30″
500g 6′30″
7 Soup
1 bowl
P100
1′40″
/ /
1. Initial
Temp: 5
℃
2. 200g
per bowl
2
bowls
3′20″
3
bowls
5′00″
8 Pasta
50g
P70
16′00″
/ /
1. Initial
Temp:
Room
Temp
2. Pasta to
water
ratio: 1:8-
10 (use
1:10 for
smaller
portions)
100g 18′00″
150g 20′00″
9 Legumes
200g
P100
4′30″
/ /
Initial
Temp: 5
℃
300g 5′30″
400g 6′30″
500g 7′30″
10 Rice
150g
P100/P50
4′00″+12′00″
/ /
1. Initial
Temp:
Room
Temp
2. Rice to
water
ratio:
1:1.8-2
(use 1:2
for
smaller
portions)
300g 6′00″+14′00″
7.8.3Presstheknobtoentertheportionselectionscreen.Rotatetheknobtoselectportionsize.
7.8.4Withthedoorclosed,presstheknobtostartthemenu.Thedisplayshowsthemenuworking
screen,countdowntimer,andtimeprogressbar.
7.8.5 After thecountdown ends, the buzzersounds
a completion prompt tone, and the system
enterstheendstate.
7.8.6SelectingMicrowavemanualfunction:
7.8.6.1Onthesecondarymenuscreen,select"microwavemanual".Presstheknobtoenterthe
microwavepowerlevelselectionscreen(default100%power,cookingtime3minutes).
7.8.6.2Rotatetheknob toselect microwavepowerlevel(range10%~100%,10steps).Pressthe
knobtoconfirmand enterthecookingtimesetting
screen.
7.8.6.3Rotatetheknobtoselectthemicrowavecookingtime.Presstheknobtoconfirmthetime
setting.
7.8.6.4 With the door closed, press the knob to start the menu. The display shows the menu
workingscreen,countdowntimer,andtimeprogressbar.
7.8.6.5Afterthecountdownends,the
systementerstheendstate.
7.9Reheat
7.9.1Ontheprimarymenuscreen,select"Reheat"andpresstheknobtoenteritssecondarymenu
selectionscreen.
7.9.2Rotatetheknobtoselectasecondarymenu."Reheat"has5menus(seetablebelow).
No.
Menu
Name
Portion
Temp. /
Power
Cooking
Time
Accessory /
Cookware
Position Remarks
1 Bread
100g
P100
0′25
〞
/ /
Initial Temp:
5°C
200g
0′40
〞
300g
0′55
〞
2 Pizza
1 slice
P100
0′40
〞
/ /
Initial Temp:
5°C
2 slice
1′00
〞
3 slice
1′30
〞
3 Curries
350g
P70
3′30
〞
/ /
Initial Temp:
5°C
500g
6′30
〞
4 Casserole
350g
P70
3′00
〞
/ /
Initial Temp:
5°C
500g
6′00
〞
7.9.3Presstheknobtoentertheportionselectionscreen.Rotatetheknobtoselectportionsize.
7.9.4Withthedoorclosed,presstheknobtostartthemenu.Thedisplayshowsthemenuworking
screen,countdowntimer,andtimeprogressbar.
7.9.5 After thecountdown ends, the buzzersounds a completion prompt tone, and the system
enterstheendstate.
7.9.6SelectingReheatmanualfunction:
7.9.6.1 On the secondary menu screen, select "Reheat manual". Press the knob to enter the
cookingtimesettingscreen.
7.9.6.2Rotatetheknobtoselectcooking
time.Presstheknobtoconfirmthetimesetting.
7.9.6.3 With the door closed, press the knob to start the menu. The display shows the menu
workingscreen,countdowntimer,andtimeprogressbar.
7.9.6.4Afterthecountdownends,thesystementerstheendstate.
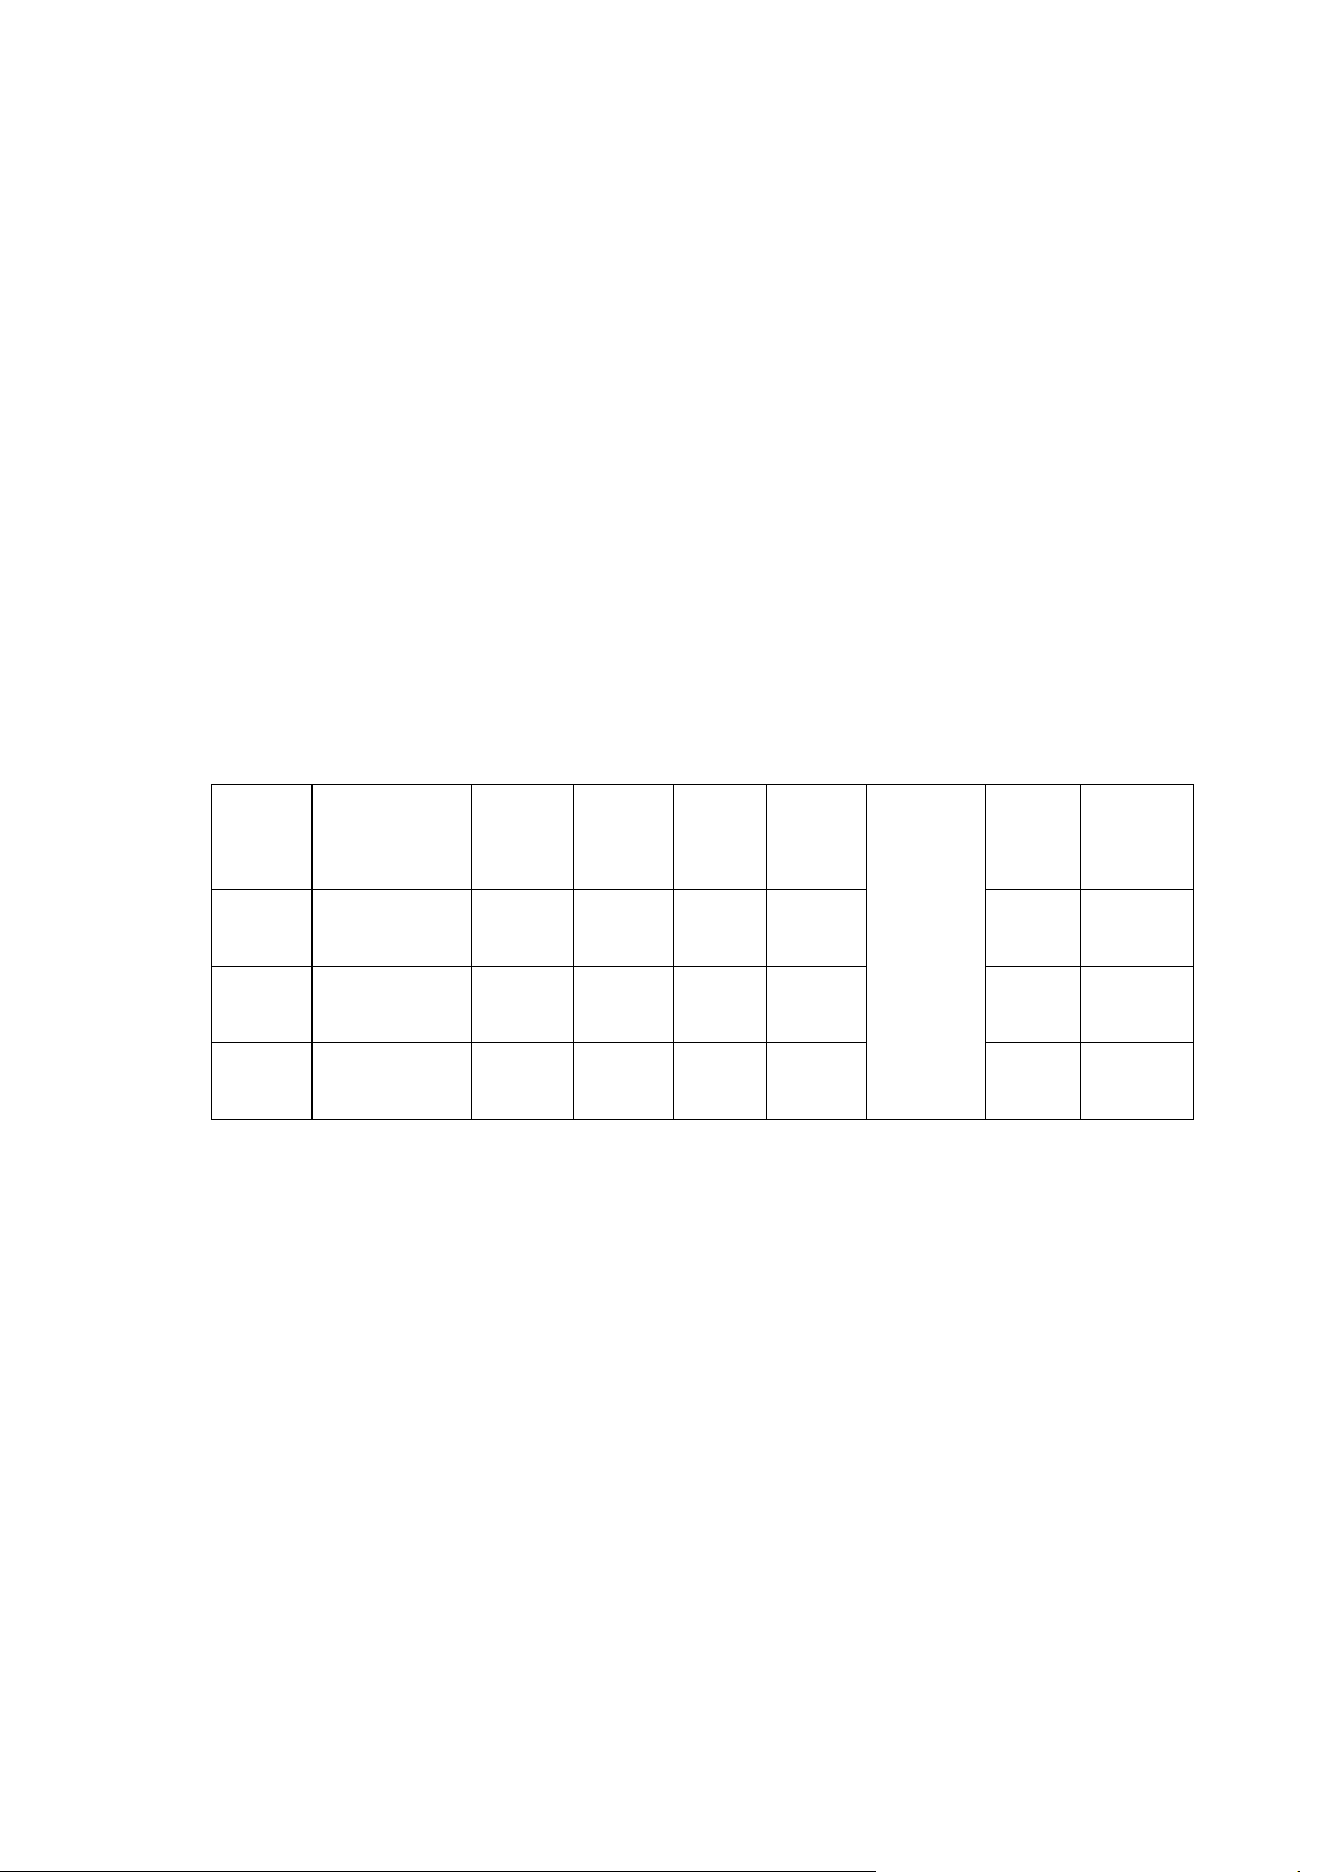
7.10Defrost
7.10.1 On the primary
menu screen,select "defrost" and pressthe knob to enterits secondary
menuselectionscreen.
7.10.2Rotatetheknobtoselectasecondarymenu."defrost"has4menus(seetablebelow).
Type Total Time
Stage
1 Time
Stage
1
Power
Stage
2
Time
Stage
2
Power
Voice
Prompt
for
Turning
Over
Stage
3
Time
Stage 3
Power
Meat
T=130W+70
(sec)
20%
12/30
P40
30%
9/30
P30
50%
6/30
P20
Fish
T=115W+50
(sec)
20%
12/30
P40
30%
9/30
P30
50%
6/30
P20
Poultry
T=135W+60
(sec)
20%
12/30
P40
30%
9/30
P30
50%
6/30
P20
Note:1.Wisweightinunitsof100grams.
2.Thebuzzersoundsaremindertonewhenhalfthedefrostingtimehaselapsed.
7.10.3Selectingmenu"timedefrost":
7.10.3.1Onthesecondarymenuscreen,select"timedefrost".Presstheknobtoenterthecooking
timesettingscreen(default0min
0sec).R otatetheknobtoselectcookingtime.Presstheknobto
confirm.
7.10.3.2 With the door closed, press the knob to start the menu. The display shows the menu
workingscreen,countdowntimer,andtimeprogressbar.
7.10.3.3Afterthecountdownends,thesystementerstheendstate.
Note:Timeddefros toperatesat30%microwavepower.
7.10.4Otherdefrostmenus:
7.10.4.1Onthesecondarymenuscreen,selectthedesireddefrosttype.Presstheknobtoenter
theweightselectionscreen(default:Meat200g,Poultry300g,Fish400g).

7.10.4.2Rotatetheknobtoselectweight(range100g~2000g).Presstheknobtoenterthedefrost
workingscreen,showingcountdowntimerandtimeprogressbar.
7.10.4.3 When half the total defrosting time has elapsed, the buzzer sounds a reminder tone
promptingtheusertoturnthefoodover.
7.0.4.4After
thecountdownends,thebuzzersoundsacompletionprompttone,andthesystem
enterstheendstate.
7.11Broil
7.11.1Ontheprimarymenuscreen,select"Broil"andpresstheknobtoenteritssecondarymenu
selectionscreen.
7.11.2Rotatetheknobtoselectasecondarymenu."Broil"has6menus
(seetablebelow).
No.
Menu
Name
Portion
Power
/
Temp.
Cooking
Time
Accessory /
Cookware
Position Remarks
1
Roasted
Potatoes
4 pcs
200°C
+ P70
30′00
〞
Multi-
function
Tray
Level 3
Initial Temp:
Room Temp
2
Roast
Meats
500g
210°C
+
P100
6′30
〞
Multi-
function
Tray
Level 3
1. Initial
Temp: 5°C
2.
Tomahawk
Steak
3
Roasted
Chicken
1000g
200°C
+
P100
25′00
〞
Multi-
function
Tray
Level 3
1. Initial
Temp: 5°C
2. Fresh
Whole
Chicken
4
Roast
Lamb
500g
200°C
+
P100
10′00
〞
Multi-
function
Tray
Level 3
Initial Temp:
5°C
5 Roast Pork 500g
200°C
+
P100
12′00
〞
Multi-
function
Tray
Level 3
Initial Temp:
5°C
6
Roasted
Vegetables
500g
210°C
+
P100
10′00
〞
Multi-
function
Tray
Level 3
Initial Temp:
Room Temp

7.11.3Presstheknobtoentertheportionselectionscreen.R otatetheknobtoselectportionsize.
7.11.4 With the door closed, press the knob to start the menu. The display shows the menu
workingscreen,countdowntimer,andtimeprogressbar.
7.11.5Afterthecountdownends,thebuzzersounds
acompletionprompttone,andthesystem
enterstheendstate.
7.12Bake
712.1Ontheprimarymenuscreen,select"Bake"andpresstheknobtoenteritssecondarymenu
selectionscreen.
7.12.2Rotatetheknobtoselectasecondarymenu."Bake"has3menus(seetablebelow).
No.
Menu
Name
Portion
Power
/
Temp.
Cooking
Time
Accessory /
Cookware
Position Remarks
1 Cookies 300g
160
℃
+
P30
10′00
〞
Multi-
function
Tray
Level 3
Initial Temp:
Room Temp
2 Cake 500g
160
℃
+
P30
Preheat
150
℃
+
50'00"
Multi-
function
Tray
Level 3
Initial Temp:
Room Temp
3 Brownies 500g
160
℃
+
P30
Preheat
150
℃
+
50'00"
Multi-
function
Tray
Level 3
Initial Temp:
Room Temp
7.12.3Cookie:R otatetoselect"Cookie",presstheknobtoentertheportionselectionscreen(only
oneportionavailable).
7.12.4 With the door closed, press the knob to start the menu. The display shows the menu
workingscreen,countdowntimer,andtimeprogressbar.
7.12.5Afterthecountdownends,the
buzzersoundsacompletionprompttone,andthesystem
enterstheendstate.
7.12.6Cakemenu:
7.12.6.1Selectthe"cake"menuandpresstheknobtoenteritsweightselectionscreen(onlyone
portionavailable).
7.12.6.2Directlypressthe"Start"key tobeginthe Cakemenu preheatstage.Thedisplayshows
the Cake preheat interface,including actual temperature, target temperature, and temperature
progressbar.
7.12.6.3Oncethetargettemperatureisreached,thebuzzersoundsaprompttone,andthesystem

entersthekeepwarmstage.Thedisplayshowsascreenpromptingtheusertoopenthedoorand
placethefood.
7.12.6.4Ifthereisnooperationwithin20minutes,theoperationends,thebuzzersounds,andthe
systemreturnstostandby.
7.12.6.5Openingthedoorduringthekeepwarmstage
pauseskeepwarm.Thedisplayshowsthe
menucountdowntime.
7.12.6.6 After closingthe door,pressthe knob to start work. The displayshowsthe countdown
time.
7.12.6.7Afterthecountdownends,thebuzzersoundsacompletionprompttone,andthesystem
enterstheendstate.
7.12.7Browniemenu:Operation
isthesameastheCakemenu.
7.13Toast
7.13.1Ontheprimarymenuscreen,select"Toast"andpresstheknobtoenteritssecondarymenu
selectionscreen.
7.13.2Rotatetheknobtoselectasecondarymenu."Toast"has2menus(seetablebelow).
No.
Menu
Name
Portion
Power
/
Temp.
Cooking
Time
Accessory /
Cookware
Position Remarks
1 Toaste 4slices 230
℃
5′00
〞
Multi-
function
Tray
Level 3
Initial Temp:
Room Temp
2 Bagel
1pcs
200
℃
2′00
〞
Multi-
function
Tray
Level 3
Initial Temp:
Room Temp
2pcs 2′30
〞
7.13.3Presstheknobtoentertheportionselectionscreen.R otatetheknobtoselectportionsize.
7.13.4 With the door closed, press the knob to start the menu. The display shows the menu
workingscreen,countdowntimer,andtimeprogressbar.
7.13.5Afterthecountdownends,thebuzzersounds
acompletionprompttone,andthesystem
enterstheendstate.
7.14Dehydration
7.14.1 On the primary menu screen, select "Dehydration" and press the knob to enter the
temperatureselectionscreen(default60°C,cookingtime2hours).

7.14.2 Rotate the knob to select temperature (range 40~90°C). Press the knob to enter the
cookingtimesettingscreen.
7.14.3Rotatetheknobtosetcookingtime.Presstheknobtoconfirm.
7.14.4 With the door closed, press the knob to start the menu. The display shows the menu
working
screen,countdowntimer,andtimeprogressbar.
7.14.5Afterthecountdownends,thesystementerstheendstate.
7.15Slowcook
7.15.1 On the primary menu screen, select "slow cook" and press the knob to enter the
temperatureselectionscreen(default90°C,cookingtime2hours).
7.15.2Rotatethe
knobtoselecttemperature(options90°C,110°C).Presstheknobtoenterthe
cookingtimesettingscreen.
7.15.3Rotatetheknobtosetcookingtime(range0~12h).Presstheknobtoconfirm.
7.15.4 With the door closed, press the knob to start the menu. The display shows the
menu
workingscreen,countdowntimer,andtimeprogressbar.
7.15.5Afterthecountdownends,thesystementerstheendstate.
7.16Combination
7.16.1 On the primary menu screen, select "Combination" and press the knob to enter the
temperatureselectionscreen(default170°C,microwave100%,cookingtime5:00).
7.16.2R otate
theknobtoselecttemperature(range60,100~230°C).Presstheknobtoenterthe
microwavepowersettingscreen.
7.16.3Rotatetheknobtoselectmicrowavepower(range10%~100%,10steps).Presstheknobto
enterthecookingtimesettingscreen.
7.16.4Rotatetheknobtoselectcookingtime(range0~95
minutes).Presstheknobtoconfirm.
7.16.5 With the door closed, press the knob to start the menu. The display shows the menu
workingscreen,countdowntimer,andtimeprogressbar.
7.16.6Afterthecountdownends,thesystementerstheendstate.
7.17Steamclean
7.17.1Ontheprimarymenuscreen,select"SteamClean".Withthedoorclosed,presstheknobto
startthecleaningcycle.
7.17.2Thetotalcleaningtimeis1minute,operatinginacombinationof200°Chotairand100%
microwavepower.
7.17.3Afterthecountdownends,thebuzzersounds
acompletionprompttone,andthesystem
enterstheendstate.
7.18SETTING
7.18.1Ontheprimar ymenuscreen,select"Setting".PresstheknobtoentertheSettingsecondary
menuscreen.Selectthe"Language"option.
7.18.2Rotatetheknobtoselectasecondarymenu.Settinghas7menus:language,Temperature
unit,time,timeformat,mutesetting,ECOsetting,information.
7.18.3Language:
7.18.3.1Rotatetoselect"Language"andpresstheknobtoentertheLanguageselectioninterface.
7.18.3.2Rotatetoselectthedesiredlanguage.PresstheknobtoconfirmandreturntotheSETTING
secondarymenuscreen.
7.18.3.3 On the Language selection
screen, press "BACK" to return to the previous level; press
"STOP"toreturntostandby.
Note:ForLanguageoptions,refertothetablebelow.
Language
Arabic
Bulgarian
Croatian
Czech
English
French
German
Hungarian

Italian
Polish
Romanian
Russian
Serbian
Slovenian
Spanish
Swedish
7.18.4Temperatureunit
7.18.4.1Rotatetoselect"Temperatureunit"andpresstheknobtoentertheselectioninterface.
7.18.4.2Rotatetoselectthetemperatureunit(options: ℃ and ℉).
7.18.4.3PresstheknobtoconfirmandreturntotheSETTINGsecondarymenuscreen.
7.18.4.4OntheTemperatureunitscreen,press
"BACK"toreturntothepreviouslevel;press"STOP"
toreturntostandby.
7.18.5Time:Rotatetoselect"Time", presstheknobtoentertheclocksettinginterface(defaultis
currenttime).Clocksettingisthesameasinitialsetupstep3.3.
7.18.6Timeformat:
7.18.6.1Rotatetoselect"Time
format",presstheknobtoentertheTimeformatselectioninterface.
Settingstepsarethesameasinitialsetupstep3.2.
7.18.6.2OntheTimeformatscreen,press"BACK"toreturntothepreviouslevel;press"STOP"to
returntostandby.
7.18.7Mute:
7.18.7.1Rotatetoselect"MUTE",presstheknob
toentertheMUTEselectioninterface.
7.18.7.2RotatetoselectOFForON.Presstheknobtoconfirm.
7.18.7.3OntheMUTEscreen,press"BACK"toreturntothepreviouslevel;press"STOP"toreturn
tostandby.
Note:MUTEoff:Buzzersounds.MUTEON:Buzzerissilent.
7.18.8ECO:
7.18.8.1
Rotatetoselect"ECO",presstheknobtoentertheECOselectioninterface.
7.18.8.2RotatetoselectOFForON.Presstheknobtoconfirm.

7.18.8.3OntheECOscreen,press"BACK"toreturntothepreviouslevel;press"STOP"toreturnto
standby.
Note:ECOON:EnablesECOpower‐savingmode.ECOOFF:Cannotenterpower‐savingmode.
7.18.9ApplianceInformation:
7.18.9.1Rotatetoselect"ApplianceInformation",presstheknob.Thedisplayshowstheappliance
information.
7.18.9.2Ontheinformationscreen,press"BACK"toreturntothepreviouslevel;press"STOP"to
returntostandby.
8.Pause,Restart,andCancel
8.1Duringoperation,openingthedoororpressingthe"STOP"keyenterspausestate.Thedisplay
countdownstops,theappliancestopsworking.The"STOP"keyindicator
isbright;otherkeylights
aredim.
8.2 In pause state, close the door and press the knob to resume work. The display shows the
remainingtime.
8.3Inpausestate,pressthe"ST OP"keytocanceltheoperationandreturntostandby.
Note:Inpausestate,closingthedooralone
doesnotrestartwork;theknobmustbepressed.
9.EndState
Afteroperationends,thedisplayshowstheend‐of‐workscreen.The"STOP"keyindicatorisbright;
otherkeylightsaredim.Thebuzzersoundstheendtonepromptingfoodremoval.
Intheendstate,pressthe"STOP"
keyoropenthedoortoreturntostandby.
10. ChildLockFunction
10.1Locking:Instandbymode,pressandholdthe"STOP"keyfor3seconds.Thebuzzersounds,
enteringchildlockstate.Thescreendisplaysthechildlockactivationpagefor3seconds.Inchild
lock,the"STOP"key
indicatorisbright,otherkeylightsaredim,andthescreenshowsthecurrent
time.
Inchildlock,pressinganykey(excepttheunlockkey)causesthebuzzertosoundalocktone,and
thescreendisplaysthechildlockactivationpagefor3seconds.Rotatingtheknobdisplaysthe
child
lockactivationpagefor3seconds.
10.2Unlocking:Inchildlockstate,pressandholdthe"STOP"keyfor3seconds.Thebuzzersounds,
enteringstandbymode,andthechildlockis 解除.
11. OvenLightProtectionFunction]
11.1Withthedooropen,theovenlightison.Ifthereisnooperationfor10minutes,theovenlight
turnsoff.
11.2Anykeypressorknobrotationturnstheovenlightbackon,andthe10‐minutetimerresets.
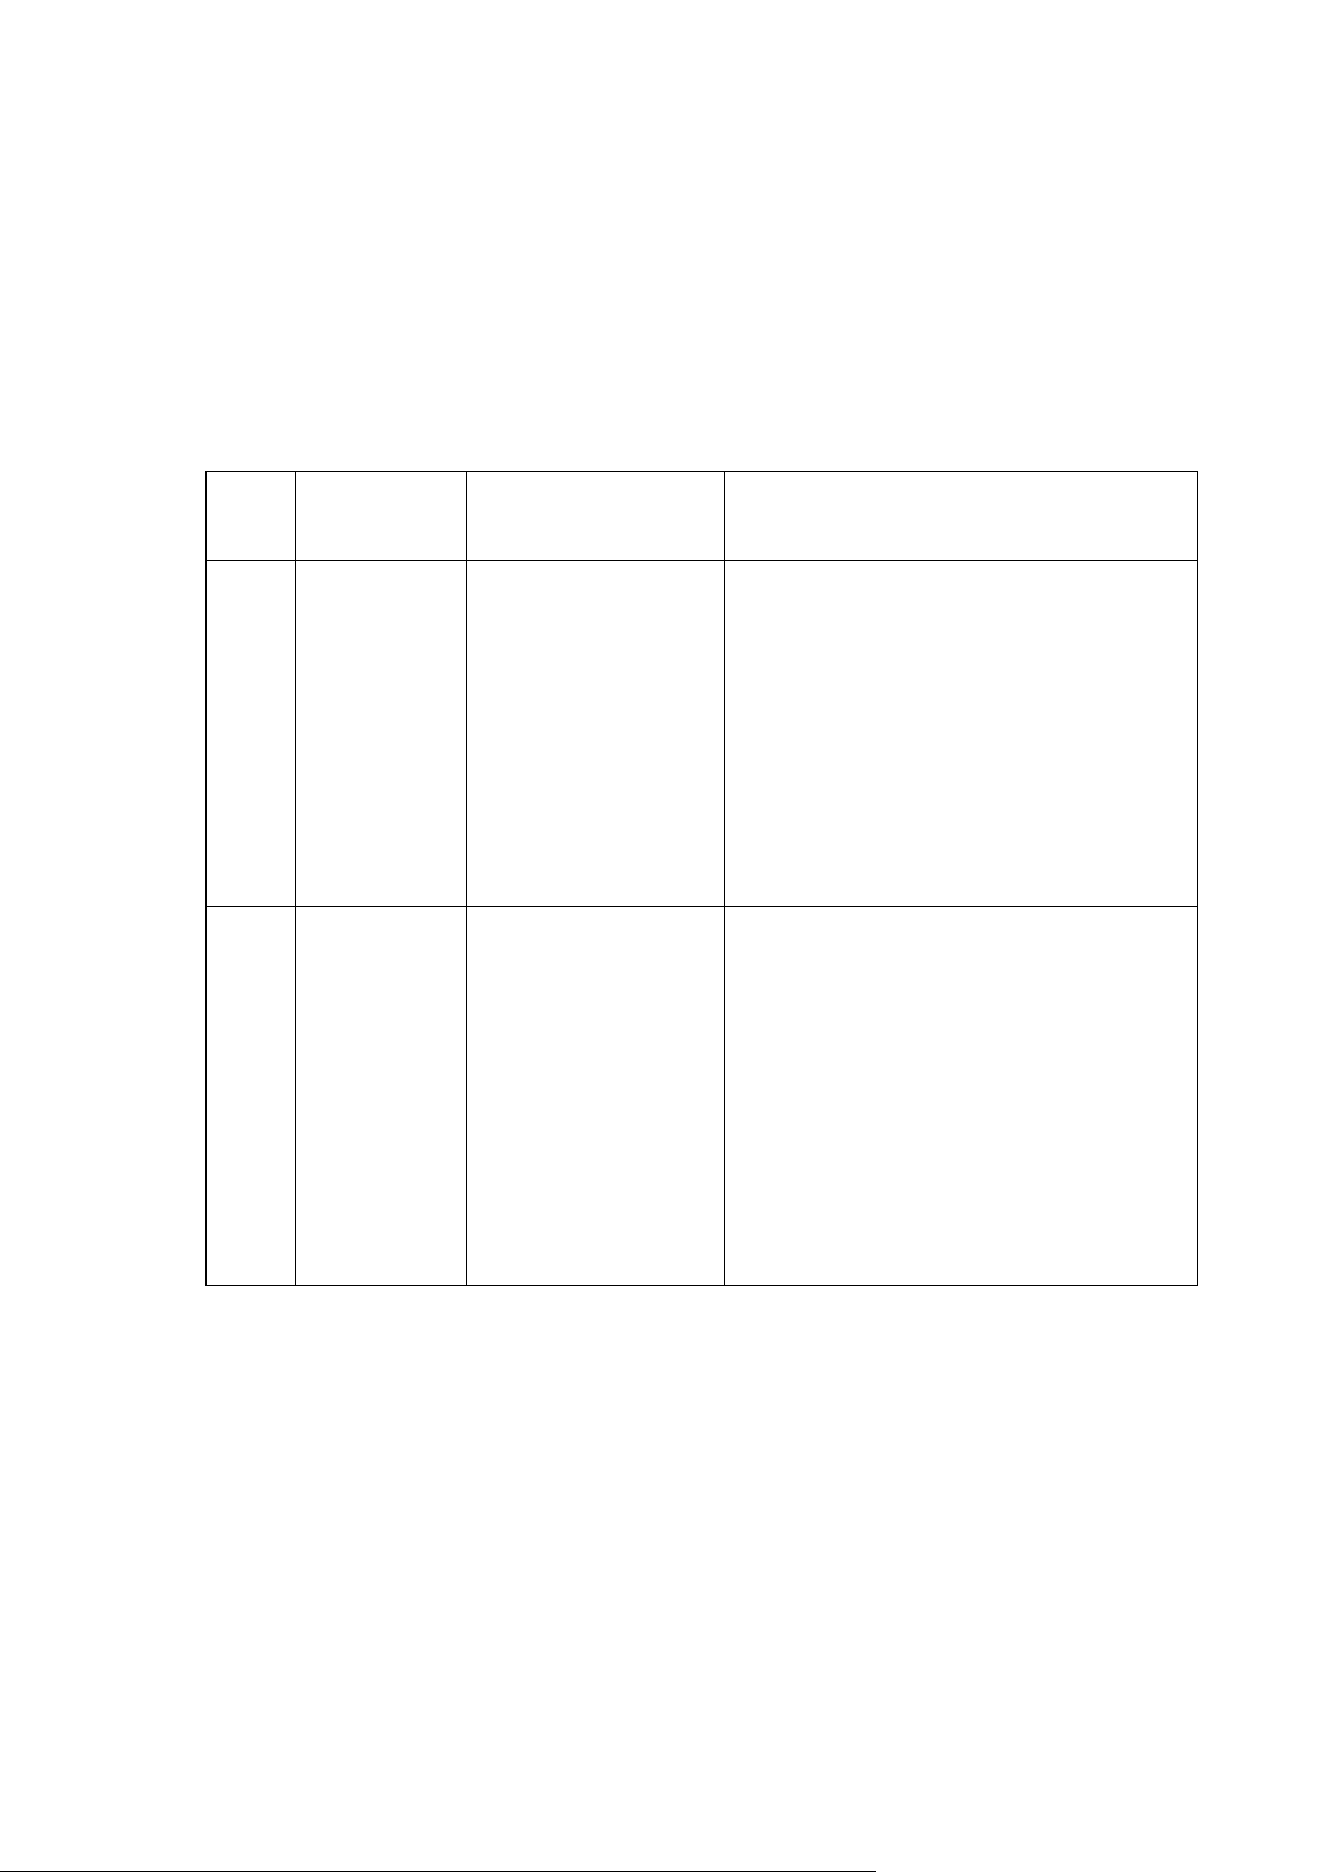
ErrorCodes
CleaningandMaintenance
Before cleaning any part of this product, unplug the
power
cord and let
the machine cool
down. Regularly
clean the machine
to prevent grease buildup, which can cause the cavity
Error
code
Cause by
Product Logic
Execution Overview
Solution
E1
Sensor short ci
rcuit
Sensor open
circuit
The display shows E-
1; all keys are dimly lit
and unresponsive.
1.Check if the temperature of the product is
too high or too low.
2.Turnoff the power and turn it on again
after 1 minute to check if the error code is
still displayed.
3.Pull out the power plug, open the product,
check if the wiring is good, and reconnect it.
4.Search for after-sales service, replace
sensors or power boards.
E2
Abnormal
operation of
hot air motor
The display shows E-2;
the "STOP" key
indicator is brightly lit,
while other key
indicators are dimly lit.
Pressing the "STOP"
key returns the device
to standby mode.
1.Press the cancel button and it will no longe
r
display and return
to standby mode.
2.Automatically return to standby mode afte
r
2.30 seconds.
3.If E2 is sill displayed after repeated restarts,
it is necessary to seek after-sales service

to
catch
fire
or produce odors, and
to
prevent
corrosion
from
dirt. Do not use abrasive
cleaning agents or cleaning items with
metal materials to clean the cavity
and door.
1.Cleaning the
Interior of the Appliance
(1) Periodically wipe the
interior of the
appliance with
a
solution of
baking
soda and
water to
keep it
clean.
(2) Use a foamy cloth to remove greasy splatters and then wipe with a damp cloth. Do
not use sharp cleaning tools (such as scouring pads or spatulas) to clean the appliance.
(3) After
closing
the
door, use a soft
cloth
dipped
in mild, on-abrasive soap or
detergent to clean
the junction between
the door and
the
appliance. Then, wipe
with a
damp
cloth.
(4) To
remove
stubborn stains, mix 1
cup
of water with 2
tablespoons
of
lemon juice
or baking
soda, pour
it
into a
cup, place it in the
appliance, and heat
it until it
boils. Let
it stand inside the
cavity for 5
minutes to allow the
softened cooking
residue
to
evaporate. Then, use
a clean paper
towel, a damp clean cloth, oar
damp
microfiber
cloth
to wipe the inside
of the cavity
to remove softened
cooking
residue.
2.Cleaning the Exterior of the Appliance
(1) Keep the seal between the door and the
appliance clean
at
all times.
(2) Use a soft cloth with soapy water to
clean the outer shell of the
product and wipe it
clean
with a
soft
dry
cloth, avoiding water
from entering
the cavity. Do not use
cleaning
sprays, excessive cleaning agents
and water, abrasive tools, or sharp objects
as these
may
damage the appliance. Note that
certain tissues may also scratch the
control
panel, so
use caution.
3.Cleaning Accessories
(1) After the
appliance
has
cooled down, wash the
accessories by hand in hot
soapy water or
use a nylon scrubber or nylon
brush, then
rinse
thoroughly. Do not wash these
accessories in a dishwasher.
(2) For food
residues that are difficult
to
remove or
baked-on grease, soak
the accessories
in
hot soapy water or use other
non-corrosive cleaning agents.
Note:
1.If
the appliance is not used for an extended period, unplug the power plug and
dry any water
or

dirt
that
may
remain
on
various parts of the appliance
to prevent rust.
2.Any other maintenance work should be performed by the customer service department.
TechnicalParameters
Product name Microwave Oven Model No.
WT928BAE-AS
Rating voltage
120V~
Rated frequency
60Hz
Capacity
28L
Air fry
power
1700W
Microwave input
power
1500W
Microwave output
power
900W