
DRNX JETPACK BY BROOD
MANUAL
V250404


3DRNX JETPACK BY BROOD
SAFETY REGULATIONS
GENERAL INFORMATION
REPAIRS / MAINTENANCE
In case of failure, problems or a suspected fault resulting from a fall, immediately remove the plug from the
power socket and alert the service provider or specialized technician. Never attempt to operate it if it is faulty.
Please report any fault to your service provider. Only the service provider and/or technician may carry out
servicing operations and repairs on DRNX JETPACK, unless otherwise informed. Any repair of the dispenser
must be done only when it is switched o and it is ascertained that there is no electric current. All spare parts
must be obtained from your service provider. Follow the service and maintenance instructions in this operation
manual.
INTENDED USE
DRNX JETPACK pulls any filtered liquid from an unpressurized container. When using DRNX JETPACK,
it’s important to adhere to the following guidelines: Firstly, utilize only the tubing provided with the machine.
Secondly, connect DRNX JETPACK to the provided pressure reducer set at 15-20 PSI. If employing a bag-
in-box, ensure it’s positioned at the same level or below, within 3 feet. When changing concentrate suppliers or
concentration ratios, recalibrate DRNX JETPACK accordingly. Exclusively utilize the beverage tubing provided
with the machine. Avoid using water exceeding 86°F (30°C) to prevent damage. Additionally, please note that
variations in ratio may arise due to factors such as air in the inner tubes, concentrate composition, bag position,
spout placement, concentrate viscosity, oils, nitrogen content, use of non-supplied tubing, and other variable
conditions.
VISCOSITY OF LIQUID
Ensure that your beverage has been filtered in order not to clog the pre-filter or if that has been bypassed, not
to clog the machine. Thick liquids risk slowing down the liquid pump inside. DRNX JETPACK comes with a
pre-filter that is already fitted onto the beverage tube. If the pre-filter is not attached, you can risk damaging
components inside.
4DRNX JETPACK BY BROOD
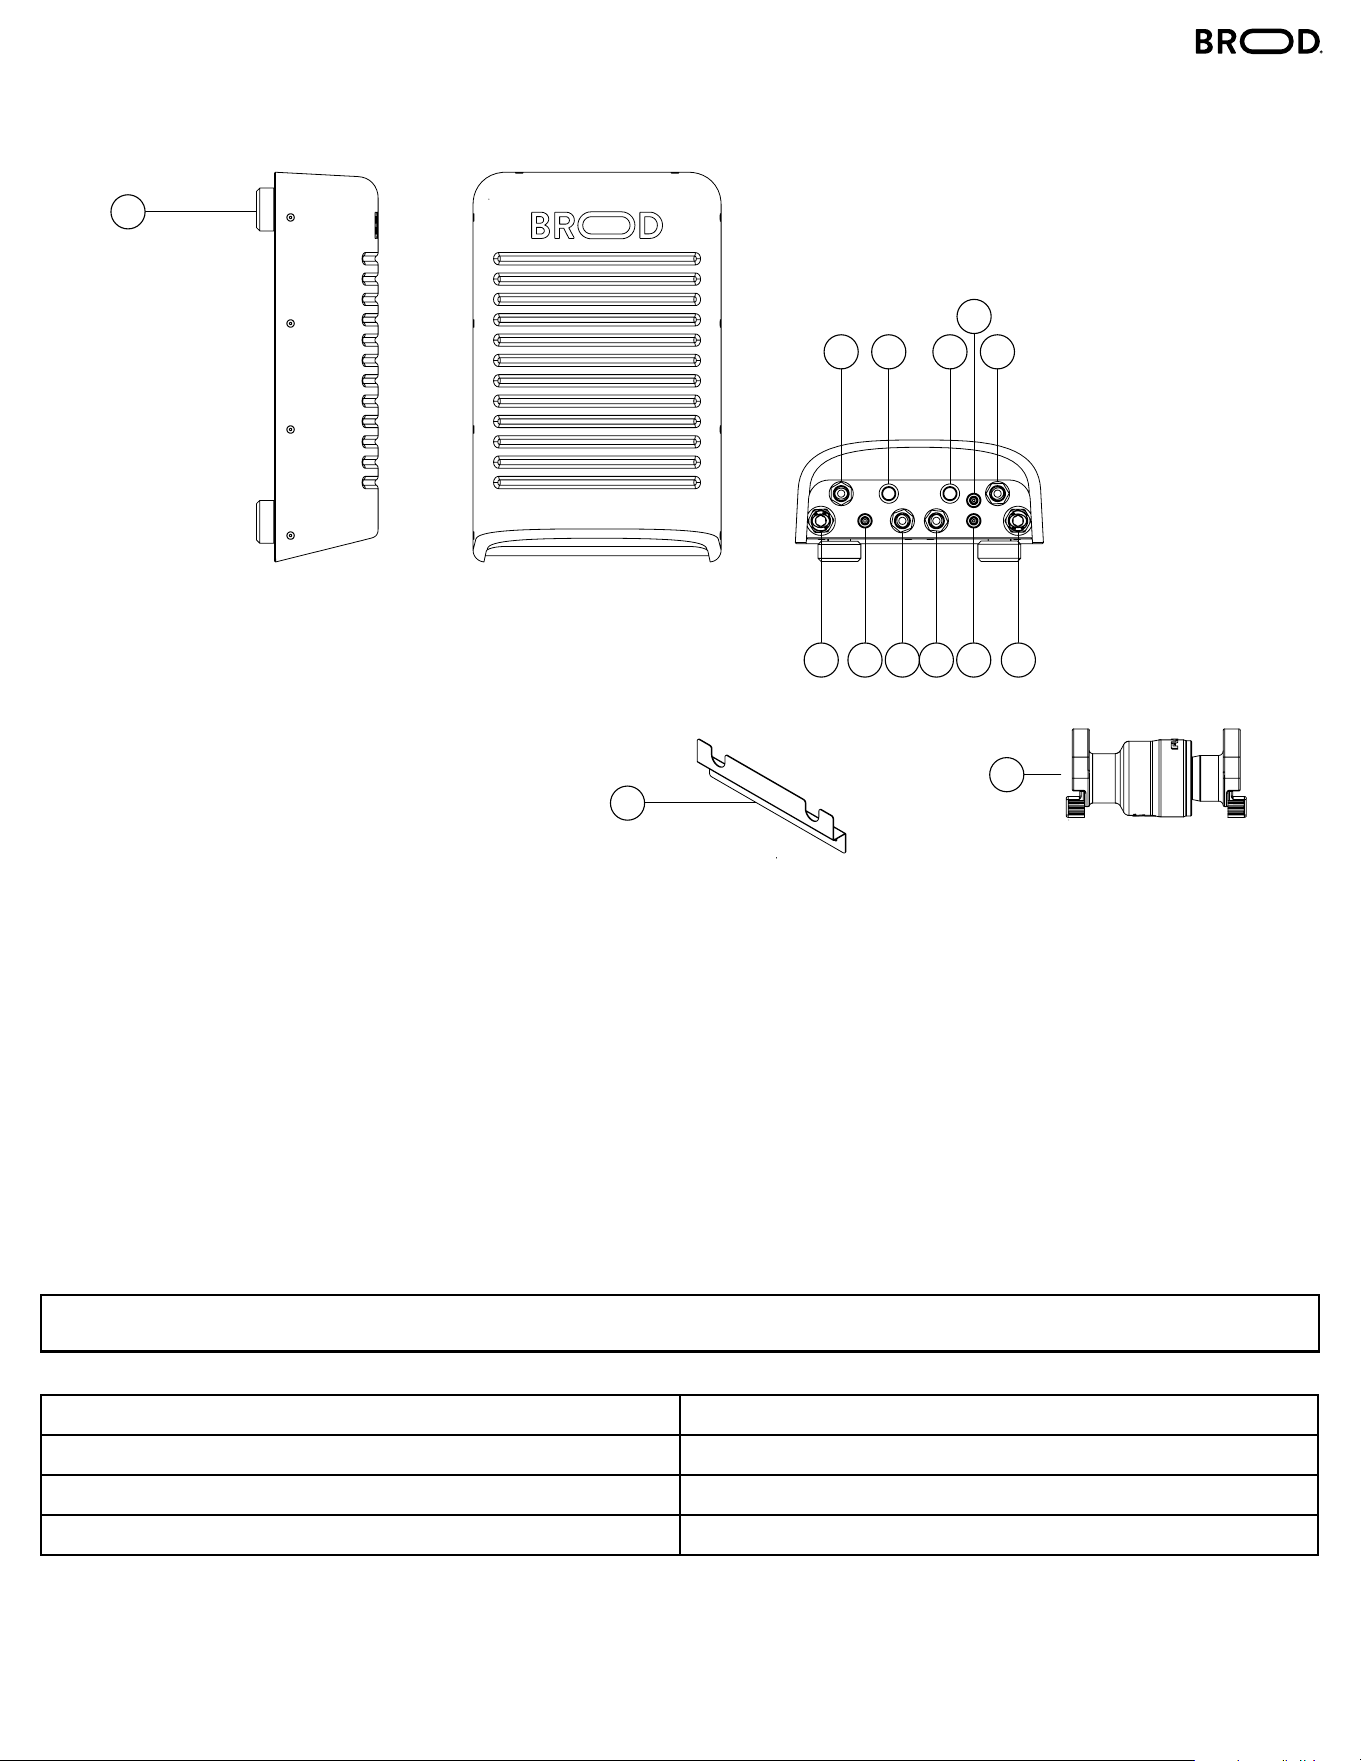
COMPONENTS
1 – Feet/Hanging Spool
2 – Concentrate Line IN (Line 1)
3 – Concentrate Line IN (Line 2)
4 – Prime (Line 1)
5 – Prime (Line 2)
6 – Serving Link (Line 1)
7 – Serving Link (Line 2)
8 – Water Line IN (Line 1)
9 – Water Line IN (Line 2)
10 – Power Supply
11 – Beverage Line Out (Line 1)
12 – Beverage Line Out (Line 2)
13 – Wall Mount Bracket
14 – Pressure Reducer
SPECIFICATIONS
Width: 9.00in Power Supply: 120V AC Input / 240V DC Output
Height: 14.3in Nominal Power: 14W
Depth: 4.5in Amps: 0.6A
Weight: 10lbs For Commercial Use Indoors
14
1
13
2 4 5 3
6
8 10 11 12 7 9
5DRNX JETPACK BY BROOD
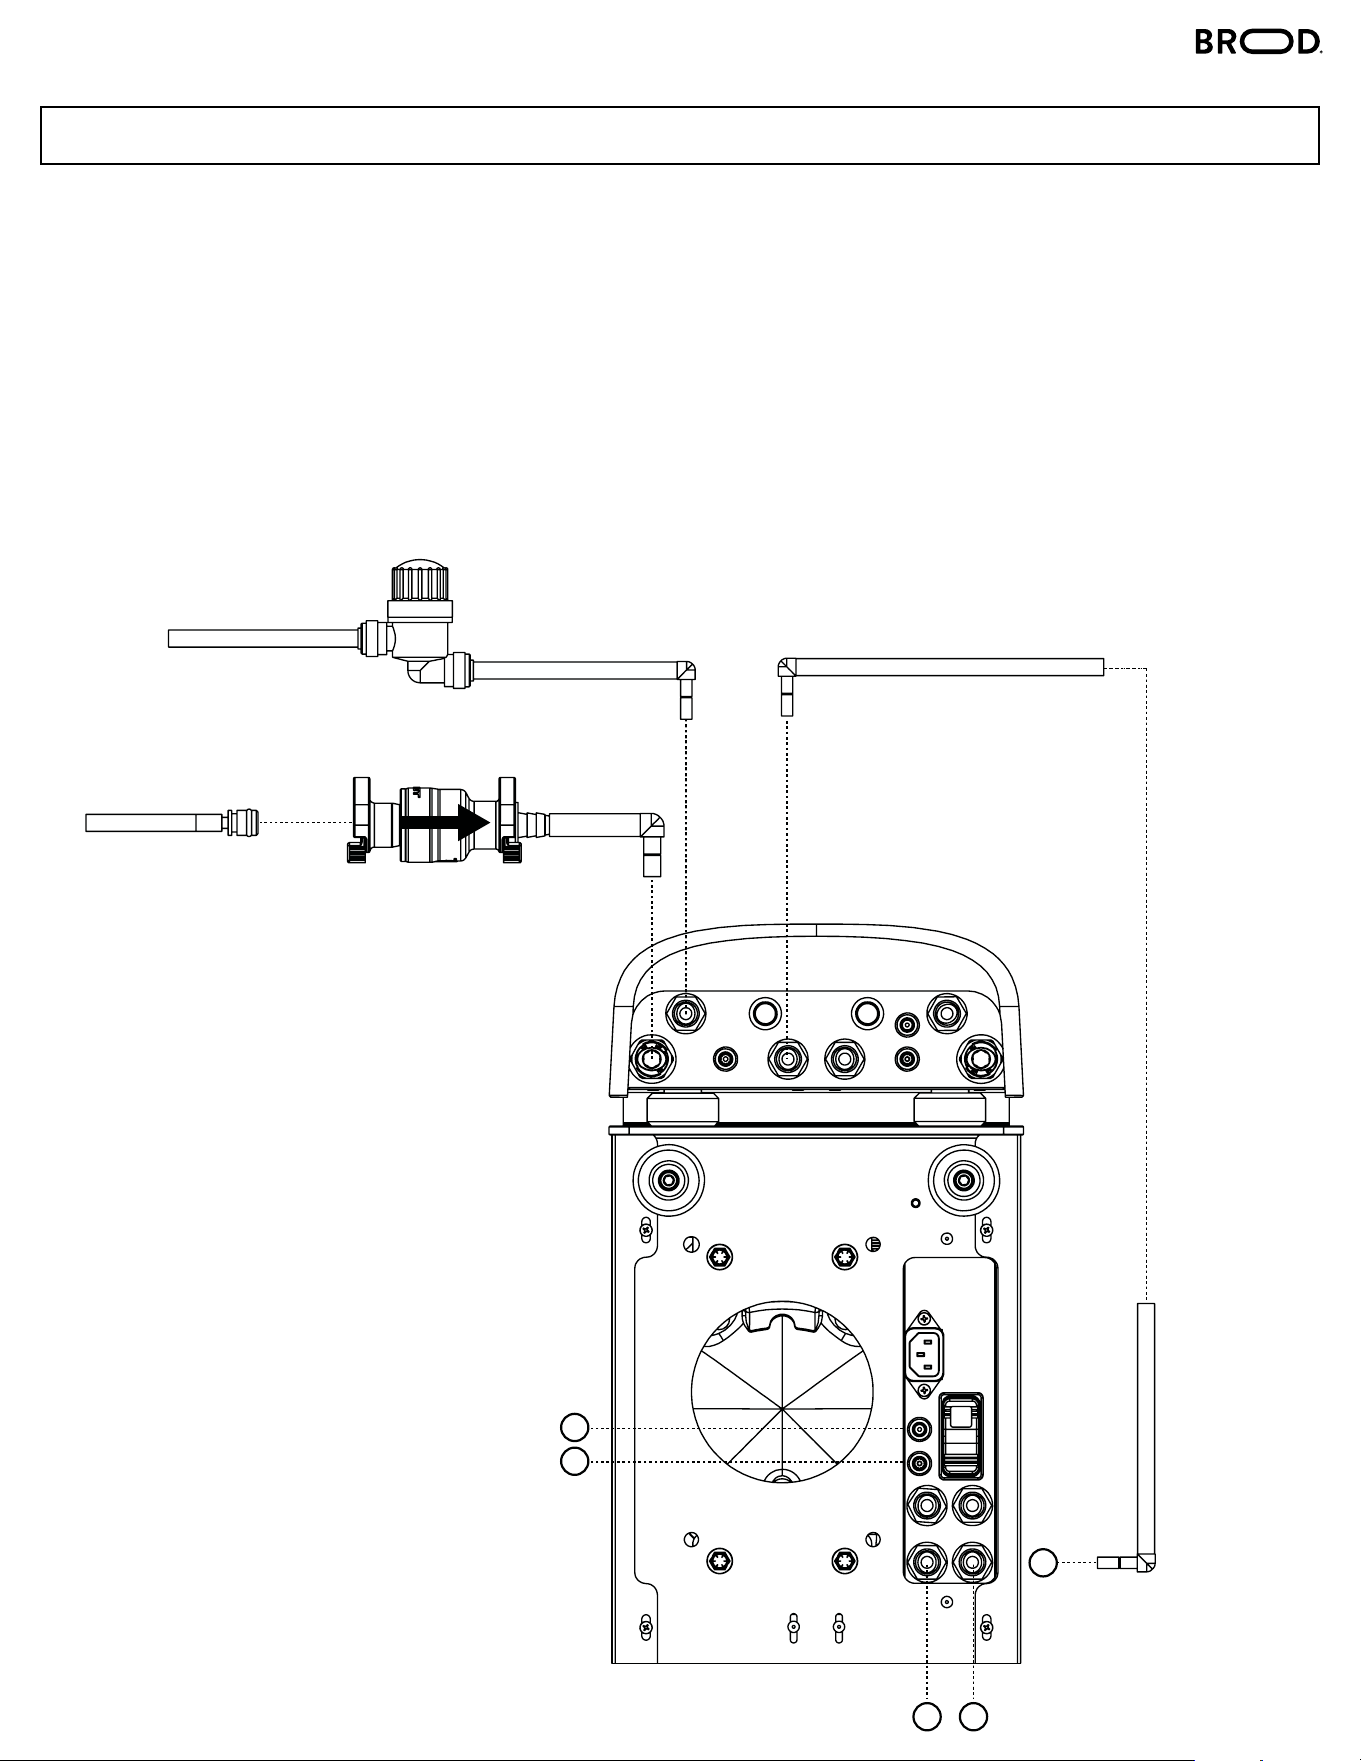
WATER LINE IN: Connect the water line, which includes a pressure reducer. The arrow on the reducer must
point in the direction of the water flow. Connect your water supply to the other end of the pressure reducer. This
comes by default with a fitting that has a ¼ barb, so you can use any tube with a ¼ ID.
CONCENTRATE LINE IN: Connect the concentrate line. This comes with a pre-filter. However, please make
sure that you first connect it to the Jetpack before connecting the concentrate line to your bag-in-box. This
helps prevent any leaks from your bag-in-box.
BEVERAGE LINE OUT: Connect the product output line from the Jetpack to the machine. Use a short tube if
mounted on the machine or a longer tube if mounted at a distance.
DUAL TAP MACHINES: Duplicate the input and output lines as needed.
WATER LINE IN
CONCENTRATE LINE IN
BEVERAGE LINE OUT
INSTALLATION
CONNECTIONS
1
1
2
1
2
6DRNX JETPACK BY BROOD
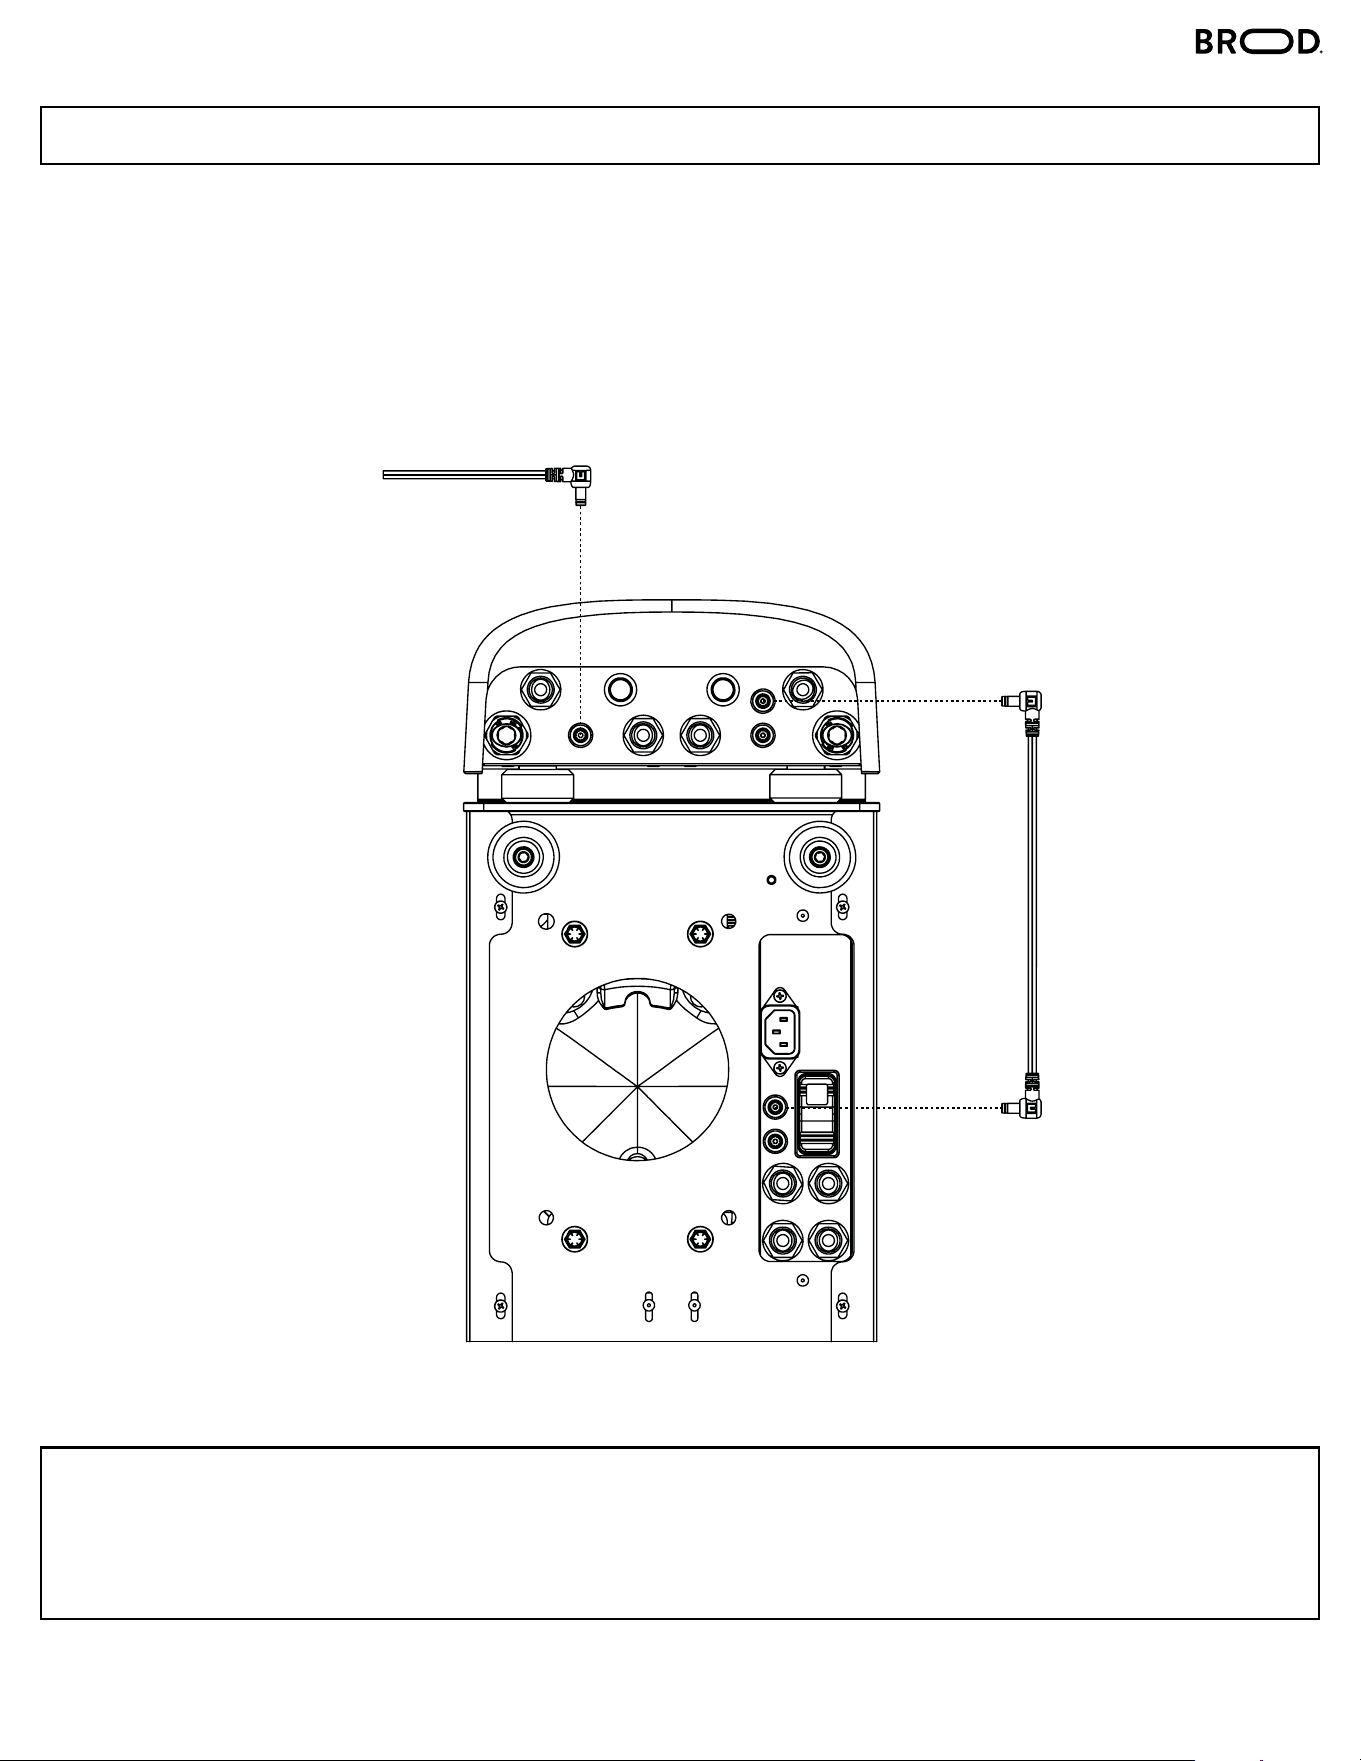
POWER SUPPLY: Connect the power supply to the Jetpack.
SERVING LINK: Securely connect each Serving Link to its designated jack port on the JetPack. Ensure that
ports (1) and (2) are paired with the corresponding jack ports beneath the DRNX unit, matching the labeled
numbers for proper alignment.
SAFETY PRECAUTIONS:
ENSURE THAT THE JETPACK AND THE DRNX ARE UNPLUGGED BEFORE MAKING ANY
CONNECTIONS. THIS IS VERY IMPORTANT FOR SAFETY REASONS.
SERVING LINK
POWER SUPPLY
INSTALLATION
ELECTRICAL CONNECTIONS
7DRNX JETPACK BY BROOD
INSTALLATION
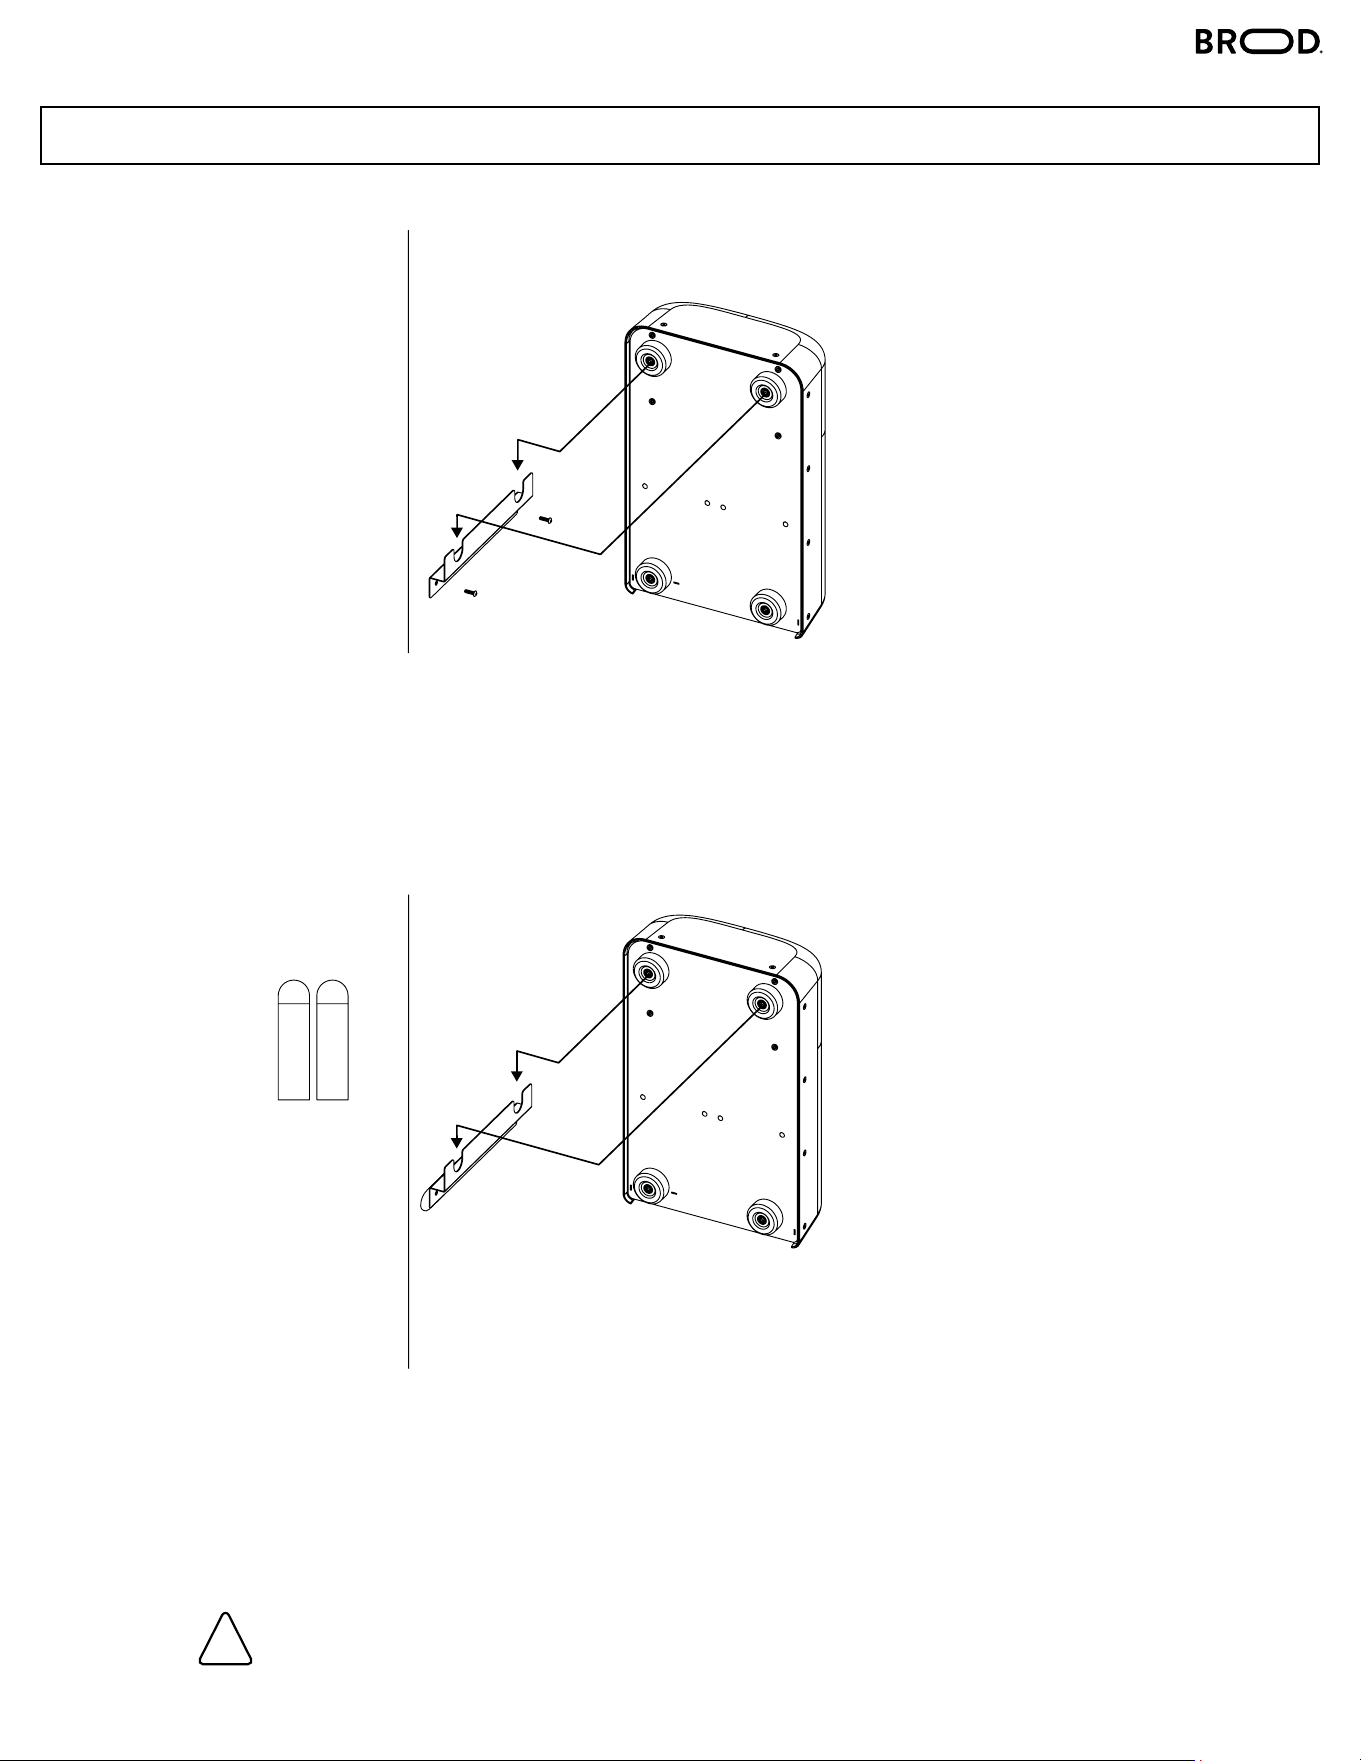
Option 1B. 1. Prepare the Surface – Clean and dry the wall. Avoid textured surfaces.
2. Attach Strips – Stick two strips horizontally on the wall and two on the mounting bracket.
3. Mount the Bracket – Align and firmly press the bracket onto the wall, ensuring the strips
fully engage.
4. Secure & Set – Hold for 30 seconds.
Press firmly for maximum support.
Option 1A. Use the supplied bracket and two self-tapping screws (provided) to mount on a vertical surface
(e.g., wall).
Ensure they are secure before hanging the Jetpack using the two top feet.
MOUNTING
!

8DRNX JETPACK BY BROOD
INSTALLATION
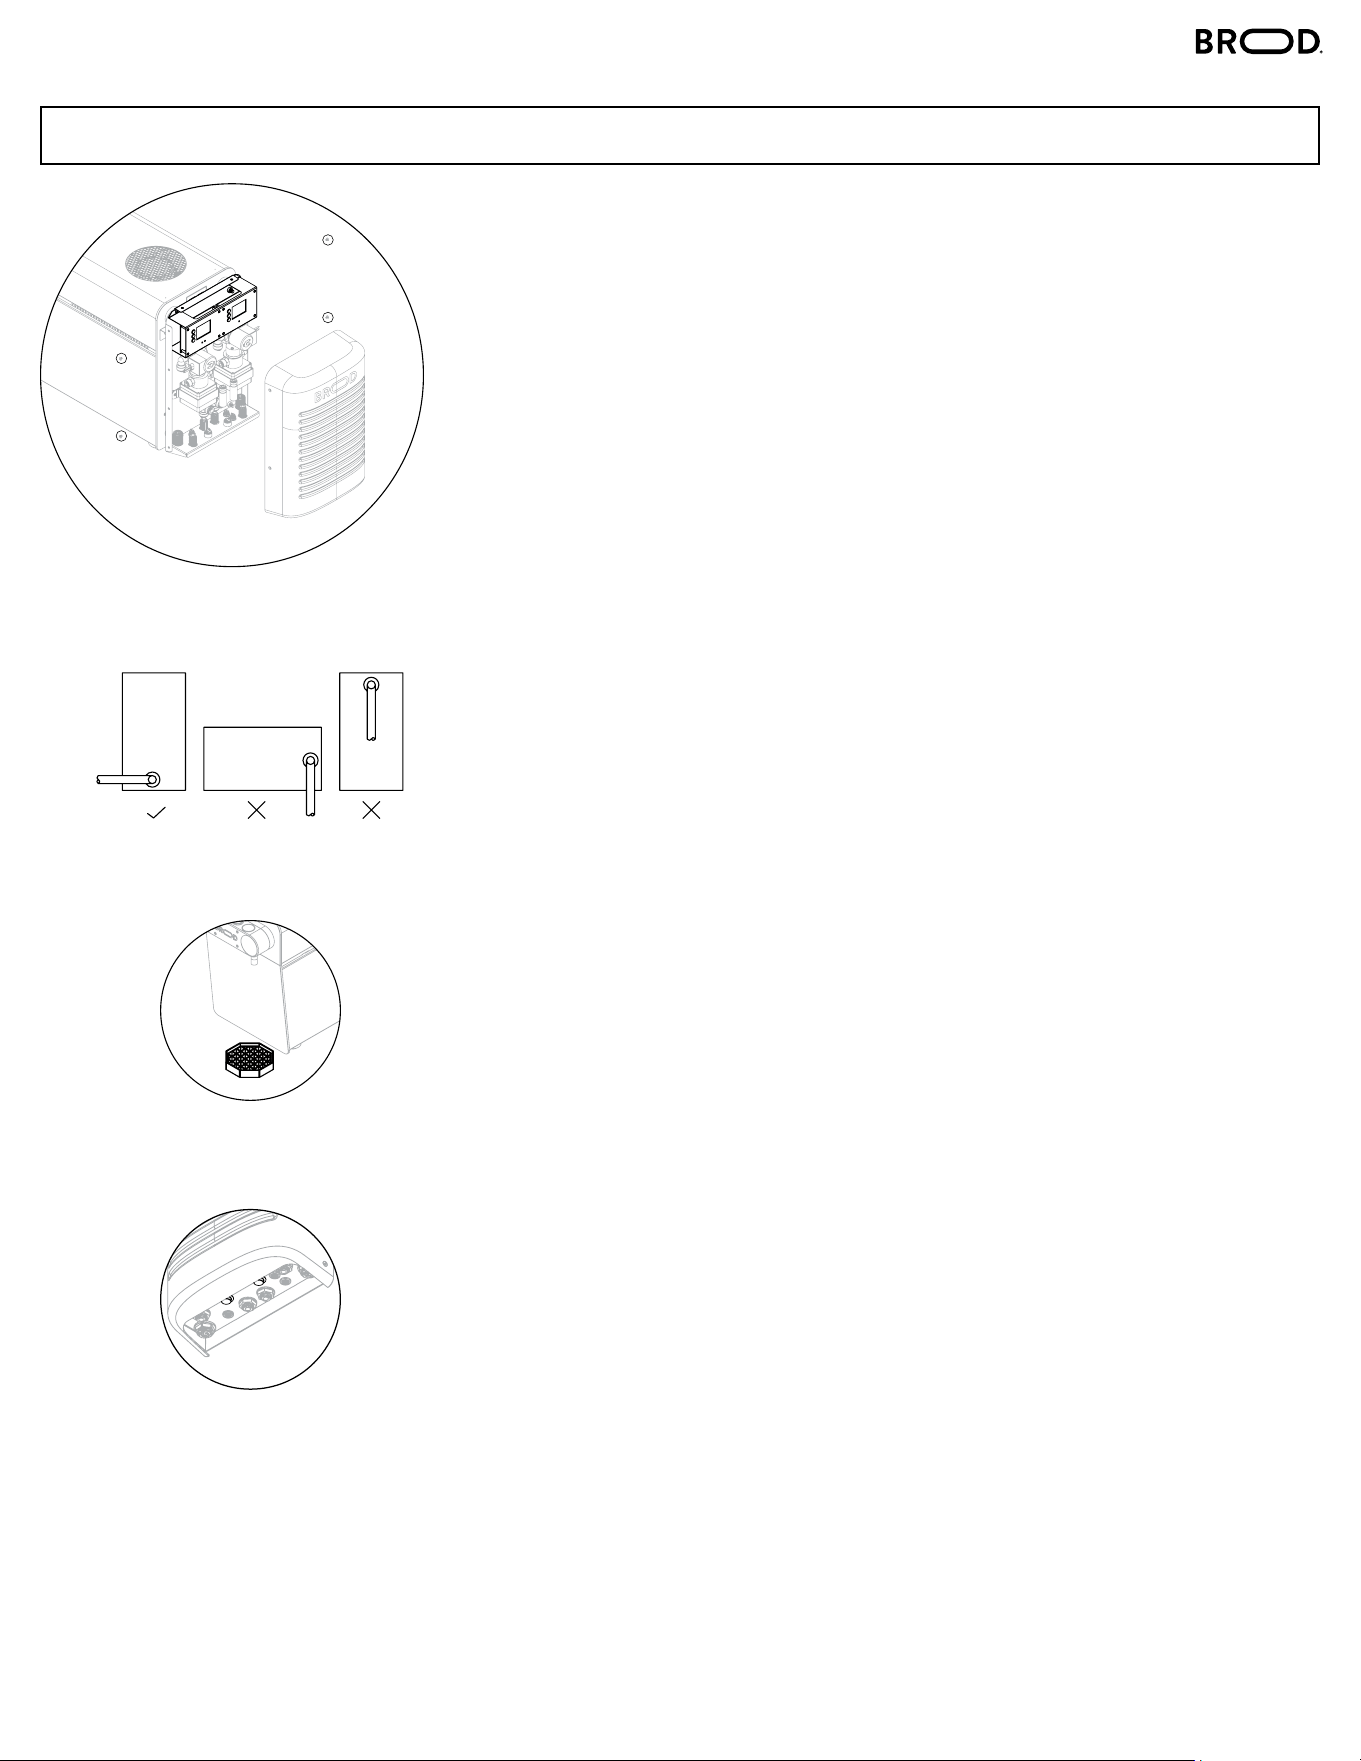
Option 3. Place the Jetpack flat on a countertop next to the machine.
Option 2. Unscrew the top two screws from the back panel. Mount the bracket on the back panel by
returning the two screws through the mounting bracket and onto the back plate of the machine.
MOUNTING
9DRNX JETPACK BY BROOD
INSTALLATION
1. Remove Cover:
Remove Plastic Cover from JetPack by unscrewing 2 Philips Screws on
each side.
2. Screen Unlocking:
• To unlock the screen, press the center button three times consecutively,
followed by a single press of the bottom button. Note that the screen will
automatically re-lock after 30 seconds.
3. Dialling in Ratio Pump:
• Adjust the Ratio Pump settings to match your desired preference, keeping
in mind that the highest achievable setting is 130.
4. Understanding Ratio Settings:
• For reference, a setting of 005 indicates less dilution, resembling a 1:1
ratio. As you progress towards 130, more water dilution occurs, resulting in
less concentrate being pumped. Changes in ratio will only be noticeable
after pouring approximately 500mL into a cup.
5. BiB Concentrate Placement:
• When using concentrate in a BiB, it’s crucial to position the BiB outlet
downward, not upwards. This arrangement ensures an uninterrupted flow
of concentrate and eliminates potential air pockets within the BiB.
6. Place Drip Tray beneath the spout.
7. Press and hold the Prime button for 5 seconds.
BiB Replacement:
If water is dispensed from the tap, it signals that the Bag in Box (BiB) is
empty, and the machine is currently dispensing only water.
SETUP
6.
7.
5.
1.
10DRNX JETPACK BY BROOD
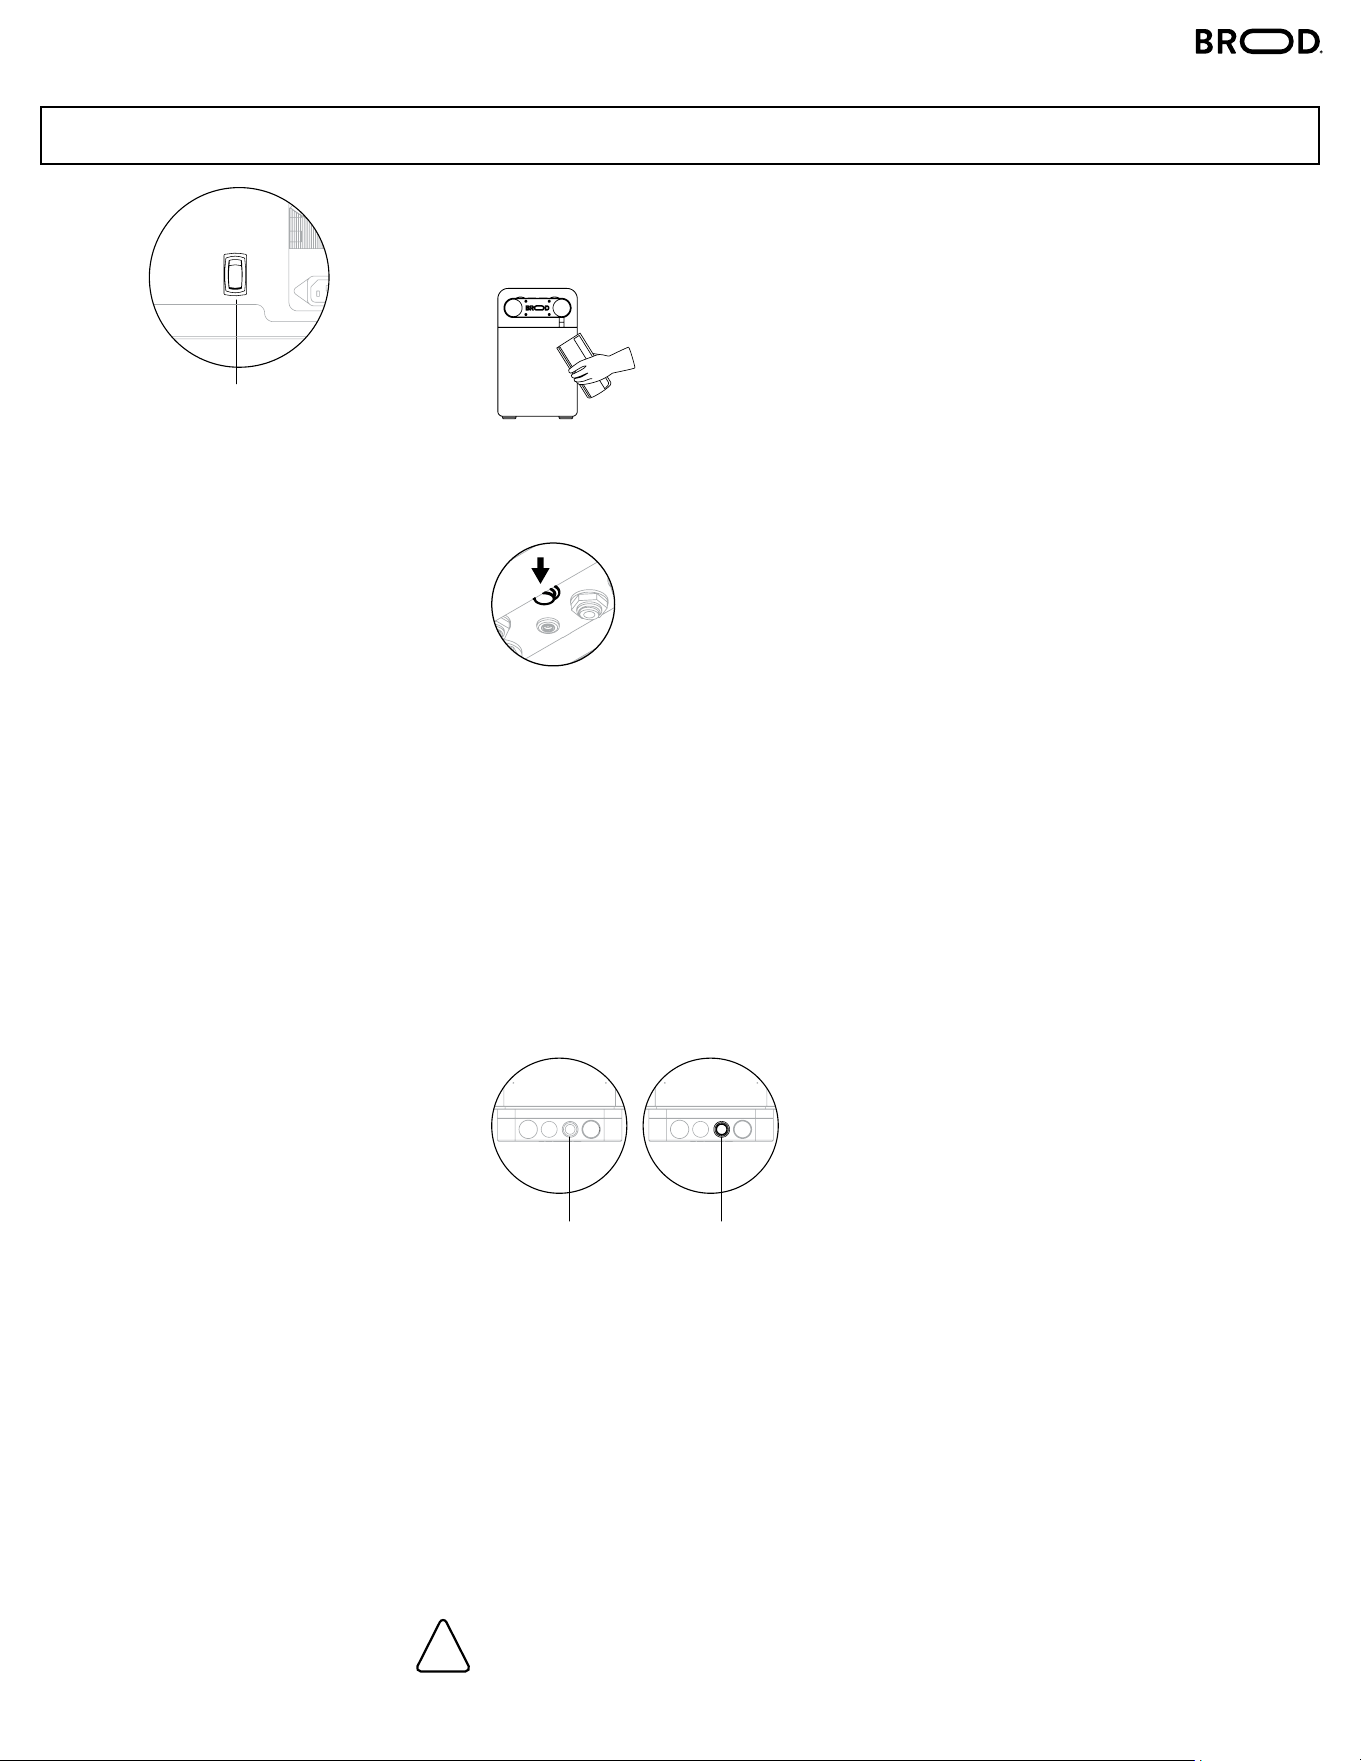
1. Switch on the main ON/OFF button at the bottom of the machine.
2. Place your cup beneath the stout at an angle for the best pour.
3. Priming: Press and hold the mushroom capped button at the bottom of the
DRNX JetPack for 5 seconds. This procedure should be repeated every time
an empty concentrate BiB is replaced with a new one.
4. First Pour: Pull the tap handle down to dispense 32 oz. of liquid to eectively
prime the machine. It is important to keep pouring until the beverage from
the spout is flowing normally. Expect a small spurt of air that might come
from the spout during this process. Keep the glass raised high and close to
the spout to contain it.
Changes in ratio will only be noticeable after pouring approximately
500mL into a cup.
5. To pour a NITRO beverage, press “INFUSION”.
To pour a STILL beverage, de-press “INFUSION”.
Please note, if the last pour was nitro cold brew and the operator wants the
next pour to be still cold brew, there will be less than 5 mL (0.34 oz) of
nitro cold brew in the tap that will come out. Every subsequent still cold brew
pour will come out fully still, until the next nitro cold brew pour.
6. Pull the tap handle down to start pouring,
and release it when the pour has been completed.
7. If water is dispensed from the tap, it signals that the Bag in Box (BiB) is
empty, and the machine is currently dispensing only water.
Make sure the pre-filter adapter is installed in the beverage tube.
Ensure that the coee is filtered with a fineness of at least 100 μm (microns).
Not using the pre-filter risks damaging the internal components of DRNX MIX.
OPERATION
!
STEPS
MAIN ON/OFF SWITCH
ON BOTTOM OF MACHINE
INFUSION BUTTON
OFF
(NO LIGHT)
INFUSION BUTTON
ON
(LIGHT)
11DRNX JETPACK BY BROOD
CARE
INSTRUCTIONS - DAILY CLEANSE
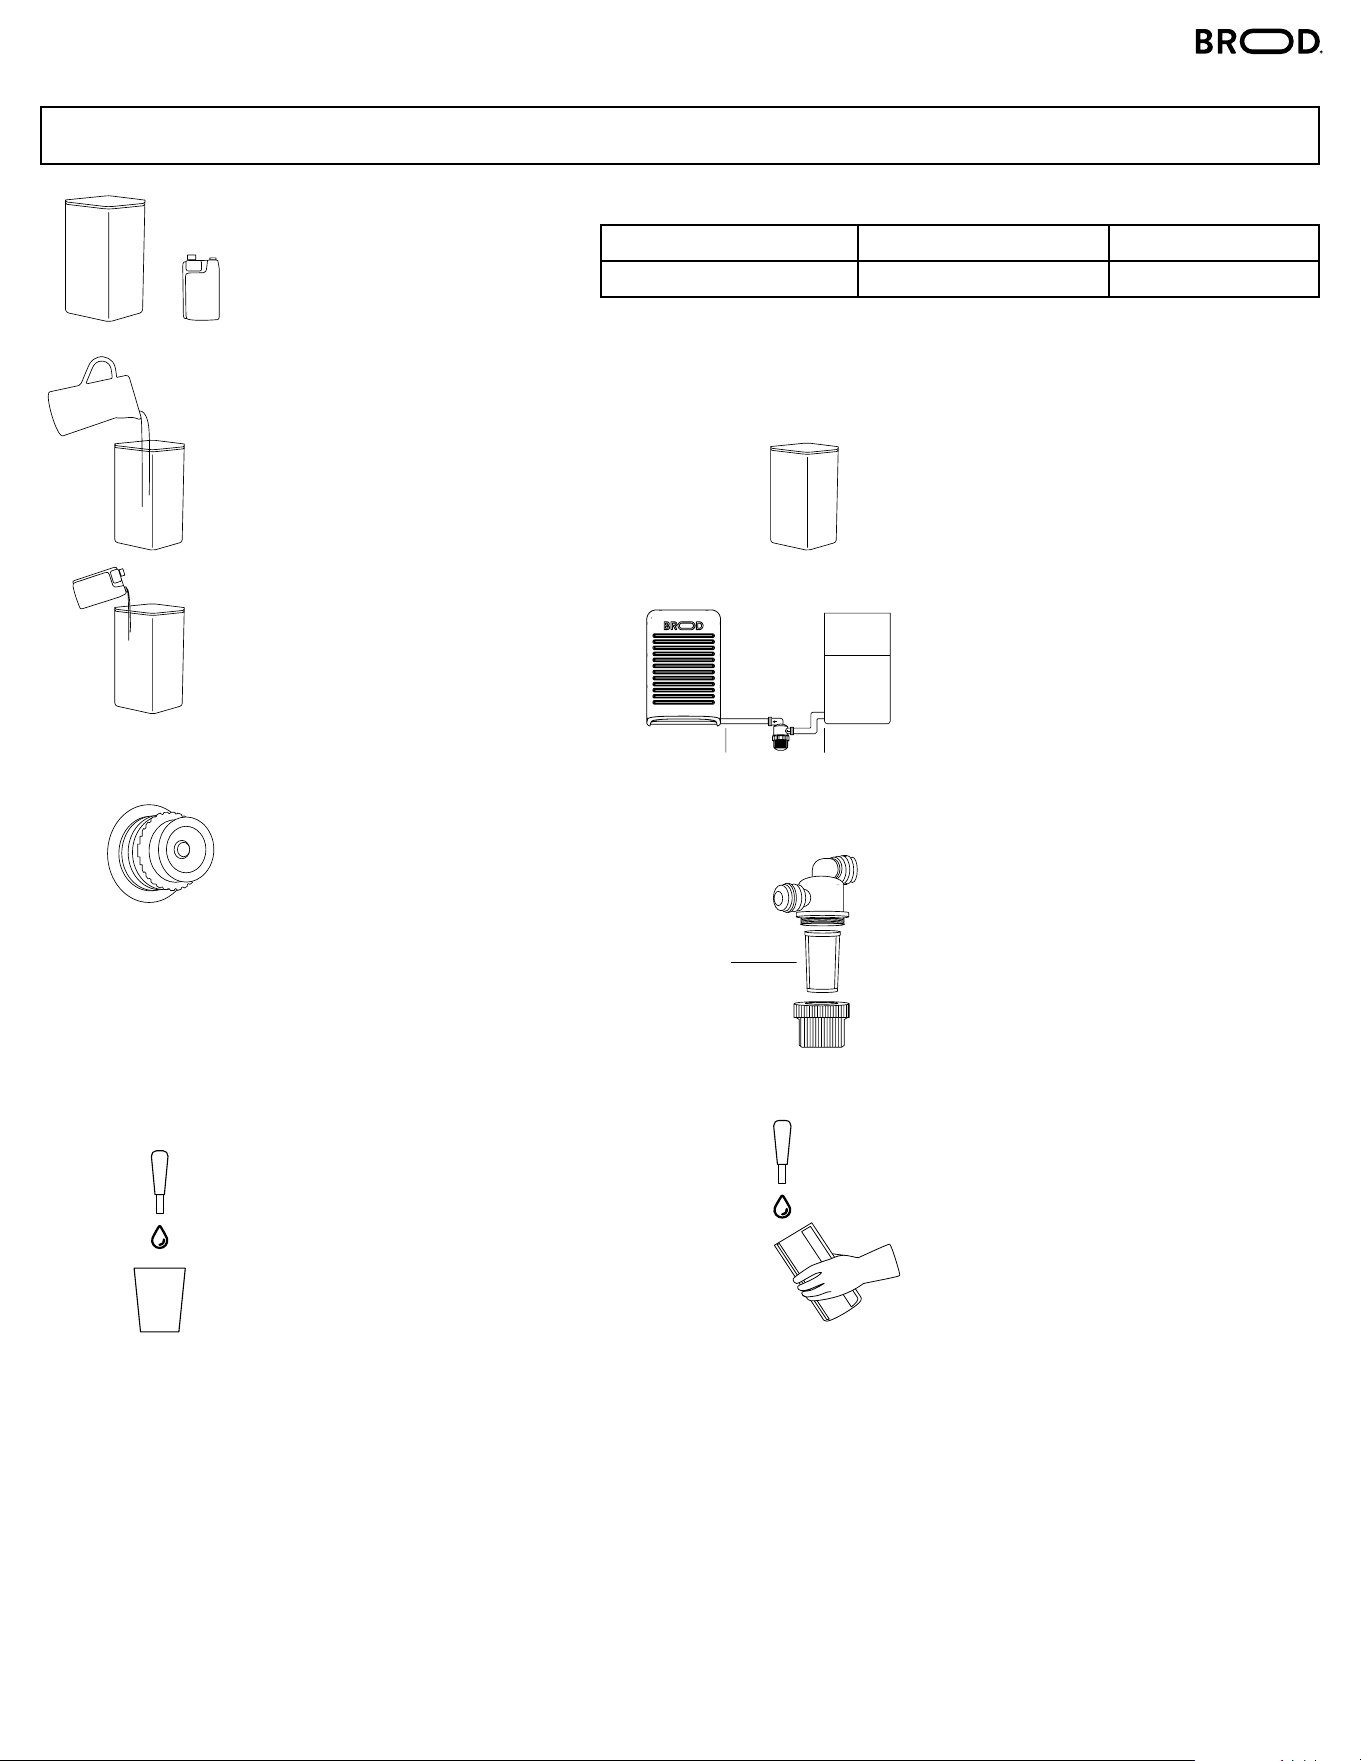
1. Fill the container with 1.5L
of clean water
1 STEP DILUTION PROCESS
RINZA
5. Rinse the container with
clean warm water
6. Fill the container with
clean water, then run 3L
of fresh water through the
tap spout before reattaching
your cold brew BiB.
8. BEFORE SERVING:
Place a glass under the tap.
Pull the tap down until the
water is flushed out and cold
brew begins to flow freely,
then close the tap.
7. Unscrew the cover of the
pre-filter by turning it
counter-clockwise. Remove
the stainless steel mesh and
wash with clean hot water.
Make sure the stainless
steel mesh is not clogged.
2. Add 180 mL Rinza
Solution to the
container and fill with an
additional 2.5L of clean
water. Measure carefully.
3. Detach the QCD Adaptor
from the Bag in Box (BiB)
and replace it with a “pink
cap.” Then, place the
assembly into the container.
The “pink cap” serves to
open the valve within the
QCD Adaptor, allowing the
flow of Rinza Solution
through the concentrate
tube.
4. Place an empty container
under the tap spout. Run
the solution through the
system for 40 seconds and
let stand for 15 minutes.
Then run the remaining
solution through the system.
STAINLESS STEEL
MESH
RIZA
CONTAINER SIZE CLEANER/SANITIZER WATER
3Liter 180 mL 3Liter
RIZA
CONNECTOR CONNECTOR
PRE-FILTER
BROOD
CONTAINER
