
Contact Information
FETCO®
Food Equipment Technologies Company
600 Rose Road
Lake Zurich • IL • 60047-1560 • USA
© 2018-2024 Food Equipment Technologies Company
Internet: www.fetco.com
Phone: (800) 338-2699 (US & Canada)
(847) 719-3000
Fax: (847) 719-3001
Email: sales@fetco.com
techsupport@fetco.com
Fast Cold Beverage Maker P232 July 2024
TABLE OF CONTENTS
Specifications and Requirements...................................... 2
Utility Specifications and Requirements ............................ 2
Installation Instructions ...................................................... 5
Sanitizing Solution ........................................................... 10
Sanitation ........................................................................ 10
Programing Menu Layout ................................................ 11
Touch display-Quick guide .............................................. 12
First Screen After Bootup ................................................ 13
Program ........................................................................... 13
Wash ............................................................................ 13
Sanitation ......................................................................... 13
Error Codes ..................................................................... 14
Calibration ....................................................................... 16
Parts Diagrams ................................................................ 18
Wiring Diagram ................................................................ 21
www.fetco.com
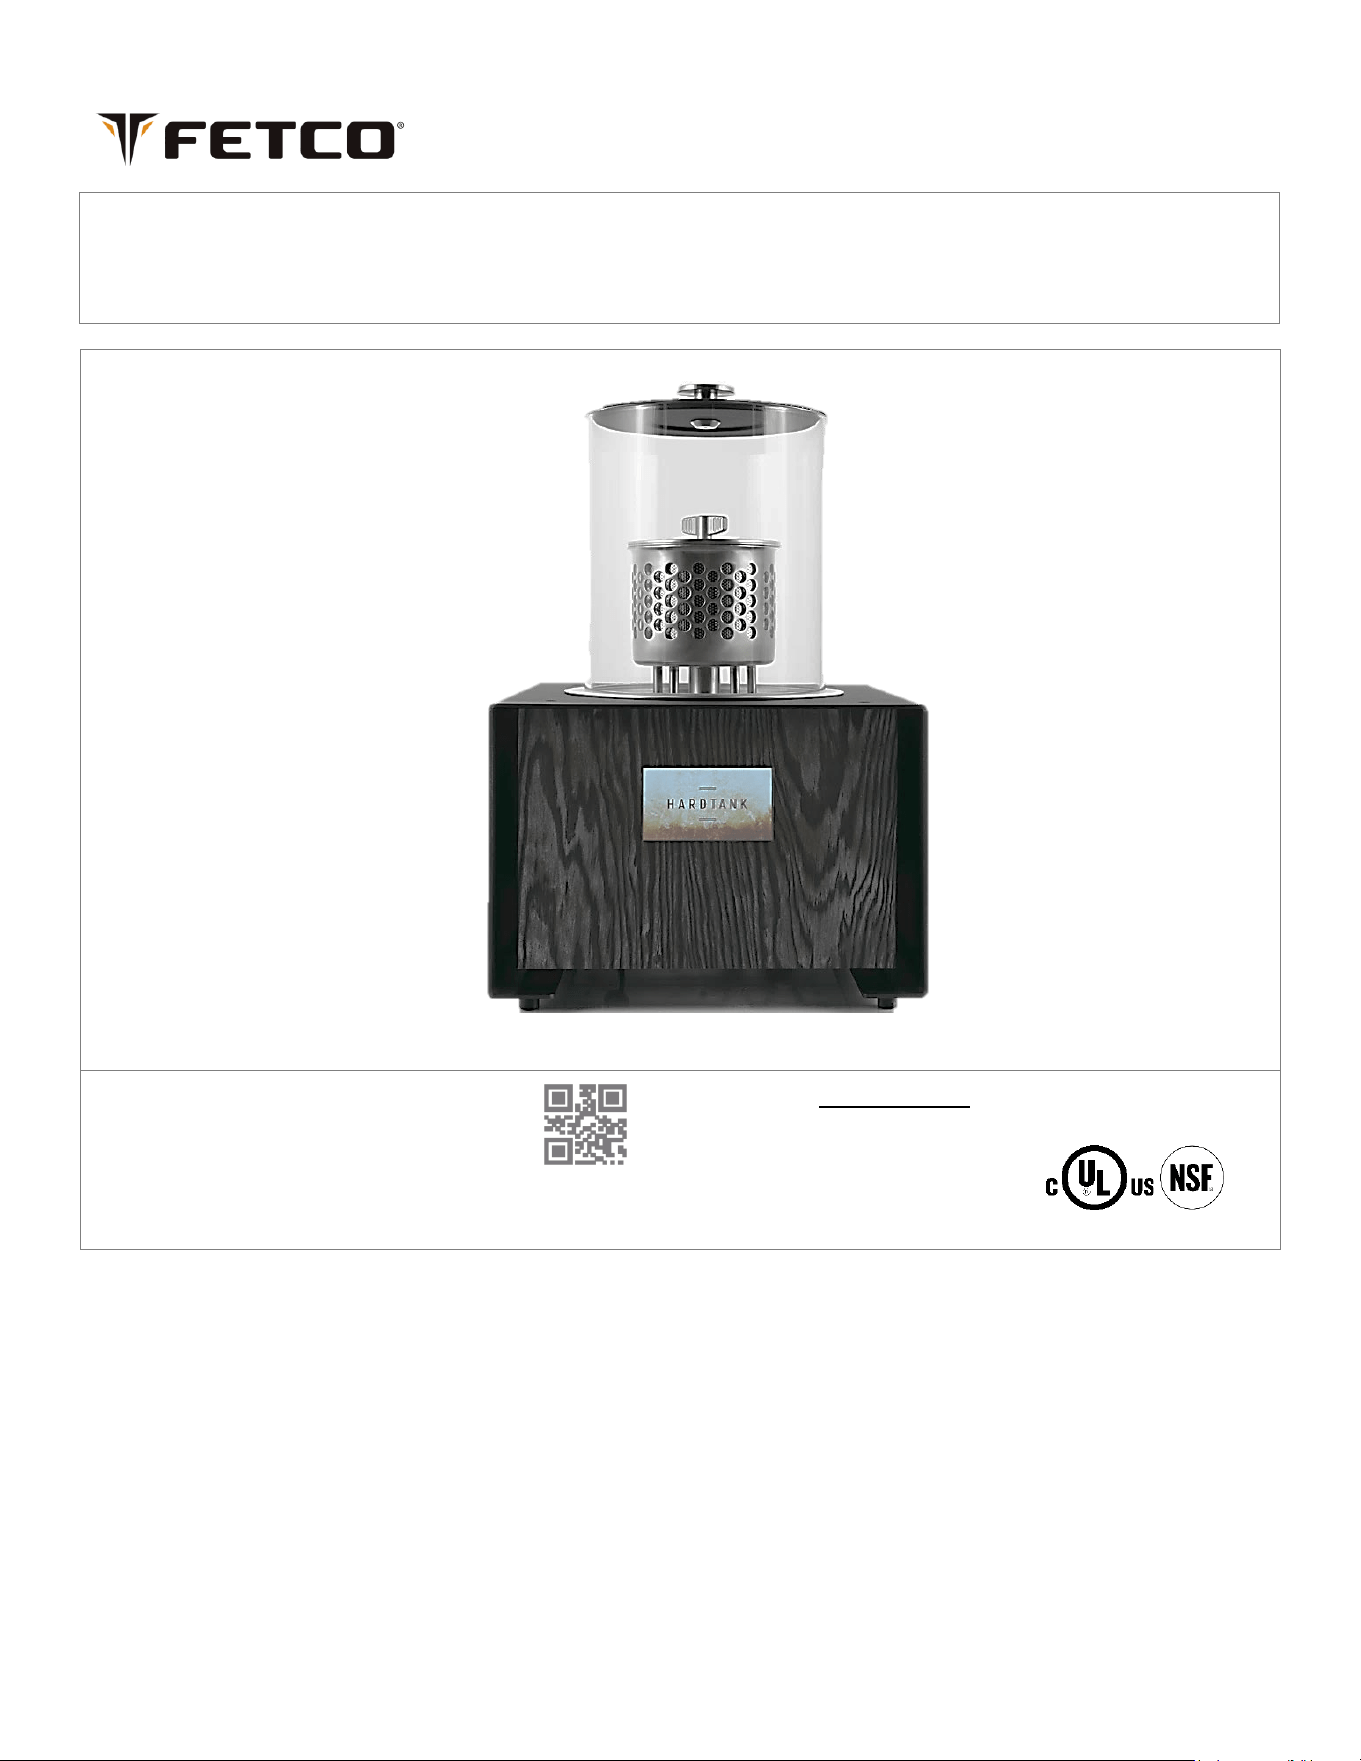
User’s Guide and Operator Instructions
Baby Hardtank
Fast Cold Beverage Maker
FETCO Commercial Beverage Equipment
fetco.com
Go to fetco.com for the latest versions of all information 2 P232 July 2024
Specifications and Requirements
The FETCO Baby Hard Tank IHT-2205 has unique construction only available for this model.
Baby Hard Tank employs an innovative high-velocity water pump that propels cold water through a specialized filter
basket filled with your favorite ground coffee or tea leaves. Using a patented flow and pressure system, the software
programming extracts rich, desirable flavors at an unprecedented speed.
Unlike traditional cold-brew methods that can take hours, our process ensures that your beverage is ready quickly while
maintaining superior taste quality.
One of the key benefits of this advanced method is the short contact time between the
cold liquid and the grounds. This brief interaction eliminates sanitation problems while preventing the extraction of
strongly acidic flavors, resulting in a clean, smoother, more balanced beverage.
Electrical Specifications FETCO Baby Hard Tank IHT-2205 (Selected Models)
SKU
Volts
Watts
Phase
Amps
Frequency*
Electrical plug
Color finish
I2205US-1A000-W1P11
100-125
100
Single
0.8-1.0
50 or 60 Hz
NEMA 5-15P
Dark Brown
I2205US-1A000-W2P11
100-125
100
Single
0.8-1.0
50 or 60 Hz
NEMA 5-15P
Gray
I2205US-1A000-W3P11
100-125
100
Single
0.8-1.0
50 or 60 Hz
NEMA 5-15P
Light Brown
I2205IN-1B000-W1P16
200-240
100
Single
0.4-0.5
50 or 60 Hz
UK1-13P
Dark Brown
I2205IN-1B000-W1P17
200-240
100
Single
0.4-0.5
50 or 60 Hz
AU1-10P
Dark Brown
I2205IN-1B000-W2P16
200-240
100
Single
0.4-0.5
50 or 60 Hz
UK1-13P
Gray
I2205IN-1B000-W2P17
200-240
100
Single
0.4-0.5
50 or 60 Hz
AU1-10P
Gray
I2205IN-1B000-W3P16
200-240
100
Single
0.4-0.5
50 or 60 Hz
UK1-13P
Light Brown
I2205IN-1B000-W3P17
200-240
100
Single
0.4-0.5
50 or 60 Hz
AU1-10P
Light Brown
I2205KS-1B000-W1P16
220
100
Single
0.4
50 or 60 Hz
UK1-13P
Dark Brown
I2205CE-1B000-W1P15
230
100
Single
0.5
50 or 60 Hz
CEE 7/7 Schuko
Dark Brown
I2205CE-1B000-W2P15
230
100
Single
0.5
50 or 60 Hz
CEE 7/7 Schuko
Gray
I2205CE-1B000-W3P15
230
100
Single
0.5
50 or 60 Hz
CEE 7/7 Schuko
Light Brown
*No adjustments are required for 50Hz or 60Hz supply power frequency Baby Hard Tank is dual-frequency compatible
Important safety notice for domestic units:
CAUTION - Fire/electric shock risk. Replace USA NEMA 5-15 power cord with FETCO part No. 1063.00045.00 only.
Utility Specifications and Requirements
FETCO Baby Hard Tank IHT-2205
Water Requirements:
29-58 psig, (200-400kPa) 1½ gpm/(5.7 lpm) +/- 100ppm or 150TDS
Water inlet fitting: 3/8 inch push to connect.
Outlet fitting (drain): 1/2 inch push to connect
(By Weight) .
Coffee Dose Size: 10.6-11.3 oz
300-320 gram
(By Volume)
(≈3 to 3¼ cup)
(≈700 to 800ml)
Coffee grind parameter
Medium fine drip grind to fine espresso grind
Important! Use a reverse osmosis water supply that has a remineralizing cartridge for this equipment for optimal results.
Baby Hardtank has single water connection and one drainage connection:
Water inlet connection – Push-to-fit 3/8” for drinks production and flushing. Drainage connection – Push-to-fit 1/2".
Infusion Cold Brew SKU Number Identification Key
Product Line
Level Family Region ID Phase Voltage Range
# Heaters
Individual
Heater Wattage
Veneer Color Body Color Power Cord
I
2
2
0
5
U
S
1
A
0
0
0
W
1
P
1
1
I= Infusion
22=Next
Generation
Baby Hard
Tank - 05
US =United
States
A = 100-120
(This area is not active for
Baby Hard Tank)
W1 =Dark Brown
(Rich Mocha Zebra Wood)
3M Di-NOC FW-1134
SS = Stainless Steel
1= NEMA 5-15P
Std. Hard
Tank - 20
IN =
International
B = 200-240
W2 = Gray.
(Pine/Larch Wood)
3M Di-NOC FW-1970
P1 = Powder Coat
Black
5=CEE 7/7
Schuko
CE = IEC
W3 = Light Brown
(Ash)
3M DI-NOC FW-1972
6=UK1-13P
KS=KSA
7= AUSTRALIAN
AS3112 (YP-35)
AU1-10P
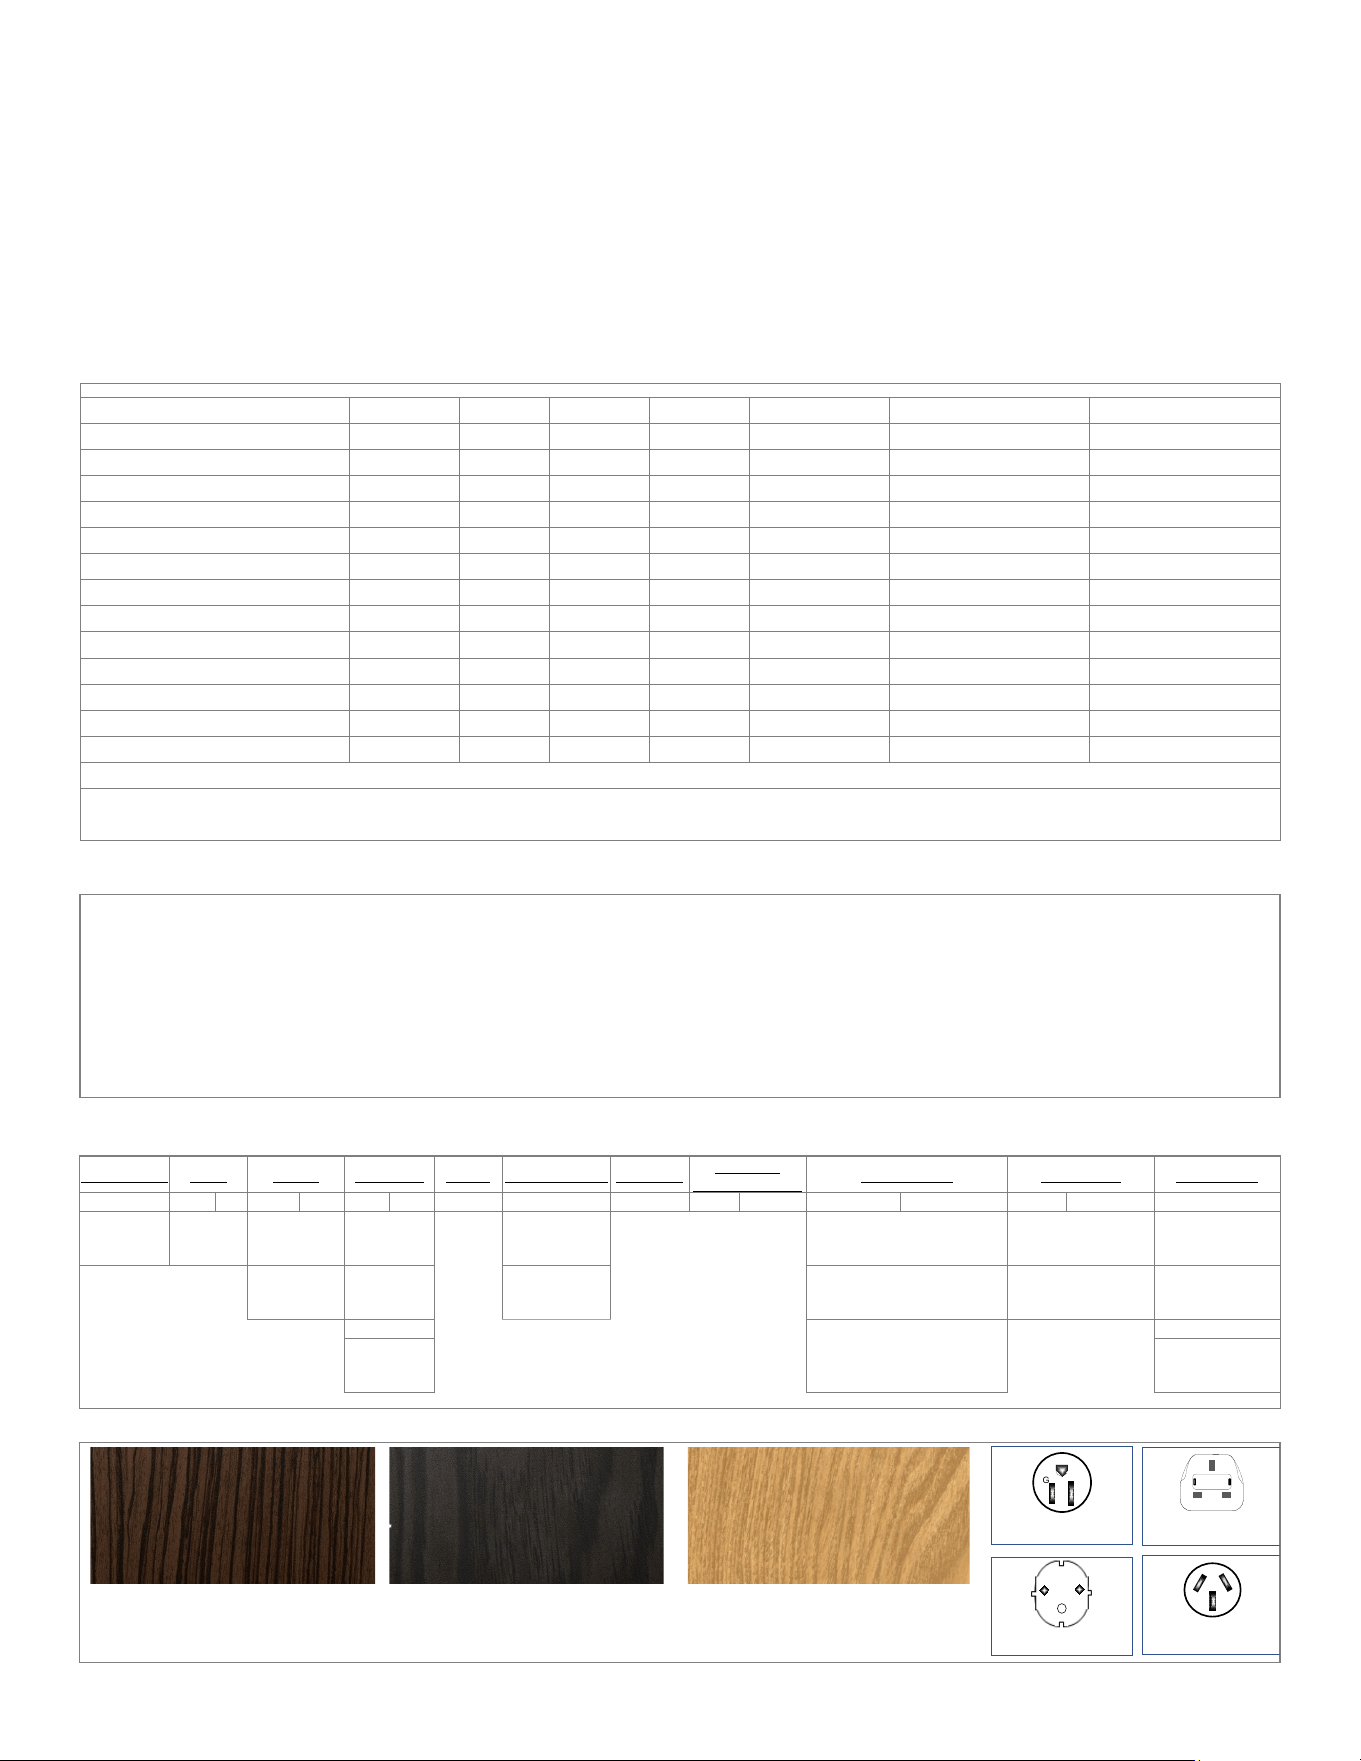
Veneer Color (Sample colors are from 3M and are approximate)
Power Cord-plug caps
Dark Brown (Mocha Zebra)
3M Architectural Code 3M Di-NOC FW-1134
Gray (Pine/Larch Wood)
3M Architectural Code 3M Di-NOC FW-1970
Light Brown (Ash)
3M Architectural Code 3M DI-NOC FW-1972
#6 Export Only 250V 13 A
BS 1363A UK
G
#1 NEMA 5-15P; 120 V
Plug Configuration
#5 Export Only 250V 16 A
“Schuko" CEE 7/7 PLUG
#7 Australian AS3112
(YP-35)Plug Configuration
Go to fetco.com for the latest versions of all information 3 P232 July 2024
Weights and Capacities
Total production time for cold brew
35 to 40 min-user adjustable
Flushing water consumption
3.2 gal 12 L
Total water for batch
1gal to 1.5gal (3.5 to 5.5 L)
Flushing cycle time
10 minutes
Finished batch size, delivered
0.8 gal to 1.3gal (3.0 to 5.0 L)
Sanitizing cycle water + Flushing
3.3 gal 12 L
Sanitation and flushing cycle time
10-12 minutes
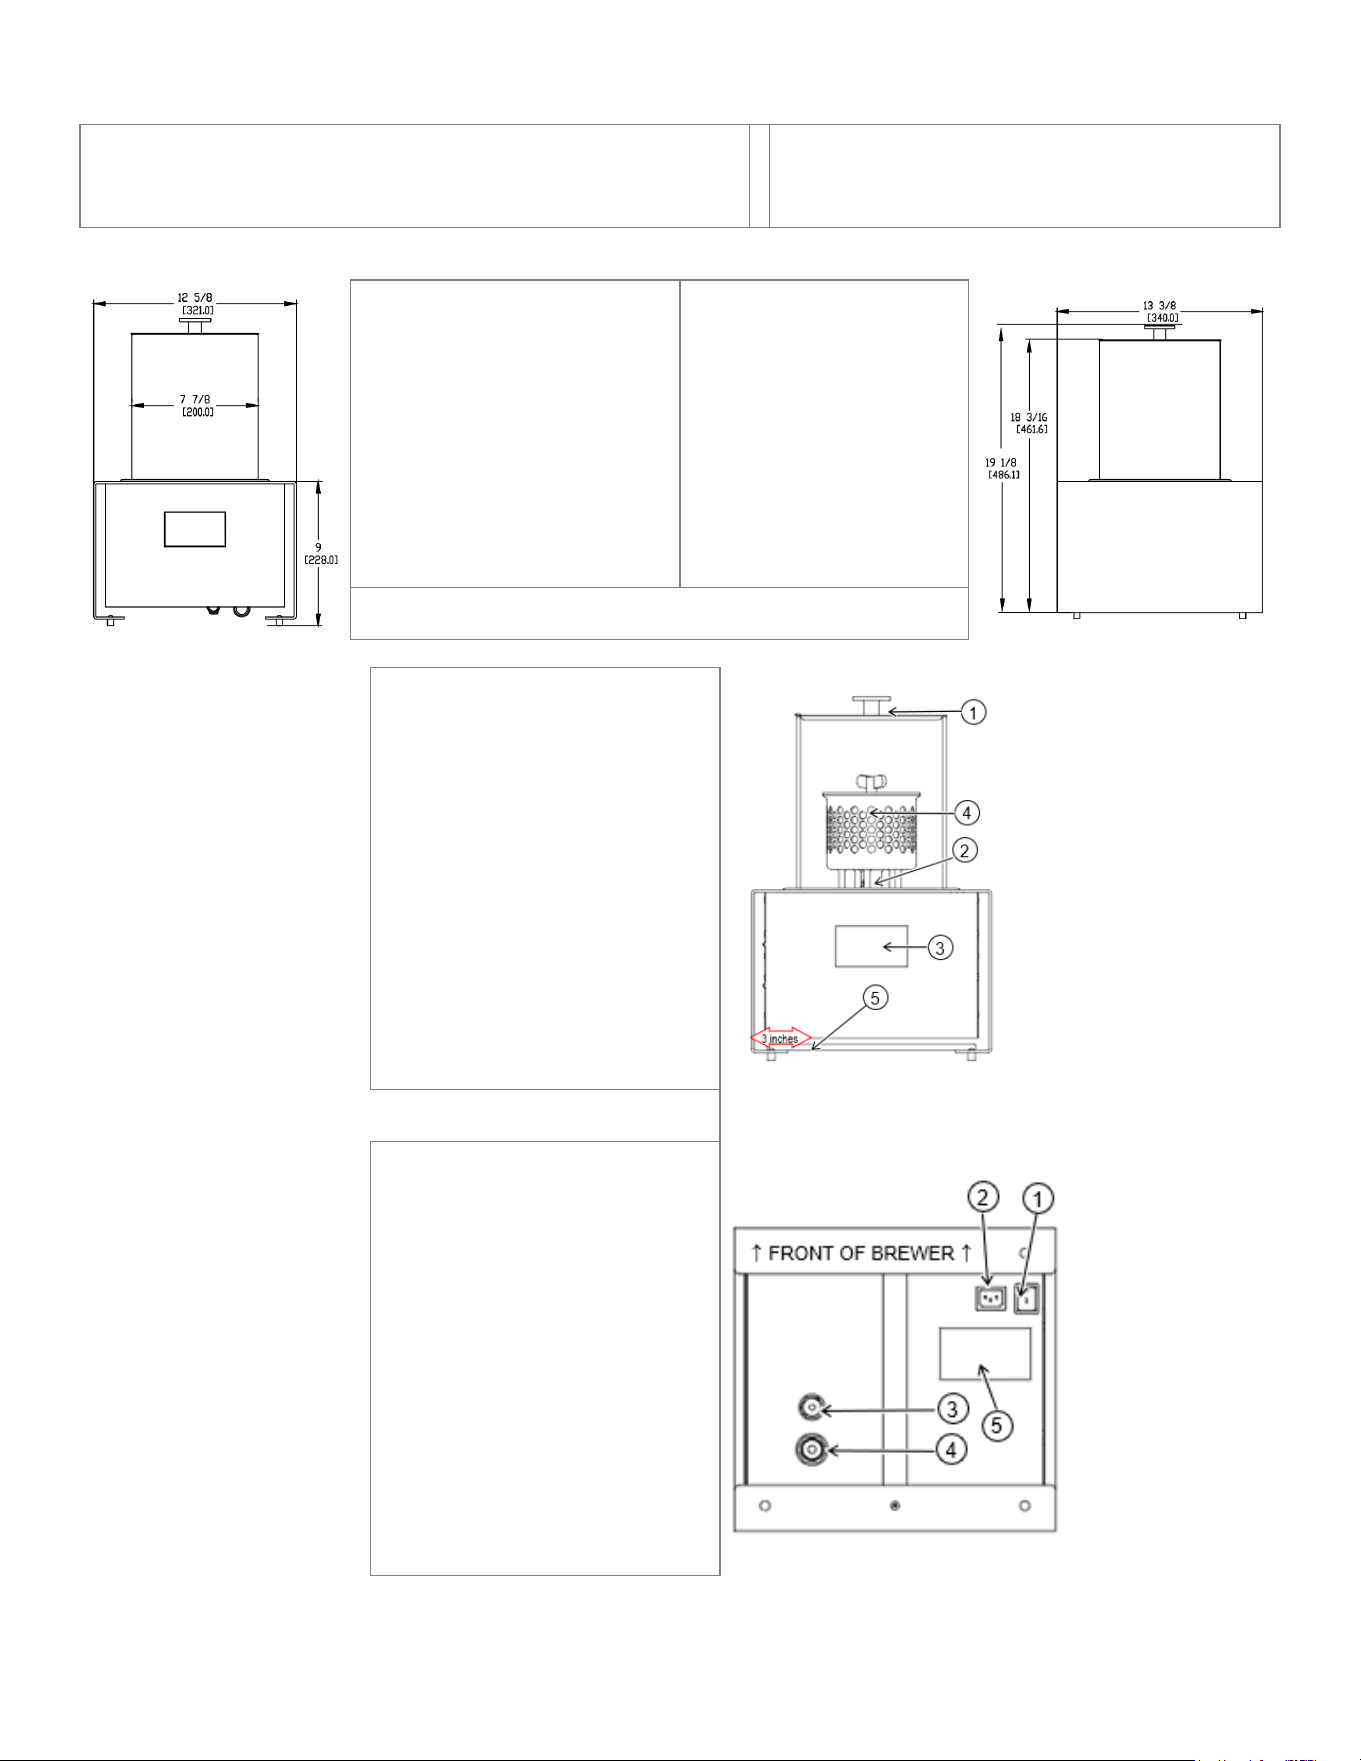
Front view
Side view
PRODUCT DIMENSIONS SHIPPING DIMENSIONS
Height: 19 3/8 inches 490mm Height: 25 inches 630 mm
Width: 13 3/8 inches 341mm Width: 18 inches 450mm
Depth:13 3/8 inches 340mm Depth:17 inches 430mm
Empty weight: 37.0 Lb/16.8kg Weight: 43 Lb/19.5kg
NOTE:
Allow minimum clearance of 32 in/813mm from counter for servicing production basket
FEATURES LAYOUT
FRONT OF THE HARD TANK
1) Tank Cover
2) Bayonet Handle Mandrel
3) Touch Display
4) Production Basket
5) ON/OFF switch
ON/OFF switch is located under
front panel, 3 inches from left side
(ON/OFF switch is located under front panel 3 inches from left)
FEATURES LAYOUT
BOTTOM OF THE HARD TANK
1) ON/OFF Switch
2) Power cord inlet connection
3) Push to connect water inlet
4) Push to connect outlet/drain
5) Serial number/SKU label
Go to fetco.com for the latest versions of all information 4 P232 July 2024
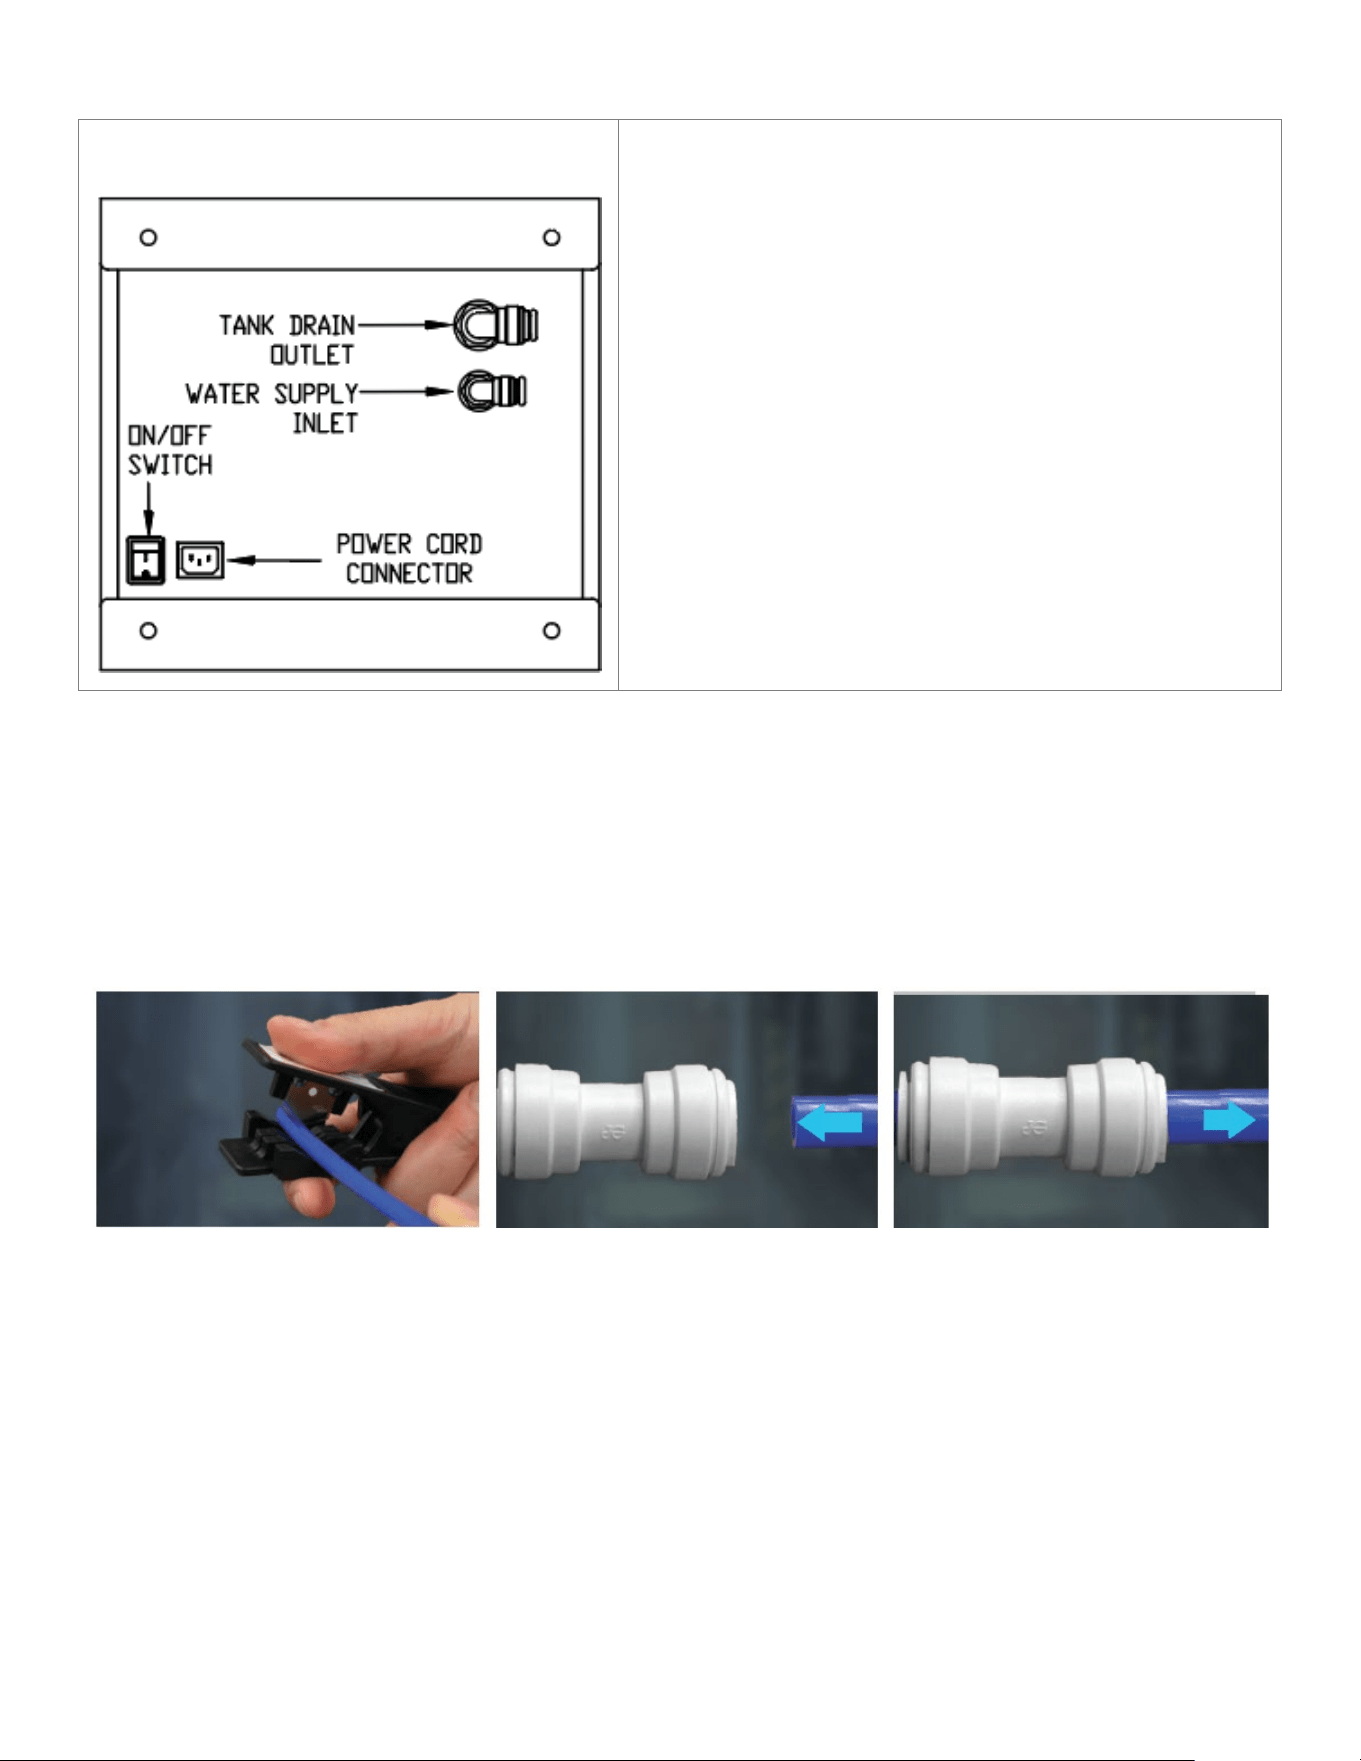
Utilities Layout (all are located at the bottom of the Baby Hard Tank)
(Illustration is the bottom of the Baby Hard Tank)
Unpack Baby Hard Tank.
Remove lid and production basket and set aside
Lay the Baby Hard Tank on its side or back. Support the
glass cylinder
The ON/OFF switch should be set to “OFF”
Install the power cord into the connector
Install the 1/2” outer diameter (OD) into the Tank Drain
Outlet (see illustration below)
Install the 3/8” outer diameter (OD) into the water supply
inlet (see illustration below)
Reposition the Baby Hard Tank to upright
Replace production basket and lid
Connect water supply line to filtered water supply and turn
water on and check for leaks
Plug power cord into an outletReady to go!
Push-To-Connect Water Fittings
Baby Hard Tank fast cold beverage maker (BHT) uses push-to-connect fittings for water inlet and product outlet (drain).
Factory specification for the two sizes are 3/8” OD by ¼” ID with a 0.062 wall and 1/2" OD 3/8" ID with a 0.062 wall
Proper installation of push to connect tubing.
Use LLDPE (linear low density polyethylene) or similar smooth tubing. Use heavy wall tubing. 0.062” wall or more
Tubing for pressurized water supply should be new and must be clean without dents or blemishes on the outer surface.
Cut the tube square and
remove any burrs or score marks.
Cut the tube square and
remove any burrs or score marks.
Tug the tube to check that it is secure.
Always test the system before use.

Go to fetco.com for the latest versions of all information 5 P232 July 2024
Installation Instructions
(For Qualified Service Technicians Only)
Unpack the device
1. Unpack Baby Hard Tank before starting installation of the device.
2. Remove the cardboard with accessories.
3. Remove the connection cables and the drink production basket and set them aside.
4. Remove the device and the film cover.
Position the device
Provide the following:
1. Supply water installation with reverse osmosis water filtration system and remineralization cartridge.
2. Drain access receiving vessel or carboy for drainage.
3. Single-phase cord and plug electrical installation ~100-120Vac or ~200-240Vac (50 or 60Hz)
4. A stable, levelled and vibration-free surface, e.g., a tabletop.
Electrical:
1. All equipment requires an electrical ground wire. Installation without grounding is dangerous.
2. Verify voltages, amperages, and cord and plug type before attaching equipment (check label on bottom).
3. The installation must comply with all applicable federal, state, and local codes at your location.
Plumbing:
1. Verify that the water line supply will provide a flow rate of at least 1½ gpm/(5.7lpm) per minute and the
water pressure is between 20-75 psig (138-517kPa) before making any connections.
2. See the push to connect illustration for the factory inlet and drain fittings to attach tubing to the equipment.
3. The suppled supply line fitting is a 3/8” push to connect the drain is ½” push to connect.
4. Connect the Baby Hard tank to a reverse osmosis system. A post-RO remineralizer is preferred.
. Total water mineralization +/- 100ppm or 150TDS
6. The water line and newly
installed reverse osmosis system must be flushed thoroughly prior to connecting
it to the brewer to prevent debris from contaminating the machine.
After flushing the inlet line, install the inlet and outlet tubes as shown in the illustration.
7. North America: All installations must comply with applicable federal, state, or local plumbing codes.
8. All Others: The water and waste piping and connections shall comply with the International Plumbing
Code, International Code Council (ICC), or to the Uniform Plumbing Code (IAPMO).
9. Install a backflow prevention device. Most municipalities require a recognized backflow preventer.
Usable on all hot beverage and cold beverage equipment is a WATTS® SD-2 or SD-3.
WATTS spring loaded double check valve models are accepted by most zoning authorities.
!The check valve should be as close to the water supply inlet of the beverage equipment as possible...
Go to fetco.com for the latest versions of all information 6 P232 July 2024
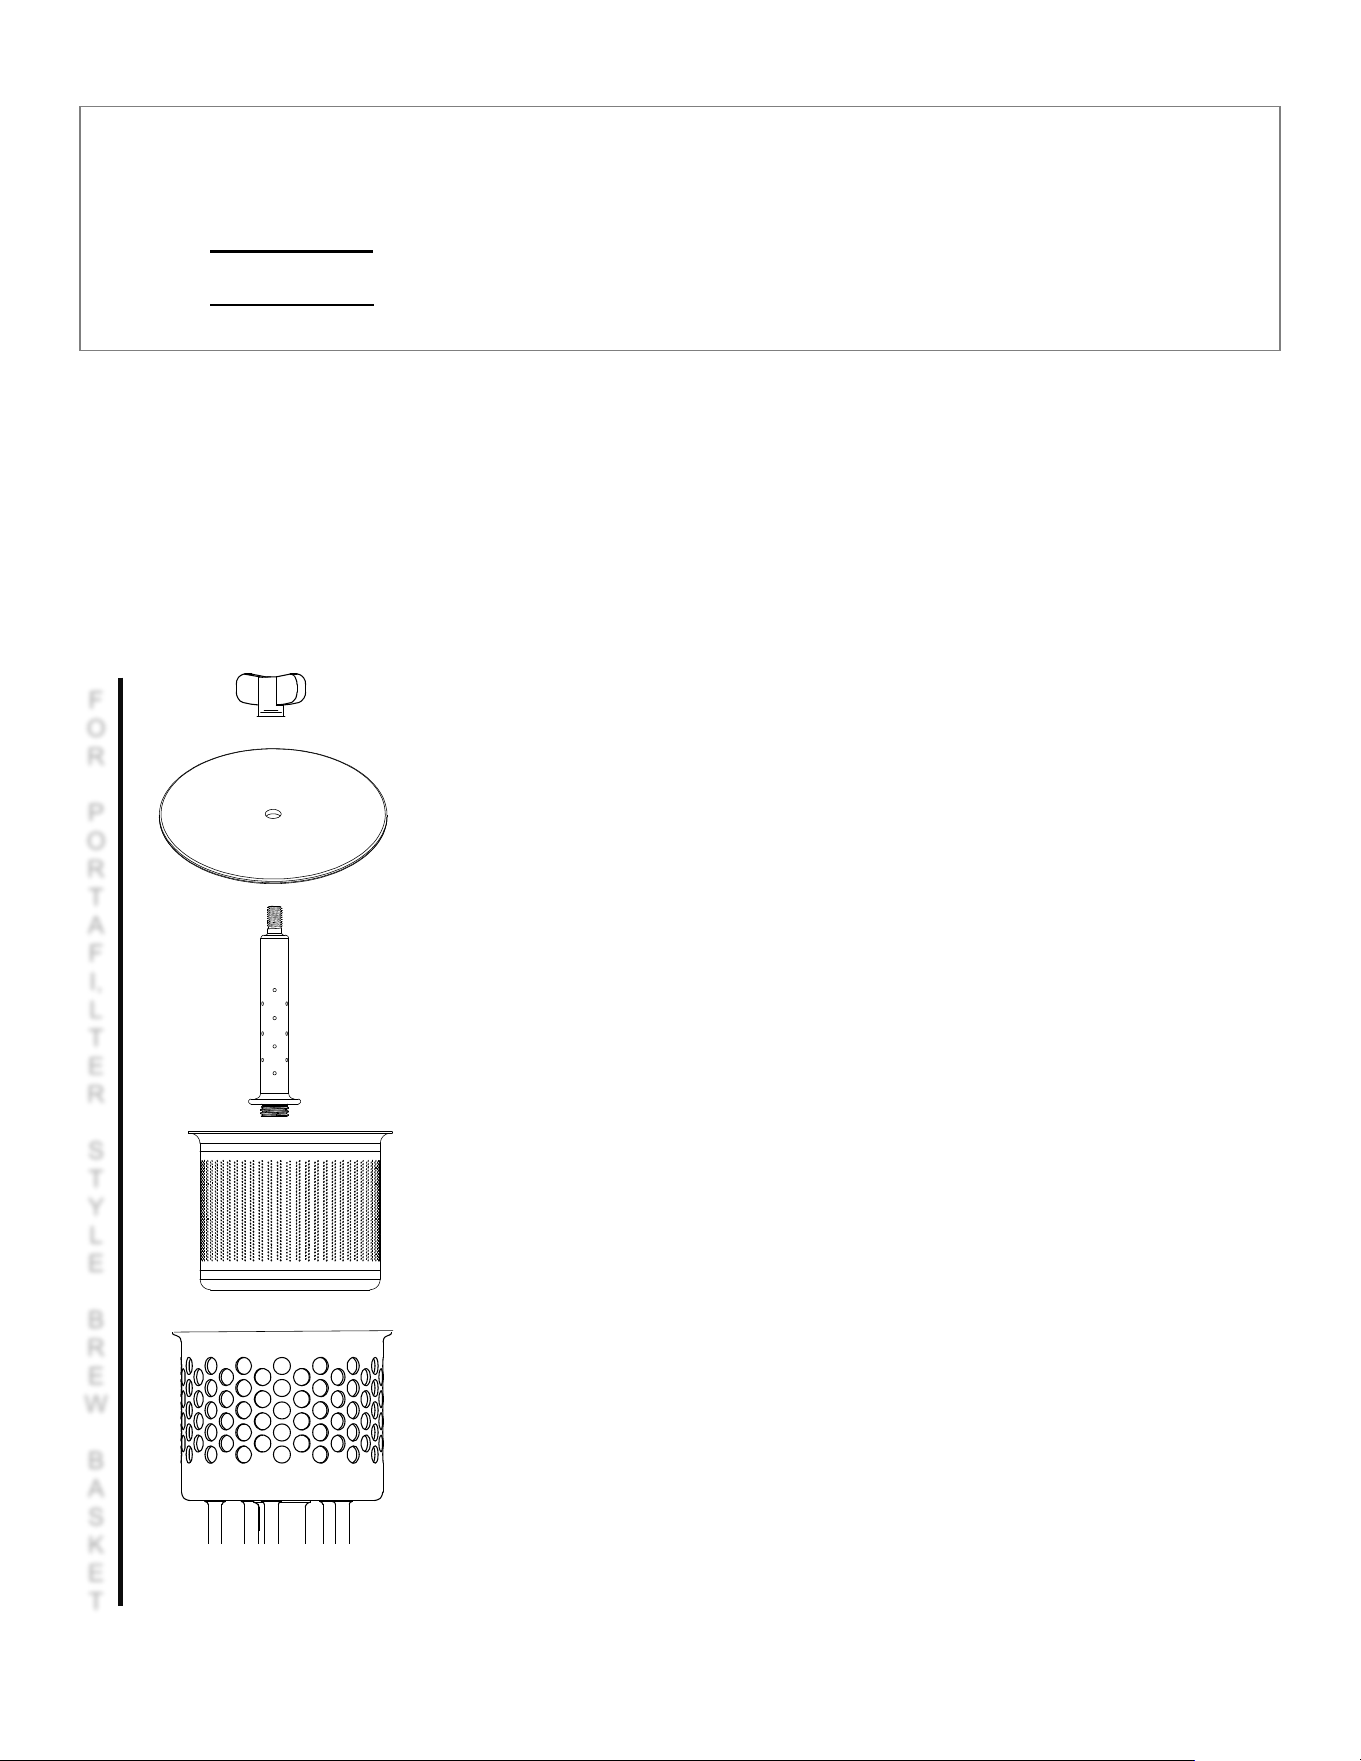
There are two types of Baby Hard Tank production baskets:
Determine which type is supplied with your Baby Hard Tank fast cold beverage maker
Non-mesh (portafilter type-round holes) Described below & next page
Mesh type (with wire mesh-square openings). Described pages 6 & 7
COLD BREW PRODUCTION (page 1 of 2)
For Portafilter (non-mesh) Production basket version
Step 1. Open the water installation valve that supplies the device
Step 2. Wash and conduct sanitation for the installation, the tank and the basket, if you have not done it yet.
Step 3. Prepare a clean receiving dispenser or keg for the finished cold brew.
Step 4. Connect the receiving dispenser or keg to the device. Open the valve on the vessels cover.
ASSEMBLY INSTRUCTIONS
Step 5. Prepare the unfolded production basket.
Step 6. Line up the basket elements as shown
Step 7. Screw the assembled element into the threaded sleeve
of the basket’s bayonet handle.
F
O
R
P
O
R
T
A
F
I,
L
T
E
R
S
T
Y
L
E
B
R
E
W
B
A
S
K
E
T
Go to fetco.com for the latest versions of all information 7 P232 July 2024
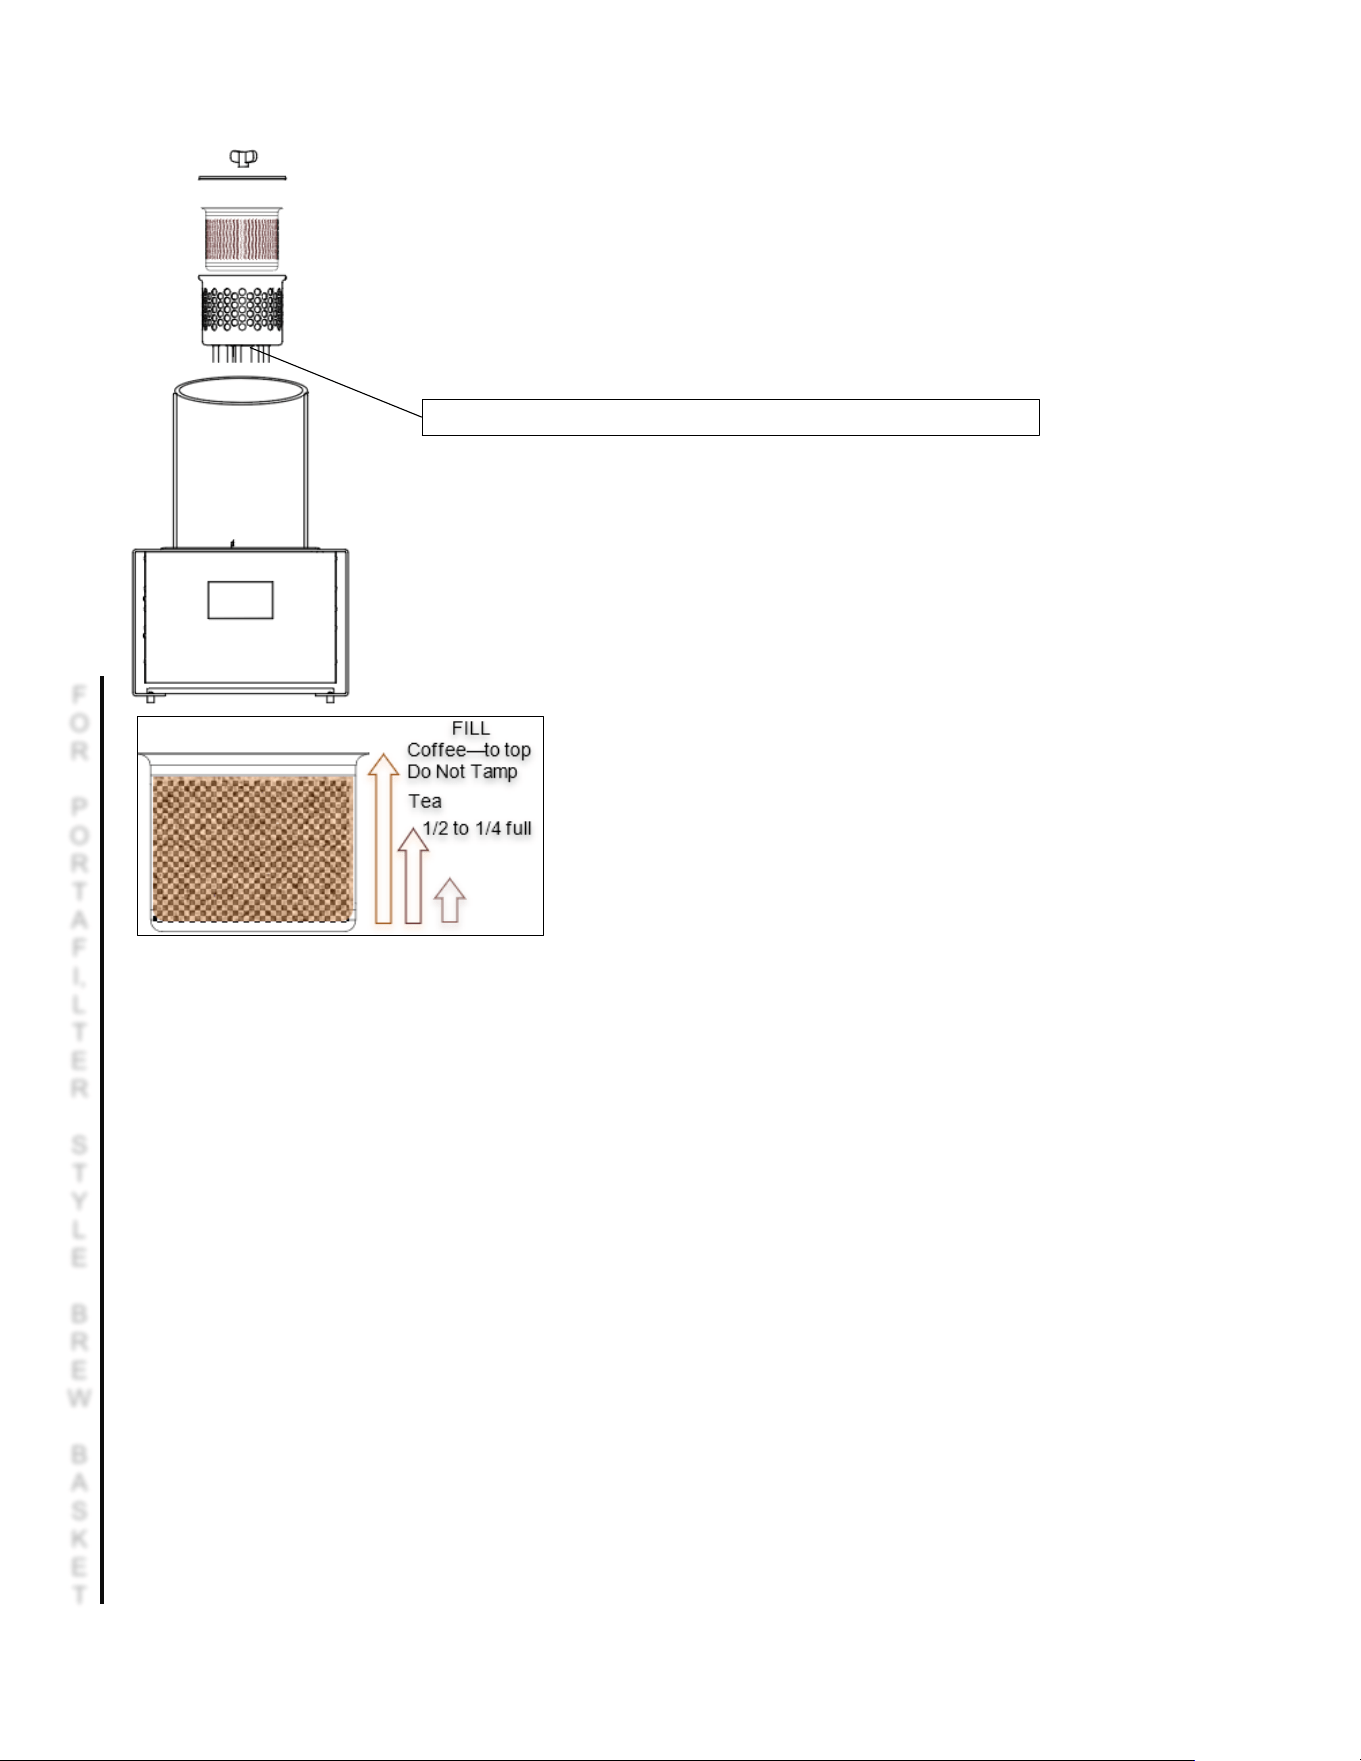
For Portafilter (non-mesh) Production basket version
COLD BREW PRODUCTION (page 2 of 2)
Step 8. Prepare ground coffee/tea/cascara/other dried product.
The grind size of the coffee should be approx. 0.45 to 0.6mm
(Fine espresso grind)
Step 9. Pour the prepared ground coffee/tea/cascara*/other dried product into the
basket. Gently shake the basket or level the contents using a spoon so that it does not
extend beyond the edges of the basket.
!!! The level of the charge must not exceed the height of the ring located at the end of the
vertical nozzle (the upper part).
Step 10. Close the basket with the cover and screw the wing nut.
Step 11. Remove the tank cover.
Step 12. Position the basket containing coffee/tea/cascara/other dried product on the
tank’s mandrel. The basket will drop deeper. Gently lift the basket. If it cannot be
removed, it means that the basket is positioned properly and secured against falling off
the bayonet handle.
If the basket lifts on the mandrel-it is not positioned correctly.
Repeat its positioning from the beginning.
Note
Coffee must be filled to the top of the basket
and covering all the perforations—do not tamp.
Tea 1/2 to 1/4 full
Step 13. Activate the device if it has not been activated yet.
Step 14. Press the [PROGRAM] button. If your drink is based on coffee, go to Step 15A.
In case of tea or another dried product – 15B.
Step 15A. In the [MODE] field, select [COFFEE].
[6]
Step 15B. In the [MODE] field, select [OTHER]. Then, in the [CAPACITY] field, select the required amount of water.
Step 16. In the [DURATION] field, select the drink extraction time.
[4]
Step 17. In the [DRAIN] field, select the mode of pumping of the finished drink.
[5]
[AUTO] – the drink will be pumped automatically upon completion of extraction.
[MANUAL] – the drink will not be poured without confirmation by the user.
Step 18. Press the [LOAD PROGRAM] button. The summary of the selected mode will be displayed.
At this stage, you may accept the recipe by clicking the middle [PLAY] button or return to settings by pressing [X].
Step 19. After pressing the [PLAY] button, the tank will be filled with water, and then the extraction process will start.
Step 20. If you have chosen the [DRAIN
– AUTO] mode, go to Step 21A.
In case of the [DRAIN – MANUAL] mode – 21B.
Step 21A. After the production time expires, the drink will be automatically pumped into the keg
.
IF MANUAL PUMP Screen will show notification to start pump.
Step 21B. After the extraction time expires, the [PROGRAM FINISHED!] message will be displayed.
Lift the cover of the tank and take a sample of the drink to assess it.
If the drink is fine, press [X] and accept to pump the drink to the keg.
If the production process must be extended, select the appropriate time on the touch display and press [PLAY].
*Cascara is also known as coffee cherry tea or “Qishr”. It is made of the dried skins of coffee cherries.
The brewed product does not taste like coffee.
Cascara contains ¼ to ⅛ the caffeine of brewed coffee-more similar to green tea
Mandrel of the bayonet handle used to position the production basket with coffee.
F
O
R
P
O
R
T
A
F
I,
L
T
E
R
S
T
Y
L
E
B
R
E
W
B
A
S
K
E
T
Go to fetco.com for the latest versions of all information 8 P232 July 2024
COLD BREW PRODUCTION (page 1 of 2)
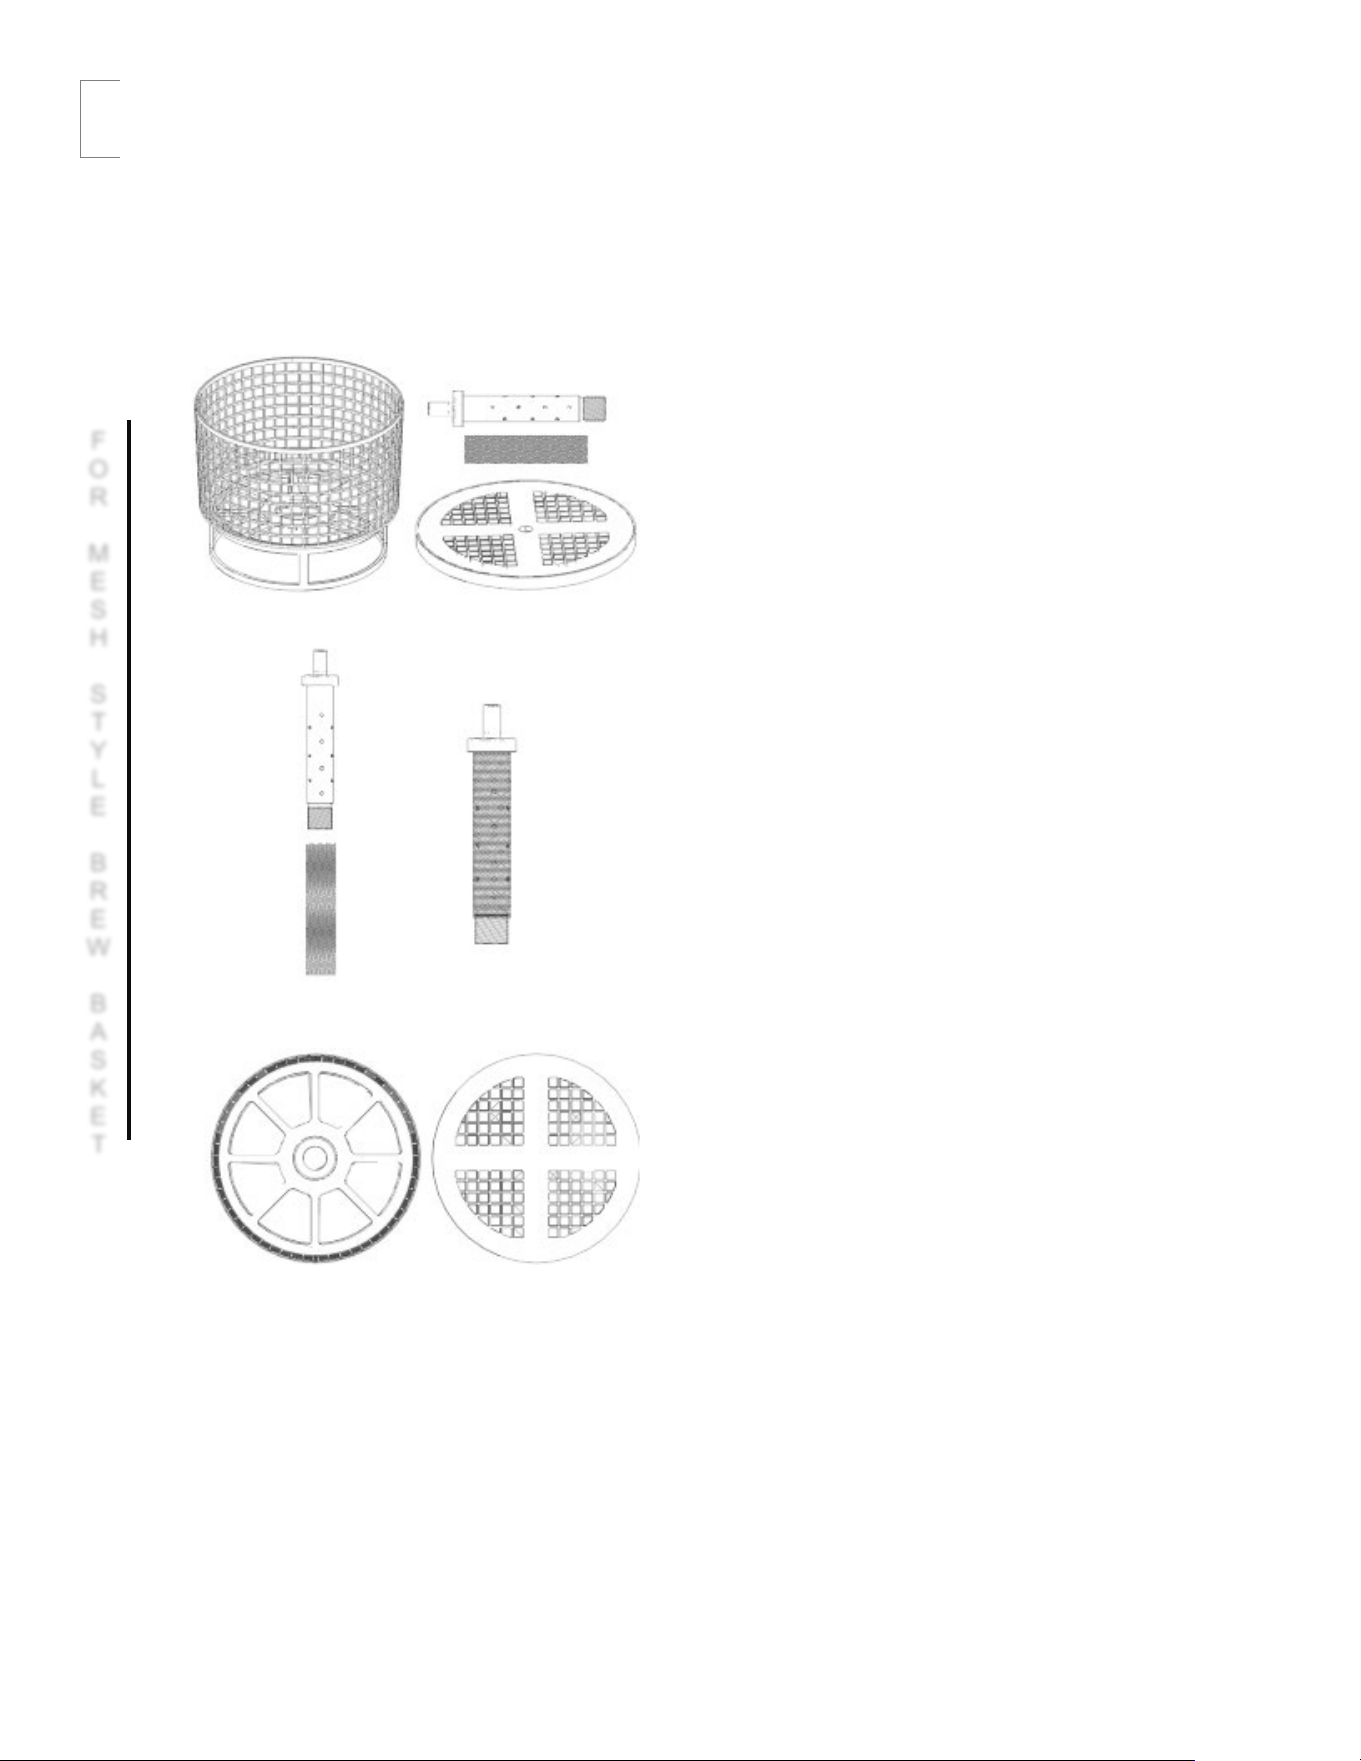
For mesh-type production basket version
Step 1. Open the water installation valve that supplies the device
Step 2. Wash and conduct sanitation for the installation, the tank and the basket, if you have not done it yet.
Step 3. Prepare a clean receiving vessel or keg for the finished cold brew.
Step 4. Connect the receiving vessel or keg to the device. Open the valve on the vessels cover.
Step 5. Prepare the unfolded production basket.
Step 6. Insert the head with nozzles into the mesh
sleeve.
Step 7. Screw the assembled element into the threaded
sleeve of the basket’s bayonet handle.
F
O
R
M
E
S
H
S
T
Y
L
E
B
R
E
W
B
A
S
K
E
T
Go to fetco.com for the latest versions of all information 9 P232 July 2024
COLD BREW PRODUCTION (page 2 of 2)
For mesh-type production basket version
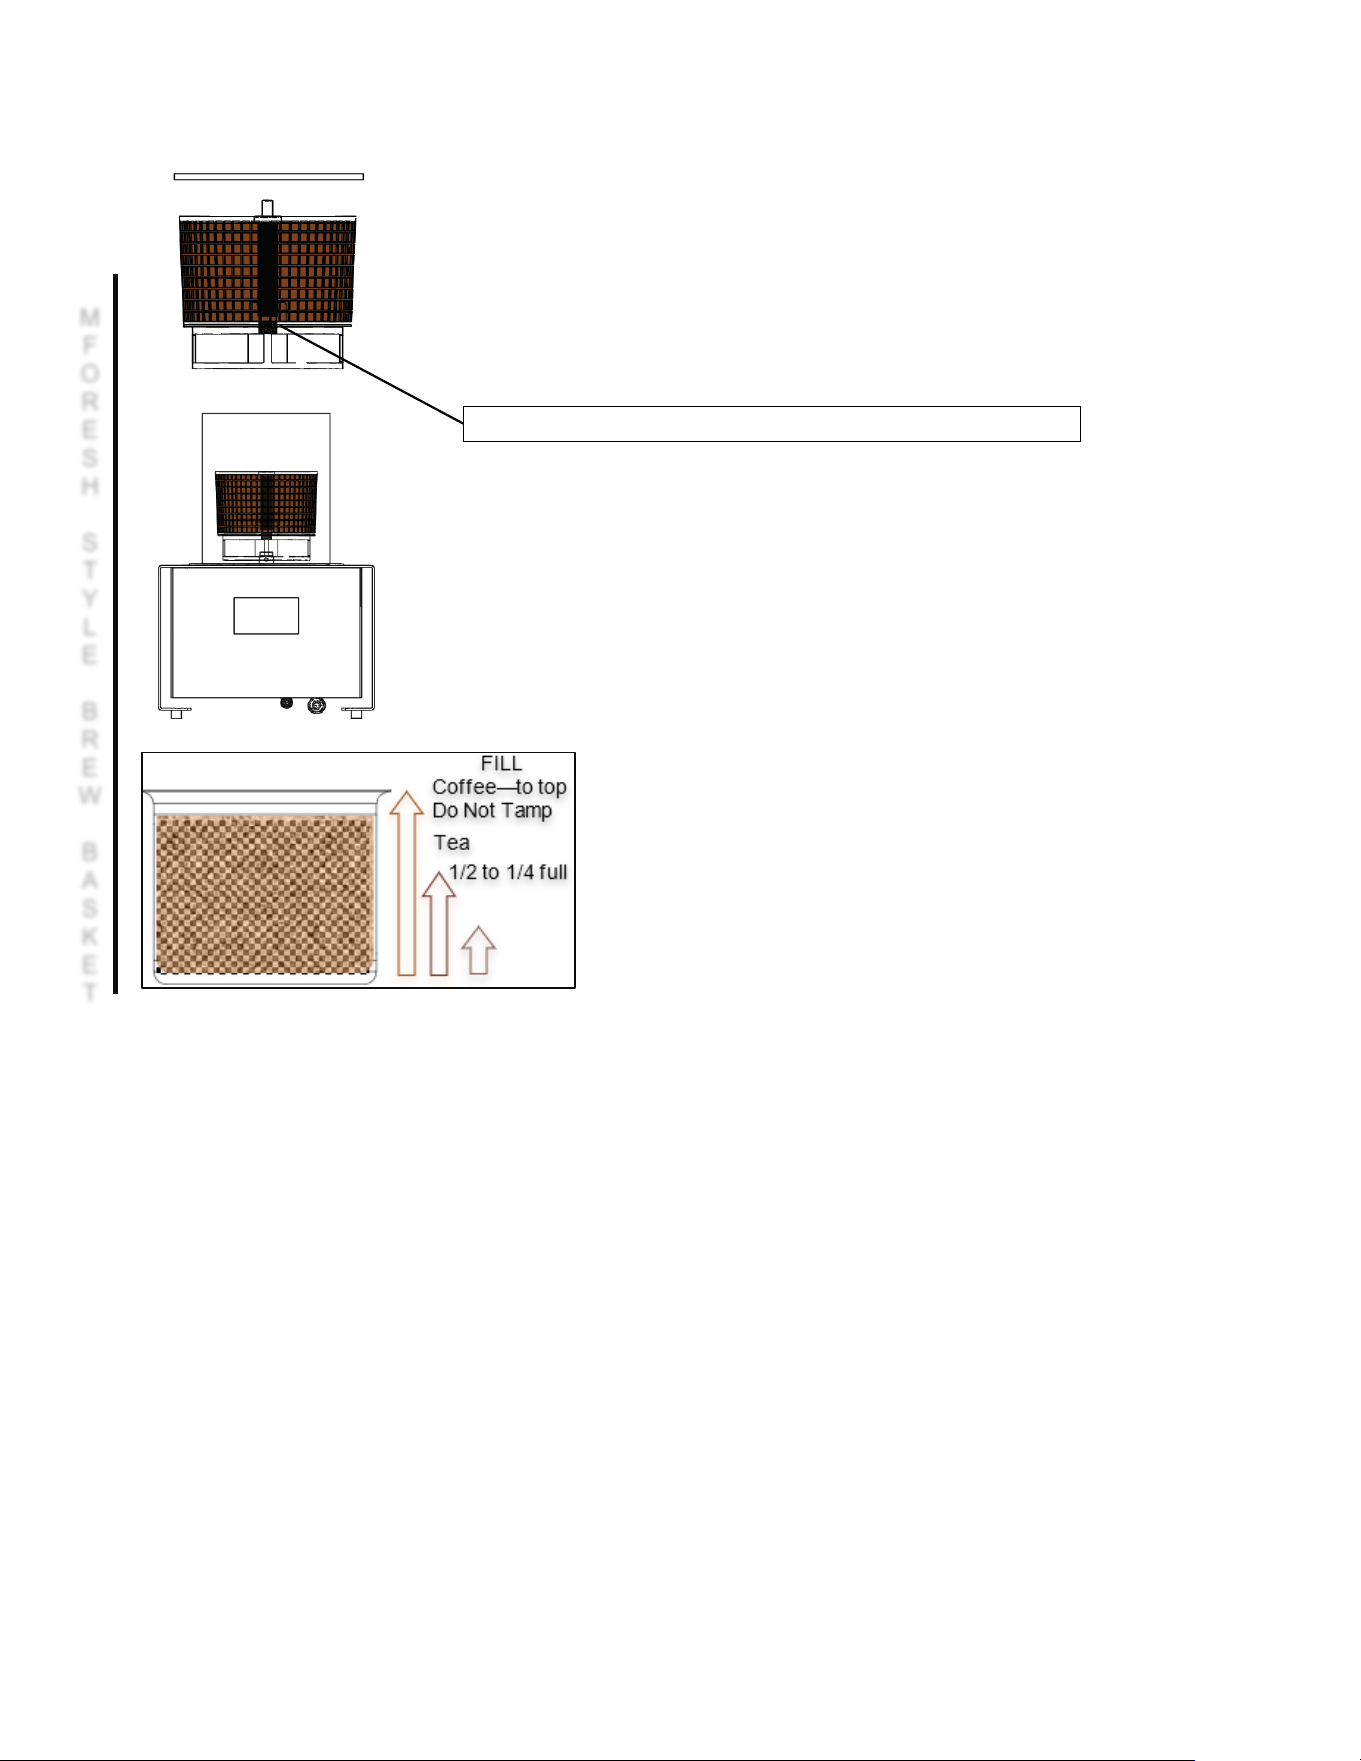
Step 8. Prepare ground coffee/tea/cascara/other dried product.
The grind size of the coffee should be approx. 0.45 to 0.6mm
(Fine espresso grind)
Step 9. Pour the prepared ground coffee/tea/cascara*/other dried product into the
basket. Gently shake the basket or level the contents using a spoon so that it does
not extend beyond the edges of the basket.
!!! The level of the charge must not exceed the height of the ring located at the end
of the vertical nozzle (the upper part).
Step 10. Close the basket with the cover and screw the wing nut.
Step 11. Remove the tank cover.
Step 12. Position the basket containing coffee/tea/cascara/other dried product on
the tank’s mandrel. The basket will drop deeper. Gently lift the basket. If it cannot
be removed, it means that the basket is positioned properly and secured against
falling off the bayonet handle. If have managed to remove the basket, repeat its
positioning from the beginning.
Note
Coffee must be filled to the top of the basket
and covering all the perforations—do not tamp.
Coffee Dose Range:
10.6-11.3 oz 300-320 gram
Note-DO NOT TAMP
Step 13. Activate the device if it has not been activated yet.
Step 14. Press the [PROGRAM] button. If your drink is based on coffee, go to Step 15A.
In case of tea or another dried product – 15B.
Step 15A. In the [MODE] field, select [COFFEE].
Step 15B. In the [MODE] field, select [OTHER]. Then, in the [CAPACITY] field, select the required amount of water.
Step 16. In the [DURATION] field, select the drink extraction time.
Step 17. In the [DRAIN] field, select the mode of pumping of the finished drink.
[AUTO] – the drink will be pumped out automatically upon completion of extraction. [MANUAL] – the drink will not be
poured without confirmation by the user.
Step 18. Press the [LOAD PROGRAM] button. The summary of the selected mode will be displayed.
At this stage, you may accept the recipe by pressing the middle [PLAY] button or return to settings by pressing [X].
Step 19. After pressing the [PLAY] button, the tank will be filled with water, and then the extraction process will start.
Step 20. If you have chosen the [DRAIN – AUTO] mode, go to Step 21A.
In case of the [DRAIN – MANUAL] mode – 21B.
Step 21A. After the production time expires, the drink will be automatically pumped into the keg.
Step 21B. After the extraction time expires, the [PROGRAM FINISHED!] message will be displayed.
Lift the cover of the tank and take a sample of the drink to assess it.
If the drink is fine, press [X] and accept to pump the drink to the keg.
If the production process must be extended, select the appropriate time on the touch display and press the enter button.
*Cascara is also known as coffee cherry tea or “Qishr”. It is made of the dried skins of coffee cherries.
The brewed product does not taste like coffee. It contains ¼ to ⅛ the caffeine of brewed coffee
-more similar to green tea.
Mandrel of the bayonet handle used to position the production basket with coffee.
M
F
O
R
E
S
H
S
T
Y
L
E
B
R
E
W
B
A
S
K
E
T

Go to fetco.com for the latest versions of all information 10 P232 July 2024
!!! Do not use metal or wooden tools to clean the basket and the cover. This may damage the basket and fittings.
Step 1. Cleaning of the production basket. Loosen the wing nut and remove the cover of the basket.
Step 2. Turn the basket upside down over a waste bin and shake it.
Coffee/tea/cascara contained within should fall out. Carefully remove the remains
in a way to not damage the basket.
Step 3. Remove the head with nozzles from the basket.
Step 4. Thoroughly clean all parts of the basket to remove the remains of coffee/tea/cascara.
Pay special attention to the openings in the head.
Ports must be clean, unobstructed and free from remains of coffee/tea/cascara.
Step 5. Put clean basket parts aside.
Step 6. Install the cleaning nozzle.
Step 7. Activate the [WASH] program.
Step 8. At the end of a working day, activate the [SANIT] program.
Step 9. After shutting down the device, disconnect it from the power and water supply.
. Remarks regarding use
-
When filling the basket with coffee, closing the basket’s cover and putting the basket into the tank, use latex gloves.
-
Do not grind coffee directly into the basket. This will charge the basket with static electricity, thus negatively impacting
production of cold brew.
-
Do not use alcohol of concentration exceeding 60% as this will damage the sealing elements.
-
Pay special attention when mounting the basket on the bayonet handle in the tank to prevent the basket from sliding off.
If the basket slides out of the sleeve, water will stop flowing through the basket, and the extraction will be affected.
Sanitizing Solution
Directions to prepare cleaning and disinfecting agents for the Baby Hard Tank disinfecting
Cleaner concentrate
Required dosage of cleaner
To make two liters of cleaning solution for two cleanings
Urnex Com ple te Caf é (Q uat)
30 ML/ 1 o unc es p er c lea ning
60 ML/ 2 o unc es i n tw o q uar ts/li ter s of wat er
Urnex Rinza (Quat)
240 ML/8 ounces per cleaning
480 ML/16 ounces in two quarts/liters of water
In accordance with the chart above, measure the amount of the cleaner concentrate for two cleanings.
Then, in a separate vessel mix two quarts/liters of water with previously prepared agent.
Add one half of the diluted cleaning agent (one quart/liter) to hard tank for each of the two cycles.
Water temperature for optimal disinfecting: 86-105 F or 30-40 C
!!! Do not pour concentrated agent directly into the device. Prepare the cleaning solution in a separate vessel
Chemical agents are used to clean the device. Before using any chemical, read the product data sheet
NOTE:
Do not use any other type of cleaner for the Hard Tank. Never use any chlorine containing cleaners with Hard Tank.
DANGER
Go to fetco.com for the latest versions of all information 11 P232 July 2024
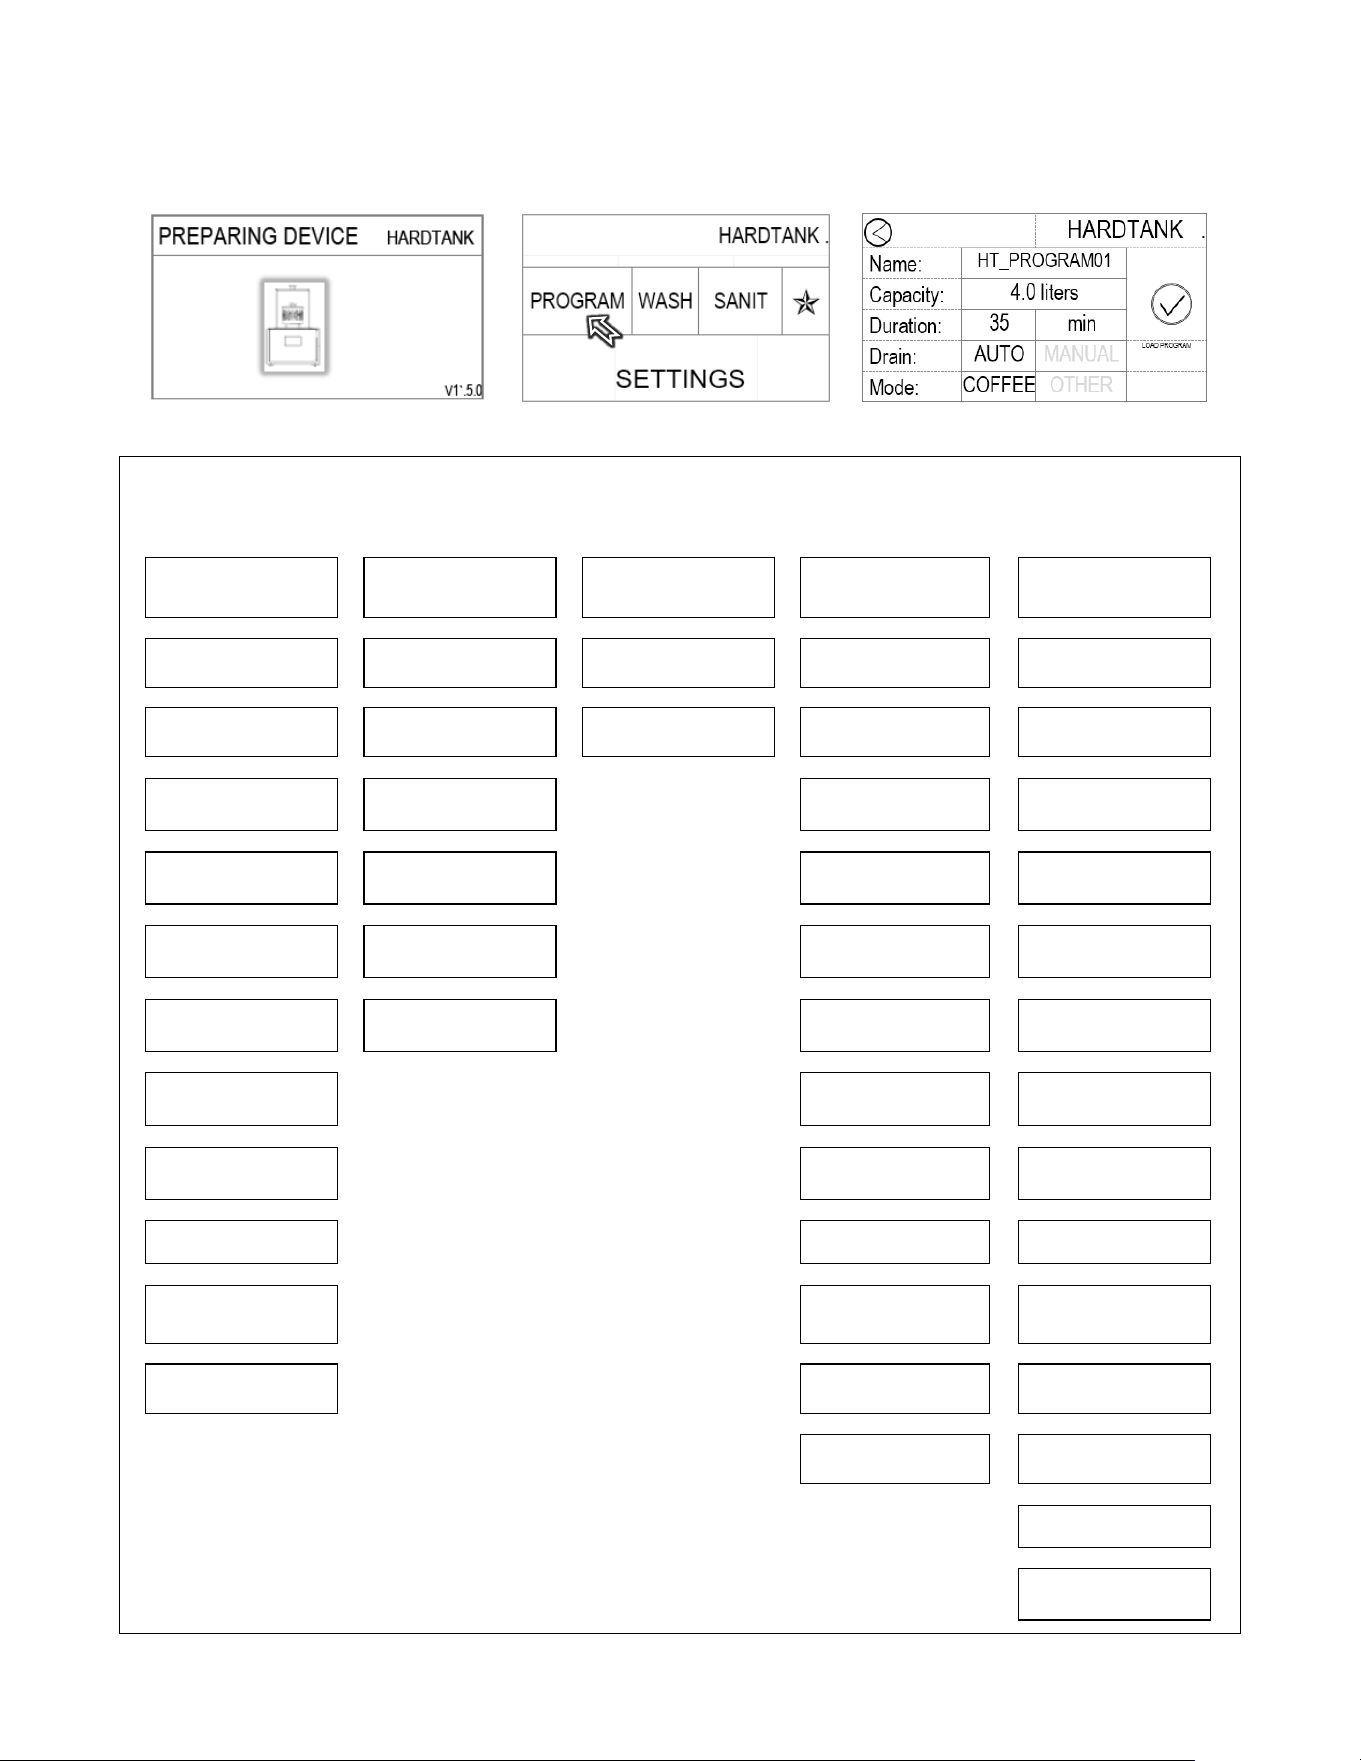
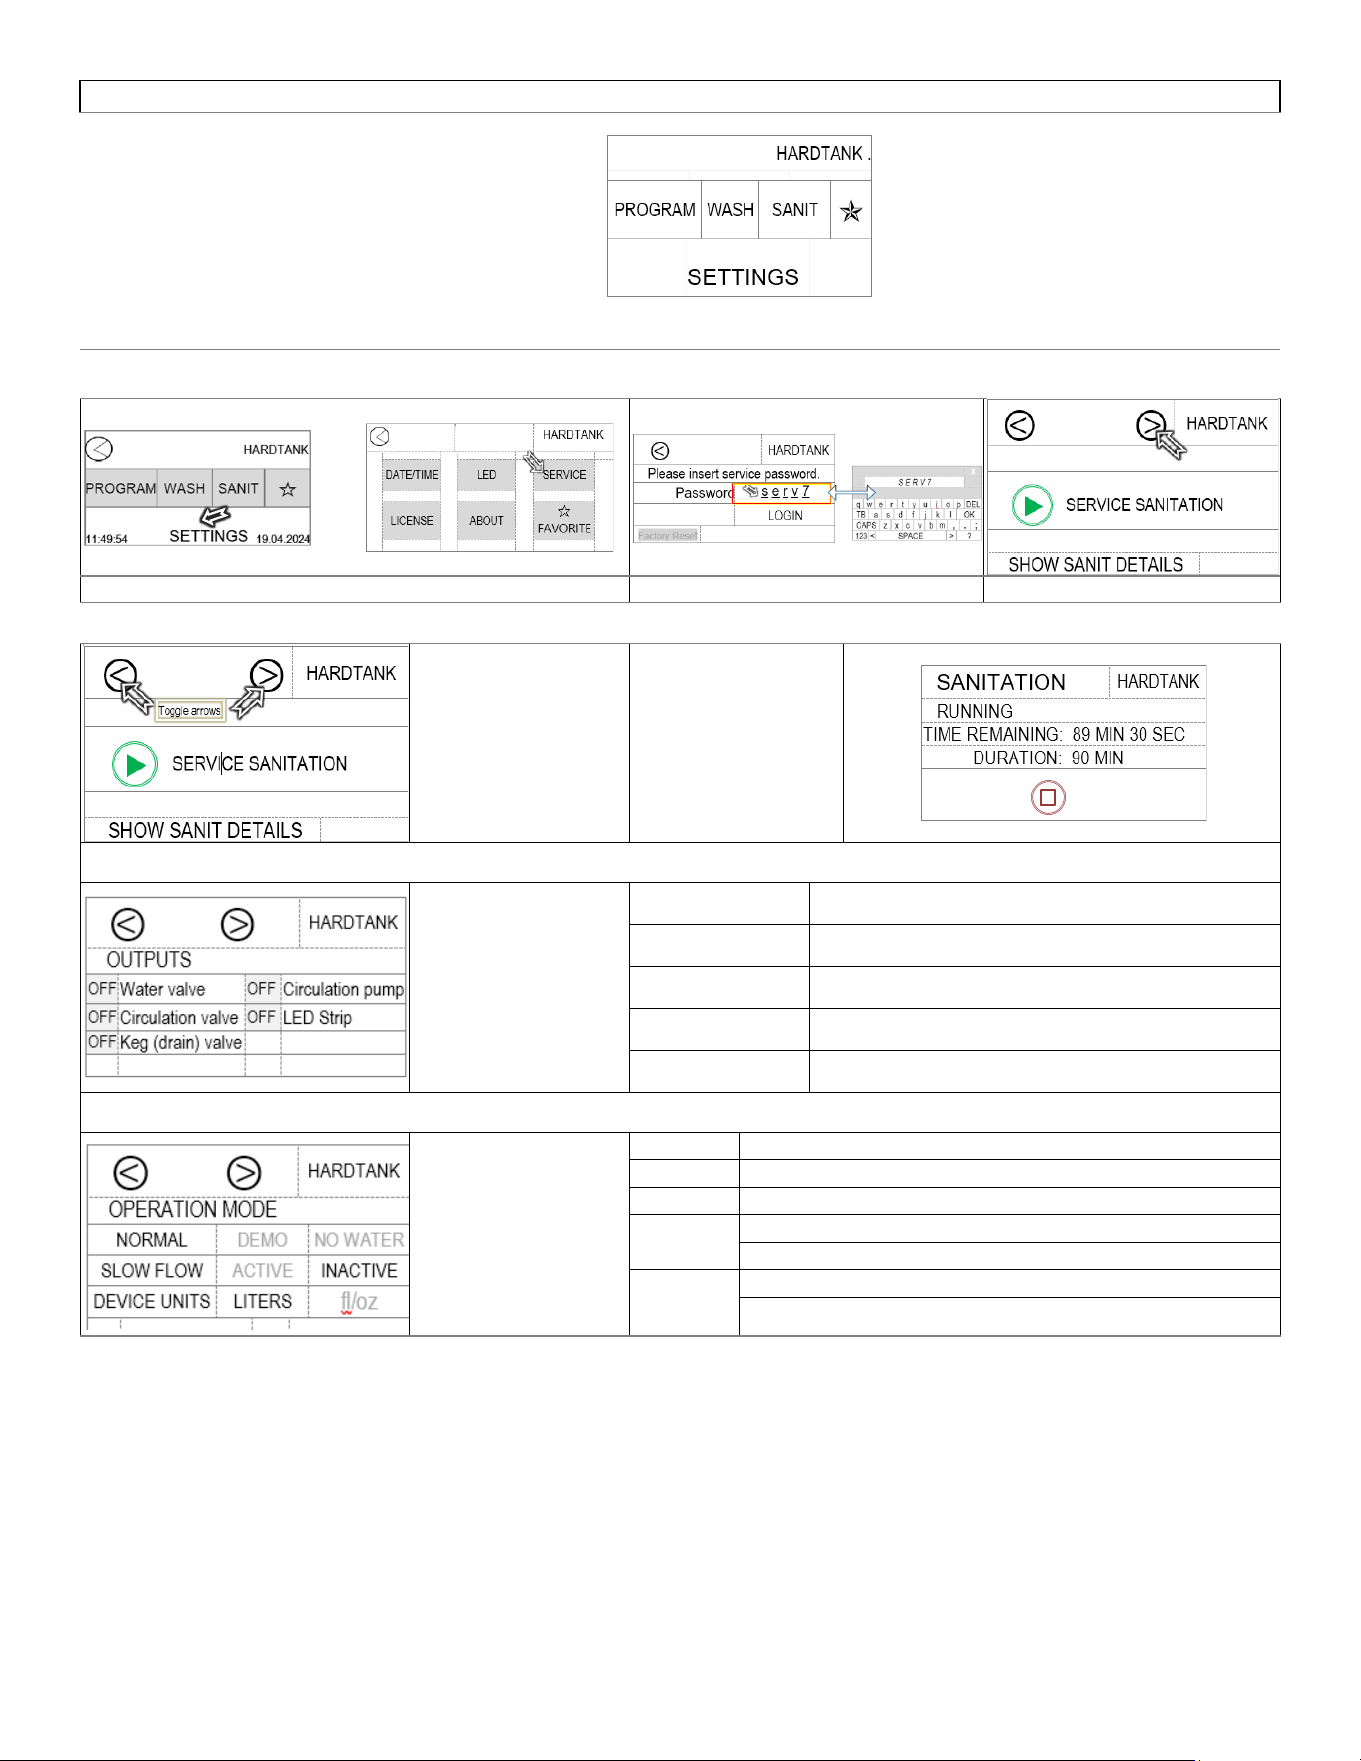
The Baby Hard Tank utilizes an Interactive Touchscreen Navigation system for its operation. This system allows
the user to easily interact with the unit and make it simple to access and adjust various operating parameters
through intuitive, editable fields. This touch interface ensures a user-friendly experience, enabling precise control
and customization of the unit’s functions.
Below are example screens that demonstrate how to access the PROGRAMMING mode.
Initialization: Waiting 30-60 seconds
First Screen – Menu layout settings below
Program Screen (after activating PROGRAM)
Programing Menu Layout
Below is the menu tree, which illustrates the positions of the various control and process screens. This visual guide helps y
ou
understand the hierarchical structure and navigation paths to access different settings and functionalities within the system
PROGRAM
WASH
SANITATION
✯
SETTINGS
|
|
|
|
|
Name
Time Remaining
Time Remaining
Favorite Program
LED
|
|
|
|
|
SELECT PROGRAM
Duration
Duration
Name
Off/50%/75%/100%
|
|
|
|
|
LOAD SELECTED
PROGRAM
IDLE
SELECT
PROGRAM
DRAIN
|
|
|
|
|
SAVE CURRENT
PROGRAM AS
RUNNING
LOAD SELECTED
PROGRAM
Start drain? YES/NO
|
|
|
|
|
Capacity
COMPLETED
SAVE CURRENT
PROGRAM AS
SERVICE
|
|
|
|
|
Duration
ABORTED
Capacity
ENTER PASSWORD
Factory Reset
|
|
|
|
|
Drain
Duration
Factory Reset
⧀ (Serv7) ⧁
|
|
|
|
|
Auto/Manual
Drain
SERVICE
SANITATION
|
|
|
|
|
Mode
Auto/Manual
OUTPUTS
|
|
|
|
|
Coffee/Other
Mode
TEST Water valve; Circulation
valve; Keg valve; Circulation
pump; LED Strip
|
|
|
|
|
LOAD PROGRAM
Coffee/Other
TANK LEVEL, DRAIN, FILL,
STOP: CALIBRATE
|
|
|
|
|
LOAD PROGRAM
LICENSE
(11111)-
|
|
|
|
|
ABOUT
|
|
|
|
|
☆
FAVORITE
Go to fetco.com for the latest versions of all information 12 P232 July 2024
This is the first screen after bootup
Touch display-Quick guide
Main Menu:
A – [PROGRAM] – production cycle configuration menu.
Select, modify and start the BHT Infuser
B – [WASH] Flushing program. Start and progress status of WASH program.
C – [SANIT] Sanitation program. Start and progress status of SANITATION program
D – [FAVORITE] Quick access to favorite recipe.
E– [SETTINGS] Access to controls and detailed setting for the BHT Infuser
Top - Calibration status-Volume NOT calibrated if red. See page 14. (Is not red if calibrated)
Ⓐ Menu [
PROGRAM
]:
1 – [<] Back to the main menu.
2 – [NAME] Saving new recipes and loading previously saved ones.
3 – [CAPACITY] Setting of the amount of water used to produce a drink.
Changes to CAPACITY may be introduced in the [OTHER] mode.
4 – [DURATION] Production time setting.
5 – [DRAIN] Selection of the finished drink pumping method. Automatic or manual.
6 – [MODE] Switch between modes [COFFEE] and [OTHER].
([COFFEE] – no ability to change the amount of water or
[OTHER] – with an ability to change the amount of water).
7 – [LOAD] Load a configured recipe.
Ⓑ Menu [WASH]:
1 – [<] Back to the main menu
2 – [PLAY] Start the flushing program
Ⓒ Menu [SANIT]:
1 – [<] Back to the main menu
2 – [PLAY] Start the sanitation program
See Page 8 for instructions
Ⓓ✭ Menu [FAVORITES]: ✭
This automatically displays and will activate a selected PROGRAM as in screen
Ⓐ shown above
Ⓔ Menu [
SETTINGS
]:
1 – [<] Back to the main menu.
2 – [DATE/TIME] Set the date and time.
3 – [LICENSE] License [1,1,1,1,1].
4 – [LED] Set the intensity of the logo highlight
5 – [ABOUT] Information about the device
6 – [SERVICE] Service menu
7 – [FAVORITE] Settings of the favorite drink
Activation of utility programs
Before starting production Baby Hardtank has:
- One drink production process program [PROGRAM].
- One tank and internal installation flushing program
[WASH]. !!! Use after each production process.
– One tank and internal installation sanitation program
[SANIT]. !!! Use at the end of each day.
The drink production process offers:
- [NAME] The ability to save new recipes and load previously saved ones.
- [CAPACITY] The ability to select the amount of water needed to produce drinks.
- [DURATION] The ability to select the extraction time.
- [DRAIN] The ability to change the drink pumping mode after extraction
(automatic upon completion of the extraction or with an ability to continue maceration).
- [MODE] Switching between operating modes
- (COFFEE) – without the ability to change the amount of water or
- (OTHER) – with the ability to change the amount of water).
Go to fetco.com for the latest versions of all information 13 P232 July 2024
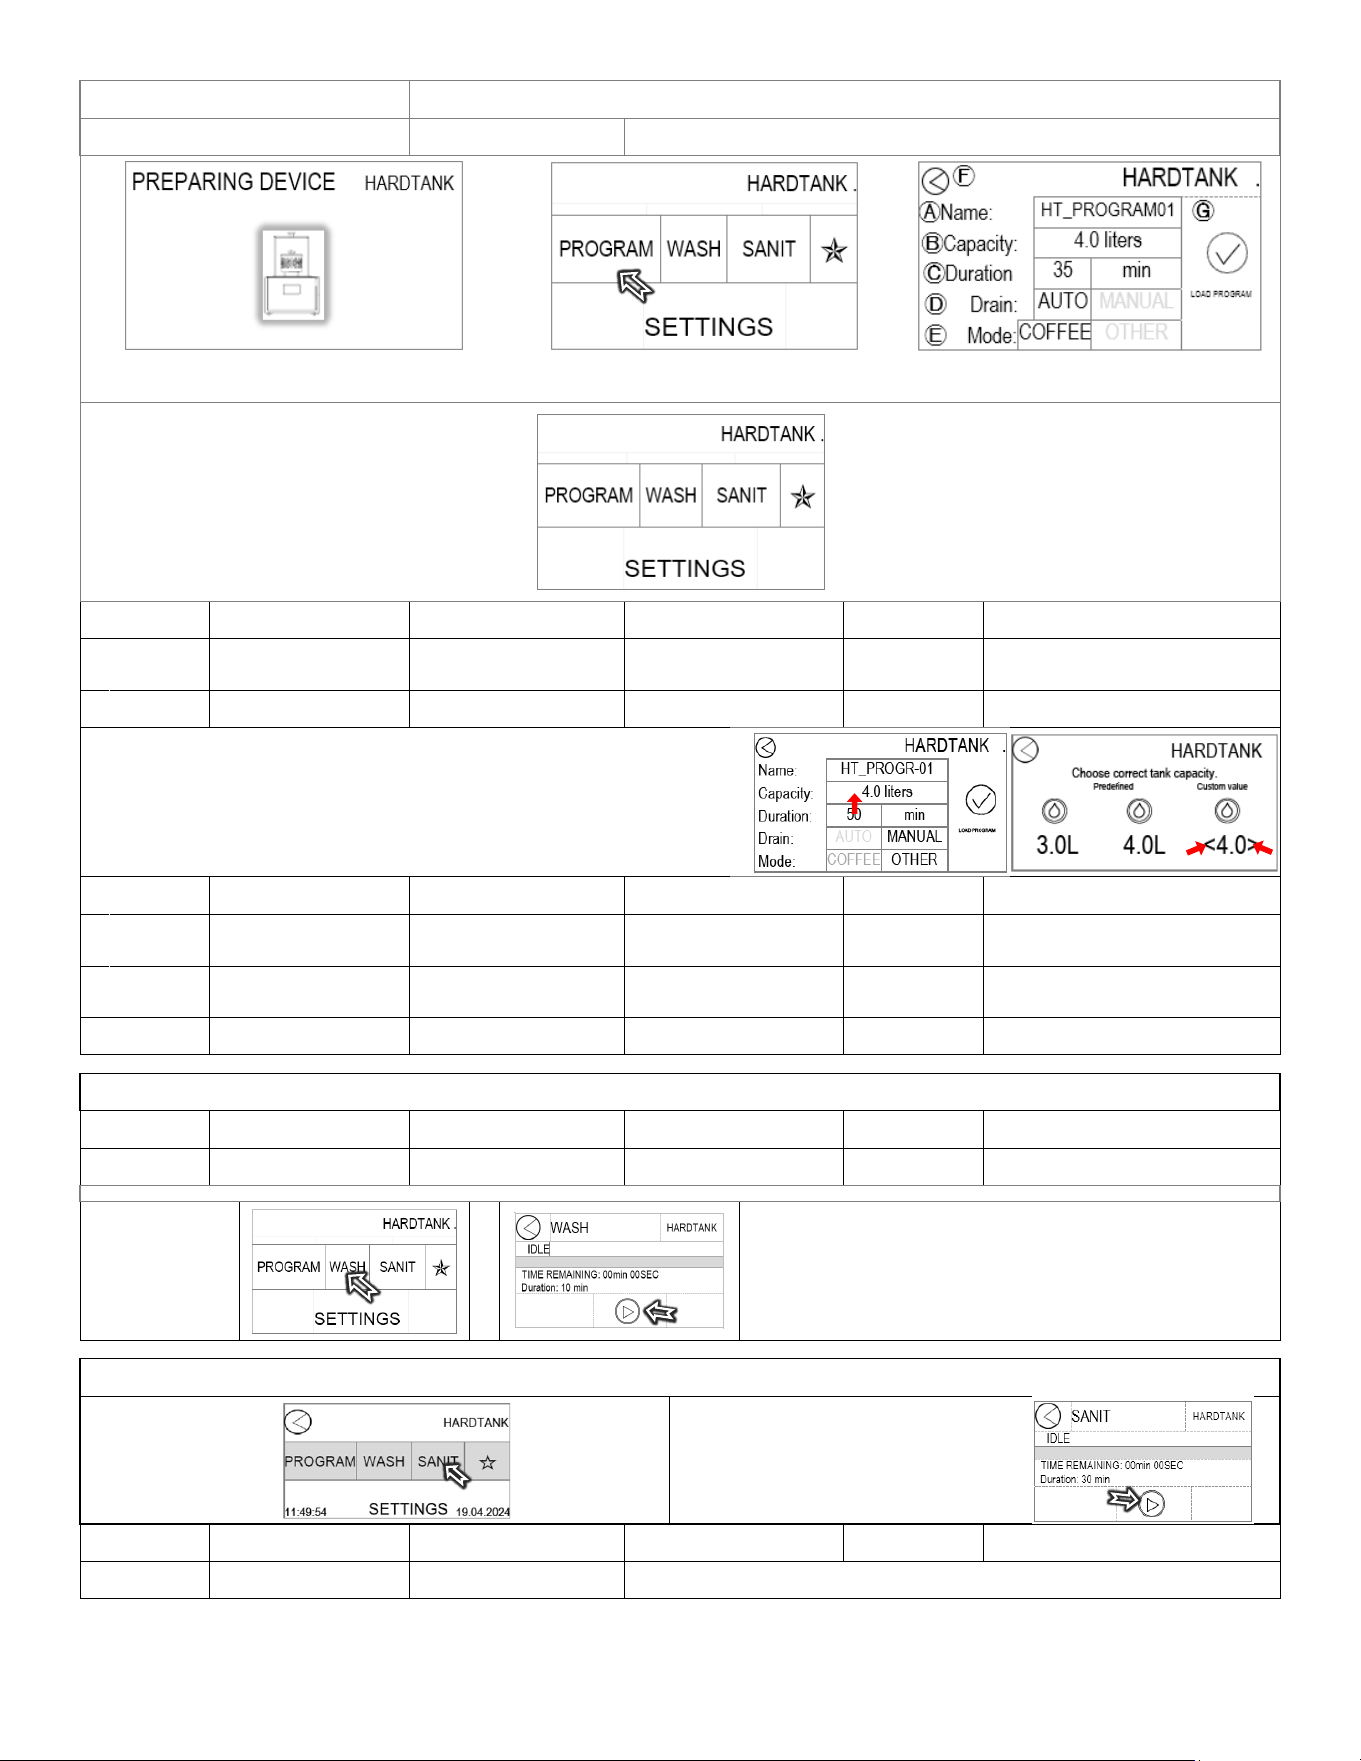
First screen after bootup
Touch display-detailed outline
PROGRAM
Baby Hard Tank operation and controls settings
Initialization: Wait 30-60 seconds
First Screen – touching “PROGRAM”
A-G identified below
POSITION Program Items Factory set Default Programming Range
Increments Notes
Ⓐ
Name Title of your recipe HT_PROGRAM01
Two or three are
preprogrammed
20+ recipes
Ⓑ
Capacity*
Size of batch 4.0 liters 1.5-5 liters 0.1 liters
*Adjusting Capacity
First-set screen to PROGRAM.
Next-set in OTHER Mode.
Touch the Capacity bar (red arrow↑)
to access Hardtank capacity settings.
Two presets are included.
3.0 and 4.0 liters
Touch the < and> icons to install a custom
batch size between 1.5 and 5 liters.
`
The 4.0 liter batch size is a good beginner
size
POSITION Program Items Factory set Default Programming Range
Increments Notes
Ⓒ
Duration
Infusion/extraction
time
35 minutes 1-99 minutes 1 minute
Ⓓ
Drain
Empties when
batch is complete
AUTO AUTO/MANUAL Manual recommended
Ⓔ
Mode
Preset COFFEE COFFEE/OTHER OTHER opens all settings
WASH
Baby Hard Tank Cleaning and Rinse
POSITION Program Items Factory set Default Programming Range
Increments Notes
Name WASH 10 Minutes
Touch Wash on
opening screen
SANITATION
Baby Hard Tank sanitizing routine
Touch Wash on
opening screen
TOUCH ⧁ to start
sanitation
POSITION Program Items Factory set Default Programming Range
Increments Notes
Name SANITATION 30 Minutes
See Page 8 for instructions
Go to fetco.com for the latest versions of all information 14 P232 July 2024
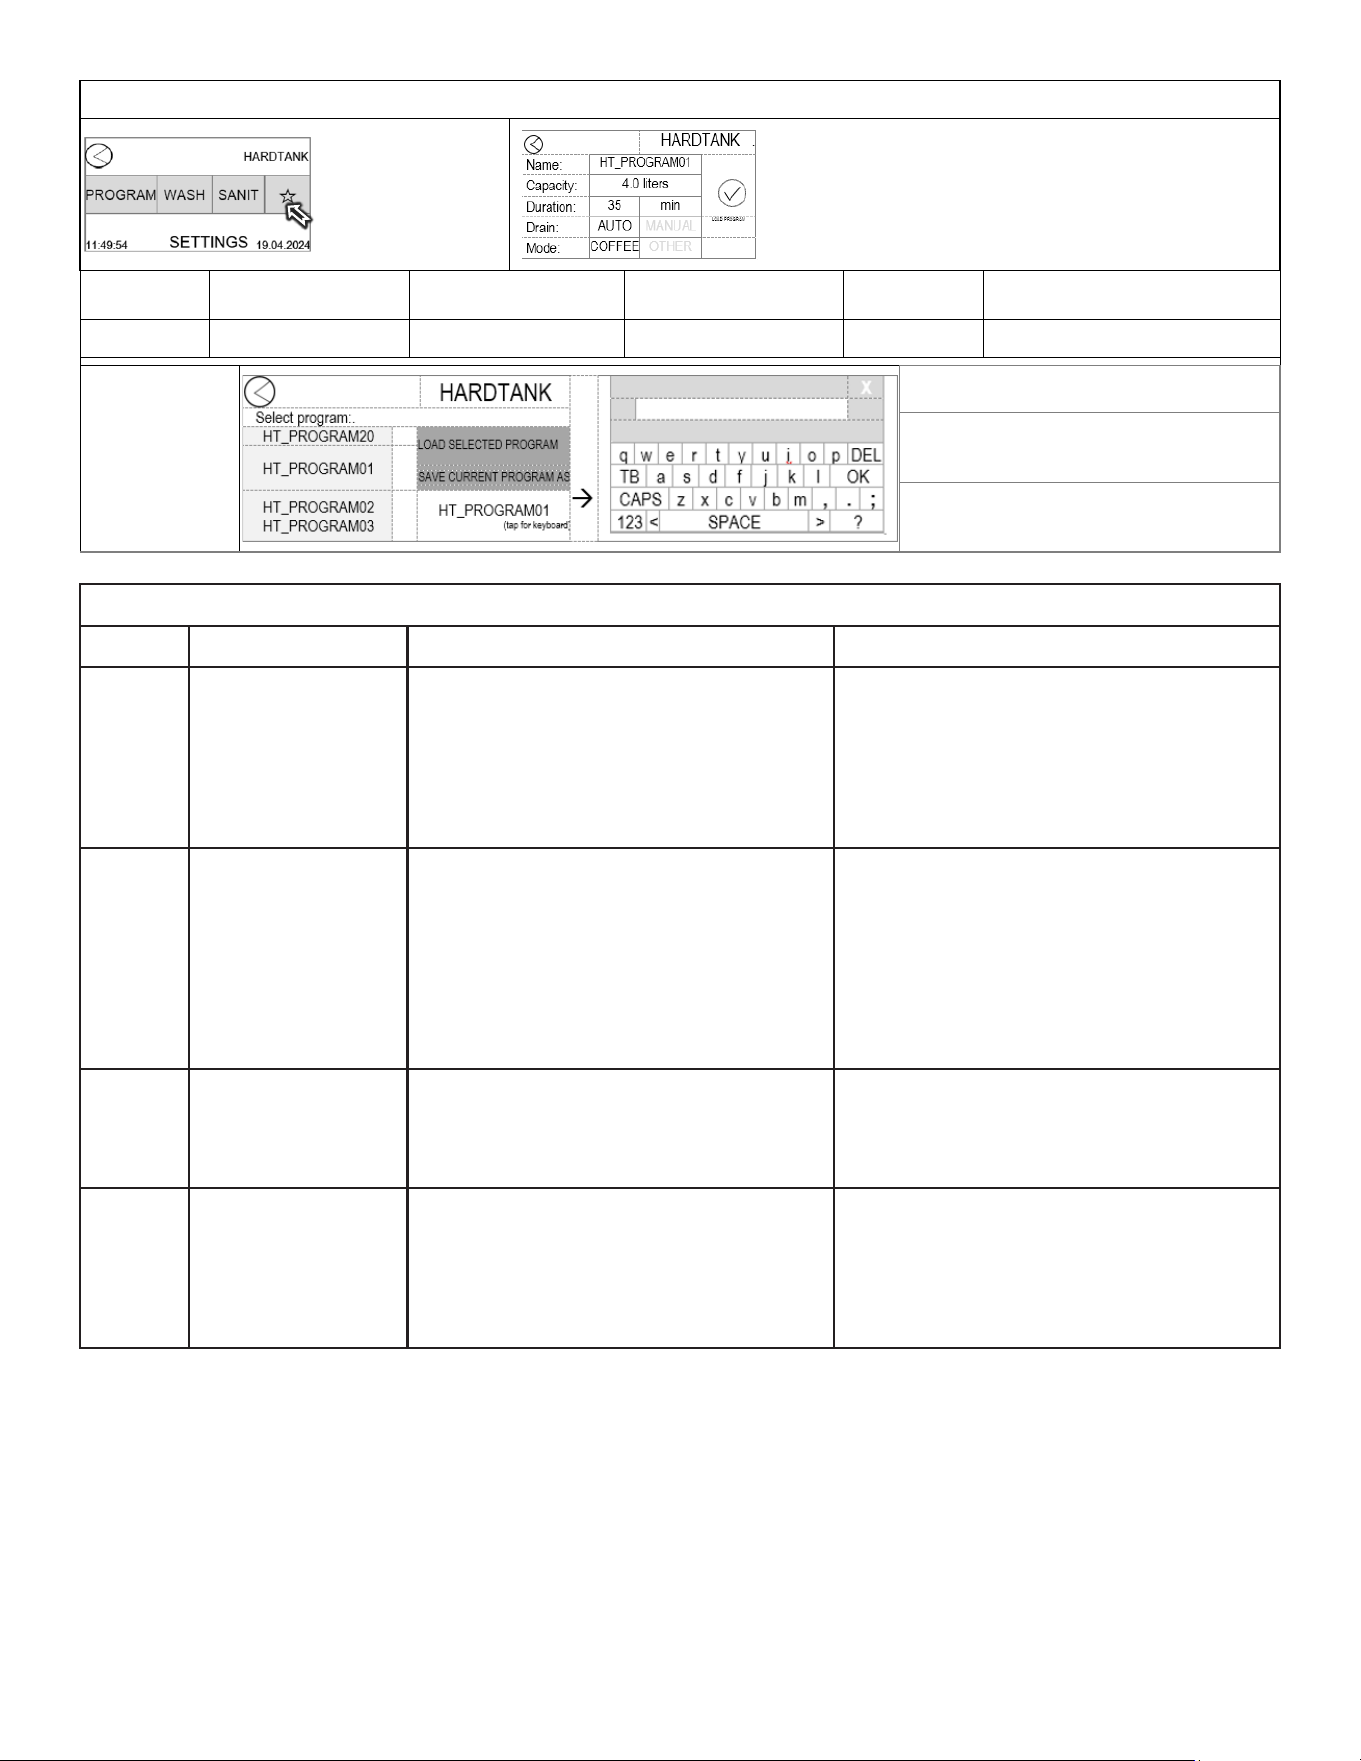
✯FAVORITES✯
Baby Hard Tank set different recipe programs
TOUCH ✯ to
enter FAVORITES
POSITION Program Items Factory set Default Programming Range
Increments Notes
NAME Title of your recipe HT_PROGRAM01 Various 20+ recipes See expansion below
All 20 saved recipes
are accessed by
scrolling the left
column. The center
position is the recipe
being accessed.
LOAD SELECTED PROGRAM will load
the recipe in lower right corner
SAVE CURRENT PROGRAM AS will
SAVE recipe routine and name in lower
right corner
Lower right corner [
HT_PROGRAM01] is the name
of the recipe
ERROR CODES
CODE MESSAGE REASONS SOLUTION
0x01 Tank filling problem
Inlet (supply) valve closed.
Loss of water source during tank filling.
- After waiting for 30 seconds for the
message to appear on the screen, select
MAIN MENU and start the selected program
again.
- Turn the device off and
on again.
0x02
Tank draining
problem
The drainage hose from the device is
blocked or clogged
The valve on the accessory KEG lid is not
opened
If the drainage hose gets blocked or
clogged during the tank emptying process
Unblock or unclog the drainage hose.
Open the valve or the
.
After waiting for 30 seconds for the
message to appear on the screen, select
MAIN MENU, and activate the DRAIN
function.
0x03
Tank level too low to
macerate
The tank was not filled to the appropriate
water level at startup or in the NO WATER
mode
Prepare more water or another liquid
ingredient for the program, restart the
program, and add liquid until the program
starts automatically.
Do you want to start
drain?
There is some liquid residue in the tank
from the previous process or it was not
completely drained.
There is liquid in the tank due to
interrupting the WASH/SANIT program
using the STOP function.
Select YES to drain the remaining liquid
from the tank.
Select NO to resume the program after
interruption upon request.
Go to fetco.com for the latest versions of all information 15 P232 July 2024
SETTINGS
Baby Hard Tank service menus
Below are the SERVICE menus for SETTINGS
Toggling <,>
advances to the
screens below
Pressing the launch
icon starts the
sanitation routine
Touching the “OFF”
icon turns that
position on. This is
for testing for service
and calibration
Water valve Opens the fill valve
Circulation valve Rotates (3-way) valve to Circulate position
Keg (drain) valve
Rotates (3-way) valve to Drain position
Circulation pump
Operates circulation pump
LED Strip Turns on enclosure LED light
Toggling <,> sets
operation settings
NORMAL
To operate Hard Tank
DEMO
To operate without water and product-for training
NO WATER
For dry operation and calibration
Slow Flow
INACTIVE=Maines water supply; plumbed connection
ACTIVE = Use with FloJet, external or self-fill supply
Device Units
LITERS-as supplied by factory
Fl/Oz -will require reboot when activated, follow prompts on screen
Go to fetco.com for the latest versions of all information 16 P232 July 2024
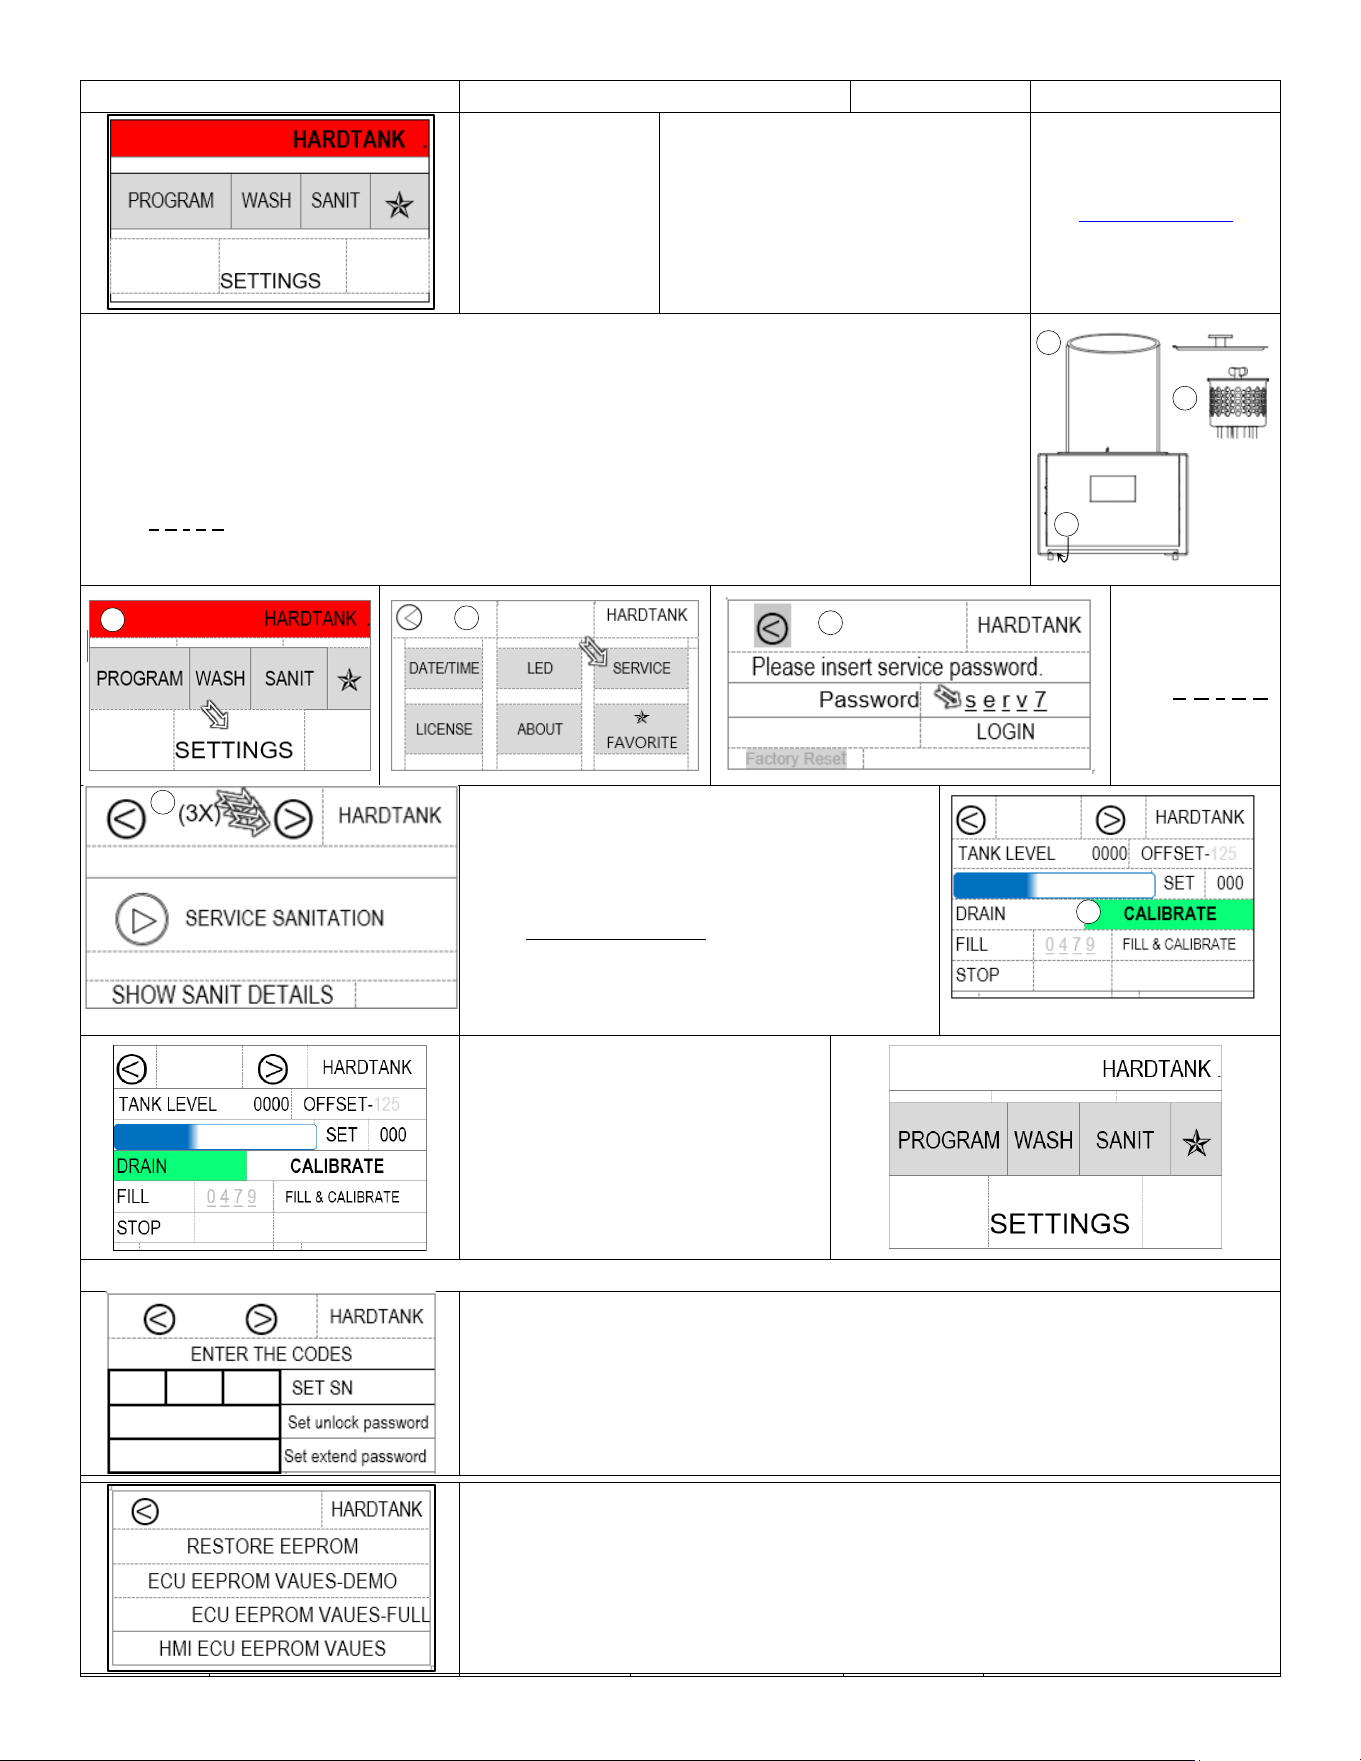
CALIBRATION
If the top banner
is red colored, the
Baby Hard Tank is
not calibrated, and
the calibration
procedure is
needed
Calibration screen.
Contact FETCO
fetco.com or Technical Support at
techsupport@fetco.com
or (800) 338-2699 -option 2 (US &
Canada) for assistance with the
calibration procedure
To calibrate the Baby Hard Tank-[Manual Calibration
-1) Carefully measure 5200ml (5.2 liters) water for the calibration. This may be added in portions
- Remove the lid and then the brewbasket, set these aside.
-Insure the unit is dry, if not: drain the unit. Use a wet/dry vacuum to remove any remaining water
from the unit and the sump.
-2) Turn the unit OFF, then ON.
-3) Touch the SETTINGS icon after the “PREPARING DEVICE” routine complets.
-4)Touch the SERVICE icon on the main screen and touch the blank password box and
enter s e r v 7 using the virtual keyboard.
-5) Press the ⧁ icon 3 times to CALIBRATE
-6) Add 5.2 L water. Touch and hold the CALIBRATE icon, then touch the DRAIN icon to drain.
Touch the blank
icon right of
Password and
enter
s e r v 7.
Touch LOGIN to
enter SERVICE
programming
Press right arrow icon three times
6) Add 5200ml or 5.2 liters* of water to the unit.
[!] Check that this amount is correct!
Touch and hold CALIBRATE for 10 sec.
(Equalivalent measures)
5.2liter =5,200 ml =5.2 kg
Or 1gallon+48 Fl oz
Or (1 gallon+1 ½ qt)
Or 11.46 lb or (11 lb +7 ½oz)
The calibration screen
Top banner is no longer red colored
(unit is calibrated)
Touch and hold DRAIN for 10 sec.
Calibration is complete
ADDITIONAL SCREENS
OPTIONAL
Enter data for the machine
Factory setting
Contact FETCO Technical Support
at techsupport@fetco.com or
(800) 338-2699 -option 2 (US & Canada) for assistance
1
3
6
4
4
5
2
1
Go to fetco.com for the latest versions of all information 17 P232 July 2024
Enter license SKU number
Procedure to correct Baby Hard Tank when it requires license entry.
1) Go to SETTING screen,
Tap SETTINGS icon
2) Tap LICENSE icon
3) Record serial number or take a
photograph of it so to retain the value
4) Go back to SETTINGS screen
Tap SERVICE icon
5) Tap PASSWORD and tap to enter the
password s e r v 7 Next- tap LOGIN.
6) Tap the forward icon (⧁) three
times to go to OFFSET screen.
7) Note or take a picture of the
OFFSET number
8) Press forward arrow (
⧁
) 2X to advance
to the RESTORE EPROM screen
9) Touch ECU EEPROM VAUES-FULL
and HMI ECU EEPROM VAUES
10) Restart device. Toggle the
ON/OFF switch to “OFF”. Next,
switch back to “ON”
11) Go to OFFSET screen; Tap “SET”
(See screen 1-SETTINGS; then screen 4-
SERVICE;Login
next: tap ⧁
3 times to OFFSET screen)
12) Enter the retained OFFSET value
(Screen 7) & press OK on dropdown.
13) Tap SET position. OFFSET
should be displayed within 2
seconds.
14) Press forward arrow (⧁) once to
advance to the license screen
15) Enter the retained SERIAL
NUMBER value (Screen 3) & press OK
on dropdown; next tap SET SN.
Go to fetco.com for the latest versions of all information 18 P232 July 2024
Baby Hard Tank table of authorities
SKU
Bill of Material
Exterior color
Cord assembly
I2205US-1A000-W3P11
1101.000611.00
Light Brown/Black powder
1063.00045.00
I2205US-1A000-W2P11
1101.000610.00
Gray/Black powder
1063.00045.00
I2205US-1A000-W1P11
1101.000609.00
Dark Brown/Black powder
1063.00045.00
I2205CE-1A000-W3P15
1101.000607.00
Light Brown/Black powder
1063.00046.00
I2205CE-1A000-W2P15
1101.000606.00
Gray/Black powder
1063.00046.00
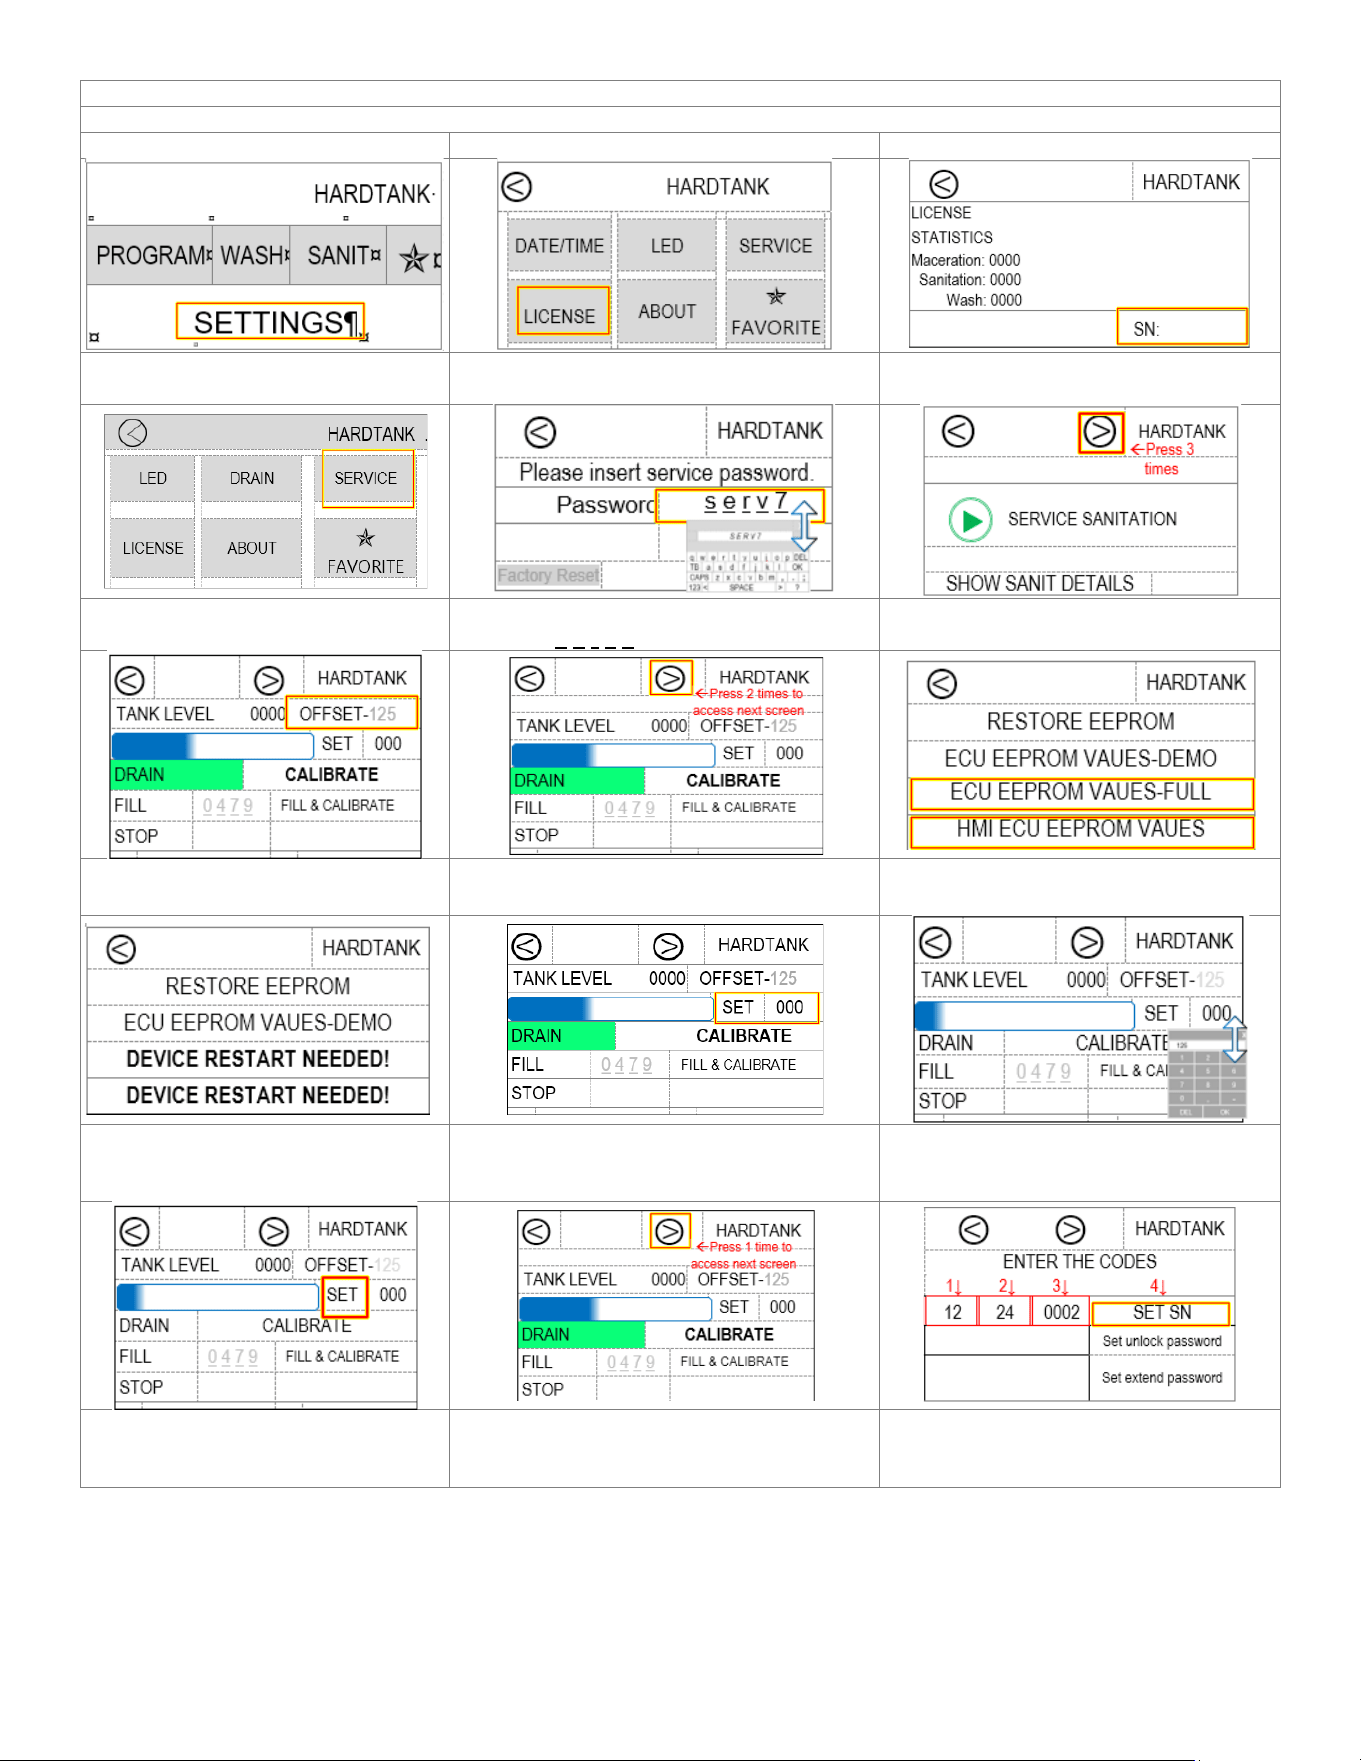
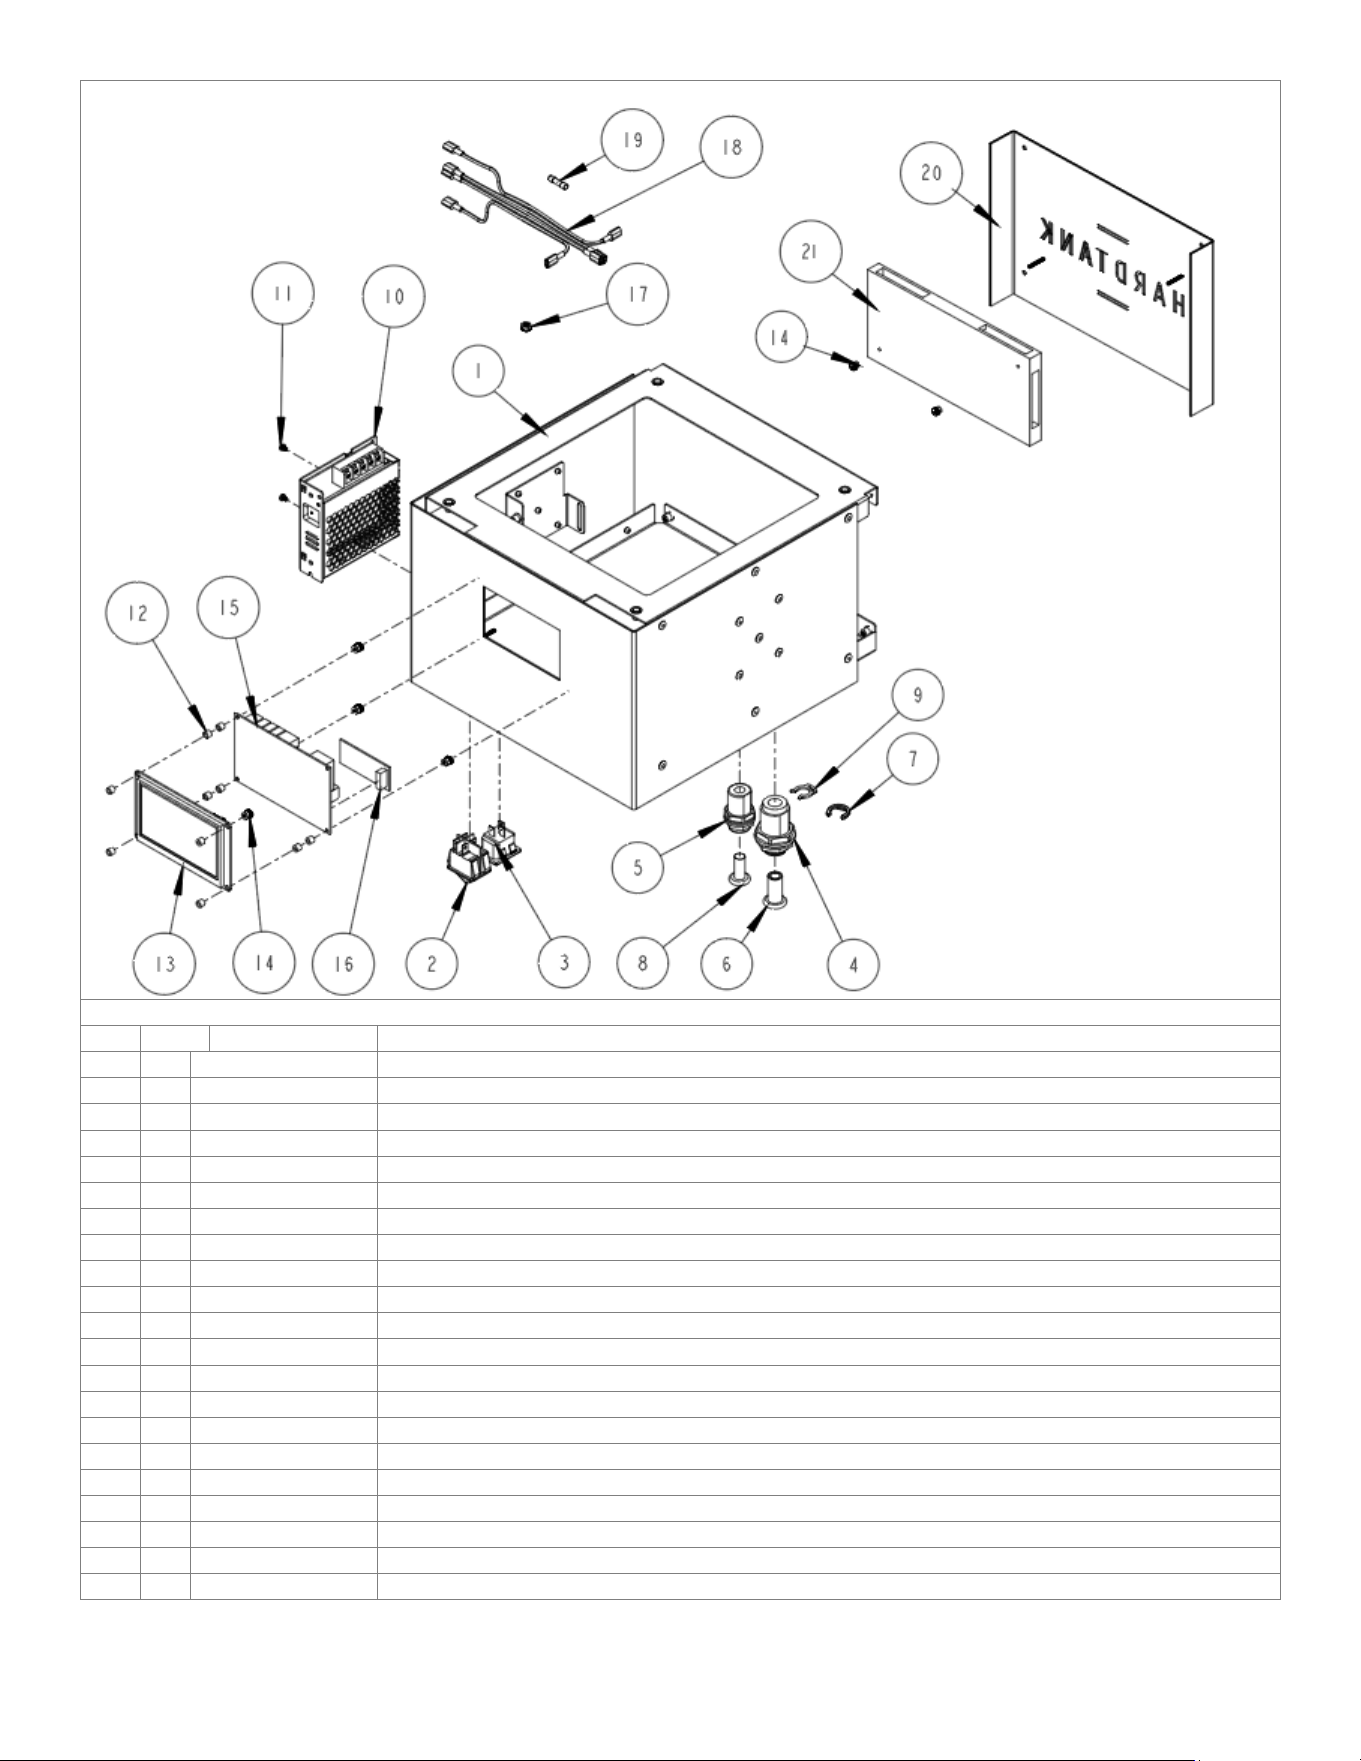
Parts Diagrams
#3 Pump assembly detail P/N1102.00517.00
Go to fetco.com for the latest versions of all information 19 P232 July 2024
Baby Hard Tank fluid handling and exterior trim subassembly drawing # 1101.00611.00
REF
QTY
Part Number
Description (Model SKU Number
1 1
1102.00510.00
Body and housing subassembly Dark Brown, (SKU I2205CE-1A000-W1P15)
1102.00509.00
Body and housing subassembly Gray, (SKU I2205CE-1A000-W2P15)
1102.00524.00
Body and housing subassembly Light Brown (SKU I2205CE-1A000-W3P15)
1102.00510.00
Body and housing subassembly Dark Brown (SKU I2205US-1A000-W1P11)
1102.00509.00
Body and housing subassembly Gray, (SKU I2205US-1A000-W2P11)
1102.00524.00
Body and housing subassembly Light Brown (SKU I2205US-1A000-W3P11)
2
1
1044.00012.00
LABEL GROUND, CE
3
1
1102.00517.00
DISTRIBUTOR, MAIN ASSEMBLY
4
1
1112.00558.00
WELDMENT, DISTRIBUTOR FLANGE, HARD TANK
5
7
1082.00023.00
SCREW, #8-32 X 3/8 TRUSS HD PHIL., MACHINE
6
1
1029.00044.00
HOLDER, CABLE TIE, 0.50" WIDE X 0.13" THICK MAXIMUM
7
1
1066.00004.00
CABLE TIE, 0.50" W X 06" TH X 11"LG, 400 LB STRENGTH
8
1
1025.00157.00
PIPE L=320mm 1/2
9
4
1086.00050.00
LOCKING CLIP 1/2
10
1
1025.00158.00
PIPE L=380mm 1/2
11
1
1025.00165.00
TUBE, 3/8" OD X 1/4" ID X 1 3/4" LONG
12
1
1057.00082.00
VALVE, 24VDC, 2.15 L/MIN FLOW, 3/8" PUSH IN TYPE
13
1
1025.00147.00
ELBOW PUSH-FIT 3/8
14
1
1025.00155.00
PIPE L=180mm 3/8
15
5
1086.00026.00
CLIP, 3/8", LOCKING
16
1
1024.00117.00
GASKET, DN32
17
1
1102.00516.00
ASSEMBLY, GLASS CYLINDER
18
1
1011.00109.00
TRICLAMP
19
1
1084.00044.00
LOCKNUT, NYLON INSERT, 5/16-18
20
1
1102.00519.00
BASKET ASSEMBLY, GASKET AND WING NUT
21
1
1102.00515.00
ASSEMBLY, LID, HARD TANK
22 1
1102.00507.00
Assembly, back & led panels, wrap137, (SKU I2205CE-1A000-W1P15)
1102.00508.00
Assembly, back & led panels, wrap138, (SKU I2205CE-1A000-W2P15)
1102.00526.00
Assembly, Light Brown & led panels, wrap 140 (SKU I2205CE-1A000-W3P15)
1102.00507.00
Assembly, back & led panels, wrap137, (SKU I2205US-1A000-W1P11)
1102.00508.00
Assembly, back & led panels, wrap138, (SKU I2205US-1A000-W2P11)
1102.00526.00
Assembly, Light Brown & led panels, wrap 140 (SKU I2205US-1A000-W3P11)
23
4
1082.00142.00
SCREW, BUTTON RD HD, HEX DRIVE, M4 X .7mm X 8mm LG, BLK OXIDE
1
1063.00045.00
CORD, POWER, AMERICAN, 13A/125VAC, 6FT to right angle. IEC 60320, C-13
1
1063.00046.00
CORD, EUROPEAN CEE 7/7 Schuko, 6.5FT to right angle. IEC 60320, C-13
1
1063.00047.00
CORD, ENGLAND, UK1-13P 6.5FT to right angle. IEC 60320, C-13
1
1063.00048.00
CORD, AUSTRALIAN, AU1-10P 6.5FT to right angle. IEC 60320, C-13
#3 Distributor (pump) assembly* (detail) P/N1102.00517.00
REF
QTY
Part Number
Description
1
1
1102.00514.00
FLOW DISTRIBUTOR ASSEMBLY
2
1
1001.00486.00
DISTRIBUTOR BRACKET, HARD TANK
3
2
1082.00023.00
SCREW, #8-32 X 3/8 TRUSS HD PHIL., MACHINE
4
1
1102.00499.00
MALE TEE SWIVEL
5
1
1057.00081.00
MOTORIZED BALL VALVE, G1/2 24VDC
6
2
1025.00150.00
STEM ADAPTER GZ1/2
7
2
1025.00149.00
TUBE ELBOW UNION 1/2
8
1
1102.00502.00
ASSEMBLY, WATER PUMP AND CONNECTOR, TOPSFLO
9
2
1025.00160.00
FEMALE ADAPTER GW1/2 1/2
10
1
1025.00156.00
PIPE L=360mm 1/2
11
2
1023.00412.00
FLOW BEND CLIP 3/8
12
1
1054.00018.00
WATER LEVEL SENSOR 12DC 0-5V
13
5
1086.00050.00
LOCKING CLIP 1/2
*Note that some components used for the pump assembly are not sold individually.
Contact FETCO Technical Support at techsupport@fetco.com for assistance with these parts
Go to fetco.com for the latest versions of all information 20 P232 July 2024
Baby Hard Tank electrical assembly
REF
QTY
Part Number
Description
1
1
1102.00504.00
HOUSING SUBASSEMBLY GRAY, HARD TANK
2
1
1058.00024.00
SWITCH, POWER, DOUBLE POLE, 16A, 125/250 VAC
3
1
1065.00003.00
CONNECTOR, POWER INLET, 15A, 250VAC
4
1
1025.00148.00
CROSSING PUSH-FIT1/2
5
1
1025.00146.00
CROSSING PUSH-FIT 3/8 RO
6
1
1023.00414.00
PLUG 1/2
7
1
1086.00050.00
LOCKING CLIP 1/2
8
1
1023.00413.00
PLUG 3/8
9
1
1086.00026.00
CLIP, 3/8", LOCKING
10
1
1052.00061.00
POWER SUPPLY UNIT LRS-75-24
11
2
1082.00081.00
SCREW, P/H PHIL. MACHINED, M3x0,5mmx4MM LG., 316SS
12
10
1081.00006.00
SPACER, 6MM OD x 3.2MM ID x 5MM LG, Z/P
13
1
1058.00170.00
NEXTION 4.3" LCD
14
6
1029.00006.00
NUT, FINGER KNURLED, #4-40
15
1
1051.00053.00
PCB MODULE, BHT
16
1
1051.00054.00
TELEMETRY MODULE, BHT
17
1
1084.00051.00
NUT, HEX LOCKWASHER, #8-32, 18-8 ST. STL.
18
1
1402.00122.00
HARNESS, HARD TANK, UNIVERSAL
19
1
1053.00055.00
FUSE, TYPE F4AH500VAC, SCHURTER
20
1
1102.00505.00
ASSEMBLY, BACK PANEL WITH WRAP137, HARD TANK
21
1
1058.00171.00
LED PANEL
Go to fetco.com for the latest versions of all information 21 P232 July 2024
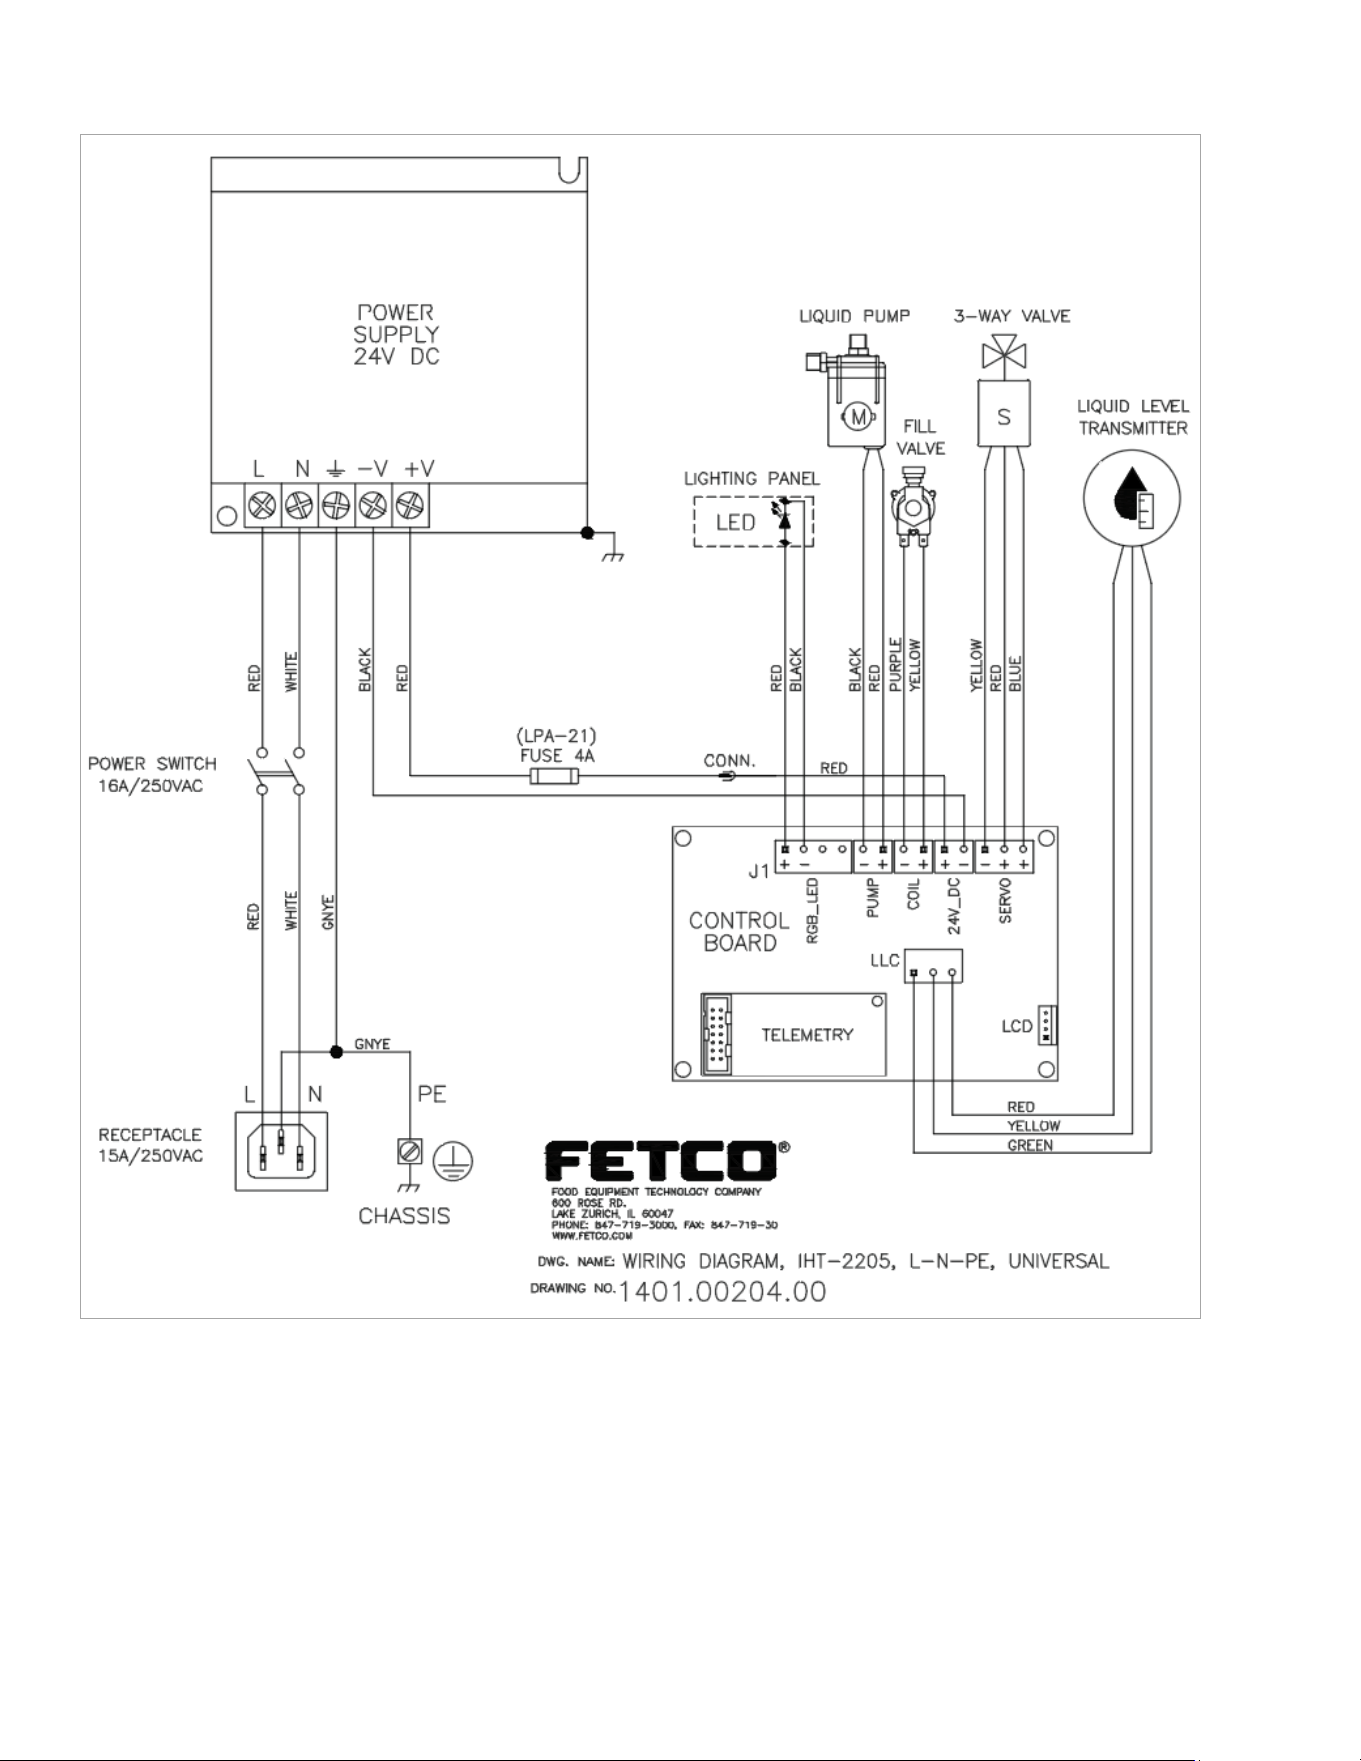
Wiring Diagram 1401.00204.00 Baby Hard Tank
