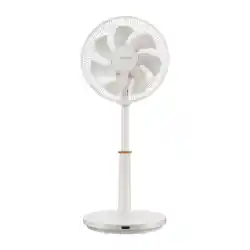

F-DLE70HK(W)
使用說明書
空氣循環扇


01
目錄
安全注意事項 ..................................................................................................................................................... 02
產品簡介 ............................................................................................................................................................... 04
產品安裝 ............................................................................................................................................................... 05
使用說明 ............................................................................................................................................................... 07
如何包裝................................................................................................................................................................ 10
產品參數 ............................................................................................................................................................... 11
清潔保養 ............................................................................................................................................................... 11
故障排除 ............................................................................................................................................................... 11
非常感謝您購買東芝電風扇。
• 為了正確、安全地使用本風扇,請在使用前仔細閱讀本用戶手冊,並充分理解其內容。
• 請妥善保管本用戶手冊,以備日後參考。
02
安全注意事項
• 請仔細閱讀安全操作規則和使用說明。
• 本産品不適用於身體、感官或智力功能有缺陷,或缺乏經驗和知識的
人員(包括兒童)使用,除非是有負責其安全的人員監督或指導。
• 兒童不得玩耍本産品。
• 當風扇運行時,切勿將手指、鉛筆或其他任何物體插入網罩中。
• 移動本産品前,請切斷電源。
• 在操作時,確保風扇放置在穩定平面上,以避免傾倒。
• 請勿將本産品放在窗戶附件使用,因爲雨水可能會造成觸電危險。
• 本電器僅限家庭使用。
• 如果電源綫損壞,必須由製造商、或其維修代理或具有類似資格的人員
進行更換,以避免危險。
• 爲防止觸電風險,請勿將本産品、電源綫或插頭浸入水中或任何液體中。
• 不使用本産品時以及在清潔前,請從插座上拔下本産品的電源插頭。
• 當風扇組裝完成後,不能再取下網罩。
- 清潔前請先拔掉電源。
- 不得拆卸/打開網罩來清潔扇葉。
- 用稍微濕潤的布擦拭風扇外殼和網罩。
注意
警告

• 在拆除網罩前,請先關閉電源。
• 注意:請將本産品放置在兒童接觸不到的地方。
誤食可能會導致化學灼傷、軟組織穿孔以及死亡。
攝入後 2 小時內可能會發生嚴重灼傷。如需就醫,請立即前往。
• 請勿讓本産品或電池暴露在過高的溫度環境中。
• 如果該電器長時間不使用,應取出電池。
切勿使用經過改裝或損壞的電池。
警告
04
產品簡介
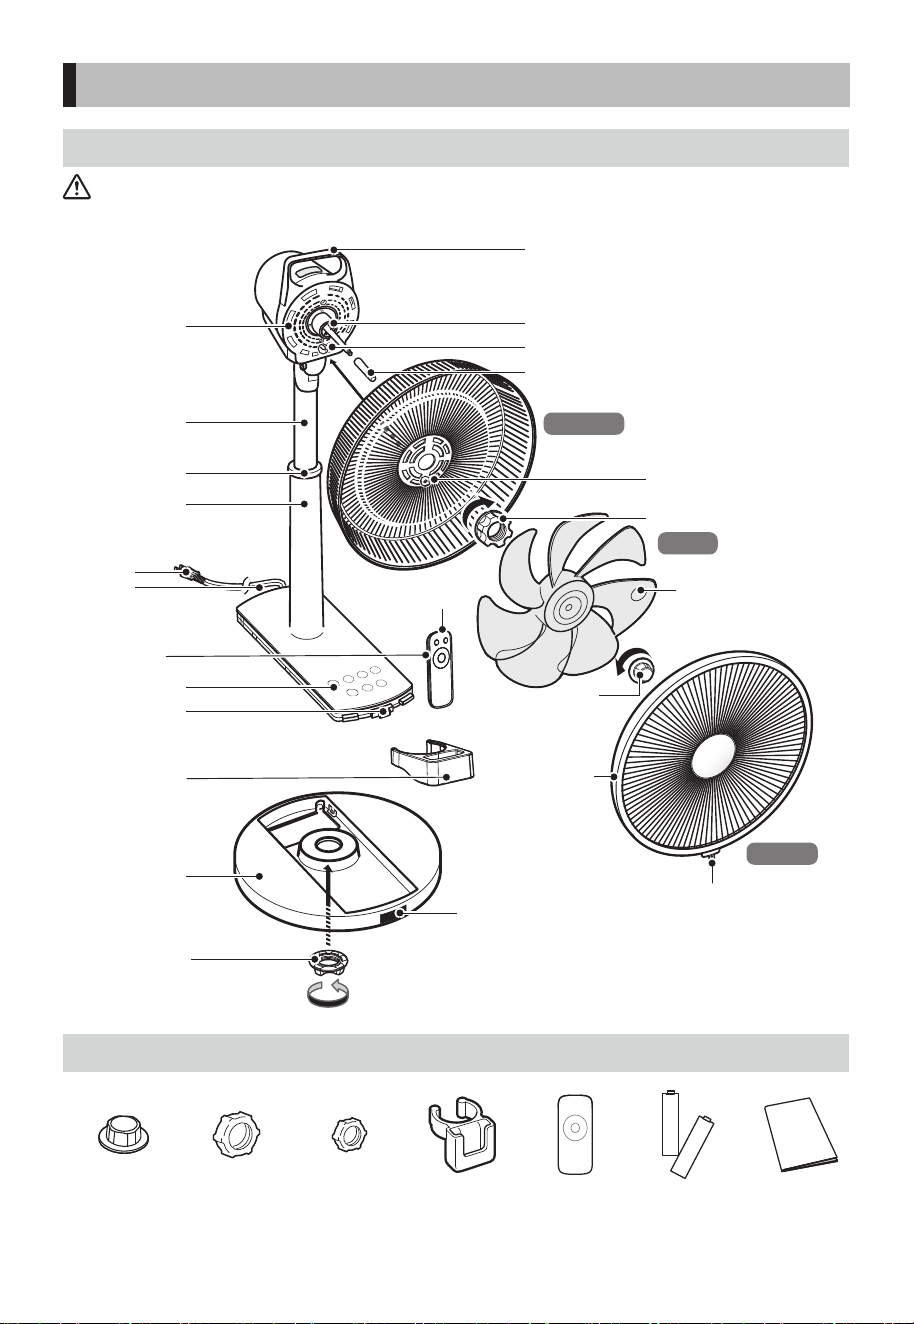
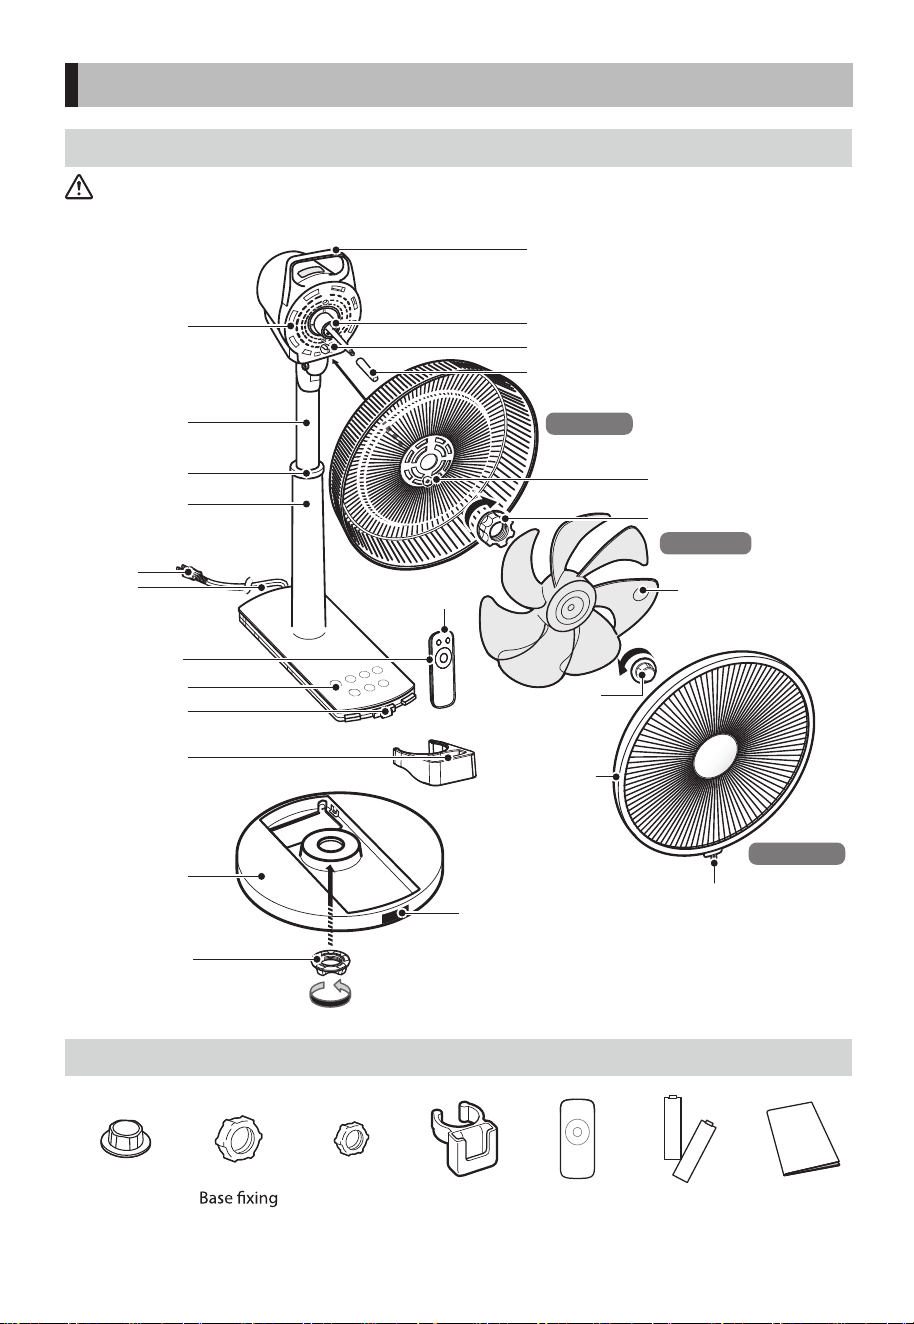
部件名稱
注意:
產品所在的包裝盒、包裝零件以及電機軸的蓋子在收納時是必須的。請注意,切勿遺失。
緊固環(大)
底座
遙控器
遙控器支架
接收器
控制面板
電機
滑動管
支腳
電源插頭
電源線
高度調整按鈕
(背面)
遙控器接收器
網箍組件
旋轉頭緊固時向
左旋轉,拆卸時
向右旋轉。
發射部
(蓋子/組裝時是拔掉的)
凸位
電機軸
手柄
後網罩
圓孔
緊固環(小)
風葉
• 請勿撕掉
葉片標籤。
網扣
安裝完成後以
螺絲固定
前網罩
配件清單
遙控器 ×1 電池 × 2 說明書 × 1
遙控器支架
×1
網罩索母
(小)×1
底座固定螺母
(大)×1
風葉螺母
×1
05
產品安裝
警告
未安裝葉片和柵即運行,或
不按下高度調整按鈕(可能
導致受傷)
不要將電源線踩在底座上
(可能導致火災或觸電)
禁止
在組裝、清潔或搬運時,
請先拔除電源插頭,以免
觸電或受傷
拔掉插頭
支腳單獨無法站立。組裝前請橫放。
• 握住支腳時,請以雙手牢牢握住。
單手握持會導致失衡,電機部分下垂,可能導致受傷。
• 當倒下時,請勿對電機軸施加負荷或衝擊。此舉可能引致故障。
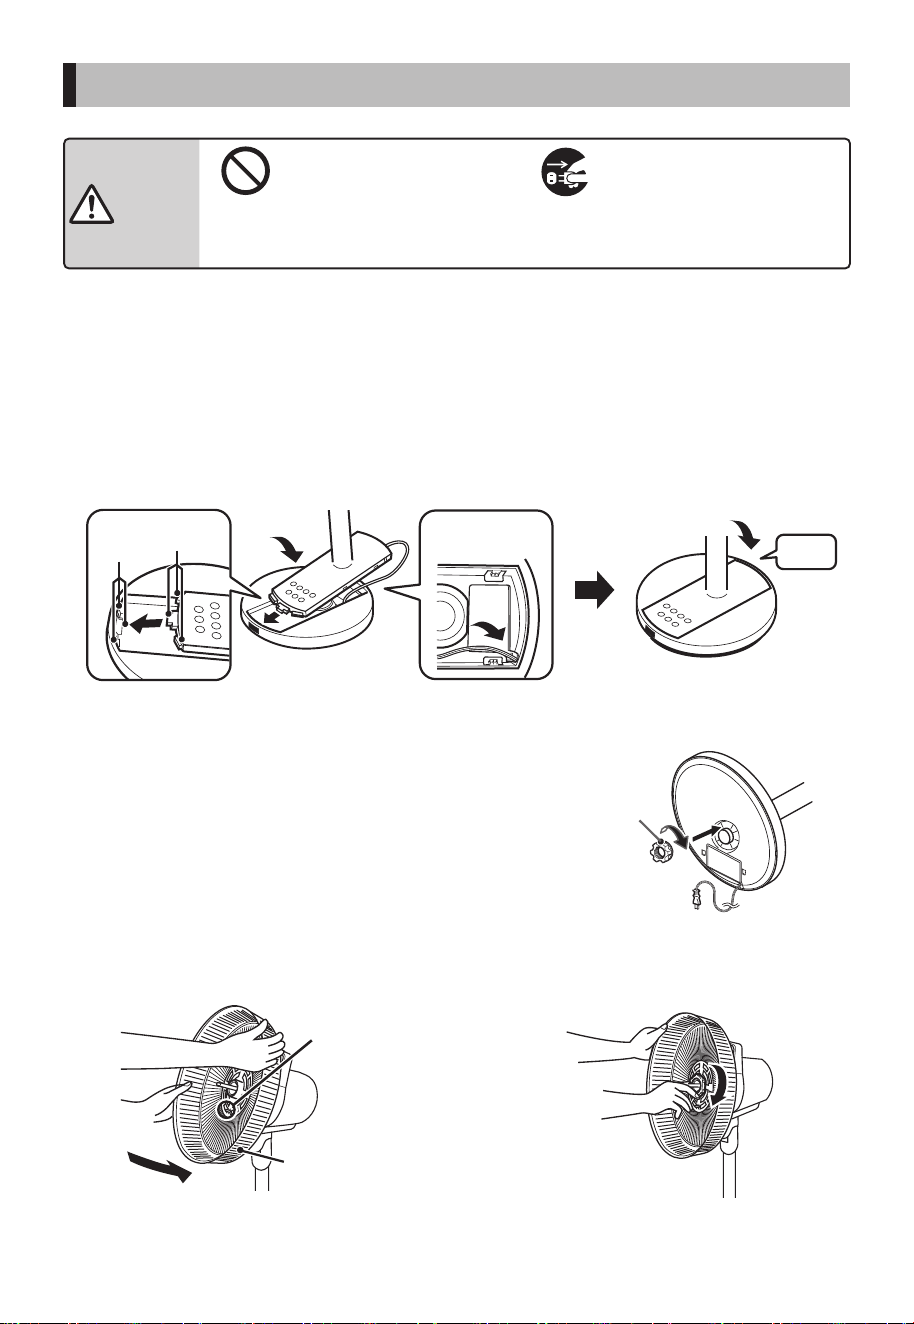
1. 將支腳固定在底座上
• 將電源線穿過底座的孔,將支柱的導向部分(3 處)插入底座的導向插入孔(3 處),
裝上支柱。
• 請注意不要夾住電源線,也不要踩在底座上。
指南板插入
支柱
推入
將電源線
穿過掛鉤
咔嚓
• 用手按住支柱和底座,水平放倒,向右旋轉緊固環(大),確保緊固環(大)已緊固。
緊固環(大)
2. 將防護網固定在電機部
• 將電機部稍微向上,將防護網的圓孔
置入電機軸下方的凸位
• 將緊固環(小)向右旋轉,確保緊固
到位
圓孔
後防護網
06
產品安裝
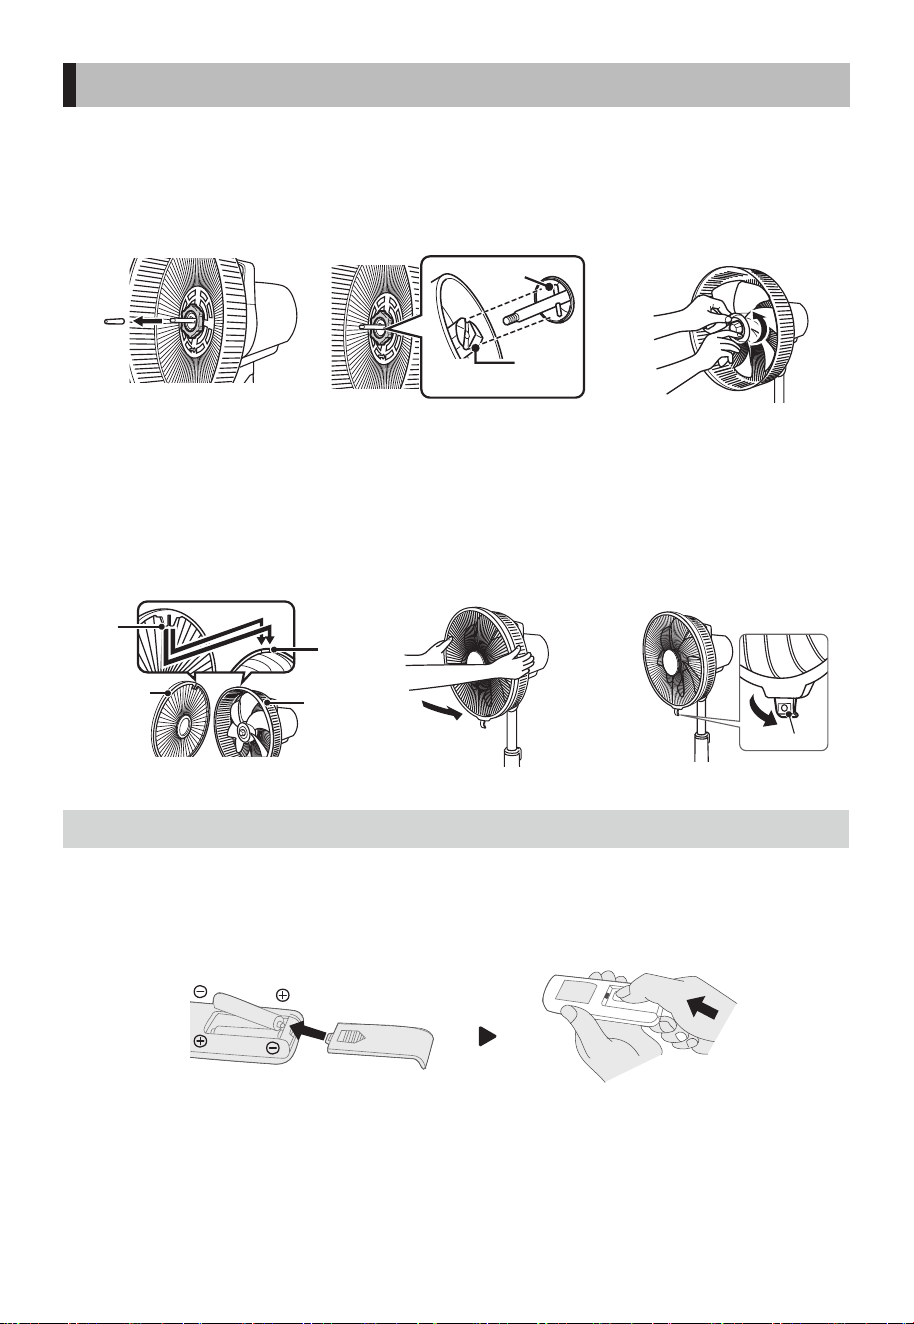
3. 取下蓋子,安裝風葉
• 取下蓋子。
• 將葉片的凹槽對準電機軸上
的凸釘,對齊凹部並扣合。
• 用手固定葉片,向左旋轉旋
轉頭,並以緊固手柄旋轉葉
片,確認旋轉頭不會脫落。
凸釘
凹陷部分
葉片的凹槽
蓋子用於儲存,
請勿丟棄。
4. 固定前網罩
• 取下網扣,將前網罩的扣齒
對準後網罩的「對齊標記」
插入。
• 從前網罩上方將前網罩固定
到後網罩上,插入。
• 使用網扣固定。
扣齒
前網罩
匹配標記
後網罩
網扣
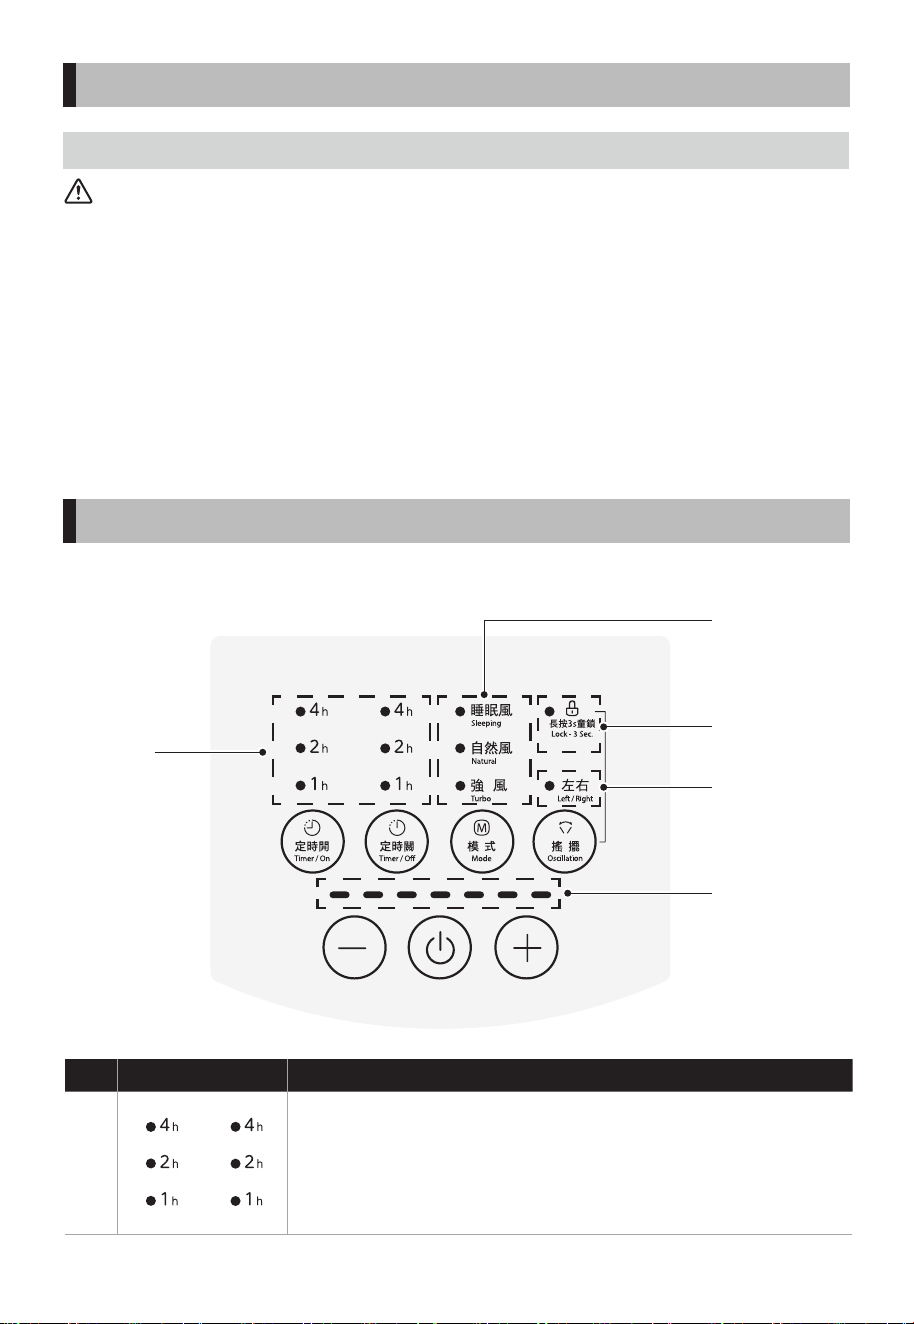
遙控器電池安裝
圖 1
• 用手指滑動移除電池盒蓋。
• 插入 2 粒 AAA 電池,並確保電池按圖示方向放置(圖 1)。
• 按圖示方向滑動安裝電池盒蓋(圖 1)。
07
1
1
2
3
4
5
No
產品安裝
遙控器電池安裝
注意:
• 遙控器使用 AAA 碳鋅電池。
• 請勿使用充電電池。切勿使用經過改裝或損壞的電池。
• 請勿將本産品或電池暴露在過高的溫度環境中。
• 請勿為不可充電電池充電。
• 電池需按正確極性插入。耗盡的電池應從裝置中取出並安全棄置。
• 若裝置長期閒置,應將電池取出,並避免令電源端子短路。
• 請勿將遙控器電池投入火中,否則可能導致電池爆炸或洩漏。
• 請勿混用新舊電池。請勿混用鹼性電池、標準(碳鋅)電池或充電(鎳鎘)電池。
• 如果發現電池有泄漏現象,請立即停止使用該産品幷切斷電源。
• 將有泄漏的電池放入密封袋或防漏容器中,將其標記爲“泄漏電池”,然後將其送至指定回收點
進行處理。
使用說明
• 請將電源插頭插入插座。
• 插入後,主體會發出「嗶」的聲音。
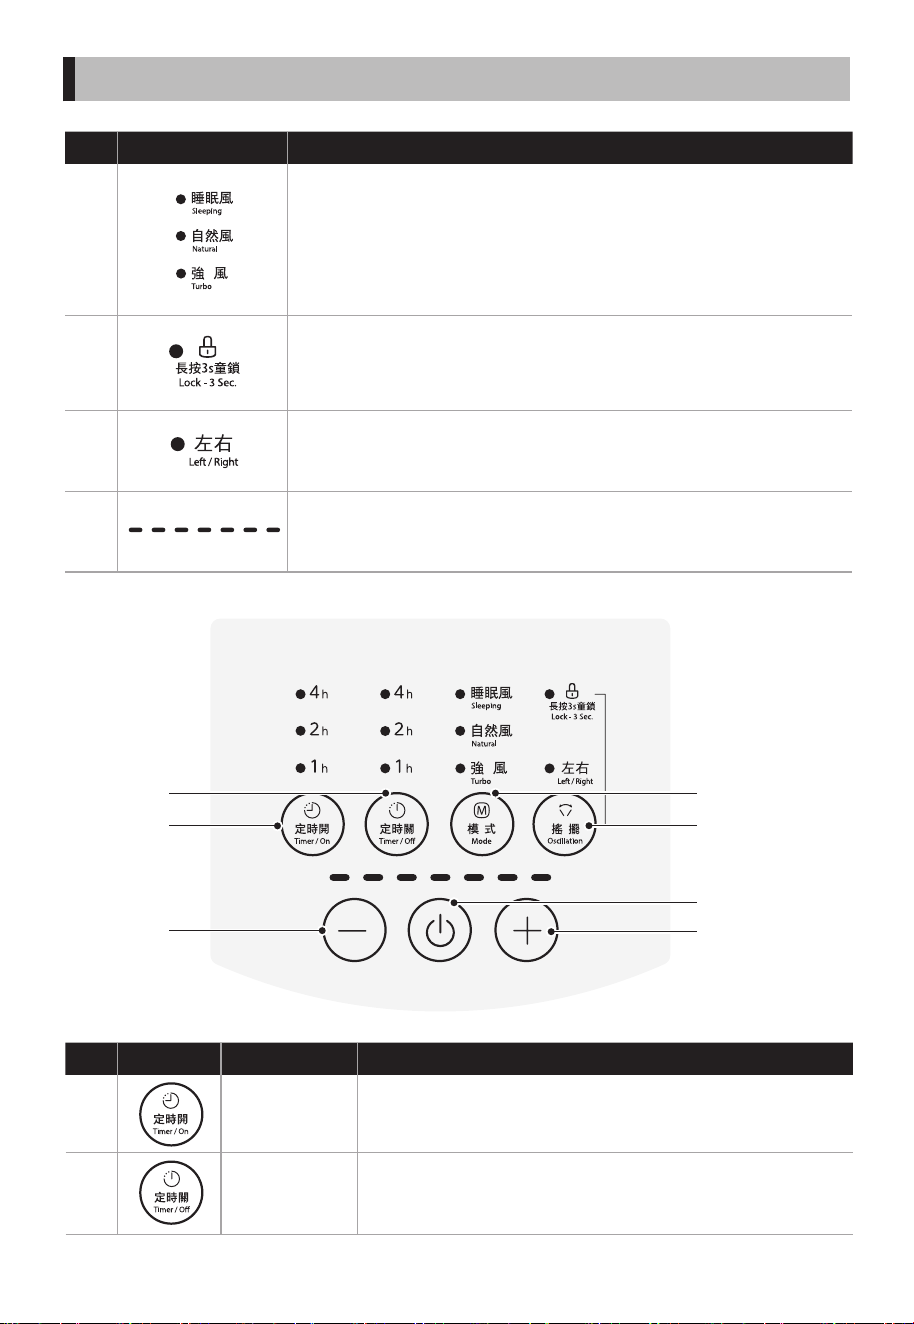
描述指示燈
• 定時開/關設置顯示燈
No
A
08
2
3
4
B
5
A
E
B C
D
F
E
No
使用說明
描述指示燈
• 睡眠風顯示燈
適合嬰兒、長者及臥室睡眠等場景。
• 自然風顯示燈
適合日常休閒及輕度降溫需要。
• 強風顯示燈
適合在快速降溫或高溫環境中使用。
• 兒童鎖顯示燈
防止兒童誤觸操作的安全鎖定。
• 左右搖擺顯示燈
• 風速檔位顯示燈
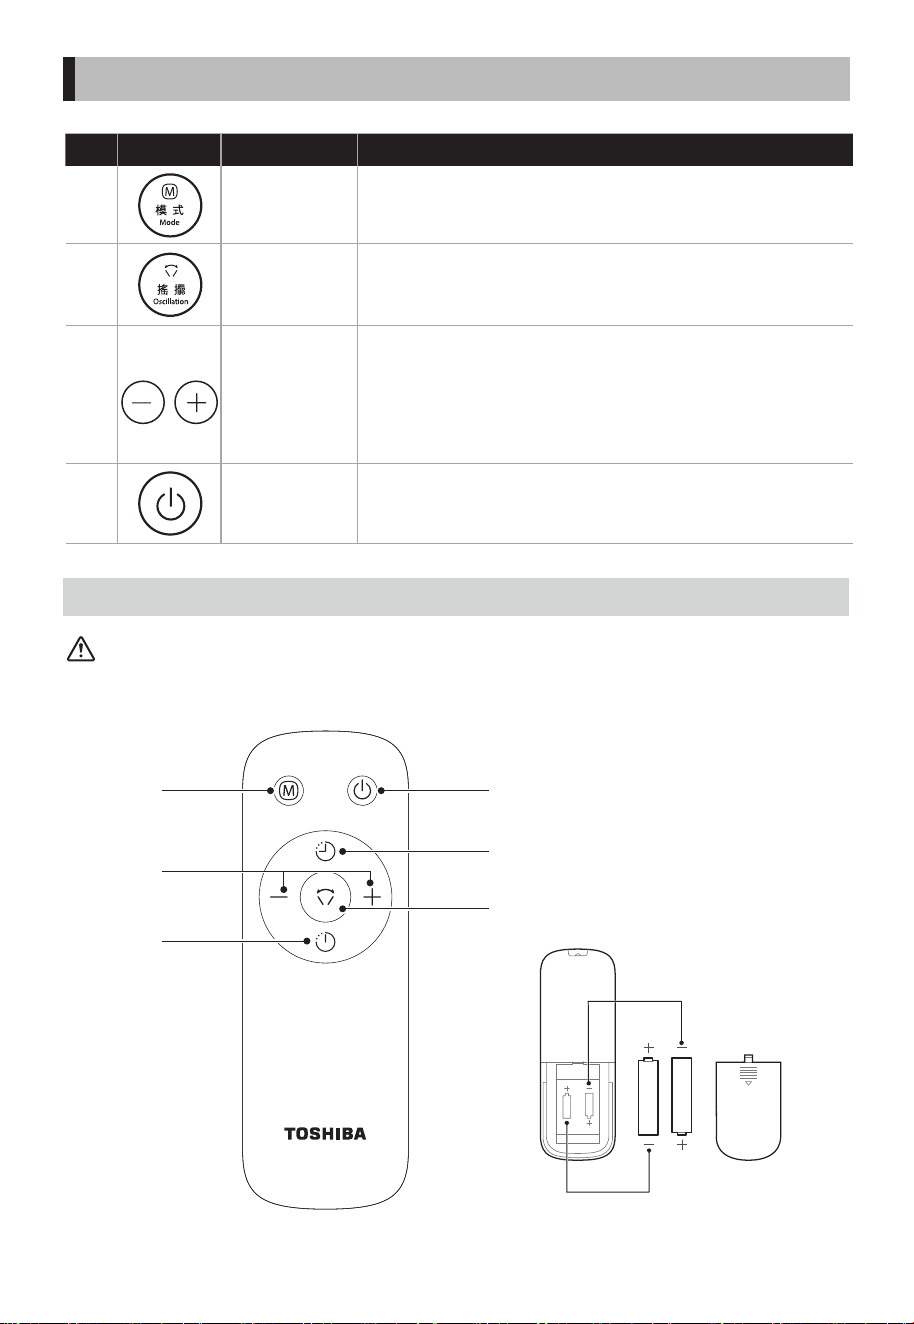
操作說明描述按鈕
定時開按鈕
定時關按鈕
• 關機狀態下,短按此按鈕設定預約定時開機
(0-1-2-…6-7 小時依次序循環設定)。
• 在開機狀態下,短按此按鈕設定預約定時
關機(0-1-2-…6-7 小時依次序循環設定)。
09
C
D
E
F
2
3
1
4
5
6
No
使用說明
操作說明描述按鈕
模式按鈕
左右搖擺按鈕
設定風速檔位
開/關機按鈕
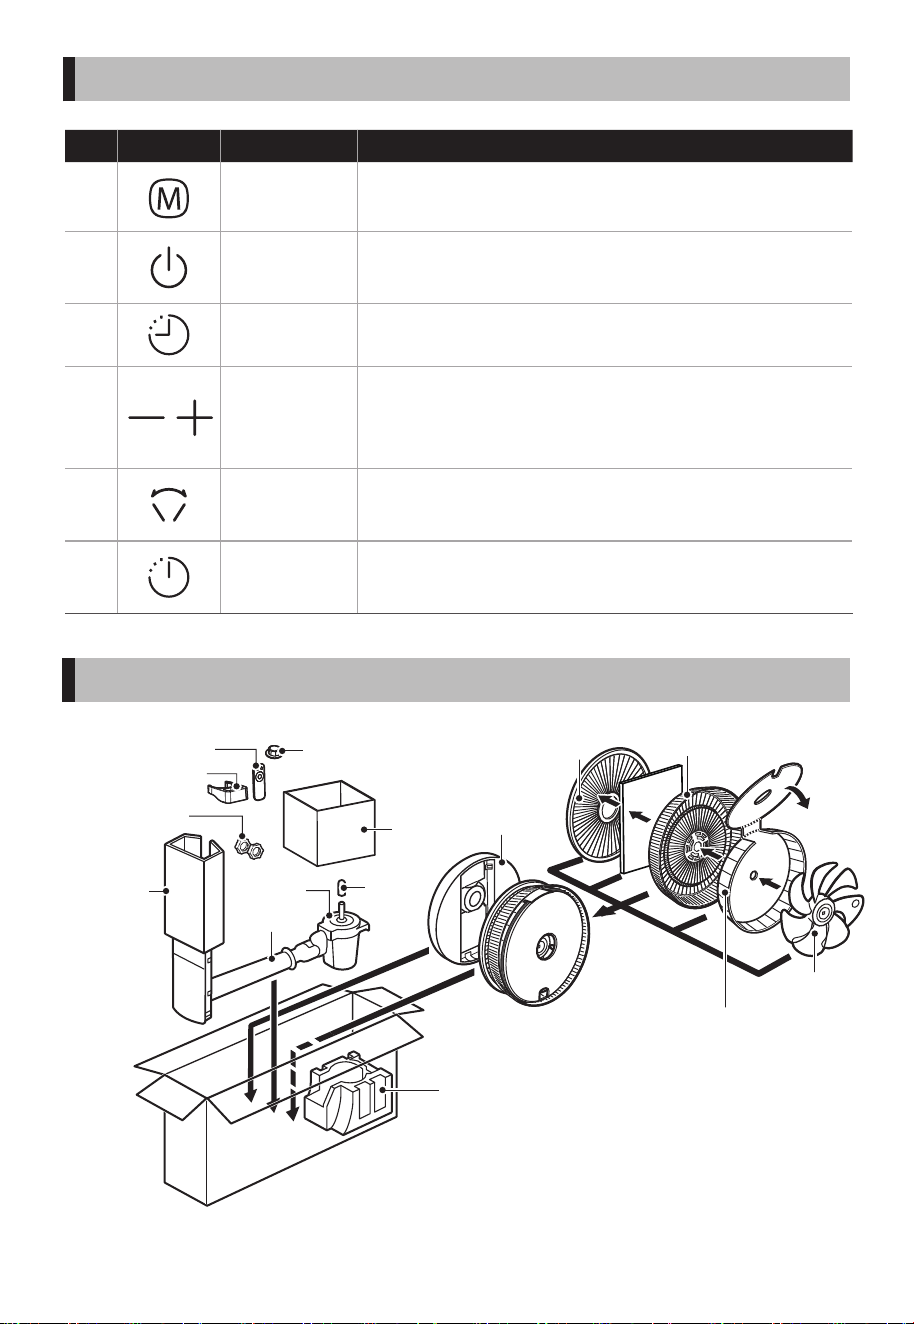
• 短按此按鈕切換模式(正常風→強風→自然風→睡眠風
依次序循環設定)。
• 單按此按鈕以開啟或關閉左右搖擺功能。
• 長按此按鈕 3 秒可關閉/開啟童鎖。
• 設定風速檔位
• 正常風模式下,短按「-/+」按鈕可循環調節風速 1–7級。
• 在自然風或睡眠風模式下,短按「-/+」按鈕可循環調節風
速 1–3 級。
• 強風模式下按「-/+」按鈕無效。
• 按一下此按鈕以開啟或關閉機器電源。
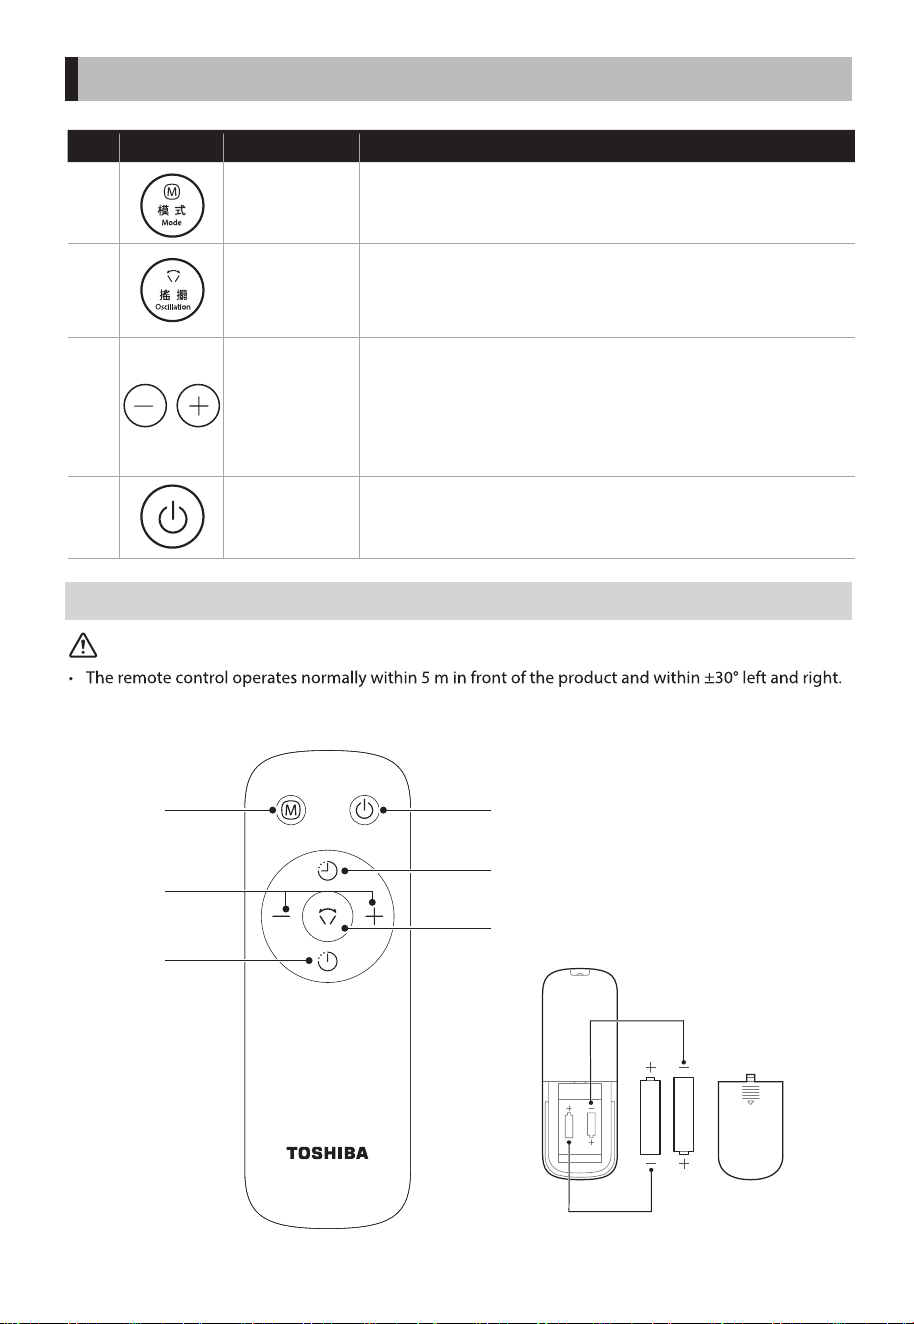
遙控器按鍵說明
注意:
• 遙控器在產品正面 5 米內、左右角度在 ±30°範圍內可正常使用。
• 遙控器電池中含有許多重金屬和酸鹼等物質,威脅人類健康;廢舊電池應分類回收。
電池(AAA 1.5 V)
電池
電池
No
1
2
3
4
10
使用說明
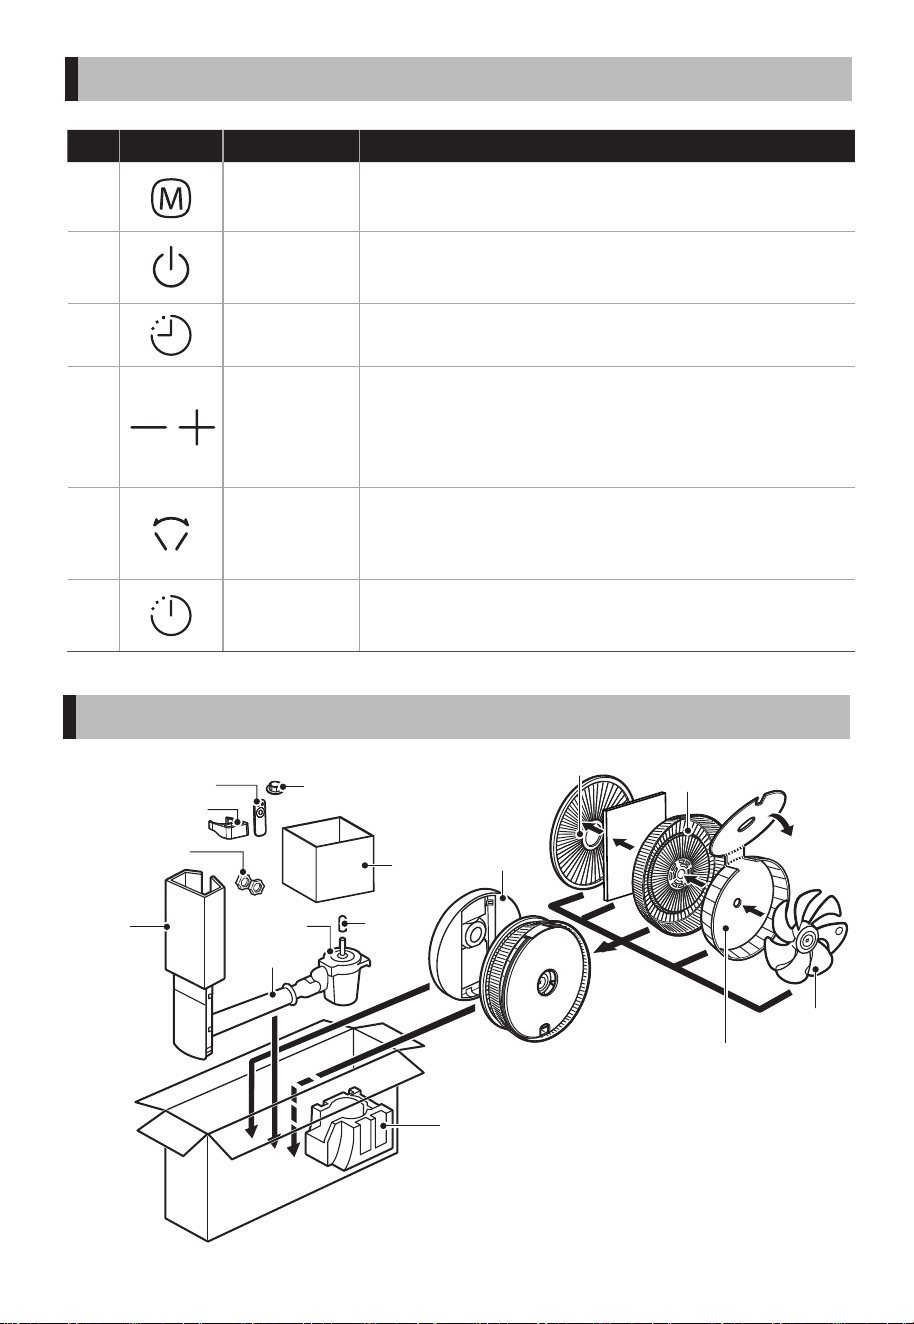
操作說明描述按鈕
• 關機狀態下,短按此按鈕設定預約定時開機
(0-1-2-…6-7 小時依次序循環設定)。
• 正常風模式下,短按「-/+」按鈕可循環調節風速 1–7 級。
• 在自然風或睡眠風模式下,短按「-/+」按鈕可循環調節風
速 1–3 級。
• 強風模式下按「-/+」按鈕無效。
• 短按此按鈕,依次循環切換模式
(正常風→強風→自然風→睡眠風)。
• 按一下此按鈕以開啟或關閉機器電源。
模式按鈕
開/關機按鈕
定時開按鈕
設定風速檔位
5
• 單按此按鈕以開啟或關閉左右搖擺功能。
左右搖擺按鈕
6
• 在開機狀態下設定定時關機,短按此按鈕設定預約定時關
機(0-1-2-…6-7 小時依次序循環設定)。
定時關按鈕
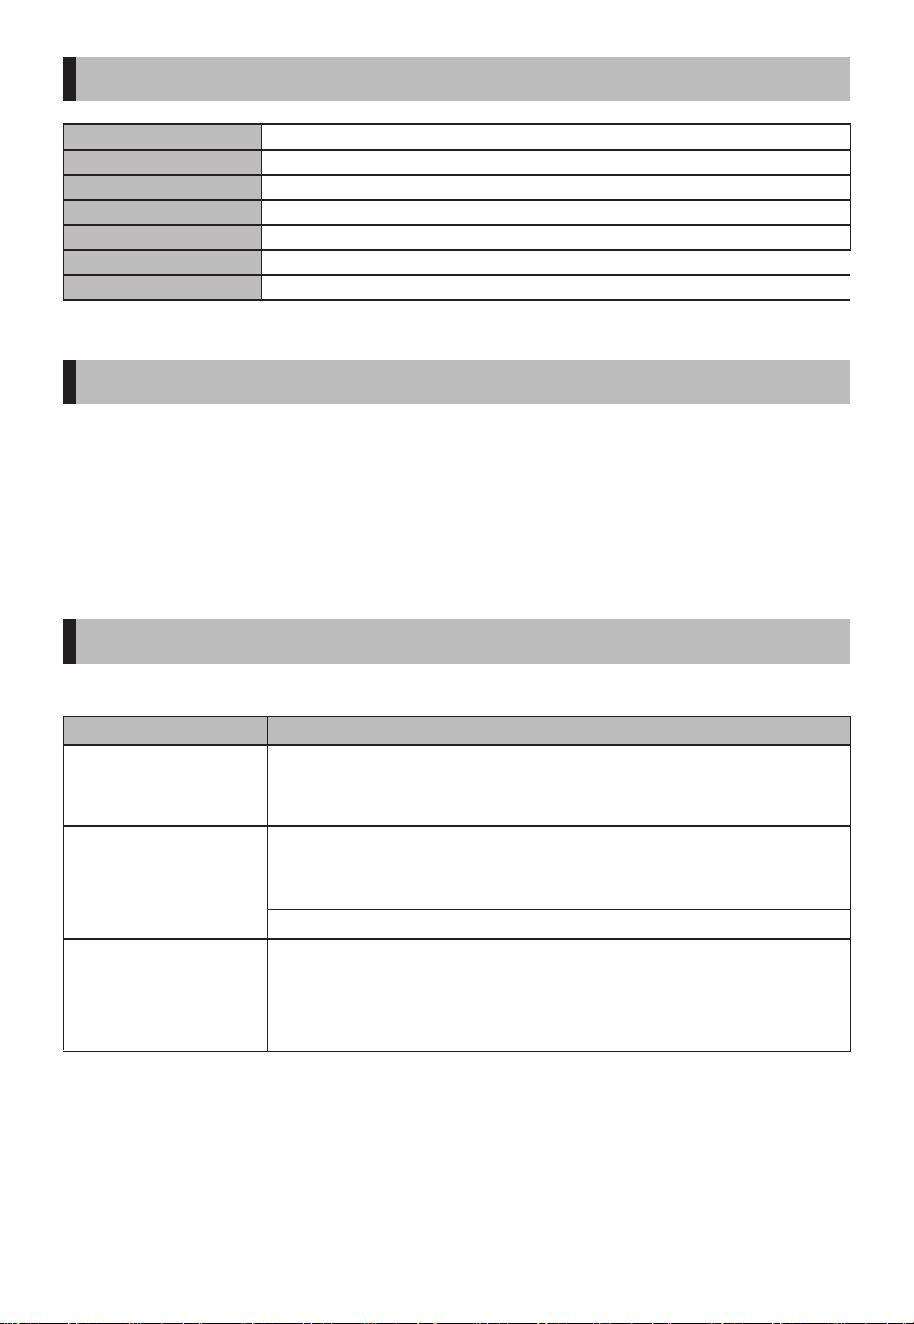
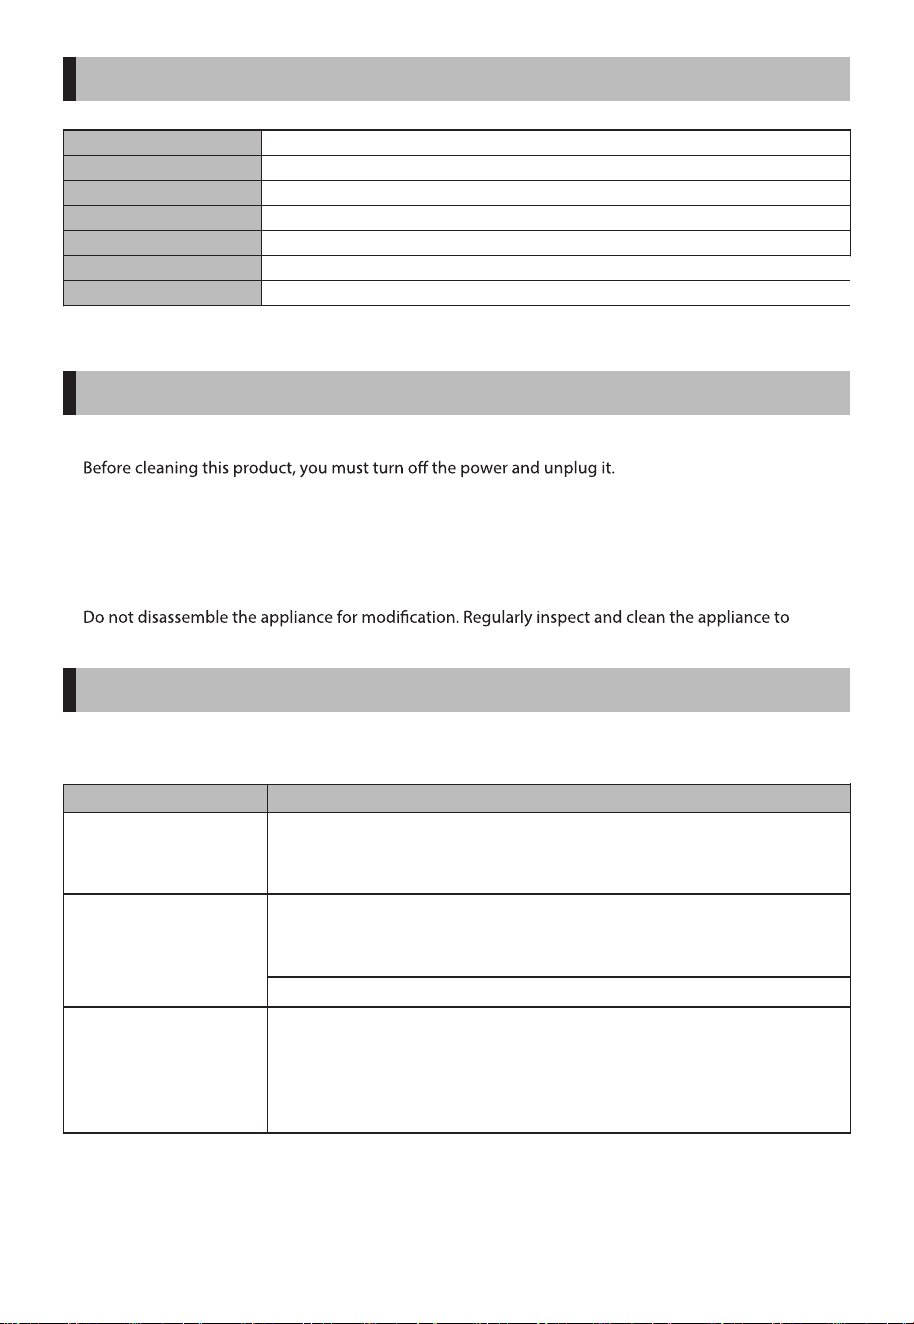
如何包裝
緊固環
(大vs小)
遙控器支架
遙控器
紙板附件
風葉螺母
紙板附件
底座
蓋子
支腳
電機
發泡膠
紙板附件
風葉
後網罩前網罩
11
產品參數
型號
工作電壓
額定頻率
額定功率
噪音
產品尺寸(WxDxH)
產品淨重
F-DLE70HK(W)
50Hz
16W
220-240V~
≤60dB(A)
360x350x(720~870)mm
3.76kg
清潔保養
故障排除
注意事項
• 清潔本產品前,必須關閉電源並拔下插頭。
• 清潔後,必須待機器充分乾燥,方可通電或存放。
• 長期不使用時,請將電源線插頭拔下,建議用原有包裝妥善放好,收藏於乾燥地方。
• 禁止用水直接沖洗機身,可用含少許中性洗滌劑的軟布輕擦機身表面,然後抹乾。請勿使用任何
具研磨性之清潔劑或溶劑,例如汽油。
• 禁止拆開機器進行改裝,建議定期對機器進行檢查和清潔,以延長其使用壽命。
如果風扇在使用過程中出現異常情況,請在報修前檢查下列各項。
問題 檢查以下內容
扇葉不旋轉。
無法用遙控器操作。
扇葉旋轉,但發出奇怪
的聲音。
• 風扇扇葉是否安裝正確?
• 電源插頭是否已插入插座?
• 是否有扇葉接觸防護罩?
• 螺旋轂蓋是否已將扇葉正確固定到位?
• 前後網罩部分是否安裝正確?
• 扇葉是否有接觸到網罩?
• 扇葉和網罩是否乾淨?
• 請參閱「遙控器按鍵說明/遙控器電池安裝」—— P05/P06/P08/P09
• 電池是否已耗盡?
• 電池的安裝方向(+ 的方向)是否正確?
• 兒童鎖是否已設定?

# MatterDetails
www.toshiba-lifestyle.com/hk

AIR CIRCULATION FAN
USER
MANUAL
F-DLE70HK(W)

01
CONTENTS
SAFETY INSTRUCTIONS .................................................................................................................................... 02
PRODUCT OVERVIEW ........................................................................................................................................ 04
PRODUCT INSTALLATION ................................................................................................................................ 05
USER INSTRUCTIONS ......................................................................................................................................... 07
HOW TO PACK ...................................................................................................................................................... 10
PRODUCT SPECIFICATIONS ............................................................................................................................ 11
CLEANING AND MAINTENANCE .................................................................................................................... 11
TROUBLESHOOTING .......................................................................................................................................... 11
Thank you very much for purchasing a Toshiba electric fan.
• To ensure correct and safe use of this fan, please read this user manual carefully before use and ensure
you fully understand its contents.
• Please keep this user manual for future reference.
02
SAFETY INSTRUCTIONS
CAUTION
• Read Rules for Safe Operation and Instructions Carefully.
• This appliance is not intended for use by persons (including
children) with reduced physical, sensory or mental capabilities, or
lack of experience and knowledge, unless they have been given
supervision or instruction concerning use of the appliance by a
person responsible for their safety.
• Children should be supervised to ensure that they do not play
with the appliance.
• Never insert fingers, pencils, or any other object through the grille
when fan is running.
• Disconnect fan when moving from one location to another.
• Be sure fan is on a stable surface when operating to avoid
overturning.
• Do not use fan in window, rain may create electrical hazard.
• This appliance is for household use only.
• If the supply cord is damaged, it must be replaced by the
manufacturer, its service agent or similarly qualified persons in
order to avoid a hazard.
• To protect against the risk of electrical shock, do not immerse the
unit, cord or plug in water or other liquid.
• When the appliance is not in use and before cleaning, unplug the
appliance from the outlet.
• When the fan was assembled, the rotor blade guard shall not be
taken off anymore.
- Unplug fan before cleaning.
- The rotor guard shall not be dissembled/opened to clean the
rotor blades.
- Wipe the fan enclosure and rotor blade guard with a slightly
damp cloth.
WARNING

03
SAFETY INSTRUCTIONS
• Ensure that the fan is switched off from the supply mains before
removing the guard.
• WARNING: Keep out of reach of children. Swallowing can lead to
chemical burns, perforation of soft tissue, and death. Severe burns
can occur within 2h of ingestion. Seek medical attention
immediately.
• Do not expose the appliance or battery to excessive temperatures.
• If the appliance is to be stored unused for a long period, the
batteries should be removed. Do not use modified or damaged
batteries.
WARNING
04
PRODUCT OVERVIEW
NAMES OF PARTS
Note:
The product's packaging box, packaging parts, and motor shaft cover are required for storage.
Please be careful not to lose them.
Fastening ring
(large)
Bottom housing
Remote control
Remote control
holder
Receiver window
Control panel
Motor
Sliding tube
Support leg
Power plug
Power cord
Height adjustment
button (rear)
Remote control
receiver window
Grille ring
assembly
To tighten, turn to
the left; to loosen,
turn to the right.
Transmitter
(Cover: remove during assembly)
Protrusion
Motor shaft
Handle
Rear grille
Round hole
Fastening ring (small)
Fan blade
• Do not remove
the blade label.
Grille clip
After installation,
secure with screws.
Front grille
ACCESSORIES LIST
Remote
control x1
Batteries x2 User manual
x1
Grille nut
(small) x1nut(large)
x1
Fan blade
retaining nut
x1
Remote control
holder x1
05
PRODUCT INSTALLATION
WARNING
Operating without the
blades and grille installed,
or not pressing the height
adjustment button
(may cause injury).
Do not step on the power
cord with the base (risk of
fire and electric shock).
FORBIDDEN
Unplug the power
plug during assembly,
cleaning, or moving
(to prevent electric
shock and injury).
Unplug
the plug
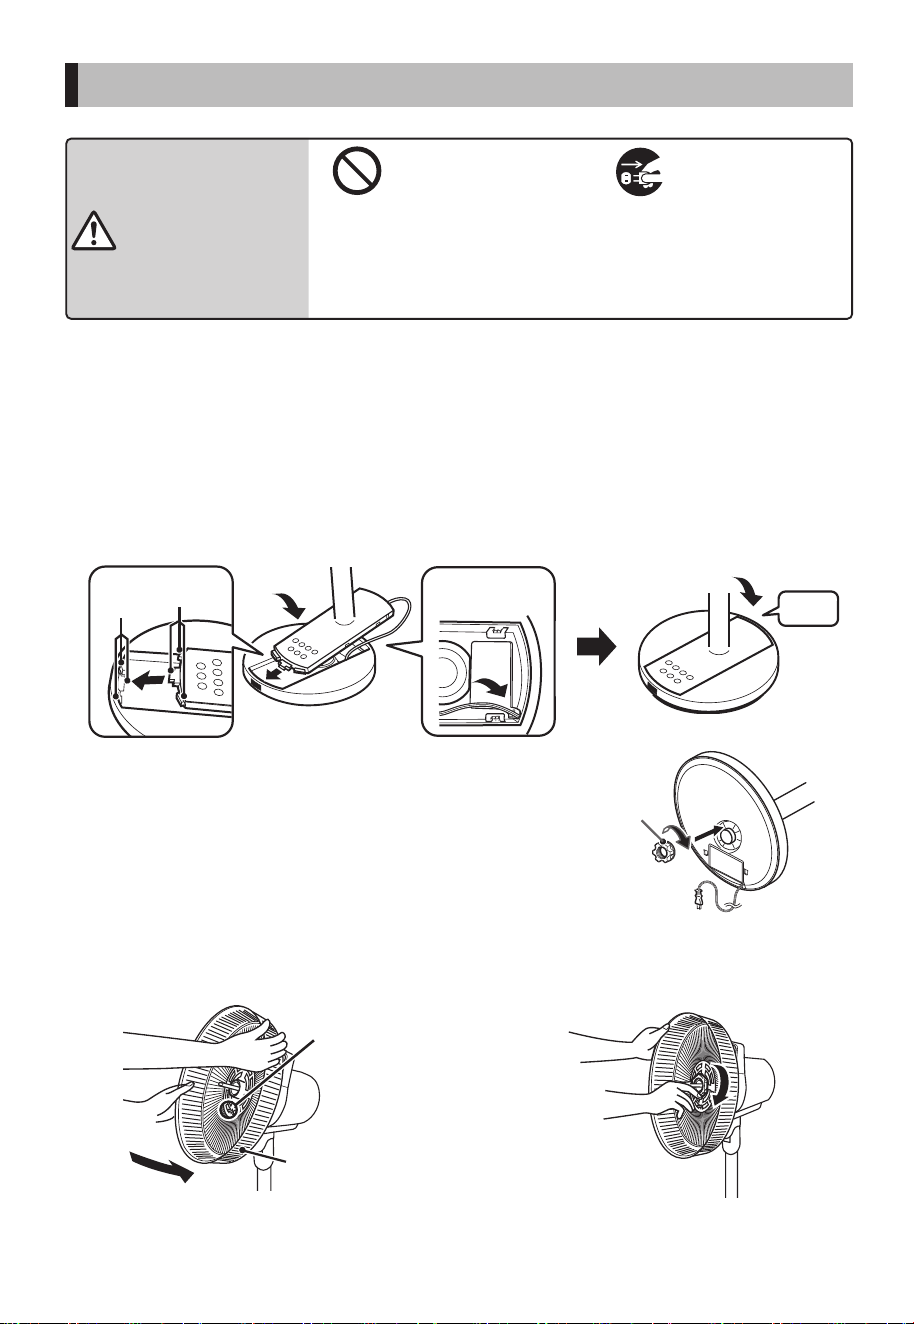
The support leg cannot stand on its own. Lay the unit flat before assembly.
• When holding the support leg, please grasp it firmly with both hands.
Holding with one hand may cause imbalance; the motor portion may sag and result in injury.
• When it falls over, do not apply any load or impact to the motor shaft.This may be the cause of the
malfunction.
1. Secure the support leg to the base.
• Route the power cord through the hole in the base, insert the guiding parts (3 places) of the
support pole into the guiding insertion holes (3 places) in the base, and attach the support pole.
• Please do not pinch the power cord or step on the base.
Guide board
inserted into
the support.
Push in
Route the power
cord through
the hook.
Click
• Hold the pole and base with your hand, lay
them horizontally, rotate the large fastening
ring to the right to tighten it, and ensure the
large fastening ring is secure.
2. Secure the protective grille to the motor unit.
• Lift the motor unit slightly upward, and insert
the round part of the protective grille into the
protrusion beneath the motor shaft
• Turn the small fastening ring to the
right to ensure it is secured in place.
Round hole
Rear grille
Fastening ring (large)
06
PRODUCT INSTALLATION
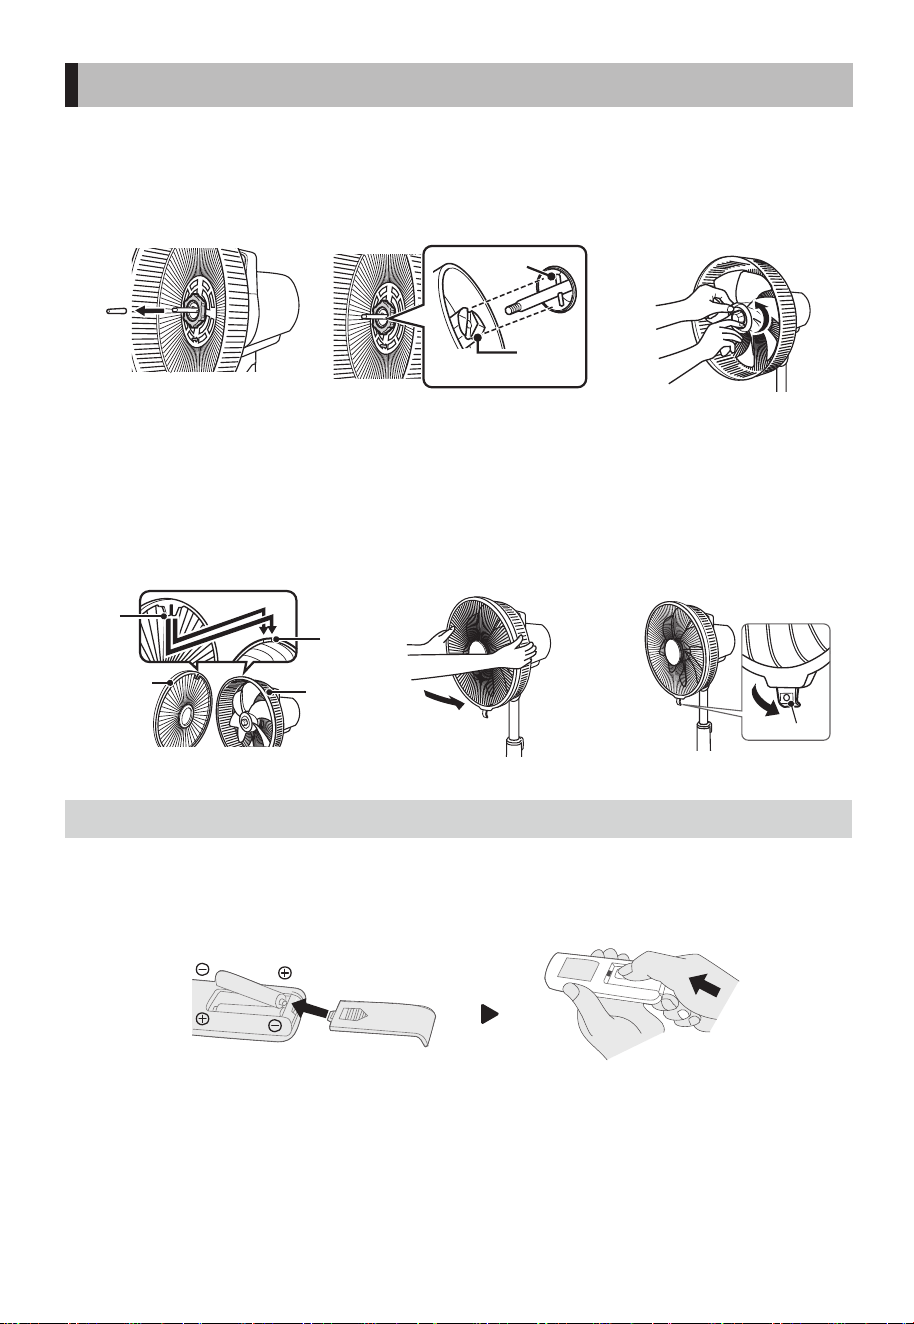
• Align the blade groove with the
protruding pin on the motor
shaft, align the recess and snap
it into place.
• Hold the blade with one hand,
rotate the retaining ring to the
left to tighten it, and ensure it
does not come loose.
Protruding pin
Recessed
area
Blade groove
The cover is for storage.
Please do not discard.
3. Remove the cover, install the fan blades
• Remove the cover.
4. Secure the front grille
• Remove the grille clip, align the
locking tabs of the front grille
with the "alignment mark" on
the rear grille, and insert.
• Insert the front grille into
the rear grille from above
to secure it.
• And secure with the grille
clips.
Locking
tab
Front grille
Matching
mark
Rear grille
Grille clip
REMOTE CONTROL BATTERY INSTALLATION
Figure 1
• Slide the battery compartment cover off with your finger.
• Insert 2 AAA batteries, and ensure the batteries are installed as shown (Figure 1).
• Slide the battery compartment cover in the direction shown to install it (Figure 1).
1
1
2
3
4
5
No
07
PRODUCT INSTALLATION
REMOTE CONTROL BATTERY INSTALLATION
Note:
• The remote control uses AAA carbon-zinc batteries.
• Do not use rechargeable batteries. Do not use modified or damaged batteries.
• Do not expose the appliance or battery to excessive temperatures.
• Non-rechargeable batteries are not to be recharged.
• Batteries must be inserted with the correct polarity. Depleted batteries should be removed from the
device and disposed of safely.
• If the device will be left unused for an extended period, remove the batteries and avoid shorting the
power terminals.
• Do not put the remote control batteries in fire; they may explode or leak.
• Do not mix new and old batteries. Do not mix alkaline batteries, standard (carbon-zinc) batteries, or
rechargeable (nickel-cadmium) batteries.
• If battery leakage is found, stop using the product immediately and disconnect the power supply.
• Put the leaking battery into a sealed bag or leak-proof container, mark it as "Leaking Battery" and send it
to a collection point for disposal.
USER INSTRUCTIONS
• Insert the power plug into the outlet.
• After insertion, the unit will emit a "beep" sound.
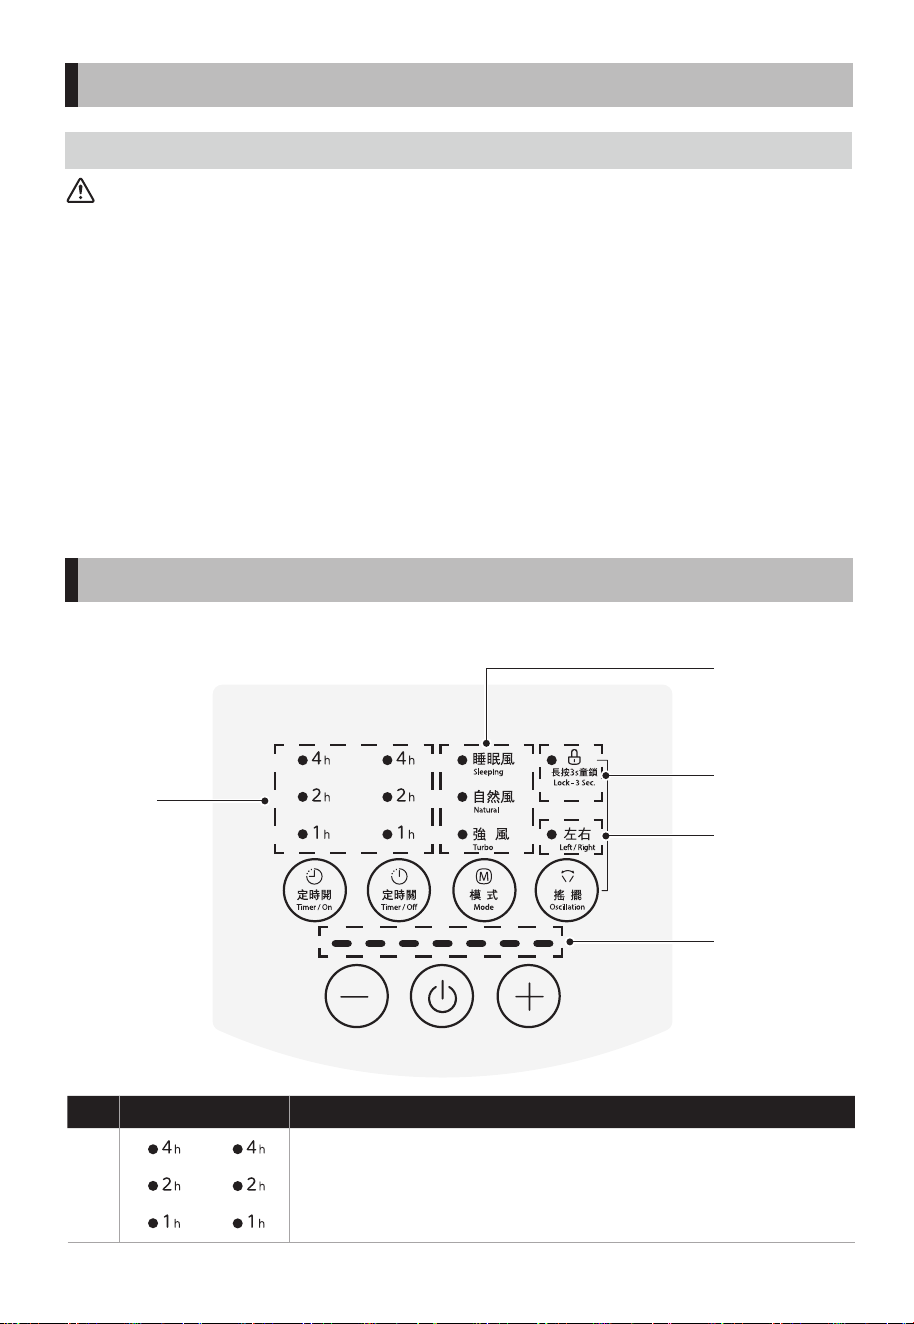
DescriptionIndicator Light
• Timer On/Off indicator light
No
A
2
3
4
B
5
A
E
B C
D
F
E
No
08
USER INSTRUCTIONS
DescriptionIndicator Light
• Sleep mode indicator light
Suitable for babies, the elderly, and bedroom sleeping scenarios.
• Natural mode indicator light
Suitable for daily leisure and gentle cooling needs.
• Strong mode indicator light
Suitable for rapid cooling or for use in high-temperature environments.
• Child lock indicator light
Child lock to prevent children from accidentally operating the controls.
• Left/right oscillation indicator light
• Fan speed indicator light
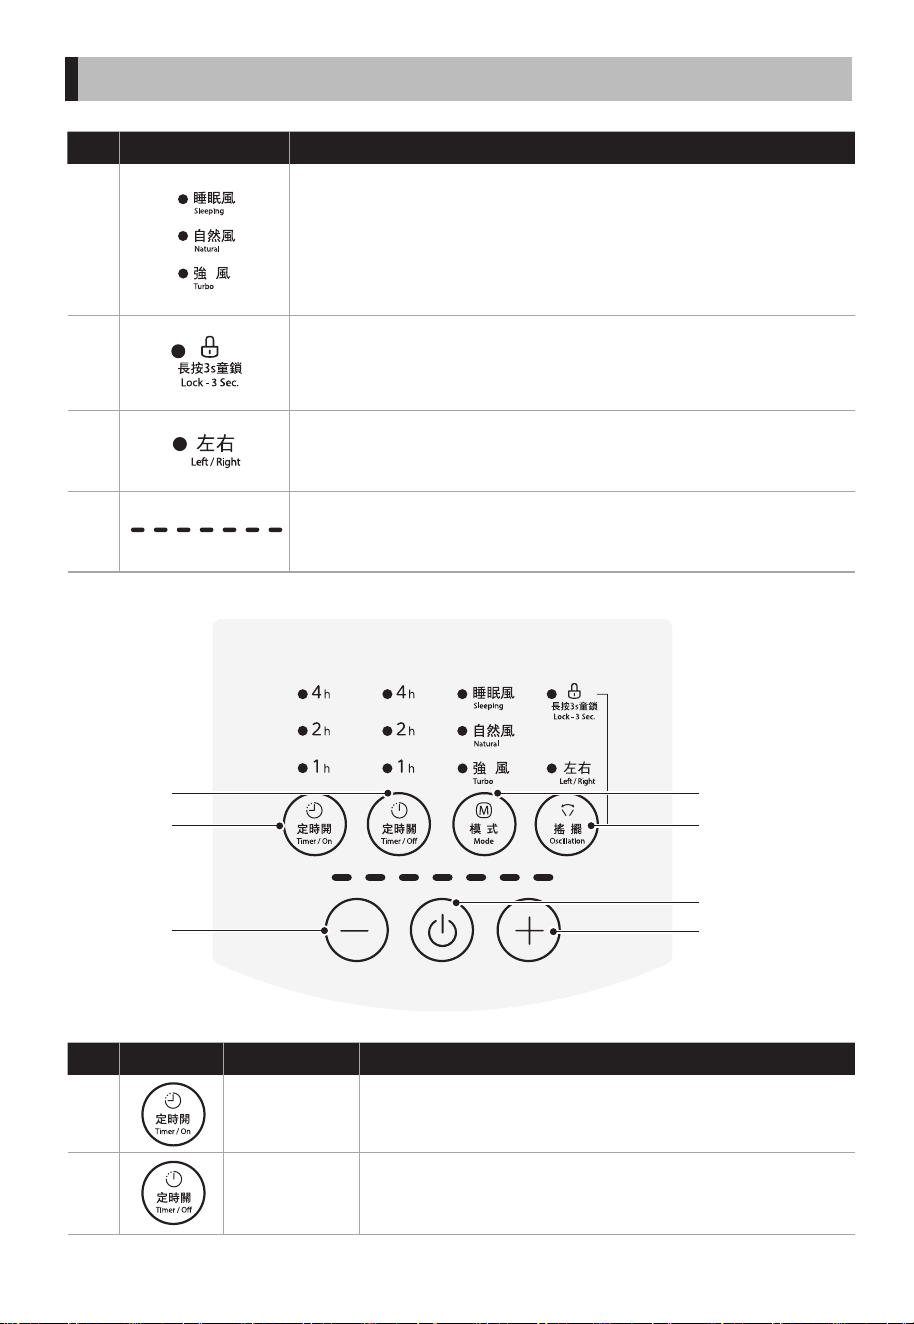
FunctionDescriptionButton
Timer On
Button
Timer Off
Button
• When the unit is off, short-press this button to set the
On-timer (cycles through 0, 1, 2, …, 6, 7 hours).
• While the unit is on, short-press this button to set the
Off-timer (cycles through 0, 1, 2, …, 6, 7 hours).
C
D
E
F
2
3
1
4
5
6
No
09
USER INSTRUCTIONS
FunctionDescriptionButton
Mode
Button
Left/Right
Oscillation
Button
Set fan speed
level
Power On/O
button
• Short-press this button to cycle modes in order
(Normal → Strong → Natural → Sleep).
• Press this button once to turn the left-right oscillation
function on or o.
• Press and hold this button for 3s to enable/disable the
child lock.
• Set fan speed level
• In Normal mode, briey press the "-/+" button to cycle
through fan speeds 1–7.
• In [Natural] or [Sleep] mode, short-press the "-/+" button to
cycle the fan speed through levels 1–3.
• Pressing the -/+ buttons has no eect in Strong mode.
• Press this button once to turn the power on or o.
REMOTE CONTROL BUTTON DESCRIPTION
Note:
• Remote control batteries contain many heavy metals, acids, alkalis, and other substances that threaten
human health; waste batteries should be sorted and recycled.
Battery (AAA 1.5 V)
Battery
Battery
No
1
2
3
4
10
USER INSTRUCTIONS
FunctionDescriptionButton
• When the unit is o, short press this button to set the
On-timer (cycles through 0, 1, 2, …, 6, 7 hours).
• In Normal mode, briey press the "-/+" button to cycle
through fan speeds 1–7.
• In [Natural] or [Sleep] mode, short-press the "-/+" button to
cycle the fan speed through levels 1–3.
• Pressing the -/+ buttons has no eect in Strong mode.
• Short press this button to cycle through modes
(Normal → Strong → Natural → Sleep).
• Press this button once to turn the power on or o.
Mode
Button
Power On/O
button
Timer On
Button
Set fan
speed level
5
• Press this button to turn the left-right oscillation function
on or o.
Left/Right
Oscillation
Button
6
• While the unit is on, short-press this button to set the
O-timer (cycles through 0, 1, 2, …, 6, 7 hours).
Timer O
Button
HOW TO PACK
Fastening ring
(large&small)
Remote control
holder
Remote control
Cardboard
accessories
Fan blade retaining nut
Cardboard
accessories
Bottom
housing
Cover
Support leg
Motor
Styrofoam
Cardboard accessories
Fan blade
Rear grille
Front grille
11
PRODUCT SPECIFICATIONS
Model
Operating voltage
Rated frequency
Rated power
Noise
Product Size (WxDxH)
Product Net Weight
F-DLE70HK(W)
50Hz
16W
220-240V~
≤60dB(A)
360x350x(720~870)mm
3.76kg
CLEANING AND MAINTENANCE
TROUBLESHOOTING
Precautions
•
• After cleaning, allow the unit to dry completely before turning on or storing.
• If the fan will not be used for an extended period, unplug the power plug. We recommend storing it in
its original packaging in a dry place.
• Do not wash the body directly with water. Use a soft cloth lightly dampened with a small amount of
neutral detergent to gently wipe the surface, then wipe dry. Do not use any abrasive cleaners or
solvents, such as gasoline.
•
extend its service life.
If the fan exhibits an abnormal condition during use, please check the following items before requesting
repair.
Troubleshooting Check the following
Fan blades do not
rotate.
Cannot operate with
the remote control.
The fan blades rotate
but emit an unusual
noise.
• Are the fan blades installed correctly?
• Is the power plug inserted into the outlet?
• Are the fan blades touching the guard?
• Is the screw-on hub cap correctly securing the fan blade in place?
• Are the front and rear grilles installed correctly?
• Are the fan blades touching the grille?
• Are the fan blades and grille clean?
• See "REMOTE CONTROL BATTERY INSTALLATION/REMOTE CONTROL
BUTTON DESCRIPTION" —— P05/P06/P08/P09
• Are the batteries depleted?
• Is the battery installation direction (the + direction) correct?
• Is the child lock set?


# MatterDetails
www.toshiba-lifestyle.com/hk


