1 1
1:1
K
A
1
2
4
6
3
5
1
2
4
6
3
5
B
C
D
E
F
G
H
A
B
C
D
E
F
G
H
技术要求(版本号:B,2023-06)
2.该说明书的幅面大小为: A5 ,未注直线尺寸公差应符合GB/T1804-v;
4.说明书警语及认证标志应满足CE/UL标准,CE:警语部分大写字母高度不低于3mm,CE标志不低于5mm,WEEE标志不低于7mm;
UL:大写字母字高不小于1/12”(2.11mm),小写字母字高不小于1/16”(1.6mm),“IMPORTANT SAFEGUARDS”,“SAVE
THESE INSTRUCTIONS”等词,其字高不小于3/16”(4.8mm),IMPORTANT SAFEGUARDS 必须在最前面。
5.产品应符合QMG-J53.021《产品说明书技术条件》的有关要求。
6.有ROHS指令要求的物料应符合美的企业标准QML-J11.006《产品中限制使用有害物质的技术标准》。
1.文字图案印刷颜色为:4色+485C ,印刷字体需清晰可见,文字不能粘到一起;
广东美的生活电器制造有限公司
会 签
钟冠华 李艳
古广君
古广君
2024-10-16
制 图
设 计
校 对
审 核
标准化
审 定
日 期
标记
处数 更改文件号 签 字 日 期
风扇
说明书
重点
校对项
1.物料编码
2.版面尺寸
3.材质标注
4.颜色标注
5.客户型号
6.产品名称
7.产品参数
8.电压功率
-----
-----
-----
9.单位符号
10.认证标志
16.LOGO比例
17.LOGO留白
18.东芝字体
11.回型标志
15.目录及
页码
12.ROHS标志
13.警语警语
及字高
14.控制面板
及功能
3.该说明书的装订方式为: 钉装 ;[70P以下为钉装,70P以上为胶装(特殊要求除外)]
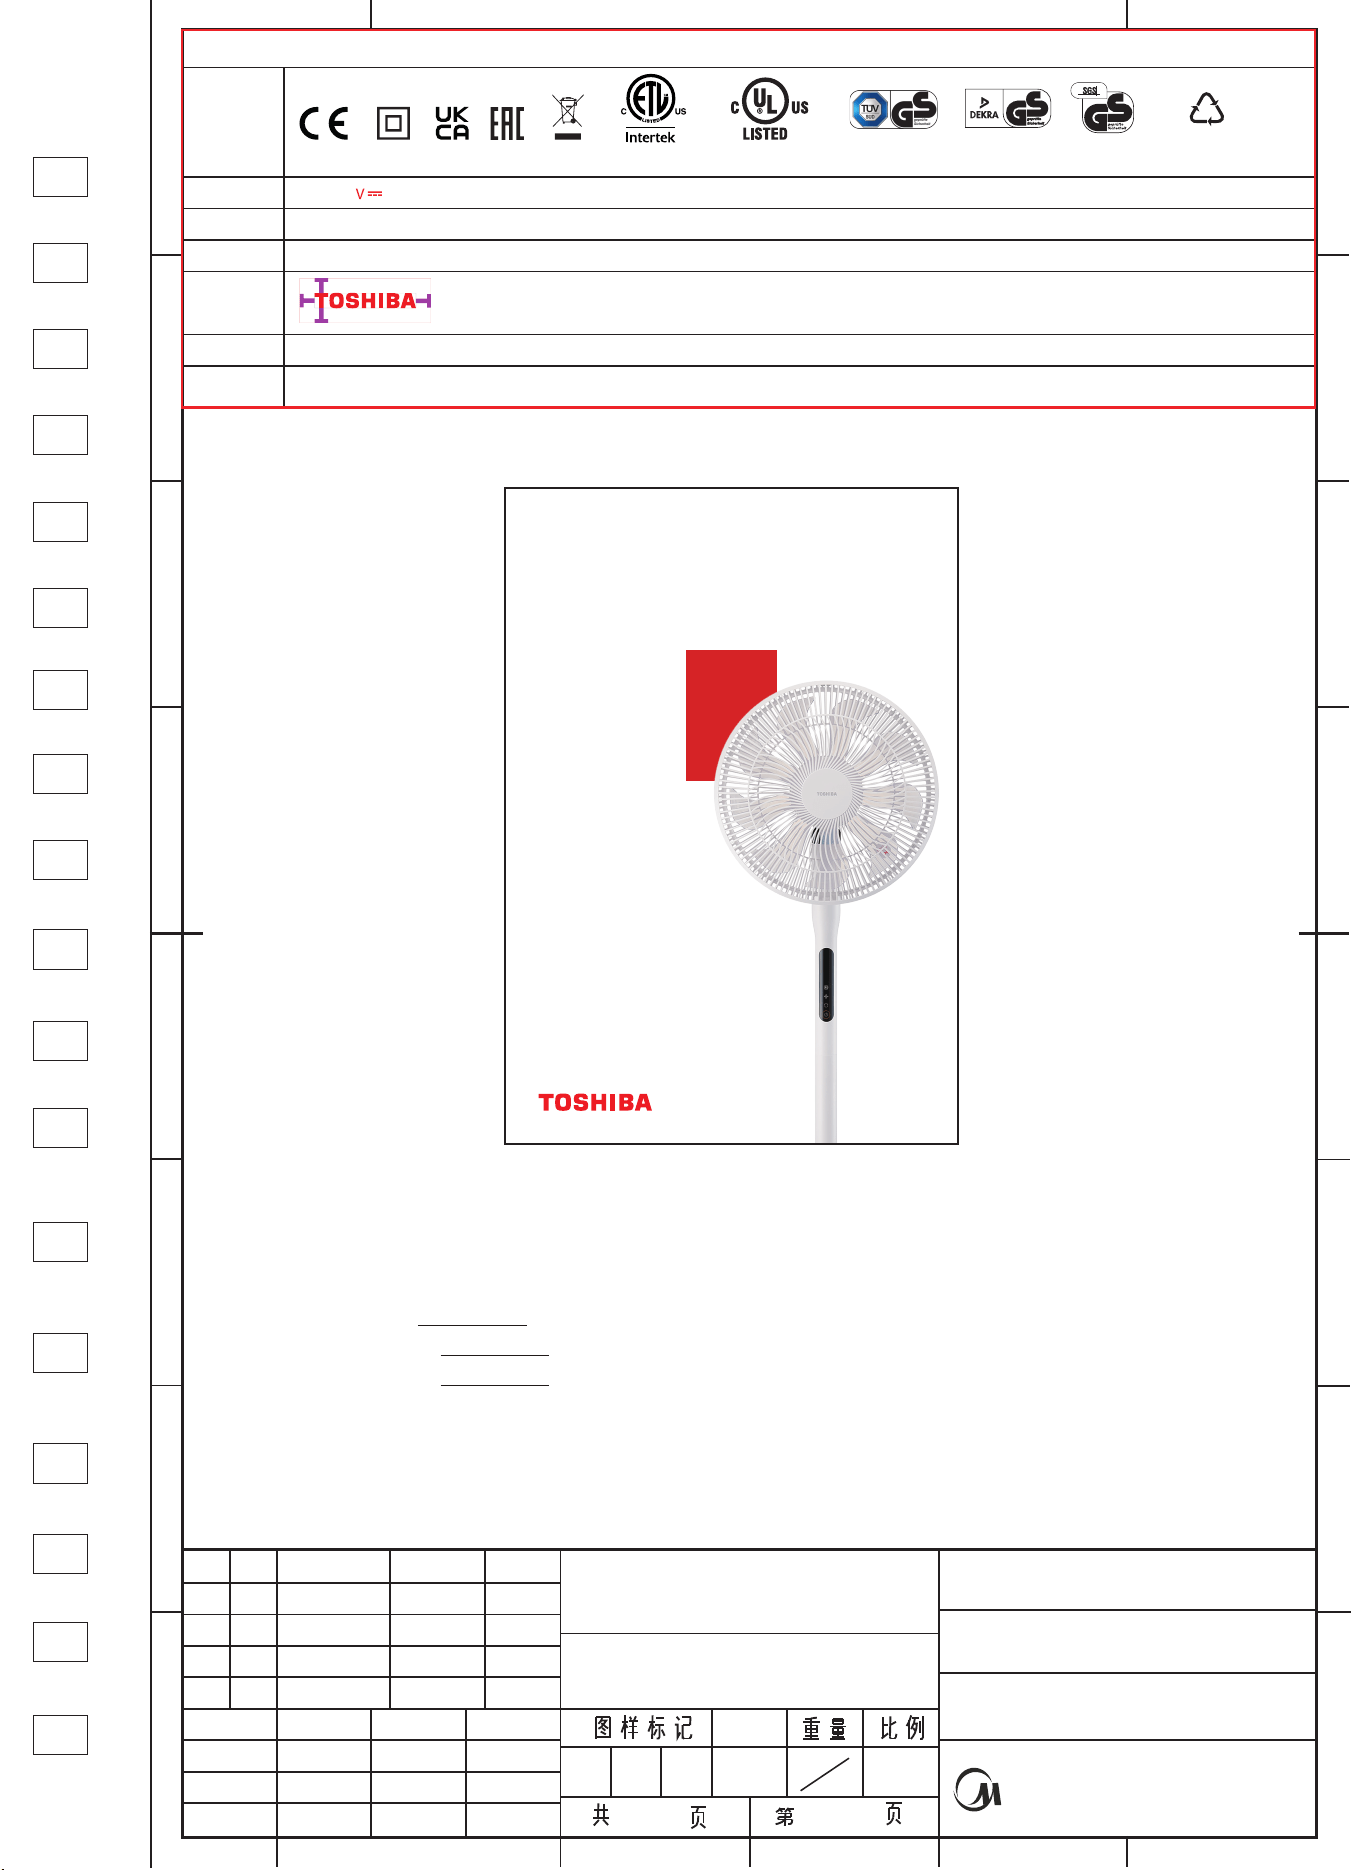
TOSHIBA-FS35-23BRD(F-DSC35SG(W))-0501
16161000A27562
材料: 105克双铜纸
认证图标
商标LOGO
单位表述
产地表述
字体要求
变更要求
000000
0000000
UL只有C+US或无ETL有C或US或C+US大于5mm
说明书、保修卡类
交流电: 频率: 功率: 容量: 电流: 压强:V~
Myriad pro Myriad pro Italic Myriad pro Condensed
MADE IN CHINA
图标丝印
Made in China
宽度不得小于16mm,四周留白大于T,商标不可变形,色值要求专色panton 485C或黑色
Made in P.R.C
Hz
正文: Myriad pro semibold小粗体:
Myriad pro semibold大粗体: 倾斜体: 缩进体:
W mL/L A Pa/kPa/MPa 长度:mm/cm/m 时间:s/min/h 重量:kg
直流电:
核对图标及丝印是否与面板一致(东芝有图标规范)
大于5mm 大于5mm 大于5mm 大于7mm GS图标无高度要求,印刷可见即可
标准元素核对表(此表仅用于印刷品制作过程核对标准内容,非印刷内容)
PAP
22
图纸变更需要核实变更内容点以及涉及的物料和MO单,尤其关注92的在途MO单
F-DSC35SG(W)
ELECTRIC FAN
USER
MANUAL
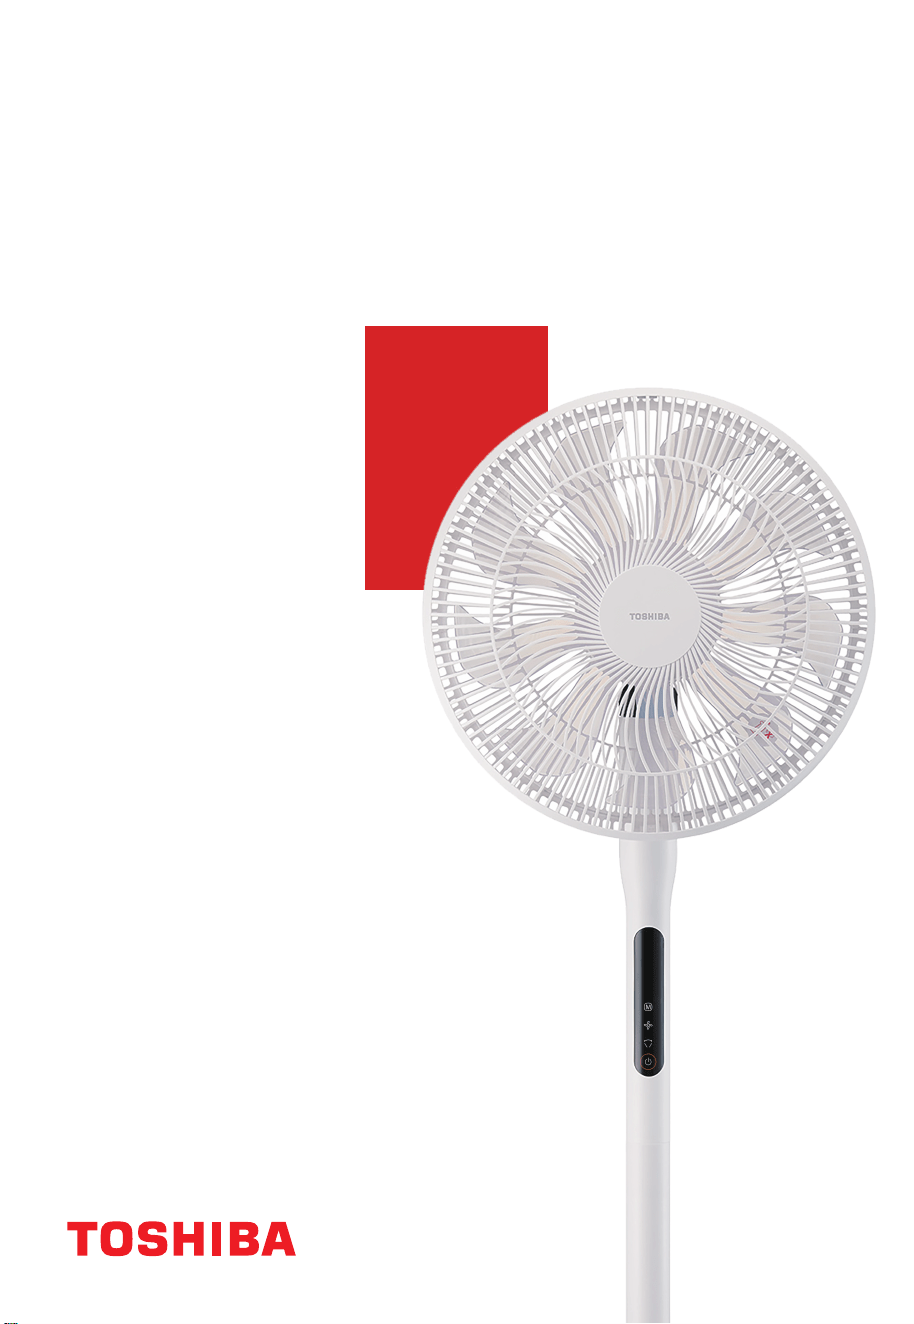
F-DSC35SG(W)
ELECTRIC FAN
USER
MANUAL


CONTENTS
Thank you very much for purchasing Toshiba electric fan.
SAFETY INSTRUCTIONS ......................................................................................................................................01
PRODUCT INTRODUCTION................................................................................................................................04
INSTALLATION INSTRUCTION ..........................................................................................................................05
OPERATING INSTRUCTION ................................................................................................................................07
SPECIFICATIONS....................................................................................................................................................10
CLEANING ANDMAINTENANCE ......................................................................................................................10
TROUBLESHOOTING............................................................................................................................................10
• In order to use this fan correctly and safely, please carefully read this instruction manual
to fully understand the content before using it.
• Keep this owner’s manual in a handy place for future reference..
1
SAFETY INSTRUCTIONS
Safety precautions
Always follow these instructions!
This manual provides instructions that must be observed when using the fan
in order to prevent danger to the user, other persons, and property.
Read Rules for Safe Operation and Instructions Carefully.
If the supply cord is damaged, it must be replaced by manufacturer or its
service agent or a similarly qualied person in order to avoid a hazard.
To protect against the risk of electrical shock, do not immerse the unit,
cord or plugin water or other liquid.
This appliance is not intended for use by persons (including children)
with reduced physical, sensory or mental capabilities, or lack of experi-
ence and knowledge, unless they have been given supervision or
instruction concerning use of the appliance by a person responsible for
their safety. Children should be supervised to ensure that they do not
play with the appliance.
When the appliance is not in use and before cleaning, unplug the
appliance from the outlet.
Keep electrical appliances out of reach from Children or inrm persons.
Do not let them use the appliances without supervision.
Indoor use only.
CAUTION
WARNING
2
SAFETY INSTRUCTIONS
1. Never insert ngers, pencils, or any other object through the grille when
fan is running.
2. Do not place the fan near the window, or the rainy day may cause electric
shock.
3. Household use only.
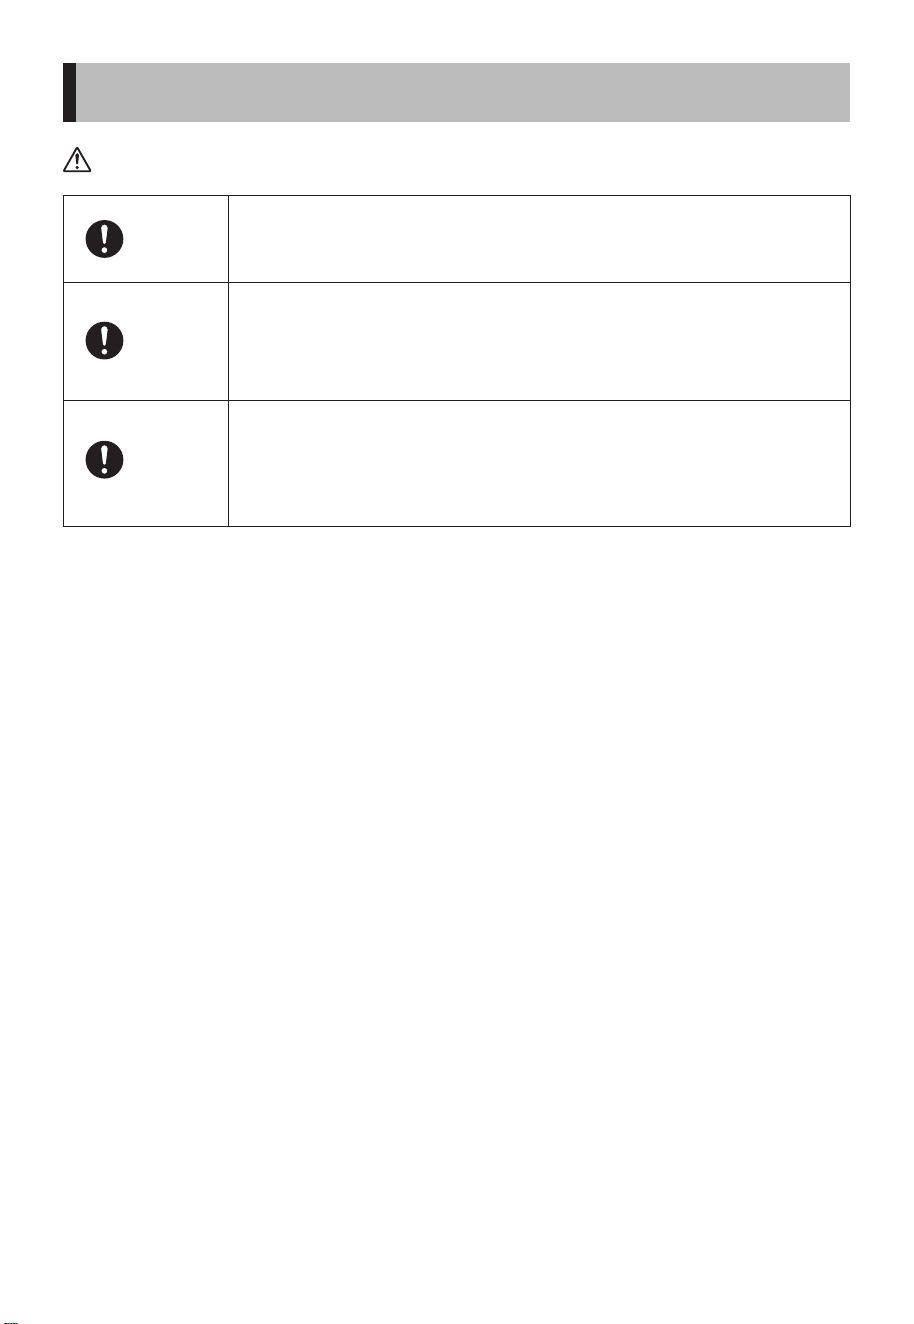
• This section describes the content and importance of safety matters to
prevent personal injury or property damage to users or others. Please read
the text with a full understanding of the following content, and be sure to
abide by the safety precautions described.
NOTE
It is prohibited to tilt manually when horizontal oscillator is
activated.
Prohibited
Do not connect the power supply until the product is installed.
Warning
Make sure the product is disconnected from the power supply
before removing the protective casing.
Warning
Do not plug or unplug the power plug with wet hands to avoid
the risk of electric shock.
Warning
Avoid using it near acid-base oils, insecticides, curtains and
other items.
Warning
Only the matching adapter can be used. Do not use other
adapters so as to avoid danger.
Warning
Cut o the power supply before moving the product.
Warning
When the product is running, do not put your ngers or sharp
objects into the grille.
Warning
Avoid use in direct sunlight or high humidity environments for
long periods of time.
Warning
It is prohibited to use it in places where there are hanging
objects that are easy to fall, where it is susceptible to impacts,
or where the placement is unstable. The product should be
placed stably when using it, please do not tip over or tilt.
Warning
3
SAFETY INSTRUCTIONS
Matters that may cause minor injury or property damage
Before use, please check whether the voltage used is the same
as the voltage marked on the product.
Warning
When you leave the machine or when the machine is not in use,
turn o the power and unplug the power plug to avoid circuit
failure and accidents.
Warning
Before use, check whether the power cord and plug are
damaged. If the power cord is damaged, it must be replaced by
the manufacturer, its maintenance department or a specialist
from a similar department in order to avoid danger.
Warning
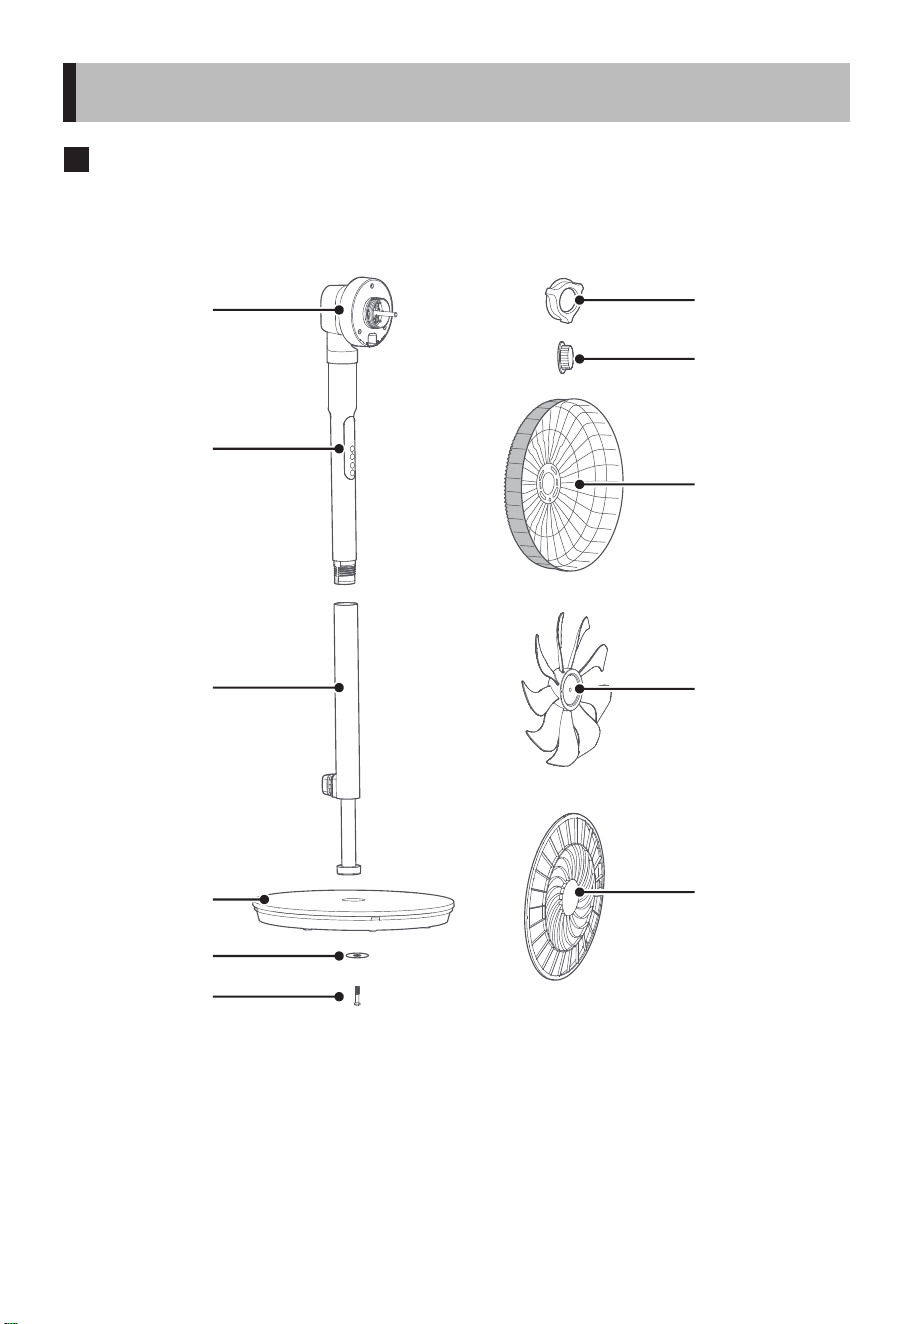
Parts name
4
PRODUCT INTRODUCTION
Motor
Grille lock nut
Blade lock nut
Rear grille
Blade
Front grille
Body
Pole
Base
Screw washer
Base screw
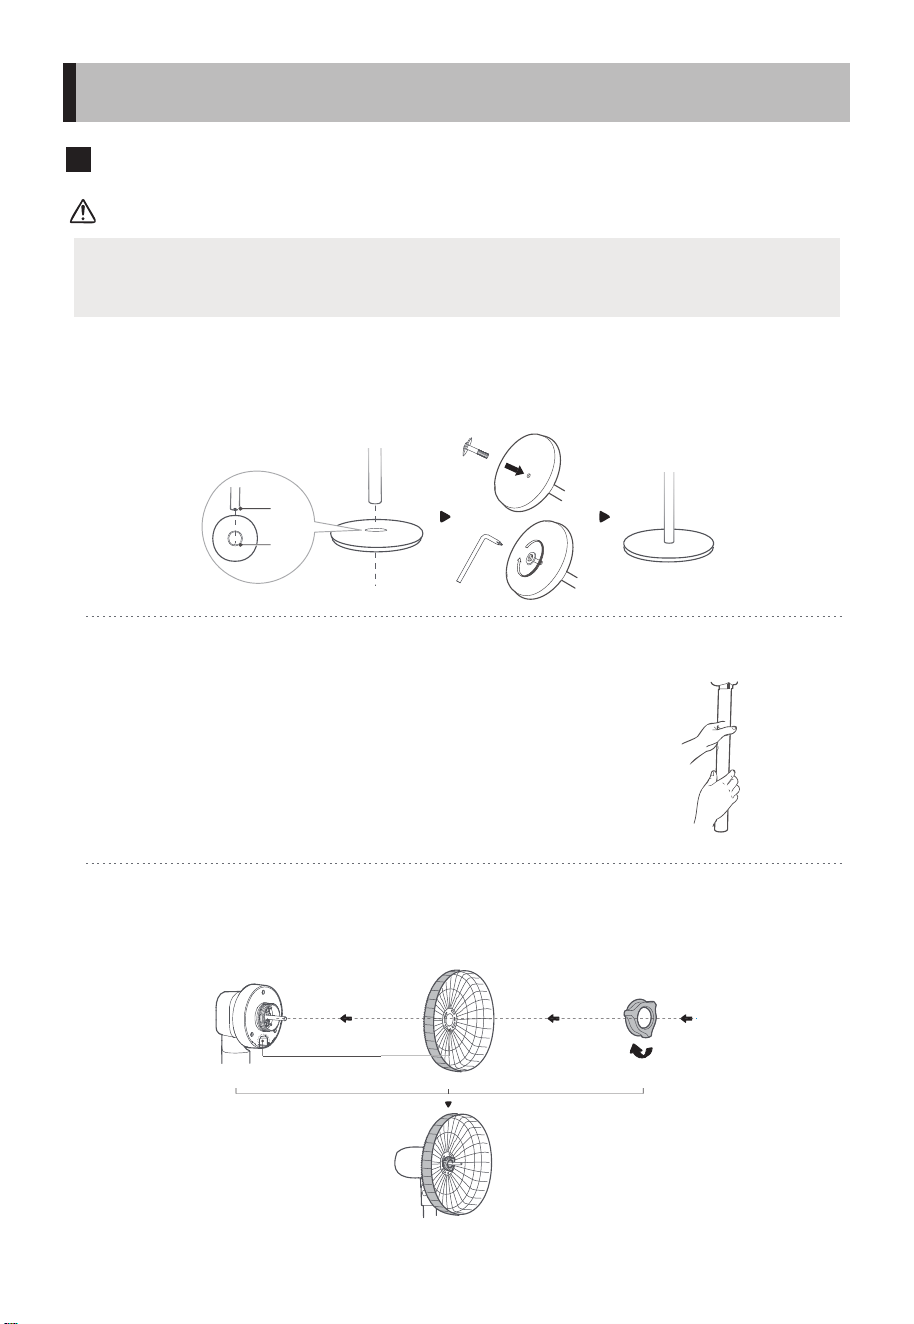
Preparation for installation
ATTENTION
5
INSTALLATION INSTRUCTION
Before installation, please rotate the grille lock nut counterclockwise
from the head thread and take it out.
1 Assembly of base
Align the pole and the base and secure them with base screw and screw
washer.
2 Assembly of body and pole
First align the holes of the body and the pole, and then
rotate clockwise to x them.
3 Assembly and lock of rear grille
Align the head and the rear grille, hang it up and lock it with the grille
lock nut.
Concave
Concave to Convex
Tighten clockwise to secure the rear grille
to
Convex
Pa!
6
INSTALLATION INSTRUCTION
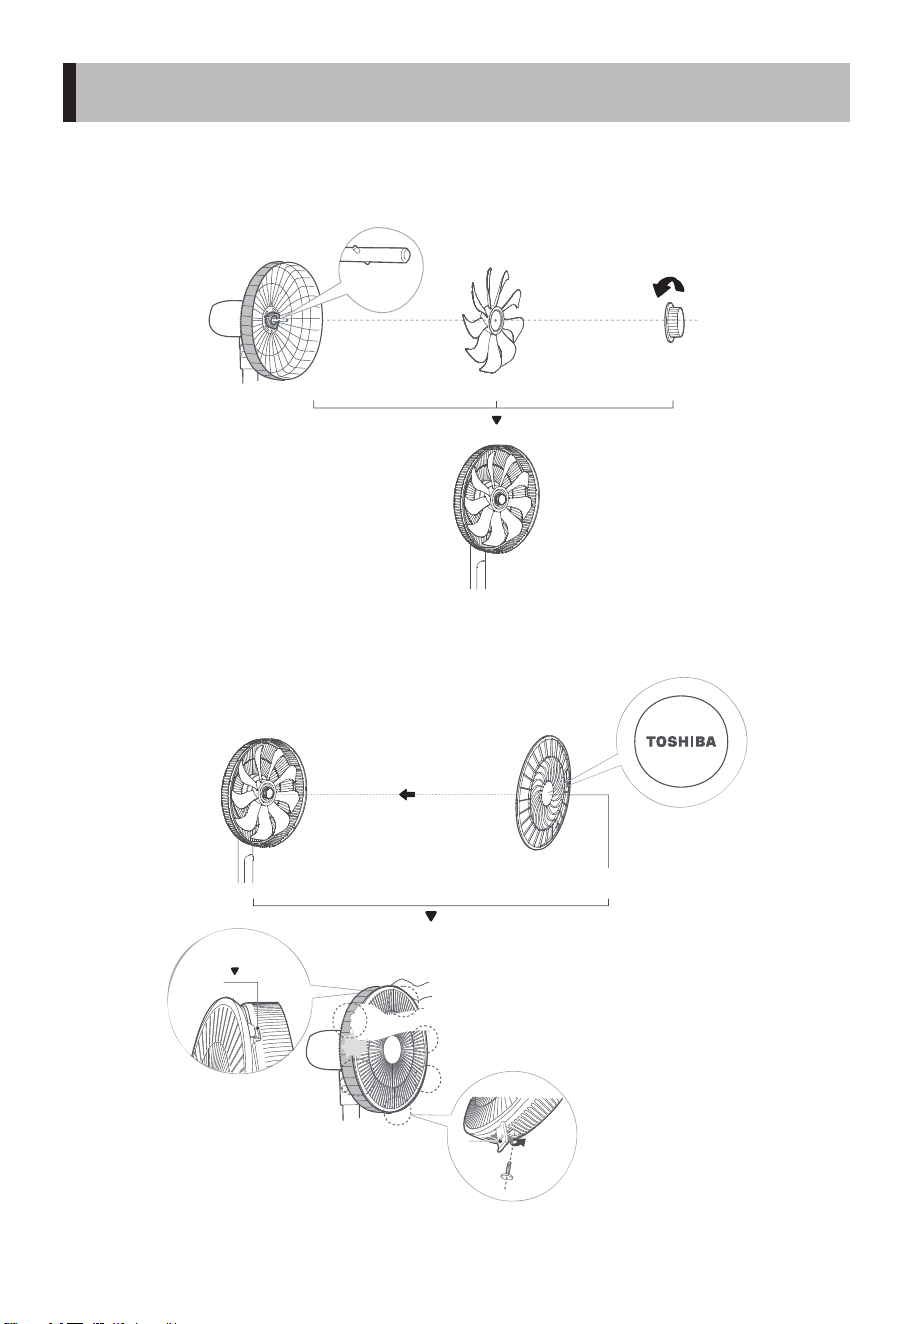
4 Assembly and lock of blade
Align and thread the fan blade with the motor shaft, and
then lock the fan blade with the blade lock nut.
5 Assembly and lock of front grille
Locate the front grille buckle and align the Toshiba logo.
Align the convex
position with the
concave position
of the blade
Tighten
counterclockwise
to lock the blade
Place the Toshiba logo
properly
Self-clipping
installation
Buckle
Press the grille in order with both hands
until you hear a click sound, and secure
the screw.
The front
grille snaps
the rear
grille
Instructions for Operation of Body
7
OPERATING INSTRUCTION
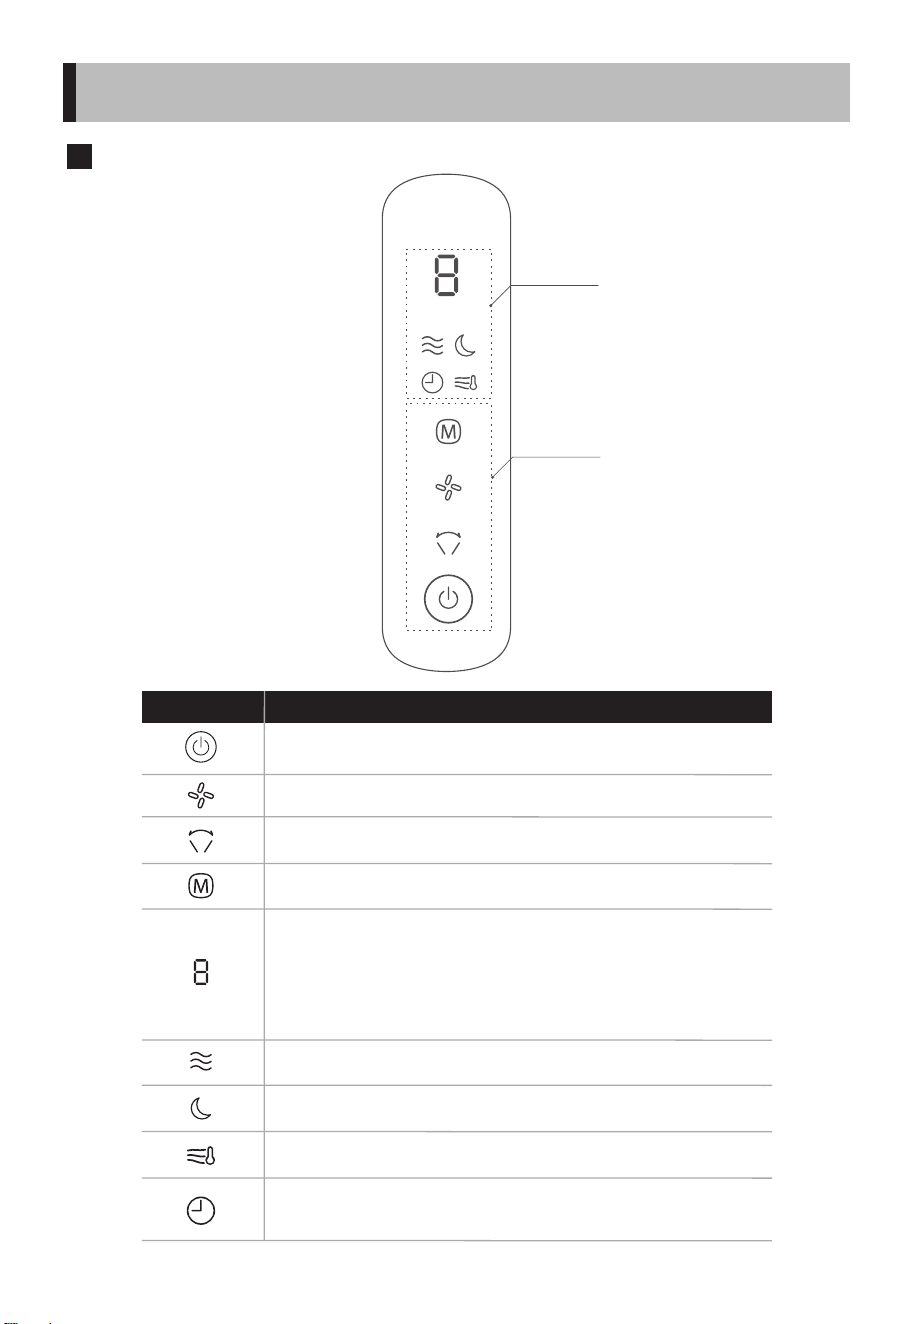
Display area
Operation area
Function Operation instruction
Adjust wind speed.
To switch the wind mode, press to cycle among normal→ AI → sleep.
Normal mode indicator light
AI mode display light
1. In power o state, press it to enter the power on state.
2. In power on state, press it to enter the power o state.
To set the oscillator operation, press to cycle the oscillator among (60°) →
(stop) → (90°) → (stop) → (120°) → (stop).
1. In power on state, the current wind speed is displayed; when the oscillator is set,
the oscillator grade is displayed; when the scheduled power o is set, the power
o time will be displayed.
2. In power o state, press it to enable the scheduled power on function, the power
on time will be displayed.
3. E1 displays when there is short circuit fault; E2 displays when there is temperature
sensor fault.
1. In power o state, this icon will light up when the scheduled power-on is enabled.
2. In power on state, this icon will light up when the scheduled power-o is enabled,
otherwise it will go out.
Sleep mode indicator light
※
※
8
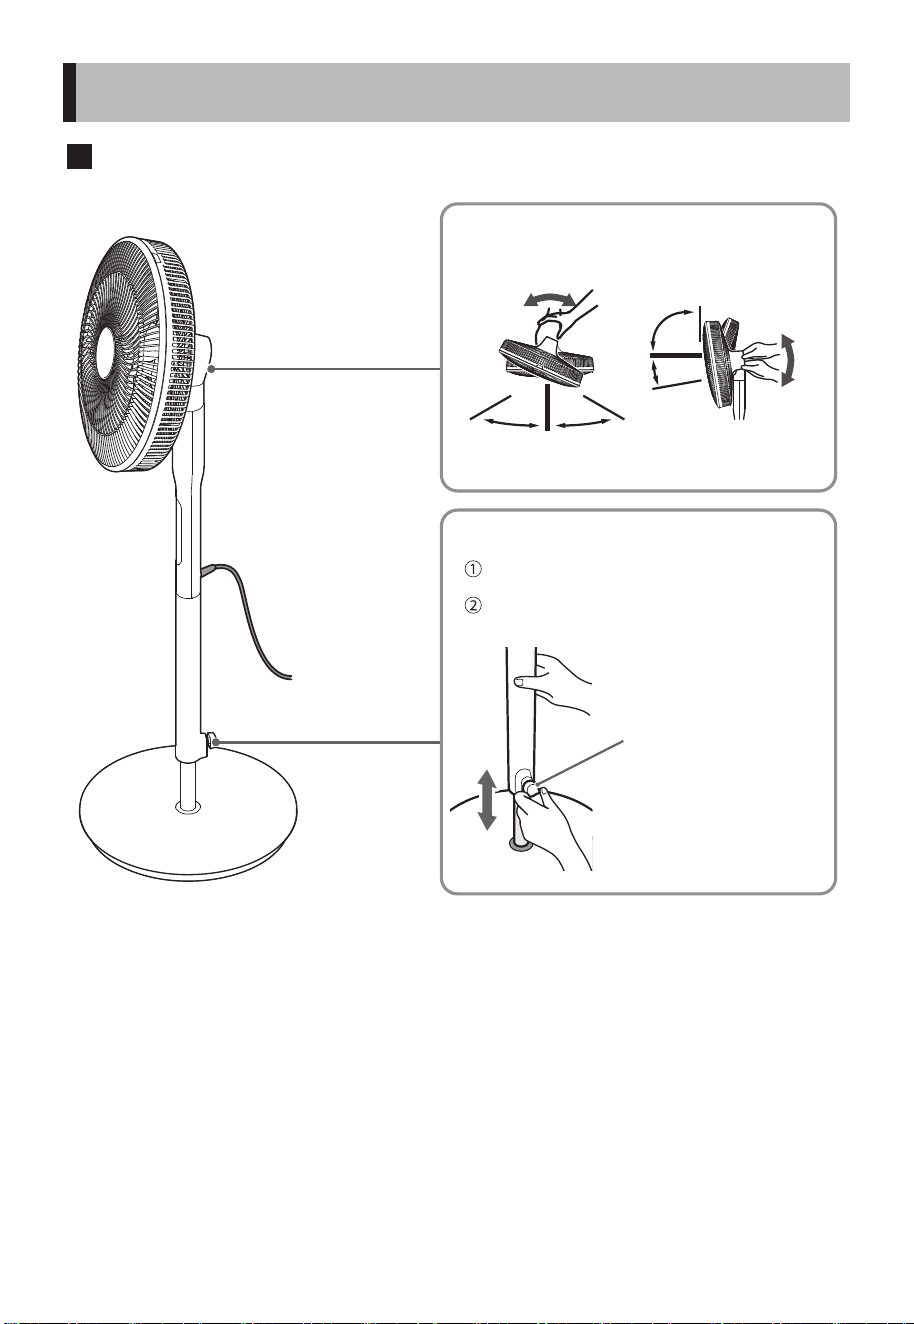
Instructions for Operation of Body
OPERATING INSTRUCTION
When adjusting the wind direction
When adjusting the height
Height adjustment lever
Please be careful not to get
your ngers caught in the
movable part when
adjusting.
Adjust left
and right
Adjust up and
down
About 60° About 60°
About
90°
About 5°
Please be careful not to get your ngers caught in
the movable part when adjusting.
Please unplug the adapter from the socket rst and
cut o the power supply.
Adjust the height adjustment lever while holding
the pole.
(For safety reasons, the operation
force has been slightly
strengthened.)
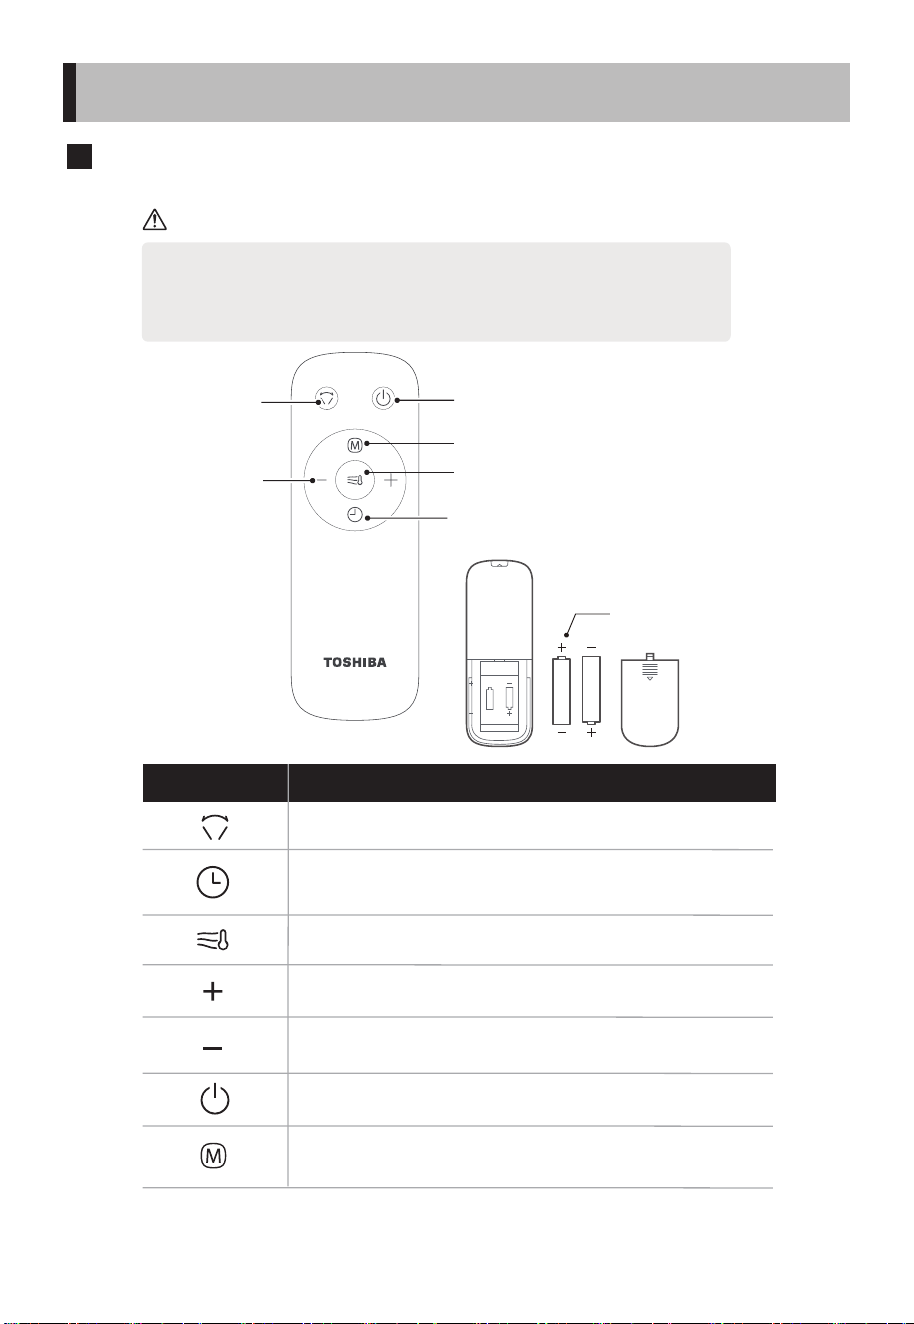
Instructions for Remote Control
9
Note
OPERATING INSTRUCTION
Function Operation instruction
1. In power on state, press it to set the scheduled power-o state, or adjust the
scheduled time, with a maximum setting of 8 hours.
2. In power o state, press it to set the scheduled power-on state, or adjust the
scheduled time, with a maximum setting of 8 hours.
1. In power on state, press it to increase the wind speed.
2. In timer setting state, increase the timing value.
1. In power o state, press it to enter the power-on state.
2. In power on state, press it to enter the power-o state.
To set the oscillator operation, press to cycle the oscillator among (60°) →
(stop) → (90°) → (stop) → (120°) → (stop).
1. In power on state, press it to turn on/o the AI wind.
2. It will changes the wind speed according to the room temperature.
1. In power on state, press it to decrease the wind speed.
2. In timer setting state, reduce the timing value.
To switch the wind mode, cycle among normal→ AI →sleep.
• The remote control should be normally used within 5 meters of the front of
the product and 30° of the deviation angle.
• The battery contains many heavy metals, acids and bases, etc., which may
threaten human's health. Waste batteries should be recycled separately.
Horizontal
oscillation on/o
On/o
Switch wind mode
Activate/Deactivate AI wind
according to temp.
Timer on/o
Battery (AAA, 1.5V)
Press “+, -” to
set wind speed
or schedule
time
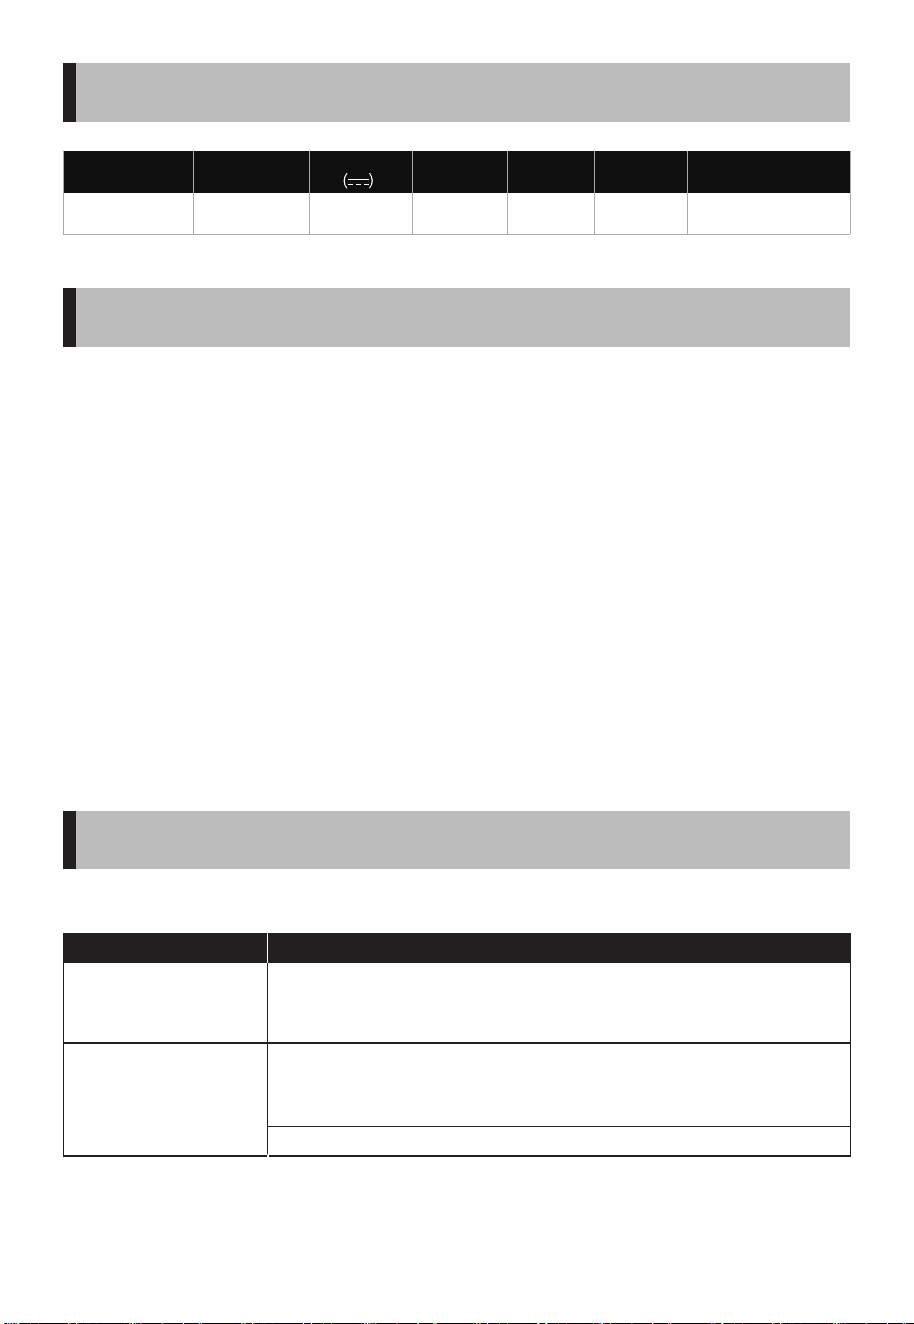
0.8
F-DSC35SG(W) 400x370x1080~1180
100-240V~
50/60Hz 1.5A
24V 11 55
10
SPECIFICATIONS
CLEANING ANDMAINTENANCE
TROUBLESHOOTING
The fan requires little maintenance. Do not try to repair it by yourself. Refer it
to qualified service personnel if service is needed.
1. Before cleaning and assembling, unplug the fan from the power supply.
2. To ensure adequate air circulation to the motor, keep vents at the rear of
the motor free of dust. Do not disassemble the fan to remove dust.
3. Please wipe the exterior parts with a soft cloth soaking a mild detergent.
4. Do not use any abrasive detergent or solvents to avoid scratching the
surface. Do not use any of the following as a cleaner: gasoline, thinner.
5. Do not allow water or any other liquid into the motor housing or interior
parts.
6. Plastic parts should be cleaned with a soft cloth moisten with mild soap.
Thoroughly remove soap with dry cloth.
In the case of any abnormality when using this fan, please check the following
points before requesting repair.
Model
Trouble
The blades do not rotate.
• Is the Fan blade installed properly?
• Is the power plug properly inserted into the outlet?
• Are any of the blades contacting guard?
• Is the spinner properly holding the blades in position?
• Are the front and rear guard sections properly mounted?
• Are any of the blades contacting guard?
• Are the blades and guard clean?
The blades spin but
make a strange sound.
Check the following
Rated input
Rated Voltage
Rated power (W) Noise dB(A)
Standby power
(W)
Unit Dimensions



# MatterDetails
https://www.toshiba-lifestyle.com/sg