
F-ALB60HK(B)
使用說明書
電風扇

仔細閱讀安全操作規則和說明。
小心
警告
1. 如果電源線損壞,必須由製造商或其服務代理商或具有類似資格的人員
更換,以避免危險。
2. 8歲以上的兒童以及身體、感官或精神上有障礙的人,或缺乏經驗和知
識的人員可以使用本電器,前提是他們已獲得有關安全使用本電器的監
督或指導,並瞭解相關的危險。兒童不得玩耍本產品。兒童不得在沒有
監督的情況下進行清潔和維護。
3. 正確處置廢棄設備!
此標記表示不得將本產品與其他生活垃圾一起處置。為了防止不受控制
的廢物處理對環境或人類健康可能造成的危害,請將廢棄設備移交到指
定回收點對其進行處理,以便回收廢棄的電子電機設備,促進物質資源
的可持續再利用。要退回舊設備,請使用回收系統或與產品零售商聯
繫,以安全回收利用此產品。
4. 僅限室內使用。
5. 在不使用設備時以及在清潔之前,請從插座上拔下電源插頭。
6. 為避免觸電危險,請勿將設備、電源線或插頭浸入水中或其他液體中。
產品簡介
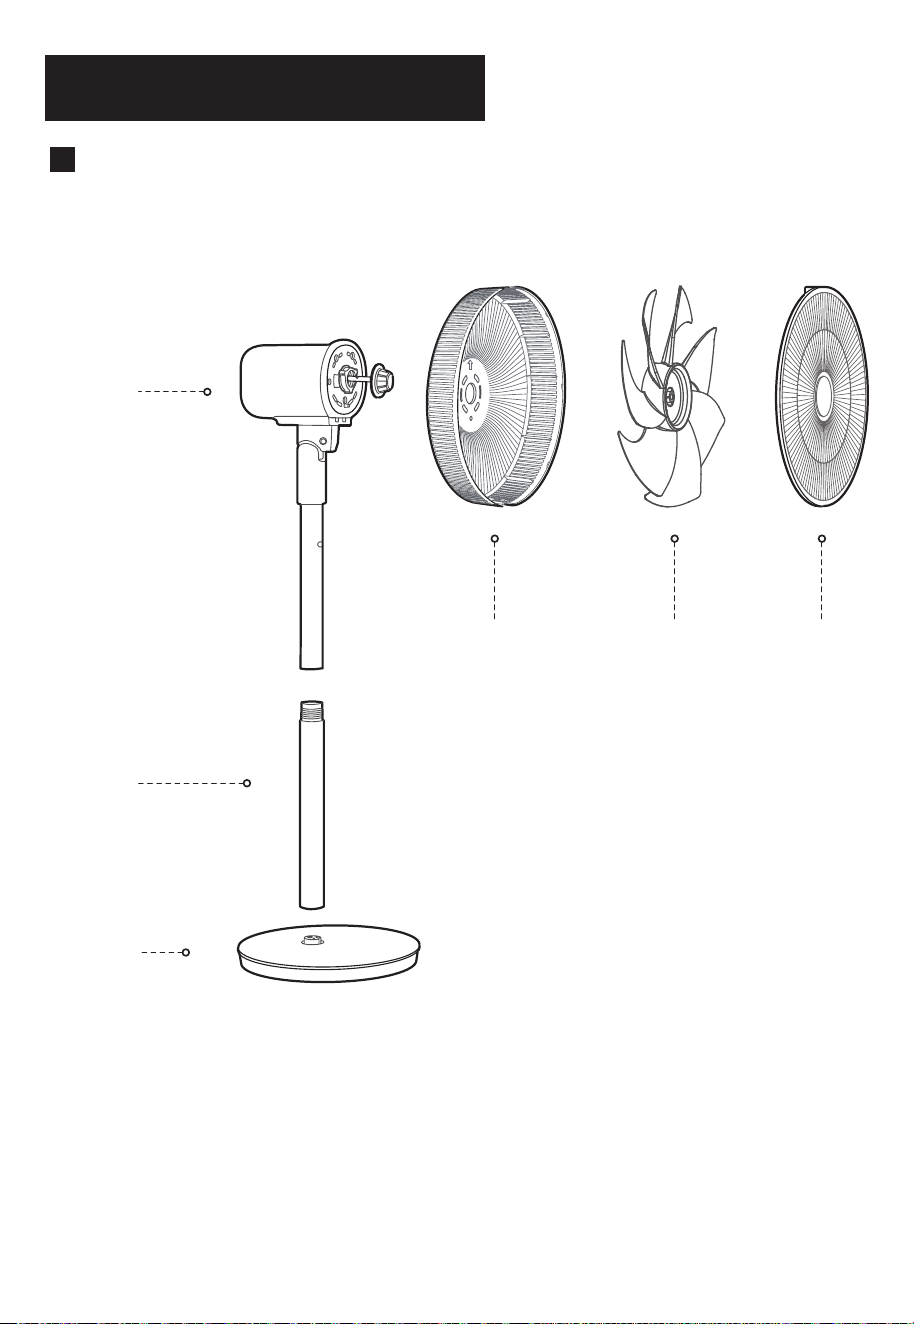
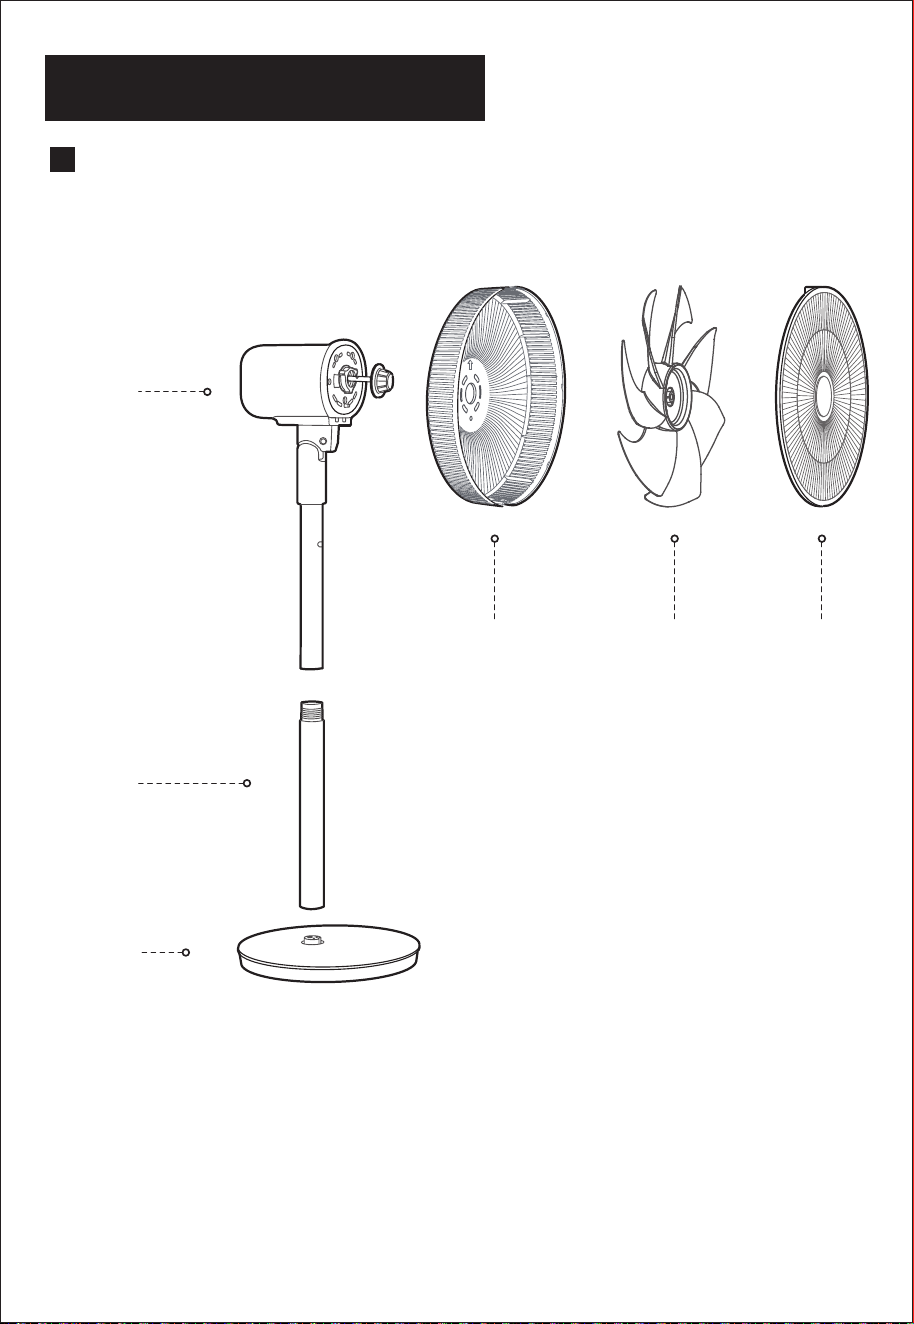
各部件名稱
機頭
立柱管
底盤
後網罩 風葉 前網罩
1
2
1
2
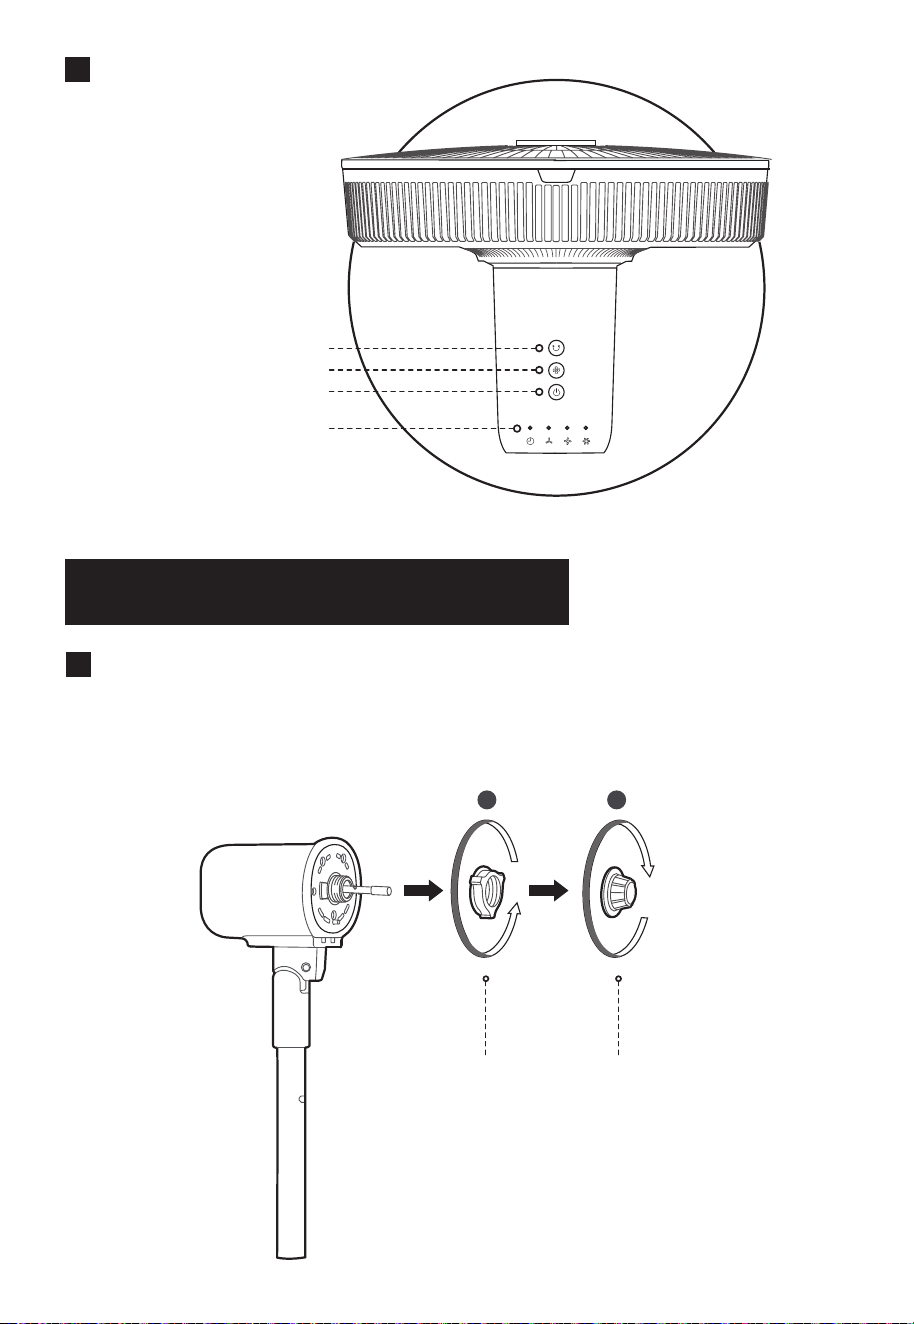
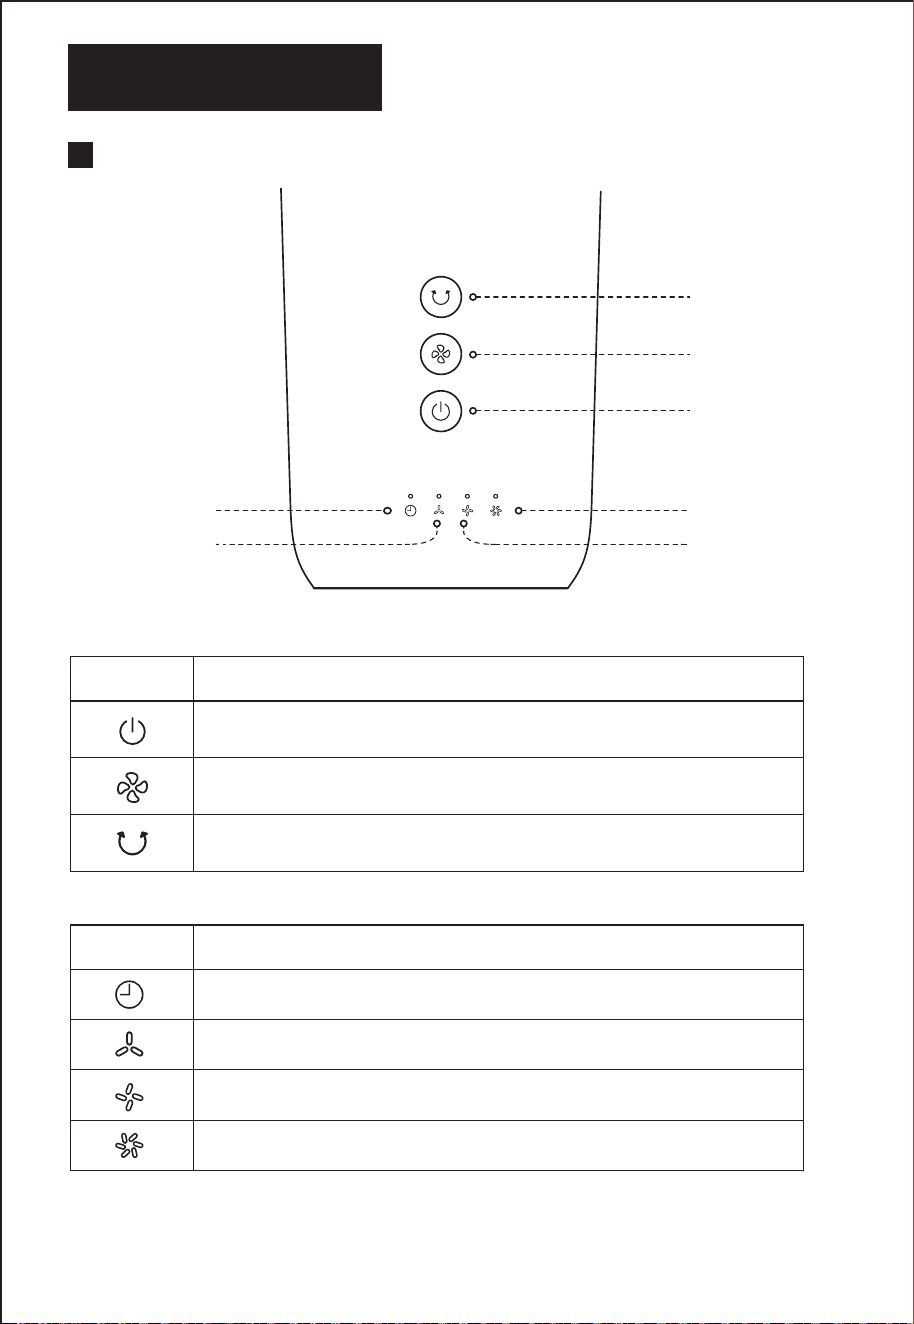
控制面板
開啟 / 停止搖頭按鍵
風速按鍵
開/待機按鍵
狀態指示燈
安裝說明
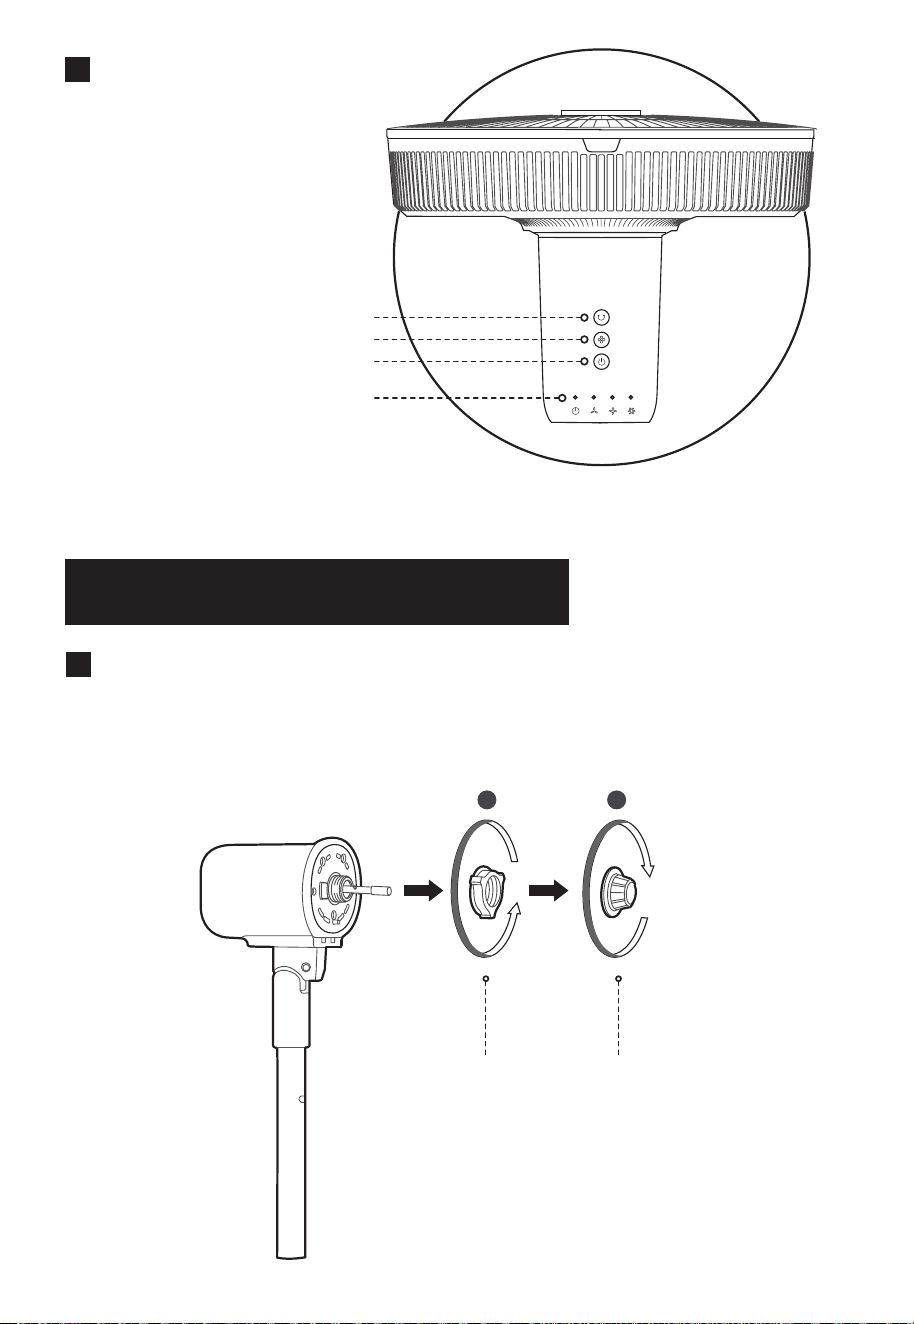
安裝準備
安裝前請先從電機前殼上,順時針方向取出風葉索母,再逆時針
方向取出網罩索母。
網罩索母
風葉索母
(順時針方向)
(逆時針方向)

3
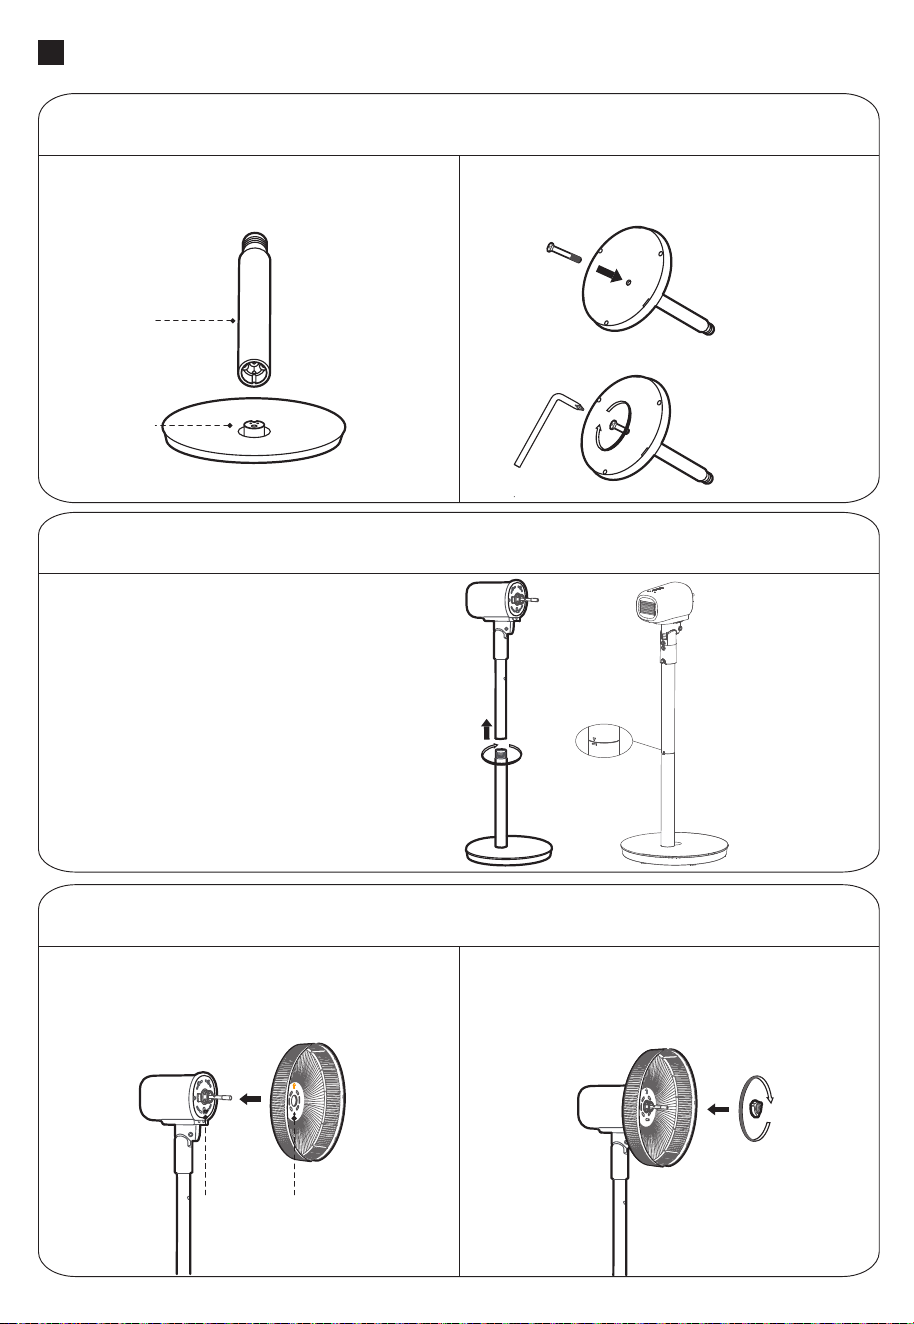
立柱管安裝
安裝步驟
底盤安裝
按圖示方向將立柱管和底盤插口對位,再將
立柱管插入底盤插口並卡穩;
將螺栓插入底盤底部的孔位,擰緊螺栓
固定立柱與底盤。
底盤
立柱管
先將機身與立柱管的孔位對準,
然後旋轉進去固定,完成立柱
管的安裝,注意務必旋轉到位!
上立柱管的箭頭標識要在下
立柱管的標識範圍內。
後網罩安裝
按圖示方向將風扇後網罩按箭頭方向朝上,
圓孔與電機前殼上的凸點對位;
在電機頭部掛上後網罩後,順時針方向
旋轉網罩索母,鎖定後網罩。
凸圓柱 圓孔處
網罩索母

4
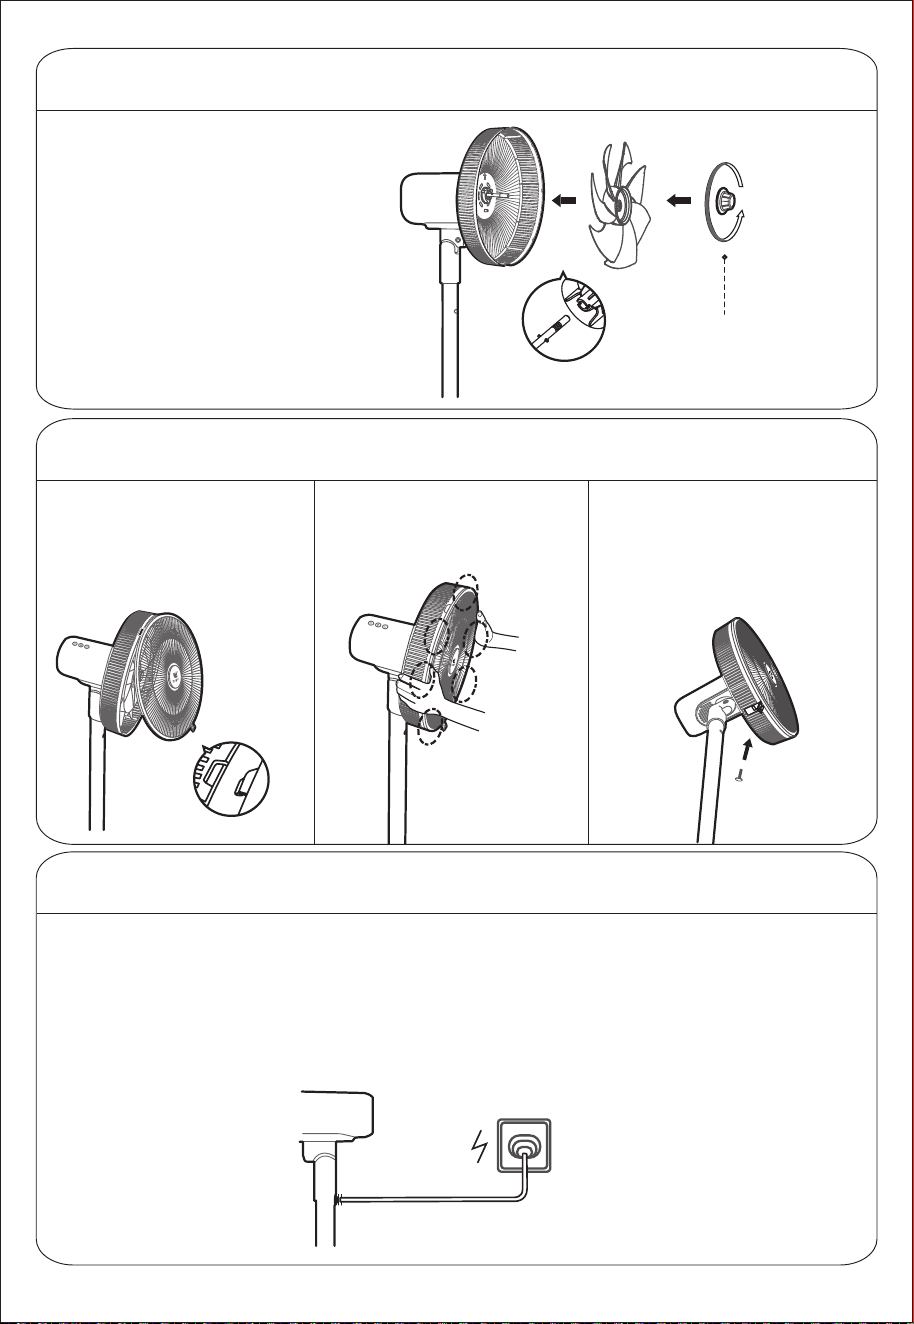
風葉安裝
將風葉和電機軸對位並穿上,
風葉上有警示貼的一面朝外;
逆時針方向旋轉風葉索母,
將風葉鎖定。
凹凸卡位
風葉索母
(逆時針方向)
前網罩安裝
先找好前、後網罩卡扣位,
將前網罩卡穩後網罩卡扣;
插入卡扣
雙手按順序按壓網罩,聽到
“啪”一聲,安裝到位;
通電使用
安裝完成後,接入電源,聽到“滴”一聲後,風扇通電成功。
再將前網罩底部網扣卡穩,將網罩
螺絲插入網扣孔位,使用螺絲刀
擰緊固定。
注:1. 網罩螺絲固定在後網罩卡扣處,
用戶需擰下螺絲再安裝。
2. 務必裝上網罩運行。
5
使用說明
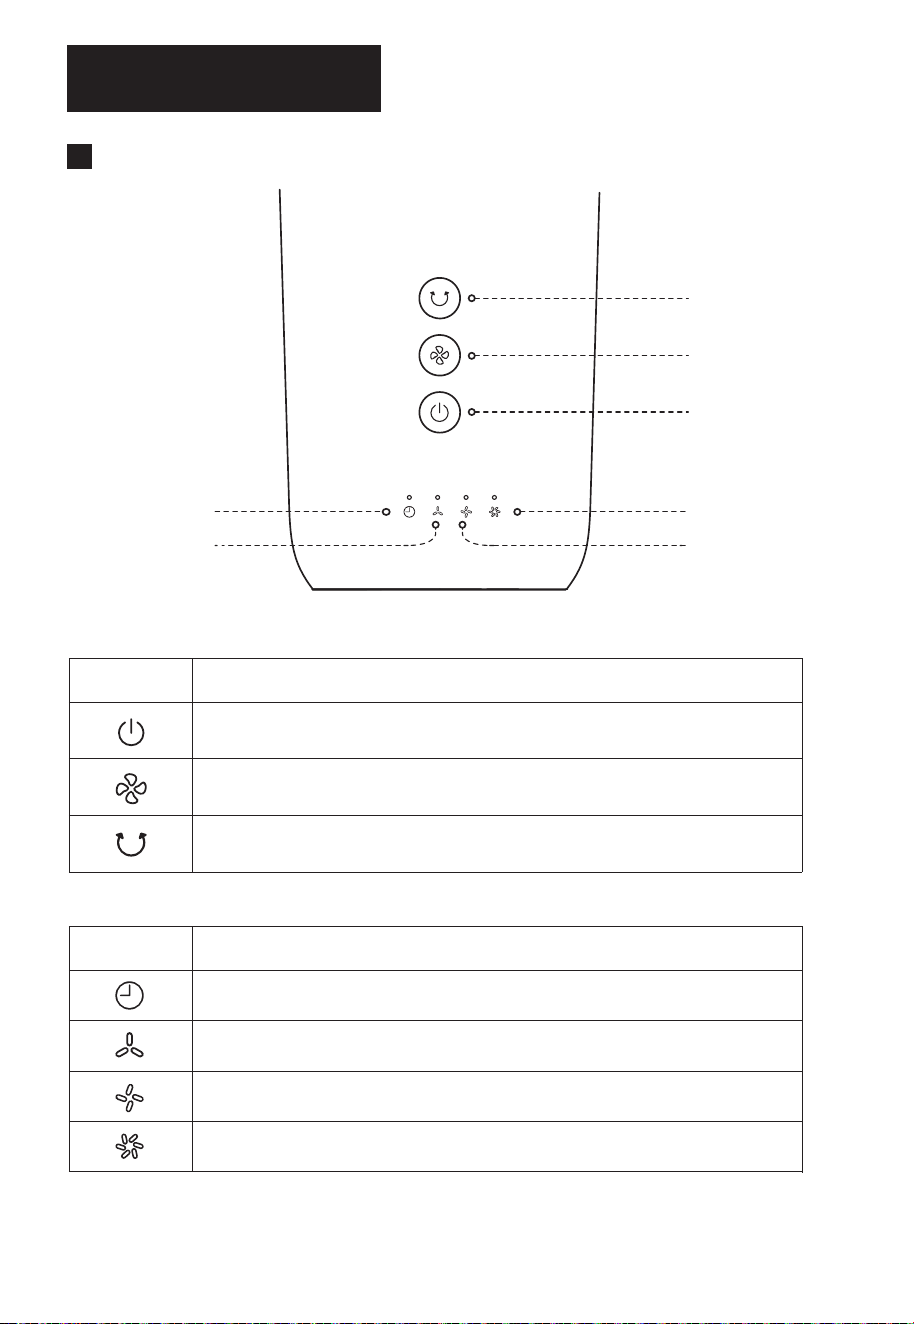
機頭面板
定時 / 預約指示燈
低檔風指示燈
中檔風指示燈
高檔風指示燈
開/ 待機按鍵
風速按鍵
開啟 / 停止搖頭按鍵
機頭按鍵說明
圖示
功能說明
圖示
功能說明
開/ 待機
切換正常風風檔,按低→中→ 高→ 低循環
開啟 / 停止搖頭送風
指示燈說明
指示定時 / 預約狀態
正常風低檔,1檔
正常風中檔,2檔
正常風高檔,3檔;強勁風模式
注:①定時關機 / 預約開機設定1小時,定時 / 預約指示燈亮;設定2小時, 定時 / 預約指示燈和低檔風指示燈亮;設定3小時,定時 / 預約指示燈、
低檔風指示燈和中檔風指示燈亮;設定4小時,4個指示燈均亮。
②為減少光線的干擾,機器具備熄屏功能,60秒內如無操作,所有指示燈會熄滅。此時風扇在無顯示下運行或停止,屬正常情況,不是故障。

6
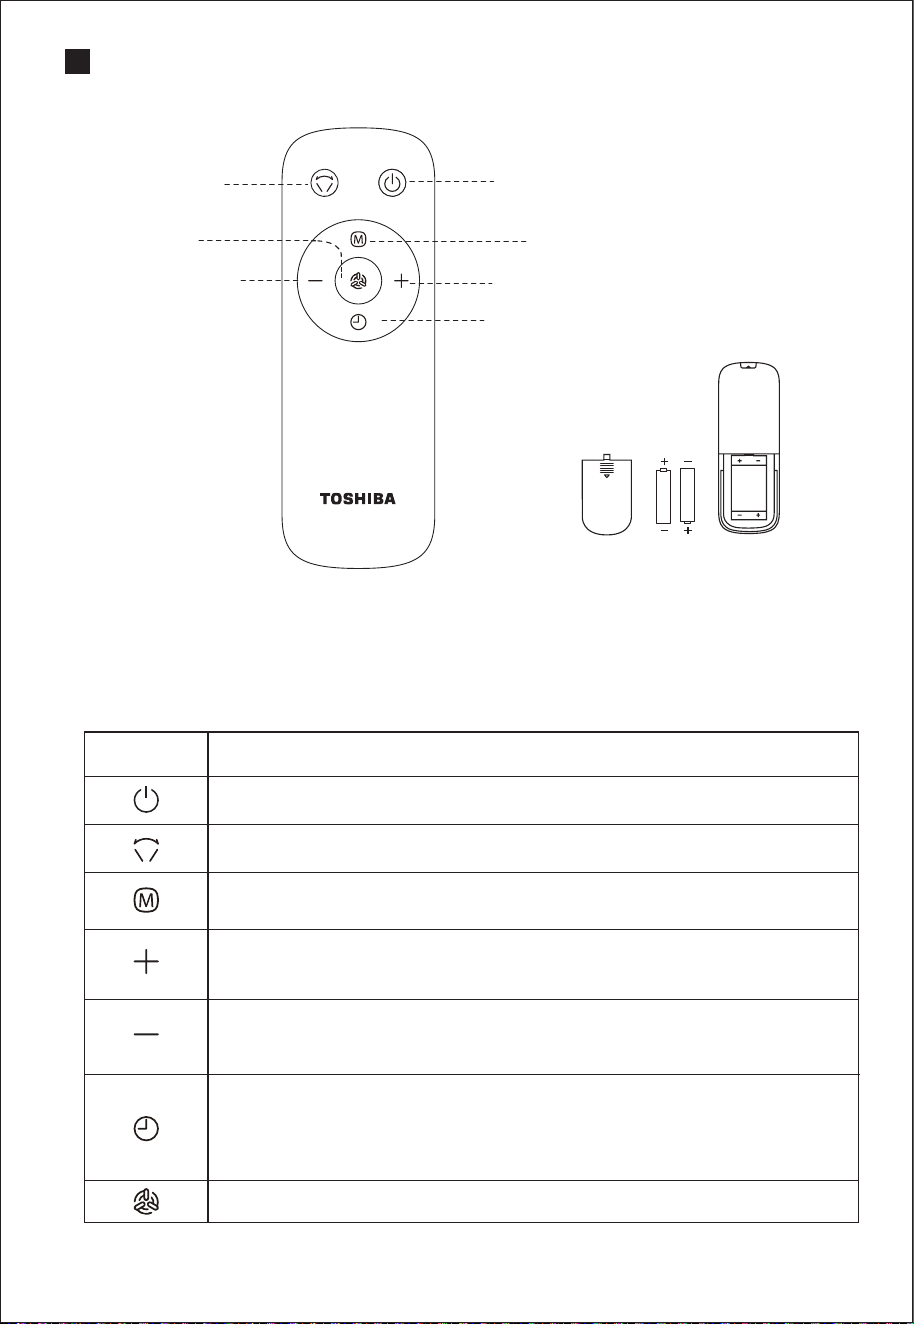
遙控器面板
開啟 / 停止
搖頭按鍵
強勁風按鍵
風量減小按鍵
(預約定時減少)
開/ 待機按鍵
風速按鍵
風量加大按鍵(預約定時增加)
定時 / 預約按鍵
(AAA 電池 1.5V)
電池裝配圖
請使用型號為"AAA"的錳電池或鹼性電池,
不要使用不可回收電池。
遙控器使用範圍
遙控器在產品正面5 米內,左右
角度在30 度範圍內正常使用。
圖示
功能說明
開/ 待機
開啟 / 停止搖頭送風
切換正常風風檔,按低→ 中→高→ 低循環
切換正常風風檔,風速檔位遞增
切換時間, 定時 / 預約時間遞減
切換正常風風檔,風速檔位遞減
切換時間, 定時 / 預約時間遞減
開啟 / 關閉定時關機,1小時後關機
開啟 / 關閉預約開機,1小時後開機
開啟 / 關閉強勁風
先按定時鍵, 5s內按“+,-”鍵則調整增加或減少定時,共4小時定時
(1,2,3,4)
遙控器按鍵說明

風扇幾乎不需要保養。不要試圖自己修理。如果需要維修,請
把它交給有資質的維修人員。
1. 在清潔和組裝之前,必須拔下風扇的電源線。
2. 為確保電機有充分的通風,請確保電機背面的通風孔沒有灰塵。請勿拆
卸風扇以清除灰塵。
3. 請用軟布蘸中性清潔劑擦拭外部部件。
4. 請勿使用任何研磨性清潔劑或溶劑,以免刮傷表面。請勿使用以下任何
一種清潔劑:汽油、稀釋劑。
5. 請勿讓水或任何其他液體進入電機外殼或內部零件。
1. 清潔前,請務必拔下電源插頭。
2. 塑膠部件應使用蘸有中性肥皂液的軟布清潔。用乾布徹底清除肥皂膜。
保養說明
清潔
7

Electric Fan
F-ALB60HK(B)
OWNER’S
MANUAL

Read Rules for Safe Operation and Instructions Carefully.
CAUTION
WARNING
1. If the supply cord is damaged, it must be replaced by manufacturer,its
service agent or a similarly qualied person in order to avoid a hazard.
2. This appliance can be used by children aged from 8 years and above and
persons with reduced physical, sensory or mental capabilities or lack of
experience and knowledge if they have been given supervision or
instruction concerning use of the appliance in a safe way and understand
the hazards involved. Children shall not play with the appliance. Cleaning
and user maintenance shall not be made by children without supervision.
3. Correct Disposal of this product
This marking indicates that this product should not be disposed with other
household wastes throughout the EU. To prevent possible harm to the
environment or human health from uncontrolled waste disposal, recycle it
responsibly to promote the sustainable reuse of material resources. To
return your used device, please use the return and collection systems or
contact the retailer where the product was purchased. They can take this
product for environmental safe recycling.The packaging material is
recyclable. Dispose of the packaging in an environmentally friendly manner
and make it available for the recyclable material collection-service.
4. Indoor and household use only.
5. When the appliance is not in use and before cleaning, unplug the appliance
from the outlet.
6. To protect against the risk of electrical shock, do not disassemble the fan
and do not immerse the unit, cord or plug in water or other liquid.
1
Product Introduction
Name of Each Component
Machine
head
Pole
Chassis
Rear Grill Blade Front Grill
2
1
2
Control Panel
Turn on/o the oscillating button
Wind speed button
On/standby button
Status indicator
Installation Instructions
Installation preparation
Please take out the lock nut of blade from the front enclosure of the
motor clockwise, and then take out the lock nut of grill counterclock-
wise before installing.
Lock nut of grill Lock nut of blade
(Clockwise direction)(Anti-clockwise direction)
3
Pole Installation
Installation Procedures
Chassis Installation
Position the pole and chassis sockets
in the direction shown, insert the pole
into the chassis socket and stabilize it;
Insert the bolt into the hole at the bottom of
the chassis and tighten the bolt to x the
pole and chassis.
Chassis
pole
First, you need to align the hole of the
machine body with the pole, then rotate it
in and x it to complete the installation of
the pole, be sure to rotate in place.
Rear Grill Installation
According to the direction shown, make the
rear grill of the fan upward in the direction of
the arrow, and make the round hole aligned
with the salient point on the front enclosure of
the motor;
After the motor head is hung on the rear grill,
rotate the plastic nut clockwise to lock the
rear grill.
Convex
cylinder
Round hole
Lock nut of grill
The arrow mark of the upper column tube
is to be within the identication range of
the lower column tube.
4
Blade Installation
Align the blade with the motor shaft and
put it on, and the side with warning label
of the blade faces outward; Rotate the
spinner counterclockwise to lock the
blade.
Concave and convex clamping
Lock nut of blade
(Anti-clockwise
direction)
Front Grill Installation
First, nd the front and rear
grill clamping, and stabilize
the front grill to the rear grill
buckles;
Insert the clamping
Press the mesh enclosure by
both hands in sequence, and
when you hear a ''click'', the
installation is in place.
Power Up
After installation, plug on the machine. After
hearing the "drop", the fan is powered on
successfully.
Then fasten the net buckle at the bottom
of the front grill, insert the mesh enclosure
screw into the hole of the net buckle, and
tighten it with a screwdriver.
Note: 1. The mesh enclosure screw is xed at the
rear grill clamping, and the user needs to
unscrew the screw and then install it.
2. Be sure to install the net cover when running.
5
Instructions for Use
Panel of machine head
Timing/reserved
indicator
Low-grade
wind indicator
Medium-grade
wind indicator
High-grade
wind indicator
On/standby button
Wind speed button
Turn on/o the
oscillating button
Instructions of buttons on the machine head
Icon
Function description
Icon
Function description
Startup/Standby
Switch to the normal wind grade by pressing the low→medium→high→low to
cycle
Turn on/o shaking the head to supply wind
Descriptions for the indicators
Indicate timing/reserved status
Normal wind of low grade, grade 1
Normal wind of medium grade, grade 2
Normal wind of high grade, grade 3, Strong wind model
Note: ① If timing turning o/on reserved is set for 1 hour, the timing/reserved indicator will be on; If it is set for 2 hours, timing/reserved indicator and low-grade
wing indicator will be on; If it is set for 3 hours, timing/reserved indicator , low and medium-grade wind indicator will be on; If it is set for 4 hours, 4 indicators will
be all on;
②The machine has a screen-o function in order to reduce the interference of light, which means if there is no operation within 60 seconds, all the indicators
will go out. At this time, the fan runs or stops without display, which is normal and is not a malfunction.
6
Panel of Remote controller
Turn on/o
the oscillating
button
Strong wind
button
Button of wind volume
decrease
(Timing time decrease)
On/ standby button
Fan speed button
Button of wind volume increase (Timing
time increase)
Timing/reserved button
(AAA battery 1.5V)
Power assembly
drawing
Please use a manganese or alkaline battery of
type "AAA" and do not use a non-recyclable
battery.
Control range of remote controller
The remote controller control can be normally
used within 5 meters in front of the product and
in the left and right angles of 30 degrees.
Specications for remote controller buttons
Icon
Function description
Turn on/Standby
Turn on/o oscillating to supply wind
Switch to the normal wind grade by pressing the low→medium→high
→low to cycle
Switch to the normal wind grade, wind speed and grade are increasing;
Switch the time, the timing/reserved time is increasing.
Switch to the normal wind grade, wind speed and grade are
decreasing;
Switch the time, the timing/reserved time is decreasing.
Turn on/o timing powering o, it will power o 1 hour later;
Turn on/o reserved powering on, it will power on 1 hour later.
Turn on/o strong wind
Press the timing button rst, then press the “+、- ”button within
5 seconds, you can adjust the increase or decrease of the timing time,
for 4 hours timing range in total(1,2,3,4).

7
MAINTENANCE INSTRUCTION
CLEANING
1. Be sure to unplug from the electrical supply source before cleaning.
2. Plastic parts should be cleaned with a soft cloth moisten with mild soap.
Thoroughly remove soap lm with dry cloth.
The fan requires little maintenance. Do not try to x it by yourself. Refer it to
qualied service personnel if service is needed.
1. Before cleaning and assembling, fan must be unplugged.
2. To ensure adequate air circulation to the motor, keep vents at the rear of the
motor free of dust. Do not disassemble the fan to remove dust.
3. Please wipe the exterior parts with a soft cloth soaking a mild detergent.
4. Do not use any abrasive detergent or solvents to avoid scratching the surface.
Do not use any of the following as a cleaner: gasoline, thinner.
5. Do not allow water or any other liquid into the motor housing or interior parts.

# MatterDetails

