Product Name and Model Number User
Manual
Page | 1 Copyright©2020 ZKTECO CO., LTD. All rights reserved.
Thank you for choosing our product. Please read the instructions carefully
before operation. Follow these instructions to ensure that the product is
functioning properly. The images shown in this manual are for illustrative
purposes only.
For further details, please visit our Company’s website
www.zkteco.com
.
User Manual
D4
Date: April 2026
Doc Version: 1.0
English

D4 User Manual
Page | 1 Copyright © 2026 ZKTECO CO., LTD. All rights reserved.
Copyright © 2026 ZKTECO CO., LTD. All rights reserved.
Without the prior written consent of ZKTeco, no portion of this manual can be copied or forwarded in
any way or form. All parts of this manual belong to ZKTeco and its subsidiaries (hereinafter the
"Company" or "ZKTeco").
Trademark
is a registered trademark of ZKTeco. Other trademarks involved in this manual are owned
by their respective owners.
Disclaimer
This manual contains information on the operation and maintenance of the ZKTeco equipment. The
copyright in all the documents, drawings, etc. in relation to the ZKTeco supplied equipment vests in
and is the property of ZKTeco. The contents hereof should not be used or shared by the receiver with
any third party without express written permission of ZKTeco.
The contents of this manual must be read as a whole before starting the operation and maintenance of
the supplied equipment. If any of the content(s) of the manual seems unclear or incomplete, please
contact ZKTeco before starting the operation and maintenance of the said equipment.
It is an essential pre-requisite for the satisfactory operation and maintenance that the operating and
maintenance personnel are fully familiar with the design and that the said personnel have received
thorough training in operating and maintaining the machine/unit/equipment. It is further essential for
the safe operation of the machine/unit/equipment that personnel has read, understood and followed
the safety instructions contained in the manual.
In case of any conflict between terms and conditions of this manual and the contract specifications,
drawings, instruction sheets or any other contract-related documents, the contract conditions/
documents shall prevail. The contract specific conditions/documents shall apply in priority.
ZKTeco offers no warranty, guarantee or representation regarding the completeness of any information
contained in this manual or any of the amendments made thereto. ZKTeco does not extend the
warranty of any kind, including, without limitation, any warranty of design, merchantability or fitness
for a particular purpose.
ZKTeco does not assume responsibility for any errors or omissions in the information or documents
which are referenced by or linked to this manual. The entire risk as to the results and performance
obtained from using the information is assumed by the user.
ZKTeco in no event shall be liable to the user or any third party for any incidental, consequential,
indirect, special, or exemplary damages, including, without limitation, loss of business, loss of profits,
business interruption, loss of business information or any pecuniary loss, arising out of, in connection
with, or relating to the use of the information contained in or referenced by this manual, even if ZKTeco
has been advised of the possibility of such damages.

D4 User Manual
Page | 2 Copyright © 2026 ZKTECO CO., LTD. All rights reserved.
This manual and the information contained therein may include technical, other inaccuracies or
typographical errors. ZKTeco periodically changes the information herein which will be incorporated
into new additions/amendments to the manual. ZKTeco reserves the right to add, delete, amend or
modify the information contained in the manual from time to time in the form of circulars, letters, notes,
etc. for better operation and safety of the machine/unit/equipment. The said additions or amendments
are meant for improvement /better operations of the machine/unit/equipment and such amendments
shall not give any right to claim any compensation or damages under any circumstances.
ZKTeco shall in no way be responsible (i) in case the machine/unit/equipment malfunctions due to any
non-compliance of the instructions contained in this manual (ii) in case of operation of the
machine/unit/equipment beyond the rate limits (iii) in case of operation of the machine and equipment
in conditions different from the prescribed conditions of the manual.
The product will be updated from time to time without prior notice. The latest operation procedures
and relevant documents are available on http://www.zkteco.com
.
If there is any issue related to the product, please contact us.
ZKTeco Headquarters
Address ZKTeco Industrial Park, No. 32, Industrial Road,
Tangxia Town, Dongguan, China.
Phone +86 769 - 82109991
Fax +86 755 - 89602394
For business related queries, please write to us at: sales@zkteco.com
.
To know more about our global branches, visit www.zkteco.com.

D4 User Manual
Page | 3 Copyright © 2026 ZKTECO CO., LTD. All rights reserved.
About the Company
ZKTeco is one of the world’s largest manufacturer of RFID and Biometric (Fingerprint, Facial, Finger-vein)
readers. Product offerings include Access Control readers and panels, Near & Far-range Facial
Recognition Cameras, Elevator/floor access controllers, Turnstiles, License Plate Recognition (LPR) gate
controllers and Consumer products including battery-operated fingerprint and face template-reader
Door Locks. Our security solutions are multi-lingual and localized in over 18 different languages. At the
ZKTeco state-of-the-art 700,000 square foot ISO9001-certified manufacturing facility, we control
manufacturing, product design, component assembly, and logistics/shipping, all under one roof.
The founders of ZKTeco have been determined for independent research and development of
biometric verification procedures and the productization of biometric verification SDK, which was
initially widely applied in PC security and identity authentication fields. With the continuous
enhancement of the development and plenty of market applications, the team has gradually
constructed an identity authentication ecosystem and smart security ecosystem, which are based on
biometric verification techniques. With years of experience in the industrialization of biometric
verifications, ZKTeco was officially established in 2007 and now has been one of the globally leading
enterprises in the biometric verification industry owning various patents and being selected as the
National High-tech Enterprise for 6 consecutive years. Its products are protected by intellectual
property rights.
About the Manual
This manual introduces the operations of D4.
All figures displayed are for illustration purposes only. Figures in this manual may not be exactly
consistent with the actual products.
Features and parameters with
★ are not available in all devices.
D4 User Manual
Page | 4 Copyright © 2026 ZKTECO CO., LTD. All rights reserved.
Document Conventions
Conventions used in this manual are listed below:
GUI Conventions
For Software
Convention Description
Bold font Used to identify software interface template names e.g. OK, Confirm, Cancel.
>
Multi-level menus are separated by these brackets. For example, File > Create >
Folder.
For Device
Convention Description
< >
Button or key names for devices. For example, press <OK>.
[ ]
Window names, menu items, data table, and field names are inside square
brackets. For example, pop up the [New User] window.
/
Multi-level menus are
separated by forwarding slashes. For example,
File/Create/Folder.
Symbols
Convention Description
This represents a note that needs to pay more attention to.
The general information which helps in performing the operations faster.
The information which is significant.
Care taken to avoid danger or mistakes.
The statement or event that warns of something or that serves as a cautionary
example.

D4 User Manual
Page | 5 Copyright © 2026 ZKTECO CO., LTD. All rights reserved.
TABLE OF CONTENTS
DATA SECURITY STATEMENT ................................................................................................................... 6
SAFETY MEASURES ................................................................................................................................... 6
1 INSTRUCTION FOR USE .......................................................................................................................... 8
FINGER POSITIONING ......................................................................................................................................................................................... 8 1.1
S
TANDBY INTERFACE ......................................................................................................................................................................................... 8 1.2
V
ERIFICATION MODE ......................................................................................................................................................................................... 9 1.3
1.3.1 FINGERPRINT VERIFICATION ............................................................................................................................................................................. 9
1.3.2 CARD VERIFICATION ........................................................................................................................................................................................ 10
2 OVERVIEW............................................................................................................................................. 11
APPEARANCE ................................................................................................................................................................................................... 11 2.1
W
IRING DESCRIPTION ..................................................................................................................................................................................... 11 2.2
2.2.1 POWER CONNECTION ...................................................................................................................................................................................... 11
3 INSTALLATION ...................................................................................................................................... 12
INSTALLATION ENVIRONMENT ....................................................................................................................................................................... 12 3.1
D
EVICE INSTALLATION .................................................................................................................................................................................... 12 3.2
4 CONNECTING TO ZKBIO ZLINK APP .................................................................................................... 14
DOWNLOAD THE ZKBIO ZLINK APP ............................................................................................................................................................. 14 4.1
L
OGIN TO THE APP .......................................................................................................................................................................................... 14 4.2
CREATE YOUR ACCOUNT ............................................................................................................................................................................... 15 4.3
A
DD DEVICE ON THE APP ............................................................................................................................................................................... 15 4.4
M
ANAGE AND ADD PERSON IN DEVICE ........................................................................................................................................................ 16 4.5
R
EGISTER VERIFICATION MODE ON THE APP ................................................................................................................................................ 17 4.6
5 CONNECT TO ZKBIO ZLINK WEB .......................................................................................................... 21
LOGIN TO THE WEB ......................................................................................................................................................................................... 21 5.1
A
DD DEVICE ON THE WEB .............................................................................................................................................................................. 21 5.2
A
DD PERSON ON THE WEB ............................................................................................................................................................................ 25 5.3
S
YNCHRONIZE PERSONS TO DEVICE .............................................................................................................................................................. 25 5.4
R
EGISTER VERIFICATION MODE ON THE WEB ............................................................................................................................................... 26 5.5
D
AYLIGHT SAVING TIME SETTINGS ................................................................................................................................................................ 29 5.6
APPENDIX 1 ............................................................................................................................................. 32
PRIVACY POLICY .................................................................................................................................................................................................... 32
E
CO-FRIENDLY OPERATION................................................................................................................................................................................... 34

D4 User Manual
Page | 6 Copyright © 2026 ZKTECO CO., LTD. All rights reserved.
Data Security Statement
ZKTeco, as a smart product supplier, may also need to know and collect some of your personal
information to better assist you in using ZKTeco's goods and services, and will treat your privacy
carefully by developing a Privacy Policy.
Please read and understand completely all the privacy protection policy regulations and key points that
appear on the device before using ZKTeco products.
As a product user, you must comply with applicable laws and regulations related to personal data
protection when collecting, storing, and using personal data, including but not limited to taking
protective measures for personal data, such as performing reasonable rights management for devices,
strengthening the physical security of device application scenarios, and so on.
Safety Measures
The following precautions are to keep the user’s safety and prevent any damage. Please read carefully
before installation.
1. Read, follow, and retain instructions - All safety and operational instructions must be properly
read and followed before bringing the device into service.
2. Do not ignore warnings - Adhere to all warnings on the unit and in the operating instructions.
3. Accessories - Use only manufacturer-recommended or product-sold accessories. Please do not use
any other components other than manufacturer suggested materials.
4. Precautions for the installation - -- Do not place this device on an unstable stand or frame. It may
fall and cause serious injury to persons and damage to the device.
5. Service - Do not try to service this unit yourself. Opening or removing covers may expose you to
hazardous voltages or other hazards.
6. Damage requiring service - Disconnect the system from the main AC or DC power source and
refer service personnel under the following conditions:
When cord or connection control is affected.
When the liquid was spilled, or an item dropped into the system.
If the system is exposed to water and/or inclement weather conditions (rain, snow, and more).
If the system is not operating normally under operating instructions.
Just change controls defined in operating instructions. Improper adjustment of other controls may
result in damage and involve a qualified technician to return the device to normal operation.
7. Replacement parts - When replacement parts are required, service technicians must only use
replacement parts provided by the supplier. Unauthorized substitutes can lead to the risk of burns,
electric shock, or other hazards.
8. Safety check - On completion of service or repair work on the unit, ask the service technician to

D4 User Manual
Page | 7 Copyright © 2026 ZKTECO CO., LTD. All rights reserved.
perform safety checks to ensure proper operation of the unit.
9. Power sources - Operate the system only from the label's power source form. If the sort of power
supply to use is unclear, call your dealer.
10. Lightning - -- Can install external lightning conductors to protect against electrical storms. It stops
power-ups destroying the system.
The devices should be installed in areas with limited access.
D4 User Manual
Page | 8 Copyright © 2026 ZKTECO CO., LTD. All rights reserved.
1 Instruction for Use
Before getting into the Device features and functions, it is recommended to be familiar with the below
fundamentals.
Finger Positioning 1.1
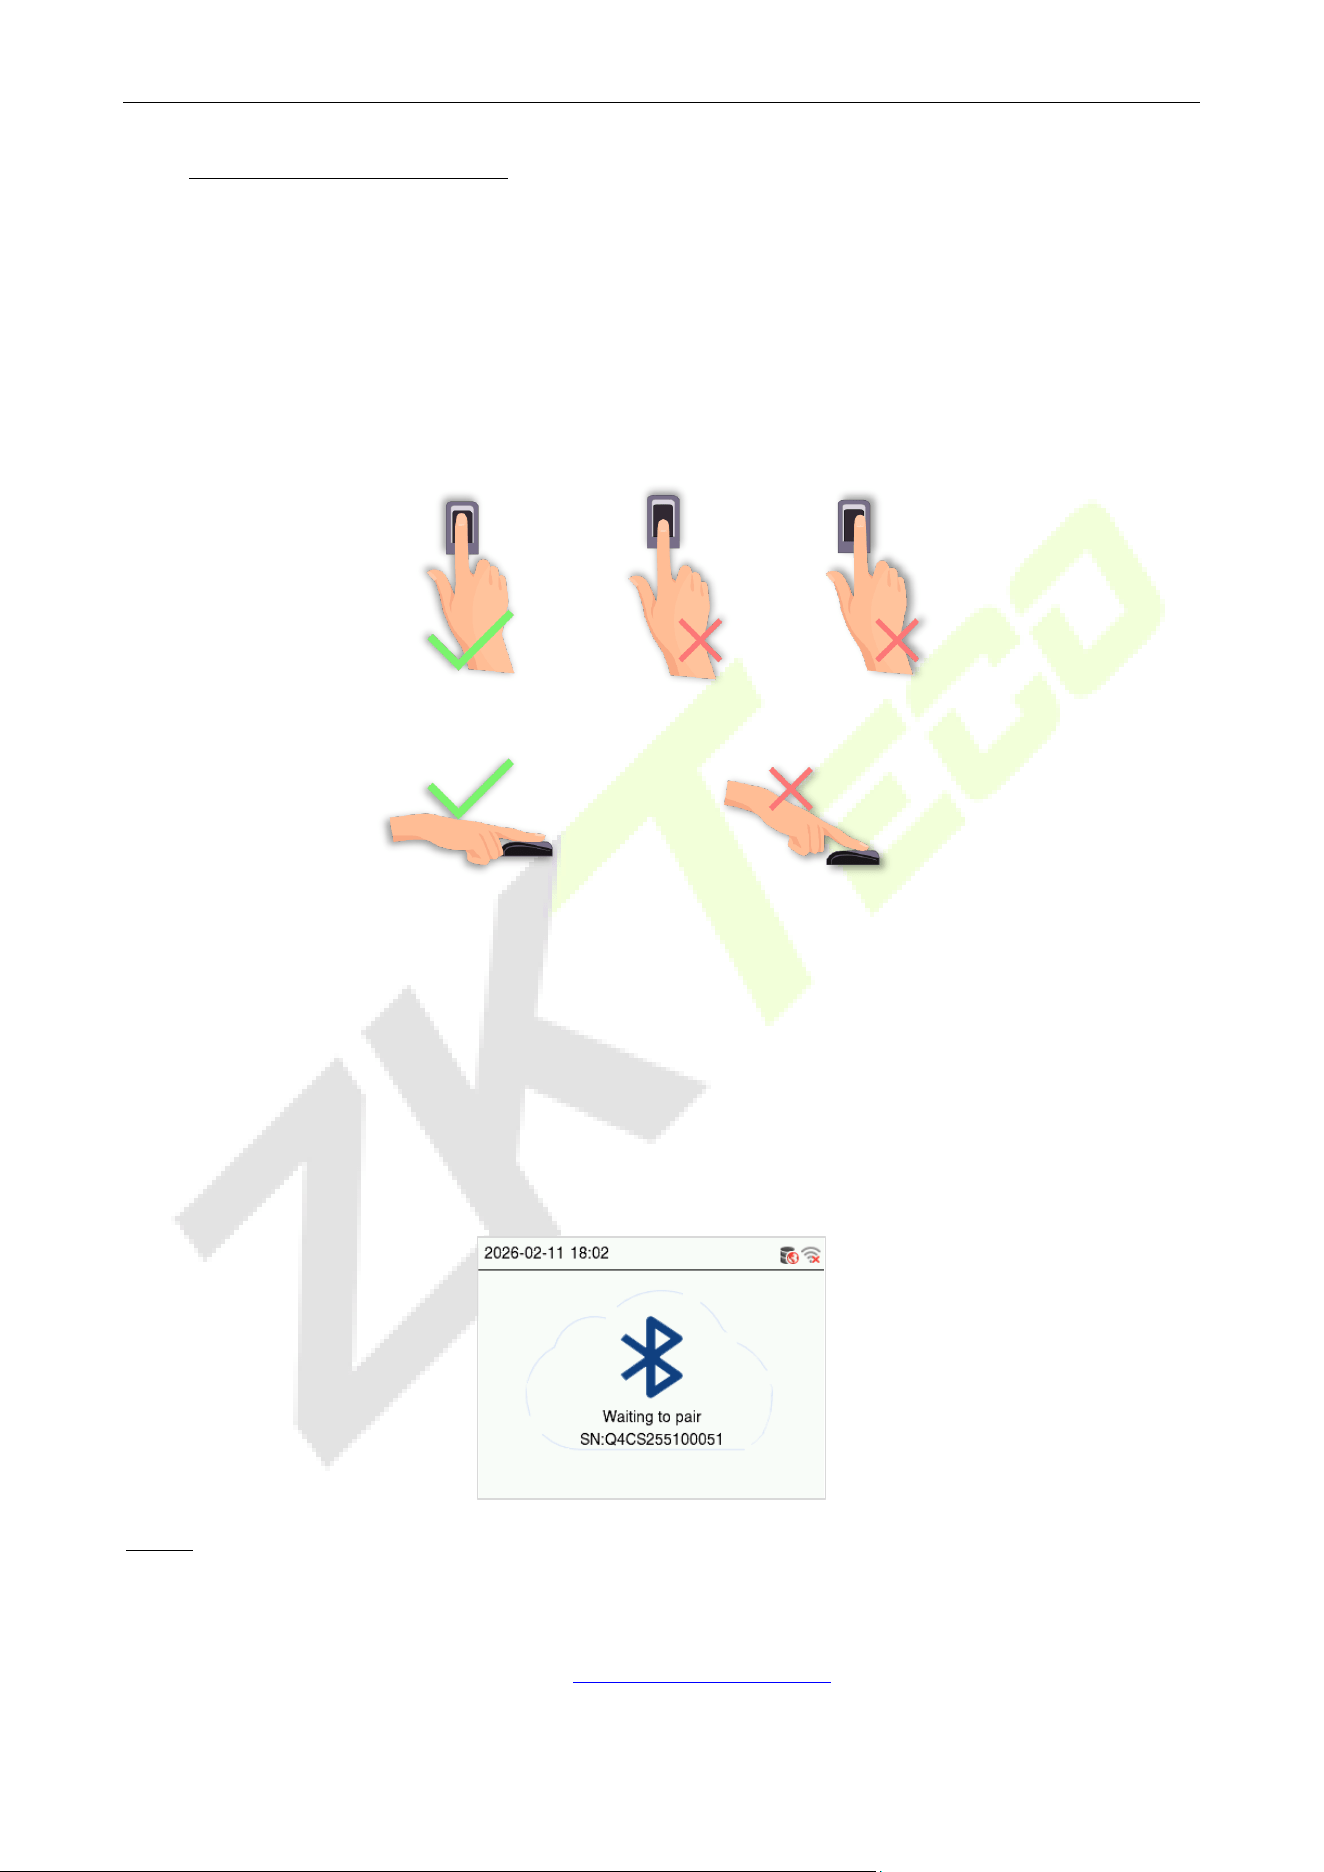
Recommended fingers: The index, middle, or ring fingers are recommended fingers to use, and avoid
using the thumb or pinky, as they are difficult to position correctly onto the fingerprint reader.
Note: Please use the correct method when pressing your fingers onto the fingerprint reader for registration
and identification. Our company will assume no liability for recognition issues that may result from incorrect
usage of the product. We reserve the right of final interpretation and modification concerning this point.
Standby Interface 1.2
1. When the device is connected to the power supply and the device is used for the first time, it
enters the standby screen as shown below:
Notes
:
1) This device needs to be used in combination with ZKBio Zlink software and ZKBio Zlink App. After binding
the device, you can unify the management of the device.
2) For details on how to bind the device, see 4.4 Add Device on the App
.
Too close to the edge
Vertical
Too low
D4 User Manual
Page | 9 Copyright © 2026 ZKTECO CO., LTD. All rights reserved.
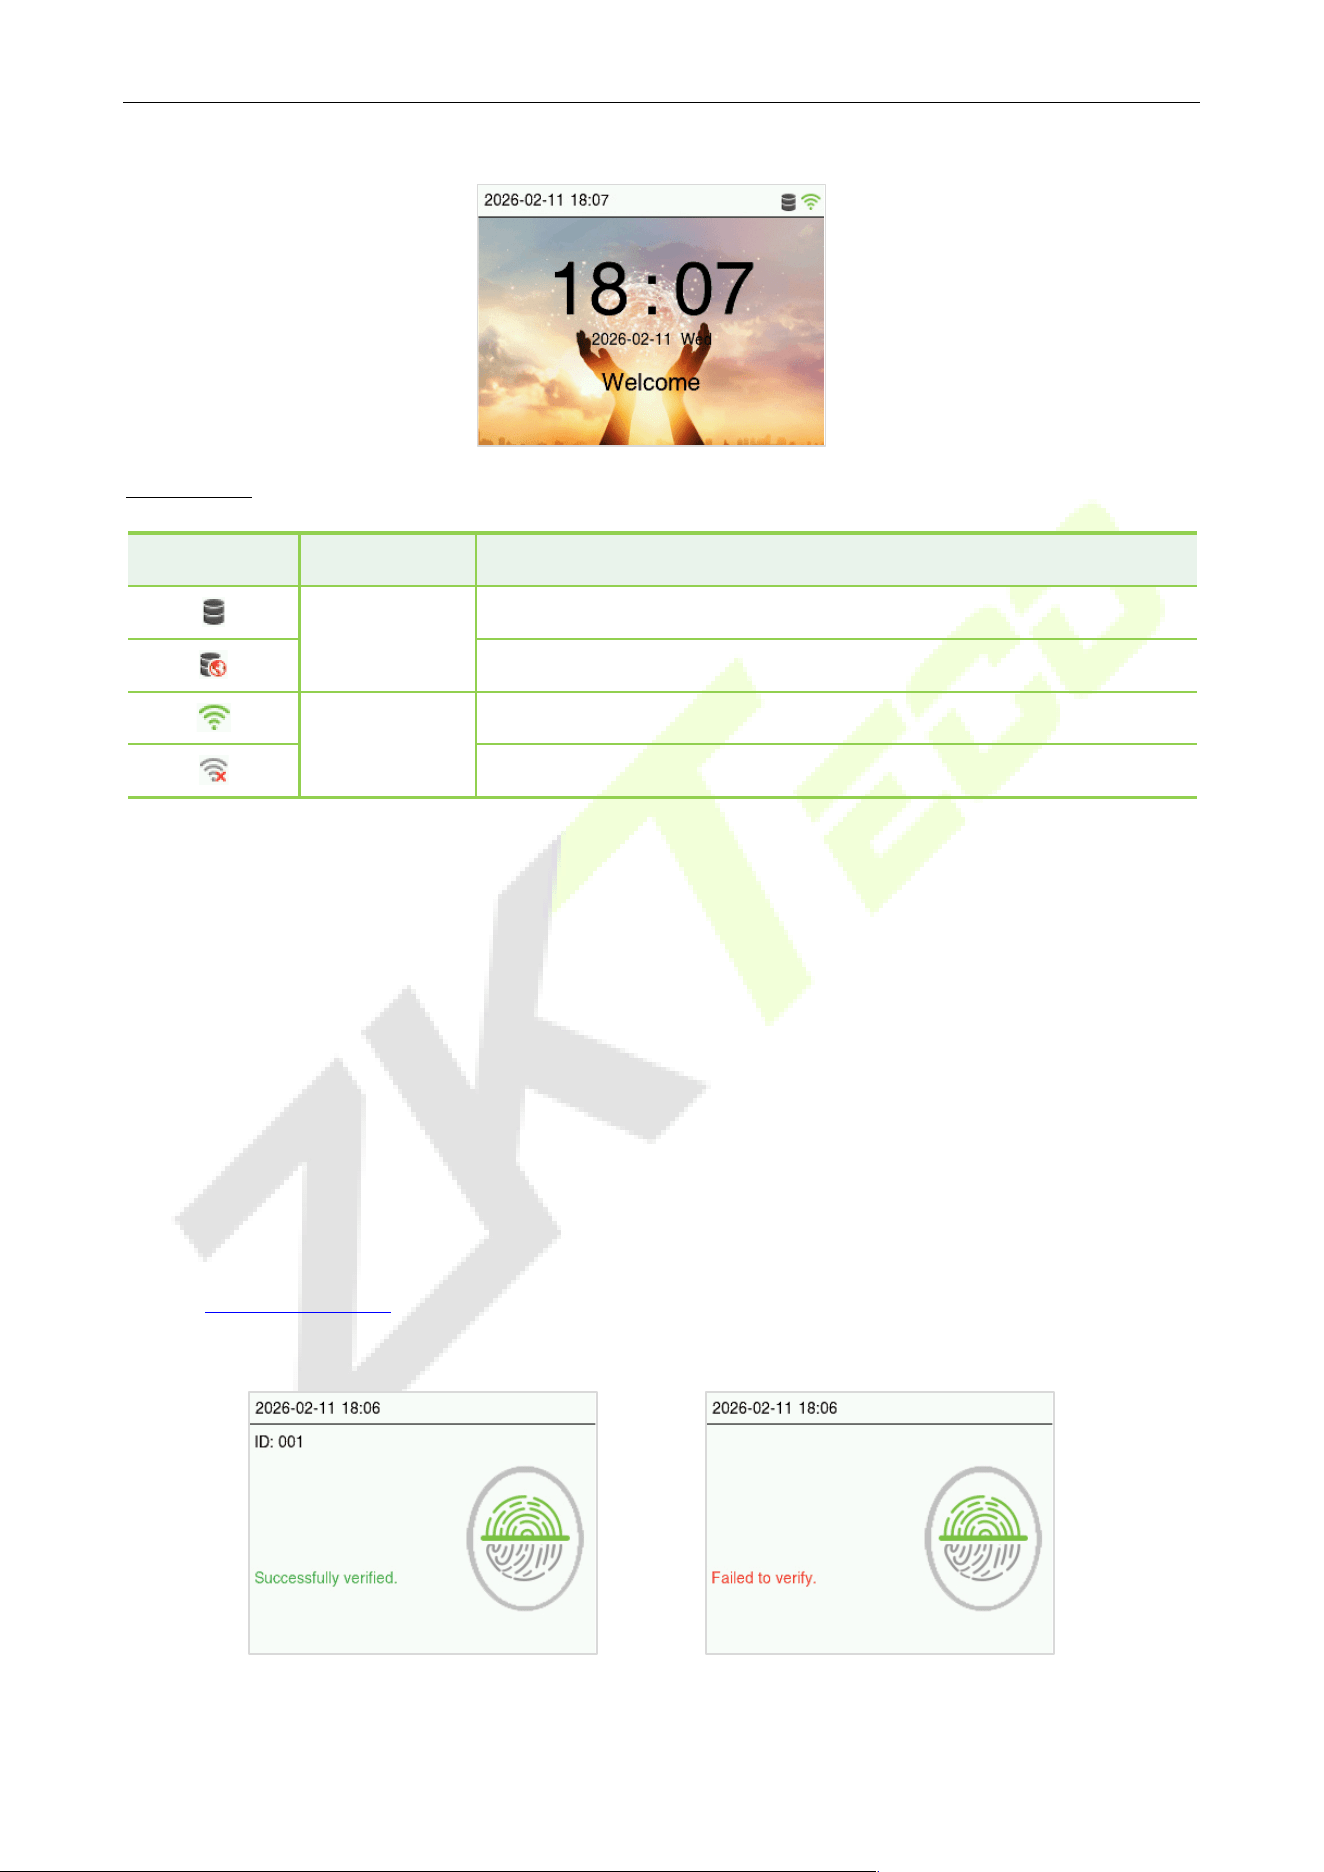
2. After successfully binding the device, the standby screen will be displayed as shown below.
Status Icons
Status Icon Name Description
ADMS Server
The connection between device and ADMS server is successful.
The connection between device and ADMS server is failed.
Wi-Fi Signal
The Wi-Fi connection is normal.
The Wi-Fi connection fails.
Verification Mode 1.3
1.3.1 Fingerprint Verification
1: N Fingerprint Verification Mode
The device compares the current fingerprint with the available fingerprint data stored in its database.
Fingerprint authentication mode is activated when a user places their finger onto the fingerprint
scanner.
Please follow the recommended way to place your finger onto the sensor. For details, please refer to
section Finger Positioning
.
Verification is successful: Verification is failed:
D4 User Manual
Page | 10 Copyright © 2026 ZKTECO CO., LTD. All rights reserved.
1.3.2 Card Verification
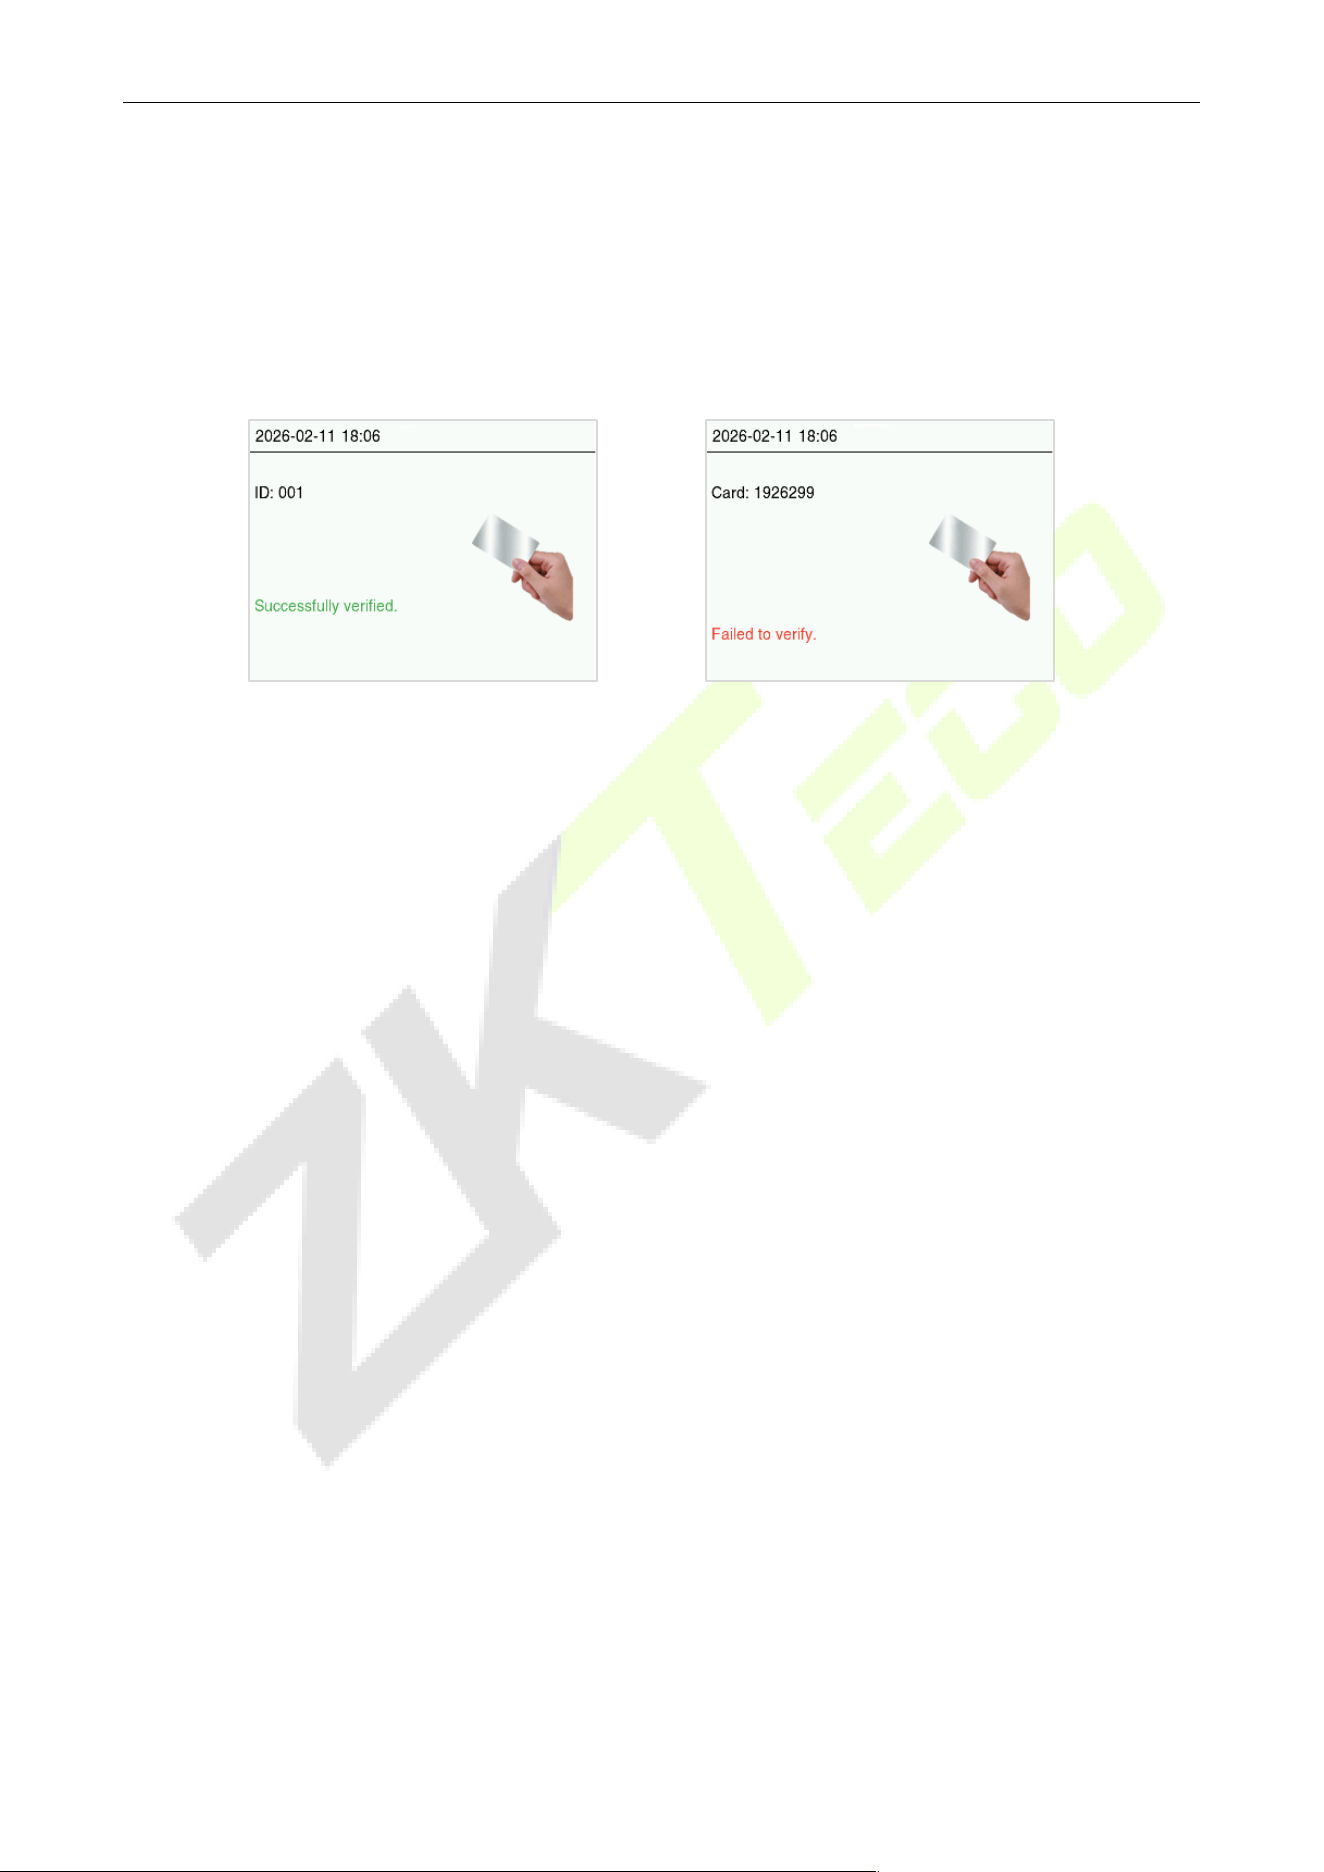
1:N card verification
The 1:N card verification mode compares the card number in the card induction area with all the card
number data registered in the device. Place the card in the collection area for verification.
Verification is successful: Verification is failed:
D4 User Manual
Page | 11 Copyright © 2026 ZKTECO CO., LTD. All rights reserved.
2 Overview
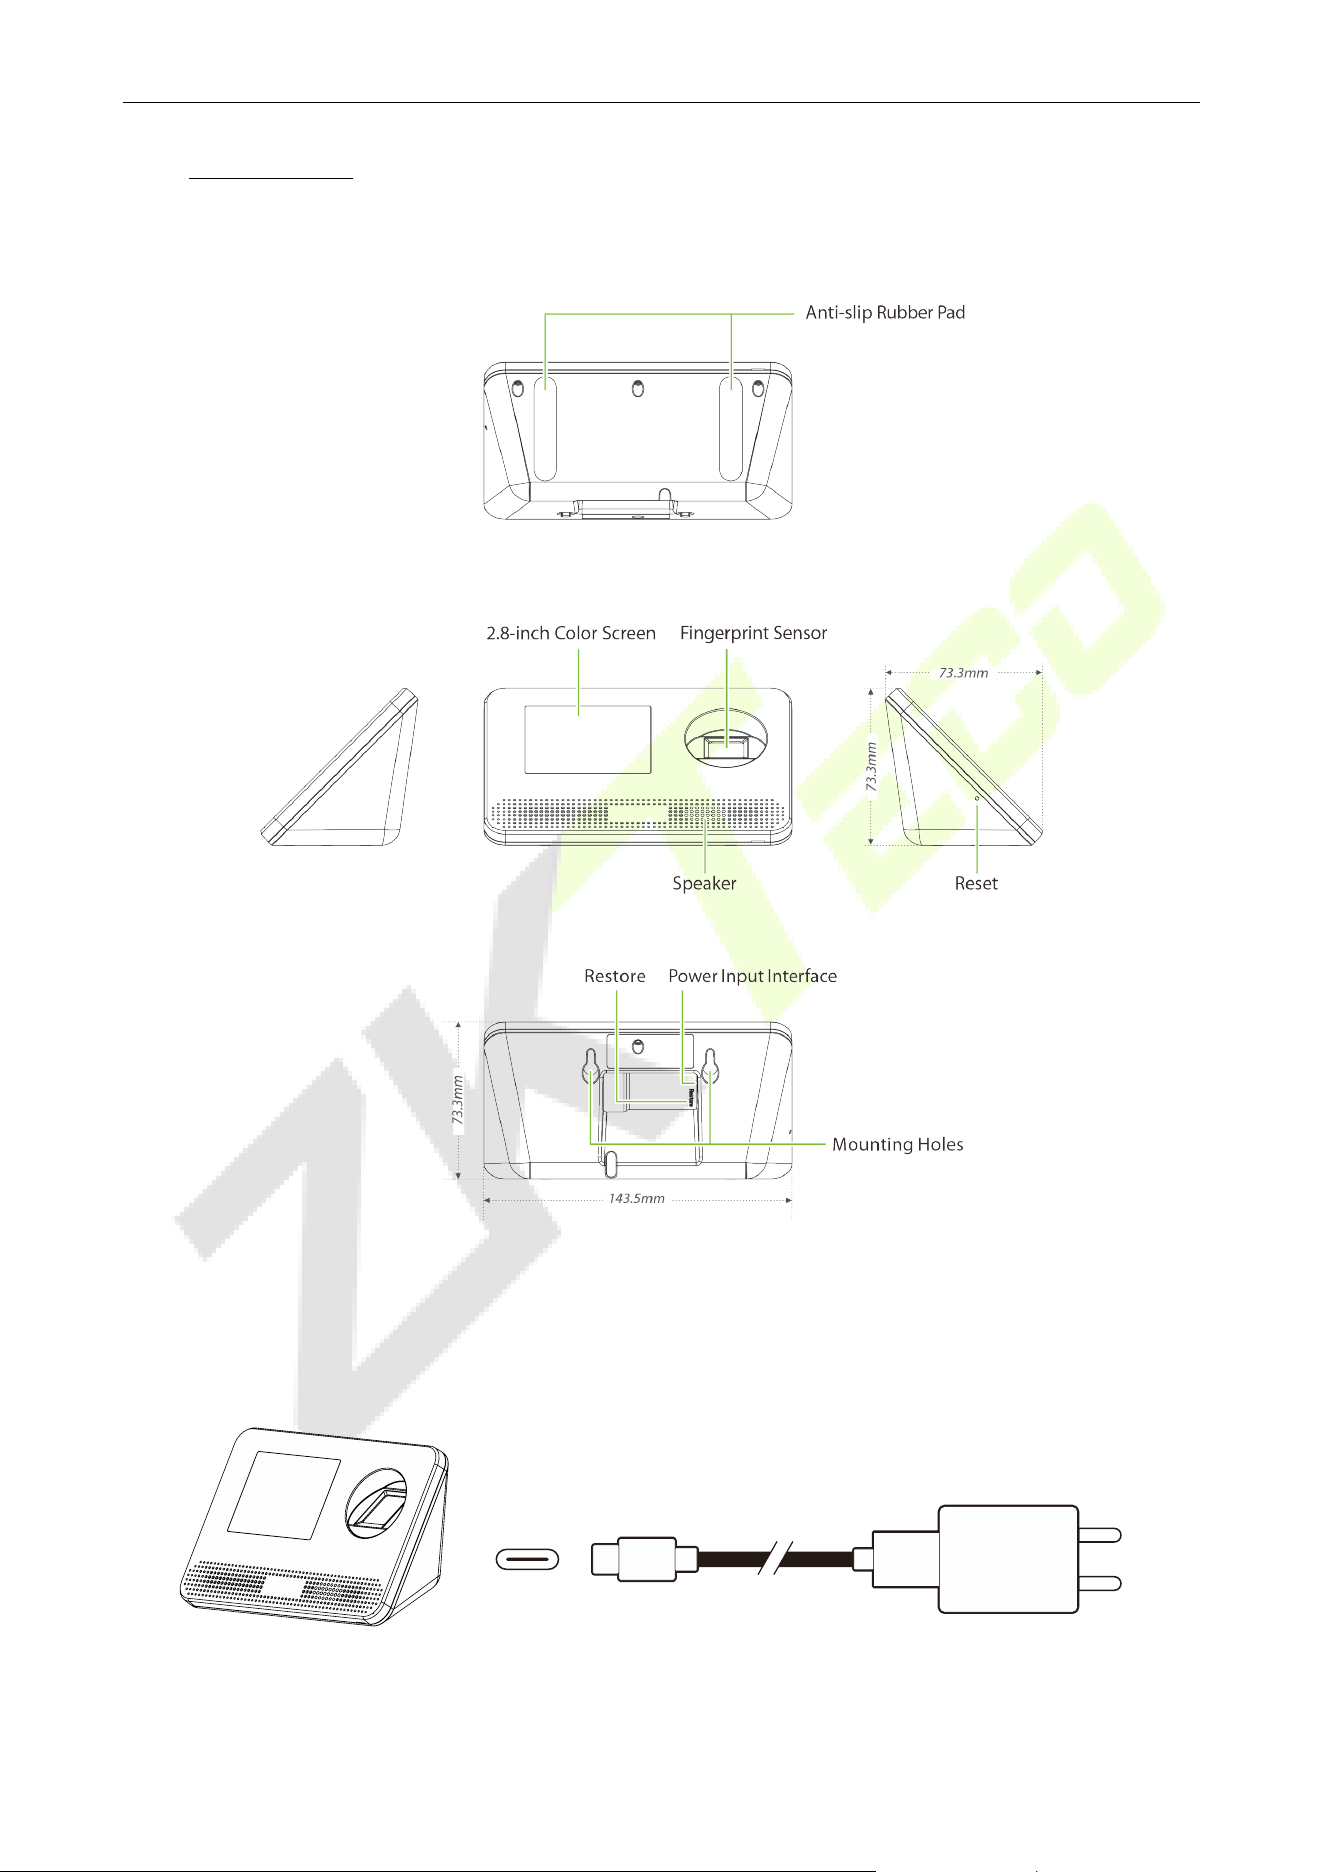
Appearance 2.1
Wiring Description 2.2
2.2.1 Power Connection
Power Interface (Type-C)
AC Adapter
DC 5V, 2A
Recommended power supply
• Rating of 5V and 2A.
D4 User Manual
Page | 12 Copyright © 2026 ZKTECO CO., LTD. All rights reserved.
3 Installation
Installation Environment 3.1
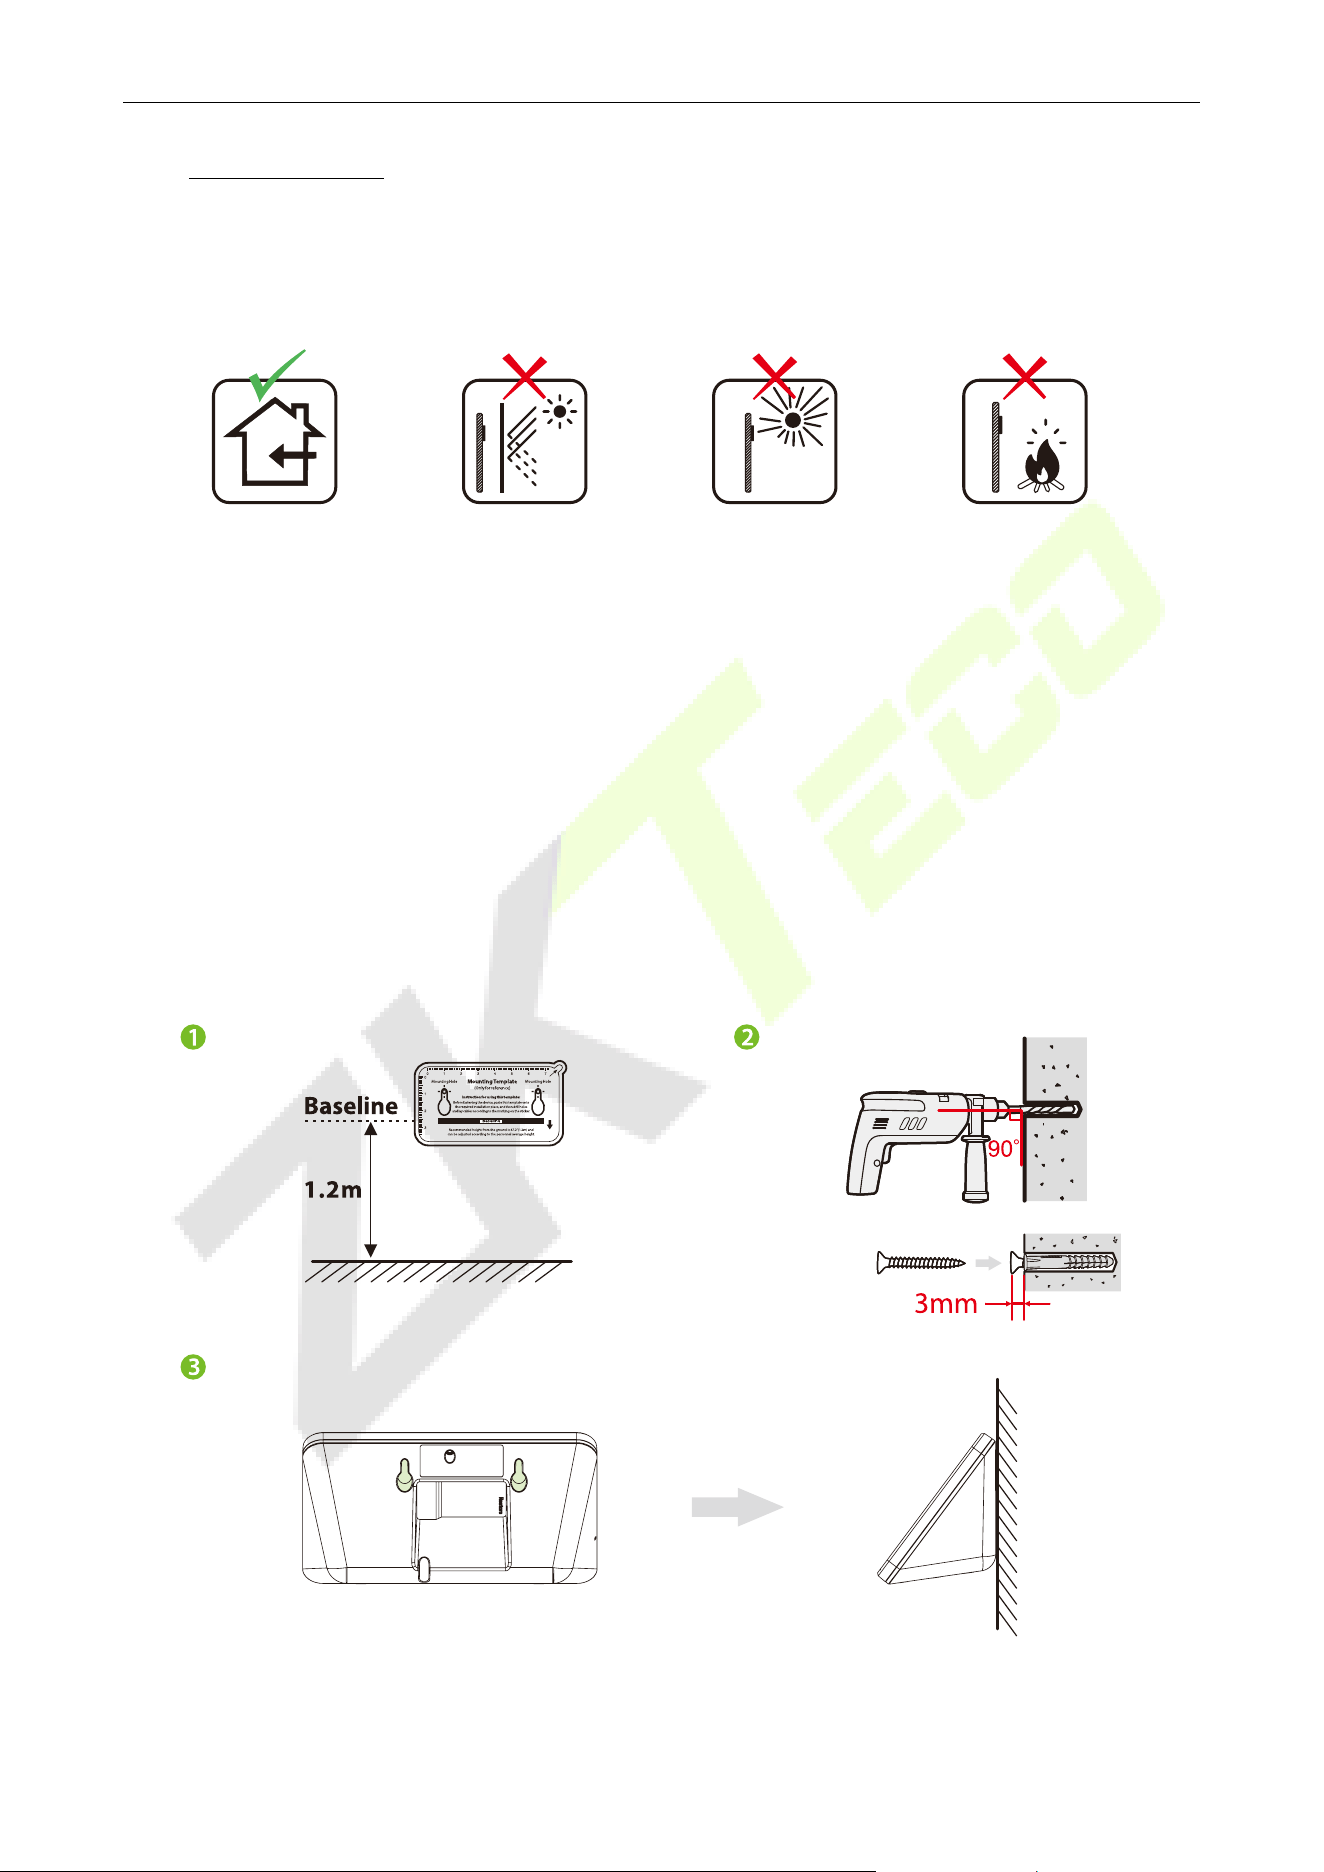
Please refer to the following recommendations for installation.
INSTALL INDOORS
ONLY
AVOID DIRECT
SUNLIGHT
AND EXPOSURE
AVOID INSTALLATION
NEAR
GLASS WINDOWS
AVOID USE OF ANY
HEAT SOURCE
NEAR THE DEVICE
Device Installation 3.2
Install on the wall
1. Stick the mounting template sticker to the wall and drill holes according to the mounting template
sticker.
2. Insert expansion tubes into the mounting holes and place self-tapping screws into them.
3. Then hook the device onto the wall as shown below.
D4 User Manual
Page | 13 Copyright © 2026 ZKTECO CO., LTD. All rights reserved.
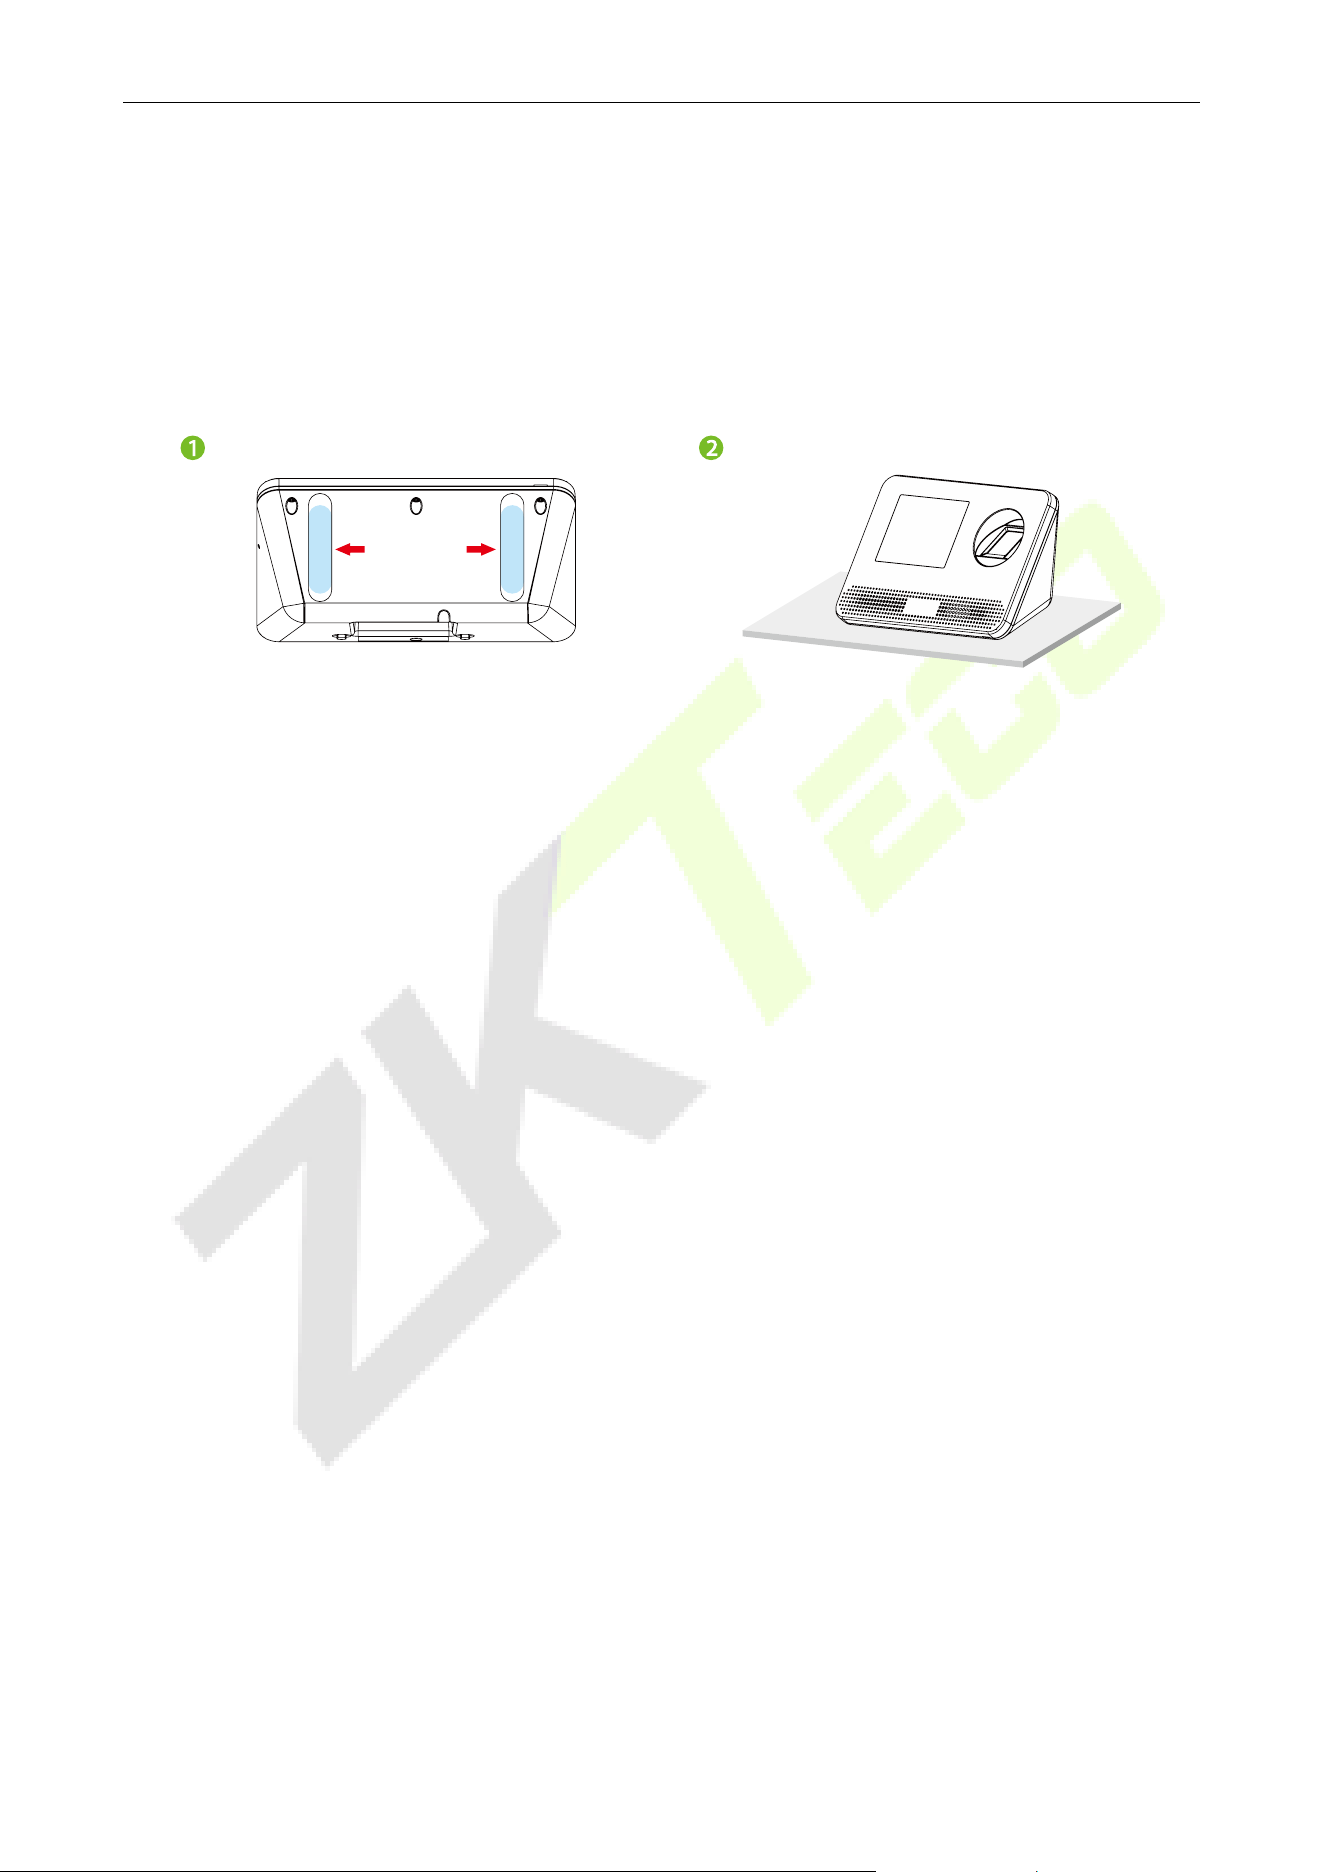
Install on the desktop
1. Please peel off the protective film from the anti-slip rubber pad first.
2. Then attach the device to the desktop.
Note: If the device feels less stable, the rubber pads may need cleaning. Wipe them and the desk surface
with a slightly damp, lint-free cloth. Let both dry completely, then press the device firmly back into place.
*Unplug before repositioning. Do not use chemical or oil-based cleaners.
D4 User Manual
Page | 14 Copyright © 2026 ZKTECO CO., LTD. All rights reserved.
4 Connecting to ZKBio Zlink App
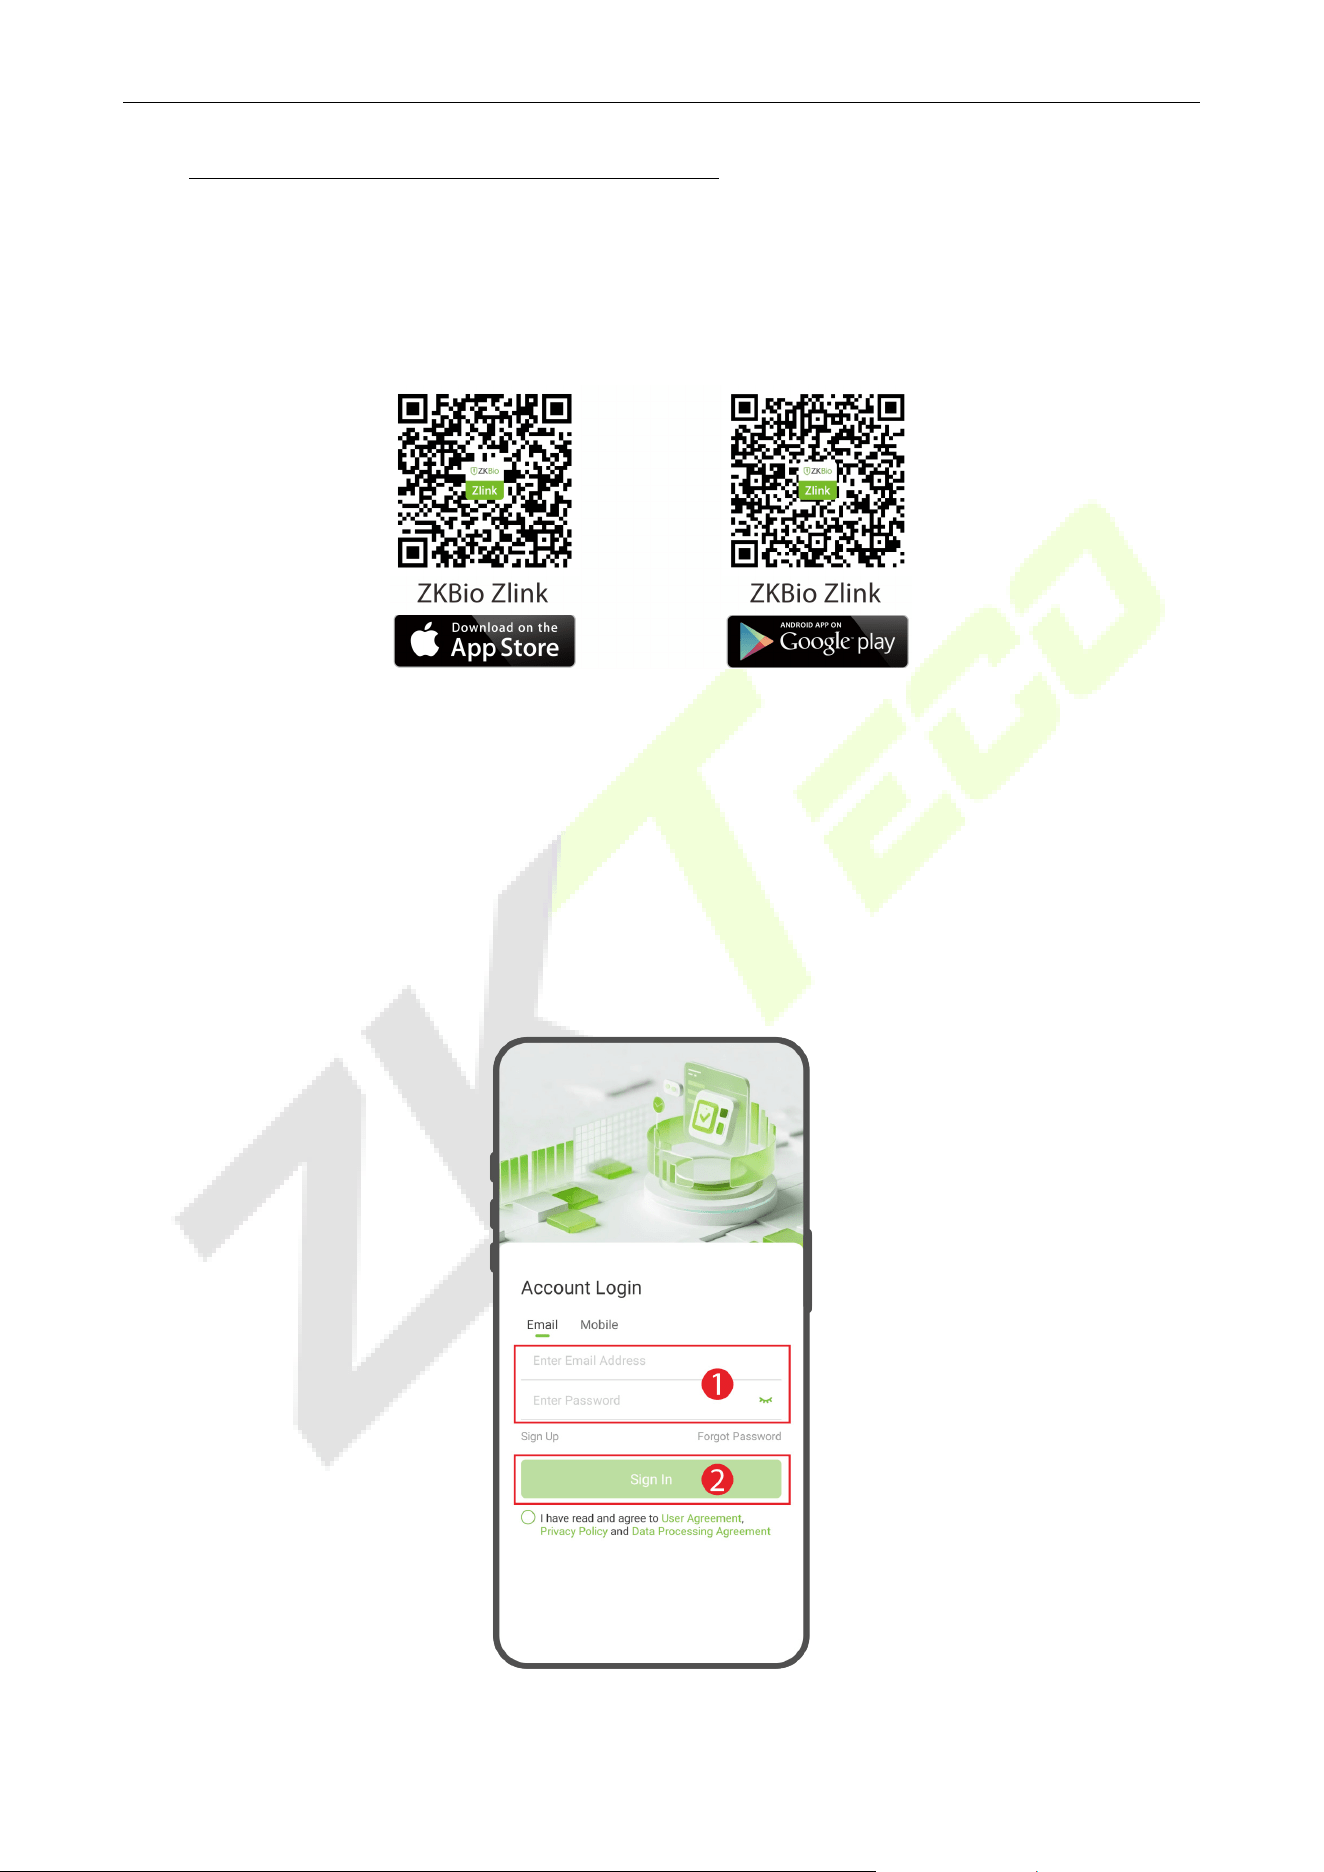
Download the ZKBio Zlink App 4.1
Search for the "ZKBio Zlink" App in the iOS App Store or Google Play Store. Or scan the QR code below
to install the app.
The device connects to the network via Bluetooth in the app.
Note: Due to the continuous updating of the App and software version, the interface of this manual is for
reference only, please refer to the actual interface of the App and software.
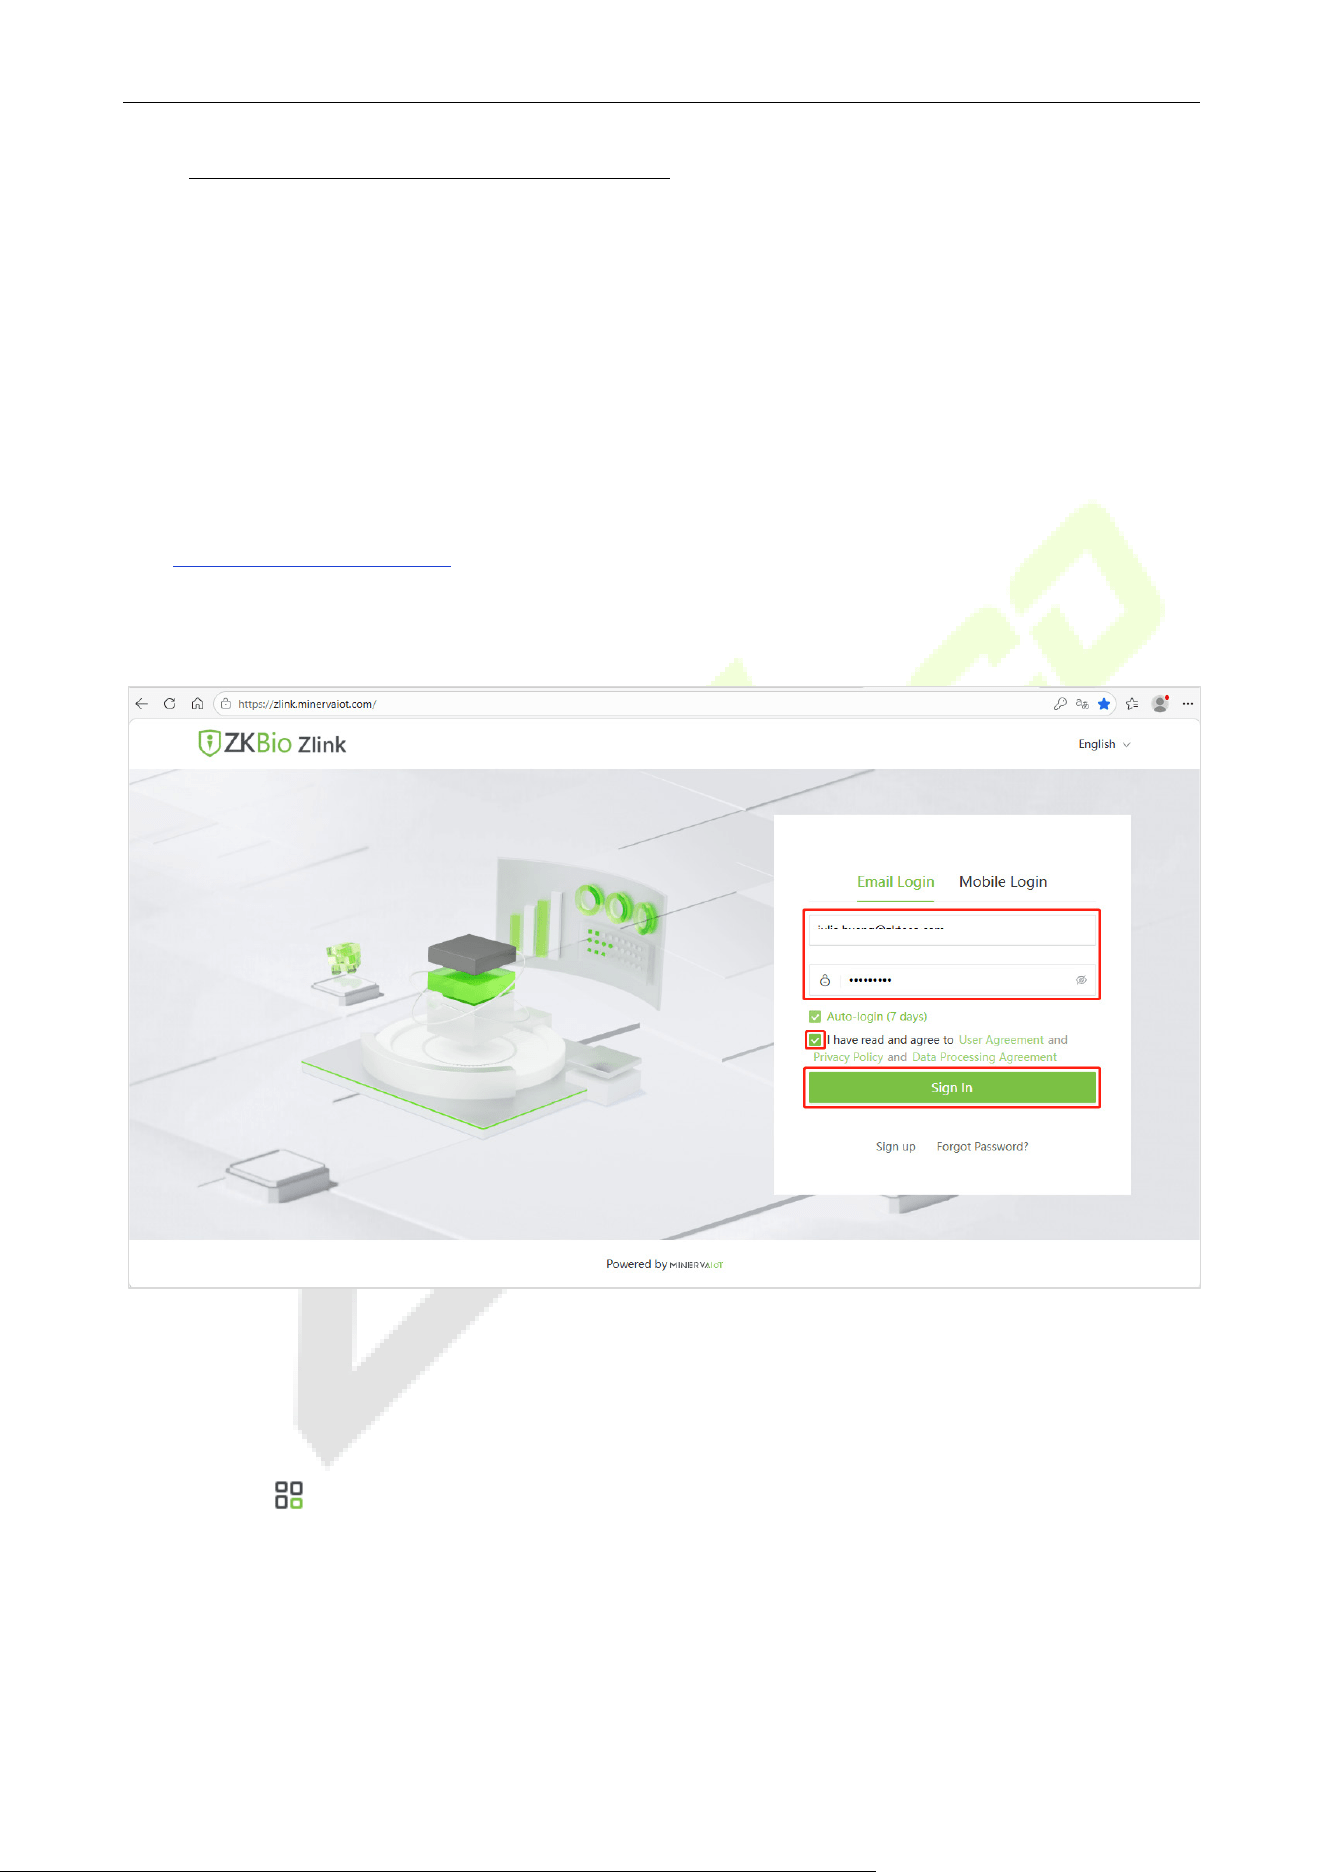
Login to the App 4.2
Enter your registered account and password, check ‘‘I have read and agree to User Agreement, Privacy
Policy and Data Processing Agreement’’ and click Sign In to log in to the App.
Note: For more operations, refer to the ZKBio Zlink App's user manual.
D4 User Manual
Page | 15 Copyright © 2026 ZKTECO CO., LTD. All rights reserved.
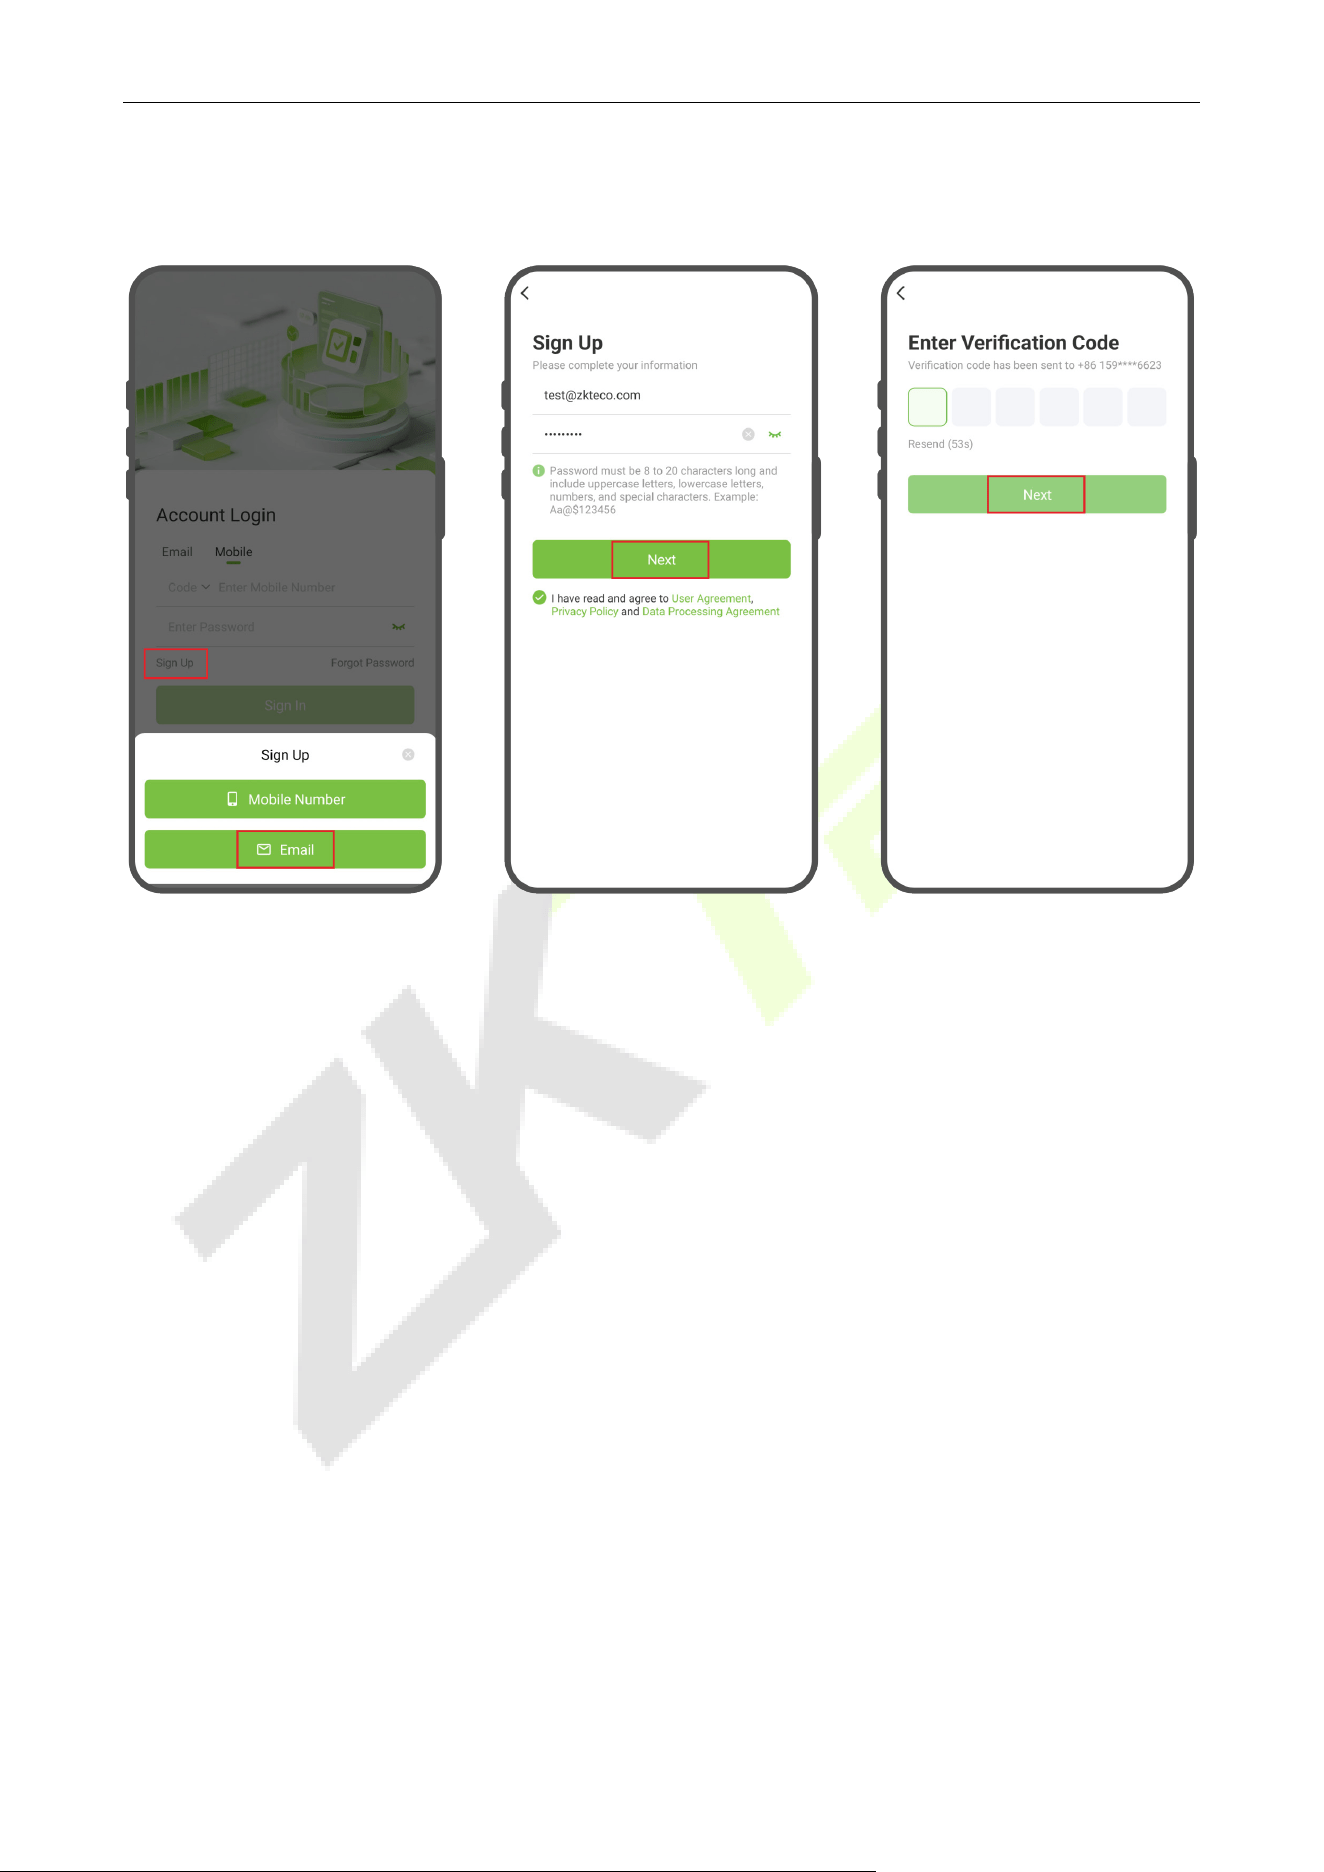
Create Your Account 4.3
Open the ZKBio Zlink App and create an account with your phone number or Email ID.
Add Device on the App 4.4
1. Log in to the ZKBio Zlink App with the account you have already created.
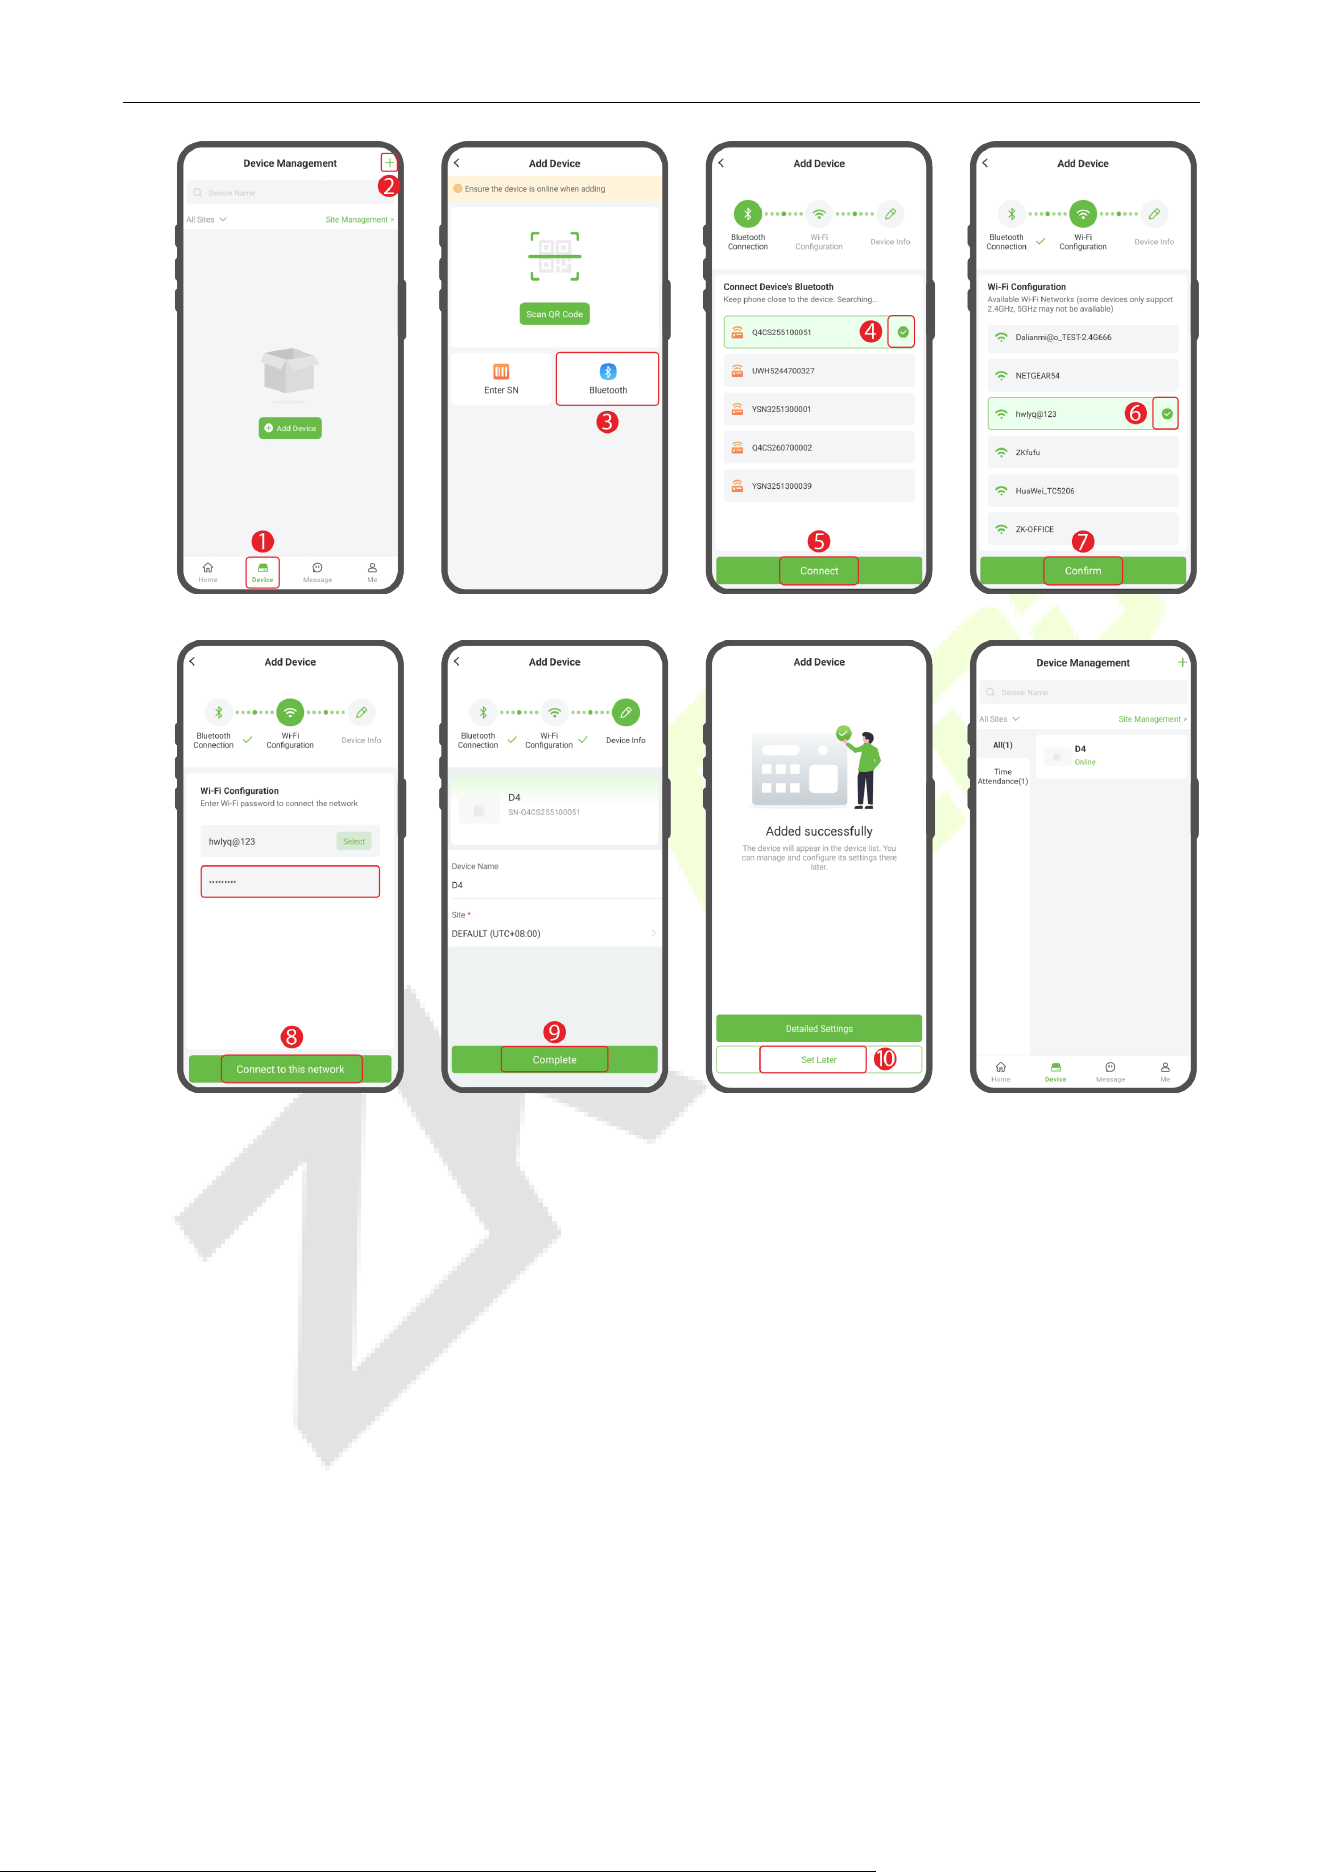
2. Click [Device] > + icon to enter the Add Device interface. (See diagram step 1,2)
3. Turn on Bluetooth on your smartphone and tap [Bluetooth] to search for devices via Bluetooth. In
the list of detected devices, use the SN code to confirm and select the device you wish to add.
Click [Connect] to connect the device and configure Wi-Fi. (See diagram step 3,4,5)
4. Then from the list of searched Wi-Fi networks, select the one you want to connect to and click
[Confirm]. (See diagram step 6,7)
5. Enter the password and click [Connect to this network]. (See diagram step 8)
6. Enter the device name and specify the device to a site. Click [Complete] to complete the addition.
A “Added successfully” prompt will appear simultaneously. (See diagram step 9)
7. Once successfully added, the device is displayed in the list of the device interface. Click [Set Later]
to return to the Device Management interface. (See diagram step 10)
D4 User Manual
Page | 16 Copyright © 2026 ZKTECO CO., LTD. All rights reserved.
Short Press Restore Button (1 second): Reactivates Bluetooth pairing mode, allowing you to switch
the device to a different Wi-Fi network via the mobile app.
Long Press Restore Button (5 seconds or more): Resets the device to factory settings and restarts it
automatically.
*Warning: A factory reset is irreversible. The device will need to be re-registered before use.
Manage and Add Person in Device 4.5
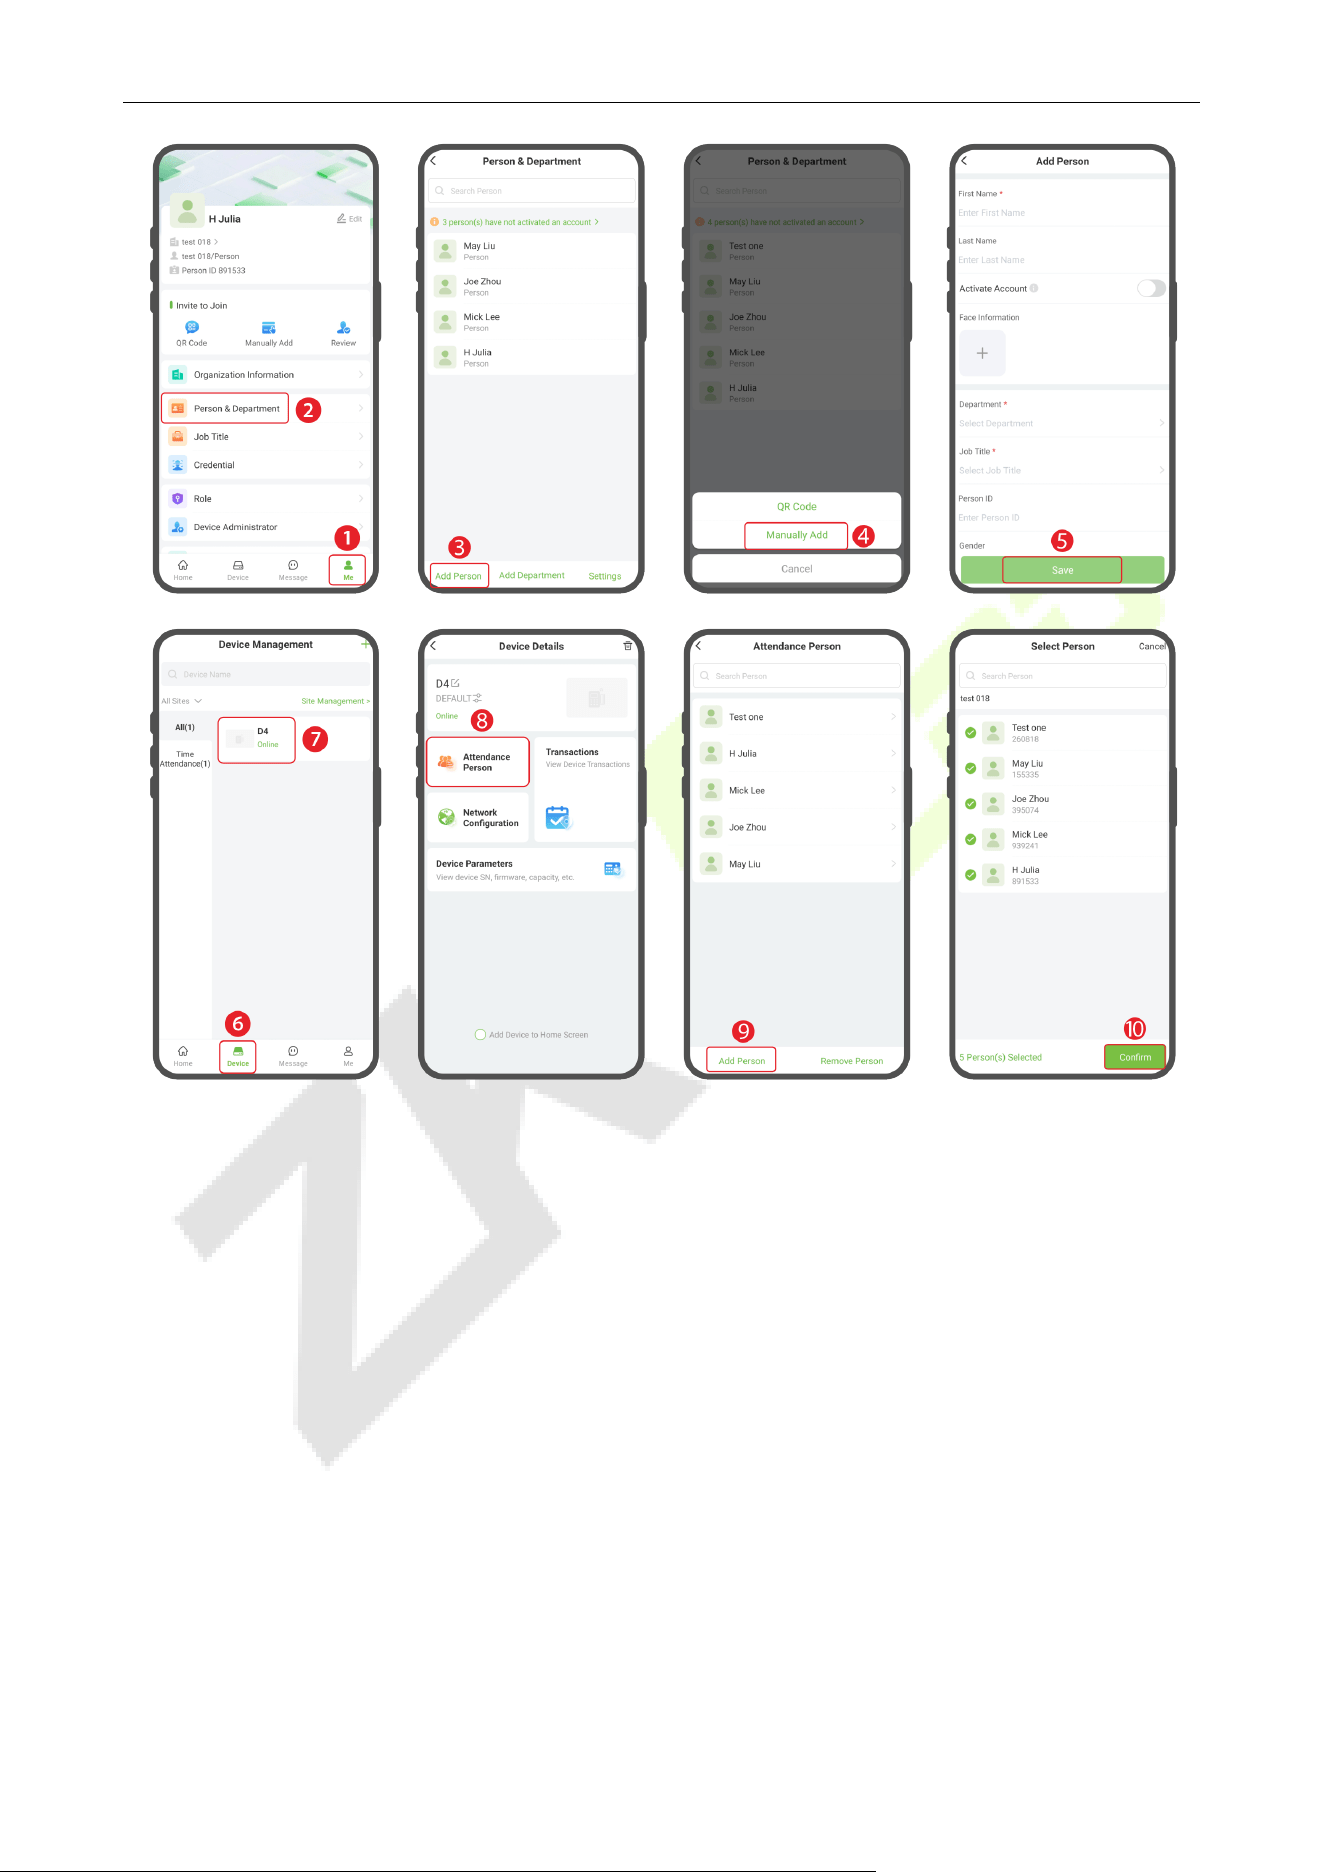
1. In the bottom menu of the app, click [Me] > [Person & Department] > [Add Person]. You may
choose to add either QR Code or Manually Add. Then, in the Add Person screen, enter the person's
details. (See diagram step 1,2,3,4,5)
2. After adding new personnel, click [Device] to enter the Device Management interface. Select the
device and click [Attendance Person] > [Add Person] to manage and add attendance personnel
for that device. After completion, click [Confirm] to synchronize personnel information to the
device. (See diagram step 6,7,8,9,10)
D4 User Manual
Page | 17 Copyright © 2026 ZKTECO CO., LTD. All rights reserved.
Register Verification Mode on the App 4.6
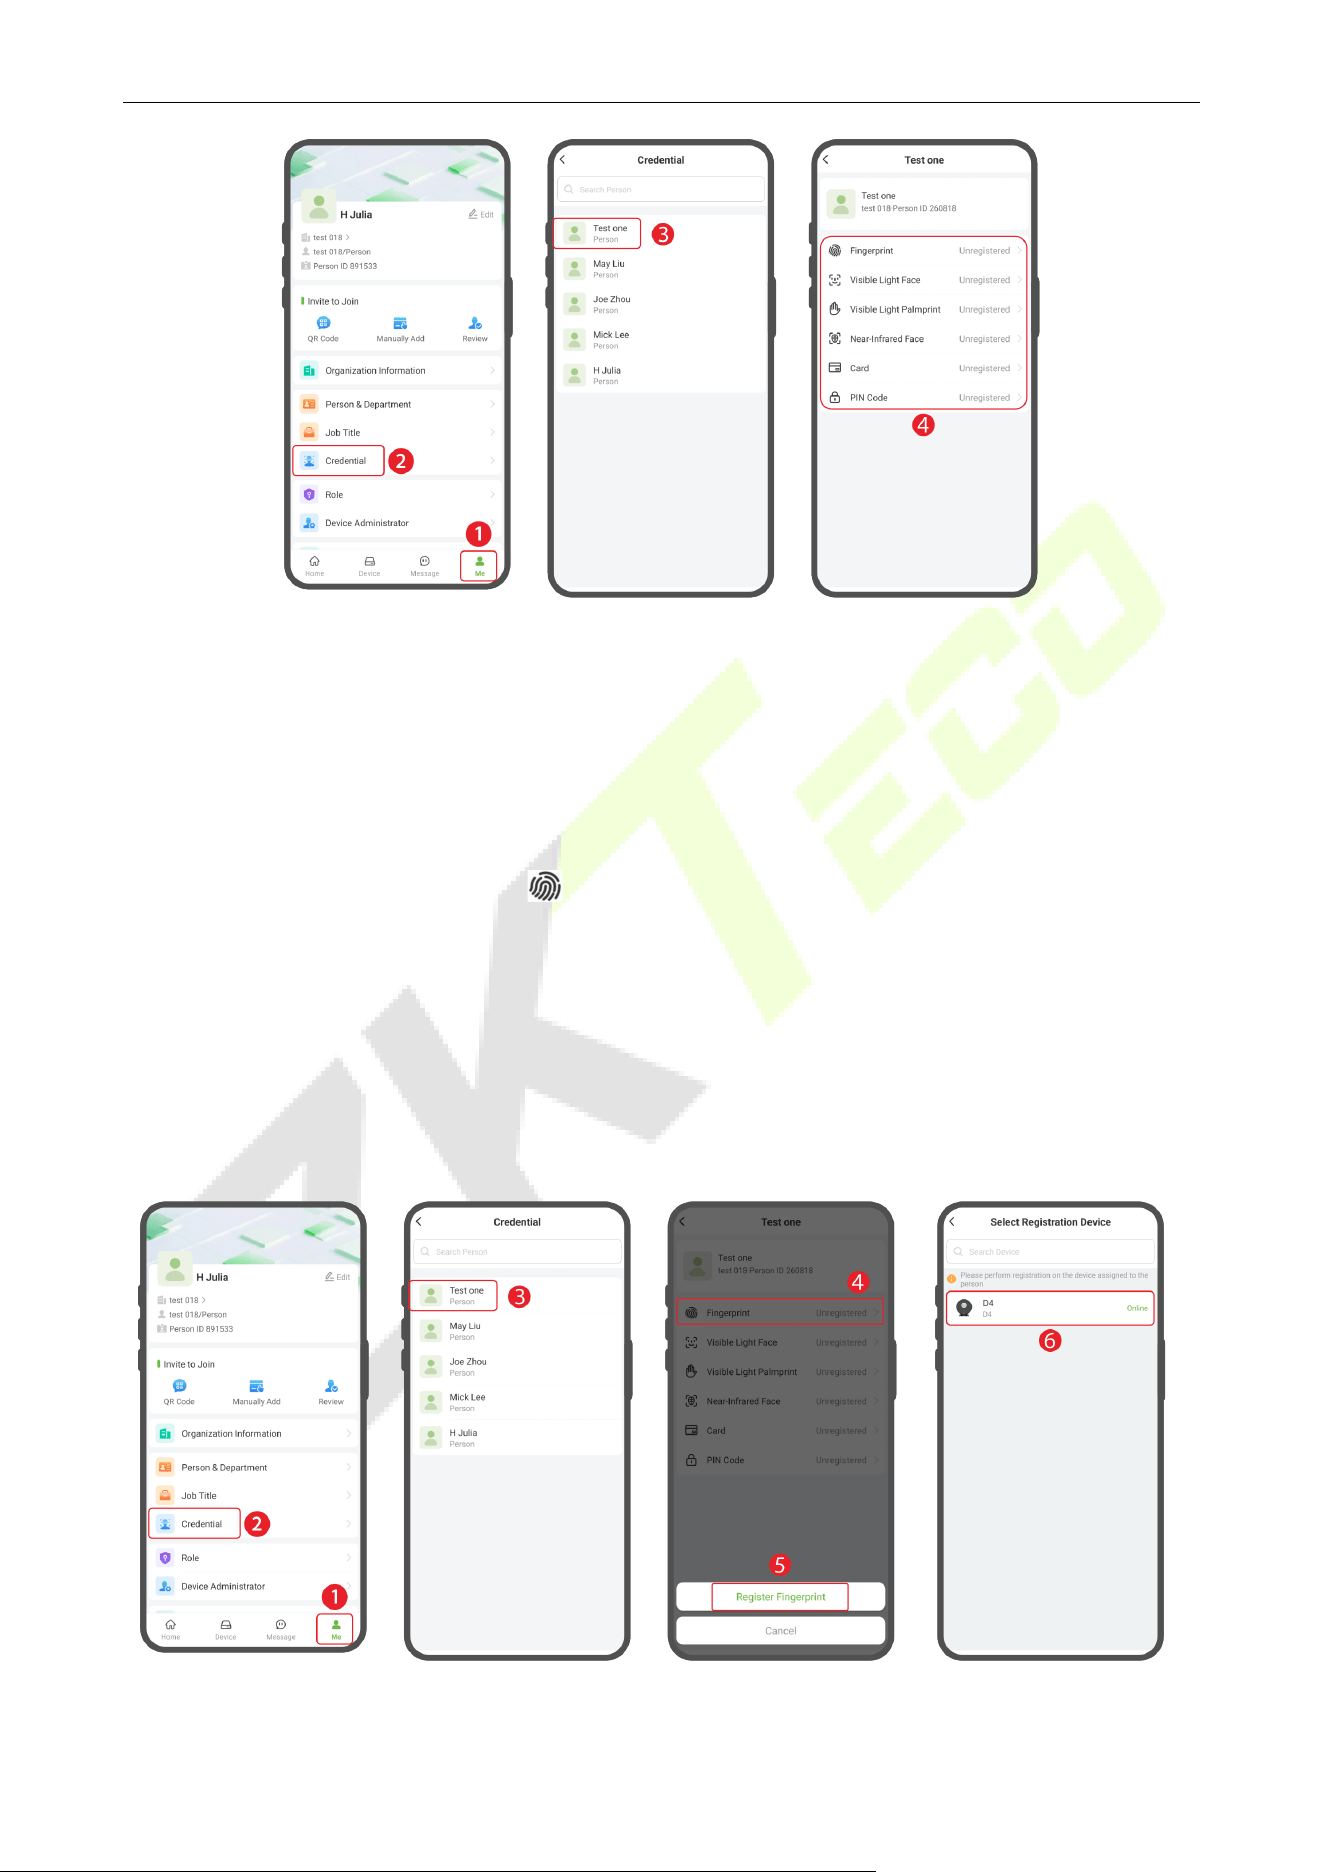
Once you have added persons to the device, you can register verification modes to them.
Click [Me] > [Credential] to enter the Credential screen, select the person who needs to register
verification mode. (1,2,3,4)
This device supports only fingerprint and card authentication methods for enrollment.
D4 User Manual
Page | 18 Copyright © 2026 ZKTECO CO., LTD. All rights reserved.
Note: It must be based on the functions actually supported by the device.
Register Fingerprint
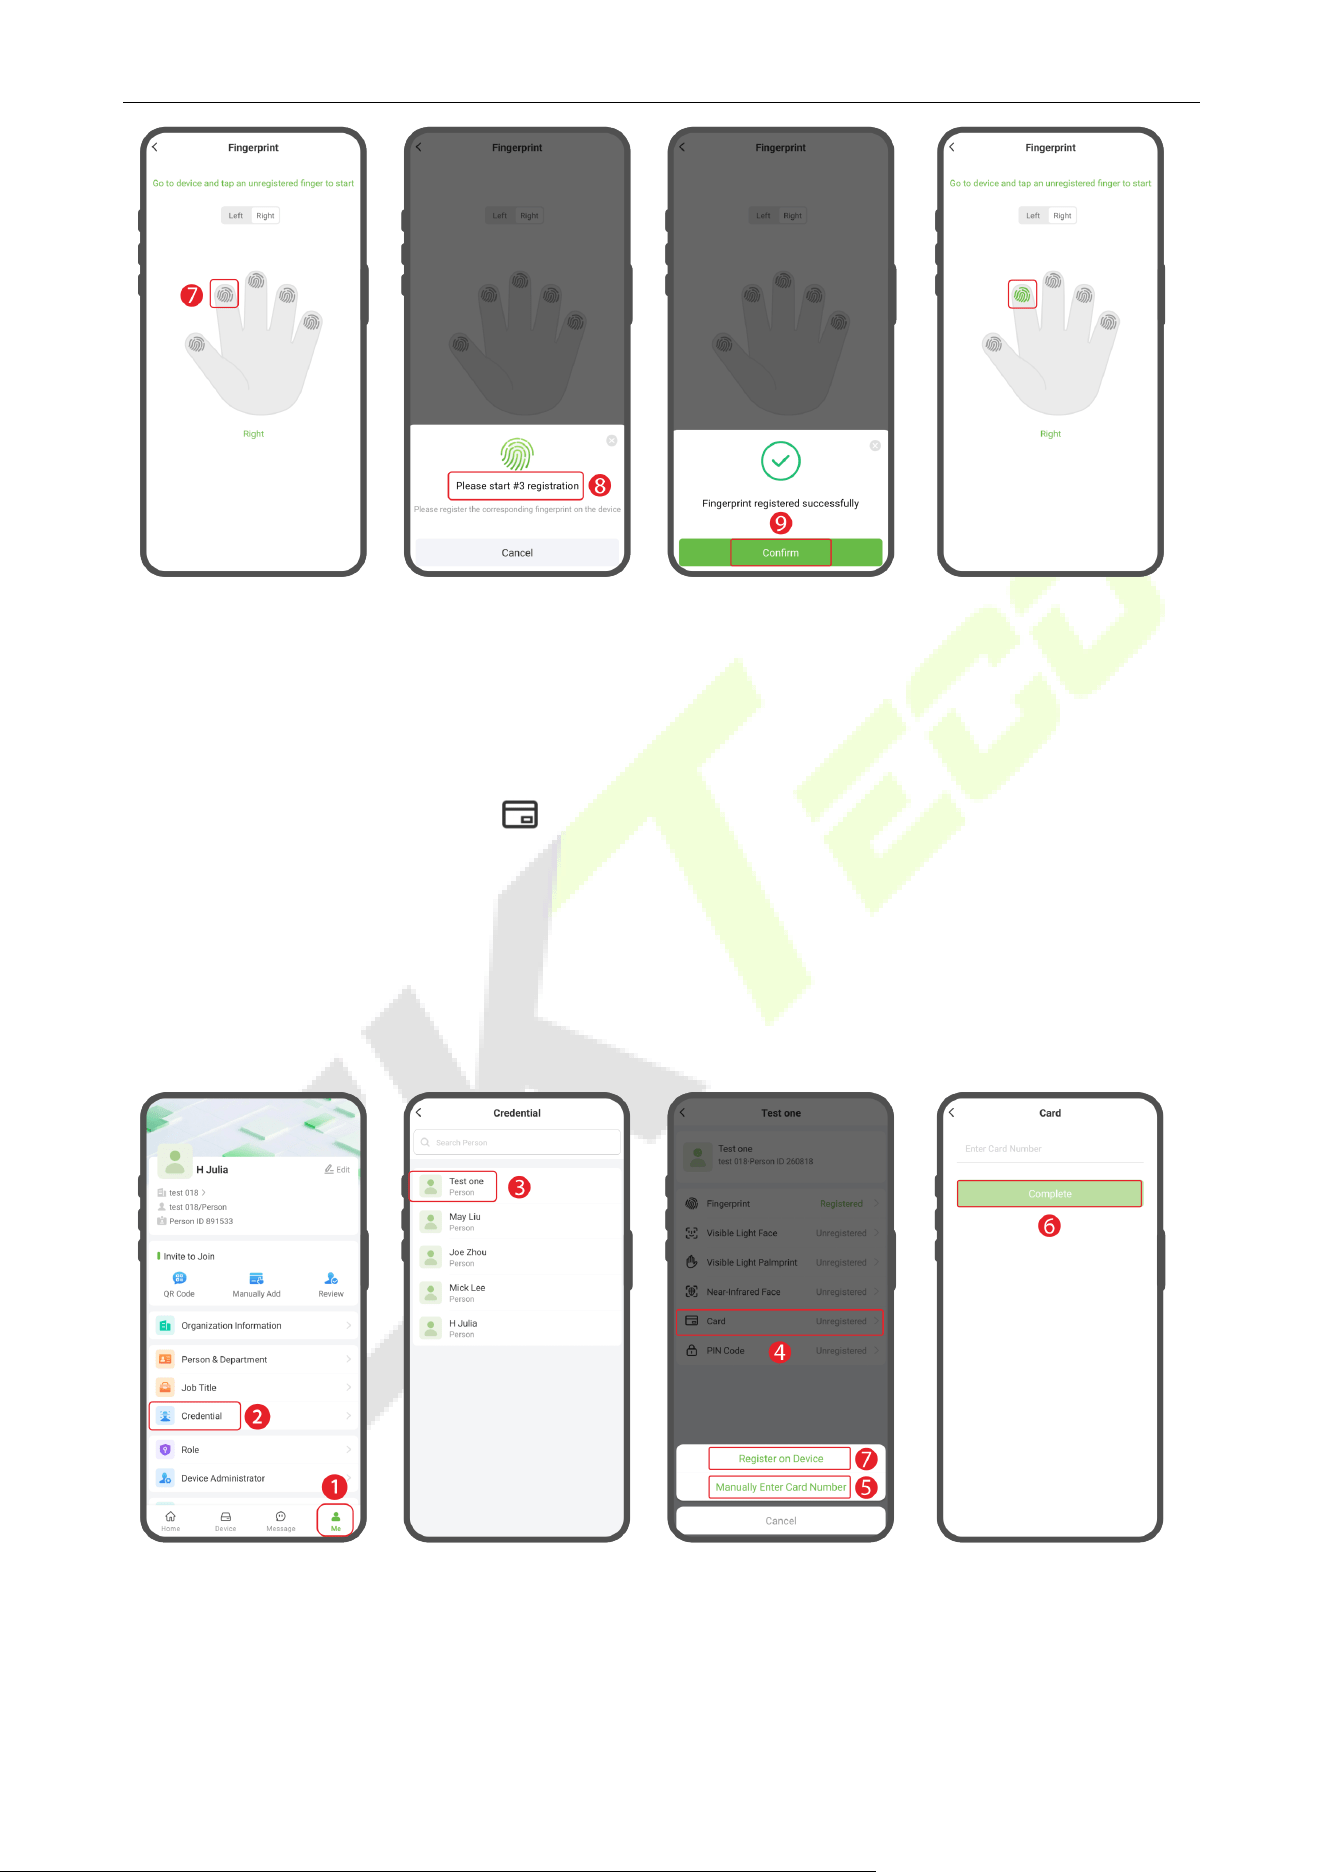
1. Click [Me] > [Credential] to enter the Credential screen, select the person who needs to register
verification mode. (See diagram step 1,2,3)
2. In the Details interface, click the icon > [Register Fingerprint], select the device and the
fingerprint to register. When selecting a device for registration, the device will prompt ‘‘Please
press your finger three times’’ and press 3 times on the collector after hearing the prompt. (See
diagram step 4,5,6,7,8)
3. Click [Confirm] to return. (See diagram step 9)
4. When you hear the message ‘‘Registration is successful’’, the registration is successful. And you can
repeat the above operation to register other fingers.
D4 User Manual
Page | 19 Copyright © 2026 ZKTECO CO., LTD. All rights reserved.
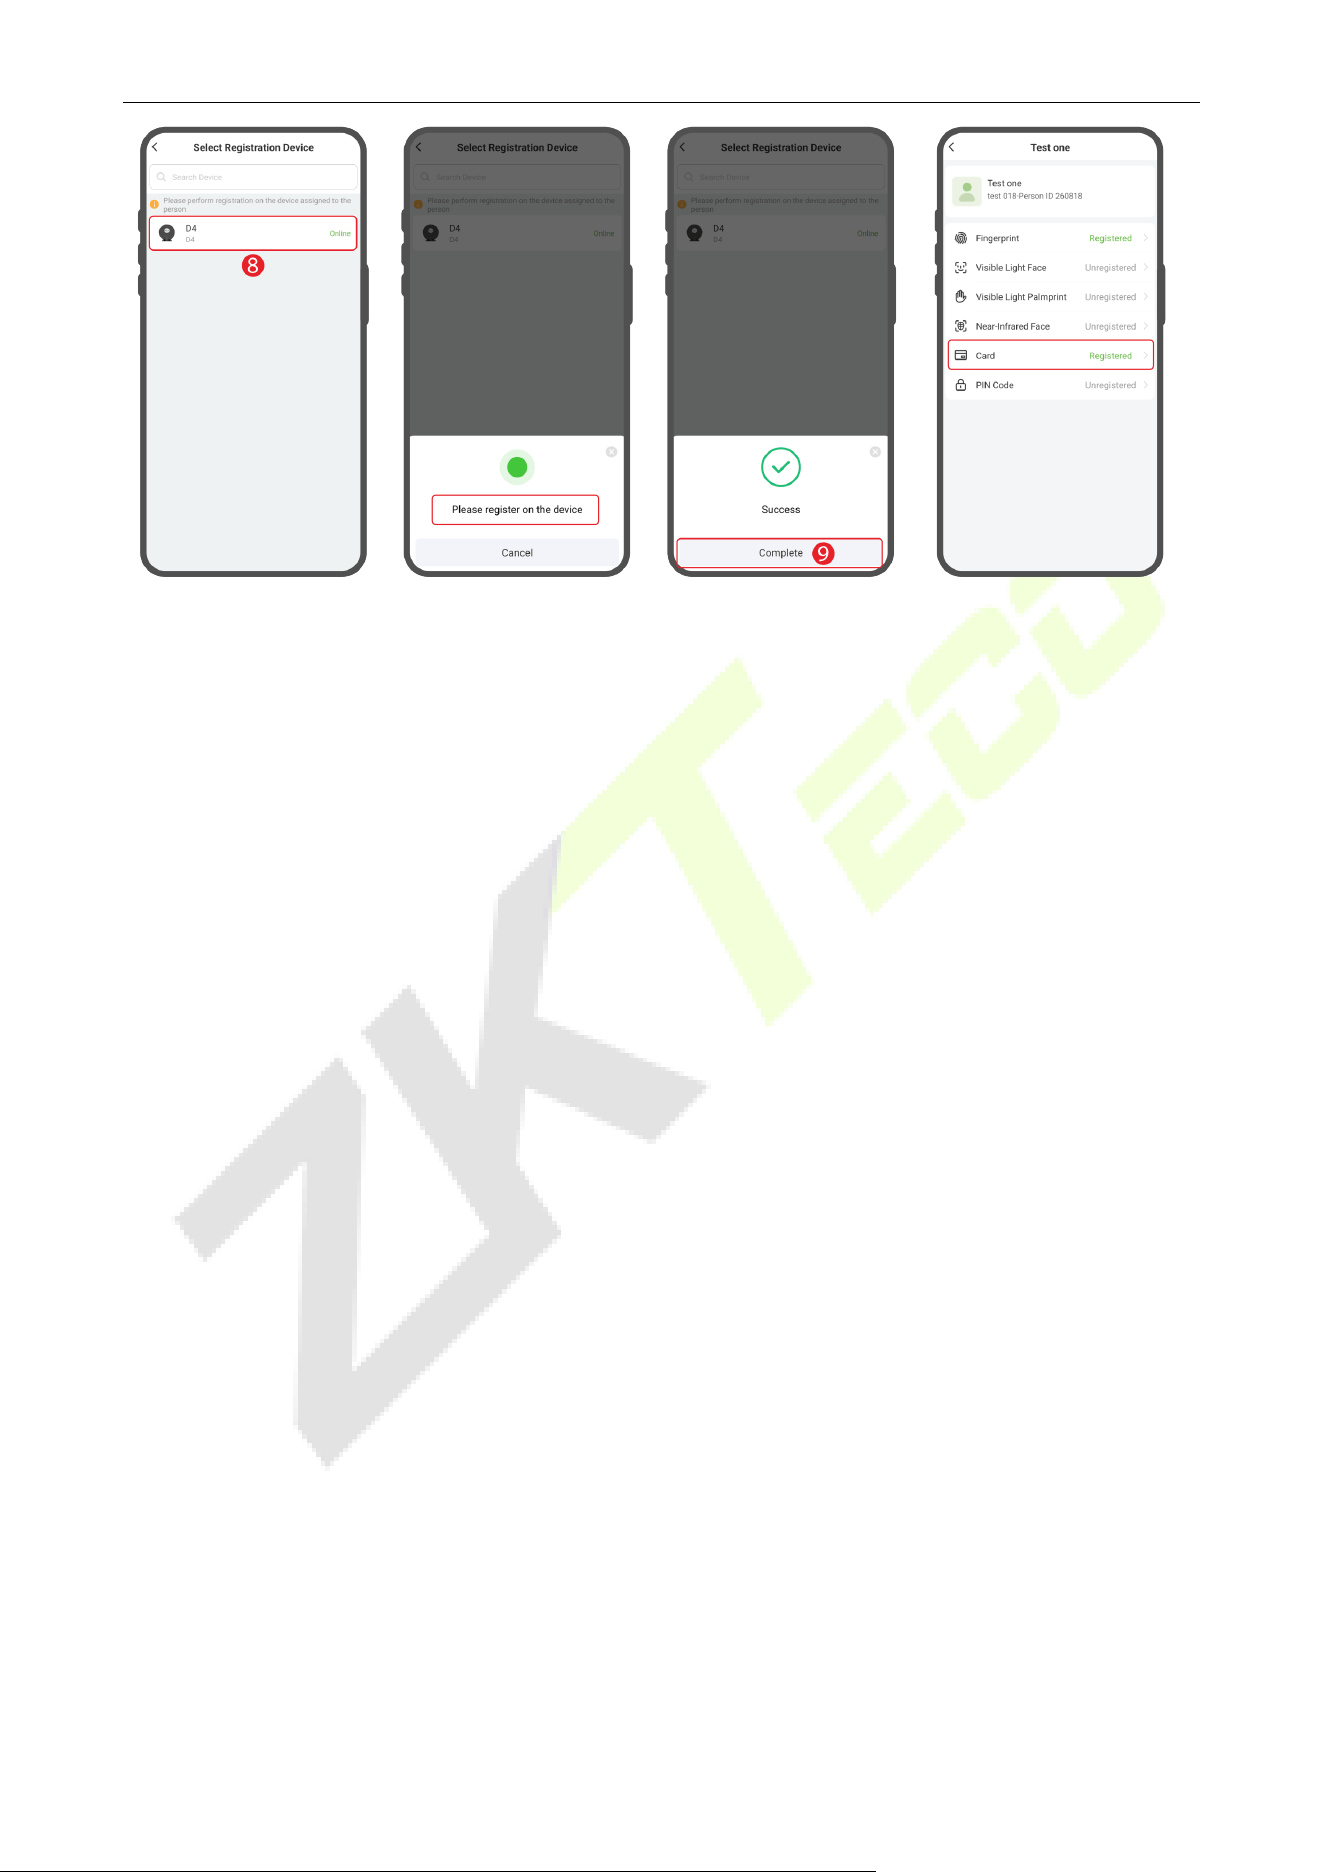
Register Card
1. Click [Me] > [Credential] to enter the Credential screen, select the person who needs to register
verification mode. (See diagram step 1,2,3)
2. In the Details interface, click the icon. You can select Register on Device or Manually Enter Card
Number. If you want to register on device, then click [Register on Device]. (See diagram step
4,5,6,7)
3. When selecting a device for registration, the device will prompt ‘‘Please swipe the card’’. Place the
card in the swipe area. Click [Complete] to return. (See diagram step 8,9)
4. When you hear the message ‘‘Registration is successful’’, the registration is successful.
D4 User Manual
Page | 20 Copyright © 2026 ZKTECO CO., LTD. All rights reserved.
Note: Please register the appropriate personnel verification method based on the actual verification
methods supported by the device. For example, click the verification method button (such as Face) to enter, if
no device is displayed, it indicates that the device itself does not support this verification method.
D4 User Manual
Page | 21 Copyright © 2026 ZKTECO CO., LTD. All rights reserved.
5 Connect to ZKBio Zlink Web
The web pages may vary depending on the version, and the document is for reference only.
After successfully adding devices using the ZKBio Zlink App, you can use the created account to access
ZKBio Zlink Web to find devices, add new personnel, register the verification method of registered
personnel, synchronize personnel to devices and query records.
Login to the Web 5.1
1. Please open the recommended browser and enter the IP address to access the ZKBio Zlink Web:
http://zlink.minervaiot.com.
2. Enter your Email ID and password on the login screen, check ‘‘I have read and agree to User
Agreement and Privacy Policy and Data Processing Agreement’’ and click [Sign In] to login.
3. If you do not have an account, please click [Sign up] to add a new account.
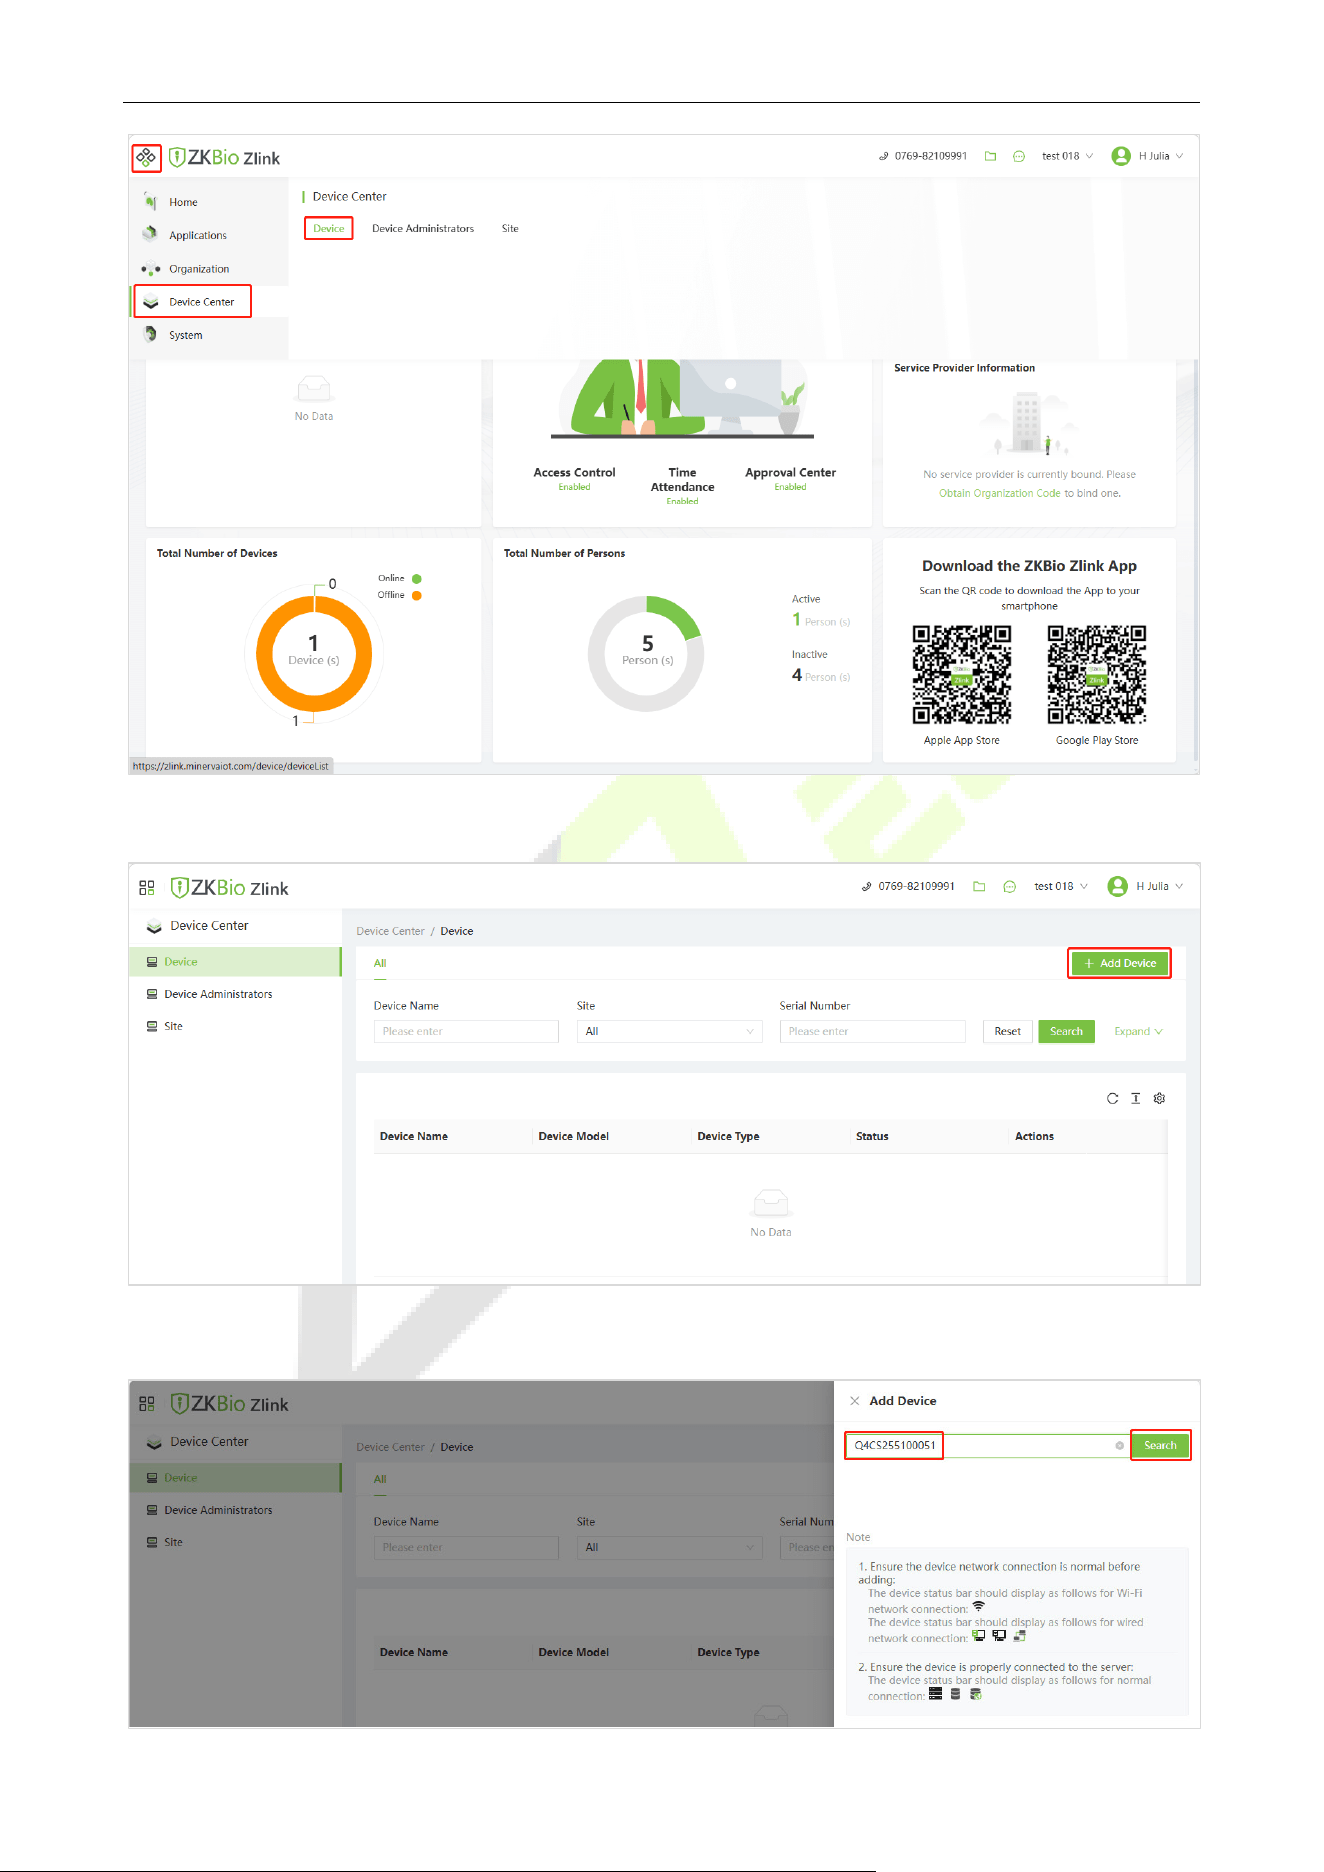
Add Device on the Web 5.2
1. Click the icon on the top left corner, and click [Device Center] > [Device] to enter the device
setting interface.
D4 User Manual
Page | 22 Copyright © 2026 ZKTECO CO., LTD. All rights reserved.
2. Then click [Add Device] to enter the Add Device interface.
3. Enter the Serial Number and click [Search].
D4 User Manual
Page | 23 Copyright © 2026 ZKTECO CO., LTD. All rights reserved.
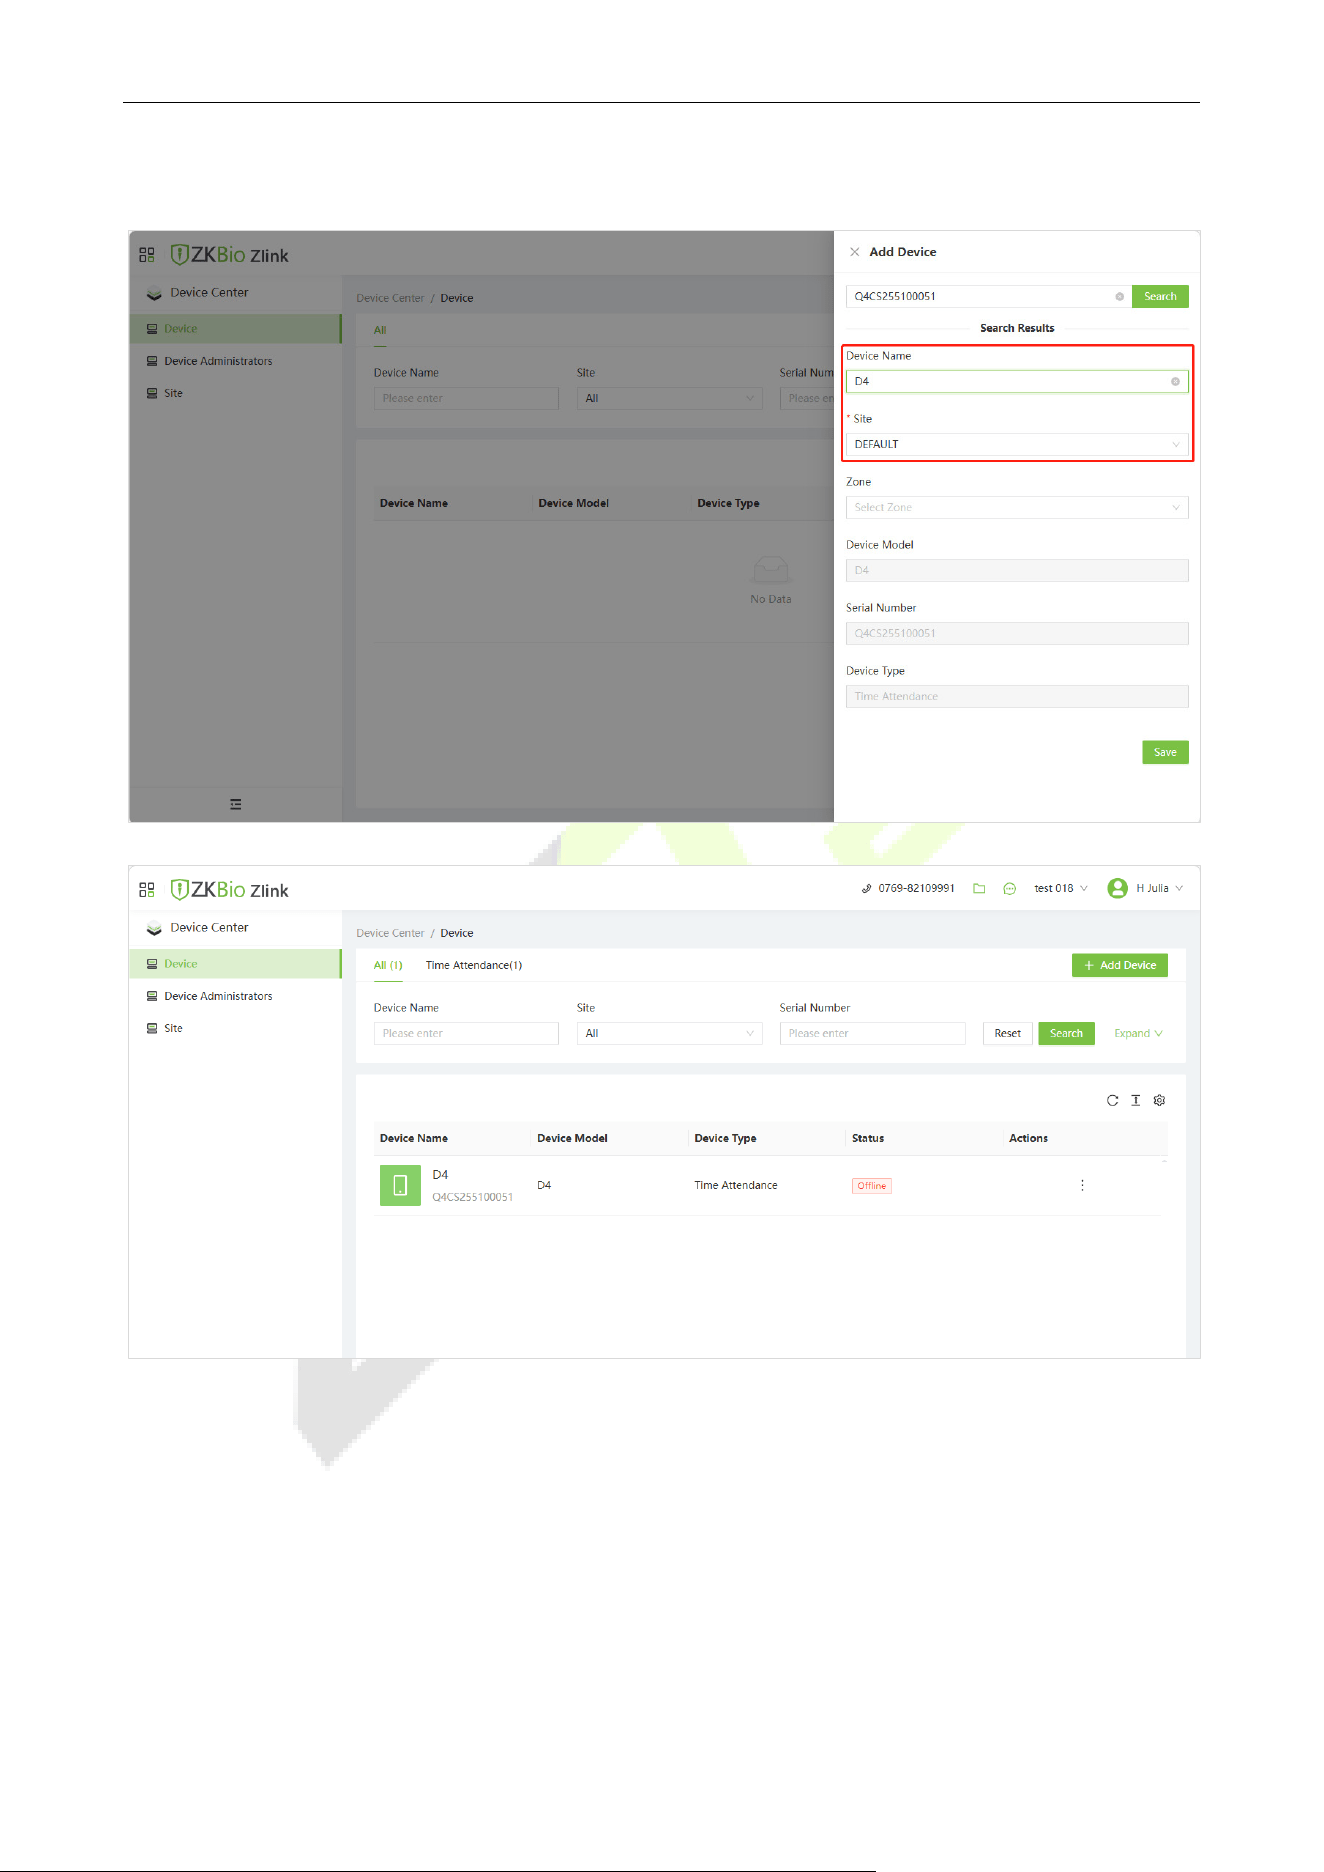
4. Then enter the device name and specify the device to a site. Select Site from the drop-down menu.
Click [Save] to complete the addition.
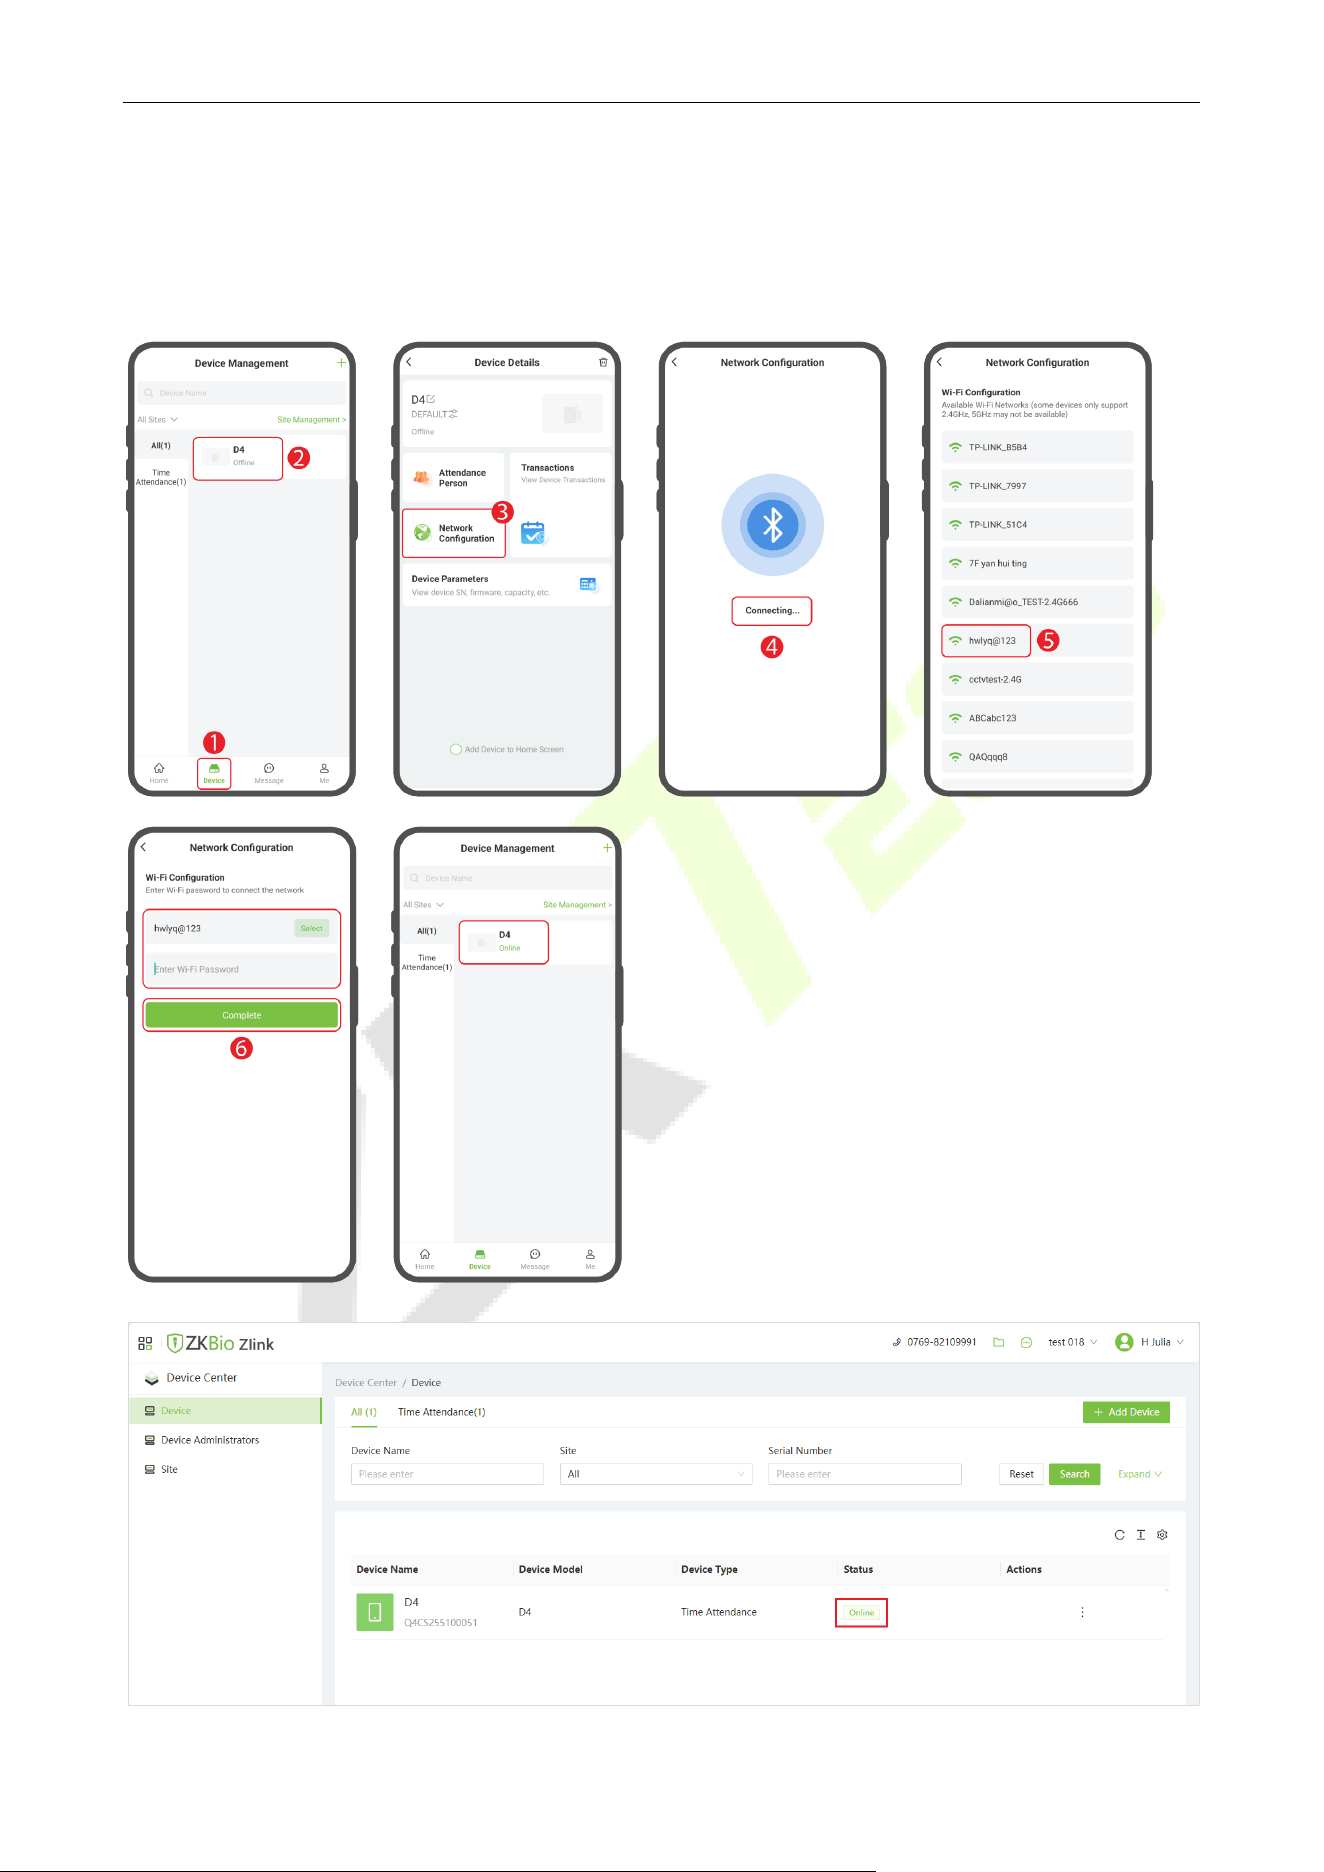
Note: After successfully adding the device, it will be in an offline state. You will need to configure the device's
network settings via the ZKBio Zlink App. Follow the steps below for detailed instructions.
Configure the network for the device in the App
1. Log in to the ZKBio Zlink App with the account you have already created.
2. Click [Device] to enter the Device Management interface. (See diagram step 1)
3. Then select the added device to enter the device details interface. Next, click [Network Configuration] to
configure the network for the device. (See diagram step 2,3)
D4 User Manual
Page | 24 Copyright © 2026 ZKTECO CO., LTD. All rights reserved.
4. The device will connect to the network via Bluetooth. (See diagram step 4)
5. From the list of detected Wi-Fi networks, select an available Wi-Fi network and enter the password.
Click [Complete] to complete the network configuration. (See diagram step 5,6)
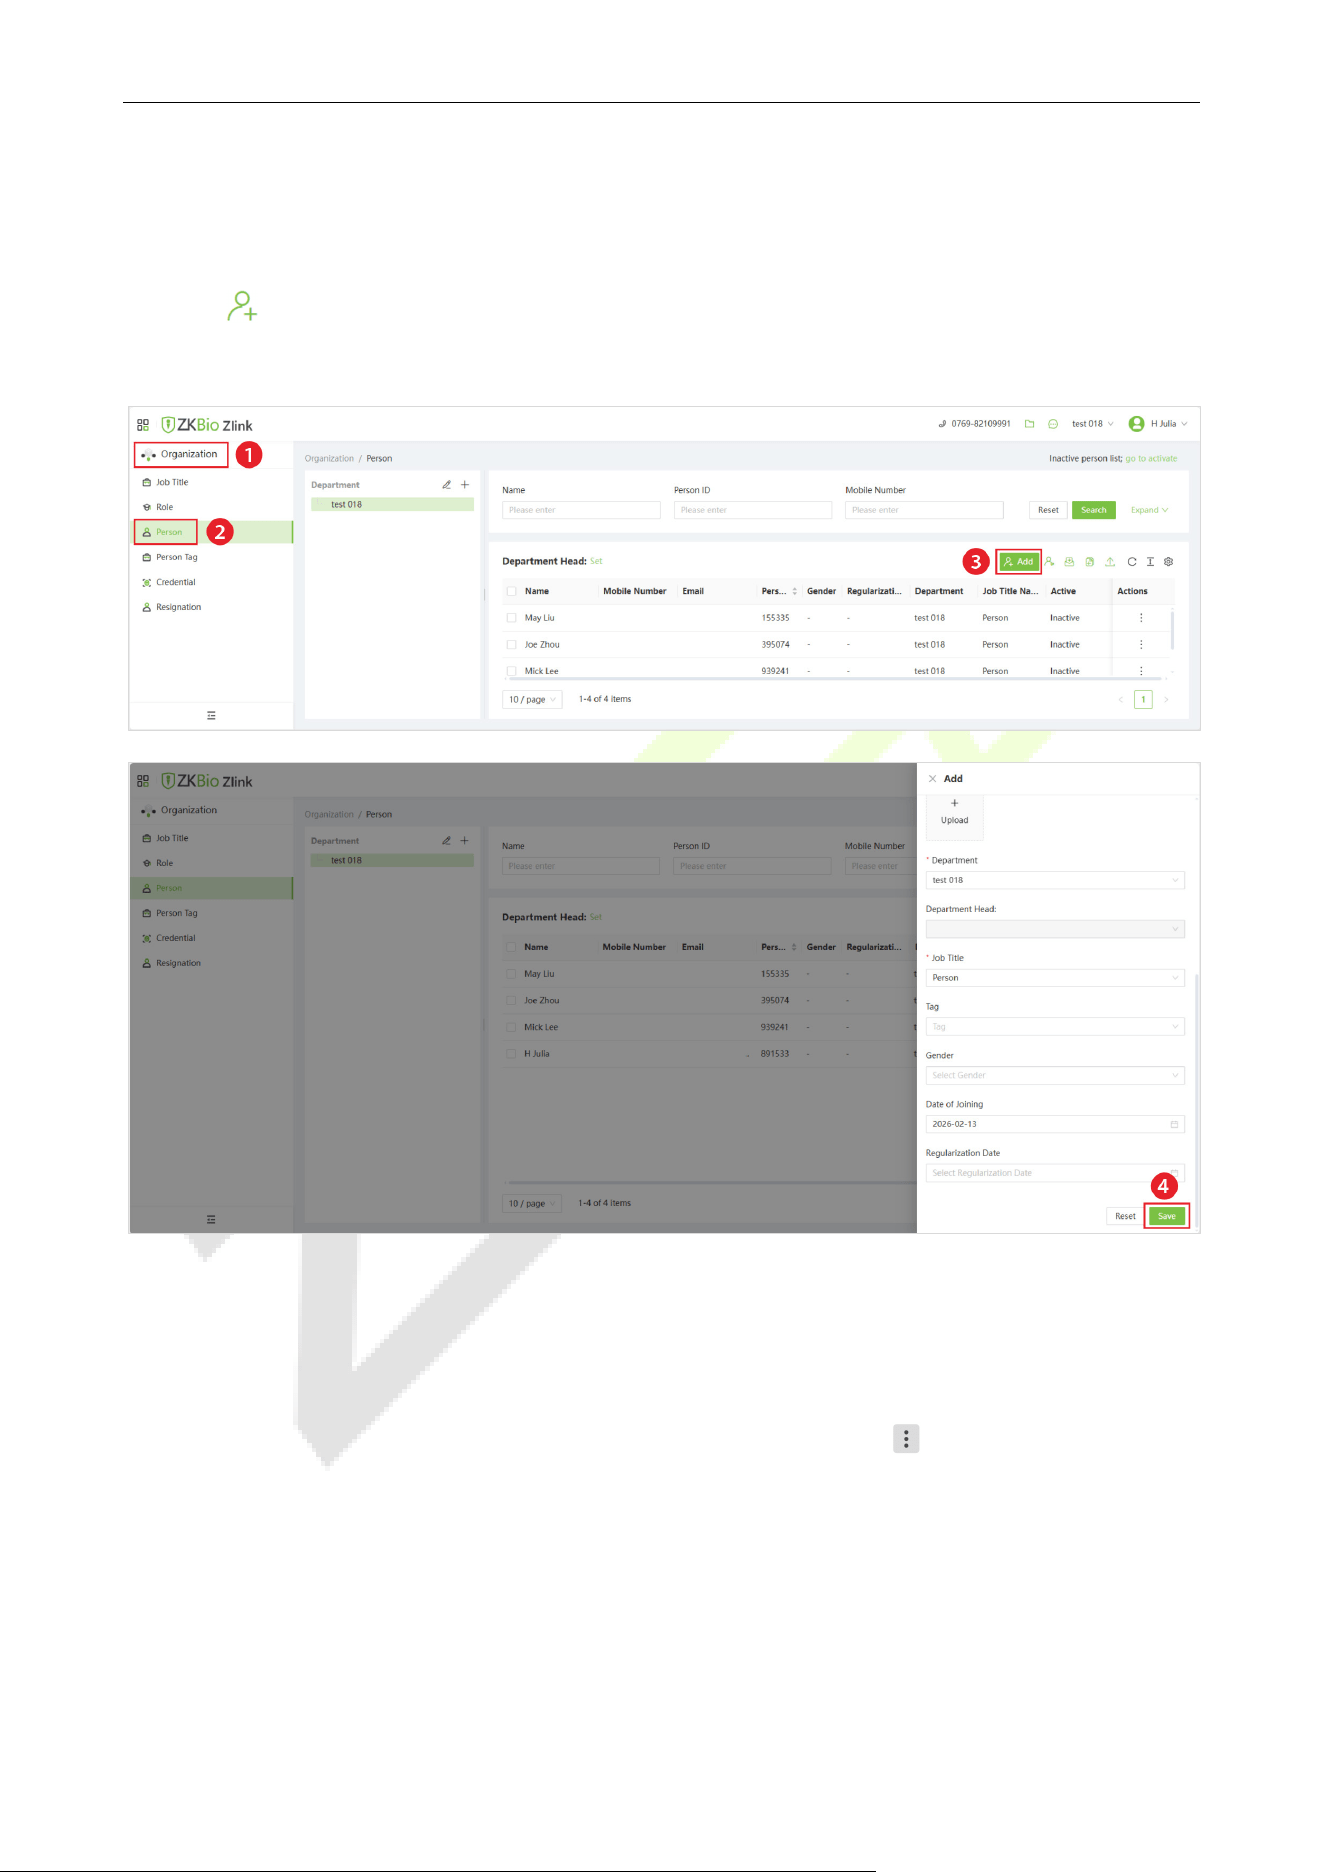
6. Upon completion, the device will display as online. As shown in the figure below.
7. On the web interface, you need to refresh the page repeatedly until the device displays as online.
D4 User Manual
Page | 25 Copyright © 2026 ZKTECO CO., LTD. All rights reserved.
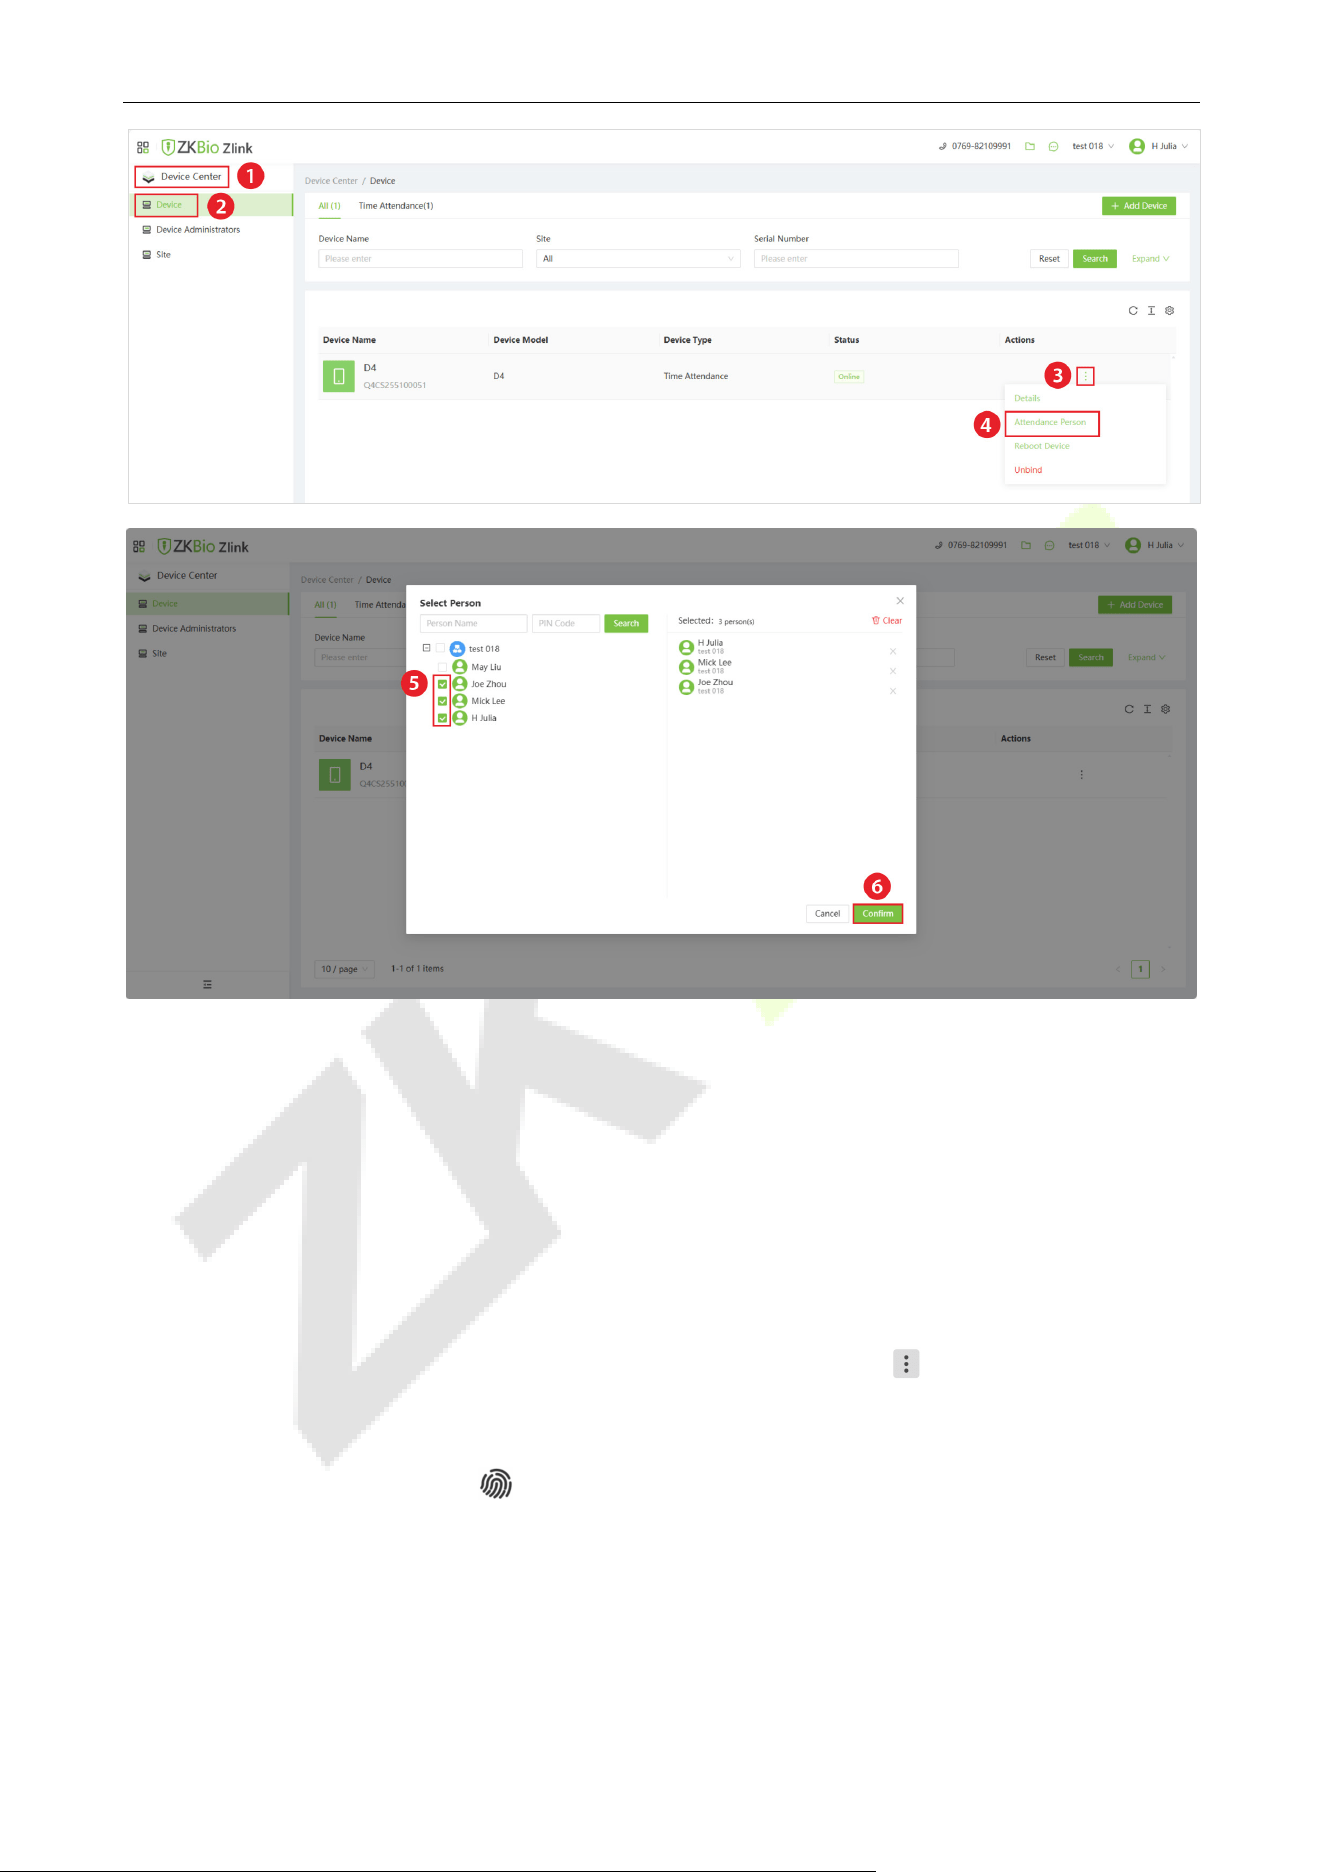
Add Person on the Web 5.3
1. Click [Organization] > [Person] on the ZKBio Zlink Web main menu to add person. (See diagram
step 1,2)
2. Click icon to add a new person. Then enter the person's information, and click [Save]. (See
diagram step 3,4)
Synchronize Persons to Device 5.4
1. Click [Device Center] > [Device] to enter the device list interface. (See diagram step 1,2)
2. Select the device you want to synchronize people with, click the icon after it and select
[Attendance Person]. (See diagram step 3,4)
3. Then select the personnel to synchronize to the device and click [Confirm]. (See diagram step 5,6)
D4 User Manual
Page | 26 Copyright © 2026 ZKTECO CO., LTD. All rights reserved.
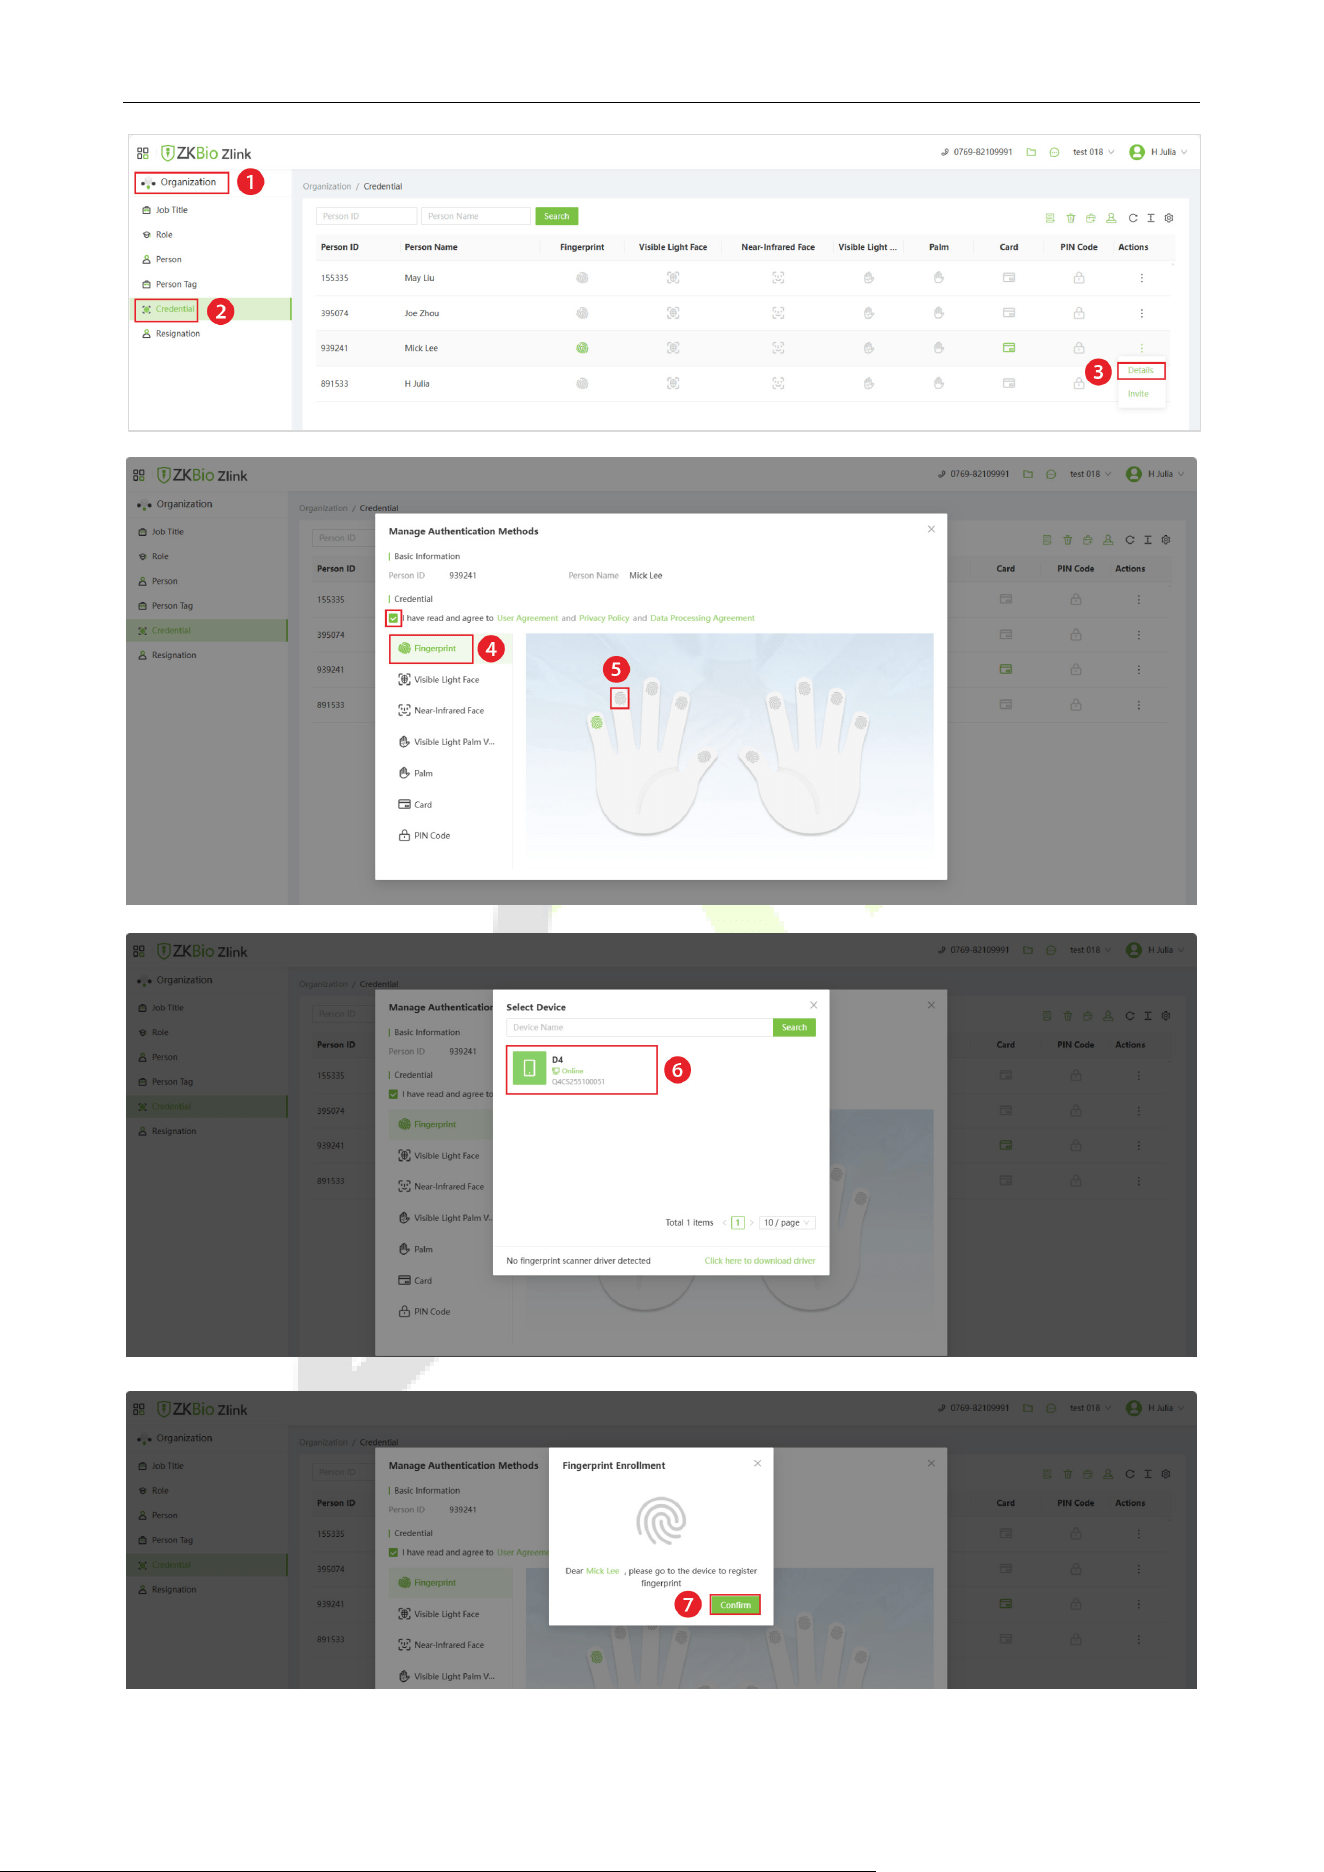
Register Verification Mode on the Web 5.5
Register Fingerprint
1. After the successfully synchronizing persons to device, you can view the basic information in the
[Credential] interface. (See diagram step 1,2)
2. Select the personnel whose fingerprints you wish to enroll, click the icon next to them, then
select [Details]. (See diagram step 3)
3. Click [Fingerprint] and select icon to register Fingerprint. (See diagram step 4,5)
4. When selecting the device for registration, the device will prompt ‘‘Please press your finger three
times’’ and press 3 times on the collector after hearing the prompt. Click [Confirm] to return. (See
diagram step 6,7)
5. When you hear the message ‘‘Registration is successful’’, the registration is successful. And you can
repeat the above operation to register other fingers.
D4 User Manual
Page | 27 Copyright © 2026 ZKTECO CO., LTD. All rights reserved.
D4 User Manual
Page | 28 Copyright © 2026 ZKTECO CO., LTD. All rights reserved.
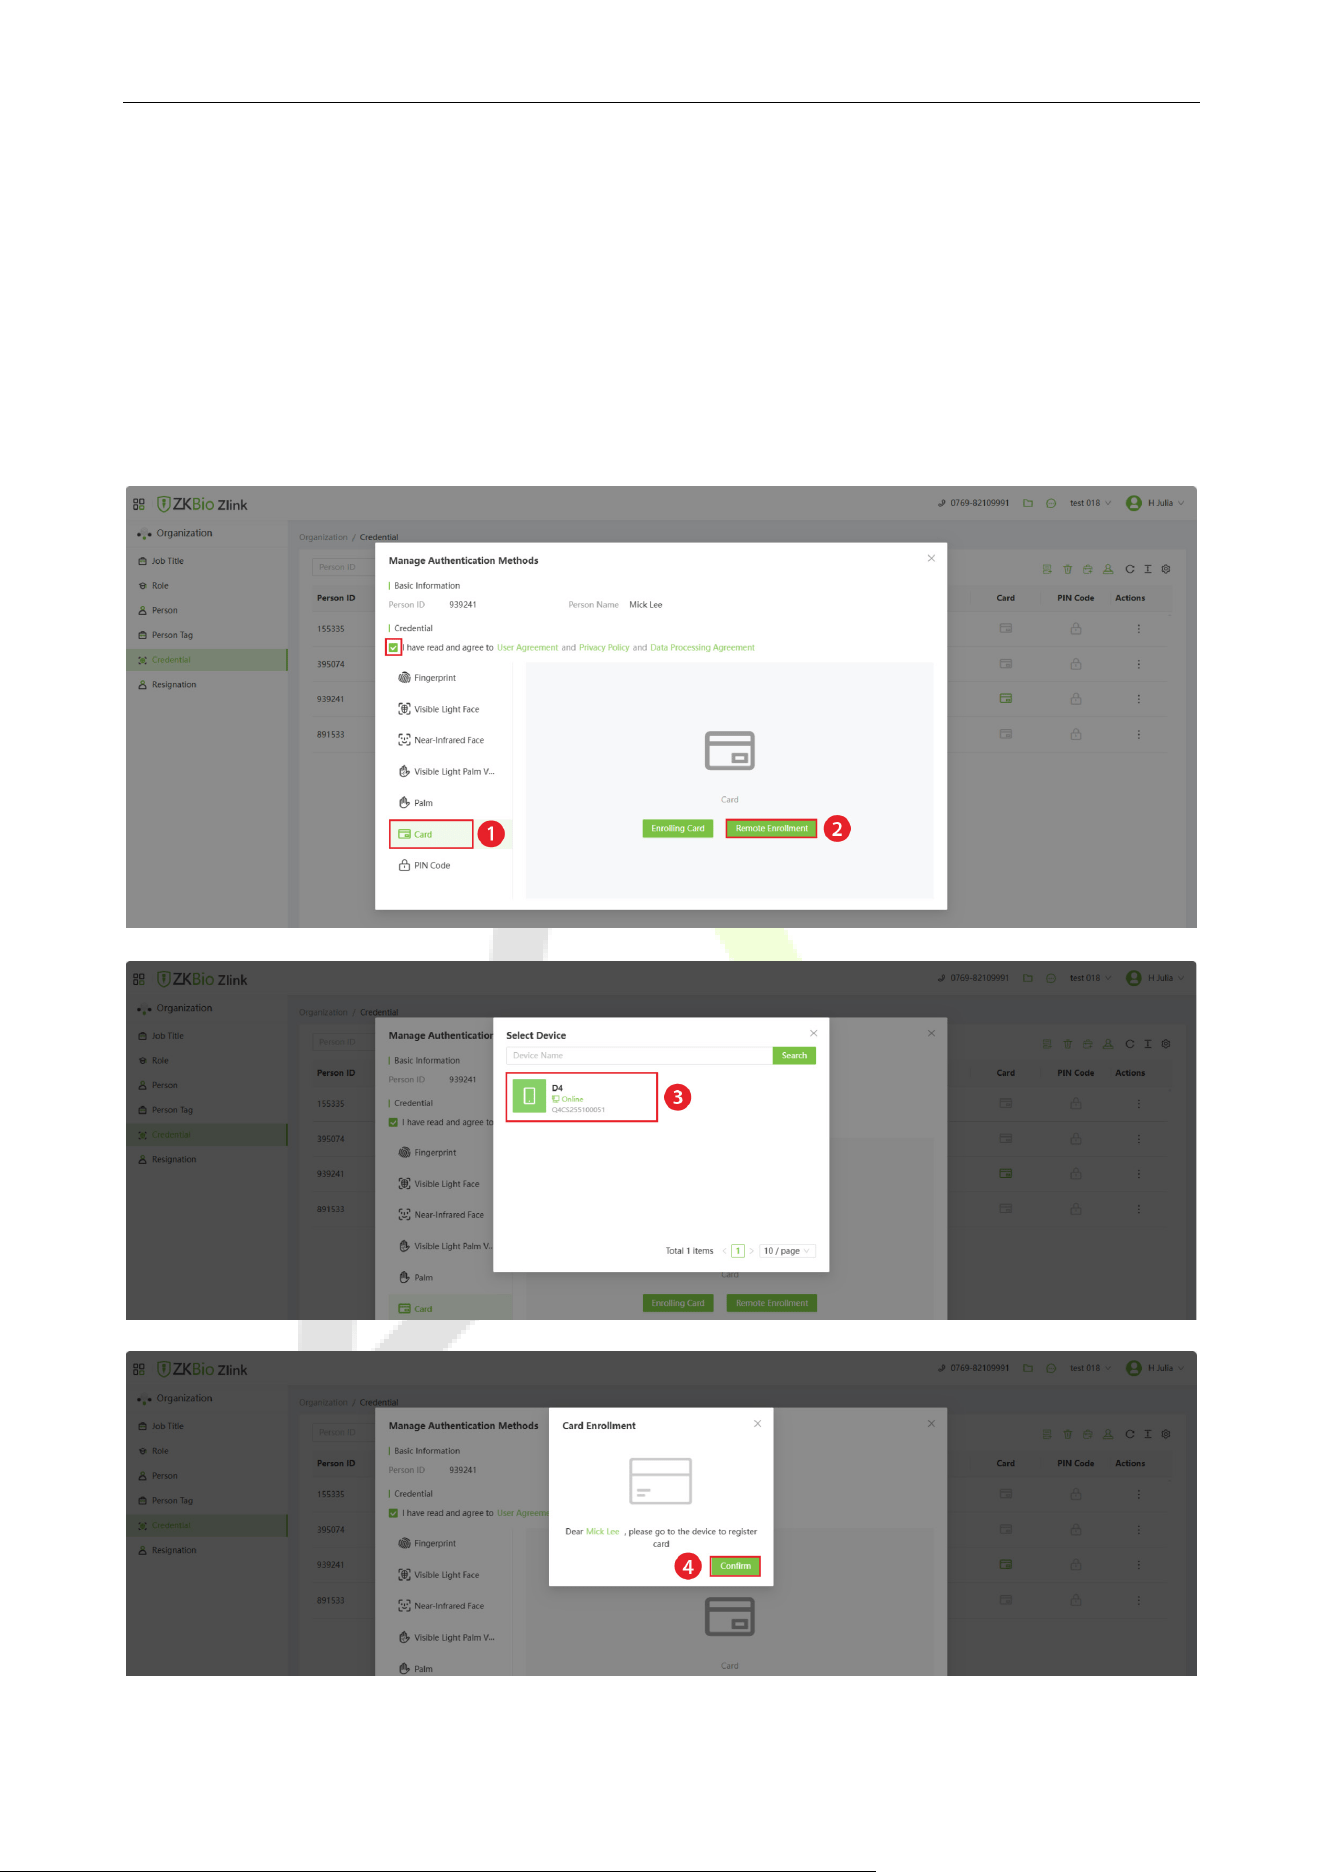
Register Card
1. Click [Card] to enter the card entry interface. (See diagram step 1)
2. You can select Enrolling Card or Remote Enrollment. If you want to register on device, then click
[Remote Enrollment]. (See diagram step 2)
3. When selecting a device for registration, the device will prompt ‘‘Please swipe the card’’. Place the
card in the swipe area. Click [Confirm] to return. (See diagram step 3,4)
4. When you hear the message ‘‘Registration is successful’’, the registration is successful.
D4 User Manual
Page | 29 Copyright © 2026 ZKTECO CO., LTD. All rights reserved.
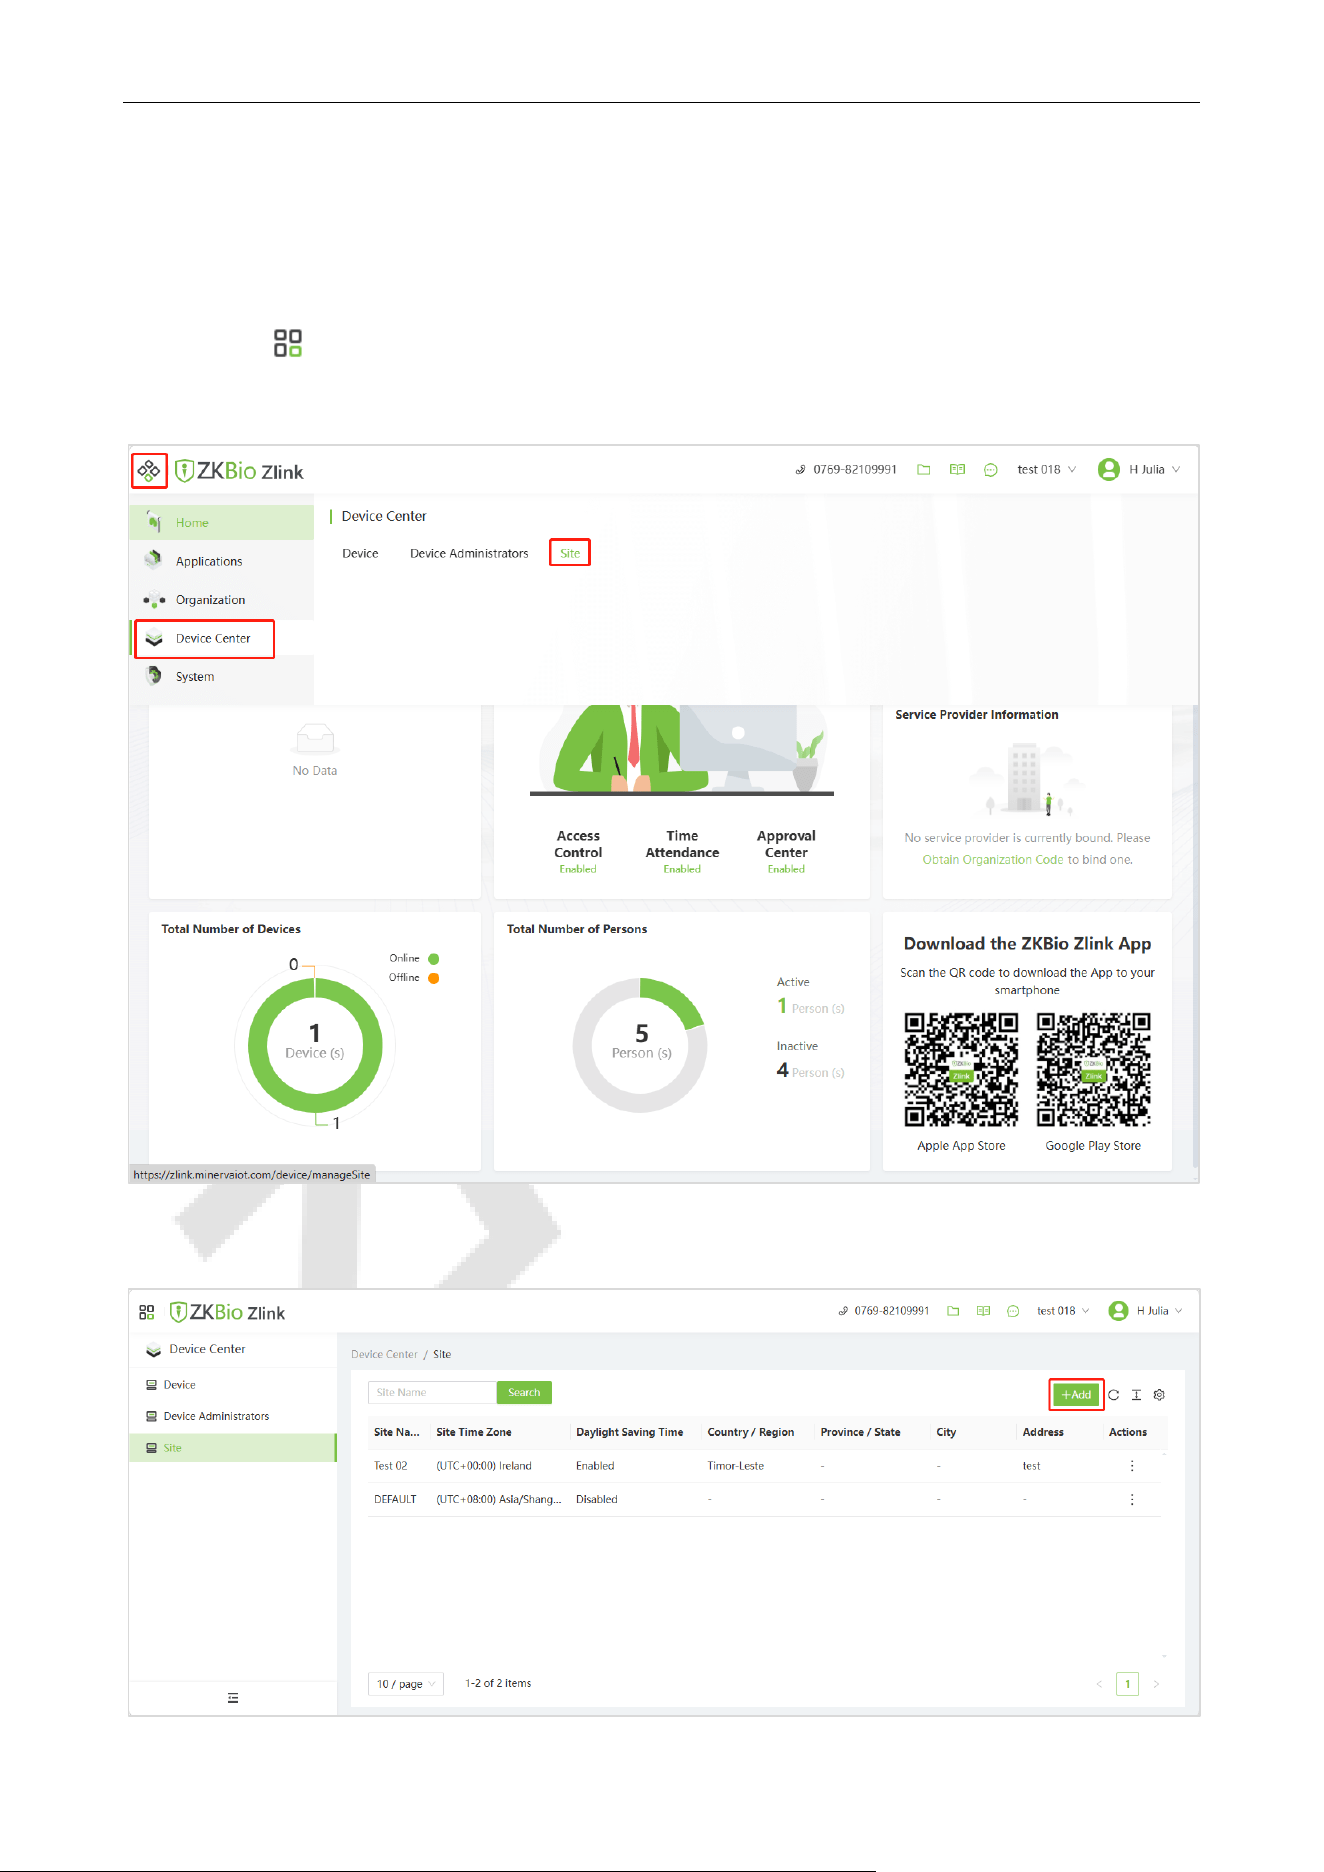
Daylight Saving Time Settings 5.6
The device supports daylight saving time settings, which must be configured via the web interface;
however, not all time zones are supported. Please refer to the following steps to set daylight saving
time.
1. Click the icon on the top left corner, and click [Device Center] > [Site] to enter the site setting
interface.
2. On the site list screen, click the
+ icon to add a new site.
D4 User Manual
Page | 30 Copyright © 2026 ZKTECO CO., LTD. All rights reserved.
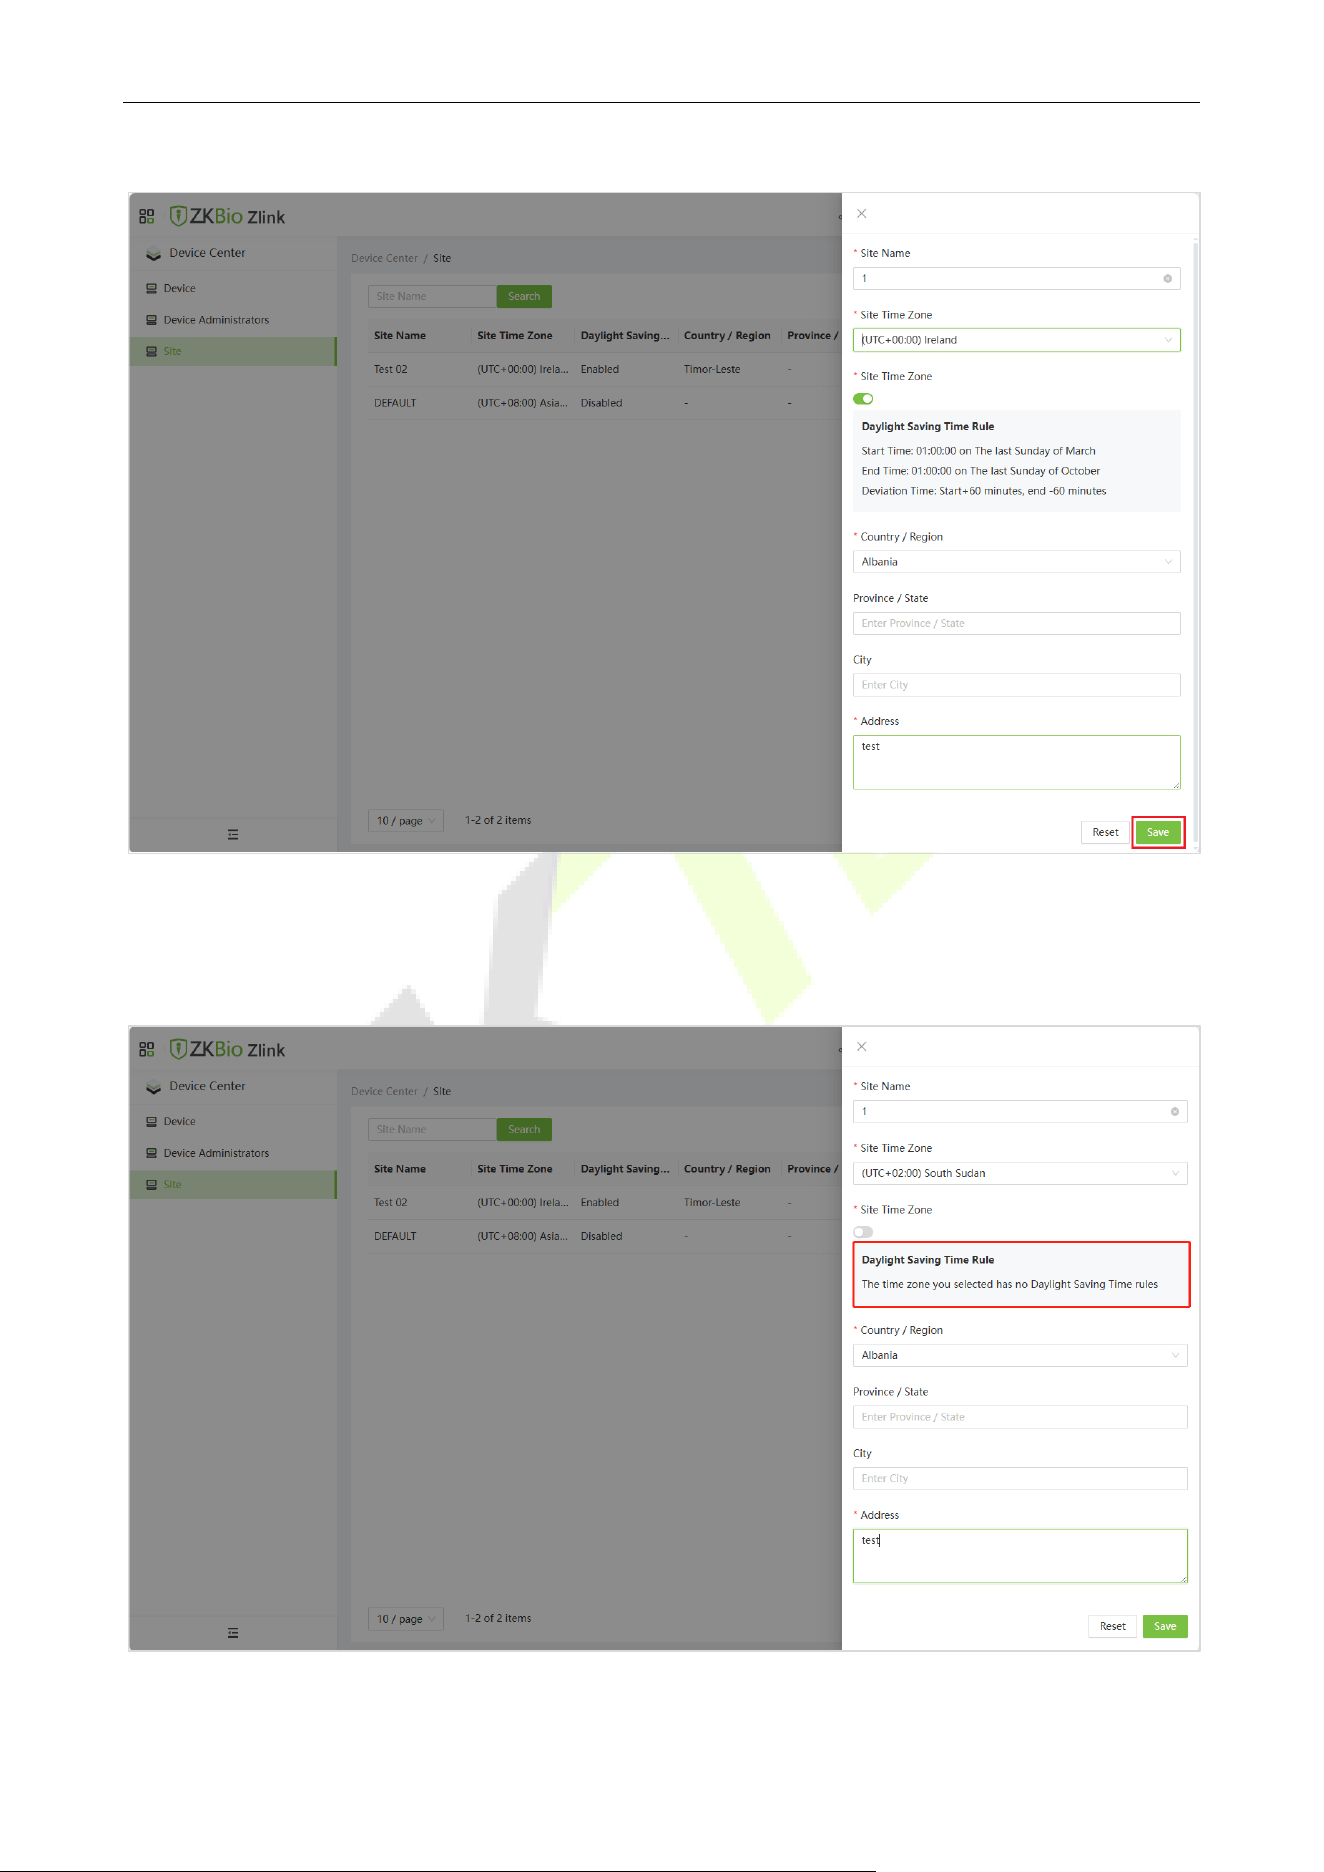
3. Set the site parameters in the pop-up window. When finished, click [Save].
4. If your time zone does not support daylight saving time, the following message will appear on the
screen: ‘‘The time zone you selected has no Daylight Saving Time rules,’’ as shown in the image
below.
D4 User Manual
Page | 31 Copyright © 2026 ZKTECO CO., LTD. All rights reserved.
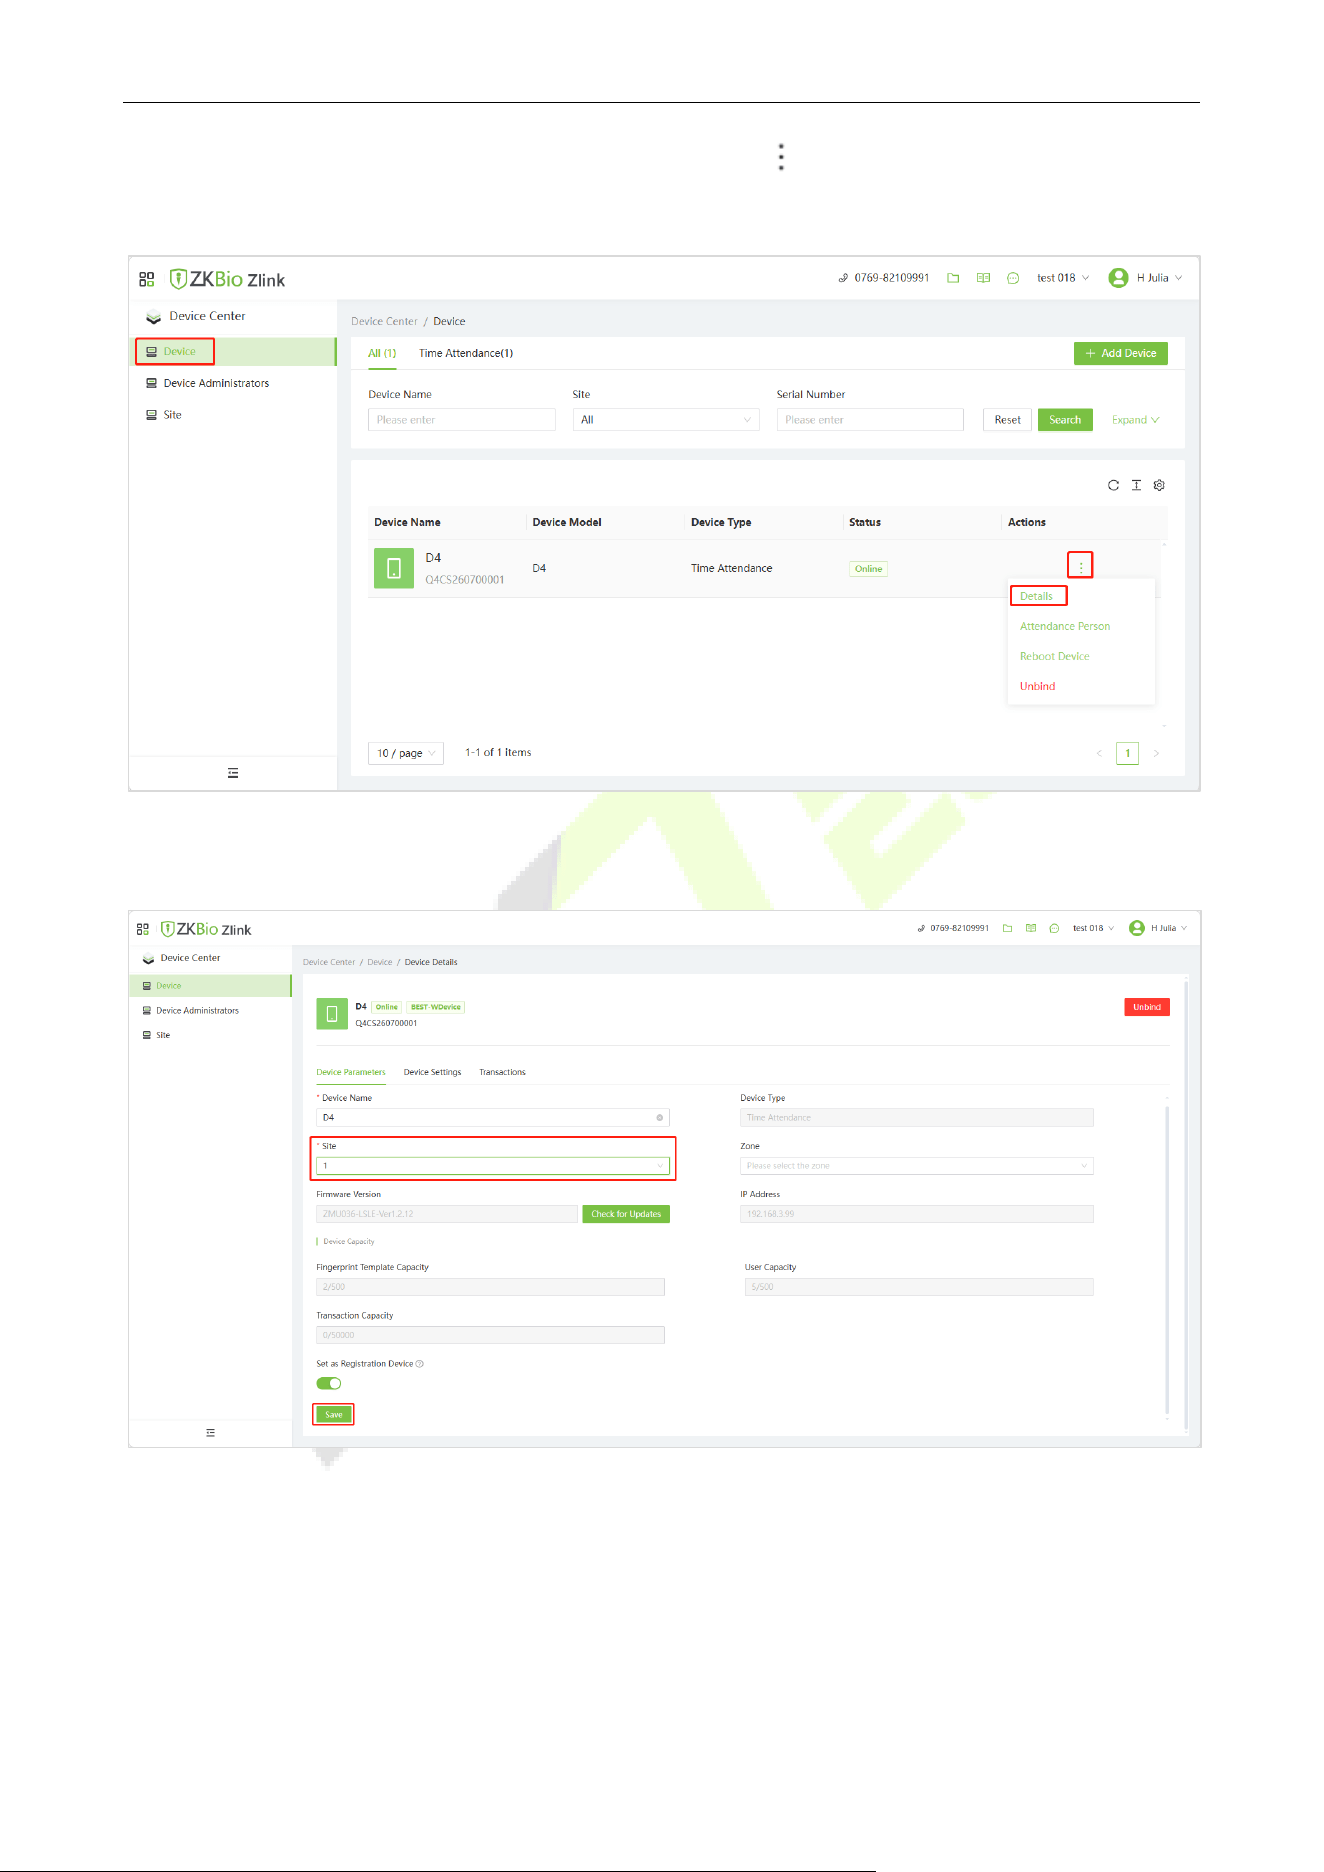
5. Then click [Device] to go to the device list screen. Click icon > [Details] to go to the device
details settings screen.
6. On this screen, select the site and click [Save] to save and exit. The device will automatically
update to a time zone that observes daylight saving time.

D4 User Manual
Page | 32 Copyright © 2026 ZKTECO CO., LTD. All rights reserved.
Appendix 1
Privacy Policy
Notice:
To help you better use the products and services of ZKTeco (hereinafter referred as "we", "our", or "us")
a smart service provider, we consistently collect your personal information. Since we understand the
importance of your personal information, we took your privacy sincerely and we have formulated this
privacy policy to protect your personal information. We have listed the privacy policies below to
precisely understand the data and privacy protection measures related to our smart products and
services.
Before using our products and services, please read carefully and understand all the rules and
provisions of this Privacy Policy. If you do not agree to the relevant agreement or any of its terms,
you must stop using our products and services.
I. Collected Information
To ensure the normal product operation and help the service improvement, we will collect the
information voluntarily provided by you or provided as authorized by you during registration
and use or generated as a result of your use of services.
1. User Registration Information: At your first registration, the feature template
(Fingerprint template/Face template template/Palm template) will be saved on the
device according to the device type you have selected to verify the unique similarity
between you and the User ID you have registered. You can optionally enter your Name
and Code. The above information is necessary for you to use our products. If you do not
provide such information, you cannot use some features of the product regularly.
2. Product information: According to the product model and your granted permission
when you install and use our services, the related information of the product on which our
services are used will be collected when the product is connected to the software,
including the Product Model, Firmware Version Number, Product Serial Number, and
Product Capacity Information. When you connect your product to the software, please
carefully read the privacy policy for the specific software.
II. Product Security and Management
1. When you use our products for the first time, you shall set the Administrator privilege
before performing specific operations. Otherwise, you will be frequently reminded to set
the Administrator privilege when you enter the main menu interface. If you still do not
set the Administrator privilege after receiving the system prompt, you should be
aware of the possible security risk (for example, the data may be manually
modified).
2. All the functions of displaying the biometric information are disabled in our products by

D4 User Manual
Page | 33 Copyright © 2026 ZKTECO CO., LTD. All rights reserved.
default. You can choose Menu > System Settings to set whether to display the biometric
information. If you enable these functions, we assume that you are aware of the personal
privacy security risks specified in the privacy policy.
3. Only your user ID is displayed by default. You can set whether to display other user
verification information (such as Name, Department, Photo, etc.) under the Administrator
privilege. If you choose to display such information, we assume that you are aware of
the potential security risks (for example, your photo will be displayed on the device
interface).
4. The camera function is disabled in our products by default. If you want to enable this
function to take pictures of yourself for attendance recording or take pictures of strangers
for access control, the product will enable the prompt tone of the camera. Once you
enable this function, we assume that you are aware of the potential security risks.
5. All the data collected by our products is encrypted using the AES 256 algorithm. All the
data uploaded by the Administrator to our products are automatically encrypted using
the AES 256 algorithm and stored securely. If the Administrator downloads data from our
products, we assume that you need to process the data and you have known the
potential security risk. In such a case, you shall take the responsibility for storing the data.
You shall know that some data cannot be downloaded for sake of data security.
6. All the personal information in our products can be queried, modified, or deleted. If you
no longer use our products, please clear your personal data.
III. How we handle personal information of minors
Our products, website and services are mainly designed for adults. Without consent of parents or
guardians, minors shall not create their own account. If you are a minor, it is recommended that
you ask your parents or guardian to read this Policy carefully, and only use our services or
information provided by us with consent of your parents or guardian.
We will only use or disclose personal information of minors collected with their parents' or
guardians' consent if and to the extent that such use or disclosure is permitted by law or we have
obtained their parents' or guardians' explicit consent, and such use or disclosure is for the purpose
of protecting minors.
Upon noticing that we have collected personal information of minors without the prior consent
from verifiable parents, we will delete such information as soon as possible.
IV. Others
You can visit https://www.zkteco.com/cn/index/Index/privacy_protection.html
to learn more
about how we collect, use, and securely store your personal information. To keep pace with the
rapid development of technology, adjustment of business operations, and to cope with customer
needs, we will constantly deliberate and optimize our privacy protection measures and policies.
Welcome to visit our official website at any time to learn our latest privacy policy.
D4 User Manual
Page | 34 Copyright © 2026 ZKTECO CO., LTD. All rights reserved.
Eco-friendly Operation
The product's "eco-friendly operational period" refers to the time during which this
product will not discharge any toxic or hazardous substances when used in accordance
with the prerequisites in this manual.
The eco-friendly operational period specified for this product does not include batteries or
other components that are easily worn down and must be periodically replaced. The
battery's eco-friendly operational period is 5 years.
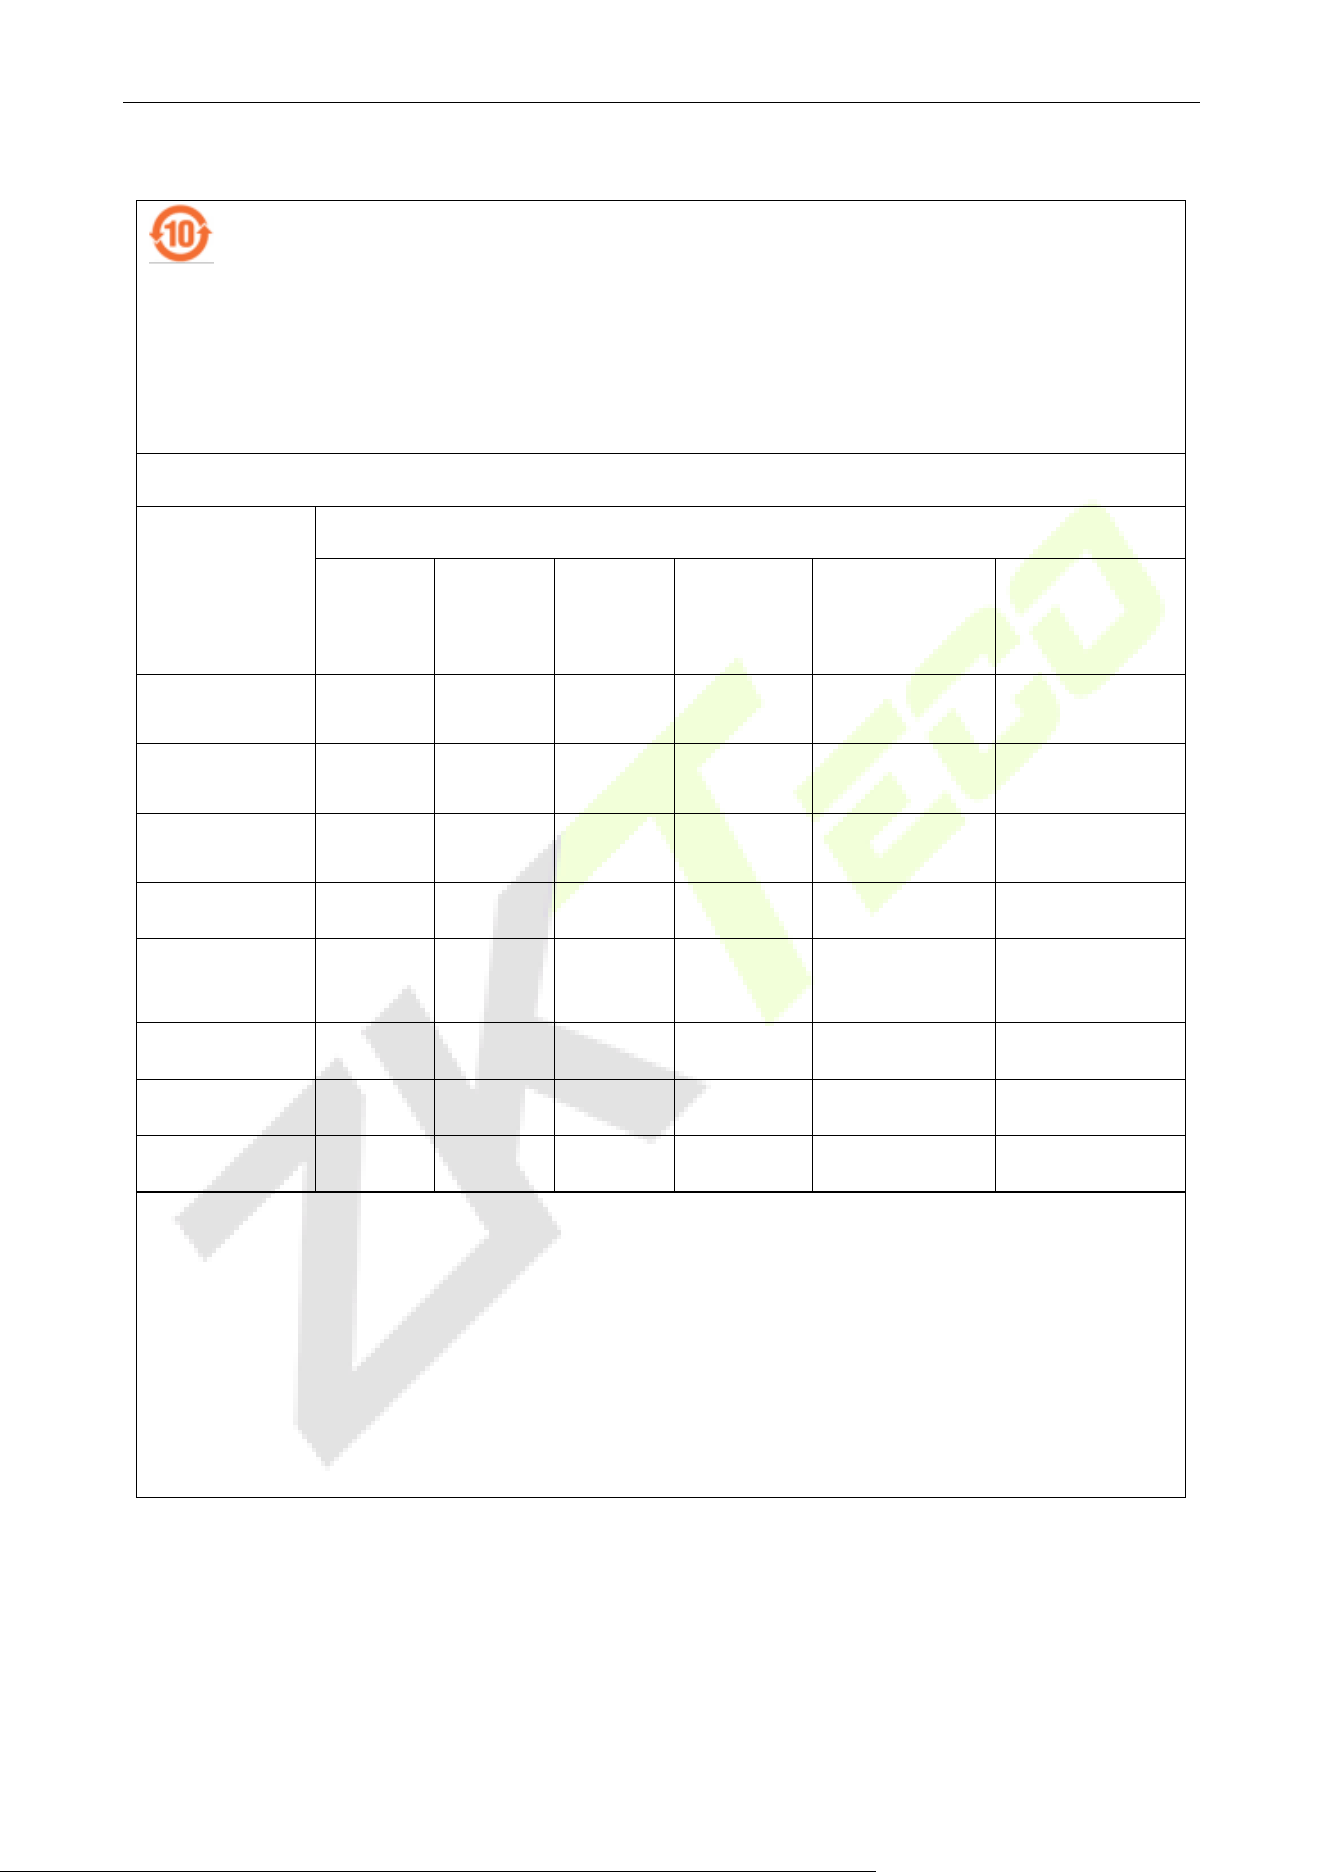
Hazardous or Toxic substances and their quantities
Component
Name
Hazardous/Toxic Substance/Element
Lead (Pb)
Mercury
(Hg)
Cadmiu
m (Cd)
Hexavalent
chromium
(Cr6+)
Polybrominate
d Biphenyls
(PBB)
Polybrominated
Diphenyl Ethers
(PBDE)
Chip Resistor ×
○ ○ ○ ○ ○
Chip Capacitor ×
○ ○ ○ ○ ○
Chip Inductor ×
○ ○ ○ ○ ○
Diode ×
○
○
○
○
○
ESD
component
×
○ ○ ○ ○ ○
Buzzer ×
○
○
○
○
○
Adapter ×
○
○
○
○
○
Screws
○
○
○
×
○
○
○ indicates that the total amount of toxic content in all the homogeneous materials is below the
limit as specified in SJ/T 11363------2006.
× indicates that the total amount of toxic content in all the homogeneous materials exceeds the limit
as specified in SJ/T 11363------2006.
Note: 80% of this product’s components are manufactured using non-toxic and eco-friendly
materials. The components which contain toxins or harmful elements are included due to the
current economic or technical limitations which prevent their replacement with non-toxic materials
or elements.

ZKTeco Industrial Park, No. 32, Industrial Road,
Tangxia Town, Dongguan, China.
Phone : +86 769 - 82109991
Fax : +86 755 - 89602394
www.zkteco.com
Copyright © 2026 ZKTECO CO., LTD. All Rights Reserved.