P a g e 1 | 15
P a g e 2 | 15
For all troubleshooting, please visit:
www.clearview4k.com.au
Click on Technical Guide
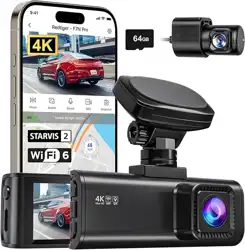
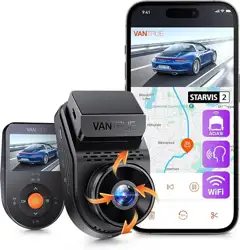
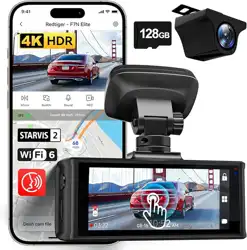
Thank you for choosing the 4K Ultra HD Dash Camera. You now have an extra set of eyes
protecting your investment and your family in the event of an incident.
Important – Please Read
1. The camera system has a voltage cut-off device to prevent the camera from draining
your car battery. Today, there are some makes and models that, by not locking your
car, can result in the car battery being drained – nothing to do with the camera
system.
2. If you have a hybrid car, please ensure that you turn off your “start/stop” button when
you park and exit your vehicle.
3. You should examine, check, and verify that your device and its SD card are correctly
operating every month. SD cards go under extreme stress in Dash Cameras. Across
all Camera brands globally, if your system appears faulty, try formatting the SD card
first.
4. This product and its components are not waterproof. As such, please do not expose
it to any water, rain, or moisture.
5. Ensure the camera lens is always kept clean, both in the front and at the back.
6. Never attempt to disassemble, repair, or make modifications to your device, as it will
void your warranty and may damage the unit.
7. Please remove items from your dashboard, as they can cause reflections to be seen
on the windscreen and thus captured during recording.
8. Avoid touching the lens on the camera. When cleaning, use a microfiber cloth.
Preface:

P a g e 3 | 15
Page 3 Contents Guide
Page 4 Controls & Indicators
Page 5 Connecting to the Dash Camera
Page 6 Connection Troubleshooting
Page 7 Home Screen
Page 8 Accessing your Files
Page 9 Accessing your Files
Page 10 Downloading your Files / Cropping / Maps
Page 11 Navigating the Settings
Page 12 Navigating the Settings
Page 13 Frequently Asked Questions
Page 14 Disclaimer
Page 15 Warranty Card
Contents Guide:
P a g e 4 | 15
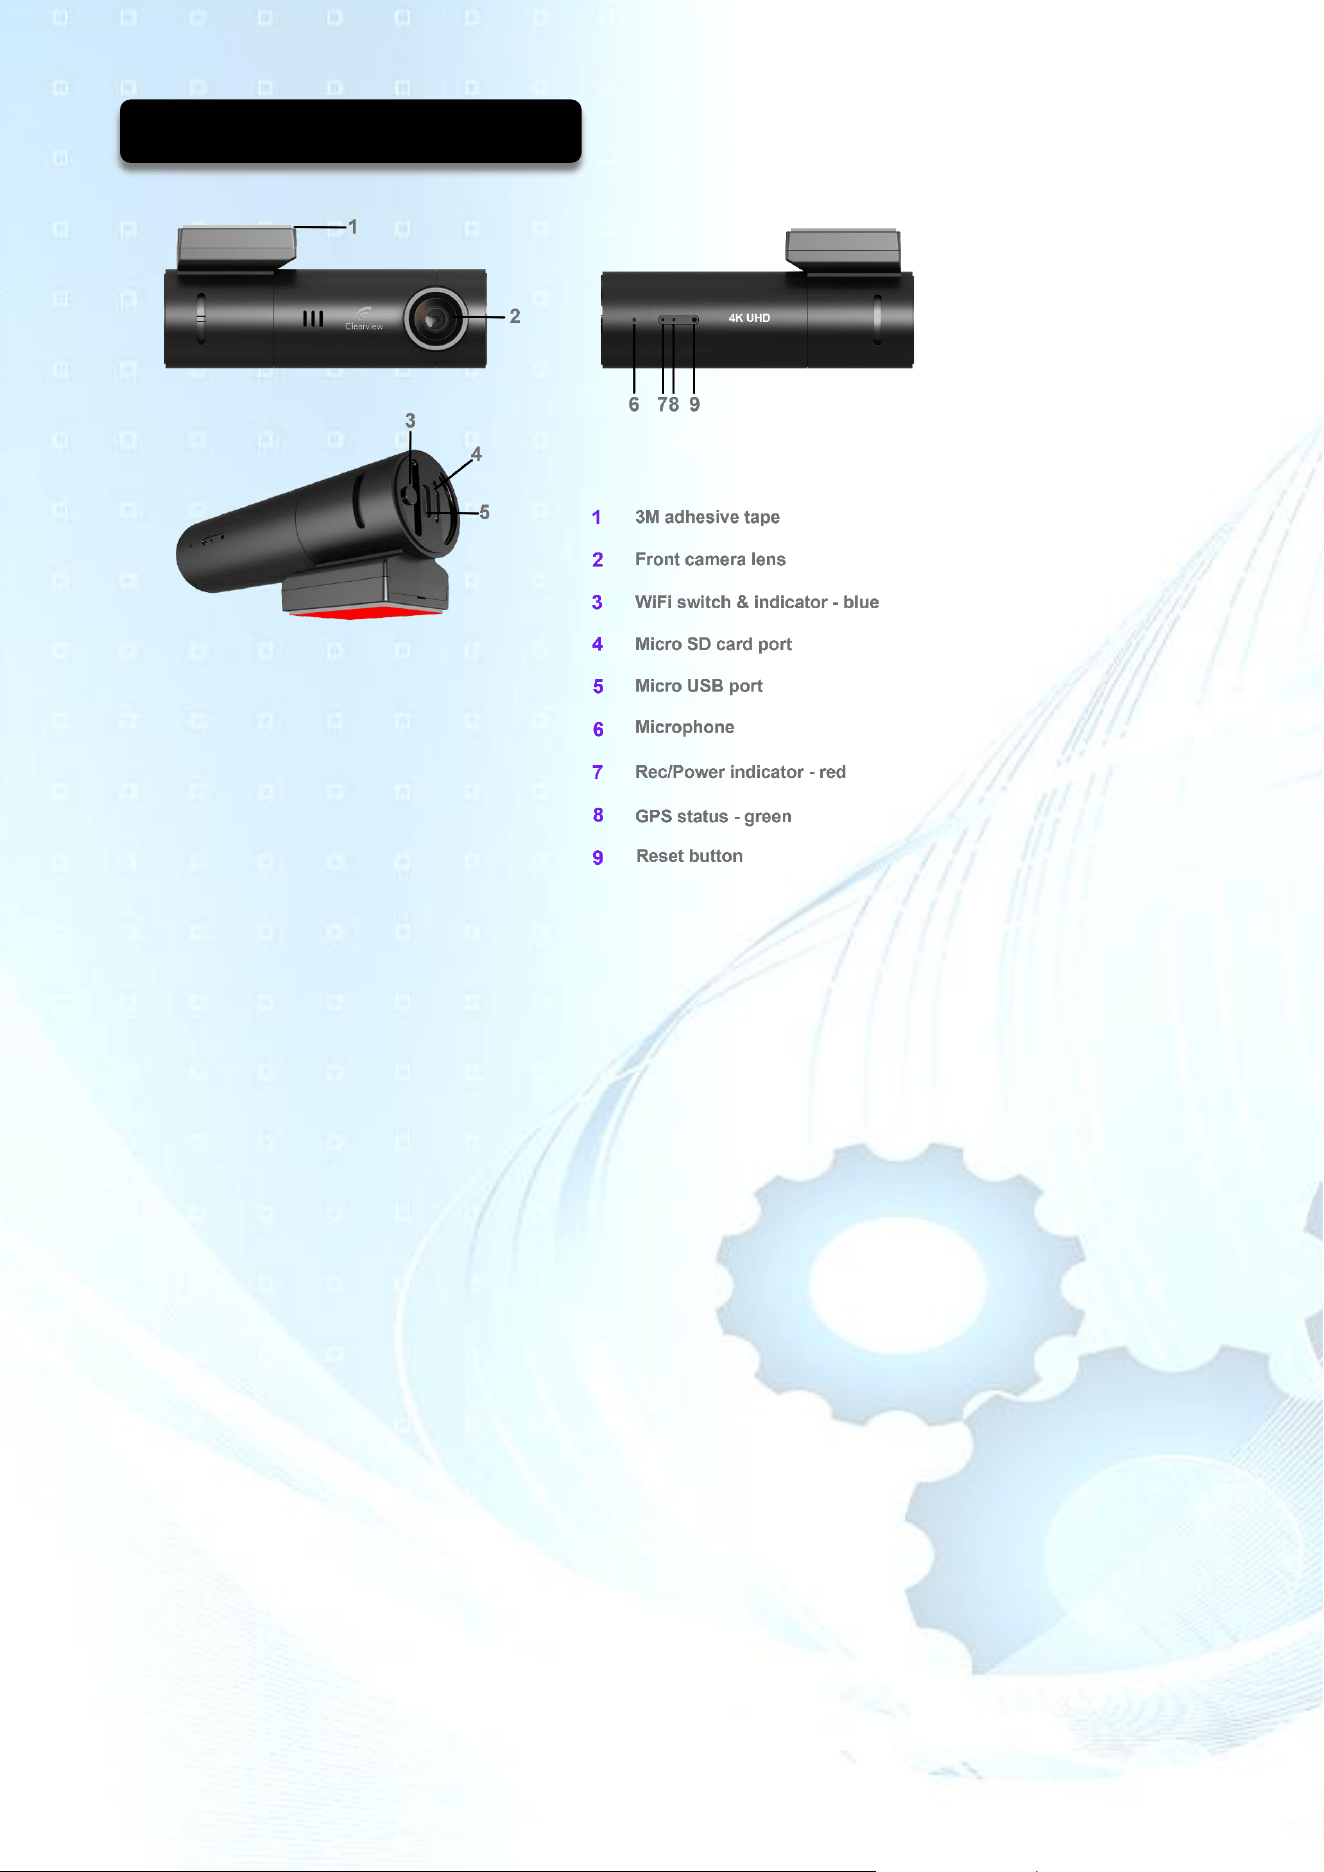
Indicator Lights
• Wi-Fi indicator (Blue): This light will be blue when Wi-Fi is on.
• Power/Video/Rec (Red): This light will be red and blink/flash when operational.
• GPS status (Green): This light will be green if there is a GPS signal.
Functions:
• Press & hold the Wi-Fi button for 4 seconds to manually turn the Wi-Fi off and on.
• Press & hold the Wi-Fi button for 12 seconds to format the SD card.
Factory reset/format SD card. You will hear the voice prompt.
Operating System:
• Powering on the system:
Welcome sound / Wi-Fi on / Rear camera sound / Recording / Red light blinking.
• While diving / Red light blinking / Wi-Fi on / Recording at 30FPS.
• Turn the ignition off – Enter Parking mode:
- Voice Prompt = Recording stopped & Wi-Fi Off.
- Voice Prompt +/- 15 seconds = Parking Mode On & Recording.
Controls & Indicators:
P a g e 5 | 15
Step 1:
Download from your app store.
(Google Play for Android and Apple Store for IOS).
Search “Sight Pro” and select download.
Step 2:
Ensure that you are within the Wi-Fi range of your dash camera.
We recommend sitting in the car to connect.
Start the engine to ensure the camera is getting power,
(red light), and that the Wi-Fi is on (blue light).
Step 3:
Go to settings on your smartphone.
Go to the settings named “Wi-Fi”.
Find the network “SightPro – xxxx” and select.
Enter your password: 12345678
Once connected under your Wi-Fi settings, the “Sight” network will be ticked & connected.
(It may say “no internet connection.” This is fine.)
Step 4:
Go to your recently downloaded “Sight Pro” smartphone application.
Once opened and loaded, click on the Dash Camera image in the middle of the page.
You will be taken to a live video feed of what your camera is seeing/recording.
You will also be able to view and adjust settings to your preference, view your files, and
take photos.
Connecting to Dash Camera:

P a g e 6 | 15
Android Auto and Apple CarPlay:
Across all dash cameras, these may cause interference with your mobile phone connecting
to the camera's Wi-Fi.
Please note that connecting to the dash camera via your mobile does not affect the
camera's recording/operating system.
1.) With the engine/ignition turned off, you will hear the Dash Camera enter “Parking
Mode” and the Wi-Fi switch off.
On the front camera, on the side, press in (3-4 seconds) the Wi-Fi button.
This will manually turn on/off the Wi-Fi on the camera.
This helps prevent vehicle interference.
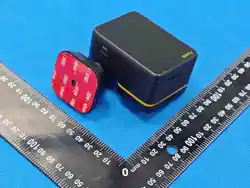
2.) You may also remove the camera's SD card and place it into your PC.
It will operate similarly to using a USB. Recommended when you need to download
large amounts of data (for speed).
My phone won’t connect:
Other phones connect to the Wi-Fi, but my phone doesn’t.
1.) Try turning your mobile phone off and back on again (power cycle).
2.) (iPhone) Go to your settings. Search under Apps, find “Sight Pro”.
Ensure the “Local Network” is turned on.
In rare cases, you can try turning the App’s Mobile Data to the “off” position.
3.) Only when trying to connect to the Dash Camera’s Wi-Fi to obtain data.
Turn Airplane mode “On”.
Then connect to the camera's Wi-Fi.
The Dash Camera doesn’t seem to be transmitting a Wi-Fi network:
With power to the camera, place a paperclip/earring into the back of the front camera, onto
the slot labelled “R” (Reset). This can reset the camera and the Wi-Fi signal.
Connection Troubleshooting:
P a g e 7 | 15
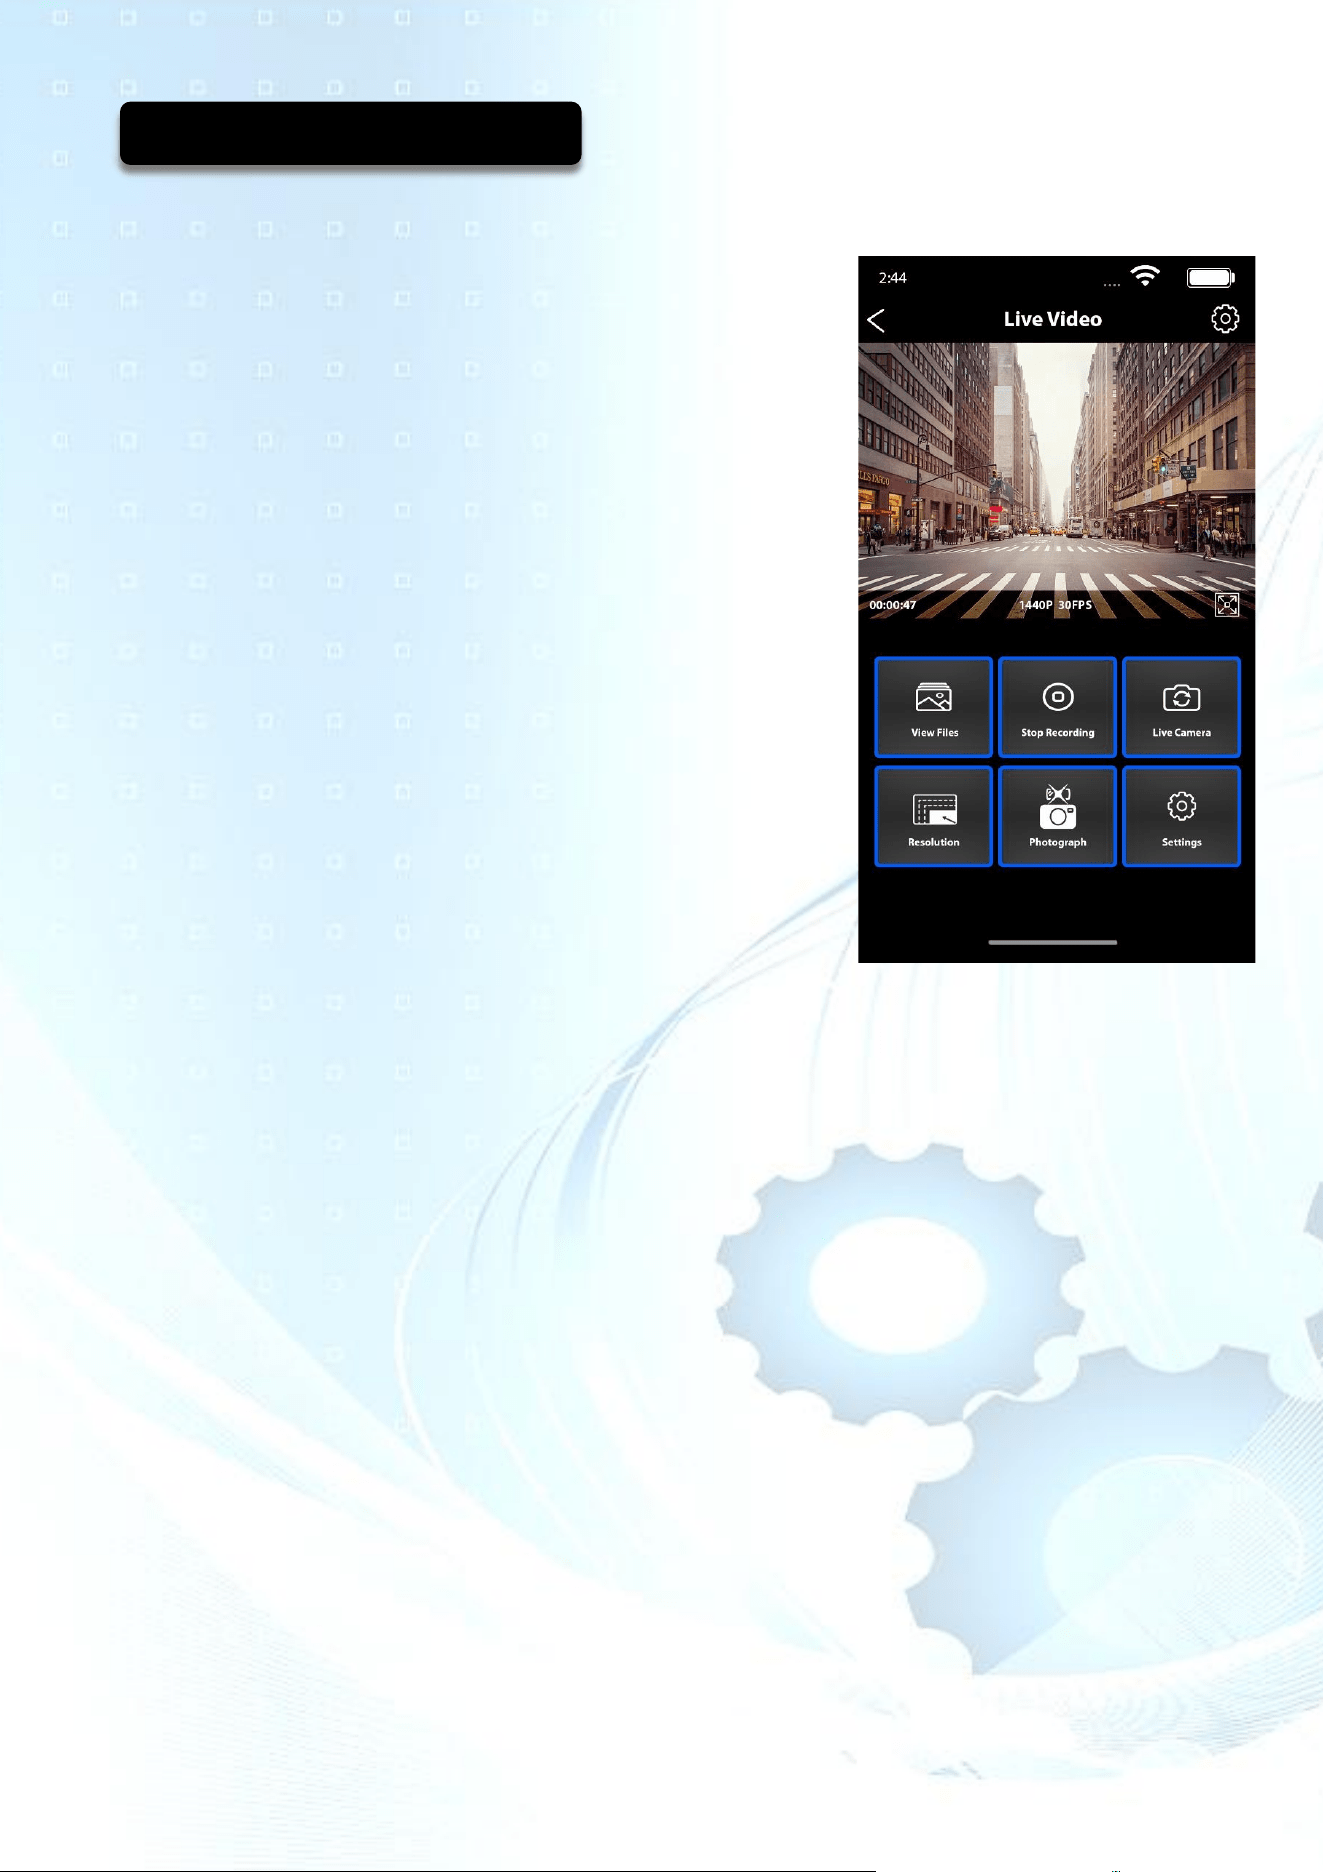
On this page, you will see the live video recording.
Digital Clock Counting:
Recording time - how long it has been recording for.
Resolution & Frame rate:
Displays your current front camera resolution and
frames per second.
Cog Icon:
An option to access your settings page.
Enlarge the Screen:
Make this screen full view and smaller again.
_________________________________________________________
View Files:
This takes you to view your 4x viewing files.
This is where all your footage is saved.
Stop Recording:
Stops recording.
Live Camera:
Change your live viewing screen. Front or Rear or Front & Rear or Rear & Front.
Resolution:
Adjust the resolution of the front camera, the higher the resolution the better the image
quality, but it will also use up memory more rapidly, the default setting is 2K.
Photograph:
Take a picture with the front and rear camera – Saved under the file PHOTO.
Settings:
Click here to access all your settings options. Default settings based on popular consensus.
Home Screen:
P a g e 8 | 15
To view your files, download your photos & videos, log in to the Sight Pro
smartphone application.
On the Live Video Preview page, click on the tab labeled View Files.
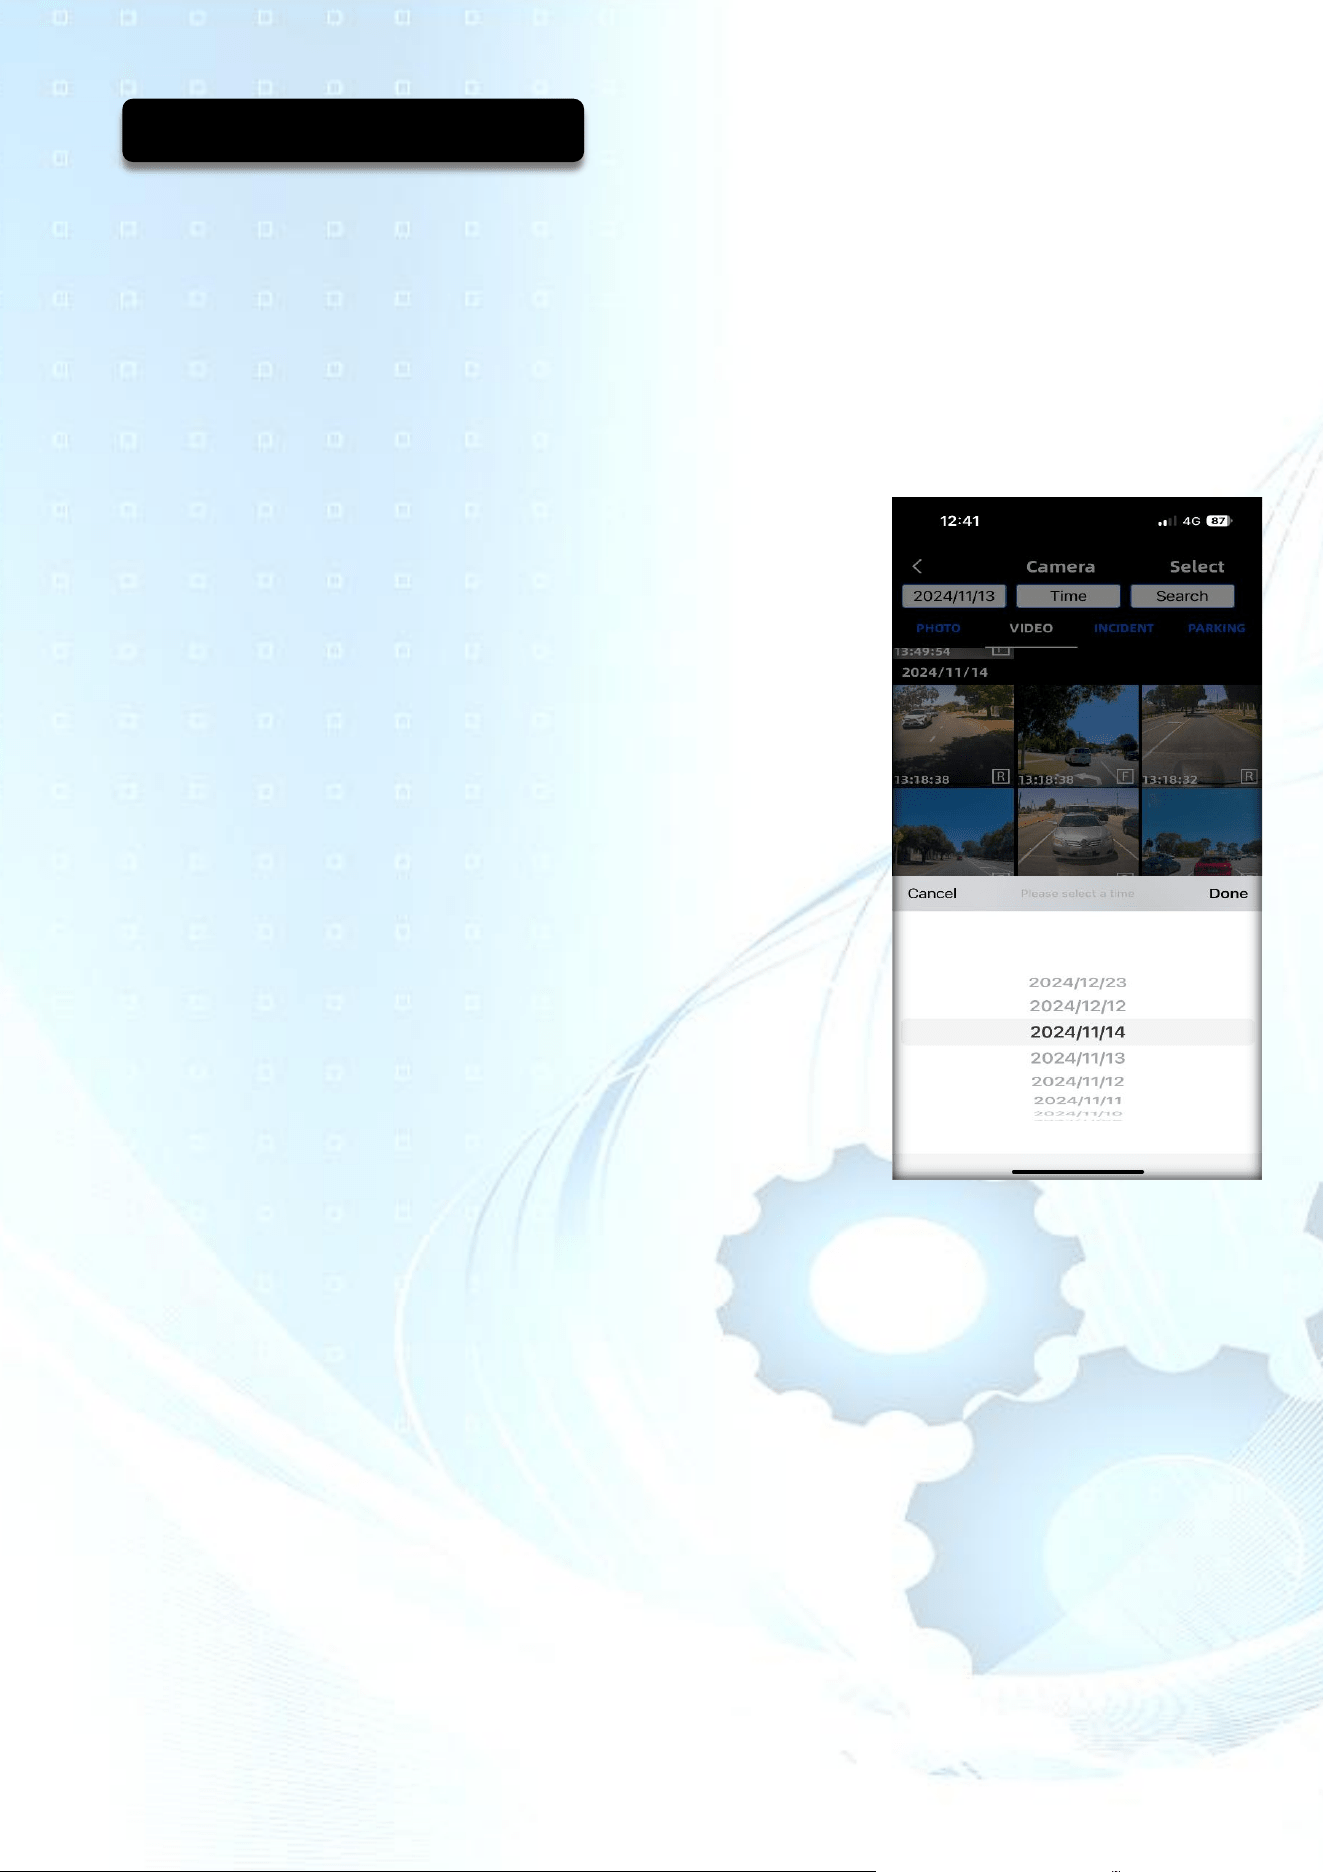
SEARCH TOOL
On the View Files page, you will notice 3x white blocks at the
top of the page.
Here you can quickly search for a particular video by entering:
The Date
The Time
Pressing - Search
Please note:
Only videos currently saved on your SD Card will have the
ability to be searched. Once the camera loop records
(re-writes) over historical data, it can no longer be found.
Accessing Your Files:
P a g e 9 | 15
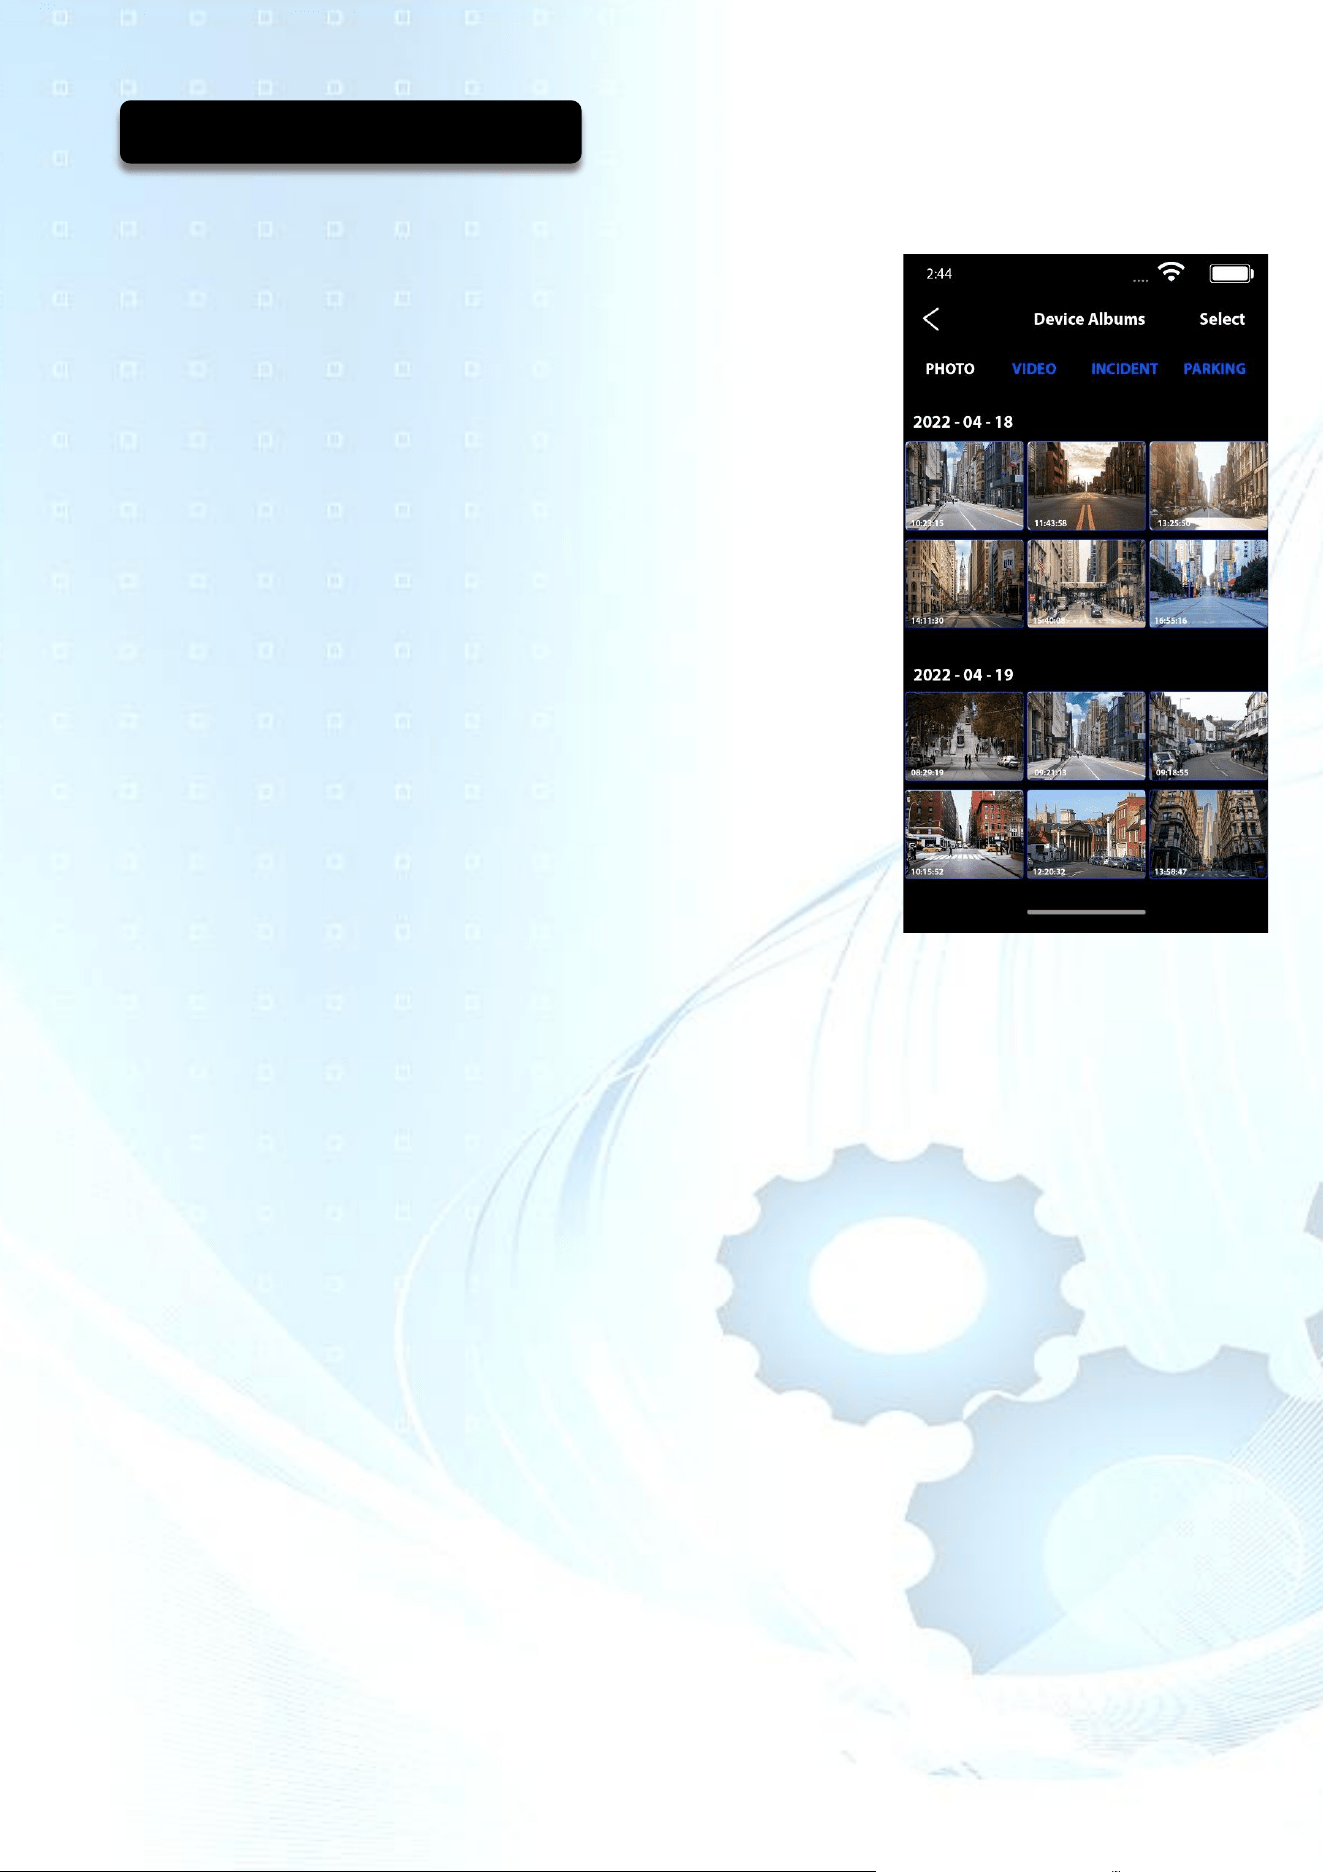
PHOTO
All photos that you take from the smartphone application will be
saved under this folder.
VIDEO
All driving (ignition on) video footage will be saved under this
folder. The operating system works on a loop recording,
meaning the camera (whilst powered) keeps recording until the
SD card is full. Thereafter, the initial videos start to get recorded
over.
INCIDENT
All driving G-Sensor footage (ignition on) is saved under this
folder. This is when the front Dash Camera picks up a shock
wave or impact and saves this footage. These videos will have a
lock icon, meaning they do not fall under the traditional loop
recording process. To remove a file, you need to manually
delete it. You can increase and decrease G-Sensor sensitivity
for both ignition on and ignition off under settings.
PARKING
All parked (ignition off) video footage (time-lapse) is saved under this file.
As well as any G-Sensor files captured while in Parking mode.
As long as the Dash Camera has power, as a default, it will record at a reduced frame rate,
reducing battery consumption and allowing for a longer parking mode before the voltage
cut-off is activated by the smart box in the power kit. When the ignition is off, the Wi-Fi also
switches off to reduce battery consumption, thus enabling a longer parking mode.
If you need to access the camera/app while the ignition is off, press and hold the Wi-Fi
button on the side of the camera for 4 seconds and it will turn back on, (blue light).
Accessing Your Files:
P a g e 10 | 15
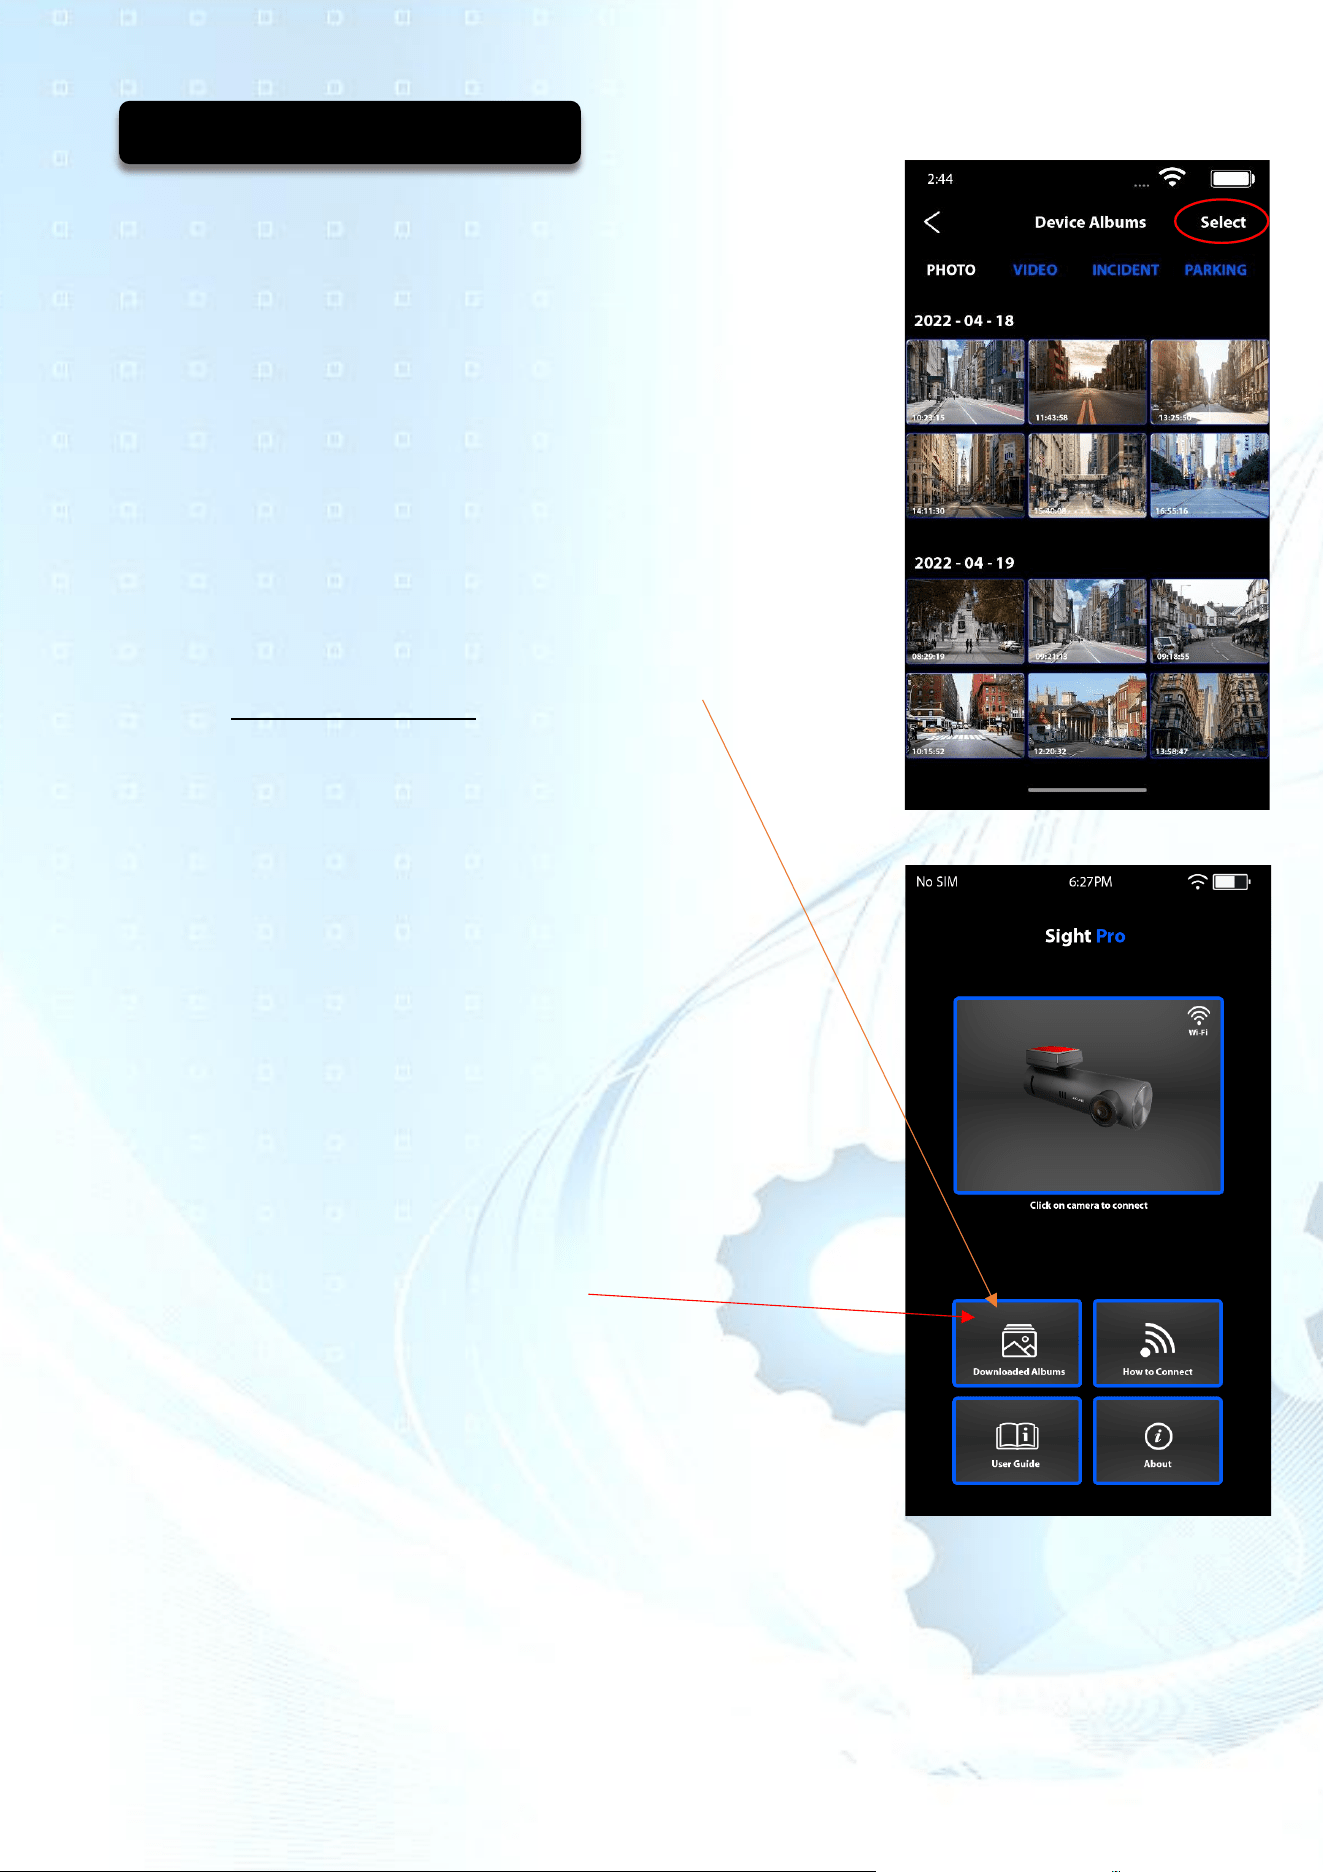
Downloading Photos and Videos
When under any of the 4 files as per the picture.
At the top right, press “Select” then click the Photo or Videos you
wish to download. Once selected, you will see that the photo or
video has been highlighted.
At the bottom of your screen click on “Download” and you will
see a download commence. The same process applies for
manually deleting, except by clicking on the trash can at the
bottom.
Incident files, as these are locked videos, these can be manually
deleted.
Sharing Your Downloaded Files
Once downloaded, head to the App “Home” page.
Click on “Downloaded Albums”.
From here you can save it to your mobile phones
PHOTOS / GALLERY app and then share it,
several ways.
Creating a Short Video
When viewing a video, you may notice a scissors icon on the
right side of the screen. By clicking on this icon, you can edit a
segment of your video file (cropping), so to only download a
portion of the video.
Historical in App. GPS Mapping
You can view where you have driven with GPS tracking maps.
Simply download the file, which will then be saved under
“Downloaded Albums”.
Once downloaded, disconnect from the Sight Pro network.
Using 5G or another Wi-Fi network, go into “Albums”.
Click on the downloaded video to view it.
Please note: The GPS Mapping will only show if, at the start of
the video, the front camera received a GPS signal – Greenlight.
Cropped/clipped videos may not show mapping due to video
compression.
Downloading Your Files:
P a g e 11 | 15
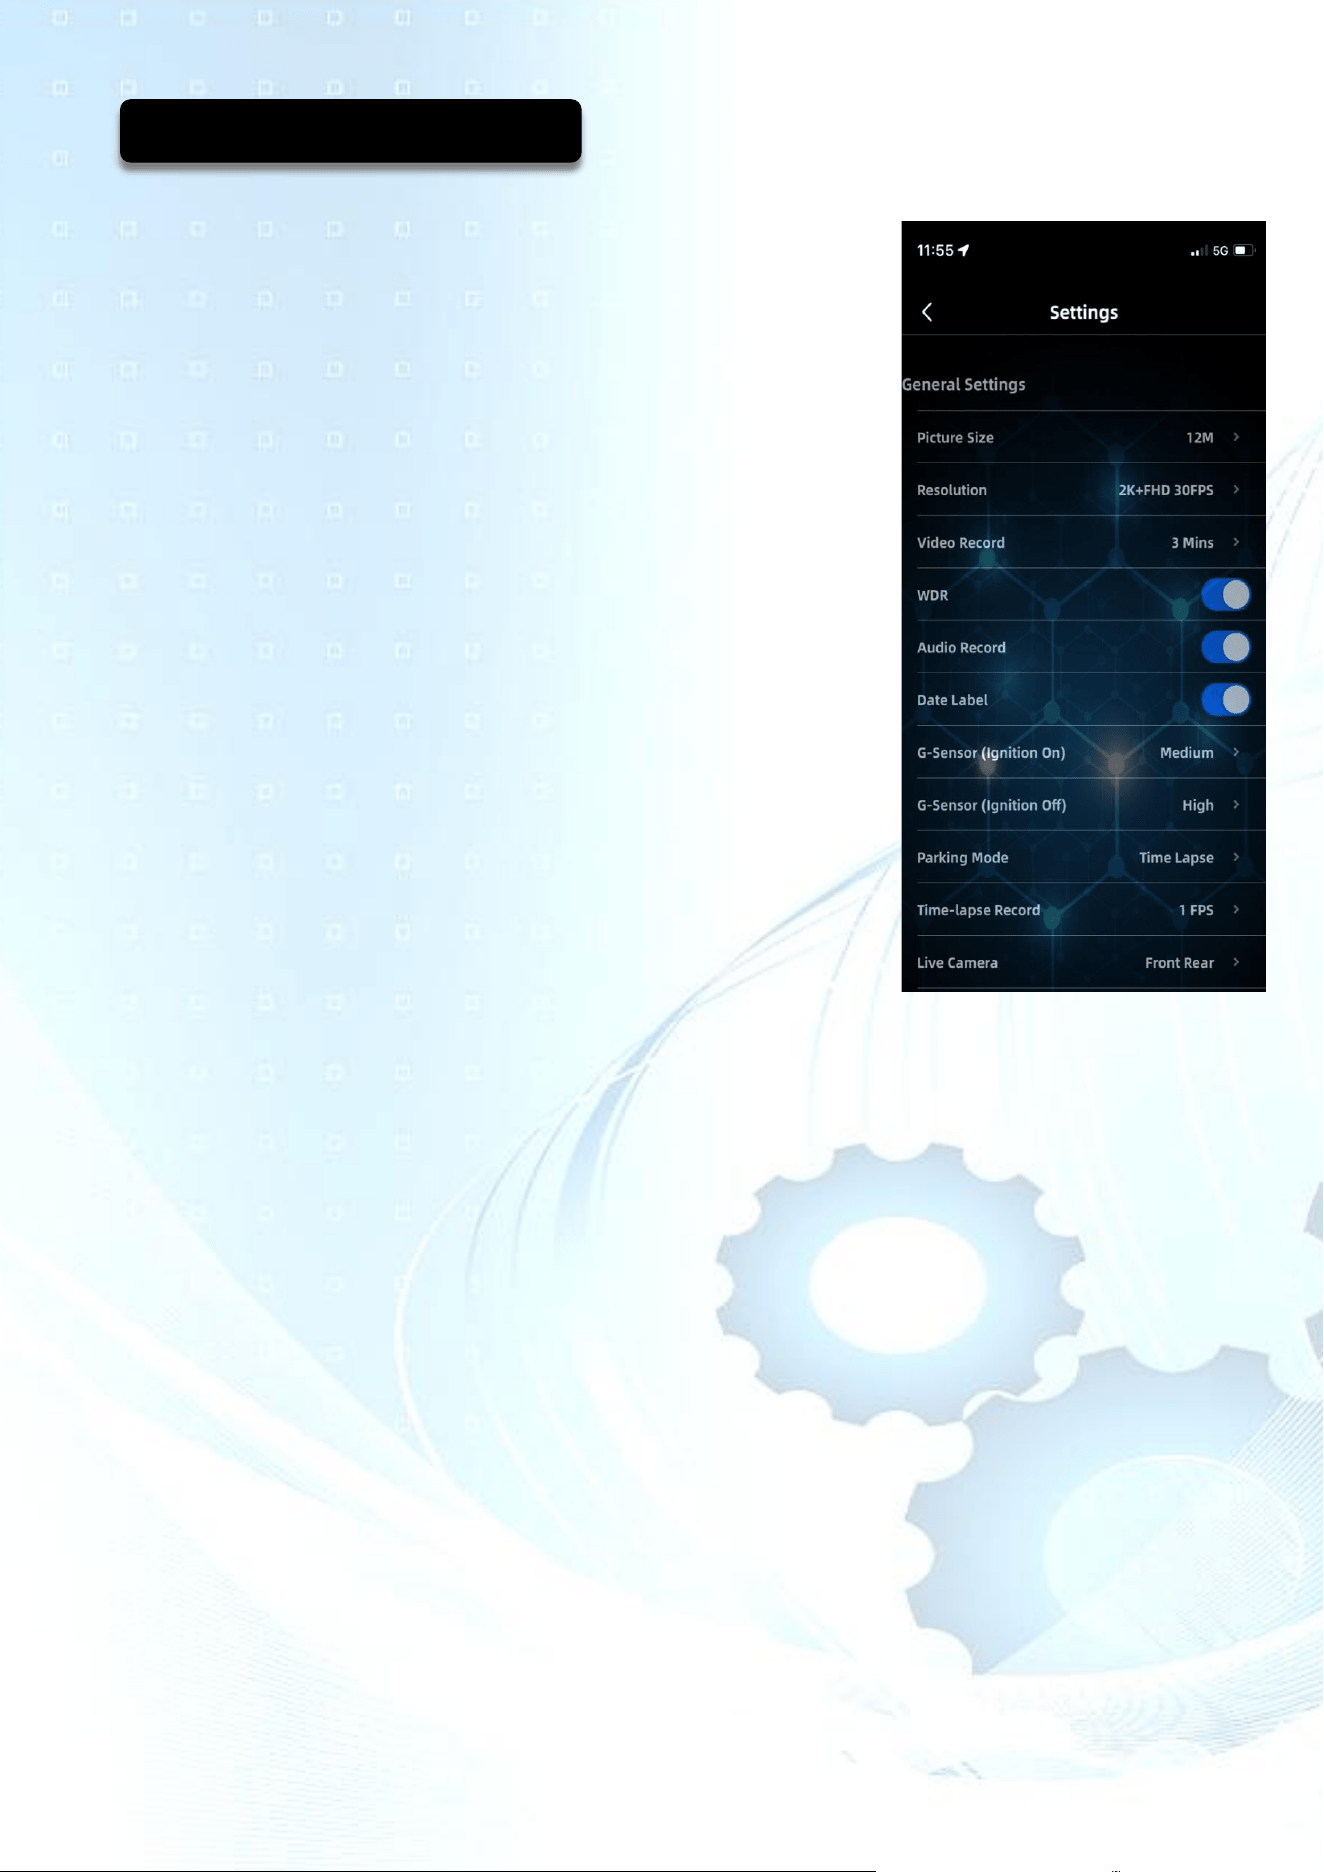
Picture Size:
Adjusts the megapixels.
Resolution:
Adjusts the video quality.
The higher the quality video, the greater the memory used.
Video Record:
Adjusts the length of each recorded video.
WDR:
Turns On / Off wide dynamic range.
May help improve the clarity of the picture in varying lighting
conditions.
Audio Record:
Turns the microphone on / off for the camera to record sound in
the vehicle’s cabin.
Date Label:
Turns the date and time stamp on / off for each video &
live screen.
G-Sensor (Ignition On):
Adjusts the sensitivity of the G-Sensor when the vehicle’s
ignition is on. If set too high, it may activate when traveling over
speed bumps.
G-Sensor (Ignition Off):
Adjusts the sensitivity of the G-Sensor when the vehicle’s ignition is off.
Parking Mode:
3 modes available
1.) Off: The camera does not operate while parked.
2.) Time Lapse: When parked (ignition off) the camera will record at 1 frame per
second. Default setting.
3.) Standby: The camera will stop recording while the vehicle is turned off. If the
G-Sensor is activated, the camera wakes up, records for 60 seconds, and turns
off again. A great feature that may allow for longer parking mode times.
Time Lapse Recording:
Adjusts the time-lapse, frames per second whilst in parking mode.
Live View Camera:
Adjust the viewing screen from Front only, to Rear only or a combination of both.
Navigating Your Settings:
P a g e 12 | 15
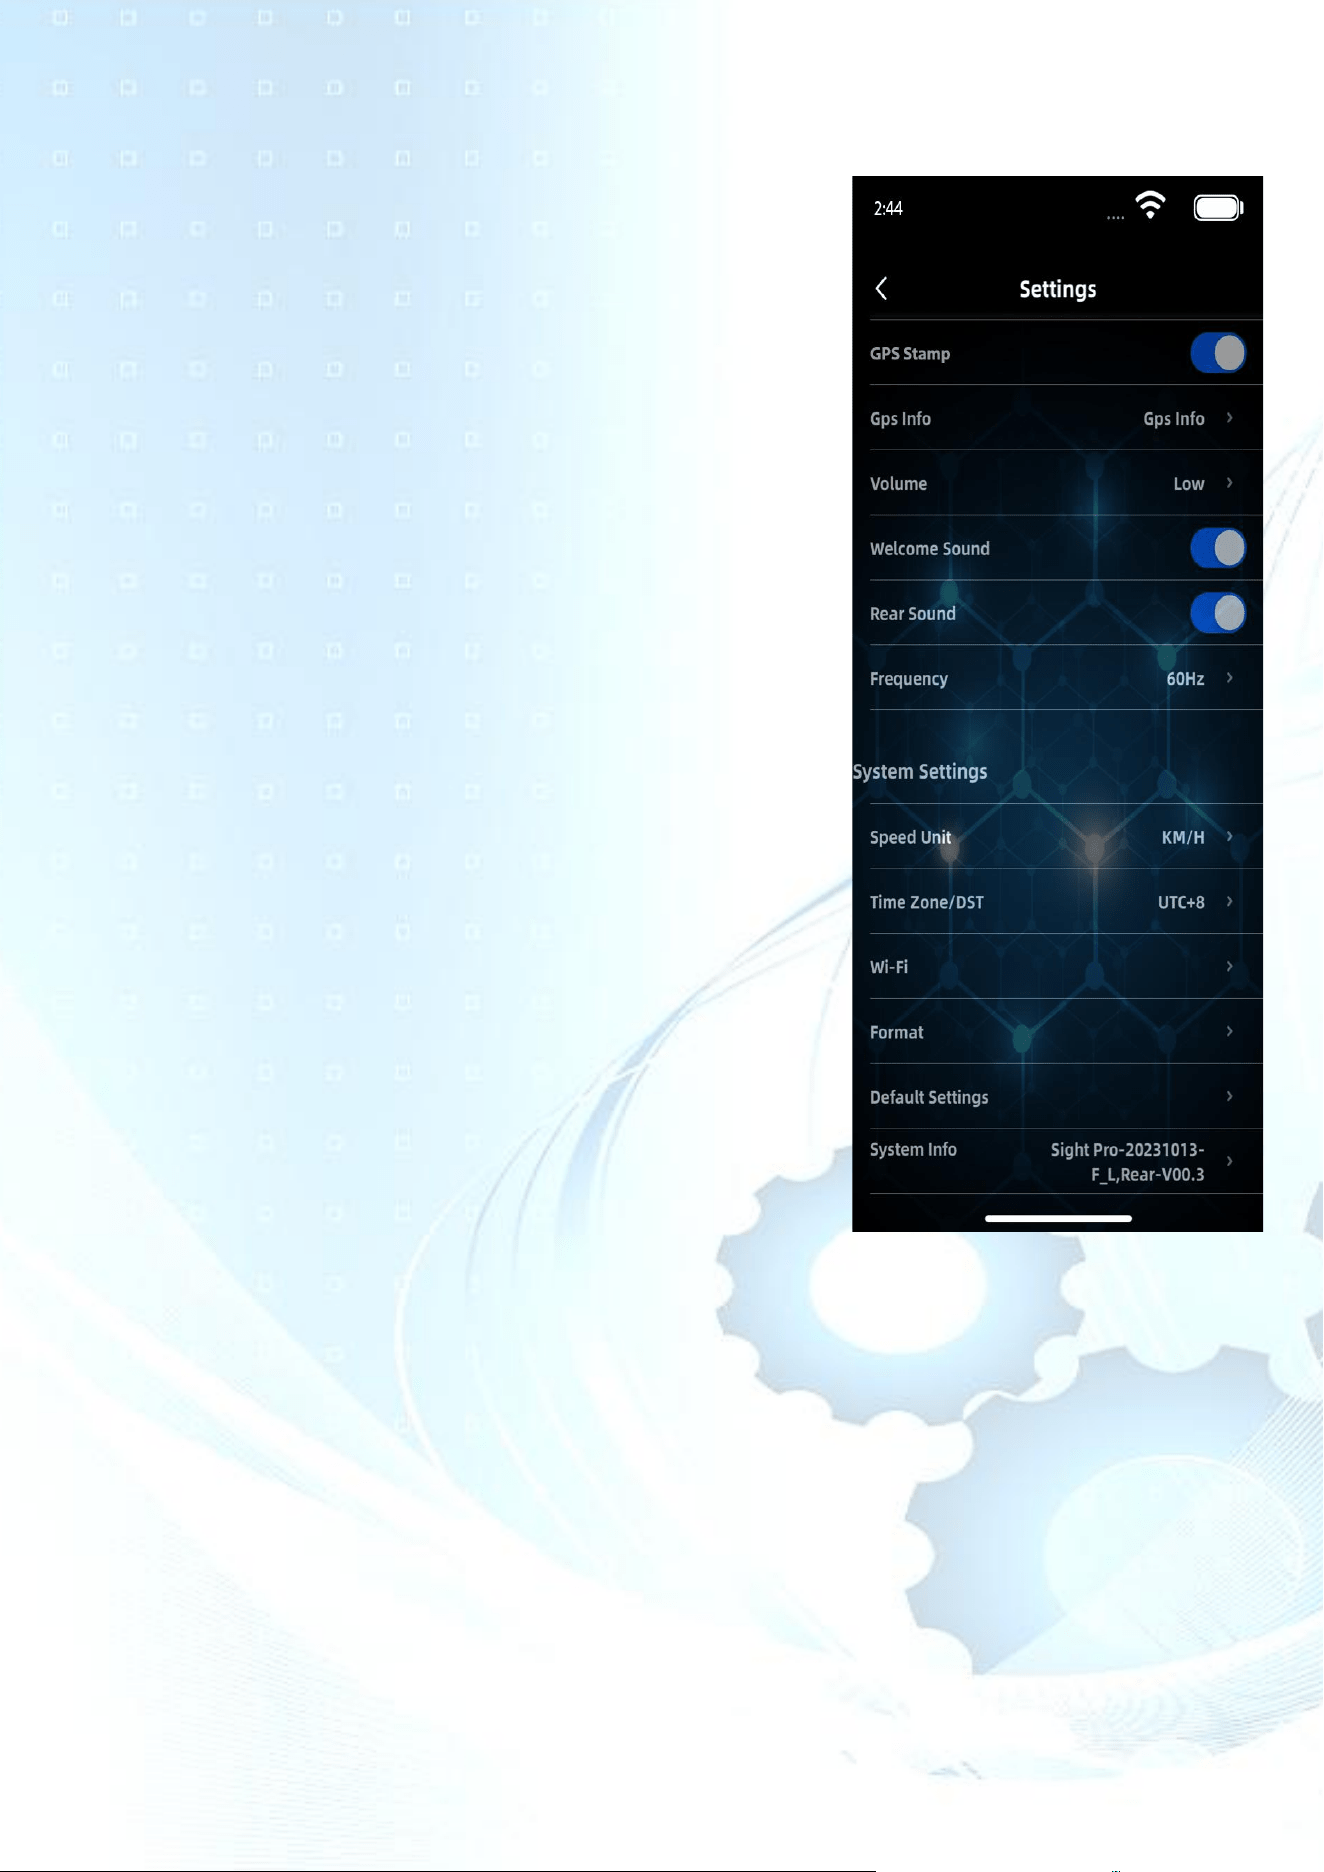
GPS Stamp:
Turns the GPS coordinates & Speed on or off on the video
recording & live screen.
GPS Info:
Displays GPS info – set as on.
Volume:
Increases and decreases the volume of the dash camera
cabin sound.
Welcome Sound:
Turns On / Off the initial welcome jingle.
Rear Sound:
Turns On / Off the initial welcome jingle.
Frequency:
Adjusts the frequency if you experience an image flicker.
System Settings
Speed Unit:
Set as KMH or MPH.
Time Zone/DST:
Adjust to your specific time zone.
Wi-Fi:
You can change the Wi-Fi password.
You may need to remove / “forget” the old network.
Format:
Manually deleting everything on the SD card.
Default Settings:
Restores your camera to the original factory settings.
System Information:
The unique serial number allocated to your camera and the software version.

P a g e 13 | 15
Question: I cannot connect to the Wi-Fi with my smartphone.
Answer: Steps you can take:
• First see page 5.
• Ensure there is power to the Dash Camera, red light (Rec).
• Ensure the Wi-Fi button is on, blue light.
• You & your phone must be positioned close to the Dash Camera to gain Wi-Fi
access/signal.
• Ensure that your “Wi-Fi” under your phone settings is switched on.
• Turn off your mobile device and restart it.
• Gently place a pin in the “R” Reset insert at the back of the front camera while powered on
to reset the device (you will hear the voice prompts confirm.
Immediately after, format the SD card.
• With some vehicles, you may need to turn Apple CarPlay off.
• If you have tried all the above and you still cannot connect, try connecting with someone
else’s phone. If it connects, it may be a setting on your phone.
• If you still cannot connect, please chat with your retailer.
Question: My camera was working, but then it started to freeze.
Answer: Try formatting the SD card.
Question: Can I remove the voice prompts sounds?
Answer: Yes, under settings, see “Volume” and set it “Off”.
Question: I cannot take a picture and or record.
Answer: Try resetting the device with a pin (page 4) factory reset and then format the SD card.
Question: Stopping automatically during recording.
Answer: This may occur if you change your SD card. Due to the large amount of 4K / 2K / HD
video data, only use a high-speed class 10 SD card.
Question: Image / Video looks blurry/fuzzy.
Answer: Check the lens and if necessary clean the lens of the camera/s with a microfibre cloth.
Question: Dark image when shooting the scene of sky or water
Answer: Adjust the "WDR" in the menu setting.
Question: Horizontal stripes interference in the image.
Answer: Adjust the frequency according to the local power supply.
Question: Image / Video is freezing.
Answer: Reset the device on the side of the camera.
Question: My Camera didn’t record in parking mode.
Answer: May occur in certain circumstances if you change the default operating settings.
Try restoring factory default settings or reset the camera.
Frequently Asked Questions:

P a g e 14 | 15
The Dash Camera is a recording instrument for information related to images and sounds.
It will operate accordingly if the Dash Camera is continuously connected to power.
The smart box in the power kit utilises a voltage cut-off switch (pre-set), thus when the engine is
turned off, the Dash Camera continues to record (Parking Mode) until said vehicle battery voltage
is reached. When this occurs, the Dash Camera will cease to operate entirely. The
purpose, whilst the engine is turned off, it continues to operate but also protects your vehicle’s
battery from excessive drainage. Example: Going on holiday, the smart power system powering
your Dash Camera will prevent your car battery from exhaustion, beyond being able to start.
It is difficult to predict how long Parking Mode will last (engine off and the battery reaches cut-off
point) as every vehicle’s car battery is different, as well as the manner in which it is utilised (short
vs long drives). To gauge, take note of the time you park at night. Log in to your camera the next
morning (Parking folder) and note the last video’s recording time. This will give you an
approximate Parking Mode time.
Please note that Parking Mode operates at a reduced frame rate (Time Lapse) to give you longer
Parking Mode times by utilising less of your vehicle’s battery. If you find your vehicle has a very
short Parking Mode time frame, you can change the default setting to “Standby Mode”. With this
setting, the camera will cease to record while parked, but will awake if the G-Sensor is activated.
Alternatively, have the voltage switch on the smart power box safely adjusted to a lower voltage
cut-off. Lastly, if Parking Mode is essential for your lifestyle, chat to your retailer about installing
the optional back-up battery.
G-Sensor - Due to the vast number of variables, there is no guarantee that the G-Sensor will
capture incidents.
Video and Images may be damaged or lost in the following cases:
1. While the camera is recording, removing the SD card will cause the last video file to be
damaged or lost.
2. The device was damaged by a devastating collision; the last video might be damaged or
lost.
3. The Dash Camera was subjected to an excessive crash, which caused the memory card to
be loose at the time, which would destroy the video file of the event or cause the video file to
be lost.
Disclaimer:

P a g e 15 | 15
Please ensure that the details below are the same as the client’s contract.
The warranty is non-transferable.
Dealership Name:
Client’s Full Name:
Date Of Purchase:
Warranty End Date:
Warranty Card
P a g e 16|
16
This device complies with part 15 of the FCC Rules. Operation is subject to the following two conditions: (1) This
device may not cause harmful interference, and (2) this device must accept any interference received, including
interference that may cause undesired operation.
NOTE: This equipment has been tested and found to comply with the limits for a Class B digital device, pursuant to
Part 15 of the FCC Rules. These limits are designed to provide reasonable protection against harmful interference in
a residential installation. This equipment generates, uses and can radiate radio frequency energy and, if not
installed and used in accordance with the instructions, may cause harmful interference to radio communications.
However, there is no guarantee that interference will not occur in a particular installation. If this equipment does
cause harmful interference to radio or television reception, which can be determined by turning the equipment off
and on, the user is encouraged to try to correct the interference by one or more of the following
measures:
-- Reorient or relocate the receiving antenna.
-- Increase the separation between the equipment and receiver.
-- Connect the equipment into an outlet on a circuit different from that to which the receiver is connected.
-- Consult the dealer or an experienced radio/TV technician for help.
Changes or modifications not expressly approved by the party responsible for compliance could void the user's
authority to operate the equipment.
This equipment complies with the FCC RF radiation exposure limits set forth for an uncontrolled environment. This
equipment should be installed and operated with a minimum distance of 20cm between the radiator and any part of
your body.