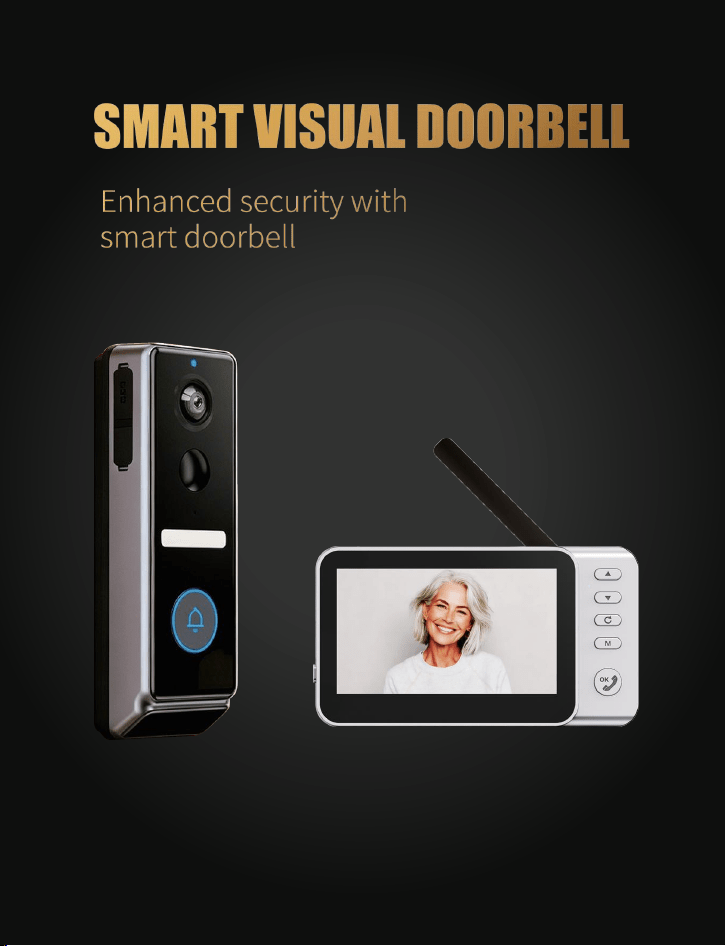
Instructions


1
DIRECTORY
English…………………………………………………………………………
Deutsch………………………………………………………………………
Français…………………………………………………………………………
Español………………………………………………………………………
Italiano…………………………………………………………………………
中文…………………………………………………………………………………
2-9
10-17
18-25
26-33
34-41
42-49
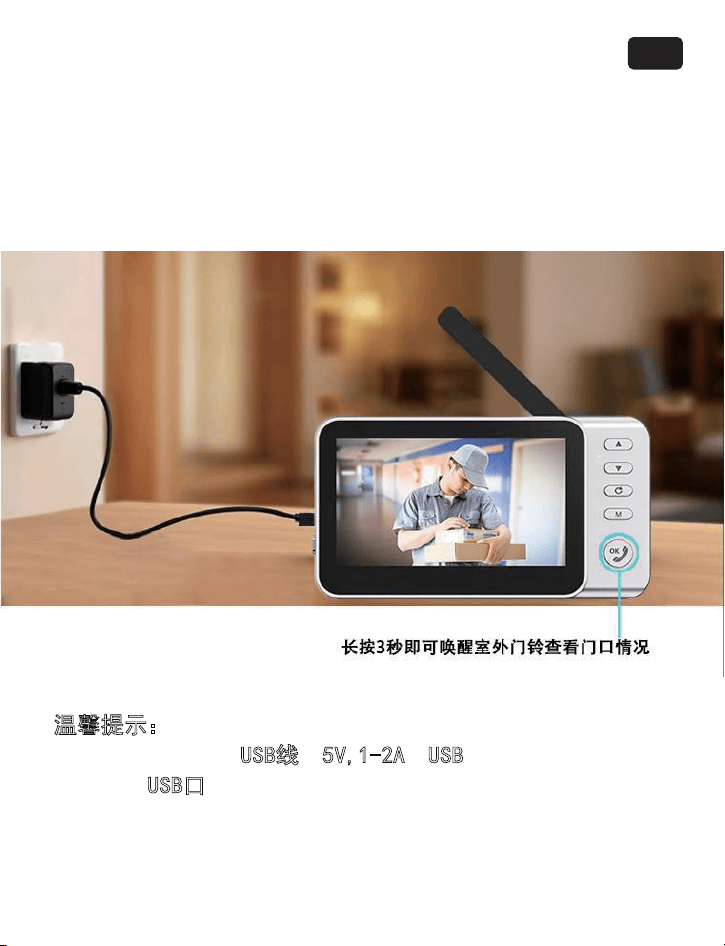
温馨提示:如长时间使用,显示器需要供电使用。
建议用产品标配的U
SB线接5V,1-2A的USB口取电,可以接手机
适配
器的U
SB口取电等。
CN
42
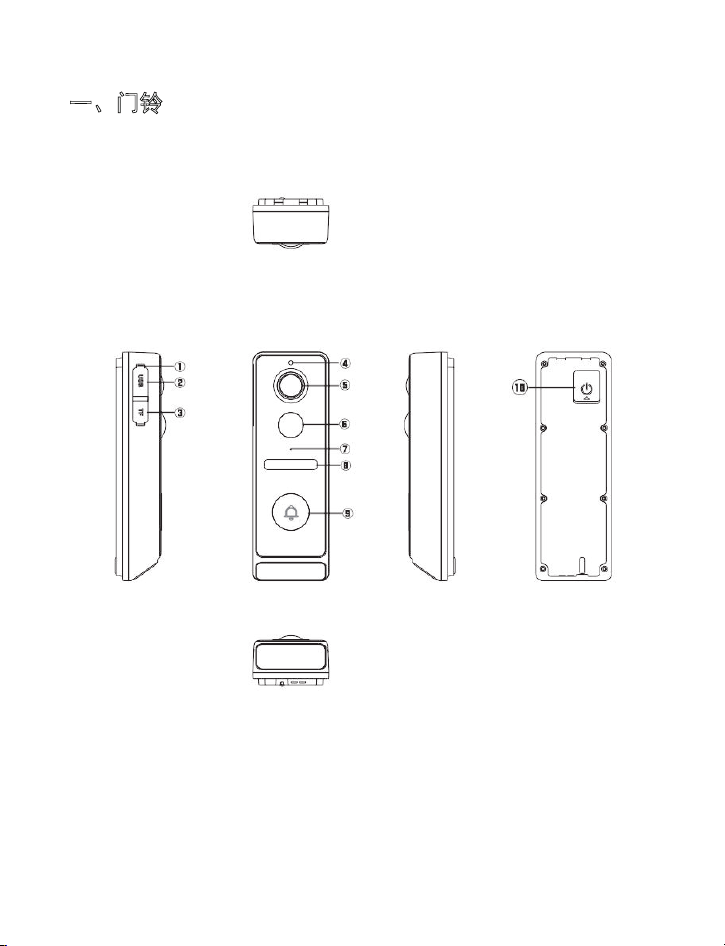
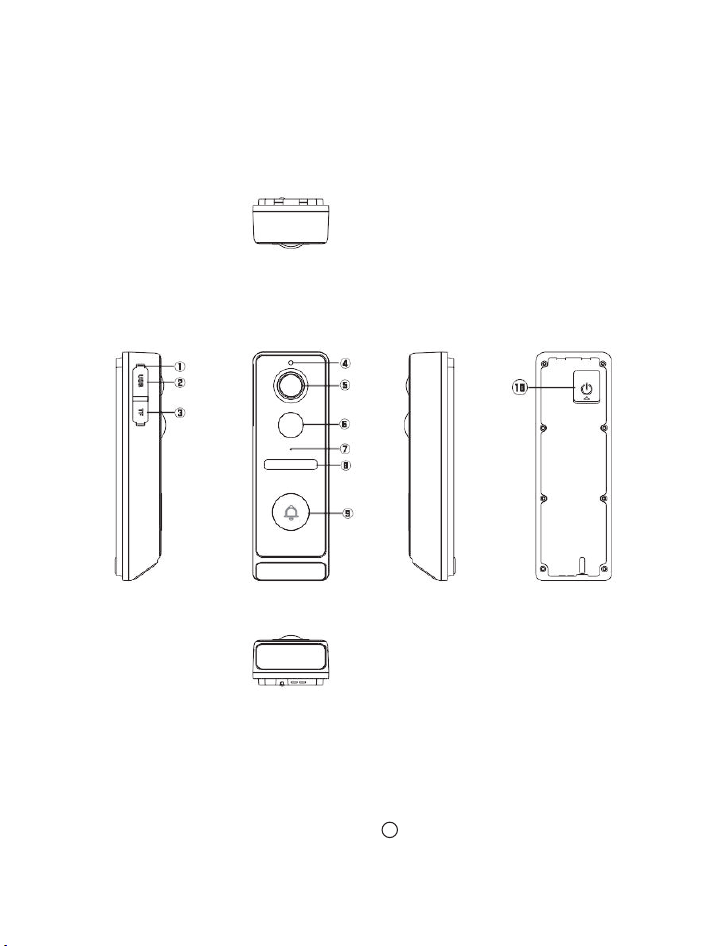
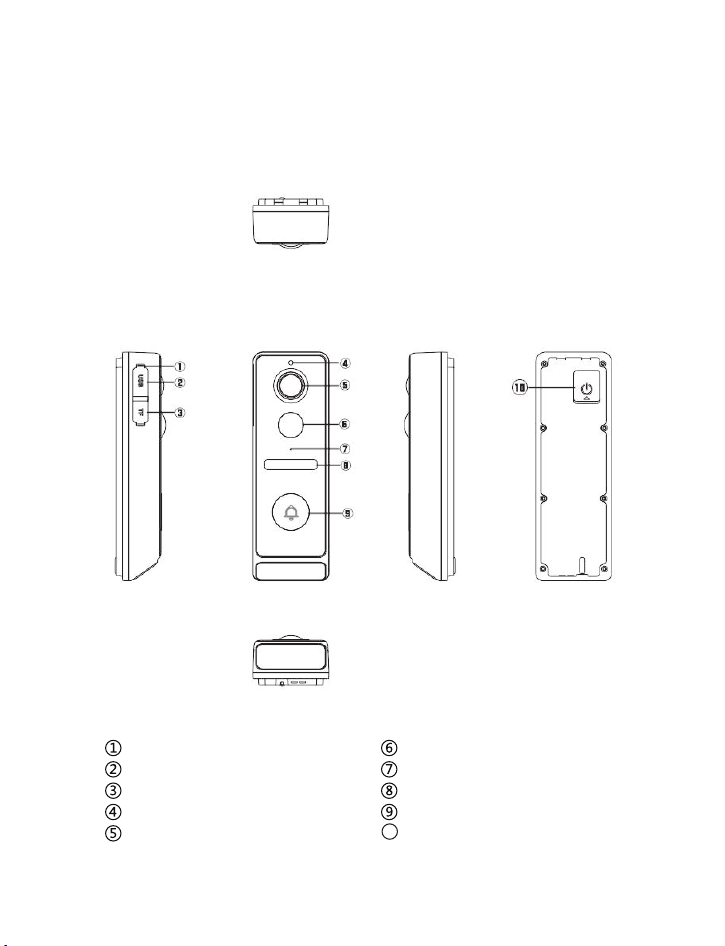
一、门铃
①复位键 ②TYPE-C充电口 ③预设TF 口 ④光敏感应
⑤镜头 ⑥PIR感应 ⑦麦克风 ⑧LED补光灯 ⑨按键
⑩预设开关
43
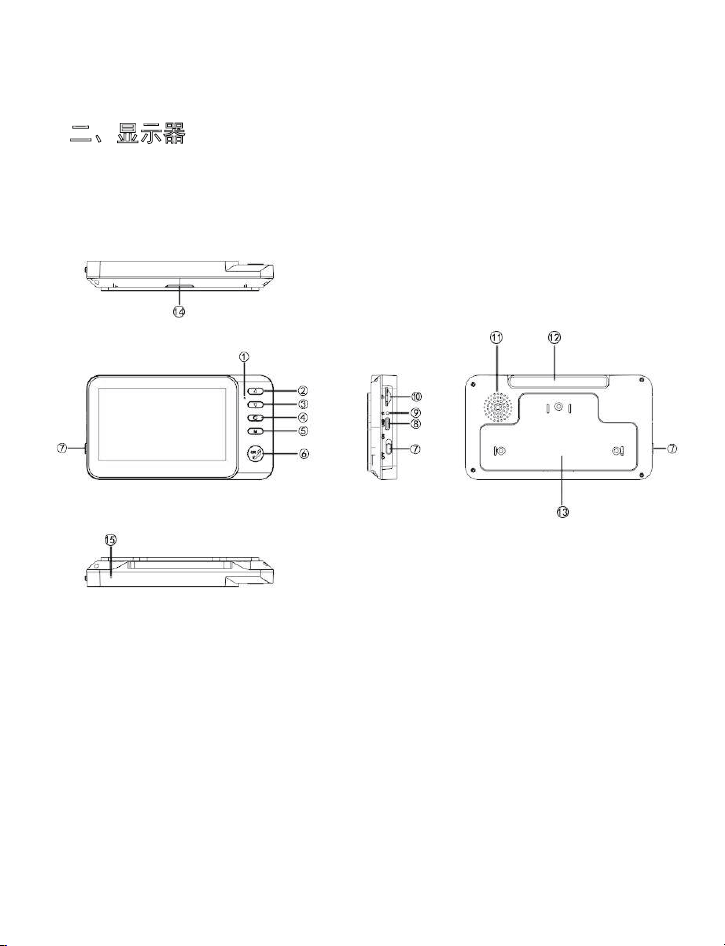
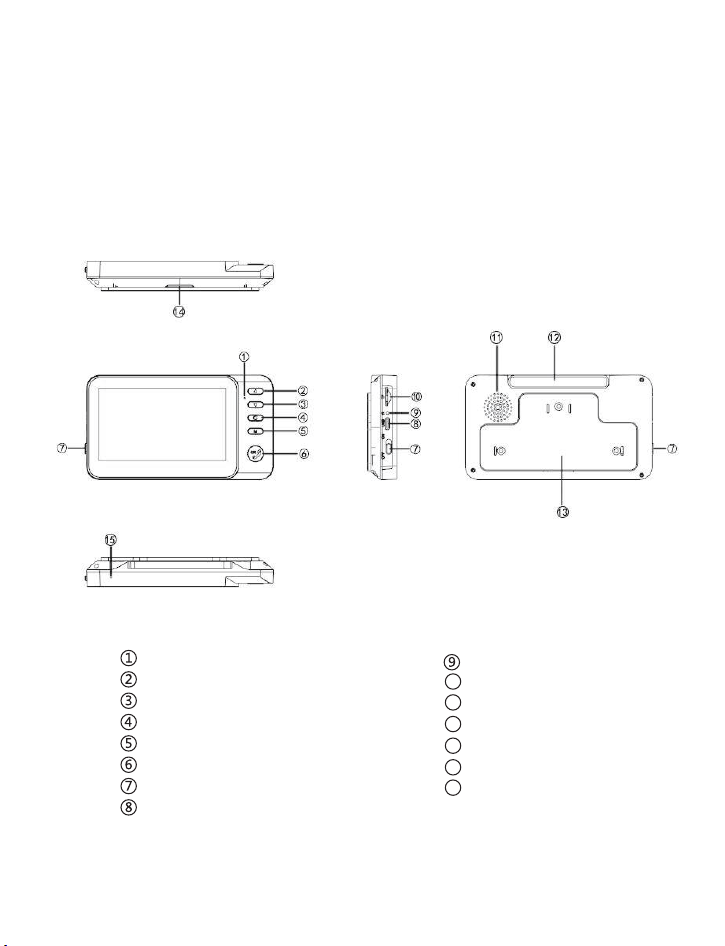
二、显示器
①指示灯 ②上键/+键 ③下键/-键 ④返回键
⑤菜单键 ⑥拨号键/ 确认键 ⑦开关机键 ⑧充电口
⑨复位键 ⑩插卡口 ⑪喇叭⑫天线 ⑬背板 ⑭支架
⑮麦克风
44
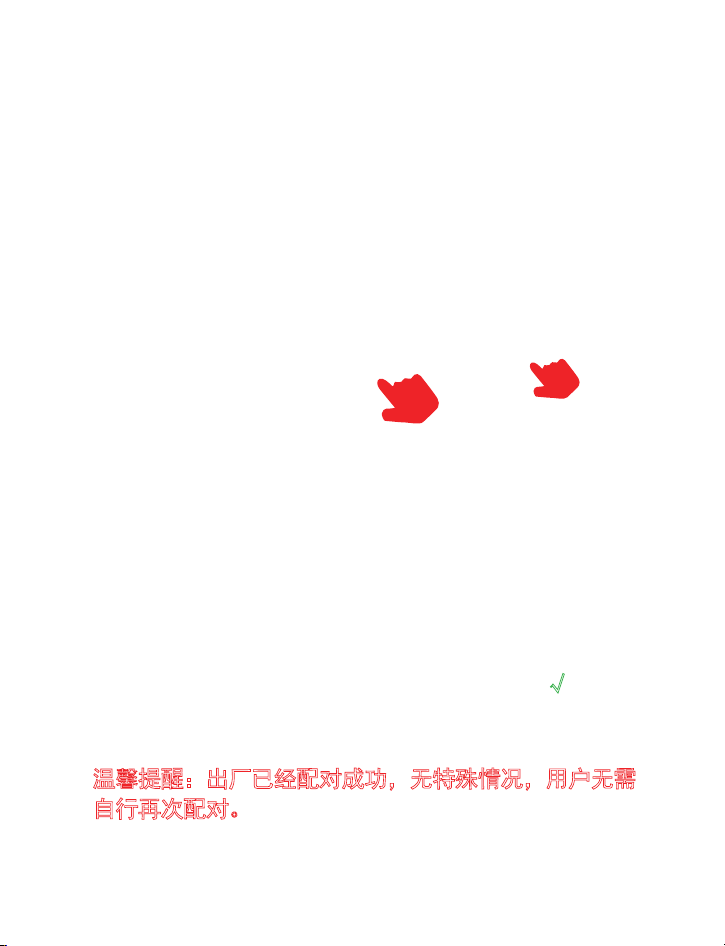
1. 找到显示器的开关键,开机后长按M按键,显示器显
示配对提示,并进入30秒倒计时。
2. 显示器显示“配对**30”提示后,再同时长按门铃按
钮,按住不要松手,直到显示器显示“配对**
√ ”提示,
则配对联机成功。
温
馨提醒:出厂已经配对成功,无特殊情况,用户无需
自行再次配对。
45

1.
1.1.长按“M”进入配对模式。
1.2.短按进入菜单选择及设置。
2
.
2.1.当访客按响门铃时,室内机(显示器)显示访客及
响铃提醒。按一次“拨号键”可接通对讲。
2.2.接通对讲后,室内机长按“拨号键”可对讲说话,
室外机(门铃)可以听到室内机的说话,室外机说
话无需任何操作。
2.3.再按一次“拨号键”挂断联机,室内机和室外机
同时进入休眠。
46
2.4.休眠模式下,长按室内显示器“拨号键”3秒,可
以唤醒室外机门铃,查看室外门口情况。
2.5.菜单模式下“拨号键”也是确认键,确认设置。
3
.
3.1.直接按 键是调节对讲音量。
3.2.进入菜单后,按”
键进入下一个选项或减小
音量/亮度;按“
”键进入上一个选项或加大音
量/亮度。
3.3.
键是返回键,进入菜单设置界面,按此键,
则返回上一级。
4
.菜单功能:
4.1.录像功能:此功能需插入TF卡,建议TF卡格式化后
使用;按响门铃,显示器自动开启录像,录满后自动
循环覆盖,保存最新录像。
注
意:使用8-32G,C10等级的高速内存卡。
4.2.铃声设置:6首铃声音乐可选。
4.3.设置:
语言设置:按▼、▲键选择语言,按“
”确认;
亮度设置:按▼、▲键调整屏幕亮度;
铃声音量:按▼、▲调整铃声音量;
47
时间设置:按▼、▲调整时间数值,按“ ”键进入
下一项设置,全部设置好,按“M”返回上一级。
5
.PIR移动侦测:当检测到移动物体时,侦测信号
会触发显示屏启动,显示屏显示室外情况。
6
.低电量提醒:显示器右上角的电池图标:TX图标,对应
的是室外机门铃的电量;R
X图标,对应的是室内机显示
器的电量。当电池低电量时,电池图标会变成红色,请
及时充电。
7
.显示器指示灯:
工作状态:指示灯绿灯;
配对模式:指示灯闪烁;
休眠待机:指示灯红灯;
充电状态:红色指示灯常亮,充满电,指示灯熄灭。
1 显示屏:根据个人需求,可放客厅,前台,门口置物
柜,等。方便取电的地方,供电是5V用电,用手机充
电器,或者插USB口供电使用。
② 门铃:木门,玻璃门,清洁好安装位置灰尘,3M胶粘
贴门上即可。铁质门,建议装门把手上端,距离地面
1.5-1.6米高度即可,可以根据个人需求改动。
温馨提示:安装前,先测试一下安装位置门铃和显示屏联
机信号接收是否良好,选信号好的位置安装。
48
用户常见问答
关于接收距离
无障碍环境,视频信号可传输50米左右。如果有实墙,铁门阻挡,
视频信号传输距离和信号强度会出现延缓和距离降低。所以,具体
使用环境,具体分析。如在墙体和有铁质门的使用环境,可以建议
消费者用蓝牙耳机或者其他蓝牙设备测试一下信号接收情况进行判
断。
关于待机时间
1
显示器:内置400毫安电池,主要用途是记忆保存时间和应对
临时断电情况使用。长时间使用,显示屏建议供电使用,使用
5V,1-2A适配器供电。
2
门铃:内置4000毫安电池,低功耗芯片,以每日10次按门铃计
算,充满电可使用4至6个月左右,门铃是充电使用。
关于对讲干扰
无线门铃对讲是无线信号传输,不同于有线传输,所以会受电磁干
扰。门铃和显示屏越近干扰就会越大,相反,随着距离的增加,干
扰就会越少。建议门铃和显示屏距离在3米外距离使用对讲,对讲
原理可以参考传统的对讲机原理。
关于充电时间/状态
门铃接通视频后,右上角显示门铃和显示器的电量。
RX是显示器的电量,TX是门铃的电量,2A充电器充10小时左右可充
满,充满电充电口指示灯会熄灭。建议不要使用快充,快充对电池
寿命会有一定的影像。
注意:插电状态下,电池格是变化的,代表着通电状态。拔掉电源
后,电池格会停在拔掉电源的那一刻状态,非真实的电量状态,关
机重启后显示器显示的电池格才是真实电量状态。
49
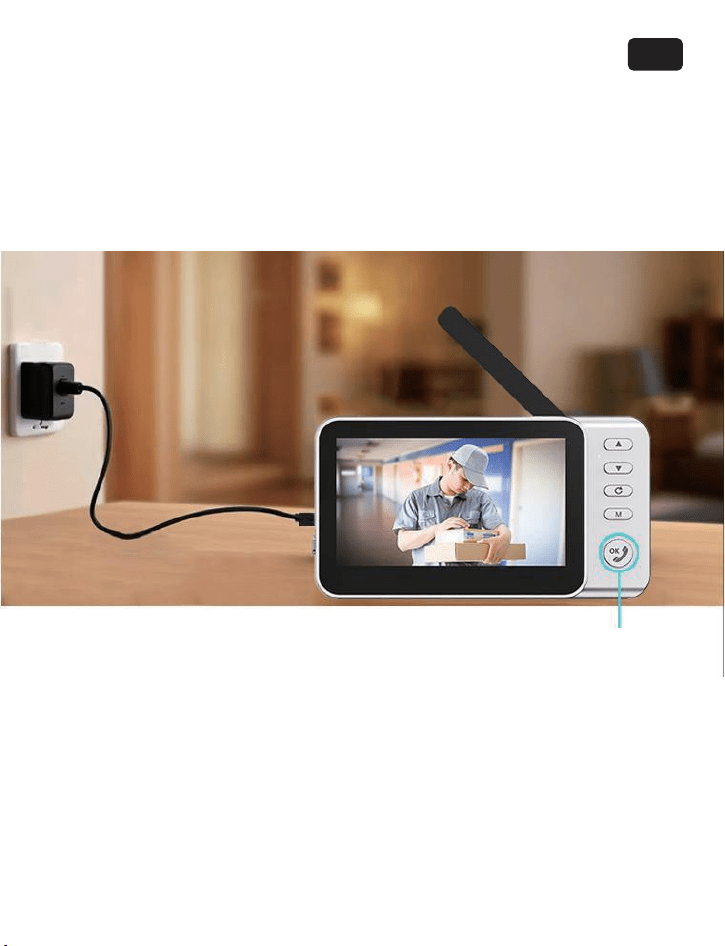
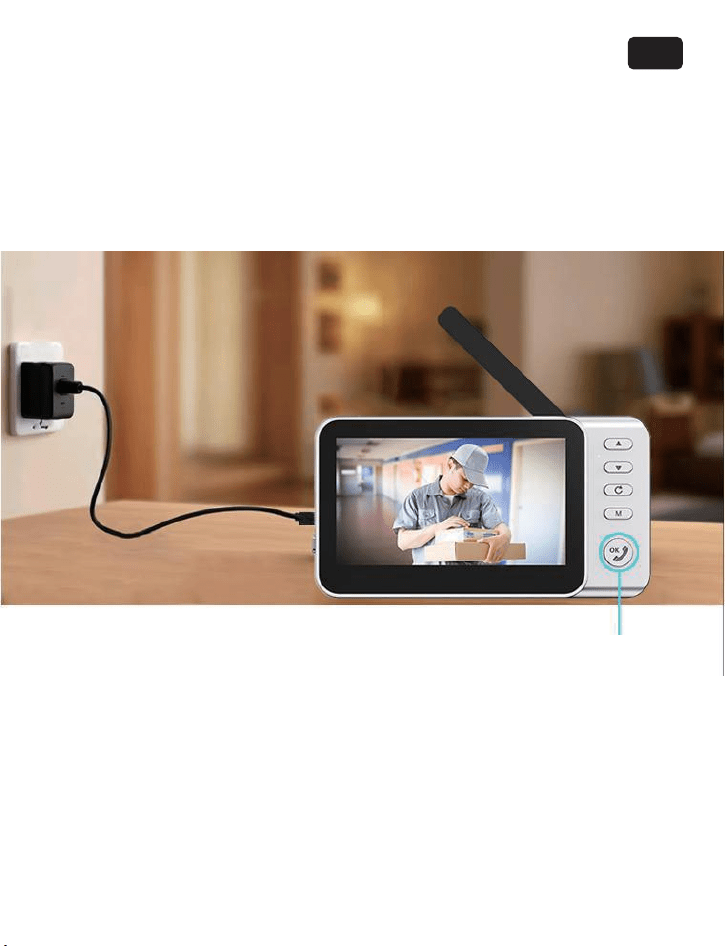
Wireless video doorbell
Instruction manual
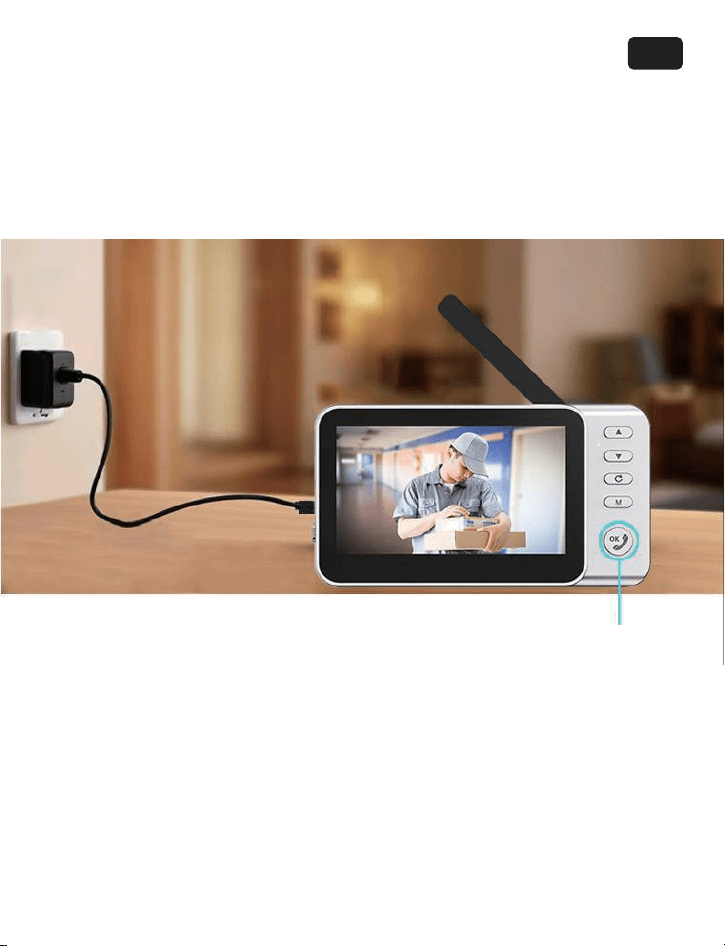
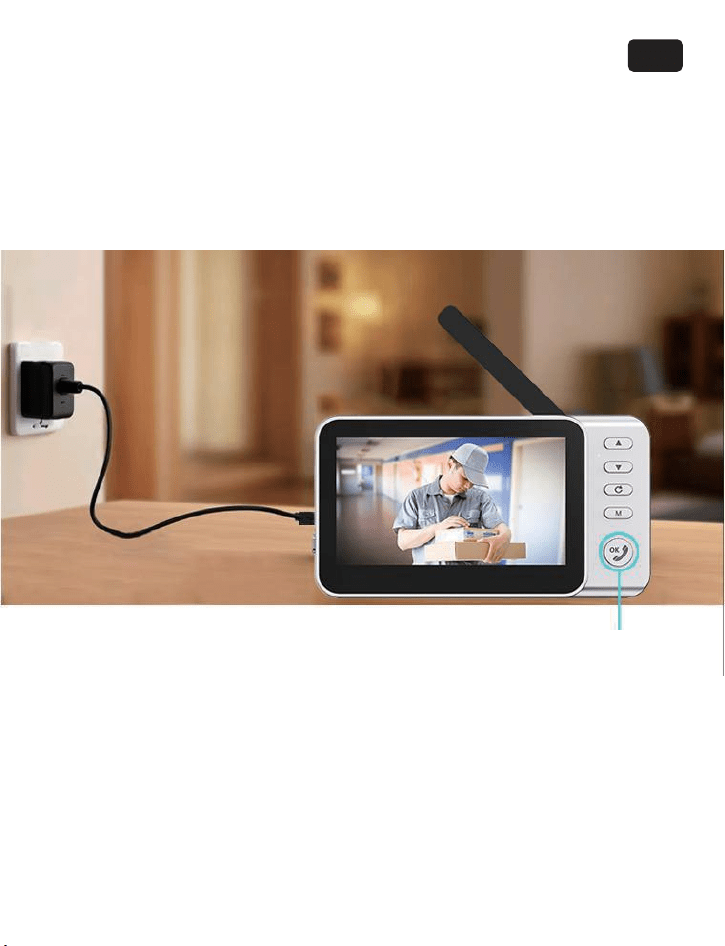
Long press for 3 seconds to wake up the outdoor
doorbell and check the situation at the door
Kind reminder: If used for a long time, the monitor needs to be powered on.
It is recommended to use the standard USB cable of the product to connect 5V,
1-2A USB port for power supply, and can also be connected to the USB port of
a mobile phone adapter for power supply.
EN
2
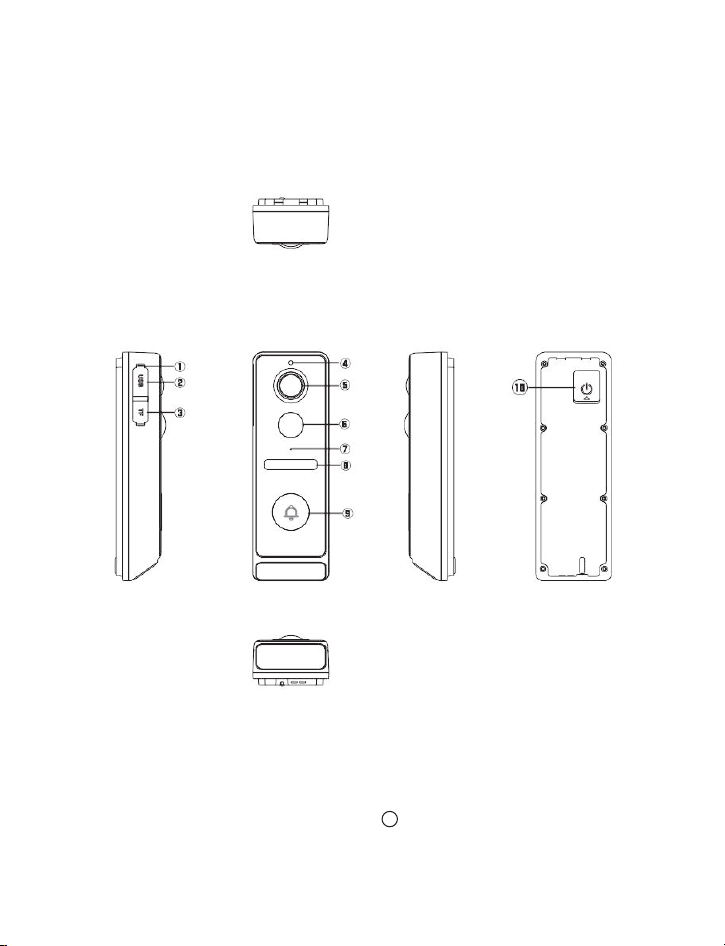
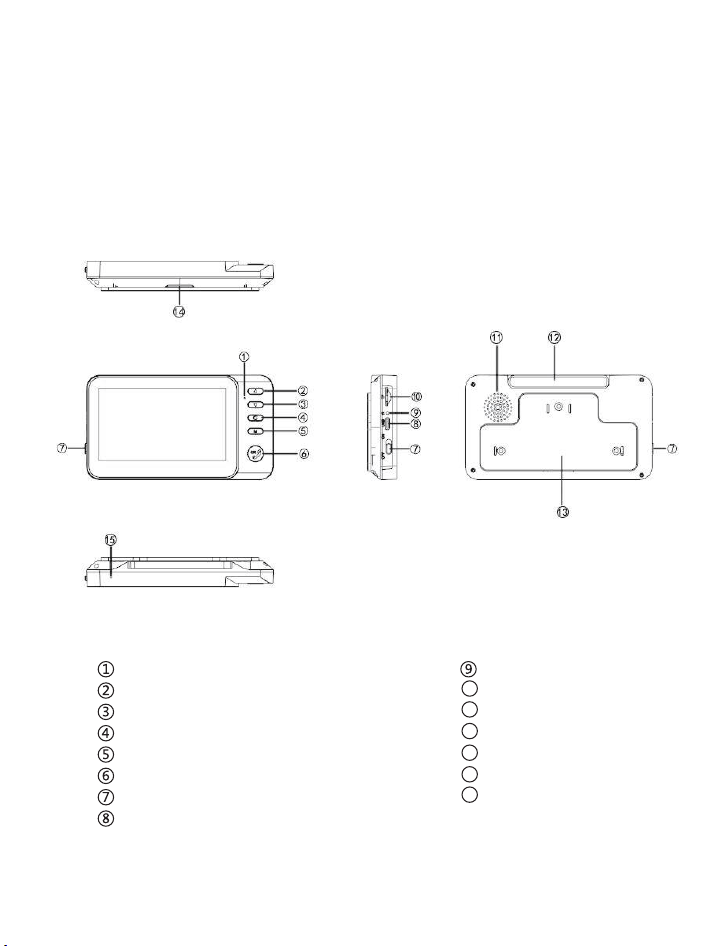
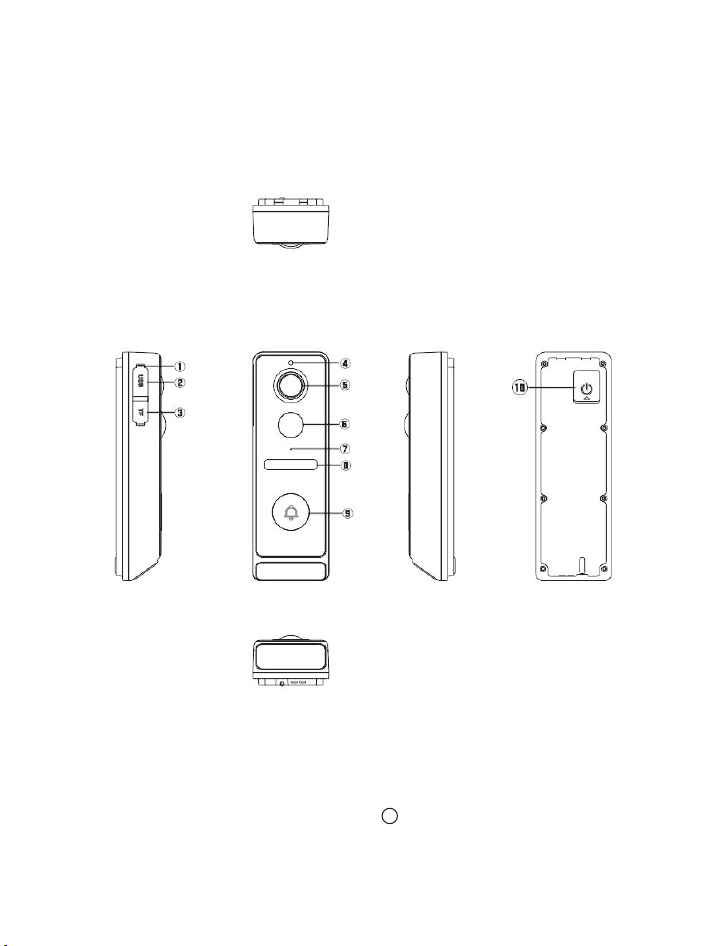
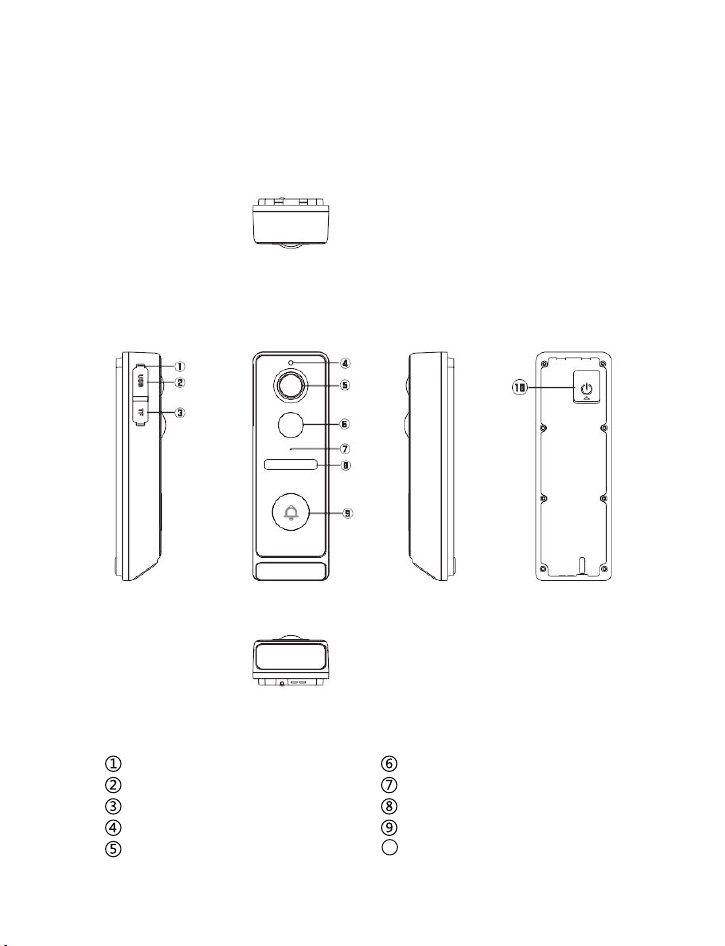
1. Doorbell
①Reset button
②Type-C charging port
③Preset TF port
④Photosensitive sensing
⑤Lens
⑥PIR sensor
⑦MIC
⑧LED fill light
⑨Button
Preset switch
10
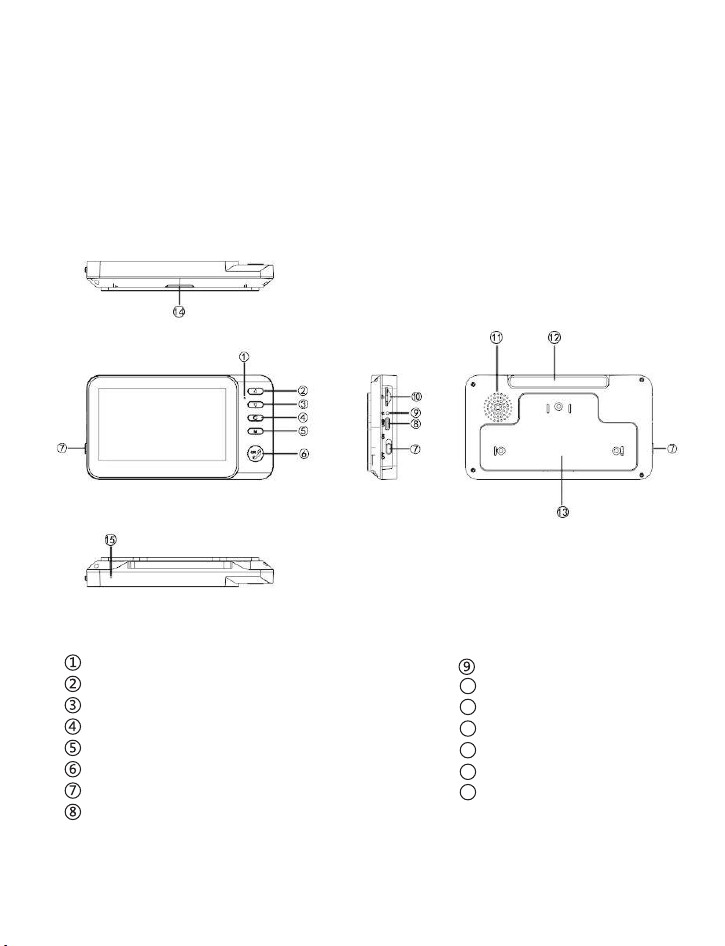
3
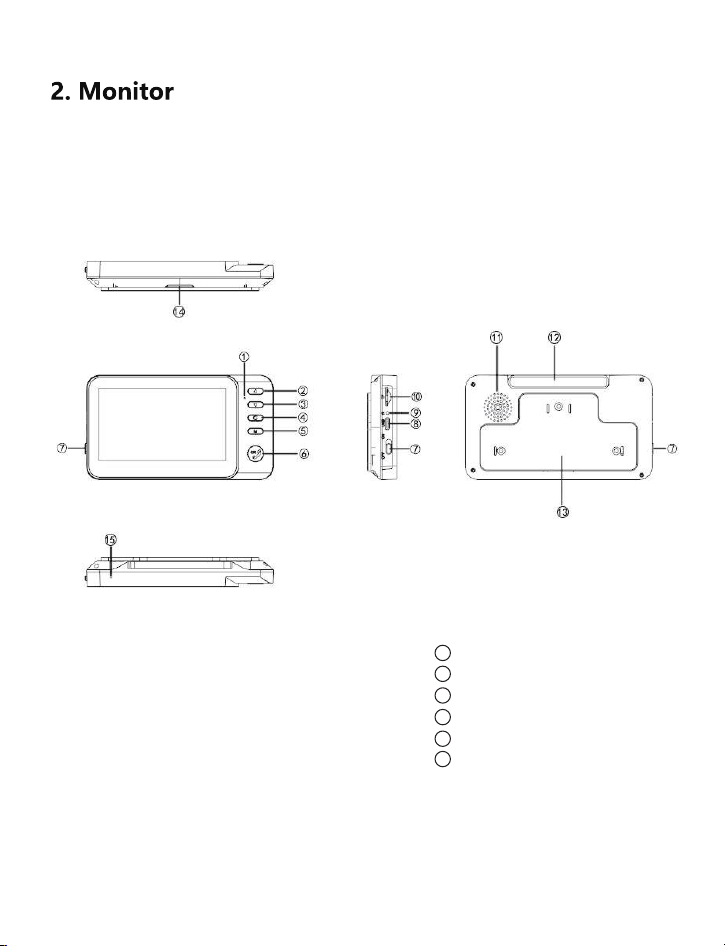
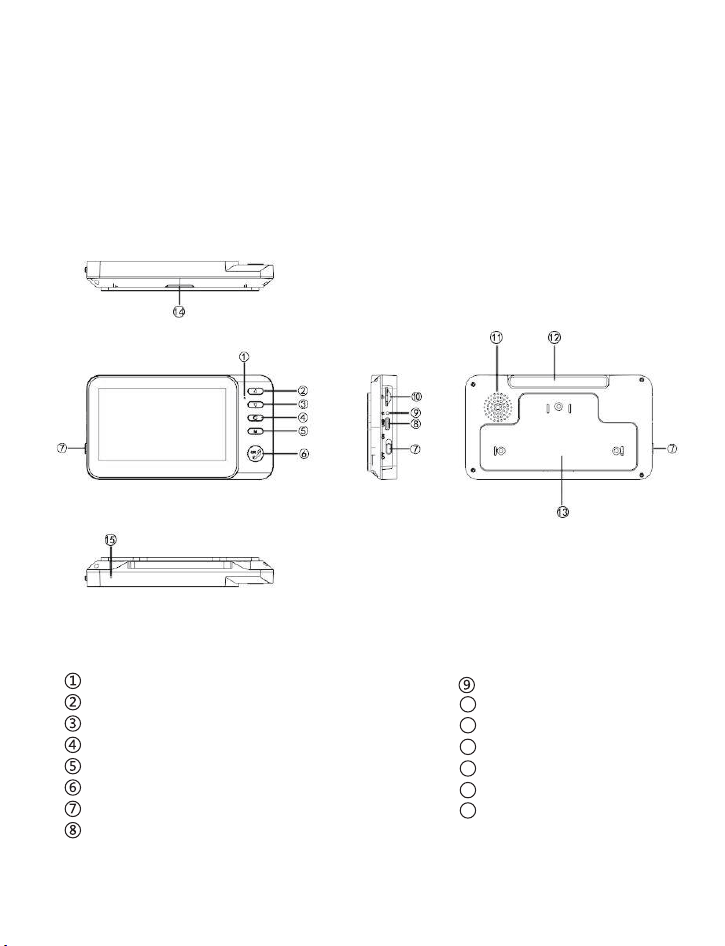
① Indicator light
② Up/+key
③ Down/- key
④ Return key
⑤ Menu key
⑥ Dial key/confirm key
⑦ Power on/off button
⑧ Charging port
⑨ Reset button
Card slot
Horn
Antenna
Backplane
Support
MIC
10
11
12
13
14
15
4

3. Matching doorbell and monitor
1. Find the power button on the monitor, press and hold the M button
after turning it on, the monitor will display a pairing prompt, and enter
a 30 second countdown.
2. After the display shows the "Pairing * * 30" prompt, press and hold
the doorbell button at the same time until the display shows the
"Pairing * * √" prompt, indicating successful pairing and connection.
Kind reminder: The pairing has been successfully completed at the
factory, and there are no special circumstances. Users do not need to
pair again on their own.
5

1.
2.
1.1. Long press "M" to enter pairing mode.
1.2. Short press to enter menu selection and settings.
2.1. When a visitor rings the doorbell, the indoor unit (monitor) displays
a reminder of the visitor and the ringing. Press the 'dial key' once to
connect the intercom.
2.2. After connecting the intercom, the indoor captain can press the
"dial button" to talk to the intercom, and the outdoor unit (doorbell)
can hear the indoor unit's voice without any operation.
2.3. Press the "dial button" again to hang up, and both the indoor and
outdoor units will enter sleep mode simultaneously.
Key function:
Dial button
4、 Keys and Function Table
Icon Function Icon Explanation
Intercom/hang up/
wake up/confirm
Short press to order/
long press to pair
Press down/decrease
Up key/Add
Return
Clock
Video replay
Ringing tone
System Settings
Nline signal strength
Doorbell battery level
Monitor battery level
Intercom pickup icon
TF card icon
Pairing in progress
Match successful
Voice volume
of intercom
Unparalleled/
doorbell in sleep mode
No connection/
please ring the doorbell
Connect * * * √
Pairing * * * 30
6

3.
2.4. In sleep mode, long press the "dial button" on the indoor monitor
for 3 seconds to wake up the outdoor unit doorbell and check the
situation at the outdoor entrance.
2.5. In menu mode, the "dial key" is also the confirm key to confirm settings.
3.1. Directly pressing the "▼" and "▲" keys is to adjust the intercom volume.
3.2. After entering the menu, press the "▼" key to enter the next option or
decrease the volume/brightness; Press the "" key to enter the previous
option or increase the volume/brightness.
The key is the return key, which enters the menu settings
interface. Pressing this key will return to the previous level.
4. Menu function:
4.1. Video recording function: This function requires inserting a TF card.
It is recommended to format the TF card before use; Ring the doorbell,
and the monitor will automatically start recording. Once the recording
is full, it will automatically loop over and save the latest recording.
Attention: Use 8-32GB, C10 level high-speed memory cards.
4.2. Ringtone settings: 6 ringtone music options are available.
4.3. Settings:
Language setting: Press the ▼ and ▲ keys to select the language,
then press“ ”confirm;
Brightness setting: Press the ▼ and ▲ keys to adjust the screen brightness;
Ringtone volume: Press ▼, ▲ to adjust the ringtone volume;
Time setting: Press ▼ and ▲ to adjust the time value, press the " " key
to enter the next setting, set everything, and press "M" to return to the
previous level.
3.3.
7

5. PIR motion detection: When a moving object is detected, the detection
signal will trigger the display screen to start, and the display screen will show
the outdoor situation.
6. Low battery reminder: The battery icon in the upper right corner of the
monitor is the TX icon, which corresponds to the battery level of the outdoor
unit doorbell; The RX icon corresponds to the battery level of the indoor unit
display. When the battery is low, the battery icon will turn red. Please charge
it in a timely manner.
7. Display indicator lights:
Working status: green indicator light;
Pairing mode: indicator light flashing;
Sleep standby: red indicator light;
Charging status: The red indicator light is always on, fully charged, and the
indicator light is off.
5、 How to install:
① Display screen: According to personal needs, it can be placed in the living
room, front desk, doorstep storage cabinet, etc. A convenient place to access
electricity, with a power supply of 5V. Use a mobile phone charger or plug it
into a USB port for power supply.
② Doorbell: Wooden door, glass door, clean the installation position for dust,
and apply 3M adhesive to the door. Iron doors, it is recommended to install
the upper end of the door handle at a height of 1.5-1.6 meters above the
ground, which can be adjusted according to personal needs.
Reminder: Before installation, test whether the online signal reception of the
doorbell and display screen in the installation location is good, and choose
a location with good signal for installation.
8

Regarding the receiving distance
Accessible environment, video signal can be transmitted for about 50 meters.
If there are solid walls and iron gates blocking, the transmission distance and
signal strength of video signals will be delayed and the distance will decrease.
So, specific usage environment, specific analysis. In environments with walls
and iron doors, it is recommended that consumers use Bluetooth earphones
or other Bluetooth devices to test the signal reception for judgment.
Regarding standby time
① Display: Equipped with a built-in 400mAh battery, mainly used for memory
retention time and responding to temporary power outages. For long-term
use, it is recommended to use a 5V, 1-2A adapter to power the display screen.
② Doorbell: Equipped with a 4000mAh battery and a low-power chip, it can
be used for about 4 to 6 months on a full charge based on 10 doorbell rings
per day. The doorbell is rechargeable.
Regarding intercom interference
Wireless doorbell intercom is a wireless signal transmission that is different
from wired transmission, so it is susceptible to electromagnetic interference.
The closer the doorbell and display screen are, the greater the interference;
conversely, as the distance increases, the interference decreases. It is
recommended to use intercom at a distance of 3 meters between the
doorbell and the display screen. The intercom principle can refer to the
traditional intercom principle.
Regarding Charging Time/Status
After the doorbell is connected to the video, the upper right corner displays
the battery levels of the doorbell and monitor.
RX is the battery level of the monitor, TX is the battery level of the doorbell,
and it takes about 10 hours to fully charge with a 2A charger. When fully
charged, the charging port indicator light will turn off. It is recommended not
to use fast charging, as it may have a certain impact on battery life.
Attention: When plugged in, the battery compartment changes, representing
the powered on state. After unplugging the power, the battery compartment
will stop at the moment of unplugging the power, which is not the actual
battery level. The battery compartment displayed on the monitor after
shutting down and restarting is the actual battery level.
User FAQ
9
FCC Caution:
This device complies with part 15 of the FCC Rules. Operation is
subject to the following two conditions: (1) This device may not
cause harmful interference, and (2) this device must accept any
interference received, including interference that may cause
undesired operation.
Any changes or modifications not expressly approved by the party
responsible for compliance could void the user's authority to operate
the equipment.
NOTE: This equipment has been tested and found to comply with the
limits for a Class B digital device, pursuant to Part 15 of the FCC
Rules. These limits are designed to provide reasonable protection
against harmful interference in a residential installation. This
equipment generates, uses and can radiate radio frequency energy
and, if not installed and used in accordance with the instructions,
may cause harmful interference to radio communications. However,
there is no guarantee that interference will not occur in a particular
installation.
If this equipment does cause harmful interference to radio or
television reception,
which can be determined by turning the equipment off and on, the
user is encouraged to try to correct the interference by one or more
of the following measures:
-- Reorient or relocate the receiving antenna.
-- Increase the separation between the equipment and receiver.
-- Connect the equipment into an outlet on a circuit different from
that to which the receiver is connected.
-- Consult the dealer or an experienced radio/TV technician for help.
The device has been evaluated to meet general RF exposure
requirement. The device can be used in portable exposure
condition without restriction.
DE
Bedienungsanleitung
Drahtlose sichtbare Türglocke
Drücken Sie 3 Sekunden lang,
um die Außenklocke zu wecken,
um die Tür zu überprüfen
Hinweis: Bei langem Gebrauch muss der Monitor mit Strom versorgt werden.
Es wird empfohlen, ein USB-Kabel mit einem USB-Anschluss von 5V, 1-2A
anzuschließen, der den USB-Anschluss des Handy-Adapters anschließen kann.
10
1. Die Türklocke
① Zurücksetztaste
② TYPE-C Ladeanschluss
③ Standard-TF-Anschluss
④ Lichtempfindlich
⑤ Objektiv
⑥ PIR-Sensor
⑦ Mikrofon
⑧ LED-Beleuchtung
⑨ Tasten
Standardschalter
10
11
2. Anzeige
10
11
12
13
14
15
Anzeigelampe
Oberste Taste / + Taste
Untere Taste / eine Taste
Zurück-Taste
Menü-Tasten
Wähltaste/Bestätigungstaste
Schalttasten
Ladeanschluss
Zurücksetztaste
Steckverbindung
Horn
Antenne
Rückplatte
Stütze
Mikrofon
12

3. Kopplung von Klocken und Monitoren
1. Finden Sie die Schalttaste des Monitors, drücken Sie die M-Taste
lange nach dem Start, der Monitor zeigt die Kopplungshinweise an
und geht in den 30-Sekunden-Rückzähl ein.
2. Nachdem das Display den "Pairing *** 30" -Hinweis anzeigt,
drücken Sie gleichzeitig die Klingeltaste und halten Sie sie gedrückt,
bis das Display den "Pairing ** √" Hinweis anzeigt, dann ist das
Pairing online erfolgreich.
Hinweis: Die Fabrik hat erfolgreich gepaart, es gibt keine Sonderfälle,
die Benutzer müssen nicht selbst erneut gepaart werden.
13

1.
2.
4. Tasten und Menü
Symbole Funktion Symbole
Beschreibung
Obertaste / Erhöhen
Zurück
Uhr
Videowiedergabe
Klingeltöne auswählen
Systemeinstellungen
Gespräch/Ausschalten/
Wecken/Bestätigen
Taste nach unten/
reduzieren
Kurz-Press-Menü/
Lang-Press-Paarung
Keine Verbindung/
Bitte Klingeln
Verbindungen***√
Vergleich***30
Online-Signalstärke
Dialoggröße
Elektrizität der Türklocke
Anzeigeleistung
Dialog Pick-up-Symbol
TP Karte Symbol
im Paar
Pairing erfolgreich
Nicht gepaart/
Türglocke ruht
1.1. Langdrücken Sie "M" in den Paarungsmodus.
1.2. kurzdrücken Sie auf Menü Auswahl und Einstellungen.
Taste funktionen:
2.1. Wenn ein Besucher die Türkingel anklickt, zeigt die Innenmaschine
(Monitor) den Besucher und die Klingel an. Drücken Sie die "Wähltaste"
einmal, um das Gespräch anzuschließen.
2.2. nach dem Anschluss an die Kommunikation, drücken Sie die
"Wähltaste", um zu kommunizieren, die Außenmaschine (Türklocke)
kann die Innenmaschine hören, die Außenmaschine spricht ohne jede
Bedienung.
2.3. Drücken Sie die "Wähltaste" erneut, um online zu hängen, und die
Indoor-Maschine und die Outdoor-Maschine gehen gleichzeitig in den
Schlaf.
Wähltaste
14

3.
3.3.
2.4. im Rufelmodus drücken Sie die "Wähltaste" des Innenbildschirms für
3 Sekunden lang, um die Türklocke im Freien zu wecken und die Lage der
Außentür zu überprüfen.
2.5.Die "Wähltaste" im Menü-Modus ist auch die Bestätigungstaste, die
Einstellungen bestätigen.
Tasten:
3.1. Direkt drücken Sie die Tasten „▼“ und „▲“, um die Lautstärke zu
regulieren.
3.2. nach dem Menü, drücken Sie die Taste "▼", um die nächste Option
oder die Lautstärke / Helligkeit zu reduzieren; Drücken Sie die Taste ▲,
um die vorherige Option zu erreichen oder die Lautstärke / Helligkeit zu
erhöhen.
Die Taste ist die Rückkehrtaste, gelangen Sie in die
Menüeinstellungen-Oberfläche, drücken Sie diese Taste und kehren
Sie zur vorherigen Ebene zurück.
4. Menü Funktionen:
4.1. Videoaufzeichnungsfunktion: Diese Funktion muss in die TF-Karte
eingesetzt werden, empfohlen wird, die TF-Karte nach dem Formatieren
zu verwenden; Drücken Sie die Türkingel, der Monitor öffnet das Video
automatisch und überschreibt automatisch, nachdem es aufgenommen
ist, um die neueste Aufnahme zu speichern.
Hinweis: Verwenden Sie eine Hochgeschwindigkeits-Speicherkarte von
8-32G, C10-Klasse.
4. 2. Klingeltoneinstellungen: 6 Klingeltonmusik ist optional.
4.3. Einstellungen:
Spracheinstellungen: Drücken Sie die ▼, ▲ Taste, um die Sprache
auszuwählen, drücken Sie " " zu bestätigen;
Helligkeitseinstellungen: Drücken Sie die ▼ und ▲ Tasten, um die
Helligkeit des Bildschirms anzupassen;
Klingelstärke: Drücken Sie ▼, ▲ um die Klingelstärke anzupassen;
Zeiteinstellung: Drücken Sie , ▲ um den Zeitwert anzupassen,
drücken Sie " "Gehen Sie zur nächsten Einstellung, alle Einstellungen
sind in Ordnung und drücken Sie "M", um zur vorherigen Stufe
zurückzukehren.
15

5. PIR-Bewegungserkennung: Wenn ein bewegendes Objekt erkannt
wird, löst das Erkennungssignal den Start des Displays aus, der die
Außensituation anzeigt.
6. Erinnerung an niedrige Stromversorgung: Batteriesymbol in der
rechten oberen Ecke des Displays: TX-Symbol, das der Stromversorgung
der Außenkingel entspricht; Das RX-Symbol entspricht der
Stromversorgung des Indoor-Monitors. Wenn die Batterie niedrig ist,
wird das Batteriesymbol rot, bitte laden Sie es rechtzeitig auf.
7. Displayanzeige:
Arbeitszustand: Anzeige grünes Licht;
Paarungsmodus: Blinkende Anzeige;
Schlafstand: rote Lichter;
Ladezustand: Die rote Anzeige ist immer hell, voll geladen und die
Anzeige ist ausgelöscht.
5. Wie man installiert:
① Display: Je nach individuellen Bedürfnissen können Sie Wohnzimmer,
Rezeption, Türschrank usw. platzieren. Bequemer Ort, um Strom zu
nehmen, ist die Stromversorgung 5V Strom, mit einem Handylader oder
einem USB-Anschluss zur Stromversorgung.
② Türglocke: Holztür, Glastür, reinigen Sie Staub der Installationsstelle,
3M-Klebstoff auf der Tür. Eisentür, empfohlen, den Türgriff am oberen
Ende zu installieren, 1,5-1,6 m Höhe vom Boden entfernt, kann je nach
individuellen Bedürfnissen geändert werden.
Tipp: Vor der Installation testen Sie zuerst, ob die Installationslage der
Türklinge und der Online-Signal-Empfang des Displays gut ist, und
wählen Sie eine gute Position für die Installation des Signals aus.
16

Über Empfangsabstand
In einer barrierefreien Umgebung kann das Videosignal etwa 50 Meter lang
übertragen werden. Wenn es eine echte Wand gibt, die eiserne Tür blockiert
ist, wird die Videosignalübertragungsentfernung und die Signalstärke
verzögert und die Entfernung verringert. Daher spezifische Umgebung,
spezifische Analyse. Zum Beispiel in einer Umgebung mit Wänden und
eisernen Türen können Verbraucher empfohlen werden, den Empfang des
Signals mit Bluetooth-Kopfhörern oder anderen Bluetooth-Geräten zu testen.
Über die Standby-Zeit
① Display: eingebaute 400 mA-Batterie, der Hauptzweck ist die
Speicherspeicherung und die Bewältigung von vorübergehenden
Stromausfallen. Langer Gebrauch, das Display wird empfohlen, mit einem 5V,
1-2A-Adapter versorgt zu werden.
② Türglocke: eingebaute 4000 mA-Batterie, niedriger Stromverbrauch-Chip,
um 10 Mal am Tag nach der Türglocke zu berechnen, kann für etwa 4 bis 6
Monate aufgeladen werden, die Türglocke wird aufgeladen.
Über Interferenzen
Die drahtlose Türglocke-Kommunikation ist eine drahtlose Signalübertragung,
die sich von der drahtgebundenen Übertragung unterscheidet und daher
elektromagnetischen Störungen ausgesetzt ist. Je näher die Glocke und das
Display liegen, desto größer ist die Störung, im Gegenteil, desto weniger wird
die Störung mit zunehmender Entfernung. Es wird empfohlen, die Türglocke
und die Anzeige in einem Abstand von 3 Metern zu verwenden, und das
Prinzip der Kommunikation kann sich auf das traditionelle Prinzip der
Kommunikation beziehen.
Über Ladezeit/Status
Nachdem die Glocke das Video angeschlossen hat, zeigt die obere rechte Ecke
die Stromversorgung der Glocke und des Monitors an.
RX ist die Stromversorgung des Displays, TX ist die Stromversorgung der
Türglocke, das 2A-Ladegerät kann etwa 10 Stunden geladen werden, und die
Anzeige für den Ladegerät wird ausgelöscht. Es wird empfohlen, keine
Schnellladung zu verwenden, Schnellladung für die Lebensdauer der Batterie
wird ein bestimmtes Bild haben.
Hinweis: Im angeschlossenen Zustand ändert sich die Batteriezelle und
repräsentiert den Stromzustand. Nach dem Ausschalten der Stromversorgung
wird die Batteriezelle im Moment des Ausschaltens des
Stromversorgungszustands gestoppt, der nicht-reale Ladezustand, und die
Batteriezelle, die auf dem Display angezeigt wird, ist der reale Ladezustand.
Häufig gestellte Fragen
17
FR
Sonnette visuelle sans fil
Mode d'emploi
Longue pression de 3 secondes pour réveiller la
sonnette extérieure voir la situation à la porte
Conseil chaleureux: si l'utilisation prolongée, le moniteur doit être
alimenté pour l'utilisation.
Il est recommandé d'utiliser le câble USB standard du produit pour
connecter 5V, la prise USB de 1 - 2a pour l'alimentation, peut prendre
la prise USB de l'adaptateur de téléphone portable pour l'alimentation, etc.
18
① lé de réinitialisation
② Port de charge type - C
③ Port TF prédéfini
④ Induction photosensible
⑤ Lentilles
⑥ Induction Pir
⑦ Microphone
⑧ Lampe de complément LED
⑨ Bouton
Interrupteurs prédéfinis
10
1. Sonnette
19
10
11
12
13
14
15
Voyant
Touche supérieure / + clé
Touche inférieure / une touche
Clé de retour
Menu
Touche de numérotation / de confirmation
Clé de commutateur
Port de charge
Clé de réinitialisation
Insérer une baïonnette
haut-parleur
Antenne
panneau arrière
Le support
Microphone
2. Affichage
20

3. Jumelage de sonnette de porte avec affichage
1. Trouvez la clé d'ouverture du moniteur, appuyez longuement sur
la touche m après le démarrage, le moniteur affiche l'invite
d'appariement et entre dans le compte à rebours de 30 secondes.
2. Une fois que le moniteur affiche l'invite "appariement * * 30",
appuyez longuement sur le bouton de sonnette en même temps,
maintenez enfoncé et ne relâchez pas la main jusqu'à ce que le
moniteur affiche l'invite "appariement * * √", puis l'appariement en
ligne réussit.
Rappel chaleureux: l'usine a été jumelée avec succès, pas de
circonstances spéciales, l'utilisateur n'a pas besoin de jumeler à
nouveau par lui - même.
21

1.
2.
Icônes Fonction Icônes
Explication
Retourner
Horloge
Replay vidéo
Sélection de sonneries
Paramètres système
Interphone/raccrochage
/réveil/confirmation
Touche inférieure/réduire
Appuyez sur menu court/
appariement long
Connexion***√
Force du signal en ligne
Taille du son Intercom
Puissance de sonnette
Puissance d'affichage
Icône Pickup talk
Icône de la carte TP
En paires
Appariement réussi
Non apparié/
sonnette dormante
Appariement***30
Aucune connexion/
Veuillez sonner à la porte
4. Touches et tableau des fonctions
Touche supérieure/
augmentation
2.1. Lorsque les visiteurs sonnent, l'unité intérieure (Moniteur) affiche
les visiteurs et les rappels de sonnerie. Appuyez une fois sur "dial key"
pour activer l'Intercom.
2.2 Après avoir allumé l'interphone, le commandant de bord intérieur
appuie sur la touche "dial" pour parler à l'interphone, l'unité extérieure
(sonnette) peut entendre l'unité intérieure parler, l'unité extérieure
parler sans aucune opération.
2.3. Appuyez une fois de plus sur la "touche de numérotation" pour
raccrocher en ligne, l'unité intérieure et l'unité extérieure entrent en
dormance en même temps.
Touche de numérotation
Fonction clé:
1.1. Appuyez longuement sur "m" pour entrer en mode d'appariement.
1.2. Appuyez brièvement pour accéder à la sélection et aux paramètres
du menu.
22

3.
3.3.
2.4. En mode d'hibernation, appuyez longuement sur l'affichage intérieur
"dial key" pendant 3 secondes, vous pouvez réveiller la sonnette de
l'unité extérieure pour voir la situation de la porte extérieure.
2.5. La "touche de numérotation" en mode menu est également la clé de
confirmation, confirmant le réglage.
Bouton
3.1. Appuyez directement sur les touches "▼" et "▲" pour régler le
volume d'interphone.
3.2. Une fois dans le menu, appuyez sur la touche "▼" pour passer à
l'option suivante ou réduire le volume / la luminosité; Appuyez sur "▲"
pour accéder à l'option précédente ou augmenter le volume/la luminosité.
Est la touche retour, allez dans l'interface de configuration du
menu, appuyez sur cette touche, puis revenez au niveau précédent.
4. Fonction de menu:
4.1. Fonction d'enregistrement vidéo: Cette fonction doit insérer la carte
TF, il est recommandé d'utiliser la carte TF après le formatage; Sonnez la
sonnette, l'écran allume automatiquement l'enregistrement vidéo, une
fois l'enregistrement terminé, la couverture cyclique automatique
enregistre la dernière vidéo.
Remarque: C10 utilisez une carte mémoire haute vitesse de classe 8-32G.
4. 2. Paramètres de sonnerie: 6 morceaux de musique de sonnerie en
option.
4.3 réglages:
Paramètres de langue: appuyez sur les touches ▼, ▲ pour sélectionner
la langue, appuyez sur confirmation;
Réglage de la luminosité: appuyez sur les touches ▼, ▲ pour ajuster la
luminosité de l'écran;
Volume de la sonnerie: appuyez sur ▼, ▲ pour ajuster le volume de la
sonnerie;
23

① affichage: selon les besoins individuels, il peut être placé dans le salon,
la réception, le meuble de porte, etc. Pratique pour obtenir de l'électricité,
l'alimentation est de 5V avec l'électricité, utilisez le chargeur de téléphone
portable, ou branchez le port usb pour l'utiliser.
② sonnette de porte: porte en bois, porte en verre, nettoyer la poussière
de bon emplacement d'installation, 3M sur la porte collée est OK. Porte e
n fer, il est recommandé de monter l'extrémité supérieure de la poignée
de porte, à 1,5 - 1,6 mètres du sol, peut être modifié en fonction des
besoins individuels.
Conseils chaleureux: Avant l'installation, testez d'abord l'emplacement de
l'installation de la sonnette et de l'affichage en ligne si la réception du
signal est bonne, sélectionnez un bon emplacement pour l'installation du
signal.
5. Comment installer:
Réglage de l'heure: appuyez sur, ▼▲ pour ajuster la valeur de l'heure,
appuyez sur " ".
Paramètre suivant, tout est réglé, appuyez sur "M" pour revenir au niveau
précédent.
5. Détection de mouvement PIR: lorsqu'un objet en mouvement est
détecté, le signal de détection déclenche le démarrage de l'écran,
qui affiche la situation extérieure.
6. Rappel de faible puissance: icône de la batterie dans le coin supérieur
droit de l'écran: icône TX, correspondant à la puissance de la sonnette de
l'unité extérieure; Icône Rx, correspondant à la quantité d'électricité de
l'écran de l'unité intérieure. Lorsque la batterie est faible, l'icône de la
batterie devient rouge, s'il vous plaît
Charge à temps.
7. Voyant d'affichage:
État de fonctionnement: voyant vert;
Mode d'appariement: le voyant clignote;
Veille dormante: voyant lumineux rouge;
État de charge: le voyant rouge est normalement allumé, complètement
chargé, le voyant s'éteint.
24

À propos de la distance de réception
Environnement sans obstacle, le signal vidéo peut être transmis à environ 50
mètres. S'il y a un mur réel, la porte de fer bloque, la distance de transmission
du signal vidéo et la force du signal apparaîtront avec un retard et une
réduction de la distance. Donc, utilisez spécifiquement l'environnement,
analysez spécifiquement. Comme dans les murs et les environnements
d'utilisation avec des portes en fer, il peut être conseillé aux consommateurs de
tester la réception du signal avec des écouteurs Bluetooth ou d'autres appareils
Bluetooth pour juger.
À propos de Standby Time
① affichage: batterie intégrée de 400 mAh, l'utilisation principale est de
mémoriser le temps de conservation et de faire face à l'utilisation de la
situation de coupure de courant temporaire. Longue durée d'utilisation, l'écran
d'affichage est recommandé pour l'utilisation de l'alimentation, en utilisant 5V,
1 - 2a adaptateur pour l'alimentation.
② sonnette: batterie 4000 Mah intégrée, puce à faible consommation d'énergie,
calculée en 10 sonneries quotidiennes, une charge complète peut être utilisée
pendant environ 4 à 6 mois, la sonnette est une utilisation rechargeable.
À propos de Talk Interference
L'interphone de sonnette sans fil est une transmission de signal sans fil,
contrairement à la transmission filaire, de sorte qu'il sera soumis à des
interférences électromagnétiques. Plus la sonnette et l'écran d'affichage sont
proches, plus ils interfèrent, et inversement, moins ils interfèrent à mesure que
la distance augmente. Il est recommandé que la sonnette et la distance
d'affichage utilisent l'interphone à une distance de 3 mètres, le principe de
l'interphone peut se référer au principe traditionnel de l'interphone.
À propos du temps / de l'état de charge
Une fois la sonnette allumée sur la vidéo, le coin supérieur droit affiche la
puissance de la sonnette et du moniteur.
RX est la quantité d'énergie de l'écran, TX est la quantité d'énergie de la
sonnette, chargeur 2a peut être rempli pendant environ 10 heures, l'indicateur
de port de charge complet s'éteindra. Il est recommandé de ne pas utiliser la
charge rapide, la charge rapide aura une certaine image de la durée de vie de
la batterie.
Remarque: dans l'état branché, la grille de la batterie est variable et représente
l'état sous tension. Après avoir débranché l'alimentation, la grille de la batterie
s'arrête à l'état du moment où vous débranchez l'alimentation, l'état de charge
non réel, l'affichage de la grille de la batterie après le redémarrage de l'arrêt
est l'état de charge réel.
Questions et réponses fréquentes pour les utilisateurs
25
ES
Manual de instrucciones
Timbre visual inalámbrico
Consejo cálido: si se utiliza durante mucho tiempo, el monitor necesita
suministro de energía.
Se recomienda conectar 5v con el cable USB estándar del producto, 1 - 2a
con el puerto usb, se puede conectar con el puerto USB del SIM del teléfono
móvil, etc.
26
Presione el timbre al aire libre durante 3
segundos para ver la situación en la puerta.
10
Inducción PIR
micrófono
Luz de llenado LED
botón
Interruptor preestablecido
Botón de reinicio
Puerto de carga tipo - C
Puerto TF preestablecido
Inducción fotosensible
Lente
1. Timbre
27
10
11
12
13
14
15
Indicador luminoso
Tecla superior / + tecla
Siguiente / un clic
Tecla de retorno
Teclas de menú
Tecla de marcación / tecla de confirmación
Botón del interruptor
Puerto de carga
Botón de reinicio
Bayoneta
Altavoz
Antena
Placa posterior
Soporte
Micrófono
2. Pantallas
28

3. Emparejamiento del timbre con el monitor
1. encuentre la clave de encendido del monitor, presione la tecla m
durante mucho tiempo después de encenderlo, el monitor muestra
el recordatorio de emparejamiento y entra en la cuenta atrás de 30
segundos.
2. después de que el monitor muestre el aviso de "emparejamiento
* * 30", Presione el botón del timbre durante mucho tiempo al mismo
tiempo, presione y no se suelte hasta que el monitor muestre
"emparejamiento * *√" el recordatorio es que el emparejamiento
está en línea con éxito.
Recordatorio cálido: la fábrica ha sido emparejada con éxito, sin
circunstancias especiales, los usuarios no necesitan emparejarse de
nuevo por sí mismos.
29

1.
2.
Iconos Función Iconos
Explicación
Haga clic/reduzca
Tecla superior/aumento
Volver
Reloj
Reproducción de vídeo
Configuración del sistema
Electricidad del timbre
Batería del monitor
Icono de la tarjeta TF
En emparejamiento
Emparejamiento exitoso
Walkie-talkie/colgar/
despertar/confirmar
Menú corto/
emparejamiento largo
Selección de
tonos de llamada
Intensidad de
la señal en línea
Tamaño del sonido
del walkie - talkie
Icono de recogida
de walkie-talkie
No emparejado/
inactivo en el timbre
Sin conexión/por
favor toque el timbre
Conexión**√
Emparejamiento**30
4. Teclas y menús
1.1. presione "m" durante mucho tiempo para entrar en el modo de
emparejamiento.
1.2. presione brevemente para ingresar al menú para seleccionar y
configurar.
Tecla función:
Botón de marcación
2.1. cuando el visitante toca el timbre, la máquina interior (monitor)
muestra el visitante y el recordatorio de la campana. Presione el "botón
de marcación" una vez para conectar el walkie - talkie.
2.2. después de conectar el walkie - talkie, el capitán interior presiona el
"botón de marcación" para hablar, la máquina exterior (timbre) puede
escuchar el habla de la máquina interior, y la máquina exterior no
necesita ninguna operación para hablar.
2.3. Presione el "botón de marcación" de nuevo para colgar en línea,
y la máquina interior y la máquina exterior entran en hibernación al
mismo tiempo.
30

3.
3.3.
2.4. en modo de hibernación, Presione el "botón de marcación" de la
pantalla interior durante 3 segundos para despertar el timbre de la
puerta de la unidad exterior y ver la situación de la puerta exterior.
2.5. la "tecla de marcación" en el modo menú también es la tecla de
confirmación para confirmar la configuración.
Botón
3.1. presione directamente
Las teclas an "▼" y "▲" son para ajustar el volumen del walkie - talkie.
3.2. después de ingresar al menú, presione la tecla "▲" para ingresar a la
siguiente opción o reducir
Volumen / brillo; Presione el botón "▲" para ingresar a la opción
anterior o aumentar el volumen / brillo.
Es la tecla de retorno, ingrese a la interfaz de configuración
del menú y presione esta tecla para volver al nivel anterior.
4. función del menú:
4.1. función de video: esta función debe insertarse en la tarjeta tf,
se recomienda que la tarjeta TF se use después del formato;
Al tocar el timbre, el monitor abre automáticamente el video,
lo cubre automáticamente después de la grabación y guarda el
último video.
Nota: use una tarjeta de memoria de alta velocidad de nivel 8-32g, c10.
4.2. configuración del timbre: 6 música del timbre opcional.
4.3. Configuración:
Configuración del idioma: presione▲/▼, las teclas para seleccionar el
idioma, presione confirmación;
Configuración de brillo: Presione las teclas ▲/▼ para ajustar el brillo
de la pantalla;
Volumen del timbre: presione▲/▼, ajuste el volumen del timbre;
31

Configuración del tiempo: presione▼▲, ajuste el valor del tiempo,
presione ” “Introduzca la siguiente configuración con la tecla,
establezca todo y presione "m" para volver al nivel anterior.
5. detección de movimiento pir: cuando se detecta un objeto en
movimiento, la señal de detección desencadenará el arranque de la
pantalla, que muestra la situación al aire libre.
6. recordatorio de baja potencia: icono de la batería en la esquina
superior derecha de la pantalla: icono tx, que corresponde a la Potencia
del timbre de la máquina al aire libre; Icono rx, que corresponde a la
electricidad del monitor de la máquina Interior. Cuando la batería es
baja, el icono de la batería se volverá rojo, por favor cargue a tiempo.
7. luces indicadoras de visualización:
Estado de trabajo: luz verde;
Modo de emparejamiento: el indicador parpadea;
Espera inactiva: luz roja del indicador;
Estado de carga: el indicador rojo siempre está encendido, lleno y el
indicador se apaga.
5. cómo instalar:
① pantalla de visualización: de acuerdo con las necesidades personales,
se puede colocar en la Sala de estar, recepción, armario en la puerta, etc.
Donde es conveniente recoger la electricidad, el suministro de energía
es de 5v, con un cargador de teléfono móvil o con un puerto usb.
② timbre: puerta de madera, puerta de vidrio, limpiar el polvo de la
posición de instalación, 3M pegado a la puerta. Puerta de hierro, se
recomienda instalar la parte superior de la manija de la puerta, a una
altura de 1,5 - 1,6 metros del suelo, se puede cambiar de acuerdo con
las necesidades personales.
Consejo cálido: antes de la instalación, primero pruebe si el timbre de
la posición de instalación y la pantalla de visualización reciben bien las
señales en línea, y seleccione la posición de la señal para instalarlas.
32

Sobre la distancia de recepción
En un entorno sin barreras, la señal de vídeo se puede transmitir a unos 50
metros. Si hay paredes reales, puertas de hierro bloqueadas, la distancia de
transmisión de la señal de vídeo y la intensidad de la señal se retrasarán y la
distancia se reducirá. Por lo tanto, el entorno de uso específico, el análisis
específico. Por ejemplo, en las paredes y en los entornos de uso con puertas
de hierro, se puede recomendar a los consumidores que prueben la recepción
de la señal con auriculares Bluetooth u otros dispositivos Bluetooth para juzgar.
Sobre el tiempo de espera
① monitor: batería incorporada de 400 ma, el uso principal es el tiempo de
conservación de la memoria y el uso para hacer frente a cortes temporales de
energía. Durante mucho tiempo, se recomienda suministrar energía a la
pantalla, utilizando adaptadores 5v, 1 - 2a.
② timbre: batería incorporada de 4.000 ma, chip de bajo consumo de energía,
calculado por tocar el timbre 10 veces al día, se puede utilizar con carga
completa durante unos 4 a 6 meses, y el timbre se utiliza con carga.
Sobre la interferencia de intercomunicación
El walkie - talkie de timbre inalámbrico es una transmisión de señal inalámbrica,
que es diferente de la transmisión por cable, por lo que se verá afectado por
interferencias electromagnéticas. Cuanto más cerca esté el timbre y la pantalla,
mayor será la interferencia, por el contrario, a medida que aumente la distancia,
menor será la interferencia. Se recomienda usar el walkie - talkie a una distancia
de 3 metros entre el timbre y la pantalla, y el principio del walkie - talkie puede
referirse al principio tradicional del walkie - talkie.
Sobre el tiempo / Estado de carga
Después de conectar el timbre al video, la esquina superior derecha muestra la
electricidad del timbre y el monitor.
Rx es la electricidad del monitor, TX es la electricidad del timbre, el cargador 2a
se puede llenar en unas 10 horas, y la luz indicadora del puerto de carga
completa se apagará. Se recomienda no usar carga rápida, la carga rápida
tendrá ciertas imágenes de la vida útil de la batería.
Nota: en el Estado enchufado, la cuadrícula de la batería cambia, lo que
representa el Estado de encendido. Después de desconectar la fuente de
alimentación, la cuadrícula de la batería se detendrá en el momento en que se
desconecta la fuente de alimentación, el Estado de la batería no real, después
de apagar y reiniciar, la cuadrícula de la batería mostrada en el monitor es el
Estado de la batería real.
Preguntas y respuestas comunes de los usuarios
33
IT
Campanello visibile wireless
Manuale
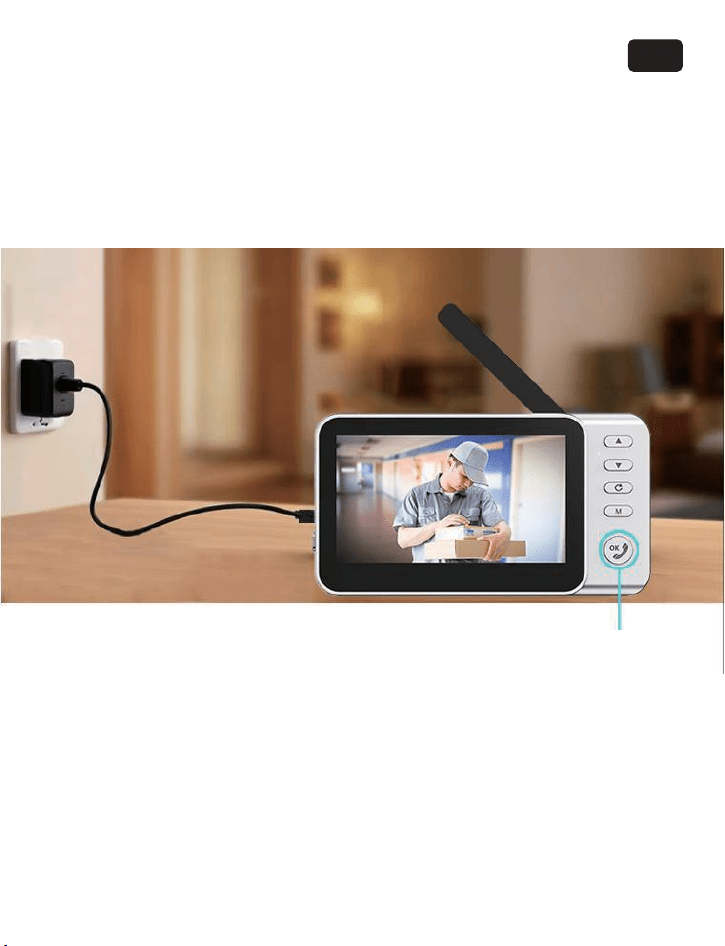
Premere per 3 secondi per svegliare il campanello
esterno per vedere la situazione della porta
Suggerimento: se utilizzato per lunghi periodi, il monitor deve essere alimentato.
Si consiglia di utilizzare il cavo USB standard del prodotto per collegare la porta
USB 5V, 1-2A per l'alimentazione, può collegare la porta USB dell'adattatore del
telefono cellulare per l'alimentazione, ecc.
34
10
Tasto di ripristino
Porta di ricarica TYPE-C
Porta TF predefinita
Sensibilità alla luce
Obiettivo
Sensazione PIR
Microfono
Lampade a LED
pulsante
Interruttore predefinito
1. Campanello
35
10
11
12
13
14
15
Indicatori
Tasto superiore / + Tasto
Tasto inferiore / Tasto unico
Taste di ritorno
Taste del menu
Chiamare/confermare
Tasto di commutazione
Porta di ricarica
Tasto di ripristino
Inserimento scheda
Altoparlanti
Antenna
Piastra posteriore
Supporto
Microfono
2. Display
36

3. Accoppiamento del campanello e del display
1. Trova il tasto di commutazione del monitor, premere il tasto M
dopo l'avvio, il display mostra il suggerimento di accoppiamento e
entra nel conto alla rovescia di 30 secondi.
2. dopo che il display mostra il suggerimento "accoppiamento ** 30",
poi premere il pulsante della campana a lungo, tenere premuto e
non rilassare fino a quando il display non mostra "accoppiamento **
√" suggerimento, allora l'abbinamento è successo online.
Attenzione: la fabbrica è stata accoppiata con successo, senza
circostanze eccezionali, l'utente non deve accoppiarsi di nuovo da solo.
37

1.
2.
Iconos Función Iconos
Explicación
Haga clic/reduzca
Tecla superior/aumento
Volver
Reloj
Reproducción de vídeo
Configuración del sistema
Walkie-talkie/colgar/
despertar/confirmar
Menú corto/
emparejamiento largo
Selección de
tonos de llamada
Fortezza del
segnale online
Dimensioni del
suono interlocutore
Nessuna connessione/
premere il campanello
Connessione**
√
Associazione***30
Potenza del monitor
Icona di
intercomunicazione
Potenza del campanello
Icona della scheda TP
In accoppiamento
Non accoppiato/
sonno campanello
Accoppiamento di successo
1.1.Premere "M" per entrare in modalità di accoppiamento.
1.2.Premere per accedere al menu di selezione e impostazioni.
Funzioni chiave:
2.1.Quando il visitatore preme il campanello, la macchina interna
(monitor) mostra il visitatore e il ricordo del campanello. Premere il
tasto "Dial" per connettersi alla conversazione.
2.2.Dopo aver collegato la comunicazione, il comandante dell'interno
preme il "tasto di marcazione" per parlare con la comunicazione, la
macchina esterna (campana) può sentire la macchina interna, la
macchina esterna parla senza alcuna operazione.
2.3.Premere ancora una volta il tasto "Dial" per sospendere la linea,
l'apparecchio interno e l'apparecchio esterno entrano in inattività
contemporaneamente.
Tasto di discesa
4. Tasti e menu
38

3.
3.3.
2.4.In modalità hibernazione, premere il "tasto di discesa" del display
interno per 3 secondi può svegliare il campanello all'aperto per
controllare la situazione della porta all'aperto.
2.5.In modalità menu "tasto di discesa" è anche il tasto di conferma,
conferma le impostazioni.
Taste:
3.1.Premere direttamente i tasti "▼" e "▲" per regolare il volume della
conversazione.
3.2.Dopo aver entrato nel menu, premere il tasto "▼" per accedere
all'opzione successiva o ridurre il volume / luminosità; Premere il tasto
"▲" per accedere all'opzione precedente o aumentare il volume /
luminosità.
È il tasto di ritorno, accedere all'interfaccia impostazioni del
menu, premere questo tasto e tornare al livello precedente.
4. Funzioni del menu:
4.1. funzione di registrazione video: questa funzione deve essere
inserita nella scheda TF, si raccomanda di usarla dopo la formattazione
della scheda TF; Premere il campanello, il monitor avvia
automaticamente la registrazione, dopo aver completato la
registrazione si sovrascrive automaticamente per salvare l'ultima
registrazione.
Nota: Utilizzare schede di memoria ad alta velocità 8-32G, C10.
Impostazioni del suono: 6 suoni musicali opzionali.
4.3. Impostazioni:
Impostazioni della lingua: premere ▼, ▲ per selezionare la lingua,
premere“ “conferma;
Impostazioni di luminosità: premere ▼, ▲ per regolare la luminosità
dello schermo;
Volume della suoneria: premere ▼, ▲ per regolare il volume della
suoneria;
39

5.Rilevamento di movimento PIR: quando viene rilevato un oggetto in
movimento, il segnale di rilevamento attiva l'avvio del display e lo
schermo mostra le condizioni all'aperto.
6.Promemoria di bassa potenza: icona della batteria nell'angolo
superiore destro del display: icona TX, corrispondente alla potenza del
campanello all'aperto; L'icona RX corrisponde alla potenza del monitor
della macchina interna. Quando la batteria è scarsa, l'icona della batteria
diventa rossa, si prega di ricaricarla tempestivamente.
7. indicatore del display:
Stato di lavoro: indicatore luce verde;
Modalità di accoppiamento: indicatore lampeggiante;
Sleep Standby: indicatore rosso;
Stato di carica: la luce rossa è sempre accesa, carica completamente,
la luce è spenta.
5. Come installare:
① Display: secondo le esigenze personali, può essere posto in salotto,
reception, porta armadio, ecc. Conveniente per prendere l'elettricità,
l'alimentazione è 5V, con il caricabatterie del telefono cellulare, o la
porta USB per l'alimentazione.
② campanello: porta in legno, porta in vetro, pulire la polvere della
posizione di installazione, 3M adesivo sulla porta. Porta in ferro, è
consigliato di montare la maniglia superiore, distanza da 1,5-1,6 metri
di altezza dal terreno, può essere modificato in base alle esigenze
personali.
Suggerimento: prima dell'installazione, prima di testare la posizione di
installazione del campanello e del display se la ricezione del segnale in
linea è buona, selezionare la posizione del segnale buona installazione.
Impostazione del tempo: premere ▼, ▲ per regolare il valore del tempo,
premere“ “Chiave per entrare
La prossima impostazione, tutto pronto, premere "M" per tornare al
livello precedente.
40

A proposito della distanza di ricezione
In un ambiente accessibile, il segnale video può essere trasmesso per circa 50
metri. Se c'è una parete reale, le porte di ferro sono bloccate, la distanza di
trasmissione del segnale video e l'intensità del segnale si rallentano e la
distanza diminuisce. Quindi, l'uso specifico dell'ambiente, l'analisi specifica.
Ad esempio, in ambienti con pareti e porte in ferro, si può consigliare ai
consumatori di testare la ricezione del segnale con cuffie Bluetooth o altri
dispositivi Bluetooth per giudicare.
Il tempo di standby
① Display: la batteria integrata di 400 mA, l'uso principale è quello di salvare il
tempo di memoria e affrontare le situazioni di interruzione temporanea. Per un
uso prolungato, lo schermo è consigliato per l'alimentazione, alimentato con
un adattatore 5V, 1-2A.
② campanello: batteria integrata di 4000 mA, chip a basso consumo, per
calcolare il campanello 10 volte al giorno, la carica completa può essere
utilizzata da 4 a 6 mesi circa, il campanello è ricaricabile.
Sulle interferenze di comunicazione
La comunicazione del campanello wireless è una trasmissione di segnale
wireless, diversa dalla trasmissione cablata, quindi è soggetta a interferenze
elettromagnetiche. Più il campanello e lo schermo si avvicinano, maggiore
sarà l'interferenza e, al contrario, meno sarà l'interferenza con l'aumento della
distanza. Si raccomanda di utilizzare la comunicazione a distanza di 3 metri
dalla campana e dal display, il principio di comunicazione può fare riferimento
al principio tradizionale della comunicazione.
Tempo di ricarica/stato
Quando il campanello è collegato al video, l'angolo in alto a destra mostra la
carica del campanello e del monitor.
RX è la carica del display, TX è la carica del campanello, il caricabatterie 2A può
essere caricato per circa 10 ore e l'indicatore della porta di carica di carica si
spegnerà. Si consiglia di non utilizzare la ricarica rapida, la ricarica rapida avrà
alcune immagini sulla durata della batteria.
Nota: nello stato di connessione, la cellula della batteria cambia e rappresenta
lo stato di alimentazione. Dopo aver staccato l'alimentazione, la cellula della
batteria si fermerà nello stato del momento in cui è stata staccata
l'alimentazione, lo stato di carica non reale, la cellula della batteria visualizzata
dopo il riavvio dello spegnimento è lo stato di carica reale.
Domande frequenti degli utenti
41