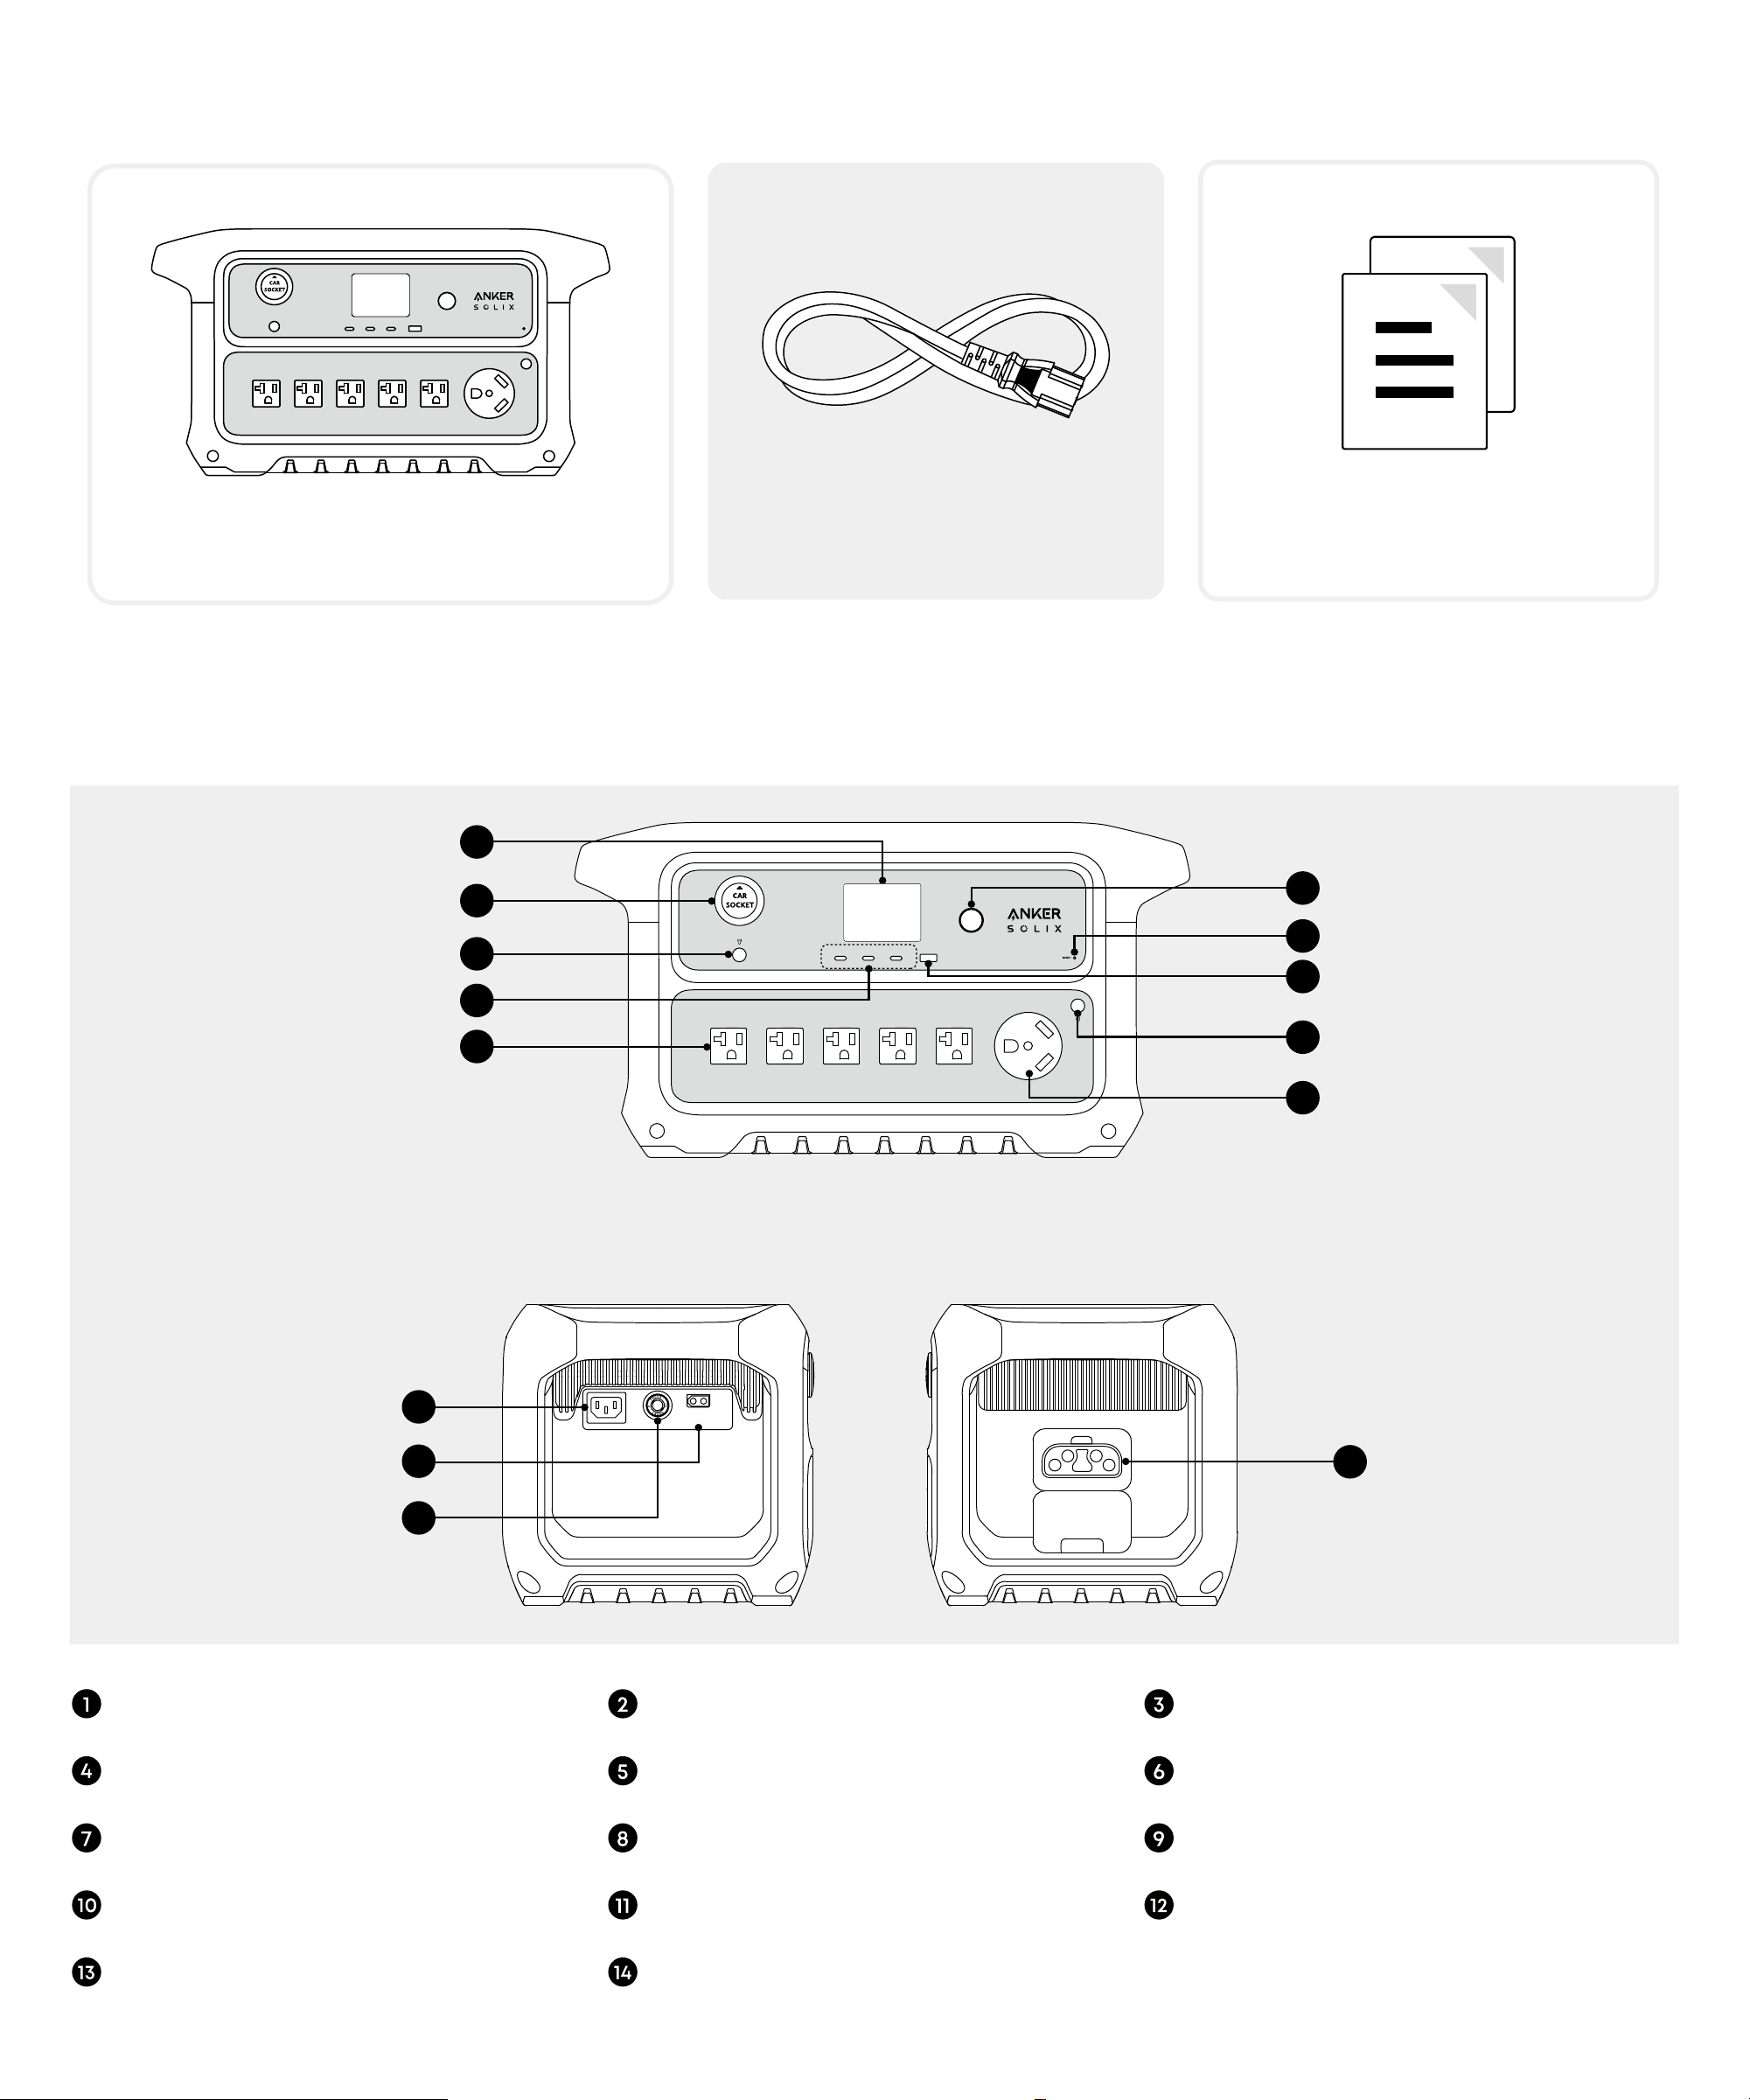
What's in the Box
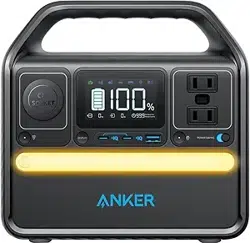
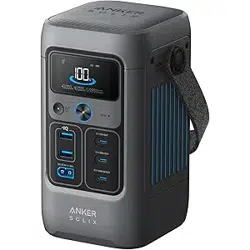
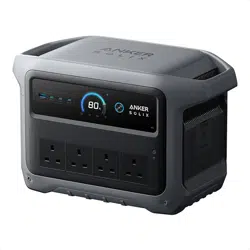
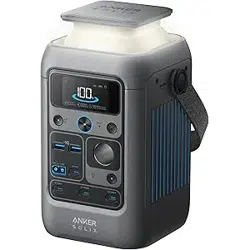
Product Overview
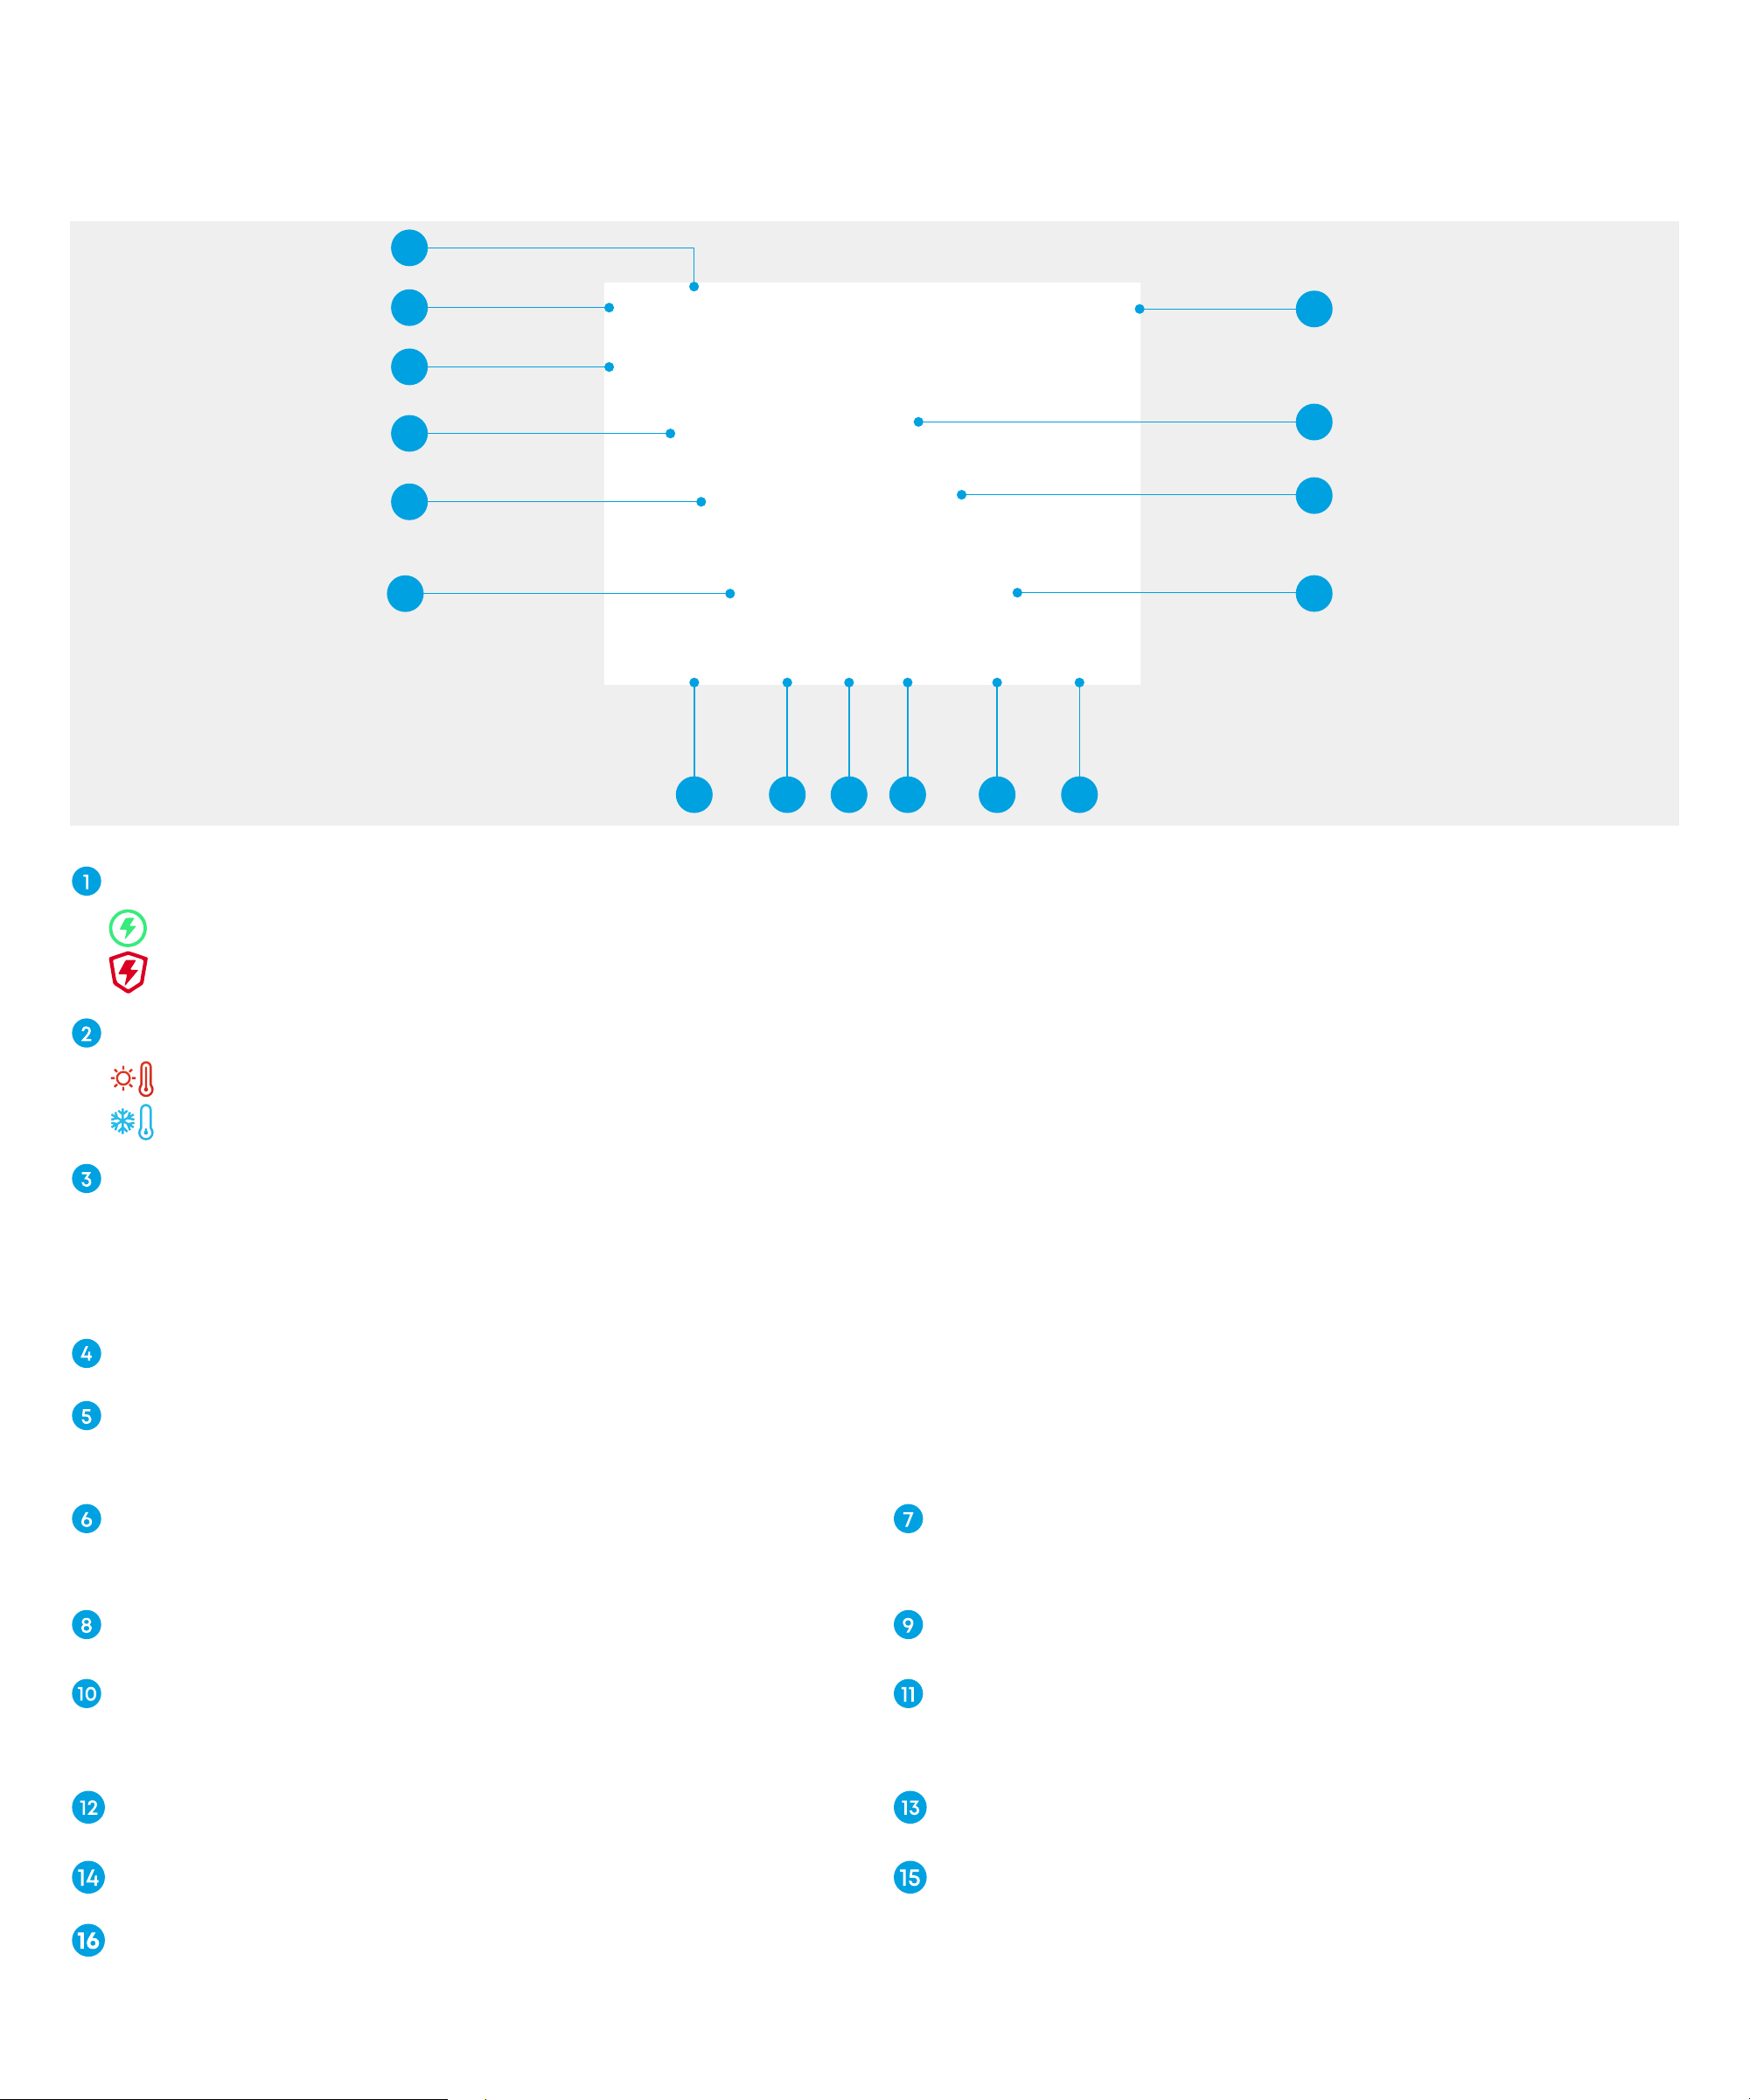
LCD Screen Guide
On-Screen Icons
Inteace Controls
Status Indication
Recharging the Power Station
AC Recharging
Solar Panel Recharging
Car Recharging
Charging Your Devices
Turning On/O the Power Station
AC Charging
SurgePad™
USB Charging
Car Socket Charging
Uninterruptible Power Supply (UPS)
Using the Anker App
Adding C2000 Gen 2 to the App
Firmware Update
Setting Up
FAQ
Specifications
01
What's in the Box
Anker SOLIX C2000 Gen 2
Portable Power Station
Documents
AC Charging Cable
Product Overview
2
1
5
3
4
6
7
9
10
8
11
12
13
14
LCD Screen Car Socket Car Socket Button
USB-C Ports AC Output Ports Main Power Button
Reset Hole USB-A Port AC Output Button
TT-30 Port AC Input Port XT60i Input Port
Overload Protection Switch Expansion Battery Port
02
LCD Screen Guide
On-Screen Icons
10
1
3
4
2
5
15
14
13
6
7 8 11 129
16
Backup Mode
Fast Charging Plan is enabled and the battery is currently charging.
Storm Guard is enabled and the battery is currently charging.
High-Temperature/Low-Temperature Alert
When this icon appears, stop using the power station and let it cool down until the icon disappears.
When this icon appears, stop using the power station until the icon disappears.
Automatic Correction of Battery Level
If a charging/discharging limit is set, the power station will fully recharge to 100% aer 720 hours of operation,
regardless of mode or status. This calibrates the battery level. Once fully charged, the power station will return to
the state or mode it was in prior to recharging.
Battery Level Ring
Charging/Discharging Limit
The lower limit can be set between 1% and 20%, while the upper limit can be set between 80% and 100% in the app.
Current Input Power AC Output Icon
This icon lights up when the AC output button is pressed.
USB-C Output Icon USB-A Output Icon
DC Output Icon
This icon lights up when the car socket button is pressed.
Expansion Battery Connected
Anker SOLIX Alternator Charger Charging Current Output Power
Battery Level Estimated Time to Charge/Discharge
Wi-Fi/Bluetooth Connected
03
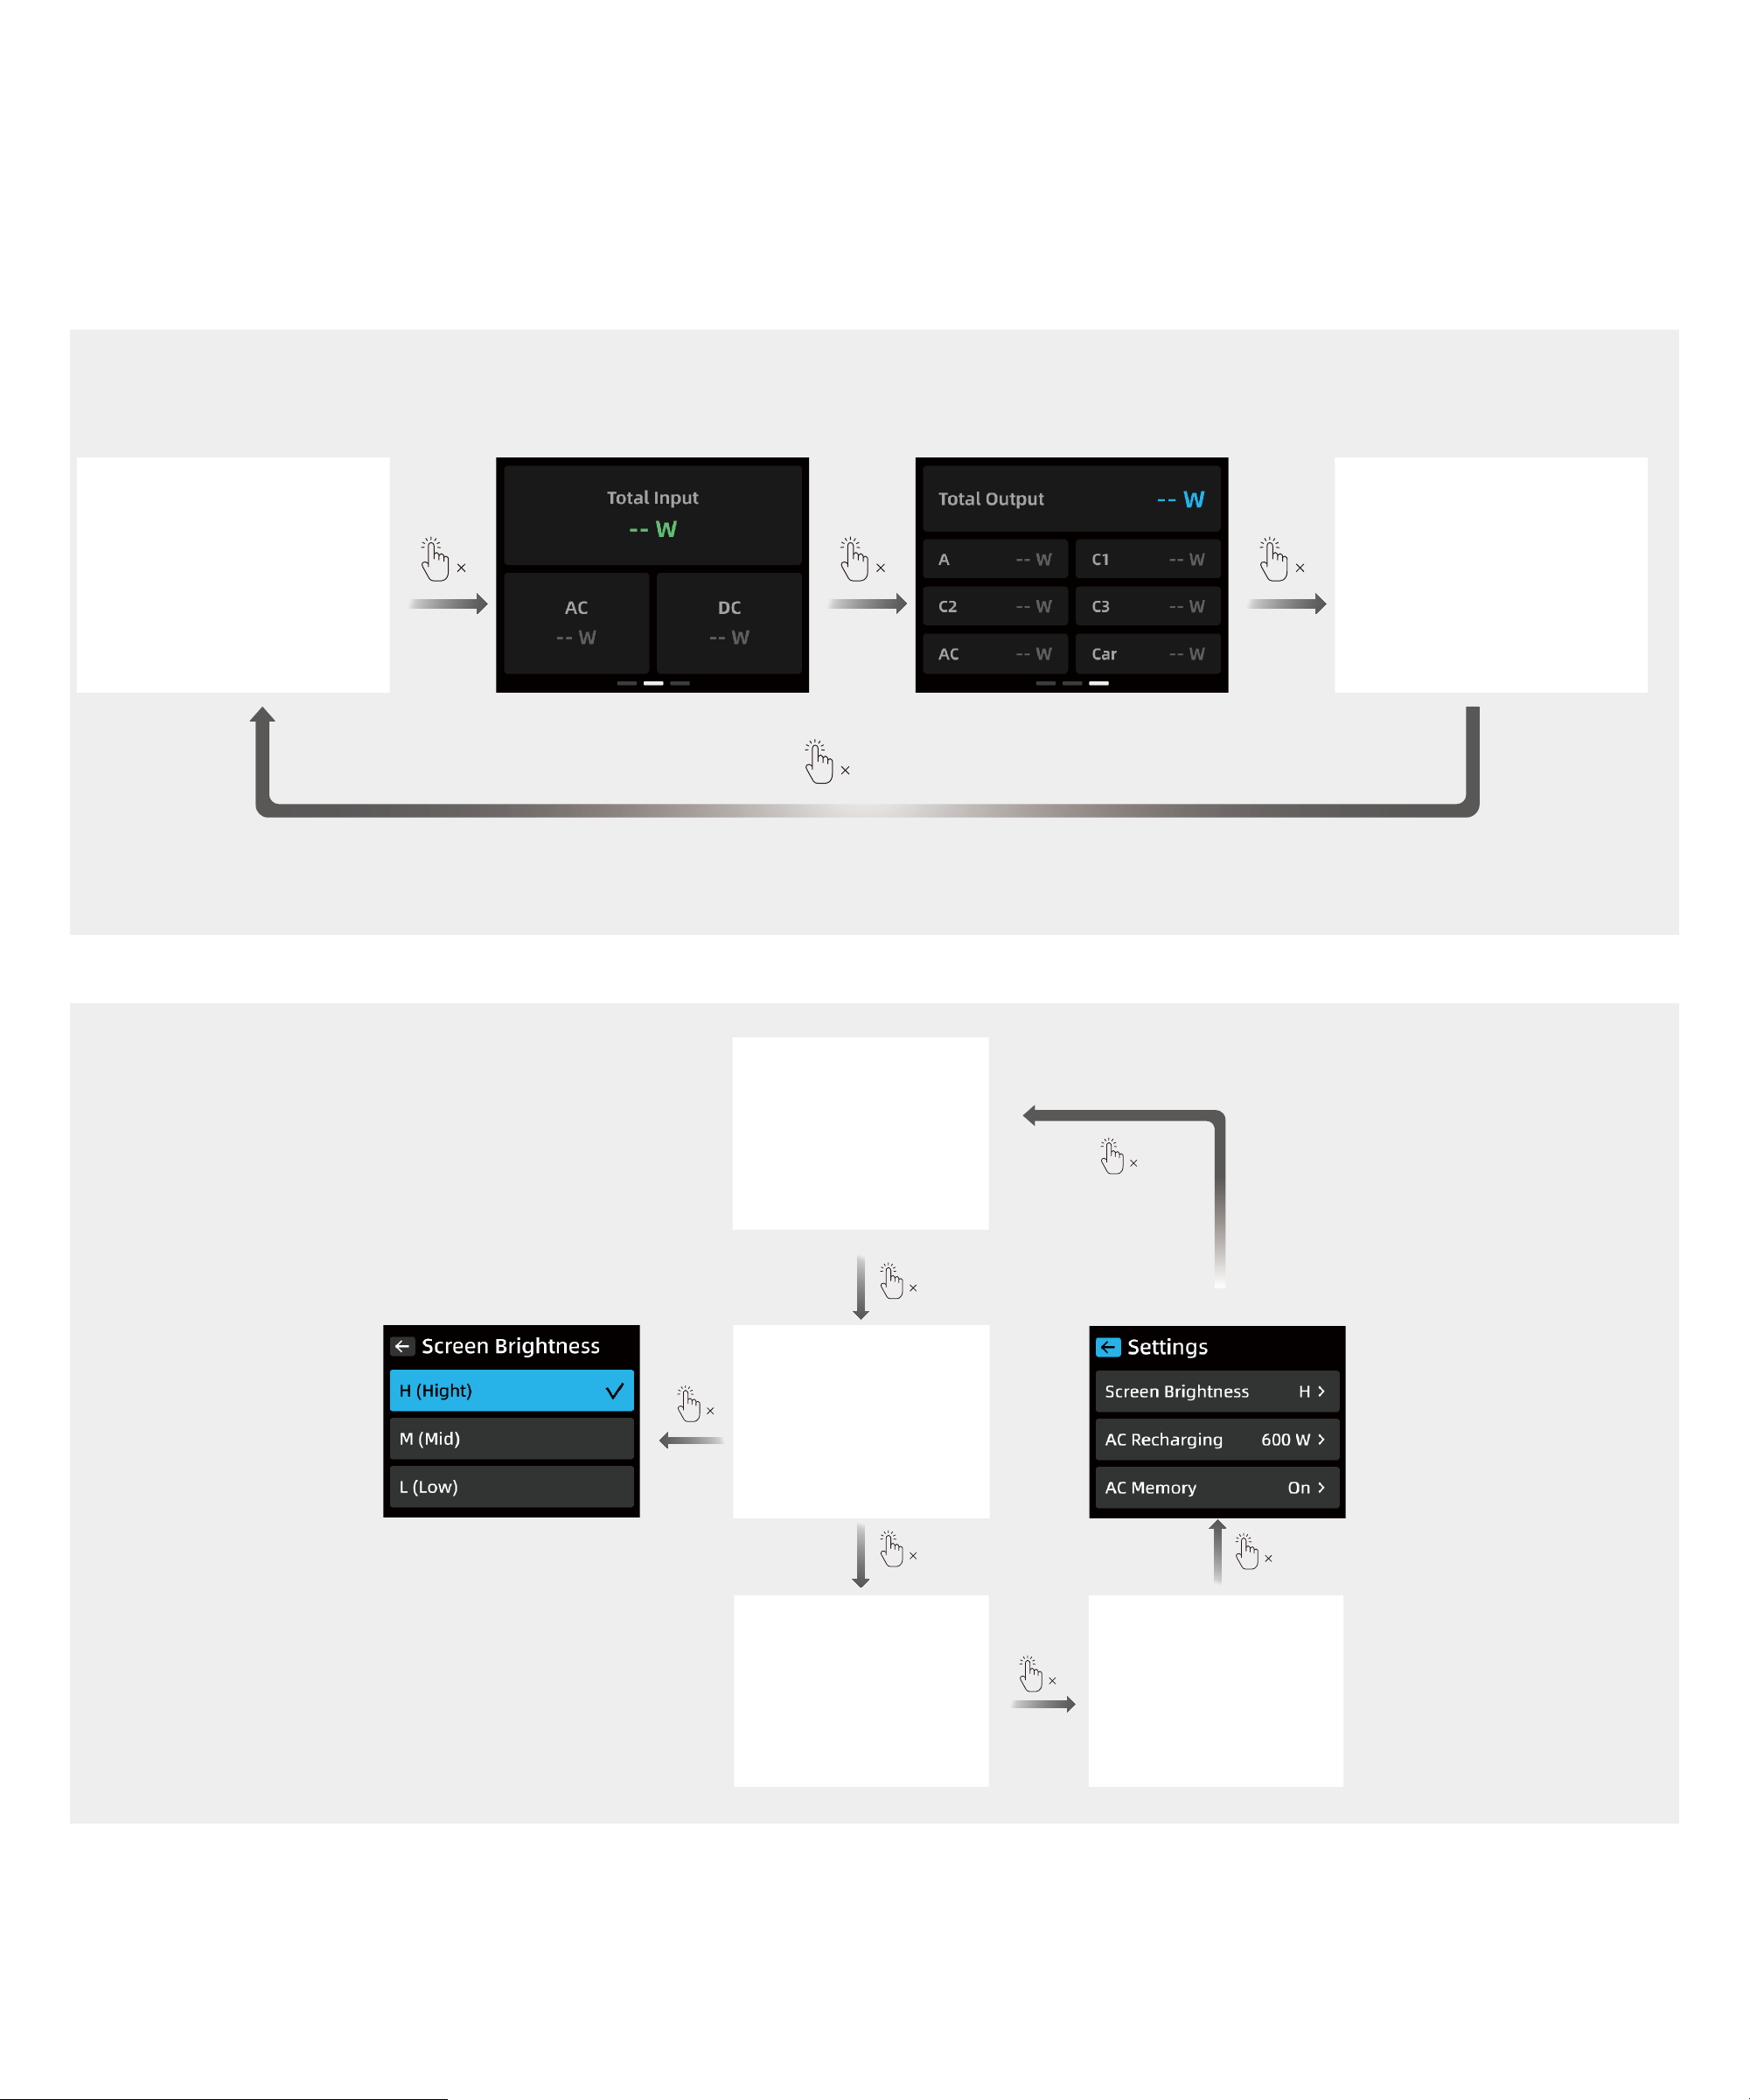
Inteace Controls
·
Turn On Screen: Press the main power button once.
·
Switch Inteace/Option: Press the main power button once
·
Confirm Selection: Press the main power button twice.
·
Auto Return: If there is no operation on the inteace for 20 seconds, it will automatically return to the main inteace.
1 1 1
1
2
1
2
2
1
1

04
Status Indication
Screen Display Status
No charging or recharging.
Charging the devices.
Recharging the power station.
Recharging specifications during simultaneous charging and recharging.
Charging specifications during simultaneous charging and recharging.
Resetting Bluetooth or Wi-Fi.
Note: Press the main power button for 7 seconds while the power station is powered
o until this icon appears on the screen, indicating a successful IoT reset.
Time-of-Use mode.
05
Silent recharging.
Note: Input power is under 1,000W.
Solar recharging.
Charge the device at a voltage greater than or equal to 20V
Screensaver: You can set the style and time format of the screensaver in the Anker
app. The screensaver will be displayed during recharging and the time periods you
set.
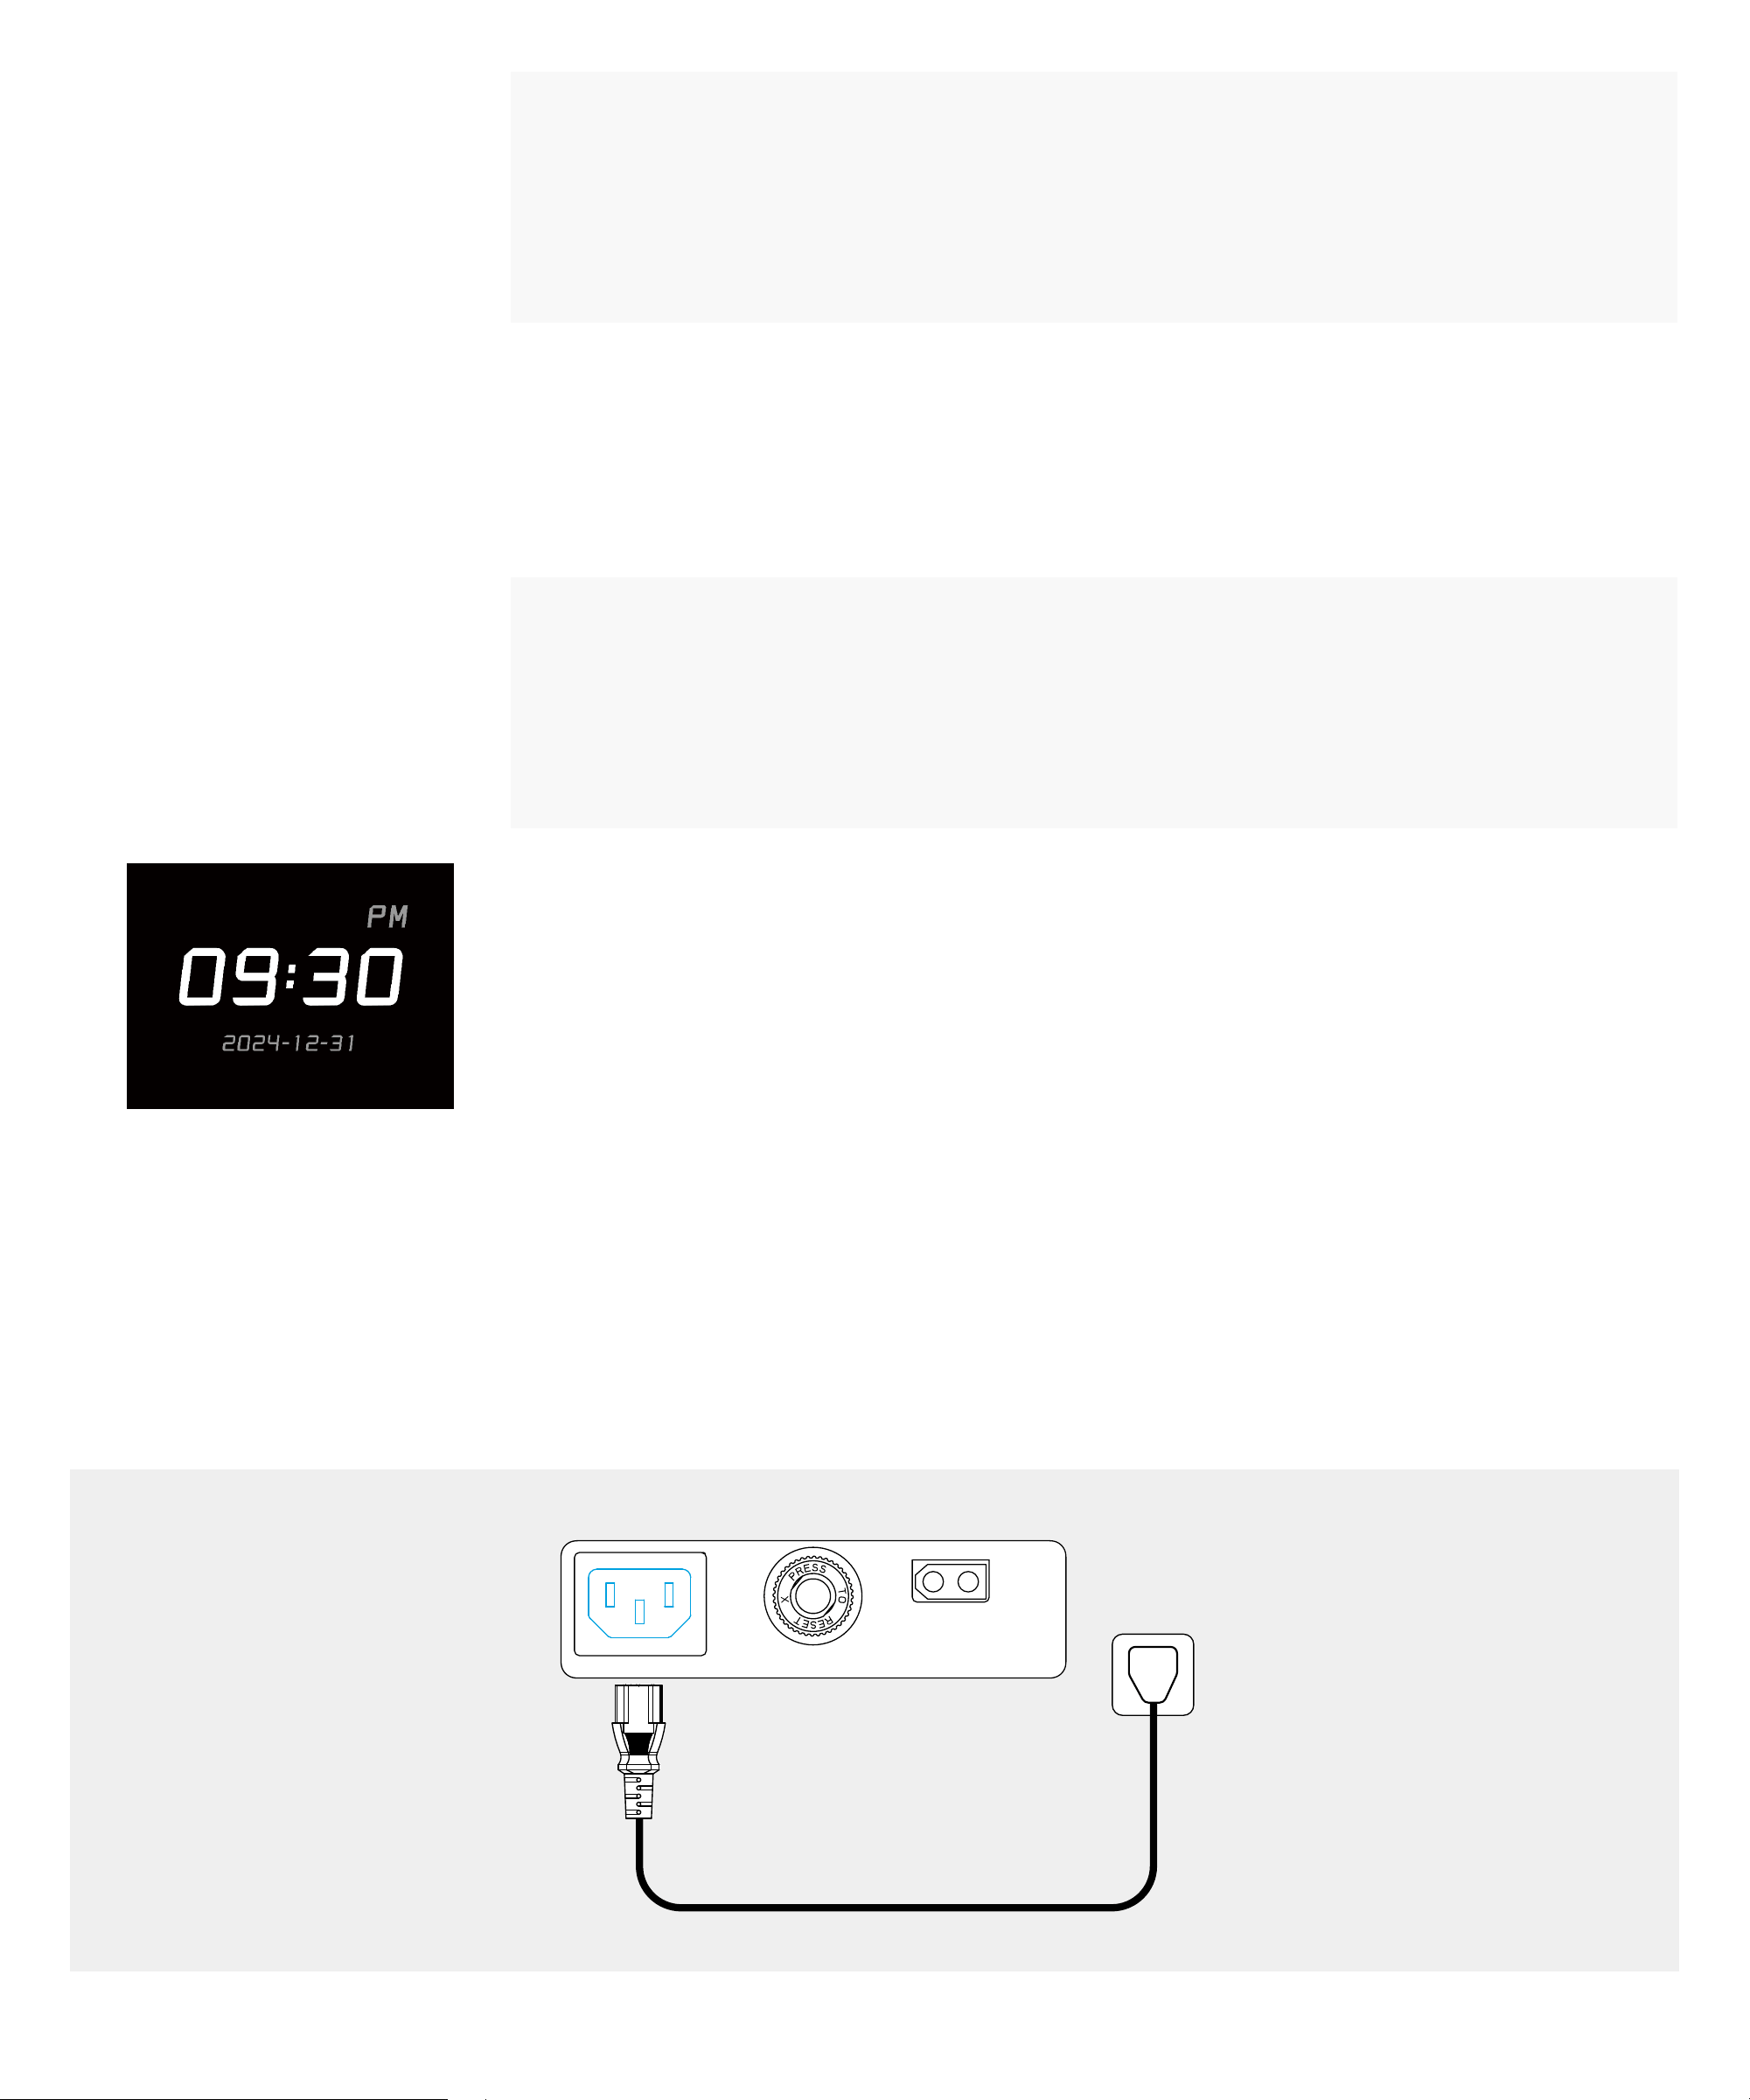
Recharging the Power Station
AC Recharging
Recharge the power station by connecting to a wall outlet with the AC charging cable. The maximum input power of
the AC port is 1,800W.
06
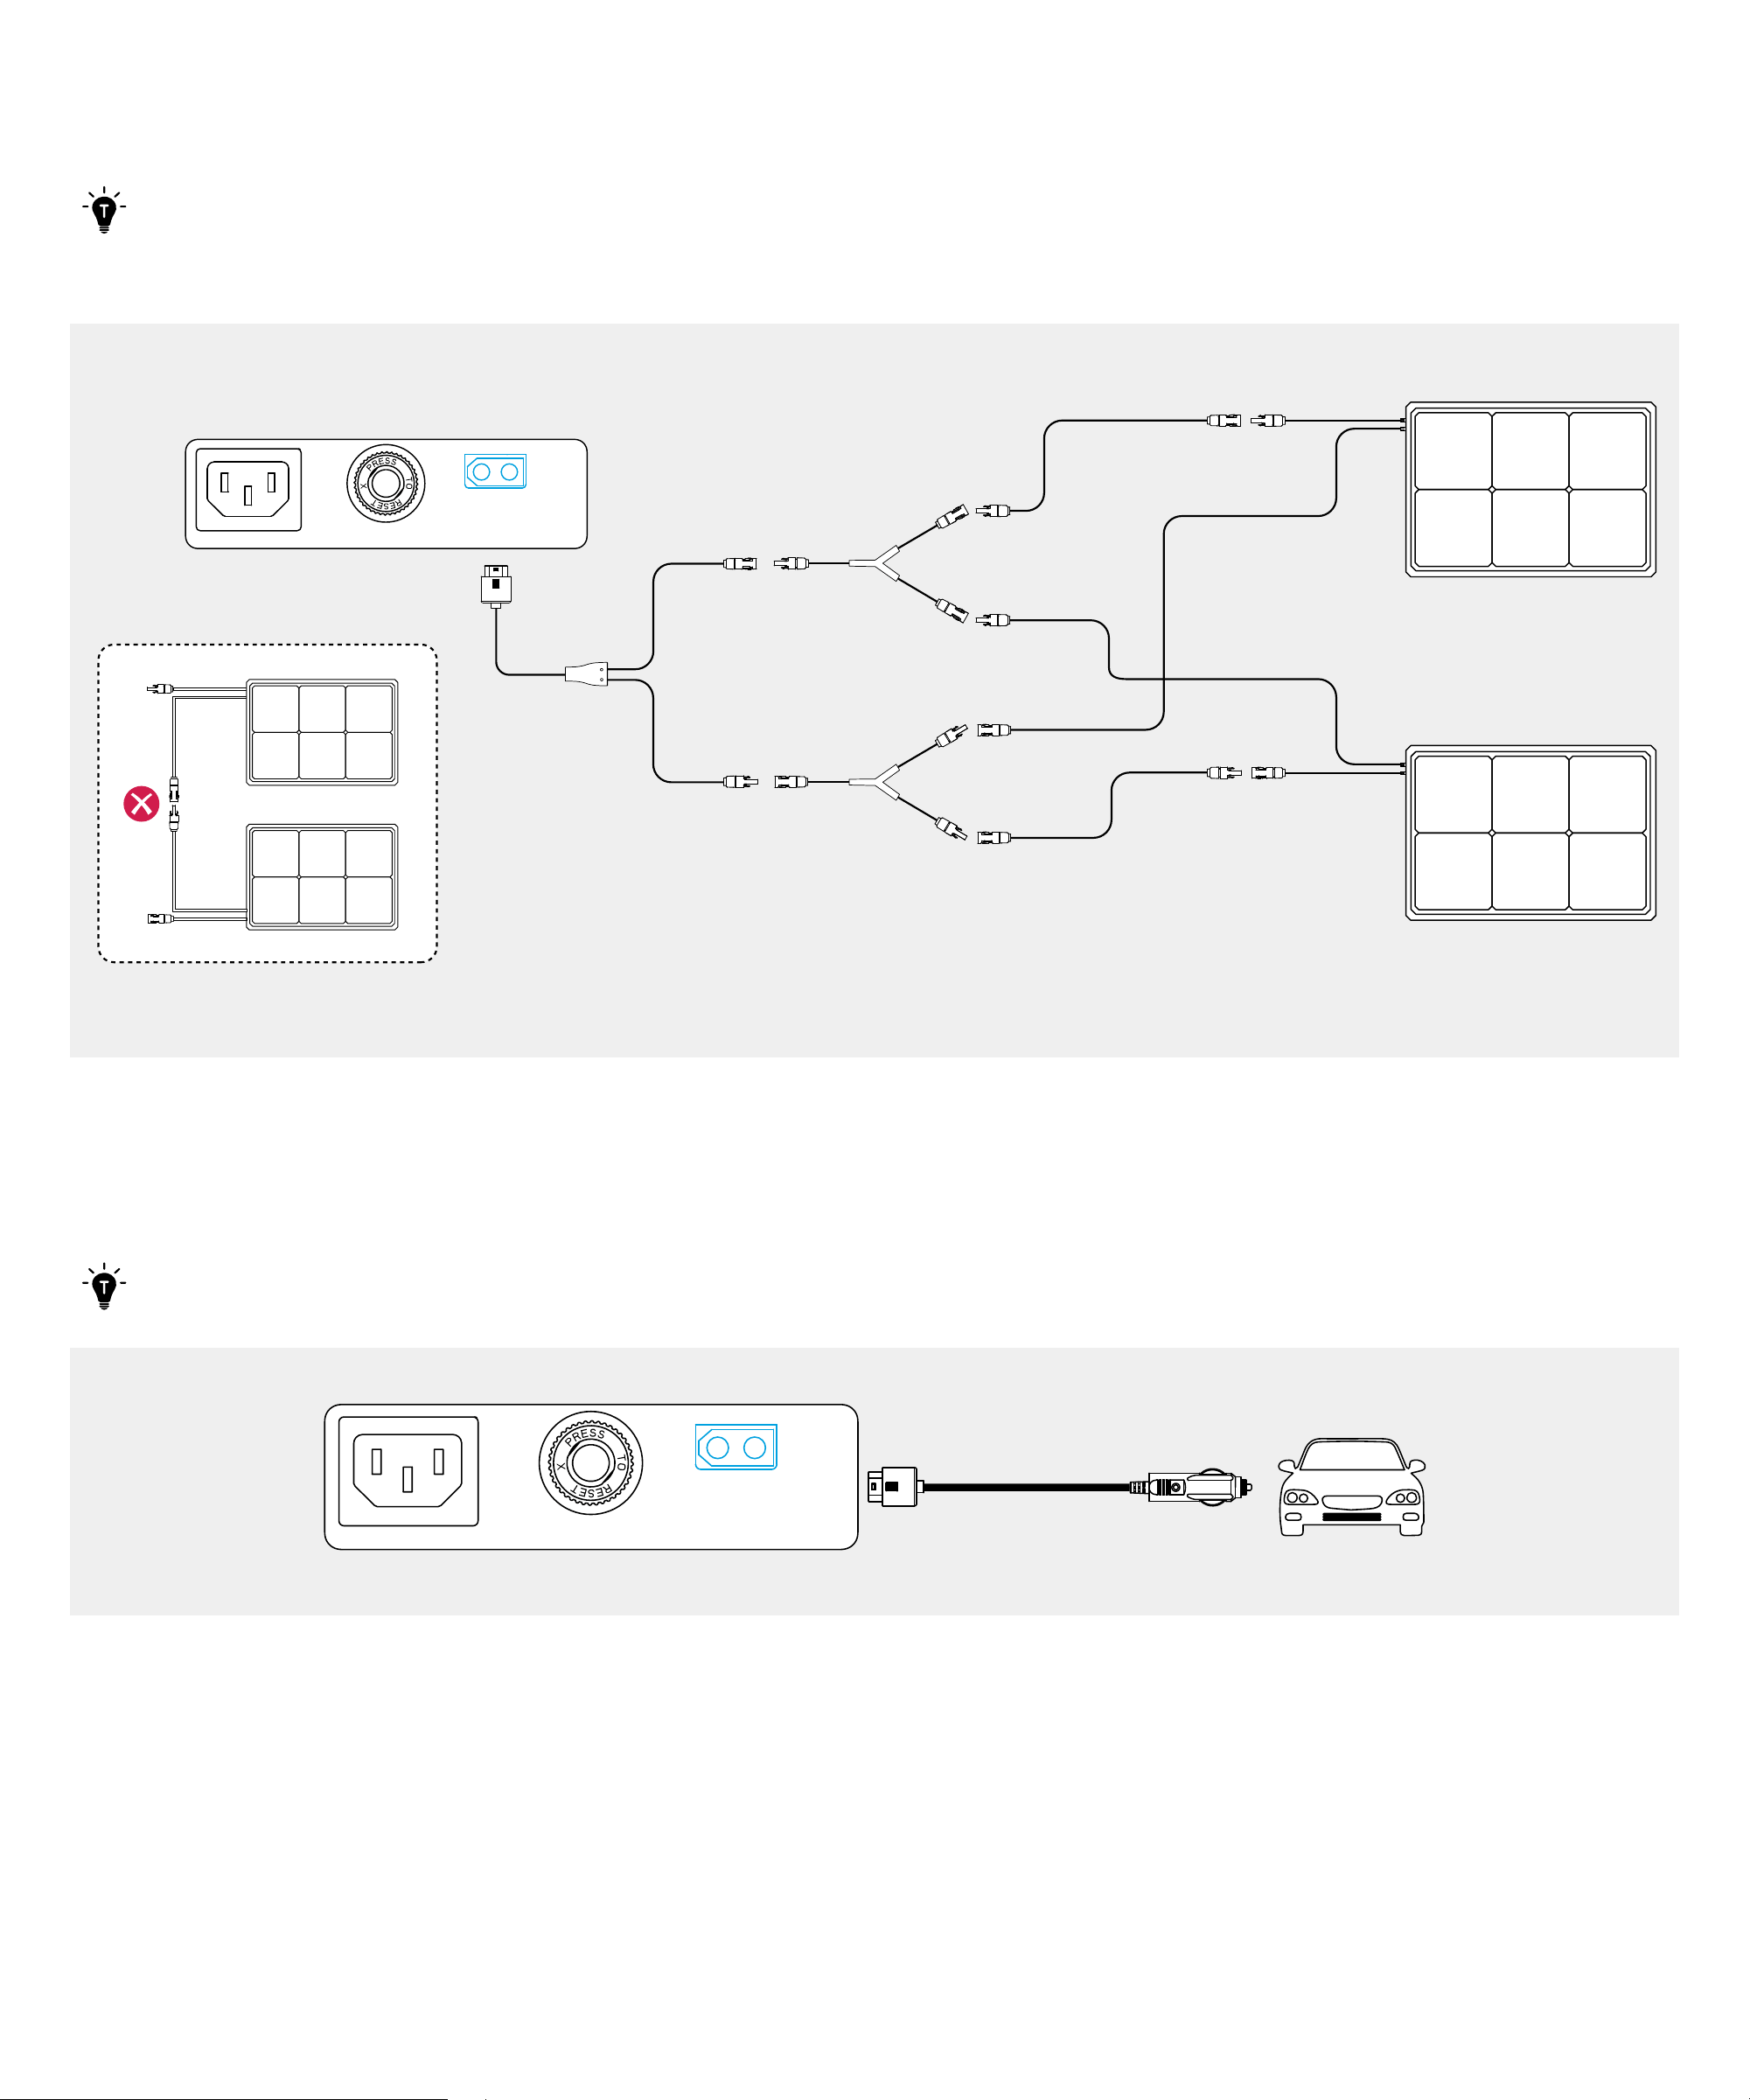
Solar Panel Recharging
Recharge the power station by connecting the solar panel to the XT60i input port.
• The solar panels, the PV connector to XT60i charging cable, and the solar panel extension cables need to be
purchased separately.
• The figure below shows an example of connecting two solar panels.
Car Recharging
Recharge the power station by connecting to a car's output port with the car charging cable.
The car charging cable needs to be purchased separately.
07
Charging Your Devices
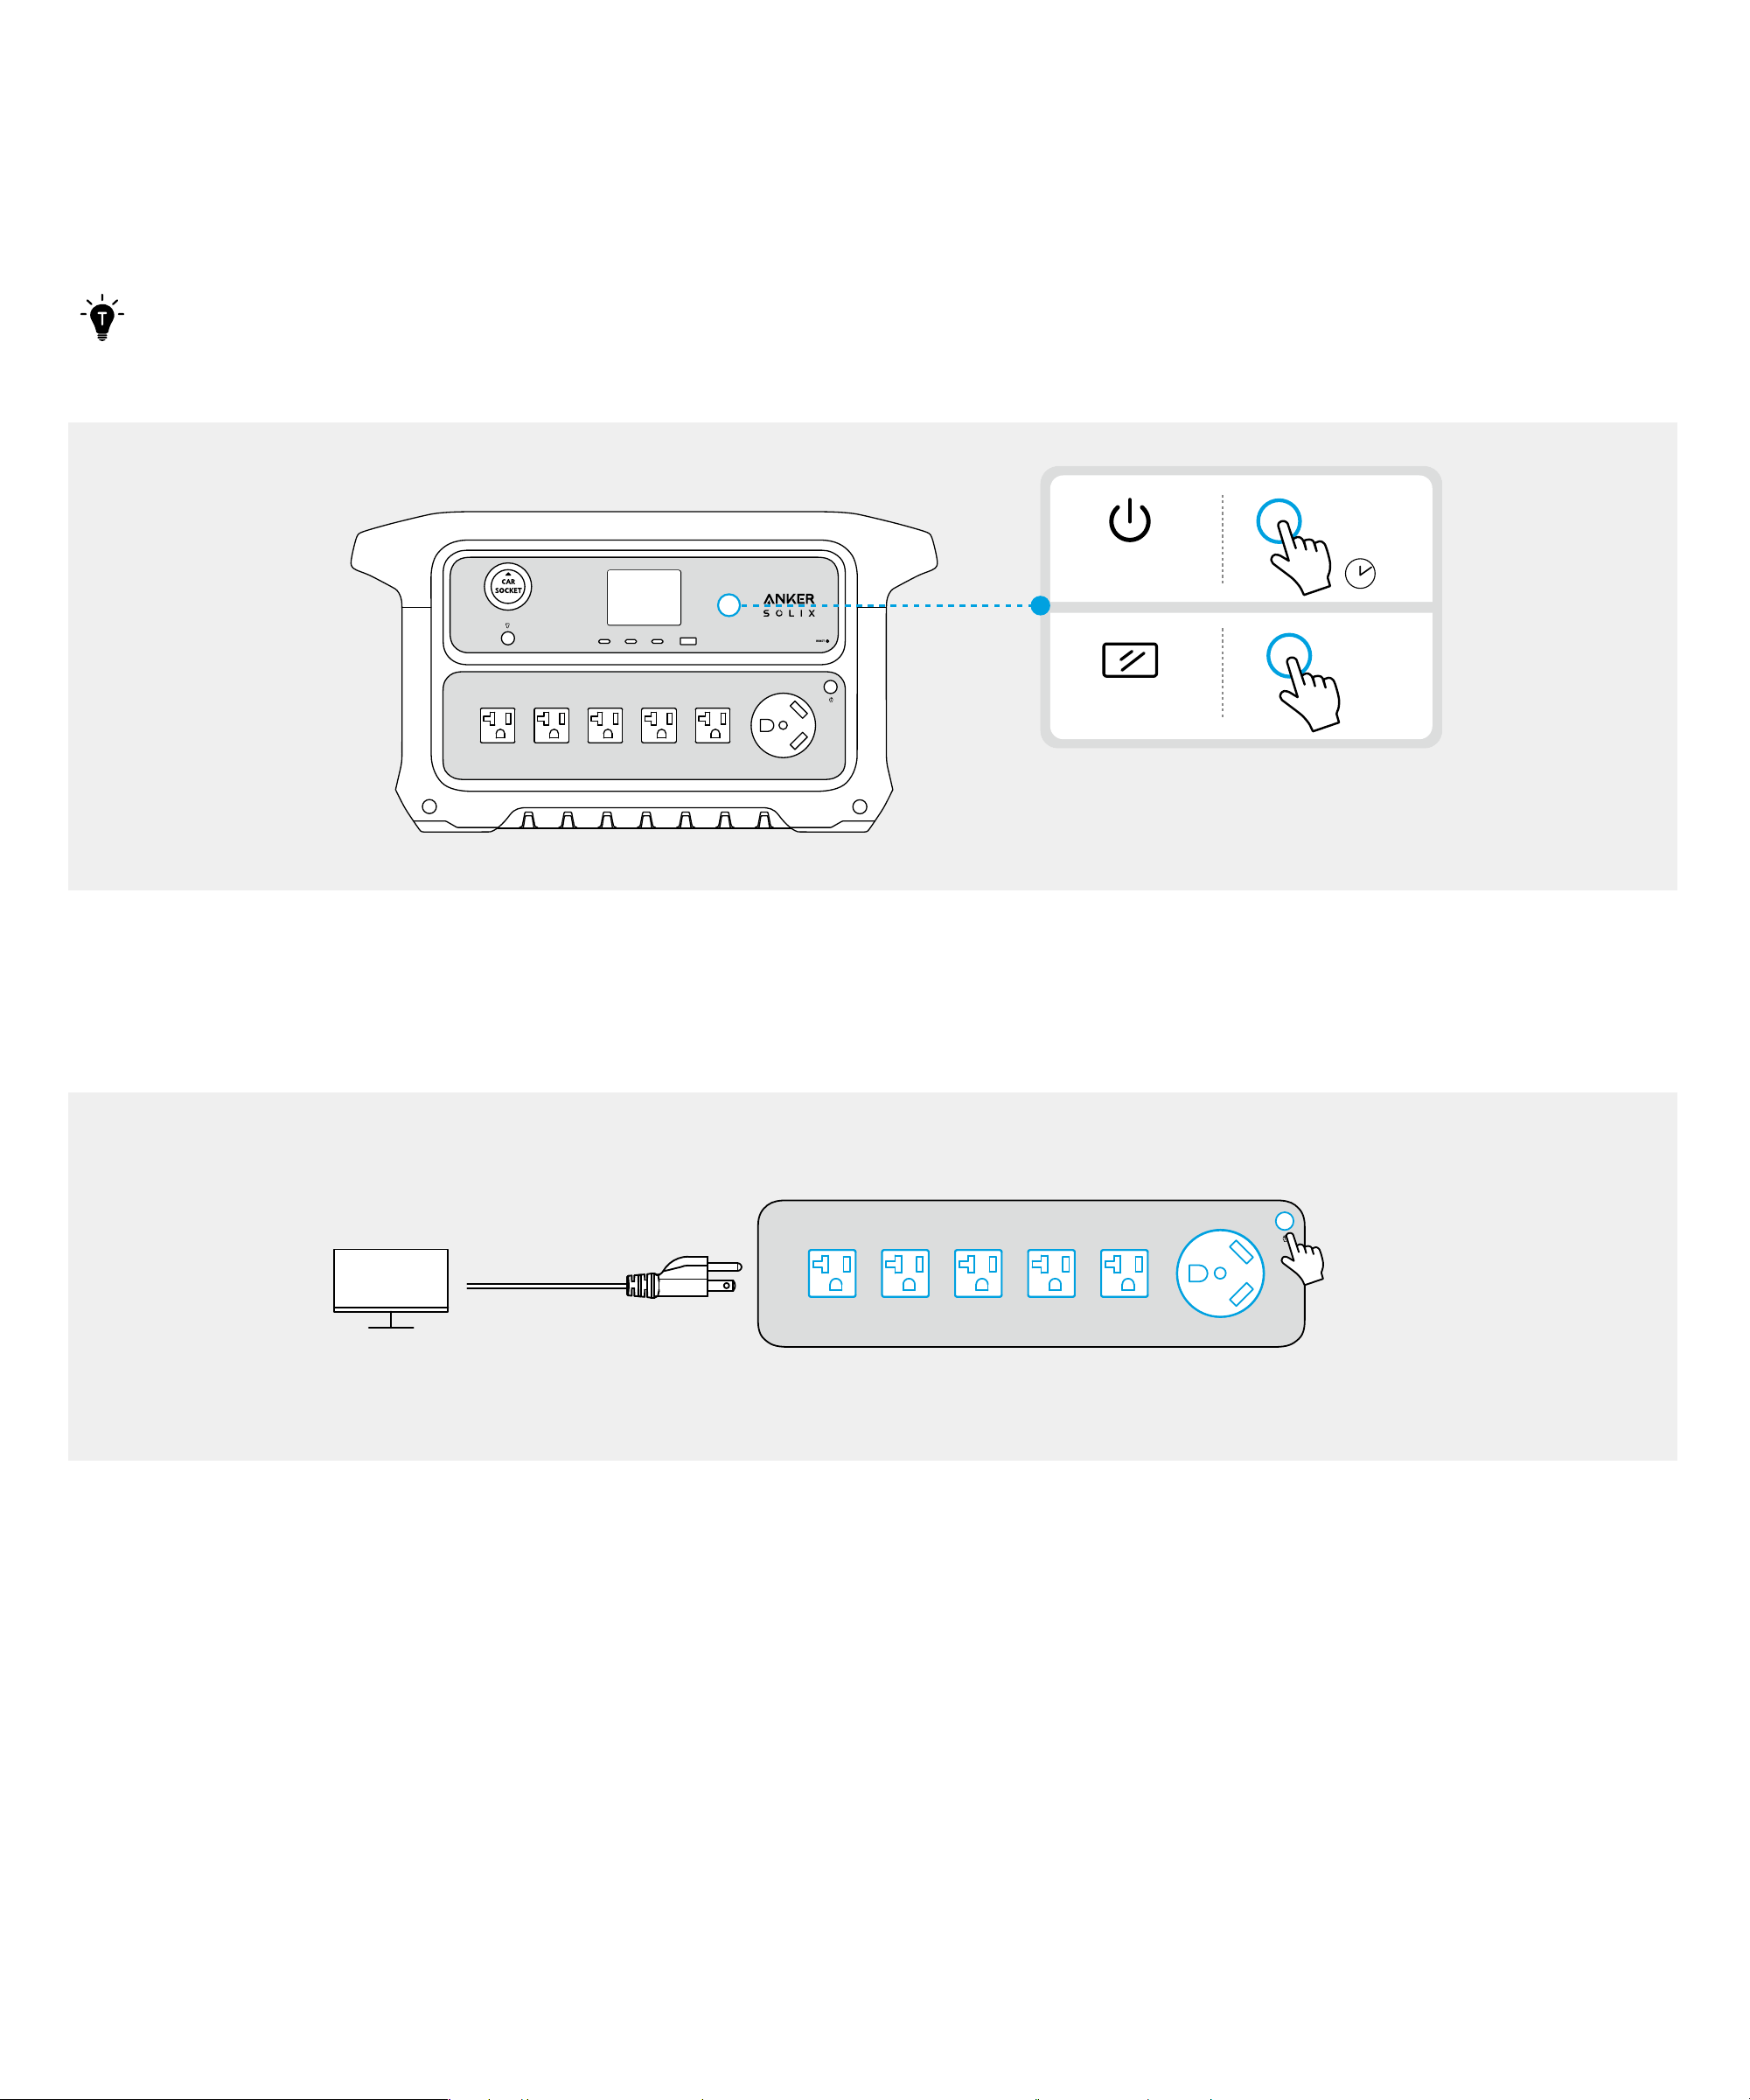
Turning On/O the Power Station
Press the main power button for 3 seconds to turn the power station on or o. Your power station is ready to charge
devices once the "Battery Level" digits show on the LCD screen.
• Press the main power button once to turn the screen on. The screen will be turned o automatically aer 30
seconds of lighting up. The auto-o time can be set in the Anker app.
• The default standby duration of the power station is 12 hours, which can be set in the Anker app.
ON/OFF
ON
3 s
× 1
AC Charging
Press the AC output button and connect your devices with the AC output ports.
SurgePad™
The power station supports the SurgePad™ feature for up to 3,000W AC output.
• SurgePad™ automatically turns on when the total output exceeds the rated output, allowing the power station to
deliver power to high-wattage devices.
• SurgePad™ does not function in bypass mode (when the power station is being charged with the AC power.
• SurgePad™ works better with devices that generate heat, but does not support precision instruments and other
devices that have voltage protection or strict voltage requirements. To see if SurgePad™ works with your high-
wattage devices, try powering them with the power station.

08
USB Charging
Connect your devices to USB ports.
To reduce power consumption and prolong the usage time, when power station detects that the USB output
power is less than 1W for a long time, it will determine that your device is fully charged and turn o the USB output
automatically. To restart the output, just unplug and plug the USB cable again.
Car Socket Charging
Press the car socket button and connect your devices to the car socket.
The car socket can intelligently identify whether a plug is inserted. It helps prevent power waste by automatically
turning o the car socket charging if no plug is detected for more than 5 hours. This feature is enabled by default,
and you may disable it in Settings.
Uninterruptible Power Supply (UPS)
Anker SOLIX C2000 Gen 2 supports UPS. When you connect your power station to an AC outlet while power your
devices via the AC output ports on the power station, the AC power from the grid will directly supply to your devices.
In the event of a power outage, the power station can automatically switch to the battery powered supply within
10ms.

09
Using the Anker App
• You can remotely control your power station using the Anker app.
• The information below may not list all of the features available on the Anker app. To ensure access to new and
improved features, download updated versions of the app as they become available.
Adding C2000 Gen 2 to the App
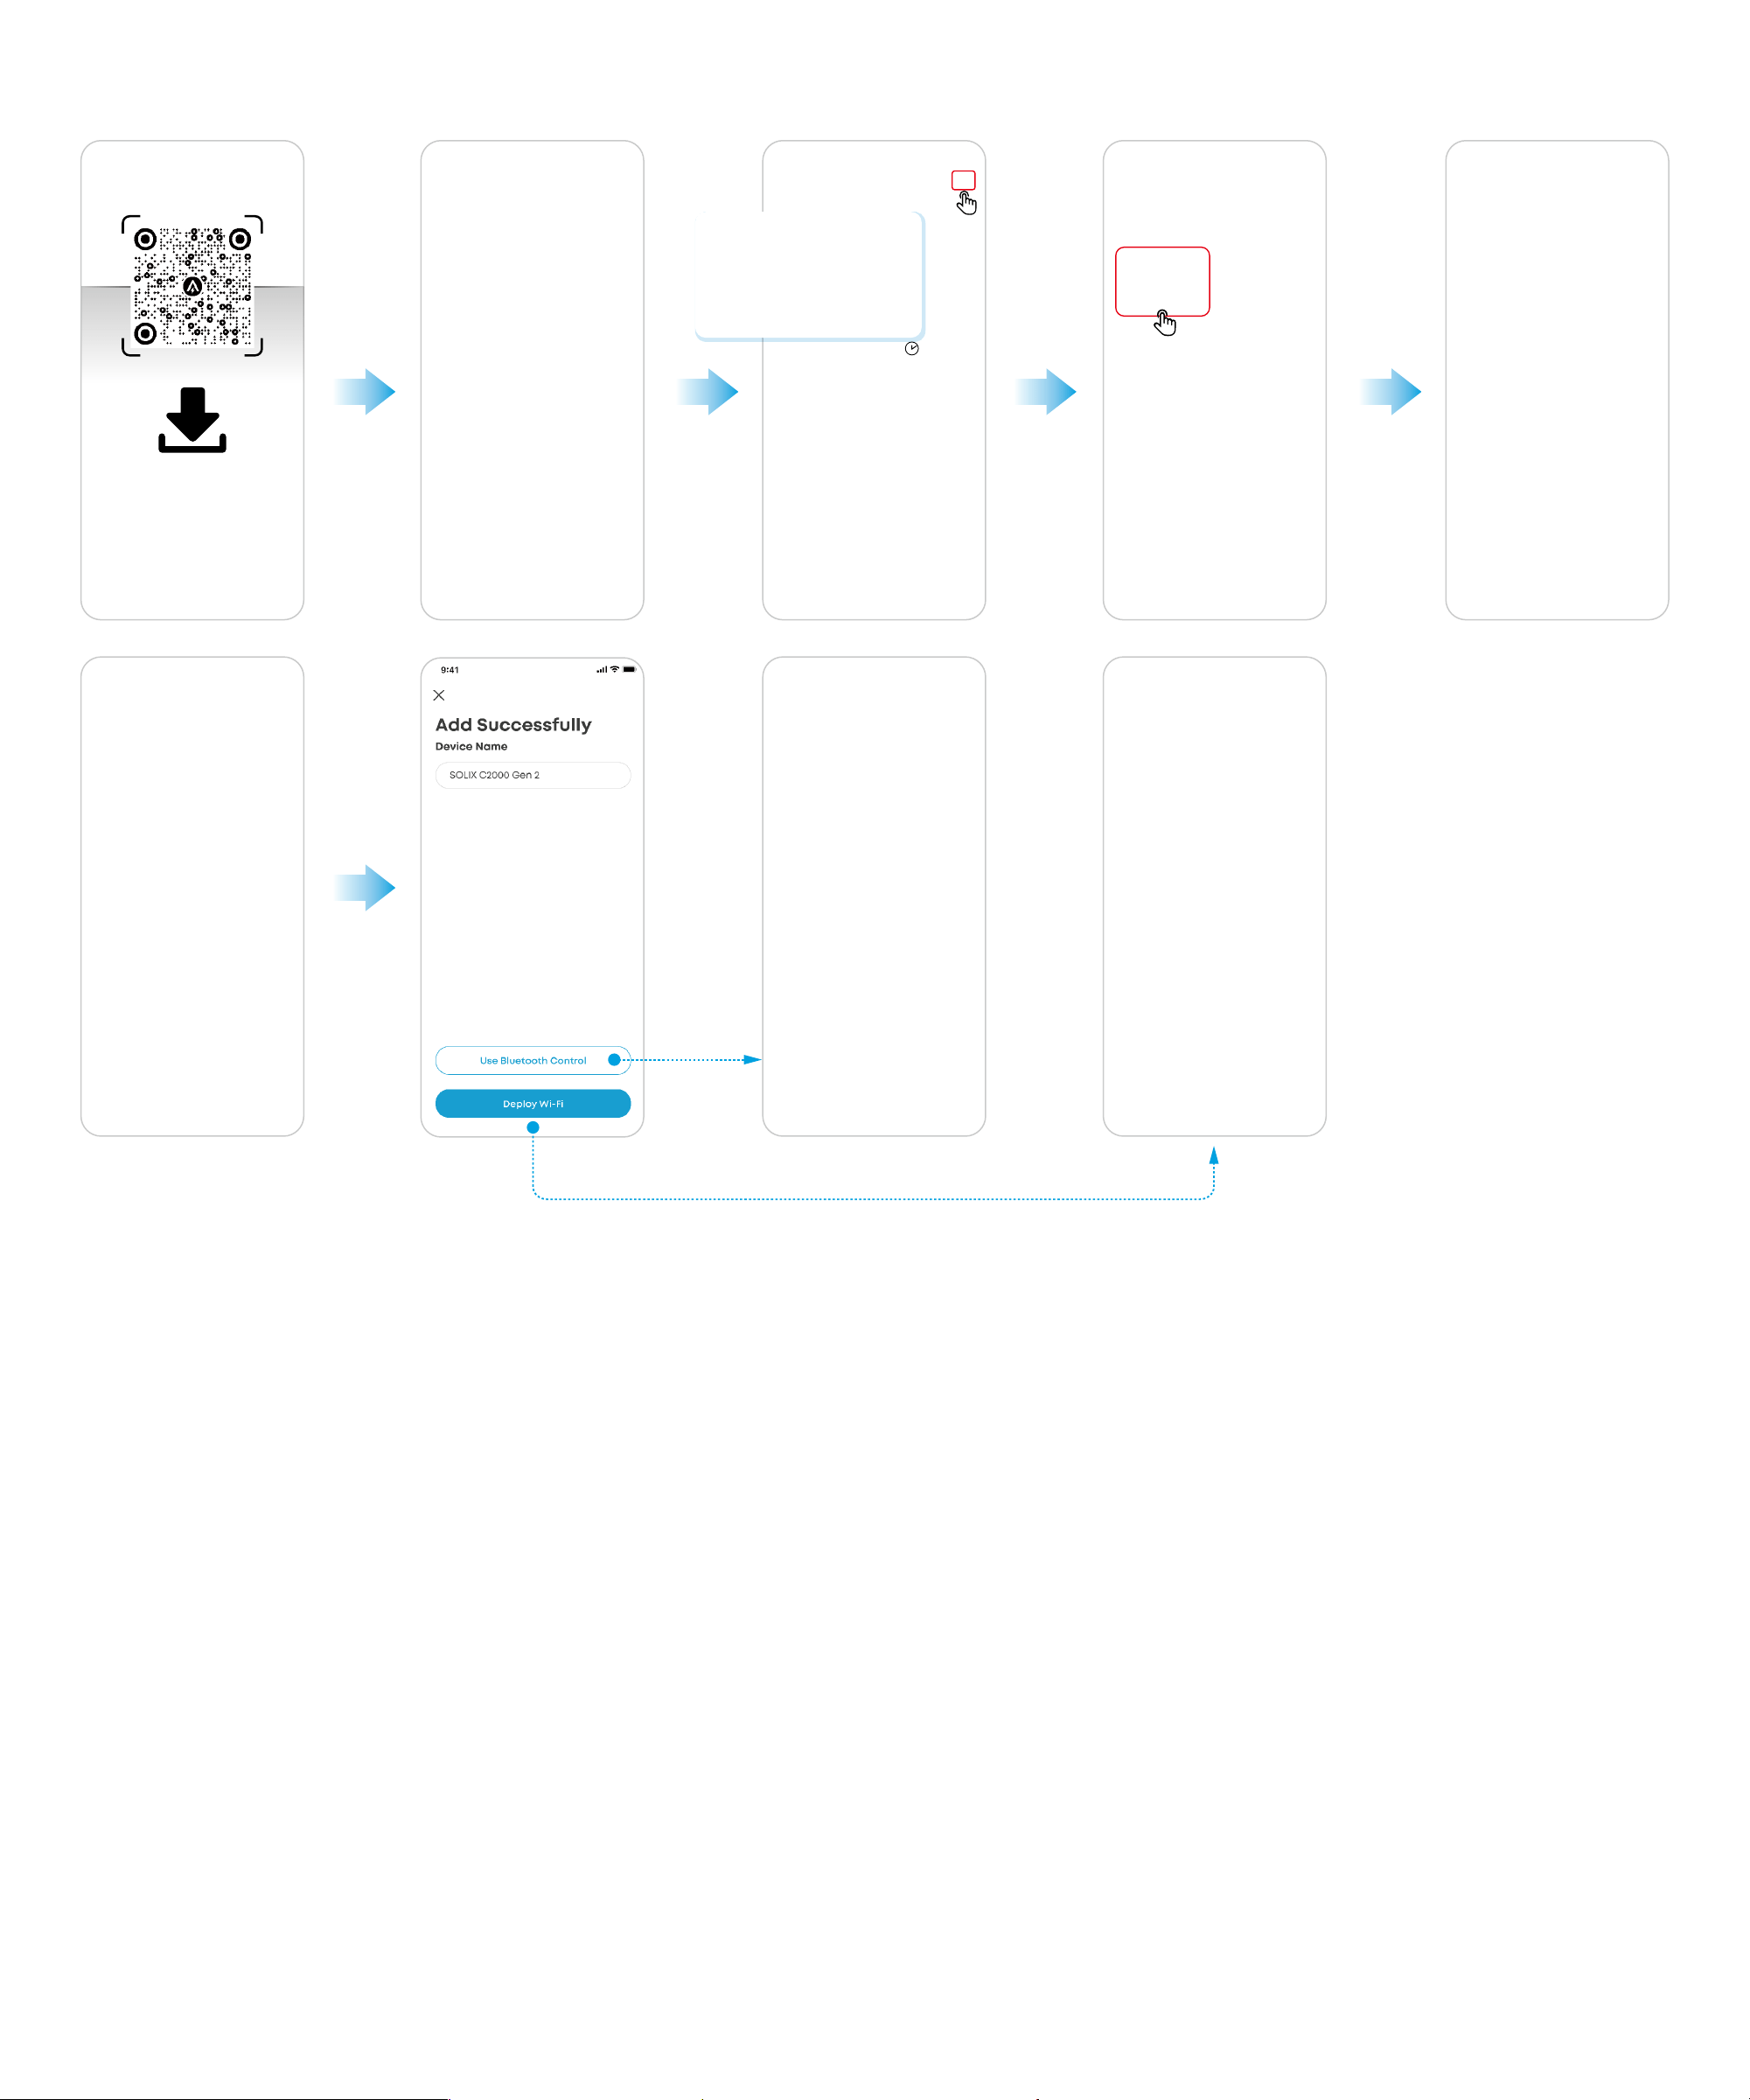
1. Download the Anker app from the App Store (iOS devices) or Google Play (Android devices), or by scanning the QR
code.
2. Sign in or create an account. Please be reminded that the country or region must match where you live. An
incorrect country or region may cause the device connection to fail.
10
3. Follow the in-app instructions to add C2000 Gen 2 and complete the setup.
2 s
3 s
Firmware Update
You will be informed once a new firmware version is detected when you connect the power station to the app. During
the update, ensure the battery level of the power station is above 5% and connected to Wi-Fi or Bluetooth.
11
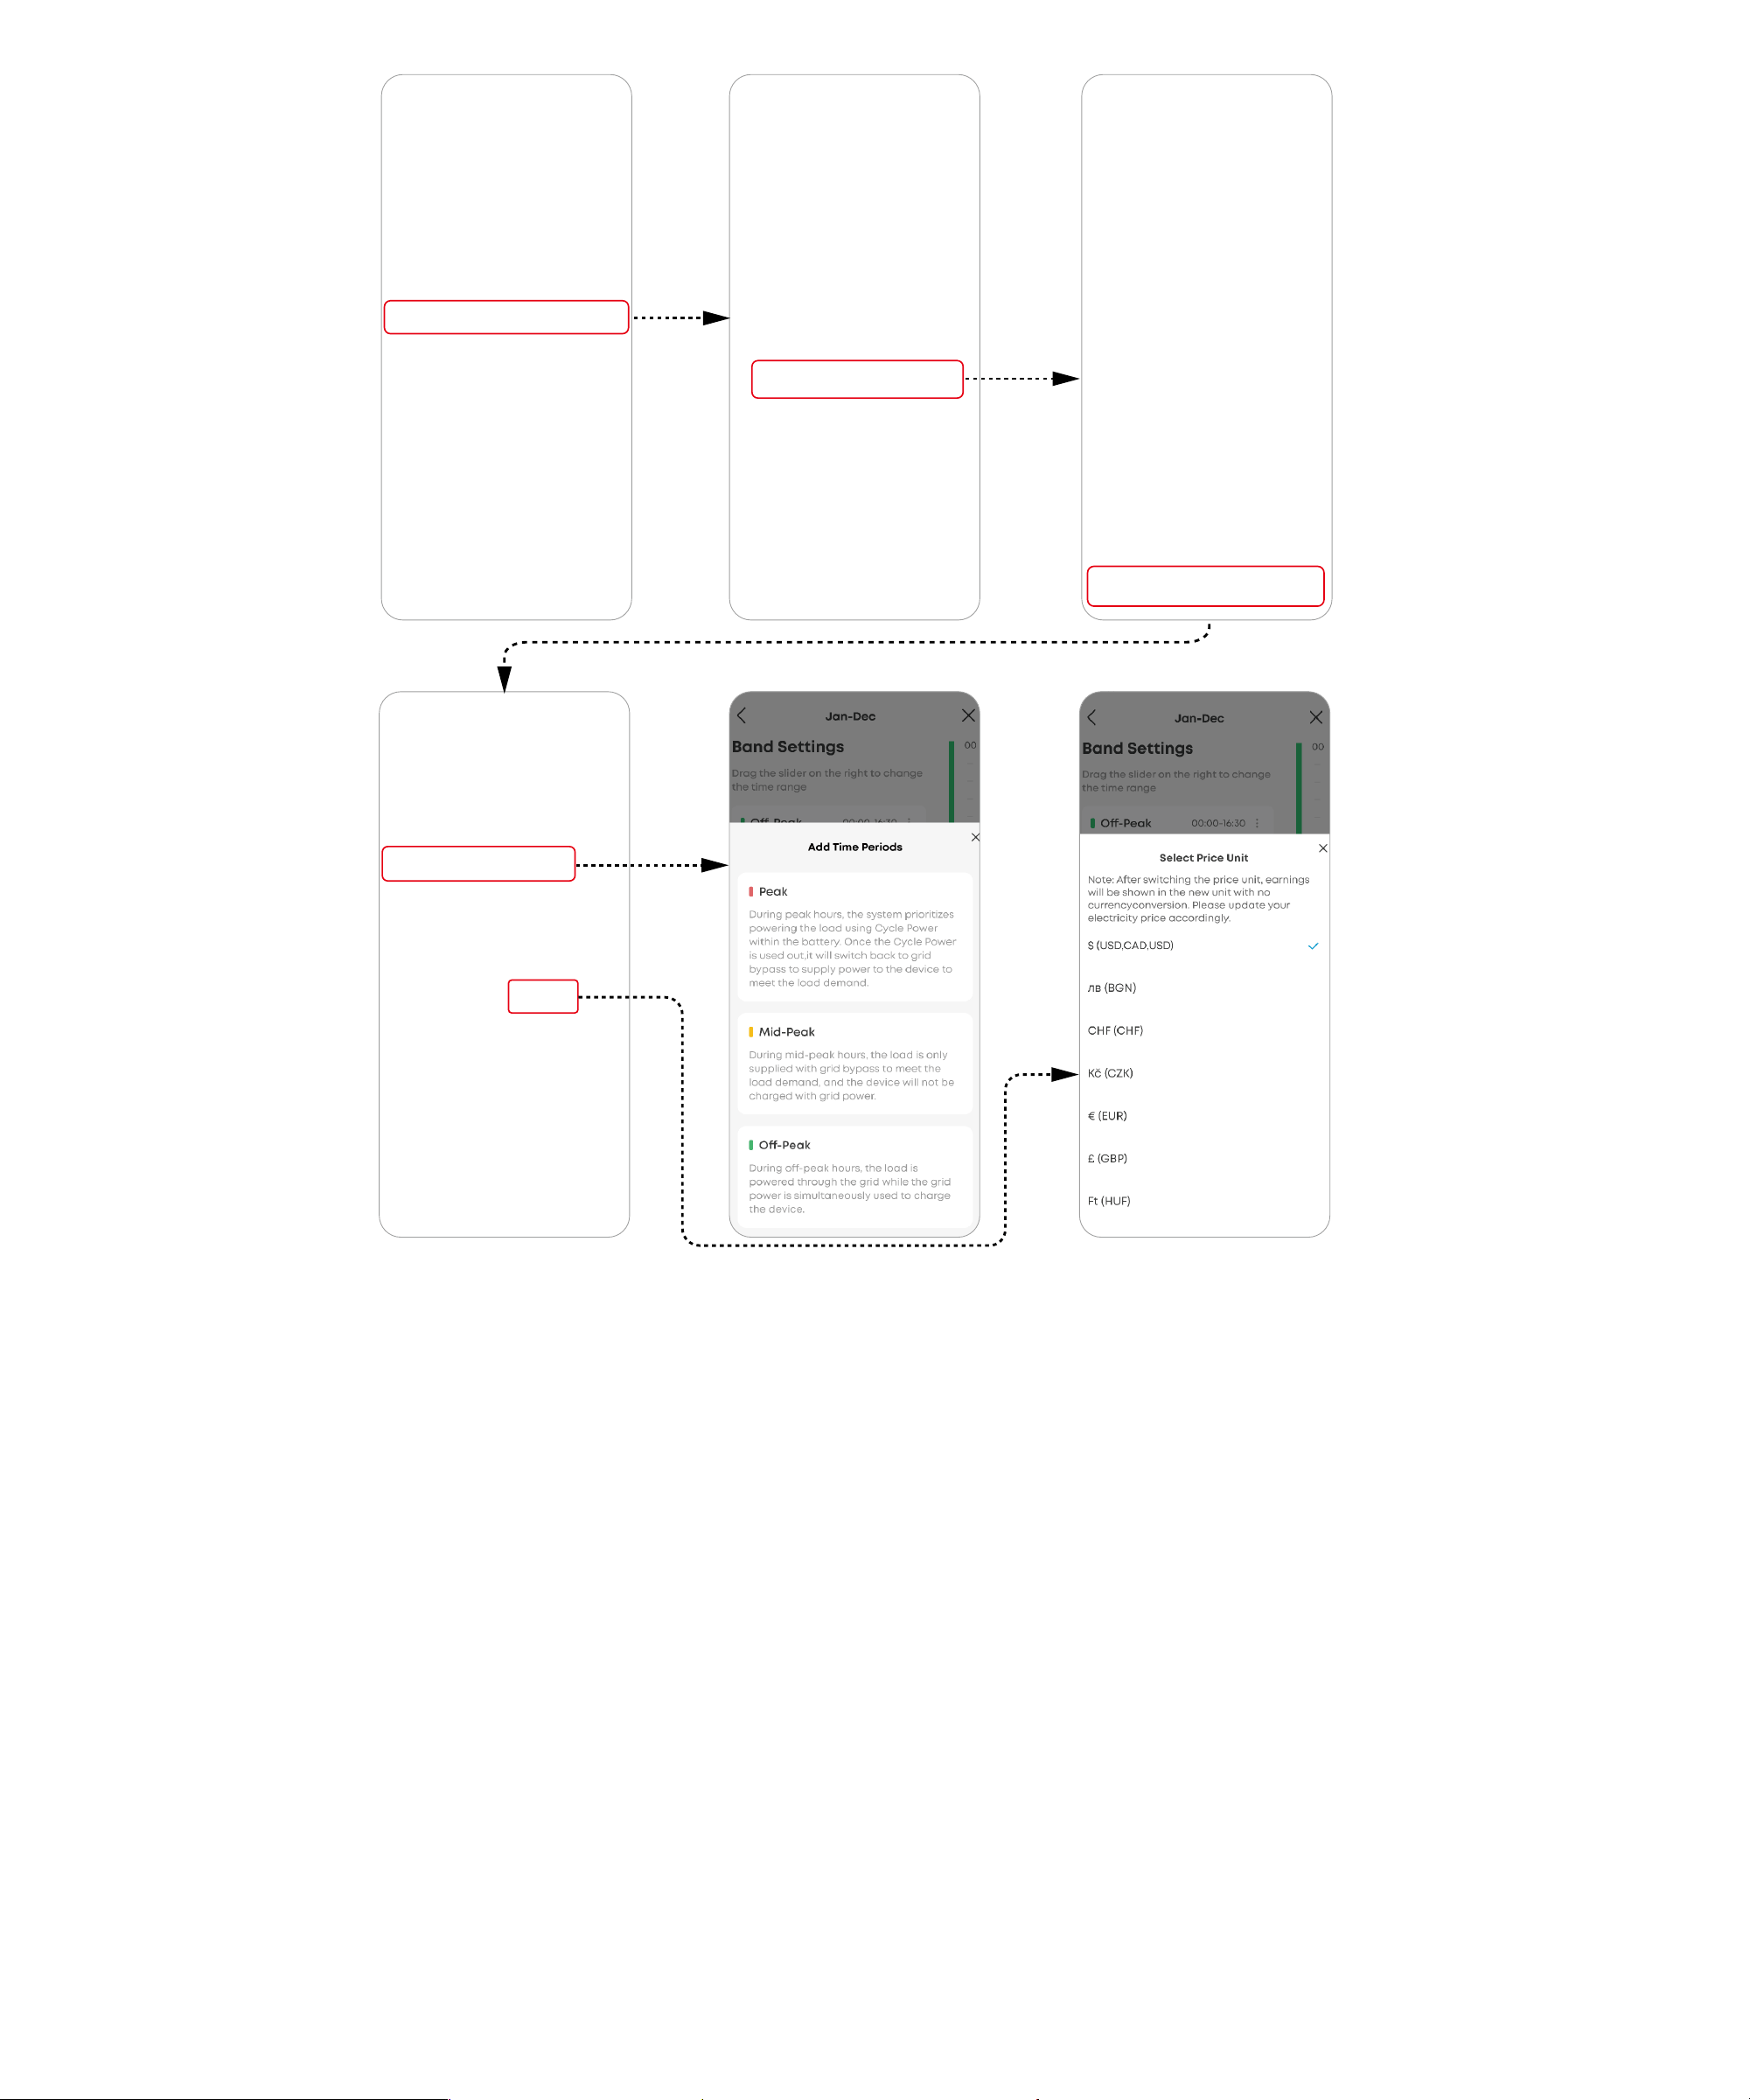
Setting Up
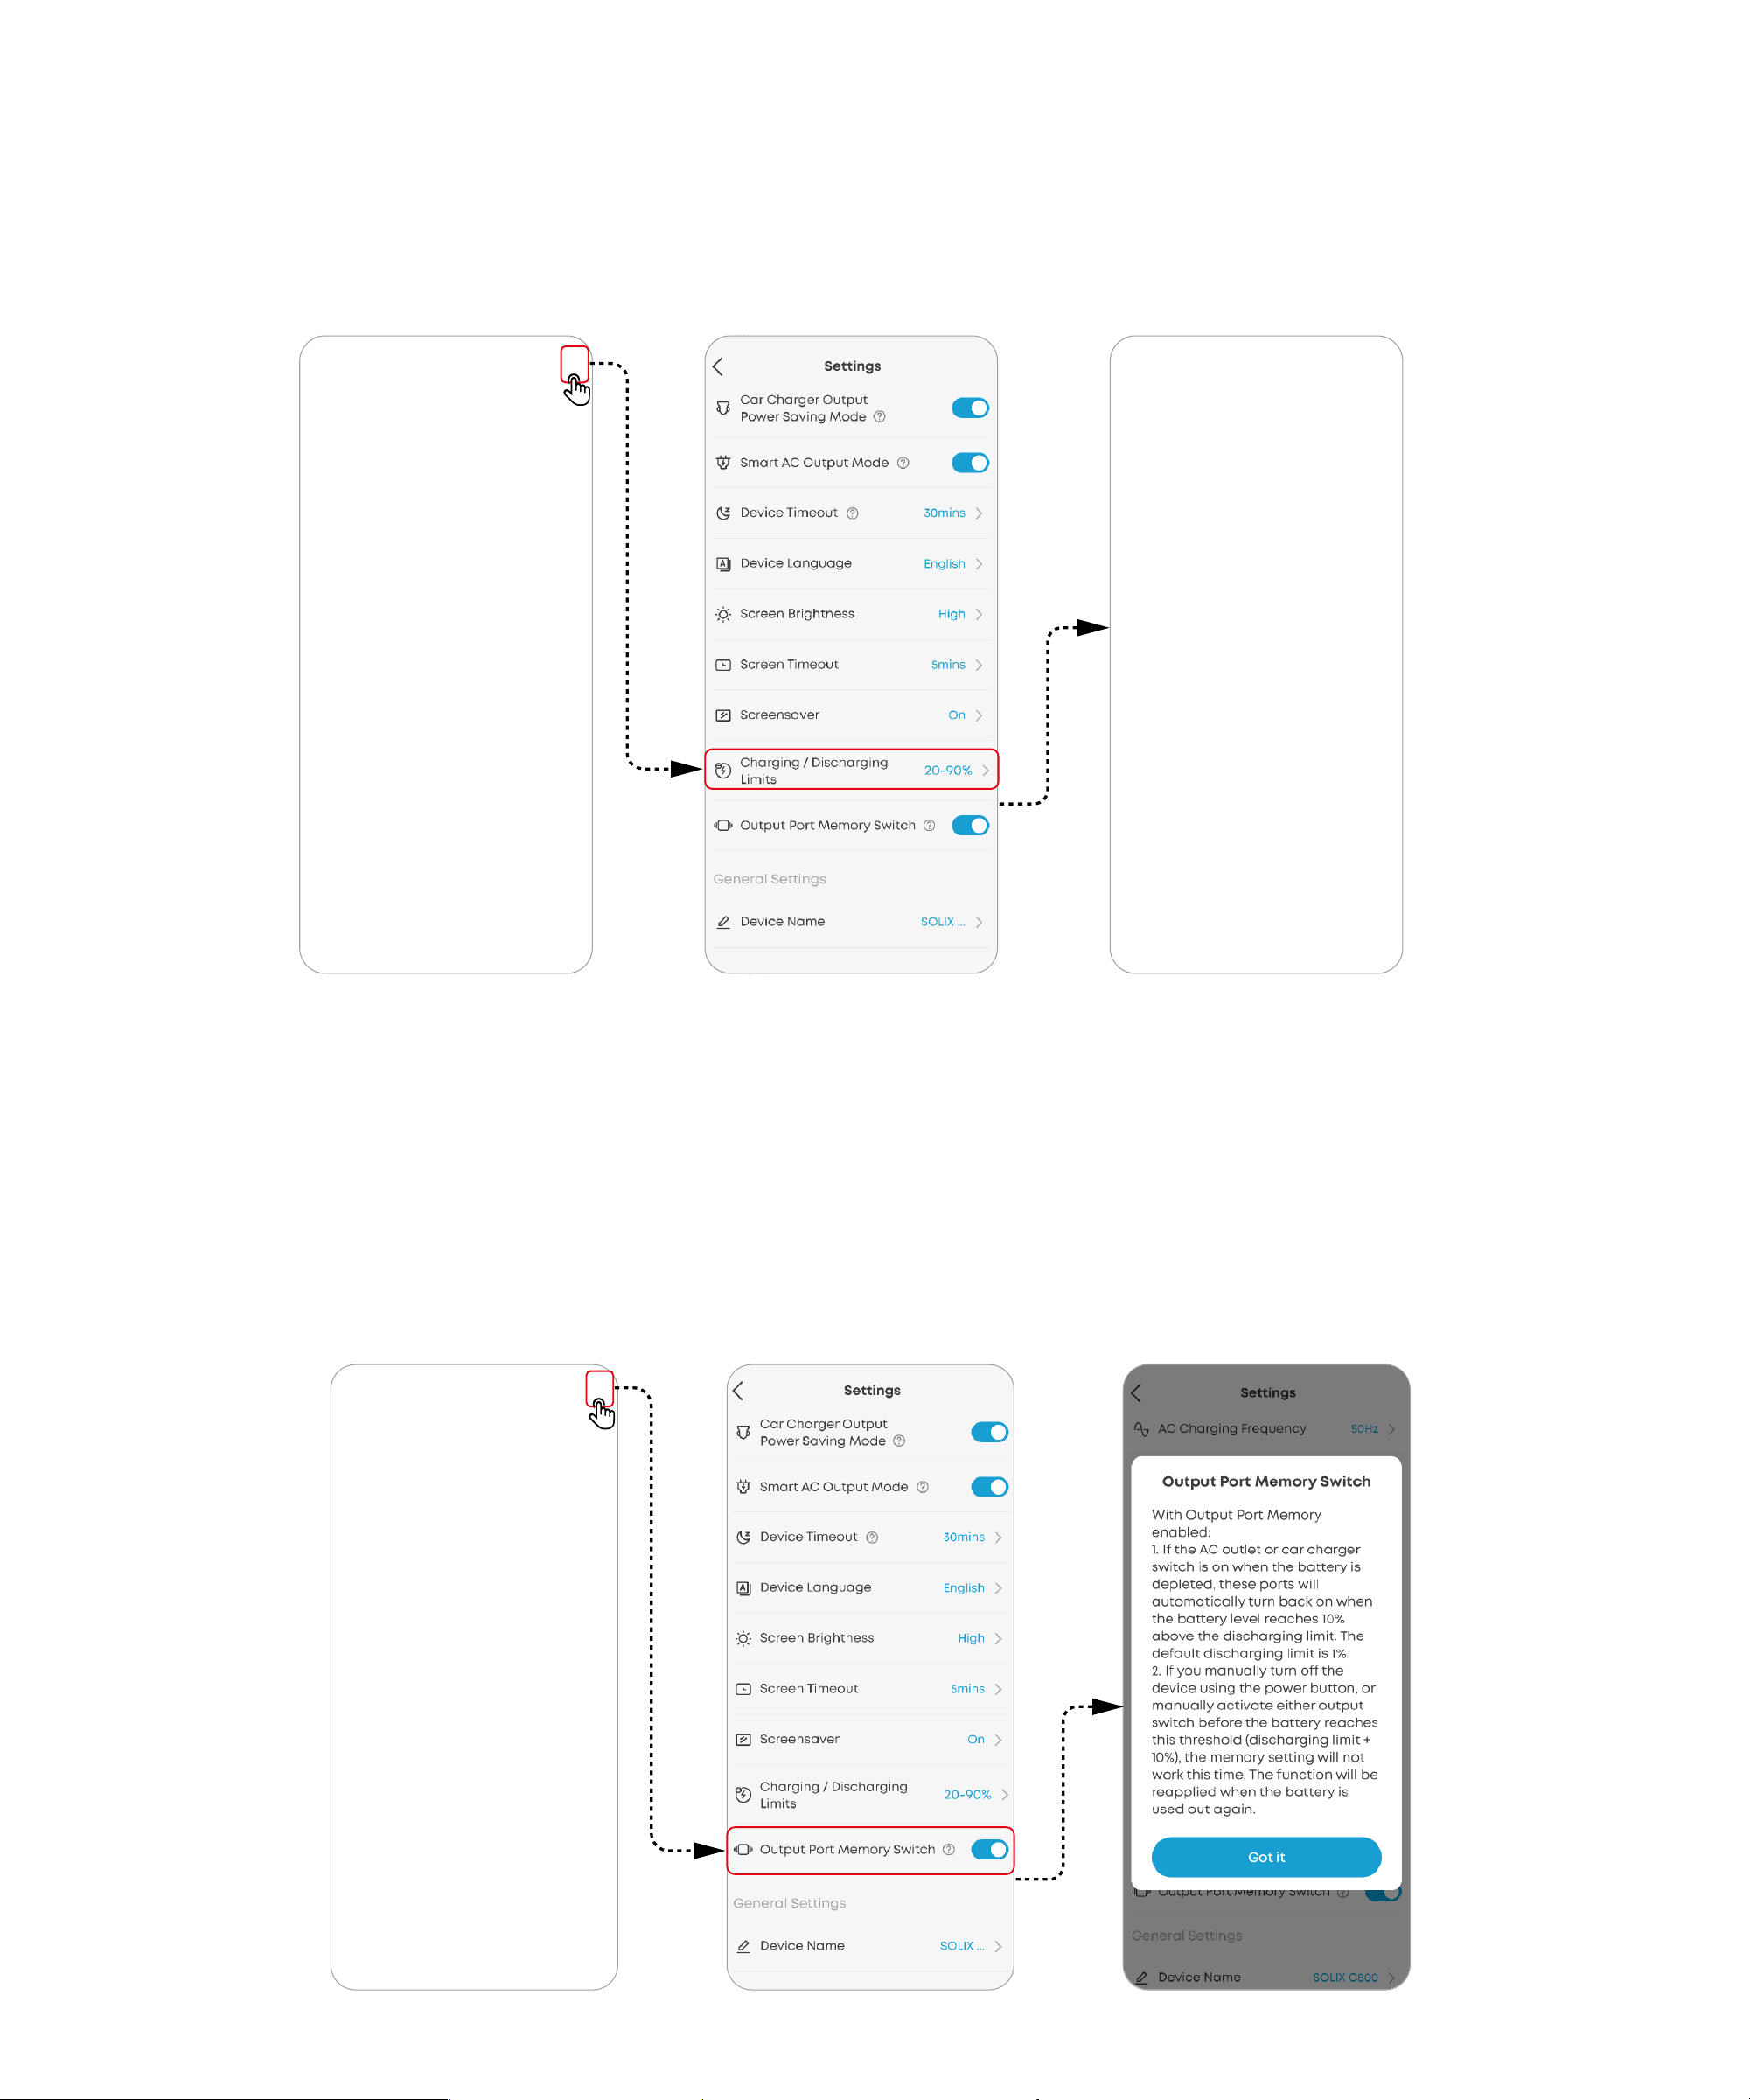
Charging/Discharging Limits
The upper charging limit and lower discharging limit of the power station can be set in the app. When recharging
the power station, once the selected upper charging limit is reached, the recharging will automatically stop. When
charging a device by power station, it will stop once the selected lower discharging limit is reached. This feature
allows the battery to improve peormance.
Output Port Memory
The output port memory switch can be turned on or o in the app.
On: If the power station is powered o due to abnormal operating conditions or low battery level, it will automatically
memorize the on/o status of AC output and car charger ports. When the power station is recovered to a normal
condition or recharged to the State of Charge (SOC) lower limit plus 10%, the on/o status of AC and DC output ports
will be restored.
O: The power station will not automatically memorize the on/o status of AC output or car charger ports.
12
Power Mode
Standard Mode
Standard Mode is the default mode if no other mode is selected.
Time-of-Use (TOU) Mode
Set time-of-use periods for automatic power scheduling to minimize costs. The power station will schedule its battery
charging and discharging depending on the period settings.
Under this mode:
• If the power station's state of charge (SOC) is below the Backup Power level, the power station will function the
same as the Standard Mode.
• If the SOC is higher than the Backup Power level, the power station will adopt dierent power use strategies in
dierent TOU periods.
Period AC Output Ports
DC Output Ports
/ Car Socket
Power Station Recharging
Peak
Power source priority:
1. Photovoltaic Power
2. Power Station Batteries
3. Grid
Power source:
Power Station
Power source:
Photovoltaic Power (excess power beside load
demand)
(Power Station will not be charged from the grid
when its SOC is higher than the Backup Power level.)
Mid-Peak
Power source priority:
1. Photovoltaic Power
2. Grid
(Power Station will not supply
power to AC output ports.)
Power source:
Power Station
Power source:
Photovoltaic Power (excess power beside load
demand)
(Power Station will not be charged from the grid
when its SOC is higher than the Backup Power level.)
O-Peak
Power source priority:
1. Photovoltaic Power
2. Grid
(Power Station will not supply
power to AC output ports.)
Power source:
Power Station
Power source priority:
1. Photovoltaic Power (excess power beside load
demand)
2. Grid
13
Storm Guard
When Storm Guard is enabled, the power station will receive weather notifications based on your location and
peorm recharging at the fastest speed before severe weathers. Under this mode, the power station will be fully
charged regardless of the preset charging limit or AC recharging limit.
Fast Charging Plan
When Fast Charging Plan is enabled, the power station will peorm recharging at the fastest speed in the time
periods you set. Under this mode, the power station will be fully charged regardless of the preset charging limit or AC
recharging limit.

14
FAQ
1. What is the maximum power output of the AC output ports?
The AC output ports can deliver a maximum of 2,400W rated power to connected devices.
2. What should I do when using a DC input to charge Anker SOLIX C2000 Gen 2 Portable Power Station?
1) Use Anker original wiring to achieve better charging peormance. Please note that the XT60i input port supports
11V to 60V input voltage. When the input voltage is between 11V and 28V, the maximum input current is 8.2A. When the
input voltage is between 28V and 60V, the maximum input current is 17A, and the maximum input power is 800W.
2) When charging with multiple solar panels, ensure that each solar panel is connected in parallel, and the input
voltage is less than or equal to 60V, otherwise the power supply may be damaged.
3. Can the USB-C ports charge the power station (input only), or are they output only?
The USB-C ports support output only.
4. What should I do when AC recharging fails?
If AC recharging does not work, check if the overload protection switch is turned on. If it is on, press to reset and
then continue recharging.
5. Why is the power station not working aer it hasn't been used for a long time?
If the power station is stored at a low capacity for a long time, lithium batteries will self-consume power which may
lead to a quick discharge. This oen leads to poor conductivity and a reduced battery lifespan that causes the
battery not to work.
6. How should I store and maintain the power station?
To store your portable power station, please make sure that you:
(1) Power o the power station when not in use to avoid battery power loss.
(2) Store in a dry and cool area.
(3) Check battery capacity each month. If the battery level is below 30%, charge to 100%.
(4) If the power station will not be used for an extended period, fully charge it to 100% at least once every three
months.
7. Can solar charging and AC charging be peormed simultaneously?
Yes. When solar and AC charging are peormed at the same time, the power station prioritizes maximizing the use
of solar energy for charging, and the remaining charging capacity is supplemented by AC charging.
8. Why can't my device work with the power station's AC output?
Some devices require a neutral-ground bond to function properly. The power station uses a floating ground design,
so you'll need to purchase a ground neutral plug. Simply plug the ground neutral plug into one of the AC outlets on
the power station, and your device will work as expected.
9. How should I enable/disable the IoT functionality?
The Bluetooth broadcasting will be auto-enabled/disabled as you power on/o the power station.
If you want to reset the connection, power o the power station and press the the main power button for 7 seconds
until the resetting icon appears on the screen. Then you can reset the connection following the instructions on the
Anker app.

15
Specifications
Rated Battery Capacity 51.2VDC / 40,000mAh / 2,048Wh
AC Input Port (Charging) 120V~15A Max, (<3 hours), 1,800W Max, 12A (continuous), 60Hz, L+N+PE
AC Input / Output Port (Bypass Mode) 120V~15A Max, 1,800W Max, 60Hz, (<3 hours when current exceeds 12A), L+N+PE
AC Output Port (Inverter Mode) 120V~20A, 60Hz, 2,400W Max, L+N+PE
AC Output Port (TT-30) 120V~20A, 60Hz, 2,400W Max
AC Output Port (Total) 2,400W Max
XT-60 Input 11V-28V
8.2A, 28V-60V 17A Max, (800W Max)
Car Charger Output 12V
10A
USB-A1 Output 5V
2.4A (12W Max)
USB-C3 Output 5V
3A (15W Max)
USB-C2 Output 5V
3A / 9V 3A / 12V 3A / 15V 3A / 20V 5A / 28V 5A (140W Max)
USB-C1 Output 5V
3A / 9V 3A / 12V 3A / 15V 3A / 20V 5A / 28V 5A (140W Max)
USB-A1 and USB-C3 Total Output 5V
4A (20W Max)
Discharging Temperature -4°F to 104°F / -20°C to 40°C
Charging Temperature 32°F to 104°F / 0°C to 40°C