Crema Deluxe
TM
Semi-Automatic
Espresso Machine
RJ54-G-SS-D-SERIES
COVER DRAWING

2
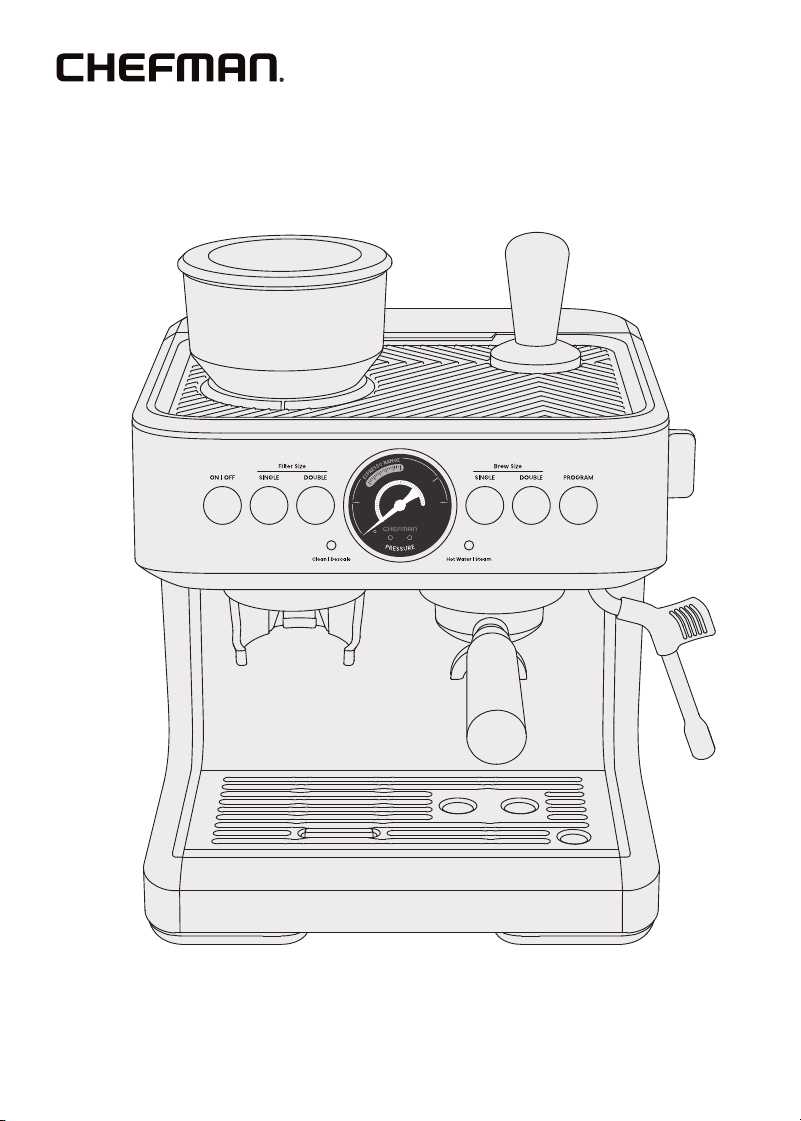
Get to Know Your
Espresso Machine
1. Control panel
2. Integrated conical burr grinder
3. Coffee bean hopper
4. Cup warming tray (with tamper storage groove)
5. Removable water tank
6. Steam | Hot Water knob
7. Swiveling steam wand
8. Tamper
9. Milk pitcher
10. Cleaning brush
11. Portafilter pipe cleaner
12. Cleaning pin
13. Brew head
14. Removable drip tray
15. Accessory storage space (below drip tray)
16. Double-shot portafilter basket
17. Single-shot portafilter basket
18. Grinding funnel
19. Water filter holder
20. Charcoal water filter
21. Portafilter
22. Grinder activation switch
23. Grinder outlet
READ ALL INSTRUCTIONS BEFORE USE
For your safety and continued enjoyment of this product,
always read the instruction manual before using.
3
Get to Know Your Espresso Machine
FEATURES DRAWING
3
5
6
7
1
8
21
4
17 16 1112 10 91820 19
13
15
14
22
23
2
4
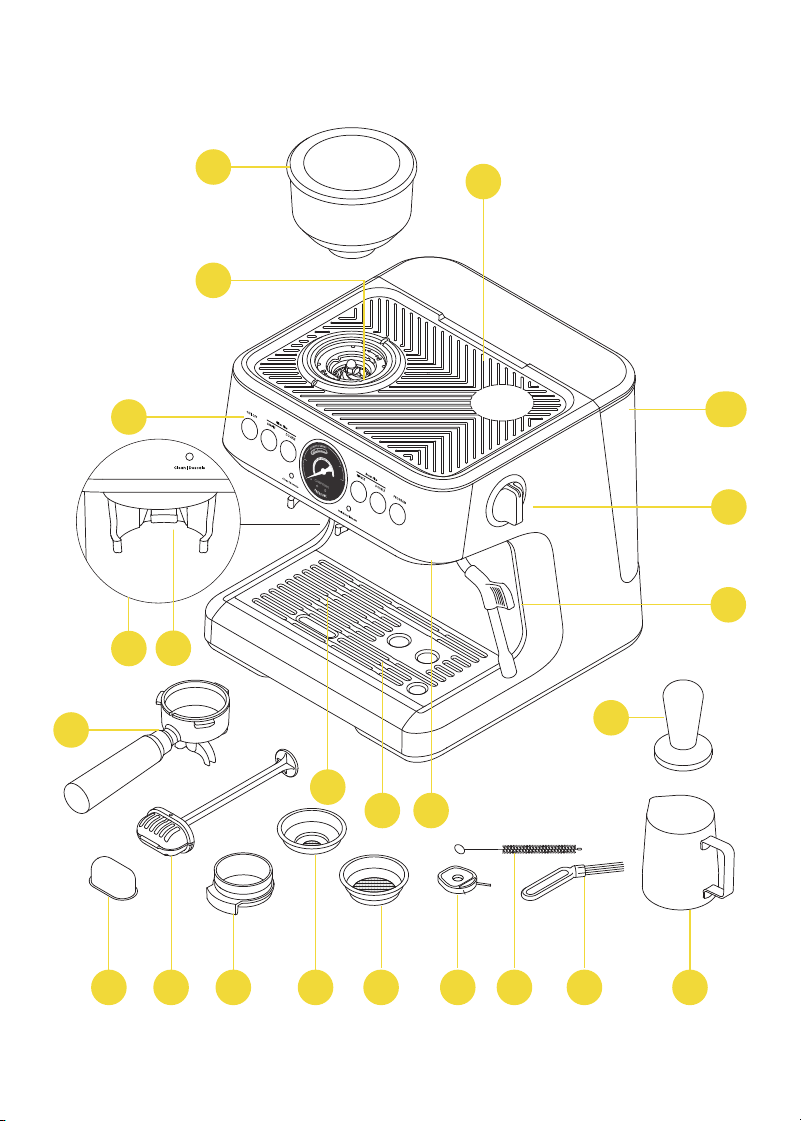
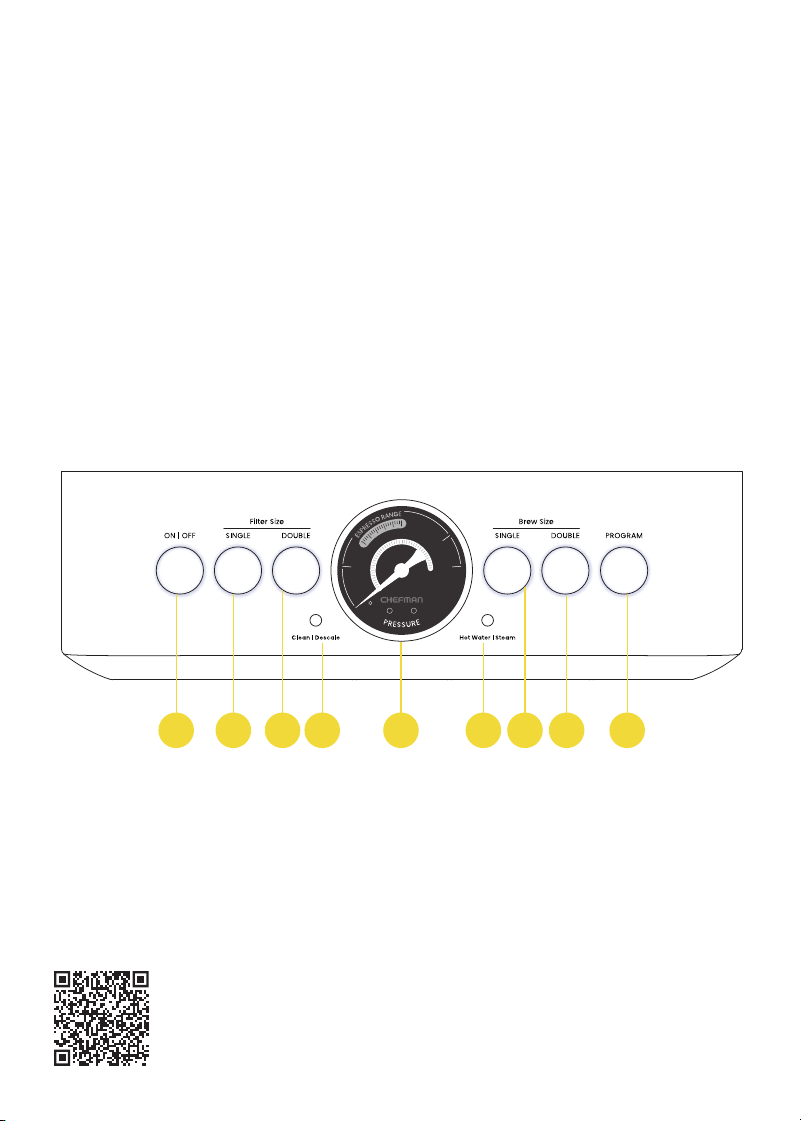
Control Panel
1. ON | OFF button
2. SINGLE Filter Size button (for grinding)
3. DOUBLE Filter Size button (for grinding)
4. Clean | Descale indicator light
5. Brewing pressure gauge
6. Hot Water | Steam indicator light
7. SINGLE Brew Size button
8. DOUBLE Brew Size button
9. PROGRAM button
CONTROL PANEL
1 2 3 4 5 6 7 8 9
Scan here for a quick video
tour of all the features and
accessories on your Crema
Supreme
TM
Espresso Machine.

5
SAFETY INSTRUCTIONS &
IMPORTANT SAFEGUARDS
WARNING: When using electrical appliances, basic safety precautions should
always be followed, including:
1. Read all instructions.
2. Do not touch hot surfaces. Use handles or knobs.
3. To protect against fire, electric shock and injuries to persons, do not
immerse cord, plug charging base, or unit in water or other liquid.
4. Close supervision is necessary when any appliance is used by or
near children.
5. Unplug from outlet when not in use and before cleaning. Allow to cool
before putting on or taking off parts, and before cleaning the appliance.
6. Do NOT operate any appliance with a damaged cord or plug or after the
appliance malfunctions, or has been damaged in any manner. If this
should occur, contact Chefman Customer Support.
7. The use of accessory attachments not recommended by Chefman may
result in fire, electric shock, or injury to persons.
8. Do NOT use outdoors.
9. Do NOT let cord hang over edge of table or counter, or touch hot surfaces.
10. Do NOT place on or near a hot gas or electric burner, or in a heated oven.
11. To disconnect, turn any control to off, then remove plug from wall outlet.
12. Do NOT use appliance for other than intended use.
13. Scalding may occur if the brew chamber is opened during heating cycle.
14. Avoid contact with moving parts.
15. Check grinder basket for presence of foreign objects before using.
16. Use the coffee grinder to grind roasted coffee beans only. Grinding other
substances, such as nuts, spices or unroasted beans may dull the blade
and cause poor grinding or injury.
17. Do NOT operate the grinder without the hopper lid in position. Keep
fingers, hands, hair, clothing, and utensils away from the hopper during
operation.
18. The temperature for operating or storing the appliance shall be higher
than 32°F.

6
SAFETY INSTRUCTIONS &
IMPORTANT SAFEGUARDS
SAVE THESE INSTRUCTIONS
FOR HOUSEHOLD USE ONLY
WARNING: Improper use of the grounding plug can result in electric shock.
Grounding Instructions
This appliance must be grounded. In the event of an electrical short circuit,
grounding reduces the risk of electric shock by providing an escape wire for the
electric current. To protect against electrical shock, this appliance is equipped
with a cord having a 3-prong grounding-type plug for insertion into a proper
grounding-type electrical outlet.
Do NOT alter the plug for use in a 2-prong outlet. If the plug will not fit into an
outlet, have a proper outlet installed by a qualified electrician.
Short Cord Instructions
A short power-supply cord is provided to reduce the hazards of entanglement
or tripping over a longer cord. Longer detachable power-supply cords or
extension cords are available and may be used if care is exercised in their use.
If a longer detachable power-supply extension cord is used:
1. The marked electrical rating of the extension cord should be at least as
great as the electrical rating of the appliance;
2. If the appliance is of the grounded type, the extension cord should be a
grounding-type 3-wire cord; and
3. The longer cord should be arranged so that it will not drape over
the countertop or tabletop where it can be pulled on by children or
tripped over.

7
California Proposition 65:
(Applicable for California Residents only)
WARNING: Cancer and Reproductive Harm
www.P65Warnings.ca.gov
Do not place the appliance on a
stovetop or any other heatable surface,
even if stovetop is not on.
Doing so is a fire hazard.
SAFETY INSTRUCTIONS &
IMPORTANT SAFEGUARDS
Power Cord Safety Tips
1. Never pull or yank on the cord or the appliance.
2. To insert the plug, grasp it firmly and guide it into the outlet.
3. To disconnect the appliance, grasp the plug and remove it from the outlet.
4. Never use the product if the power cord shows signs of abrasion or
excessive wear. Contact Chefman Customer Support for additional
guidance and support.
5. Never wrap the cord tightly around the appliance, as this could place
undue stress on the cord where it enters the appliance and cause it to
fray and break.
DO NOT OPERATE THE APPLIANCE IF THE POWER CORD SHOWS ANY DAMAGE
OR IF THE APPLIANCE WORKS INTERMITTENTLY OR STOPS WORKING ENTIRELY.

8
How to Use the
Espresso Machine
Before First Use
1. Remove all packaging materials and check to ensure that all parts and
accessories are accounted for. Read and remove all stickers, except for
the rating label, which should remain on the unit.
2. Remove and hand wash the water tank, portafilter, portafilter baskets,
tamper, drip tray, and milk pitcher with a mild detergent and water. Rinse
and dry well. Do not use abrasive cleansers or pads, which can damage
the surface of the parts. Do not immerse the unit housing, power cord, or
plug in water or any other liquid.
Install the Water Filter & Fill the Tank
1. Soak the charcoal filter in water for 5 minutes, then rinse thoroughly under
running water.
2. Place the filter in the "basket" portion of the filter holder, then snap shut.
3. Holding the filter holder by the stem, install it in the tank, pressing it firmly
into place.
4. Fill the tank with cool water.
5. Place the tank on the back of the unit, ensuring it’s securely in place.
Fill the Hopper & Set Grind Size
The unit offers 30 grind sizes, allowing you to achieve the perfect extraction.
We recommend using 100% arabica coffee beans, preferably a dark espresso-
style roast. For the best results, use coffee beans as soon as possible after
they are roasted and grind them just before using.
1. Ensure the hopper is locked into place; if not, twist clockwise until
the notch on the base of the top cover aligns with the tick marks on
the hopper.
2. Remove the lid and fill the hopper with about 1 oz of coffee beans. Replace
the hopper lid.
3. Place a container below the grinder chute. Plug in the unit and press
the ON | OFF button to turn it on. Press and release the DOUBLE Filter Size
button. When grinding finishes, press and release it again. Continue
running grind cycles until all the beans are ground, then discard the
grounds (this removes any packing debris from the interior of the grinder).

9
How to Use the Espresso Machine
4. To adjust the grind size, rotate the hopper until the notch on the top cover
aligns with your chosen size marking on the hopper, from fine to coarse.
We recommend grind size 12 to start, and you can adjust as needed
based on your results.
5. When the grind size is set, fill the hopper with fresh beans before use.
A minimum of 2 oz of beans are needed for proper unit operation.
Prime & Flush the Espresso Maker
1. Place a large heatproof cup on the drip tray below the brew head.
2. Press the DOUBLE Brew Size button and “brew” a cup of plain water to
clean any debris from the water lines. We also recommend doing this as
a first step to warm the brew head and internal parts when the unit has
been unused for several hours.
3. Discard the water and repeat.
4. Position the tip of the steam wand over the drip tray and turn the
knob to HOT WATER. Let the hot water run for a few seconds to clean
the wand interior.
10
Quick Start
How to Grind & Tamp Coffee
1. Ensure that the water tank is filled
and installed, and the hopper
is filled with fresh coffee beans.
Plug in the unit and press the
ON | OFF button to turn it on.
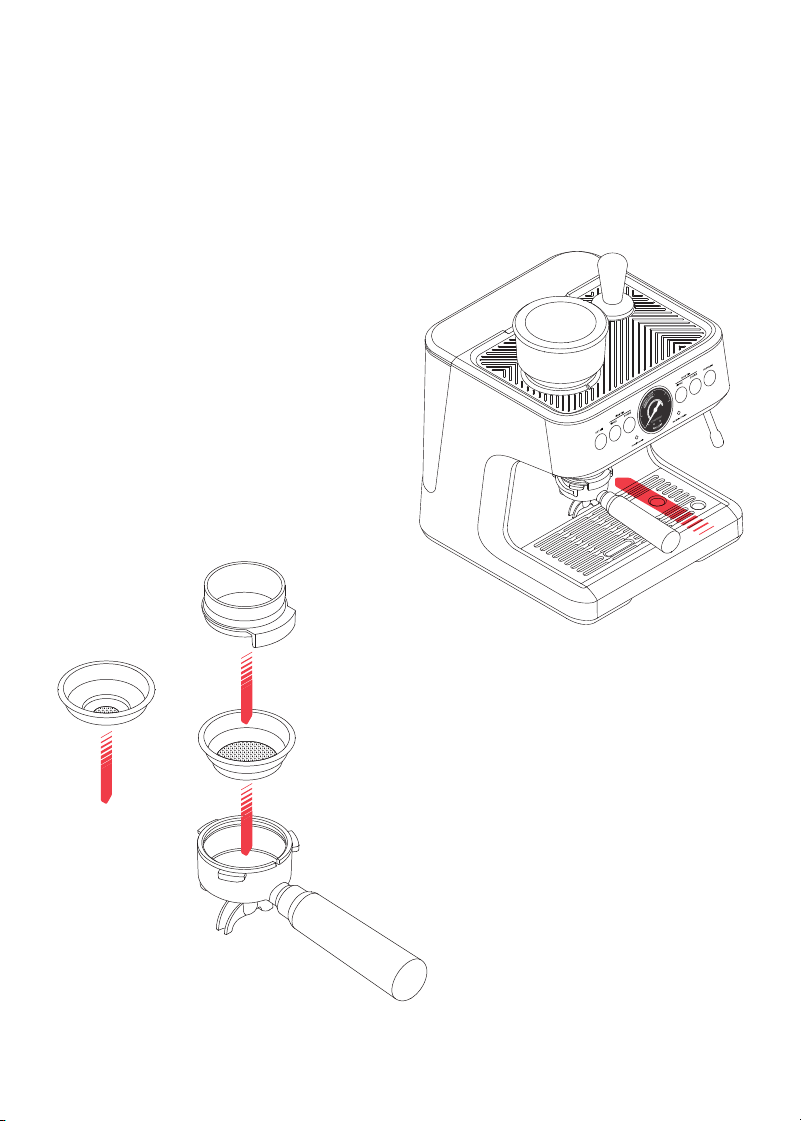
2. Choose a portafilter basket
(single- or double-shot) and
snap it into the portafilter. If
desired, place the grinding
funnel over the portafilter and
basket. The funnel prevents
grounds from escaping
from the basket during the
grinding process, especially
useful when grinding the
double-shot amount.
3. Slide the portafilter under the
grinder outlet, with the lip of
the basket just above the
grinder arms.
SERIES 1 - STEP 1
STEP 2
11
Quick Start
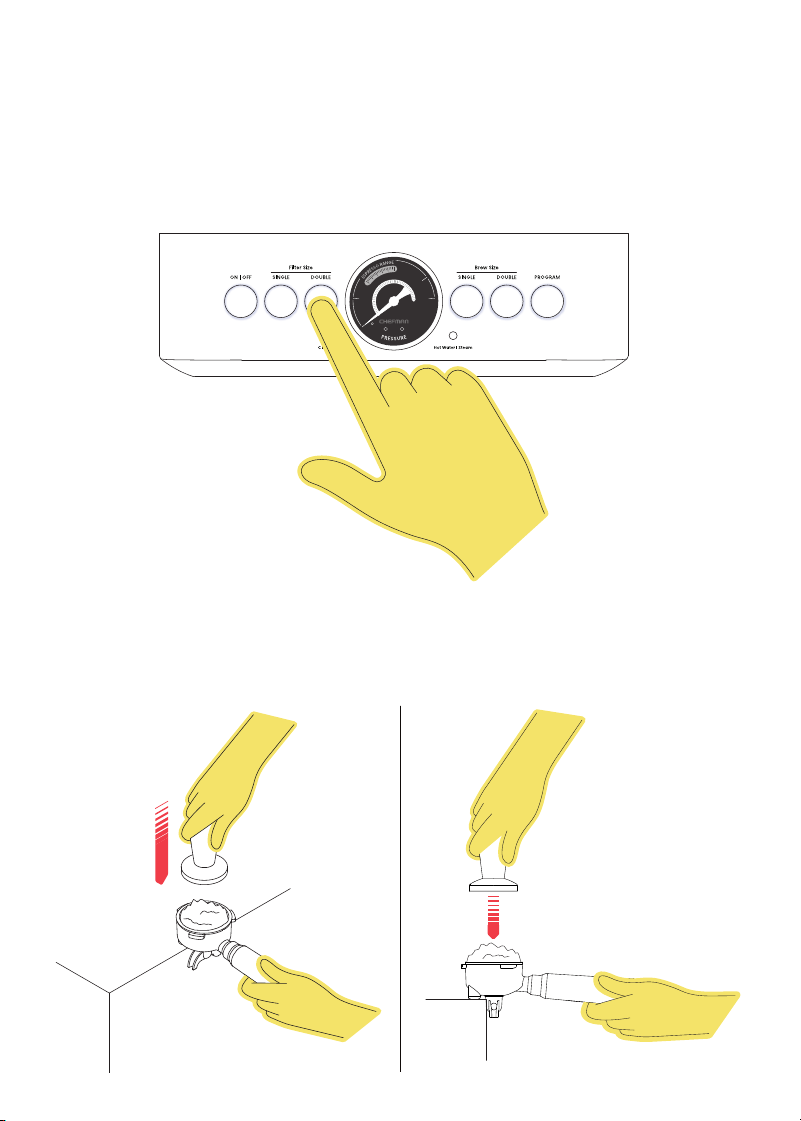
4. Press SINGLE or DOUBLE Filter Size button. The unit will automatically
grind the correct amount of coffee for the size you’ve chosen,
but you can customize to adjust the amount if you wish (see p. 17).
Alternatively, you can manually grind your preferred amount of coffee by
pressing the portafilter further back into the grinding cradle, activating
the grinding switch. When you have the desired amount of coffee simply
pull the portafilter out and grinding will stop.
STEP 3
STEP 4
5. When the grinder stops, remove the portafilter. Remove the grinding
funnel, if used, and rest the portafilter’s rubber base on a flat surface.
Holding the handle with one hand, use the other hand to firmly tamp
the coffee with the tamper.
STEP 4
12
Quick Start
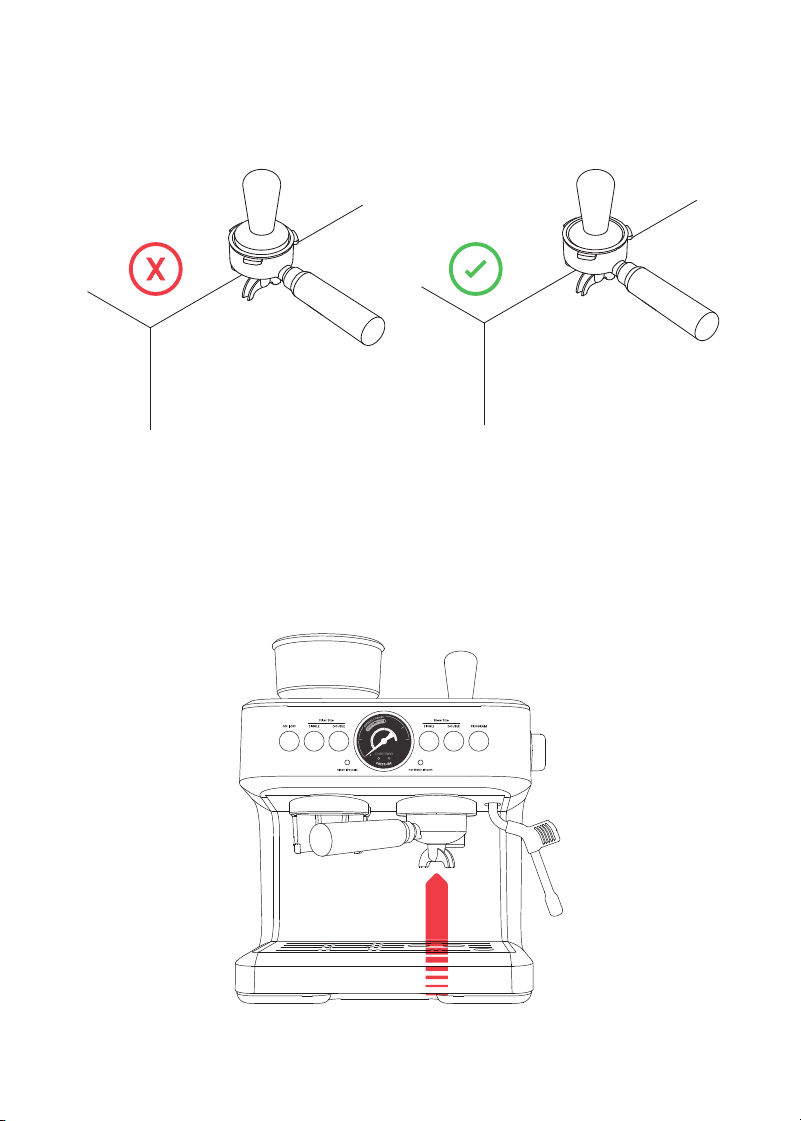
6. It may take some practice to tamp the coffee with just the right amount
of pressure. Be sure to apply even pressure across the whole surface of
ground coffee. As a rule of thumb, the top of the tamper “cap” should
end up aligned with the top edge of the portafilter basket.
7. Wipe any excess coffee grounds from the rim of the portafilter basket.
How to Brew Espresso
1. With the handle pointing at an angle to the left, insert the portafilter up
into the brew head.
SERIES 4 - STEP 1
SERIES 2 - STEP 1
13
Quick Start
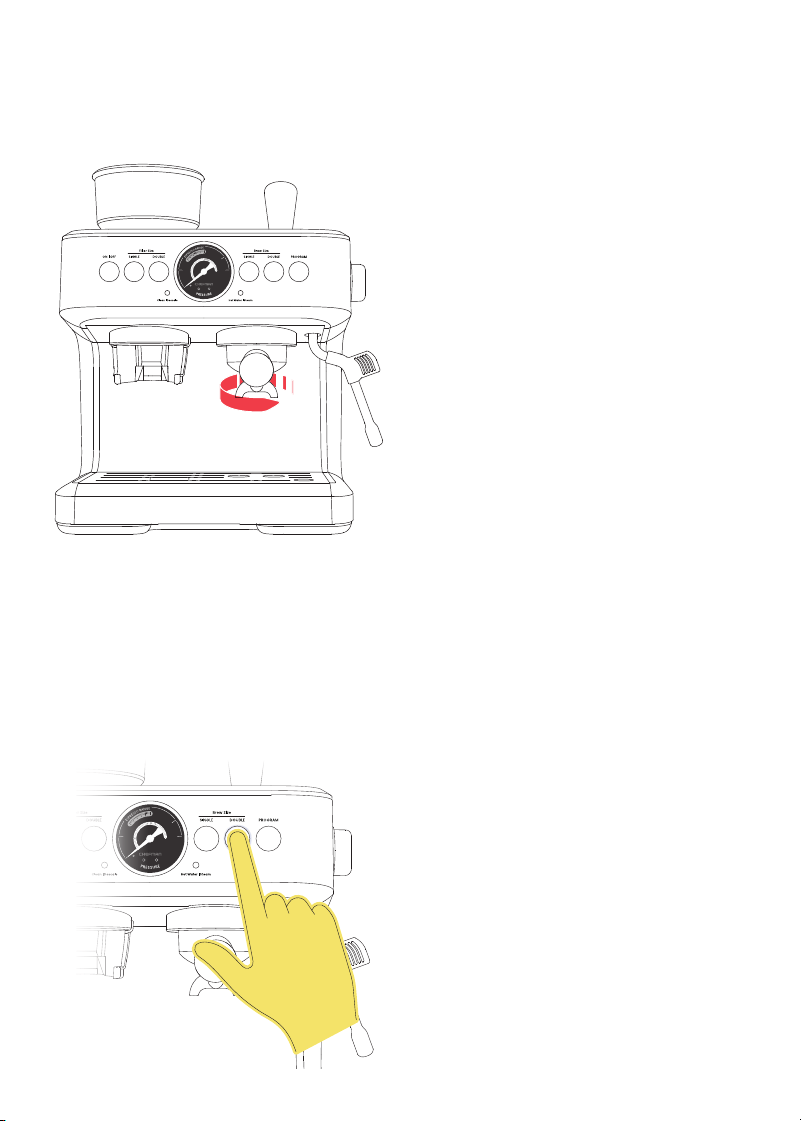
2. Turn the handle to the right
to lock it into place. When the
portafilter is fully locked, the
handle will point straight forward.
3. When all the lights around the
buttons turn solid, the unit is
preheated and ready to brew.
Place a cup below the brew head
and press the SINGLE or DOUBLE
Brew Size button, corresponding
to the basket size used.
4. After a few seconds, espresso
will begin flowing from the brew
head. The unit will stop after the
preset shot volume has been
extracted. To stop brewing mid-
cycle, press your selected brew
button again. You can also re-
program the volume of espresso
extracted with the preset buttons
(see p. 17). NOTE: The amount of
espresso extracted in the cup will
vary depending on your tamping
pressure, grind size, and grind
amount, as well as water volume
and temperature settings.
5. When finished brewing, wait
60 seconds, then remove the
portafilter carefully to slowly
release pressure. Immediately
discard the spent grounds. Turn
the portafilter upside down over
a waste container and give it
a good hard tap; the basket
doesn’t fall out easily. Remove
the basket from the portafilter
using the flat end of the cleaning
brush tool and immediately rinse
both with hot water.
6. After brewing the unit will
return to standby mode.
After 7 minutes in standby mode,
the unit will go into sleep mode.
STEP 3
STEP 2
14
Quick Start
How to Steam & Froth Milk
Thanks to the espresso maker's double boiler, you can steam milk while the
espresso brews, for perfectly fresh, hot cappuccinos and lattes.
1. Fill the milk pitcher no more than 2/3 full with cold milk. You can use any type
of dairy or non-dairy milk, although milk with some fat content produces
the best froth. For the best results with plant-based milks, look for those
specifically designed for coffee drinks.
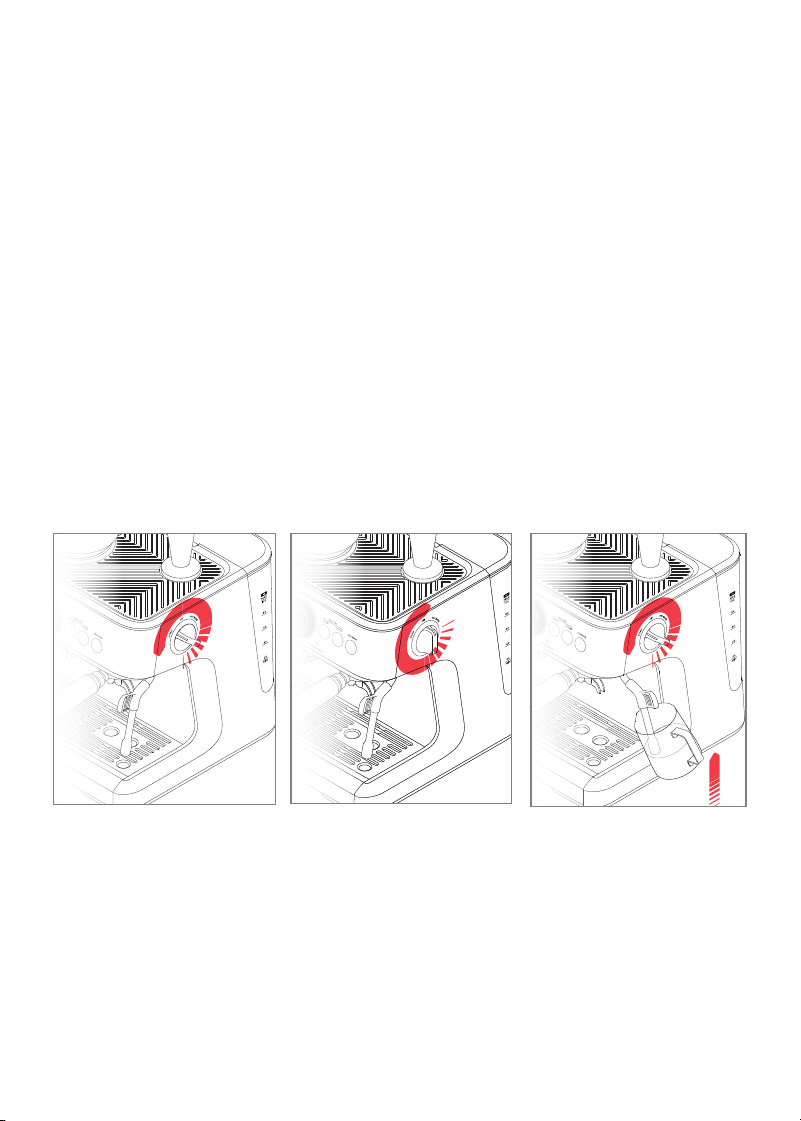
2. Swivel the steam wand so the tip is over the drip tray. With the unit turned
on, turn the Steam | Hot Water knob to STEAM. The ON | OFF light and the Hot
Water | Steam light will blink as the unit heats. NOTE: While the boiler heats,
a small amount of water may purge from the wand. This is normal.
3. When the ON | OFF light stops blinking, the unit is ready. Briefly turn the
Steam | Hot Water knob back to OFF. The Hot Water | Steam light will turn off.
4. Swivel the steam wand out to the side of the machine and raise the milk
pitcher under it until the tip of the wand is just submerged beneath the
surface of the milk. Quickly turn the Steam | Hot Water knob back to STEAM.
The Hot Water | Steam light will start blinking again (pausing the steam like
this prevents splatter when the wand is inserted into the milk).
5. As the unit steams, keep the tip of the wand just below the surface of the
milk to introduce air, slowly lowering the pitcher as the volume increases.
When the froth reaches the desired volume, submerge the wand deeper to
continue heating.
2
STEP 2
3 4
15
Quick Start
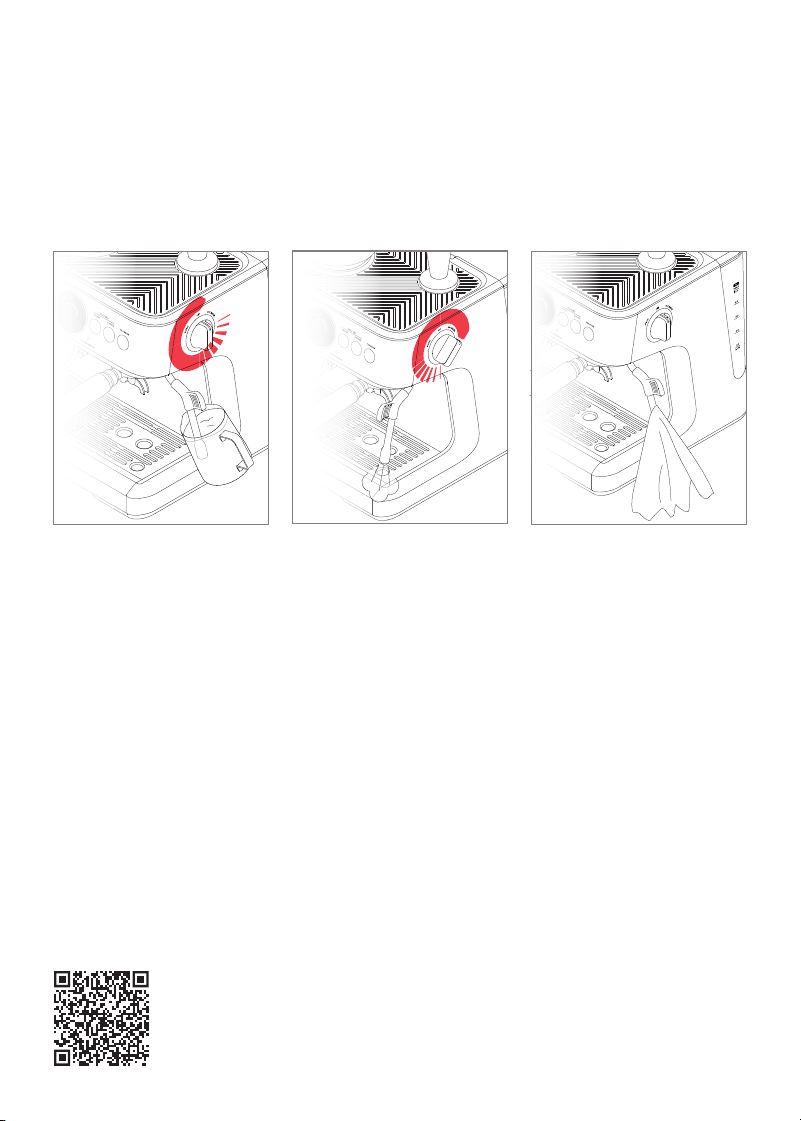
6. When the milk reaches 140-150°F (the pitcher will be hot to the touch), return
the Steam | Hot Water knob to the OFF position and remove the wand from
the milk. Tap the pitcher on the counter to pop any big bubbles, then swirl it
to even the texture of the milk.
7. Immediately position the tip over the drip tray and briefly turn the knob to
HOT WATER to clean out the inside.
8. Wipe down the steam wand with a damp cloth.
How to Make Hot Water
The steam wand also produces hot water, perfect for warming your cup before
brewing or making an Americano.
1. With the unit heated and in standby mode, position the tip of the steam
wand over the drip tray. Place an empty cup (or cup of espresso, if making
an Americano) under the wand.
2. Turn the Steam | Hot Water knob to the HOT WATER position. The Hot Water |
Steam light will start blinking.
3. When you are finished dispensing water, turn the Steam | Hot Water knob to
its OFF position.
Scan here for a video
tutorial on the art
of steaming and
frothing milk.
6 8
7
1616
Perfecting Your Espresso
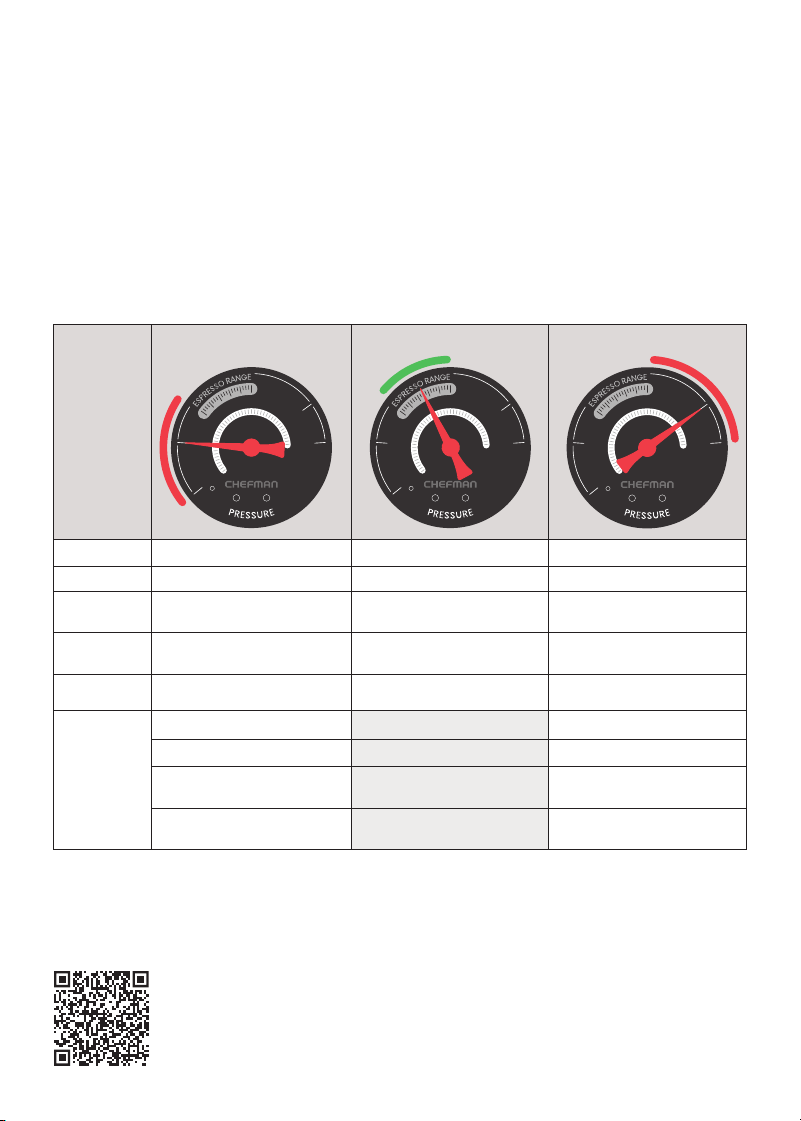
The key to a delicious cup of espresso is getting the extraction pressure right.
Watch the gauge while your espresso is brewing and make sure it is in the
“Espresso Range.” If you’re not achieving the ideal extraction, you should start
by adjusting the grind size used, and adjusting the compression pressure
as you tamp the grounds in the basket. If you are still not achieving perfect
extraction, you can adjust the parameters of grind time, shot volume, and
extraction temperature, as detailed after the chart. See also p. 8–9 for adjusting
the grind size.
Under Extracted Perfect Extraction Over Extracted
Flavor
Acidic, weak flavor Rich, smooth flavor Bitter, burnt flavor
Color
Pale brown Deep brown Black-brown
Flow rate
Fast flow, like water Slow but steady flow, like
syrup or cream
Coffee drips from
brew head
Extraction
time
20 seconds or less 25-40 seconds* More than 45 seconds
Crema
Thin, pale crema Fine, mousse-like, and tan Dark, spotty crema
Solutions
Increase grind amount Decrease grind amount
Adjust grind size finer Adjust grind size coarser
Increase brew
temperature
Decrease brew
temperature
Tamp grinds harder Tamp grinds with
less pressure
*A double shot takes longer, but will not be twice the time of a single.
Scan here for video tips
on how to customize
the extraction of
your espresso.
EXTRACTION GUIDE - pressure too low
EXTRACTION GUIDE - pressure too high
EXTRACTION GUIDE - pressure just right

17
Perfecting Your Espresso
How to Adjust Grind Time
The unit’s default grind time is about 9 seconds for a single shot (but can be
adjusted from 5 to 13 seconds) and 13 seconds for a double shot, (but can be
adjusted from 10 to 18 seconds). Changing grind time will change the amount
of ground coffee used for your brew. To adjust the grind time:
1. Press and hold either the SINGLE or DOUBLE Filter Size button. That button
and the PROGRAM button will start to blink and the grinding will begin.
2. When you’ve reached the desired grind time, release the button you’re
holding. Grinding will stop, the unit will beep once, the PROGRAM button
will flash four times, and the new time will be saved.
3. Alternatively, If you'd like to set the grinder to a preferred weight of coffee,
place a cup on a scale under the grinding outlet and zero out the scale.
Press and hold your chosen Filter Size button as above, then grind until
you reach your desired weight, and release the button.
4. To return the grinding time to factory settings: Press and hold either the
SINGLE or DOUBLE Filter Size button AND the PROGRAM button. After the
unit beeps once, release the buttons. The unit will be reset to factory-
programmed grinding time.
NOTE: When using a coarser grind, it is typical for the amount of ground coffee
dispensed to exceed the portafilter basket area. Do not attempt to insert an
overfilled portafilter into the brew head. Whatever can't be tamped down to be
level with the edge of the portafilter must be removed.
How to Adjust Single and Double Shot Volume
The unit’s default brew volume is about 30 ml for a single shot (can be adjusted
from 20 to 150 ml) and 60 ml for a double dose (can be adjusted from 20 to
250 ml). To adjust the volume:
1. Press and hold either the SINGLE or DOUBLE Brew Size button. That button
and the PROGRAM button will start to blink and the brewing will begin.
2. When you’ve reached the desired volume, release the button you’re holding.
Brewing will stop, the unit will beep once, and the new time will be saved.
3. To return the brew volume to factory settings: Press and hold either the
SINGLE or DOUBLE Brew Size button AND the PROGRAM button. After the
unit beeps once and those lights flash twice, release the buttons. The unit
will be reset to factory-programmed brewing volume.

18
Perfecting Your Espresso
How to Adjust Brewing Temperature
The brewing temperature is not the final temperature of your drink; there
are many factors that affect the actual drink temperature, including grind
size, weight of the dose, and tamping pressure. Note, too, that making this
adjustment does not only change the temperature of your finished drink, but
can also affect the extraction of your espresso. See “Perfecting Your Espresso”
on p. 16, for more information. If you wish to only make your drink hotter, you can
preheat the cup and portafilter (see instructions on the following page). Default
brewing temperature is 198°F (92°C) . To change it:
Press and hold the PROGRAM button for 3 seconds, the machine will beep and
the button will flash. Then choose one of the following:
• Press the SINGLE Filter Size button to adjust the temperature to
194°F (90°C).
• Press the SINGLE Brew Size button to adjust temperature to 201°F (94°C).
• Press the DOUBLE Brew Size button to adjust temperature to 205°F (96°C).
After setting the above temperatures, press the PROGRAM button again, the
unit will beep once and return to standby mode. The unit will go back to
standby (and save your changes) after 1 minute if no buttons are pressed.
To reset to the factory default of 198°F (92°C), hold and press the PROGRAM
button for 3 seconds as above, and then Press the DOUBLE Filter Size button,
followed by the PROGRAM button again.
19
Perfecting Your Espresso
To Preheat Your Cup and Portafilter Before Brewing
1. Once the unit is powered on and preheated, place the portafilter (with
desired portafilter basket) without coffee into the brew head. Place the
serving cup underneath. Brew a double shot. Keep the hot water in the
cup and set aside. Alternatively, the cup can be heated with “cleaner”
water from the HOT WATER setting of the steam wand, but this does not
preheat the portafilter.
2. Dry the heated portafilter, then grind coffee, fill the basket, and tamp
following instructions on p. 10-12.
3. Prepare the steamed milk, if using.
4. Drain the water from the cup and dry it.
5. Brew espresso following instructions on p. 12-13
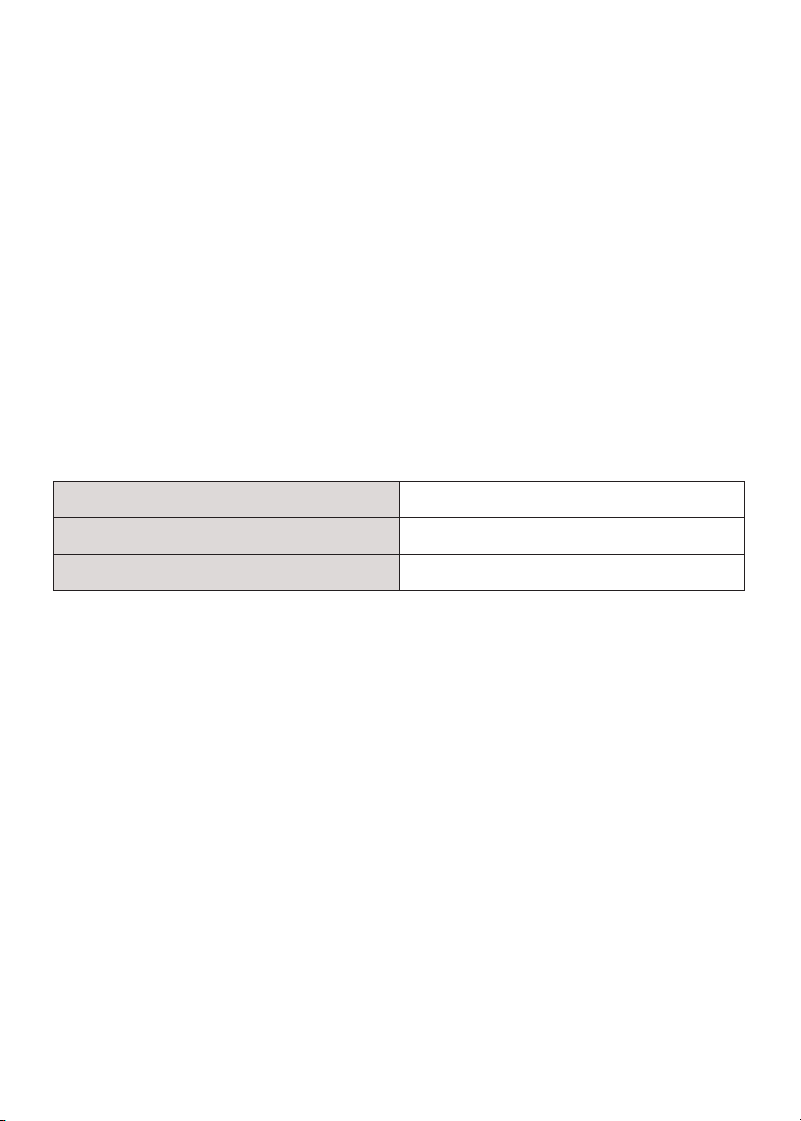
Recommended Grind and Brew Parameters
Dose weight** 12g (single) 20g (double)
Brewing Temperature 198°F (92°C)
Grind Size 12
* * These weights are recommended to produce a dose volume of
approximately 30 ml (single) and 60 ml (double)
How to Reset to ALL Factory Defaults
With the unit in standby mode, press and hold the ON | OFF button and
the PROGRAM button. The unit will beep once and all lights will flash twice,
indicating that any custom settings have been cleared.
20
Guide to Espresso Drinks
Espresso
An intense, small dose (single or
double shot) of coffee, served in
a small demitasse cup.
Ristretto
A very short and intensely flavored
shot of espresso—about half the
volume (15 ml) of a typical shot. To
make a ristretto in this unit, press the
brew size button halfway through
brewing to cut cycle short.
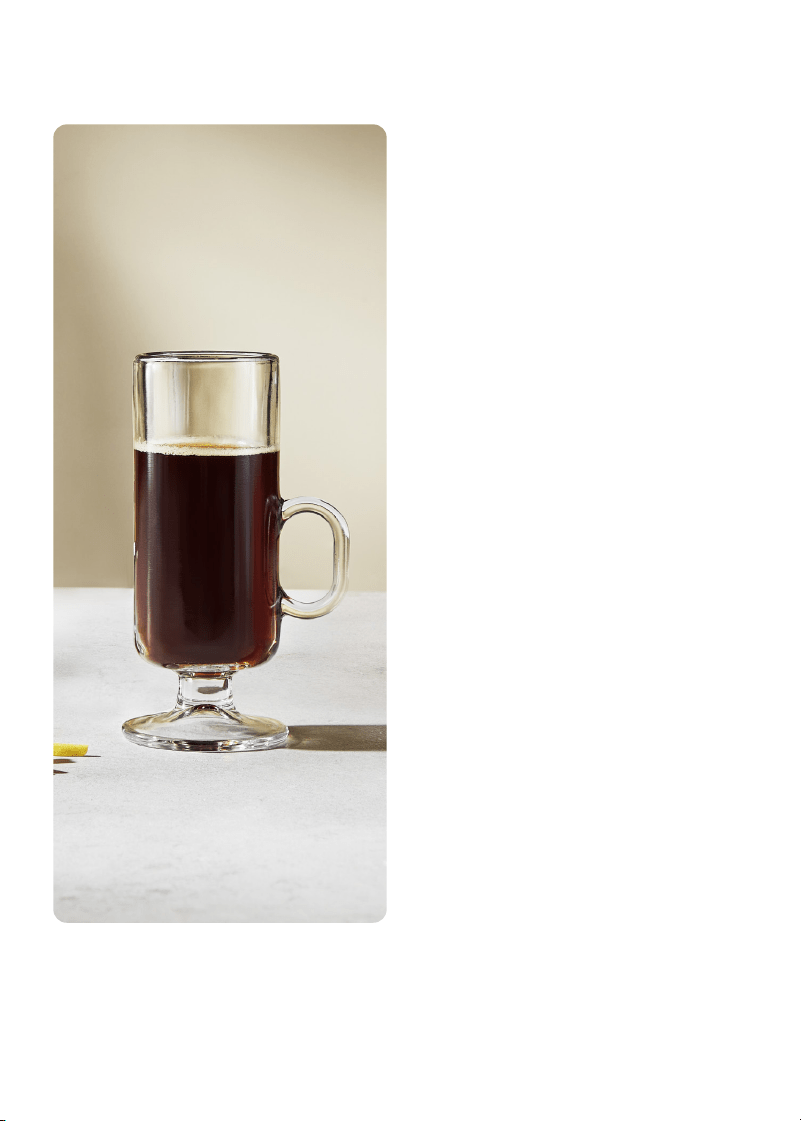
Americano (at left)
A single or double shot of espresso
diluted with hot water so that the
intensity is similar to American
brewed coffee.
Macchiato
A single or double shot of espresso
“marked” with a dollop of milk foam.
Not to be confused with a latte
macchiato, which is mainly steamed
milk marked with a little espresso.
Affogato
A quick, heavenly dessert consisting
of a shot (or two) of espresso poured
over ice cream—traditionally vanilla
but, caramel, chocolate, or hazelnut
are other delicious choices.
21
Guide to Espresso Drinks
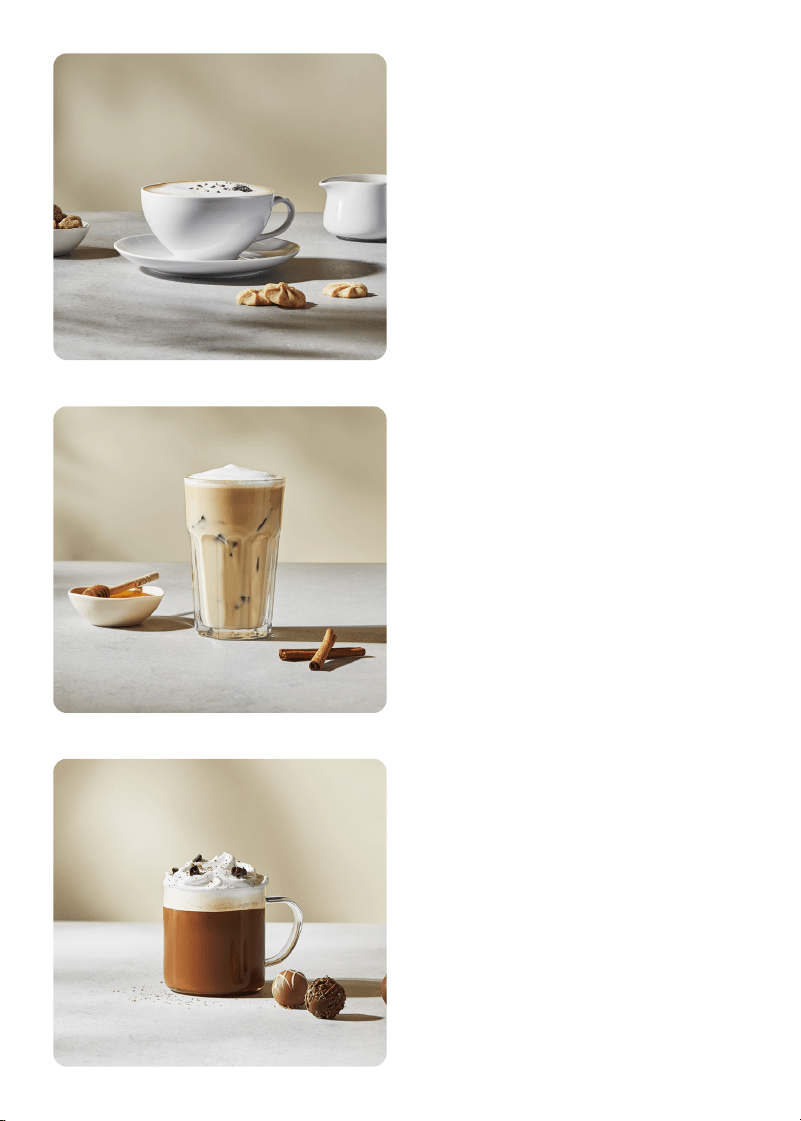
Cappuccino
Named for capuchin monks and
their signature brown robes, this
drink consists of one third espresso,
one third steamed milk, and one
third foamed milk, often dusted
with cinnamon and cocoa.
Latte
A single or double espresso in
a large cup of steamed milk,
capped with a thin layer of foam.
Also delicious over ice, using cold
milk instead of steamed.
Caffe Mocha
Give your latte a chocolate twist by
stirring chocolate syrup into the milk
after steaming. Use a bit less milk
foam than a cappuccino, but top
with whipped cream and chocolate
shavings, if desired.

22
Keep It Clean
How to Clean After Each Use
Perform a few simple steps each time you use the espresso machine to keep
it in top condition:
1. Rinse the portafilter and baskets in hot water immediately after use. If
there are coffee grounds stuck in the holes of the basket, use the pin end
of the cleaning tool to remove them.
2. Wipe the underside of the brew head with a damp cloth or paper towel to
remove any stray coffee grounds. Place a large heatproof cup under the
brew head and run a double-shot cycle with water only (no portafilter in
place) to purge any grounds stuck in the brew head.
3. Remove the drip tray. Wash it (as well as the milk pitcher, if used) in hot,
soapy water. Wipe the drip tray and the storage tray clean with a soft,
damp cloth.
4. If the steam wand is used to steam milk, position the tip over the drip tray
and briefly turn the Steam | Hot Water knob to HOT WATER to clean the
inside of the wand right after steaming. Wipe down the wand with a soft,
damp cloth.
5. If the steam wand tip becomes blocked, turn off the machine and let it
cool down. Use the pin end of the cleaning tool to clear the blockage. If
necessary, you can remove the tip of the wand by twisting it clockwise,
then soak it in hot water until the blockage can be removed.
6. Wipe down the outer housing and cup warming tray with a soft, damp
cloth. Do not use abrasive cleansers, pads or cloths which can scratch
the surface.
7. If storing the machine long term, be sure that the Steam | Hot Water knob
is in the OFF position, remove the coffee beans from the hopper and clean
the grinder (see instructions that follow), and empty the water tank. Store
all accessories in the storage compartment.
Scan here for a
video tutorial on
how to clean your
espresso machine.

23
Keep It Clean
Cleaning the Grinder
Periodically you’ll need to clean the grinder’s upper and lower burrs to remove
the oils and fine particles of coffee, which can interfere with the grinder’s
performance. WARNING: The burrs are extremely sharp. Use caution when
handling and cleaning them.
1. With the power off, turn the hopper counterclockwise and lift off the unit.
2. Remove the remaining beans above the burrs. There are two ways to
do this: either vacuum them out with a hand-held vacuum and hose
attachment; or empty the hopper and return it to the unit, grind until
nothing more comes out of the grinder, and remove the hopper again.
3. Remove the upper burr: Using the wire handle, turn counterclockwise,
then lift the upper burr straight up from the lower burr.
4. Use the included brush to clean three areas of the grinder: the upper burr,
lower burr, and the grounds dispensing chute.
5. Place the upper burr back in position above the lower burr, and lock by
twisting clockwise. Re-install the hopper.
Changing the Water Filter
We recommend changing the filter every 2 months or 60 brews. Replacement
filters can be ordered online. (Look for ones measuring about 2.2” x 1.2” x 1.0”)
1. Pull the filter holder out of the tank.
2. Open the basket portion of the holder; remove and discard the old
charcoal filter.
3. Soak and rinse a new filter, following the instructions on p. 8.
4. Place the filter into the holder, then re-install in the water tank following
the instructions on p. 8.

24
Keep It Clean
Descaling the Unit
Over time, deposits from dissolved calcium and other minerals will build up in
the unit and affect the operation. Descaling removes these deposits to return
it to peak function. The frequency of descaling depends on the hardness of
your water. When the Clean | Descale light blinks, it is time to descale.
NOTE: When the Clean | Descale light comes on, you can still operate the
unit, but the alert light will not turn off until a cleaning/descaling cycle is run.
We recommend performing descaling at least every 4–6 months, regardless
of whether the alert light has come on.
1. Prepare a commercial descaling solution according to package directions.
2. Remove the water filter and filter holder from the tank, then add the
solution to the tank.
3. Empty the drip tray, if necessary, and place two large cups under the brew
head and steam wand.
4. Simultaneously press the SINGLE brew size, DOUBLE brew size, and
PROGRAM buttons to enter descaling mode. (If no further action is taken in
60 seconds, the unit will exit descaling mode.)
5. Turn the Steam | Hot Water knob to STEAM. Water will dispense from both
the brew head and the steam wand for about 2 minutes.
6. When the Clean | Descale and Hot Water | Steam lights blink and
the unit beeps, step 1 is done.
7. Turn the knob to OFF, wipe the brew head and steam wand with a damp
cloth. (If the knob is not turned off, the unit will automatically exit descaling
mode after 5 minutes.)
8. Empty the water tank, rinse thoroughly, and refill with clean water.
9. Empty the cups and then place them back under the brew head and
steam wand.
10. Turn the knob to HOT WATER. Water will again dispense from both the
brew head and the steam wand for about 2 minutes.
11. When the Clean | Descale light turns off, the Hot Water | Steam light
blinks, and the unit beeps, step 2 is done. Turn the knob to
OFF and empty the cups. The unit will return to standby mode.
25
Having Trouble?
Problem Likely Cause Solution
Machine does not
heat up
STEAM | HOT WATER knob is
not in the OFF position. (HOT
WATER | STEAM light will also
be flashing when machine is
powered on.)
Turn knob to OFF position. The unit
will begin preheating.
Water tank is empty. Fill water tank.
Water tank is not properly
installed.
Ensure tank is properly seated on
the unit and locked into place.
Unit needs descaling. Follow descaling procedure on p. 24.
If water flows but unit doesn’t
produce steam; the steam
wand may be blocked.
Clean the steam wand, following
instructions on p. 22.
Espresso runs out
around the sides
of the portafilter
Portafilter is not inserted
correctly or fully locked on
the unit.
Make sure the portafilter is correctly
inserted and rotated until you feel
resistance and the handle points
straight forward.
There are coffee grounds on the
rim of the portafilter basket.
After tamping, wipe away any
excess grounds from the rim.
There’s too much coffee in the
basket.
Adjust dose size and/or make sure
you’re using the proper size basket.
Coffee drinks are not
hot enough
Cups are cold. Rinse cups with hot water and place
on heating tray.
Portafilter is cold. Rinse portafilter with hot water
and dry thoroughly before using.
Milk wasn’t steamed for
long enough (for a cappuccino
or latte).
Steam the milk until the base of the
milk pitcher is hot to the touch.
Water temperature is not set
high enough.
Adjust water temperature according
to instructions on p. 18.
Unit needs descaling. Follow descaling procedure on p. 24.
Unit is on but stops
operating
Unit went into overheat
protection mode.
Press the ON | OFF button to turn the
unit off and unplug from the power
outlet. Allow to cool for about
30–60 minutes. If the problem
persists, contact Chefman
Customer Support.
No or little ground
coffee coming
from grinder
Not enough coffee beans in
the hopper.
Fill the hopper with fresh
coffee beans.
Grinding chamber or chute
is blocked.
Clean grinder and chute according
to directions on p. 23.
26
Notes

27
Notes

28
Terms & Conditions
Limited Warranty
RJ Brands, LLC d/b/a Chefman® offers a limited 1-year Warranty (the “Warranty”)
available on sales through authorized distributors and retailers only. Please
note that this Warranty becomes valid from the date of initial retail purchase
and that the Warranty is nontransferable and applies only to the
original purchaser.
This Warranty is void without proof of purchase within the United States and
Canada. Please be aware that this Warranty supersedes all other warranties
and constitutes the entire agreement between the consumer and Chefman®.
Any changes to the Terms and Conditions of this Warranty must be in writing,
signed by a representative of Chefman®. No other party has the right or ability
to alter or change the Terms and Conditions of this Warranty.
We may ask you to please submit, via email, photos and/or video of the issue
you are experiencing. This is to help us better assess the matter and possibly
offer a quick fix. Photos and/or video may also be required to determine
Warranty eligibility.
We encourage you to register your product. Registering can make the Warranty
process easier and can keep you informed of any updates or recalls on
your product. To register, follow the directions on the Chefman® Warranty
Registration page in the Chefman® User Guide. Please retain your proof of
purchase even after registering. In the event that you do not have proof of
your purchase date, we may declare your Warranty void or we may, at our sole
discretion, apply the date of manufacture as the purchase date for purposes of
this Warranty.

29
Terms & Conditions
What the Warranty Covers
• Manufacturer Defects
Chefman® products are warranted against defects in material and
workmanship, under normal household use, for a period of
1 year from the date of purchase when used in accordance with the
directions listed in the Chefman® User Guide. If your product does not work
as it should, please contact Customer Support at support@chefman.com so
that we may assist you.
This Warranty Does Not Cover
• Misuse
Damage that occurs from neglectful or improper use of products, including,
but not limited to, damage that occurs as a result of usage with incompatible
voltage, regardless of whether the product was used with a converter or
adapter. See Safety Instructions in the Chefman® User Guide for information
on proper use of product;
• Poor Maintenance
General lack of proper care. We encourage you to take care of your
Chefman® products so that you may continue to enjoy them. Please see
Keep It Clean directions in this Chefman® User Guide for information on
proper maintenance;
• Commercial Use
Damage that occurs from commercial use;
• Normal Wear and Tear
Damage or degradation expected to occur due to normal use over time;
• Altered Products
Damage that occurs from alterations or modifications by any entity
other than Chefman® such as the removal of the rating label affixed to
the product;
• Catastrophic Events
Damage that occurs from fire, floods, or natural disasters; or
• Loss of Interest
Claims of loss of interest or enjoyment.

30
Terms & Conditions
For product information, please visit us at Chefman.com.
EXCEPT WHERE SUCH LIABILITY IS REQUIRED BY LAW, THIS WARRANTY DOES NOT
COVER, AND CHEFMAN® SHALL NOT BE LIABLE FOR, INCIDENTAL, INDIRECT, SPECIAL,
OR CONSEQUENTIAL DAMAGES, INCLUDING WITHOUT LIMITATION, DAMAGE TO, OR
LOSS OF USE OF THE PRODUCT, OR LOST SALES OR PROFITS OR DELAY OR FAILURE TO
PERFORM THIS WARRANTY OBLIGATION. THE REMEDIES PROVIDED HEREIN ARE THE
EXCLUSIVE REMEDIES UNDER THIS WARRANTY, WHETHER BASED ON CONTRACT,
TORT OR OTHERWISE.
31
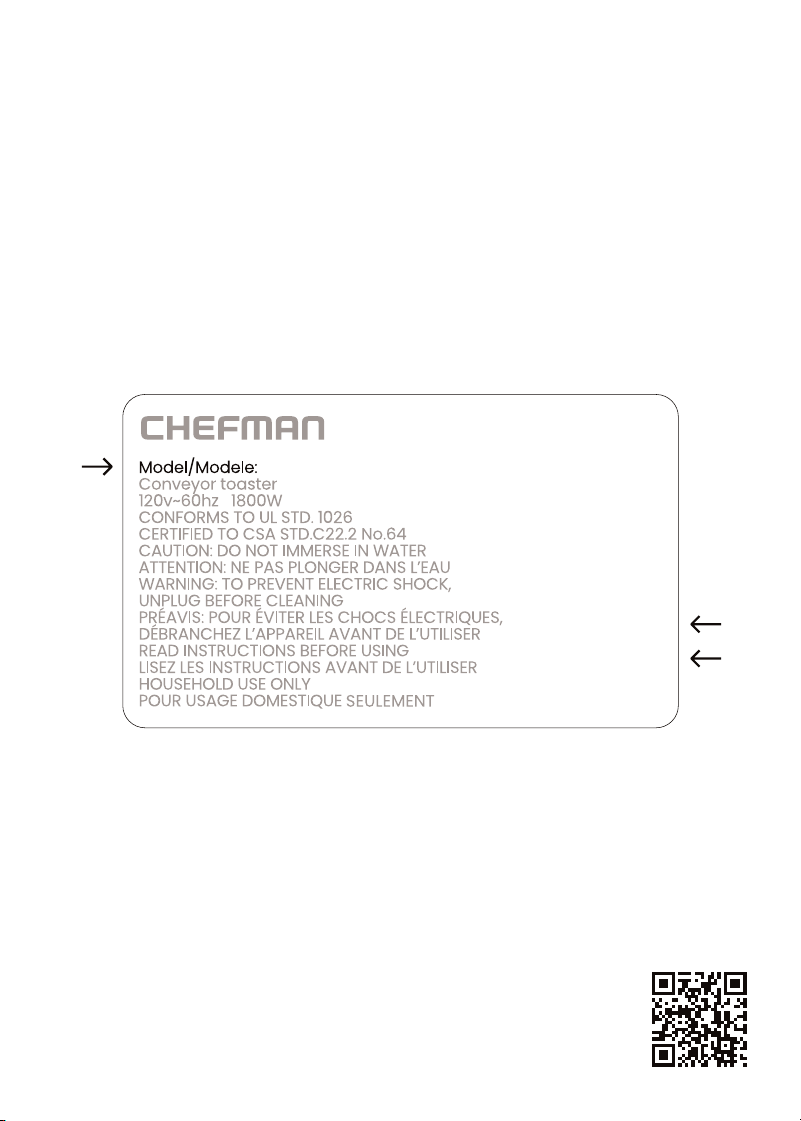
How do I register my product?
All you need to do is fill out a simple Chefman® registration form.
You can easily access the form in one of the two ways listed below:
• Visit Chefman.com/register.
• Scan the QR code to the right to access site.
NOTE: Label depicted here is an example.
Please see label on your product for actual model/date code/access code.
Warranty Registration
What do I need to register my product?
• Contact Information
• Model Number (see example below)
• Proof of Purchase (online confirmation, receipt, gift receipt)
• Date Code (see example below)
• Access Code (see example below)
Date Code:
0000
Access Code:
Xxxxxxxx
XXXXX

RJ54GSSDSERIESUG072225
Crema Deluxe
TM
Semi-Automatic
Espresso Machine
Chefman® is a registered trademark of RJ Brands, LLC.
Crema Supreme
TM
is a trademark of RJ Brands, LLC.
