C27-TJ-2U-SERIES
Obliterator™


Table of Contents
4 Get to Know Your Blender
5 Control Panel
6 Safety Instructions & Important Safeguards
10 Before First Use
11 Quick Start: How to Use the Blender
14 Special Features & Functions
16 Blending Tips
17 Keep It Clean
18 Having Trouble?
19 Notes
20 Terms & Conditions
23 Warranty Registration
4
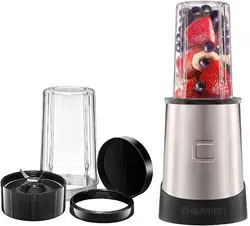
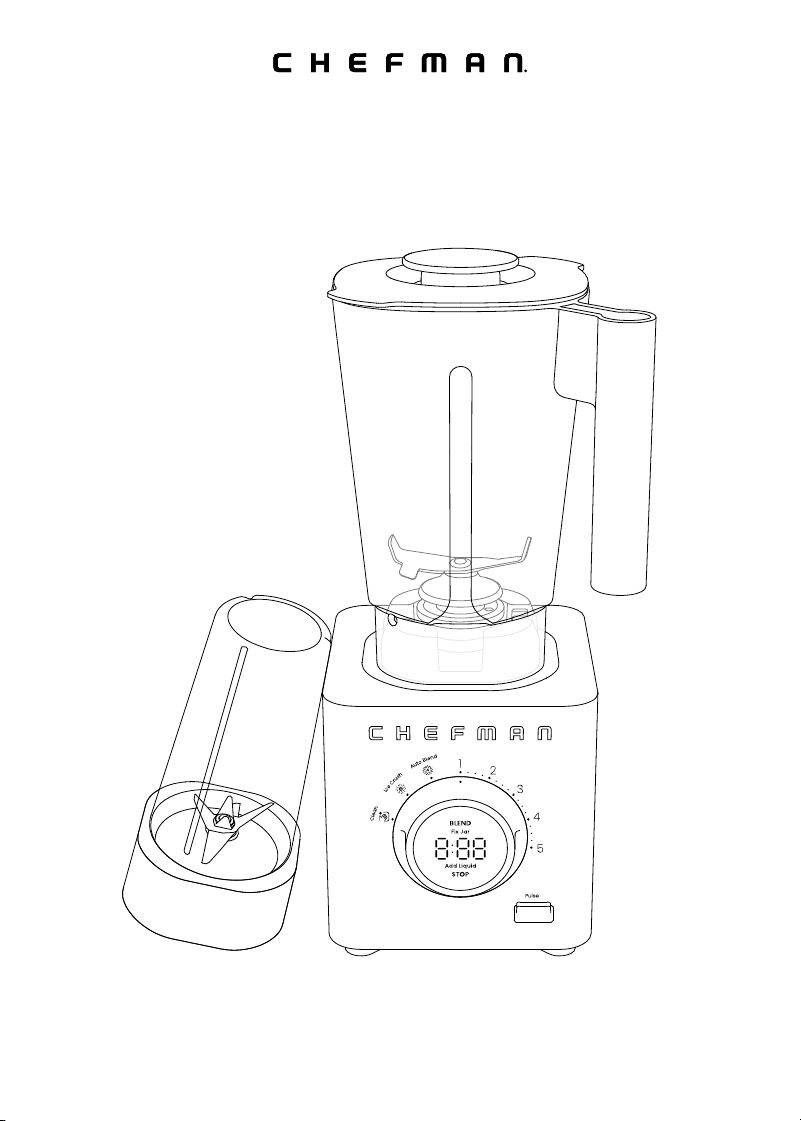
Get to Know Your Blender
1. Cover | measuring cup
2. Blending jar lid
3. Blending jar
(48 oz/1400 ml capacity)
4. 2-in-1 Tamper | scraper tool
5. Power switch
6. Motor base
7. Control panel
8. Travel jar blade assembly
9. Travel jar (20 oz/600 ml capacity)
10. Travel jar to-go lid
3
10
9
8
7
2
1
6
5
4
FEATURES DRAWING
5
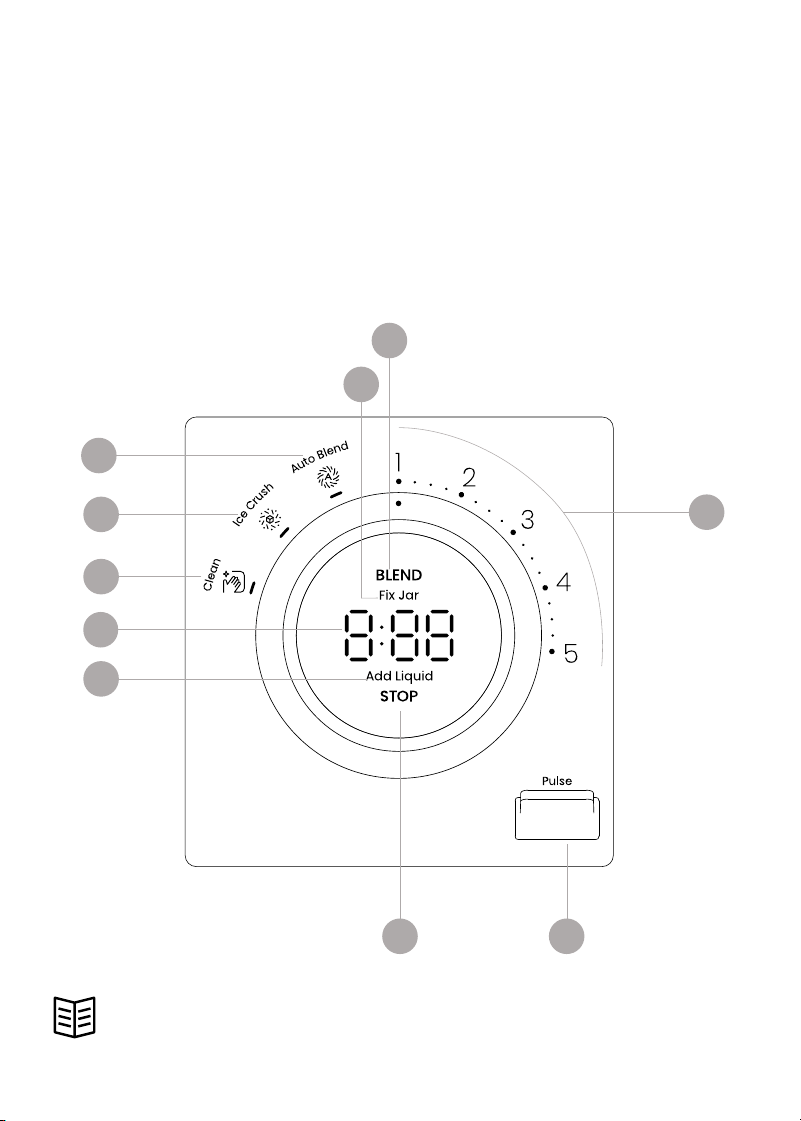
CONTROL PANEL
Control Panel
1. BLEND light | center button
2. Fix Jar warning light
3. Manual speed settings (1–5)
4. Pulse button
5. STOP light | center button
6. Add Liquid warning light
7. Timer display
8. Clean setting
9. Ice Crush setting
10. Auto Blend setting
READ ALL INSTRUCTIONS BEFORE USE
For your safety and continued enjoyment of this product,
always read the instruction manual before using.
6
8
9
10
3
45
1
2
7

6
SAFETY INSTRUCTIONS &
IMPORTANT SAFEGUARDS
When using electrical appliances, basic safety precautions should
always be followed:
1.
Read all instructions.
2. To protect against risk of electrical shock do not put the unit base or
power cord in water or other liquid.
3. This appliance is not intended for use by persons (including children) with
reduced physical, sensory, or mental capabilities, or lack of experience
and knowledge, unless they are closely supervised and instructed
concerning use of the appliance by a person responsible for their safety.
4. Close supervision is necessary when any appliance is used by or near
children. Children should be supervised to ensure that they do not play
with the appliance.
5. Turn the appliance OFF, then unplug from the outlet when not in use,
before assembling or disassembling parts and before cleaning.
To unplug, grasp the plug and pull from the outlet. Never pull from
the power cord.
6. Avoid contacting moving parts.
7. Do NOT operate any appliance with a damaged cord or plug or
after the appliance malfunctions, or is dropped or damaged in any
manner. Contact Chefman Customer Support for examination, repair,
or adjustment.
8. The use of attachments, including canning jars, not recommended by
the manufacturer may cause a risk of injury to persons.
9. Do NOT use outdoors.
10. Do NOT let cord hang over edge of table or counter, or touch hot surfaces.
11. Keep hands and utensils, other than the tamper provided, out of
container while blending to reduce the risk of severe injury to persons or
damage to the blender. The cover must remain in place when using the
tamper through the cover opening. A scraper may be used but must be
used only when the blender is not running.

7
SAFETY INSTRUCTIONS &
IMPORTANT SAFEGUARDS
12. Blades are sharp. Handle carefully.
13. To reduce the risk of injury, never place cutter-assembly blades on base
without jar properly attached.
14. Always operate blender with cover in place.
15. When blending hot liquids, remove cap from cover.
16. Do NOT place on or near a hot gas or electric burner, or in a heated oven.
SAVE THESE INSTRUCTIONS
FOR HOUSEHOLD USE ONLY

8
SAFETY INSTRUCTIONS &
IMPORTANT SAFEGUARDS
WARNING: Improper use of the grounding plug can result in electric shock.
Grounding Instructions
This appliance must be grounded. In the event of an electrical short circuit,
grounding reduces the risk of electric shock by providing an escape wire for the
electric current. To protect against electrical shock, this appliance is equipped
with a cord having a 3-prong grounding-type plug for insertion into a proper
grounding-type electrical outlet.
Do NOT alter the plug for use in a 2-prong outlet. If the plug will not fit into an
outlet, have a proper outlet installed by a qualified electrician.
Short Cord Instructions
A short power-supply cord is provided to reduce the hazards of entanglement
or tripping over a longer cord. Longer detachable power-supply cords or
extension cords are available and may be used if care is exercised in
their use. If a longer detachable power-supply extension cord is used:
1. The marked electrical rating of the extension cord should be at least as
great as the electrical rating of the appliance;
2. If the appliance is of the grounded type, the extension cord should be a
grounding-type 3-wire cord; and
3. The longer cord should be arranged so that it will not drape over
the countertop or tabletop where it can be pulled on by children or
tripped over.

9
California Proposition 65:
(Applicable for California Residents only)
WARNING: Cancer and Reproductive Harm
www.P65Warnings.ca.gov
Do not place the appliance on
a stovetop or any other heatable
surface, even if stovetop is not on.
Doing so is a fire hazard.
SAFETY INSTRUCTIONS &
IMPORTANT SAFEGUARDS
Power Cord Safety Tips
1. Never pull or yank on the cord or the appliance.
2. To insert the plug, grasp it firmly and guide it into the outlet.
3. To disconnect the appliance, grasp the plug and remove it from
the outlet.
4. Never use the product if the power cord shows signs of abrasion or
excessive wear. Contact Chefman® Customer Support for additional
guidance and support.
5. Never wrap the cord tightly around the appliance, as this could place
undue stress on the cord where it enters the appliance and cause it to
fray and break.
DO NOT OPERATE THE APPLIANCE IF THE POWER CORD SHOWS ANY DAMAGE
OR IF THE APPLIANCE WORKS INTERMITTENTLY OR STOPS WORKING ENTIRELY.

10
Before First Use
1. Remove all packaging materials and check to ensure that all parts and
accessories are accounted for. Read and remove all stickers, except for
the rating label, which should remain on the unit.
2. Remove and wash the blending jar, lid, cover | measuring cup, travel jar,
travel jar lid, and tamper | scraper tool with a mild detergent and water.
Rinse and dry well. Do not use abrasive cleansers or pads, which can
damage the surface of the parts.
3. Wipe down the motor base with a damp cloth. Do not immerse the base,
power cord, or plug in water or any other liquid.
11
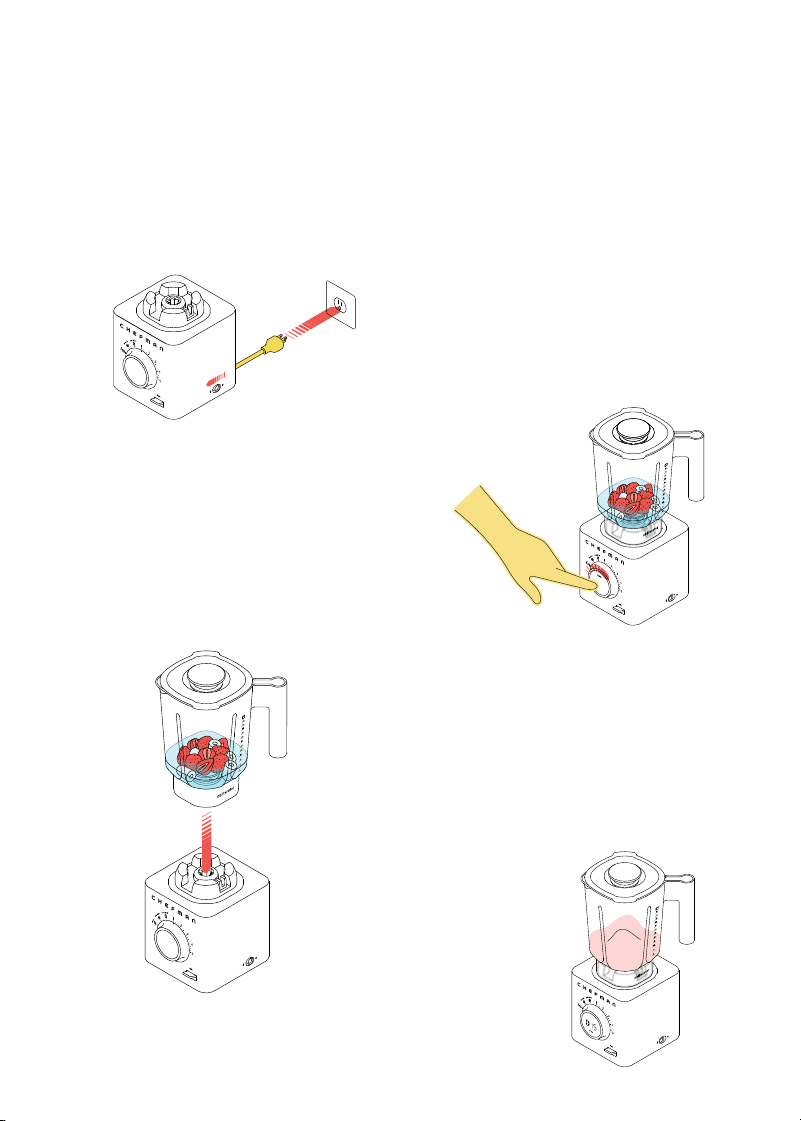
1. Plug in the unit and turn the
power switch on.
Quick Start:
How to Use the Blender
How to Blend in the 48 oz. Blending Jar
STEP 1
STEP 2
STEP 3
STEP 4
2. Place your food in the jar. Be sure
not to exceed the maximum
capacity of 48 fl oz (1400 ml).
Press the lid on the jar and set
the jar on the base, ensuring it is
fully seated on the blade gear.
3. Turn the knob to make your
selection—either setting the
speed manually on the right side
of the knob, or choosing one of
the preset functions (Ice Crush
or Auto Blend) on the left (see
p. 14 for more about how these
functions work). Press BLEND to
begin blending.
4. If you set a speed manually, the
timer display will count up; you
can stop blending any time you
wish by pressing STOP (or the
blender will manually time out).
For Ice Crush, Auto Blend and
Clean, the unit will automatically
turn off when the preset function
has finished.
12
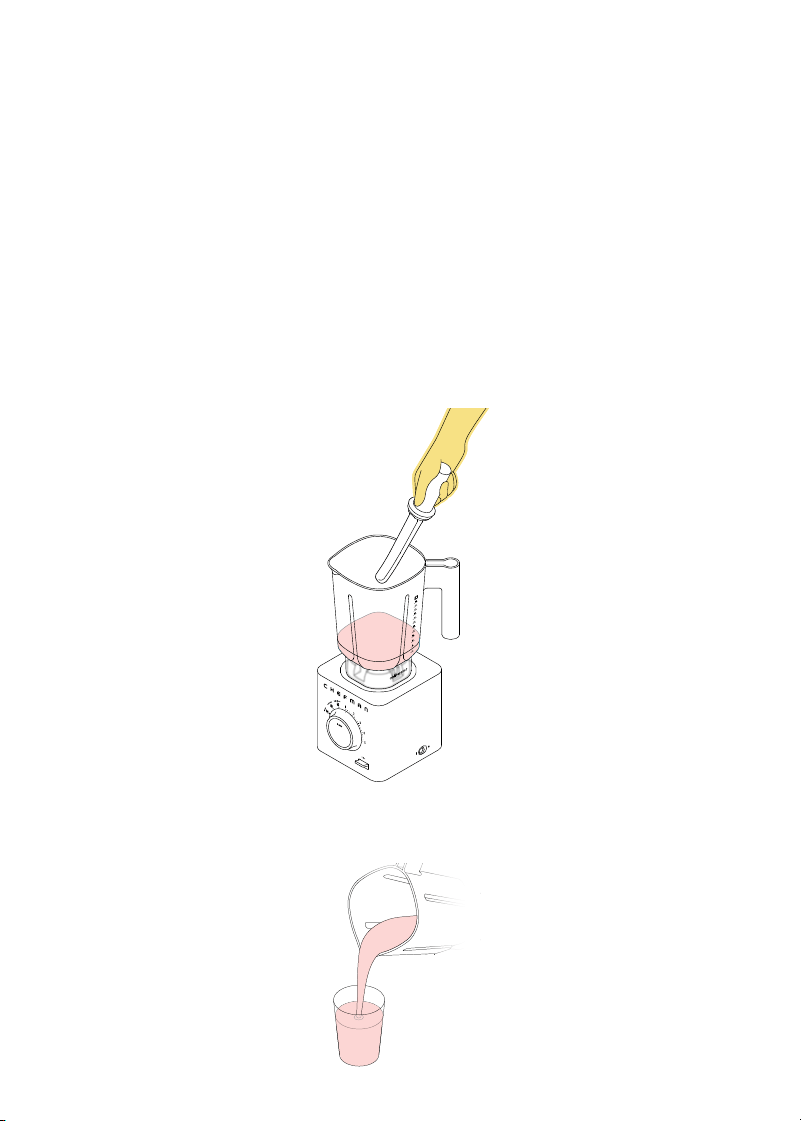
Quick Start: How to Use the Blender
5. The Pulse button can be pressed while a manual speed is running for an
additional boost of speed and power. When the Pulse button is released,
the blender will return to the manual speed. NOTE: Pulse does not work
with Auto Blend, Clean, or Ice Crush settings; it can only be used with the
five manual speed settings or in standby mode (see step 6 following).
6. Alternatively, to blend in short, controlled bursts, simply press the Pulse
button (no need to set the speed). The blender will run only while you’re
pressing it down.
7. By removing the cover/measuring cup from the lid, the tamper can be
safely inserted while actively blending; however, the scraper should ONLY
be used In between blending cycles, to scrape down the sides of the jar,
as needed. Be sure the blades come to a complete stop before taking
the lid off the jar to use the scraper. (See p.13 for additional description
of 2-in-1 tamper | scraper tool use.)
STEP 6
STEP 5
8. When finished blending, wait for the blades to come to a complete stop,
then remove the lid and serve your food.

13
Quick Start: How to Use the Blender
How to Blend in the 20 oz. Travel Blending Jar
The travel jar lets you blend up a breakfast smoothie for the road with its
convenient to-go sip lid. Unlike the full-size jar, the travel jar is not vented, so it
should not be used to blend hot liquids. IMPORTANT: Before each use, be sure to
check that the silicone gasket is firmly seated in the blade assembly.
1. Add your ingredients to the travel jar; do NOT exceed the 20 oz. (600 ml)
maximum. We do not recommend blending just ice without any liquid.
Screw the travel jar blade assembly onto the top of the jar (do not
overtighten).
2. Turn the travel jar over and set it on the motor base, making sure the
blade assembly is fully seated.
3. Follow steps 2–4 from the 48 oz. (1400 ml) Blending Jar instructions
(see p. 11) to blend manually.
4. Auto Blend was engineered for optimal use with the 48 oz. (1400 ml)
Blending Jar. Although Auto Blend can be used with the travel jar, for the
best results, we recommend using the five manual speed settings.
5. When finished blending, wait for the blades to come to a complete stop,
then remove the blade assembly. If you like, place the to-go lid on the
travel jar.
How to Use the 2-in-1 Tamper/Scraper Tool
The 2-in-1 Tamper/Scraper Tool lets you blend more efficiently and safely.
The tamper is useful for pressing down loose and bulky foods, such as leafy
greens or larger ice, so that they come into better contact with the blades and
get completely blended. For safety, the tamper is too short to reach the blade,
so it can be used while blending is under way. Never insert any other tool into
the blender jar while the motor is running.
The scraper can be used in between blending to clear off partly blended bits
that cling to the side of the jar, so they can then be re-incorporated and fully
blended—useful for especially thick mixtures such as hummus or batters.
Never use the scraper while the blender is running.
Cookbook
Scan for a cookbook, full of delicious recipes created just
for your Obliterator™ blender, from smoothies and frozen
cocktails, to hummus and creamy vegetable soup.

1414
Special Features & Functions
Auto Blend
The Auto Blend function automatically senses the consistency of food in
the jar and applies the appropriate speed and runtime to produce a fully
blended mixture. To use, simply add your ingredients to the 48-oz blending
jar, turn the knob to Auto Blend and press BLEND. Three dashes on the
display will light up sequentially as the unit detects what is in the jar.
Once the appropriate blending speed and runtime are determined, the
speed may change and the dashes on the display will begin to run in a circle.
When the blending cycle is complete, the blender will automatically turn off.
If the mixture is blending without problems, for best results, we recommend
letting the program run. But if necessary, you can pause blending to scrape or
add liquid by pressing the STOP button. When you are ready to begin blending
again, press BLEND and the Auto Blend function will resume where it left off
(occasionally it may sense that an adjustment is needed, and restart with a
different blending speed and/or runtime). When paused, the unit’s circling
animation will pause. The blender will stay in this state for a few minutes
before returning to standby. To exit this pause state earlier, simply rotate the
dial out of Auto Blend.
Auto Blend is equipped with sophisticated algorithms to help blend very
dense mixtures, even when the food is so thick it becomes out of reach of the
blades. Auto Blend employs vigorous and dynamic pulsing patterns to knock
food down into the blade’s path. Don’t be afraid of the motor running at high
speeds (it will be loud) and seemingly not blending; allow Auto Blend to run
its course and you’ll be amazed at how it regains control of the mixture and
“obliterates” it.
Occasionally, the blender may sense that it can not work through a mixture.
This is likely due to thick and sticky foods or insufficient liquid. The Add Liquid
light will display. It is recommended to tamp the mixture and add liquid
as needed to continue efficiently blending. If needed, the program can be
paused to scrape food into the blade’s path. If the Auto Blend cycle ends
but the food is not fully blended, add liquid, tamp, then press BLEND again.

15
Special Features & Functions
Ice Crush
The blender’s dull blade design and powerful motor makes quick work of
hard ice, turning it into finely powdered snow in seconds. This function is
great for homemade snow cones, shaved ice desserts, or finely crushed
ice for cocktails. For best results:
• When processing ice with no liquid, be sure that the inside of the jar
is completely dry, or else the ice can stick to the bottom and not
blend evenly.
• We recommend working in batches of no more than 1 ½ lb at a time
for the most even blending.
• To prevent over-compaction, stop the program if you hear that all ice
has been crushed before the preset time ends.
Overheat Protection
To protect and extend the life of your blender, it is equipped with overheat
protection. During extended and strenuous blending tasks, the motor will heat
up. If the blender senses that the motor is too hot to perform at its best, it will
display the word “Hot” (blinking) and will not allow blending until the unit has
sufficiently cooled. “Hot” will stop being displayed once the unit has cooled
and use can continue. This is normal and does not require Chefman Customer
Support to be contacted.

16
Blending Tips
Cut solid foods into uniform sizes (about 1 inch or smaller) for easy blending
and consistent results.
• When blending hard fruits and vegetables, such as carrots, add water
to the jar, in a ratio of 2 parts food to 3 parts water, to facilitate blending.
• Do not fill the full-size jar above the 48 oz. mark, as blending can cause
the liquid level to rise and the jar may overflow if too full. Do not fill the
travel jar above the 20 oz. mark
• If you need to scrape down the sides of the jar, do NOT do it while the
blender is running. Press the STOP button and unplug the blender from
the outlet. Scrape the sides with included scraper tool or a silicone or
plastic spatula and replace the lid before plugging the unit back in and
continuing to blend.
• To add liquid ingredients while blending, remove the center cover |
measuring cup of the two-piece lid and pour ingredients through the
opening. Do NOT put any nonliquid object through the opening in the lid
other than the included tamper tool.
• When blending at higher speeds, be sure to have the cover | measuring
cup in place on the blending jar lid. (However, when blending hot foods,
you may replace the cover | measuring cap with a kitchen towel. See tip
directly below.)
• To safely blend hot foods, follow these steps:
1. Allow hot foods to cool slightly before blending.
2. Don’t fill the blender all the way; blend in batches, using only half of
the jar’s capacity at a time.
3. Start at a low speed before increasing.
4. Remove the cover | measuring cap and cover with a kitchen towel
(hold it in place while blending).
5. If you feel pressure building in the blender, stop blending, allow to
cool and continue blending.
• If the mixture in the blender becomes stuck, follow these steps to
resolve it:
1. Use the tamper to push foods into the path of the blade, adding
additional liquid if appropriate.
2. If using manual mode, press Pulse a few times to loosen the mixture.
3. Stop blending and use the scraper tool to help combine ingredients
before you restart blending.

17
Keep It Clean
The Clean preset function on the blender makes it super easy to clean up
after blending:
1. We recommend that you take care of your blender by cleaning the jar and
accessories immediately after each use to preserve their best condition.
2. Empty the food from the blending jar. Fill the jar a quarter of the way full
with water and add a few drops of mild dishwashing soap.
3. Put the lid on the blending jar and install the jar on the base.
4. Turn the knob to Clean and press BLEND. The timer will count down the
cleaning cycle.
5. When blending ends, remove the jar from the base, discard the soapy
water, rinse and dry thoroughly.
6. You can use the Clean function to clean the travel blending jar as well;
again, filling the jar a quarter of the way full with water and adding a few
drops of mild soap.
7. Both jars and all accessories are also dishwasher safe.
8. If needed, wipe away any spills from the motor base with a damp cloth.
Do NOT immerse the base, power cord, or plug in water or any other liquid.
9. Although it is okay to soak the jars, do NOT leave them immersed in water
or any other liquid for an extended period of time.
10. Do NOT use abrasive cleaners (e.g., a harsh brush or steel wool) or you
could damage the finishes.
11. Do NOT attempt to remove the blade from the base; it is not removable.

18
Problem Likely Cause Solution
Fix Jar indicator
displays on panel
1. Full-size jar is not fully seated
on the gear.
2. Travel jar is not completely
screwed onto the blade
assembly.
1. Remove and reseat the jar. There’s
no need to twist but it needs to be
firmly pressed down.
2. Firmly tighten the blade assembly
onto the travel jar, then reseat it on
the base.
Add Liquid indicator
displays on panel
Filling the jar solely with hard
and/or solid foods creates an
overly heavy load for the motor.
Add a bit of liquid to the jar, scrape
and tamp the solution, and press
BLEND again.
The display slowly
blinks the word “Hot”
Unit is overheated. Allow the blender to cool for about
20 minutes.
The display shows error
codes E1, E3, E4 or E5
Sensor or motor malfunction. Contact Chefman Customer
Support.
Having Trouble?

19
Notes

20
Terms & Conditions
Limited Warranty
RJ Brands, LLC d/b/a Chefman® offers a limited 5-year Warranty (the
“Warranty”) available on sales through authorized distributors and retailers
only. Please note that this Warranty becomes valid from the date of initial retail
purchase and that the Warranty is nontransferable and applies only to the
original purchaser.
This Warranty is void without proof of purchase within the United States and
Canada. Please be aware that this Warranty supersedes all other warranties
and constitutes the entire agreement between the consumer and Chefman®.
Any changes to the Terms and Conditions of this Warranty must be in writing,
signed by a representative of Chefman®. No other party has the right or ability
to alter or change the Terms and Conditions of this Warranty.
We may ask you to please submit, via email, photos and/or video of the issue
you are experiencing. This is to help us better assess the matter and possibly
offer a quick fix. Photos and/or video may also be required to determine
Warranty eligibility.
We encourage you to register your product. Registering can make the Warranty
process easier and can keep you informed of any updates or recalls on
your product. To register, follow the directions on the Chefman® Warranty
Registration page in the Chefman® User Guide. Please retain your proof of
purchase even after registering. In the event that you do not have proof of
your purchase date, we may declare your Warranty void or we may, at our sole
discretion, apply the date of manufacture as the purchase date for purposes
of this Warranty.

21
Terms & Conditions
What the Warranty Covers
• Manufacturer Defects
Chefman® products are warranted against defects in material and
workmanship, under normal household use, for a period of 5 years from
the date of purchase when used in accordance with the directions listed
in the Chefman® User Guide. If your product does not work as it should,
please contact Customer Support at support@chefman.com so that
we may assist you;
This Warranty Does Not Cover
• Misuse
Damage that occurs from neglectful or improper use of products, including,
but not limited to, damage that occurs as a result of usage with incompatible
voltage, regardless of whether the product was used with a converter or
adapter. See Safety Instructions in the Chefman® User Guide for information
on proper use of product;
• Poor Maintenance
General lack of proper care. We encourage you to take care of your
Chefman® products so that you may continue to enjoy them. Please see
Keep It Clean directions in this Chefman® User Guide for information on
proper maintenance;
• Commercial Use
Damage that occurs from commercial use;
• Normal Wear and Tear
Damage or degradation expected to occur due to normal use over time;
• Altered Products
Damage that occurs from alterations or modifications by any entity
other than Chefman® such as the removal of the rating label affixed to
the product;
• Catastrophic Events
Damage that occurs from fire, floods, or natural disasters; or
• Loss of Interest
Claims of loss of interest or enjoyment.

22
Terms & Conditions
For product information, please visit us at Chefman.com.
EXCEPT WHERE SUCH LIABILITY IS REQUIRED BY LAW, THIS WARRANTY DOES NOT
COVER, AND CHEFMAN® SHALL NOT BE LIABLE FOR, INCIDENTAL, INDIRECT, SPECIAL,
OR CONSEQUENTIAL DAMAGES, INCLUDING WITHOUT LIMITATION, DAMAGE TO, OR
LOSS OF USE OF THE PRODUCT, OR LOST SALES OR PROFITS OR DELAY OR FAILURE
TO PERFORM THIS WARRANTY OBLIGATION. THE REMEDIES PROVIDED HEREIN ARE
THE EXCLUSIVE REMEDIES UNDER THIS WARRANTY, WHETHER BASED ON CONTRACT,
TORT OR OTHERWISE.
23
How do I register my product?
All you need to do is fill out a simple Chefman® registration form.
You can easily access the form in one of the two ways listed below:
• Visit Chefman.com/register.
• Scan the QR code to the right to access site.
Warranty Registration
What do I need to register my product?
• Contact Information
• Model Number (see example below)
• Proof of Purchase (online confirmation, receipt, gift receipt)
• Date Code (see example below)
• Access Code (see example below)
NOTE: Label depicted here is an example.
Please see label on your product for actual model/date code/access code.
Date Code:
0000
Access Code:
Xxxxxxxx
Made in China/Fabrique en Chine
AC Only/ AC Seulement
XXXXX

C27TJ2USERIESUG031925
Chefman® is a registered trademark of RJ Brands, LLC.
Obliterator
TM
is a trademark of RJ Brands, LLC.