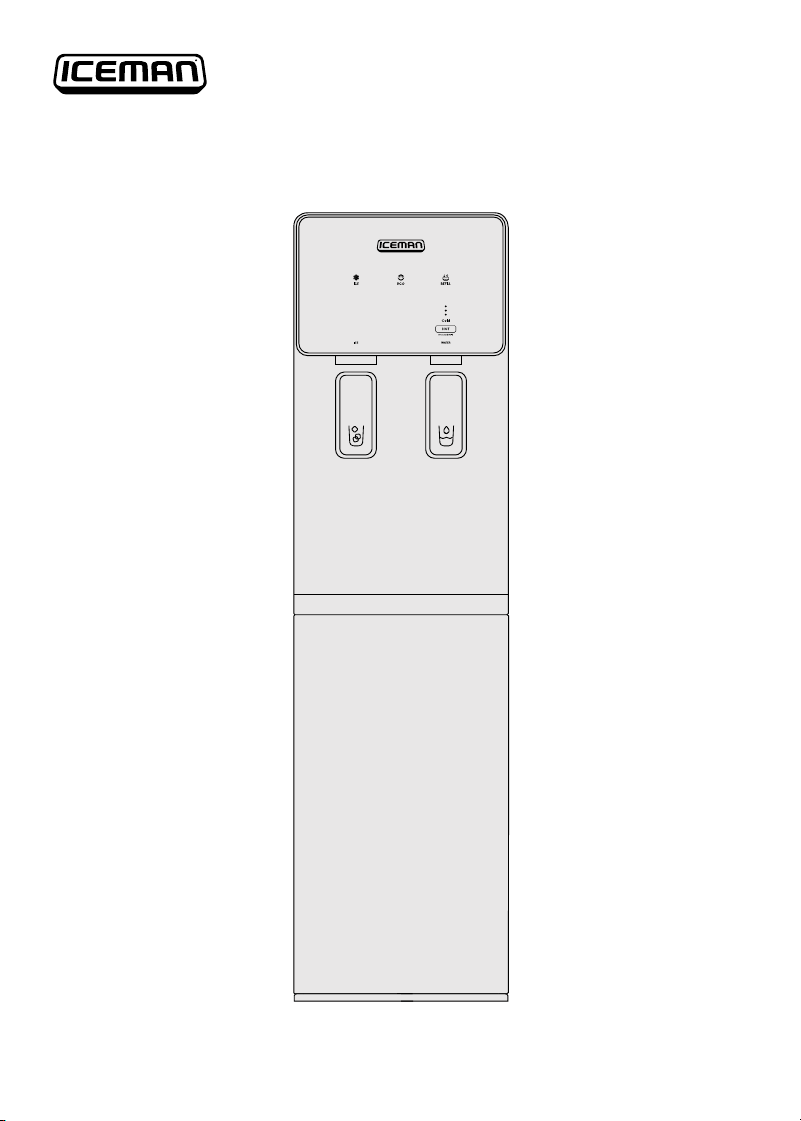
Glacier Spring
TM
Ice Maker &
Water Dispenser
RJ56-DIS
COVER DRAWING
2
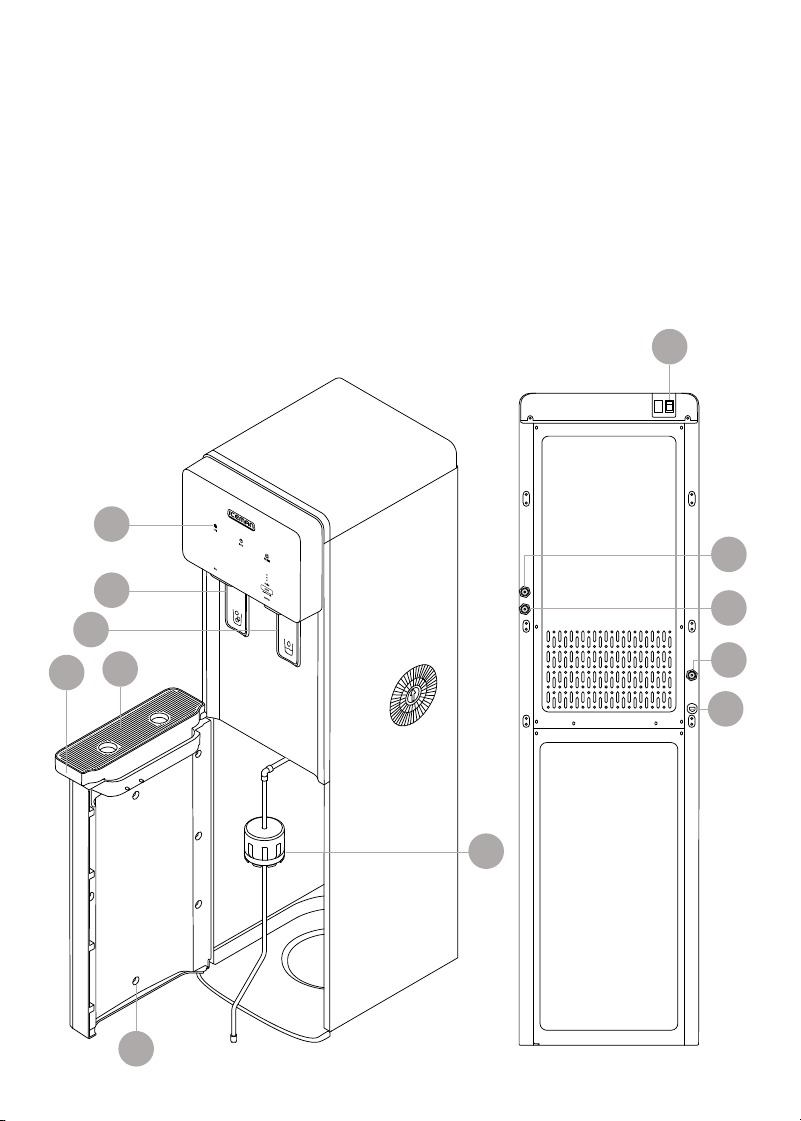
FEATURES DRAWING
Get to Know Your Ice Maker
1. Control panel
2. Ice dispensing trigger
3. Water dispensing trigger
4. Drip tray cover
5. Drip tray
6. Door
7. Bottle cover and supply tube
8. Power switch
9. Hot water tank drain valve
10. Storage tank drain valve
11. Cold water tank drain valve
12. Power cord (not shown)
4
8
5
1
2
3
11
10
7
6
9
12

3
CONTROL PANEL
Control Panel
1. ICE button
2. ECO mode button
3. REFILL indicator and button
4. Progress indicator lights
5. Cold water indicator light
6. HOT water button
7. WATER outlet label
8. ICE outlet label
READ ALL INSTRUCTIONS BEFORE USE
For your safety and continued enjoyment of this product,
always read the instruction manual before using.
1
78
2 3
4
5
6

44
SAFETY INSTRUCTIONS &
IMPORTANT SAFEGUARDS
WARNING: When using electrical appliances, basic safety precautions should
always be followed, including:
1. Read all instructions.
2. DANGER! To protect against the risk of electric shock, do NOT immerse the
cord, plug, or any part of the unit in water or other liquid.
3. Do NOT operate any electrical appliance with a damaged cord or plug,
or after the appliance malfunctions or has been dropped or damaged
in any manner. If damage is suspected, contact Customer Support for
examination, repair, or electrical or mechanical adjustment.
4. The use of accessory attachments that are not recommended by the
manufacturer may cause fire, electric shock, or injury.
5. Do NOT use outdoors.
6. Do NOT use an appliance for anything other than its intended use.
7. Prior to use, this dispenser must be properly assembled and installed in
accordance with this manual.
8. This dispenser is intended for water dispensing only. Do NOT use other
liquids. Use recommended water bottles only. Do NOT use for anything
other than intended purposes.
9. Install and use only on a hard, flat, and level surface.
10. Do NOT place the dispenser in an enclosed space or cabinet.
11. Do NOT operate the dispenser in the presence of explosive fumes.
12. Position the right side of the dispenser no closer than 6 inches from
the wall, and permit free airflow between the wall and the dispenser.
13. Use only properly grounded outlets.
14. Do NOT use an extension cord with this unit.
15. Always grasp plug and pull straight out from outlet. Never unplug by
pulling on power cord.
16. Never allow children to dispense hot water without proper and direct
supervision. Unplug unit to prevent unsupervised use by children.
17. Service should be performed only by a certified technician.
18. WARNING: Do NOT damage the refrigerant circuit.

5
SAFETY INSTRUCTIONS &
IMPORTANT SAFEGUARDS
19. This appliance can be used by children aged from 8 years and above
if they have been given supervision or instruction concerning use of the
appliance in a safe way and if they understand the hazards involved.
Cleaning and user maintenance shall not be made by children unless
they are older than 8 and supervised. Keep the appliance and its cord
out of reach of children less than 8 years.
20. Appliances can be used by persons with reduced physical, sensory, or
mental capabilities or lack of experience and knowledge if they have
been given supervision or instruction concerning use of the appliance
in a safe way and understand the hazards involved. Children shall not
play with the appliance.
21. This appliance is intended to be used in a household and similar
applications such as: kitchen areas in shops, offices, and other working
environments, bed-and-breakfast-type environments, and catering and
similar nonretail applications.
22. Do NOT store explosive substances such as aerosol cans with flammable
propellant in this appliance.
23. If the supply cord is damaged, it must be replaced by a special cord
assembly available from the manufacturer or its service agent.
24. Never turn the machine upside down or lean it more than 45°.
25. The thermostat has been adjusted. There is no need to adjust it by
yourself. When the machine is below the freezing point and blocked by
ice, the ice making mode should be turned off for 4 hours before turning
it on again to continue its operation.
26. CAUTION: The dispenser will heat water to a temperature of
approximately 204°F. It can cause severe burns if not handled carefully.
Please use caution while operating and cleaning. Please allow ample
time for any hot water inside the machine to cool down before draining it.
SAVE THESE INSTRUCTIONS
FOR HOUSEHOLD USE ONLY

6
SAFETY INSTRUCTIONS &
IMPORTANT SAFEGUARDS
WARNING: Improper use of the grounding plug can result in electric shock.
Grounding Instructions
This appliance must be grounded. In the event of an electrical short circuit,
grounding reduces the risk of electric shock by providing an escape wire for the
electric current. To protect against electrical shock, this appliance is equipped
with a cord having a 3-prong grounding-type plug for insertion into a proper
grounding-type electrical outlet.
Do NOT alter the plug for use in a 2-prong outlet. If the plug will not fit into an
outlet, have a proper outlet installed by a qualified electrician.
Short Cord Instructions
A short power-supply cord is provided to reduce the hazards of entanglement
or tripping over a longer cord. Longer detachable power-supply cords or
extension cords are available and may be used if care is exercised in their use.
If a longer detachable power-supply extension cord is used:
1. The marked electrical rating of the extension cord should be at least as
great as the electrical rating of the appliance;
2. If the appliance is of the grounded type, the extension cord should be a
grounding-type 3-wire cord; and
3. The longer cord should be arranged so that it will not drape over the
countertop or tabletop where it can be pulled on by children or
tripped over.

7
California Proposition 65:
(Applicable for California Residents only)
WARNING: Cancer and Reproductive Harm
www.P65Warnings.ca.gov
Do not place the appliance on a
stovetop or any other heatable surface,
even if stovetop is not on.
Doing so is a fire hazard.
SAFETY INSTRUCTIONS &
IMPORTANT SAFEGUARDS
Power Cord Safety Tips
1. Never pull or yank on the cord or the appliance.
2. To insert the plug, grasp it firmly and guide it into the outlet.
3. To disconnect the appliance, grasp the plug and remove it from the outlet.
4. Never use the product if the power cord shows signs of abrasion or
excessive wear. Contact Customer Support for additional guidance
and support.
5. Never wrap the cord tightly around the appliance, as this could place
undue stress on the cord where it enters the appliance and cause it to
fray and break.
DO NOT OPERATE THE APPLIANCE IF THE POWER CORD SHOWS ANY DAMAGE
OR IF THE APPLIANCE WORKS INTERMITTENTLY OR STOPS WORKING ENTIRELY.
8
Before First Use
1. Remove all packaging materials, such as plastic bags and foam inserts.
Check to ensure that all parts and accessories are accounted for.
2. Read and remove any stickers on the unit except for the rating label,
which should remain on the unit.
3. Before plugging in the water dispenser, place it on a level surface away
from direct sunlight and other heat sources. Keep at least 6 inches of
clearance on the right side of the unit to ensure proper ventilation.
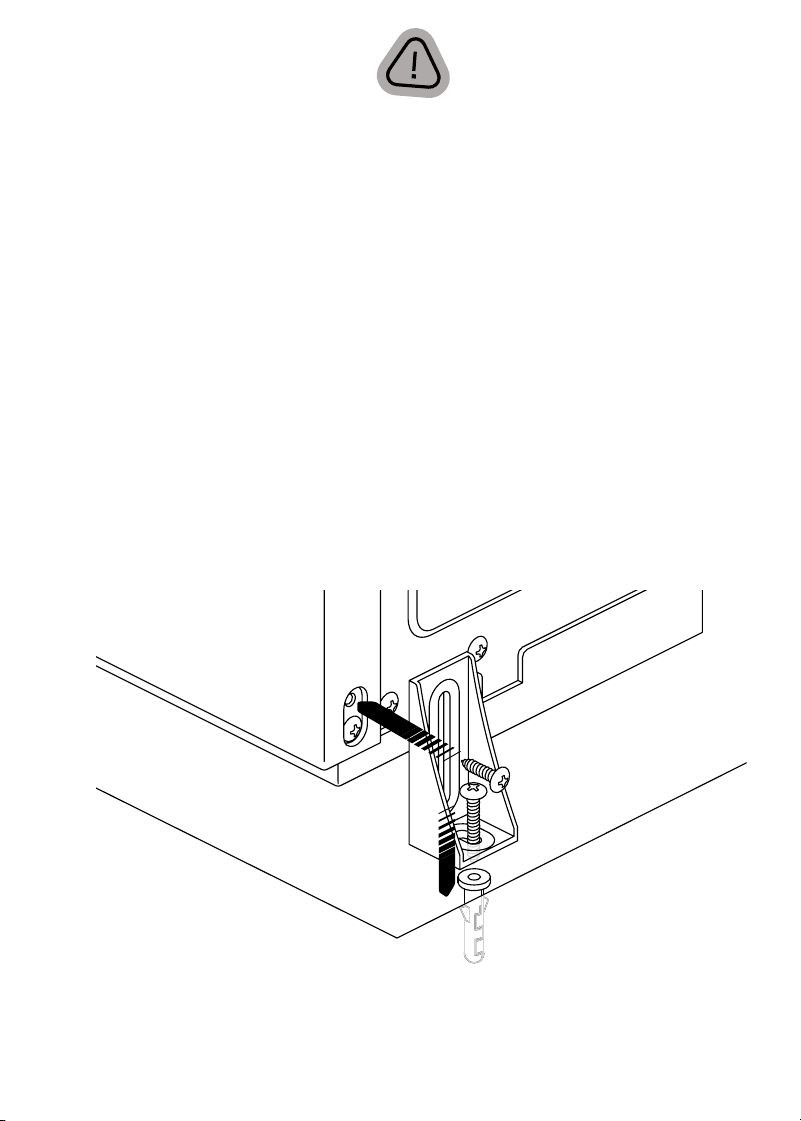
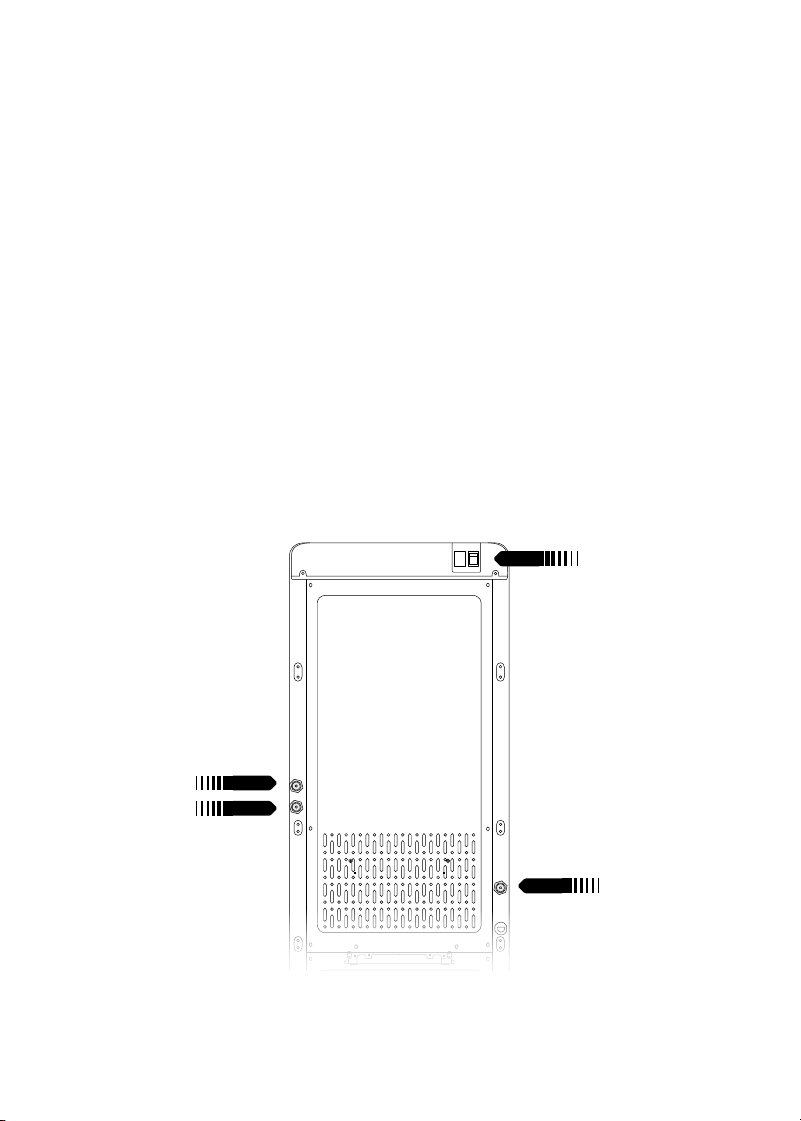
4. If the ground is NOT completely flat, install the anti-tip bracket: Using a
screwdriver, remove the upper frame panel screw from the lower left
or right side of the back of the unit as shown below. NOTE: There are
two screws in this location; be sure to remove the upper one. Place the
L-shaped bracket with the long side up against the unit and the short side
on the floor. Secure it to the unit using the same screw that was removed.
5. Using a drill with a 3/8-inch diameter bit, drill a 1½-inch deep hole into the
floor. Tap the anchor into the hole so it’s flush with the floor.
6. Place the washer and long screw over the hole in the bracket and use a
screwdriver to tighten the screw, securing the unit to the floor.
7. IMPORTANT: Before plugging in the water dispenser, let it sit upright for
24 hours. This will allow the refrigerant fluid to settle.
9
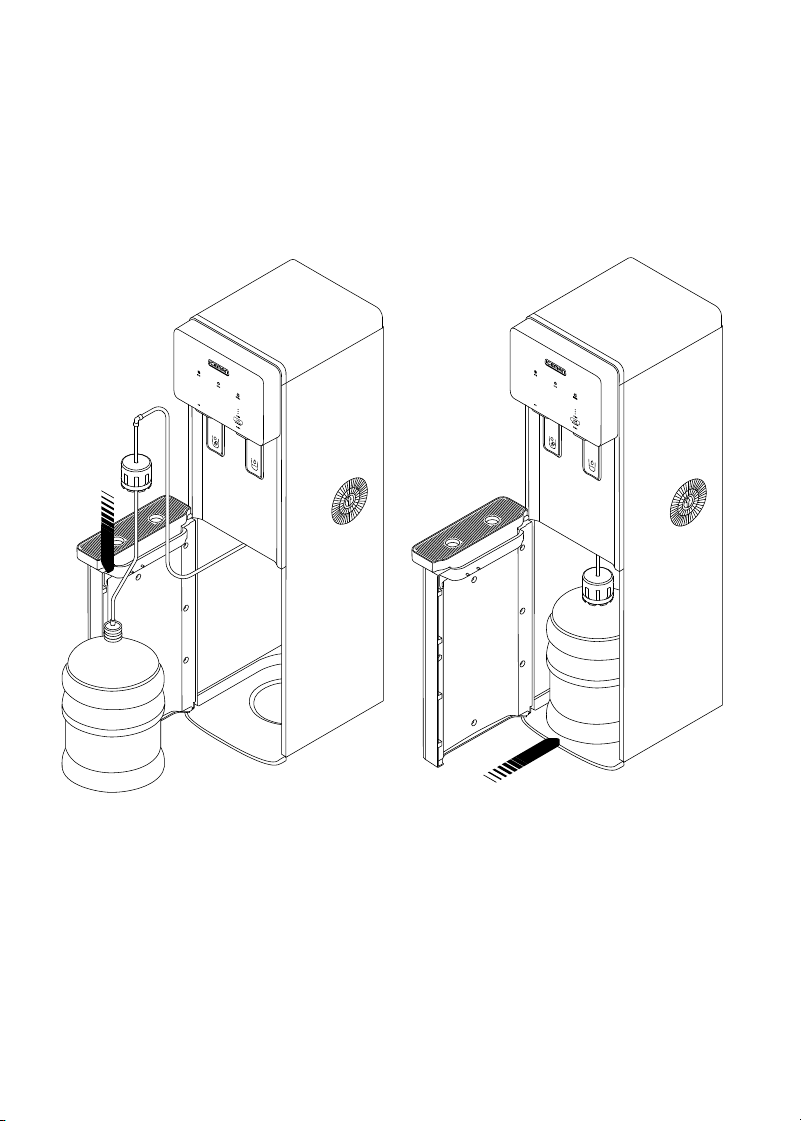
Quick Start: Set Up Your Ice Maker
1. Remove the plastic cap from
a standard water jug up to 5
gallons. Feed the metal supply
tube into the jug and press the
bottle cover firmly over the neck
of the jug.
2. Slide the water jug into the
unit, centered on the circular
indentation in the floor of the
unit, then close the door.
STEP 1
STEP 2
Quick Start: Set Up Your Ice Maker
10
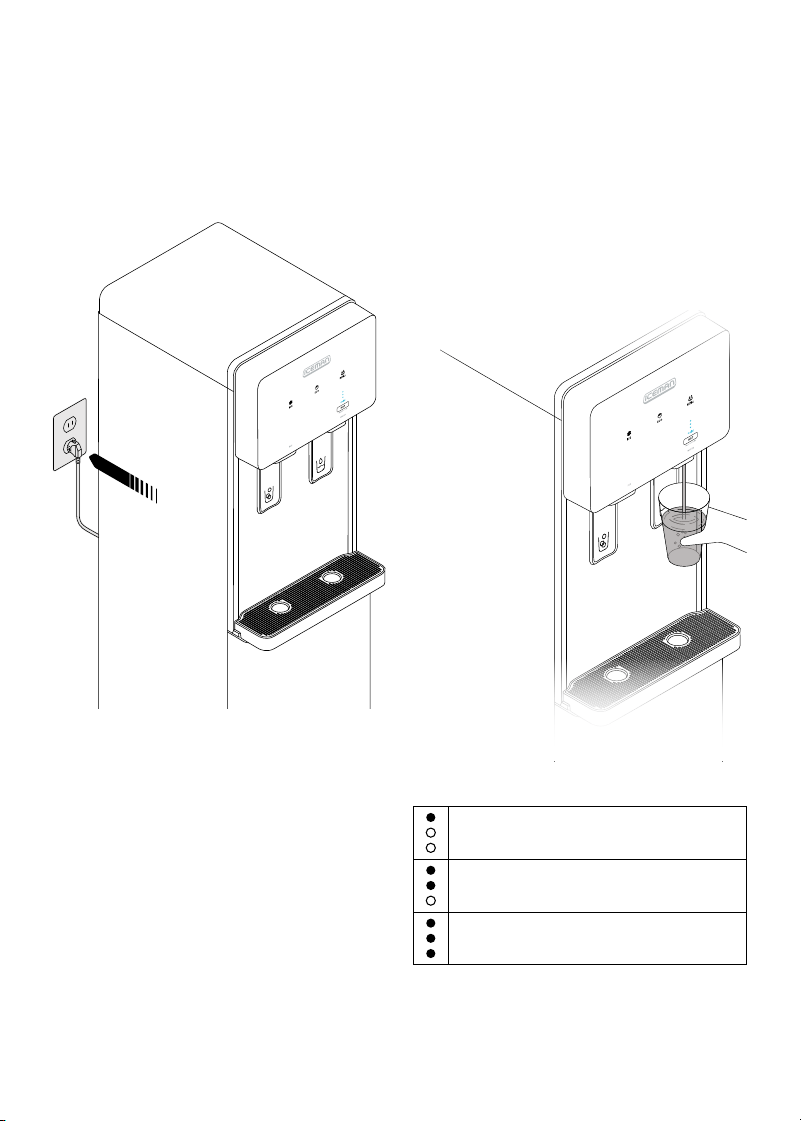
3. Plug in the unit and turn on the
power switch. The Cold light will
illuminate in blue. As the water
cools, the three indicator lights
above will progressively light up.
4. To dispense water, press a cup
against the right dispensing
trigger. Depending on the
water’s initial temperature and
ambient room temperature, it
will take about 20 to 25 minutes
to cool the water to 50°F;
however, you can dispense water
immediately.
STEP 3
STEP 4
Cooling active:
Cold Water tank is above 50°F
Cooling active:
Cold Water tank is between 50°F - 41°F
Cooling complete:
Cold Water tank has reached 41°F
11
Quick Start: Set Up Your Ice Maker
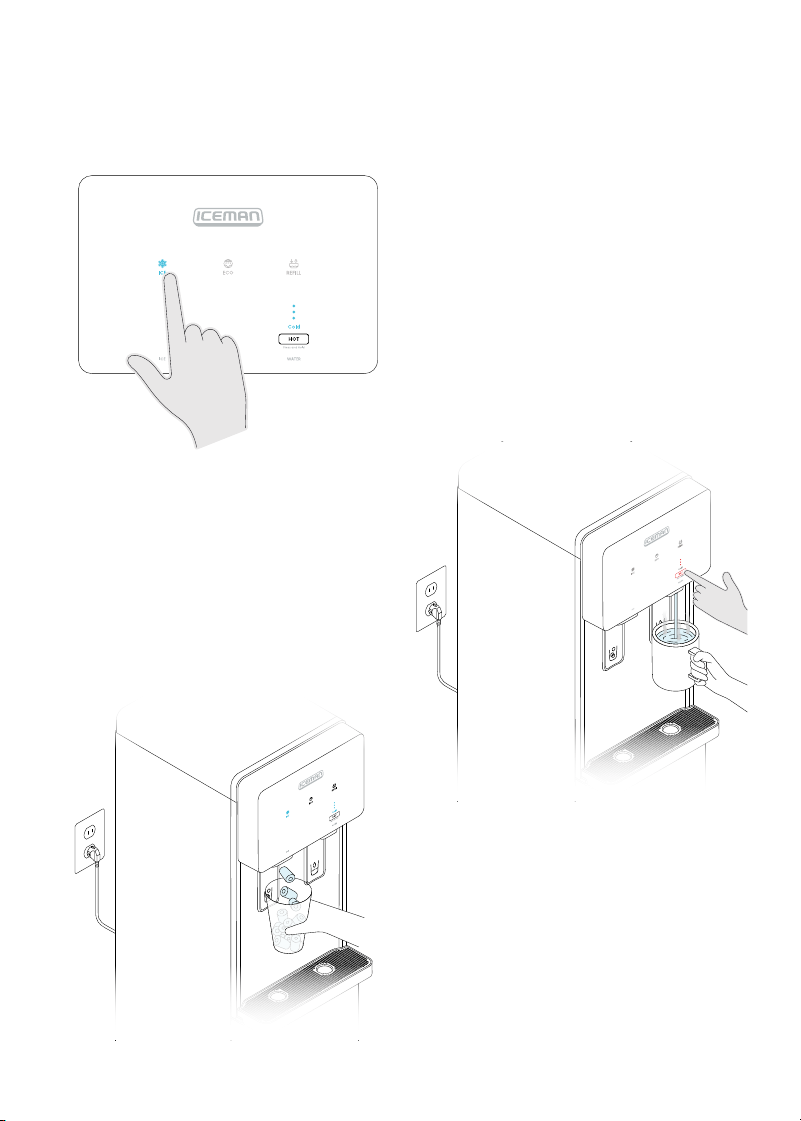
5. To activate the ice maker, press
the ICE button. The unit will begin
making ice after the water in the
tank has cooled to 50°F.
6. To dispense ice, press a cup
against the dispensing trigger.
You can dispense ice as soon as
some is available in the internal
ice bucket (about 5 minutes after
it starts making ice). The unit
will completely fill the bucket in
about 3½ hours.
7. To dispense hot water, press
and hold the HOT button while
simultaneously pressing a cup
to the water dispensing trigger.
The Cold light will turn off, and
the three indicator lights will
progressively light up red.
When all three indicator lights
are red (about 3 seconds), the
hot water will begin to dispense.
This double action to dispense
protects against accidental hot
water burns. After the hot water
begins dispensing, you can
release the HOT button.
8. To stop dispensing hot water,
remove the cup from the
dispensing trigger.
STEP 5
STEP 8

12
Additional Functions
Eco Mode
Eco Mode enables the ice maker to conserve energy during long stretches
of disuse, such as overnight in an office. To turn on Eco Mode, press the ECO
button; it will illuminate green. After sensing that the room is dark for 30
minutes, the unit will stop making ice (if ICE mode is active) and hold the water
at 55°F. When lights in the room turn back on, water cooling and ice making
(if previously active) will resume. If desired, you can keep the unit in Eco Mode
all the time. To turn off Eco Mode, simply press the ECO button again.
Refill Indicator
When the unit detects that it is no longer pumping water, the REFILL light
illuminates orange and the rest of the lights turn off. To refill the unit, open the
door, pull the empty water jug out from under the unit, then remove the bottle
cover and metal supply tube from the empty jug. Follow instructions 1 through
3 on pp. 9 and 10 to set up the dispenser with a new jug. Close the door or
press REFILL to resume water cooling and ice making.
SWITCH OFF
13
Keep It Clean
Since fresh water jugs are swapped into the unit each time one runs out, the ice
maker requires no regular cleaning. However, every few months the tank should
be drained and the supply lines flushed with fresh water. The tank should also
be drained in this manner before transporting the unit:
1. Press and hold the REFILL button for 3 seconds. The progress indicator
lights will alternately blink blue and red.
2. The cleaning cycle will run for about 10 minutes. During this time, the
other functions can’t be used. (To cancel the cleaning cycle and return
to standby mode, press REFILL.)
3. When the cleaning cycle is complete, the ICE, ECO, and REFILL icons
will blink. The power switch must be turned off, then back on, to resume
normal operation.
4. Power the unit off with the switch on the back. One at a time, unscrew the
three valve caps on the back of the unit and remove the three rubber
plugs to drain the water lines.
5. When the water has finished flowing out of all three valves, replace the
plugs and screw the valve caps back on. Make sure to remove the water
jug before attempting to relocate the unit.
14
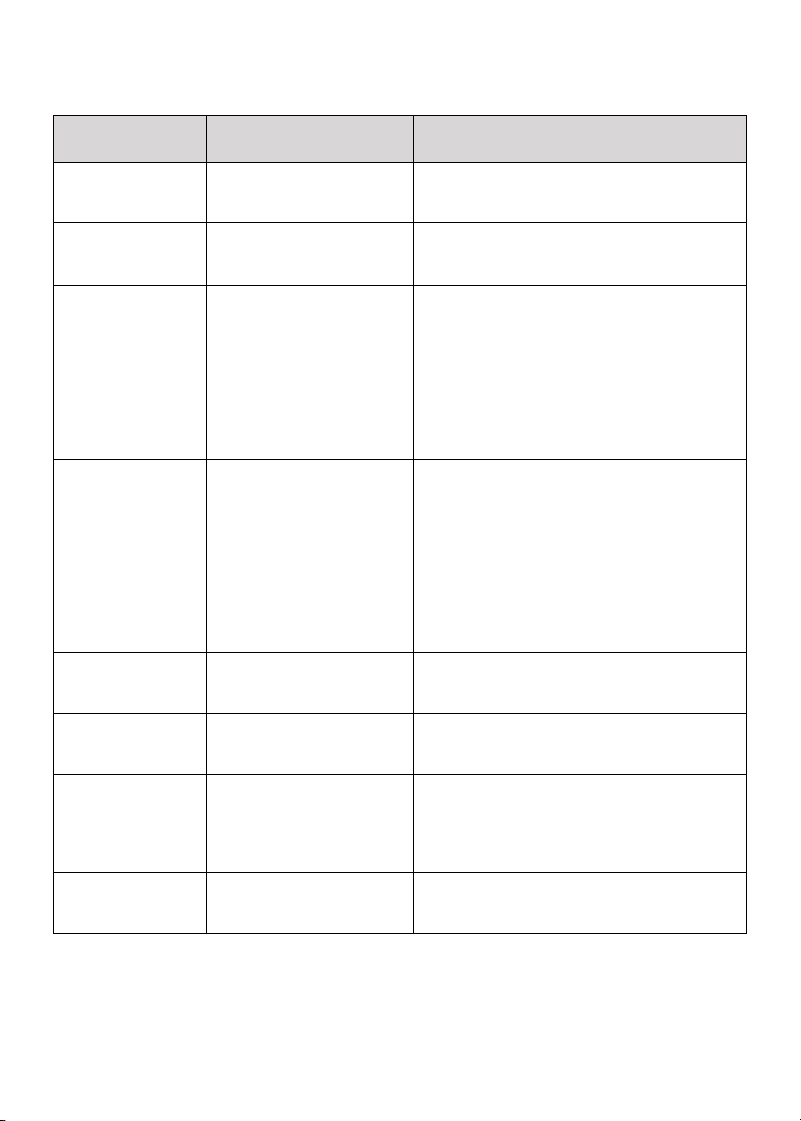
Having Trouble?
Problem
Likely Cause
Solution
All indicator lights
are off.
Unit is unplugged. Re-insert the plug into the outlet. If
the problem is not resolved, contact
Customer Support.
REFILL light is on;
ICE and Cold lights
are off.
The water jug is empty.
Replace water jug (see instructions on
p. 9), then press the REFILL button to return to
standby mode.
The unit is not
dispensing ice or
cold water. The ICE
light is blinking, the
cold water progress
lights do not
illuminate, and the
compressor and
fan are running.
1. Ice cubes have fallen
into the ice-making
box and are blocking
production of more ice.
2. There is a leakage
or blockage in the
refrigeration lines.
1. Press the ICE button to turn off ice-
making, then turn it back on again. If
the light still blinks, turn ice-making off
again and wait about 2 hours for the ice
to melt.
2. If the problem persists, contact
Customer Support.
Unit is not
dispensing ice
(ICE light is lit solid).
1. Ice-making is not
finished.
2. The ice spiral rod is
frozen and blocked.
1. Wait at least 5 minutes after activating
ice mode before trying to dispense. Also,
water must be cooled to 10°C for ice
making to begin.
2. Try to dispense again after 5 minutes. If
the problem doesn’t resolve, turn off the
ice function to help melt the ice around
the rod. After 1 hour, turn the ice function
back on and try again. If the problem
persists, contact Customer Support.
Cold water light is
flashing.
The cold water NTC
probe has a short circuit
or open circuit.
Contact Customer Support.
When HOT water
is selected, water
doesn’t dispense.
The solenoid valve or
heating unit is broken.
Contact Customer Support
When Cold water is
selected, the water
dispensed isn’t cold.
1. Cooling isn’t
finished yet.
2. There is a leakage
or blockage in the
refrigeration system.
1. Be sure to wait until at least 2 of the 3
cooling progress lights are illuminated.
2. If all 3 are illuminated and the water is
still not cold, contact Customer Support.
Ice spills out of the
unit after taking the
cup away.
Ice is already in the
chute when the trigger is
released.
After releasing the trigger, keep the cup
under the chute for about 2 seconds.

15
Notes

16
Terms & Conditions
Limited Warranty
RJ Brands, LLC d/b/a Iceman® offers a limited 1-year Warranty (the “Warranty”)
available on sales through authorized distributors and retailers only. Please
note that this Warranty becomes valid from the date of initial retail purchase
and that the Warranty is nontransferable and applies only to the
original purchaser.
This Warranty is void without proof of purchase within the United States and
Canada. Please be aware that this Warranty supersedes all other warranties
and constitutes the entire agreement between the consumer and Iceman®.
Any changes to the Terms and Conditions of this Warranty must be in writing,
signed by a representative of Iceman®. No other party has the right or ability to
alter or change the Terms and Conditions of this Warranty.
We may ask you to please submit, via email, photos and/or video of the issue
you are experiencing. This is to help us better assess the matter and possibly
offer a quick fix. Photos and/or video may also be required to determine
Warranty eligibility.
We encourage you to register your product. Registering can make the
Warranty process easier and can keep you informed of any updates or recalls
on your product. To register, follow the directions on the Iceman® Warranty
Registration page in the Iceman® User Guide. Please retain your proof of
purchase even after registering. In the event that you do not have proof of
your purchase date, we may declare your Warranty void or we may, at our
sole discretion, apply the date of manufacture as the purchase date for
purposes of this Warranty.

17
Terms & Conditions
What the Warranty Covers
• Manufacturer Defects
Iceman® products are warranted against defects in material and
workmanship, under normal household use, for a period of 1 year from the
date of purchase when used in accordance with the directions listed in
the Iceman® User Guide. If your product does not work as it should, please
contact Customer Support at Chillwithiceman.com so that we may
assist you.
This Warranty Does Not Cover
• Misuse
Damage that occurs from neglectful or improper use of products, including,
but not limited to, damage that occurs as a result of usage with incompatible
voltage, regardless of whether the product was used with a converter or
adapter. See Safety Instructions in the Iceman® User Guide for information on
proper use of product;
• Poor Maintenance
General lack of proper care. We encourage you to take care of your Iceman®
products so that you may continue to enjoy them. Please see Keep It Clean
directions in this Iceman® User Guide for information on proper maintenance;
• Commercial Use
Damage that occurs from commercial use;
• Normal Wear and Tear
Damage or degradation expected to occur due to normal use over time;
• Altered Products
Damage that occurs from alterations or modifications by any entity
other than Iceman® such as the removal of the rating label affixed to
the product;
• Catastrophic Events
Damage that occurs from fire, floods, or natural disasters; or
• Loss of Interest
Claims of loss of interest or enjoyment.

18
Terms & Conditions
For product information, please visit us at Chillwithiceman.com.
EXCEPT WHERE SUCH LIABILITY IS REQUIRED BY LAW, THIS WARRANTY DOES NOT
COVER, AND ICEMAN® SHALL NOT BE LIABLE FOR, INCIDENTAL, INDIRECT, SPECIAL,
OR CONSEQUENTIAL DAMAGES, INCLUDING WITHOUT LIMITATION, DAMAGE TO, OR
LOSS OF USE OF THE PRODUCT, OR LOST SALES OR PROFITS OR DELAY OR FAILURE TO
PERFORM THIS WARRANTY OBLIGATION. THE REMEDIES PROVIDED HEREIN ARE THE
EXCLUSIVE REMEDIES UNDER THIS WARRANTY, WHETHER BASED ON CONTRACT,
TORT OR OTHERWISE.
19
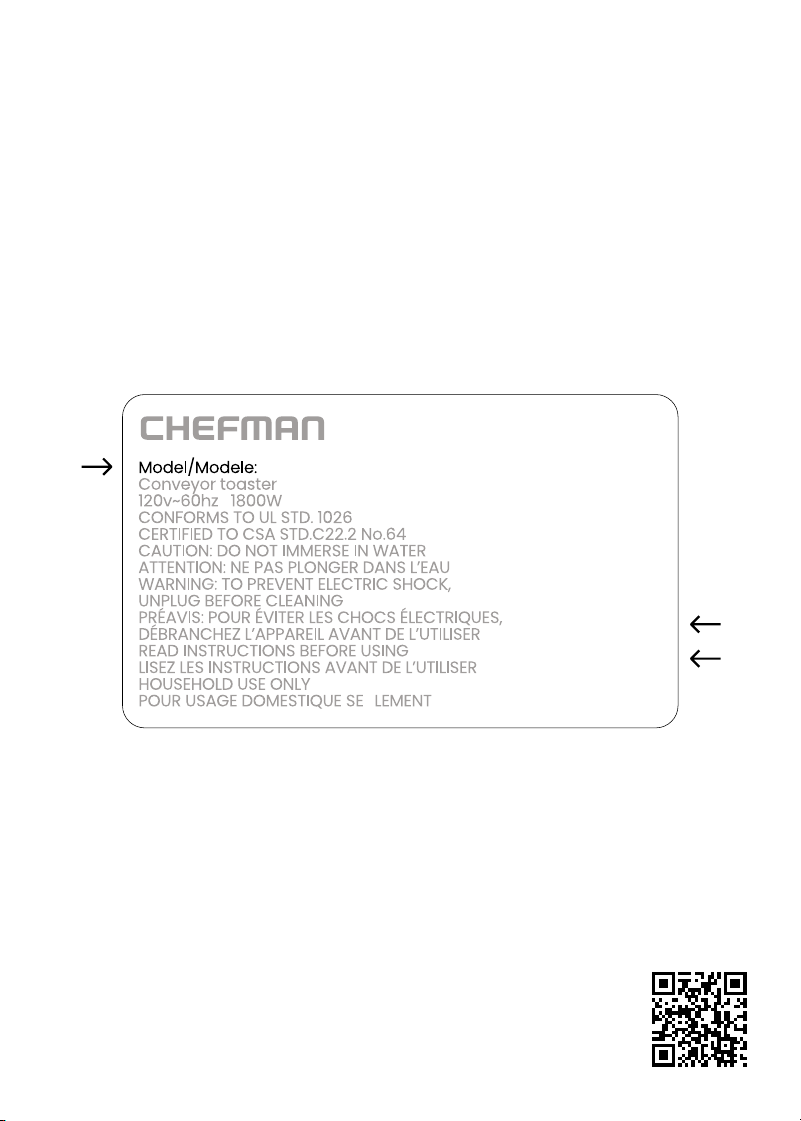
How do I register my product?
All you need to do is fill out a simple Iceman® registration form.
You can easily access the form in one of the two ways listed below:
• Visit Chillwithiceman.com.
• Scan the QR code to the right to access site.
NOTE: Label depicted here is an example.
Please see label on your product for actual model/date code/access code.
Warranty Registration
What do I need to register my product?
• Contact Information
• Model Number (see example below)
• Proof of Purchase (online confirmation, receipt, gift receipt)
• Date Code (see example below)
• Access Code (see example below)
Date Code:
0000
Access Code:
Xxxxxxxx
Made in China/Fabrique en Chine
AC Only/ AC Seulement
XXXXX

RJ56DISUG032125
Glacier Spring
TM
Ice Maker &
Water Dispenser
Iceman® is a registered trademark of RJ Brands, LLC.
