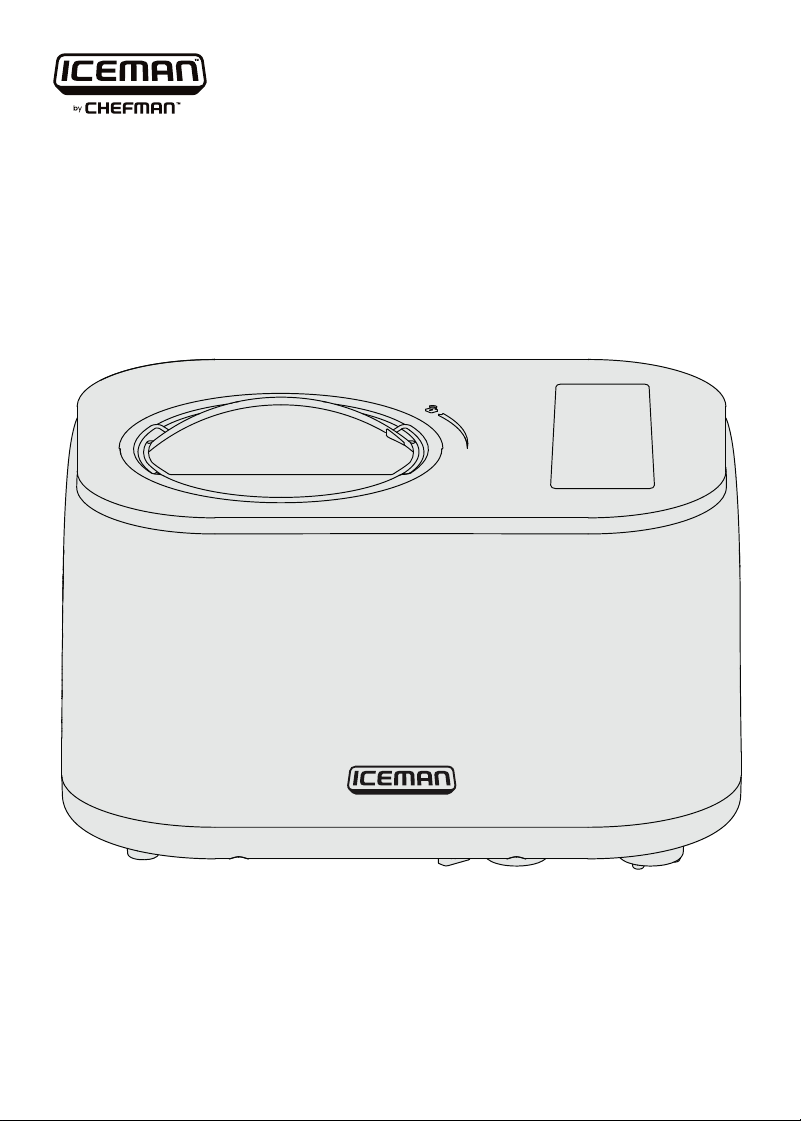
Iceman Trio
Ice Cream,
Frozen Yogurt &
Italian Ice Maker
RJ64-10-SERIES
COVER
2
FE ATU R ES
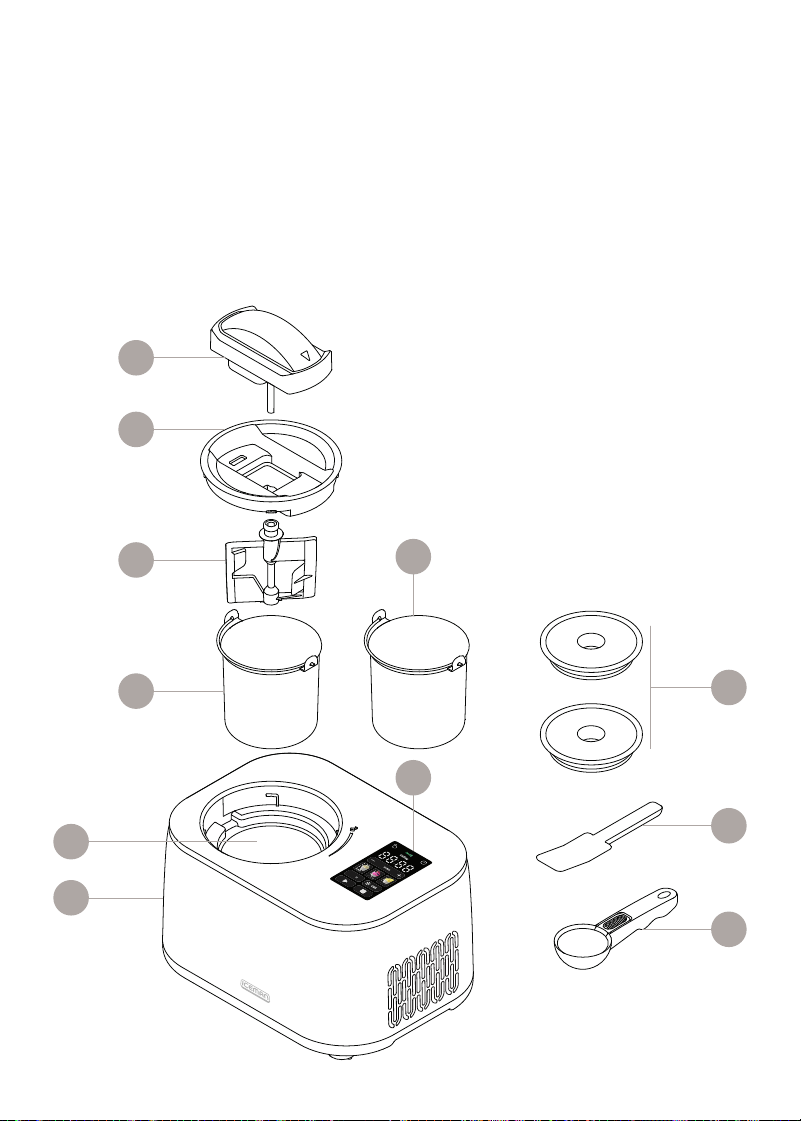
Get to Know Your Ice Maker
1. Lid handle
2. Easy-view transparent lid
3. Paddle
4. Chilling bucket inserts (2)
5. Chilling cylinder
6. Motor base with compressor
7. Control panel
8. Storage lids (2)
9. Ice cream shovel
10. Ice cream scoop
3
4
6
4
7
2
1
8
9
10
5

3
Control Panel
1. Lid unlocked indicator light
2. Ready indicator light
3. Chilling indicator light
4. Power button
5. Digital time display
6. Time + and - buttons
7. Preset buttons*
8. Chill button
9. Stop button
10. Start button
11. Mix button
READ ALL INSTRUCTIONS BEFORE USE
For your safety and continued enjoyment of this product,
always read the instruction manual before using.
CONTROL PANEL
4
5
6
8
9
7
1
11
10
2 3
* Press and hold the Frozen Yogurt button for 3 seconds while in Standby mode
to mute the unit's beeps. Press and hold again to turn sound back on.

4
SAFETY INSTRUCTIONS &
IMPORTANT SAFEGUARDS
When using electrical appliances, basic safety precautions should always be
followed, including:
1. Read all instructions.
2. Remove all bags and packaging from appliance before use.
3. Never leave appliance unattended when in use.
4. Make sure the appliance is cleaned thoroughly before using.
5. Do NOT use appliance for other than its intended use. For household use
only. Do not use outdoors.
6. To prevent electric shock, do not submerge the cord, plugs, motor unit, or
any electrical parts in water or any other liquid.
7. Do NOT operate this appliance with a damaged cord, damaged plug,
after the appliance malfunctions, is dropped, or damaged in any manner.
Contact Customer Support for replacement, examination, or repair.
8. Do NOT place appliance on or near a hot gas burner, hot electric burner, or
in a heated oven.
9. Refrain from using attachments that are not recommended by Iceman, as
this may result in fire, electric shock, or personal injury.
10. Do NOT let the cord touch hot surfaces, or hang over the edges of tables
or counters.
11. This appliance can be used by persons with reduced physical, sensory, or
mental capabilities or lack of experience or knowledge, if they have been
given supervision or instruction concerning use of the appliance in a safe
way and understand the hazards involved.
12. Children should be supervised not to play with the appliance.
13. Avoid contact with moving parts.
14. Always be sure to unplug the appliance from the outlet prior to moving,
cleaning, storage, and when not in use.
15. Always place the unit on a firm and stable surface prior to use.
16. Improper use of the appliance can result in property damage or even in
personal injury.

5
SAFETY INSTRUCTIONS &
IMPORTANT SAFEGUARDS
17. Never use abrasive cleaning agents when cleaning this unit.
18. Unit should remain upright at all times. If unit is turned on its side or
upside down, you will need to put it in upright position and wait 24 hours
before using.
SAVE THESE INSTRUCTIONS
FOR HOUSEHOLD USE ONLY
WARNING: Improper use of the grounding plug can result in electric shock.
Grounding Instructions
This appliance must be grounded. In the event of an electrical short circuit,
grounding reduces the risk of electric shock by providing an escape wire for
the electric current.
To protect against electrical shock, this appliance is equipped with a cord
having a 3-prong grounding-type plug for insertion into a proper grounding-
type electrical outlet. DO NOT alter the plug for use in a 2-prong outlet. If the
plug will not fit into an outlet, have a proper outlet installed by a qualified
electrician.

6
SAFETY INSTRUCTIONS &
IMPORTANT SAFEGUARDS
Short Cord Instructions
A short power-supply cord is provided to reduce the hazards of entanglement
or tripping over a longer cord. Longer detachable power-supply cords or
extension cords are available and may be used if care is exercised in their use.
If a longer detachable power-supply extension cord is used:
1. The marked electrical rating of the extension cord should be at least as
great as the electrical rating of the appliance;
2. If the appliance is of the grounded type, the extension cord should be a
grounding-type 3-wire cord; and
3. The longer cord should be arranged so that it will not drape over the
countertop or tabletop where it can be pulled on by children or tripped over.
Power Cord Safety Tips
1. Never pull or yank on the cord or the appliance.
2. To insert the plug, grasp it firmly and guide it into the outlet.
3. To disconnect the appliance, grasp the plug and remove it from the outlet.
4. Never use the product if the power cord shows signs of abrasion or
excessive wear. Contact Customer Support for additional guidance
and support.
5. Never wrap the cord tightly around the appliance, as this could place
undue stress on the cord where it enters the appliance and cause it to fray
and break.
DO NOT OPERATE THE APPLIANCE IF THE POWER CORD SHOWS ANY DAMAGE
OR IF THE APPLIANCE WORKS INTERMITTENTLY OR STOPS WORKING ENTIRELY.
California Proposition 65:
(Applicable for California Residents only)
WARNING: Cancer and Reproductive Harm
www.P65Warnings.ca.gov
Do not place the appliance on a
stovetop or any other heatable surface,
even if stovetop is not on.
Doing so is a fire hazard.

7
Before First Use
1. Remove all packaging materials and check to ensure that all parts and
accessories are accounted for. Read and remove all stickers (except for the
rating label, which should remain on the unit).
2. Set the unit upright on a flat surface. Let it stand for at least 2 hours before
using, to allow the refrigerant to settle.
3. Remove and hand wash the chilling buckets, paddle, transparent lid, lid
handle, storage lids, as well as the ice cream scoop and shovel.
4. Wipe down the unit housing with a soft, damp cloth. Do not immerse the
unit in water or any other liquid. Never use abrasive cleaning agents, which
can damage the finish.
8
STEP 1
How to Use the Ice Cream Maker
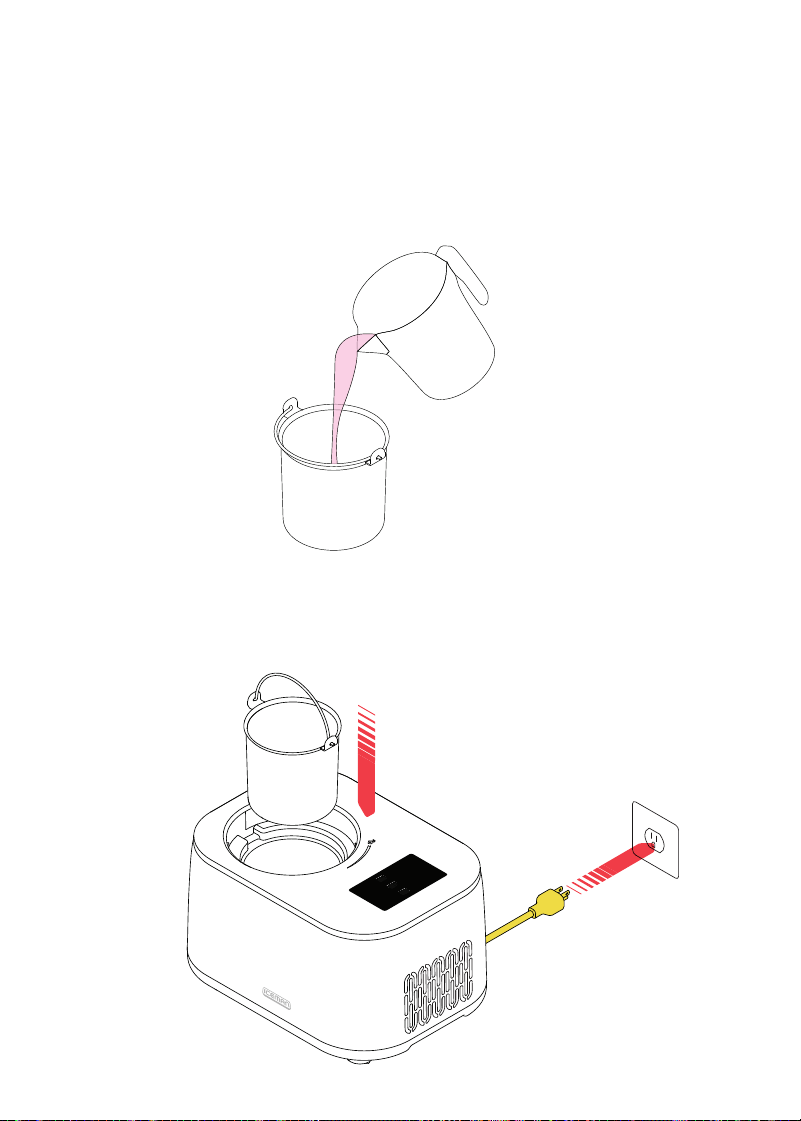
1. Prepare your ice cream, Italian ice, or frozen yogurt base and pour it into
one of the chilling buckets. NOTE: Do not exceed the appropriate Max line
for what you are making (Max 1 for Italian ice; Max 2 for frozen yogurt and
ice cream). For the best results, make sure your mixture is chilled (room
temperature is OK too). Never use the unit to chill hot liquids.
2. Plug in the ice cream maker and lower the bucket into the chilling cylinder,
making sure the two tabs on the side of the bucket are aligned with the
notches in the cylinder housing.
STEP 2
9
How to Use the Ice Cream Maker
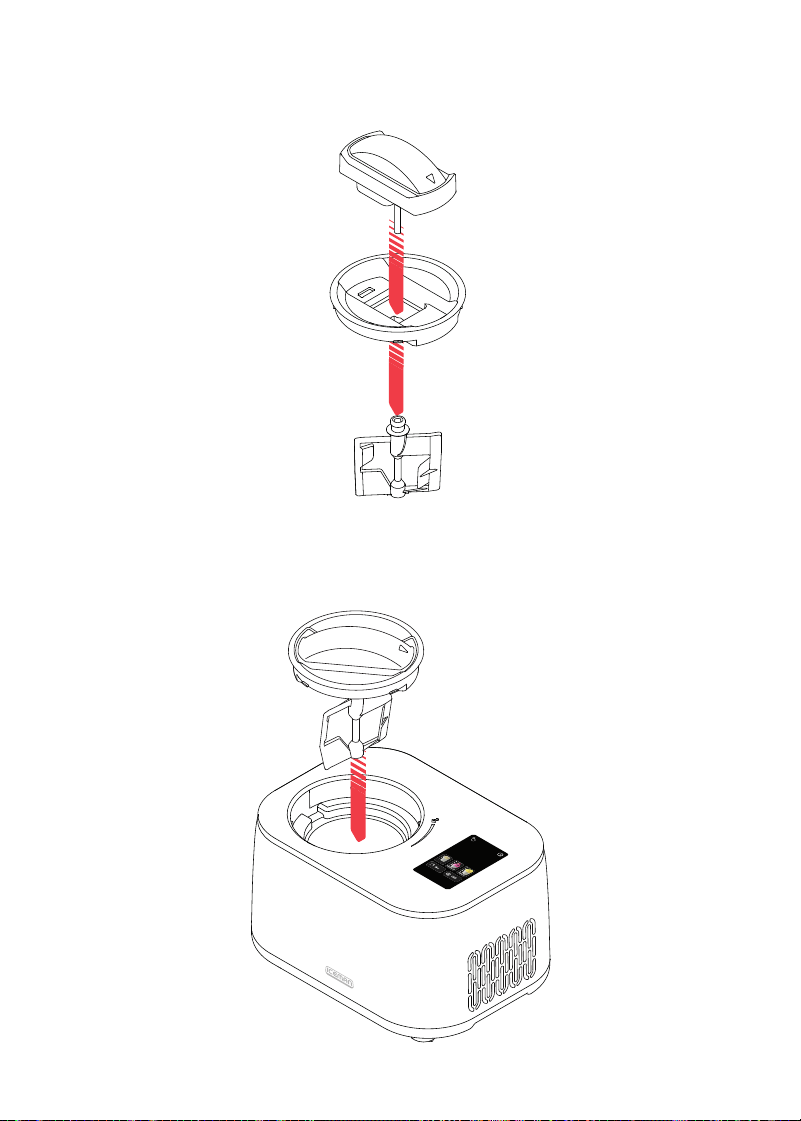
3. Snap the lid handle onto the transparent lid. Insert the spindle on the lid
into the end of the paddle with a collar, then press until they click together.
4. Lower the lid/paddle assembly into the bucket, aligning the arrow on the lid
handle with the unlock icon on the unit.
STEP 4
STEP 3
How to Use the Ice Cream Maker
STEP6
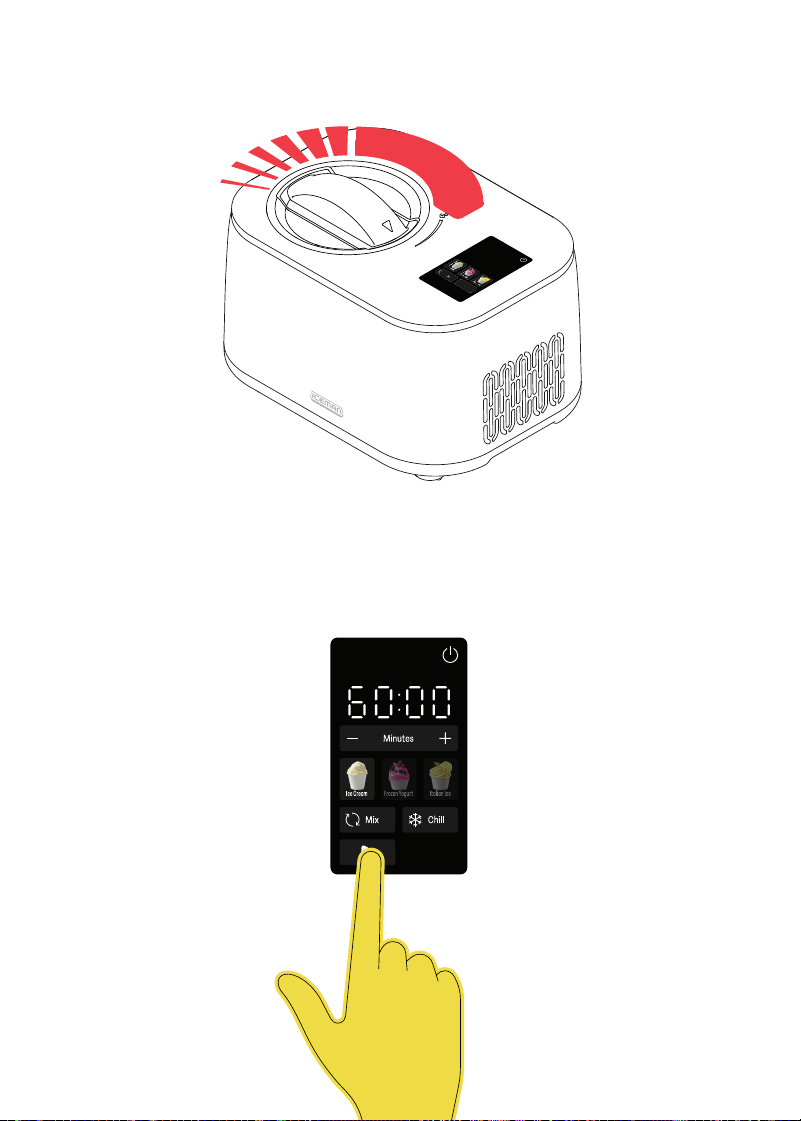
5. Turn the lid handle clockwise to lock the lid in place; you'll feel and hear a
click, and the Lid unlocked indicator light on the control panel will turn off.
6. Select your chosen preset (see details p. 12). If desired, use the + and –
buttons to adjust the time up or down, to a maximum of 60 minutes,
depending on preset. Press Start.
STEP 5
10
11
How to Use the Ice Cream Maker
7. The unit will begin churning and counting down the remaining time in
the cycle. If you want to check on your ice cream at any time, press the
Stop button; the churning will pause, and you can either look through
the transparent lid, or unlock and remove the lid to check consistency. To
resume the cycle, press Start again.
8. When the cycle finishes, the unit will beep and automatically switch to
Chill mode (the Chilling and Ready indicator lights will illuminate). The
paddle will stop churning but the unit will keep your ice cream cold until
you remove it, for up to 60 minutes. If desired, use the Mix function to add
your mix-ins at this point (see p. 12 for more details). IMPORTANT: If the
unit detects that the ice cream has reached the right consistency before
the programmed time, it will stop churning, the word "dENSE" will scroll
across the digital display, "Ready" will illuminate, and the unit will switch
to Chill mode.
9. Unlock and remove the lid/paddle
assembly and lift the bucket
out of the unit. At the end of the
freezing cycle, your frozen treat
will have a soft-serve consistency.
10. To achieve the typical “hard-
pack” ice cream consistency, put
one of the storage lids on the
bucket (or transfer to a separate
lidded freezing container) and
place in your freezer for at least
4 hours.
STEP 7
STEP 8

12
Presets & Special Functions
The three presets offer preprogrammed typical times for different types of
frozen treats. Because some types of frozen treats expand more than others,
there are also two different Max fill lines depending on what you're making.
Preset Max Fill Line Default Run Time Use it for
Ice Cream
Max 2 Line
50 minutes Traditional cooked and no-cook ice
cream bases, sorbets, and sherbets
Frozen Yogurt
Max 2 Line
40 minutes A creamy, tangy yogurt treat with
higher protein and lower fat, perfect
for flavoring with fruit and honey
Italian Ice
Max 1 Line
35 minutes Sweetened fruit juices, fruit syrups
Chill function
In Chill mode, the unit chills the ice cream but does not mix it. When your
chosen preset finishes, the unit switches automatically to Chill mode to keep
your ice cream cold for up to 60 minutes. Chill mode means you don’t need
to hover over the unit to immediately transfer to the freezer when it’s finished
processing. You can also use the Chill function on its own. With the unit powered
on, simply press Chill and use the +/- buttons to adjust the time up to
30 minutes, then press Start.
Mix function
In Mix mode, the unit stirs the ice cream mixture but does not chill it, making
this function ideal for blending in mix-ins after an ice cream or frozen yogurt
finishes processing. (It can also be used to mix together liquid ingredients
before the freezing cycle.) To use it, unlock and remove the lid/paddle assembly,
then add up to ¾ cup of mix-in(s) to the bucket. Return the lid/paddle to the
bucket and lock it. Press Mix, then adjust the time between 1 and 5 minutes
using the + and - buttons. Press Start; the unit will begin mixing and counting
down the time. Be careful not to overmix, especially with crumbly mix-ins such
as cookies—many take only a minute or two to fully incorporate. When the Mix
cycle finishes, press Chill to return to Chill mode OR transfer the finished ice
cream to the freezer. NOTE: If your unit has entered Chill mode with a "dENSE"
alert because it froze sufficiently before the estimated time, it will not run a mix
cycle for more than a few seconds. In this case, remove the ice cream from the
bucket and fold in the mix-ins by hand.

13
Ice Cream, Frozen Yogurt
& Italian Ice Tips
• Frozen treats expand in volume as they freeze, so be sure to fill the bucket only
to the appropriate Max line to prevent overflow. Italian ice expands more than
ice cream or frozen yogurt, so its Max line (Max 1) is lower.
• Before processing, always make sure the cylinder and outside of the bucket
are completely dry. Any moisture in between the two can freeze during the
chilling cycle, causing the bucket to get stuck inside the cylinder.
• Homemade ice cream will keep well in the freezer for up to 1 week; after that it
tends to develop ice crystals. To maximize storage time, press parchment or
waxed paper over the surface of the ice cream before putting the lid on.
• Ice creams with cooked (custard) bases, or simple stir-together dairy (and
dairy-alternative) bases both work well in the ice cream maker.
• For cooked bases, strain the custard before processing to remove any bits of
cooked egg.
• For the creamiest texture, let ice creams with cooked bases chill in the
refrigerator or an ice bath before processing in the unit. If you’re pressed for
time, you can start processing when the mixture is at room temperature
(adding time to the cycle as needed) but NEVER begin processing the base
while it is still hot.
• Sorbets (made from pureed fruit) work best on the ice cream setting,
which yields a smooth, scoopable result. Thinner fruit juice bases should be
processed on the Italian ice preset, which will yield a granita-like texture.
• The proportion of sugar vs fat in your specific recipe or the inclusion of any
alcoholic ingredients can affect the time it takes to fully freeze. If the ice cream
hasn’t frozen adequately after 75 minutes, the base may have too much
sugar or alcohol.
• If finished ice cream has an icy texture, the base may be too low in sugar
or fat.
• If the finished ice cream has a thick, waxy mouthfeel, the base may be too
high in fat.
• Chill mode keeps your frozen treat cold until you are able to transfer it to the
freezer for further hardening. As the ice cream sits in Chill mode, the sides
begin to harden up while the inside stays soft, so we recommend transferring
it to the freezer as soon as possible for the most even freezing.

14
Creating Flavors
A good basic ice cream or frozen yogurt can be transformed into dozens of
flavors with the addition of extracts, fruit purees, or cocoa or espresso powder.
Start with the base of your choice (see below), then use the amounts in this
chart as a guideline. Chunky mix-ins should be added using the Mix function
(see p. 12) after the ice cream finishes processing; other flavorings should be
stirred into the base before processing. NOTE: Avoid large amounts of thin liquid
mix-ins, which will create an icy texture.
Flavoring
Recommended amount
(per 2-cup batch)
Notes
Extracts (e.g., vanilla,
lemon, orange, mint,
coconut)
1 – 2 tsp A little vanilla extract enhances certain
flavors like chocolate or coffee but can
clash or compete with other flavors.
Fruit puree
(e.g., raspberry,
strawberry, peach)
¾ – 1 cup Work best with no-cook dairy bases. For
more concentrated flavor, cook fruit until
softened, then puree.
Cocoa powder 3 Tbsp Dutch-process cocoa, such as Hershey’s
Special Dark, mixes best into bases
without clumping.
Instant espresso
powder
1–2 Tbsp
Chunky mix-ins (e.g.,
crushed cookies or
candies, chocolate
chips)
1⁄3 cup – ¾ cup Add using the Mix function after the ice
cream is fully processed.
3 Tasty Bases
Sweet Cream Ice Cream: Whisk together 1 cup heavy cream, ¾ cup whole
milk, and 2/3 cup sugar, along with desired flavorings. Process on Ice Cream.
Tangy Frozen Yogurt: Whisk together 2 cups plain, whole-milk Greek yogurt
and 1 cup sugar, along with any desired flavorings. Process on Frozen Yogurt.
Citrus Italian ice: Whisk ½ cup sugar in 2/3 cup warm water until dissolved. Add
1/3 cup plus 2 Tbsp fresh lemon or lime juice (or a mix) and ¾ cup cold water.
Process on Italian Ice. NOTE: Due to its unique texture and sugar requirements,
Italian ice is only compatible with extracts or powdered flavorings, not fruit
purees or mix-ins.
Scan here for a digital cookbook full of
delicious recipes created by our expert
chefs especially for your Iceman Trio
Ice Cream, Frozen Yogurt & Italian Ice Maker.

15
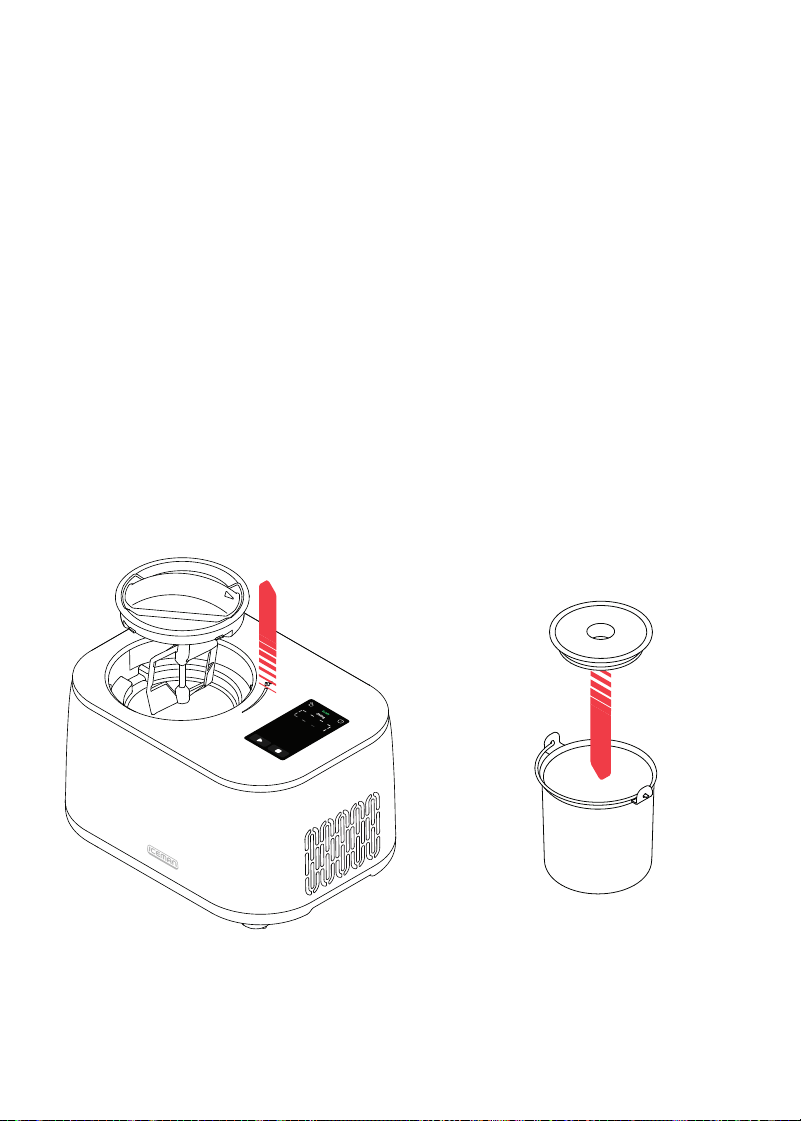
Keep It Clean
1. Unplug the unit and let the chilling cylinder warm to room temperature
before cleaning.
2. To separate the transparent lid and the handle, press in the two tabs on the
underside of the lid, then pull the two pieces apart.
3. Wipe down the unit housing, lid handle, and the chilling cylinder with a
damp cloth. Do not use abrasive cleaners, as they may damage the finish.
Never immerse the unit housing in water or any other liquid.
4. Wash the chilling bucket inserts, transparent lid, and paddle in warm soapy
water, then rinse and dry with a soft cloth. These parts are also top-rack
dishwasher safe.
5. The storage lids, ice cream shovel, and ice cream scoop are also
dishwasher safe.

16
Having Trouble?
Problem Likely Cause Solution
Chilling bucket
insert is stuck in
chilling cylinder
after freezing.
The bucket and cylinder have
frozen together due to moisture
in between them.
Press the Stop button to turn off
the Chill mode; wait a few minutes,
then try to separate again.
Unit goes into Chill
mode before timer
has counted down
and "dENSE" scrolls
across display.
The ice cream has frozen sufficiently
ahead of the estimated time.
This is normal.
Mix mode runs for
only a few seconds
then turns off,
with "dENSE' alert
scrolling across
display.
To protect the motor, the unit turns off
Mix mode if it has just automatically
ended a preset cycle with the "dENSE"
alert.
This is normal, but if you would like
to add mix-ins to your ice cream,
remove it from the chilling cylinder
and fold them in by hand.
Time is up but
mixture isn’t frozen/
firm enough.
1. Base needs additional time
due to higher sugar or alcohol
content.
2. The unit is designed to produce
ice cream that is a soft-serve
consistency.
1. Add additional time to the
processing cycle. If after 75
minutes it still hasn’t frozen,
the sugar or alcohol content
may be too high.
2. To firm up ice cream to
hard-pack consistency, cover
bucket and transfer to freezer
for about 4 hours.
Timer is counting
down, but paddle is
not churning.
1. Paddle is not properly attached
to lid.
2. Lid is not completely locked.
3. Food residue is blocking the
electrical contact points on the
unit so it doesn't detect the lid.
1. Remove and re-install paddle.
2. Remove and re-install lid. It
must audibly click to be fully
locked.
3. Power off the unit and clean
the electrical contact points:
two small silver circles above
the chilling cylinder, on either
side of where the lid handle
rests when locked.

17
Notes

18
Notes

19
Notes

2020
Terms & Conditions
Limited Warranty
RJ Brands, LLC d/b/a Chefman™ offers a limited 1-year Warranty (the “Warranty”)
available on sales through authorized distributors and retailers only. Please
note that this Warranty becomes valid from the date of initial retail purchase
and that the Warranty is nontransferable and applies only to the
original purchaser.
This Warranty is void without proof of purchase within the United States and
Canada. Please be aware that this Warranty supersedes all other warranties
and constitutes the entire agreement between the consumer and Chefman™.
Any changes to the Terms and Conditions of this Warranty must be in writing,
signed by a representative of Chefman™. No other party has the right or ability
to alter or change the Terms and Conditions of this Warranty.
We may ask you to please submit, via email, photos and/or video of the issue
you are experiencing. This is to help us better assess the matter and possibly
offer a quick fix. Photos and/or video may also be required to determine
Warranty eligibility.
We encourage you to register your product. Registering can make the
Warranty process easier and can keep you informed of any updates or recalls
on your product. To register, follow the directions on the Chefman® Warranty
Registration page in the Chefman™ User Guide. Please retain your proof of
purchase even after registering. In the event that you do not have proof of
your purchase date, we may declare your Warranty void or we may, at our
sole discretion, apply the date of manufacture as the purchase date for
purposes of this Warranty.

21
Terms & Conditions
What the Warranty Covers
• Manufacturer Defects
Chefman™ products are warranted against defects in material and
workmanship, under normal household use, for a period of 1 year from the
date of purchase when used in accordance with the directions listed in the
Chefman™ User Guide. If your product does not work as it should, please
contact Customer Support at Chefman.com so that we may
assist you.
This Warranty Does Not Cover
• Misuse
Damage that occurs from neglectful or improper use of products, including,
but not limited to, damage that occurs as a result of usage with incompatible
voltage, regardless of whether the product was used with a converter or
adapter. See Safety Instructions in the Chefman™ User Guide for information
on proper use of product;
• Poor Maintenance
General lack of proper care. We encourage you to take care of your
Chefman™ products so that you may continue to enjoy them. Please see
Keep It Clean directions in this Chefman™ User Guide for information on
proper maintenance;
• Commercial Use
Damage that occurs from commercial use;
• Normal Wear and Tear
Damage or degradation expected to occur due to normal use over time;
• Altered Products
Damage that occurs from alterations or modifications by any entity
other than Chefman™ such as the removal of the rating label affixed to
the product;
• Catastrophic Events
Damage that occurs from fire, floods, or natural disasters; or
• Loss of Interest
Claims of loss of interest or enjoyment.

22
Terms & Conditions
For product information, please visit us at Chefman.com.
EXCEPT WHERE SUCH LIABILITY IS REQUIRED BY LAW, THIS WARRANTY DOES NOT
COVER, AND CHEFMAN™ SHALL NOT BE LIABLE FOR, INCIDENTAL, INDIRECT, SPECIAL,
OR CONSEQUENTIAL DAMAGES, INCLUDING WITHOUT LIMITATION, DAMAGE TO, OR
LOSS OF USE OF THE PRODUCT, OR LOST SALES OR PROFITS OR DELAY OR FAILURE TO
PERFORM THIS WARRANTY OBLIGATION. THE REMEDIES PROVIDED HEREIN ARE THE
EXCLUSIVE REMEDIES UNDER THIS WARRANTY, WHETHER BASED ON CONTRACT,
TORT OR OTHERWISE.
23
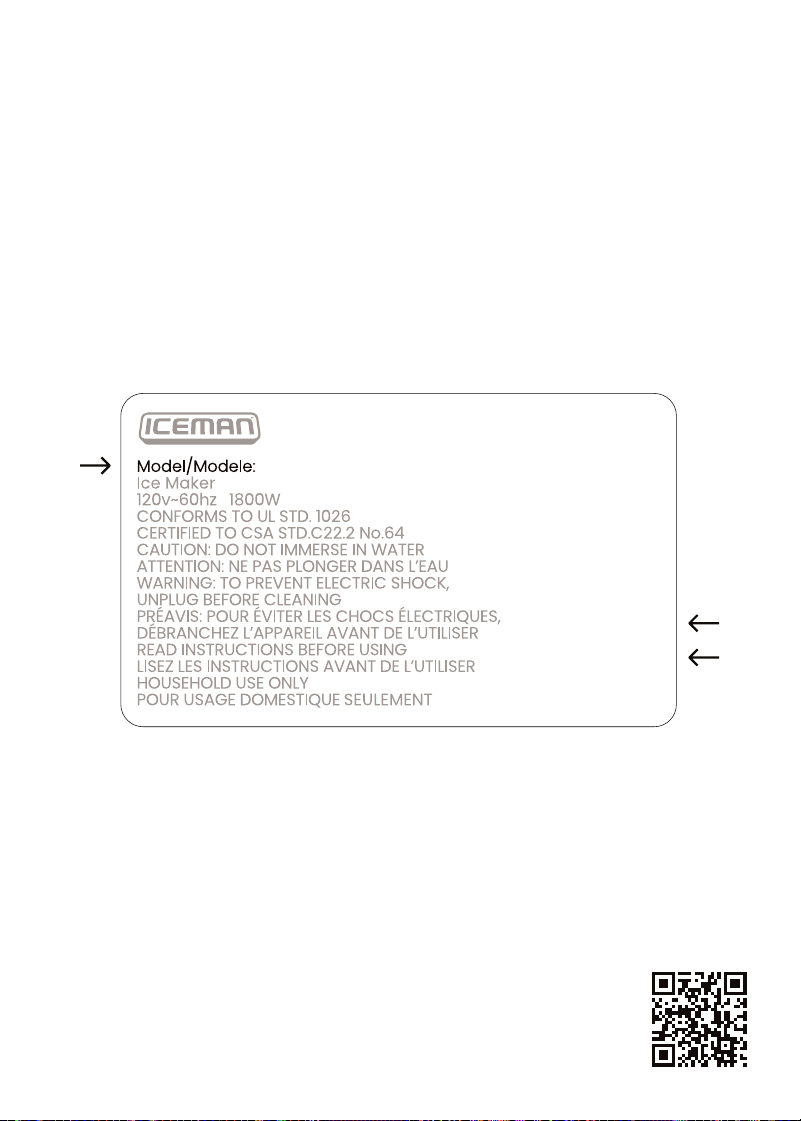
How do I register my product?
All you need to do is fill out a simple Chefman™ registration form.
You can easily access the form in one of the two ways listed below:
• Visit Chefman.com.
• Scan the QR code to the right to access site.
NOTE: Label depicted here is an example.
Please see label on your product for actual model/date code/access code.
Warranty Registration
What do I need to register my product?
• Contact Information
• Model Number (see example below)
• Proof of Purchase (online confirmation, receipt, gift receipt)
• Date Code (see example below)
• Access Code (see example below)
Date Code:
0000
Access Code:
Xxxxxxxx
XXXXX

Iceman™ is a trademark of RJ Brands, LLC.
Chefman™ is a trademark of RJ Brands, LLC.
Iceman Trio
Ice Cream, Frozen Yogurt
& Italian Ice Maker
RJ6410SERIESUG081525