USER GUIDE
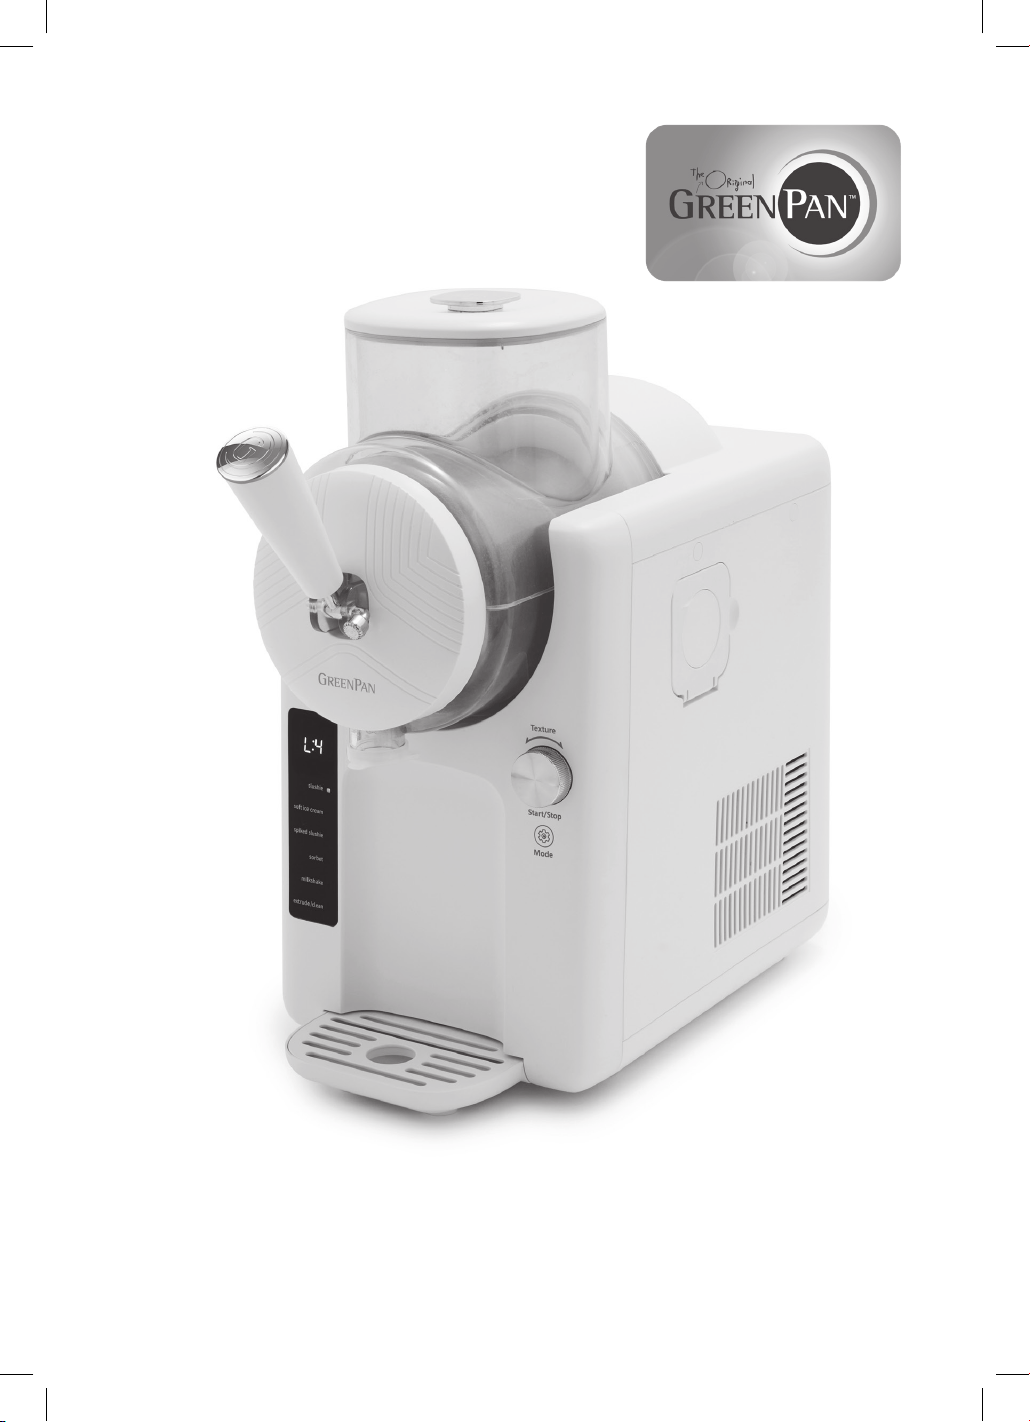
FROST ICE CREAM &
FROZEN DRINK MAKER

2
IMPORTANT
SAFEGUARDS
When using an electrical appliance,
basic safety precautions should always
be followed to reduce the risk of fire,
electric shock, and or injury, including
the following:
1. Read all instructions
before using.
2. If the supply cord is damaged, it must be
replaced by the manufacturer or its service
agent or a similarly qualified person in order
to avoid a hazard.
3. This appliance is not intended for use by
persons (including children) with reduced
physical, sensory or mental capabilities, or
lack of experience and knowledge, unless
they have been given supervision or instruction
concerning use of the appliance by a person
responsible for their safety. Children should be
supervised to ensure that they do not play with
the appliance.
4. This appliance can be used by children
aged from 8 years and above and persons
with reduced physical, sensory or mental
capabilities or lack of experience and
knowledge if they have been given supervision
or instruction concerning use of the appliance
in a safe way and understand the hazards
involved. Children shall not play with the
appliance. Cleaning and user maintenance
shall not be made by children
without supervision.
WARNING:
• Do not store explosive substances such as
aerosol cans with a flammable propellant
in this appliance.
• Keep ventilation openings, in the appliance
enclosure or in the built-in structure, clear
of obstruction.
• Do not use mechanical devices or other means
to accelerate the defrosting process, other than
those recommended by the manufacturer.
• Do not damage the refrigerant circuit.
• Do not use electrical appliances inside the
food storage compartments of the appliance,
unless they are of the type recommended by
the manufacturer.
• When positioning the appliance, ensure the
supply cord is not trapped or damaged.
• Do not locate multiple portable socket-outlets
or portable power supplies at the rear of
the appliance.
• When disposing of the appliance, do so only
at an authorized waste disposal center. Do not
expose to flame.
DANGER:
• Risk of fire or explosion. Flammable refrigerant
used. Do not use mechanical devices to defrost
refrigerator. Do not puncture refrigerant tubing.
• Risk of fire or explosion. Flammable refrigerant
used. To be repaired only by trained service
personnel. Use only manufacturer-authorized
service parts. Any repair equipment used must
be designed for flammable refrigerants. Follow
all manufacturer repair instructions. Do not
puncture refrigerant tubing.
CAUTION:
• Risk of fire or explosion. Dispose of refrigerator
properly in accordance with the applicable
federal or local regulations. Flammable
refrigerant used.
• Risk of fire or explosion due to puncture of
refrigerant tubing; follow handling instructions
carefully. Flammable refrigerant used.
The refrigerant (R290)
is flammable.
• Risk of fire/Flammable materials.
The refrigerant isobutene (R290) is contained
within the refrigerant circuit of the appliance, a
natural gas with a high level of environmental
compatibility, which is nevertheless flammable.
During transportation and installation of the
appliance, ensure that none of the components
of the refrigerant circuit becomes damaged.
Refrigerant is flammable gas, do not expose to
open flame. When disposing of this equipment,
be sure to dispose of it at an authorized waste
disposal center.
If the refrigerant circuit should be damaged:
• Avoid opening flames and sources
of ignition.
• Thoroughly ventilate the room in which the
appliance is situated.
1. Do not use outdoors.
2. This appliance is intended to be used in
household and similar applications such as:
• Staff kitchen areas in shops, offices and
other working environments;
• Farm houses and by clients in hotels, motels
and other residential type environments;
• Bed and breakfast type environments.
• Catering and similar non retail applications.

3
1. Before using the appliance for the first time,
please wait 2 hours after positioning it, and
keep the transparent lid open for at least
2 hours.
2. Ensure the voltage is compliant with the
voltage range stated on the rating label,
and ensure the earthing of the socket is
in good condition.
3. Do not upend this product or incline
it over a 45° angle.
4. To protect against risk of electric shock, do
not pour water on cord, plug and ventilation,
immerse the appliance in water or any
other liquid.
5. The plug must be removed before cleaning,
maintaining or filling the appliance.
6. Keep the appliance 20cm from other objects
to ensure the good heat releasing.
7. Do not use the accessories which are not
recommended by Manufacturer.
8. Do not use the appliance close by flames, hot
plates or stoves.
9. Do not switch on the power button frequently
(ensure 5 min. interval at least) to avoid the
damage of compressor.
10. Do not use outdoors.
11. Never clean with scouring powders
or hard implements.
12. Please keep the instruction manual.
13. Do not put your fingers into the outlet
to avoid danger.
14. If the SUPPLY CORD is damaged, it must be
replaced by the manufacturer, its service
agent or similarly qualified persons in order to
avoid a hazard.
15. If there is a fault, please check it again before
requesting maintenance. If the fault still cannot
be eliminated, please go to the designated
maintenance point for maintenance, or
contact our company, and please confirm the
following items.
SAVE THESE
INSTRUCTIONS
FOR HOUSEHOLD
USE ONLY
SPECIAL CORD SET INSTRUCTIONS:
A short power-supply cord is provided to reduce the
risks resulting from becoming entangled in or tripping
over a longer cord. Longer extension cords may be
used if care is exercised. If a long extension cord is
used, the marked electrical rating of the extension
cord should be at least as great as the electrical rating
of the appliance, and the longer cord should be
arranged so that it will not drape over the countertop
or tabletop where it can be pulled on by children or
animals or tripped over.

4
Before First Use
Parts
Control Panel
Assembly
Operation
Quick Tips
Cleaning & Maintenance
Troubleshooting
Warranty
CONTENTS
05
05
05
06
07
10
11
12
13
NO FREEZER,
NO WAITING,
NO HASSLE.
Welcome to the GreenPan Frost Ice Cream
and Frozen Drink Maker, the easiest way to
bring frozen treats home! We have helpful
tips, tricks, and quick recipes to help you
get started creating your favorite slushie or
frozen cocktail, homemade ice cream, or
creamy milkshakes. Enjoy!

5
12
9
8
5
15
4
14
16
1
2
317
7
6
11
10
13
4. Wash all accessories in warm, soapy water.
Rinse and dry thoroughly.
NOTE: Do not use harsh abrasive cleaners. If
washing accessories in the dishwasher, a slight
discoloration to accessories may occur. This is
cosmetic only and will not affect performance.
BEFORE FIRST USE
1. Read all instructions and important safeguards.
2. Remove all packaging materials and check that
all items have been received in good condition.
3. Tear up all plastic bags and dispose of properly
as they can pose a suffocation or choking risk
to children.
CONTROL PANEL
1. Slushie: Use slushie mode to make icy
treats and more.
2. Soft Ice Cream: Use for ice cream, frozen
custards, frozen yogurts, sherbet and more.
3. Spiked Slushies: Use spiked slushie
mode to make delicious icy drinks
with alcohol.
4. Sorbet: Make fresh fruit sorbets for
healthier alternatives.
5. Milkshake: Make soft or thick milkshakes
with milkshake mode.
6. Extrude/Clean: Use extrude mode to
clear the mixing bowl of ingredients when
ready. Once done add warm water and
soap to previously extruded mixing bowl for
a quick clean.
Control Dial:
Turn the control
dial to cycle
between textures
on specified
modes.
Press the control dial
to start the mode.
Press and hold the control
dial to stop a mode.
Mode Button:
Use the mode
button to cycle
between the
6 modes.
Tip: Once unit is in COOL,
press mode button to begin
extrude mode. Press again
to go back to COOL mode.
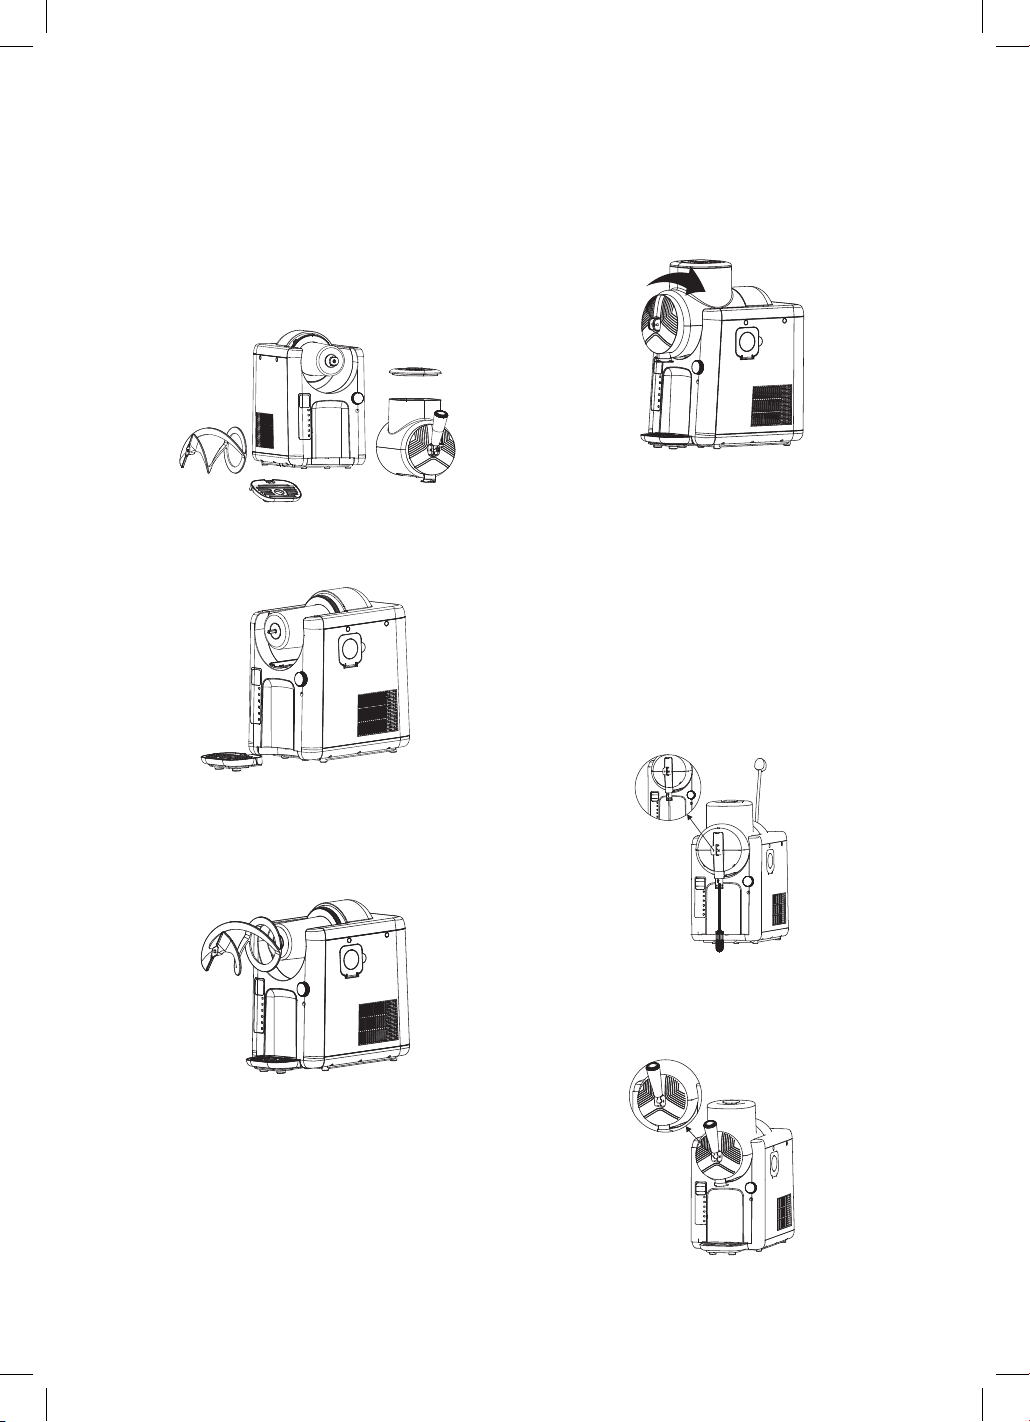
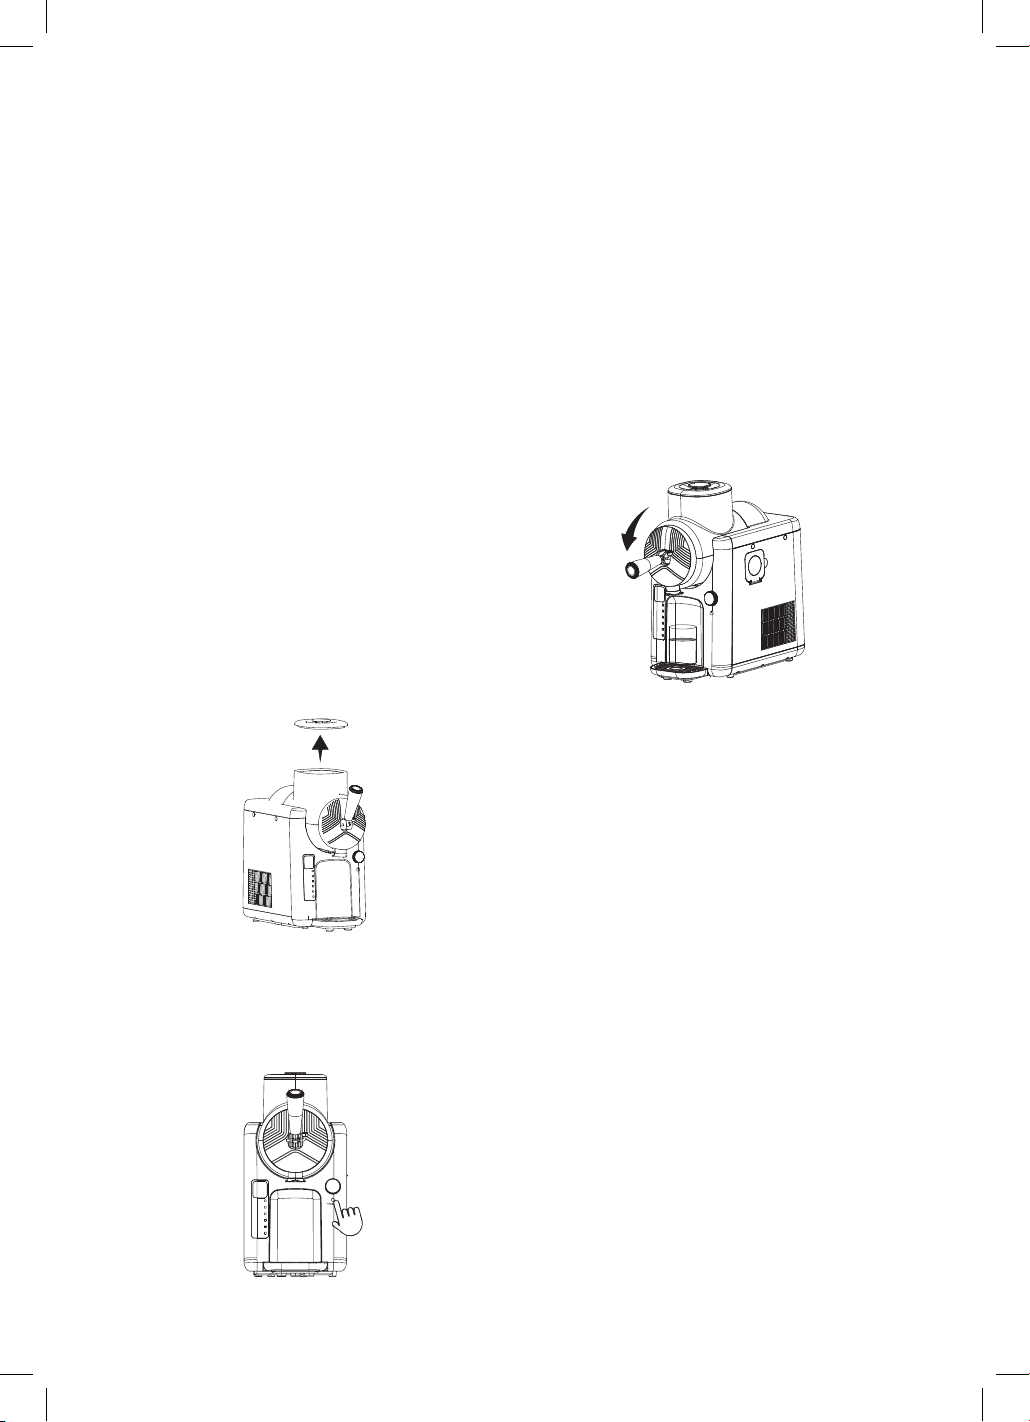
PARTS
1. Ice Cream Cone Holder
2. Main Body
3. Control Dial
4. Cooling Rod
5. Stirring Blade
6. Mixing Bowl
7. Two-Part Removable Drip Tray
8. Mixing Bowl Cover
9. Removable Decorative Cover
10. Extrude Cover Accessory
11. Extrusion Head
12. Handle
13. Handle Fixing Pin
14. Cleaning Brush
15. Extrusion Head Slot
16. Installation Rod
17. Mode Button
1.
4.
2.
5.
3.
6.
6
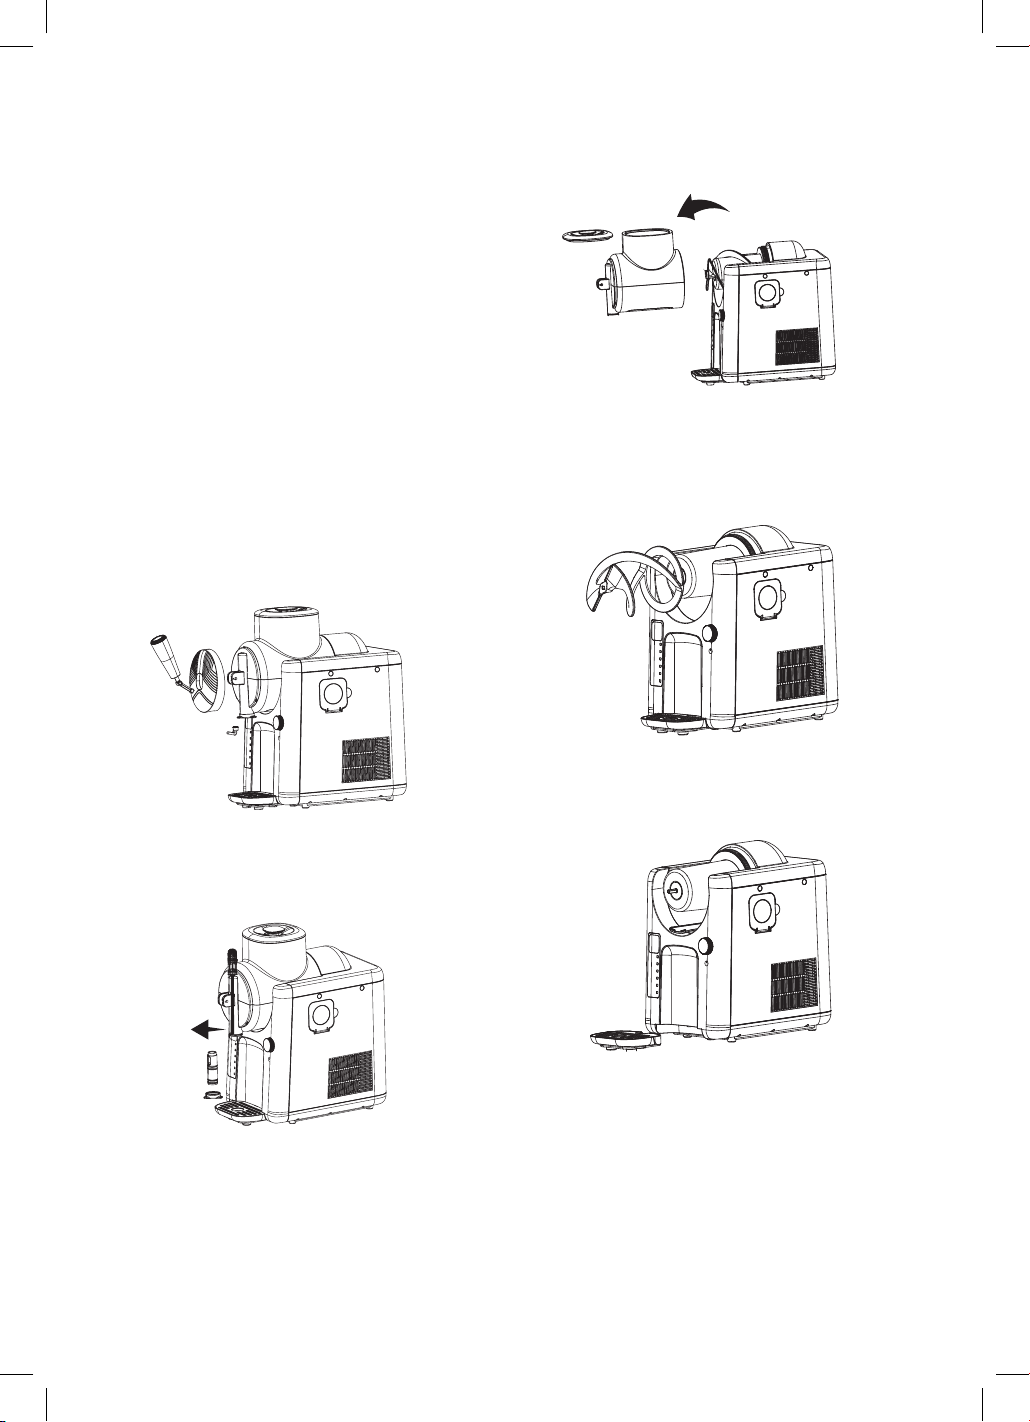
5. Insert the mixing bowl onto the main body
with the decorative cover facing outward.
Once in the correct position turn the mixing
bowl clockwise to lock into place. Please
reference the icons on the main body of the
unit for further reference.
6. Put the removable extrude head into the
extrude head slot and install the latch
sleeve to tighten it. This part must be in
place to operate. Installation rod can be
used here to insert properly. See insertion
directions below.
REMOVABLE EXTRUDE HEAD
& HANDLE INSTALLATION
1. Insert extrusion head into the extrude head
slot right side up (as shown below). Use the
installation rod to push the extrusion head
into the correct place. This will allow for the
handle to be inserted.
2. Once the extrusion head is in place,
insert the handle into the opening of the
extrusion head slot. Make sure the handle
is facing upward.
ASSEMBLY
INSTRUCTIONS
NOTICE: Keep unit upright for at least 2 hours
before first use.
1. Ensure all parts are fully cleaned and the
Ice Cream & Frozen Drink Maker is level
on a flat, solid surface.
2. Insert the two-part removable drip tray in front
of the motor base Insert the drip tray from the
wider side and slide under the main body.
3. Install the stirring blade on the cooling rod. By
aligning the square end of the cooling rod with
the opening of the stirring blade. Make sure
the bottom of the stirring blade is affixed to the
cooling rod.
4. Attach the removable decorative cover onto the
end of the mixing bowl and turn to the right to
lock in place.
7
3. Hold this handle in place and thread the handle
fixing pin through the hole on the mixing bowl
and the hole on the handle. Make sure that the
pin latch is in the correct position and place all
the way through. Lock the extrusion pin in the
up position to continue.
4. To dissemble for cleaning remove the pin and
handle and thread the installation rod through
the top of the extrude head slot to slide out the
removable extrude head.
OPERATION
1. Plug the Ice Cream & Frozen Drink Maker
into an outlet. Once this is done the screen
will illuminate. If a texture or new mode is
not selected in 1 minute the unit will go into
standby mode.
2. To select a mode press the Mode Button
below the dial until you select your desired
mode. The control panel indicator will
illuminate on the current mode selected.
3. Once the correct mode is chosen use the
control dial to select the desired texture of
your frozen treat. Each mode has its own
texture level. For reference, Level 1 is thinner
and softer and higher levels are more firm or
thick. Press the control dial to begin the
mixing process.
4. PLEASE NOTE: Always make sure handle is
in up position before adding Ingredients into
the mixing bowl.
After desired texture is selected and mixing
has begun, open the mixing bowl cover and
add your ingredients into the mixing bowl.
5. The Ice Cream & Frozen Drink Maker will
begin to make your frozen treat. Time will
vary depending on the mode selected,
temperature of the mix, and amount of
content in the mixing bowl.
6. Once the Ice Cream & Frozen Drink Maker
determines when the mixture is ready the
unit will beep and COOL will display on
the screen.
7. You can extrude your frozen treats while in
COOL mode by pulling the handle down as
the stirring blade will continue to spin. If you
want to extrude more quickly, simply press the
mode button and the program will change to
extrude/clean. After 1 minute this will return to
the COOL mode, or you can press the mode
button again to return to the previous mode.
8. If you notice the mixture is not to your desired
texture or firmness in cool mode increase the
texture level by turning the control dial to a
higher setting. A texture cannot be decreased,
ONLY increased once in COOL mode. After
higher setting is selected press the control dial
to confirm.
9. If you want to stop the cooling/mixing process
at any time, hold down the control dial for 3
seconds. This will cancel the selected mode
and texture selected.

8
2. The stirring blades will continue to rotate to
clean the mixing bowl, cooling rod and
stirring blade.
3. The Extrude/Clean mode will work for a
total of 5 minutes. Let the soapy water stir for
approximately one minute. Add a large bowl
or pitcher under the Ice Cream & Frozen
Drink Maker and pull the handle down to
extrude the contents of the mixing bowl. We
recommend repeating this 1 or 2 times to
completely clean the unit. Please reference
cleaning & maintenance instructions on
page 11 for more details.
4. Press and hold the control dial to exit this
mode or let the 5 minutes elapse.
TIP: Adding warm water and soap more than
once will clean the inner parts more.
EXTRUDE/CLEAN MODE
In this mode, the stirring blade rotates at a high
speed, without cooling, to extrude or clean all
contents from the unit.
EXTRUDE
1. Select Extrude/Clean mode by pressing the
mode button. Confirm mode by pressing the
control dial.
2. The stirring blade will begin to spin. Put a large
bowl or storage container under the removable
extrusion head. Once ready pull the
handle down.
CLEAN
1. Once all of the ingredients are extruded from the
mixing bowl. Put the handle into the up position,
add warm water and a small amount of soap. Fill
up to the bowl’s max fill line.
PREP-FREE DRINKS
1. Pick a Prep-Free bottled or canned beverage.
See options in below section for Slushies, Frozen cocktails and Frozen juices.
2–3 SERVINGS: Add 2 1/2 cups 4–6 SERVINGS: Add 5 cups
2. Chill ingredients before adding.
Chilling your ingredients will result in less icy and smoother texture overall.
3. Select Spiked Slushie or Slushie Modes
Adjust the temperature for your preferred texture.
4. Serve & Enjoy
NOTE: Please refer to page 9 for Sugar & Alcohol requirements.
EASY SLUSHIES
• Soda (root beer, cola, ginger ale,
orange, grape, cream, or other
flavored soda)
• Sweetened Iced Tea
FROZEN COCKTAILS
Bottled or Canned:
• Sour Beers
• Wine (white or rosé)
• Hard Lemonade
• Hard Seltzers
JUICE SLUSHIES
• Fruit Punch
• Pineapple Juice
• Orange Juice
• Apple Juice/Apple Cider
• Lemonade
• Sports Drinks
• Kombucha
• Hard Kombucha
• Hard Cider
• Hard Tea
• Premixed
Margaritas
• Bottled
Pre-Made
Smoothies
• Cherry Juice
• Cranberry Juice
• Limeade
• Fruit Punch
• Energy Drinks
Pre-made Cocktails:
• Old Fashioned
• Cosmopolitan
• Rum Punch
• Grape Juice
• Mango Juice
• Tropical Juice
• Watermelon Juice
9
HARD ALCOHOL/
SPIRIT GUIDELINES
Creating a delicious frozen cocktail is easy
with your Ice Cream/Frozen Drink maker!
Just follow these simple guidelines:
Option 1: Using a canned or bottled
beverage (Beer, Wine, Seltzer etc.)
Your drink must be between 2.8% and 16%
alcohol for the best results.
Lower alcohol (closer to 2.8%)? It will freeze faster
and have a more icy texture.
Higher alcohol (closer to 16%)? It will freeze more
slowly and have a slushier texture.
Too much alcohol? If it’s over 16%, it won’t freeze
properly and have a very thin texture.
Option 2: Mixing Hard Spirits Into Your Drink.
If adding a hard spirit (vodka, tequila, rum, etc.)
to any liquids to create your own spiked slushie,
follow the chart below to keep the balance right:
Important:
Adjusting Your Slushie’s Texture
If your drink isn’t freezing as expected:
• Too icy? Increasing the alcohol content slightly,
adding more sugar or lowering the texture
setting can all help.
• Too soft? Reducing the alcohol content slightly,
reducing the sugar or increasing the texture
setting, can all help.
• Still not right? Adjust the texture setting on your
machine and tweak the alcohol/sugar balance
until you get the perfect slushie.
SUGAR CONTENT
The entire recipe must contain at least 4%
sugar. Refer to drink/liquid nutrition label to
ensure sugar content meets the recommended
minimums below:
If a drink does not meet minimum requirement
of total sugar: Add 1–2 tablespoons of
flavored syrup, juice, sugar, date sugar,
coconut sugar, maple syrup, agave, simple
syrup, or honey per serving. Combine
additional sugar with the base prior to
pouring into unit.
If there is not enough sugar in the recipe
added to the machine the display will
illuminate “EEE” and the Ice Cream/Frozen
Drink Maker will Beep. To avoid this,
always have a minimum of 4% sugar in the
mixture. To clear this, you must either add
more liquid or allow the mixture to thaw for
30 minutes before restarting.
PLEASE NOTE: Sugar can be added to the
ingredients before EEE is displayed on screen.
Total
Recipe Size
Maximum
Alcohol Amount
3 Cups (24 oz) ½ Cup ( 4 oz)
4½ Cups (36 oz) ¾ Cup (6 oz)
6 Cups (48 oz) 1 Cup (8 oz)
Listed
Serving Size
Minimum Total
Sugar Amount
8 oz (240 ml) 8 g
12 oz (355 ml) 11 g
20 oz (591 ml) 18 g
10
MODE REFERENCE TABLE
Preset Default Texture Range and
Default Texture
Slushie L:4 Levels 1-7 If you like softer
slushies choose a lower level.
If you are looking for more
texture and ice use a higher
level. For lower sugar drinks,
it is recommended to choose
level 1 or 2.
Soft Ice
Cream
L:4 Levels 1-6 If you like softer ice
cream choose a lower level. If
you are looking for firmer ice
cream use a higher level.
Spiked
Slushie
L:4 Levels 1-7 If you like softer
slushies choose a lower level.
If you are looking for more
texture and ice use a higher
level. For lower sugar drinks,
it is recommended to choose
level 1 or 2.
Sorbet L:4 Levels 1-6 If you like softer
sorbet choose a lower level.
If you are looking for firmer
sorbet use a higher level.
Milkshake L:3 Levels 1-4 If you like softer
milkshake choose a lower
level. If you are looking for
thicker milkshake use a
higher level.
Extrude/
Clean
/ 5 min
DO NOT add hot ingredients,
ice, or solid ingredients like fruit,
ice cream, or frozen fruit.
The entire recipe must contain
at least 4% sugar. If the sugar
content is below 4%, you can
add syrup or sugar.
Use the control dial to find
your ideal texture.
For best and faster results,
chill liquid(s) before adding
to the unit.
For an extra icy drink, chill
your glass before dispensing
your creations.
For best results when using soda or
carbonated beverages vigorously
stir or shake the soda first to reduce
the level of carbonation.
Minimum input = 3 cups (24 oz/710 ml)
Maximum input = 6 cups (48oz/1.4L)
PLEASE NOTE: the maximum input will expand
due to freezing. Final output is up to 64oz. This
will depend on the ingredients being used.
For the best dispensing experience, fill the unit to
the max-fill line (48 oz)
Always be sure to have handle in the UP
position when filling with ingredients.
This will prevent ingredients from
extruding from the extrusion head.
• Keep the Ice Cream and Frozen Drink Maker
upright for at least 2 hours before first use.
• Mixture can be extruded at any time during the
cooling/ mixing process. It is not necessary to
go into the Extrude/ Clean Mode to dispense
contents from this machine. As long as the
stirring blade is moving contents can
be dispensed.
• The Ice cream & Frozen Drink Maker will
automatically go into cool mode for 2 hours after
the selected texture setting has been reached. The
Ice Cream & Frozen Drink Maker will automatically
shut off after cool mode has finished.
• We recommend that any Ice Cream,
Frozen Yogurt or Sorbet that you do not eat
immediately be stored in a sealed container
in your freezer.
• Please note that ingredients always taste
sweeter before they are frozen, do not worry
if it seems too sweet before adding it to the Ice
cream and Frozen Drink Maker.
• When using the Spiked Slushie mode, all pre-
made mixes and recipes must contain between
2.8% and 16% alcohol.
• For best results, chill liquid(s) or blended
ingredients before adding to the unit.
• For the best dispensing experience, fill the unit
to the max-fill line
• DO NOT OVERFILL.
IMPORTANT:
ONLY add mix-ins after you have extruded into
your own bowl or container.
DO NOT add mix-ins to the Mixing Bowl
For best results when using soda or carbonated
beverages vigorously stir or shake the soda first to
reduce the level of carbonation.
QUICK TIPS
11
CLEANING &
MAINTENANCE
IMPORTANT: For easier cleaning of internal
parts always use extrude/ clean mode before
removing mixing bowl. The Extrude/Clean
mode will work for a total of 5 minutes. Let
the soapy water stir for approximately one
minute. Add a large bowl or pitcher under
the Ice Cream & Frozen Drink Maker and pull
the handle down to extrude the contents of
the mixing bowl. We recommend repeating
this 1 or 2 times to completely clean the unit.
The Stirring blade, mixing bowl, two-part
removable drip tray, extrusion head, cleaning
brush and removable decorative cover are top
rack dishwasher safe.
DISASSEMBLY FOR CLEANING
1. Pull out the pin, remove the handle, and
rotate counter clockwise to remove the
decorative cover.
2. Use the installation rod to push out the
removable extrusion head for cleaning,
and then use the cleaning brush to clean
the extrude head slot.
3. Rotate the mixing bowl counterclockwise,
then gently remove the mixing bowl from the
main unit and set it aside.
4. Remove the stirring blade from the cooling
rod and wipe the remaining liquid on and
around the cooling rod with a dry dishcloth.
5. Slide the two-part removable drip tray out of
the main body and clean the parts with wet
soapy water. Dry before using again.
12
TROUBLESHOOTING
Issue Cause Solution
After the frozen
treat is made,
it is difficult
to remove
the bowl.
There may have been
water in the mixing
bowl before the unit
was started creating
ice behind the bowl.
Wait 10 to 15 minutes for the unit to thaw before trying again.
Your frozen treat
is too grainy
There is too much
water in your recipe.
Increase, milk, cream or sugar ratio.
Machine Displays
“EEE” message
Incorrect ingredient
amount or sugar ratio
Increase ingredients to a minimum of 24oz or make sure that there is enough
sugar in your mixture.
The machine
stops working
Poor exhaust and high
internal temperature
The product is too close to the wall, resulting in poor air circulation and high
temperature. The product vent should be at least 20cm away from the wall.
To solve, wait 10-15mins & try again. If issue persists please contact customer
service team.
The recipe is
not freezing on
spiked slushie
mode
High Alcohol or
sugar content.
Make sure that the alcohol percentage is not over 16% a higher alcohol content
will make the recipe difficult to freeze.
The recipe is
not freezing on
Slushie, Soft
Ice Cream, and
Milkshake mode.
High sugar content or
overfilled mixing bowl
If you are using too high of a sugar content dispense some of the liquid and
replace with water or liquid without sugar.
If there is too much liquid, the contents will take much longer to freeze and will
risk overflowing due to expansion.
If issues persist, contact customer service.

13
LIMITED
WARRANTY
GreenPan Electrics are covered by a limited
warranty against defects in materials and
workmanship, beginning on the date you
receive the product and lasting for two years.
If your GreenPan Electrics product has a
defect covered by the limited warranty during
the warranty period, The Cookware Company
(USA), LLC will either repair or replace the
product. Further information on the warranty
claim process, exclusions from warranty
coverage, and other terms can be found in
the complete limited warranty for this product,
available online at greenpan.us/warranty.”
TERMS OF SALE;
ARBITRATION
The terms on which The Cookware Company
(USA), LLC sells GreenPan Electrics are
available online at greenpan.us/pages/
terms-of-sale (the “Terms”). The Terms contain
very important information regarding your
rights and obligations, as well as conditions,
limitations, and exclusions that may apply to
you. Please read them carefully.
In particular, the Terms provide that, by
your purchase of this product, you and The
Cookware Company (USA), LLC are agreeing
to give up any rights to litigate in a court
or before a jury, or to participate in a class
action or representative action with respect to
a claim. Other rights that you would have if
you went to court may also be unavailable or
limited in arbitration. Any claim, dispute, or
controversy between you and The Cookware
Company (USA), LLC arising from or relating
in any way to your purchase of products
or services will be resolved exclusively and
finally by binding arbitration.
The arbitration will be administered by the
American Arbitration Association (“AAA”) in
accordance with the Consumer Arbitration
Rules (the “AAA Rules”) then in effect, except
as modified hereby. (The AAA Rules are
available at adr.org or by calling the AAA at
1-800-778-7879.) The Federal Arbitration Act
will govern the interpretation and enforcement
of this arbitration and waiver provision.
The Cookware Company (USA), LLC will
be responsible for the AAA filing fee of
any such proceeding. Other than your right
to pursue a claim in small claims court, as
described in the Terms, the arbitrator will
have exclusive authority to resolve any dispute
relating to arbitrability and/or enforceability
of this arbitration provision, including any
unconscionability challenge or any other
challenge that the arbitration provision or
these Terms are void, voidable or otherwise
invalid. The arbitrator will be empowered to
grant whatever relief would be available in
court under law or in equity. Any award of
the arbitrator(s) will be final and binding on
each of the parties and may be entered as a
judgment in any court of competent jurisdiction.
Attorney fee shifting in this case is governed
by the Terms. You agree to an arbitration on
an individual basis. In any dispute, NEITHER
YOU NOR THE COOKWARE COMPANY
(USA), LLC WILL BE ENTITLED TO JOIN OR
CONSOLIDATE CLAIMS BY OR AGAINST
OTHER CUSTOMERS IN COURT OR IN
ARBITRATION OR OTHERWISE PARTICIPATE
IN ANY CLAIM AS A CLASS REPRESENTATIVE,
CLASS MEMBER OR IN A PRIVATE ATTORNEY
GENERAL CAPACITY. The arbitral tribunal may
not consolidate more than one person’s claims
and may not otherwise preside over any form
of a representative or class proceeding. The
arbitral tribunal has no power to consider the
enforceability of this class arbitration waiver
and any challenge to the class arbitration
waiver may only be raised in a court of
competent jurisdiction.
If any provision of the arbitration agreement
described herein and in the Terms is found
unenforceable, the unenforceable provision
will be severed and the remaining arbitration
terms will be enforced.
14
NOTES

15

1400030980