Milo Manual
Milo User Manual
Milo Manual
Features:
Perpetual Calendar Up to Year 2099
Day of week in 15 languages user selectable: English, German, French, Spanish, Italian, Dutch, Danish,
Portuguese, Norwegian, Swedish, Polish, Finnish, Czech, Hungarian, and Slovak
Time in optional 12/24 hour format
Alarm and snooze function
Temperature:
— Indoor temperature measurement ranges: -10°C (14°F) to 50°C (122°F)
— Outdoor temperature measurement ranges: -40°C (-40°F) to70°C (158°F)
— Temperature alternatively in °C or °F.
Indoor comfort index and outdoor feeling index display
Indoor mold risk, outdoor heat index and dew point temperature are displayed on the INDEX switch.
Wireless Outdoor Sensor:
— Wall Mount or Table Stand
— 433.92MHz RF transmitting frequency
— 60 meters transmission range in an open area
—Up to 3 wireless outdoor sensors can be connected. (One Wireless outdoor Sensor Included)
The weather forecasting and clothing tips function
Power Supply:
Weather Station: Battery: 2 x LR03 AAA
Wireless Remote Sensor: Battery:2 x LR6 AA
F.Y.I.:
The wireless remote sensor can work at -30°C to +70°C. Please choose the right battery according to the
limit temperature of the wireless sensor:
Alkaline zinc manganese battery can work at -20°C to +60°C
Polymer lithium ion rechargeable battery can work at -40°C to +70°C.
1
Milo Manual
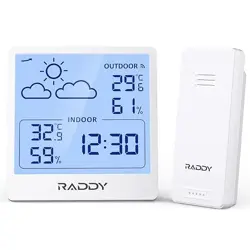
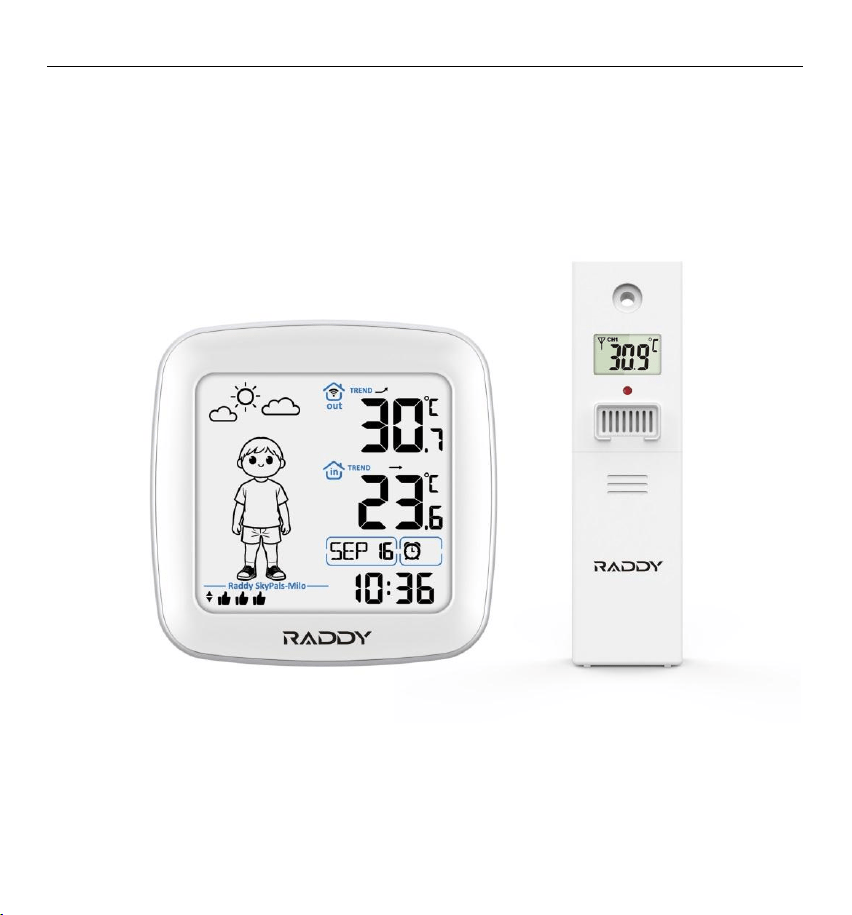
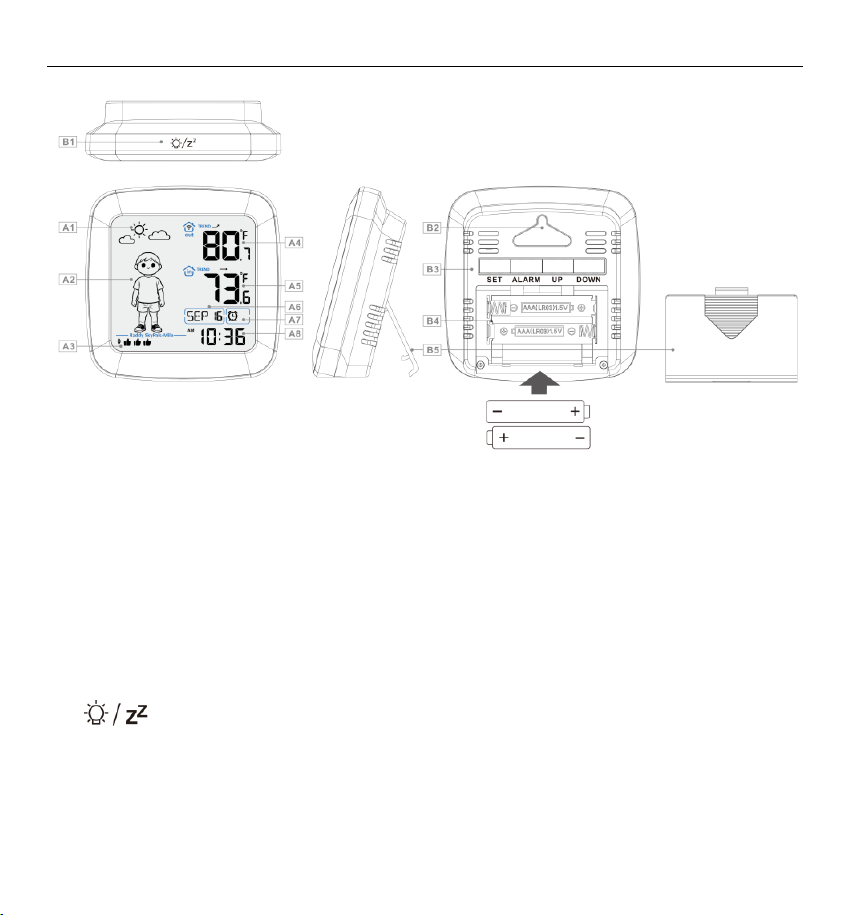
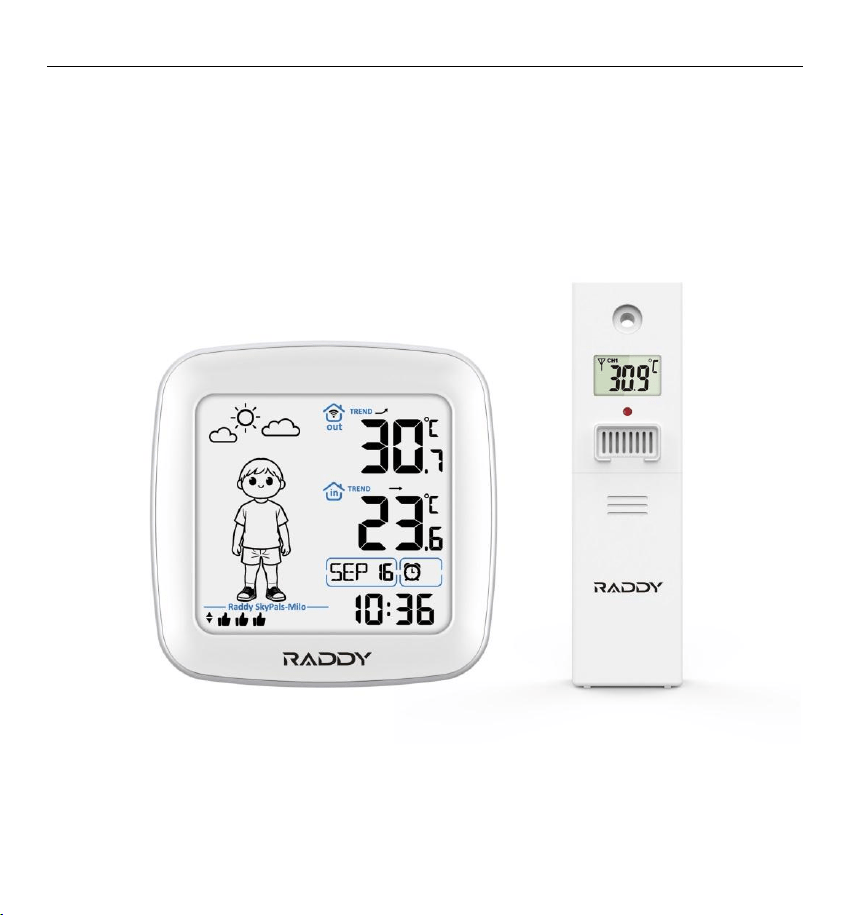
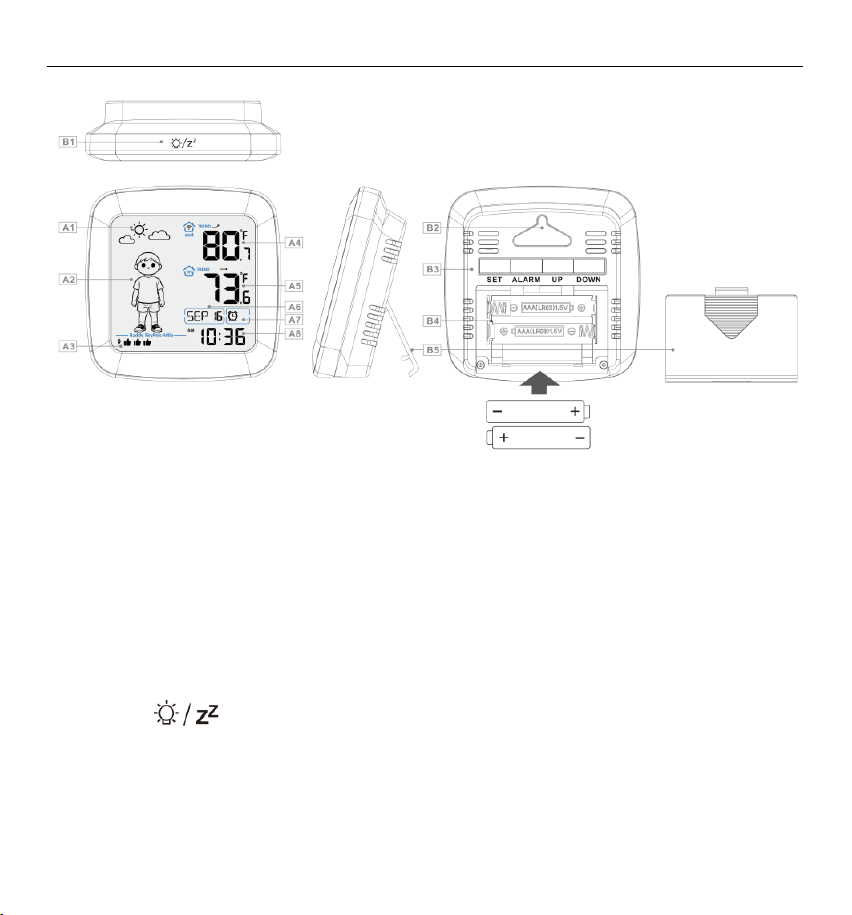
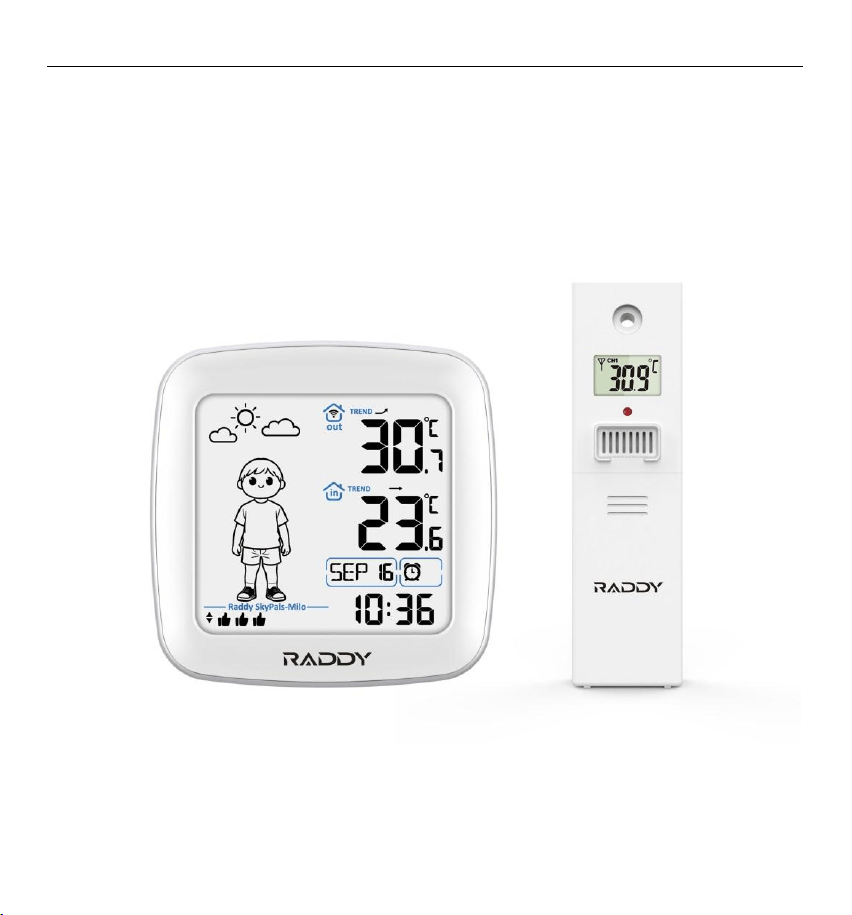
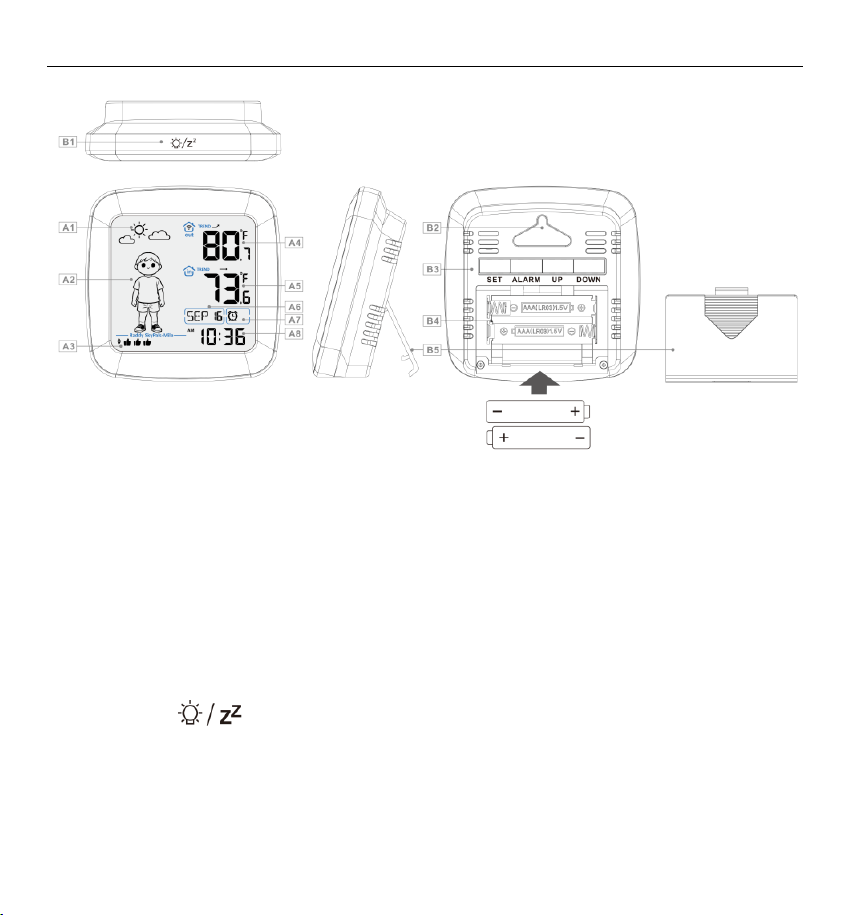
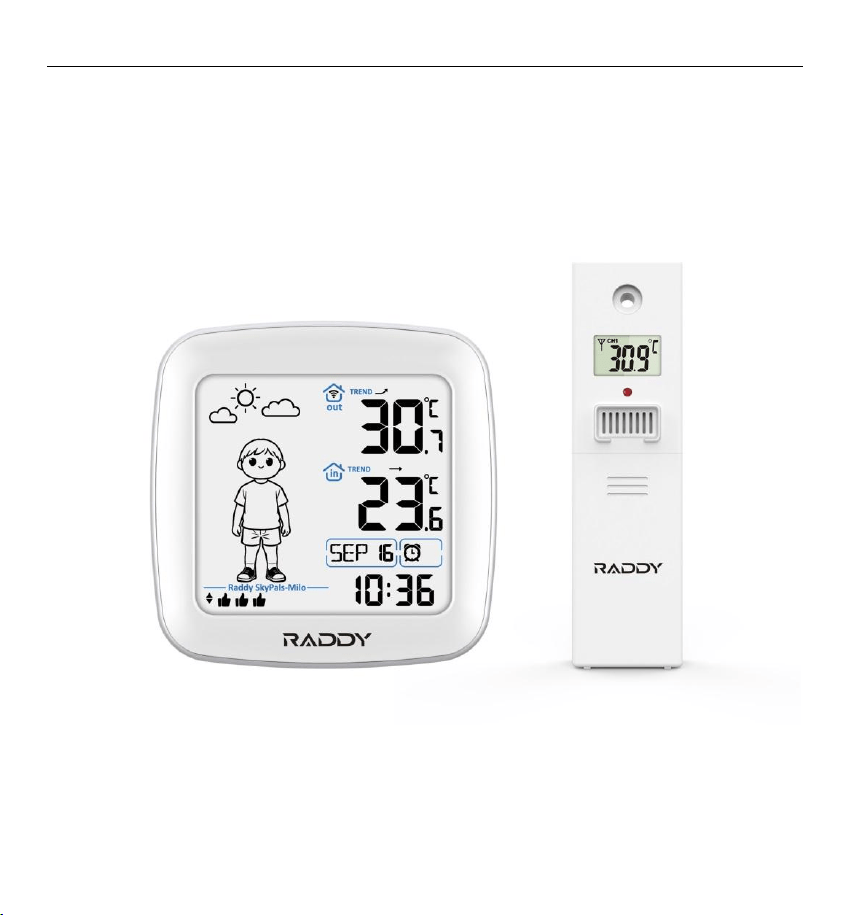
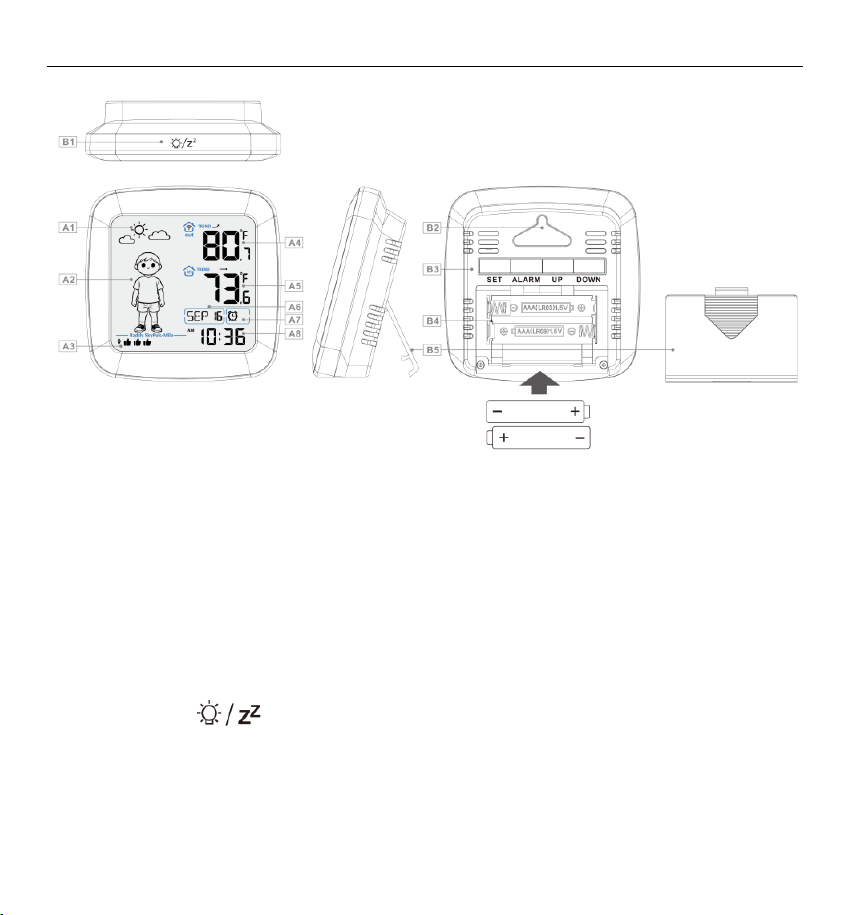
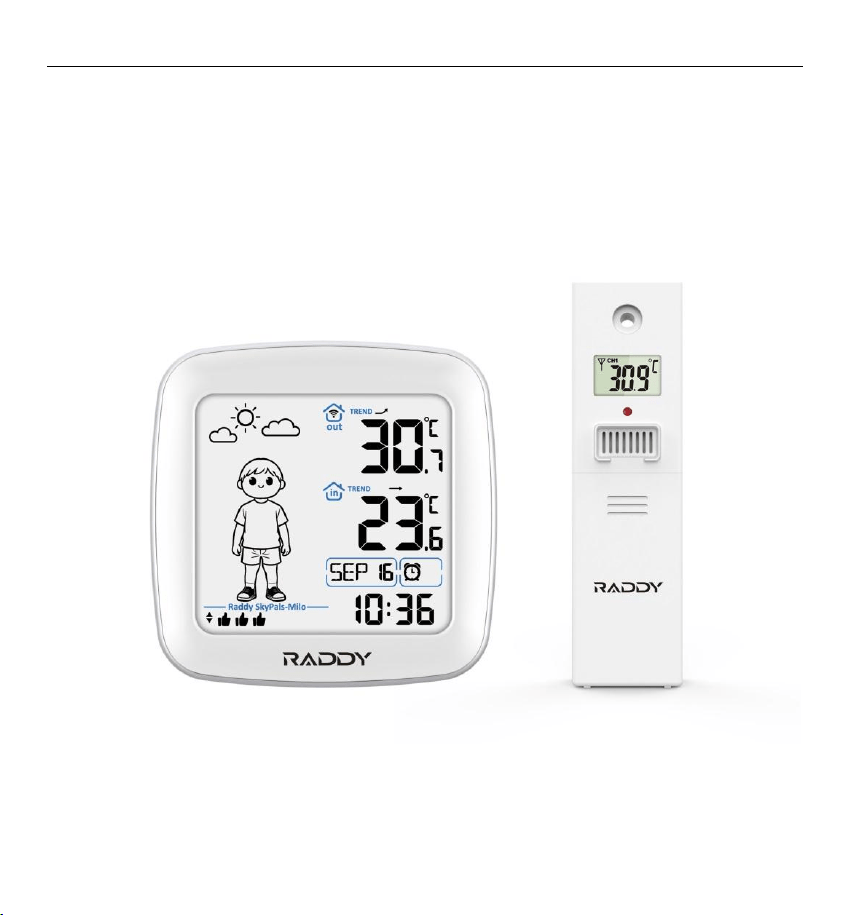
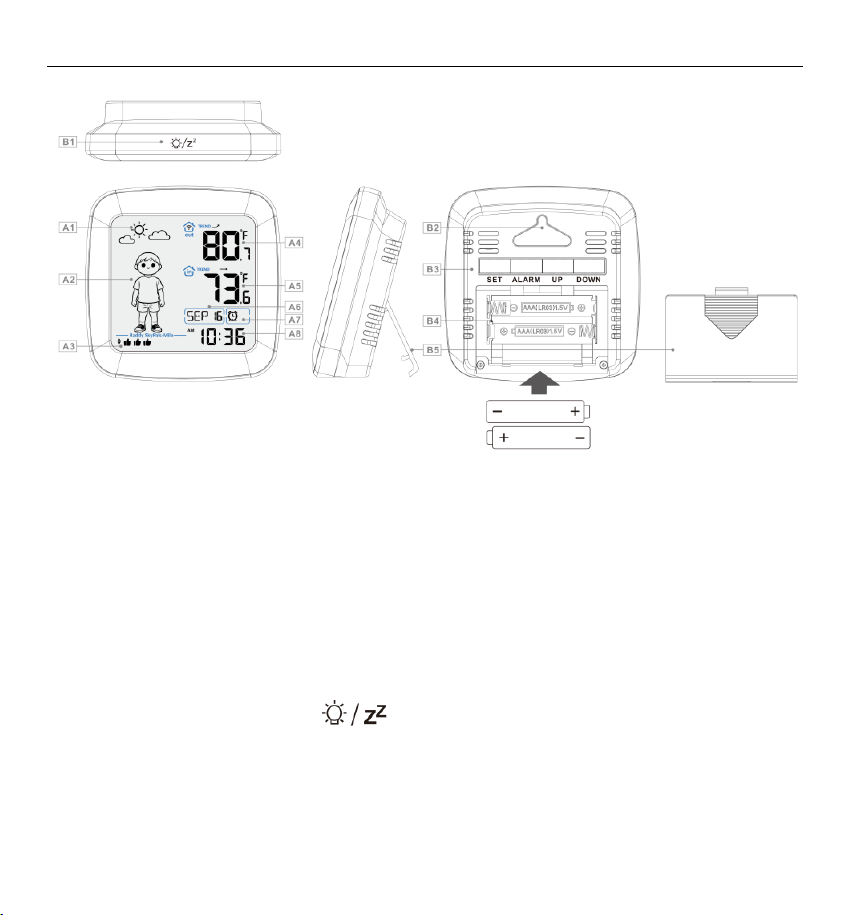
Weather Station Appearance
Part A-Positive LCD
A1: Weather forecasting
A2: Clothing tips
A3: Weather smart kid rewards
A4: Outdoor remote temperature
A5: Indoor temperature
A6: Calendar
A7: Alarm ON/OFF icon
A8: Time
Part B – Back button and power
B1: “ ” touch field
B2: Hanging hole
B3: Function operation buttons
B4: Battery compartment
B5: support frame (embedded in the battery cover)
2
Milo Manual
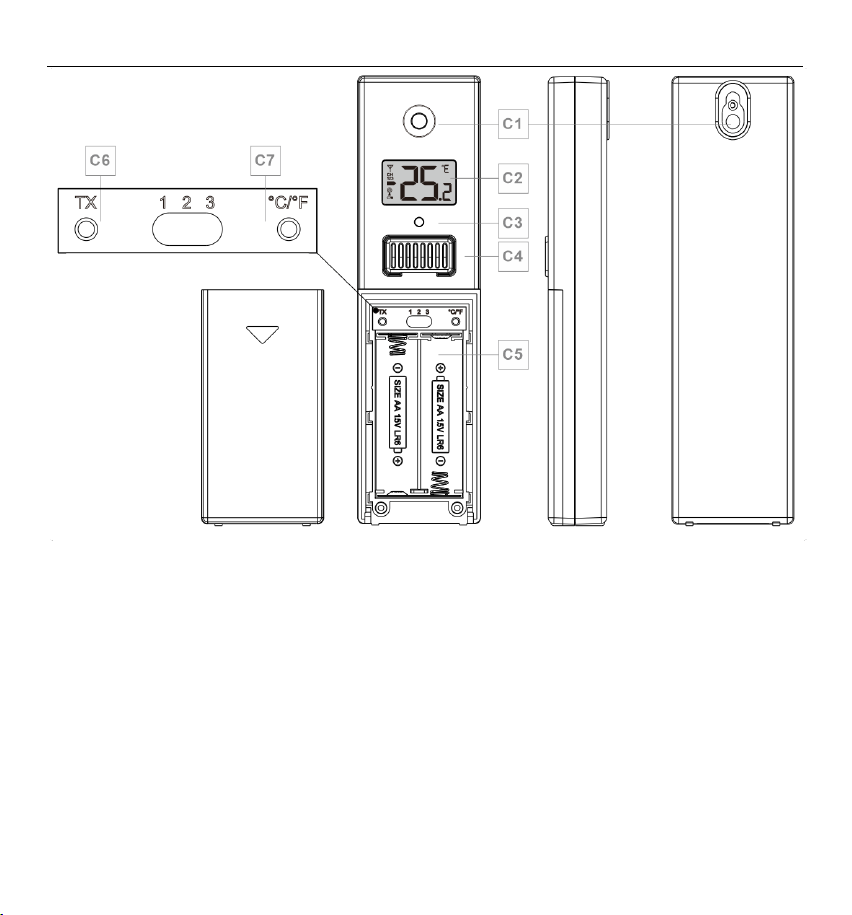
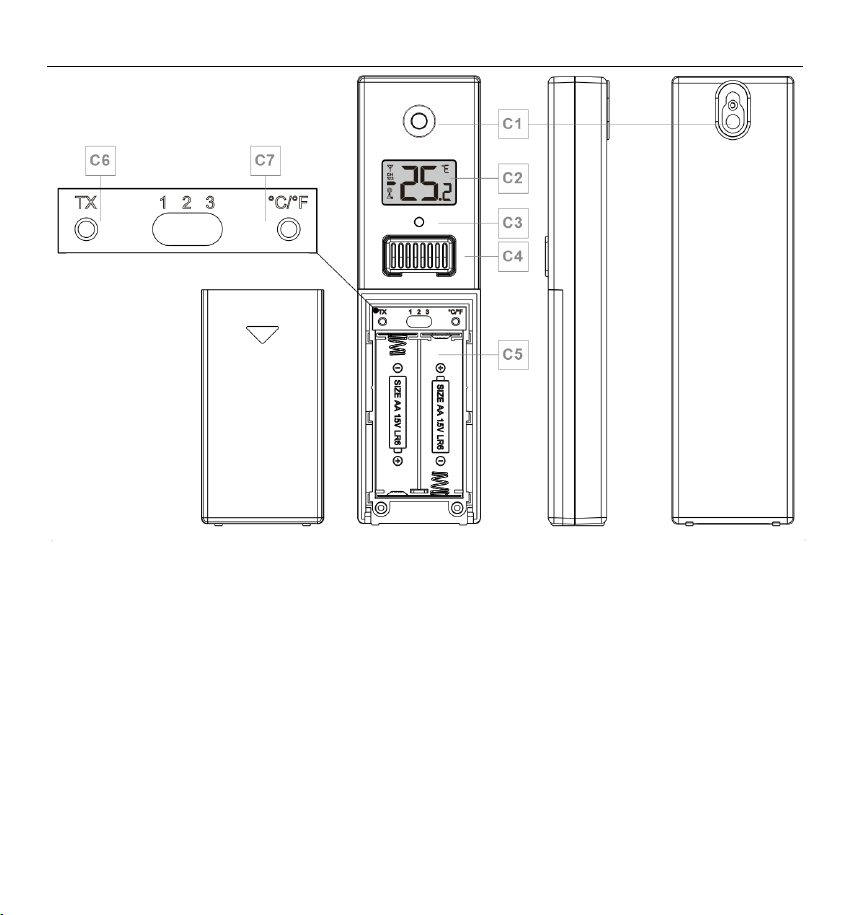
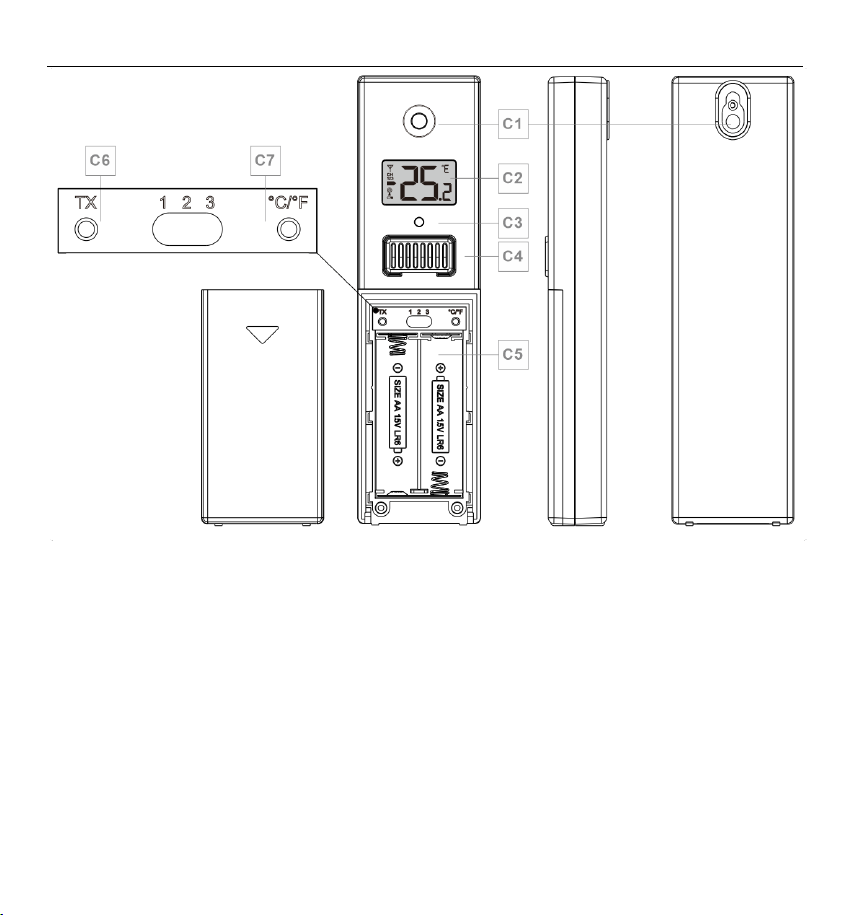
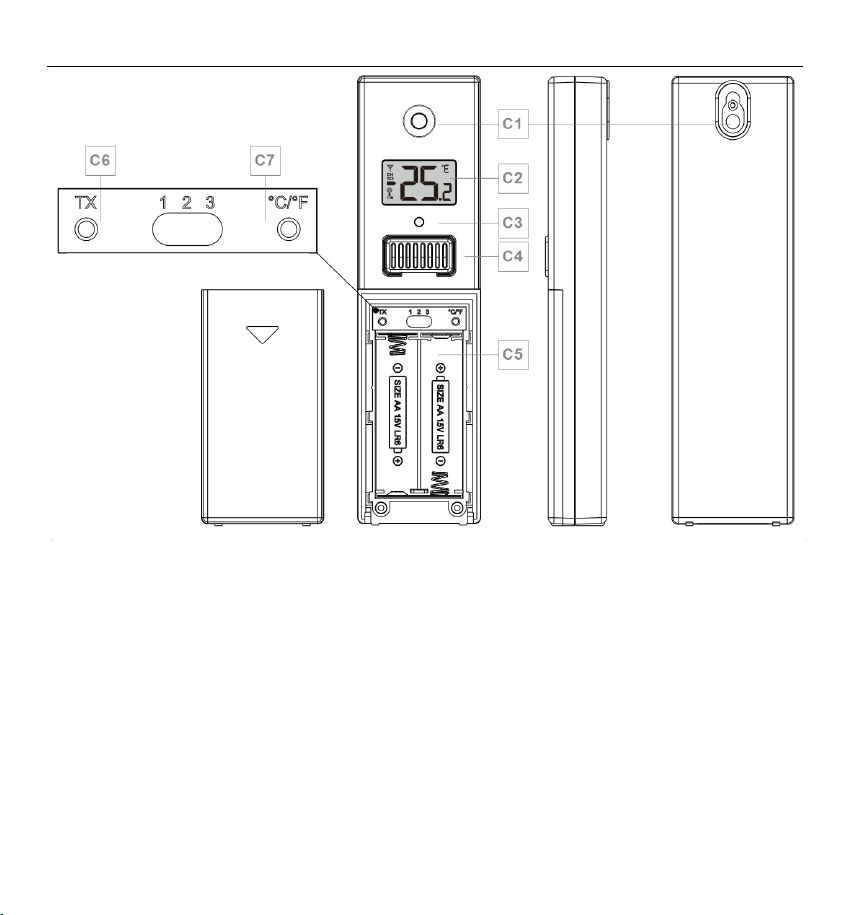
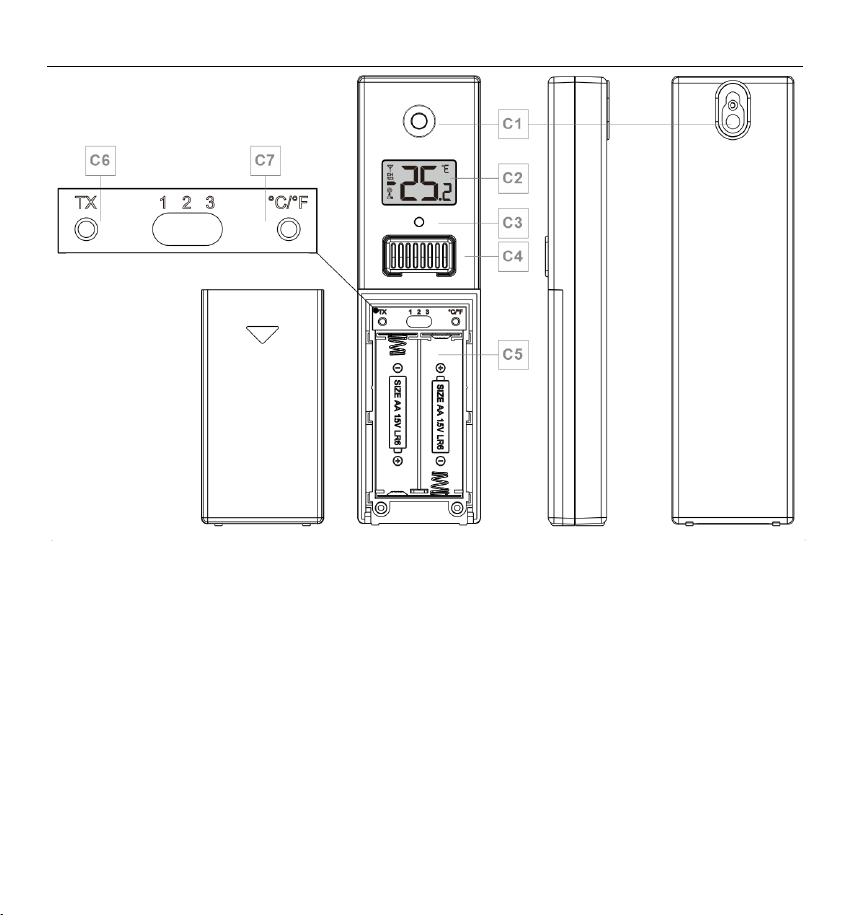
Part C –Wireless sensors
C1: Hanging hole
C2: LCD display
C3: LED indicator
C4: Temperature | Humidity sensing louver
C5: Battery compartment
C6: Manual transmit signal button “TX”
C7: Temperature unit conversion button “°C/°F”
Initial operation:
Open the station battery cover and insert 2 x AAA batteries, ensuring correct polarity ([+] and [-]).
Once powered, all the icons on the LCD screen will light up for 3 seconds, and you will hear a beep. At the
same time, the display area of the "in" house icon will show the temperature value.
The weather station will now begin establishing a connection with the outdoor remote sensor. This process
will take approximately 3 minutes, the antenna symbol in the "out" area will flash during this time.
This now, Open the sensor battery cover. Use the shift switch at the C6 position to select the desired
channel, then insert 2 x AA batteries following the polarity marks.
3
Milo Manual
When the wireless sensor is loaded into the battery, all the icon on the LCD display will briefly light up for 3
seconds, and detect the temperature and humidity of the sensor, At the same time, LED lights flicker once,
the wireless sensors automatically transmit wireless signals.
When the wireless sensor is activated, the weather station will automatically receive its wireless signal.
When a valid signal is received, the corresponding temperature value will be displayed in the area of the "out"
section.
Manual time setting:
Press and hold down the “SET” button for more than 2 seconds to enter setting menu, First set the unit of
temperature in “°C” or “°F”, Now use the “UP” and “DOWN” button to set the temperature of the unit, the unit
of temperature can be set to “°C” or “°F”.
Use the UP / DOWN buttons to adjust each setting, and press SET to confirm and move to the next item.
The settings are adjusted in the following order:
Temperature Unit – Select °C or °F
Time Format – Select 12-hour or 24-hour display
Hour – Set the current hour
Minute – Set the current minute
Year – Set the current year
Month – Set the current month
Date – Set the current date
Language – Select the display language for weekday and month
Initial Weather – Select the current weather condition
After completing all settings, press SET to confirm and exit. The device will return to clock mode.
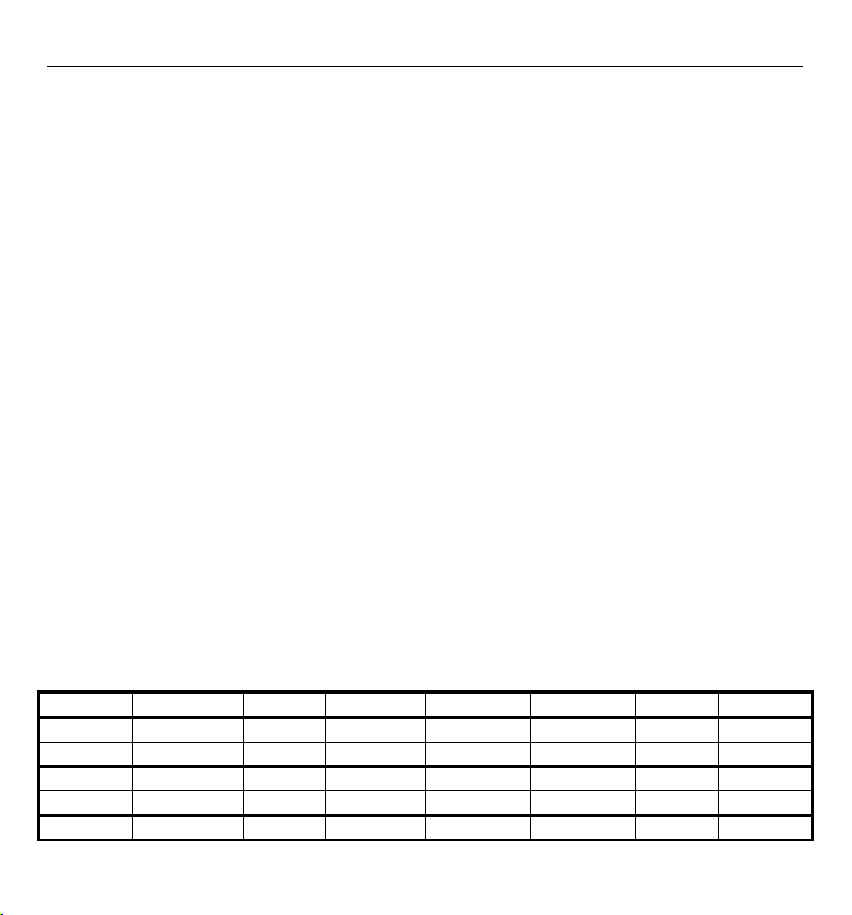
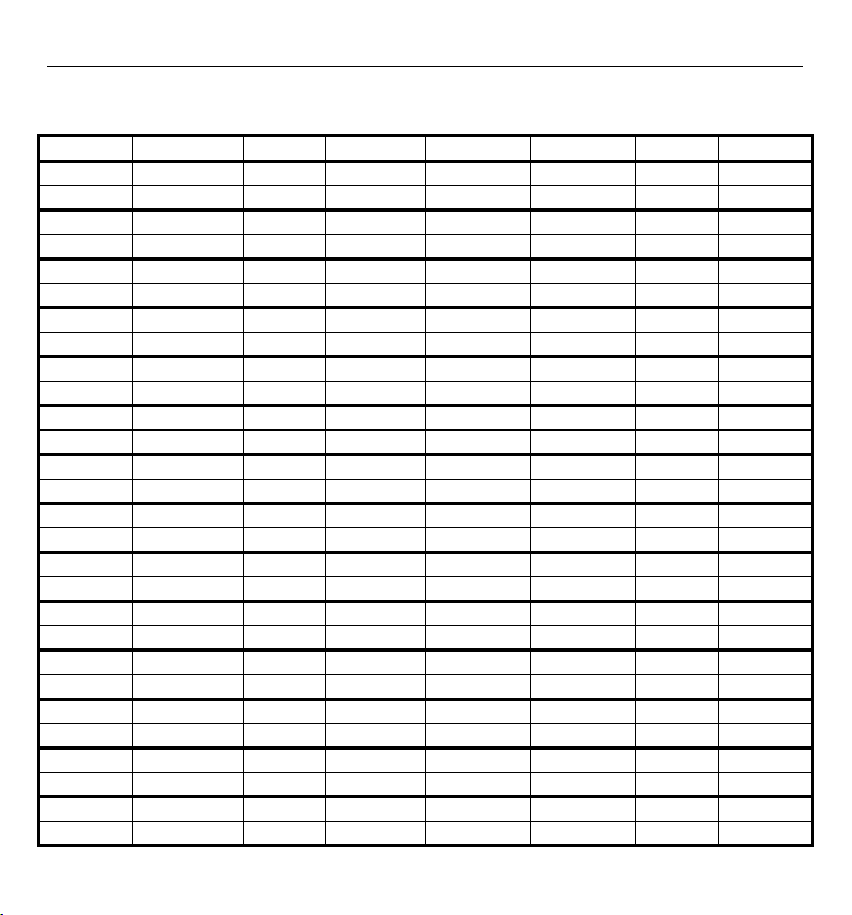
Note: There are 15 languages of Weekday: English, German, French, Italian, Spanish, Portuguese, Dutch,
Danish, Norwegian, Swedish, Polish, Finnish, Czech, Hungarian, and Slovakia
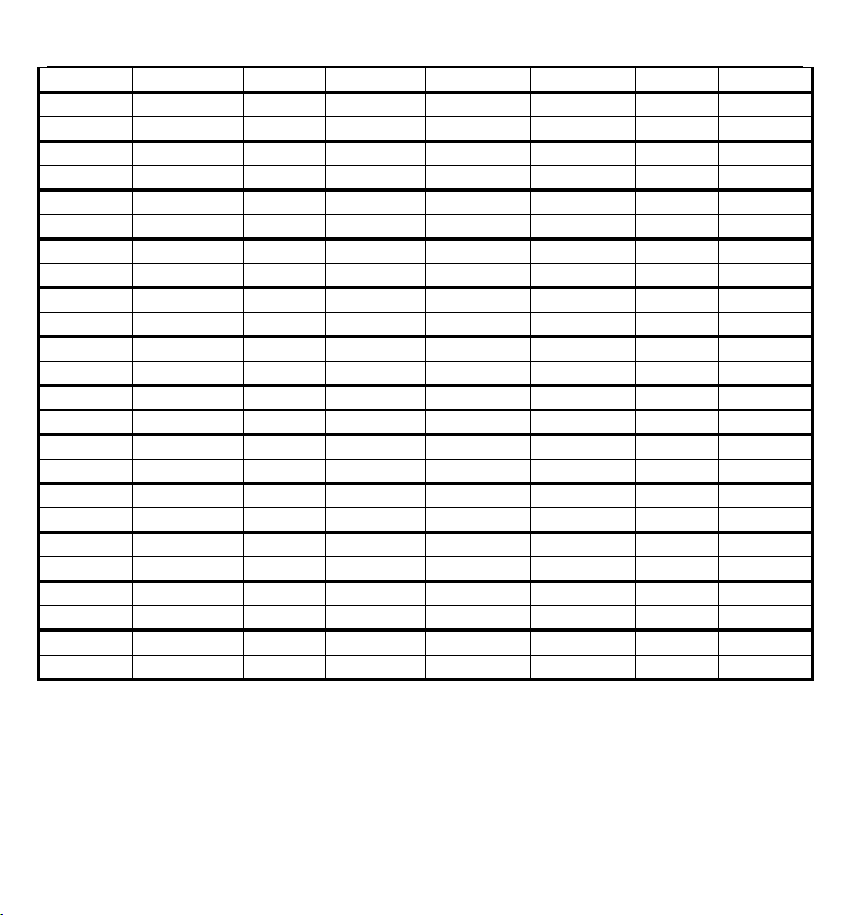
Week language display
Language
Sunday
Monday
Tuesday
Wednesday
Thursday
Friday
Saturday
ENGLISH
MONDAY
TUESDAY
WEDNESDAY
THURSDAY
FRIDAY
SATURDAY
SUNDAY
ENG
MON
TUE
WED
THU
FRI
SAT
SUN
GERMAN
MONTAG
DIENSTAG
MITTWOCH
DONNERSTAG
FREITAG
SAMSTAG
SONNTAG
GER
MON
DIE
MIT
DON
FRE
SAM
SON
FRENCH
LUNDI
MARDI
MERCREDI
JEUDI
VENDREDI
SAMEDI
DIMANCHE
4
Milo Manual
FRE
LUN
MAR
MER
JEU
VEN
SAM
DIM
ITALIAN
LUNEDI
MARTEDÌ
MERCOLEDÌ
GIOVEDI
VENERDÌ
SABATO
DOMENICA
ITA
LUN
MAR
MER
GIO
VEN
SAB
DOM
SPANISH
LUNES
MARTES
MIERCOLES
JUEVES
VIERNES
SABADO
DOMINGO
SPA
LUN
MAR
MIE
JUE
VIE
SAB
DOM
PORTUGUESE
SEGUNDA-FEIRA
TERÇA
QUARTA-FEIRA
QUINTA-FEIRA
SEXTA-FEIRA
SABADO
DOMINGO
POR
SEG
TER
QUA
QUI
SEX
SAB
DOM
DUTCH
MAANDAG
DINSDAG
WOENSDAG
DONDERDAG
VRIJDAG
ZATERDAG
ZONDAG
DUT
MAA
DIN
WOE
DON
VRI
ZAT
ZON
DANISH
MANDAG
TIRSDAG
ONSDAG
TORSDAG
FREDAG
LØRDAG
SØNDAG
DAN
MAN
TIR
ONS
TOR
FRE
LOR
SON
NORWEGIAN
MANDAG
TIRSDAG
ONSDAG
TORSDAG
FREDAG
LØRDAG
SØNDAG
NOR
MAN
TIR
ONS
TOR
FRE
LOR
SON
SWEDISH
MÅNDAG
TISDAG
ONSDAG
TORSDAG
FREDAG
LÖRDAG
SÖNDAG
SWE
MAN
TIS
ONS
TOR
FRE
LOR
SON
POLISH
PONIEDZIAŁEK
WTOREK
ŚRODA
CZWARTEK
PIĄTEK
SOBOTA
NIEDZIELA
POL
PON
WTO
SRO
CZW
PIA
SOB
NIE
FINNISH
MAANANTAI
TIISTAI
KESKIVIIKKO
TORSTAI
PERJANTAI
LAUANTAI
SUNNUNTAI
FIN
MAN
TII
KIS
TOR
PER
LAU
SUN
CZECH
PONDĚLÍ
ÚTERÝ
STŘEDA
ČTVRTEK
PÁTEK
SOBOTA
NEDĚLE
CZE
PON
UTE
STR
CTV
PAT
SOB
NED
HUNGARIAN
HÉTFŐ
KEDD
SZERDA
CSÜTÖRTÖK
PÉNTEK
SZOMBAT
VASÁRNAP
HUN
HET
KED
SZE
CSU
PEN
SZO
VAS
Slovakia
Pondelok
utorok
Streda
Štvrtok
piatok
sobota
nedeľa
SVK
PON
UTO
STR
STV
PIA
SOB
NED
F.Y.I.:
If no button is pressed for 15 seconds, the device will automatically exit setting mode and return to normal
clock mode.
When adjusting the time, seconds will reset to 00 once the minute value is changed.
You can press and hold the UP / DOWN buttons to quickly adjust values.
When using the weather station for the first time, the default weather display may not match the current
5
Milo Manual
conditions. You can manually set the initial weather to reflect your local environment.
Setting the daily alarms:
Press and hold the ALARM button for more than 2 seconds to enter alarm setting mode.
Use the UP / DOWN buttons to adjust each setting, and press ALARM to confirm and move to the next
item:
Hour – Set the alarm hour
Minute – Set the alarm minute
After completing the settings, press ALARM to confirm and exit.
F.Y.I.:
If no button is pressed for 15 seconds, the device will automatically exit setting mode and return to normal
clock mode.
Alarm ON / OFF
In standard mode, short press the “ALARM” button to activate the alarm function, and the alarm symbol
“ ” will remain displayed. If the alarm is turned off, “OFF” will be displayed next to the alarm symbol “ ”.
Switching off the alarm signal
Press any button except the “ ” button to stop the alarm signal.The alarm will remain active and will
ring again at the next scheduled time.
F.Y.I.:
If no button is pressed, the alarm will sound for 1 minute and then stop automatically.
The alarm will repeat after 24 hours.
The alarm uses a crescendo tone, increasing in volume in 4 steps during the 1-minute duration.
Snooze function:
When the time is up to the alarm, press the “ ” buttonto stop the alarm and enter snooze mode.
The alarm will sound again after the snooze interval.
In snooze mode, press any buttons except the “ ” button or touch and hold the “ ” position
to exit the snooze mode.
F.Y.I.:
6
Milo Manual
Snooze time is fixed at 5 minutes.
Temperature detection:
Indoor temperature range: -10°C (+14°F) ~ +50°C (+122°F), LL.L °C(°F) will displayed if value lower than
-10°C (+14°F), HH.H °C(°F) will displayed if value higher than +50°C (+122°F).
Outdoor temperature range: 40°C (-40°F) ~ +70°C (+158°F), LL.L °C(°F) will displayed if value lower than
-40°C (-40°F), HH.H °C(°F) will displayed if value higher than +70°C (+158°F).
Wireless sensor transmission:
When the weather station successfully receives a signal from the wireless sensor, the outdoor temperature
will be shown in the "out" display area.
If no signal is received (the “OUT” display shows “--”), press and hold the "up" and "down" buttons
simultaneously for 3 seconds to start manual signal reception. The "out" icon will display an animation of the
radio frequency antenna symbol, and the weather station will resume receiving the wireless signal from the
outdoor sensor.
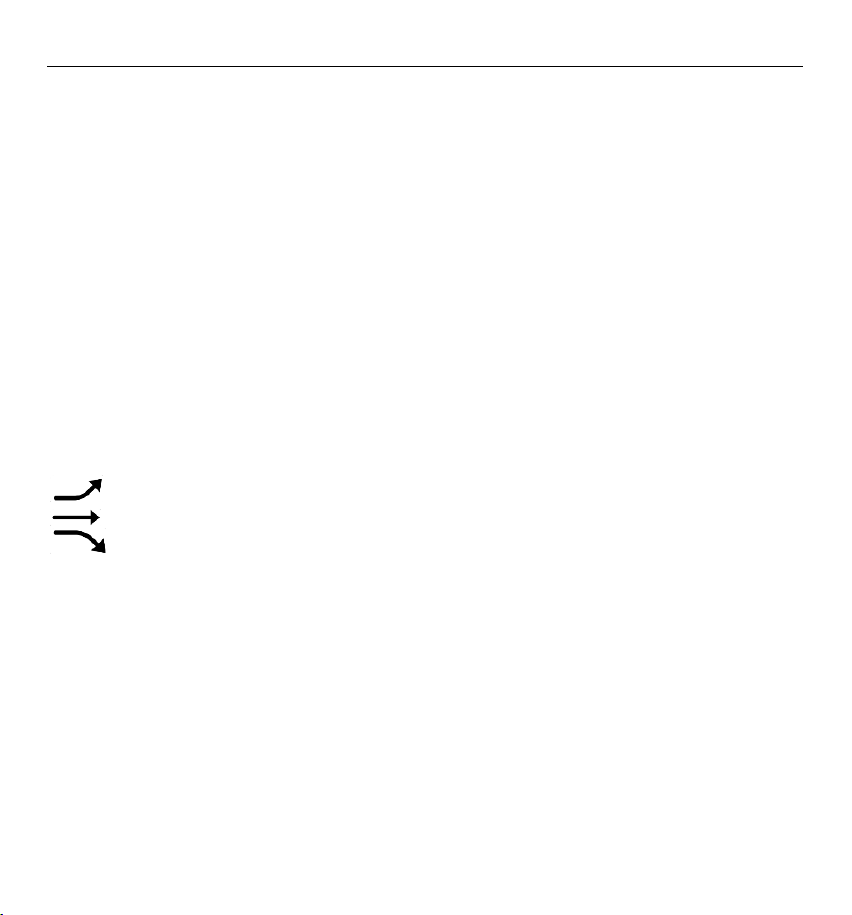
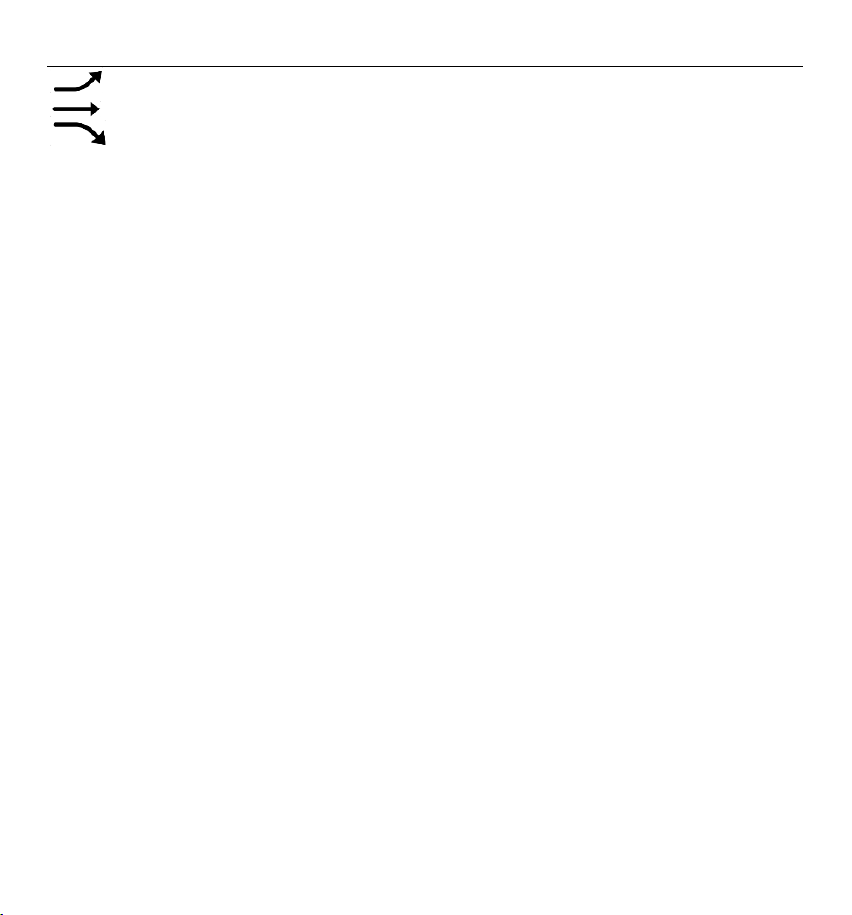
Displaying temperature trend
You may see the following displays:
: The temperature is rising.
: The temperature is remaining constant.
: The temperature is falling.
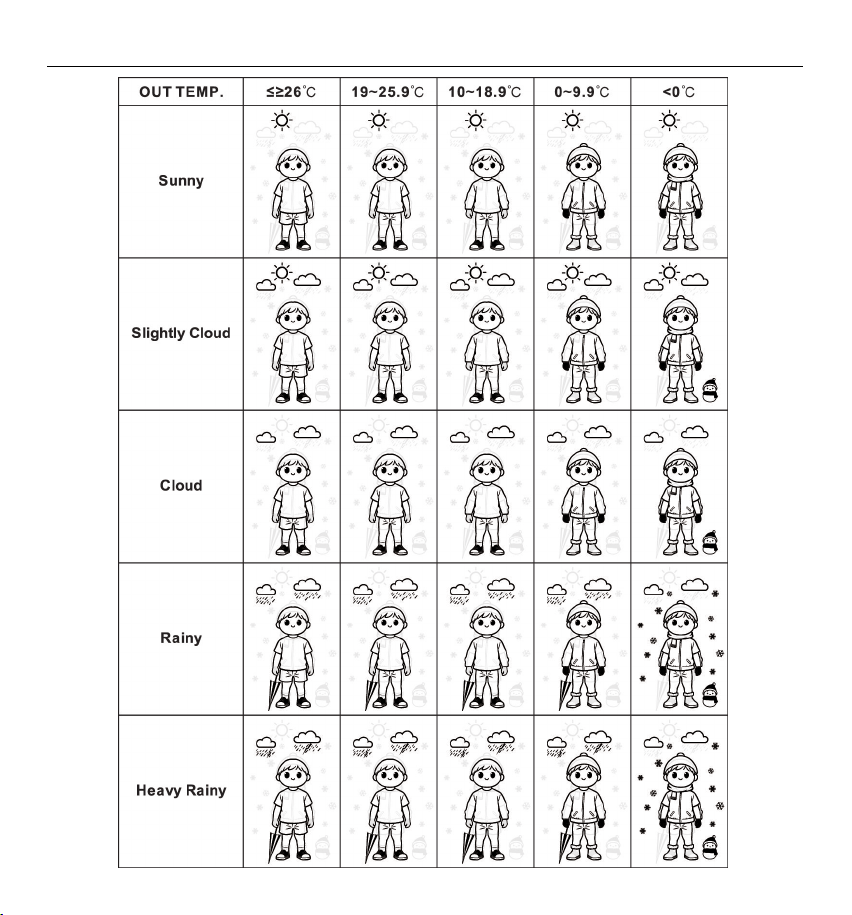
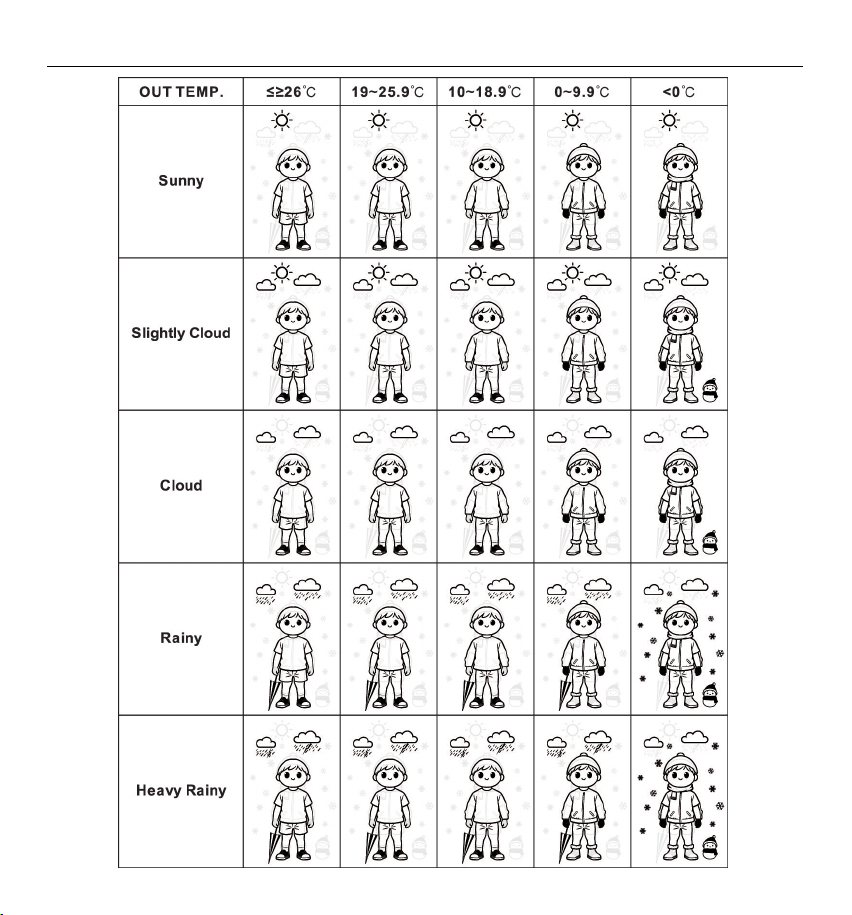
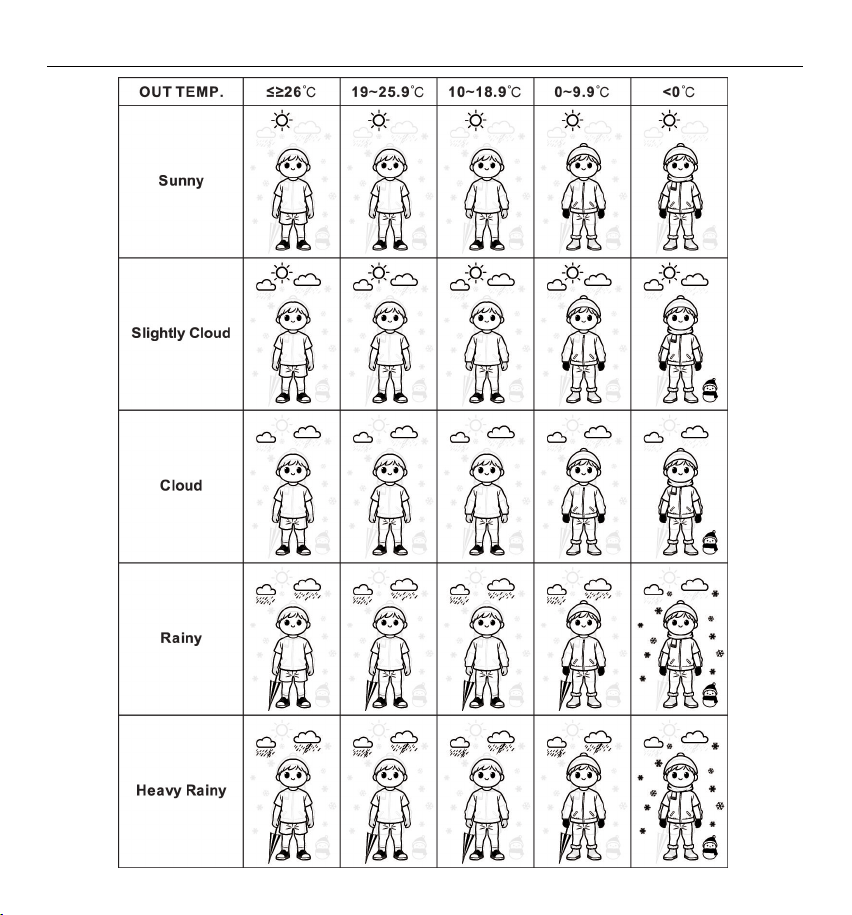
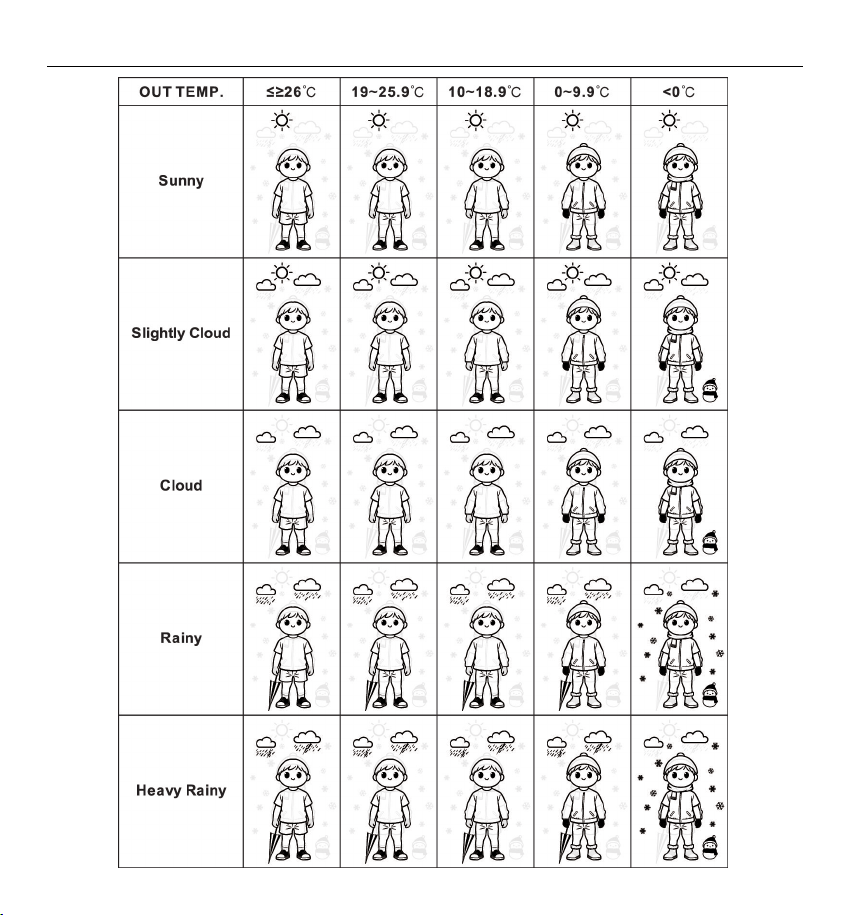
Weather forecast and clothing index:
Weather forecasts predict weather conditions for the next 12 hours based on past and current atmospheric
pressure changes. The device provides six weather display types. The forecast is updated every 6 hours.
See the image below for icon details:
7
Milo Manual
8
Milo Manual
Smart weather boy rewards
The Smart Weather Boy feature provides a simple reward system based on daily outfit matching. If the outfit
matches the weather conditions, a “Like” icon will appear on the screen as positive feedback.
To add a like, press and release the "Up" button in normal operation mode. Only one like can be added per
day. Likes will be automatically cleared after 5 likes.
To remove a like, press and hold the "Down" button for 5 seconds in normal operation mode.
Background lighting
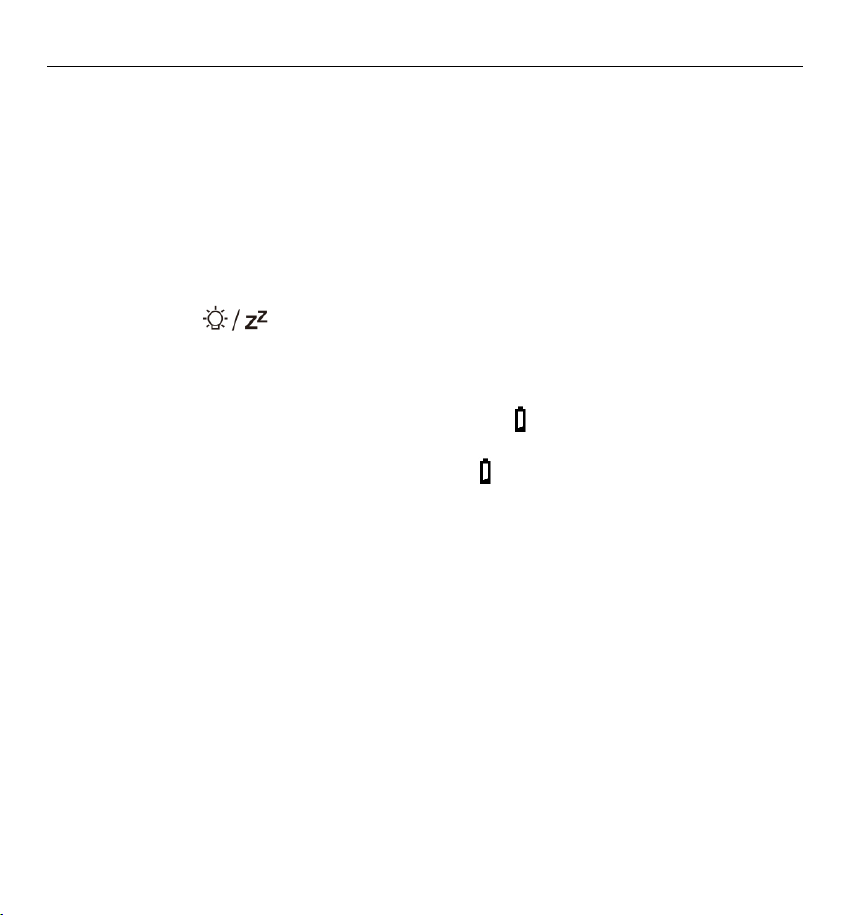
Touch the “ ” button. The backlight will stay on for 10 seconds.
Low battery:
When the “in” icon shows the low battery symbol “ ”, replace the batteries of the weather station as soon
as possible.
When the “out” icon shows the low battery symbol “ ”, replace the batteries of the corresponding wireless
sensor based on the displayed channel.
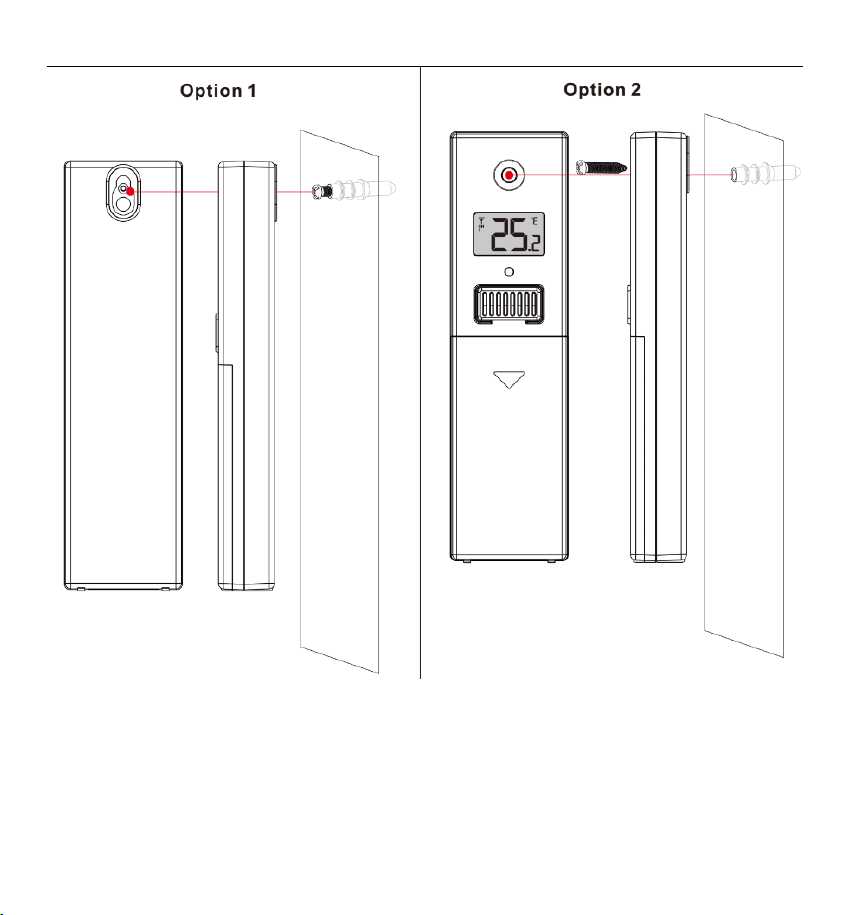
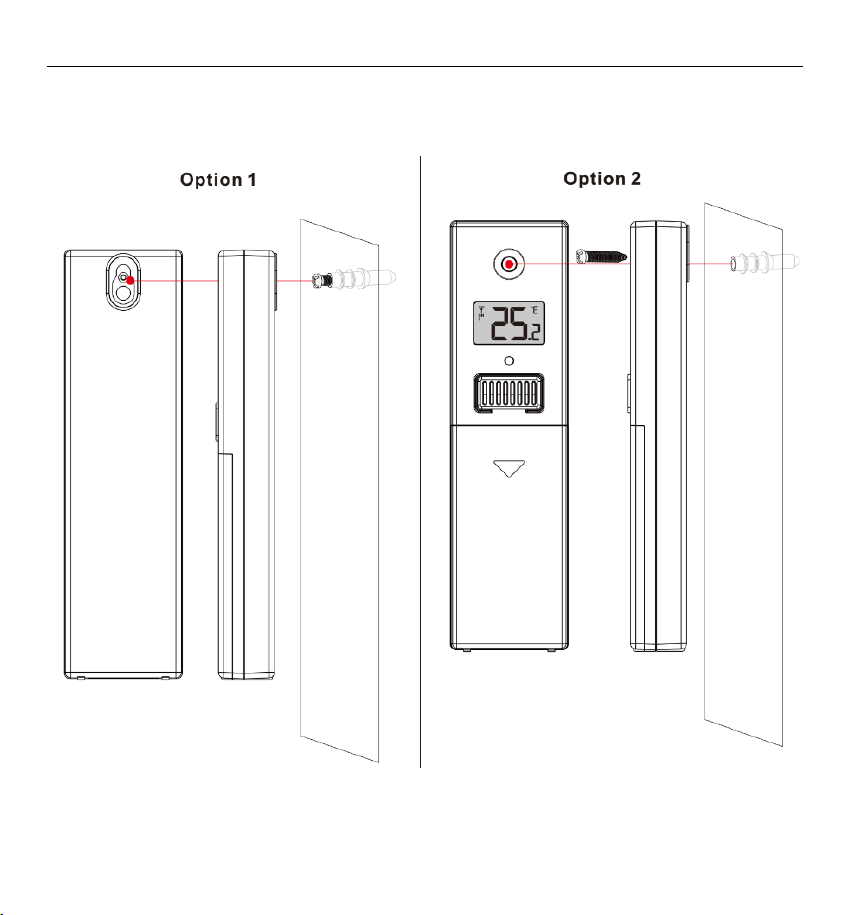
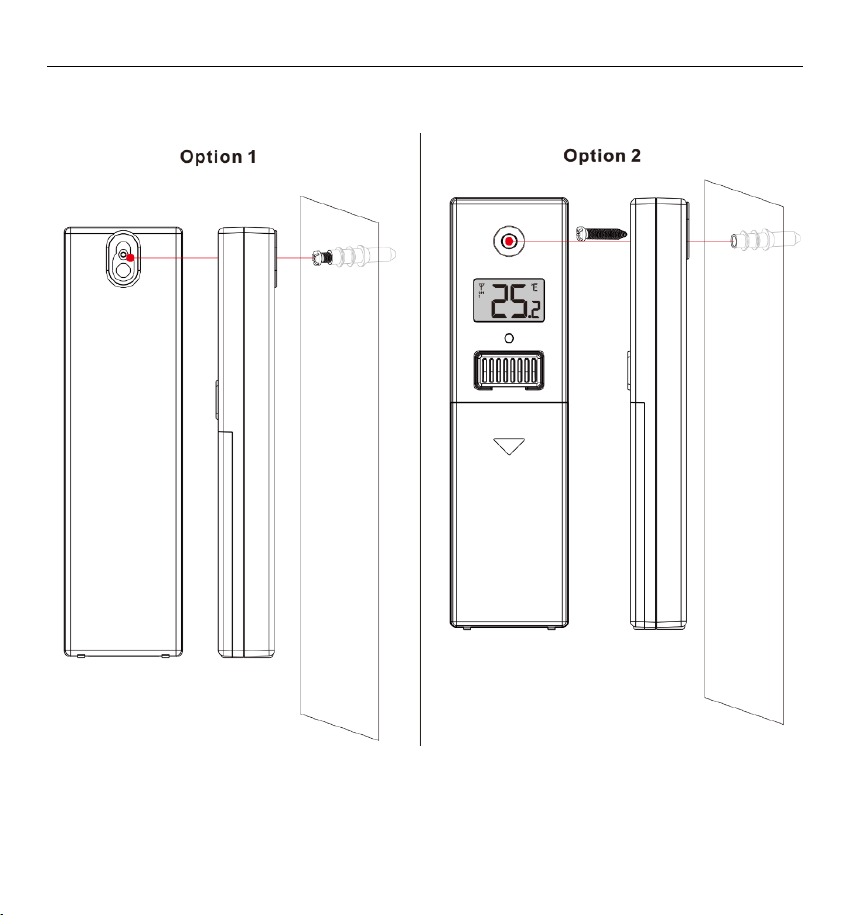
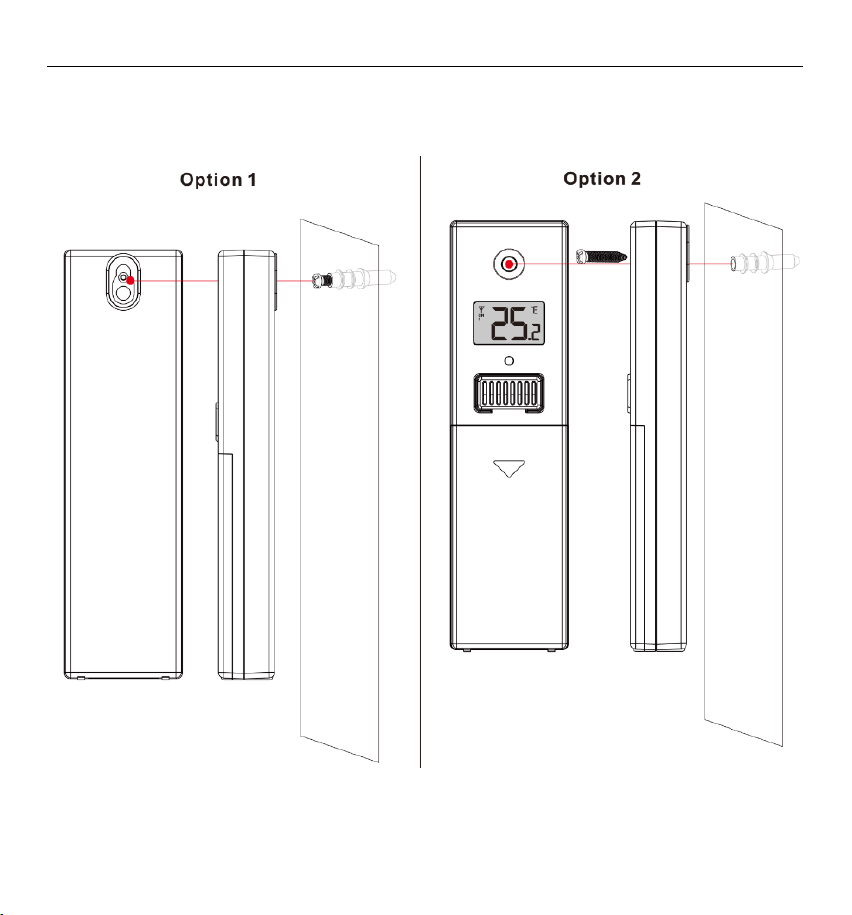
Mounting Instructions (wireless sensor)
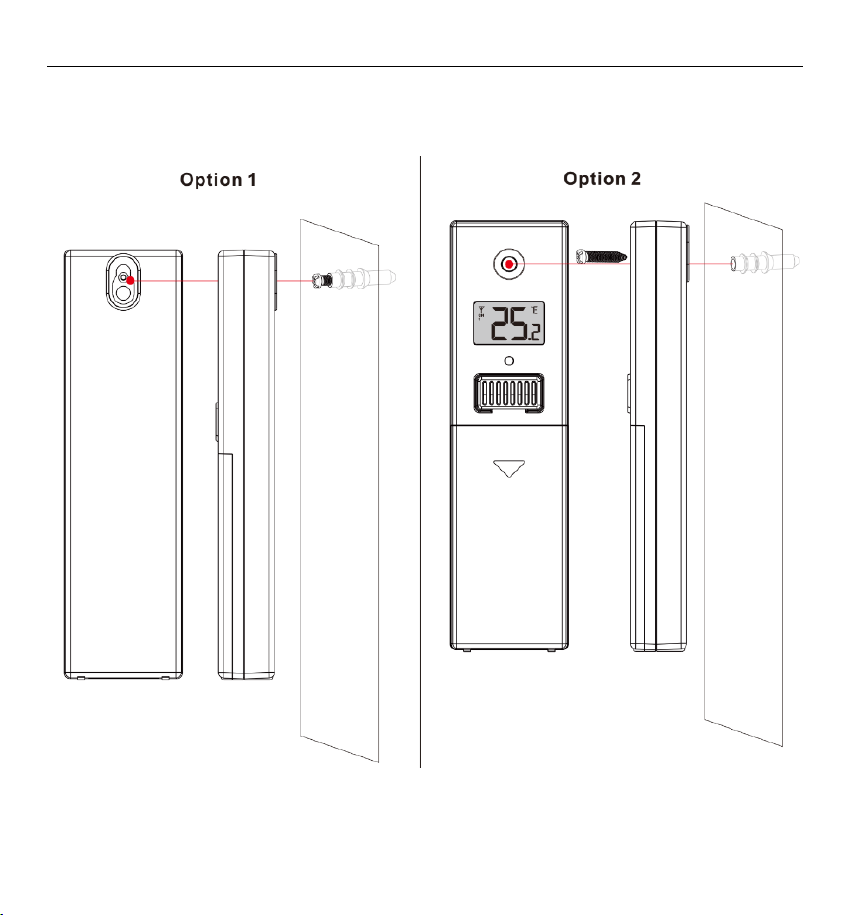
Option 1:
Mount the mounting screws to the wall.
Hang the wireless sensor on the screw.
Option 2:
Insert the screws through the mounting holes on the sensor and secure it directly to the wall.
Tighten the screws until secure (do not overtighten).
Installation Tips:
Install the sensor on a north-facing wall or in a shaded area to avoid direct sunlight.
Avoid placing it in direct sun, as this may cause higher temperature readings.
Mounting under eaves or on a covered railing is recommended.
Ensure the sensor is installed vertically to allow proper ventilation and moisture drainage.
9
Milo Manual
10
Milo-Handbuch
Milo-Bedienungsanleitung
11
Milo-Handbuch
Funktionen:
Ewiger Kalender bis zum Jahr 2099
Wochentag in 15 Sprachen, vom Benutzer wählbar: Englisch, Deutsch, Französisch, Spanisch, Italienisch,
Niederländisch, Dänisch, Portugiesisch, Norwegisch, Schwedisch, Polnisch, Finnisch, Tschechisch,
Ungarisch und Slowakisch
Zeitangabe wahlweise im 12- oder 24-Stunden-Format
Weck- und Schlummerfunktion
Temperatur:
— Messbereich für die Innentemperatur: -10 °C (14 °F) bis 50 °C (122 °F)
— Messbereich Außentemperatur: -40 °C (-40 °F) bis 70 °C (158 °F)
— Temperatur wahlweise in °C oder °F.
Anzeige des Innenraum-Komfortindex und des Außenraum-Gefühlsindex
Schimmelrisiko im Innenbereich, Hitzeindex im Außenbereich und Taupunkttemperatur werden auf dem
INDEX-Schalter angezeigt.
Drahtloser Außensensor :
— Wandhalterung oder Tischständer
— 433,92 MHz HF-Sendefrequenz
— 60 Meter Reichweite im Freien
— Bis zu 3 drahtlose Außensensoren können angeschlossen werden. (Ein drahtloser Außensensor im
Lieferumfang enthalten)
Wettervorhersage und Tipps zur Kleidung
Stromversorgung:
Wetterstation: Batterie: 2 x LR03 AAA
Drahtloser Fernsensor: Batterie: 2 x LR6 AA
Zur Information:
Der drahtlose Fernsensor funktioniert bei Temperaturen von -30 °C bis +70 °C. Bitte wählen Sie die richtige
Batterie entsprechend der Temperaturgrenze des drahtlosen Sensors:
Alkali-Zink-Mangan-Batterien funktionieren bei Temperaturen von -20 °C bis +60 °C
Wiederaufladbare Lithium-Ionen-Polymer-Akkus funktionieren bei Temperaturen von -40 °C bis +70 °C.
12
Milo-Handbuch
Aussehen der Wetterstation
Teil A – Positives LCD
A1: Wettervorhersage
A2: Kleidungsempfehlungen
A3: Belohnungen für wetterbewusste Kinder
A4: Außentemperatur
A5: Innentemperatur
A6: Kalender
A7: Symbol für Alarm ein/aus
A8: Uhrzeit
Teil B – „ “ Zurück-Taste und Ein-/Aus-Taste
B1: Touchfeld „ “
B2: Aufhängeloch
B3: Funktionstasten
B4: Batteriefach
B5: Halterahmen (in den Batteriefachdeckel eingelassen)
13
Milo-Handbuch
Teil C – Drahtlose Sensoren
C1: Aufhängeloch
C2: LCD-Anzeige
C3: LED-Anzeige
C4: Lüftungsschlitz für Temperatur- und
Feuchtigkeitsmessung
C5: Batteriefach
C6: Taste für manuelle Signalübertragung „TX“
C7: Taste zur Umschaltung der
Temperatureinheit „°C/°F“
Erstinbetriebnahme:
Öffnen Sie die Batteriefachabdeckung der Station und legen Sie 2 AAA-Batterien ein, wobei Sie auf die
richtige Polarität ([+] und [-]) achten müssen.
Nach dem Einschalten leuchten alle Symbole auf dem LCD-Bildschirm 3 Sekunden lang auf, und Sie hören
einen Signalton. Gleichzeitig wird im Anzeigebereich des „in“-Haus-Symbols der Temperaturwert angezeigt.
Die Wetterstation beginnt nun, eine Verbindung mit dem Außen-Fernsensor herzustellen. Dieser Vorgang
14
Milo-Handbuch
dauert etwa 3 Minuten; während dieser Zeit blinkt das Antennensymbol im „Out“-Bereich.
Öffnen Sie nun die Batterieabdeckung des Sensors. Wählen Sie mit dem Umschalter in Position C6 den
gewünschten Kanal aus und legen Sie dann 2 AA-Batterien entsprechend den Polaritätsmarkierungen ein.
Wenn der Funksensor mit Batterien bestückt ist, leuchten alle Symbole auf dem LCD-Display kurz für 3
Sekunden auf, und die Temperatur und Luftfeuchtigkeit des Sensors werden erfasst. Gleichzeitig blinken die
LED-Leuchten einmal, und die Funksensoren senden automatisch Funksignale.
Sobald der Funksensor aktiviert ist, empfängt die Wetterstation automatisch sein Funksignal. Bei Empfang
eines gültigen Signals wird der entsprechende Temperaturwert im Bereich „out“ angezeigt.
Manuelle Zeiteinstellung:
Halten Sie die Taste „SET“ der „ “ länger als 2 Sekunden gedrückt, um das Einstellungsmenü aufzurufen.
Stellen Sie zunächst die Temperatureinheit auf „°C“ oder „°F“ ein. Verwenden Sie nun die Tasten „UP“ und
„DOWN“, um die Temperatur einzustellen; die Temperatureinheit kann auf „°C“ oder „°F“ eingestellt werden.
Verwenden Sie die Tasten UP / DOWN, um die einzelnen Einstellungen anzupassen, und drücken Sie SET,
um zu bestätigen und zum nächsten Punkt zu gelangen.
Die Einstellungen werden in der folgenden Reihenfolge angepasst:
Temperatureinheit – Wählen Sie °C oder °F
Zeitformat – Wählen Sie die 12-Stunden- oder 24-Stunden-Anzeige
Stunde – Stellen Sie die aktuelle Stunde ein
Minute – Stellen Sie die aktuelle Minute ein
Jahr – Stellen Sie das aktuelle Jahr ein
Monat – Stellen Sie den aktuellen Monat ein
Datum – Stellen Sie das aktuelle Datum ein
Sprache – Wählen Sie die Anzeigesprache für Wochentag und Monat
Aktuelles Wetter – Wählen Sie die aktuelle Wetterlage
Nachdem Sie alle Einstellungen vorgenommen haben, drücken Sie SET, um zu bestätigen und den
Vorgang zu beenden. Das Gerät kehrt in den Uhrmodus zurück.
Hinweis: Es stehen 15 Sprachen für die Wochentage zur Verfügung: Englisch, Deutsch, Französisch,
Italienisch, Spanisch, Portugiesisch, Niederländisch, Dänisch, Norwegisch, Schwedisch, Polnisch, Finnisch,
Tschechisch, Ungarisch und Slowakisch
Anzeige der Wochentags-Sprache
15
Milo-Handbuch
Sprache
Sonntag
Montag
Dienstag
Mittwoch
Donnerstag
Freitag
Samstag
ENGLISH
MONDAY
TUESDAY
WEDNESDAY
THURSDAY
FRIDAY
SATURDAY
SUNDAY
ENG
MON
TUE
WED
THU
FRI
SAT
SUN
GERMAN
MONTAG
DIENSTAG
MITTWOCH
DONNERSTAG
FREITAG
SAMSTAG
SONNTAG
GER
MON
DIE
MIT
DON
FRE
SAM
SON
FRENCH
LUNDI
MARDI
MERCREDI
JEUDI
VENDREDI
SAMEDI
DIMANCHE
FRE
LUN
MAR
MER
JEU
VEN
SAM
DIM
ITALIAN
LUNEDI
MARTEDÌ
MERCOLEDÌ
GIOVEDI
VENERDÌ
SABATO
DOMENICA
ITA
LUN
MAR
MER
GIO
VEN
SAB
DOM
SPANISH
LUNES
MARTES
MIERCOLES
JUEVES
VIERNES
SABADO
DOMINGO
SPA
LUN
MAR
MIE
JUE
VIE
SAB
DOM
PORTUGUESE
SEGUNDA-FEIRA
TERÇA
QUARTA-FEIRA
QUINTA-FEIRA
SEXTA-FEIRA
SABADO
DOMINGO
POR
SEG
TER
QUA
QUI
SEX
SAB
DOM
DUTCH
MAANDAG
DINSDAG
WOENSDAG
DONDERDAG
VRIJDAG
ZATERDAG
ZONDAG
DUT
MAA
DIN
WOE
DON
VRI
ZAT
ZON
DANISH
MANDAG
TIRSDAG
ONSDAG
TORSDAG
FREDAG
LØRDAG
SØNDAG
DAN
MAN
TIR
ONS
TOR
FRE
LOR
SON
NORWEGIAN
MANDAG
TIRSDAG
ONSDAG
TORSDAG
FREDAG
LØRDAG
SØNDAG
NOR
MAN
TIR
ONS
TOR
FRE
LOR
SON
SWEDISH
MÅNDAG
TISDAG
ONSDAG
TORSDAG
FREDAG
LÖRDAG
SÖNDAG
SWE
MAN
TIS
ONS
TOR
FRE
LOR
SON
POLISH
PONIEDZIAŁEK
WTOREK
ŚRODA
CZWARTEK
PIĄTEK
SOBOTA
NIEDZIELA
POL
PON
WTO
SRO
CZW
PIA
SOB
NIE
FINNISH
MAANANTAI
TIISTAI
KESKIVIIKKO
TORSTAI
PERJANTAI
LAUANTAI
SUNNUNTAI
FIN
MAN
TII
KIS
TOR
PER
LAU
SUN
CZECH
PONDĚLÍ
ÚTERÝ
STŘEDA
ČTVRTEK
PÁTEK
SOBOTA
NEDĚLE
CZE
PON
UTE
STR
CTV
PAT
SOB
NED
HUNGARIAN
HÉTFŐ
KEDD
SZERDA
CSÜTÖRTÖK
PÉNTEK
SZOMBAT
VASÁRNAP
HUN
HET
KED
SZE
CSU
PEN
SZO
VAS
Slovakia
Pondelok
utorok
Streda
Štvrtok
piatok
sobota
nedeľa
SVK
PON
UTO
STR
STV
PIA
SOB
NED
16
Milo-Handbuch
Zur Information:
Wenn 15 Sekunden lang keine Taste gedrückt wird, verlässt das Gerät automatisch den Einstellungsmodus
und kehrt in den normalen Uhrmodus zurück.
Beim Einstellen der Uhrzeit werden die Sekunden auf 00 zurückgesetzt, sobald der Minutenwert geändert
wird.
Sie können die Tasten UP / DOWN gedrückt halten, um Werte schnell anzupassen.
Bei der ersten Verwendung der Wetterstation entspricht die Standard-Wetteranzeige möglicherweise nicht
den aktuellen Bedingungen. Sie können das Anfangswetter manuell einstellen, um es an Ihre örtlichen
Gegebenheiten anzupassen.
Einstellung der täglichen Alarme:
Halten Sie die ALARM-Taste länger als 2 Sekunden gedrückt, um den Weckereinstellungsmodus
aufzurufen.
Verwenden Sie die Tasten UP / DOWN, um die einzelnen Einstellungen anzupassen, und drücken Sie
ALARM, um zu bestätigen und zum nächsten Punkt zu gelangen:
Stunde – Stellen Sie die Alarmstunde ein
Minute – Stellen Sie die Weckminute ein
Drücken Sie nach Abschluss der Einstellungen auf ALARM, um zu bestätigen und den Modus zu verlassen.
Zur Information:
Wenn 15 Sekunden lang keine Taste gedrückt wird, verlässt das Gerät automatisch den Einstellungsmodus
und kehrt in den normalen Uhrmodus zurück.
Wecker EIN/AUS
Im Standardmodus drücken Sie kurz die Taste „ALARM“, um die Alarmfunktion zu aktivieren; das
Alarmsymbol „ “ bleibt angezeigt. Wenn der Alarm ausgeschaltet ist, wird neben dem Alarmsymbol „
“ die Anzeige „OFF“ angezeigt.
Ausschalten des Alarmsignals
Drücken Sie eine beliebige Taste außer der Taste „ “, um das Alarmsignal zu stoppen. Der Alarm
bleibt aktiv und ertönt zur nächsten eingestellten Zeit erneut.
Zur Information:
17
Milo-Handbuch
Wenn keine Taste gedrückt wird, ertönt der Alarm 1 Minute lang und stoppt dann automatisch.
Der Alarm wiederholt sich nach 24 Stunden.
Der Alarm verwendet einen Crescendo-Ton, dessen Lautstärke während der 1-minütigen Dauer in 4 Stufen
ansteigt.
Schlummerfunktion:
Wenn die Weckzeit abgelaufen ist, drücken Sie die Taste „ “, um den Alarm zu stoppen und den
Schlummermodus zu aktivieren. Der Alarm ertönt nach Ablauf der Schlummerzeit erneut.
Drücken Sie im Schlummermodus eine beliebige Taste außer der Taste „ “ oder halten Sie die
Position „ “ gedrückt, um den Schlummermodus zu beenden.
Zur Information:
Die Schlummerzeit ist auf 5 Minuten festgelegt.
Temperaturerkennung:
Temperaturbereich in Innenräumen: -10 °C (+14 °F) bis +50 °C (+122 °F); bei Werten unter -10 °C (+14 °F)
wird „LL.L °C(°F)“ angezeigt, bei Werten über +50 °C (+122 °F) wird „HH.H °C(°F)“ angezeigt.
Außentemperaturbereich: 40 °C (-40 °F) bis +70 °C (+158 °F); bei Werten unter -40 °C (-40 °F) wird „
LL.L °C(°F)“ angezeigt, bei Werten über +70 °C (+158 °F) wird „HH.H °C(°F)“ angezeigt.
Drahtlose Sensorübertragung:
Wenn die Wetterstation erfolgreich ein Signal vom Funksensor empfängt, wird die Außentemperatur im
Anzeigebereich „out“ angezeigt.
Wenn kein Signal empfangen wird (die Anzeige „OUT“ zeigt „--“ an), halten Sie die Tasten „Auf“ und
„Ab“ gleichzeitig 3 Sekunden lang gedrückt, um den manuellen Signalempfang zu starten. Das Symbol
„out“ zeigt eine Animation des Funkfrequenz-Antennensymbols an, und die Wetterstation nimmt den
Empfang des Funksignals vom Außensensor wieder auf.
Anzeige des Temperaturtrends
Möglicherweise werden folgende Anzeigen angezeigt:
: Die Temperatur steigt.
: Die Temperatur bleibt konstant.
18
Milo-Handbuch
: Die Temperatur sinkt.
Wettervorhersage und Kleiderindex:
Wettervorhersagen prognostizieren die Wetterbedingungen für die nächsten 12 Stunden auf der Grundlage
vergangener und aktueller Luftdruckveränderungen. Das Gerät bietet sechs Arten der Wetteranzeige. Die
Vorhersage wird alle 6 Stunden aktualisiert.
Details zu den Symbolen finden Sie in der Abbildung unten:
19
Milo-Handbuch
20
Milo-Handbuch
Belohnungen von Smart Weather Boy
Die Funktion „Smart Weather Boy“ bietet ein einfaches Belohnungssystem, das auf der täglichen
Abstimmung des Outfits basiert. Wenn das Outfit zu den Wetterbedingungen passt, erscheint als positives
Feedback ein „Gefällt mir“-Symbol auf dem Bildschirm.
Um ein „Like“ hinzuzufügen, drücken Sie im normalen Betriebsmodus kurz die „Auf“-Taste. Pro Tag kann
nur ein „Like“ hinzugefügt werden. Nach 5 „Likes“ werden diese automatisch gelöscht.
Um ein „Like“ zu entfernen, halten Sie im Normalbetrieb die „Ab“-Taste 5 Sekunden lang gedrückt.
Hintergrundbeleuchtung
Berühren Sie die Taste „ “. Die Hintergrundbeleuchtung bleibt 10 Sekunden
lang eingeschaltet.
Schwache Batterie:
Wenn das „in“-Symbol das Symbol für niedrigen Batteriestand „ “ anzeigt, wechseln Sie die Batterien der
Wetterstation so schnell wie möglich.
Wenn das „Out“-Symbol das Symbol für niedrigen Batteriestand „ “ anzeigt, wechseln Sie die Batterien
des entsprechenden Funksensors entsprechend dem angezeigten Kanal.
Montageanleitung (Funk-Sensor)
Option 1:
Befestigen Sie die Befestigungsschrauben an der Wand.
Hängen Sie den Funksensor an die Schraube.
Option 2:
Führen Sie die Schrauben durch die Befestigungslöcher am Sensor und befestigen Sie ihn direkt an der
Wand.
Ziehen Sie die Schrauben fest, bis der Sensor sicher sitzt (nicht zu fest anziehen).
Tipps zur Installation:
Installieren Sie den Sensor an einer nach Norden ausgerichteten Wand oder in einem schattigen Bereich,
um direkte Sonneneinstrahlung zu vermeiden.
Vermeiden Sie die Platzierung in direktem Sonnenlicht, da dies zu höheren Temperaturmesswerten fü
hren kann.
21
Milo-Handbuch
Die Montage unter einem Dachvorsprung oder an einem überdachten Geländer wird empfohlen.
Stellen Sie sicher, dass der Sensor senkrecht installiert ist, um eine ordnungsgemäße Belüftung und
Feuchtigkeitsableitung zu gewährleisten.
22
Manual de Milo
Manual de usuario de Milo
23
Manual de Milo
Características:
Calendario perpetuo hasta el año 2099
Día de la semana seleccionable por el usuario en 15 idiomas: inglés, alemán, francés, español, italiano,
neerlandés, danés, portugués, noruego, sueco, polaco, finés, checo, húngaro y eslovaco
Hora en formato opcional de 12/24 horas
Función de alarma y repetición
Temperatura:
— Rangos de medición de temperatura interior: de -10 °C (14 °F) a 50 °C (122 °F)
— Rangos de medición de la temperatura exterior: de -40 °C (-40 °F) a 70 °C (158 °F)
— Temperatura en °C o °F.
Visualización del índice de confort interior y del índice de sensación exterior
El riesgo de moho en interiores, el índice de calor exterior y la temperatura del punto de rocío se muestran
en el interruptor INDEX.
Sensor exterior inalámbrico :
— Montaje en pared o soporte de mesa
— Frecuencia de transmisión RF de 433,92 MHz
— Alcance de transmisión de 60 metros en espacio abierto
— Se pueden conectar hasta 3 sensores inalámbricos para exteriores. (Se incluye un sensor inalámbrico
para exteriores)
Función de previsión meteorológica y consejos de vestimenta
Fuente de alimentación:
Estación meteorológica: Batería: 2 x LR03 AAA
Sensor remoto inalámbrico: Pilas: 2 x LR6 AA
Nota:
El sensor remoto inalámbrico puede funcionar entre -30 °C y +70 °C. Elige la pila adecuada según el rango
de temperatura del sensor inalámbrico:
Las pilas alcalinas de zinc-manganeso funcionan entre -20 °C y +60 °C
Las pilas recargables de polímero de iones de litio funcionan entre -40 °C y +70 °C.
24
Manual de Milo
Aspecto de la estación meteorológica
Parte A: pantalla LCD positiva
A1: Previsión meteorológica
A2: Consejos de vestimenta
A3: Recompensas para niños por su comportamiento inteligente con respecto al clima
A4: Temperatura exterior remota
A5: Temperatura interior
A6: Calendario
A7: Icono de activación/desactivación de la alarma
A8: Hora
Parte B – Botón de retroceso y encendido de
B1: Campo táctil « »
B2: Orificio para colgar
B3: Botones de funcionamiento
B4: Compartimento de la batería
B5: estructura de soporte (integrada en la tapa de la batería)
25
Manual de Milo
Parte C: Sensores inalámbricos
C1: Orificio de suspensión
C2: Pantalla LCD
C3: Indicador LED
C4: Rejilla de detección de temperatura | humedad
C5: Compartimento de la batería
C6: Botón de transmisión manual de señal «TX»
C7: Botón de conversión de unidades de
temperatura «°C/°F»
Puesta en marcha:
Abre la tapa del compartimento de pilas de la estación e inserta 2 pilas AAA, asegurándote de que la
polaridad sea correcta ([+] y [-]).
Una vez encendida, todos los iconos de la pantalla LCD se iluminarán durante 3 segundos y se oirá un
pitido. Al mismo tiempo, el área de visualización del icono «in» (interior) mostrará el valor de la temperatura.
La estación meteorológica comenzará ahora a establecer una conexión con el sensor remoto exterior. Este
proceso durará aproximadamente 3 minutos; durante este tiempo, el símbolo de la antena en el área «out»
26
Manual de Milo
parpadeará.
Ahora, abra la tapa de la batería del sensor. Utilice el interruptor de cambio en la posición C6 para
seleccionar el canal deseado y, a continuación, inserte 2 pilas AA siguiendo las marcas de polaridad.
Cuando el sensor inalámbrico se coloca en la batería, todos los iconos de la pantalla LCD se iluminarán
brevemente durante 3 segundos y detectarán la temperatura y la humedad del sensor; al mismo tiempo, las
luces LED parpadearán una vez, y los sensores inalámbricos transmitirán automáticamente señales
inalámbricas.
Cuando el sensor inalámbrico se active, la estación meteorológica recibirá automáticamente su señal
inalámbrica. Cuando se reciba una señal válida, se mostrará el valor de temperatura correspondiente en el
área de la sección «out».
Ajuste manual de la hora:
Mantenga pulsado el botón «SET» de durante más de 2 segundos para acceder al menú de configuración.
En primer lugar, seleccione la unidad de temperatura en «°C» o «°F». A continuación, utilice los botones
«UP» y «DOWN» para ajustar la temperatura; la unidad de temperatura puede configurarse en «°C» o «°F».
Utilice los botones ARRIBA/ABAJO para ajustar cada configuración y pulse SET para confirmar y pasar al
siguiente elemento.
Los ajustes se configuran en el siguiente orden:
Unidad de temperatura: seleccione °C o °F
Formato de hora: seleccione visualización de 12 o 24 horas
Hora: ajuste la hora actual
Minutos: ajusta los minutos actuales
Año: configura el año actual
Mes: configura el mes actual
Fecha: configura la fecha actual
Idioma: selecciona el idioma de visualización para el día de la semana y el mes
Tiempo inicial: selecciona las condiciones meteorológicas actuales
Una vez completados todos los ajustes, pulse SET para confirmar y salir. El dispositivo volverá al modo
reloj.
Nota: Hay 15 idiomas disponibles para los días de la semana: inglés, alemán, francés, italiano, español,
portugués, neerlandés, danés, noruego, sueco, polaco, finés, checo, húngaro y eslovaco
Idioma de visualización de los días de la semana
27
Manual de Milo
Idioma
Domingo
Lunes
Martes
Miércoles
Jueves
Viernes
Sábado
ENGLISH
MONDAY
TUESDAY
WEDNESDAY
THURSDAY
FRIDAY
SATURDAY
SUNDAY
ENG
MON
TUE
WED
THU
FRI
SAT
SUN
GERMAN
MONTAG
DIENSTAG
MITTWOCH
DONNERSTAG
FREITAG
SAMSTAG
SONNTAG
GER
MON
DIE
MIT
DON
FRE
SAM
SON
FRENCH
LUNDI
MARDI
MERCREDI
JEUDI
VENDREDI
SAMEDI
DIMANCHE
FRE
LUN
MAR
MER
JEU
VEN
SAM
DIM
ITALIAN
LUNEDI
MARTEDÌ
MERCOLEDÌ
GIOVEDI
VENERDÌ
SABATO
DOMENICA
ITA
LUN
MAR
MER
GIO
VEN
SAB
DOM
SPANISH
LUNES
MARTES
MIERCOLES
JUEVES
VIERNES
SABADO
DOMINGO
SPA
LUN
MAR
MIE
JUE
VIE
SAB
DOM
PORTUGUESE
SEGUNDA-FEIRA
TERÇA
QUARTA-FEIRA
QUINTA-FEIRA
SEXTA-FEIRA
SABADO
DOMINGO
POR
SEG
TER
QUA
QUI
SEX
SAB
DOM
DUTCH
MAANDAG
DINSDAG
WOENSDAG
DONDERDAG
VRIJDAG
ZATERDAG
ZONDAG
DUT
MAA
DIN
WOE
DON
VRI
ZAT
ZON
DANISH
MANDAG
TIRSDAG
ONSDAG
TORSDAG
FREDAG
LØRDAG
SØNDAG
DAN
MAN
TIR
ONS
TOR
FRE
LOR
SON
NORWEGIAN
MANDAG
TIRSDAG
ONSDAG
TORSDAG
FREDAG
LØRDAG
SØNDAG
NOR
MAN
TIR
ONS
TOR
FRE
LOR
SON
SWEDISH
MÅNDAG
TISDAG
ONSDAG
TORSDAG
FREDAG
LÖRDAG
SÖNDAG
SWE
MAN
TIS
ONS
TOR
FRE
LOR
SON
POLISH
PONIEDZIAŁEK
WTOREK
ŚRODA
CZWARTEK
PIĄTEK
SOBOTA
NIEDZIELA
POL
PON
WTO
SRO
CZW
PIA
SOB
NIE
FINNISH
MAANANTAI
TIISTAI
KESKIVIIKKO
TORSTAI
PERJANTAI
LAUANTAI
SUNNUNTAI
FIN
MAN
TII
KIS
TOR
PER
LAU
SUN
CZECH
PONDĚLÍ
ÚTERÝ
STŘEDA
ČTVRTEK
PÁTEK
SOBOTA
NEDĚLE
CZE
PON
UTE
STR
CTV
PAT
SOB
NED
HUNGARIAN
HÉTFŐ
KEDD
SZERDA
CSÜTÖRTÖK
PÉNTEK
SZOMBAT
VASÁRNAP
HUN
HET
KED
SZE
CSU
PEN
SZO
VAS
Slovakia
Pondelok
utorok
Streda
Štvrtok
piatok
sobota
nedeľa
SVK
PON
UTO
STR
STV
PIA
SOB
NED
28
Manual de Milo
Nota:
Si no se pulsa ningún botón durante 15 segundos, el dispositivo saldrá automáticamente del modo de
configuración y volverá al modo de reloj normal.
Al ajustar la hora, los segundos se pondrán a 00 una vez que se cambie el valor de los minutos.
Puede mantener pulsados los botones ARRIBA/ABAJO para ajustar rápidamente los valores.
Al utilizar la estación meteorológica por primera vez, es posible que la visualización meteorológica
predeterminada no coincida con las condiciones actuales. Puede configurar manualmente el tiempo inicial
para que refleje su entorno local.
Configuración de las alarmas diarias:
Mantenga pulsado el botón ALARM durante más de 2 segundos para acceder al modo de configuración de
alarmas.
Utilice los botones ARRIBA/ABAJO para ajustar cada configuración y pulse ALARMA para confirmar y
pasar al siguiente elemento:
Hora: configura la hora de la alarma
Minutos: configura los minutos de la alarma
Una vez completados los ajustes, pulsa ALARM para confirmar y salir.
Nota:
Si no se pulsa ningún botón durante 15 segundos, el dispositivo saldrá automáticamente del modo de
configuración y volverá al modo de reloj normal.
Alarma ON/OFF
En el modo estándar, pulse brevemente el botón «ALARM» para activar la función de alarma; el símbolo de
alarma « » permanecerá en pantalla. Si la alarma está desactivada, aparecerá «OFF» junto al símbolo
de alarma « ».
Desactivación de la señal de alarma
Pulse cualquier botón excepto el botón « » para detener la señal de alarma. La alarma
permanecerá activa y volverá a sonar a la siguiente hora programada.
Nota:
29
Manual de Milo
Si no se pulsa ningún botón, la alarma sonará durante 1 minuto y luego se detendrá automáticamente.
La alarma se repetirá tras 24 horas.
La alarma utiliza un tono en crescendo, que aumenta de volumen en 4 pasos durante el minuto de duració
n.
Función de repetición:
Cuando suene la alarma, pulse el botón « » para detenerla y activar el modo de repetición. La
alarma volverá a sonar tras el intervalo de repetición.
En el modo de repetición, pulsa cualquier botón excepto el botón « » o mantén pulsada la
posición « » para salir del modo de repetición.
Nota:
El tiempo de repetición está fijado en 5 minutos.
Detección de temperatura:
Rango de temperatura interior: -10 °C (+14 °F) ~ +50 °C (+122 °F); se mostrará «LL.L °C(°F)» si el valor es
inferior a -10 °C (+14 °F) y «HH.H °C(°F)» si el valor es superior a +50 °C (+122 °F).
Rango de temperatura exterior: 40 °C (-40 °F) ~ +70 °C (+158 °F); se mostrará LL.L °C(°F) si el valor es
inferior a -40 °C (-40 °F) y HH.H °C(°F) si el valor es superior a +70 °C (+158 °F).
Transmisión del sensor inalámbrico:
Cuando la estación meteorológica reciba correctamente una señal del sensor inalámbrico, la temperatura
exterior se mostrará en el área de visualización «out».
Si no se recibe ninguna señal (la pantalla «OUT» muestra «--») , mantenga pulsados los botones «arriba» y
«abajo» simultáneamente durante 3 segundos para iniciar la recepción manual de la señal. El icono «out»
mostrará una animación del símbolo de la antena de radiofrecuencia y la estación meteorológica reanudará
la recepción de la señal inalámbrica del sensor exterior.
Visualización de la tendencia de la temperatura
Es posible que vea las siguientes indicaciones:
: La temperatura está subiendo.
: La temperatura se mantiene constante.
30
Manual de Milo
: La temperatura está bajando.
Previsión meteorológica e índice de vestimenta:
Las previsiones meteorológicas predicen las condiciones meteorológicas para las próximas 12 horas
basándose en los cambios de presión atmosférica pasados y actuales. El dispositivo ofrece seis tipos de
visualización meteorológica. La previsión se actualiza cada 6 horas.
Consulte la imagen siguiente para ver los detalles de los iconos:
31
Manual de Milo
32
Manual de Milo
Recompensas de Smart Weather Boy
La función Smart Weather Boy ofrece un sencillo sistema de recompensas basado en la combinación diaria
de la vestimenta. Si el atuendo se adapta a las condiciones meteorológicas, aparecerá un icono de «Me
gusta» en la pantalla como señal de aprobación.
Para añadir un «Me gusta», pulsa y suelta el botón «Arriba» en el modo de funcionamiento normal. Solo se
puede añadir un «Me gusta» al día. Los «Me gusta» se borrarán automáticamente tras alcanzar los 5.
Para eliminar un «Me gusta», mantén pulsado el botón «Abajo» durante 5 segundos en el modo de
funcionamiento normal.
Iluminación de fondo
Toca el botón « ». La retroiluminación permanecerá encendida durante 10
segundos.
Batería baja:
Cuando el icono «in» muestre el símbolo de batería baja « », sustituya las pilas de la estación
meteorológica lo antes posible.
Cuando el icono «out» muestre el símbolo de batería baja « », sustituya las pilas del sensor inalámbrico
correspondiente según el canal mostrado.
Instrucciones de montaje (sensor inalámbrico)
Opción 1:
Fije los tornillos de montaje a la pared.
Cuelgue el sensor inalámbrico en el tornillo.
Opción 2:
Inserte los tornillos a través de los orificios de montaje del sensor y fíjelo directamente a la pared.
Apriete los tornillos hasta que queden bien sujetos (no los apriete en exceso).
Consejos de instalación:
Instale el sensor en una pared orientada al norte o en una zona sombreada para evitar la luz solar
directa.
Evite colocarlo bajo el sol directo, ya que esto puede provocar lecturas de temperatura más altas.
Se recomienda montarlo bajo aleros o en una barandilla cubierta.
33
Manual de Milo
Asegúrese de que el sensor esté instalado en posición vertical para permitir una ventilación adecuada y
el drenaje de la humedad.
34
Manuel Milo
Manuel d'utilisation de Milo
35
Manuel Milo
Caractéristiques :
Calendrier perpétuel jusqu'en 2099
Jour de la semaine sélectionnable par l'utilisateur en 15 langues : anglais, allemand, français, espagnol,
italien, néerlandais, danois, portugais, norvégien, suédois, polonais, finnois, tchèque, hongrois et slovaque
Heure au format 12/24 heures (au choix)
Fonction alarme et répétition
Température :
— Plages de mesure de la température intérieure : de -10 °C (14 °F) à 50 °C (122 °F)
— Plages de mesure de la température extérieure : de -40 °C (-40 °F) à 70 °C (158 °F)
— Affichage de la température au choix en °C ou °F.
Affichage de l'indice de confort intérieur et de l'indice de sensation de chaleur extérieur
Le risque de moisissure à l'intérieur, l'indice de chaleur à l'extérieur et la température du point de rosée
s'affichent sur le commutateur INDEX.
s du capteur extérieur sans fil :
— Fixation murale ou support de table
— Fréquence de transmission RF 433,92 MHz
— Portée de transmission de 60 mètres en espace dégagé
— Possibilité de connecter jusqu'à 3 capteurs extérieurs sans fil. (Un capteur extérieur sans fil inclus)
Fonction de prévisions météorologiques et de conseils vestimentaires
Alimentation :
Station météo : piles : 2 x LR03 AAA
Capteur sans fil à distance : piles : 2 x LR6 AA
À titre informatif :
Le capteur sans fil à distance fonctionne entre -30 °C et +70 °C. Veuillez choisir les piles adaptées en
fonction de la plage de température du capteur sans fil :
Les piles alcalines au zinc-manganèse fonctionnent entre -20 °C et +60 °C
Les piles rechargeables au lithium-ion polymère fonctionnent entre -40 °C et +70 °C.
36
Manuel Milo
Aspect de la station météo
Partie A - Écran LCD
A1 : Prévisions météorologiques
A2 : Conseils vestimentaires
A3 : Récompenses pour les enfants qui respectent la météo
A4 : Température extérieure à distance
A5 : Température intérieure
A6 : Calendrier
A7 : Icône d'activation/désactivation de l'alarme
A8 : Heure
Partie B – Bouton de retour et d'alimentation de l'
B1 : Zone tactile « »
B2 : Trou de suspension
B3 : Boutons de commande des fonctions
B4 : Compartiment à piles
B5 : cadre de support (intégré au couvercle du compartiment à piles)
37
Manuel Milo
Partie C – Capteurs sans fil
C1 : trou de suspension
C2 : écran LCD
C3 : Voyant LED
C4 : Grille de détection de la température et de
l'humidité
C5 : Compartiment à piles
C6 : Bouton de transmission manuelle du signal «
TX »
C7 : Bouton de conversion des unités de
température « °C/°F »
Mise en service :
Ouvrez le couvercle du compartiment à piles de la station et insérez 2 piles AAA en respectant la polarité
([+] et [-]).
Une fois sous tension, toutes les icônes de l'écran LCD s'allument pendant 3 secondes et un bip retentit.
En même temps, la zone d'affichage de l'icône « in » (intérieur) indique la température.
38
Manuel Milo
La station météo va maintenant commencer à établir une connexion avec le capteur extérieur. Ce
processus prendra environ 3 minutes ; pendant ce temps, le symbole de l'antenne dans la zone « out »
clignotera.
À présent, ouvrez le couvercle du compartiment à piles du capteur. Utilisez le commutateur de sélection en
position C6 pour choisir le canal souhaité, puis insérez 2 piles AA en respectant les repères de polarité.
Lorsque le capteur sans fil est équipé de piles, toutes les icônes de l'écran LCD s'allument brièvement
pendant 3 secondes, et la température et l'humidité du capteur sont détectées. En même temps, les voyants
LED clignotent une fois, les capteurs sans fil transmettent automatiquement des signaux sans fil.
Lorsque le capteur sans fil est activé, la station météo recevra automatiquement son signal sans fil.
Lorsqu'un signal valide est reçu, la valeur de température correspondante s'affichera dans la zone de la
section « out ».
Réglage manuel de l'heure :
Appuyez sur le bouton « SET » de l' et maintenez-le enfoncé pendant plus de 2 secondes pour accéder au
menu de réglage. Commencez par régler l'unité de température sur « °C » ou « °F ». Utilisez ensuite les
boutons « UP » et « DOWN » pour régler la température. L'unité de température peut être réglée sur « °C »
ou « °F ».
Utilisez les boutons UP / DOWN pour régler chaque paramètre, puis appuyez sur SET pour confirmer et
passer à l'élément suivant.
Les réglages s'effectuent dans l'ordre suivant :
Unité de température – Sélectionnez °C ou °F
Format de l'heure – Sélectionnez l'affichage en 12 heures ou en 24 heures
Heure – Réglez l'heure actuelle
Minute – Réglez la minute actuelle
Année – Réglez l'année en cours
Mois – Réglez le mois actuel
Date – Réglez la date actuelle
Langue – Sélectionnez la langue d'affichage pour le jour de la semaine et le mois
Météo initiale – Sélectionnez les conditions météorologiques actuelles
Une fois tous les réglages effectués, appuyez sur SET pour confirmer et quitter. L'appareil revient en mode
horloge.
Remarque : les jours de la semaine sont disponibles en 15 langues : anglais, allemand, français, italien,
espagnol, portugais, néerlandais, danois, norvégien, suédois, polonais, finnois, tchèque, hongrois et
slovaque
39
Manuel Milo
Affichage de la langue de la semaine
Langue
Dimanche
Lundi
Mardi
Mercredi
Jeudi
Vendredi
Samedi
ENGLISH
MONDAY
TUESDAY
WEDNESDAY
THURSDAY
FRIDAY
SATURDAY
SUNDAY
ENG
MON
TUE
WED
THU
FRI
SAT
SUN
GERMAN
MONTAG
DIENSTAG
MITTWOCH
DONNERSTAG
FREITAG
SAMSTAG
SONNTAG
GER
MON
DIE
MIT
DON
FRE
SAM
SON
FRENCH
LUNDI
MARDI
MERCREDI
JEUDI
VENDREDI
SAMEDI
DIMANCHE
FRE
LUN
MAR
MER
JEU
VEN
SAM
DIM
ITALIAN
LUNEDI
MARTEDÌ
MERCOLEDÌ
GIOVEDI
VENERDÌ
SABATO
DOMENICA
ITA
LUN
MAR
MER
GIO
VEN
SAB
DOM
SPANISH
LUNES
MARTES
MIERCOLES
JUEVES
VIERNES
SABADO
DOMINGO
SPA
LUN
MAR
MIE
JUE
VIE
SAB
DOM
PORTUGUESE
SEGUNDA-FEIRA
TERÇA
QUARTA-FEIRA
QUINTA-FEIRA
SEXTA-FEIRA
SABADO
DOMINGO
POR
SEG
TER
QUA
QUI
SEX
SAB
DOM
DUTCH
MAANDAG
DINSDAG
WOENSDAG
DONDERDAG
VRIJDAG
ZATERDAG
ZONDAG
DUT
MAA
DIN
WOE
DON
VRI
ZAT
ZON
DANISH
MANDAG
TIRSDAG
ONSDAG
TORSDAG
FREDAG
LØRDAG
SØNDAG
DAN
MAN
TIR
ONS
TOR
FRE
LOR
SON
NORWEGIAN
MANDAG
TIRSDAG
ONSDAG
TORSDAG
FREDAG
LØRDAG
SØNDAG
NOR
MAN
TIR
ONS
TOR
FRE
LOR
SON
SWEDISH
MÅNDAG
TISDAG
ONSDAG
TORSDAG
FREDAG
LÖRDAG
SÖNDAG
SWE
MAN
TIS
ONS
TOR
FRE
LOR
SON
POLISH
PONIEDZIAŁEK
WTOREK
ŚRODA
CZWARTEK
PIĄTEK
SOBOTA
NIEDZIELA
POL
PON
WTO
SRO
CZW
PIA
SOB
NIE
FINNISH
MAANANTAI
TIISTAI
KESKIVIIKKO
TORSTAI
PERJANTAI
LAUANTAI
SUNNUNTAI
FIN
MAN
TII
KIS
TOR
PER
LAU
SUN
CZECH
PONDĚLÍ
ÚTERÝ
STŘEDA
ČTVRTEK
PÁTEK
SOBOTA
NEDĚLE
CZE
PON
UTE
STR
CTV
PAT
SOB
NED
HUNGARIAN
HÉTFŐ
KEDD
SZERDA
CSÜTÖRTÖK
PÉNTEK
SZOMBAT
VASÁRNAP
HUN
HET
KED
SZE
CSU
PEN
SZO
VAS
40
Manuel Milo
Slovakia
Pondelok
utorok
Streda
Štvrtok
piatok
sobota
nedeľa
SVK
PON
UTO
STR
STV
PIA
SOB
NED
À titre d'information :
Si aucun bouton n'est enfoncé pendant 15 secondes, l'appareil quitte automatiquement le mode de réglage
et revient au mode horloge normal.
Lors du réglage de l'heure, les secondes sont remises à 00 dès que la valeur des minutes est modifiée.
Vous pouvez maintenir les boutons HAUT / BAS enfoncés pour régler rapidement les valeurs.
Lors de la première utilisation de la station météo, l'affichage météo par défaut peut ne pas correspondre
aux conditions actuelles. Vous pouvez régler manuellement les conditions météo initiales pour qu'elles reflè
tent votre environnement local.
Réglage des alarmes quotidiennes :
Appuyez sur le bouton ALARM et maintenez-le enfoncé pendant plus de 2 secondes pour accéder au mode
de réglage des alarmes.
Utilisez les boutons HAUT / BAS pour régler chaque paramètre, puis appuyez sur ALARM pour confirmer et
passer à l'élément suivant :
Heure – Réglez l'heure de l'alarme
Minute – Réglez la minute de l'alarme
Une fois les réglages terminés, appuyez sur ALARM pour confirmer et quitter.
À titre d'information :
Si aucun bouton n'est enfoncé pendant 15 secondes, l'appareil quitte automatiquement le mode de réglage
et revient au mode horloge normal.
Activation/désactivation de l'alarme
En mode standard, appuyez brièvement sur le bouton « ALARM » pour activer la fonction d'alarme ; le
symbole d'alarme « » restera affiché. Si l'alarme est désactivée, « OFF » s'affichera à côté du symbole
d'alarme « ».
Désactivation du signal d'alarme
Appuyez sur n'importe quel bouton, à l'exception du bouton « », pour arrêter le signal d'alarme.
41
Manuel Milo
L'alarme restera active et retentira à nouveau à l'heure prévue suivante.
À titre d'information :
Si aucun bouton n'est enfoncé, l'alarme retentira pendant 1 minute, puis s'arrêtera automatiquement.
L'alarme se répète après 24 heures.
L'alarme utilise une tonalité crescendo, dont le volume augmente par paliers de 4 niveaux pendant la durée
d'une minute.
Fonction snooze :
Lorsque l'alarme se déclenche, appuyez sur le bouton « » pour l'arrêter et passer en mode
snooze. L'alarme retentira à nouveau après l'intervalle de snooze.
En mode snooze, appuyez sur n'importe quel bouton sauf le bouton « » ou appuyez longuement
sur la position « » pour quitter le mode snooze.
À titre d'information :
La durée de la répétition est fixée à 5 minutes.
Détection de la température :
Plage de température intérieure : -10 °C (+14 °F) à +50 °C (+122 °F) ; « LL.L °C(°F) » s'affiche si la valeur
est inférieure à -10 °C (+14 °F) ; « HH.H °C(°F) » s'affiche si la valeur est supérieure à +50 °C (+122 °F).
Plage de température extérieure : 40 °C (-40 °F) ~ +70 °C (+158 °F) ; LL.L °C(°F) s'affiche si la valeur est
inférieure à -40 °C (-40 °F) ; HH.H °C(°F) s'affiche si la valeur est supérieure à +70 °C (+158 °F).
Transmission du capteur sans fil :
Lorsque la station météo reçoit correctement un signal du capteur sans fil, la température extérieure
s'affiche dans la zone d'affichage « out ».
Si aucun signal n'est reçu (l'affichage « OUT » indique « -- ») , appuyez simultanément sur les boutons «
haut » et « bas » et maintenez-les enfoncés pendant 3 secondes pour lancer la réception manuelle du signal.
L'icône « out » affichera une animation du symbole de l'antenne radio, et la station météo reprendra la
réception du signal sans fil provenant du capteur extérieur.
Affichage de la tendance de température
Les affichages suivants peuvent apparaître :
42
Manuel Milo
: La température augmente.
: La température reste constante.
: La température baisse.
Prévisions météorologiques et indice vestimentaire :
Les prévisions météorologiques indiquent les conditions météorologiques pour les 12 prochaines heures en
fonction des variations passées et actuelles de la pression atmosphérique. L'appareil propose six types
d'affichage météo. Les prévisions sont mises à jour toutes les 6 heures.
Voir l'image ci-dessous pour plus de détails sur les icônes :
43
Manuel Milo
44
Manuel Milo
Récompenses Smart Weather Boy
La fonctionnalité « Smart Weather Boy » propose un système de récompense simple basé sur
l'assortiment quotidien de la tenue. Si la tenue est adaptée aux conditions météorologiques, une icône «
J'aime » s'affiche à l'écran en guise de retour positif.
Pour ajouter un « J'aime », appuyez brièvement sur le bouton « Haut » en mode de fonctionnement normal.
Un seul « J'aime » peut être ajouté par jour. Les « J'aime » seront automatiquement effacés après 5 « J'aime
».
Pour supprimer un « J'aime », maintenez le bouton « Bas » enfoncé pendant 5 secondes en mode de
fonctionnement normal.
Rétroéclairage
Appuyez sur le bouton « ». Le rétroéclairage restera allumé pendant 10
secondes.
Batterie faible :
Lorsque l'icône « in » affiche le symbole de batterie faible « », remplacez les piles de la station météo
dès que possible.
Lorsque l'icône « out » affiche le symbole de batterie faible « », remplacez les piles du capteur sans fil
correspondant en fonction du canal affiché.
Instructions de montage (capteur sans fil)
Option 1 :
Vissez les vis de fixation au mur.
Accrochez le capteur sans fil à la vis.
Option 2 :
Insérez les vis dans les trous de fixation du capteur et fixez-le directement au mur.
Serrez les vis jusqu'à ce qu'elles soient bien fixées (ne serrez pas trop).
Conseils d'installation :
Installez le capteur sur un mur orienté au nord ou dans un endroit ombragé pour éviter l'exposition
directe au soleil.
Évitez de le placer en plein soleil, car cela pourrait entraîner des relevés de température plus élevés.
45
Manuel Milo
Il est recommandé de le monter sous un avant-toit ou sur une balustrade couverte.
Assurez-vous que le capteur est installé à la verticale pour permettre une bonne ventilation et l'é
vacuation de l'humidité.
46
Manuale di Milo
Manuale d'uso di Milo
47
Manuale di Milo
Caratteristiche:
Calendario perpetuo fino al 2099
Giorno della settimana selezionabile dall'utente in 15 lingue: inglese, tedesco, francese, spagnolo, italiano,
olandese, danese, portoghese, norvegese, svedese, polacco, finlandese, ceco, ungherese e slovacco
Ora in formato 12/24 ore opzionale
Funzione sveglia e snooze
Temperatura:
— Intervalli di misurazione della temperatura interna: da -10 °C (14 °F) a 50 °C (122 °F)
— Intervalli di misurazione della temperatura esterna: da -40 °C (-40 °F) a 70 °C (158 °F)
— Temperatura visualizzabile in °C o °F.
Visualizzazione dell'indice di comfort interno e dell'indice di percepizione esterna
Il rischio di muffa in ambienti interni, l'indice di calore esterno e la temperatura del punto di rugiada vengono
visualizzati sull'interruttore INDEX.
Sensore esterno wireless :
— Montaggio a parete o supporto da tavolo
— Frequenza di trasmissione RF 433,92 MHz
— Portata di trasmissione di 60 metri in area aperta
— È possibile collegare fino a 3 sensori esterni wireless. (Un sensore esterno wireless incluso)
Funzione di previsioni meteorologiche e consigli sull'abbigliamento
Alimentazione:
Stazione meteorologica: Batteria: 2 x LR03 AAA
Sensore remoto wireless: Batterie: 2 x LR6 AA
Nota:
Il sensore remoto wireless funziona a temperature comprese tra -30 °C e +70 °C. Scegliere le batterie
appropriate in base alla temperatura limite del sensore wireless:
Le batterie alcaline allo zinco-manganese funzionano a temperature comprese tra -20 °C e +60 °C
Le batterie ricaricabili agli ioni di litio polimerico funzionano a temperature comprese tra -40 °C e +70 °C.
48
Manuale di Milo
Aspetto della stazione meteorologica
Parte A - LCD positivo
A1: Previsioni meteorologiche
A2: Consigli sull'abbigliamento
A3: Premi per i bambini che seguono le previsioni del tempo
A4: Temperatura esterna
A5: Temperatura interna
A6: Calendario
A7: Icona di attivazione/disattivazione della sveglia
A8: Ora
Parte B – Pulsante Indietro e accensione
B1: Campo tattile “ ”
B2: Foro per appendere
B3: Pulsanti di funzionamento
B4: Vano batterie
B5: telaio di supporto (integrato nel coperchio della batteria)
49
Manuale di Milo
Parte C – Sensori wireless
C1: Foro di sospensione
C2: display LCD
C3: Indicatore LED
C4: Griglia di rilevamento temperatura | umidità
C5: Vano batterie
C6: Pulsante di trasmissione manuale del
segnale “TX”
C7: Pulsante di conversione dell'unità di misura
della temperatura “°C/°F”
Messa in funzione iniziale:
Aprire il coperchio del vano batterie della stazione e inserire 2 batterie AAA, assicurandosi che la polarità
sia corretta ([+] e [-]).
Una volta accesa, tutte le icone sullo schermo LCD si illumineranno per 3 secondi e si sentirà un segnale
acustico. Allo stesso tempo, l'area di visualizzazione dell'icona "in" (interno) mostrerà il valore della
temperatura.
50
Manuale di Milo
La stazione meteorologica inizierà ora a stabilire una connessione con il sensore remoto esterno. Questo
processo richiederà circa 3 minuti; durante questo periodo, il simbolo dell'antenna nell'area "out" lampeggerà.
Ora, aprire il coperchio del vano batterie del sensore. Utilizzare l'interruttore di selezione in posizione C6
per selezionare il canale desiderato, quindi inserire 2 batterie AA seguendo i segni di polarità.
Quando il sensore wireless viene inserito nella batteria, tutte le icone sul display LCD si accenderanno
brevemente per 3 secondi e rileveranno la temperatura e l'umidità del sensore; contemporaneamente, le luci
LED lampeggeranno una volta e i sensori wireless trasmetteranno automaticamente i segnali wireless.
Quando il sensore wireless è attivato, la stazione meteorologica riceverà automaticamente il suo segnale
wireless. Quando viene ricevuto un segnale valido, il valore di temperatura corrispondente verrà visualizzato
nell'area della sezione "out".
Impostazione manuale dell'ora:
Tenere premuto il pulsante "SET" dell' e per più di 2 secondi per accedere al menu di impostazione.
Impostare innanzitutto l'unità di misura della temperatura in "°C" o "°F". Ora utilizzare i pulsanti "UP" e
"DOWN" per impostare la temperatura; l'unità di misura può essere impostata su "°C" o "°F".
Utilizzare i pulsanti UP / DOWN per regolare ciascuna impostazione, quindi premere SET per confermare e
passare alla voce successiva.
Le impostazioni vengono regolate nel seguente ordine:
Unità di misura della temperatura – Selezionare °C o °F
Formato ora – Selezionare visualizzazione 12 ore o 24 ore
Ora – Imposta l'ora corrente
Minuti – Imposta i minuti correnti
Anno – Imposta l'anno corrente
Mese – Imposta il mese corrente
Data – Imposta la data corrente
Lingua – Seleziona la lingua di visualizzazione per il giorno della settimana e il mese
Condizioni meteo iniziali – Seleziona le condizioni meteo attuali
Dopo aver completato tutte le impostazioni, premere SET per confermare e uscire. Il dispositivo tornerà
alla modalità orologio.
Nota: sono disponibili 15 lingue per i giorni della settimana: inglese, tedesco, francese, italiano, spagnolo,
portoghese, olandese, danese, norvegese, svedese, polacco, finlandese, ceco, ungherese e slovacco
Visualizzazione della lingua della settimana
51
Manuale di Milo
Lingua
Domenica
Lunedì
Martedì
Mercoledì
Giovedì
Venerdì
Sabato
ENGLISH
MONDAY
TUESDAY
WEDNESDAY
THURSDAY
FRIDAY
SATURDAY
SUNDAY
ENG
MON
TUE
WED
THU
FRI
SAT
SUN
GERMAN
MONTAG
DIENSTAG
MITTWOCH
DONNERSTAG
FREITAG
SAMSTAG
SONNTAG
GER
MON
DIE
MIT
DON
FRE
SAM
SON
FRENCH
LUNDI
MARDI
MERCREDI
JEUDI
VENDREDI
SAMEDI
DIMANCHE
FRE
LUN
MAR
MER
JEU
VEN
SAM
DIM
ITALIAN
LUNEDI
MARTEDÌ
MERCOLEDÌ
GIOVEDI
VENERDÌ
SABATO
DOMENICA
ITA
LUN
MAR
MER
GIO
VEN
SAB
DOM
SPANISH
LUNES
MARTES
MIERCOLES
JUEVES
VIERNES
SABADO
DOMINGO
SPA
LUN
MAR
MIE
JUE
VIE
SAB
DOM
PORTUGUESE
SEGUNDA-FEIRA
TERÇA
QUARTA-FEIRA
QUINTA-FEIRA
SEXTA-FEIRA
SABADO
DOMINGO
POR
SEG
TER
QUA
QUI
SEX
SAB
DOM
DUTCH
MAANDAG
DINSDAG
WOENSDAG
DONDERDAG
VRIJDAG
ZATERDAG
ZONDAG
DUT
MAA
DIN
WOE
DON
VRI
ZAT
ZON
DANISH
MANDAG
TIRSDAG
ONSDAG
TORSDAG
FREDAG
LØRDAG
SØNDAG
DAN
MAN
TIR
ONS
TOR
FRE
LOR
SON
NORWEGIAN
MANDAG
TIRSDAG
ONSDAG
TORSDAG
FREDAG
LØRDAG
SØNDAG
NOR
MAN
TIR
ONS
TOR
FRE
LOR
SON
SWEDISH
MÅNDAG
TISDAG
ONSDAG
TORSDAG
FREDAG
LÖRDAG
SÖNDAG
SWE
MAN
TIS
ONS
TOR
FRE
LOR
SON
POLISH
PONIEDZIAŁEK
WTOREK
ŚRODA
CZWARTEK
PIĄTEK
SOBOTA
NIEDZIELA
POL
PON
WTO
SRO
CZW
PIA
SOB
NIE
FINNISH
MAANANTAI
TIISTAI
KESKIVIIKKO
TORSTAI
PERJANTAI
LAUANTAI
SUNNUNTAI
FIN
MAN
TII
KIS
TOR
PER
LAU
SUN
CZECH
PONDĚLÍ
ÚTERÝ
STŘEDA
ČTVRTEK
PÁTEK
SOBOTA
NEDĚLE
CZE
PON
UTE
STR
CTV
PAT
SOB
NED
HUNGARIAN
HÉTFŐ
KEDD
SZERDA
CSÜTÖRTÖK
PÉNTEK
SZOMBAT
VASÁRNAP
HUN
HET
KED
SZE
CSU
PEN
SZO
VAS
Slovakia
Pondelok
utorok
Streda
Štvrtok
piatok
sobota
nedeľa
SVK
PON
UTO
STR
STV
PIA
SOB
NED
52
Manuale di Milo
Nota:
Se non viene premuto alcun pulsante per 15 secondi, il dispositivo uscirà automaticamente dalla modalità
di impostazione e tornerà alla modalità orologio normale.
Durante la regolazione dell'ora, i secondi si azzerano a 00 una volta modificato il valore dei minuti.
È possibile tenere premuti i pulsanti SU / GIÙ per regolare rapidamente i valori.
Quando si utilizza la stazione meteorologica per la prima volta, la visualizzazione meteorologica predefinita
potrebbe non corrispondere alle condizioni attuali. È possibile impostare manualmente le condizioni
meteorologiche iniziali in modo che riflettano l'ambiente locale.
Impostazione delle sveglie giornaliere:
Tenere premuto il pulsante ALARM per più di 2 secondi per accedere alla modalità di impostazione della
sveglia.
Utilizzare i pulsanti SU / GIÙ per regolare ciascuna impostazione, quindi premere ALARM per confermare e
passare alla voce successiva:
Ora – Imposta l'ora della sveglia
Minuti – Imposta i minuti della sveglia
Dopo aver completato le impostazioni, premere ALARM per confermare e uscire.
Nota:
Se non viene premuto alcun pulsante per 15 secondi, il dispositivo uscirà automaticamente dalla modalità
di impostazione e tornerà alla normale modalità orologio.
Sveglia ON / OFF
In modalità standard, premere brevemente il pulsante “ALARM” per attivare la funzione sveglia; il simbolo
della sveglia “ ” rimarrà visualizzato. Se la sveglia è disattivata, accanto al simbolo della sveglia “ ”
verrà visualizzato “OFF”.
Disattivazione del segnale di sveglia
Premere un pulsante qualsiasi tranne il pulsante “ ” per interrompere il segnale di sveglia. La
sveglia rimarrà attiva e suonerà nuovamente all’ora programmata successiva.
Nota:
53
Manuale di Milo
Se non viene premuto alcun pulsante, la sveglia suonerà per 1 minuto e poi si spegnerà automaticamente.
La sveglia si ripeterà dopo 24 ore.
La sveglia utilizza un tono in crescendo, con un aumento di volume in 4 fasi durante la durata di 1 minuto.
Funzione snooze:
Quando scatta la sveglia, premere il pulsante “ ” per spegnerla e attivare la modalità snooze. La
sveglia suonerà nuovamente dopo l’intervallo di snooze.
In modalità snooze, premere qualsiasi pulsante tranne il pulsante “ ” oppure toccare e tenere
premuto il pulsante “ ” per uscire dalla modalità snooze.
Nota:
Il tempo di snooze è fissato a 5 minuti.
Rilevamento della temperatura:
Intervallo di temperatura interna: da -10 °C (+14 °F) a +50 °C (+122 °F); se il valore è inferiore a -10 °C
(+14 °F) verrà visualizzato LL.L °C(°F), mentre se il valore è superiore a +50 °C (+122 °F) verrà visualizzato
HH.H °C(°F).
Intervallo di temperatura esterna: da -40 °C (-40 °F) a +70 °C (+158 °F); se il valore è inferiore a -40 °C
(-40 °F) verrà visualizzato LL.L °C(°F), se il valore è superiore a +70 °C (+158 °F) verrà visualizzato
HH.H °C(°F).
Trasmissione del sensore wireless:
Quando la stazione meteorologica riceve correttamente un segnale dal sensore wireless, la temperatura
esterna verrà visualizzata nell'area di visualizzazione "out".
Se non viene ricevuto alcun segnale (il display "OUT" mostra "--"), tenere premuti contemporaneamente i
pulsanti "su" e "giù" per 3 secondi per avviare la ricezione manuale del segnale. L'icona "out" visualizzerà
un'animazione del simbolo dell'antenna a radiofrequenza e la stazione meteorologica riprenderà a ricevere il
segnale wireless dal sensore esterno.
Visualizzazione dell'andamento della temperatura
È possibile visualizzare le seguenti indicazioni:
: La temperatura sta aumentando.
: La temperatura rimane costante.
54
Manuale di Milo
: La temperatura sta diminuendo.
Previsioni meteorologiche e indice di abbigliamento:
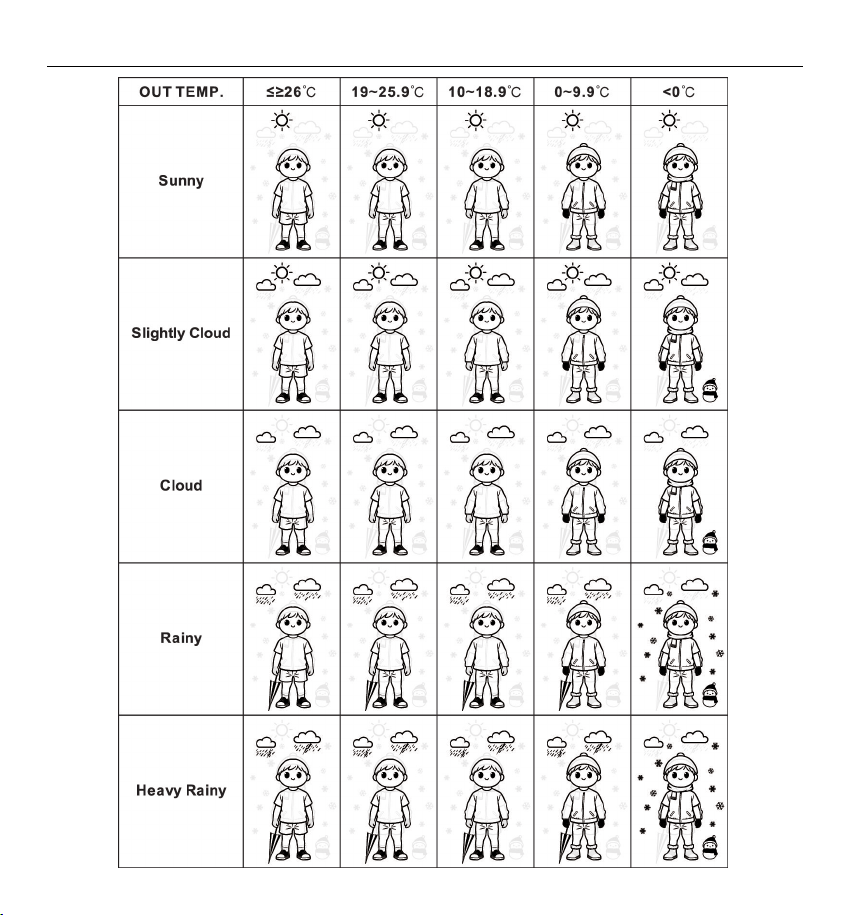
Le previsioni meteorologiche indicano le condizioni del tempo per le prossime 12 ore in base alle variazioni
della pressione atmosferica passate e attuali. Il dispositivo offre sei tipi di visualizzazione delle condizioni
meteorologiche. Le previsioni vengono aggiornate ogni 6 ore.
Vedi l'immagine qui sotto per i dettagli sulle icone:
55
Manuale di Milo
56
Manuale di Milo
Premi Smart Weather Boy
La funzione Smart Weather Boy offre un semplice sistema di ricompense basato sull'abbinamento
quotidiano dell'abbigliamento. Se l'abbigliamento è in linea con le condizioni meteorologiche, sullo schermo
apparirà l'icona "Mi piace" come feedback positivo.
Per aggiungere un "Mi piace", premere e rilasciare il pulsante "Su" in modalità di funzionamento normale. È
possibile aggiungere un solo "Mi piace" al giorno. I "Mi piace" verranno automaticamente cancellati dopo aver
raggiunto il limite di 5.
Per rimuovere un "Mi piace", tenere premuto il pulsante "Giù" per 5 secondi in modalità di funzionamento
normale.
Illuminazione dello schermo
Toccare il pulsante " ". La retroilluminazione rimarrà accesa per 10 secondi.
Batteria scarica:
Quando l'icona "in" mostra il simbolo di batteria scarica " ", sostituire le batterie della stazione
meteorologica il prima possibile.
Quando l'icona "out" mostra il simbolo di batteria scarica " ", sostituire le batterie del sensore wireless
corrispondente in base al canale visualizzato.
Istruzioni di montaggio (sensore wireless)
Opzione 1:
Fissare le viti di montaggio alla parete.
Appendere il sensore wireless alla vite.
Opzione 2:
Inserire le viti nei fori di montaggio presenti sul sensore e fissarlo direttamente alla parete.
Serrare le viti fino a quando non sono ben salde (non serrare eccessivamente).
Suggerimenti per l'installazione:
Installare il sensore su una parete esposta a nord o in una zona ombreggiata per evitare l'esposizione
diretta alla luce solare.
Evitare di posizionarlo alla luce diretta del sole, poiché ciò potrebbe causare letture di temperatura più
elevate.
57
Manuale di Milo
Si consiglia il montaggio sotto la grondaia o su una ringhiera coperta.
Assicurarsi che il sensore sia installato in verticale per consentire una corretta ventilazione e il drenaggio
dell'umidità.
58
Manuale di Milo
SAIN3 LLC
251 Little Falls Drive Wilmington, New Castle, DE, 19808
www.iraddy.com
support@iraddy.com
59