UV6 Manual
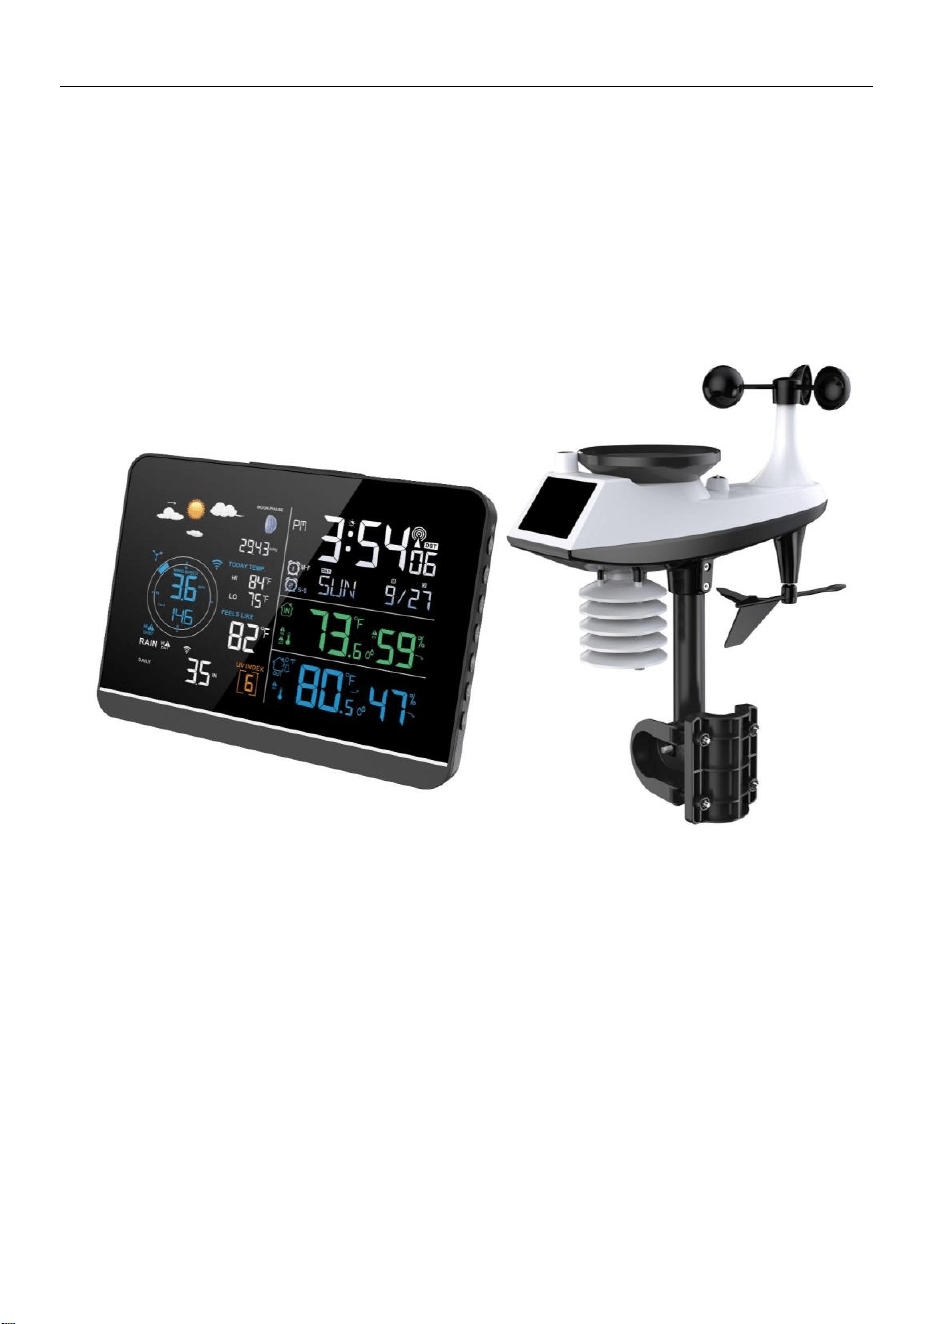
PROFESSIONAL WEATHER STATION

UV6 Manual
Features:
WWVB Radio control time function
Perpetual calendar up to year 2099
Day of week in 3 languages user selectable: English, French and Spanish
Two daily alarms
Automatic snooze function (OFF or 5~60min)
Moon phases
Temperature:
— Maximum range of indoor temperature detection display: 14.1°F (-9.9°C) to 122°F (50°C)
— Maximum range of outdoor temperature detection display: -40°F (-40°C) to 158°F (70°C)
— Maximum range of feels like temperature detection display: -40°F (-40°C) to 158°F (70°C)
Humidity:
— Maximum range of indoor and outdoor humidity detection display: 1% to 99%
— Level 5 indoor and outdoor comfort display - data source temperature and humidity
Air pressure:
— Maximum range of atmospheric pressure measurement display:
17.72 to 32.48 inHg (600 to 1100 hPa or 450 to 825.1 mmHg)
Rain
— Maximum range displayed for rainfall measurement: 0 to 393.6 inches (0 to 9999mm)
Wind
— Maximum range displayed for wind speed measurement: 0 to 111 mph (0 to 180 km/h, 0 to 50m/s)
— Maximum range displayed for wind direction measurement: 0 to 359 degrees
Light and UV index
— Maximum range of light intensity measurement display: 0 to 11.9 kfc (0 to 128 klux)
— Maximum range of UV index measurement display: 0 to 15 level
— Level 5 UVI sun exposure level indication
Wireless outdoor sensor:
— 433.92MHz RF transmitting frequency
— 300 feet (100 meters) transmission range in an open area, not including walls or floors.
—Up to 4 wireless outdoor sensors can be connected. (A maximum of one multi -combined wireless remote
control sensor and three temperature | Wet wireless remote control sensor)
Record of temperature, humidity, wind speed and rainfall
The weather forecasting function
Level 4 display backlight
Power Supply:
Weather station:
Equipment power input: DC 5V more than 1A (Power cord or power adapter)
F.Y.I.:
The main unit of the weather station can operate at temperatures ranging from 32°F to 122°F. If the function
exceeds the range, it may cause abnormalities. Please use it in this environment.
The wireless remote sensor can work at -22°F to 158°F. Please choose the right battery according to the limit
temperature of the wireless sensor:
Alkaline zinc manganese battery can work at -4°F to 140°F
Polymer lithium ion rechargeable battery can work at -40°F to +158°F
2
UV6 Manual
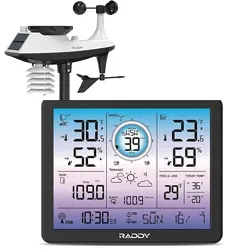
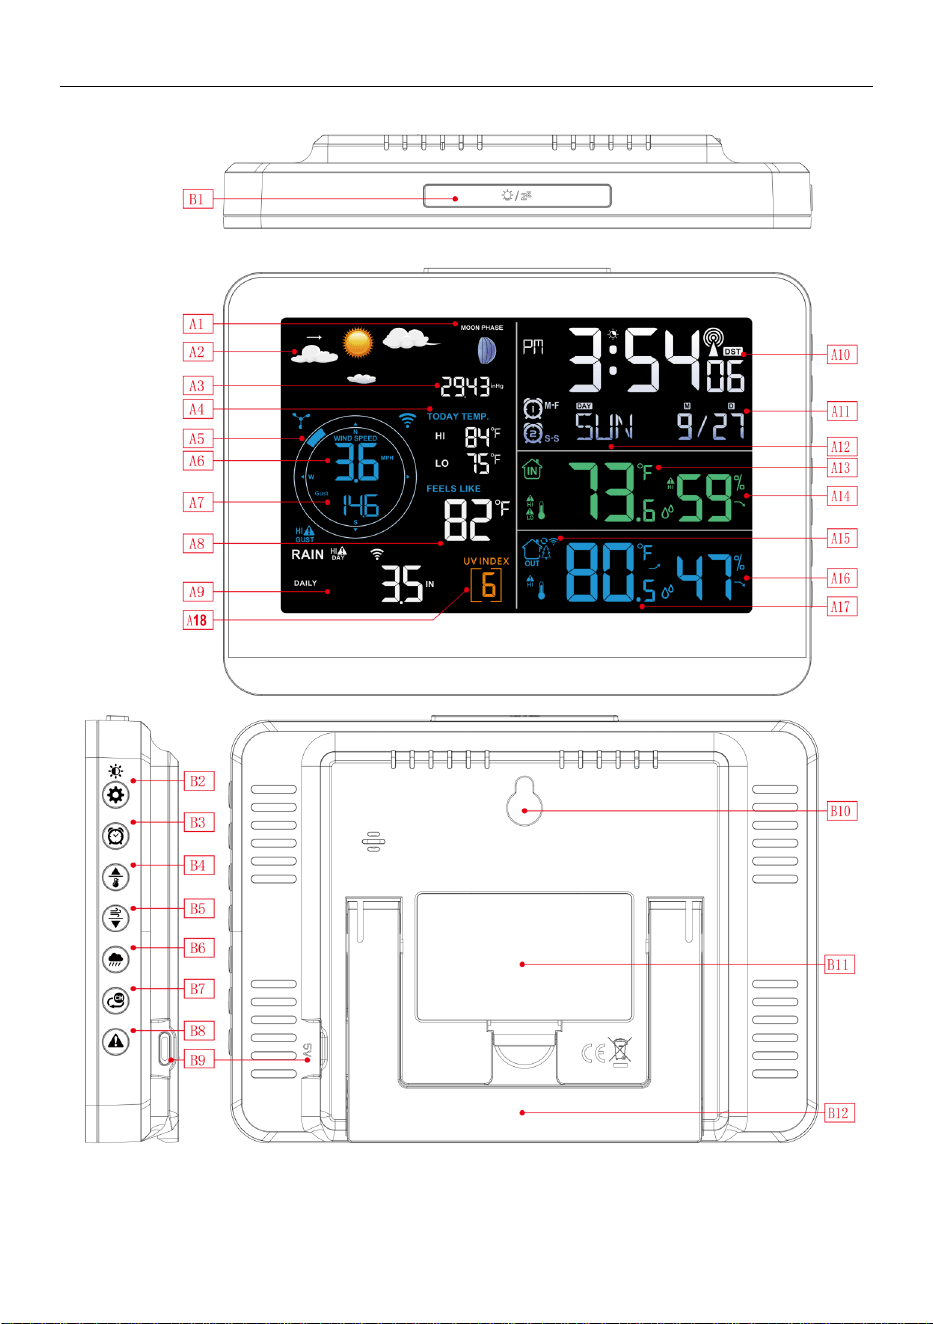
Weather Station Appearance
3
UV6 Manual
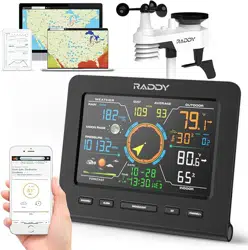
Part A-Positive LCD
A1: Moon phases
A2: Weather forecast
A3: Air pressure
A4: Today's highest and lowest temperature record
A5: Wind direction steering wheel
A6: Wind speed
A7: Wind direction or gusts or average wind speed
A8: Feels like temperature
A9: Rainfall or light intensity(switch display)
A10: Time
A11: Calendar
A12: Day of the week
A13: Indoor temperature
A14: Indoor humidity
A15: Outdoor wireless channel
A16: Outdoor humidity
A17: Outdoor temperature
A18: UV index
Part B –Buttons and Exterior
B1: “ ” Snooze/Light touch location
B7: “ ” Channel switching button
B2: “ / ” Set and brightness button
B8: “ ” Alert button
B3: “ ” Alarm button
B9: Power supply socket –TYPE-C
B4: “ ” Up and memory button
B10: Hanging hole
B5: “ ” Down and wind button
B11: Battery compartment
B6: “ ” Rain button
B12: Support frame
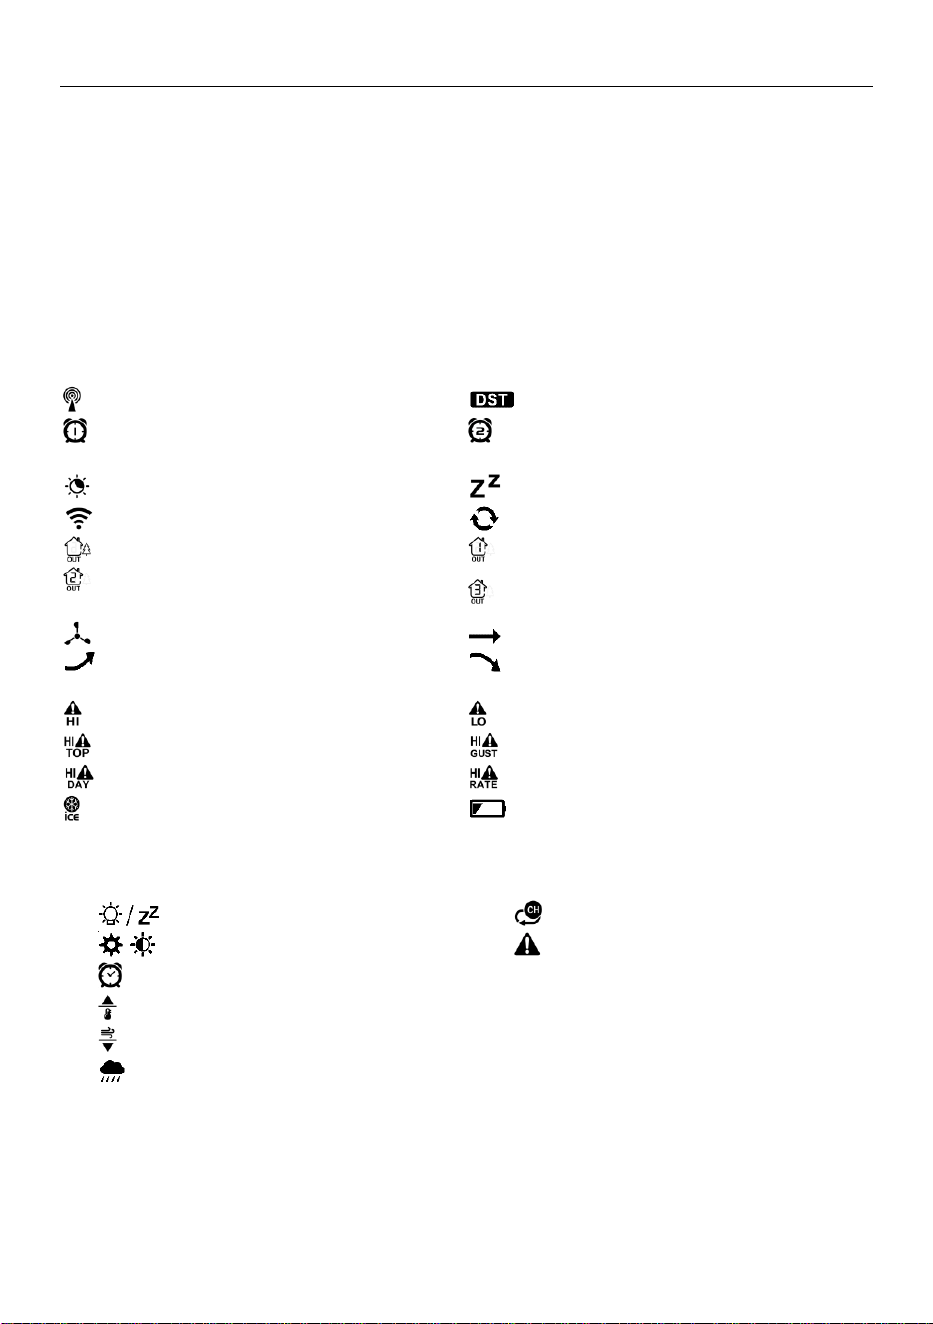
RCC signal Icon
Summer time icon
Alarm 1 icon
Alarm 2 icon
M-F Monday-Friday repeat alarm icon
S-S Saturday-Sunday repeat alarm icon
Backlight night mode icon
Alarm snooze icon
Wireless receiving icon
Wireless channel loop icon
Multi-combination wireless sensor icon
Temperature | humidity wireless sensor CH1 icon
Temperature | humidity wireless sensor CH2
icon
Temperature | humidity wireless sensor CH3 icon
Wind icon
Pressure constant trend arrow
Temperature | humidity | Pressure up trend
arrow
Temperature | humidity | Pressure down trend
arrow
High temperature | humidity alert icon
Low temperature | humidity alert icon
Top wind speed alert icon
Top gust speed alert icon
Daily rainfall alert icon
Daily rainfall rate alert icon
Frost Police icon
Battery low pressure icon
4
UV6 Manual
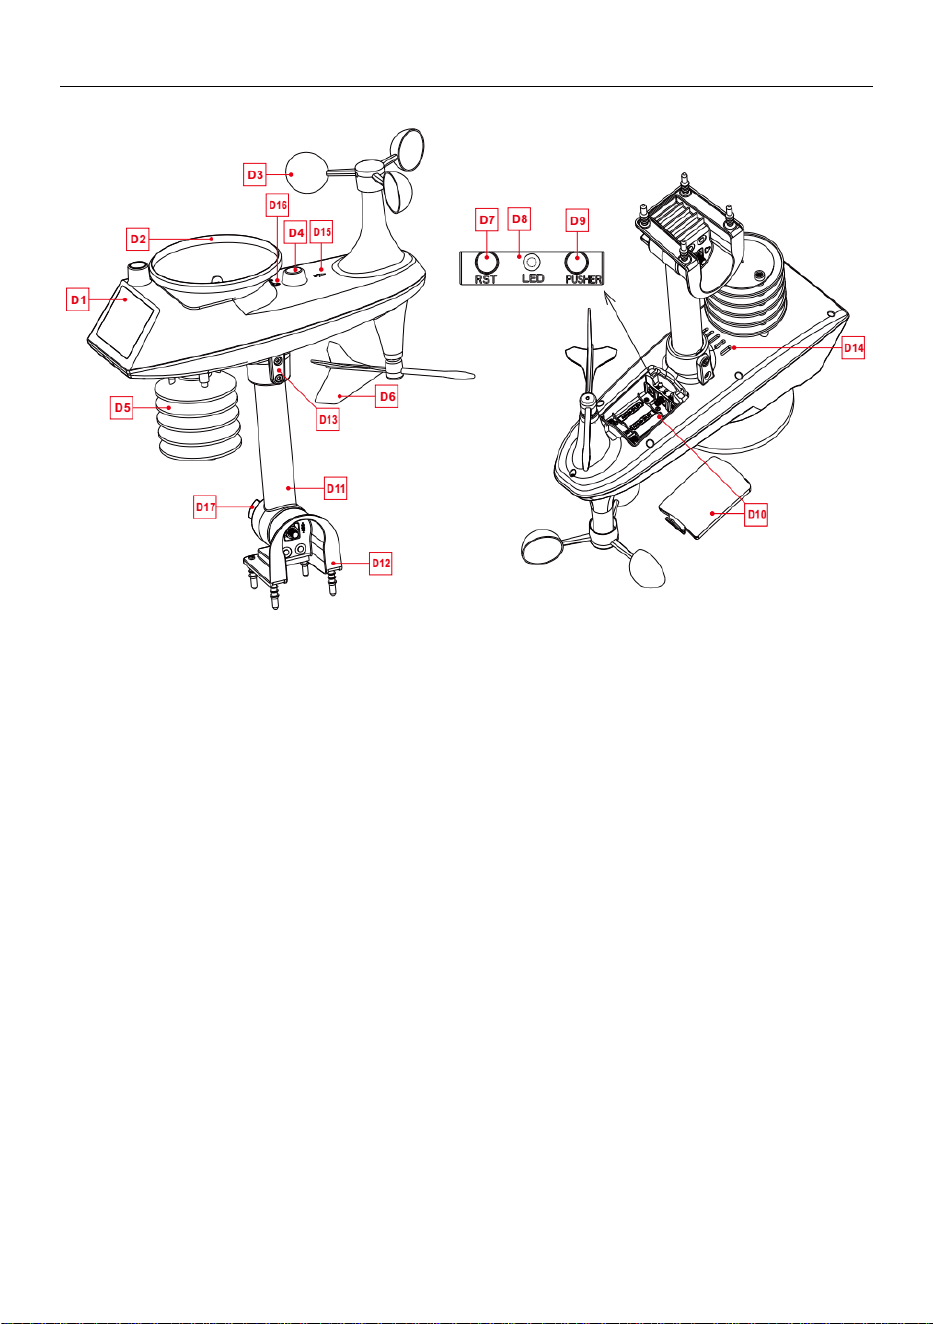
Multi-combination Wireless Remote Sensor Appearance
Part D –Exterior
D1: Solar panel
D2: Rain funnel
D3: Wind cups
D4: Bubble level
D5: Temperature | humidity induction box
D6: Wind directional vane
D7: Reset button
D8: LED indicator
D9: Manual transmit signal button
D10: Battery compartment
D11: Support rod
D12: Fixed base
D13: Socket head cap screws
D14: Drain vents for rain sensor
D15: North direction mark
D16: Rain funnel rotation mark
D17: Large nut for fixing the support rod and the
base
5
UV6 Manual
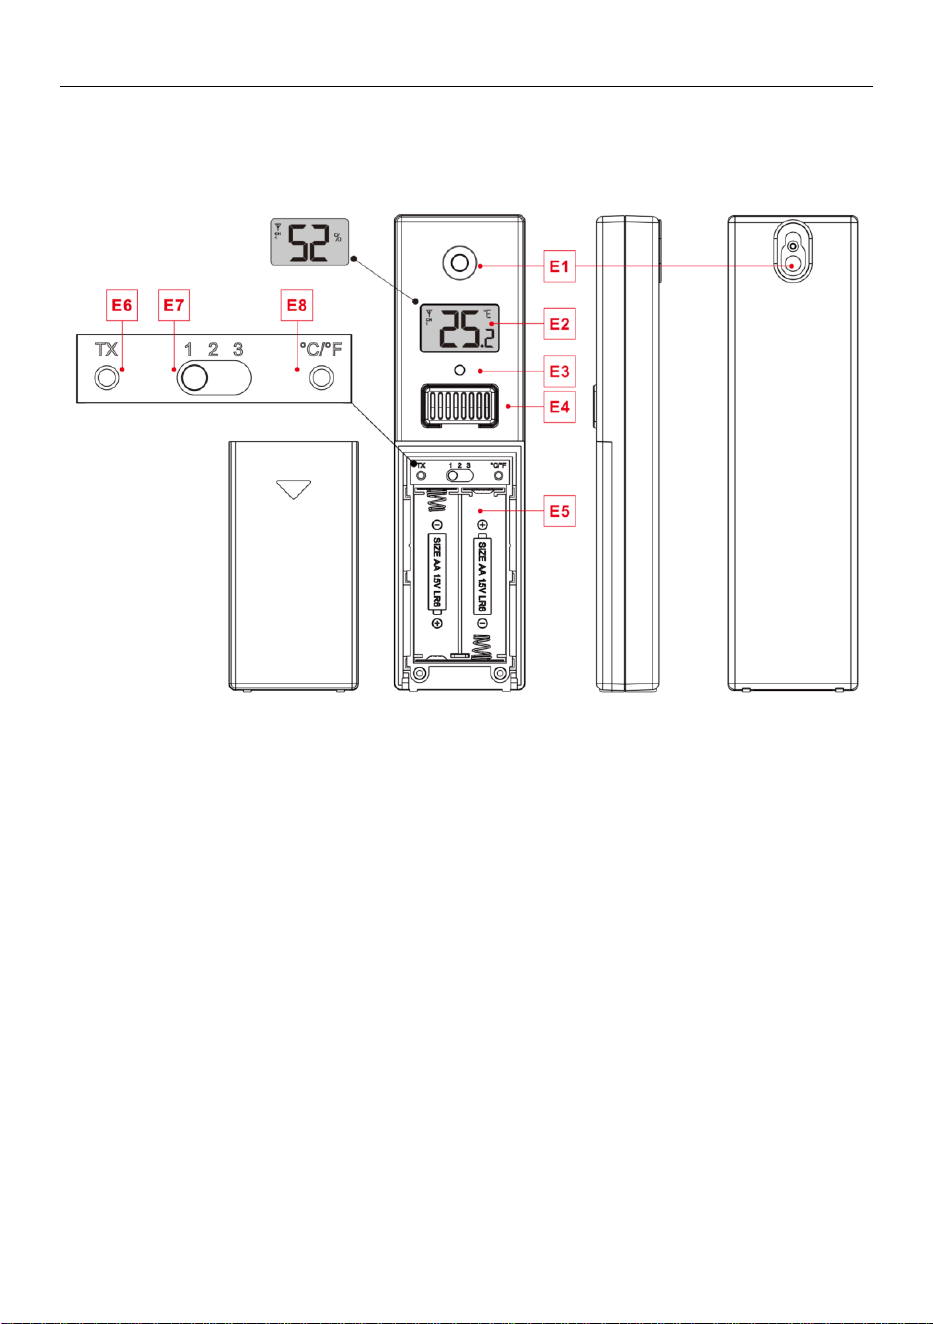
Temperature | Humidity Wireless Remote Sensor Appearance
(This sensor is not configured, please purchase separately if
needed)
Part E –Exterior
E1: Hanging hole
E2: LCD display
E3: LED indicator
E4: Temperature | Humidity sensing louver
E5: Battery compartment
E6: Manual transmit signal button “TX”
E7: “CHANNEL 1 or 2 or 3” switch
E8: Reset button
6
UV6 Manual
Setup Preparation
Items you will need to setup your station (not included):
1. Crosshead screwdriver and hex driver for assembly.
For best results:
• Remove weather station and sensors from the package and place together on a table or bench, within easy
reach.
• Place batteries and screwdriver within reach of setup location.
• Keep sensors and weather station 0.15-0.3 meter or 5-10 feet for at least 15 minutes after installing batteries,
to allow the sensors and station to connect repeatedly.
Quick Setup
1. Insert 3 AA batteries into the multi-combination wireless remote sensor
2. Insert 3-AA battery into the temperature | humidity wireless remote sensor
3. Then plug the power cord into the weather station
4. Configure basic settings. Set time, date, unit, etc.
5. Insert 2 AA batteries into the weather station (when the power adapter is unexpectedly powered off, the
settings will not be lost)
6. Move the remote sensor to outdoor or other location after 5 minutes
7. Move the weather station to the appropriate location, with a minimum distance of 2.5 meters from all
sources of interference, such as a television or computer monitor, radio reception is weaker in rooms with
concrete walls (e.g.: in cellars) and in offices. In such extreme circumstances, place the weather station close to
the window.
Note: The weather station has a radio control clock calibration time function. After power-on and searching the
wireless sensor for 3 minutes or all channels successfully search for the wireless sensor, the weather station will
automatically enter the radio control clock timing mode. If you need to set the time and unit manually, you
need to press and hold the “ ” button to exit the radio time mode, and then continue to the next step.
Wireless Sensor Connection
The weather station can connect up to 1 Multi-combination wireless sensor and 3 different wireless sensors
(If you need this remote single temperature and humidity sensor, please purchase separately).
The weather station automatically searches for all wireless sensors within 3 minutes of power-on and
registers the sensor IDs. Each sensor generates a random ID after power-on to distinguish the sensors.
In the main display interface, press the “ ” button to convert the values of wireless sensors on different
channels in the OUT temperature and humidity column. Press “ ” button once, switch a channel, in order:
OUT | CH1 | CH2 | CH3 | loop mode, when entering the loop mode, the icon “ ” display
Note: In the channel icon, the number of channels is displayed: (representing multiple combination
wireless sensors) | | | (representing three channels of temperature and humidity wireless sensors) |
Loop mode
Note: In the loop mode, the display of the number of channels and temperature and humidity in the OUT
column switches to one channel every 5 seconds, in the order: | | | . If the channel has no signal,
it will automatically skip during the loop.
Note: In the loop mode, only the values of temperature and humidity are being converted, and the values of
wind speed, wind direction, rainfall, etc. are not converted, and the values are still derived from the
Multi-combination wireless sensor.
7
UV6 Manual
Note: When the weather station loses sensor signals or the sensor is not connected to the channel, the value of
the channel is displayed as “—”
If you need to add a new sensor or replace a sensor, press the “ ” button to switch to the corresponding
communication, and then press and hold the “ ” button for more than 3 seconds. The weather station will
search for a signal for 3 minutes again, and the new channel sensor will be added to the weather station within
3 minutes.
Note: When adding a new sensor or replacing a sensor (old sensor replacement battery), you need to turn on
the sensor first, then follow the steps above to control the weather station.
Note: When the channel icon displays the low voltage icon “ ” , the battery of the corresponding channel
wireless sensor is replaced according to the channel number of the channel icon. Then follow the steps above
to re-add the wireless sensor to the weather station.
Radio Control Clock (Abbreviation: RCC) Timing:
After the weather station searches for the wireless sensor after power-on, (up to 3 minutes) will
automatically enter the RCC timing mode. The weather station will automatically search for the RCC signal for 7
minutes, the RCC signal icon will flash and the backlight will automatically turn off.
Note: Enter the RCC signal search mode. Since the RCC signal search requires the device to be in a static
working state as much as possible, the backlight is automatically turned off to prevent signal interference.
Please try not to control the weather station within seven minutes. If you need to exit the search mode of the
RCC signal, press and hold the “ ” button for 3 seconds to exit.
The weather station will automatically perform an RCC signal search at 1:00 / 2:00 / 3:00 every day to correct
any deviation from the precise time. If this sync attempt is unsuccessful (the radio mast icon disappears from
the display), the system will automatically try another sync for the next full hour. This process is automatically
repeated up to 5 times a day.
Note: When the radio wave receiving is turned on, the triangle in the radio wave symbol flickered. When a valid
signal was received, the signal indication of the upper part of the radio wave symbol flickered.
If you need to manually search for RCC signals, press and hold the “ ” button for 3 seconds to enter the
search mode. Again, the longest search is 7 minutes.
Note: The flashing radio mast icon indicates that the RCC signal search is in progress. Continuous display of the
continuously displayed radio mast icon indicates that the successful RCC signal timing is completed and the
calibration time is successful. The icon “DST” indicates that the calibration time is the daylight saving time.
Note: We recommend that the minimum distance placed at all interference sources is 2.5 meters, such as a TV
or computer monitor to prevent the receiving radio wave from being disturbed. Radio receiving is weak in
rooms with concrete walls (eg, in wine cellars) and office rooms. In this extreme situation, the main unit is
placed near the window.
Time and Unit Settings
Press and hold the “ ” button for 3 seconds to enter the time setting mode.
Press the “ ” or “ ” button to adjust the value. Press and hold the “ ” or “ ” button to adjust quickly.
Press the “ ” button to confirm and move to the next item.
Note: Wait for 20 seconds without pressing any buttons, or touch the “ ” position and keep it for 1
second to exit the setting mode.
8
UV6 Manual
Settings order:
1. Temperature unit: °C | °F
2. Pressure unit: hPa| inHg | mmHg
3. Wind speed unit: km/h |mph | m/s
4. Wind degree (angle) or direction (letter) selection
5. Rainfall unit: MM| IN
6. Light unit: Klux | Kfc
6. Radio control clock function: ON |OFF
7. summer time function: ON |OFF
8. Time zone: -2 to +2 hr
9. Hour format: 24Hr | 12Hr
10. Hour
11. minutes
12. Calendar display format: Month/Date | Date/Month
13. Year
14. Month
15. Date
16. Week display language: a total of 15 countries
17.Air pressure setting: absolute or relative
18. Initial weather forecast
Note: Please select the correct time zone according to your region, otherwise the RCC time will be inaccurate:
AST: Altantic Standard Time -4Hr
EST: Eastern Standard Time -5Hr
CST: Central Standard Time -6Hr
MST: Mountain Standard Time -7Hr
PST: Pacific Standard Time -8Hr
AKT: Alaska Standard Time -9Hr
HAT: Hawaii-Aleutian Standard Time -10Hr
Note: Exceeding the NIST radio station in Fort Collins, Colorado, USA, with a diameter of more than 1500 km,
the signal received by the radio clock signal is very poor. It is recommended to set the RCC to OFF.
Note: If you live in an area that observes Daylight Saving Time, DST should be set to ON, even if it is not
currently Daylight Saving Time.
Note: In the set time, the number of minutes of the change, automatically from the zero second forward
Note: There are 3 languages of Weekday: English, French and Spanish.
Week language display
Language
Sunday
Monday
Tuesday
Wednesday
Thursday
Friday
Saturday
ENGLISH
MONDAY
TUESDAY
WEDNESDAY
THURSDAY
FRIDAY
SATURDAY
SUNDAY
ENG
MON
TUE
WED
THU
FRI
SAT
SUN
FRENCH
LUNDI
MARDI
MERCREDI
JEUDI
VENDREDI
SAMEDI
DIMANCHE
FRE
LUN
MAR
MER
JEU
VEN
SAM
DIM
SPANISH
LUNES
MARTES
MIERCOLES
JUEVES
VIERNES
SABADO
DOMINGO
SPA
LUN
MAR
MIE
JUE
VIE
SAB
DOM
9
UV6 Manual
Alarm Function Control
Press the “ ” button, you can view the alarm time, check the order in turn: alarm 1 time | alarm 2 time |
return regular time
In the mode of viewing the alarm 1 time or the alarm 2 time, press the “ ” or “ ” button to turn the alarm
function on or off.
Note: When the function of Alarm 1 or Alarm 2 is turned on, the symbol “ ” or “ ” is displayed. At the same
time, the relevant alarm repeat icon “M-F” | “S-S” is displayed
Note: The APP sets the repetition icon “M-F” | “S-S” not to be displayed on weekdays (Only the “M-F” icon is
displayed), weekends (Only the “S-S” icon is displayed), and weekly (The “M-F” and “S-S” icons are displayed
simultaneously)
Note: Wait for 20 seconds without pressing any buttons, or touch the “ ” position and keep it for 1
second to exit the viewing modes.
Alarm and Snooze Settings
Press and hold the “ ” button for 3 seconds to enter the alarm and snooze setting mode.
Press the “ ” or “ ” button to adjust the value. Press and hold the “ ” or “ ” button to adjust quickly.
Press the “ ” button to confirm and move to the next item.
Note: Wait for 20 seconds without pressing any buttons, or touch the “ ” position and keep it for 1
second to exit the setting modes.
Settings order:
1. Alarm 1 hour
2. Alarm 1 minutes
3. Alarm 1 repeat: M-F | S-S | M-S
4. Alarm 1 snooze time: 5 to 60minutes | OFF
5. Alarm 2 hour
6. Alarm 2 minutes
7. Alarm 2 repeat: M-F | S-S | M-S
8. Alarm 2 snooze time: 5 to 60minutes | OFF
Note: The alarm is repeatedly set to M-F, the alarm function will be activated from Monday to Friday, the
Saturday and Sunday will be invalid. The alarm is repeatedly set to S-S, and the alarm function will be activated
on Saturday and Sunday, and will expire from Monday to Friday. When the alarm is repeatedly set to display
both M-F and S-S, the alarm function will be activated throughout the week.
Note: The snooze time setting range: 5 ~ 60MIN, OFF, when set to OFF, means no snooze function. Snooze time
unit is minutes.
Note: The alarm will sound for 2 minutes if you do not deactivate it by pressing any button. In this case the
alarm will be repeated automatically after 24 hours.
Note: Rising alarm sound (crescendo, duration: 2 minutes) changes the volume 4 times whilst the alarm signal
is heard.
Switching Off the Alarm Signal
The alarm sound when trigger, press any buttons except the “ ” touch button or touch and hold the
“ ” button for more than 3 seconds to stop the alarm signal.
10
UV6 Manual
Snooze Function:
When the time is up to the alarm, touch the “ ” touch button, the alarm signal stops, and enter the
snooze timing mode. At the end of the snooze timer, it will ring again (can repeat snooze)
In snooze timing mode, press any buttons except the “ ” touch button or touch hold down the
“ ” touch button for more than 3 seconds to exit the snooze mode
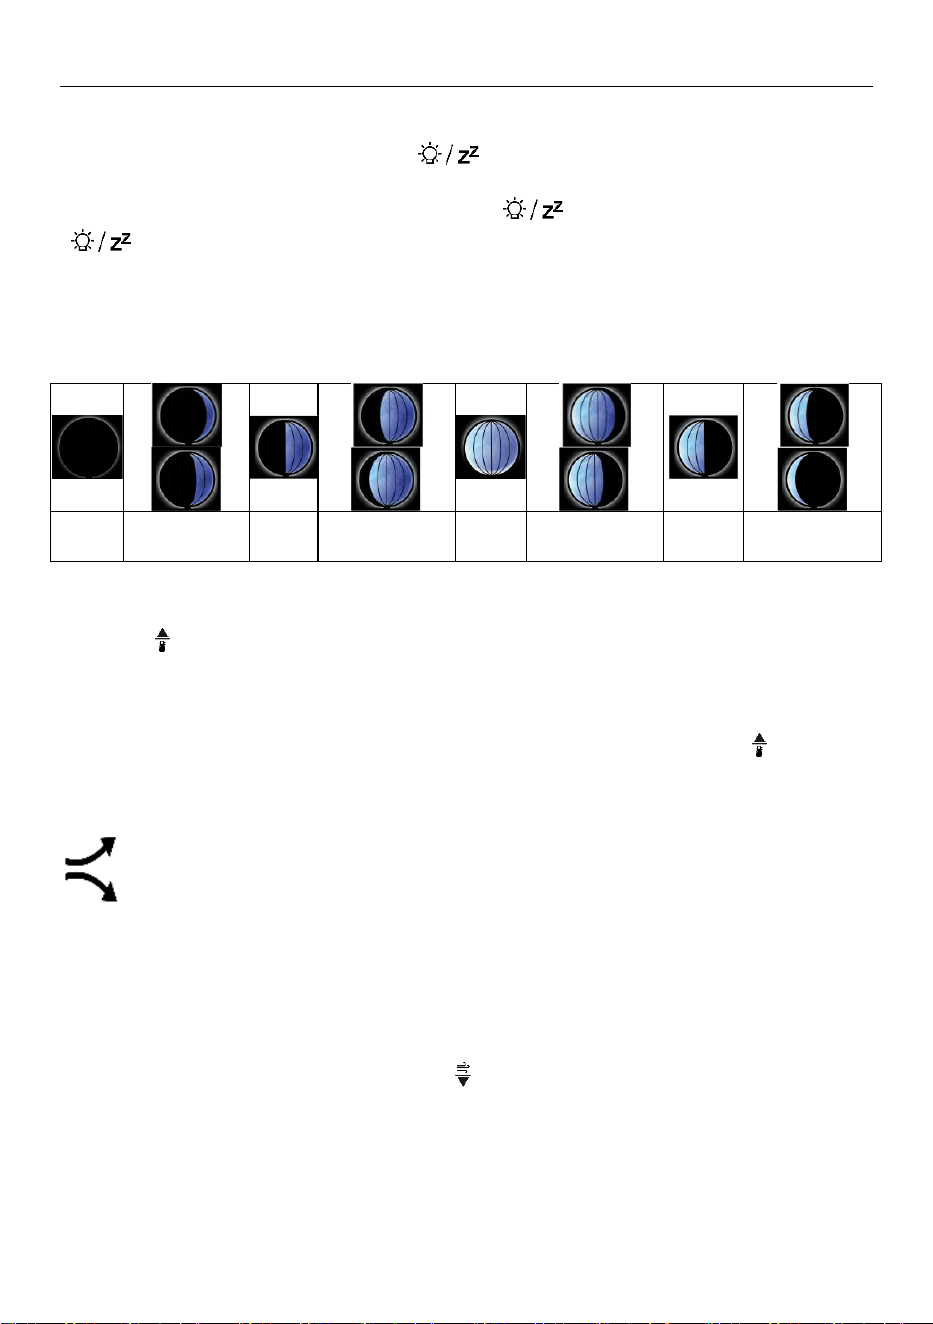
Moon Phases and Tide Indicator:
The moon icon and tide indicator of the weather station will also display 12 different moon phase and 3 kinds
of tide phases according to the set calendar.
New moon
Waxing half-moon
Half-moon
Waxing full
moon
Full
moon
Waning full
moon
Half-moon
Waning half-moon
Temperature | Humidity Reading | Record |Trend
Press the “ ” button to toggle indoor/outdoor maximum, minimum temperature and humidity data:
Once to show the maximum temperature and humidity values.
Twice to sow the minimum temperature and humidity values
Three times to return to the current temperature and humidity levels
To reset the maximum and minimum temperature and humidity, press and hold down the “ ” button for 2
seconds. This will reset all minimum and maximum data recorded to the current displayed values.
Indoor temperature | Humidity and outdoor remote temperature | Humidity | light intensity and feels like
temperature and air pressure will have trend change tips
: The temperature/humidity is rising.
: The temperature/humidity is falling
No display: The temperature/humidity is remaining constant
The temperature of feels like is related to the outdoor temperature, humidity and wind speed detected by
multi-combination wireless remote sensor. The highest minimum temperature on the day was also collected by
multi-combination wireless remote sensor
Wind Readings | History
In the main display interface, press and hold the " " button for 3 seconds to convert the display to wind
direction, gusts, or average wind speed
Note: WIND SPEED: average speed over the past 30 seconds
GUST WIND SPEED: Maximum average wind speed every 3 seconds for 30 seconds
AGE WIND SPEED:10-minute average wind speed
WIND DIRECTION: In letters or degrees
Note: Each operation can only be converted once, and after the conversion is completed, a BI sound prompt
11
UV6 Manual
will sound. To switch again, first release the button and then press and hold it down
View history: Press and release the “ ” button to view the maximum wind and gust history values: 1 Hour
(default) | 24 Hour | 7 Days | Month | Year
Note: One Hour: past 60 minute period (default Top Speed record, already shown)
24 hour: Past 24 hour period, from last record
7 Days: Past 7-day period, from last record
Month: Defned by Calendar Month i.e. January 1 - January 31
Year: Defned by Calendar Year i.e. January 1 - December 31
In the mode of viewing wind speed history, press and hold the “ ” button for 3 seconds to clear all history of
wind speed.
Note: Wind speed reading will reset to current wind speed.
Note: Wait for 20 seconds without pressing any buttons, or touch the “ ” position and keep it for 1
second to exit the viewing modes.
Rain Readings | History
In the main display interface, press and hold the “ ” button for 3 seconds to convert the display to
cumulative value of rainfall or rate of rainfall
Press the “ ” button to view the rain history, in order:
EVENT | HOURLY | DAILY | WEEKLY | MONTHLY | YEARLY | TOTAL | EVENT RATE | DAILY RATE
Note: EVENT: The cumulative value of the current rainfall event. If there is no rain for more than 30 minutes, it
means the end of the current rainfall event
HOURLY: Total rainfall for the current hour
DAILY: Total rainfall for today.
WEEKLY: Total rainfall for the current week
MONTHLY: Total rainfall for the current month
YEARLY: Total rainfall in the current year
TOTAL: The cumulative value of the total run time (no time stamp) since the weather station was started
EVENT RATE: The rainfall event has occurred to the current average rainfall per hour
DAILY RATE: T Today to the current average rainfall per hour
In the rain history mode, press and hold the “ ” button for 3 seconds to clear all history of rain.
Note: The rain reading will reset to 0 mm (in).
Note: Wait for 20 seconds without pressing any buttons, or touch the “ ” position and keep it for 1
second to exit the viewing modes, The weather station will resume normal time display and display the last
rainfall record you viewed. When the rain shows the rain rate before entering the observation mode, it still
shows the rain rate when returning from the observation mode to the normal time display.
Light Intensity Reading
In the main display interface, press and hold the “ ” button for 3 seconds to convert the display to
real-time values of light intensity, Press and hold the button for another 3 seconds to return to the cumulative
reading of rainfall.
Weather Alerts Viewing and Setting
Press the “ ” button to view the weather alerts mode. Press the “ ” button again to confirm and move
12
UV6 Manual
to the next item.
Note: Wait for 20 seconds without pressing any buttons, or touch the “ ” position for 1 second to exit
the view mode.
Note: View Outdoor | REMOTE Temperature | Humidity alert, press the “CH” button to switch to other
channels. (A total of 4 channels: | | | )
In each weather alert view item, press and hold the “ ” or “ ” button to turn the alert on or off.
Note: The weather alert is initially turned off by default, and the display is OFF. When the weather alert is
turned on, it is displayed as ON.
Press and hold the “ ” button for 3 seconds to enter the weather alert setting mode.
Press the “ ” or “ ” button to adjust the value. Press and hold the “ ” or “ ” button to adjust quickly.
Press the “ ” button to confirm and move to the next item.
Note: Wait for 20 seconds without pressing any buttons, or touch the “ ” position and keep it for 1
second to exit the settings.
Note: Set outdoor or remote temperature | humidity alert, press the “ ” button to switch to other channels.
(A total of 4 channels: | | | )
View and settings order:
1. Indoor temperature upper limit alert value
2. Indoor temperature lower limit alert value
3. Indoor humidity upper limit alert value
4. Indoor humidity lower limit alert value
5. Outdoor temperature upper limit alert value
6. Outdoor temperature lower limit alert value
7. Outdoor humidity upper limit alert value
8. Outdoor humidity lower limit alert value
9. Top wind speed upper limit alert value
10. Gust wind speed upper limit alert value
11. Daily rainfall upper limit alert value
12. Daily rainfall rate upper limit alert value
Temperature | Humidity | Wind Speed | Rainfall Alert Trigger
When the actual detection value exceeds the arming warning value, the weather station will sound an alarm
for 1 minute first, and then beep once every 5 minutes.
The corresponding alert icon will flash when alarming.
Press any button to stop the alert sound.
Note: If you want to permanently cancel the alert, enter the weather view mode and switch to the item you
want to cancel, press the “ ” or “ ” button to set to OFF.
Frost Warning
When the multi -combined sensor outdoor temperature (collected by the multi -combined sensor) of the
corresponding remote wireless channel is within the range of - 1°C (+30°F) to +3°C (+37°F), a frost warning will
be triggered, and the frost symbol “ ” will be displayed on the corresponding channel and flash
13
UV6 Manual
Weather Forecast:
The weather station calculates a weather forecast for about the next 12 hours based on the barometric
pressure trend. Of course this forecast can‘t compare to that of professional weather services supported by
satellites and high performance computers, It provides only an approximate indication of the current weather
development in a small local area. Please take the weather forecast from your local weather forecasting service
into account as well as the forecast from your weather station. If there are discrepancies between the
information from your device and from the local weather forecasting service, please take the advice of the
latter as authoritative.
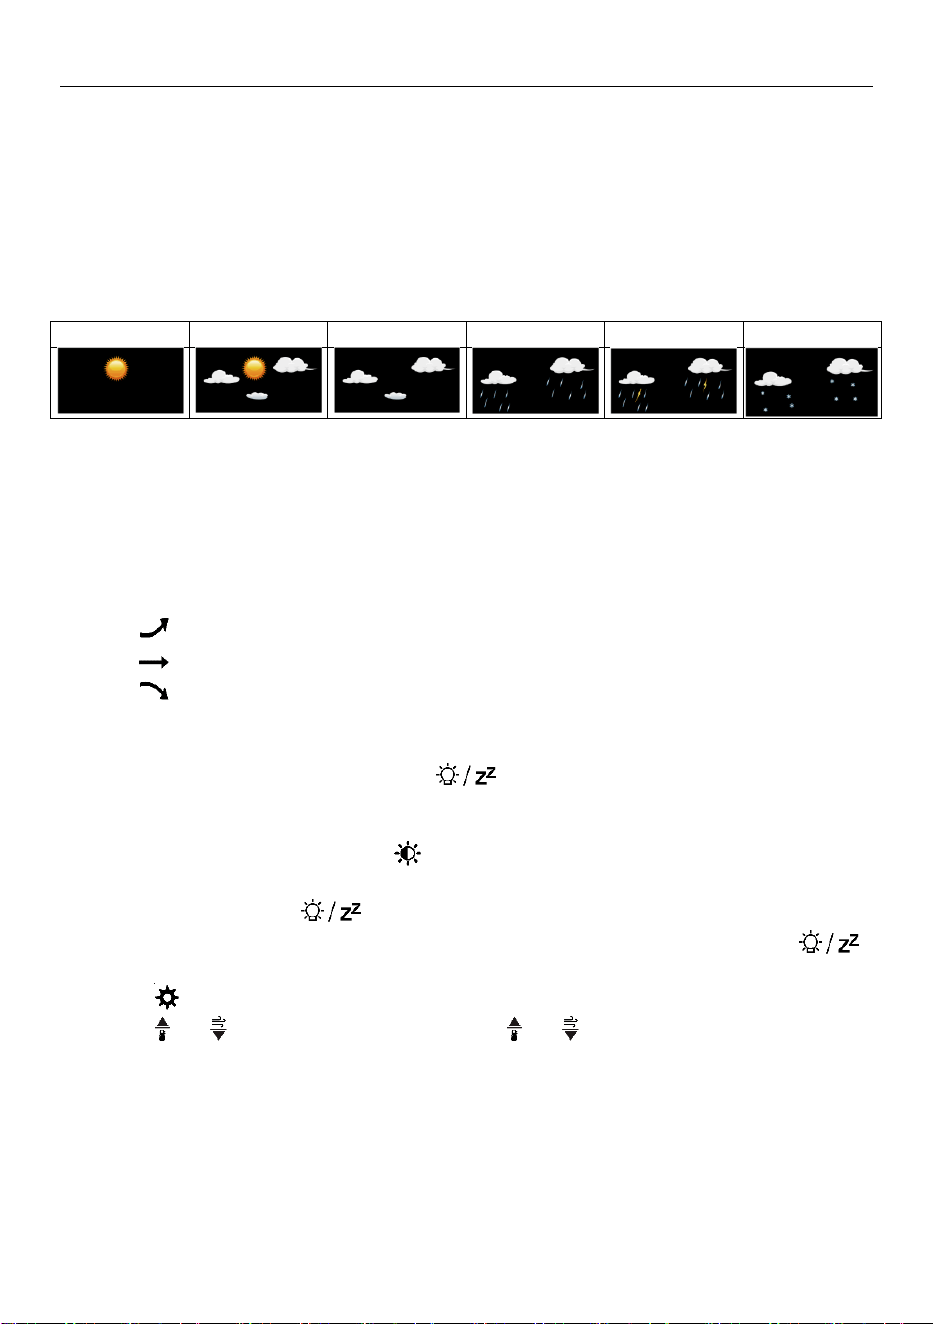
The weather station displays the following weather icon:
sunny
Mostly Cloudy
Cloudy
Rainy
Thunder Rainy
Snow
Note: The snowy icon will only appear if the outdoor temperature (refers to the temperature detected by
multiple combined sensors) is below+25°F (-4°C) and the forecast would be rainy or Thunder Rainy.
After 7-10 days of air pressure calibration, the weather station's forecast will stabilize, achieving an accuracy
rate of 70%-75%.
The weather station can display the barometric pressure trend.
You may see the following displays:
: The barometric pressure will rise
: The barometric pressure will remain constant
: The barometric pressure will fall
Background Lighting
If the product is powered by batteries, press the “ ” button to activate the backlight, which will stay lit
for 15 seconds.
When the product is connected to the power supply adapter, the battery will automatically disconnect, and
the backlight will always be bright. Press the “ ” button to adjust the backlight brightness, you can adjust the
5 state: 4 different brightness backlight and close the backlight. When the backlight brightness is not at the
maximum brightness, press the “ ” button will activate the maximum brightness for 20 seconds.
The weather station can also set the backlight to automatically dim at night. Press and hold the “ ”
button for more than 3 seconds to enter the night mode setting.
Press the “ ” button to confirm and move to the next item.
Press the “ ” or “ ” button to adjust the value. Hold the “ ” or “ ” button to adjust quickly.
Settings order:
1. night mode on | off
2. Backlight brightness setting at night
3. Hour setting for night entry time
4. Minute setting for night entry time
5. Hour setting of night exit time
6. Minute setting of night exit time
14
UV6 Manual
Note: when the night function is set off, press and release “ ” button to exit directly, omitting the settings of
other items
Note: Wait for 20 seconds without pressing any buttons, or touch the “ ” position and keep it for 1
second to exit the settings modes.
When the night mode is on, the icon “ ” will be displayed. When the time reaches the time to enter the
night mode, the backlight will automatically switch to the set night mode brightness, and when the time
reaches the time to exit the night mode, the backlight will return to the original brightness.
In night mode, the backlight can be switched to the highest brightness for 15 seconds by touch the “ ”
position.
When the backlight is in night mode and the brightness is readjusted by pressing the “ ” button, the
backlight will exit the night mode and only re-enter the next day
In the RCC receiving mode, ouch the “ ” position can light up the backlight to the maximum
brightness 15 seconds
Low Battery:
If the “ ” column is display the battery icon “ ”, you need to replace the weather station's battery as
soon as possible
15
UV6 Manual
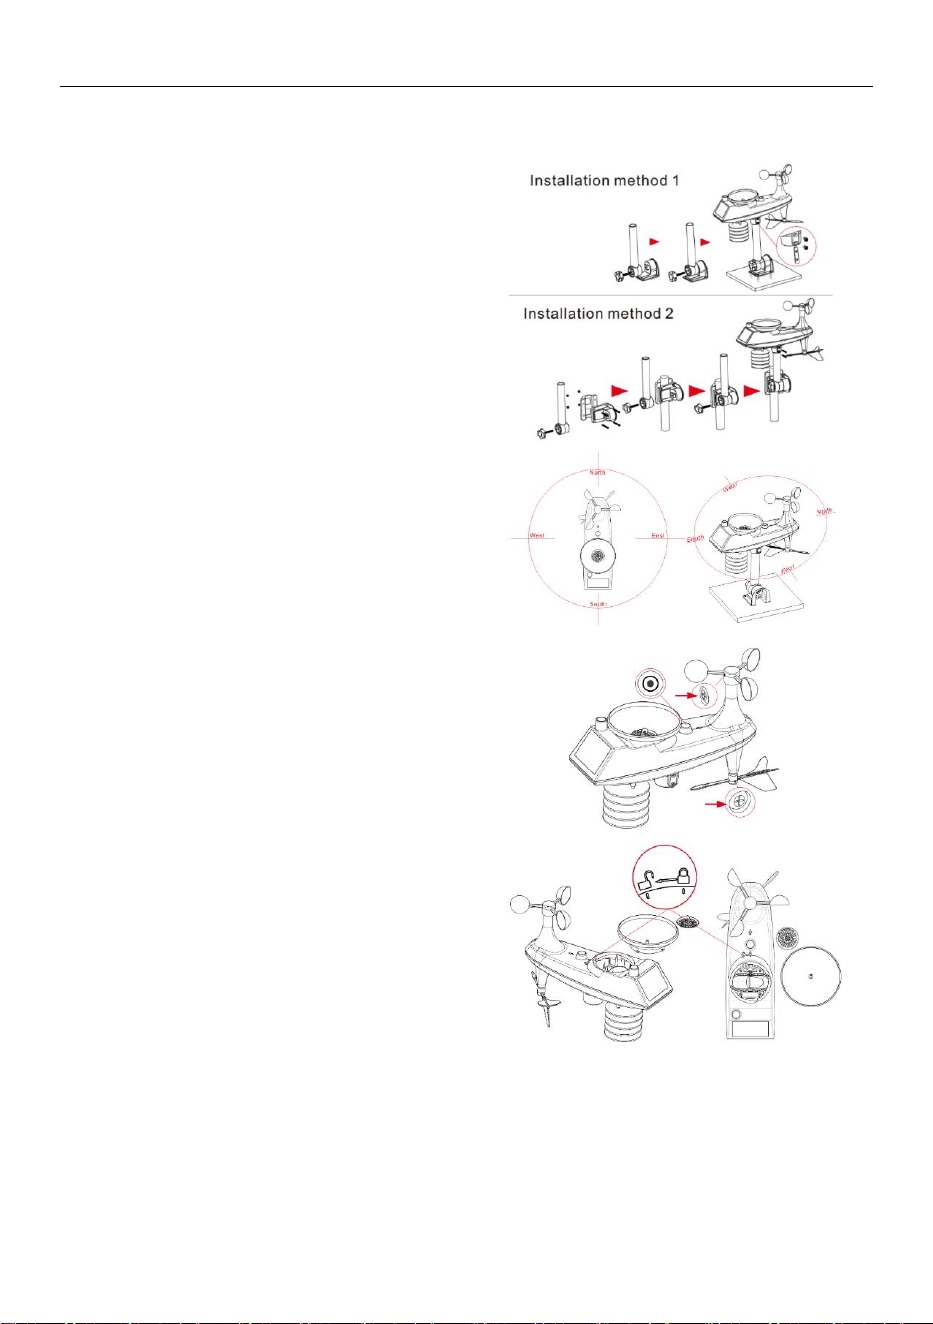
Mounting Instructions (Wireless Sensor)
Multi-Combination Wireless Remote Sensor
Mount in an open area clear for 15 meters (50
feet) in all directions.
The sensor needs to be mounted on a sturdy
platform or bracket that is mounted 1.5 m (5 ft)
above the ground.
The base of the sensor is screwed to the
platform and the support frame. Tighten the large
nut that secures the support rod to the base
When installing, adjust the sensor body so that
the solar panel faces south, otherwise the wind
direction will be wrong. Note the “N” North
Embossed Mark on the top of the sensor
(requires a compass for proofreading, and the “N”
North Emboss mark is identical to the “N” of the
compass).
When installing the sensor, use the top bubble
level to ensure the sensor level, otherwise the
accuracy of the rainfall reading will be affected.
After completing the above two steps, lock the
two hexagon socket screws on the side of the
sensor body.
When installing, the fixing screws of the wind
cup and the wind direction cursor should be
tightened and tightened.
The rainforest structure of the sensor needs to
be cleaned regularly (recommended cycle 1-3
months, depending on the frequency of rain):
1. Remove the rainwater funnel (turn the rain
sand funnel according to the direction of rotation
shown).
2. Gently remove debris or insects from the rain
sensor.
3. Remove debris from the rainwater funnel itself,
especially debris from the funnel drain.
4. Remove the debris from the drain.
5. Reinstall the rainwater bucket.
6. Note: Do not apply oil to the rain sensor.
Note: Make sure the wireless sensor is installed within 100 meters of the weather station (empty,
unobstructed). According to the thickness of the obstacle between the wireless sensor and the weather station,
the distance should be shortened as much as possible (the distance after the wireless signal penetrates the
obstacle will be shortened), otherwise the data transmission may be disturbed.
Temperature | Humidity Wireless Remote Sensor
(This sensor is not configured, please purchase separately if needed)
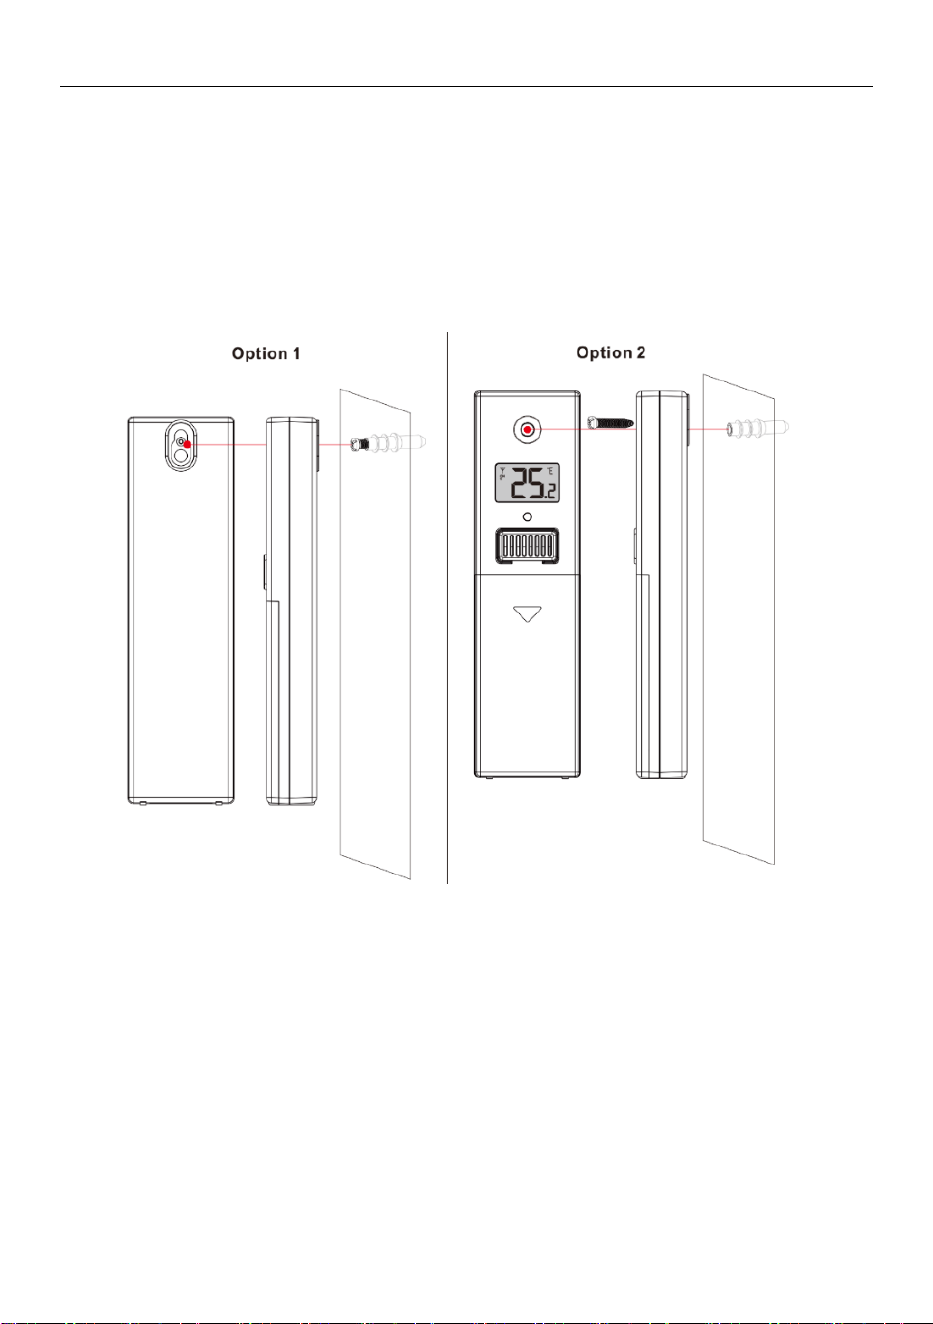
Option 1:
16
UV6 Manual
Mount the mounting screws to the wall.
Hang the wireless sensor on the screw.
Option 2:
Insert the mounting screws through the front of the wireless sensor into the wall.
Tighten the screws to fit snugly (do not overtighten).
If the wireless sensor is placed outdoors, install the temperature | humidity wireless sensor on a north facing
wall or any shadow. The sun will make it even higher.
The guardrail under the eaves or under the deck is preferred.
Make sure the wireless sensor is installed vertically to vent moisture.
17