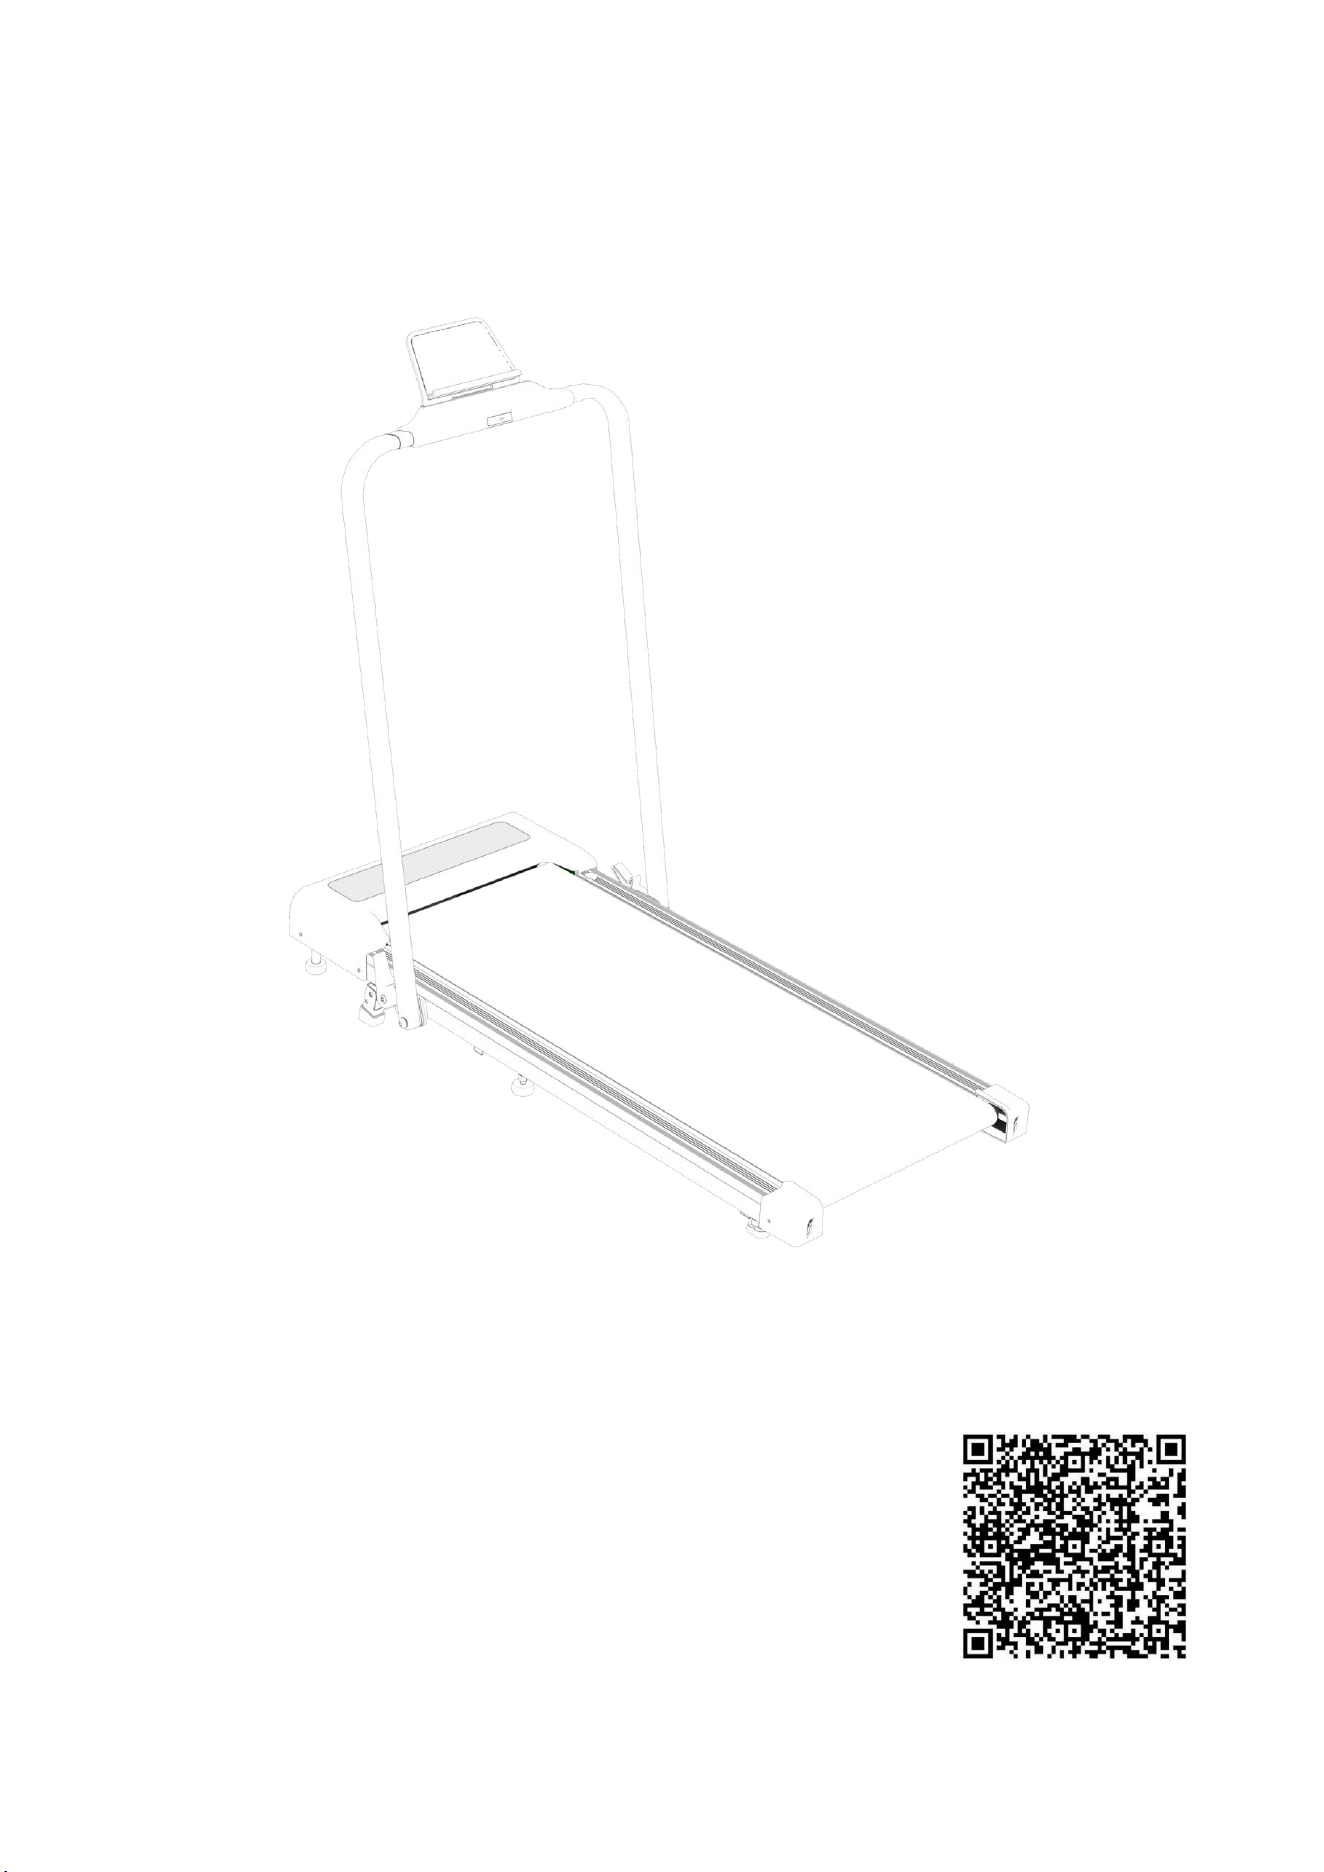
X381PT USER MANUAL
keep this user manual for future reference.

1
Instructions
Installation Instructions ...................................................................................... 2
Installation Steps ................................................................................................ 3
Product Profile ....................................................................................................6
Product Features ................................................................................................ 7
Product Instructions ........................................................................................... 7
1. Display...................................................................................................... 7
2. Brief Description ....................................................................................... 8
3. Bluetooth APP Function Description .........................................................8
4. Parameter Description ..............................................................................9
5. Panel Button Functions and Description ................................................... 9
6. Panel Button Functions and Operation Instructions ................................. 9
7. Remote Control Button Function Description ......................................... 10
8. Remote Control Battery Replacement Instructions ................................. 11
9. Description of The Movement Patterns .................................................. 12
10. Sleep Mode Description ........................................................................15
11. Safety Lock Function Description .......................................................... 15
DC System Error Message Description for Treadmill ......................................... 16
Safety Precautions for Use................................................................................18
Exercise Recommendations and Guidelines ......................................................19
Exercise Safety Measures ................................................................................. 20
Maintenance Guide .......................................................................................... 21
Maintenance Instructions .................................................................................22
Frequently Asked Questions(FAQ) .................................................................... 24
Warranty .......................................................................................................... 25
2
Installation Instructions
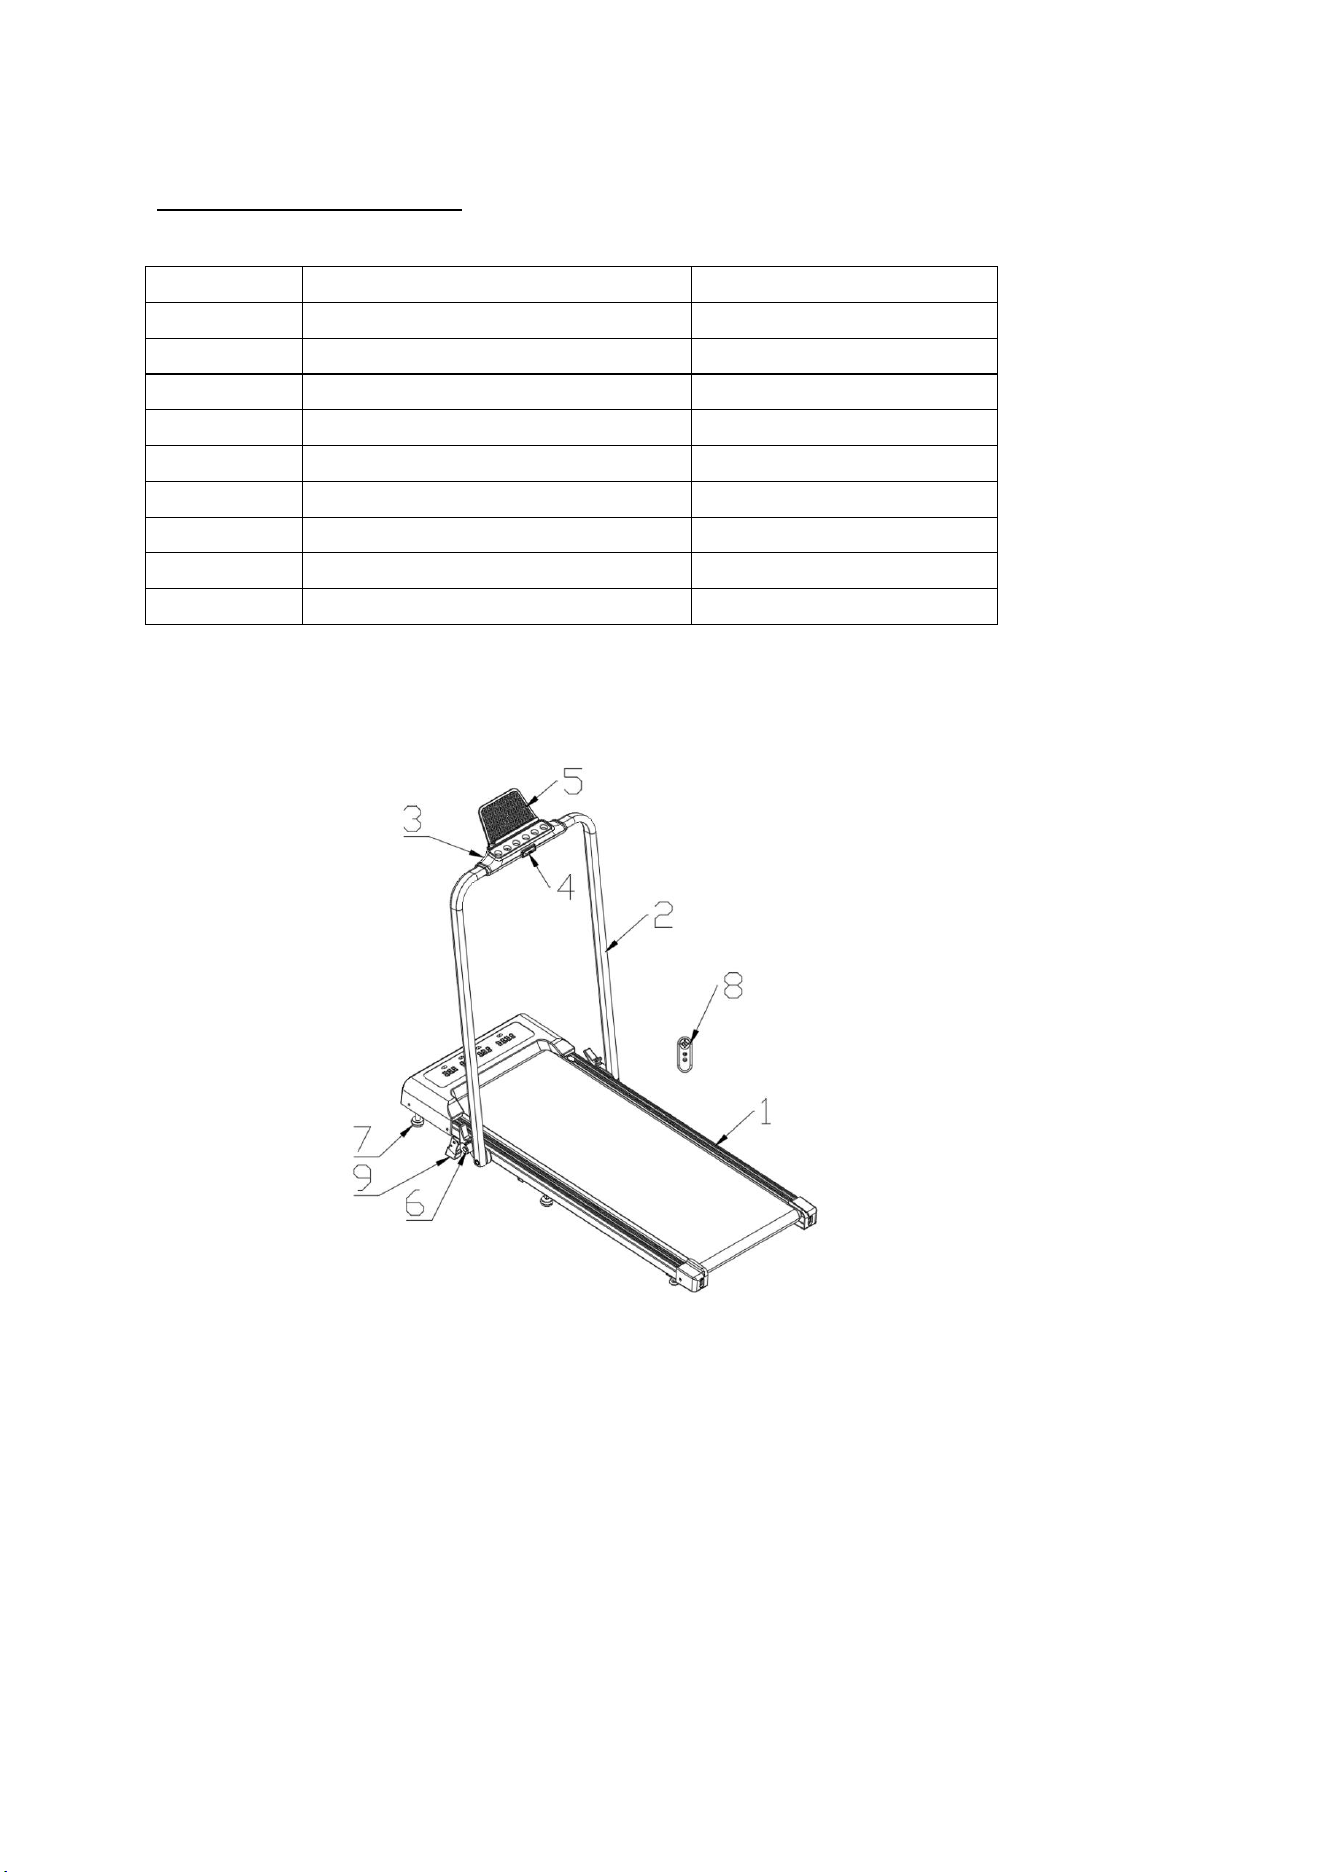
List of installed parts
The structure of the walking pad
Number
Part name
Quantity
1
Running platform
1
2
Column
2
3
Convenient touch screen
1
4
Security/Safety lock
1
5
Device holder
1
6
Quick-release handle
2
7
Front rubber foot
2
8
Remote control
1
9
Incline mechanism
1
3
Installation Steps
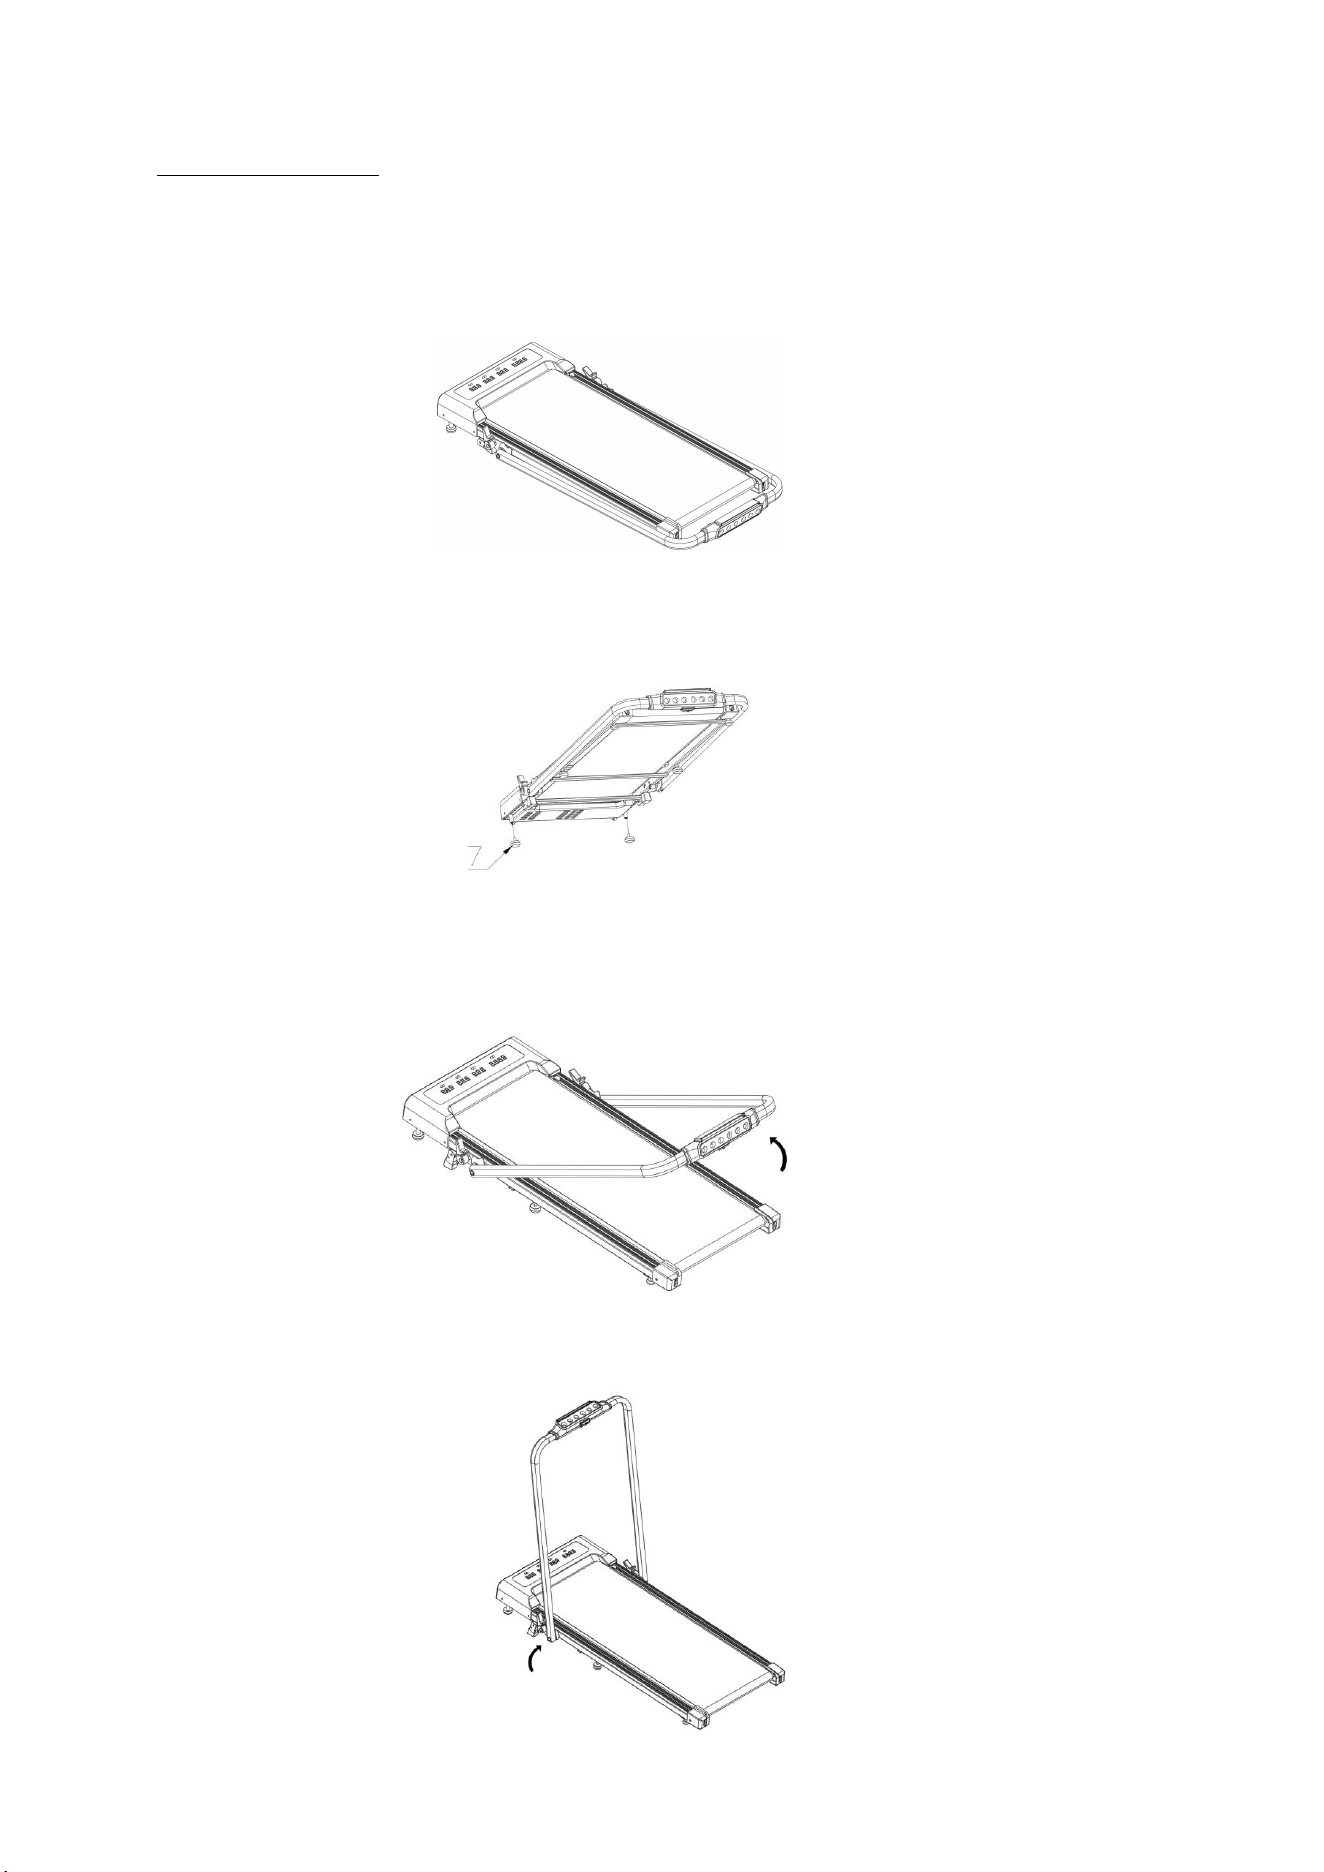
1). Open the package, take out the assembly parts in the box,and place the
main unit flat on the ground.
2). Screw on the front foot pad at the front end of the frame.
3). Push upwards in the direction of the arrow, as shown in the figure.
4). Secure the quick-release handle tightly against the column in the direction of the arrow.
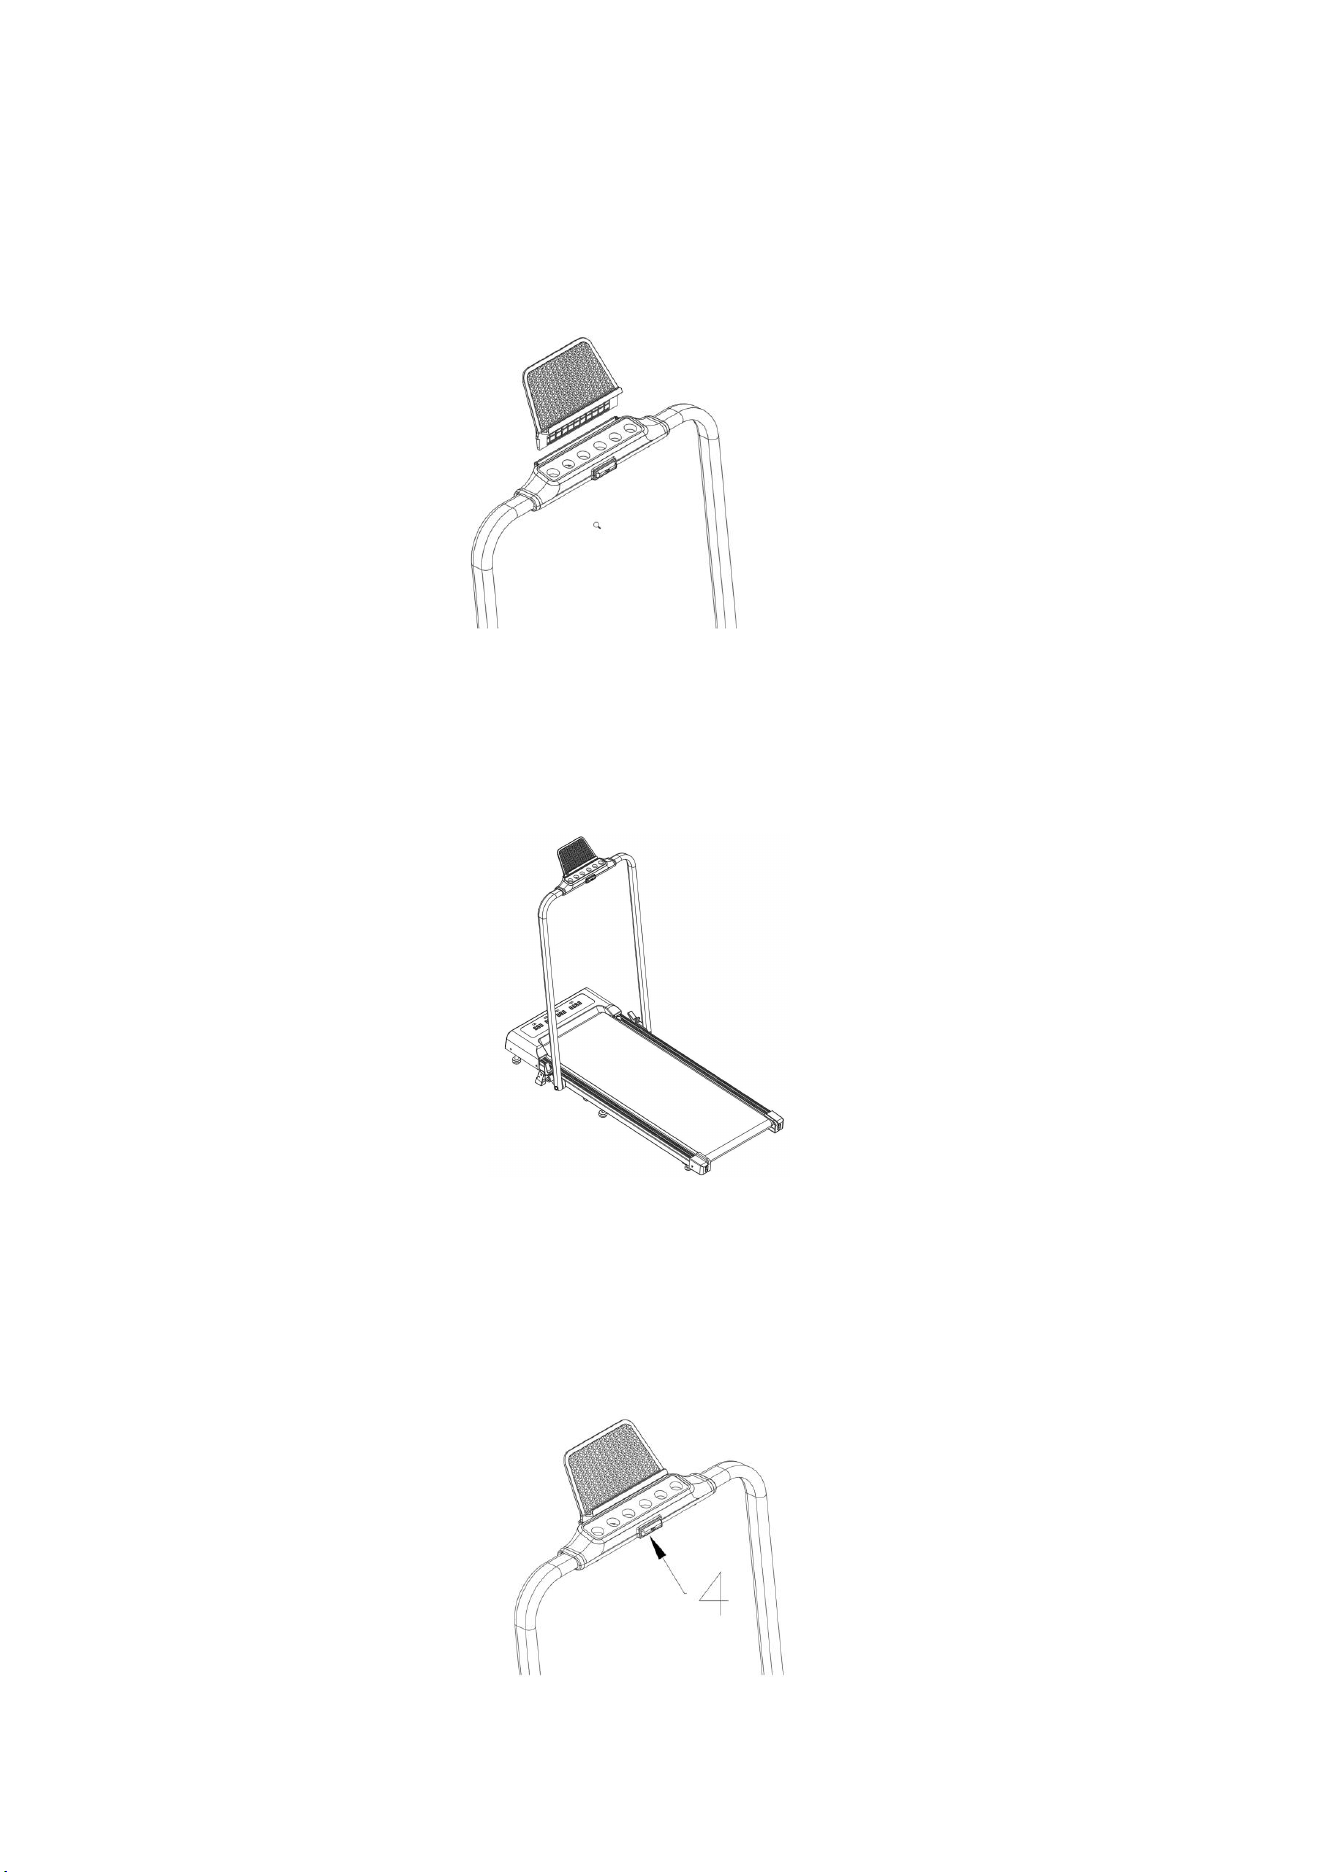
4
5).Insert the device holder into the slot of the electronic display as indicated by
the arrow.
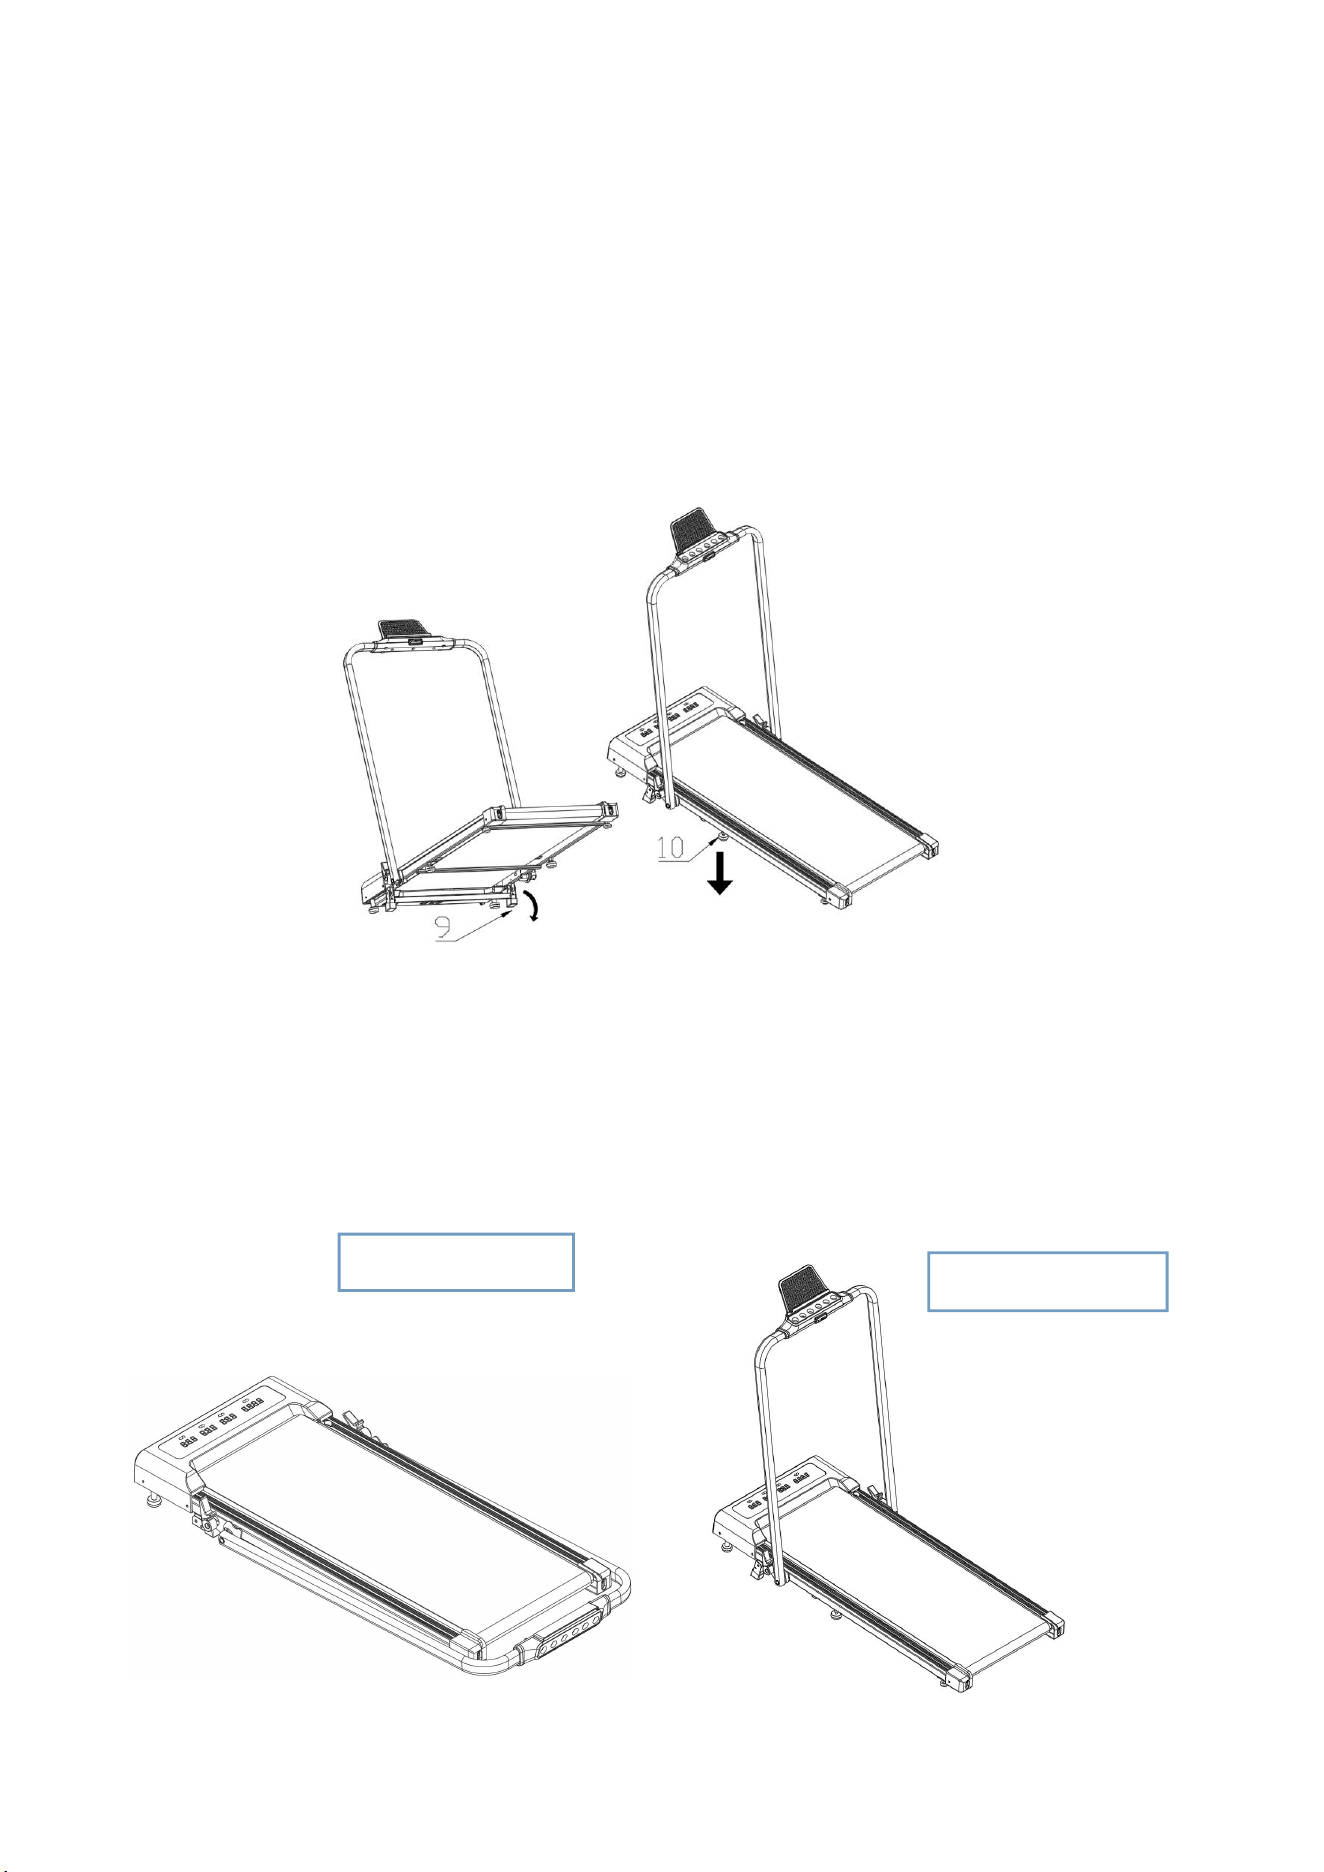
6). Assembly and installation are now completed.
7). Place the safety switch on the yellow sticker of the electronic display, then
turn on the power to operate the treadmill.
5
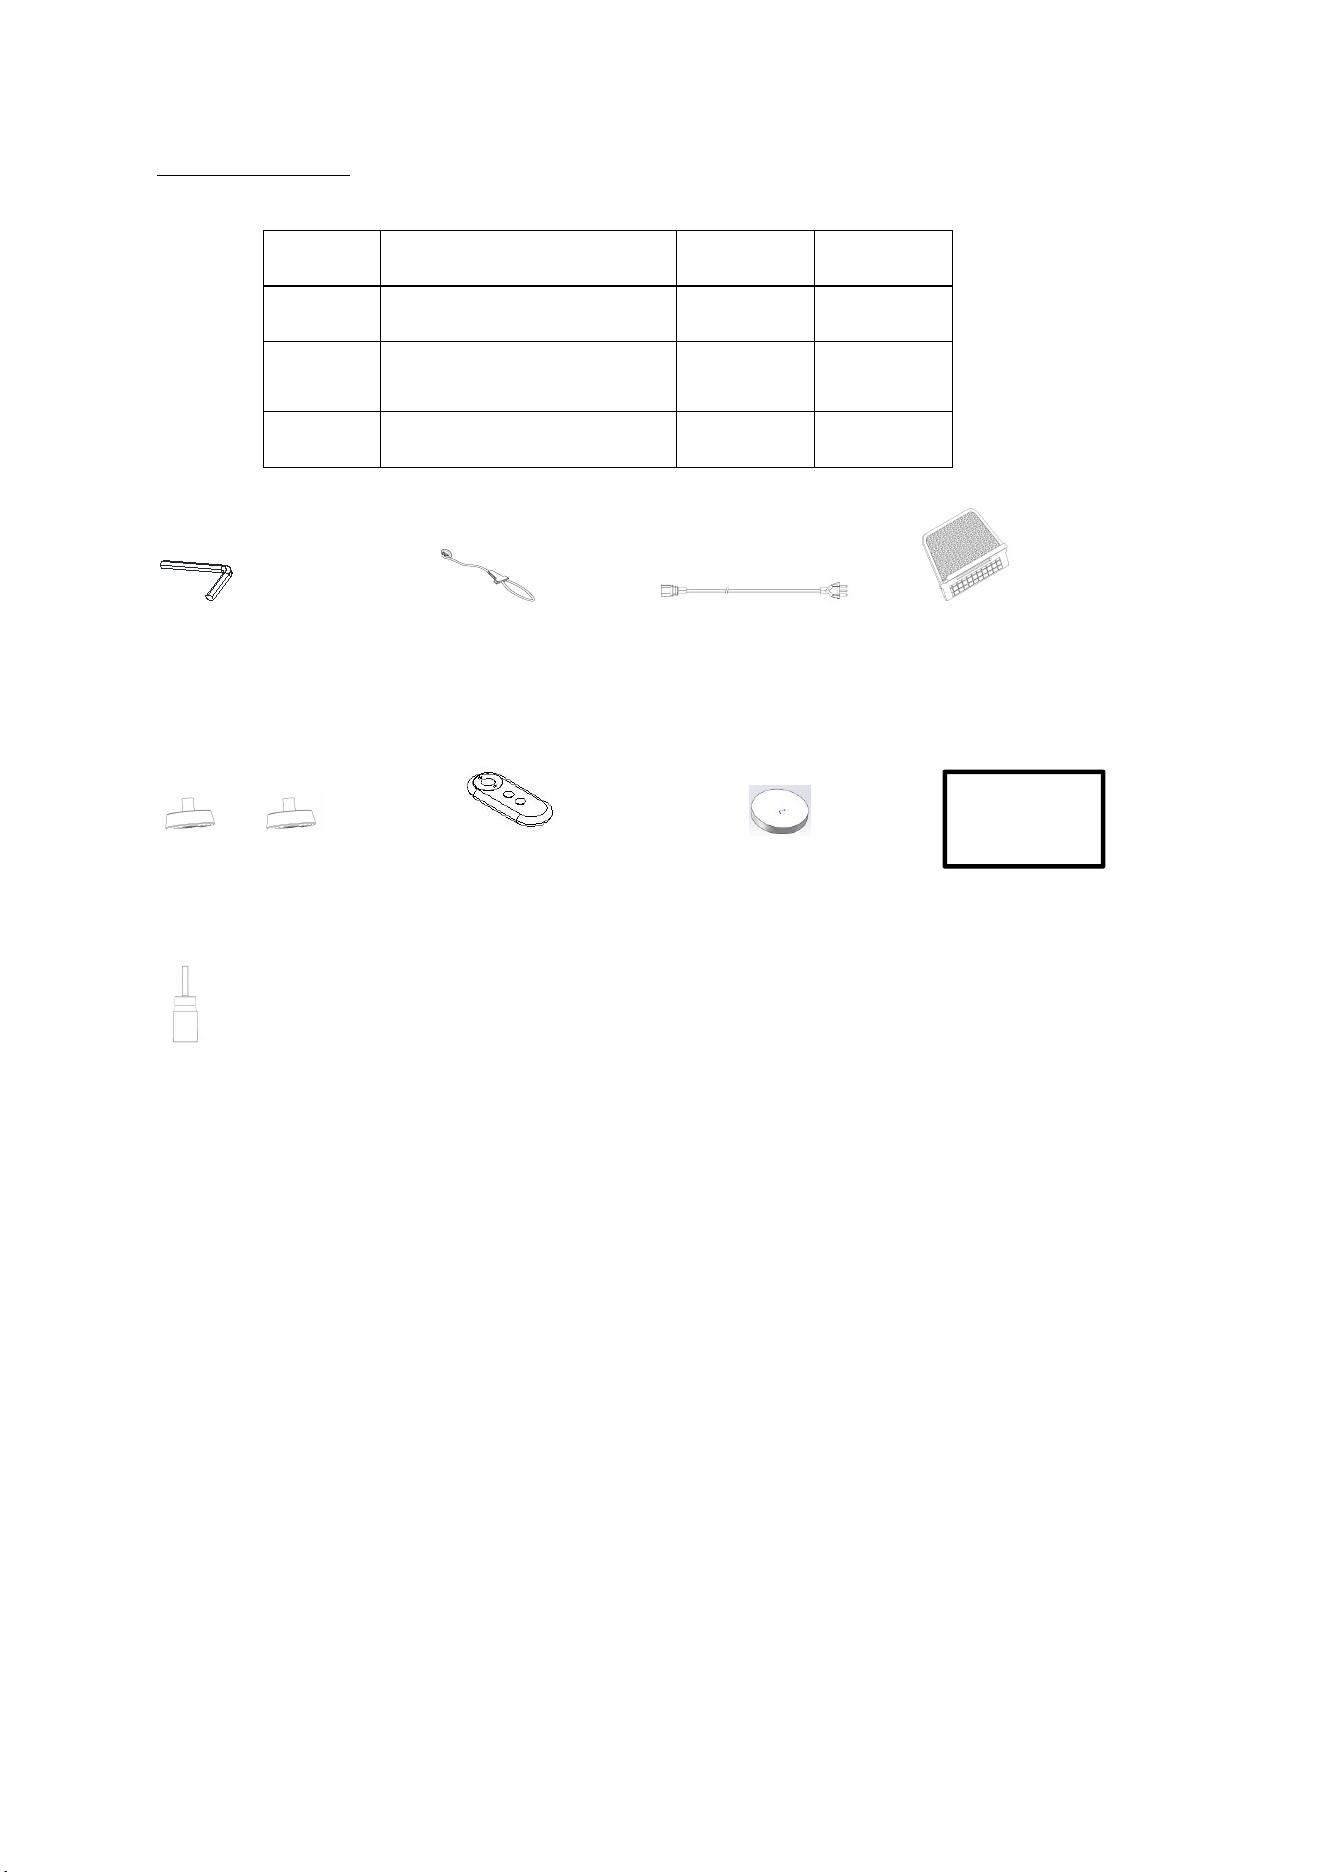
8).Adjust the slope of the treadmill, kick the incline frame with your feet
according to the direction shown in the diagram. At the same time, tighten the
screws of the adjustable foot pads(10) to the ground to support the treadmill
and prevent the machine from hanging in the air.
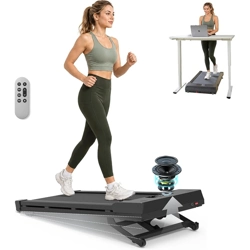
9).The speed can be switched from 0.6 to 3.8 mph by laying down the machine
column. The speed is 0.6 to 7.5 mph when the column is upright.
、
Speed 0.6-7.5mph
Speed 0.6-3.8mph
6
Product Profile
1.
Packing List
Number
Name
Quantity
Notice
1
Main unit (running platform)
1
2
Complete machine
1
See the
attached
3
Accessories package
1
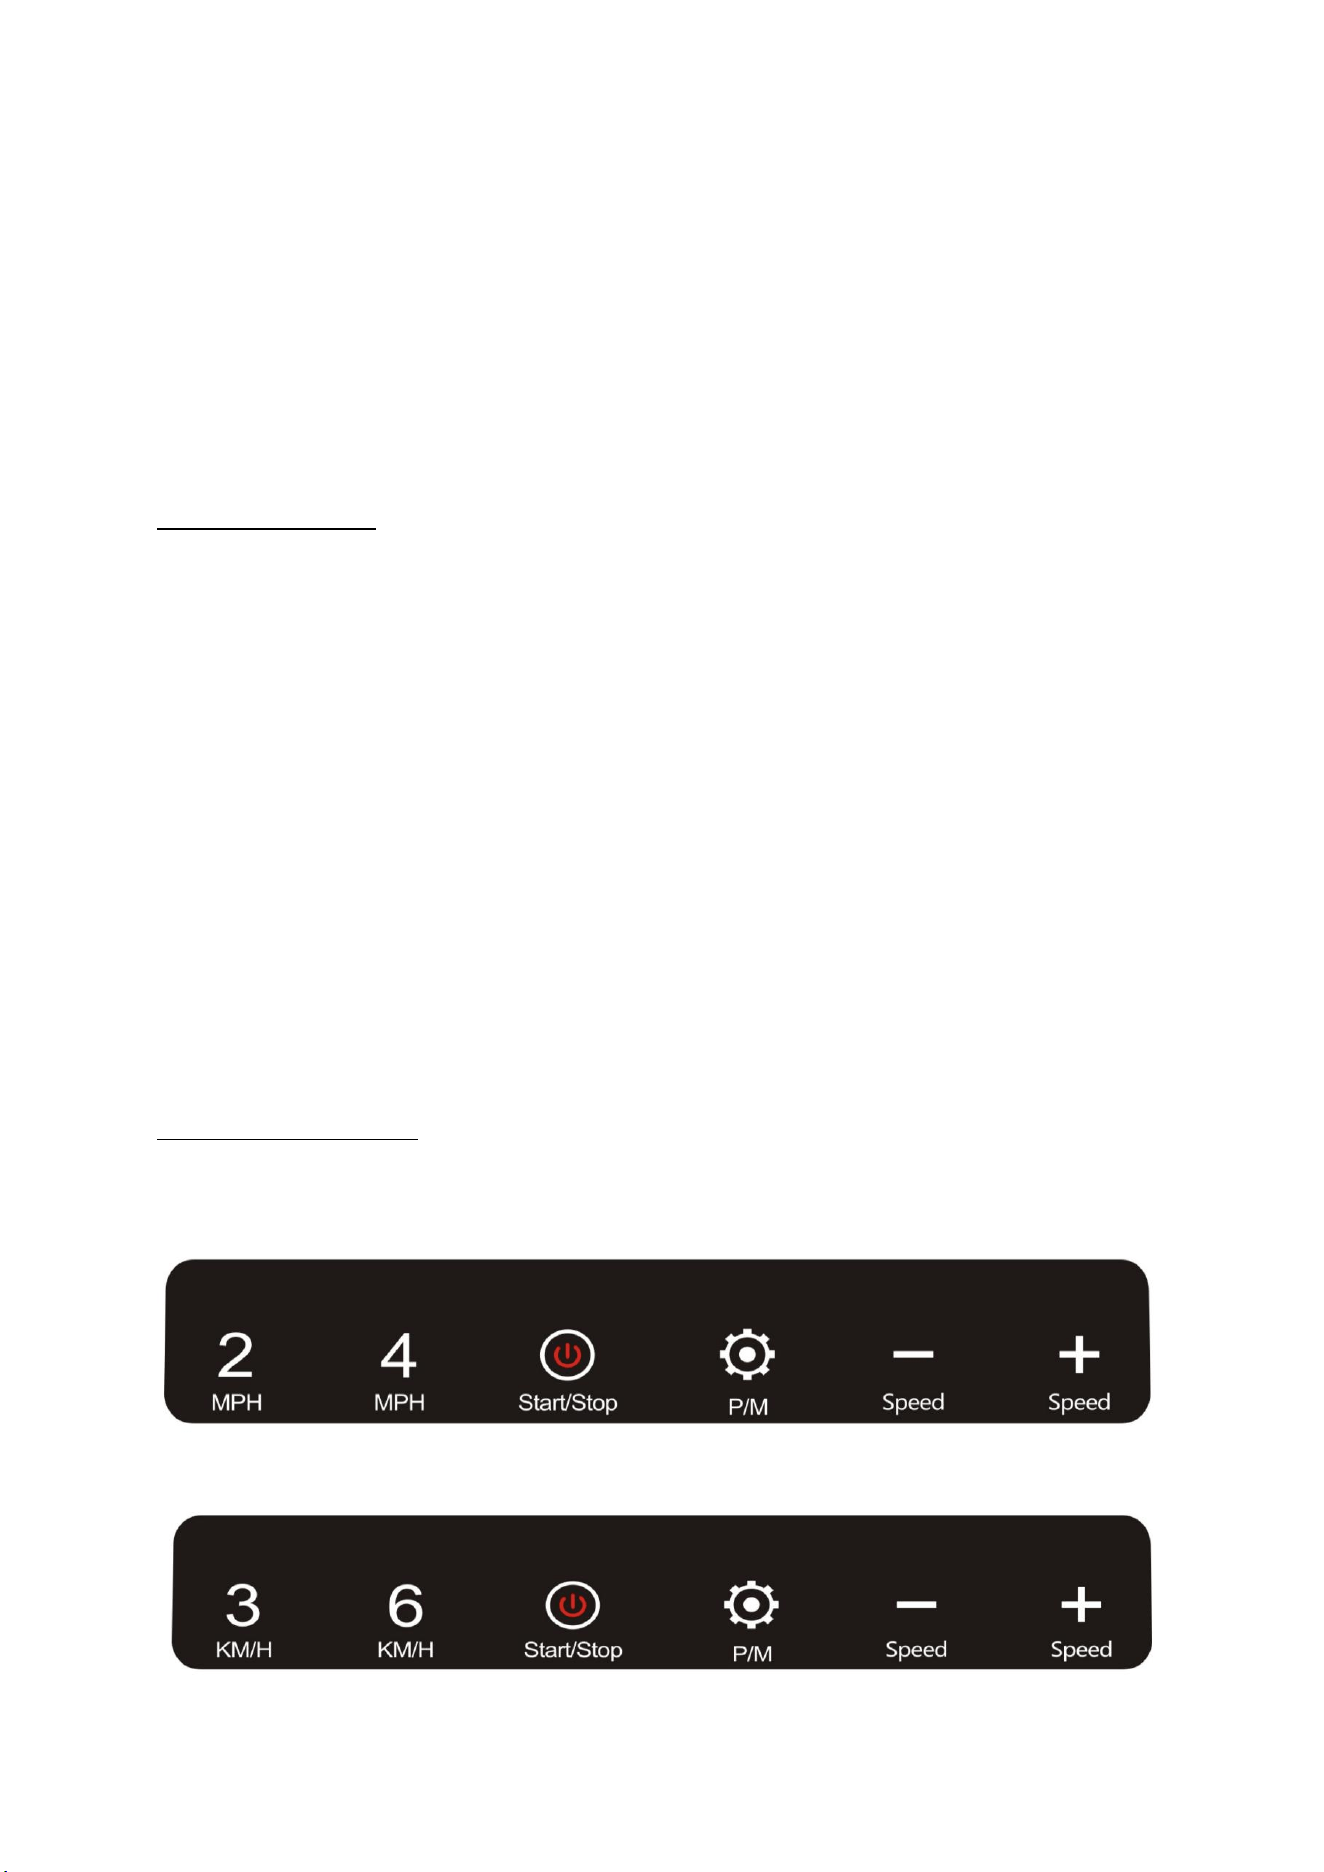
2. Attached list (list of accessory packages)
Hex wrench 1PCS
Safety lock 1PCS
Power cord
Front body mounts 2PCS
Remote control 1PCS
3V button battery 1PCS
Device holder
Silicone oil 1PCS
(
25ml)
User manual 1PS
USER MANUAL
7
Attention:
1) Before using this product, please check if the treadmill is reliably grounded.
2) Check if the power is loaded before exercising; Check if the safety lock is effective.
3) If an abnormal situation occurs during exercise, the safety lock can be removed, and the
treadmill will quickly slow down and stop.
4) If there are any problems with this device, please contact the dealer. Non-professionals
should not attempt disassembly or repair to avoid causing damage the equipment.
Product Features
1. Features both running and walking.
2. F-grade industrial-grade motor, low noise, high power, provides powerful propulsion,
reaching speeds of up to 7.5 mph (12 km/h).
3. High-strength, tensile-resistant, and anti-static running belt.
4. High-strength, high-density, and highly elastic double-layer running deck with rubber
shock-absorbing cushioning.
5. Front and rear rollers utilize 3.0mm thick oil tubing with a 3-degree taper at each end,
ensuring the running belt automatically resets.
6. LED display.
7. Easy treadmill installation: Simply fold the uprights to a desired angle and tighten the
quick-release wrench to secure them. The entire wiring system is pre-wired at the factory;
simply unfold the machine and power it on for immediate operation, eliminating potential
damage from improper installation.
Product Instructions
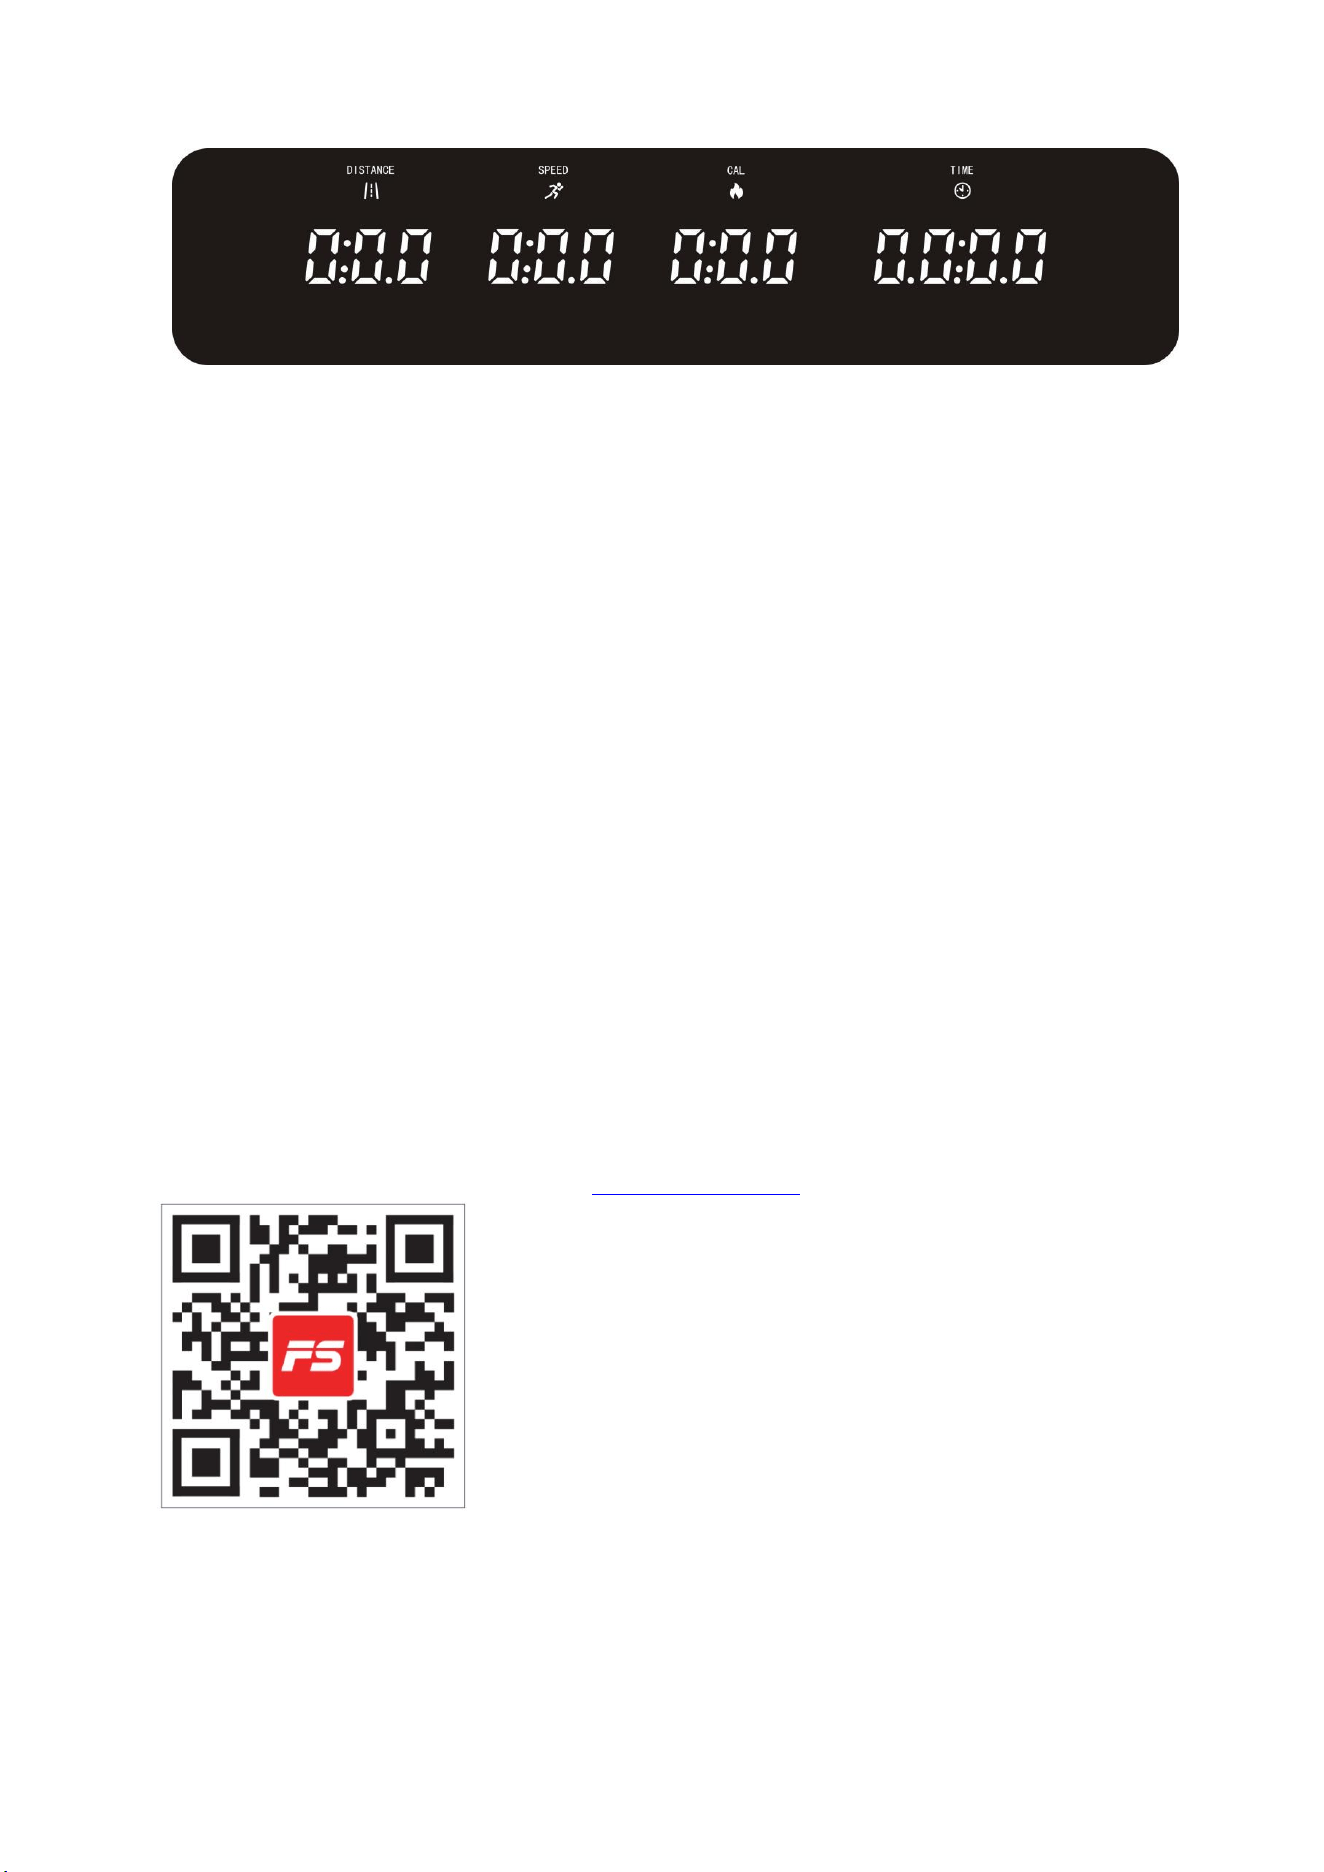
1. Display
8
2. Brief Description
Features of this electronic display:
Wireless remote control function
Speed switching function
White display function
App control function
The terms used in this manual are defined as follows:
Treadmill parameters: "Speed" value
Sports parameters: "Distance" value, "Calorie" value, "Time" value
Sports modes: Manual, Mode
Full manual sport mode: An exercise mode without a set amount of exercise.
Countdown mode motion mode: An exercise mode with a set amount of exercise.
3. Bluetooth APP Function Description
Control the speed through the APP, you can download and open the Sports Show APP. After entering the
APP interface, click Search. After searching for the Bluetooth name ("FSXXXXXX"), click Connect Device.
After connecting, you can operate the treadmill through the APP.
FITSHOW Installation Procedure:
1. Please search for "FITSHOW" in the Apple App Store or Google Play Store and download.
2. Use the link or scan QR code to download: http://fitshow.com/gr
- Jump to the app store to download and open the FITSHOW app, and set the permissions according to the
system prompts;
- Log in to the app and register as a new user using your mobile number or email address;
- Select your type of equipment (e.g. treadmill), Make sure that the device type of the home page
navigation is the same as your device;
- On the "Sports" page, click the "Quick Start" button;

9
- Turn on Bluetooth and the device will appear in the list, connect to FS-xxxxxx (6 random numbers +
letters);
- Start using FITSHOW.
The treadmill is also compatible with the "Kinomap" and "Zwift" sports apps.
4. Parameter Description
Movement parameters in various movement modes:
The lowest display speed is 0.6 mph/1 km/h
Maximum display speed of 7.5 mph/12 km/h
Maximum exercise time in time mode: 99 minutes
Minimum exercise time in time mode: 8 minutes
Maximum motion distance in distance mode: 99 mile/km
Minimum motion distance in distance mode: 1 mile/km
Maximum number of calories consumed in calorie mode: 990 calories
Minimum number of calories consumed in calorie mode: 20 calories
5. Panel Button Functions and Description
Keypad function keys:
Start/stop Button
Program key/Mode key
Speed + key Speed - key
US: 2 speed shortcut keys (2/4 MPH)
EU/JP: 2 speed shortcut keys (3/6 KM/H)
6. Panel Button Functions and Operation Instructions
Start key / Pause key---Functional Description: Start/pause motor operation
Operation Instructions:
1. When the electronic watch is in full manual mode, press this button to start the motor.
2. When the electronic watch is in countdown mode, press this button to start the motor.
3. When the electronic watch is in automatic mode, press this button to start the motor.
4. When the electronic watch is running, press this button to stop the motor.
Program key/Mode key---Functional Description: Automatic program selection
Operation Instructions:
1. When the watch is in countdown mode, press this button to enter automatic program setting.
2. When the watch is in full manual mode, press this button to enter automatic program setting.
3. Operational flow in standby mode: Full manual mode - Automatic program - Full manual mode
Countdown mode selection
Operation Instructions:
1. When the watch is in full manual mode, press this button to enter countdown mode.
2. Operational flow in standby mode: Time countdown - Distance countdown - Calorie countdown -
Automatic program selection
10
Speed + /- key---Functional Description: Speed adjustment during operation and
parameter adjustment during parameter setting
Operation Instructions:
1. When the electronic meter is running, the speed value can be adjusted.
2. When the parameter value is set, the parameter value can be adjusted.
Speed Shortcut Key---Function Description: Directly select the speed Value
Operation Instructions:
1. When the electronic meter is running, press this key to directly select the corresponding
speed value.
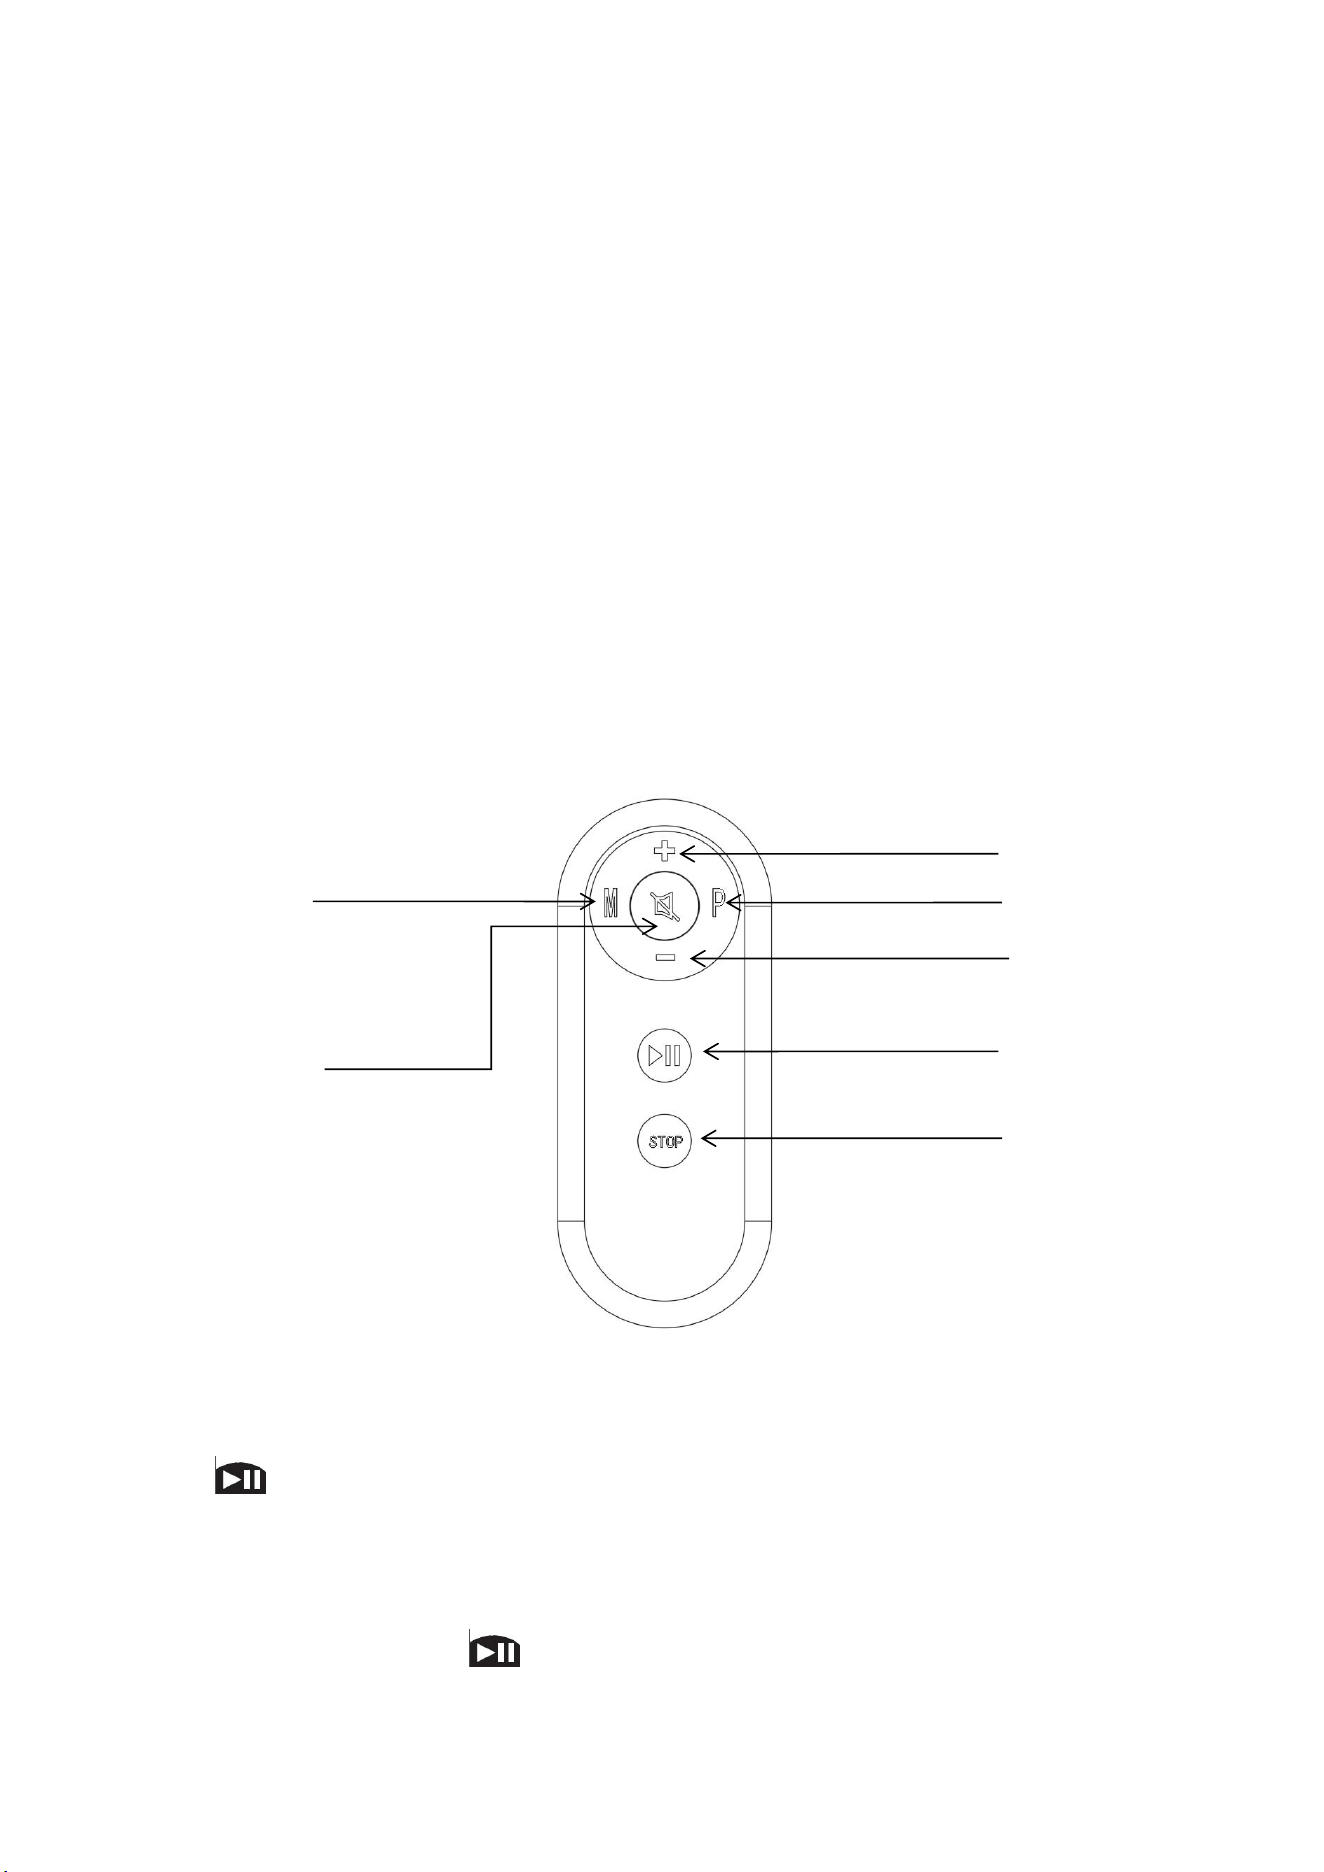
7. Remote Control Button Function Description
Remote control function keys:
Start key / Pause key Stop key
Program key Mode key
Speed + key Speed - key
Mute Key
Start key / Pause key: Start/pause motor operation
Speed +
Program
Speed -
Start/Pause
Stop
Mode
Mute
11
Operation Instructions:
1. In full manual mode, press this button to start the motor. Press again to pause the motor,
and the data will be retained.
2. In countdown mode, press this button to start/pause the motor.
3. In automatic mode, press this button to start/pause the motor.
Stop key---Functional Description:In any mode, press this button to stop the motor.
Mode key---Functional Description:Countdown mode selection
Operation Instructions:
1. In manual mode, press this button to enter countdown mode.
2. In standby mode, select Time Countdown, Distance Countdown, or Calories Countdown.
Program key ---Functional Description:
Automatic program selection
Operation Instructions:
1. In countdown mode, press this button to enter automatic program setting.
2. In manual mode, press this button to enter automatic program setting.
3. Operational Flow in Standby Mode: Manual Mode - Automatic Programming
Speed +/- keys---Operation Instructions: Speed adjustment during operation and
parameter adjustment during parameter setting
Operation Instructions:
1. In the running state, the speed value can be adjusted.
2. In the parameter setting state, the parameter value can be adjusted.
Mute Key--- Function description: Turn the buzzer sound on or off.
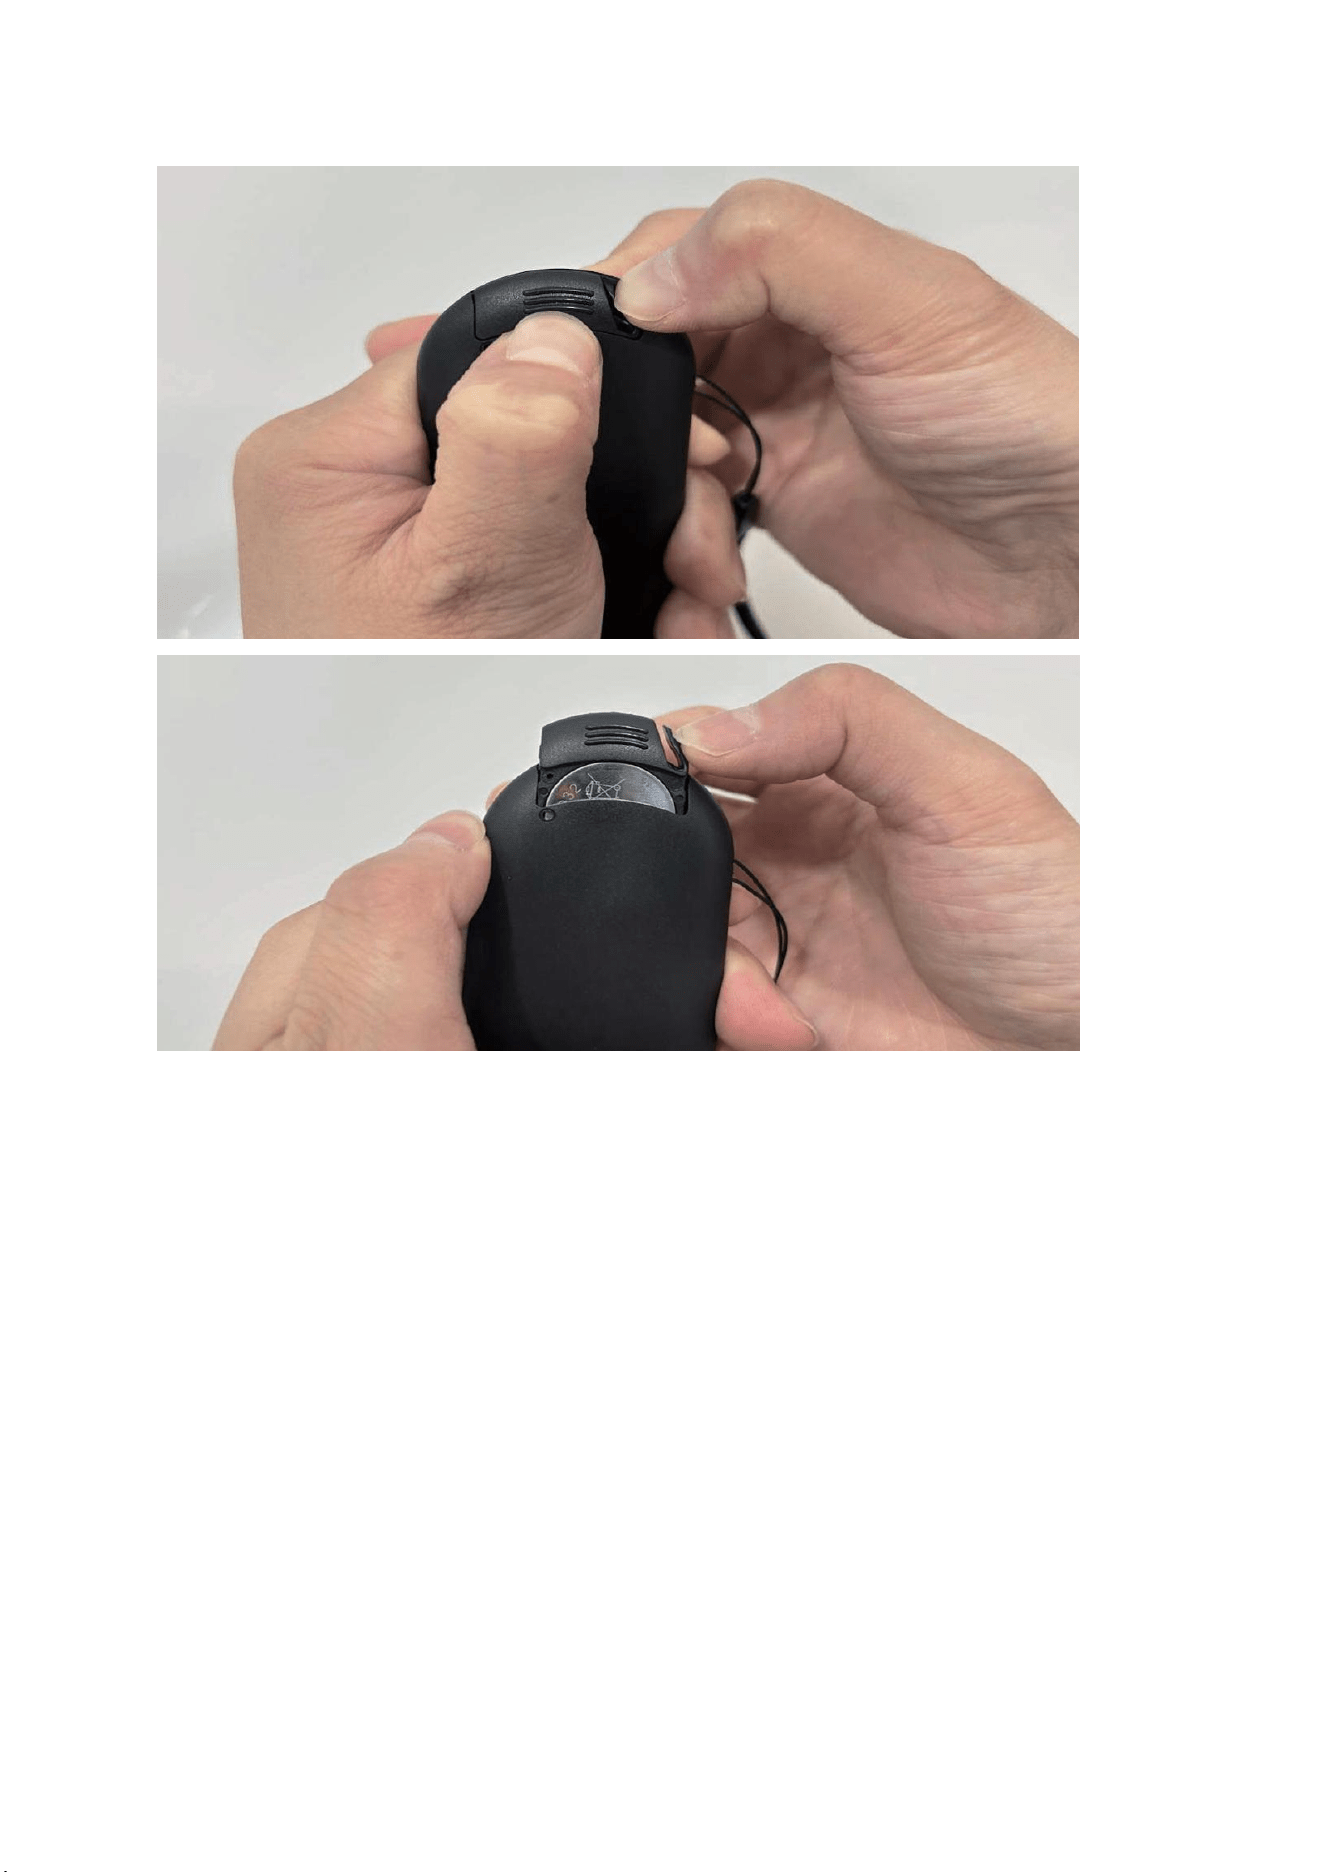
8. Remote Control Battery Replacement Instructions
As shown in the figure on the next page: Use your right hand to clamp the battery cover in the slot, pull
open the buckle with force to the left, and then use your left thumb to push out the battery cover, remove
and replace the battery, and then push back the battery cover.
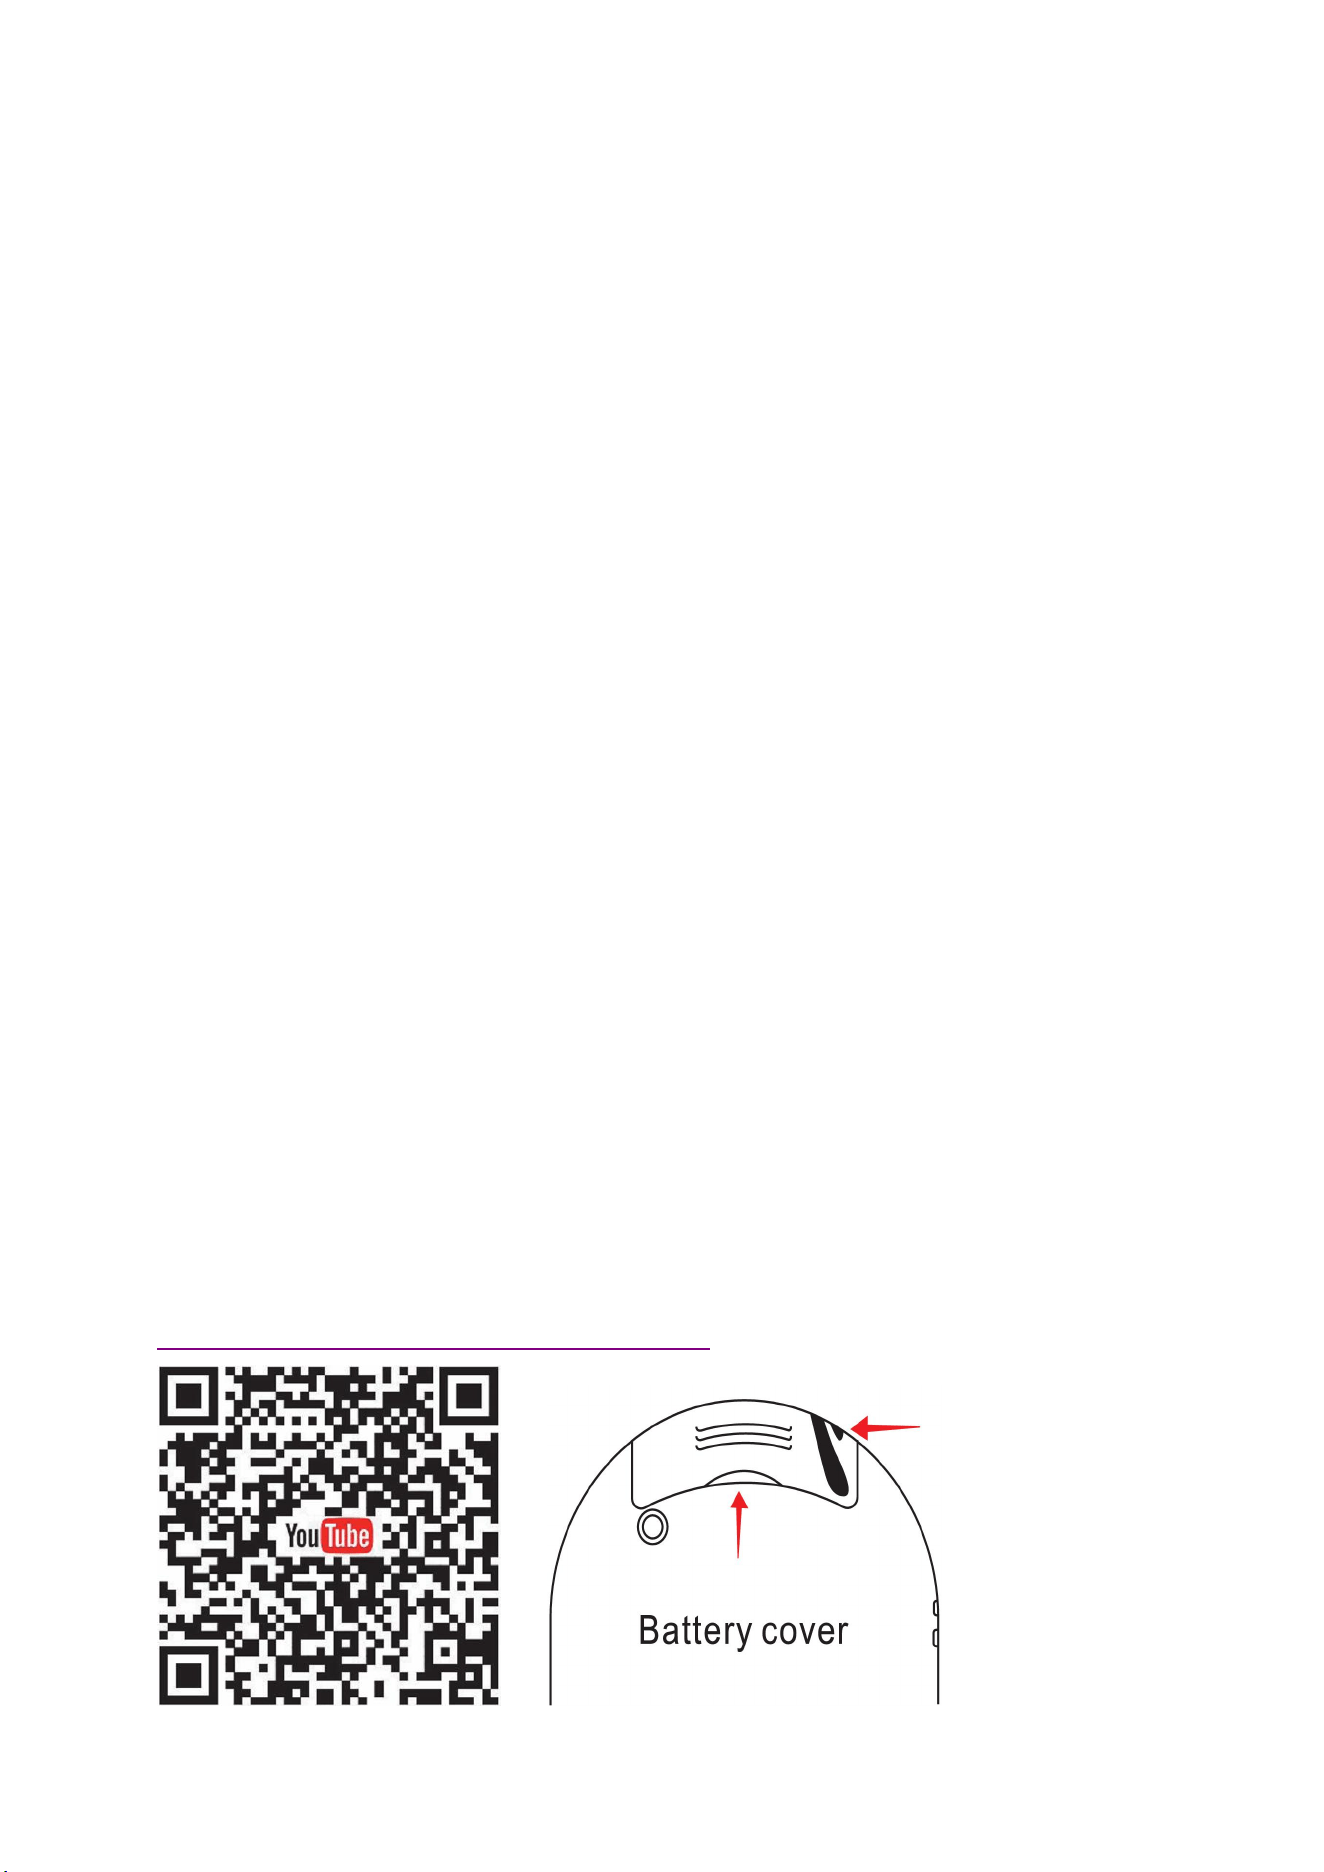
Click the link or scan the QR code below to jump to YouTube to view the remote control battery
replacement video:
https://youtube.com/shorts/H7Rk9TKEjRM?feature=share
12
Battery model: CR2032
9. Description of The Movement Patterns
A
:
Manual Mode Function
Entering Manual Mode: Upon power-up and full display initialization, the treadmill enters
the full manual operation standby mode. Press the Start button to commence operation in
manual mode.
Operating Instructions: The initial operating speed is 0.6 mph/1 km/h. The time, distance,
and calorie countdown windows start from zero. Press the speed adjustment button to
adjust the operating speed. The system will automatically shut down after 100 minutes of
operation.
B: Countdown Mode Function.
1. Time countdown mode: In full manual mode, press the Mode button to select Countdown
Mode. The time window will now display 30:00 minutes and flash. You can use the +/-
buttons to set the desired run time, ranging from 8:00 to 99:00 minutes. Press the Start
button to enter Countdown Mode.

13
Operational Instructions: The initial run speed is 0.6 mph/1 km/h. The time window will
begin counting down based on the set run time, while the distance and calories burned
windows will count up from zero. Press the Speed Adjustment button to adjust the run speed.
When the set run time reaches zero, the electronic watch will slowly stop.
2.
Distance countdown mode: In full manual mode, press the Mode button to select Distance
Countdown mode. The distance window will now display 1.0 mile/kilometer and flash. Use
the Speed +/- keys to set the desired distance, ranging from 1 to 99 miles/kilometers. Press
the Start button to enter Distance Countdown mode.
Operational Instructions: The initial running speed is 0.6 mph/km/h. The distance window
will begin counting down based on the set distance, while the time and calories windows will
count up from zero. Press the speed adjustment button to adjust the running speed. When
the set distance reaches zero, the electronic watch will slowly stop.
3. Calorie countdown mode: In full manual mode, press the Mode button to select the
Calorie Countdown mode. The Calorie display will flash 50. Use the speed +/- keys to set the
desired running calorie count, ranging from 20 to 990. Press the Start button to enter the
Calorie Countdown mode.
Operation Instructions: The initial running speed is 0.6 mph/1 km/h. The Calorie display will
begin counting down based on the set calorie count, while the Time and Distance windows
will count up from zero. Press the speed adjustment key to adjust the running speed. When
the set calorie countdown reaches zero, the electronic watch will slowly stop.
C: Automatic program function
Entering the automatic program: In the fully manual operation mode or mode setting state,
press the program key to enter the automatic program selection. At this time, the time
window displays 30:00 minutes and flashes (the required running time can be set through
the speed+/-key, with a setting range of 8:00~99 minutes). Press the start key to enter the
automatic program operation.
Running instructions: The automatic program is divided into 20 sections, and the speed value
of each section runs according to the predetermined value in the automatic program. The
running time of each section is 1/20 of the set time. The time window starts counting down
according to the set running time, and the distance and calorie windows start counting up
from zero. Press the speed adjustment button to adjust the size of the running speed value.
When the program reaches the next section, the speed automatically adjusts to the
predetermined value in the next section. When the set time counts down to zero, the
electronic watch starts to slowly stop running.
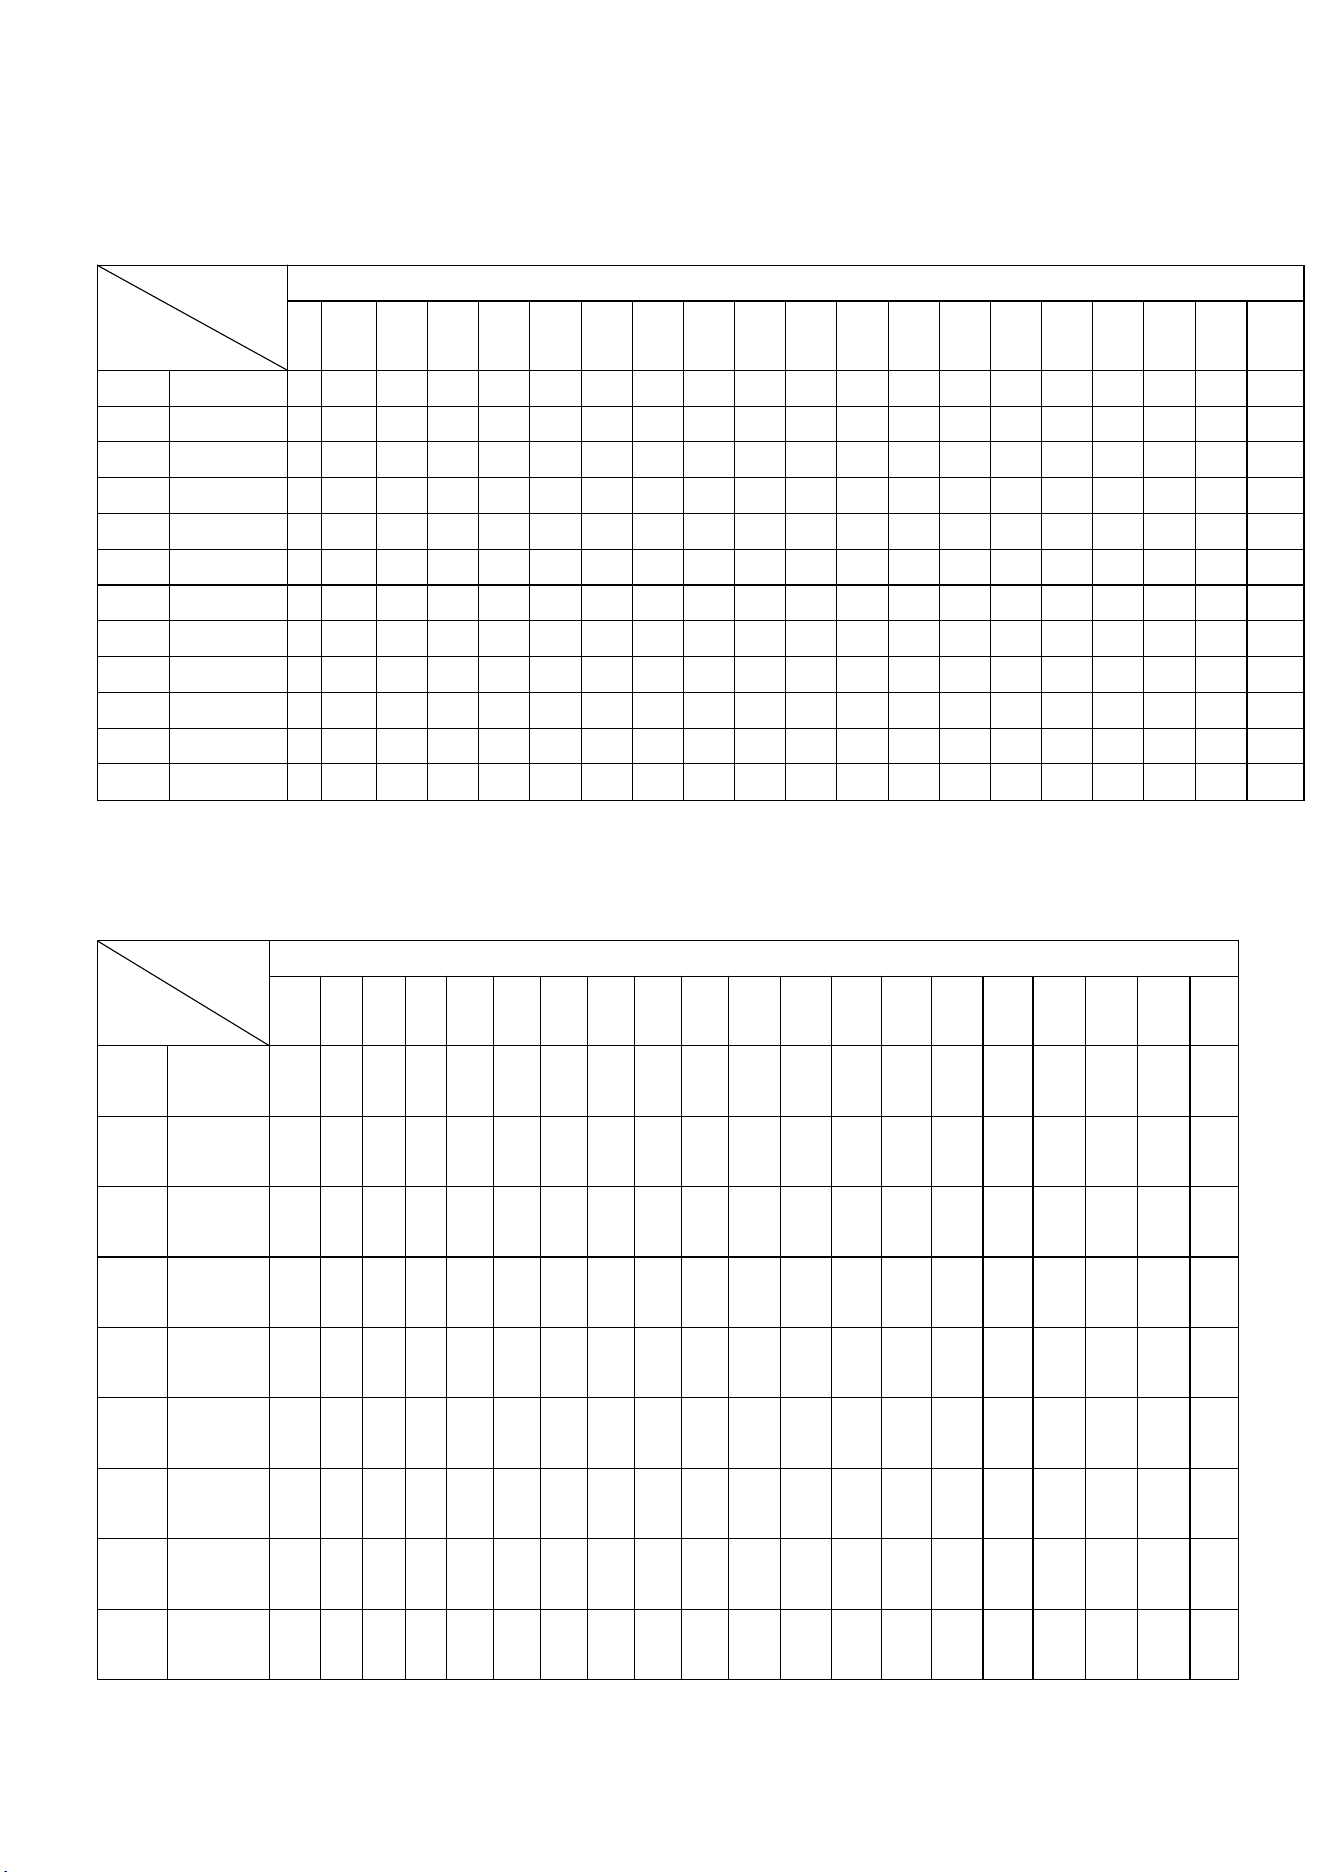
14
P1-P12 program motion diagram (This diagram is the kilometer program diagram in high-speed mode. If
you enter low-speed mode, the speed in the diagram below exceeds 8KM/H will automatically run at
8KM/H)
Time period
Program
The set time / 20 time periods = the running time of the upper and lower time periods
1
2
3
4
5
6
7
8
9
10
11
12
13
14
15
16
17
18
19
20
P1
Speed
2
3
3
4
5
3
4
5
5
3
4
5
4
4
4
2
3
3
5
3
P2
Speed
2
4
4
5
6
4
6
6
6
4
5
6
4
4
4
2
2
5
4
1
P3
Speed
2
4
4
6
6
4
7
7
7
4
7
7
4
4
4
2
4
5
3
2
P4
Speed
3
5
5
6
7
7
5
7
7
8
8
5
9
5
5
6
6
4
4
3
P5
Speed
2
4
4
5
6
7
7
5
6
7
8
8
5
4
3
3
6
5
4
2
P6
Speed
2
4
3
4
5
4
8
7
6
7
8
3
6
4
4
2
5
4
3
2
P7
Speed
2
3
3
3
4
5
3
4
5
3
4
5
3
3
3
6
6
5
3
3
P8
Speed
2
3
3
6
7
7
4
6
7
4
6
7
4
4
4
2
3
4
4
2
P9
Speed
2
4
4
7
7
4
7
8
4
8
9
9
4
4
4
5
6
3
3
2
P10
Speed
2
4
5
6
7
5
4
6
8
8
6
6
5
4
4
2
4
4
3
3
P11
Speed
3
4
5
9
5
9
5
5
5
9
5
5
5
5
9
9
8
7
6
3
P12
Speed
2
5
8
10
7
7
10
10
7
7
10
10
6
6
9
9
5
5
4
3
P1-P12 program motion diagram (This diagram is the mile program diagram in high-speed mode. If
you enter low-speed mode, the speed in the diagram below that exceeds 5 MPH will automatically
run at 5 MPH) Appendix 1: P1-P12 programmed motion diagram
Time period
Program
The set time / 20 time periods = the running time of the upper and lower time periods
1
2
3
4
5
6
7
8
9
10
11
12
13
14
15
16
17
18
19
20
P1
Speed
1.
2
1.
8
1.
8
2.
4
3.
1
1.
8
2.
4
3.
1
3.
1
1.
8
2.
4
3.
1
2.
4
2.
4
2.
4
1.
2
1.
8
1.
8
3.
1
1.
8
P2
Speed
1.
2
2.
4
2.
4
3.
1
3.
7
2.
4
3.
7
3.
7
3.
7
2.
4
3.
1
3.
7
2.
4
2.
4
2.
4
1.
2
1.
2
3.
1
2.
4
0.
6
P3
Speed
1.
2
2.
4
2.
4
3.
7
3.
7
2.
4
4.
3
4.
3
4.
3
2.
4
4.
3
4.
3
2.
4
2.
4
2.
4
1.
2
2.
4
3.
1
1.
8
1.
2
P4
Speed
1.
8
3.
1
3.
1
3.
7
4.
3
4.
3
3.
1
4.
3
4.
3
4.
9
4.
9
3.
1
5.
5
3.
1
3.
1
3.
7
3.
7
2.
4
2.
4
1.
8
P5
Speed
1.
2
2.
4
2.
4
3.
1
3.
7
4.
3
4.
3
3.
1
3.
7
4.
3
4.
9
4.
9
3.
1
2.
4
1.
8
1.
8
3.
7
3.
1
2.
4
1.
2
P6
Speed
1.
2
2.
4
1.
8
2.
4
3.
1
2.
4
4.
9
4.
3
3.
7
4.
3
4.
9
1.
8
3.
7
2.
4
2.
4
1.
2
3.
1
2.
4
1.
8
1.
2
P7
Speed
1.
2
1.
8
1.
8
1.
8
2.
4
3.
1
1.
8
2.
4
3.
1
1.
8
2.
4
3.
1
1.
8
1.
8
1.
8
3.
7
3.
7
3.
1
1.
8
1.
8
P8
Speed
1.
2
1.
8
1.
8
3.
7
4.
3
4.
3
2.
4
3.
7
4.
3
2.
4
3.
7
4.
3
2.
4
2.
4
2.
4
1.
2
1.
8
2.
4
2.
4
1.
2
P9
Speed
1.
2
2.
4
2.
4
4.
3
4.
3
2.
4
4.
3
4.
9
2.
4
4.
9
5.
5
5.
5
2.
4
2.
4
2.
4
3.
1
3.
7
1.
8
1.
8
1.
2
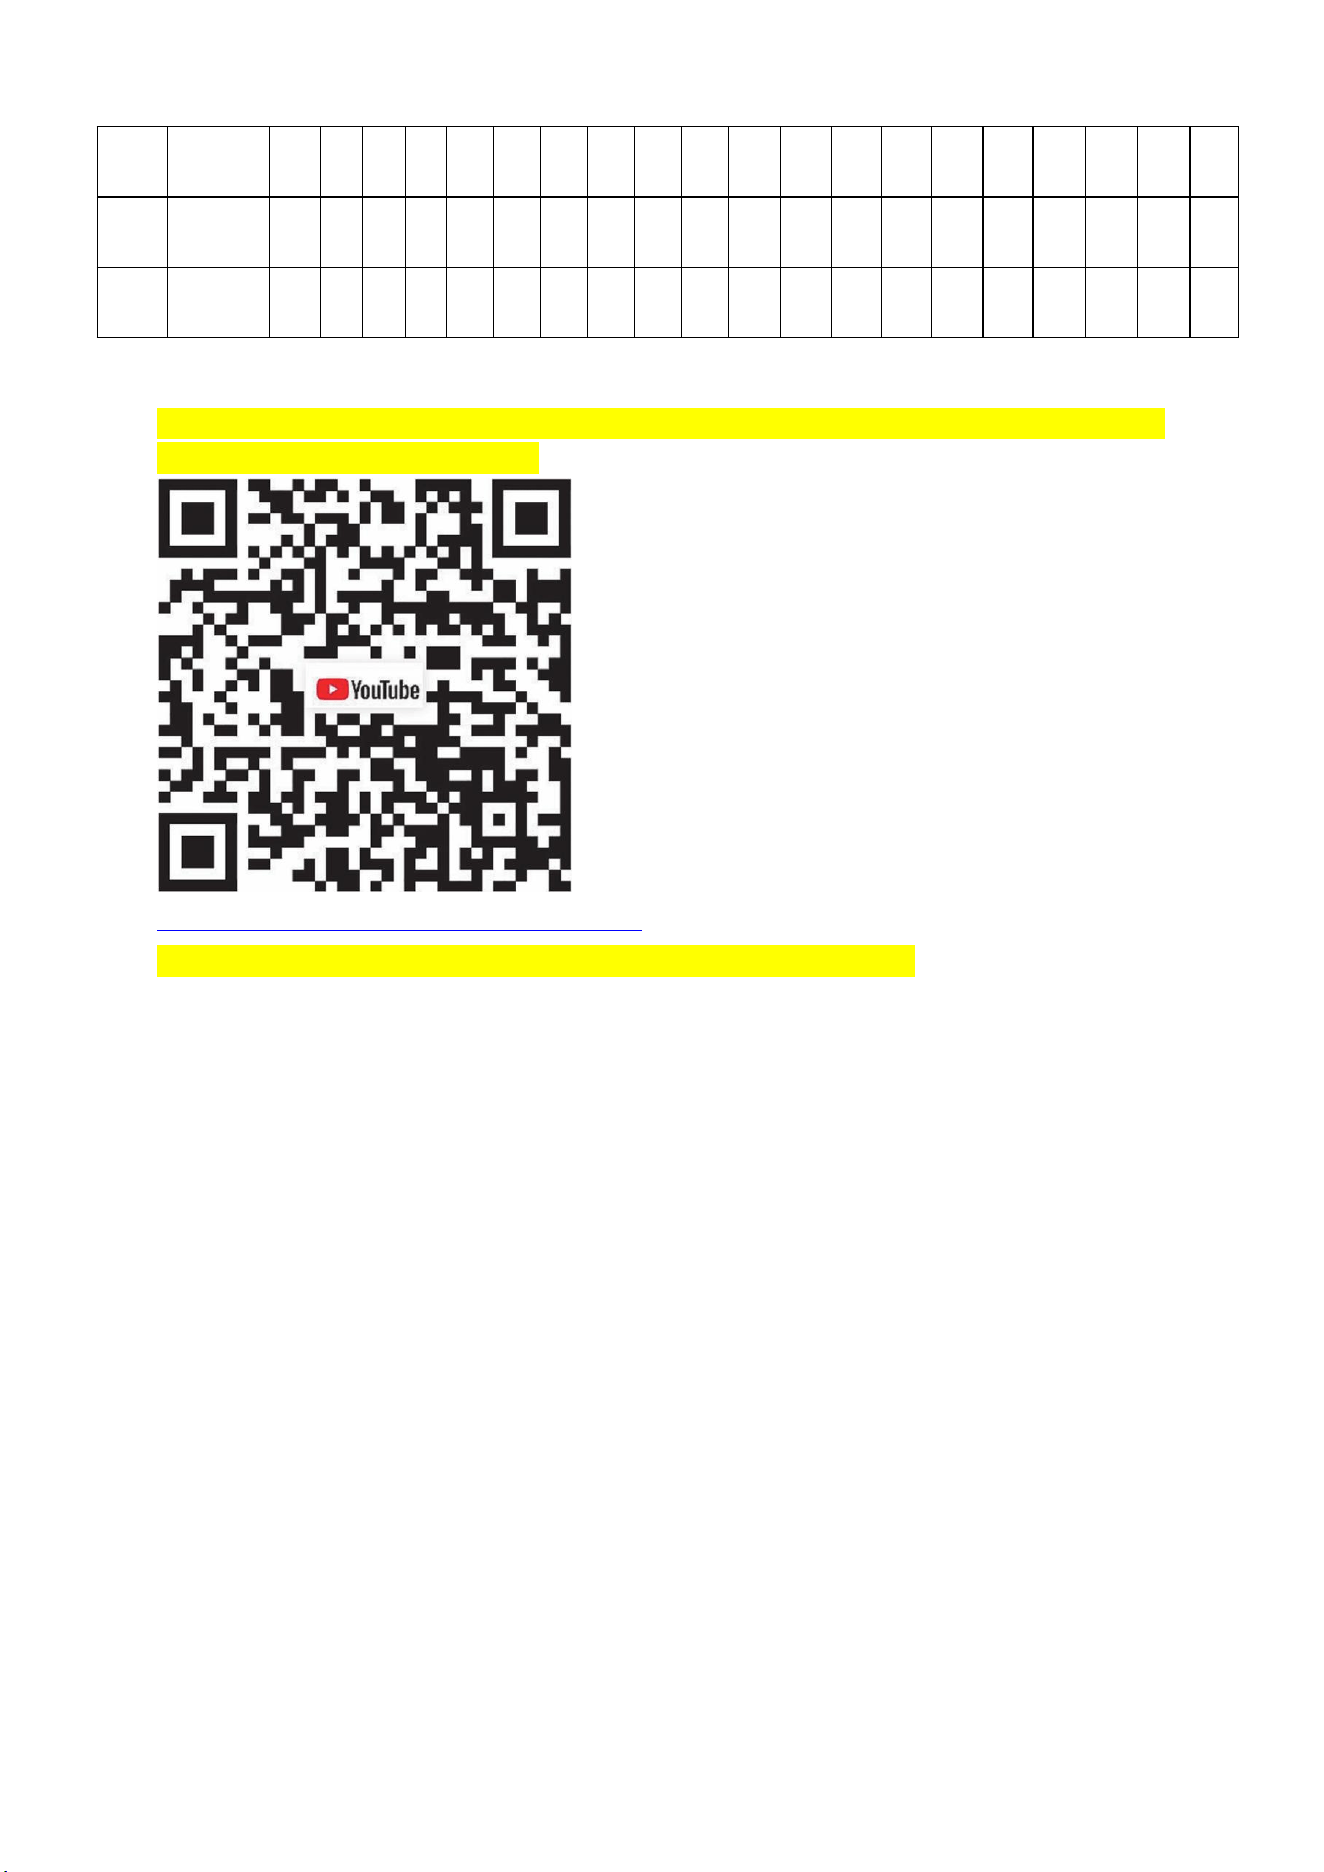
15
P10
Speed
1.
2
2.
4
3.
1
3.
7
4.
3
3.
1
2.
4
3.
7
4.
9
4.
9
3.
7
3.
7
3.
1
2.
4
2.
4
1.
2
2.
4
2.
4
1.
8
1.
8
P11
Speed
1.
8
2.
4
3.
1
5.
5
3.
1
5.
5
3.
1
3.
1
3.
1
5.
5
3.
1
3.
1
3.
1
3.
1
5.
5
5.
5
4.
9
4.
3
3.
7
1.
8
P12
Speed
1.
2
3.
1
4.
9
6.
2
4.
3
4.
3
6.
2
6.
2
4.
3
4.
3
6.
2
6.
2
3.
7
3.
7
5.
5
5.
5
3.
1
3.
1
2.
4
1.
8
Please watch the following video to get the usage method of the remote control: How to enter the
countdown mode and 12 HIIT programs:
https://www.youtube.com/watch?v=_I7xO5lMeGU
NOTE: If the scan fails, you can search for FOUSAE on YOUTUBE to get the video.
10. Sleep Mode Description
When the treadmill stops running and there is no activity for more than 10 minutes, it enters sleep mode,
and the electronic display automatically shuts off, Pressing any key can wake it up. The electronic display
will enter the initial standby mode again.
11. Safety Lock Function Description
During use, the safety lock should be placed in the designated position before operation, Removing the
safety lock will display "---" on various display windows of the electronic display, accompanied by a
warning sound, if the safety lock is removed during operation, the system will stop immediately. After
reattaching the safety lock, all motion data will be reset to 0.
16
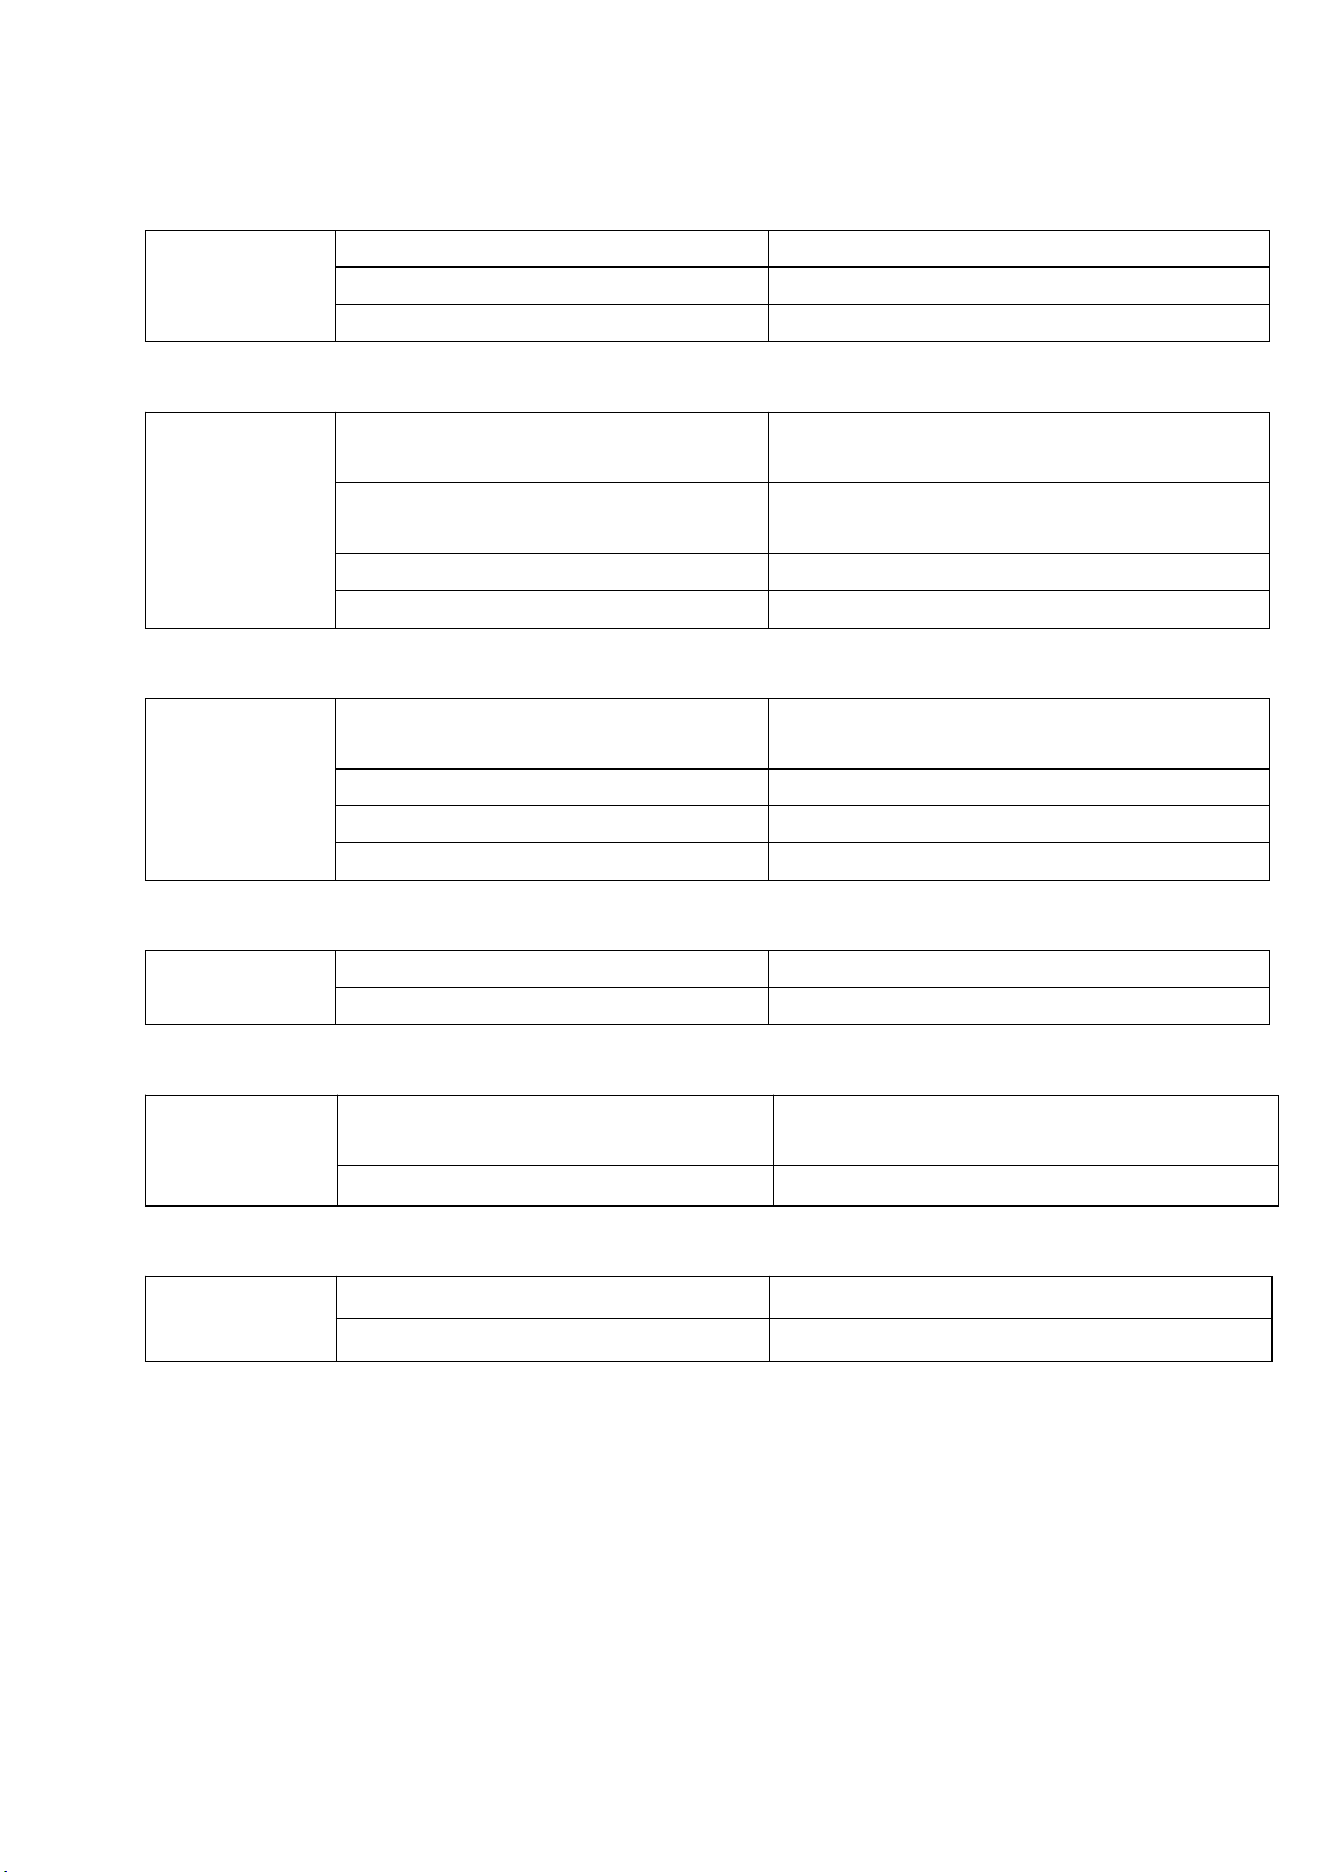
DC System Error Message Description for Treadmill
Er01: Indicates abnormal communication between the electronic display and the
electronic control system
Er01 FAQs
The interface of the upper and lower
control main connection lines is loose
Reinforce the connection line interface
The upper and lower control main
connection lines are broken
Replace the main connection lines of the upper and
lower control
The electronic display is broken
Replace the display
Controller damaged
Replace the controller
Er02:Er02: Indicates a lower control power input over voltage prompt
Er02 FAQs
User grid voltage is unstable and the peak
voltage is very low
External filter regulators need to be added
Controller damaged
Replace the lower control and wait for repair
Er03:Indicates a low voltage prompt for the lower control power input
Er03 FAQs
User grid voltage is unstable and the peak
voltage is very low
External filter regulators need to be added
Controller damaged
Replace the lower control and wait for repair
Er04:Indicates an open circuit anomaly in the main motor
Er04FAQs
The main motor wire is not connected or
loose
Reinforce the main motor connection wire
The main motor is open circuit and
damaged
Replace the motor
Controller open circuit, damaged
Replace the controller
The main motor is blocked and damaged
Replace the motor
Er05
:
Indicates an abnormal current ADC prompt
Er05 FAQs
User grid voltage is unstable and the peak
voltage is very high
External filter regulators need to be added
The wheel diameter value is set incorrectly
When resetting the wheel diameter value, try not
to exceed the rated voltage of the motor
Controller damaged
Replace the lower control and wait for repair
Er06:Indicates an abnormal voltage ADC prompt
Er06 FAQs
User grid voltage is unstable and the peak
voltage is very high
External filter regulators need to be added
The wheel diameter value is set incorrectly
When resetting the wheel diameter value, try not
to exceed the rated voltage of the motor
Controller damaged
Replace the lower control and wait for repair
17
Er08:Indicates a brushless motor phase loss prompt
Er08 FAQs
The main motor is damaged
Replace the motor
Abnormal damage to the controller
Replace the controller
Abnormal contact of the wire
Re-reinforce the plugging and unplugging wires
Er11:Indicates an overload anomaly alert
Er11 FAQs
The main motor wire is not connected or
loose
Reinforce the main motor connection wire
The main motor is open circuit and
damaged
Replace the motor
Controller open circuit, damaged
Replace the controller
The main motor is blocked and damaged
Replace the motor
Er13:Indicates Hall signal value or timing error prompt
Er13 FAQs
The motor hall signal line is not connected
or loose
Reinforce the Hall signal line
Motor Hall signal line timing error
Change the timing of the motor Hall signal line
Motor mismatch
Replace the motor
Controller damaged
Replace the lower control and wait for repair
Er14:Indicates a heat sink NTC temperature above 93 degrees
Er14 FAQs
The controller temperature is too high
Stop using the cooling
Abnormal damage to the controller
Replace the controller
Er15:Indicates triggering the hardware protection prompt
Er15 FAQs
Power transistor breakdown, controller
damage
Replace the controller
Motor short circuit
Replace the motor
Er17:Indicates excessive Hall signal error prompt
Er17 FAQs
Hall signal error is too large
Replace the motor
Controller damaged
Replace the lower control and wait for repair

18
Safety Precautions for Use
Thank you for choosing our product. Proper use of the treadmill ensures your safety and
convenience. Please read the following content carefully before using the treadmill:
1、 Only after confirming that the treadmill has been installed in strict accordance with the
installation instructions can you connect the power supply. When placing the treadmill,
ensure it does not block the power outlet on the wall, and reserve a space of 0.8 meters
in front of it for easy access to the outlet.
2、 Reserve a safety space of 0.8 meters on each side of the treadmill, and a safety space of
2 meters (length) × 1 meter (width) at the rear of the treadmill.
3、 Insert the power cord into a grounded power socket. The power cord of the electric
treadmill is dedicated. If the power cord is damaged, please purchase a replacement
from the dealer and have it installed by a professional, or contact our company directly to
arrange for a professional to replace it.
4、 The treadmill is an indoor device and must not be used outdoors. Place it in a clean, flat
area, keep it away from moisture, and do not place it on thick carpets or similar items, as
this may affect the air circulation at the bottom of the treadmill. The electric treadmill is
a dedicated device and must not be modified or used for other purposes.
5、 Do not wear overly large or loose clothing during exercise to prevent it from getting
caught in the electric treadmill and causing safety accidents. It is recommended to wear
running shoes or fitness shoes with rubber soles.
6、 Do not remove the protective cover casually. If it needs to be opened for maintenance,
be sure to unplug the power cord first.
7、 When the electric treadmill is in use, keep children away from it to prevent hazards.
8、 If you are using the treadmill for the first time, remember to hold onto the handrails
until you feel comfortable enough to let go.
9、 If the electronic display system malfunctions, causing the electric treadmill to suddenly
accelerate or the speed to increase automatically continuously, please immediately pull
out the safety key from the electronic display, and the electric treadmill will stop
immediately.
10 、 If the electronic system fails and the treadmill cannot be stopped, quickly place your
hands on the handrails on both sides, jump off the running area at the same time, step on
the side strips on both sides, turn off the power supply in a timely manner, and notify the
after-sales personnel.
11、When the electric treadmill is not in use, the power cord should be unplugged and stored
properly.
12、Minors must be accompanied by an adult when using the electric treadmill.

19
Exercise Recommendations and Guidelines
If you are using the electric treadmill for the first time, it is necessary for you to read the
following content:
Preparation
Before exercising, it is essential to understand your health condition to develop an
exercise plan that suits you. It is recommended to consult a doctor or professional; this may
help you achieve twice the result with half the effort.
Before using the electric treadmill for the first time, stand beside it to familiarize yourself
with its controls: starting, stopping, speed adjustment, etc. Only after you are familiar with
these operations can you start using it. Then stand on the plastic anti-slip plates on both
sides of the treadmill, hold onto the handrails with both hands, set the machine to a low
speed of 1.6-3.2 KM/H (1-2 MPH), stand upright, look forward, and "walk" a few steps on the
running belt to relax as much as possible. Then step onto the running belt and move with it.
When you feel adapted, slowly increase the speed to 3-5 KM/H (1.9-3.1 MPH). Maintain this
speed for about 10 minutes, then slowly stop the machine. Do not run at high speed when
using it for the first time to prevent falls.
Exercise
Walk about 1 KM (0.6 MI) at a steady pace and record the time taken. This may take
15-25 minutes. When walking at a speed of 4.8 KM/H (3 MPH), it takes approximately 13
minutes to complete 1 km (0.6 MI). After you can easily do this several times, you can
gradually increase the speed. Maintaining this exercise for 30 minutes will provide you with a
good workout. Before starting a walking exercise program, keep in mind: do not be impatient.
This exercise is for your lifelong health, not an overnight miracle.
Exercise Frequency
The goal is 3-5 times a week, with each exercise session lasting 15-60 minutes. It is best
to develop an exercise schedule based on your physical condition rather than your
preferences. You can adjust the intensity of the exercise by modifying the speed and exercise
duration.
amount of exercise
A Time-Saving Tip - Exercising for 15-20 minutes is a great way to save time. Warm up
for 5 minutes at a speed of 4-4.8 KM/H (2.5-3 MPH), then increase the speed by 0.3 KM/H
(0.2 MPH) every minute until you reach a speed where maintaining it for 45 minutes feels
challenging.
The above content is for reference only. For specific circumstances, please consult a
professional.
Clothing
All you need is a good pair of shoes; it is recommended to choose running shoes or
fitness shoes. At the same time, ensure there is no debris stuck on the shoe soles to avoid
bringing debris into the running belt, which may wear the running board and running belt.
Wear comfortable clothing suitable for exercise; cotton, breathable sportswear is
20
recommended.
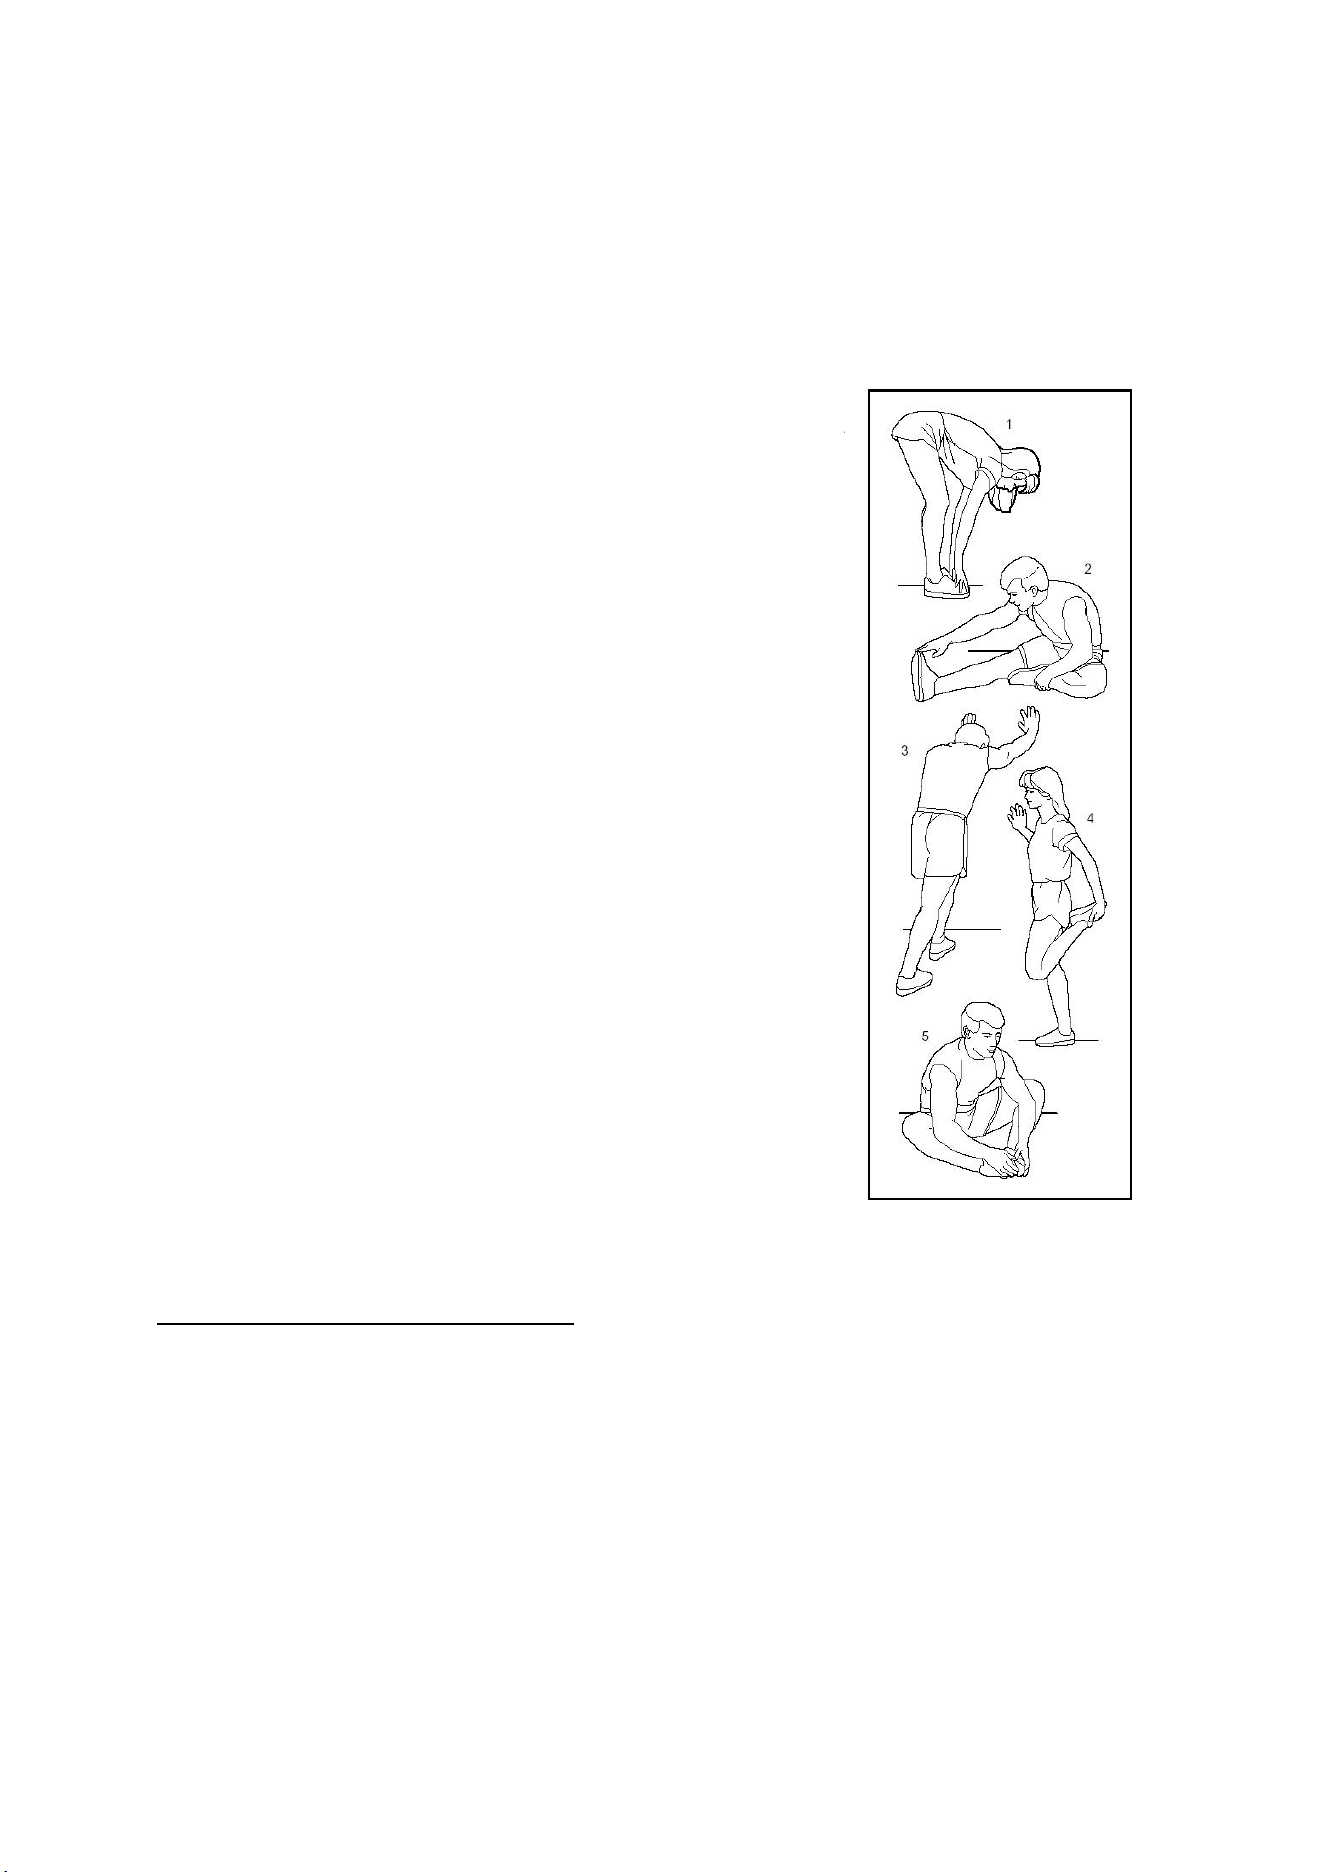
Stretching Exercises
No matter what speed you walk at, it is best to do some stretching exercises first. Warm
muscles are easier to stretch, so walk for 5-10 minutes to warm up first. Then stop and
perform the following stretching exercises - do each exercise 5 times, holding each stretch for
10 seconds or more per leg. Repeat these stretches after the workout.
1、 Forward Bend Stretch
Bend your knees slightly, slowly lean your body forward,
relax your back and shoulders, and try to touch your
toes with your hands. Hold for 10-15 seconds, then
relax. Repeat 3 times for each leg.
2、 Hamstring Stretch
Sit on a clean cushion, straighten one leg. Pull the
other leg inward so that it is close to the inner side of the
straight leg. Try to touch your toes with your hands. Hold for
10-15 seconds, then relax. Repeat 3 times for each leg.
3、 Calf and Achilles Tendon Stretch
Stand facing a wall or tree, with one foot behind you.
Keep the back leg straight and the heel on the ground, and lean
toward the wall or tree. Hold for 10-15 seconds, then relax.
Repeat 3 times for each leg.
4、Quadriceps Stretch
Hold onto a wall or table with your left hand to
maintain balance, then reach back with your right hand, grab
your right ankle, and slowly pull it toward your buttocks until
you feel tension in the muscles on the front of your thigh. Hold
for 10-15 seconds, then relax. Repeat 3 times for each leg.
5、Sartorius Muscle (Inner Thigh Muscle) Stretch
Sit with the soles of your feet together and your knees
pointing outward. Grab your feet with both hands and pull
them toward your groin. Hold for 10-15 seconds, then relax.
Repeat 3 times.
Exercise Safety Measures
Before starting any exercise program, please consult a professional. They can recommend the
exercise frequency, intensity, and duration that match your age and physical condition.
During exercise, if you experience chest tightness, chest pain, irregular heartbeat, shortness
of breath, dizziness, or other discomforts, stop immediately! Consult a professional before
continuing to exercise.

21
Maintenance Guide
Warning:Before cleaning or maintaining the product, be sure to unplug the power cord of
the electric treadmill.
Cleaning:Thorough cleaning will greatly extend the service life of the electric treadmill.
Regularly remove dust to keep the components clean. Be sure to clean the exposed parts on
both sides of the running belt; this will reduce the accumulation of debris under the
running belt. Ensure your sports shoes are clean to avoid bringing debris into the
running belt, which may wear the running board and running belt. Wipe the surface of
the running belt with a damp cloth dipped in soap. Please note that water should not
splash onto the electrical components or under the running belt.
Warning: Before moving the motor protective cover, be sure to unplug the power cord of
the electric treadmill. Open the motor protective cover at least once a year to vacuum and
clean the motor, and apply silicone oil to lubricate the running belt.
The space between the running board and running belt of this electric treadmill has
been pre-coated with lubricating silicone oil. The friction between the running belt and
running board has a significant impact on the service life and performance of the electric
treadmill, so it is necessary to apply lubricating silicone oil regularly. We recommend
checking the running board regularly. If the running board is damaged, please contact our
customer service center.
We recommend applying lubricating silicone oil between the running belt and running board
of the electric treadmill according to the following schedule:
Light-usage users (using less than 3 hours per week): Once every 6 months
Medium-usage users (using 3-5 hours per week): Once every 3 months
Heavy-usage users (using more than 5 hours per week): Once every 1.5 months
We recommend purchasing lubricating silicone oil from your local dealer or contacting our
company directly.
22
Maintenance Instructions
To better maintain your electric treadmill and extend its service life, it is recommended
to turn off the power and let the machine rest for 10 minutes after continuous use for 2
hours before using it again.
If the running belt is too loose, it will slip during running; if it is too tight, it may reduce
the motor performance and cause increased wear on the rollers and running belt. When the
running belt is properly tightened, you can lift both sides of the running belt off the running
board by approximately 50-75mm with your hands.
Running Board Lubrication
1. As mentioned above, the running board should be lubricated in a timely manner, but do
not over-lubricate. More lubricant is not better. Remember: proper lubrication is an
important factor in extending the service life of the treadmill.
2. To check if additional lubricant is needed, simply grasp the running belt and reach as far
as possible to touch the center of the back of the running belt. If your hand is coated
with silicone oil (with a slight damp feeling), it means no additional lubricant is needed.
If the running board is dry and no silicone oil is stuck to your hand, lubricating silicone oil
needs to be added.
3. Steps to apply lubricating silicone oil to the running board:
Tilt the running deck to one side, pull up the running belt, then drop approximately
10ML of silicone oil between the running board and running belt. Then place the running
deck flat, operate the treadmill at a speed of 1km/h (0.6mph) to evenly distribute the
silicone oil, and gently step on the running belt on the front of the running deck from left to
right. Maintain this for about 8-10 minutes to ensure the silicone oil is fully absorbed by the
running belt.
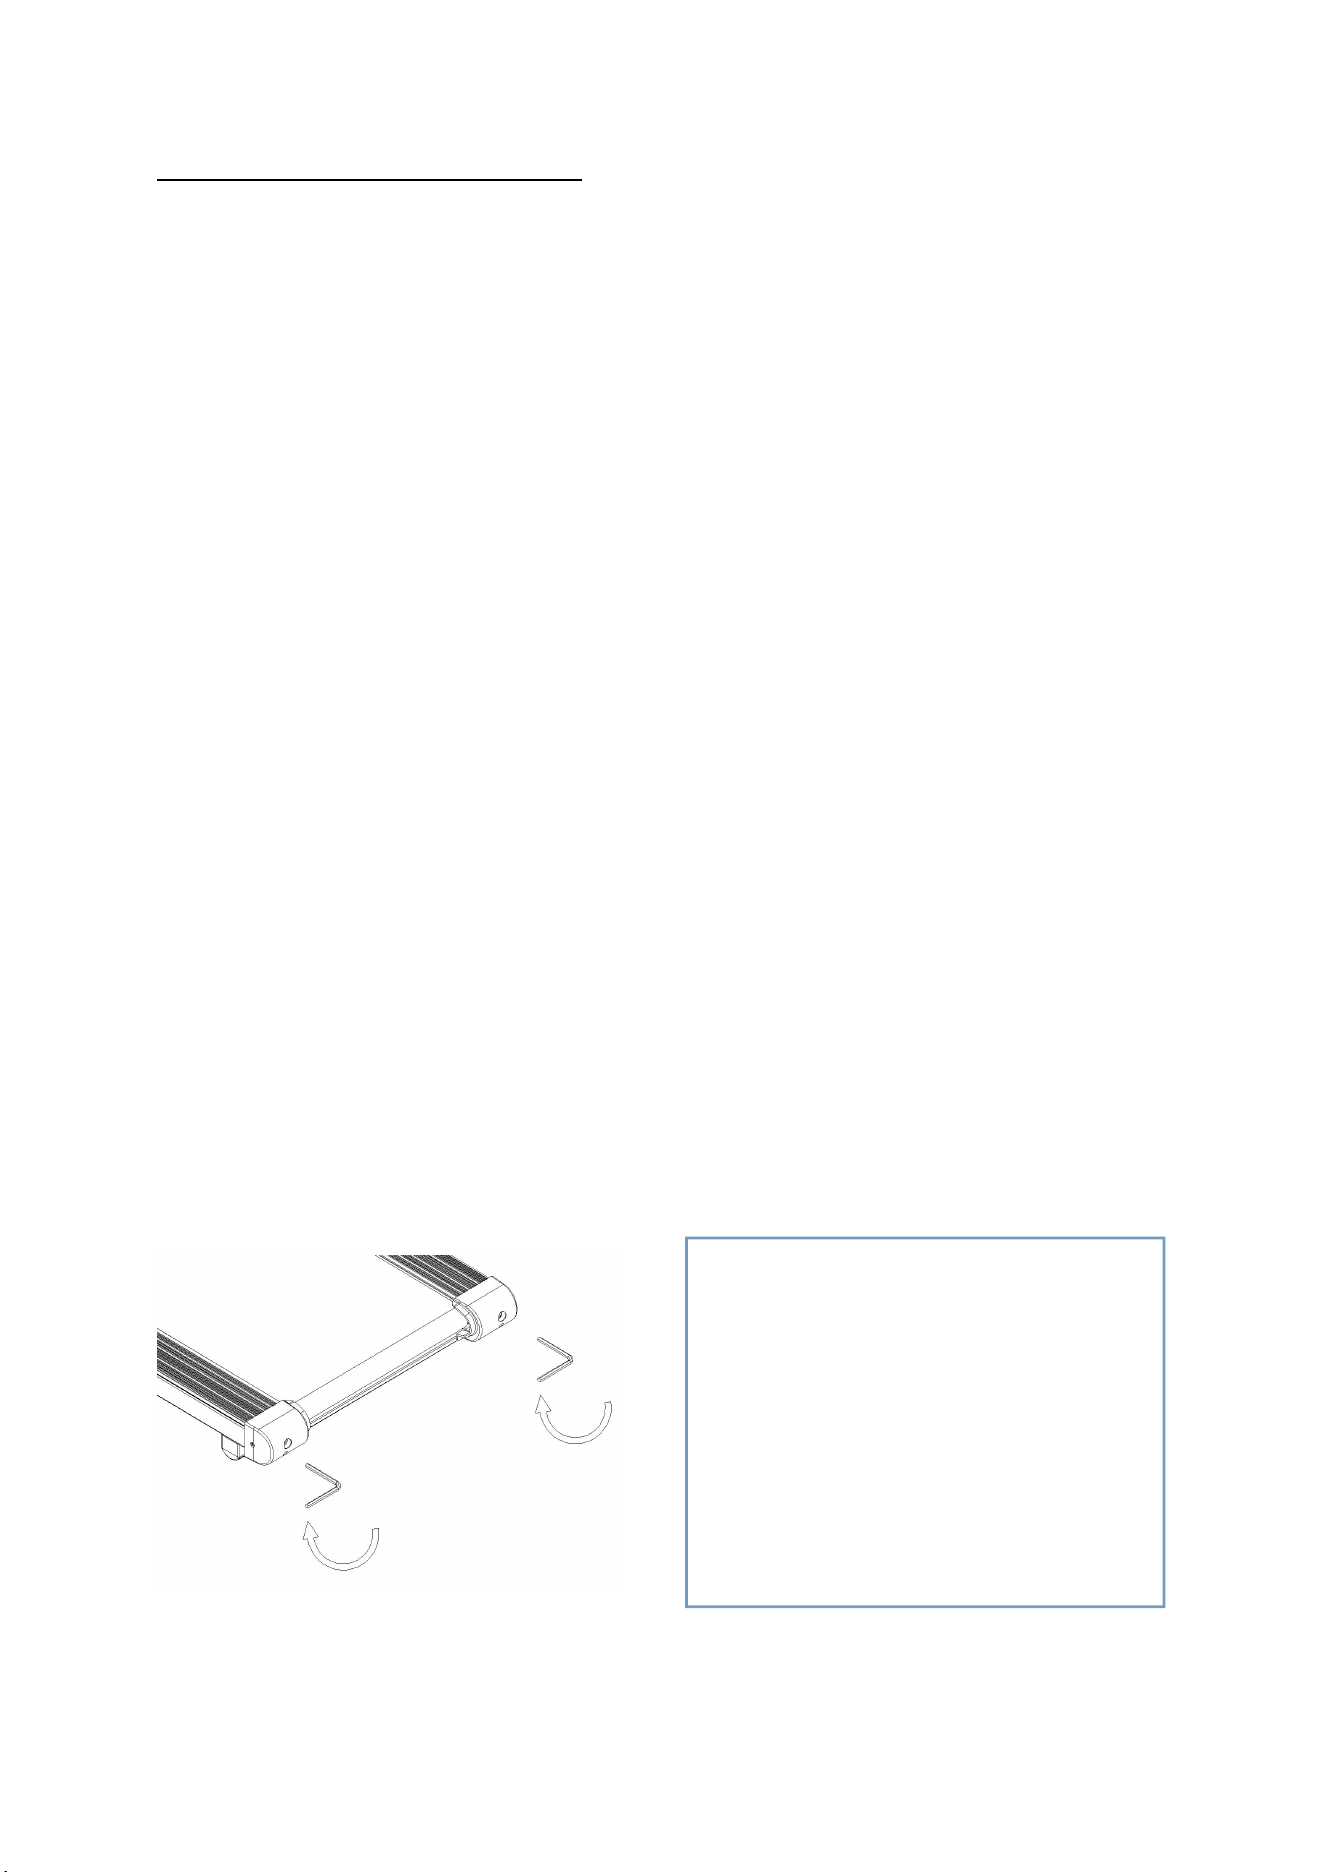
Running Belt Tension Adjustment
The running belt of the treadmill is adjusted
before leaving the factory. After unpacking
and installing the treadmill, please first check
the operation of the running belt. If the user
experiences hesitation or slipping during
running, adjust the running belt adjustment
bolts synchronously on both sides in a
clockwise direction, ½ turn at a time. Make
fine adjustments until the above phenomena
no longer occur during normal use.
23
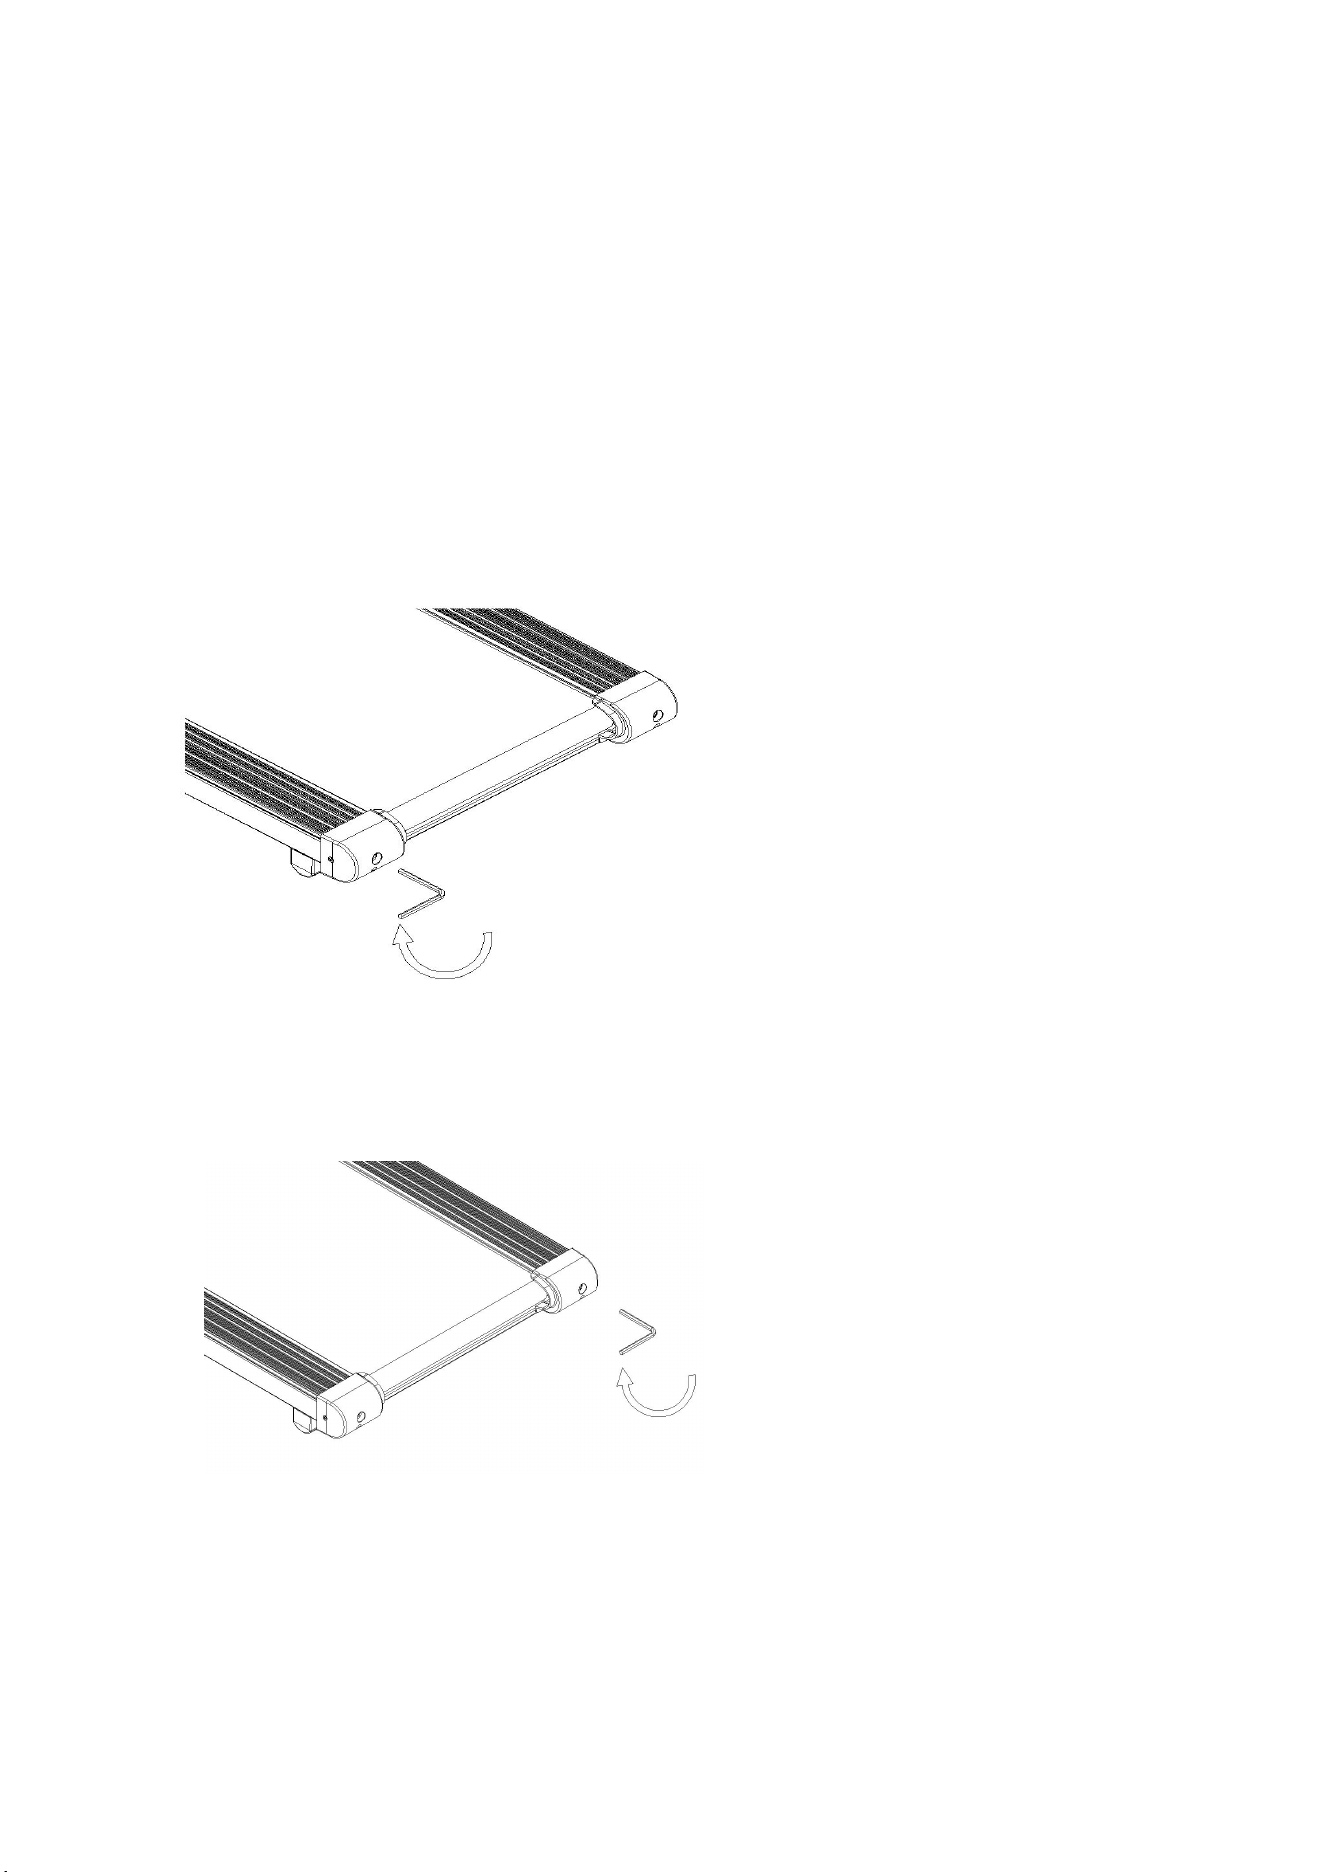
Running Belt Alignment
1.Place the electric treadmill on a flat surface.
2.Operate the electric treadmill at a speed of approximately 3.5km/h (2.2 mph).
3.If the running belt deviates to the left, turn the left adjustment bolt ¼ turn clockwise,
then pause for 30 seconds to allow the running belt to align automatically. If it does not align,
repeat the above adjustment method.
4.If the running belt deviates to the right, turn the right adjustment bolt ¼ turn
clockwise, then pause for 30 seconds to allow the running belt to align automatically. If it
does not align, repeat the above adjustment method.
If the running belt deviates to the left,
turn the left adjustment bolt ¼ turn
clockwise, then pause for 30 seconds
to allow the running belt to align
automatically. If it does not align,
repeat the above adjustment method.
If the running belt deviates to the
right, turn the right adjustment bolt ¼
turn clockwise, then pause for 30
seconds to allow the running belt to
align automatically. If it does not align,
repeat the above adjustment method.

24
Frequently Asked Questions(FAQ)
Issue
Solution
The treadmill won't turn on.
Check and reconnect the power
cord, and turn on the power
switch.
The treadmill makes a
squeaking
noise.
Follow the previous steps to
lubricate the running board
with silicone oil.
The remote doesn't work.
Ensure the battery insulation
sheet is removed and reinstall
the battery properly or replace
the button cell battery.
Running belt is misaligned.
Refer to the running belt
adjustment instructions.
Error code appears.
Please check the previous error
code for the description and
solution.

25
Warranty
Thank you for choosing FOUSAE, we provides 12 months after-sales service,
please feel free contact the after-sales email to activate the warranty. Failure to
contact us for activation will be considered as automatic waiver of the warranty.
(Please send us your Amazon Order ID/Number to us and confirm successful
activation after receiving our email reply).
If you encounter the above list or other problems in the process of using the
treadmill, please feel free to contact our after-sales department, we will
provide you with guidance.
This warranty does not cover:
Damage caused by accident, abuse, mishandling, or transport.
Damage resulting from unauthorized disassembly or repairs.
Damage caused by not following FOUSAE's instructions.
Damage exceeding the original product cost.
Damage due to improper storage or protective conditions by the customer.
The inability to provide a order number or proof of purchase date.
Purchased from a store other than our own.

26
FCC Statement:
This device complies with part 15 of the FCC Rules. Operation is subject to the
following two conditions:
(1) This device may not cause harmful interference, and
(2) this device must accept any interference received, including interference that
may cause undesired
operation.
This equipment has been tested and found to comply with the limits for a Class B
digital device, pursuant
to part 15 of the FCC Rules. These limits are designed to provide reasonable
protection against harmful
interference in a residential installation. This equipment generates, uses and can
radiate radio frequency
energy and, if not installed and used in accordance with the instructions, may
cause harmful interference to
radio communications. However, there is no guarant ee that interference will not
occur in a particular
installation. If this equipment does cause harmful interference to radio or television
reception, which can
be determined by turning the equipment off and on, the user is encouraged to try
to correct the
interference by one or more of the following measures:
—Reorient or relocate the receiving antenna.
—Increase the separation between the equipment and receiver.
—Connect the equipment into an outlet on a circuit different from that to which the
receiver is connected.
—Consult the dealer or an experienced radio/TV technician for help.
Caution: Any changes or modifications not expressly approved by the party
responsible for compliance
could void the user's authority to operate the equipment.
This equipment complies with FCC radiation exposure limits set forth for an
uncontrolled environm ent.
This transmitter must not be co‐located or operating in conjunction with any other
antenna or transmitter..