CONTENT
Warnings and Safety Instructions ···········································02
Setting Up for Treadmill ···························································08
Plugging in and Powering on ·····················································11
Maintenance and Care ······························································12
Package List ··············································································13
Product Structure ····································································14
Product Specifications ······························································14
Introduction To Display ······························································16
Remote Control Instructions ······················································19
Operation Mode ···········································································21
Bluetooth Speaker Connection ··················································23
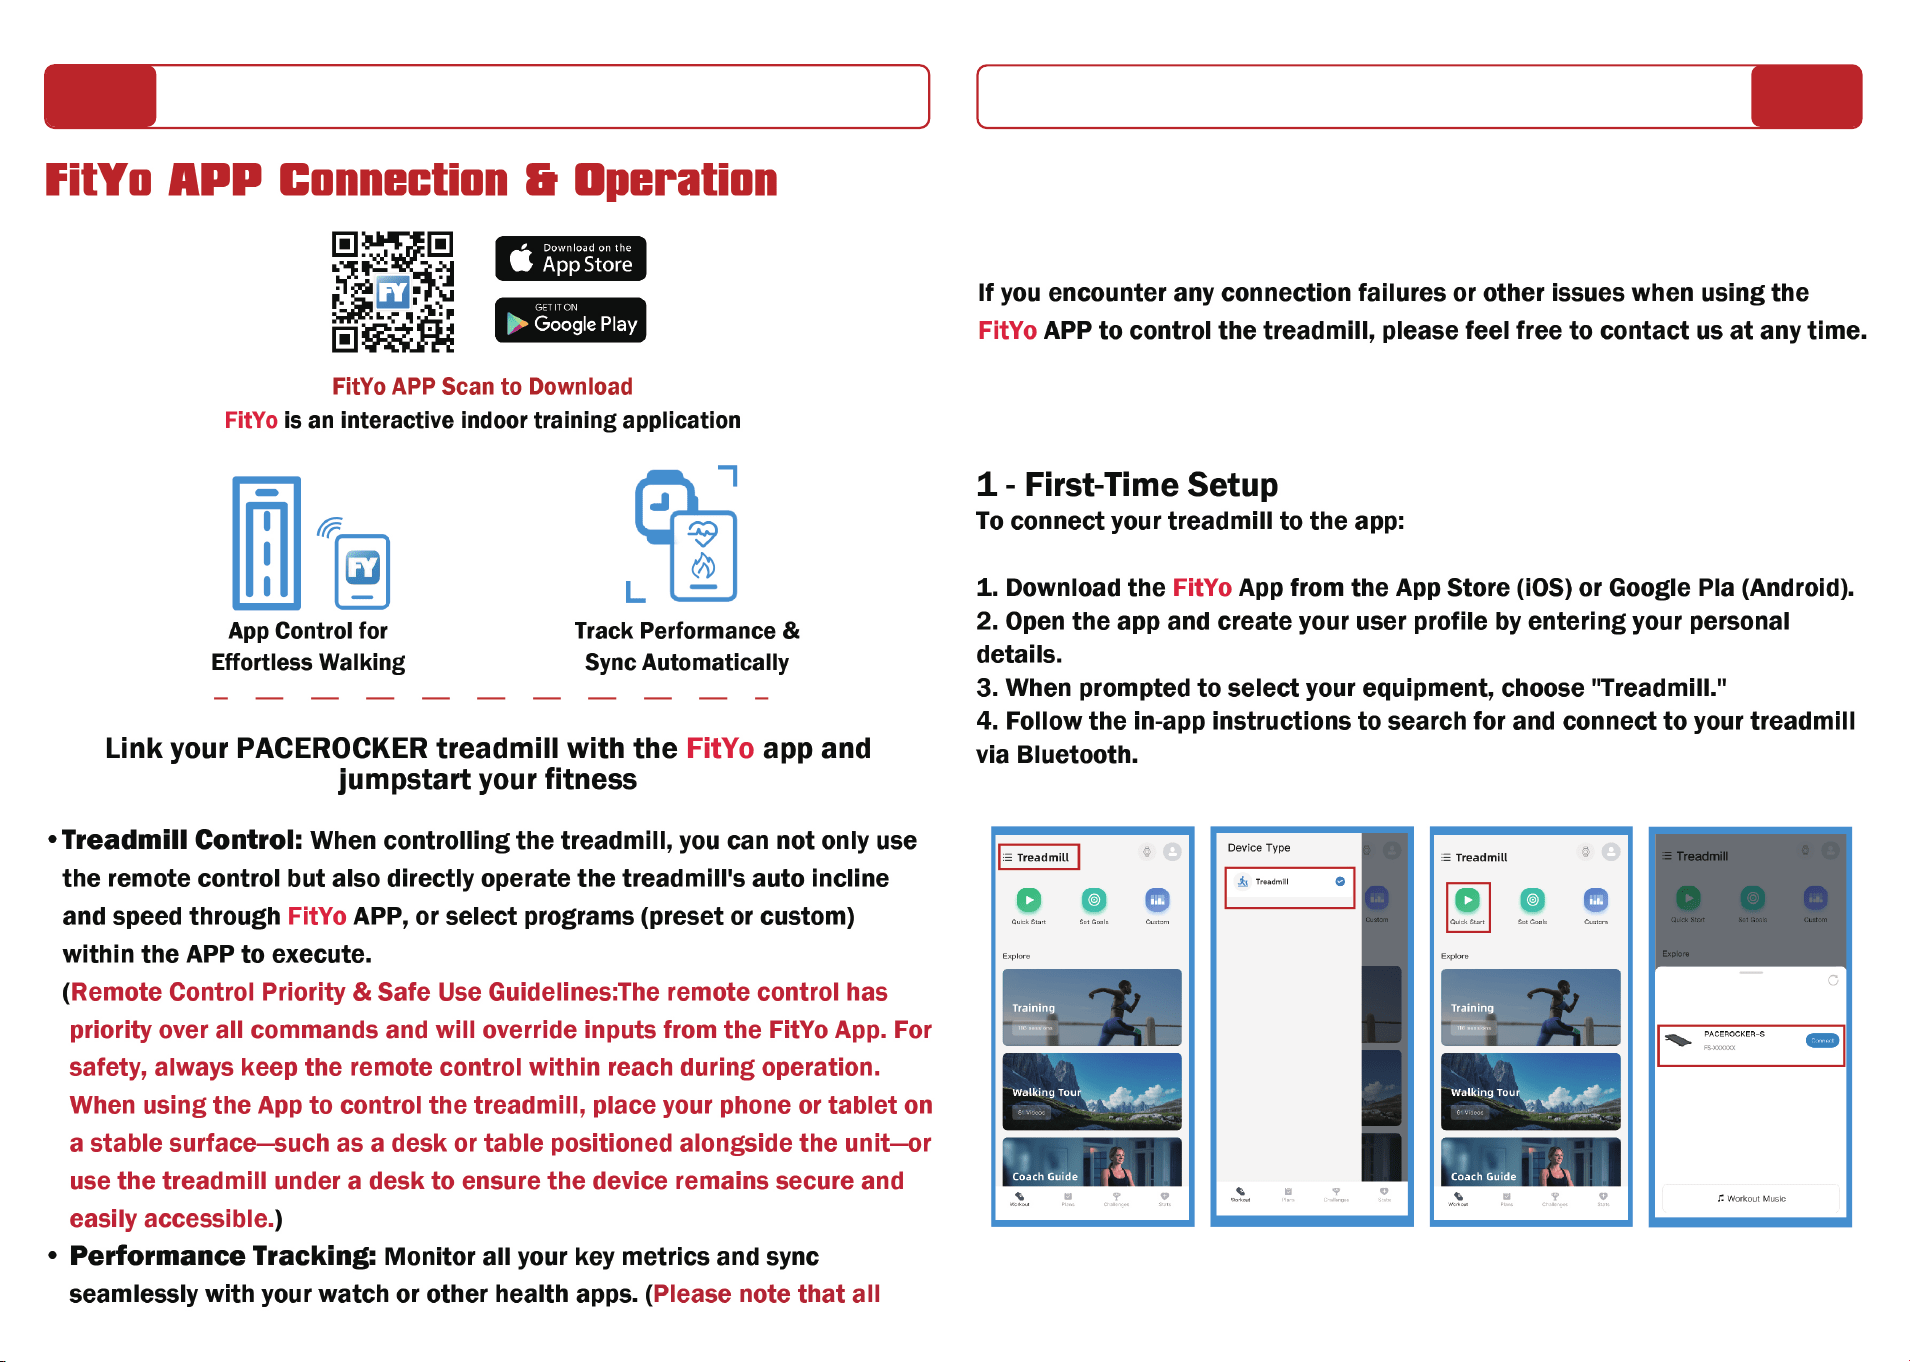
FitYo APP Connection & Operation ···········································24
Running Belt Adjustment ····························································30
Oil Belt Lubricant ········································································31
Trouble Shooting ·······································································33
Warranty Statement ··································································34
Fuel Your Passion
Ignite Your Fitness
User Manual
Treadmill With Auto Incline
03
02
Warnings and Safety Instructions
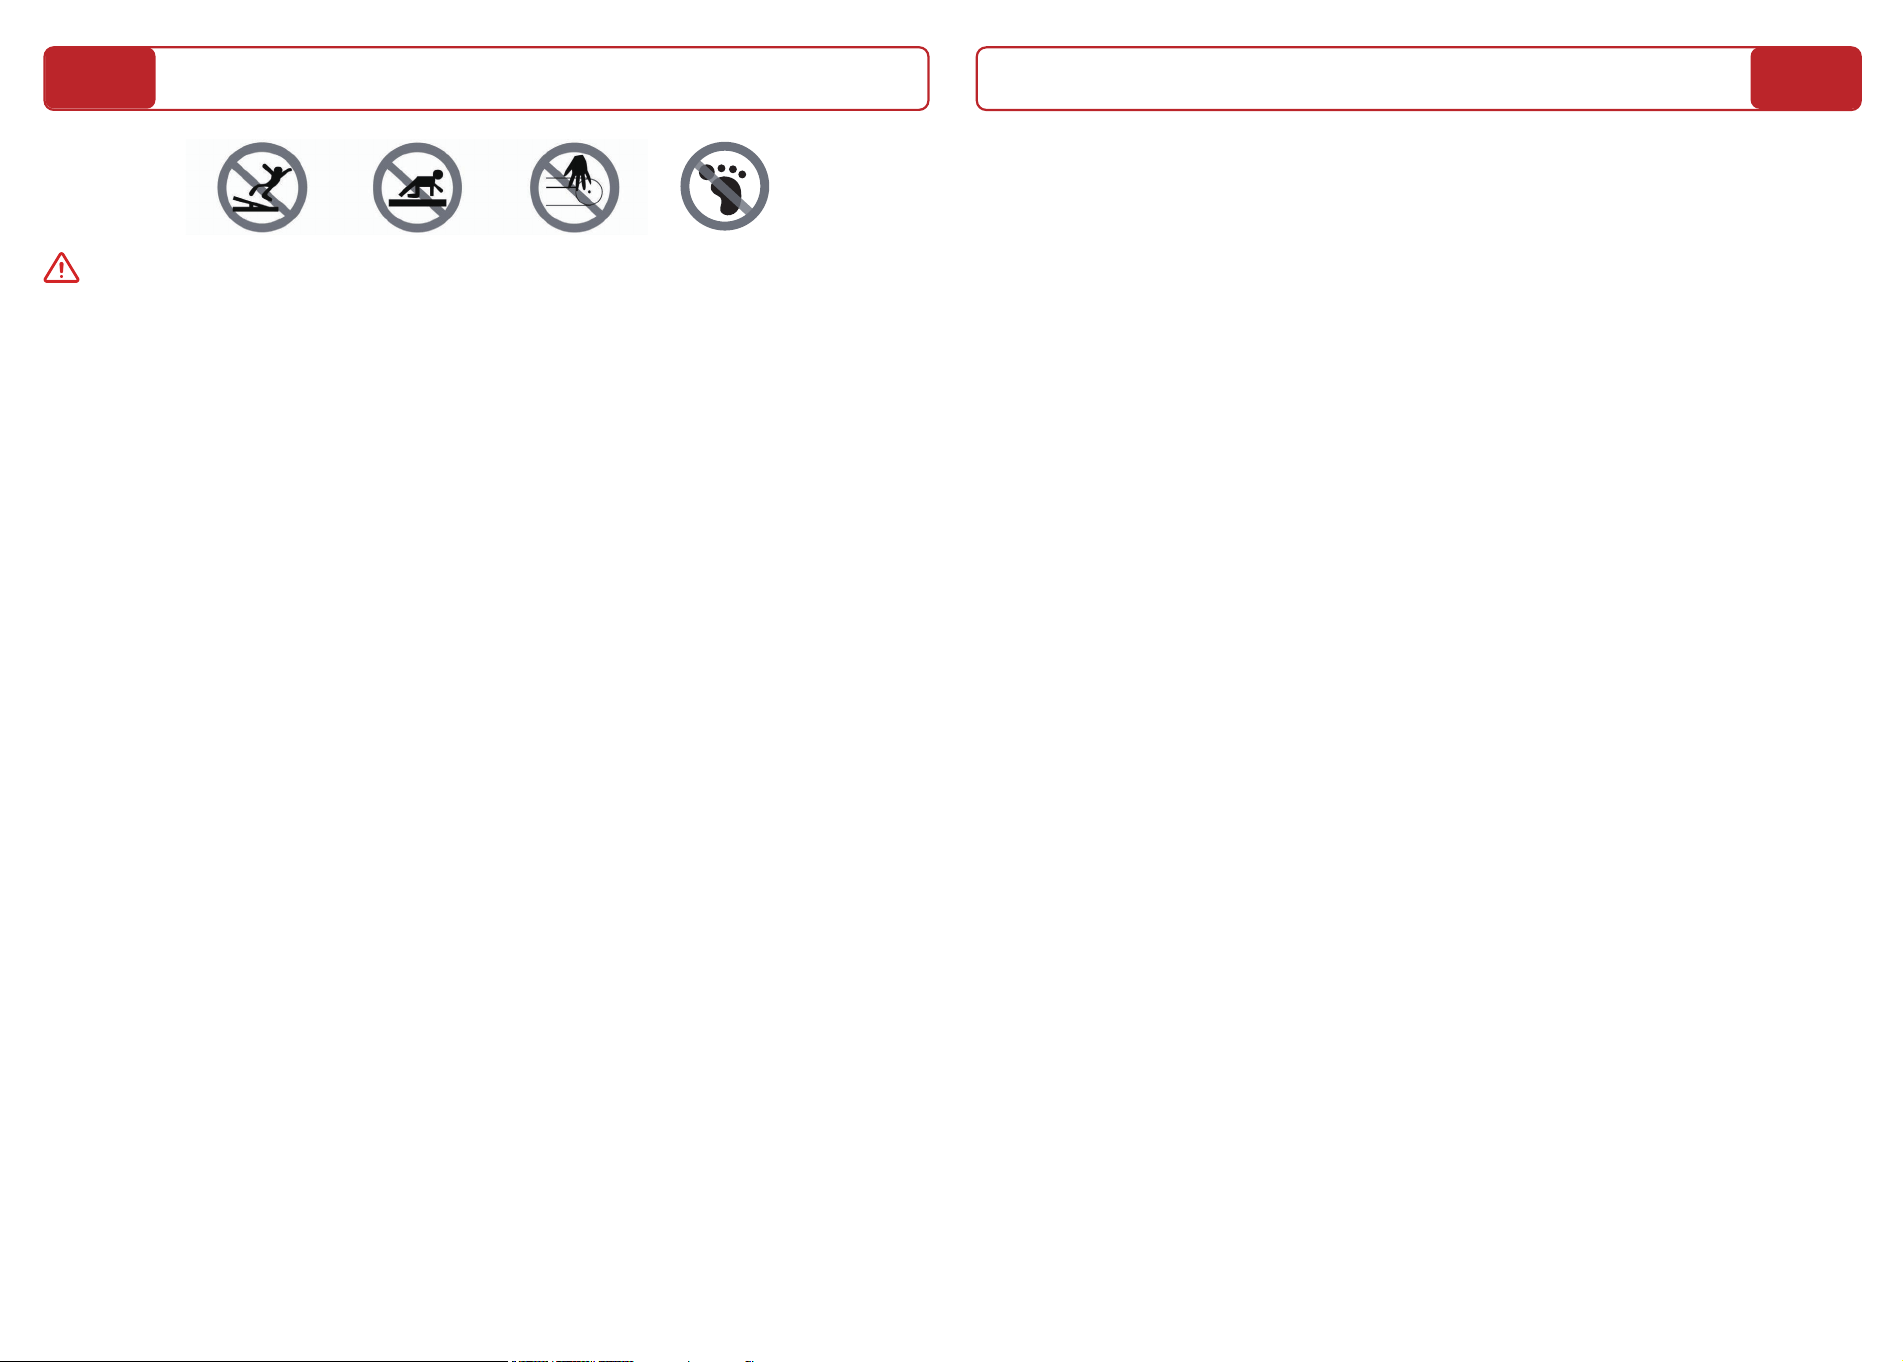
- Read Before Use
1.Set up and operate the treadmill on a solid, level surface and in an area
not accessible to children, pets, or anyone else who should not have access
to the treadmill.
2.People under the age of 16 and persons with reduced physical, sensory,
or mental capabilities that impair the safe use of the equipment must not
use the treadmill. People over the age of 16 and persons with a lack of
experience and knowledge must be given supervision or instruction before
using the treadmill.
3.Keep children, pets, and objects away from the treadmill at all times.
Never allow children of an age to play with or on the treadmill.
4.Inspect the treadmill for loose, worn, damaged, or incorrect parts before
using. Do not use before parts are replaced, repaired, or tightened.
5.Always keep the running surface clean and dry.
6.Never operate the treadmill if it isn’t working properly, or if the power
cord has been damaged. Keep power cord away from heated surfaces,
sharp edges, and water.
WARNING: For your safety, please read all precautions and
instructions in this booklet before using the equipment. Keep this booklet
for future reference. All users of this equipment must read and understand
these safety instructions before operating the treadmill.
7.To reduce the risk of burn, fire, electric shock, or injury to persons,
connect this appliance only to a properly grounded outlet.
8.Users must not be over 450 lb/204 kg.
9.This product can only be used by one person at a time.
10.Make sure you have at least 78.7 in/2 m of clearance directly behind
the treadmill, and 24 in/60 cm of clearance on each side of the treadmill.
Keep the area around the treadmill clear of furniture, equipment, and
accessories.
11.Exposed moving parts can cause serious injury. Keep hands away from
moving parts. Never touch the moving belt or reach under the treadmill
while it is powered on. Never put items under the deck.
12.Use only as described. Misuse of this equipment may result in serious
injury or death. PACEROCKER is not responsible for damage or injury
caused by inappropriate use.
13.Read and follow all warnings, instructions, and procedures before using
the PACEROCKER walking pad. It is the owner’s responsibility to ensure
that all users are aware of all warnings and precautions.
14.Keep the area around the treadmill clear of furniture, exercise
equipment or other objects, and abide by clearance requirements at all
times. Do not place objects on the running belt.
15.Use caution when stepping on and off the PACEROCKER walking pad.
Be careful when mounting and dismounting. Never mount or dismount
while the belt is moving.
16.Consult a physician before beginning a new fitness plan. Incorrect or
excessive training can result in serious injury.
05
04
17.If you experience faintness, chest pain, or shortness of breath, stop
exercising immediately and consult a physician.
18.Metrics on the screen may be inaccurate. Use values for reference only.
19.Ensure that the power cable never passes under the PACEROCKER
walking pad. Never operate the treadmill if it isn’t working properly, or if the
power cord has been damaged. Keep the power cord away from heated
surfaces and sharp edges. Always keep the power cable clean and dry.
Sweat, spills, and other damage to the power cable may result in property
damage or bodily harm.
20.The treadmill is for indoor use only. Do not store or operate the treadmill
outdoors, at high humidity levels, or in damp or wet locations.
21.The treadmill is designed for home use. Do not use in a commercial or
rental setting.
22.To prevent personal injury, do not wear loose or dangling clothing while
using the treadmill. Keep towels and loose clothing away from the belt.
Make sure your shoelaces don’t extend past the soles of your shoes.
23.Do not operate where aerosol (spray) products are being used or where
oxygen is being administered.
24.If an error occurs during operation, the treadmill belt may come to a
gradual or sudden stop, depending on the error and your speed. Always
remain alert while using the treadmill.
25.Use only original parts from
PACEROCKER
. Unauthorized changes or
modifications to this equipment could damage the treadmill and impair its
operation.
26.Do not attempt to service the treadmill yourself other than performing
the basic maintenance described in this manual. Service other than basic
maintenance should be performed by authorized personnel.
27.If the treadmill overheats or emits smoke or a burning odor, discontinue
use immediately, unplug the unit, and contact customer service for
replacement.
Cleaning:
• Always switch power off, unplug the treadmill when the treadmill is not in
use.
• Do not soak or spray pad surfaces with liquid. Clean using a damp cloth.
SAVE THESE INSTRUCTIONS.
07
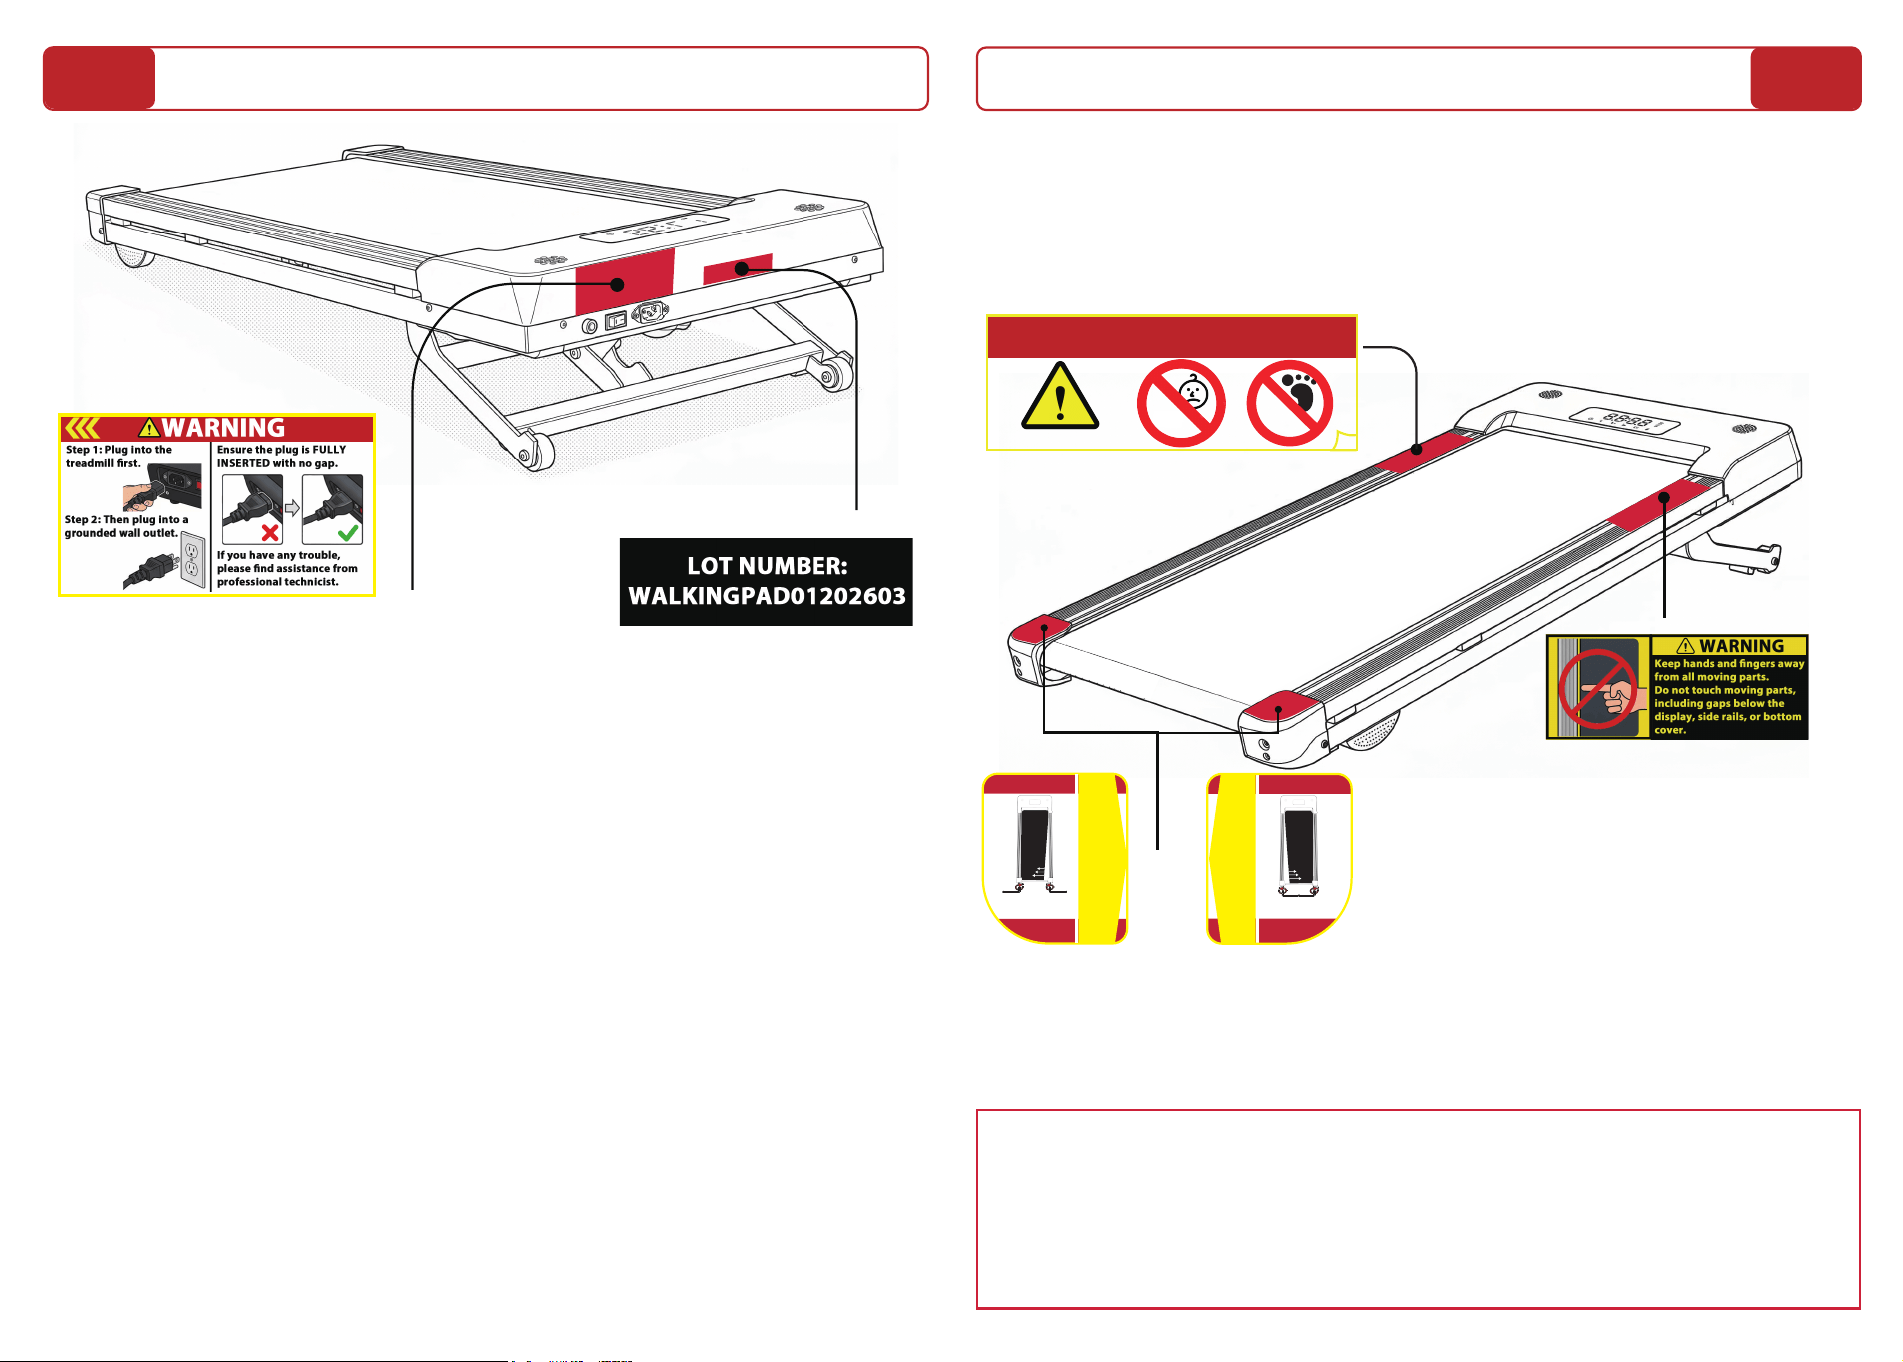
Insert the power cord into the treadmill firmly
first. • Make sure it is fully seated. • Then plug
the other end of the power cord into a wall
outlet. • This product must be grounded. •
Improper connection of the equipment-grounding
conductor can result in a risk of electric shock. •
Do not modify the plug provided with the product.
• If an error occurs during operation, the
treadmill belt may come to a gradual or sudden
stop, depending on the error and your speed.
Always remain alert while using the treadmill.
Product Label here:
The lot number on the Product
Label indicates the month and
year of manufacture. For
example,
“WALKINGPAD01202603”
means the unit was
manufactured in March 2026.
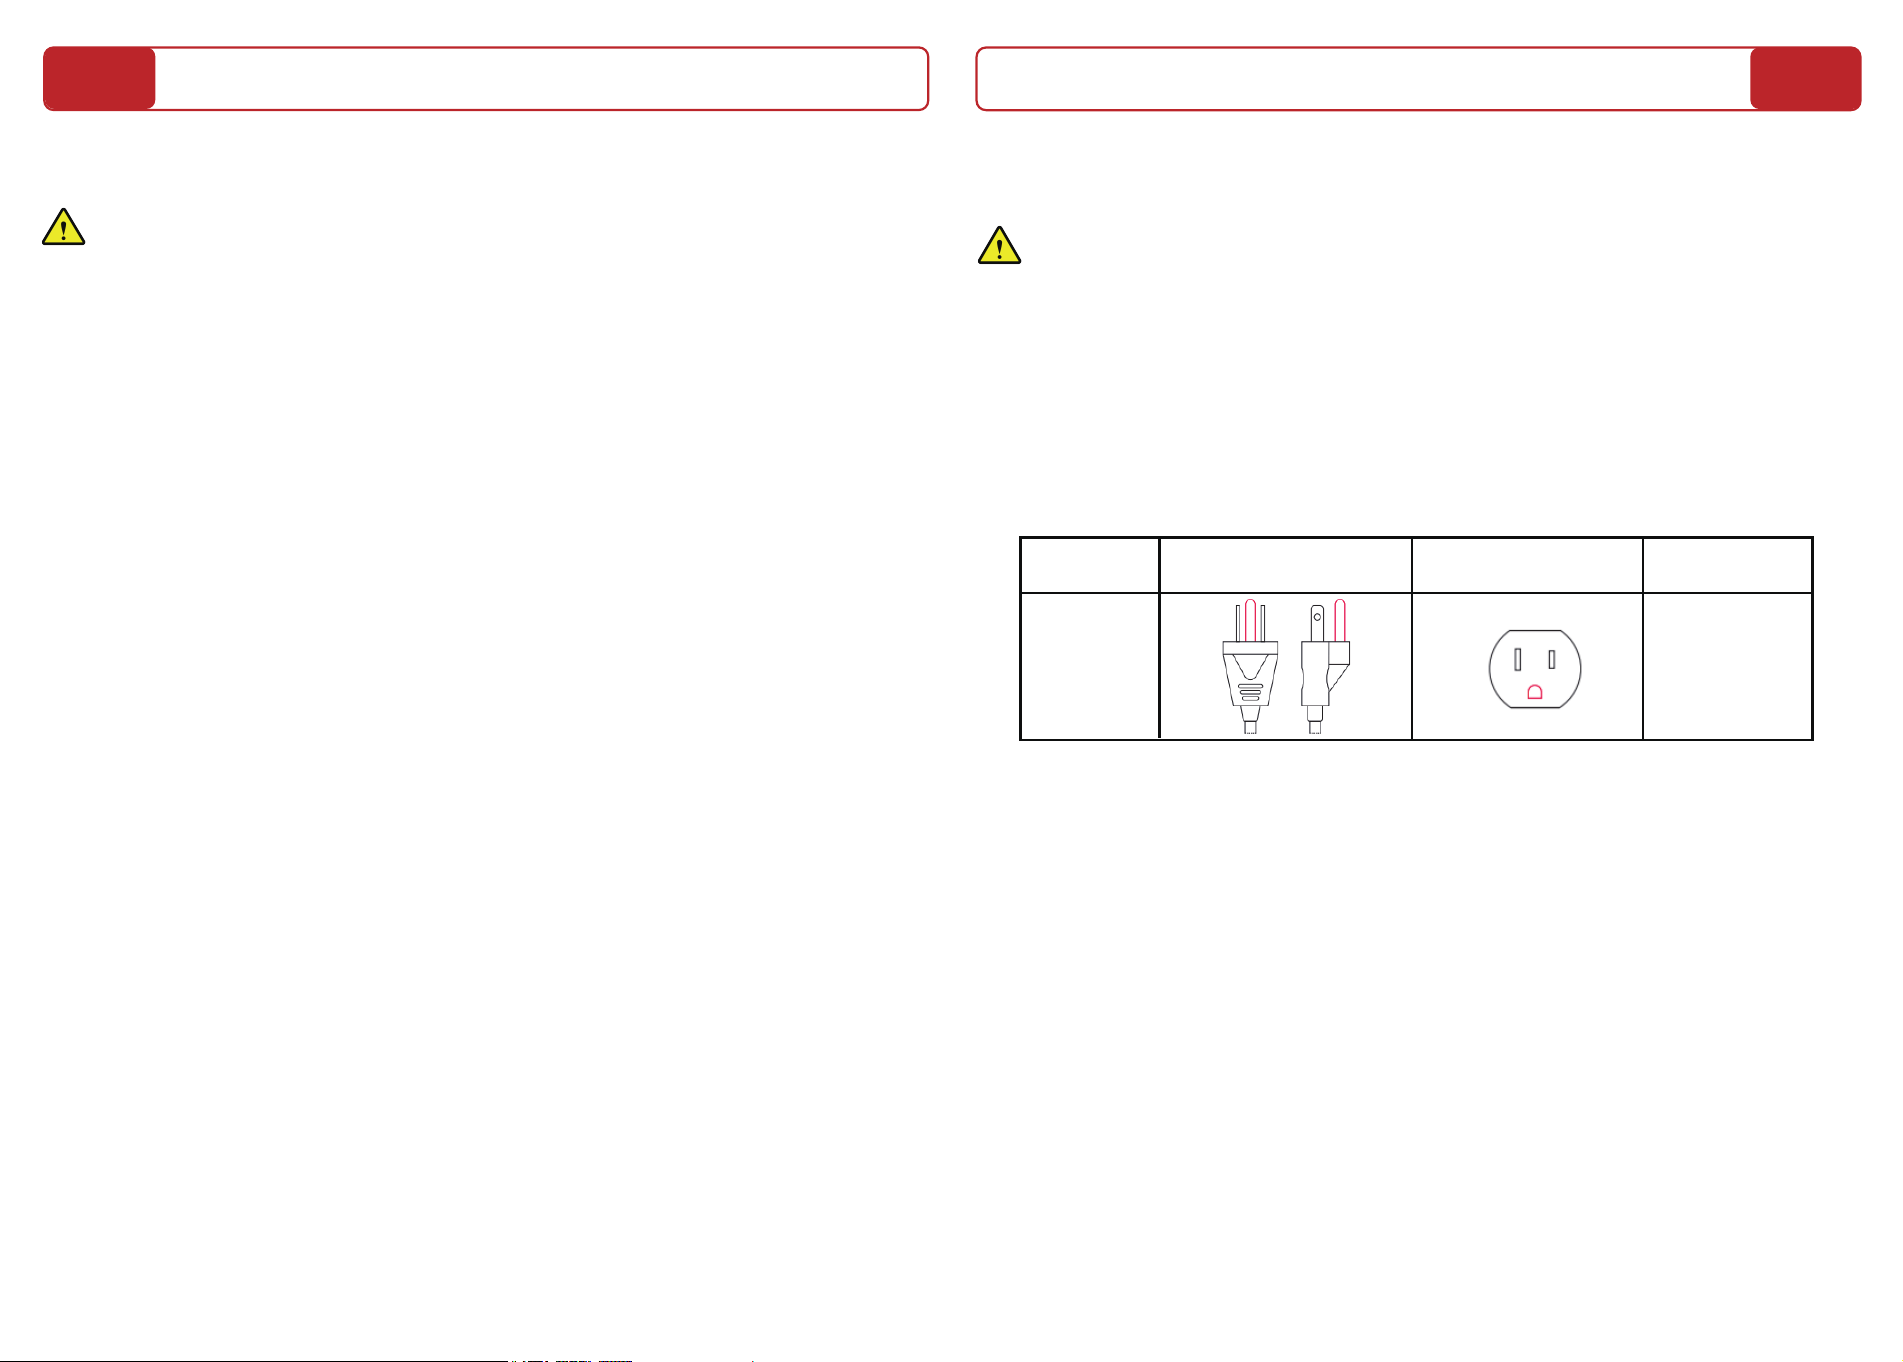
Misuse of this equipment may result in serious injury or death. • Read and understand the
user manual prior to use. • Follow all warnings and instructions in the manual and on the
equipment. • Inspect the equipment before use. Do not use if it is worn or damaged. •
Exposed moving parts can cause injury. Keep clear. • Use caution when stepping on and
off the treadmill. • If you feel faint or dizzy, or experience pain while exercising, stop
immediately. • Do not touch moving parts. Keep shoelaces, loose clothing, and
accessories away from the running surface. • Metrics on the screen may be inaccurate.
Use values for reference only. • For consumer use only.
Exposed moving parts can cause injury. • Keep the area around and behind the
treadmill clear. • People under 16 may not use the treadmill. Keep children and
pets away from the treadmill at all times. • Please wear sneakers when
exercising. • Keep shoelaces, towels, and loose clothing away from the running
surface. • Make sure your shoelaces don’t extend past the soles of your shoes.
Never touch the moving belt or
reach under the treadmill while it
is powered on. • Never touch
moving parts, including gaps
below the display, side rails, or
bottom cover. • Exposed moving
parts can cause serious injury. •
Contact with the moving surface
may result in severe friction burns.
Do not touch any moving parts of the treadmill.
• Keep children and pets away from this
machine at all times. • Keep hands away from
moving parts.
06
Right 1/4 CW
Left 1/4 CCW
Tighten it OR Loosen it
Tighten it OR Loosen it
Left 1/4 CW
Right 1/4 CCW
Adjust running belt
in second
Adjust running belt
in second
TO RIGHT
TO LEFT
DO NOT TOUCH
REAR COVER GAP
DO NOT TOUCH
REAR COVER GAP
keep
children
away
pay attention to safety
Wear
Shoes
Required
For safety, keep your children away from treadmill
while exercising!
Safety Label Notice:
Safety labels may vary slightly by production batch, and the labels on your unit may differ
in number or wording from those shown in this manual. Please use this manual as the
primary reference for all safety label information. Be sure to read and understand all of
the safety labels above before operating the treadmill.
08
Setting Up Your Treadmill
09
WARNINGS AND SAFETY INSTRUCTIONS:
1.Keep the area around the treadmill clear of furniture, exercise equipment
or other objects, and abide by clearance requirements at all times. Never
put anything under the treadmill or reach under the treadmill while it is
powered on.
2.Comply with all local codes and ordinances for electrical installation
when installing the treadmill. Consult an electrician if you are not sure
whether your outlet can support the treadmill.
3.Do not use extension cords or adapters. Do not attach other appliances to
the same circuit. If no suitable outlet is available, contact an electrician.
4.Changes or modifications to this unit not expressly approved by
PACEROCKER
could result in damage to the treadmill, or cause injury to the
user.
5.Use a dedicated, grounded circuit capable of carrying 6A or more amps
(US model), If the circuit is not properly grounded there is a risk of electric
shock.
6.Never put anything under the treadmill or reach under the treadmill while
it is powered on.
7.Keep the area around the treadmill free of obstructions.
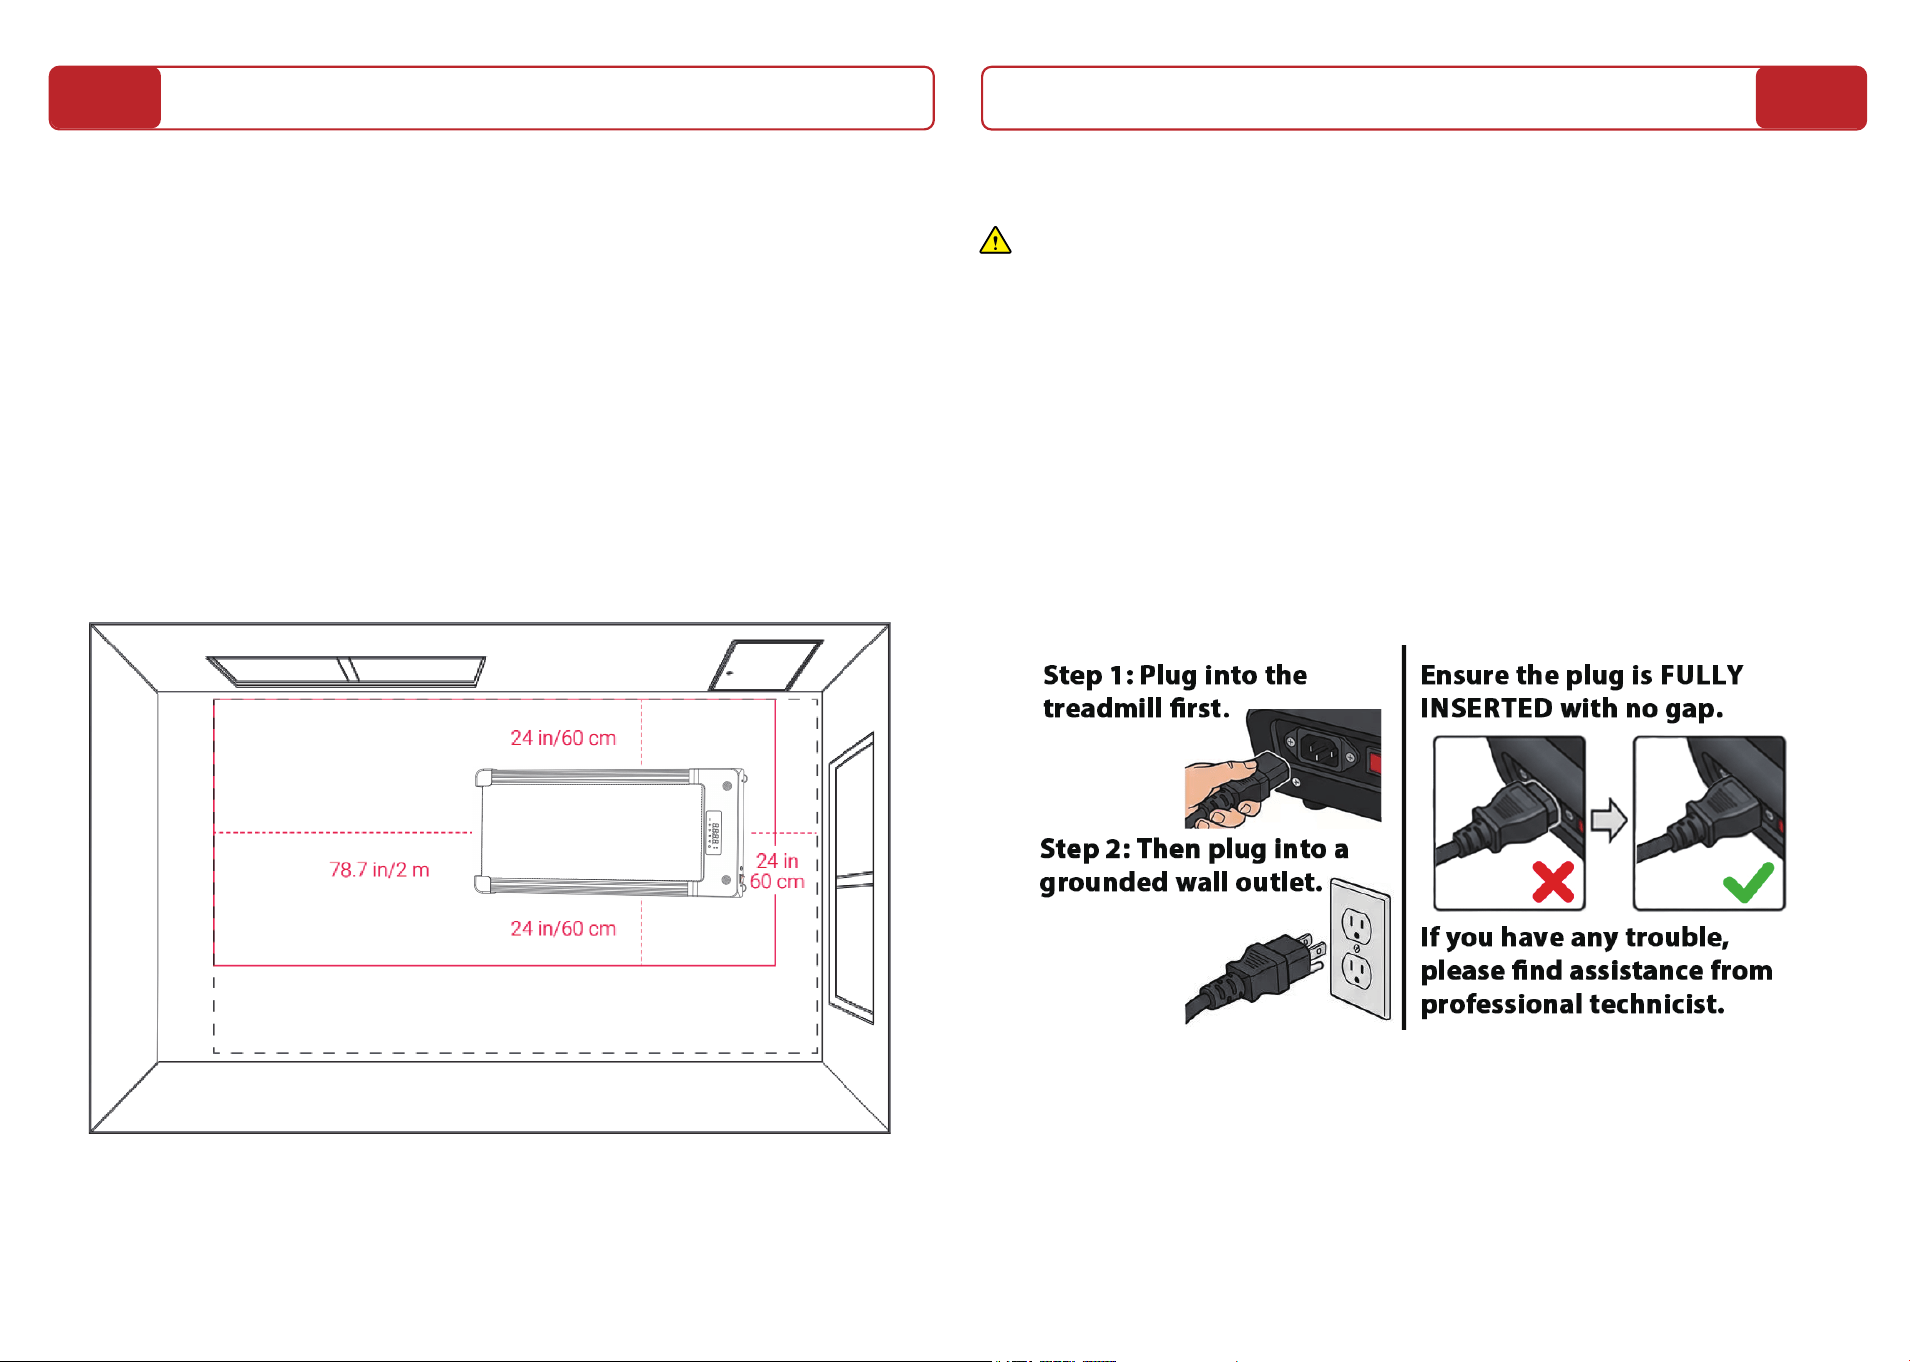
GROUNDING INSTRUCTIONS:
This product must be grounded. If it should malfunction or break down,
grounding provides a path of least resistance for electric current to reduce
the risk of electric shock. The plug must be plugged into an appropriate
outlet that is properly installed and grounded in accordance with all local
codes and ordinances.
DANGER:
Improper connection of the equipment-grounding conductor can result in a
risk of electric shock. Check with a qualified electrician or service person if
you are in doubt as to whether the product is properly grounded. Do not
modify the plug provided with the product – if it will not fit in the outlet,
have a proper outlet installed by a qualified electrician. This product is for
use on a nominal 120-volt circuit in the US. Grounding plugs and sockets
look like the ones pictured here.
LOCATION REQUIREMENTS
1.Make sure you have at least 78.7 in/2 m of clearance behind the
treadmill and 24 in/60 cm of clearance on each side of the treadmill.
2.Install the treadmill in an area not accessible to children or pets.
3.Always keep the area around the treadmill clear of exercise equipment,
furniture and other objects.
4.Store the treadmill in a dry, indoor area.
5.Install the treadmill on a hard, flat, stable surface. Avoid high pile
carpets. If you put a mat under the treadmill, choose a hard, thick mat that
won’t curl up or interfere with the incline mechanism.
COUNTRY GROUNDED PLUG GROUNDED SOCKET TYPE RATING
US
TYPE B
100-120V/
50-60HZ
10
Plugging in and Powering on
11
6.Make sure that you have adequate space to work out behind or alongside
the treadmill.
7.The treadmill deck can incline to a height of 9.2 in/23.5 cm. Make sure
that the area above your pad is free of obstructions and that the ceiling
height is at least 20 in/51 cm greater than the height of your tallest pad
user.
8.Make sure the treadmill is situated within 4 ft/120 cm of an outlet. The
provided power cord must be able to reach the outlet at minimum and
maximum incline, with some slack. The power cord must never pass under
the treadmill.
WARNING: Always turn off and unplug the treadmill when it is not in
use.
Power On Instructions:
1.Insert the power cord into the treadmill first. Make sure it is fully seated.
2.Then plug the other end of the power cord into a wall outlet.
3.Turn on the power switch.
4.Press the START button on the remote to wake the display pad.
5.Over time, the treadmill power connection may become loose. If this
occurs, discontinue use immediately and contact PACEROCKER Customer
Service for assistance.
12
13
Maintenance and Care
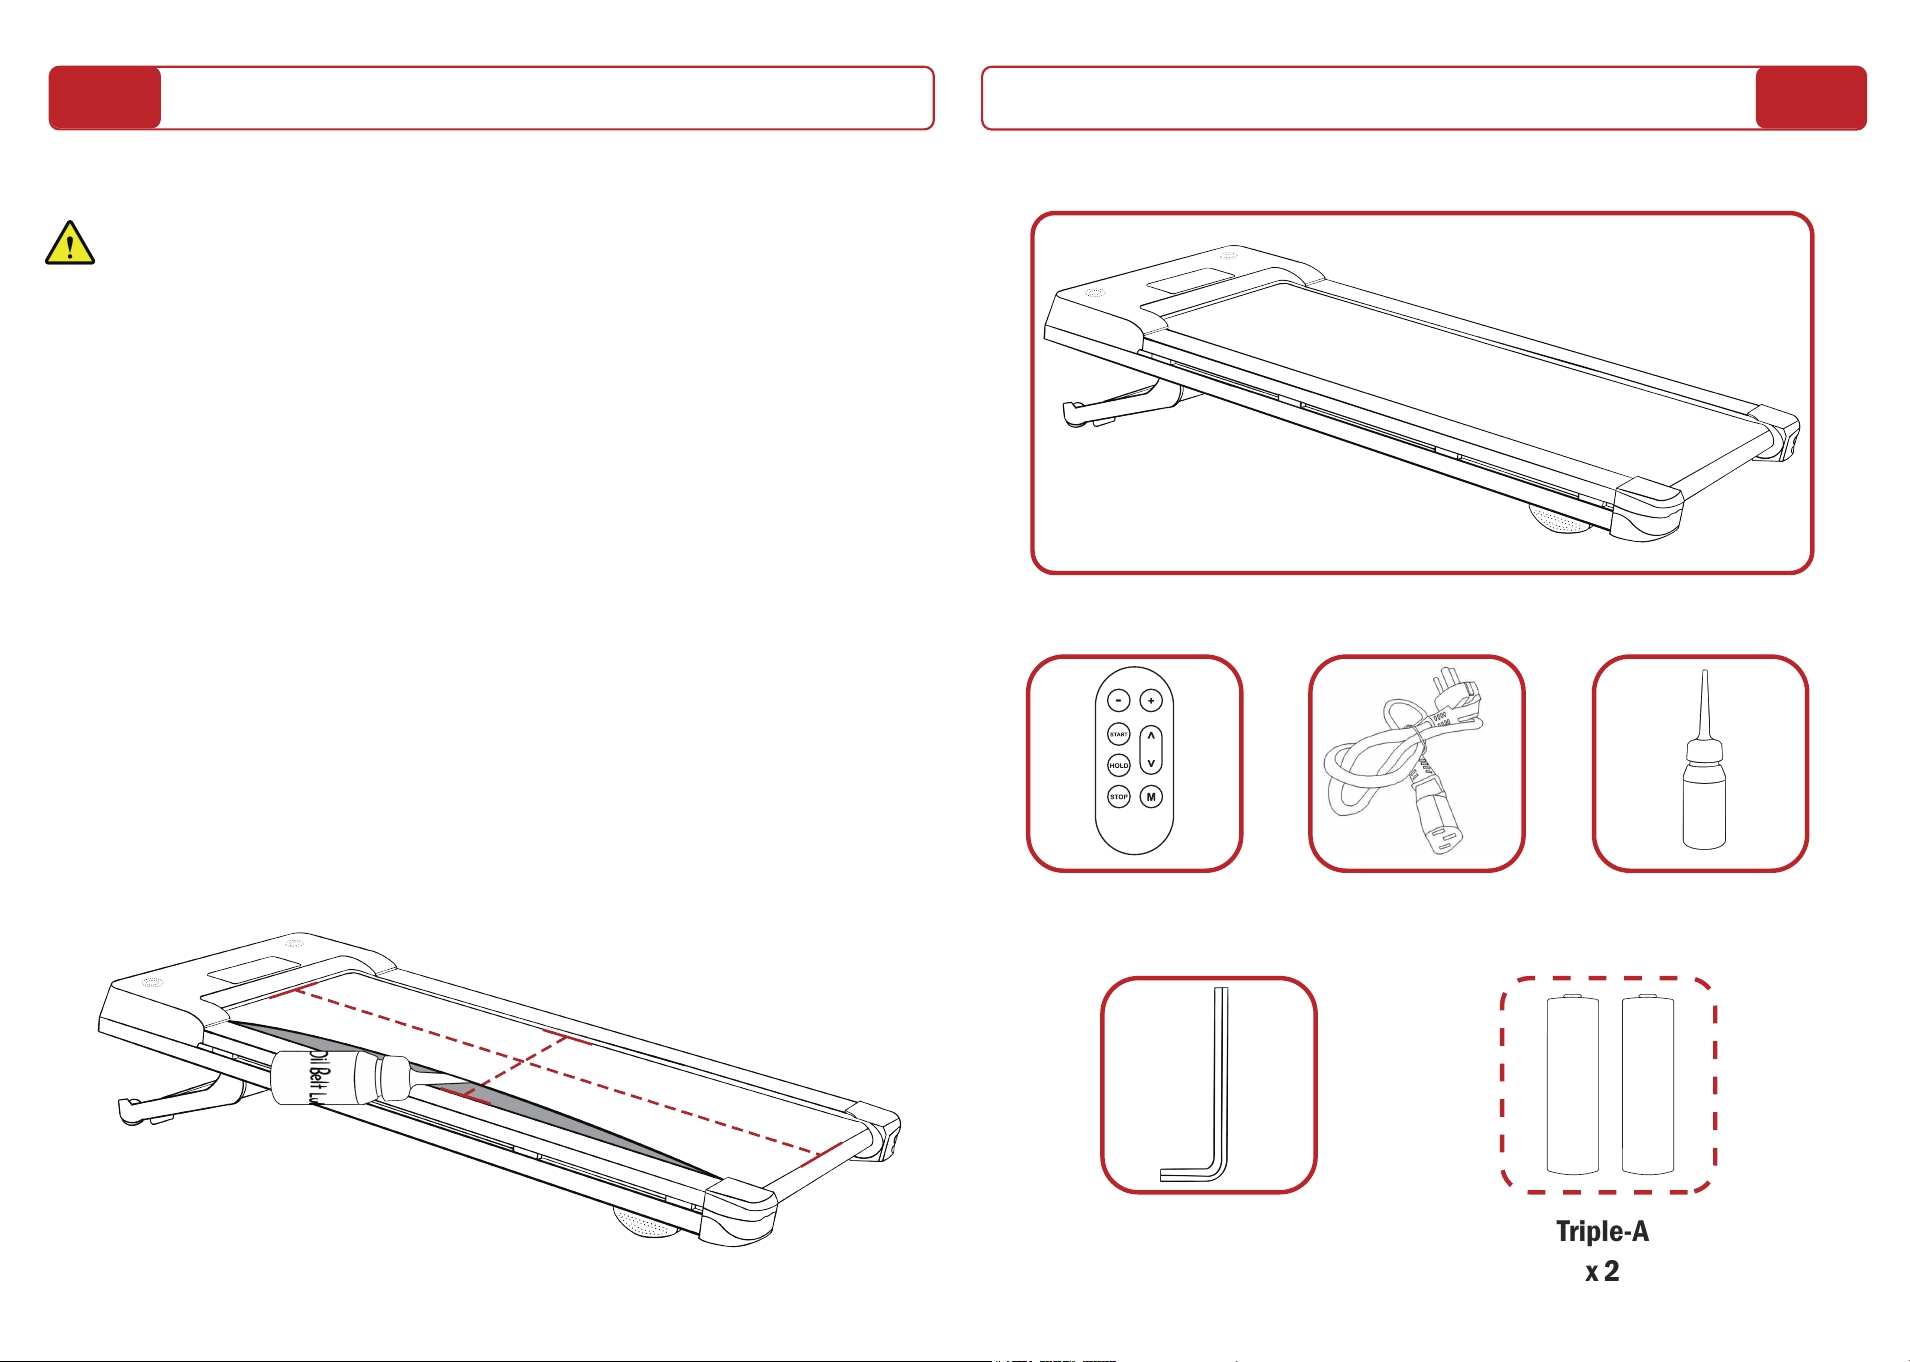
Package List
Treadmill
Remote Controller
x 2
Power Line
x 1
Oil Belt Lubricant
x 1
Triple-A
x 2
L-Shaped Wrench
x 1
+ AAA -
+ AAA -
(No battery included for shipping safety,
please prepare it first !)
WARNINGS AND SAFETY INSTRUCTIONS
1.Always power down and unplug the treadmill before cleaning or
performing maintenance.
2.The safety and integrity of the treadmill can only be maintained when it is
regularly examined for damage and repaired.
3.It is the owner’s sole responsibility to ensure that regular maintenance is
performed.
4.Replace worn or damaged parts immediately. Do not use the treadmill
until repairs are made.
5.Use only original parts from
PACEROCKER
. Changes or modifications to
this unit not expressly approved by
PACEROCKER
could result in damage to
the treadmill, or cause injury to the user.
6.Service other than the procedures described here must be performed by
an authorized technician.
14
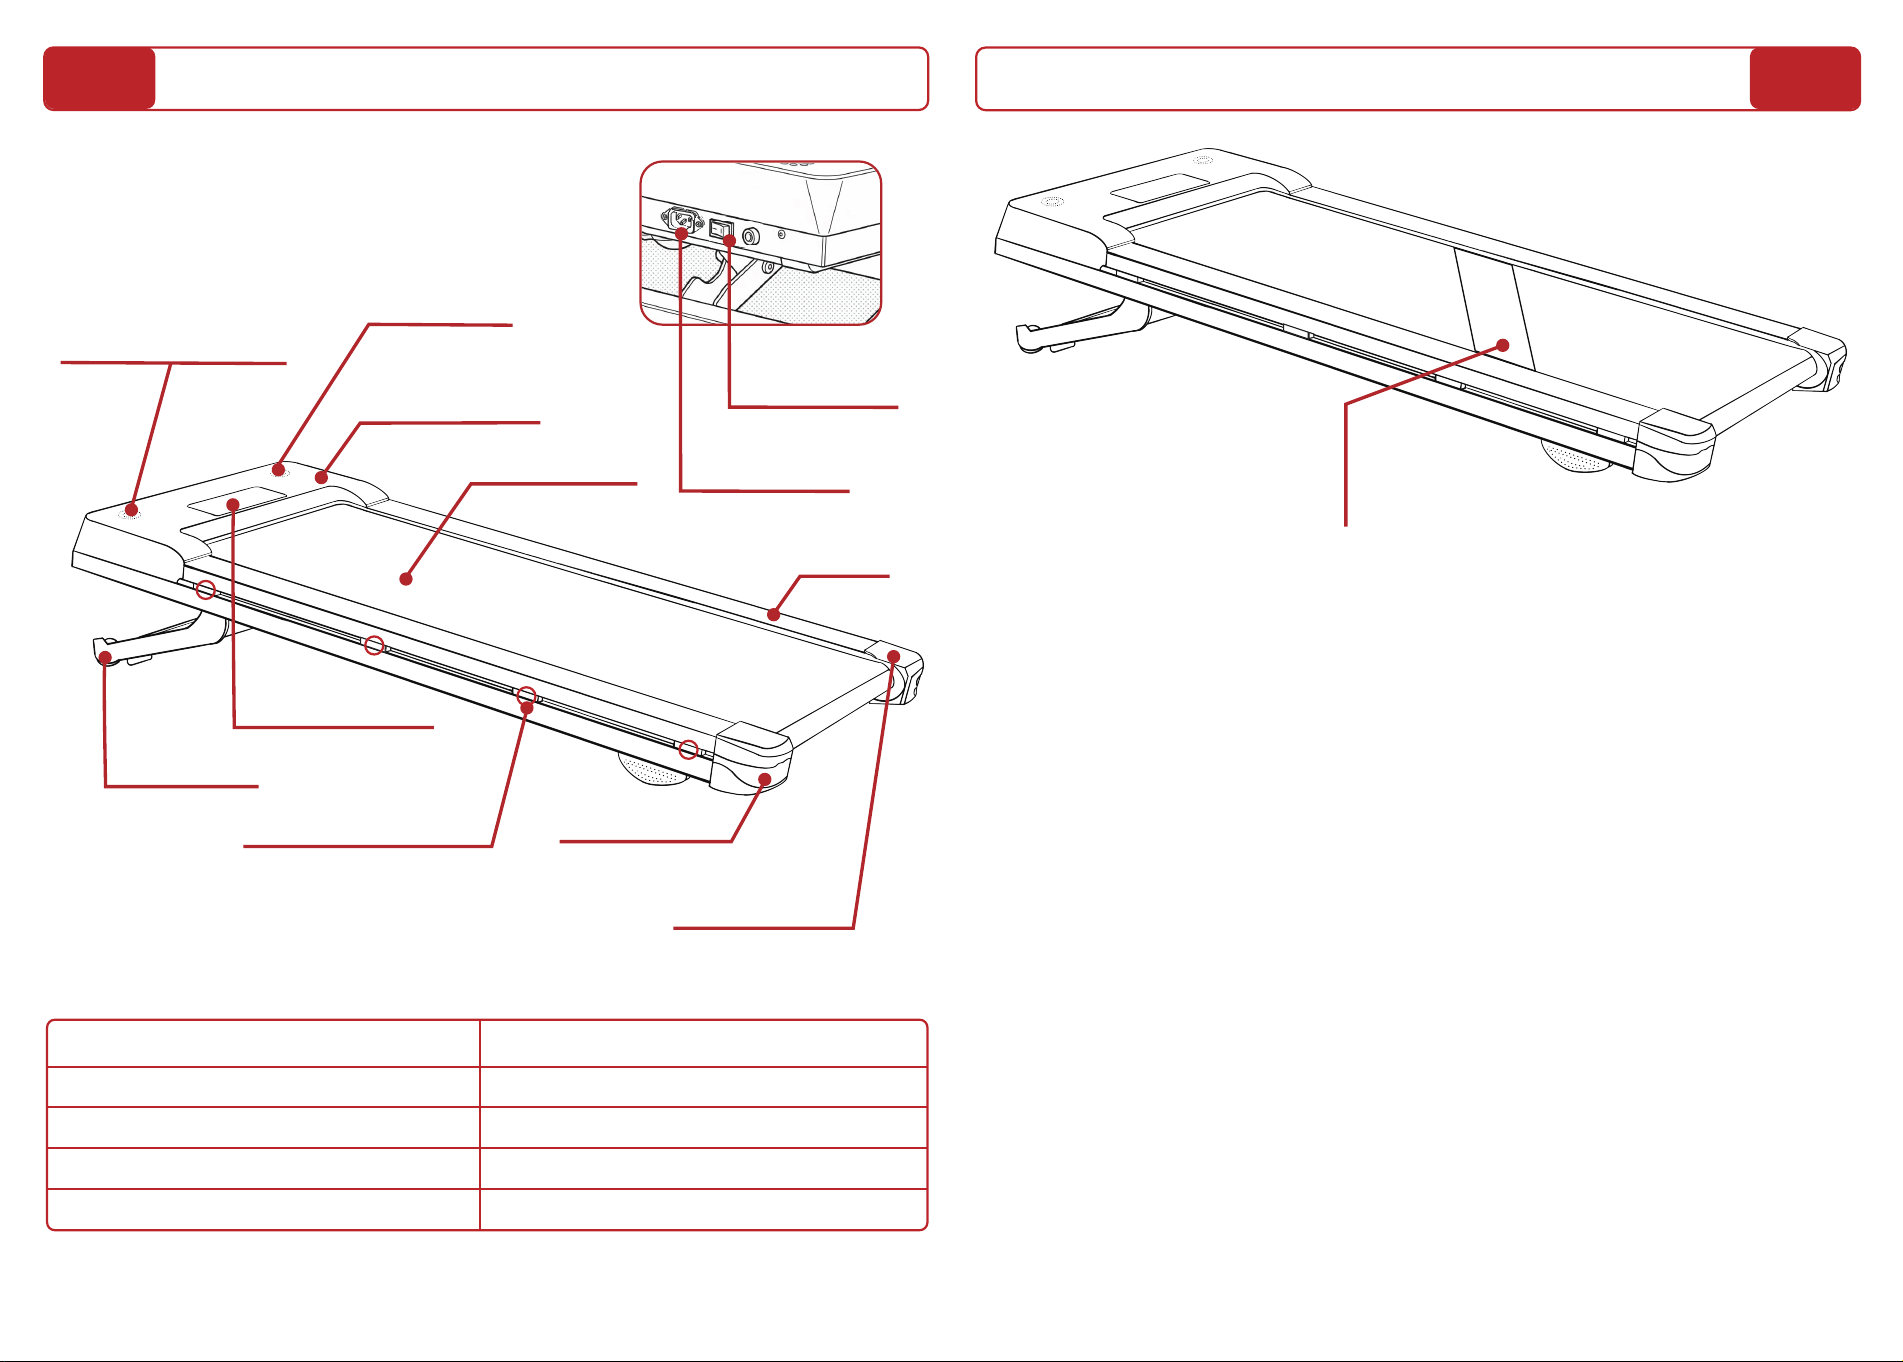
Product Structure
Running Belt
Left Rear Cap
Display Window
Strake
Power Switch
On/Off
Powerline Interface
8x Shock Absorption
Pad Stands
Right Rear Cap
Motor Top Cap
Sound Vent
Motor Cooling Vent
Product Specifications
Product Configuration Technical Parameters
Speed Range 0-5.0 mph
Maximum Load Bearing 450 lbs
Maximum Horsepower 2.5 hp
Incline 12% 9-level positions
1
2
3
4
About the Treadmill Belt Seam
You may notice a visible mark or textured line on the treadmill belt. This is
not a defect — it’s a normal result of the heat-welding process used during
manufacturing.
To create a continuous, durable belt, two ends are joined together using
high-frequency heat welding technology. This method fuses the materials
into a strong seam that matches the strength and performance of the rest
of the belt.
Important Notes:
• The visible mark at the seam is purely cosmetic.
• It does not affect how flat, smooth, or stable the belt runs.
• The belt’s performance, safety, and durability are fully maintained.
You can use your treadmill with confidence, knowing that this is part of the
normal manufacturing process and does not impact function or lifespan in
any way.
15
16
17
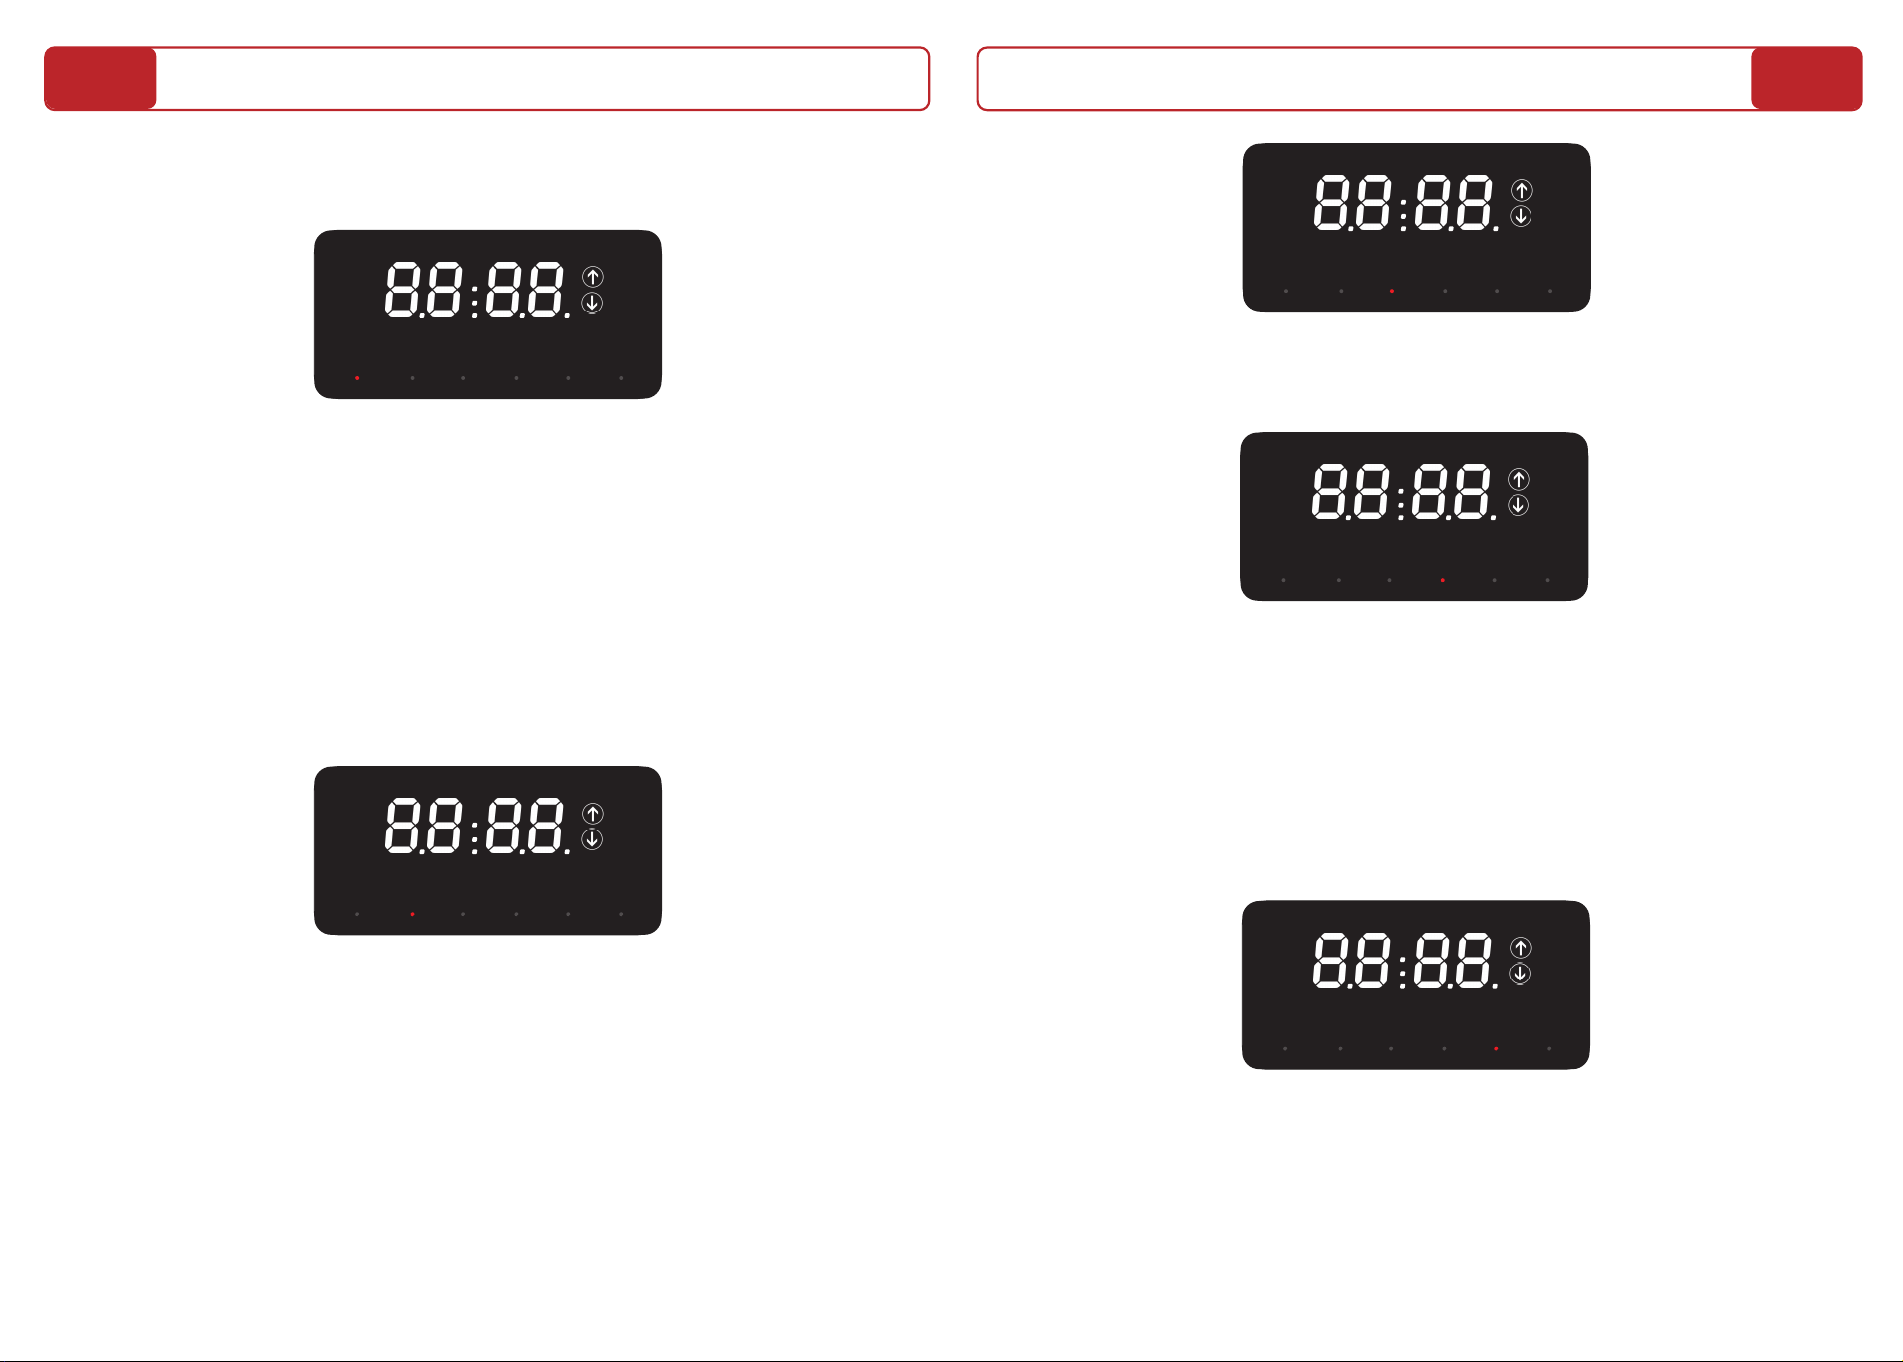
Introduction To Display
1. SPEED (SPEED Display)
The "SPEED" window displays the current speed, ranging from 0.6 to 5.0
mph. The user can adjust the speed in manual mode or after setting it in
"M" mode (countdown setting for speed). Each press of the "+" or "−" button
adjusts the speed by 0.2 mph.
Notice: When using the FitYo App, the speed can be adjusted more
precisely in 0.1 mph increments, allowing smoother and more accurate
control.
SPEED INC STEP DIS. TIME CAL.
SPEED INC STEP DIS. TIME CAL.
2. INC Incline (Incline Description)
The "INC" window displays the current incline level, ranging from 0 to 9
levels (0% to 12%). In manual mode, the user can use the incline increase
or decrease buttons to adjust the incline across 9 levels. Each time the
incline button is pressed, the corresponding up or down arrow icon will
light up.
SPEED INC STEP DIS. TIME CAL.
3. STEP (Step Display)
The "STEP" window displays the current step count, ranging from 0 to 9999.
SPEED INC STEP DIS. TIME CAL.
SPEED INC STEP DIS. TIME CAL.
4. DISTANCE (Distance Display)
The "DISTANCE" window displays the current walking distance from 0 to
99.99 miles in both manual and "M" (countdown) modes. In standby mode,
press the "M" button to select distance as the countdown unit. By default, it
counts down from 1.0 mile, but you can set it within the range of 1.0 to 99.9
miles. Each press of the "+", "-", " ", or " " button adjusts the distance
countdown by 0.1 mile.
5. TIME (Time Display)
The "TIME" window displays the current walking time from 0 to 99:59
minutes in both manual and "M" (countdown) mode. In standby mode, press
the "M" button to select time as the countdown unit. The default setting is
30 minutes, adjustable within 5–99 minutes. Each press of the "+", "-", " ",
or " " button adjusts the time countdown by 1 minute.
>
>
>
>
SPEED INC STEP DIS. TIME CAL.
6. Calories Burned (Calorie Consumption Display)
The "CAL" window displays the current calories burned during exercise,
ranging from 0 to 999.9 calories, in both manual mode and "M" mode
(countdown setting for calories). While the machine is in standby mode, you
can use the "M" button to select calories as the unit of measurement for
the countdown. By default, it counts down from 50.0 calories, but you can
set it within the range of 10 to 990 calories. Each press of the "+", "-", " ",
or " " button adjusts the calorie countdown by 10 calories.
Please note that calorie burn, steps, and distance are estimates based on
general profiles and sensor data. These values are for reference only and
may not reflect individual results. For more accurate tracking, use a fitness
app or device that includes personal data such as weight and heart rate.
>
>
18
19
Incline Increase Button
Mode Button
Incline Decrease Button
Speed Increase Button
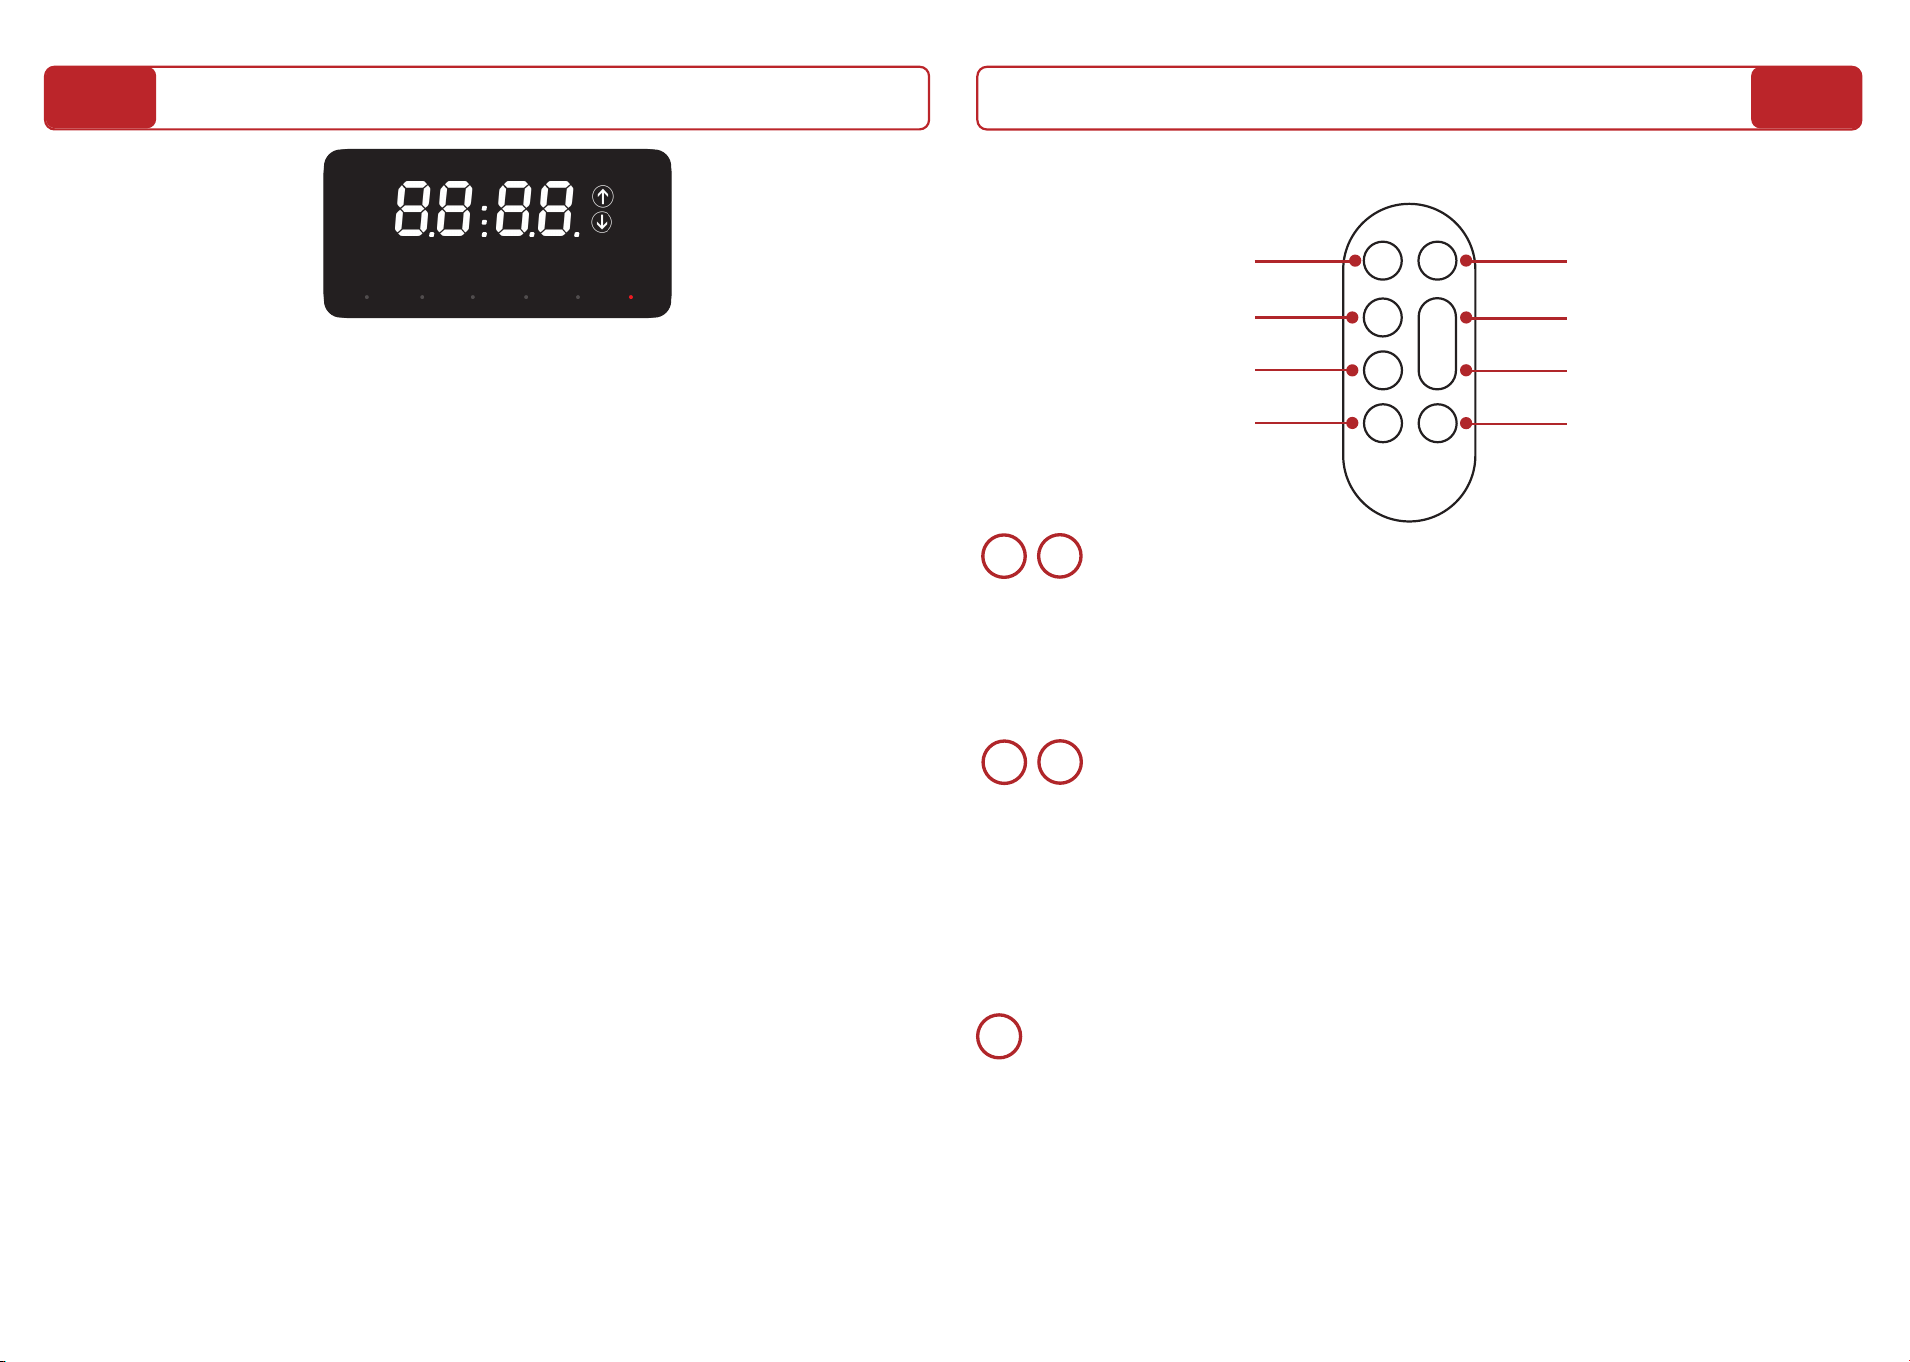
Remote Control Instructions
Hold Button
Start Button
Stop Button
Speed Decrease Button
M
HOLD
START
STOP
< >
+
-
+
Adjust the speed using the provided buttons in manual mode. In "M" mode
(Countdown Setting), you can also use the "+" or "-" buttons to adjust the
time, distance, or calorie countdown targets for your exercise.
Speed Increase & Decrease Buttons
-
Adjust the incline using the provided buttons. In manual mode, you can select from 1 to
9 incline levels. Each time you adjust the incline level, the corresponding up or down
arrow lights will illuminate to help you clearly see the changes. In "M" mode (Count-
down Setting), you can also use the " " or " " buttons to adjust the time, distance,
or calorie countdown targets for your exercise.
Incline Increase & Decrease Button
>
>
>
>
M
When the machine is in standby mode, press the "M" button to switch
between countdown targets: calories burned, time, or distance. Use the
"+", "-", " ", or " " buttons to set the desired countdown value for the
selected target. Once set, press the "START" button to begin running
according to the countdown target. The treadmill will automatically stop
once the target is reached.
M Button
>
>
20
21
Operation Mode
1. Manual/Free Mode
Start: After turning on the power switch, the machine enters standby mode. Press
"START" to begin using the treadmill directly. The screen will display a 3-2-1 countdown
with sound prompts, and the speed will default to 0.6 mph. The step count, calories
burned, time, and distance will start counting from 0, and the incline will default to
level 0.
1. Speed Setting:The speed ranges from 0.6 to 5.0 mph. Each press of the speed
increase or decrease button adjusts the speed by 0.2 mph.
When using the FitYo App, the speed can be adjusted more precisely in 0.1 mph
increments, allowing for finer control during your workout.
2. Incline Setting: The incline ranges from 0 to 9 levels. Each press of the incline
increase or decrease button adjusts the incline by 1 level.
During exercise, you can view the current speed, incline, step count, distance, time, and
calories burned, with the corresponding indicators lighting up in sequence.
Hold: Press "HOLD" to pause the treadmill at any time. The speed and incline level will
gradually decrease to 0, and the calories burned, time, steps, and distance will stop
counting. When you press the start button again, the speed and incline level will slowly
return to their previous settings, while the step count, calories burned, time, and
distance will continue to accumulate.
Stop: Press "STOP" to pause the treadmill at any time. The speed and incline level will
gradually decrease to 0, and the calories burned, time, steps, and distance will reset to
0. When you press the start button again, the speed and incline level will not return to
their previous settings, and the step count, calories burned, time, and distance will
start counting from 0.
1 - Manual/Free Mode
During operation, you can adjust the speed and incline at any time:
Press the "Stop" button, and the machine will stop running no matter what
state it’s in. All motion parameters will be reset to zero.
STOP
Stop Button
Start Button
START
HOLD
Hold Button
Press the "START" button to begin exercise. You can set the speed and
incline you want when you walking or jogging. The default speed is 0.6mph,
and the maximum speed is 5.0 mph. The treadmill will stop automatically
after 99:59 minutes of operation.
When the machine enters a paused state, press the ''Start'' button to
resume operation with the same parameters as before the pause, and the
slope will return to its pre-pause value.
When the machine is running, press the "Hold" button to pause it. The
machine will enter a paused state and display "PAU". It will save all current
motion parameters (speed, incline level, steps, distance, time, and calories
burned). For safety, the incline level and speed will gradually decrease to 0.
When you press the start button again, the speed and incline level will
slowly return to their previous settings, while the step count, calories
burned, time, and distance will continue to accumulate.
After the Hold function is activated, you can restart the system by pressing
the start button within a maximum of 1 hour by default, and continue
walking or jogging, during which data will resume and continue accumulat-
ing calculations. If the hold status persists for over 1 hour, historical
records in the system will automatically reset to zero, and numerical accu-
mulation calculations will become irrecoverable.
2 - Countdown Setting Mode
While the machine is in standby mode, press the "M" button to switch between
calories, time, and distance as your countdown target.
1. Calories: Press the "M" button to select calories as the countdown unit. By default,
it counts down from 50 calories, but you can set it within the range of 10 to 990
calories, adjusting by 10 calories each time.
2. Time: Press the "M" button to select time as the countdown unit. By default, it
counts down from 30 minutes, but you can set it within the range of 5 to 99 minutes,
adjusting by 1 minute each time.
3. Distance: Press the "M" button to select distance as the countdown unit. By default,
it counts down from 1.0 mile, but you can set it within the range of 1.0 to 99.9 miles,
adjusting by 0.1 mile each time.
Once you’ve selected and set a specific target, press "START" to begin using the
treadmill. You can adjust the speed and incline as needed during operation. During
exercise, you can view the current speed, incline, step count, distance, time, and
calories burned, with the corresponding indicators lighting up in sequence.
Note: In Manual/Free Mode, the treadmill will automatically stop after
running for a maximum of 99 minutes and 59 seconds.
Sleep Mode: When the walking pad is powered on, if no remote control
commands are issued (excluding the hold/pause function), the machine
will automatically enter a screen-off state after 5 minutes and switch to
sleep mode to conserve power. You can reactivate the walking pad and
resume usage by performing any remote control operation.
Bluetooth Speaker Connection
1- Connect Bluetooth Speaker:
After the walking machine is powered on, you can connect the Bluetooth
speaker of the walking machine through devices such as mobile phones or
Pad.
IOS & Android device: Enter "Settings - Bluetooth", turn on Bluetooth,
search, and select the device that matches the format: "FS-" followed by six
random letters or numbers, and ending with one letter (e.g., FS-XXXXXX-A).
Once successfully connected, you will hear an audible prompt.
2- Play Music:
You can directly adjust the music volume through your mobile phone /Pad
device and select and switch your favorite music.
3- Disconnect the Bluetooth Speaker:
To disconnect your device from the treadmill’s Bluetooth speaker, simply
turn off Bluetooth on your phone or tablet, or disconnect the device from
your Bluetooth settings. Once the connection is successfully disconnected,
the treadmill will emit a confirmation sound.
4- Replace the Player Device:
When a new device is waiting to be connected, the currently connected
player device needs to disconnect/turn off the Bluetooth function first,
disconnect the connection with the Bluetooth speaker of the walking
machine, and the new device can be connected.
We have a high-quality Hi-Res Audio Bluetooth speaker built so
you can enjoy great music while working out.
22
23
24
25
data displayed within the app,including calories, steps, and distance, are
estimates provided for general reference only and are not intended to
represent precise or individualized measurements.)
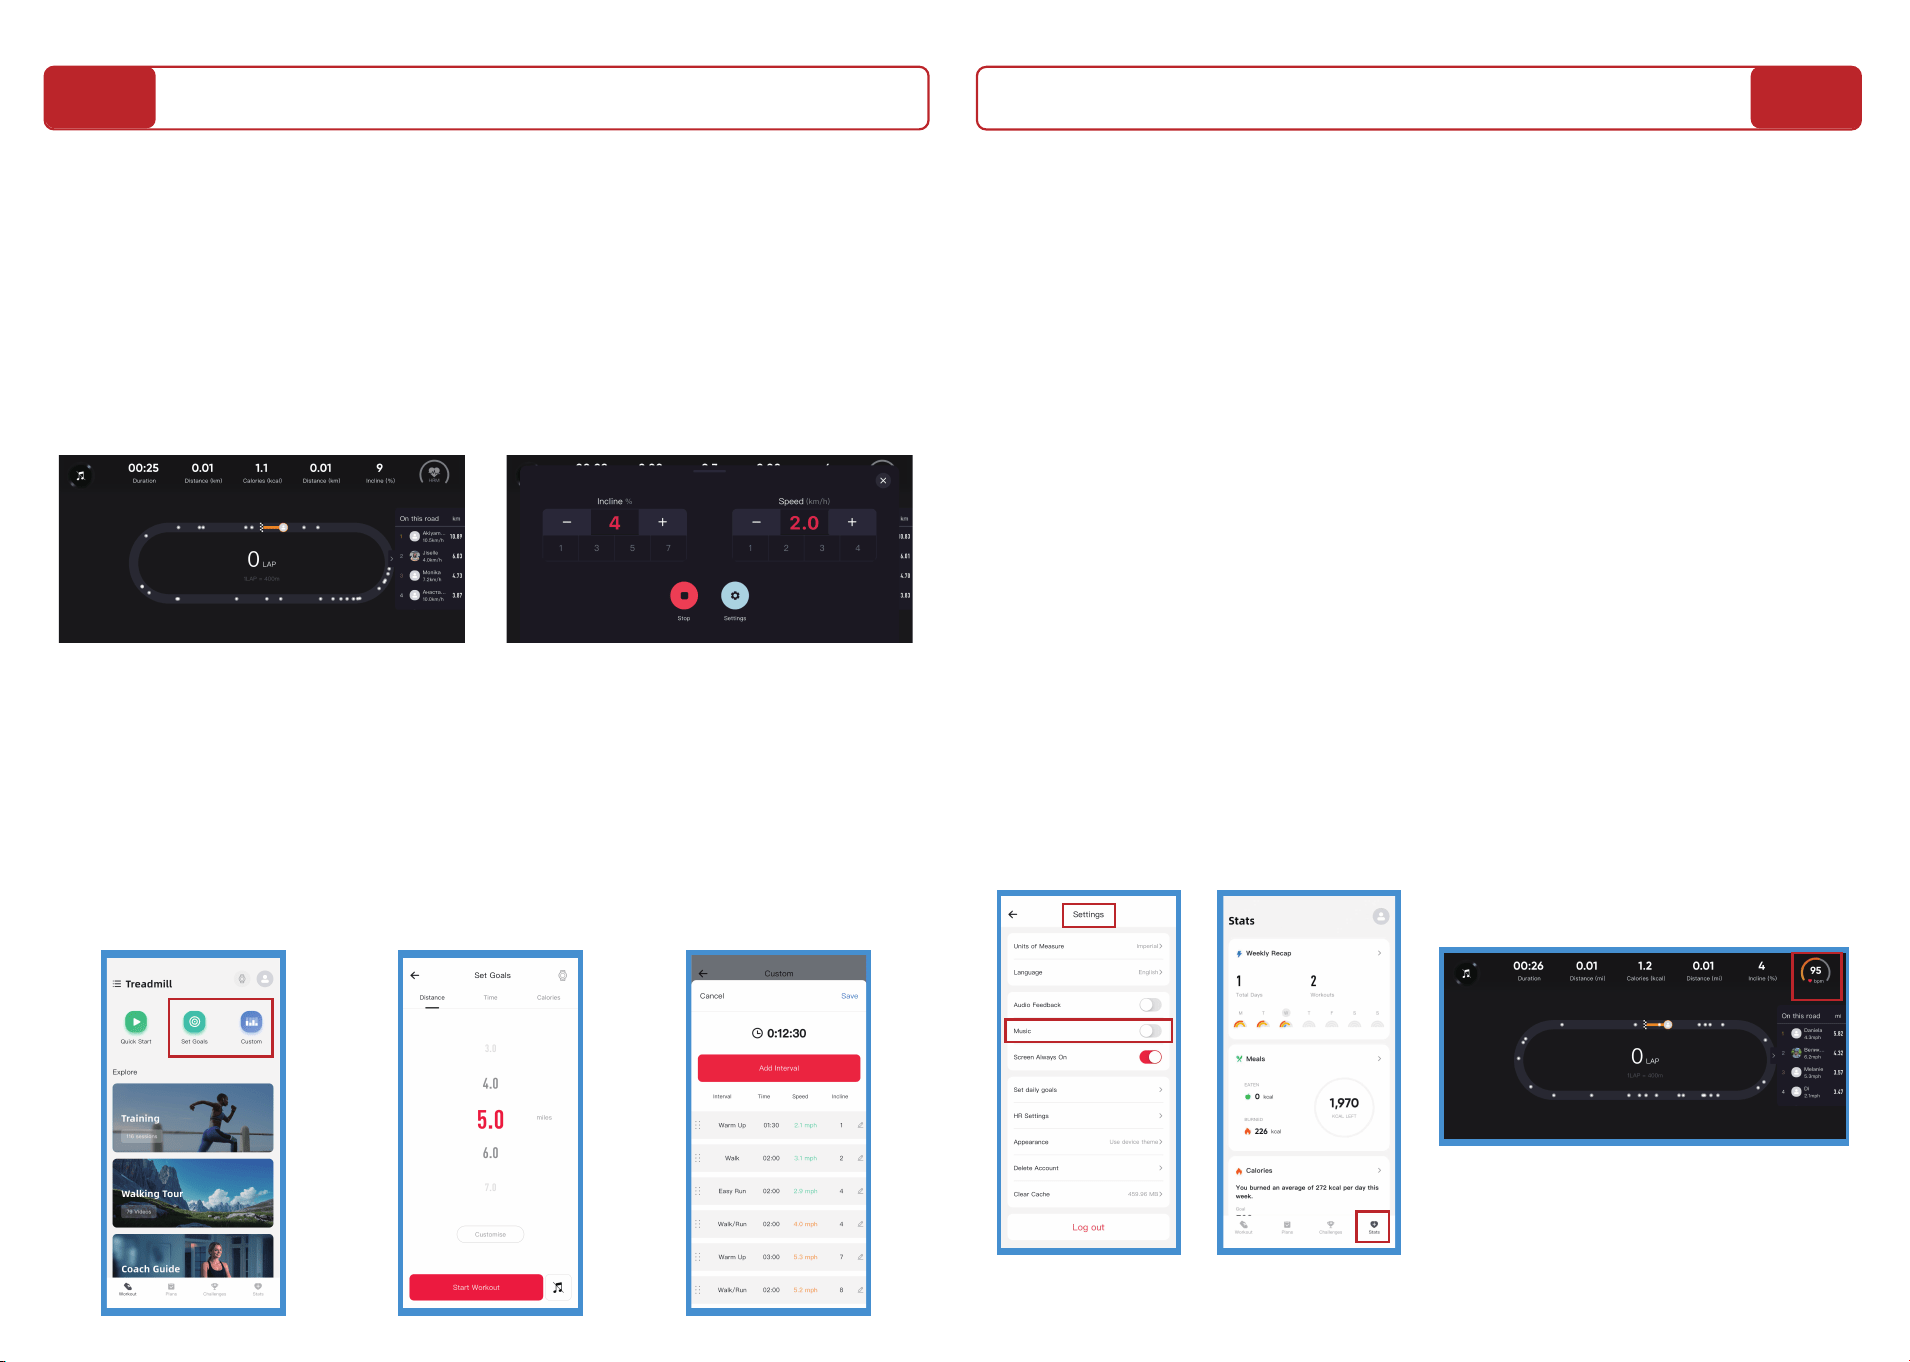
2 - Operation Modes
The FitYo app offers several modes to control your workout.
Manual Mode
This mode gives you full control over your session.
- Quick Start: For an immediate start. Tap "Quick Start" to begin your
workout. You can adjust the speed and incline from the app or the remote
control.
- Set Goals: For targeted training. Before starting, you can set a target
based on Distance, Time, or Calories. The treadmill will automatically stop
once the target is reached.
- Custom Program: Create and save your own personalized workout
routines. You can design a sequence of different segments (e.g., Warm Up,
Run, Cool Down), each with a specific duration, speed, and incline.
3 - Smart Device Integration
Bluetooth Speaker Connection
Your treadmill can function as a high-quality Bluetooth speaker.
-On your phone or tablet, go to Settings - Bluetooth.
- Search for and select the device named like "FS-XXXXXX-A" to pair. A
sound prompt will confirm the connection.
-Any audio played from your mobile device will now come through the
treadmill's speakers.
*Pro-Tip: To use other music apps like Spotify, you may need to disable the
default background music in the FitYo app's settings menu.
Smartwatch Connection (e.g., Apple Watch)
- Before using the FitYo App, please make sure your smartwatch is
already paired with your mobile device to enable quick data
synchronization.
- Pair your smartwatch with the FitYo App to sync real-time data such as
heart rate and steps.
- The synced data will appear in the “Stats” tab of the app and can also be
shared with your phone’s native health application (e.g., Apple Health).
26
27
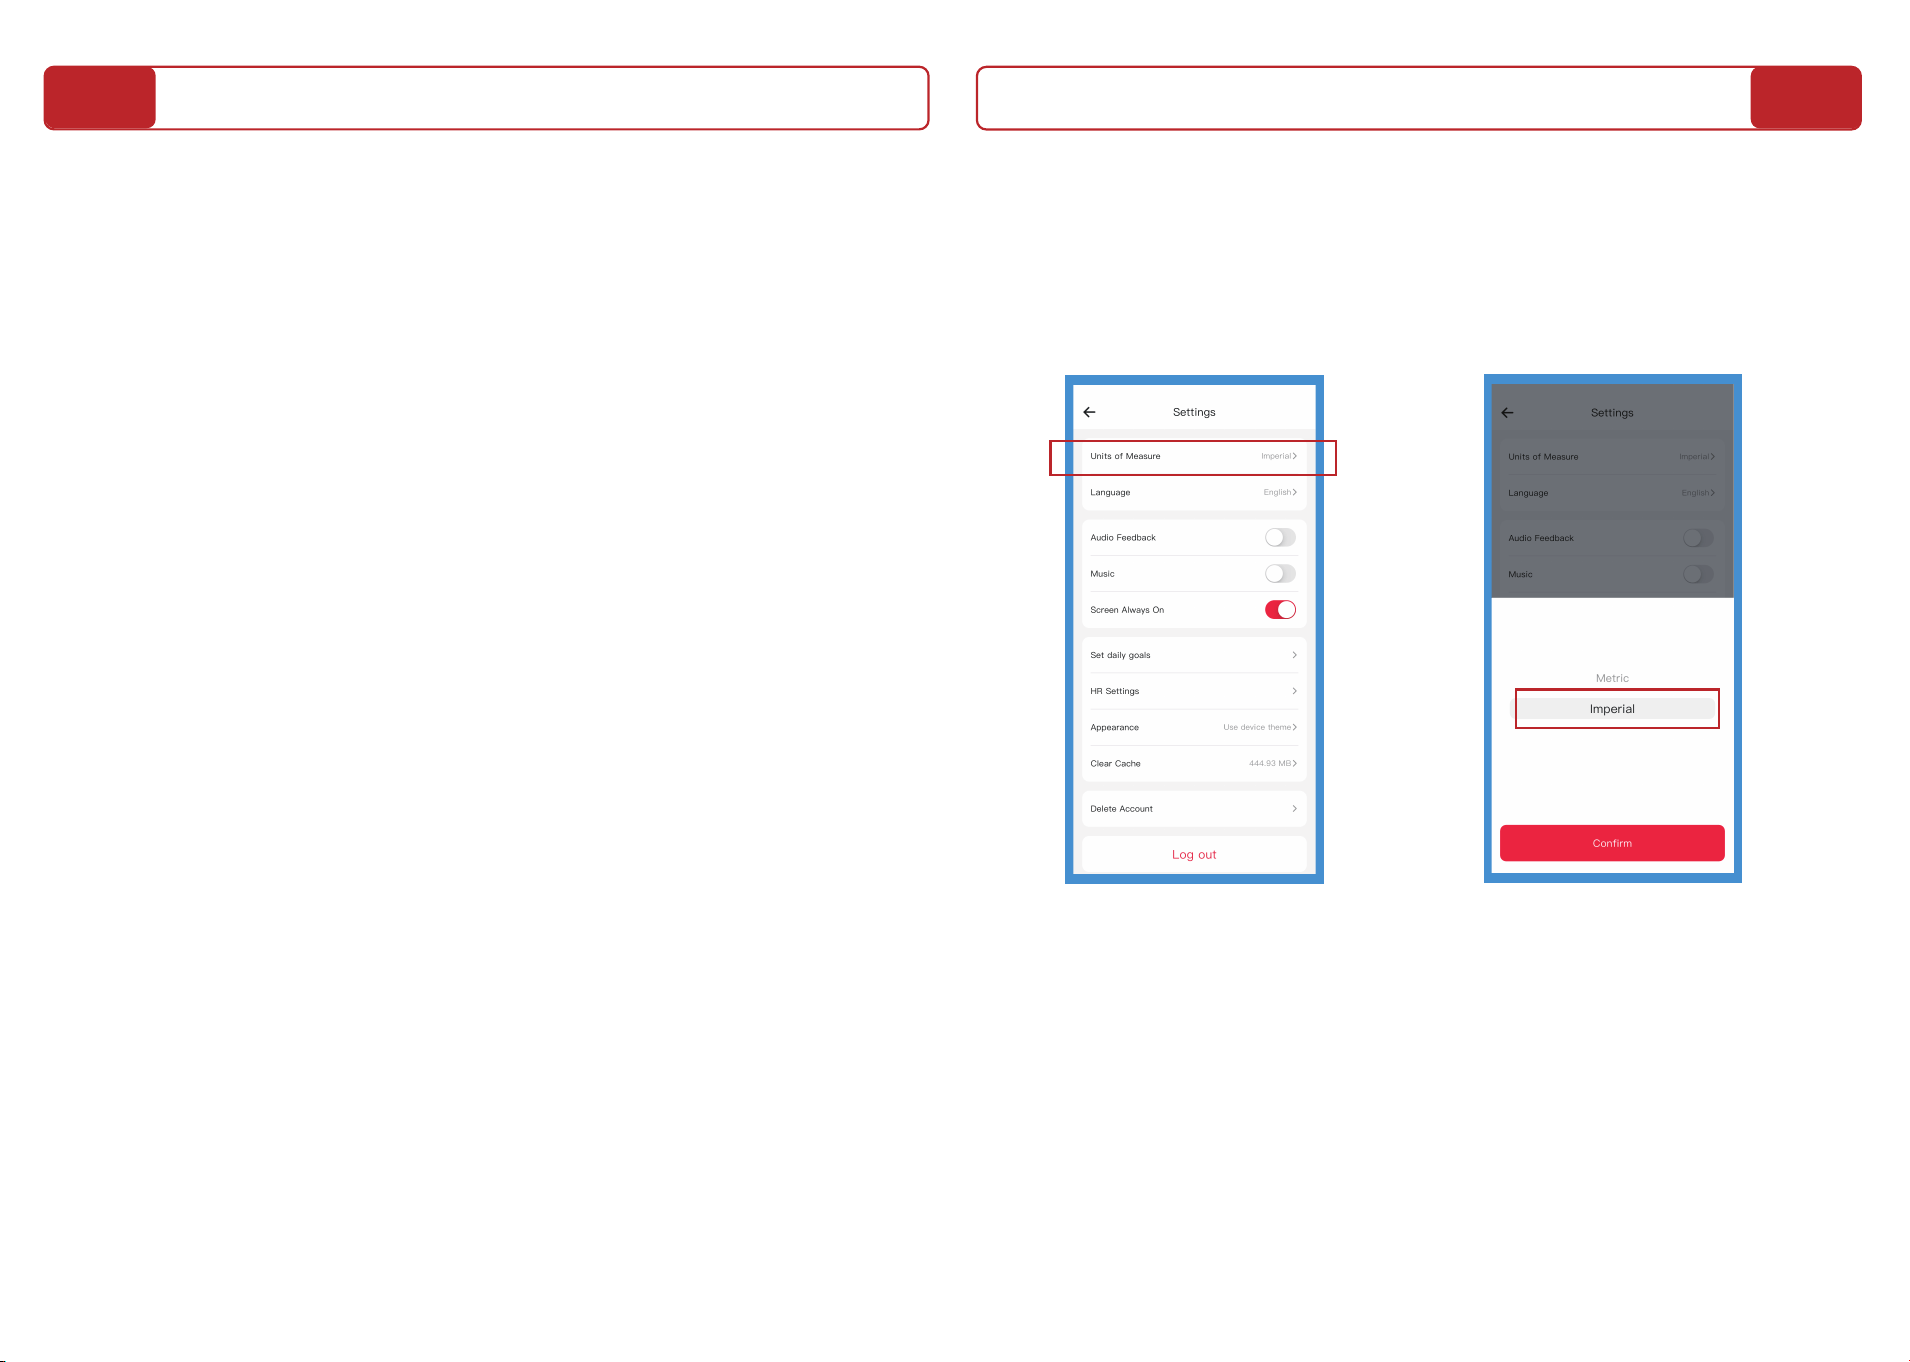
Unit Setting (for U.S. Users)
- To match the treadmill's display, ensure the app's unit of measurement is
set to Imperial (Miles).
- Path: In the FitYo app, go to Profile Avatar - Settings - Unit - Select
"Imperial."
4 - Important Information & Tips
Remote Control Priority
- The Golden Rule: The remote control always has the highest priority and
will override any command from the FitYo app. For safety, always keep the
remote control within reach.
- To Use App Control: After turning the treadmill on, initiate your workout
directly from the FitYo app.
- To Regain App Control: If the remote control is used first, the FitYo App
will temporarily lose control until the treadmill is stopped. To switch back,
you must press the [STOP] button on the remote. Once the treadmill belt
has completely stopped, you can begin a new session from the app.
Hardware Limits
- Your treadmill has maximum hardware limits (e.g., Speed: 5.0 mph,
Incline: Level 9). If a program in the FitYo app calls for a setting that
exceeds these limits, the treadmill will safely operate at its physical
maximum.
App Background Activity
- The FitYo app must remain running in your phone's background to
maintain connection. Do not force-close ("swipe away") the app during your
workout, as this will sever the connection and stop app control.
28
29
Oil Belt Lubricant
Lubrication:
After using the running belt for a certain period, it is necessary to lubricate
it with a special lubricant. The recommended lubrication frequency
depends on the usage time:
- For less than 3 hours per week, lubricate every 5 months.
- For 4-7 hours per week, lubricate every 2 months.
- For more than 7 hours per week, lubricate once a month.
Note: Do not add too much lubricant at once.
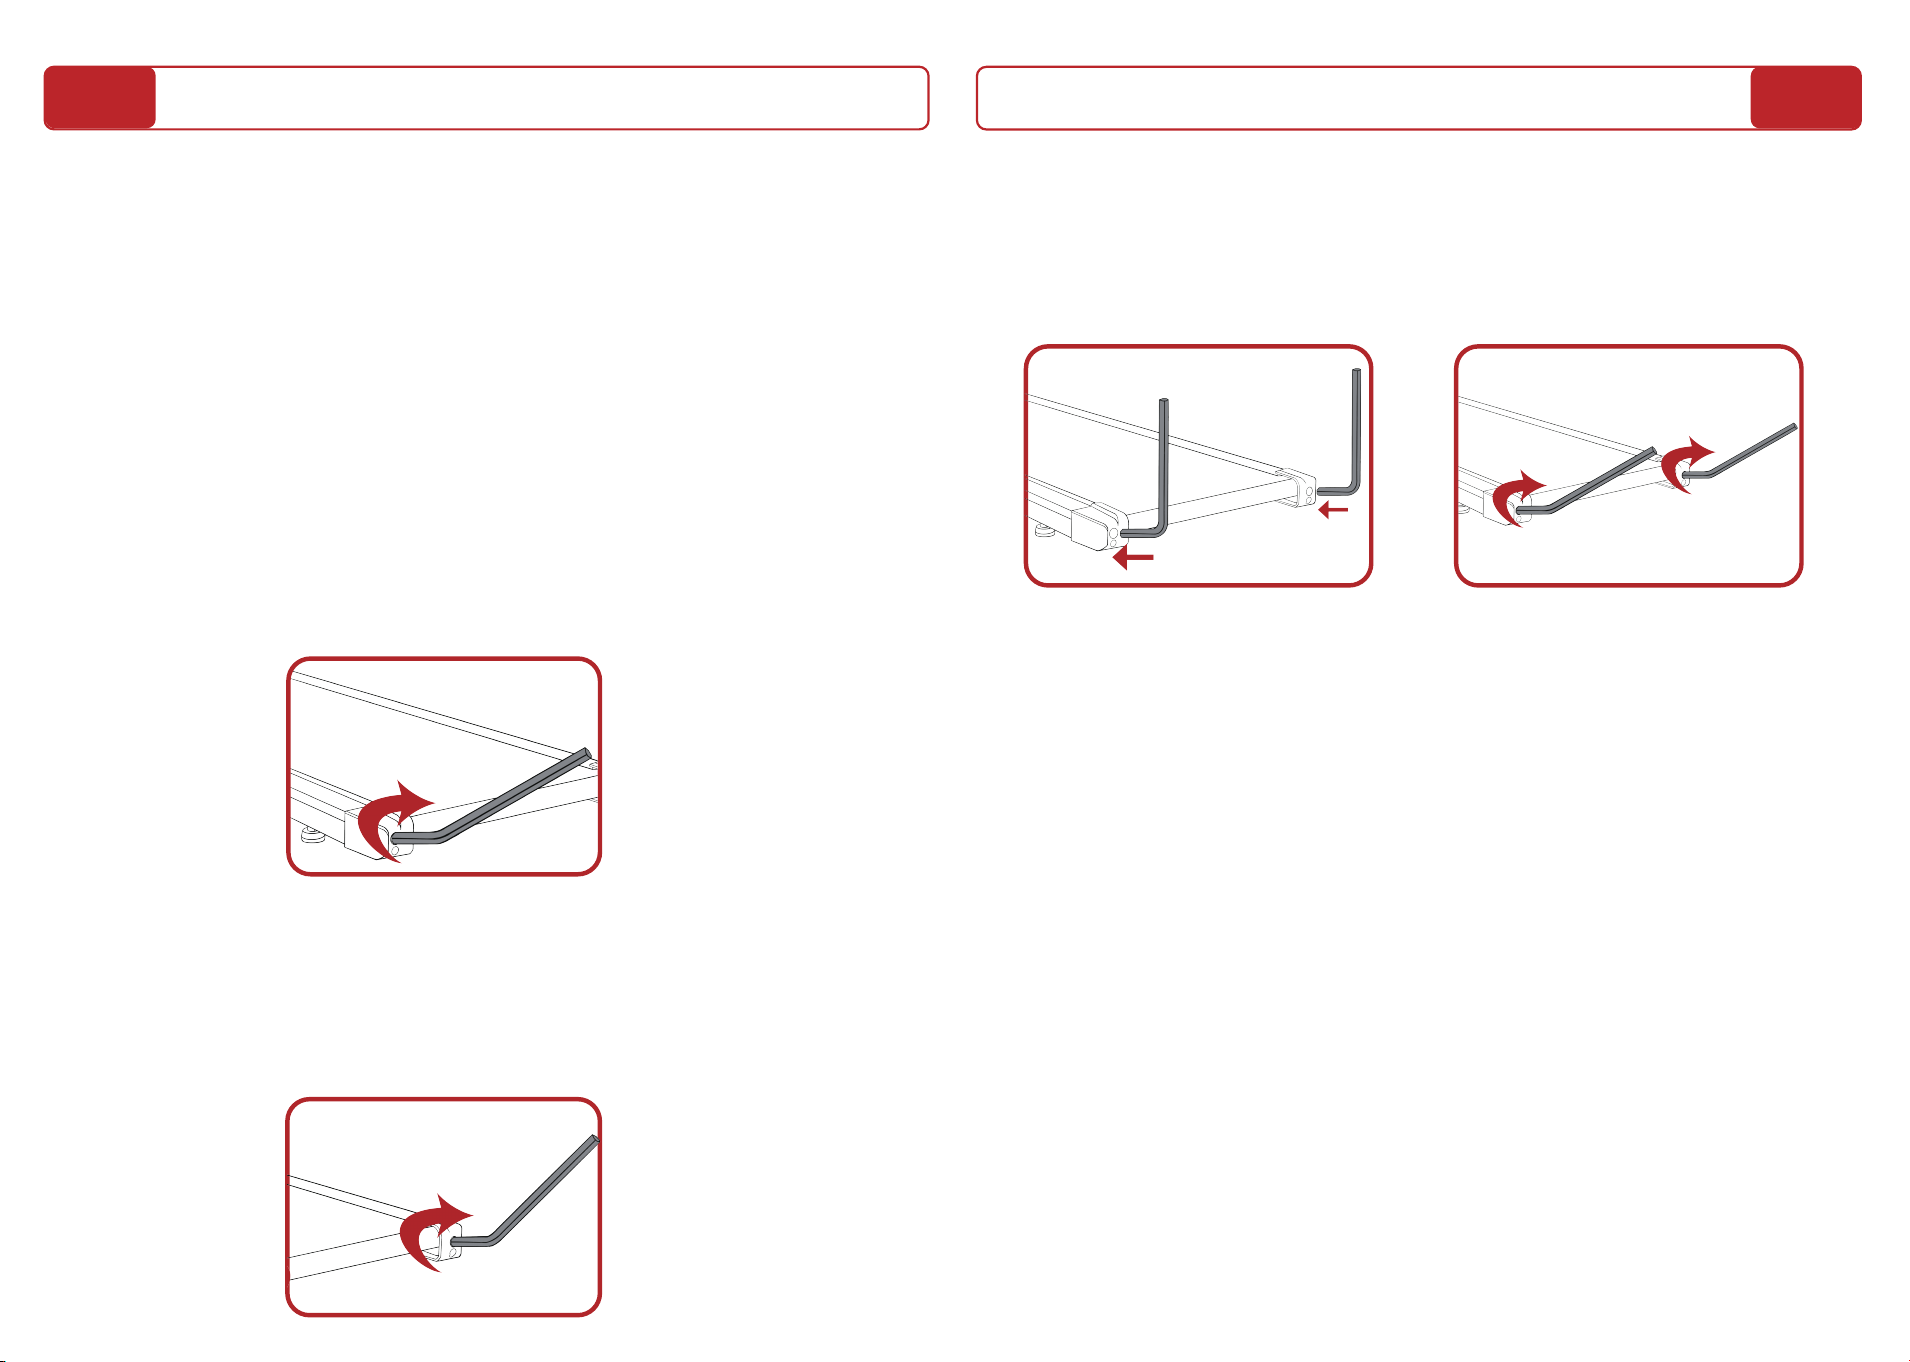
3. Running belt is loose:
- Use the L-Wrench turn both rear idler bolts clockwise 1/4 of a turn to
tighten the running belt. Then plug in the power cord, run the treadmill for
several minutes. Repeat until the running belt is not slipping.
Running Belt Adjustment
All treadmills have their running belt adjusted at the factory, but after a
while, the running belt may become loose or misaligned. If you notice that
the running belt is slipping, it means that it is loose. You can use an
L-Wrench to adjust.
To adjust the running belt:
1. Running belt shifted to the left:
- Use the L-Wrench wrench to turn the left rear roller bolt clockwise 1/4 of
a turn to tighten the running belt. Then plug in the power cord, and run the
treadmill for 3 minutes. Repeat until the running belt is centered.
2.Running belt shifted to the right:
- Use the L-Wrench to turn the right rear roller bolt clockwise 1/4 of a turn
to tighten the running belt. Then plug in the power cord, and run the
treadmill for 3 minutes. Repeat until the running belt is centered.
30
31
When there is a problem with the treadmill's lift and it cannot lift
normally:
1-Within 10 seconds of turning on the treadmill's power switch, press and
hold the "
" Incline Reduce Button on the remote for about 5 seconds. The
lift motor will automatically rise and then lower.
2-The incline value will dynamically display as a scrolling "0" during this
process. Once the calibration is successful, this scrolling display will
stop.
3- If the scrolling display continues or the lift motor completes its
movement but shows an "E09" error code, it means the calibration failed.
In this case, repeat step 1 to retry the calibration.
Trouble Shooting
If you find that the Walking Treadmill isn’t available due to error
codes that begins with
E, or if you’re facing any issues that
disrupt its normal function, please email us immediately!
-If you encounter any connection failures or other issues when using the
FitYo APP to control the treadmill, please feel free to contact us at any
time.
To ensure we can provide you with the best assistance possible, it would be
wonderful if you could prepare the following information when contacting
us:
1-Your order number.
2-A description and a picture or video of the issue you’re experiencing,
attach an error code if it appears on screen.
3-Recipient's full address and phone number.
We’re here to help and will swiftly send you a replacement walking
treadmill and any necessary accessories. And there is no need to return the
faulty treadmill for your convenience.
>
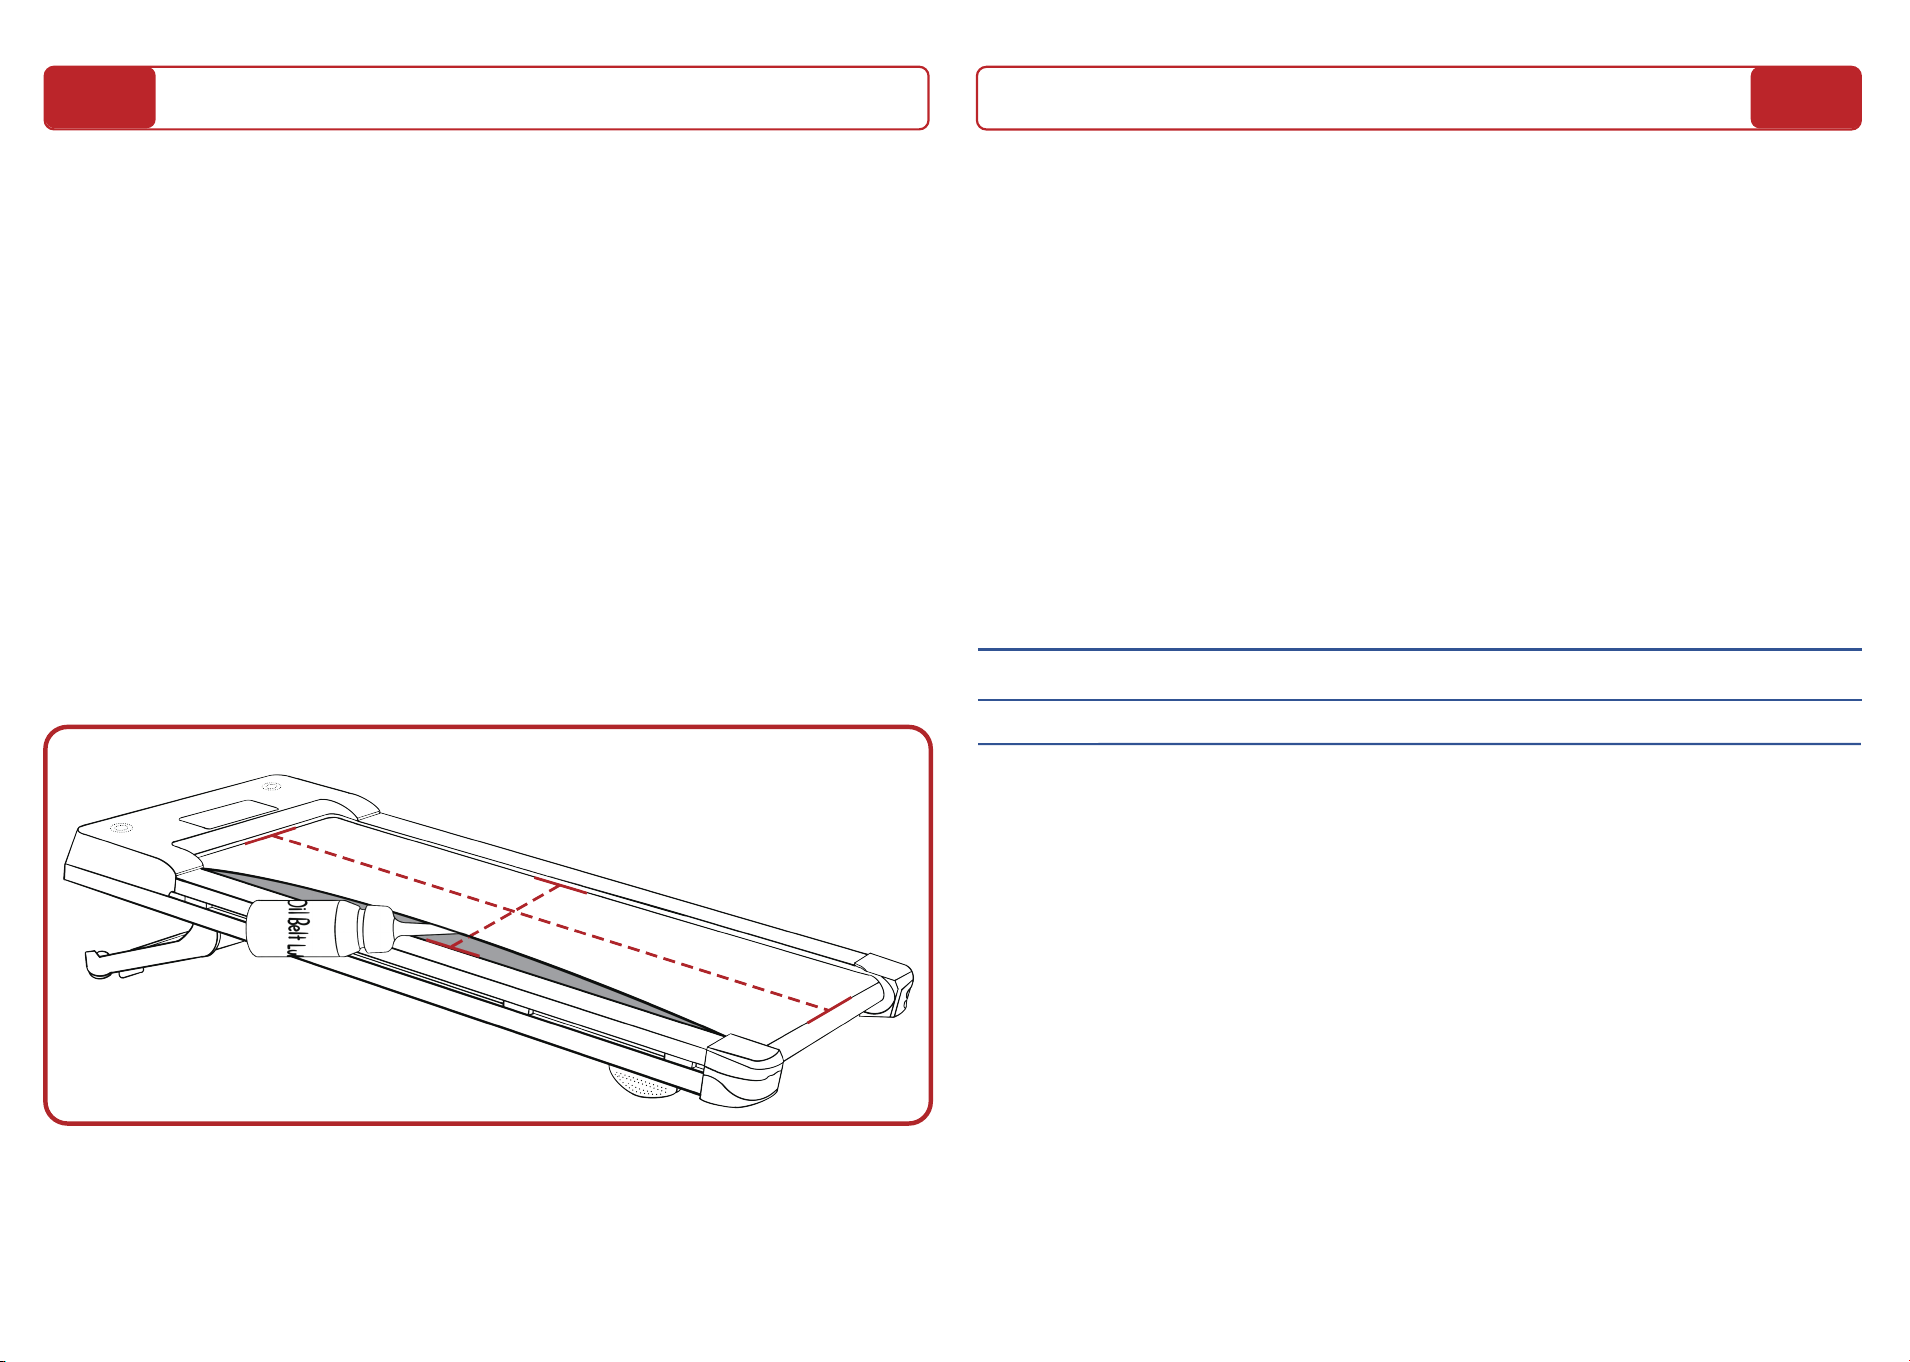
Check for lubrication:
To check if the running belt needs lubrication, grasp it and touch the center
area at the rear as closely as possible. If there is silicone oil on the belt or if
it feels slightly slick, it means that lubrication is not needed. If the running
belt feels dry and there is no silicone oil on your hand, you need to add
lubricant.
To lubricate the running belt, locate the both side of the belt and spray
silicone oil on each side of it. Then, run the treadmill at a speed of 0.6mph,
spreading the silicone oil evenly and letting the belt from left to right. After
about a minute, the silicone oil will be absorbed into the running belt.
32
33
Warranty Statement
The PACEROCKER warranty includes the following contents:
1-Free refund or exchange the walking machine within 90 days from
the date of purchase.
2-Free replacement of accessories within 1 year from the date of
purchase.
3-Access to the FitYo APP, allowing you to connect, control your
PACEROCKER treadmill, and track your fitness data.
New Model Auto Incline Treadmill
PACEROCKER
USER MANUAL
with Bluetooth Speaker
Jumpstart your fitness — download the
app and connect to your treadmill.