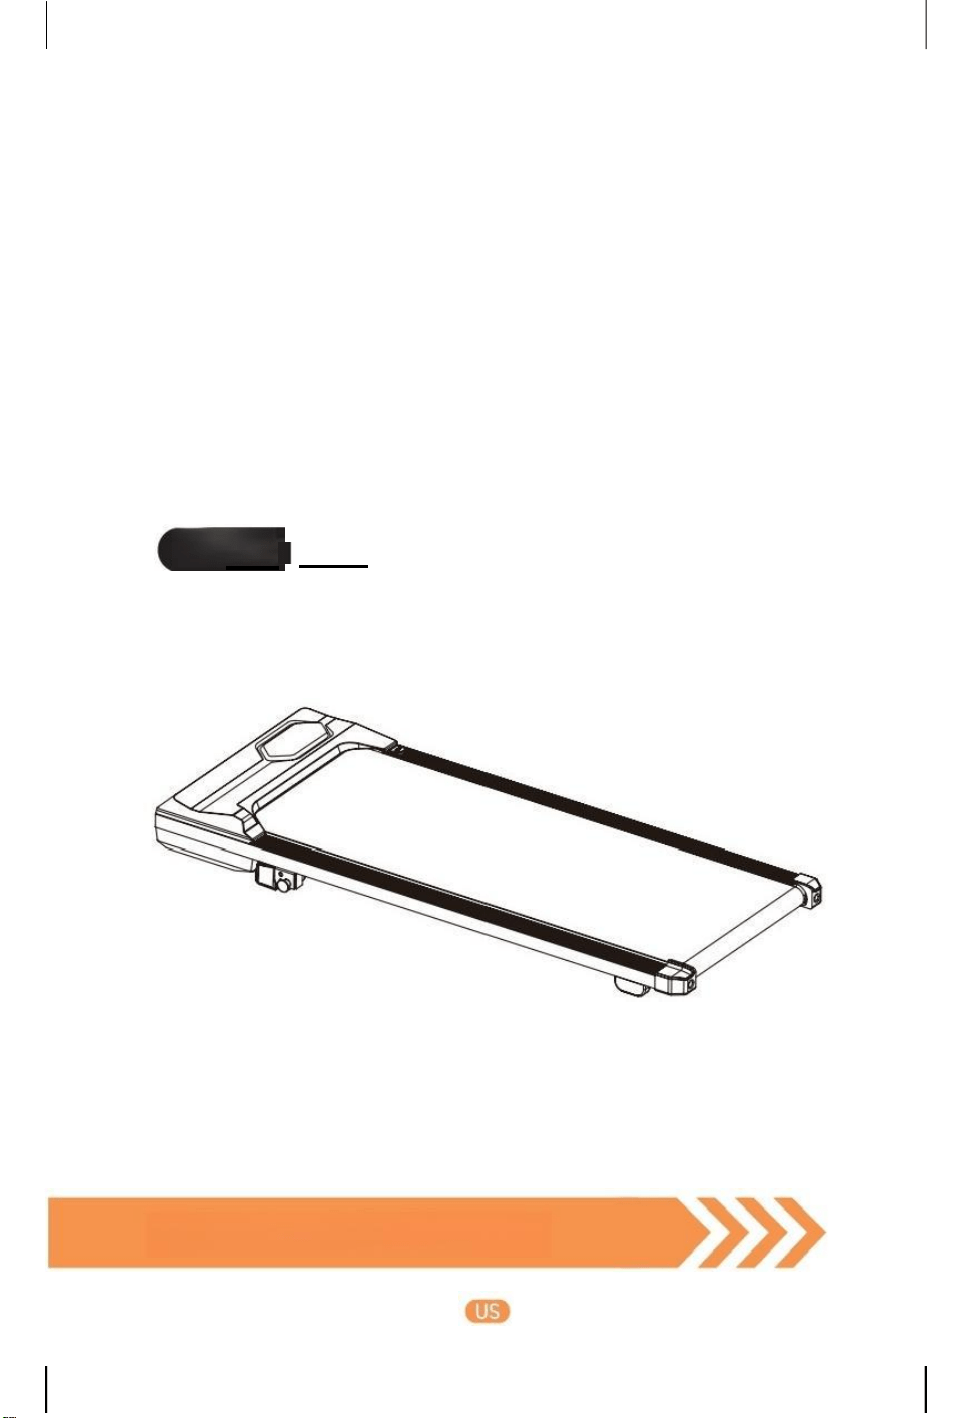
AC 三乙0三
Under Desk Treadmill
User Manual
Model
S30
Born for a Healthier Life!

CONTENT
1. After -sales Service .................................................................................................. 03
2. Important Safety Warning .......................................................................... 04
2.1Precautions Before Use .................................................................................................04
2.2 Precautions While Using .............................................................................................. 04
2.3 Storage and Maintenance Precautions ...................................................................... 05
2.4 Precautions for Coin Cell Batteries ............................................................................ 05
3. Overview & Accessories-
.................................................................................
06
3.1 Package List .............................................................................................................. 06
3.2 Product Overview ..........................................................................................................07
3.3 LED Display
..................................................................................................................
08
3.4 Remote Control
..............................................................................................................
09
4. Assembly ........................................................................................................................ 10
4.1 AssemblyPreparation .....................................................................................................10
4.2 How to Install ..................................................................................................................10
5. How to Use .................................................................................................................... 11
5.1 Slope Adjusting ................................................................................................................11
5.2 Start / Pause / Stop ...................................................................................................... 12
5.3 Free Run
..........................................................................................................................
12
5.4 Countdown Mode .......................................................................................................... 12
5.5 Built -in Program .............................................................................................................13
5.6 Sleep Mode
....................................................................................................................
14
6. How to Use with APP
............................................................................................
14
6.1 APPDownload
.................................................................................................................
14
6.2 Connect & Control Device ............................................................................................15
6.3 Functions ........................................................................................................................ 16
7. Storage & Maintenance
.................................................................................
17
7.1 Storage
..............................................................................................................................
17
7.2 General Maintenance
....................................................................................................
19
— — Ifyou have anyquestions , please email tosupport 01@acezoe .us
7.3 Running BeltAdjustment
...............................................................................
19
7.4 Running BeltLubrication.................................................................................. 21
7.5 RemoteControlBatteryReplacement
..............................................................
22
7.6 ProductCleaning........................................................................................... 22
8. Specification Parameters
....................................................................
23
9. Troubleshooting
..........................................................................................
24
10. Warranty ..................................................................................................... 25
11. FCC Statement ....................................................................................... 27
12. Disposal
...................................................................................................
27
13. Reture & Warranty Process
...............................................................
28
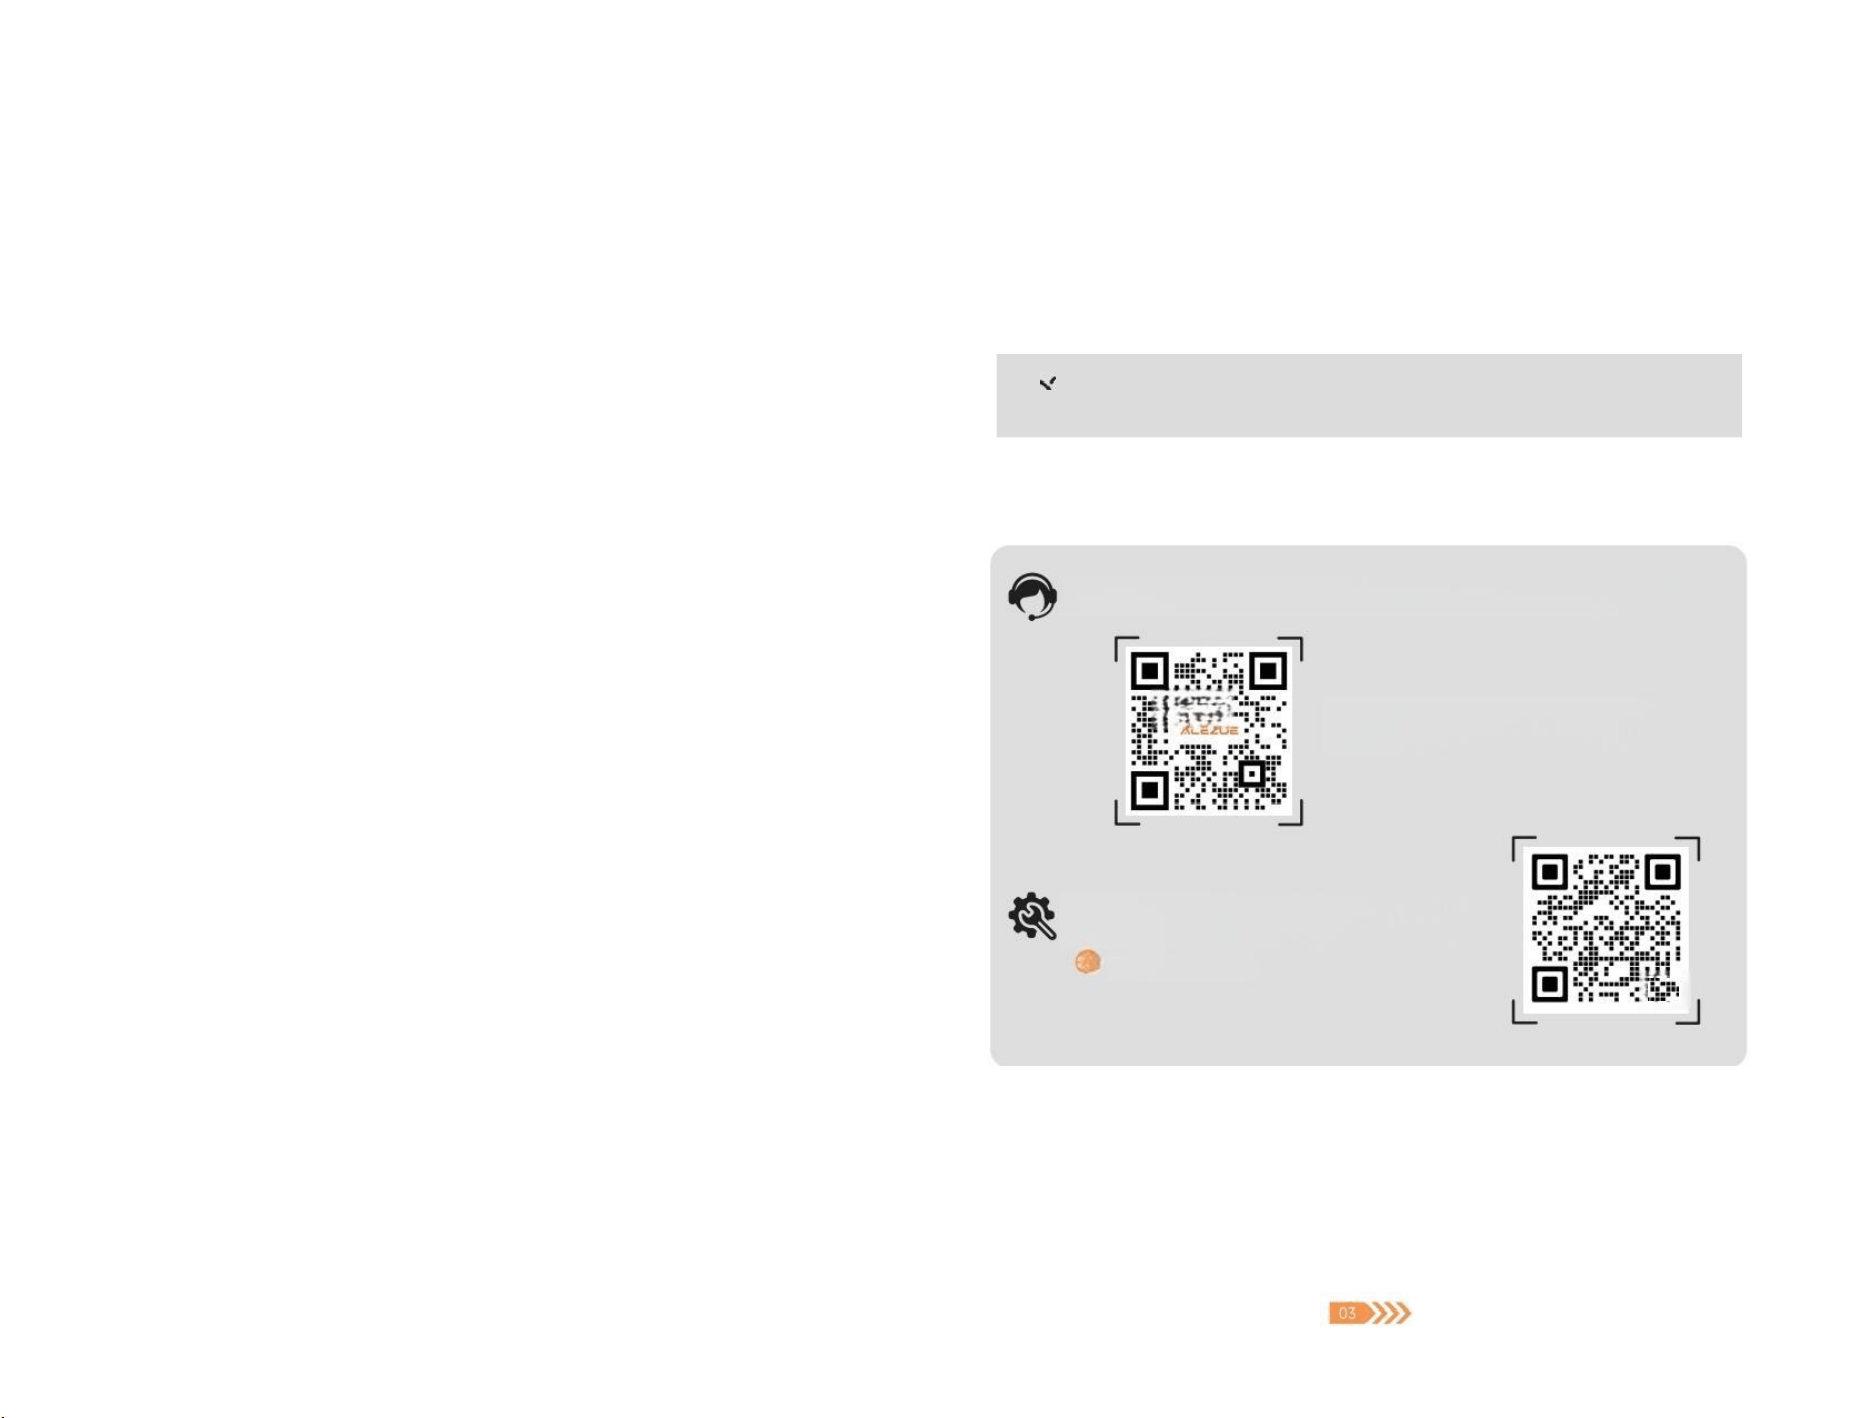
1. After -sales Service
Please do not disassemble, repairor return the machine before contacting
AcezoeSupportTeam.
For damagedordefective products, questions, replacement parts oranyotherservicesupport,
pleasefeelfreecontactour customer servicedepartment as below.
Emailour Customer Service toget morehelp: support01@acezoe.us
用
Acezoeis glad to serve you, we will get
back to you within 1 business day.
Scan this QR code or browse Acezoe official
websiteto get moreproduct Installation Guide:
www. acezoe.us

—If you have any questions,please email to ×support01@acezoe.us If you have any questions,please email to support01@acezoe.us
2.Important Safety Warning
ATTENTION:Before using this machine,please read all instructions
in themanualandcautionarymarkings onthe machine carefully.
2.1 Precautions Before Use
·This product only works under 120V/60Hz voltage.Be sure to use a power socket with
safety ground.The grounding plug must be installed and grounded according to the
parameters specifiedlocally.If the plug does not match the socket,ask qualified electricians
or after-sales staff to handle it.
·Be careful not to place the treadmill on items such as thck carpets,so as not to affect the
air circulation under the treadmil l▲
·Keep the room well ventilated when using the treadmill
·Do not use or store in places exposed to direct sunlight,high-temperature places such as
around stoves,or heating appliances such as electric blankets,which may cause electric
leakage or fire. ▲
·Do not usewith wet hands!Do not pull out or insert the power plug with wet hands to
avoid electric shock or injury.▲
·Do not use the product in a state where the outside of the product is cracked ,damaged,
or peeled off(the internal structure is exposed),or when the welding part is peeled off
·Do not use if the power cord or plug is damaged,or if the outlet jack is loose,which may
result in electric shock,short circuit or fire.▲
2.2 Precautions While Using
·Barefoot exercise is strictly prohibited.Please do warm-up exercise before exercise to avoid
body strain
·Please stop exercising immediately and consult a doctor if you feel unwell or have
abnormalities during use.
·Patients who are being treated by a doctor should be sure to use this product only after
discussing with a specialized doctor,especially thosewho have suffered injuries to the legs,
waist and neck;those who have deforming arthritis,rheumatism,gout;those who have
osteoporosis;those who have heart disease,vascular disorders,high blood pressure,and so
on;people with obvious poor health condition.
·Do not jump up and down during exercise to avoid falling and getting injured.
·Do not let children approach treadmill in use to avoid accidents.Pay attention to the
surrounding people not to get close during using.
·Do not use thismachine with two or more people at the same time,which may result in an
accident or fall injury.
·Personswho are indisposed,mentally disabled orlackcommon sense are not allowed to
use it,unless under the supervision and guidance of persons responsible for their safety.
·Minors must be accompanied by adults when using treadmill
·Avoid long-term overload operation.It is recommended that turn off the power after 2 hours
of continuous use and let the machine rest for 10 minutes before using it
·Please turn off the power switch after exercise.Pull out the power plug from the socket
when not in use to avoid the deterioration of the insulation dueto dust and moisture,which
may lead to electric leakage and fires.▲
2.3 Storage and Maintenance Precautions
·Please be sure to unplug the power plug of the treadmill before cleaning,maintaining and
moving the product.▲
·Open the motor protection cover at least once a year to vacuum and clean the motor.
·Add 10ml of lubricating oil every 3 months to maintain the machine.Silicone oil must be
placed out of the reach of children to avoid serious consequences by accidental ingestion.
·Store the treadmill indoors to avoid moisture and do not place any foreign objects.Do not
expose the motor or operating parts to water or liquids,to avoid electric shock or fire. ▲
·If there is anyproblem with this machine,please contactAcezoe Support Team.Non-
professionals,please do not attempt to disassemble or repair it to avoid equipmentdamage.
2.4 Precautions for Coin Cell Batteries
·Ensure the batteries are installed correctly according to polarity (+and -).
·Do not mix old and new batteries,different brands or types of batteries,such as alkaline
carbon-zinc,or rechargeable batteries.
·The compatible battery type is CR2025.
·The nominal battery voltage is 3V.
·Remove and immediately recycle or dispose of batteries from equipment not used for an
extended period of time according to local regulations.
·Always completely secure the battery compartment.If the battery compartment does not
close securely,stop using the product,remove the batteries,and keep them away from
children.
·Non-rechargeable batteries are not to be recharged.
·Do not force discharge,recharge,disassemble,heat or incinerate.Doing so may result in
injury due to venting,leakage or explosion resulting in chemical burns.▲
·Remove and immediately recycle or dispose of usedbatteries according to local regulations
and keep away from children.Do NOT dispose of batteries in household trash or incinerate.▲
·Even used batteries may cause severe injury or death.▲
·Call a local poison control center for treatment information.
SAVE THESE INSTRUCTIONS
If you have any questions,please email to ×support01@acezoe.us
3.Overview &Accessories
3.1 Package List
ACEzoa
Uhder Denk Tesdml
User Manual
》
Magnetic Remote
Control×1
6mm L-type
Inner
Allen key×1
If you have any questions,pleaseemail to凶 supporto1@acezoe.us
3.2 Product Overview
Standing
Anti-slp
Mat
Remote Control
Battery×1
S30 Treadmill
×1
Power Cable
×1
Power Cable
Socket
User Manual
×1
Lubricating
Oil×1
Ouick Start
Guide ×1
Moving
Wheel
Power
Switch
—If youhave any questions,please email to ×support01@acezoe.us If youhave any questions,please email to区 [email protected]
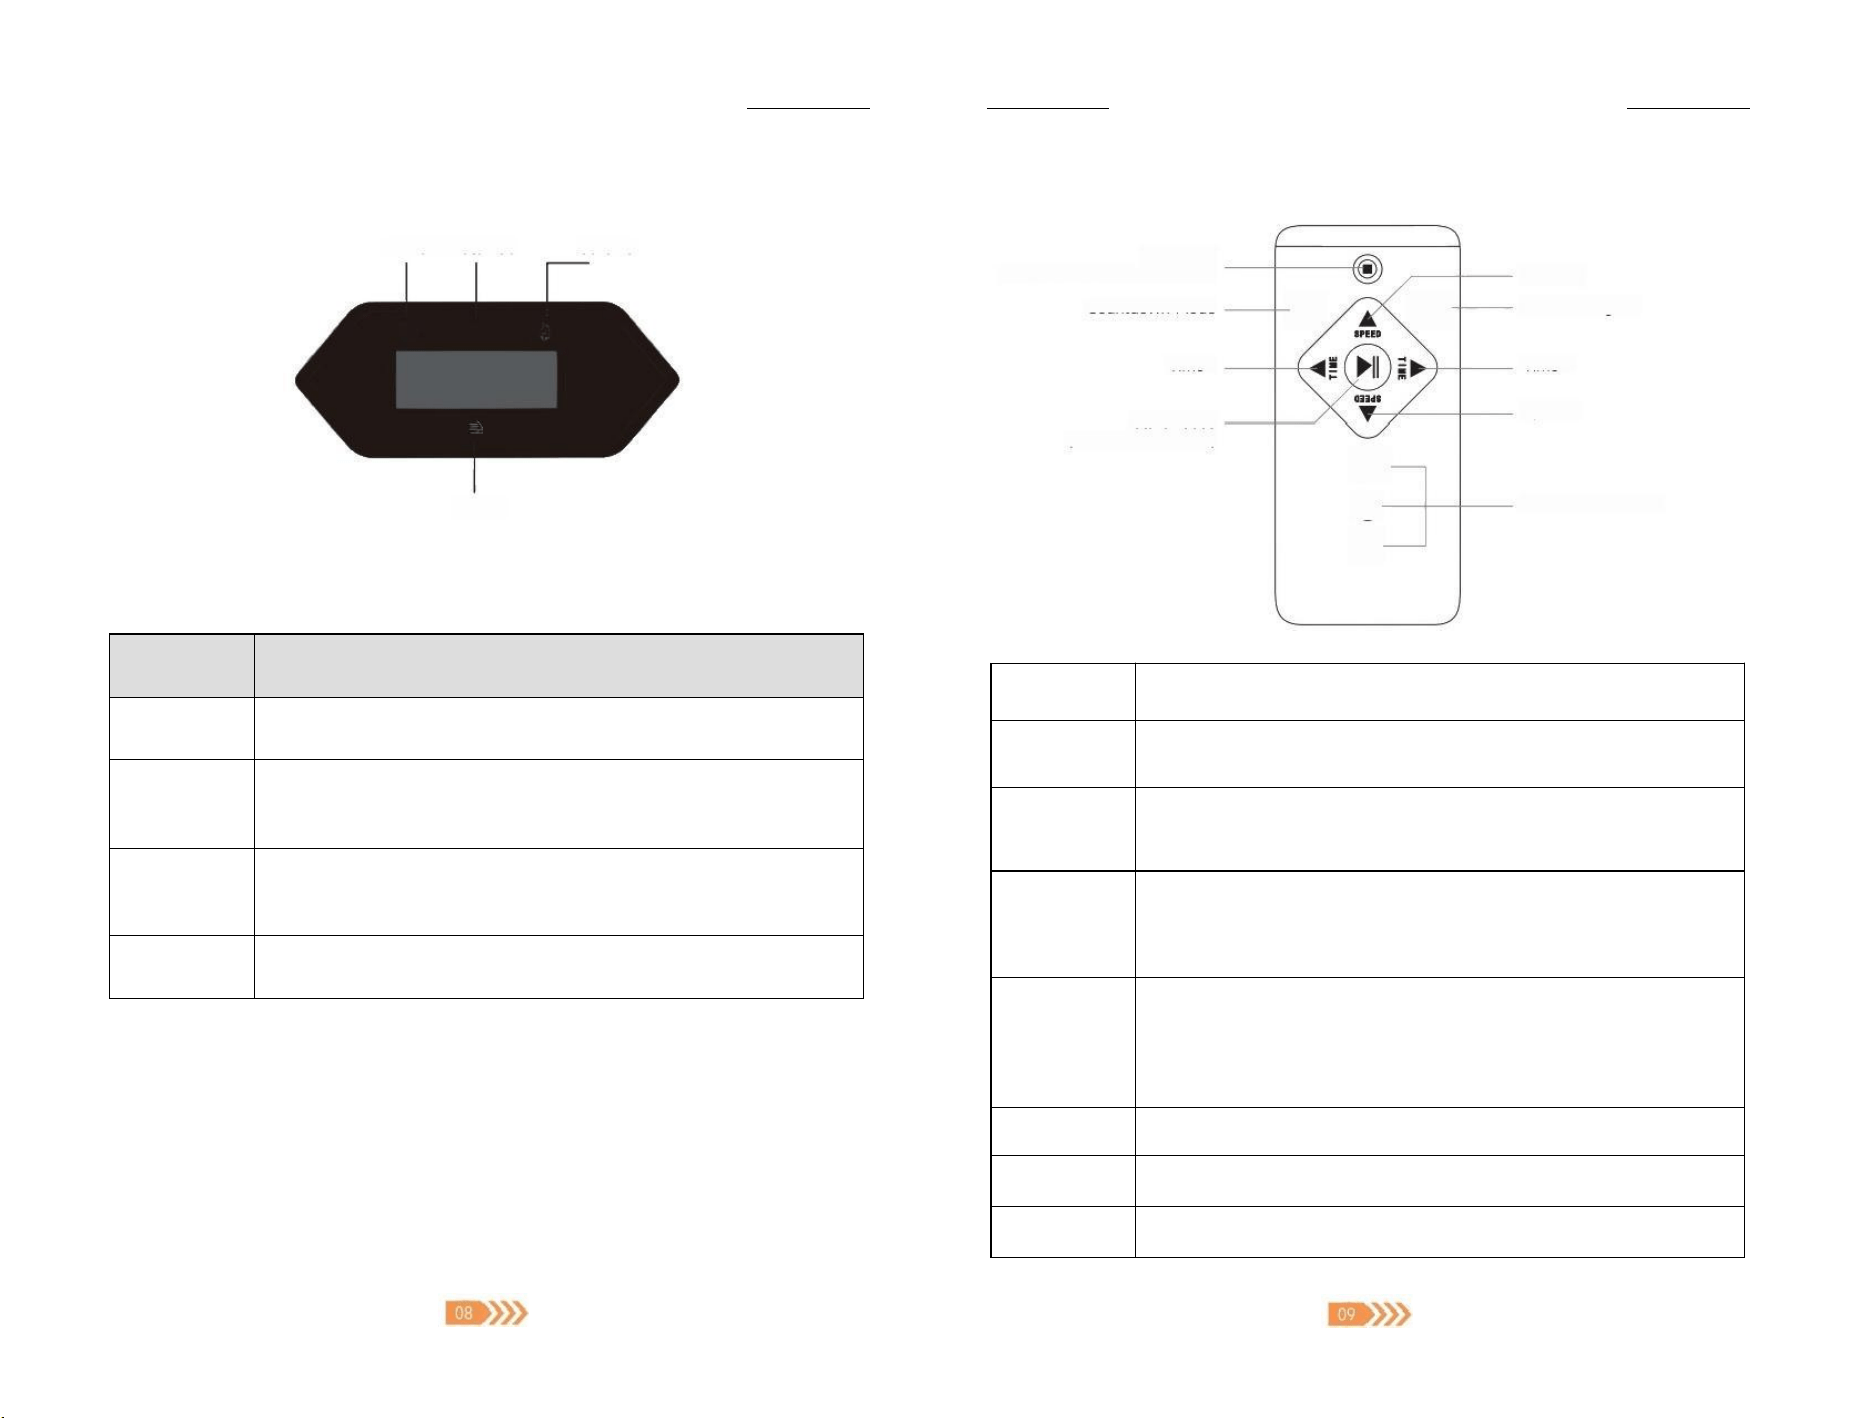
3.3 LED Display
Time Distance Calorie
9 不
Speed
Display Value on Display
Indicator
Meaning of Value
Distance
·The current exercising distance during exercise.
·The target distance value,when setting in the countdown mode
Speed
·The current speed during exercise.
Time
·The current exercising time during exercise.
·The target time value,when setting in the countdown mode.
·The countdowns of "3"-"2"-"1"in turn during startup.
Calorie
·The current value of caloriesburned during exercise.
·The target calorie value,when setting in the countdown mode
3.4 Remote Control
Power Off
(All value are cleared to zero.)
Countdown Mode
Time -
Start/Pause
(All value are saved.)
M P-
②
③
④
Speed +
Built-in Program
Time +
Speed -
2/3/4MPH Shortcut
Button
Function
O
Press to stop the treadmill during running.The speed slowly decreases
and all value will be cleared to zero.
▶ Ⅱ
Press to start the treadmill.It will start running after a 3s countdown.
Press again to pause the treadmill and retain the current distance,
time,and calorie value.
M
·In standbymode,press the button to enter the countdown mode
setting
·Press once,twice,or three times to set the countdown target values
for H1-time,H2-speed,and H3-distance respectively.
P
·In standby mode,press the button to enterthe built-in program
setting.
·Press to choose from built-in P01~P12 programs,the speed changes
differently for each program.
213/4
The treadmill will accelerate SPEED to 2/3/4 MPH directly.
▲/▶
Increase speed,time,distance,and calorie values.
V1
Decrease speed,time,distance,and calorie values.
f you have any questions,please email to ×support01@acezoe.us If you have any questions,please email to support01@acezoe.us
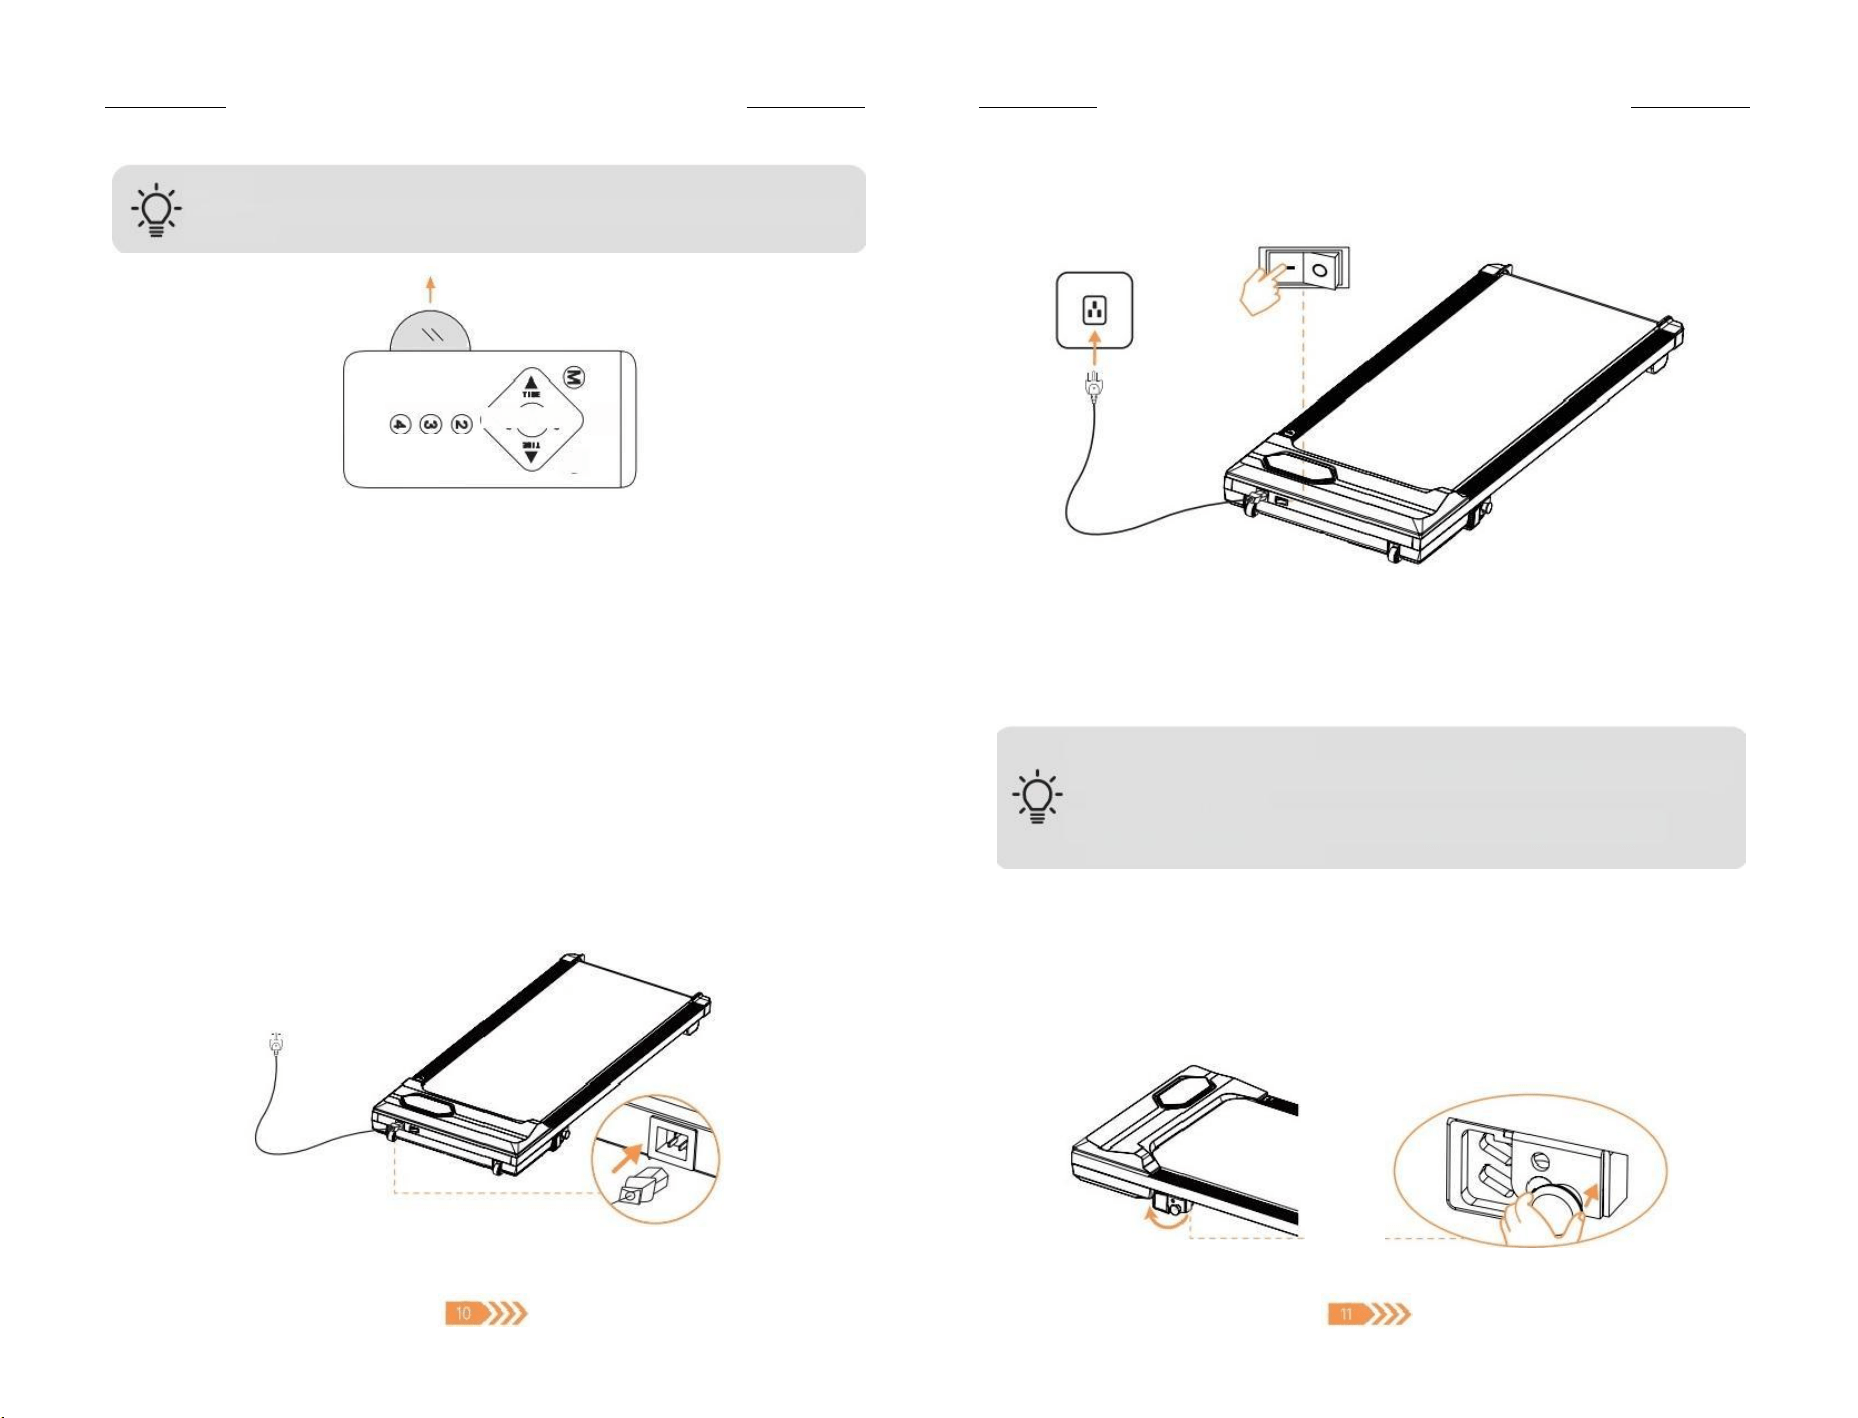
TIPS:
Please remove the insulating tabs from the battery when using the remote control for the
first time.
( ( 二
◎
◎
4.Assembly
4.1 Assembly Preparation
·For safety operation,please select a safe,dry,solid and spacious horizontalsurface for
installation.
·After receiving the product,take out all parts from the product package.Please carefully
check whether the parts and toolsare completeaccording to the packing list.
4.2 How to Install
① Place the treadmill on a flat ground,stay away from thick carpeting and keep the air
circulating.
② Connect the power cord to a grounded 120V160Hz outlet only.Turn the power switch to the
"—"position to start using the product
5.How to Use
Before use,make sure that:
·Wear appropriate athletic shoes and keep the laces fastened.Barefoot exercise
is strictly prohibited.
·Don't place the treadmill on a thick blanket to avoid affecting the heat
dissipation of the machine
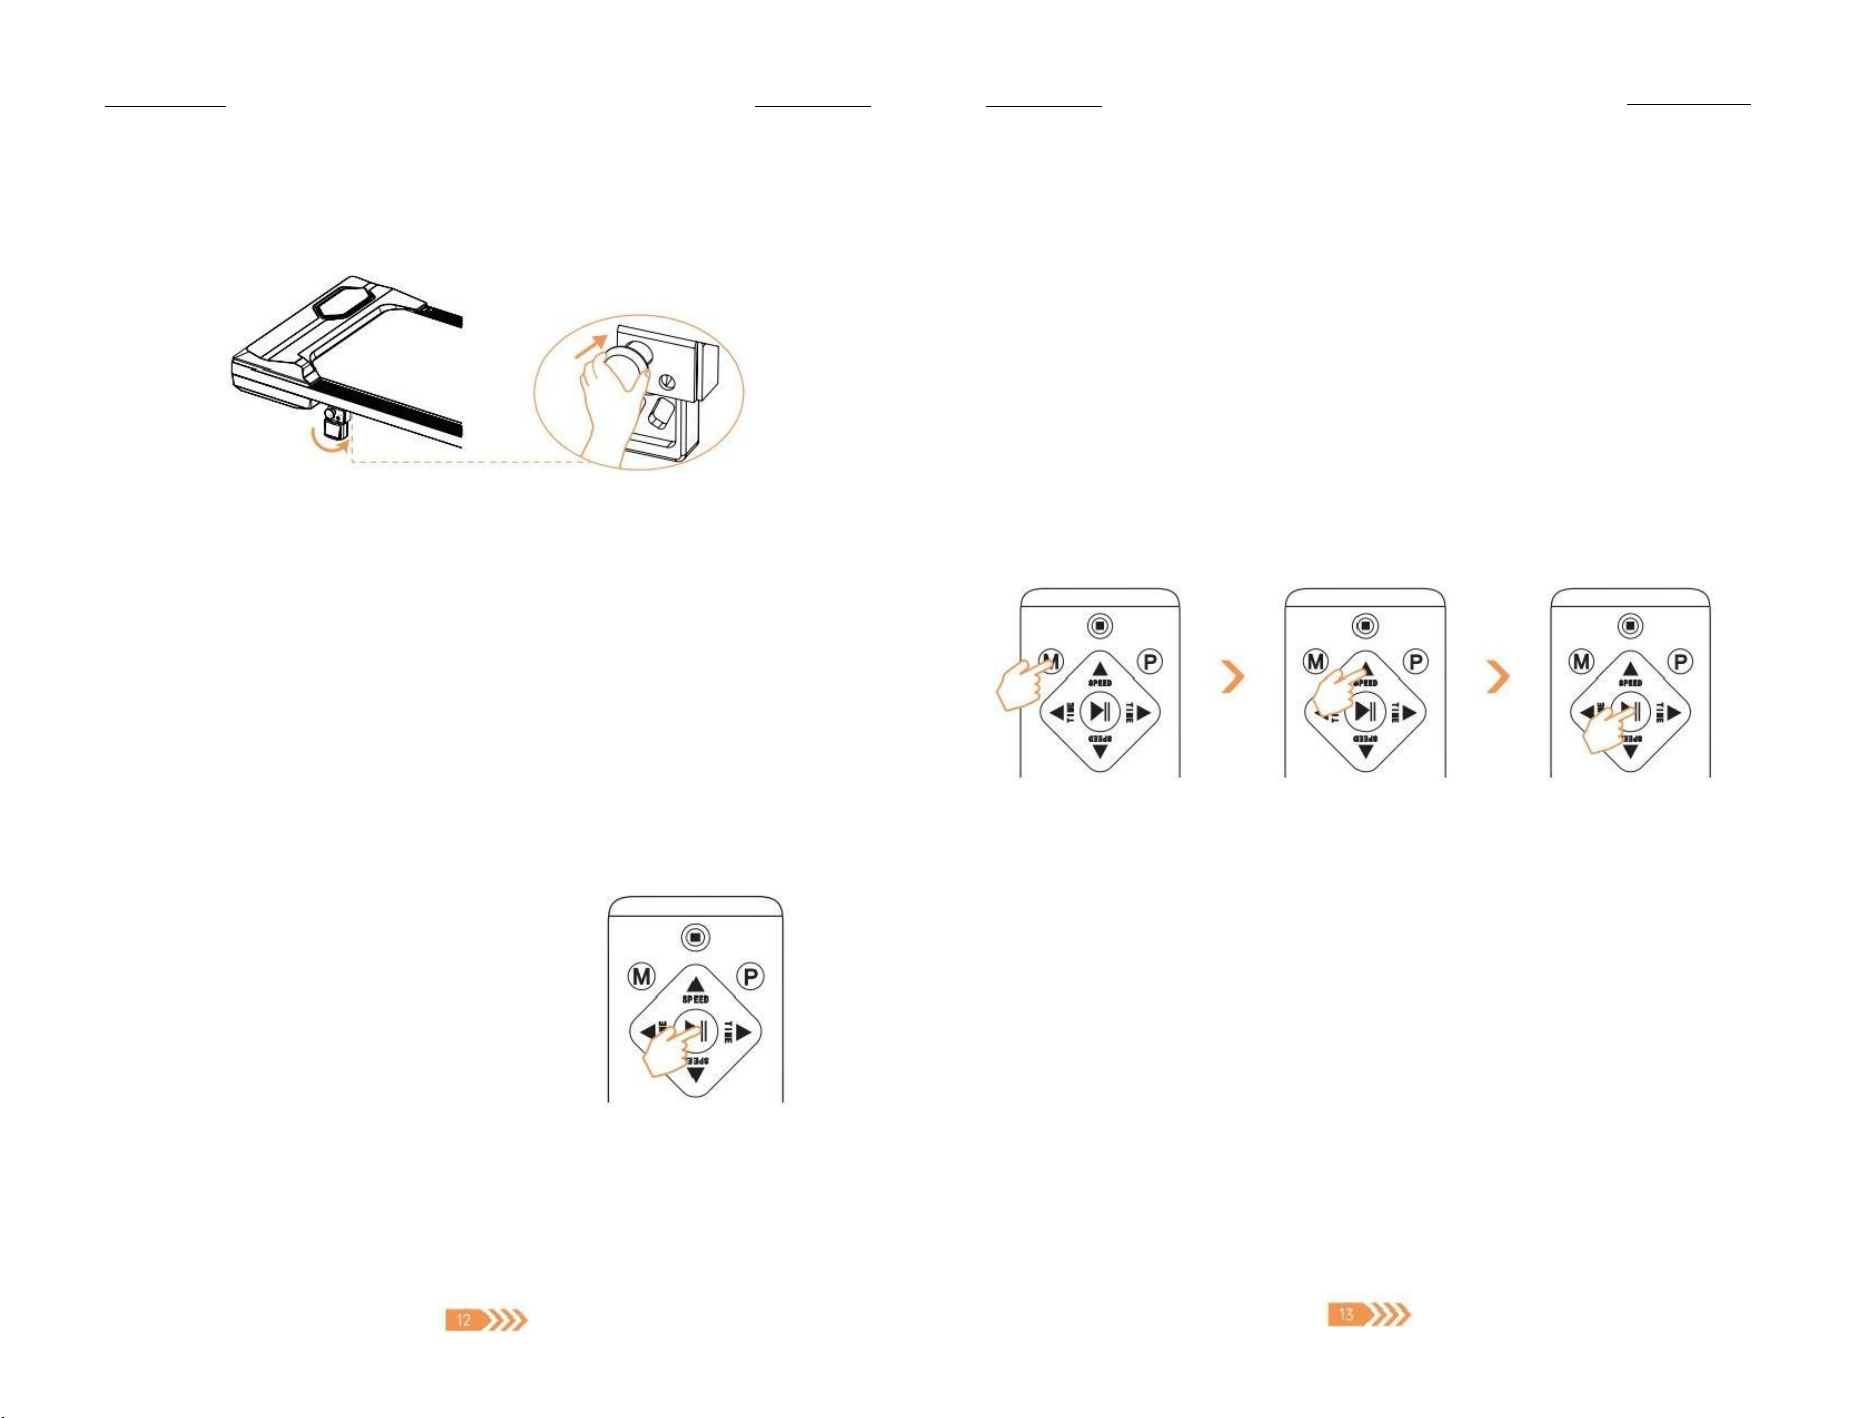
5.1 Slope Adjusting
No Incline
·When the slope bracket is placed horizontally,fully insert the slope adjustment pins into the
lower holes.
If you have any questions,please email to support01@acezoe.us
If you have any questions,please email to support01@acezoe.us
With Incline
·Remove the fixed slope adjustment pins,rotate the slope bracket to make it vertical,then
fully insert the slope adjustment pins into the upper holes.
5.2 Start /Pause /Stop
·Press the">II" button on the remote control,the treadmill will start after a 3s countdown
·During exercise,press the">II "button again,the treadmill pauses slowly,the speed is
cleared to zero,other data remains in the current state,and the screen is always lit
·During exercise,press the"◎"on the remote control,the treadmillstop running,all data
are cleared to zero.
5.3 Free Run
① Press the">II "button,the machine starts running at 0.5MPH after a 3s countdown
② Press"Speed-/Speed +"or"2/3/4"speed shortcut to adjust the speed (minimum 0.5MPH,
maximum 4.0MPH).Distance,time and calorie data will keep increasing during running.
Tips:
After 99:59 minutes of exercise,the
machinestops automatically,press ">II"
button to restart,the time starts counting
from zero again.
5.4 Countdown Mode
In this mode,the value of time,distance,and calories can be set as target countdown value on
demand.
① In standby mode,press the"M" button on the remote control to enter the countdown
mode;
② Press the"M" button to cycle switch:"H1-Time"-"H2-Distance"-"H3 - Calorie" -
"Standby" .The selected window value flashes
③ Press the"▲V"button to add and decrease the value of the current window;
-"Time"Countdown:Valuedefaults to 30 minutes (settable value range:5-99 Minutes)
-"Distance"Countdown:Value defaults to 1 mile (settable value range:1-99 Miles)
-"Calorie"Countdown:Value defaults to 50 kcal (settable value range:20-990 kcal)
④ Afte r setting,press the">Il" button,the treadmill starts from the lowest speed (0.5MPH)
after a 3s countdown.The speed also can be adjusted on demand.
⑤ When the value set by countdown mode on the window drops to"O",the treadmill will
slowdown and stop automatically.
5.5 Built-in Program
There are 12 different programs built into the treadmil,each program varies in speed.
Each program is divided into 10 segments,and the running time of each segment is set time /10.
① In standby mode,press the"P"button to select any built-in program from P01 to P12;
② At this time,the"Time "window displays the default value (30mins) and flashes.Press
the " ▶ "buttons to adjust the required exercising time (settable value range:5-99
Minutes);
③ Press the">II" button,after a 3s countdown,the treadmill will start to run at thespeed of
the first segment of the selected program;
④ When first segment of the program is finished,the treadmill will automatically enter the next
segment of the program and change to the preset speed;
⑤ While running,press the"▲V"key to adjust the speed on demand,but the treadmill will
automatically change to preset speed while entering the next segment;
⑥ When all segments of the program are finished,the treadmill will slowdown and stop
automatically.
f you have any questions,please email to ×support01@acezoe.us If you have any questions,please email to support01@acezoe.us
NOTE:
TimeValueset/10segments=Runingtimeofeachsegment
Segment
Program
1
2
3
4
5
6
7
8
9
10
P1
Speed
1
2
2
1
1
2
2
3
4
1
P2
Speed
1
2
1
2
1
2
3
4
2
P3
Speed
2
2
3
2
4
2
1
2
P4
Speed
2
1
2
2
3
3
1
2
P5
Speed
2
1
2
2
1
2
3
2
2
P6
Speed
2
2
2
3
2
3
2
3
P7
Speed
2
2
2
2
2
3
P8
Speed
2
3
2
1
2
2
2
3
P9
Speed
2
2
4
2
4
2
2
3
2
1
P10
Speed
1
2
2
1
2
2
3
2
3
2
P11
Speed
2
3
4
4
3
3
2
3
3
1
P12
Speed
2
2
1
2
2
3
2
3
2
3
5.6 Sleep Mode
When the treadmill stops running and there is no operation for more than 10 minutes,the
system will automatically turn off all displays and enter the sleep mode.Pressing any key will
wake it up.
6.How to Use with APP
6.1 APP Download
Scan the QR Code or search the APP named"FITSHOW"in Google Play or APP Store (Http:/
lifitshow.com/qr)
Tips:
Jump to the APP Store to
download and install to open
the APP,allow permission
based on the system prompt.
6.2 Connect &Control Device
① Open the FITSHOW App and agree to the Privacy Policy and Terms of Service.
② Log in the APP,please use the mobile number or email toregister for new user
③ Fillin the basic user information likes height for more accurate exercise program reco-
mmendations.
④ On the APP homepage,click the"Workout"tab then press the"Quick Start"button
⑤ Turn on Bluetooth on your phone to search for device "Acezoe S30"
If you have any questions,please email to support01@acezoe.us
⑥ In the workout screen,swipe down for settings and swipe up for control.
⑦Tap the screen to end the workout
6.3 Functions
Workout Mode
Quick Start
Workout with others in real time.Speed settings can be adjusted on
demand.
Set Goals
Customize distance,time and calorie value as goal.
Program/
Training
Jump into workouts to explore new places from beautiful forest to
breathtaking mountains.
Scenic Videos
It is recommended to watch some experts tips before exercising to
make a suitabe exercise plan.
If you have any questions,please email to support01@acezoe.us
Profile
Qucik overview
of daily goals and
activity data.
7.Storage &Maintenance
7.1 Storage
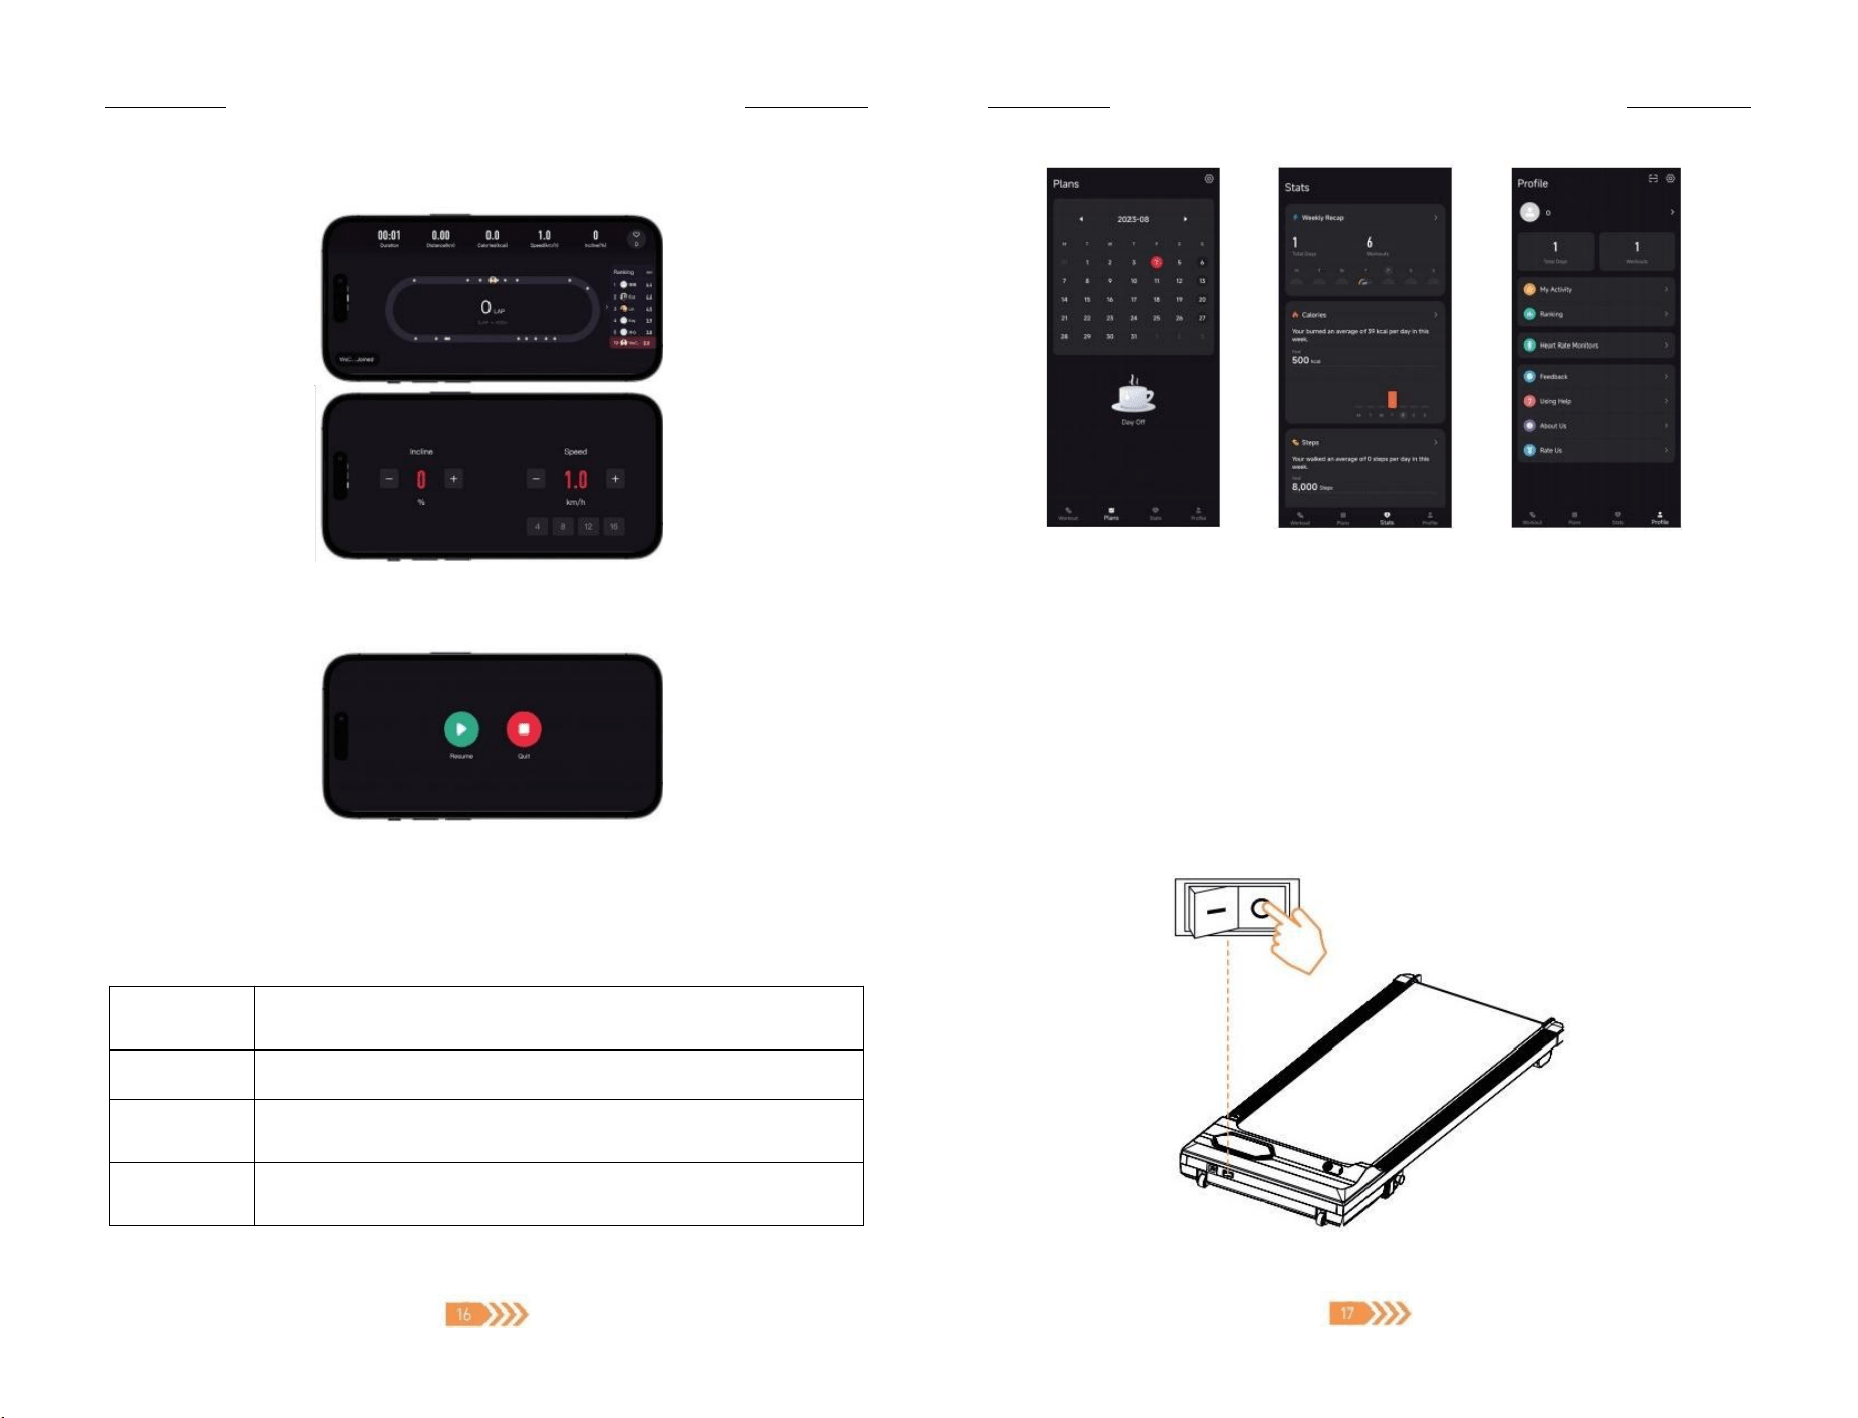
① Turn the power switch of tothe"O"position.Unplug the power cable.
Plans
Quick overview of
exercise date.
Stats
Quick overview of
daily activity data
If you haveany questions,please email to ×support01@acezoe.us
-If you have any questions,please email to support01@acezoe.us
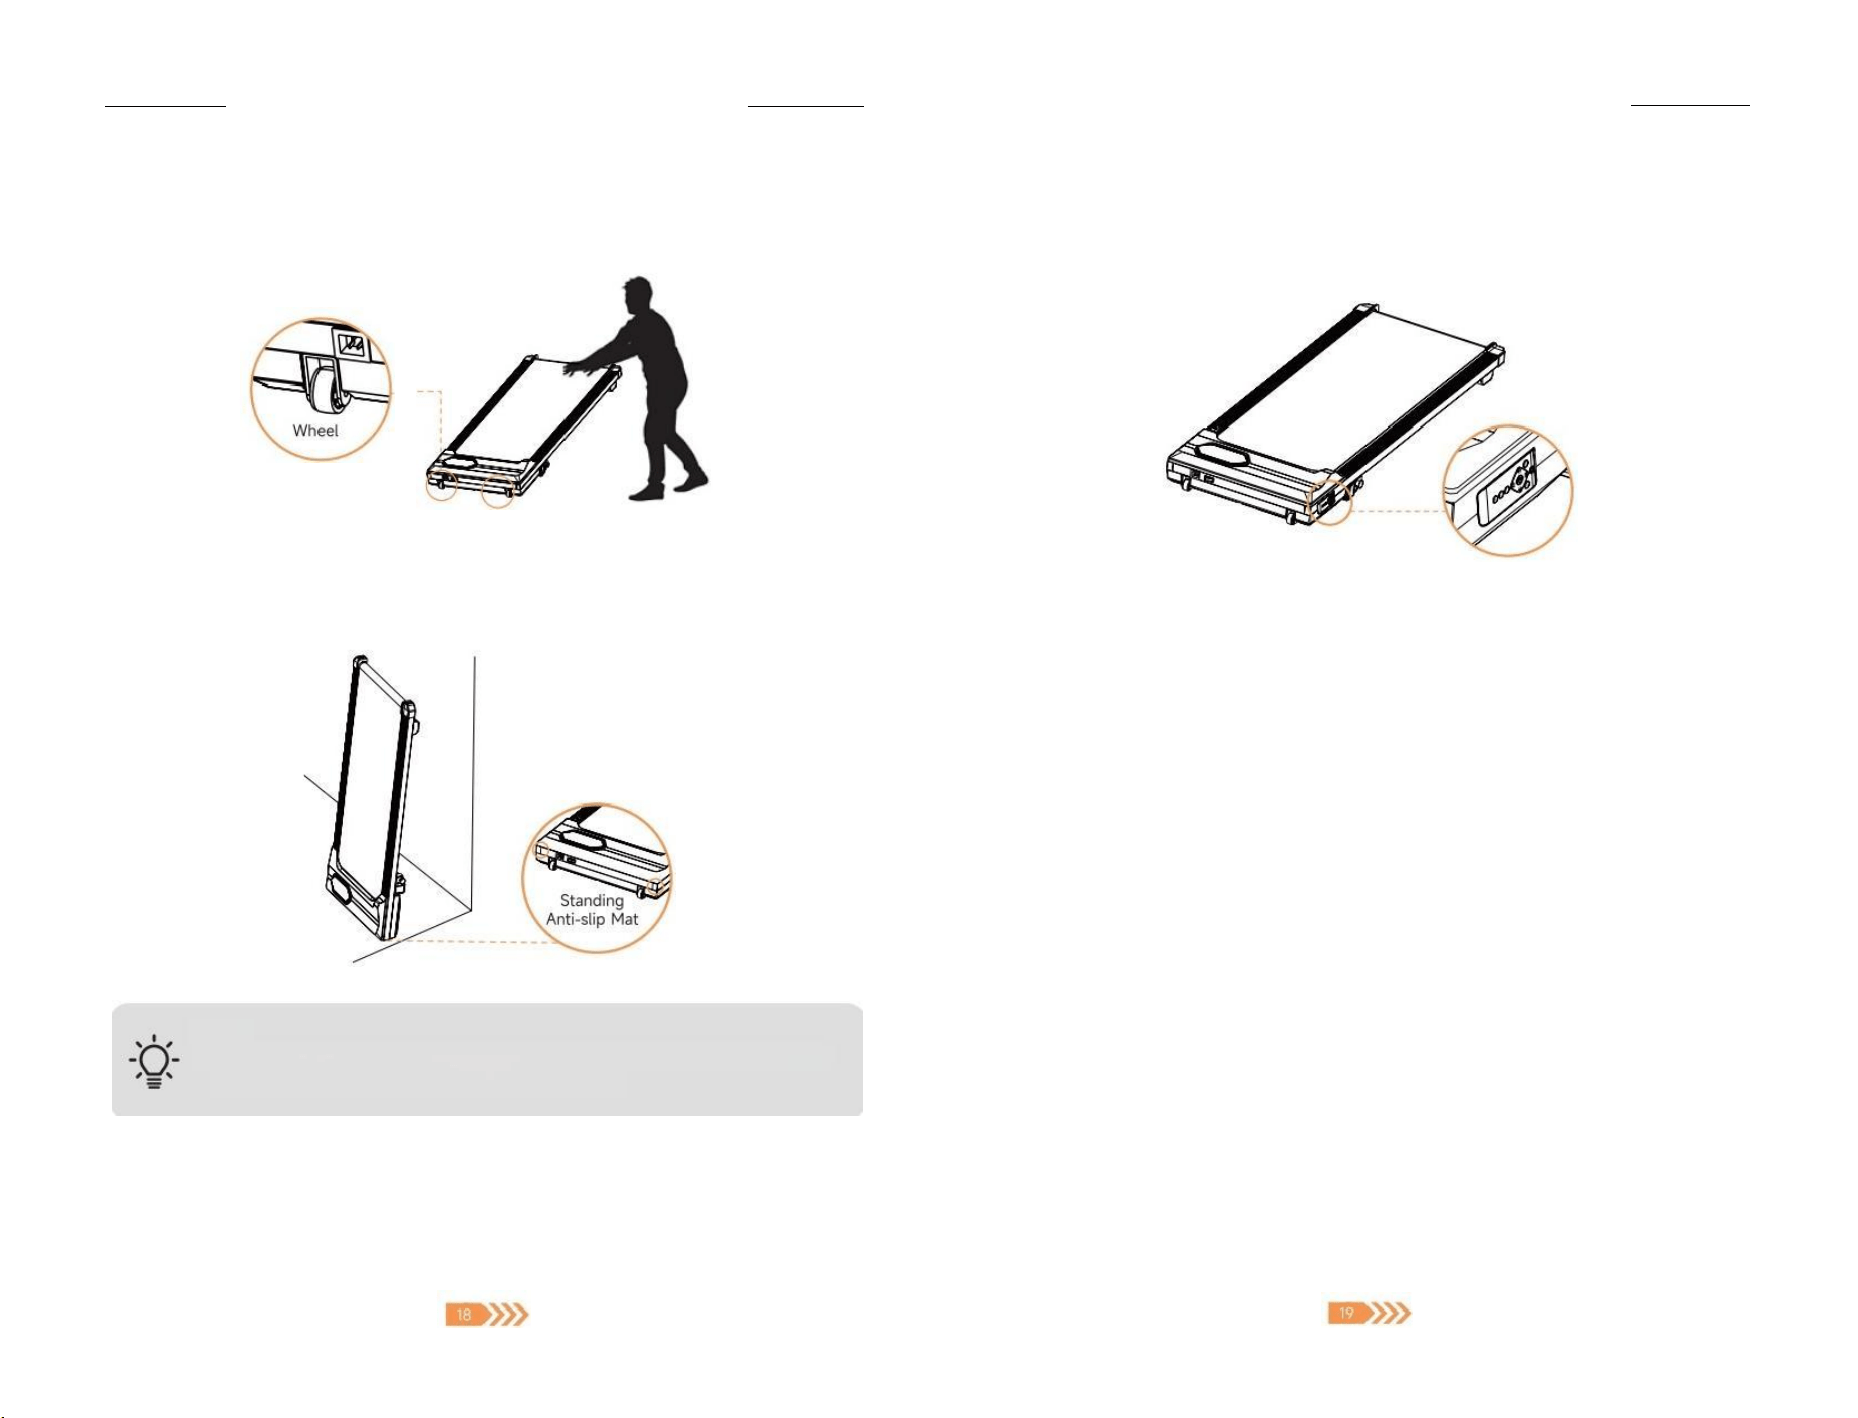
② Lift the back end of the treadmill and push the treadmill under the couch or bed with
the help of the moving wheels.
③Lift thebackend of thetreadmill and push it to side of the wall with the help of the
moving wheels,then lean it againstthe wall for storage.
Note
·To avoid the machine tipping over,the treadmill should be tilted against the
wall with a certain angle,not completely vertical.
Remote Control Storage
The remote control of the S30 treadmill has a magnetic effect and can be attached to the
mainframe for temporary storage when idle.
7.2 General Maintenance
Proper maintenance is helpful to prolong the service life of the treadmill
·Pleaseplace the treadmill in a dry and shady environment.Don't placethe treadmill
outdoors in direct sunlight.
·After 2 hours of continuous use,it is recommended to turn off the power and let the
machine rest for 10 minutes,which will effectively protect the machine motor and prolong
the life of the machine
·Make sure the shoes are clean when exercising,which avoid bringing foreign objects into
the running belt to wear down the running desk/belt.
·Check and lock all parts of the treadmill regularly,and replace defective parts in time
·Don't use the treadmill by force when it is damaged to avoid product and personal damage.
Contact Acezoe Support Team by email support01@acezoe.us ,the after sales team will assist
you.
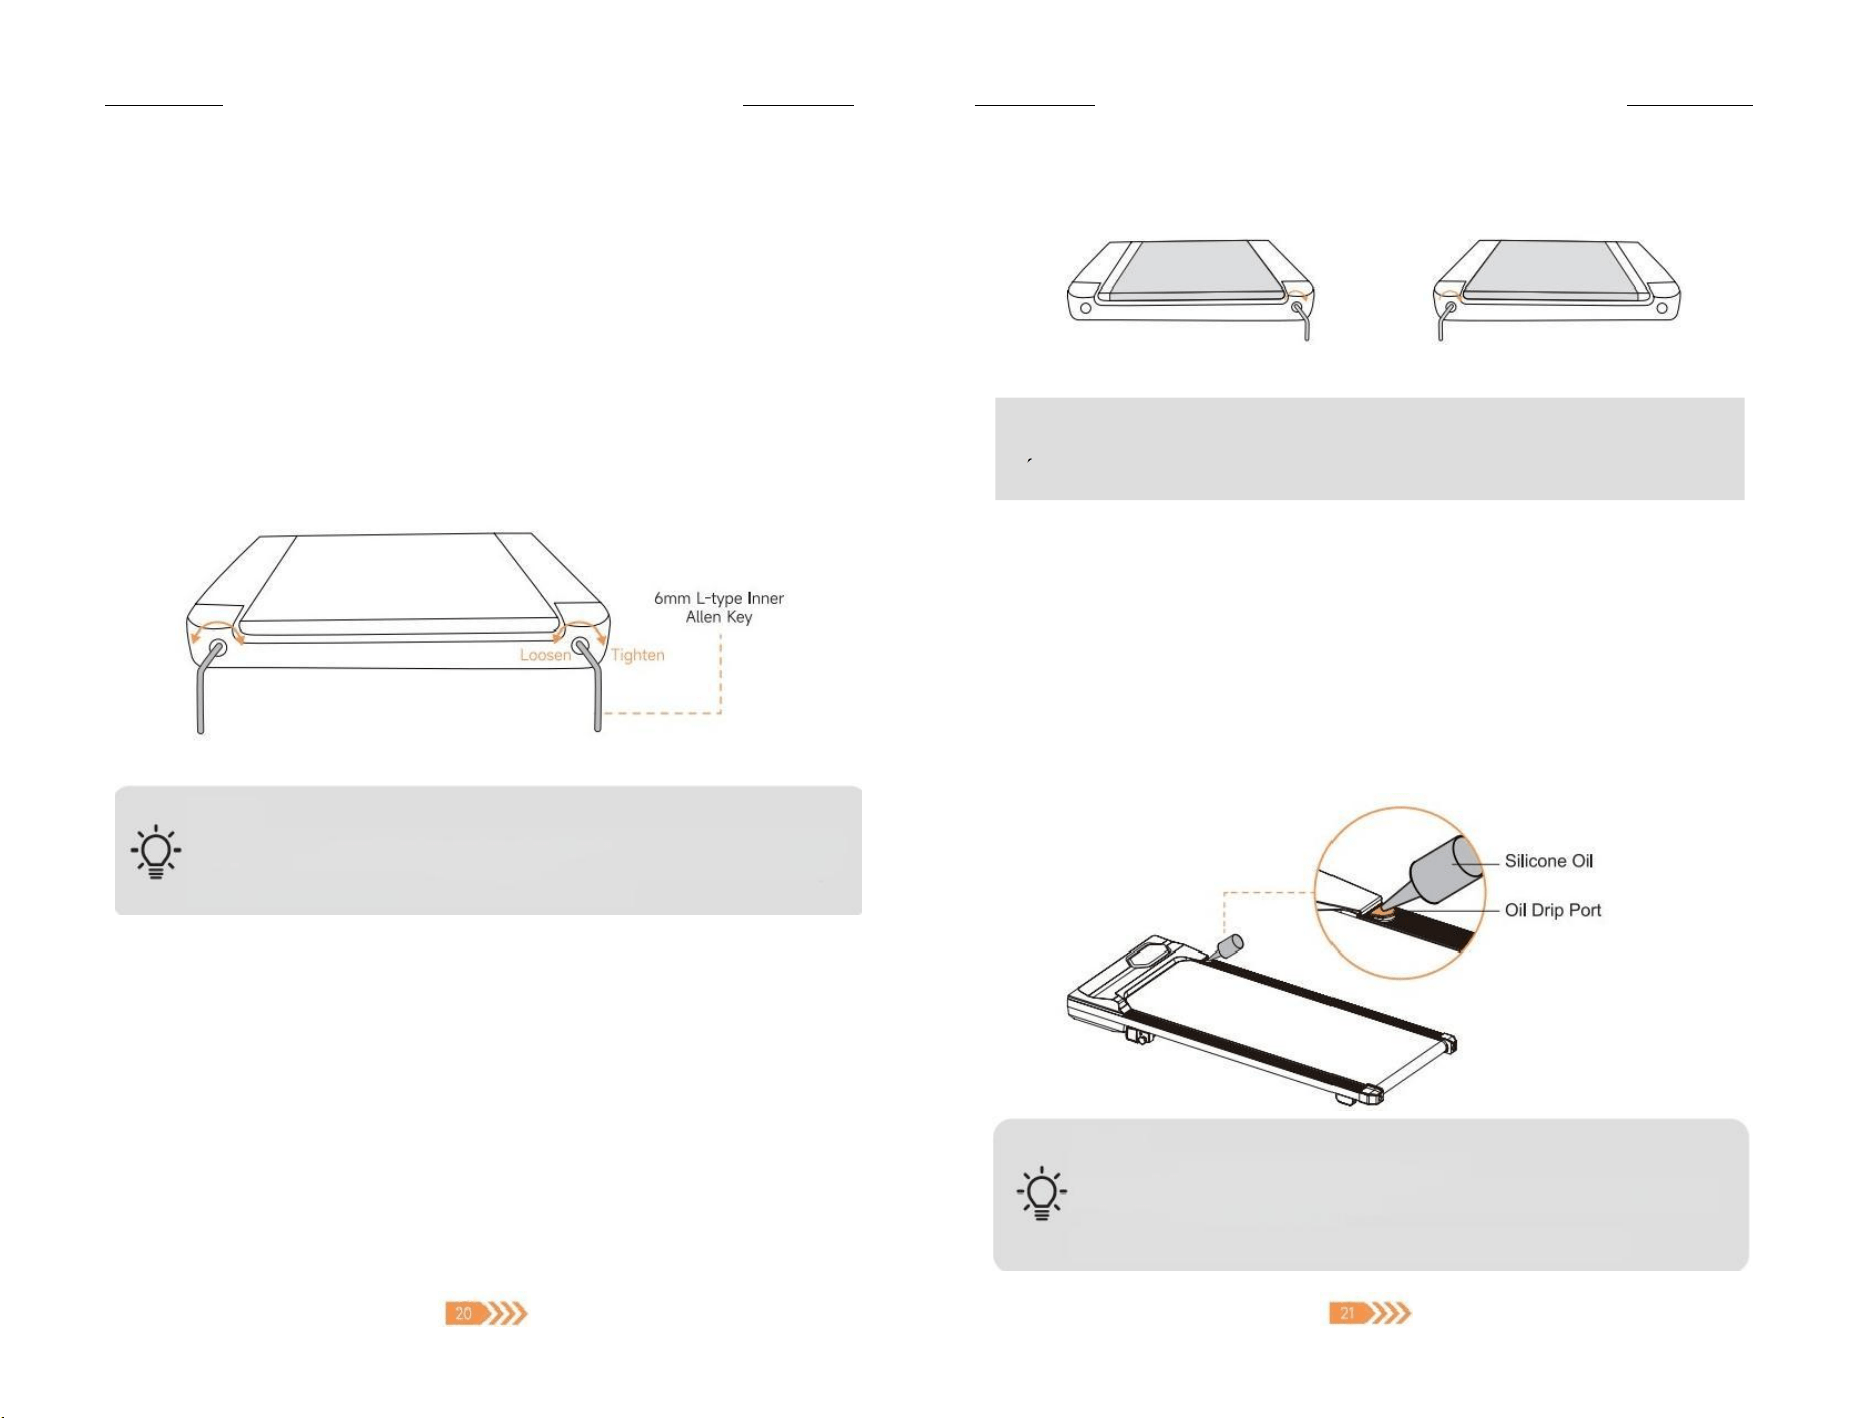
7.3 Running Belt Adjustment
The running belt of treadmill is adjusted before leaving the factory,during transportation,it
may be stretched or have deviated from the center position.Please let the running belt run
by itself when using it for the first time,and observe whether the running belt is in the center
position,and there is no pause or slippage
-If you have any questions,please email to ×support01@acezoe.us If you have any questions,please email to support01@acezoe.us
Adjust the Tightness of Running Belt
If the running belt slips or does not run smoothly in use,or there is a ratting noise from the
running belt,adjust the tightness of the running belt to improve it.
① Insert the Allen key in the adjustment screw socket on the left side of the running belt,
then turn the wrench clockwise to tighten the running belt.It's recommended to rotate
1/2 circlefirst;
② Repeat step 1 to adjust the right screw,same rotate 1/2 circle;
③ Repeat steps 1 and 2 until the running belt doesn't slip.Be sure in adjusting the screw to
rotate the same distance;
④ If you need to loosen the running belt,please turn the key counterclockwise,and note
that the left and right sides should rotate the same distance.
NOTE:
The running belt should not be adjusted too tightly,otherwise it will damage the
running belt,which increase the pressure of the front/rear rotary drum,damage
the drum bearing,produce noise and other problems
Adjust the Position of Running Belt
When using the treadmil,because of the possible force difference exerted by both feet and
the unbalanced pressure exerted on the running belt,the running belt may deviatefrom the
center,but this deviation phenomenon is normal.
① Place the treadmill on a level surface.
② Let the treadmill run at a speed of about 2.2MPH.
③If the running belt is to the left,use the allen key to turn the adjustment bolt on the left
side 1/4 turn clockwise,then let the treadmill run for 30s,the running belt will return to
center.
④ If the running belt is to the right,use the allen key to turn the right adjustment bolt 1/4
turn clockwise,then let the treadmill run for 30s,the running belt will return to center.
⑤ If the running belt is stil not in the middle position,repeat the above operation until it is
adjusted to the center position.
Running Belt Right to Center
Running Belt Left to Center
7.4 Running Belt Lubrication
Adding lubricant Step
① Turn the treadmillto a low speed of 0.5MPH;
② Open the lid of the drip port and inject 10ml of lubricating oil;
③ Lightly step on the running belt on the front of the treadmill fromleft to right,then keep for
about 8~10 minutes to make the silicone oil be completely absorbed bythe running belt
NOTE:
·Please use silicone oil not made of petroleum.
·Please do not over-lubricate to avoid insufficient friction between the running
belt and the running platform.
·It's recommended to add lubricant regularly,10ml every 3 months.
NOTE
Do not over-tighten the rotary drum asthis will cause permanent damage to the
bearing
If you have any questions,please email to support01@acezoe.us -If you have any questions,please email to support01@acezoe.us
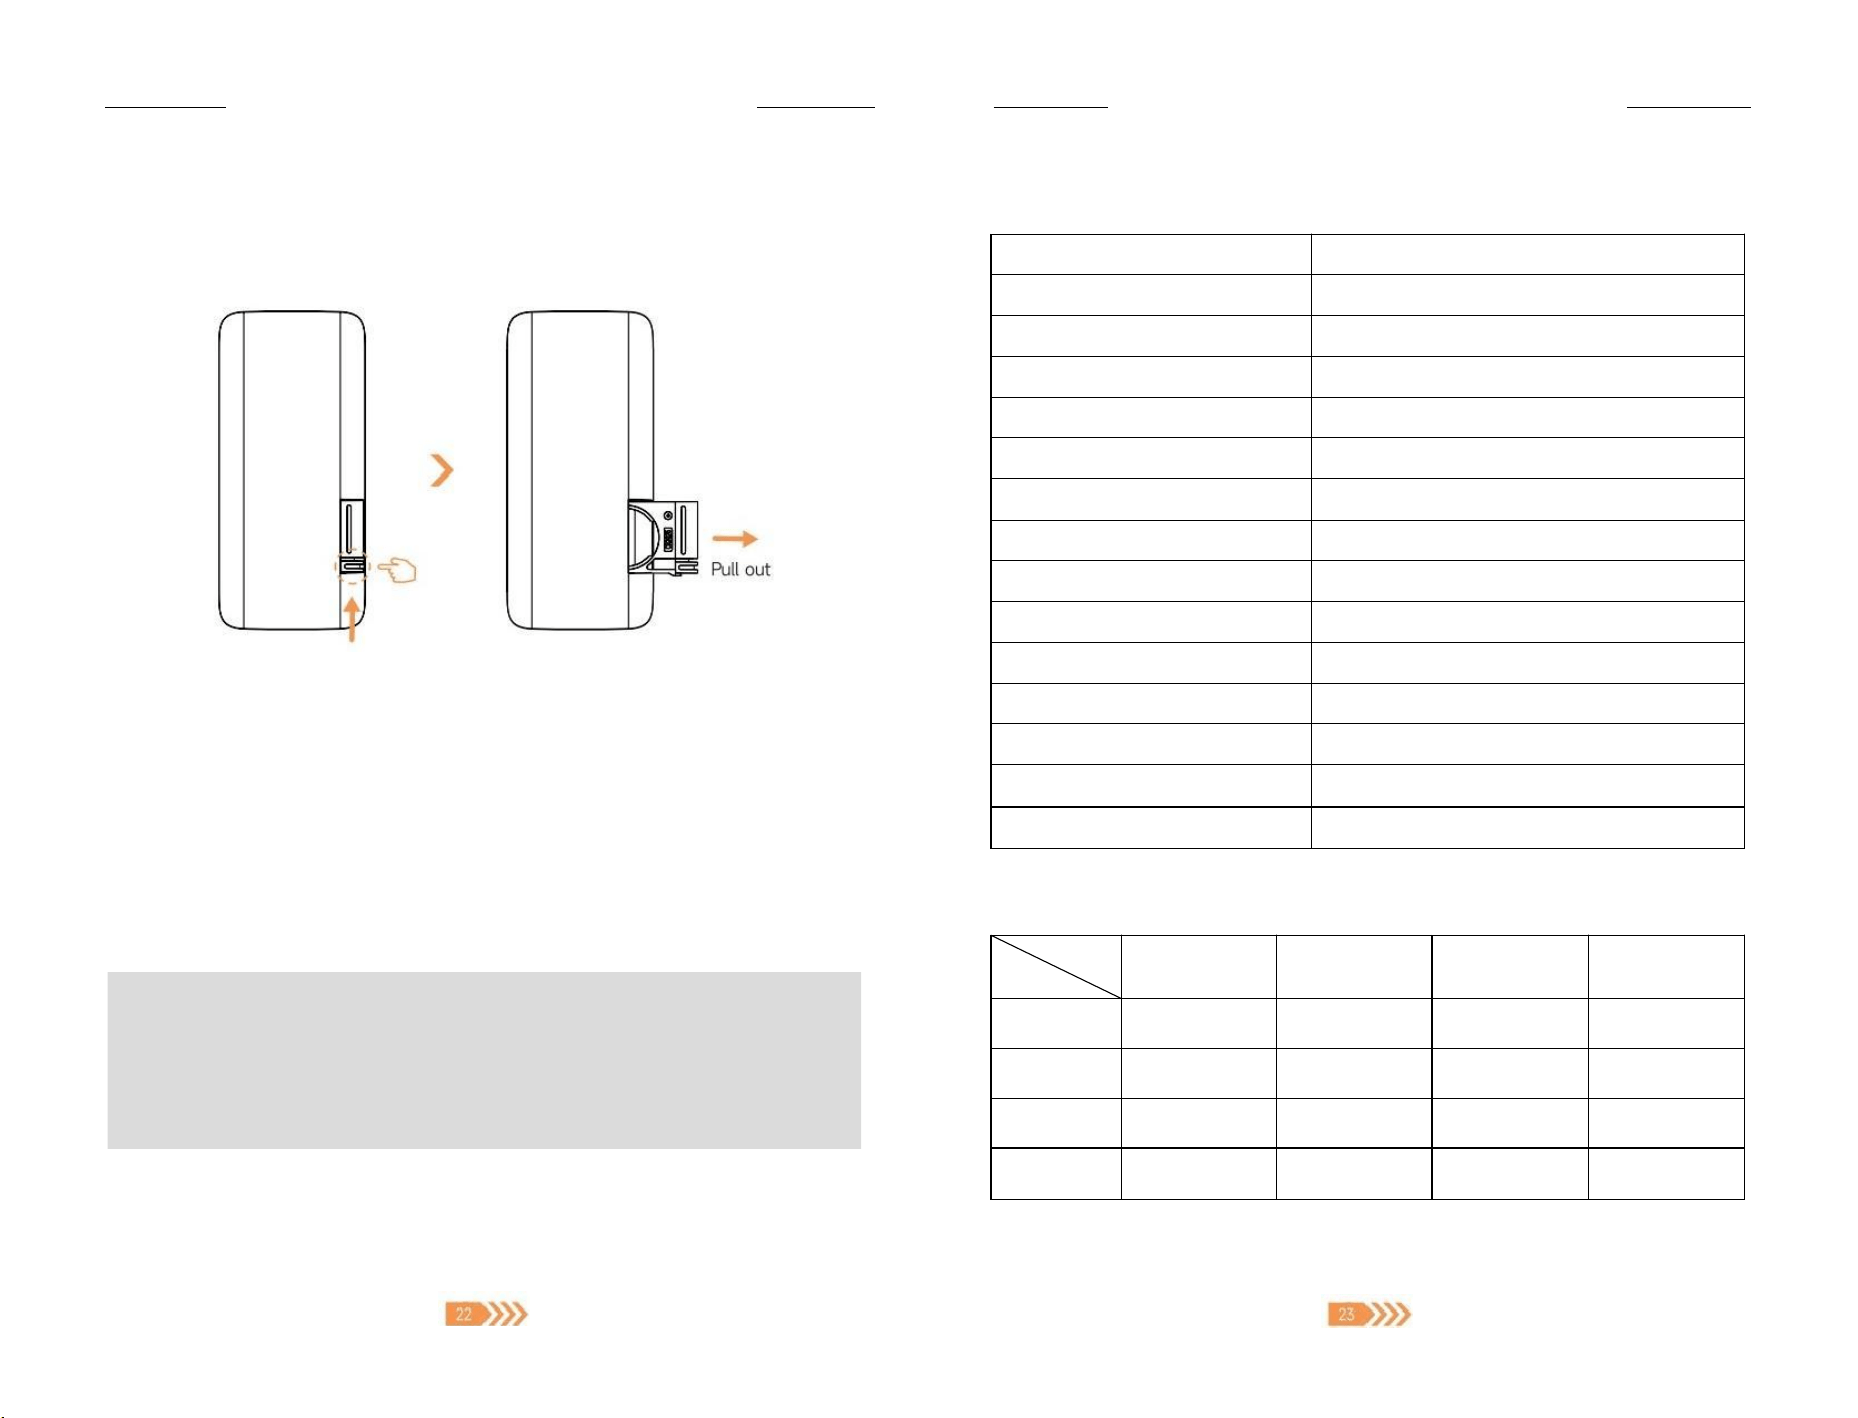
7.5 Remote Control Battery Replacement
Replace the battery by pushing the latch upward with your finger,then pulling out the battery
slot to the right.It's recommend to use a CR2025 battery.(One complimentary battery is
included in the package list)
Upward
7.6 Product Cleaning
·After using the product each time,please wipe the stains off the motor cover,display,side
strips and other parts with a clean cloth.
·If the product is used frequently,it can be wiped with a mild detergent
·Open the motorprotection cover at least once a year,vacuum the motor,and clean the
running belt and lubricating silicone oil onceto avoid dust accumulation affecting machine
performance.
NOTE:
·When cleaning the treadmil,the power switch should be turned off and the
powercord should be removed from the socket.
·Please do not use corrosive detergent to wipe
·Please be careful not to splash water under the bluetooth speaker port and the
running belt
8.Specification Parameters
Brand
Acezoe
Product
Under Desk Treadmill
Model
S30
Rated Voltage
110-240V~,50/60Hz
Range of Speed
0.5-4.0 MPHI1-6KM/H
Running Area
15.35*39.4 inches|39*100cm
Product Size
44.1*19.3*4.5 inches |112*49*11.4 cm
Package Size
50.8*22.5*5.6inches |129*57*14.3 cm
Maximum loading bearing
265 lbs |120kgs
Net Weight
17.2 kgs|37.9 lbs
Gross Weight
20.5 kgs|45.2 lbs
Control Method
Remote Control,App Control
RunningMode
Free Run,Countdown Mode,P01~P12 Program
Incline Mode
Yes
Usage
Indoor
Parameter Display and Setting Range
Setting Range
Display Range
Mode Default
Value
Program
Default Value
Speed
0.5-4.0 MPH
0.0-4.0 MPH
Time
5:00~99:00
Mins
0:00~99:99
Mins
30:00
30:00
Distance
1~99.0 MI
0~99.9 MI
1
Calories
20~990 kcal
0~999 kcal
50
If you haveany questions,please email to ×support01@acezoe.us If you have any questions,please email to support01@acezoe.us
9.Troubleshooting
Issue
Cause
Solution
No information is
displayed on the
screen
1.The power is not connected
2.The switch is not turned on
3.Blown fuse on main control
4.Poor contact between main
control and transformer
1.Connect the power cord
correctly and turn on the
power switch
2.Contact After-sales Team to
replace the main control
Power failure
during use
1.The power is not connected
2.Motor failure
1.Check power cord is
connected firmly
2.Contact After-sales Team
Runningbelt is
not centered
1.Uneven ground
2.Due to the unbalanced force
on the left and right,the
running belt deviates
1.Put the machine on a flat
ground foruse
2.Refer to the adjustment of
running belt,use the Allen
Key to adjust the running belt
Running belt stuck
or slipped
Running belt tooloose
Adjust the running belt to fit
refer to the adjustment of
running belt
Error Code
Code
Causes
Resolutions
E01
1.Poor contact of the
communication line of the
touch console
2.No signal output from the
touch console or main control
Contact the after-sales team
to rewire or replace the touch
console
E02
1.Loose motor cable or defective
motor
2.The voltage between the
motor and the main control is
abnormal
1.Open the motor cover and
check whether the wiring is
firm
2.Contact the after-sales team
to replace the motor or main
control
E03
The main control detects
abnormal speed,and the PMW
drive circuit failed
Contact the after-sales team to
replace the main control
E04
1.The machine is overloaded,
exceeding the rated voltage
2.Abnormal motor
3.Over-voltage function failure of
main control
1.Use within the rated voltage
range of 110-125V
2.Contact the after-sales team
to replace the motor or main
control
E05
1.Motor over-current protection
2.Abnormal motor assembly
3.Failure of current limiting
system of main control
1.Use within the rated operating
current of 9.8A
2.Open the motor cover and
check the abnormal assembly
of the treadmill motor
3.Replace main control
E06
1.The power supply voltage is
too low
2.Poor contact of main control
1.Please check whether the
power cord is normal
2.Contact the after-sales team to
replace the main control
NOTE
If the problem in your treadmill is not included in the above,while you are
not sure how to solve it,please contact us(Email:support01@acezoe.us )
timely and do not handle it by yourself.
10.Warranty
The 2-Year Limited Warranty
·Your Acezoe machine has a 2-year warranty against original defects in material and
workmanship,when used for private household purposes in accordance with the Acezoe
Instruction Manual.
·This warranty provides parts necessary to ensure your machine is in proper operating
condition during the warranty period for free.
WHAT IS COVERED?
·According to the requirements outlined in this instruction manual,subject to the following
conditions and exclusions

—
—If you have anyquestions,please email to support01@acezoe.us —
-If you have any questions,pleaseemail to support01@acezoe.us
·Only applies to purchases made from authorized retailers of Acezoe.
·This warranty willonly be valid if the machine is used in the country in which it was sold.
·Any repair or replacement shall provide no new warranty coverage,but shall retain only the
remaining portion of the original product's warranty.This warranty is offered only to the
original purchaser and is not transferable.Proof of original purchase is required.
WHATIS cOVERED?
Acezoe shall not be liable for costs,damages or repairs incurred as a result of:
·Machines purchased from an unauthorized dealer.
·Careless operation or handling,misuse,abuse and/or lack of maintenance or use not in
accordance with the Acezoe Instruction Manual.
·The machines are used for commercial or rental purposes in addition to normal domestic
use.
·Use of parts not in accordancewith the Acezoe Instruction Manual.
·Use of parts and accessories other than those produced or recommended by Acezoe.
·External factorsunrelated to product quality and use,like accidental water damage
·Repairs or alterations carried out by unauthorized parties or agents.
·Damage caused bynormal wear and tear,vandalism,accidents or by animals.
·Any act of Nature (such as fire,flooding,snow,ice,hurricanes,earthquakes,lightnings or
other natural disasters),environmental conditions (such as air pollution,mold,mildew,etc.),
or staining from foreign substances (such as dirt,grease,oil,etc.)
·Normal weathering due to exposure to sunlight,weather and atmosphere which can cause
colored surfaces to among other things,flake,chalk,accumulate dirt or stains
·Improper operation,alteration,handling,storage,abuse or neglect of the products
All work will be carried out by Acezoe or its authorized agency.Any replaced defective parts
will become the property of Acezoe.
11.FCC Statement
FCC ID:2A48I-JF-H-39K
HOW TO CLAIM?
Please keep your proof of purchase.
To make a claim under our Limited Warranty,or if there are any problems or malfunctions
during use,or you still have any questions after reading this manual carefully,please feel fre
FCC STATEMENT:
This device complies with part 15 of the FCC Rules. Operation is subject to the following two
conditions: (1) This device may not cause harmful interference, and (2) this device must accept any
interference received, including interference that may cause undesired operation.
Any Changes or modifications not expressly approved by the party responsible for compliance could
void the user's authority to operate the equipment.
Note: This equipment has been tested and found to comply with the limits for a Class B digital device,
pursuant to part 15 of the FCC Rules. These limits are designed to provide reasonable protection
against harmful interference in a residential installation. This equipment generates uses and can
radiate radio frequency energy and, if not installed and used in accordance with the instructions, may
cause harmful interference to radio communications. However, there is no guarantee that interference
will not occur in a particular installation. If this equipment does cause harmful interference to radio or
television reception, which can be determined by turning the equipment off and on, the user is
encouraged to try to correct the interference by one or more of the following measures:
-Reorient or relocate the receiving antenna.
-Increase the separation between the equipment and receiver.
-Connect the equipment into an outlet on a circuit different from that to which the receiver is
connected.
-Consult the dealer or an experienced radio/TV technician for help.
The device has been evaluated to meet general RF exposure requirement. The device can be used in
portable exposure condition without restriction.
e
to contact us through email: support01@acezoe.us, we will try our best to provide you
with a satisfactory solution.
You need to provide the following information:
1.Model
2.Order Number
3.Purchase Date
4.Description of Issues (Adding photos or videos would be helpful)
12.Disposal
Correct Disposal of this product
This marking indicates that this product should not be disposed with other
household wastes throughout the EU.To prevent possible harm to the
environment or human health from uncontrolled waste disposal,recycle it
responsibly to promote the sustainable reuse of material resources.To return your
used device,please use the return and collection systems or contact the retailer
where the product was purchased.They can take this product for environmental
safe recycling.

If you have any questions,please email to ×support01@acezoe.us
13.Reture &Warranty Process
① Scan the QR code on the left to
activate the warranty of your order.
9
② Send the problem description to
AcezoeTeam (supporto1@acezoe.us).
③ Acezoe Team provide the best
solution includes troubleshooting
replacement parts or new machine
④ UPS delivers the package to you or
Amazon refunds you.
Contact US | 凶 support01@acezoe.us
Please feel free to contact us if you encounter any problem,we'l try our
best to give you a satisfied solution.
0
·
Contact us -We will get back
to you within 1 business day.
Scan for product installation
and maintenance videos.
You
Acezoe
WWw.acezoe.us
Made in China
IMPORTANT:Read allinstructions carefully before using this
product.Retain this owner's manual for future reference.
Please do notdisassemble,repair or return the machine before
contacting AcezoeSupportTeam.
S30-2405-2828