WALKING PAD USER MANUAL
CAUTION
Read all precautions and instructions in this manual before
using this equipment. Save this manual for future
reference.


TABLE OF CONTENTS
Warranty Information & After-Sales Service .......................... 1
Important Precautions ........................................................... 2
Product Specifications ............................................................ 3
Packing List ............................................................................ 5
How to Use the Walking Pad .................................................. 6
LED Monitor Instruction .......................................................... 7
Description of Remote Control Buttons ................................. 8
Troubleshooting and Maintenance ...................................... 10
Maintenance Instructions ..................................................... 12
Exercise Guidelines ............................................................. 15
Suggested Stretches ............................................................ 16

1
Warranty Information & After-Sales Service
Welcome to using Lichico series products. This product comes with
a 2-YEAR FREE WARRANTY for normal use, provided that it is not
damaged
by human intervention. Please
note that our company is
not responsible for any failures caused by incorrect installation,
incorrect use, or replacement of parts, and
the warranty does
not
apply to unauthorized repairs, including resulting repair costs which
are the responsibility of the customer.
Please note that this product is intended for home use only, and our
company is not responsible for any problems caused by
commercial use.
After-sales Service
If you encounter any product problems or
have lost the remote
control, please contact us through the following methods. We
provide 24/7 customer service and support.
Service Team contact information

2
Important Precautions
1. Carefully read the user manual before using the product.
2. The product must be grounded properly when connected to the power
supply. Failure to do so may result in electric shock.
3. Do not replace or modify any parts of the treadmill to ensure safety.
4. Use the treadmill normally according to the user manual and do not remove
any parts to avoid injury, such as the motor cover or the rear roller cover.
5. Do not touch the moving parts while the treadmill is in operation and keep
children away from
it.
6. Exercise moderately to avoid health damage. Stop exercising immediately
if you feel dizzy.
7.
Wait for the running belt to stop before folding it.
8.
If the power cord is damaged, replace it with the help of the manufacturer,
its service department, or a professional worker to avoid danger.
9.This product is only suitable for adults in good physical and mental condition.
Please do
not let children use it.
3
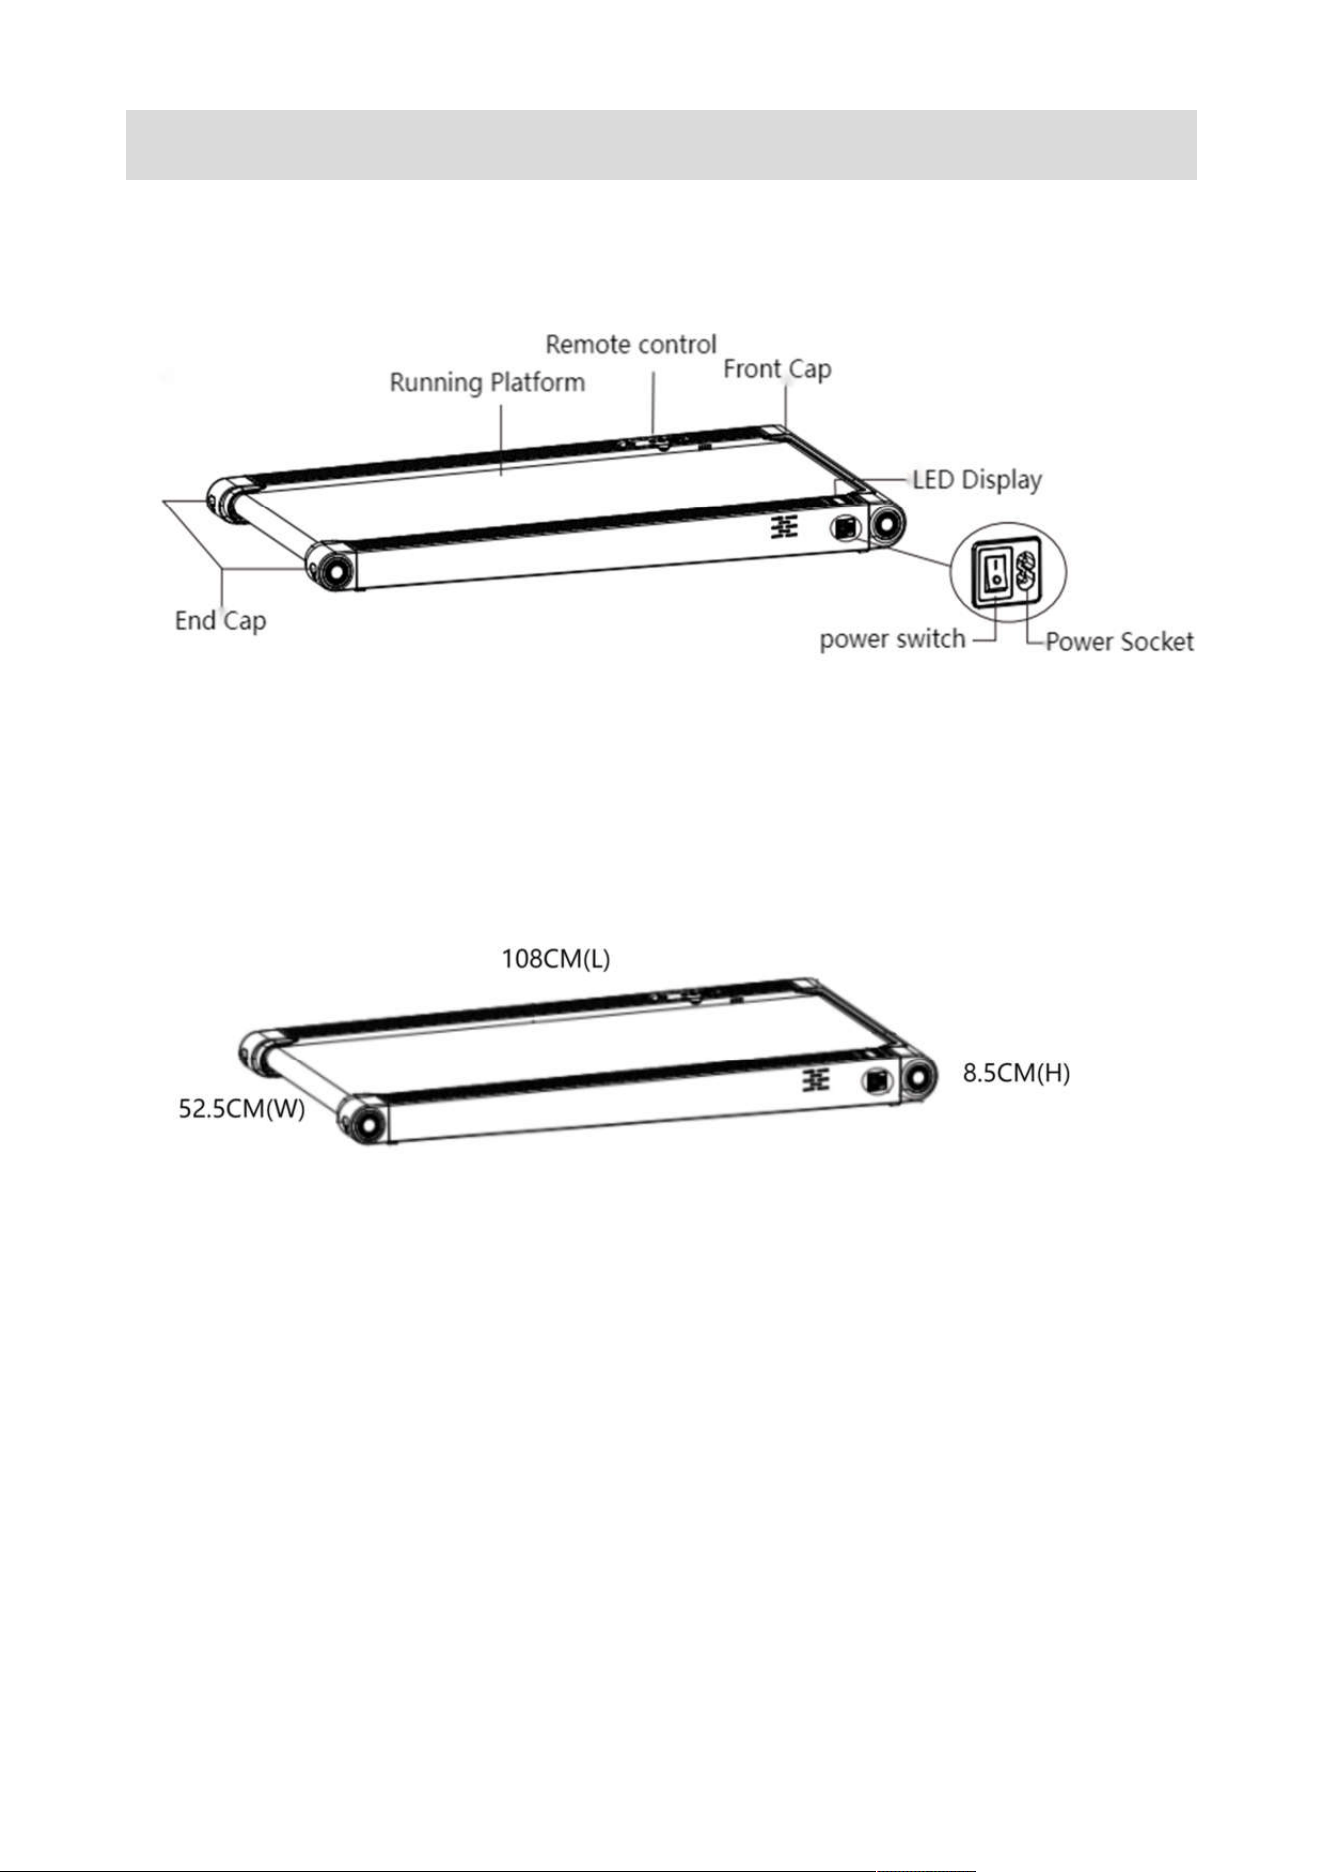
Product Specifications

4
Product name: Walking Pad Treadmill
Product model: 38AG
Product dimensions: 108cm (L), 52.5 (W), 8.5cm (H)
Running area: 1000*380MM
Speed range: 0.8-6
KM/H
Weight capacity: 100KG
Motor horsepower: 1.5 HP
Net weight: 11KG
Gross weight: 14KG
Rated voltage: 220V
Class: HC
①Reminder: The product size, net weight, and gross weight provided are
approximate values.
For specific size and weight information, please refer to
the actual product.
Bluetooth APP: Besyfit.
JOIN THE APP Besyfit
Scan the QR code to download
5
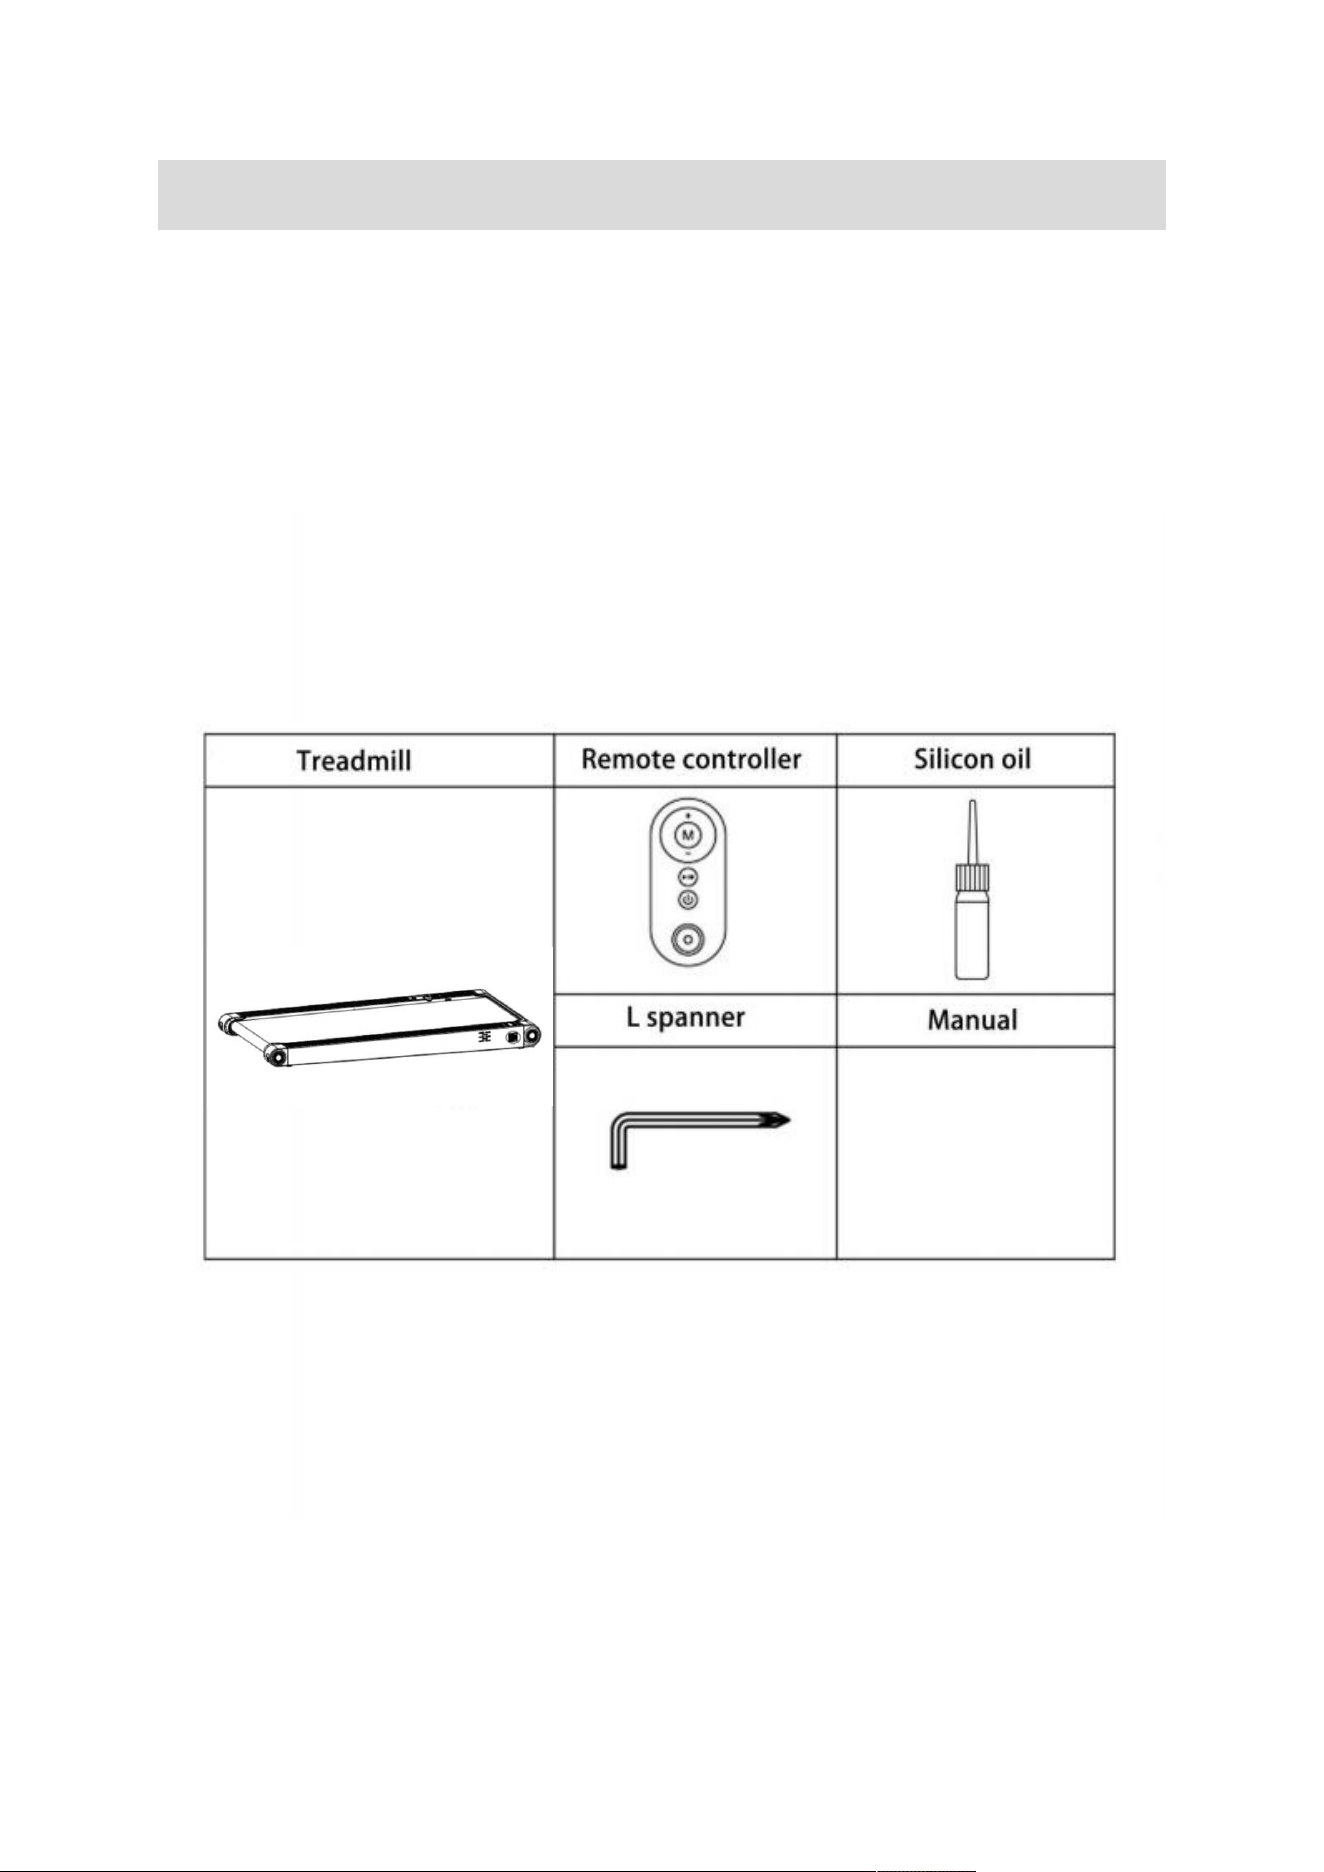
Packing List
1. Walking
Pad Treadmill
2. Accessory kits:
1) Remote controller x 1
2) Silicone oil x
1
3) L spanner x
1
4) User manual x
1

6
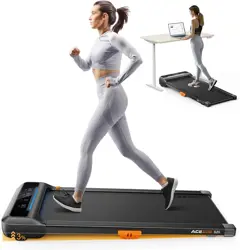
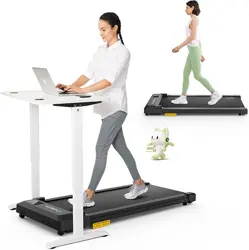
How to Use the Walking Pad
To quickly use the walking pad, please follow these steps:
1. Connect the power to the walking pad.
2. Turn on the power switch located on the front of the deck.
3. Press the "Start/Stop" button on the remote controller to start the
walking pad, and the LED monitor will display "3-2-1", with the buzzer
sounding once for every count down. After this, the motor will start
running.
4. Once the walking pad is running, you can use the remote controller's
"speed +" and "speed -" keys to adjust the speed according to your needs.
The data on the LED monitor will automatically cycle and display every 5
seconds while the walking pad is in use.
5. To stop the walking pad, press the "Start/Stop" button on the remote
controller.
8
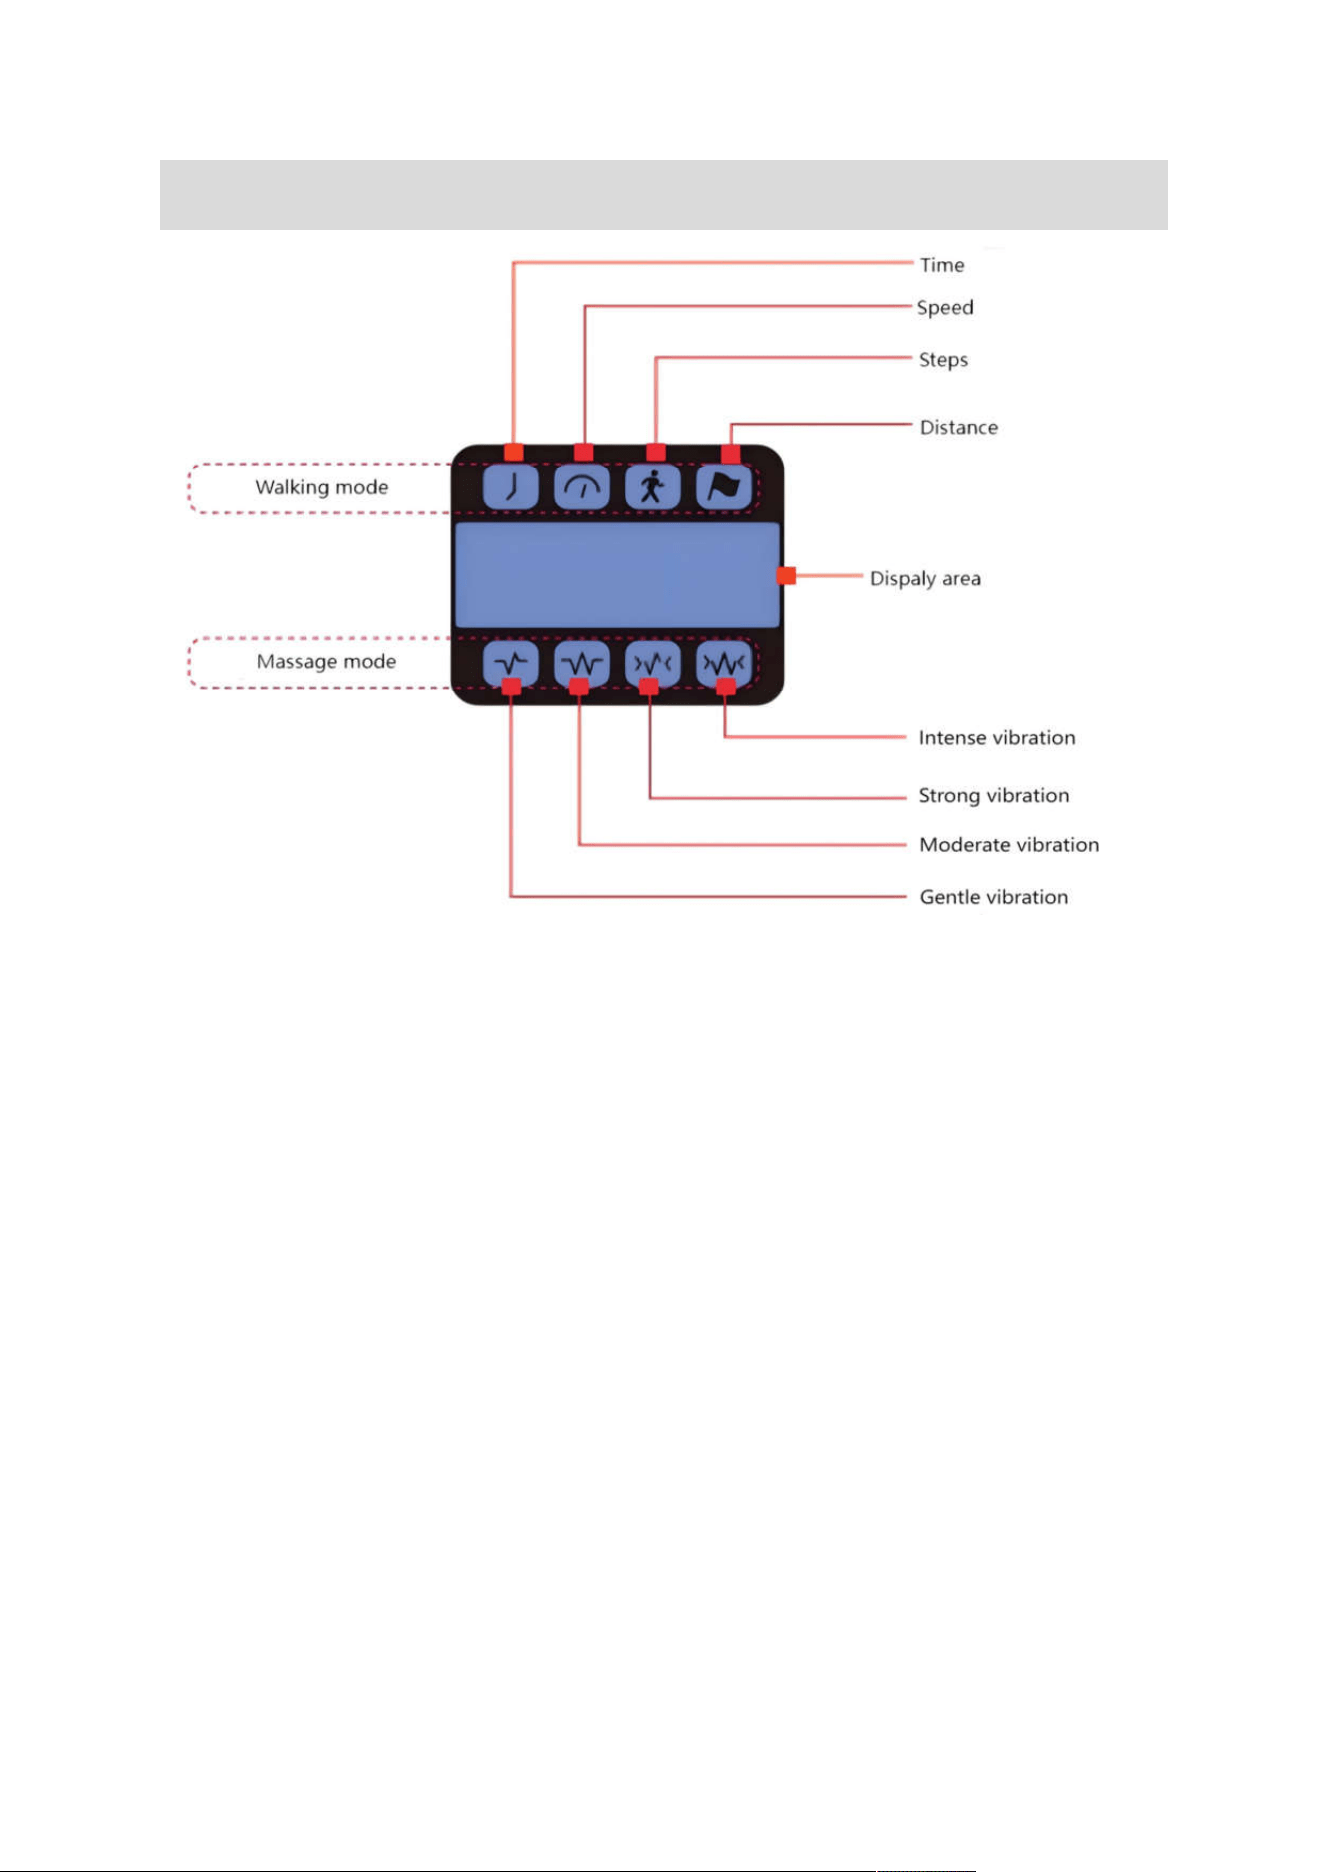
LED Monitor Instruction
The LED window on the walking pad displays the following functions:
A. Time Window: Shows time. Range: 0:00 - 99:59. The time indicator
light is lit when displaying time.
B. Speed Window: Shows speed. Range: 0.8 - 6.0 km/h. The speed
indicator light is lit when displaying speed.
C. Step Count Window: Shows distance data. Range: 0 - 99999. The
distance indicator light is lit when displaying distance.
D. Calories Window: Shows calories data. Range: 0 - 9999. The calorie
indicator light is lit when displaying calories.
E. Distance Window: Shows distance reading. Range: 0 - 9999. The
distance indicator light is lit when displaying distance.
F. Displays F01: Gentle vibration. Vibration level 1 indicator light is lit.
G. Displays F02: Moderate vibration. Vibration level 2 indicator light is lit.
H. Displays F03: Strong vibration. Vibration level 3 indicator light is lit.
I. Displays F04: Intense vibration. Vibration level 4 indicator light is lit.
8
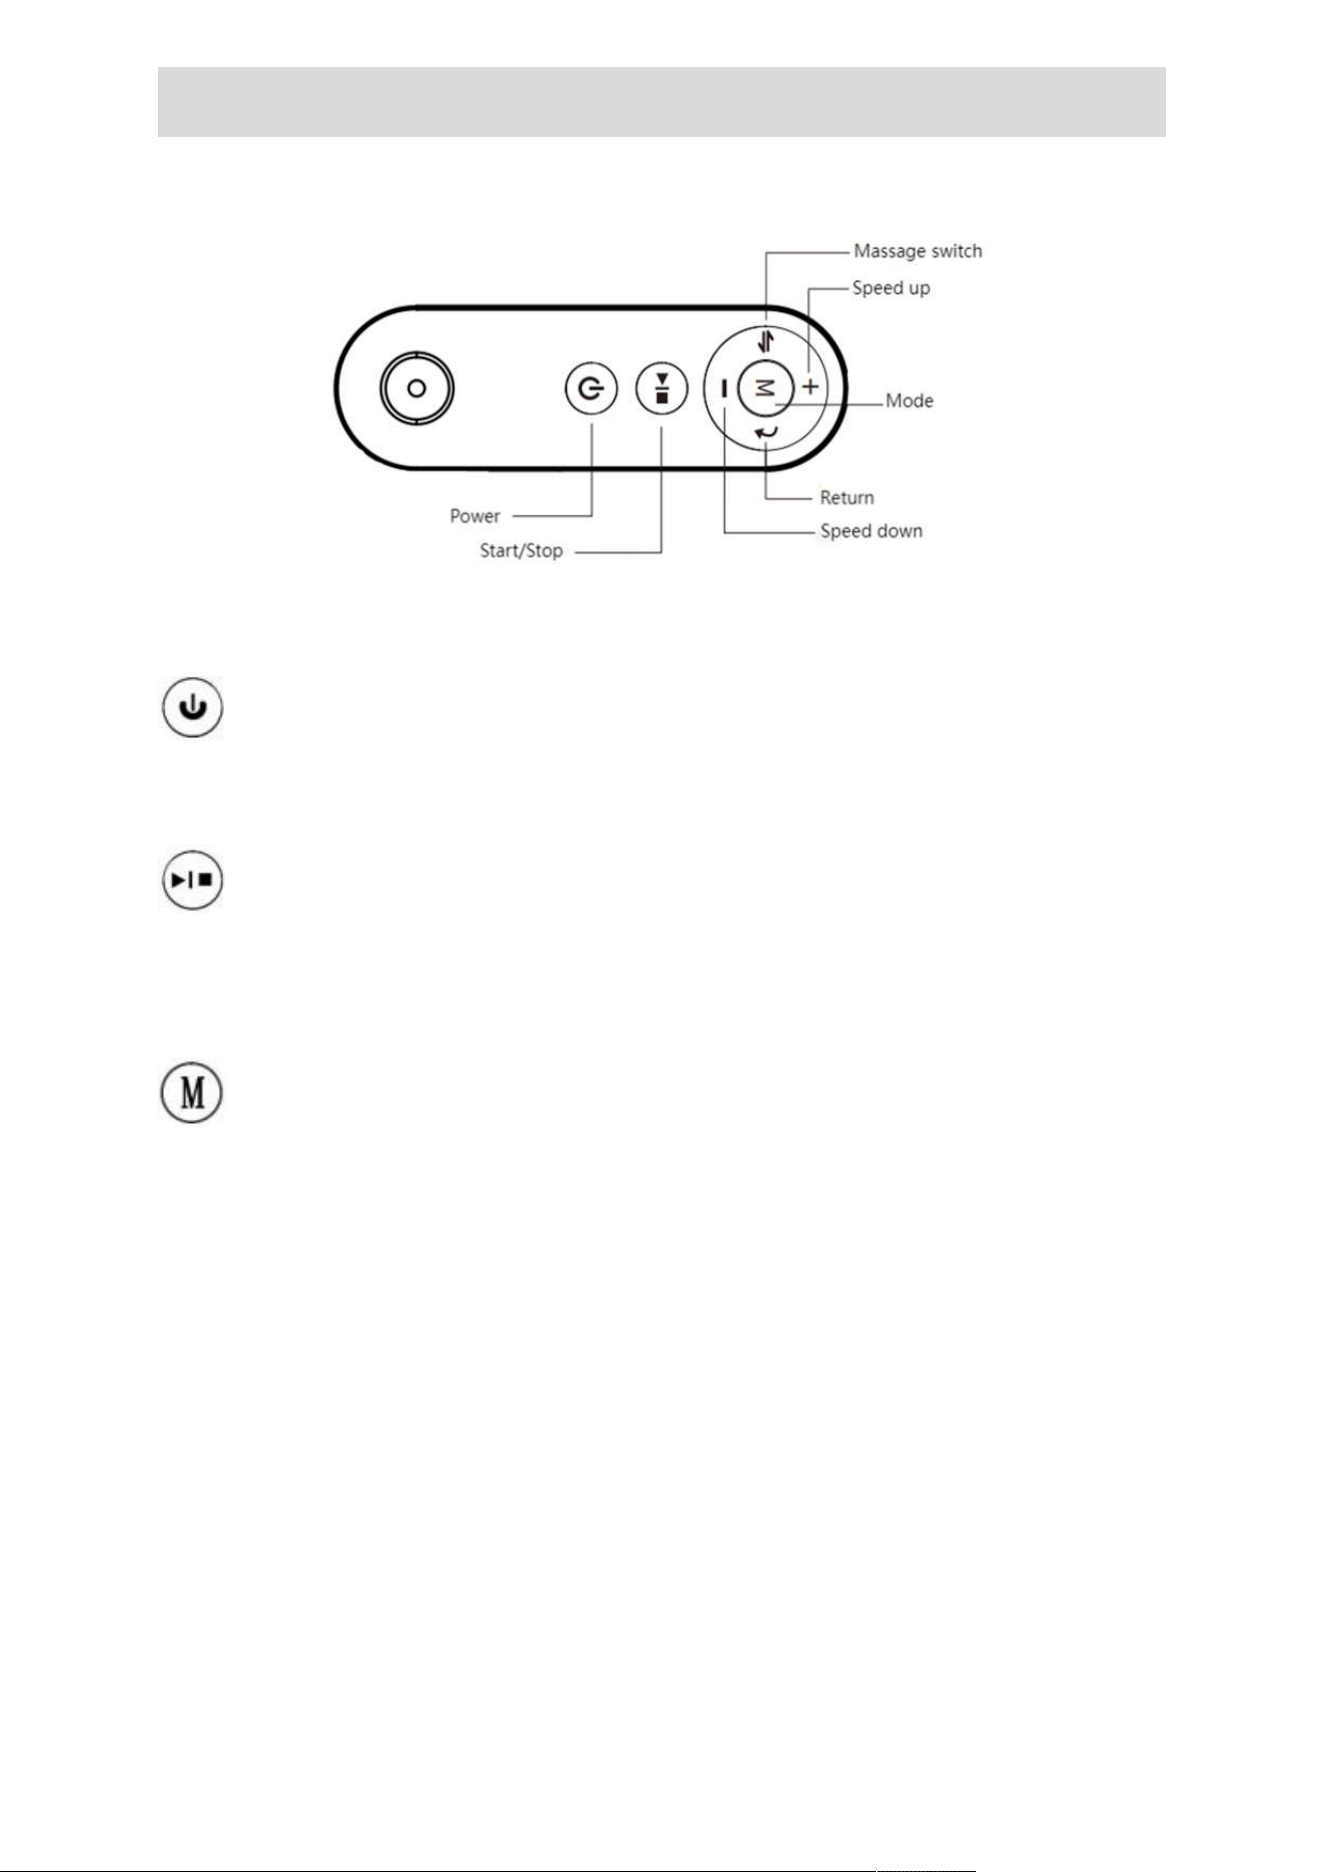
Description of Remote Control Buttons
Remote control function buttons: power, start/stop, mode, speed increase
and decrease.massage switch
The "Power" button is used to turn off the walking pad when it is
running. When the walking pad is in standby mode, pressing this button
will turn off the display and enter sleep mode.
The "Start/Stop" button is used to start or stop the walking pad.
When the power is turned on, pressing this button in the stop state will
start the walking pad.
Pressing the button when the walking pad is
running will stop the walking pad.
The "Mode" button is used to select the countdown mode for time,
distance or calorie, as well as a free mode. Pressing this button will cycle
through the options of "30:00" (time countdown mode), " 1.0" (distance
countdown mode), "50.0" (calorie countdown mode), and "0.0" (free
mode).
+
The "Speed +" button is used to increase the speed of the walking pad
after it is started. After a single press, the speed will
be adjusted by
0. 1 KM/H. When the button is pressed continuously for more than
1 second, the speed will continue to increase.
9
-
The "Speed -" button is used to decrease the speed of the walking
pad after it is started. After a single press, the speed will be adjusted by
0. 1 KM/H. When the button is pressed continuously for more than 1
second, the speed will continue to decrease.
The ”Massage switch” button is used to switch between massage
and walking modes. When the treadmill is in standby mode, the massage
mode can be activated and different massage modes can be switched.
The display screen will correspondingly show F01-F04, and the
corresponding indicator lights will also light up. This mode is not available
in the walking mode.
The”Return” botton is used to exit the settings when use the “M” key
to set the mode.
Usage
Precautions
1.There should be sufficient space around the walking pad, and a safe
area of 2000mm* 1000mm behind the walking pad should
be maintained.
2.Children should not be allowed to use the walking pad to prevent
potential hazards.
3.Prior to using the walking pad,
it is recommended to warm up.
4.The walking pad should be placed on a stable and level surface.

9
5.While using the walking pad, it is recommended that the user stands on
one-third of the walking surface at the front of the walking pad for walking.
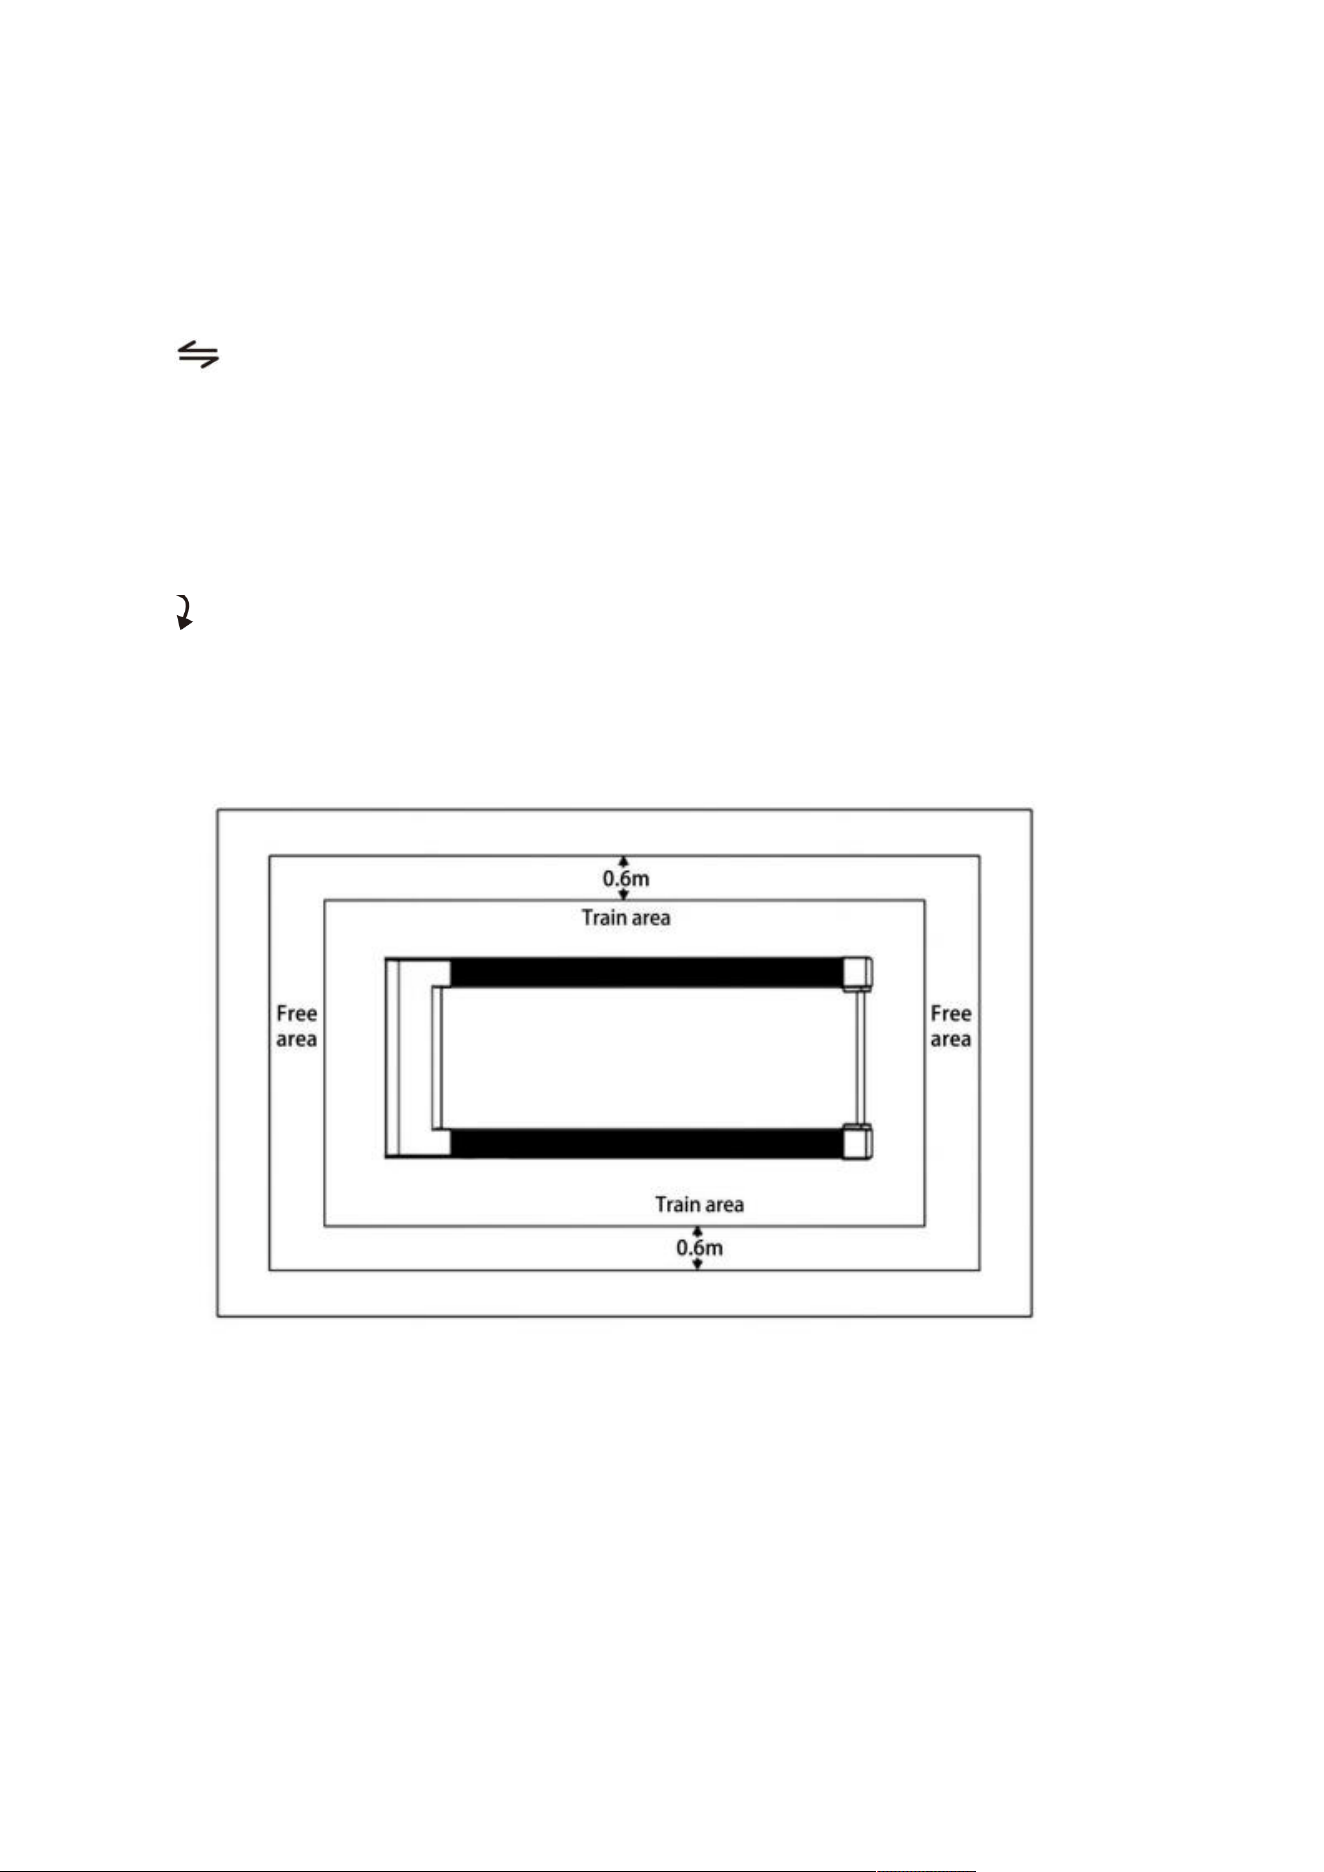
6.The product's free area in the direction of use must be at least 0.6m
larger than the training area, including the emergency jumping area, as
shown in the figure.

10
Troubleshooting and Maintenance
Fault Code
Main reason
Solution
Treadmill not
working
A. No power Plug
in to get power
B.Connection wire
not work well
Check all connection wire
Belt
not
running
smoothly
A.Lubrication oil is
less
Add some silicon oil
B.Running belt is
too tight
Loosen running
belt
E01
The wire from
computer to
bottom control
board didn’t
connected well
1. If communication between the electrical
control and screen is obstructed, check each
connection of the communication line from
the screen to the lower control, ensuring that
each wire is properly connected.
2. Check if there is any wire damage
between the screen and controller, and
replace the communication line
if necessary.
E02
IGBT breakdown
or motor open
circuit (DC
brushless motor is
over-voltage,
under-voltage)
1. Check if the power supply voltage
is below
50% of the normal voltage, and
retest using
the correct voltage specifications.
2. Check if there is any abnormal odor
coming from the controller, and replace it if
necessary.
3. Check if the motor wires are properly
connected, and reconnect if needed.
E03
Speed sensor fail
1. If no speed sensor signal is detected for
5-8 seconds, check whether the sensor plug
is
properly connected or damaged, and
reconnect or replace the sensor accordingly.
2. Check if there is any abnormal odor
coming from the controller, and replace it if
necessary.
3. If there is no
motor input signal detected
for 5-8 seconds, check whether the
motor
wires are properly connected or if the motor
is defective.

11
E05
Over-current
Protection
1. The system
may be drawing excessive
current due to the load being over the rated
capacity, triggering the protective shutdown.
The system can be restarted after a
complete shutdown.
2. If a certain part of the treadmill becomes
stuck, it can cause the motor to be unable to
rotate normally, resulting
in excess load and
current flow. This may trigger the system
protection and shut down the system. To
resolve this issue, the treadmill needs to be
adjusted and once done, the system
can be
restarted for normal operation.
3. Inspect the motor for any signs of
excessive
noise or a burning smell during
operation. If such signs are
present, it may
indicate a faulty motor that needs to be
replaced.
4. Check if there is any burnt smell coming
from the components of the controller.
If any
components show signs of damage, it may
indicate a faulty controller that needs to be
replaced.
5. Inspect if the power supply voltage are
incorrect or lower than required. Use the
appropriate voltage and retest the machine.
For DC brushless machines, also check if the
motor wires are properly connected.
E08
Driver failure
(internal self-test
error 'driver
overheating)
1. Wait for a period of time, then restart the
power after it has cooled down. (Only
applicable for brushless controllers.)
2.
The controller is faulty. Replace the
controller.
E09
Communication
failure
If the lower-level controller is not receiving
signals from the higher-level controller,
replace the communication cable and check
if the communication port is functioning
properly.
E10
Motor open circuit
1. Check whether the motor wires are
properly connected, and reconnect if
necessary.
2. Check if the motor brushes are stuck.

12
Maintenance Instructions
Walking pads require regular maintenance and
upkeep.
We recommend the following:
1.Check the equipment frequently for wear and damage, such as the
running belt and attachment points. After repairing any issues, the
equipment should remain safe for a
period of time.
2.If the walking pad experiences a malfunction, do not use it. Seek
guidance and replace any defective
parts as needed.
3.How to adjust the running belt tension and off set position:
(1) Adjustment of running belt tightness
Before leaving the factory and after installation, the running belt needs to
be adjusted. However, after a period of use, it may become loose,
causing the belt to slip or pause. In this case, adjust the running belt by
turning the adjustment bolts clockwise in half-circle increments. If the
running belt is too loose, it will slip when stepped on, while being too tight
can increase the electric load and damage the motor, running belt, and
roller, etc.
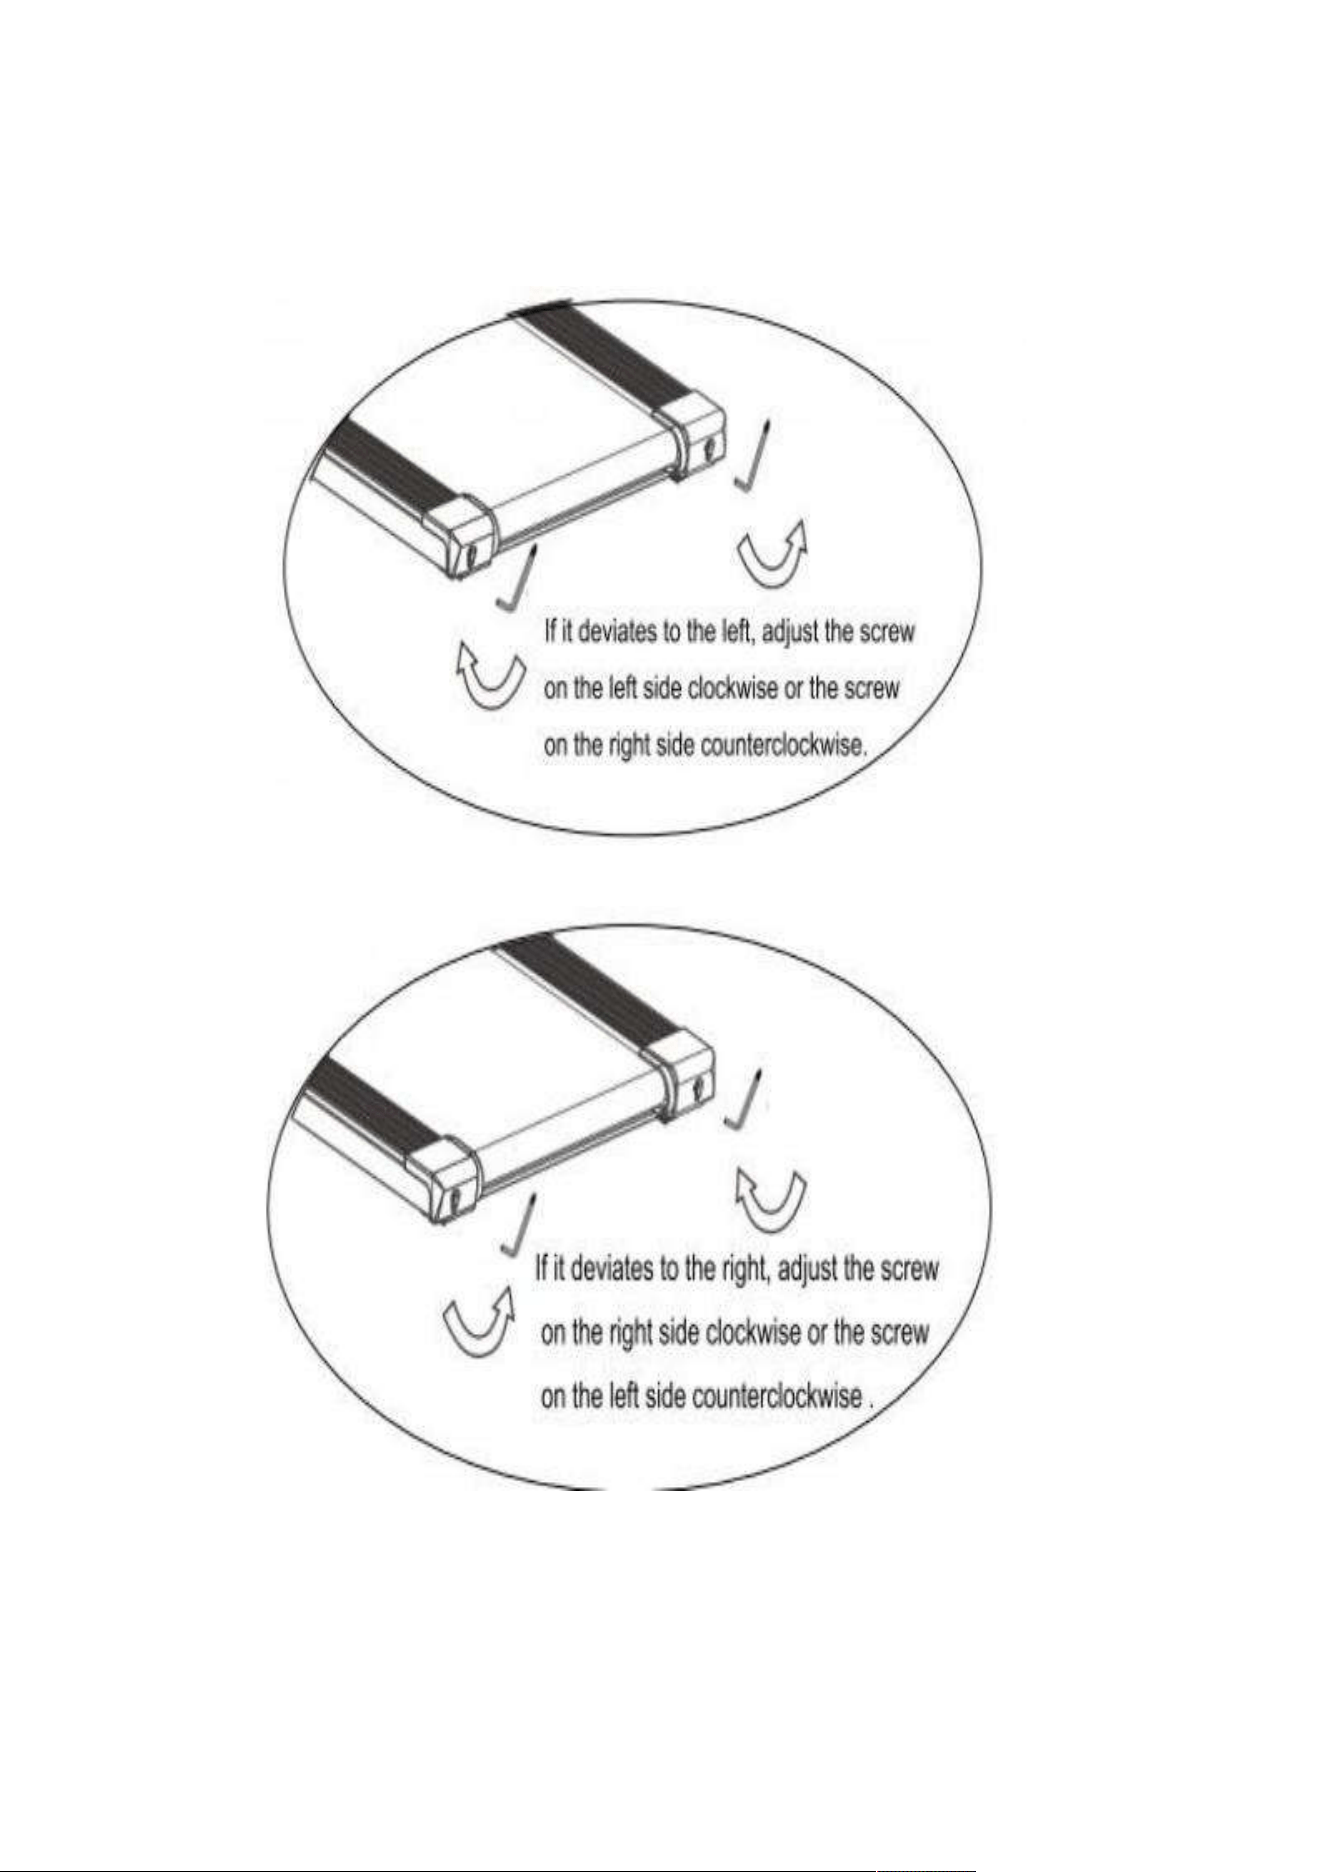
(2) Running belt deviation adjustment
All treadmills need to be adjusted before
leaving the factory and after
installation, but
it may still become misaligned due to following reasons:
a)
Uneven placement of the walking pad
b) The user's feet not being in the center of the running belt when running.
c) The uneven force of the user's feet causes the deviation. The deviation
can sometimes be self-corrected after a few minutes of no-load rotation,
but if it persists, the user can use a T-type wrench to gradually adjust it in
units of a quarter of a turn.
It's important to note that the deviation of the running belt is not covered
by the warranty and users should follow the instructions for
self-maintenance.
Failure to correct the deviation in time can seriously
damage the running belt.
13
d) To adjust the running belt deviation, start the walking pad at a speed
of 3MPH and then use the method shown
in the figure for adjustment.
14
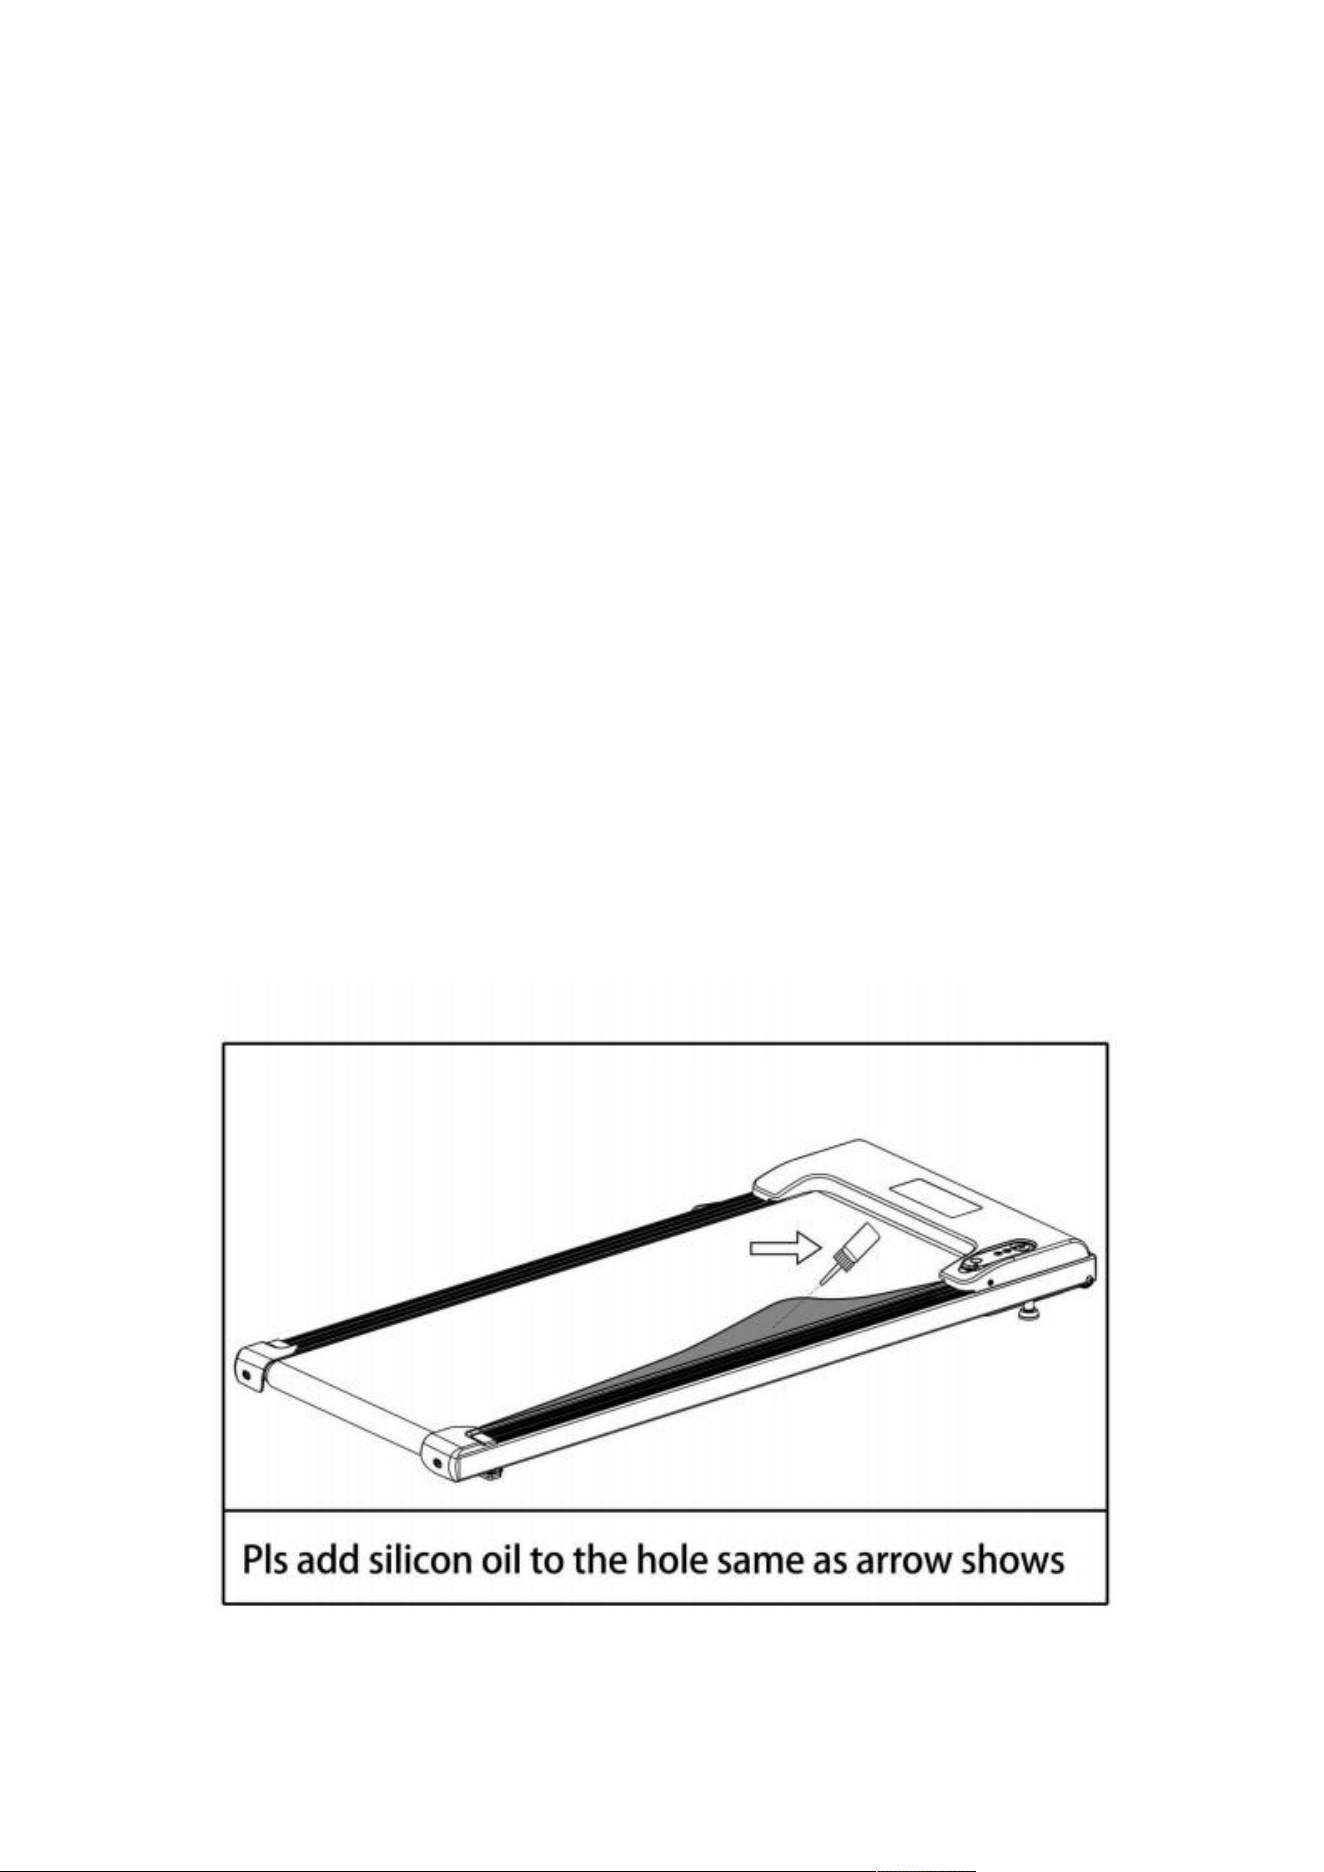
(3)Lubrication
After the running belt
has been used for a period of time, it must be
lubricated with a special configuration of methyl silicone oil. Please note
that only 2-4 drops of lubricating oil need to be added each time.
a) Suggestions
Use walking pad less than 3 hours per week, to lubricate once every 5
months.
Use walking pad 4-7 hours per week, to lubricate once every 2 months.
Use walking pad more than 7 hours per week, to lubricate once a month.
It's important to avoid over-lubrication, as more lubricant doesn't
necessarily mean better performance.
Remember that reasonable
lubrication
is a key factor in extending the lifespan of your walking pad.
b) Lubrication
method
The lubrication method is shown
in the figure.
Lift the middle of the
running belt with your hands, and then squeeze the lubricant between the
running deck and the running belt.

15
Exercise Guidelines
Warm-up: It is necessary to do 5 to
10 minutes of warm-up exercise
before each use of the machine.
Breathing: Breathing cannot be blocked during exercise.
It is
recommended to inhale through the nose and exhale through the mouth
while coordinating with the action. If breathing becomes too fast, stop
exercising immediately.
Frequency: It is important to give a 24-hour rest period for the same
muscle group before exercising again.
Load: Determine the amount of training based on individual physical
training state and practice according to the principle of progressive load.
Muscle soreness during initial training is normal and will disappear with
continued training.
Diet: Exercise one hour after a meal to protect the digestive system. Wait
at least half an hour after training before eating.
It is recommended to
drink less water during exercise and avoid drinking too much to prevent
an increase in the
burden on the heart and kidneys.
Stretching: It is recommended to stretch before exercising. Warm
muscles are easier to stretch.
So walk for 5-10 minutes to warm up first. Stop and do stretching
exercises 5 times,
holding each leg for at least 10 seconds each time.
Repeat the stretching exercises after the workout.
16
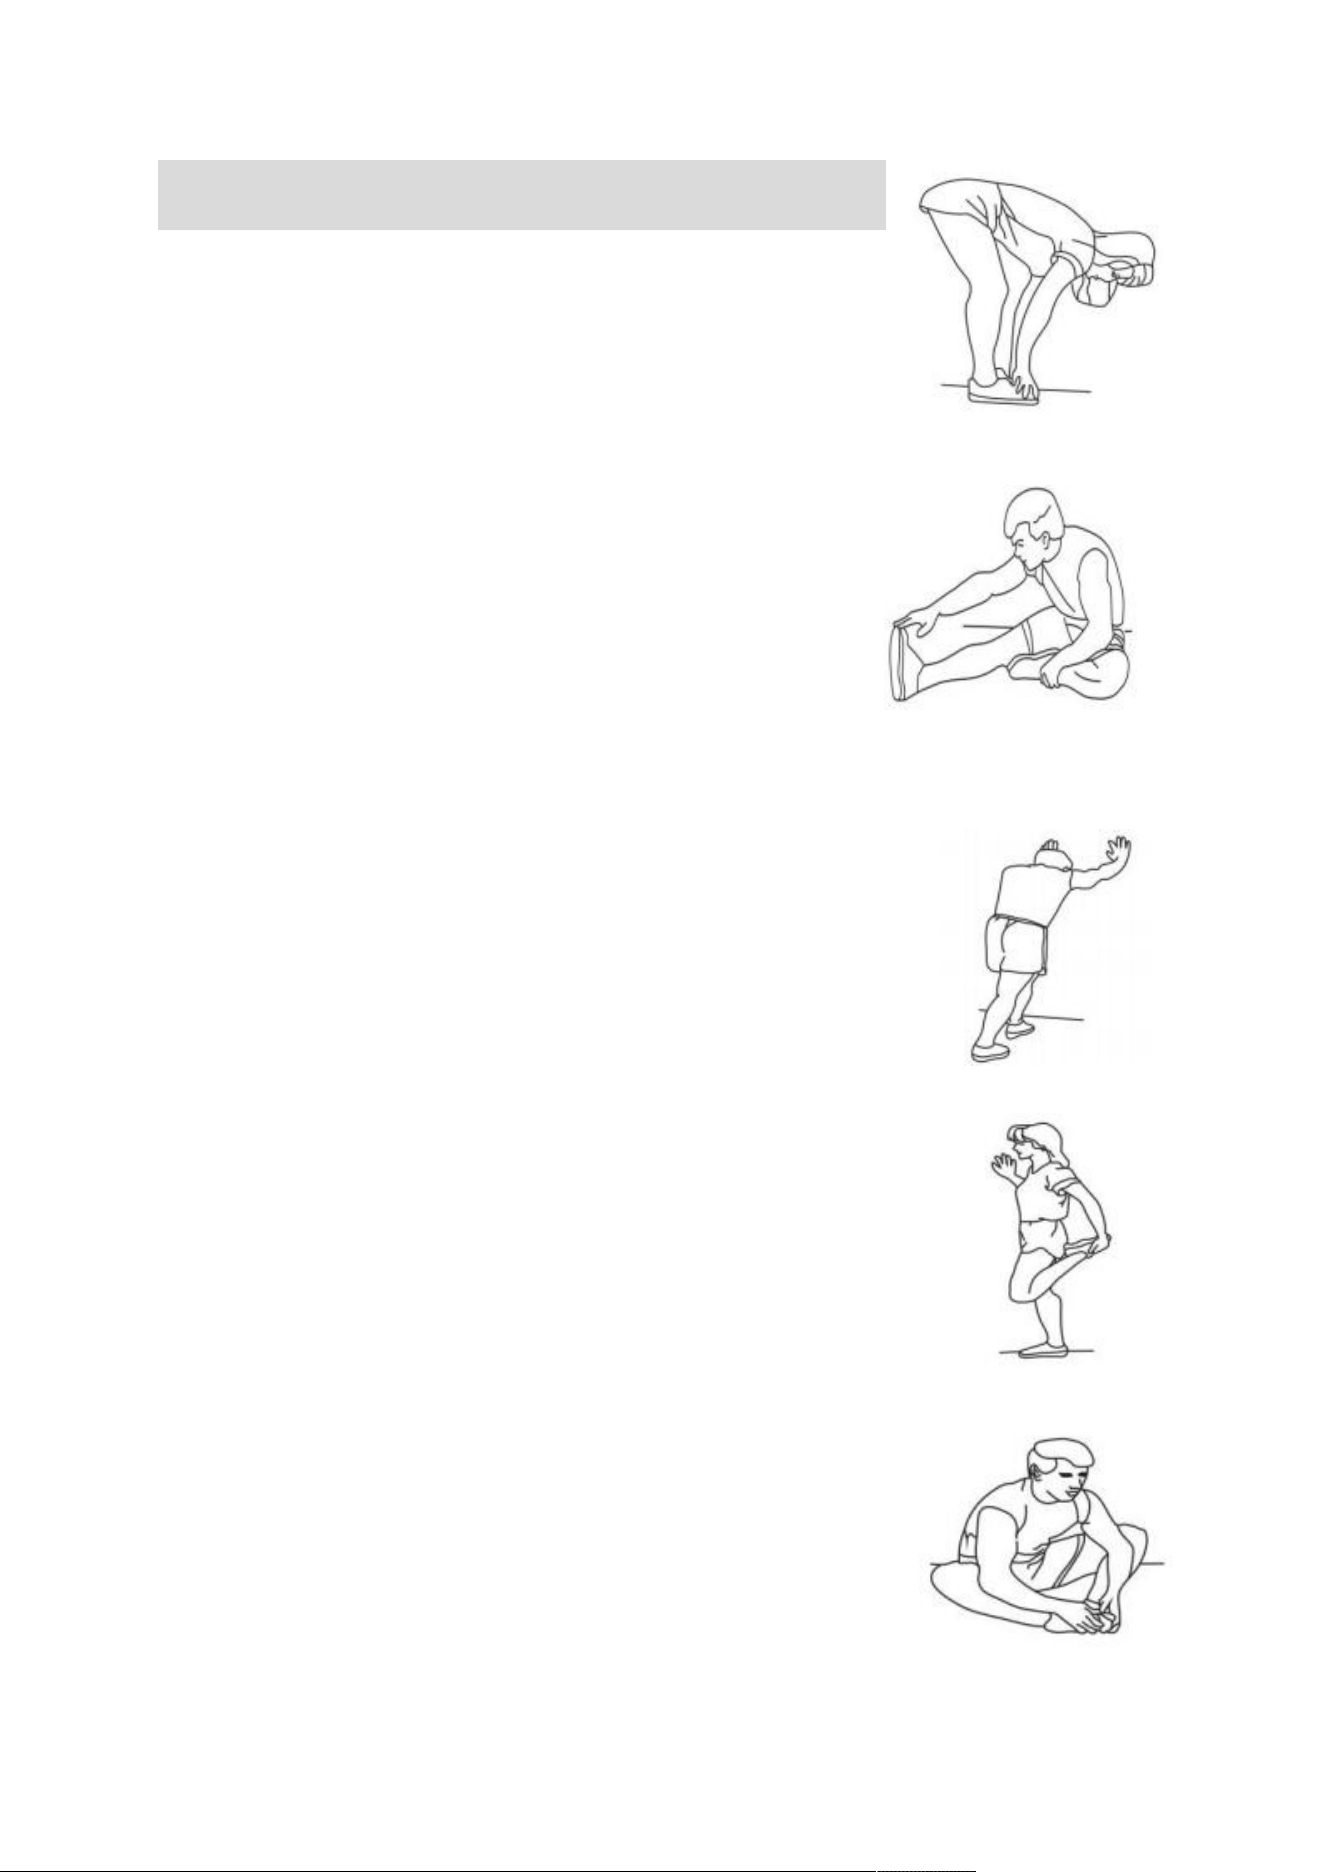
Suggested Stretches
1. Stretch Down
Bend your knees slightly, and slowly bend your body
down, letting your back and shoulders relax and try
to touch your toes with your hands. Hold for 10-15
seconds, then relax. Repeat 3 times ( picture 1)
2. Hamstring Stretch
Sit on a clean seat cushion and straighten one leg.
Put the other leg in so that it fits against the inside
of the straightened leg. Measure with your hands
and touch your toes as much as possible. Hold for
10-15 seconds, then relax.
Repeat 3 times for each
leg. ( picture 2)
3. Calf and Achilles Tendon Stretches
Stand with two
hands against a wall or tree, one foot
behind. Keep your hind legs upright and land on your
heels and lean toward the wall or tree. Hold for 10-15
seconds, then relax. Repeat 3 times for each leg.
(Picture 3)
4. Ankle Stretch
Hold the balance with your left hand against the wall
or table, then stretch your right
hand back. Grab the
toe of your right toe and slowly pull toward your buttocks
until you feel the muscles on the face are very tense.
Hold for 10-15 seconds, then relax. Repeat 3 times for
each leg.( Picture 4)
5. Stretch Sartorius (inner thigh muscle)
Sit with your feet facing each other and your knees
facing out. Grab both feet with both hands toward the
abdomen and pull in the direction of the ditch. Hold for
10-15 seconds, then relax. Repeat 3 times for each
leg (Picture 5)

FCC Statement:
This device complies with part 15 of the FCC Rules. Operation is subject to the following two conditions:
(1) This device may not cause harmful interference, and
(2) this device must accept any interference received, including interference that may cause undesired
operation.
This equipment has been tested and found to comply with the limits for a Class B digital device, pursuant
to part 15 of the FCC Rules. These limits are designed to provide reasonable protection against harmful
interference in a residential installation. This equipment generates, uses and can radiate radio frequency
energy and, if not installed and used in accordance with the instructions, may cause harmful interference
to radio communications. However, there is no guarant ee that interference will not occur in a particular
installation. If this equipment does cause harmful interference to radio or television reception, which can
be determined by turning the equipment off and on, the user is encouraged to try to correct the
interference by one or more of the following measures:
—Reorient or relocate the receiving antenna.
—Increase the separation between the equipment and receiver.
—Connect the equipment into an outlet on a circuit different from that to which the receiver is
connected.
—Consult the dealer or an experienced radio/TV technician for help.
Caution: Any changes or modifications not expressly approved by the party responsible for compliance
could void the user's authority to operate the equipment.
This equipment complies with FCC radiation exposure limits set forth for an uncontrolled environm ent.
This transmitter must not be co‐located or operating in conjunction with any other antenna or
transmitter.
RF exposure warning:
This equipment complies with radiation exposure limits set forth for an uncontrolled environment. This
equipment should be installed and operated with Minimum distance 20cm between the radiator and your
body.