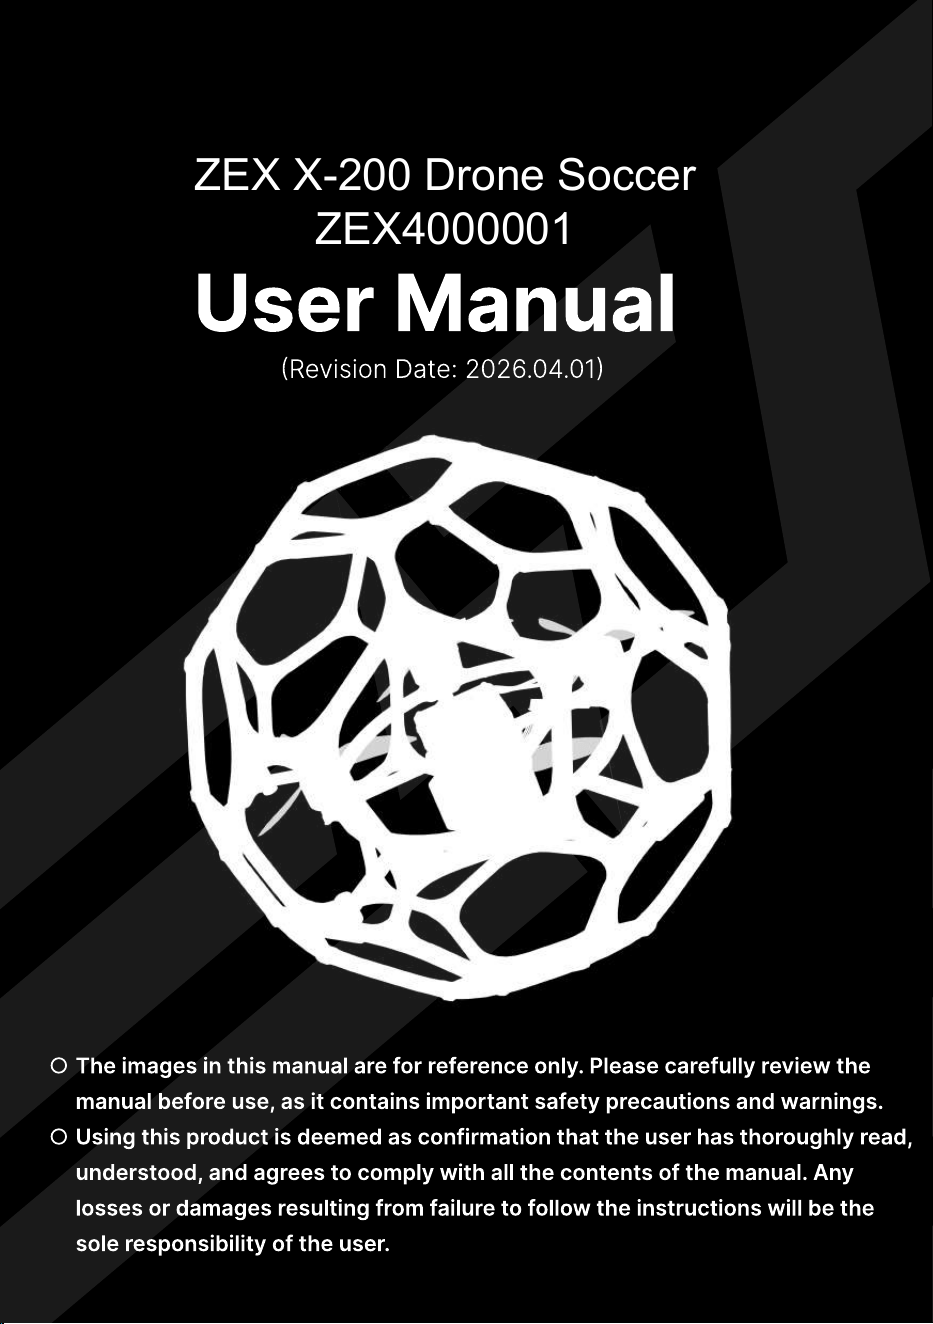
User Manual
(Revision Date: 2026.04.01)
○
○
The images in this manual are for reference only. Please carefully review the
manual before use, as it contains important safety precautions and warnings.
Using this product is deemed as confirmation that the user has thoroughly read,
understood, and agrees to comply with all the contents of the manual. Any
losses or damages resulting from failure to follow the instructions will be the
sole responsibility of the user.
ZEX X-200 Drone Soccer
ZEX4000001
ZEX X-200 User Manual
Product Safety Guidelines
Safe Usage Instructions
When using, you must strictly follow the operating specifications.
Ensure the propeller has completely stopped before performing any contact
operations.
Do not operate this equipment to collide with people or animals; maintain a
safe distance.
Before performing any maintenance operations, disconnect the power supply.
Use is prohibited for individuals under 14 years old; teenagers must be
supervised throughout usage.
The charging process must be supervised by an adult, and the equipment
should be stored in a location inaccessible to children.
Pay special attention to eye protection during operation.
It is strictly prohibited to throw or apply external forces to damage the
equipment in any way.
Batteries must be kept away from high temperatures and humid environments.
Any accidents caused by violations of operating rules are the sole
responsibility of the user; the company is not liable.
Key Points of Equipment Maintenance
Before takeoff, please check if the device is damaged
Severe collisions may cause device damage.
If the device's battery level is lower than 14.4V, a low battery warning will
be triggered. Please stop use immediately and power off the device.
Before each use, complete the propeller status check and system
calibration.
When storing long-term, maintain the battery voltage at 3.8V and perform
regular charge and discharge maintenance.
Usage Precautions
Product images are for reference only; the actual product may have optimized
adjustments.
This product is designed specifically for indoor use; do not use it outdoors.
Ensure operation within the visible range to avoid signal loss.
The usage environment should be kept dry and clean, away from dust and
liquids.
If an abnormal rotation of the propellers is detected, stop using immediately.
Company Statement
Shenzhen ZEX Future Technology Co., Ltd. reserves the final right of
interpretation for the relevant user guides.
The latest information regarding the products will be updated and
published on the official website WWW.ZEXFPV.COM at any time.
1
ZEX X-200 User Manual
Safety Warnings
Before using, please carefully read this user guide to familiarize yourself
with the product functions and operating specifications. Improper
operation may lead to equipment damage, and even cause personal
injury or property loss
Ensure there is sufficient safety distance around the aircraft to avoid
collisions or accidental damage. This product uses 2.4GHz radio signals
for control, which may be affected by unpredictable sources of
interference in the environment (such as Wi-Fi routers, communication
base stations, microwave ovens, high-power appliances, radio stations,
etc.), resulting in signal loss or loss of control
Keep batteries, chemicals, and small parts out of reach of children to
avoid risks of accidental ingestion or electric shock
Do not put any parts of the product into the mouth under any
circumstances, as this may cause severe injury or even life-threatening
situations
In case of impact or emergency, immediately lower the throttle stick to
its minimum position to cut off power output and reduce the risk of
accidents
If screws become loose, be sure to confirm the corresponding screw
dimensions and lengths for each mounting hole. Improper use of screws
may lead to short circuits, equipment damage, or other serious
consequences
When plugging or unplugging the power cables, ensure the battery
connectors and flight control power cables are securely connected.
Avoid excessive plugging or pulling. Before powering on, check whether
the power cables are loose or solder joints have fallen off. If any
abnormalities are detected, do not use power.
2
ZEX X-200 User Manual
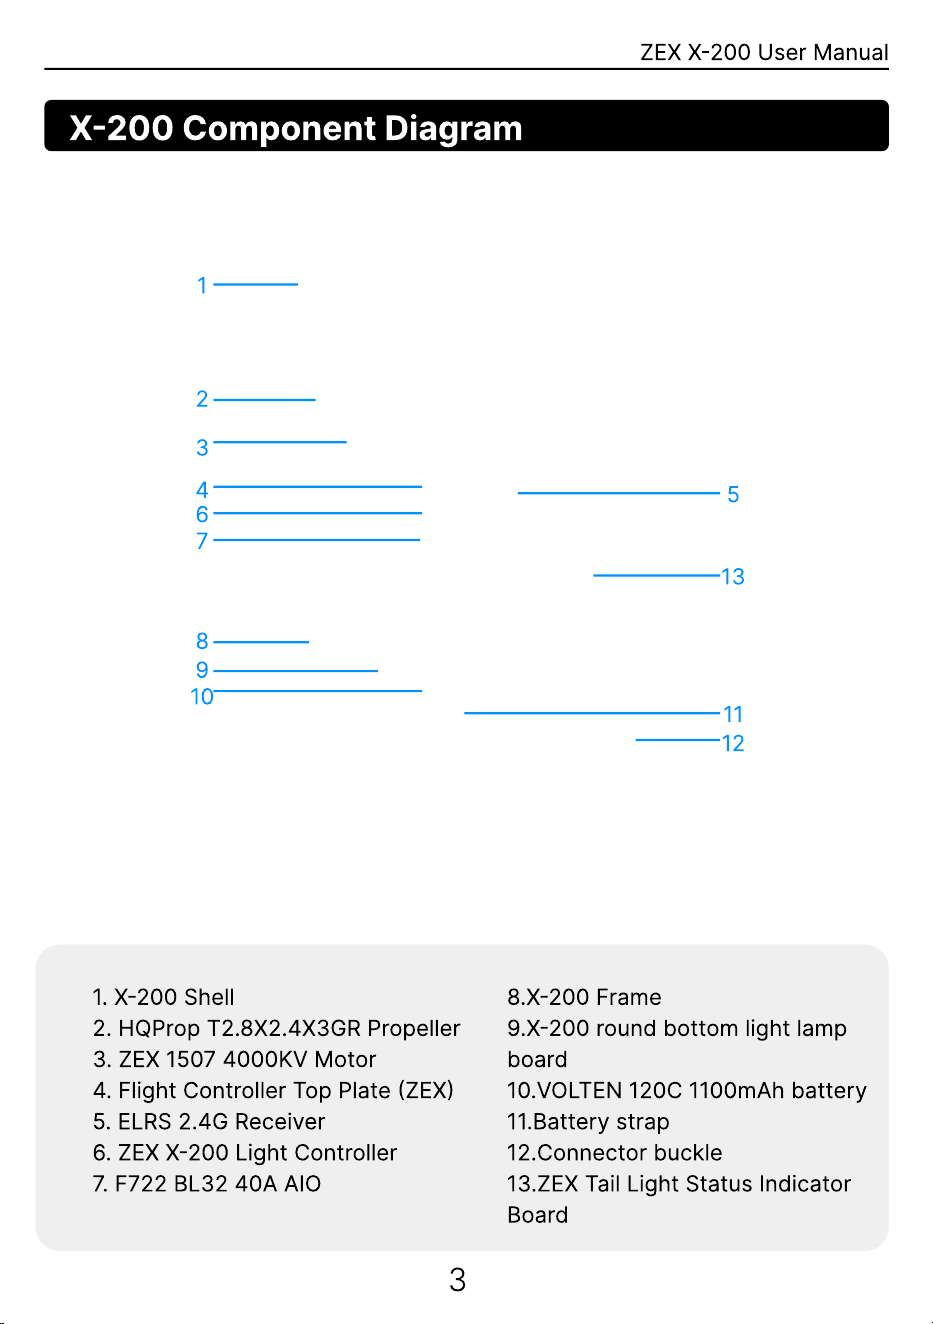
X-200 Component Diagram
1
2
3
4
6
7
5
13
8
9
10
11
12
1. X-200 Shell
2
. HQProp T2.8X2.4X3GR Propeller
3. ZEX 1507 4000KV Motor
4. Flight Controller Top Plate (ZEX)
5. ELRS 2.4G Receiver
6. ZEX X-200 Light Controller
7. F722 BL32 40A AIO
3
8.X-200 Frame
9.X-200 round bottom light lamp
board
10.VOLTEN 120C 1100mAh battery
11.Battery strap
12.Connector buckle
13.ZEX Tail Light Status Indicator
Board
ZEX X-200 User Manual
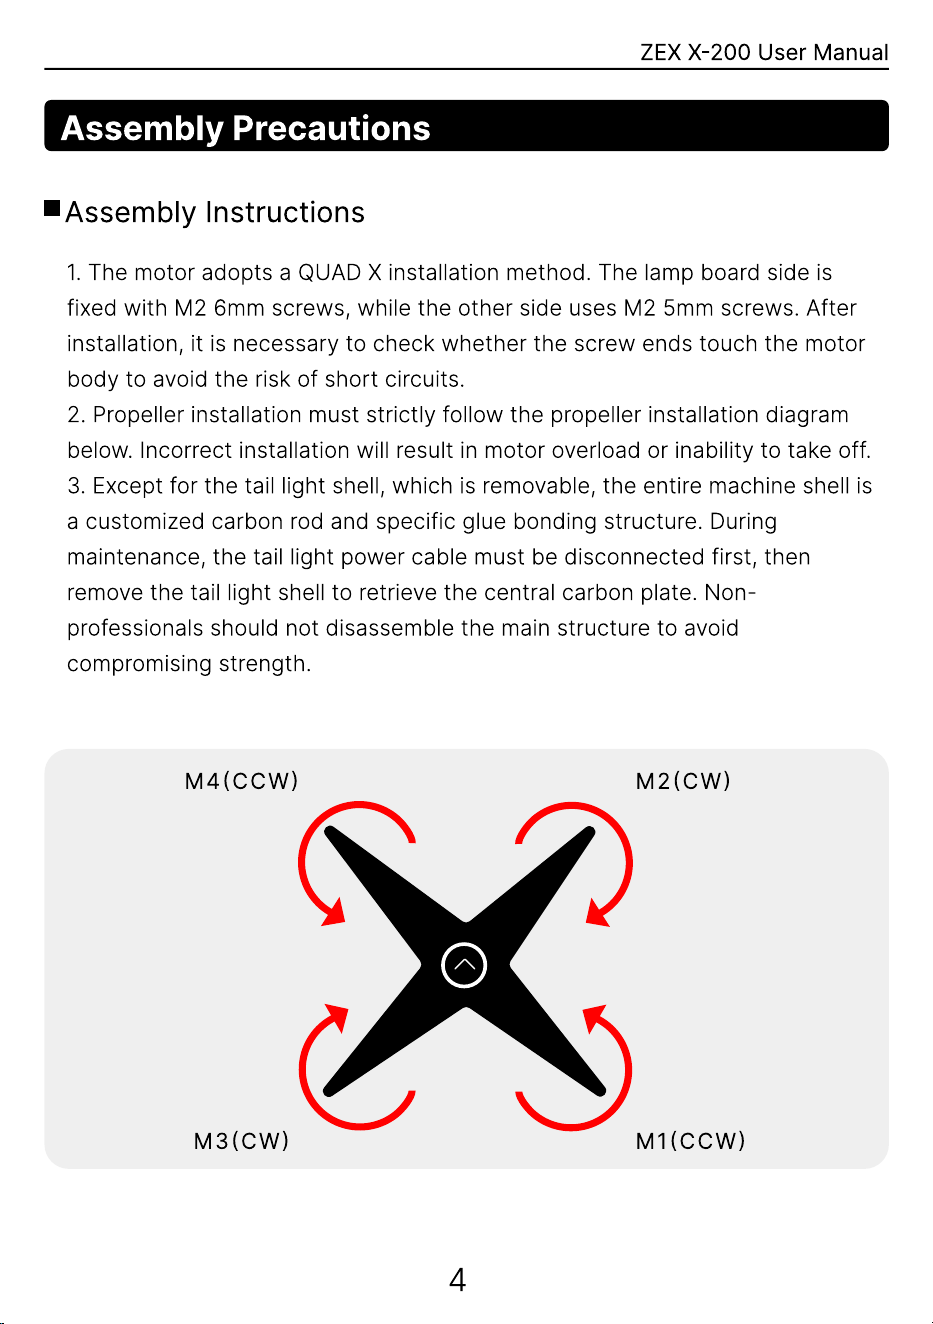
Assembly Precautions
Assembly Instructions
1. The motor adopts a QUAD X installation method. The lamp board side is
fixed with M2 6mm screws, while the other side uses M2 5mm screws. After
installation, it is necessary to check whether the screw ends touch the motor
body to avoid the risk of short circuits.
2. Propeller installation must strictly follow the propeller installation diagram
below. Incorrect installation will result in motor overload or inability to take off.
3. Except for the tail light shell, which is removable, the entire machine shell is
a customized carbon rod and specific glue bonding structure. During
maintenance, the tail light power cable must be disconnected first, then
remove the tail light shell to retrieve the central carbon plate. Non-
professionals should not disassemble the main structure to avoid
compromising strength.
M4(CCW) M2(CW)
M3(CW) M1(CCW)
4
ZEX X-200 User Manual
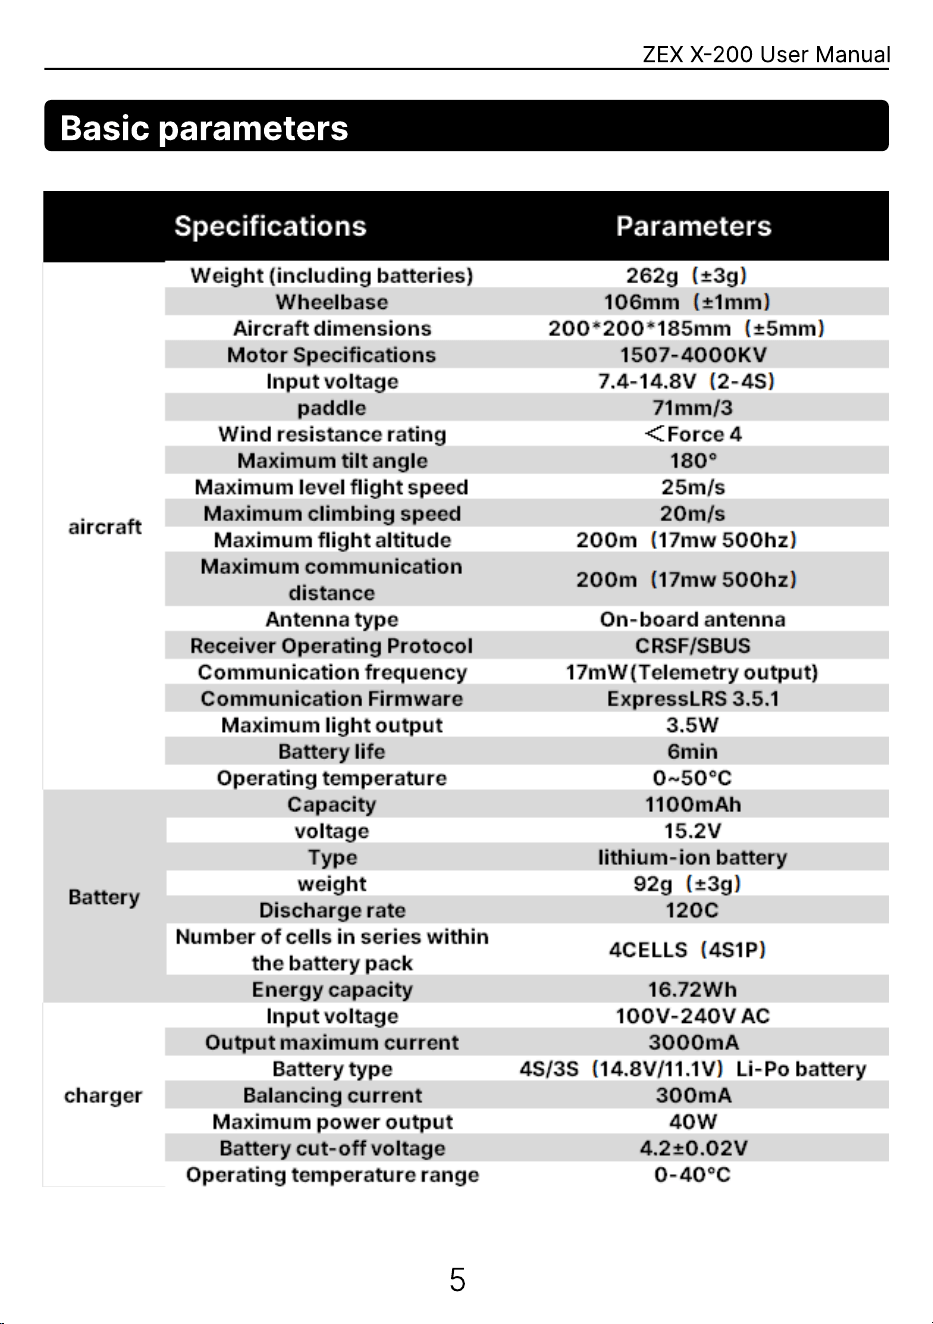
Basic parameters
5
ZEX X-200 User Manual
Light Signal Table
Fast flight
1. Before operation, ensure that all buttons and toggles on the remote
control have been reset, securely fasten the battery under the carbon board
of the ball drone, turn on the remote control power first, and then start the
drone soccer power.
2. After powering on, immediately observe the status light pattern of the
drone tail light. If a green flowing light appears, the drone can be unlocked
normally.
3. Press the SD button on the remote control twice to toggle the remote
control light once, and switch to the designated exclusive team light color
specified for the match.
4. To activate headless mode, first align the ball drone's tail towards the
operator's front, then switch the SC toggle to the middle position. When the
tail light flashes yellow three times consecutively, it indicates headless mode
has been successfully activated.
5. Push down the SA toggle to unlock. The unlocked status is confirmed by
the flashing white flowing light as the signal.
6
ZEX X-200 User Manual
WiFi Lighting Control Function Guide
Safety advice
Before operating the device, please ensure that the PTZ camera is switched o.
Do not connect to Wi-Fi or change the settings whilst the device is in ight.
Product Oveiew
This lighting control system allows you to customise the lighting eects of the
PTZ camera in dierent states via Wi-Fi, enabling tactical indicators and status
ales.
Initial connection
Step 1: Power on the ball camera; the lighting control board will launch a Wi-Fi
hotspot (ZEX-LEDController(WiFi))
Step 2: Connect to this Wi-Fi hotspot using your mobile phone or computer
(default password: 12345678)
Step 3: Open a web browser and manually enter the management address (e.g.
`10.3.2.1`) to access the conguration dashboard.
Connect the device to Wi-Fi (default
password: 12345678)
Once the device is connected to
Wi-Fi, enter 10.3.2.1 in your
browser’s address bar to access the
device’s conguration inteace.
7
G
o to the ad
m
in dashboard and chec
k
whether the Wi-Fi connection icon in
the top-left corner of the page shows
a tic
k
. Once you have conr
m
ed that
the connection is successful, you can
proceed with the various settings.
ZEX X-200 User Manual
WiFi Lighting Control Function Guide
Basic lighting eects settings
Function Description: Congure the colour settings for the aircraft’s basic functional
lighting eect
Operation Path: Navigate to the functions page and congure the following status
lighting eects for `LED1 Settings` and `LED2 Settings` respectively
Transmitter pairing lighting eect: The lighting eect displayed after entering
pairing mode by powering on three times in succession (Facto default: white
breathing light
Power-up light eect: The light eect during the power-on self-test (Facto
default: white three-segment ashing
Receiver disconnected light eect: The light eect when the transmitter is not
powered on (Facto default: steady white light
Receiver connection light eect: Standby light eect after the remote control is
powered on and pairing is successful (Facto default: three-segment green meteor
Unlock prohibited light eect: Light eect before unlock conditions are met
(Facto default: three-segment red meteor
Unlock permitted light eect: Light eect when all unlock conditions are met and
the system is ready (Facto default: green three-segment ashing
Unlock light eect: Light eect when the motor is unlocked (Facto default: white
ashing light
Flight light eect: Light eect during ight (Facto default: 7 light eects including
red, green, blue, multicoloured and lights o
Low voltage light eect: Warning light eect when batte voltage is too low
(Facto default: rapid red ashing)
8
ZEX X-200 User Manual
WiFi Lighting Control Function Guide
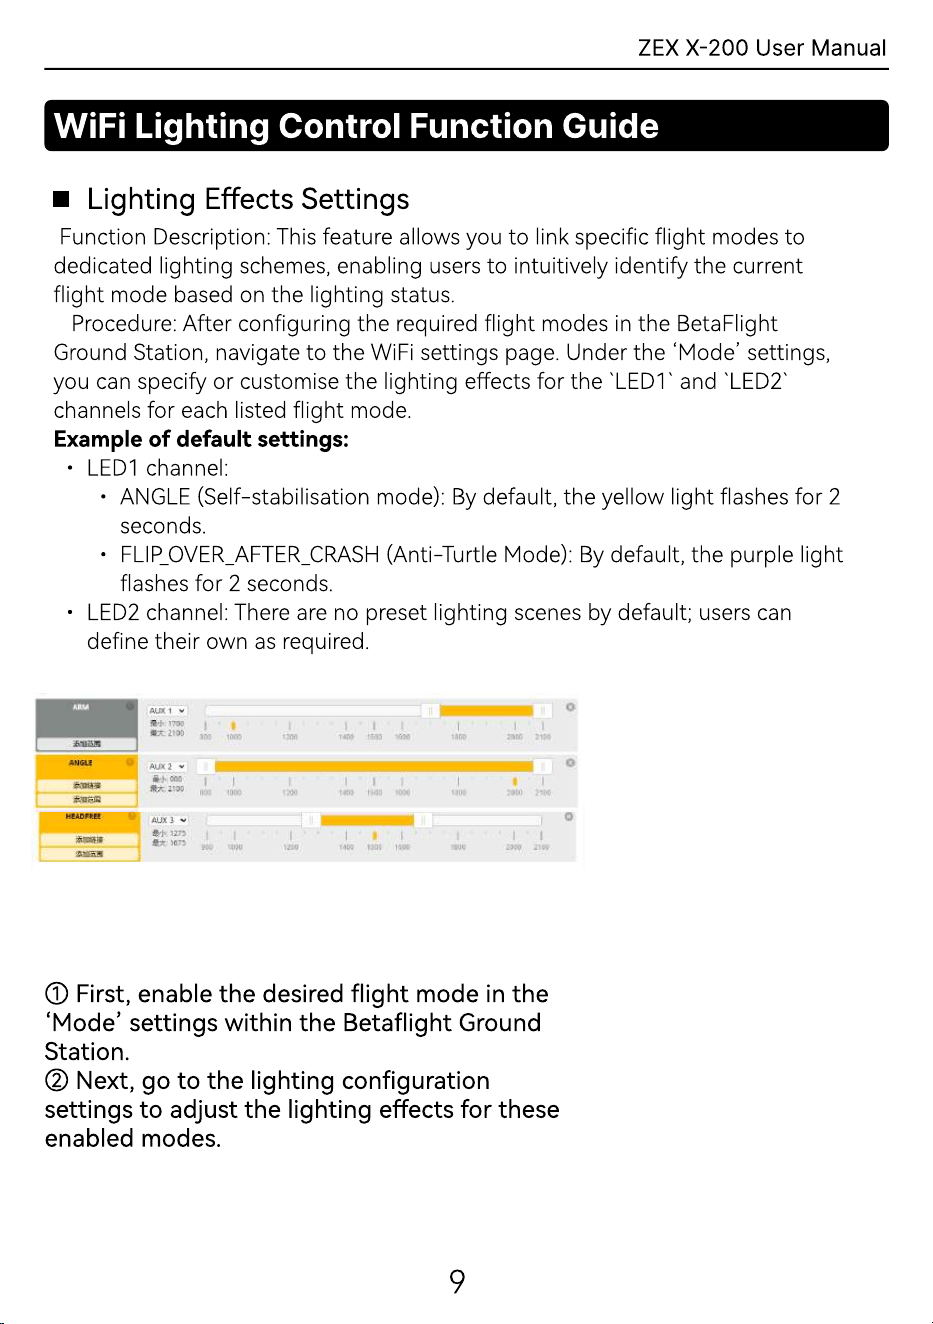
Lighting Eects Settings
Function Description: This feature allows you to link specic ight modes to
dedicated lighting schemes, enabling users to intuitively identify the current
ight mode based on the lighting status
Procedure: After conguring the required ight modes in the BetaFlight
Ground Station, navigate to the WiFi settings page. Under the ‘Mode’ settings,
you can specify or customise the lighting eects for the `LED1` and `LED2`
channels for each listed ight mode
Example of default settings
LED1 channel
ANGLE (Self-stabilisation mode): By default, the yellow light ashes for 2
seconds
FLIP_OVER_AFTER_CRASH (Anti-Tule Mode): By default, the purple light
ashes for 2 seconds
LED2 channel: There are no preset lighting scenes by default; users can
dene their own as required.
① First, enable the desired ight mode in the
‘Mode’ settings within the Betaight Ground
Station
② Next, go to the lighting conguration
settings to adjust the lighting eects for these
enabled modes.
9
ZEX X-200 User Manual
WiFi Lighting Control Function Guide
Remote control channel recognition and triggering (preset)
Function description: You can select a specic remote control channel to act as
a colour-changing switch, add your custom lighting eects, and use the switch
value of that channel to trigger preset lighting scenes
Instructions:
1. In ‘System Settings’ under ‘Remote Control Channels’, press the button
or switch on the remote control you wish to assign; the system will display and
recognise the corresponding channel number
2. Assign several preset lighting scenes to this channel.
10
ZEX X-200 User Manual
WiFi Lighting Control Function Guide
Remote control channel recognition and triggering (preset)
1. Lighting setting
Number of LEDs: Set this according to the actual number of LEDs connected
to ensure the lighting eects are displayed in full
Strip brightness: Adjust the overall brightness of all lighting eects to balance
visual impact and power consumption
2. Conguration le managemen
Function description: You can save multiple complete lighting congurations
(e.g. `League Conguration`, `World Championship Conguration`, `Training
Conguration`) and switch between them at any time with a single click
Procedure
Save conguration: After creating a new conguration and completing all
settings within it, go to the “Conguration Files” page, enter a name and click
“Save”
Load Conguration: Select the desired conguration from the list of proles
and click “Load”; the changes will take eect immediately
Delete Conguration: Manage your saved proles.
11
ZEX X-200 User Manual
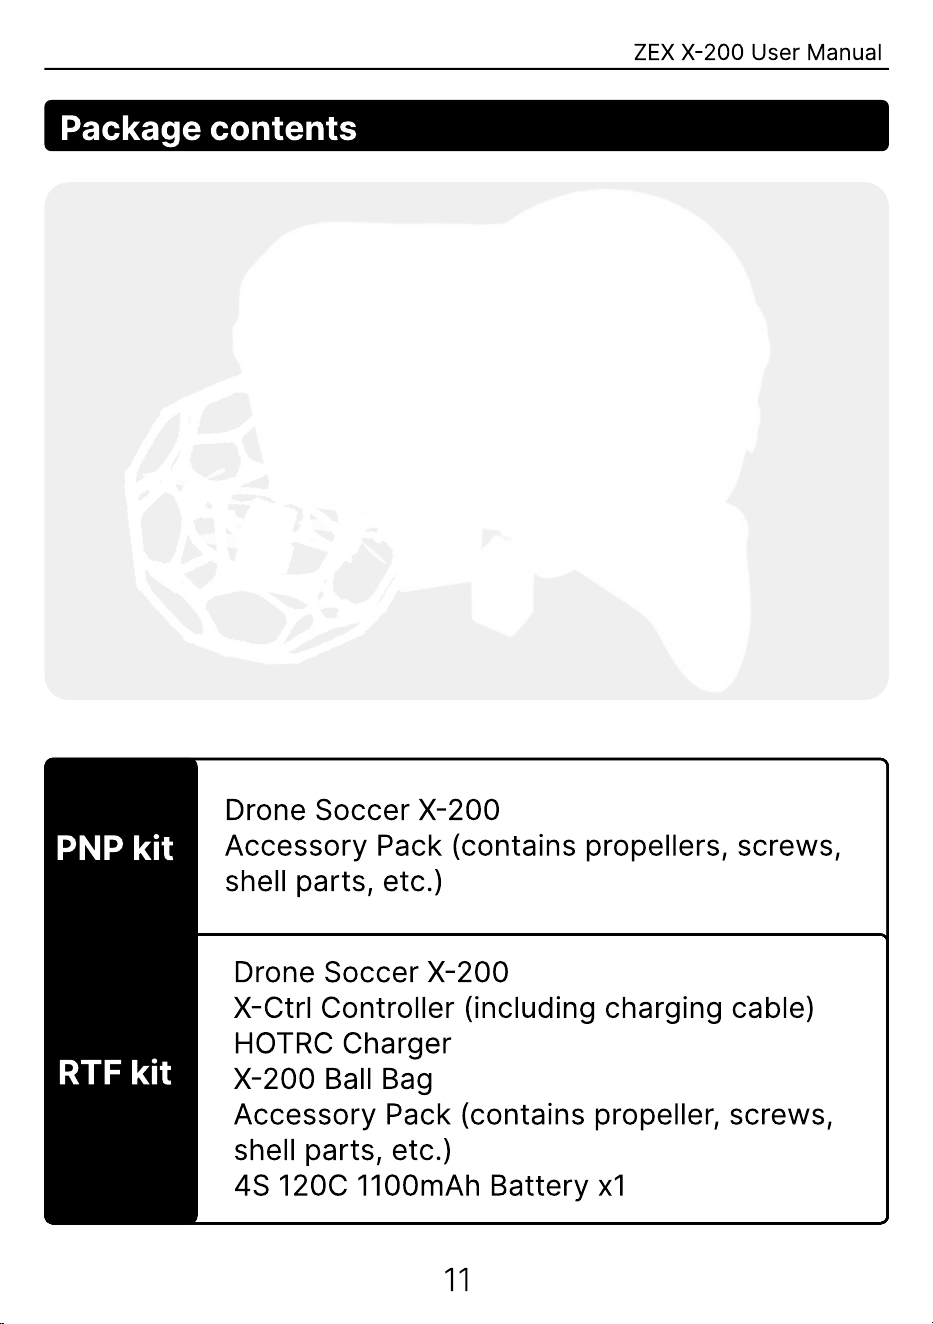
Package contents
PNP kit
RTF kit
Drone Soccer X-200
Accessory Pack (contains propellers, screws,
shell parts, etc.)
Drone Soccer X-200
X
-Ctrl Controller (including charging cable)
HOTRC Charger
X-200 Ball Bag
Accessory Pack (contains propeller, screws,
shell parts, etc.)
4S 120C 1100mAh Battery x1
11
ZEX X-200 User Manual
Remote Control Basic Function Description
The front side of the X-Ctrl remote control is shown in
the figure below.
12
ZEX X-200 User Manual
Remote Control Basic Function Description
1. Button Function Introduction
The remote control has 3 buttons, with specific functions as follows:
Power Button: Long press this button to turn the device on or off.
BIND Button: Short press this button to enter pairing mode for the
remote control.
SETUP Button: Short press this button to put the remote control into
joystick calibration mode.
2. Powering On and Off Operations
3. LED indicator light and prompt tone description
Power On: When powered off, press and hold for 3 seconds. The sequence
‘do re mi’ sounds, and the red light changes to a steady blue light
Power Off: When powered on, press and hold for 3 seconds. The sequence
‘mi re do’ sounds, and the red light flashes rapidly.
Beneath the power button is an RGB LED indicator, which displays the
various operational statuses of the remote control.
4. Remote control binds to receiver
Entering Pairing (Binding) Mode
① Switch on the remote control and confirm the indicator light remains solid
blue
② Briefly press the BIND button on the underside; the power indicator will
flash red (for 5 seconds)
③ Place the receiver into pairing mode to complete the pairing process
④ After 5 seconds, the device will automatically exit pairing mode. Verify
the binding result; if unsuccessful, repeat from step 2.
13
ZEX X-200 User Manual
Remote Control Basic Function Description
5.Low battery alert and chargin
Low battery alert: A slow blue light flash accompanied by a buzzer indicates low
power and requires recharging. Charging procedure
Switch off the remote contro
Charge using a 5V adapter (e.g., mobile phone charger) via USB cabl
Red light gradually flashing: Charging in progress; Green light gradually
flashing: Charging complet
Fully charged battery provides approximately 15 hours of operatio
When fully charged and stored for 30 days, the battery retains approximately
80% capacity.
6.Joystick calibratio
Briefly press the SETUP button upon power-up. Upon hearing two ‘beep’
tones and observing the red indicator light flash rapidly twice in succession,
the calibration mode is activated. Position the joystick centrally and briefly
press the SETUP button again. Upon hearing three ‘beep-beep-beep’ tones
and the red light maintaining the same rapid flashing pattern, the joystick
centre-point calibration is complete, and the system proceeds to the boundary
value calibration stage.
14
ZEX X-200 User Manual
Remote Control Basic Function Description
After completing the centre calibration, gently push the joystick sequentially
to each of the four boundaries (up, down, left, right) and hold briefly (1-2
seconds). Finally, press the SETUP button. When a 3-second long beep
sounds and the red light extinguishes, the entire joystick calibration process is
complete.
Remote Control Function Settings Guide
This remote control defaults to American hand mode, which requires
proficiency to master. To accommodate the X-200 drone football, the remote
control and ball unit have undergone joint optimisation at the factory, with
additional function key channels incorporated
1. Frequency Pairing Mode Operatio
Device end: Rapidly power on the drone three times. When both tail lights and
base lights display a white breathing pattern, the device enters frequency
pairing mode
Remote control end: Briefly press the BIND button on the remote controller.
The indicator light will flash red (5-second pairing status). Observe the tail light
on the gimbal: a green flowing light indicates success, while a red flowing light
indicates failure
Note: Factory-paired. Power-up sequence: Remote control first, then drone
2. Unlocking Procedur
Prerequisites: Successful pairing, all buttons reset, throttle stick in lowest
position
Procedure: Press and hold the SA button to enter unlock mode( ). The
propeller begins rotating, and the tail light displays a white flowing flash
pattern
Note: Unlocking is not possible if the PTZ camera status is not approved (tail
light red)
3. Flight Mode Switc
The SB switch lever in the rear position ( default state) engages stabilisation
mode
Moving the SB switch lever to the middle position ( ) engages semi-
stabilisation mode
Moving the SB switch lever to the forward position ( ) engages manual mode.
15
ZEX X-200 User Manual
Remote Control Function Settings Guide
4. Headless Mode Setu
Setup: Position the SC switch to the middle position( ). The tail light will flash
yellow three times to indicate successful activation
Note: Before use, the operator must stand directly behind the aircraft,
ensuring the tail light faces them. This mode must be activated prior to
unlocking to take effect.
5. Anti-Turtle Mod
Setup: Push the SC toggle switch fully forward( ). The tail light will flash
purple three times before remaining steadily lit, indicating successful
configuration
Activation: After setup, press the SA( ) button to unlock (tail light displays a
white flowing flash) for the mode to function correctly
Note: The throttle stick is inactive in this mode; do not push it upwards
6. Lighting Mode Switchin
Switching: Before or during flight, press the SD ( )button repeatedly to cycle
through lighting modes (each double-press changes one colour, with eight
options available)
Observation: Prior to flight, the status indicator takes precedence over the tail
light; observe the underside illumination to verify the current flight lighting
configuration
Synchronisation: Once unlocked, when throttle input reaches ≥10%, the tail
light will automatically synchronise to match the underside lighting's flight
colour
7. Low Battery Voltage Warnin
Warning: When battery voltage falls below 14.4V, the tail light will flash red
Action: Immediately perform a controlled descent. Allow the battery to return
to normal temperature before recharging to prevent swelling or loss of
capacity due to prolonged low-voltage flight
Note: During aggressive flight manoeuvres, the warning may briefly activate
and then reset when voltage approaches 14.4V due to back-pressure effects.
This behaviour is normal.
16
Troubleshooting
ZEX X-200 User Manual
17

ZEX X-200 User Manual
After-Sales Service Policy (Mainland China)
After-sales Contact Information
After-sales Support: Please scan the QR code to add our official after-
sales WeChat account. For product malfunctions, first consult the official
tutorial on Bilibili. Should the issue persist, then contact after-sales
support
Safety Operation: This product is precision equipment. Avoid dropping or
subjecting it to impact. In the event of abnormal flight behaviour,
immediately lock the motors
Accessory Service: The product includes spare parts such as the outer
casing and connecting buckles for self-replacement. Should any
components be lost, they may be purchased via our official website or by
contacting customer service.
Bilibili QR Code Customer Service WeChat QR Code
Return-to-Factory Repair Process
Information required for repairs:
Purchase details: Shop name and Wangwang ID (or other purchasing
channel
Date of purchas
Product(s) to be repaired and quantit
Detailed fault descriptio
Recipient details for post-repair delivery (name, telephone number,
address)
18
ZEX X-200 User Manual
After-Sales Service Policy (Mainland China)
Warranty Terms
Conditions for 30-day complimentary warranty
The product exhibits non-human-induced quality issues, with valid
proof provided
Purchased through official authorised channels, with valid proof of
purchase provided
The product shows no record of unauthorised disassembly,
modification, or parameter tampering
The following circumstances will incur a charge for repairs
Damage caused by human error: including drops, impacts, unauthorised
disassembly, incorrect soldering, reverse polarity connection, or battery
overcharging/over-discharging
Out of warranty: exceeding the 30-day complimentary warranty period
Non-authorised channels: purchased through unofficial channels (such as
second-hand platforms or unauthorised dealers)
Other circumstances: including unauthorised repairs, liquid ingress, or
faults resulting from accidents or improper operation.
Fee Schedule
30-day warranty
Free return shipping for quality issues within 7 days; beyond 7 days,
customer bears return shipping costs
Repair labour charges
Parts costs assessed based on actual damage incurred.
Returns and Exchanges Policy
7-Day After-Sales Polic
No-Questions-Asked Returns: Products must be unused, with packaging
and accessories intact, and in a condition suitable for resale
Exchanges for Quality Issues: Products exhibiting performance faults or
significant discrepancies from the description.
Note: Shenzhen ZEX Future Technology Co., Ltd. reserves the right of final interpretation and
may adjust its after-sales policies based on actual circumstances. The latest information shall be
subject to the announcements on the official website (www.ZEXFPV.com).
19
WWW.ZEXFPV.COM
MANUAL

This device complies with part 15 of the FCC Rules. Operation is subject to the
following two conditions: (1) This device may not cause harmful interference, and (2)
this device must accept any interference received, including interference that may cause
undesired operation.
Any Changes or modifications not expressly approved by the party responsible for
compliance could void the user's authority to operate the equipment.
Note: This equipment has been tested and found to comply with the limits for a Class B
digital device, pursuant to part 15 of the FCC Rules. These limits are designed to
provide reasonable protection against harmful interference in a residential installation.
This equipment generates uses and can radiate radio frequency energy and, if not
installed and used in accordance with the instructions, may cause harmful interference
to radio communications. However, there is no guarantee that interference will not
occur in a particular installation. If this equipment does cause harmful interference to
radio or television reception, which can be determined by turning the equipment off and
on, the user is encouraged to try to correct the interference by one or more of the
following measures:
-Reorient or relocate the receiving antenna.
-Increase the separation between the equipment and receiver.
-Connect the equipment into an outlet on a circuit different from that to which the
receiver is connected.
-Consult the dealer or an experienced radio/TV technician for help.
FCC Radiation Exposure statement
The device has been evaluated to meet general RF exposure requirement. The
device can be used in portable exposure condition without restriction.