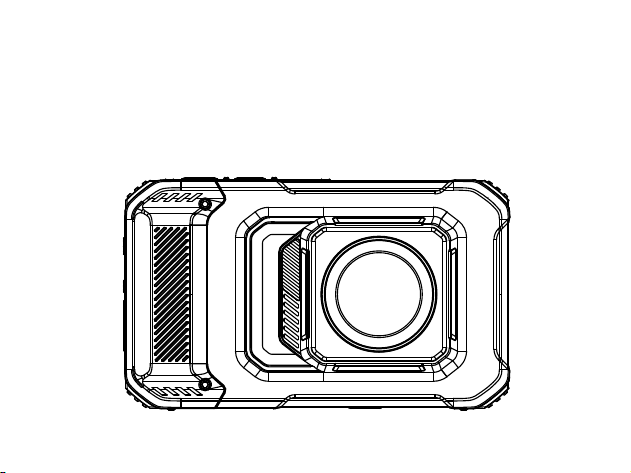
5K WATERPROOF CAMERA
User manual

1
Product Characteristics
Ultra-high video resolution, supports 5K 30fps.
Ultra-high photo resolution, supports 96MP.
60 filters, 8 film effects, 10 scene modes, 5-level beauty enhancement,
enabling ultra-free shooting.
Supports HDR (High Dynamic Range) imaging, capturing more details.
10-meter water resistance, 1.5-meter drop resistance, IP6X rated for
complete dust resistance, suitable for multi-scenario use.
Supports ISO100-6400, enabling low-light shooting in varying
conditions.
8X digital zoom, ultra-fast focusing.
High-speed continuous shooting, capturing every action.
Built-in high-power LED flash.

2
Camera usage tips
Camera safety and operation
Please do not disassemble or repair the camera yourself.
Avoid exposing the camera to extreme temperatures or humid
environments.
When transitioning from a cold environment to a warm one, one must
adapt gradually to prevent condensation.
Do not press the lens hard or expose it to direct sunlight for extended
periods.
Clean with a slightly damp soft cloth only, and avoid using chemical
solvents.
Handle with care to avoid impacting the camera's display screen.
Camera usage warning
Do not point the flash directly at people's eyes at close range, as it may
cause discomfort or injury.

3
Do not operate the camera while walking or driving to prevent
accidents.
Do not allow the camera strap to entangle around a child's neck, as it
poses a risk of suffocation.
Camera maintenance tips
When the camera is not in use, please store it in a cool and dry place
and remove the battery.
Please wear a lanyard when using the camera to prevent it from
accidentally falling.
Using a camera bag can prevent scratches on the lens and screen.
When cleaning the lens, please gently blow away the dust first, and
then wipe it with a cloth specifically designed for optical equipment. If
necessary, Lens cleaning solution can be used.
Do not use organic solvents to clean the camera.
Avoid touching the lens directly with your hands, as dirt on the lens can
affect the imaging quality.

4
Storage card usage tips
Formatting and compatibility
The new card needs to be formatted before its first use, and cards
previously used in other devices also need to be reformatted.
Do not directly use a memory card that has been formatted by another
camera, video recorder, or card reader.
Operational precautions
Before inserting or removing the memory card, turn off the camera
power.
Avoid bending, dropping, or squeezing the memory card, and keep it
away from strong magnetic/electric fields.
It is normal for the memory card to become slightly warm after
prolonged use.
Data protection
Do not power off or remove the card when recording, deleting,
formatting, or reading data.
Regularly back up important data to other storage devices.
5
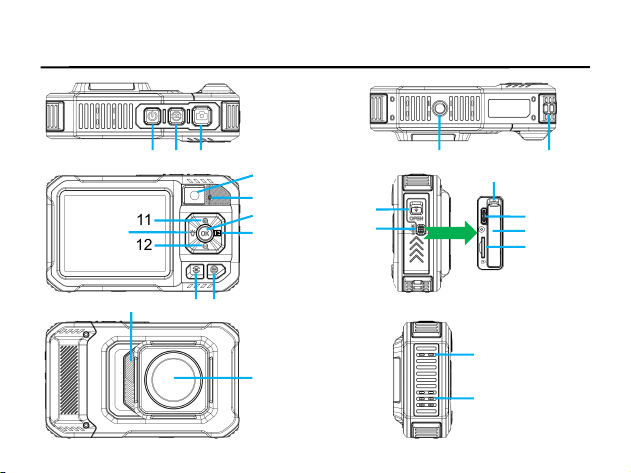
Introduction of camera parts
1 2 3
4 5
6
7
8
9
11
12
13 14
22
21
23
24
17
18
19
20
15
16
10

6
No. Name Function
1
Power Button
Short press to turn on the camera.
Long press to turn off the camera.
2
Camera switch
button
Switch between main camera and selfie camera.
3
Shutter Button/
Confirm Button
Photo mode: Press halfway down to auto-focus,
full press to take photo.
Video mode: Press halfway down to auto-focus,
full press to record.
4
Tripod Mount Standard screw port
5
Hook Attachable camera strap
6
Selfie camera Can be used for selfie
7
Indicator Light
The blue indicator lights up 1 time to indicate that it
is taking a picture.
The blue light is flashing when recording.
The red light is on when charging.
8
OK button
Confirm button.
Pause/resume video playback.
Photo Mode: Pop up the filter menu.

7
9
Right button
(playback)
Shot preview: Turn on playback mode to view
photos and videos.
Playback mode: Short press to enter the next file
selection of photo and video.
10
Left button
(flash)
Shot preview: Switch to flash mode (for taking
photos); Switch to fill light mode (video recording).
Playback mode: Short press to enter the previous
file selection of photo and video.
11
Up button
(zoom in)
View Photos: Zoom In.
Photo/Video: Focus Closer.
Menu selection.
12
Down button
(zoom out)
View Photos: Zoom Out.
Photo/Video: Increase Focus Distance.
Playback Mode: Enter the album and display
thumbnails.
Menu selection.
13
Mode Button Switch the shooting mode(Photo/ Video)
14
Menu Button
Short press to enter the menu setting bar, and then
short press to return.
15
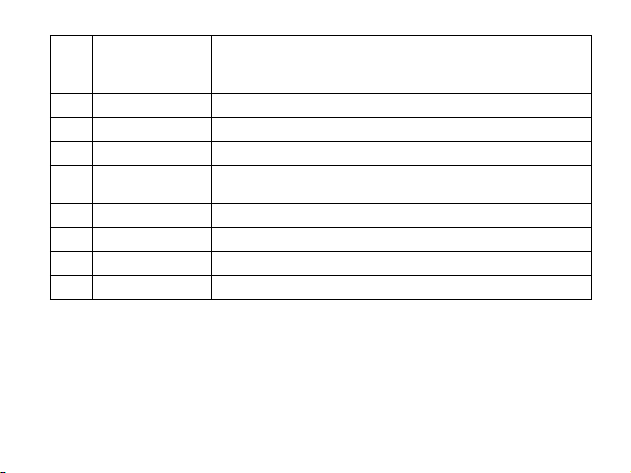
Battery Cover Install battery, Micro SD card, and USB port.
8
16
Battery
Warehouse
Switch
Battery cap Lock / unlock
17
Battery latch Fixed battery
18
USB Port Support Type-C/ USB
19
Battery Slot Battery storage location
20
Micro SD card
Slot
Support up to 1T (Micro SD Card)
21
LED light Support flash and fill light functions
22
Lens /
23
MIC hole Sound pickup
24
Horn hole /
9
Preparation before Use
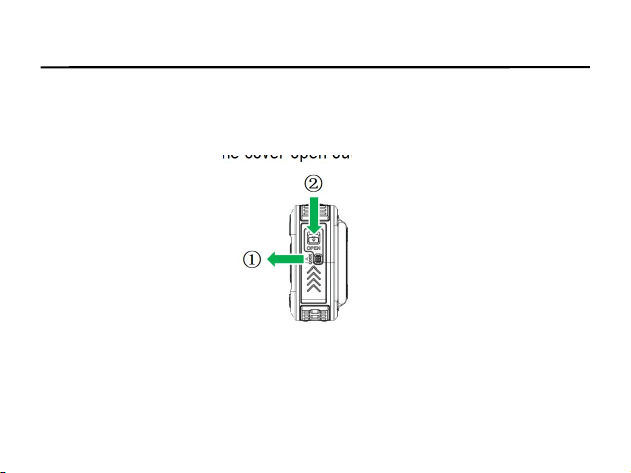
Battery Cover ON / OFF
1. Turn on the battery cover: Slide the battery compartment switch to the
left and hold it, then flip the cover open outward.
2. Turn off the battery cover: Press the battery compartment cover down
until you hear a click, indicating that the switch is locked and the cover is
securely closed.
10
Battery Insert / Remove
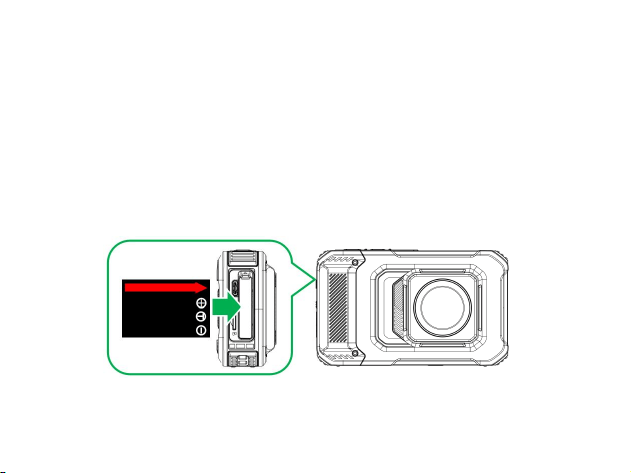
1. To install the battery:
a. Open the battery compartment cover. b. Insert the battery, aligning the
electronic contacts as illustrated, until the lock engages with an audible
click.c. The battery is now securely installed.
11
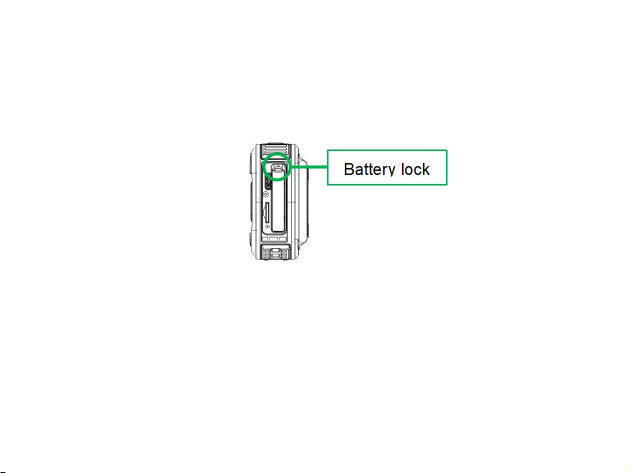
2. To remove the battery:
a. Open the battery compartment cover.
b. Push the battery lock to release it, and then take out the battery.
How to Charge the Camera
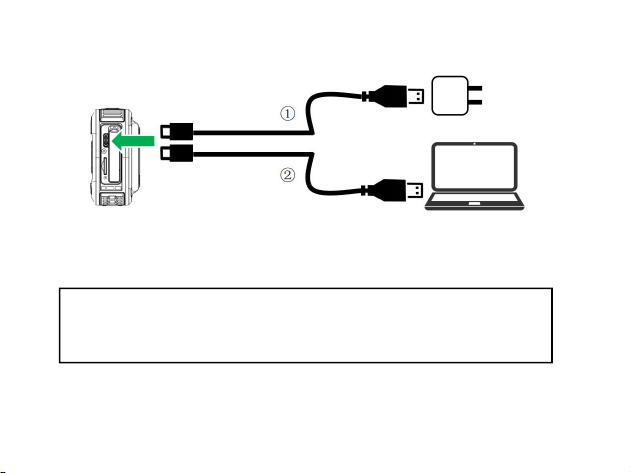
1. Please use the Type-C/USB cable to charge the camera. (Do not
charge under water.)
① Use a Type-C/USB cable paired with a 5V charger to charge the
camera;
12
② Connect the camera to the computer using a Type-C/USB cable.
2)When the camera light goes out, it means the camera is fully charged.
Note: If the charging light flickers slightly, it indicates that the
battery is not installed or reversed. Please check if the battery is
installed correctly.
13
Micro SD Card Insert / Remove
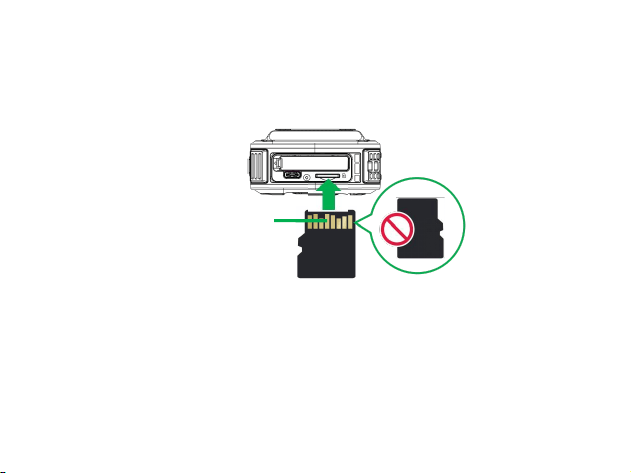
1)Insert the Micro SD card: As shown by the illustration, face the card's
metal contacts side toward you and insert it until it locks in place.
2)Remove the Micro SD card:Press the Micro SD card, then it can pop up.
Caution: 1. This camera is compatible with 1TB Micro SD cards. Class10
is recommended, we do not recommend using U3 level card.
2. When the Micro SD card is used for the first time, please format it by the
camera.
Metal contacts side

14
How to format a memory card
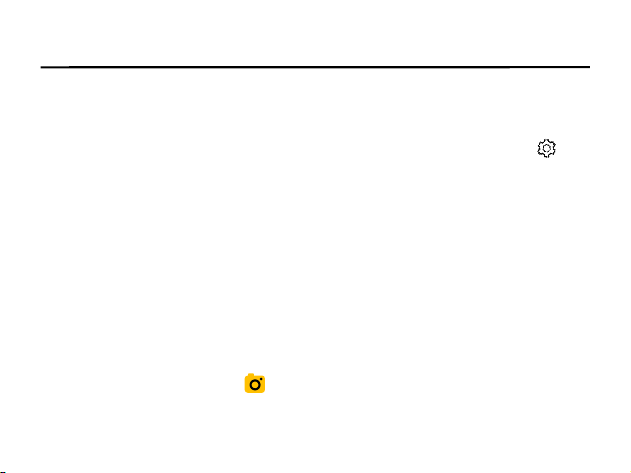
1. In photo or video mode, press the Menu button to enter the camera
menu. Use the Right button to select the camera system settings【 】,
then press the Down button to choose the "Format Memory Card" option.
2. Press the OK button to confirm formatting.
3. Press the Menu button again to exit the system settings page.
15
Camera Setting
System Settings
1. In photo or video mode, press the Menu button to enter the camera
menu. Use the Right button to select the camera system settings【 】.
2. Use the Up and Down buttons to select a menu item, then press the OK
button to enter the sub-options.
3. After completing the settings, press the Menu button again to exit the
system settings.
Photo Settings
1. In photo or video mode, press the Menu button to enter the camera
menu. The photo settings【 】 will open by default.

16
2. Use the Up and Down buttons to select a menu item, then press the OK
button to enter the sub-options.
3. After completing the settings, press the Menu button again to exit the
photo settings.
Recording Settings
1. In photo or recording mode, press the Menu button to enter the camera
menu. Use the Right button to select the recording settings【 】.
2. Use the Up and Down buttons to select a menu item, then press the OK
button to enter the sub-options.
3. After completing the settings, press the Menu button again to exit the
recording settings.

17
Playback Settings
1. In photo/recording mode, press the Right button to enter the camera's
playback mode.
2. In playback mode, press the Menu button to enter the playback menu.
Then, press the Right button to switch between the playback settings【 】
and system settings.
3. In the playback settings, use the Up and Down buttons to select a menu
item, then press the OK button to enter the sub-options.
4. After completing the settings, press the Menu button again to exit the
playback settings.
18
Photo Mode
Take Still Image
1. Press the Mode button to switch to Photo Mode. When the【 】icon
appears in the upper left corner of the screen, it indicates that the camera
is in Photo Mode.
2. Half-press the shooting button to focus. The focus frame on the screen
will turn green.
3. Fully press the shooting button to take the photo.
4. In low-light conditions, turn on the camera's fill light. Press the Left
button to select a flash mode.
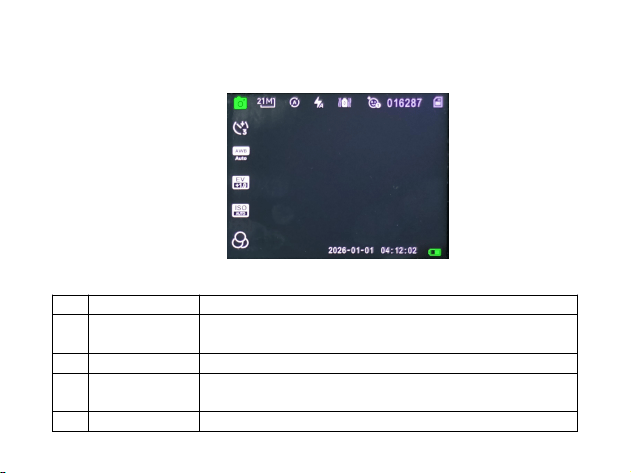
19
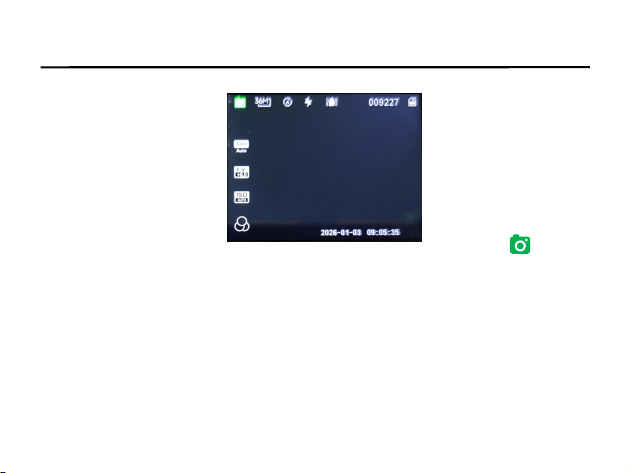
Photo Mode screen icon
No. Icon name Description
1
Shooting
Mode
Photography mode icon
2 Photo Size Current photo resolution setting
3 Scene
Select the corresponding scene, and the camera
will automatically match the more suitable settings
4 Flash mode Press the left flash button to switch between flash
1 2 3 4 5 6 7 8
9
10
11
12
13
14 15

20
modes:Turn off flash/ Auto flash/ Force flash.
5 Anti-Shake Prevent camera shake from affecting image clarity
6 Beauty It can beautify portraits
7
Number of
photos that
can be taken
The number of photos that can be taken with the
current camera memory
8 Memory card Is the storage card installed
9 Capture Mode
Single Shot/ Self-timer (3s)/ Self-timer(5s)
Self-timer (10s)/ Continuous Shooting (3 shots)
Continuous Shooting (6 shots)
Continuous Shooting (12 shots)
10 White Balance Current white balance setting
11
Exposure
Compensation
Current exposure compensation value
12 ISO Current ISO sensitivity setting
13 Filter
Apply unique color, tonal, and style effects directly
to photos or videos during capture, enabling the
creation of creative and textured works.
14 Time&Date Timestamp
15 Battery status The battery is charging or the battery level.

21
Video mode
Shoot video
1. Press the Mode button to switch to Video Mode. An icon 【 】 will
appear in the upper left corner of the screen, indicating that the camera is
now in video recording mode.
2. Half-press the shooting button to focus. The focus frame on the screen
will turn green once the focus is achieved.
3. Fully press the shooting button to start recording. Press it again to stop
recording.
4. In low-light conditions, turn on the camera's fill light. Press the Left
button to select the desired fill light mode.
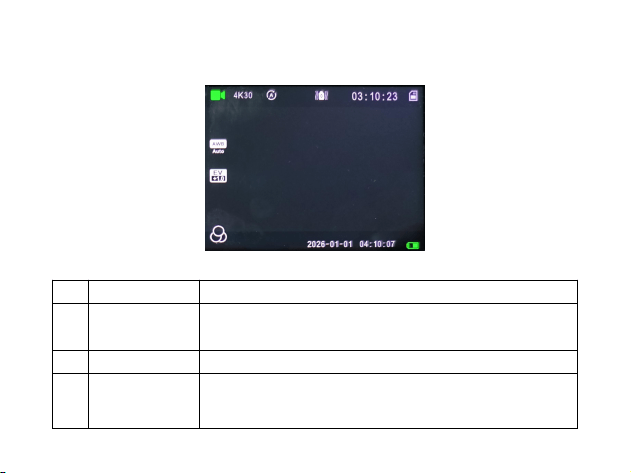
22
Video Mode screen icon
No. Icon name Description
1
Shooting
Mode
Video recording mode icon
2 Photo Size Current photo resolution setting
3
Scene
Select the corresponding scene, and the camera
will automatically match the more suitable settings
1 2 3 4 5 6 7
8
9
10
11 12
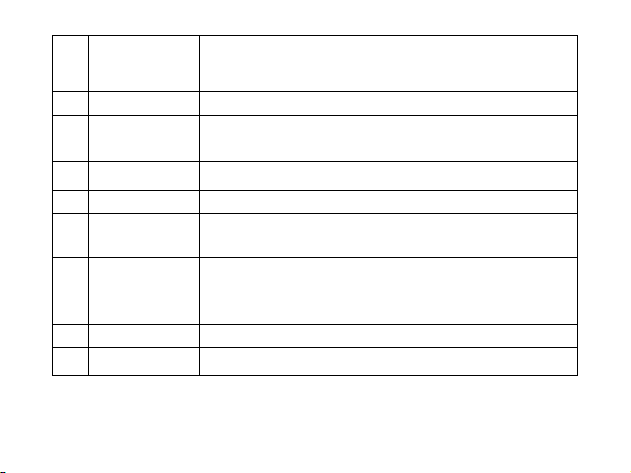
23
4
Fill Light
Mode
Press the Left button to switch between fill light
modes:Turn off fill light/ Turn on fill light
5
Anti-Shake Prevent camera shake from affecting image clarity
6
Video
recording time
Remaining recording time in the camera's current
memory
7
Memory card Is the storage card installed
8 White Balance Current white balance setting
9
Exposure
Compensation
Current exposure compensation value
10 Filter
Apply unique color, tonal, and style effects directly
to photos or videos during capture, enabling the
creation of creative and textured works.
11 Time&Date Timestamp
12
Battery status The battery is charging or the battery level.

24
Playback and Deleting Photos/Videos
1. In photo/video mode, press the Right button to enter the camera’s
Playback Mode.
2. In playback mode, press the Left button or Right button to browse
through the photos or videos.
3. To delete the currently viewed photo or video, press the Menu button
to open the playback settings. Locate the "Delete" option, where you can
choose to delete the current file or delete all files.
4. Within the playback settings, press the Menu button to exit the settings
menu.
5. After browsing, press the Mode button to exit Playback Mode and
return to the shooting mode.

25
Selfie Mode
1. Switching to Selfie Mode & Taking Photos/Videos
On the preview screen, press the Camera Switch Button to switch to the
front camera and activate selfie mode. Press the shutter button to capture
a photo or start/stop recording a video.
2. Switching Back to the Main Camera
Press the Camera Switch Button again to switch back to the main camera.
3. Optimal Shooting Distance
The recommended shooting distance for the front camera is 50–120 cm
to ensure image clarity.
Important Notes:
Single-Lens Mode: The camera supports only one active lens at a time—
either the main camera or the front camera.
Focusing Tip: The front camera uses a fixed focus design (no autofocus
function). Therefore, a green focus frame and focus confirmation tone will
not appear when using the front camera. Adjust your distance flexibly
based on the previewed image to ensure a clear picture
26
Download Still Image/ Video Files to Computer
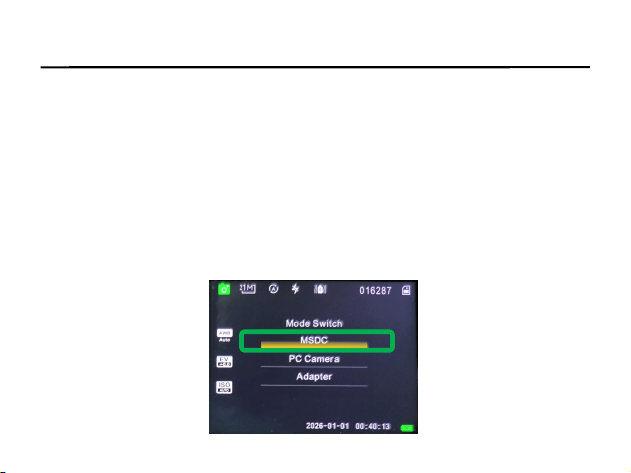
1)When the camera is turned on, use the USB cable (in the package) to
connect the computer.
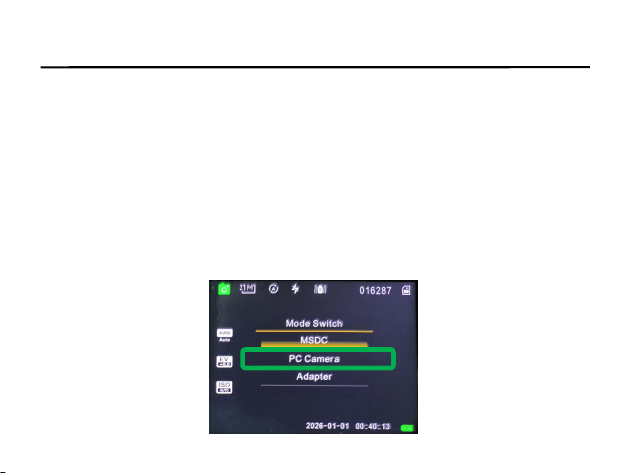
2)When the connection is completed, the camera screen displays a
dialog box accordingly.
3)Please select MSDC,and then you can download the files from the
camera to your Computer.
4)After downloading, please remove the USB cable and the camera is
exiting the MSDC mode.
27
How to Use Camera As Webcam
Please use the USB cable (in the package) to connect the computer.
1)When the connection is completed, the camera screen displays a
dialog box accordingly.
2)Please select PC camera and then you can use the camera
as the webcam on the computer.
3)After using, please remove the USB cable and the camera
will exit webcam mode.

28
Specifications
Image resolution
96M; 64M; 48M; 36M; 21M; 14M; 12M etc.
Video resolution
5K 30FPS; 4K 30FPS; 2.7K 60FPS; 2.7K 30FPS;
FHD 60FPS; FHD 30FPS; HD60FPS; HD30FPS
etc.
Memory card
Support Micro SD card(Maximum1TB)
and SDHC Class 6
File format
JPG, MP4(H.264 codec)
Aperture /
Focal length
Ff(F=1.8 ; f=4.69mm)
Digital zoom
8X
Shooting distance
Main lens: 18 cm to infinity; Selfie lens: 50-120
cm
Display screen 2.8-inch , 640*480 IPS , 4:3 aspect ratio
29
Power
1050mA/h 3.7V ,Rechargeable Lithium-ion
battery
USB Port Type-C
working hours
4K recording ≤60 minutes,
photo taking ≤100 minutes
Waterproof 5 meters
Dustproof IP6X
PC system Win7/Win8/Win10/Win 11
Attention: Product specification is the latest information at the time when
this use manual is made. No further notice will be made for any variation.
Specific operating methods are subject to the real camera that you
purchased.

30
Frequent asked questions
The camera
cannot be started
after installing the
battery
Insufficient battery power, please replace the new
battery.
Battery pack is not removed.
The battery is inverted or not in place, please
confirm that the battery is installed correctly.
Press the shutter
button to take
photos and video
The memory card is full, please store the shooting
files to another memory.
The picture is
blurred
The hand shakes when taking pictures.Please
hold the camera with both hands, or use other
objects such as a tripod to stabilize the body. Do
not shake the camera when taking pictures.
The photo or
video is dim
The shooting environment is not light.Please shoot
in well lit places or use light to increase brightness.
31
The camera is
automatically
turned off
Insufficient battery power, please replace the
battery.
For save power, the camera will be automatically
closed without any operation for more than 1
minute (3 or 5 minutes, depending on the settings).
Camera crash or
screen blurred
The Micro SD card formatting the Micro SD card in
the camera or computer before using.

No.WDC902 5K 260522

This device complies with part 15 of the FCC Rules. Operation is subject to the following two conditions: (1) this device may
not cause harmful interference, and
(2) This device must accept any interference received, including interference that may cause undesired operation.
Changes or modifications not expressly approved by the party responsible for compliance could void the user’s authority to
operate the equipment. This equipment has been tested and found to comply with the limits for a Class B digital device,
pursuant to Part 15 of the FCC Rules. These limits are designed to provide reasonable protection against harmful interference
in a residential installation. This equipment generates uses and can radiate radio frequency energy and, if not installed and
used in accordance with the instructions, may cause harmful interference to radio communications. However, there is no
guarantee that interference will not occur in a particular installation. If this equipment does cause harmful interference to radio
or television reception, which can be determined by turning the equipment off and on, the user is encouraged to try to correct
the interference by one or more of the following measures:
‐‐ Reorient or relocate the receiving antenna.
‐‐ Increase the separation between the equipment and receiver.
‐‐Connect the equipment into an outlet on a circuit different from that to which the receiver is connected.
‐‐ Consult the dealer or an experienced radio/TV technician for help.ct.
*RF warning for Portable device:
The device has been evaluated to meet general RF exposure requirement.
The device can be used in portable exposure condition without restriction.