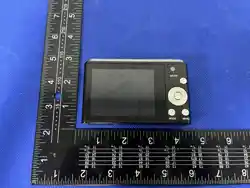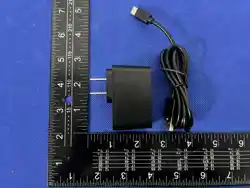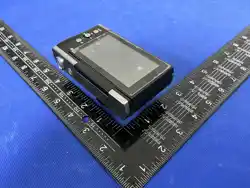
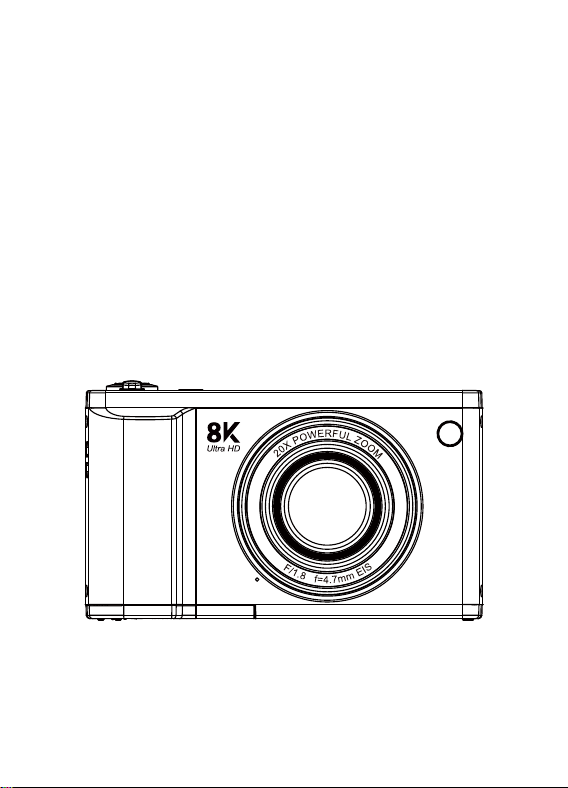
Digital Camera
User Manual
96.0
MEGA PIXELS

1
Catalogue
Catalogue ........................................................................................................... 1
Preface .............................................................................................................. 3
Camera features ........................................................................................ 3
Camera usage tips ....................................................................................... 3
Storage card usage tips ........................................................................................ 4
Preparations before use .................................................................................... 5
Camera components .......................................................................................... 10
Turning the camera on and off ....................................................................... 12
Format the storage card ........................................................................ 12
Camera settings .......................................................................................... 13
Camera screen icon .......................................................................................... 14
Take photos and videos .................................................................................... 17
Flash Mode ...................................................................................... 22
Fill light Mode ..................................................................................... 22
Flip Screen .......................................................................................... 23
Set date and time and watermark ...................................................... 23
Replay Mode ......................................................................................... 24
Connect to camera Wi-Fi ................................................................ 25
Download camera photos and videos to the computer ............................... 27

2
Webcam ............................................................................................ 28
Camera parameters .................................................................................... 29
Frequently Asked Questions ....................................................................... 30
FCC Warning Statement ....................................................................... 31

3
Preface
Thank you for purchasing our digital camera. Before using the camera, please be
sure to read and understand the relevant content of "Safety Matters". Please keep
this manual properly for future reference.
It is recommended to take a few non-essential images before capturing important
ones to ensure that you are operating the camera correctly.
The interface illustrations and camera schematics in this manual are examples from
the product development stage. If some functions are supplemented or modified
through camera firmware upgrades, the content of the manual may differ from the
actual functions. Please refer to the actual camera information.
Camera features
96MP high-resolution photography
8K ultra HD video recording
20X zoom
HDR (High Dynamic Range) imaging
High-speed continuous shooting
3.5-inch IPS screen
180° flip screen
Wi-Fi image transmission
Camera usage tips
Camera safety and operation
Please do not disassemble or repair the camera yourself.
Avoid exposing the camera to extreme temperatures or humid environments.
When transitioning from a cold environment to a warm one, one must adapt
gradually to prevent condensation.
Do not press the lens hard or expose it to direct sunlight for extended periods.
Clean with a slightly damp soft cloth only, and avoid using chemical solvents.
Handle with care to avoid impacting the camera's display screen.

4
Camera usage warning
Do not point the flash directly at people's eyes at close range, as it may cause
discomfort or injury.
Do not operate the camera while walking or driving to prevent accidents.
Do not allow the camera strap to entangle around a child's neck, as it poses a
risk of suffocation.
Camera maintenance tips
When the camera is not in use, please store it in a cool and dry place and
remove the battery.
Please wear a lanyard when using the camera to prevent it from accidentally
falling.
Using a camera bag can prevent scratches on the lens and screen.
When cleaning the lens, please gently blow away the dust first, and then wipe it
with a cloth
specifically designed for optical equipment. If necessary, Lens cleaning solution can
be used.
Do not use organic solvents to clean the camera.
Avoid touching the lens directly with your hands, as dirt on the lens can affect
the imaging quality.
Storage card usage tips
Formatting and compatibility
The new card needs to be formatted before its first use, and cards previously
used in other devices also need to be reformatted.
Do not directly use a memory card that has been formatted by another camera,
video recorder, or card reader.
Operational precautions
Before inserting or removing the memory card, turn off the camera power.
Avoid bending, dropping, or squeezing the memory card, and keep it away from
strong magnetic/electric fields.
It is normal for the memory card to become slightly warm after prolonged use.
Data protection
Do not power off or remove the card when recording, deleting, formatting, or
reading data.
Regularly back up important data to other storage devices.
5
Preparations before use
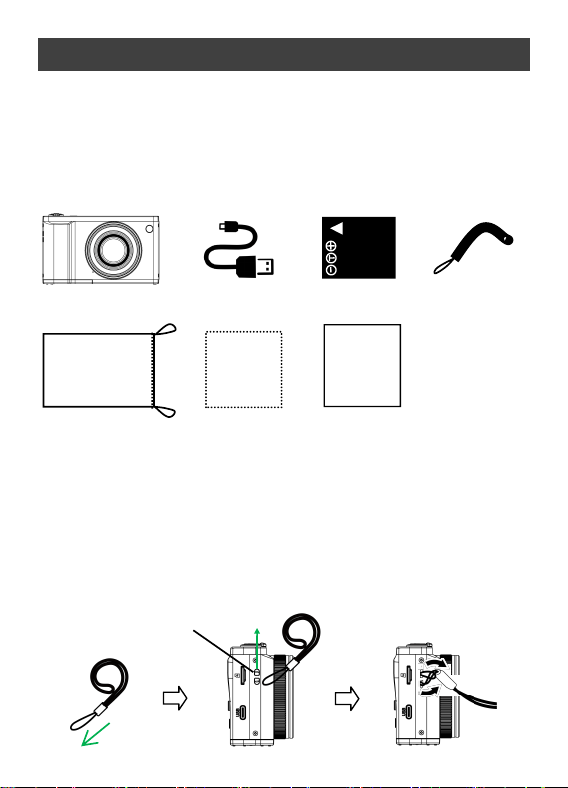
Inspect the items inside the package
1. Upon purchase, the package includes the following camera and standard
accessories.
2. If you find any missing or damaged parts, please contact the dealer where you
purchased the camera.
Camera, USB cable, Lithium battery, Lanyard,
Camera bag, Lens cloth, User manual
Install the lanyard
1. Before installing the lanyard, as shown in the picture, first straighten the end of
the lanyard.
2. Then locate the lanyard hole on the camera, thread the lanyard through the hole,
and tie it securely.
3. If installation is not easy, you can use tweezers or a toothpick to assist in securing
the lanyard.
4. After installing the lanyard, tighten it to ensure it doesn't loosen.
User Manual
Lanyard hole
6
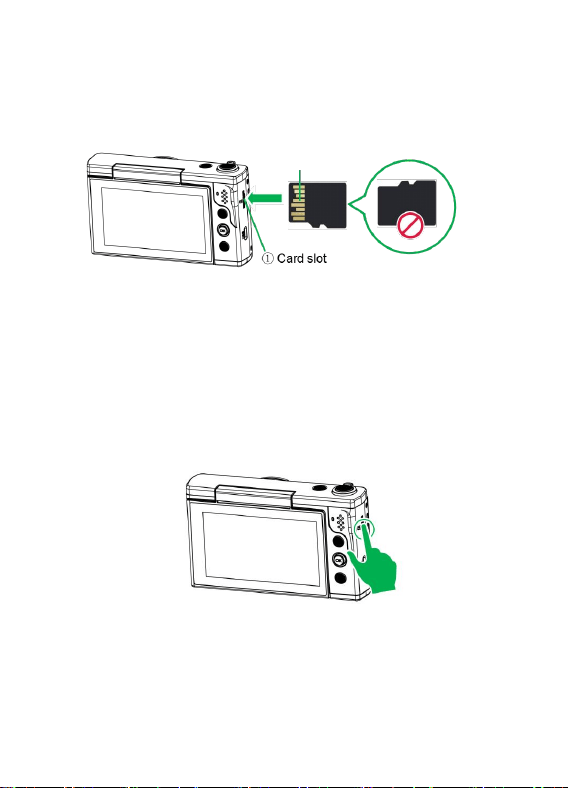
Insert storage card
1. This camera supports Micro SD cards (4GB-1TB) and SDHC Class 6 cards.
2. Turn off the camera first. Then follow the icon instructions next to the card slot:
align the metal side of the memory card with the screen orientation, and insert the
card into the slot until it locks securely.
⚠ Please insert the memory card in the correct orientation to avoid damaging
the card or the camera.
⚠ Please do not insert a damaged or deformed memory card into the card slot
with force, as this may damage the card slot.
⚠ New memory cards or memory cards that have been used in other devices
must be formatted on this camera.
Remove the memory card
Press and release the memory card, it will automatically eject, and then pull out the
memory card.
⚠ Before replacing the memory card, please turn off the camera power first.
⚠ Do not remove the memory card when it is in a read-write state.
②
Metal terminal
7
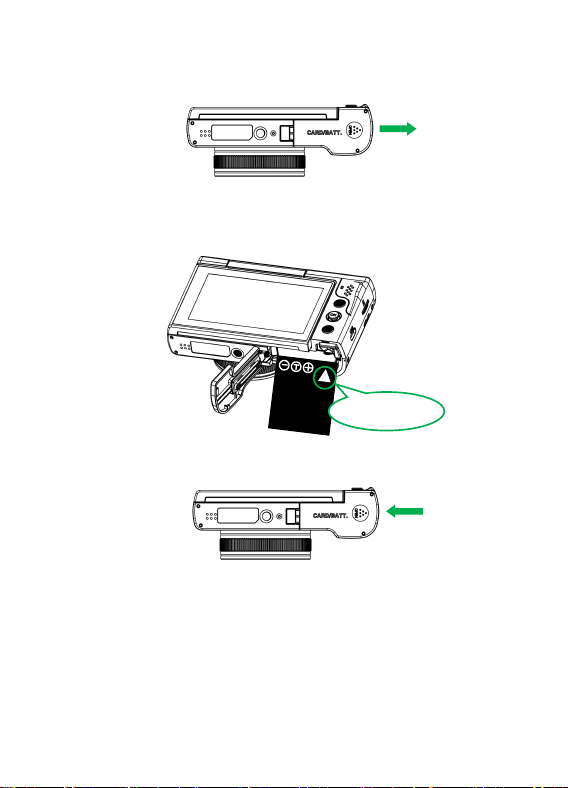
Insert the battery
1.Slide the battery compartment cover outwards to unlock and open it.
2.Insert one end of the battery's metal electronic contact. Enter the battery
compartment and push inward until you reach the battery. It is locked in place by the
battery latch.
3. Close the battery compartment cover and slide it inward to secure it.
⚠ Please ensure that the battery compartment cover is closed before using the
camera.
Battery direction
8
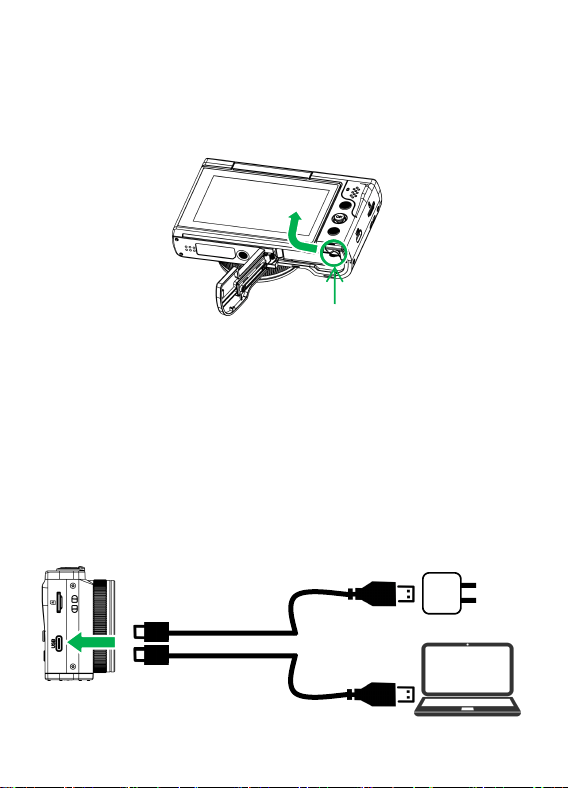
Remove the battery
Please turn off the camera before opening or closing the battery compartment cover.
To remove the battery, slide the battery latch clockwise in the direction of the arrow,
and the battery will automatically pop out. The battery will automatically pop out,
and then you can remove it.
⚠ If you are unable to remove the battery yourself, please contact an officially
authorized dealer for assistance. Do not apply excessive force during the
operation.
⚠ Do not remove the battery when the memory card is in read-write mode.
Battery charging
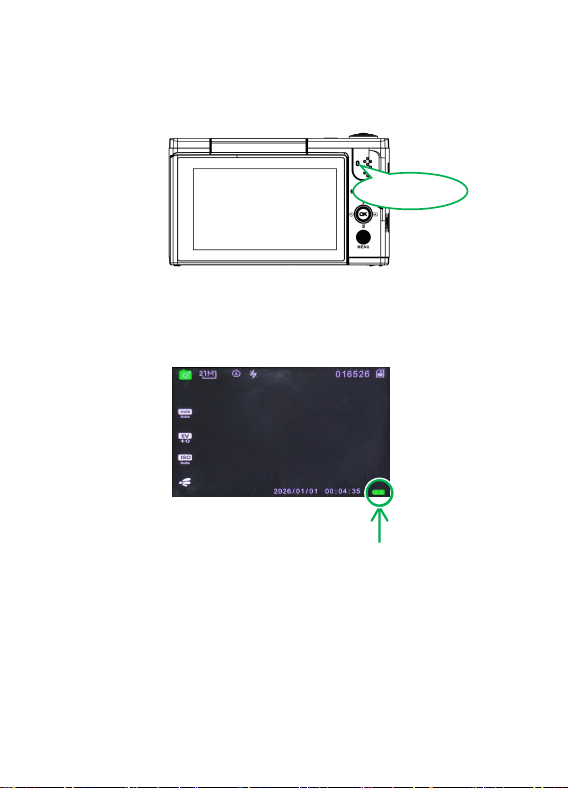
1. The camera battery is low. The following methods can be used to charge the
camera:
① Use a Type-C/USB cable paired with a 5V charger to charge the camera;
② Connect the camera to the computer using a Type-C/USB cable.
①
②
Battery latch
9
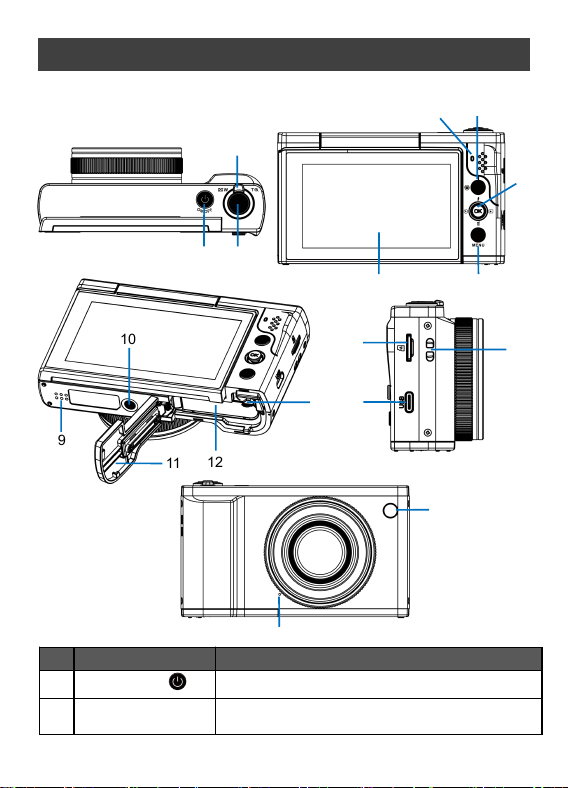
2. When charging the camera, the indicator light will remain red. (It is
recommended to charge while the camera is powered off.)
3. When the battery is fully charged, the indicator light will turn off. Please unplug
the USB cable from the camera.
4. The camera battery icon displays the battery level currently in use, with the
battery level indicated by battery bars. When the battery level drops below 10%, the
battery bar icon turns red.
Battery level indicator
Indicator light
10
Camera components
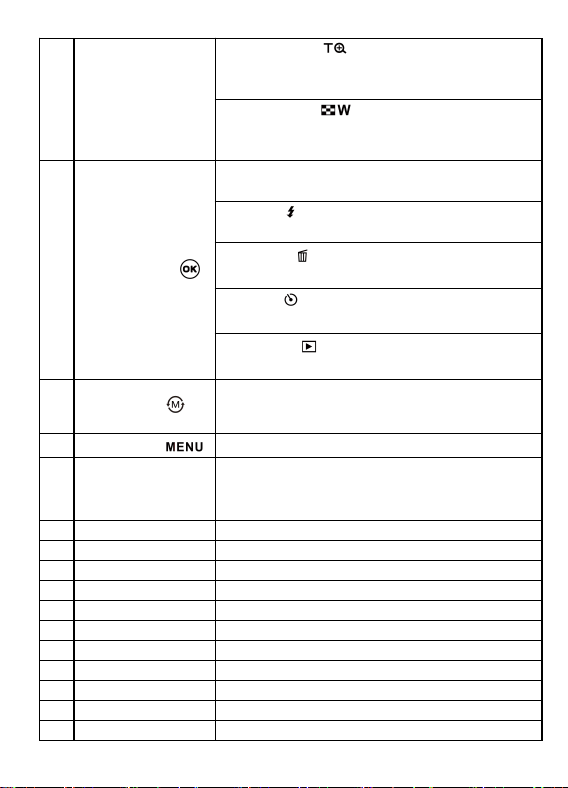
*The image is for reference only, please refer to the actual product.
No.
Name
Function
1
Power button「 」
Long press 2S to power on/off
2
Shutter button
The shutter button for taking photos and recording
videos
14
16
15
5
7
4
6
8
18
17
13
11
10
9
12
3
2
1
11
3
Zoom Lever
Push toward 「 」 : Adjust focusing distance
(photo/video); Zoom in on photos (during playback);
Increase volume (during video playback).
Push toward 「 」 : Adjust focusing distance
(photo/video); Zoom out on photos (during playback);
Decrease volume (during video playback).
4
5-Way Joystick「 」
Press center (Center OK button): Confirm selection;
Play / Pause video.
Push Up「 」: Menu navigation; Switch flash mode
(photo mode); Switch fill light mode (video mode).
Push Down「 」: Menu navigation; Quickly delete the
most recent photo/video.
Push Left「 」: Menu navigation; Set self-timer delay:
2s / 5s / 10s.
Push Right 「 」: Menu navigation; Open playback
mode to view photos and videos.
5
Mode button「 」
Switch shooting modes: Photo Mode, Video Mode,
Slow Motion Mode, Scene Mode, Filter Mode,
Night Scenery Mode, Landscape Mode, Portrait Mode
6
Menu button「 」
Open menu or exit menu
7
Indicator Light
Red steady on: Camera is charging;
Red off: Battery fully charged.
Blue fast flashing: Taking photos;
Blue slow flashing: Recording video.
8
Display
3.5-inch IPS screen, 180° flip design.
9
Speaker holes
/
10
Tripod mount
Install the tripod (with 1/4 inch standard screw hole)
11
Battery cover
Battery and memory card locations
12
Battery compartment
Install the batteries
13
Battery latch
Fixed battery
14
Memory card slot
Install the memory card
15
USB
Type-C port
16
Lanyard hole
Install the camera strap
17
LED light
/
18
MIC hole
Sound pickup
12
Turning the camera on and off
1. Long press the power button「 」for 2 second to turn on/off the camera.
2. Power off: When the camera is turned on, press and hold the power button for 2
seconds to turn it off.
(Automatic shutdown: When the camera's standby time reaches the set automatic
shutdown time, the camera will automatically shut down to save power.)
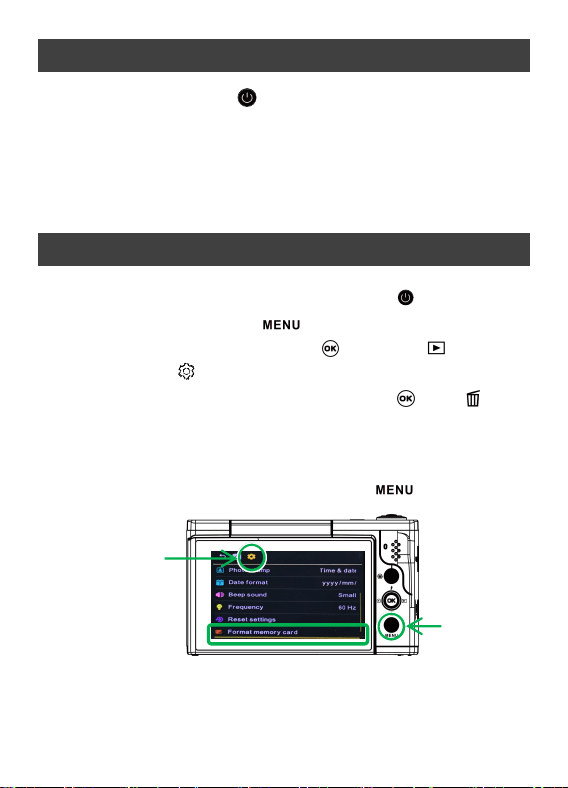
Format the storage card
1. After inserting the memory card, press the Power Button「 」to turn on the
camera, then press the Menu Button「 」to enter the menu page.
2. On the menu page, push the 5-Way Joystick「 」to the right「 」to select the
System Settings icon「 」.
3. In the System Settings interface, push the 5-Way Joystick「 」down「 」to find
the "Format memory card" option, then press the 5-Way joystick to enter.
4. On the Format page, push the joystick up or down to select "Yes", then press the
5-Way joystick to confirm and start formatting.
5. Once formatting is complete, press the Menu Button「 」again to exit the
menu mode.
⚠ Please do not accidentally click the storage card formatting option during
use.
⚠ After formatting the storage card once, you do not need to format it again.
(The first formatting is only to match the camera settings)
System Settings
Menu button
13
⚠ It is recommended that you regularly back up your photos to your
computer.
⚠ If you want to reformat the storage card, please make sure to back up
important data, as reformatting will erase all data on the storage card,
including photos, videos, documents, etc. Once formatted, these data cannot be
recovered.
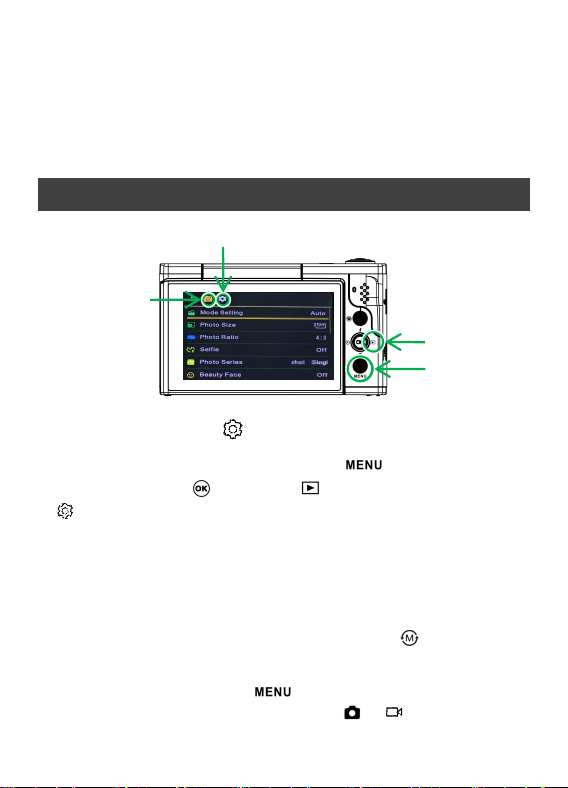
Camera Settings
Camera system settings「 」
After turning on the camera, press the Menu Button「 」to enter the menu page.
Push the 5-Way Joystick「 」to the right「 」to select the System Settings icon
「 」. Push the 5-Way joystick up or down to select a submenu, then press the
5-Way joystick to enter and adjust settings. Press the 5-Way joystick to save.
Finally, press the Menu Button to exit.
Photo & Video Settings
In the Photo/Video preview interface, press the Mode Button「 」to open the mode
selection page. Push the 5-Way joystick left/right to select a mode and press joystick
to confirm. Press the Menu Button「 」to enter the menu, push the joystick
left/right to select the shooting mode settings icon (
「 」
/
「 」
), and press to open.
Shooting mode
setting
System Settings
Menu button
Replay
14
Push the joystick up/down to select a submenu, press to enter, adjust, and save. Press
the Menu Button
「 」
to exit.
Playback Settings
During preview, push the 5-Way joystick to the right
「 」
to enter Playback Mode .
Press the Menu Button「 」to enter the playback menu. Push the joystick
left/right to select the settings icon「 」to open playback settings.
Photos: Can be deleted, write-protected, printed, cropped, or used in a slideshow.
Videos: Can be deleted or write-protected.
Select a submenu to adjust and save, then press the Menu Button「 」to exit.
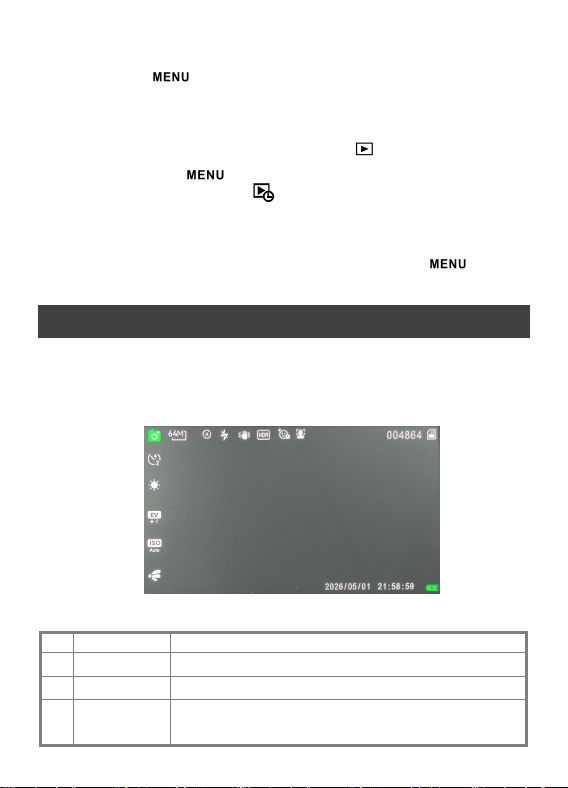
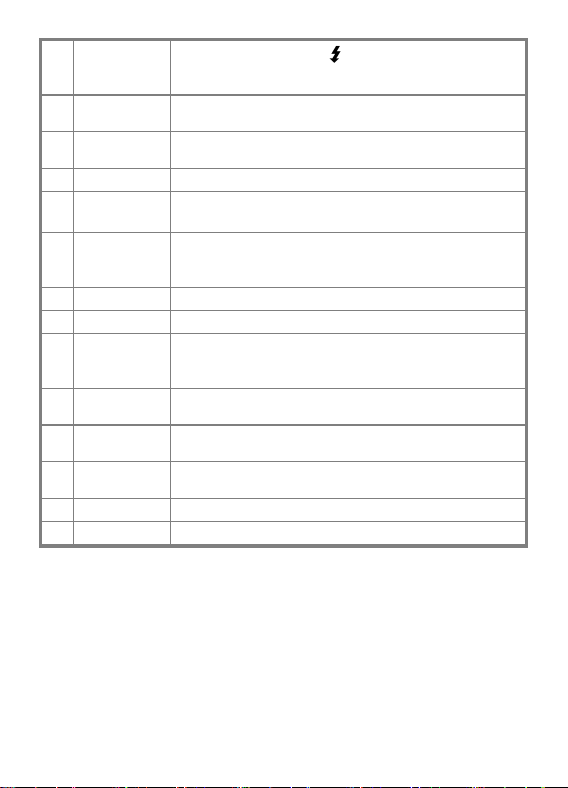
Camera screen icon
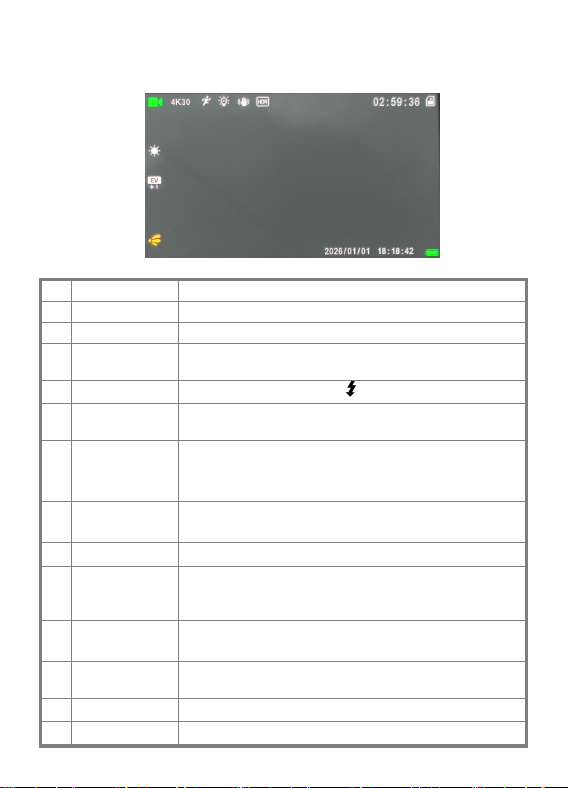
Photo Mode screen icon
No.
Icon name
Instructions
1
Shooting Mode
Photography mode icon
2
Image size
The photo pixel set in the current camera settings
3
Mode Setting
Select the corresponding scene, and the camera will
automatically match the more suitable settings
17
16
2 3
11
5
1
4
6
7
12
15
8
9
13
14
10
15
4
Flash mode
Push 5-Way joystick up「 」to toggle: Off / Auto / Force
Flash
5
Image
Stabilization
Prevents camera shake from affecting image clarity.
6
High Dynamic
Range (HDR)
Expand the recordable and presentable brightness range
to fully present the true shading levels
7
Beauty
It can beautify portraits
8
Face Detect
Automatically identifies faces for precise focus and
exposure
9
Number of
photos that can
be taken
The number of photos that can be taken with the current
camera memory
10
Memory card
Is the storage card installed
11
Self-Timer
Set countdown timer: 2s / 5s / 10s
12
WB ( White
Balance)
Under different color temperatures of light sources, the
white in the image is restored to neutral white, ensuring
that the overall color is not skewed
13
EV exposure
compensation
Adjust the screen brightness (increase if it's too dark,
decrease if it's too bright)
14
ISO sensitivity
The higher the ISO value, the stronger the light
sensitivity and the brighter the image
15
Shooting
Effects
Various filters available
(White icon = Standard; Yellow icon = Filter active)
16
Time & Date
Timestamp watermark
17
Battery status
The battery is charging or the battery level
16
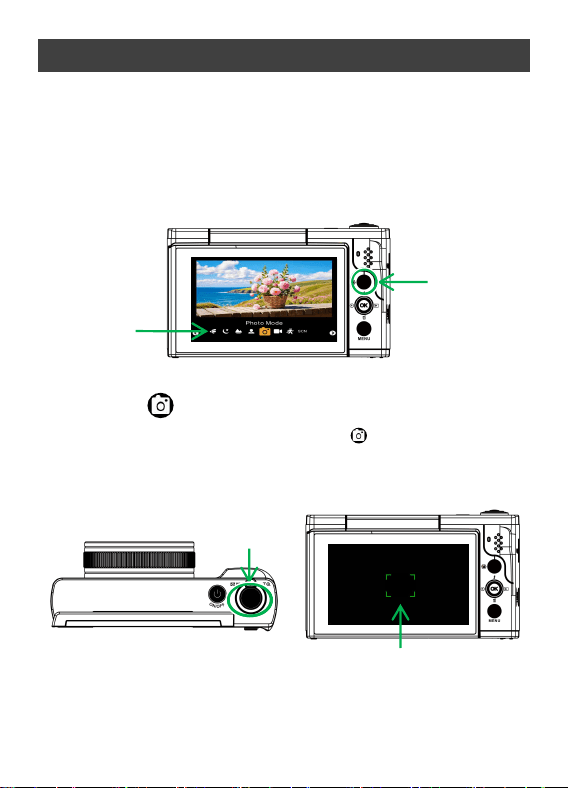
Video Mode screen icon
No.
Icon name
Instructions
1
Shooting Mode
Video recording mode icon
2
Video size
Video resolution set for current recording
3
Mode Setting
Select the corresponding scene, and the camera will
automatically match the more suitable settings
4
Fill light mode
Push 5-Way joystick up「 」to toggle: Off / On
5
Image
Stabilization
Prevents camera shake from affecting image clarity.
6
High Dynamic
Range (HDR)
Expand the range of brightness that can be recorded
and presented, striving to fully depict the authentic
shades and tones
7
Video recording
time
Remaining recording time in the camera's current
memory
8
Memory card
Is the storage card installed
9
WB ( White
Balance)
Under different color temperatures of light sources, the
white in the image is restored to neutral white, ensuring
that the overall color is not skewed
10
EV exposure
compensation
Adjust the screen brightness (increase if it's too dark,
decrease if it's too bright)
11
Shooting Effects
Various filters available
(White icon = Standard; Yellow icon = Filter active)
12
Time & Date
Timestamp watermark
13
Battery status
The battery is charging or the battery level
1
7
2
5
3
8
6
9
10
11
12
13
4
17
Take photos and videos
Switch between 8 shooting modes
After turning on the camera, on the shooting preview interface, press the Mode
button "" to open the mode selection page. You can switch between eight modes:
Photo Mode, Video Mode, Slow Motion Mode, Scene Mode, Filter Mode, Night
Scenery Mode, Landscape Mode, Portrait Mode.
Push the 5-Way joystick left/right to select an icon, then press to confirm.
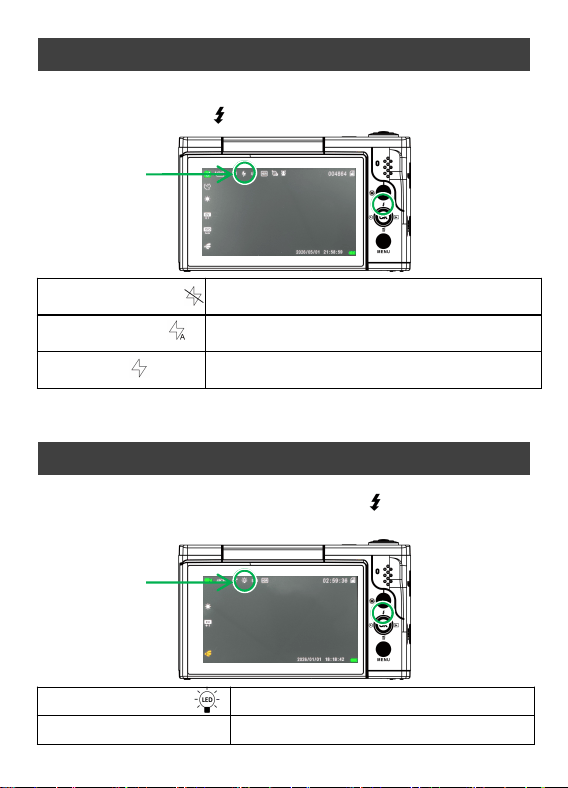
Photo Mode「 」
1.On the mode selection page, select the Photo icon「 」to enter photo mode.
2.In the preview interface, half-press the Shutter Button to focus. Once focused,
fully press the Shutter Button to take the photo.
● Manual Focus Mode: Half-press the shutter until a green focus box appears with
a beep. Keep the camera steady and fully press to shoot.
Mode selection
page
Mode button
The appearance of a green focus frame
indicates that autofocus has been completed
EV 0.0
1/60
ISO 111
Shutter button

18
● Continuous Auto Focus (C-AF): When enabled in settings, the camera
continuously tracks and focuses on the subject, ideal for moving objects like athletes
or pets.
⚠ Shooting range: 18cm to infinity. Maintain an appropriate distance (too
close will prevent focusing).
⚠ Hold the camera steady to avoid blur. Using a tripod is recommended.
Video Mode 「 」
1.Select the recording icon「 」on the mode selection page to enter recording mode.
2.On the video preview interface, half-press the shutter button to focus. After focus
is achieved, fully press the shutter button to start recording video, then fully press
the shutter button again to end recording.
Slow Motion Mode「 」
1.On the mode selection page, select the Slow Motion icon「 」. The camera will
automatically enter the slow-motion multiplier selection page. Push the
5-Way joystick left or right to switch between slow-motion multiplier options, then
press the joystick once to confirm, and the camera will switch to the corresponding
slow-motion mode. When previewing in Slow Motion mode, you can press the
5-Way joystick once to open the slow-motion multiplier selection page.
2.On the slow-motion recording preview interface, half-press the shutter button to
focus. Once focus is complete, fully press the shutter button to start recording. The
camera will capture the footage at a high frame rate. Fully press the shutter button
again to end the recording. The duration of the final slow-motion video file will be
1/N times the actual recording duration (N is the set slow-motion multiplier).
Scene Mode - SCN 「 」
Scene Mode is the camera's intelligent shooting mode. Based on the selected scene
type, the camera will automatically optimize core parameters such as exposure,

19
white balance, ISO, and shutter speed. Without the need for manual adjustments,
you can capture excellent quality photos/videos suitable for the corresponding
environment. It is suitable for beginners to shoot quickly and meets the shooting
needs of various daily scenes, offering simple operation and efficient results.
1.On the mode selection page, select the SCN icon 「 」 . The camera will
automatically enter the scene mode setting selection page. Push the joystick left or
right to switch between scene options, then press the 5-Way joystick once to confirm,
and the camera will switch to the corresponding scene mode. When previewing in
Scene mode, you can press the 5-Way joystick once to open the mode setting
selection page.
2.On the scene mode photo preview interface, half-press the shutter button to focus.
Once focus is complete, fully press the shutter button to take the photo.
Filter Mode「 」
Filter Mode is a built-in image style optimization function. Without the need for
post-processing, you can directly add color and light/shadow effects to
photos/videos during shooting, allowing the image to present different artistic
textures. It is suitable for daily check-ins, atmospheric shooting, creative creation,
and other scenes, offering simple operation and real-time effect preview.
1.On the mode selection page, select the Filter Mode icon「 」to enter the filter
effect selection page. Push the 5-Way joystick left or right to switch between filter
options. After selecting, press the 5-Way joystick once to confirm, and the camera
will switch to the corresponding filter mode. When previewing in Filter mode, you
can press the 5-Way joystick once to open the filter effect selection page.
2.On the filter mode photo preview interface, half-press the shutter button to focus.
Once focus is complete, fully press the shutter button to take the photo.
3.Filter Mode can be used universally across the other 7 shooting modes. During
shooting preview, press the joystick to open the filter effect selection page, allowing
you to select any filter for shooting. (For Slow Motion mode and SCN mode, you
need to open the menu and set the filter effect in the shooting mode settings.)

20
Night Scenery Mode「 」
Night Scenery Mode is a specialized shooting function designed for low-light
environments. By optimizing exposure and noise reduction techniques, it enables the
camera to capture clear and bright photos under nighttime or dim lighting conditions.
It is suitable for use in scenarios such as streetlights, city lights, and indoor low-light
settings.
1.On the mode selection screen, select the night mode icon 「 」 to enter Night
Scenery Mode.
2.In the night scenery mode preview interface, half-press the shutter button to focus.
After focus is achieved, fully press the shutter button to capture the photo.
3.If the use of night mode results in loss of detail in high-contrast scenes, it is
recommended to enable the High Dynamic Range (HDR) function.
⚠ Night Scenery Mode consumes more power. It is recommended to ensure the
battery is fully charged and to have a backup power source available. Extended
shooting or continuous shooting in this mode will reduce battery life, which is a
normal occurrence.
Landscape Mode「 」
Landscape mode is an intelligent shooting mode specifically optimized for outdoor
landscape photography. The camera will automatically adjust key parameters such
as depth of field, color, and exposure to achieve full clarity from foreground to
background, while enhancing the color saturation and tonal contrast of elements like
the sky, mountains, and architecture. Without the need for manual parameter
adjustments, even beginners can easily capture clear and three-dimensional
landscape photos. This mode is suitable for photography.
1.On the mode selection screen, select the landscape icon「 」to enter landscape
mode.
2.In the landscape mode preview interface, half-press the shutter button to focus.
After focus is achieved, fully press the shutter button to capture the photo.
3.In landscape mode, slight manual adjustments can be made. Exposure

21
compensation (±2.0 EV) can be adjusted as needed: if the image is too dark, increase
to (+1.0/ +2.0); if too bright, decrease to (-1.0/ -2.0) to preserve more details.
Portrait Mode「 」
Portrait mode is an intelligent shooting mode specially optimized for photographing
people. The camera automatically adjusts key parameters such as aperture and color
to achieve a background blur effect, highlighting the subject. It also intelligently
enhances skin tone restoration and facial sharpness, making facial features appear
more delicate and three-dimensional, all without the need for manual adjustments.
1.On the mode selection screen, select the portrait mode icon「 」to enter portrait
mode.
2.In the portrait mode preview interface, half-press the shutter button to precisely
align the focus frame with the subject’s eyes (the core focus point for portrait
photography). Once the focus frame turns green (indicating successful focus), fully
press the shutter button to capture the photo, ensuring facial features remain sharp.
3.Portrait Mode delivers even more outstanding results when combined with
functions such as Beauty, Shaping, and Face Detection.
22
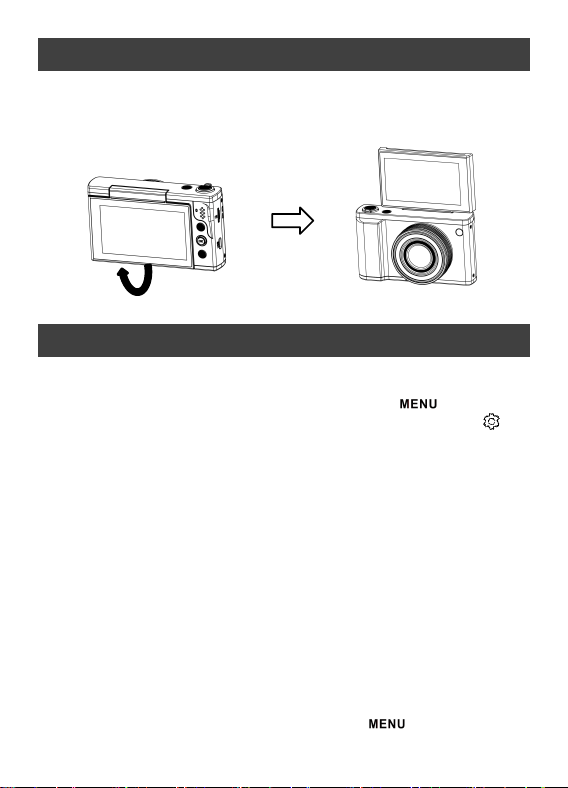
Flash Mode
In Photo/SCN/Filter/Night Scenery/Landscape/Portrait modes,
push the 5-Way joystick up
「 」
to switch between flash modes.
Turn off the flashlight
There was no flash when taking photos in any
situation.
Automatic flashing
Under low-light conditions, the flash will
automatically illuminate when taking a photo.
Forced Flash
Whether in a bright or dim environment, the flash is
activated during photo taking.
⚠ The flash function cannot be enabled in burst photo mode.
Fill light mode
In Video/Slow Motion modes, press the Flash Button
「 」
to toggle the LED fill
light On/Off.
Turn on the fill light
The LED light remains continuously on.
Turn off the fill light
/
Fill light icon
Flash icon
23
Flip Screen
1.The screen can flip up 0°~180°. Flipping 180° allows for front-facing
selfies and real-time composition adjustment.
2.To store, flip the screen down 180° back into place.
Set date and time and watermark
1.Set Date and Time
① In the shooting preview interface, press the Menu Button「 」to enter the
menu page. Push the 5-Way joystick left or right to select System Settings「 」,
push down to find the submenu "Set Date & Time", and press the joystick to enter.
② Then, push the 5-Way joystick left or right to select "Year/Month/Day/
Hour/Minute", and push the 5-Way joystick up or down to change the numbers.
After selection, press the 5-Way joystick to save the settings.
2.Date Format
In System Settings, find and enter the submenu "Date format". Push the 5-Way
joystick up or down to select the date display format (e.g., Year/Month/Day,
Month/Day/Year, Day/Month/Year), then press the 5-Way joystick to save the
settings.
3.Photo Stamp
① In System Settings, open the submenu "Photo stamp", select "Date" or "Time &
date", and press the joystick to save the settings. Photos and videos taken by the
camera will then have a date watermark or a date & time watermark.
4.Exit the Menu
After the settings are complete, press the Menu Button「 」to exit the menu.
0°~ 180°
24
Replay Mode
1.Enter Playback Mode
After taking photos or videos, push the joystick to the right「 」to open Playback
Mode, where you can view photos and videos.
2.Playback Functions
① Browse Photos/Videos:
● Switch Images: Push the 5-Way joystick left or right to switch to the previous/next
photo/video.
● Thumbnail Mode: Push the zoom lever towards「 」until the camera screen
displays multiple photos and videos in a grid format for quick positioning.
② Zoom In/Out Photos
● Zoom In: Push the zoom lever towards 「 」to enlarge the photo. Use the
5-way joystick to move the zoomed-in area.
● Zoom Out: Press the 「 」button to zoom out the photo and return to the
original scale.
③ Video Playback
● After selecting a video file, press the 5-Way joystick to start playback. Press the
5-Way joystick again to pause the video.
● During video playback, push the 5-Way joystick left to rewind, or push right to
fast-forward.
● During video playback, adjust the volume by pushing the zoom lever towards
「 」to increase volume / towards「 」to decrease volume.
● During video playback, you can press the Mode Button 「 」 to terminate
playback.
3.Delete & Protect
● Delete: After selecting and opening a file, push the 5-Way joystick down「 」to
confirm and delete the file.
● Protect: After selecting and opening a file, press the Menu Button 「 」to
enter Playback Settings, and turn on "Write protect" to lock important photos/videos
and prevent accidental deletion.
4.Rotate Photo
After selecting and opening a photo file, press the Menu Button「 」to enter
Playback Settings, and select "Rotate" to rotate the photo.
25
5.Slideshow
In Playback Settings, select "Slideshow", and then choose the playback interval time
(e.g., 3 seconds). The camera will automatically play all photos in a full-screen loop.
During slideshow playback, press the Menu Button「 」to stop playback, and
press the Menu Button again to exit the slideshow.
6.Exit Playback Mode
Press the Mode Button 「 」to exit Playback Mode and return to Shooting
Mode.
Connect to camera Wi-Fi
Please follow the steps below to connect your mobile phone to the camera and
achieve remote control via the APP.
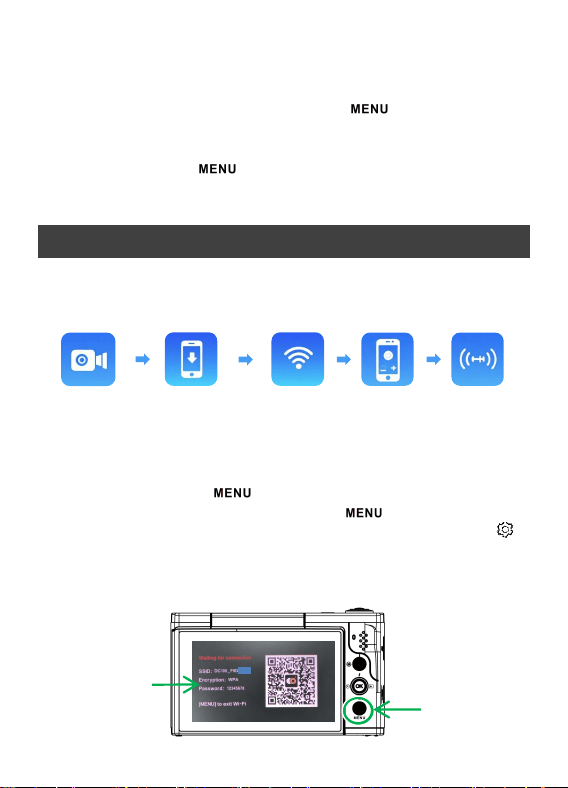
1.Activate Camera Wi-Fi
Method 1: After turning on the camera, in the shooting preview interface,
long-press the Menu Button「 」for 2 seconds to enable Camera Wi-Fi mode.
Method 2: Alternatively, press the Menu Button「 」 to enter the menu
page, push the 5-Way joystick left or right to select the System Settings icon「 」
→ push the joystick up or down to select the "Wi-Fi" option → enable Camera
Wi-Fi mode.
1.Activate Wi-Fi 2.Download APP 3.Connect WiFi 4.Use APP 5.Disconnect
Wi-Fi mode
Menu Button
26
2.Download and Install the "Viipulse" APP
① Android users: Please search for "Viipulse" in the App Store or a third-party
browser to install the APP.
② iOS (Apple) users: Please search for "Viipulse" in the App Store to install the
APP.
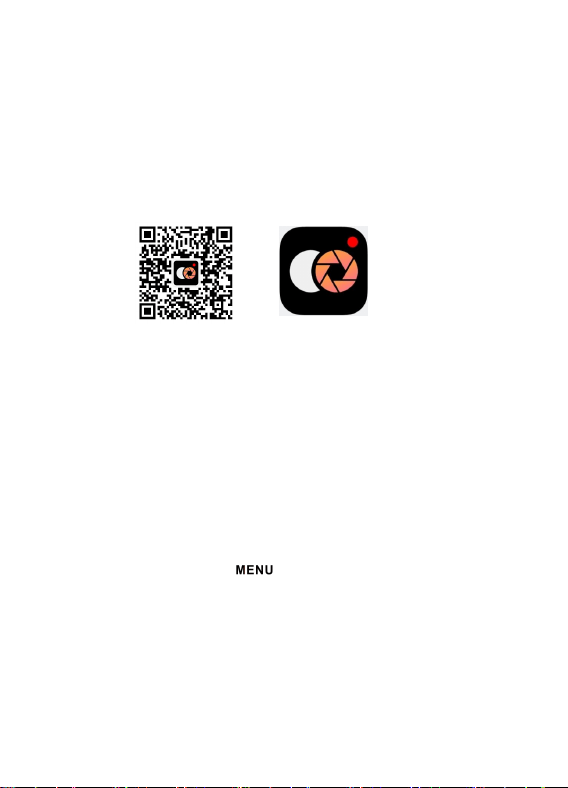
③ Android/iOS users: You can also use your mobile browser to scan the QR code
below (or the QR code on the camera's Wi-Fi mode page) to download and install
the "Viipulse" APP.
3. Connect the phone to the camera's Wi-Fi
Open the Wi-Fi settings on your phone, find the Wi-Fi name (SSID) of the camera:
DC105-XXXXXX, click on it and enter the Wi-Fi password (Password) of the
camera: XXXXXXXX.
4. Use the " Viipulse " APP
1. Open the " Viipulse " app on your phone and add a camera.
2. The APP allows remote control of the camera for taking photos and videos, and
also enables users to browse the camera's photos and videos through the APP, as
well as download files from the camera to their mobile phones or tablets for sharing.
5. Turn off camera Wi-Fi
Press the camera's Menu button「 」to exit the camera's Wi-Fi Mode, and the
camera will disconnect from the mobile app.
Viipulse
27
Download camera photos and videos to the computer
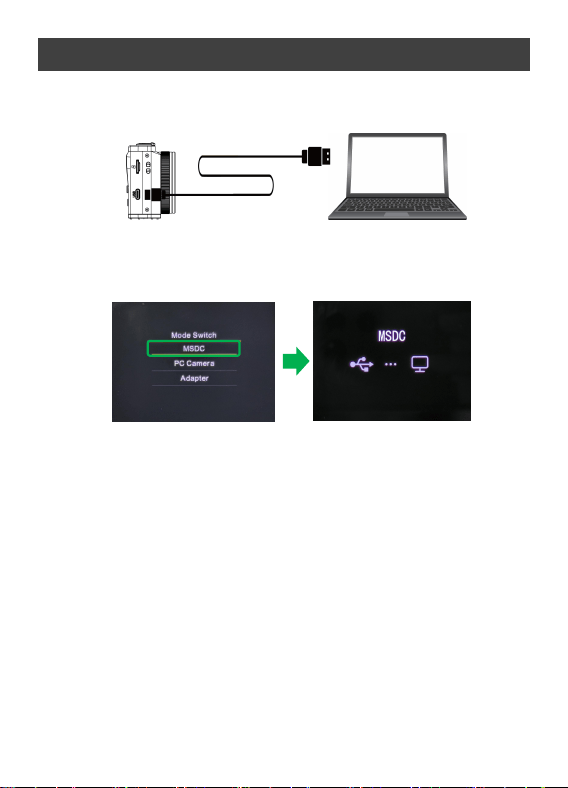
1. Connect the camera to the computer using a USB cable, and then turn on the
camera.
2. After successful connection, the "USB" dialog box will pop up on the camera
screen. Please select " MSDC ".
3. Then, check for new removable disks in "My Computer". Photos or videos taken
by the camera will be saved under DCIM. Users can copy the photos and videos
from the camera folder to their computer.
4. After the download is complete, please press and hold the camera power button
until it shuts down, or simply unplug the USB cable. The camera will exit the
mobile hard disk mode.
⚠ Do not disconnect the camera from the computer while downloading files.
⚠ During the process of transmitting data from the camera to the computer,
please do not insert or remove the memory card inside the camera to avoid data
loss.
28
Webcam
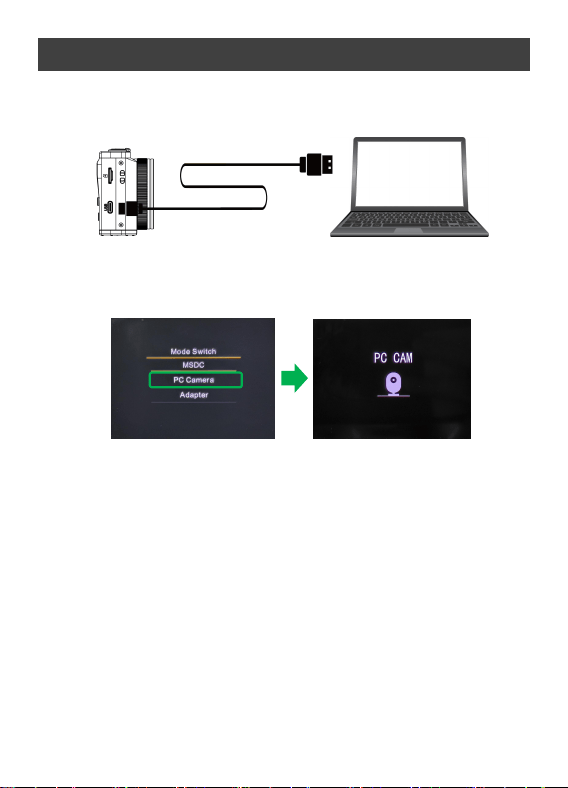
1. Connect the camera to the computer using a USB cable, and then turn on the
camera.
2. After successful connection, a "USB" dialog box will pop up on the camera
screen. Please select " PC Camera ".
3. Please select "USB CAMERA" in the external camera settings of your social
media software.
4. To exit webcam mode, simply unplug the USB cable.
29
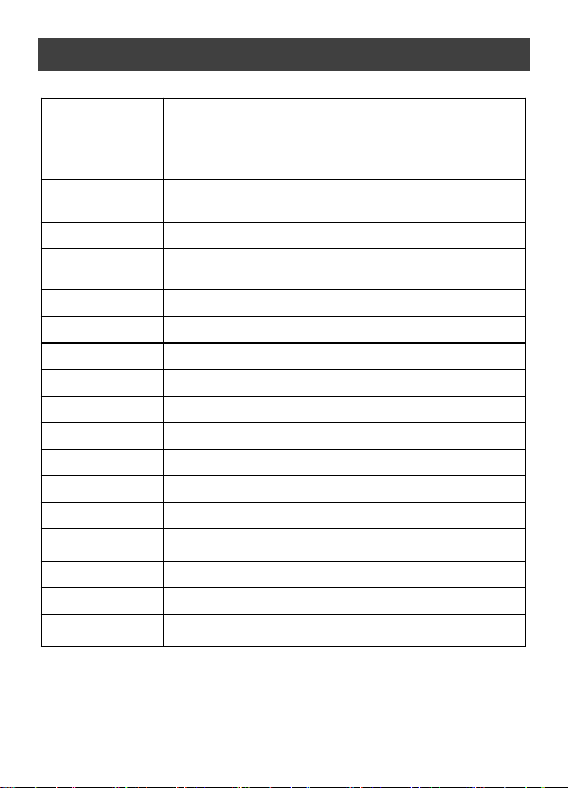
Camera parameters
Image resolution
96M; 64M; 48M; 36M; 21M; 12M etc.
(Photo resolution is calculated by default based on the 4:3
photo ratio. If you switch to other ratios, the photo resolution
will vary.)
Video resolution
8K 30FPS; 5K 30FPS; 4K 30FPS; 2.7K 60FPS; 2.7K 30FPS;
FHD 60FPS; FHD 30FPS; HD60FPS; HD30FPS etc.
File format
Photos: JPG; Videos: MP4 (H.264 codec)
Memory card
Supports Micro SD memory cards (4GB to 1TB),
Supports SDHC Class 6
Focal length
f=4.7mm
Aperture
F/1.8
Zoom
20X
Camera lens angle
V 53.4°; H 67.4°; D 79.8°
Shutter speed
1/10 second ~ 1/2650 second
Screen
3.5-inch IPS LCD, 180° Flip Screen
USB Port
Type-C
Power input
DC 5V⎓ 1A,5W
Battery
Rechargeable lithium-ion battery, 3.7 V
Tripod
Mounting hole
1/4 inch standard screw thread
Camera size
102 × 63 × 24 mm
Camera weight
207 g (including battery)
Operating system
demand
Win7/Win8/Win 10/Win 11
Note: Product specs are latest at time of publication. Subject to change without prior
notice. Please refer to the actual camera.
30
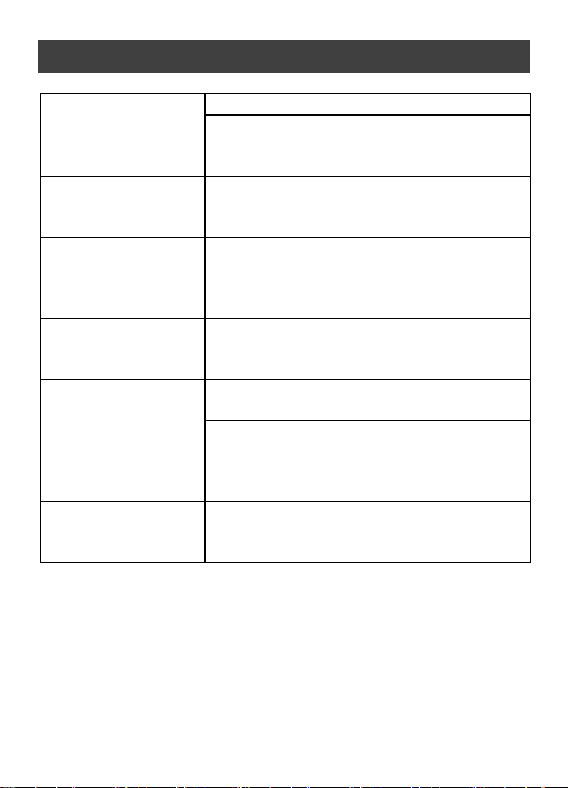
Frequently Asked Questions
The camera cannot be
started after the battery
is installed
The battery is low, please replace it with a new one.
The battery is installed upside down or not in place.
Please confirm that the battery installation method
is correct.
Pressing the shutter
button cannot take
photos or record videos
The built-in memory is full. Please save the
captured files to another storage device.
The photo taken is
blurry
Your hands are shaking when taking photos. Please
hold the camera steadily with both hands, or use a
tripod or other objects to stabilize the camera body.
Avoid shaking the camera when taking photos.
The photos or videos
taken appear dim
The lighting in the shooting environment is
insufficient. Please shoot in a well-lit place, or use
lighting to increase the brightness.
The camera
automatically shuts
down
The battery is low on power. Please charge or
replace the battery.
To conserve energy, if there is no operation on the
camera for more than 1 minute (3 minutes or 5
minutes, depending on the setting), it will
automatically shut down according to the setting.
Camera freeze or blurry
screen
The Micro SD card is in the wrong format. Please
format the Micro SD card in the camera or on a
computer before using it.

31
FCC Warning Statement
Changes or modifications not expressly approved by the party responsible for
compliance could void the user’s authority to operate the equipment. This equipment
has been tested and found to comply with the limits for a Class B digital device,
pursuant to Part 15 of the FCC Rules. These limits are designed to provide
reasonable protection against harmful interference in a residential installation. This
equipment generates uses and can radiate radio frequency energy and, if not installed
and used in accordance with the instructions, may cause harmful interference to
radio communications. However, there is no guarantee that interference will not
occur in a particular installation. If this equipment does cause harmful interference
to radio or television reception, which can be determined by turning the equipment
off and on, the user is encouraged to try to correct the interference by one or more of
the following measures:
‐‐ Reorient or relocate the receiving antenna.
‐‐ Increase the separation between the equipment and receiver.
‐‐Connect the equipment into an outlet on a circuit different from that to which the
receiver is connected.
‐‐ Consult the dealer or an experienced radio/TV technician for help.
This device complies with part 15 of the FCC Rules. Operation is subject to the
following two conditions:
(1) This device may not cause harmful interference, and
(2) this device must accept any interference received, including interference that
may cause undesired operation.
The device has been evaluated to meet general RF exposure requirement. The device
can be used in portable exposure condition without restriction.

No.DC105(8K) 260509