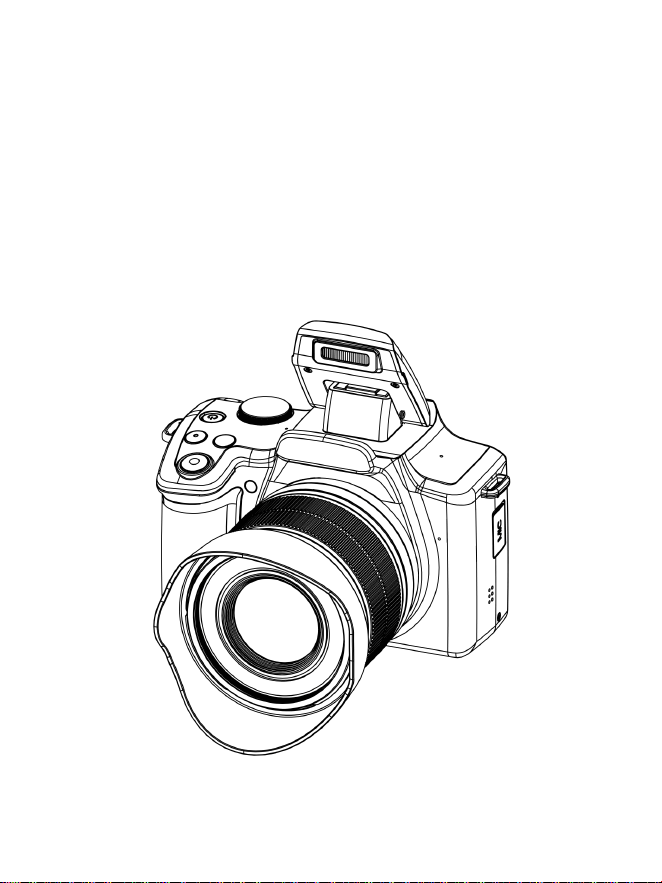
User Manual
Digital Camera


1
Preface
Thank you for purchasing our digital camera. Before using the camera,
please be sure to read and understand the relevant content of "Safety
Matters". Pleas e keep this manual properly for future reference.
It is recommended to take a few non-esse ntial images before capturing
important ones to ensure that you are operating the camera correctly.
The interface illustrations and camera schematics in this manual are
examples from the product development stage. If some functions are
supplemented or modifie d through camera firmware upgrades, the
content of the manua l may differ from th e act ual functions. Please refer
to the act ual camera information.
Camera features
✤ 10X optical zoom
✤ 64-megapixel photos
✤ 5K HD video recording
✤ IPS HD capacitive touchscreen
✤ Six-axis EIS (Electronic Image Stabilization)
✤ Full-color n ight vision
✤ Dual front and rear cameras
✤ Wi-Fi connectivity
✤ Webcam
Camera usage t ips
Camera safety and operation
1. Please do not disassembl e or repair t he camera yourself .
2. Avoid exposing the cam era to extreme temperatur es or humid
environment s.
3. When transitioni ng from a cold env ironment t o a warm one, one must
adapt gradually t o prevent condensat ion.
4. Do not press the lens hard or ex pose it to direct s unlight for extended

2
periods.
5. Clean with a slightly damp soft cloth only, and avoid using chemical
solvents.
6. Handle with care t o avoid impacting t he camera's display screen.
Camera usage warning
1. Do not point the flash directly at people's eyes at close range, as it may
cause discomfort or injury.
2. Do not operate th e camera while walking or driving to prevent
accidents.
3. Do not allow the camera st rap to entangle aroun d a child's neck, as it
poses a risk of suffocation .
Camera maintenance ti ps
1. When the camera is not i n use, please store it in a coo l and dry place
and remove the battery.
2. Please wear a lanyard when using th e camera to prevent it from
accidentally fallin g.
3. Using a camera bag can preven t scratches on the lens and scree n.
4. When cleaning th e lens, please gently blo w away th e dust first, and
then wipe it with a cloth specif ically designed for optical equipm ent. If
necessary, Len s cleaning solution can be used.
5. Do not use organic solvent s to clean the cam era.
6. Avoid touching the lens dire ctly wit h your hands, as dirt on the lens can
affect the imaging quali ty.
Storage card us age tips
Formatting an d compatibility
1. The new card needs to be formatted before its fir st use, and cards
previously used in oth er devices also need to be reformatt ed.
2. Do not directly use a mem ory card th at has been formatted by an other
camera, video recor der, or card reader.
Operational p recautions
1. Before inserting or remo ving th e memory card, turn off the camera
power.
2. Avoid bending, dropp ing, or squeez ing the memo ry card, and keep i t
away from strong magnetic/electr ic fields.

3
3. It is normal for the memory card to become slight ly warm after
prolonged use.
Data protection
1. Do not power off or remove the card when record ing, deleting,
formattin g, or reading data.
2. Regularly back up impor tant data to oth er storage device s.
Battery Safety G uidelines
If handled improperly, batteries may burst, cause a fire, or even result in
chemical burns. Please observ e the following precautions:
1. Do not disassemble the battery.
2. Do not crush the battery or subject it to a ny impact or force, such a s
striking it with a hammer, dropping it, or stepping on it.
3. Do not allow metal objects to come into contact with the batter y
terminals to prevent a short circuit.
4. Do not expose t he batter y to temperat ures above 60°C (140°F), such as
inside a car exposed to direct sunl ight.
5. Do not dispose of the batter y by burning it.
6. Do not touch damaged or leaking lithium-io n batteries directly.
7. Be sure to cha rge t he batter y using t he original charger or a compatible
charger.
8. Store the battery out of the reach of children.
9. Keep the battery dry.
10. If you need to replace the battery, use an original manufacturer’s
batter y or one of the same ty pe.
11. Used batteries contain hazardous substances and must not be
disposed of as regular household waste. Please follow local
environmental regulations and hand them over to designated collection
points or professional organizations for proper disposal .
4
Installing & C harging the B attery
Insert the battery
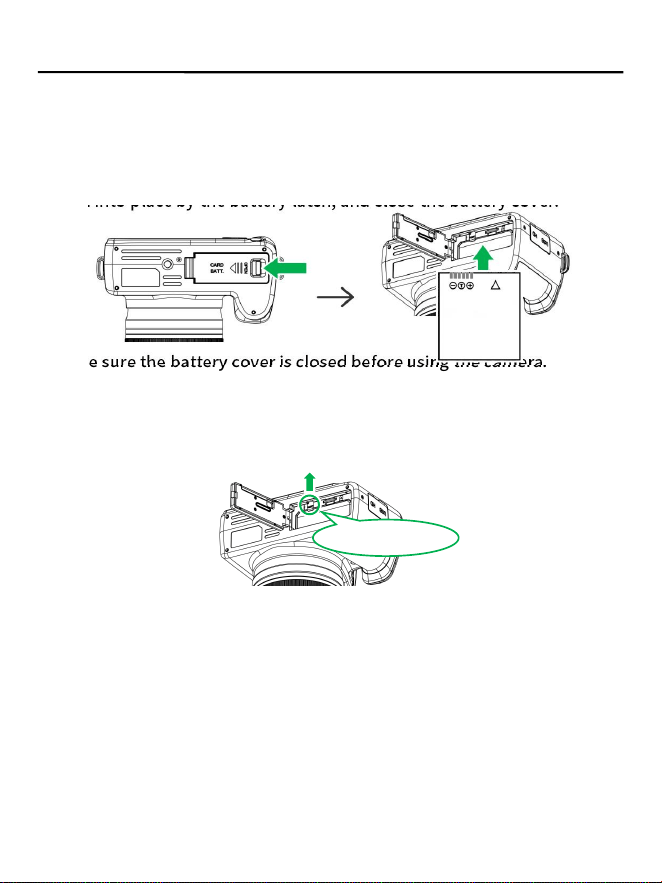
1. Press the battery cover release latch to unloc k it, then open t he batter y
cover.
2. As shown in t he figure, insert the end of the battery with the metal
contacts into t he battery compartment, th en push it in until th e battery is
locked into place by the battery latch, and close the batter y cover.
3. Make sure the battery cover is closed before using the camera.
Removin g the Battery
Turn off the camera before removing th e battery. Open the batter y cover,
push the batter y latch, and the battery will pop out automatically. Close
the batter y cover after removing the battery.
⚠ If you are unabl e to remove the battery yourself, please contact an
authorized dealer for assistance. Do not use excess ive force when
attempting to remove the battery.
⚠ Do not remove the battery while the memory card is being read or
written to.
Charging the Batter y
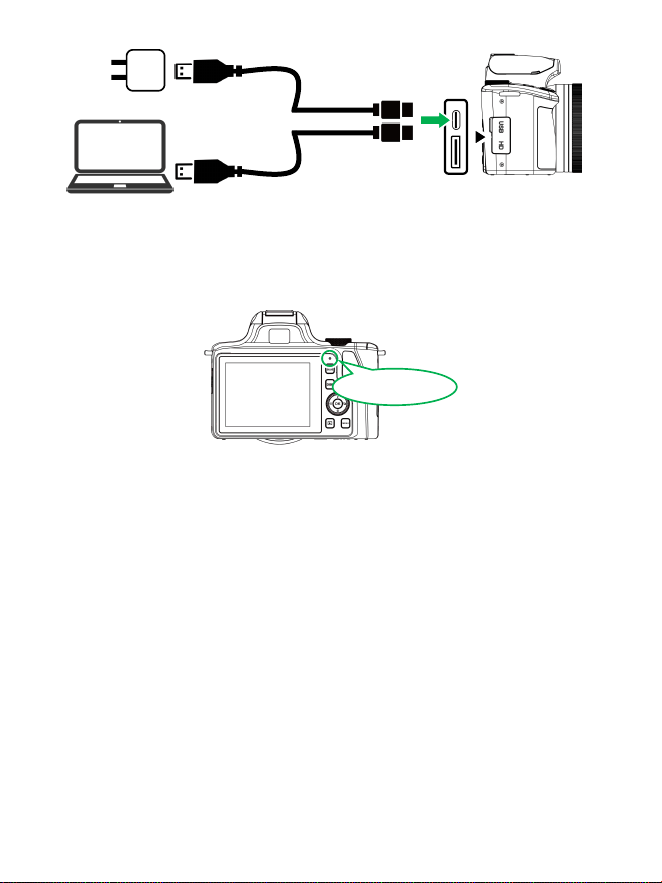
1. If the camera’s battery is low, you can charge it usin g the following
methods:
① Charge the camera using a Type-C/USB cable connected to a 5V
charger;
② Connect the camera to a computer using a Type-C/USB cable.
Battery latch
5
2. While the camera is charging, the indicator ligh t will remain solid red. It
is recom mended to ch arge t he camera when it is turned off.
3. When the battery is fully charged, the indicator light will turn off. Please
disconnect the USB ca ble from the camera.
4.The camera’s batter y icon displays the current battery level, shown as
batter y bars. When the batter y level falls below 10%, th e battery bar icon
turns red.
Indicator light
6
Inse rt storage card
Inserting a Memory Card
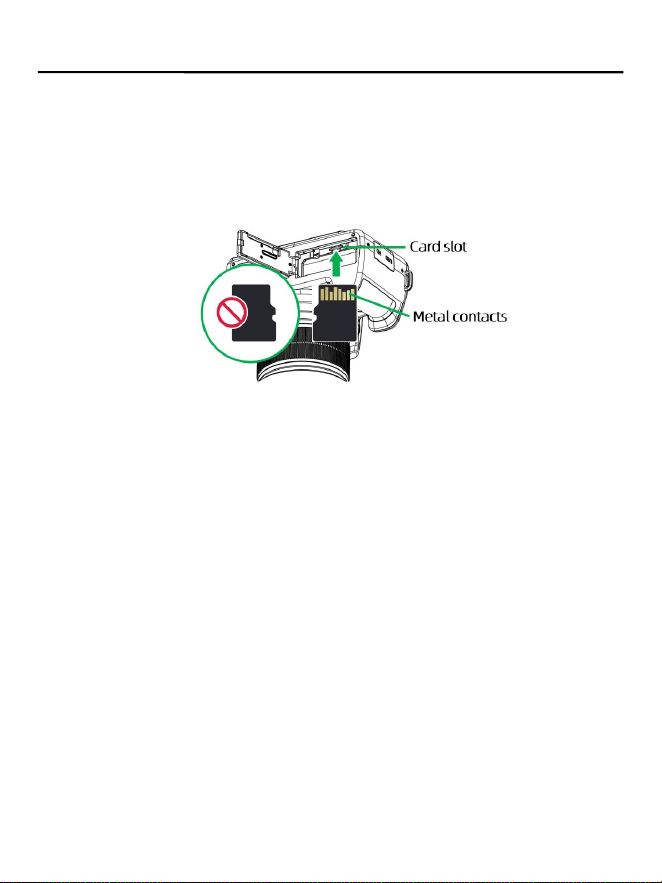
1. This camera sup ports Micro SD cards (4GB–256GB ) and Class 10/U3
memory cards.
2. With the camera turned off, open the battery cover and follow the icon
next to the card slot. Align th e metal contacts on the mem ory card with
the screen, then insert the card into the slot until it clicks into place.
⚠ Please insert the memory card in the correct orient ation to avoid
damaging th e card or the camera.
⚠ Please do not insert a dam aged or def ormed mem ory card into the
card slot with force, as thi s may damage t he card slot.
⚠ New mem ory cards or memory cards that have been used in ot her
devices must be forma tted on thi s ca mera.
Remove the memory c ard
Press an d release the memor y card, it will automati cally eject, and then
pull out the memor y card.
⚠ Before replacing the memory ca rd, please t urn off the camera power
first.
⚠ Do not remove the mem ory card when it is in a read-write state.
7
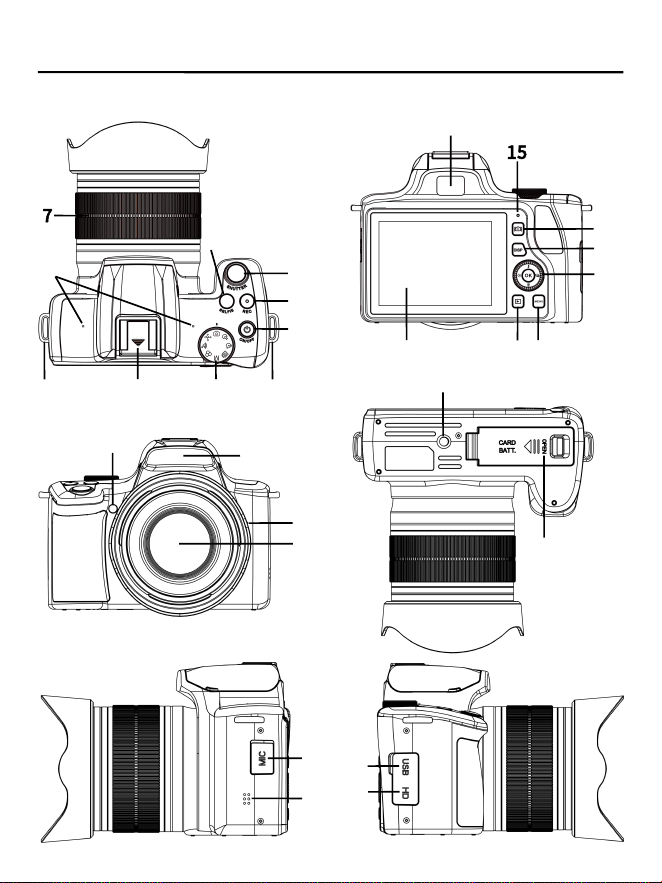
Ca mera compone nts
*The image is for reference only, please refer to th e actual product
22
21
23
18
19
8
20
25
26
1
7
5
8
9
6
4
2
3
9
24
15
17
14
12
11
10
13
16
8
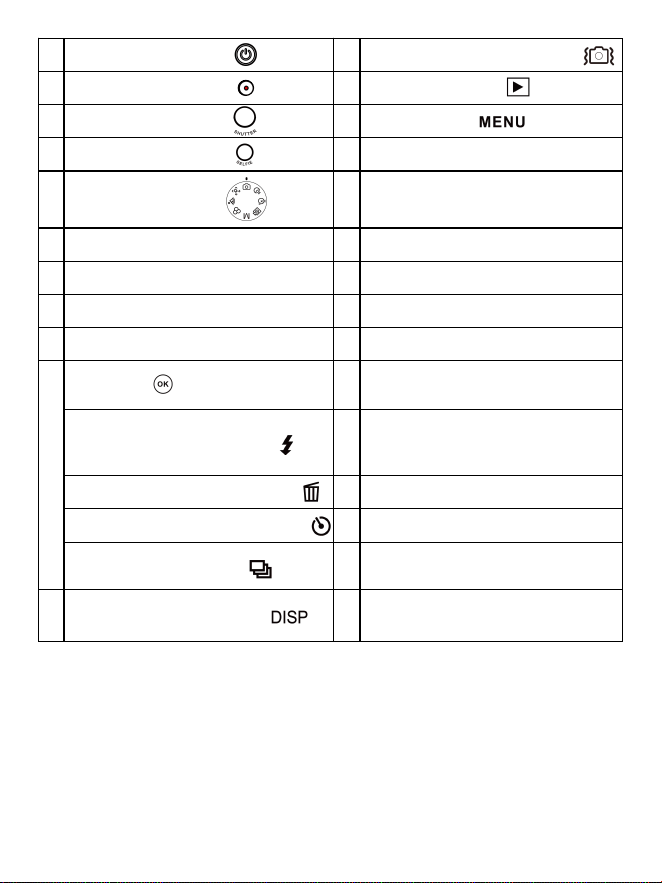
1
Power Button
12
Image Stabilization Button
2
Shooting Button
13
Playback Button
3
Photo Button
14
Menu Button
4
Selfie Button
15
Indicator Ligh t
5
Mode Dial
16
Front-Facing Camera
6
Hot Shoe
17
IPS HD Touchscreen
7
Zoom Rin g/Fo cus R ing
18
Focus Assist Light
8
Built-in Microphone Jack
19
Flash Cover
9
Stra p Loop
20
Main Lens
10
OK Button
21
Tripod Mount
(1/4-inch standard s crew hole)
Up Button (Flash Button)
22
Battery Cover
(Battery Compartment, Me mory
Card Slot)
Down Button (De lete Button)
23
Microphone Jack (3.5m m)
Left Button (Self-Timer Button)
24
Speaker Grille
Right Button
(Burst Mode Button)
25
USB Type-C Port
11
Display Button
(Burst Mode Button)
26
HD Port
9
Turning th e came ra o n a nd o ff
1.Press and hold the power button“ ”for 2 s econds to t urn the device on
or off.
2.Automatic shutdown: When the camera's standby time reaches the set
automatic shutdown time, the camera will a utomatically shut down to
save power.
Ca mera Settings
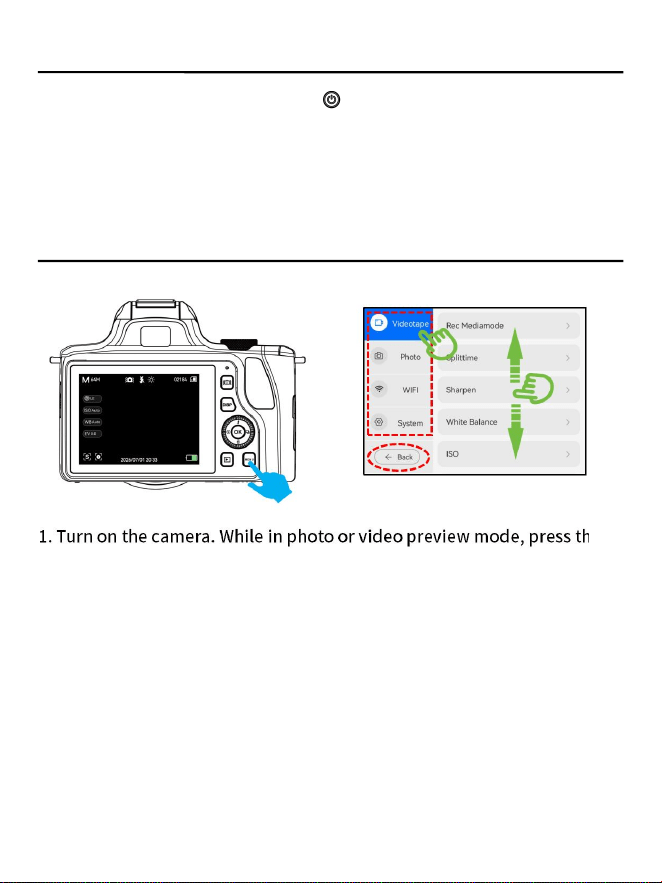
1. Turn on t he camera. While in photo or video preview mode, press t he
Menu button to open th e settings menu.
2. Tap “Video Settings/Photo S ettings/Wi-Fi Settings/System Settings”
on the left side of the camera screen; the corresponding submenu will
appear on the right side of the screen.
3. Then, swipe “up” or “down” in the sub menu area on the right side
of the screen to find the desired option, and tap it to confirm the setting.
4. Once you ’ve finished making your settings, tap “Back ” in the
lower-left corner of the screen to exit the settings menu.
10
Format th e storage c ard
Metho d 1 : Touchsc reen Operation
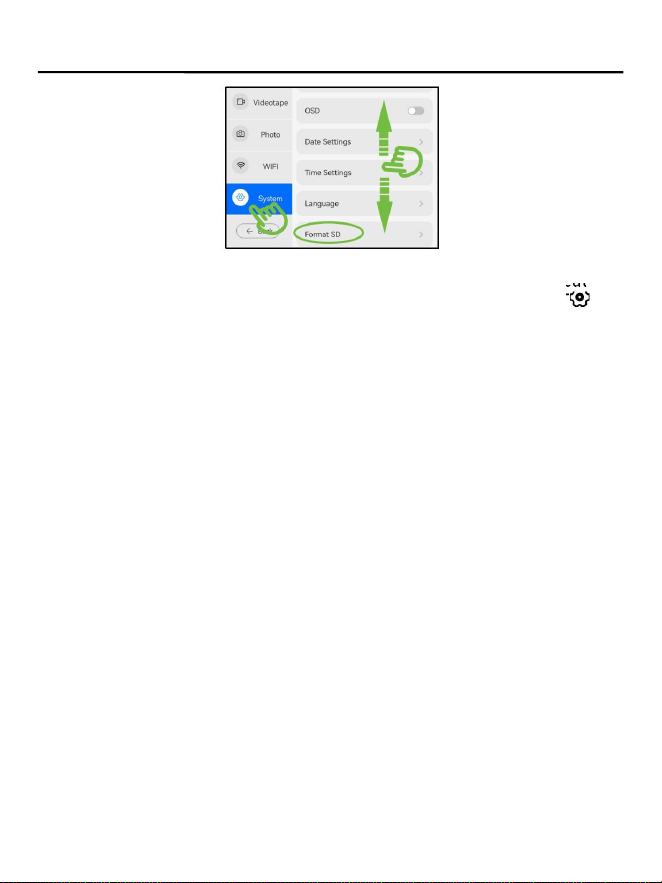
1. After turn ing on the camera, swipe left once on the screen to reveal th e
hidden icons on the right side of the screen. Tap the Settings icon 「 」 to
open the Settings menu.
2. Tap “System S ettings” i n the lower-left corner of t he screen to open
the System Settings menu.
3. Scroll down in the menu area on the right side of the screen, locate and
tap th e “Format Memory Card” option, then confirm to format the card.
4. Once formatting is complete, tap “Back” in the lower-left corner of the
screen to exit t he settings me nu.
Metho d 2 : Button Controls
1. After turn ing on the camera, press the Menu button to ent er the
settings men u.
2. Use the navigation buttons to select “System Settings,” then press the
OK button to confirm and enter the system settings menu .
3. Use the navigation buttons to locate “Format Memory Card,” then
press the OK button to confirm formatting.
4. Once formatting is complete, press th e Playback button once to exit the
settings men u.
⚠ Please do not accidentally click th e storage card formatting option
during use.
⚠ After formatting the storage card once, you do not need to format it
again. (The first formatting is only to match th e camera settings)
⚠ It is recommended that you regularly back up your photos to your
computer.
⚠ If you want to reformat the stora ge ca rd, please make sure to back up
important data, as reformatting wil l erase all data on the storage card,
including photos, videos, documents, etc. Once formatted, these data
cannot be recovered.
11
On-Screen Icons
Icon D isplay
When previewing a photo or video:
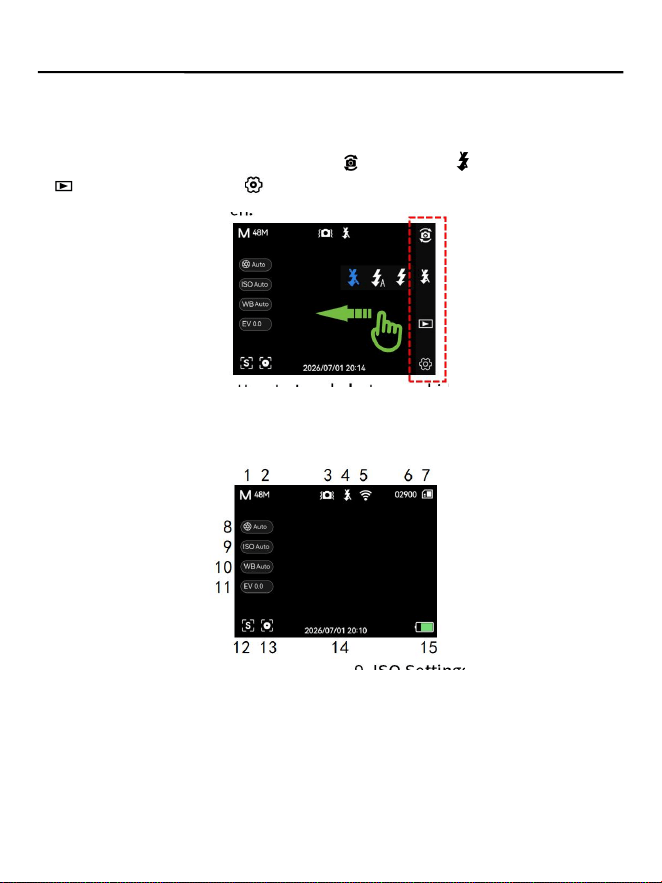
1. Swipe left once on the camera screen to reveal the hidden icons on the
right side of the screen: Lens Switch “ ” / Flash “ ” / Playback Mod e
“ ” / Settings Menu “ ”. Then swipe righ t once to hide th e icons on
the right side of the screen.
2. Press the on-screen button to toggle between: hidi ng all icons on the
screen / hiding grid lines / displayin g all icons on the screen.
Icon N ames
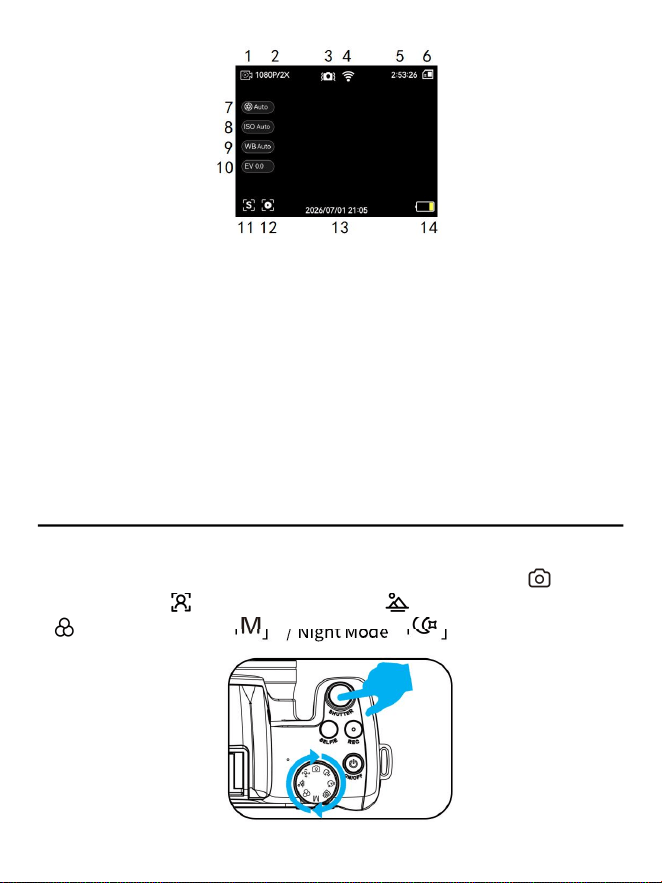
Photo Mo de Icons
1. Photo Mode
2. Photo Resolution
3. Image Stabilization
4. Flash Mode
5. Wi-Fi
6. Number of Photos Remain ing
7. Memory Card
8. Shutter Speed
9. ISO Settings
10. White Balance
11. Exposu re Compensa tion
12. Focus Settings
13. Center Focus
14. Date and Time Watermark
15. Batter y Level
12
Vid eo M ode Icons
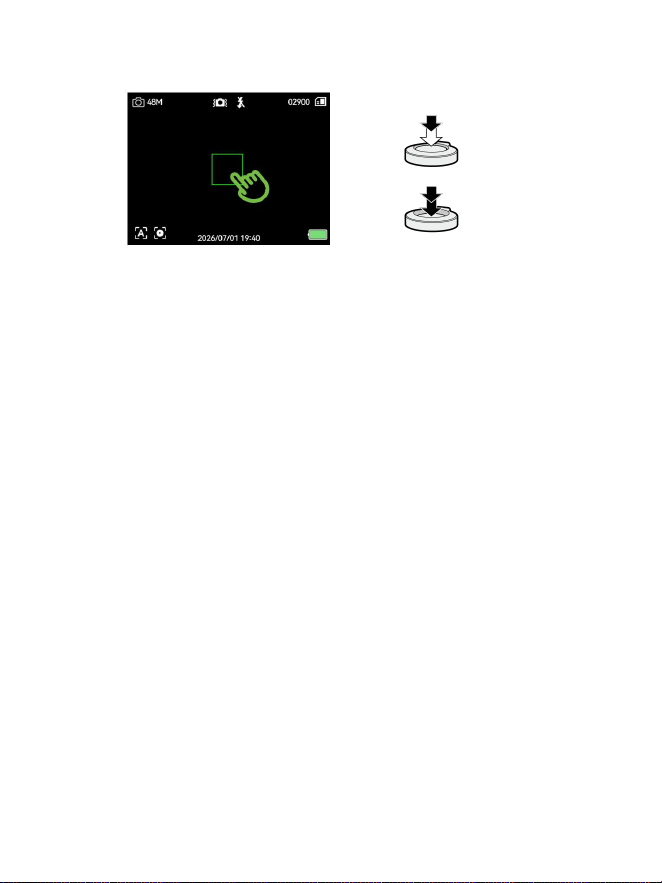
1. Video Mode
2. Video Resolution
3. Image Stabilization
4. Wi-Fi
5. Recording Time
6. Memory Card
7. Shutter Speed
8. ISO Settings
9. White Bal ance
10. Exposu re Compensa tion
11. Focus Settings
12. Center Focus
13. Date and Time Watermark
14. Batter y Level
Taking P hoto s
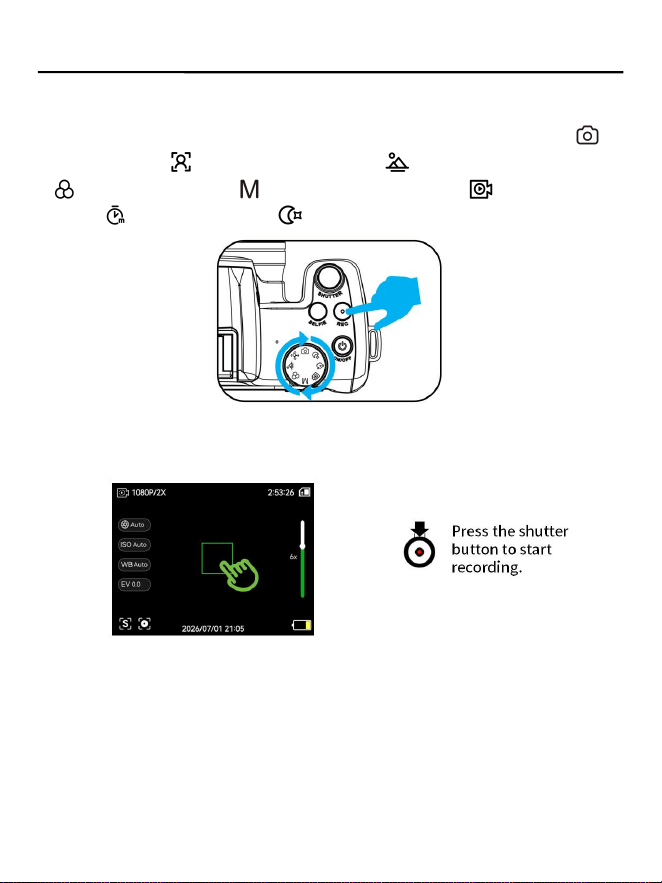
1. Sel ect a S hooting Mod e
Rotate the mode dial to select a shooting mode: Auto Mode 「 」 /
Portra it Mode 「 」 / Landscape Mode 「 」 / Black-a nd-White Mode
「 」 / Manual Mode 「 」 / Night Mod e 「 」.
13
2. Focus and Take a Photo
(1) Singl e-s hot Foc us
① Open the Settings menu → Select “System Settings” → “Focus
Settings” → “Single Focus” → Tap “Back” to return to the camera
preview mode.
② Then, adjust the optical zoom by rotating the zoom ring on th e lens.
③ Tap a custom area on the screen to focus.
④ Half-press t he shutter button; the focus frame will turn from white to
green, indicating the image is in focus. Press the shutter button fully to
take the photo.
(2) Manual Foc us Photography
① Open the Settings menu → Select “System Settings” → “Focus
Settings” → “Manual Focus” → Tap “Back” to return to the camera
preview mode.
② Adjust th e optical zoom by pinching with two fingers on the camera
screen.
③ Rotate the focus ring on the lens to focus.
④ Once the image is in focus, press the shutter button all the way down
to take t he photo.
(3) Ta king P hotos with Auto Focus
① Open the Settings menu → Select“System Settings”→“Focus Settings”
→“Auto Focus”→ Tap “Back” to return to the camera preview mode.
② Adjust th e optical zoom by rotating the zoom ring on t he lens.
③ Tap a custom area on the screen to focus; the camera
3. While in camera preview mode, press the on-screen buttons to toggle:
Hide on-screen icons/grid lines/Show on-screen icons.
4. During the photo preview, pinch or spread two fingers on the camera
screen to zoom i n or out.
5. During the photo preview, press the selfie button to turn the
front-faci ng camera on or off. (You cannot adjust the focal length when
taking photos with the front-fa cing camera.)
Half-press the
Shutter Button
Press the Video
Recording
14
Vi deo Recording
1. Sel ect a V ideo Recording Mode
Rotate the mode dial to select a video recording mode: Auto Mode 「 」 /
Portra it Mode 「 」 / Landscape Mode 「 」 / Black-a nd-White Mode
「 」 / Manu al Mode 「 」 / Slow-Motion Mode 「 」 / Time-Lapse
Mode 「 」 / Night Mode 「 」.
2. Focusi ng During Video Re cording
(1) Single-Focus Video Recording
① Open the Settings menu → Select “System Settings” → “Focus
Settings” → “Single Focus” → Tap “Back” to return to the video
preview mode.
② Press the shutter button once to start recording.
③ Rotate the zoom ring to adjust the optical zoom.
④ Tap a custom area on the screen to focus, or half-press the shutter
button to focus; the focus frame will change from white to green,
indicating that t he image is in focus.
⑤ Press the record button once more to stop recording.

15
(2) Manual Focus Recording
① Open the Settings menu → Select “System Settings” → “Focus
Settings” → “Manual Focus” → Tap “Back” to return to th e recording
preview mode.
② Press the record button once to start recording.
③ Rotate the zoom ring on the lens to focus.
④ Press the record button once more to stop recording.
(3) Autofocus Recording
① Open the Settings menu → Select “System Settings” → “Focus
Settings” → “Autofocus” → Tap “Back” to return to recording preview
mode.
② Press the shutter button once to start recording.
③ Rotate the zoom ring to adjust the optical zoom; t he camera will
autofocus a utomatically.
④ Press the shutter button again to stop recording.
3. In recording preview mode, press t he On-Screen Display button to
toggle: Hide on-screen icons / Grid lines / Show on-screen icons.
4. During recording preview, use a two-finger pinch gesture on the camera
screen to zoom i n or out.
5. During recording preview, press the Selfie button to turn th e selfie
camera on or off. (You cannot adjust the focal length when taking photos
with the selfie camera.)
16
Pla yback Mo de
1. Open Pla yback Mod e
After taking a photo or recording a video, press the Playback button to
open Playback Mode and view your photos and videos.
2. Browse Photos/Video s
● Switch bet ween images: Swipe left or right on the screen to switch to
the previous or next photo or video.
● Thumbnail mode: While viewin g photos and videos, press the
Playback bu tton again to open the file list. The camera screen will display
multiple photos and videos in a grid layout, making it easy to quickly
locate what you’re looking for.
● In the file list, swipe up or down on the screen to select a photo or
video, then tap it to open an d view it.
3. Zooming In/ Out on Photos
● Zoom in: S pread two fingers apart on t he camera screen to zoom in on
a photo or video; swip e the screen to move the zoomed area.
● Zoom out: Pin ch two fingers together on the camera screen to zoom
out and return to th e original aspect ratio.
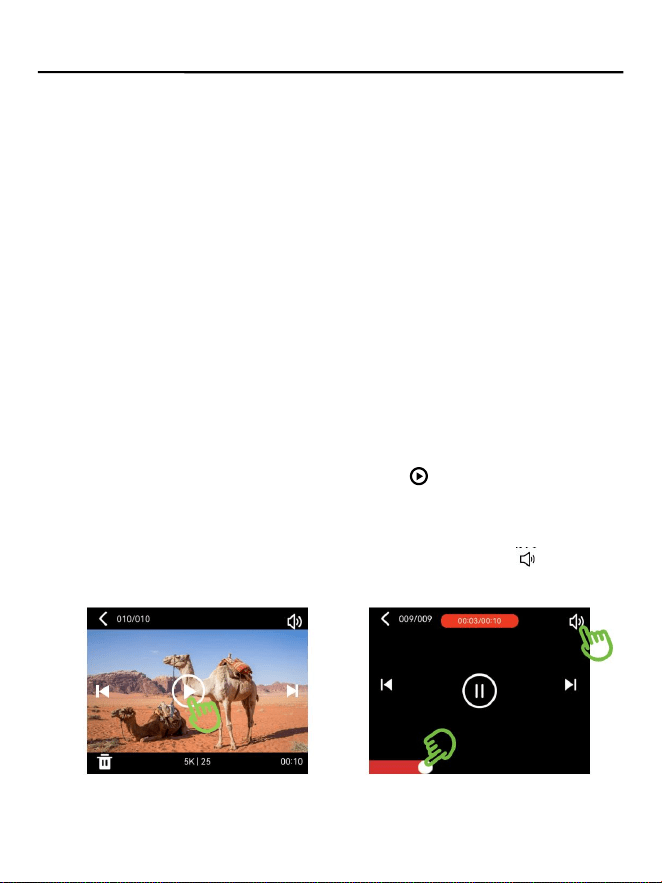
4. Video Play back
● After selecting a video fil e, press the OK button to start or pause
playback. (Alternatively, tap the play icon “ ” in the center of the
screen to start or pause playback.)
● While the video is playing, press and hold the progress bar at the
bottom and drag it back and forth to fast-forward or rewind the video.
● While the video is playing, tap th e volume icon “ ” in the
upper-right corner of the screen to adjust the playback volume.
5. Deleti ng Files
● In th e file list, tap “Select” in the top-right corner to delete photo or
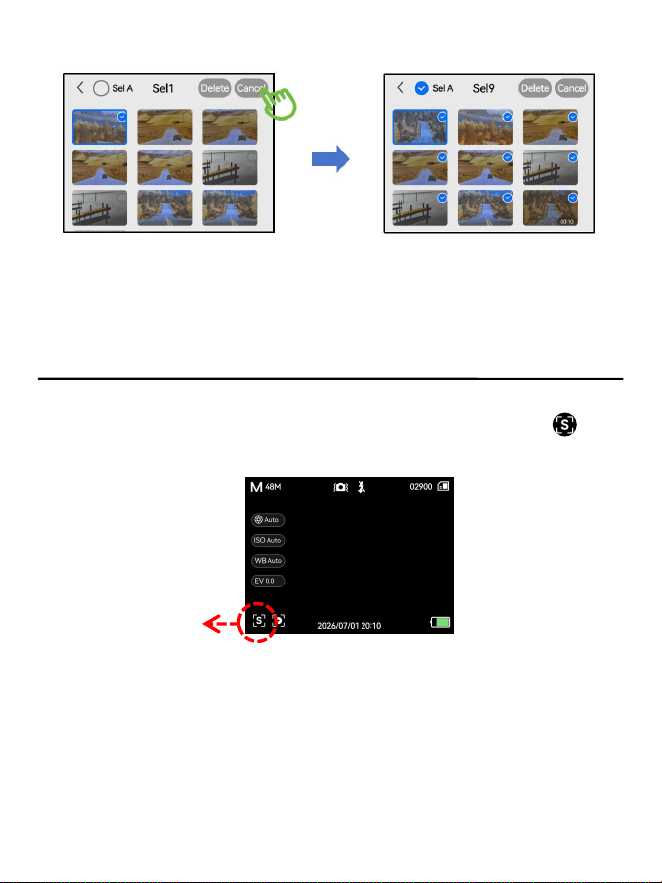
17
video files; select “Select All” to delete all files.
6. Exiting P laybac k Mode
In the file list, press th e Playback button to exit playback mode an d return
to shooting mode.
Focus an d Zoom
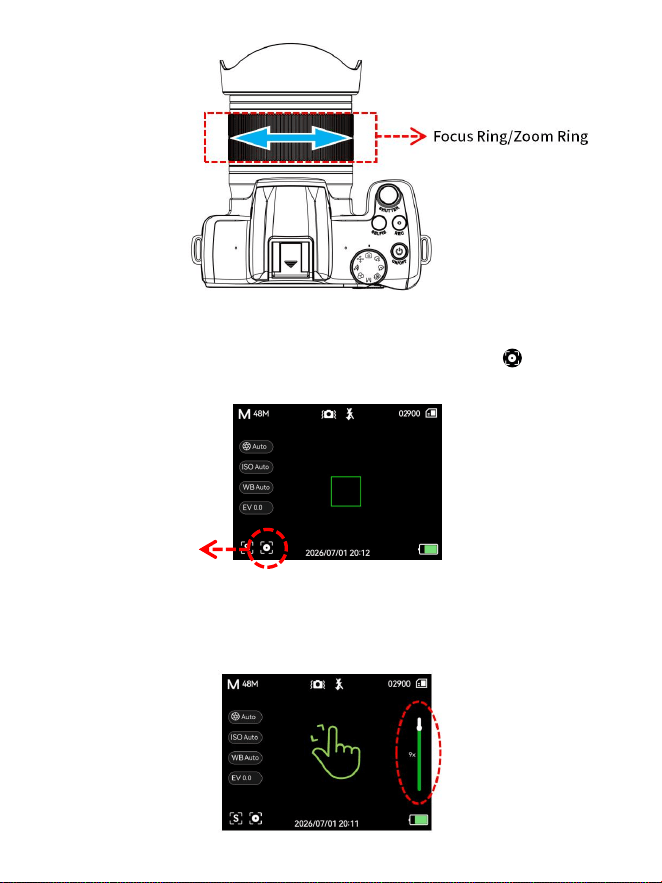
1. Focus S ettings
While previewing a photo or video, tap the focus settings icon “ ” in
the lower-left corner of the screen to toggle between: [ A ] Auto Focus, [ S ]
Single Focus, and [ M ] Manual Focus.
2. Focus R ing/ Zoom Rin g
① In [M ] Manual Focus mode, you can manually rotate the focus ring on
the lens to a djust focus.
② In [A ] Auto Focus or [S] Single Focus modes, you can manually rotate
the zoom ring on the lens to adjust the zoom, zooming in or out.
Focus Settings
18
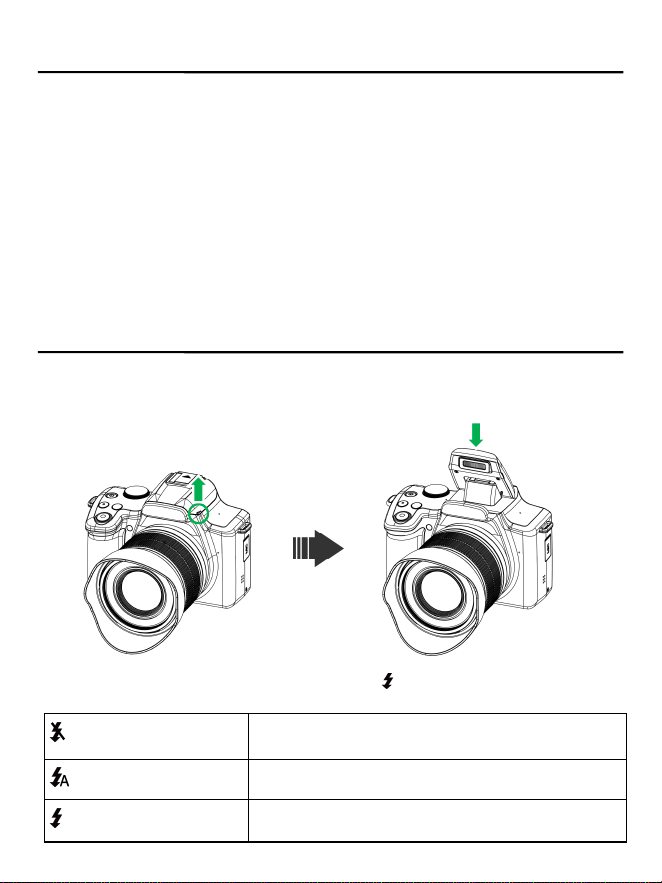
3. Center Focus
In [A] Auto Focus or [S] Single Focus mod es, tap anywhere on the screen
to displa y a focus frame, then tap the center focus icon “ ” in the
lower-left corner to center the focus.
4. Two-F inger Pinch-to-Zoom
In [A] Auto Focus and [S] Single Focus mo des, you can also zoom by
pinching with two fingers on th e camera screen.
Center f ocus
19
Filters
In Auto, Portrait, Landscape, and Manual modes, press the Menu button
to open the settings menu → select “Camera Settings” → “Filters” to
choose from a variety of filter effects—s uch as Retro, Cool Tones, Abao
Colors, and Film—for y our photos.
Filter mode is a built-in feature th at optimizes i mage styles. It allows you
to add color and lightin g effects directly to your photos while shooting—
without the need for post-processi ng—givi ng your images a distinct
artistic feel. It ’s ideal for everyday sn apshots, atmospheric shots, an d
creative photography, and offers simple operation wit h real-time
previews of the effects.
Fla sh
1. Open the flash cover
There is a raised latch beneath th e flash cover; lift it upward to open t he
cover and activate the flash. When the flash is n ot needed, close the cover
to turn it off.
2. Switch Flash Modes
In photo mode, press the flash button “ ” to switch between flash
modes.
Turn off the flashligh t
There was no flash when taking photos in any
situation.
Automatic flashing
Under low-light conditions, th e flash will
automatical ly illuminate when taking a phot o.
Forced Flas h
Whether in a bright or di m environme nt, th e
flash is activat ed during phot o taking.
20
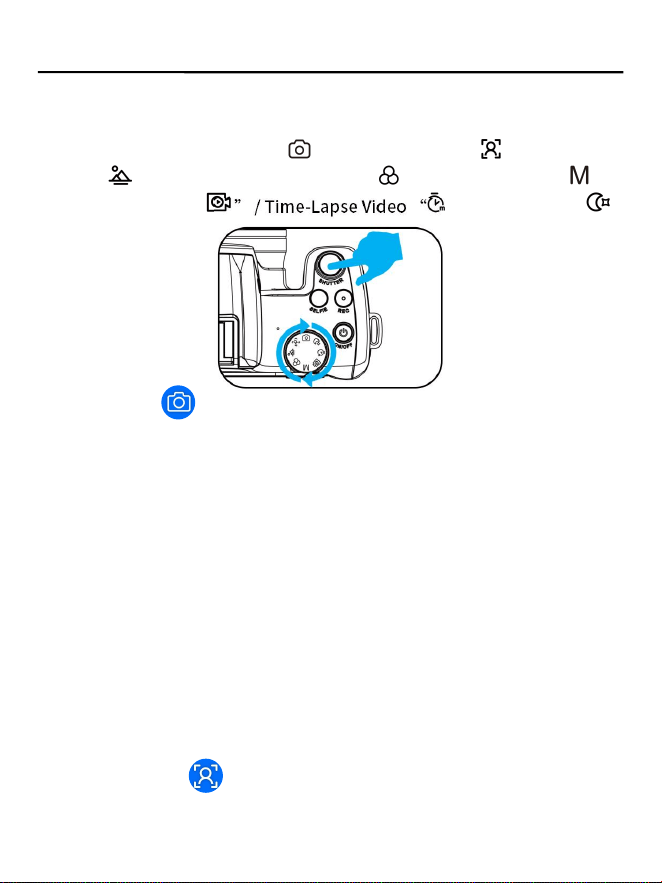
Mo de Di al
1. Selecting the 8 Modes
Rotate the mode dial to switch to the desired mode.
The 8 modes are: Auto Mode “ ” / Portrait Mode “ ” / La ndscape
Mode “ ” / Black-and-White Photo “ ” / Manu al Mode “ ” /
Slow-Motion Video “ ” / Time-Lapse Video “ ” / Night Mode “ ”.
(1) Auto Mode
A fully automatic exposure mo de where th e camera controls all shooting
parameters. The camera uses its bu ilt-in scene recognition sy stem to
analyze the brightness, color, contrast, and presence of moving objects in
the current scene, a utomatically selecting the most appropriate aper ture,
shutter speed , ISO sensit ivity, white balance, and focus mode.
Metering: The camera uses matrix/evaluative metering, dividing the frame
into multiple zones to measure light separately and calculatin g th e
optimal exposure value based on the combined data.
Focus: The camera automatically selects t he focus area, prioriti zing the
closest or mo st prominent subject in the frame (such as faces or pets).
Parameter Coordination: In bright conditions, th e camera automatically
closes t he aperture to improve i mage qualit y; in low-light conditions, it
automatically opens the a perture or increases the IS O; and when camera
shake i s detected, it automatically increases the shutter speed.
Ideal Scenarios: Casual s napshots at family gatherings, tra vel
photogra phy, practice for photography beginners, candid shots, and other
situations that do not requi re creative control.
(2) Portrait Mode
The camera automa tically optimiz es shooting param eters cent ered on
the subject, with th e primary goal of making the “person ” stand out and

21
look their best in th e frame.
Aperture Strategy: Automati cally selects a wider apertur e (e.g., f/1.8 –f/2.8)
to create a shallow depth of field, naturally blurring the backgrou nd (i.e.,
“background blur”) to highlight t he subject.
Focus Logic: Prioritizes face detecti on and eye detection autofocus to
ensure the subject ’s eyes are sharp and clear —since th e eyes are the soul
of a portrait.
Color Calibration: A utomatically adjusts white balance and color
saturation to give ski n tones a natural, h ealthy glow, a voiding a yellowish
or bluish cast. Some cam eras slightly red uce contrast to soften the skin’s
texture.
Exposure Compens ation: Metering is based on t he brightness of the
subject’s face t o prevent the face from appearing t oo dark or
overexposed in ba cklit condi tions.
Suitable Scenarios : Close-ups, h alf-body portrait s, photos of best friends
or couples, family com memorat ive photos, an d ID photos.
Advanced Tips:
When shooting, keep t he subject at a cer tain distance from the
background (at least 1 meter) for a more pronoun ced bokeh effect.
Choose a textured backgr ound (such a s leaves, lights, or bric k walls) t o
create more beaut iful bokeh hi ghlights.
(3) Landscape Mode
Optimizes setting s to capture the details and colors of expans ive scenes,
prioritizing “deep depth of field” and “hi gh saturation.”
Aperture Strategy: Automatically select a smaller apert ure (e.g., f/8– f/11)
to leverage the deep dep th of field provided by a small aperture, en suring
the entire scene— from foreground to background —remains s harp.
Focus Logic: Set th e focus distance to a great er distance, typica lly locking
onto infinity or beyond the focal length, t o ensure the backgr ound is
sharp.
Color Calibration: A utomatically enhances color s aturation and contras t,
making blue skies bluer , green trees gree ner, and sunset skies more
vibrant.
Sharpness Optimizat ion: Autom atically i ncreases image sh arpness,
making mountain textures, architect ural lines, an d leaf veins clearer a nd
more distinct.
Noise Reduction S trategy: Prioriti zes low ISO set tings in well-lit
conditions to ensure optimal image qu ality.
Suitable Scenarios : Natural landscap es (mounta ins, oceans, grasslands),

22
city skylines, architect ural phot ography, an d travel souvenirs.
Notes:
Landscape mode works best in bright light ; a tripod is recom mended on
cloudy days or at dusk.
If there are moving eleme nts in the frame (suc h as pedestrians or
vehicles), th e slow shutter speed cause d by a small apert ure may result i n
motion blur.
(4) Black-and-Whit e Mode
The camera captures images directly i n black-and-whi te (monochr ome)
mode, rather tha n desaturating t hem in post-process ing. This means
color informati on is discarded when da ta is read from t he sensor,
allowing the camera to focus on light, shadow , texture, and composition.
Color Filtering: The cam era sens or still captures color i nformation, bu t it
is converted direct ly to a grayscale i mage during in-camera processing.
Some advanced cameras simulate the spectral response curve of
traditional black- and-white film .
Contrast Enhanceme nt: Autom atically or manual ly enhances the contrast
between light an d dark areas, making t he “black,”“whi te,” and “gray”
tones in black-and-wh ite photos more rich and nuance d.
Sharpness Optimizat ion: Sin ce color information is removed, i mage
details and text ures become more pro minent; t he camera appropr iately
increases sharpness to enhance th is effect.
Suitable Scenarios : Street document ary photogr aphy, artist ic portraits ,
highlightin g architectural lines, conveying mood or storytelling, and
creating retro-style works.
(5) Manual Mode
Gives the user full contro l over aperture, shutter speed, and ISO
sensitivit y; the camera does not int ervene in any paramete r settin gs.
Suitable Scenarios :
Long-exposure photography: Ca pturing th e trails of moving vehicle s, the
misty effect of flowing water , and st ar trails—requires manually sett ing a
slow shutter speed (e.g., 30s).
Astrophotog raphy: Requires a precis e combinati on of high ISO (160 0–
6400) and long exposure (15–30s).
Studio Lighting: Und er constant light ing condition s, precise contro l of
exposure paramete rs is required.
Panorama Stitch ing: When sti tching multiple ph otos into a panor ama, all
parameters must remain consistent; only Manual (M) mo de can be used.
M

23
Creative Exposur e: Intentionally underexposing to preserve h ighlight
details, or intenti onally overexposi ng to creat e a high-key at mosphere.
Advanced Techni ques:
Shutter Speed Sa fety Rule: When sh ooting handheld , the shutter speed
should not be slower t han “1/focal lengt h” seconds (e.g ., when using a
50mm lens, the shutt er speed should not be slower than 1/50s).
Exposure Lock: Meter the subject first, lock the exposure value, and then
recompose th e shot.
(6) Slow-Motion Vi deo Mode
The camera records at a fr ame rate much h igher than the st andard frame
rate and then plays back the footage at the sta ndard frame rate, creating
a visual effect where “t ime appears t o slow down.”
High Frame Rat e Recording: The came ra records contin uously at a h igh
frame rate.
Auto Slow-Motion: A fter recording is complete, t he camera automat ically
plays back the video at t he standard frame rate to achieve the
slow-motion effect.
Focus Strategy: Due t o fast motion, t he camera enables Cont inuous
Autofocus (AF-C) and increases focus tracking sensitiv ity.
Exposure Adjustment : A high frame rate means the exposur e time per
frame is extremely short, so ample light or a h igh ISO sett ing is required
to ensure sufficien t brightness.
Suitable Scenes: Soccer shots on goal, ru nning sprints, water droplets
splashing, flower peta ls blooming, slow- motion glances over t he
shoulder, etc.
Shooting Tips:
Make sure there is plent y of light! Slow mot ion requires ext remely short
exposure times; insufficient light will resu lt in underexpose d image s or
excessive noise.
Use a tripod or stabilizer, as slow motion magnif ies even t he slightest
camera shak e.
Anticipate where th e action will occur a nd keep th e subject centered in
the frame.
(7) Time-Lapse Video Mode
The camera captures photos at intervals much longer tha n the standard
frame rate (e.g., one ph oto every 1 second, 5 second s, 10 seconds , or even
30 seconds), then combi nes these photos into a video at th e standard
frame rate, allowing slow- changing processes to be pre sented quick ly

24
within a short timeframe .
Interval Shooting: T he camera automatically tak es hundreds t o
thousands of phot os in succession at a set t ime interval (e.g., one photo
every 5 seconds).
In-Camera Compos iting: After sh ooting is compl ete, the camera
automatically combin es these photos into a video.
Suitable Scenes: Surging sea of clouds , sunrises and sunset s, traffic trails,
changing neon ligh ts, the rotation of t he starry sky, etc.
Essential Equipmen t:
Tripod: Absolutely essential! The cam era must remai n completely
stationary for anywher e from t ens of minutes to several h ours.
High-Capacit y Memory Card: Time-lapse photogra phy genera tes a large
number of photo files.
Advanced Tips:
Exposure Lock: Use Manua l (M) mode t o lock all settin gs and prevent
sudden changes i n brightness.
White Balance Lock: L ock the white balanc e (e.g., Dayligh t) to avoid color
fluctuations.
Battery Managemen t: For exten ded time-laps e sessions, be sure t o use a
fully charged bat tery or an external pow er source.
(8) Night Scene Mode
In extremely low-light conditions , the camera uses multi -frame merging
technology or long exposu res to captu re sufficient light, while
maintaining image clarity th rough intelligent noise reduction algorit hms.
Automatic Parame ter Adjustmen t Strategy :
Aperture: Automatica lly opens to the widest aperture t o capture as much
light as possible.
Shutter Speed: A utomatically sele cts a safe shutter speed or a long
exposure based on handheld stabi lity or tripod use.
ISO: Automatica lly increases t he ISO (typically 800 –6400) and uses
multi-frame noise reduction algorit hms to control noise.
Focus: Automatica lly switches to contrast-detecti on autofoc us in low
light; the camera will use t he AF assist light .
Suitable Scenarios : Moonlit landsc apes, dim ly lit interiors, firew orks/light
shows (requiring long ex posures t o capture light t rails), etc.
Shooting Tips:
Handheld Shootin g: Try to find a support poin t (leani ng against a wall or
railing), hold th e camera firmly with both hands, and hold your breath as
you press the shutter butt on.
25
Tripod Shooting: Use a sh utter release cable or the 2-second self-t imer t o
avoid camera shak e caused by pressing the shutter button.
Turn Off Image Sta bilization: When using a tripod, it is recommende d to
turn off lens and/or cam era body image st abilization, as it may actually
introduce slight image quality loss when there is no camera sh ake.
Frequently As ked Questions:
Blurry images: Th is is usually caused by unsteady handheld shooting;
using a tripod is recomm ended.
Excessive noise: Th is is caused by an ISO s etting that is too high; t ry
lowering the ISO a nd increasing the exposu re time.
Focusing issues: A utofocus can be diff icult in low light ; switch to manual
focus and use peak focus assistance.
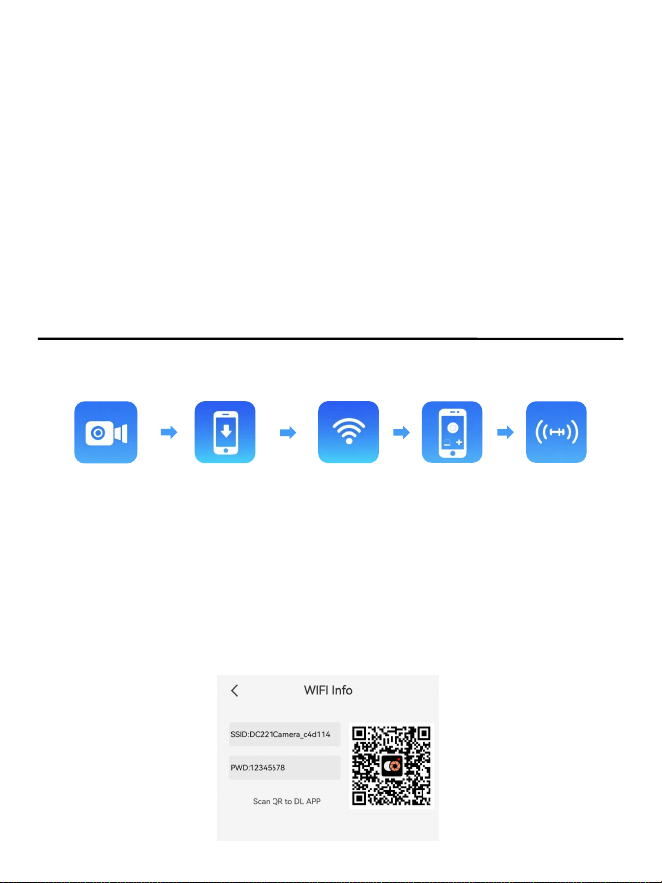
Co nnect t o c amera W i-F i
Please follow the steps below to connec t your phone t o the camera for
remote control vi a the APP.
1. Turn on the camera’s Wi-F i
① After t urning on the camera, on the shooting preview screen, press the
Menu button to open th e Settings menu → select “Wi-Fi Settings” →
toggle the “Wi-Fi” switch to enable the camera’s Wi-Fi mode.
Alternatively, on the shooting preview screen, press and hold th e Menu
button for 2 seconds to enable the camera’s Wi-Fi mode.
② Go to the Settings menu → select “Wi-Fi Settings” → select “Wi- Fi
Information” to vi ew the details.
1.Activate Wi-Fi 2.Download APP 3.Connect WiFi 4.Use APP 5.Disconnect
26
2. Downl oad an d Install t he “Vii puls e” Ap p
① Android users: Search for “ Viipulse” i n the app store or a third-party
browser to install th e app.
② iPhone users: Search for “Viipulse ” in the App Store to in stall the app.
③ Both Android a nd iPhone users can s can the QR code bel ow (or the QR
code on the camera’s Wi-Fi information page) using their phone’ s
browser to download and install the “Viipulse” app.
3. Conne ct Your Pho ne to the C amera’s Wi- Fi
Open your phone’s Wi- Fi settings, find the camera’s network name:
DC221Camera_XXXXXX, tap it, and enter the camera’s Wi-Fi password:
XXXXXXXX.
4. Using the “V iipulse” App
1. Open the “Viipulse” a pp on your phone a nd add the camera.
2. The app allows you to remotely control the camera to take photos and
record videos. You can also use th e app to browse the camera’s photos
and videos, and download files from the camera to your phone or tablet
for s haring.
5. Turn Off the Came ra’s Wi-Fi
Press the camera’s Menu button to exit Wi-Fi mode, which will disconnect
the camera from t he mobile app.
Viipulse
27
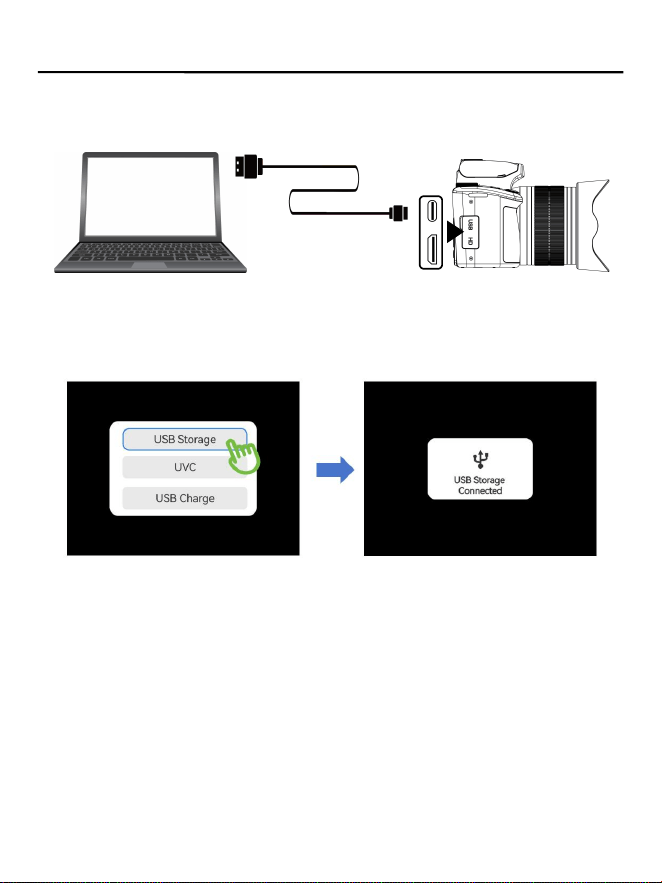
Download came ra p hotos a nd v ideos to t he computer
1.Turn on the camera and use a Type-C USB cable to connect it to your
computer.
2.Once connected, a dialog box wil l appear on the camera screen. Select
“USB Storage” on the screen.
3. Then, check for the new removable disk in “My Computer.” The photos
and videos taken by th e camera will be s aved in the DCIM folder, and you
can copy them from the camera’s folder to your computer.
4. Once t he download is complete, unpl ug the USB cable, and the camera
will exit portable hard drive mode.
⚠ Do not disconnect the camera from the computer while files are being
downloaded.
⚠ Do not remove or insert the memory card from the camera while data
is being transferred via the computer, to avoid data loss.
28
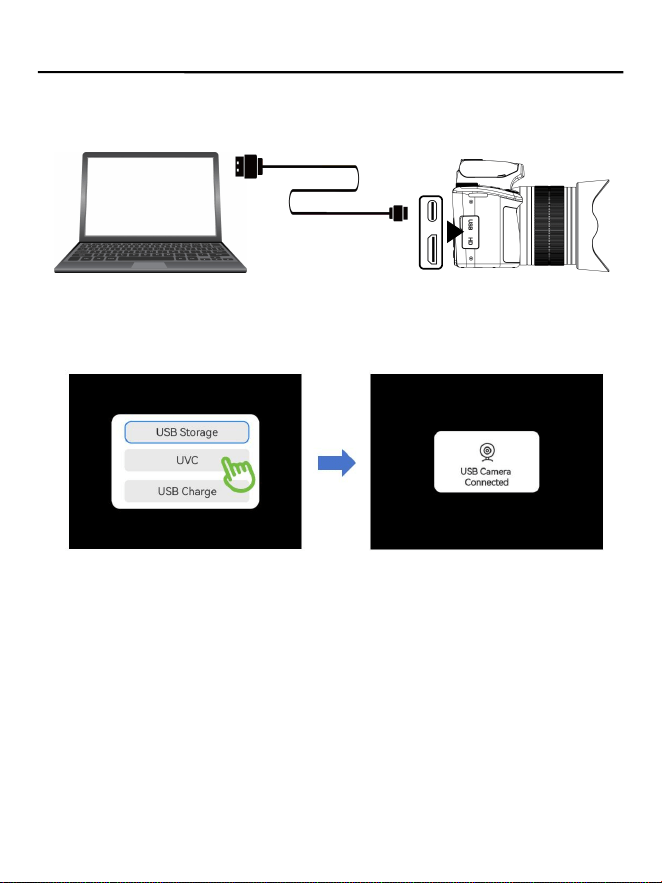
Web cam
1.Turn on the camera and use a Type-C USB cable to connect it to your
computer.
2.Once connected, a USB dialog box will appear on the camera’s s creen.
Click“UVC”.
3. In the external camera s ettings of your social media app, select “UVC ”.
You can then use the camera as your computer’s webcam.
4. When you’re finished, unp lug the cable, and the camera will exit
webcam mode.
29
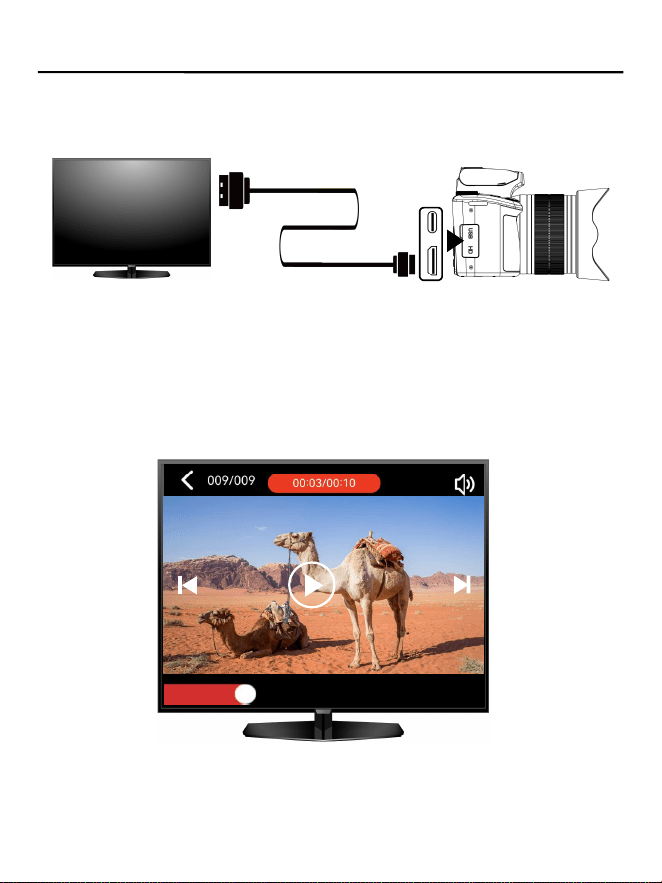
Co nnecting to a T V fo r P la yback
1.Turn on the camera and Use an HDMI Cable to connect the camera to t he
TV.
2. Once t he connection is established, press the camera’s playback
button to enter playback mode.
3. Use the up/down arrows to select the video you want to play, th en
press the OK button to confirm playback.
4. When you’re finished, unplug the HD cable, and the camera will exit TV
playback mode.

30
Ca mera parameters
Photo Resoluti on
16:9 (64M, 32M, 18M, 8M);
4:3 (48M, 44M, 24M, 10M , 6M), etc.
Video Resolution
5K/25 fps; 4K/30 fps; 2.7K /30 fps;
1080p/60 fps; 1080 p/30 fps; 720p/6 0 fps, etc.
Memory Card
Supports Micro SD mem ory cards (4 – 256 GB),
supports Class 10/U3
File Format
Photos: JPG; Videos: MP4
Display
3.2-inch IPS HD touchscreen displa y, 640×854
Optical Zoom Ratio
10X
Main Lens
Lens Type: 5G/1 3E
Field of View: D 75.4° (W) to 8.8° (T),
H 67.5° (W) to 7.6° (T), V 40.2° (W) to 4.3° (T)
Aperture and Focal Length:
Ff (F/1.8–3.0, f = 4.3–43 mm)
Focusing Distance: 5cm ~ ∞
Selfie Camera
Lens Type: 7P
Field of View: D 73.8°, H 62° , V 48.5°
Aperture and Focal Length: Ff (F/2.2, f = 3.37 mm)
Focusing Distance: 50cm ~ 80cm
USB Port
Type-C
Input
5V⎓ 2A
Operating Sy stem
Requirements
Windows 7/Wind ows 8/Windows 10 /Windows 11
Product Dimensions
(with Lens Hood)
139.5×143× 103mm
Note: The product specificat ions provided are the latest information
available at t he time of writing this manu al. If t here are any ch anges to
the specifi cations, no further not ice will be giv en. Please ref er t o th e
actual camera for accuracy!

31
FCC Warning Statement
Changes or modi fications not expressly approved by the party
responsible for compl iance could void the user’s authority to operat e the
equipment. This equi pment has been tested and found to comply with
the limits for a Class B digi tal device, pu rsuant t o Part 15 of the FCC Rules.
These limits are designed to provide reasonab le protecti on agai nst
harmful interferen ce in a residential inst allation. This equipm ent
generates uses and can radiate radio frequenc y energy and, if not
installed and used in a ccordance with the instructi ons, may cause
harmful interferenc e to radio commun ications. Howeve r, there is no
guarantee that interference will not occur in a particul ar installation. If
this equipment does cause harmful int erference to radio or television
reception, whi ch can be determ ined by turning the equipmen t off and on,
the user is encouraged to try t o correct th e interferen ce by one or more of
the following measur es:
‐‐ Reorient or reloca te the receiving antenna.
‐‐ Increase th e s eparation between the equ ipment and receiver.
‐ ‐ Connec t the equipment into an outlet on a circuit different from tha t
to which the receiver is connected.
‐‐ Consult the dealer or an experienced radio /TV technicia n for help.
This device com plies with part 15 of the FCC Rules. Operation is subject t o
the following two condit ions:
(1) This device may not ca use harmful interf erence, an d
(2) this devi ce mus t accept any interfere nce received, in cluding
interference tha t may cause undesire d operati on.
The device has been eva luated to meet gener al RF exposur e
requirements. T he device can be used i n portable ex posure condit ions
without restrict ion.

32
No. DC221X 260808