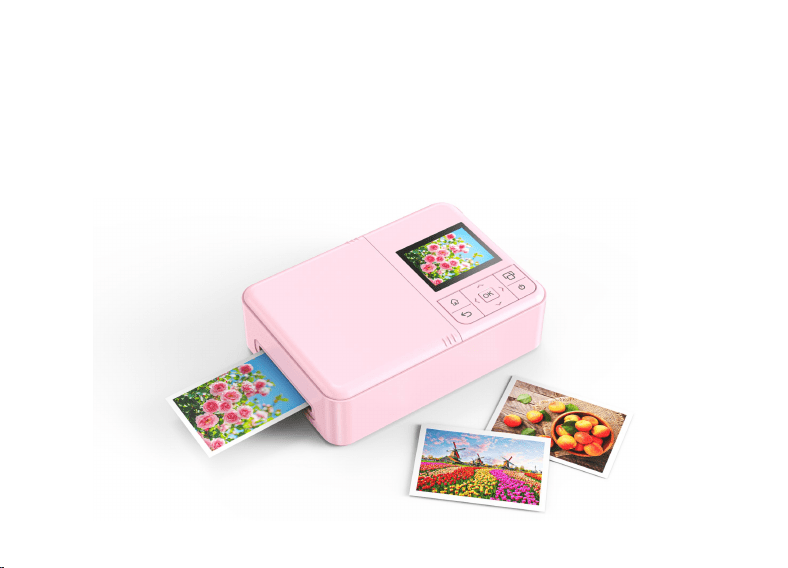
Portable Photo Printer
User manual

1
Product Overview
This printer is a portable color photo printing device that supports direct preview and printing of
photos by inserting Micro SD or SD cards. It also supports quick printing of high-quality photos
through Wi-Fi wireless connection to smartphones and direct connection to cameras via a data cable.
With its compact and portable design, it is suitable for travel, home use, or instant image sharing.
Product Features
Using color inkjet printing technology, the colors are vibrant and can be preserved for a long
time.
High-definition color photo printing, with a maximum resolution of up to 600 dpi.
Supports Wi-Fi wireless connection for mobile printing.
Supports direct printing from camera via USB data cable (Camera compatible with Type-C
interface).
Supports printing from SD and Micro SD cards.
Supports direct printing via wireless connection with specified cameras (our company's
designated camera models).

2
Equipped with a 2000mAh high-capacity rechargeable battery, it provides long-lasting battery
life, freeing you from the constraints of power cords.
High cost-effective printing consumables, high quality and low price.
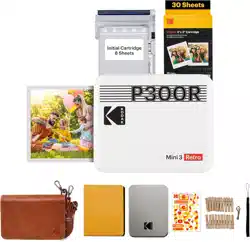
Product accessories
Standard accessories
①
Printer main unit × 1 unit
④
USB-A to USB-C charging cable × 1 piece
②
Ink cartridge × 1 piece
⑤
USB-C to USB-C data cable × 1 piece
③ Photographic paper × 1 pack (10 sheets) ⑥ User Manual × 1 copy

3
Product Parameters
Print imaging technology
Inkjet printing
Supported image formats
JPG, PNG
Memory card
Supports SD memory card (up to 128GB);
Supports Micro SD memory card (up to 128GB)
Photographic paper size
50MM × 90MM (including tear line)
Print area size
45MM × 60MM
Print resolution
600dpi
Print speed
About 100 seconds per sheet
Number of continuous prints
10 sheets
Ink cartridge capacity
1.2mL × 3 colors
Number of pages that can be
printed with a single ink
cartridge
≥100 sheets (coverage rate 20%)
Printing method
SD card, Micro SD card, USB cable, Wi-Fi wireless

4
Display screen
IPS display screen, 2.0 inches, resolution 320*240
Battery
2000mAh/3.7V, rechargeable lithium battery
USB port
Type-C
USB power input voltage
5V/2A
Operating Temperature
15℃~ 35℃
Operating Humidity
20%~90% (40℃)
Storage temperature
-20℃~60℃
Storage humidity
20%~93%(40℃)
Product dimensions
147 × 104 × 43.5 mm
Product weight
356.7g (with ink cartridge and 10 sheets of photo paper)
Note: The specifications of this product are the latest information available at the time of manual
compilation. If there are any changes to the specifications, no further notice will be given. Please
refer to the actual product for accuracy!
5
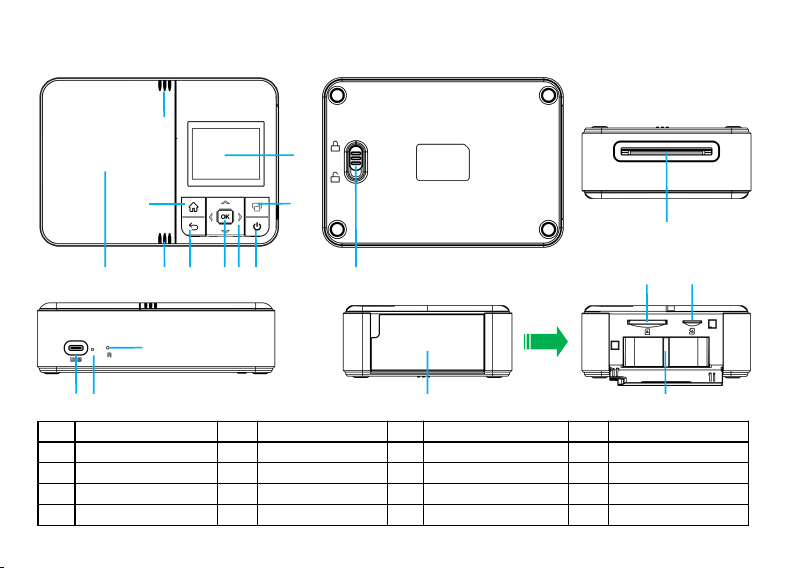
Product structure
1
Power button
2
Direction
selection key
3
OK button
4
Back button
5
Home button
6
Print button
7
Display screen
8
Anti-slip pattern
9
Host flip cover
10
Paper box latch
11
Paper output
slotexport
12
USB port
13
Indicator light
14
Reset hole
15
Paper box cover
16
SD card slot
17
Micro SD card slot
18
Paper box
12
13
14
15
17
16
18
9 8 4 3 2
5
6
7
8
1
11
10
6
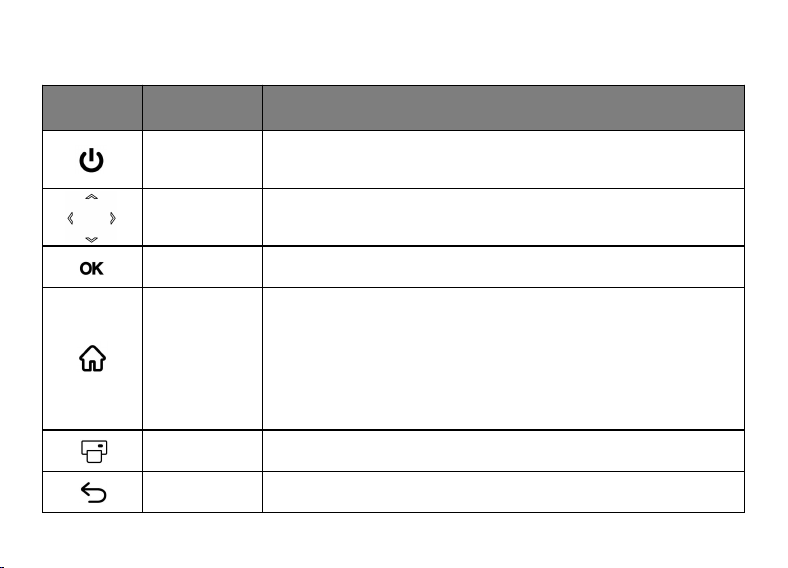
Button Function
Button icon
Name
Instructions
Power button
Long press for 3 seconds to power on/off
Arrow keys
Direction selection in the menu (up, down, left, right)
OK button
Confirm button
Home button
(Clear All
button)
Home button: Press the home button to exit the current
operation at any time and return to the standby home screen.
Clear All Button: This button cancels all queued or pending
print tasks in the current session with a single click, clearing the
print list and returning the printer to a state with no print tasks.
Print button
Open the print list; Initiate the printing of images
Back button
Return to the previous page in the menu
7
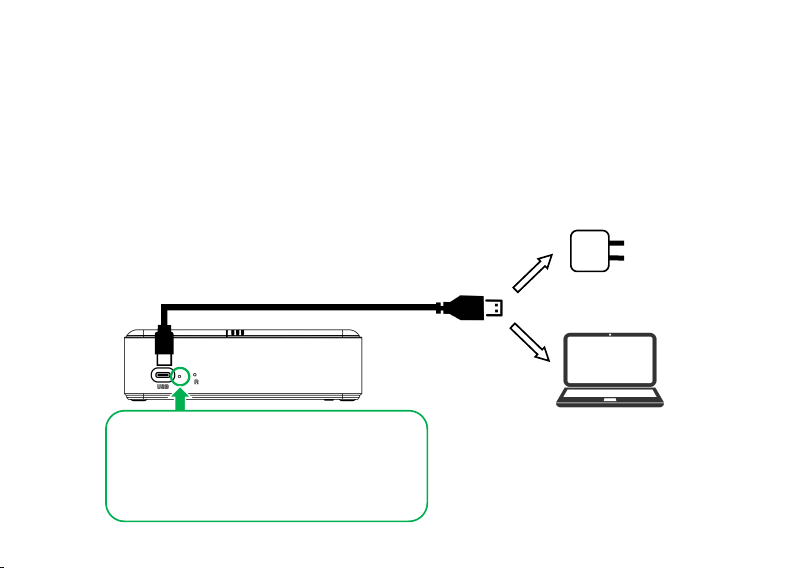
Battery and Charging
1. Built-in rechargeable lithium battery capacity: 2000mAh/3.7V, 7.4Wh.
2. Charging time: Approximately 120 to 150 minutes (from 0% to 100% charged).
3. Endurance: Generally capable of printing approximately 30 photos (via memory card printing).
4. Charging method: Simply connect a 5V charger or computer using a USB-A to USB-C charging
cable.
1. The red indicator light is constantly
on: the battery is charging.
2. The red indicator light is off: The
battery is fully charged.

8
Indicator light
Indicator light
Status
Instructions
Charging
indicator light
When the device is turned off for charging, the red light
stays on
Battery charging
When the device is turned off for charging, the red light
goes out
The battery is fully
charged
When charging with the device turned on, the yellow
light stays on
Battery charging
When charging while the device is turned on, the green
light stays constantly on
The battery is fully
charged
Standby indicator
light
When turned on, the green light is constantly on
Standby
9
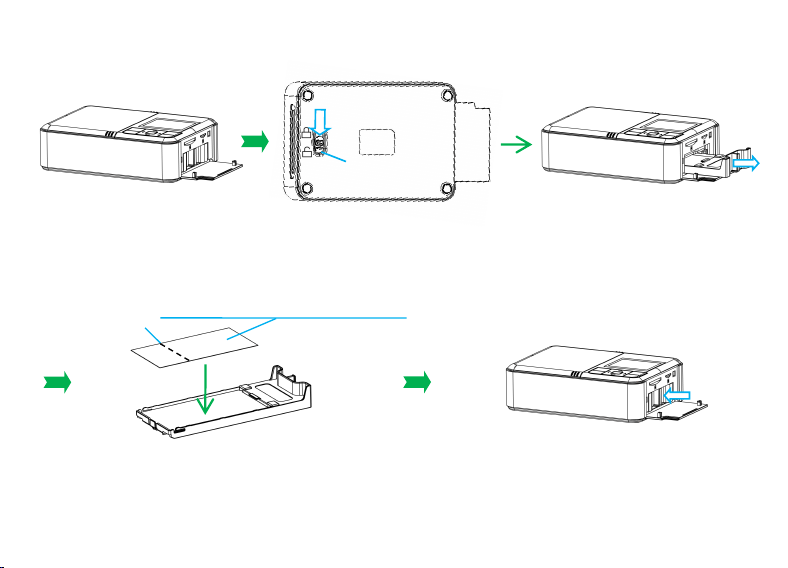
Load the photographic paper
3. Place the blank printing side of the photo
paper up, with the pre-tear line facing the paper
exit, into the paper tray. The paper tray can
accommodate up to 10 sheets of photo paper.
4. Push the paper tray with the paper
loaded into the main unit until you hear
the "click" sound indicating that the tray
latch has been reset.
1. Open the paper
tray cover.
2. Pull the paper tray latch [①] from the locked state to the
unlocked state and hold it until the paper tray is pulled out
from the main unit and then released.
Number of photographic paper sheets ≤ 10
Pre-tear line
①
10
Photographic paper size
1. Paper size: Supports 50mm × 90mm (including tear-off line).
2. Print area size: 60 mm × 45 mm.
Note: (1) Both adhesive-backed and non-adhesive-backed photo paper are supported. It is
recommended to use original dedicated printing photo paper.
(2) It is recommended to add more photo paper after using up the entire pack (10 sheets) to avoid
opening the paper tray when there is still paper left.
Precautions
1. Keep your hands clean and dry when using, avoid contact with sweat, oil, and dust on the
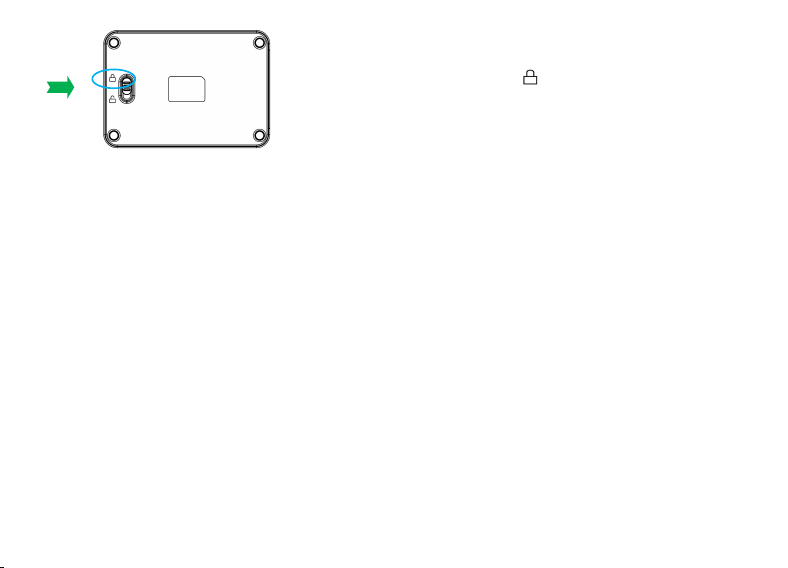
5. Check to ensure that the paper
tray latch is in the locked state ,
indicating that the photo paper
installation is complete.

11
photographic paper, and install it into the printer as soon as possible after unsealing.
2. The unused photographic paper should be put back into the packaging bag/moisture-proof bag
and sealed properly to reduce the impact of moisture and static electricity on the paper feeding.
3. Photographic paper should be stored away from light, moisture, and high temperatures, and
should be protected from being squeezed by hard objects and prolonged exposure to moisture in the
air.

12
Replace ink cartridge
2. Flip the main unit up
and press and hold the
power button for 3 seconds
to turn it on, waiting for
the print head to move to
the replaceable position.
1. Press and hold the
anti-slip pattern on the
flip cover of the main
unit [①], and push the
flip cover towards the
photo paper exit.
3. Gently remove the old ink
cartridge, align the contacts of
the new ink cartridge with the
contacts of the slot, insert it
vertically until you hear a
"click" sound and confirm that
it is securely in place, close the
main unit flip cover, and push it
until the latch clicks into place.
①

13
Precautions
1. Pre-use Operation: Before installing the ink cartridge, please first remove the shipping clamp
and the nozzle transparent protective film from the new cartridge.
2. Handling Method: When handling the ink cartridge, always hold it by the sides of the casing.
Avoid touching the printhead to prevent getting your hands stained or causing ink cross-
contamination, which can lead to color shifts in printing. Before installation, ensure the printhead is
facing the correct direction.
3. Handling Precautions: Exercise caution during installation and use to avoid knocking or
scratching the printhead area of the cartridge, as this may crack or damage it. Also, do not touch the
metal contacts of the chip to prevent poor electrical connection.
4. Frequency of Use: It is recommended to use the ink cartridges regularly. This prevents the ink in
the printhead from drying out and clogging, thereby ensuring print quality.
5. Protective Film: Once the printhead transparent protective film is peeled off, it must not be re-
applied. Doing so may cause ink cross-contamination or leakage (Re-applying the film correctly
requires specialized equipment).
14
6. Transport Clamp: After removing the printhead protective film, do not re-secure the cartridge in
the transport clamp. Doing so may compress the printhead cushion, causing ink to leak out, which
can potentially lead to color mixing or ink waste.
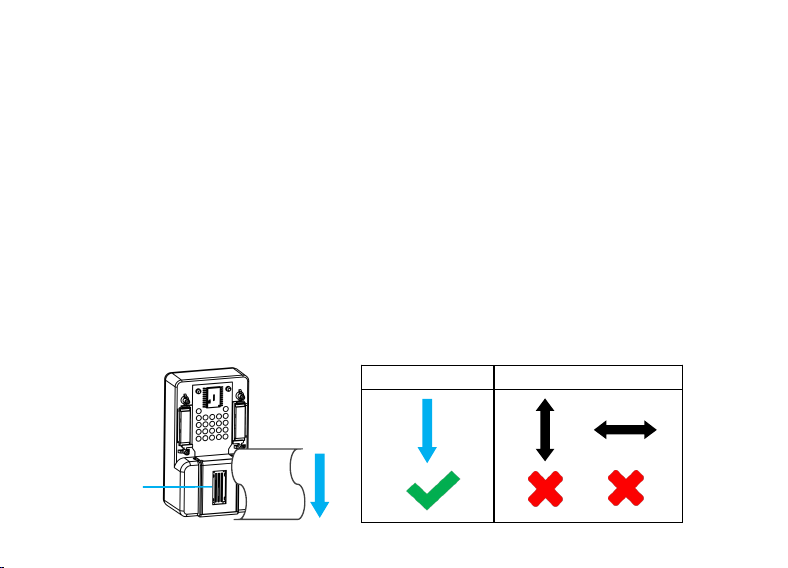
7. Clean the printhead: It is normal for the ink cartridge to experience color loss during
printing due to dried nozzles after being stored for a long time. It is recommended to wipe the
nozzle of the ink cartridge with a tissue (Note: Wipe vertically in one direction along the print
head structure; do not wipe back and forth, as this will cause ink mixing) until you see blue,
red, and yellow colors. Then, print a few unimportant photos until the colors return to
normal. (PS: If a certain color is missing during normal printing, it indicates that the ink for
that color has run out.) It is recommended to replace the ink cartridge with a new one.).
Correct
Incorrect
Printhead

15
8. Anti-static cleaning: In a dry environment, first touch a grounded metal object to discharge static
electricity. Observe whether the metal contacts are dirty and whether the nozzles have residual ink
or clogs. Regularly wipe the metal contacts and nozzles gently with dry, fiber-free paper towels or
cotton swabs. Do not use corrosive cleaning agents, or allow liquids to enter the machine body.
9. Confirm compatibility between model and consumables: Check the compatibility between the
printer model and the ink cartridge model. Do not force installation if there is a mismatch, as it may
damage the printer or consumables. If using third-party consumables, you assume the risks of
compatibility and warranty.
10. Storage Requirements: After printing, please place the ink cartridge in a sealed container for
storage. This can prevent the ink from drying out and causing nozzle clogging.
11. Use up as soon as possible: After installing the new ink cartridge, try to use it up within 6
months. Long-term storage may cause it to dry out and affect its quality.

16
Ink Cartridge Maintenance
1. To extend the service life of the cartridge, it is recommended to store it in a sealed container after
printing. This effectively prevents the ink from volatilizing and solidifying.
2. Handling Nozzle Clogging (Manifesting as Grid/Checkered Patterns in Prints):
① For Mild Cases: It is suggested to use the printer's built-in "Print Head Cleaning" or "Nozzle
Cleaning" utility to clear the blockage.
② For Moderate Cases: User intervention is required. Gently wipe the printhead with a lint-free
alcohol swab (use a paper towel only as a last resort).
③ For Severe Cases: Submerge only the printhead portion of the cartridge in lukewarm water for
approximately 5 minutes. (Important: Do not immerse the chip contacts or the entire cartridge. )
After removal, dry the printhead thoroughly with a paper towel.

17
Print photos
Power on
After loading the photo paper and ink cartridge, press and hold the printer power button " " for
3 seconds to turn it on.
Wi-Fi wireless connection for mobile printing
(1) Enable the printer's Wi-Fi hotspot
Select " " on the printer's screen homepage, and then press the OK button. The printer will
automatically turn on the Wi-Fi hotspot and enter Wi-Fi mode. The screen will display the printer's
Wi-Fi name, Wi-Fi password, and a QR code for downloading and installing the official printing
app.
(2) Download and install the "SDPrint" app on your mobile phone
For Android phone users, please search for "SDPrint" in the app store or a third-party browser to
install the app.
② For Apple phone users, please search for "SDPrint" in the App Store to install the app.
③ Both Android and iPhone users can use their mobile browsers to scan the QR code on the

18
printer's Wi-Fi mode page to download and install the "SDPrint" app.
(3) Add device on mobile terminal
Open your phone's Wi-Fi settings, locate the printer's Wi-Fi name, click on it and enter the printer's
Wi-Fi password, connect to the printer's Wi-Fi hotspot, and wait for a successful connection prompt.
(4) Select photos and print
In the "SDPrint" app, select one or multiple photos from the album/files, and then perform simple
edits on the photos (such as applying filters, cropping, adding text or stickers, etc.). After editing,
click the print icon " " to start printing the photos.
Connect the data cable to the camera for printing
(1) Hardware connection: Connect the printer and camera, both in the powered-on state, using a
USB-C to USB-C cable. Then, select "External Storage" in the USB connection dialog on the
camera screen to allow access.
(2) Calling for printing: After successful connection, select "USB" on the printer's home screen,
enter it, view the pictures, and print the photos.
(3) Applicable tips: This method is suitable for camera models with USB printing function. Please

19
refer to the actual situation to determine whether the camera supports direct connection via a data
cable.
Memory card printing
(1) Insert the storage card: Insert an SD card or Micro SD card into the corresponding card slot of
the printer. Select Memory Card " " on the home screen, and the screen will display a list of
printable thumbnails.
(2) Selecting images and settings: Select the images you want to print from the printer's thumbnail
list, and then set the image printing range (if the image size ratio can fully cover the photo paper,
there is no need to set it).
(3) Start printing: After setting, press the " " print button to print.
Take a photo
After printing is complete, wait for a few seconds for the ink/dye to fully set, and then remove the
photo from the output slot.

20
Precautions
It is recommended to fully charge the battery before printing for the first time.
Please do not forcibly pull out the paper or move the device during the printing process.
Please charge the printer for a while before use when the battery is low, to avoid interruption of
printing due to insufficient power during use.
If not in use for an extended period, please charge periodically to preserve battery life.
Please place the printer and consumables in an environment with room temperature, avoiding
direct sunlight, dustproof, moisture-proof, and shock-proof.
Please store the printed photos away from direct sunlight to prevent fading.
Please do not dispose of the product by throwing it into a fire or heating furnace, nor by
mechanically squeezing or cutting it.
This product has a built-in 2000mAh battery. Please do not disassemble or replace it yourself.
This product can only be charged using a charger that has obtained CCC certification and

21
meets the standard specifications (5V/2A). The charger should be used under adult supervision.
The charger used to charge this product cannot be used as a toy.
This product cannot be connected to more power sources than recommended.
Please regularly check whether the wires, interfaces, casing, or other components of this
product are damaged. If any damage is found, discontinue use until it has been repaired and is in
good condition.

22
Troubleshooting
Problem
Solution
Paper jam during
printing
1. Paper jam at the paper feed slot/paper jam inside the printer: Pull
out the paper tray and use a small pair of tweezers to remove the
jammed photo paper from the paper feed slot.
2. Paper jam at the output: Pull out the paper tray, remove any residual
photo paper from the printer, and gently pull out the jammed photo
paper from the output port. Do not pull it hard.
Missing print colors
The ink nozzle of the ink cartridge is dried and blocked. It is
recommended to wipe the nozzle of the ink cartridge with a tissue
(wipe in the direction of the nozzle) until you see blue, red, and yellow
colors. Then, print a few unimportant photos until the colors return to
normal. (PS: If a certain color is missing during normal printing, it
indicates that the ink of that color has run out. It is recommended to
replace the ink cartridge with a new one.)

23
Unable to power on
Check if the battery is fully drained, and try again after charging.
Unable to connect to
the device wirelessly
Restart the printer, ensure the Wi-Fi hotspot is turned on, and re-enter
the password to pair the device.
Unable to connect to
the device via wired
connection
Replace the data cable.
No ink cartridge
detected
First, confirm whether the ink cartridge model matches and if the ink
cartridge is installed properly. Then, use fiber-free paper towels or
cotton swabs to clean the contacts and try again.
Abnormal noise
1. Check if there are any foreign objects on the paper pickup roller.
2. Check if the print head is stuck.
The printing speed is
slow
1. Printer settings → Print quality → Switch from "Fine" to "Normal".
2. Check whether the device is running too many programs.

24
Maintenance and Care
1. Regularly clean the machine's outer shell with a soft, dry cloth.
2. When not in use for an extended period, please keep the battery at around 50% charge and store
it in a dry and cool place.
After-sales service
Friendly reminder: The specific functions, App name, supported paper types, and connection
methods of the printer may differ from those described in this manual. It is recommended to
download the official App when using the printer to obtain the most accurate operational experience
and functional support.

25
FCC Warning Statement
Changes or modifications not expressly approved by the party responsible for compliance could
void the user ’s authority to operate the equipment. This equipment has been tested and found to
comply with the limits for a Class B digital device, pursuant to Part 15 of the FCC Rules. These
limits are designed to provide reasonable protection against harmful interference in a residential
installation. This equipment generates, uses and can radiate radio frequency energy and, if not
installed and used in accordance with the instructions, may cause harmful interference to radio
communications. However, there is no guarantee that interference will not occur in a particular
installation. If this equipment does cause harmful interference to radio or television reception,
which can be determined by turning the equipment off and on, the user is encouraged to try to
correct the interference by one or more of the following measures:
‐‐ Reorient or relocate the receiving antenna.
‐‐ Increase the separation between the equipment and receiver.
‐ ‐ Connect the equipment into an outlet on a circuit different from that to which the receiver is

26
connected.
‐‐ Consult the dealer or an experienced radio/TV technician for help.
This device complies with part 15 of the FCC Rules. Operation is subject to the following two
conditions:
(1) This device may not cause harmful interference, and
(2) This device must accept any interference received, including interference that may cause
undesired operation.
The device has been evaluated to meet general RF exposure requirement. The device can be used in
portable exposure condition without restriction.
No.PT01 260428